

Page 1
SDW800PW/S
Instruction Manual
8 placesettings
Page 2
Read the section on Troubleshooting Tips
to help you to solve some common problems
by yourself and not needto ask for service.
DearC st mer,uo
Readthis User Information carefully and keep it
to refer to at a later date.
This manual contains sectionsofSafetyInstructions,
Operating Instructions,
Installation Instructions
and Troubleshooting Tips etc.
Carefully reading it before using the d ishwasher will help
youtouseandmaintain
the dishwasher properly.
Control Panel......................................... ..........3
Dishwasher Features..................................... ...3
A、 Water Softener............................................4
RINSE AID DISPENSER..................................... 6
Attention before or after loading the Dishwasher
Rack..........................................................10
Removing the Dishes.....................................10
Wash Cycle Table.............................................14
Turning on the Appliance..................................14
Change the Programme.............. ................15.....
Filtering System..............................................16
B Loading the salt into the softener
、 ....................5
C Fill the Rinse Aid Dispenser
、
...........................5
Adjusting Rinse Aid Dispenser......... ............... 6
D Function ofDetergent .......、
...........................7
How to use the 3in1 programme.......................8,9
Loading the upper Rack............................... .10
Adjusting the upper Rack............................. .10
Loading the Lower Rack...................................11
Folding spikes................................................11
Silverware Basket............................. ........... ...12
Attention .......................................................13
Suggested remedy...........................................13
At the Ene of the Wash Cycle..............................13
Cleaning the Spray Arms..... .............................17
Cleaning the Door...........................................18
.............18How to Keep Your Dishwasher in Shape
Water Connection...........................................20
Before calling for service.......................... .......22
Error indication..............................................23
Technical information.....................................24
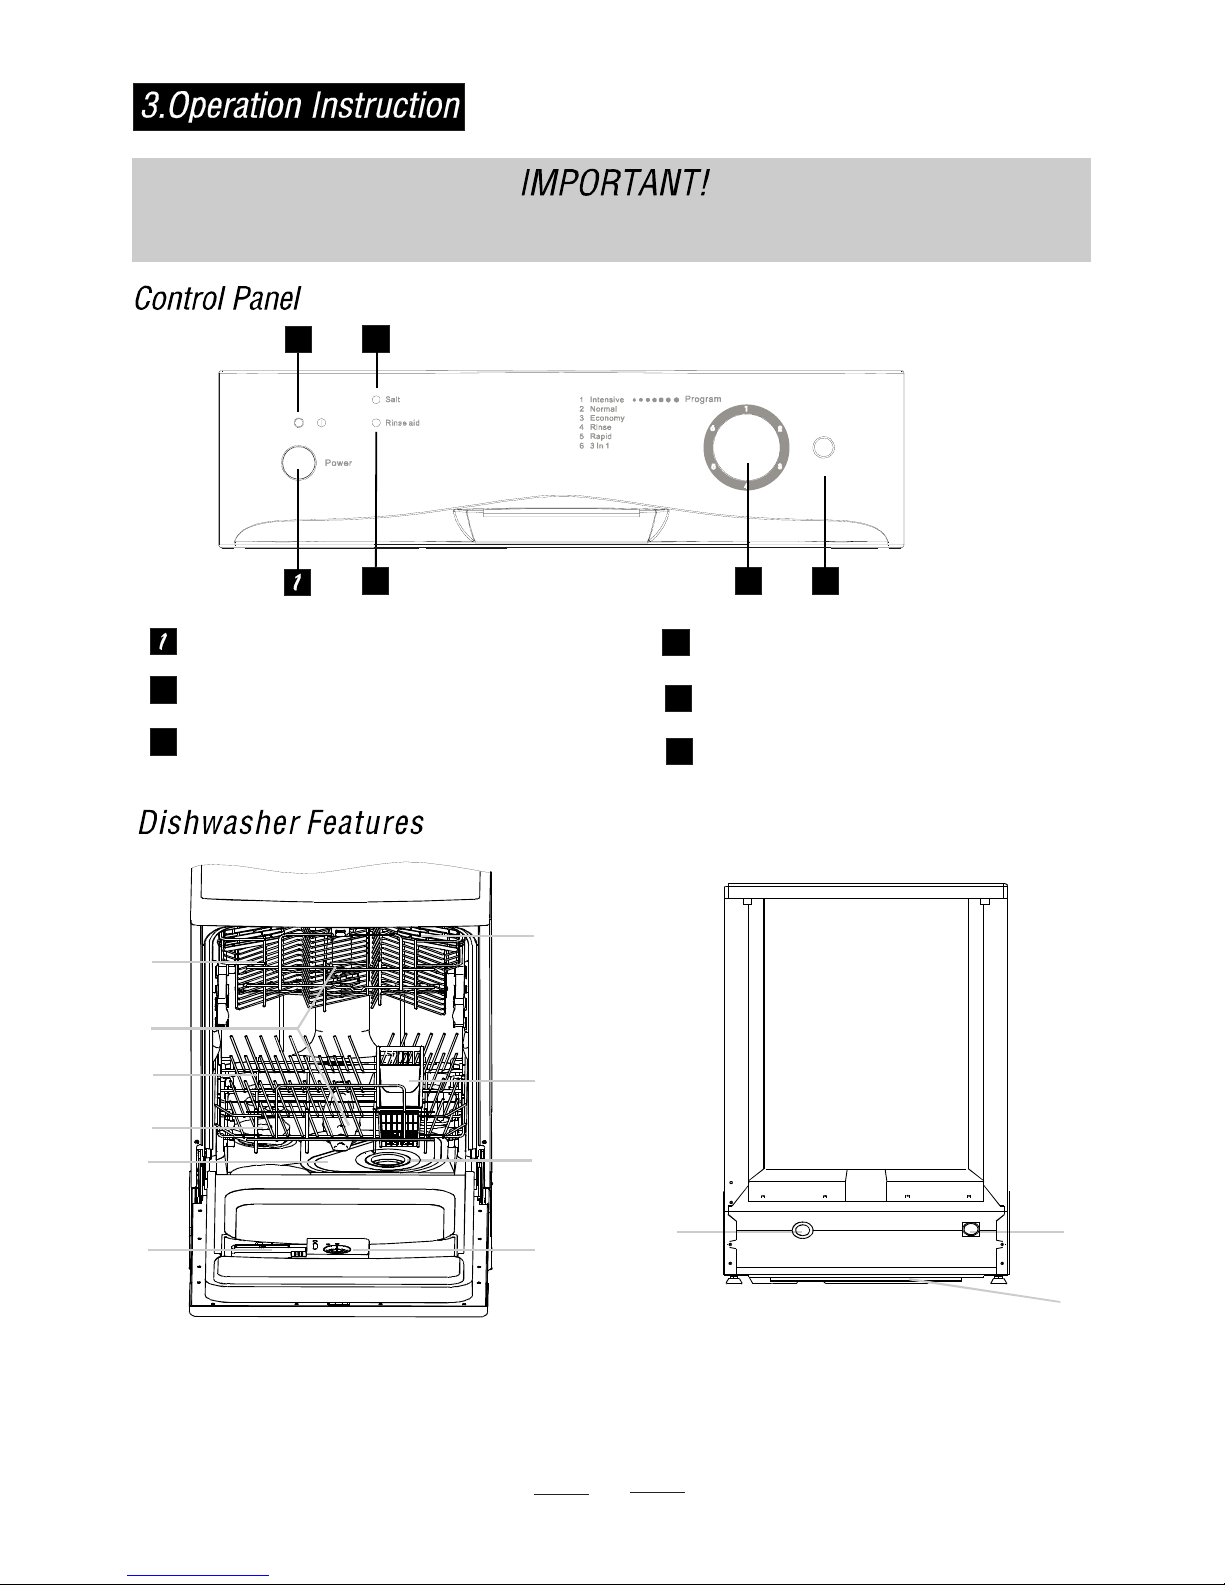
Page 3
1
•
•
•
•
•
•
•
•
•
•
Do not sit on, or stand on the door or dish racks.
Do not touch the heating element immediately after use.
Do not operate your dishwasher unless all enclosure panels are properly in place. Open the door very
carefully if the dishwasher is operating. There is a risk of hot water being ejected.
Do not place any heavy objects on the door when it is open, or the appliance could tip forward.
When loading itemsto be washed:
Locate sharp items so that they are not likely to damage the door seal;
Load sharp knives with the handles up to reduce the risk of injuries;
Warning: knives and other utensils with sharp points must be l oaded in the basket with their points down
or placed in a horizontal position.
When using your dishwasher, you should prevent plastic items from contact with the heating element.
Check that the detergent receptacle is empty after completion of the wash cycle.
Do not wash plastic items unless they are marked dishwasher safe or the equivalent. For plastic items not
so marked, check the manufacturer's recommendations.
Use only detergent and rinse additives designed for an automatic dishwasher. Never use soap, laundry
detergent, or hand washing detergent in your dishwasher.
Keep children away from detergentand rinse aid, keep children away from the open door of the dishwasher,
there could still be some detergent left inside.
o
o
o
Children should be supervised to ensure that they do not play with the appliance.
This appliance is not intended for use by persons(including children ) with reduced physical, sensory or mental
capabilities, or lack of experience and knowledge ,unless they have been given supervision or instruction concerning
use of the appliance by a person responsible for their safety.
Dishwasher detergents are strongly alkaline. They can be extremely dangerous if swallowed.Avoid contact
with skin and eyes and keep children away from the dishwasher when the door isopen.
The door should not be left in the open position since this could present a tripping hazard.
This dishwasher is intended for domestic use only, any other use may invalidate the warranty and might be dangerous.•
•
•
•
•
•
•
•
•
•
If the supply cord is damaged,it must be replaced by the manufacturer or its service agent or a similarly
qualified person in order to avoid a hazard.
Please dispose of packing materials at your local recycling point.
Use the dishwasher only for its intended function.
Durin g installation, make sure the product is not stood on the mains cable and make s ure i t is not bent or flattened.
The appliance is to be connected to the water mains using new hose sets , the old hose-sets should not
be reused.
This appliance is not intended for use by persons(include children) with reduced physical , sensory or mental
capabilities, or lack of experience and kno wledge, unless they have been given supervision or instruction
concerning use of the appliance by a person responsible for their safety
Please unplug before cleaning the appliance.
•
•
Page 4

2
Packagingmaterial could be dangerous for children!
For disposing of package and the appliance please go to a recycling centre. Therefore cut
off the power supply cable .
Cardboard packaging is manufactured from recycled paper and should be disposed in the
waste paper collection for recycling.
Make sure this product is disposed of correctly,you will help prevent potential negative
consequences for the environment and human health, which could otherwise be caused
by inappropriate waste handling of this product.
Warning!
When disposing of a n old appliance, make sure the door latch or locking device is disabled
or broken to avoid entrapment of children when playing.
Page 5
For getting the best performance from your dishwasher,please read all operating instructions before
using it for the first time.
5
Rinse Aid Warning Light : Comes on when the
rinse aid dispenser needs to be refilled .
2
3
4
ON/OFF Button: To turn on/off the power.
Washing Program Selector : Turn the knob to
select wash cycles.
3
Salt Warning Light : Comes on when the watersoftener
needs to be refilled with salt.
Power Light : Comes on when the ON/OFF Button
is i n the ON position.
2
3
4
5
11
12
Back View
13
Main Filter
5
Detergent Dispenser
6
Cup Shelf
7
Silverware Basket
8
Coarse Filter
9
Rinse Aid Dispenser
10
Inlet pipe connector
12
Drain pipe connector
11
Lower Basket
3
Spray Arms
2
Upper Basket
1
Water softener
4
13
Tray assembly
Front view
1
2
3
4
5
6
7
8
9
10
6
Start / Reset Button : Press this button to start
or pause the dishwasher.
6
Start/ Reset
Page 6
A. Set the water softener(See WATER SOFTENER below)
B. Pour 1/2 litre of water inside the salt container and then fill with dishwasher salt
C. Fill the rinse aid dispenser
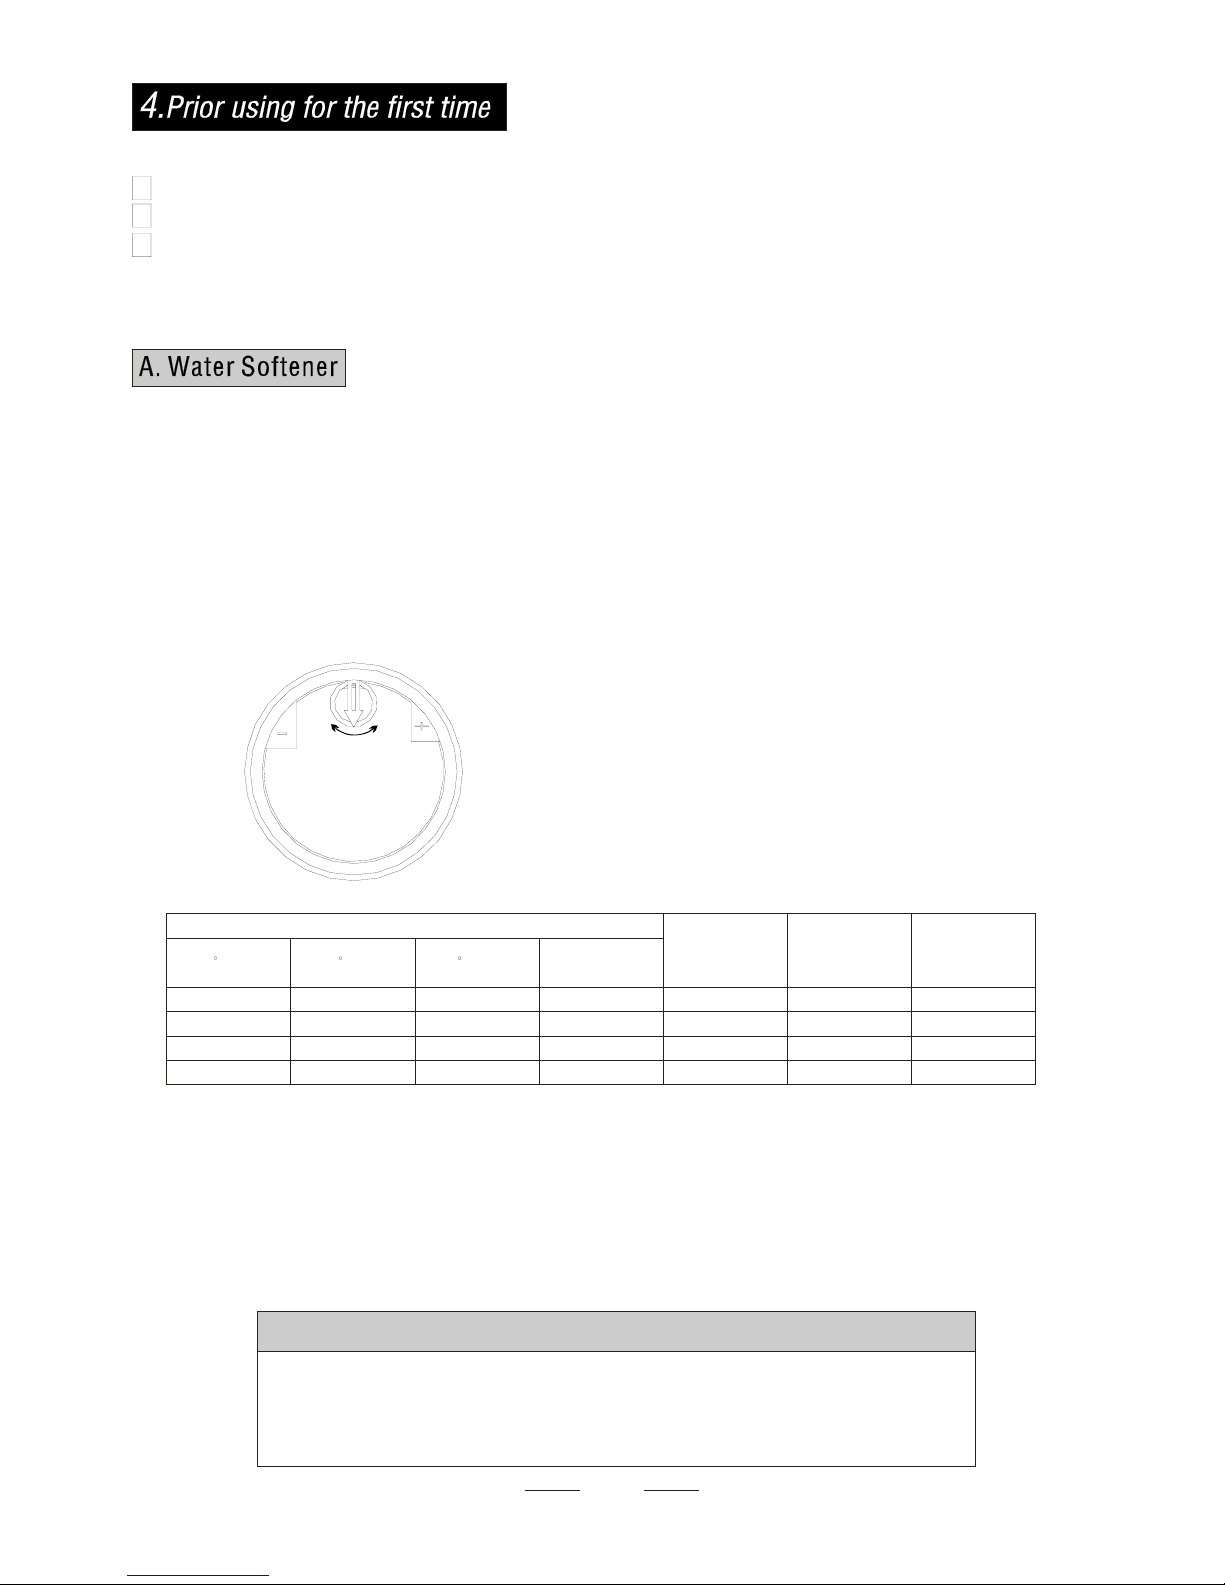
The water softener must be set manually, using the water hardness dial inside the softener container cover.
The water softener is designed to remove minerals and salts from the water, whichwouldhave
a detrimental or adverse effect on the operation of the appliance. The higher the
content of these minerals and salts, the harder your water is. The softener should be
adjusted according to the hardnessof the water in your area. Your local Water Au thority
can advise you on the hardness of the water in your area.
Adjusting Salt Consumption
The dishwasher is designed to allow for adjusting the amount of salt consumed b ased on
the hardness of the water use d. This is intended to optimize and customize the level of
salt consumption so that the salt consumption could be set proceed as follows:
1. Unscrew the cap from the salt container
2. There is a ring on the container with an arrow on it (see
figureto the side), if necessary, rotate the ring in the
anticlockwise direction fro m the “-”Setting toward the
“ ”sign, based on the hardness of the water being used.
Itis recommendedthat adjustments shouldbe madein
accordance with the following schema:
+
WATER SOFTENER
The hardness of the water varies from place to place. If hard water is used in the
dishwasher, deposits will from on the dishes and utensils.
The appliance is equipped with a special softener that uses a salt specifically
designed to eliminate lime and minerals from the water.
4
Contact your local water board for information on the hardness of your water supply.
dH
mmol/l
0~140~8 0~1.4
/
0
/
14~398~22 1.4~3.9 - 20 60
39~8022~45 3.9~8 Mid 40 30
>80>45 >8
+
60 20
fH
0~10
10~28
28~56
>56
Clark
°
Clark: British degree
°
fH : French degree
°
dH : German degree
Note:1°dH=1.25°Clark=1.78
°
fH=0.178mmol/l
WATER HARDNESS
Selector Position
Salt cons umption
(gram/cycle)
Auto nomy
(cycles/1.2kgs)
Page 7
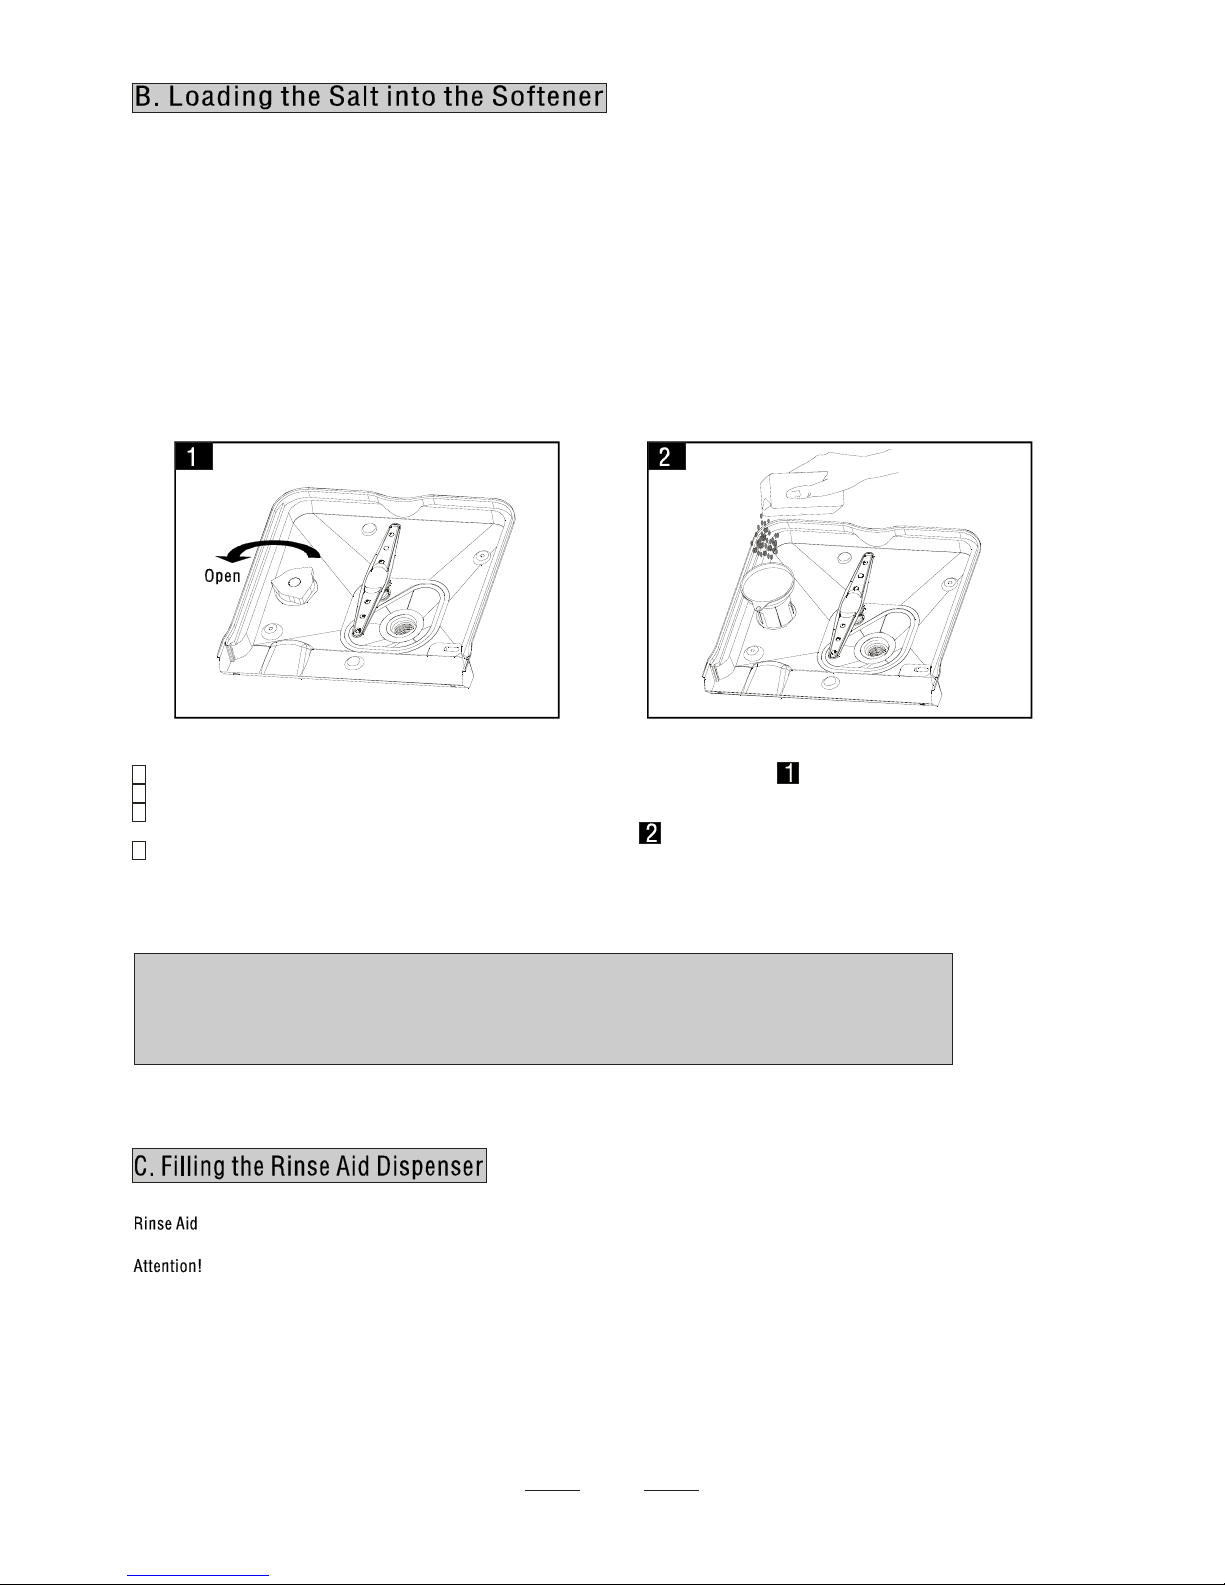
The salt container is located beneath the lower rack and should be filled as follows:
Attention!
Only use salt specifically designed for use in dishwashers! All other typesof
salt not specifically designed foruse in a dishwasher,especially table salt, will
damage the water softener. If damage is caused by the use of unsuitable
salt the Warranty will be VOID, the manufacturer will not be held responsible for
any damage incurred.
Make sure y ou fill with salt just before starting one of the complete washing programmes.
This will prevent any grains of salt or salty water, which may have been split,
remaining of the bottom of the machine for any period of time, which may cause
corrosion.
After the first wash cycle the control panel light will go out.
A Remove the lower basket and then unscrew and remove the cap from the salt container.
B If you are filling the container for the first time, fill 2/3 of its volume with water (around 500ml).
C Place the end of the funnel (supplied) into the hole and introduce about 1,2kg of salt. It is
Normalfor a small amount of water to come out of the salt container.
D Carefully screw the cap back on.
NOTE:
Rinse aid is automatically released during the last rinse, to ensure the best rinse and drying effect.
Only use branded rinse aid. Never fill the rinse aid dispenser with any Other substances (e.g. dishwasher
cleaning agent, liquid detergent). This would damage the appliance.
5
The salt container must be refilled when the salt warning light on the control panel comes on .1.
After the salt cont ainer is filled, the indicator li ght may not go out beforethefirstfullwashcycle.
Page 8
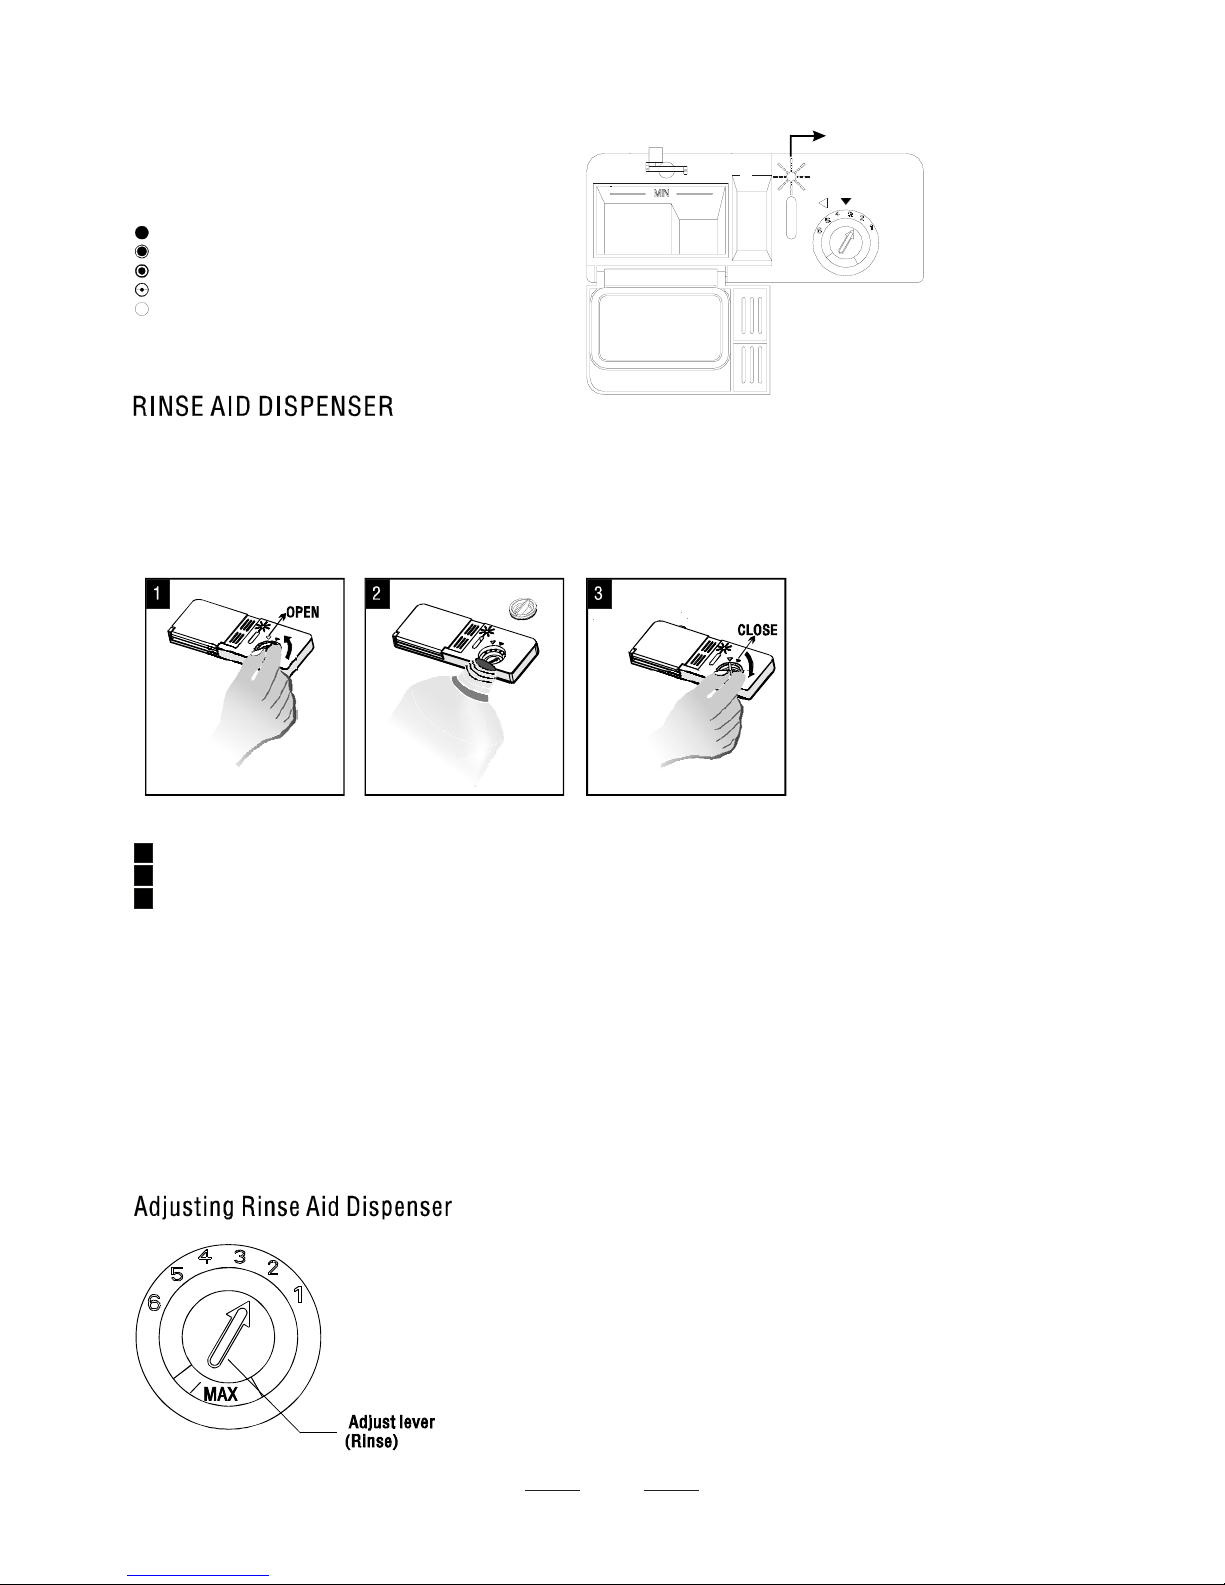
To open the dispenser, turn the cap to the "open" (left) arrow and lift it out.
Pour the rinse aid into the dispenser, being careful not to overfill.
Replace the cap by insertingit aligned with "open" arrow and turning it to the closed (right) arrow.
The rinse aid is released during the final rinse to prevent water from forming droplets on your dishes
that can leave spots and streaks. It also improves drying by allowing water to run off the dishes.
Your dishwasher is designed to use liquid rinse aids. The rinse aid dispenser is located inside the
door next to the detergent dispenser. To fill the dispenser, open the cap and pour the rinse aid into
the dispenser until the level indicatorturns completely black. The volumeoftherinseaidcontainer
is about 140ml.
Be careful not to overfill the dispenser, because this could cause over foaming. Wipeaway anyspills
with a damp cloth. Don't forget to replace the cap before you close dishwasher door.
Attention!
Clean up any rinse aid spilt during filling with an absorbent cloth to avoid excess foaming
during the next wash.
Therinse aid dispenserhas six settings.Always start with the dispenser set on “ ”2.
If spots and poor drying are problems,increase the amount of rinse aid dispensed
by removing the dispenser lid and rotating the dial to “3”. If the dishes still are not
drying properly or are spotted, adjust the dial to the next higher number until your
dishes are spot-free. (Factory value is “4”)
NOTE:
Increa se the dose if there a re d rops of water or lime spots on the dishes after washing.
Reduceit if there are sticky whitish streakson the dishes or a bluish film onglassware
or
knife blades.
6
1
2
3
As the rinse aid diminishes, the size of the black dot
on the rinse aid level indicator changes, as illustrated below.
Full
3/4full
1/2full
1 / 4 full - Should refill to eliminate spotting
Empty
D (Rinse-Aid indicator)
WHEN TO REFILL THE RINSE AIDDISPENSER
Page 9
Based on their chem ical composition, dishwasher detergents can be split intwobasictypes:
conventional, alkaline detergents with caustic components
low alkaline concentrated d eter gent s with natural enzymes
The use of “normal” washing programmes in conjunction with concentrated detergents
reduces pollution and is good for your dishes; these wash programmes are s pecially matc hed
to the dirt-dissolving properties of the enzymes of the concentrated detergent. For this reason
“normal”wash programmesin whichconcentrateddetergents are used can achieve the
same results that can otherwise only be achieved using “intensive” programmes.
Detergent tablets of different brands dissolveat different speeds. For this reason some
detergent tablets cannot dissolve and develop their full cleaning power during short
programmes. Therefore please use long programmeswhen using detergent tablets, to
unsure the complete removal of detergent residuals.
The dispenser must be refilled before the start of each wash cycle following the instruction s
provided in the Wash Cycle Table? Your dishwashers use less detergent and rinse aid
then conventional dishwashers. Generally, only one tablespoonof detergent is needed for
a normal wash load. Also, more heavily soiled i tems need more detergent. Always add the
detergent just before starting the dishwasher, otherwise it could get damp and will not dissolve
properly.
Amount of Detergent to Use
Alwaysadd the detergent just before starting each wash cycle.
Only use branded detergent aid for dishwasher.
If the lid is closed: press the release button. The lid springs open.
Dishwasherdetergent is corrosive! Take care to keep it out of reachof children.
Proper Use of Detergent
Use only detergent specifically made for use in dishwashers. Keep your detergent fresh
and dry. Don't put powder detergent into the dispenser until you're ready to wash dishes.
7
Concentrated Detergent
Detergent Tablets
Detergent Dispenser
1
2
Page 10

8
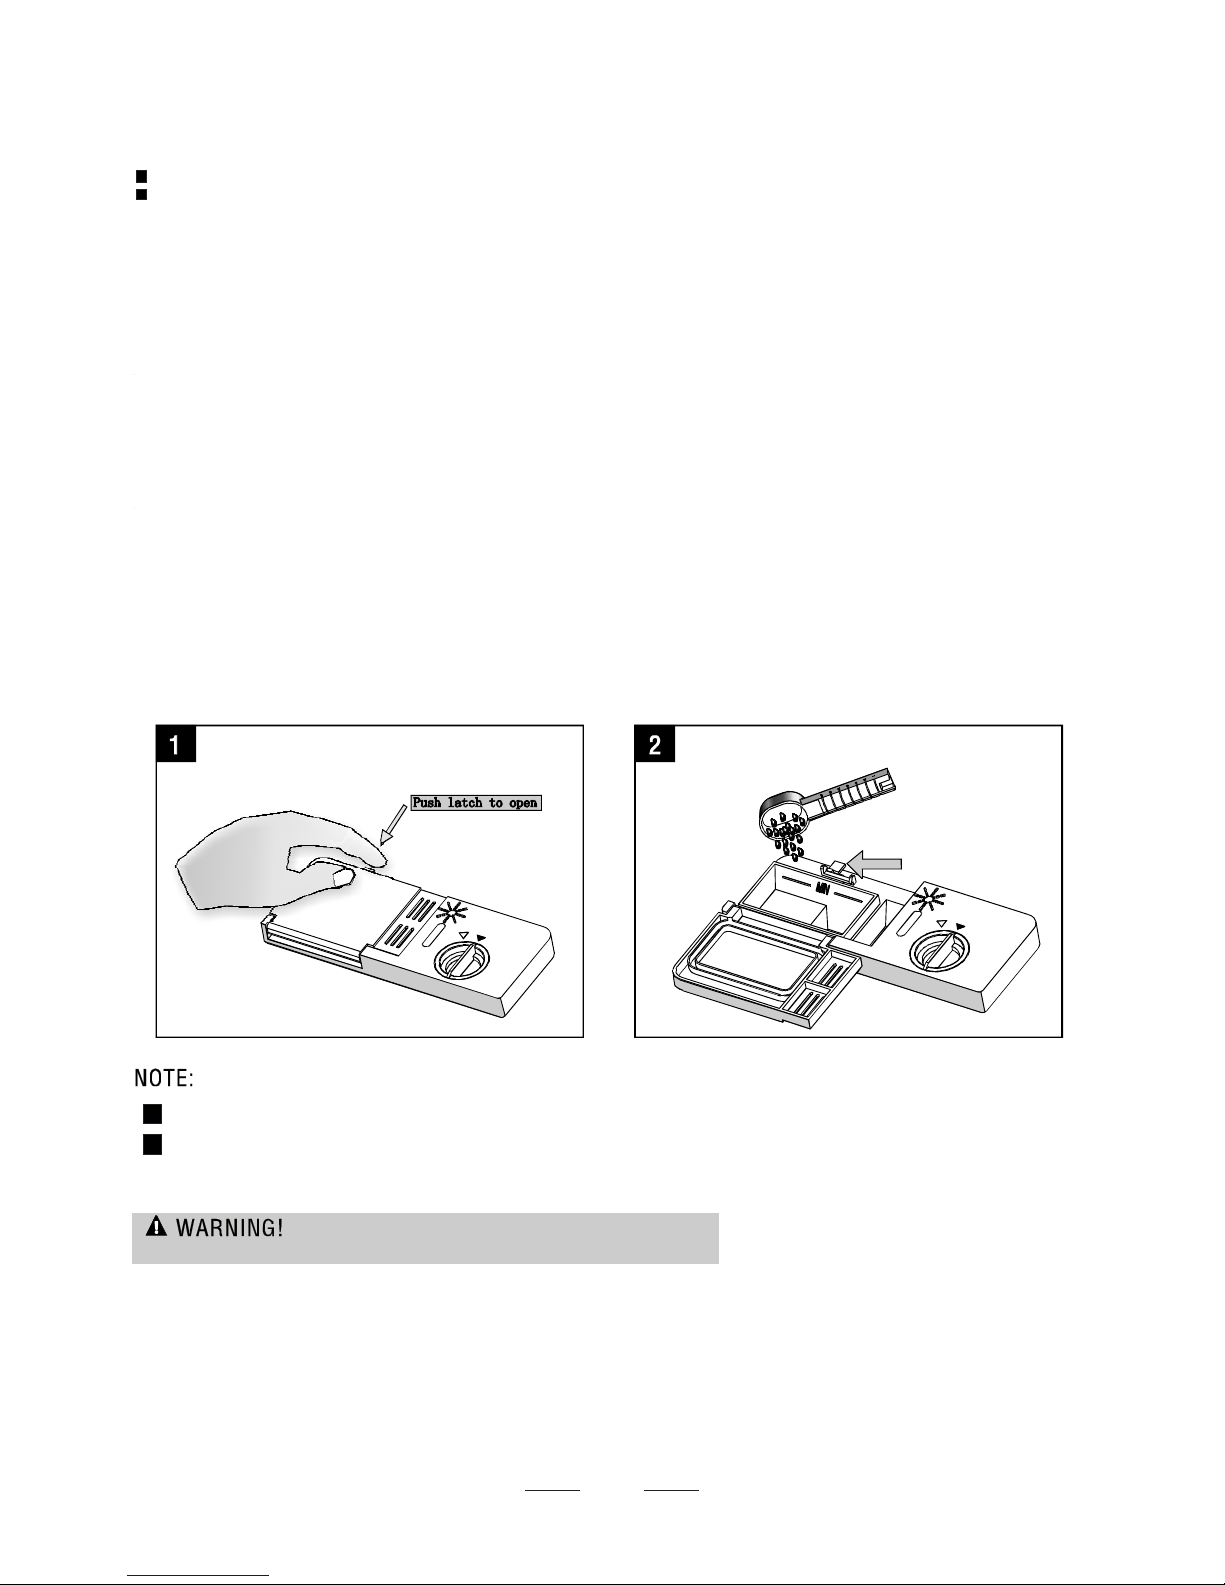
Fill the detergentdispenser with detergent.
The marking indicates the amounts , as
illustrated on right:
The main w ash cycle det ergent placed ,
“MIN”means approximately 20g of detergent.
The pre-wash cycle detergent placed,
approximately 5g of detergent
Please observe the manufacturers amounts and storage
recommendations as stated on the detergent pa ckaging.
Close the lid and press until it locks in place.
If the dishes are heavily soiled,place an additional detergent dose in the pre-wash detergent
chamber. This detergent will take effect during the pre-wash phase.
Youfindinformation about the amount of detergent for the single programmes on th e
last page. Please aware, that according to the level of soilingand the specifi c hardness of
water differencesare possible.
Please observe the manufacturer's recommendations on the detergent packaging.
Detergents
There are 3 sorts of detergents
1.With phosphate and with chlorine
2.With phosphate and without chlorine
3.Without phosphate and without chlo ride
Normally new pulverised detergent is without phosphate. The water softener function of
phosphate is not given. In this case we recommendto fill the salt container even when
the hardness of water is only 6 dH. If detergents without phosphate were used in case of hard
water often white spots appear at dishes and glasses. In this case please add moredetergent
to reach better results. Detergents without chlorine only bleach a little. Strong and coloured
spotswillnotberemovedcompletely.Inthiscasechooseaprogrammewithahigher
temperature.
NOTE:
1
2
WHEN TO REFILL THE RINSE AID DISPENCER
Use of “2 in 1”、“3 in 1”、“4 in 1” and “
5 in 1” Combination / Compact Detergents
These products are detergents with integrated and combined detergent/rinse aid and
salt functions. Before using these products you should first check that the water hardness
in your supply is compat ible with the use of these products as per the detergent manu facturers (on the product packaging). These products should be strictly used according to
the detergent manufacturer's instructions. In general detergents that include rinse aid or
water softener are only able to give good results under certain conditions:rinseaidand
water softener can not adapted to specific conditions. For this reason, in some cases
there might be unwanted cleaning or drying results. Please ask the detergent manufacturer to in form you about the best conditions. If you encounter problems when
using these products for the first time then please contact the detergent manufac turers
care line. The manufacturer of yourdishwasher isnot liable fordamagescaused by
compact detergents nor gives warranty if you use compact detergents.
When using “2 in 1”、“3 in 1”、“4 i n 1” or “
5 in 1” Combination / Compact Detergents ,plea se pay at tenti on to make sure that the size of the detergent dispenser is large enough
to allowthe detergent tablet to be easily
Attention
Keep all detergents in a safe place out of childre n's r each.
Always add the detergent in the dispenser just before starting the dishwasher.
fit into the dispenser tray without using force.
Page 11

1、Referring to the diagram , hang the 3 in 1 tablet container on the upper basket.below
2 Referring to the diagrambelow, r change the location of the containerif needed、 otate the upper sprayer and to make
sure the upper sprayer does not fowl the 3 in 1 tablet container.
3、Put the 3 in 1 tablet into the container then start the
3 in 1 program.
Your dishwasher has a 3 in 1 program which needs no salt and rinse aid use only aTHREEIN
ONE tablet. This dishwasher comes with a 3 in 1 tablet container as an accessory.
NOTE: Only the 3 in 1 program uses a 3 in 1 tablet. If using 3 in 1 tablet with other programs, the
appliance will not give best performance.
9
Page 12

For best performance, follow these loading guidelines. Features and
appearanceof racks and cutlery baskets may vary from your model.
Scrape off any large amounts of leftover food. It is not necessary to rinse the dishes under
running water. Place objects in the dishwasher in following way:
1.Items such as cups, glasses, pots/pans, etc. are stood upside down.
2.Curve items, or those with recesses, should be at a slant so that water can run off.
3.Make sure they are stacked securely and can not tip over.
4.They do not prevent the spray arms from rotating while washing takes place.
Very small items should not be washed in the dishwasher as they could easily fall out of the racks.
To prevent water dripping from the upper rack into the lower rack, we recommend that you
empty the lower basket first and then the upper rack.
The u pper rack is designed to hold more delicate and lighter dishware such as glasses, coffee
and tea cup and saucers, as well as plates, small bowls and shallow pans (as longastheyare
not too dirty).
Position the dishes and cookware so that they do not get moved by the spray of water.
Attention before or after Loading the Dishwasher Racks
Removing the Dishes
Loading the Upper Rack
Adjusting the Upper Rack
If required, the height of the upper rack can be adjusted in order to create m ore space for large
utensilseither in the upper rack or lower rack. The upper rack can be adjusted for height by
putting wheels of different heights into the rails. Long items, serving cutlery, salad servers or
knives should be placed on the shelf so that they do not obstruct the rotation of the spray arms.
The shelf can be folded back or removed when not required for use.
1
Cups
2
Small serving bowl
3
Large serving bowl
4
Glasses
Saucers
5
6
Dish
1
2
3
4
6
5
10
NOTE:The max imu m capacity of t his dishwashe r is 8 place se ttings.
Page 13

We recommend that you place large items which are most difficult to clean into the lower rack:
pots, pans, lids, serving dishes and bowls, as shown in the below.diagram
It is preferable to place serving dishes and lids on the side of the ra cks in order to avoid blocking
therotationof the top spray arm.
Pots, serving bowls , etc. must always be placed top down.
Deep pots should be slanted to allow water to flow out.
A bottom rack feature is to fold down rows so that larger or more pots and pans can be loaded.
To improve stacking of pots and pans, the dish holders can be folded down
11
1
Oval platt er
3
Soup plates
Dessert dishes
4
2
Dinner plates
5
Silverware basket
2
3
4
1
5
4
Page 14

Cutlery Basket
Silverware should be placed in the cutlerybasket with handles at the bottom: Ifthe rack
has side baskets, the spoon should be loaded individually into the appropriate slots,
espec ially long utensils should be placed in the horizontal position at th e front of the
upper rack.
Cutlery with wooden, horn china or
mother-of-pearl handles
Plastic items that are not heat resistant
Older cutlery with glued parts that is not
temperature resistant
Bonded cutlery items or dishes
Pewter or cooper items
Lead crystal glass
Steel items subject to rusting
Wooden platters
Items made from synthetic fibres
Do not put in items that are dirty with
cigarette ash, candle wax, lacquer or
paint. If you buy new dishes please make
sure that they are suitable for dishwashers.
Some types of glasses can become
dull after a large number of washes
Silverandaluminium parts have a
tendency to discolour during washing
Glazed patterns may fade if machine
washed frequently
Please do not overload your dishwasher. There is only space for 8 standard dishes. Do not
use dish that is not suitable for dishwashers. This is important for good results and for
reasonable energy consumption.
Before loading the dishes, you should:
Remove large lef t-ov er food deposits.
Soften rem nants of burnt food in pans
Dishes and cutlerymust not impede the rotation of the spray arms
Load hollow items s uch as cups, glasses, pans etc. with the opening downwards so that
water cannotcollect in the container.
12
NOTE:
NOTE:
Are not suitable
Are of limited suitability
Loading cutlery and dishes
When loading the dishes and cutlery, please note:
Do not let any item extend through bottom.
Teaspoons
4
Soup spoons
2
Forks
1
Serving fork
8
Serving spoon
6
Knife
5
3
Dessert spoons
7
Gravy ladle
1
1
1
1
1
4
7
8
1
1
1
6
2
2
2
2
2
2
2
2
5
5
5
5
5
5
5
5
3
3
3
6
4
4
4
4
4
4
4
3
3
3
3
3
Page 15

13
Di
To
T
shes and items of cutlery must not lie inside one another, or cover each other
avoid damage to glasses, they must not touch
Load large items whichare most difficult to clean into the lower rack
he upper rack is designed to hold more delicate and lighter dishware such as glasses, coffee
and tea cups
Attention!
Possible causes:
Suggested remedy:
Long bladed knives stored in an upright position are a potential hazard!
Long and/or sharp items of cutlery such as carving knives must be positioned
horizontally in the upper basket.
Damage to glassware and other dishes
Type of glass or manufacturing process. Chemical composition of detergent.
Water temperature and duration of dishwasher programme.
Use glassware or porcelain dishes that have been marked dishwasher-proof by the
manufa ctur er
Use a mild detergent that is described as kind of dishes If necessary, seek further
information from detergent manufacturers.
Select a programme with as low a temperature.
To prevent damage, take glass and cutlery out of the di shwasher as soon as po ssible
after the programme has ended.
At the End of the Wash Cycle
When the washing cycle has finished, the buzzer will sound for 8 seconds,
then stop. Turn the appliance off using the ON/OFF button, shut off the water supply and
open the door of the dishwasher. Wait a few minutes before unloading the dishwasher to
avoid handling the dishes and utensils while they are still hot and more susceptible to
breakage. They will also dry better.
WARNING:
Hot steam may be ejected when the door is opened, danger of scalding.
Page 16

14
For normally soiled loads,
such as pots, plates,glasses
and lightly s oiled pa ns.
standard daily cycle.
For lightly soiled loads,such
as plates,glasses,bowls and
lightly soiled pans.
For the heaviest soiled loads,
such as pots,pans,casserole
dish es and dishe s that have
been sitting with dried food
on them for a while.
A shorter wash for lig htly
soiled loads that do not
need drying.
For dishes that need to be
rinsed and dried only.
Normal
Eco
Intensive
Rapid
Rinse
140
150
120
30
80
Pre-wash(50℃)
pre-wash
wash(70℃)
rinse
rinse
rinse(55℃)
drying
Pre-wash(50℃)
wash(50℃)
rinse
rinse(65℃)
drying
pre-wash
wash(50℃)
rinse(60℃)
drying
Wash(40℃)
rinse (7 0℃)
drying
Wash (40 ℃)
Rinse 45(℃)
4/20 g.
4/20 g.
15 g.
1.2
0.95
0.74
0.80
0.40
18
12
11
7
10
3in1
150
pre-wash
wash(50℃)
rinse(70℃)
drying
0.85
11
Turning on the Appliance
Starting a cycle wash
For normally soiled loads,
such as , plates,glasses
and lightlysoiled pans.
standard daily cycle.
pots
(EN 50242)
4/20 g.
1 Draw out the lower and upper basket, load the dishes and push them back.
It is the lower basket first, than the upper one (see
the section entitled “"Loading the Dishwasher ”).
2 Pour in the dete rgent (see the sec tion entitled Salt, Detergent and Rinse Aid”).
3 Insert the plug into the socket. The power supply range is 220-240 VAC /50 HZ,
Make sure that the water supply is turned on to full pressure.
4 Close the door, press the ON/OFF button, the ON/OFF light will turn on.
Turn the Washing Program Knob to select a desired Wash cycle, Then press the star/reset button.
seconds, the machine will start to operate.
recommended to load
After roughly10
Page 17

15
PREMISE:
1. y after has been
runningfor a short time. Otherwise, the detergent may have alreadybeenreleased,
and the appliance may have already drained the wash water. If this is the case,
the detergent dispenser must be refilled (see the section entitled" Loading the
Detergent " ).
2. Press start/Reset button more than 3 seconds to cancel the current program ,
then you can change the program to the desired cycle setting (see the section
entitled" Starting a wash cycle. . . " ).
You can modif th e washing program, the dishwasher
NOTE:
If you open the door when washing, the machine will pause. The buzzer will sound every minute until
you close the door. After you close the door , the machine will continue working after 10 seconds.
A forgotten dish can be added any time before the detergent opens.despenser
Open the door a little to stop the washing.
After the spray arms stop working, you can open the door
completely.
Add forgotten dishes.
4
3
2
1
It is dangerous to open the door when washing, scald you.ejected hot water and steam may
The program light has stopped blingking and is The programme has ended.lit permane ntly.
1.Switch of f the dishwasher by pressing the ON/OFF button.
2.Turn off the water tap!
Open the door carefully. Hot steam may escape when the door is opened!
Hot dishes are sensitive to knocks. The dishes should therefore b e allowed to cool down around
15 minutes beforeremoving from the appliance.
Openthedishwasher'sdoor,leaveitajarandwaitafewminutesbeforeremovingthe dishes.
In this way they will be cooler and the drying will be improved.
Unloadingthedishwasher
It is normal that the dishwasher is wet inside.
Empty the lower basket first and then the upper one. This will avoid water dripping from the
upper basket onto the dishes in the lower one.
Close the door , then press the start/reset button ,the dishwasher
will work after ten seconds.
Page 18

16
The filter prevents larger remnants of food or other objects from getting inside the pump. This residue can
occasionally clog up the filters.
The filter system consists of a coarse filter,a flat (Main filter)
And a microfilter (Fine filter).
Main filter
Food and soil particles trapped by this filter are pulverized by a
special jet on the lower spray arm and washed down the
drain.
Coarse filter
Larger items, such as pieces of bone or glass, that could clog
the drain are trapped in the coarse filter. To remove an item
caught in this filter, gently squeeze the tabs on the top of this
filter and lift it out.
Fine filter
This filter holds soil and food residue in the sump area and
prevents it from being redeposit on the dishes during a cycle.
- Inspect the filters for obstructions every time the dishwasher has been used.
- By unscrewing the coarse filter. You can remove the filter system. Remove any food remnants and clean the
filters under running water.
1
2
3
2
3
1
2
3
step1:Rotate the Coarse filter anti-clockwise.
Then lift it up;
step2:Remove the Main filter
step 3: Remove the Fine filter
Replace the filters in the reverse order of the above procedure.
NOTE:
1
Page 19

17
It is necessary to clean the spray arms regularly for hard water chemicals will clog the spray
arm jets and bearings. To remove the spray arms, screw off the nut clockwise to take out the
washer on top of the spray arm and remove the arm. Wash the arms in soapy and warm water
and use a soft brush to cleanthe jets. Replace them after rinsing them thoroughly.
Cleaning the Spray Arms
Caring for the Dishwasher
To clean the control panel use a lightly dampened cloth then dry thoroughly. To clean the exterior
use a goodappliance polish wax.
Never use sharp objects,scouring padsor harshcleaners on any part of the dishwasher.
Protect Against Freezing
If your dishwasher is left in an unheated place f or a pro longed period:
1.Disconnect from the main s power .
2.Turn off the water supply and disconnect the water inlet pipe from th e water valve.
3.Drain water from the inlet pipe and water valve. (Use a pan to catch the water)
4.Reconnectthe water inlet pipe to the water valve.
5.Remove the filter in the tub the bottom and use a sponge to use up water in sump.
Filter assembly
For best performance and results, the filter assemblymust be cleaned. The filter efficiently
removesfood particlesfrom the wash water, allowing it to be recirculatedduringthe cycle. For
this reason, it is a good idea to remove the larger food particles trapped in the filter after each
wash cycle by rinsingthe semicircular filter and cup under running water. To remove the filter
assembly, pull on the cup handle in the upward direction. The entire filter assembly should be
cleanedonce a week.
To clean the coarse filter and the fine filter, use a stiff brush. Then, reassemble the filter
parts as shown in the figures above and reinsert the entire assembly in the dishwasher, positioning
in its seat and pressing downward.
The dishwasher must never be used without the filters. Improper replacement of the filter may
reduce the performance level of the appliance and damage dishes and utensils.
Never run the dishwasher without the filters in place. When cleaning the filters, don't force
them. Otherwise, the filters could be compromised.distort causing performance to
Page 20

18
Never use a spray cleaner to clean the door panel for it could damage the door lock and electrical components. It is not allowed
to use the abrasive agent or some paper towel because of the risk of scratching or leaving spots on the stainless steel surface.
After every wash, turn of f the wate r supply to the
appliance and l eave the door slightly ajar so that
moisture and odours are not trapped inside.
Before cleaning or performing maintenance, always
removethe plug from the socket. Do not run risks.
To clean the ex terior and rubber parts of th e dishwasher,
do not use solvents or abrasive cleaning p roducts.
Use a cloth and warm soapy water.
To remove spots or stains from the surfaceof the
interior, use a cloth dampened with water and a little
white vinegar, or a cleaning product made specifically
for dishwashers.
When you go on holiday, it is recommended that you run a
wash cycle with the dishwasher empty and then remove
the plug from the socket, turn off the water supply and
leave the door of the appliance slightly ajar. This will help
the seals last longer and prevent odoursfrom forming
withinthe appliance.
If the appliance must be moved, try to keep it in the vertical
position. If absolutely necessary, it can be positioned on
its back.
One of the factors that cause odours to form in the
dishwasher is food that remains trappedin the seals.
Periodic cleaning w ith a damp sponge will prevent this
from occu rring.
To clean the edge around the door, you should use only a soft warm, damp rag. To prevent
penetration of water into the door lock and electrical components, do not use a spray cleaner
of any kind.
Also, never use abrasive cleaners or scouring pads on the outer surfaces because they will
scratc h the finish. Some papers towels can also scratch or leave marks on thesurface.
After making sure that the voltage and the frequency values for your local supply
correspond to those on the rating plate, insert the plug into an electrical socket which is
earthedproperly. If the electrical socket to which the appliance must be connected is not
appropriate for the , replace the plug, rather than using adaptors as theyplug constitute a
fire risk and could cause injury.
Insure proper ground exists before use
This applian ce must be grounde d. In the event of a malfunction or break down, grounding will
reduc e the risk of electric shock by providing a path of least resistance of electric current. This
appliance is equipped with a cord having an equipment-grounding conductor and a grounding
plug. The plug must be plugged into an appropriateoutlet that is installed and grounded in accordance
with all local codes and ordinances.
Make sure that the voltage on the rating plate matches that of your local supply.
DO NOT STAND THE APPLIANCE ON A THICK PILE CARPET AS THIS WILL BLOCK THE VENTILATION SLOTS
ON THE UNDERSIDE OF THE APPLIANCE.
DO NOT, UNDER ANY CIRCUMSTANCES, CUT OR REMOVE THE THIRD GROUNDING PRONG FROM THE POWER CORD.
DO NOT USE AN EXTENSION CORD OR AN ADAPTER PLUG WITH THIS APPLIANCE.
Page 21

ELECTRICAL CONNECTION (UK ONLY)
For your safety please read the following information
Warning: This appliance must be earthed.
The appliance must be connected to a 220 -240 volts 50 cycle AC supply by meansofathreepinsocket,suitably
earthed and should be protected by a 13 amp fuse in the plug.
The appliance is supplied with a standard 13-amp 3-pin mains plug fitted with a 13 amp fuse. Should the fuse require
replacement, it must be replaced with a fuse rated at 13 amp and approved to BS1362.
The plug contains a removable fuse cover that must be refitted when the fuse is replaced. In the event of the fuse
cover being lost or damaged, the plug must not be used until a replacement cover has been obtained.
If the mains plug is unsuitable for the socket outlet in your home or is removed for any other reason, then the fuse
should be removed and the cut off plug disposed of safely to prevent the hazard of electric shock.
There is a danger of electric shock if the cut off plug is inserted into a 13 ampsocket.
Howtowirea13ampplug.
Important The wires in the mains lead on this appliance are coloured in accordance with the following code:
Green and Yellow - Earth
Blue – Neutral Brown – Live
As the colours may not correspond with the markings identifying the terminals in your plug proceed
as follows.
The green and yellow wire must be connected to the terminal in the plug which is marked with the letter E or
with the earth symbol or coloured green and yellow.
The blue wire must be connected to the terminal marked N.
The brown wire must be connected to the terminal marked L.
Youmustmakesurethemainscordisheldfirmlyunderthecordclamp.
19
Page 22

Connect the cold water supply hose to a threaded3/4(inch) connectorandmake sure that it is
fastened tightly in place.
If th e water p ipes are new or have not been used for an extended period of time, let the water
runtomakesurethatthewaterisclearandfree ofimpurities.Ifthisprecaution is not taken,
there is a risk that the water inlet can get blocked and damage the appliance.
The water supply to the appliance can also be connected to the house hot waterline,
as long as it does not exceed a temperature of 60 ℃. In this case, the wash cycletime
will be shortened by about 15 minutes and the wash e fficiency slightly reduced.
The connection must be made to the hot water line following the same procedures as those
for the connection to the cold water line. A cold water connection is advised.
Position the appliance in the desired location. The back should rest against the wall behind it, and the sides, along the adjacent
cabinets or wall. The dishwasher is equipped with water supply and drain hoses that can be positioned to the right or the left to
facilitate proper installation.
20
Insert the drain hose into a drain pipe with a minimum diameter of 4 cm, or let it run into the sink, making sure to avoid bending
or crimping it. Use the special plastic support that comes with the appliance. The free end of the hose must be at a height
between 40 and 100cm and must not be immersed in water.
Once the appliance is positioned,adjust the feet (screwing them in or out) to adjust the
heightof the dishwasher, making it level. The appliance should not be slanted more than 2 .
φ40mm
Drain h ose hook
Drain pipe
Front
A
B
C
Attach the drain hose hook to the counter
Counter
NOTE:
The inlet water pressure must be between a Minimum of 0.04 MPa and a maximum of1.0Mpa.
Page 23

21
●
Attention
●
Starting the dishwasher
The followings should be checked before starting the dishwasher.
1
Whether the dishwasher is level and stable
2
Whether the water inlet valve is open
3
Whether there are leaks at the connections of the water pipes
4
Whether the mains plug is tightly in the wall socket
5
Whether the power is switched on
6
Whether the inlet and drain hoses are knotted
7
All packing materials and should be removed from the dishwasherinstructions
After installation, keep these instructions for future reference.
Water Outlet
Connect the water drain hose. The drain hose must be correctly fitted to avoid water leaks.
Ensure that the water inlet hose is not kinked or squashed.
Extension Hose
If you need a drain hose extension, use a similar drain hose.
It must be no longer than 4 metres; otherwisethe cleaning effect of the dishwasher could be reduced.
Syphon Connection
The waste connection must be at a height of between 50 cm (minimum) and 100 cm (maximum)
From . The water drain hose should be fixed by a hose clip.ground level
Page 24

22
Before Calling for Service
the charts on the following pages .Carefully read
Fuse blown, or the
circuit breaker acted
Replace fuse or reset circuit breaker. Remove any other
appliances sharing the same circuit with the dishwasher
Sound from soft food shredding action and detergent cup
opening.
Utensils are not secure
in the baskets or something
small has dropped into
the basket
To ensure everything is secured in the dishwasher.
Motor hums Dishwasher has not been used regularly. If you do not use it
often, remember to set it to fill and pump out every week,
which will help keep the seal moist.
Improper detergent
Add 1 gallon of cold water to the tub. Close and latch the
dishwasher,
. Repeat if necessary.
then to drain out the
water .
Start the "rapid" wash cycle
Spilled rinse agent Always wipe up rinse agent spills immediately.
Detergent with
colorant was used
Make sure that the detergent is the one without colorant.
Rinse agent dispenser
is empty
Make sure that the rinse agent dispense is filled.
Improper program
Improper rack loading Make sure that the action of the detergent dispenser and
spray arms are not blocked by large dishware.
Extremely hard water
Low inlet
temperature
Overloading the
dishwasher
Improper loading
Old or d amp powder
detergent
Empty rinse agent
dispenser
Incorrect dosage of
detergent
To remove spots from glassware:
Take out all metal utensils out of the dishwasher.
Do not add detergent.
Choose the longest cycle.
Start the dishwasher and allow it to run for about
18 to 22 minutes, then it will be in the main wash.
Open the doo r to pour 2 cups of white vinegar
into the bottom of the dishwasher.
Close the door and let the dishwasher complete
the cycle. If the vinegar does not work : Repeat
as above, except use 1/4 cup (60 ml)of citric acid
crystals instead of vinegar.
Some audible sounds are
normal
'
Make sure the dishwasher is turned on and the door is
closed securely.
Check that the water supply is connected properly and
the water is turned on.
Make sure the power cord is properly plugged into the
wall socket.
Power supply is n ot
turned on
Water pressure is low
Select stronger program
Use only the special dishwasher detergent to avoid suds.
If this occurs, open the dishwasher and let suds evaporate.
Page 25

Combination of soft
water and too much
detergent
Use less detergent if you have soft water and select a
shortest cycle to wash the glassware and to get them clean.
Tea or coffee stains using a solution of 1/2 cup of bleach and 3 cups warm water
to remove the stains by hand.
You have to wait for 20 minutes after a cycle to let the heating
elements cool down before cleaning interior; otherwise, burns
will happen.
Iron deposits in water
can cause an overall film
You have to call a water softener company for a special filter.
Hard water minerals To clean the interior, use a damp sponge with dishwasher
detergent and wear rubber gloves. Never use any other cleaner
than dishwasher detergent for the risk of foaming or suds.
Dial is not in the
position
OFF
Turnthe Dial to
OFF position and slide the door latch to the
left.
Dishes block detergent
cups
Re-lo ading the dishes properly.
Normal phenomenon
Thereissomesteamcomingthroughtheventbythedoor
latch during drying and water draining.
Aluminum utensils have
rubbed a gains t dishes
Use a mild abrasive cleaner to eliminate those marks.
'
This is normal A small amount of clean w ater around the outlet on
the tub bottom keeps the water seal lubricated.
Be careful not to overfill the rinse aid dispenser.
Spilled rinse aid could cause oversudsing andlead
to overflowing. Wipe away any s pills with a damp cloth.
Make sure the dishwasher is level.
Overfill d ispenser or rinse
aid spills
Dishwasher isn t level
'
Damage d or detective
drain pump
Replace the drain pump
23
If overflow occurs, turn off the main water supply before calling for service. If there is water in the base pan because of an overfill
or small leak, the water should be removed before restarting the dishwasher.
Longer inlet time.
Water tap is not opened.
Longer draining time.
The installation position of the drain pipe is too high.
Overfilled.
Too much inlet water pressure.
Page 26

24
Height : 850mm
Width : 450mm
Depth : 580mm
Voltage connected Load : see rating label
Water pressure: 0.04-1.0MPa
Hot water connection : max 60 ℃
Power supply: see rating label
Capacity: 8 Place settings
Page 27

You must dispose of this product and its packaging according to local laws and regulations. Because
this product contains electroniccomponents, the product and its accessories must be disposed of
separately from household waste when the product reaches its end of life.
Contact your local authority to learn about disposal and recycling.
The product and packagingshould be taken to your local collection point for recycling.
Some collection points accept products free of charge.
If there is something about your appliance which you do not understand and you live in the UK
you can phone our help line during normal office hours on: 0844 800959 5
We apologise for any inconvenience caused by minor inconsistencies in these
instructions, which may occur as a result of product improvement and development.
18 / 07 / 2008
Kesa Electricals UK, HU1 3AU
As such we urge you to follow the correct disposal procedure for your product
and packaging materials. This will help conserve natural recourses and ensure
that it is recycled in a manner that protects health and the environment.
 Loading...