

Page 1
Please read these instructions carefully before attempting to install or use this
product. It is advisable to keep these instructions in a safe place for future reference.
Installation and Operating Instructions
ELECTRIC SINGLE OVEN
PSO60FW / PSO60FX
ELECTRIC SINGLE OVEN
26302-020306.qxp 13/04/2006 09:49 Page 1
Page 2
2
INTRODUCTION
Before using the oven
Remove any packing and protective film
and keep away from children. Wash the
oven thoroughly with clean soapy water.
The first time you use the oven
Switch on the oven for approximately 30
minutes at a high temperature to burn off
any residues from the manufacturing
process.
Thank you for choosing this quality
appliance. It has been designed to give
years of trouble-free service, provided it is
installed and maintained correctly.
Please read these instructions carefully
before installing or using your appliance. It
is advisable to keep your purchase and
installation receipts with these instructions
in a safe place for future reference.
Included is some important safety
information in addition to guidelines and
recommendations which will enable you to
take full advantage of all the functions
available.
This quality appliance has been tested and
certified to meet all applicable UK electrical
and safety standards.
This appliance must be installed and
connected in accordance with current
installment regulations by a qualified
electrician.
After unpacking the appliance ensure that
there is no visible damage. If the appliance
has been damaged during transit, do not
use it.
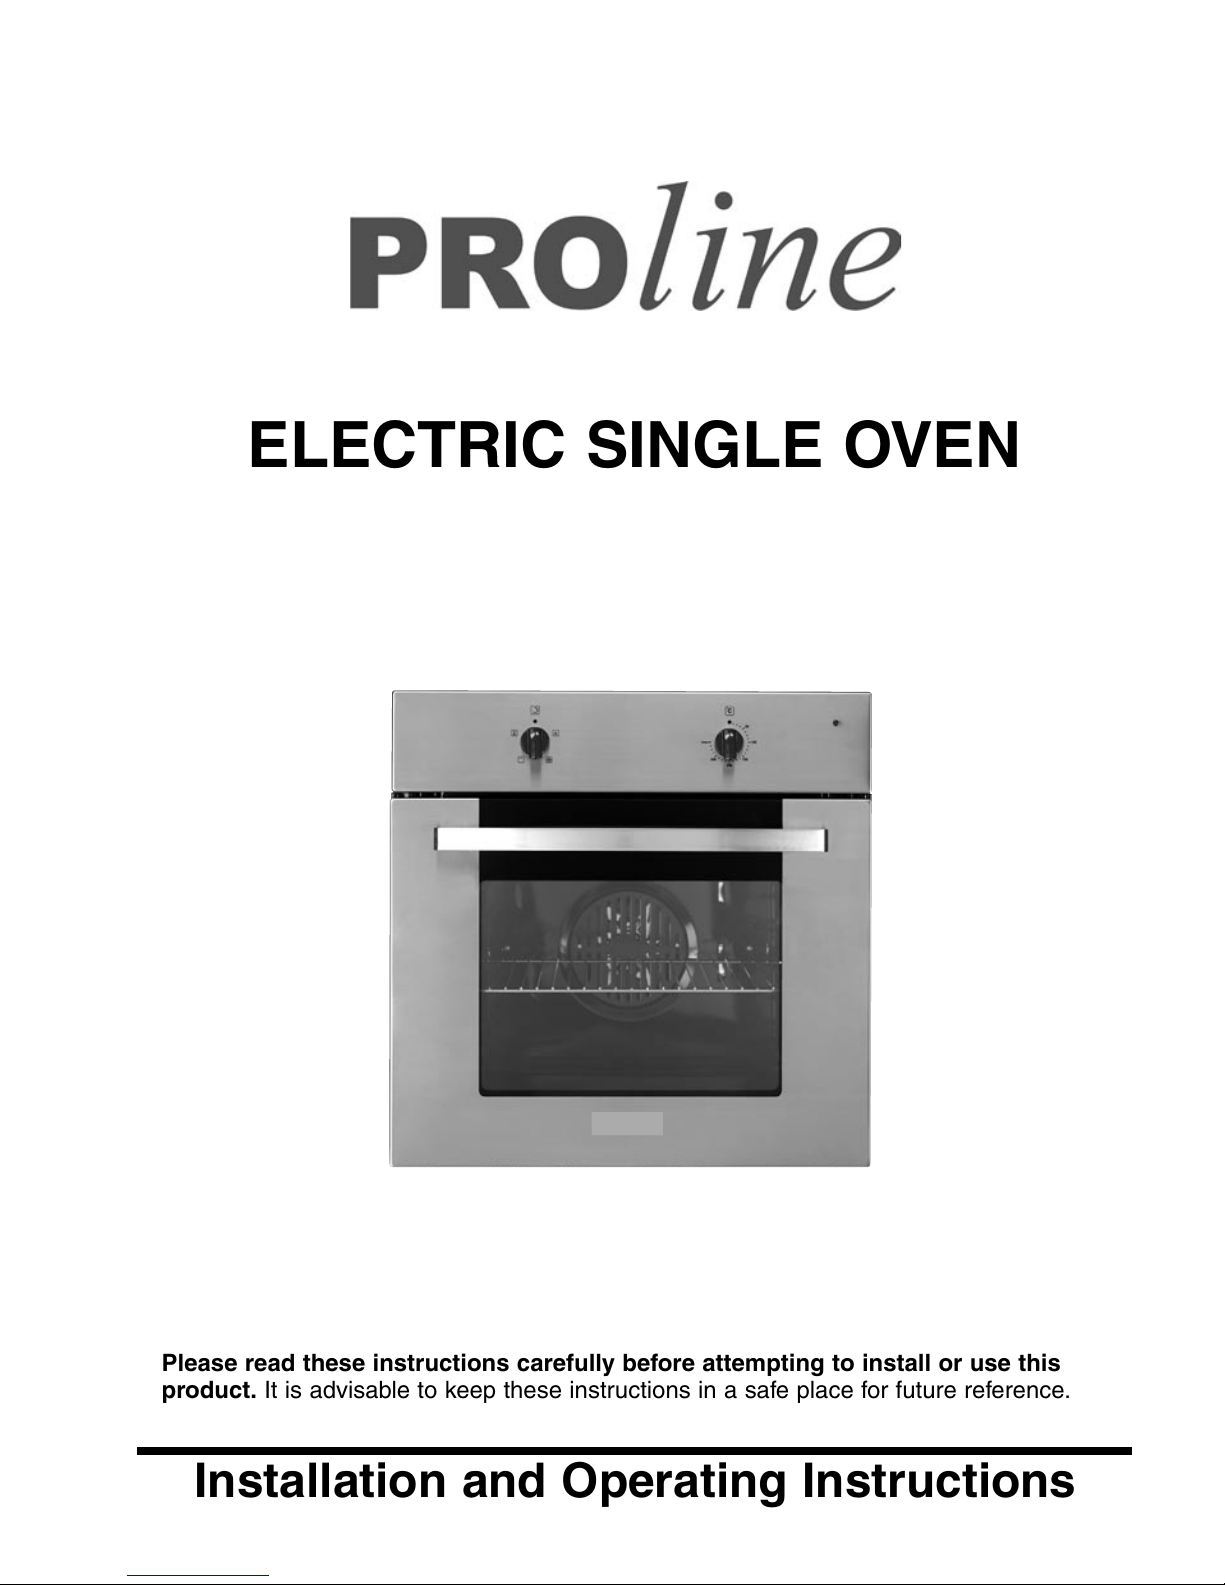
PARTS IDENTIFICATION
1 - Control panel
2 - Wire shelf
3 - Grill pan and handle
4 - Control
Figure 1
1
2
3
4
Page 3
3
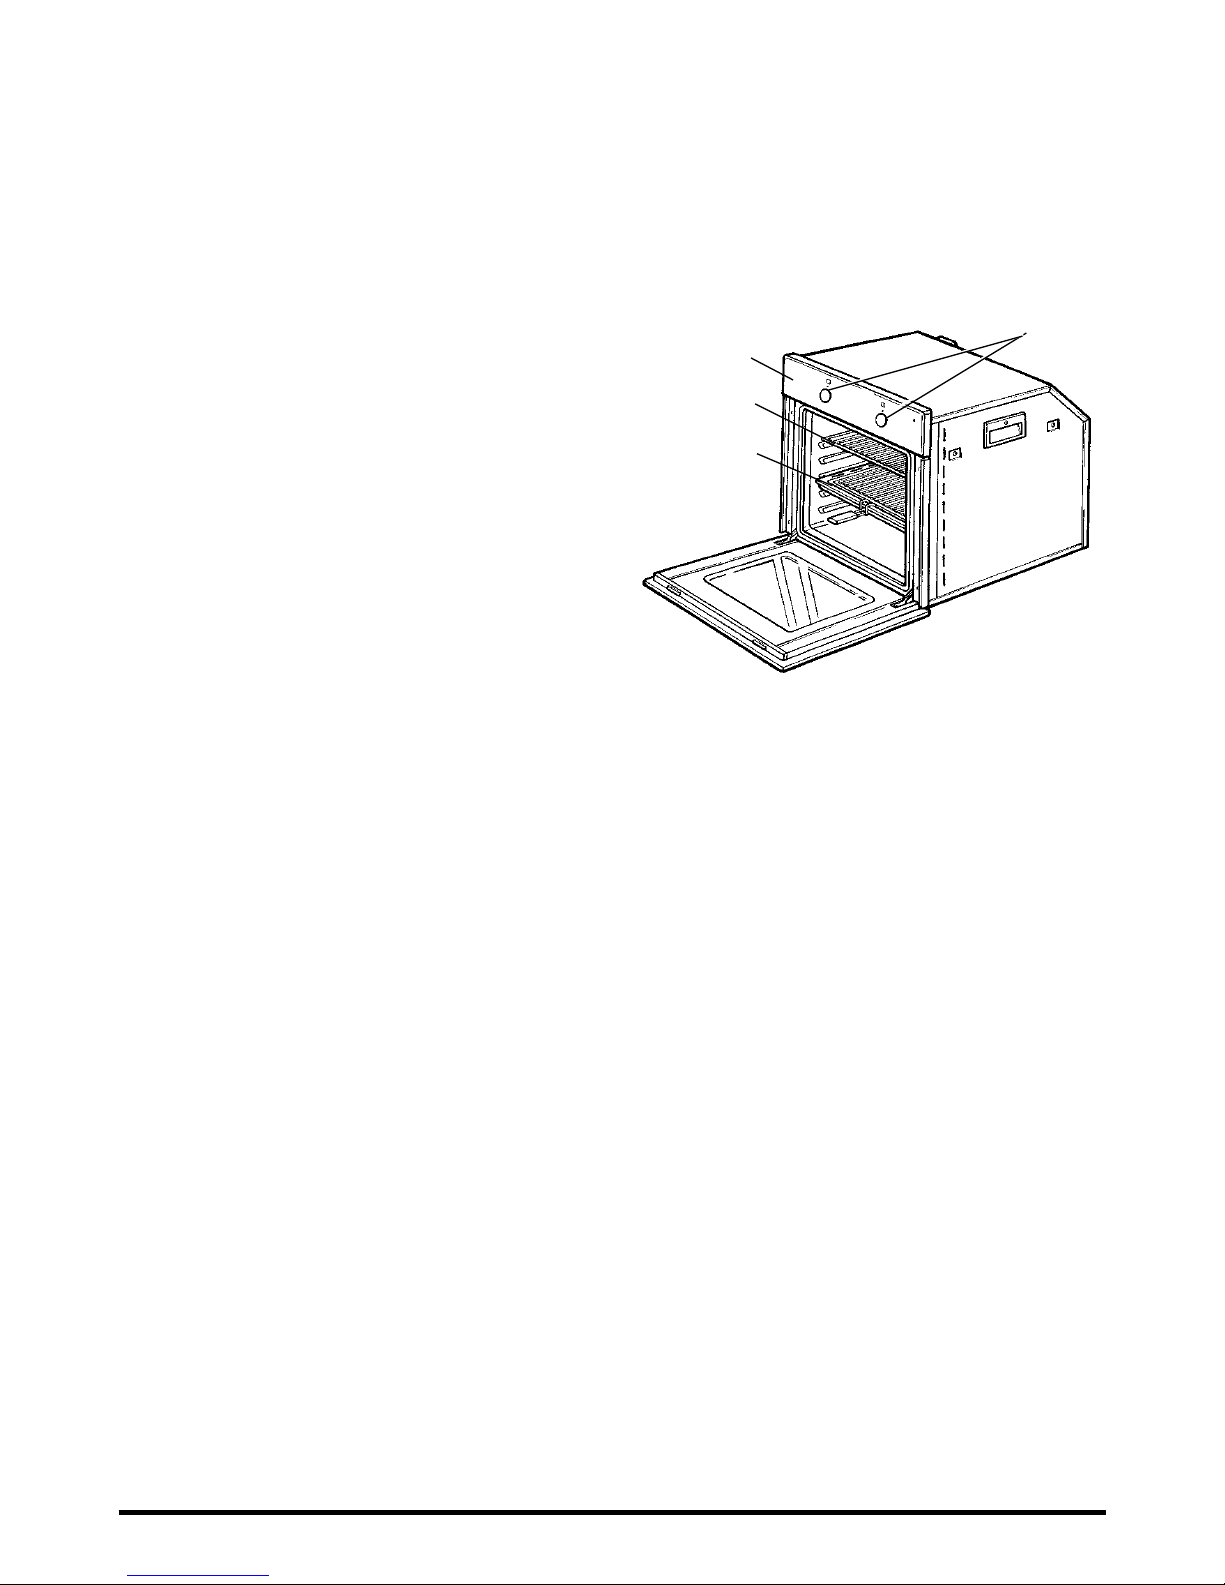
CONTROLS
Top heating element (grill)
Temperature range: 50°C to
MAX.
Top heating element (grill) with
fan
Temperature range: 50°C to
MAX.
OFF position.
Defrosting with fan
Operates the fan with no heat for
defrosting food.
Circular heating element with
fan
Thermostat setting from 50°C to
MAX.
°C
�
THERMOSTAT CONTROL
To set the oven temperature, turn the
control knob clockwise to align with the
required temperature on the control panel.
Temperature range: 50°C to MAX (280°C).
CONTROL SELECTOR FUNCTIONS
Turn the control selector to the required
function.
Selecting a function also turns the light on
inside the oven.
Page 4

4
FAN OVEN
General cooking
Turn the control selector to . The oven
uses a circular element to quickly and
efficiently heat the oven. As the fan is very
efficient at distributing heat, the oven is
more uniformly heated so cooking times
may be shortened.
Select the temperature on the thermostat
control between 50°C and MAX.
The thermostat indicator light goes out
when the oven is at the correct
temperature.
For efficient and economic cooking, keep
the oven door closed as much as possible.
Defrosting setting
Turn the control selector to and keep
the thermostat control at
�
. The fan turns
on with no heat.
This allows frozen food to rapidly defrost.
Figure 3
GRILL
Open the door.
Move the shelf to the first or second
position from the top.
Select the symbol on the control
selector.
Turn the thermostat control between 50°C
and MAX and preheat the element for five
minutes.
Place the food in the middle of the grill pan
and position the pan so the food is near
but not touching the top element. Do not
line the grill pan with aluminium foil. Use
the handle when handling the grill pan
(Fig. 5).
When the food is cooked turn the grill
control to off (
�
).
Figure 2
Figure 5
GRILL
PAN
Always grill with the oven door closed.
Close
Page 5

MAINTENANCE AND CLEANING
1. Before cleaning it you should wait until the oven cools down.
2. Do not steam pressure clean the oven.
3. It is best to clean the bottom of the oven after every use and not allow the remains of food
and spots of oil to remain burned on.
Do not use caustic paste, abrasive wire, powders or hard instruments to clean surfaces.
All parts and surfaces can be safely cleaned in warm soapy water and left to dry before
reassembling. Wait for the oven to cool before cleaning to avoid risk of skin burns.
For stubborn marks on glass surfaces a mild cream cleaner can be used. Dry parts with a
soft cloth. On painted surfaces only use a clean cloth wrung out in hot soapy water.
For vitreous enamel surfaces use a mild cream cleaner specially approved for these
surfaces.
26302-020306.qxp 13/04/2006 09:50 Page 5
For stainless steel surfaces clean using an appropriate product and always dry thoroughly.
IMPORTANT: These parts must be cleaned very carefully to avoid scratching and abrasion.
You are advised to use a soft cloth and neutral soap.
4
FAN OVEN
General cooking
Turn the control selector to . The oven
uses a circular element to quickly and
efficiently heat the oven. As the fan is very
efficient at distributing heat, the oven is
more uniformly heated so cooking times
may be shortened.
Select the temperature on the thermostat
control between 50°C and MAX.
The thermostat indicator light goes out
when the oven is at the correct
temperature.
For efficient and economic cooking, keep
the oven door closed as much as possible.
Defrosting setting
Turn the control selector to and keep
the thermostat control at
�
. The fan turns
on with no heat.
This allows frozen food to rapidly defrost.
Figure 3
GRILL
Open the door.
Move the shelf to the first or second
position from the top.
Select the symbol on the control
selector.
Turn the thermostat control between 50°C
and MAX and preheat the element for five
minutes.
Place the food in the middle of the grill pan
and position the pan so the food is near
but not touching the top element. Do not
line the grill pan with aluminium foil. Use
the handle when handling the grill pan
(Fig. 5).
When the food is cooked turn the grill
control to off (
�
).
Figure 2
Figure 5
GRILL
PAN
5
MAINTENANCE AND CLEANING
1. Before cleaning it you should wait until the oven cools down.
2. Do not steam pressure clean the oven.
3. It is best to clean the bottom of the oven after every use and not allow the remains of food
and spots of oil to remain burned on.
Do not use caustic paste, abrasive wire, powders or hard instruments to clean surfaces.
All parts and surfaces can be safely cleaned in warm soapy water and left to dry before
reassembling. Wait for the oven to cool before cleaning to avoid risk of skin burns.
For stubborn marks on glass surfaces a mild cream cleaner can be used. Dry parts with a
soft cloth. On painted surfaces only use a clean cloth wrung out in hot soapy water.
For vitreous enamel surfaces use a mild cream cleaner specially approved for these
surfaces.
CLEANING GLASS DOOR
Cleaning the glass oven door
Ensure the oven door is cool before cleaning. Removal of the
door makes it easier to clean the door, the door surround and
the seals.
To remove the door proceed as follows:
1. Open the door fully.
2. Raise one hinge clip and rotate it towards you as far as the
stop (Figure 20). Repeat the procedure with the second
hinge clip on the other side of the door.
3. Raise the door gently until it comes to rest against the hinge
clips.
4. Grip the edges of the door and lift the door clear of the
catches in the hinge openings.
5. When cleaning the door, take care not to move the clips from their position.
6. Once cleaning is complete, lift the door and slide the hinges into the hinge openings.
7. Engage the slots on the hinges with the catches in the hinge openings.
8. Check that the weight of the door is fully supported on the hinges.
9. Lower the door and raise the hinge clips, then return them away from you and back to their starting
positions.
10. Check that the seal is in place then close the door. Make sure that the inner face of the door meets and
shuts against the seal all around.
HINGE CLIP
STOP
CATCH
SLOT
HINGE
OPENING
Figure 20 - removing the oven door
MAINTENANCE AND CLEANING
1. Before cleaning it you should wait until the oven cools down.
2. Do not steam pressure clean the oven.
3. It is best to clean the bottom of the oven after every use and not allow the remains of food
and spots of oil to remain burned on.
Do not use caustic paste, abrasive wire, powders or hard instruments to clean surfaces.
All parts and surfaces can be safely cleaned in warm soapy water and left to dry before
reassembling. Wait for the oven to cool before cleaning to avoid risk of skin burns.
For stubborn marks on glass surfaces a mild cream cleaner can be used. Dry parts with a
soft cloth. On painted surfaces only use a clean cloth wrung out in hot soapy water.
For vitreous enamel surfaces use a mild cream cleaner specially approved for these
surfaces.
CLEANING GLASS DOOR
Ensure the oven door is cold before cleaning. Release the two screws securing the top
frame. Remove the top frame and slide out the glass.
To replace the glass, place bottom edge of the glass in the clips. Carefully lay the glass on
the buffers so it rests flush with the side frame. Replace the top frame and secure with the
two screws.
Figure 6
SCREW
BUFFER
TOP
FRAME
CLIP
GLASS
SIDE FRAME
SIDE
FRAME
SCREW
Figure 7
LAMP
LAMPHOLDER
DIFFUSER
LAMP REPLACEMENT
Wait for the oven to cool.
Unscrew and remove the diffuser. Unscrew
the lamp from the lampholder. Replace
lamp and diffuser (Figure. 7).
The replacement lamp must be of the
same type, voltage and wattage (15W SES
300°C).
Page 6

6
SAFETY TIPS
• Always use dry oven gloves when
removing items from the oven.
• Always be careful when operating the
oven and take care to avoid touching
hot elements inside the oven.
• Always keep children away from the
oven as it will get hot during use.
• Always ensure that the cables of other
household appliances used near the
working oven are away from its hot
elements. Ensure also that the cables
are not trapped by the oven door.
• Always keep the oven door closed when
the oven is not in use.
• Always keep the oven clean as a build
up of grease or fat from cooking can
cause a fire.
• Always allow the oven to cool before
cleaning.
NEVER:
• Never leave children unsupervised
where the oven is installed as the
appliance will get hot during and after
use.
• Never allow anyone to sit or stand on
any part of the oven.
• Never store items above the oven that
children may attempt to reach.
• Never heat up unopened food
containers as pressure can build up
causing them to burst.
• Never store chemicals, food stuffs or
pressurised containers in cabinets
above or next to the oven.
• Never use the oven as a room heater.
• Never dry clothes or place other items
on the oven door.
INSTALLATION
Figure 8a
Figure 8b
The housing dimensions are shown in
Figure 9.
Before installing the oven in its
housing, insert the mains plug into the
mains outlet socket.
The oven can be installed either in a
housing unit as shown in Figure 8a or
under a worktop as shown in Figure 8b.
Ensure that the surrounding material is not
combustible and is heat resistant.
Figure 9
Align the oven centrally in the aperture
and secure it in place with four screws
(Figure 10).
SCREWS
Figure 10
6
Page 7

6
SAFETY TIPS
• Always use dry oven gloves when
removing items from the oven.
• Always be careful when operating the
oven and take care to avoid touching
hot elements inside the oven.
• Always keep children away from the
oven as it will get hot during use.
• Always ensure that the cables of other
household appliances used near the
working oven are away from its hot
elements. Ensure also that the cables
are not trapped by the oven door.
• Always keep the oven door closed when
the oven is not in use.
• Always keep the oven clean as a build
up of grease or fat from cooking can
cause a fire.
• Always allow the oven to cool before
cleaning.
NEVER:
• Never leave children unsupervised
where the oven is installed as the
appliance will get hot during and after
use.
• Never allow anyone to sit or stand on
any part of the oven.
• Never store items above the oven that
children may attempt to reach.
• Never heat up unopened food
containers as pressure can build up
causing them to burst.
• Never store chemicals, food stuffs or
pressurised containers in cabinets
above or next to the oven.
• Never use the oven as a room heater.
• Never dry clothes or place other items
on the oven door.
INSTALLATION
Figure 8a
Figure 8b
The housing dimensions are shown in
Figure 9.
Before installing the oven in its
housing, insert the mains plug into the
mains outlet socket.
The oven can be installed either in a
housing unit as shown in Figure 8a or
under a worktop as shown in Figure 8b.
Ensure that the surrounding material is not
combustible and is heat resistant.
Figure 9
Align the oven centrally in the aperture
and secure it in place with four screws
(Figure 10).
SCREWS
Figure 10
7
Page 8

Important
The wires in the mains lead on this appliance are coloured in accordance with the
following code:
Green and Yellow - Earth
Blue – Neutral
Brown – Live
As the colours may not correspond with the markings
identifying the terminals in your plug proceed as follows.
The green and yellow wire must be connected to the terminal in the plug which is marked
with the letter E or with the earth symbol or coloured green and yellow.
The blue wire must be connected to the terminal marked N.
The brown wire must be connected to the terminal marked L.
You must make sure the lead is firmly secured under the cord clamp.
ELECTRICAL CONNECTION (UK ONLY)
For your safety please read the following information
Warning: This appliance must be earthed.
The appliance must be connected to a 230 volts 50 cycle AC supply by means of a three pin
socket, suitably earthed and should be protected by a 13 amp fuse in the plug.
If the mains lead becomes damaged it must be replaced by the manufacturer, its service agent or
a similarly qualified person with an approved lead of the same type and rating.
The appliance is supplied with a standard 13 amp 3-pin plug fitted with a 13-amp fuse. Should
the fuse require replacement, it must be replaced with a fuse rated at 13 amp and approved to
BS1362.
If the mains plug is unsuitable for the socket outlet in your home or is removed for any other
reason, then the cut off plug should be disposed of safely, do not insert the cut off plug into a
mains outlet to prevent the hazard of electric shock. Remove the fuse before disposal.
There is a danger of electric shock if the cut off plug is inserted into any 13-amp socket outlet.
How to wire a 13 amp plug.
IMPORTANT DISPOSAL INSTRUCTIONS
As a responsible retailer we care about the environment.
As such we urge you to follow the correct disposal procedure for your product, and
packaging materials. This will help conserve natural recourses and ensure that it is
recycled in a manner that protects health and the environment.
You must dispose of this product and its packaging according to local laws and regulations. Because
this product contains electronic components the product and its accessories must be disposed of
separately from household waste when the product reaches its end of life.Contact your local authority to
learn about disposal and recycling.The product and if applicable, its batteries should be taken to your
local collection point for recycling. Some collection points accept products free of charge.
If something doesn’t seem to work
If there is something about your appliance which you do not understand and you live in the UK you can
phone our helpline during normal office hours on: 0113 2793520 or if you require a service engineer to
call to your home you will find the telephone number on your purchase receipt.
Calls are charged at standard rates.
We apologise for any inconvenience caused by minor inconsistencies in these instructions, which may
occur as a result of product improvement and development.
KESA U.K. HU1 3AU 24 / 07/ 2008
 Loading...