

Page 1

16011822/R00
INSTRUCTION MANUAL
PPSSOO5588F
F
Page 2
INSTALLING YOUR NEW OVEN
ELECTRICAL CONNECTION
USING THE GRILL
USING THE FAN
DEFROSTING FAN
MAINTENANCE AND CLEANING
ACCESSORIES
CHANGING THE OVEN LAMPS
USING THE CLOCKWORK TIMER
TECHNICAL INFORMATION
Child Safety
• This appliance is designed to be operated by adults. Do not allow
children to play near or with the appliance.
• The appliance gets hot when it is in use. Children should be
kept away until it has cooled down.
• Children can also injure themselves by pulling pans or pots off the
appliance.
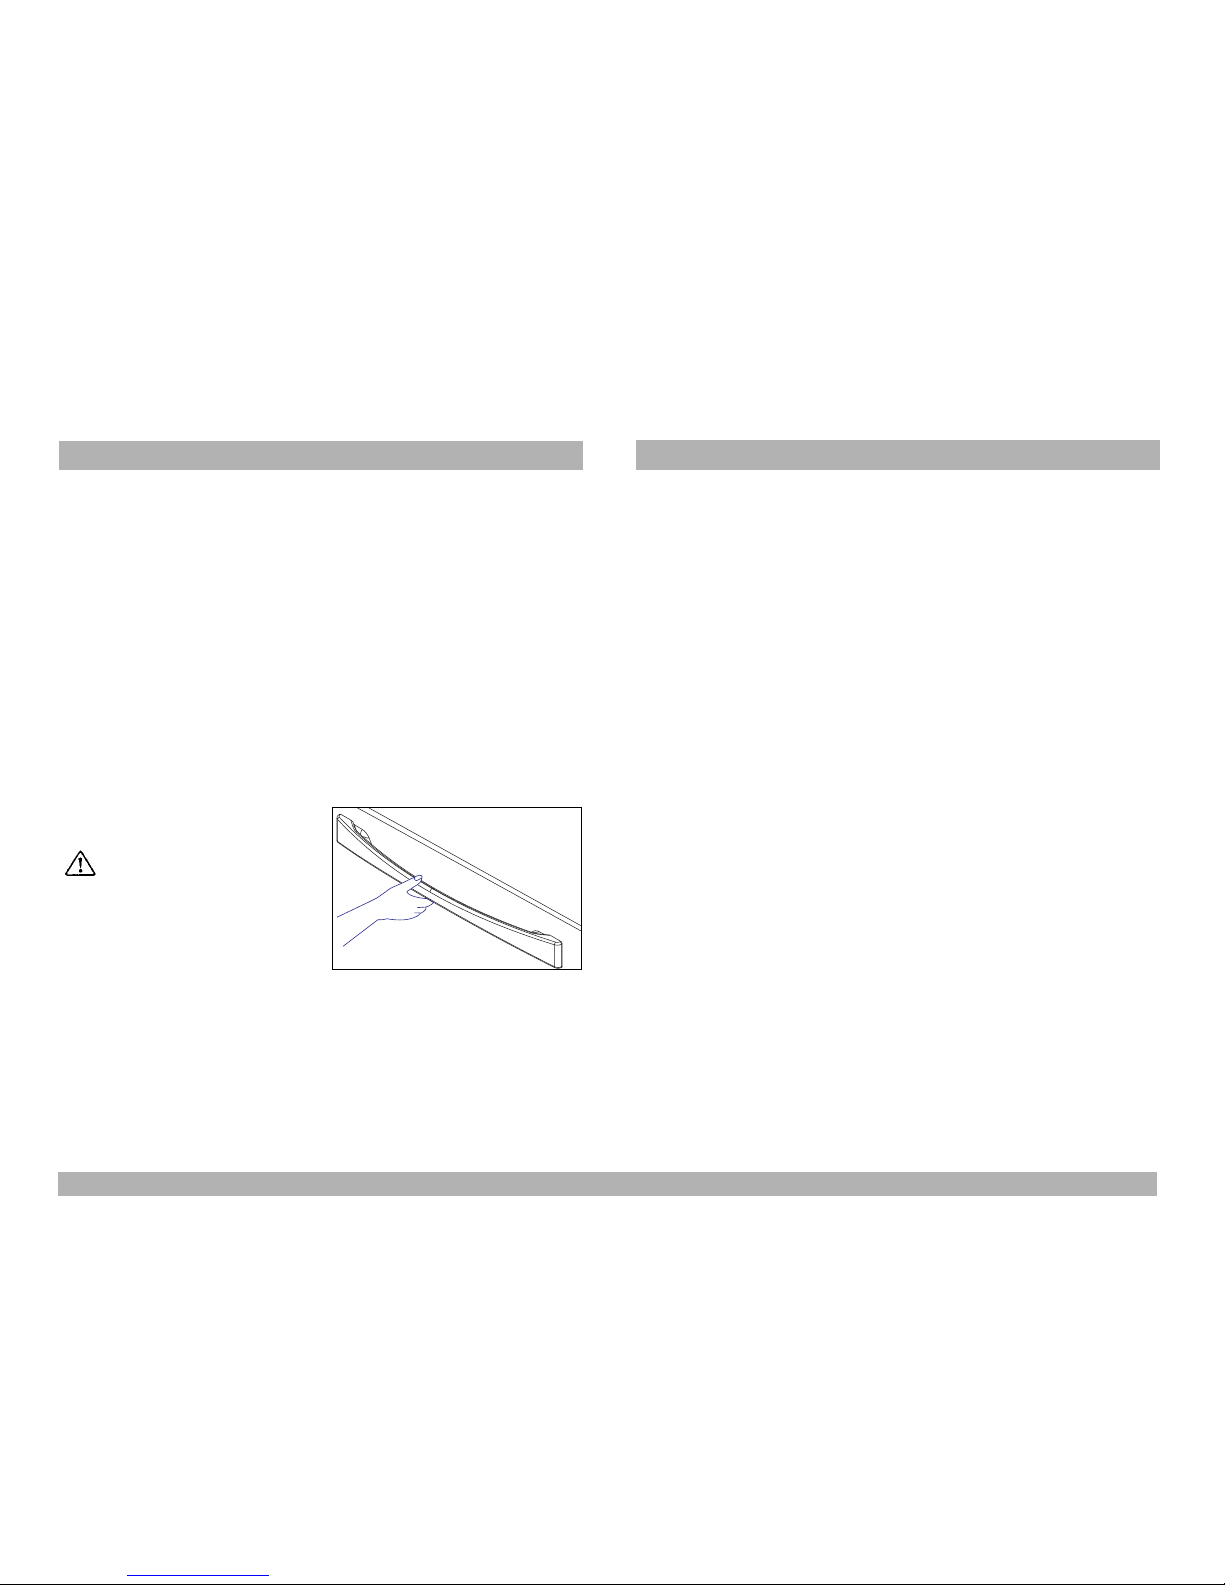
When opening and closing
the oven door always hold
the handle in a centralized
position.
To improve the performance of your new oven,venting is through the left
hand side of the door handle.
As with all oven vents this area must be kept clean and unobstructed at
all times.
It is very important that you regularly clean around the venting area of
your oven, this will help to keep your built in oven looking like new.
Due to the position of the oven vent you may notice slight condensation
on cold surfaces, this is not a fault and should be wiped with a dry cloth
to prevent discolouraton of the surfaces.
Accessible parts may be hot when the appliance is in use, Young children should be kept well away.
Dear Customer,
We are sure this new, modern, functional and practical Oven, built
with the the very highest quality parts and materials, will meet your
requirements in every possible way. The Oven is easy to use.
It is important that you should read through this Instruction Manual
to ensure the best results.
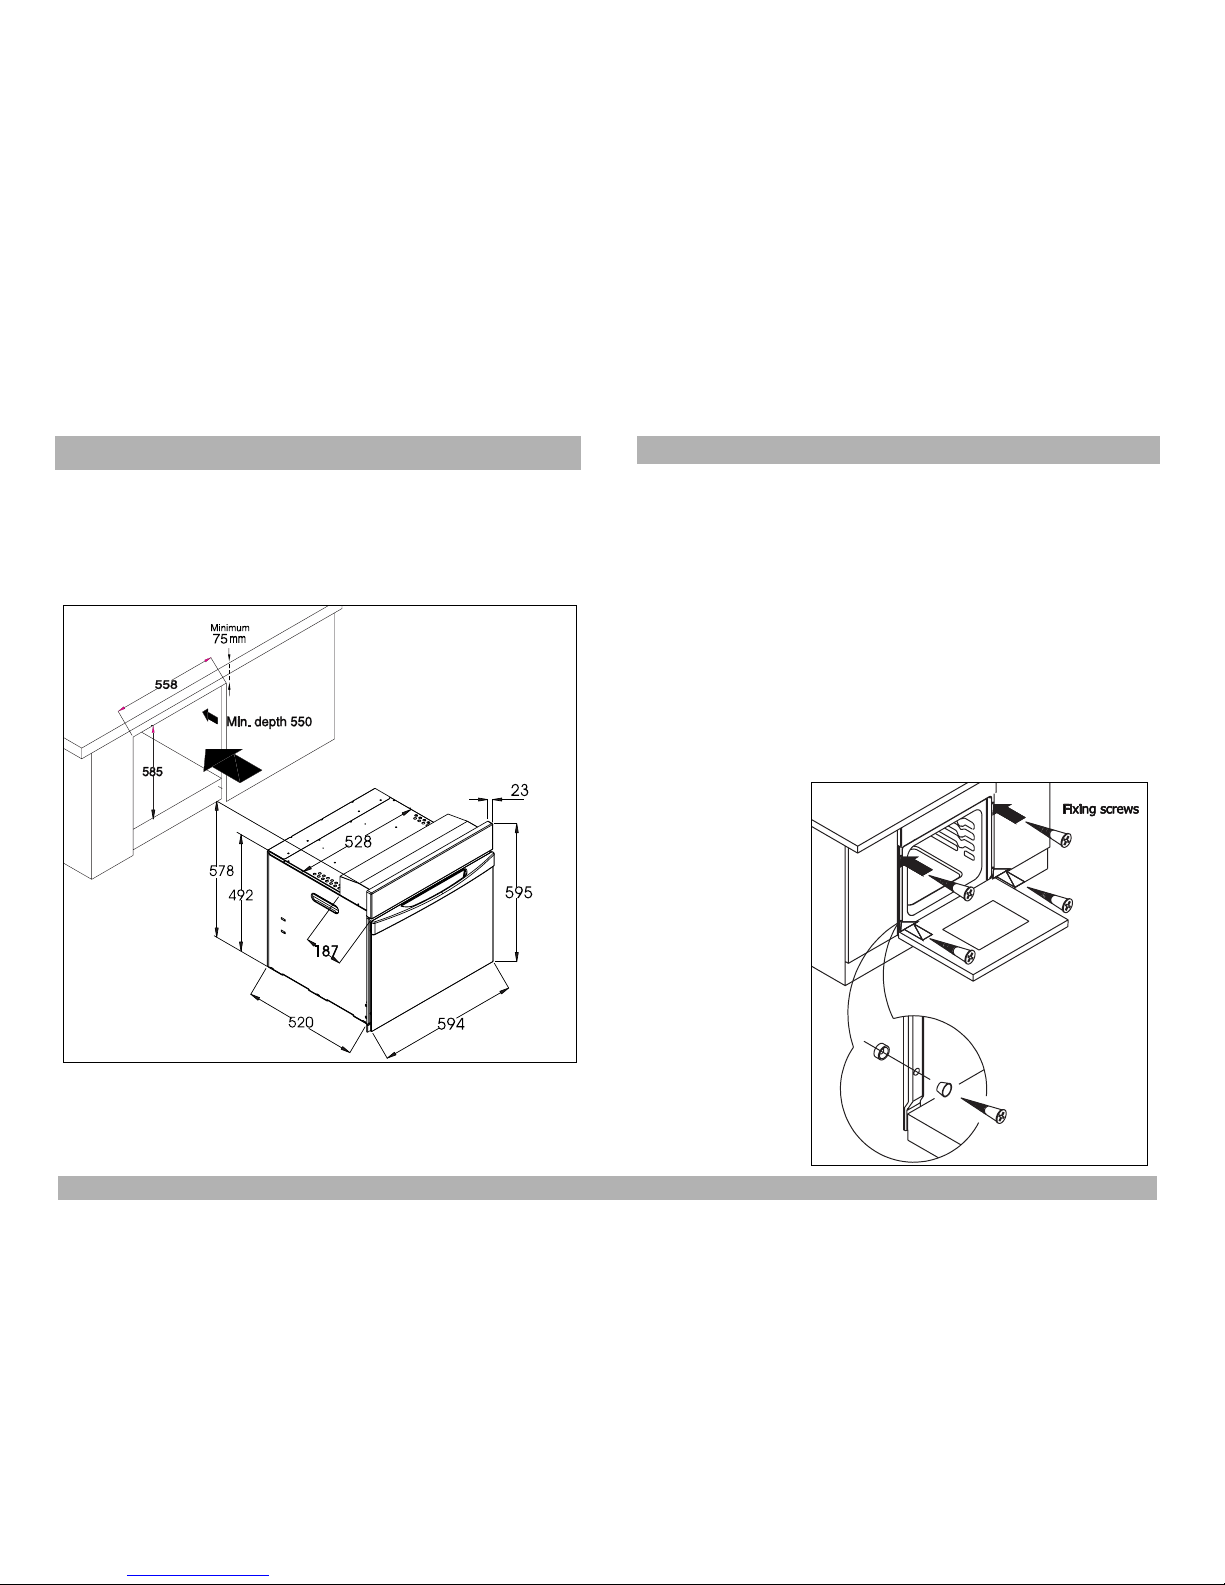
When fitting your built in oven, please make sure that the top edge of the
cut out made for fitting the oven has a mimimum distance of 75 mm to
the work top/surface above it.
For your own safety
- Always make sure you remove all packing from inside the oven/grill
before switching on for the first time.
- Always make sure you understand the controls prior to using the appliance.
- Always keep children away from the appliance when in use as the surfaces will get extremely hot.
- Always make sure all controls are turned off when you have finished
cooking and when not in use.
- Always use dry good quality oven gloves when removing items from the
oven/grill.
- Always take care to avoid heat/steam burns when operating the controls.
- Always turn off the electricity supply to the appliance before cleaning
and allow the appliance to cool.
- Always make sure the shelves are in the correct position before
switching on the oven/grill.
- Always keep the oven/grill door closed when the appliance is not in use.
- Always keep the appliance clean, as build up of grease or fat from
cooking can cause a fire.
- Always follow the basic principles of food handling and hygiene to
prevent the possibility of bacterial growth.
- Always keep ventilation slots clear of obstructions.
- Always refer servicing to a qualified appliance service engineer.
- Never leave children unsupervised where a cooking appliance is
installed as all surfaces will be hot during and after its use.
- Never allow anyone to sit or stand on any part of the appliance.
- Never store items above the appliance that children may attempt to reach.
- Never remove the oven shelves whilst the oven is hot.
- Never heat up unopened food containers as pressure can build up
causing the container to burst.
1
16011822/R00
CONTENTS
INSTALLING YOUR NEW OVEN
Page 3
. Never store chemicals / food stuffs, pressurised container in or on the
appliance, or in cabinets immediately above or next to the appliance.
. Never use the appliance as a room heater.
. Never use the grill to warm plates.
. Never dry any items on the oven door.
. Never install the appliance next to curtains or other soft furnishings.
1.Remove all the brown corrugated card packaging materials inside the oven.
These are to protect the oven and its parts during delivery to your home.
2.The oven has been designed to be fitted into a kitchen unit. It can be
fitted either under a worktop or in a taller cupboard unit at eye-level.
Instal you oven into the kitchen unit, as shown in the adjacent
diagram.
3.Ensure there is sufficient support below the oven to carry the weight
of the oven.
4.The four fixing screws and plastic support parts supplied with the
oven should be used to secure the oven in position (Fig.2).
Preparing the oven before use.
Please ensure all packaging has been removed from the appliance.
Clean the oven thoroughly before using for the first time, use hot soapy
water and then rinse carefully.
Once the above operations are completed,
heat both the oven and
the grill element at
maximum temperature
for a about 11/2 hrs to
eliminate any residual
factory grease that
might impart unpleasant smells to the
meals being cooked.
2
16011822/R00
INSTALLING YOUR NEW OVEN
INSTALLING YOUR NEW OVEN
Min. depth 550
Fig. 1
Fig. 2
Page 4

This Oven must be connected by a qualified electrician.
Technical information on the Oven is on page 9 .
For your safety please read the following information.
Warning: This appliance must be earthed.
This appliance operates from a 3 pin 13 amp plug. The voltage rating is
230 volts and should be protected by a 13 amp fuse either in the plug or
distribution board.
The appliance is supplied with a moulded 13 amp 3 pin mains plug fitted
with a 13 amp fuse. Should the fuse require replacement, it must be
replaced with a fuse rated at 13 amp and approved to BS1362.
The plug contains a removable fuse cover that must be refitted when the
fuse is replaced. In the event of the fuse cover being lost or damaged,
the plug must not be used until a replacement cover has been obtained.
If the moulded mains plug is unsuitable for the socket outlet in your
home or is removed for any other reason, then the fuse should be
removed and the cut off plug disposed of safely to prevent the hazard of
electric shock.
There is a danger of electric shock if the cut off plug is inserted into any
13 amp socket outlet.
How to wire a 13 amp plug.
Important
The wires in the mains lead on this appliance are coloured in accordance with the following code:
Green and Yellow - Earth
Blue - Neutral
Brown - Live
As the colours may not correspond with the markings identifying the terminals in your plug proceed as follows.
The green and yellow wire must be connected to the terminal in the plug
which is marked with the letter E or with the earth symbol or coloured
green and yellow.
The blue wire must be connected to the terminal marked N or coloured
black.
The brown wire must be connected to the terminal marked L or coloured
red.
3
16011822/R00
ELECTRICAL CONNECTION
ELECTRICAL CONNECTION
Fig. 3
Page 5

Grill Heating Element
Accessible parts may be hot when grill is used, young
children should be kept away.
Always preheat the grill for about 3 minutes for best-cooking
results.
Note: All grilling must be done with the oven door closed
1.Turn the function control knob to the grill symbol .
2.Turn the thermostat control knob to a maximum setting of 200
degrease centigrade.
3. position the shelf and grill pan grid to the correct hight for the thickness of the food being cooked.
Add a little water to the bottom of the grill pan to help stop exsesive
smoke and fat splashes, do not cover the grill pan grid or oven shelves
with aluminium foil this may stop air circulation in the oven.
Grilling meat
1. Prepare the meat to be grilled, lightly brush it with oil on both sides.
2.Turn the function control knob to the grill symbol.
3.Turn the thermostat control knob to a maximum setting of 200
degrease centigrade.
4. position the shelf and grill pan grid to the correct hight for the thick-
ness of the food being cooked.
5. When the first side is brown, turn the meat without pricking it in
order that the juices are not lost.
6.Grill the second side.
Cooking time is not determined by the
weight but thickness of the piece to be
grilled.
Add a little water to the bottom of the grill
pan to help to stop exsesive smoke and
fat splashes do not cover the grill pan
grid or oven shelves with aluminium foil
this may stop air circulation in the oven.
During use of the oven or grill aluminium foil or baking trays
must not be placed directly on the bottom of the oven cavity. This
may result in poor performance of the appliance and may also be
the cause of excessive heat being generated in that area.
Consequently oils and fats could reach ignition temperature. Such
misuse of this product will result in the warranty becoming null and
void.
4
16011822/R00
USING THE GRILL
Page 6

5
16011822/R00
The appliance parts may become hot during use on the grill position.
Ensure children are kept away from the Oven.
Note: All grilling must be done with the oven door closed
The fan spreads the heat produced by the Oven evenly. Items on all
shelves will cook at the same rate. The top of the Oven will NOT be
hotter than the bottom.
Many pre-prepared meals show separate cooking times for fan Ovens.
Your Oven has a fan, first turn the function control knob to show the fan
symbol. Then turn the thermostat control knob to the temperature
required.
Your Oven has both these symbols on the
same knob, you can choose whether or not
to use the Fan with the oven or grill.
The thermostat control knob shows
temperatures in degrees centigrade.
There is a thermostat which controls the
temperature of your oven.
The thermostat indicator will stay on until
the correct temperature has been
reached,then it will cycle between on and
off as the oven temperature is maintained
automatically.
You can speed up the process of
defrosting by placing frozen food in
your Oven with the knob set to the
symbol shown.
This setting which will not cook the
food ,but will help the defrosting
process.
Place the item to be defrosted on a
Wire Shelf on the third shelf support up
from the bottom.
USING THE GRILL
Fig.4
DEFROSTING FAN
USING THE FAN
0
0
Page 7

Before cleaning, ensure all control knobs are in the OFF
position, and the appliance has cooled completely.
Before any maintenance can be carried out, you must
disconnect the appliance from the electricity supply.
Cleaning Materials
Before using any cleaning materials on your oven, check that they are
suitable and that their use is recommended by the manufacturer.
Do not use caustic pastes, abrasive cleaning powders,
coarse wire wool or any hard implements, as they will
damage the surfaces.
Do not use a steam cleaner.
Oven Cavity
The enamelled oven cavity is best cleaned whilst the oven is still
slightly warm. Wipe the oven over with a soft cloth soaked in warm
soapy water after each use. From time to time it will be necessary to
carry out a more thorough cleaning, using a liquid cleaner.
Oven Door
To clean the oven door glass inside and out, use a glass
cleaner. Rinse and polish with a dry cloth.The door can be
dismantled for cleaning as follows:
1. Open the door completely.
2. Insert the metal pin through the
holes as shown figure 5.
3. Do this for both hinges.
4. Raise the door slightlyand pull
it straight outwards away from the
oven.
The door will come completely off.
See figure below.
5. When replacing the door, locate
it back into the hinge holes.
Pull it down fully and remove the
pins.
DO NOT clean the oven door while the glass panels are warm.
If this precaution is not observed the glass panel may shatter.
If the door glass panel becomes chipped or has deep
scratches, the glass will be weakened and must be replaced
to prevent the possibility of the panel shattering.
Baking Tray
To clean the enamelled
pan, use detergent and
warm water.
Rinse and polish with a
dry cloth.
Accessories
It is best to soak the accessories in household detergent immediately
after use. Any leftover dirt can then be easily removed using a brush or
cleaning sponge.
To improve the performance of your new oven,venting is through the left
hand side of the door handle.
As with all oven vents this area must be kept clean and unobstructed at
all times.
It is very important that you regularly clean around the venting area of
your oven, this will help to keep your built in oven looking like new.
Due to the position of the oven vent you may notice slight condensation
on cold surfaces, this is not a fault and should be wiped with a dry cloth
to prevent discolouraton of the surfaces.
Accessible parts may be hot when the appliance is in use, Young
children should be kept away
6
16011822/R00
MAINTENANCE AND CLEANING
MAINTENANCE AND CLEANING
Fig. 5
Fig. 6
Page 8

ACCESSORIES
7
16011822/R00
PLEASE NOTE : THE GRILL TRAY SHOULD BE USED AS SHOWN
(WITH THE SHORTEST DIMENSION FROM FRONT TO BACK) TO
ENSURE EFFICIENT USE OF THE GRILL.
2 x SHELVES
GRILL TRAY
AND
DETACHABLE
HANDLE
Page 9

8
16011822/R00
To replace the oven lamp disconect the oven from the mains power
supply.
unscrew the lamp cover (A) by turning it anti-clockwise direction, remove
the old lamp (B).
insert a new lamp type XG3 300 degrees centigrade 230-240Vac 25W.
Replace the lamp cover (A) by turning in a clockwise direction.
Reconnect the mains power supply.
Ensure the appliance is switched off before replacing the
lamp to avoid the possibility of electric shock.
The ‘clockwork’ timer is set by turning the knob clockwise. The timer will
return to ‘0’ and ring after the set number of minutes have passed.
The Oven will automatically switch itself off.
You should turn the knob to ‘M’ (Manual) to use the Oven without the
Timer.
“ DON’T FORGET TO TURN THE OVEN/GRILL FUNCTION
CONTROL TO THE OFF POSITION AFTER YOU HAVE FINISHED
COOKING.”
PLEASE NOTE: If the oven does not apper to opperate please
check that the timer is turned to the (M) manual position or try
reseting the timer.
CHANGING THE OVEN LAMPS
USING THE CLOCKWORK TIMER
Page 10

9
16011822/R00
TECHNICAL INFORMATION
595 x 594 x 545
350 x 440 x 400
37
220V~ 230V~ 240V~
1.9 2.1 2.3
1.8 2.0 2.2
1.8 2.0 2.2
Mechanical (100min.)
Fan
External Dimensions height/ width/ depth in mm
Internal Dimensions height/ width/ depth in mm
Weight in kg
Voltage
Maximum power
Grill Heating Element in kW
Turbo resistance in kW
SPECIAL FEATURES
TIMER
Page 11

Environmental notes:
Disposal of packaging materials with normal household waste.These
materials are recylable and should be sorted (e.g. cardboard, plastic,
polystyrene) and disposed of in accordance with local regulations.
The Proline policy:
The Proline policy is one of continuous development and for this reason
we reserve the right to change specifications without prior notice.
If after reading this instruction manual, you require more information
regarding your Proline built in oven.
Please contact the Proline help line.
Proline help line number 0113 2793520 during normal office hours.
( Note: you can not book a service call through this number).
If you require a service engineer to call The number is 0870 542525.
Disposal
Waste electrical products must not be disposed of
with household waste.
This equipment should be taken to your local
recycling centre for safe treatment.
10
16011822/R00
 Loading...