

Page 1

BEDIENING EN INSTALLATIE
INSTRUCTIES VOOR VRIJSTAANDE
GECOMBINEERD KOOKTOESTEL
PMC66SS-N
Page 2
Beste klant,
Dank u voor uw aankoop van een Proline gasoven.
De veiligheidsmaatregelen en aanbevelingen in deze instructies gelden
voor uw veiligheid en die van anderen.
Ze bieden ook een mogelijkheid om alle functies van uw toestel optimaal te
gebruiken.
Bewaar dit boekje in een veilige locatie. Het kan handig zijn in de toekomst,
voor u zelf of anderen indien u twijfels hebt over de bediening.
Dit apparaat mag enkel worden gebruikt voor het voorbestemde gebruik,
m.a.w. voor het huishoudelijk bereiden
van eetwaren. Ieder ander gebruik moet worden beschouwd als
ongeschikt en daarom gevaarlijk.
De fabrikant wijst iedere verantwoordelijkheid af bij schade veroorzaakt
door ongepast of incorrect gebruikt van het apparaat.
Page 3
INHOUD
1- Presentatie en afmetingen van het product
2- Let op! Lees dit eerst voordat u aan de slag gaat
3- Installatie en voorbereidingen voor gebruik
4- Hoe uw toestel te gebruiken (kooktoestel)
5- Reiniging en onderhoud
6- Service en transport
1
Page 4
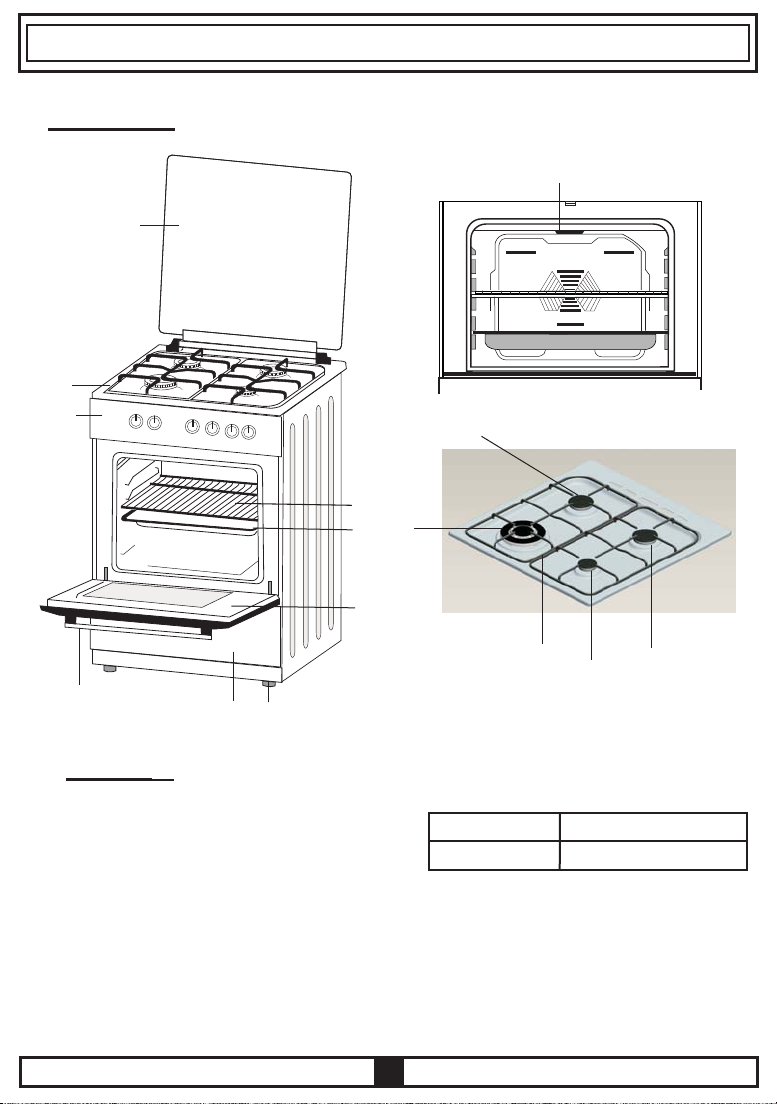
DEEL 1: PRESENTATIE EN AFMETINGEN VAN HET PRODUCT
Voorstelling:
10
1
2
3
9
8
11
7
12
4
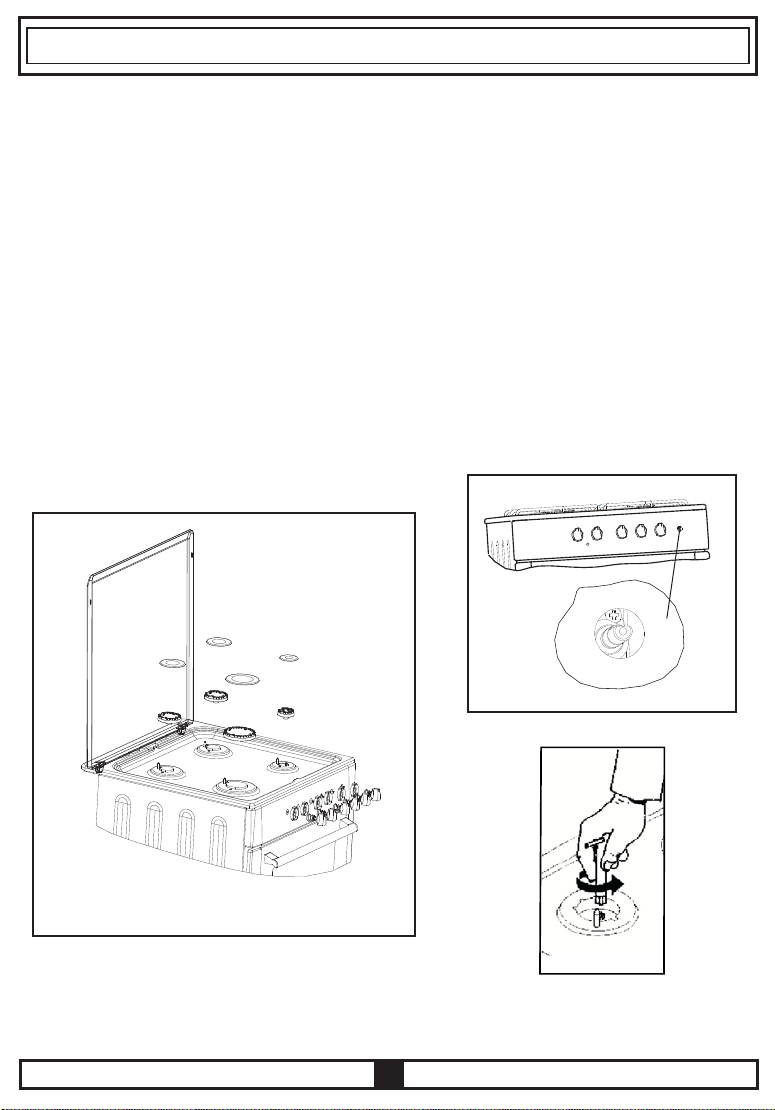
Onderdelenlijst :
1- Kookplaat deksel
2- Kookplaat
3- Bedieningspaneel
4- Ovendeur handvat
5- Lade deksel
6- Steunvoet
7- Ovendeur
8- Ovenlade
6
5
9- Draadrooster
10- Verwarmingselement
bovenaan
11- Wok brander
12- Gemiddelde brander
13- Hulpbrander
14- Rooster kookplaat
15- Gemiddelde brander
14
MODEL
PMC66SS-N
2
15
13
Afmetingen (cm)
60*60*85
Page 5

DEEL 2: Let op! Lees dit eerst voordat u aan de slag gaat
BELANGRIJKE VOORZORGSMAATREGELEN EN AANBEVELINGEN
Controleer na het uitpakken van het toestel of het niet beschadigd is.
Mocht u enige twijfels hebben, gebruik dan het toestel niet en raadpleeg uw verkooppunt of een
professioneel opgeleide specialist.
Verpakkingsonderdelen (zoals plastic zakken, piepschuim, nagels, verpakkingsbandjes,
enz.) horen niet rond te slingeren binnen het bereik van kinderen, aangezien deze ernstige
verwondingen kunnen veroorzaken.
Het verpakkingsmateriaal is recycleerbaar en draagt het recyclagesymbool.
Probeer niet om de technische eigenschappen van het toestel te veranderen aangezien
dit kan leiden tot gevaarlijk gebruik van het toestel.
Het toestel is ontworpen voor niet-professioneel huishoudelijk gebruik door particulieren.
De producent kan niet verantwoordelijk worden gehouden voor schade of verwondingen
door onredelijk, onjuist of onbezonnen gebruik van het toestel.
Wanneer u beslist het toestel niet te gebruiken (of beslist om een ouder model te vervangen),
is het belangrijk dat u, vooraleer u het toestel wegdoet, het toestel op een correcte manier
buiten werking stelt volgens de plaatselijke wetten. Indien u een oud toestel wegdoet met een
slot of een grendel op de deur, maak deze dan onbruikbaar om te vermijden dat kinderen
tijdens het spelen vast komen te zitten.
Het toestel moet geïnstalleerd worden en de gas-/elektrische aansluitingen moeten gemaakt
worden door een bevoegde specialist in overeenstemming met de huidige plaatselijke
regelgeving en volgens de instructies van de producent.
TIPS VOOR DE GEBRUIKER
Týjdens en na het gebruiken van de kookplaat zullen bepaalde onderdelen heel heet worden.
Raak geen hete delen aan.
Houd kinderen weg van de kookplaat wanneer deze in gebruik is.
Zorg ervoor dat na gebruik de knoppen in de positie ? (off (uit)) staan en sluit de hoofdkraan
van de gastoevoer of de cilinderklep van het gas.
Het is aan te raden dat de gaskraan gesloten is wanneer het toestel niet wordt gebruikt.
De regelmatige smering van de gaskranen mag enkel gedaan worden door gespecialiseerde
vaklieden. Indien u moeilijkheden ondervindt bij het bedienen van de gaskranen, bel dan naar
de Dienst.
Voor een reiniging- of onderhoudsbeurt moet de elektriciteit naar de kookplaat uitgeschakeld
worden.
Brandgevaar!
Laat geen brandbaar materiaal achter op de kookplaat.
Zorg ervoor dat de elektriciteitssnoeren van andere toestellen in de buurt van de kookplaat
niet in aanraking kunnen komen met de kookplaat.
3
Page 6
BELANGRIJKE VOORZORGSMAATREGELEN EN AANBEVELINGEN VOOR HET
GEBRUIK VAN ELEKTRISCHE TOESTELLEN
Bij het gebruik van elektrische toestellen moeten een aantal elementaire regels in
acht worden genomen. In het bijzonder:
raak het toestel nooit aan met natte handen of voeten;
bedien het toestel niet met natte handen of voeten of wanneer u op blote voeten loopt;
laat kinderen of gehandicapten niet zonder uw toezicht gebruik maken van het toestel.
De producent kan niet verantwoordelijk gehouden worden voor schade veroorzaakt door
ongeschikt, onjuist of onredelijk gebruik van het toestel.
Het gebruik van een gasfornuis veroorzaakt warmte- en vochtigheid in de kamer
waar het geïnstalleerd is. Zorg ervoor dat de keuken goed wordt verlucht: houd de
natuurlijke ventilatieopeningen open of installeer een mechanisch ventilatietoestel
(mechanische ventilator).
Langdurig intensief gebruik van het toestel kan bijkomende ventilatie vereisen,
bijvoorbeeld door het openen van een raam of meer efficiënte ventilatie; het niveau
van de mechanische ventilatie verhogen).
Bewaar geen ontvlambare materialen in de buurt van het toestel.
Let op de kabels van de andere elektrische apparaten die in werking zijn dicht bij het
apparaat zodat u de warme punten niet aanraakt.
Let erop dat de schakelaars op "0" staan wanneer het toestel niet in werking is.
Houd kinderen uit de buurt van de oven.
Tijdens het gebruik wordt het toestel heet. Let erop dat u de warmte elementen in
de ovenholte niet aanraakt.
Tijdens de grillmodus moet de ovendeur gesloten zijn.
Gebruik geen stoomreinigers om de oven kookplaten en de ovenholte te reinigen.
Het toestel mag niet worden gebruikt door kinderen of personen met verminderde
fysieke, gevoelsmatige of mentale capaciteiten, of met een gebrek aan ervaring
en kennis, tenzij zijn onder toezicht staan of instructies krijgen.
VOOR DE EFFICIENTIE EN VEILIGHEID VAN HET APPARAAT RADEN WE AAN DAT U STEEDS
DE ORIGINELE DELEN GEBRUIKT EN DAT U UITSLUITEND BEROEP DOET OP ONZE ERKENDE
TECHNICI IN GEVAL VAN NOOD.
4
Page 7
DEEL 3: Installatie en voorbereidingen voor gebruik
BELANGRIJK
Het apparaat moet worden geïnstalleerd, gereguleerd en aangepast zodat het kan werken
met andere types gas door een GEKWALIFICEERDE INSTALLATEUR.
Het niet naleven van deze voorwaarde maakt deze garantie nietig.
De kookplaat mag enkel worden geïnstalleerd door een Gas-geregistreerde installateur.
Hij moet ook een gekwalificeerde elektricien zijn als het toestel een verbinding vereist met
het elektrisch netwerk.
Het toestel moet worden geïnstalleerd conform met de geldige regelgeving.
De installateurs moeten de huidige wetgeving naleven met betrekking tot ventilatie en de
verwijdering van uitlaatgassen.
Steeds de stekker van het toestel verwijderen voor u onderhoudswerken of reparaties uitvoert.
Het toestel moet in warmtebestendige eenheden worden geplaatst.
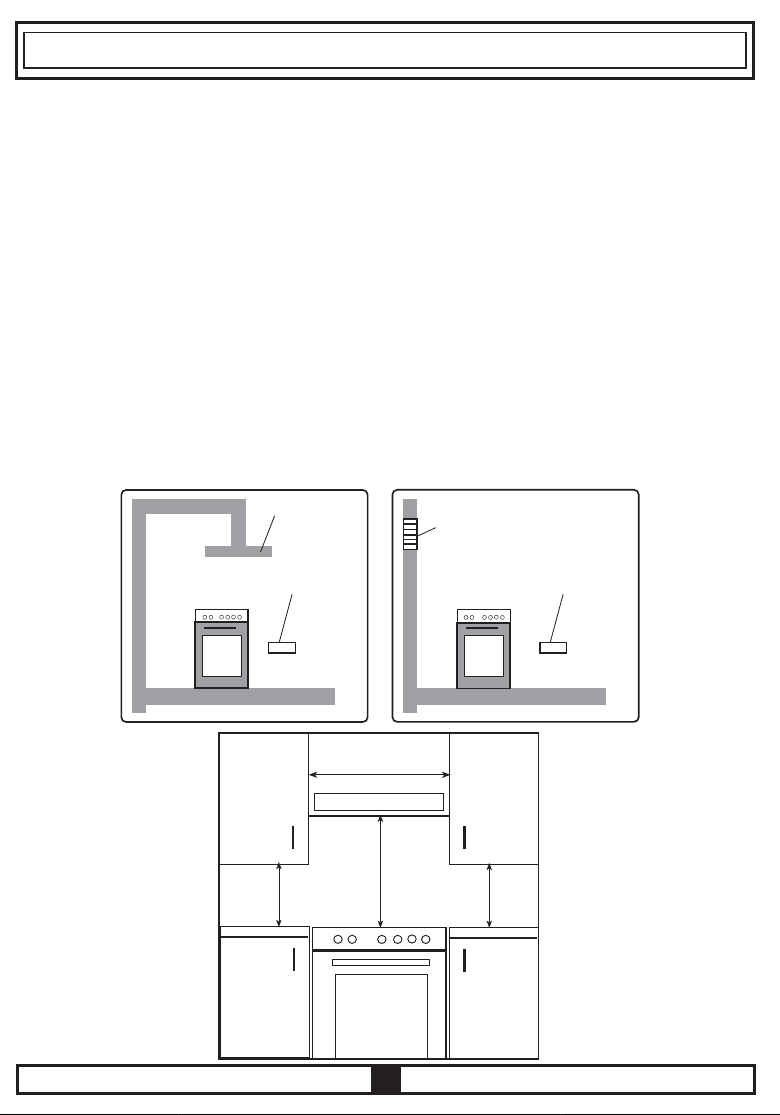
Deze tippen moeten in de keukenkasten worden ingebouwd van 600mm diep.
De wanden van de eenheid mogen niet hoger zijn dan het werkblad en moeten bestand
zijn tegen temperaturen van 75°C boven kamertemperatuur.
Installeer het toestel niet dicht bij ontvlambare materialen (bijv. gordijnen).
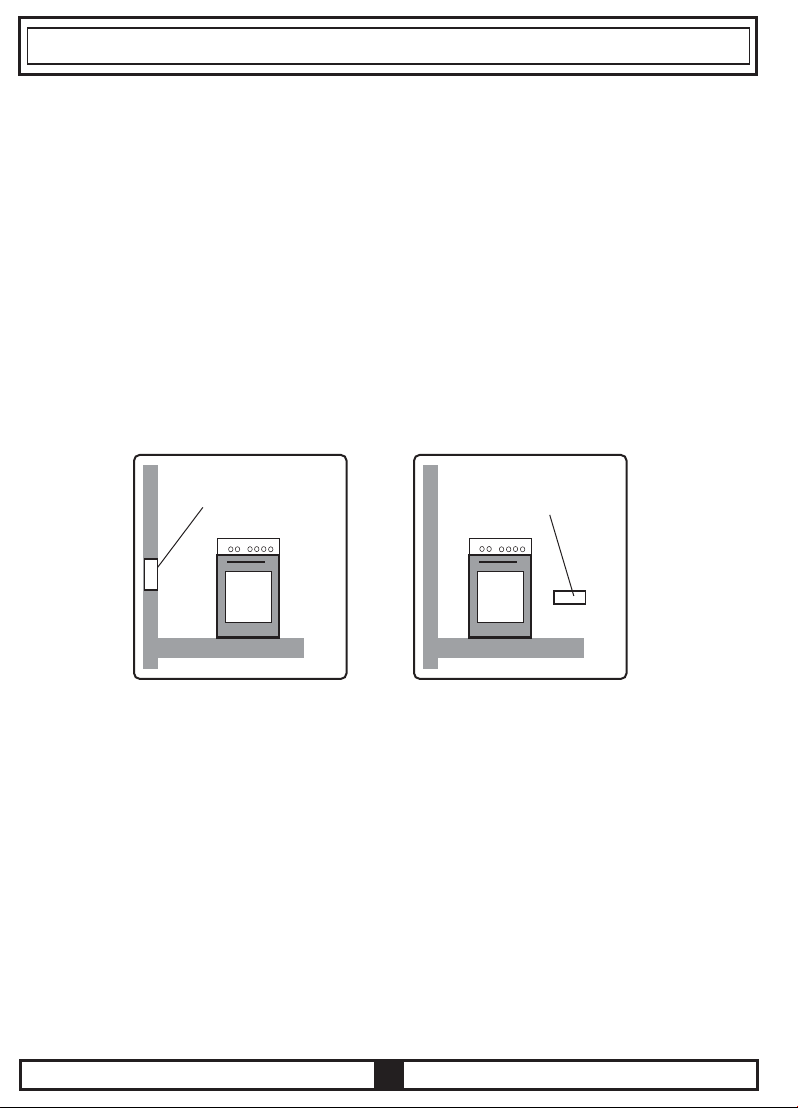
Luchtinvoergedeelte
min. 100cm
2
Luchtinvoergedeelte
min 100cm
2
Afbeelding 1 Afbeelding 2
VENTILATIEVEREISTEN
Het apparaat moet worden geïnstalleerd in een kamer of ruimte met een luchttoevoer in
conformiteit met BS 5440-2:2000
Voor kamers met een volume van minder dan 5m3 permanente ventilatie van 100 cm2 vrije
zone is vereist
.
Voor kamers met een volume van 5m3 en 10m3 is een permanente ventilatie van 50cm2 vrije
zone vereist, tenzij de kamer voorzien is van een deur die rechtstreeks uitgeeft op de
buitenlucht. In dit geval is geen permanente ventilatie vereist
Voor kamers met een volume dat hoger is dan 10m3 is geen permanente ventilatie vereist.
NB. Ongeacht de grootte van de kamer, alle kamers waarin het apparaat wordt geplaatst
moeten direct uitgeven op de buitenlucht via een open venster of equivalent
Indien er andere toestellen aanwezig zijn in dezelfde kamer die brandstoffen verbranden, moet
BS 5440-2:2000 worden geraadpleegd om de correcte hoeveelheid vast te stellen voor de
vrije zone ventilatievereisten
De bovenstaande vereisten bieden de mogelijkheid een gasoven en grill te gebruiken indien
er andere gasbrandende toestellen aanwezig zijn in dezelfde kamer, raadpleeg een
gekwalificeerde ingenieur
.
.
.
.
.
5
Page 8
GASINSTALLATIE BELANGRIJKE NOTA
Dit toestel wordt uitsluitend geleverd voor gebruik met AARDGAS en kan niet worden gebruikt
met een ander gas zonder wijziging.
Dit toestel wordt gefabriceerd voor conversie naar LPG. Om een LPG conversiekit aan te
kopen, kunt u contact opnemen op het nummer 0870 6052020.
INSTALLATIE & DIENSTREGELINGEN (VERENIGD KONINKRIJK)
Het is een wettelijke vereiste dat alle gasvereisten worden geïnstalleerd & onderhouden door
een deskundige persoon in overeenstemming met de huidige edities van de volgende normen
& regelgeving of de regelgeving die van toepassing is in de geografische regio waar ze worden
geïnstalleerd
:
· Gasveiligheid (Installatie & gebruik) regelgeving
· Bouwreglementeringen
· Britse normen
· Reglementeringen voor elektrische installaties
De installatie en onderhoud van een gasproduct moet worden uitgevoerd door een correct
gekwalificeerd persoon met ervaring met het type product dat wordt geïnstalleerd of onderhouden
en die houder is van een geldig bekwaamheidscertificaat voor het uitgevoerde werk. Op dit
moment is het bekwaamheidsbewijs het Geaccrediteerde certificatieschema (ACS) of S/NVQ
dat werd uitgelijnd met het ACS
.
Het is ook een vereiste dat alle bedrijven of zelfstandige installateurs lid zijn van een klasse
van personen die werd goedgekeurd door de Gezondheid en veiligheid uitvoerend orgaan.
Momenteel is het enige orgaan met een dergelijke goedkeuring het GAS SAFE register.
Het incorrect installeren van het toestel kan de garantie van de fabrikant nietig verklaren en
resulteren in een gerechtelijke vervolging onder de bovenvermelde regelgeving.
Kookfornuiskap
pijp
Elektrische ventilator
Luchtinvoergedeelte
min. 100cm
2
Afbeelding 3
Min. 42 cm.
Min. 60 cm.
Kookfornuiskap
6
Min.75 cm(zonder deksel)
Min. 42 cm.
Luchtinvoergedeelte
min. 100cm
2
Afbeelding 4
Afbeelding 5
Page 9
3.2 INSTALLATIE VAN OVEN
Opmerkingen:
Flexibele slangen kunnen worden gebruikt als de omgevingstemperatuur van de slang niet
hoger is dan 70°C. Deze slangen worden gefabriceerd in overeenstemming met BS669 deel
1 en moeten van de correcte constructie zijn voor het type gas dat wordt gebruikt.
Gasslangen ontworpen voor aardgas MOGEN NIET worden gebruikt voor de toevoer van LPGgas (LPG-gasslangen kunnen worden geïdentificeerd met een rode band of streep op de
rubberen externe laag van de slang).
De slang mag niet worden ingedrukt of gekneld of in contact komen met scherpe of schurende
randen.
Met een geschikte lekdetectie vloeistofoplossing (bijv. Rocol) moet iedere gasverbinding één
voor één worden gecontroleerd door de oplossing over de verbinding te wrijven.
De aanwezigheid van bellen wijst op een lek. Als een lek wordt opgemerkt, moet de fitting
worden aangedraaid en er moet opnieuw worden gecontroleerd op lekken.
BELANGRIJK!
Nooit een naakte vlam gebruiken om te testen op lekken.
3.3 VERSTELBARE POOTJES
De oven staat op vier instelbare voeten die kunnen worden bijgeregeld door ze met of tegen
de klok in te draaien. Regel deze voeten bij wanneer de oven wordt gepositioneerd op de
locatie waar hij wordt geïnstalleerd.
Zorg ervoor dat de oven waterpas en stabiel staat.
3.4 EEN GASSLANG EN CONTROLEREN OP LEKKAGE
Het gas van het toestel moet ook verbonden worden in overeenstemming met de standaard.
Het aangepaste gastype van het toestel moet bepaald worden volgens het typeplaatje op de
achterzijde van het apparaat. U vindt de informatie met betrekking tot het juiste gastype en
gepaste gasinjectoren terug op de technische gegevenstabel. Let er op dat de gastoevoerdruk
moet overeenstemmen met de waarden die op de technische gegevenstabel terug te vinden
zijn, zodat u de beste efficiëntie en het minste verbruik heeft. Indien de druk van verbruikt gas
anders dan deze waarden of wisselvallig is, moet een drukregelaar worden gemonteerd op
de toevoerbuis. Een geautoriseerde dienst moet worden geraadpleegd om deze
aanpassingen uit te voeren.
7
Page 10
GASVERBINDING
FIG 6
OPGELET: Het gebruik van een gastoestel om etenswaren te bereiden, resulteert in de
productie van warmte, vocht en ontbrandingsproducten in de ruimte waarin het wordt
geïnstalleerd. Zorg ervoor dat de keuken goed geventileerd is, in het bijzonder als het toestel
wordt gebruikt. Houd de natuurlijke ventilatieopeningen open of installeer een mechanische
ventilatietoestel (mechanische ventilator).
OPGELET: Dit toestel dient uitsluitend om etenswaren te bereiden. Het mag niet worden
gebruikt voor andere doeleinden, bijvoorbeeld om een ruimte op te warmen.
De installatie van de gaskookplaat op aardgas of LPG-gas moet worden uitgevoerd door een
gas geregistreerde installateur. Installateurs moeten de voorzieningen van de praktijkcode van
de relevante Britse normen, het gas veiligheidsreglement en de bouwnormen strikt naleven.
(Schotland) (Consolidatie) Regelgeving uitgevaardigd door het Scottish Development Department.
De kookplaat wordt geleverd met een elleboogverbinding zoals in afbeelding 5.1 en wordt
aangepast om te werken met stadsgas.
INSTALLATIE OP AARDGAS
Installatie op aardgas moet conform zijn met de praktijkcode, etc. De toevoerdruk voor aardgas
is 20 mbar.
OPGELET!!!
Gebruik geen open vuur, zoals een lucifer, om een gaslek te zoeken omwille van het
ontploffingsgevaar.
8
Page 11
CONVERSIE OP LPG-GAS
Dit toestel mag uitsluitend worden verbonden met LPG nadat een LPG-conversiekit werd
aangebracht.
Wanneer u werkt met butaangas is een toevoerdruk van 28-30 mbar vereist.
Wanneer u werkt met propaangas is een toevoerdruk van 37 mbar vereist.
De installatie moet conform zijn met de relevante Britse normen. Waarschuwing: De oven
mag uitsluitend worden geïnstalleerd door een Gas safe geregistreerde installateur met
technische kennis van elektriciteit.
Hij moet de reglementering en praktijkcodes naleven die van toepassing zijn op een dergelijke
installatie van gastoestellen.
Opmerking: Het wordt aanbevolen dat de gasverbinding op het kooktoestel te installeren
met een flexibele verbindingbuis conform met BS 5386.
Om te converteren op LP-gas moeten de volgende stappen worden uitgevoerd.
Loskoppelen van de gas- en elektriciteittoevoer.
Verwijder het deksel en de adapter (Afb. 7).
Schroef de injectors los (Afb. 8)
Vervang de injector met diegene die overeen stemt met het type gas dat gebruikt zal worden,
volgens de informatielijst achterin deze handleiding.
Afbeelding7
9
Afbeelding8
Page 12
De Verminderde Vlampositie aanpassen :
Voor verminderde vlampositie moeten de overbruggingsschroeven losser gemaakt worden
bij de conversie van LPG naar NG. Als men omzet van NG naar LPG, moeten dezelfde
schroeven vaster gemaakt worden. Verzeker u ervan dat het toestel uitgeschakeld is en
dat de gastoevoer open is.
Steek de branders aan en laat hen in een minimum positie staan.
Verwijder de knoppen aangezien de schroeven enkel toegankelijk zijn wanneer de knoppen
verwijderd zijn.
Draai de overbruggingsschroef 90° losser of vaster met een kleine schroevendraaier. Dit
verlaagt de vlam van de brander tot een minimum (Afb. 6).
Wanneer de vlam een omvang heeft van 4mm, dan is het gas goed verdeeld. Zorg ervoor
dat de vlam niet uitdooft tijdens de overgang van de maximum op minimum stand.
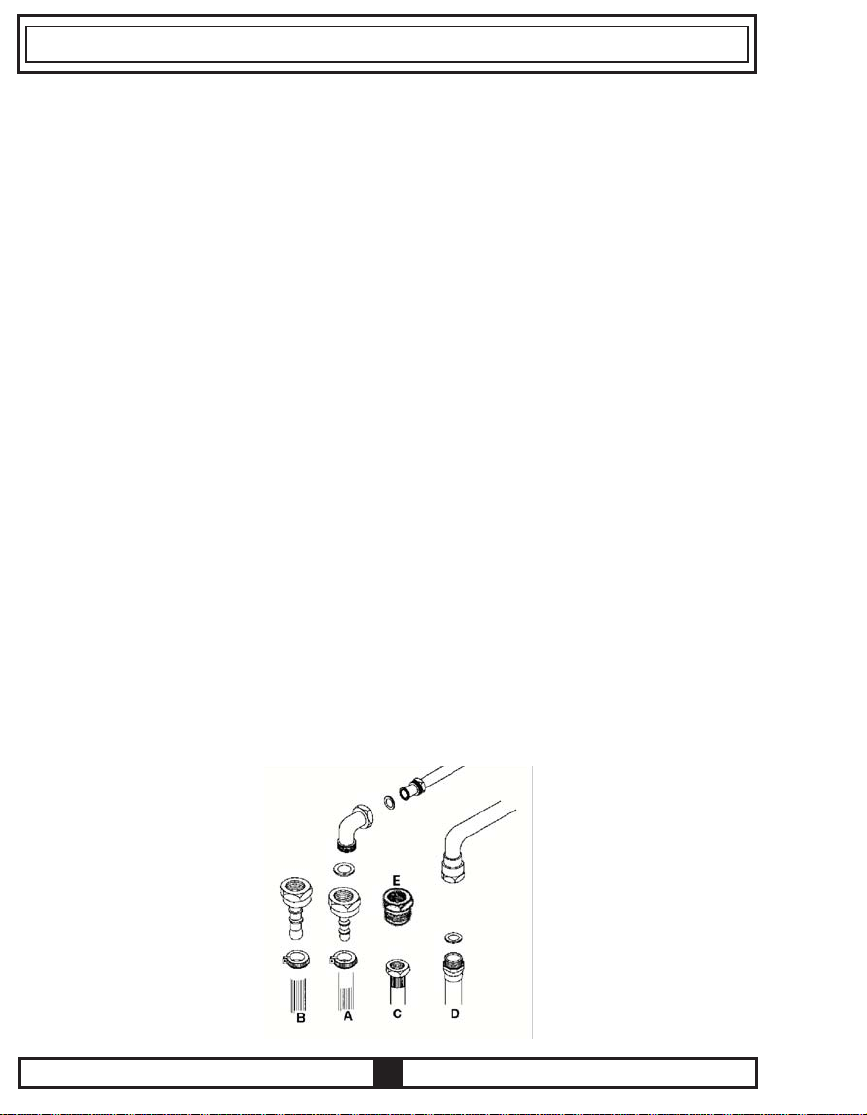
De gastoegang vervangen :
De gastoevoerpijp, die conform is aan de regulaties met betrekking tot "A", geplaatst op de
pijpondersteuning, moet in de lengte zichtbaar zijn; ze moet worden aangebracht zodat het niet in
contact komt met onderdelen die opwarmen. Het wordt aangeraden om altijd een verbindingsstuk tussen
de elleboogpijp en de gastoevoerpijp te plaatsen. Spanje, Italië, Portugal, Luxemburg, Griekenland en
Duitsland laten de verbinding van de gasslang met het gasverbindingsstuk toe, zoals aangegeven in
"B". Voor deze landen moet de vorm van het gasverbindingsstuk conform zijn aan de nationale wetten
en regels.
Voor Denemarken, Nederland, Frankrijk, Algerije, Ierland moet de verbinding in stand gebracht worden
door gebruik van de stukken "E" en buigzame slangen of onbuigzame pijpen zoals beschreven in "C".
Dit verbindingstype kan ook in Frankrijk, Algerije, Spanje, Italië, Portugal, Griekenland en Luxemburg
gebruikt worden. Voor het Verenigd koninkrijk moet de gasverbinding uitgevoerd worden zoals beschreven
in "D". De buigzame gastoevoerslang mag nooit achter het over lopen of in contact komen met
ontvlambaar materiaal. De minimale afstand tussen het toestel en nabij liggende oppervlakten moet
20mm zijn.
Nadat er een verbinding tot stand is gebracht, moet het getest worden. De test kan gedaan worden
door een zeepsop op de verbinding aan te brengen. Er mogen geen luchtbellen verschijnen. Indien er
wel luchtbellen zijn, kijk de verbinding opnieuw na en kijk opnieuw na.
10
Page 13
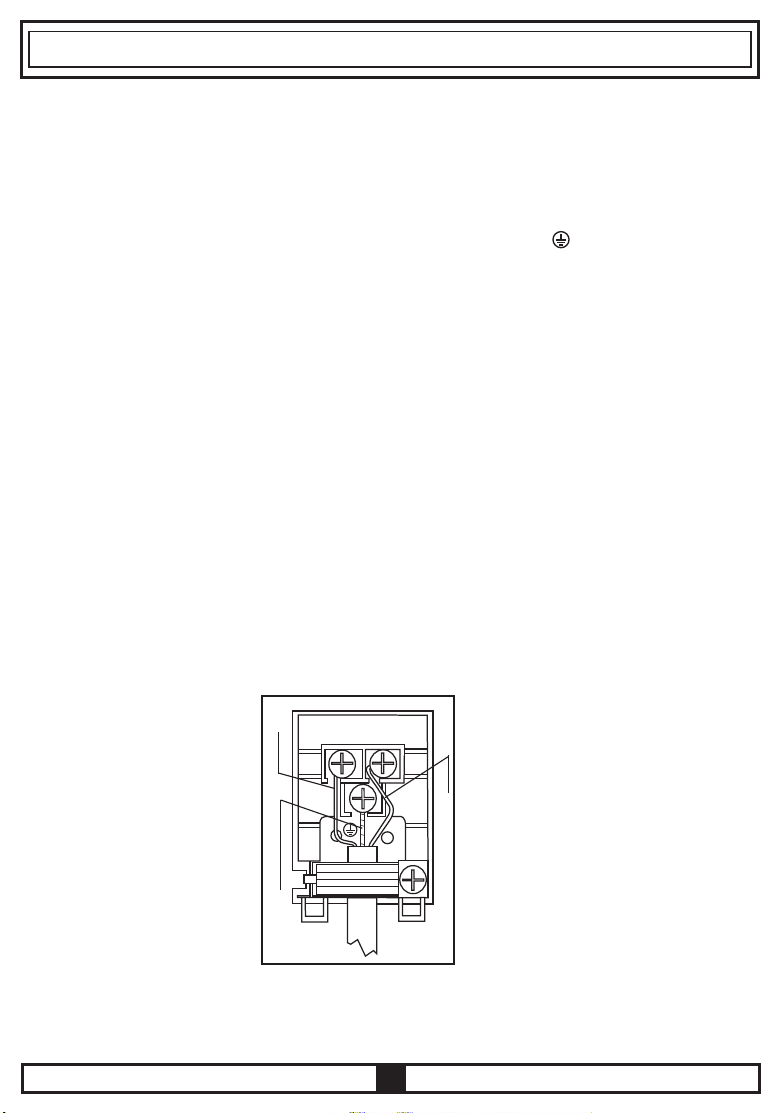
3.5 ELEKTRISCHE VERBINDING EN VEILIGHEID
Volg onderstaande instructies tijdens de elektrische verbinding:
De aardleiding moet verbonden worden met het aardingseinde ( ).
Indien er geen gepaste aarding is volgens de voorschriften van de plaats waar het toestel is
geïnstalleerd, contacteer dan onmiddellijk uw gekwalificeerde elektricien.
De aardingscontactdoos moet dicht bij het toestel zijn. Gebruik nooit een verlengsnoer.
De voedingskabel mag geen warm oppervlak van het product raken.
Als het netsnoer beschadigd is, moet het door de fabrikant, de onderhoudsdienst of een
gelijkaardig gekwalificeerd persoon worden vervangen met een snoer van hetzelfde type en
vermogen om gevaar te vermijden.
De verkeerde elektrische verbinding kan uw toestel beschadigen. Dergelijke schade wordt
niet gedekt door de garantie.
Het toestel is ontworpen voor 220-240 Volt elektriciteit. Als de toevoerspanning verschillend
is, moet u onmiddellijk contact opnemen met uw geautoriseerde onderhoudsdepartement.
De voedingskabel mag niet in aanraking komen met warme onderdelen van het toestel. De
voedingskabel mag de achterzijde van het toestel niet raken. Zo niet, kan de voedingskabel
van het toestel beschadigd raken. En dit kan een kortsluiting veroorzaken.
De fabrikant aanvaardt geen verantwoordelijkheid voor schade of letsels die worden
veroorzaakt als men de incorrecte toevoerspanning aansluit.
BRUIN
L
GEEL+GROEN
BLAUW
N
Elektrisch-verbindingschema
11
Page 14
DEEL 4: GEBRUIK VAN UW OVEN
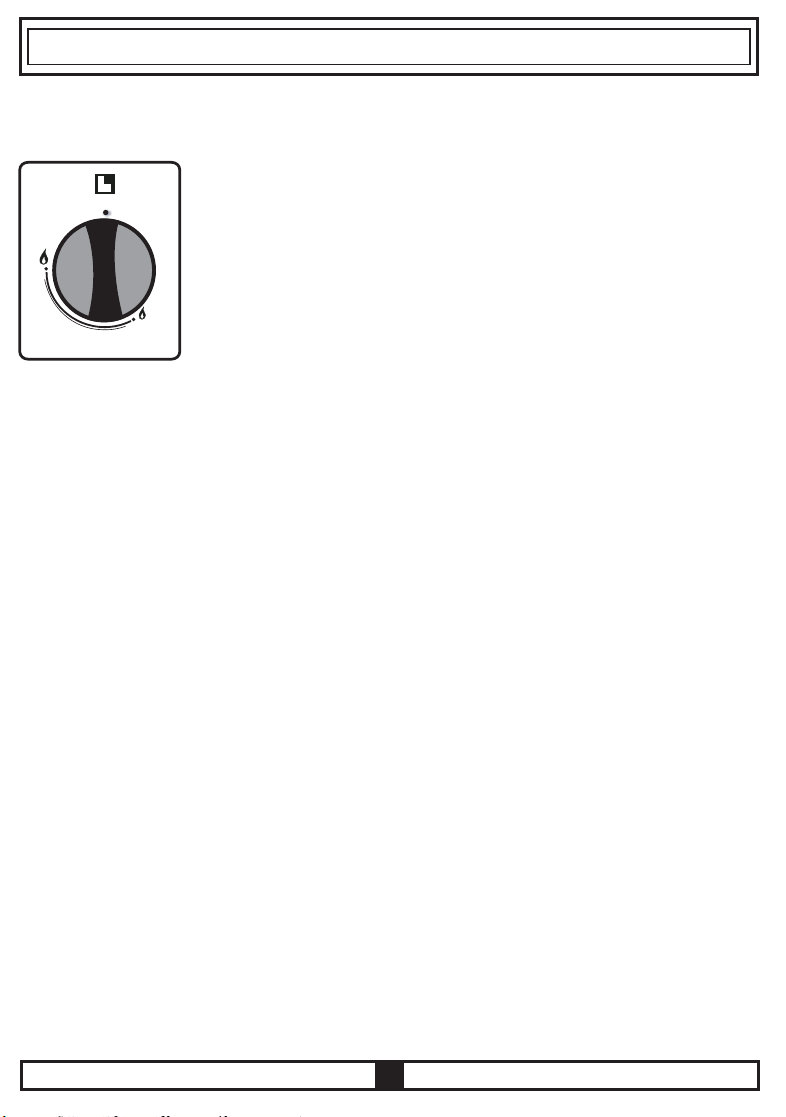
4.1 Het gebruik van de kookplaat (gas)
Het pictogram boven de bedieningsknoppen geeft de gasbrander of
0
Aan het einde van de bereiding draait de u de bedieningsknop op 0 (OFF) voor u oven zonder
toezicht laat.
WAARSCHUWING:
Vergeet niet dat de gasbranders of elektrische verwarmingsring gedurende een zekere periode
warm blijft nadat de bedieningsknop is uitgeschakeld.
Gasvlam defect toestel (FFD)
Dit toestel wordt aangebracht met een vlamdefect beveiliging die de gastoevoer naar de
brander afsnijdt indien de vlam om de een of andere reden uitdooft.
Het gas wordt afgesneden binnen 90 seconden na het uitdoven van de vlam.
Als de vlam beveiliging werkt, kan de brander onmiddellijk opnieuw worden ontstoken.
Als de vlam wordt uitgedoofd door het morsen van vloeistof of eetwaren moet u de brander
schoonmaken voor u hem opnieuw probeert te ontsteken.
elektrische verwarmingsring aan die hij bedient.
Voor gasbranders drukt u de bedieningsknop in en u houdt hem ingedrukt.
Draai deze volledig aan (Grote vlam afbeelding), druk de ontstekingstoets
in op het bedieningspaneel van de oven of gebruik een lucifer om de
brander te ontsteken. Houd de bedieningsknop een aantal seconden
langer ingedrukt voor u de knop los laat. Stel daarna de bedieningsknop
in op de vereiste instelling.
Het is belangrijk dat de basisdiameter van de pot minimum even groot zijn is als de diameter
van de branderring om een efficiënte warmteoverdracht te verkrijgen.
Plaats de pannen steeds centraal boven de branders.
Stel de grootte van de vlammen zodanig in dat ze niet langs de zijde van de pan lopen.
Plaats de handvaten zodanig dat ze niet per ongeluk kunnen worden omgestoten.
12
Page 15
4.3 Het gebruik van de oven (Elektrisch)
Ovenfunctie bediening
Om de ovenfunctie te selecteren, uitgelegd in het volgend deel en
in tabel 1, moet u de functie selectieknop instellen samen met de
thermostaat knop tot een te selecteren temperatuurswaarde. Zo
niet, zal de functie die u geselecteerd hebt niet werken.
Oven thermostaatbediening
Om de oven temperatuur te selecteren (Afb.4). Samen gebruikt met
de ovenfunctie bedieningsknop. Indien de temperatuur in de oven de
door u gekozen waarde bereikt, zal de thermostaat het circuit
onderbreken en het thermostaatlichtje gaat uit. Indien de temperatuur
lager is dan de ingestelde waarde, zal de thermostaat terug aanslaan
en zal het thermostaatlichtje terug branden.
Max
0
50
100
250
200
150
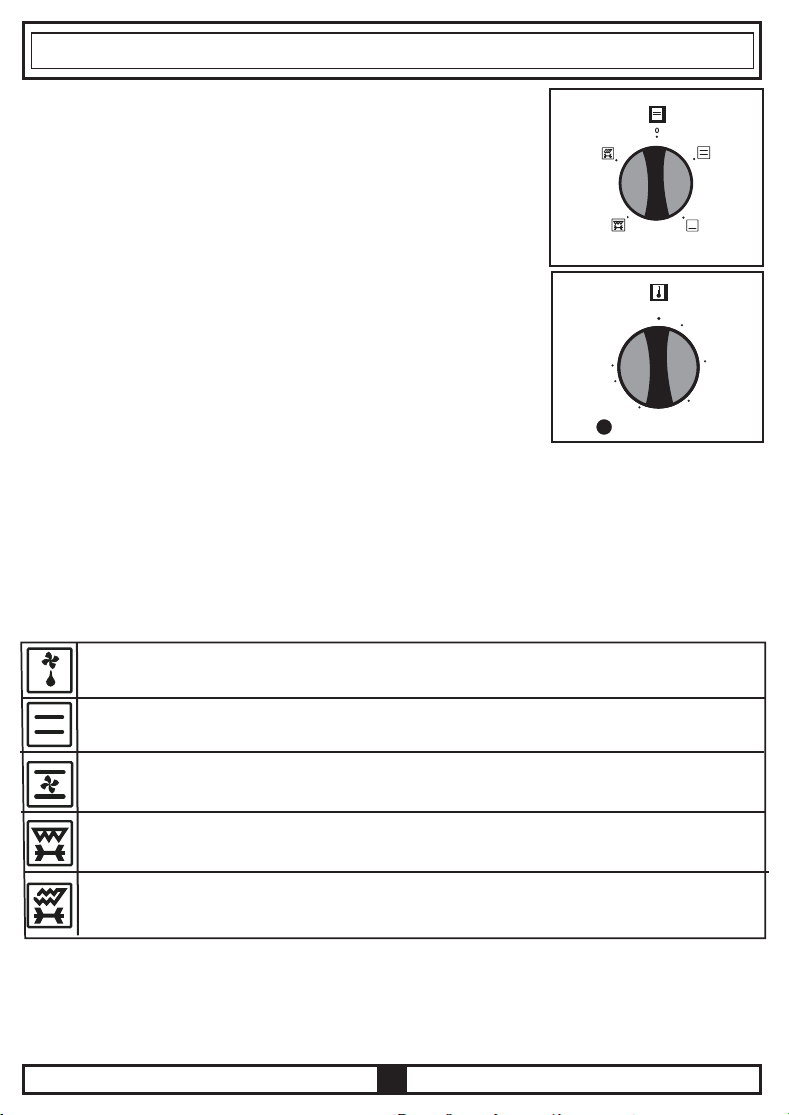
4.4 GEBRUIK VAN DE OVENFUNCTIE SCHAKELAARS
Deze schakelaar laar u toe om de ovenfuncties te selecteren. Deze functies en hun standen
worden in volgende tabel weergegeven. Ook worden de gedetailleerde instructies en hun gebruik
in de volgende pagina's uitgelegd.
Tabel 1
Uw diepgevroren eetwaren ontdooien.
Uw verwarmingselementen boven- en onderaan zijn ingeschakeld.
De convectiemodus van uw oven met verwarmingselementen boven- en
onderaan.
De grillverwarmer en kip rotisserie functie van uw oven.
Het verwarmingselement bovenaan, de grillverwarmer en kip rotisserie
functie van uw oven.
13
Page 16

Ontdooi functie
U kunt het ontdooiproces starten door het diepgevroren voedsel in uw oven te plaatsen
en de schakelaar in de bovenstaande positie te draaien. Dit is een programma dat het
voedsel niet bereidt, maar enkel helpt het te ontdooien in een korte tijd. Plaats de te
ontdooien eetwaren op een draadlade op de derde lade van onderaan te beginnen. Plaats
een schotel op de bodem van de oven om het water op te vangen dat vrijkomt na de
ontdooiing.
Onder en bovenwarmte functie
Deze instelling wordt beschouwd als de traditionele methode, de verwarmingselementen
boven- onderaan verspreidt de warmte in uw oven. Dit zorgt ervoor dat de eetwaren
gelijkmatig worden bereid.
Het wordt aanbevolen de oven 10 minuten voor te warmen. De verwarmingselementen
onderaan-bovenaan instelling is de voorkeursfunctie om cake, lichte cake, flan, lasagne
en pizza te maken
.
Als u klaar bent met koken, schakelt u de ovenschakelaar en warmteregelaar uit en u
annuleert ieder eventueel tijdprogramma. Haal de bereide eetwaren uit de oven en plaats
ze op een veilige plaats.
Vergeet niet dat de oven warm blijft gedurende een bepaalde periode na de bereiding.
Houd kinderen uit de buurt van de oven.
Hetelucht functie
De warmte van de verwarmingselementen boven- en onderaan wordt gelijkmatig verdeeld
in de oven via de convectieventilator.
De verwarming instellingsknop wordt ingesteld op de instelling die wordt aanbevolen in
het recept. Draai de oven bedieningsknop op de vereiste instelling. Hierdoor wordt de
oventijd ingesteld op de aanbevolen tijdsduur voor de bereiding. U moet de oven 10
minuten voorverwarmen. De eetwaren worden in de oven geplaatst en daarna bereid.
Gebruik deze instelling om gebak te bereiden. Elk deel van het voedsel zal gelijkmatig
gebakken worden. Dit is de instelling die wordt gebruikt om een enkele schaal te bakken.
Aan het einde van de bereiding schakelt u de oven en de warmte bedieningsknop uit.
Annuleer het tijdsprogramma van de oven en neem het bereide voedsel uit de oven en
plaats het op een veilige plaats. Vergeet niet dat de oven warm blijft gedurende een
bepaalde periode na de bereiding. Houd kinderen dus uit de buurt.
Grill functie
Deze functie wordt gebruikt om te grillen, kip aan 't spit en eetwaren te bereiden op een
spies. Om het draaien te starten, gebruikt u de "draaiende spies". Om te grillen, plaatst
u de eetwaren op de grill, in de pan en daarna voert u de grillpan in de grill aan het
hoogste niveau. U kunt de gril starten nadat u de ovenschaal op de derde schaal
geplaatst heeft. De schaal, die geplaatst is op het derde schap, zal er voor zorgen dat
er de olie, die van het eten druipt, opgevangen wordt.
14
Page 17

Draai de verwarming instelling van de ovenbediening in deze instelling. Plaats uw eetwaar
in de oven nadat deze 5 minuten voorverwarmd is.
Na het koken, draai de ovenschakelaar en warmteschakelaar uit, zoals bij alle
kookprocessen. Annuleer het tijdsprogramma van de oven en neem het bereide voedsel
uit de oven en plaats het op een veilige plaats.
Waarschuwing: Maximale instelling van de thermostaat is 190°C
Bovenste verwarmer, Grill en Braadkipfunctie
Deze instelling wordt gebruikt om snel te grillen, kip te braden en gebakken voedsel op
een spies te bereiden.
Om de rotisserie te gebruiken, verwijzen wij u naar HET GEBRUIK VAN DE ROTISSERIE.
Om te grillen, plaatst u de eetwaren op de grill, in de pan en daarna voert u de grillpan
in de grill aan het hoogste niveau. U kunt de gril starten nadat u de ovenschaal op de
derde schaal geplaatst heeft. De schaal, die geplaatst is op het derde schap, zal er voor
zorgen dat er de olie, die van het eten druipt, opgevangen wordt.
Draai de verwarming instelling van de ovenbediening in deze instelling. Plaats uw eetwaar
in de oven nadat deze 5 minuten voorverwarmd is.
Na het koken, draai de ovenschakelaar en warmteschakelaar uit, zoals bij alle
kookprocessen. Annuleer het tijdsprogramma van de oven en neem het bereide voedsel
uit de oven en plaats het op een veilige plaats.
Waarschuwing: Maximale instelling van de thermostaat is 190°C
Energiebesparing:
Als u de elektrische kookplaten gebruikt, is het noodzakelijk steelpannen te gebruiken met een
vlakke bodem.
Gebruik pannen en schotels met correcte afmetingen.
Gebruik deksels voor uw pannen en schotels om de bereidingstijd te verminderen.
Verminder de hoeveelheid vloeistof of vet om bereidingstijden te verminderen.
Als de vloeistof begint te koken, moet u de verwarming instelling verlagen.
De ovendeur mag niet worden geopend tijdens de bereidingperiode.
15
Page 18

(dk)
Bereidingstijd
4
Rek
pos.
4
3 - 4
GRILL
C)
0
pos.(
Thermostaat
(dk)
Bereidingstijd
2
1 - 2
Rek
pos.
C)
0
pos.(
VENTILATORBOVEN-
Thermostaat
ONDERAAN
(dk)
Bereidingstijd
Rek
pos.
1 - 2 - 3
1 - 2 - 3
1 - 2
1 - 21 - 2
1 - 2
1 - 2
2
1 - 2
ONDER-BOVEN
C)
0
pos.(
Thermostaat
cake
GERECHTEN
Gebak
Koekjes
Cake
eetwaren
gehaktballen
Gegrilde
16
Kip
Water
Karbonade
Biefstuk
gebak
Bradenmet kippenspit
2-lagen
*
2-lagen
Page 19

Gebruikte toebehoren in de Oven :
3de of 4de
5. Rek
4. Rek
3. Rek
2. Rek
1. Rek
Het wordt aangeraden dat u de containers gebruikt die worden vermeld in de tabel, afhankelijk
van de soort eetwaren dat u bereidt. Los van de ovenschalen en spies om kip te braden, die
samen met de oven worden geleverd, kunt u ook glazen containers, cake vormen, speciale
ovenschalen die geschikt zijn voor gebruik in uw oven. Let op de informatie in dit verband die
door de fabrikant wordt voorzien.
Indien er kleine houders worden gebruikt, plaats de houder op de grillplaat zodat het in het zich
in het midden van de grill bevindt. De onderstaande informatie moet worden toegepast op
geëmailleerde containers.
Indien de te koken eetwaren de ovenschaal niet volledig bedekken, indien de eetwaren of de
gebruikte schaal voor de sappen van de eetwaren op te vangen uit de diepvriezer komen, kan
de vorm van de schaal, wegens de hoge temperatuur tijdens het kook- of braadproces, vervormen.
De schaal zal na afkoeling terug zijn oorspronkelijke vorm krijgen. Dit is een normaal fysisch
proces dat voorkomt tijdens warmteoverdracht. Plaats de glazen schaal of houder niet onmiddellijk
na het koken in een koude omgeving. Plaats ze niet op koude en vochtige oppervlakken. Plaats
ze op een droge doek en zorg ervoor dat ze langzaam afkoelen. Anders kan het de glazen
schaal of houder barsten. Indien u in uw oven gaat grillen, raden wij u aan dat u op de gril op
de schaal gebruikt, samen met uw product geleverd (indien uw product dit gereedschap bevat.)
Zo zal het druipen en gespetter van olie de binnenkant van de oven niet bevuilen. Indien u de
grote grilschaal gebruikt, plaats dan een blad in de lagere schabben om zo de opeenstapeling
van oliën te vermijden. Om het schoonmaken te vergemakkelijken, plaats wat water op de
plateau. Tijdens het grillen, gebruik de 4de of 5de rek en breng wat olie op de gril aan zodat
er geen etenswaren aan de gril blijven kleven.
6. Rek
5. Rek
4. Rek
3. Rek
2. Rek
1. Rek
Draadrooster: Gebruikt om te grillen of
om andere containers dan de kookschotel
op te plaatsen.
Diepe plateau: Gebruikt om stoofschotels
te bereiden.
17
Page 20

Spies handvat
Aanhechtingsholte
spies
Schotel op tweede rek
Spies Steun
Spies
Gebruik van roosteraccessoires
Steek de spies door de kip en vergrendel de klemmen,
steek het uiteinde van de spies in het gat dat aan het
achterpaneel te vinden is en zorg ervoor dat het volledig
steunt op het frame en dat het in de motorschacht past.
Draai hiervoor het deksel naar de zijkant, voor de
invoegopening, zoals weergegeven op de afbeeldingen.
Plaats de spies in het spiesraster (geplaatst op het derde
rek) of spiessteun (geplaatst in de plateaugaten) Verwijder
de hendel van de spies, indien geïnstalleerd, en sluit de
ovendeur. De hendel moet enkel bevestigd zijn om de
etenswaren na het grillen te verwijderen.
Verzeker u ervan dat de oven niet in werking is tijdens het
uitvoeren van deze handeling.
18
Page 21

DEEL 5: SCHOONMAKEN EN ONDERHOUD VAN UW OVEN
5.1 SCHOONMAKEN
Zorg ervoor dat alle schakelaars uitgeschakeld zijn en dat uw oven afgekoeld is voor u hem
schoonmaakt.
Verwijder de stekker uit het stopcontact, zorg ervoor dat u de schoonmaakmiddelen gebruikt die
worden aanbevolen door de fabrikant voor u schoonmaakmiddelen gebruikt in uw oven. Gebruik
geen bijtende emulsies, schurende schoonmaakmiddelen, staalwol of harde werktuigen want
deze kunnen de oppervlakken beschadigen. Indien vloeistoffen overkoken en blijven branden,
kan dit de glazuur beschadigen. Maak alle gemorste vloeistoffen onmiddellijk schoon.
De binnenkant van uw oven reinigen
U moet de oven loskoppelen van het elektrisch netwerk voor u hem schoonmaakt
De binnenzijde van de oven wordt het best schoongemaakt als de oven warm is. Wrijf de oven
schoon met een zachte doek met een zeepsopje na ieder gebruik. Veeg nadien de oven met
een vochtige doek schoon en droog de oven.
Het kan soms noodzakelijk zijn een vloeibaar schoonmaakmiddel te gebruiken.
Reinig niet met droge en poeder reinigingsmiddelen.
Deksel
Hoofd
Gasbranders onderdelen schoonmaken
Til de steelpanhouders en koppen van de branders op bovenaan op uw oven.
Veeg en maak de achterzijde met een vod gedrenkt in zeepsop schoon Was de bovenzijde en
koppen van de branders af en spoel ze af. Vervang de achterpanelen na het drogen. Maak de
achterzijde schoon met staalwol.
Dit kan krassen veroorzaken.
Het email waar de steelpandrager in contact komt met de vlammen, kan verslijten. De onderdelen
waarvan het email verslijt, veroorzaken geen roest.
19
Page 22

DEEL 6: DIENST EN TRANSPORT
6.1 VEREISTEN VOOR U DE ONDERHOUDSDIENST CONTACTEERT
Indien de oven niet werkt ;
Het is mogelijk dat de stekker van de oven uit het stopcontact is verwijderd, er kan een
stroompanne zijn. Bij modellen met een timer is het mogelijk dat de timer niet is ingesteld.
Indien de oven niet opwarmt ;
De temperatuur is mogelijk niet ingesteld op de temperatuurregelaar van de oven.
Koken (Indien deel boven-onderaan niet gelijkmatig kookt) ;
Verplaats de rekken, de bereidingtijd en temperatuurwaarden volgens de instructies.
6.2 INFORMATIE MET BETREKKING TOT TRANSPORT
Indien u transport nodig heeft ;
Als u de oven moet verplaatsen, moet u hem transporteren in de originele verpakking.
Plak de kookplaat op de bovenste delen, deksels en koppen en de pansteunen op de
kookpanelen.
Breng een stuk papier aan tussen het bovenste deksel en het kookpaneel, bedek het bovenste
deksel en tape het dan vast aan de zijkanten van de oven.
Tape karton of papier aan de voorkant van het binnenglas van de oven zodat het geschikt is
voor de schotels, de draadgril en de schotels in uw oven, zodat de oven niet wordt beschadigd
tijdens het transport.
Tape de hoeken van de oven vast aan de zijpanelen.
Indien het zijn originele verpakking niet meer heeft ;
Bescherm de externe oppervlakten (geverfde oppervlakten) van de oven tegen mogelijke
schokken.
20
Page 23

NG
G25
125
3
0.82
332.2 lt/h
1
72
0.3
110.74 lt/h
94
1.75
0.495
193.79 lt/h
148
3.8
1.6
420.82 lt/h
LPG
G20
20 mbar 25 mbar
G30
50 mbar
G31
28-30/37 mbar
G30
28-30 mbar
3
115
0.7
285.7 lt/h
3
75
1.23
218.13 gr/h
3
85
0.85
214.28 gr/h
3
85
0.85
218.13 gr/h
1
72
0.3
1
43
0.5
72.71 gr/h
1
50
0.4
71.42 gr/h
1
50
0.4
72.71 gr/h
95.24 lt/h
97
1.75
0.495
166.66 lt/h
58
1.75
0.65
127.25gr/h
65
0.65
1.75
125 gr/h
65
0.65
1.75
127.25 gr/h
135
77
98
98
3.8
3.8
3.8
3.8
1.7
1.9
276.3 gr/h
1.55
271.42 gr/h
1.55
276.3 gr/h
361.9 lt/h
2L3B/P
Categorie
II2L3B/P
NL Klasse :1
Categorie:
SNELLE BRANDER
Injectiediam. (% mm)
Nominaal Vermogen (kw)
(bij 15°C en 1013 mbar druk)
Min. vermogen (kw)
Verbruik in 1 uur
Verbruik 1 uur
SECUNDAIRE BRANDER
Injectiediam. (% mm)
Nominaal Vermogen (kw)
Min. vermogen (kw)
Verbruik 1 uur
MEDIUM BRANDER
(bij 15°C en 1013 mbar druk)
Verbruik in 1 uur
21
Injectiediam. (% mm)
Min. vermogen (kw)
Verbruik 1 uur
Nominaal Vermogen (kw)
(bij 15°C en 1013 mbar druk)
Verbruik in 1 uur
Nominaal Vermogen (kw)
WOK BRANDER
Min. vermogen (kw)
Injectiediam. (% mm)
Verbruik 1 uur
(bij 15°C en 1013 mbar druk)
Verbruik in 1 uur
Page 24

Als er iets niet werkt
Kesa Electricals © UK, HU1 3AU 01/04/2010
Als er iets met uw toestel is wat u niet begrijpt en u woont in het VK, kunt u met ons
contact opnemen tijdens de normale werkuren op: 0844 8009595 Als u een technicus
nodig heeft, bel het telefoonnummer op uw ontvangstbewijs.
Oproepen worden aan standaardtarief gerekend.
Wij bieden onze excuses aan voor eventuele kleine inconsistenties in deze instructie,
die het resultaat zijn van productverbetering en ontwikkeling.
Kesa Electricals U.K HU1 3AU 11 / 06 / 2010
52034923 06/10 R000
Page 25

OPERATING AND INSTALLATION
DUAL FUEL
INSTRUCTIONS OF FREESTANDING
COMBINED COOKER
PMC66SS-N
Page 26

Dear Customer,
Thank you for purchasing a Proline Gas Cooker.
The safety precautions and recommendations in these instructions are for
your own safety and that of others.
They will also provide a means by which to make full use of the features
offered by your appliance.
Please keep this booklet in a safe place. It may be useful in future, either to
yourself or to others in the event that doubts should arise relating to its
operation.
This appliance must be used only for its intended purpose, that is for
the domestic cooking of foodstuffs. Any other form of usage is to be
considered as inappropriate and therefore dangerous.
The manufacturer declines all responsibility in the event of damage
caused by improper or incorrect use of the appliance.
Page 27

CONTENTS
1- Presentation and Dimensions of the product
2- Warnings
3- Installation and preperation for use
4- How to use your product(cooker)
5- Cleaning and maintenance
6- Service and Transport
1
Page 28

PART 1: PRESENTATION AND DIMENSIONS OF THE PRODUCT
PRESENTATION:
10
1
2
3
9
8
11
7
12
4
Part of List :
1- Glass lid
2- Cooktop
3- Control Panel
4- Oven Door Handle
5- Drawer Cover
6- Support leg
7- Oven Door
8- Oven Tray
6
5
9- Wire Grid
10- Upper heater
11- Wok burner
12- Medium Burner
13- Auxillary Burner
14- Hob Grids
15- Medium Burner
13
SIZE(cm)
60*60*85
15
14
MODEL
PMC66SS-N
2
Page 29

PART 2 : WARNINGSPART 2 : WARNINGS
IMPORTANT PRECAUTIONS AND RECOMMENDATIONS
• After having unpacked the appliance, check to ensure that it is not damaged.
If you have any doubts, do not use it and consult your supplier or a professionally qualified technician.
• Packing elements (i.e. plastic bags, polystyrene foam, nails, packing straps, etc.) should not be left around
within easy reach of children, as these may cause serious injuries.
• The packaging material is recyclable and is marked with the recycling symbol.
• Do not attempt to modify the technical characteristics of the appliance as this may become dangerous to use.
• The appliance was designed for nonprofessional use by private individuals in communal dwellings.
• The manufacturer cannot be held responsible for damage or injury caused by unreasonable, incorrect or rash
use of the appliance.
• If you should decide not to use the appliance (or decide to substitute an older model), before disposing of it, it is
important that it be made inoperative in an appropriate manner in accordance to local laws, If you are disposing
of an old appliance with a lock or catch on the door, disable it to avoid entrapment of children when playing.
• The appliance should be installed and all the gas/electrical connections made by a qualified engineer in
compliance with local regulations in force and following the manufacturer's instructions.
TIPS FOR THE USER
• During and after use of the cook top, certain parts will become very hot. Do
not touch hot parts.
• Keep children away from the cooking hob when it is in use.
• After use, ensure that the knobs are in position ● (off), and close the main gas delivery valve or the gas cylinder
valve.
• When the appliance is not being used, it is advisable to keep the gas tap closed.
• The periodic lubrication of the gas taps must be done only by specialized personnel. In case of difficulty in the
gas taps operation, call Service.
• Before any cleaning or maintenance, switch off the electricity to the cook top.
Risk of fire!
• Do not leave inflammable material on the cook top.
• Make sure that the electrical cables of other appliances installed nearby cannot come into contact with the cook
top.
IMPORTANT PRECAUTIONS AND RECOMMENDATIONS FOR USE OF ELECTRICAL APPLIANCES
Use of any electrical appliance implies the necessity to follow a series of fundamental rules. In particular:
• Never touch the appliance with wet hands or feet;
• do not operate the appliance with wet hands or feet or when barefooted;
• do not allow children or disabled people to use the appliance without your supervision.
The manufacturer cannot be held responsible for any damages caused by improper, incorrect or unreasonable
use of the appliance.
3
Page 30

The use of a gas cooking appliance results in the production of heat and moisture
CAUTION: The use of a gas cooking appliance results in the production of heat, moisture
and products of combustion in the room in which it is installed. Ensure that the kitchen is
well ventilated especially when the appliance is in use, keep natural ventilation holes open
or install a mechanical ventilation device(mechanical extractor hood).
CAUTION: This appliance is for cooking purposes only. It must not be used for other
purposes, for example room heating.
in the room in which it is installed. Ensure that the kitchen is well vantilated: keep
natural ventilation holes open or install a mechanical ventilation device (mechanical
extractor hood).
Prolonged intensive use of the appliance may call for additional ventilation,
for example opening a window or more effective ventilation; for example increasing
the level of mechanical ventilation, where present.
Do not keep flammable materials close while the appliance is operating.
Pay attention to the cables of the other electrical devices operating near the
appliance, so as not to touch to hot points.
Pay attention the switches to be 0, when the appliance does not operate.
Keep children away from the oven.
During the use the appliance gets hot. Take special care to prevent touching of
heating elements inside oven cavity.
During grilling mode the oven door should be closed.
CAUTION: Glass lids may shatter when heated, turn off all burners before shutting
the lid.
WARNINGS:
The appliance is not intended to be used by persons(including children) with reduced
physical, sensory or mental capabilities, or lack of experience and knowledge,
unless they have been given supervision or instruction concerning use of the
appliance by a person responsible for their safety. Children should be supervised
to ensure that they do not play with the appliance.
FOR EFFICIENCY AND SECURITY OF APPLIANCE, WE RECOMMEND YOU ALWAYS TO
USE THE ORIGINAL SPARE PARTS AND TO CALL ONLY OUR AUTHORISED SERVICES
WHEN IN CASE OF A NEED.
During use the appliance becomes hot. Care should be taken to avoid touching
heating elements inside the oven. Any spillage should be removed from the lid before
opening.
4
Page 31

PART 3 : INSTALLATION AND PREPARATION FOR USE
IMPORTANT
The appliance should be installed, regulated and adapted to function with other types of
gas by a QUALIFIED INSTALLATION TECHNICIAN.
Failure to comply with this condition will render the guarantee invalid.
The hob should only be installed by a Gas registered installer.
He should also be a qualified electrician if the appliance requires connection to a mains
electricity supply.
The appliance must be installed in compliance with regulations in force.
Installation technicians must comply to current laws in force concerning ventilation and the
evacuation of exhaust gases.
Always unplug the appliance before carrying out any maintenance operations or repairs.
The appliance must be housed in heat-resistant units.
These tips are designed to be embedded into kitchen fixtures measuring 600
mm in depth.
The walls of the units must not be higher than work top and must be capable of
resisting temperatures of 75 °C above room temperature.
Do not install the appliance near inflammable materials (eg. curtains).
Air inlet section
min. 100cm
2
Air inlet section
min. 100cm
2
Figure 1 Figure 2
VENTILATION REQUIREMENTS
The appliance should be installed into a room or space with an air supply in accordance with
BS 5440-2:2000.
For rooms with a volume of less than 5 m3 - permanent ventilation of 100 cm2 free area will be
equired.
For rooms with a volume of between 5 m3 and 10 m3 a permanent ventilation of 50 cm2 free
area will be required unless the room has a door which opens directly to the outside air in which
case no permanent ventilation is required.
For rooms with a volume greater than 10 m3 - no permanent ventilation is required.
NB. Regardless of room size, all rooms containing the appliance must have direct
access to the outside air via an open window or equivalent.
Where there are other fuel burning appliances in the same room, BS 5440-2:2000 should be
consulted to determine the correct amount of free area ventilation requirements.
The above requirements allow also for use of a gas oven and grill but if there are other gas
burning appliances in the same room, consult a qualified engineer.
5
Page 32

GAS INSTALLATION IMPORTANT NOTE
This appliance is supplied for use on NATURAL GAS only and cannot be used on any other
gas without modification.
This appliance is manufactured for conversion to LPG. To purchase an LPG conversion kit
telephone accessories direct 0870 6052020.
INSTALLATION & SERVICE REGULATIONS (UNITED KINGDOM)
It is a legal requirement that all gas appliances are Installed & Serviced by a competent
person in accordance with the current editions of the following Standards & Regulations
or those regulations appropriate to the geographical region in which they are to be installed:
· Gas Safety (Installation & Use) Regulations
· Building Regulations
· British Standards
· Regulations for Electrical Installation
Installation and service of any gas product must be made by a suitably qualified person
competent on the type of product being installed or serviced and holding a valid certificate
of competence for the work being carried out. Currently the proof of competence is the
Accredited Certification Scheme (ACS) or S/NVQ that has been aligned to the ACS.
It is also a requirement that all businesses or self employed installers are members of a
class of person approved by the Health and Safety Executive.
Currently the only body with such approval is the GAS SAFE register.
Failure to install the appliance correctly could invalidate any manufacturer's warranty and
lead to prosecution under the above quoted regulation.
Cooker hood flue
Electrical ventilator
Air inlet section
min. 100cm
Figure3
Min. 42 cm.
2
COOKER HOOD
Min. 60 cm.
Min.75 cm(without hood)
6
Air inlet section
min. 100cm
Min. 42 cm.
2
Figure4
Figure 5
Page 33

3.2 INSTALLATION OF OVEN
Notes:
Flexible hoses can be used where the sited ambient temperature of the hose does not
exceed 70°C. These hoses must be manufactured in accordance with BS669 part 1
and be of the correct construction for the type of gas being used.
Gas hoses designed for natural gas MUST NOT be used for supplying LPG gas (LPG gas
hoses can be identified by a either a red band or stripe on the rubber outer coating of the
hose).
The hose should not be crushed or trapped or be in contact with sharp or abrasive edges.
Using a suitable leak detection fluid solution (e.g. Rocol) check each gas connection one
at a time by brushing the solution over the connection.
The presence of bubbles will indicate a leak. If there is a leak, tighten the fitting and then
recheck for leaks.
IMPORTANT!
Do not use a naked flame to test for leaks.
3.3 ADJUSTMENT OF FEET
The oven stands on four adjustable feet that can be adjusted by turning them clockwise or
anti-clockwise, adjust these feet when the oven is positioned where it will be installed.
Make sure the oven is level and stable.
3.4 MOUNTING OF GAS HOSE AND IMPERVIOUSNESS CONTROL
The gas of appliance must also be connected in accordance with standards. The adjusted
gas type of appliance must be determined on the rating plate on the back of the
appliance. You can find the information related to appropriate gas types and appropriate
gas injectors on technical data table. Pay attention that the feeding gas pressure must be
appropriate for the values on technical data table to be able to get the most efficiency and
to ensure the least consumption. If the pressure of used gas is different than these values
or changeable, it is required to install a pressure regulator on the supply pipe. It is
required to contact an authorised service to make these adjusments.
7
Page 34

GAS CONNECTION
FIG 6
The installation of the gas hob to Natural Gas or LP Gas must be carried out by a gas
registered installer. Installers shall take due account of the provisions of the relevant British
Standards Code of Practice, the Gas Safety Regulations and the Building Standards
(Scotland) (Consolidation) Regulations issued by the Scottish Development Department.
The cooking hob is supplied with an elbow connection as figure 5.1 and is adjusted to work
with mains gas.
INSTALLATION TO NATURAL GAS
Installation to Natural Gas must conform to the Code of Practice, etc. The supply pressure for
Natural Gas is 20 mbar.
ATTENTION!!!
Do not search for a gas leak with a naked flame such as a lighted match, danger of explosion.
8
Page 35

CONVERSION TO LP GAS
This appliance must only be connected to LPG after an LPG conversion kit has been fitted.
When operating on Butane gas a supply pressure of 28-30 mbar is required.
When using Propane gas a supply pressure of 37 mbar is required.
The installation must conform to the relevant British Standards. Warning: Only a Gas safe
registered installer, also with technical knowledge of electricity should install the oven.
He should observe the Regulations and Codes of Practice governing such installation of
gas appliances.
Note: It is recommended that the gas connection to the cooker is installed with a flexible
connecting tube made to BS 5386.
To convert to LP gas the following steps should be performed.
Disconnect from the gas and electricity supplies.
Remove the cap and the adapter (Figure 7).
Unscrew the injectors (Figure 8)
Replace the injector with the ones corresponding to the type of gas that is going to be used,
according to the information chart at the rear of this manual.
Figure7
9
Figure8
Page 36

Adjusting The Reduced Flame Position :
For reduced flame position the bypass screw must be loosened when converting from
LPG to NG. When converting from NG to LPG, the same screw must be tightend. Make
sure that the appliance is unpluged from the electric current and the gas feed is open.
Ignite the burners and leave them on in minimum position.
Remove the knobs because the screws are accesible only when the knobs are removed.
With the help of a small screwdriver tighten or loosen the bypass screw 900, which makes
the flame of the burner come down to the minimum (Figure 6).
When the flame has a length of at least 4mm, the gas is well distributed. Make sure that
the flame does not die out when passing from the maximum position to the minimum
position.
Changing the Gas Inlet :
The gas feeding pipe which conforms to the regulations on effect A placed on pipe support must be visible for all its length, it must be placed to avoid any contact with parts that will heat up.
It is recomended to always place a joint between the elbow and gas supply pipe. Spain,
Italy, Portugal, Luxemburg, Greece and Deutschland autorize the connection of the gas
hose to gas connection medium as it is shown in B. For these countries, the shape of
gas connection medium must conform to national rules and norms on effect.
For Denmark, Netherlands, France, Algeria, Ireland the connection is obtained by using
the pieces E and flexible hoses as seen in C or rigid pipes. This type of connection
can also be used in France, Algeria, Spain, Italy, Portugal, Greece and Luxemburg.
For the United Kingdom, The gas connection shall be carried out as shown in D.
In all cases, the flexible gas supply hose can neither pass behind an oven nor be
contact with combustible meterials. The minimum distance between the appliance and
adjacent surfaces must be 20mm.
After the connection had been made, it has to be tested. This test can be done by
applying a soapy liquid to the connection. No bubble should appear. If there are bubbles,
check the connection joint and remake it if necassary.
10
Page 37

3.5 ELECTRIC CONNECTION AND SECURITY
During the electric connection, surely follow the instructions bellow:
The earthing cable must be connected to the earth terminal ( ).
If there is not any appropriate earthed electric outlet in accordance with regulations in the
place where the appliance will be installed, immediately contact a qualified electrician.
The earthed electric outlet must be close to the appliance. Do not use an extension
cord.
The feeding cable must not touch the hot surface of the product.
If the mains cord is damaged, it must be replaced by the manufacturer, its service agent or
similarly qualified person with a cord of the same type and rating to avoid a hazard.
The wrong electric connection may damage your appliance. Such damage is not
covered by the warranty.
The appliance is designed for 220-240 Volts of electricity. If the supply voltage is different,
immediately contact your authorised service department.
The electric cable must not touch to the hot parts of appliance. The electric cable must
not touch the back part of the appliance. Otherwise the electric cable of appliance may be
damaged. And this may cause short circuit.
The manufacturer accepts no responsibilty for damage or injury caused by connecting
to the wrong supply voltage.
BROWN
L
YELLOW+GREEN
BLUE
N
Electric Connection Diagram
11
Page 38

PART 4 : USE OF YOUR OVEN
4.1 Using the Hob (gas)
The icon above the control knobs indicates which gas burner or electric
0
When you have finished cooking, turn the control knob to 0 (OFF) before leaving the oven
unattended.
WARNING:
Remember that the gas burners or electric heating ring will remain hot for some time after
the control has been turned off.
Gas Flame Failure Device (FFD)
This appliance is fitted with a flame failure device which will cut off the gas supply to the
burner should the flame be extinguished for any reason.
The gas will be cut of within a 90 seconds of flame failure.
If the flame failure device operates, the burner can be ignited again immediately.
If the flame was extinguished by liquid or food spillage, clean the burner before attempting to
re ignite it.
heating ring it controls.
For gas burners, press and hold the control knob and turn it to full on
(Large flame picture) press the ignition button on the oven control panel
or approach the burner with a match to ignite the burner. Hold the control
knob for a further few seconds before releasing it. Then adjust the control
knob to the setting you require.
It is important that the base diameter of the pot is at least the same diameter as the burner
ring to obtain an efficient
heat transfer.
Always position pans centrally over the burners.
Adjust the size of the flame so that it does not lick up the side of the pan.
Position pan handles so that they cannot be accidentally knocked.
12
Page 39

4.3 Using the Oven (Electric)
13
Oven Function Control
For you to select the oven functions .Explained in the next
Part and in Table 1. You need to adjust the function selection
knob and the oven thermostat knob together to a temperature
value you wish to select. Otherwise, the function you
selected will not operate.
Oven Thermostat Control
For you to select the oven temperature (Figure 4). Used together
with the oven function control button. When the temperature inside
your oven reaches the value you set, the thermostat will cut the
circuit and the thermostat light will go off. When the temperature falls
below the set value,the thermostat will again be turned on and the
thermostat light will be on.
Max
0
50
100
250
200
150
4.4 USE OF OVEN FUNCTION SWITCHES
This switch allows you to select the oven functions. The functions and their grades are shown
at the following table. Also, the detailed instructions and their uses will also be explained in
details in the next pages.
Table 1
Defrosting your frozen food.
Your ovens lower and upper heaters are operating.
Your ovens convection mode with upper and lower heaters.
Your ovens grill heater and chicken rotisery function.
Your ovens upper heater, grill heater and chicken rotisery function.
14
Page 40

Defrost setting
14
You can start the defrosting process by placing the frozen food into your oven and
turning the switch onto the above position. This is a program does not cook the
food, just to defrost them in a very short time. Place the food to be defrosted on the third
shelf from the bottom, on a wire shelf. Place a tray in the bottom of the oven in order to
collect the water that is formed due to defrosting.
Lower - Upper Heater Setting
This setting is considered to be the traditional method, the upper and lower heating elements
disipates the heat into your oven this ensures the food will be cooked equally.
It is recommended to pre-heat the oven for 10 minutes. The Lower-Upper
Heater setting is the setting that is preferred to cook cake, sponge cake, flan,
lasagna, pizza.
At the end of cooking process, turn the ovens switch and heat set up switch off and
cancel any timer program. Take the cooked food from the oven, put onto a safe place.
Remember, the oven will remain hot for some time after cooking has finished,
keep children away from the oven.
Fan and Lower - Upper Heater Setting
The heat from the lower and upper heating elements is distributed evenly throughout the
oven by the convection fan.
The heat adjsutment switch is adjusted to the setting that is recommended by the
recipie. Turn the oven control to the required setting, then the ovens time is adjusted to
the recommended time for cooking, Pre-heat the oven for 10 minutes. The food is placed
into the oven and then cooked. Use this setting for cooking of pastries. Every part of the
food will be cooked equally at this location. It is the setting for cooking a single tray.
At the end of cooking, turn the oven and the heat control knobs to off. Cancel
the ovens time program and take the cooked food from oven and leave it in a safe
place. Remember, the oven will remain hot for some time after cooking has finished, so
keep children away.
Grill and chicken rotisserie setting
This function is used to grill and to rotisserie, cooked food on a skewer.
To make turning, use the skewer. To grill, place the food onto the grill, pan, then insert
the grill pan into the grill at the highest level. You can start to grill after placing the oven
tray
onto the 3rd Shelf. The tray that is placed onto the 3rd Shelf will ensure the collection
of oils that drop from food.
15
Page 41

Turn your ovens heat set up control to this setting. Place your food into the oven after
15
pre heating of 5 minutes.
At the end of cooking, as in all other cooking processes; turn off the ovens switch
and heat set up switch. Cancel the ovens time program and take the cooked food from
oven and leave in a safe place.
Warning: Max. set of thermostat 1900C
Upper heater, Grill and Roast Chicken Function
This setting is used to grill rapidly and to roast chicken, cooked food on a skewer.
To use the rotisserie, see the section on USING THE ROTISSERIE. To grill, place the
food onto the grill pan, then insert the grill pan into the grill onto the highest level. You
can start to grill after placing the oven tray onto the 3rd Shelf. The tray that is placed onto
the 3rd Shelf will ensure collection of oils that drop from food.
Turn your ovens heat set up control to this setting. Place your food into the oven after
pre heating of 5 minutes.
At the end of cooking process, as in all other cooking processes; turn off the ovens
switch and heat set up switch. Cancel the ovens time program and take the cooked
food from oven and leave onto a safe place.
Warning: Max. set of thermostat 190
0
C
Energy Saving:
During use of electrical cookers, it is required to use saucepans having flat bases.
Choose a cookware of proper size.
Using a cookware lid will reduce cooking times.
Minimise the amount of liquid or fat to reduce cooking times.
When liquid starts boiling, reduce the heat setting.
Oven door should not be opened often during cooking period.
16
Page 42

min
16
4
min
1-2
1-2-3
min
1-2
1-2
min
2
1-2-3
2
1-2
4
3-4
1-2
1-2
1-2-3
1-2-3
2
1-2-3
1-4
1-4
17
Page 43

Accessories Used in the Oven :
5. rack
4. rack
3. rack
2. rack
1. rack
3. or
4.rack
17
It is recommended that you use the containers indicated on the table depending on the food
you will cook in your oven. Apart from the oven trays and inner grill roast chicken skewer which
are supplied together with your oven, you can also use glass containers, cake cutters, special
oven trays suitable for use in your oven. Pay attention to the information
given by the manufacturer concerning this issue.
If small sized containers are used, place this container on the inner grill wire so it will be
precisely on the middle of the wire. The information given below should be implemented for
enamelled containers.
If the food to be cooked does not completely cover the oven tray, if the food is taken out of the
deep-freezer or if the tray is used to collect the dripping juices of the foods during the grill
operation; deformation might be observed on the tray due to high temperatures forming
during the cooking/frying operation. However; the tray will regain its shape after cooling off
following the cooking operation. This is a normal, physical state that results during the heat
transfer. Do not leave a glass tray or container in a cold environment immediately after
cooking in them.Do not place them on cold and wet surfaces. Ensure that they slowly cool
off placing them on a dry piece of cloth. Otherwise, the glass tray or container might break.
If you are going to perform a grill operation in your oven, we recommend that you use the grill
on the tray, supplied together with your product (if your product includes this equipment). This
way, splattering and dripping oils will not make the oven interior dirty. If you are going to use
the large wire grill, insert a tray into one of the lower racks to avoid accumulation of the oils.
To make cleaning easier, add some water into it as well. In a grilling operation, use the 4. or
the 5.rack and oil the grill to prevent the food to be grilled from sticking to the grill.
6. rack
5. rack
4. rack
3. rack
2. rack
1. rack
Wire Grid: Used for grills or for placing
different containers other than the cooking
tray on it.
Deep Tray: Used for cooking stews.
18
Page 44

skewer handle
18
skewer insertion
hole
tray on second rack
skewer bracket
skewer
Use of rotisserie accessories
Pass the skewer through the chicken and lock the clamps,
insert the tip of the skewer into the hole found at the rear
panel of cavity and make sure that it completely leans on
the frame and fits in motor shaft.
To do this, first you have to turn the lid to the side, which
is found infront of the skewer insertion hole, as shown in
the figures. After that, fit the skewer onto the skewer grid
(placed on the third rack) or skewer bracket (placed on
the holes of tray). Remove the handle from screwer, if it
is installed and close the oven door. The handle must be
attached only for removing the food after grilling.
Make sure that the oven is not operating while performing
these operations.
19
Page 45

PART 5 : CLEANING AND MAINTENANCE OF YOUR OVEN
19
5.1 CLEANING
Be sure that all control switches are off and your oven is cooled before cleaning.
Disconnect from the mains make sure the cleaners are recommended by the manufacturer
before using the cleaning materials on your oven. As they may damage the surfaces, do not
use caustic creams, abrasive cleaning powders, thick wire wool or hard tools. If liquids
overflows and burns on, the enamel may be damaged. Immediately clean any spilled liquids.
Cleaning of Inside of Your Oven
Disconnect from the mains before cleaning
The inside of the oven is cleaned best when the oven is warm. Wipe the oven with a soft cloth
in soapy water after each use. Later wipe it with a wet cloth once more and then dry it.
It may be required to use a liquid cleaning material ocasionally.
Do not clean with dry and powder cleansers.
lid
head
Cleaning of Gas Cookers burner parts
Lift up the saucepan carriers, and heads of the burners on upper part of your oven.
Wipe and clean the back panel with a soapy cloth. Wash the tops and heads of the burners
and rinse them. Replace the back panels after drying. Do not clean the back panel with
wire wool.
It causes the surface to scratch.
The enamel where the saucepan carriers touch to the flame on end parts, may get old and
shabby. The end parts of which the enamels get old and shabby do not cause rust.
GLASS LID
This symbol means Do not shut lid when burner alight.
20
Page 46

PART 6 : SERVICE AND TRANSPORT
20
6.1 REQUIREMENTS BEFORE CONTANTÝNG TO SERVICE
If the oven does not operate ;
The oven may be unplugged, there has been a power cut. On models fitted with a timer,
timer may be set.
If the oven does not heat ;
The heat may be not adjusted with ovens heater control switch.
Cooking (If lower-upper part does not cook equally) ;
Move the shelf locations, cooking period and heat values according to the instructions.
6.2 INFORMATION RELATED TO TRANSPORT
If you need any transport ;
If you need to move the oven, transport it in its original packaging.
Tape the cooker upper parts, hats and heads and saucepan carriers to the cooking panels.
Place a paper between the upper cover and cooking panel, cover the upper
cover, then tape it to the side surfaces of oven.
Tape cardboard or paper onto the front cover on interior glass of oven as it will be
suitable to the traysi, for the wire grill and trays in your oven not to damage
to the ovens cover during transport.
Also tape the ovenscovers to the side walls.
If it does not have the original case ;
Protect the external surfaces (painted surfaces) of oven against possible
blows.
21
Page 47

NG
21
G25
125
3
0.82
332.2 lt/h
1
72
0.3
110.74 lt/h
94
1.75
0.495
193.79 lt/h
148
3.8
1.6
420.82 lt/h
LPG
G20
20 mbar 25 mbar
G30
50 mbar
G31
28-30/37 mbar
G30
28-30 mbar
3
115
0.7
285.7 lt/h
3
75
1.23
218.13 gr/h
3
85
0.85
214.28 gr/h
3
85
0.85
218.13 gr/h
1
72
0.3
1
43
0.5
72.71 gr/h
1
50
0.4
71.42 gr/h
1
50
0.4
72.71 gr/h
95.24 lt/h
97
1.75
0.495
166.66 lt/h
58
1.75
0.65
127.25gr/h
65
0.65
1.75
125 gr/h
65
0.65
1.75
127.25 gr/h
135
77
98
98
3.8
3.8
3.8
3.8
1.7
1.9
276.3 gr/h
1.55
271.42 gr/h
1.55
276.3 gr/h
361.9 lt/h
2L3B/P
NL Class :1
Category
II2L3B/P
Category:
RAPID BURNER
C and 1013mbar press)
0
Injector diam.(%mm)
Nominal Rating (kw)
(at 15
Min. Rating (kw)
Consumption in 1h
Consumption in 1h
AUXILLARY BURNER
Injector diam.(%mm)
Nominal Rating (kw)
Min. Rating (kw)
C and 1013mbar press)
0
MEDIUM BURNER
(at 15
Consumption in 1h
Consumption in 1h
22
C and 1013mbar press)
0
Injector diam.(%mm)
Min. Rating (kw)
Consumption in 1h
Nominal Rating (kw)
(at 15
Consumption in 1h
Nominal Rating (kw)
WOK BURNER
Min. Rating (kw)
Injector diam.(%mm)
C and 1013mbar press)
0
(at 15
Consumption in 1h
Consumption in 1h
Page 48

If something doesn't seem to work
52043274 03/11 R000
Kesa Electricals © UK, HU1 3AU 01/04/2010
If there is something about your appliance which you do not understand and you live
in the UK you can phone our help line during normal office hours on: 0844 8009595
If you need a service engineer please phone the number on your sales receipt.
Calls are charged at standard rates.
We apologise for any inconvenience caused by minor inconsistencies in these
instructions, which may occur as a result of product improvement and development.
Kesa Electricals U.K HU1 3AU 01 / 04 / 2010
52030327 04/10 R000
 Loading...