

Page 1
OPERATING INSTRUCTIONS
ISTRUZIONI OPERATIVE MANUAL DE INSTRUCCIONES
MANUAL DE INSTRUCÕES
NÁVOD K OBSLUZE NÁVOD NA OBSLUHU
MANUEL D'UTILISATION HANDLEIDING
BEDIENUNGSANLEITUNG
MICROWAVE OVEN
MAGNETRONOVEN
FOUR À MICRO-ONDES
FORNO A MICROONDE
HORNO MICROONDAS
MIKROVLNNÁ TROUBA
MIKROVLNNÁ RÚRA
KE W20
Page 2

1
GB
e
f
TTaabblle
IMPORTANT SAFETY INSTRUCTIONS.................................................................................. 2
COOKING UTENSILS............................................................................................................... 3
OTHER HELPFUL INSTRUCTIONS ........................................................................................ 6
OVEN OVERVIEW.................................................................................................................... 7
TURNTABLE INSTALLATION.................................................................................................7
COUNTERTOP INSTALLATION.............................................................................................. 8
MICROWAVE OVEN INSTALLATION..................................................................................... 8
CONTROL PANEL.................................................................................................................... 9
OPERATION ........................................................................................................................... 10
CLEANING AND MAINTENANCE ......................................................................................... 13
SPECIFICATIONS................................................................................................................... 14
QUESTIONS AND ANSWERS...............................................................................................15
TROUBLESHOOTING............................................................................................................ 16
IMPORTANT DISPOSAL INSTRUCTIONS............................................................................ 17
oof
CCoonntteenntts
s
Page 3

Page 4

Page 5

Page 6
5
GB
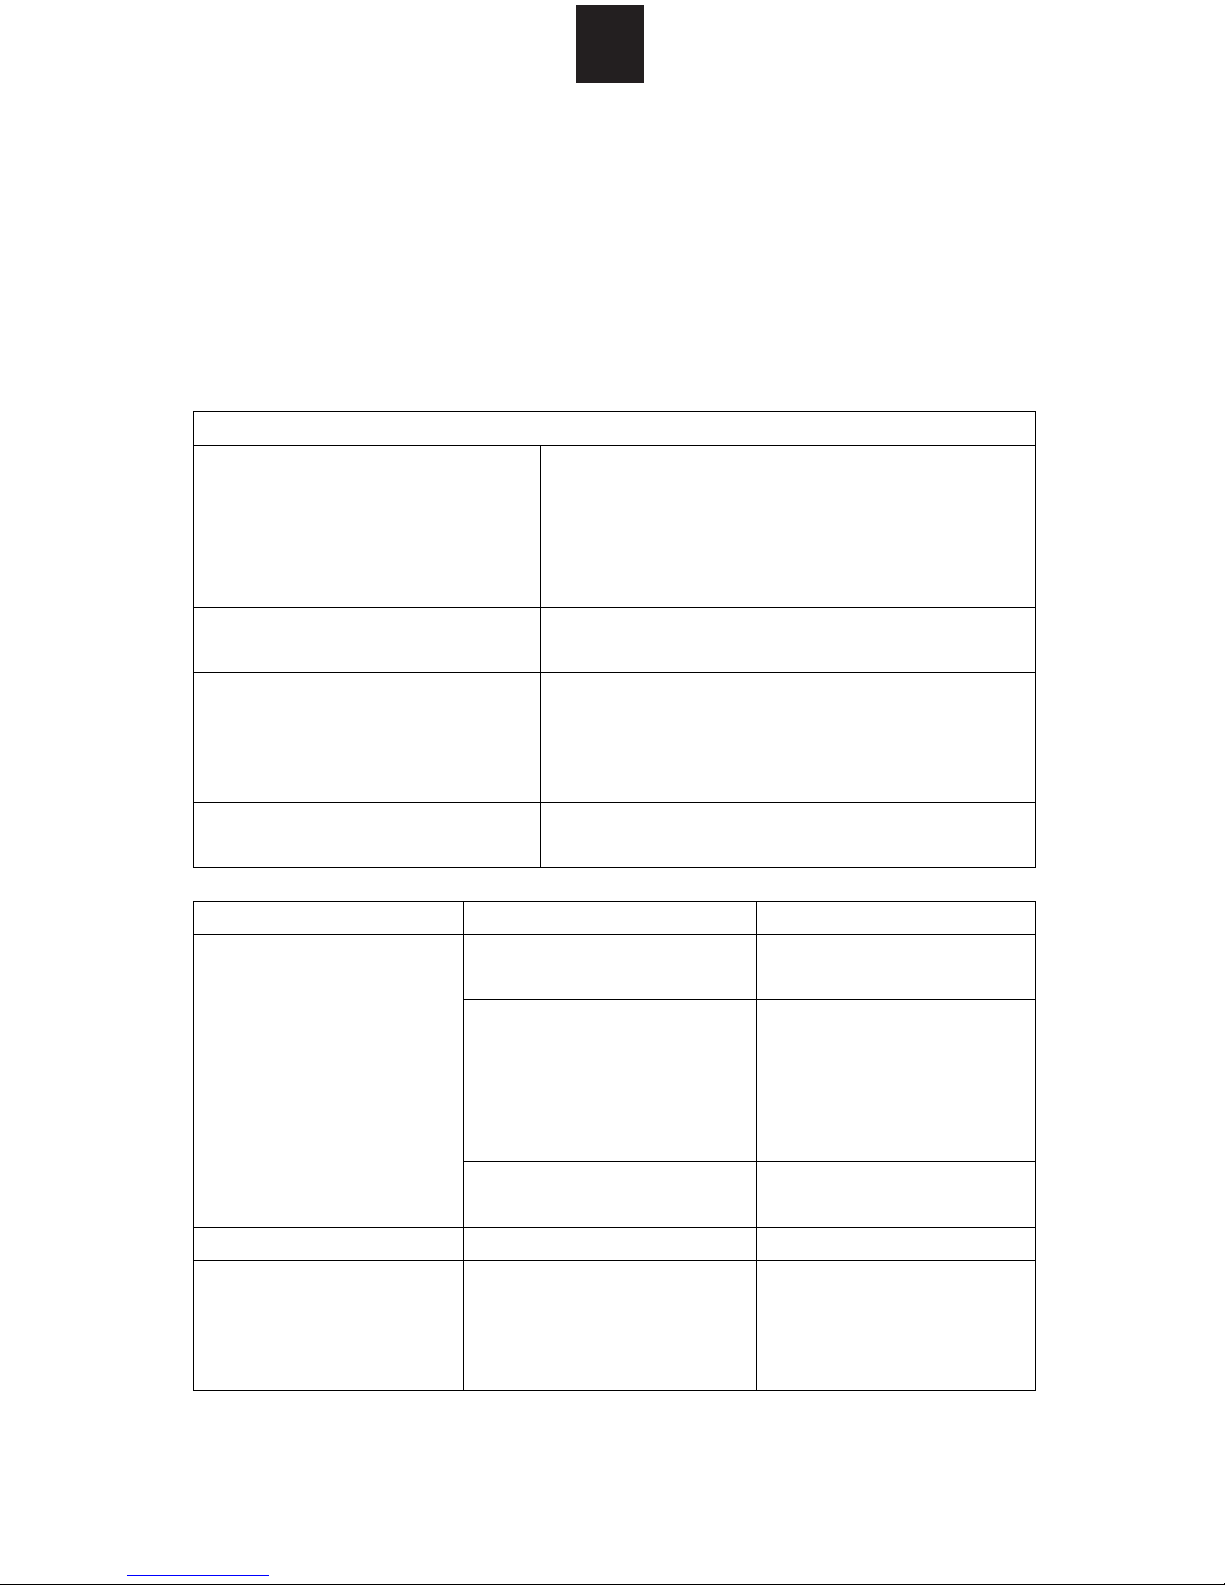
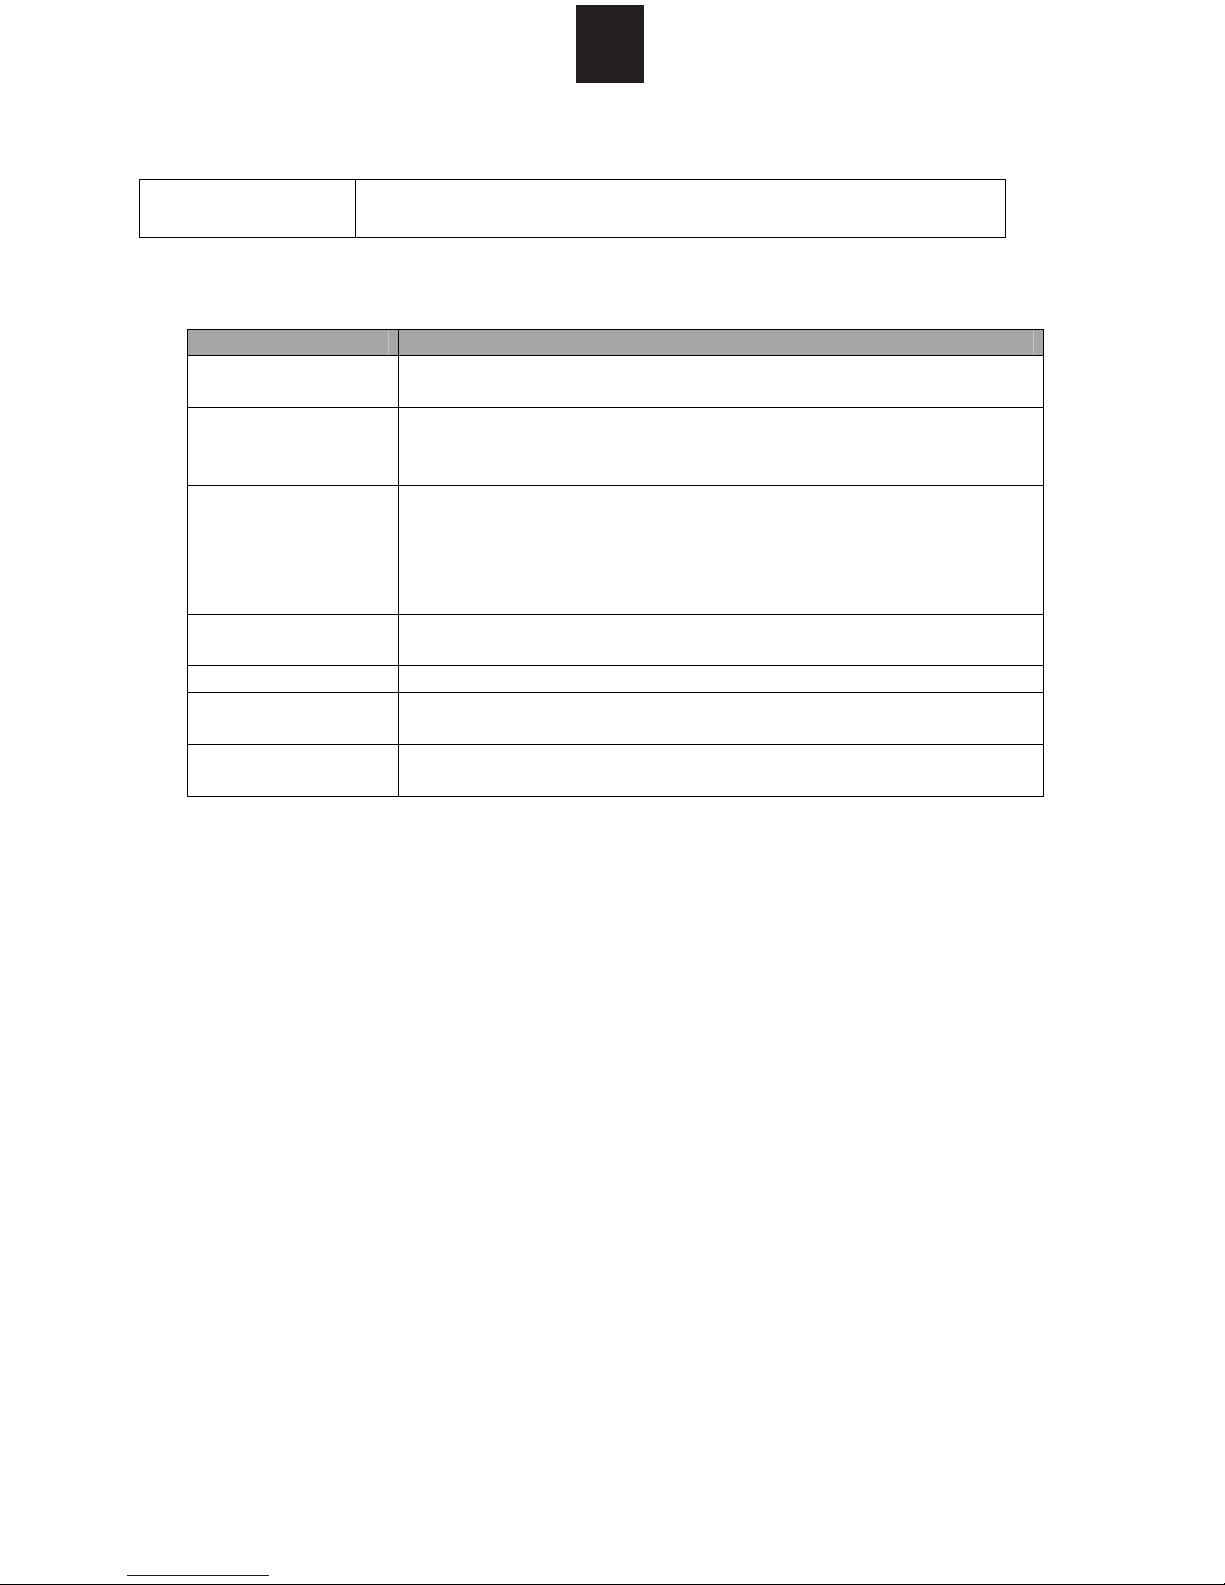
Materials to be avoided in microwave oven
Utensils Remarks
Aluminium tray May cause arcing. Transfer food into microwave-safe
dish.
Food carton with
metal handle
Metal or metaltrimmed utensils
Metal twist ties May cause arcing and could cause a fire in the oven.
Paper bags May cause a fire in the oven.
Plastic foam Plastic foam may melt or contaminate the liquid inside
Wood Wood will dry out when used in the microwave oven and
Notes:
z Care should be taken when removing utensils or the glass turntable, as
they may become hot during cooking.
z Only use a thermometer that is designed for use in the microwave oven.
z Ensure the turntable is in place when you operate the oven.
May cause arcing. Transfer food into microwave-safe
dish.
Metal shields the food from microwave energy. Metal trim
may cause arcing.
when exposed to high temperature.
may split or crack.
Page 7

6
GB
OTHER HELPFUL INSTRUCTIONS
For best results and more enjoyable cooking, please read these
comments thoroughly.
For Best Results:
1. When determining the time for a particular food, begin by using minimum
time and checking condition occasionally. It is easy to overcook food
because microwaves cook very quickly.
2. Small quantities of food or foods with low water content may dry out and
become hard if cooked too long.
Defrosting Frozen Food:
1. Foods that have been frozen can be place directly in the oven for thawing.
(Be certain to remove any metallic ties or wraps).
2. Defrost according to the Defrosting instructions found in this manual.
3. For areas of the food thawing faster than others, cover with small pieces of
aluminum foil. This helps slow down or stop the defrosting process.
4. Some foods should not be completely thawed before cooking. For example,
fish cooks so quickly that it is sometimes better to begin cooking while still
slightly frozen.
5. It may be necessary to increase or decrease the cooking time in some
recipes, depending on the starting temperature of the food.
Note: Air from the vent may become warm during cooking.
Browning:
There are a few foods which are not cooked long enough in the microwave
oven to brown and may need additional colour.
Coatings such as paprika and browning agents such as Worcestershire sauce
may be used on chops, meat patties or chicken pieces.
Roasts, poultry or ham, cooked for 10-15 minutes or longer, will brown without
extra additives.
Page 8
7
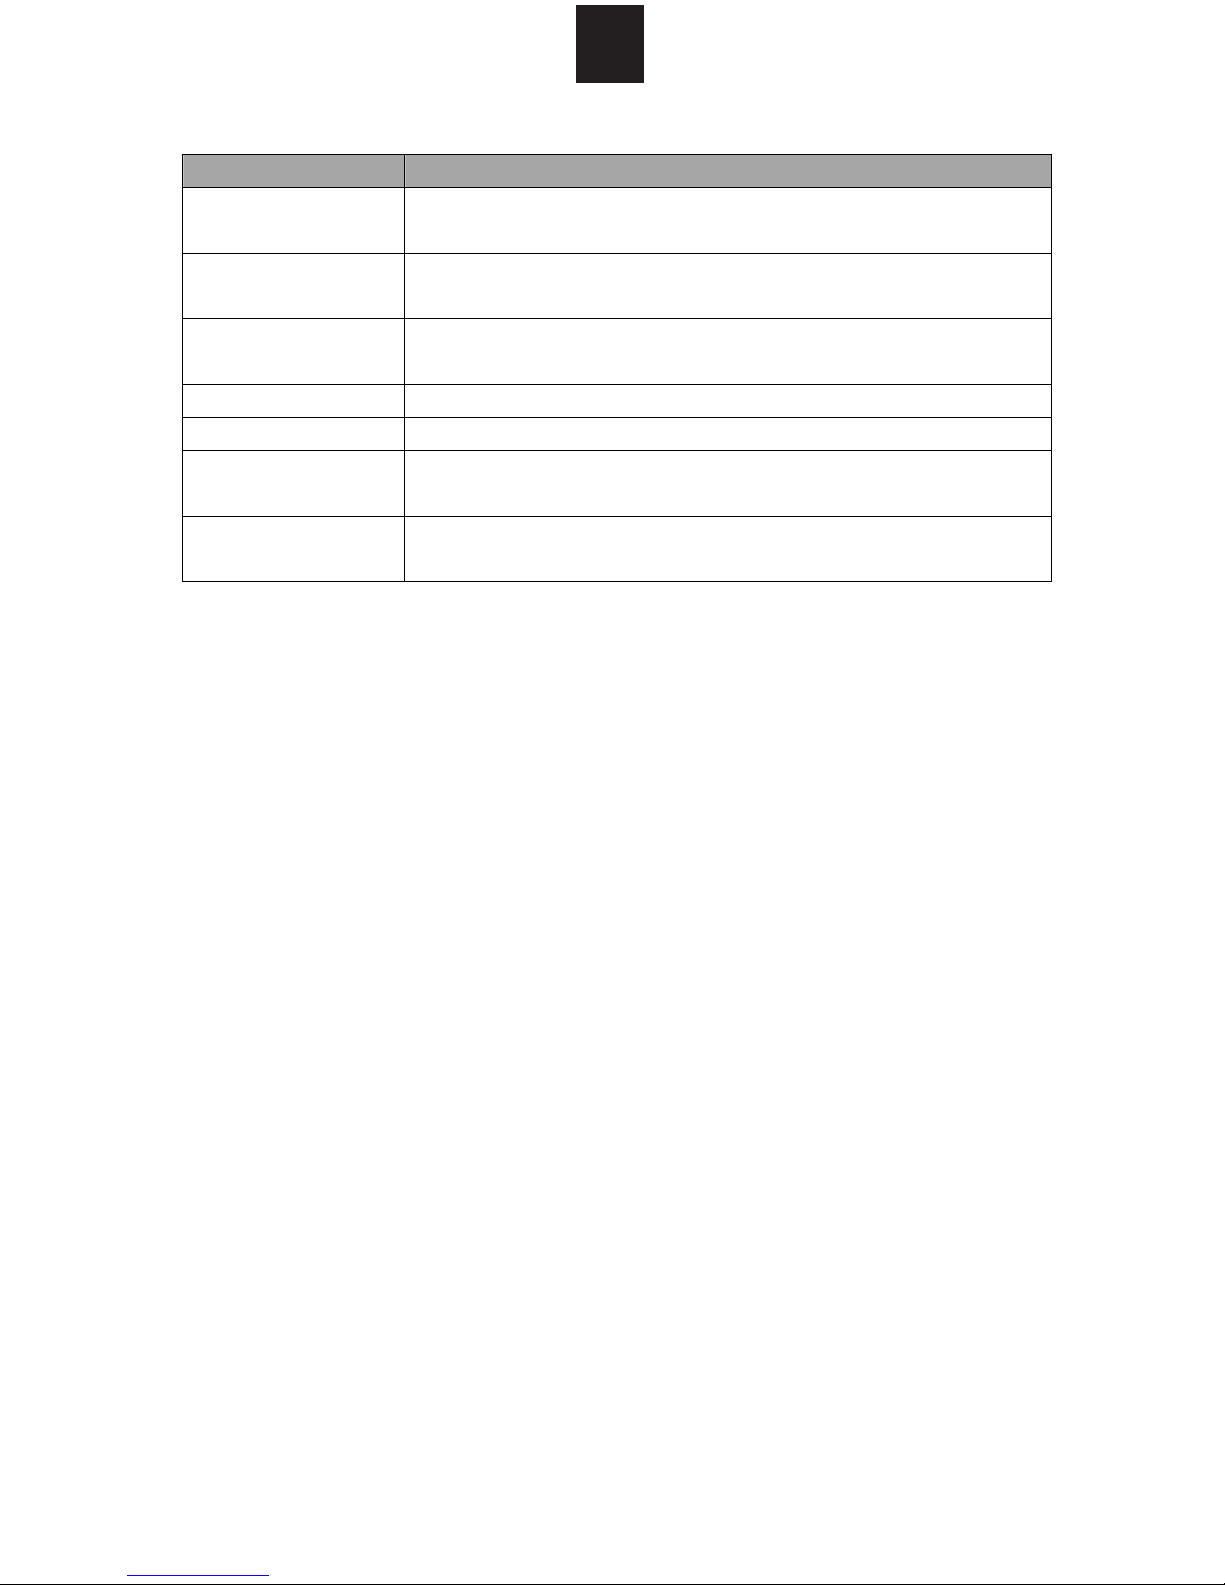
OVEN OVERVIEW
Names of Oven Parts
F
GB
A
G
TURNTABLE INSTALLATION
Hub (underside)
a. Never place the glass tray upside down.
b. Both glass tray and turntable ring assembly
Glass tray
c. All food and containers of food are always
d. If glass tray or turntable ring assembly
Turntable shaft
Turntable ring assembly
E
D
C B
A) Control panel
B) Turntable shaft
C) Turntable ring assembly
D) Glass tray
E) Observation window
F) Door assembly
G) Safety interlock system
The glass tray should never be restricted.
must always be used during cooking.
placed on the glass tray for cooking.
cracks or breaks, contact your nearest
authorised service centre.
Page 9
8
GB
COUNTERTOP INSTALLATION
Remove all packing material and
accessories. Examine the oven for
any damage such as dents or broken
door. Do not install if the oven is
damaged.
Cabinet: Remove any protective film
found on the microwave oven
cabinet surface.
Do not remove the light brown
Mica cover that is attached to the
inside of the oven cavity to protect
the magnetron.
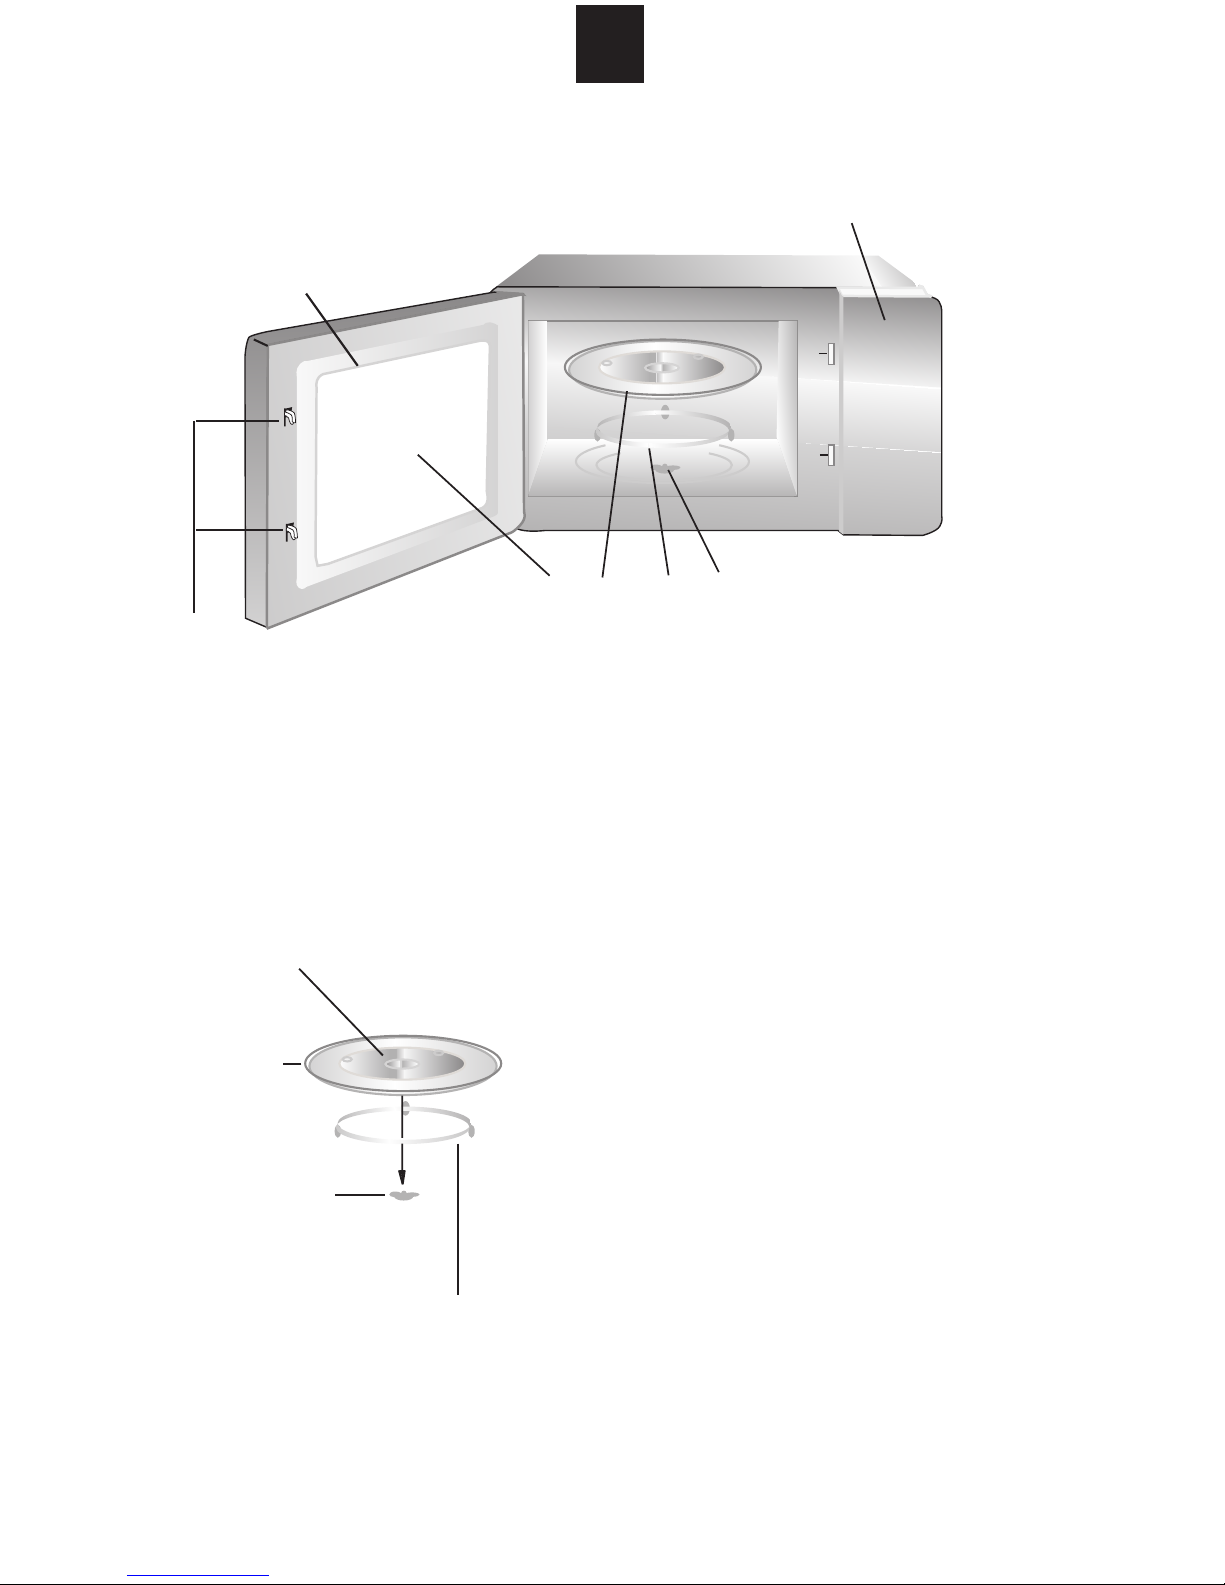
MICROWAVE OVEN INSTALLATION
1. Select a level surface that
provides enough open space for
the intake and/or outlet vents.
12 inch(30cm)
OPEN
3.0 inch(7.5cm)
A minimum clearance of 3.0 inches
(7.5cm) is required between the oven
and any adjacent walls. One side
must be open.
(1) Leave a minimum clearance of 12
inches (30cm) above the oven.
(2) Do not remove the feet from the
bottom of the oven.
(3) Blocking the intake and/or outlet
(4) Place the oven as far away from
WARNING: Do not install the oven
over a range cooktop or other
heat-producing appliance. If installed
near or over a heat source, the oven
could be damaged and the warranty
would be void.
openings can damage the oven.
radios and TV as possible.
Operation of microwave oven may
cause interference to your radio or
TV reception.
2. Plug your oven into a standard
household outlet. Be sure the
voltage and the frequency is the
same as the voltage and the
frequency on the rating label.
Page 10

Page 11
10
GB
OPERATION
When the oven is plugged in, the display will show “0:00” and a beep sound
will be heard.
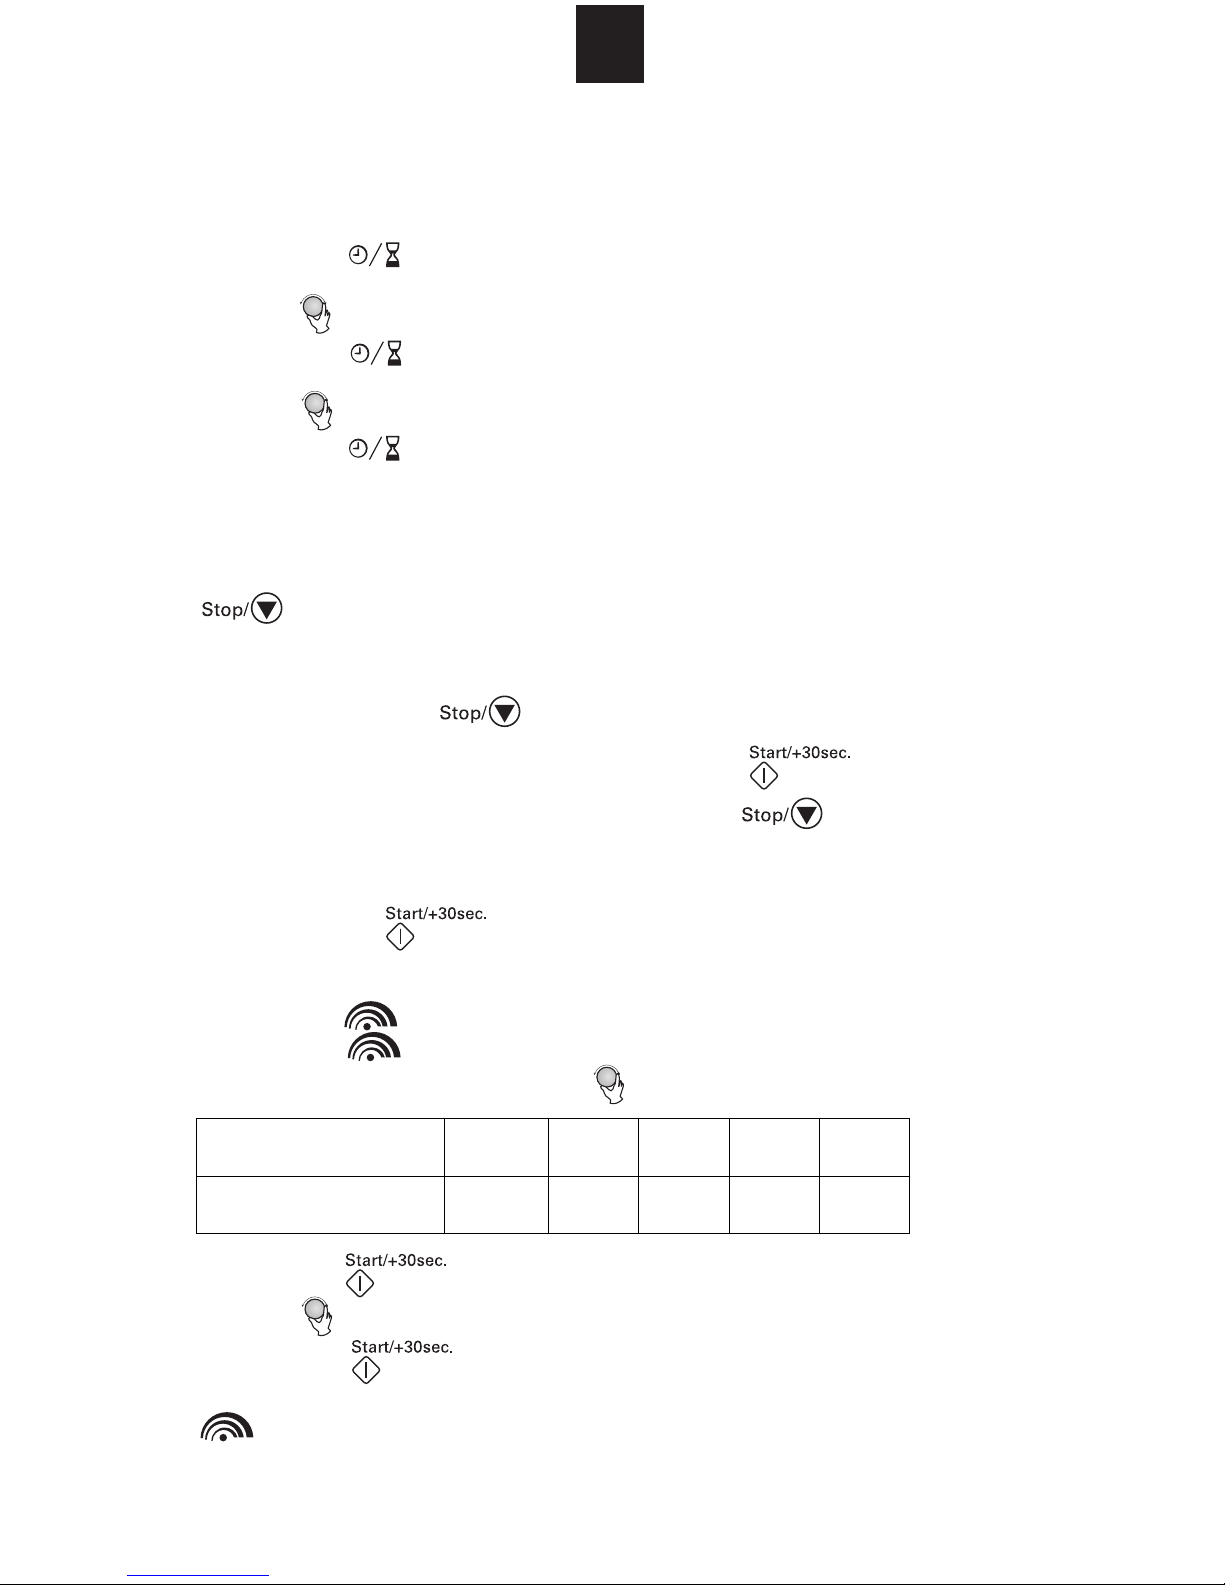
Setting the Clock
1. Press , the hour digits blink.
2. Turn to adjust the hour digits, the input hour should be a 24-hour time
value.
3. Press , the minute digits blink.
4. Turn to adjust the minute digits.
5. Press to confirm the setting. “:” blinks on the display.
Note:
1) If the clock is not set, the oven will not function when powered on.
2) During the clock setting, if you press
previous status.
General Operations
, the oven will return to the
1. Press once to temporarily stop cooking and you can start the
cooking again by pressing , or press twice to cancel the
cooking program.
2. After the cooking time has elapsed, the oven beeps five times and returns
to the standby mode.
3. During cooking, each press of can increase the cooking time by 30
seconds.
Microwave Cooking
1. Press and “P100” displays.
2. Press repeatedly or turn to select the required microwave power.
Microwave Power 100% 80% 50% 30% 10%
Display P100 P80 P50 P30 P10
3. Press to confirm.
4. Turn to set the cooking time.
5. Press
Note: You can check the cooking power during cooking by pressing .
to start cooking.
Speed Cooking
In standby state, press
Each press of the button will increase the cooking time by 30 seconds. The
longest cooking time is 95 minutes.
to cook with 100% power level for 30 seconds.
Page 12
11
GB
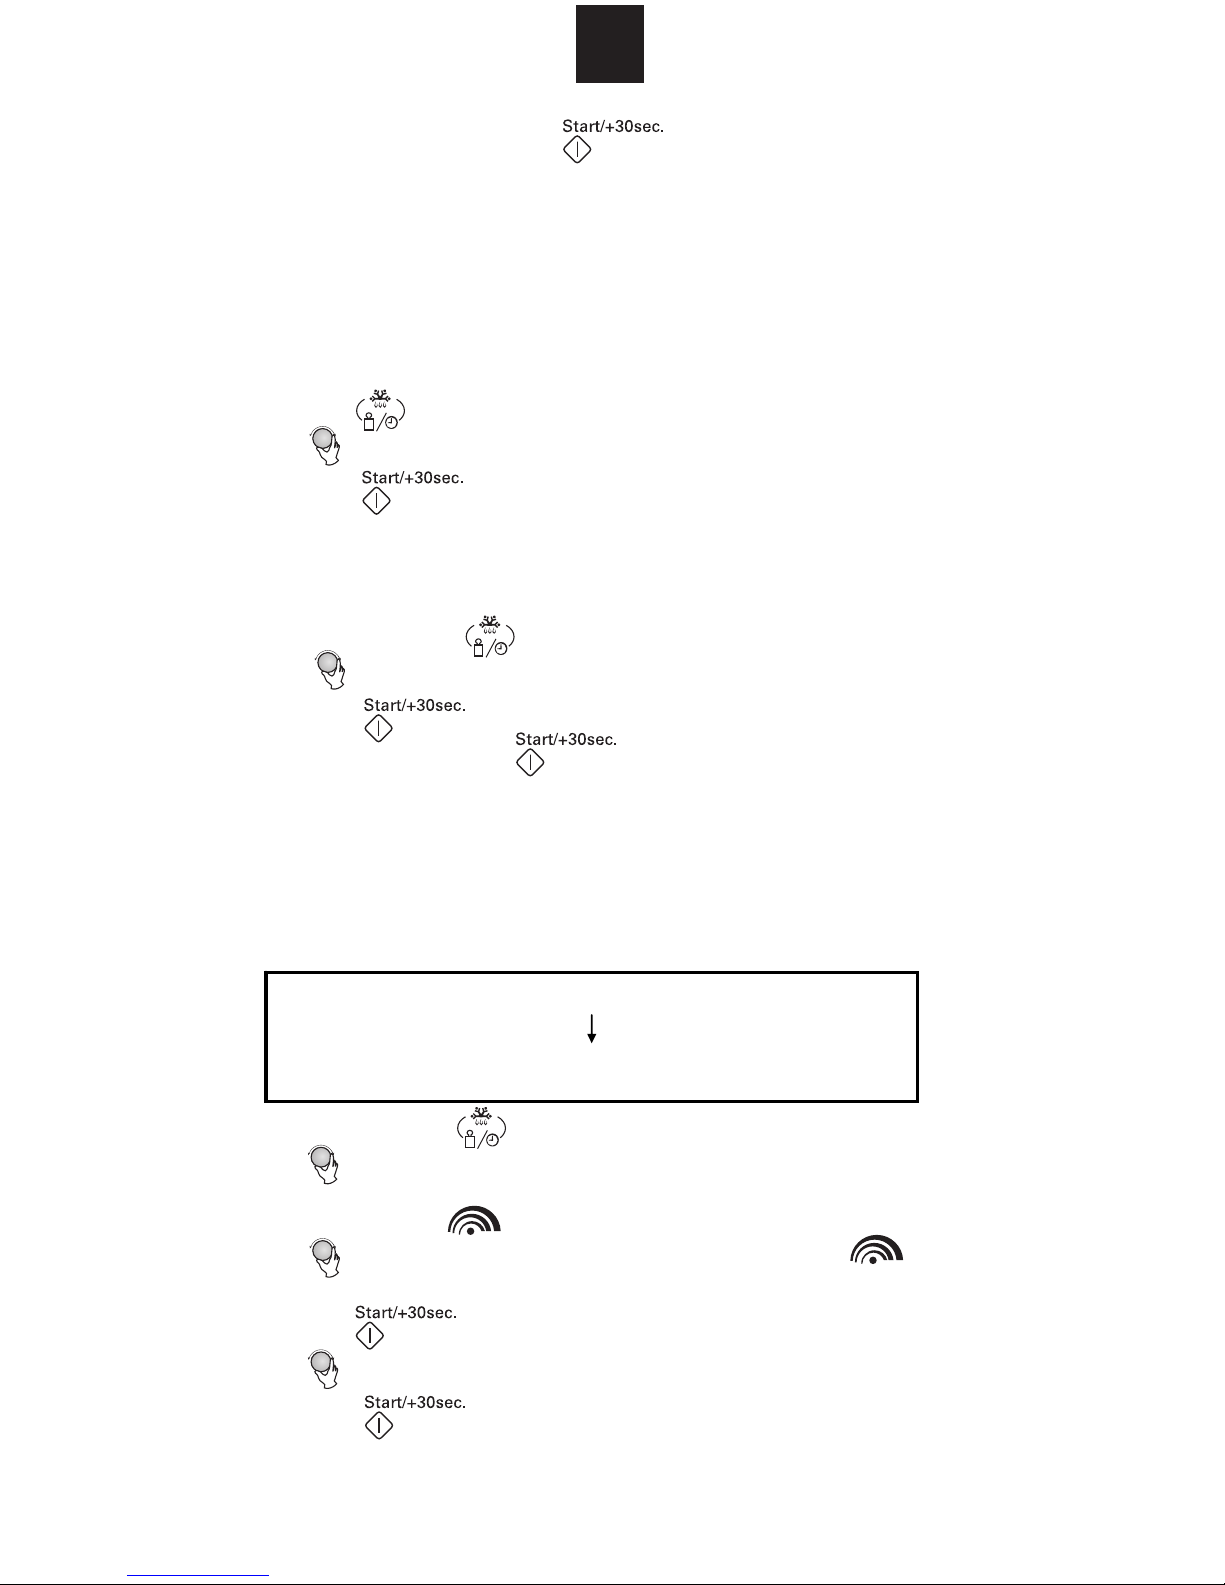
Weight Defrost
The oven could be used to defrost food based on the weight selected. The
defrosting time and power level are automatically set once the weight is
programmed. The frozen food weight ranges from 100g to 2000g.
1. Press . “dEF1” will show on the display.
2. Turn to select the desired food weight.
3. Press
Note: When half the defrost time passes, the oven beeps to remind you of
turning the food over.
Defrost by Time
The longest defrosting time is 95 minutes (95:00).
1. Press
2. Turn to select the desired defrosting time.
3. Press to start defrosting.
to start defrosting.
twice. "dEF2" will show on the display.
Note: Each press of
will increase the defrosting time by 30 seconds.
Multi-Stage Cooking
Your oven can be programmed for up to 2 automatic cooking sequences.
Defrosting can only be set in the first stage.
Note: Auto cooking can not be selected in a cooking program.
Suppose you want to set the following cooking program:
Microwave cooking (80% power level for 7 minutes)
Defrost (5 minutes)
1. Press twice, “dEF2” appears on the display.
2. Turn to select the defrosting time until “5:00” displays.
3. Press once.
4. Turn or press repeatedly to select the microwave power level until
“P80” displays.
5. Press
to confirm.
6. Turn to select the cooking time until “7:00” displays.
7. Press
to start cooking.
Note: After one cooking stage is finished, a beep sound is heard, indicating the
next cooking stage has begun.
Pre-Set Function
1. Set the clock. (See ‘Setting the Clock’)
2. Set a cooking program (See steps 1 to 6 in the ‘Multi-Stage Cooking’
section).
Page 13

Page 14

Page 15

Page 16

15
GB
QUESTIONS AND ANSWERS
Q. What is wrong when the oven light will not glow?
A. * Light bulb has blown.
*Door not closed.
Q. Why is steam coming out of the air exhaust vent and/or why is water
dripping from the bottom of the door?
A. Steam is normally produced during cooking operations. This microwave
oven has been made to vent this steam out of the side and top vents,
occasionally this steam condenses on the door and water then drips out at
the bottom of the door. This is quite normal and safe.
Q. Does microwave energy pass through the viewing screen in the door?
A. No. The screen reflects the energy to the oven cavity, the holes, or ports are
made to allow light to pass, they do not let microwave energy through.
Q. Will the microwave oven be damaged if it operates while empty?
A. Yes. Never run it empty.
Q. Why do eggs sometimes pop?
A. When baking or poaching eggs, the yolk may pop due to steam build-up
inside the yolk membrane. To prevent this, simply pierce the yolk before
cooking.
Q. Why is standing time recommended after the cooking operation has been
completed?
A. Standing time is very important.
With microwave cooking, the heat is in the food, not in the oven. Many foods
build up enough internal heat to allow the cooking process to continue, even
after the food is removed from the oven. Standing time for joints of meat,
large vegetables and cakes is to allow the inside to cook completely, without
overcooking the outside.
Q. Why does my oven not always cook fast as the microwave cooking guide
says?
A. Check your cooking guide again, to make sure you’ve followed directions
exactly and to see what might cause variations in cooking times. Cooking
guide times and heat settings are suggestions, to help prevent overcooking
the most common problem in getting used to a microwave oven. Variations
in the size, shape and weights could require longer cooking time. Use your
own judgement along with the cooking guide suggestions to check whether
the food has been properly cooked just as you would do with a conventional
cooker.
Page 17
16
GB
Q. Why do sparks and crackling (arcing) occur in the oven?
A. There may be several reasons why sparks and crackling (arcing) within the
cavity happens.
* You have left a fork or other metal utensils in the oven.
* You are using dishes with meta l parts or trim (silver or gold).
* You are using a large amount of metal foil.
* You are using a metal twist tie.
TROUBLESHOOTING
Normal
Microwave oven interfering
TV reception.
Dim oven light. In low power microwave cooking, the oven
Steam accumulating on door,
hot air out of vents.
Oven started accidentally
with no food in.
Trouble Possible Cause Remedy
(1) Power cord not
(2) Fuse blowing or
Oven can not be
started.
(3) Trouble with outlet. Test outlet with other
Oven does not heat. Door not closed well. Close door well.
Glass turntable makes
noise when
microwave oven
operates.
Dirty roller rest and oven
bottom.
Radio and TV reception may be affected
when the microwave oven is operating. It is
similar to the interference of small electrical
appliances, like mixer, vacuum cleaner and
electric fan. It is normal.
light may become dim. It is normal.
In cooking, steam may come out of food.
Most will escape from the vents. But some
may accumulate on a cool place like the
oven door. It is normal.
It is forbidden to run the unit without any
food inside. It is very dangerous.
Unplug. Then plug in
plugged in tightly.
circuit breaker works.
again after 10 seconds.
Replace fuse or reset
circuit breaker
(repaired by
professional personnel
of authorised agent)
electrical appliances.
Refer to ‘CLEANING
AND CARE’ to clean
dirty parts.
Page 18

Page 19

1
FR
SSoommmmaaiirree
INSTRUCTIONS DE SÉCURITÉ IMPORTANTES............................... ......................................
USTENSILES DE CUISSON.................................................................................................. .....
AUTRES INSTRUCTIONS UTILES............................................................................. ...............
PRÉSENTATION DU FOUR.............................................. .........................................................
INSTALLATION DU PLATEAU TOURNANT.............................................................................
DÉBALLAGE ..............................................................................................................................
INSTALLATION DU FOUR.........................................................................................................
PANNEAU DE COMMANDE......................................................................................................
UTILISATION..............................................................................................................................
ENTRETIEN ET NETTOYAGE...................................................................................................
SPÉCIFICATIONS............................................................................ ...........................................
QUESTIONS ET RÉPONSES.....................................................................................................
DÉPANNAGE..............................................................................................................................
IMPORTANTES INSTRUCTIONS DE MISE AU REBUT................. ..........................................
Appareil de groupe 2 Classe B
Cet appareil est un appareil de Groupe 2 car il produit intentionnellement de l' énergie à
fréquence
dans un local domestique o
distribution d'électricité à
domestique (Classe B)
2
3
6
7
7
8
8
9
10
13
14
15
16
17
radioélectrique pour le traitement de la matière et il est destiné à être utilisé
u un établissement raccordé directement au réseau de
basse tension a
limentant des bâtiments à usage
Page 20

Page 21

Page 22
4
FR
Matériaux utilisables dans v otre four à micro-ondes
Ustensile Remarques
Feuille
d'aluminium
Plat brunisseur
Vaisselle de
table
Bocaux
Verre
Sac de cuisson
au four
Assiette et verre
en papier
Serviette en
papier
Papier sulfurisé
Plastique
Emballage en
plastique
Thermomètre
Protection uniquement. Utilisez des petits morcea ux pour
couvrir les fines parties de viande ou de volaille afin
qu'elles ne cuisent pas de trop. Un effet d'arc électrique
est possible lorsque la feuille d'aluminium est trop proche
des parois du four. Pour l'éviter, n'approchez pas la feuille
de moins de 2,5 cm des parois.
Conformez-vous aux instructions du constructeur. Le fond
du plat brunisseur doit se trouver à au moins 5 mm
au-dessus du plateau tournant. Un mauvais usage risque
de casser le plateau tournant.
Pour des ustensiles insensibles aux micro-ondes
uniquement. Conformez-vous aux instructions du
constructeur. N'introduisez aucun verre fêlé ou ébréché
dans votre four.
Retirez toujours le couvercle. Utilisez les bocau x
uniquement pour réchauffer des aliments.
La plupart des bocaux ne résistent pas à la chaleur et se
cassent.
Utilisez uniquement des verres qui résistent à la chaleur.
Vérifiez l'absence de toute garni ture métallique.
N'introduisez aucun verre fêlé ou ébréché dans votre four.
Conformez-vous aux instructions du constructeur. Ne
fermez pas avec une attache métallique. Prat iquez des
fentes dans le sac pour permettre l'évacuation de la
vapeur.
Utilisez les assiettes et verres en papier uniquement pour
cuire ou réchauffer sur de courtes durées. Ne laissez pas
le four fonctionner sans surveillance.
Utilisez les serviettes en papier pour couvrir les aliments à
réchauffer et absorber les graisses. Utilisez uniquement
sur de courtes durées et toujours en surv eillant la cuisson.
Utilisez le papier sulfurisé pour couvrir les aliments afin de
prévenir des projections ou pour cuire à la vapeur.
Pour des ustensiles insensibles aux micro-ondes
uniquement. Conformez-vous aux instructions du
constructeur. Les ustensiles doivent porter la mention
“Pour four à micro-ondes”. Certains plastiques
s'amollissent lorsque le contenu est chaud. Percez les
“sacs résistant à l'ébullition” et les sacs en plastique
fermés hermétiquement, comme cela est recommandé
sur l'emballage.
Pour des plastiques insensibles aux micro-ondes
uniquement. Ils servent à couvrir la nourriture pendant la
cuisson pour conserver l'humidité. Veillez à ce que
l'emballage plastique ne touche pas l'aliment.
Pour des thermomètres insensibles aux micro-ondes
uniquement (thermomètre à viande et à bonbons).
Page 23
5
FR
Papier de
paraffine
Il sert à couvrir l'aliment pour empêcher les projections et
conserver l'humidité.
Matériaux à ne pas utiliser dans un four à micro-ondes
Ustensile Remarques
Plateau en
aluminium
Carton alimentaire
avec une poignée
métallique
Ustensile
métallique et
ustensile à
garniture
métallique
Attache métallique
pour emballage
Sac en papier Peut prendre feu dans le four.
Mousse plastique Risque de fondre ou de contaminer les liquides lorsqu'elle est
Bois Le bois sèche sous l'effet de fortes températures et risque alors
Risque de provoquer un effet d'arc électrique. Transférez
l'aliment dans un plat insensible aux micro-ondes.
Risque de provoquer un effet d'arc électrique. Transférez
l'aliment dans un plat insensible aux micro-ondes.
Les métaux isolent l'aliment des micro-ondes. Les garnitures
métalliques risquent de provoquer un effet d'arc électrique.
Risque de provoquer un effet d'arc électrique capable
d'enflammer le four.
exposée à de fortes tempér atures.
de se fendre.
Remarques :
z Soyez prudent lorsque vous manipulez des ustensiles ou le plateau
tournant en verre : ils peuvent s'échauffer.
z Si vous utilisez un thermomètre, prenez-en un spécialement conçu ou
recommandé pour les fours à micro-ondes.
z Vé rifiez que le plateau tournant est bien en place lorsque vous utilisez le
four.
Page 24

6
FR
AUTRES INSTRUCTIONS UTILES
Pour de meilleurs résultats et une cuisine plus agréable, lisez toutes les
recommandations ci-dessous.
Pour de meilleurs résultats :
1. Pour déterminer le temps idéal de cuisson pour un aliment particulier,
mettez cet aliment à cuire dans le four pendant la durée minimale puis
continuez de le cuire en regardant fréquemment son degré de cuisson. Il est
facile de trop cuire un aliment tant les fours à micro-ondes cuisent
rapidement.
2. Les aliments en petite quantité ou contenant peu d'eau risquent de sécher
et de devenir durs si vous les laissez trop longtemps cuire.
Décongélation d'aliments congelés :
1. Vous pouvez placer des aliments congelés directement dans le four pour
les décongeler. (N'oubliez pas d’enlever les attaches métalliques et les
emballages).
2. Décongelez selon les instructions fournies dans ce guide d'utilisation.
3. Si certai nes parties de l’aliment se déc ongèlent plus rapidement q ue les
autres, couvrez-les avec un peu d’aluminium. L’aluminium permet en effet
de ralentir, voire arrêter, le processus de décongélation.
4. Certains aliments doivent être mis à cuire avant leur décongélation
complète. C'est le cas, par exemple, du poisson, car il cuit vite.
5. Selon la température de l’aliment au moment où vous commencez à le
cuire, vous pouvez être amené à ajouter ou enlever quelq ues minutes à la
durée de cuisson indiquée dans la recette.
Remarque : l’air sortant des ouvertures d’aération peut devenir chaud durant
la cuisson.
Brunissement :
Certains aliments ne restent pas suffisamment longtemps dans le four à
micro-ondes pour brunir, aussi un élément colorant pou rra-t-il être nécessaire.
Pour des côtelettes, des boulettes de viande et des morceaux de poulet,
utilisez du paprika ou une sauce Worcestershire.
Aucun additif n'est nécessaire pour un rôti, une volaille ou du jambon dès lors
que vous les cuisez pendant au moins 10 à 15 minutes.
Page 25

Page 26

Page 27
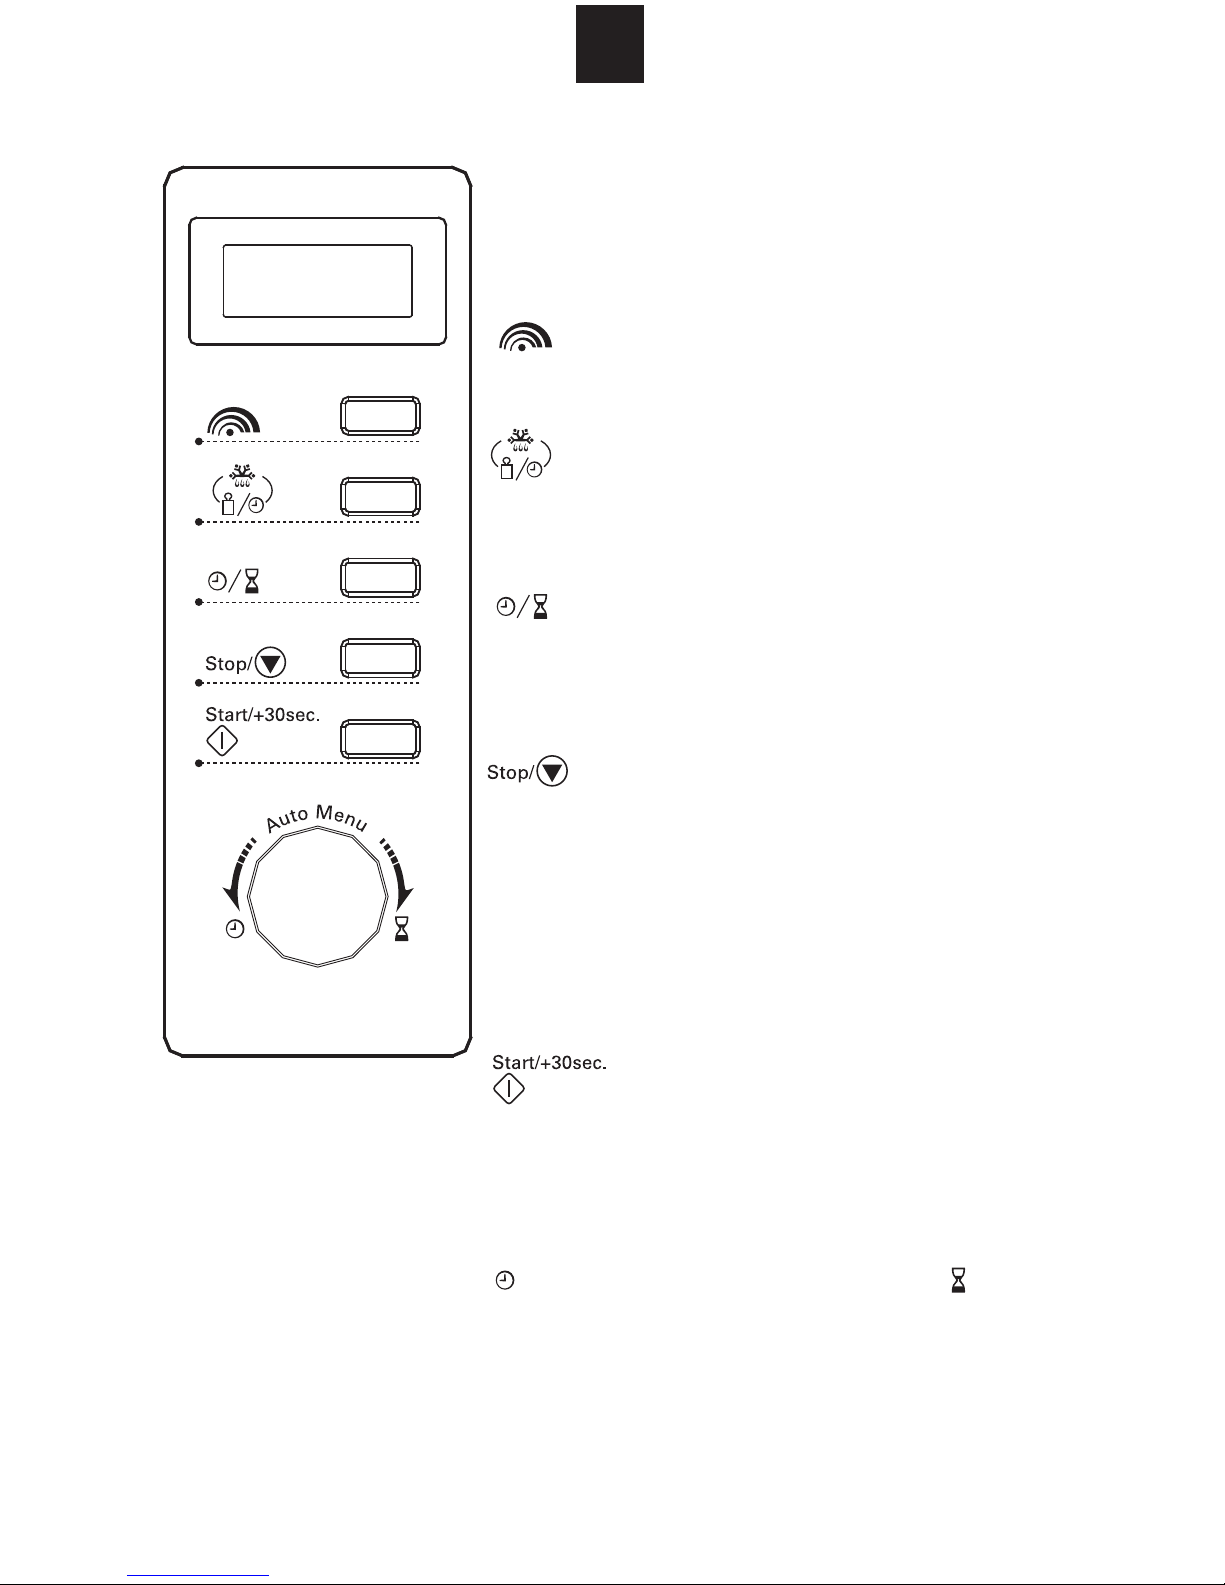
9
PANNEAU DE COMMANDE
ÉCRAN
L'écran affiche le temps de cuisson, la puissance de
chauffe, divers indicateurs et l'heure actuelle.
PUISSANCE DE CHAUFFE
Appuyez sur cette touche pour sélectionner la
puissance de chauffe du fou r .
LA DURÉE
Appuyez sur cette touche pour décongeler un
aliment d'après le poids ou d'après la durée.
FR
DÉCONGÉLATION SELON LE POIDS OU
HORLOGE/PRÉSÉLECTION
Appuyez sur cette touche pour régler l'horloge ou
programmer le démarrage d'une cuisson à une
heure ultérieure.
ARRÊT/RÉINITIALISATION
Appuyez sur cette touche pour annuler un e
programmation ou réinitialiser le four avant de
programmer les phases d’une cuisson.
Appuyez une fois pour interrompre temporairement
la cuisson ; appuyez deux fois pour annuler la
cuisson.
Permet d’activer la fonction de verrouillage du four.
DÉMARRAGE/DÉMARRAGE
RAPIDE/CONFIRMER)
Appuyez sur cette touche pour démarrer
un programme de cuisson ou activer
le démarrage rapide.
Appuyez sur cette touche pour confirmer le réglage.
/ AUTO MENU (Menu automatique) /
Tournez pour sélectionner un programme
de cuisson ou spécifier une durée o u
un poids.
Page 28
10
FR
UTILISATION
Lorsque vous branchez votre four, "0:00" s'affiche sur l'écran et un bip retentit.
Réglage de l'horloge
1. Appuyez sur
2. Tournez pour ajuster les chiffres des heures, en format 24 heures.
. Les chiffres des heures clignotent.
3. Appuyez sur . Les chiffres des minutes clignotent.
4. Tournez pour ajuster les chiffres des minutes.
5. Appuyez sur
pour confirmer le réglage. “:” clignote sur l'écran.
Remarque :
1) Vous devez régler l'horloge pour pouvoir utiliser votre four à micro-ondes.
2) Pour revenir à l'état précédent pendant le réglage de l'horloge, appuyez sur
.
Principales opérations
1. Appuyez une fois sur pour interrompre momentanément la cuisson
en cours. Pour reprendre la cuisson, appuyez sur . Pour arrêter
définitivement la cuisson, appuyez deux fois sur
.
2. La fin de la cuisson est signalée par cinq bips. Le four repasse ensuite en
mode veille.
3.
Chaque appui sur augmente le temps de cuisson de 30 secondes.
Cuisson par micro-ondes
Appuyez sur . L'indication "P100" s'affiche sur l'écran.
1.
Appuyez sur autant de fois que nécessaire pour sélectionner le
2.
programme de cuisson ou tournez pour sélectionner ce programm e.
Puissance de
chauffe
Indication affichée
sur l'écran
100% 80% 50% 30% 10%
P100 P80 P50 P30 P10
3. Appuyez sur pour valider votre choix.
4. Tournez pour ajuster la durée de cuisson.
5. Appuyez sur pour démarrer la cuisson.
Remarque : pour vérifier la puissance de chauffe pendant la cuisson, appuyez
sur .
Page 29
11
FR
Augmentation de la du rée de cuisson
Depuis le mode veille, appuyez sur pour cuire à 100% de la puissance
totale pendant 30 secondes. Chaque appui sur cette touche augmente la durée
de cuisson de 30 secondes. La plus longue durée possible est de 95 minutes.
Décongélation d'après le poids
Vous pouvez utiliser votre four pour décongeler des aliments d'après leur poids.
La durée de décongélation et la puissance de chauffe sont calculées
automatiquement d'après le poids que vous programmez. Ce poids peut varier
entre 100 g et 2000 g.
1. Appuyez sur . L'indication "dEF1" apparaît sur l'écran.
2. Tournez jusqu'à sélectionner le poids des aliments à cuire.
3. Appuyez sur pour démarrer la décongélation.
Remarque : à mi-temps, un bip retentit pour vous rappeler de tou rner l'aliment.
Décongélation selon la durée
Toute cuisson aux micro-ondes ne peut d épasser 95 minutes (95:00).
1. Appuyez deux fois sur
2. Tournez pour ajuster la durée de décongélation.
. L'indication "dEF2" apparaît sur l'écran.
3. Appuyez sur pour démarrer la décongélation.
Remarque : chaque appui sur augmente la durée de cuisson de 30
secondes.
Cuisson programmée
Vous pouvez programmer jusqu'à 2 cycles de cuisson automatique. Si la
décongélation est l'un d'eux, il doit toujours être programmé en premier.
Remarque : le cycle menu automatique n'est pas programmable.
Supposons que vous vouliez programme r les cycles suivants :
Four micro-ondes (puissance de chauffe de 80% pendant 7 minutes)
Décongélation (5 minutes)
1. Appuyez deux fois sur . "dEF2" s'affiche sur l'écran.
2. Tournez jusqu' à sélectionner la durée de décongélation "5:00" sur
l'écran.
3. Appuyez une fois sur .
4. Tournez ou appuyez autant de fois que nécessaire sur pour
sélectionner la puissance de chauffe "P80" sur l'écran.
5. Appuyez sur pour valider votre choix.
6. Tournez jusqu' à sélectionner la durée de cuisson "7:00" sur l'écran.
7. Appuyez sur pour démarrer la cuisson.
Remarque : la fin du premier cycle programmé est signalée par un bip, avant
que ne commence le second cycle.
Page 30
12
FR
Cuisson à démarrage programmé
1. Réglez l'horloge (reportez-vous à la section "Réglage de l'horloge").
2. Choisissez un programme (reportez-vous aux instructions 1 à 6 de la
section "Cuisson programmée").
3. Appuyez sur . Les chiffres des heures clignotent.
4. Tournez pour ajuster les chiffres des heures, en forma t 24 heures.
5. Appuyez sur . Les chiffres des minutes clignotent.
6. Tournez pour ajuster les chiffres des minutes.
7. Appuyez sur pour confirmer le réglage. “:” clignote sur l'écran.
8. La cuisson démarrera automatiquement à l' heure que vous vene z de définir
(le démarrage vous est signalé par des bips).
Menu automatique
Pour cuire les aliments mentionnés dans le tableau ci-dessous, vous n'avez à
sélectionner ni la puissance de chauffe ni la durée de cuisson. Procédez
simplement comme suit :
1. Depuis le mode veille, tournez dans le sens des aiguilles d'une montre
jusqu'à sélectionner le menu que vou s désirez, indiqué ci-dessous.
Appuyez sur pour valider votre choix.
2.
3. Tournez jusqu'à sélectionner le poids des aliments à cuire.
4. Appuyez sur pour démarrer la cuisson.
Menu Poids (g) Puissance de chauffe
A-1
RÉCHAUFF
EMENT
A-2
LÉGUMES
200
400
600
200
300
400
100%
100%
250
A-3
POISSON
350
80%
450
250
A-4
VIANDE
350
100%
450
A-5
PÂTES
50 (avec 45 0 g d'eau)
80%
100 (avec 800 g d'eau)
A-6
POMMES
DE TERRE
A-7
PIZZA
A-8
SOUPE
200
400
600
200
400
200
400
100%
100%
80%
Page 31

Page 32

Page 33

15
FR
QUESTIONS ET RÉPONSES
Q. La lumière de four ne s'allume pas. Quel est le problème ?
A. *L’ampoule a sauté.
* Vous n'avez pas fermé la porte du four.
Q. Pourquoi de la vapeur sort-elle des ouvertures d'aération et/ou pourquoi de
l'eau s'égoutte-t-elle en bas de la porte ?
A. Toute cuisson produit normalement de la vapeur. Ce four à micro-ondes est
conçu pour évacuer cette vapeur via les orifices d'aération prévus sur le côté
et en haut du four ; si un peu de cette vapeur touche la paroi froide du four,
elle se condense et la goutte d'eau alors reconstituée s’écoule par le bas de
la porte. Tout cela est normal et ne présente aucun danger.
Q. Est-ce que l’énergie des micro-ondes traverse la fenêtre d’observation de la
porte ?
A. Non. L'écran renvoie l'énergie à l'inté rieur du four. Les trou s et ports laissent
passer uniquement la lumière, non l'énergie des micro-ondes.
Q. Est-ce qu'un fonctionnement à vide peut endommager le four à
micro-ondes ?
A. Oui. Aussi, ne le faites jamais fonctionner alors qu’il est vide.
Q. Pourquoi les oeufs éclatent-ils parfois ?
A. Lorsque vous cuisez ou pochez des oeufs, une pression importante se
développe à l’intérieur de la membrane du jaune, pouvant entraîner un
éclatement. Pour éviter cela, percez simplement le jaune avant de le cuire.
Q. Pourquoi est-il recommandé d’attendre quelque peu après la fin de la
cuisson avant de sortir le plat du four ?
A. Ce temps d'attente est très important.
L'énergie des micro-ondes chauffe les aliments, pas le four. Nombreux sont
les aliments qui accumulent alors suffisamment de chaleur en eux pour que
le processus de cuisson se continue même après que ces aliments ont été
retirés du four. Pour des gros morceaux de viande, des gros légum es et des
gâteaux, le temps d'attente permet de terminer la cuisson à l’intérieur de ces
aliments sans trop cuire l’extérieur.
Q. Pourquoi mon four ne cuit pas toujours aussi rapidement que le laisse
penser le livre de cuisine ?
A. Vérifiez que vous avez scrupuleusement suivi les instructions de votre livre
de cuisine et recherchez dans ce même livre ce qui peut expliquer le
décalage constaté dans les temps de cuisson. Les temps de cuisson et les
températures indiqués ne sont souvent que des suggestions pour éviter que
les aliments ne brûlent, ce qui arrive souvent à tous ceux qui débutent dans
Page 34

16
FR
la cuisson par micro-ondes. Tou te variation dans la taille, la forme et le poids
des aliments suffit pour allonger le temps de cuisson par rapport à ce qui est
marqué. Utilisez votre bon sens et les recommandations du livre de cuisine
pour déterminer si vos aliments sont suffisamment cuits, somme toute ce
que vous faites avec votre four traditionnel.
Q. D'où proviennent les étincelles et crépitements (effet d'arc) à l'intérieur du
four ?
A. Plusieurs raisons peuvent expliquer ces phénomènes.
* Vous avez laissé une fourchette ou tout autre ustensile métallique dans le
four.
* Vous utilisez des plats avec des parties métalliques (argent ou or).
* Vous utilisez une grande quantité d’aluminium.
* Vous utilisez des ligatures métalliques.
DÉPANNAGE
Normal
Le four à micro-ondes
perturbe la réception du p oste
de télévision
La lumière du four est faible Ce phénomène se produit lorsque vous
De la vapeur s'accumule sur
la porte et de l'air chaud
s'échappe des ouvertur es
d'aération
Le four s'est mis en marche
accidentellement sans aucun
aliment à l'intérieur.
La technologie des mi cro-ondes gêne en
effet la réception des signaux radio et
télévision. Cette gêne est similaire à celle
causée par les petits appareils
électroménagers tels qu'un mixeur, un
aspirateur ou un ventilateur. Ce
phénomène est normal.
utilisez le four à une faible température. Ce
phénomène est normal.
La cuisson des aliments dégage de la
vapeur dont la plus grande partie s'échappe
par les ouvertures d'aération. Une faible
partie s'accumule sur la porte. Ce
phénomène est normal.
Le constructeur interdit de faire marcher
son four sans aucun aliment à l'intérieur.
Cela est très dangereux.
Page 35

Page 36

1
NL
l
IInnhhoouuddssttaaffeel
BELANGRIJKE VEILIGHEIDSINSTRUCTIES......................................................................... 2
KOOKGEREI......... ....................................................................................................................3
ANDERE HANDIGE INSTRUCTIES............................................................................ ......... ....6
OVERZICHT VAN DE OVEN.................................... ................................................................ 7
INSTALLATIE VAN DE DRAAITAFEL................................................................... .................. 7
INSTALLATIE OP HET AANRECHT........................................................................................ 8
INSTALLATIE VAN DE MAGNETRON.................................................................................... 8
BEDIENINGSPANEEL.............................................................................................................. 9
WERKING ........................................................................................ .........................................10
SCHOONMAAK EN ONDERHOUD ............................. ..... ..... .... ..... ..... .... ..... ......... ..... ..... .... ....13
TECHNISCHE GEGEVENS......................................................................................................14
VRAGEN EN ANTWOORDEN................................................ .... .......... .... ..... ..... .... ..... ..... ..... ...15
PROBLEEMGIDS............................................................................. ......................................
BELANGRIJKE INSTRUCTIES BETREFFENDE ....................................................................17
HET WEGWERPEN VAN DIT APPAR AAT
...16
1
Page 37

Page 38

Page 39

4
NL
Materialen dat U kan gebruiken in de magnetron
Keukengerei Opmerkingen
Aluminiumfolie
Bruineringschaal
Tafelservies
Glazen potten
Glaswerk
Ovenzakken
Papieren borden
en bekers
Papieren
handdoeken
Perkamentpapier
Plastiek
Enkel voor afdekking. Kleine stukken kunnen gebruikt
worden om dunne delen van vlees of gevogelte te
bedekken om overkoke n te vo orkomen. Vonkoverslagen
kunnen voorkomen indien de folie zich te dicht bij de
ovenwanden bevindt. De folie moet tenminste 2.5cm
verwijderd zijn van de ovenwa nd e n.
Volg de instructies van de fabrikant. De onderzijde van
de ruïneringschaal moet zich tenminste 5mm boven de
draaitafel bevinden. Door verkeerd gebruik kan de
draaitafel breken.
Enkel servies dat geschikt is voor de magnetron. Volg de
instructies van de fabrikant. Gebruik geen gebarsten of
afgeschilferde schotels.
Verwijder altijd het deksel. Gebruik enkel om voedsel op
te warmen tot het warm is.
De meeste glazen potten zijn niet hittebestendig en
kunnen breken.
Gebruik enkel hittebestendig glaswerk. Zorg ervoor dat
het glaswerk geen metalen rand heeft. Gebruik geen
gebarsten of afgeschilferde schotels.
Volg de instructies van de fabrikant. Sluit niet af met een
metalen sluitstrip. Maak inkepingen om de stoom te laten
ontsnappen.
Gebruik enkel om te koken/op te warmen voor korte
periodes. Laat de oven niet zonder toezicht tijdens het
koken.
Gebruik om op te warmen voedsel te bedekken en om
vet te absorberen. Gebruik enkel onder toezicht om te
koken voor korte periodes.
Gebruik als afdekking om spatten te voorkomen of als
omwikkeling tijdens het stomen.
Enkel plastiek geschikt voor de magnetron. Volg de
instructies van de fabrikant. Moet voorzien zijn van een
“Microwave Safe” (Geschikt voor Magnetron) etiket.
Sommige plastieken containers worden za chter w ann eer
het voedsel warm wordt. “Ko ok zakke n ” en strak
afgesloten plastieken zakken moeten voorzien worden
van gleuven, gaten of ventilatieopeningen zoals vermeld
op de verpakking.
Page 40

Page 41

6
NL
ANDERE HANDIGE INSTRUCTIES
Gelieve deze tips aandachtig te lezen voor de beste resultaten en een
aangenamere kookervaring.
Voor de beste resultaten:
1. Wanneer U de kooktijd voor een bepaald soort voedsel wil bepalen, stel
dan eerst de minimumtijd in en controleer het eten vervolgens af en toe.
Het is makkelijk om voedsel te gaar te koken omdat magnetrons heel snel
koken.
2. Kleine hoeveelheden voedsel of etenswaren met een laag vochtgehalte
kunnen uitdrogen en hard worden indien ze te lang worden gekookt.
Diepvriesvoeding Ontdooien
1. Ingevroren voeding kan rechtstreeks in de oven worden geplaatst om te
ontdooien. (Zorg ervoor dat alle metalen sluitstrips en folie verwijderd zijn)
2. Ontdooi volgens de Ontdooi-instructies in deze handleiding.
3. Stukken van de voeding die sneller ontdooien dan andere kan U bedekken
met kleine stukjes aluminiumfolie. Hiermee kan U het ontdooiingproces
vertragen of stoppen.
4. Sommige voeding mag niet volledig ontdooien vooraleer te koken.
Bijvoorbeeld, vis kookt zo snel dat het soms beter is om te beginnen terwijl
de vis nog een beetje bevroren is.
5. Soms is het nodig om de kooktijd te verhogen of te verlagen bij sommige
recepten, afhankelijk van de begintemperatuur van het voedsel.
Opmerking: De lucht uit de ventilatieopeningen kan warm worden tijdens het
koken.
Bruineren
Sommige etenswaren die niet lang genoeg gekookt zijn in de magnetron
kunnen bijkomende kleuring nodig hebben.
Deklagen zoals paprika of bruinwerkingsmiddelen zoals Worcestershiresaus
kan gebruikt worden om koteletten, gehaktschijven of stukken kip.
Gebraad, gevogelte of ham dat 10-15 minuten of langer is gekookt zal zonder
extra additieven bruinen.
Page 42

Page 43

8
NL
INSTALLATIE OP HET AANRECHT
Verwijder al het
verpakkingsmateriaal en accessoires.
Inspecteer de oven op enige
beschadiging zoals deuken of een
gebroken deur. Installeer niet indien
de oven beschadigd is.
Behuizing: Verwijder de
beschermende film op het
behuizingoppervlak van de
microgolfoven.
Verwijder de lichtbruine
Mica-bescherming niet, bevestigd
op de ovenlagering om de
magnetron te beschermen.
INSTALLATIE VAN DE MAGNETRON
1. Kies een vlak oppervlak met
genoeg open ruimte voor de
ventilatie-openingen.
12 inch(30cm)
3.0 inch(7.5cm)
3.0 inch(7.5cm)
OPEN
Tenminste 3.0 inches (7.5cm) ruimte
tussen de oven en de omringende
muren is vereist. Een zijde dient
open te blijven.
(1) Laat tenminste 12 inches (30 cm )
ruimte vrij boven de oven.
(2) Verwijder de poten aan de
onderzijde van de oven niet.
(3) Het blokkeren van de
ventilatieopeningen kan de oven
beschadigen.
(4) Plaats de oven zo ver mogelijk uit
de buurt van radio’s en TV’s.
Het gebruik van een magnetron
kan storing veroorzaken op uw
radio- of TV-ontvangst.
2. Sluit de oven aan op een
standaard stopcontact. Zorg
ervoor dat de voltage en de
frequentie dezelfde is als de
voltage en de frequentie op het
typeplaatje.
WAARSCHUWING: Installeer de
oven niet op een kookplaat of op
andere toestellen die warmte
genereren. Indien het toes te l wordt
geïnstalleerd nabij een warmtebron
kan dit de oven beschadigen wat de
garantie ongeldig kan maken.
Page 44

Page 45

10
NL
WERKING
Wanneer de oven is ingeschakeld zal de display “0:00 ” weergeven en zal een
biepgeluid weerklinken.
De Klok Instellen
1. Druk op
, de cijfers van de uren knipperen.
2. Draai aan om de cijfers van de uren in te stellen, het ingevoerde uur
moet een 24-uur waarde hebben.
3. Druk op
, de cijfers van de minuten knipperen.
4. Draai aan om de cijfers van de minuten aan te passen.
5. Druk
om de instelling te bevestigen. “:”knippert of op de display.
Opmerking:
1) Indien de klok niet is ingesteld zal de oven niet werken wanneer
ingeschakeld.
2) Wanneer U
indrukt tijdens het instellen van de klok zal de oven
terugkeren naar de vorige stand.
Algemene Werking
1. Druk eenmaal op
om het koken tijdelijk te stoppen. U kan het
koken opnieuw starten door in te drukken of druk tweemaal op
om het kookprogramma te annuleren.
2. Nadat de kooktijd is verstreken zal de oven vijfmaal biepen en terugkeren
naar de stand-by modus.
3. Tijdens het koken zal elke druk op de knop de kooktijd met 30
seconden verlengen.
KOKEN MET DE MAGNETRON
1. Druk en “P100” zal weergegeven worden.
2. Druk herhaaldelijk op of gebruik om het gewenste
magnetronvermogen te selecteren.
Magnetronvermogen 100% 80% 50% 30% 10%
Display P100 P80 P50 P30 P10
3. Druk om te bevestigen.
4. Gebruik om de kooktijd in te stellen.
5. Druk om het koken te starten.
Opmerking: U kan het kookvermogen tijdens het bereiden controleren door in te
drukken.
Page 46

11
NL
Snelbereiding
Druk in stand-by modus op om 30 seconden te koken aan een
vermogen van 100%. Elke druk op de toets zal de bereiding stijd met 30
seconden verlengen. De langst mogelijke bereidingstijd is 95 minuten.
Ontdooien op Gewicht
De oven kan gebruikt worden om voedsel te ontdooien op basis van het
gekozen gewicht. De ontdooitijd en het vermogenniveau worden automatisch
ingesteld eenmaal het gewicht is geprogrammeerd. Het ingevroren
voedselgewicht ligt tussen 100g en 2000g.
1. Druk . “dEF1” zal op de display verschijnen.
2. Gebruik om het gewenste gewicht van het voedsel te selecteren.
3. Druk
om het ontdooien te beginnen.
Opmerking: Wanneer de helft van de ontdooitijd is verstreken zal de oven
biepen om U eraan te herinneren dat het voedsel moet omgedraaid
worden.
Ontdooien op Tijd
De langst mogelijke ontdooittijd is 95 minuten (95:00).
1. Druk tweemaal . "dEF2" zal op de display verschijnen.
2. Gebruik om de gewenste ontdooitijd te selecteren.
3. Druk om het ontdooien te beginnen.
Opmerking: Elke druk op de toets zal de ontdooitijd met 30
seconden verlengen.
Koken In Meerdere Stappen
Uw oven kan ingesteld worden om tot 2 automatische kooksequenties te
gebruiken. Ontdooien kan enkel ingesteld worden tijdens de eerste stap.
Opmerking: Automatische bereiding kan niet geselecteerd worden tijdens een
kookprogramma.
Veronderstel dat U het volgende kookprogramma wil instellen:
Microgolfkoken (80% vermogen gedurende 7 minuten)
Ontdooien (5 minuten)
1. Druk tweemaal ,“dEF2” zal op de display verschijnen.
2. Gebruik om de ontdooitijd te selecteren tot “5:00” verschijnt.
3. Druk eenmaal .
4. Druk of druk herhaaldelijk op om het gewenste
magnetronvermogen in te stellen op “P80”.
5. Druk om te bevestigen.
6. Gebruik om de gewenste bereidingstijd in te stellen op “7:00”.
7. Druk om het koken te starten.
Opmerking: Nadat de ene bereidingsfase is beëindigd zal een biep
weerklinken om aan te duiden dat de volgende bereidingsfase is
begonnen.
Page 47

12
NL
Preset-functie
1. Stel de klok in. (Zie ‘De Klok Instellen’)
2. Stel een kookprogramma in (Zie stappen 1 tot 6 in het hoofdstuk ‘Koken in
Meerdere Stappen’).
3. Druk op , de cijfers van de uren knipperen.
<0}
4. Gebruik om de cijfers van de uren in te stellen, het ingevoerde uur
moet een 24-uur waarde hebben.
5. Druk op , de cijfers van de minuten knipperen.
6. Gebruik om de cijfers van de minuten aan te passen.
7. Druk om de instelling te bevestigen. “:”knippert of op de display.
8. Wanneer de vooringestelde tijd is bereikt zullen enkele pieptonen
weerklinken. Het koken zal vervolgens automatisch starten.
Auto-menu
Voor voedsel in de volgende tabel is het niet noodzakelijk om de kookduur en
het vermogen te programmeren. Neem de volgende stappen:
1. In stand-by modus draait U rechtsom om het gewenste menu uit
de onderstaande tabel te selecteren.
2. Druk om te bevestigen.
3. Gebruik om het voedselgewicht te selecteren.
4. Druk om het koken te starten.
MENU Gewicht(g) Kookvermogen
200
A-1
OPWARMEN
400
600
200
A-2
GROENTEN
300
400
250
A-3
VIS
350
450
250
A-4
VLEES
350
450
50 (met 450g water). A-5
PASTA
100 (met 800g water).
200
A-6
AARDAPPELEN
400
600
200 A-7
PIZZA
400
A-8 200 80%
SOEP 400
100%
100%
80%
100%
80%
100%
100%
Page 48

Page 49

Page 50

15
NL
VRAGEN EN ANTWOORDEN
V. Wat gaat er verkeerd wanneer het ovenlampje niet oplicht?
A. * De lamp is gesprongen.
*De deur is niet gesloten.
V. Waarom ontsnapt er stoom uit de ventilatieopening en/of waarom druppelt
er water uit de onderzijde van de deur?
A. Het is heel normaal dat stoom vrijkomt tijdens het bereiden van voedsel. De
magnetron is zo ontworpen om stoom af te voeren la ngs de
ventilatieopeningen aan de zij- en bovenkant. Af en toe condenseert deze
stoom op de deur en druppelt het water vervolgens onderaan de deur. Dit is
heel normaal en niet gevaarlijk.
V. Straalt de microgolfenergie door het kijkvenster van de deur?
A. Nee. Het venster reflecteert de energie teru g naar de ovenruimte. De
openingen of gaten zijn ontworpen om licht door te laten, maar geen
microgolfenergie.
V. Zal de magnetron beschadigd worden indien deze leeg wordt gebruikt?
A. Ja. Gebruik nooit indien de oven leeg is.
V. Waarom ontploffen de eieren soms?
A. Wanneer U eieren bakt of pocheert kan de dooier soms ontploffen wegens
opgebouwde stoom in het dooiermembraan. Doorprik de dooier simpelweg
vóór het koken om dit te voorkomen.
V. Waarom is het aangeraden om het voedsel te laten rusten nadat het koken
is voltooid?
A. De wachttijd is zeer belangrijk.
Bij het koken in de magnetron zit de hitte in de eetwaren en niet in de oven.
Veel eetwaren bouwen voldoende interne hitte op om het bereidingspro ces
verder te zetten, ook nadat zij uit de oven zijn verwijderd. De wachttijd voor
grote stukken vlees, grote groenten en cakes dient om volledig te garen
zonder dat de buitenkant gaat aanbranden.
V. Waarom bereidt mijn oven gerechten niet altijd even snel als een recept
voorschrijft?
A. Kijk uw recept opnieuw na en controleer of u de richtlijnen precies heeft
gevolgd en wat variaties in de bereidingstijd kan hebben veroorzaakt. De
hierin aangegeven bereidingstijden en warmte-instellingen zijn louter
suggesties om aanbranden te voorkomen, omdat dit bij magnetrons het
vaakst voorkomende probleem is. Variaties in grootte, vorm, g ewicht en
afmetingen kunnen een langere of kortere bereidi ngstijd vergen . Gebruik uw
Page 51

16
NL
eigen oordeel samen met de suggesties in recepten en controleer
regelmatig of uw gerecht gaar is, net zoals u dit zou doen me t een gewone
oven.
V. Waarom komen vonken en gekraak (vonko verslag) in de oven voor?
A. Er kunnen verschillend e oorzaken van vonken en gekraak (vonkoversla g) in
de ovenholte zijn.
* U heeft een vork of ander metalen kookgerei in de oven achtergelaten.
* U gebruikt schotels of schalen met metalen onderdelen of afwerking (zilver
of goud).
* U gebruikt een te grote hoeveelheid metaalfolie.
* U gebruikt een metalen sluitstrip.
PROBLEEMGIDS
Normaal
De magnetron stoort de TV
ontvangst.
Het ovenlampje is gedimd. Tijdens het koken op laag vermogen zal
Stoom slaat op de deur neer
en warme lucht komt uit de
ventilatieopeningen.
De oven is per abuis
ingeschakeld zonder dat
eetwaren waren ingezet.
De ontvangst van radio en tv kan verstoord
worden door een werkende
magnetronoven.
storing van kleine elektrische toestellen
zoals een mixer, stofzuiger en elektrische
ventilator. Dit is normaal.
het ovenlampje dimmen. Dit is normaal.
Tijdens koken kan stoom vrijkomen uit het
voedsel. Het overgrote deel zal uit de
ventilatieopeningen ontsnappen. Maar
sommige stoom zal zich op een koele
plaats opstapelen zoals de ovendeur. Dit is
normaal.
Het is verboden om het toestel te
gebruiken zonder voedsel in de oven. Dit is
heel gevaarlijk.
Dit is vergelijkbaar met de
Page 52

Page 53

1
IT
i
CCoonntteennuutti
IMPORTANTI ISTRUZIONI DI SICUREZZA ............................................................................ 2
UTENSILI DA CUCINA............................................................................................................. 3
ALTRE ISTRUZIONI UTILI ....................................................................................................... 6
VEDUTA FORNO...................................................................................................................... 7
INSTALLAZIONE PIATTAFORMA ROTANTE........................................................................ 7
INSTALLAZIONE RIPIANO...................................................................................................... 8
INSTALLAZIONE FORNO A MICROONDE............................................................................. 8
PANNELLO DI CONTROLLO .................................................................................................. 9
FUNZIONAMENTO................................................................................................................. 10
PULIZIA E MANUTENZIONE.................................................................................................13
SPECIFICHE TECNICHE........................................................................................................ 14
DOMANDE E RISPOSTE ....................................................................................................... 15
RISOLUZIONE PROBLEMI.................................................................................................... 16
IMPORTANTI ISTRUZIONI PER LO SMALTIMENTO........................................................... 17
Page 54

Page 55

Page 56

4
IT
Materiali che possono essere usati nel forno a microonde
Utensili Osservazioni
Foglio
d’alluminio
Piatto doratura
Servizi da tavola
Barattoli di
vetro
Cristalleria
Sacchetti per la
cottura in forno
Piatti e bicchieri
di carta
Tovaglioli di
carta
Carta
pergamenata
Plastica
Involucri di
plastica
Termometri
Carta oleata
Solo per protezione. Piccole parti lisce possono essere
usate per coprire parti sottili di carne o pollame così da
prevenire l’eccessiva cottura. Se il foglio è troppo vicino
alle pareti del forno possono comparire fiammelle. Il foglio
deve essere posizionato ad almeno 2.5 cm dalle pareti.
Seguire le istruzioni del produttore. La base del piatto
doratura deve essere posizionato ad almeno 5mm dal
piatto rotante. L’uso scorretto può causare la rottura del
piatto rotante.
Solo utensili adatti al microonde. Seguire le istruzioni del
produttore. Non usare piatti incrinati o scheggiati.
Rimuovere sempre il coperchio. Usare solo per scaldare il
cibo finché è caldo.
La maggior parte dei barattoli di vetro non è resistente al
calore e potrebbe rompersi.
Solo cristalleria da forno resistente al calore. Assicurarsi
che non ci siano finiture metalliche. Non usare piatti
incrinati o scheggiati.
Seguire le istruzioni del produttore. Non chiudere con
lacci metallici. Effettuare dei tagli per permettere la
fuoriuscita del vapore.
Usare solo per cuocere/scaldare per breve tempo. Non
lasciare il forno incustodito durante la cottura.
Usare per coprire il cibo per riscaldarlo ed assorbire i
grassi. Usare solo sotto supervisione e per cuocere per
breve tempo.
Usare come copertura per prevenire gli schizzi o come
copertura per il vapore.
Solo utensili adatti al microonde. Seguire le istruzioni del
produttore. Deve avere l’etichetta “Ideale per microonde”.
Alcuni contenitori di plastica si ammorbidiscono se il cibo
all’interno diventa caldo. I sacchetti per cuocere e i
sacchetti di plastica sigillati devono essere tagliati, forati o
bucati come previsto nella confezione.
Solo utensili adatti al microonde. Usare per coprire il cibo
durante la cottura per mantenere l’umidità. Non
permettere agli involucri di plastica di toccare il cibo.
Solo se adatti al microonde (termometri per carne e
dolci).
Usare come copertura per prevenire gli schizzi e per
mantenere l’umidità.
Page 57

5
IT
Materiali da evitare nel forno a microonde
Utensili Osservazioni
Vassoio d’alluminio Può causare scintille. Trasferire il cibo in un piatto
adatto al microonde.
Cartone per il cibo con
maniglia metallica
Utensili metallici o con
rifiniture metalliche
Lacci di chiusura
metallici
Sacchetti di carta Possono causare un incendio nel forno.
Schiuma plastica
espansa
Legno Il legno si seccherà se usato nel forno a microonde e
Note:
z Prestare attenzione alla rimozione degli utensili o del piatto girevole,
potrebbero diventare caldi durante la cottura.
z Usare solo un termometro progettato per l’utilizzo nel forno a microonde.
z Assicurarsi che il piatto rotante sia in posizione, quando fate funzionare il
forno.
Può causare scintille. Trasferire il cibo in un piatto
adatto al microonde.
Il metallo protegge il cibo dalle microonde. Le
rifiniture metalliche possono causare scintille.
Possono causare scintille e un incendio nel forno.
La schiuma plastica espansa potrebbe sciogliersi o
contaminare il liquido all’interno se esposta ad alte
temperature.
potrebbe spaccarsi o incrinarsi.
Page 58

6
IT
ALTRE ISTRUZIONI UTILI
Per migliori risultati e per una cottura piacevole, leggete queste
annotazioni.
Per migliori risultati:
1. Quando determinate il tempo per un cibo particolare, iniziate usando un
tempo minore e controllate le condizioni occasionalmente. È facile cuocere
troppo il cibo perché le microonde cuociono molto velocemente.
2. Piccole quantità di cibo, o cibi con basso contenuto di acqua possono
asciugarsi e diventare duri se cotti troppo a lungo.
Scongelare cibo congelato:
1. Il cibo che è stato congelato può essere messo direttamente nel forno per
lo scongelamento. (Assicuratevi di rimuovere i lacci di chiusura metallici).
2. Scongelare seguendo i Consigli per lo Scongelamento presenti in questo
manuale.
3. Per le zone in cui il cibo si scongela più velocemente delle altre, copritele
con piccoli pezzi di fogli di alluminio. Questo serve a rallentare o fermare il
processo di scongelamento.
4. Alcuni cibi non dovrebbero essere completamente scongelati prima della
cottura. Ad esempio, il pesce cuoce così velocemente che a volte è meglio
iniziare la cottura mentre è ancora un po’ congelato.
5. Potrebbe essere necessario aumentare o diminuire il tempo di cottura in
alcune ricette, dipende dalla temperatura iniziale del cibo.
Nota: Durante la cottura, l’aria delle ventole potrebbe diventare calda.
Doratura:
Vi sono alcuni cibi che non vengono cotti abbastanza a lungo nel microonde
da dorarsi e potrebbero aver bisogno dell’aggiunta di colore.
Rivestimenti come paprika e agenti doranti come la salsa Worcester possono
essere usati su braciole, pasticci di carne e pezzi di pollo.
Arrosti, pollame e prosciutto, cotto per 10-15 minuti o di più, si doreranno
senza aggiunte extra.
Page 59

Page 60

8
INSTALLAZIONE RIPIANO
IT
Rimuovere tutto il materiale da
imballaggio e gli accessori.
Esaminare il forno per eventuali
danni come ammaccature o porta
rotta. Non installare se il forno è
danneggiato.
Interno: Rimuovere la pellicola
INSTALLAZIONE FORNO A MICROONDE
1. Scegliere una superficie piana
che abbia abbastanza spazio
libero per le ventole interne ed
esterne.
30cm
7.5cm
7.5cm
Tra il forno e le pareti adiacenti sono
necessari almeno 3.0 inches (7,5 cm)
di distanza. Un lato deve essere
aperto.
(1) Lasciare un minimo di 12 inches
(30cm) di distanza sopra il forno.
(2) Non rimuovere i piedini dalla
parte inferiore del forno.
(3) Bloccare le aperture dell’aria in
entrata e in uscita può
danneggiare il forno.
(4) Posizionare il forno il più possibile
lontano da radio e TV.
Il funzionamento del microonde
può causare interferenze alla
radio o alla TV.
APERTO
protettiva che si trova sulla superficie
interna del forno a microonde.
Non rimuovere la copertura
marrone chiaro Mica attaccata alla
cavità del forno per proteggere il
magnetron.
2. Collegare il forno ad una presa
domestica standard. Assicurarsi
che il voltaggio e la frequenza
siano le stesse del voltaggio e
della frequenza presenti
sull'etichetta.
ATTENZIONE: Non installare il forno
su un piano cottura oscillante o su
altri apparecchi che producono
calore. Se installato vicino o sopra
una fonte di calore, il forno potrebbe
essere danneggiato e la garanzia
nulla.
Page 61

9
PANNELLO DI CONTROLLO
IT
SCHERMO DISPLAY
Sono mostrati tempo di cottura, accensione,
indicatori e ora attuale.
LIVELLO POTENZA
Premere per impostare il livello di
potenza del microonde.
Premere per scongelare i cibi in base
al peso o all’tempo selezionato.
PESO/TEMPO DEFROST
OROLOGIO / PRESET
Premere per impostare l’orario o
la caratteristica di preset.
STOP / ANNULLA
Premere per annullare l’impostazione
o resettare il forno prima di impostare
il programma di cottura.
Premere una volta per arrestare
temporaneamente la cottura, o due volte
per annullare la cottura.
È anche usato per impostare il blocco bambini.
Premere per iniziare il programma di cottura
o impostare il programma di cottura quick start.
Premere per confermare l’impostazione.
START / QUICK START /
CONFERMA
/ AUTO MENU /
Ruotare per selezionare i menù di
cottura automatici o inserire tempo o peso.
Page 62

10
IT
FUNZIONAMENTO
Quando il forno è collegato, il display mostrerà “0:00” e si sentirà un beep.
Impostare l’orologio
1. Premere , lampeggia la cifra dell’ora.
2. Ruotare per regolare le cifre dell’ora, l’ora inserita deve essere con
valore 24 ore.
3. Premere , lampeggia la cifra dei minuti.
4. Ruotare per regolare le cifre dei minuti.
5. Premere per confermare l’impostazione. “:” lampeggia sul display.
Nota:
1) Se l’orario non è impostato, il forno non funzionerà quando è acceso.
2) Durante l’impostazione dell’orario, se si preme , il forno ritornerà
allo stato precedente.
Funzionamenti generali
1. Premere una volta per arrestare temporaneamente la cottura ed è
possibile iniziare la cottura nuovamente premendo , o premere
due volte per annullare il programma di cottura.
2. Dopo che è trascorso il tempo di cottura, il forno suona cinque volte e
ritorna in modalità standby.
3. Durante la cottura, ogni pressione di può aumentare il tempo di
cottura di 30 secondi.
Cottura al microonde
1. Premere e appare “P100”.
2. Premere ripetutamente o ruotare per selezionare la potenza
microonde richiesta.
Potenza microonde 100% 80% 50% 30% 10%
Display P100 P80 P50 P30 P10
3. Premere per confermare.
4. Ruotare per impostare il tempo di cottura.
5. Premere iniziare la cottura.
Nota: È possibile controllare la potenza di cottura durante la cottura premendo ..
per
Page 63

11
IT
Cottura rapida
In modalità standby, premere
100% per 30 secondi. Ogni pressione del tasto aumenterà il tempo di cottura
di 30 secondi. Il tempo di cottura più lungo è di 95 minuti.
Defrost per peso
Il forno può essere usato per scongelare i cibi in base al peso selezionato. Il
tempo di scongelamento e il livello di potenza sono impostati automaticamente
una volta che il peso è stato programmato. Il peso del cibo congelato varia da
100g a 2000g.
1. Premere . “dEF1” lampeggerà sul display.
2. Ruotare per selezionare il peso del cibo desiderato.
3. Premere per iniziare lo scongelamento.
Nota: Quando è trascorso metà tempo di scongelamento, il forno suona per
ricordare di ruotare il cibo.
Defrost per tempo
Il tempo di scongelamento più lungo è 95 minuti (95:00).
1. Premere
due volte. “dEF2” lampeggerà sul display.
2. Ruotare per selezionare il tempo di scongelamento desiderato.
per cuocere al livello di potenza del
3. Premere per iniziare lo scongelamento.
Nota: Ogni pressione del tasto aumenterà il tempo di scongelamento
di 30 secondi.
Cottura multi-stadi
Il forno può essere programmato fino a 2 sequenze di cottura automatiche. Lo
scongelamento può essere impostato solo nel primo stadio.
Nota: La cottura automatica non può essere selezionata nel programma di
cottura.
Supponiamo che si voglia impostare il seguente programma di cottura:
Defrost (5 minutes)
Cottura microonde (livello potenza 80% per 7 minuti)
Microwave cooking (80% power level for 7 minutes)
Defrost (5 minuti)
1. Premere due volte, “dEF2” appare sul display.
2. Ruotare per selezionare il tempo di scongelamento finché non appare
“5:00”.
3. Premere una volta.
4. Ruotare o premere ripetutamente per selezionare il livello di
potenza del microonde finché non appare “P80”.
5. Premere per confermare.
6. Ruotare per selezionare il tempo di cottura finché non appare “7:00”.
7. Premere per iniziare la cottura.
Nota: Dopo che uno stadio di cottura è finito, si sente un beep, indicando che
è iniziato il successivo stadio di cottura.
Page 64

12
IT
Funzione Pre-Set
1. Impostare l’orologio. (Vedere “Impostare l’orologio”)
2. Impostare un programma di cottura (Vedere passi da 1 a 6 nella sezione
“Cottura Multi-stadio).
3. Premere ,lampeggia la cifra dell’ora.
4. Ruotare per regolare le cifre dell’ora, l’ora inserita deve essere con
valore 24 ore.
5. Premere ,lampeggia la cifra dei minuti.
6. Ruotare per regolare le cifre dei minuti.
7. Premere per concludere l’impostazione. “:” lampeggia sul display.
8. Quando si raggiunge l’orario preimpostato, si sentirà un beep e la cottura
inizierà automaticamente.
Auto Menu
Per il cibo nella seguente tavola, non è necessario programmare la potenza e
il tempo di cottura. Seguire i seguenti passaggi:
1. In modalità standby, ruotare in senso orario per selezionare il menù
desiderato dalla tavola sotto.
2. Premere per confermare.
3. Ruotare per selezionare il peso del cibo.
4. Premere per iniziare la cottura.
Menù Peso (g) Potenza Cottura
A-1
RISCALDAMENTO
A-2
VEGETALI
A-3
PESCE
A-4
CARNE
A-5
PASTA
A-6
PATATE
50 (con 450g di acqua)
100 (con 800g di acqua)
200
400
600
200
300
400
250
350
450
250
350
450
200
400
100%
100%
80%
100%
80%
100%
A-7
PIZZA
A-8
ZUPPA
600
200
100%
400
200
80%
400
Page 65

Page 66

Page 67

15
IT
DOMANDE E RISPOSTE
D. Cosa non va quando la luce del forno non si accende?
R. * La lampadina è fulminata.
* La porta non è chiusa.
D. Perché il vapore fuoriesce dalle griglie di ventilazione e/o perché l’acqua
gocciola dalla base della porta?
R. Il vapore è prodotto normalmente durante la cottura. Questo forno a
microonde è stato progettato per far fuoriuscire il vapore dalle griglie di
ventilazione laterali e superiori, raramente il vapore si condensa sulla porta
e l’acqua gocciola dalla base della porta. È normale e sicuro.
D. Le microonde attraversano lo schermo della porta?
R. No. Lo schermo riflette l’energia nella cavità del forno, i fori o le porte sono
progettate per permettere alla luce di passare, non fanno passare le
microonde.
D. Il forno a microonde può danneggiarsi se funziona vuoto?
R. Sì. Non farlo funzionare vuoto.
D. Perché le uova a volte scoppiano?
R. Quando si cuociono o bolliscono le uova, il tuorlo potrebbe scoppiare a
causa del vapore presente all’interno della membrana. Per prevenire ciò,
forare il tuorlo della cottura.
D. Perché si consiglia un tempo di attesa dopo che le operazioni di cottura si
sono completate?
R. Il tempo di attesa è molto importante.
Con la cottura al microonde, il calore è nel cibo, non nel forno. Molti cibi
accumulano abbastanza calore interno per far sì che il processo di cottura
continui, anche dopo la rimozione del cibo dal forno. Il tempo di attesa per
grandi pezzi di carne, grandi vegetali e torte serve a far sì che l'interno si
cucini completamente, senza cuocere troppo l’esterno.
D. Perché il mio forno non cuoce sempre velocemente come dice il libro di
cucina per microonde?
R. Controllate nuovamente il libro, per essere sicuri che avete seguito
correttamente le indicazioni e vedere cosa può aver causato le variazioni nel
tempo di cottura. I tempi e le impostazioni di calore presenti nei libri di
cucina sono suggerimenti per prevenire il problema comune dei microonde,
cioè la troppa cottura. Le variazioni di dimensione, forma e peso possono
richiedere maggiori tempi di cottura. Usate il vostro giudizio insieme ai
suggerimenti dei libri per controllare se il cibo è stato cotto correttamente
come vorreste, così come fareste con un forno convenzionale.
Page 68

16
IT
D. Perché si verificano scintille e scricchiolii nel forno?
R. Potrebbero esserci diversi motivi sul perché ci siano scintille e scricchiolii
(fiammelle) all’interno della cavità.
* Avete dimenticato una forchetta o un altro utensile metallico nel forno.
* State usando piatti con parti o rifiniture metalliche (argento o oro).
* State usando una quantità eccessiva di foglio metallico.
* State usando un laccio di chiusura metallico.
RISOLUZIONE PROBLEMI
Normale
Il forno a microonde
interferisce con la ricezione
della TV.
Luce forno bassa. In modalità cottura a bassa potenza, la luce
Vapore accumulato sulla
porta, aria calda fuoriesce
dalle ventole.
Il forno si avvia
accidentalmente senza cibo
al suo interno.
Problema Possibile causa Rimedio
(1) Cavo non collegato
(2) Fusibile interrotto o
Il forno non può
essere avviato.
(3) Problemi con la
Il forno non scalda. La porta non è chiusa
bene.
Il piatto rotante di
vetro fa rumore
quando il forno è in
funzione.
Appoggio rotante e base
del forno sporchi.
Il funzionamento del forno a microonde
potrebbe influire sulla ricezione radio e TV.
È simile alle interferenze di piccoli
elettrodomestici come mixer, aspirapolvere
e ventilatore. È normale.
del forno potrebbe essere bassa. È
normale.
Durante la cottura, il vapore potrebbe
fuoriuscire dal cibo. La maggior parte
uscirà dalle ventole. Ma in alcuni casi
potrebbe accumularsi in un luogo freddo
come la porta del forno. È normale.
È vietato far funzionare l’unità senza cibo al
suo interno. È molto pericoloso.
Scollegare. Quindi
perfettamente.
salvavita non
funzionante.
corrente.
collegare nuovamente
dopo 10 secondi.
Sostituire il fusibile o
resettare il salvavita
(riparato da personale
qualificato)
Controllare la corrente
con altri
elettrodomestici.
Chiudere bene la porta.
Fare riferimento a
“PULIZIA E
MANUTENZIONE” per
pulire le parti sporche.
Page 69

Page 70

1
ES
ÍÍnnddiiccee
IMPORTANTES INSTRUCCIONES DE SEGURIDAD.................................... 2
UTENSILIOS PARA COCINAR.................. ..................................................... 3
OTRAS INSTRUCCIONES ÚTILES .............................................................. .. 6
DESCRIPCIÓN DEL HORNO ........................................... .... ........ ..... .... .... .... .. 7
INSTALACIÓN DEL PLATO GIRATORIO ...................................................... 7
INSTALACIÓN SOBRE LA ENCIMERA ......................................................... 8
INSTALACIÓN DEL HORNO MICROONDAS ................................................ 8
PANEL DE CONTROL..................................................................................... 9
FUNCIONAMIENTO.......................................................... ............................... 10
LIMPIEZA Y CUIDADO................................................................................... 13
ESPECIFICACIONES .............................................. ......... ........ ......... ........ ...... 14
PREGUNTAS Y RESPUESTAS ........................................................ ........ ...... 15
RESOLUCIÓN DE PROBLEMAS.................................................................... 16
INSTRUCCIONES IMPORTANTES DE ELIMINACIÓN................................. 1 7
Page 71

Page 72

Page 73

4
Materiales utilizables en el horno microondas
Utensilios Observaciones
Papel de
aluminio
Bandeja para
dorar (Browning
dish)
Piezas de vajilla
Frascos de
cristal
Solo como protección. Puede utilizar trozos pequeños
para cubrir ligeramente los trozos finos de carne o pollo
para evitar una cocción excesiva. Si el papel de aluminio
está muy cerca de las paredes del microondas se
podrían originar chispas. El aluminio debe estar al menos
a 2.5 cm de distancia de las paredes del horno.
Siga las instrucciones del fabricante. La parte inferior de
la bandeja debe estar al menos 5cm por encima del plato
giratorio. El uso incorrecto puede provocar la rotura del
plato giratorio.
Utilizar solo las piezas que pueden utilizarse en un
microondas. Siga las instrucciones del fabricante. No
utilice ninguna pieza con grietas o roturas.
Destape siempre el frasco. Utilice solo para calentar
alimentos hasta que la jarr a esté caliente. L a mayoría de
frascos no son termorresistentes y se podrían rom per.
ES
Recipientes de
cristal
Bolsas para la
cocción en el
horno
Platos y tazas
de papel
Papel de cocina
Papel de
plástico
Plástico
Utilizar solo recipientes termorresistentes indicados para
el horno. Compruebe que no tiene un borde metálico. No
utilice ninguna pieza con grietas o roturas.
Siga las instrucciones del fabric ante. No cerrar con cinta
metálica. Realice unos pequeño s orific ios para perm itir la
salida del vapor.
Utilizar solo para cocinar/calentar durante intervalos
cortos. No dejar el horno sin supervisión durante el
proceso de cocción.
Utilizar para cubrir los alimentos al recalentarlos para que
absorban el exceso de grasa. Utilizar con supervisión y
solo durante intervalos cortos de cocción.
Utilizar como una tapa para evitar salpicar o como
envoltorio para cocer al vapor.
Solo el indicado para uso en microondas. Siga las
instrucciones del fabricante. Debe incluir la indicación
“uso en microondas”. Algunos recipientes de plástico se
ablandan, mientras los alimentos se calientan. Las
“bolsas de ebullición” y bolsas de plástico herméticas se
deberán cortar, pinchar o agujerear siguiendo las
indicaciones del envase.
Film de plástico
Termómetros
Papel de cera
Solo el indicado para uso en microondas. Utilizar para
tapar alimentos durante la cocción y conservar su jugo.
No permita que el film de plástico toque los alimentos.
Solo los indicados para uso en m icroon das (termó metr os
para carne y dulces).
Utilizar para cubrir los alimentos, evitar salpicaduras y
conservar el jugo de los alimentos.
Page 74

5
ES
Materiales que no puede utilizar en el horno microondas
Utensilios Observaciones
Bandeja de
aluminio
Cartón para
alimentos con
asas metálicas
Utensilios
metálicos o con
borde metálico
Tira metálica de
alambre
Bolsas de papel Puede provocar un incendio en el interior del horno.
Espuma de
plástico
Madera La madera se secará cuando se utilice en el horno
Notas:
z Extreme las precaucion es al extraer ute nsilio s o el plato giratorio, porque
podrían haberse calentado durante el proceso de cocción.
calentado durante el proceso de cocción.
z Utilice solo un termómetro diseñado especialmente o indicado para el uso
en el horno microondas.
z Asegúrese de que el plato giratorio está correctamente instalado antes de
poner el horno en funcionamiento.
Puede provocar chispas. Transfiera los alimentos a un
recipiente adecuado para el uso en el microondas.
Puede provocar chispas. Transfiera los alimentos a un
recipiente adecuado para el uso en el microondas.
El metal impide la llegada de la energía de microondas a
los alimentos. El borde metálico pued e provoc ar ch ispas.
Puede provocar chispas y un incendio en el interior del
horno.
La espuma de plástic o se puede derretir o c ontamin ar el
contenido líquido cuando se expone a temperaturas muy
elevadas.
microondas y se podría partir o agrietar.
Page 75

6
OTRAS INSTRUCCIONES ÚTILES
Para obtener el mejor resultado y disfrutar cocinando, lea detenidamente
estos comentarios.
Para Obtener el Mejor Resultado:
1. Para poder determinar el tiempo necesario para cocinar un alimento
determinado, comience seleccionando un tiempo breve y compruebe el
proceso de cocción con frecuencia. Es muy fáci l cocer en exceso un
alimento porque el horno microondas cocina muy rápidamente.
2. Las cantidades pequeñas de alimentos, o alimentos con ba jo contenido de
agua podrían secarse y endurecerse cuando se cocinan durante
demasiado tiempo.
Descongelación de Alimentos Congelados:
1. Los alimentos congelados pueden coloca rse directamente en el horno
para descongelarlos. (Compruebe que ha retirado todos los cierres o
alambres metálicos.)
2. Descongele los alimentos siguiendo los Consejos de Descongelación
que se incluyen en este manual.
3. Las partes de los alimentos que se descongelan más rápidamente,
deberán taparse con trozos pequeños de papel de aluminio. Esto
retardará o detendrá el proceso de descongelación en las zonas
tapadas.
4. Algunos alimentos deben descongelarse por completo antes de
cocinarlos. Por ejemplo, el pescado se cocina tan rápidamente que en
ocasiones es preferible iniciar el proceso de cocción cuando todavía
está ligeramente congelado.
5. En algunas recetas será necesario incrementar o disminuir el tiempo de
cocción, según la temperatura inicial del alimento.
Nota:El aire de los conductos de ventilación podría calentarse durante el
proceso de cocción.
Dorar los alimentos:
Existen algunos alimentos que no se cocinan durante un tiempo suficiente en
el horno microondas para dorarlos y puede que necesiten color adicional.
Puede añadir pimentón u otro ingrediente como salsa Worcestershire sobre
las chuletas, empanadas de carne o trozos de pollo para conseguir dorarlos.
La carne asada, el pollo o el jamón, cocinados durante 10-15 minutos o
durante más tiempo, se dorarán sin añadir otros ingredientes adicionales.
ES
Page 76

Page 77

8
ES
INSTALACIÓN SOBRE LA ENCIMERA
Retire todo el material de embalaje y
los accesorios. Examine el horno
para detectar posibles daños como
muescas o la puerta rota. No instalar
el horno en caso de que esté
dañado.
Carcasa: Retire el film protector
INSTALACIÓN DEL HORNO MICROONDAS
situado en la superficie exterior del
horno microondas.
No retire la cubierta Mica de color
marrón claro que está adherida a
la cavidad del horno para proteger
el magnetrón.
1. Seleccione una superficie plana
con suficiente espacio abierto
para los orificios de entrada y/o
salida de aire.
7.5cm
(3.0 pulg)
7.5cm
(3.0 pulg)
30cm (12 pulg)
ABRIR
Debe existir al menos una distancia
de 7.5 cm (3.0 pulgadas) entre el
horno y las paredes contiguas. Un
lateral debe estar abierto.
(1) En la parte superior del horno
debe existir al menos un espacio
de 30 cm (12 pulgadas).
(2) No retire los pies de la parte
inferior del horno.
(3) Si bloquea los orificios de entrada
y/o salida de aire, el horno podría
resultar dañado.
(4) Coloque el horno lo más lejos
posible de radios y TV.
El funcionamiento del horno
microondas puede provocar
interferencias en la recepción de
radio o TV.
2. Conecte el horno a una toma de
corriente normal de su hogar.
Compruebe que el voltaje y la
frecuencia son iguales que los
valores de voltaje y frecuencia
indicados en la placa de
características.
ADVERTENCIA: No instale el
horno encima de los fuegos de la
cocina u otros aparatos que em itan
calor. Si se instala cerca o sobre una
fuente de calor, el horno podría
resultar dañado y la garantía
quedaría anulada.
Page 78

9
ES
PANELDE CONTROL
PANTALLA DE VISUALIZACIÓN
En la pantalla de visualización podrá ver el tiempo de cocción, la potencia, los
indicadores y el reloj.
NIVEL DE POTENCIA
Pulse para configurar el nivel de potencia del
microondas.
DESCONGELACIÓN POR PESO / TIEMPO
Pulse para descongelar los alimentos según el
peso o el tiempo seleccionado.
RELOJ / PRECONFIGURACIÓN
Pulse para configurar la hora del reloj o la
prestación preconfigurada.
STOP / ELIMINAR
Pulse para cancelar la configuración o reiniciar el
horno antes de configurar un programa de
cocción.
Pulse una vez para detener temporalmente el
proceso de cocción, o dos veces para cancelar la
cocción.
También se utiliza para configurar el bloqueo
infantil.
INICIAR / INICIO RÁPIDO / CONFIRMAR
Pulse para iniciar el programa de cocción o
seleccionar el programa de cocción de inicio
rápido
Gire para seleccionar los menús automáticos de
cocción o introducir el tiempo
.
/ MENÚ AUTOMÁTICO /
o el peso.
Page 79

10
ES
FUNCIONAMIENTO
Al conectar el cable eléctrico del horno, el visualizador indicará “0:00”y se
escuchará un pitido.
Configuración del Reloj
1. Pulse
2. Gire para ajustar los dígitos de las horas, el valor de las horas debe
corresponder al formato de 24-horas.
3. Pulse
4. Gire para ajustar los dígitos de los minutos.
5. Pulse
visualizador.
Nota:
1) Si no se configura el reloj, el horno no funcionará al encenderlo.
2) Durante la configuración del reloj, si pulsa
estado anterior.
Funciones Generales
1. Pulse
reiniciar el proceso de cocción pulsando , o pulse dos veces
para cancelar el programa de cocción.
2. Cuando el tiempo de cocción haya transcurrido, el horno emitirá cinco
pitidos y regresará al modo de espera.
3. Durante la cocción, cada vez que pulse se incrementará el tiempo
de cocción en 30 segundos.
, los dígitos de las horas parpadearán.
, los dígitos de los minutos parpadearán.
para confirmar la configuración. “:” parpadeará en el
, el horno regresará al
una vez para detener temporalmente la cocción y podrá
Cocción por Microondas
1. Pulse y el visualizador indicará“P100”.
2. Pulse repetidas veces o gire para seleccionar la potencia de
microondas deseada.
Potencia de
Microondas
Visualizador
3. Pulse para confirmar.
4. Gire para seleccionar el tiempo de cocción.
5. Pulse para iniciar la cocción.
Nota: La potencia de cocción se puede comprobar durante la cocción
pulsando .
Cocción Rápida
En el modo de espera, pulse para cocinar al 100% de potencia
durante 30 segundos. Con cada pulsación del botón, el tiempo de cocción
incrementará en 30 segundos. El tiempo de cocción máximo es 95 minutos.
100% 80% 50% 30% 10%
P100 P80 P50 P30 P10
Page 80

11
ES
Descongelación por Peso
El honro se puede utilizar para descongelar alimentos seleccionando el peso
correspondiente. El tiempo de descongelación y la potencia se configuran
automáticamente después de programar el peso. El peso de los alimentos
congelados oscila de 100g a 2000g.
1. Pulse . El visualizador indicará “dEF1”.
2. Gire para seleccionar el peso correspondiente a los alimentos.
3. Pulse para iniciar la descongelación.
Nota: Cuando haya transcurrido la mitad del tiempo de cocción, el horno
pitará para recordarle que debe girar los alimentos.
Descongelación por Tiempo
El tiempo máximo de descongelación es 95 minutos (95:00).
1. Pulse dos veces. El visualizador indicará "dEF2".
2. Gire para seleccionar el tiempo de descongelación deseado.
3. Pulse para iniciar la descongelación.
Nota: Con cada pulsación de el tiempo de descongelación
incrementará en 30 segundos.
Cocción en Etapas
El horno se puede programar con 2 secuencias automáticas de cocción. La
descongelación solo se podrá configurar en la primera etapa.
Nota: La cocción automática no se puede seleccionar en un programa de
cocción.
Supongamos que desea configurar el siguiente programa de cocción:
Cocción por microondas (nivel de potencia del 80% durante 7 minutos)
1. Pulse dos veces, el visualizador indica“dEF2”.
2. Gire para seleccionar el tiempo de descongelación hasta que el
visualizador indique “5:00”.
3. Pulse una vez.
4. Gire o pulse repetidas veces para seleccionar el nivel de
potencia del microondas hasta que el visualizador indique “P80”.
Descongelación (5 minutos)
5. Pulse para confirmar.
6. Gire para seleccionar el tiempo de cocción hasta que el visualizador
indique “7:00”.
7. Pulse para iniciar el proceso de cocción.
Nota: Cuando una etapa de cocción haya transcurrido, escuchará un pitido
que indica que la siguiente etapa de cocción se ha iniciado.
Función Preconfigurada
1. Configure el reloj. (Consulte la sección ‘Configuración del Reloj’)
Page 81

12
ES
2. Seleccione un programa de cocción (Consulte los pasos 1 a 6 de la
sección ‘Cocción en Etapas’).
3. Pulse , los dígitos de las horas parpadearán.
4. Gire para ajustar los dígitos de las horas, el valor introducido para las
horas debe corresponder al formato de 24-horas.
5. Pulse , los dígitos de los minutos parpadearán.
6. Gire para ajustar los dígitos de los minutos.
7. Pulse para concluir la configuración. En el visualizador“:”
parpadeará.
8. Cuando se alcance la hora configurada, se escuchará un pitido y
automáticamente se iniciará elproceso de cocción.
Menú Automático
Para los alimentos incluidos en la tabla siguiente, no será necesario
programar la potencia de cocción y el tiempo. Siga los pasos siguientes:
1. En el modo de espera, gire en el sentido de las agujas del reloj
para seleccionar el menú deseado de la tabla siguien te.
2.
P ulse para confirmar.
3. Gire para seleccionar el peso de los alimentos.
4. Pulse para iniciar el proceso de cocción.
Menú
A-1
RECALENTAR
A-2
VERDURA
A-3
PESCADO
A-4
CARNE
A-5
PASTA
A-6
PATATAS
A-7
PIZZA
A-8
SOPA
Peso (g)
200
400
600
200
300
400
250
350
450
250
350
450
50 (con 450g de agua)
100 (con 800g de agua)
200
400
600
200
400
200
400
Potencia de Cocción
100%
100%
80%
100%
80%
100%
100%
80%
Page 82

Page 83

Page 84

15
ES
PREGUNTAS Y RESPUESTAS
P. ¿Por qué no se enciende la luz del horno?
R. * La bombilla se ha fundido.
* La puerta no está cerrada.
P. ¿Por qué hay vapor saliendo por el orificio de salida de aire y / o por qué
cae agua por la parte inferior de la puerta?
R. El vapor normalmente se produce durante la cocción. El horno microondas
ha sido diseñado para que expulse este vapor por los orificios laterales y
superiores, en ocasiones este vapor se condensa en la puerta y cae agua por
la parte inferior de la puerta. Esto es bastante normal y no supone ningún
problema.
P. ¿La energía de las microondas puede atravesar la pantalla de observación
de la puerta?
R. No. La energía se refleja sob re pa nta lla me tálic a y regr es a a l a cav idad de l
horno, los orificios o puertos permiten pasar la luz pero no permiten el paso de
la energía de microondas.
P. ¿Resultará dañado el horno si se pone en funcionamiento vacío?
R. Sí. El horno nunca debe funcionar vacío.
P. ¿Por qué los huevos revientan en algunas ocasiones?
R. Al cocer o escalfar huevos, la yema podría reventar debido a la
acumulación de vapor en el interior de la membrana de la yema. Para evita r
que esto suceda, pinche la yema con un palillo mondadientes antes de cocer
los huevos. No cueza nunca los huevos sin agujerear previamente las
cáscaras.
P. ¿Por qué se recomienda dejar un tiempo de espera después de concluir el
tiempo de cocción?
R. El tiempo de espera es muy importante.
Durante la cocción en el microondas, el calor está en los alimentos y no en el
horno. Muchos alimentos acumulan suficiente calor interno para permitir que
el proceso de cocción continúe, incluso después de sacar los alimentos del
horno. El tiempo de espera par a piezas de carne, verd uras de g ran tamaño y
pasteles permite que el interior se cocine por completo, sin cocinar
excesivamente el exterior.
P. ¿Por qué mi horno no siempre cocina tan rápidamente como la guía de
cocina del microondas?
R. Consulte la guía de cocina de nuevo, para comprobar que ha seguido las
instrucciones con exactitud y averiguar qué puede haber causado esta
discrepancia en el tiempo de cocción. Los tiempos de cocción y la
configuración de potencia son sugerencias para evitar una cocción excesiva,
que es el problema más común hasta acostumbrarse al horno microondas.
Los cambios de tamaño, forma y peso así como las dimensiones pueden
significar un mayor tiempo de cocción. Utilice el sentido común junto con las
sugerencias de la guía de cocina para comprobar que los alimentos se han
cocinado correctamente, del mismo modo que con otro método de cocción.
P. ¿Por qué se producen chispas y crujidos en el interior del horno?
R. Las chispas y crujidos en el interior de la cavidad pueden pr oducirse por
distintos motivos.
Page 85

16
ES
• Hay un tenedor u otro utensilio metálico en el interior del horno.
• Está utilizando platos con partes o con un borde metálico (plateado o
dorado).
• Está utilizando una gran cantidad de papel de aluminio.
• Está utilizando una tira de alambre.
RESOLUCIÓN DE PROBLEMAS
Normal
El horno microondas provoca
interferencias en la recepción
de radio
El interior del horno está
poco iluminado
Acumulación de vapor en la
puerta, salida de aire c aliente
por los orificios de ventilación
El horno se ha puesto en
marcha accidentalmente sin
alimentos en el interior.
Problema Causa Posible Solución
El horno no funciona
El horno no calienta. La puerta no está bien
El plato giratorio hace
ruido durante el
funcionamiento del
horno microondas.
(1) El cable no está
correctamente
enchufado
(2) Fusible fundido o el
cortacircuitos se ha
activado.
(3) La toma eléctrica
está averiada
cerrada.
El soporte del rodillo y la
base del horno están
sucios.
La recepción de radio y TV puede verse
afectada por el funcionamiento del horno
microondas. Es similar a las interferencias
de pequeños aparatos eléctricos, por
ejemplo una batidora, un aspirador o un
ventilador. Es normal
Si utiliza una potencia de cocción baja, el
horno estará poco iluminado. Es normal.
Durante la cocción, se pr oduce una salida
de vapor en los alimentos. La mayor parte
de este vapor saldrá por los orificios de
ventilación. Pero parte de este vapor se
acumulará en un lugar frío como la puerta
del horno. Es normal.
Nunca debe funcionar el horno sin
alimentos en el interior. Es muy peligroso.
Desenchufe el cable.
Enchufe el cable de
nuevo después de 10
segundos.
Cambie el fusible o
vuelva a configurar el
cortacircuitos
(reparado por un
profesional o servicio
técnico)
Compruebe el
funcionamiento de la
toma eléctrica
conectando otros
aparatos.
Cierre la puerta
correctamente.
Consulte la sección
“LIMPIEZA Y
CUIDADO” antes de
limpiar las partes
sucias.
Page 86

Page 87

1
CZ
OObbssaahh
DŮLEŽITÉ BEZPEČNOSTNÍ POKYNY ................................................................................... 2
NÁDOBÍ PRO VAŘENÍ ............................................................................................................. 3
DALŠÍ UŽITEČNÉ POKYNY..................................................................................................... 6
PŘEHLED O TROUBĚ ............................................................................................................. 7
INSTALACE TOČNICE............................................................................................................. 7
INSTALACE NA PRACOVNÍ PLOCHU ................................................................................... 8
INSTALACE MIKROVLNNÉ TROUBY..................................................................................... 8
OVLÁDACÍ PANEL................................................................................................................... 9
OBSLUHA............................................................................................................................... 10
ČIŠTĚNÍ A ÚDRŽBA............................................................................................................... 13
TECHNICKÉ ÚDAJE .............................................................................................................. 14
DOTAZY A ODPOVĚDI .......................................................................................................... 15
ŘEŠENÍ PROBLÉMŮ.............................................................................................................. 16
DDŮŮLLEEŽŽIITTÉÉ PPOOKKYYNNYY PPRROO LLIIK
KVVIIDDAACCII
....................................................................................17
Page 88

Page 89

Page 90

4
CZ
Materiály, které lze používat v mikrovlnné troubě
Nádobí Komentáře
Hliníková fólie
Sádropísková
mísa
Stolní nádobí
Skleněné
džbány
Skleněné zboží
Sáčky do
mikrovlnných
trub
Papírové hrnky
a talíře
Papírové
ručníky
Pergamenový
papír
Plast
Plastové obaly
Teploměry
Voskový papír
Pouze k přikrývání. K pokrytí lze použít malé tenké
kousky, tyto části masa drůbežího jsou chráněny před
převařením. Může nastat jiskření, pokud je fólie blízko
stěn trouby. Fólie musí být alespoň 2,5 cm od stěn trouby.
Dodržujte pokyny výrobce. Dno sádropískové mísy musí
být alespoň 5 mm nad otočným talířem. Nesprávné
používání, může způsobit popraskání otočného talíře.
Pouze vhodné pro mikrovlnné trouby. Dodržujte pokyny
výrobce. Nepoužívejte prasklé nebo polámané nádobí.
Vždy sundávejte víko. Používejte pouze pro ohřátí jídla.
Většina džbánů ze skla není odolných horku a mohou
prasknout.
Pouze žáruvzdorné sklo pro mikrovlnné trouby. Ujistěte
se, že nemají kovovou ozdobu. Nepoužívejte prasklé
nebo polámané nádobí.
Dodržujte pokyny výrobce. Nezavírejte je kovovou
sponou. Rozřízněte je, aby mohla unikat pára.
Používejte pro jednorázové vaření/ohřívání.
Neponechávejte troubu bez dozoru, když vaříte.
Používejte pro přikrytí potravin pro opětovné ohřívání a
absorpci tuku. Používejte s dozorem pro jednorázové
vaření/ohřívání.
Používejte jako kryt proti stříkání nebo jako obal pro
napařování.
Pouze vhodné pro mikrovlnné trouby. Dodržujte pokyny
výrobce. Jsou označeny „Microwave Safe“ (nepoškozují
mikrovlnnou troubu). Některé plastové nádoby změknou,
protože potraviny uvnitř jsou horké. „Varné sáčky“ a
upnuté plastové sáčky se musí rozříznout, proděravět
nebo odvzdušnit dle pokynů na obalu.
Pouze vhodné pro mikrovlnné trouby. Používejte pro
přikrytí potravin během vaření pro uchování vlhkosti.
Nenechávejte plastový obal dotýkat potravin.
Pouze nepoškozující mikrovlnnou troubu (teploměry pro
maso a cukroví).
Používejte jako kryt proti stříkání a úniku vlhkosti.
Page 91

5
CZ
Materiály, které se nesmí používat v mikrovlnné troubě
Nádobí Komentáře
Hliníkové talíře Způsobují jiskření. Přendejte do nádobí nepoškozujícího
mikrovlnnou troubu.
Potravinové
kartony s kovovou
rukojetí
Kovové nebo
železné ozdoby
Kovové spony Kovové spony způsobují jiskření a mohou způsobit požár uvnitř
Papírové sáčky Mohou způsobit požár uvnitř trouby.
Plastová pěna Plastová pěna se může roztavit nebo kontaminovat tekutiny
Dřevo Dřevo vyschne, když se používá v mikrovlnné troubě a může se
Poznámky:
z Při vyndávání nádobí nebo skleněného talíře dbejte zvýšené pozornosti,
jelikož mohou být po vaření velmi horké.
z Používejte pouze teploměr, který je vyroben pro použití v mikrovlnné
troubě.
z Ujistěte se, že talíř je na správném místě, když používáte troubu.
Způsobují jiskření. Přendejte do nádobí nepoškozujícího
mikrovlnnou troubu.
Kov zastiňuje potraviny před mikrovlnnou energií. Kovové
ozdoby způsobují jiskření.
trouby.
uvnitř, je-li vystavena vysoké teplotě.
rozpadnout nebo zlomit.
Page 92

6
CZ
DALŠÍ UŽITEČNÉ POKYNY
Pro nejlepší výsledky a radostnější vaření čtěte důkladně tyto instrukce.
Pro nejlepší výsledky:
1. Pokud určujete dobu pro určitá jídla, začněte použitím kratších časů a
často kontrolujte proces vaření. Je snadné jídlo převařit, protože
mikrovlnná trouba je velmi rychlá.
2. Malé množství jídla nebo jídla s malým obsahem vody se mohou při
dlouhém vaření vysušit a ztvrdnout.
Rozmrazování mražených pokrmů:
1. Pokrmy ve zmražené podobě mohou být umísťovány přímo do trouby za
účelem jejich rozmrazení. (Ujistěte se, že jste odstranili veškeré kovové
obaly).
2. Rozmrazujte podle Rozmrazovacích pokynů uvedených v tomto manuálu.
3. Části jídla, které se rychleji rozmrazují než ostatní, přikryjte malými kousky
hliníkové fólie. Toto pomáhá zpomalit nebo zastavit proces rozmrazování
v pokrytých částech.
4. Některá jídla by neměla být zcela rozmražena před vařením. Například
ryba se vaří tak rychle, že je mnohokrát lepší začít vařit, pokud je ještě
lehce zmražená.
5. Často je nutné zvýšit nebo snížit dobu vaření jednotlivých receptů, a to
podle počáteční teploty pokrmu.
Poznámka: Vzduch vycházející z větracího ventilu může být horký.
Vaření dozlatova:
Existují pokrmy, které i při nedostatečně dlouhém ohřevu mohou vypadat jako
opečené dozlatova, je třeba je tedy zbarvit do nějaké další barvy.
Polevy jako např. papriková nebo worcester mohou být použity na kotlety,
masové taštičky, nebo kuřecí kousky.
Pečeně, drůbeží nebo šunka, vařená 10-15 minut nebo déle, zhnědne bez
zvláštních přísad, pokud vaříte v kombinovaném režimu.
Page 93

Page 94

8
CZ
INSTALACE NA PRACOVNÍ PLOCHU
Odstraňte všechny balící materiály a
doplňky. Prohlédněte troubu, zda
není poškozena, například
promáčknutí nebo rozbité dveře.
Neinstalujte, pokud je trouba
poškozena.
Skříň: Odstraňte ochrannou fólii
INSTALACE MIKROVLNNÉ TROUBY
1. Vyberte rovnou plochu, která
poskytne dostatečný volný
prostor pro vstupní a/nebo
výstupní ventilační otvory.
7,5cm
(3palce)
7,5cm
(3 palce)
30cm
(12palců)
OTVÍRÁNÍ
nacházející se na povrchu skříně
mikrovlnné trouby.
Neodstraňujte světle hnědý kryt
Mica, který je přiložen k vnitřním
stěnám trouby pro ochranu
magnetronu.
výstupních ventilačních otvorů
může troubu poškodit.
(4) Troubu umisťujte pokud možno
co nejdále od rádií a TV.
Práce mikrovlnné trouby může
způsobit rušení příjmu Vašeho rádia
nebo TV.
2. Vaši troubu připojujte do
standardní domovní zásuvky.
Zkontrolujte napětí a kmitočet
na výkonnostním štítku, zda se
shoduje s napětím a kmitočtem
v místní síti.
Minimální mezera 3.0 palce (7,5 cm)
je zapotřebí mezi troubou a všemi
přilehlými stěnami. Jedna strana musí
být volná.
(1) Ponechte minimální mezeru 30
cm (12 palců) nad troubou.
(2) Neodstraňujte nohy ze spodní
části trouby.
(3) Blokování vstupních a/nebo
VAROVÁNÍ: Troubu neinstalujte
v blízkosti plotny pro vaření nebo
jiných teplo produkujících přístrojů.
Pokud je nainstalována v blízkosti
nebo na zdroji tepla, může se trouba
poškodit a přijdete o záruku k ní.
Page 95

OVLÁDACÍ PANEL
9
CZ
ZOBRAZOVACÍ DISPLEJ
Zobrazuje dobu vaření, výkon, ukazatele a
aktuální čas.
ÚROVEŇ VÝKONU
Stiskněte pro nastavení úrovně výkonu
mikrovlnné trouby.
(ROZMRAZOVÁNÍ DLE HMOTNOSTI/ČASU)
Stiskněte pro rozmrazování dle hmotnosti nebo
času.
WEIGHT / TIME DEFROST
CLOCK / PRESET
(ČAS/PŘEDNASTAVENÍ)
Stiskněte pro nastavení času nebo
přednastavené funkce.
STOP/CLEAR (ZASTAVIT/SMAZAT)
Stiskněte pro zrušení nastavení nebo vynulování
trouby před nastavením programu vaření.
Jednou stiskněte pro dočasné zastavení vaření
nebo dvakrát stiskněte pro ukončení nastavení.
Tímto lze také nastavit dětský zámek.
(SPUSTIT/SNADNÉ
Stiskněte pro spuštění programu vaření
nastavení programu snadného
START/QUICK START/CONFIRM
SPUŠTĚNÍ/POTVRDIT)
nebo
spuštění vaření.
Stiskněte , abyste potvrdili nastavení.
/ AUTO MENU (AUTOMATICKÉ MENU) /
Otáčejte pro výběr nabídek automatického vaření
nebo zadejte čas nebo hmotnost.
Page 96

10
CZ
OBSLUHA
Pokud se mikrovlnná trouba zapojí, zobrazí trouba „0:00“ a reproduktor pípne.
Nastavení hodin
1. Stiskněte blikají hodinové číslice.
2. Otočte pro nastavení číslic hodin, vstupní čas by měl být 24 hodinovou
hodnotou.
3. Stiskněte , minutové číslice začnou blikat.
Otáčejte pro seřízení minutových číslic.
4.
Stiskněte , abyste potvrdili nastavení. “:” bliká na displeji
5.
Poznámka:
1) Pokud nejsou hodiny nastaveny, nebude trouba po zapnutí pracovat.
2) Během nastavování hodin, pokud stlačíte , se trouba automaticky
vrátí do předchozího stavu.
Všeobecná činnost
Jednou stiskněte pro dočasné zastavení, vaření lze spustit
1.
opětovným spuštěním ; nebo dvakrát stiskněte pro
přerušení celého programu vaření.
2.
Po uplynutí doby vaření trouba pětkrát zapípá a vrátí se do pohotovostního
režimu.
3. Každé stisknutí během vaření zvýší dobu vaření o 30 vteřin.
Mikrovlnné vaření
1.
Stiskněte a zobrazí „P100“.
2.
Stiskněte opakovaně nebo otáčejte pro výběr požadovaného
výkonu mikrovlnné trouby.
Výkon mikrovlnné
trouby
Displej P100 P80 P50 P30 P10
3. Potvrďte stisknutím .
Otáčejte pro výběr doby vaření.
4.
100% 80% 50% 30% 10%
Stiskněte pro spuštění vaření.
.
5
Poznámka: Výkon vaření lze vybírat během vlastního vaření stisknutím .
Page 97

11
CZ
Rychlost vaření
V pohotovostním režimu stiskněte pro vaření se 100% výkonem po
30 vteřin. Každé stisknutí tlačítka zvýší dobu vaření o 30 vteřin. Maximální
doba vaření je 95 minut.
Weight Defrost (Rozmrazování dle hmotnosti)
Trouba by se měla používat pro rozmrazování dle zvolené hmotnosti. Doba
rozmrazování a úroveň výkonu se automaticky nastavují, jakmile se zadá
hmotnost. Rozsah rozmrazovaných potravin je v rozmezí 100g až 2000g.
1.
Stiskněte . Na displeji se objeví „dEF1“.
Otáčejte pro výběr požadované hmotnosti potraviny.
2.
Stiskněte pro spuštění rozmrazování.
3.
Poznámka: Když se dosáhne poloviny doby rozmrazování, trouba pípne pro
upozornění, abyste jídlo obrátili.
Rozmrazování dle času
Maximální doba rozmrazování je 95 minut (95:00).
1. Dvakrát stiskněte . Na displeji se objeví „dEF2“.
2. Otáčejte pro výběr požadované doby rozmrazování.
3. Stiskněte pro spuštění rozmrazování.
Poznámka: Každé stisknutí zvýší dobu rozmrazování o 30 vteřin.
Vícestupňové vaření
Vaše trouba může být naprogramována až pro 2 automatické vařící sekvence.
Rozmrazování může být nastaveno jen v prvním stupni.
Poznámka: Automatické vaření nelze vybrat v program vaření.
Dejme tomu, že chcete nastavit následující program vaření:
Stiskněte dvakrát , na displeji se objeví „dEF2“.
1.
Otáčejte pro výběr doby rozmrazování, až se zobrazí „5:00“.
2.
3.
Jednou stiskněte .
Otáčejte nebo opakovaně stiskněte pro výběr úrovně
4.
Mikrovlnné vaření (80% výkon na 7 minut)
Rozmrazování (5 minut)
mikrovlnného výkonu, až se zobrazí „P80“.
5.
Potvrďte stisknutím .
Otáčejte pro výběr doby vaření, až se zobrazí „7:00“.
6.
Stiskněte pro spuštění vaření.
7.
Poznámka: Po dokončení jednoho stupně vaření se ozve pípání značící další
začatý stupeň vaření.
Page 98

12
CZ
Funkce Pre-Set (Přednastavení)
1. Nastavte hodiny. (Viz „Nastavení hodin“)
2. Nastavte program vaření (viz kroky 1 až 6 v části „Vícestupňové vaření“).
Stiskněte blikají hodinové číslice.
3.
Otáčejte pro nastavení číslic hodin, vstupní čas by měl být 24
4.
hodinovou hodnotou.
5. Stiskněte , minutové číslice začnou blikat.
Otáčejte pro seřízení minutových číslic.
6.
Stiskněte pro dokončení nastavení. “:” bliká na displeji
7.
8. Pokud se dosáhne přednastaveného času, ozve se pípnutí, pak se začne
automaticky vařit.
Automatické menu
Pro potraviny v následující tabulce není nutné programovat dobu a výkon
vaření. Dbejte následujících kroků:
V pohotovostním režimu otáčejte ve směru otáčení hodinových ručiček
1.
pro výběr požadovaného menu z tabulky níže.
Potvrďte stisknutím .
2.
Otočte pro výběr hmotnosti potraviny.
3.
4.
Stiskněte pro spuštění vaření.
Nabídka Hmotnost (g) Výkon vaření
200
A-1
PŘIHŘÍVÁNÍ
400
600
200
A-2
ZELENINA
300
400
250
A-3
RYBA
350
450
250
A-4
MASO
350
450
100%
100%
80%
100%
A-5
TĚSTOVINY
A-6
BRAMBORY
A-7
PIZZA
-
A8
POLÉVKA
50 (s 450 g vody)
100 (s 800g vody)
200
400
600
200
400
200
400
80%
100%
100%
80%
Page 99

Page 100

 Loading...