

Page 1
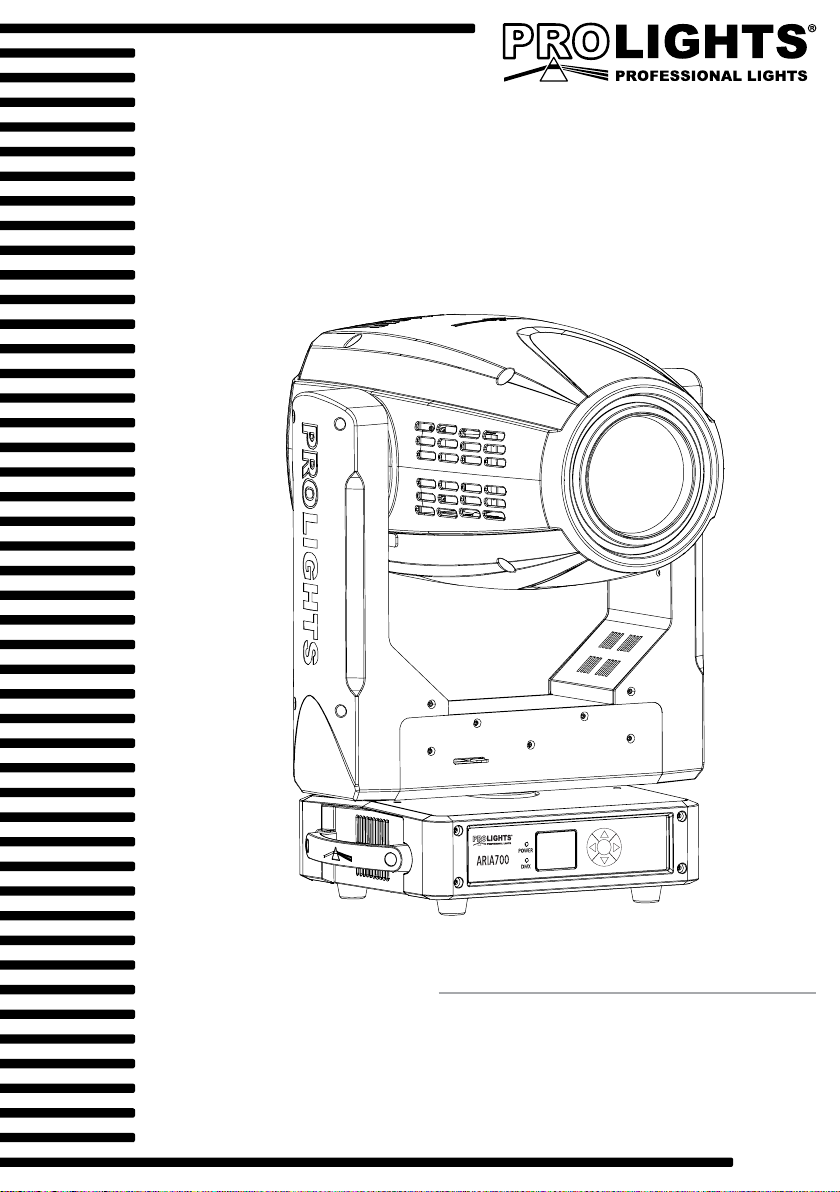
ARIA700SPOT
MOVING HEAD
MANUALE UTENTE
USER MANUAL
IT - EN
Page 2

Music & Lights S.r.l. si riserva ogni diritto di elaborazione in qualsiasi forma delle presenti istruzioni per l’uso.
Al ne di migliorare la qualità dei prodotti, la Music&Lights S.r.l. si riserva la facoltà di modicare, in
qualunque momento e senza preavviso, le speciche menzionate nel presente manuale di istruzioni.
Tutte le revisioni e gli aggiornamenti sono disponibili nella sezione 'Manuali' sul sito www.musiclights.it
La riproduzione - anche parziale - per propri scopi commerciali è vietata.
REV.001-05/17
Page 3

ARIA700SPOT
3
INDICE
Sicurezza
Avvertenze generali
Attenzioni e precauzioni per l’installazione
1 Introduzione
1. 1 Descrizione
1. 2 Speciche tecniche
1. 3 Elementi di comando e di collegamento
2 Installazione
2. 1 Montaggio
3 Funzioni e impostazioni
3. 1 Funzionamento
3. 2 Impostazione base
3. 3 Utilizzo del menu
3. 4 Struttura menu
3. 5 Collegamento
3. 6 Connect
Indirizzo DMX
Modalità DMX
Wireless
Artnet
3. 7 Setup
Movement
Screen
Fixture
Auto test
Manual Test
3. 8 Advanced
Reset
Adjust
Factory reload
3. 9 Information
3. 10 Collegamenti della linea DMX
3. 11 Costruzione del terminatore DMX
3. 12 Canali DMX
3. 13 Wheels
4
4
5
5
7
8
9
9
10
10
13
13
13
13
13
13
14
14
14
14
15
15
15
15
16
16
16
17
17
18
22
Contenuto dell'imballo:
4 Manutenzione
4. 1 Manutenzione e pulizia del sistema ottico
4. 2 Sostituzione fusibile
4. 3 Risoluzione dei problemi
• ARIA700SPOT
• Staa di ssaggio
• Manuale utente
23
23
24
Page 4
4
ATTENZIONE! Prima di effettuare qualsiasi operazione con l’unità, leggere con attenzione
questo manuale e conservarlo accuratamente per riferimenti futuri. Contiene informazioni
importanti riguardo l’installazione, l’uso e la manutenzione dell’unità.
ARIA700SPOT
SICUREZZA
Avvertenze generali
• I prodotti a cui questo manuale si riferisce sono conformi alle Direttive della Comunità Europea e pertanto recano la sigla .
• Il dispositivo funziona con pericolosa tensione di rete 230V~. Non intervenire mai al suo interno al di
fuori delle operazioni descritte nel presente manuale; esiste il pericolo di una scarica elettrica.
• È obbligatorio eettuare il collegamento ad un impianto di alimentazione dotato di un’eciente messa
a terra (apparecchio di Classe I secondo norma EN 60598-1). Si raccomanda, inoltre, di proteggere le
linee di alimentazione delle unità dai contatti indiretti e/o cortocircuiti verso massa tramite l’uso di
interruttori dierenziali opportunamente dimensionati.
• Le operazioni di collegamento alla rete di distribuzione dell’energia elettrica devono essere eettuate
da un installatore elettrico qualicato. Vericare che frequenza e tensione della rete corrispondono alla
frequenza ed alla tensione per cui l’unità è predisposta, indicate sulla targhetta dei dati elettrici.
• L’unità non per uso domestico, solo per uso professionale.
• Evitare di utilizzare l’unità:
- in luoghi soggetti a vibrazioni, o a possibili urti;
- in luoghi a temperatura superiore ai 45°C.
• Evitare che nell’unità penetrino liquidi inammabili, acqua o oggetti metallici.
• Non smontare e non apportare modiche all’unità.
• Tutti gli interventi devono essere sempre e solo eettuati da personale tecnico qualicato. Rivolgersi al
più vicino centro di assistenza tecnica autorizzato.
• Se si desidera eliminare il dispositivo denitivamente, consegnarlo
per lo smaltimento ad un’istituzione locale per il riciclaggio.
Attenzioni e precauzioni per l’installazione
• Se il dispositivo dovesse trovarsi ad operare in condizioni dierenti da quelle descritte nel presente
manuale, potrebbero vericarsi dei danni; in tal caso la garanzia verrebbe a decadere. Inoltre, ogni altra
operazione potrebbe provocare cortocircuiti, incendi, scosse elettriche, rotture etc.
• Prima di iniziare qualsiasi operazione di manutenzione o pulizia sull’unità togliere la tensione dalla rete
di alimentazione.
• È assolutamente necessario proteggere l’unità per mezzo di una fune di sicurezza. Nell’eseguire qualsiasi intervento attenersi scrupolosamente a tutte le normative (in materia di sicurezza) vigenti nel
paese di utilizzo.
• Questo prodotto è solo per uso interno.
• La distanza minima tra il proiettore e le pareti circostanti deve essere superiore a 50 cm e non devono
essere ostruite, in nessun caso, le aperture di aerazione.
• Installare l’unità in un luogo ben ventilato.
• Mantenere i materiali inammabili ad una distanza di sicurezza dall’unità.
• La temperatura massima raggiungibile sulla supercie esterna dell’unità, in condizioni di regime termico, è elevata. Dopo lo spegnimento, attendere 15 minuti per il rareddamento.
• I ltri, le lenti o gli schermi ultravioletti se danneggiati possono limitare la loro ecienza.
• I LED devono essere sostituiti se danneggiati o termicamente deformati.
• Non guardare direttamente il fascio luminoso. Tenete presente che i veloci cambi di luce possono provocare attacchi d’epilessia presso persone fotosensibili o epilettiche.
Page 5

ARIA700SPOT
5
- 1 - INTRODUZIONE
1.1 DESCRIZIONE
ARIA700 è stato progettato n dall’inizio per fornire la essibilità creativa e la precisione che le produzioni
richiedono dai teatri di trasmissione e di grandi arene.
1.2 SPECIFICHE TECNICHE
SORGENTE LUMINOSA
• Sorgente: 400W custom RGBW LEDs
• CT: Tunable 2700K~8000K
• Flusso luminoso: 5474lm
• Lux: (10°) 19986 - (40°) 1797lux @3m Full
• Lux: (10°) 7880 - (40°) 647lux @5m Full
• Durata media sorgente: >20.000 h
OTTICA
• Zoom: 10-40° Motorizzato, Lineare
• Tipo lente: Lenti antiriesso ad alta denizione con trattamento acromatico
• Focus: Motorizzato con autofocus
• Altro: High quality at eld projection
SISTEMA COLORE
• Color Mixing: RGBW/FC
• White Presets: 2000K ~ 10000K
• Ruota colori: Ruota colori virtuale con preset
EFFETTI DINAMICI
• Animation Wheel: Ruota animazione indicizzabile con rotazione oraria e antioraria
• Gobos Rotanti: 7 gobo rotanti+Open, Intercambiabili, Indicizzabili
• Gobos Fissi: 8 gobos ssi+Open
• Prisma Circolare: 3f con rotazione bidirezionale, Indicizzabile
• Frost: 0-100%, Lineare
• Iris: 5-100% motorizzato lineare
CORPO
• Risoluzione Pan/Tilt: 16 bit
• Feedback: Riposizionamento automatico in seguito a spostamenti acciden
• Corpo: Struttura in alluminio con coperture in policarbonato ad alta resistenza
• Colore: Nero
CONTROLLO
• Protocolli: DMX512, RDM, Art-Net
• W-DMX: Integrato, ricevitore ad antenna (2.4 GHz) by Wireless Solution Sweden
• RDM: RDM ready per controllo e impostazioni remote della xture
• Display: Display a colori LCD ad alta risoluzione con rotazione automatica
• Upgrade Firmware: Si, con interfaccia USB-DMX (UPBOX1) non inclusa
ELETTRONICA
• Dimmer: 0~100% lineare, Elettronico
Page 6
6
• Curve Dimmer: 4 Curve dimmer regolabili
• Strobo/Shutter: 1-28 Hz, elettronico
• Temperatura d’esercizio: -10° ~ +45°
• Flicker: Flicker free
ALIMENTAZIONE
• Power Supply: 100-240V – 50/60Hz
• Potenza assorbita (a 230V): 435W
• Potenza assorbita (a 120V): 436W
• Output (a 230V): 4 unità connesse in serie
• Output (a 120V): 2 unità connesse in serie
CARATTERISTICHE FISICHE
• Connessioni di segnale: 5p in/out, RJ45 in/out
• Connessioni di alimentazione: PowerCON TRUE1 in/out
• IP: 20
• Rareddamento: Sistema di dissipazione a liquido
• Pan/Tilt Lock: Sistema Pan/Tilt lock per il trasporto e manutenzione
• Sospensione e ssaggio: Qualsiasi posizione con supporti omega (inclusi) “quicklock”
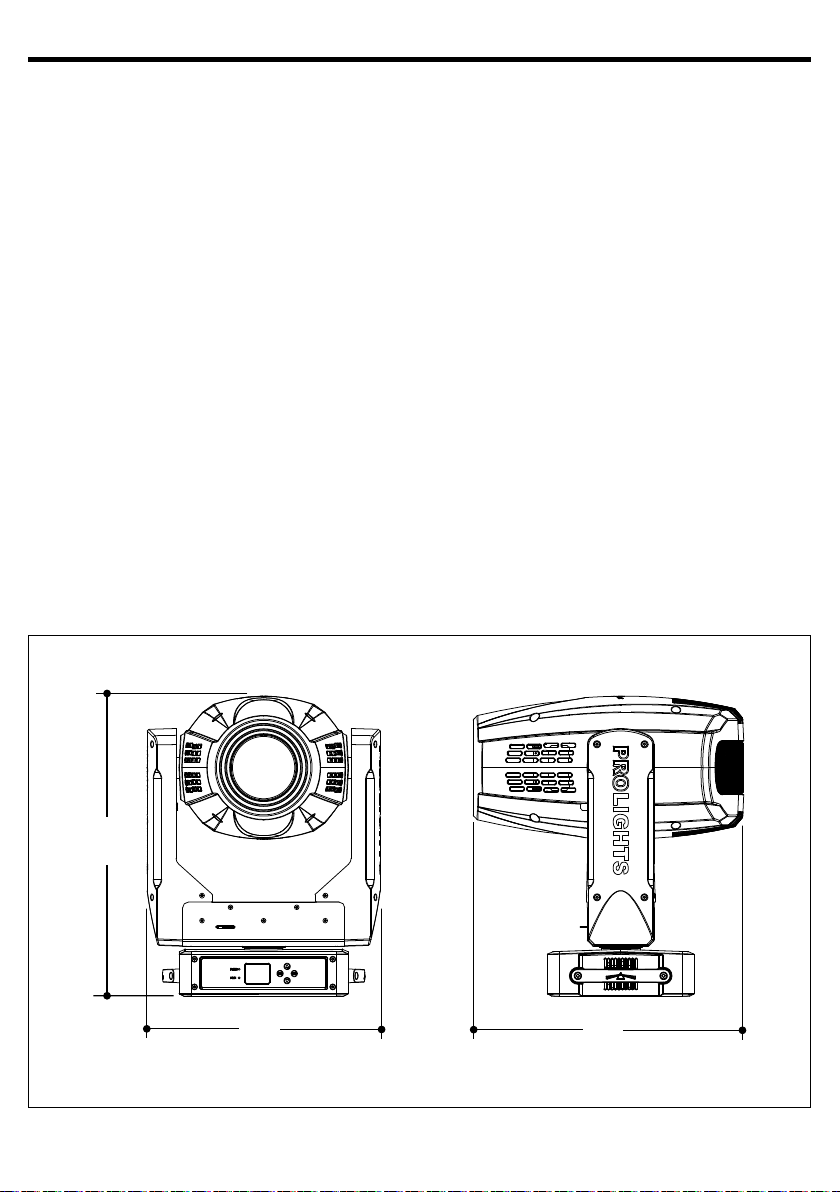
• Dimensioni (LxAxP): 408x676x257mm
• Peso: 22.7kg
ARIA700SPOT
526
408
474
Disegno tecnico
Fig.1
Page 7
ARIA700SPOT
1.3 ELEMENTI DI COMANDO E DI COLLEGAMENTO
1
2
3
4
5
9
6
7
11 14
8
13
7
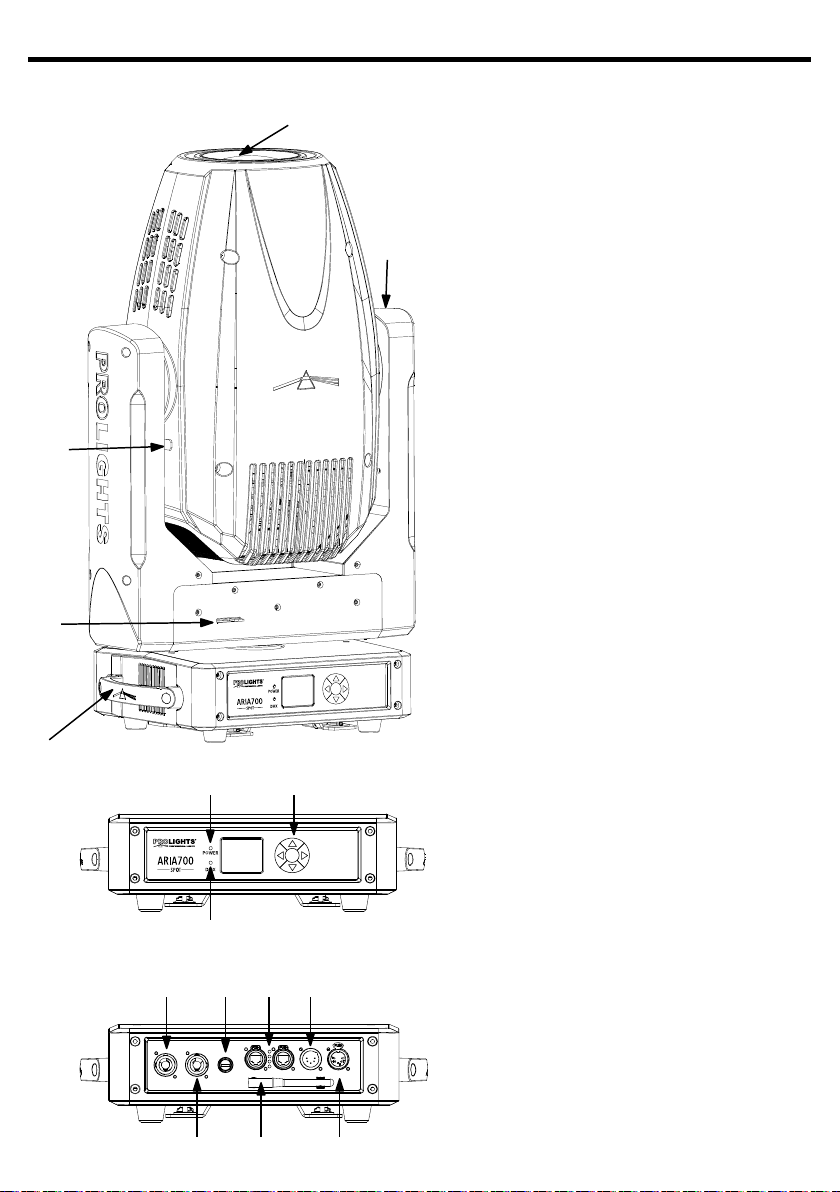
1. TESTA MOBILE
2. BRACCIO GIREVOLE
3. BLOCCO E SBLOCCO MOVIMENTO
TILT
4. BLOCCO E SBLOCCO MOVIMENTO
PAN
5. MANIGLIA PER TRASPORTO
6. INDICATORE CONNESSIONE
ELETTRICA
7. INDICATORE SEGNALE DMX
8. PANNELLO DI CONTROLLO con
display LCD e 5 pulsanti per
l'accesso e gestione delle diverse
funzioni.
9. POWER IN (PowerCON TRUE IN):
per il collegamento ad una presa
di rete (100-240V~/50-60Hz)
tramite il cavo rete in dotazione.
10. POWER OUT (PowerCON TRUE
OUT): per il collegamento ad una
presa di rete (100-240V~/50-60Hz)
tramite il cavo rete in dotazione.
11. PORTAFUSIBILE: sostituire un
fusibile difettoso solo con uno
dello stesso tipo.
12. Antenna Wi-Fi
13. ARTNET IN/OUT (RJ45):
14. DMX IN (XLR a 5 poli):
1 = massa, 2 = DMX -, 3 = DMX +,
4 N/C, 5 N/C
15. DMX OUT (XLR a 5 poli):
1= massa, 2 = DMX -, 3 = DMX +,
4 N/C, 5 N/C
10 15
12
Fig.2
Page 8
8
ARIA700SPOT
- 2 - INSTALLAZIONE
2.1 MONTAGGIO
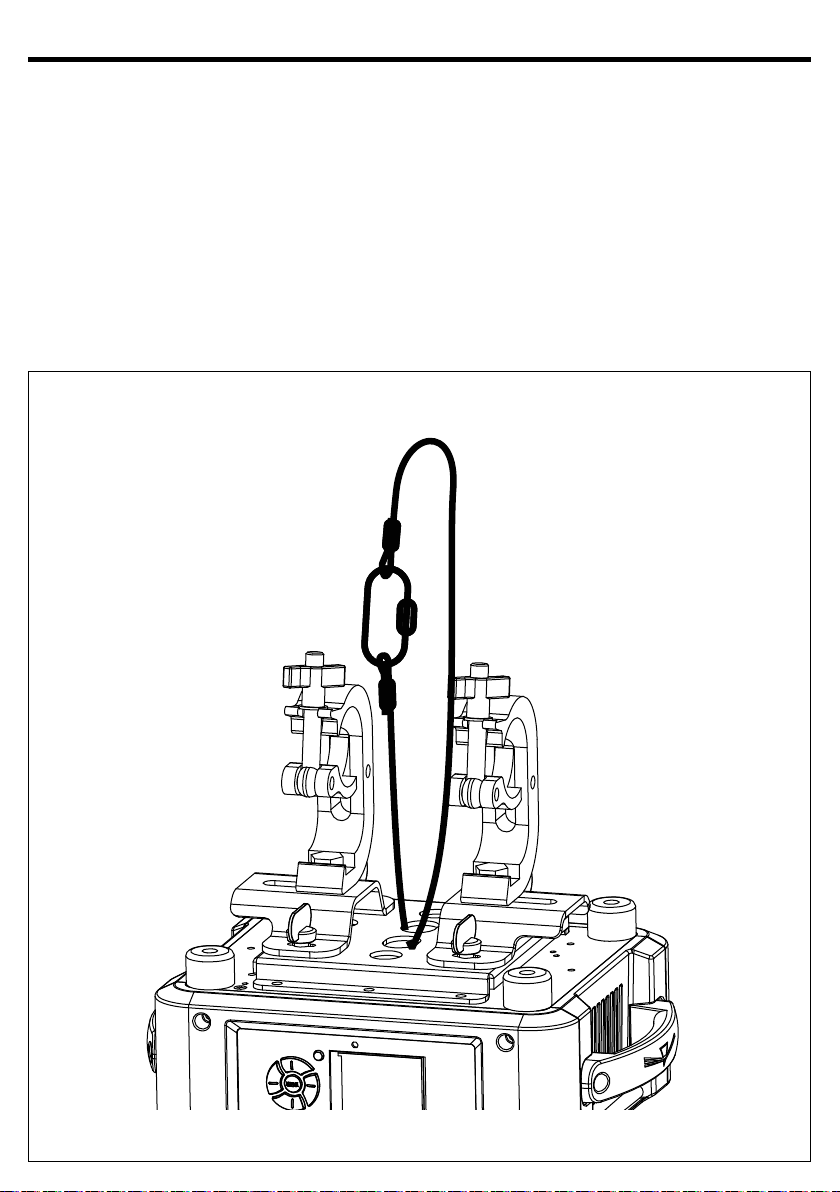
Il ARIA700 può essere collocato su un piano solido. Inoltre, grazie ai fori di ssaggio, l’unità può essere
montata anche a testa in giù, su una traversa (g.3). Per il ssaggio occorrono dei supporti robusti per il
montaggio. Come si vede nell’illustrazione, i perni del sistema di aggancio rapido, dei supporti omega,
sono da inserire nelle apposite sedi della piastra dove vengono bloccati con una rotazione in senso orario
(no all’arresto). Assicurarsi che l’unità sia saldamente ssata al ne di evitare vibrazioni e scivolamenti
durante il funzionamento. L’area di collocazione deve avere una stabilità suciente e supportare almeno
10 volte il peso dell’unità. Inoltre assicurarsi di rispettare tutte le avvertenze in materia di sicurezza. È assolutamente necessario assicurare il proiettore contro la caduta utilizzando un cavo di sicurezza: in particolare collegare il cavo in un punto adatto in modo che la caduta del proiettore non possa superare i 20 cm.
CAVO DI
SICUREZZA
GANCIO
SUPPORTI
OMEGA
Fig.3
Page 9
ARIA700SPOT
STAND ALONE
9
- 3 - FUNZIONI E IMPOSTAZIONI
3.1 FUNZIONAMENTO
Per accendere il ARIA700 inserire la spina del cavo di alimentazione in una presa di rete (100-240V~/5060Hz). La testa mobile e tutti i motori di comando si mettono in una precisa posizione di partenza. Poco
dopo l’unità è pronta. Per spegnere il ARIA700, staccare la spina dalla presa di rete. Per maggiore comodità
è consigliabile collegare l’unità con una presa comandata da un interruttore.
3.2 IMPOSTAZIONE BASE
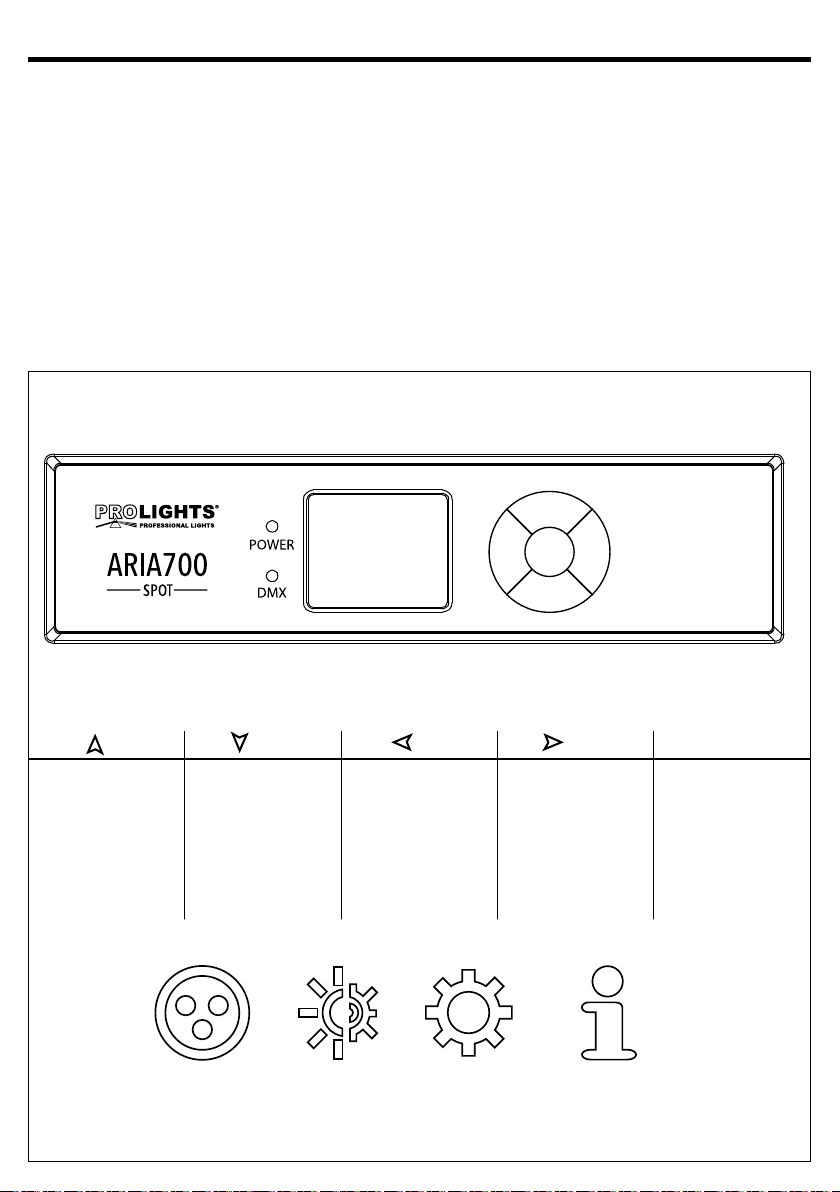
Sul pannello di controllo del ARIA700 sono presenti il display ed i pulsanti che permettono la gestione del
menu e la completa programmazione del proiettore (g.4).
UP
Per incrementare il
valore visualizzato
oppure passare alla voce
precedente di menu
DOWN
Per decrementare il
valore visualizzato
oppure passare alla voce
seguente di menu
Per ritornare al menu
precedente
LEFT RIGHT
Per passare nei menu dal
valore centinaia a quello
decine no a unità
CONNECT SETUP ADVANCED INFORMATION
Fig.4 - Funzione dei tasti e icone display
ENTER
Per entrare nel menu
successivo o confermare
il valore visualizzato
oppure per attivare la
funzione visualizzata
Page 10

10
3.3 UTILIZZO DEL MENU
1. Premere il tasto ENTER per accedere al menu principale.
2. Con i tasti UP/DOWN selezionare il menu su cui si desidera operare:
• Connect;
• Setup;
• Advanced;
• Information;
3. Premere il tasto ENTER per visualizzare la prima voce del menu selezionato.
4. Con i tasti UP/DOWN selezionare le voci del menu.
NOTA - Il display può trovarsi in due condizioni possibili: lo stato di riposo e lo stato di impostazione.
Quando si trova nello stato di riposo, il display mostra l’indirizzo DMX del proiettore. Invece, durante lo
stato di impostazione del menu, quando trascorre un certo tempo di attesa senza che venga premuto
alcun tasto, la visualizzazione torna automaticamente allo stato di riposo. Si noti che al vericarsi di questa
condizione, un eventuale valore modicato ma non ancora confermato con il tasto ENTER verrà annullato.
3.4 STRUTTURA MENU
MENU
1 CONNECT
2 SET UP
ð
ð
DMX Address
DMX Mode
Wireless
Ethernet
Movement
Screen
Fixture
ARIA700SPOT
Value (1-512)
ð
Standard 23CH
ð
Extended 28CH
Receive
ð
Receive reset
Universe
ð
Start Channel
IP address
Pan Reverse
ð
Tilt Reverse
Pan Feedbacks
Tilt Feedbacks
Backlight
ð
Flip Display
Warn Cue
Key Lock
White Balance
ð
Dimmer Mode
ð
Fans Mode
ð
Theater Mode
ð
Temperature Unit
ð
ð
ð
ð
ð
ð
ð
ð
ð
ð
ð
ð
ð
ð
ð
ð
ð
ð
ð
ð
ON/OFF
YES/NO
0-255
1-512
2/10.133.139.215
YES/NO
YES/NO
YES/NO
YES/NO
Always On/10s/20s/30s
YES/NO/AUTO
ON/OFF
YES/NO
OFF
MANUAL (RGBW 125-255)
O/Dimmer1/Dimmer2/
Dimmer3
Auto Speed/High Speed
Auto/Silent/O
C/F
Page 11

ARIA700SPOT
11
3 ADVANCED
ð
ð
ð
ð
Auto Test
Manual Test
Reset
Adjust
Auto Test
ð
Pan 000-255
ð
Pan Fine 000-255
ð
Tilt 000-255
ð
Tilt Fine 000-255
ð
P/T Speed 000-255
ð
Dimmer 000-255
ð
Shutter 000-255
ð
Red 000-255
ð
Green 000-255
ð
Blue 000-255
ð
White 000-255
ð
Gobo1 000-255
ð
RGobo1 000-255
ð
Gobo2 000-255
ð
PrismRot. 000-255
ð
Eect 000-255
ð
REect 000-255
ð
Focus 000-255
ð
Zoom 000-255
ð
Frost 000-255
ð
Iris 000-255
ð
All
ð
Pan
ð
Tilt
ð
Gobo1
ð
Gobo2
ð
Prism
ð
Eect
ð
Focus
ð
Zoom
ð
Frost
ð
Iris
ð
Pan
ð
ð
000-255
Page 12

12
ARIA700SPOT
4 INFORMATION
ð
ð
Factory Reload
Fixture Time
Temperature
Fans Speed
Software Vers.
UID
Tilt
ð
Gobo
ð
RGobo
ð
Prism
ð
Eect
ð
Focus
ð
Zoom
ð
Frost
ð
Iris
ð
YES/NO
ð
0-9999
ð
58 °C
ð
**%
ð
DISP- V1.0
NET-V1.0
CTR1-XY- V1.0
ð
CTR2-MOTOR-V1.0
CTR3-MOTOR-V1.0
15D00214****
ð
ð
ð
ð
ð
ð
ð
ð
ð
ð
000-255
000-255
000-255
000-255
000-255
000-255
000-255
000-255
000-255
Page 13

ARIA700SPOT
3.5 COLLEGAMENTO
Si possono collegare più unità anché tutte le unità secondarie abbiano lo stesso eetto luce dell’unità
principale (Master).
1. Collegare l’uscita DMX OUT dell’unità principale con l’ingresso DMX IN della prima unità secondaria
servendosi di un cavo XLR a 3/5 poli.
2. Collegare l’uscita DMX OUT della prima unità secondaria con l’ingresso DMX IN della seconda unità
secondaria ecc.
3.6 CONNECT
INDIRIZZO DMX
Per entrare nella modalità DMX procedere nel seguente modo:
• Premere il tasto ENTER per accedere al menu principale.
• Premere il tasto UP/DOWN per scorrere nel menu, selezionare Connect, quindi premere il tasto ENTER per
accedere al menu successivo Address.
• Premere il tasto ENTER e selezionare DMX con il tasto UP/DOWN, quindi confermare la scelta con il tasto
ENTER.
• Impostare con i tasti direzionali il valore desiderato (001-512). Premere il tasto ENTER per confermare.
• Premere il tasto LEFT più volte per uscire dal menu e per salvare le modiche apportate.
MODALITA’ DMX
ARIA700 dispone di più congurazioni dei canali DMX a cui si può accedere dal pannello di controllo.
• Premere il tasto MENU per accedere al menu principale.
• Premere il tasto UP/DOWN per scorrere nel menu, selezionare Connect, quindi premere il tasto ENTER per
accedere al menu successivo DMX Mode.
• Attraverso il tasto UP/DOWN selezionare la congurazione dei canali DMX desiderata, quindi premere
il tasto ENTER per confermare la scelta.
• Premere il tasto MENU più volte per uscire dal menu e per salvare le modiche apportate.
13
WIRELESS
Selezionare questa funzione per impostare la modalità di funzionamento del wireless:
• Premere il tasto ENTER per accedere al menu principale.
• Premere il tasto UP/DOWN per scorrere nel menu, selezionare Connect, quindi premere il tasto ENTER per
accedere al menu successivo Wireless.
• Selezionare l’opzione proposta con il tasto UP/DOWN e premere il tasto ENTER per confermare.
- Receive on/o - Per attivare la modalità di ricezione wireless utilizzare i tasti UP/DOWN e selezionare
l’opzione On.
- Receive Reset - Per eettuare il reset dell’unità.
ARTNET
Per le impostazioni ArtNet da attribuire all’unità far riferimento alla seguente sezione del menu.
• Premere il tasto UP/DOWN per scorrere nel menu, selezionare Connect, quindi premere il tasto ENTER per
accedere al menu successivo Ethernet con il tasto UP/DOWN, quindi premere il tasto ENTER.
• Selezionare con i tasti UP/DOWN una delle seguenti impostazioni: Universe, Start Channel, IP Address.
• Premere il tasto ENTER per confermare la scelta ed entrare nel sub menu.
• Impostrare mediante i tasti UP/DOWN il valore desiderato relativo alla funzione scelta. Quindi premere
il tasto ENTER.
• Premere il tasto MENU per tornare indietro o attendere alcuni secondi per uscire dal menu di impostazione.
Page 14

14
3.7 SETUP
È possibile modicare i parametri relativi al dispositivo procedendo nel seguente modo:
MOVEMENT
• Premere il tasto ENTER per accedere al menu principale.
• Premere il tasto UP/DOWN per scorrere nel menu, selezionare S et Up, quindi premere il tasto ENTER per
accedere al menu successivo.
• Premere il tasto UP/DOWN per selezionare Movement e premere il tasto ENTER per procedere.
• Selezionare l’opzione proposta con il tasto UP/DOWN e premere il tasto ENTER per confermare.
- Pan Reverse - Rotazione in senso opposto della testa mobile. NO per disattivare la funzione (impostazione normale); YES per attivare la funzione (Pan Reverse).
- Tilt Reverse - Inclinazione in senso opposto della testa mobile. NO per disattivare la funzione (impostazione normale), YES per attivare la funzione (Tilt Reverse).
- Pan/Tilt Feedbacks - Riassetto posizione Pan/Tilt dopo spostamento accidentale. Selezionare NO per
disattivare la funzione oppure YES per attivare la funzione.
• Premere il tasto ENTER per confermare la scelta.
• Premere il tasto MENU più volte per uscire dal menu e per salvare le modiche apportate.
SCREEN
È possibile modicare i seguenti parametri, relativi al display, seguendo la medesima procedura:
• Premere il tasto ENTER per accedere al menu principale.
• Premere il tasto UP/DOWN per scorrere nel menu, selezionare S et Up, quindi premere il tasto ENTER per
accedere al menu successivo.
• Premere il tasto UP/DOWN per selezionare Screen e premere il tasto ENTER per procedere.
• Selezionare l’opzione proposta con il tasto UP/DOWN e premere il tasto ENTER per confermare.
- Backlight - Retroilluminazione display Auto O. Questa funzione permette di spegnere automaticamente la retroilluminazione del display dopo un determinato tempo che può essere impostato
tramite i tasti direzionali. Per avere il display sempre acceso seleziona Always On oppure impostare un
valore tra quelli indicati per far spegnere il display una volta trascorso il tempo scelto, dopo l’uscita
dal menu.
- Flip Display - Orientamento del display. Questa funzione permette di ruotare il display di 180° per
ottenere una migliore visualizzazione del display quando l’unità è appesa a testa in giù. Selezionare
YES per attivare la funzione oppure NO per disattivarla.
- Warn Cue - Avviso di errore. Usare i tasti direzionali per selezionare OFF oppure ON a seconda che si
voglia o meno che il display mostri avvisi di errore.
- Key lock - Blocco tasti. Con questa funzione è possibile bloccare i tasti del pannello di controllo,
per evitare, ad esempio, manomissioni delle impostazioni. Se questa funzione viene attivata, i tasti
vengono bloccati automaticamente. Per disattivare o temporaneamente o disattivare la funzione
di blocco tasti, premere i tasti nel seguente ordine per riottenere l’accesso ai comandi di menu:
SU, GIÙ, SU, GIÙ, ENTER, ENTER. Selezionare YES per attivare la funzione oppure NO per disattivarla.
• Premere il tasto ENTER per confermare la scelta.
• Premere il tasto MENU più volte per uscire dal menu e per salvare le modiche apportate.
ARIA700SPOT
FIXTURE
White Balance - Funzione Bilanciamento del bianco. Selezionare la funzione White Balance per impostare il
bilanciamento del bianco modicando i valori (125 - 255) dei colori Red, Green, Blue e White.
Dimmer Mode - Funzione Dimmer. Selezionare la funzione Dimmer Mode, per entrare nella modalità dimmer e
scegliere e simulare diverse curve dimming. In particolare, quando è impostato su:
• O - L’aumento dell’intensità luminosa è lineare.
• Dimmer 1 - Il controllo dell’intensità luminosa è più ne a livelli bassi e grossolana a livelli alti.
Page 15

ARIA700SPOT
• Dimmer 2 - Il controllo dell’intensità luminosa è più ne a livelli alti e grossolana a livelli bassi.
• Dimmer 3 - Il controllo dell’intensità luminosa è più ne a livelli bassi e alti, e grossolana a livelli medi.
Fans Mode - selezionare questa funzione per impostare la modalità di funzionamento delle ventole:
• Premere il tasto ENTER per accedere al menu principale.
• Premere il tasto UP/DOWN per scorrere nel menu, selezionare SET UP, quindi premere il tasto ENTER per
accedere al menu successivo.
• Premere il tasto UP/DOWN per selezionare FIXTURE e premere il tasto ENTER per procedere.
• Premere il tasto UP/DOWN per scorrere nel menu, quindi selezionare Fans Mode e premere il tasto
ENTER per confermare.
• Premere il tasto UP/DOWN per selezionare la modalità Auto Speed/High Speed, quindi premere il tasto
ENTER per confermare la scelta.
• Premere il tasto MENU più volte per uscire dal menu e per salvare le modiche apportate
Theater Mode - questa modalità permette una funzionamento ideale in teatri e studi televisivi inuendo sulla
rumorosità delle ventole e sul bialnciamento del bianco:
• Premere il tasto ENTER per accedere al menu principale.
• Premere il tasto UP/DOWN per scorrere nel menu, selezionare SET UP, quindi premere il tasto ENTER per
accedere al menu successivo.
• Premere il tasto UP/DOWN per selezionare FIXTURE e premere il tasto ENTER per procedere.
• Premere il tasto UP/DOWN per scorrere nel menu, quindi selezionare Theater Mode e premere il tasto
ENTER per confermare.
• Premere il tasto UP/DOWN per selezionare la modalità Auto Speed/Silent/O, quindi premere il tasto
ENTER per confermare la scelta.
• Premere il tasto MENU più volte per uscire dal menu e per salvare le modiche apportate
15
Temperature - Selezionare questa funzione per impostare l’unità di misura della temperatura visualizzata
sul display:
• Premere il tasto ENTER per accedere al menu principale.
• Premere il tasto UP/DOWN per scorrere nel menu, selezionare l’icona Set, quindi premere il tasto ENTER
per accedere al menu successivo.
• Premere il tasto UP/DOWN per selezionare UI Set e premere il tasto ENTER per procedere.
• Premere il tasto UP/DOWN per scorrere nel menu, quindi selezionare Temperature C/F e premere il
tasto ENTER per confermare.
• Premere il tasto UP/DOWN per selezionare l’unità di misura Celsius/Fahrenheit, quindi premere il tasto
ENTER per confermare la scelta.
• Premere il tasto MENU più volte per uscire dal menu e per salvare le modiche apportate.
Auto e Manual test - Attraverso queste menu è possibile testare il funzionamento di tutte le funzioni della
testa mobile.
3.8 ADVANCED
Reset
È possibile avviare un programma preimpostato per ripristinare la funzione selezionata:
• Premere il tasto ENTER per accedere al menu principale.
• Premere il tasto UP/DOWN per scorrere nel menu, selezionare Advanced, quindi premere il tasto ENTER
per accedere al menu successivo.
• Premere il tasto UP/DOWN per selezionare Reset e premere il tasto ENTER per accedere al menu successivo.
Page 16

16
• Premere il tasto UP/DOWN per scorrere nel menu, quindi selezionare la funzione che si desidera resettare fra All, Pan, Tilt, Gobo1, Gobo2, Prism, Eect, Focus, Zoom, Frost, Iris.
• Premere il tasto ENTER per confermare la scelta ed attendere il ripristino della funzione selezionata.
Adjust
Questa funzione consente di calibrare tutti i seguenti parametri: Pan , Tilt , Gobo , RGobo , Prism , Eect , Focus
, Zoom , Frost , Iris Oset. Premere i tasti UP/DOWN per selezionare uno dei parametri e premere ENTER per
modicarne il valore (000-255) attraverso i tasti UP/DOWN.
• Premere il tasto ENTER per accedere al menu principale.
• Premere il tasto UP/DOWN per scorrere nel menu, selezionare Advanced, quindi premere il tasto ENTER
per accedere al menu successivo.
• Premere il tasto ENTER per confermare la scelta.
• Premere il tasto MENU più volte per uscire dal menu e per salvare le modiche apportate.
Factory Reload
Selezionare questa funzione per ripristinare l’unità alle impostazioni di fabbrica:
• Premere il tasto ENTER per accedere al menu principale.
• Premere il tasto UP/DOWN per scorrere nel menu, selezionare Advanced, quindi premere il tasto ENTER
per accedere al menu successivo.
• Premere il tasto UP/DOWN per selezionare Factory Reload e premere il tasto ENTER per procedere.
• Premere i tasti UP/DOWN per selezionare YES oppure NO, quindi premere il tasto ENTER per confermare.
3.9 INFORMATION
Per visualizzare tutte le informazioni sul dispositivo procedere nel seguente modo:
• Premere il tasto ENTER per accedere al menu principale.
• Premere il tasto UP/DOWN per selezionare Information, quindi premere il tasto ENTER per accedere al
menu successivo.
• Premere il tasto UP/DOWN per scorrere nel menu, quindi selezionare una delle seguenti informazioni e
premere il tasto ENTER per visualizzarla.
- Fixture Time - Attraverso la funzione Fixture Time è possibile visualizzare sul display il tempo di funzionamento del proiettore.
- Temperature - Attraverso la funzione Temperature è possibile visualizzare sul display la temperatura
presente all’interno della testa mobile, dove è situata la lampada. La temperatura può essere visualizzata in gradi Celsius o Fahrenheit.
- Fans Speed - Attraverso la funzione Fans Speed è possibile visualizzare sul display la velocità della ventola presente vicino la lampada. La misura della velocità è espressa in RPM (giri per minuto).
- Software Version - Attraverso la funzione Software Version è possibile visualizzare sul display la versione
del software installata.
- UID - Selezionare la funzione UID per visualizzare l’ID identicativo per il controllo RDM.
• Premere il tasto MENU più volte per uscire dal menu.
ARIA700SPOT
RDM - Questa xture possiede la funzione di RDM (Remote Device Management) che rende possibile il
controllo remoto di dispositivi connessi via DMX Con questa funzione è possibile richiamare i vari sottomenu
dell'unità. Le impostazioni manuali, come ad esempio l'indirizzamento DMX, non sono più necessarie. I dati
RDM vengono trasmessi tramite lo standard XLR a poli 1 e 2, per questo non sono necessari dei cavi DMX
appositi. Tecnologia RDM e dispositivi DMX convenzionali possono operare su un'unica linea DMX. Nel caso
in cui vengano utilizzati splitter DMX ed un controller RDM, lo splitter dovrà supportare il protocollo RDM.
Page 17
ARIA700SPOT
17
3.10 COLLEGAMENTI DELLA LINEA DMX
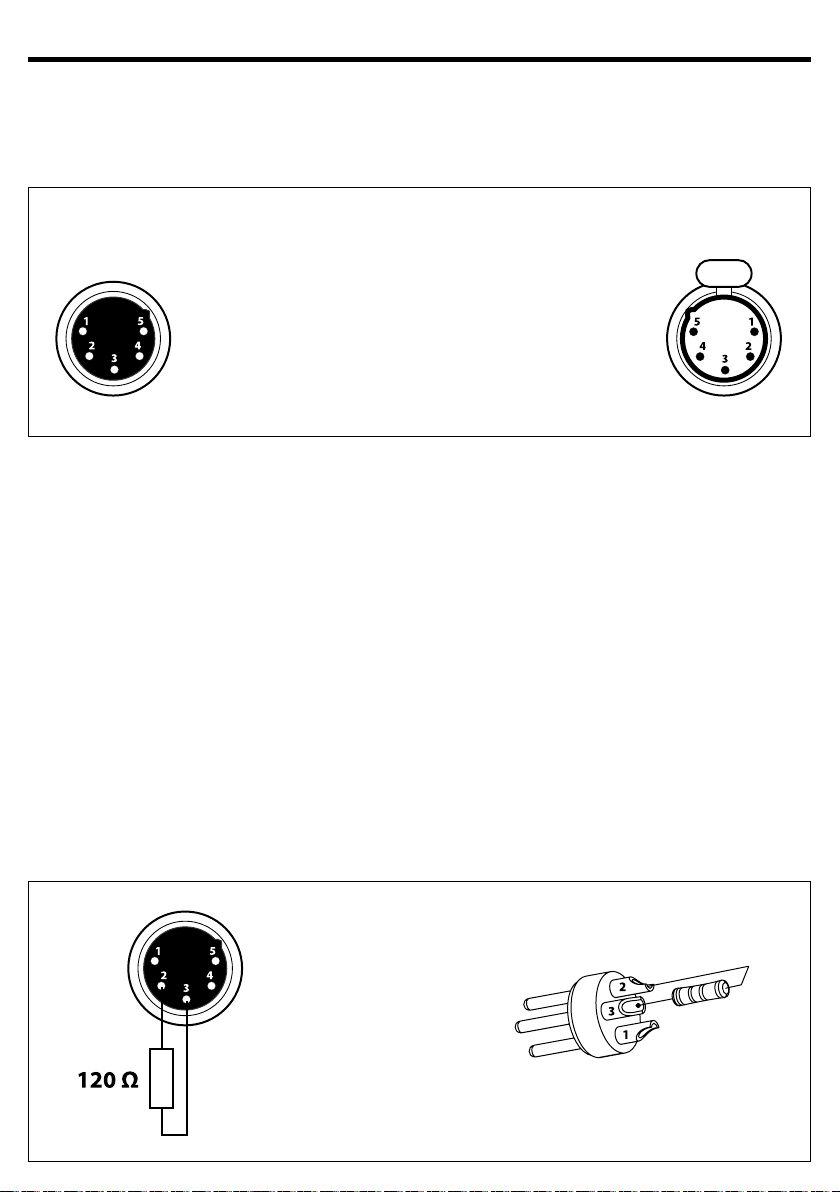
La connessione DMX è realizzata con connettori standard XLR. Utilizzare cavi schermati, 2 poli ritorti, con
impedenza 120Ω e bassa capacità.
Per il collegamento fare riferimento allo schema di connessione riportato di seguito:
DMX - INPUT
Spina XLR
Pin1 : Massa - Schermo
Pin2 : - Negativo
Pin3 : + Positivo
Pin4 : N/C
Pin5 : N/C
DMX - OUTPUT
Presa XLR
Fig.7
ATTENZIONE
La parte schermata del cavo (calza) non deve mai essere collegata alla terra dell’impianto; ciò comporterebbe malfunzionamenti delle unità e dei controller.
Per passaggi lunghi può essere necessario l’inserimento di un amplicatore DMX.
In tal caso, è sconsigliato utilizzare nei collegamenti cavo bilanciato microfonico poiché non è in grado di
trasmettere in modo adabile i dati di controllo DMX.
• Collegare l’uscita DMX del controller con l’ingresso DMX della prima unità;
• Collegare, quindi, l’uscita DMX con l’ingresso DMX della successiva unità; l’uscita di quest’ultima con
l’ingresso di quella successiva e via dicendo nchè tutte le unità sono collegate formando una catena.
• Per installazioni in cui il cavo di segnale deve percorrere lunghe distanze è consigliato inserire sull’ultima unità una terminazione DMX.
3.11 COSTRUZIONE DEL TERMINATORE DMX
La terminazione evita la probabilità che il segnale DMX 512, una volta raggiunta la ne della linea stessa
venga riesso indietro lungo il cavo, provocando, in certe condizioni e lunghezze, la sua sovrapposizione
al segnale originale e la sua cancellazione.
La terminazione deve essere eettuata, sull’ultima unità della catena, con connettori XLR a 3/5 pin, saldando una resistenza di 120Ω (minimo 1/4W) tra i terminali 2 e 3, così come indicato in gura.
Esempio:
connettore XLR a 3 pin
Fig.8
Page 18
18
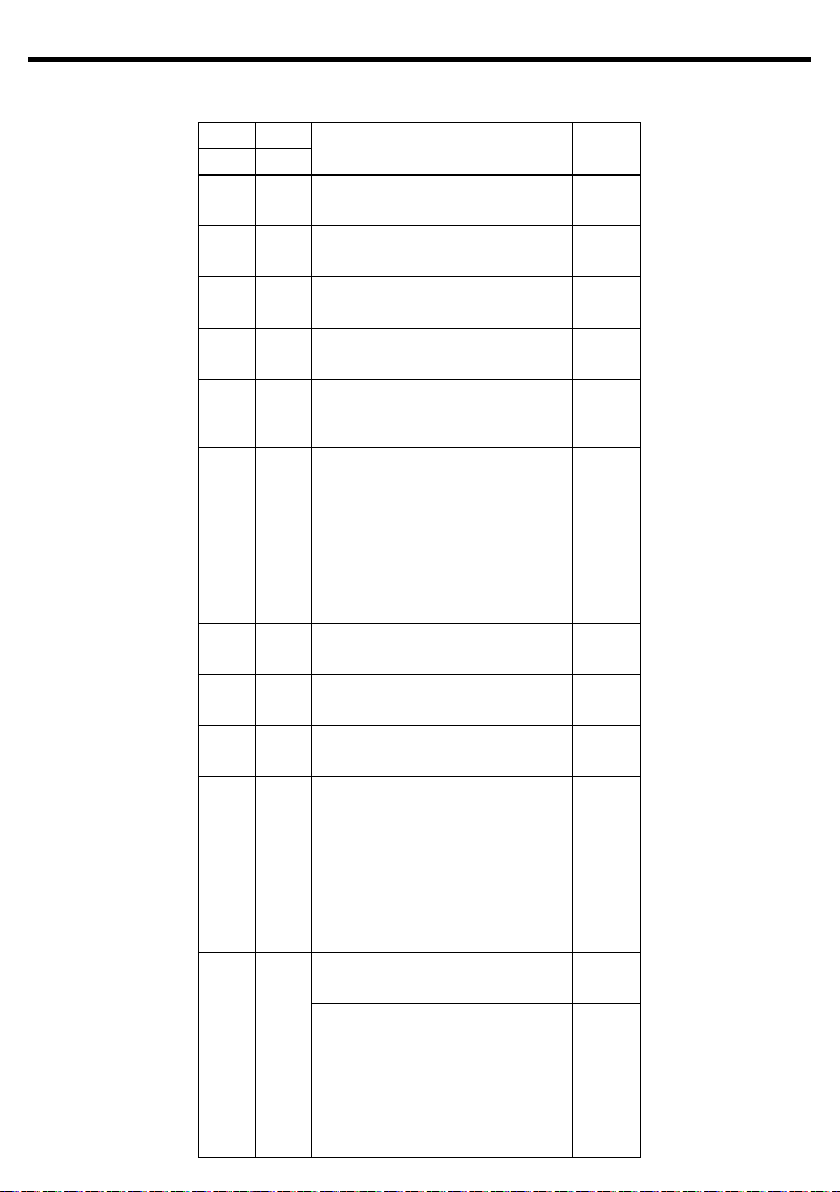
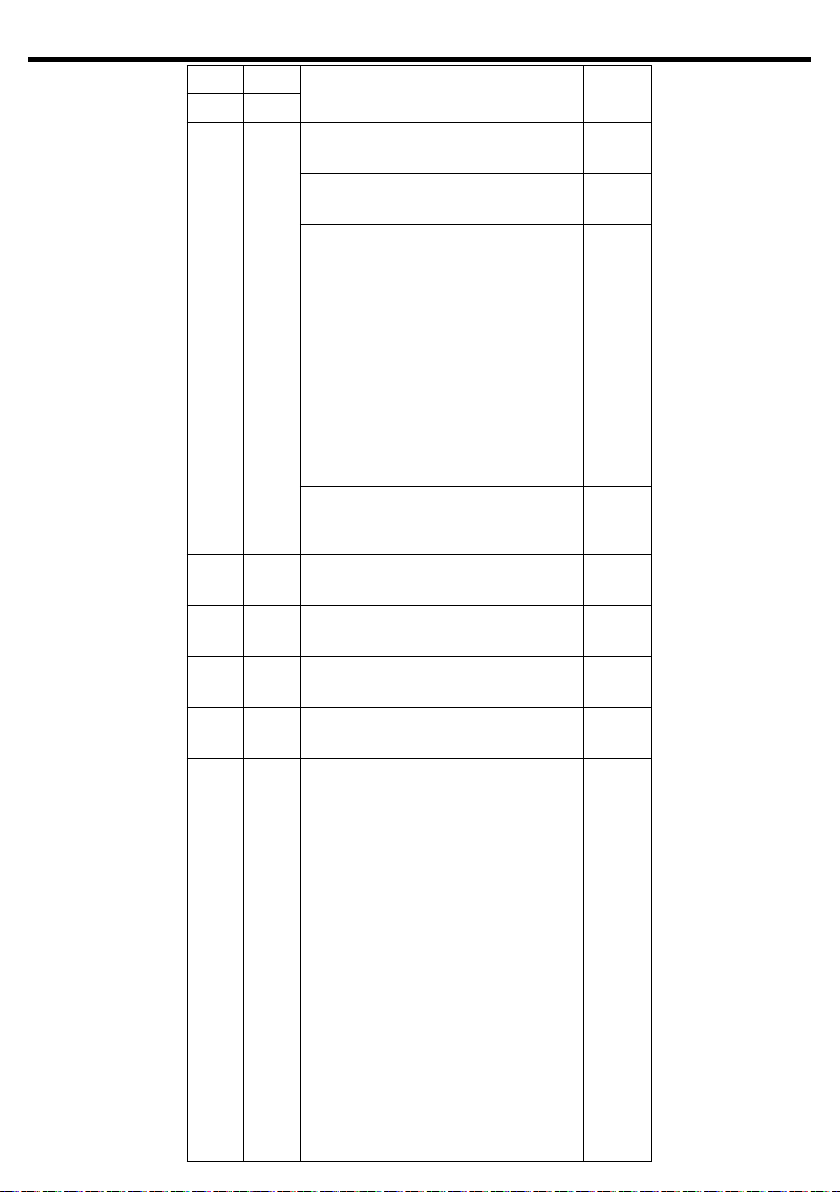
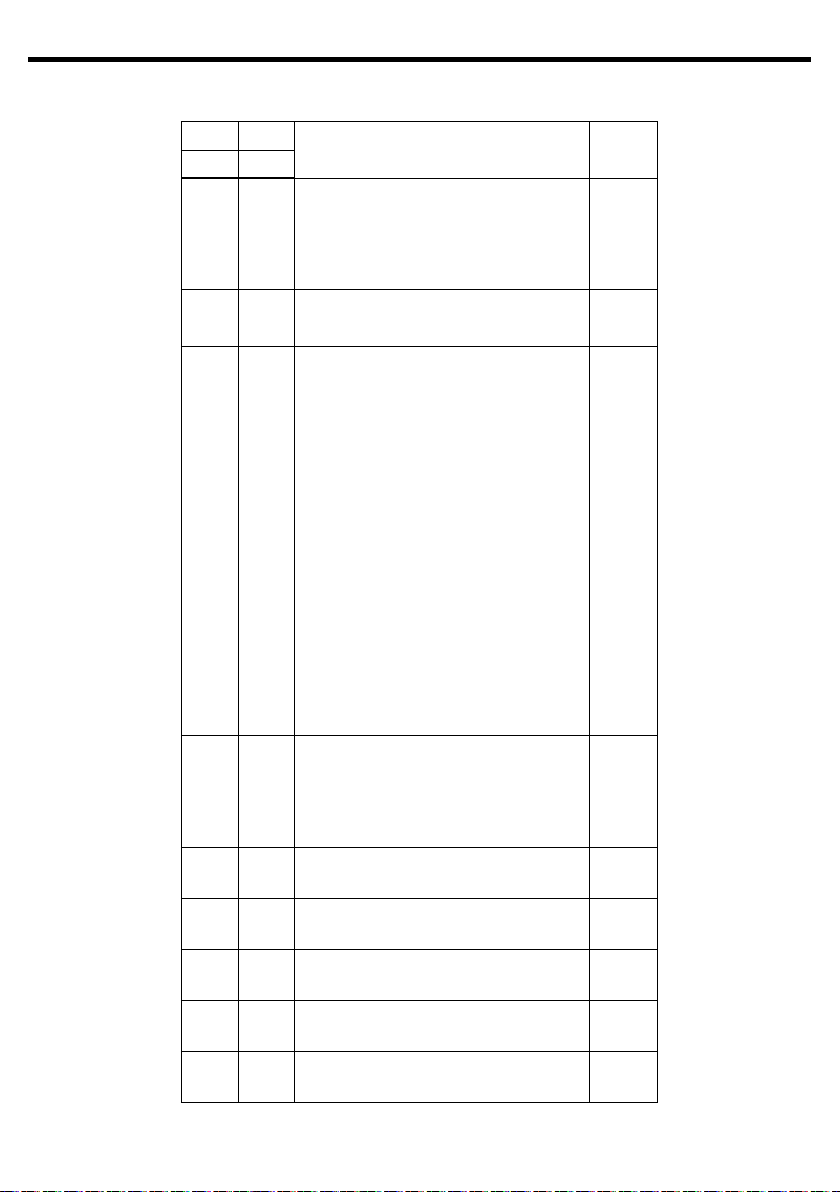
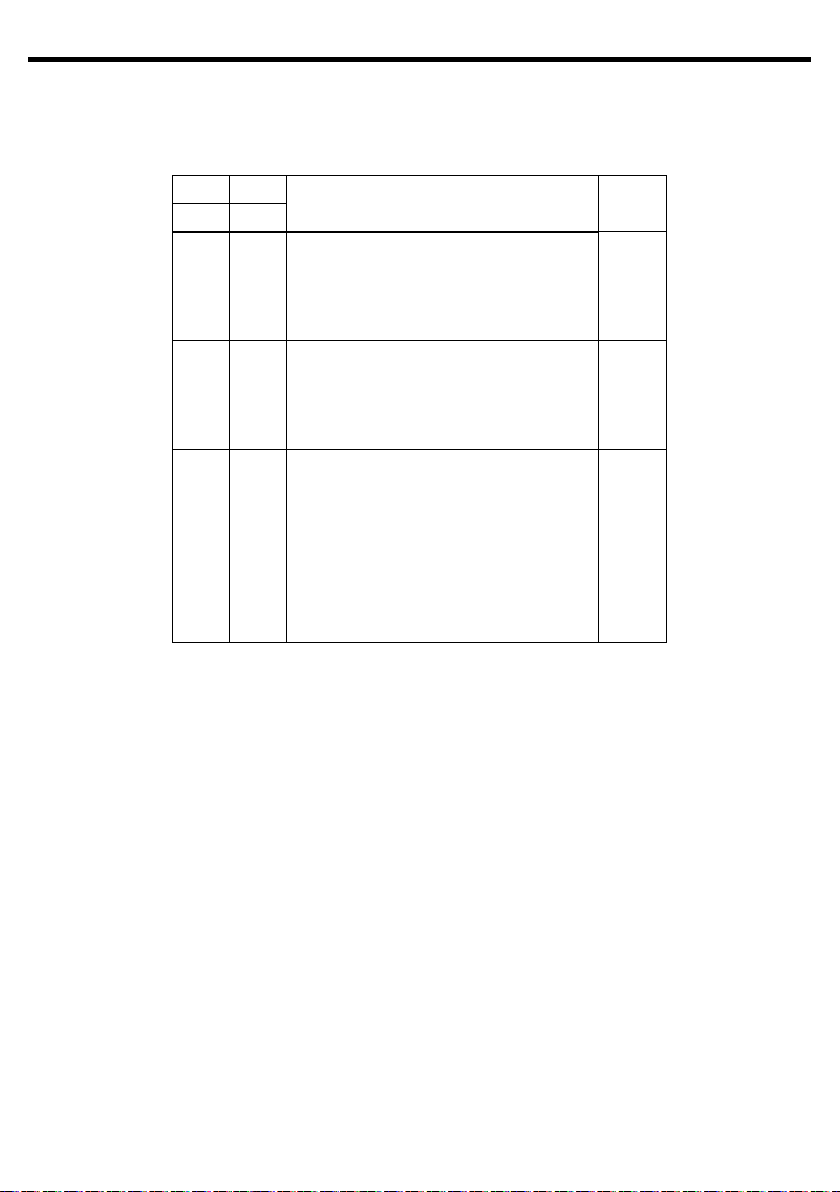
3.12 CANALI DMX
ARIA700SPOT
STD EXT
23 Ch 28 Ch
1 1
2 2
3 3
4 4
5 5
6 6
7 7
8
9
8 10
9 11
FUNCTION
PAN 8bit
Pan Coarse 000 - 255
PAN 16bit
Pan Fine 000 - 255
TILT 8bit
Tilt Coarse 000 - 255
TILT 16bit
Tilt Fine 000 - 255
P/T SPEED
Fastest to slowest
Movement with Blackout
SHUTTER
No function (shutter open)
Strobe eect slow to fast
No function (shutter open)
Pulse-eect in sequences
No function (shutter open)
Random strobe eect slow to fast
No function (shutter open)
DIMMER 8bit
(0% to 100%) 000 - 255
DIMMER 16bit
(0% to 100%) 000 - 255
DIMMER fade
(0% to 100%) 000 - 255
COLOR FUNCTION
No function
White presets
Forward spin
Reverse spin
Continuous
CTC
TBD
COLOR (no function)
No function 000 - 255
COLOR (white preset)
White 2000K ~ 2700K
White 2700K ~ 3200K
White 3200K ~ 4200K
White 4200K ~ 5600K
White 5600K ~ 8000K
White 8000K ~ 10000K
DMX
Value
000 - 250
251 - 255
000 - 010
011 - 082
083 - 093
094 - 163
164 - 174
175 - 244
245 - 255
000 - 015
016 - 031
032 - 047
048 - 063
064 - 079
080 - 111
112 - 255
000 - 155
156 - 175
176 - 195
196 - 215
216 - 235
236 - 255
Page 19
ARIA700SPOT
19
STD EXT
23 Ch 28 Ch
9 11
10 12
11 13
12 14
13 15
14 16
FUNCTION
COLOR (FW spin)
Rainbow Eect (Slow to Fast) 000 - 255
COLOR (RV spin)
Rainbow Eect (Slow to Fast) 000 - 255
COLOR (Continuos)
Black
Red
Green
Blue
White
Red=0, Green->up, Blue=full, White=0
Red=0, Green=full, Blue->down, White=0
Red->up, Green=full, Blue=0, White=0
Red=full, Green->down, Blue=0, White=0
Red=full, Green=0, Blue->up, White=0
Red->down, Green=0, Blue=full, White=0
COLOR (CTC)
CTC adjustment of output color, same as a
“classic” CMY xture with CTC linear correction.
RED
0~100%
GREEN
0~100%
BLUE
0~100%
WHITE
0~100%
ROTATING GOBO WHEEL
Open
Gobo 1
Gobo 2
Gobo 3
Gobo 4
Gobo 5
Gobo 6
Gobo 7
Gobo 1 shake (from slow to fast)
Gobo 2 shake (from slow to fast)
Gobo 3 shake (from slow to fast)
Gobo 4 shake (from slow to fast)
Gobo 5 shake (from slow to fast)
Gobo 6 shake (from slow to fast)
Gobo 7 shake (from slow to fast)
Stop to fastest (Forward Wheel Spin)
Stop to fastest (Reverse Wheel Spin)
DMX
Value
000 - 000
001 - 001
002 - 002
003 - 003
004 - 004
005 - 046
047 - 088
089 - 130
131 - 172
173 - 214
215 - 255
000 -255
000 - 255
000 - 255
000 - 255
000 - 255
000 - 005
006 - 010
011 - 015
016 - 020
021 - 025
026 - 030
031 - 035
036 - 040
041 - 055
056 - 070
071 - 085
086 - 100
101 - 115
116 - 130
131 - 145
146 - 200
201 - 255
Page 20
20
ARIA700SPOT
STD EXT
23 Ch 28 Ch
15 17
18
16 19
17 20
18 21
19 22
23
20 24
25
FUNCTION
GOBO ROTATION 8bit
Positioning from 0-360 degrees(Indexing)
Slowest to fastest(Forward Spin)
Stop
Fastest to Slowest(Reverse Spin)
GOBO ROTATION 16bit
0 - 100 %
STATIC GOBO WHEEL
Open
Gobo 1
Gobo 2
Gobo 3
Gobo 4
Gobo 5
Gobo 6
Gobo 7
Gobo 8
Gobo 1 shake (from slow to fast)
Gobo 2 shake (from slow to fast)
Gobo 3 shake (from slow to fast)
Gobo 4 shake (from slow to fast)
Gobo 5 shake (from slow to fast)
Gobo 6 shake (from slow to fast)
Gobo 7 shake (from slow to fast)
Gobo 8 shake (from slow to fast)
Stop to fastest (Forward Wheel Spin)
Stop to Slowest (Reverse Wheel Spin)
PRISM ROT
Open
Slowest to fastest (Forward Spin)
Prism stop
Fastest to Slowest (Reverse Spin)
FROST
Frost 0->100%
FOCUS 8bit
Focus
FOCUS 16bit
Focus Fine
ZOOM 8bit
Zoom
ZOOM 16bit
Focus Fine
DMX
Value
000 - 191
192 - 221
222 - 225
226 - 255
000 - 255
000 - 005
006 - 009
010 - 013
014 - 017
018 - 021
022 - 025
026 - 029
030 - 033
034 - 037
038 - 051
052 - 065
066 - 079
080 - 093
094 - 107
108 - 121
122 - 135
136 - 149
150 - 202
203 - 255
000 - 003
004 - 127
128 - 131
132 - 255
000 - 255
000 - 255
000 - 255
000 - 255
000 - 255
Page 21
ARIA700SPOT
21
STD EXT
23 Ch 28 Ch
21 26
22 27
23 28
FUNCTION
ANIMATION WHEEL
Open / No function
Forward stop to fastest
Stop
Reverse stop to fastest
IRIS
From large to small
Open and close by arrive slow to fast (Eects)
Open from slow to fast (Eects)
Close from slow to fast (Eects)
Control
No function
Reset all
Pan&Tilt Reset
Eects Reset
Gobo Reset
TBD
Other Reset
TBD (not used)
DMX
Value
000 - 003
004 - 127
128 - 131
132 - 255
000 - 063
064 - 127
128 - 191
192 - 255
000 - 007
008 - 015
016 - 023
024 - 031
032 - 039
040 - 047
048 - 055
056 - 255
Page 22
22
4
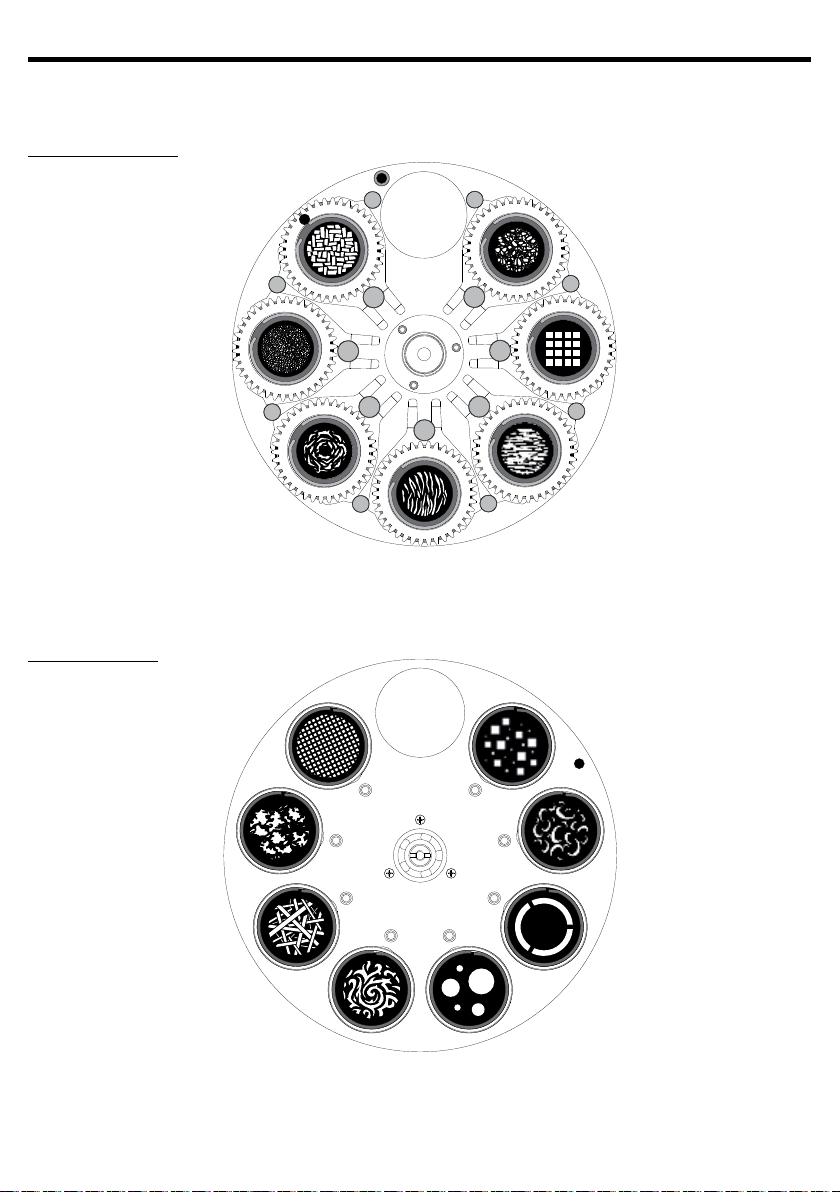
STATIC GOBOS
3.13 RUOTE
ROTATING GOBOS WHEEL
ARIA700SPOT
STATIC GOBOS WHEEL
7
6
5
8
1
2
3
1
7
6
45
2
3
Page 23
ARIA700SPOT
23
- 4 - MANUTENZIONE
4.1 MANUTENZIONE E PULIZIA DEL SISTEMA OTTICO
• Durante gli interventi, assicurarsi che l’area sotto il luogo di installazione sia libera da personale non
qualicato.
• Spegnere l’unità, scollegare il cavo di alimentazione ed aspettare nché l’unità non si sia rareddata.
• Tutte le viti utilizzate per l’installazione dell’unità e le sue parti dovrebbero essere assicurate saldamente e non dovrebbero essere corrose.
• Alloggiamenti, elementi di ssaggio e di installazione (sotto, truss, sospensioni) dovrebbero essere
totalmente esenti da qualsiasi deformazione.
• Quando una lente ottica è visibilmente danneggiata a causa di rotture o gra profondi, deve essere
sostituita.
• I cavi di alimentazione devono essere in condizione impeccabile e dovrebbero essere sostituiti immediatamente nel momento in cui anche un piccolo problema viene rilevato.
• Al ne di proteggere l’unità da surriscaldamento, le ventole di rareddamento (e nel caso) le aperture
di ventilazione, devono essere pulite mensilmente.
Per mantenere funzionalità e rendimento ottimali per lungo tempo è indispensabile eettuare una pulizia periodica delle parti soggette all’accumulo di polveri e grassi. La frequenza con la quale eettuare le
operazioni sotto indicate dipende da diversi fattori, quali la quantità di movimenti degli eetti e la qualità
dell’ambiente di lavoro (umidità dell’aria, presenza di polvere, salsedine, ecc.). Per rimuovere lo sporco dal
riettore, dalle lenti e dai ltri usare un panno morbido inumidito di un qualsiasi liquido detergente per
la pulizia del vetro. Annualmente si consiglia di sottoporre il proiettore a personale tecnico qualicato per
una manutenzione straordinaria consistente almeno nelle seguenti operazioni:
- Pulizia generale delle parti interne.
- Ripristino della lubricazione di tutte le parti soggette ad attrito tramite l’utilizzo di lubricanti
appropriati.
- Controllo visivo generale di componenti interni, cablaggio, parti meccaniche, ecc.
- Controlli elettrici, fotometrici e funzionali; eventuali riparazioni.
Attenzione: consigliamo che la pulizia interna sia eseguita da personale qualicato!
4.2 SOSTITUZIONE FUSIBILE
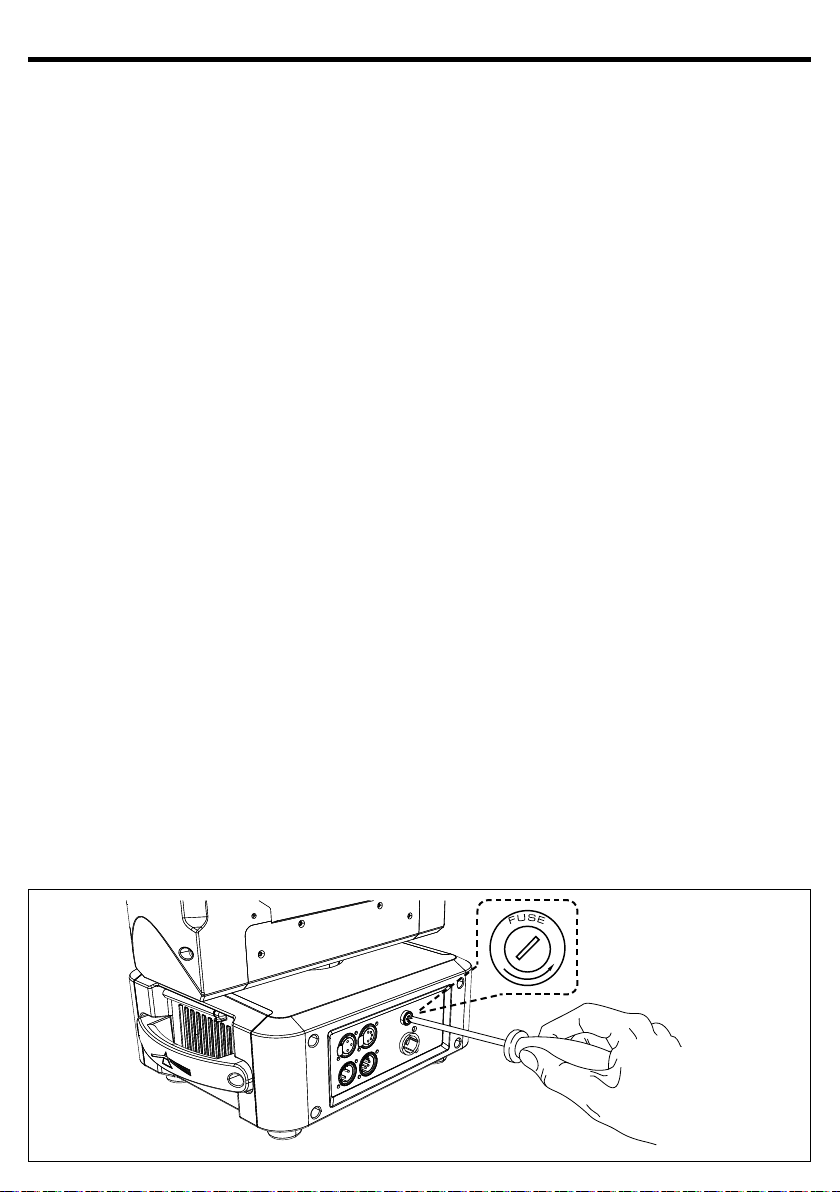
1. Assicurarsi di scollegare il cavo di alimentazione del proiettore prima di sostituire un fusibile bruciato.
2. Con un cacciavite, rimuovere il portafusibile dalla sua sede e il fusibile bruciato dal suo supporto; sostituire il fusibile con uno identico per tipologia e valore.
3. Inserire il portafusibile al suo posto e ricollegare l’alimentazione.
Fig.9
Page 24

24
ARIA700SPOT
4.3 RISOLUZIONE DEI PROBLEMI
Anomalie Possibili cause Controlli e rimedi
Il proiettore non illumina
Bassa intensità di luce generale
Il proiettore non è alimentato
Il proiettore non risponde al
DMX
• Mancanza di alimentazione di rete
• Dimmer impostato a 0
• Tutti i colori impostati a 0
• LED difettoso/i
• Scheda LED difettosa
• Lenti sporche
• Lente disallineata
• Mancanza di alimentazione di rete
• Cavo di alimentazione danneggiato
• Alimentatore interno difettoso
• Indirizzamento DMX errato
• Cavo di segnale DMX difettoso
• Rimbalzo segnale DMX
• Vericare la presenza della tensione alimentazione
• Incrementare i valori del canale dimmer
• Incrementare i valori dei canali colori
• Sostituire scheda LED
• Sostituire scheda LED
• Pulire il dispositivo regolarmente
• Installare il gruppo ottico correttamente
• Vericare la presenza della tensione alimentazione
• Controllare il cavo di alimentazione
• Sostituire l'alimentatore interno
• Controllare il pannello di controllo e
l'indirizzamento delle unità
• Controllare il cavo di segnale DMX
• Installare una terminazione DMX come suggerito
Rivolgersi a un centro di assistenza tecnico autorizzato nel caso in cui il problema non sia riportato in
tabella.
Page 25

ARIA700SPOT
25
Page 26

All rights reserved by Music & Lights S.r.l. No part of this instruction manual may be
reproduced in any form or by any means for any commercial use.
In order to improve the quality of products, Music&Lights S.r.l. reserves the right to modify the
characteristics stated in this instruction manual at any time and without prior notice.
All revisions and updates are available in the ‘manuals’ section on site www.musiclights.it
Page 27

ARIA700SPOT
1
TABLE OF
CONTENTS
Safety
General instructions
Warnings and installation precautions
1 Introduction
1. 1 Description
1. 2 Technical specications
1. 3 Operating elements and connections
2 Installation
2. 1 Mounting
3 Functions and settings
3. 1 Operation
3. 2 Basic
3. 3 Using the menu
3. 4 Menu structure
3. 5 Linking
3. 6 Connect
DMX addressing
DMX mode
Wireless
Artnet
3.7 Setup
Movement
Screen
Fixture
3.8 Advanced
Reset
Adjust
Factory reload
3.9 Information
3. 10 Connection of the DMX line
3. 11 Construction of the DMX termination
3. 12 Channel DMX
3. 13 Gobos wheels
3
3
3
3
5
6
7
7
8
8
11
11
11
11
11
11
12
12
12
12
13
13
13
14
14
15
15
16
20
Packing content
4 Maintenance
4. 1 Maintenance and cleaning the unit
4. 2 Fuse replacement
4. 3 Trouble shooting
• ARIA700SPOT
• Mount bracket
• User manual
21
21
22
Page 28
2
WARNING! Before carrying out any operations with the unit, carefully read this instruction
manual and keep it with cure for future reference. It contains important information about
the installation, usage and maintenance of the unit.
ARIA700SPOT
SAFETY
General instruction
• The products referred to in this manual conform to the European Community Directives and are therefore marked with .
• The unit is supplied with hazardous network voltage (230V~). Leave servicing to skilled personnel only.
Never make any modications on the unit not described in this instruction manual, otherwise you will
risk an electric shock.
• Connection must be made to a power supply system tted with ecient earthing (Class I appliance according to standard EN 60598-1). It is, moreover, recommended to protect the supply lines of the units
from indirect contact and/or shorting to earth by using appropriately sized residual current devices.
• The connection to the main network of electric distribution must be carried out by a qualied electrical
installer. Check that the main frequency and voltage correspond to those for which the unit is designed
as given on the electrical data label.
• This unit is not for home use, only professional applications.
• Never use the xture under the following conditions:
- in places wet;
- in places subject to vibrations or bumps;
- in places with an ambient temperature of over 45°C.
• Make certain that no inammable liquids, water or metal objects enter the xture.
• Do not dismantle or modify the xture.
• All work must always be carried out by qualied technical personnel. Contact the nearest sales point for
an inspection or contact the manufacturer directly.
• If the unit is to be put out of operation denitively, take it to a local recycling
plant for a disposal which is not harmful to the environment.
Warnings and installation precautions
• If this device will be operated in any way dierent to the one described in this manual, it may suer
damage and the guarantee becomes void. Furthermore, any other operation may lead to dangers like
short circuit, burns, electric shock, etc.
• Before starting any maintenance work or cleaning the projector, cut o power from the main supply.
• Always additionally secure the projector with the safety rope. When carrying out any work, always comply scrupulously with all the regulations (particularly regarding safety) currently in force in the country
in which the xture’s being used.
• For inside use only. Not designed for outside use.
• The minimum distance between the xture and surrounding walls must be more than 50 cm and the
air vents at the housing must not be covered in any case.
• Install the xture in a well ventilated place.
• Keep any inammable material at a safe distance from the xture.
• The maximum temperature that can be reached on the external surface of the tting, in a thermally
steady state, is high. After power o, please cool down over 15 minutes.
• Shields, lenses or ultraviolet screens shall be changed if they have become damaged to such an extent
that their eectiveness is impaired.
• The lamp (LED) shall be changed if it has become damaged or thermally deformed.
• Never look directly at the light beam. Please note that fast changes in lighting, e. g. ashing light, may
trigger epileptic seizures in photosensitive persons or persons with epilepsy.
Page 29

ARIA700SPOT
3
- 1 - INTRODUCTION
1.1 DESCRIPTION
ARIA700 is a 400W theatrical LED luminaire designed to bring renement and silence to the stage. Featuring a custom RGBW engine which delivers an extensive color palette, and an optical system designed
to allow the layering of eects, the Aria700 puts the theatre into LED.
LIGHT SOURCE
• Source: 400W custom RGBW LEDs
• CT: Tunable 2700K~8000K
• Luminous Flux: 5474lm
• Lux: (10°) 19986 - (40°) 1797lux @3m Full
• Lux: (10°) 7195 - (40°) 647lux @5m Full
• Source Life Expectancy: >20.000 h
OPTICS
• Zoom: 10-40° Motorised linear zoom
• Lens Type: HD anti-reection lenses with achromatic coating
• Focus: Motorised with autofocus
• Other: High quality at eld projection
COLOR SYSTEM
• Color Mixing: RGBW/FC
• White Presets: 2000K ~ 10000K
• Color Wheel: Virtual color wheel with presets
DYNAMIC EFFECTS
• Animation Wheel: Animation wheel with CW and CCW rotation
• Rotating Gobos: 7 Rotating gobos+Open, Interchangeable, Indexing
• Fixed gobos: 8 Fixed gobos+Open
• Circular Prism: 3f with bi-directional rotation, Indexing
• Frost: Linear 0-100% frost lter
• Iris: 5-100% motorized linear iris
BODY
• Pan/Tilt Resolution: 16 bit
• Feedback: Automatic repositioning after accidental movement
• Body: Aluminium structure with hi-resistance polycarbonate cover
• Body Color: Black
CONTROL
• Protocols: DMX512, RDM, Art-Net
• W-DMX: Included, Wireless Solution receiver
• RDM: RDM ready for xture remote monitor and settings
• Display: LCD high resolution color display with autoip
• Firmware Upgrade: Yes, via USB-DMX interface (UPBOX1) not included
ELECTRONICS
• Dimmer: Linear 0~100% electronic dimmer
• Dimmer Curves: 4 Dierent dimming curves available
Page 30
4
• Strobe/Shutter: 1-28 Hz, electronic
• Operating Temperature: -10° ~ +45°
• Flicker: Flicker free operation
ELECTRICAL
• Power Supply: 100-240V – 50/60Hz
• Power Consumption (at 230V): 435W
• Power Consumption (at 120V): 436W
• Output (at 230V): 4 units on a single power line
• Output (at 120V): 2 units on a single power line
PHYSICAL
• Signal Connection: 5p in/out, RJ45 in/out
• Power Connection: PowerCON TRUE1 in/out
• IP: 20
• Cooling: Combination of liquid cooling system and low noise fan
• Pan/Tilt Lock: Pan and Tilt locking for transportation and maintenance
• Suspension And Fixing: Any position with “quick-lock” omega brackets
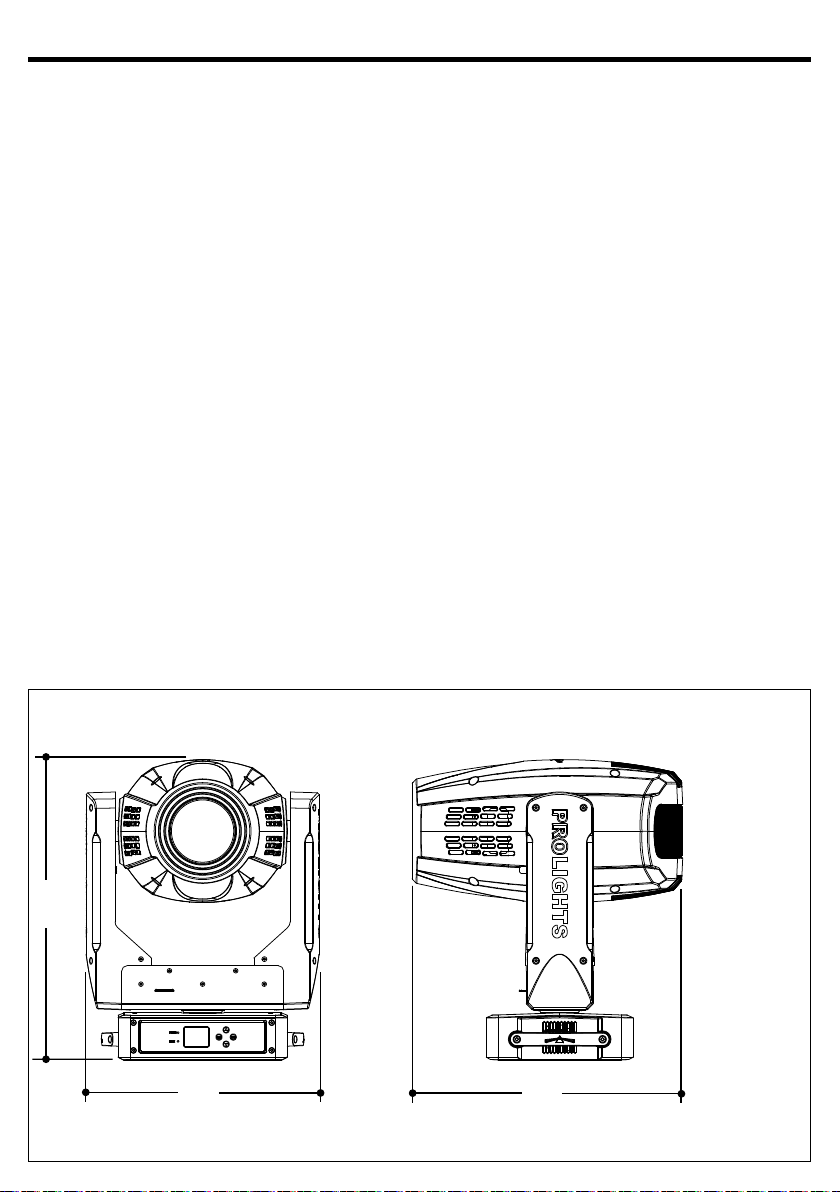
• Dimensions (WxHxD): 408x676x257mm
• Weight: 22.7kg
ARIA700SPOT
526
408
474
Technical drawing
Fig.1
Page 31
ARIA700SPOT
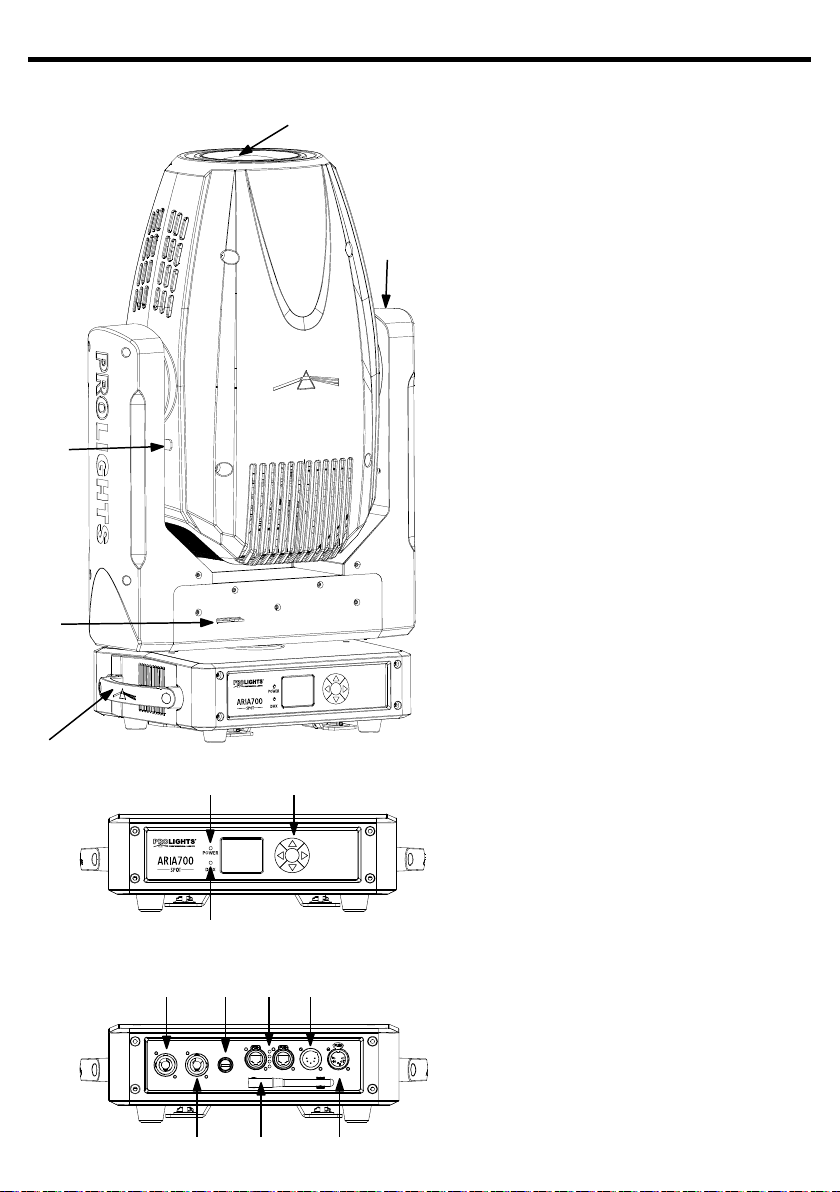
1.3 OPERATING ELEMENTS AND CONNECTIONS
1
2
3
4
5
6
8
5
1. MOVING HEAD
2. ROTARY ARM
3. TILT Mechanism Lock and Release
4. PAN Mechanism Lock and Release
5. HANDLE
6. LED INDICATOR "POWER"
7. LED INDICATOR "WDMX"
8. CONTROL PANEL with LCD display
and 4 button used to access
the control panel functions and
manage them.
9. POWER IN (PowerCON TRUE
IN): for connection to a socket
(100-240V~/50-60Hz) via the
supplied mains cable.
10. POWER OUT (PowerCON OUT):
power output for connection of
multiple units in series.
11. MAIN FUSE HOLDER: replace a
burnt-out fuse by one of the same
type only.
12. ANTENNA
13. EtherCON connector Signal IN/
OUT
14. DMX IN (3-pole XLR):
1 = ground, 2 = DMX -, 3 = DMX +
15. DMX OUT (5-pole XLR):
1 = ground, 2 = DMX-, 3 = DMX+,
4 N/C, 5 N/C
Fig.2
7
9
11 14
13
10 15
12
Page 32
6
ARIA700SPOT
- 2 - INSTALLATION
2.1 MOUNTING
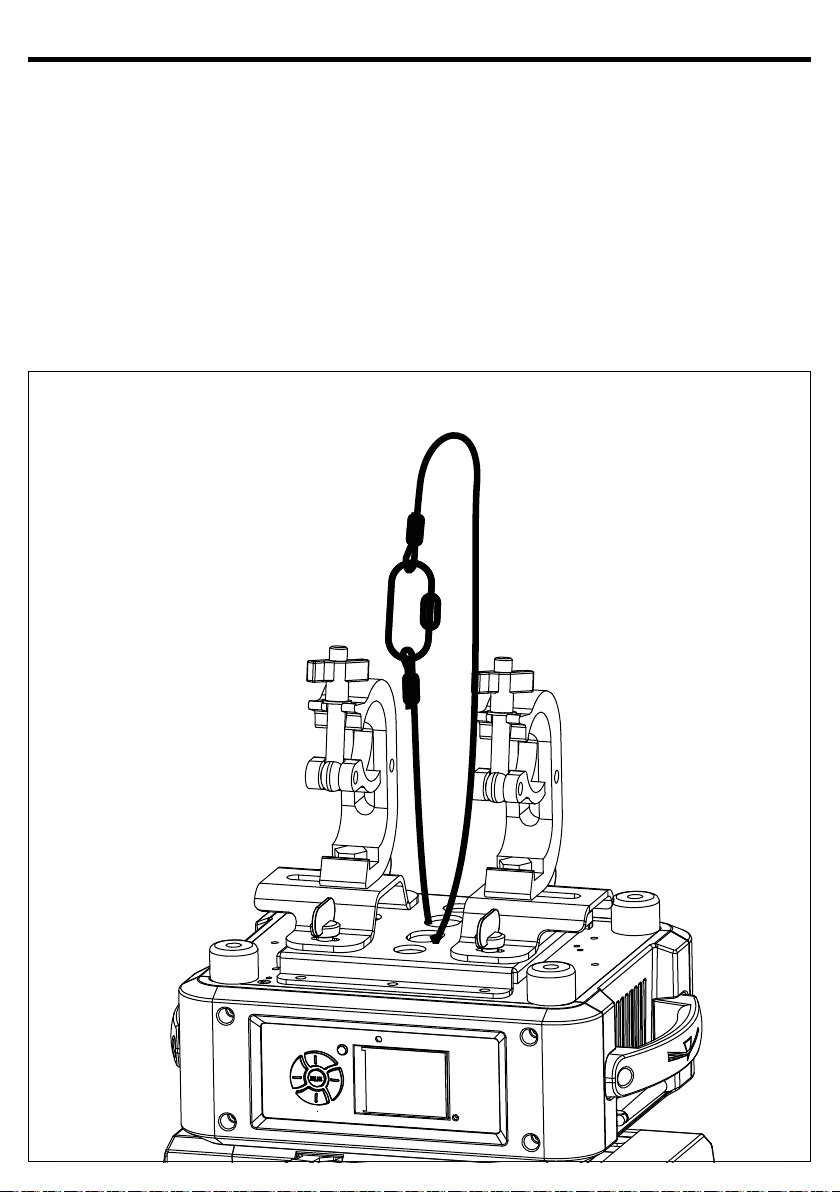
The ARIA700SPOT may be set up on a solid and even surface. By means of the xing facilities of the baseplate, the unit can also be mounted upside down to a cross arm. The base plate is shown in g.3. For xing,
stable mounting clips are required. According to the gure, the bolts of the brackets are placed into the
openings provided in the base plate and turned clockwise until they lock (to the stop). Always ensure that
the unit is rmly xed to avoid vibration and slipping while operating. The mounting place must be of
sucient stability and be able to support a weight of 10 times of the unit’s weight. When carrying out any
installation, always comply scrupulously with all the regulations (particularly regarding safety) currently
in force in the country in which the xture’s being used. Always additionally secure the projector with the
safety rope from falling down. For this purpose, fasten the safety rope at a suitable position so that the
maximum fall of the projector will be 20 cm.
SAFETY ROPE
CLAMP
OMEGA
Fig.3
Page 33
ARIA700SPOT
STAND ALONE
7
- 3 - FUNCTIONS AND SETTINGS
3.1 OPERATION
Connect the supplied main cable to a socket (100-240V~/50-60Hz). The unit will run built-in program to re set all motors to their home position. Shortly after that the ARIA700SPOT is ready for operation. To switch
o, disconnect the mains plug from the socket. For a more convenient operation it is recommended to
connect the unit to a socket which can be switched on and o via light switch.
3.2 BASIC
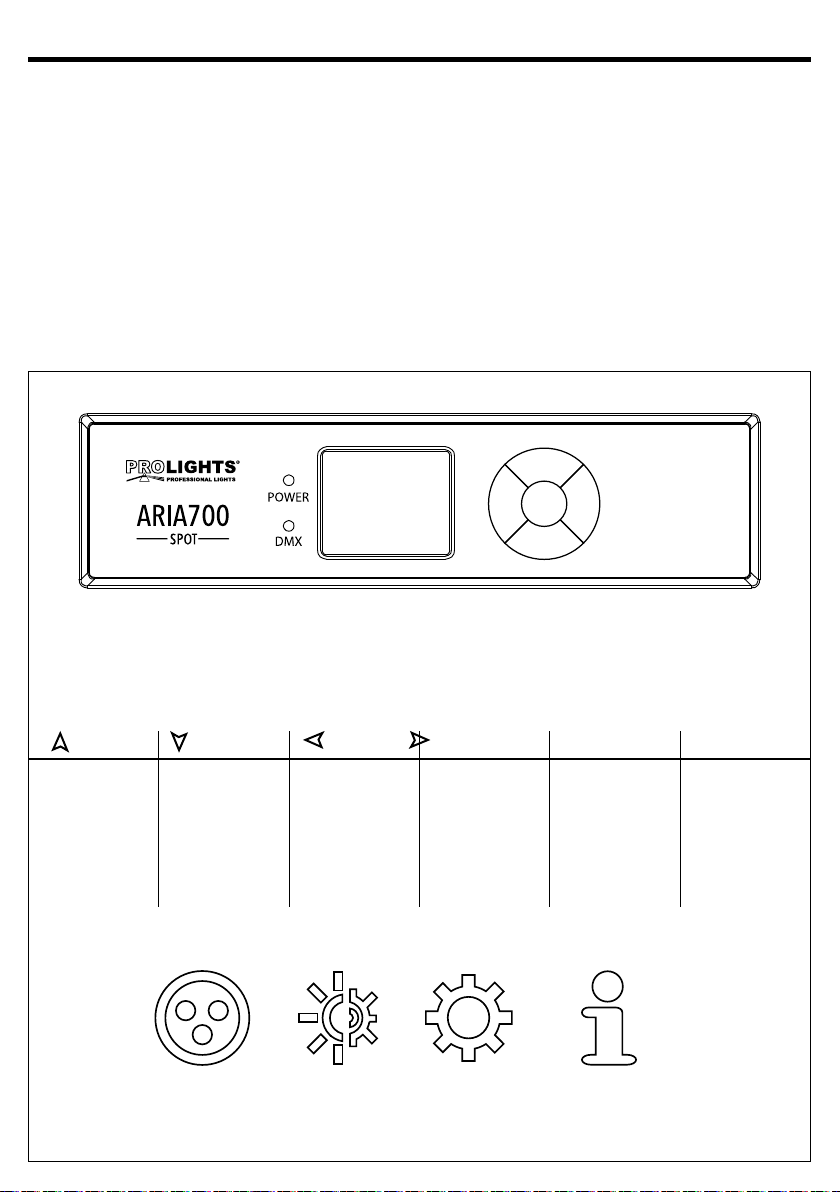
The control panel of ARIA700SPOT has a display and 5 buttons for the complete programming and management of the projector menu (g.4).
UP DOWN LEFT RIGHT ENTER BATTERY
Increases the value
displayed or passes
to the previous item
in a menu
Decreases the value
displayed or passes
to the next item in
the menu
Return to the top
level
Commute from
units, tens, hundred
in the menu
Conrms the
displayed value,
or activates the
displayed function,
or enters the
successive menu
CONNECT SETUP ADVANCED INFORMATION
Fig.4 - Functions of the buttons and display icons
Used to activate the
backup battery. It
allows to switching
display interface
without main power
Page 34
8
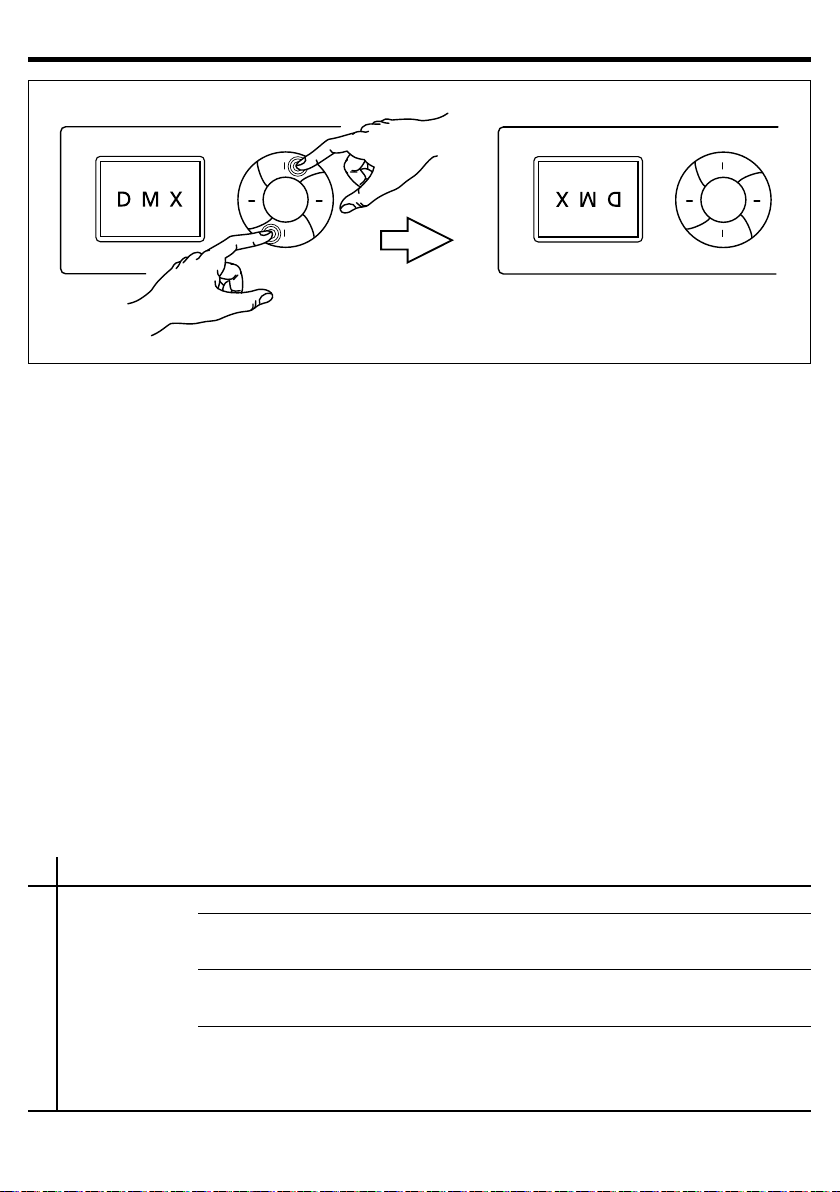
Reversal of the display
To activate this function, hold simultaneously for 3 seconds UP and DOWN buttons while the display is in
the rest mode. This status will be memorised and maintained even for the next time it will be switched on.
To return to the initial state, repeat the operation all over again.
3.3 USING THE MENU
1. Press the ENTER button to access the main menu.
2. Use the UP/DOWN button to select the menu to be used:
• Connect;
• Setup;
• Advanced;
• Information;
3. Press ENTER to display the rst item in the selected menu.
4. Use the UP/DOWN button to select the menu items.
NOTE - The display can be in one of two conditions: rest status and setting status. When it is in the rest status, the display shows the projector’s DMX address. During menu setting status, after a wait time without
any key having been pressed, the display automatically returns to rest status.
It should be noted than when this condition occurs, any possible value that has been modied but not yet
conrmed with the ENTER button will be cancelled.
ARIA700SPOT
Fig.5 - Reversal of the display
3.4 MENU STRUCTURE
MENU
1 CONNECT
ð
DMX Address
DMX Mode
Wireless
Ethernet
ð
ð
ð
ð
Value (1-512)
Standard 23CH
Extended 28CH
Receive
Receive reset
Universe
Start Channel
IP address
ON/OFF
ð
YES/NO
ð
0-255
ð
1-512
ð
2/10.133.139.215
ð
Page 35

ARIA700SPOT
9
2 SET UP
ð
Movement
Screen
Fixture
Pan Reverse
ð
Tilt Reverse
Pan Feedbacks
Tilt Feedbacks
Backlight
ð
Flip Display
Warn Cue
Key Lock
White Balance
ð
Dimmer Mode
ð
Fans Mode
ð
Theater Mode
ð
Temperature Unit
ð
Auto Test
ð
Manual Test
ð
YES/NO
ð
YES/NO
ð
YES/NO
ð
YES/NO
ð
Always On/10s/20s/30s
ð
YES/NO/AUTO
ð
ON/OFF
ð
YES/NO
ð
OFF
ð
MANUAL (RGBW 125-255)
ð
O/Dimmer1/Dimmer2/Dimmer3
ð
Auto Speed/High Speed
ð
Auto/Silent/O
ð
C/F
ð
Auto Test
ð
Pan 000-255
ð
Pan Fine 000-255
ð
Tilt 000-255
ð
Tilt Fine 000-255
ð
P/T Speed 000-255
ð
Dimmer 000-255
ð
Shutter 000-255
ð
Red 000-255
ð
Green 000-255
ð
Blue 000-255
ð
White 000-255
ð
Gobo1 000-255
ð
RGobo1 000-255
ð
Gobo2 000-255
ð
PrismRot. 000-255
ð
Eect 000-255
ð
REect 000-255
ð
Focus 000-255
ð
Zoom 000-255
ð
Frost 000-255
ð
Iris 000-255
ð
Page 36

10
ARIA700SPOT
3 ADVANCED
4 INFORMATION
ð
ð
ð
ð
Reset
Adjust
Factory Reload
Fixture Time
Temperature
Fans Speed
Software Vers.
UID
All
ð
Pan
ð
Tilt
ð
Gobo1
ð
Gobo2
ð
Prism
ð
Eect
ð
Focus
ð
Zoom
ð
Frost
ð
Iris
ð
Pan
ð
Tilt
ð
Gobo1
ð
RGobo
ð
Gobo2
ð
Prism
ð
Eect
ð
Focus
ð
Zoom
ð
Frost
ð
Iris
ð
YES/NO
ð
0-9999
ð
58 °C
ð
**%
ð
DISP- V1.0
NET-V1.0
CTR1-XY- V1.0
CTR2-MOTOR-V1.0
ð
CTR3-MOTOR-V1.0
CTR4-MOTOR-V1.0
CTR5-MOTOR-V1.0
15D00214****
ð
ð
ð
ð
ð
ð
ð
ð
ð
ð
ð
000-255
000-255
000-255
000-255
000-255
000-255
000-255
000-255
000-255
000-255
Page 37

ARIA700SPOT
3.5 LINKING
Several units may be interconnected in order to control all further slave units to the same eect of the
master unit.
1. Connect the DMX OUT of the master unit via 3/5-pole XLR cable to the DMX IN of the rst slave unit.
2. Connect the DMX OUT of the rst slave unit to the DMX IN of the second slave unit, etc. until all units
are connected in a chain.
3.6 CONNECT
DMX ADDRESSING
To enter the DMX mode, follow these steps:
• Press the ENTER button to access the main menu.
• Press the UP/DOWN button to scroll the menu, select the Connect icon, then press the ENTER button to
enter the next menu.
• Press the UP/DOWN button to scroll through the menu, select the Address and press the ENTER key.
• Press the arrow keys to select the desired value (001-512).
• Press the ENTER key to conrm the setting.
• Press the LEFT button repeatedly to exit the menu and save changes.
DMX MODE
The ARIA700SPOT has 5 DMX channel congurations which can be accessed from the control panel.
• Press the ENTER button to access the main menu.
• Press the UP/DOWN button to scroll the menu, select the Connect icon, then press the ENTER button to
enter the next menu.
• Press the UP/DOWN button to scroll through the menu, select DMX Mode and press the ENTER button to
enter the next menu.
• Press the UP/DOWN button to scroll through the menu, select Mode and press ENTER to conrm your
choice.
• Use the UP/DOWN button to select the desired DMX channel conguration (Standard, Extended, Basic-8bit,
Basic-16bit, User), then press the ENTER button to conrm your choice.
• Press the LEFT button repeatedly to exit the menu and save changes.
The tables on page 19 show the mode of operation and their values DMX.
The unit is equipped with 3/5-pole XLR connections.
11
WIRELESS
To enable wireless control mode, proceed as follows:
• Press the ENTER button to access the main menu.
• Press the UP/DOWN button to scroll the menu, select the Connect icon, then press the ENTER button to
enter the next menu Wireless.
• Press the UP/DOWN button to scroll through the menu, select Receive on/o and press ENTER to activate
the wireless mode.
• Press the UP/DOWN button to scroll through the menu, select Reset Connect to reset the wireless connection of the unit.
ARTNET
To enable Artnet mode, proceed as follows:
• Press the ENTER button to access the main menu.
• Press the UP/DOWN button to scroll the menu, select the Connect icon, then press the ENTER button to
enter the next menu Ethernet.
• Press the UP/DOWN button to scroll through the menu, select Universe, Start Channel, IP Address and press
ENTER to activate the mode.
Page 38

12
3.7 SETUP
You can change the parameters for the device by following these steps:
MOVEMENT
• Press the ENTER button to access the main menu.
• Press the UP/DOWN button to scroll the menu, select the Set Up icon, then press the ENTER button to
enter the next menu.
• Press the UP/DOWN button to scroll through the menu, then select Movement and press the ENTER but-
ton to enter the next menu.
• Use the UP/DOWN button to select the option proposed and press the ENTER button to conrm the
setting.
- Pan Reverse - Pan rotation in the opposite direction. Select NO to deactivate the function (normal setting); YES to activate the function (Pan Reverse).
- Tilt Reverse - Used for reversing tilt movement. Select NO to deactivate the function (normal setting);
YES to activate the function (Tilt Reverse).
- Pan/Tilt Feedbacks - Reorganization Pan/Tilt position after rolling away. Select NO to deactivate or YES
to activate the function.
• Press the ENTER button to conrm your choice.
• Press the LEFT button repeatedly to exit the menu and save changes.
SCREEN
You can change the following parameters related to the display, following the same procedure:
• Press the ENTER button to access the main menu.
• Press the UP / DOWN keys to scroll the menu, select the Set Up icon, then press the ENTER button to
enter the next menu.
• Press UP / DOWN to scroll through the menu, then select Screen, and press the ENTER button to enter
the next menu.
• Press UP / DOWN to scroll through the menu, and then select one of the following settings for the display and press the ENTER key to display it.
- Back Light - Backlight display Auto O. This feature allows you to automatically turn o the backlight
after a specied time that you can set using the arrow buttons. To have the display always on select
Always On or set a value of 01-99 min to turn o the display after the amount of time you choose.
- Flip Display - Orientation of the display. This function allows you to rotate the display 180° to get a
better view of the display when the unit is hanging upside down. Select YES to activate or NO to disable this function.
- Warn Cue - Error warning. Use the directional keys to select OFF or ON depending on Whether you
want the display to show error alerts.
- Key Lock - Lock keys. With this function, you can lock the buttons on the control panel. If this function
is activated, the keys are automatically locked. To disable or temporarily disable the key lock function, press the buttons in the following order to regain access to menu commands: UP, DOWN, LEFT,
RIGHT, ENTER. Select YES to activate or NO to disable.
• Press the ENTER button to conrm your choice.
• Press the LEFT button repeatedly to exit the menu and save changes.
ARIA700SPOT
FIXTURE
White Balance - White Balance Function. Select the White Balance function to set the white balance by
changing the values (125 - 255) of Red, Green, Blue and White colors.
Dimmer Mode - Dimmer Function. Select Dimmer Mode and choose and simulate dierent dimming
curves. Specically, when set to:
Page 39

ARIA700SPOT
Off - The brightness increase is linear.
Dimmer 1 - Light intensity control is ner at low level and coarse at high levels.
Dimmer 2 - Light intensity control is ner at high level and coarse at low levels.
Dimmer 3 - Light intensity control is ner at low and high levels, and coarse to medium levels.
For the ARIA700SPOT you can access the following special functions:
• Press the ENTER button to access the main menu.
• Press the UP/DOWN button to scroll the menu, select the icon Set Up, then press the ENTER button to
enter the next menu.
• Press the UP/DOWN button to scroll through the Fixture menu, then select one of the following information and press the ENTER button to display it.
- Theater Mode - Activate this function to set a lower light output with a lower heat and fans operation.
- Fans Mode - Select this function to set the fans operation mode. Use the arrow buttons to select Auto
Speed /High Speed. Press the ENTER button to conrm your choice.
• Press the ENTER button to conrm your choice.
• Press the LEFT button repeatedly to exit the menu and save changes.
Temperature
You can change the parameters of the device by following these steps:
• Press the ENTER button to access the main menu.
• Press the UP/DOWN button to scroll the menu, select the Set Up icon, then press the ENTER button to
enter the next menu.
• Press UP/DOWN to scroll through the Temperature menu, select one of the following settings and press
the ENTER button to display it.
- Max Temperature - Temperature operating limits. This function allows you to set the maximum temperature inside the projector, after which the lamp will automatically turn o. Press the arrow buttons to set the desired temperature (80° -139°). Temperatures of less than 90° C are not critical. We
recommend that you enable this feature for temperatures higher than 90°.
• Press the ENTER button to conrm your choice.
• Press the LEFT button repeatedly to exit the menu and save changes.
13
3.8 ADVANCED
Reset Functions
You can start a preset program to restore the selected function:
• Press the ENTER button to access the main menu.
• Press the UP/DOWN button to scroll the menu, select the Advanced icon, then press the ENTER button
to enter the next menu.
• Press the UP/DOWN button to scroll through the menu, select Reset and press the ENTER button to
enter the next menu.
• Press the UP/DOWN button to scroll through the menu, then select the function you wish to reset between All, Pan, Tilt, Gobo1, Gobo2, Prism, Eect, Focus, Zoom, Frost, Iris.
• Press the ENTER button to conrm your choice and wait for the recovery of the selected function.
Adjust
Adjust - Adjusts the lamp. This function allows you to modify all the parameters of the lamp: Pan, Tilt, Gobo1,
RGobo, Gobo2, Prism, Eect, Focus, Zoom, Frost, Iris Oset. Press the UP/DOWN button to select one of the param-
eters and press ENTER to edit the value (000-255) through the UP/DOWN button.
Page 40

14
Factory Reload
Select this function to reset the unit to factory settings:
• Press the ENTER button to access the main menu.
• Press the UP/DOWN button to scroll the menu, select the Advanced icon, then press the ENTER button
to enter the next menu.
• Press the UP/DOWN button to scroll through the menu, select Factory Reload and press the ENTER button
to enter the next menu.
• Press the UP/DOWN button to select YES or NO, then press the ENTER button to conrm.
3.9 INFORMATION
To view all the information on the device, proceed as follows:
• Press the ENTER button to access the main menu.
• Press the UP/DOWN button to scroll the menu, select the icon Information, then press the ENTER button
to enter the next menu.
• Press the UP/DOWN button to scroll through the menu, then select one of the following information
and press the ENTER button to display it.
- Fixture Time - Through the Fixture Time function you can display the operating time of the projector.
- Temperature - Through the Temperature function can be displayed the temperature inside the xture,
near the lamp. The temperature can be displayed in degrees Celsius or Fahrenheit.
- Fans Speed - Through the Fans Speed function you can show on display the fan speed present near the
lamp. Velocity is expressed in RPM (revolutions per minute).
- Software Version - Through Software Version function you can display the currently installed software
version.
- UID - Through the UID function you can display the identier for RDM control.
• Press the LEFT button repeatedly to exit the menu.
ARIA700SPOT
RDM
With this function you can call up various submenus via RDM.
This device is RDM ready. RDM stands for “Remote Device Management” and makes remote control of devices connected to the DMX-bus possible. Manual settings like adjusting the DMX starting address are no
longer needed. This is especially useful when the device is installed in a remote area. RDM is integrated in
DMX without inuencing the connections. The RDM-data is transmitted via the standard XLR-poles 1 and
2 – new DMX-cables are not necessary. RDM ready and conventional DMX devices can be operated in one
DMX line. If DMX splitters are used and RDM control is to be used, these splitters must support RDM. The
number and type of RDM parameters depend on the RDM controller (not included) is used.
Page 41
ARIA700SPOT
15
3.10 CONNECTION OF THE DMX LINE
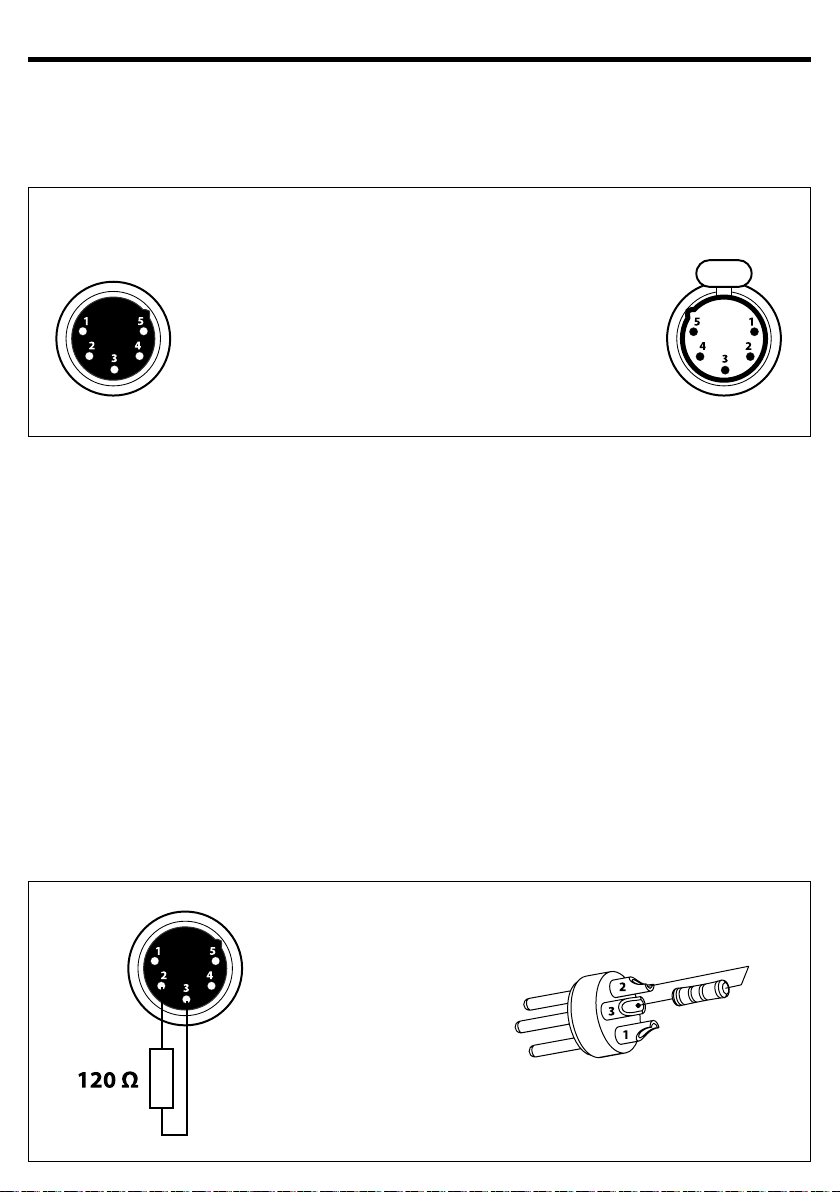
DMX connection employs standard XLR connectors. Use shielded pair-twisted cables with 120Ω impedance and low capacity.
The following diagram shows the connection mode:
DMX - INPUT
Spina XLR
Pin1 : Massa - Schermo
Pin2 : - Negativo
Pin3 : + Positivo
Pin4 : N/C
Pin5 : N/C
DMX - OUTPUT
Presa XLR
Fig.7
ATTENTION
The screened parts of the cable (sleeve) must never be connected to the system’s earth, as this would
cause faulty xture and controller operation.
Over long runs can be necessary to insert a DMX level matching amplier.
For those connections the use of balanced microphone cable is not recommended because it cannot
transmit control DMX data reliably.
• Connect the controller DMX input to the DMX output of the rst unit.
• Connect the DMX output to the DMX input of the following unit. Connect again the output to the input
of the following unit until all the units are connected in chain.
• When the signal cable has to run longer distance is recommended to insert a DMX termination on the
last unit.
3.11 CONSTRUCTION OF THE DMX TERMINATION
The termination avoids the risk of DMX 512 signals being reected back along the cable when they reaches the end of the line: under certain conditions and with certain cable lengths, this could cause them to
cancel the original signals.
The termination is prepared by soldering a 120Ω 1/4 W resistor between pins 2 and 3 of the 5-pin male XLR
connector, as shown in gure.
Esempio:
connettore XLR a 3 pin
Fig.8
Page 42
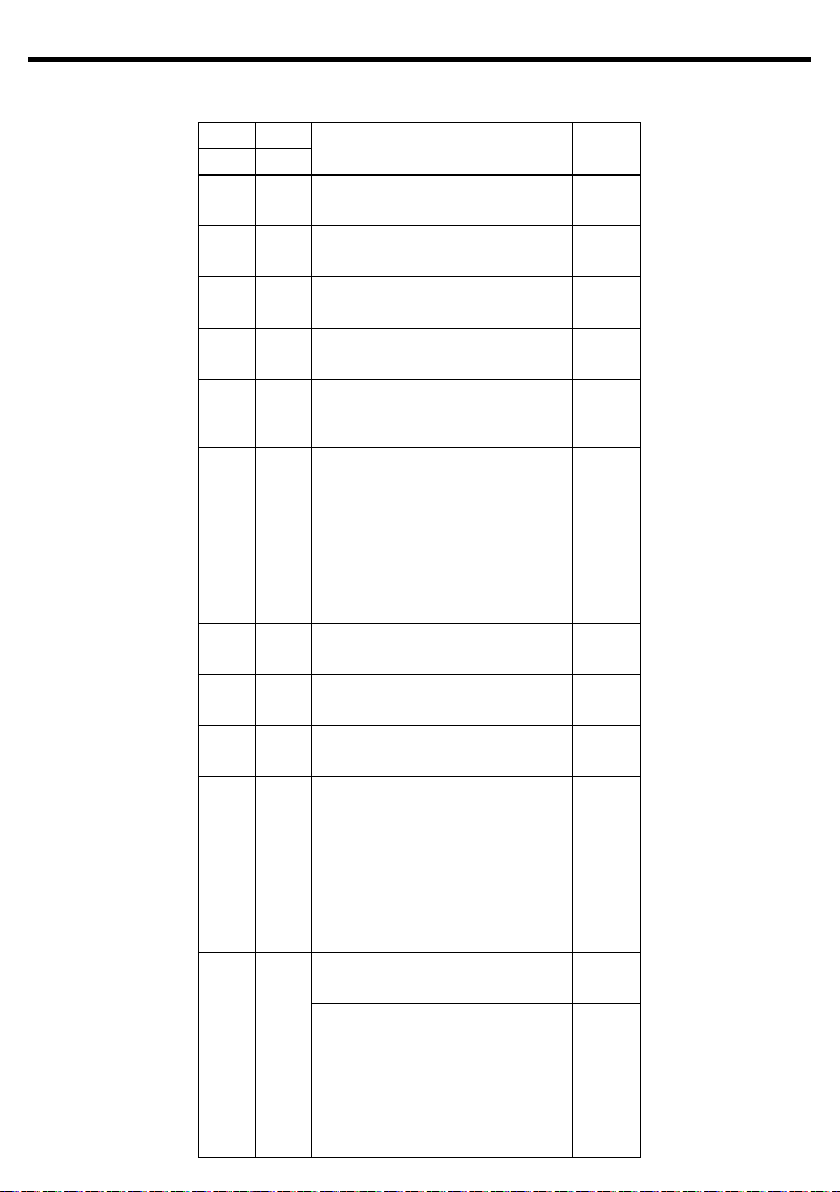
16
3.12 DMX CONTROL
ARIA700SPOT
STD EXT
23 Ch 28 Ch
1 1
2 2
3 3
4 4
5 5
6 6
7 7
8
9
8 10
9 11
FUNCTION
PAN 8bit
Pan Coarse 000 - 255
PAN 16bit
Pan Fine 000 - 255
TILT 8bit
Tilt Coarse 000 - 255
TILT 16bit
Tilt Fine 000 - 255
P/T SPEED
Fastest to slowest
Movement with Blackout
SHUTTER
No function (shutter open)
Strobe eect slow to fast
No function (shutter open)
Pulse-eect in sequences
No function (shutter open)
Random strobe eect slow to fast
No function (shutter open)
DIMMER 8bit
(0% to 100%) 000 - 255
DIMMER 16bit
(0% to 100%) 000 - 255
DIMMER fade
(0% to 100%) 000 - 255
COLOR FUNCTION
No function
White presets
Forward spin
Reverse spin
Continuous
CTC
TBD
COLOR (no function)
No function 000 - 255
COLOR (white preset)
White 2000K ~ 2700K
White 2700K ~ 3200K
White 3200K ~ 4200K
White 4200K ~ 5600K
White 5600K ~ 8000K
White 8000K ~ 10000K
DMX
Value
000 - 250
251 - 255
000 - 010
011 - 082
083 - 093
094 - 163
164 - 174
175 - 244
245 - 255
000 - 015
016 - 031
032 - 047
048 - 063
064 - 079
080 - 111
112 - 255
000 - 155
156 - 175
176 - 195
196 - 215
216 - 235
236 - 255
Page 43
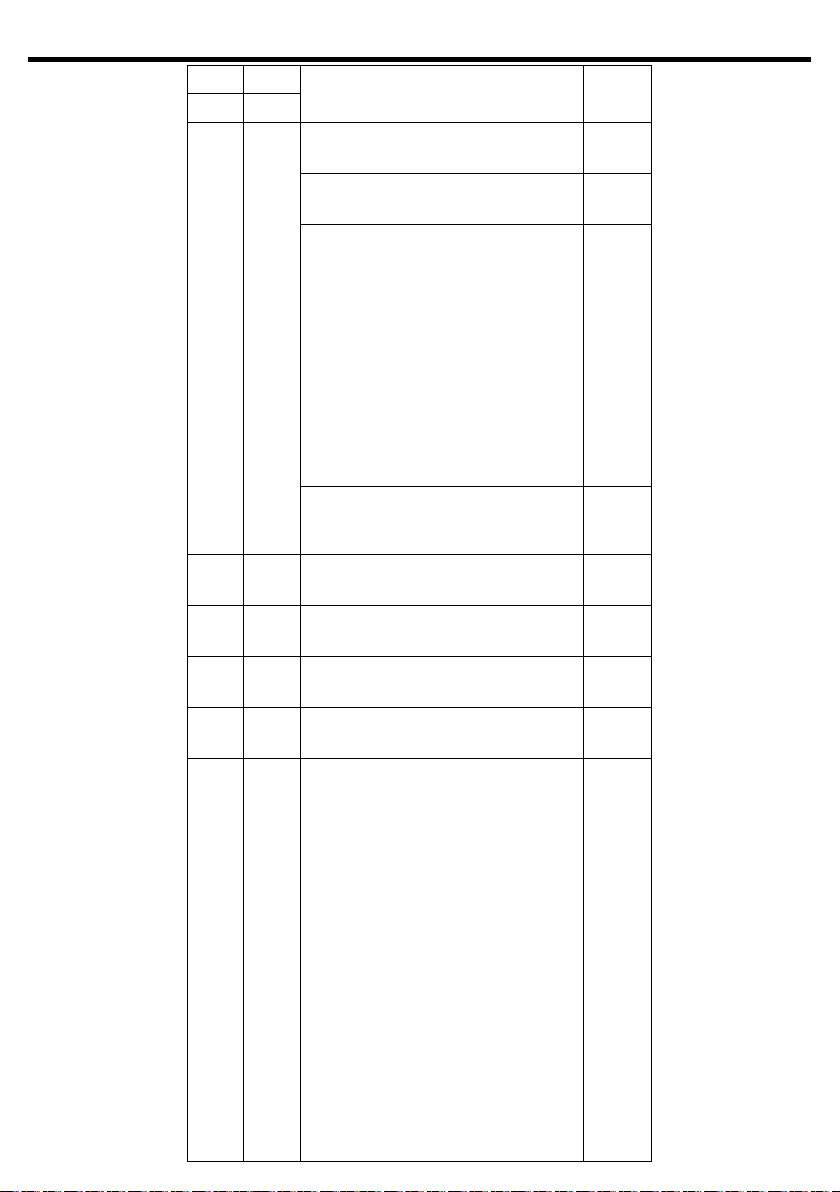
ARIA700SPOT
17
STD EXT
23 Ch 28 Ch
9 11
10 12
11 13
12 14
13 15
14 16
FUNCTION
COLOR (FW spin)
Rainbow Eect (Slow to Fast) 000 - 255
COLOR (RV spin)
Rainbow Eect (Slow to Fast) 000 - 255
COLOR (Continuos)
Black
Red
Green
Blue
White
Red=0, Green->up, Blue=full, White=0
Red=0, Green=full, Blue->down, White=0
Red->up, Green=full, Blue=0, White=0
Red=full, Green->down, Blue=0, White=0
Red=full, Green=0, Blue->up, White=0
Red->down, Green=0, Blue=full, White=0
COLOR (CTC)
CTC adjustment of output color, same as a
“classic” CMY xture with CTC linear correction.
RED
0~100%
GREEN
0~100%
BLUE
0~100%
WHITE
0~100%
ROTATING GOBO WHEEL
Open
Gobo 1
Gobo 2
Gobo 3
Gobo 4
Gobo 5
Gobo 6
Gobo 7
Gobo 1 shake (from slow to fast)
Gobo 2 shake (from slow to fast)
Gobo 3 shake (from slow to fast)
Gobo 4 shake (from slow to fast)
Gobo 5 shake (from slow to fast)
Gobo 6 shake (from slow to fast)
Gobo 7 shake (from slow to fast)
Stop to fastest (Forward Wheel Spin)
Stop to fastest (Reverse Wheel Spin)
DMX
Value
000 - 000
001 - 001
002 - 002
003 - 003
004 - 004
005 - 046
047 - 088
089 - 130
131 - 172
173 - 214
215 - 255
000 -255
000 - 255
000 - 255
000 - 255
000 - 255
000 - 005
006 - 010
011 - 015
016 - 020
021 - 025
026 - 030
031 - 035
036 - 040
041 - 055
056 - 070
071 - 085
086 - 100
101 - 115
116 - 130
131 - 145
146 - 200
201 - 255
Page 44
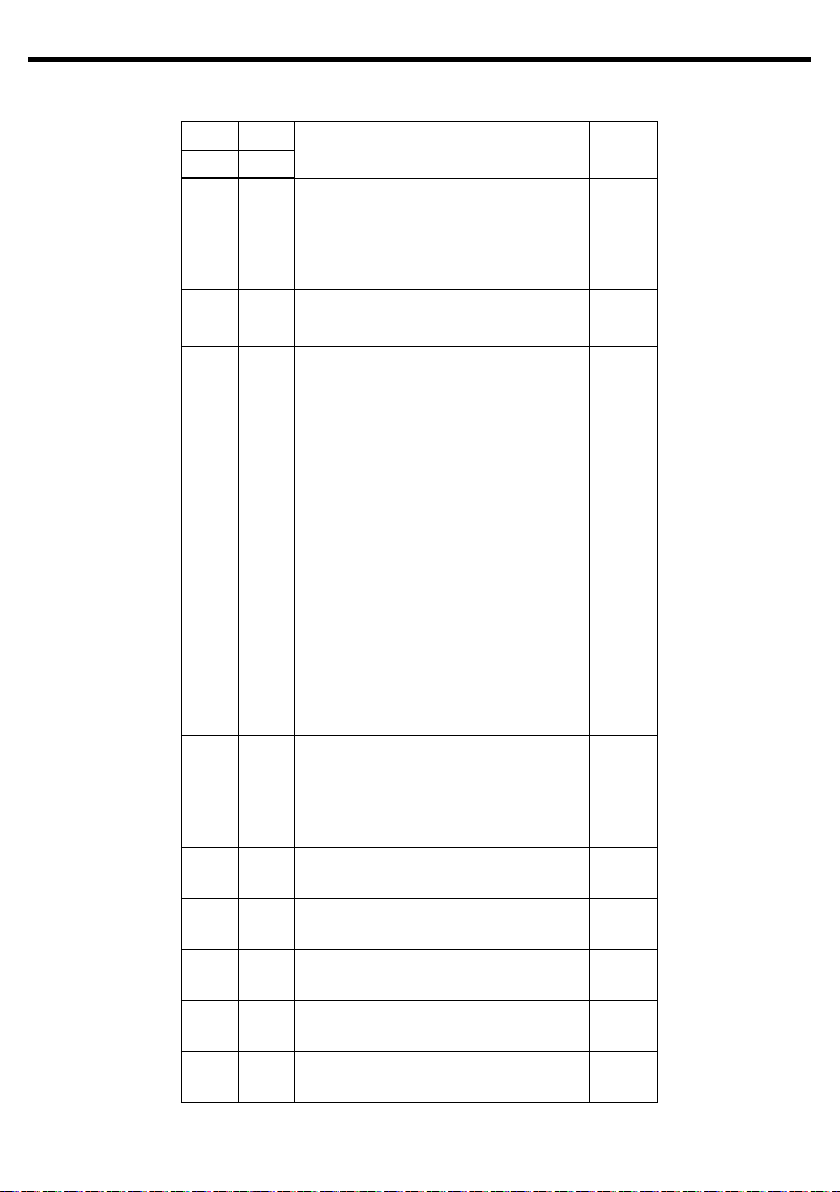
18
ARIA700SPOT
STD EXT
23 Ch 28 Ch
15 17
18
16 19
17 20
18 21
19 22
23
20 24
25
FUNCTION
GOBO ROTATION 8bit
Positioning from 0-360 degrees(Indexing)
Slowest to fastest(Forward Spin)
Stop
Fastest to Slowest(Reverse Spin)
GOBO ROTATION 16bit
0 - 100 %
STATIC GOBO WHEEL
Open
Gobo 1
Gobo 2
Gobo 3
Gobo 4
Gobo 5
Gobo 6
Gobo 7
Gobo 8
Gobo 1 shake (from slow to fast)
Gobo 2 shake (from slow to fast)
Gobo 3 shake (from slow to fast)
Gobo 4 shake (from slow to fast)
Gobo 5 shake (from slow to fast)
Gobo 6 shake (from slow to fast)
Gobo 7 shake (from slow to fast)
Gobo 8 shake (from slow to fast)
Stop to fastest (Forward Wheel Spin)
Stop to Slowest (Reverse Wheel Spin)
PRISM ROT
Open
Slowest to fastest (Forward Spin)
Prism stop
Fastest to Slowest (Reverse Spin)
FROST
Frost 0->100%
FOCUS 8bit
Focus
FOCUS 16bit
Focus Fine
ZOOM 8bit
Zoom
ZOOM 16bit
Focus Fine
DMX
Value
000 - 191
192 - 221
222 - 225
226 - 255
000 - 255
000 - 005
006 - 009
010 - 013
014 - 017
018 - 021
022 - 025
026 - 029
030 - 033
034 - 037
038 - 051
052 - 065
066 - 079
080 - 093
094 - 107
108 - 121
122 - 135
136 - 149
150 - 202
203 - 255
000 - 003
004 - 127
128 - 131
132 - 255
000 - 255
000 - 255
000 - 255
000 - 255
000 - 255
Page 45
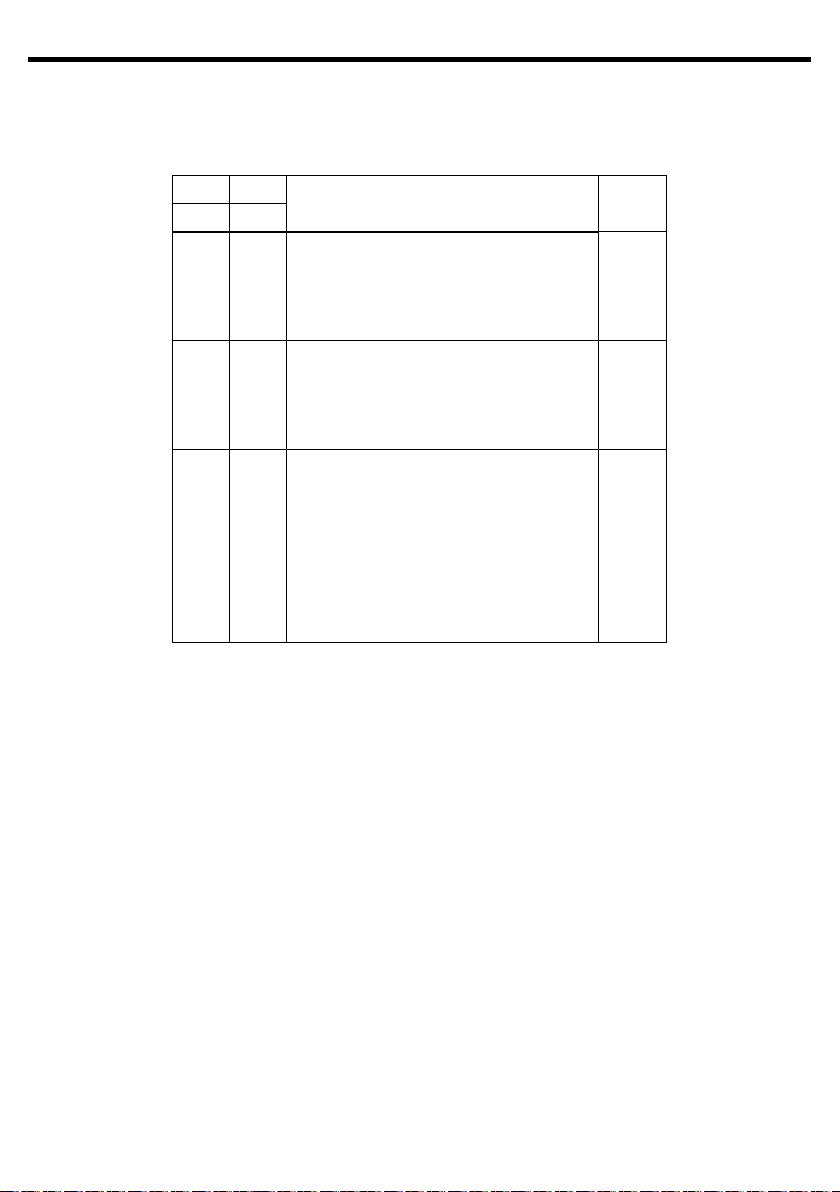
ARIA700SPOT
19
STD EXT
23 Ch 28 Ch
21 26
22 27
23 28
FUNCTION
ANIMATION WHEEL
Open / No function
Forward stop to fastest
Stop
Reverse stop to fastest
IRIS
From large to small
Open and close by arrive slow to fast (Eects)
Open from slow to fast (Eects)
Close from slow to fast (Eects)
Control
No function
Reset all
Pan&Tilt Reset
Eects Reset
Gobo Reset
TBD
Other Reset
TBD (not used)
DMX
Value
000 - 003
004 - 127
128 - 131
132 - 255
000 - 063
064 - 127
128 - 191
192 - 255
000 - 007
008 - 015
016 - 023
024 - 031
032 - 039
040 - 047
048 - 055
056 - 255
Page 46
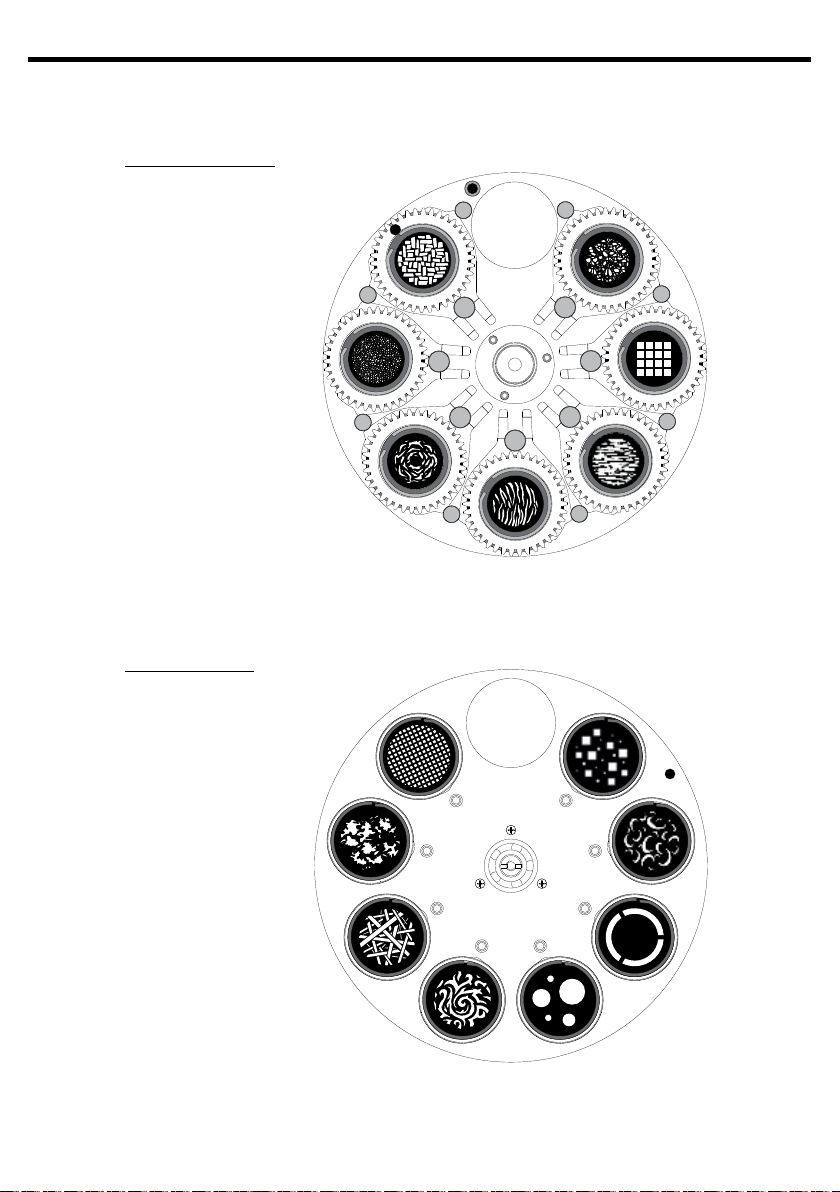
20
4
STATIC GOBOS
3.13 GOBOS WHEEL
ROTATING GOBOS WHEEL
ARIA700SPOT
STATIC GOBOS WHEEL
7
6
5
8
1
2
3
1
7
6
45
2
3
Page 47
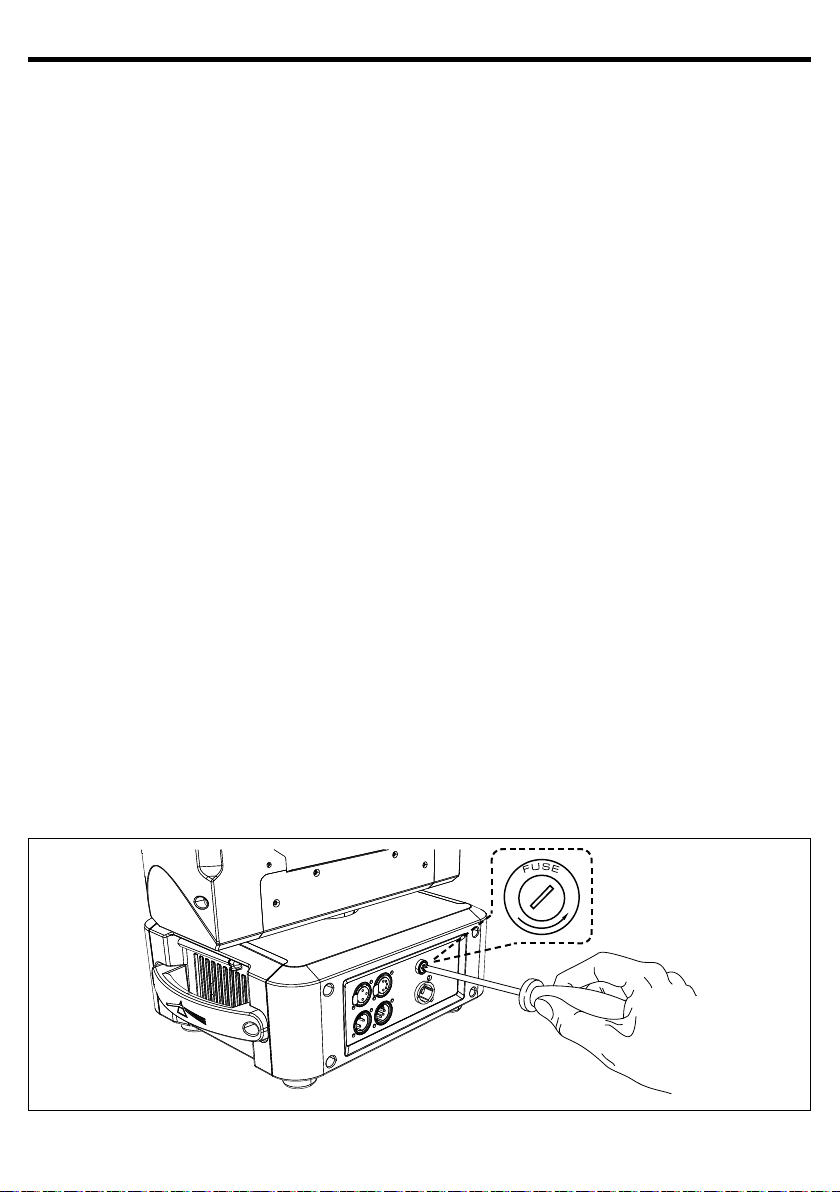
ARIA700SPOT
21
- 4 - MAINTENANCE
4.1 MAINTENANCE AND CLEANING THE UNIT
• Make sure the area below the installation place is free from unwanted persons during setup.
• Switch o the unit, unplug the main cable and wait until the unit has cooled down.
• All screws used for installing the device and any of its parts should be tightly fastened and should not
be corroded.
• Housings, xations and installation spots (ceiling, trusses, suspensions) should be totally free from any
deformation.
• When the lens is visibly damaged due to cracks or deep scratches, it must be replaced.
• The main cables must be in impeccable condition and should be replaced immediately even when a
small problem is detected.
• In order to protect the device from overheating the cooling fans (if any), and ventilation openings
should be cleaned monthly.
To ensure optimal operation and performance for a long time it is essential to periodically clean the parts
subject to dust and grease deposits. The frequency with which the following operations are to be carried
out depends on various factors, such as the amount of the eects and the quality of the working environment (air humidity, presence of dust, salinity, etc.). Use a soft cloth dampened with any detergent liquid
for cleaning glass to remove the dirt from the reectors, from the lenses and lters.
It is recommended that the projector undergoes an annual service by a qualied technician for special
maintenance involving at least the following operations:
- General cleaning of internal parts..
- Restoring lubrication of all parts subject to friction, using lubricants specically.
- General visual check of the internal components, cabling, mechanical parts, etc.
- Electrical, photometric and functional checks; eventual repairs.
Warning: we strongly recommend internal cleaning to be carried out by qualied personnel!
4.2 FUSE REPLACEMENT
1. Disconnect this product from the power outlet.
2. Using a screwdriver, unscrew the fuse holder cap from the housing.
3. Remove the blown fuse and replace with a good fuse of the same type and rating.
4. Screw the fuse holder cap back in place and reconnect power.
Fig.9
Page 48

22
ARIA700SPOT
4.3 TROUBLESHOOTING
Problems Possible causes Checks and remedies
Fixture does not light up
General low light intensity
Fixture does not power up
Fixture does not respond to DMX
• No mains supply
• Dimmer fader set to 0
• All color faders set to 0
• Faulty LED
• Faulty LED board
• Dirty lens assembly
• Misaligned lens assembly
• No power
• Loose or damaged power cord
• Faulty internal power supply
• Wrong DMX addressing
• Damaged DMX cables
• Bouncing signals
• Check the power supply voltage
• Increase the value of the dimmer channels
• Increase the value of the color channels
• Replace the LED board
• Replace the LED board
• Clean the xture regularly
• Install lens assembly properly
• Check for power on power outlet
• Check power cord
• Replace internal power supply
• Check control panel and unit addressing
• Check DMX cables
• Install terminator as suggested
Contact an authorized service center in case of technical problems or not reported in the table can not be
resolved by the procedure given in the table.
Page 49

Page 50

Page 51

Page 52

©2017 Music & Lights S.r.l.PROLIGHTS è un brand di proprietà della Music & Lights S.r.l. PROLIGHTS is a brand of Music & Lights S.r.l .company.
MUSIC & LIGHTS S.r.l.
Via Appia, km 136,200 - 04020 Itri (LT) - ITALY
Phone +39 0771 72190 - Fax +39 0771 721955
www.musiclights.it - email: [email protected]
ISO 9001:2008 Certied Company
 Loading...