

Page 1
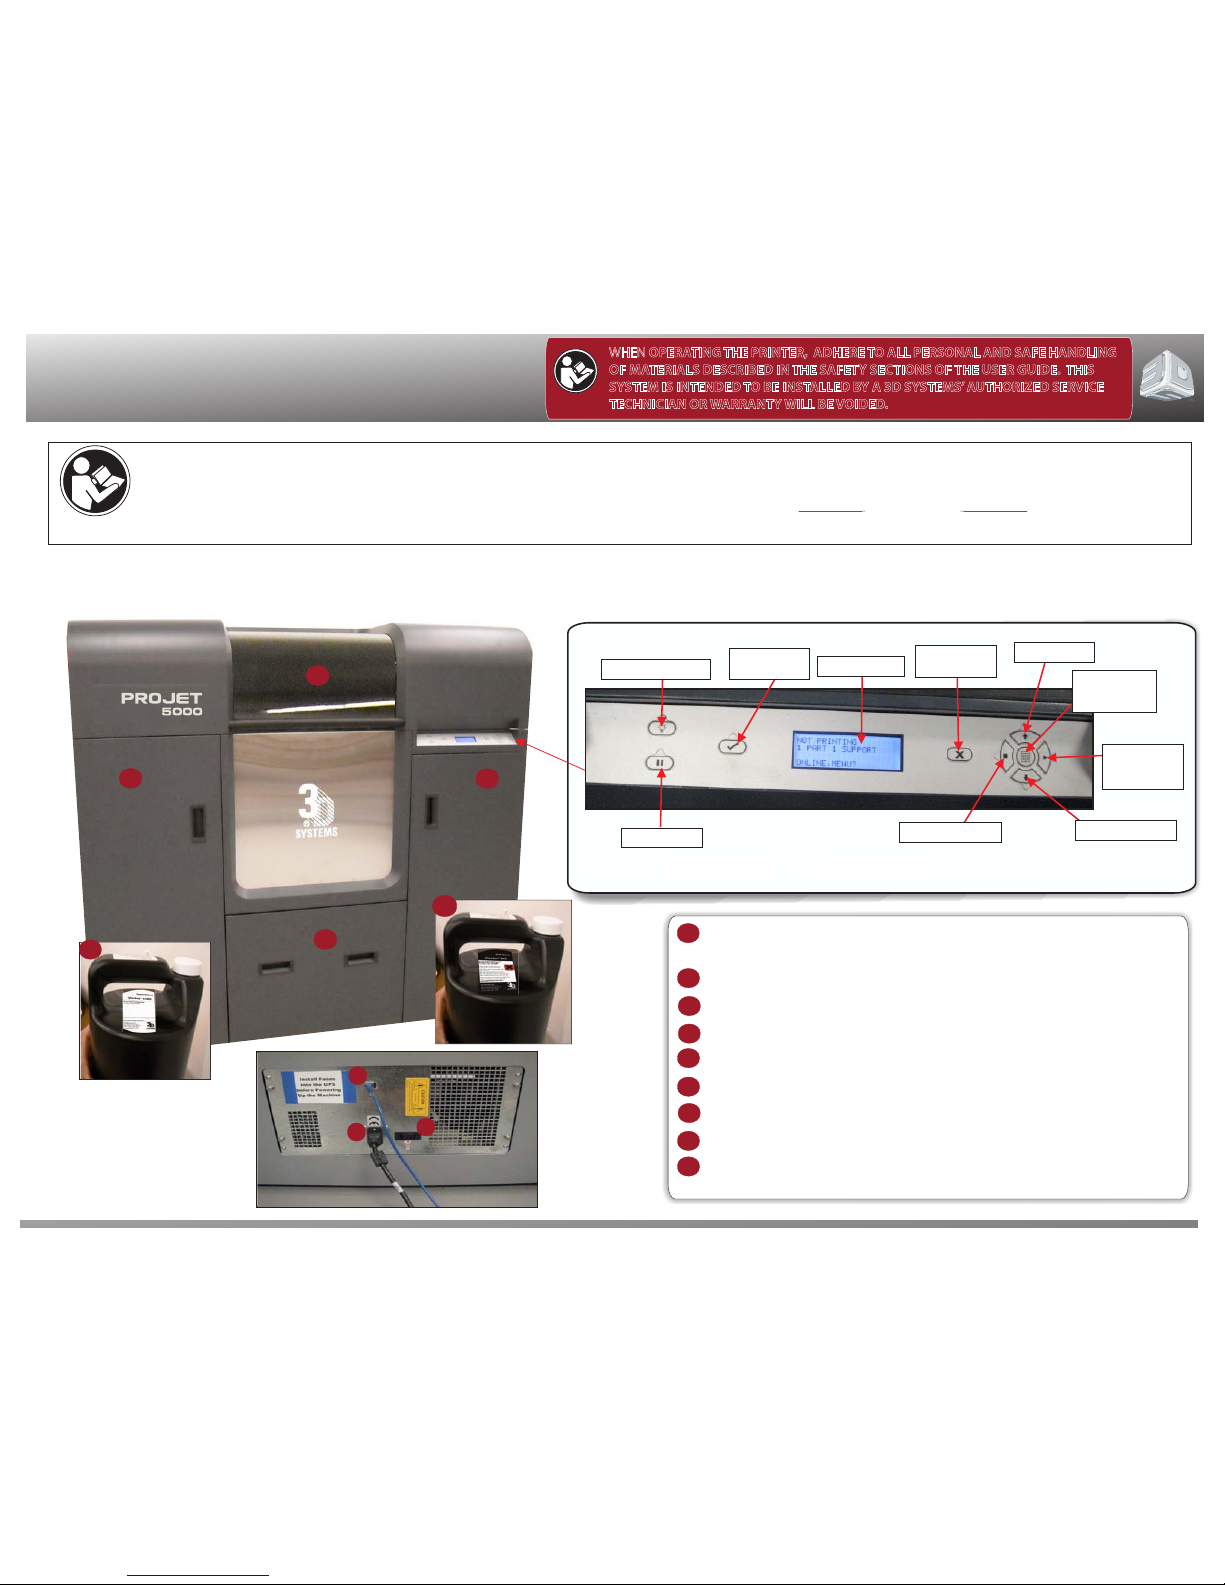
Build Chamber
Build Platform (Located in Build Chamber)
Support Material Delivery Module Compartment
Part Material Delivery Module Compartment
Waste Drawer
Material Bottle (Support Material)
Material Bottle (Part Material)
Shielded Ethernet Cable (Not Supplied)
Power Cord
Power Switch
A
C
D
E
B
B
3D Systems Confidential
B
B
C
D
F
F
G
H
I
FAMILIARIZATION
TM TM
It will be necessary to register your ProJet 3-D Production System to access the ProJet 5000 Online User Guide. To register, type in “
projet.3dsystems.com” in the web browser. Once registered, an email confirmation will be sent to you with a link to 3D Systems' 3dpedia.
(http://3dpedia.3dsystems.com). Once you are at the login page, enter the assigned user name
pj5k-01 and password pj5k-01.
Please keep the user name and password in a accessible area for future use.
Quick Reference Guide
Quick Reference Guide
3-D Printer
WHEN OPERATING THE PRINTER, ADHERE TO ALL PERSONAL AND SAFE HANDLING
O
F MATERIALS DESCRIBED IN THE SAFETY SECTIONS OF THE USER GUIDE. THIS
S
YSTEM IS INTENDED TO BE INSTALLED BY A 3D SYSTEMS’ AUTHORIZED SERVICE
T
ECHNICIAN OR WARRANTY WILL BE VOIDED.
B
A
G
H
I
www.3dsystems.com
Confirm
“NO”
Menu
Options
Online/
Offline
Scroll Down
Abort Job
Scroll Up
E
Operator Panel
Confirm
“YES”
LIGHT On/Off
Pause Job
LCD Display
ProJet™ 5000
P.N.: 316131-04, 02/12
Page 2
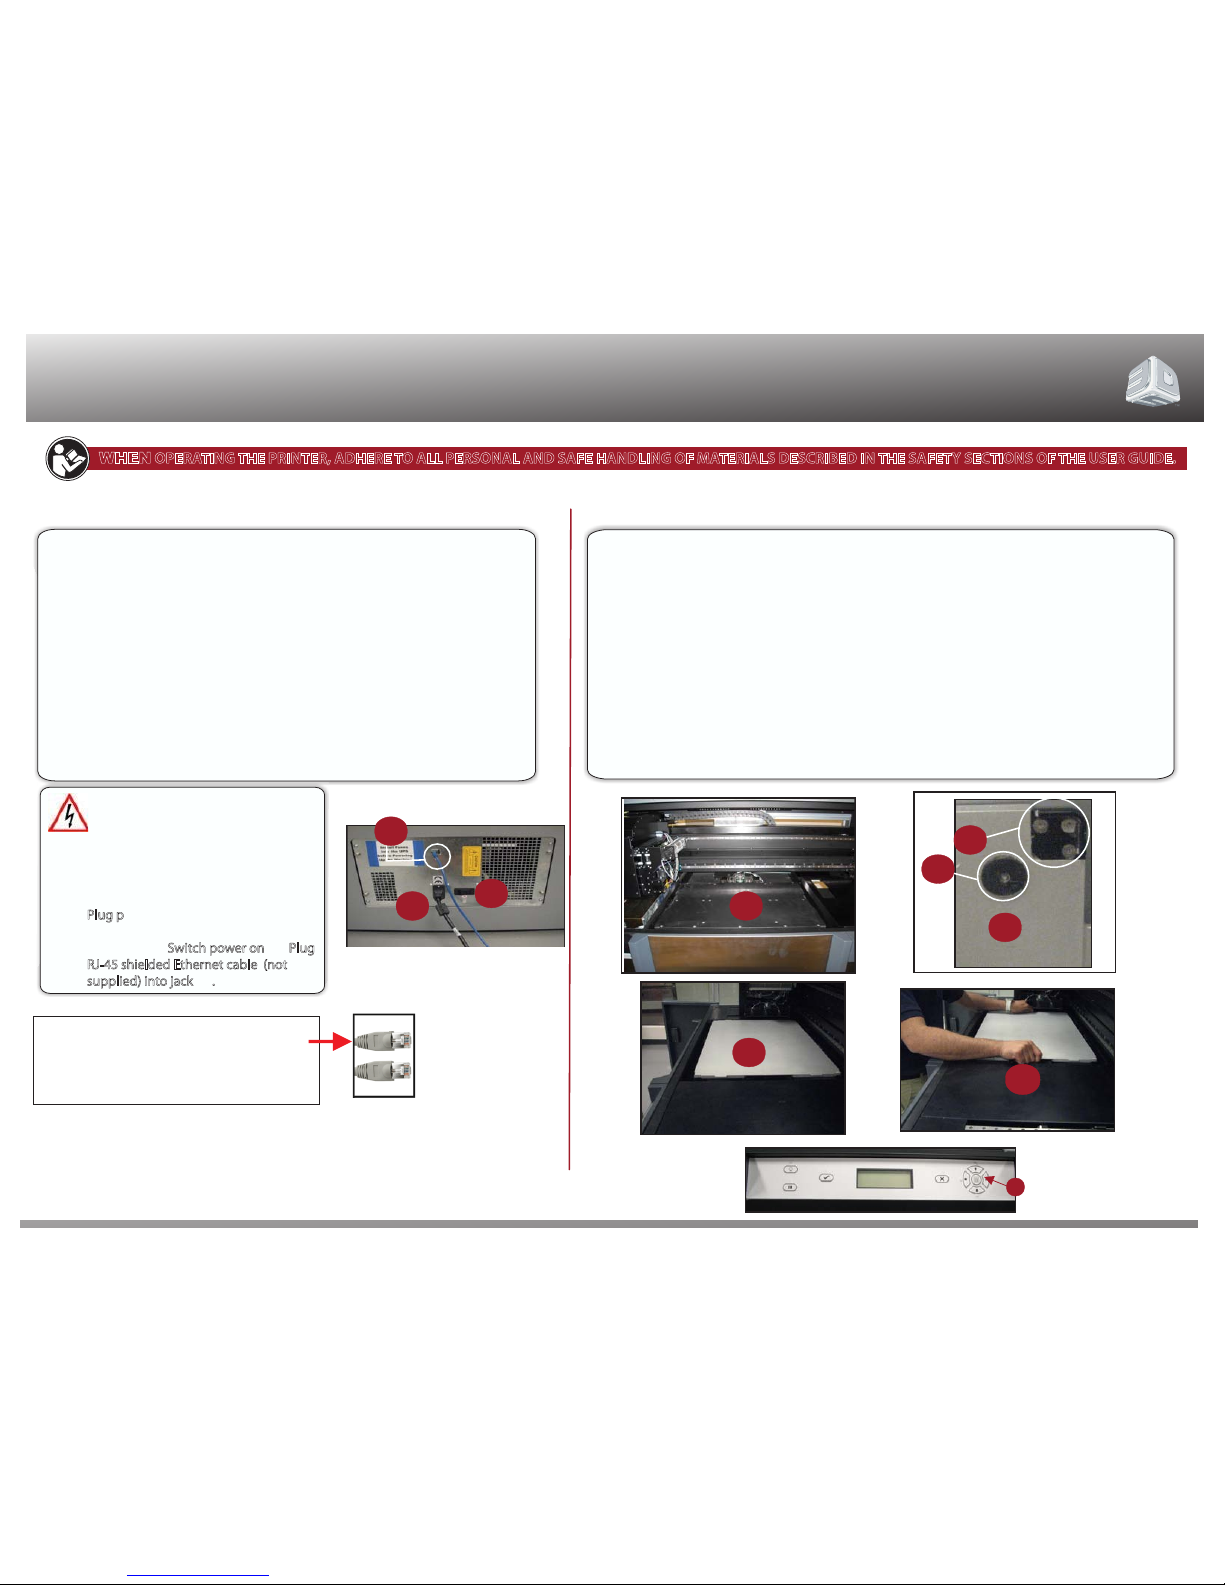
NOTE: Clean platform elevator (A) and platform (B) using Isopropyl Alcohol. When cleaning
platform, clean the front and back sides.
Ensure that the corner guides (C) on the backside of platform are clean and free of debris. If
debris exists when installing, the platform guides will not lock into the platform elevator.
Lift build chamber door. (See “Familiarization (A)” for build chamber door location. )
Place platform with corner guides and pads facing down onto the platform elevator
and seat onto elevator . The magnetic guides will
affix the platform to the elevator and if
properly installed, platform will not move. It should sit squarely on the elevator and be firmly
located by the corner guides. Use caution not to drop the platform or hit the printhead.
To remove platform, lift from the sides and pull up and out from the platform elevator .
Close the build chamber door and press ONLINE .
(E) (F) (C)
(D)
(E)
(G)
POWER SUPPLY
PLATFORM INSTALLATION
Before plugging in the power cord,
confirm the specifications of
electrical service and breaker.
Make sure that the red shipping
restraints and braces have been
removed from the printer.
P
lug p
Switch power on Plug
R
J-45 shielded Ethernet cable (not
s
upplied) into jack .
ower cord into power outlet
on back side of printer and into facility’s
power outlet.
(A)
(B).
(C)
3D Systems Confidential
NOTE:
A Ethernet cable is
required when connecting from the
printer to the end user’s computer.
shielded (C)
The AC voltage and current requirements for the ProJet™ Production Modeling
System are:
· 100 VAC, 50/60 Hz (Dedicated 30 amp. Circuit Breaker)
· 115 VAC, 50/60 Hz (Dedicated 30 amp. Circuit Breaker)
· 230 VAC, 50/60 Hz (Dedicated 20 amp. Circuit Breaker)
Note: The installation of The ProJet™ Production Printing System shall comply
with the National Standards and Local Electrical Codes of the location in
which it is installed.
See ProJet™ Facility Requirement Guide for detailed information for electrical
power supply and other facility information.
WHEN OPERATING THE PRINTER, ADHERE TO ALL PERSONAL AND SAFE HANDLING OF MATERIALS DESCRIBED IN THE SAFETY SECTIONS OF THE USER GUIDE.
A
ONLINE
G
www.3dsystems.com
B
C
B
B
A
B
E
B
D
C
B
F
B
Quick Reference Guide
3-D Printer
ProJet™ 5000
P.N.: 316131-04, 02/12
Page 3
1
WHEN OPERATING THE PRINTER, ADHERE TO ALL PERSONAL AND SAFE HANDLING OF MATERIALS DESCRIBED IN THE SAFETY SECTIONS OF THE USER GUIDE.
SUPPORT & BUILD MATERIAL BOTTLE INSTALLATIONS
3D Systems Confidential
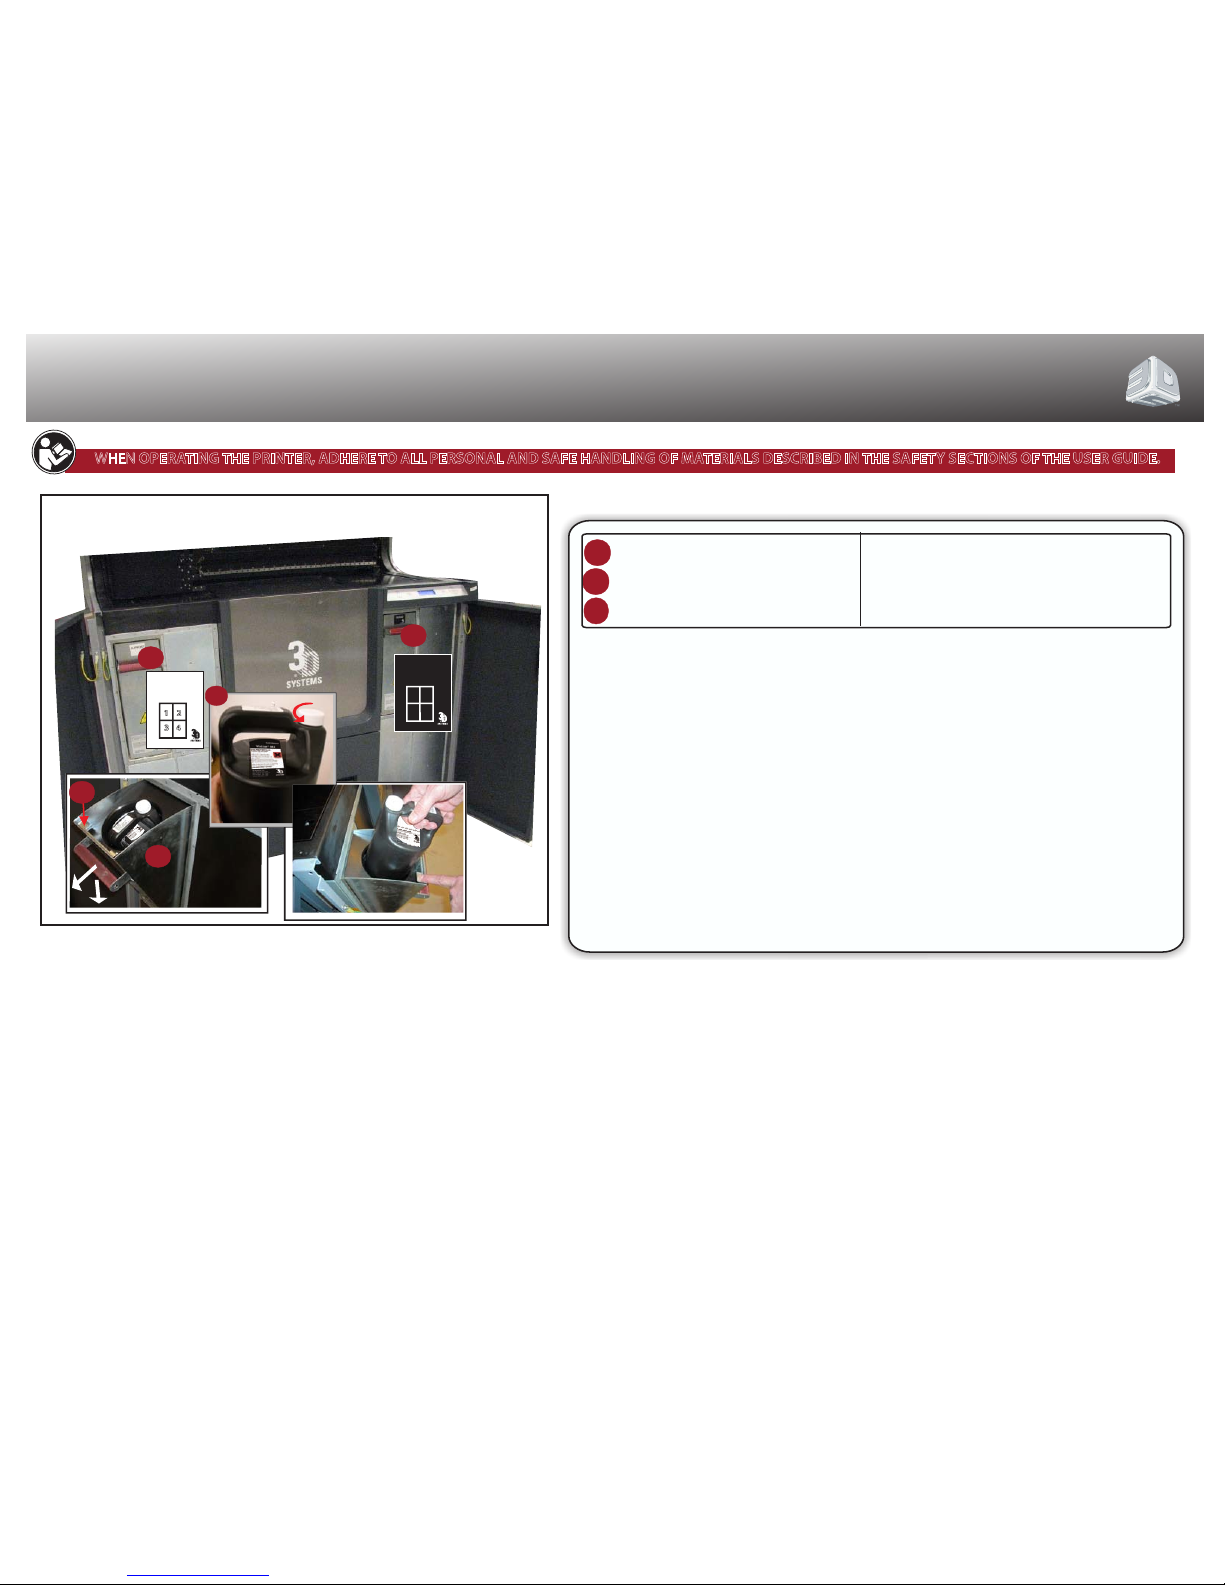
Unpack bottles and MSDS/SDS Sheet from
carton and read the MSDS/SDS before
handling the materials.
A
B
A
B
C
Support Material Delivery Module
Part Material Delivery Module
Release Latch
Loosen bottle cap to allow air to vent.
Open doors to the material delivery modules . Open left and/or right material
delivery modules by pushing handle down and pulling out the compartment .
Install bottle into compartment and press bottle down until a click sounds.
To remove bottle, open delivery module;
press and hold release latch (C) down. Grip bottle handle and lift bottle out of module.
(D)
(A & B)
(E)
NOTE: Do not
place support material into build delivery modules and visa versa. Doing so can cause
damage to the printer.
NOTE: Be sure that the bottle is locked in place. If bottle is loose, press bottle down to
ensure it is latched. Close compartment.
NOTE: The illustration in this step depicts removing the support material module. This
step also applies to the build material module.
NOTE: See ProJet™ 5000 User Guide for proper material bottle storage instructions.
½ turn counterclockwise
E
C
C
D
A
PN:316028-01
Position
1
2
3
4
SUPPORT
MDM
B
PN:316027-01
Position
1
2
3
4
PART
MDM
Quick Reference Guide
3-D Printer
ProJet™ 5000
P.N.: 316131-04, 02/12
Page 4
3D Systems Confidential
www.3dsystems.com
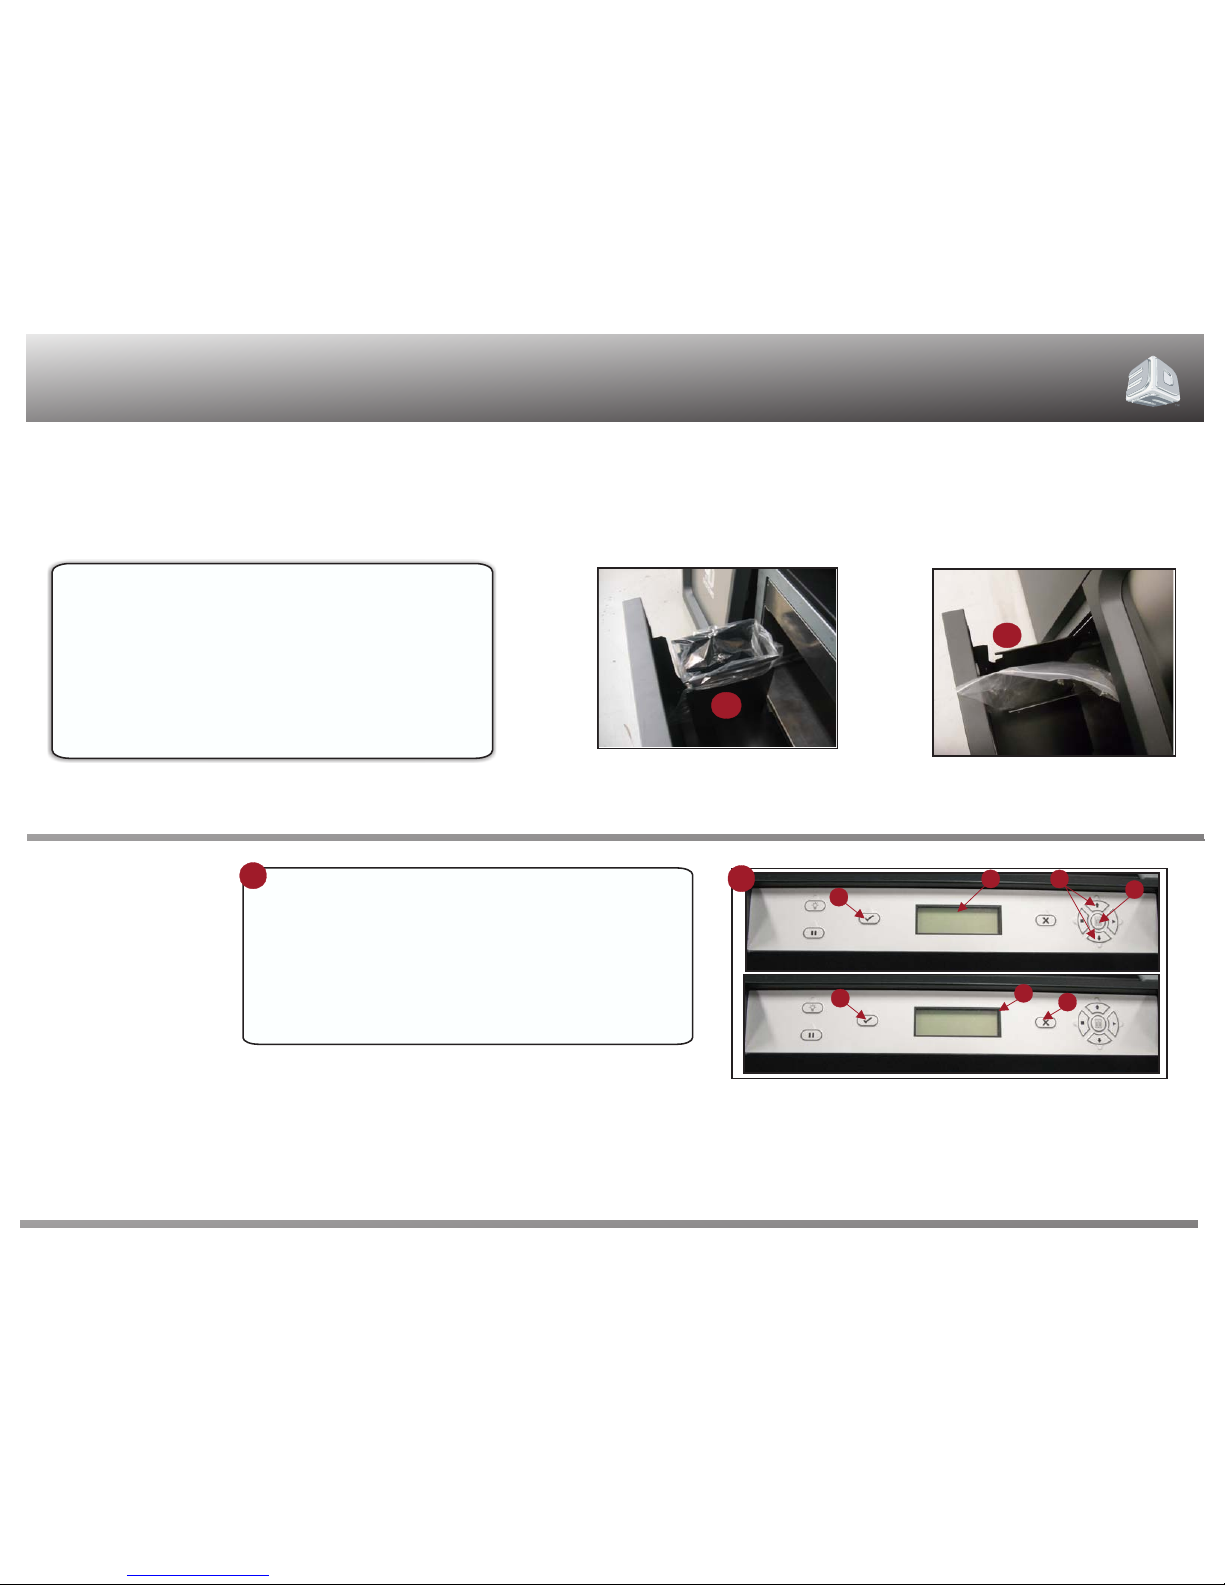
Open waste drawer and install waste bag onto waste bag
holder by pushing the top frame in while inserting the
bag over the frame. Drape bag over the sides of holder and
close drawer.
Once bag is removed, seal bag
and dispose of it according to your local regulatory
guidelines.
(E)
(F)
Reverse procedure to remove bag. Dispose of the used pan
liners into the waste bag.
B
E
F
Wear protective gloves before removing any waste material. Be careful not to spill, drop, or expose others to these materials. Dispose the material according to your local
regulatory guidelines.
Waste Bag Installation & Removal
OPERATION
TEST PRINT
PLATFORM EMPTY/
DOOR CLOSED?
Y/N
A1
A4
A5
A4
A6
A
Submit Print Build
(A1), (A2) (A3)
(A4)
(A5) (A4)
(A6).
NOTE: It is recommended to submit a Test Build prior to each
build job.
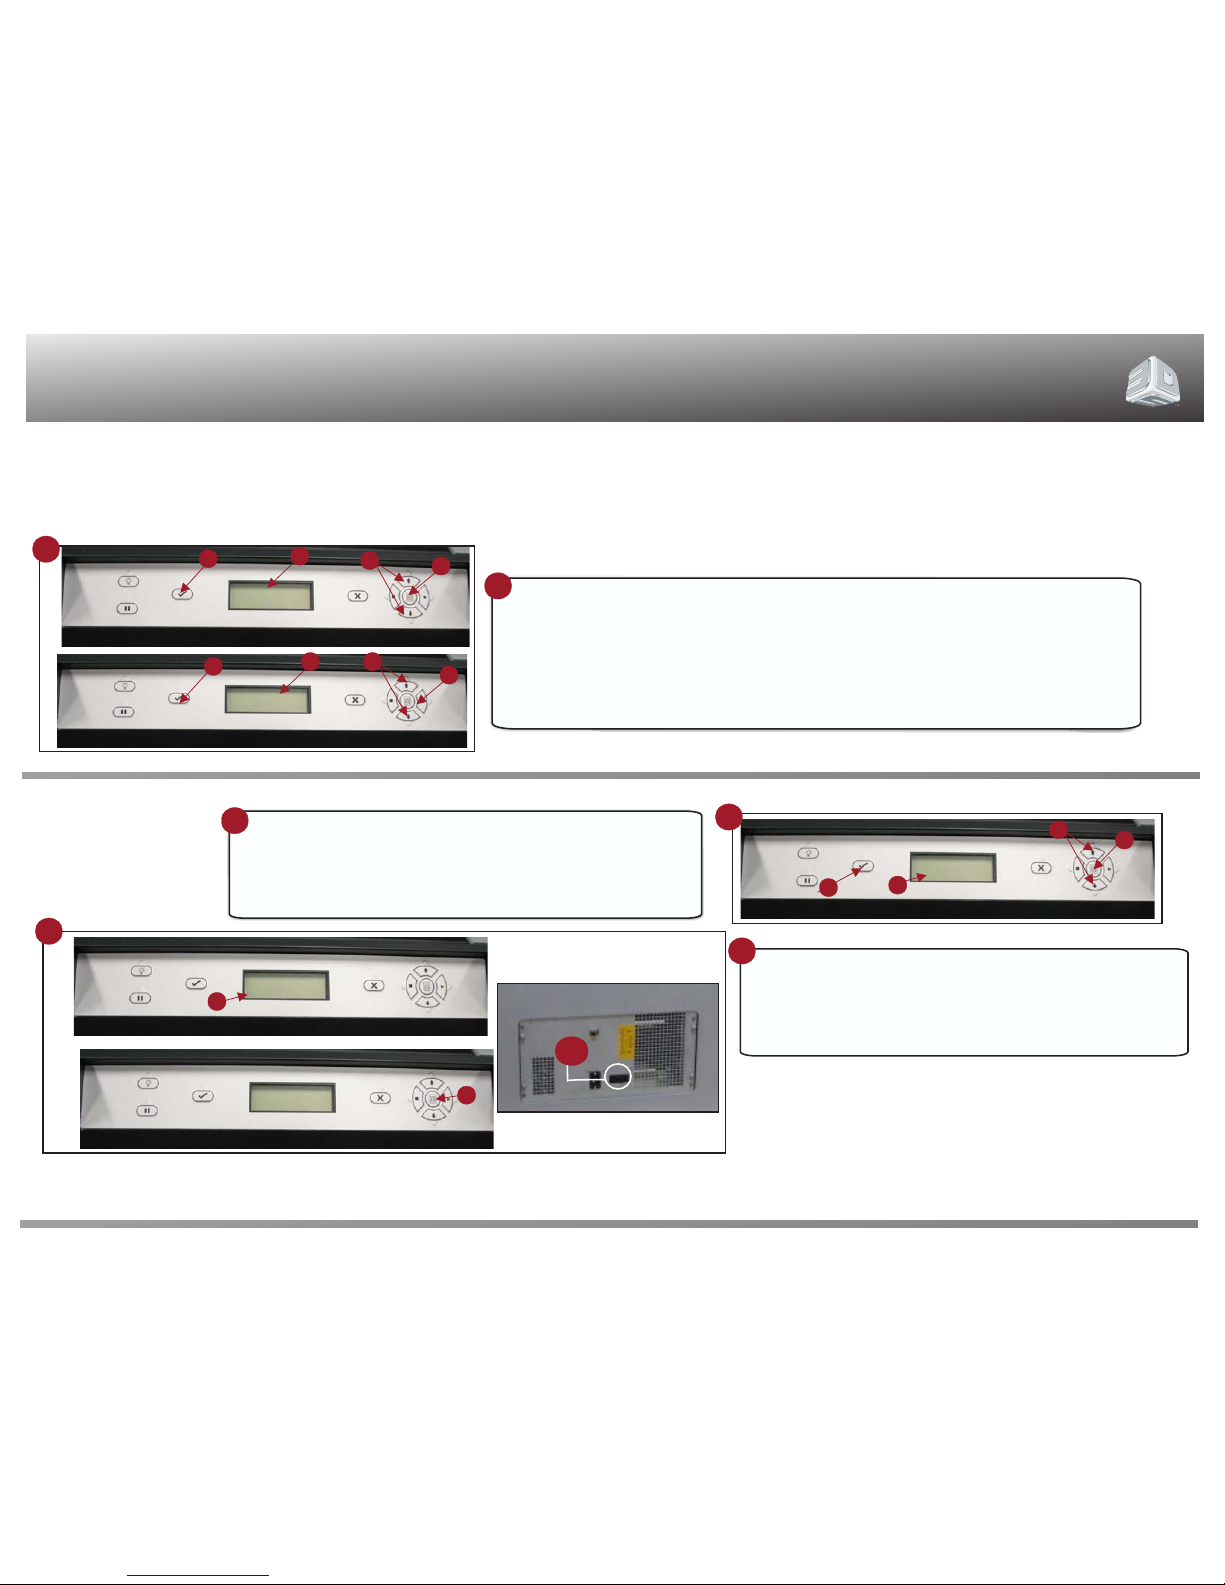
Press MENU Scroll to highlight TEST PRINT and
press YES . The message PLATFORM EMPTY? DOOR
CLOSED? Y/ N scrolls across the display, Press YES if
the platform is empty and the door is closed, otherwise press NO
A
A2
A3
Quick Reference Guide
3-D Printer
ProJet™ 5000
P.N.: 316131-04, 02/12
Page 5
OPERATION
B
3D Systems Confidential
www.3dsystems.com
PRINT DEMO
B1
B2
B3
B4
OK TO POWER OFF
XXX
D1
SHUTDOWN
C3
C1
C2
C4
ONLINE
B1
B2
B5
B4
Build Demo
(B1) (B2) (B3) (B4)
(B5)
(B4)
Press MENU , Scroll to highlight PRINT DEMO and press YES ; the system displays
PLATFORM EMPTY/DOOR CLOSED? Y/N .
When the platform is empty, press YES . The modeler will start the demo build job.
TM
NOTE: Refer to ProJet
5000 User Guide, under the operation section for the build process, how to
remove parts from the modeler and cleaning parts procedure.
PLATFORM EMPTY/
DOOR CLOSED?
Y/N
NOTE: Verify that printer is not building; if job is running, abort the
current job.
(C1) (C2) (C3) (C4)Press MENU , scroll to SHUTDOWN , press YES twice.
Shutting Down Printer
C
B
C
D2
When the display shows OK TO POWER OFF XXX , press the power
switch on the rear panel .
To halt shutdown, press ONLINE before pressing power switch.
(D1)
(D2)
(D3)
D
D
D3
P.N.: 316131-04, 02/12
Quick Reference Guide
3-D Printer
ProJet™ 5000
 Loading...