

Page 1

PLEASE READ
We are in no way responsible for the
contents of the manual. We do not guarantee
its accuracy and we do not make any claim
of copyright. The copyright remains the
property of their respective owners.
Visit the site to read the latest projector
news and reviews, read and comment on
projector specifications, download user
manuals and much more.
Page 2
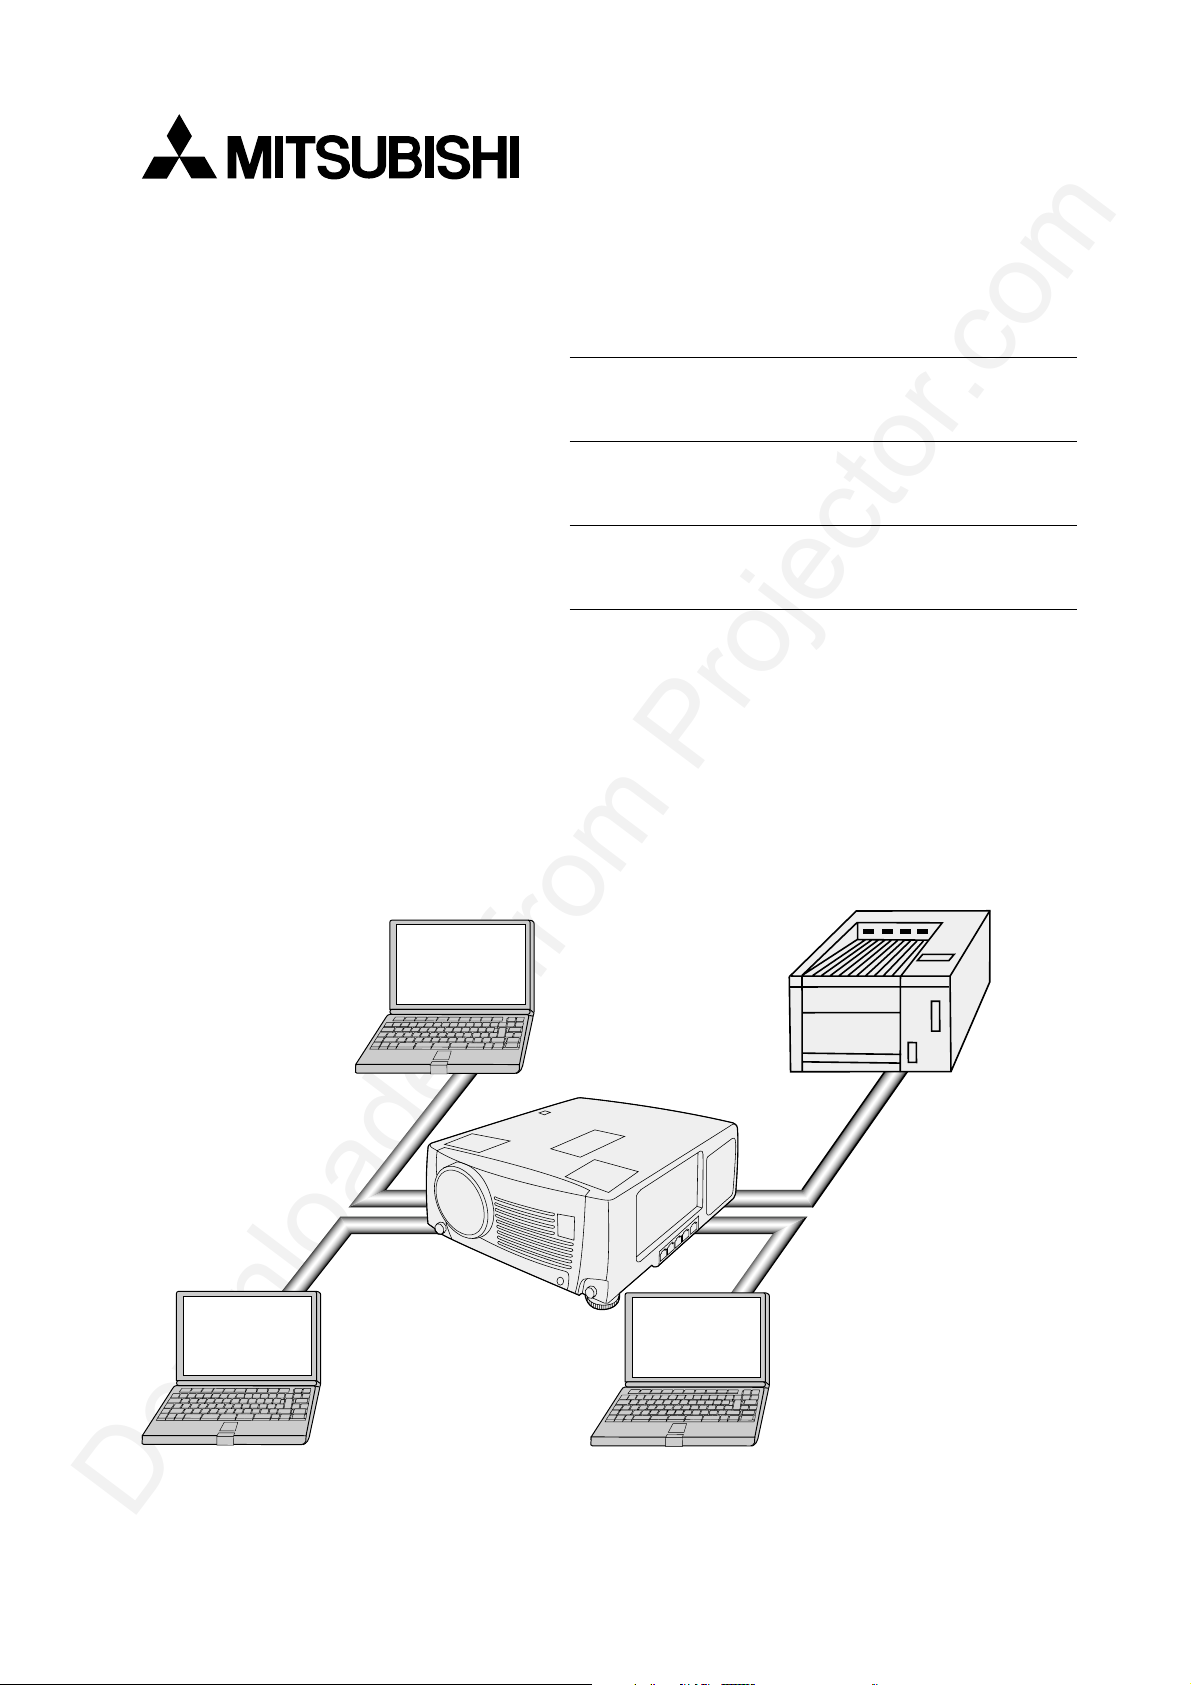
Smart Hub
Networking
System
User Manual
1
Page 3
Connection
What you can do with HUB
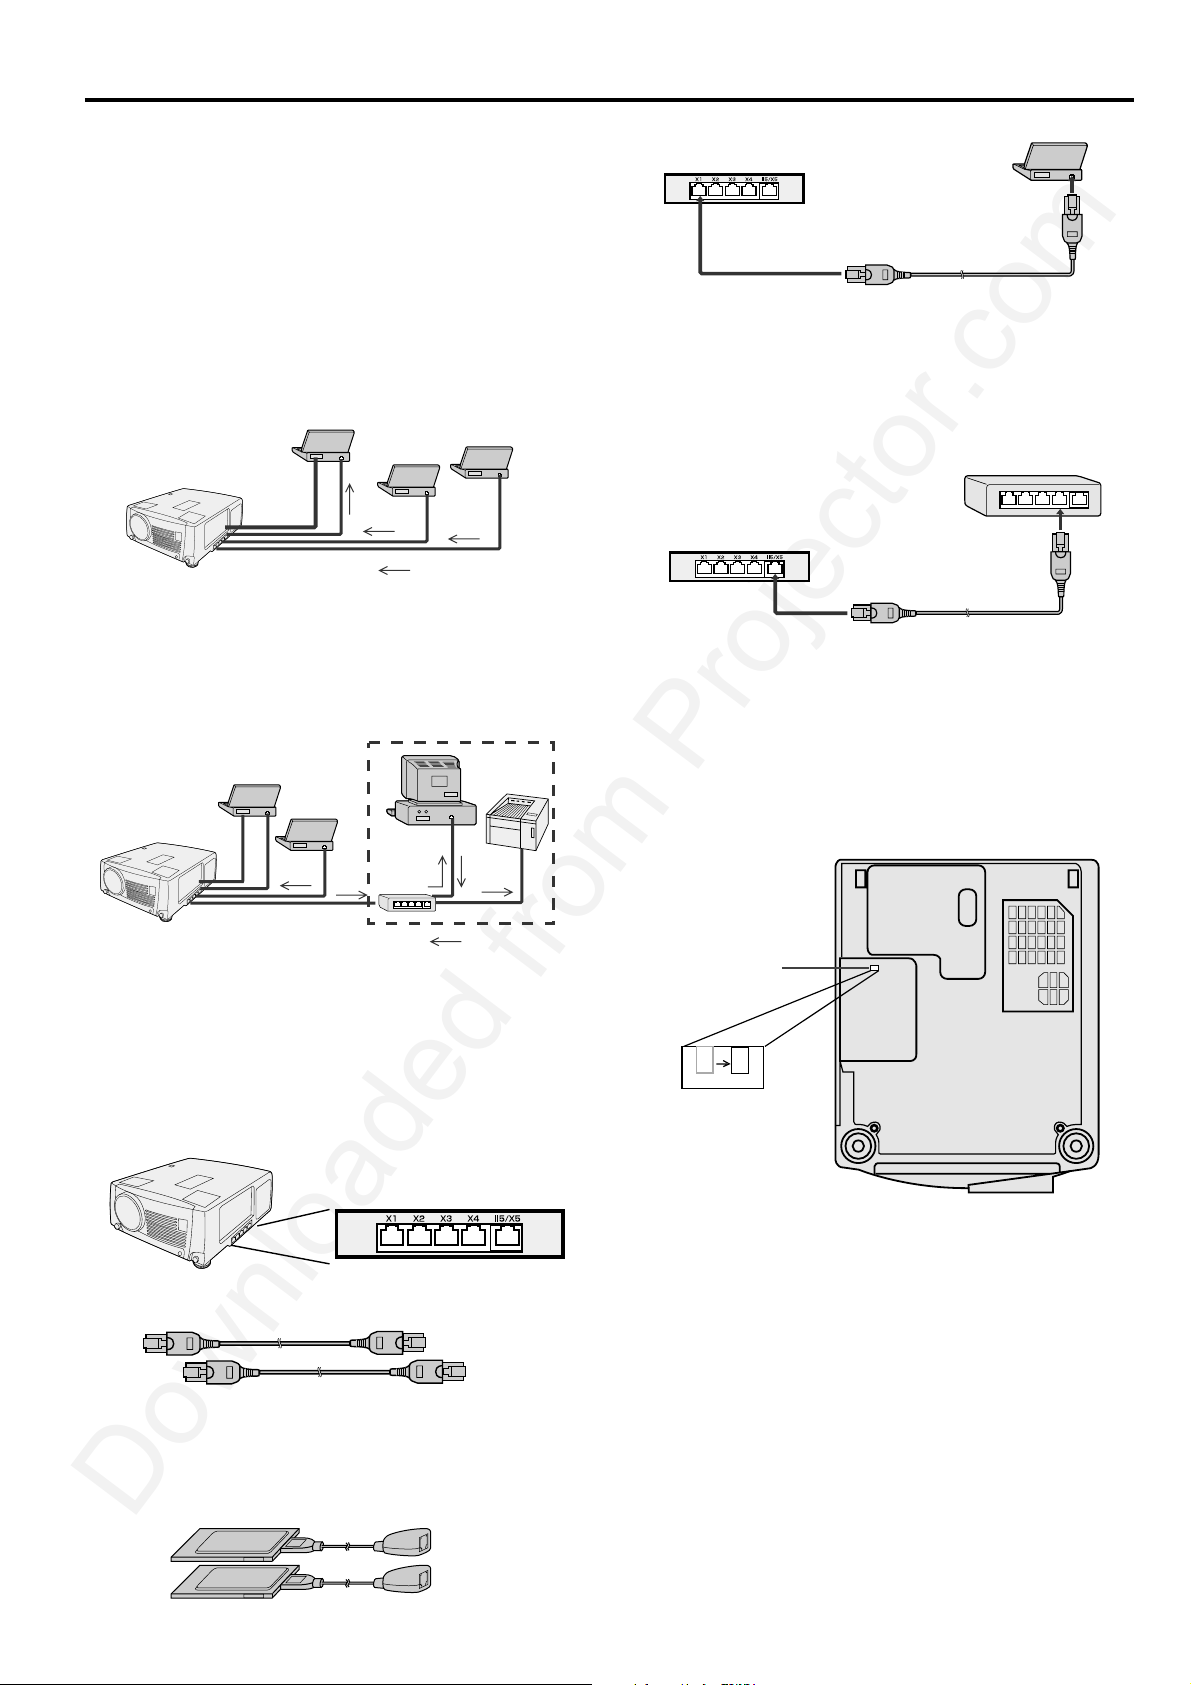
This projector is equipped with a relaying HUB.
You can do:
– Easy Data (File) Exchange
– Projection of the data in the computers connected
via the HUB
– Connection with an existing LAN
– Print out through a Network printer
Example of Network System
1) Connect laptop computers directly to the internal
HUB. Copy data to the computer which is con-
nected to this projector with RGB connection, and
project the data.
Flow of DATA
• You can also send presentation data to other
computers easily.
2) Connect an existing LAN network to the internal
HUB. Print out data through a Network printer
which is connected to the existing LAN.
Existing LAN network
Connection with a computer
Internal HUB
to LAN port
to LAN X1 - X4 port
• When connecting computers, use the LAN X1 - X4
port of the internal HUB.
Provided LAN cable or
optional streight LAN cable
Connection with an External HUB
For connecting with an existing LAN, you should
connect the computers to the external HUB via
the internal HUB.
Internal HUB
to LAN II5/X5 port
• When connecting with an external HUB, use the
LAN II5/X5 port of the internal HUB.
• The external HUB is not included in the box.
Provided LAN cable or
optional streight LAN cable
External HUB
to 10BASE-T port
Flow of DATA
• Read out data using the computer which has the
IP address of the existing LAN network and then
print them out.
• A printer driver, etc. may be necessary for printing.
Please refer to the owner’s guide of the printer.
Required Hardware
1. HUB TERMINAL (built-in)
2. LAN CABLE (at least 2 cables, included in the
box.)
When connecting five computers, use an external
HUB or set the LAN II5/X5 port to X5 (10BASE-T) by
switching the cascade switch on the bottom face
using a rod such as a precision screwdriver.
Cascade switch
II5 X5
CASCADE
II5 .... Port for connection with an external HUB.
X5 .... Port for connection with a computer.
10BASE-T
Setting Computers
When building a network only with this projector and
computers, make preparations for all the computers
to be connected.
3. LAN CARD (Network Card)
Some computers have a built-in LAN port. If your
computer doesn’t have one, you need at least two
LAN cards.
• They are not included in the box.
When using the HUB system, turn on the main
switch of the projector. The HUB system doesn’t
work when the main switch of the projector is off.
2
Page 4
Settings
For Windows Me/98/95
When building a network only with this projector and computers, make the preparations for all the computers to
be connected.
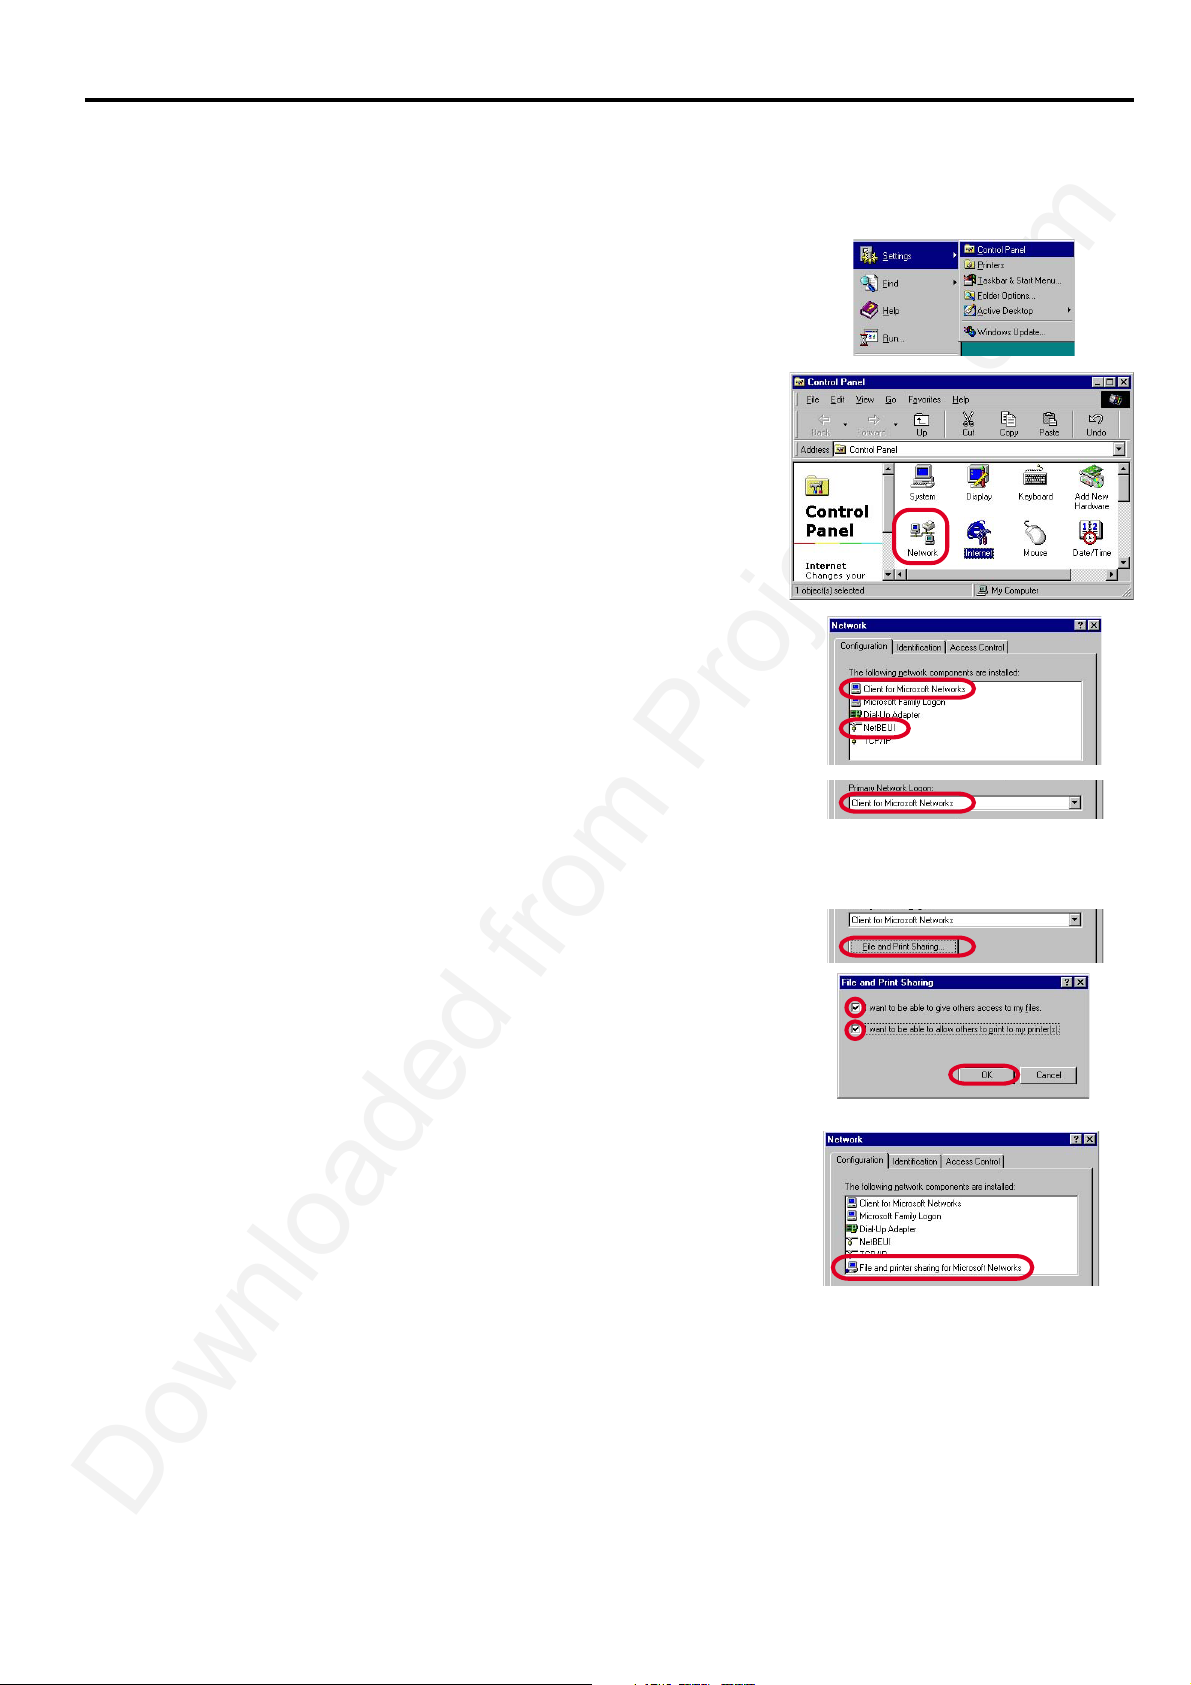
A. Check of “Client for Microsoft Networks” and “NetBEUI”
1. Click the Start button, point to Settings, and then click Control
Panel.
2. Double-click Network to open the Network dialog box.
3. Make sure that Client for Microsoft Networks and NetBEUI are
displayed in the installed network list.
• If the Client for Microsoft Networks is not displayed, go to
“E. Adding Client for Microsoft Network”.
• If the Net BEUI is not displayed, go to “F. Adding NetBEUI”.
For Windows 98 or Windows Me
4. Set Primary Network Logon to Client for Microsoft Networks.
B. Adding File and printer sharing for Microsoft Networks
1. Click the File and Print Sharing button.
2. Check the check boxes of I want to be able to give others access to
my files and I want to be able to allow others to print to my
printer(s), and then click OK.
• The File and printer sharing for Microsoft Networks appears
in the installed network list.
3
Page 5
Settings (Continued)
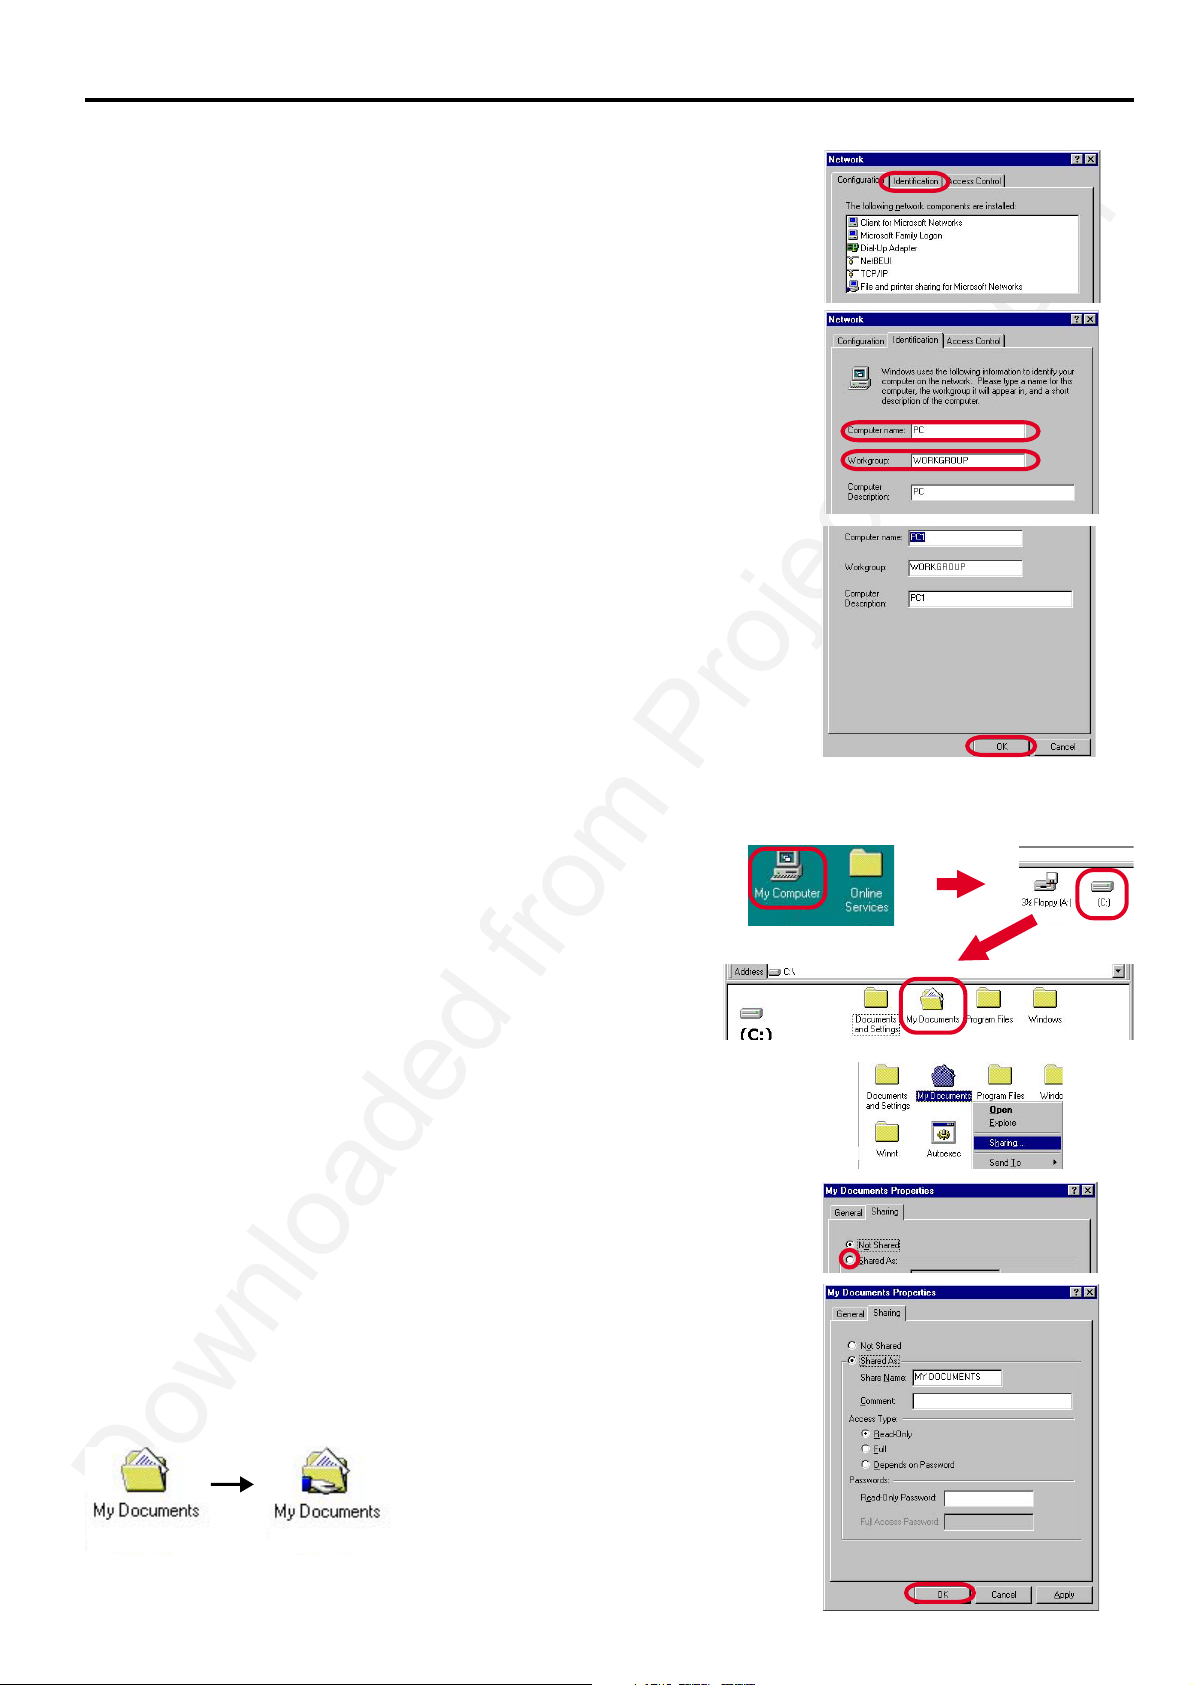
C. Check of Computer name and Workgroup
1. Click Identification tab.
2. Make sure that Computer name and Workgroup are correct.
3. Click OK.
• You must restart your computer before the new settings will take
effect.
D. Sharing computer
1. In My Computer, right-click the icon of the folder you want to share
with others, and then click Sharing.
2. In the Properties dialog box, click Shared As.
3. In Share Name, type a name for the folder.
In Comment, you can type a brief comment or description of the folder.
(Example: When sharing My
Documents folder.)
4. Click OK.
• The folder icon changes to an icon with a hand, indicating that the
folder is now shared.
5. Go to “G. Using files and printers controlled by other
computers”
4
Page 6
Settings (Continued)
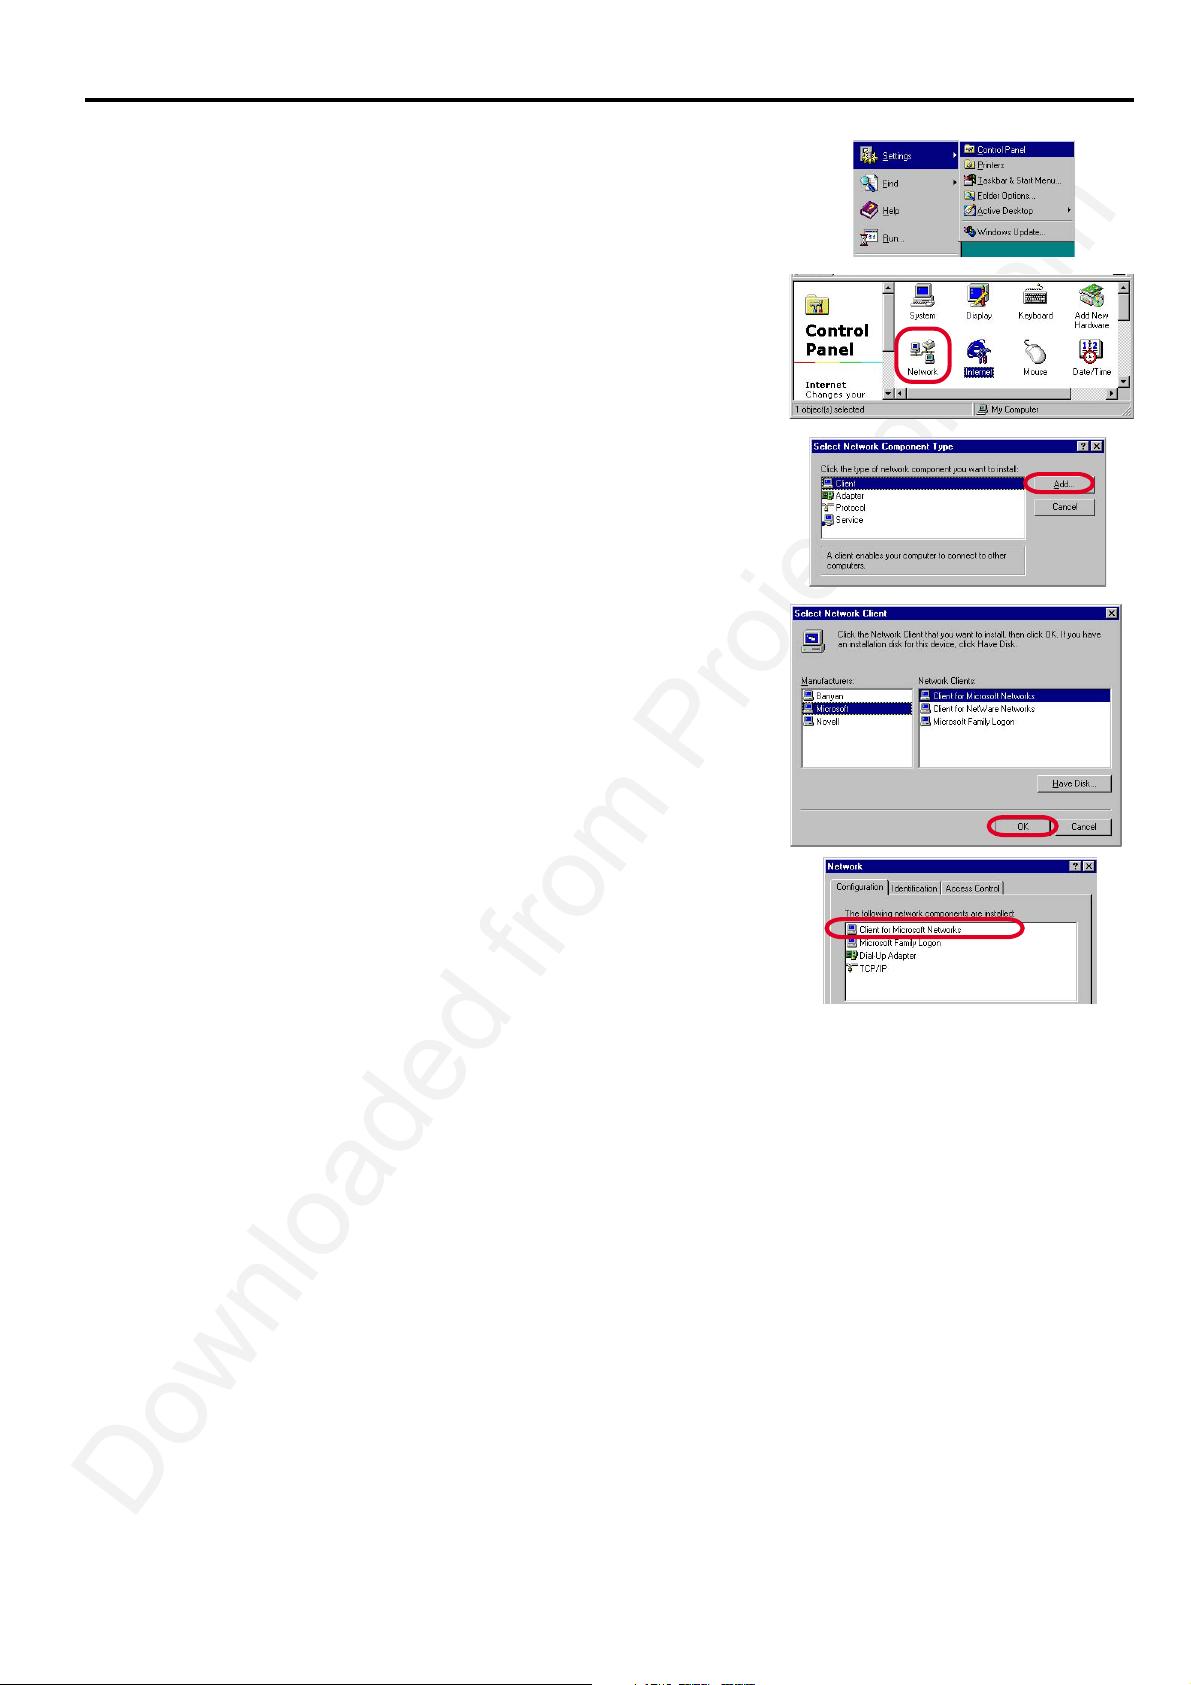
E. Adding Client for Microsoft Networks
1. Click the Start button, point to Settings, and then click Control
Panel.
2. Double-click Network to open the Network dialog box.
3. Click Client, and then click Add.
• A list of client software appears.
4. In the Manufacturers list, click Microsoft.
5. In the Network Clients list, select Client for Microsoft Networks,
and then click OK.
• The Client for Microsoft Networks is added to your computer.
6. Go to “A. Check of “Client for Microsoft Networks” and
“NetBEUI””
5
Page 7
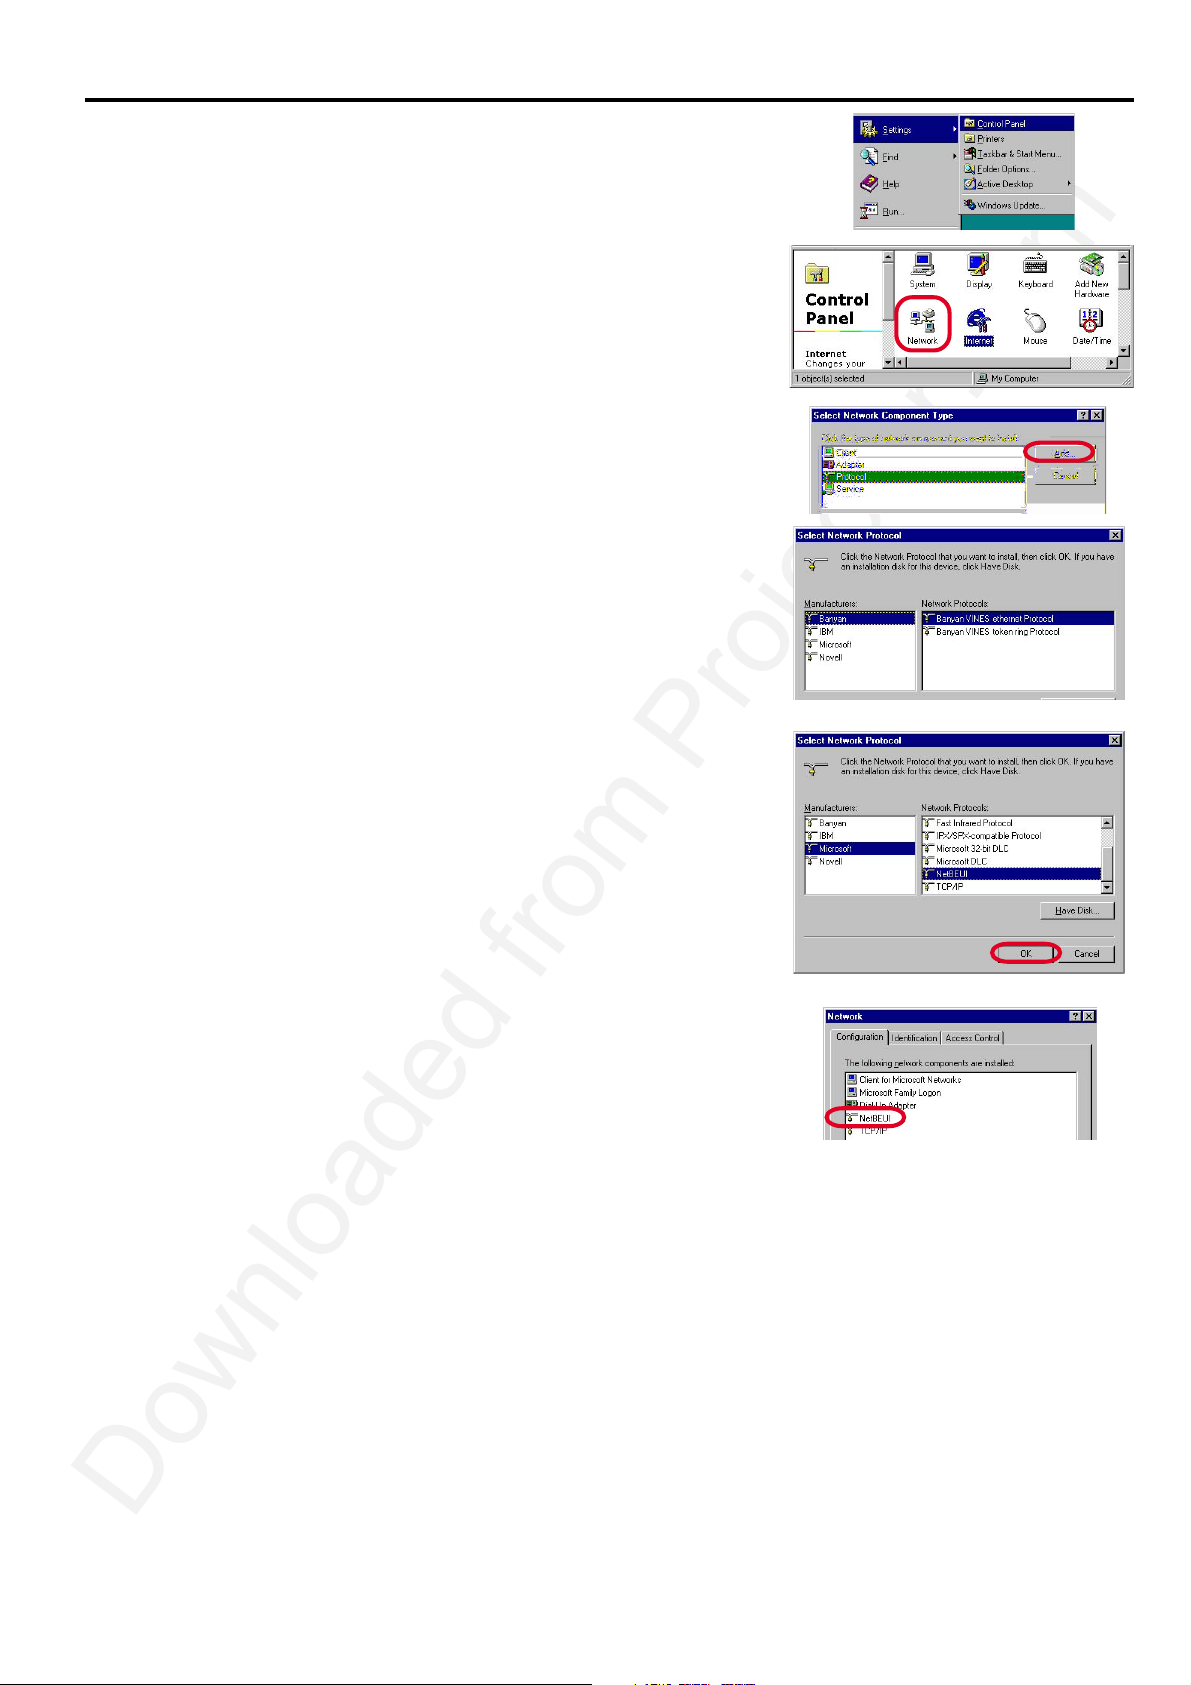
F. Adding NetBEUI
1. Click the Start button, point to Settings, and then click Control
Panel.
2. Double-click Network to open the Network dialog box.
3. Click Protocol, and then click Add.
• A list of client software appears.
4. In the Manufacturers list, click Microsoft.
5. In the Network Protocols list, select NetBEUI, and then click OK.
• The NetBEUI is added to your computer.
6. Go to “A. Check of “Client for Microsoft Networks” and
“NetBEUI””
6
Page 8
Settings (Continued)
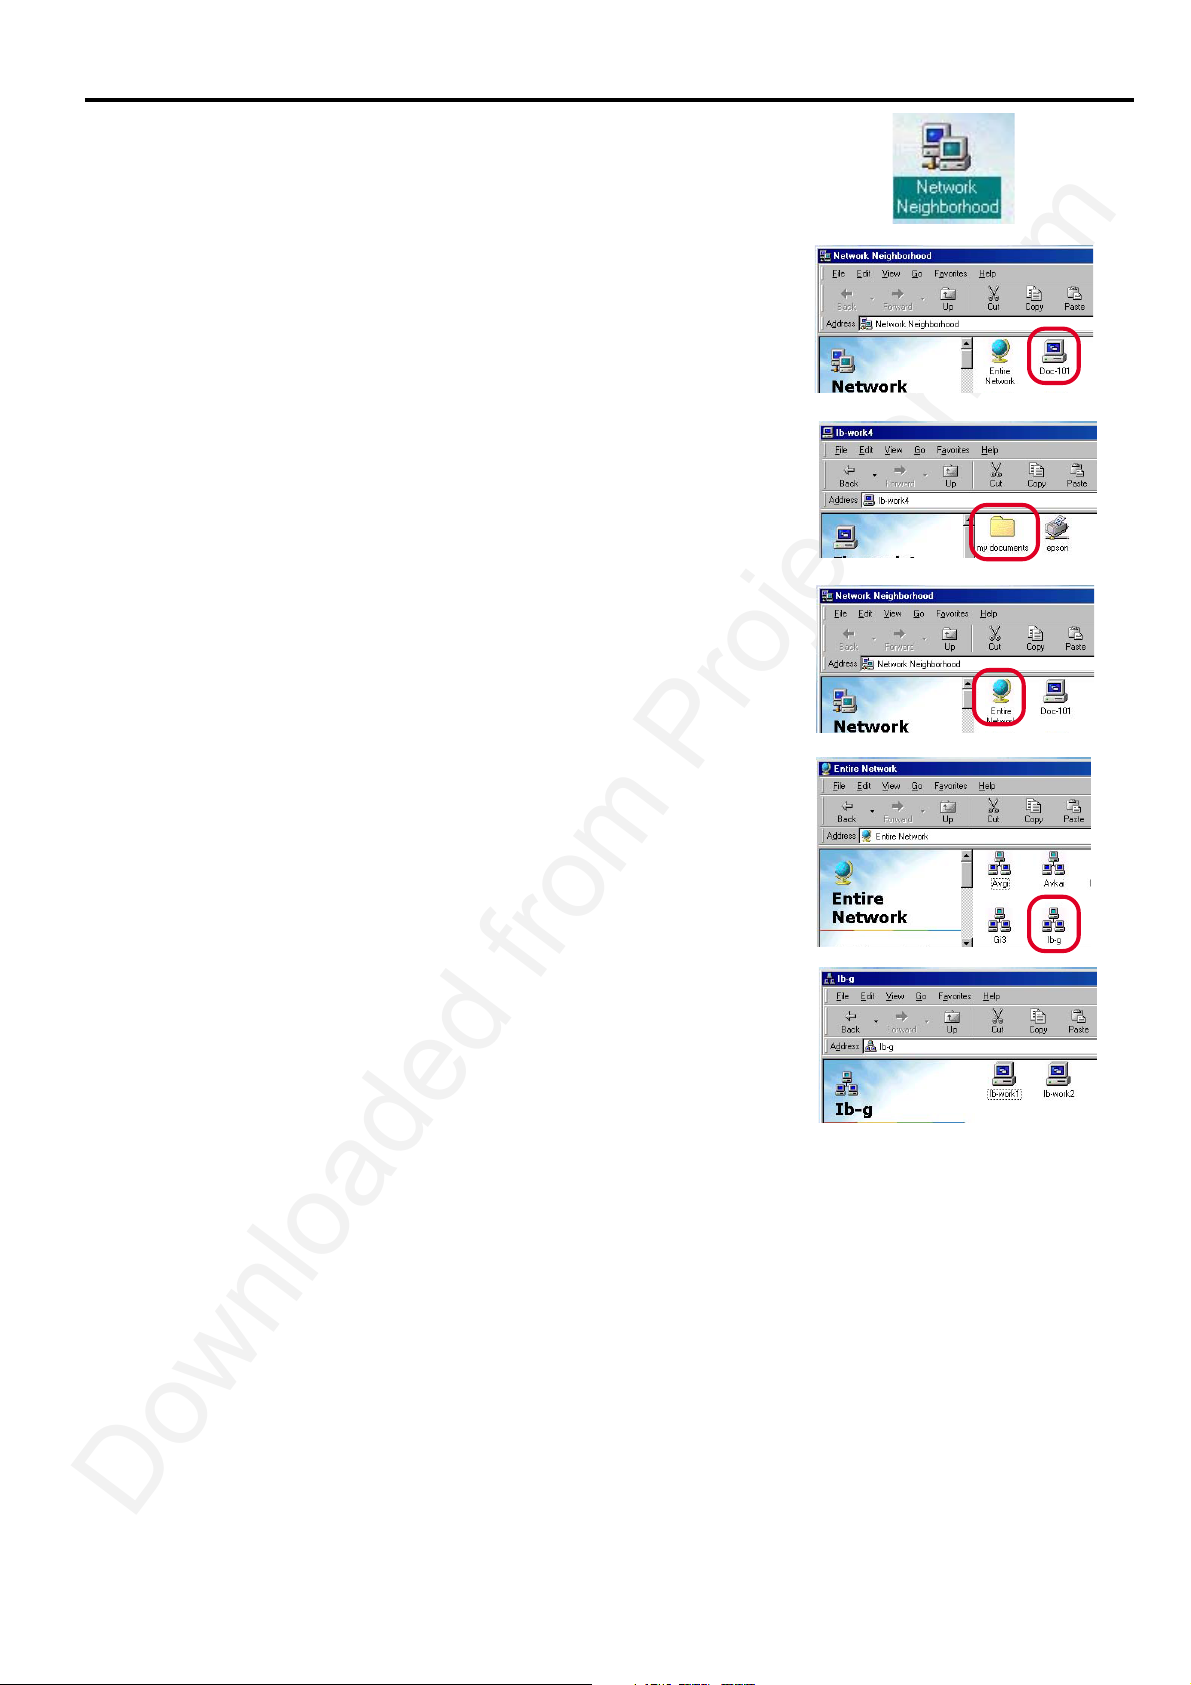
G. Using files and printers controlled by other computers
1. Double-click Network Neighborhood icon.
2. Double-click the icon for the computer that controls the folder you want
to use.
3. To use a shared folder, double-click its icon.
• If the computer you are looking for is not in your workgroup in step 2:
1. Double-click Entire Network icon.
2. Double-click the appropriate workgroup.
3. Double-click the icon for the computer that controls the folder
you want to use.
7
Page 9
Settings (Continued)
For Windows 2000
When building a network only with this projector and computers, make the preparations for all the computers to
be connected.
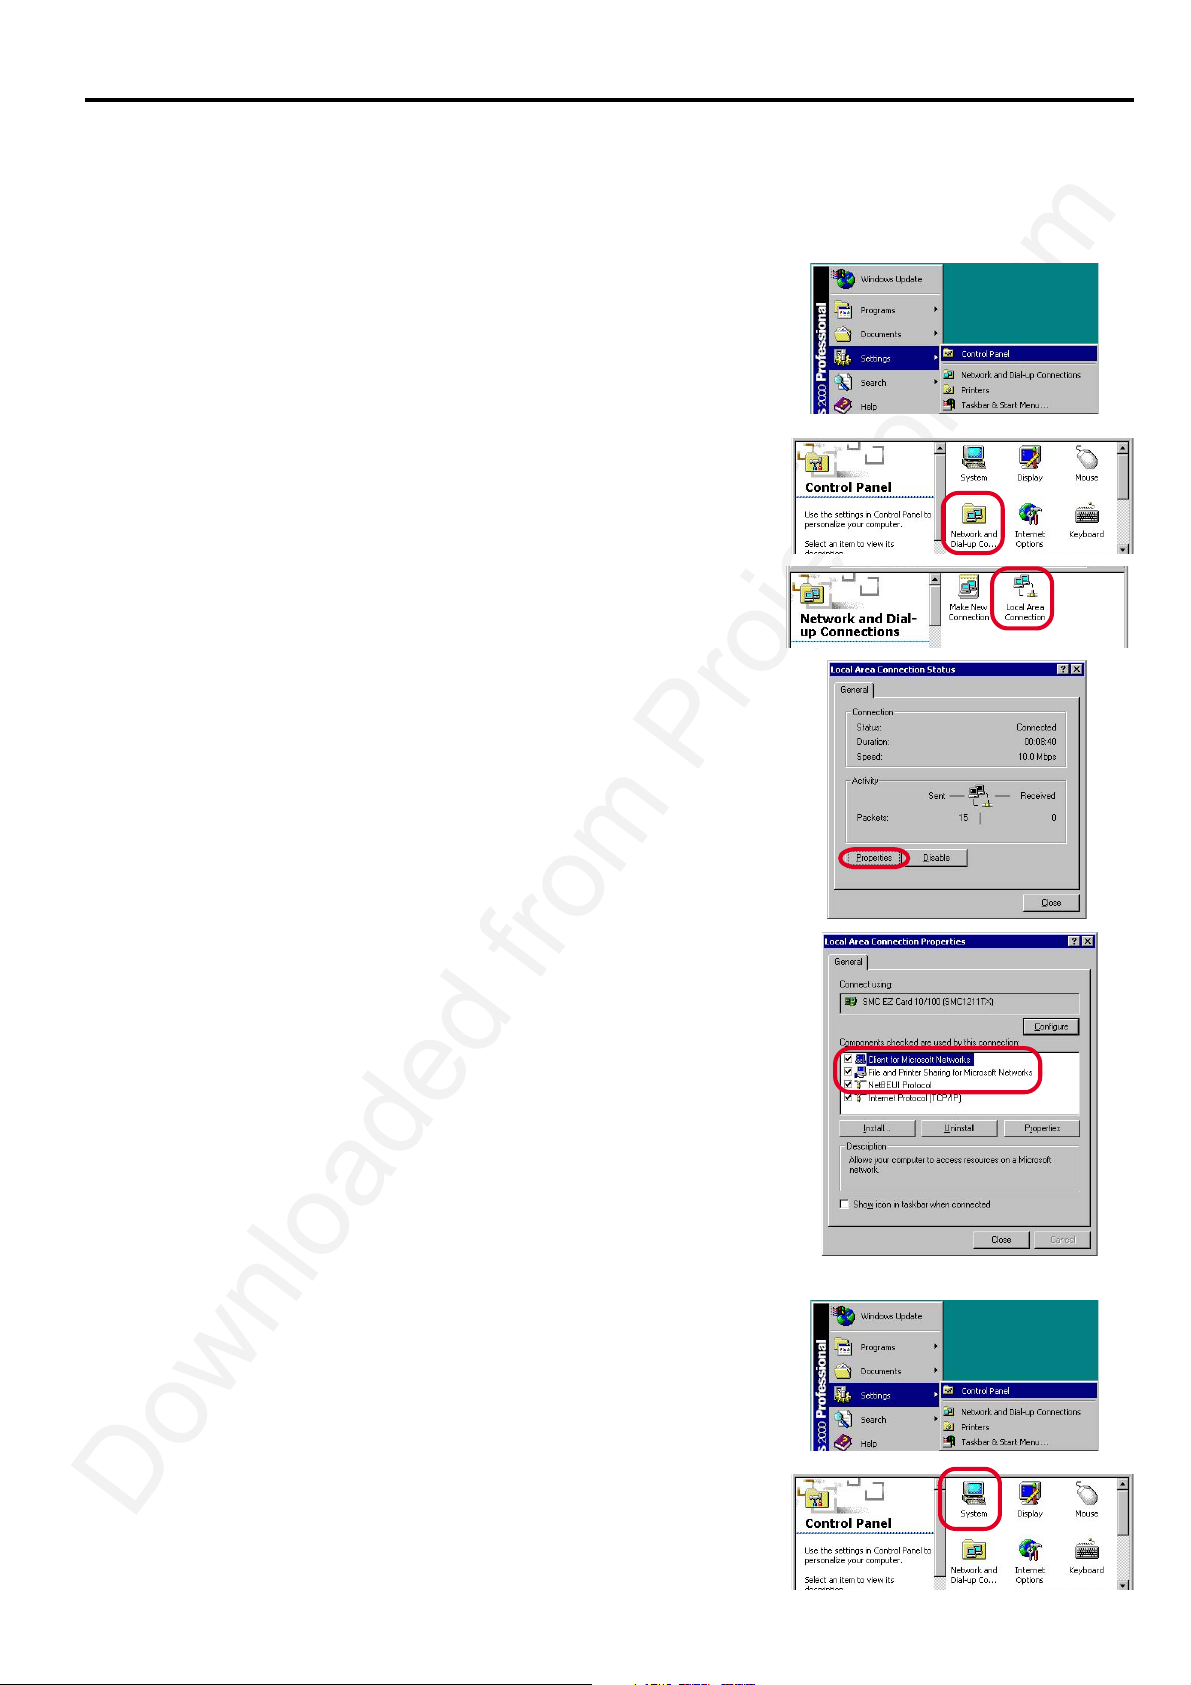
A. Check of “File and Printer Sharing for Microsoft Networks”, “Client for Microsoft
Networks” and “NetBEUI protocol”
1. Click the Start button, point to Settings, and then click Control
Panel.
2. Double-click Network and Dial-up Connections to open the Network dialog box.
3. Right-click Local Area Connection and then click Properties to
open the Local Area Connection properties dialog box.
4. Make sure that File and Printer Sharing for Microsoft Networks,
Client for Microsoft Networks and NetBEUI Protocol are displayed in the installed network list.
• If the File and Printer Sharing for Microsoft Networks is not
displayed, go to “D. Adding File and printer sharing for
Microsoft Networks”.
• If the Client for Microsoft Networks is not displayed, go to
“E. Adding Client for Microsoft Network”.
• If the NetBEUI Protocol is not displayed, go to “F. Adding
NetBEUI”.
5. Make sure that the check boxes of File and Printer Sharing for
Microsoft Networks, Client for Microsoft Networks and
NetBEUI Protocol are checked.
6. Click Close.
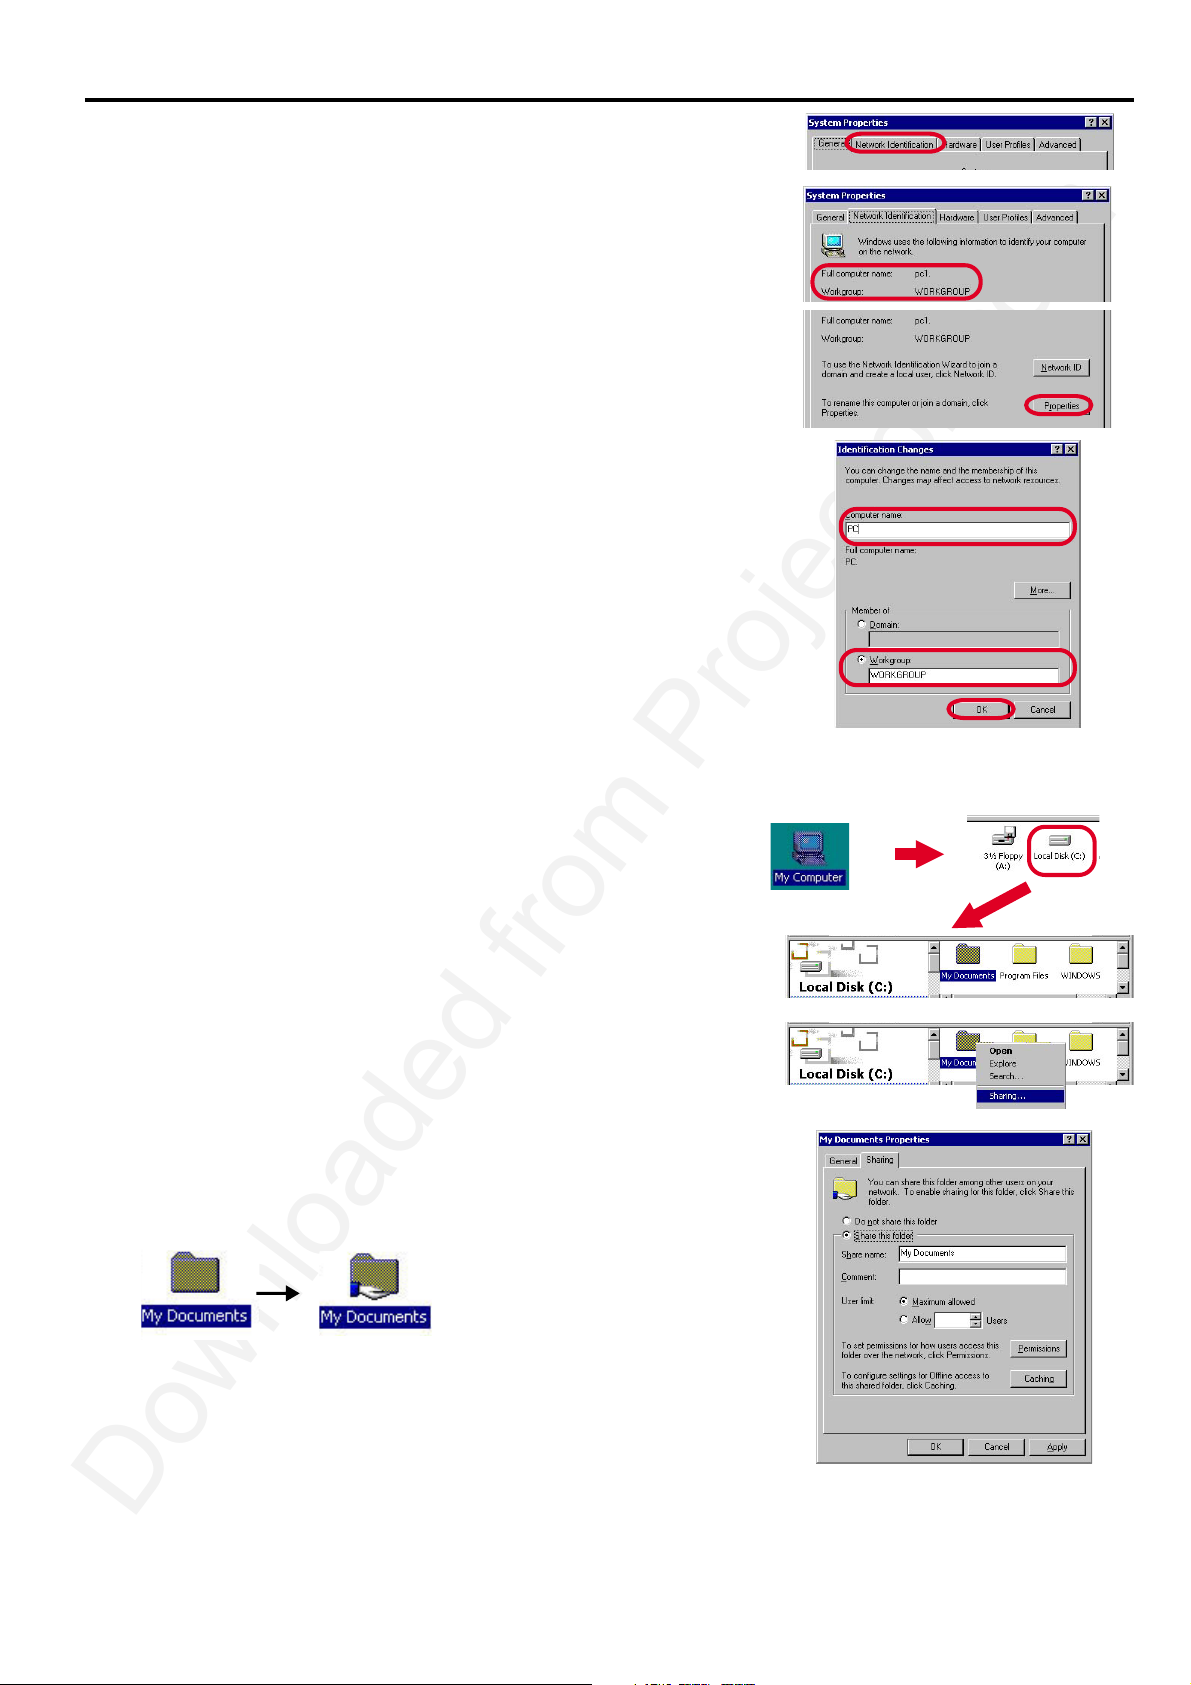
B. Check of Computer name and Workgroup
1. Click the Start button, point to Settings, and then click Control
Panel.
2. Double-click System to open the Network dialog box.
8
Page 10
Settings (Continued)
3. Click Network Identification tab.
4. Make sure that Full computer name and Workgroup are correct.
5. Click OK.
• If they are not correct, change the computer name and Workgroup
as follows:
1. Click Properties.
2. Input a new computer name or Workgroup.
3. Click OK.
C. Sharing computer
1. In My Computer, right-click the icon of the folder you want to share
with others, and then click Sharing.
2. In the Properties dialog box, click Sharing tab, and then click
Shared this folder.
3. In Share Name, type a name for the folder.
In Comment, you can type a brief comment or description of the folder.
4. Click OK.
• The folder icon changes to an icon with a hand, indicating that the
folder is now shared.
(Example: When sharing My
Documents folder.)
5. Go to “G. Using files and printers controlled by other
computers”
9
Page 11
Settings (Continued)
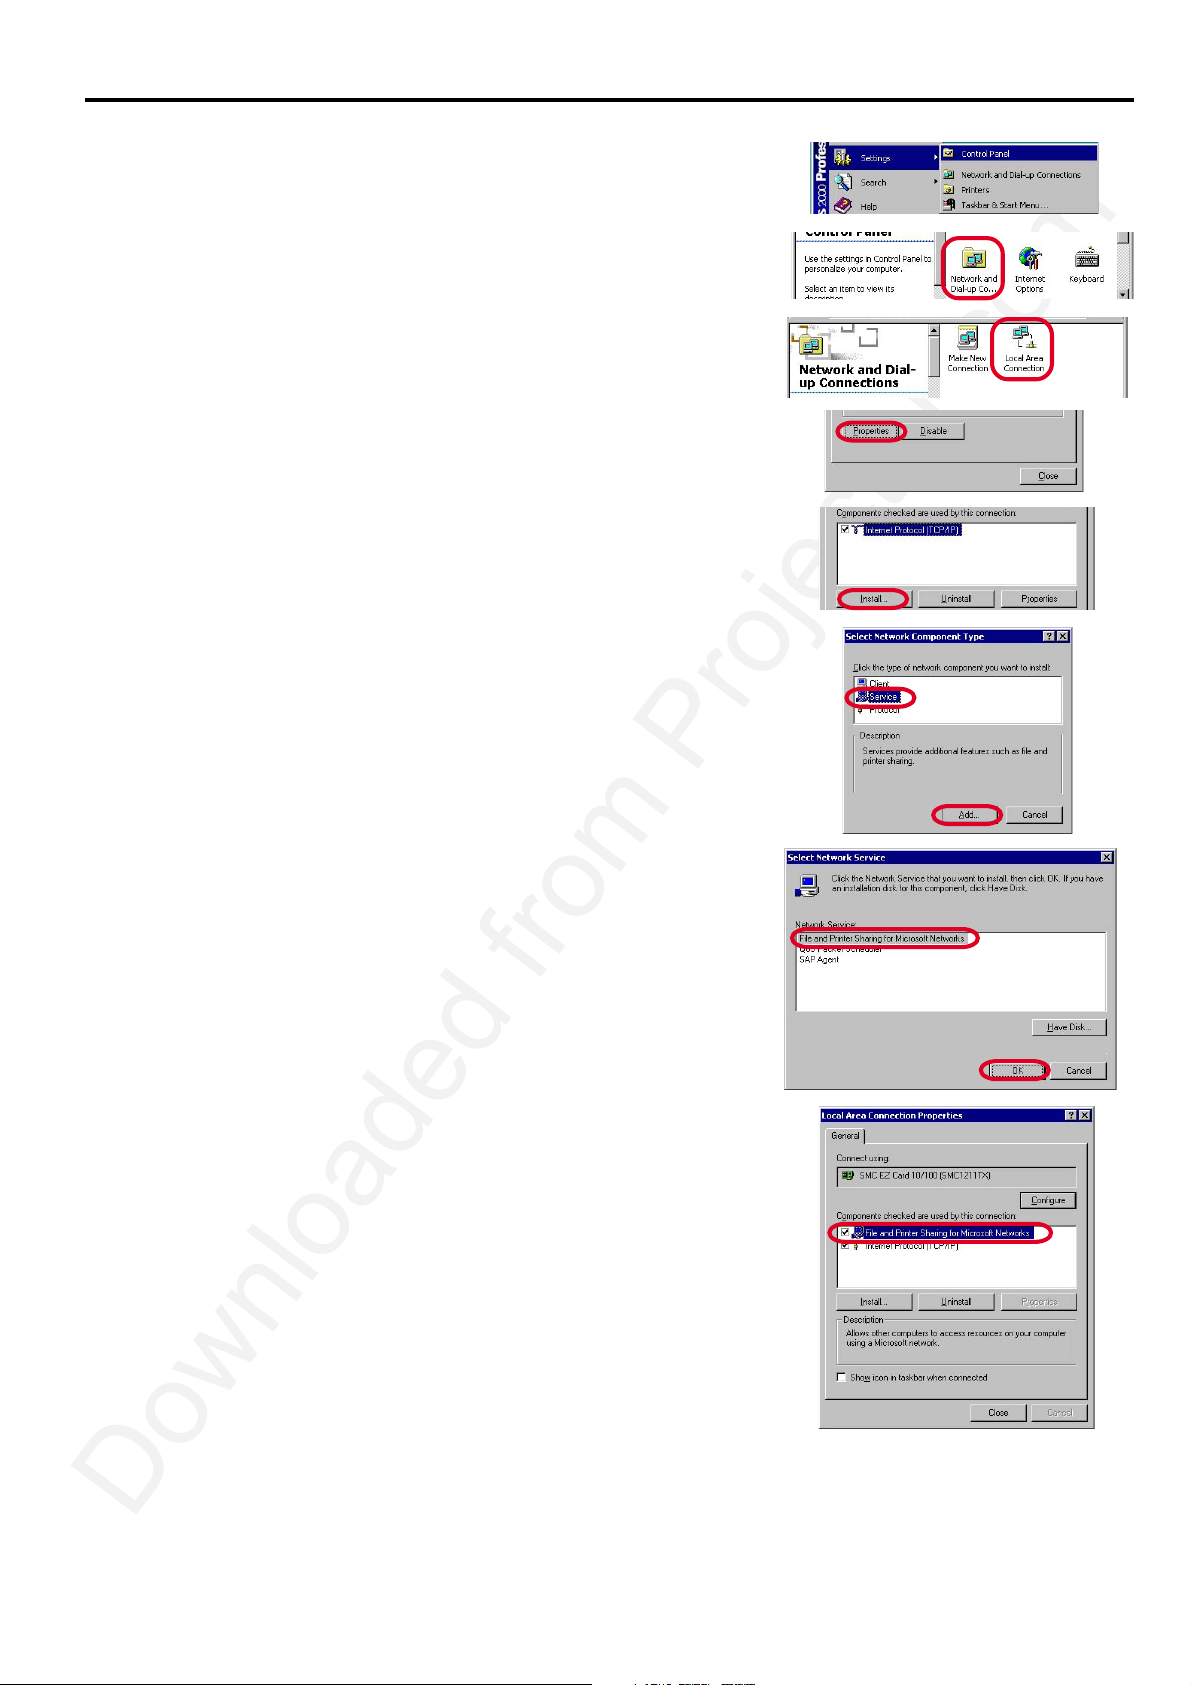
D. Adding File and Printer Sharing for Microsoft Networks
1. Click the Start button, point to Settings, and then click Control
Panel.
2. Double-click Network and Dial-up Connections.
3. Right-click Local Area Connection
4. Click Properties to open the Local Area Connection properties
dialog box.
5. Click Install.
6. Click Service, and then click Add.
• A list of Network Service appears.
7. In the Network Service list, select File and Printer Sharing for
Microsoft Networks, and then click OK.
• The File and Printer Sharing for Microsoft Networks appears
in the installed network list.
8. Go to A. Check of “File and Printer Sharing for Microsoft
Networks”, “Client for Microsoft Networks” and “NetBEUI
protocol”.
10
Page 12
Settings (Continued)
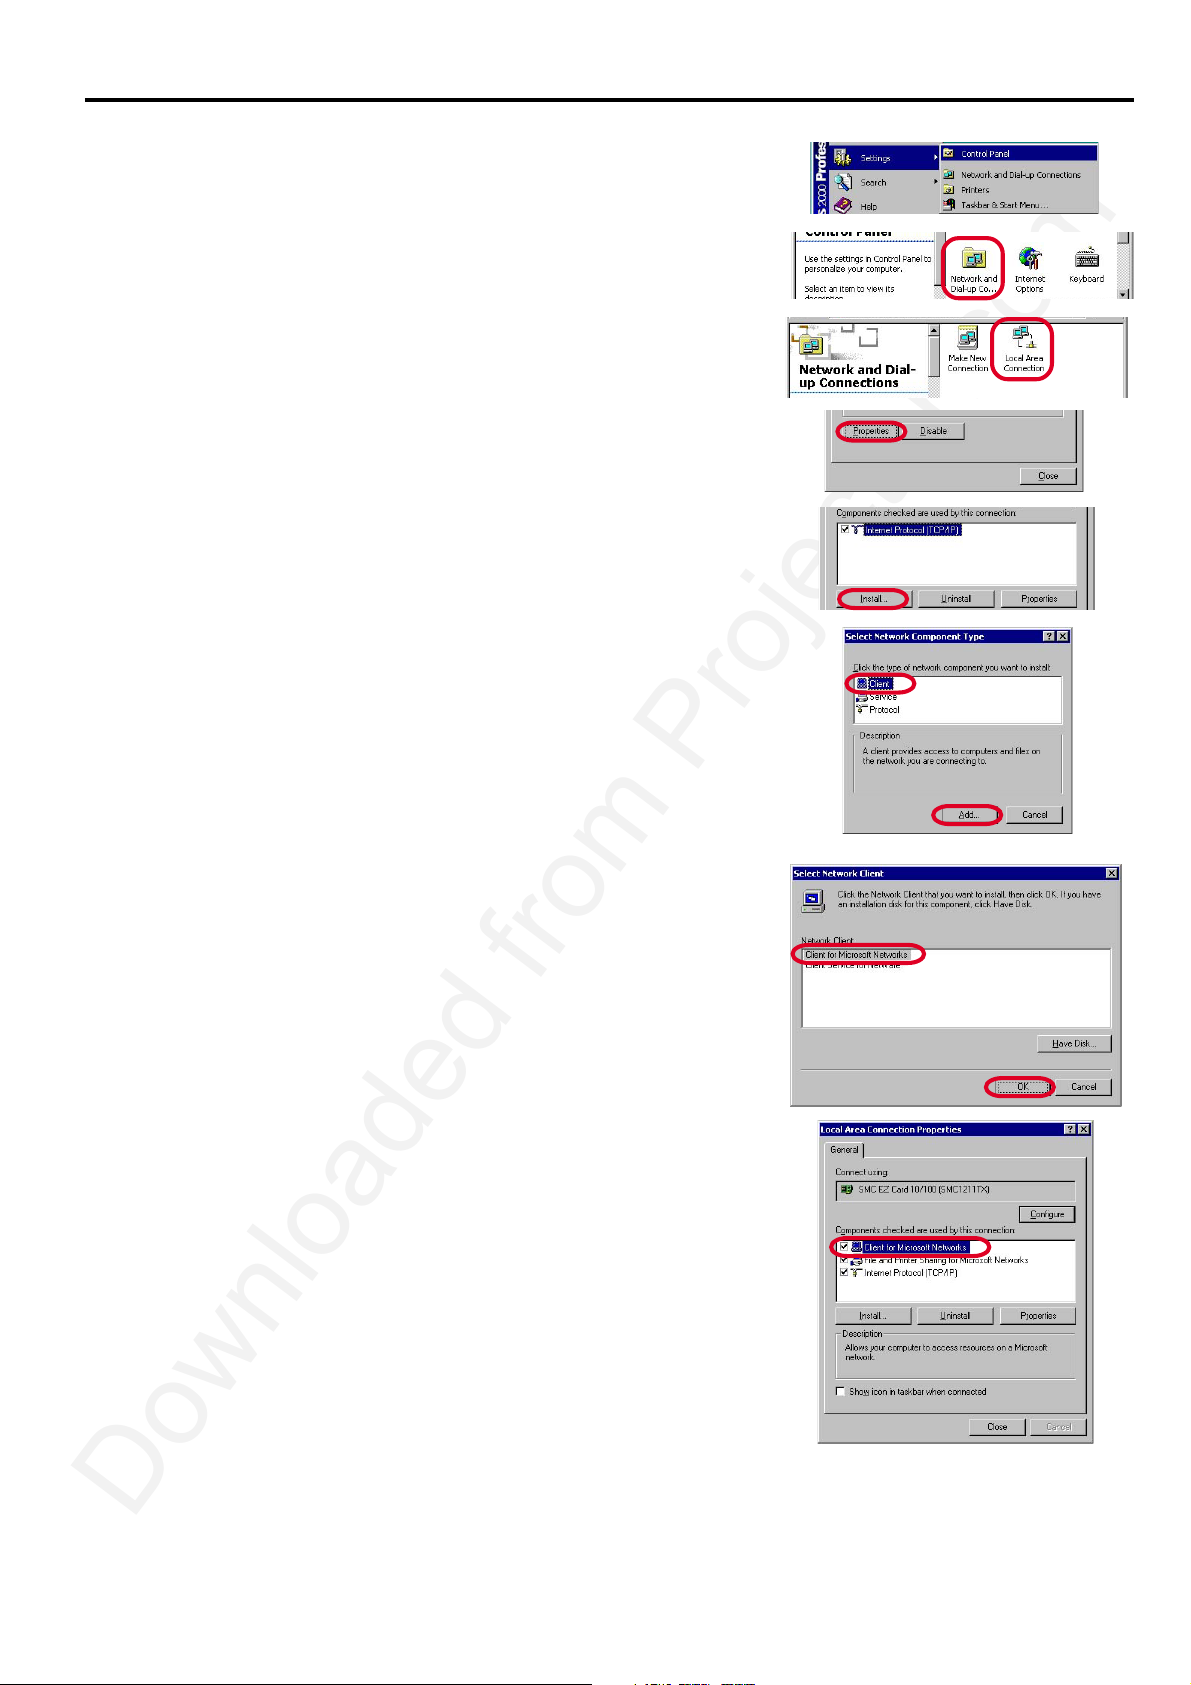
E. Adding Client for Microsoft Networks
1. Click the Start button, point to Settings, and then click Control
Panel.
2. Double-click Network and Dial-up Connections.
3. Right-click Local Area Connection
4. Click Properties to open the Local Area Connection properties
dialog box.
5. Click Install.
6. Click Client, and then click Add.
• A list of client software appears.
7. In the Network Clients list, select Client for Microsoft Networks,
and then click OK.
• The Client for Microsoft Networks appears in the installed
network list.
6. Go to A. Check of “File and Printer Sharing for Microsoft
Networks”, “Client for Microsoft Networks” and “NetBEUI
protocol”.
11
Page 13
Settings (Continued)
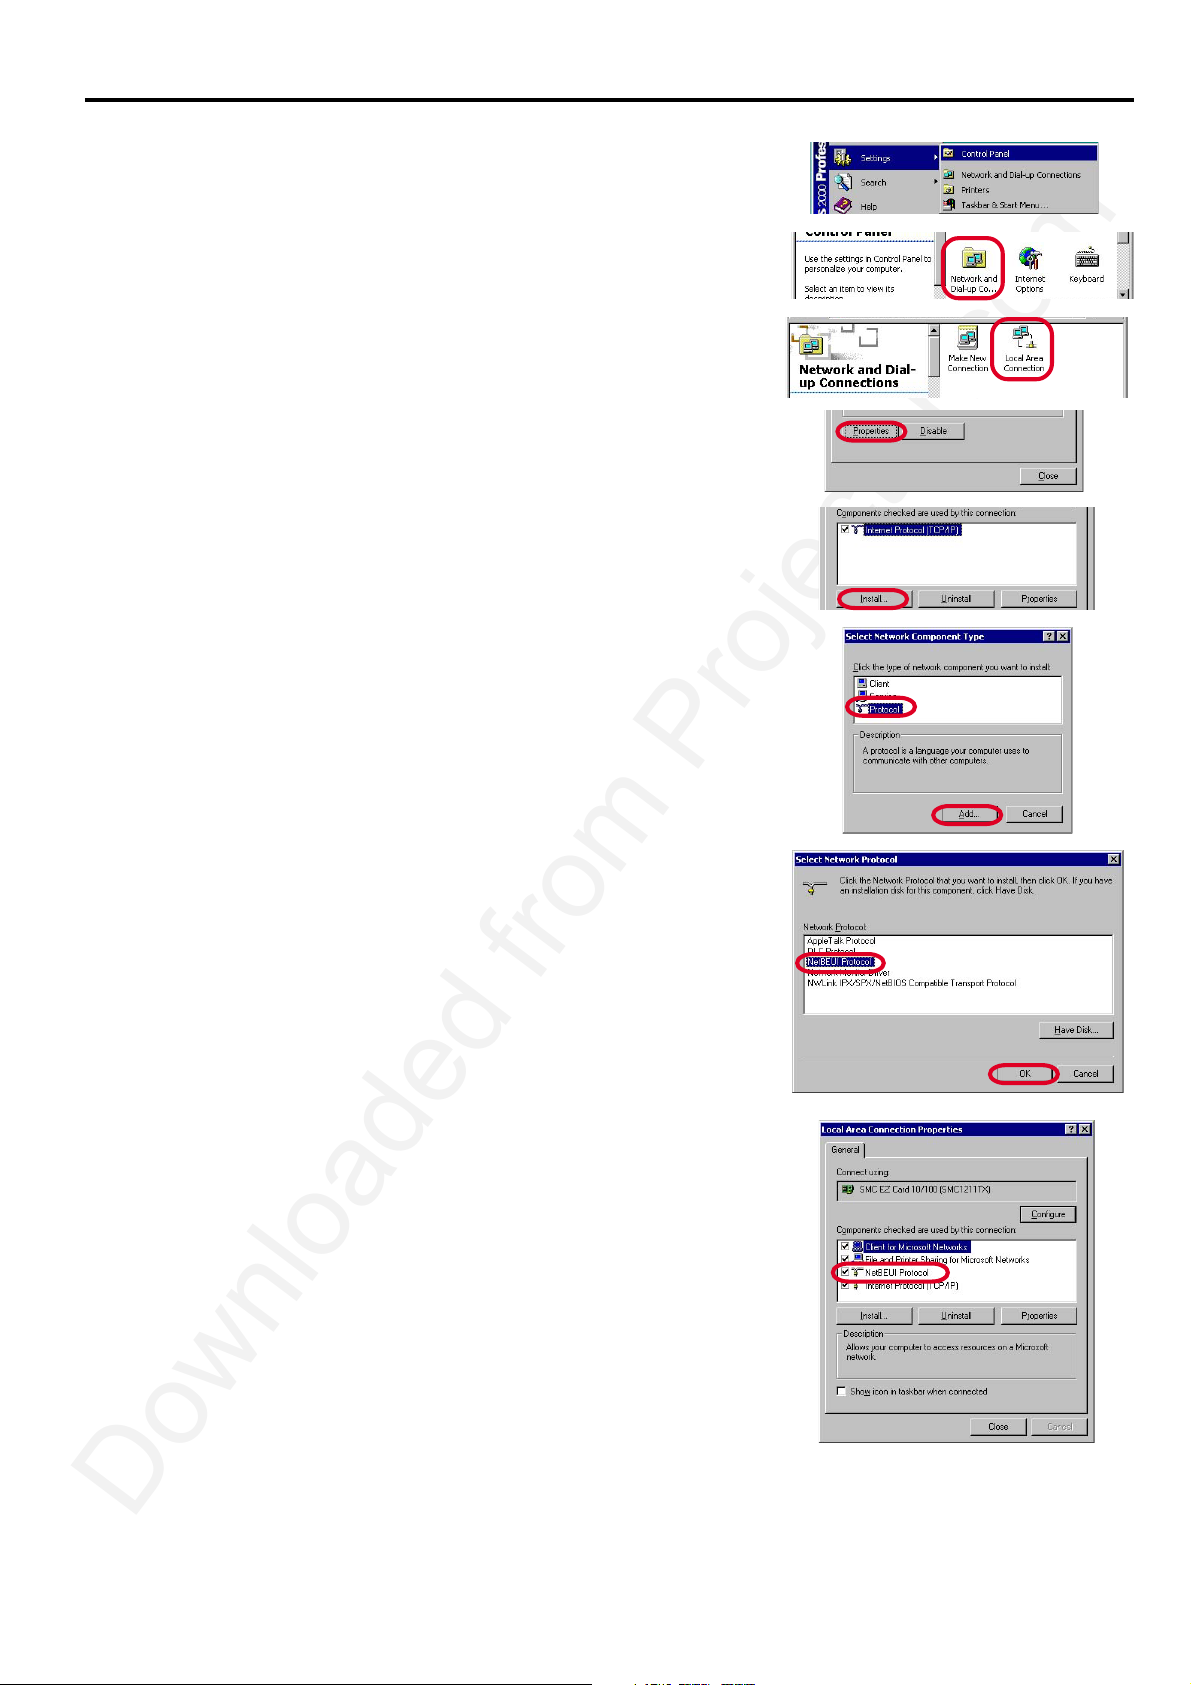
F. Adding NetBEUI
1. Click the Start button, point to Settings, and then click Control
Panel.
2. Double-click Network and Dial-up Connections.
3. Right-click Local Area Connection
4. Click Properties to open the Local Area Connection properties
dialog box.
5. Click Install.
6. Click Protocol, and then click Add.
• A Network protocols list appears.
5. In the Network Protocols list, select NetBEUI Protocols, and then
click OK.
• The NetBEUI Protocol appears in the installed network list.
6. Go to A. Check of “File and Printer Sharing for Microsoft
Networks”, “Client for Microsoft Networks” and “NetBEUI
protocol”.
12
Page 14
Settings (Continued)
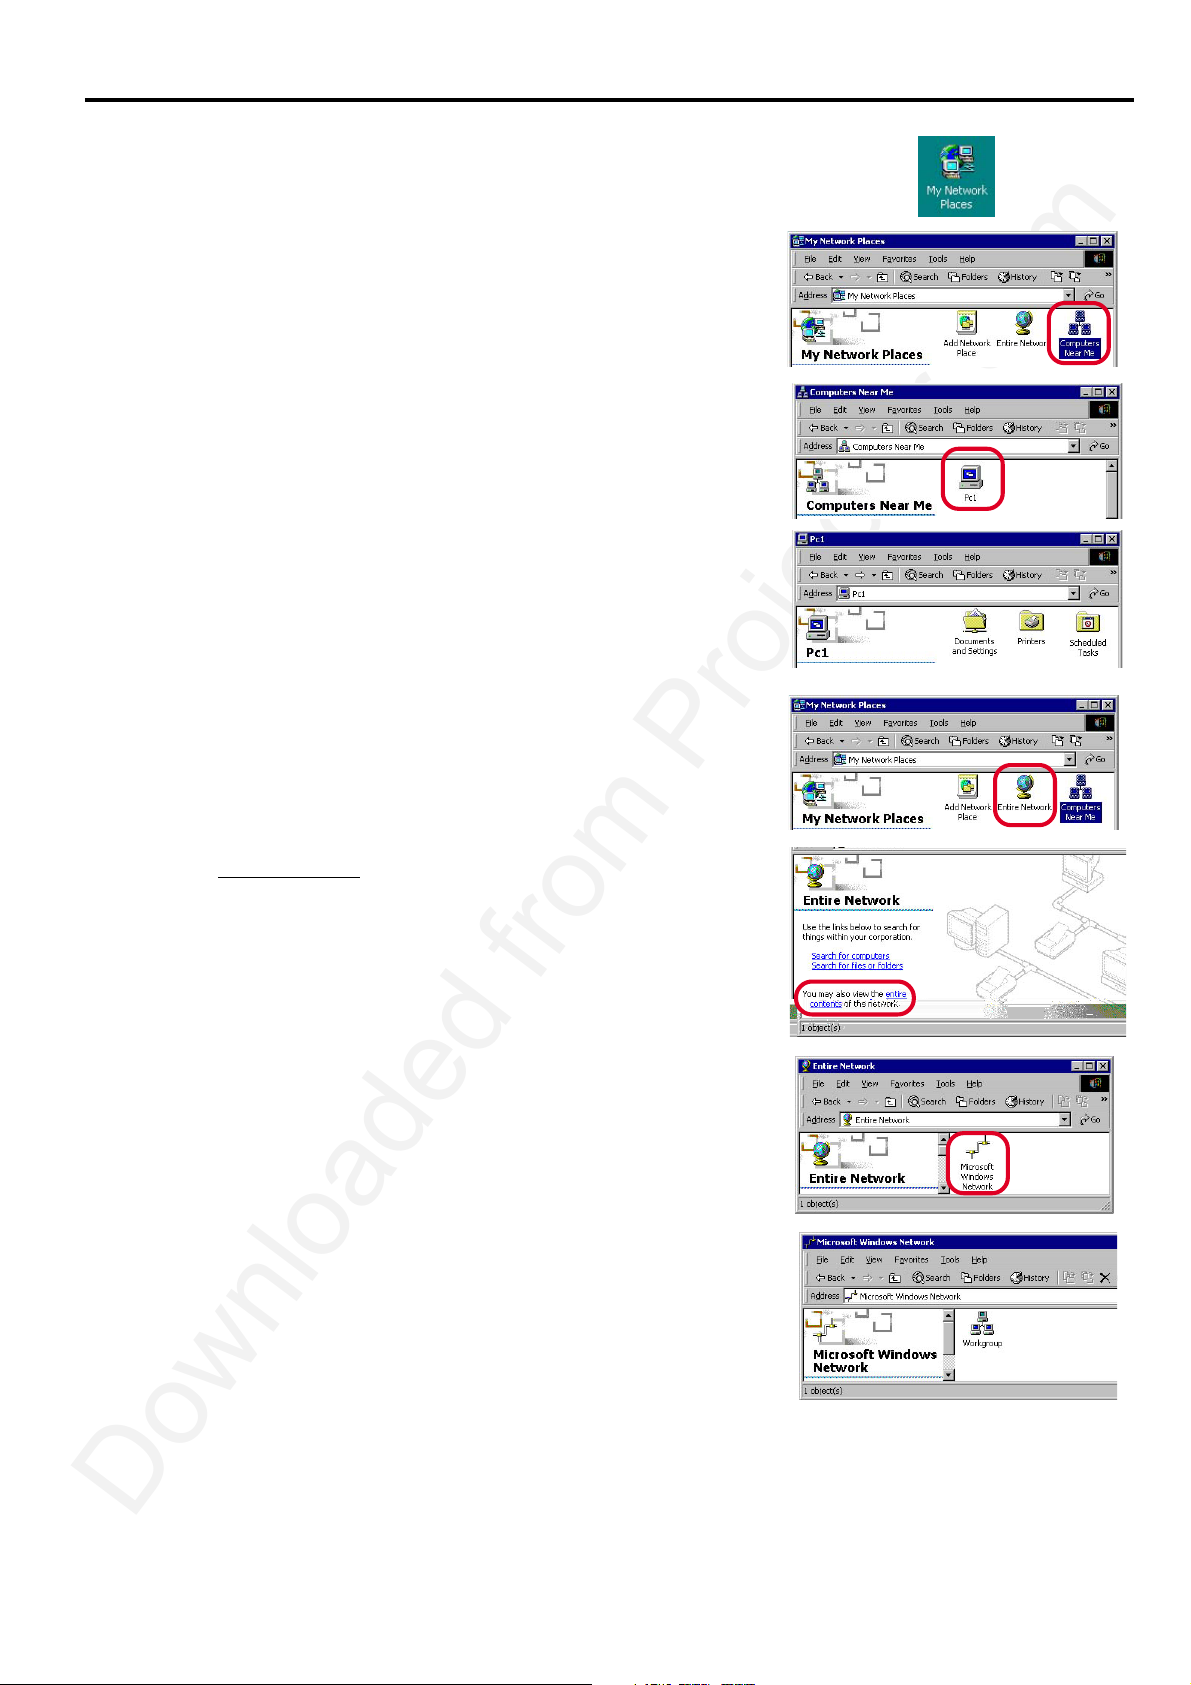
G. Using files and printers controlled by other computers
1. Double-click My Network Places icon.
2. Double-click Computers Near Me icon.
3. Double-click the icon for the computer that controls the folder you want
to use.
4. To use a shared folder, double-click its icon.
• If the computer you are looking for is not in your workgroup:
1. Double-click Entire Network icon.
2. Click entire contents.
3. Double-click Microsoft Windows Network icon.
4. Double-click the appropriate workgroup.
5. Double-click the icon for the computer that controls the folder
you want to use.
13
Page 15

Troubleshooting
PROBLEMS
Can’t access
other computers
on the network.
CAUSE
• The main power switch of the projector
isn’t turned on.
• The LAN cable isn’t connected properly.
• The LAN cable is broken.
• The connected computers (LAN cards)
don’t support a 10BASE-T.
• The external HUB connected isn’t set to
support a 10 BASE-T and half-duplex.
• The password wasn’t entered when the
Windows started.
• The network is being searched now, or the
computer is now waiting other computers
on the network to be presented.
• The settings of the working group is
wrong.
• The network isn’t set correctly.
• The computer is connected to the II5/X5
port.
• The external HUB is connected to any of
the X1 to X4 ports.
• The cascade switch on the bottom is set to
X5.
• The other computer is Macintosh.
POSSIBLE SOLUTIONS
• Turn on the main power switch of the
projector.
• Connect the LAN cable properly.
• Check the LAN cable isn’t broken by
replacing it with another LAN cable.
• Use a LAN card supporting a 10BASE-T.
• Set the external HUB to support a
10BASE-T and half-duplex. See the
operation guide of the HUB for setting.
• Enter the password when Windows starts
and click on the OK button.
• Select [Start] - [Search] - [Other computers] to search for other computers.
• Check the setting of the working group.
• Check the setting of the sharing status of
the protocol and working group.
• Connect the computer to any of the X1 to
X4 ports, or set the cascade switch on the
bottom to X5.
• Connect the external HUB to X5 port. In
this time, Make sure that the cascade
switch on the bottom is set to II5.
• Set the cascade switch on the bottom to
II5.
• Generally, the Microsoft Windows network
can’t access AppleTalk network directly.
Can’t share the
folder.
Can’t transmit
the data correctly.
• The password wasn’t entered when Windows started.
• The file or printer sharing isn’t valid.
• Power noise may occur during data trans-
mission.
• Enter the password when Windows starts
and click on the OK button.
For Windows Me/95/98
• Click on the check box in the [File and
Print Sharing] dialog box to share the
folder.
For Windows 2000
• Click the check box for sharing the file
or printer on the Microsoft network
shown by the components structure in the
[Local area connection property]
dialog box.
• Power noise may occur when the POWER
button is pressed to illuminate the light
source lamp during data transmission. Do
not press the POWER button during data
transmission.
14
Page 16

Glossary
AppleTalk
A trade mark of Apple Computer Inc., for a local area network standard that is built into Macintosh computers.
HUB
A central device for connecting the network cables from each computer. Data are communicated in either way of
full-duplex transmission or half-duplex transmission. The internal HUB of this projector supports only halfduplex transmission. Also the internal HUB of this projector supports only 10BASE-T.
IP address
A 32-bit code which is used on the Internet or a LAN network. This is separated by periods every 8 bits as
255.255.255.0.
LAN (Local Area Network)
A network over a relatively short distance, used within a building. Data are generally communicated with
10BASE-T or 100BASE-TX on this network. The internal HUB of this projector supports only 10BASE-T.
LAN card (Network card)
An extension card to be attached to a computer for communication on a LAN network. Use a LAN card which
complies to 10BASE-T for connection with the built-in HUB of this projector.
LAN cable (Network cable)
A cable to connect computers on a LAN network. Use the cable attached to this projector or a straight cable
belonging to the category 3 or above.
NetBEUI
One of the protocols which are used for communication between Windows-running computers on a LAN network.
This protocol has the following features.
• Suitable for a small-scale LAN network
• Easy setting
• High speed processing
Protocol (Communication control procedure)
A set of rules or standard designed so that computers can exchange information on a network. Protocol includes
TCP/IP, which is used to control communication on the Internet and NetBEUI, which is used between Windowsrunning computers on a LAN network.
Service
Software to be installed on a computer which provides shared resources. Windows include [Client for
Microsoft Networks].
TCP/IP (Transmission Control Protocol / Internet Protocol)
One of the protocols which are used for communication on a LAN network. This protocol is necessary to directly
access the Internet.
Trademark, Registered trademark
Windows is registered trademark of Microsoft in the U.S. and other countries.
Macintosh is registered trademark of Apple Computer Inc.
Other brand or product names are trademarks or registered trademarks of their respective holders.
15
Page 17

PLEASE READ
We are in no way responsible for the
contents of the manual. We do not guarantee
its accuracy and we do not make any claim
of copyright. The copyright remains the
property of their respective owners.
Visit the site to read the latest projector
news and reviews, read and comment on
projector specifications, download user
manuals and much more.
 Loading...