

Page 1

PE-5 Chassis Service Manual
SERVICE MANUAL
PE-5 CHASSIS
1
Page 2

PE-5 Chassis Service Manual
Table of Contents-Service Manual of PE-5 Chassis
Remark: Suitable for 38”— 70” RPTV. Demonstrate on the main model
1. Technical Specifications ……………….(Circuit Diagram、Structure)
2. Safety Instruction……………………….(Circuit Diagram、Structure)
3. Signal Procedure Chart…………………
4. Power Supply System Chart………………….
5. Remote Control Chart……………………
6. Key-Points Wave Form Chart………………………
7. Repair Analyze………………………….
8. Repair Parameter Adjustment……………………….
9. Convergence Parameter Fine-Adjustment…………………
10. IC Datum, On Line Resistor Quantity and Normal Working Power
Voltage…………………..
11. Prototype Trouble Shooting Procedure …………………………………
12. Circuit Diagram, PCB Chart, Exploded View Chart and I2C-Bus Chart
13. Part List……………………………………….
2
Page 3
PE-5 Chassis Service Manual
Warning
This service manual is suitable only for experienced service personnel, not normal
user. Ant attempt to repair the products related to this service manual by any
non-experienced service personnel will cause serious injury, even life hazard!
TECHNICAL DATA
Rated Voltage:160—260V~ ,50Hz
Rated Consumption Power: 230W〈 1W (On Standby)
FS System:Frequency Synthesis Auto Searching FS
Channels Preset:100
RF:75Ω Non-Balance Coaxial
Color System:PAL 、NTSC、SECAM
Audio System:D/K、B/G、I、L
Signal Terminal:RF、AV、S-Video、SCART
Project Tube:7”High Bright and Long Life Project Tube
High Votage:30.5±1.0KV
Audio Output Consumption Power:26W(13W+13W)(10%THD)
Video/Audio Terminal:
CVBS:1.0Vp-p 75Ω
S-Video: Y: 1.0Vp-p 75Ω C:0.3Vp-p 75Ω
Monitor Output:AV:1.0Vp-p 75Ω Audio:200mVrms 1KΩ
Dimension and Weight: Reference to User’s Manual
Screen Size:
RPTV Model
38EP91 788*595 43
43EP91 890*671 50
43EP89 899*679 76
51EP89 1058*803 82
Remark: No Pre-Notification when any design or specification changed
Screen Size(Width*Height,mm) Weight(kg)
1
Page 4

PE-5 Chassis Service Manual
RECOMMENDATION FOR SERVICE REPAIRS
1- Use only original spare parts. Only use
components with the same specifications for
replacement.
2- Original fuse value only should be used.
3- Main leads and connecting leads should be
checked for external damage before
connection.
Check the insulation.
4- Parts contributing to the safety of the product
must not be damaged or obviously
unsuitable.
This is valid especially for insulators and
insulating parts.
5- Thermally loaded solder pads are to be
sucked off and re-soldered.
6- Ensure that the ventilation slots are not
obstructed.
7- The voltage is as high as 32KV when the
RPTV is under working status. Please pay
special attention to that when carrying out
the power on repairing. Nor, life hazard will
be possible.
Before repairing on the project tube, please
discharge the positive pole of the project
tube under power off status. There is high
vacuum inside of the project tube, and glass
chips will strongly splash when the project
tube is broken. Wear shock-resistant
protective glasses and keep far away from
persons without taking protective measures.
8- Keep wire away from the high voltage or high
temperature components.
9- When replacing a wattage resistor in circuit
board, keep the resistor 10 mm away from
circuit board.
10- Project tube, screen, optical lens and convex
lens inside of the cooling tube are all
precision displaying apparatus and their
surface or inside should be kept away from
the any hard project. Or the picture quality
will be affected.
11- Please recover the positions of all parts, the
install status, the component model and
parameter to their former status before
repairing.
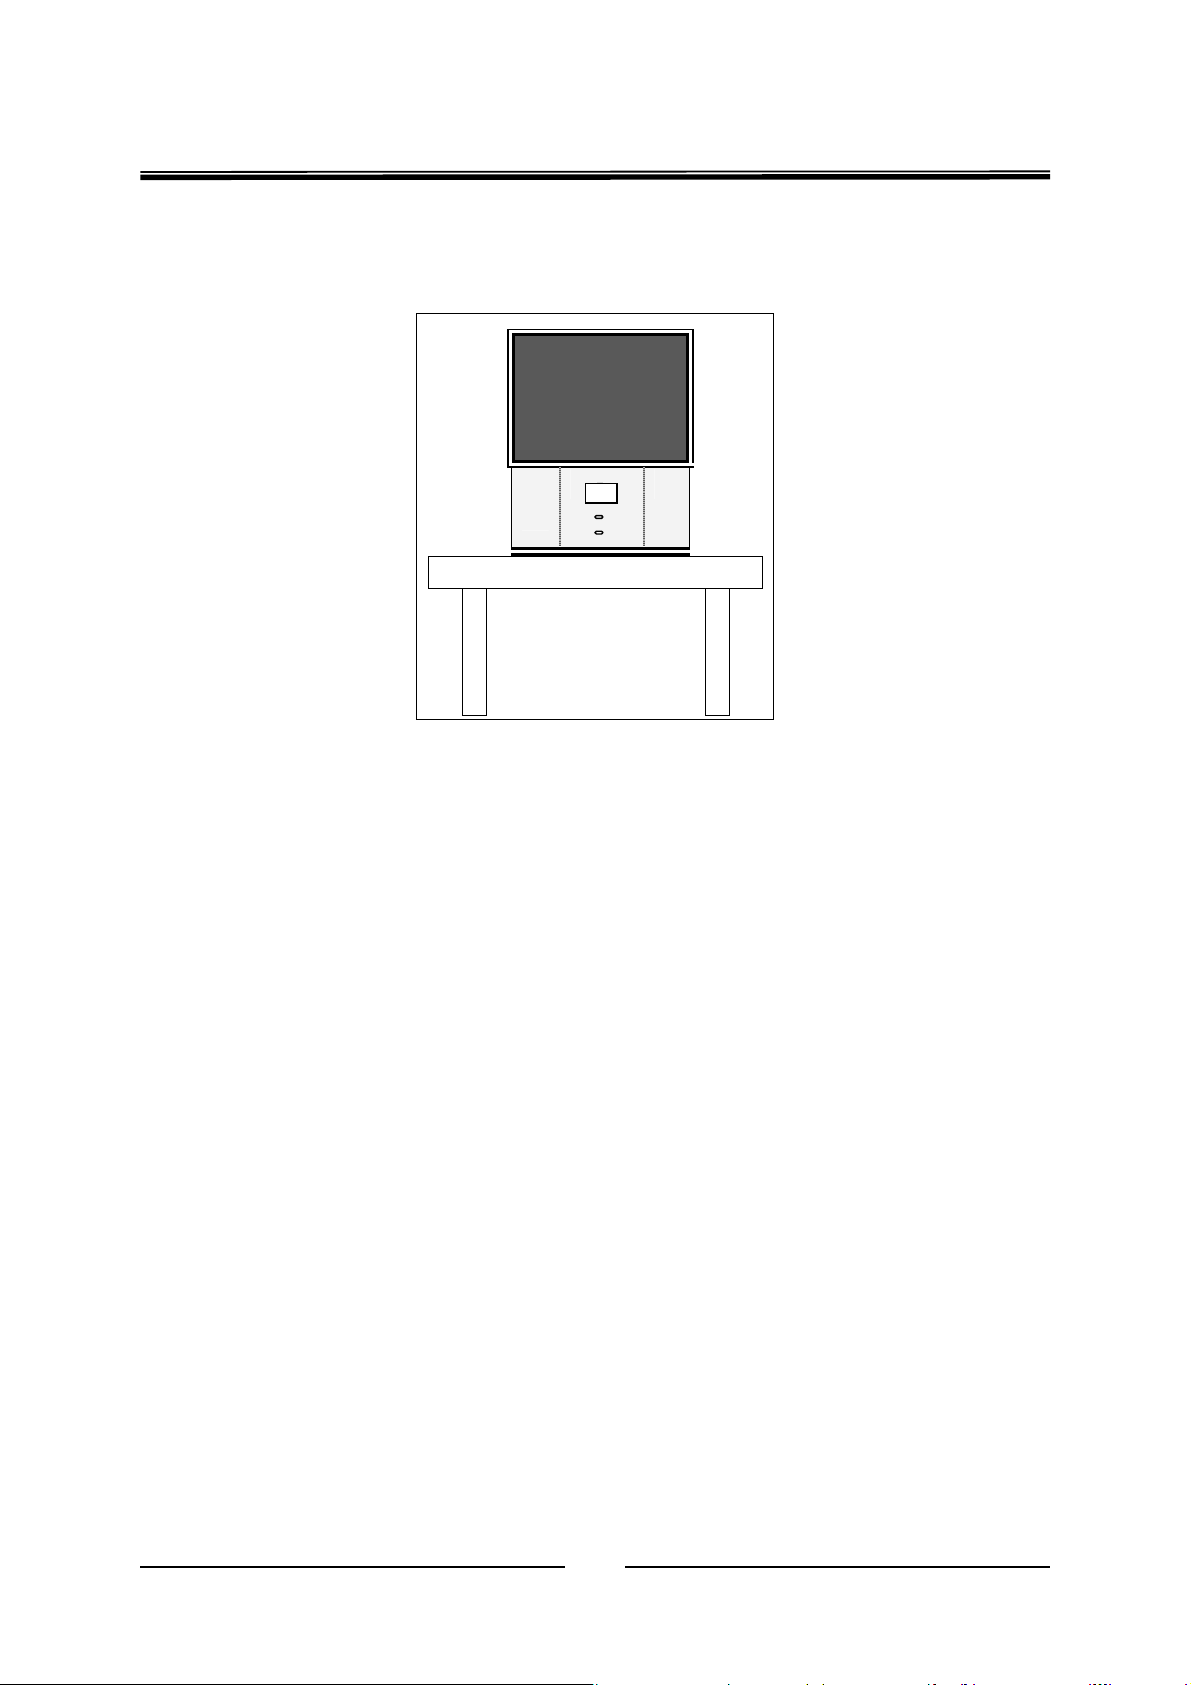
12- Strongly recommend put the machine on a
proper-height desk to make it easy to watch
and text during repairing on the board of the
bottom panel. (As shown in Chart 1)
HANDLING OF MOS CHIP COMPONENTS
MOS circuit requires special attention with
regard to static charges. Static charges may
occur with any highly insulating plastics and can
be transferred to persons wearing clothes and
shoes made of synthetic materials. Protective
circuits on the inputs and outputs of mos circuits
give protection to a limited extend only due to
time of reaction.
Please observe the following instructions to
protect the components against damage from
static charges.
1- Keep mos components in conductive
package until they are used. Most
components must never be stored in
styropor materials or plastic magazines.
2- Persons have to rid themselves of
electrostatic charges by touching MOS
components.
2
Page 5
PE-5 Chassis Service Manual
3- Hold the component by the body touching
the terminals.
4- Use only grounded instruments for testing
and processing purposes.
5- Remove or connect MOS ICs when
operating voltage is disconnected
Chart 1
3
Page 6
PE-5 Chassis Service Manual
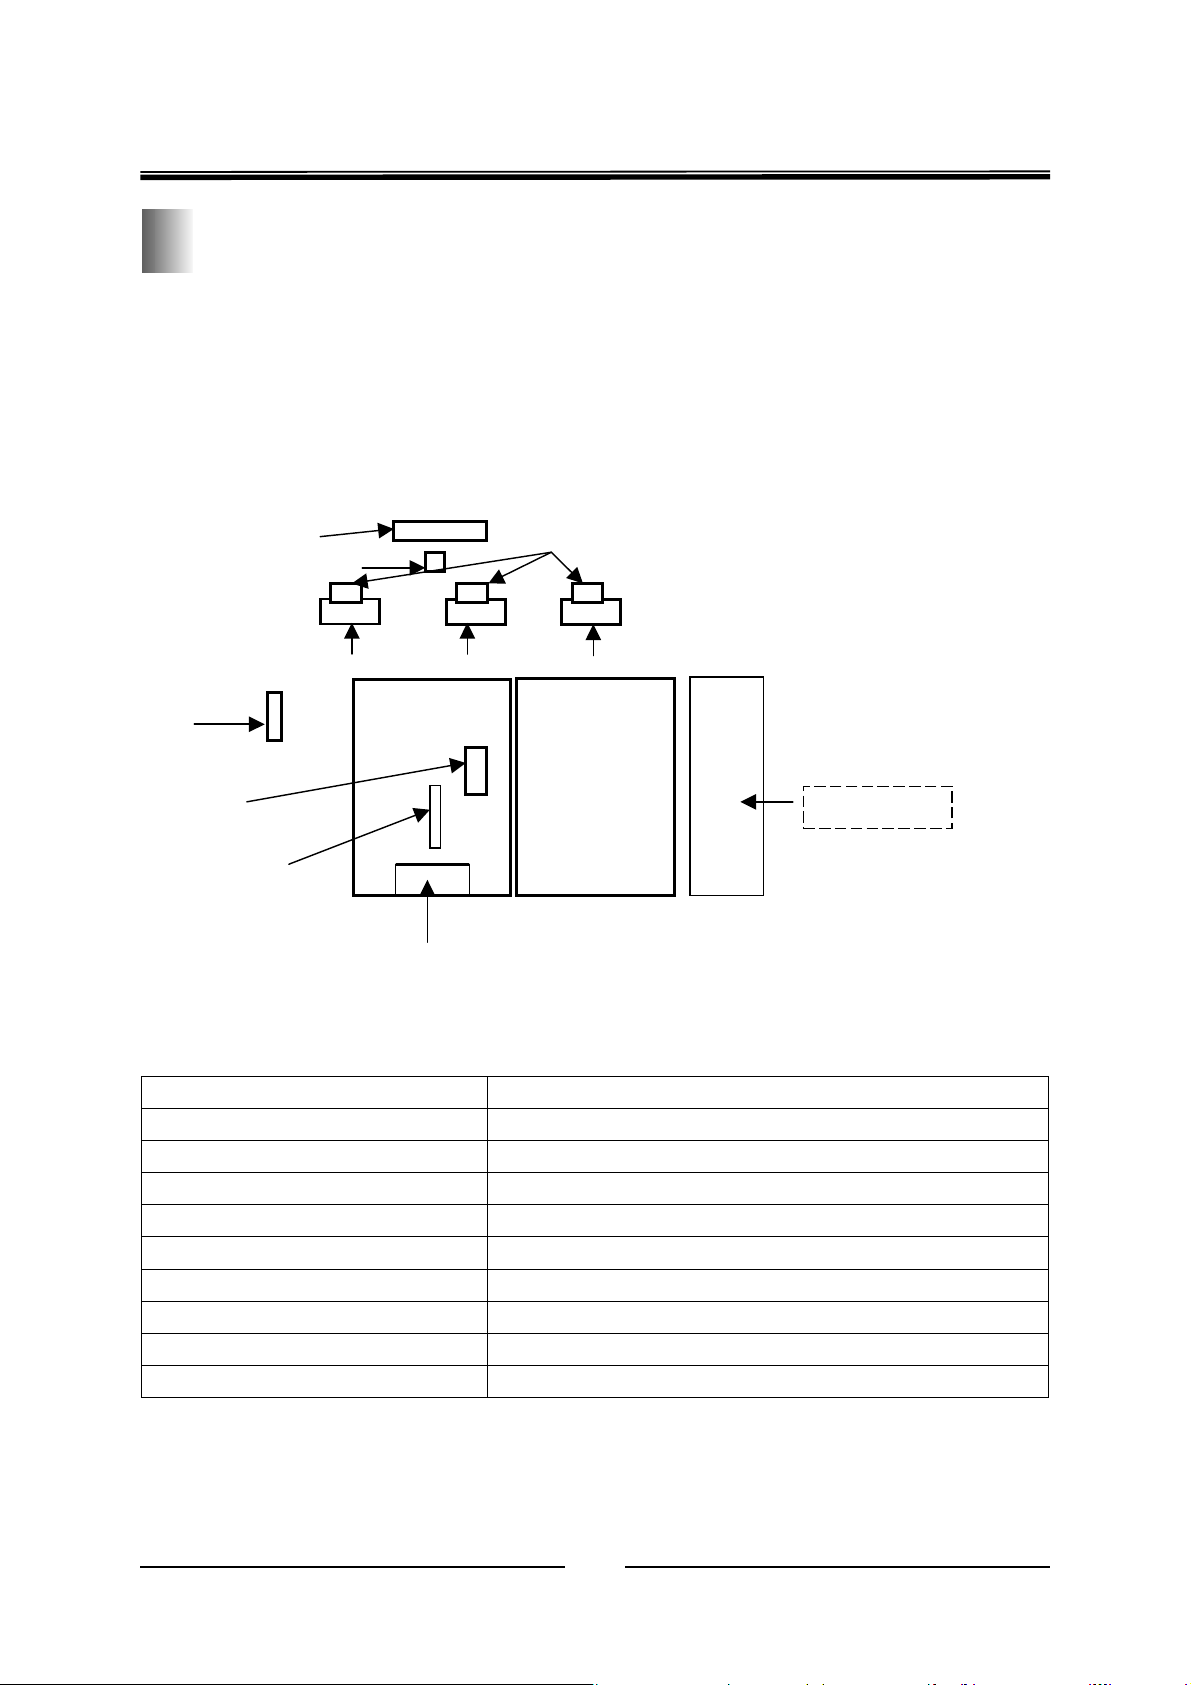
Distribution of circuit board on chassis
Remark: A. The specific position and the install mode of all circuit boards, and the side AV board are
subject to actual models;
B. The remote receiving board is always installed inside the cabinet back of the displaying screen.
Please take off the displaying screen or the back cover when repairing the remote receiving
board.
K Board VM Amplify Board
Remote control Board
Y(B) Board Y(G)
Front side AV
Board
Convergence
Board
Digital board
Main Board
AV Board
Board Y(R) Board
Scan Board
Power Board
Circuit Board Name Description on Functions
Main Board Signal processing
Scanning Board Scanning, Convergence, Amplify, High-Voltage Supplying
Power Board Machine Power Supplying
AV Board, Front AV Board Audio and Video Shift, Audio Processing
Convergence Board Convergence Processing
Digital Board Inverter Processing
Y Board CPT Driving
Remote Receiving Board (K Board) Signal Controlling by Button on, Remote Signal Receiving
VM Amplify Board VM Signal Power Amplifying
4
Page 7
PE-5 Chassis Service Manual
SERVICE MENU
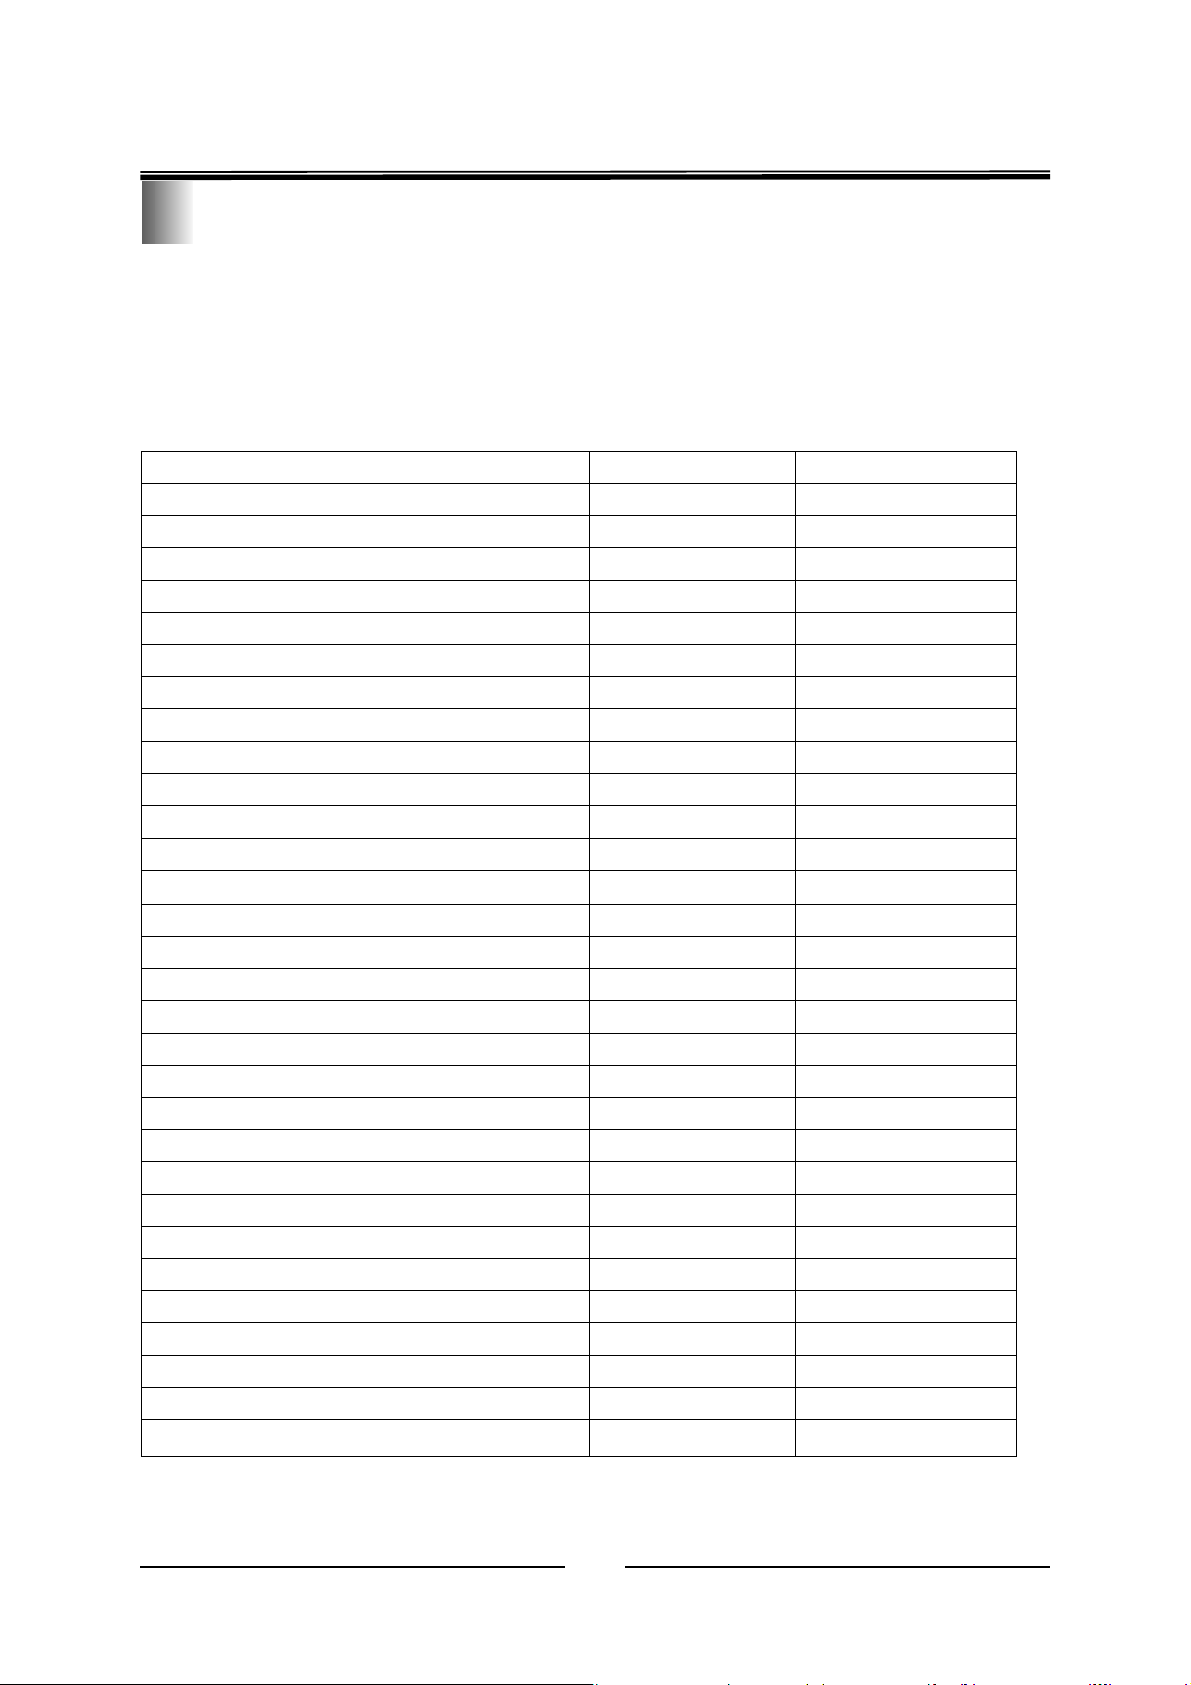
1 In PE-5 chassis, can enter into, adjust and exit the”S” Mode according to the instruction as follows:
Reduce the volume to “0” and press the “Mute” button at the same time till the color of the “Mute” button
turns to yellow. Then press “Menu” button on the machine body to enter into”S”
mode. Under the“S” mod, you can choose menus, choose item to adjust by pressing “P+” or “P-”, adjust
parameter by pressing “V+” or “V-.” Exit “S” mode by pressing “STILL” button.
2 Parameter Item and default Value:
Parameter Item Default Value Remark
[01]
V-AMP (Frame) 54
V-SHIFT (Frame Center) 86
V- LINEARITY (Frame Linearity) 21
S-COR (Frame S Adjust) 32
V-DF- PHASE (Frame Dynamic Focus Phase) 8
V-DF- AMP ((Frame Dynamic Focus Breadth) 8
EW-WIDTH (Horizontal) 34
H-SHIFT (Horizontal Center) 57
EW-PARAW (Pincushion Distortion) 15
EW-TRAP (Trapezium Distortion) 57
EW-UPCORN (Upper Corner Distortion) 16
EW-DNCORN (Down Corner Distortion) 16
EW-CORNER Corner Distortion) 16
[02]
DRIVE-R 3F
DRIVE-B 3F
R- CUT 80
G- CUT 80
B- CUT 80
BUS STOP ON(Bus switch)
FIRST POWER ON(Default)
SUB BRIGHT (Side Brightness) 57
Y-DELAY(PAL Y D elay)
SECAM-Y-DELAY(SECAM Y Delay)
NTSC-Y-DELAY(NTSC Y Delay)
VSM-PHASE 7
OFF
OFF
8
0
8
5
Page 8
PE-5 Chassis Service Manual
Remark: (1) The datum in the above chart may be different according to different
chassis (Deflection Supplier) or different structure size and optical system
on a same chassis.
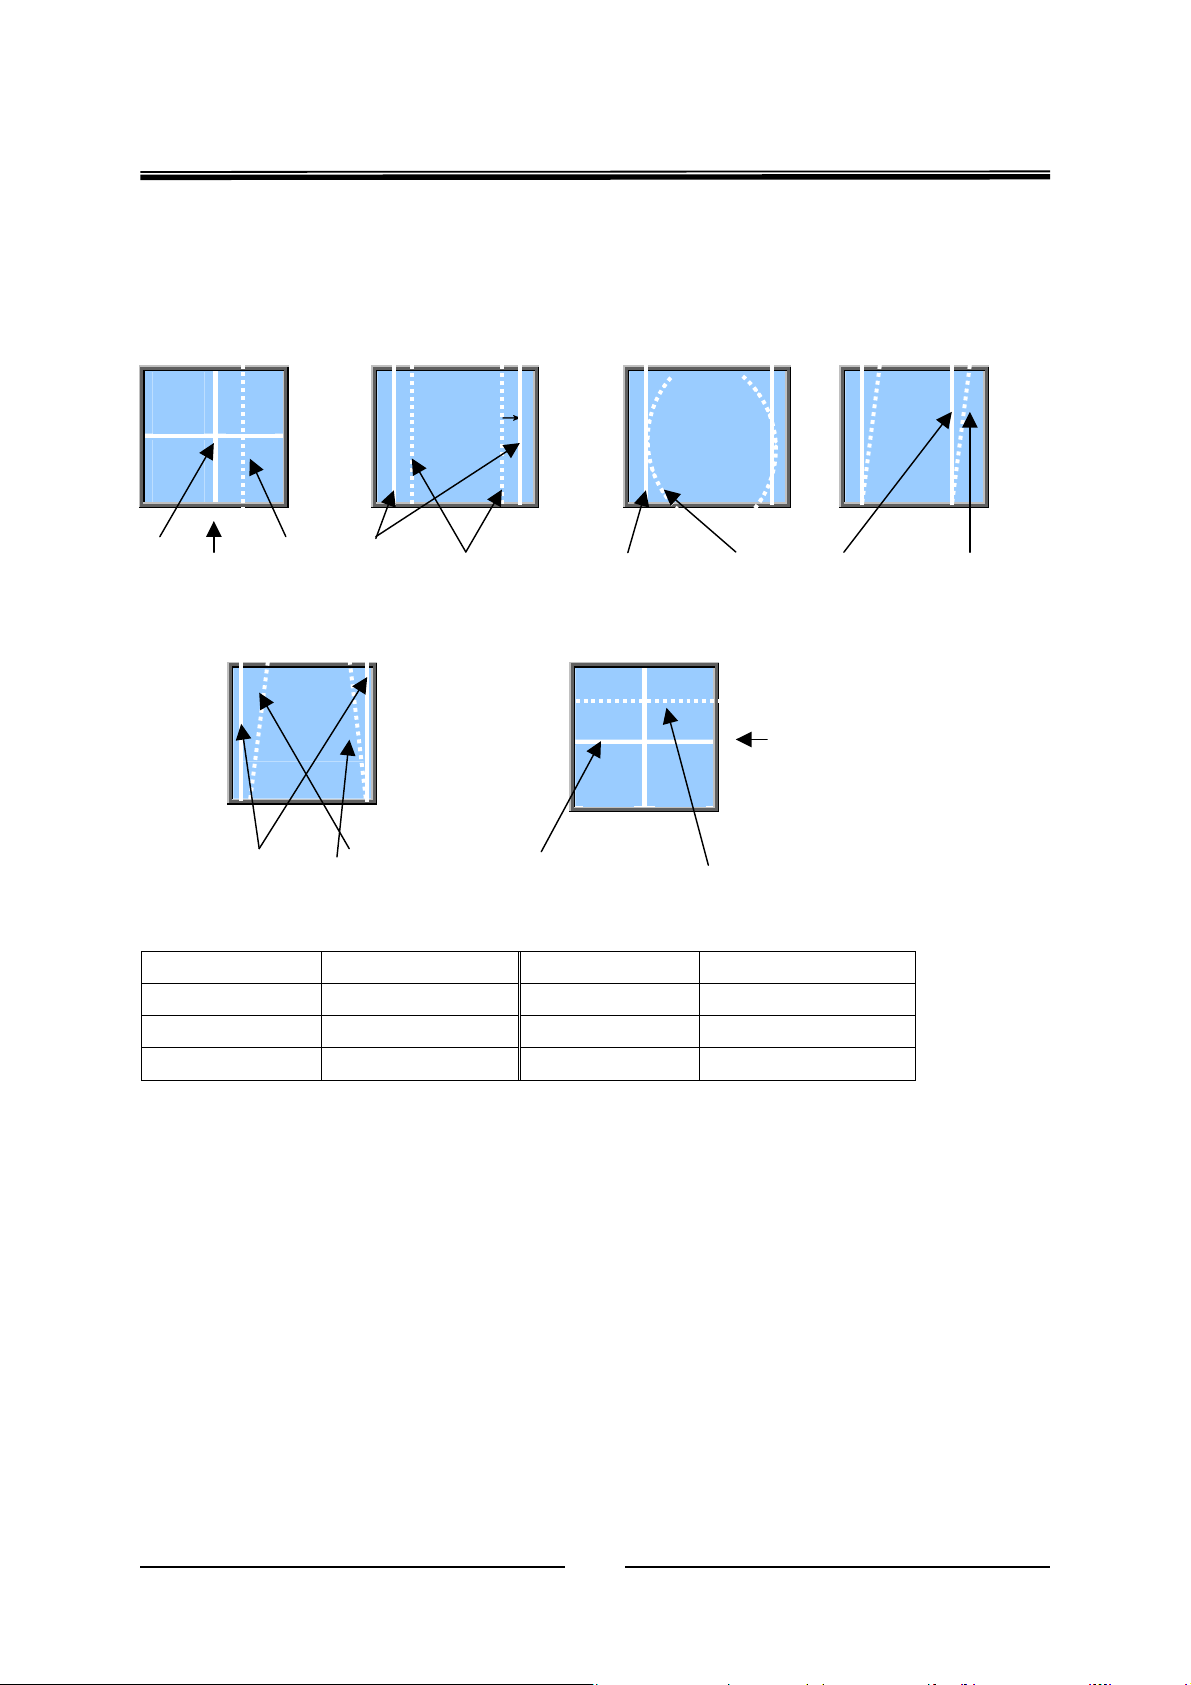
(2)Geometry Parameter Adjusting Model:
“H SHIFT”Adjusting “EW-WIDTH”Adjusting “EW PARAW ”Adjusting “EW-COR”Adjusting
A/A B/A A/A B/A A/A B/A A/A B/A
“EW-TRAP” Adjusting “V SHIFT” Adjusting
A/A: After Adjusting; B/B: Before Adjusting;
(3) White Balance Parameter:
←
A/A B/A A/A B/A
←
←
→
← →
↓
←
Parameter Item Parameter Value Parameter Item Parameter Value
R CUT 80 R DRI 3F
G CUT 80 B DRI 3F
B CUT 80
Need to adjust the above white balance parameter after carrying on the following repairing
working:
1) Replacing project tube
2) Replacing signal processing board or the IC on the board.
3) Replacing Y board or the IC on the board.
6
Page 9
PE-5 Chassis Service Manual
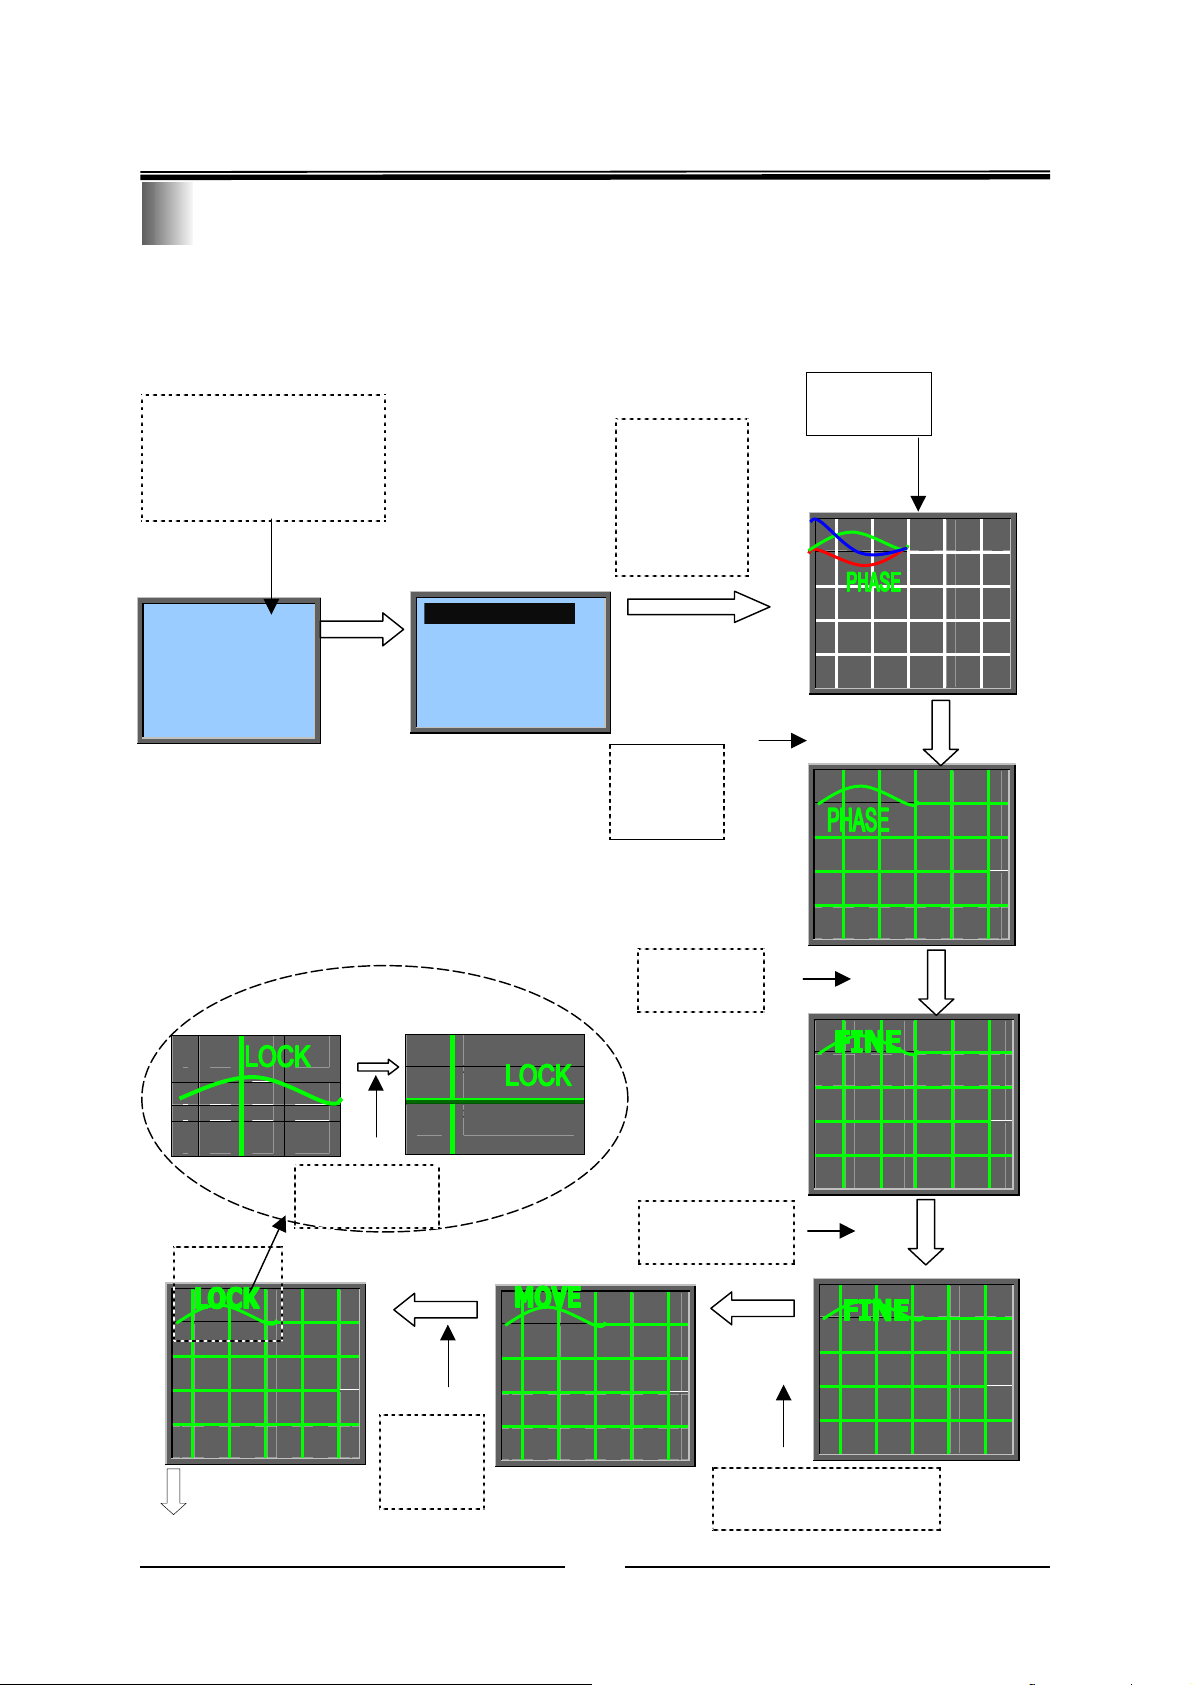
Convergence Fine Adjusting
Remark:● Please pay attention to the displaying color of the network and the cursor, and the
displaying status during adjusting.
● Convergence under 16: 9 mode and 4: 3 mode need to be adjusted separately.
Fine Adjusting Model:
1.Press “MUTE” Key
without release and
press ”MENU” Key on
the machine body.
Set the volume to “0”
S-MODE PE5-M-X
2. Press
“8” key to
enter into
adjustment
mode.
Abnormal
convergence
┌ ┐
└ ┘
3.Press
“3” key
repeatedly
4.Press AV
key
┌ ┐
└ ┘
┌ ┐
└ ┘
Press VOL-/+
or P-/+ key
┌ ┐
└ ┘
7.Press
“10” key
┌ ┐
└ ┘
7
5.Press “●” key
repeatedly.
6.Press P-/+ and VOL-/+
keys to move the cursor.
┌ ┐
└ ┘
┌ ┐
└ ┘
┌ ┐
└ ┘
(Continued)
Page 10
PE-5 Chassis Service Manual
y
y
┌ ┐
└ ┘
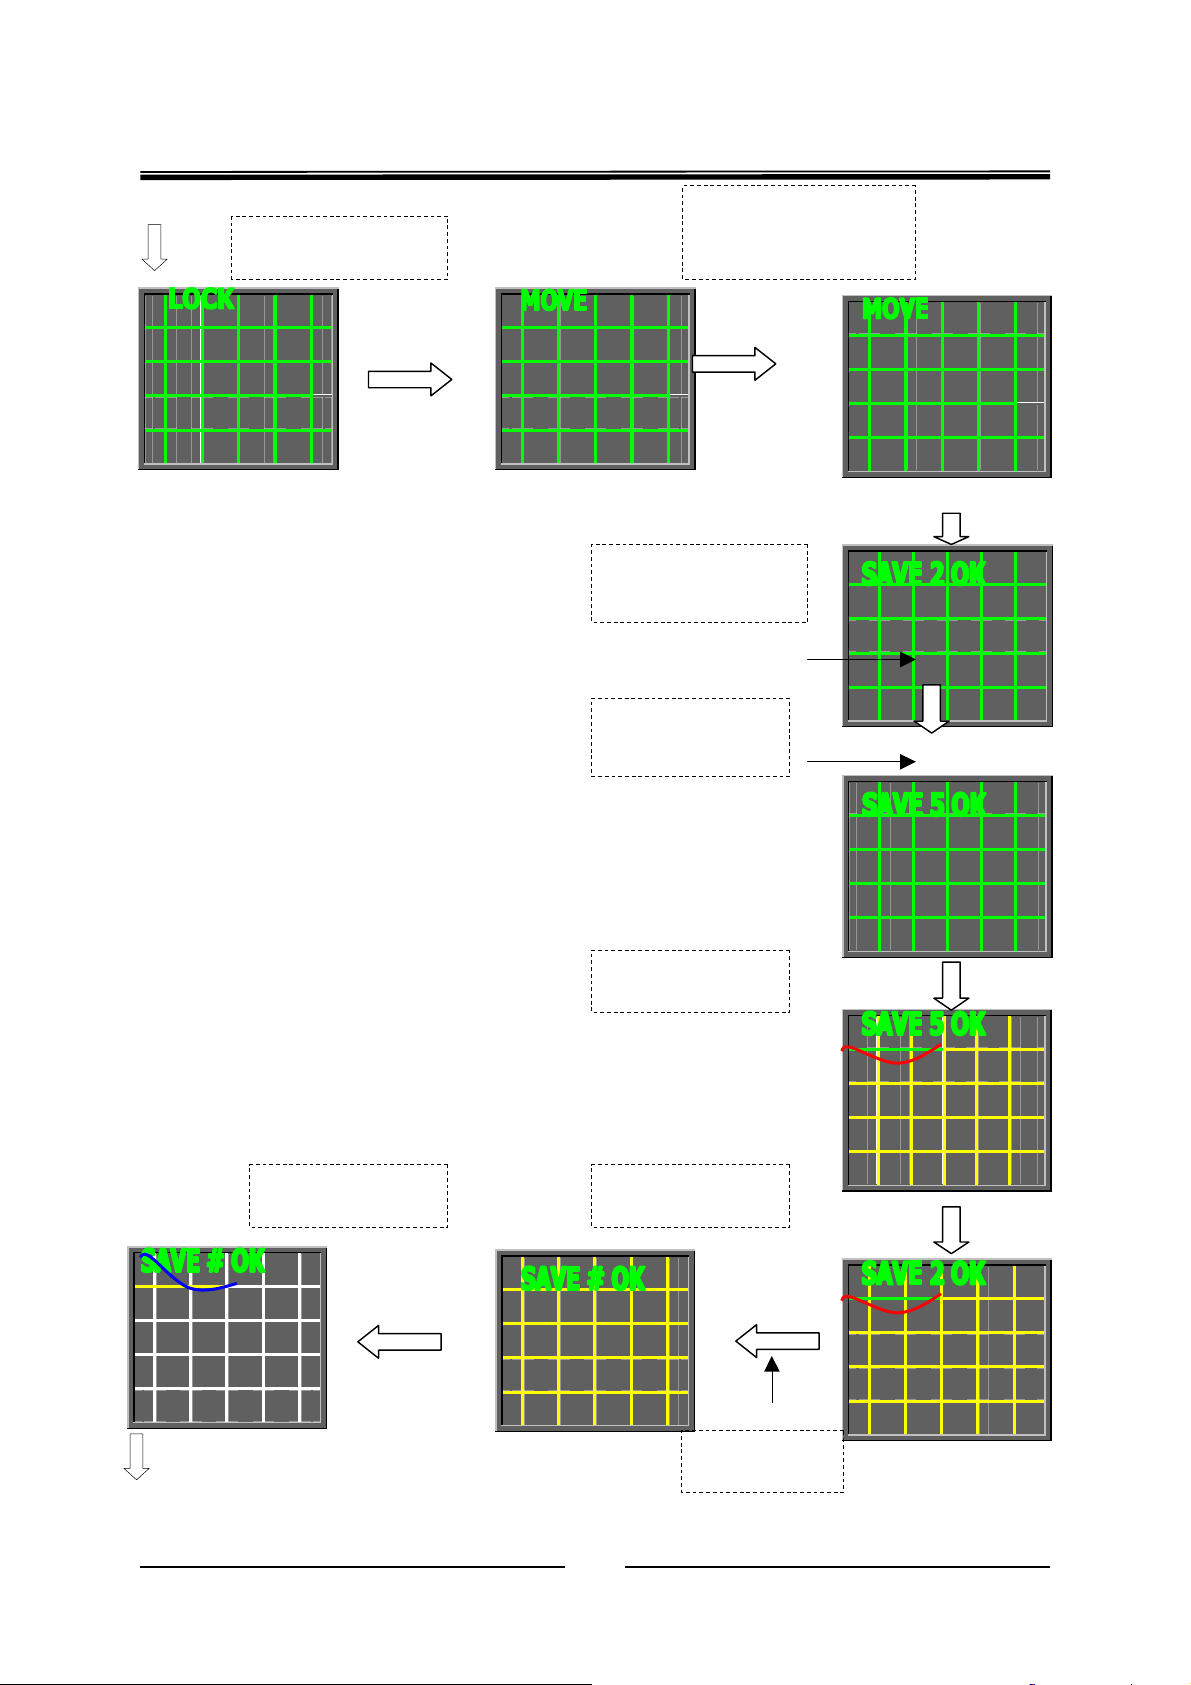
8. Press “10” key to
release the cursor.
┌ ┐
└ ┘
Strongly recommend to save and backup
the adjusted data every 5 minutes in case
the adjusted data lost due to sudden power off.
15. Press “3” key
repeatedly.
┌ ┐
└ ┘
(After G convergence properly adjusted)
10.Press “RECALL”
key to save data.
11.P ress 9 to
backup data.
12.Press “3” ke
repeatedly.
13. Press “●” ke
repeatedly.
┌ ┐
└ ┘
9.Redo Step 6- Step 8
for other position
under green mode.
C
14. Redo step
6 — step 11.
┌ ┐
└ ┘
┌ ┐
└ ┘
┌ ┐
└ ┘
┌ ┐
└ ┘
┌ ┐
└ ┘
(Continued)
8
Page 11
PE-5 Chassis Service Manual
y
r
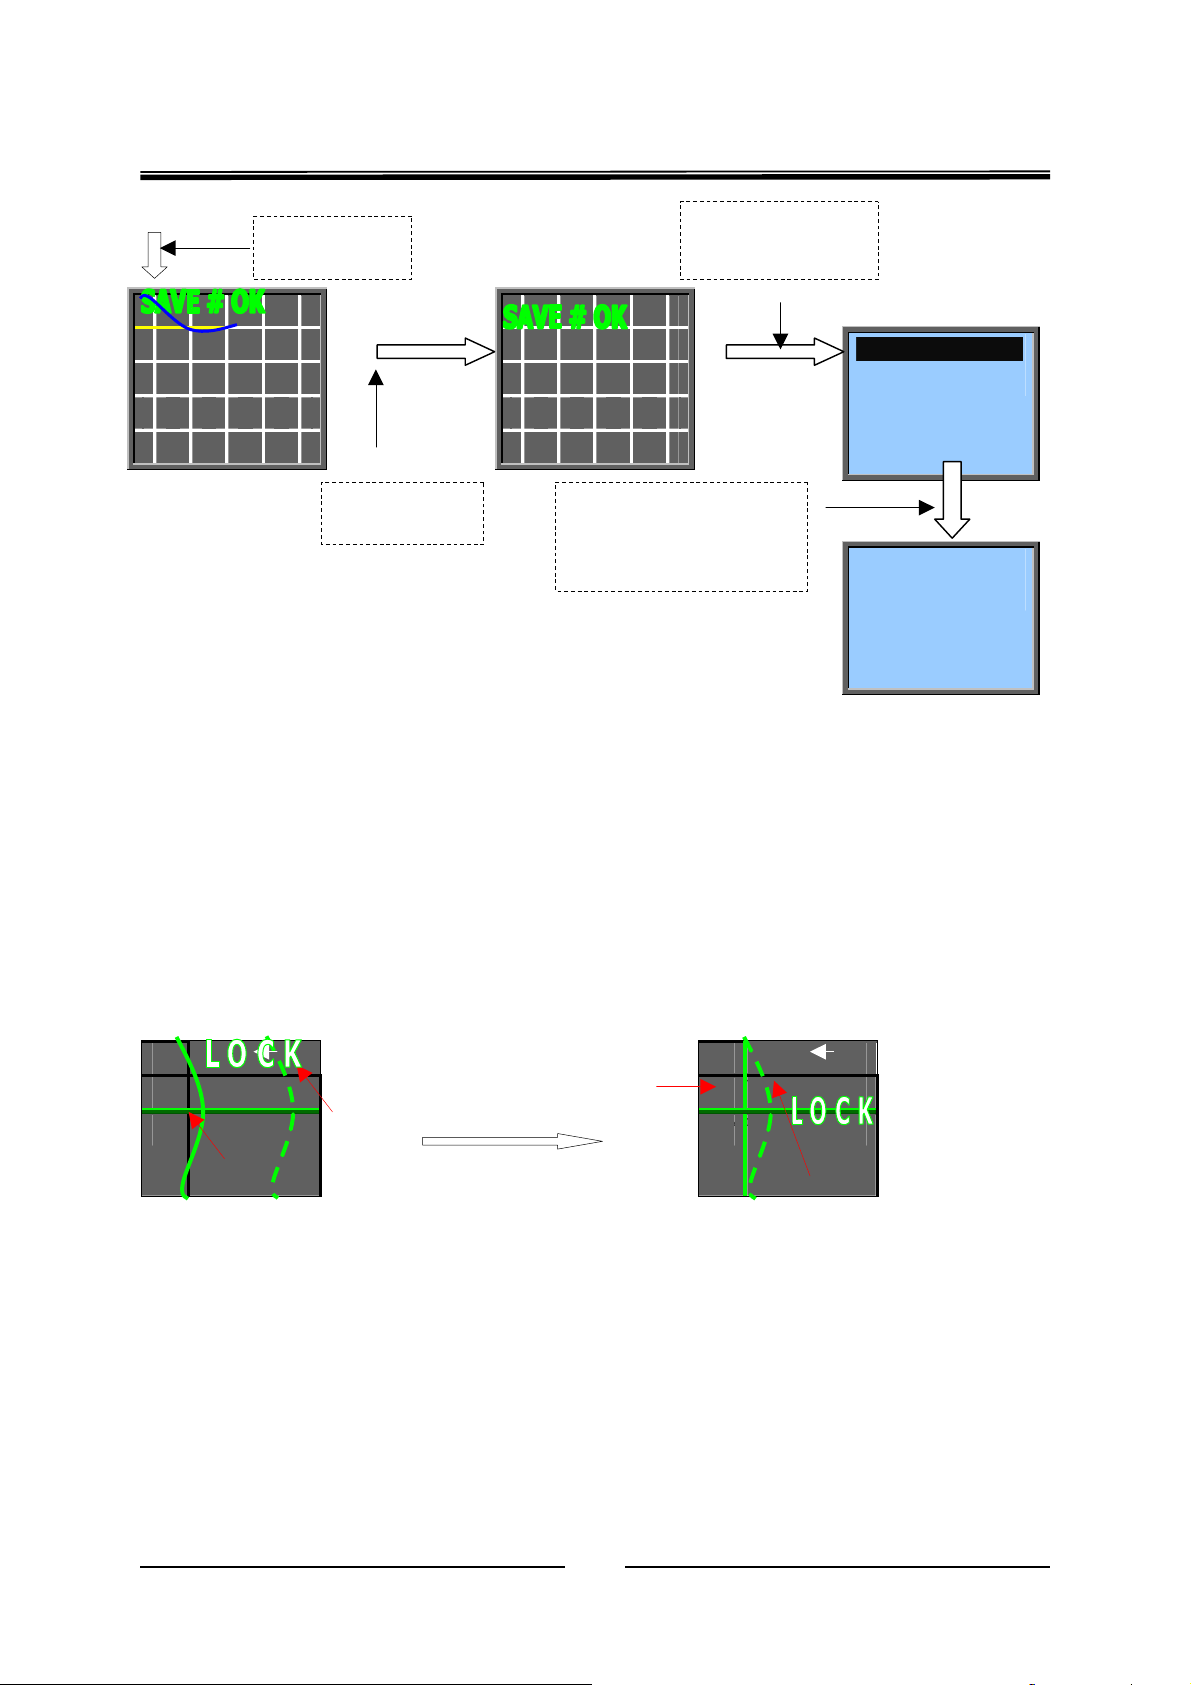
16.Press
GREEN ke
18.Pres“EXIT”to exit
convergence adjust
┌ ┐
└ ┘
┌ ┐
└ ┘
S-MODE PE5 MX
17.Rdeo step 6
— step 11
19.Press STILL key back to
normal watching, or to
adjust convergence unde
other modes
Attachment:Examples of dot/line adjustment
● During convergence adjustment, press “5”key on the remote control to switch between DOT
and LINE modes. Can use these two adjust modes during convergence adjusting.
(Example 1:line mode) (Example 2:dot mode)
Moving convergence lines to right or left Making convergence lines straight.
┌ ┐
└ ┘
2(After Dot Adjust)
┌ ┐
└ ┘
1(Before Line Adjust)
2(After Line Adjust, while before Dot adjust) 1(Before Dot Adjust)
9
Page 12
PE-5 Chassis Service Manual
Direction of Fine-Adjustment Convergence
For PE-5 Chassis
The following adjustment procedures are USED ONLY for Fine-Adjustment (i.e. some convergence
lines are little bit slantwise, bended or the red or blue convergence line deviates from the green
convergence line).
Important:
1. Convergences under 4:3 mode and 16:9 mode should be checked and adjusted respectively.
2. Don’t cut off or change the signal source after entering into the convergence adjustment mode.
3. Don’t press “ EXIT” key on the remote control during adjustment, otherwise you will lose the date
(Back to Non-adjusted status).
4. Please check the “Convergence Fine Adjusting” for your reference when reading this direction.。
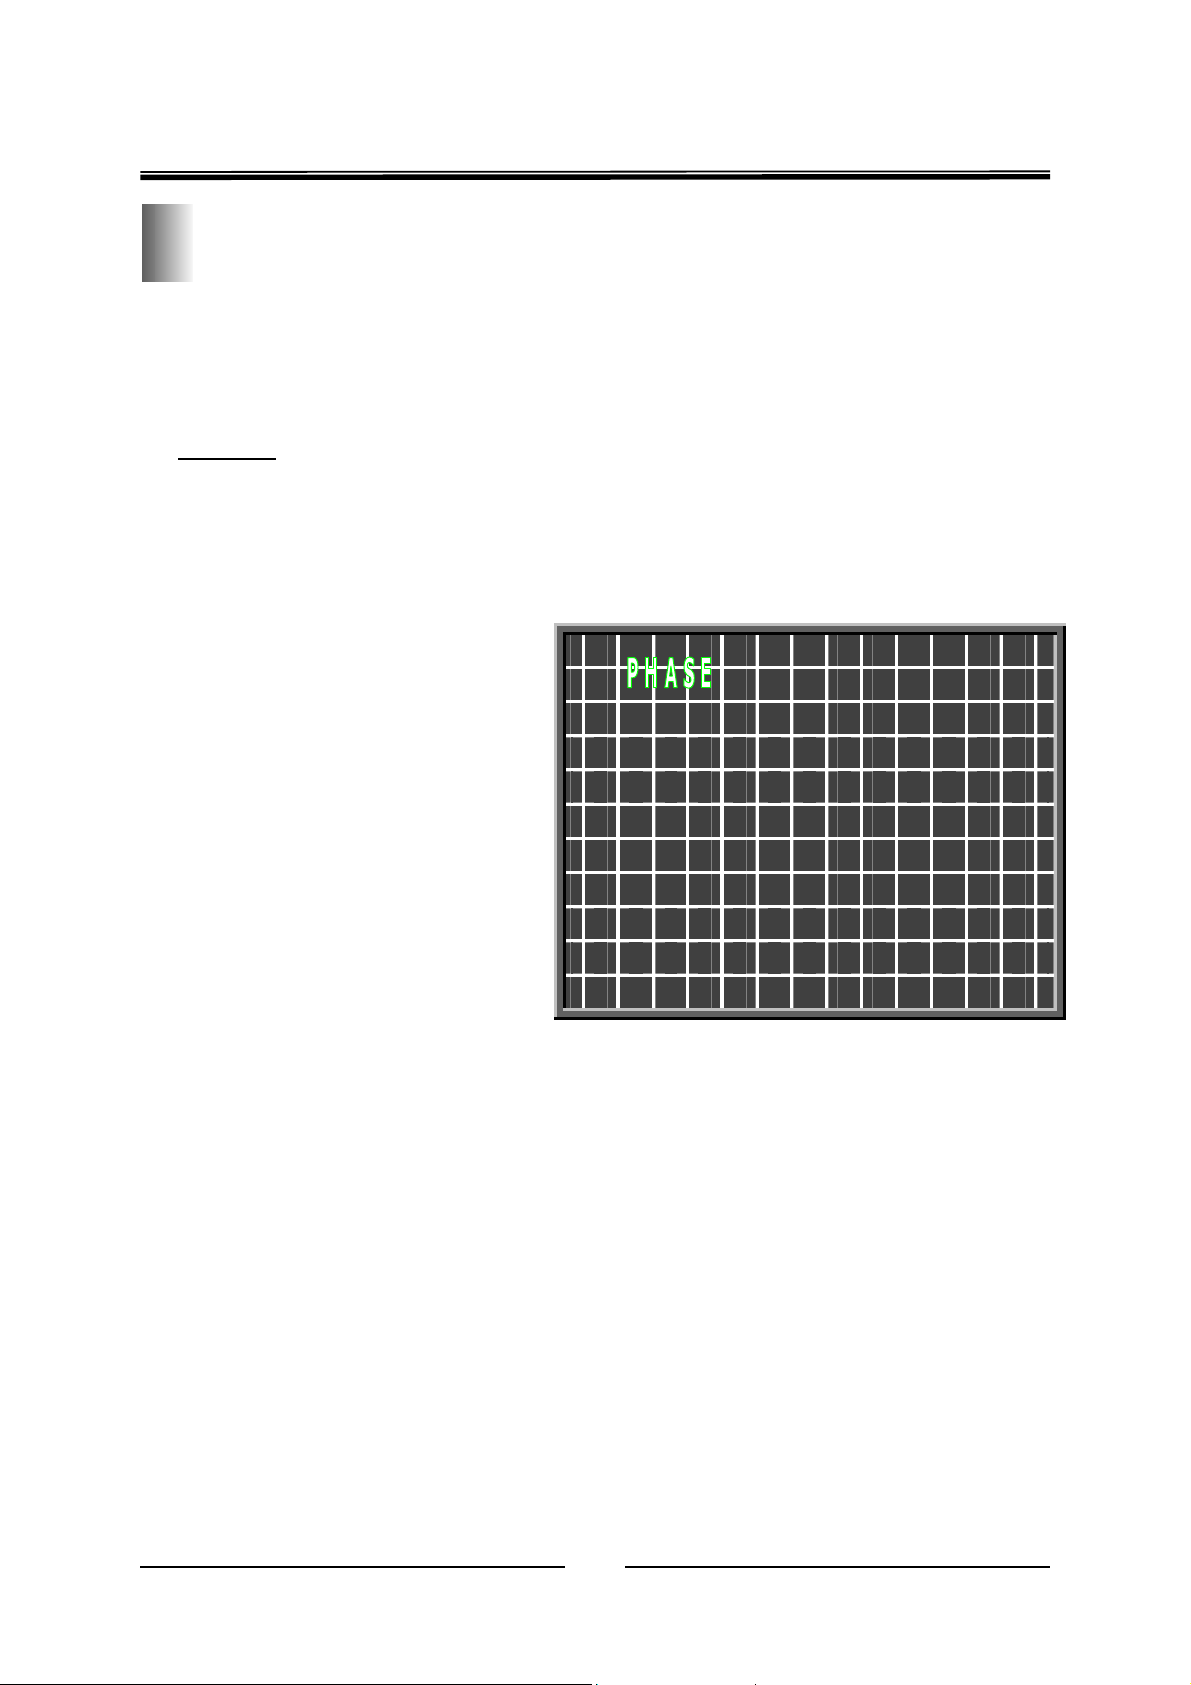
●If the crosshatches shown as the right
figure 1 (The white lines are straight and in
parallel with the frame of the screen ), that
means the convergence of your rear
projection TV is excellently adjusted in the
factory and you don’t need to re-adjust it
( the amount of convergence lines ,
distribution and shape of the screen are
subject to actual status of the projection
TV ).
Chart 1(Normal Convergence Crosshatch)
┏ ┓
┗ ┛
● Functions of Keys on Remote Control in Convergence Adjusting
“8” Key:Enter Convergence Adjust Mode AV :Convergence Adjust Mode Select
P +/- :Move Cursor Up or Down “10” Key :Lock/Release Cursor
“3” Key:Change Crosshatch Color V -/+ :Move Cursor Left or Right
“●” key :Change Cursor Color 9 :Backup Adjusted Dat
“5” Key :Change Between Dot Adjust Mode and Line Adjust Mode
0 :Load Backup Data
RECALL:Store Convergence Data “7” Key :Clear Data
SLEEP :Superimpose Crosshatch with Picture
CH + / CH - :Speed up/Slow down Adjusting Speed
EXIT : Exit Convergence Adjust Mode STIIL:Load Present Mode Data
10
Page 13

PE-5 Chassis Service Manual
Convergence Fine-Adjusting Procedures. (The following steps comply with the steps which are
stipulated in the Convergence Fine-adjusting for PE-5 chassis).
1. Reduce the volume to 0. Press and hold “MUTE” key on the remote control till the color of “MUTE”
turns , and press “MENU” key on the front panel of the unit at the same time when a “S-MODE
PE5-M-V1.03 03-04-21”” appears on the left corner of the screen. This means that you have
entered the “S Mode” also known as “Repairing Mode”. V1.03 refers to the software version and
03-04-21 refers to date of software fixed. These may be different according to different
manufacturing time.
2. Press “8” key on the remote control to enter into convergence adjust mode. If the white
crosshatches and the red cursor are shown as in figure 1, it means that the convergence of your
rear projection TV is excellently adjusted in the factory.
3. Press “3” key on the remote control repeatedly when the crosshatches’ color changes. To adjust
the green convergence line, choose green convergence line firstly.
4. Press ‘AV” key on the remote control repeatedly when the convergence adjustment mode circles in
PHASE→COARS→FINE→PHASE. Highlight FINE to enter into fine-adjustment convergence
mode.
5. Press “GREEN” key on the remote control when the cursor’s colour circles in red→green→blue→
red. The cursor’s colour shows red means that the red convergence line needs to be adjusted. The
cursor’s colour shows green means that the green convergence line needs to be adjusted, and so
on. (The green convergence line always needs to be adjusted firstly. Then the red line and the
blue line need to be adjusted to be in line with the green line).
6. Press “P+”/“P-” or “VOL+”/ “VOL-”key on the remote control respectively to move the cursor right
/ left or up / down to the position where you want to adjust.
7. Press “10” key on the remote control to lock the cursor when its colour turns white and “FINE”
character changes to “LOCK” on the screen), you can start convergence adjusting. (During
adjusting, press “P+”/“P-” or “VOL+”/ “VOL-”key on the remote control will lead the convergence
lines around the cursor move up and down or left and right to adjust the convergence there.)
Remark:
a. In order to adjust the whole convergence line, please press “5” key on the remote control to
display LINE MODE on the screen. See Convergence Fine Adjusting for PE-5 chassis. Press “10”
key on the remote control to lock the cursor, and press “P+”/“P-” or “VOL+”/ “VOL-”key on the
remote control to adjust convergence line right/left or up/down. Press “5” key on the remote control
again to display “POINT” on the screen, which means the projection TV return to convergence dot
adjustment mode (After entering into convergence adjusting mode, the default setting is dot
mode).
b. The location of the adjusted crosshatch dot is displayed on the screen. That’s for reference only.
11
Page 14

PE-5 Chassis Service Manual
8. When adjustment finish, press “10” key to release the cursor (the cursor’s colour turns back to
green and “LOCK” character changes to “MOVE”).
9. Press “P+”/“P-” or “VOL+”/ “VOL-”key on the remote control to move the cursor right / left or up
/ down to the other place you want to adjust. Redo step 6-8. (The finished whole green
convergence crosshatches are as good as shown in Chart 1.)
10. When green convergence adjustment finish, press “RECALL” key on the remote control to save the
adjusted data and “SAVE # OK” appears on the screen (“SAVE 2 OK” appears on the screen 10
seconds after “RECALL” key pressed).
11.Press “9” key on the remote control to backup the adjusted data and “SAVE 5 OK” appears on the
screen when storage finish.
12. After green convergence adjust, storage and backup finish, repeatedly press “3 ” key on the remote
control till the convergence crosshatches on the screen turn their colors to coinage color of Red
and Green. (The color of the crosshatches where Red and Green completely coinage will be
yellow.)
13. Press“GREEN”Key to turn the cursor’s color to Red and enter into Red Convergence Adjusting
Mode.
14. Redo steps 6-11. Make red lines be line with green lines
15. After red convergence adjust, storage and backup finish, repeatedly press “3 ” key on the remote
control till the convergence crosshatches on the screen turn their colors to coinage color of Red
and Green and Blue. (The color of the crosshatches where Red and Green and Blue completely
coinage will be white.)
16. Press“GREEN”Key to turn the cursor’s color to Blue and enter into Blue Convergence Adjusting
Mode.
17. Redo steps 6-11. Make blue lines be line with green lines. Store and backup adjusted data.
18. After storing and backuping the adjusted data, press “EXIT” key on the remote control to exit the
convergence adjustment mode. Exit convergence mode means back to “S Mode”
19. Press STILL key back to normal watching, or to adjust convergence under other modes
Remark: Key “3”, “5”, “7”, “8”,”10”, etc., please check the
attached “43RP-100 Key Function On the Remote Control .tif ”!!!
12
Page 15
PE-5 Chassis Service Manual
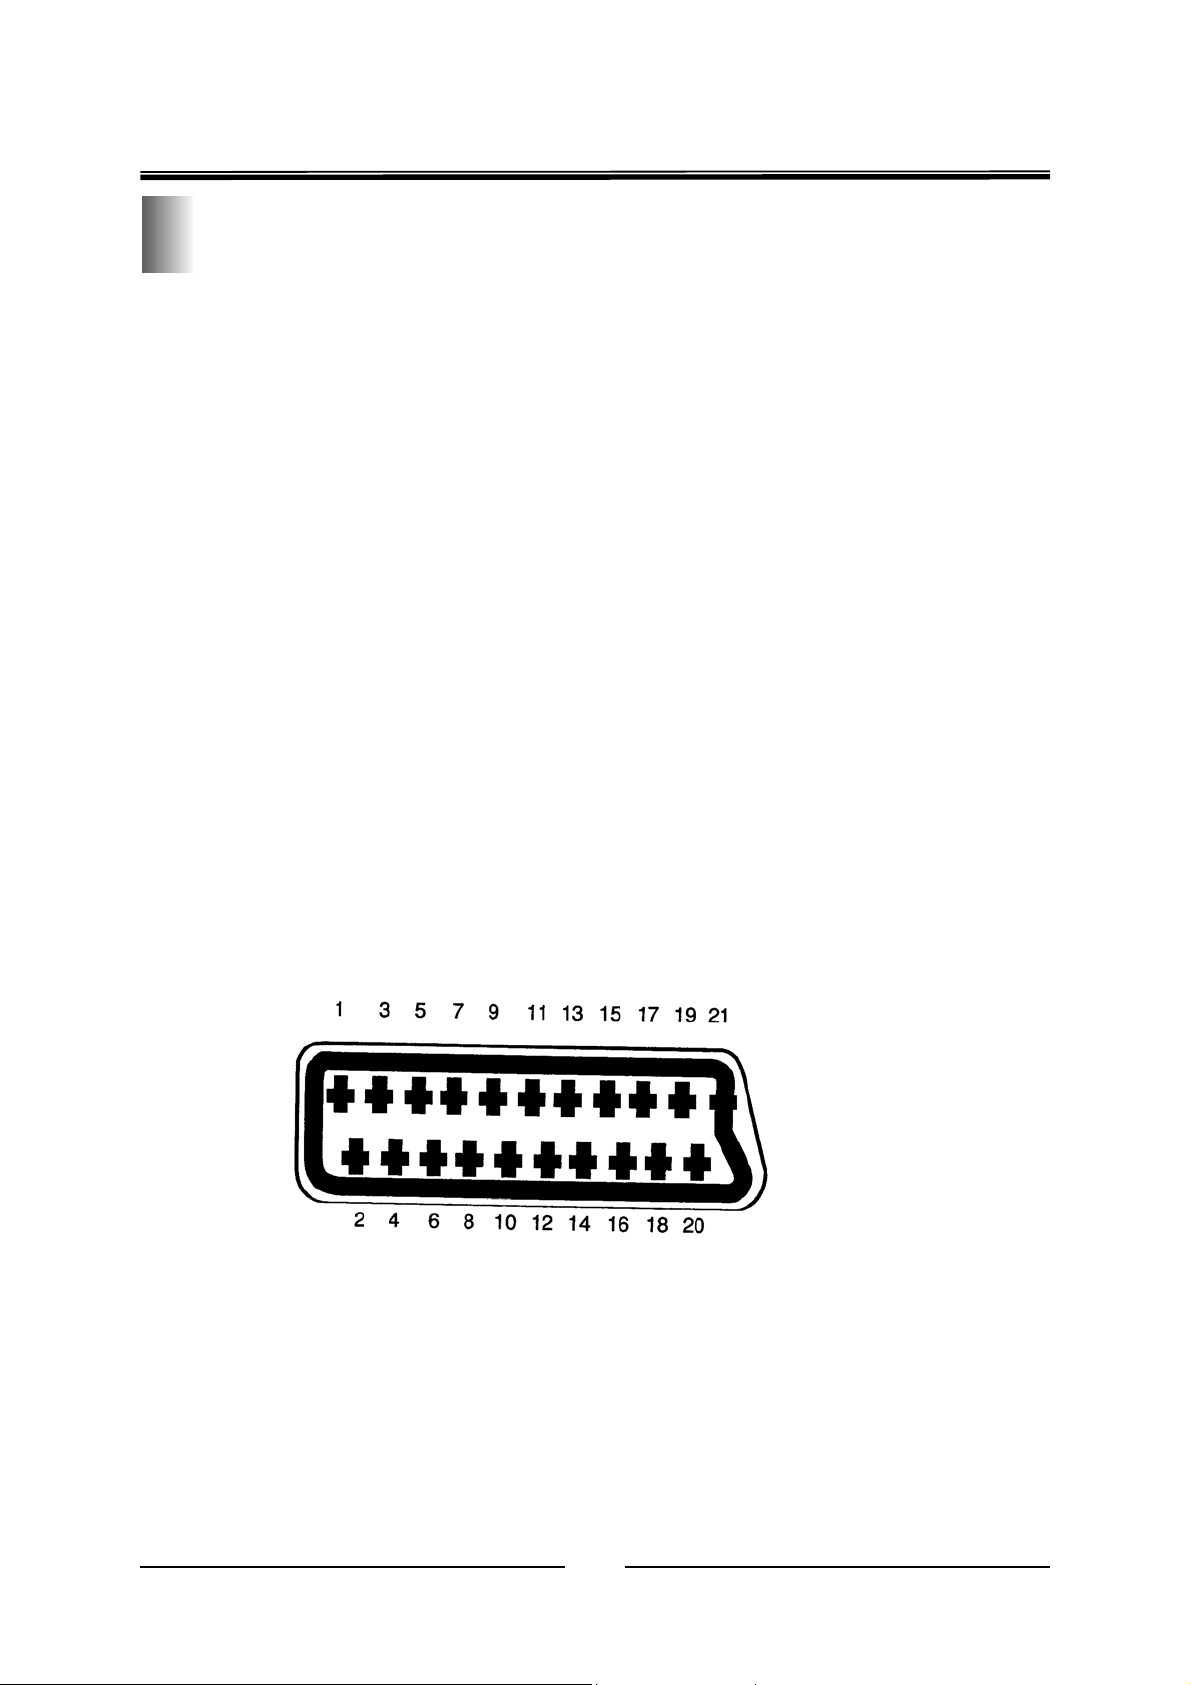
SPECIFICATION OF THE CONNECTOR
(EURO SCART)
1- Audio output 1. right channel 0.5 VRMS/<l k 0
2- Audio input 1. right channel 0.5 VRMS (connected to No.6)
3- Audio output 2. left channel 0.5 VRMS (connected to No.1)
4- GND (audio)
5- GND
6- Audio input 2. left channel 0.5 VRMS/>10k 0
7- RGB input, blue (B)
8- Switch signal video (status)
9- GND
10- Reserved for clock signals (not connected)
11- RGB input, green (G)
12- Reserved for remote control (not connected)
13- GND
14- GND switch signal RGB
15- RGB input, red (R)
16- Switch signal RGB
17- GND (video)
18- GND 19- Video output 1 Vpp/75 ohm
19- Video input 1 Vpp/75 ohm
20- Shield
13
Page 16
PE-5 Chassis Service Manual
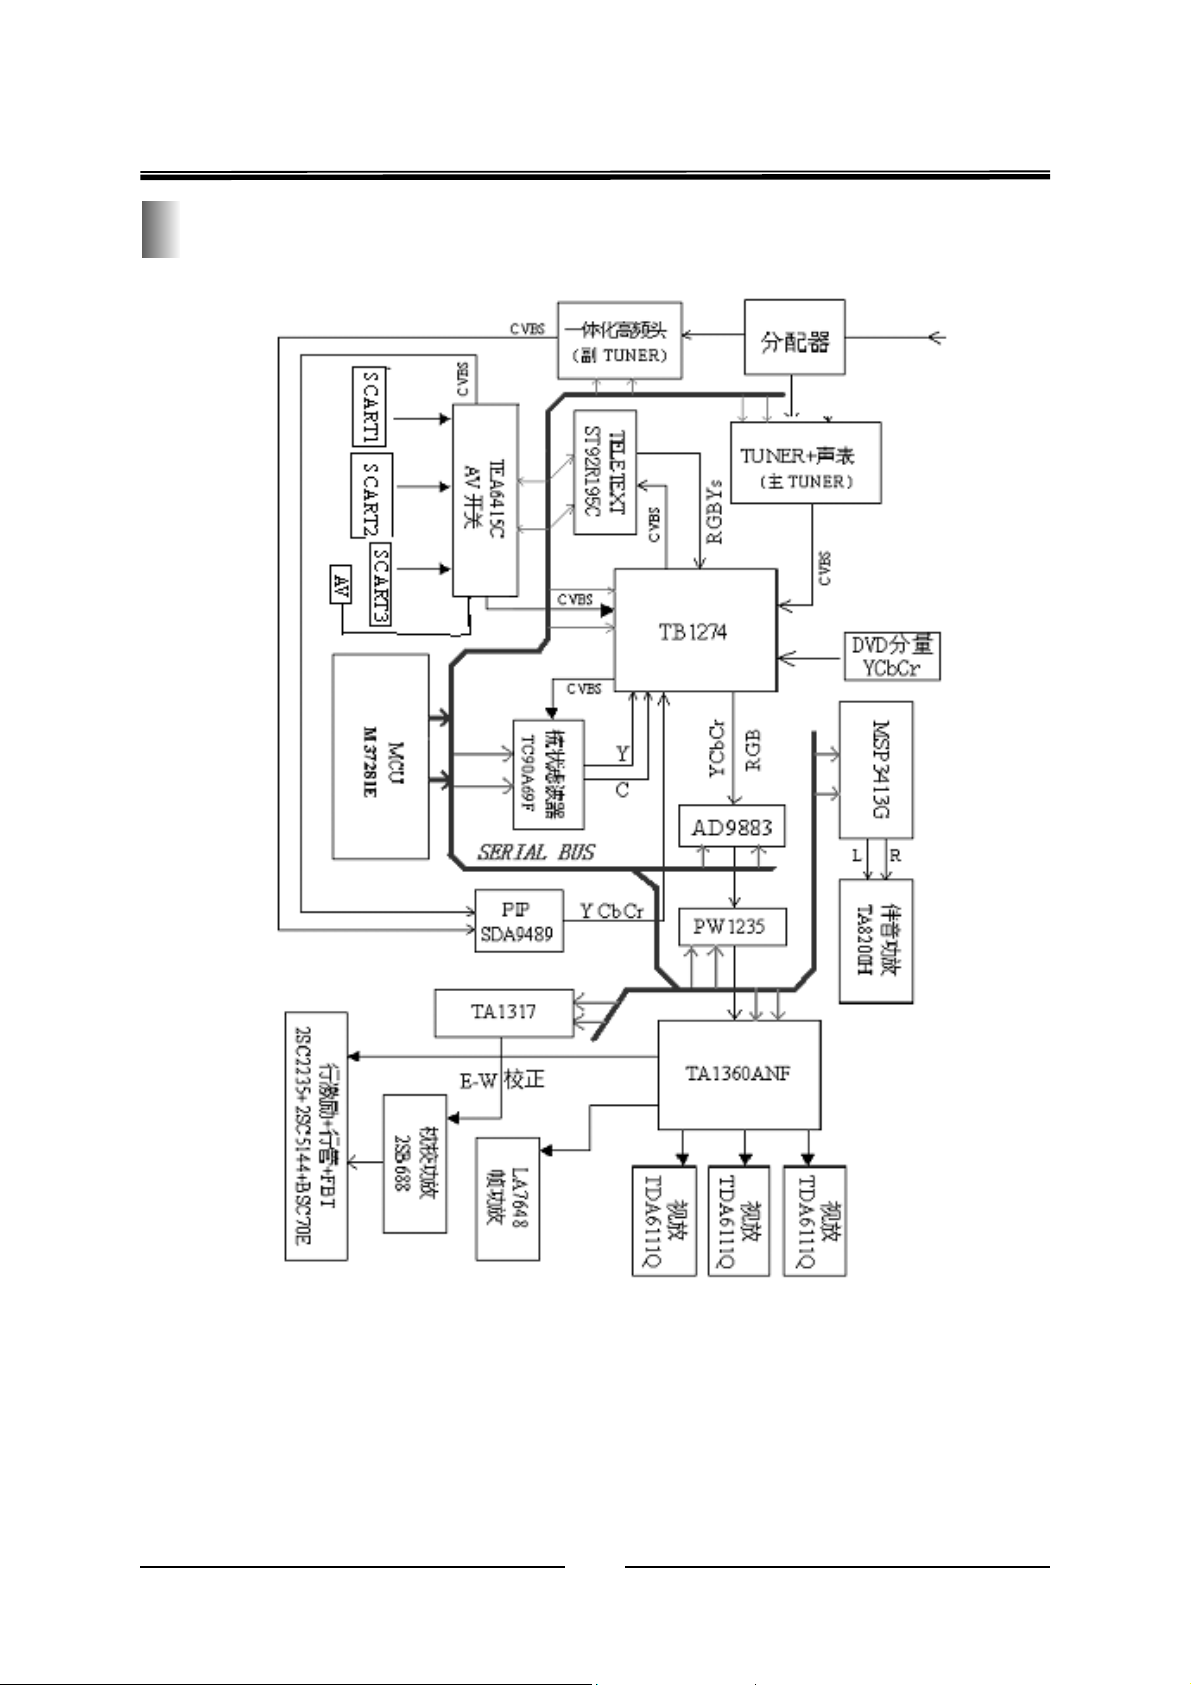
Signal Processing Flowchart
14
Page 17
PE-5 Chassis Service Manual
Repairing Disassembling
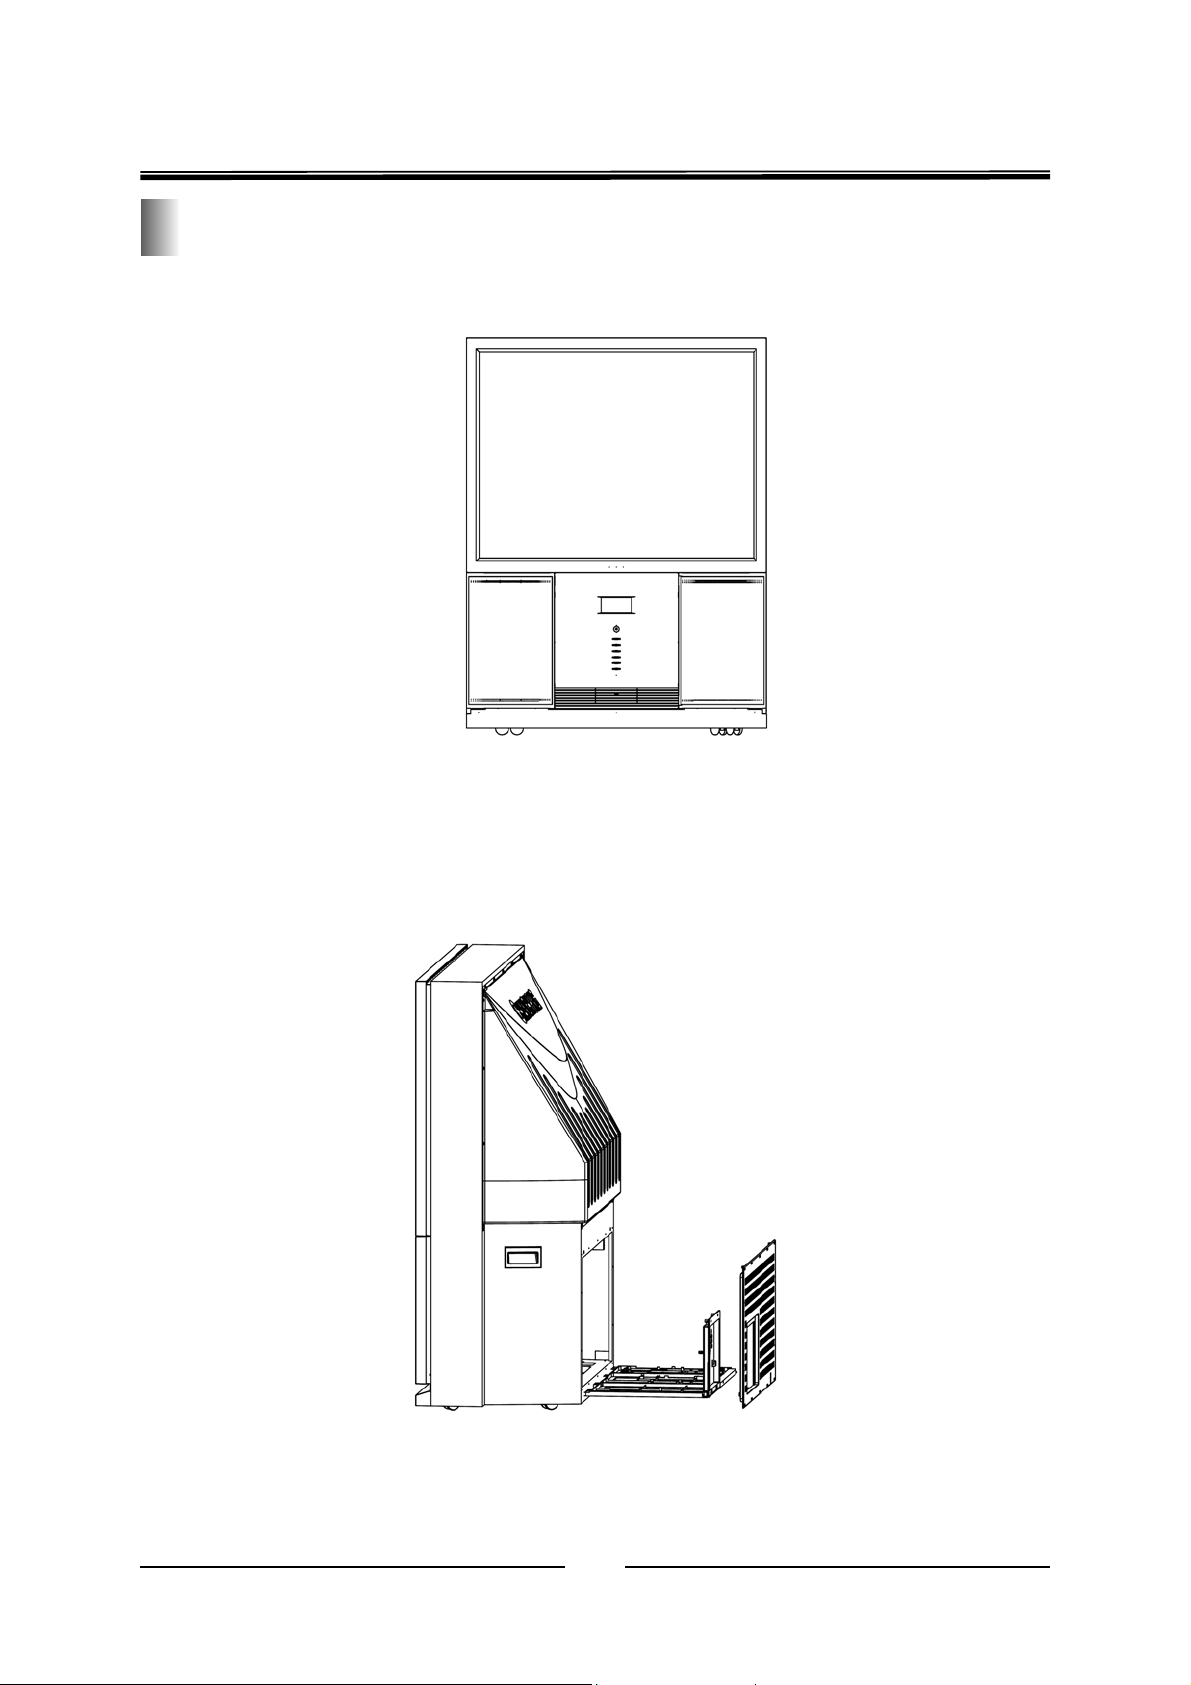
This outlook chart is for reference only. The real outlook is subject to the actual machine.
Before repairing the chassis bottom board, please release the screw, which fixed the back cover, take
off the back cover, then release the screw, which fixed the plastic cabinet of the chassis board (If not
under power-on repairing, some plugs may be pulled out). After drag the chassis board a little bit out,
you can start checking and testing.
15
Page 18
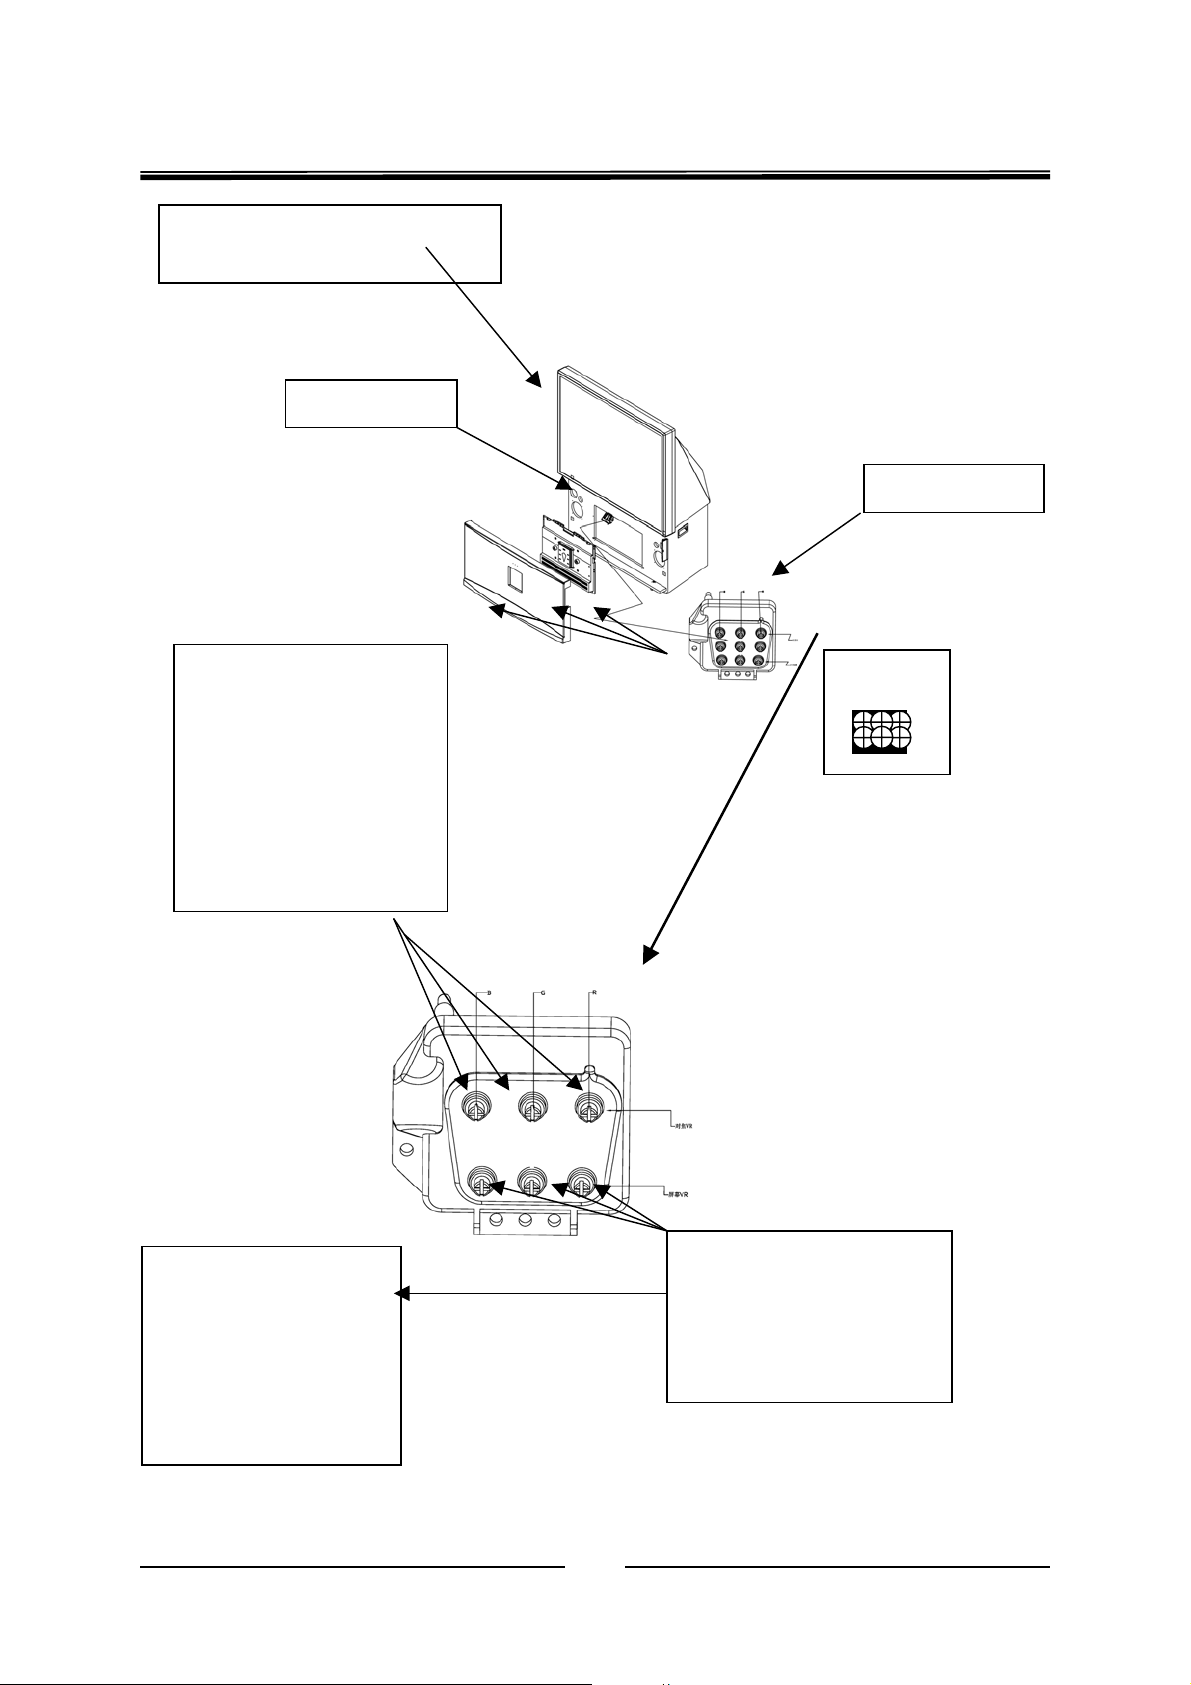
A
t
Instruction on Front Panel Taking
Off
Control Panel
PE-5 Chassis Service Manual
Focus Assembly
Focus adjusting knobs R、
G、B from left to right. The
whole focus effect reach
best is regarded as the
best status of focus
adjusting. The knobs
should be painted in red
when adjusting completed.
对焦VR
屏幕
Before adjusting the
curtain, reduce “Bright”,
and “Contrast” on the
menu to 0. Then adjus
the curtain knob till the
screen to be black.
16
djust Curtain by adjusting
curtain knob (Knob R、G、B
from left to right). Fixed the
knobs by print when
adjusting completed
Page 19
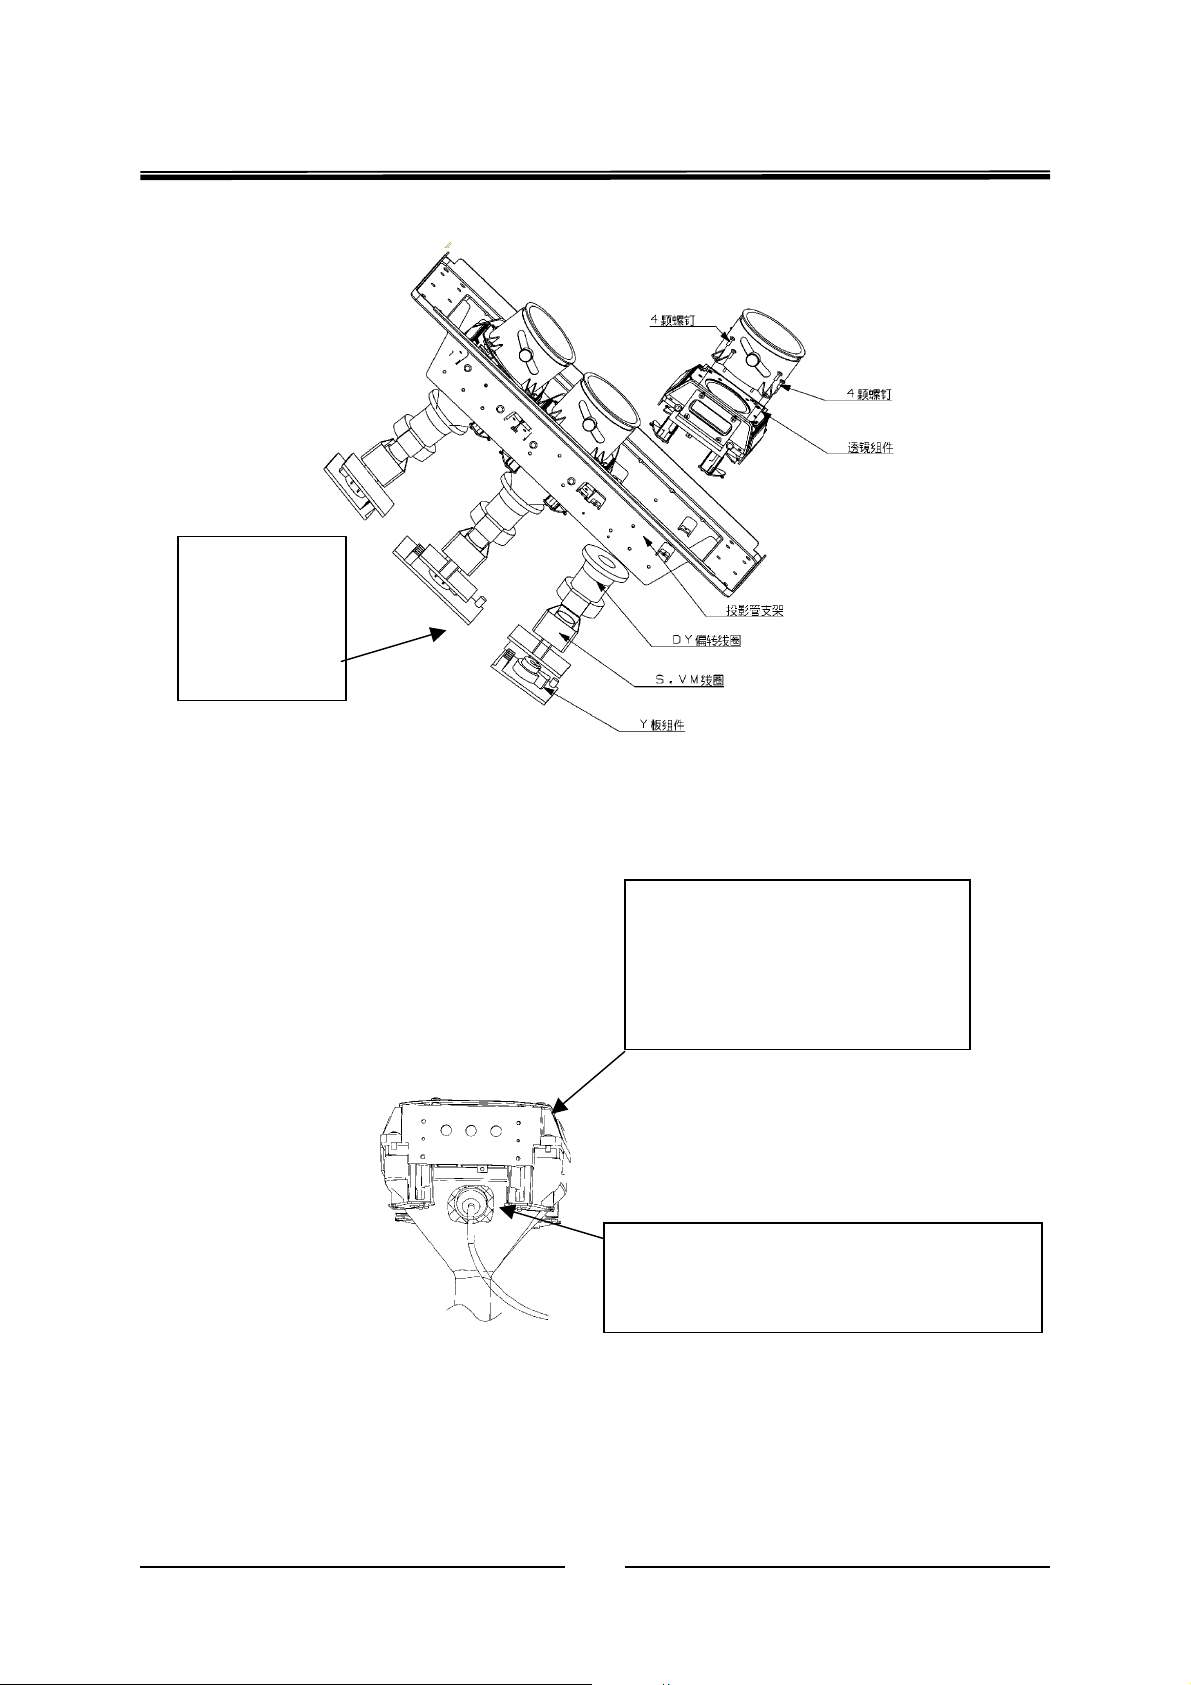
r
r
Instruction on
disassembling
the project tube
holder
PE-5 Chassis Service Manual
Cooling juice inside of the Cooling
tube. The cooling tube should be
kept on properly sealed afte
replacing the cooling juice.
High-voltage cap sealing. The silicon rubbe
should be kept in wholly sealed and isolated
to protect the high-voltage from leaking.
17
Page 20
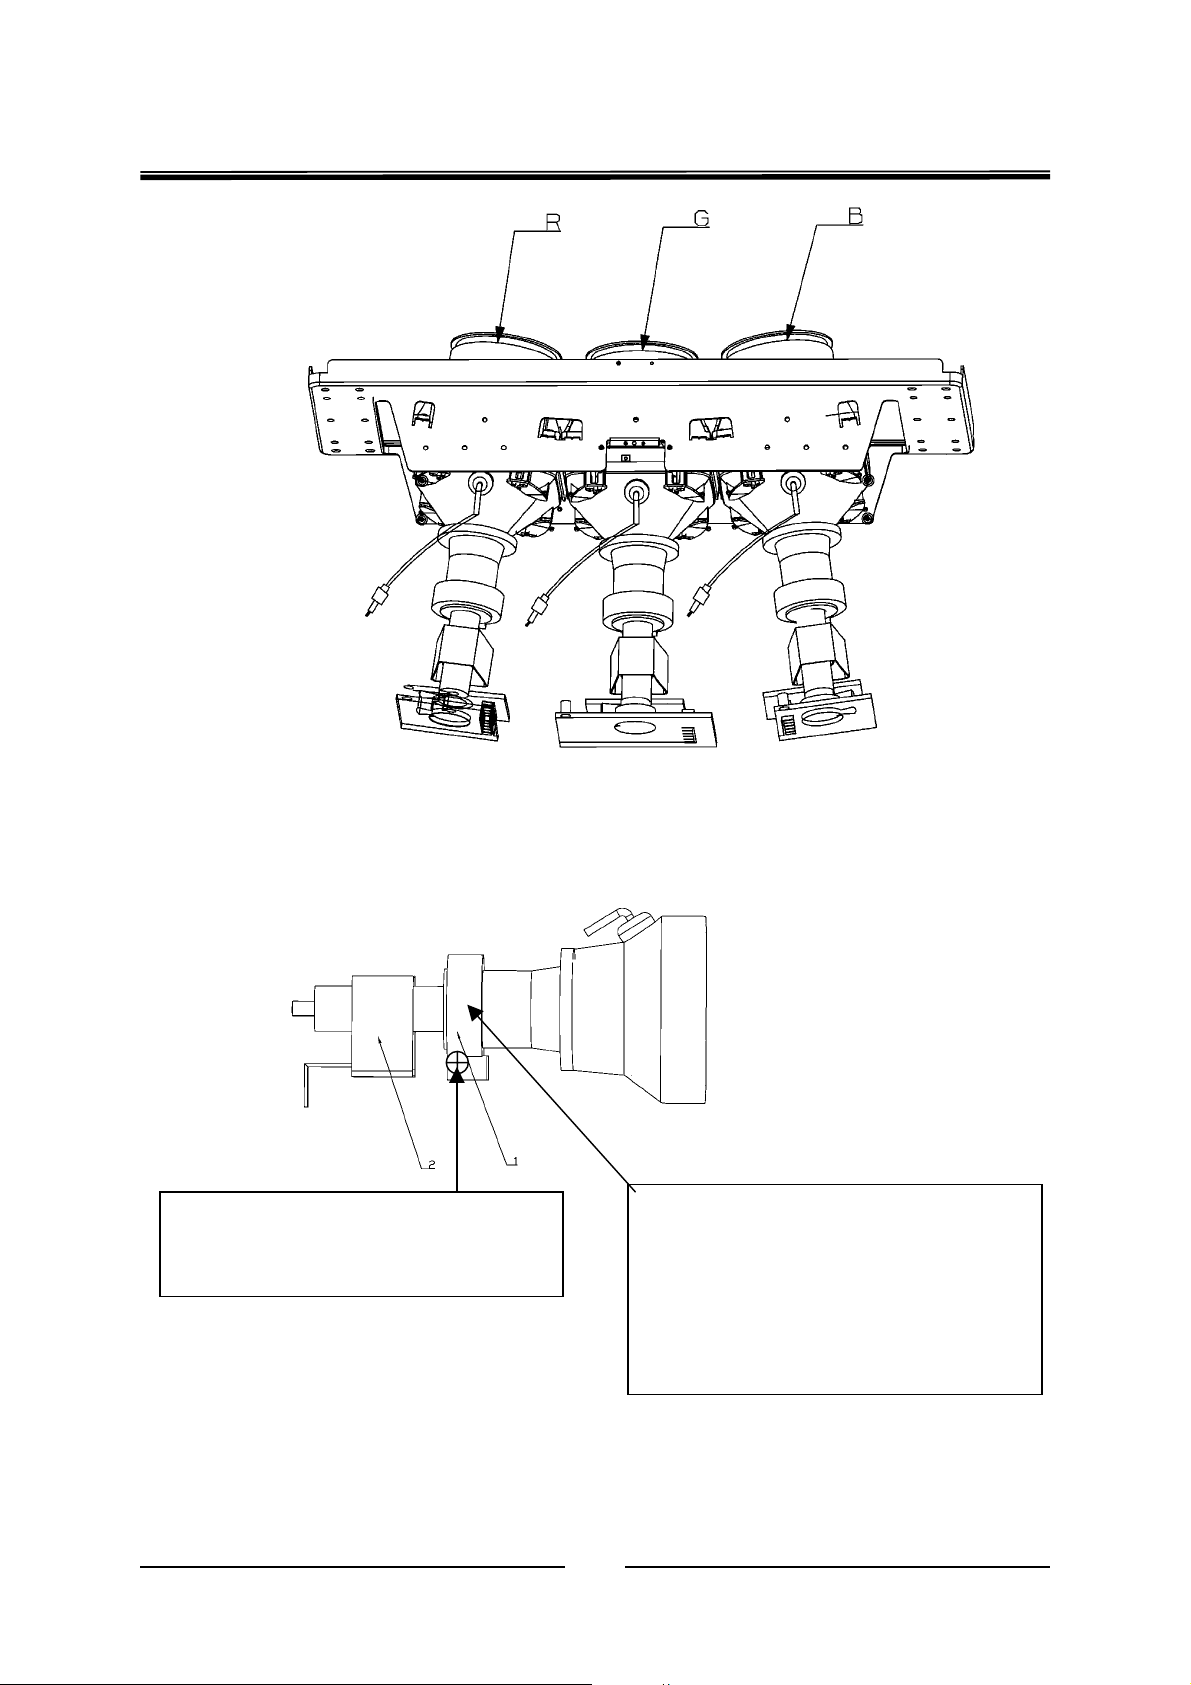
PE-5 Chassis Service Manual
t
g
Fix the deflected screw:
Anticlockwise Revolving: Releasing
Clockwise Revolvin
: Tighten
Deflected Coil. Revolving the deflection
after releasing the screw by
magnetism-free screwdriver will adjust the
picture quality (Better under colorful tes
card).
As shown in the follow chart
Need to re-adjust the deflected coil to the normal quality of the picture after replacing the project tube or
deflected coil, etc. (As shown in the follow chart)
18
Page 21
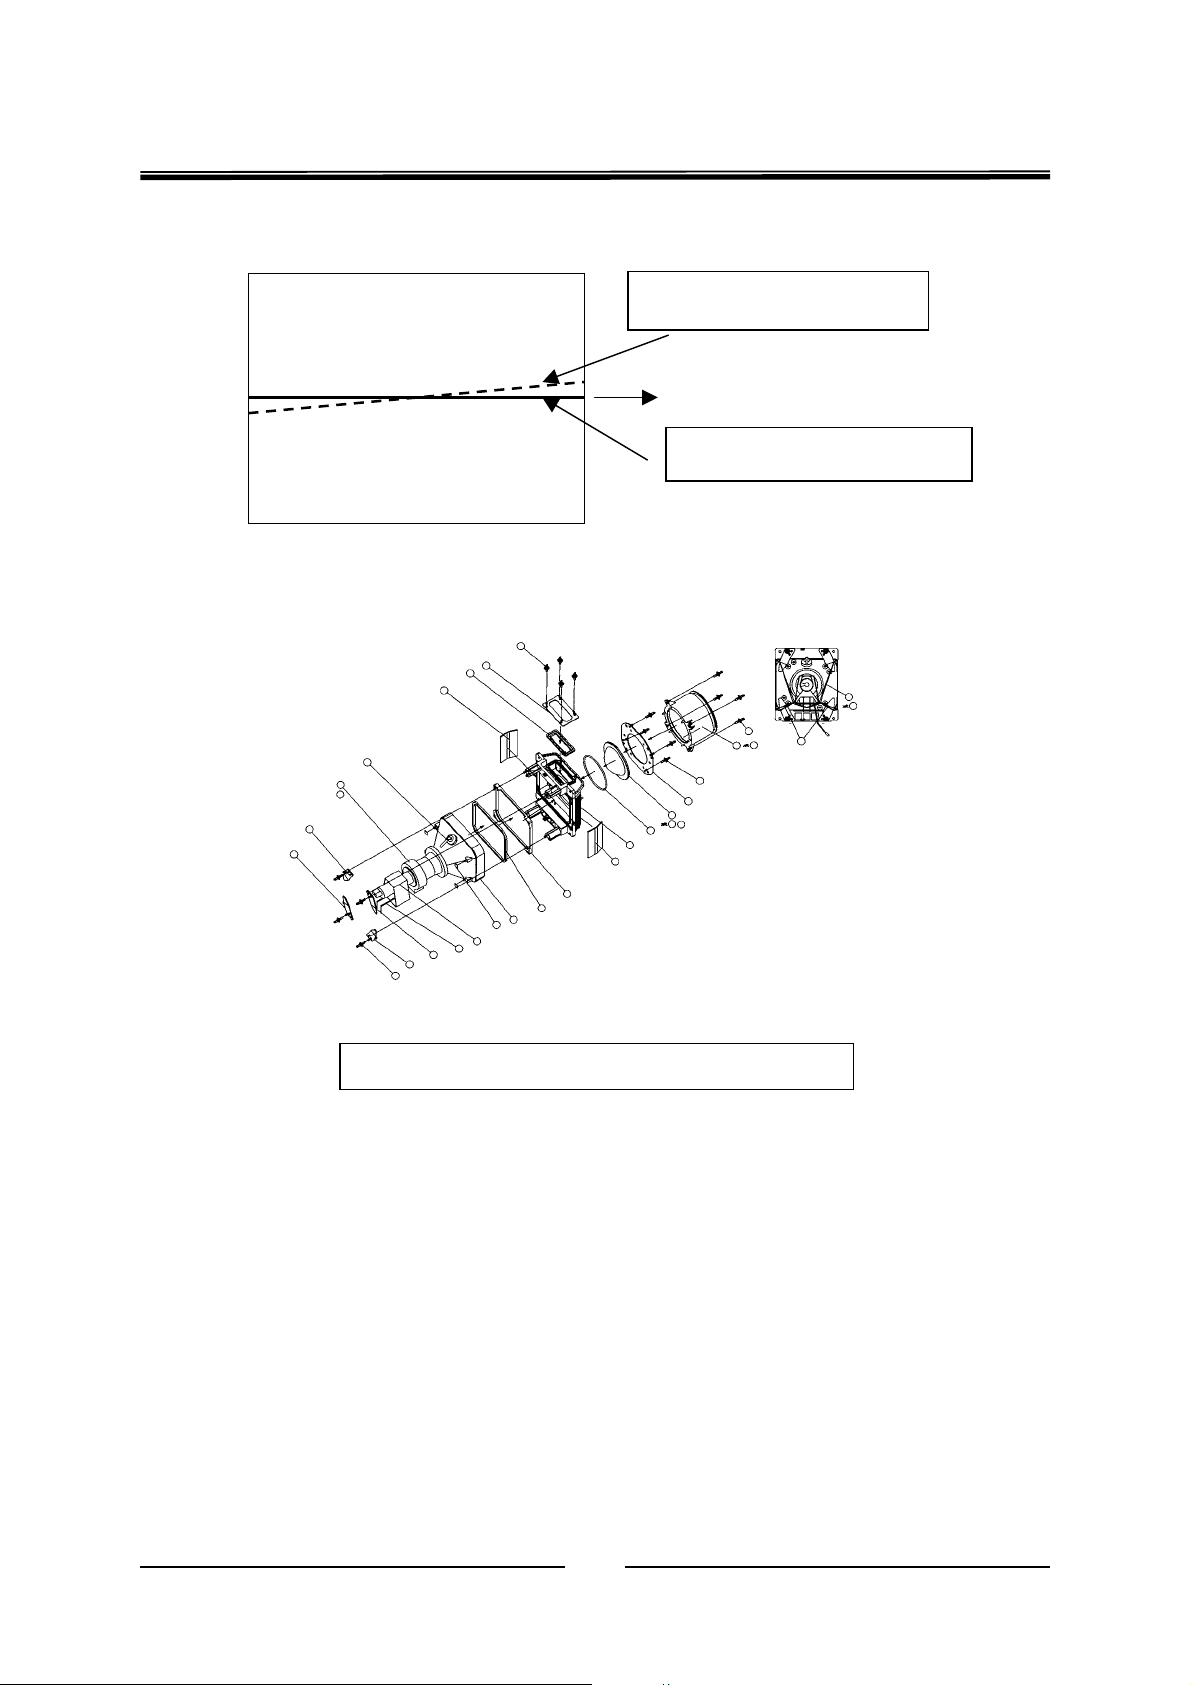
PE-5 Chassis Service Manual
Before adjusting the deflection
Middle horizontal line on the screen
After adjusting the deflection
Exploded view on the assembly of the project tube
Most of the components of the whole assembly are all precision displaying apparatus and their surface
or inside should be kept away from the any hard project. Or the picture quality will be affected.
19
Page 22
PE-5 Chassis Service Manual
A
Make sure the metal part is straight
when inserting the plug into the
high0-voltage covering barrel.
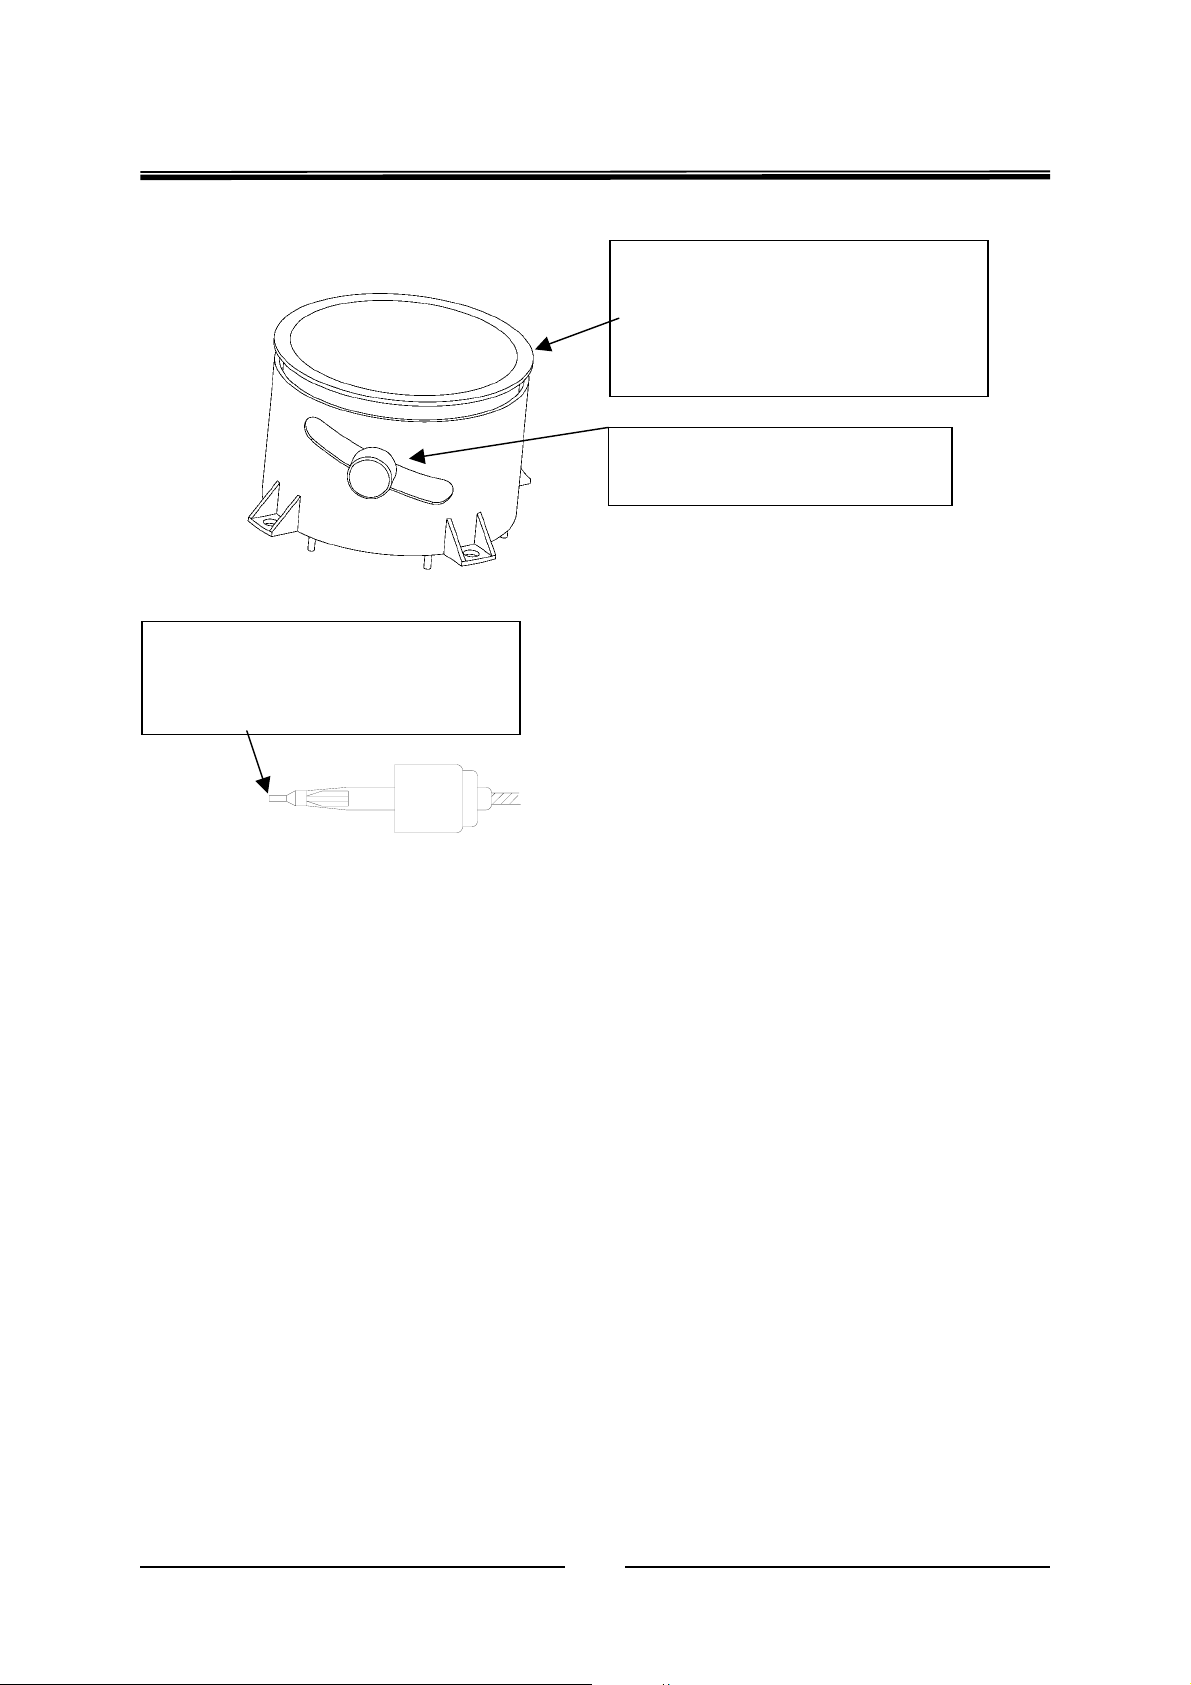
fter releasing the screw, revolving
here to adjust the optical focus till the
convergence lines on the whole screen
to reach their best focus effect.
Anticlockwise Revolving: Releasing
Clockwise Revolving: Tighten
20
Page 23
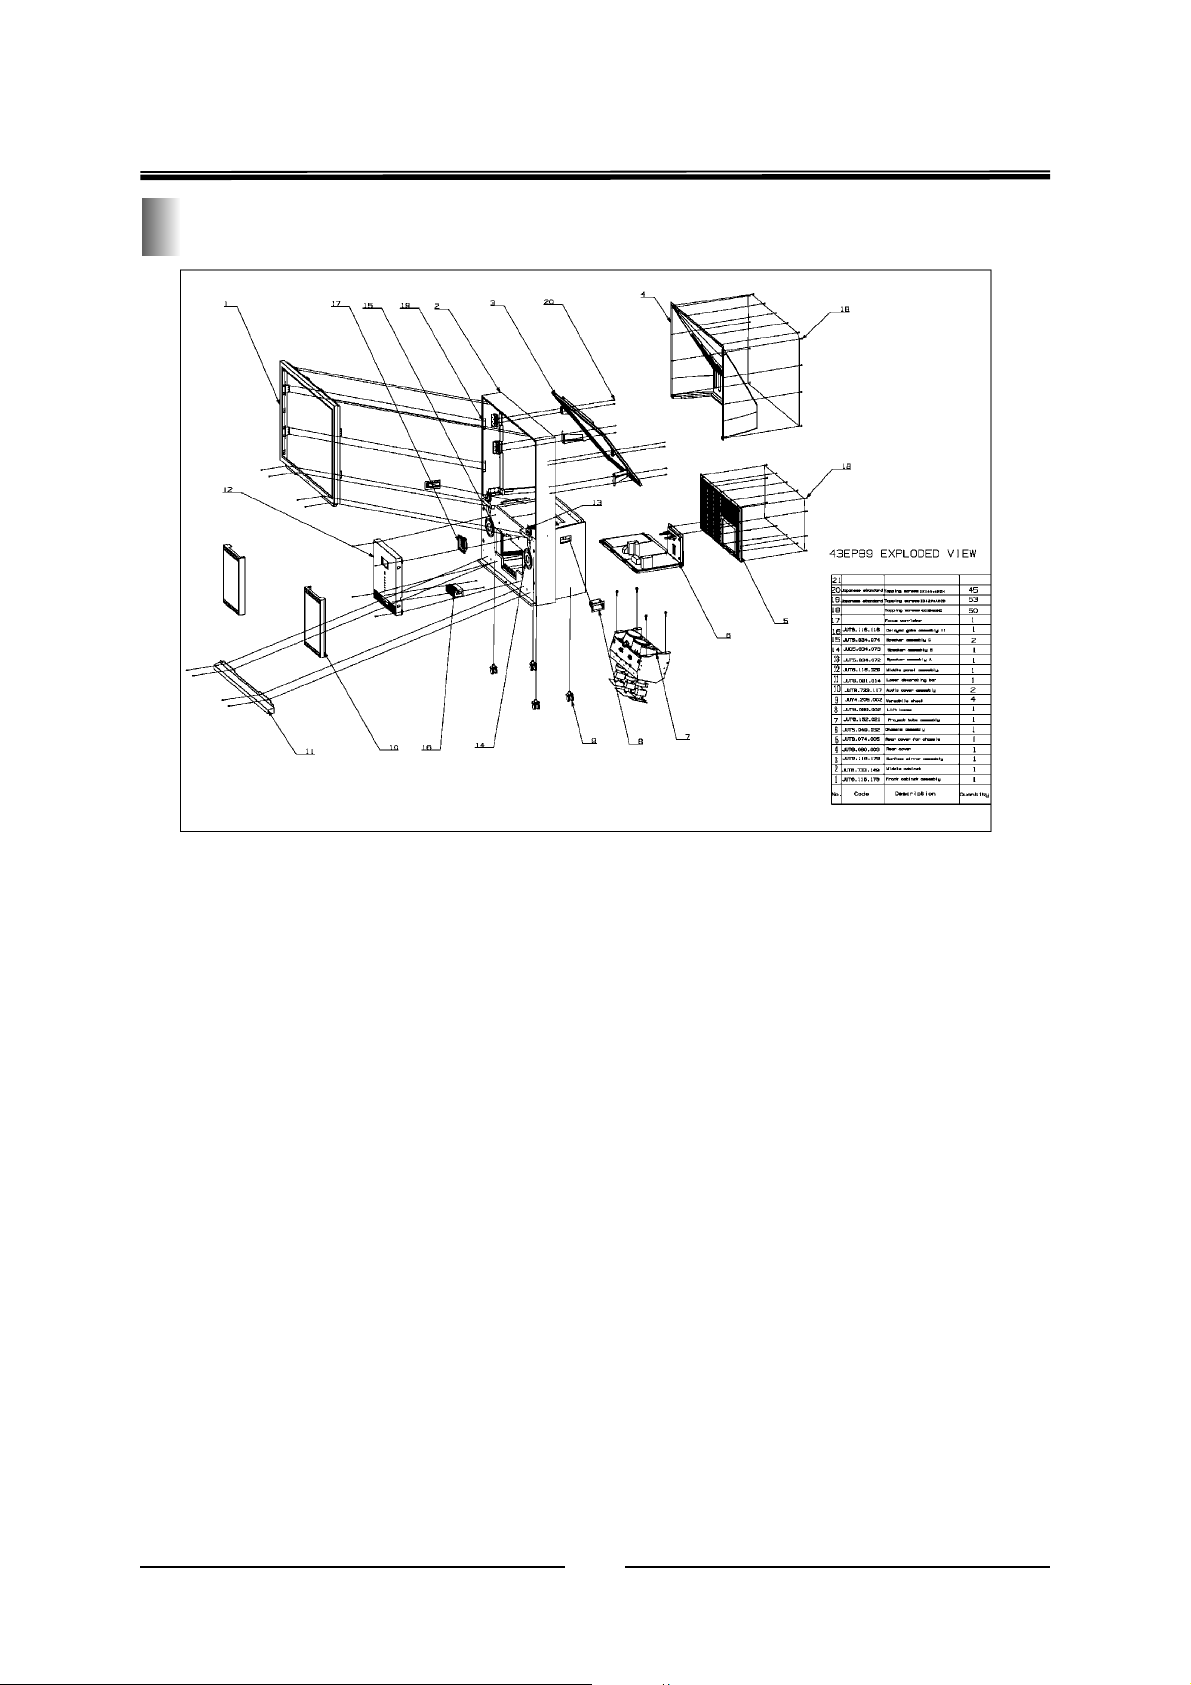
Machine Exploded View
PE-5 Chassis Service Manual
Detailed operation and attention reference to other related parts of this service manual.
21
Page 24
PE-5 Chassis Service Manual
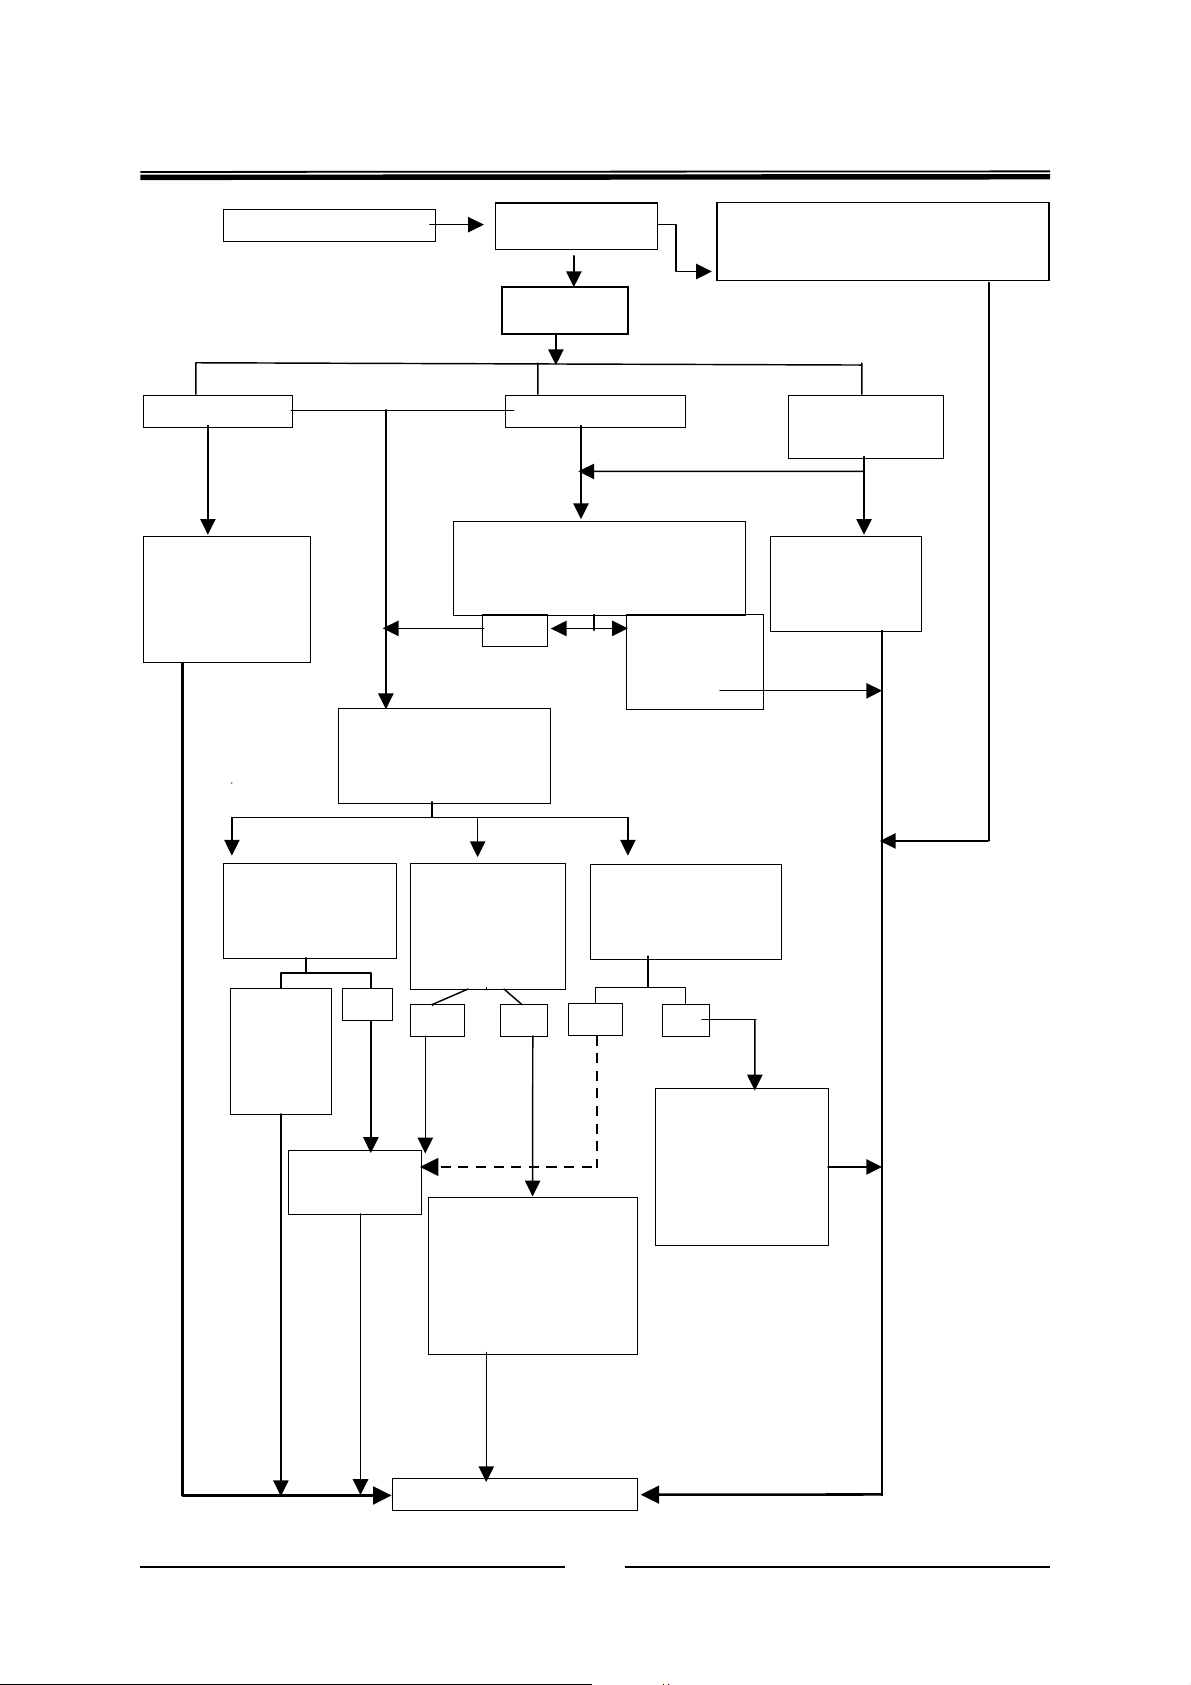
Abnormal Audio
Check AV
AV OK but TV Abnormal Then
Check / Replace “TUNER” Circuit
Audio Hoarse Only Left
Check/Replace
Speaker. Fix
loosed structure
parts.
Check Pins of
N102ground
capacity
Abnorm
al,
Replace
N102
Pin N102(7)and Pin
(12)without normal
audio output
Check Pin
N102(2)(4)
whether have
OK
Yes
Check other
items
Check AV board ,
outside components.
Abnormal
No Audio
Check (Left/Right) speaker
connecting and inserting part
and XP109
OK
input
No
N901、N902
Input/Output.
Check/Replace
Yes
Reconnect
abnormal
part
Check Pin N102
(5)(9)whether
have audio voltage
No
Check/ReplaceC
152、C151and
fuse and resistor
in front power
Audio OK
board
(Right) Audio
Set “Balance”
on audio
menu to “0”
22
Page 25
PE-5 Chassis Service Manual
A
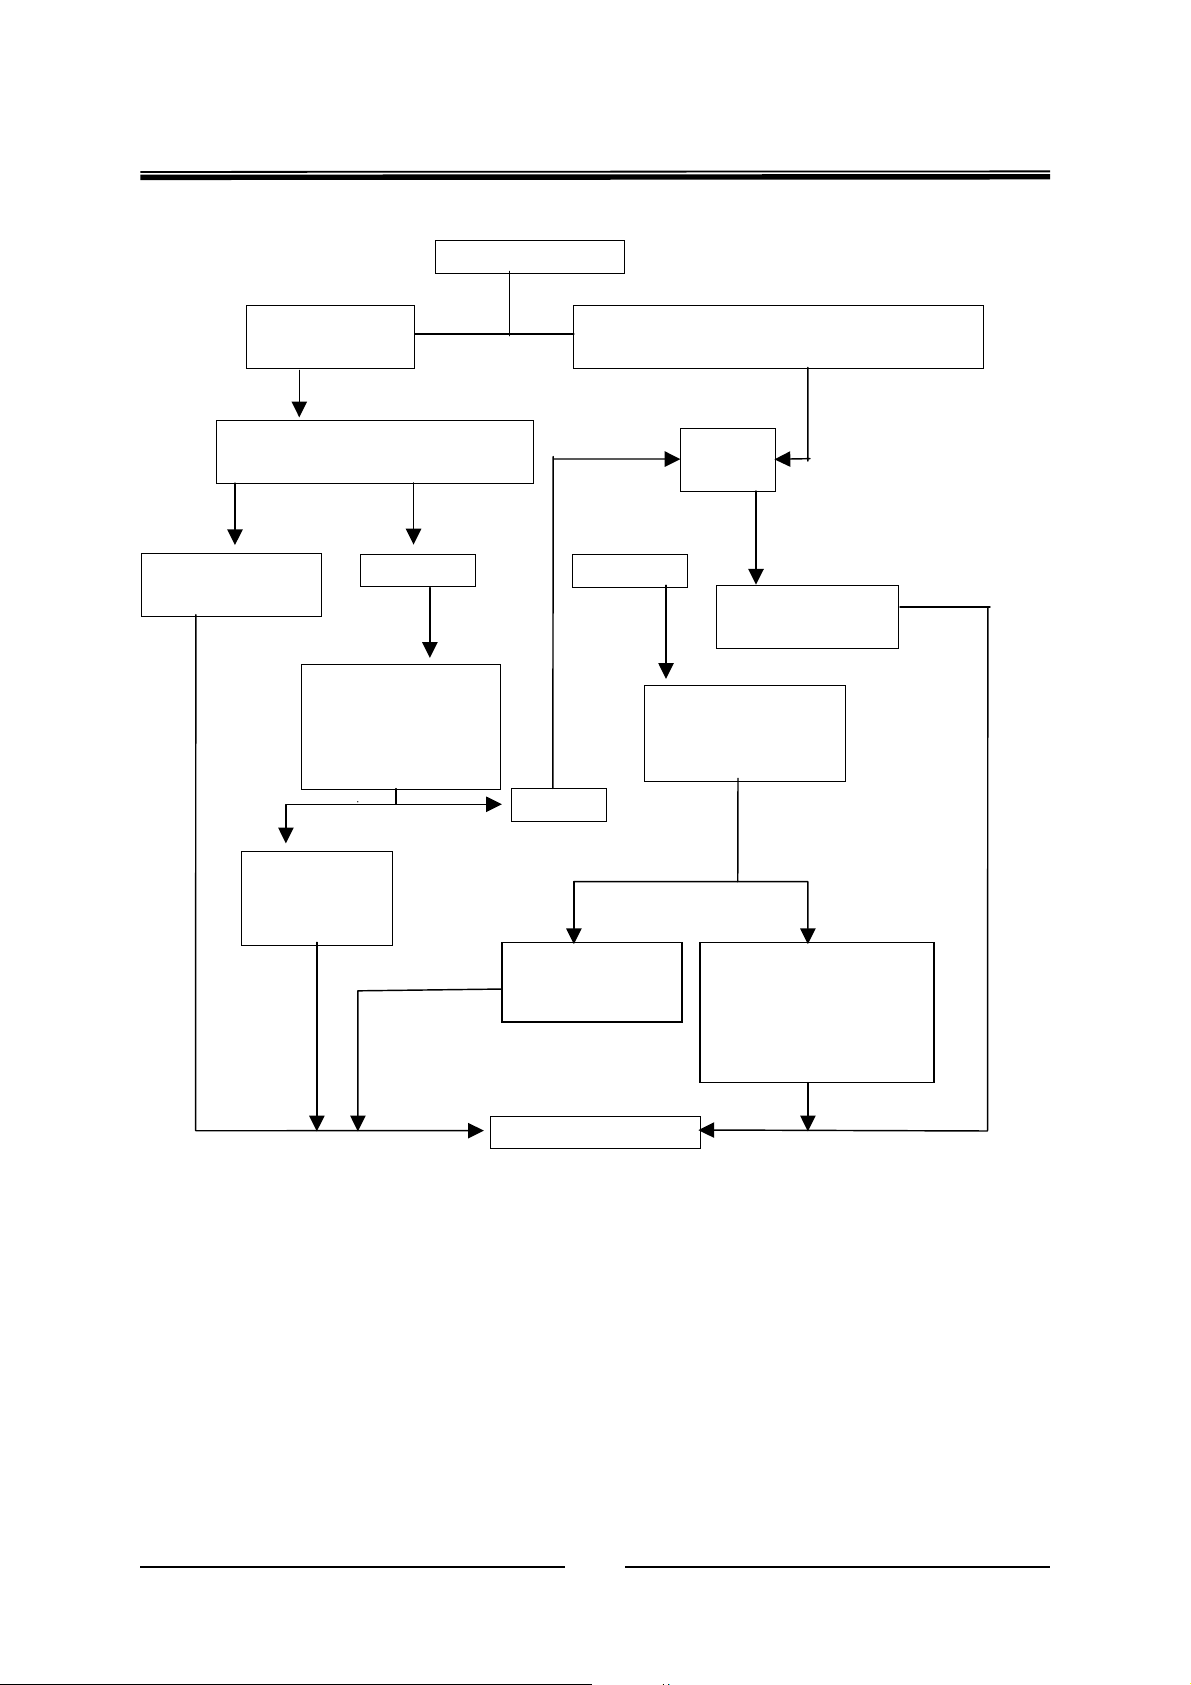
Can’t Power On
Indicator Off
Check Main Power cord, power
switching
Abnormal
Repair, Replace
OK
Check K Board,
Remote Receiving
Board connect to
main board
Indicator on, while can’t press “POWER”
key or P+/P- to power on
Check
CPU5V
OK
Abnormal
Repair, Replace
Check power board
voltage and fuse
OK
Abnormal
Repair,
Replace
Abnormal
Repair, Replace
bnormal, check and
replace TA1360outside
components and
digital board
OK
23
Page 26
PE-5 Chassis Service Manual
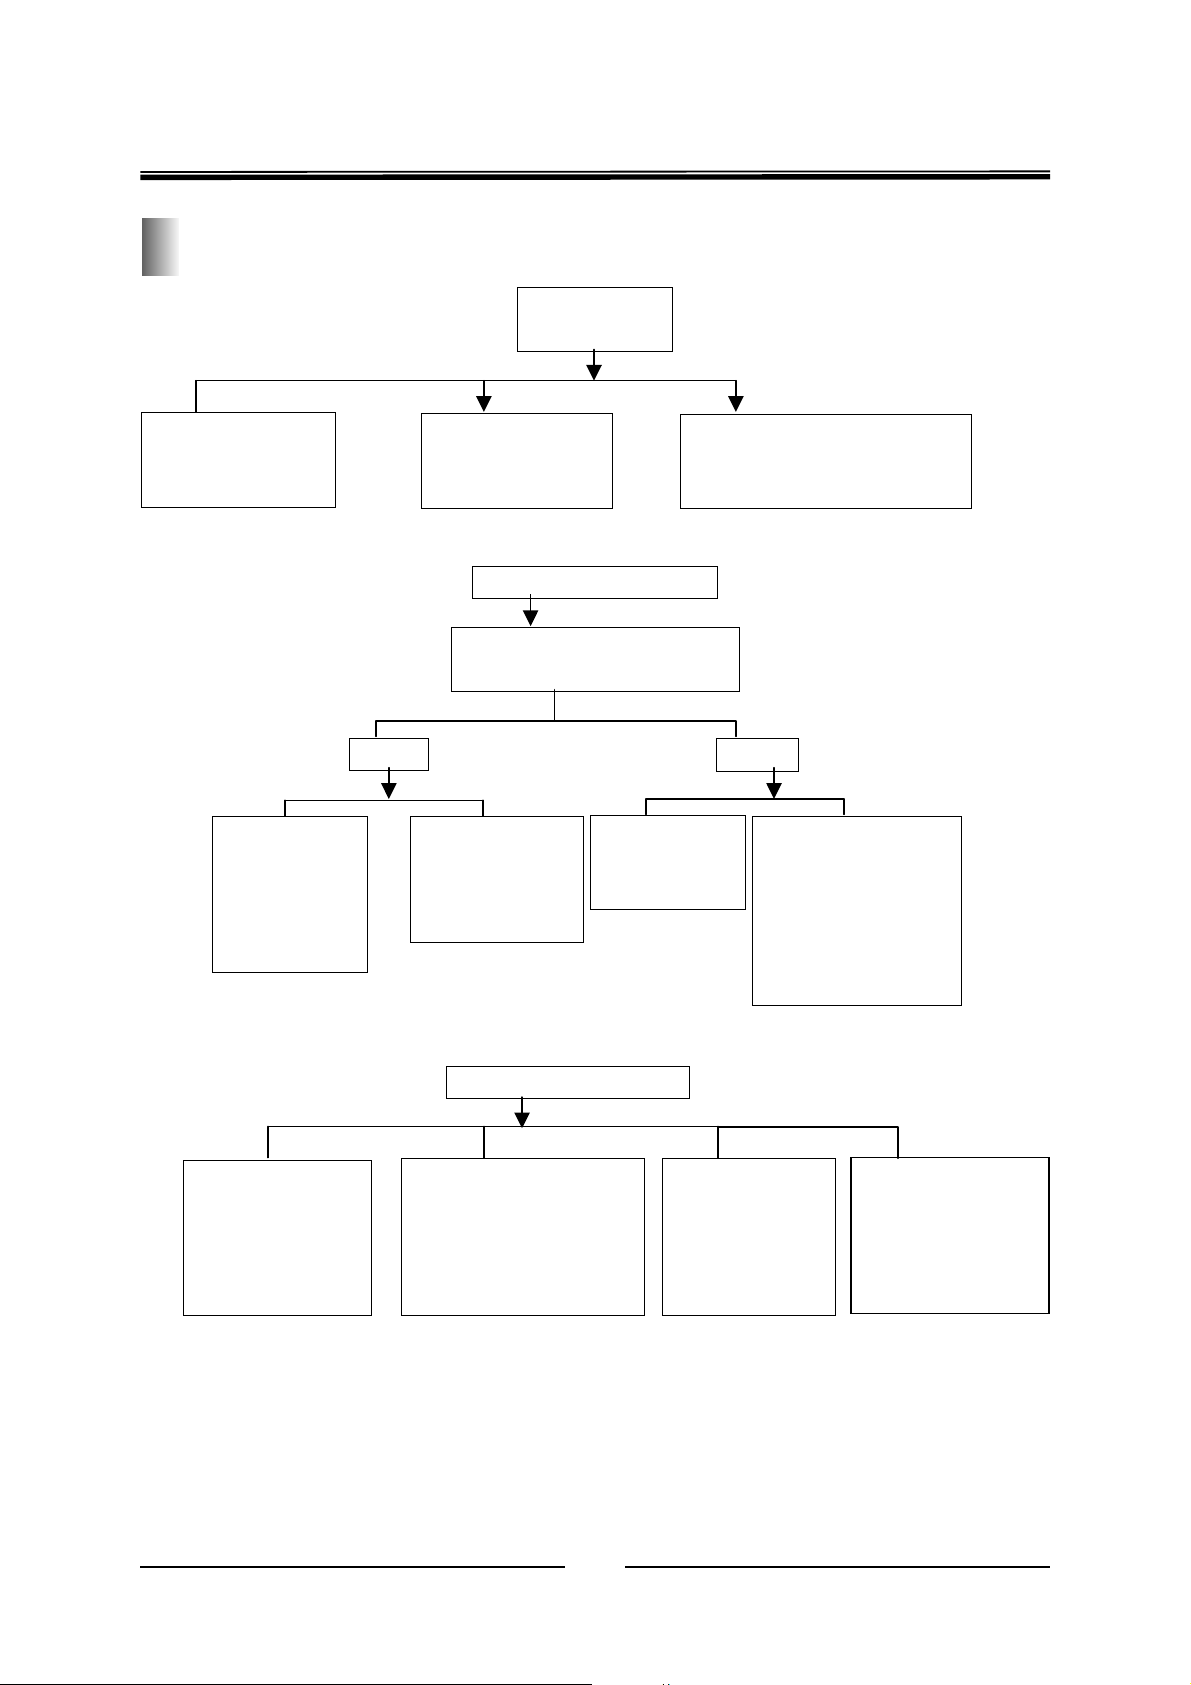
Typical Troubleshooting Flowchart
Picture
Blurring
Adjust parameter
of “VSM-PHASE”
under S Mode
Adjust Electric
Focus Screw on
Focus Assembly
Adjust Optical focus lens focal
length check the surface of
lens and reflecting mirror
Picture Color Deflection
Check R, G, B Color lost or
not under convergence mode
No
Yes
Check whether
the weak focus
of one color
causing color
deflection
Adjust white
balance
parameter in “S
Mode”
Check the lens
of
color-lost-tube
Check the power
supplying circuit of
the color-lost-tube, Y
board IC power
supplying circuit and
outside circuit.
No Picture (Audio On)
Check lens and
reflection mirror
Check/replace N301and
its power supplying
circuit components,
horizontal/frame output
circuit components
Check/replace 的
R、G、B signal
output
components in
pinN113
Check/Replace
digital board
24
Page 27
PE-5 Chassis Service Manual
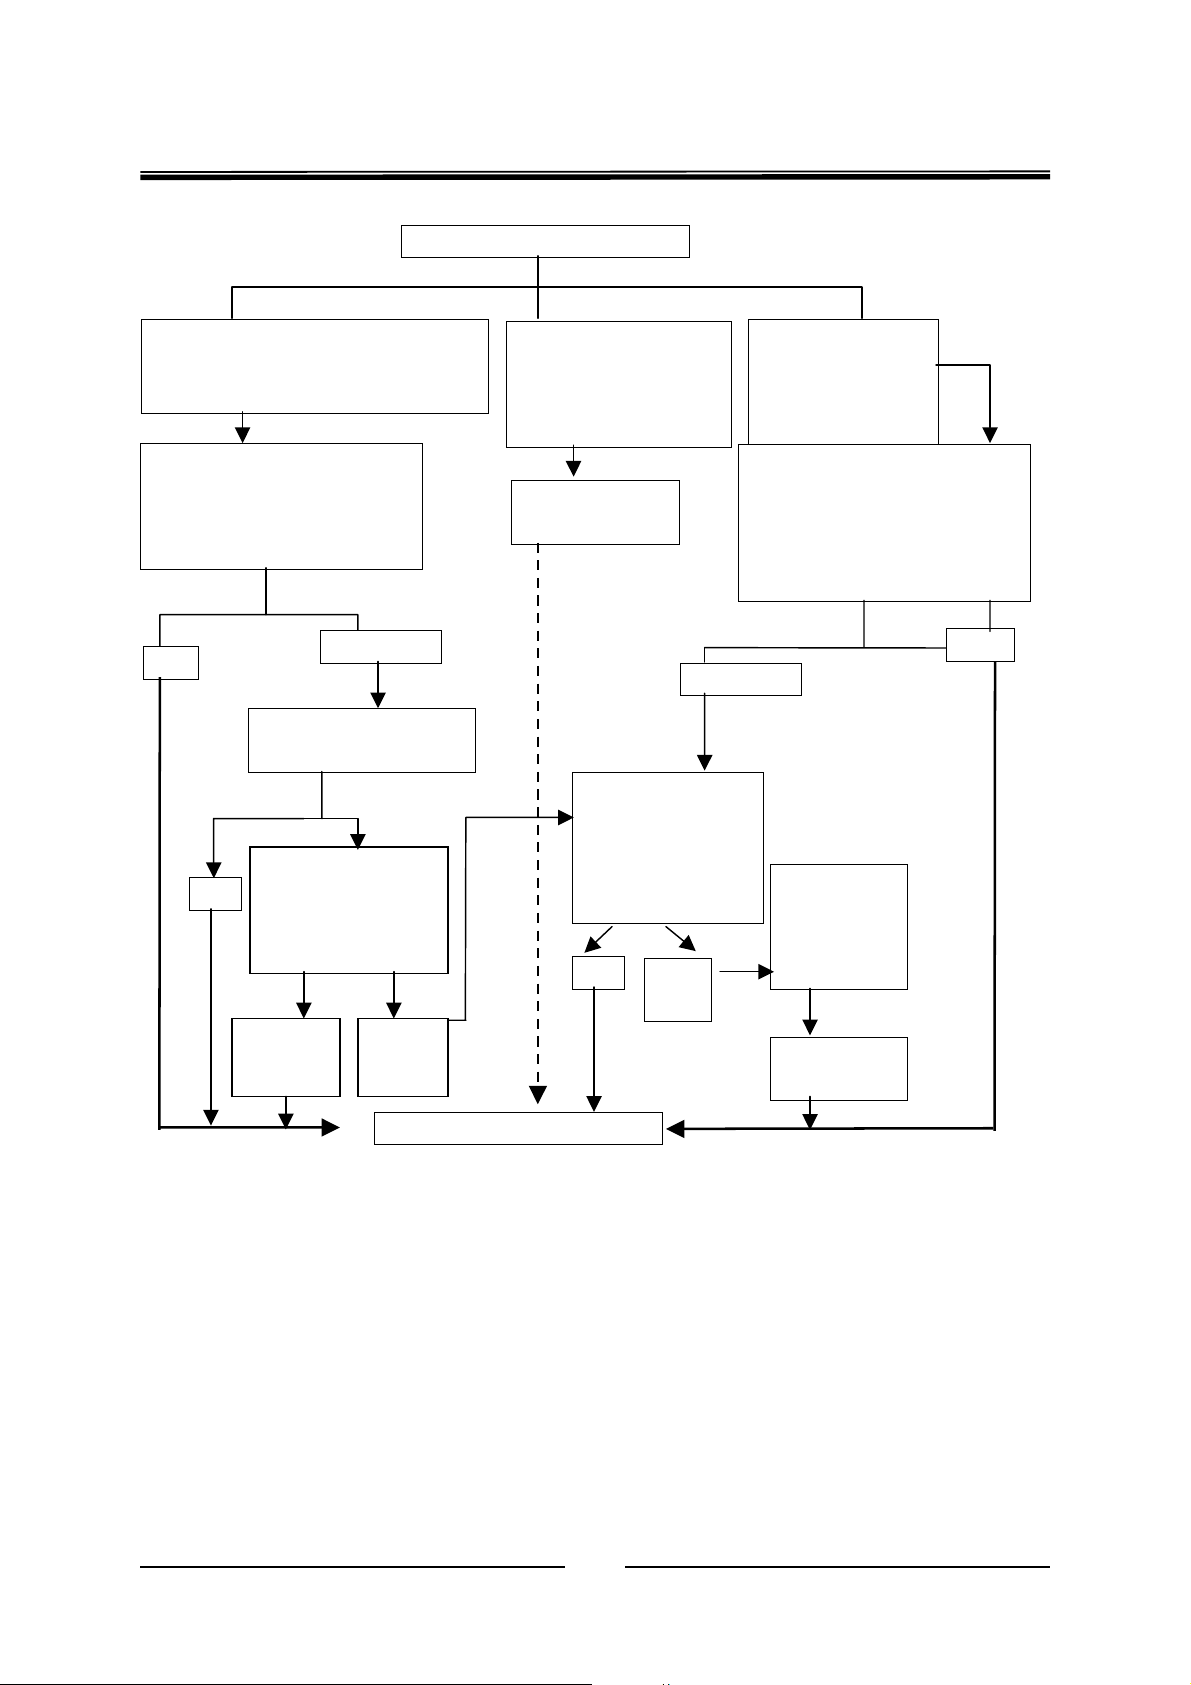
Abnormal convergence
Three Colors are all in non-convergence
status (Convergence lines on whole
screen are asunder and contorted)
Check Convergence assembly
and main board, deflection yoke
with scanning board XP307 、
XP308、XP309
Partial three colors (or
single color)
Convergence lines are
asunder and contorted
Convergence
Fine-Adjusting
OK
No Effect
Check power supplying
circuit to N303 and N304
Check protect
OK
voltage in Pin N303,
N304(2)
Check pins of
N303 、 N304, and
plug of
convergence
assembly
OK
Low,
repair
No
Effect
Normal Convergence
No
Effect
Single color (Or
three colors)
convergence lines
can’t be adjusted
Check degaussing coil with
scanning board , XP307,XP308,
XP30, and wire between
deflection yoke and scanning
board
No Effect
Replace IC
N303、N304
Adjust
convergence
OK
25
Page 28
PE-5 Chassis Service Manual
r
t
t
k
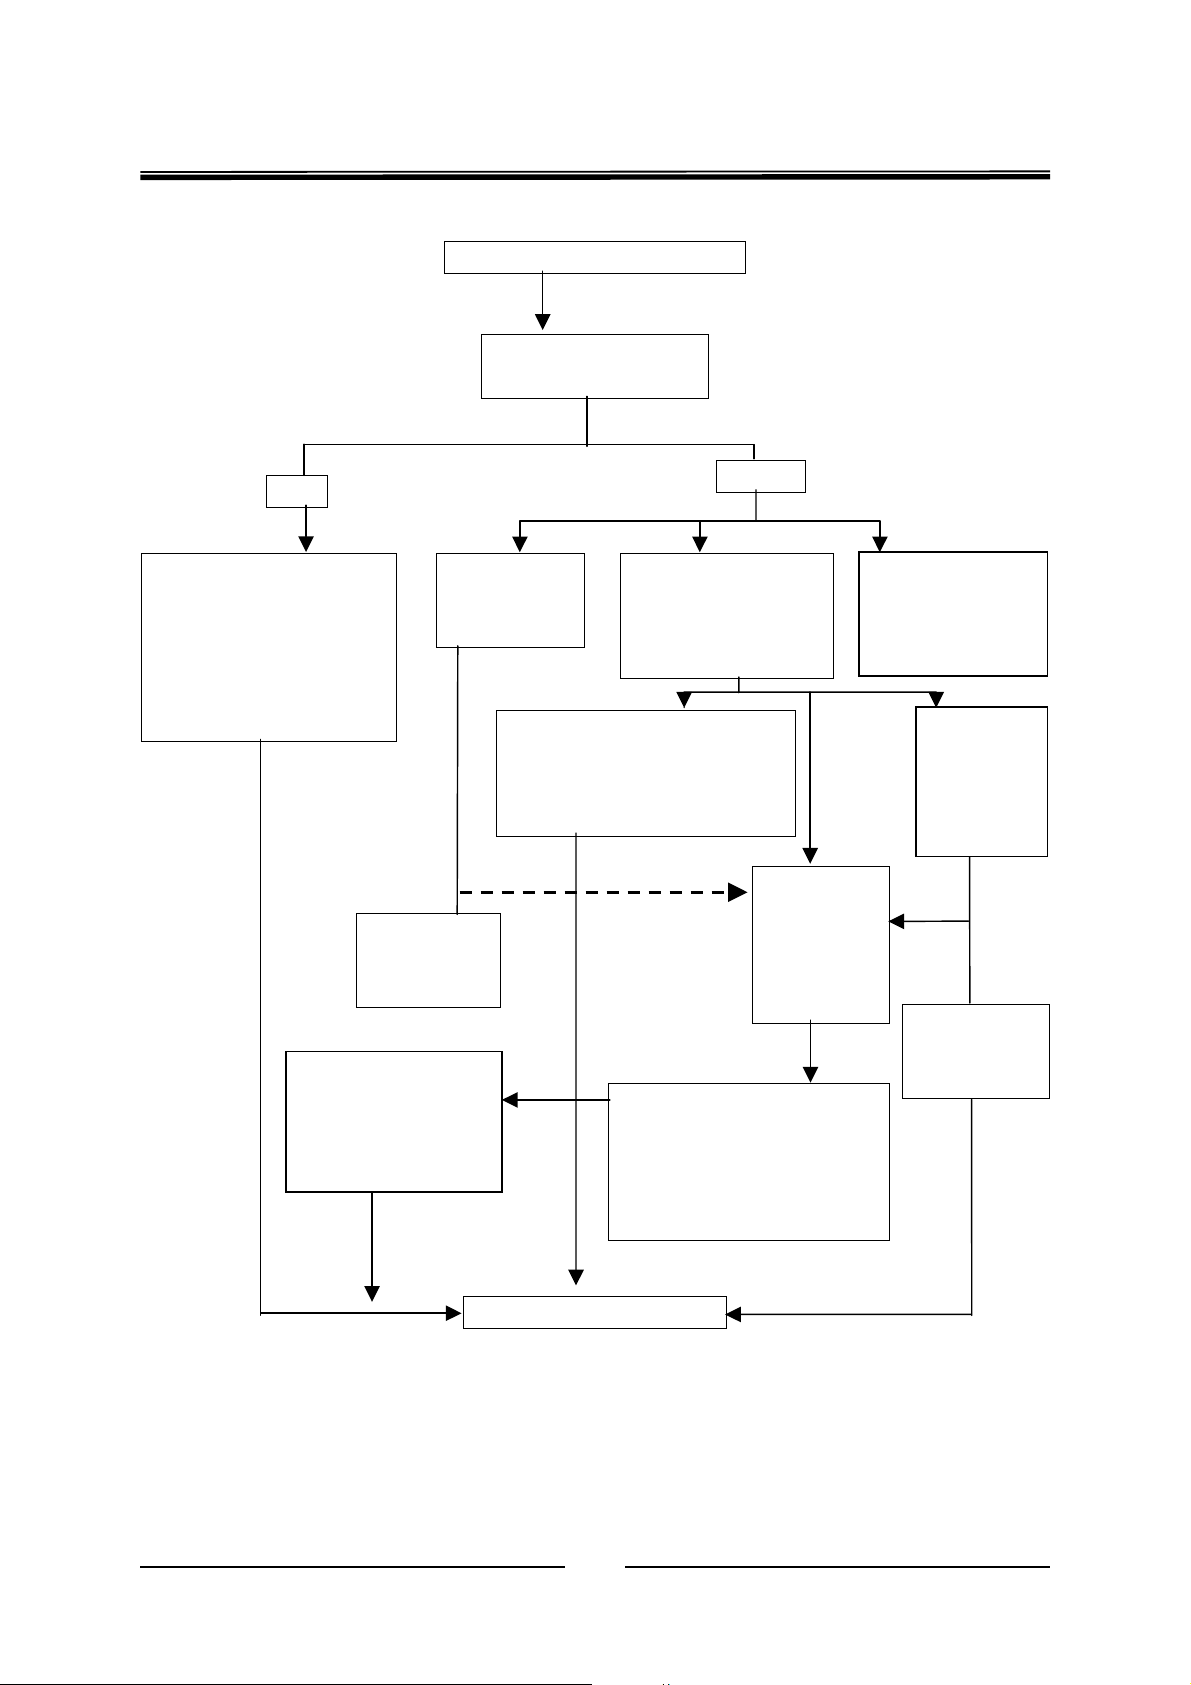
Bright Horizontal Line
Check frame signal
output in N301(3)
With
Without
Check connecting wire
plug between scanning
board and deflection yoke
XP310 , XP311 , XP312
and welding point of
deflection yoke
Check N301
and its ground
capacity
Abnormal then check/replace
R310 or
VD302and their front power
supplying circuit components
Check whether pin
N301 ( 4 )、 has
+30Vworking voltage,
outside circuit
Check pin N301
Check pin N301
(6)has frame
( 6 ) has frame
signal input or
signal input or no
not
Abnormal
then replace
N301
Power
supply,
N301and its
outside are
OK
Check pins of N113
(27)have output o
not. And their ground
status
Check pin N302 ( 4 ) has
output or not, pin N302(21)
has input or not. Replace
when abnormal found
Normal Picture
● Detailed operation and attention reference to other related parts of this service manual.
No input then
No inpu
then chec
check out
out
components
component
of pin (6)
s of pin (6)
Replace upon
damaged
found
26
Page 29
PE-5 Chassis Service Manual
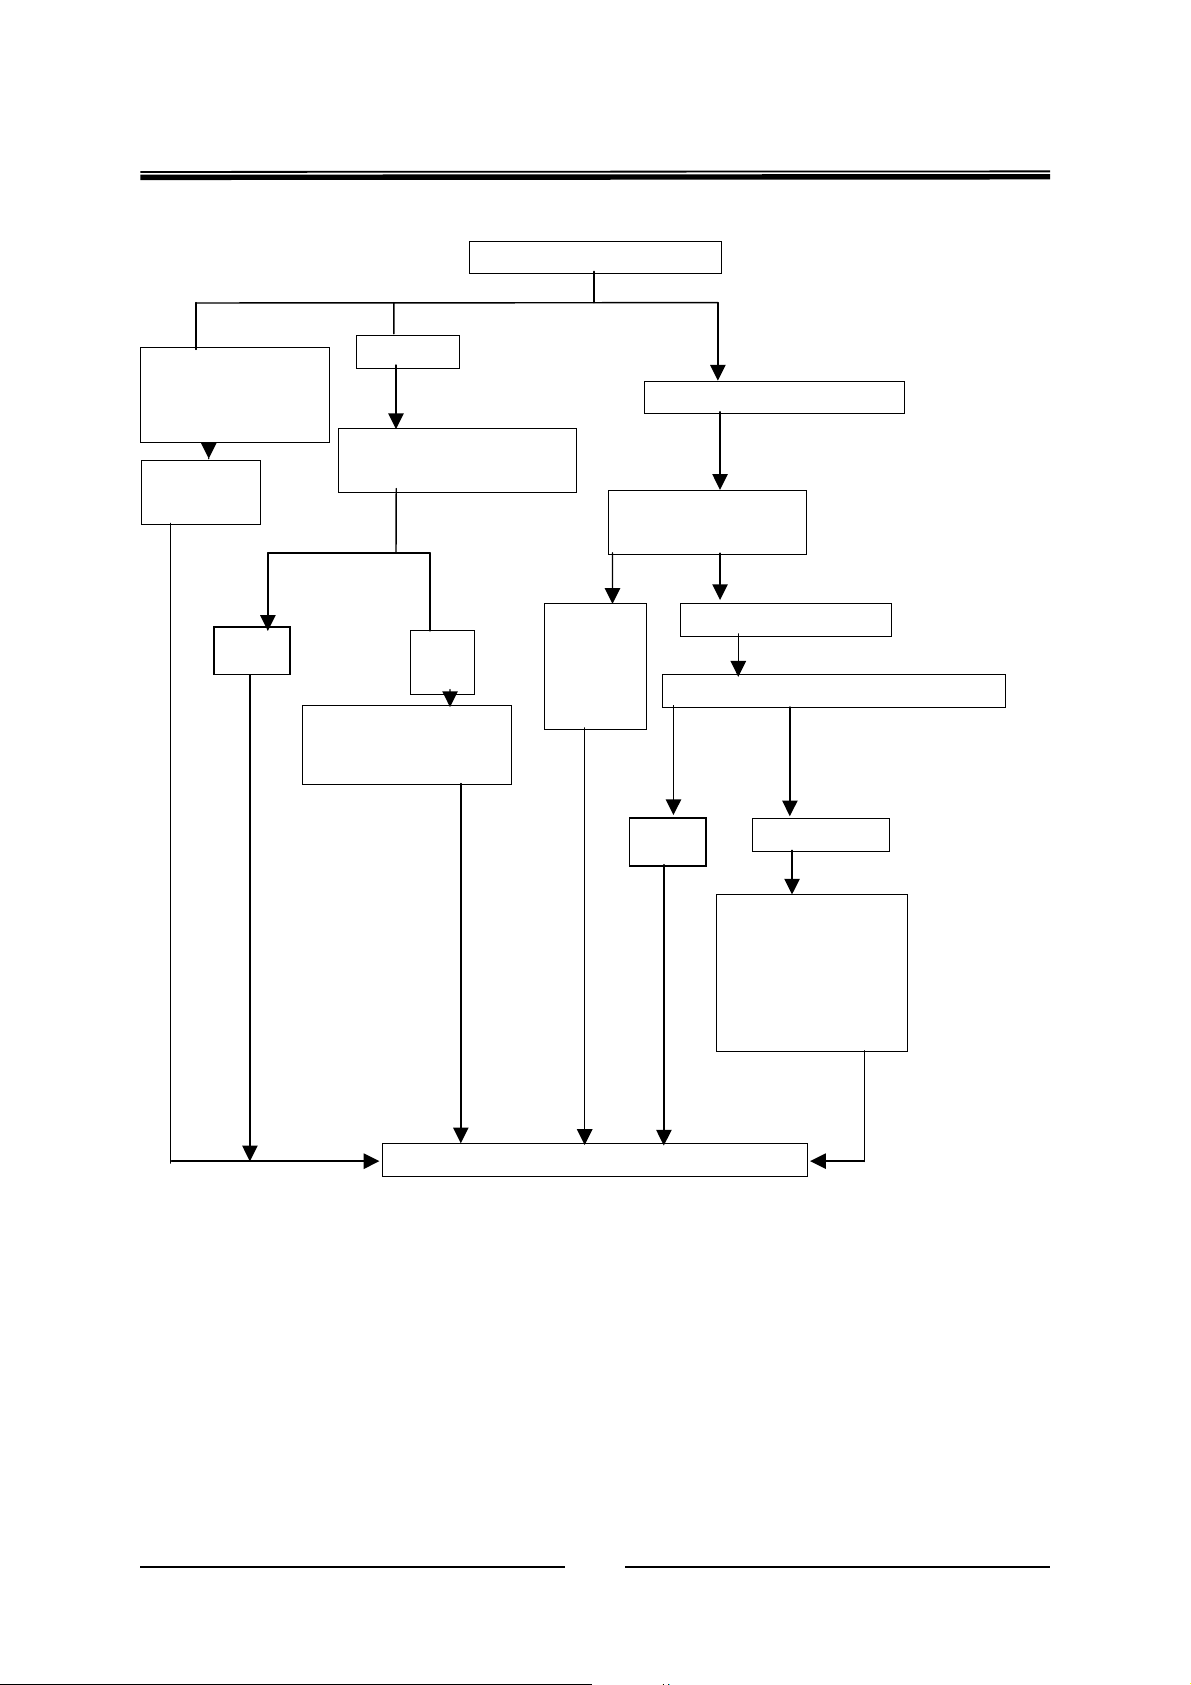
Double image, partial
picture distortion at
corners
Adjust
convergence
OK
No color
Adjust color, colority and
audio system
No
effect
Check N113 and its
outside components
Abnormal Picture
Check signal quality
and connecting quality
Reason of
signal,
re-connect
signal
Weak signal, many noisy wave
Not the reason of signal
Check pin D100 (1) 9 V supplying voltage
OK
No effect
Check/replace D100
and digital board and
related outside
components (See
signal flowchart)
Normal Picture
● Detailed operation and attention reference to other related parts of this service manual.
27
Page 30
PE-5 Chassis Service Manual
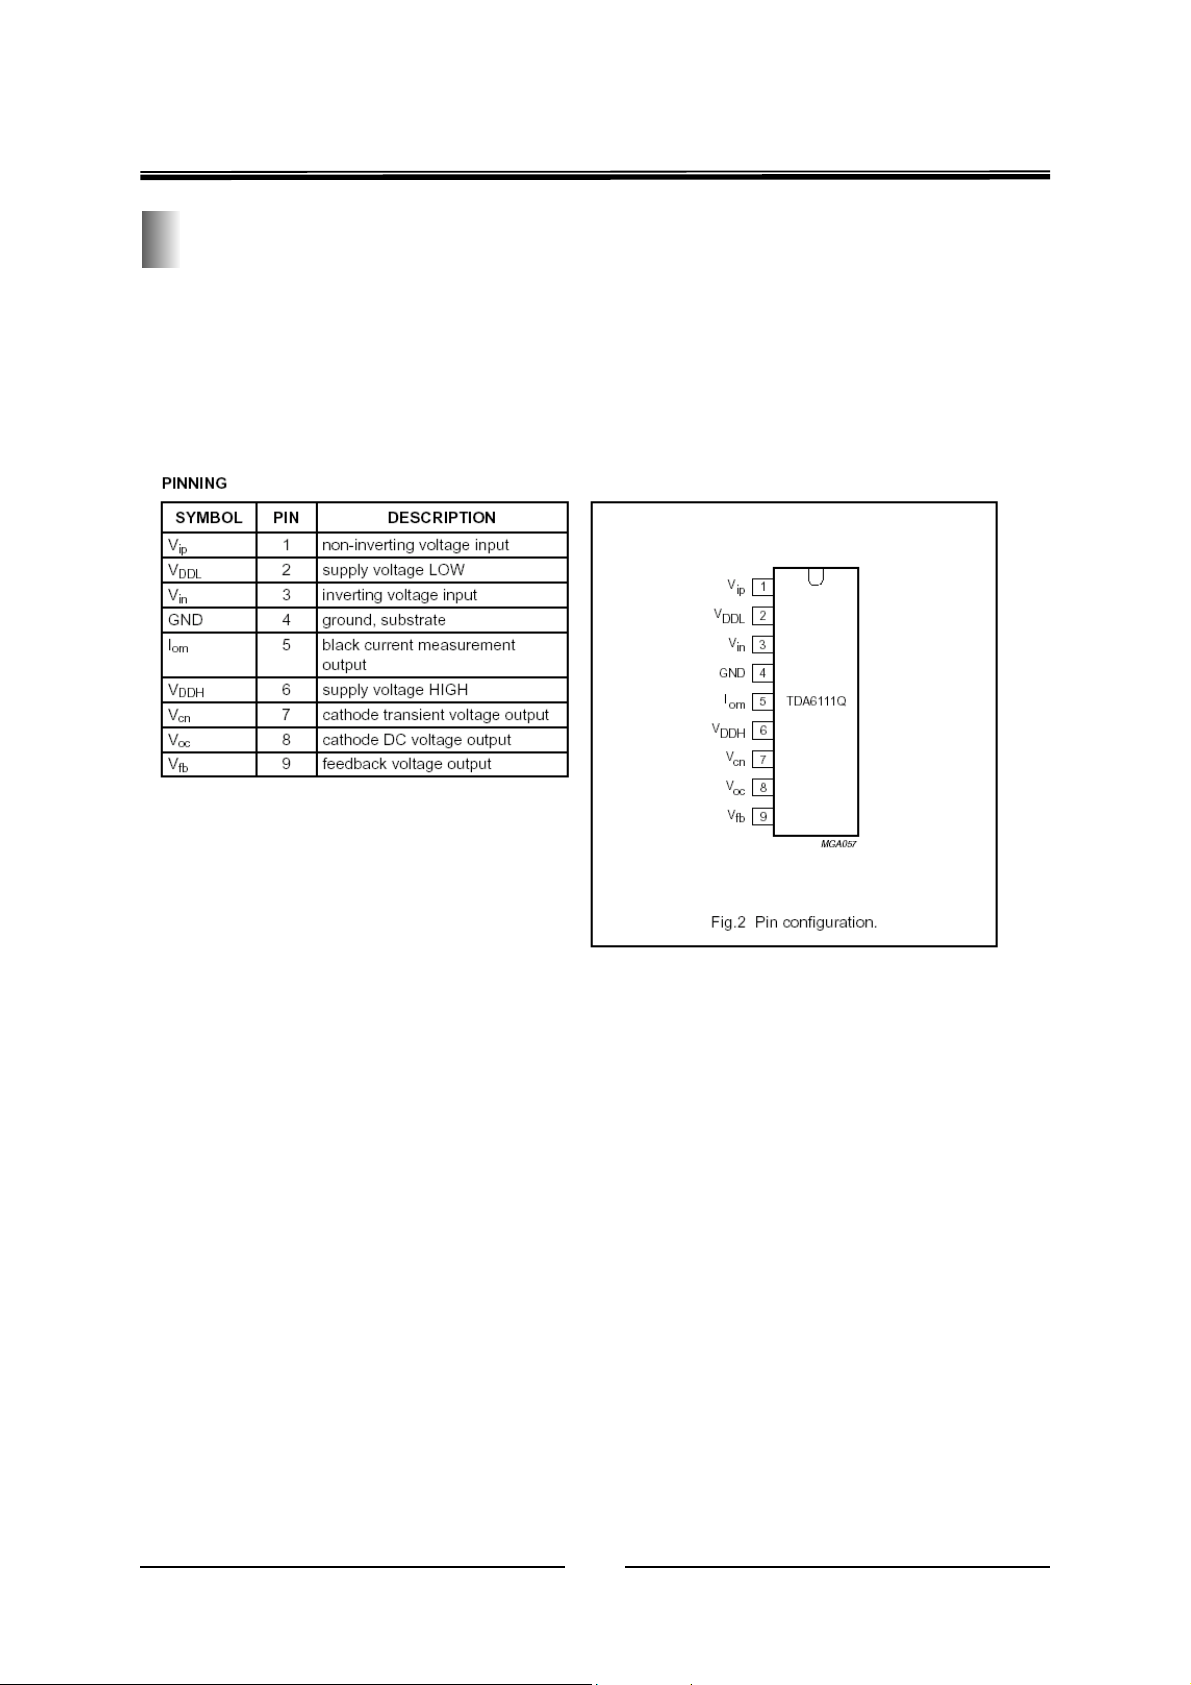
Key IC Pin Definition and Electric Performance Parameter
TDA6111Q
The TDA6111Q is a video output amplifier with 16 MHz bandwidth. The device is contained in a single
in-line 9-pin medium power (DBS9MPF) package, using high-voltage DMOS technology, intended to
drive the cathode of a colour CRT.
28
Page 31
PE-5 Chassis Service Manual
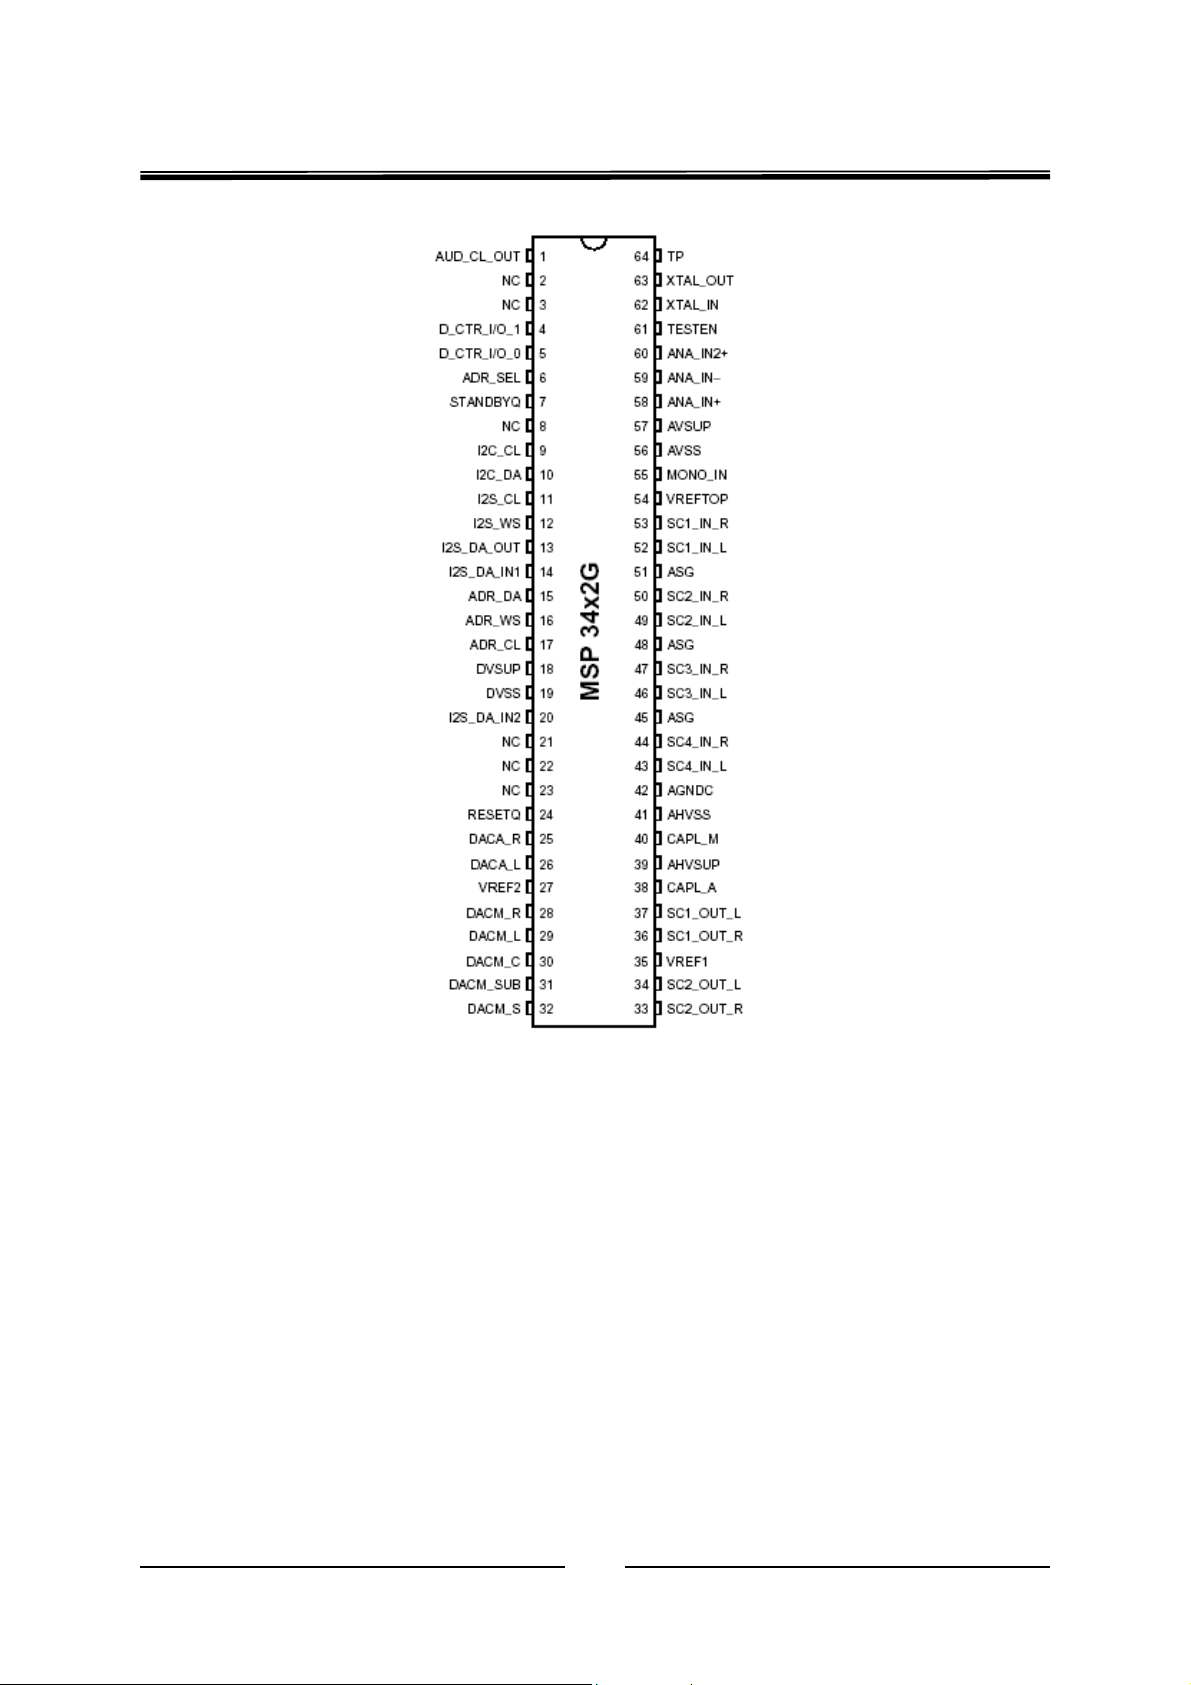
MSP3413
MSP 34x3G Multistandard Sound Processor Family
The Multistandard Sound Processor family MSP 34x3G covers all sound processing functions of the
MSP 34x0G
family. In addition, the MSP 34x3G family offers the Micronas Surround Sound features.
– The above-mentioned functions and features are implemented in the same manner as in the MSP
34x2G.
– The MSP 34x2G data sheet is also valid for the MSP 34x3G except for the differences shown below.
Differences between the MSP 34x3G and the MSP 34x2G:
Decoder Matrix in the Surround Processing Mode:
In the MSP 34x3G, only the passive matrix is available, whereas the MSP 34x2G also offers the
adaptive matrix,
which is necessary for Dolby Pro Logic modes. As a result, only the Micronas Surround Sound modes
can be activated in MSP 34x3G.
The following tables of the MSP 34x2G data sheet have been changed to reflect these differences and
apply only to the MSP 34x3G.
29
Page 32
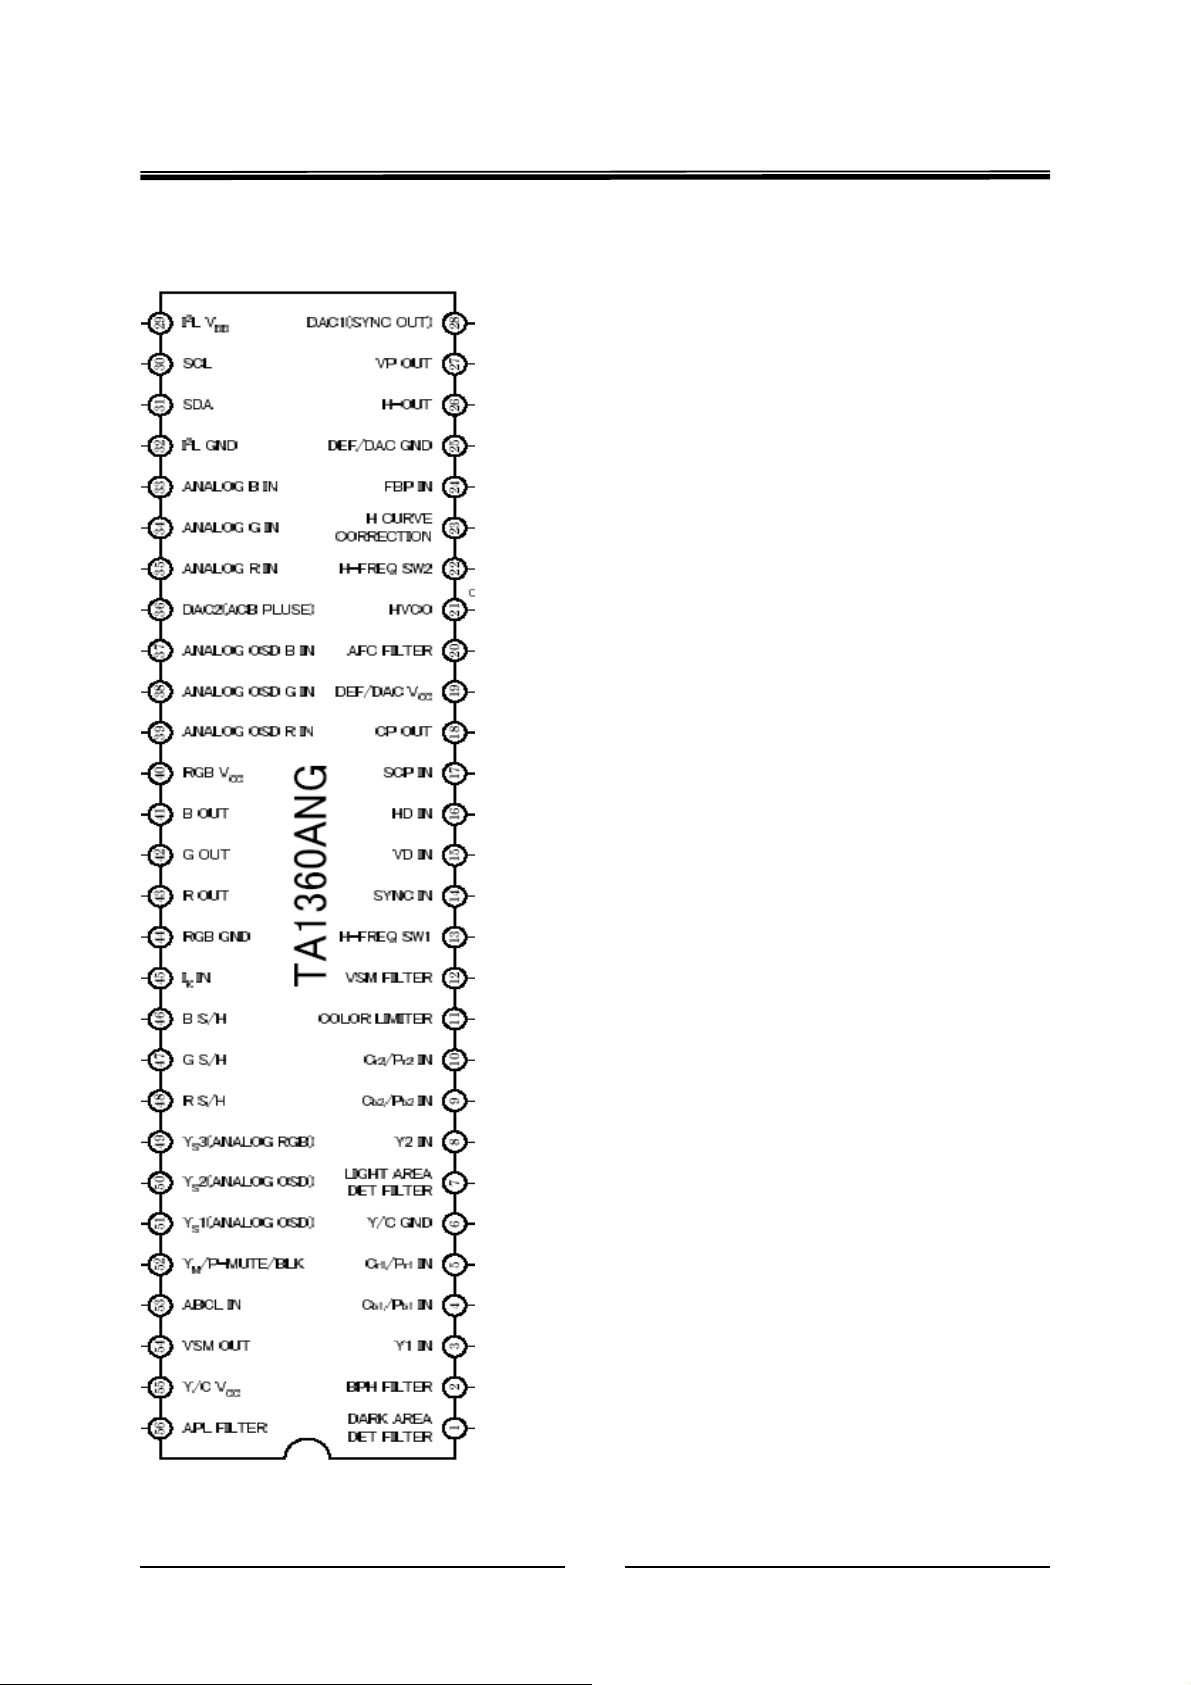
TA1360ANG
FEATURES
PE-5 Chassis Service Manual
LUMINANCE BLOCK
・Black stretch, DC restoration
・Dynamicγ correction
・SRT (LTI)
・Y group delay correction (Shoot balance
correction)
・Hi-bright color
・Color detail enhancer (CDE)
・White pulse limiter
・VSM out
COLOR DIFFERENCE BLOCK
・Flesh color
・Dynamic Y/C correction
・Color SRT (CTI)
・Colorγ
・White peak blue
・Green stretch
・Blue stretch
TEXT BLOCK
・OSD blending SW
・ACB (only black level)
・Two analog RGB in
SYNCHRONIZATION BLOCK
・Horizontal synchronization (15.75k, 28.125k,
31.5k, 33.75k, 37.9k, 45kHz)
・Vertical synchronization (525I/P, 625I/P, 750P,
1125I/P, PAL 100Hz, NTSC 120Hz)
・Synchronization separation circuit for 2-level
and 3-level sync.
・Accept both positive and negative HD/VD input
・Mask for copy-guard signal
・Vertical blanking
SDOP56-P-600-1.78
30
Page 33
PE-5 Chassis Service Manual
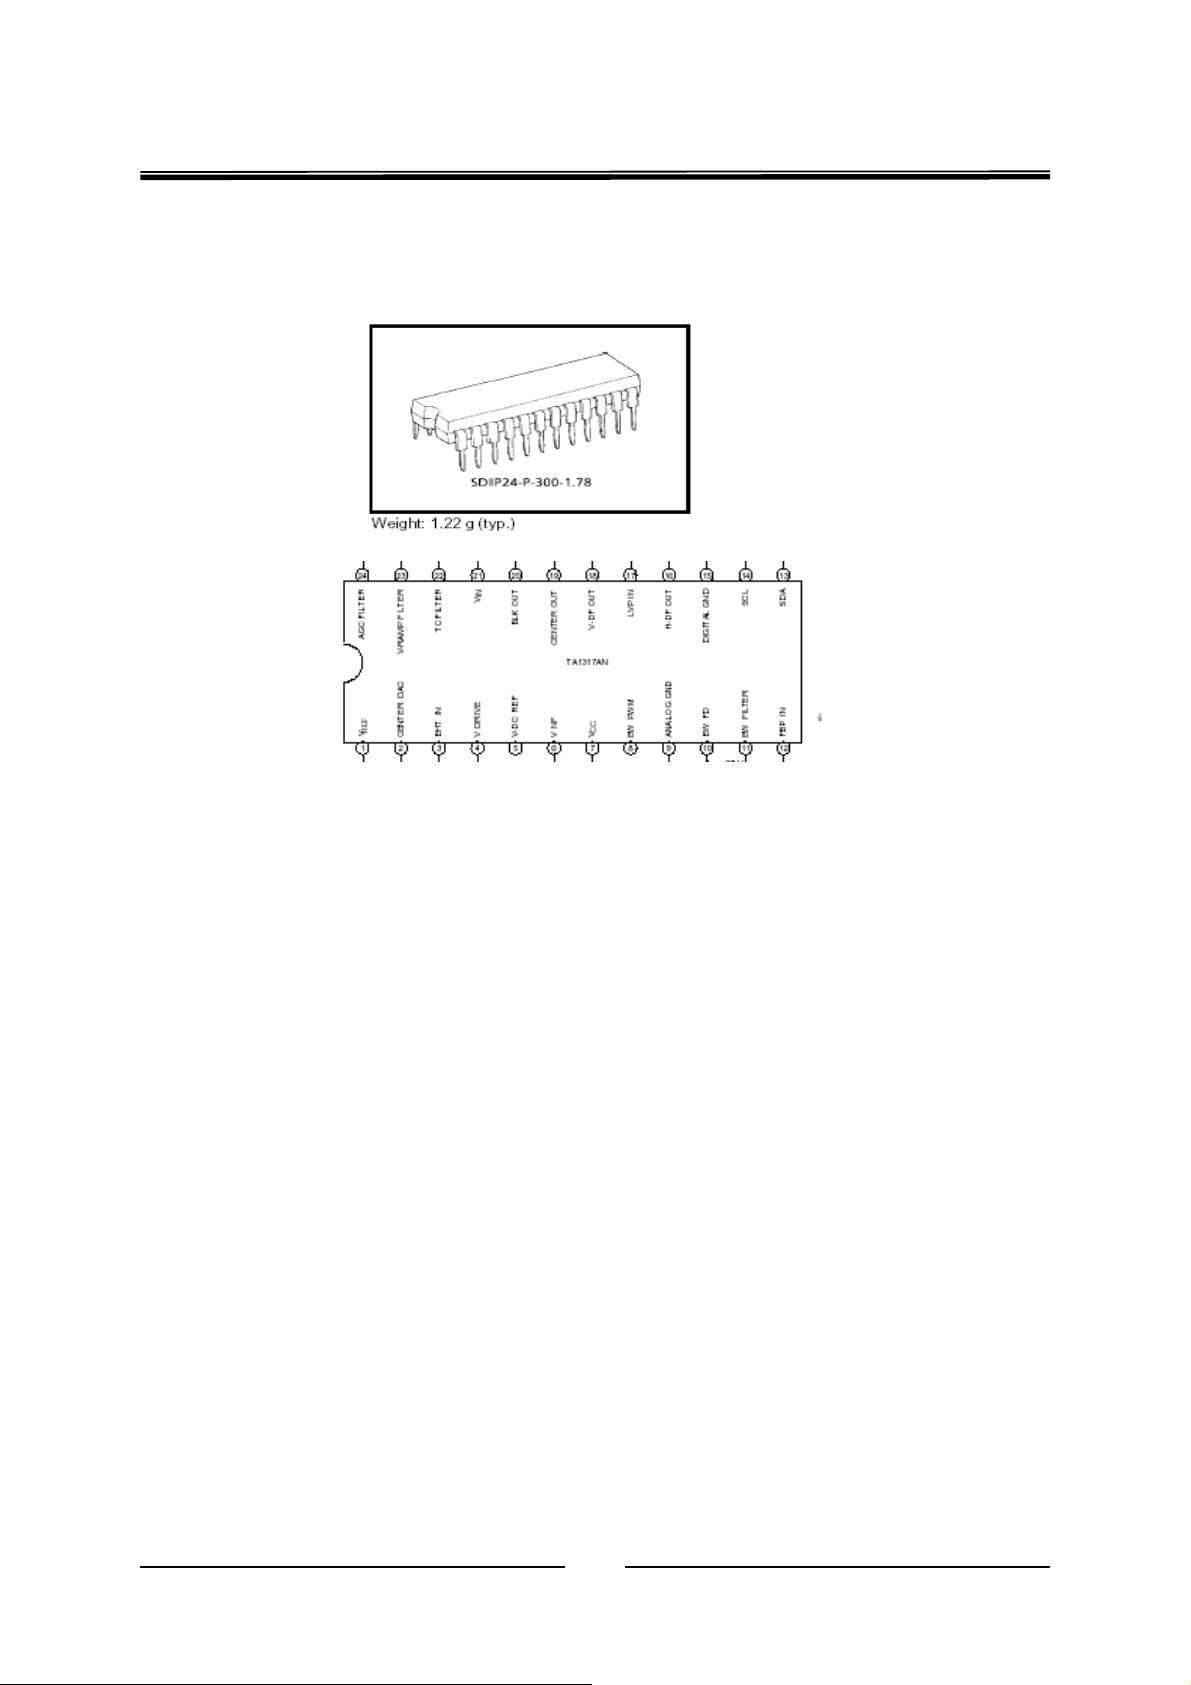
TA1317AN is a deflection processor IC for a large and wide picture tube.
TA1317AN incorporates EW, vertical distortion correction circuit and dynamic
focus correction circuit. .
TA1317AN
Features
Vertical drive (AC/DC-coupling)
Picture height adjustment
Vertical shift adjustment
Vertical symmetry correction
Vertical linearity correction
Vertical S correction
Vertical integral correction
Vertical/Horizontal EHT compensation
EW drive (parabola/PWM output)
Picture width
EW trapezium correction
EW parabola correction
EW corner correction (top only/bottom only/ top & bottom)
EW S correction
Center curve correction (SAW/PAR)
Parabola output for horizontal and vertical dynamic focus (H/V output independently)
Horizontal and vertical dynamic focus phase adjustment
Horizontal and vertical dynamic focus amplitude adjustment
Horizontal dynamic focus curve characteristic adjustment
V-ramp limiter circuit
Analog blanking output
31
Page 34
PE-5 Chassis Service Manual
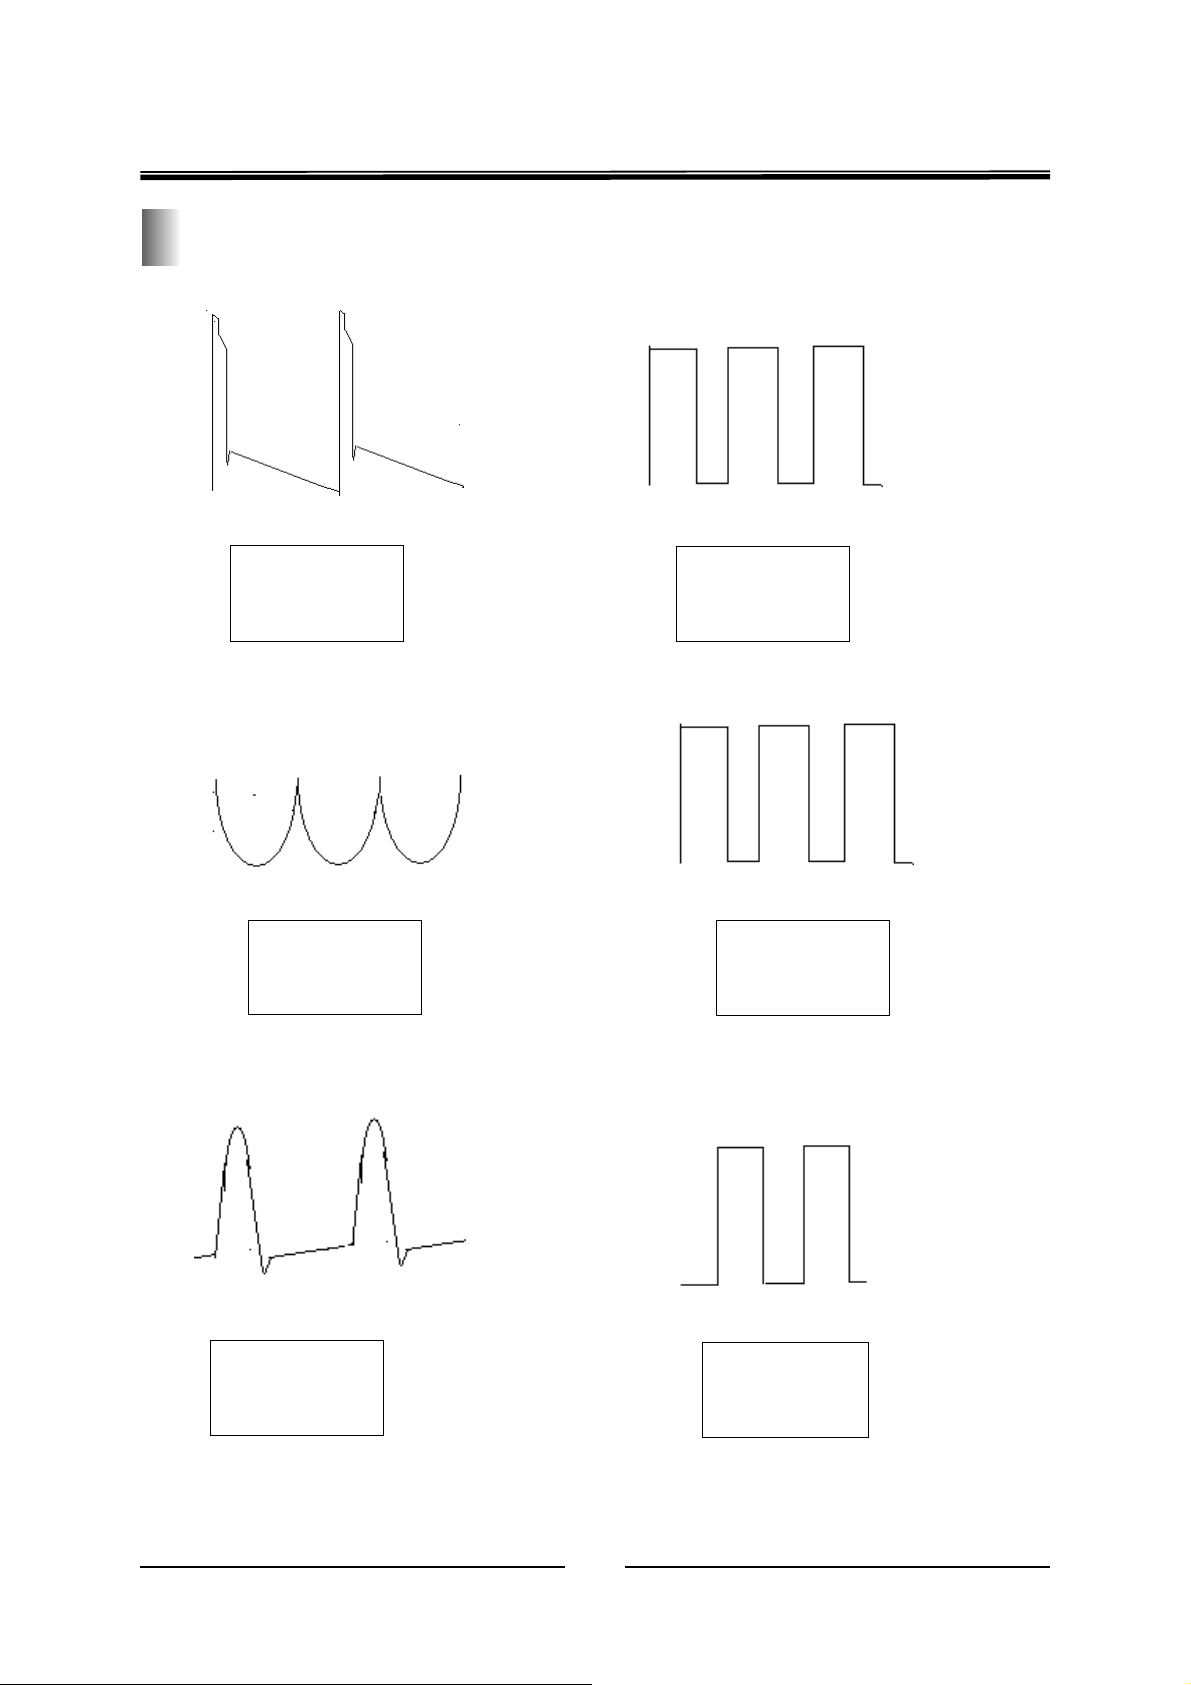
Key-Point Wave Form Chart
TA1360(27) Leg TA1360(26) Leg
Vp-p = 5.75V
Vrms = 5.00 V
Vavg = 5.40 V
V307 C Pole TA1317(11) Leg
Vp-p = 19.8 V
Vrms = 30.8V
Vavg = 3.0 V
Vp-p = 1.6V
Vrms = 0.83 V
Vavg = 1.12 V
Vp-p = 34.5V
Vrms = 2.25V
Vavg = 4.12V
C337、C338 Connecting Point TA1317(5)Leg
Vp-p = 127 V
Vrms = 43.8V
Vavg = 26.5 V
Vp-p = 9.31V
Vrms = 9.08V
Vavg = 8.59V
32
Page 35
PE-5 Chassis Service Manual
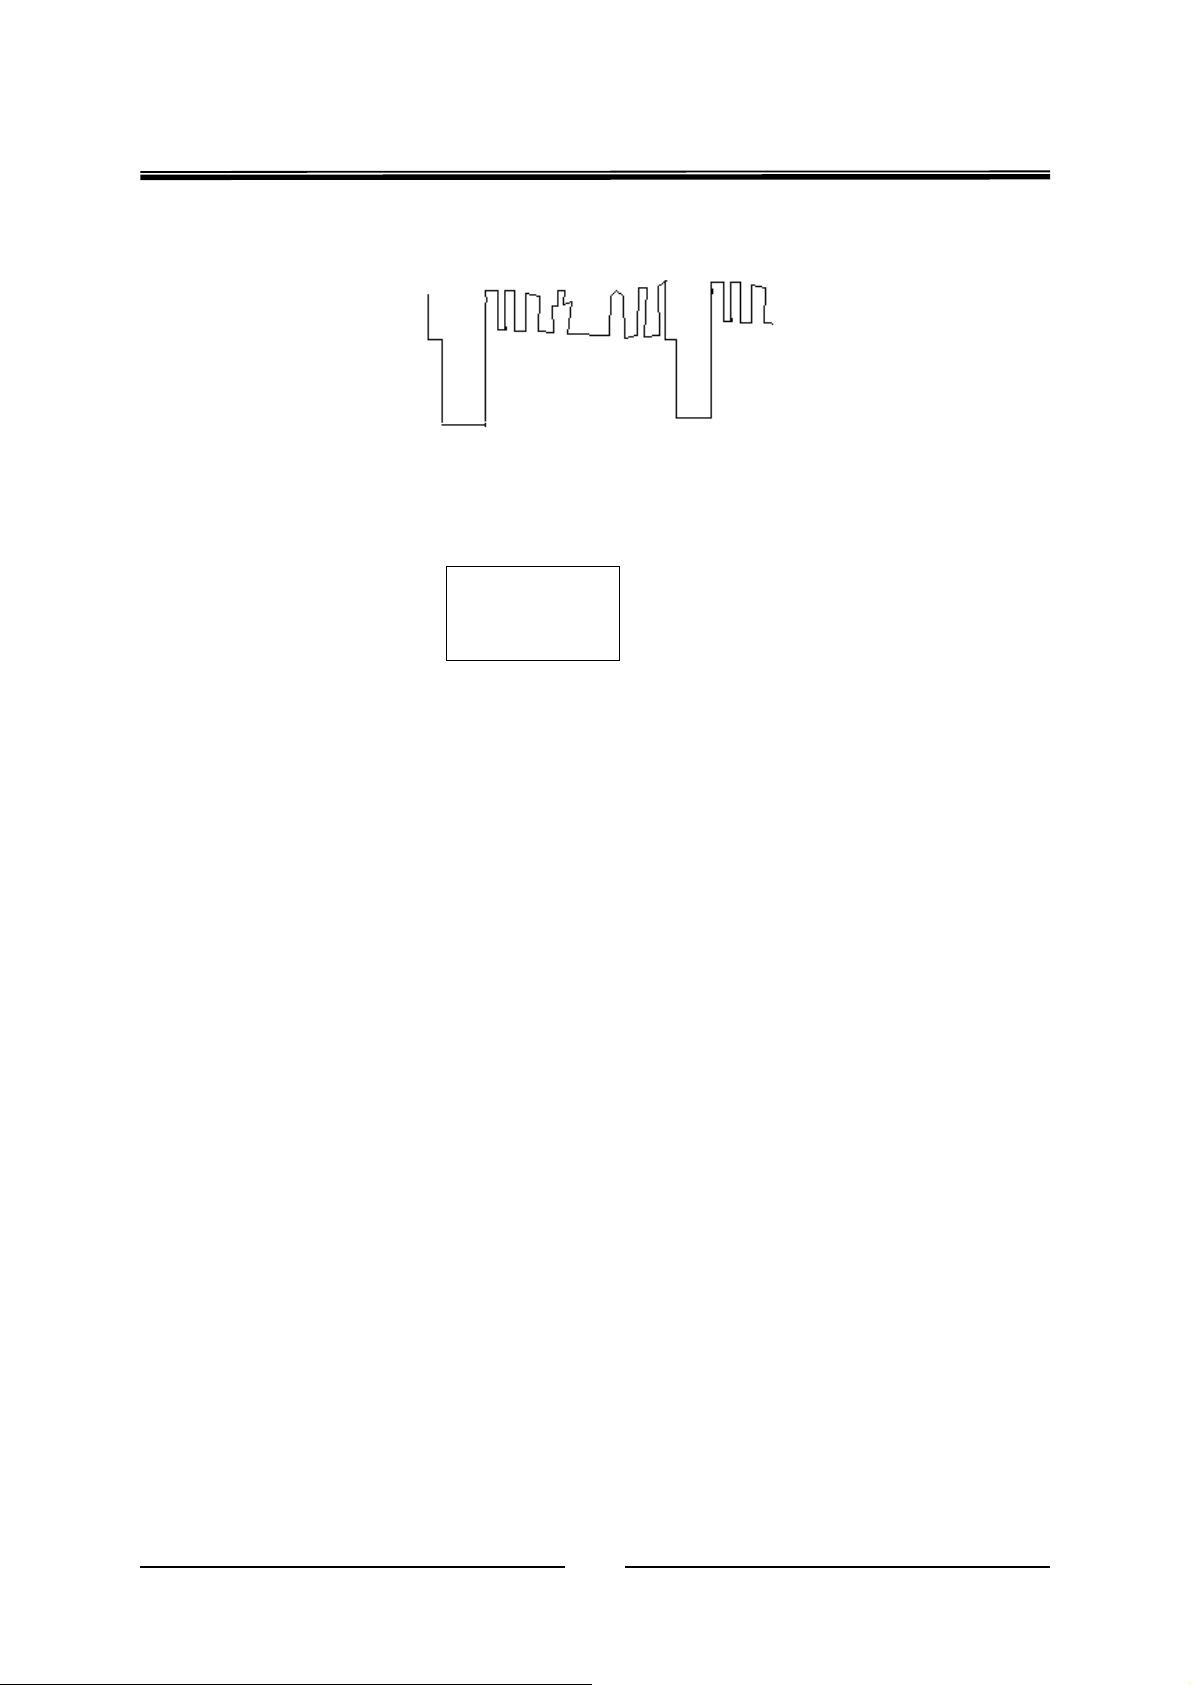
Key-Point Wave Form Chart (Continued from previouse Page):
TA1360ANG (41) (42) (43) Leg
(The wave form of each leg will be a little bit different from the signal)
Vp-p = 4.38 V
Vrms = 4.20V
Vavg = 3.05V
33
Page 36
PE-5 Chassis Service Manual
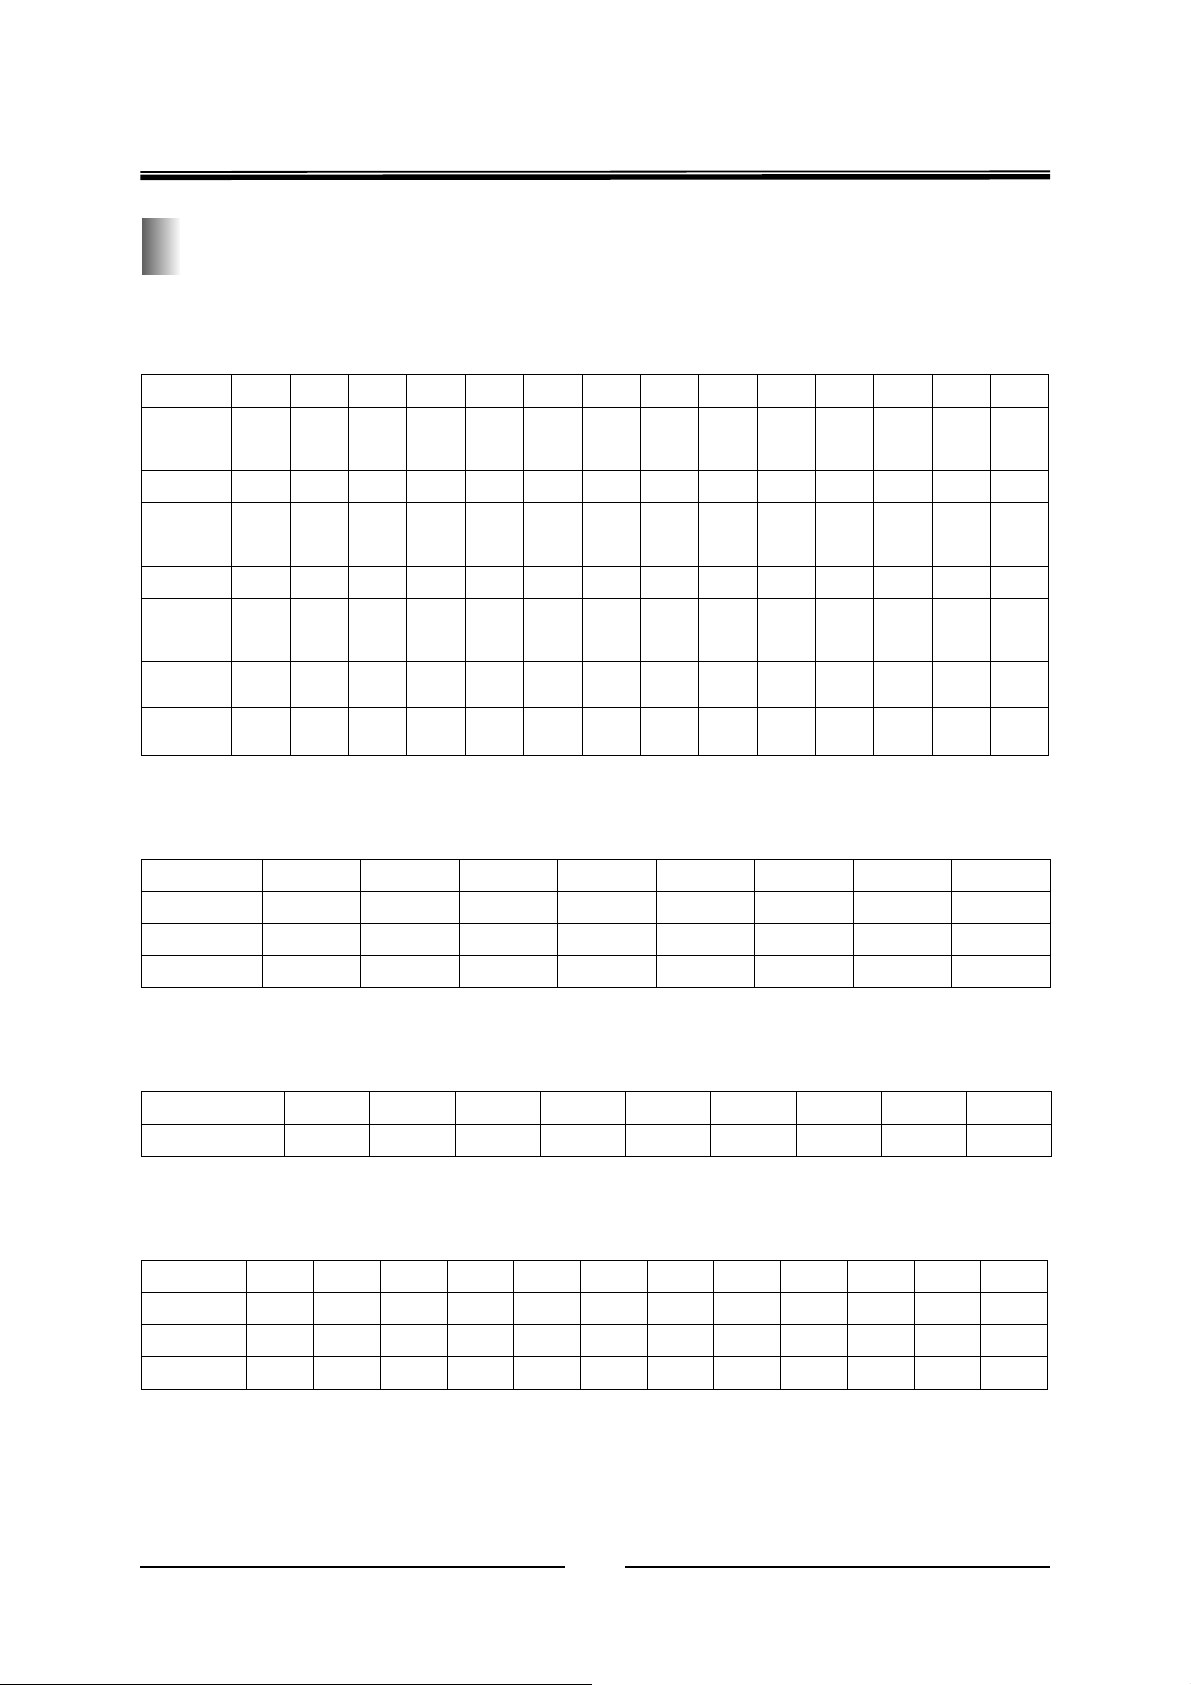
Pins DC Level of Key IC on normal working
Unit:V
1. TA1360
Pin
Voltage 0.32 4.29 4.83 4.83 4.83 0 0.75 5.04 4.83 4.85 6.68 7.43 0 1.99
Pin
Voltage 0 0.45 0 0.13 8.79 6.36 5.2 5.8 2.41 0.93 0 0.78 4.78 0
Pin
Voltage 2.16 3 2.92 0 3.8 3.8 3.8 0 3.78 3.77 3.77 8.71 2.89 2.92
Pin
Voltage 3 0 8.74 5 4.5 5.3 0 0 0 0 6.19 4.18 8.7 5.27
1 2 3 4 5 6 7 8 9 10 11 12 13 14
15 16 17 18 19 20 21 22 23 24 25 26 27 28
29 30 31 32 33 34 35 36 37 38 39 40 41 42
43 44 45 46 47 48 49 50 51 52 53 54 55 56
1. LA7846N
Pin
Voltage 0 0 16.2 31.8 2 2 31.3 2.4
Pin
Voltage 0 0
1 2 3 4 5 6 7 8
9 10
1. TDA6111Q
Pin
Voltage 0 11.9 0 0 9.2 207 116 118 11.5
4. TA1317N
Pin
Voltage 4.9 2.3 5.9 1.6 4.9 4.9 8.7 0 0 2.3 2.0 1.9
Pin
Voltage 2.7 2.8 0 3.6 3.2 3.5 4.3 3.8 4.8 3.8 4.0 3.6
1 2 3 4 5 6 7 8 9
1 2 3 4 5 6 7 8 9 10 11 12
13 14 15 16 17 18 19 20 21 22 23 24
34
Page 37
PE-5 Chassis Service Manual
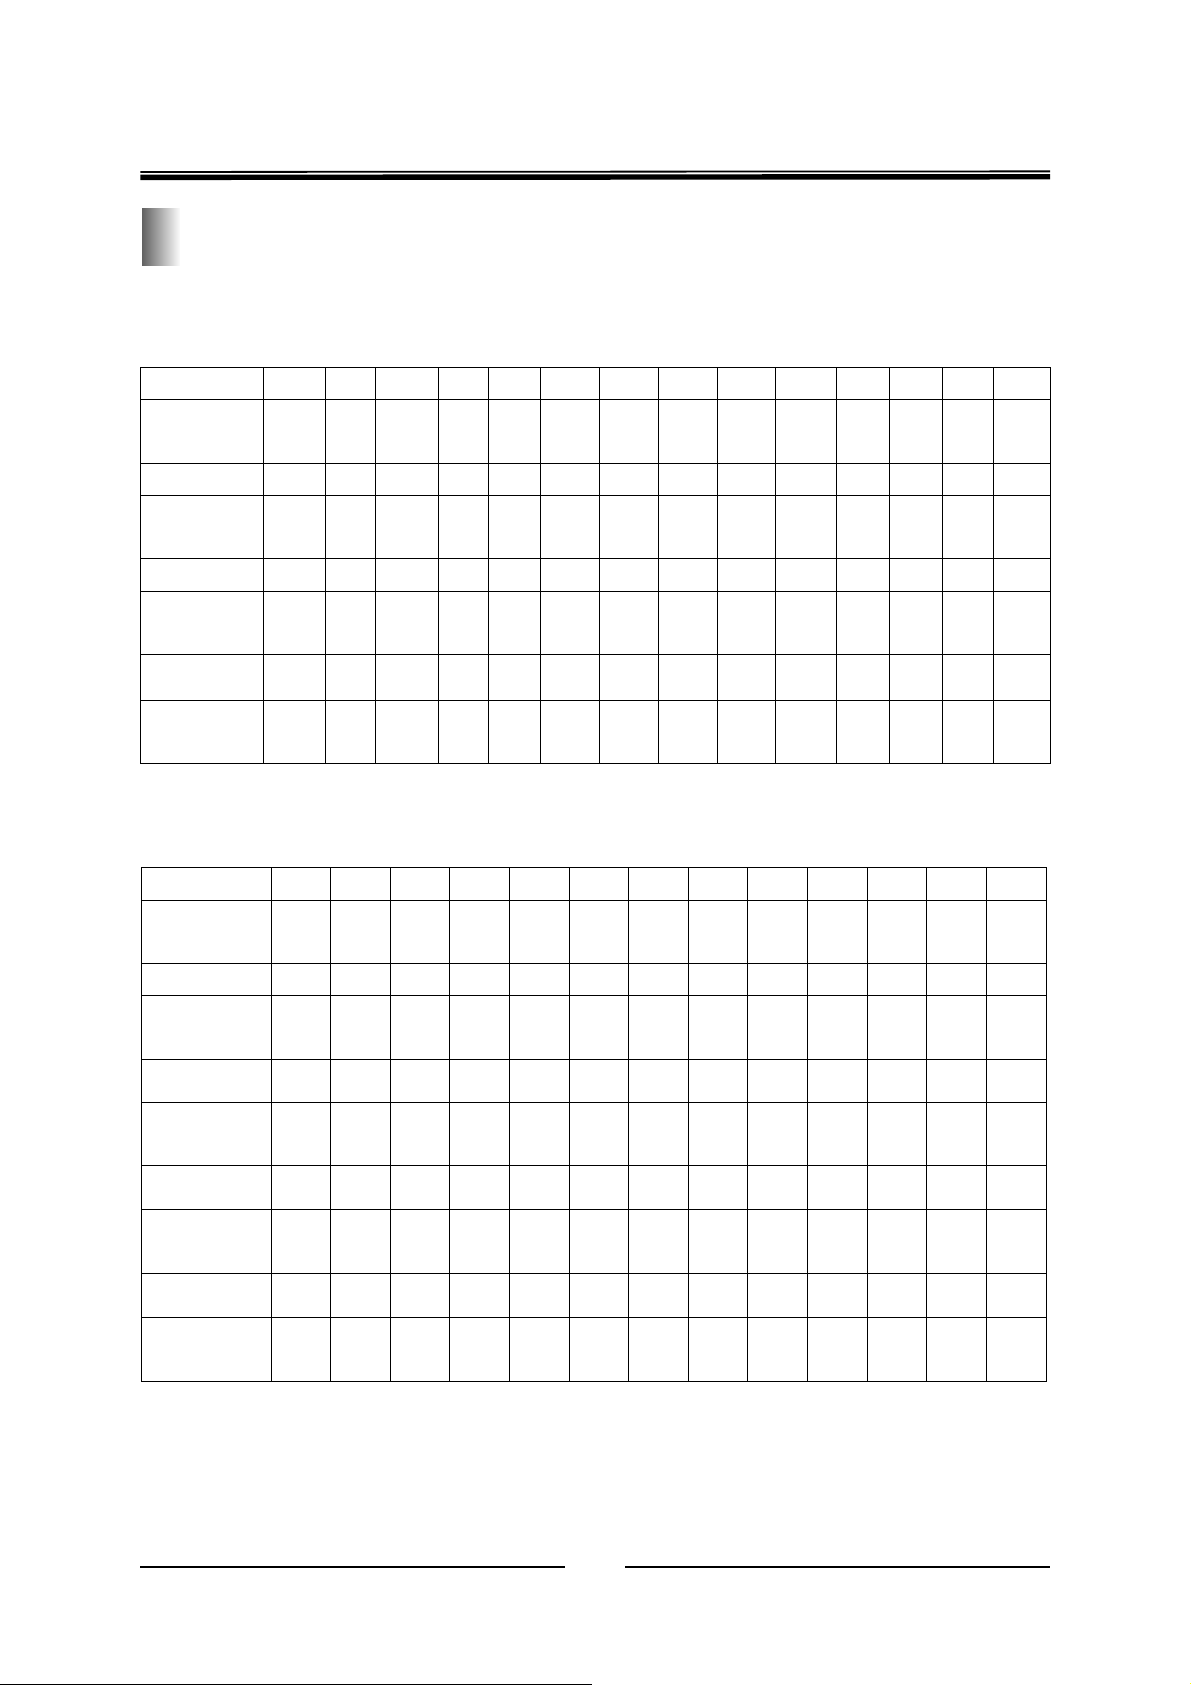
Pins of Key IC Power On Resistance
Unit:KΩ
1. TA1360
Pin
Resistance
Capacity
Pin
Resistance
Capacity
Pin
Resistance
Capacity
Pin
Resistance
Capacity
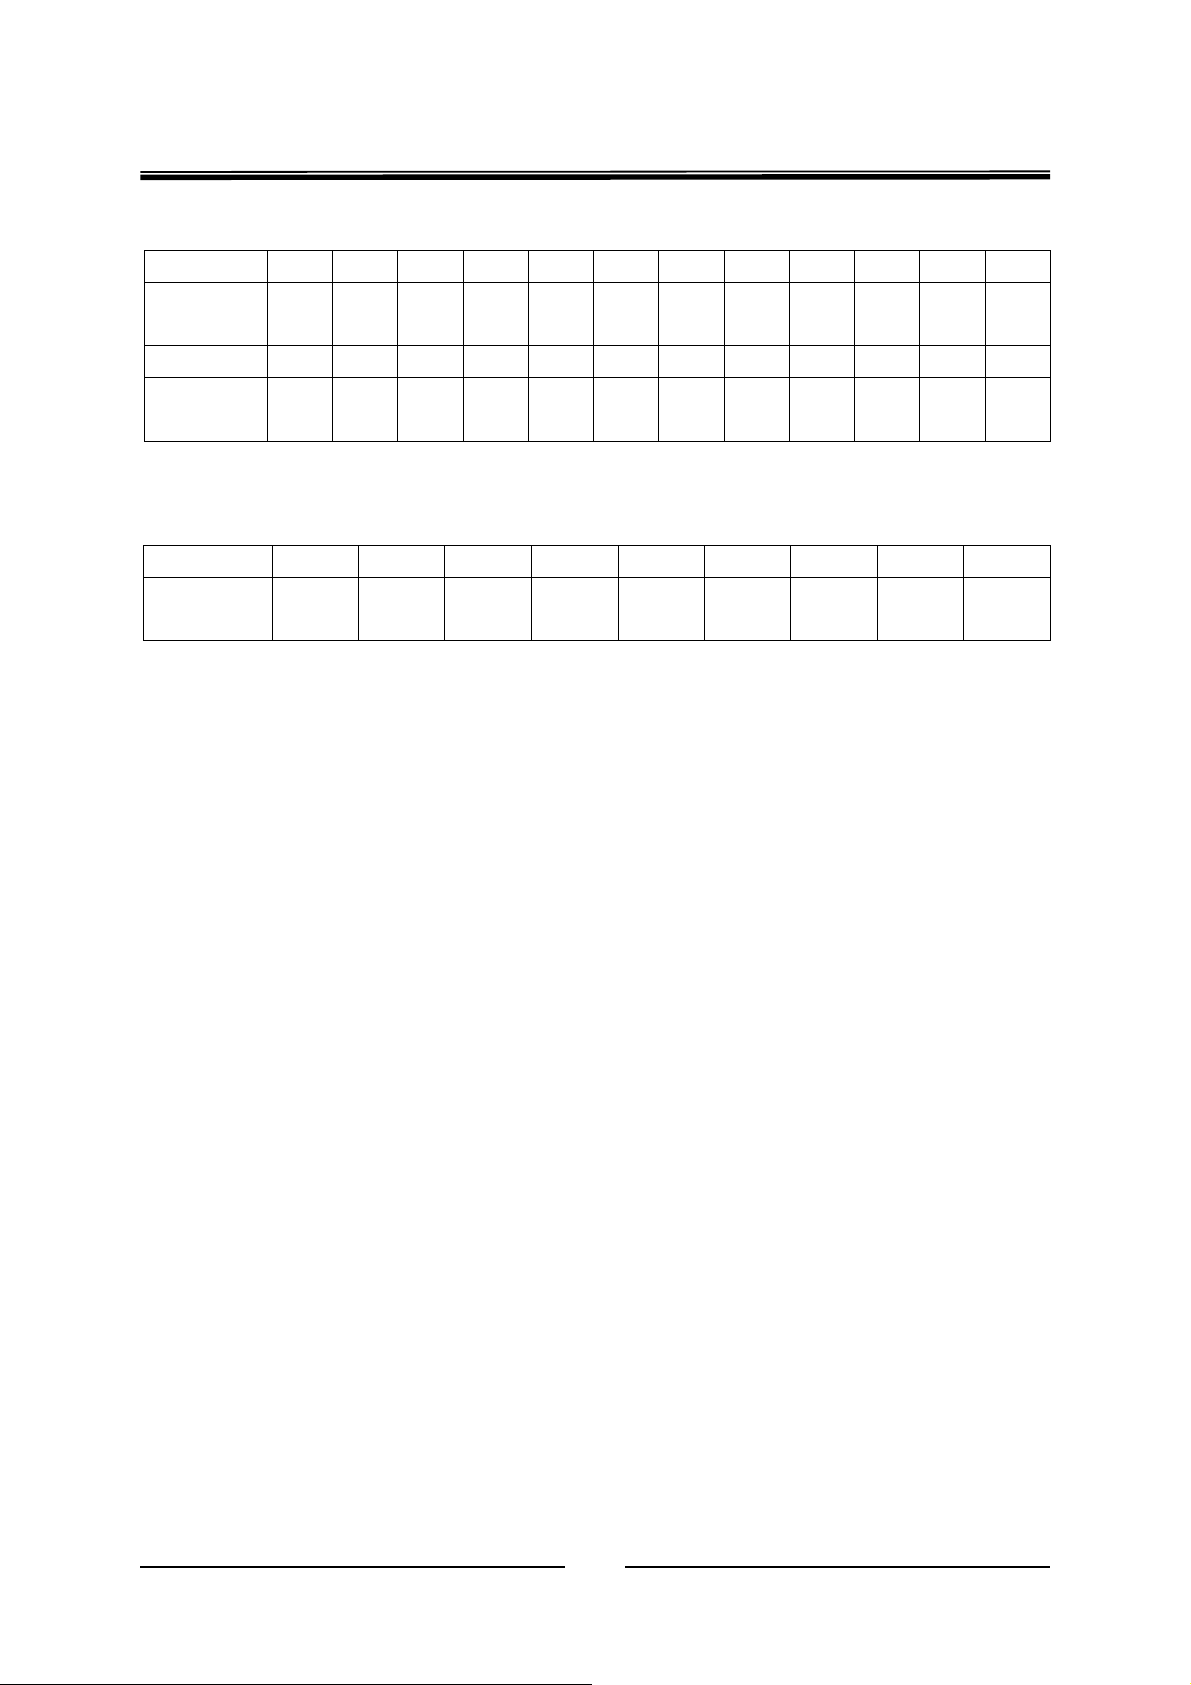
1. MSP3413
Pin
Resistance
Capacity
Pin
Resistance
Capacity
Pin
1 2 3 4 5 6 7 8 9 10 11 12 13 14
98.5
∞ ∞ ∞ ∞
15 16 17 18 19 20 21 22 23 24 25 26 27 28
46 51 49.9 5.3 1.2 99.5
29 30 31 32 33 34 35 36 37 38 39 40 41 42
1.5 6.3 6.3 0
43 44 45 46 47 48 49 50 51 52 53 54 55 56
0 0.4
∞
1 2 3 4 5 6 7 8 9 10 11 12 13
∞ ∞ ∞ ∞ ∞
14 15 16 17 18 19 20 21 22 23 24 25 26
∞ ∞ ∞
27 28 29 30 31 32 33 34 35 36 37 38 39
∞ ∞ ∞ ∞ ∞ ∞ ∞
∞ ∞
1.2 0 0
0 9.81
0.5 24.4 25.4 88.7
1.2
∞ ∞ ∞ ∞
1.2 19.2 26.9 0 2.3
∞
1.9 3.6 6.0
∞
∞ ∞ ∞ ∞
1.4 0
0.4
∞ ∞ ∞
∞ ∞ ∞
5.1 3.3 3.3
∞
∞ ∞
∞ ∞
0.4 7.92
Resistance
Capacity
Pin
Resistance
Capacity
Pin
Resistance
Capacity
0 3.3 3.3 3.3 3.4 3.4
40 41 42 43 44 45 46 47 48 49 50 51 52
∞
53 54 55 56 57 58 59 60 61 62 63 64
∞
0
∞ ∞ ∞
1.5
∞
0 1.2
∞ ∞ ∞
0
∞ ∞
∞ ∞
35
0
∞ ∞ ∞
0
∞ ∞
0
∞ ∞ ∞
0.4
0
∞
Page 38
5. TA1317N
PE-5 Chassis Service Manual
Pin
Resistance
Capacity
Pin
Resistance
Capacity
59.8 4.6 100 3.1 4.7 14.2 1.2
6. TDA6111Q
Pin
Resistance
Capacity
∞ ∞ ∞ ∞ ∞
1 2 3 4 5 6 7 8 9 10 11 12
∞
13 14 15 16 17 18 19 20 21 22 23 24
5.8 6.1
1 2 3 4 5 6 7 8 9
24.3 22.5
∞
∞
23.2
∞ ∞
2
0 5.5 46.8 32
14.8
∞ ∞
∞ ∞
67.9
36
Page 39
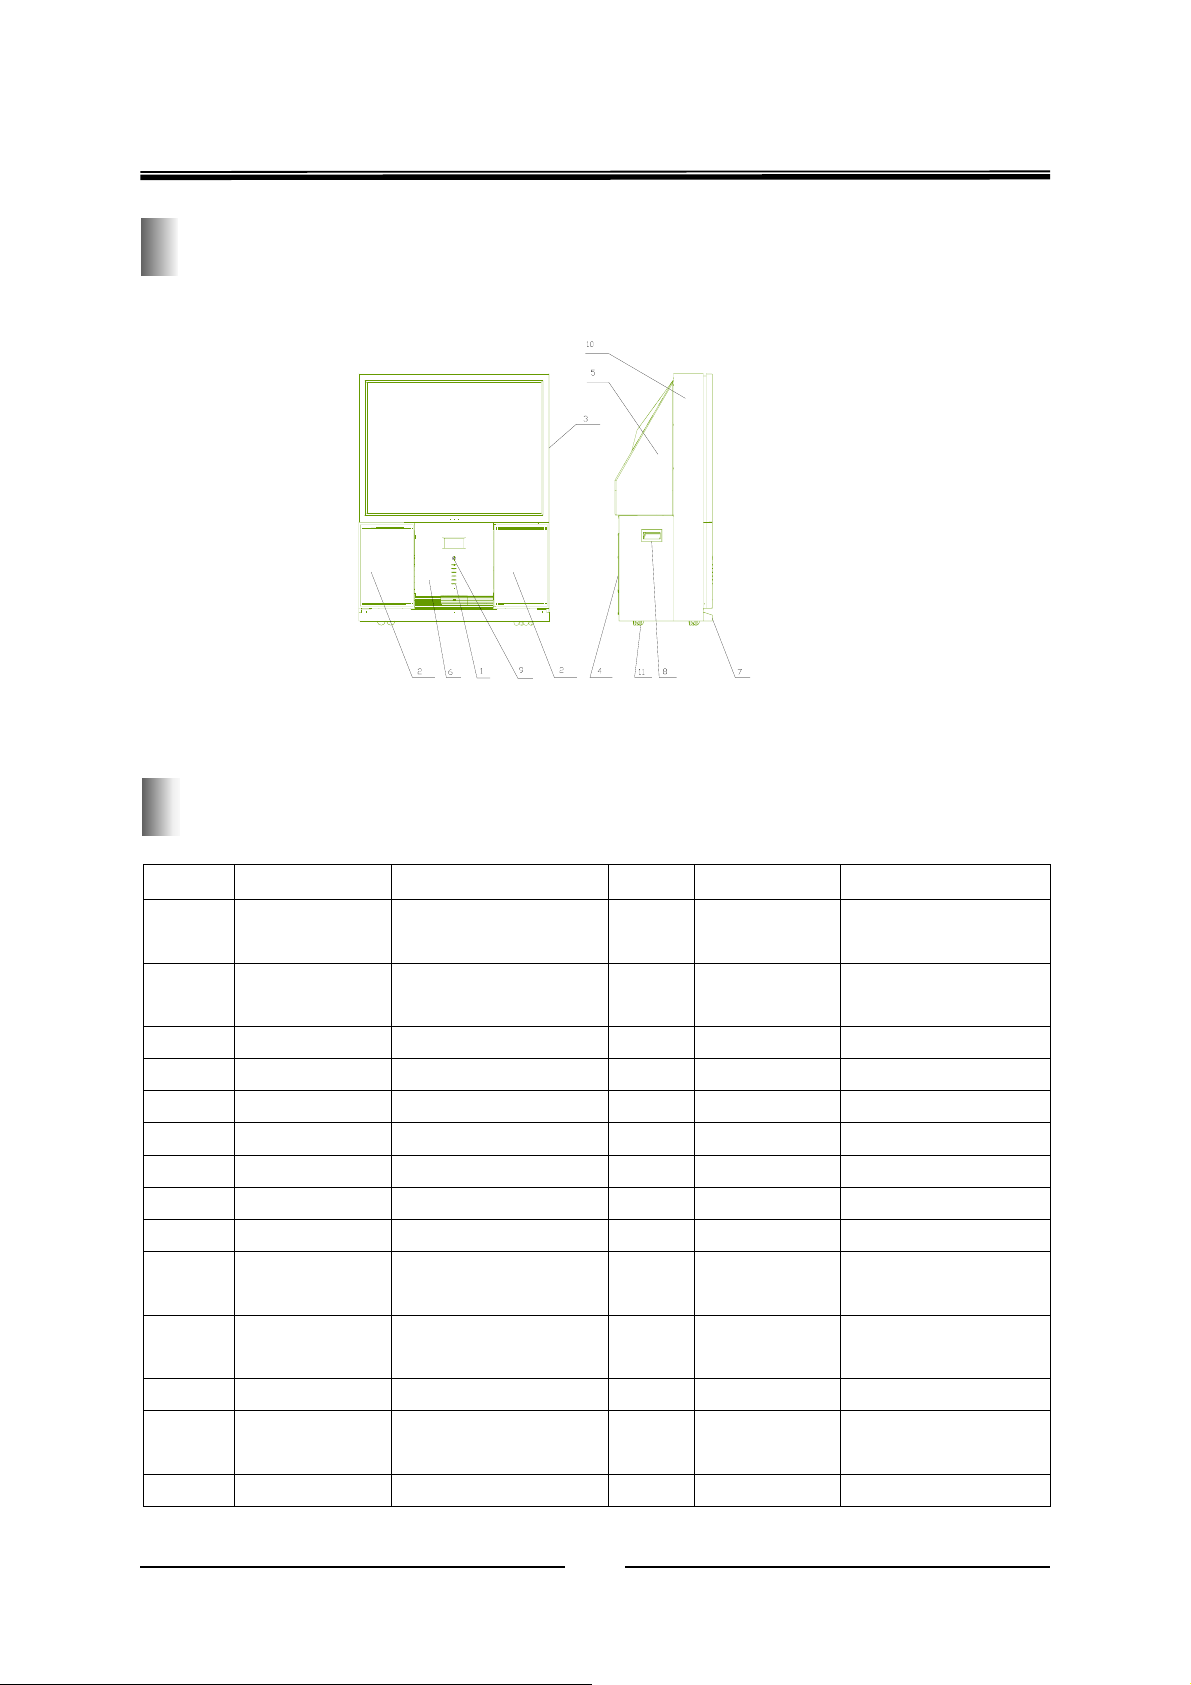
Structure List
PE-5 Chassis Service Manual
Mechanic Replacing Parts List
Number Part Code Part Name Number Part Code Part Name
3X12VwAHCh Self Screw JUT8.078.001 Upper reflection holder
(Left)
4X16BAHCh Self Screw JUT8.078.002 Upper reflection holder
(Right)
4X16HwAHO 6-corners wood screw 5 JUT8.080.002 Back cover
60mmX50m Water-free Belt 6 JUT8.081.006 Front panel
D240.ABU Lens 7 JUT8.081.008 Down decorated panel
D250G.RCT Lens Chip JUT8.088.019 Anti-dust cover
JU6.152.272 Tube assembly R 8 JUT8.089.002 Carrying on box
JU6.152.273 Tube assembly B 9 JUT8.337.003 Power button
JU6.152.277 Tube assembly G 10 JUT8.733.137 Cabinet
JU8.078.148 Upper Reflection Mirror
Holder(Left)
JU8.078.149 Upper Reflection Mirror
Holder(Right)
JUC5.834.072 Speaker Assembly A HR94SC/43 Reflection Wheel
JUC5.834.073 Speaker Assembly B T/JU8.089.013 Plastic handle of carton
JUC5.834.074 Speaker Assembly C
JUT8.733.150 Front cover panel
11 JUY4.205.002 W-1 Multi-ways wheel
box
37
Page 40
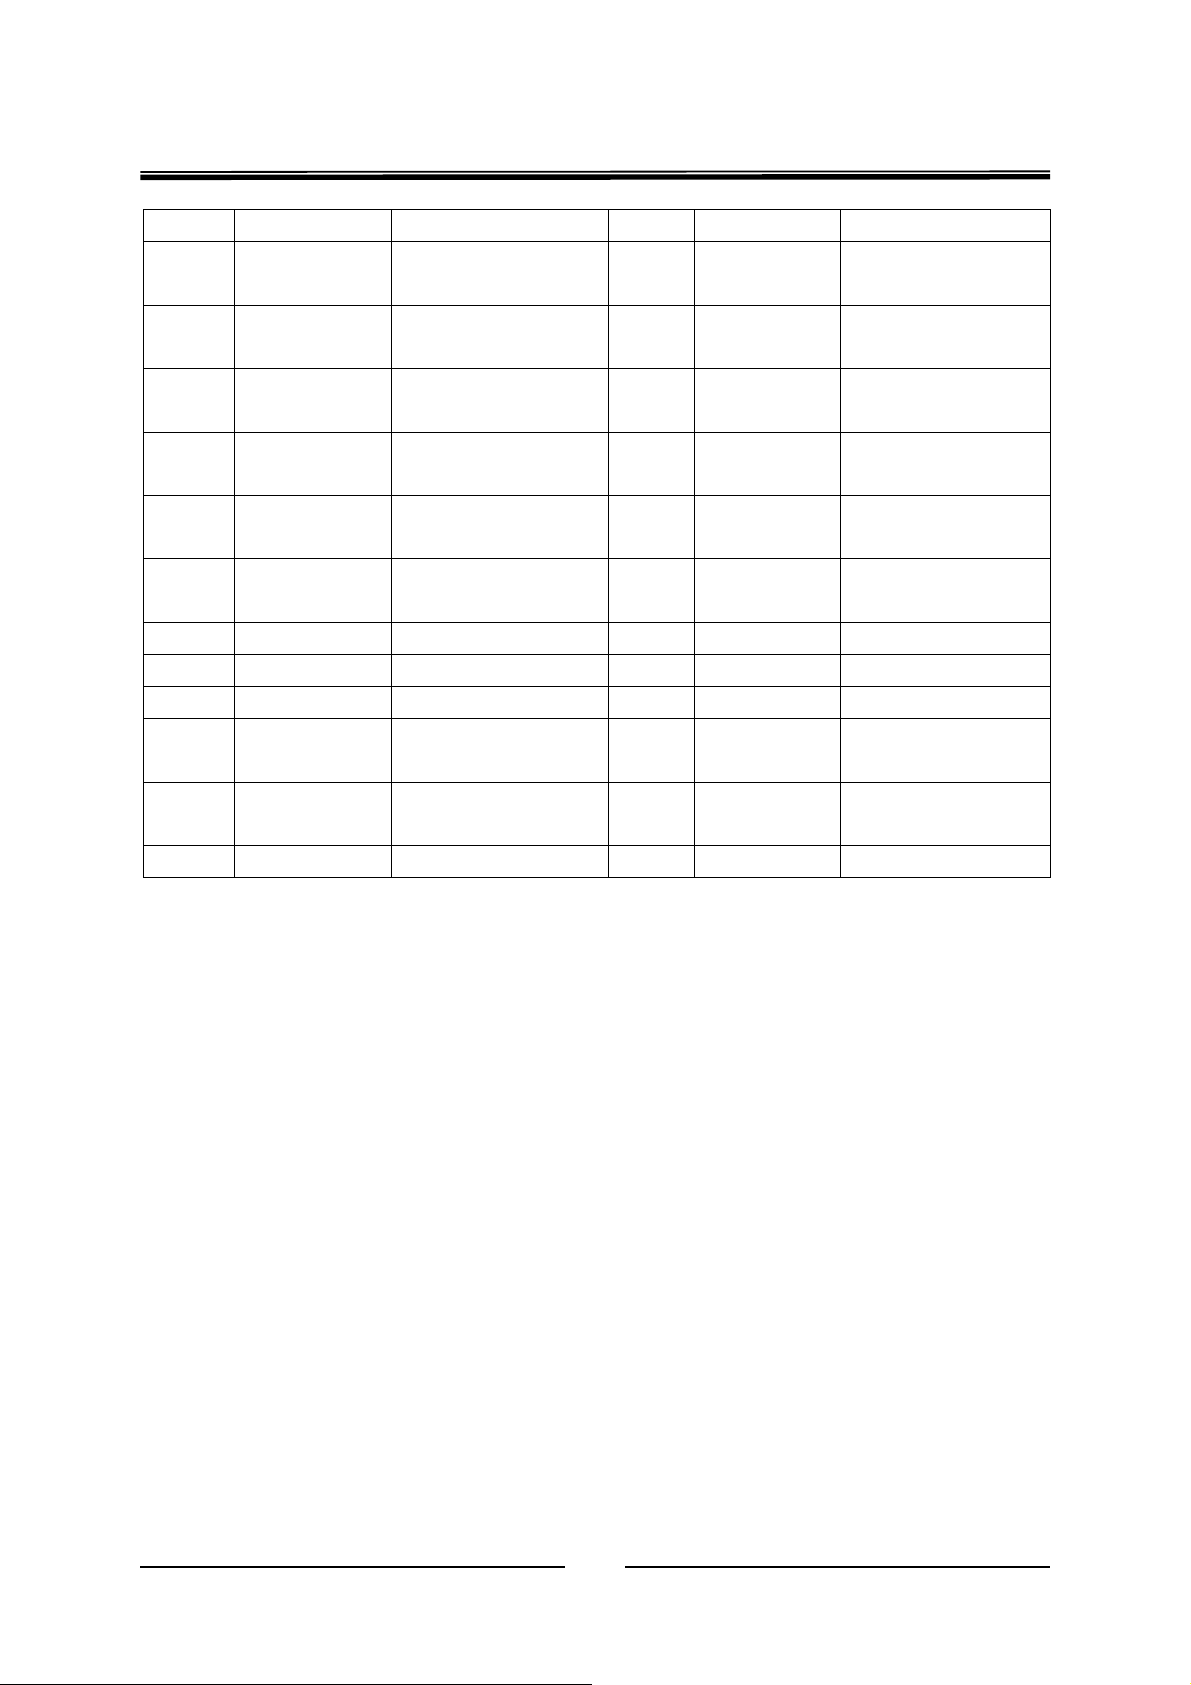
PE-5 Chassis Service Manual
1 JUC8.337.064 6 Buttons JUT7.374.043 Corner connector
JUP8.840.049 Out package plastic bag JUT8.048.007 Reflection mirror
connector
JUP8.840.050 Machine Package bag JUT8.048.008 Screen cabinet
connector
JUP8.846.910/9
11
JUP8.846.912/9
13
JUP8.864.078 Paper-made steel
JUP8.864.079 Paper-made corner
JUP8.865.218 Paper board JUT8.048.086 Upper connector
JUP6.876.434 Body box JUT8.048.195 Upper round cabinet
JUP6.876.435 Bottom box 4 JUT8.074.005 Chassis back cover
2 JUT6.116.114 Speaker cover
3 JUT6.116.302 Screen cabinet
JUT6.152.026 Tube holder assembly
Upper Holder
(Left/right)
Down Holder
(Left/right)
supporting column
steel cabinet
Assembly
assembly
JUT8.048.074 Corner connector
JUT8.048.075 Corner connector
JUT8.048.081 Down round cabinet
JUT8.048.083 Side round cabinet
JUT8.077.022 Chassis cabinet
JUT8.077.028 Rear terminals board
(Down)
(Upper)
38
Page 41
PE-5 Chassis Service Manual
R
Parts List
1. Part on Sensor Processing PCB
POSITION NAME TYPE
R138 carbon film resi RT13-0.166W-2.2ΩJ
R149 carbon film resi RT13-0.166W-2.2ΩJ
R282 carbon film resi RT13-0.166W-33ΩJ
R140 carbon film resi RT13-0.166W-33ΩJ
R119 carbon film resi RT13-0.166W-47ΩJ
R143 carbon film resi RT13-0.166W-47ΩJ
R178A carbon film resi RT13-0.166W-75ΩJ
R228 carbon film resi RT13-0.166W-75ΩJ
R229 carbon film resi RT13-0.166W-75ΩJ
R111 carbon film resi RT13-0.166W-100ΩJ
R112 carbon film resi RT13-0.166W-100ΩJ
R113 carbon film resi RT13-0.166W-100ΩJ
R117 carbon film resi RT13-0.166W-100ΩJ
R123 carbon film resi RT13-0.166W-100ΩJ
R125 carbon film resi RT13-0.166W-100ΩJ
R127 carbon film resi RT13-0.166W-100ΩJ
R144A carbon film resi RT13-0.166W-100ΩJ
R159 carbon film resi RT13-0.166W-100ΩJ
R169 carbon film resi RT13-0.166W-100ΩJ
R170 carbon film resi
R171 carbon film resi RT13-0.166W-100ΩJ
R173 carbon film resi RT13-0.166W-100ΩJ
R174 carbon film resi RT13-0.166W-100ΩJ
R177 carbon film resi RT13-0.166W-100ΩJ
R178 carbon film resi RT13-0.166W-100ΩJ
R179 carbon film resi RT13-0.166W-100ΩJ
R180 carbon film resi RT13-0.166W-100ΩJ
R181 carbon film resi RT13-0.166W-100ΩJ
R182 carbon film resi RT13-0.166W-100ΩJ
R183 carbon film resi RT13-0.166W-100ΩJ
R183 carbon film resi RT13-0.166W-100ΩJ
R190 carbon film resi RT13-0.166W-100ΩJ
R191 carbon film resi RT13-0.166W-100ΩJ
R193 carbon film resi RT13-0.166W-100ΩJ
R194 carbon film resi RT13-0.166W-100ΩJ
R195 carbon film resi RT13-0.166W-100ΩJ
R196 carbon film resi RT13-0.166W-100ΩJ
R197 carbon film resi RT13-0.166W-100ΩJ
R198 carbon film resi RT13-0.166W-100ΩJ
R199 carbon film resi RT13-0.166W-100ΩJ
R200 carbon film resi RT13-0.166W-100ΩJ
T13-0.166W-100ΩJ
39
Page 42
PE-5 Chassis Service Manual
POSITION NAME TYPE
R201 carbon film resi RT13-0.166W-100ΩJ
R202 carbon film resi RT13-0.166W-100ΩJ
R203 carbon film resi RT13-0.166W-100ΩJ
R231 carbon film resi RT13-0.166W-100ΩJ
R238 carbon film resi RT13-0.166W-100ΩJ
R240 carbon film resi RT13-0.166W-100ΩJ
R258 carbon film resi RT13-0.166W-100ΩJ
R259 carbon film resi RT13-0.166W-100ΩJ
R272 carbon film resi RT13-0.166W-100ΩJ
R273 carbon film resi RT13-0.166W-100ΩJ
R279 carbon film resi RT13-0.166W-100ΩJ
R280 carbon film resi RT13-0.166W-100ΩJ
R281 carbon film resi RT13-0.166W-100ΩJ
R295 carbon film resi RT13-0.166W-100ΩJ
W121 carbon film resi RT13-0.166W-100ΩJ
R148 carbon film resi RT13-0.166W-150ΩJ
R153 carbon film resi RT13-0.166W-200ΩJ
R153A carbon film resi RT13-0.166W-200ΩJ
R262 carbon film resi RT13-0.166W-220ΩJ
R277 carbon film resi RT13-0.166W-240ΩJ
R122 carbon film resi RT13-0.166W-330ΩJ
R150 carbon film resi RT13-0.166W-330ΩJ
R235 carbon film resi RT13-0.166W-330ΩJ
R236 carbon film resi RT13-0.166W-330ΩJ
R237 carbon film resi RT13-0.166W-330ΩJ
R118 carbon film resi RT13-0.166W-470ΩJ
R118A carbon film resi RT13-0.166W-470ΩJ
R133 carbon film resi RT13-0.166W-470ΩJ
R139 carbon film resi RT13-0.166W-470ΩJ
R139A carbon film resi RT13-0.166W-470ΩJ
R218 carbon film resi RT13-0.166W-470ΩJ
R219 carbon film resi RT13-0.166W-470ΩJ
R220 carbon film resi RT13-0.166W-470ΩJ
R221 carbon film resi RT13-0.166W-470ΩJ
R222 carbon film resi RT13-0.166W-470ΩJ
R246 carbon film resi RT13-0.166W-470ΩJ
R247 carbon film resi RT13-0.166W-470ΩJ
R286 carbon film resi RT13-0.166W-470ΩJ
R189 carbon film resi RT13-0.166W-360ΩJ
R248 carbon film resi RT13-0.166W-560ΩJ
R278 carbon film resi RT13-0.166W-680ΩJ
R276 carbon film resi RT13-0.166W-680ΩJ
R137 carbon film resi RT13-0.166W-1KΩJ
R243 carbon film resi RT13-0.166W-1KΩJ
R244 carbon film resi RT13-0.166W-1KΩJ
40
Page 43
PE-5 Chassis Service Manual
POSITION NAME TYPE
R245 carbon film resi RT13-0.166W-1KΩJ
R250 carbon film resi RT13-0.166W-1KΩJ
R251 carbon film resi RT13-0.166W-1KΩJ
R252 carbon film resi RT13-0.166W-1KΩJ
R253 carbon film resi RT13-0.166W-1KΩJ
R294 carbon film resi RT13-0.166W-1KΩJ
R290 carbon film resi RT13-0.166W-1KΩJ
R293 carbon film resi RT13-0.166W-1KΩJ
R256 carbon film resi RT13-0.166W-1.5KΩJ
R151 carbon film resi RT13-0.166W-1.5KΩJ
R206 carbon film resi RT13-0.166W-1.5KΩJ
R254 carbon film resi RT13-0.166W-1.5KΩJ
R255 carbon film resi RT13-0.166W-1.5KΩJ
R129 carbon film resi RT13-0.166W-1.8KΩJ
R134 carbon film resi RT13-0.166W-1.8KΩJ
R291 carbon film resi RT13-0.166W-2KΩJ
R147 carbon film resi RT13-0.166W-2KΩJ
R230 carbon film resi RT13-0.166W-2.2KΩJ
R289 carbon film resi RT13-0.166W-3KΩJ
R130 carbon film resi RT13-0.166W-3.9KΩJ
R135 carbon film resi RT13-0.166W-3.9KΩJ
R154 carbon film resi RT13-0.166W-4.7KΩJ
R155 carbon film resi RT13-0.166W-4.7KΩJ
R157 carbon film resi RT13-0.166W-4.7KΩJ
R161 carbon film resi RT13-0.166W-4.7KΩJ
R163 carbon film resi RT13-0.166W-4.7KΩJ
R165 carbon film resi RT13-0.166W-4.7KΩJ
R166 carbon film resi RT13-0.166W-4.7KΩJ
R167 carbon film resi RT13-0.166W-4.7KΩJ
R204 carbon film resi RT13-0.166W-4.7KΩJ
R205 carbon film resi RT13-0.166W-4.7KΩJ
R207 carbon film resi RT13-0.166W-4.7KΩJ
R208 carbon film resi RT13-0.166W-4.7KΩJ
R209 carbon film resi RT13-0.166W-4.7KΩJ
R210 carbon film resi RT13-0.166W-4.7KΩJ
R211 carbon film resi RT13-0.166W-4.7KΩJ
R212 carbon film resi RT13-0.166W-4.7KΩJ
R213 carbon film resi RT13-0.166W-4.7KΩJ
R214 carbon film resi RT13-0.166W-4.7KΩJ
R214A carbon film resi RT13-0.166W-4.7KΩJ
R215 carbon film resi RT13-0.166W-4.7KΩJ
R216 carbon film resi RT13-0.166W-4.7KΩJ
R217 carbon film resi RT13-0.166W-4.7KΩJ
R225 carbon film resi RT13-0.166W-4.7KΩJ
R226 carbon film resi RT13-0.166W-4.7KΩJ
41
Page 44
PE-5 Chassis Service Manual
POSITION NAME TYPE
R232 carbon film resi RT13-0.166W-4.7KΩJ
R239 carbon film resi RT13-0.166W-4.7KΩJ
R260 carbon film resi RT13-0.166W-4.7KΩJ
R261 carbon film resi RT13-0.166W-4.7KΩJ
R172A carbon film resi RT13-0.166W-5.1KΩG
R175A carbon film resi RT13-0.166W-5.1KΩG
R176A carbon film resi RT13-0.166W-5.1KΩG
R185 carbon film resi RT13-0.166W-5.6KΩJ
R186 carbon film resi RT13-0.166W-5.6KΩJ
R187 carbon film resi RT13-0.166W-5.6KΩJ
R152 carbon film resi RT13-0.166W-6.8KΩJ
R142 carbon film resi RT13-0.166W-7.5KΩJ
R275A carbon film resi RT13-0.166W-8.2KΩJ
R120 carbon film resi RT13-0.166W-10KΩJ
R128 carbon film resi RT13-0.166W-10KΩJ
R132 carbon film resi RT13-0.166W-10KΩJ
R145 carbon film resi RT13-0.166W-10KΩJ
R223 carbon film resi RT13-0.166W-10KΩJ
R284 carbon film resi RT13-0.166W-10KΩJ
R172 carbon film resi RT13-0.166W-10KΩG
R175 carbon film resi RT13-0.166W-10KΩG
R176 carbon film resi RT13-0.166W-10KΩG
R121 carbon film resi RT13-0.166W-15KΩJ
R136 carbon film resi RT13-0.166W-15KΩJ
R146 carbon film resi RT13-0.166W-15KΩJ
R141 carbon film resi RT13-0.166W-22KΩJ
R124 carbon film resi RT13-0.166W-22KΩJ
R131 carbon film resi RT13-0.166W-22KΩJ
R275 carbon film resi RT13-0.166W-27KΩJ
R126 carbon film resi RT13-0.166W-39KΩJ
R292 carbon film resi RT13-0.166W-56KΩJ
R268 carbon film resi RT13-0.166W-100KΩJ
R285 carbon film resi RT13-0.166W-100KΩJ
R269 carbon film resi RT13-0.166W-1MΩJ
R274 metal oxide film RY21-0.5W-180ΩJ
R108 metal oxide film RY21-2W-22KΩJ
R102 metal oxide film RY21-2W-15ΩJ
R103 metal oxide film RY21-2W-15ΩJ
R114 metal oxide film RY21-2W-15ΩJ
R115 metal oxide film RY21-2W-15ΩJ
R116 Direct fuse RF10-1W-0.27ΩJ
C173 ceramic capacito CC1-63V-06a-C-10PFJ
C174 ceramic capacito CC1-63V-06a-C-10PFJ
C167 ceramic capacito CC1-63V-06a-C-22PFJ
C169 ceramic capacito CC1-63V-06a-C-22PFJ
42
Page 45
PE-5 Chassis Service Manual
poly
poly
poly
poly
poly
j
poly
poly
poly
poly
poly
poly
poly
poly
poly
poly
poly
poly
poly
poly
poly
poly
poly
poly
poly
poly
POSITION NAME TYPE
C235 ceramic capacito CC1-63V-06a-C-22PFJ
C154 ceramic capacito CC1-63V-06a-C-27PFJ
C150 ceramic capacito CC1-63V-06a-C-33PFJ
C221 ceramic capacito CC1-63V-06a-C-47PFJ
C156 ceramic capacito CC1-63V-06c-SL-150PFJ
C166 ceramic capacito CC1-63V-06c-SL-220PFJ
C178 ceramic capacito CT1-63V-06a-2B4-1000PFK
C160 ceramic capacito CT1-63V-06a-2B4-1000PFK
C168 ceramic capacito CT1-63V-06a-2B4-1000PFK
C139 ceramic capacito CT1-63V-06a-2B4-1000PFK
C142 ceramic capacito CT1-63V-06a-2B4-1000PFK
C146 ceramic capacito CT1-63V-06a-2B4-1000PFK
C177 ceramic capacito CT1-63V-06a-2B4-1000PFK
C231 ceramic capacito CT1-63V-06a-2B4-1200PFK
C115 ceramic capacito CT1-63V-08A-2F4-10nFZ
C119 ceramic capacito CT1-63V-08A-2F4-10nFZ
C131 ceramic capacito CT1-63V-08A-2F4-10nFZ
C133 ceramic capacito CT1-63V-08A-2F4-10nFZ
C136 ceramic capacito CT1-63V-08A-2F4-10nFZ
C175 ceramic capacito CT1-63V-08A-2F4-10nFZ
C106
C109
C121
C122
C124A
C124B
C124C
C194
C196
C199
C203
C208
C209
C210
C215
C217
C220
C180
C107A
C107B
C107C
C117
C118
C126A
C129
ster film ca CL21X-50V-0.01μFJ
ster film ca CL21X-50V-0.01μFJ
ster film ca CL21X-50V-0.01μFJ
ster film ca CL21X-50V-0.01μFJ
ster film ca CL21X-50V-0.01Μf
ster film ca CL21X-50V-0.01μFJ
ster film ca CL21X-50V-0.01μFJ
ster film ca CL21X-50V-0.01μFJ
ster film ca CL21X-50V-0.01μFJ
ster film ca CL21X-50V-0.01μFJ
ster film ca CL21X-50V-0.01μFJ
ster film ca CL21X-50V-0.01μFJ
ster film ca CL21X-50V-0.01μFJ
ster film ca CL21X-50V-0.01μFJ
ster film ca CL21X-50V-0.01μFJ
ster film ca CL21X-50V-0.01μFJ
ster film ca CL21X-50V-0.01μFJ
ster film ca CL21X-50V-0.1μFJ
ster film ca CL21X-50V-0.1μFJ
ster film ca CL21X-50V-0.1μFJ
ster film ca CL21X-50V-0.1μFJ
ster film ca CL21X-50V-0.1μFJ
ster film ca CL21X-50V-0.1μFJ
ster film ca CL21X-50V-0.1μFJ
ster film ca CL21X-50V-0.1μFJ
43
Page 46
PE-5 Chassis Service Manual
poly
poly
poly
poly
poly
poly
poly
poly
poly
poly
poly
poly
poly
poly
poly
poly
poly
poly
poly
poly
poly
poly
poly
poly
poly
poly
poly
poly
poly
POSITION NAME TYPE
C130
C137
C149
C161
C171
C189
C190
C191
C200
C201
C202
C205
C206
C207
C211
C213A
C219
C224
C225
C226
C227
C232A
C152
C157
C233
C234
C186
C212
C237
C164 aluminium electr CD110X-16V-1μFM
C172 aluminium electr CD110X-16V-1μFM
C193 aluminium electr CD110X-16V-2.2μFM
C216 aluminium electr CD110X-16V-2.2μFM
C236 aluminium electr CD110X-16V-10μFM
C213 aluminium electr CD110X-16V-22μFM
C113 aluminium electr CD110X-16V-47μFM
C114 aluminium electr CD110X-16V-47μFM
C125 aluminium electr CD110X-16V-47μFM
C126 aluminium electr CD110X-16V-47μFM
C127 aluminium electr CD110X-16V-47μFM
C128 aluminium electr CD110X-16V-47μFM
C132 aluminium electr CD110X-16V-47μFM
C153 aluminium electr CD110X-16V-47μFM
C159 aluminium electr CD110X-16V-47μFM
C170 aluminium electr CD110X-16V-47μFM
ster film ca CL21X-50V-0.1μFJ
ster film ca CL21X-50V-0.1μFJ
ster film ca CL21X-50V-0.1μFJ
ster film ca CL21X-50V-0.1μFJ
ster film ca CL21X-50V-0.1μFJ
ster film ca CL21X-50V-0.1μFJ
ster film ca CL21X-50V-0.1μFJ
ster film ca CL21X-50V-0.1μFJ
ster film ca CL21X-50V-0.1μFJ
ster film ca CL21X-50V-0.1μFJ
ster film ca CL21X-50V-0.1μFJ
ster film ca CL21X-50V-0.1μFJ
sterfilm ca CL21X-50V-0.1μFJ
ster film ca CL21X-50V-0.1μFJ
ster film ca CL21X-50V-0.1μFJ
ster film ca CL21X-50V-0.1μFJ
ster film ca CL21X-50V-0.1μFJ
ster film ca CL21X-50V-0.1μFJ
ster film ca CL21X-50V-0.1μFJ
ster film ca CL21X-50V-0.1μFJ
ster film ca CL21X-50V-0.1μFJ
ster film ca CL21X-50V-0.1μFJ
ster film ca CL21X-50V-0.1μFJ
ster film ca CL21X-50V-0.1μFJ
ster film ca CL21X-50V-0.1μFJ
ster film ca CL21X-50V-0.1μFJ
ster film ca CL21X-50V-0.1μFJ
ster film ca CD21X-50V-0.33μFJ
ster film ca CD21X-50V-0.47μFJ
44
Page 47
PE-5 Chassis Service Manual
POSITION NAME TYPE
C223 aluminium electr CD110X-16V-47μFM
C232 aluminium electr CD110X-16V-47μFM
C214 aluminium electr CD110X-16V-100μFM
C107 aluminium electr CD110X-16V-100μFM
C158 aluminium electr CD110X-16V-100μFM
C204 aluminium electr CD110X-16V-100μFM
C198 aluminium electr CD110X-16V-220μFM
C124 aluminium electr CD110X-25V-100μFM
C111 aluminium electr CD110X-35V-47μFM
C123 aluminium electr CD110X-35V-47μFM
C120 aluminium electr CD110X-35V-100μFM
C187 aluminium electr CD110X-50V-0.47μFM
C192 aluminium electr CD110X-50V-0.47μFM
C140 aluminium electr CD110X-50V-1μFM
C143 aluminium electr CD110X-50V-1μFM
C188 aluminium electr CD110X-50V-1μFM
C218 aluminium electr CD110X-50V-1μFM
C229 aluminium electr CD110X-50V-1μFM
C141 aluminium electr CD110X-50V-47μFM
C135 aluminium electr CD110X-50V-47μFM
C104 aluminium electr CD110X-50V-100μFM
C138 aluminium electr CD110X-50V-100μFM
C144 aluminium electr CD110X-50V-100μFM
C145 aluminium electr CD110X-50V-100μFM
C148 aluminium electr CD110X-50V-100μFM
C151 aluminium electr CD110X-50V-1000μFM
C155 aluminium electr CD110X-50V-1000μFM
C147 aluminium electr CD110X-50V-1000μFM
C176 aluminium electr CD110X-50V-33μFM
L116 fixed inductor LGB0606-2.7μHJ
L114 fixed inductor LGB0606-10μHJ
L115 fixed inductor LGB0606-22μHJ
L111 fixed inductor LGB0606-47μHJ
L118 fixed inductor LGB0606-47μHJ
L119 fixed inductor LGB0606-47μHJ
L120 fixed inductor LGB0606-47μHJ
L121 fixed inductor LGB0606-47μHJ
L105 cored inductor TEM2011
L106 cored inductor TEM2011
L110 cored inductor TEM2011
L112 cored inductor TEM2011
L113 cored inductor TEM2011
L117 cored inductor TEM2011
D101 diode 1N4148
D102 diode 1N4148
45
Page 48
PE-5 Chassis Service Manual
POSITION NAME TYPE
D103 diode 1N4148
D104 diode 1N4148
D106 diode 1N4148
D107 diode 1N4148
D108 diode 1N4148
D117 diode 1N4148
D118 diode 1N4148
D119 diode 1N4148
D120 diode 1N4148
D125 diode 1N4148
D126 diode 1N4148
D127 diode 1N4148
D128 diode 1N4148
D137 diode 1N4148
D137A diode 1N4148
D137B diode 1N4148
D138 diode 1N4148
D139 diode 1N4148
D134 diode W05Z2.0B
D121 diode W05Z5.1B
D122 diode W05Z5.1B
D123 diode W05Z5.1B
D124 diode W05Z6.8B
Q104 triode 2SA1015-Y
Q114 triode 2SA1015-Y
Q117 triode 2SA1015-Y
Q118 triode 2SA1015-Y
Q119 triode 2SA1015-Y
Q111 triode 2SA1015-Y
Q110 triode 2SC1815-Y
Q102 triode 2SC1815-Y
Q107 triode 2SC1815-Y
Q108 triode 2SC1815-Y
Q113 triode 2SC1815-Y
Q120 triode 2SC1815-Y
Q121 triode 2SC1815-Y
Q122 triode 2SC1815-Y
Q103 triode 2SC2878-A
Q105 triode 2SC2878-A
Q106 triode RN1204
Q109 triode RN1204
XN101 Crystal oscillat JA18A-8.00MHz
XN102 Crystal oscillat CSBLA503KECZF30
N100 Tuner TCLW3101PD18A(S)
N101 Tuner TCPW3001PC18B(S)
N102 IC TA8200AH
46
Page 49
PE-5 Chassis Service Manual
POSITION NAME TYPE
N103 IC M37281-EKPS
N104 IC AT24C16
N106 IC L7812CV
N109 IC L7812CV
N105 IC L7912CV
N107 IC L7805CV
N108 IC L7805CV
N115 IC L7805CV
N110 IC L7809CV
N111 IC L7809CV
D100 IC uPC574J
D100 IC CW574CS
N113 IC TA1360ANG
N116 IC 74HCT86N
47
Page 50
2. Parts on Scan PCB
POSITION NAME TYPE
PE-5 Chassis Service Manual
48
Page 51
PE-5 Chassis Service Manual
POSITION NAME TYPE
49
Page 52
PE-5 Chassis Service Manual
POSITION NAME TYPE
50
Page 53
PE-5 Chassis Service Manual
POSITION NAME TYPE
51
Page 54
PE-5 Chassis Service Manual
POSITION NAME TYPE
52
Page 55
PE-5 Chassis Service Manual
POSITION NAME TYPE
53
Page 56
PE-5 Chassis Service Manual
POSITION NAME TYPE
54
Page 57
PE-5 Chassis Service Manual
POSITION NAME TYPE
VD313 Diode EU2A
VD317 diode EU2A
VD305 diode ERC20-06
VD306 diode 2CZRV2
VD306 diode 5VUZ52
V302 triode 2C1815-Y
V306 triode 2C1815-Y
V307 triode 2C1815-Y
V308 triode 2C1815-Y
V311 triode 2C1815-Y
V312 triode 2C1815-Y
V313 triode 2C1815-Y
V316 triode 2C1815-Y
55
Page 58
PE-5 Chassis Service Manual
)
POSITION NAME TYPE
V318 triode 2C1815-Y
V303 triode 2SC2235-0
V304 triode 2SB688
V305 triode 2SC5144
V314 triode 2SA1015-Y
V315 triode 2SA1015-Y
V309 triode 2SC4686A
V317 triode TL431C
T301 Line drive BCT-7(JU4.739.039
T303 Line drive BSD70A
T302 Line drive TLN2168
N301 IC LA7846N
N315 High-voltage box RCB-01
N303 IC STK392-560
N304 IC STK392-560
N302 IC TA1317N
N305 IC TCA0372
56
Page 59
3.
Parts on Power PCB
PE-5 Chassis Service Manual
57
Page 60
PE-5 Chassis Service Manual
58
Page 61
PE-5 Chassis Service Manual
59
Page 62
PE-5 Chassis Service Manual
60
Page 63
4. Parts on Digital PCB
PE-5 Chassis Service Manual
61
Page 64
PE-5 Chassis Service Manual
62
Page 65
PE-5 Chassis Service Manual
63
Page 66
PE-5 Chassis Service Manual
64
Page 67
PE-5 Chassis Service Manual
65
Page 68
PE-5 Chassis Service Manual
66
Page 69
PE-5 Chassis Service Manual
67
Page 70
PE-5 Chassis Service Manual
68
Page 71
PE-5 Chassis Service Manual
69
Page 72
PE-5 Chassis Service Manual
D511 chip diode BAV99LT1
D512 chip diode BAV99LT1
V500 chip triode MMBT3906
V501 chip triode MMBT3906
V505 chip triode MMBT3906
V506 chip triode MMBT3906
V507 chip triode MMBT3906
V502 chip triode MMBT3906
V503 chip triode MMBT3906
V504 chip triode MMBT3906
V513 chip triode MMBT3904
70
Page 73
PE-5 Chassis Service Manual
V514 chip triode MMBT3904
V515 chip triode MMBT3904
V516 chip triode MMBT3904
V510 chip triode MMBT3904
V511 chip triode MMBT3904
V512 chip triode MMBT3904
N513 IC HY57V641620HG
N509 IC AS1117M2-2.5
N510 IC AIC1117-25CY
N502 IC AS1117M3-3.3
N503 IC AS1117M3-3.3
N504 IC AS1117M3-3.3
N505 IC AS1117M3-3.3
N506 IC AS1117M3-3.3
N512 IC AS1117M3-3.3
N507 IC AD9883A - 110MSPS
N511 IC PW1235
N516 IC TC90A69F
N514 IC TB1274AF
N515 IC SDA9489X
X500 Crystal oscillat JA18S-10.00MHZ
X501 Crystal oscillat NR-18NT-16.2020MHZ
X502 Crystal oscillat JA18A1-20250KHZ
71
Page 74
5. Parts on CONV PCB
PE-5 Chassis Service Manual
72
Page 75
PE-5 Chassis Service Manual
73
Page 76
PE-5 Chassis Service Manual
74
Page 77
PE-5 Chassis Service Manual
75
Page 78
PE-5 Chassis Service Manual
76
Page 79
PE-5 Chassis Service Manual
77
Page 80
PE-5 Chassis Service Manual
78
Page 81
PE-5 Chassis Service Manual
79
Page 82
PE-5 Chassis Service Manual
80
Page 83
PE-5 Chassis Service Manual
81
Page 84
PE-5 Chassis Service Manual
82
Page 85
PE-5 Chassis Service Manual
83
Page 86
PE-5 Chassis Service Manual
84
Page 87
PE-5 Chassis Service Manual
85
Page 88
6. Part on Sensor Processing PC
PE-5 Chassis Service Manual
86
Page 89
PE-5 Chassis Service Manual
87
Page 90
7. Parts on TEXT PCB
PE-5 Chassis Service Manual
88
Page 91
PE-5 Chassis Service Manual
89
Page 92
PE-5 Chassis Service Manual
8. Parts on AV PCB
POSITION NAME TYPE
Parts on AV PCB
R916 carbon film resi RT13-0.166W-75ΩJ
R923 carbon film resi RT13-0.166W-75ΩJ
R925 carbon film resi RT13-0.166W-75ΩJ
R926 carbon film resi RT13-0.166W-75ΩJ
R966 carbon film resi RT13-0.166W-75ΩJ
R967 carbon film resi RT13-0.166W-75ΩJ
R971 carbon film resi RT13-0.166W-75ΩJ
R975 carbon film resi RT13-0.166W-75ΩJ
R976 carbon film resi RT13-0.166W-75ΩJ
R977 carbon film resi RT13-0.166W-75ΩJ
R981 carbon film resi RT13-0.166W-75ΩJ
R904 carbon film resi RT13-0.166W-75ΩJ
R911 carbon film resi RT13-0.166W-75ΩJ
R902 carbon film resi RT13-0.166W-100ΩJ
R903 carbon film resi RT13-0.166W-100ΩJ
R931 carbon film resi RT13-0.166W-100ΩJ
R937 carbon film resi RT13-0.166W-100ΩJ
R939 carbon film resi RT13-0.166W-100ΩJ
R941 carbon film resi RT13-0.166W-100ΩJ
R962 carbon film resi RT13-0.166W-100ΩJ
R963 carbon film resi RT13-0.166W-100ΩJ
R964 carbon film resi RT13-0.166W-100ΩJ
R983 carbon film resi RT13-0.166W-100ΩJ
R984 carbon film resi RT13-0.166W-100ΩJ
R965 carbon film resi RT13-0.166W-100ΩJ
R918 carbon film resi RT13-0.166W-180ΩJ
R919 carbon film resi RT13-0.166W-180ΩJ
R920 carbon film resi RT13-0.166W-180ΩJ
R910 carbon film resi RT13-0.166W-180ΩJ
R942 carbon film resi RT13-0.166W-220ΩJ
R943 carbon film resi RT13-0.166W-220ΩJ
R944 carbon film resi RT13-0.166W-220ΩJ
R945 carbon film resi RT13-0.166W-220ΩJ
R986 carbon film resi RT13-0.166W-220ΩJ
R989 carbon film resi RT13-0.166W-220ΩJ
R990 carbon film resi RT13-0.166W-220ΩJ
R991 carbon film resi RT13-0.166W-220ΩJ
R992 carbon film resi RT13-0.166W-220ΩJ
R993 carbon film resi RT13-0.166W-220ΩJ
R997 carbon film resi RT13-0.166W-220ΩJ
R932 carbon film resi RT13-0.166W-220ΩJ
R935 carbon film resi RT13-0.166W-220ΩJ
R927 carbon film resi RT13-0.166W-470ΩJ
90
Page 93
PE-5 Chassis Service Manual
POSITION NAME TYPE
R928 carbon film resi RT13-0.166W-470ΩJ
R968 carbon film resi RT13-0.166W-470ΩJ
R970 carbon film resi RT13-0.166W-470ΩJ
R973 carbon film resi RT13-0.166W-470ΩJ
R978 carbon film resi RT13-0.166W-470ΩJ
R979 carbon film resi RT13-0.166W-470ΩJ
R982 carbon film resi RT13-0.166W-470ΩJ
R957 carbon film resi RT13-0.166W-1KΩJ
R958 carbon film resi RT13-0.166W-1KΩJ
R959 carbon film resi RT13-0.166W-1KΩJ
R961 carbon film resi RT13-0.166W-1KΩJ
R988 carbon film resi RT13-0.166W-1KΩJ
R999 carbon film resi RT13-0.166W-1KΩJ
R938 carbon film resi RT13-0.166W-1KΩJ
R934 carbon film resi RT13-0.166W-1KΩJ
R952 carbon film resi RT13-0.166W-2.2KΩJ
R953 carbon film resi RT13-0.166W-2.2KΩJ
R954 carbon film resi RT13-0.166W-2.2KΩJ
R960 carbon film resi RT13-0.166W-2.2KΩJ
R987B carbon film resi RT13-0.166W-2.2KΩJ
R998B carbon film resi RT13-0.166W-2.2KΩJ
R934A carbon film resi RT13-0.166W-2.2KΩJ
R938A carbon film resi RT13-0.166W-2.2KΩJ
R946 carbon film resi RT13-0.166W-5.6KΩJ
R947 carbon film resi RT13-0.166W-5.6KΩJ
R948 carbon film resi RT13-0.166W-5.6KΩJ
R949 carbon film resi RT13-0.166W-5.6KΩJ
R950 carbon film resi RT13-0.166W-5.6KΩJ
R951 carbon film resi RT13-0.166W-5.6KΩJ
R955 carbon film resi RT13-0.166W-5.6KΩJ
R956 carbon film resi RT13-0.166W-5.6KΩJ
R987 carbon film resi RT13-0.166W-5.6KΩJ
R987A carbon film resi RT13-0.166W-5.6KΩJ
R998 carbon film resi RT13-0.166W-5.6KΩJ
R998A carbon film resi RT13-0.166W-5.6KΩJ
R933 carbon film resi RT13-0.166W-5.6KΩJ
R933A carbon film resi RT13-0.166W-5.6KΩJ
R936 carbon film resi RT13-0.166W-5.6KΩJ
R936A carbon film resi RT13-0.166W-5.6KΩJ
R915 carbon film resi RT13-0.166W-22KΩJ
R917 carbon film resi RT13-0.166W-22KΩJ
R924 carbon film resi RT13-0.166W-22KΩJ
R906 carbon film resi RT13-0.166W-22KΩJ
R912 carbon film resi RT13-0.166W-47KΩJ
R914 carbon film resi RT13-0.166W-47KΩJ
91
Page 94
PE-5 Chassis Service Manual
poly
poly
poly
poly
poly
poly
poly
poly
poly
POSITION NAME TYPE
R909 carbon film resi RT13-0.166W-47KΩJ
R929 carbon film resi RT13-0.166W-1MΩJ
R930 carbon film resi RT13-0.166W-1MΩJ
R931A carbon film resi RT13-0.166W-1MΩJ
R937A carbon film resi RT13-0.166W-1MΩJ
R969 carbon film resi RT13-0.166W-1MΩJ
R974 carbon film resi RT13-0.166W-1MΩJ
R972 carbon film resi RT13-0.166W-1MΩJ
R980 carbon film resi RT13-0.166W-1MΩJ
R983A carbon film resi RT13-0.166W-1MΩJ
R984A carbon film resi RT13-0.166W-1MΩJ
R901 metal oxide film RY21-0.5W-8.2ΩJ
C938 ceramic capacito CC1-63V-06A-C-2PFC
C939 ceramic capacito CC1-63V-06A-C-2PFC
C933 ceramic capacito CC1-63V-06a-SL-56PFJ
C934 ceramic capacito CC1-63V-06a-SL-56PFJ
C959 ceramic capacito CT1-63V-06a-2B4-330PFK
C963 ceramic capacito CT1-63V-06a-2B4-330PFK
C964 ceramic capacito CT1-63V-06a-2B4-330PFK
C965 ceramic capacito CT1-63V-06a-2B4-330PFK
C966 ceramic capacito CT1-63V-06a-2B4-330PFK
C967 ceramic capacito CT1-63V-06a-2B4-330PFK
C972 ceramic capacito CT1-63V-06a-2B4-330PFK
C973 ceramic capacito CT1-63V-06a-2B4-330PFK
C942 ceramic capacito CT1-63V-06a-2B4-470PFK
C920 ceramic capacito CT1-63V-06a-2B4-1000PFK
C922 ceramic capacito CT1-63V-06a-2B4-1000PFK
C923 ceramic capacito CT1-63V-06a-2B4-1000PFK
C924 ceramic capacito CT1-63V-06a-2B4-1000PFK
C975 ceramic capacito CT1-63V-06a-2B4-1000PFK
C976 ceramic capacito CT1-63V-06a-2B4-1000PFK
C977 ceramic capacito CT1-63V-06a-2B4-1000PFK
C978 ceramic capacito CT1-63V-06a-2B4-1000PFK
C979 ceramic capacito CT1-63V-06a-2B4-1000PFK
C980 ceramic capacito CT1-63V-06a-2B4-1000PFK
C981 ceramic capacito CT1-63V-06a-2B4-1000PFK
C926
C943
C954
C902
C927
C929
C957
C974
C901
ster film ca CL21X-50V-1500PFJ
ster film ca CL21X-50V-1500PFJ
ster film ca CL21X-50V-1500PFJ
ster film ca CL21X-63V-0.1μFJ
ster film ca CL21X-63V-0.1μFJ
ster film ca CL21X-63V-0.1μFJ
ster film ca
ster film ca
ster film ca CL21X-50V-0.22μFJ
92
Page 95
PE-5 Chassis Service Manual
poly
poly
poly
poly
poly
poly
poly
poly
poly
poly
poly
poly
poly
poly
poly
poly
poly
poly
poly
POSITION NAME TYPE
C903
C904
C905
C907
C908
C912
C913
C946
C947
C948
C949
C950
C951
C952
C953
C982
C983
C984
C985
C918 aluminium electr CD110X-50V-1μFM
C919 aluminium electr CD110X-50V-1μFM
C936 aluminium electr CD110X-16V-3.3μFM
C956 aluminium electr CD110X-16V-3.3μFM
C906 aluminium electr CD110-16V-10μFM
C925 aluminium electr CD110-16V-10μFM
C930 aluminium electr CD110-16V-10μFM
C931 aluminium electr CD110-16V-10μFM
C932 aluminium electr CD110-16V-10μFM
C955 aluminium electr CD110-16V-10μFM
C937 aluminium electr CD110-16V-22μFM
C940 aluminium electr CD110-16V-22μFM
C944 aluminium electr CD110-16V-22μFM
C945 aluminium electr CD110-16V-22μFM
C958 aluminium electr CD110-16V-22μFM
C960 aluminium electr CD110-16V-22μFM
C961 aluminium electr CD110-16V-22μFM
C962 aluminium electr CD110-16V-22μFM
C968 aluminium electr CD110-16V-22μFM
C969 aluminium electr CD110-16V-22μFM
C970 aluminium electr CD110-16V-22μFM
C971 aluminium electr CD110-16V-22μFM
C990 aluminium electr CD110-16V-22μFM
C991 aluminium electr CD110-16V-22μFM
C986 aluminium electr CD110-16V-22μFM
C988 aluminium electr
ster film ca CL21X-50V-0.22μFJ
ster film ca CL21X-50V-0.22μFJ
ster film ca CL21X-50V-0.22μFJ
ster film ca CL21X-50V-0.22μFJ
ster film ca CL21X-50V-0.22μFJ
ster film ca CL21X-50V-0.22μFJ
ster film ca CL21X-50V-0.22μFJ
ster film ca CL21X-50V-0.33μFJ
ster film ca CL21X-50V-0.33μFJ
ster film ca CL21X-50V-0.33μFJ
ster film ca CL21X-50V-0.33μFJ
ster film ca CL21X-50V-0.33μFJ
ster film ca CL21X-50V-0.33μFJ
ster film ca CL21X-50V-0.33μFJ
ster film ca CL21X-50V-0.33μFJ
ster film ca CL21X-50V-0.33μFJ
ster film ca CL21X-50V-0.33μFJ
ster film ca CL21X-50V-0.33μFJ
ster film ca CL21X-50V-0.33μFJ
93
Page 96
PE-5 Chassis Service Manual
POSITION NAME TYPE
C909 aluminium electr CD110X-16V-47μFM
C910 aluminium electr CD110X-16V-47μFM
C911 aluminium electr CD110X-16V-47μFM
C914A aluminium electr CD110X-16V-47μFM
C915 aluminium electr CD110X-16V-470μFM
C916 aluminium electr CD110X-16V-470μFM
C917 aluminium electr CD110X-16V-470μFM
C914 aluminium electr CD110X-16V-470μFM
L901 fixed inductor LGB0606-10μHK
L903 fixed inductor LGB0606-10μHK
L902 cored inductor TEM2011
L904 cored inductor TEM2011
L905 cored inductor TEM2011
L904A cored inductor TEM2011
L906 cored inductor TEM2028K
L907 cored inductor TEM2028K
L908 cored inductor TEM2028K
L909 cored inductor TEM2028K
L910 cored inductor TEM2028K
L912 cored inductor TEM2028K
L913 cored inductor TEM2028K
L914 cored inductor TEM2028K
L915 cored inductor TEM2028K
L916 cored inductor TEM2028K
L917 cored inductor TEM2028K
L918 cored inductor TEM2028K
L919 cored inductor TEM2028K
L920 cored inductor TEM2028K
L921 cored inductor TEM2028K
L922 cored inductor TEM2028K
L923 cored inductor TEM2028K
L924 cored inductor TEM2028K
L925 cored inductor TEM2028K
L926 cored inductor TEM2028K
L927 cored inductor TEM2028K
L928 cored inductor TEM2028K
VD901 Diode W05Z10B
V902 Triode 2SC1815-Y
V903 Triode 2SC1815-Y
V905 Triode 2SC1815-Y
V906 Triode 2SC1815-Y
V907 Triode 2SC1815-Y
V908 Triode 2SC1815-Y
V910 Triode 2SC1815-Y
V909 Triode 2SC1815-Y
94
Page 97
PE-5 Chassis Service Manual
POSITION NAME TYPE
V911 Triode 2SC1815-Y
V904 Triode 2SC1815-Y
V917 Triode 2SC1815-Y
V918 Triode 2SC1815-Y
V912 Triode 2SC1815-Y
V913 Triode 2SC1815-Y
V914 Triode 2SC1815-Y
V915 Triode 2SC1815-Y
V916 Triode 2SC1815-Y
N901 IC TEA6415C
N902 IC MSP3413G-B3
N903 IC HEF4052BP
Z901 Crystal oscillat JA18A1-18.432MHZ
SCART1 AV-SCART switch GCH01-0010
SCART2 AV-SCART switch GCH01-0010
SCART3 AV-SCART switch GCH01-0010
CN3 AV terminals AVW-23-6R
XP906 S-Video terminal AV-1S-PE5
95
Page 98
9. Parts on control of PCB
PE-5 Chassis Service Manual
96
Page 99
PE-5 Chassis Service Manual
g
g
poly
poly
poly
polypropy
Parts on CRT RGB PCB-G
10.
POSITION NAME TYPE
Parts on CRT RGB PCB-G
RG35 carbon film resi RT13-0.166W-56ΩJ
RG36 carbon film resi RT13-0.166W-56ΩJ
RG14 carbon film resi RT13-0.166W-100ΩJ
RG03 carbon film resi RT13-0.166W-1KΩJ
RG53 carbon film resi RT13-0.166W-1KΩJ
RG02 carbon film resi RT13-0.166W-1.5KΩJ
RG06 carbon film resi RT13-0.166W-1.5KΩJ
RG52 carbon film resi RT13-0.166W-2.7KΩJ
RG39 carbon film resi RT13-0.166W-3.6KΩJ
RG38 carbon film resi RT13-0.166W-10KΩJ
RG51 carbon film resi RT13-0.166W-10KΩJ
RG11 metal oxide film RY21-1W-68KΩJ
RG01A carbon film resi RT13-0.166W-100KΩJ
RG17A metal oxide film RY21-0.5W-3.9KΩJ
RG20 metal oxide film RY21-1W-33ΩJ
RG50 metal oxide film RY21-1W-100KΩJ
RG17 Glass
RG05 Glass
CG02 ceramic capacito CC1-63V-06a-C-2PFC
CG03 ceramic capacito CC1-63V-06a-C-8PFC
CG04 ceramic capacito CT1-500V-06a-2B4-470PFK
CG14 ceramic capacito CT1-500V-06a-2B4-560PFK
CG08
CG05
CG11
CG01
CG30 aluminium electr CD110X-16V-10μFM
CG26 aluminium electr CD110X-16V-470μFM
CG27 aluminium electr CD110X-25V-100μFM
CG28 aluminium electr CD110-50V-0.47μFM
CG29 aluminium electr CD288H-250V-33μFM
CG50 aluminium electr CD288H-250V-10μFM
LG17 bushing-type ind LGA0204-4.7μHJ
LG01 bushing-type ind TEM2011
LG02 bushing-type ind TEM2011
VDG10 diode 1N4148
VDG10 diode 2CK75D
VDG08 diode 1N4148
VDG08 diode 2CK75D
VDG20 diode W05Z9.1B
VDG14 diode MTZJ13A
VDG14 diode W05Z13A
lazed res RI40-1W-330ΩJ
lazed res RI40-0.5W-10KΩJ
ster film ca CL21X-50V-0.022μFJ
ster film ca CL21X-50V-0.1μFJ
ster film ca CL21X-250V-0.1μFJ
lene ca CBB81-1.6KV-1800PFJ
97
Page 100
PE-5 Chassis Service Manual
Q
)
g
poly
poly
poly
polypropy
POSITION NAME TYPE
VDG01 diode 2CZRU2
VDG18 diode BAV21
VG06 triode BF422
VG05 triode 2SC1815-Y
VG05 triode 3DG1815-Y
VG07 triode 2SC1815-Y
VG07 triode 3DG1815-Y
NG02 IC TDA6111
SG01 GZS CRT socket GZS10-2-108(B
Parts on CRT RGB PCB-B
RB35 carbon film resi RT13-0.166W-56ΩJ
RB36 carbon film resi RT13-0.166W-56ΩJ
RB14 carbon film resi RT13-0.166W-100ΩJ
RB08 carbon film resi RT13-0.166W-1KΩJ
RB52 carbon film resi RT13-0.166W-1KΩJ
RB02 carbon film resi RT13-0.166W-1.5KΩJ
RB05 carbon film resi RT13-0.166W-1.5KΩJ
RB53 carbon film resi RT13-0.166W-2.7KΩJ
RB40 carbon film resi RT13-0.166W-3.6KΩJ
RB39 carbon film resi RT13-0.166W-10KΩJ
RB51 carbon film resi RT13-0.166W-10KΩJ
RB11 metal oxide film RY21-1W-82KΩJ
RB17 Glass
RB17A metal oxide film RY21-0.5W-3.9KΩJ
RB20 metal oxide film RY21-1W-33ΩJ
RB50 metal oxide film RY21-1W-100KΩJ
RB16 metal oxide film RI40-0.5W-10KΩJ
CB02 ceramic capacito CC1-63V-06a-C-2PFC
CB04 ceramic capacito CT1-500V-06a-2B4-470PFK
CB14 ceramic capacito CT1-500V-06a-2B4-560PFK
CB08
CB05
CB11
CB39
CB30 aluminium electr CD11C-16V-10μFM
CB26 aluminium electr CD110X-16V-470μFM
CB27 aluminium electr CD110X-25V-100μFM
CB28 aluminium electr CD110X-50V-0.47μFM
CB50 aluminium electr CD288-250V-10μFM
CB29 aluminium electr CD288H-250V-33μFM
LB17 bushing-type ind LGA0204-4.7μHJ
LB01 bushing-type ind TEM2011
LB02 bushing-type ind TEM2011
VDB10 diode 1N4148
VDB10 diode 2CK75D
lazed res RI40-1W-330ΩJ
ster film ca CL21X-50V-0.022μFJ
ster film ca CL21X-50V-0.1μFJ
ster film ca CL21X-250V-0.1μFJ
lene ca CBB81-1.6KV-1800PFJ
98
 Loading...