

Page 1
dnx
COMPATIBLE
dnx
COMPATIBLE
projectiondesign as SXGA+
user guide
user guide
SXGA+
HD720
HD720
dnx
dnx
COMPATIBLE
COMPATIBLE
user guide
benutzerhandbuch
guide d’utilisateur
guía del usario
manuale d’uso
brukerveiledning
Page 2

TABLE OF CONTENTS
english
INTRODUCTION ........................................................................4
SAFETY & WARNINGS ...................................................................6
WARNING SYMBOLS ON THE PROJECTOR ...............................................12
SUPPLIED MATERIAL ...................................................................14
OVERVIEW ...........................................................................16
KEYPAD ............................................................................18
INDICATORS .........................................................................20
INDICATOR LIGHT ...................................................................20
FLASHING BLUE LIGHT ...............................................................20
PERMANENT BLUE LIGHT ............................................................20
PERMANENT ORANGE LIGHT ..........................................................20
FLASHING YELLOW LIGHT ............................................................20
FLASHING RED LIGHT ................................................................20
PERMANENT RED LIGHT ..............................................................20
NO LIGHT ..........................................................................20
REMOTE CONTROL ....................................................................22
CONNECTOR PANEL ...................................................................28
SET UP ..............................................................................30
VIDEO .............................................................................30
COMPUTER ........................................................................30
IMAGE ADJUSTMENTS .................................................................32
PIN CODE ...........................................................................32
CEILING MOUNT ......................................................................34
OPERATION ..........................................................................34
USING THE PROJECTOR ................................................................36
RS 232 AND LAN CONTROL ...........................................................38
TIMER ............................................................................40
IMAGE CALIBRATION AND CORRECTION .................................................42
MENU SYSTEM .......................................................................44
OVERVIEW .........................................................................44
TOP MENU .........................................................................44
NAVIGATING THE MENU SYSTEM .......................................................44
PICTURE MENU .....................................................................46
REALCOLOR SUB MENU ..............................................................50
ADVANCED SUB MENU ...............................................................52
ENHANCEMENTS SUB MENU ..........................................................54
INSTALLATION SUB MENU .............................................................56
LAMP SUB MENU ...................................................................58
SETTINGS SUB MENU ................................................................60
PROFILES SUB MENU ................................................................64
LANGUAGES SUB MENU ..............................................................64
STATUS SUB MENU ..................................................................66
TROUBLE SHOOTING ..................................................................68
NO IMAGE .........................................................................68
DARK IMAGE .......................................................................68
FLICKERING IMAGE ..................................................................68
UNSHARP IMAGE ....................................................................68
MAINTENANCE .......................................................................70
HEAVY DUTY AND CONTINOUS USE .....................................................70
SERVICE INFORMATION ................................................................70
LAMP CHANGE .......................................................................72
TECHNICAL DATA .....................................................................74
DECLARATIONS .......................................................................78
2
Page 3

INTRODUCTION
SAFETY & WARNINGS
SAFETY & WARNINGS
This digital projector is designed with the latest state-of-the-art technologies in
illumination, imaging, optics, electronics, thermal and industrial design in order to
serve traditional as well as novel imaging applications across a variety of markets,
offering features such as:
SXGA+ 1400x1050 or HD720 1280x720 pixel DLP™ technology•
Single chip DMD™ with DarkChip™ technology by Texas Instruments®•
BrilliantColor™ technologly for saturated and accurate colours•
10-Bit color resolution for perfect grey scale reproduction•
High contrast for vibrant colors and deep blacks•
High resolution for unprecedented detail•
High brightness for larger screens•
Deep blacks for maximum dynamics•
RealColor color calibration for precise images•
Real time clock for timing control•
Reduced image noise through high end signal processing•
Pixelworks DNX™ technology video de-interlacing and processing•
Eco mode for reduced power consumption and lower audible noise•
Variable lamp power for alignment of multi-screen configurations•
Long life lamp•
Stylish and compact magnesium design to fit most applications, •
installed or movable
Six video and graphics inputs for virtually any video and data source•
HDMI ver. 1.3 Input•
LAN, RS232 and USB ports for control and monitoring•
The specifications and functionality of the product may change without prior
notice.
This user guide contains important information about safety precautions and the set-up and use of
the projector. Please read the manual carefully before you operate the projector.
SAFETY
This device complies with relevant safety regulations for data processing equipment for use in an
office environment. Before using the projector for the first time, please read the safety instructions
thoroughly.
WARNING
Use only the cables and cords supplied with the projector or original replacement cables. Using
other cables or cords may lead to malfunction and permanent damage of the unit.
Always use 3-prong / grounded power cord to ensure proper grounding of the unit. Never use
2-prong power cords, as this is dangerous and could lead to electrical shock.
Never open the unit. The projector contains no user serviceable parts. Refer all repairs to qualified
personnel only. Make sure that no objects enter into the vents and openings of the set.
Do not spill any liquids on the projector or into the vents or openings of the unit.
Always remove lens cap before switching on the projector. If the lens cap is not removed, it may
melt due to the high energy light emitted through the lens. Melting the lens cap may permanently
damage the surface of the projection lens.
Do not look into the projection lens when the projector is switched on. The strong light may
permanently damage sight. Do not look into the laser beam when activated on the remote control.
Laser light may permanently damage sight.
Do not point laser beam on people.
Only place the projector on a stable surface, or mount it securely using an approved ceiling-mount.
Do not drop the projector.
Always operate the projector horizontally, within the range of the adjustable rear feet. Operating the
unit in other positions may reduce lamp life significantly, and may lead to overheating, resulting in
malfunctioning.
Always allow ample airflow through the projector. Never block any of the air vents. Never cover the
unit in any way while running. Allow for sufficient distance to walls and ceilings to avoid overheating.
Minimum safety distance to any side of the unit is 50 cm / 20” in any direction.
CAUTION! Hot air is exhausted from the rear vent. Do not place objects that
are sensitive to heat nearer than 50cm / 20” to the exhaust vent.
The projector is designed for indoor use only. Never operate the unit outdoors.
Do not operate the projector outside its temperature and humidity specifications, as this may result
in overheating and malfunctioning.
Only connect the projector to signal sources and voltages as described in the technical
specification. Connecting to unspecified signal sources or voltages may lead to malfunction and
permanent damage of the unit.
Allow the unit to cool down for 60 minutes before lamp change.
INFORMATION AND WARNING ABOUT POTENTIAL HEALTH ISSUES
RELATED TO MERCURY VAPOR.
This projector uses a very powerful UHP™ lamp for illumination to produce an extremely bright
image.
This technology is similar to other high-pressure discharge lamps that are extensively used in cars,
street lights and other lighting appliances today. These lamps, like fluorescent lighting, contain small
amounts of mercury. The amount of mercury present in a lamp is far below the limits of danger set
by the authorities. It is very important that lamps containing mercury are treated properly to minimize
potential health hazards.
The UHP™ lamp, like any other high brightness projector lamp, is under high-pressure when
operating. While the lamp and the projector are carefully designed to minimize the probability of
lamp rupture, the lamp may break while operating and small amounts of mercury vapor may be
emitted from the projector. The probability of rupture increases when the lamp reaches its nominal
life. It is therefore highly recommended that the lamp is replaced when the rated lifetime is reached.
As a general precaution, secure good ventilation in the room when operating the projector. If lamp
rupture occurs, evacuate the room and secure good ventilation. Children and pregnant women in
particular should leave the room.
When replacing a worn lamp, dispose of the used lamp carefully by proper recycling.
Mercury is a naturally occurring, stable metallic element that may pose a safety risk to people under
certain conditions. According to the Public Health Statement for Mercur y published by the Agency
for Toxic Substances and Disease Registry (“ATSDR”, part of the United States Public Health
Service), the brain, central nervous system and kidneys are sensitive to the effects of mercury,
and permanent damage can occur at sufficiently high levels of exposure. Acute exposure to high
concentrations of mercury vapor can cause conditions such as lung and airway irritation, tightness
in the chest, a burning sensation in the lungs, coughing, nausea, vomiting and diarrhea. Children
and fetuses are particularly sensitive to the harmful effects of metallic mercury to the nervous
system.
Seek medical attention if any of the above symptoms are experienced or if other unusual conditions
are experienced following lamp rupture.
4
6
8
Page 4

SAFETY & WARNINGS
english
WEEE INFORMATION
This product conforms to all requirements of the EU Directive on waste
electrical and electronic equipment (WEEE). This product shall be
recycled properly. It can be disassembled to facilitate proper recycling
of it’s individual parts. This product is using projection lamps that shall
be recycled properly. Consult your dealer or relevant public authority
regarding drop-off points for collection of WEEE.
WARNING
This product contains chemicals, including lead, known to the State of
California to cause birth defects or other reproductive harm. Recycle
properly, do not dispose of in ordinary waste!
REMOTE CONTROL WARNING
Laser radiation class II product; wavelength 670nm; maximum output
1mW.
Remote control complies with applicable requirements of 21 CFR
1040.10 and 1040.11.
Remote control complies with applicable requirements of EN 60 825-1:
1994 + A11
10
Page 5
SAFETY & WARNINGS
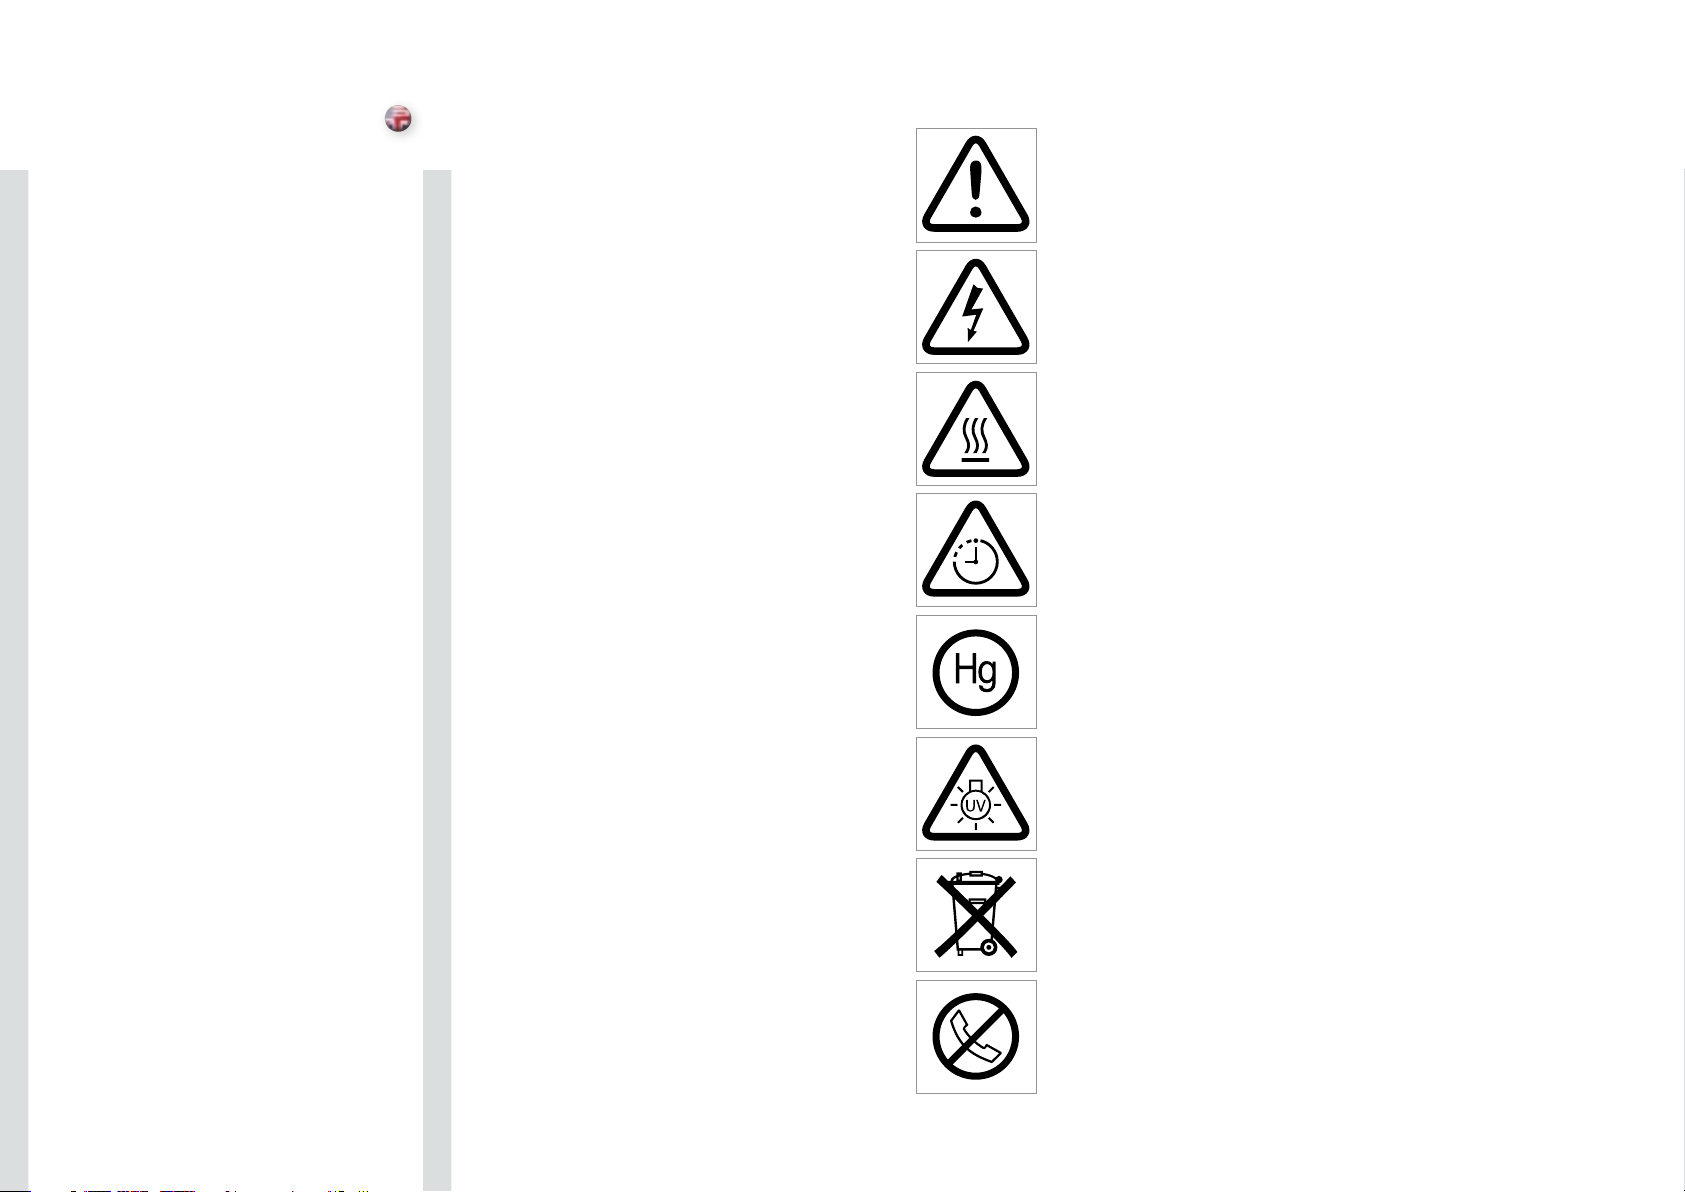
WARNING SYMBOLS ON THE PROJECTOR
READ USER GUIDE
Attention! Read the user guide for further information!
DANGEROUS VOLTAGE
Danger! High voltage inside the product!
HOT
Warning! Hot surfaces!
WAIT
Warning! Wait until cooled down!
MERCURY
Warning! Lamp contains mercury! Recycle properly, do not
dispose of in ordinary waste!
english
UV
Warning! UV radiation inside the product!
RECYCLE
Warning! Recycle properly, do not dispose of in ordinary
waste!
NO TELEPHONE
Warning! Do not connect to telephone lines!
12
Page 6
SUPPLIED MATERIAL
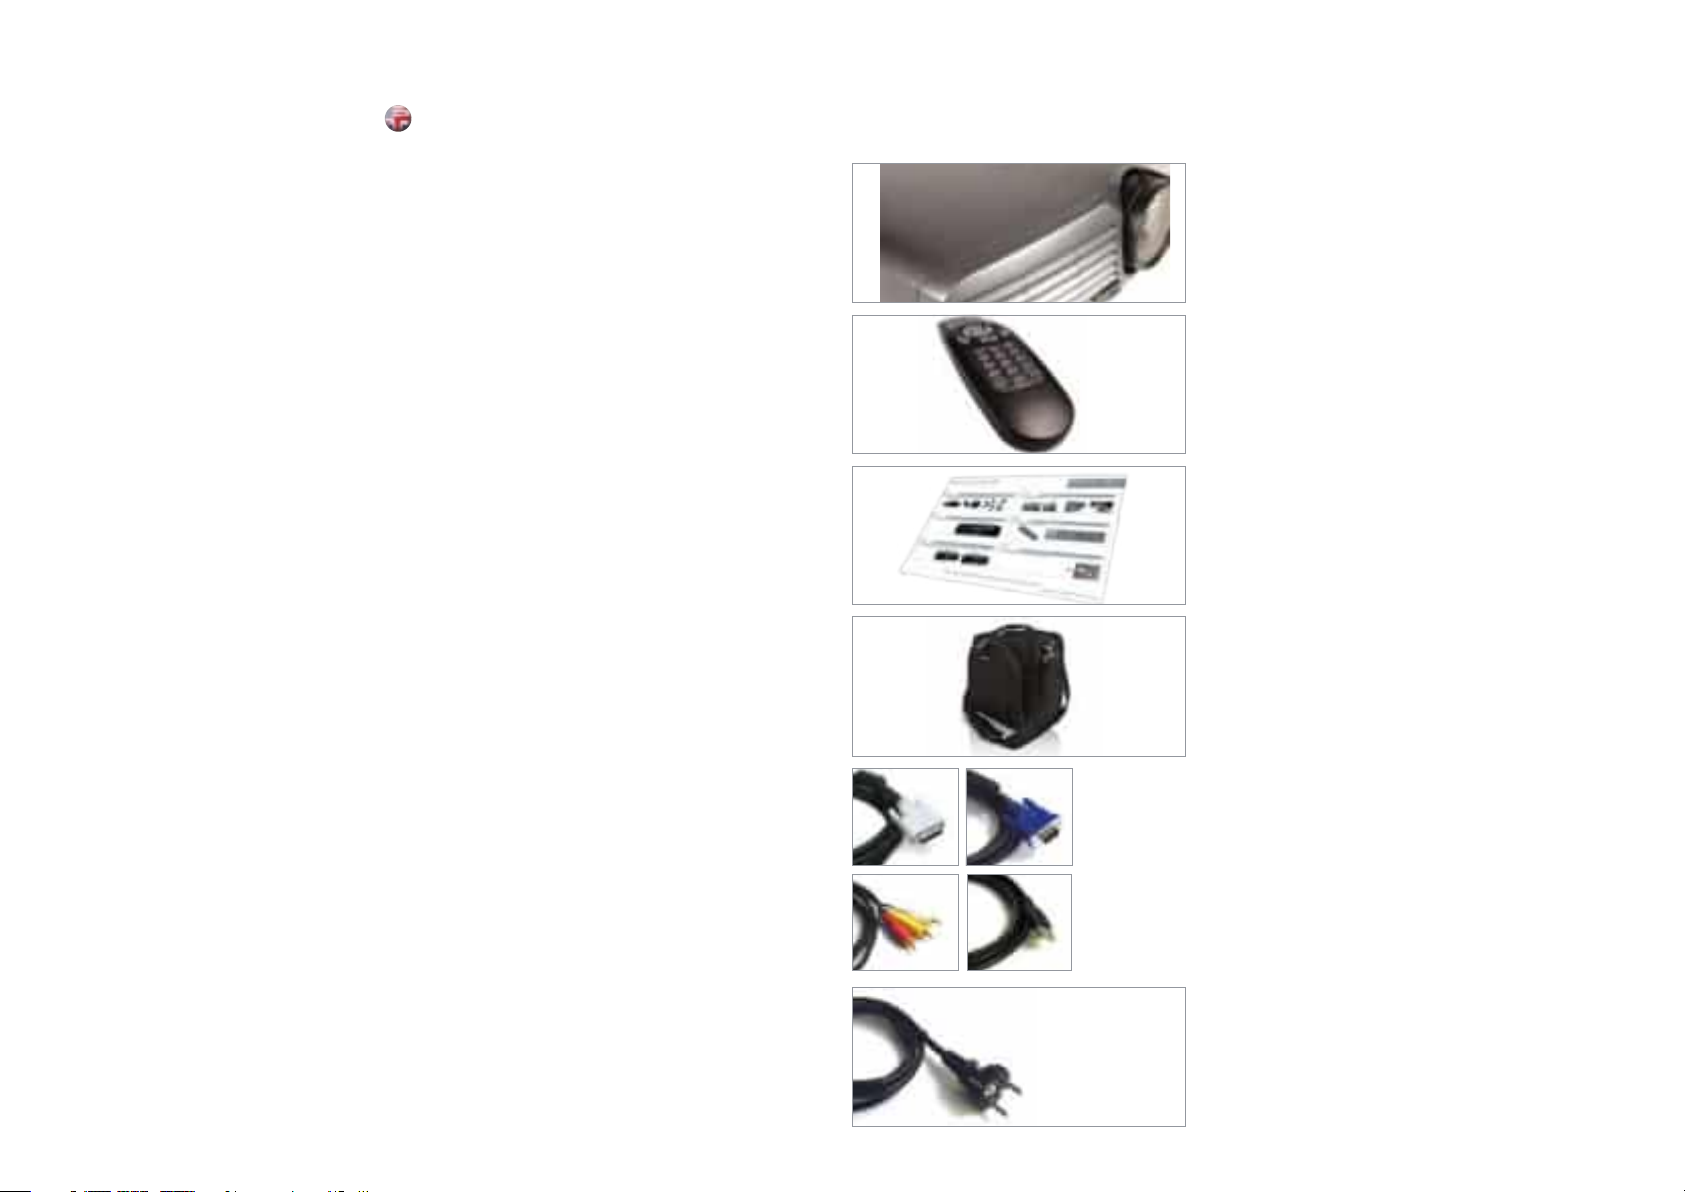
Projector
Remote control with batteries
Quick Start Guide
Bag (optional)
english
Cables (optional)
Power Cord
(country dependent)
Before Set up and Use
Unpack the supplied parts and familiarise yourself with the
various components.
14
DVI
A-V
VGA
USB
Page 7
OVERVIEW
english
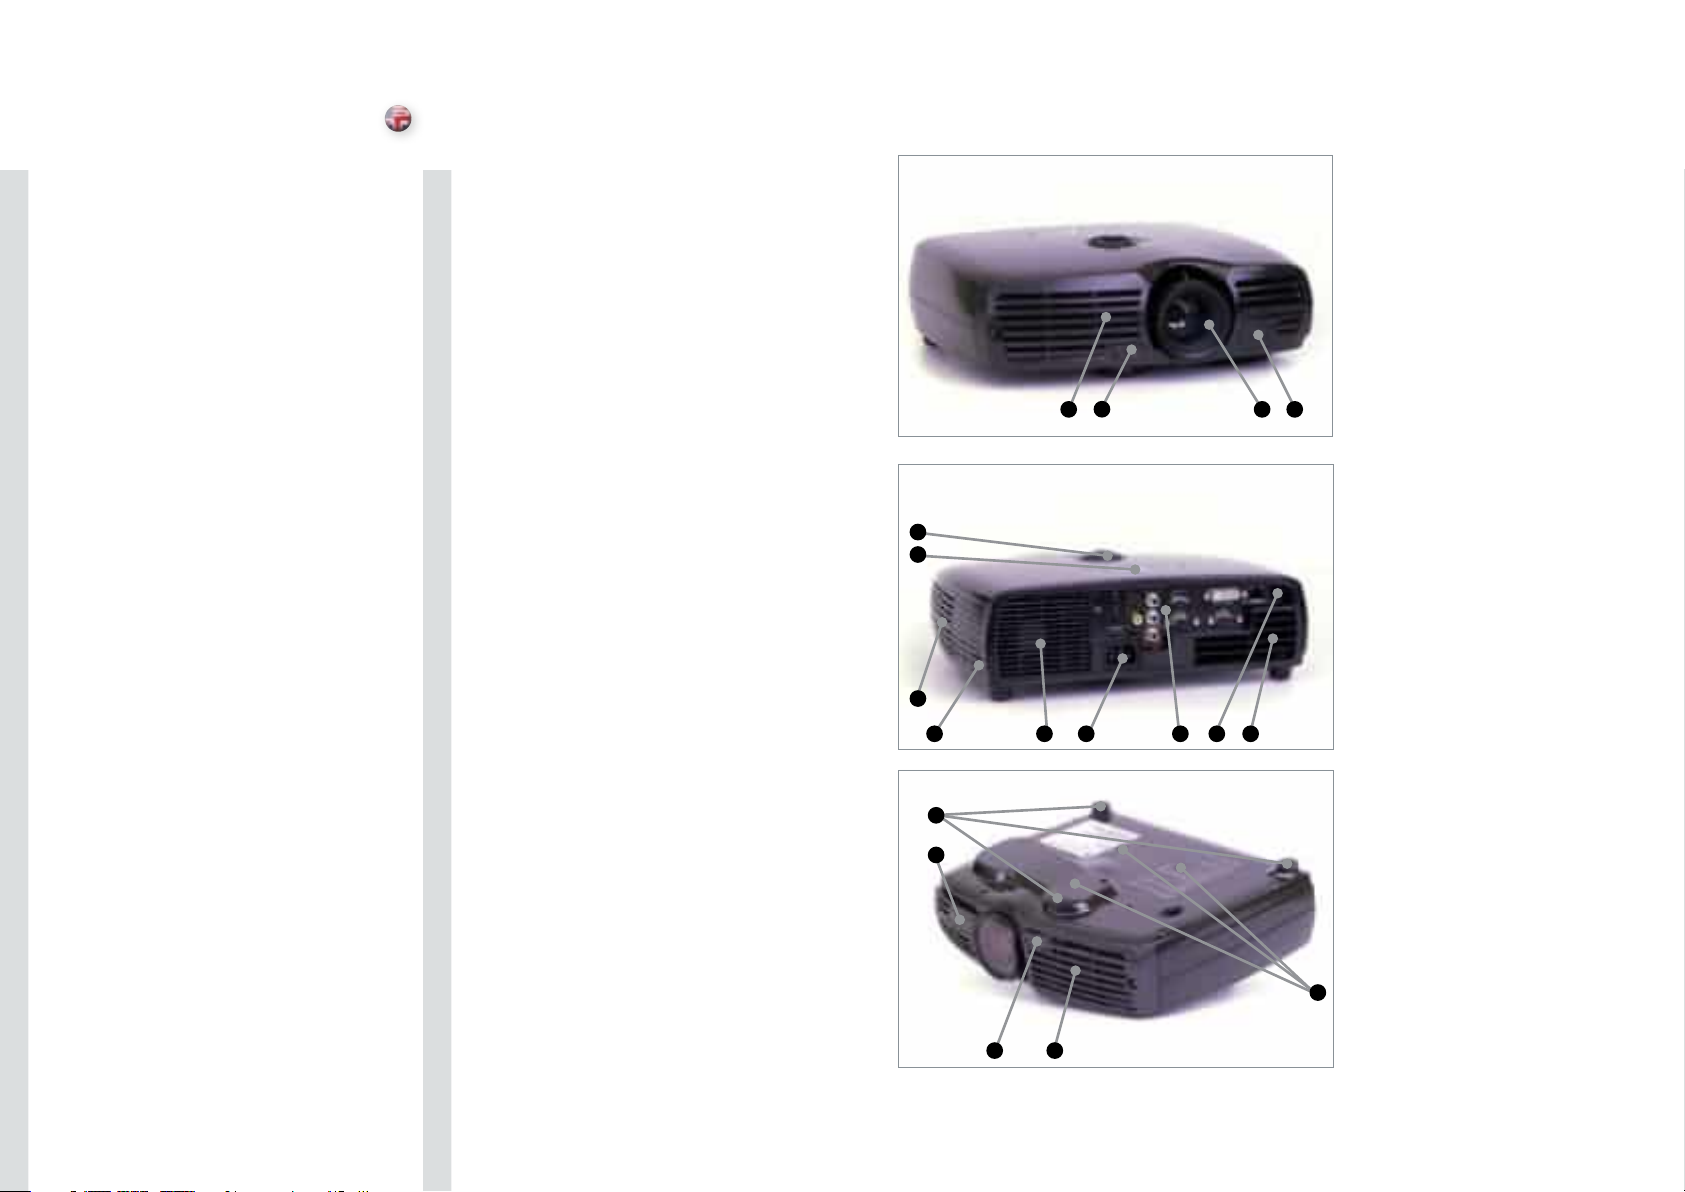
LensA
IR sensorB
VentilationC
Foot releaseD
Power connector E
Keypad F
Connector panelG
Lens shiftH
Adjustable feetI
Security lockJ
Ceiling mountK
D
C
H
F
C
J C E G B C
I
A B
16
B
K
D C
Page 8
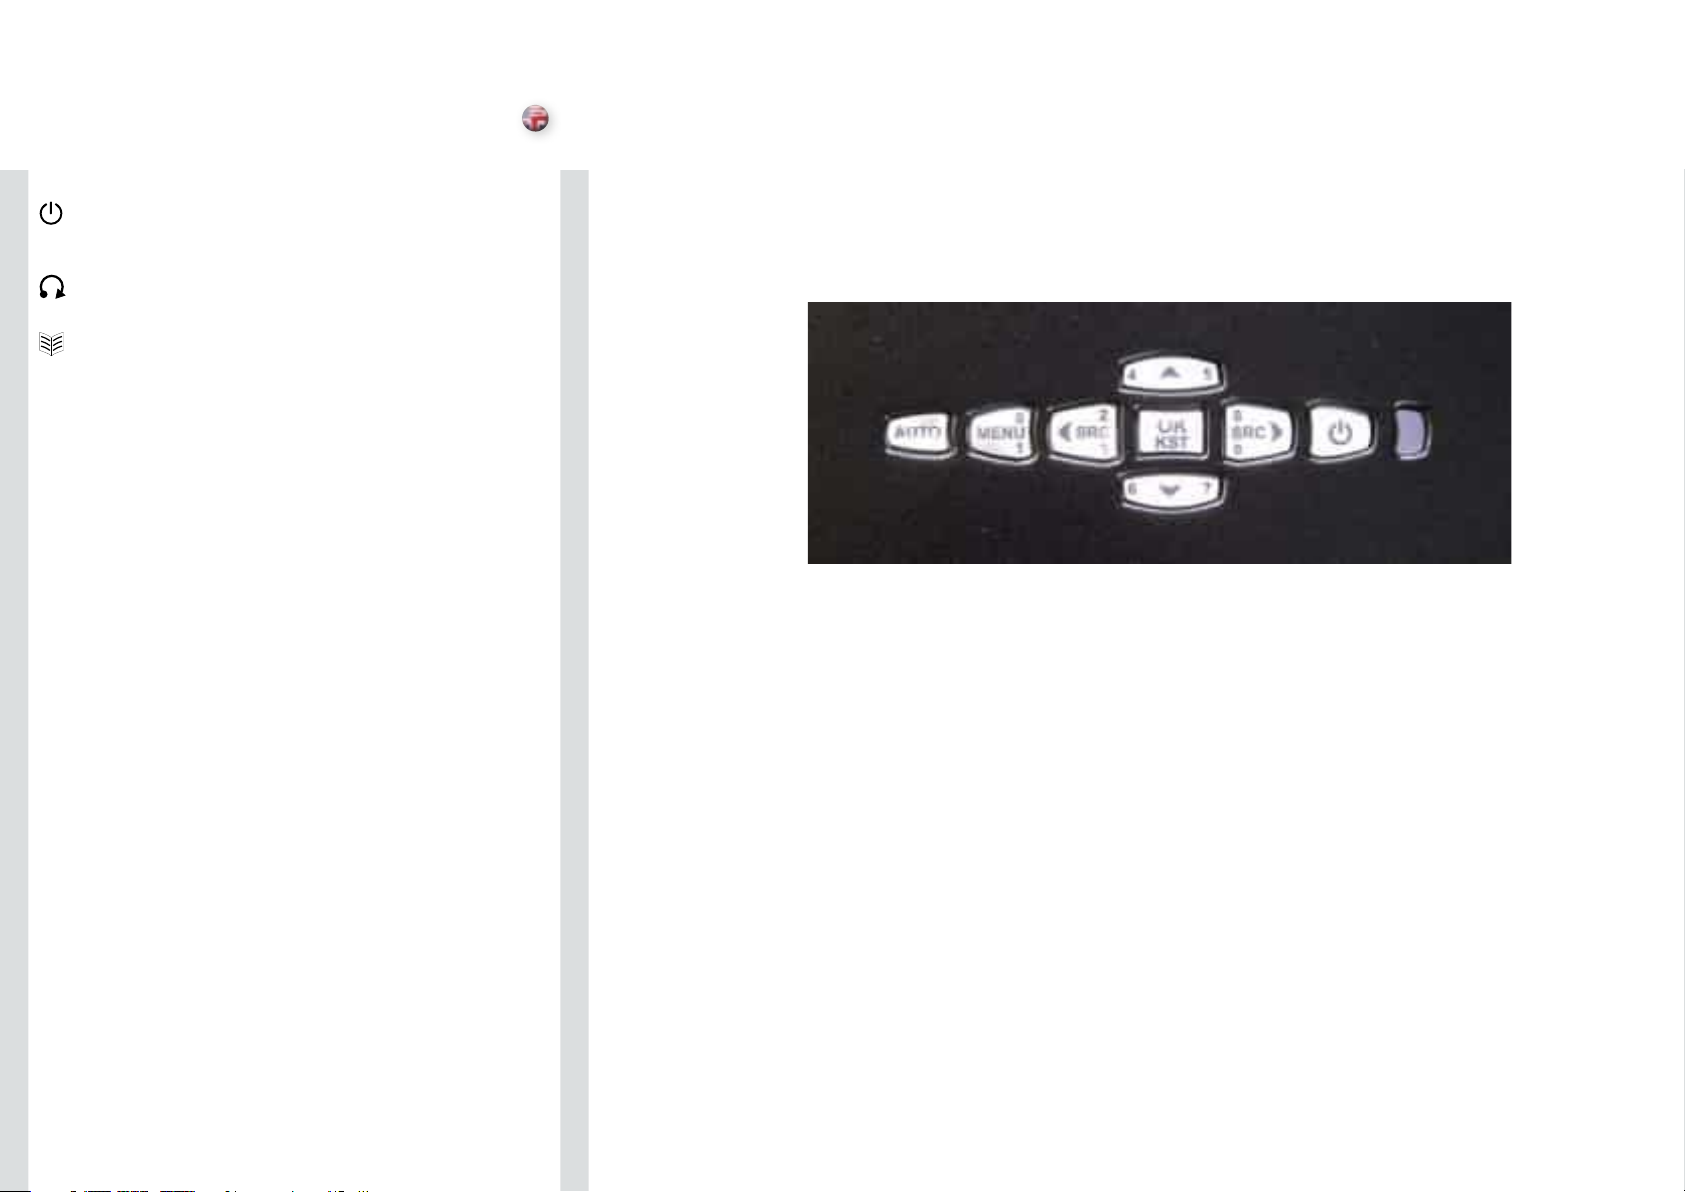
KEYPAD
The keypad is illuminated for operation in dark environments. Several keys have
multiple functions.
(POWER)
Switches the projector between on and standby modes. Press firmly (1 sec) to
switch on. Press firmly (1 sec) twice to switch off (the second press confirms
switching off).
(AUTO)
Adjusts the projector to display a correct image, including position, width, height
and overall stability.
(MENU)
Activates the menu system. Use the four arrow keys to navigate and “OK” to
activate.
ARROW KEYS
Use the arrow keys to navigate the menu system, control keystone setting (up /
down), or select source (left / right).
OK/KST
Confirm menu option when menu system is activated. Activates keystone function.
0-9
These keys are used for PIN code entry.
SRC
Use these keys to select active source.
KST
Engage digital keystone correction when not in menu mode. Use arrow keys to
adjust.
english
18
18
Page 9
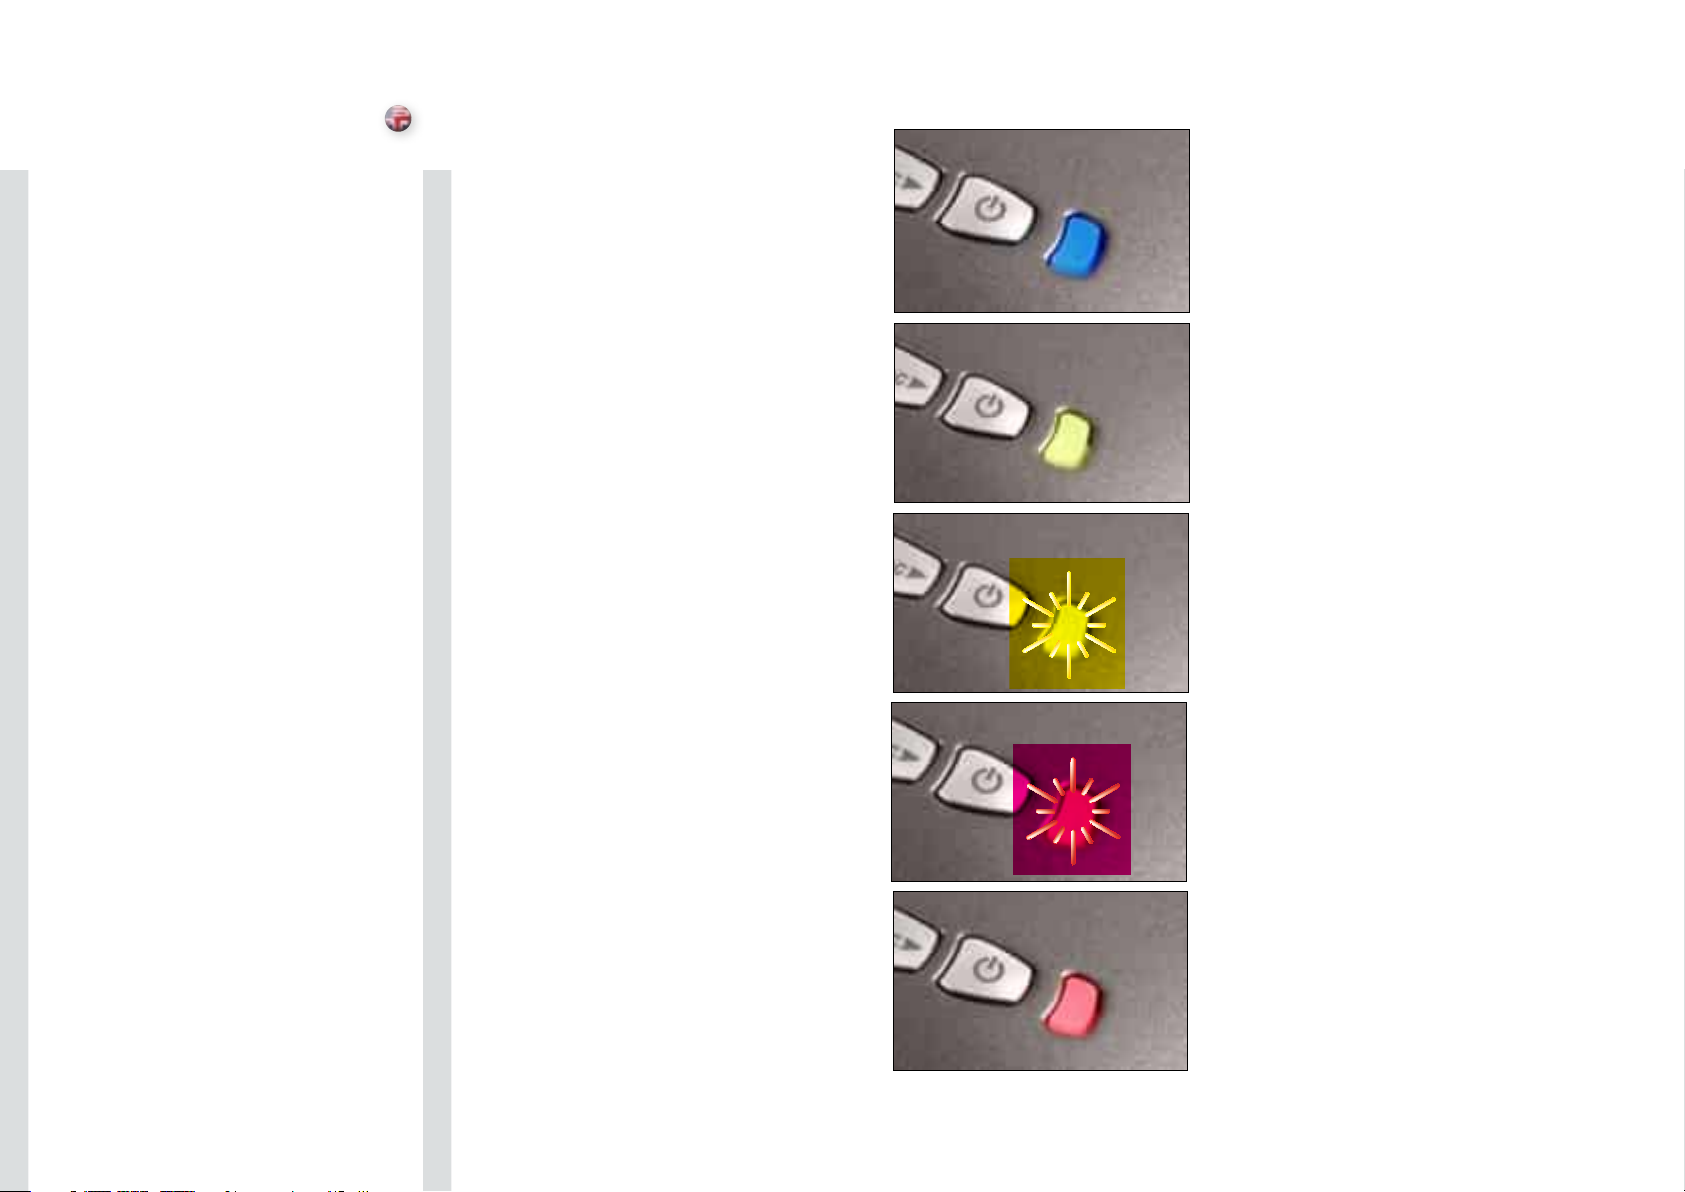
INDICATORS
INDICATOR LIGHT
The light next to the power key indicates the overall system
status by blue, orange and red colors.
FLASHING BLUE LIGHT
The projector has been turned on, and is warming up.
PERMANENT BLUE LIGHT
The projector is turned on and in normal operation.
PERMANENT ORANGE LIGHT
The unit is in standby mode; no source(s) connected, or the
source(s) connected are inactive or switched off, thereby
activating the powersave function (DPMS). You may enable
or disable the power save function in the SET UP sub menu,
DPMS on or off.
FLASHING YELLOW LIGHT
Please wait. The yellow light will flash once after power
cord is connected (4 - 5 sec.), and a period after going to
standby mode while lamp is cooling down (approximately
45 sec.). The projector may not be turned on again until the
light has turned to permanent yellow.
FLASHING RED LIGHT
Projector is overheated. Turn off immediately! Check if
air inlets are covered or if ambient temperature is outside
specifications. The projector can not be restarted unless the
power cord is disconnected and reconnected again. If the
projector continues to flash red, you will need to return the
unit for service.
PERMANENT RED LIGHT
Lamp life has expired. Please change projection lamp
immediately. Failing to change lamp may lead to lamp
explosion.
NO LIGHT
Power is not connected to the projector.
english
20
Page 10
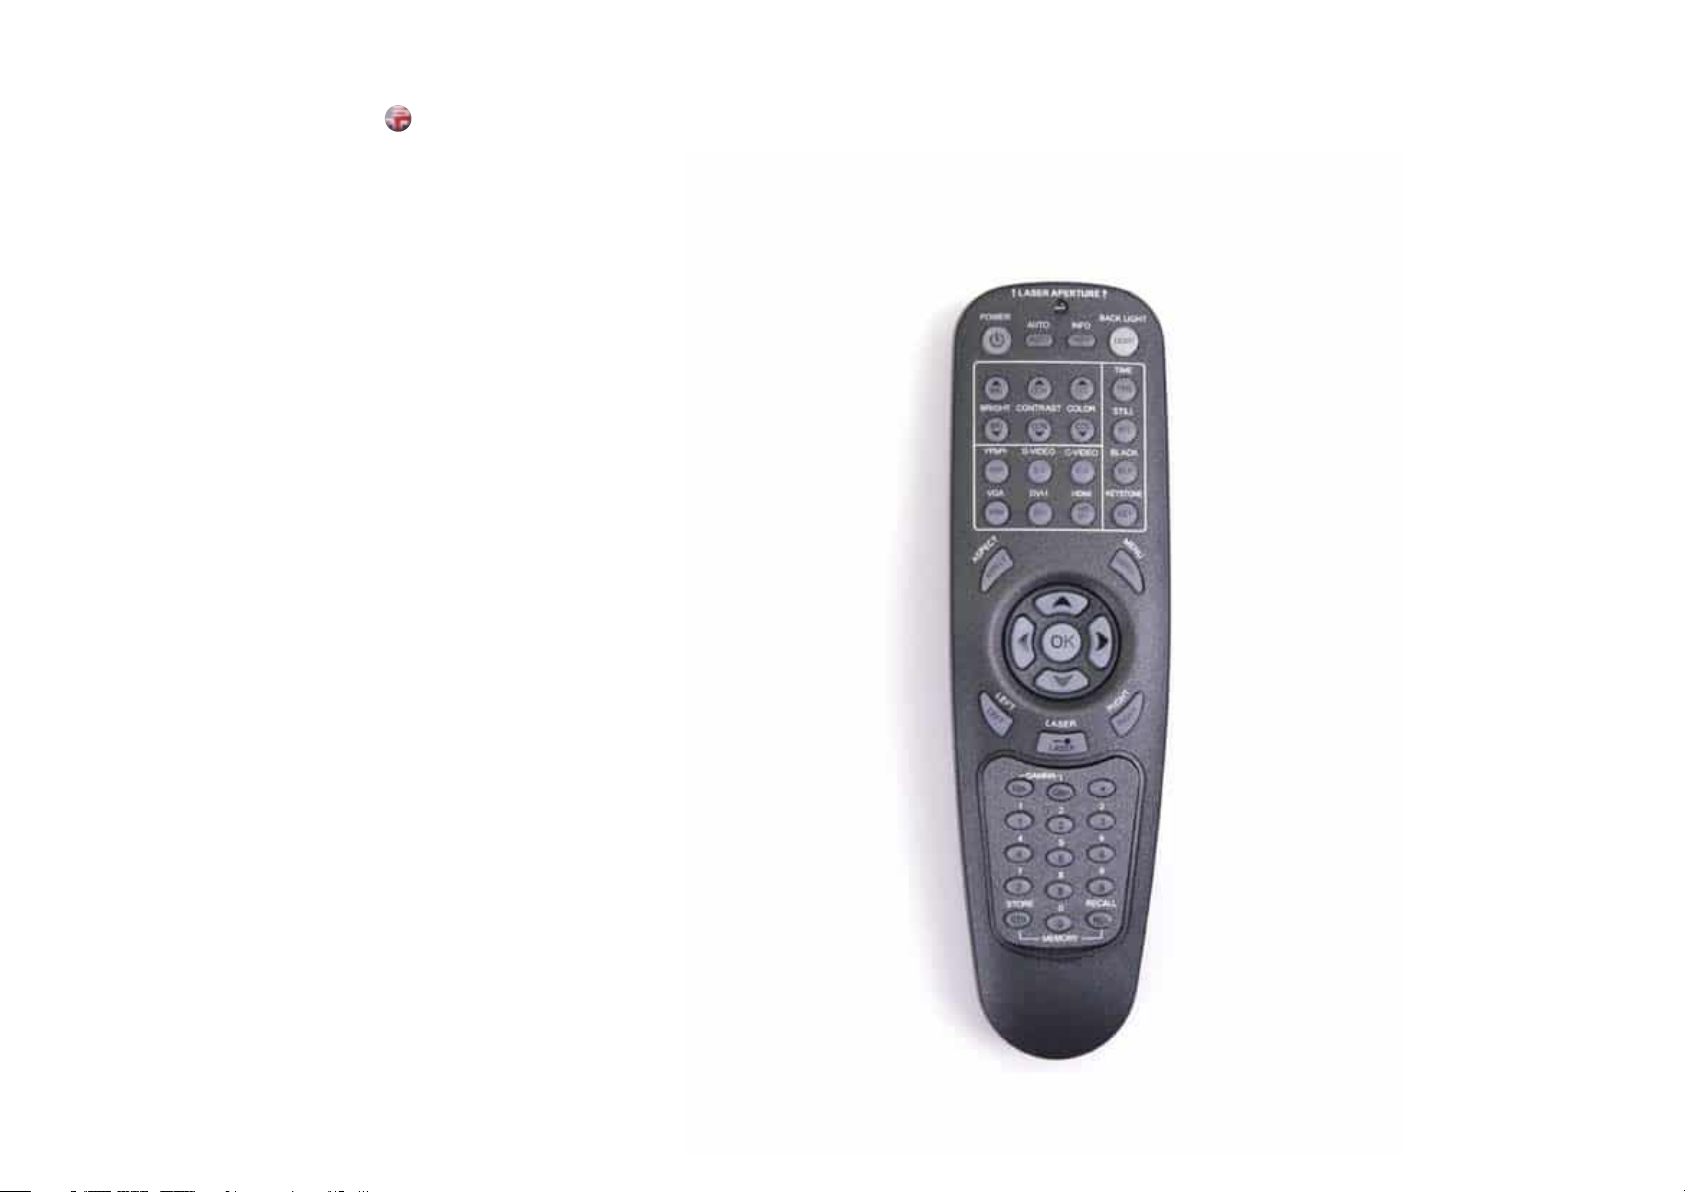
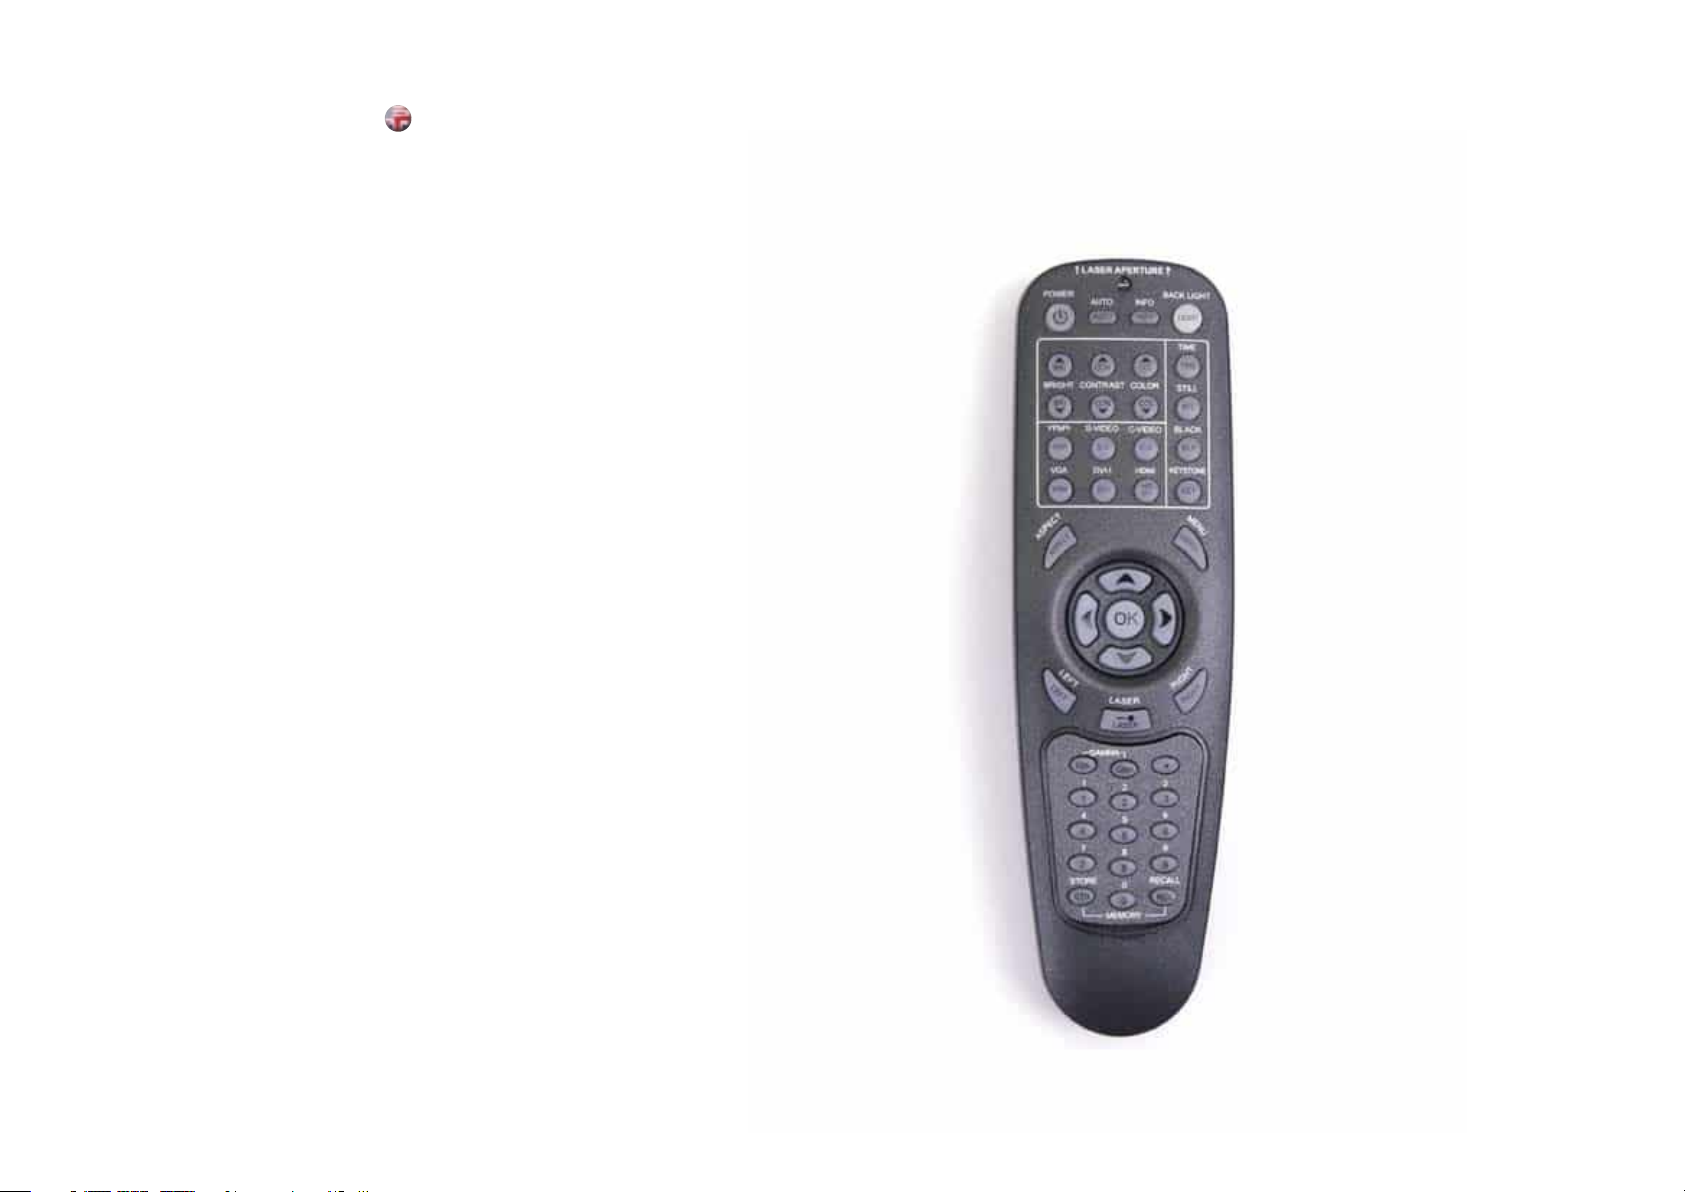
REMOTE CONTROL
The remote control allows flexible access to the projector
settings, either through direct keys, or through the menu
system. The remote control is backlit for use in dark
environments. It also has a data-jack that allows for wired
connection to the projector. When the wire is connected, the
IR (infra-red) beam and internal batteries are switched off.
The remote control can be operated either in ‘broadcast
mode’, or ‘individual mode’. When several projectors are in
use in an installation, individual control may be convenient.
Individual control is available either by wired remote control,
using the data-jack, or by using an individual number code.
For individual control, first set the individual RC ID code
using the projector menu system, see the SETTINGS sub
menu. Then, to select a specific projector to control, first
press the ‘*’ button in the lower keypad area, then the code
as set in the target projector. A code can be in the range
‘0’..’255’. ‘0’ is reserved for broadcast. To select another
target, repeat the process by pressing ‘*’ and a new code.
To exit individual control, press ‘*’’*’ twice or press ‘*’ and
‘0’.
english
POWER
Switches the projector between on and standby modes.
AUTO
Adjusting the projector to display a correct image, including
position, width, height and overall stability.
INFO
Displays source and projector status on screen.
BACKLIGHT
Switches the backlight on and off. The backlight will switch
off automatically after ten seconds.
BRIGHT
Adjusts image brightness.
CONTRAST
Adjusts image contrast.
COLOR
Adjusts color saturation of the image.
22
Page 11
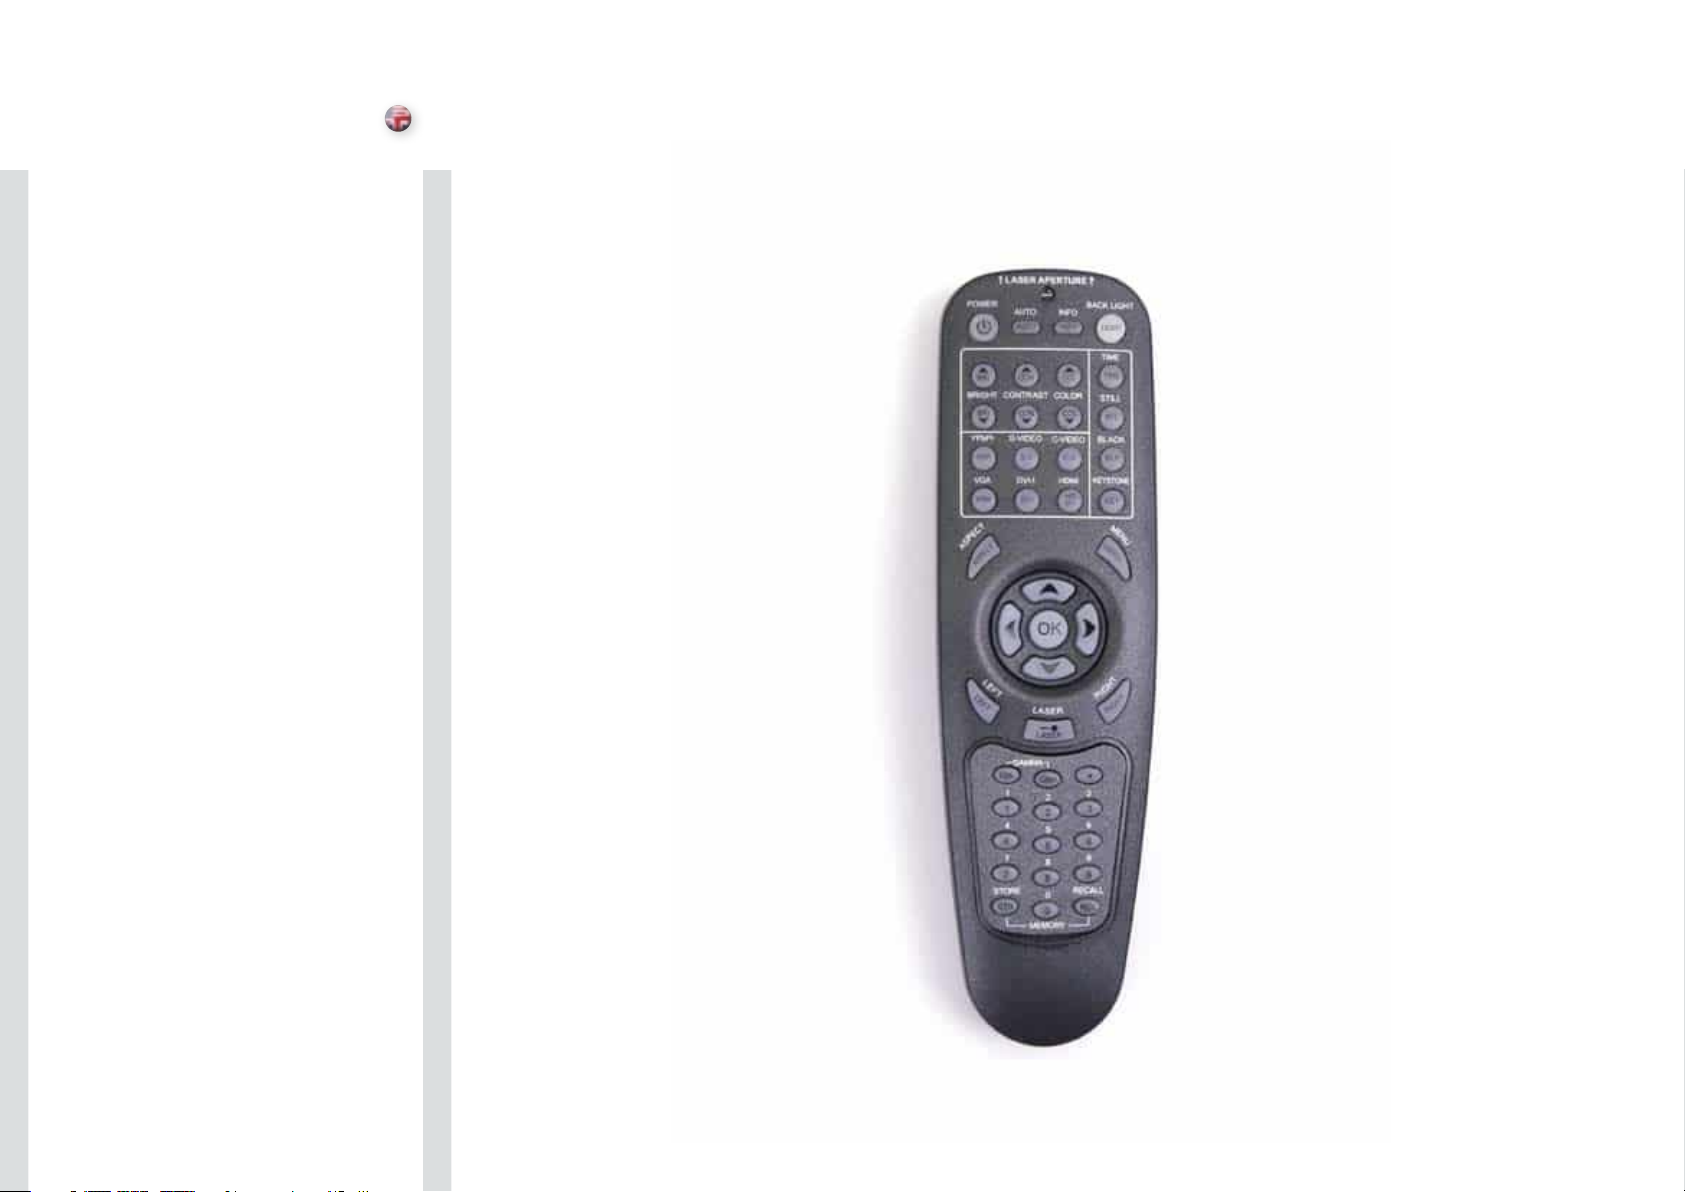
REMOTE CONTROL
C-VIDEO
Selects the composite video input as signal source.
S-VIDEO
Selects the super video input as signal source.
YPbPr
Selects component video input.
DVI-I
Selects the DVI-I input.
HDMI
Selects the HDMI input.
VGA
Selects the VGA input.
BLACK
Toggles the projected image on and off. The lamp is not
shut off.
STILL
Toggle function, locking the projected image on and off.
TIME
Displays date and time. Set the date and time in the MENU
system, SETTINGS sub menu.
KEYSTONE
Press KEYSTONE to activate the electronic trapezoid
correction, adjust with arrow keys.
ASPECT
Cycles through the aspect ratios available with the current
source.
MENU
Toggles the menu system on and off, and navigates one
step backward in the menu system.
ARROW KEYS
Use the arrow keys to navigate in the menu system and
other adjustments.
OK
Press OK to confirm selected option in menu.
english
24
Page 12
english
LASER
Activates the built-in laser pointer. CAUTION! Do not point
laser beam at people. Do not stare into laser beam.
GAMMA
Press GM+ or GM- to select between gamma settings.
STORE
Press STORE, then one digit 0-9, to store user setting in
memory.
RECALL
Press RECALL, then one digit 0-9, to recall user setting from
memory.
0-9
Used for various numeric functions such as PIN code and
user memory.
* (ASTERISK)
Used for RC ID control. See the explanation above.
26
Page 13
CONNECTOR PANEL
english
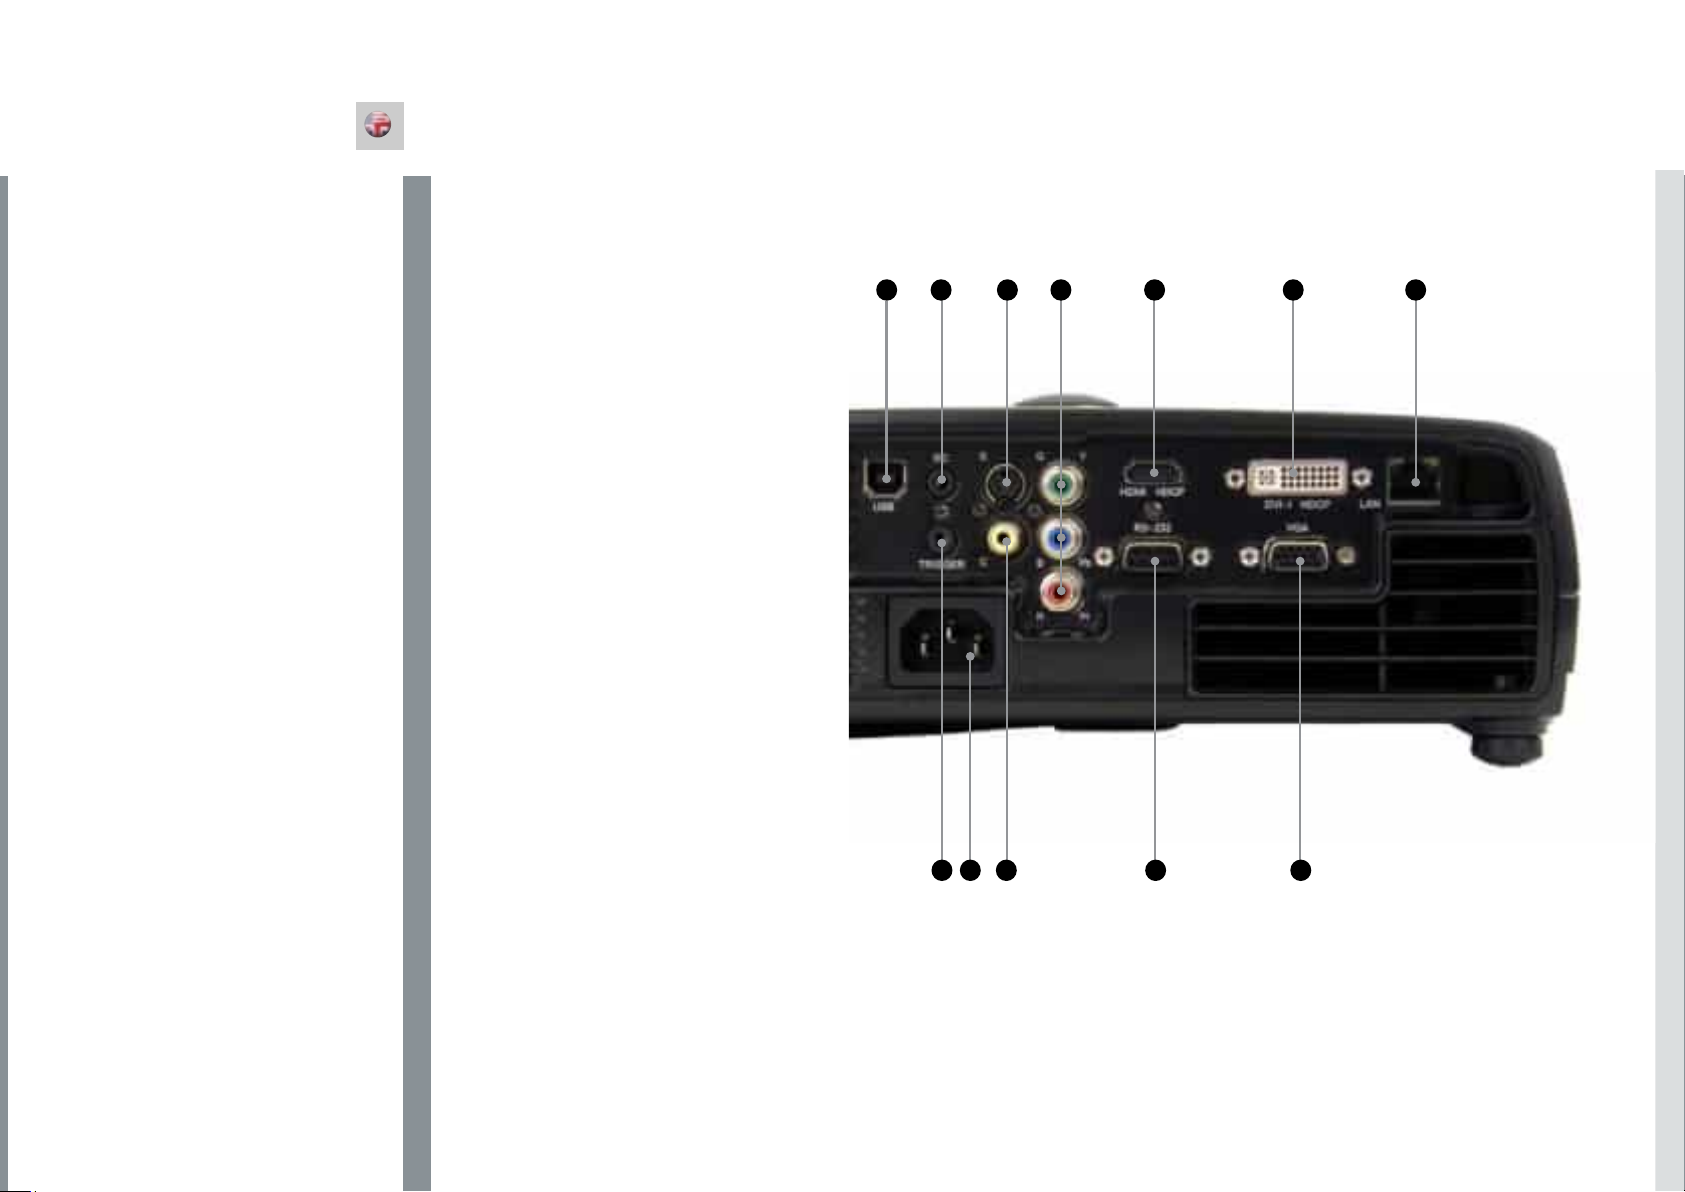
A C-VIDEO: Used for standard video quality.
B S-VIDEO: Used for improved quality video.
C YPbPr: Used for high quality video reproduction.
D DVI-D - Digital RGB: For a low noise computer and
video image.
E VGA – Analog RGB: The standard analog computer
graphics interface.
F HDMI – digital RGB: for low noise computer and video
images.
G RS 232 control: Allows for wired remote control and
monitoring of many projector functions used in installation
environments.
H 12VDC Trigger - Aspect: Controls the aspect ratio
I USB - interface: For upgrade only.
J LAN: Provides access to control and monitoring over a
K Mains power connector: Use only three-prong/
L RC: Allows connection of external IR receiver or wired
switching in externally connected electrical screens.
Local Area Network.
grounded power cord.
remote control.
I JDFBL
28
A EKCH
G
29
Page 14
SET UP
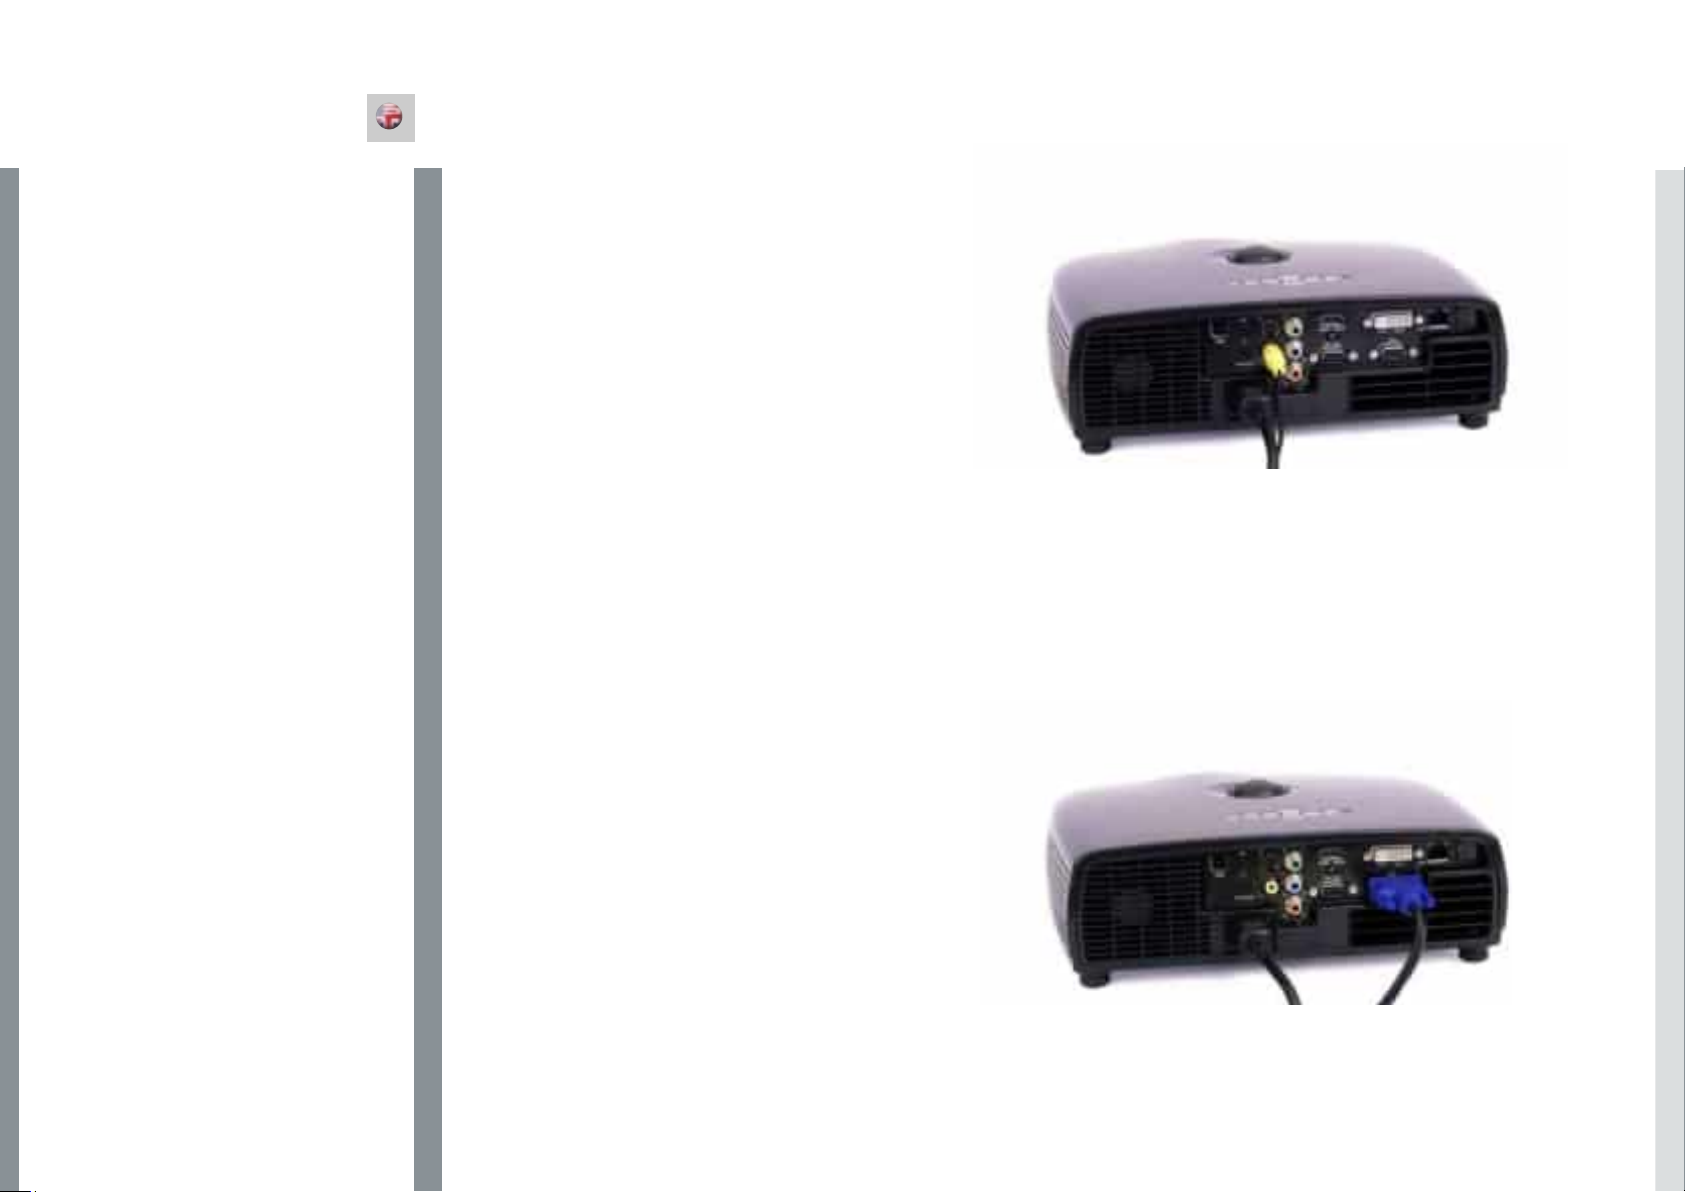
VIDEO
Before setting-up, switch off all equipment.
Several analogue video sources may be connected,
using the YPbPr (component), S-VIDEO (super video) and
C-VIDEO (composite video) inputs.
Component will display more detailed images. Composite
video yields images with less detail.
In addition, the HDMI and DVI-I inputs can be used with
video sources (for instance DVD players fitted with an
HDCP compliant DVI or HDMI connectors) for a pure digital
connection.
Connect the power cord.
COMPUTER
Before setting-up, switch off all equipment.
The projector may be connected to three computer sources
simultaneously, using the DVI-I, VGA, and HDMI inputs.
The VGA interface is analog and may cause some noise in
the projected image, depending on the signal quality from
the graphics card in the computer.
The DVI (Digital Visual Interface) and HDMI interfaces are alldigital and will yield a projected images with very low noise.
Connect the RS232 or LAN interface to allow for control of
the projector.
Connect the power cord.
english
30
31
Page 15
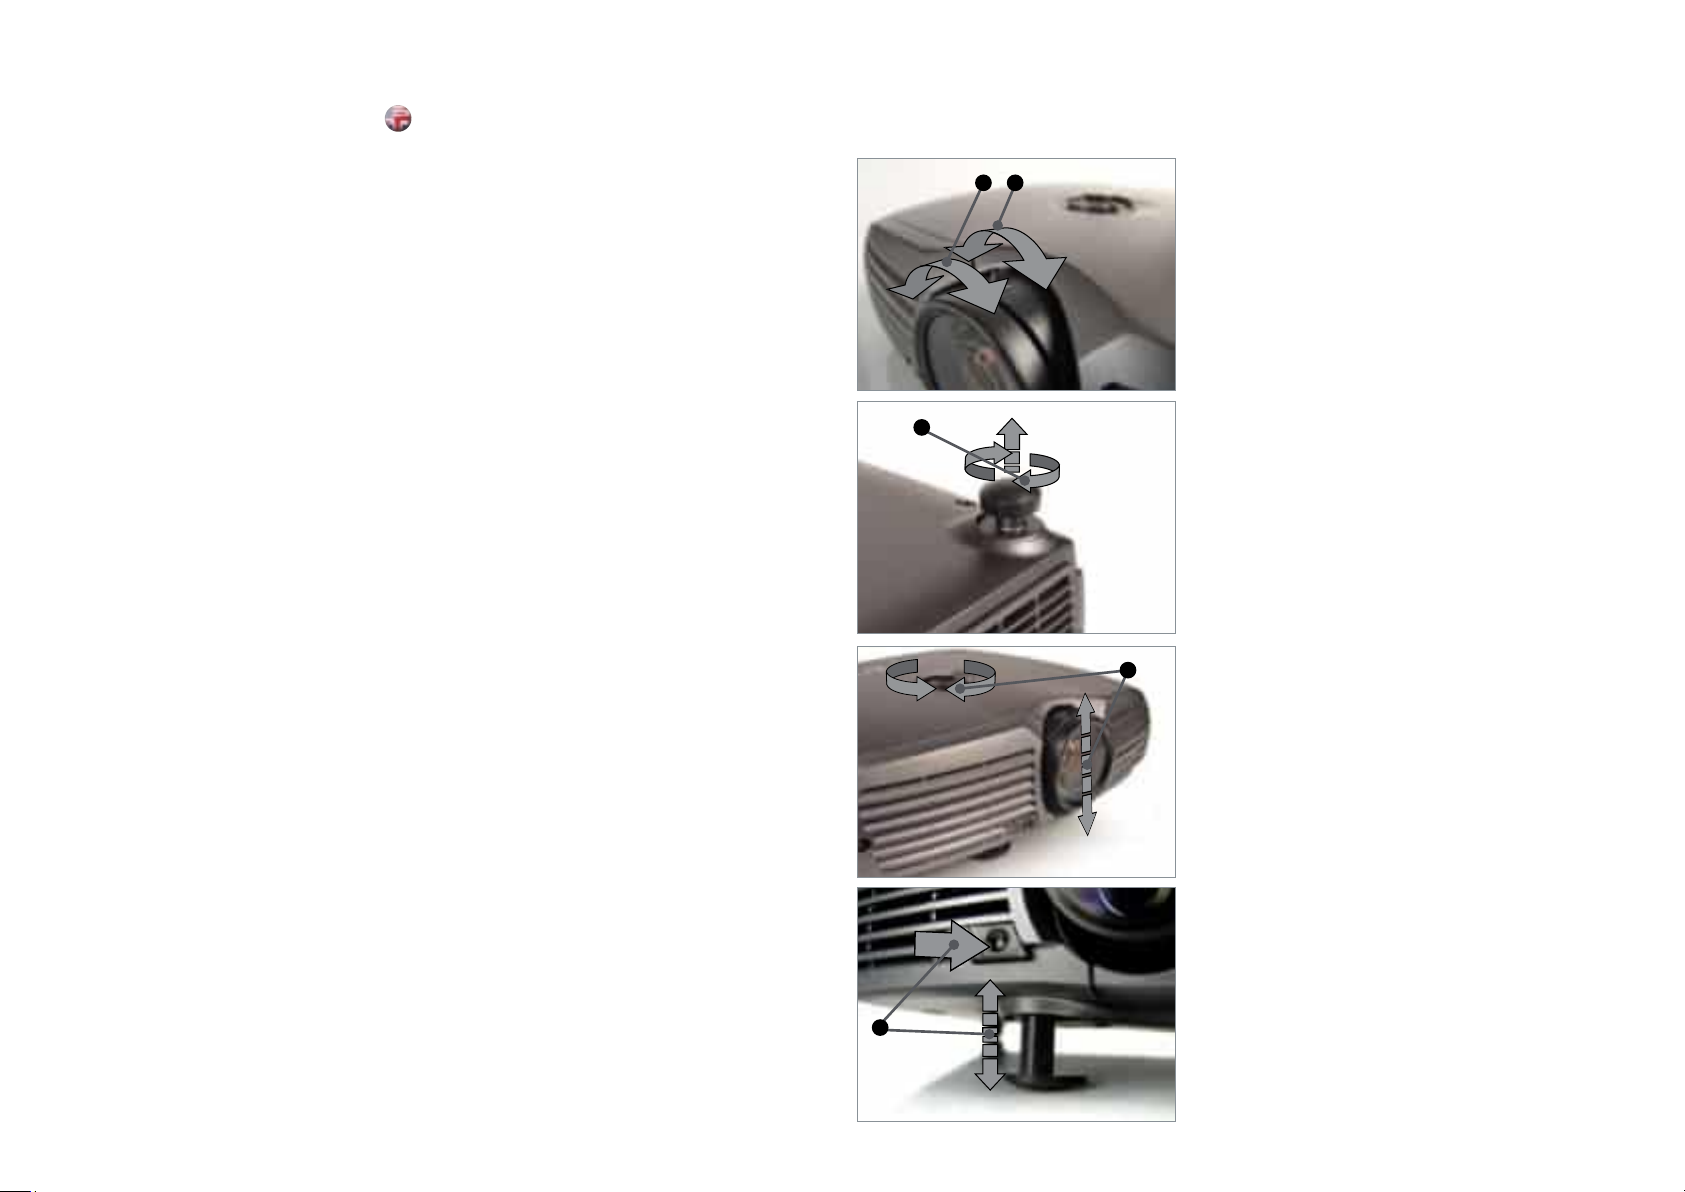
IMAGE ADJUSTMENTS
english
Position the projector on a level surface, preferably pointing
straight on to the projection screen. Place it at a suitable
distance within the throw range of the zoom lens.
ZOOM the image for the right size. Reposition the A
projector if the desired image size is not achievable.
ZOOM is not available on some lenses.
FOCUS the image properly. B
Level the image by adjusting the rear feet. C
To adjust the image vertically on the screen, turn the D
vertical adjustment knob on top of the unit.
in addition you may release the front foot E
If the front foot is ejected, you may compensate for the
‘keystone’ effect by pressing the ‘KST’ key on the keypad
and adjust with the arrow keys.
PIN CODE
The projector may be controlled by a PIN (Personal Identity
Number) code. The PIN code is 4 digits, and if the PIN code
is activated, you must enter the correct code to unlock the
projector.
To activate the PIN code, see the SETTINGS > PIN CODE
sub menu.
If an incorrect PIN code is entered, you may try again two
times. If you fail three times in a row, a PUK (unlock) code is
needed. The PUK code is supplied with the product.
WARNING! ENTERING THE PUK CODE CORRECTLY IS THE
CUSTOMERS RESPONSIBILITY
If you also fail three times with the PUK code, the projector
locks up permanently, and can only be unlocked by a
special service unlock code.
To access this code, you will need to contact your dealer or
a service station. The service unlock code will be generated
based on a secure, encrypted number that is produced by
the projector itself. The projector will produce a new number
every time.
NOTE! TO UNLOCK THE PROJECTOR, PROOF OF OWNERSHIP
MUST BE PROVIDED BY THE CUSTOMER
B A
C
D
E
32
Page 16

34
english
deutsch
francais
español
The projector can be ceiling mounted using an approved
UL tested/ listed ceiling mount fixture, with a capacity of
minimum 12 kg / 26 lbs.
For ceiling mount use M4 screws that penetrate maximum
5 mm (0.19 in) into the projector body.
For proper ventilation the minimum distance from ceiling /
rear wall should be: 30 / 50 cm (12 / 20 in).
CEILING MOUNT
DECKENMONTAGE MONTAGE AU PLAFOND MONTAJE EN EL TECHO
Der Projektor kann mit der nach UL getesteten
/ zugelassenen Montagehalterung mit einer
Mindesttragfähigkeit von 12 kg / 26 Pfund an der Decke
montiert werden.
Verwenden Sie zur Deckenmontage M4-Schrauben,
die maximal 5 mm (0,19 Zoll) in den Projektorkörper
eindringen.
Um eine korrekte Belüftung zu gewährleisten, muss der
Mindestabstand zur Decke / Rückwand wie folgt sein:
30 / 50 cm (12/ 20 Zoll).
El proyector se puede montar en el techo utilizando un
anclaje para techo catalogado, homologado y aprobado por
UL, con una capacidad mínima de 12 kg (26 libras).
Para el montaje en el techo use tornillos M4 que penetran
un máximo de 5 mm (0,6 pulgadas) en el cuerpo del
proyector.
Para una ventilación adecuada, la distancia mínima del
techo/la pared posterior debe ser de: 30/50 cm
(12/20 pulgadas).
Le projecteur peut être monté au plafond en utilisant une
installation UL testée/classée approuvée pour montage
plafond, avec une capacité minimale de 12 kg / 26 lbs.
Pour le montage au plafond, utilisez des vis M4 qui
pénètrent au maximum à 5 mm (0.19 in) dans le boîtier du
projecteur.
Pour une ventilation correcte, la distance minimale entre le
plafond et le mur arrière doit être : de 30 / 50 cm
(12 / 20 in).
Las restricciones son aplicables a los ángulos de desviación.
No haga funcionar la unidad en ángulos superiores a +/20º, ya que esto reducirá notablemente la duración de la
lámpara.
Bei den Verschiebungswinkeln treten gewisse
Einschränkungen auf. Das Gerät darf nicht in einem Winkel
von mehr als +/- 20º betrieben werden, da in diesem Fall
die Lebensdauer der Lampe deutlich verringert wird.
Les restrictions s’appliquent aux angles décalés. Ne faites
pas fonctionner l’unité à des angles supérieurs à +/- 20º
car cela peut réduire la durée de vie de la lampe de façon
significative.
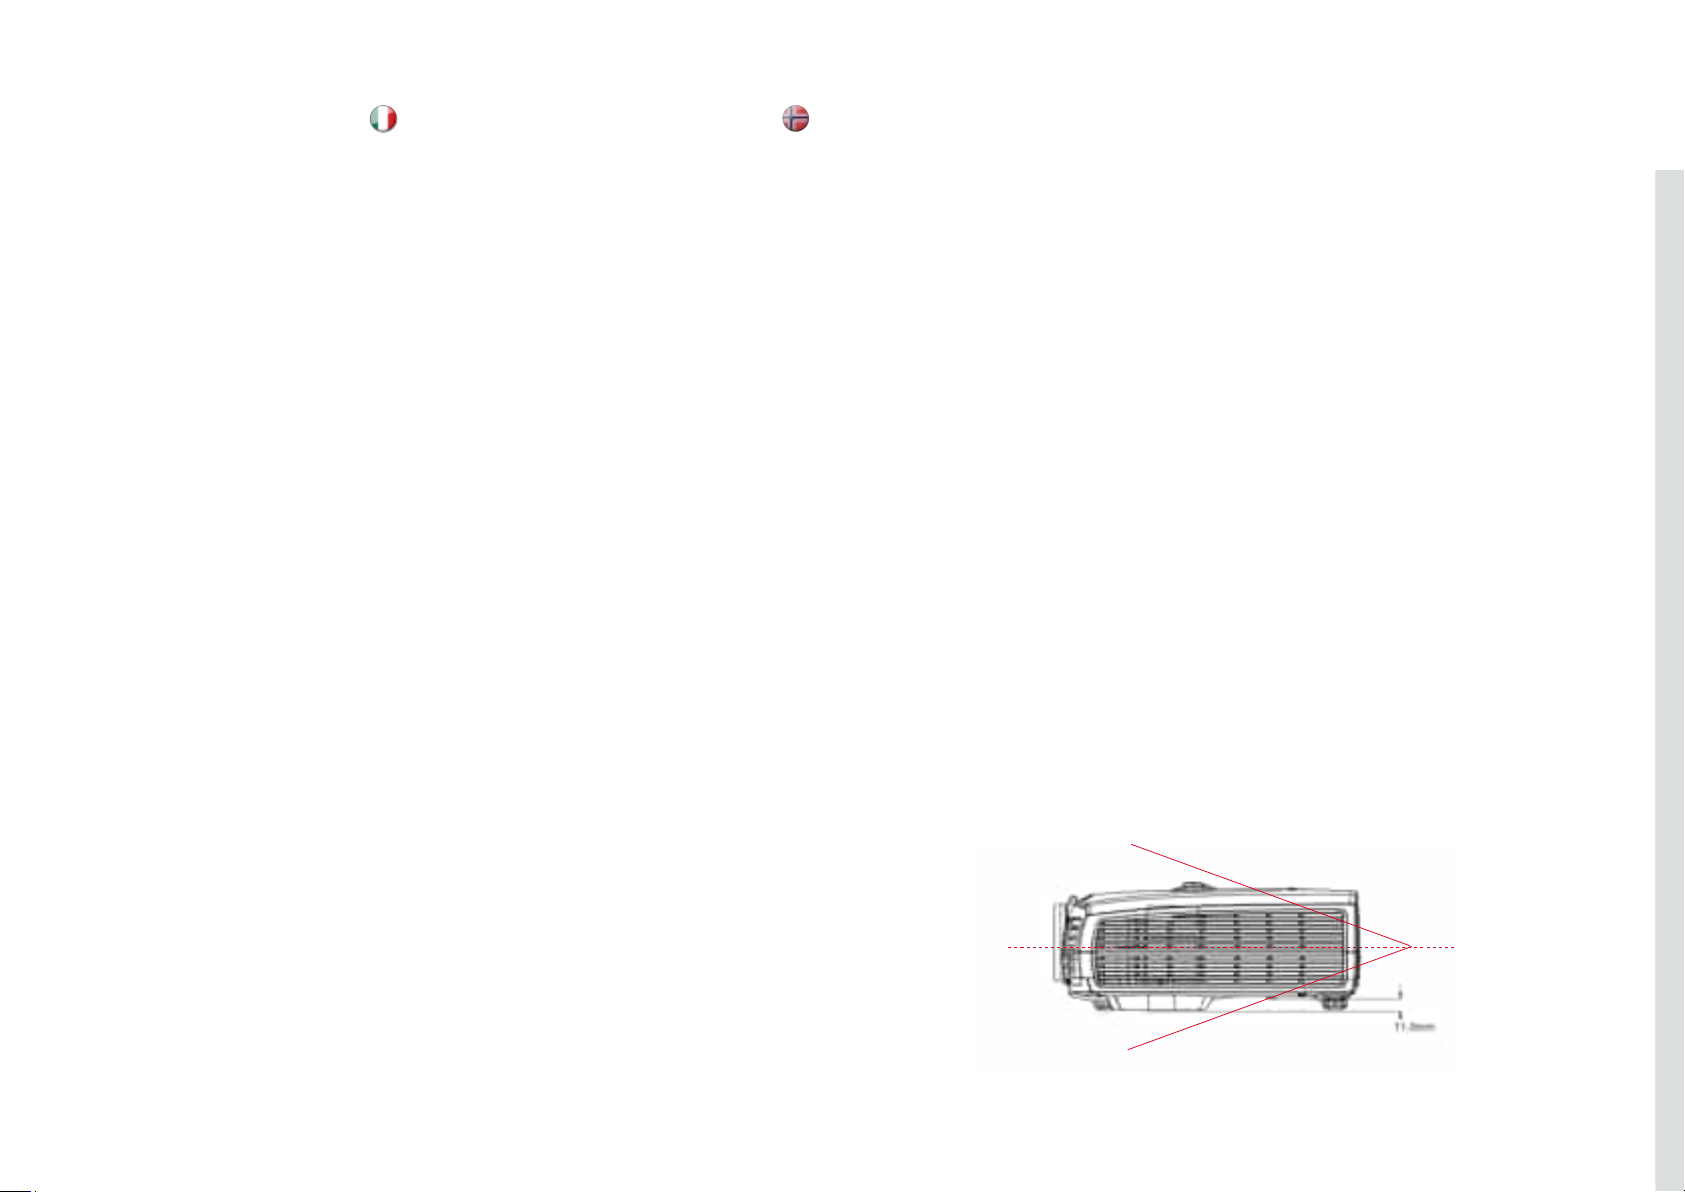
The projector can be operated through a range of offset
angles. Restrictions apply to offset angles. Do not operate
the unit at angles greater than +/- 20º, as this will greatly
reduce lamp life time.
OPERATION BETRIEB UTILISATION FUNCIONAMIENTO
Page 17
35
italiano
norsk
± 20°
MONTAGGIO A SOFFITTO
TAKMONTASJE
Il proiettore può essere montato a soffitto, utilizzando un
supporto di montaggio omologato UL, con capacità di
minimo 12 kg / 26 lbs.
Per il montaggio a soffitto, utilizzare delle viti M4
introducendole per massimo 5 mm (0,19») nel corpo del
proiettore.
Per ottenere una ventilazione corretta, la distanza minima
dalla parete posteriore / dal soffitto è di: 30/ 50 cm
(12/ 20”).
Enheten må ikke plasseres i vinkler større enn +/- 20º,
siden dette vil redusere lampelevetiden vesentlig.
Projektoren kan festes i taket ved hjelp av et godkjent
takfeste. Benytt en anerkjent leverandør av takfester.
Takfestest må tåle minimum 12 kg last.
Benytt M4 skruer som skrus 5 mm (max) inn i
skruefestene.
For å sikre god ventilasjon anbefales en minste avstand
til vegg på 50 cm og tak på 30 cm. Sørg uansett for at
ventilasjonen er god.
Si applicano dei limiti agli angoli di offset. Non azionare
l’unità con angolazioni superiori a +/- 20º, per non ridurre
sensibilmente la durata della lampada.
FUNZIONAMENTO
PLASSERING
Page 18
english deutsch francais
36
After setting-up, switch on all equipment. The projector can be controlled by the
keypad, by the remote control or using the RS232 or LAN interfaces. To switch the
projector on, firmly press the POWER button on the keypad or the remote control.
The STATUS indicator will turn from yellow to blue when the unit is switched on.
If the STATUS indicator is flashing yellow, please wait until it turns permanent
yellow. Issue the PIN code if activated.
When only one source is connected, the projector will auto-detect that source. If
more sources are connected, the projector will search for the next active source
according to the following list, provided that SOURCE SCAN is activated in the
SETTINGS sub menu (see description of menu system):
HDMI •
VGA •
DVI-D / DVI-A•
C-video •
S-Video •
YPbPr (Component)•
Toggle between the sources by pressing the SRC buttons on the keypad or the
direct source selection keys on the remote control. Only sources that are active will
be displayed.
If no source is active, searching messages will appear on the screen. If no source
is active for a long time, the projector will go in standby mode if DPMS (Display
Power Management Signalling) is enabled in the SETTINGS sub menu.
The STATUS indicator will turn from blue to flashing orange, then orange. The
projector will be switched back on if at least one source is (re)activated. The
power-down function can be disabled in the menu.
See DPMS in the SETTINGS sub menu.
To switch the projector off, firmly press the POWER button on the keypad or
the remote control twice (to confirm that you really want to switch off the unit).
The STATUS indicator will turn from blue to flashing orange, then orange when
completely switched off. You may not switch the unit on while the STATUS
indicator is flashing orange. Please wait until the indicator is permanent orange.
USING THE PROJECTOR EINSATZ DES PROJEKTORS UTILISATION DU PROJECTEUR
Nach der Einrichtung, müssen alle Geräte eingeschaltet werden. Der Projektor
kann über das Tastenfeld, die Fernbedienung oder die RS232- bzw. LANSchnittstellen gesteuert werden. Zum Einschalten des Projektors, drücken
Sie fest auf die Taste STROMVERSORGUNG auf dem Tastenfeld oder der
Fernbedienung. Die Anzeige STATUS schaltet von Gelb auf Blau, sobald das
Gerät angeschaltet ist.
Blinkt die Anzeige STATUS gelb, müssen Sie warten, bis sie kontinuierliche gelb
leuchtet. Geben Sie den PIN-Code ein, falls dieser aktiviert ist.
Ist nur eine Quelle angeschlossen, so erkennt der Projektor diese automatisch.
Sind mehrere Quellen angeschlossen, sucht der Projektor die folgende aktive
Quelle nach der nachstehenden Liste, vorausgesetzt die Option QUELLEN
SCANNEN ist im Untermenü EINSTELLUNGEN eingestellt (siehe die
Beschreibung des Menüsystems):
HDMI •
VGA•
DVI-D / DVI-A•
C-Video•
S-Video•
YPbPr (Komponente)•
Schalten Sie mit Hilfe der Taste SRC auf dem Tastenfeld bzw. der Fernbedienung
zwischen den verschiedenen Quellen um. Es werden nur aktive Quellen
angezeigt.
Ist keine Quelle aktiv, so erscheinen auf dem Bildschirm Suchmeldungen. Ist
längere Zeit keine Quelle aktiv, schaltet der Projektor in den Standby-Betrieb
um, vorausgesetzt die Option DPMS (Stromsparbetrieb) ist im Untermenü
EINSTELLUNGEN auf EIN gestellt.
Die Anzeige STATUS schaltet von Blau auf blinkend Gelb und dann auf Gelb.
Der Projektor schaltet wieder zurück, wenn zumindest eine Quelle (erneut)
aktiviert wird. Die Abschaltefunktion kann im Menü deaktiviert werden.
Siehe DPMS im Untermenü EINSTELLUNGEN.
Zum Ausschalten des Projektors, drücken Sie fest zwei Mal auf die Taste
STROMVERSORGUNG auf dem Tastenfeld oder der Fernbedienung (um zu
bestätigen, dass Sie das Gerät wirklich ausschalten möchten). Die Anzeige
STATUS schaltet von Blau auf blinkend Gelb und dann auf Gelb, wenn das Gerät
ausgeschaltet wird. Das Gerät kann nicht wieder eingeschaltet werden, solange
die Anzeige STATUS gelb blinkt. Warten Sie bitte, bis die Anzeige kontinuierlich
gelb leuchtet.
Après l’installation, allumez tout le système. Le projecteur peut être commandé
par le clavier, par la télécommande ou par les interfaces RS 232 ou LAN. Pour
allumer le projecteur, appuyez fermement sur le bouton POWER du clavier ou de
la télécommande. L’indicateur d’ETAT passe du jaune au bleu quand l’appareil est
allumé.
Si l’indicateur d’ETAT clignote jaune, patientez jusqu’à ce qu’il devienne
permanent. Tapez le code PIN s’il est activé.
Quand une seule source est connectée, le projecteur détecte automatiquement
cette source. Si plusieurs sources sont connectées, le projecteur cherche la
prochaine source active selon la liste suivante, à condition que BALAYAGES DE
SOURCES soit sur ON dans le sous-menu PARAMÈTRES (voir la description du
menu) :
HDMI •
VGA•
DVI-D / DVI-A•
C-Vidéo•
S-Vidéo•
YPbPr (Composante)•
Choisissez parmi les sources en appuyant sur les boutons SRC du clavier ou sur
les touches de sélection directe des sources sur la télécommande. Seules les
sources actives sont affichées.
Si aucune source n’est active, recherchez dans les messages qui apparaissent
sur l’écran. Si aucune source n’est active pendant longtemps, le projecteur se
met en mode veille si DPMS (économie d’énergie) est sur ON dans le sous-menu
PARAMÈTRES.
L’indicateur d’ETAT passe du bleu au clignotant jaune, puis au jaune permanent.
Le projecteur est rallumé si au moins une source est (ré) activée. La fonction horstension peut être désactivée dans le menu.
Regardez DPMS dans le sous-menu PARAMÈTRES.
Pour éteindre le projecteur, appuyez fermement deux fois (pour confirmer que
vous voulez vraiment éteindre l’appareil) sur le bouton POWER du clavier ou de
la télécommande. L’indicateur d‘ETAT passe du bleu au clignotant jaune, puis
au jaune quand il est éteint. Vous ne pouvez pas allumer l’appareil tant que
l’indicateur d’ETAT clignote jaune. Attendez que l’indicateur soit jaune permanent.
Page 19

español italiano norsk
37
UTILIZACIÓN DEL PROYECTOR UTILIZZO DEL PROIETTORE
BRUK AV PROJEKTOREN
Completata la configurazione, accendere tutte le apparecchiature. Il proiettore
può essere controllato con il tastierino, con il telecomando oppure utilizzando
le interfacce LAN o RS232. Per accendere il proiettore, spingere con decisione
il pulsante di accensione POWER sul tastierino o sul telecomando. Si illumina
l’indicatore di STATO che quando viene accesa l’unità passa da giallo a verde.
Se l’indicatore di STATO è giallo lampeggiante, attendere che si stabilizzi sul
giallo fisso. Se è stato attivato, inserire il codice PIN.
Se è collegata una sola sorgente, il proiettore la rileva automaticamente. Se sono
collegate più sorgenti, il proiettore cerca la sorgente attiva successiva in base
all’elenco seguente, a condizione che nel sottomenu IMPOSTAZIONI sia attivata
SCANSIONE SORGENTE; per informazioni consultare la descrizione del sistema
dei menu:
HDMI•
VGA•
DVI-D / DVI-A•
C-Video•
S-Video•
YPbPr (componente)•
Selezionare la sorgente premendo i pulsanti SRC (Sorgente) sul tastierino o i tasti
di selezione diretta della sorgente sul telecomando. Sono visibili solo le sorgenti
attive.
Se non ci sono sorgenti attive, sullo schermo vengono visualizzati dei messaggi
di ricerca. Quando non si attiva alcuna sorgente per molto tempo, il proiettore
passa in modalità standby se la funzione DPMS (risparmio energetico) è
impostata su ON nel sottomenu IMPOSTAZIONI.
La spia di STATO passa da verde a giallo lampeggiante e poi a giallo. Il
proiettore viene riacceso se viene (ri)attivata almeno una sorgente. La funzione
di spegnimento può essere disabilitata tramite menu.
Vedere DPMS nel sottomenu IMPOSTAZIONI.
Per spegnere il proiettore, spingere con decisione il pulsante POWER sul
tastierino o sul telecomando per due volte (per confermare che si desidera
effettivamente spegnere l’unità). La spia di STATO passa da blu a giallo
lampeggiante e poi a giallo quando il proiettore viene spento. L’unità non può
essere riaccesa se la spia di stato è giallo lampeggiante; attendere che la spia si
stabilizzi sul giallo fisso.
Después de la instalación, encienda todo el equipo. El proyector se puede
controlar mediante el teclado, el mando a distancia o utilizando las interfaces
RS232 o LAN. Para encender el proyector, pulse con firmeza el botón POWER
del teclado o del mando a distancia. El indicador de ESTADO pasará de amarillo a
azul cuando se encienda el aparato.
Si el indicador de ESTADO está amarillo intermitente, espere a que se quede en
amarillo fijo. Introduzca el código PIN si está activado.
Cuando sólo hay una fuente conectada, el proyector detectará esa fuente
automáticamente. Si hay más fuentes conectadas, el proyector buscará
la siguiente fuente activa de la lista indicada a continuación, siempre que
EXPLORACIÓN FUENTE esté activado en el submenú AJUSTES (véase la
descripción del sistema de menús):
HDMI •
VGA•
DVI-D / DVI-A•
C-Video•
S-Video•
YPbPr (Componente)•
Seleccione las fuentes pulsando los botones SRC del teclado o las teclas de
selección de fuente directa del mando a distancia. Sólo se mostrarán las fuentes
que estén activas.
Si no hay ninguna fuente activa, la pantalla indicará que se están buscando
mensajes. Si no hay ninguna fuente activa durante mucho tiempo, el proyector
entrará en modo de espera si en el submenú AJUSTES se ha puesto DPMS
(ahorro de energía) en ON.
El indicador de ESTADO pasará de azul a amarillo intermitente y luego a amarillo.
Se volverá a encender el proyector si se (re)activa al menos una fuente. La función
de apagado puede desactivarse en el menú.
Véase DPMS en el submenú AJUSTES.
Para apagar el proyector, pulse firmemente dos veces el botón POWER del
teclado o del mando a distancia (para confirmar que realmente desea apagar el
aparato). El indicador de ESTADO pasará de azul a amarillo intermitente y luego
a amarillo al apagarse. No se puede encender el aparato cuando el indicador de
ESTADO está amarillo intermitente. Espere a que se quede en amarillo fijo.
Etter oppkobling skrus alt utstyret på. Projektoren kan styres fra tastaturet, med
fjernkontrollen eller over RS232 eller LAN. Skru på projektoren ved å trykke
bestemt på POWER tasten, enten på tastaturet eller fjernkontrollen. STATUS
indikatoren vil skifte fra gult til blått når enheten skrus på.
Vent hvis STATUS indikatoren blinker gult. Tast inn PIN koden dersom den er
aktivisert.
Når kun en aktiv kilde er tilkoblet, vil denne kilden automatisk kobles opp.
Dersom flere aktive kilder er koblet til, vil projektoren søke seg fram basert på
nedenstående liste, gitt at KILDESØK er aktivisert i INNSTILLINGER undermenyen
(se bekrivelse av menysystemet):
HDMI•
VGA•
DVI-D / DVI-A•
C-video•
S-video•
YPbPr (komponent)•
Velg kilde ved å trykke på SRC knappene på tastaturet eller direktevalg tastene på
fjernkontrollen. Kun aktive kilder vises.
Hvis ingen kilder er aktive, vil søkemelding komme opp på skjermen. Hvis ingen
aktiv kilde er tilkoblet over lengre tid, vil projektoren gå i hvilemodus dersom DPMS
(strømsparing) er satt på i INNSTILLINGER undermenyen.
STATUS indikatoren vil skifte fra blått til blinkende gult, deretter gult. Projektoren vil
skru seg på igjen dersom minst en kilde (re)aktiveres. Strømsparing kan skrus på
og av i menyen, se INNSTILLINGER undermenyen.
For å skru projektoren av, trykk bestemt på POWER knappen på tastaturet eller
fjernkontrollen to ganger (for å sikre mot at enheten skrus av utilsiktet). STATUS
indikatoren skifter fra blått til blinkende gult, deretter fast gult når enheten er
skrudd av.
Enheten kan ikke skrus på når STATUS indikatoren blinker gult. Vennligst vent til
lyset blir fast gult.
Page 20

38
english
deutsch
francais
español
RS 232 AND LAN CONTROL
RS 232
You may control and monitor the projector remotely through the serial
RS232 control interface.
Two RS232 protocols are employed. A simple instruction set (SIS)
ASCII protocol gives access to the most frequently used commands.
In addition, a binary protocol is available where each command is a
series of 32 bytes in one packet. The protocols allow for both SET and
GET operations. To utilize GET operations the host needs a routine for
receiving and interpreting incoming packets. SET operations are used
to force the projector into different modes, like setting brightness and
contrast, switching between sources, etc. A separate document “RS232 and LAN communication protocol and command set” is available
that describes the communications parameters and operational codes
in detail.
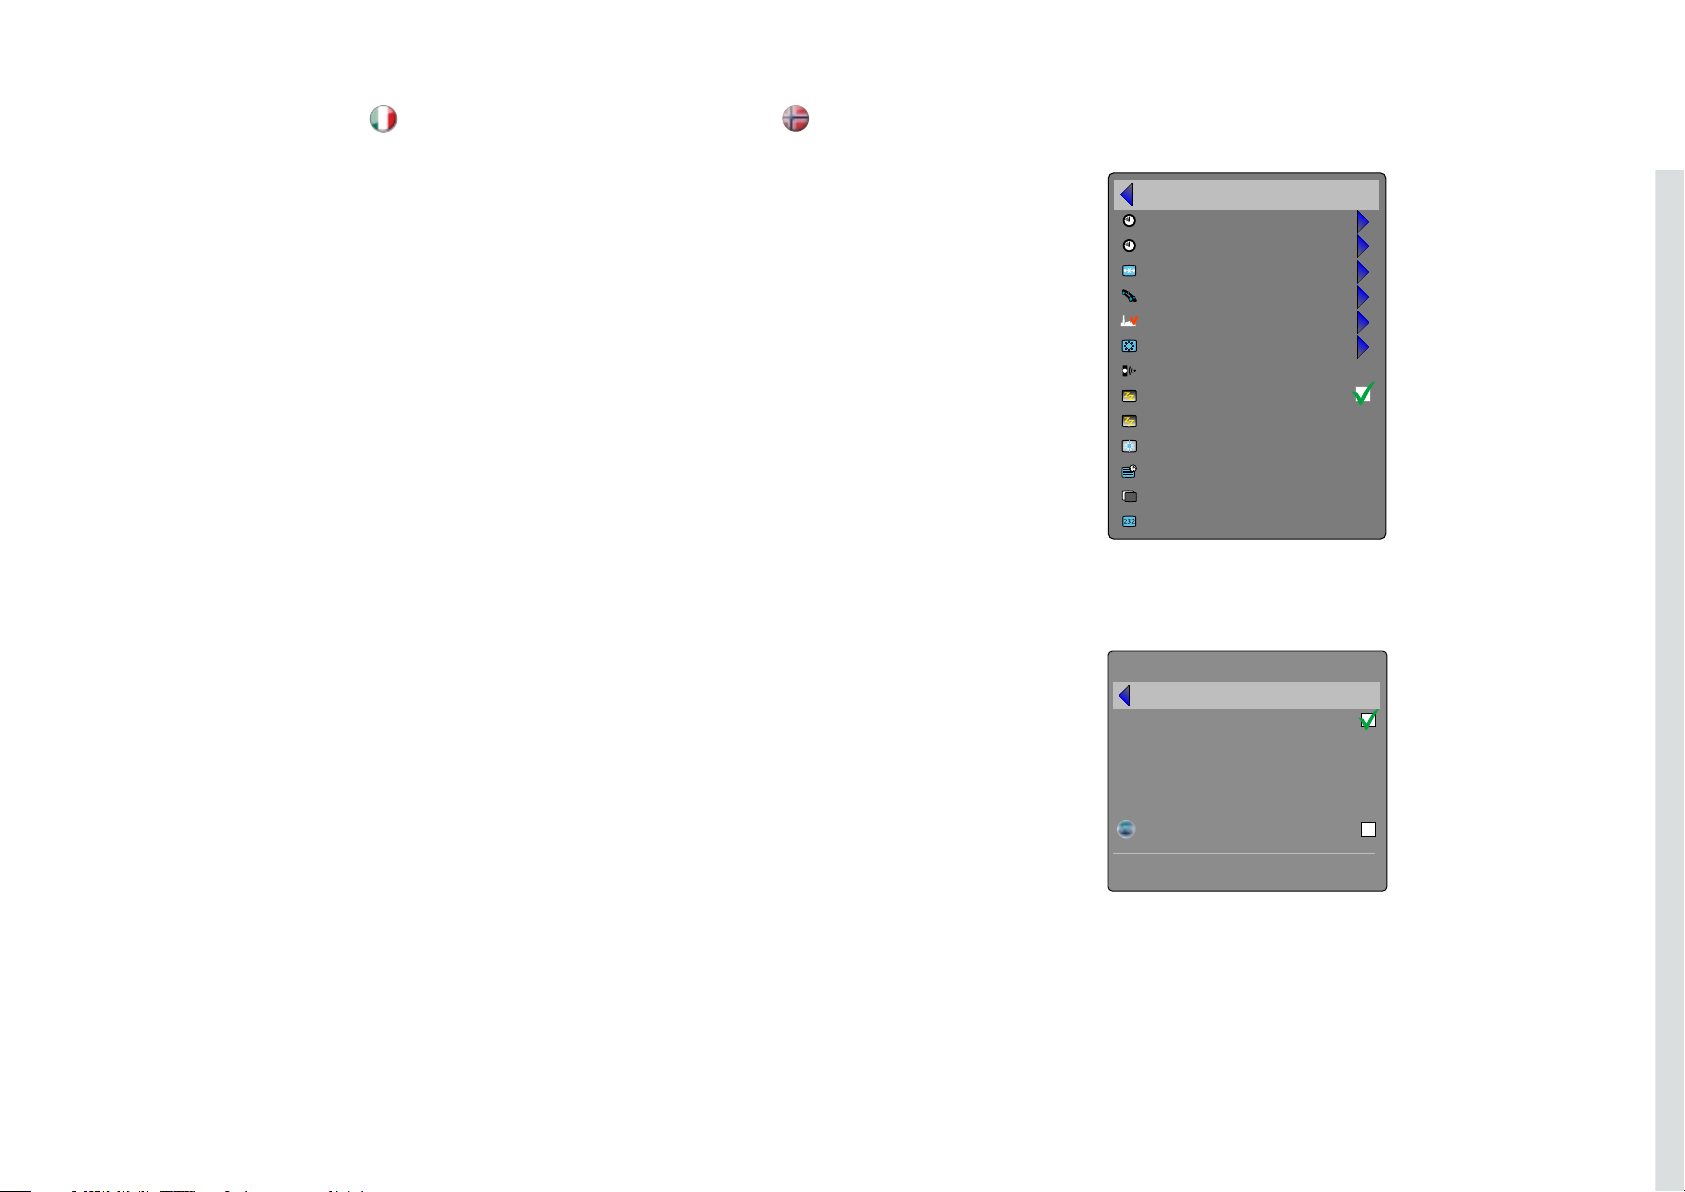
When using the RS232 interface, make sure that the baudrate is set
correctly. Baudrate can be set in the INSTALLATION menu, and can
be toggled between 4800, 9600, and 19200 bps.
USING THE PROJECTOR EINSATZ DES PROJEKTORS UTILISATION DU PROJECTEUR UTILIZACIÓN DEL PROYECTOR
RS 232 UND LAN STEUERUNG
RS 232
Es besteht die Möglichkeit, den Projektor über die serielle RS232Schnittstelle auf Distanz zu steuern und überwachen.
Es werden zwei RS232-Protokolle verwendet. Ein einfacher
Befehlssatz (SIS) in Form eines ASCII-Protokolls ermöglicht den
Zugriff auf die am häufigsten verwendeten Befehle. Daneben stehe
ein binäres Protokoll zur Verfügung, bei dem jeder Befehl eine
32 Bytes lange Reihe in einem Paket ist. Die Protokolle lassen
sowohl Einstellungs- als auch Empfangsoperationen zu. Für den
Einsatz von Empfangsoperationen benötigt der Host eine Routine
für den Empfang und Interpretation der eingehenden Pakete. Die
Einstellungsoperationen werden verwendet, um den Projektor in
verschiedene Betriebsarten zu forcieren, wie z.B. die Einstellung
der Helligkeit und des Kontrast, die Umschaltung zwischen Quellen
usw. In einem separaten Dokument unter dem Titel „RS-232und LAN-Kommunikationsprotokoll und Befehlssatz” werden
die Kommunikationsparameter und Dienstcodes im Einzelnen
beschrieben.
CONTROL RS 232 y LAN
RS 232
Puede controlar y supervisar el proyector a distancia a través de la
interfaz de control serie RS232.
Se utilizan dos protocolos RS232. Un juego de instrucciones sencillas
del protocolo ASCII le da acceso a los comandos utilizados con más
frecuencia. Además, dispone de un protocolo binario en el que cada
comando es una serie de 32 bytes en un paquete. Los protocolos
permiten las operaciones SET y GET. Para utilizar las operaciones
GET, la unidad principal (host) necesita una rutina para recibir e
interpretar los paquetes entrantes. Las operaciones SET se utilizan
para poner el proyector en modos diferentes, como el ajuste de brillo
y contraste, el cambio entre fuentes, etc. Hay un documento aparte
disponible (“RS-232 and LAN communication protocol and command
set”) que describe en detalle los parámetros de comunicaciones y
códigos operativos.
CONTRÔLE RS 232 ET LAN
RS 232
Vous pouvez commander et surveiller le projecteur à distance avec
une interface de commande série RS 232.
Deux protocoles RS 232 sont employés. Une simple instruction
d’installation (SIS) ASCII du protocole donne accès à la plupart des
commandes fréquemment utilisées. En plus, un protocole binaire est
disponible où chaque commande est une série de 32 octets dans
un seul paquet. Les protocoles permettent les utilisations SET et
GET pour les deux. Pour utiliser les fonctionnements GET, le serveur
a besoin d’un sous-programme pour la réception et l’interprétation
des paquets qui arrivent. Les utilisations SET sont utilisées pour
faire entrer de force le projecteur dans différents modes, comme les
réglages de luminosité et de contraste, le changement de sources,
etc. Un document séparé “protocole de communication RS-232 et
LAN et réglages de commande” est disponible et décrit en detail les
paramètres de communication et les codes de fonctionnement.
LAN
Der Projektor kann als Alternative zur RS232-Schnittstelle über
den LAN-Anschluss gesteuert und überwacht werden. Die LANSteuerung ist entweder über eine eingebettete Webseite mit den am
häufigsten verwendeten Befehlen oder den gleichen Befehlssatz wie
für RS232 möglich und bietet umfassenden Zugriff auf die gesamte
Systemsteuerung.
HINWEIS! DER PROJEKTOR IST MIT EINER
STANDARDGEMÄSSEN IP-ADRESSE KONFIGURIERT.
IN DEN SYSTEMANGABEN, ZU ERREICHEN ÜBER DAS
MENÜSYSTEM ODER DIE FERNBEDIENUNG, FINDEN SIE DIE
AKTUELLE IP-ADRESSE.
Eine detaillierte Beschreibung der Konfiguration, Verwendung
und des Befehlssatzes finden Sie in einem separaten Dokument
unter dem Titel „RS-232- und LAN-Kommunikationsprotokoll und
Befehlssatz”. Als Mittel zur Diebstahlserkennung kann die LANSchnittstelle eingesetzt werden. Wird der Projektor abgebaut, wird
das LAN getrennt; dies kann über das lokale Netzwerk erkannt und
zum Auslösen eines Alarms verwendet werden.
LAN
The projector can be controlled and monitored through the LAN
connector as an alternative to RS232. LAN control is available
either through an embedded web page for the most frequently used
commands or using the same command set as for RS232 for full
access to all system controls.
NOTE! THE PROJECTOR IS CONFIGURED WITH A DEFAULT
IP ADDRESS. SEE THE SYSTEM INFORMATION AVAILABLE
THROUGH THE MENU SYSTEM OR REMOTE CONTROL FOR
THE ACTUAL IP-ADDRESS.
Detailed descriptions of configuration, use and command set is
described in a separate document “RS-232 and LAN communication
protocol and command set”. You may consider using the LAN
interface as a means of theft detection. When the projector is
removed, the LAN will be disconnected; this may be detected over the
local area network and could be used to trigger an alarm.
LAN
Le projecteur peut être commandé et surveillé avec la liaison LAN
comme une alternative à la liaison RS 232. La commande LAN
est disponible sur une page web intégrée pour les commandes
les plus fréquemment utilisées ou en utilisant le même réglage de
commande que pour RS 232 pour un plein accès aux commandes
de tout le système.
NOTE ! LE PROJECTEUR EST CONFIGURÉ AVEC
UNE ADRESSE IP PAR DÉFAUT. REPORTEZ-VOUS À
L’INFORMATION DU SYSTÈME DANS LE MENU OU SUR LA
TÉLÉCOMMANDE POUR L’ADRESSE IP ACTUELLE.
Les descriptions détaillées de configuration, réglage d’utilisation et
de commande sont décrites sur un document à part « protocole
de communication RS 232 et LAN et de réglage de commande ».
Considérez l’utilisation de l’interface LAN comme moyen de
détection anti-vol. Quand le projecteur est supprimé, l’interface
LAN est déconnectée ; celle-ci peut être détectée sur le réseau local
et peut être utilisée comme déclencheur d’alarme.
LAN
El proyector se puede controlar y supervisar mediante el conector
LAN como alternativa a RS232. El control LAN está disponible bien
mediante una página Web intercalada para los comandos utilizados
más frecuentemente o utilizando el mismo juego de comandos de
RS232 para un acceso completo a todos los controles del sistema.
¡NOTA! EL PROYECTOR ESTÁ CONFIGURADO CON UNA
DIRECCIÓN IP PREDETERMINADA. VÉASE LA DIRECCIÓN IP
ACTUAL EN LA INFORMACIÓN DEL SISTEMA ACCESIBLE A
TRAVÉS DEL SISTEMA DE MENÚS O EL MANDO A DISTANCIA.
Las descripciones detalladas de configuración, uso y juego de
comandos se ofrecen en un documento aparte (“RS-232 and LAN
communication protocol and command set”). Puede considerar el
uso de la interfaz de LAN como medio de detección de robo. Si el
proyector se sustrae, la LAN se desconectará; esto se puede detectar
a través de la red de área local y se puede utilizar para disparar una
alarma.
Page 21
UTILIZZO DEL PROIETTORE
italiano
BRUK AV PROJEKTOREN
norsk
CONTROLLO LAN ED RS
RS 232
È possibile controllare e monitorare il proiettore a distanza tramite
l’interfaccia di controllo seriale RS232.
Sono utilizzati due protocolli RS232. Un protocollo ASCII (SIS) con un
gruppo di istruzioni semplici dà accesso ai comandi usati più spesso.
In aggiunta, è disponibile un protocollo binario in cui ogni comando
è una serie di 32 byte in un pacchetto. I protocolli consentono
operazioni di tipo SET e GET. Per usare le operazioni GET, l’host
richiede una routine per ricevere e interpretare i pacchetti in arrivo. Le
operazioni SET consentono di forzare il proiettore in modalità diverse,
ad esempio d’impostare luminosità e contrasto, attivare le sorgenti
disponibili ecc. È disponibile un documento separato “RS-232 and
LAN communication protocol and command set” (Serie di comandi e
protocollo di comunicazione LAN e rs-232) che descrive in dettaglio i
parametri di comunicazione e i codici operativi.
LAN
In alternativa all’RS232, il proiettore può essere controllato e
monitorato tramite il connettore LAN. Il controllo LAN è disponibile sia
tramite una pagina Web incorporata per i comandi usati più spesso
oppure utilizzando lo stesso gruppo di comandi di RS232 per avere
l’accesso a tutti i comandi del sistema.
NOTA: IL PROIETTORE È CONFIGURATO CON UN INDIRIZZO
IP PREDEFINITO. PER INFORMAZIONI SULL’INDIRIZZO
IP CORRENTE, VEDERE LE INFORMAZIONI DI SISTEMA,
DISPONIBILI TRAMITE IL SISTEMA DEI MENU O IL
TELECOMANDO.
Una descrizione dettagliata della configurazione, l’uso e il gruppo di
comandi è riportata in un documento separato, intitolato “RS-232 and
LAN communication protocol and command set”. L’interfaccia LAN
può essere utilizzata come antifurto. Quando si rimuove il proiettore,
la LAN viene scollegata; questa disconnessione può essere rilevata
tramite la Local Area Network e configurata per far scattare un allarme.
RS232 OG LAN STYRING
RS232
Projektoren kan styres med serielt RS232 grensesnitt. To ulike
styringsprotokoller er tilgjengelige. En forenklet ASCII versjon (SIS,
Simple Instruction Set) gir tilgang til det mest brukte funksjonene. I
tillegg finnes en binær-protokoll der hver kommando består av 32
byte i en pakke. Protokollene tillater både SET og GET operasjoner.
For å kunne benytte GET operasjoner, må verten ha en rutine som
kan motta og forstå innkommende pakker. SET operasjoner styrer
projektorens ulike funksjoner, som lysstyrke, kontrast, kildevalg etc.
Et eget dokument “RS-232 and LAN communication protocol and
command set” som beskriver kommunikasjonsparametrene i detalj
er tilgjengelig.
Når styring via RS232 er i bruk må baudrate settes til korrekt verdi.
Dette settes i INNSTILLINGER menyen, og mulige verdier er 4800,
9600 og 19200 bps.
LAN
Projektoren kan styres over LAN som et alternativ til RS232. LAN
styring er tilgjengelig enten gjennom den innebygde web-siden eller
ved hjelp av samme styringer som for RS232.
BEMERK! PROJEKTOREN ER SATT OPP MED EN STADARD
IP-ADRESSE. SJEKK SYSTEMINFORMASJONEN SOM ER
TILGJENGELIG VED HJELP AV FJERNKONTROLLEN ELLER I
MENYEN FOR Å FINNE DEN GYLDIGE IP-ADRESSEN.
Et eget dokument “RS-232 and LAN communication protocol
andcommand set” som beskriver kommunikasjonsparametrene
i detalj er tilgjengelig. LAN grensesnittet kan benyttes som
tyverisikring. Dersom enheten fjernes, blir LAN forbindelsen koblet
fra. Dette kan da registreres over nettverket slik at en alarm kan
settes i gang.
back
set date and time
timer
PIN code
network
factory reset
service
remote control ID
broadcast
DPMS
DPMS timeout
backlight timeout
menu timeout
splash
baudrate
network
back
DHCP enabled
IP address
subnet mask
default gateway
TCP/UDP port
AMX Device Discovery
MAC address
30 minutes
30 seconds
30 seconds
black
19200
192.168.1.90
255.255.255.0
192.168.1.1
1025
00-0D-34-A0-FF-18
The colors and graphics in this manual may
deviate from your projector set-up.
39
Page 22

40
english
deutsch
francais
español
TIMER
The projector features a real-time clock that enables timing control.
This means that the projector can be programmed to switch on
and off at certain pre-set times during a weekly cycle. To allow for a
flexible schedule, 10 ‘programs’ are available. With each program, you
can define the switch on or switch off time for a single day (Monday
to Sunday), all work days (Monday through Friday), or week-end
(Saturday and Sunday). One, several or all programs can be active
at the same time as desired. In this way, a flexible scheme can be
established. Observe the 24 hour time format. For more information,
see the SETTINGS > TIMER menu.
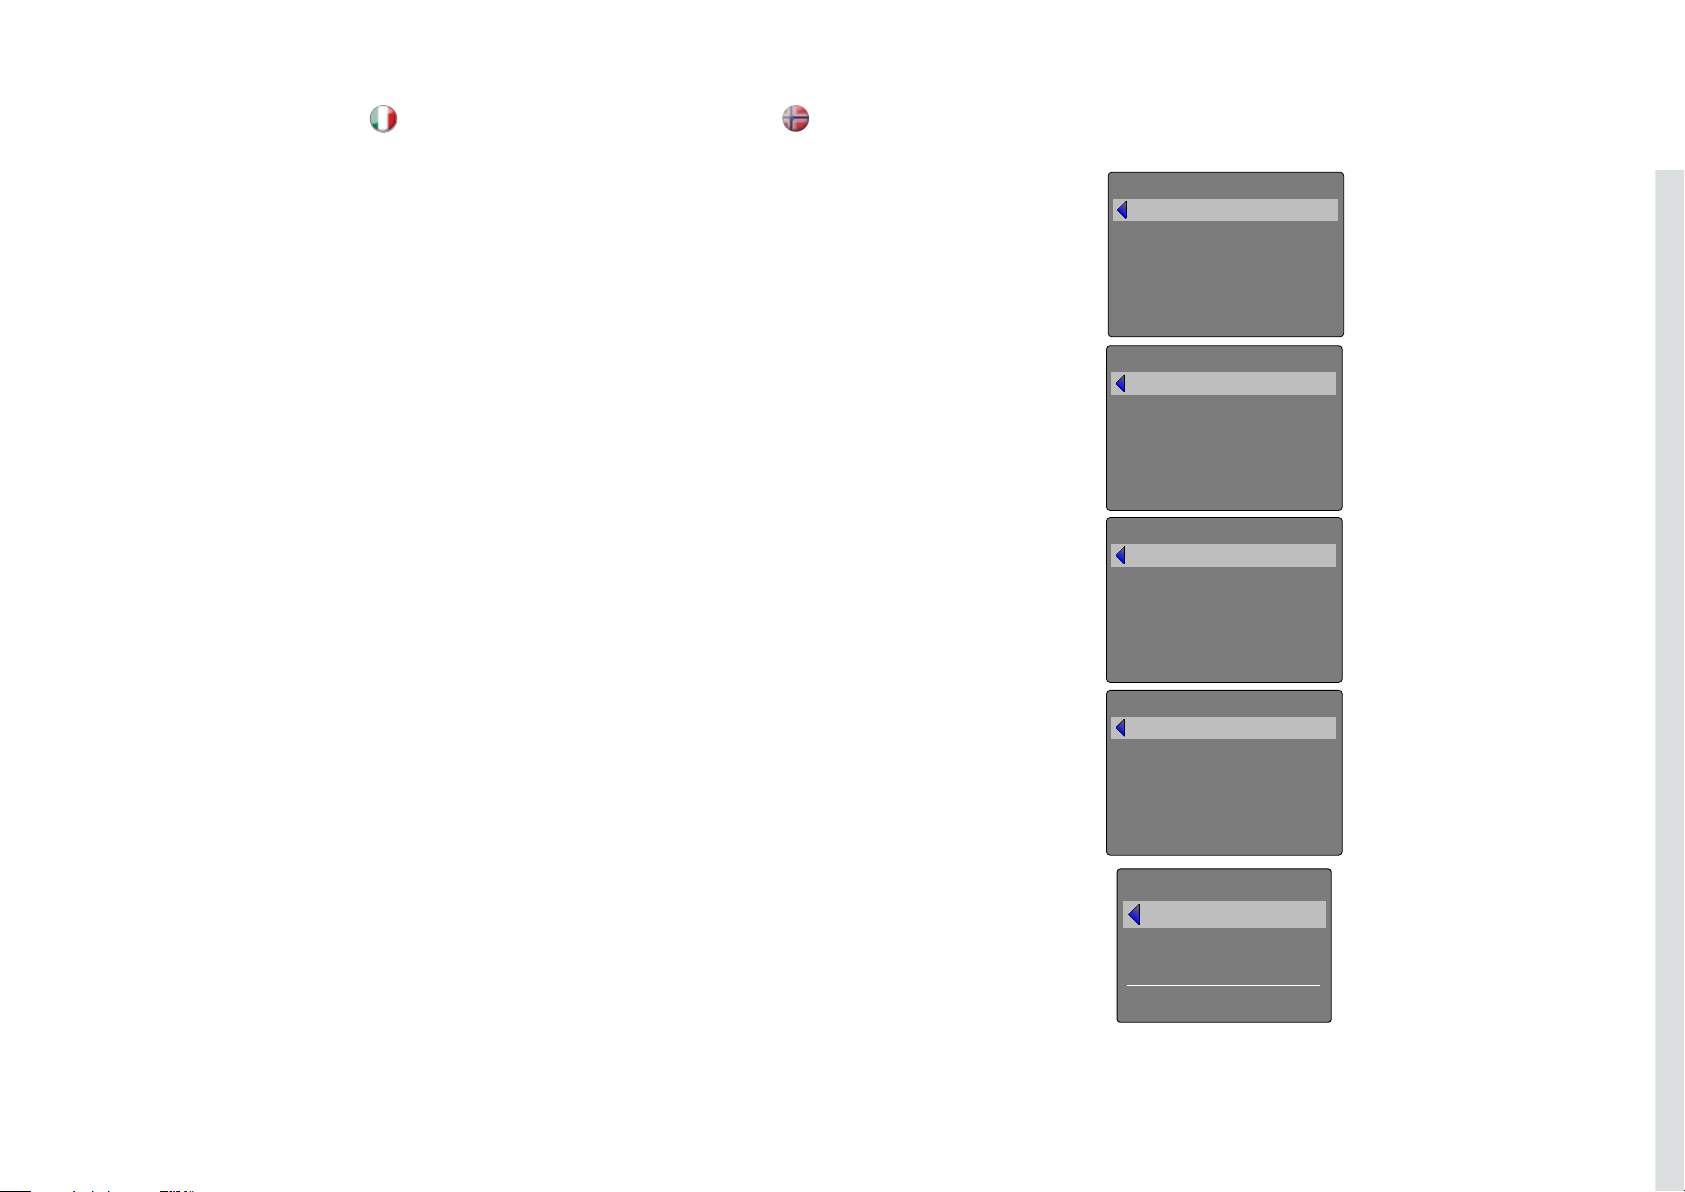
The following example illustrates a case where the projector turns
on at 08:00 in the morning (8 am) and switches off at 20:00 (8 pm)
on weekdays (Monday through Friday). Weekends (Saturdays and
Sundays), it turns on at 10:00 (10 am) and off at 18:00 (6 pm). VGA is
used as the source. For this, four programs are needed, 2 for on and
two for off.
USING THE PROJECTOR EINSATZ DES PROJEKTORS UTILISATION DU PROJECTEUR UTILIZACIÓN DEL PROYECTOR
TIMER
Der Projektor ist mit einer Echtzeituhr ausgerüstet, über die eine
Zeitsteuerung möglich ist. Das bedeutet, dass der Projektor so
programmiert werden kann, dass er sich in einem wöchentlichen
Zyklus zu bestimmten vorgegebenen Zeiten ein- bzw. ausschaltet.
Für eine flexible Planung stehen 10 ‘Programme’ zur Verfügung.
In jedem Programm kann die Ein- und Ausschaltzeit für einen
Tag (Montag bis Sonntag), alle Werketage (Montag bis Freitag)
oder das Wochenende (Sam- und Sonntag) festgelegt werden.
Eines, mehrere oder alle Programme können je nach Belieben
gleichzeitig aktiv sein. So kann eine flexible Einstellung erfolgen.
Beachten Sie das 24-Stundenformat der Uhr. Nähere Angaben zur
Einstellung der Programme finden Sie im MENÜ-System, Untermenü
EINSTELLUNGEN > TIMER.
Das nachstehende Beispiel zeigt einen Fall, bei dem der Projektor
an den Werktagen (Montag bis Freitag) um 08:00 morgens ein- und
um 20:00) ausgeschaltet wird. An den Wochenenden (Sam- und
Sonntag) wird er um 10:00 ein- und um 18:00 ausgeschaltet. Als
Quelle wird VGA verwendet. Dazu sind vier Programme erforderlich,
2 zum Ein- und 2 zum Ausschalten.
HORLOGE
Le projecteur dispose d’une véritable horloge qui active le contrôle
du temps. Cela signifie qu’on peut programmer le projecteur pour
s’allumer ou pour s’éteindre à un certain moment pré-réglé sur une
semaine. Pour permettre un horaire flexible, 10’programmes’ sont
disponibles. Avec chaque programme, vous pouvez définir l’heure
d’allumage ou d’extinction pour un jour (du lundi au dimanche),
pour les jours de travail (lundi au vendredi), ou le week-end (samedi
et dimanche). Un seul, plusieurs ou tous les programmes peuvent
être activés en même temps à volonté. De cette façon, un système
flexible peut être établi. Observez le format 24H. Reportez-vous au
MENU système, sous-menu PARAMÈTRES > MINUTERIE, pour
plus de détails sur la manière de définir les programmes.
L’exemple suivant illustre un cas où le projecteur s’allume à 08:00
et s’éteint à 20:00 les jours de semaine (du lundi au vendredi). Le
week-end (samedi et dimanche), il s’allume à 10:00 et s’éteint à
18:00. La source VGA est utilisée. Pour cela, 4 programmes sont
nécessaires, 2 pour l’allumage et 2 pour l’extinction.
TEMPORIZADOR
El proyector incluye un reloj en tiempo real que permite un control
temporizado. Esto significa que el proyector se puede programar
para que se encienda y apague a horas prefijadas durante un ciclo
semanal. Para permitir una programación flexible, hay 10 “programas”
disponibles. Con cada programa, puede definir la hora de encendido o
apagado para un sólo día (lunes a domingo), todos los días laborables
(lunes a viernes), o el fin de semana (sábado y domingo). Uno, varios
o todos los programas pueden estar activos al mismo tiempo, según
se desee. De este modo se puede establecer un esquema flexible.
Respete el formato de 24 horas. Consulte la TEMPORIZADOR en
el submenú AJUSTES del sistema de MENÚS, para obtener más
información sobre cómo definir los programas.
El ejemplo siguiente ilustra un caso donde el proyector se enciende
a las 08:00 de la mañana y se apaga a las 20:00 horas los días
laborables (lunes a viernes). Los fines de semana (sábados y
domingos), se enciende a las 10:00 horas y se apaga a las 18:00
horas. Se utiliza VGA como fuente. Para esto se necesitan cuatro
programas, 2 para el encendido y 2 para el apagado.
Page 23
41
italiano
norsk
UTILIZZO DEL PROIETTORE
BRUK AV PROJEKTOREN
TIMER
Il proiettore dispone di un orologio in tempo reale che consente di
controllare l’orario. In pratica il proiettore può essere programmato per
accendersi/spegnersi ad orari preimpostati di un ciclo settimanale. I
dieci programmi disponibili consentono una programmazione flessibile.
Con ogni programma è possibile definire l’orario di accensione o
spegnimento per un singolo giorno (da lunedì a domenica), su tutti
i giorni feriali (da lunedì a venerdì) o festivi (sabati e domeniche). È
possibile attivare contemporaneamente più/tutti i programmi, come
si desidera. In questo modo si può stabilire uno schema flessibile.
Utilizzare il formato a 24 ore. Per maggiori dettagli su come definire
i programmi, fare riferimento al sistema dei MENU, sottomenu
IMPOSTAZIONI (Varie), TIMER (Configurazione del timer).
L’esempio successivo illustra un caso in cui il proiettore di accende
alle 08:00 e si spegne alle 20:00, nei giorni feriali (da lunedì a venerdì).
Nel fine-settimana (sabati e domeniche), si accende alle 10:00 e si
spegne alle 18:00. La sorgente utilizzata è VGA. Per questo tipo di
impostazione, sono necessaria quattro programmi, due di accensione
e due di spegnimento.
TIMER
Projektoren inneholder en sanntids-klokke som kan benyttes til
tidsstyring. Dette betyr at projektoren kan programmeres til å skru
seg av og på etter et valgt skjema. 10 programmer er tilgjengelige.
Hvert program definerer om prosjektøren for eksempel skal skru seg
av eller på, og når dette skal skje, enten basert på enkelt ukedag
(mandag til søndag), alle arbeidsdager (mandag til fredag) eller helg
(lørdag og søndag). Ett, flere eller alle programmer kan være aktive
samtidig etter ønske. Timeren benytter 24-timers format. For mere
detaljer, se menysystemet i INNSTILLINGER > TIMER.
Følgende eksempel viser et tilfelle der projektoren skrus på klokka
08:00 om morgenen og skrus av klokken 20:00 om kvelden alle
arbeidsdager. I helgen skrus den på klokken 10:00 og av klokken
18:00. VGA inngangen benyttes som kilde. Fire programmer trengs,
to for å skru på, to for å skru av.
back
program number
weekday(s)
execute time
action
start-up source
status
1
monday - friday
08 : 00
power on
VGA
enabled
timer
back
program number
weekday(s)
execute time
action
start-up source
status
2
monday - friday
20 : 00
power off
VGA
enabled
timer
back
program number
weekday(s)
execute time
action
start-up source
status
3
saturday - sunday
10 : 00
power on
VGA
enabled
timer
back
program number
weekday(s)
execute time
action
start-up source
status
4
saturday - sunday
18 : 00
power off
VGA
enabled
timer
back
date
time
day of week
dd.mm.yyyy
hh:mm:ss
monday
set date and time
Page 24

USING THE PROJECTOR
IMAGE CALIBRATION AND CORRECTION
Some applications require very precise color reproduction of the images. In
addition, depending on application, different color standards are applied. When
preparing for correct color reproduction, both the source and the projector must
be considered.
The projector offers several ways to calibrate colors, as well as correction of the
input signal.
The source may need correction because it is usually not calibrated from the
factory, which leads to higher or lower signal levels than nominal. In addition,
R, G and B may be slightly different (not balanced), adding a tint to the image.
Correcting the input signal means adjusting the gain (contrast) and offset
(brightness) of R, G and B individually. This is in addition to the normal brightness
and contrast controls.
The projector may also need calibration regardless of the source signal, because
there may be slight differences in optical coatings, as well as the spectral
distribution of individual lamps, which can even change over time. Calibrating the
projector can be done in different ways, either by changing the color temperature,
by defining the x and y color coordinates or by R, G and B adjustment.
This feature is not avalable on all models.
See the MENU system, PICTURE sub menu, for details on how to correct and
calibrate.
english
42
Page 25
MENU SYSTEM
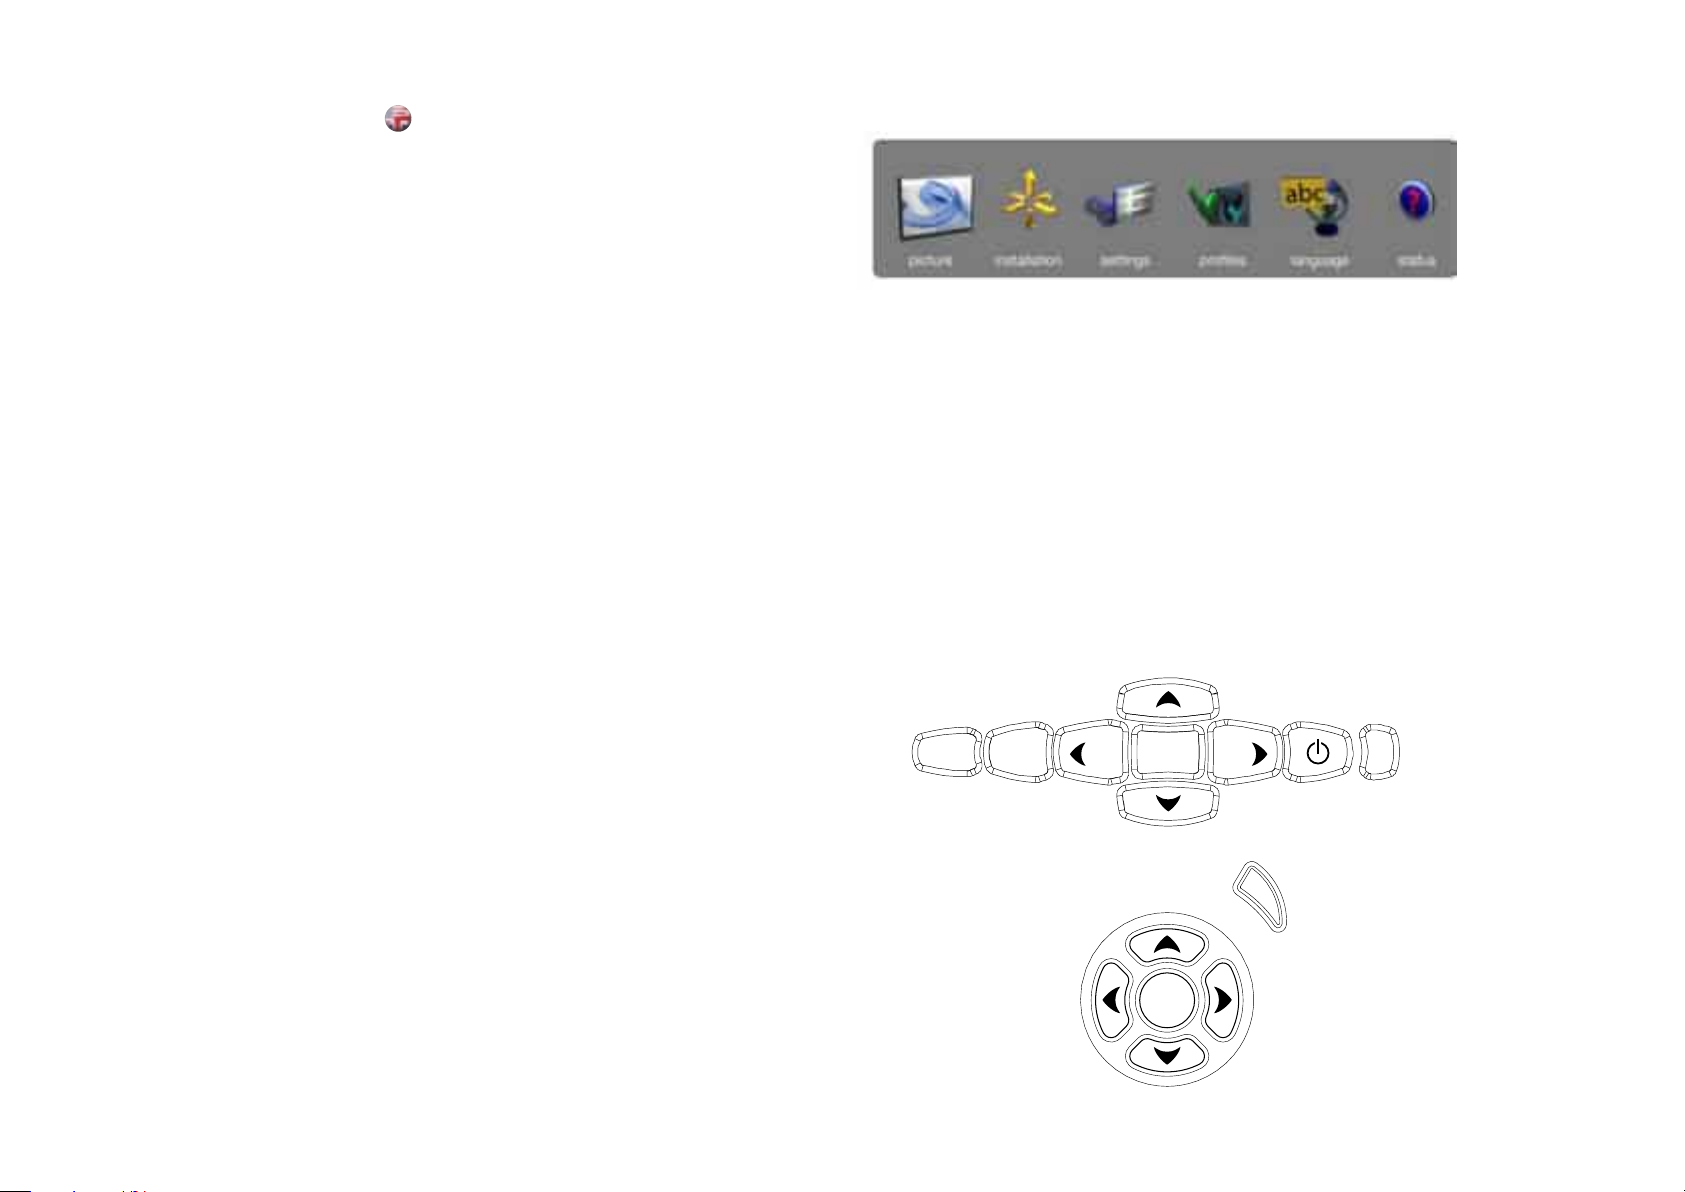
OVERVIEW
The menu system gives access to a multitude of image and
system controls. The menu system is structured through a
top menu and several sub menus. The sub menus may vary
depending on the actual source selected. Some functions
are not available with some sources.
Press the MENU key and navigate using the arrow keys on
the keypad or the arrow keys on the remote control
TOP MENU
picture
Basic and advanced picture controls.
installation
System controls and information.
settings
Settings that affect how the projector behaves or interacts
with third party devices, such as networks and control
systems
profiles
Pre-stored, and user defined settings.
language
Selects menu language.
status
System information.
english
NAVIGATING THE MENU SYSTEM
The menu system can be navigated through the on board
keypad, or via the remote control.
menu
Invokes the menu, or returns to the previous level, and exits
the menu when at top level.
OK
Selects desired function, toggles checkboxes, or enters sub
menus. Pressing OK on a directly adjustable function such
as “brigthness” minimises the menu system, and invokes a
mini adjustment dialog box. Pressing OK again returns to
the full menu system
up/down arrows
Navigates up or down in menu.
left / right arrows
Moves between top level menus. Changes, or toggles
adjustable values. Enters or exits sub menus.
44
AUTO
MENU
4 5
0
1
SRC
2
OK
KST
3
8
SRC
9
6 7
MENU
MENU
OK
Page 26
MENU SYSTEM
english
PICTURE MENU
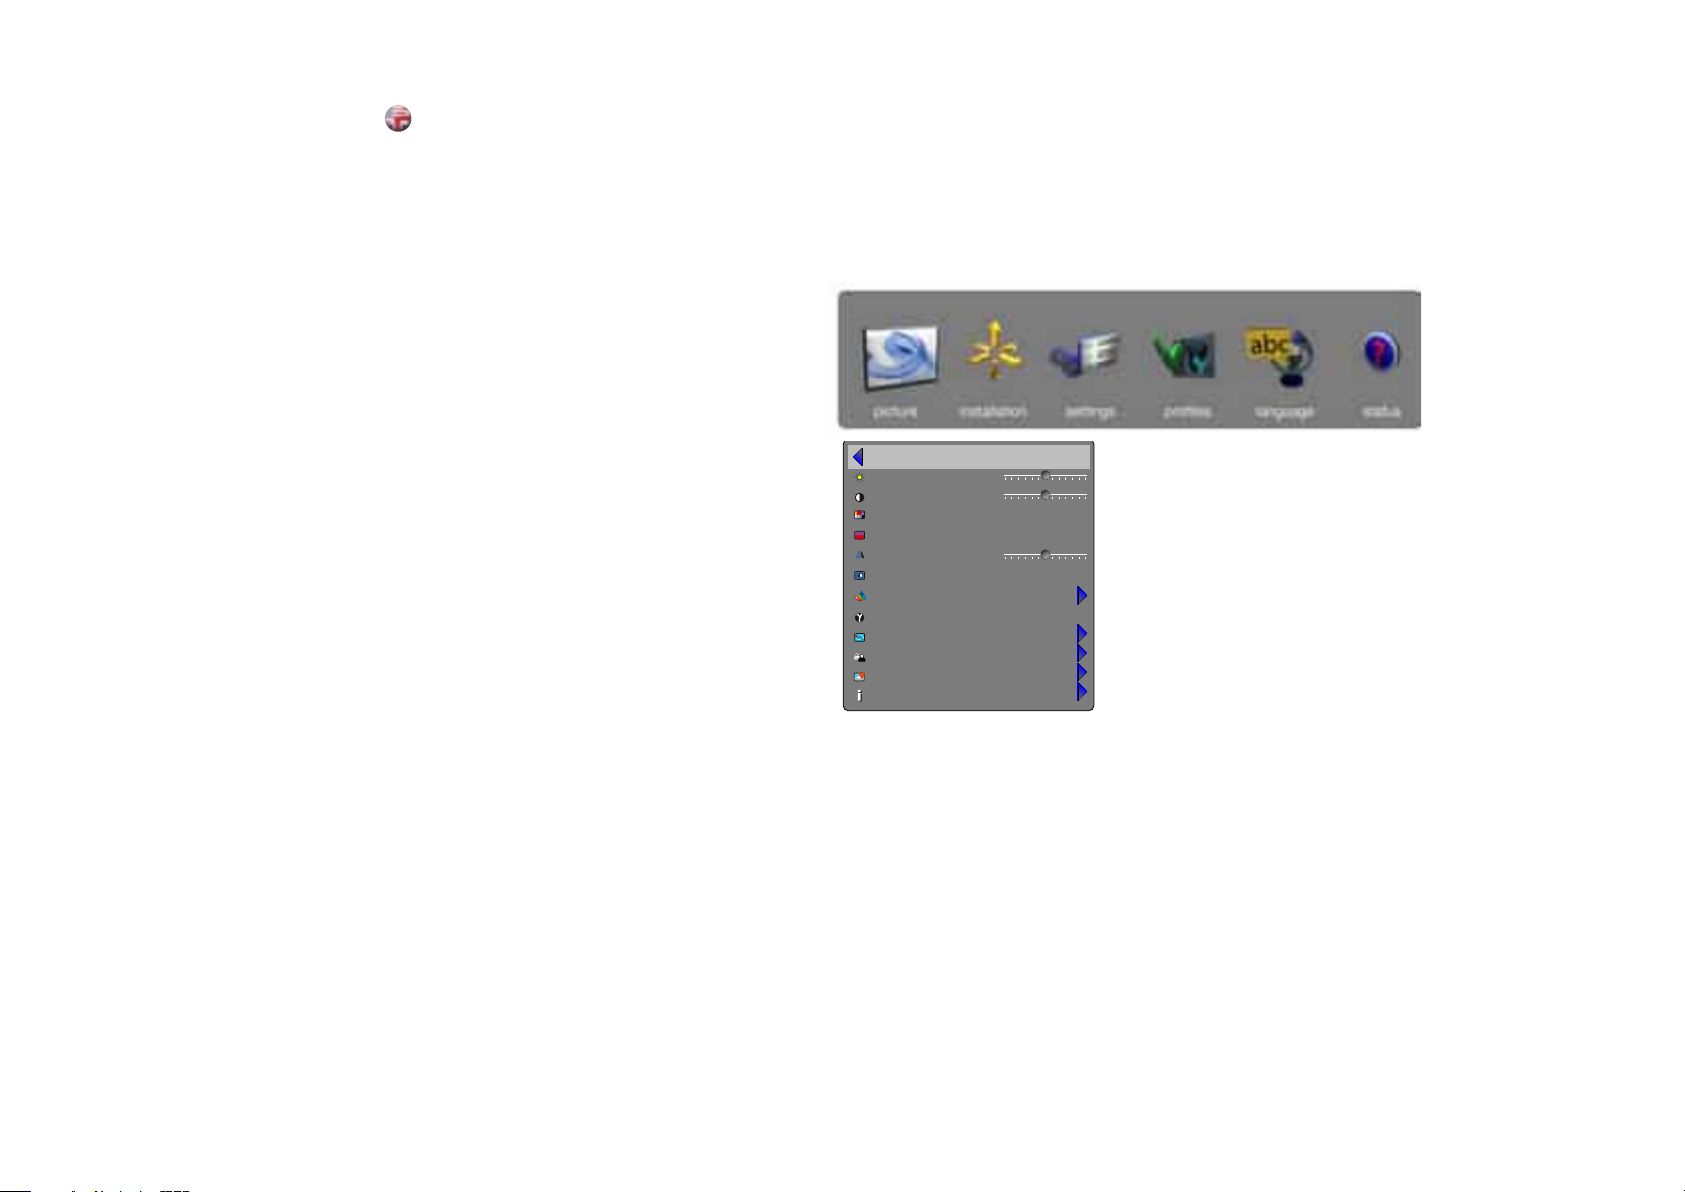
The picture menu contains basic and advanced settings and
adjustments for detailed picture enhancement control. All
adjustments are local, ie specific to each single source being
displayed, and are stored in memory as such. All picture
settings are automatically stored relative to the source, and
recalled upon reconnection.
brightness
Adjusts the image brightness. A higher setting will increase
the brightness, a lower setting will decrease the brightness
of the image.
contrast
Controls the contrast of the image. A higher setting will yield
a ‘harder’ image with larger difference between shades,
while a low setting will produce a ‘softer’ image with less
difference between shades.
color
Adjusts the color saturation. A higher setting will produce
stronger coloring, while a lower setting will yield paler colors.
hue
Adjusts the NTSC color tint. Applicable to the NTSC video
standard only. A higher setting will yield a more reddish color
scheme, while a lower setting will turn colors more greenish.
sharpness
Controls the image sharpness. A higher setting will yield a
harder image, with less filtering. In video applications, this
may produce more noise in the projected image. A lower
setting will soften the image, looking more smeared out, and
reducing the overall noise.
aspect
Selects image format. An image may be displayed in various
aspect ratios. This function is used when displaying source
formats that differ from the projectors native display format.
Options include “fill aspect ratio” (default – follows the
source input aspect ratio), “fill all” (streches or compresses
input aspect ratio to fill the projector resolution), “fill 16:9”
(adapts the input aspect ratio to fill a 16:9 window),
“letterbox to 16:9” (adapts the input to fill a center 16:9 box),
and “letterbox subtitle to 16:9” (adapts the input aspect
ratio to fill a 16:9 window, and moves it up to give room for
subtitles).
back
brightness
contrast
color
hue
sharpness
aspect
RealColor
gamma
advanced
enhancements
picture reset
source information
50
50
ll aspect ratio
lm 1
46
Page 27

48
english
deutsch
francais
español
MENU SYSTEM MENÜSYSTEM SYSTEME MENU SISTEMA DE MENÚS
RealColor
Accesses the colour management sub menu, see the
RealColor submenu for more information.
gamma
The source image is adapted to characteristics typical to
certain applications. This enables an optimized display of
images, depending on whether the source material is film
based, video, computer etc.
advanced
Enters the advanced settings sub menu.
enhancements
Enters the enhancement settings sub menu.
picture reset
Resets all source specific settings, such as brightness,
contrast and format settings. Picture reset does not affect
global settings such as installation specific valuses.
source information
Displays information about the source currently being
displayed.
RealColor
Öffnet das Untermenü für die Farbverwaltung, siehe
Untermenü RealColor für weitere Informationen.
gamma
Das Quellbild wird an Eigenschaften angepasst, die für
manche Anwendungen typisch sind. Dadurch kann die
Anzeige von Bildern optimiert werden, je nachdem, ob das
Quellenmaterial ein Film, Video, Computer usw. ist.
Erweitert
Öffnet das Untermenü mit den erweiterten Einstellungen.
Verbesserungen
Öffnet das Untermenü mit den
Verbesserungseinstellungen.
Bild-Reset
Setzt alle Einstellungen, die die Quelle betreffen, zurück, z.
B. Helligkeit, Kontrast oder Format. Globale Einstellungen
wie installationsspezifische Werte sind von einem BildReset nicht betroffen.
Quelleninfo
Zeigt Informationen über die aktuell angezeigte Quelle an.
RealColor
Permet d’accéder au sous –menu de gestion de
la couleur, voir sous-menu RealColor pour plus de
renseignements.
gamma
L’image source est adaptée aux caractéristiques types de
certaines applications. Cela permet un affichage optimalisé
des images, dépendant de si le matériel source se base
sur une pellicule, une vidéo, un ordinateur, etc.
avancé
Introduit le sous –menu de paramètres avancés
améliorations
Introduit le sous –menu de paramètres d’amélioration
réinitialisation image
Réinitialise tous les paramètres spécifiques de source,
comme les paramètres de luminosité, de contraste et
de format. La Réinitialisation d’image n’affecte pas les
paramètres généraux comme les valeurs spécifiques
d’installation.
information de source
Affiche l’information au sujet de la source qui est affichée.
RealColor
Accede al submenú de gestión del color, vea el submenú
RealColor para obtener más información.
gamma
La imagen fuente se adapta a las características
habituales de determinadas aplicaciones. Esto habilita una
visualización optimizada de las imágenes, dependiendo
de que el material fuente esté basado en película, vídeo,
ordenador, etc.
avanzado
Accede al submenú de ajustes avanzados.
mejoras
Accede al submenú de ajustes de mejora.
restauración de imagen
Restaura todos los ajustes específicos de la fuente, como
los ajustes de brillo, contraste y formato. La restauración de
la imagen no afecta a los ajustes globales como los valores
específicos de instalación.
información de fuente
Muestra toda la información acerca de la fuente visualizada
en ese momento.
Page 28
49
italiano
norsk
SISTEMA DEI MENU
MENYSYSTEM
back
brightness
contrast
color
hue
sharpness
aspect
RealColor
gamma
advanced
enhancements
picture reset
source information
50
50
ll aspect ratio
lm 1
RealColor
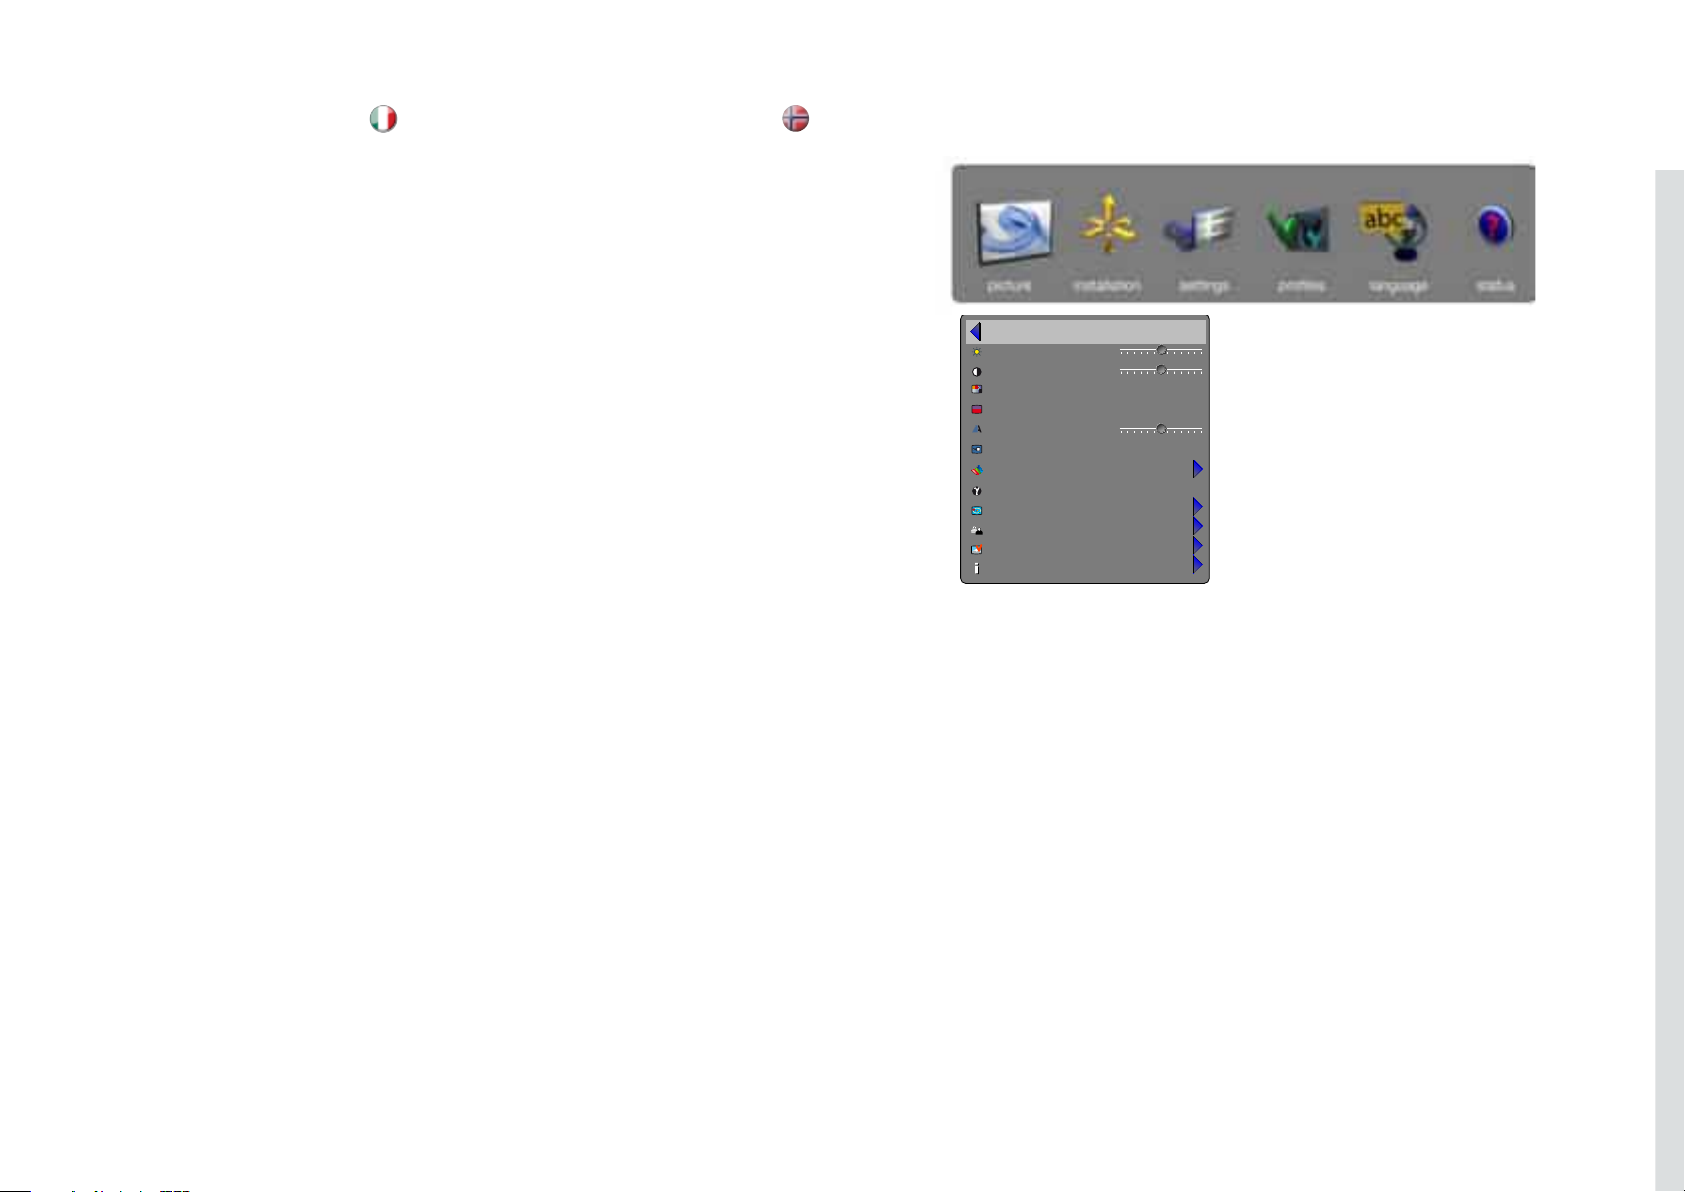
Accede al sottomenu di gestione dei colori. Per maggiori
informazioni, v. il sottomenu RealColor.
gamma
L’immagine sorgente si adatta alle caratteristiche tipiche di
alcune applicazioni. In questo modo la visualizzazione delle
immagini risulta ottimizzata in base al materiale sorgente
(basato su film, video, computer ecc.).
avanzate
Apre il sottomenu delle impostazioni avanzate.
miglioramenti
Apre il sottomenu delle impostazioni perfezionate.
ripristino immagine
Ripristina tutte le impostazioni specifiche della sorgente,
ad esempio luminosità, contrasto e formato. Il ripristino
dell’immagine non ha alcun effetto sulle impostazioni globali
come i valori specifici dell’installazione.
informazioni sorgente
Visualizza informazioni sulla sorgente che si sta
visualizzando.
RealColor
Åpner RealColor undermenyen, se RealColor for mer
informasjon.
gamma
Kildebildet blir tilpasset til adapted til typiske innstillinger
for visse applikasjoner. Dette sikrer optimal bildevisning
enten det er snakk om film, video eller data.
avansert
Åpner undermenyen for avanserte innstillinger.
bildeforbedringer
Åpner undermenyen for bildeforbedringer.
tilbakestill bildeinnstillinger
Nullstiller alle innstillinger som er kildespesifikke, som
lysstyrke, kontrast, og formatinformasjon. Tilbakestill
bildeinnstillinger påvirker ikke globale innstillinger som
takmontering,
kildeinformasjon
Viser informasjon om den kilden som er tilkoblet.
Page 29

50
english
deutsch
francais
español
MENU SYSTEM MENÜSYSTEM SYSTEME MENU SISTEMA DE MENÚS
UNTERMENÜ RealColor
Im Untermenü RealColor stehen benutzerfreundliche und
extrem leistungsfähige Tools zur Verfügung, um perfekte
Farben, Grauskaleneinstellungen und Farbabstimmungen
zwischen Projektoren zu erreichen. Jeder Projektor wird
bei Verlassen des Werks auf die korrekte Wiedergabe des
angezeigten Bildes analysiert.
BrilliantColor™-Voreinstellung
Stellt BrilliantColor™-Verarbeitung auf Computer, Video
oder Aus ein. Nur relevant für das Modell SXGA+.
BrilliantColor™ Boost
Stellt die Wirkung der BrilliantColor™-Farbverarbeitung
zwischen 0 und 10 ein. Nur relevant für SXGA+.
BrilliantColor™
Stellt die BrilliantColor-Sequenz auf beste Leistung
beim vorliegenden Ausgangsmaterial ein. Verwendung
der Einstellungen Computer balanced, Video balanced,
Computer native, Video native und Aus. Nur relevant für
die Modelle 1080 und WUXGA.
verstärkungsabgleich
Automatischer Abgleich der Intensitätswerte für R, G, B, C,
M und Y, um eine korrekte Farbdarstellung gegenüber Weiß
zu erreichen.
gewünschter Coords-Modus
Erlaubt dem Benutzer die Eingabe der gewünschten
Farbraumkonvertierung für die Ausgabe, um eine
Farbanpassung und korrekte Darstellung der Farben
sicherzustellen.
gewünschte Werte
Wenn der gewünschte Coords-Modus aktiviert ist, können
hier die gewünschten Koordinaten der Ausgabefarbe
eingestellt werden.
gemessene Werte
Die gemessenen Farbkoordinaten des Projektors, die für
die Berechnung der gewünschten Ausgabekoordinaten
benutzt werden. Es können vom Benutzer gemessene
Werte eingegeben werden.
temperatur
Stellt die Temperatur des projizierten Bildes auf einen Wert
zwischen 3200 und 9300 Grad Kelvin ein, wenn als Modus
“Temperature“ (Temperatur) ausgewählt ist.
X-Koordinate
Stellt die X-Koordinate des Weißpunktes des projizierten
Bildes ein, wenn als Modus “Coordinates“ (Koordinaten)
eingestellt ist.
Y-Koordinate
Stellt die Y-Koordinate des Weißpunktes des projizierten
Bildes ein, wenn als Modus “Coordinates“ (Koordinaten)
eingestellt ist.
reset auf D65
Setzt den Weißpunkt des projizierten Bildes für farbgetreue
Weißwiedergabe des Videos auf D65 (x=0,312, y=0,329).
anpassung der Anzeige
Ändert den R-, G- und B-Treiberausgang aus dem Display.
RealColor SUB MENU
El submenú RealColor da acceso a herramientas de
uso fácil para obtener colores perfectos, escala gris y
coincidencia de colores entre los proyectores, con una
eficacia extraordinaria. Cada proyector está sintonizado en
fábrica para asegurar imágenes de visualización perfecta.
Preajuste de BrilliantColor™
Ajusta el procesado BrilliantColor™ para computadora,
vídeo u OFF. Opción exclusiva del modelo SXGA+.
Reforzador BrilliantColor™
Ajusta el efecto del procesado de colores BrilliantColor™
de 0 a 10. Opción exclusiva de los modelos 1080 y
WUZGA.
BrilliantColor™
Regola la sequenza dei colori BrilliantColor per ottenere
le massime prestazioni in base al materiale utilizzato.
Impostazioni: bilanciamento al computer, bilanciamento
video, nativo computer, nativo video e disattivata. Opción
exclusiva de los modelos 1080 y WUZGA.
activar ganancias de equilibrio
Equilibra automáticamente los valores de intensidad de R,
G, B, C, M e Y de modo que estén correctos en relación al
blanco.
modo de coordenadas deseado
Permite que el usuario ajuste la gama de colores de salida
que desee, utilizada para la coincidencia de colores y una
visualización precisa del color.
valores deseados
Cuando se activa el modo de coordenadas preferido, aquí
se pueden seleccionar las coordenadas de color de salida
deseadas.
valores medidos
Las coordenadas de color medidas que se usan para
calcular las coordenadas de color de salida deseadas. Se
pueden introducir valores medidos personalizados.
temperatura
Ajusta la temperatura de color de la imgan proyectada
a un valor entre 3200 y 9300 grados Kelvin cuando la
temperatura está seleccionada en Modo.
coordenada x
Ajusta la coordenada X del punto blanco de la imagen
proyectada cuando se ha seleccionado “coordinates”
(coordenadas) en Modo.
coordenada y
Ajusta la coordenada Y del punto blanco de la imagen
proyectada cuando se ha seleccionado “coordinates”
(coordenadas) en Modo.
restaurar a D65
Restaura el punto blanco de la imagen proyectada a D65
(x=0,312, y=0,329) para obtener unos colores blancos
auténticos de vídeo.
personalización de la pantalla
Cambia la salida de la unidad R, G y B de la pantalla.
SOUS MENU RealColor
Donne accès à des outils intuitifs et puissants pour
obtenir des couleurs et des échelles de gris parfaites ainsi
qu’une excellente égalisation des couleurs des différents
projecteurs. La qualité d’image est contrôlée avant la
sortie d’usine de chaque projecteur.
BrilliantColor™ preset
Règle le traitement BrilliantColor™ sur « ordinateur », «
video » ou « off ». Concerne uniquement le modèle
SXGA+.
BrilliantColor™ boost
Ajuste l’effet du traitement couleur BrilliantColor™ sur
une échelle de 0 à 10. Concerne uniquement le modèle
SXGA+.
BrilliantColor™
Ajuste la séquence brilliant color de meilleure performance
sur le matériel source appliqué, et cela à l’aide des
réglages « computer balanced », « video balanced », «
computer native », « video native » et « off ». Concerne
uniquement les modèles 1080 et WUXGA.
activation des gains d’équilibrage
Sert à l’équilibrage automatique de l’intensité des R, G, B,
C, M et Y par rapport au blanc.
mode coordonnées visées
Permet de définir un gamut pour l’égalisation et l’affichage
précis des couleurs.
valeurs visées
Permet de régler les coordonnées des couleurs de sorties
lorsque le mode « coordonnées visées » est actif.
valeurs mesurées
Coordonnées colorimétriques mesurées du projecteur
utilisées pour calculer les valeurs de sortie souhaitées. On
peut saisir des mesures personnalisées.
température
Sert à définir la température de couleur d’une image
projetée (de 3200 à 9300 degrés Kalvin).
coordonnée x
Ajuste la coordonnée x du point blanc de l’image projetée
lorsque Le mode « coordonnées » est actif.
coordonnée y
Ajuste la coordonnée y du point blanc de l’image projetée
lorsque Le mode « coordonnées » est actif.
réinitialisation D65
Ramène le point blanc de l’image projetée à la valeur
initiale D65 (x=0.312, y=0.329) pour produire des blancs
réalistes.
afficher la personnalisation
Modifie le rendu des R, V et B.
RealColor SUB MENU
The RealColor sub menu gives access easy-to-use tools to
achieve perfect colours, grey scale, and colour matching
between projectors, and is increadibly powerful. Each
projector is characterized as it leaves the factory to ensure
correctly displayed images.
BrilliantColor™ preset
Sets BrilliantColor™ processing to computer, video or off.
Applies for SXGA+ model only.
BrilliantColor™ boost
Adjusts the effect of BrilliantColor™ colour processing from
0 to 10. Applies for SXGA+ model only.
BrilliantColor™
Adjusts brilliant color sequence for best performance
on current source material using the settings; computer
balanced, video balanced, computer native, video native
and off. Aplies for 1080- and WUXGA-models only.
balance gains enable
Automatically balances R, G, B, C, M, and Y intencity values
so they are correct relative to white.
desired coords mode
Allows the user to set a desired output colour gamut, used
for colour matching and accurate colour display.
desired values
When desired coords mode is set to on, the desired output
colour coordinates can be set here.
measured values
The projector’s measured colour coordinates that are
used to calculate the desired output coordinates. Custom
measured values can be entered.
temperature
Sets projected image colour temperature to a value between
3200 and 9300 degrees Kelvin when temperature is set
under mode.
x-coordinate
Sets projected image white point x-coordinate when
“coordinates” is set under mode.
y-coordinate
Sets projected image white point y-coordinate when
“coordinates” is set under mode.
reset to D65
Resets the projected image white point to D65 (x=0.312,
y=0.329) for true video white colours.
display customization
Changes the R, G, and B drive output from the display.
Page 30
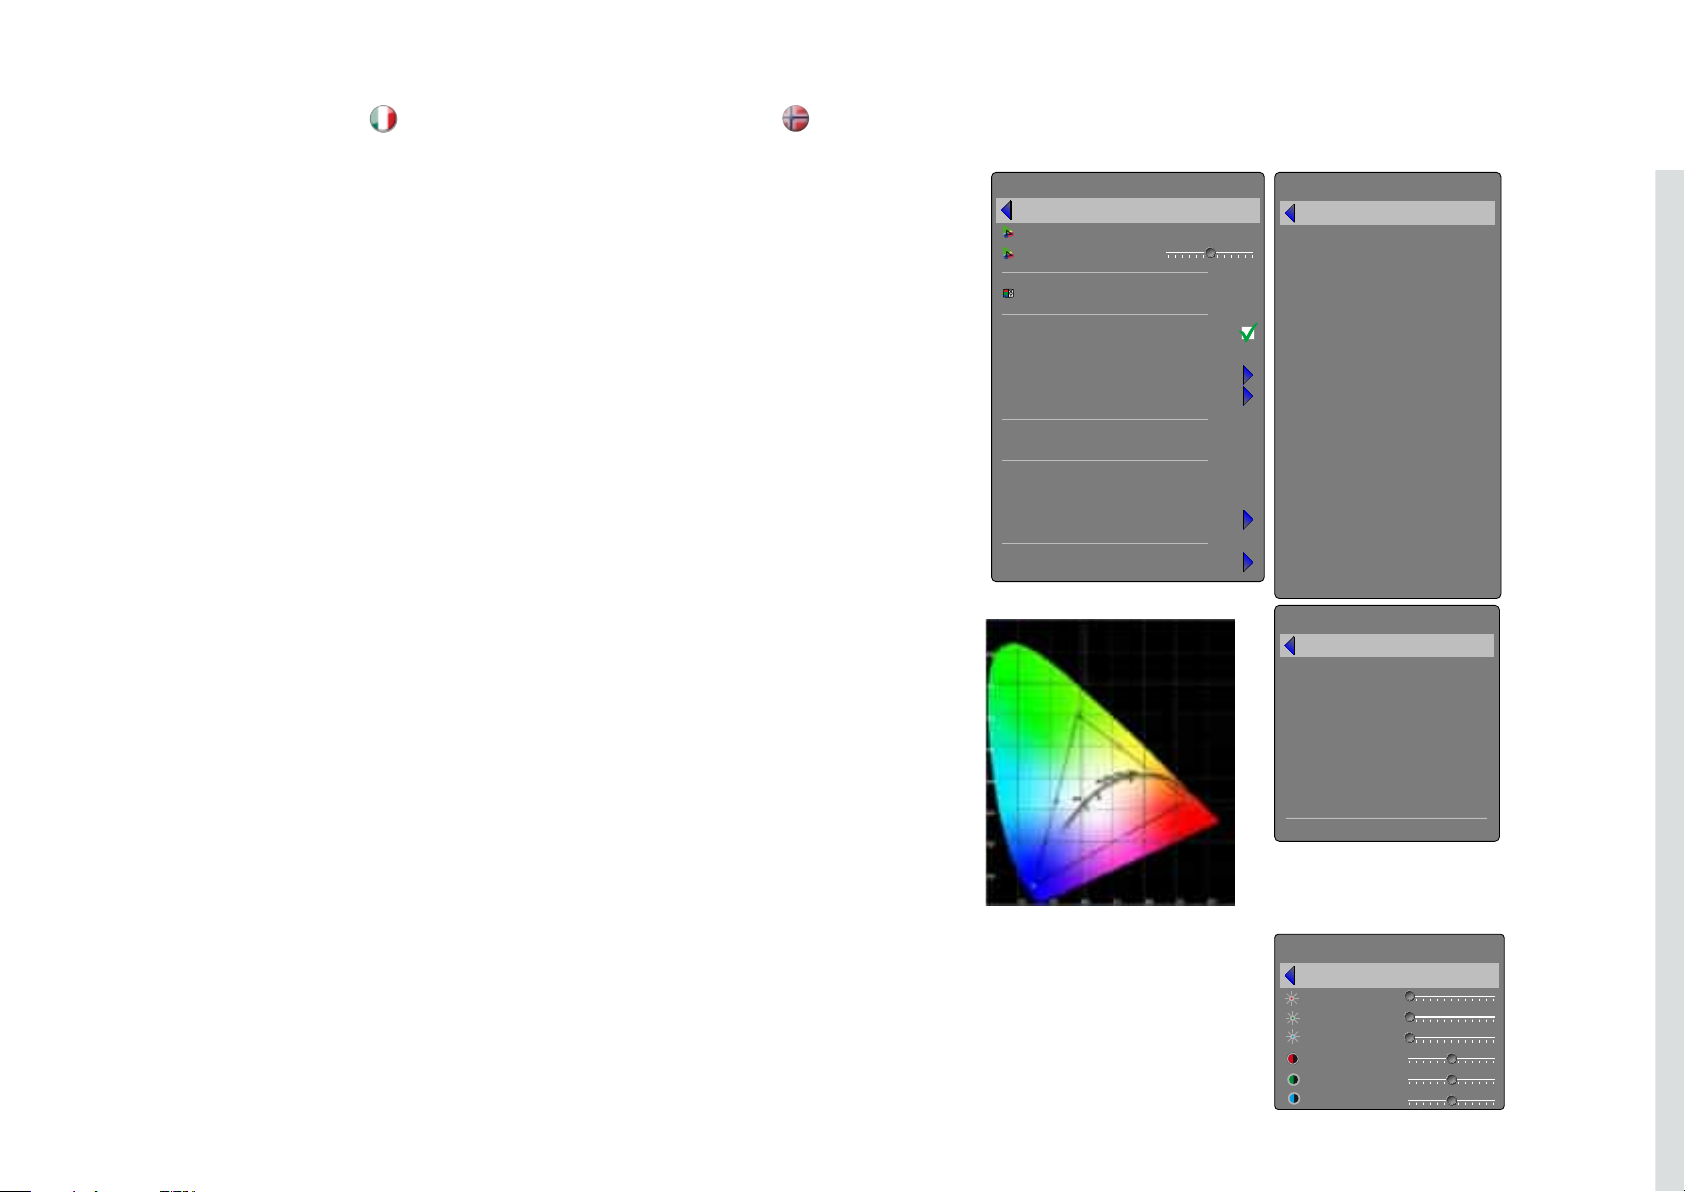
SISTEMA DEI MENU
italiano
MENYSYSTEM
norsk
SOTTOMENU RealColor
Il sottomenu RealColour offre strumenti intuitivi e potenti
per ottenere una scala di grigio e colori perfetti e per
sintonizzare i colori tra diversi proiettori. Alla consegna, ogni
proiettore è regolato per garantire la corretta visualizzazione
delle immagini.
Preimpostazione BrilliantColor™
Permette di impostare l’elaborazione BrilliantColor™ su
computer, video o disattivata. Solo modello SXGA+.
BrilliantColor™ boost
Regola l’effetto dell’elaborazione dei colori BrilliantColor™
da 0 a 10. Solo modello SXGA+.
BrilliantColor™
Regola la sequenza dei colori BrilliantColor per ottenere
le massime prestazioni in base al materiale utilizzato.
Impostazioni: bilanciamento al computer, bilanciamento
video, nativo computer, nativo video e disattivata. Solo
modelli 1080 e WUXGA.
Abilitazione bilanciamento guadagno
Bilancia automaticamente i valori dell’intensità R, G, B, C, M
e Y per correggerli in base al bianco.
Modalità coord. desiderata
Consente all’utente di impostare una gamma di colori
desiderata per definire i colori e visualizzarli correttamente.
Valori desiderati
Una volta impostata la modalità coordinate desiderata, qui
è possibile impostare le coordinate per il colore di output
desiderato.
Valori misurati
Le coordinate di colore misurate del proiettore, utilizzate per
calcolare l’output desiderato. È possibile specificare valori
misurati personalizzati.
Temperatura
Imposta la temperatura cromatica dell’immagine proiettata
su un valore compreso tra 3200 e 9300 gradi Kelvin quando
la temperatura viene impostata sotto mode (modalità).
Coordinata x
Imposta la coordinata x del punto di bianco dell’immagine
proiettata quando in mode (modalità) è impostato
“coordinates” (coordinate).
Coordinata y
Imposta la coordinata y del punto di bianco dell’immagine
proiettata quando in mode (modalità) è impostato
“coordinates” (coordinate).
Ripristina D65
Reimposta il punto di bianco per l’immagine proiettata su
D65 (x=0,312, y=0,329) per bianchi realistici.
Visualizza personalizzazione
Cambia l’output R, G e B del display.
RealColor UNDERMENY
RealColor undermenyene gir tilgang til lettbrukte verktøy
for å oppnå perfekte farger, gråskala og samsvarende
farger på ulike projektorer og er et kraftig verktøy. Hver
prosjektor blir optimalisert når den forlater fabrikken for å
sikre at bildene blir korrekt gjengitt.
BrilliantColor™ forhåndsinnstilling
Setter BrilliantColor™ prosesseringen til data, video eller
av. Gjelder kun SXGA+ modeller.
BrilliantColor™ forsterkning
Justerer effekten av BrilliantColor™ fargeprosessering fra
0 til 10. Gjelder kun SXGA+ modeller.
BrilliantColor™
Justerer effekten av BrilliantColor sekvensen for best
mulig ytelse med gjeldende kildematriell; balansert data,
balansert video, standard data, standard video eller av.
Gjelder kun SXGA+ modeller.
Balanse balance gains enable
Banserer automatisk R, G, B, C, M og Y intensitetsverdier
slik at de er korrekte i forhold til hvit.
Ønsket koordineringsmodus
Tillater brukeren å stille inn ønsket fargespekter, som
brukes til fargetilpasning og nøyaktig fargegjengivelse.
Ønskede verdier
Når ønsket koordineringsmodus er slått på, kan
preferansene for fargekoordinering stilles inn her.
Målte verdier
Projektorens målte fargekoordinater som blir brukt til å
kalkulere de ønskede ytelseskoordinartene. Projektorens
målte fargekoordinater som brukes for å kalkulere de
ønskede effektkoordinatene. Egendefinerte målingsverrdier
kan legges inn.
Temperatur
Stiller fargetemperaturen for det projiserte bildet til en verdi
mellom 3200 og 9300 grader Kelvin når temperatur er stit
inn under modus.
X-koordinat
Stiller inn det projiserte bildets x-koordinater for
hvitområdet når “koordinatene” er satt under instillinger.
Y-koordinat
Stiller inn det projiserte bildets y-koordinater for
hvitområdet når “koordinatene” er satt under instillinger.
Tilbakestill til D65
Tilbakestiller det projiserte bildet hvitverdi til D65 (x=0.312,
y=0.329) for ekte video hvitfarger.
Vis individuell tilpassning
Endrer R, G og B innstillingene på displayet.
RealColor
back
BrilliantColor
BrilliantColor
mode
balanced gains enable
desired coords mode
desired values
measured values
temperature
x-coordinate
y-coordinate
reset to D65
display customization
TM
preset
TM
boost
5
coordinates (x,y)
6500K
0.312
0.329
desired values
on
on
off
measured values
display customization
back
red x
red y
red gain
green x
green y
green gain
blue x
blue y
blue gain
cyan x
cyan y
cyan gain
magenta x
magenta y
magenta gain
yellow x
yellow y
yellow gain
back
red x
red y
green x
green y
blue x
blue y
white x
white y
white luminance
back
red offset
green offset
blue offset
red gain
green gain
blue gain
0.600
0.300
0.300
0.550
0.140
0.070
0.639
0.348
0.336
0.558
0.140
0.121
0.312
0.344
1.000
0
0
0
100
100
100
51
Page 31
52
english
deutsch
francais
español
ADVANCED SUB MENU
The advanced sub menu contains less used, and more
spesific picture adjustment settings.
horizontal position
Shifts the image sideways.
vertical position
Shifts the image up and down.
phase
Adjust for stable image. A jittery image may appear with
certain VGA sources. You may also press the AUTO button
on the keypad or remote control to optimize.
frequency
Adjust image width. An incorrect setting may produce
vertical, unstable bands in the image, and parts of the image
may not be displayed on screen. Push the AUTO button to
find a correct setting, or manually adjust the frequency until
the vertical bands disappear. Frequency adjusts the pixel
clock sampling frequency.
IRE setup
sets black level for NTSC video input sources.
digital level
Sets the dynamic range for the digital inputs to video or
range; 16 – 234 or 0 – 255.
digital color space
Sets digital colour space to RGB or YUV.
source correction
Optimises input signal for processing. Use this to correct
for source signal level inaccuracies. Source correction
gives access to AD calibration, a process that can only
be performed with analogue RGB sources, and must
be performed with a specific input test image. For more
information, please contact yout dealer, or visit our web site.
MENU SYSTEM MENÜSYSTEM SYSTEME MENU SISTEMA DE MENÚS
UNTERMENÜ ERWEITERT
Das Untermenü advanced (Erweitert) enthält weniger
häufig verwendete sowie speziellere Bildeinstellungen.
Horizontale Position
Verschiebt das Bild in seitlicher Richtung.
Vertikale Position
Verschiebt das Bild nach oben oder unten.
Takt
Stellt ein stabiles Bild ein. Bei manchen VGA-Quellen kann
das Bild zittern. Mit der AUTO-Taste an der Tastatur oder
Fernbedienung kann das Bild optimiert werden.
Frequenz
Stellt die Bildbreite ein. Eine falsche Einstellung kann
senkrechte, laufende Balken im Bild erzeugen und
unter Umständen werden Teile des Bildes nicht auf dem
Bildschirm angezeigt. Die optimale Einstellung, bei der die
Balken verschwinden, kann entweder manuell oder mithilfe
der AUTO-Taste gesucht werden. Frequenz dient der
Einstellung der Pixel Clock-Abtastrate.
IRE Einstellung
Stellt die Schwarzstufe für NTSC-Videoeingangsquellen
ein.
Digitalstufe
Stellt den dynamischen Bereich für Digitaleingänge auf
Video oder einen Bereich ein; 16 – 234 oder 0 – 255.
Digitaler Farbraum
Stellt den digitalen Farbraum auf RGB oder YUV ein.
Quellenkorrektur
Optimiert das Eingangssignal für die Verarbeitung.
Verwenden Sie diese Einstellung, um Abweichungen im
Quellensignalpegel zu korrigieren. Die Quellenkorrektur
führt Sie auch zur AD-Kalibrierung, einem Prozess, der
nur für analoge RGB-Quellen zur Verfügung steht und
mit einem speziellen Testbild ausgeführt werden muss.
Für weitere Informationen wenden Sie sich an Ihren
Fachhändler oder besuchen Sie unsere Website.
SOUS MENU AVANCÉ
Le sous –menu avancé contient des paramètres de
réglage d’image moins utilisés et plus particuliers.
position horizontale
Décale l’image latéralement.
position verticale
Décale l’image de haut en bas.
phase
Ajuste la stabilité de l’image. Une image scintillante peut
apparaître avec certaines sources VGA. Vous pouvez
aussi appuyez sur le bouton AUTO du clavier ou de la
télécommande pour l’optimaliser.
fréquence
Ajuste la largeur de l’image. Un paramètre incorrect peut
provoquer des bandes verticales et instables sur l’image,
et des parties de celle-ci peuvent ne pas s’afficher sur
l’écran. Appuyer sur le bouton AUTO pour rechercher
un paramètre correct, ou ajuster manuellement la
fréquence jusqu’à faire disparaître les bandes verticales.
La fréquence ajuste la fréquence d’échantillonnage de
l’horloge en pixel.
configuration IRE
Ajuste le niveau de noir des sources d’entrée de vidéo
NTSC.
niveau numérique
Ajuste la plage dynamique des entrées numériques sur
vidéo ou plage ; 16 – 234 ou 0 – 255.
espace colorimétrique numérique
Ajuste l’espace colorimétrique numérique sur RVB ou YUV.
corriger source
Optimalise le signal d’entrée pour le traitement. Utilisez
cela pour corriger les inexactitudes du niveau du signal
de source. La correction de la source offre un accès
au calibrage AD, un procédé qui ne peut être obtenu
qu’avec des sources analogiques, et doit être réalisée
avec une image d’essai d’entrée spécifique. Pour plus de
renseignements, veuillez contacter votre revendeur, ou
visitez notre site Internet.
SUBMENÚ AVANZADO
El submenú Avanzado contiene los valores de ajuste menos
utilizados y más específicos de la imagen.
posición horizontal
Cambia la imagen lateralmente.
posición vertical
Cambia la imagen arriba y abajo.
fase
Ajuste para una imagen estable. Con determinadas fuentes
VGA puede aparecer una imagen inestable.También puede
pulsar el botón AUTO del teclado o el control remoto para
optimizarla.
frecuencia
Ajusta el ancho de la imagen. Un ajuste incorrecto puede
producir bandas inestables verticales en la imagen y es
posible que partes de la imagen no se vean en la pantalla.
Presione el botón AUTO para encontrar el ajuste correcto,
o ajuste la frecuencia manualmente hasta que las bandas
verticales desaparezcan. La frecuencia ajusta la frecuencia
de muestreo del reloj de píxel.
configuración de IRE
ajusta el nivel de negro de las fuentes de entrada de vídeo
NTSC.
nivel digital
Ajusta el rango dinámico para las entradas digitales a vídeo
o rango; 16-234 o 0-255.
espacio de color digital
Ajusta el espacio de color digital a RGB o YUV.
corrección de fuente
Optimiza la señala de entrada para el procesamiento. Use
esta opción para corregir las imprecisiones de nivel de la
señal fuente. La corrección de la fuente proporciona acceso
a la calibración AD, un proceso que sólo se puede ejecutar
con fuentes RGB analógicas y debe realizarse con una
imagen de prueba de entrada específica. Para obtener más
información, póngase en contacto con su distribuidor o
visite nuestro sitio Web.
Page 32
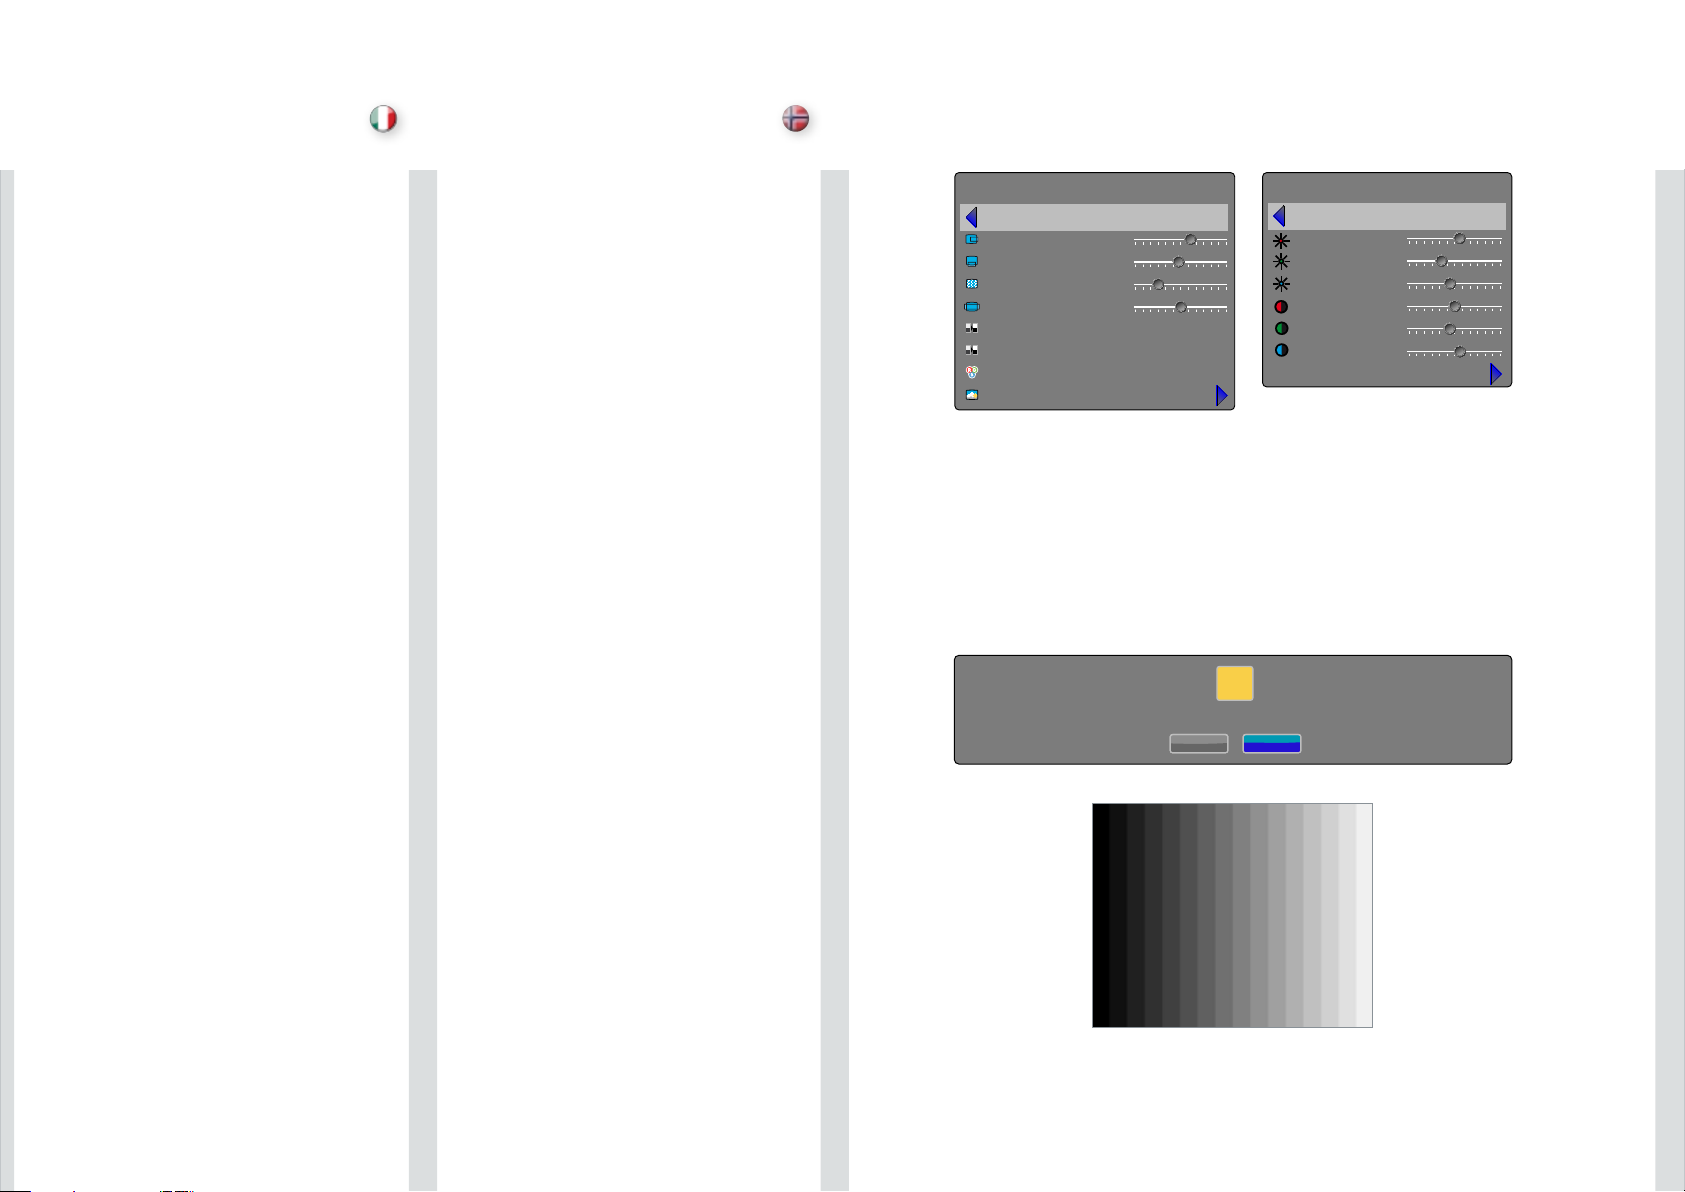
SISTEMA DEI MENU
italiano
MENYSYSTEM
norsk
AVANZATO
Il sottomenu advanced (avanzato) contiene impostazioni di
regolazione dell’immagine meno utilizzate e più specifiche.
posizione orizzontale
Sposta l’immagine di lato.
posizione verticale
Sposta l’immagine in alto e in basso.
fase
Regola la stabilità dell’immagine. Con alcune sorgenti VGA,
l’immagine può apparire mossa. Per ottimizzare l’immagine
è possibile anche spingere il tasto AUTO della tastiera o del
telecomando.
frequenza
Regola la larghezza dell’immagine. Un’impostazione errata
può produrre fasce verticali e instabili sull’immagine e
impedire la visualizzazione a schermo di parti dell’immagine.
Spingere il tasto AUTO per trovare un’impostazione corretta
oppure regolare manualmente la frequenza fino a far
scomparire le fasce verticali. Frequency (frequenza) regola la
frequenza di campionatura del clock dei pixel.
impostazione IRE
Imposta il livello del nero per le sorgenti di input video NTSC.
livello digitale
Imposta la gamma dinamica per gli input digitali su video o
range; 16 – 234 oppure 0 – 255.
spazio colore digitale
Imposta lo spazio dei colori digitali su RGB oppure YUV.
correzione sorgente
Ottimizza il segnale in ingresso per l’elaborazione. Utilizzare
questa opzione per correggere le imperfezioni a livello del
segnale sorgente. La correzione della sorgente dà accesso
alla calibrazione AD, un processo che può essere eseguito
unicamente con le sorgenti RGB analogiche e che va
effettuato con un’immagine di prova ingresso specifica. Per
ulteriori informazioni, contattare il rivenditore oppure visitare
il sito Web.
AVANSERT UNDERMENU
Menyen for avanserte justeringer inneholder mer spesielle
bildeinstilinger.
horisontal posisjon
Flytter bildet sideveis.
vertikal posisjon
Flytter bildet oppover eller nedover.
fase
Justér denne for å få stabilisere flimrete bilder. Et flimrete
bilde kan oppstå med noen analoge VGA-kilder. Å trykke
“auto”-knappen på fjernkontrollen kan fungere på samme
måte.
frekvens
Justerer bildebredden. Et ukorrekt instilt bilde vil kunne
gi vertikale, ustabile bånd i deler av bildet, og andre deler
kan være utenfor bilderammen. Trykk “auto” for å finne en
optimal instilling, eller justér manuelt. Frekvensjusteringen
endrer den analoge pixelklokken og samplefrekvens.
IRE setup
sets black level for NTSC video input sources.
digital level
Sets the dynamic range for the digital inputs to video or
range; 16 – 234 or 0 – 255.
digital color space
Sets digital colour space to RGB or YUV.
source correction
Optimises input signal for processing. Use this to correct
for source signal level inaccuracies. Source correction
gives access to AD calibration, a process that can only
be performed with analogue RGB sources, and must
be performed with a specific input test image. For more
information, please contact yout dealer, or visit our web
site.
advanced
back
horizontal position
vertical position
phase
frequency
IRE setup
digital level
digital color space
source correction
267
31
8
1312
7.5 IRE
source correction
back
red offset
green offset
blue offset
red gain
green gain
blue gain
AD calibration
0
0
0
100
100
100
!
using this function without the correct input signal may result in reduced image quality
noyes
53
Page 33
54
english
deutsch
francais
español
ENHANCEMENTS SUB MENU
The enhancements sub menu contains a range of picture
enhancement settings for video displays.
DLTI (Digital Luminance Transient Improvement) level
Use this function to increase visible image sharpness for
video.
DCTI (Digital Chroma Transient Improvement) level
Use this function to increase visible colour sharpness in
video images.
3D comb filter
This filter reduces dot crawl in composite video signals.
2D peaking
A collection of built-in filters provided to enhance detail
display in edges and blocks.
adaptive noise reduction
This filter adapts to the source material, and reduces noise
in motion video.
CEH (Colour Enhancement) red, blue, green, yellow,
fleshtone
The Colour Enhancement filters enhance individual colours
by analyzing the image, and allowing gain (contrast) to the
colour selected. Fleshtone adjustment enhances the gain
setting for a range of colours that are typical flesh tones.
horizontal deblocking
A 2D filter that analyzes each frame for jaggies and blocking,
and reduces so called MPEG blocking artefacts typical with
DVD and other compressed video formats.|
dynamic contrast enhancement
Dynamically adjusts and adapts image contrast.
dynamic contrast level
Dynamically adjusts and adapts image contrast level.
UNTERMENÜ VERBESSERUNG
Das Untermenü enhancements (Verbesserung) enthält
eine Reihe von Bildverbesserungseinstellungen für
Videoanzeigen.
DLTI (Digital Luminance Transient Improvement)-Stufe
Verwenden Sie diese Funktion, um die sichtbare
Bildschärfe für Video zu verbessern.
DCTI (Digital Chroma Transient Improvement)-Stufe
Verwenden Sie diese Funktion, um die sichtbare
Farbschärfe bei Videobildern zu verbessern.
3D-Kombifilter
Dieser Filter verhindert Punktkriechen bei Composite
Video-Signalen.
2D-Spitze
Auswahl eingebauter Filter für eine verbesserte Detailtreue
an Kanten und Blöcken.
Reduziert adaptives Rauschen
Dieser Filter steltl sich auf das Quellenmaterial ein und
reduziert Rauschen bei Bewegungsvideo.
CEH (Colour Enhancement) rot, blau, grün, gelb,
hautfarben
Die Colour Enhancement-Filter zur Farbverbesserung
verbessern einzelne Farben, indem sie das Bild analysieren
und die gewählte Farbe verstärken (Kontrast erhöhen).
Die Einstellung Fleshtone (Hautfarben) verbessert die
Verstärkungseinstellung für einen Farbbereich mit den
typischen Hautfarben.
Horizontale Deblockierung
Ein 2D-Filter der jedes einzelne Bild auf Ausfransungen
(Treppeneffekte) und Blockierungen überprüft und sog.
MPEG-Blockierungsartefakte, wie sie bei DVD und
anderen komprimierten Videoformaten auftreten, reduziert.
Dynamische Kontrastverbesserung
Dynamische Einstellung und Anpassung des
Bildkontrastes.
Dynamische Kontraststufe
Dynamische Einstellung und Anpassung des
Bildkontrastes.
SUBMENÚ MEJORAS
El submenú Mejoras contiene una gama de ajustes de
mejora de imagen para visualizaciones de vídeo.
Nivel de DLTI, Mejora digital de las transiciones de la
luminancia
Use esta función para aumentar la intensidad de la imagen
visible para vídeo.
Nivel de DCTI, Mejora digital de las transiciones
cromáticas
Use esta función para aumentar la intensidad del color
visible en imágenes de vídeo.
filtro comb 3D
Este filtro reduce el arrastre de puntos en las señales de
vídeo compuesto.
pico 2D
Una colección de filtros incorporados para ampliar la
visualización de detalles en cantos y bloques.
reducción del ruido adaptativo
Este filtro se adapta al material fuente y reduce el ruido de la
película de vídeo.
CEH (Mejora del color) rojo, azul, verde, amarillo, carne
Los filtros de mejora del color mejoran los colores
individuales analizando la imagen y permitiendo una
ganancia (contraste) al color seleccionado. El ajuste del
color carne mejora el ajuste de ganancia para una gama de
colores que habitualmente son color carne.
desbloqueo horizontal
Un filtro 2D que analiza cada fotograma en busca de
dientes de sierra y bloqueo y que reduce los denominados
artefactos de bloqueo de MPEG normalmente con DVD y
otros formatos de vídeo comprimido.
mejora dinámica del contraste
Ajusta y adapta dinámicamente el contraste de la imagen.
nivel dinámico del contraste
Ajusta y adapta dinámicamente el contraste de la imagen.
SOUS – MENU AMÉLIORATIONS
Le sous- menu d’améliorations contient une gamme de
paramètres d’amélioration de l’image pour les affichages
vidéo.
Niveau DLTI (Amélioration provisoire de la luminosité
numérique)
Utilisez cette fonction pour augmenter la netteté de
l’image visible de vidéo.
Niveau DCTI (Amélioration provisoire de la saturation
numérique)
Utilisez cette fonction pour augmenter la netteté de la
couleur visible des images vidéo.
filtre en peigne 3D
Ce filtre réduit la bande de points des signaux vidéo
composés.
filtres de compensation 2D
Série de filtres destinés à renforcer l’affichage des détails
des bordures et des blocs.
réduction adaptive des parasites
Ce filtre s’adapte au matériel de source, et réduit les
parasites des vidéos animées.
CEH (Amélioration couleur) rouge, bleue, verte, jaune,
ton chair
Les filtres d’Amélioration de la Couleur améliorent les
couleurs individuelles par l’analyse de l’image et en
laissant du gain (contraste) à la couleur choisie. Le réglage
du ton chair améliore le paramètre de gain pour une
gamme de couleurs qui sont habituellement des tons
chair.
dégroupage horizontal
Un filtre 2D qui analyse chaque cadre de crénelage
et d’obstruction, et réduit les soi disant produits
d’obstruction MPEG habituels avec des DVD et autres
formats de vidéo comprimés.
amélioration de contraste dynamique
Ajuste et adapte dynamiquement le contraste de l‘image.
niveau de contraste dynamique
Ajuste et adapte dynamiquement le contraste de l‘image.
MENU SYSTEM MENÜSYSTEM SYSTEME MENU SISTEMA DE MENÚS
Page 34
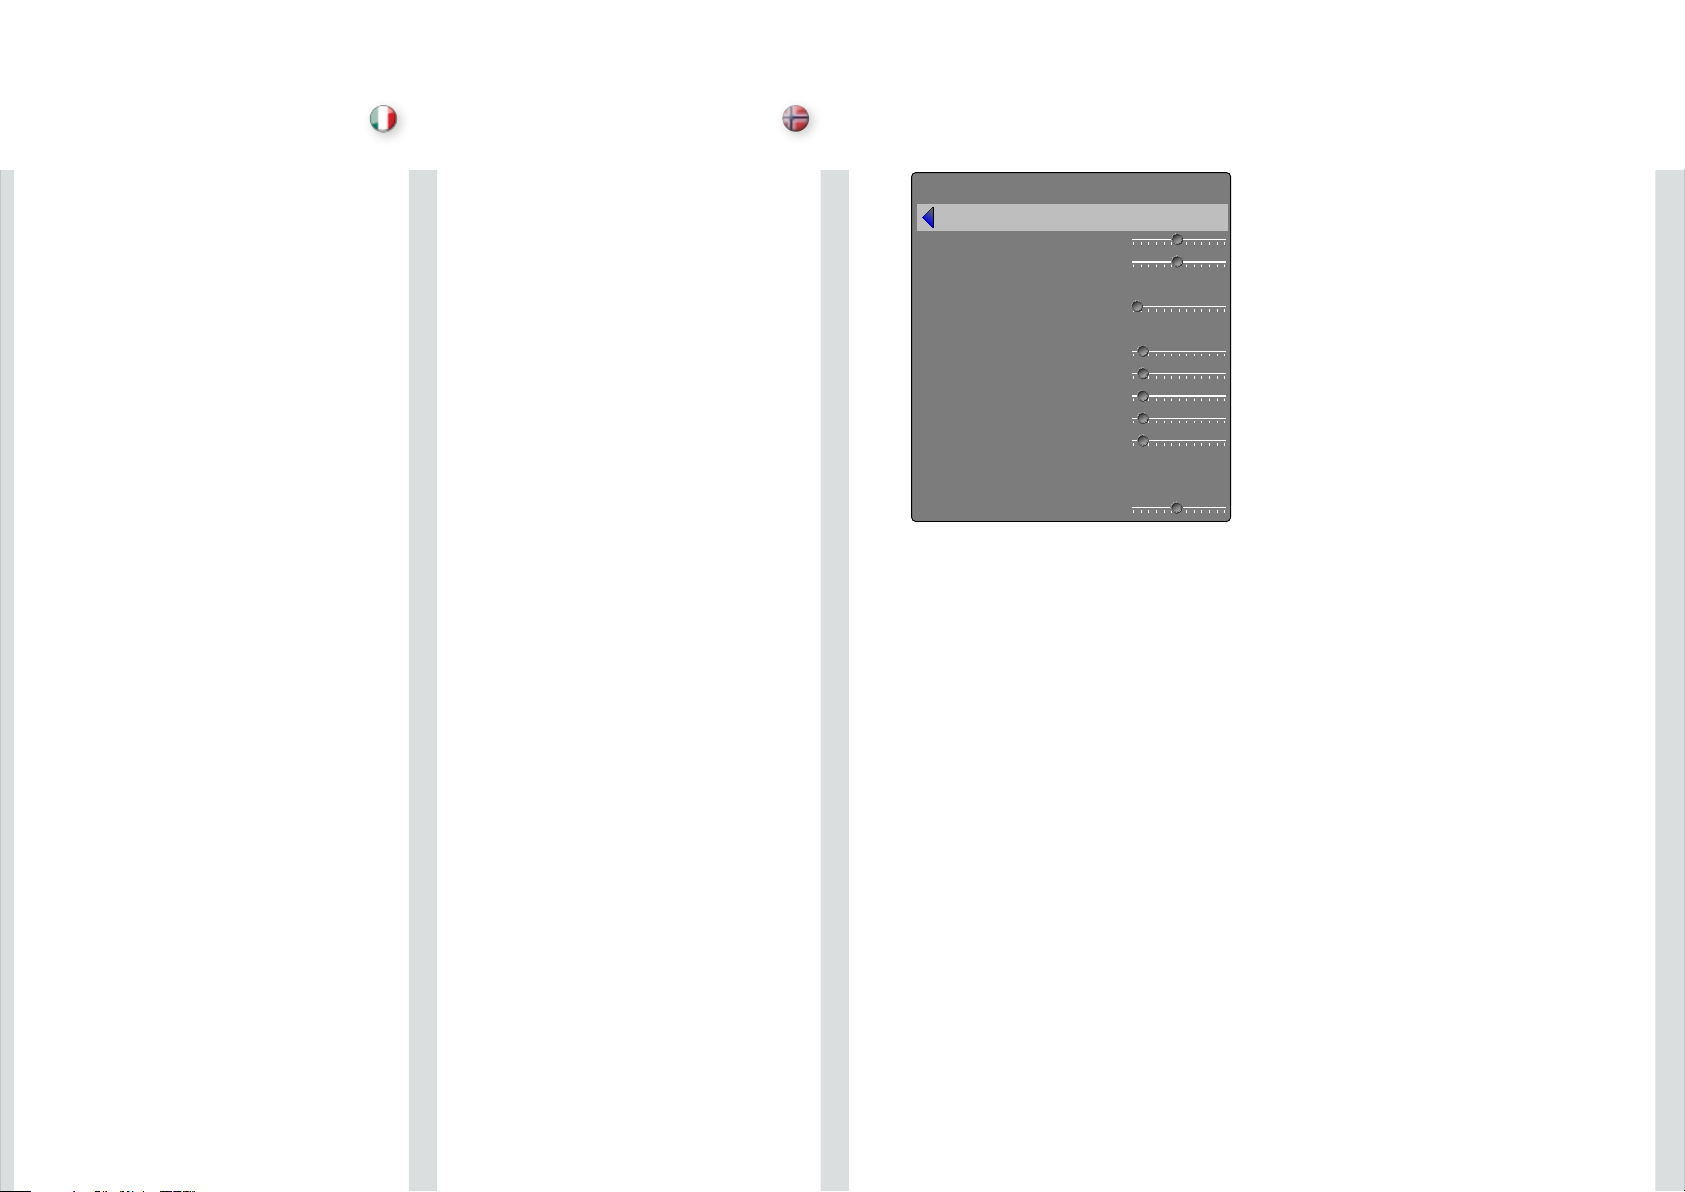
55
italiano
norsk
SOTTOMENU ENHANCEMENT (MIGLIORAMENTI)
Il sottomenu enhancements (miglioramenti) contiene una
gamma di impostazioni che migliorano le immagini per la
visualizzazione dei video.
livello DLTI (Digital Luminance Transient Improvement)
Utilizzare questa funzione per aumentare la nitidezza
dell’immagine per i video.
livello DCTI (Digital Chroma Transient Improvement)
Utilizzare questa funzione per aumentare la nitidezza del
colore visibile per le immagini video.
filtro a pettine 3D
Questo filtro riduce l’effetto “dot crawl” nei segnali video
compositi.
miglioramento contorni 2D
Raccolta di filtri incorporati per una migliore visualizzazione
dei dettagli in contorni e blocchi.
riduzione adattativa dei disturbi
Questo filtro si adatta al materiale sorgente e riduce i disturbi
nei video in movimento.
CEH (Colour Enhancement) rosso, blu, verde, giallo,
incarnato
I filtri CEH (Colour Enhancement) migliorano i singoli
colori analizzando l’immagine e consentendo il guadagno
(contrasto) del colore selezionato. La regolazione
dell’incarnato migliora l’impostazione del guadagno per una
serie di colori che solitamente sono quelli dell’incarnato.
deblock orizzontale
Un filtro 2D che analizza ogni fotogramma per individuare
jaggies e blocking e riduce i così detti gli artefatti del
blocking MPEG tipici del DVD e di altri formati video
compressi.
miglioramento dinamico contrasto
Regola e adatta dinamicamente il contrasto dell’immagine.
livello dinamico contrasto
Regola e adatta dinamicamente il contrasto dell’immagine.
UTVIDELSER UNDERMENYMENU
Den utvidede undermenyen inneholder et utvalg av
bildeforbedringsinnstillinger for videovisning.
DLTI (Digital Luminance Transient Improvement) nivå
Bruk denne funksjonen for å øke synlig bildeskaphet for
video.
DCTI (Digital Chroma Transient Improvement) nivå
Bruk denne funksjonen for å øke synlig bildeskaphet for
video.
3D kamfilter
Dette filteret reduserer bildestøy (dot crawl) i kompositt
video signaler.
2D peaking
En samling av innebyggede filtre som sørger for å
fremheve detaljer på kanter og bokser.
adaptiv støyreduksjon
Dette filteret tilpasser seg kildematriellet og reduserer
støyen i bevegelige bilder.
CEH (Colour Enhancement) red, blue, green, yellow,
fleshtone
Colour Enhancement-filtere forsterker individueller farger
ved å analysere bildet og tillater økning (kontrast) for den
valgte fargen.
horisontal deblocking
Et 2D filter som analyserer hver ramme for “jaggies” og
blokking og reduserer såkalt MPEG blokking av typiske
kunstigheter i DVD eller andre komprimerte videoformater.
dynamisk kontrastøkning
Justerer og tilpasser bildekontrasten dynamisk.
dynamisk kontrastnivå
Justerer og tilpasser bildekontrastnivået dynamisk.
SISTEMA DEI MENU
MENYSYSTEM
back
DLTI level
DCTI level
3D comb filter
2D peaking
adaptive noise reduction
CEH red
CEH blue
CEH green
CEH yellow
CEH fleshtone
horizontal deblocking
dynamic contrast enhancement
dynamic contrast level
off
on
6
6
0
1
1
1
1
1
18
enhancements
Page 35

56
english
deutsch
francais
español
INSTALLATION SUB MENU
The installation sub menu provides easy access to global
system settings, including ceiling mount and rear projection
settings, analogue source sync termination settings, and
keystone. These settings will affect all sources connected,
and are system specific, rather than source specific.
image orientatation
Set the image orientation to reflect the installation setting.
Select between “desktop front”, “desktop rear”, “ceiling
front” and “ceiling rear” modes. The image will be flipped
and reversed accordingly.
source scan
When enabled, the projector automatically searches for
available sources on all input terminals, and displays the
image from the first one available with a valid input signal.
Source scan is on by default.
RGB video
The component video input can be configurated to receive
RGB and composite sync (using the composite video input
as a fourth connector).
IR front/rear
Enables or disables individual IR receivers. Disable if the
projector is being used with a control system, if the projector
experiences strange behaviour (due to stray IR light in some
environments), or the remote control is not needed. IR
enable is on by default.
wide setup
Wide setup gives manual control to correctly displaying
sources that are wide aspect ratio of standard resolutions,
such as 1680x1050 (SXGA+), 1280x768 (WXGA), and
similar.
sync termination VGA
Changes the input impedance to match source signal
impedance. Use if signal is fuzzy or unstable.
OSD enble
Enables or disables the OSD (On Screen Display) dialogues.
Possible settings include “on”, “off”, or “only warnings”. The
latter will display system warnings, such as overheating,
lamp life expiry, other other critical information. “off” disables
all warnings and messages. OSD enable is set to “on” by
default.
test image
Displays a test image frame that is easy to use when setting
up and determining screen size, and position. Options
include 4:3, 16:9, 1.85:1, 2.35:1, and a combination of all
of the above.
UNTERMENÜ INSTALLATION
Das Untermenü Installation bietet Zugang zu den
allgemeinen Systemeinstellungen, inklusive Einstellungen
für Deckenmontage oder Rückwärtsprojektion,
Synchronisationseinstellungen für analoge Quellen
und Trapezkorrektur. Diese Einstellungen betreffen alle
angeschlossenen Quellen, d. h. sie sind system- und nicht
quellenspezifisch.
Bildausrichtung
Stellt die Bildausrichtung gemäß der Konfiguration
der Installation ein. Zur Auswahl stehen die Modi
„desktop front“ (Tisch, Vorwärtsprojektion), „desktop
rear“ (Tisch, Rückwärtsprojektion), „ceiling front“
(Decke, Vorwärtsprojektion) und „ceiling rear“ (Decke,
Rückwärtsprojektion). Das Bild wird entsprechend gedreht
und gekippt.
Quellen-Suchlauf
Wenn diese Option aktiviert wird, sucht der Projektor
automatisch nach verfügbaren Quellen und zeigt dann das
Bild von der ersten verfügbaren Quelle an, die ein gültiges
Signal liefert. Der Quellensuchlauf ist standardmäßig
aktiviert.
RGB-Video
Der Component Video-Eingang kann so konfiguriert
werden, dass RGB und Composite Sync empfangen
werden (mit dem Composite Video-Eingang als viertem
Anschluss).
Infrarot vorne/hinten
Schaltet die einzelnen Infrarot-Empfänger ein oder aus.
Ausschalten, wenn der Projektor mit einem Steuersystem
verwendet wird, wenn der Projektor Fehlfunktionen aufweist
(infolge von Infrarot-Streulicht in einigen Umgebungen)
oder wenn die Fernbedienung nicht benötigt wird.
Standardmäßig sind die Infrarot-Empfänger eingeschaltet.
Weiten-Einstellung
Die Weiten-Einstellung erlaubt die manuelle Einstellung der
korrekten Anzeige von Quellen, die eine Breitbildeinstellung
in Standardauflösung haben, wie z.B. 1680x1050 (SXGA+),
1280x768 (WXGA) und Ähnliche.
Sync-Anschluss VGA
Verändert die Eingangs-Impedanz entsprechend der
Impedanz des Quellsignals. Verändern Sie diese Einstellung,
wenn das Signal unscharf oder instabil ist.
OSD aktivieren
Aktiviert oder deaktiviert die OSD-Dialoge. Mögliche
Einstellungen sind „on“, (ein), „off“ (aus) oder „only
warnings“ (nur Warnmeldungen). Die zuletzt genannte
Einstellung zeigt Warnmeldungen des Systems an, z. B.
Überhitzung, Lebensdauer der Lampe und andere kritische
Informationen. „off“ (Aus) deaktiviert alle Warnmeldungen
und Mitteilungen. Der OSD enable (OSD aktivieren) ist
standardmäßig aktiviert.
Testbild
Zeigt ein Testbild an, das insbesondere bei der Einstellung
und beim Einrichten der Bildschirmgröße und -position sehr
nützlich ist. Zur Auswahl stehen „4:3“, „16:9“, „1,85:1“,
„2,35:1“ sowie eine Kombination aller vorgenannten
Möglichkeiten.
SUBMENÚ INSTALACIÓN
El submenú Instalación proporciona un fácil acceso a los
ajustes globales del sistema, incluyendo los ajustes para
el montaje en el techo y la retroproyección, ajustes de
terminación sincronizada, fuente analógica y distorsión
trapezoidal. Estos ajustes afectarán a todas las fuentes
conectadas y son específicos del sistema, en lugar de ser
específicos de la fuente.
orientación de la imagen
Ajusta la orientación de la imagen para reflejar los ajustes
de instalación. Selecciona entre los modos “desktop
front” (frontal del escritorio), “desktop rear” (trasera del
escritorio), “ceiling front” (frontal máximo) y “ceiling rear”
(trasera máxima). La imagen puede voltearse e invertirse en
consonancia.
exploración fuente
Cuando se activa, el proyector busca automáticamente
todas las fuentes disponibles en todos los terminales de
entrada, y muestra la imagen de la primera fuente disponible
con una señal de entrada válida. La exploración fuente está
activada por defecto.
vídeo RGB
La entrada de vídeo componente se puede configurar para
recibir RGB y sincronización compuesta (usando la entrada
de vídeo compuesto como un cuarto conector).
IR frontal/trasero
Conecta y desconecta los receptores IR individuales.
Desconecte si el proyector se utiliza con un sistema de
control, si el proyector se comporta extraño (debido a
luz IR parásita en algunos entornos), o si el mando a
distancia no hace falta. Activar IR está conectado de forma
predeterminada.
wide setup
Wide setup proporciona control manual para visualizar
correctamente las fuentes que son de relación de
aspecto amplia de resoluciones normalizadas, como p.ej.
1680x1050 (SXGA+), 1280x768 (WXGA) y similar.
sync termination VGA
Cambia la impedancia de entrada para igualar la impedancia
de la señal de fuente. Se debe utilizar si la señal es difusa o
inestable.
activar OSD
Activa o desactiva los diálogos OSD (visualización en
pantalla). Los posibles ajustes incluyen “on” (activado), “off”
(desactivado), o “only warnings” (sólo advertencias). Este
último mostrará las advertencias del sistema, tales como
sobrecalentamiento, fin de la vida útil de la lámpara u otra
información crítica. “off” (desactivado) desactiva todas las
advertencias y mensajes. Activar OSD está activado por
defecto.
probar imagen
Muestra un fotograma de una imagen de prueba que es fácil
de usar al configurar y determinar el tamaño y la posición
de la pantalla. Las opciones incluyen “4:3”, “16:9”, “1.85:1”,
“2.35:1”, y una combinación de todas las opciones.
SOUS–MENU INSTALLATION
Le sous–menu installation offre un accès facile aux
paramètres du système général, y compris les paramètres
de projection au plafond et arrière, les paramètres de fin
de synchronisme de source analogique, et le trapèze.
Ces paramètres affectent toutes les sources connectées,
et sont des systèmes spécifiques, plus que des sources
spécifiques.
orientation de l’image
Ajuste l’orientation de l’image afin de réfléchir le paramètre
d’installation. Sélectionner entre les modes “desktop front”
(bureau avant), “desktop rear” (bureau arrière), “ceiling
front” (plafond avant) et ceiling rear” (plafond arrière).
L’image est retournée et inversée en conséquence.
balayage de sources
Lorsqu’il y est habilité, le projecteur recherche
automatiquement des sources disponibles sur toutes les
bornes d’entrée, et affiche l’image du premier disponible
possédant un signal d’entrée valable. Le balayage de
sources est en marche par défaut.
vidéo RVB
L’entrée de vidéo en composante peut être configurée afin
de recevoir RVB et un composite de synchronisation (en
utilisant l’entrée de vidéo composite comme quatrième
connecteur).
IR avant/arrière
Permet d’activer ou désactiver les différents récepteurs
IR. À désactiver si le projecteur est employé avec un
système de commande, si le projecteur est affecté par
des anomalies (causées par la lumière IR dans certains
environnements), ou si la télécommande est superflue. IR
est actif par défaut.
Format large
Permet de commander manuellement l’appareil pour
afficher correctement des sources de format large écran
à résolutions standard : 1680x1050 (SXGA), 1280x768
(WXGA) et équivalents.
terminaison de sync VGA
Ajuste l’impédance d’entrée sur l’impédance du signal
source. Sert à corriger le signal si celui-ci est flou ou
instable.
activer OSD
Active ou désactive les dialogues d’OSD (Affichage sur
écran). Des paramètres possibles comprennent “on”
(marche), “off” (arrêt) ou “only warnings” (seulement
avertissements). Ce dernier affiche les avertissements du
système, comme l’échauffement, l’expiration de vie du
voyant, ou autre information critique. “Off” (arrêt) désactive
tous les messages et les avertissements. Activer OSD est
ajusté sur « marche » par défaut.
tester l’image
Affiche le cadre Tester l’image, facile à utiliser lors du
paramétrage et de la détermination de la taille et de la
position de l’écran. Les options comprennent “4:3”,
“16:9”, “1.85:1”, “2.35:1”, et une combinaison de tout ce
qui est au dessus.
MENU SYSTEM MENÜSYSTEM SYSTEME MENU SISTEMA DE MENÚS
Page 36
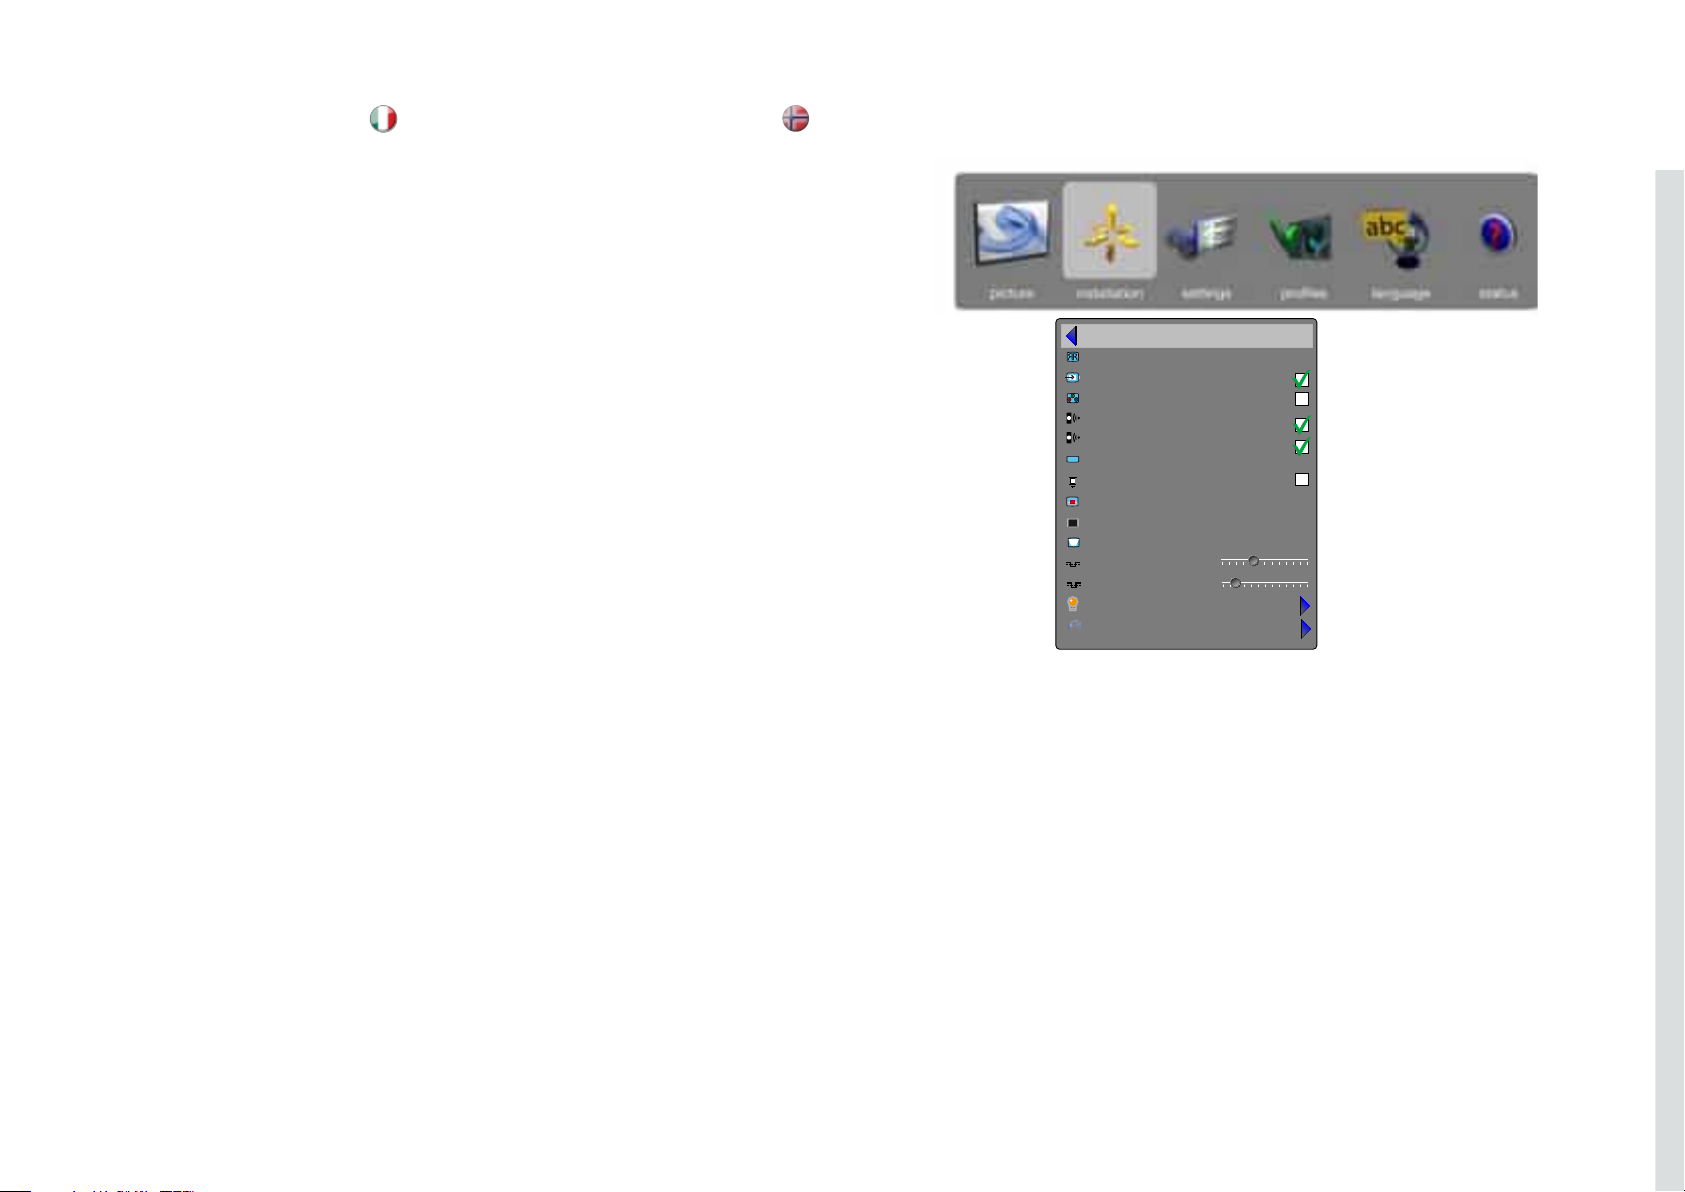
57
italiano
norsk
SOTTOMENU INSTALLAZIONE
Il sottomenu d’installazione consente l’accesso semplificato
alle impostazioni globali del sistema, incluso il montaggio
a soffitto e le impostazioni di retro proiezione, terminazione
della sincronizzazione della sorgente analogica e
deformazione trapezoidale. Queste impostazioni riguardano
tutte le sorgenti collegate e sono specifica per i sistemi
piuttosto che per la sorgente.
orientamento immagine
L’orientamento dell’immagine può essere impostato per
riflettere l’impostazione dell’installazione. Selezionare una
delle modalità “desktop front” (scrivania davanti), “desktop
rear” (scrivania dietro), “ceiling front” (soffitto davanti) e
“ceiling rear” (soffitto dietro). L’immagine viene capovolta e
invertita di conseguenza.
scansione sorgente
Se questa opzione è abilitata, il proiettore cerca
automaticamente le sorgenti disponibili su tutti i terminali
in ingresso e visualizza l’immagine della prima sorgente
disponibile con un segnale d’ingresso valido. Questa
opzione è attiva per default.
video RGB
L’ingresso component video può essere configurato per
ricevere il segnale RGB e sync composito (utilizzando
l’ingresso video composito come quarto connettore).
IR anteriore/posteriore
Abilita o disabilita i singoli ricevitori a infrarossi. Questa
funzione deve essere disabilitata se il proiettore è sprovvisto
di sistema di comando, in caso di comportamento anomalo
del proiettore (in seguito alla riflessione della luce in alcuni
ambienti) oppure se non viene utilizzato il telecomando. La
funzione a infrarossi è abilitata per default.
configurazione wide
La configurazione wide assicura il controllo manuale
necessario per visualizzare correttamente le fonti con
rapporto di aspetto largo delle risoluzioni standard, ad es.
1680x1050 (SXGA+), 1280x768 (WXGA) e simili.
terminazione sinc. VGA
Modifica l’impedenza in entrata in base all’impedenza di
segnale della fonte. Si utilizza se il segnale è approssimativo
o instabile.
abilitazione OSD
Abilita o disabilita le finestre di dialogo OSD (On Screen
Display, visualizzazione a schermo). Le possibili impostazioni
includono “on”, “off” oppure “only warnings” (solo avvisi).
Quest’ultima visualizza gli avvisi di sistema, ad esempio
sul surriscaldamento, l’esaurimento della lampada e altre
informazioni importanti. “off” disattiva tutti gli avvisi e i
messaggi. Questa opzione è impostata su “on” per default.
immagine di test
Visualizza il fotogramma di un’immagine di prova facile da
usare quando s’impostano e si stabiliscono la posizione
e le dimensioni dello schermo. Le opzioni includono
“4:3”, “16:9”, “1.85:1”, “2.35:1”e una combinazione delle
precedenti.
SISTEMA DEI MENU
MENYSYSTEM
UNDERMENY INNSTALLASJON
Undermenyen for installasjon gir enkel tilgang til de
globale innstillingene, inkludert oppsettet for takmontering
bakprojeksjon, analog kildesynk terminering og keystone.
Disse instillingene vil påvirke alle tilkoblede kilder og er
systemspesifikke, istedet for kildespesifikke.
montering
Stiller bildeoppsettet til å stemme med installasjonen.Velg
mellom “frontprojeksjon”, “bakprojeksjon” og “takmontert
bakprojeksjon” innstilling. Bildet vil bli snudd og reversert i
forhold til justeringene.
kildesøk
Når denne er aktivert søker projektoren automatisk etter
tilgjengelige kilder på alle kontakter og viser den første
som har sender et akseptabelt signal. Kildesøk er satt opp
som standard.
RGB video
Komponent video signalene kan konfigureres til å motta
RGA og kompositt synk (ved å bruke kompositt video som
en fjerde kontakt).
IR fremside/bakside
Aktiverer eller dekativerer individuelle IR mottakere.
Deaktiver hvis projektoren brukes med ett kontrollsystem,
projektoren oppfører seg rart (på grunn av IR -signaler
på avveie), eller det ikke er bruk for fjernkontrollen. IR
mottaket er aktivt som standard.
aktiviser bredformat
Aktiviser bredformat gir manuell kontroll for korrekt visning
av kilder som har breddeforat av standardoppløsninger.
For eksempel 1680x1050 (SXGA+), 1280x768 (WXGA) og
liknende.
synkterminering VGA
Endrer impedans på inngående signaler til å passe til
kildesignalets impedans.
aktiviser OSD
Aktiverer eller deaktiverer OSD (On Screen Display)
dialoger. Mulige innstillinger inkluderer “på”, “av” eller
“kun advarsler”. Sistnevnte viser systemadvarsler, som
overoppheting, behov for lampebytte og annen kritisk
informasjon. “av” deaktiverer alle advarsler og meldinger.
Aktiviser OSD er satt til “på” som standard.
testbilde
Viser en test bilderamme som er lett å bruke ved
montering og for å bestemme bildestørrelse og plassering.
Alternativene inkluderer 4:3, 16:9, 1.85:1, 2.35:1og en
kombinasjon av alle de forannevnte.
back
image orientation
source scan
RGB video
IR front
IR rear right
wide setup
sync termination VGA
OSD enable
test image
vertical keystone
sync level VGA/BNC
sync level RGB video
lamp
trigger
on
off
8
4
desktop front
Page 37
58
english
deutsch
francais
español
vertical keystone
vertical keystone correction electronically compensates for
the trapezoidal image created when the projector is tilted,
and is no longer perpendicular to the wall or screen surface.
Instead of electronic keystone correction, it is adviced that
optical lens shift is used, if possible.
NOTE: THIS FUNCTION DOES NOT APPLY FOR WUXGA
PRODUCTS.
sync level VGA/BNC
Manually changes the level of sync that is needed for the
projector to accept it.
Warning! If set too low, the image will disappear!
sync level RGB vIdeo
Manually changes the level of sync that is needed for the
projector to accept it.
Warning! If set too low, the image will disappear!
lamp
Enters the lamp management sub menu. See below.
trigger
Enters trigger sub menu where you can select aspect trigger
mode and screen trigger mode. The alternatives are auto,
on or off:
Auto: Screen trigger: on when projector is on, off when
projector is off
On: Always on (12V)
Off: Always off (0V)
If RS232 control is used, this overides the trigger settings.
LAMP SUB MENU
eco mode
Switch eco mode (low power and long life) on or off. When
on, lamp power may not be adjusted. When off, lamp power
may be adjusted.
lamp power
Adjust lamp power when not in eco mode.
reset lamp timer
For resetting the lamp timer when changing lamp.
Vertikale Keystone-Verzerrung
Die Korrektur der vertikalen Keystone-Korrektur
kompensiert die Trapezverzerrung, die entsteht, wenn der
Projektor geneigt wird und deshalb nicht mehr im rechten
Winkel zur Wand oder Bildschirmoberfläche steht. Anstelle
der elektronischen Keystone-Korrektur sollte, sofern
möglich, die optische Linse verschoben werden.
HINWEIS: DIESE FUNKTION STEHT FÜR WUXGAPRODUKTE NICHT ZUR VERFÜGUNG
Sync Level VGA/BNC
Manuelle Einstellung der Synchronisationsstufe, die der
Projektor benötigt.
Achtung! Wenn diese Einstellung zu niedrig ist,
verschwindet das Bild!
Sync Level RGB vIdeo
Manuelle Einstellung der Synchronisationsstufe, die der
Projektor benötigt.
Achtung! Wenn diese Einstellung zu niedrig ist,
verschwindet das Bild!
Lampe
Umschalten in das Untermenü Lampeneinstellungen.
Siehe unten.
Trigger (Auslöser)
Umschalten in das Untermenü Trigger zum Einstellen
des Auslösemodus für Darstellung und Bildschirm. Die
Einstellungen sind Auto, An und Aus:
Auto: Bildschirm-Auslösemodus: An beieingeschaltetem
Projektor. Aus bei ausgeschaltetem Projektor.
An: Immer an (12 V).
Aus: Immer aus (0V).
Wenn die RS232-Steuerung aktiviert ist, werden die
Auslöser-Einstellungen außer Kraft gesetzt.
trapèze vertical
La correction électronique du trapèze vertical compense
l’image trapézoïdale créée quand le projecteur est
penché, et n’est plus perpendiculaire au mur ou à la
surface d’écran. Au lieu de la correction de trapèze
électronique, il est conseillé d’utiliser, si possible, un
décalage de lentille optique.
NOTE: CETTE FONCTION NE S’APPLIQUE PAS AUX
PRODUITS DE NORME WUXGA.
nniveau de sync VGA/BNC
Permet d’ajuster en mode manuel le niveau de sync sur
un niveau accepté par le projecteur.
Attention ! S’il est trop faible, l’image risque de
disparaître.
niveau de sync vidéo RGB
Permet d’ajuster en mode manuel le niveau de sync sur
un niveau accepté par le projecteur.
Attention ! S’il est trop faible, l’image risque de
disparaître.
lampe
Permet accéder au sous-menu de gestion des lampes.
Voir infra.
déclencheur
Permet d’accéder au sous-menu « Déclencheur » pour
agir sur le mode Déclencheur d’aspect et le mode
Déclencheur d’écran. Réglages possibles : auto, activé
et désactivé :
Auto: Déclencheur d’écran: actif quand le
projecteur est en marche, non actif quand le
projecteur est éteint.
Activé: Toujours en marche (12V).
Désactivé:Toujours inactif (0V).
L’emploi de la commande RS232 annule et remplace le
réglage du déclencheur.
distorsión trapezoidal vertical
la corrección de la distorsión trapezoidal vertical compensa
electrónicamente la imagen trapezoidal creada cuando se
inclina el proyector y ya no queda perpendicular a la pared
o a la superficie de la pantalla. En lugar de una corrección
de la distorsión trapezoidal electrónica, se aconseja usar el
desplazamiento de la lente óptica, si es posible.
OBSERVE: ESTA FUNCIÓN NO EXISTE EN LOS
PRODUCTOS WUXGA.
sync level VGA/BNC
Cambia manualmente el nivel de sincronización necesario
para que lo acepte el proyector.
Advertencia: ¡Si se ajusta demasiado bajo, desaparecerá la
imagen!
sync level RGB vIdeo
Cambia manualmente el nivel de sincronización necesario
para que lo acepte el proyector.
Advertencia: ¡Si se ajusta demasiado bajo, desaparecerá la
imagen!
lamp
Entra en el submenú de gestión de lámpara. Véase abajo.
trigger
Entra en el submenú del disparador donde puede
seleccionarse modo de disparo de aspecto y modo de
disparo en la pantalla. Las alternativas son auto, on/off:
Auto: El modo de disparo en la pantalla: está activado al
conectarse el proyector, está desactivado al
desconectarse el proyector.
On: Siempre conectado (12V).
Off: Siempre desconectado (0V).
Si se utiliza RS232, se anularán los ajustes del disparador.
UNTERMENÜ LAMPE
Eco-Modus
Schaltet den Eco-Modus (niedriger Energieverbrauch
und lange Lampenlebensdauer) ein oder aus.
Wenn die Funktion eingeschaltet ist, kann die
Lampenausgangsleistung nicht mehr geregelt werden.
Wenn die Funktion ausgeschaltet ist, kann die
Lampenausgangsleistung geregelt werden.
Lampenleistung
Stellt die Lampenausgangsleistung der Lampe ein, wenn
der Eco-Modus ausgeschaltet ist.
reset lamp timer
Dient dem Nullstellen des Lampen-Betriebsstundenzählers
nach einem Lampenwechsel.
SOUS–MENU VOYANT
mode éco
Mettre le mode éco (faible puissance et longue durée) en
marche ou arrêt. En marche, la puissance du voyant ne
peut pas être ajustée. En arrêt, la puissance du voyant
peut être ajustée.
puissance du voyant
Ajuster la puissance du voyant lorsqu’il n’est pas en mode
éco.
ràZ compteur lampe
Permet d’initialiser le compteur de temps de service de la
lampe à son remplacement.
SUBMENÚ BOMBILLA
modo ecológico
Cambia entre el modo ecológico (baja energía y larga vida
útil) activado o desactivado. Cuando está activado, no
se puede ajustar la energía de la bombilla. Cuando está
desactivado, se puede ajustar la energía de la bombilla.
energía de la bombilla
Ajusta la energía de la bombilla cuando no está en modo
ecológico.
reset lámpara temporizador
Para restauración del temporizador de la lámpara al cambiar
la lámpara.
Page 38
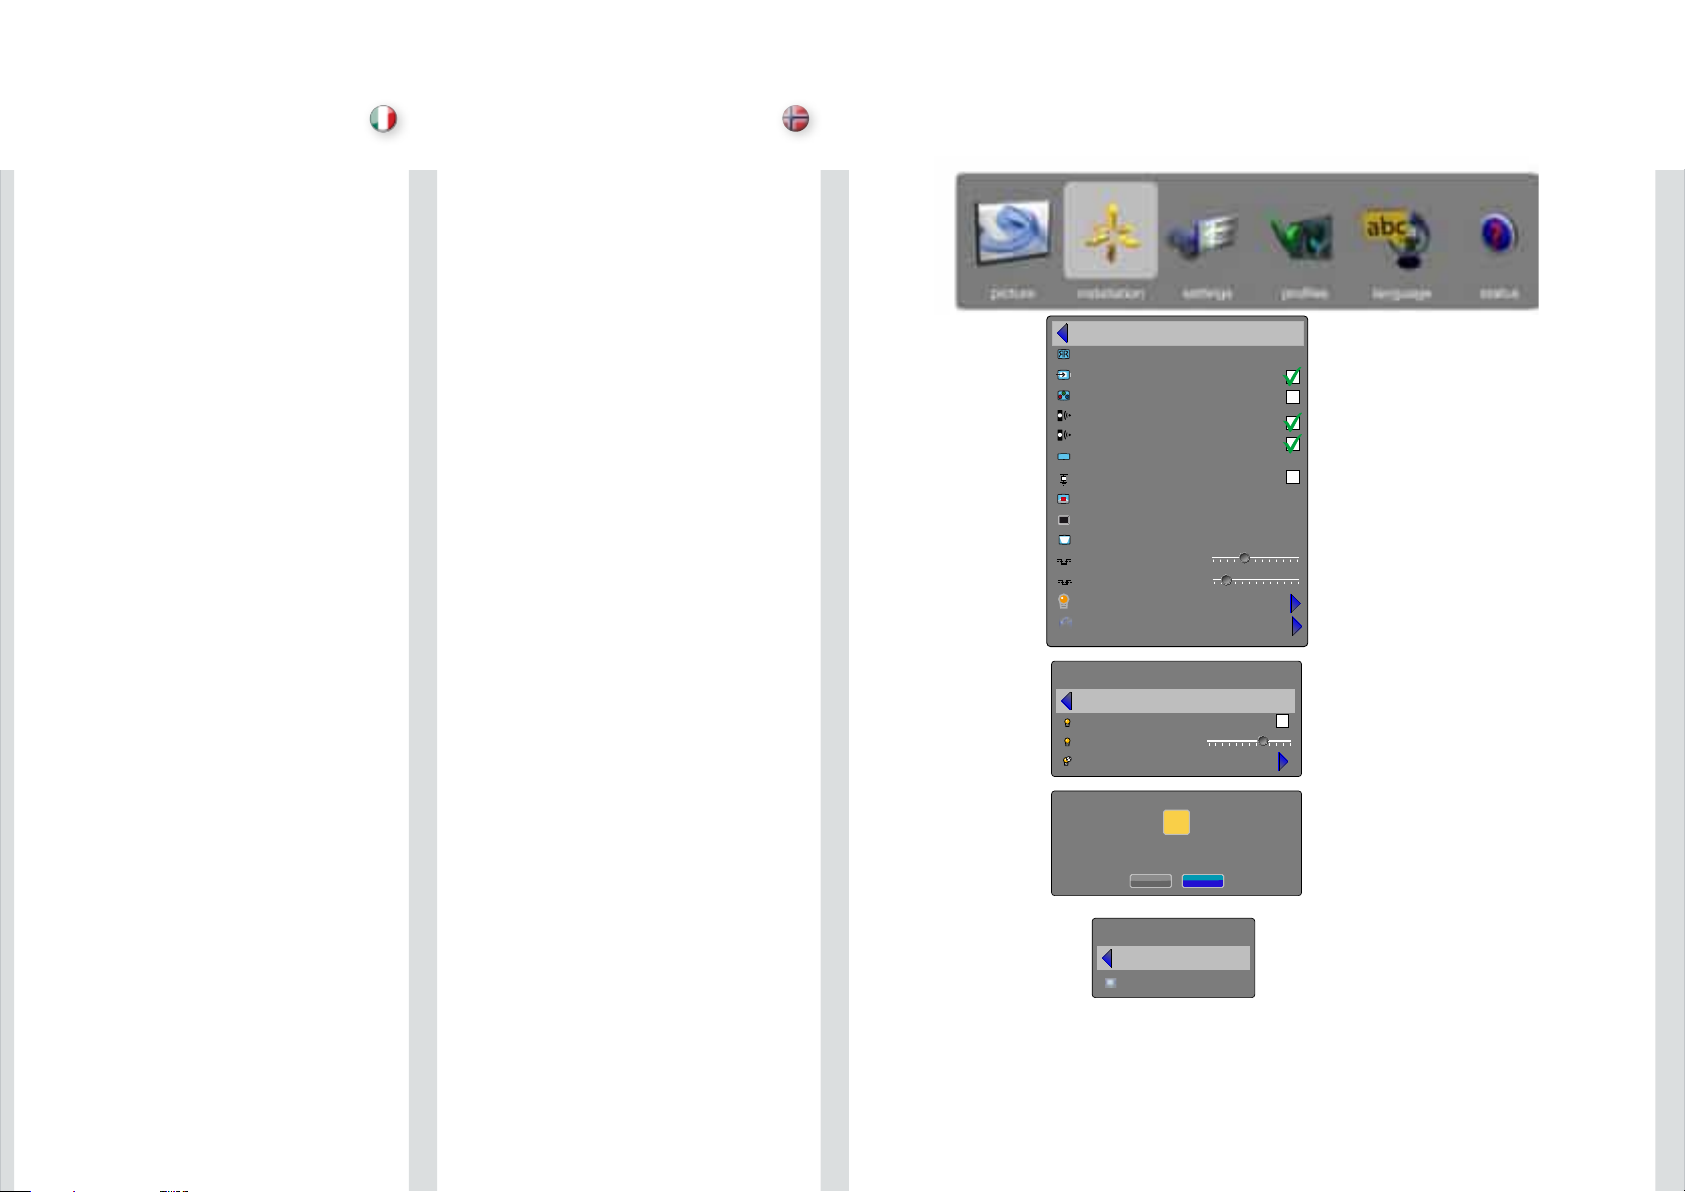
italiano
norsk
deformazione trapezoidale verticale
la correzione della deformazione trapezoidale verticale
compensa l’immagine trapezoidale generata quando il
proiettore viene inclinato e, perciò, non è più perpendicolare
alla parete o alla superficie dello schermo. Invece della
correzione elettronica della deformazione si consiglia di
utilizzare, se possibile, la funzione “lens shift”.
NOTA: QUESTA FUNZIONE NON È APPLICABILE AI
PRODOTTI WUXGA.
livello sinc. VGA/BNC
Permette di modificare manualmente il livello di
sincronizzazione necessario per il proiettore.
Avvertenza! Qualora sia troppo basso, l’immagine
scomparirà!
livello sinc. video RGB
Permette di modificare manualmente il livello di
sincronizzazione necessario per il proiettore.
Avvertenza! Qualora sia troppo basso, l’immagine
scomparirà!
lampada
Permette di accedere al sottomenu di gestione della
lampada. Vedere sotto.
trigger
Permette di accedere al sottomenu trigger, dal quale è
possibile selezionare la modalità trigger di aspetto e dello
schermo. Le alternative sono auto, on oppure off:
Auto: La modalità trigger dello: è attivata all’avviamento del
proiettore, disattivata all’avviamento del proiettore.
On: Sempre attivata (12 V).
Off: Sempre disattivata (0 V).
Se utilizzato, il comando RS232 bypassa le impostazioni di
trigger.
SOTTOMENU LAMPADA
modalità risparmio
Consente di attivare o disattivare la modalità risparmio
(basso consumo e maggiore durata). Quando la modalità
è attiva non è possibile regolare la lampada. Quando la
modalità è disattiva è possibile regolare l’alimentazione della
lampada.
potenza lampada
Regolare la potenza della lampada quando non è attiva la
modalità eco (risparmio).
azzera timer lampada
Permette di azzerare il timer alla sostituzione della lampada.
vertikal keystone-effekt
Elektronisk vertikal keystone-korreksjon kompenserer for det
trapesformede bildet som oppstår når projektoren blir tiltet
og ikke lenger står vinkelrett på veggen eller lerretet. Istedet
for elektronisk keystone-korreksjon anbefales det at linsen
justeres der dette er mulig.
MERK: DENNE FUNKSJONEN FINS IKKE PÅ WUXGA
PRODUKTER.
syknivå VGA/BNC
Endrer syknivået manuelt til et nivå som projektoren
aksepterer.
Advarsel! Hvis denne stilles for lavt vil bildet forsvinne!
synknivå RGB video
Endrer syknivået manuelt til et nivå som projektoren
aksepterer.
Advarsel! Hvis denne stilles for lavt vil bildet forsvinne!
lampe
Åpner undermenyen for lampehåndtering, se nedenfor.
trigger
Åpner trigger undermenyen hvor du kan velge aspect
trigger-modus eller skjerm trigger-modus. Alternativene er
auto, på eller av:
Auto:Skjerm trigger: På når projektor er på.
Av når projektor er av.
Av: Altid på (12V).
På: Alltid av (0V).
Hvis RS232 kontrollen brukes, dette overstyrer triggerinnstillingene.
LAMPE UNDERMENY
eco-modus
Slå eco-modus (lavt forbruk og lang levetid) av eller på. Når
på kan ikke lampestyrken justeres. Når av kan lampestyrken
justeres.
lampestyrke
Juster lampestyrken når eco-modus ikke er i bruk.
nullstill lampelevetid
For nullstilling av lampetelleverk ved bytte av lampe.
back
image orientation
source scan
RGB video
IR front
IR rear right
wide setup
sync termination VGA
OSD enable
test image
vertical keystone
sync level VGA/BNC
sync level RGB video
lamp
trigger
lamp
back
eco mode
lamp power
reset lamp timer
reset lamp time
are you sure?
this should only be done when changing the lamp
trigger
back
screen trigger mode auto
desktop front
8
4
!
noyes
on
off
59
Page 39
60
english
deutsch
francais
español
SETTINGS SUB MENU
The settings sub menu contains settings that are system
specific, and source independent, such as networking,
and third party equipment interaction, display power
management, PIN code and security settings, amongst
other things.
set date and time
Set system date and time for the projector to utilise timer
and programming options.
Date and time are easiest set with the remote control. Select
either date or time, press “OK” on the remote control, and
the first digit will be highlighted. Change value with the up
/ down arrow keys, and move between values with the left
/ right arrow keys. Press OK when done. Day of week is
automatically set when a date is set.
timer
The projector can be programmed to power up or down
at any time desired, using the timer option. See example
on pages 40 - 41. Configure “program number” (1-10),
“weekday(s)”, “execute time”, and “start up source” (the
input the projector defaults to when starting up) , and enable
or disable the programme.
Select the value to be edited, and change the value with the
left / rigth arrow keys.
For “execute time”, press “OK”, change value with the up /
down arrow keys, move between values with the left / right
arrow keys.
PIN code
The projector can be secured and locked with a 4-digit PIN
(Personal Identification Number) code, similarly to mobile
phones and other electronic equipment. To enable PIN
code protection, a valid, four-digit code must be entered.
Press “OK” to select the code, enter new PIN code via the
numeric pad on the keypad or remote control. Please note
that entered numbers are masked. To disable PIN code, or
change it, follow the same procedure as above.
When PIN code is enabled, the user is prompted to enter
the code when powering up the projector. The user has
three attempts. See PIN code security on page 30 - 31 for
more information.
network
The projector features a built-in network connector for asset
management and control over IP. The network menu allows
enabling DHCP in order to automatically be assigned an
IP when connected, or setting a static IP address, subnet
mask, and default gateway.
Highlight the setting to be changed, press “OK”, and change
the values with the up / down arrow keys. Move beteween
values with the left / right arrow keys.
MENU SYSTEM MENÜSYSTEM SYSTEME MENU SISTEMA DE MENÚS
EINSTELLUNGEN
Das Untermenü settings (Einstellungen) enthält
systemspezifische, quellenunabhängige Einstellungen,
wie z. B. Vernetzung, sowie außerdem Einstellungen für
den Anschluss von Drittgeräten, Energieverwaltung für die
Anzeige, PIN-Code und Sicherheitseinstellungen usw.
Einstellung von Datum/Uhrzeit
Stellt die Systemzeit und das Systemdatum ein,
das der Projektor für die Timer-Funktion oder die
Programmieroptionen benötigt.
Datum und Uhrzeit lassen sich am einfachsten über die
Fernbedienung einstellen. Wählen Sie entweder Datum
oder Uhrzeit und drücken Sie an der Fernbedienung
auf OK, um die erste Ziffer hervorzuheben. Ändern Sie
den Wert mit den Pfeiltasten auf/ab und benutzen Sie
die Pfeiltasten rechts/links, um zwischen den Werten
zu wechseln. Wenn Sie fertig sind, drücken Sie auf OK.
Der Wochentag wird automatisch eingestellt, sobald das
Datum eingegeben ist.
Timer
Der Projektor kann mithilfe der Timer-Funktion so
programmiert werden, dass er sich zu bestimmten
Zeiten ein- oder ausschaltet. Siehe Beispiele auf den
Seiten 40 - 41. Konfigurieren Sie „program number“
(Programmnummer, 1-10), „weekday(s)“ (Wochentage),
„execute time“ (Ausführungszeit) und „start up source“
(eingeschaltete Quelle, der Eingang, der beim Einschalten
standardmäßig gewählt wird) und aktivieren oder
deaktivieren Sie das Programm.
Wählen Sie den Wert, den Sie bearbeiten möchten und
ändern Sie ihn mit den Pfeiltasten rechts/links.
Bei „execute time“ (Ausführungszeit) drücken Sie auf
OK und ändern Sie den Wert mit den Pfeiltasten auf/ab.
Benutzen Sie die Pfeiltasten rechts/links, um zwischen den
Werten zu wechseln.
PIN-Code
Der Projektor kann ähnlich wie ein Mobiltelefon oder
andere elektronische Geräte mithilfe eines vierstelligen
PIN-Code gesichert und gesperrt werden. Zur Aktivierung
des PIN-Schutzes muss ein gültiger vierstelliger Code
eingegeben werden. Drücken Sie auf OK, um den Code
auszuwählen, geben Sie über den Ziffernblock an der
Tastatur oder über die Fernbedienung einen neuen PINCode ein. Die Eingabe der Ziffern erfolgt verdeckt. Zur
Deaktivierung des PIN-Code oder um den PIN-Code zu
ändern, gehen Sie ebenfalls wie oben beschrieben vor.
Wenn der PIN-Code aktiviert ist, wird der Benutzer
beim Einschalten des Projektors aufgefordert, den
Code einzugeben. Für die Eingabe hat der Benutzer
drei Versuche. Ausführliche Hinweise siehe PIN-CodeSicherheit auf Seite 30 - 31.
Netzwerk
Der Projektor verfügt über einen eingebauten
Netzwerkanschluss für das Gerätemanagement und die
Steuerung über IP. Das Menü network (Netzwerk) gestattet
die Aktivierung von DHCP, um bei Herstellung einer
Verbindung automatisch eine IP zugeteilt zu erhalten oder
eine statische IP-Adresse, eine Subnet-Maske und ein
Default-Gateway einzustellen.
Wählen Sie den Wert, den Sie bearbeiten möchten,
drücken Sie auf OK und ändern Sie den Wert mit den
Pfeiltasten auf/ab. Benutzen Sie die Pfeiltasten links/
rechts, um zwischen den Werten zu wechseln.
SUBMENÚ AJUSTES
El submenú Ajustes contiene ajustes que son específicos
del sistema e independientes de la fuente, tales como la
comunicación en red y la interacción con otros equipos,
visualización de administración de energía, ajustes de
código PIN y seguridad, entre otros.
ajuste de la fecha y la hora
Ajusta la fecha y la hora del sistema para que el proyector
utilice las opciones de temporizador y programación.
La fecha y la hora son más fáciles de ajustar con el
control remoto. Seleccione la fecha o la hora, pulse “OK”
(Aceptar) en el control remoto y el primer dígito quedará
resaltado. Cambie el valor con la teclas de flecha arriba/
abajo y desplácese entre los valores con las teclas de flecha
izquierda/derecha. Pulse OK cuando haya terminado. Los
días de la semana se ajustan automáticamente cuando se
ha fijado una fecha.
temporizador
El proyector se puede programar para encenderse o
apagarse en el momento que desee usando la opción
de temporizador. Vea el ejemplo en las páginas 40 - 41.
Configure “program number” (1-10 – número de programa),
“weekday(s)” (día de la semana), “execute time” (tiempo de
ejecución), y “start up source” (fuente de inicio) (la entrada
predeterminada del proyector al encenderse), y active o
desactive el programa.
Seleccione el valor a editar y cambie el valor con las teclas
de flecha izquierda/derecha.
Para “execute time” (tiempo de ejecución), pulse “OK”
(Aceptar), cambie el valor con la teclas de flecha arriba/
abajo y desplácese entre los valores con las teclas de flecha
izquierda/derecha.
código PIN
El proyector se puede asegurar y bloquear con un código
PIN (Número de identificación personal) de 4 dígitos,
de modo similar a los teléfonos móviles y otros equipos
electrónicos. Para habilitar la protección con código PIN,
debe introducirse un código válido de cuatro dígitos. Pulse
“OK” (Aceptar) para seleccionar el código, introduzca
un nuevo código PIN mediante el teclado numérico o el
control remoto. Observe que los números introducidos
quedan enmascarados. Para inhabilitar el código PIN o para
cambiarlo, siga el mismo procedimiento anterior.
Cuando el código PIN está habilitado, se le pedirá al usuario
que introduzca el código al encender el proyector. El usuario
dispone de tres intentos. Vea la seguridad del código PIN en
las páginas 30-31 para obtener más información.
red
El proyector incluye un conector de red incorporado para
la gestión y el control de activos sobre IP. El menú de red
permite habilitar DHCP para asignar automáticamente un
IP al conectarse, o seleccionar una dirección IP estática,
máscara de subred y gateway predeterminadas.
Resalte el ajuste que desea modificar, pulse “OK” (Aceptar)
y cambie los valores con las teclas de flecha arriba/abajo.
Desplácese entre los valores con las teclas de flecha
izquierda/derecha.
SOUS-MENU PARAMÈTRES)
Le sous –menu des paramètres contient les paramètres
qui sont un système spécifique, et une source
indépendante, comme le réseau ou une interaction
d’équipement indépendants, une gestion de puissance
d’affichage, des paramètres de sécurité et de code PIN,
parmi d’autres choses.
ajuster la date et l’heure
Ajuster la date et l’heure du système du projecteur afin
d’utiliser les options de minuterie et de programmation.
La date et l’heure sont plus faciles à ajuster avec la
télécommande. Sélectionner la date ou l’heure, appuyer
sur l’ “OK” (OK) de la télécommande, et le premier chiffre
est en évidence. Changer la valeur avec les flèches haut
/bas, et se déplacer parmi les valeurs avec les flèches
gauche /droite. Appuyer sur “OK” (OK) lorsque c’est
fait. Le jour de la semaine est ajusté automatiquement,
lorsqu’une date est entrée.
minuterie
Le projecteur peut être programmé pour s’allumer ou
s’éteindre au moment souhaité, grâce à l’option de
minuterie. Voir exemples des pages 40-41. Configurer
“program number” (numéro de programme) (1-10),
“weekday(s)” (jour(s) de la semaine), “execute time” (heure
d’exécution) et “start up source” (source de démarrage)
(entrée par défaut du projecteur lors du démarrage), et
activer ou désactiver le programme.
Sélectionner la valeur à modifier, et changer la valeur avec
les flèches gauche/ droite.
Pour « heure d’exécution », appuyer sur “OK” (OK),
changer la valeur avec les flèches haut /bas, et se
déplacer parmi les valeurs avec les flèches gauche /droite.
Code PIN
Le projecteur peut être sécurisé et verrouillé avec un
code PIN (numéro d’identification personnel) à 4 chiffres,
semblable à celui des téléphones portables et des autres
équipements électroniques. Pour activer la protection
du code PIN, un code à quatre chiffres, valable, doit être
introduit. Appuyer sur “OK” (OK) pour sélectionner le code,
introduire un nouveau code PIN via le pavé numérique ou
la télécommande. Veuillez remarquer que les nombres
introduits sont masqués. Pour désactiver le code PIN, ou
le modifier, suivre le même procédé que ci-dessus.
Lorsque le code PIN est activé, l’utilisateur est invité
à introduire le code lors du démarrage du projecteur.
L’utilisateur possède trois essais. Voir sécurité du code
PIN page 30-31 pour plus de renseignements.
réseau
Le projecteur se caractérise par un connecteur de réseau
intégré pour une gestion de parc et un contrôle sur IP.
Le menu de réseau permet l’activation de DHCP afin
d’attribuer automatiquement un IP lors de la connexion,
ou le paramétrage d’une adresse statique IP, d’un masque
de sous -réseau et d’une passerelle par défaut.
Mettre en évidence le paramètre à changer, appuyer
sur “OK” (OK), puis changer les valeurs avec les flèches
haut /bas. Se déplacer parmi les valeurs avec les flèches
gauche / droite.
Page 40
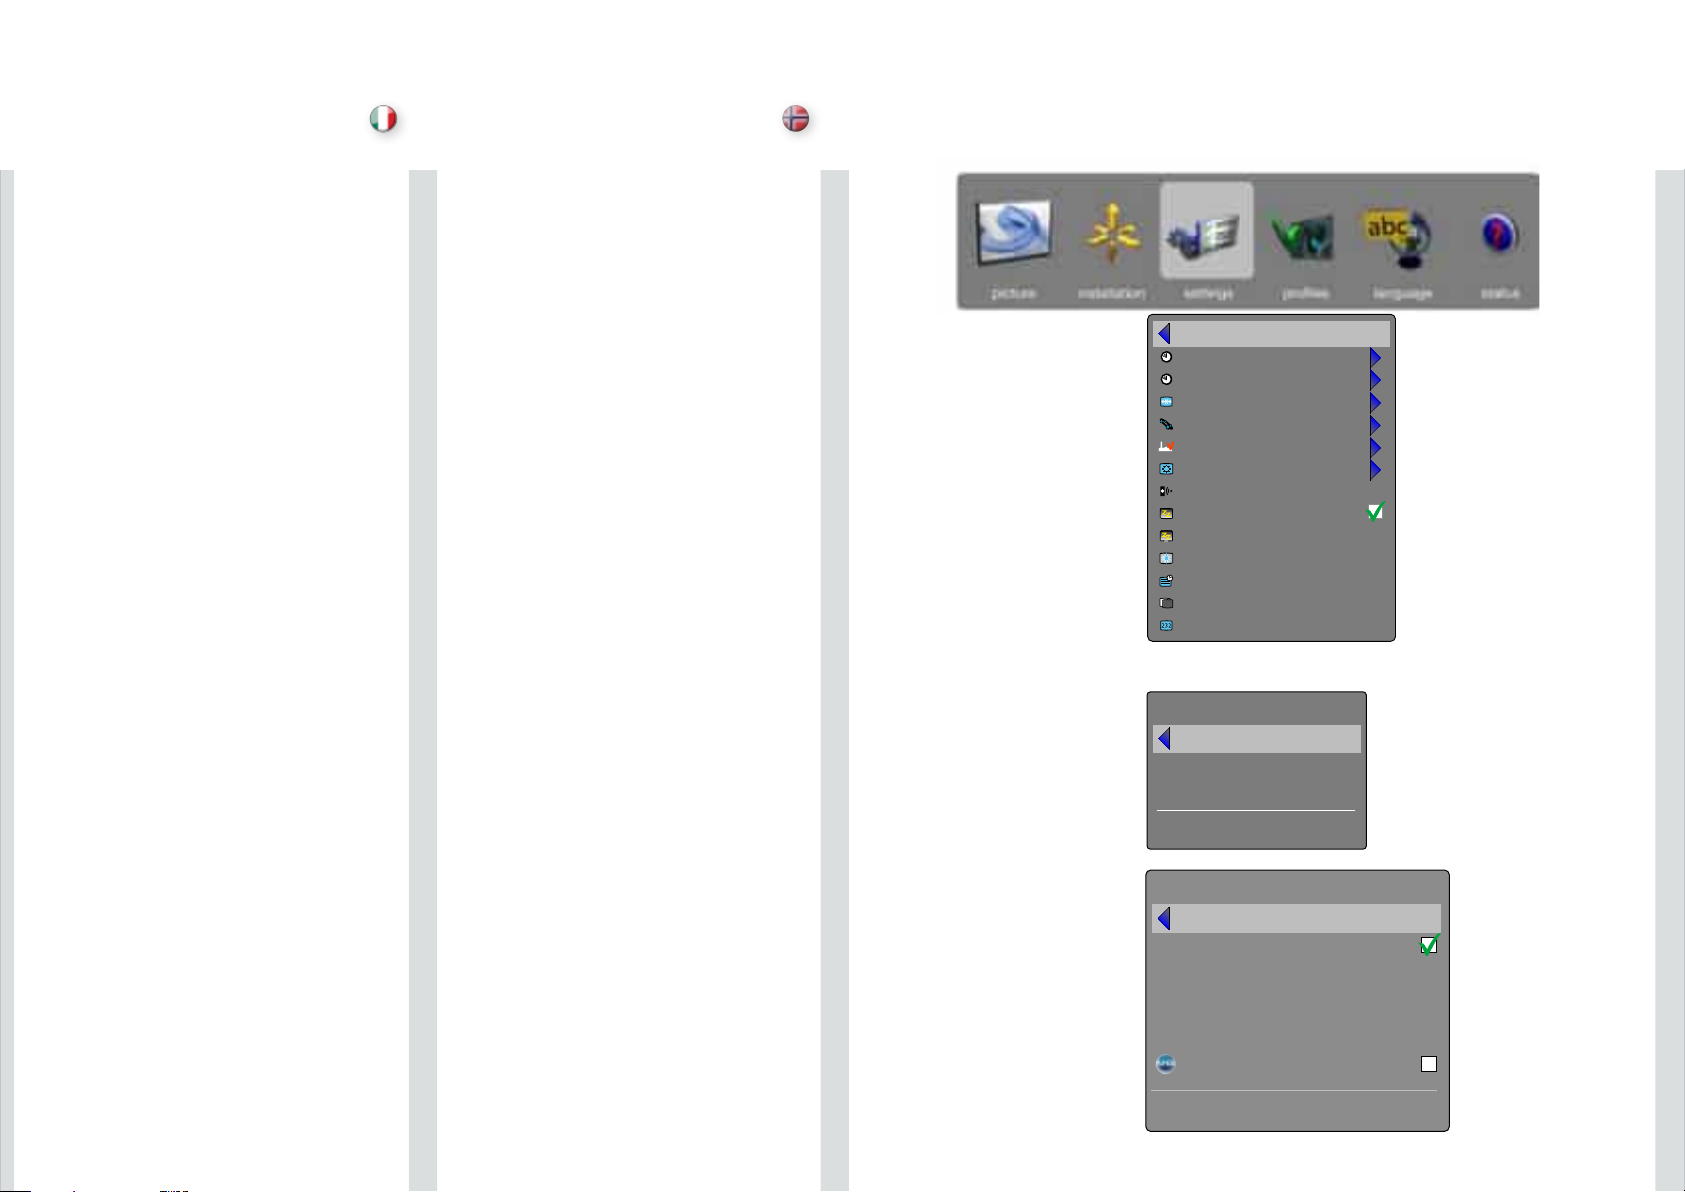
61
italiano
norsk
SISTEMA DEI MENU
MENYSYSTEM
SOTTOMENU IMPOSTAZIONI
Il sottomenu impostazioni contiene le impostazioni
specifiche del sistema e indipendenti dalla sorgente, ad
esempio la rete e l’interazione con apparecchiature di terzi,
la gestione della potenza di visualizzazione, le impostazioni
di sicurezza e del codice PIN tra le altre.
impostazione data e ora
Impostare per il proiettore la data e l’ora di sistema per
utilizzare le opzioni di programmazione e il timer.
Data e ora sono configurabili più facilmente con il
telecomando. Selezionare la data oppure l’ora e premere
“OK” sul telecomando: viene evidenziata la prima cifra.
Cambiare il valore con i tasti freccia su / giù e spostarsi
tra i valori usando i tasti freccia sinistra / destra. Al termine
premere OK. Il giorno della settimana viene impostato
automaticamente quando si sceglie una data.
timer
Il proiettore può essere programmato per accendersi o
spegnersi a qualsiasi ora si desideri, utilizzando l’opzione
timer. Vedere gli esempi alle pagg. 40 - 41. Configurare
“program number” (numero programma )(1-10),
“weekday(s)” (giorni della settimana), “execute time” (tempo
di esecuzione) e “start up source” (sorgente di avvio) - cioè
l’ingresso su cui il proiettore s’imposta automaticamente
all’avvio - e attivare o disattivare il programma.
Selezionare il valore da modificare e cambiarlo con i tasti
freccia sinistra / destra.
Per “execute time” (ora di esecuzione), premere “OK”,
cambiare il valore con i tasti freccia su / giù e spostarsi tra i
valori usando i tasti freccia sinistra / destra.
codice PIN
Il proiettore può essere bloccato con un codice PIN
(Personal Identification Number) a quattro cifre come
avviene per i telefoni cellulari e altri dispositivi elettronici.
Per abilitare la protezione tramite codice PIN, è necessario
inserire un codice valido a quattro cifre. Premere “OK” per
selezionare il codice, inserire il nuovo codice PIN tramite il
tastierino numerico sulla tastiera o il telecomando. I numeri
inseriti non sono visibili. Per disabilitare il codice PIN o per
modificarlo seguire la stessa procedura descritta sopra.
Se il codice PIN è abilitato, all’utente viene richiesto
d’inserirlo quando accende il proiettore. L’utente dispone
di tre tentativi. Per ulteriori informazioni, v. il paragrafo sul
codice PIN a pag. 30 - 31.
rete
Il proiettore dispone di un connettore di rete integrato per
la gestione delle risorse e il controllo tramite IP. Il menu
network (rete) consente di abilitare DHCP per ricevere
automaticamente un IP quando si è collegati oppure per
impostare un indirizzo IP statico, una subnet mask e il
gateway di default.
Evidenziare l’impostazione da modificare, premere “OK” e
cambiare i valori utilizzando i tasti freccia su / giù. Utilizzare i
tasti freccia sinistra / destra per spostarsi tra i valori.
back
set date and time
timer
PIN code
network
factory reset
service
remote control ID
DPMS
DPMS timeout
backlight timeout
menu timeout
splash
baudrate
broadcast
30 minutes
30 seconds
30 seconds
black
19200
back
date
time
day of week
dd.mm.yyyy
hh:mm:ss
monday
set date and time
back
DHCP enabled
IP address
subnet mask
default gateway
TCP/UDP port
AMX Device Discovery
MAC address
network
192.168.1.90
255.255.255.0
192.168.1.1
1025
00-0D-34-A0-FF-18
INNSTILLING AV UNDERMENY
Innstillingene i undermenyene inneholder innstillinger
som systemspesifikke og kildeuavhengige som ved bla.
nettverksoppsett og tilkobling av tredjeparts utstyr, display
power-styring, PIN kode og sikkerhetsinnstillinger.
dato og tid
Setter systemdata og tid for projektoren for å utnytte timer
og programmerings opsjonene.
Dato og tid stilles lettest ved å bruke fjernkotrollen. Velg
entene dato eller tid, trykk “OK” på fjernkontrollen og det
første tallet lyser opp. Endre verrdier med opp/ned tastene
og flytt mellom verdier med venstre / høyre piltast. Trykk
OK når det er gjort. Ukedag stilles inn automatisk når det
er satt en dato.
timer
Projektoren kan programmeres til å slå seg på eller av
til ønsket tid, ved å bruke timer opsjonen. Se eksempel
på side 40 - 41. Konfigurer “programm nummer” (1-10),
“ukedag(er)”, “utføres klokka” og “oppstartskilde” (verdiene
projektoren bruker som standard ved oppstart) og starter
eller stopper programmet.
Velg verdien som skal redigeres og skift verdi med venstre
/ høyre piltast.
For “utfør klokka”, trykk “OK”, skift verdi med opp / ned
piltastene og bytt mellom verdier med venstre / høyre
piltast.
PIN kode
Projektoren kan sikres og låses med en 4-sifret PIN
(Personal Identification Number) kode, samme som brukes
på mobiltelefoner og elektronisk utstyr. For å muliggjøre
PIN-kodet beskyttelse må en gyldig 4-sifret kode legges
inn. Trykk “OK” for å velge koden, legg inn ny PIN-kode
via det numeriske tastaturet eller på fjernkontrollen.
Legg merke til at det angitte nummeret er maskert. For
å oppheve PIN-koden eller forandre den, følg samme
metode som tidligere beskrevet.
Når PIN-koden er aktiv blir brukeren bedt om å oppgi
koden når projektoren slås på. Brukeren har tre forsøk. Se
PIN-kode sikkerhet på side 30-31 for mer informasjon.
nettverk
Projektoren inneholder en innebygget nettverkskontakt
for ressursstyring og IP-kontroll. Nettverksmenyen tillater
DHCP for automatisk å kunne tildeles en IP ved tilkobling
eller å stille inn en statisk IP adresse, subnet maske og
default gateway.
Merk innstillingen som skal endres og trykk “OK” og endre
verdiene med opp/ned pilene. Flytt mellom verdiene med
høyre/venstre piltast.
Page 41

62
english
deutsch
francais
español
factory reset
Factory reset erases all memorised source and system
settings, and sets all back to default values.
service
Service enters the service menu. This is available to
authorised service personnel only. Entering the service menu
without proper knowledge may permanentely damage the
projector.
remote control ID
The projector can be set up to have a unique ID, so that
it only responds to remote controls transmitting the same
ID. Up to 99 units can be handled without interfering with
eachother, using the same remote. By default, the projector
is set to respond to any one remote control, thus is set to
“broadcast”. To change, and set a unique ID, select, and
change the value with the left / right arrow keys.
To set the remote control to broadcast to a specific ID, press
the asterisk key (“*”), and enter a number that corresponds
with the projector you wish to control using the numeric
keypad. When pressing the asterisk key towards a projector,
it will respond with its unique ID, and prompt the user to
enter a matching one.
DPMS
Enable or disable the DPMS (Display Power Management
Signalling). When enabled, the projector will automatically
switch to standby mode after a specified time if there is no
valid source present at its inputs. When a valid source is
reconnected, the projector will start up again.
DPMS timeout
DPMS can be set from 1 – 180 minutes. Default is 30
minutes.
backlight timeout
Set the amount of time before the backlight for the on-board
keypad fades out after use. Default is 30 seconds.
menu timeout
Set the amount of time before the menu automatically goes
away if not used. Default is 30 seconds.
splash
Select the splash screen to be displayed if no valid source is
connected. Options include black, grey, and white.
baudrate
Set the baudrate at which the projector communicates over
RS232. Options include 4800, 9600, and 19200 bps. See
separate documentation for details on RS232 and LAN
communications.
Werkseinstellungen
Das Reset auf die Werkseinstellungen löscht alle
gespeicherten Einstellungen für Quelle und System und
stellt die ursprünglichen Einstellungen wieder her.
Service
Service (Wartung) öffnet das Menü für die Wartung.
Dieses Menü steht nur autorisiertem Wartungspersonal
zur Verfügung. Bei nicht fachgerechter Verwendung des
Menüs besteht die Gefahr, dass der Projektor permanent
beschädigt wird.
Fernbedienungs-ID
Der Projektor kann mit einer eindeutigen ID eingerichtet
werden, sodass er nur auf die Fernbedienung reagiert,
die dieselbe ID sendet. Bis zu 99 Geräte können
nebeneinander und ohne einander zu stören mit einund derselben Fernbedienung bedient werden. Der
Projektor ist standardmäßig so eingerichtet, dass er auf
jede Fernbedienung reagiert, d. h. er ist auf „broadcast“
eingestellt. Zur Änderung dieser Einstellung und um eine
eindeutige ID einzustellen, wählen und ändern Sie den
Wert mit den Pfeiltasten links / rechts.
Zur Einstellung der Fernbedienung für eine spezifische ID,
drücken Sie auf die Stern-Taste („*“) und geben über das
Ziffernfeld die Nummer des Projektors ein, den Sie steuern
möchten. Wenn Sie die Stern-Taste an der auf einen
Projektor weisenden Fernbedienung drücken, antwortet
der Projektor mit seiner eigenen, eindeutigen ID und
fordert den Benutzer zur Eingabe der passenden ID ein.
DPMS
Aktiviert oder deaktiviert das DPMS (Display Power
Management Signalling). Wenn DPMS aktiviert ist, schaltet
der Projektor automatisch in den Standby-Modus, wenn
nach der vordefinierten Zeit keine gültige Quelle am
Eingang ansteht. Wenn eine gültige Quelle angeschlossen
wird, schaltet sich der Projektor automatisch ein.
DPMS Zeitfehler
DPMS kann auf einen beliebigen Wert zwischen 1 – 180
Minuten eingestellt werden. Die vorgegebene Zeit lautet
30 Minuten.
Timeout der Hintergrundbeleuchtung
Stellt ein, wann die Hintergrundbeleuchtung der
Tastatur gedimmt wird, wenn keine Eingabe erfolgt. Die
vorgegebene Zeit lautet 30 Sekunden.
Menü Zeitfehler
Stellt die Zeit ein, nach der das Menü automatisch
ausgeblendet wird, wenn keine Eingabe erfolgt. Die
vorgegebene Zeit lautet 30 Sekunden.
Splash
Aktiviert den Splash-Bildschirm, wenn keine gültige Quelle
angeschlossen ist. Zu den Optionen gehören schwarz,
grau und weiß.
Baudrate
Stellt die Baudrate für die Übertragungsgeschwindigkeit
am RS232 ein. Zu den Optionen gehören 4800, 9600
und 19200 Bit/s. Nähere Details zu RS232 und LANKommunikation siehe das gesonderte Handbuch.
réinitialisation usine
La réinitialisation usine efface tous les paramètres de
système et de source gardés en mémoire, et restaure
toutes les valeurs par défaut.
service
Service introduit au menu de service. Cela n’est disponible
que pour le personnel de service autorisé. L’entrée au
menu de service sans la connaissance adéquate peut
endommager de manière permanente le projecteur.
ID télécommande
Le projecteur peut être configuré pour posséder une ID
unique, pour qu’il ne réponde qu’aux télécommandes
n’émettant que la même ID. Jusqu’à 99 unités peuvent
être manipulées sans interférences entre elles, avec la
même télécommande. Par défaut, le projecteur est ajusté
pour répondre à une seule télécommande, donc ajusté
sur “broadcast” (émission). Pour changer, et ajuster une ID
unique, sélectionner et modifier la valeur avec les flèches
gauche /droite.
Pour ajuster la télécommande sur une émission d’une
ID spécifique, appuyer sur la touche astérisque (“*”), et
introduire un nombre qui correspond avec le projecteur
que vous voulez commander avec le pavé numérique.
En appuyant sur la touche astérisque vers un projecteur,
il répondra avec son ID unique, et invitera l’utilisateur à
introduire une qui corresponde.
DPMS
Activer ou désactiver le DPMS (Signalisation de la gestion
de puissance d’affichage) Si activé, le projecteur se met
automatiquement en mode attente, après une période
spécifiée s’il n’y a aucune source valable à ses entrées.
Lorsqu’une source valable est reconnectée, le projecteur
redémarre.
délai écoulé DPMS
DPMS peut être ajusté entre 1 à 180 minutes. Par défaut,
est sur 30 minutes.
délai écoulé du rétroéclairage
Ajuster la durée avant la fermeture en fondu du
rétroéclairage du clavier à bord après son utilisation. Par
défaut, est sur 30 secondes.
délai écoulé du menu
Ajuster la durée avant que le menu ne s’éteigne
automatiquement, en cas de non utilisation. Par défaut,
est sur 30 secondes.
garde
Sélectionner la page de garde à afficher si aucune source
valable n’est connectée. Les options comprennent noir,
gris et blanc.
débit en bauds
Ajuster le débit en bauds où se communique le
projecteur sur RS232. Les options comprennent 4800,
9600 et 19200 bps. Voir documentation à part pour les
communications RS232 et LAN en détail.
restauración de fábrica
La restauración de fábrica borra todos los ajustes
memorizados del sistema y las fuentes y restablece todos
los valores predeterminados.
servicio
Servicio permite acceder al menú Servicio. Está disponible
únicamente para el personal de servicio autorizado. Acceder
al menú Servicio sin un conocimiento adecuado puede
dañar el proyector de forma permanente.
ID de control remoto
El proyector se puede configurar para tener un único ID, de
modo que responda únicamente a los controles remotos
que transmitan el mismo ID. Se pueden controlar hasta 99
unidades con el mismo control remoto sin que se interfieran
unas a otras. Por defecto, el proyector está configurado
para responder a cualquier control remoto, por tanto está
ajustado para “broadcast” (retransmitir). Para cambiarlo y
seleccionar un único ID, seleccione y cambie el valor con las
teclas de flecha izquierda/derecha.
Para ajustar el control remoto para retransmitir a un ID
específico, pulse la tecla asterisco (“*”) e introduzca un
número que corresponda con el proyector que desea
controlar usando el teclado numérico. Cuando pulse la tecla
asterisco hacia un proyector, éste responderá con su ID
único y pedirá al usuario que introduzca uno que coincida.
DPMS
Activa o desactiva DPMS (Señalización en pantalla de
administración de energía). Cuando está activada, el
proyector cambia automáticamente al modo de espera
tras un tiempo especificado si no hay ninguna fuente válida
presente en las entradas. Cuando se vuelve a conectar una
fuente válida, el proyector se pone en marcha de nuevo.
Tiempo de espera DPMS
DPMS se puede ajustar desde 1 a 180 minutos. El valor
predeterminado es 30 minutos.
tiempo de espera de la iluminación
Ajusta el tiempo de espera antes de que la iluminación del
teclado se apague tras el uso. El valor predeterminado es
30 segundos.
tiempo de espera del menú
Ajusta el tiempo antes de que el menú desaparezca
automáticamente si no se usa. El valor predeterminado es
30 segundos.
bienvenida
Selecciona la pantalla de bienvenida que se mostrará si no
hay ninguna fuente válida conectada. Las opciones incluyen
negro, gris y blanco.
tasa de baudios
Ajusta la tasa de baudios a la que el proyector se comunica
por RS232. Las opciones incluyen 4800, 9600 y 19200 bps.
Vea la documentación separada para ampliar información
sobre las comunicaciones RS232 y LAN.
Page 42
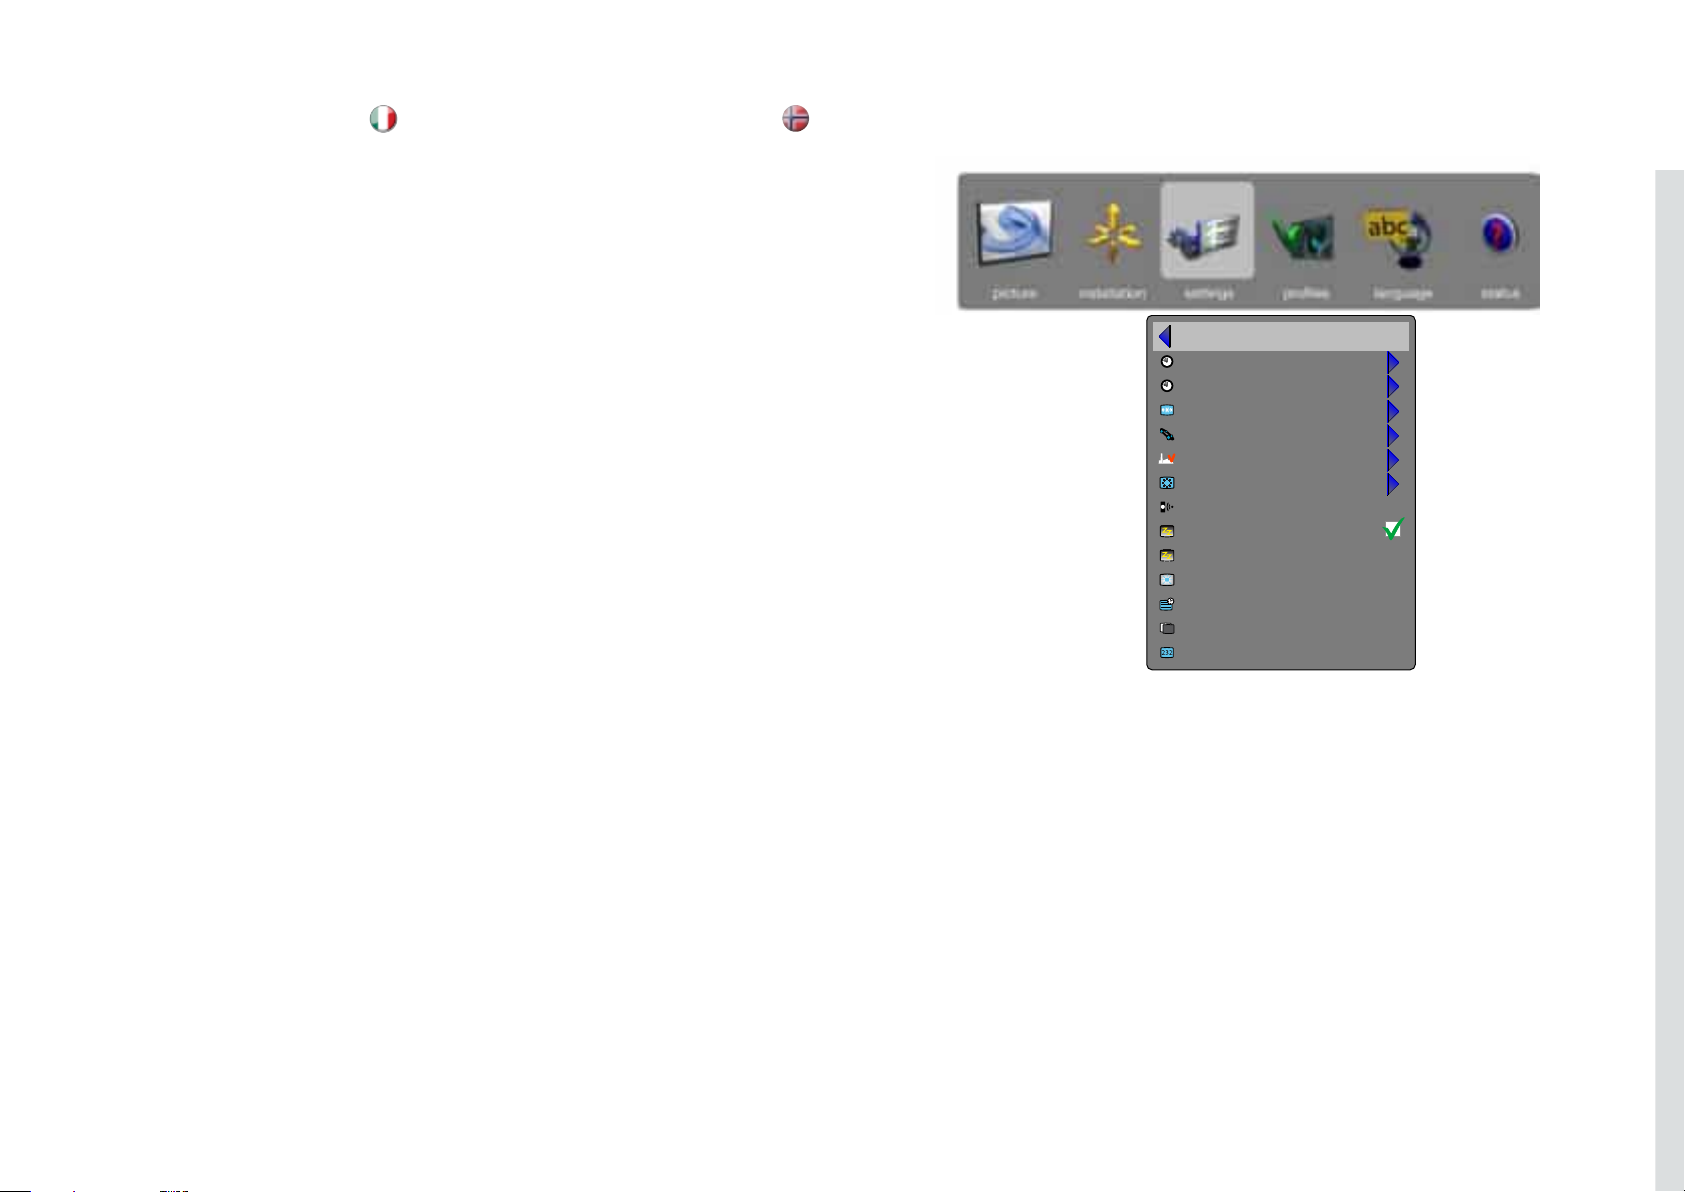
63
italiano
norsk
back
set date and time
timer
PIN code
network
factory reset
service
remote control ID
DPMS
DPMS timeout
backlight timeout
menu timeout
splash
baudrate
broadcast
30 minutes
30 seconds
30 seconds
black
19200
ripristino in fabbrica
Il ripristino di fabbrica cancella tutte le impostazioni di
sistema e le sorgenti memorizzate e reimposta tutti i valori
di default.
assistenza
Service (assistenza) consente di accedere al menu
dell’assistenza. Questo menu è disponibile solo al personale
di assistenza autorizzato. L’accesso al menu di assistenza
da parte di persone inesperte può danneggiare il proiettore
in modo irreversibile.
remote control ID (ID telecomando)
Il proiettore può essere impostato assegnandogli un ID
unico, in modo tale che risponda solo ai telecomandi
che trasmettono quello specifico ID. Con il medesimo
telecomando è possibile gestire fino a 99 unità che non
interferiscono reciprocamente. Per default, il proiettore è
impostato per rispondere a qualsiasi telecomando, ovvero
è impostato su “broadcast” (trasmissione). Per cambiare
l’impostazione e impostare un ID unico, selezionare e
cambiare il valore usando i tasti freccia sinistra / destra.
Per impostare il telecomando per trasmettere uno specifico
ID, premere il tasto con l’asterisco (“*”) e inserire un numero
corrispondente al proiettore da controllare usando il
tastierino numerico. Quando si preme il tasto con l’asterisco
puntando il telecomando in direzione di un proiettore,
questo risponderà con il suo ID esclusivo, richiedendo
all’utente di inserire un codice corrispondente.
DPMS
Abilita o disabilita lo standard DPMS (Display Power
Management Signalling). Quando questa opzione è abilitata,
il proiettore passa automaticamente in modalità standby
se dopo uno specifico tempo non ci sono sorgenti valide
in ingresso. Se viene ricollegata una sorgente valida, il
proiettore si avvia di nuovo.
timeout DPMS
Lo standard DPMS può essere impostato su 1 – 180 minuti.
Il valore di default è 30 minuti.
Timeout retroilluminazione
Consente di impostare l’intervallo di tempo prima che si
spenga la retroilluminazione della tastiera incorporata dopo
che è stata usata. Il valore di default è 30 secondi.
timeout menu
Consente di impostare l’intervallo di tempo prima che il
menu scompaia automaticamente se resta inutilizzato. Il
valore di default è 30 secondi.
caricamento
Selezionare la schermata di caricamento da visualizzare se
non è collegata alcuna sorgente valida. Le opzioni includono
nero, grigio e bianco.
velocità in baud
Imposta la velocità in baud alla quale il proiettore comunica
su RS232. Le opzioni includono 4800, 9600 e 19200
bps. Per dettagli sulle comunicazioni RS232 e LAN, v. la
documentazione separata.
fabrikkinnstilling
Tilbakestilling til fabrikkinnstilling sletter alle lagrede kilde og
systeminstillinger og tilbakestiller alt til standardverdier.
service
Service gir tilgang til servicemenyen. Denne er kun
tilgjengelig for kvalifisert servicepersonell. Å gå inn i
servicemenyen uten tilstekkelig kunnskap kan forårsake
varig skade på projektoren.
fjernkontroll ID
Projektoren kan settes opp med en unik ID, slik at den kun
reagerer på fjernkontroller som sender ut samme ID. Opp
til 99 enheter kan håndteres uten at de forstyrrer hverandre
via den samme fjernkontrollen. Som standard er projektoren
satt opp til å respondere på kun en fjernkontroll, slik at
denne er satt til “broadcast”. For å endre og sette en unik
ID, velg og endre verdien med høyre/venstre piltast.
For å stille inn fjernkontrollen til å sende en spesifik ID, trykk
på asterisk knappen (*) og bruk det numeriske tastaturet
til å legge inn et nummer som korresponderer med den
projektoren du ønsker å kontrollere. Hvis du trykker på
asterisk-knappen i retning av en projektor vil den svare med
sin unike ID og oppfordre mottakeren til å legge inn sin
tilsvarende kode.
DPMS
Aktiver eller deaktiver DPMS (Display Power Management
Signalling). Når funksjonen er aktivert vil projektoren
automatisk slå seg over i standby modus etter en spesifisert
tid, hvis det ikke er kobllet til en kilde til en av inngangene.
Når en gyldig kilde blir koblet til vil projektoren starte opp
igjen.
DPMS timeout
DPMS kan stilles fra 1 – 180 minutter. Default er 30 minutter.
bagrunnslys timeout
Sett tiden bakgrunnsbelysningen på projektorpanelet skal
stå på før det dimmes ned etter bruk. Standard er 30
sekunder.
meny timeout
Sett tiden menyen skal stå på før den automatisk forsvinner
hvis den ikke brukes. Standard er 30 sekunder.
oppstartsbilde
Velg oppstartsbilde som skal vises hvis ingen gyldig kilde er
tilkoblet. Alternativene inkluderer svart, grå og hvit.
overføringshastighet
Velg overføringshastigheten som projektoren skal
kommunisere over RS232 med. Alternativene omfatter
4800, 9600 og 19200 bps. Se egen dokumentasjon for
detaljer om RS232 og LAN kommunikasjon.
Page 43
64
english
deutsch
francais
español
PROFILES SUB MENU
The profiles sub menu contains predefined and user saved
projector setup profiles, so that a specific setting or desired
projection mode quickly can be reinstated.
store settings
Displays information about the source and projector status.
recall settings
Turn the On Screen Display on (display) or off (hide) during
source scan.
MENU SYSTEM MENÜSYSTEM SYSTEME MENU SISTEMA DE MENÚS
SUBMENÚ PERFILES
El submenú Perfiles contiene los perfiles de configuración
del proyector predefinidos y aquellos guardados por el
usuario, lo que permite restablecer rápidamente un ajuste
específico o el modo de proyección que se desee.
guardar ajustes
Muestra información acerca del estado de la fuente y el
proyector.
recordar ajustes
Activa (muestra) o desactiva (oculta) la visualización en
pantalla durante la exploración de la fuente.
SOUS MENU PROFILS
Le sous – menu Profils contient les profils de configuration
su projecteur prédéfini et celui sauvegardé par l’utilisateur,
pour qu’un paramètre spécifique ou un mode de
projection souhaité soit rapidement réinstallé.
stocker les paramètres
Affiche l’information au sujet de l’état et de la source du
projecteur.
rappeler paramètres
Allumer (afficher) ou éteindre(cacher) l’écran d’affichage
pendant le balayage de sources.
LANGUAGES SUB MENU
Selects menu language.
UNTERMENÜ PROFILE
Das Untermenü Profile enthält vordefinierte und vom
Benutzer gespeicherte Profile für die Einrichtung des
Projektors, sodass spezifische Einstellungen oder der
gewünschte Projektionsmodus schnell wieder hergestellt
werden können.
Einstellungen speichern
Zeigt Informationen über die Quelle und den
Projektorstatus an.
Einstellungen wiederherstellen
Schaltet das On Screen Display während des
Quellensuchlaufs ein (einblenden) oder aus (ausblenden).
SPRACHE
Wählt die Menüsprache.
SOUS MENU LANGUES
Il sélectionne la langue du menu.
SUBMENÚ IDIOMAS
Selecciona el idioma del menú.
Page 44
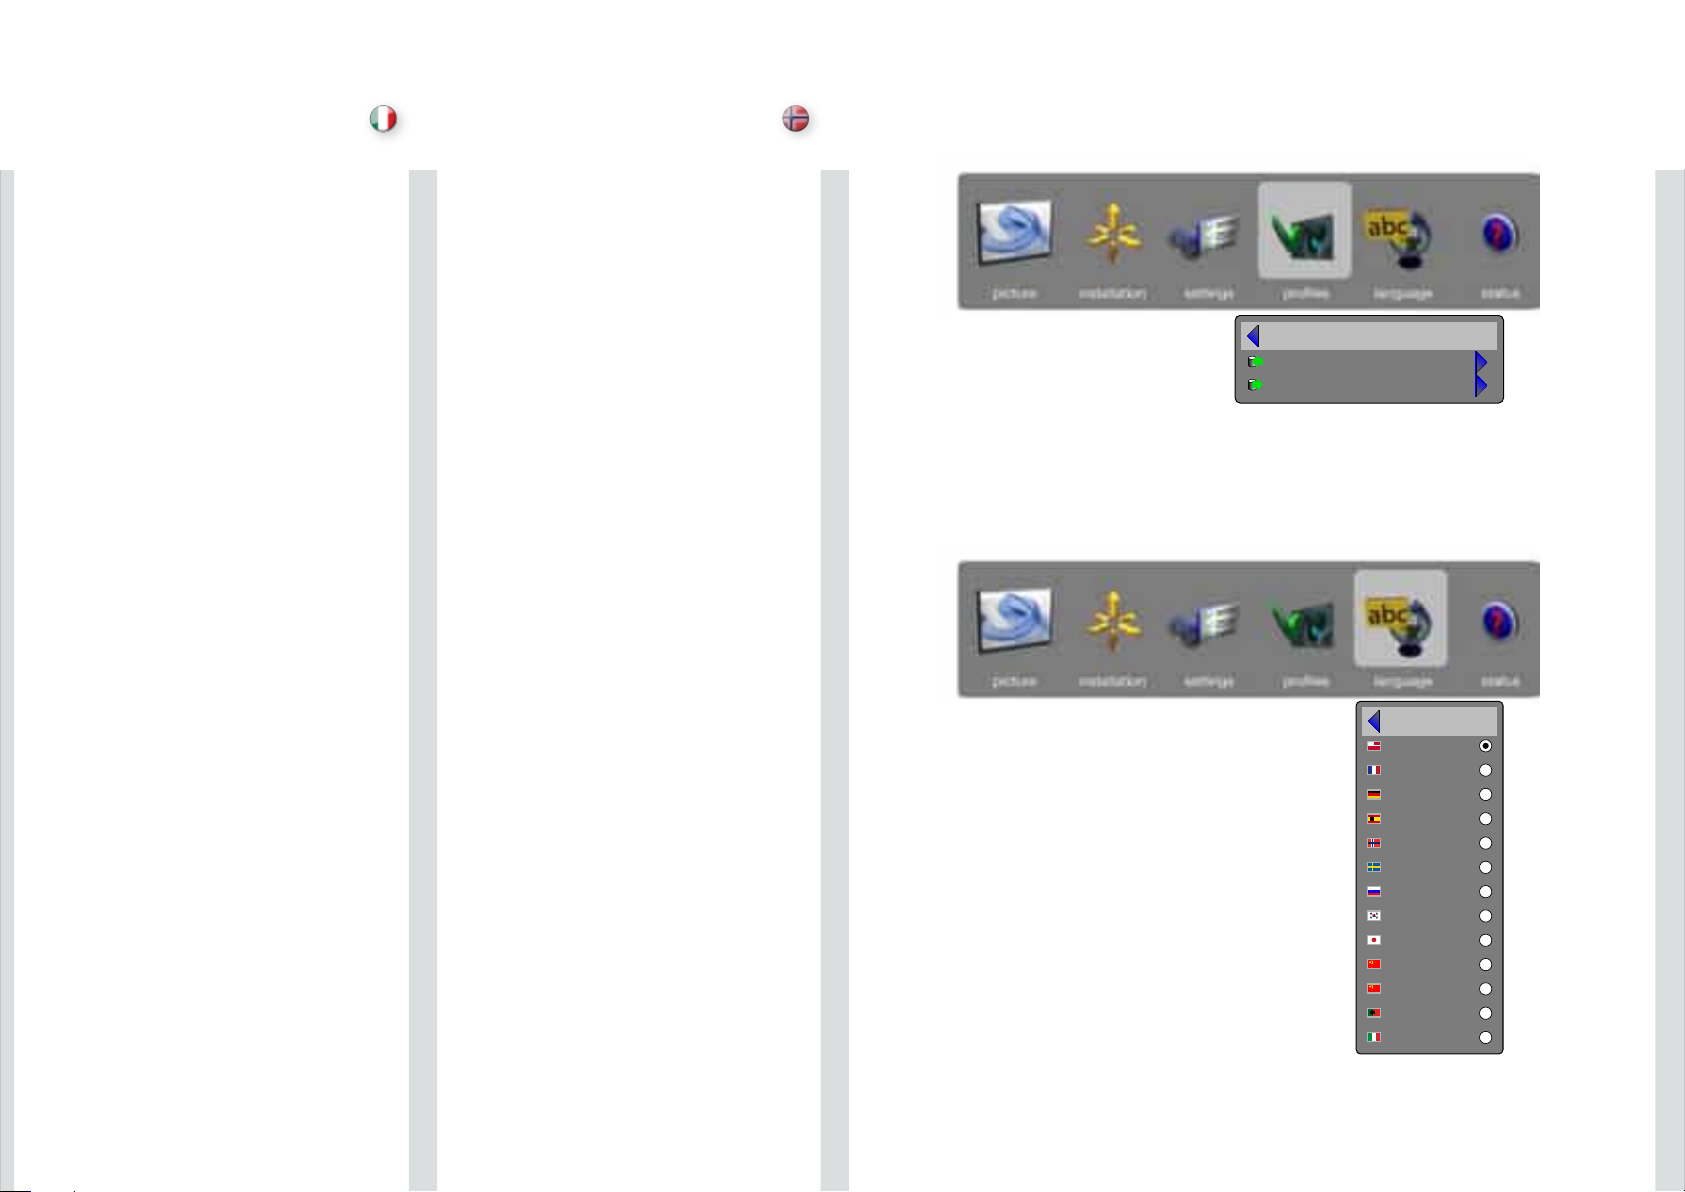
SISTEMA DEI MENU
italiano
MENYSYSTEM
norsk
SOTTOMENU PROFILI
Il sottomenu profiles (profili) contiene i profili di impostazione
del proiettore, sia quelli predefiniti che quelli salvati
dall'utente, per consentire di reinstallare rapidamente
una specifica impostazione o una specifica modalità di
proiezione.
impostazioni memoria
Visualizza informazioni sulla sorgente e lo stato del
proiettore.
impostazioni richiamo
Consente di attivare o nascondere la visualizzazione durante
la scansione della sorgente.
SOTTOMENU LINGUE
Seleziona la lingua dei menu.
PROFILER UNDERMENY
Undermenyen for profilene inneholder forhåndsdefinerte
og brukerlagrede projektor oppsettsprofiler, slik at en
spesiell innstilling eller ønsket projeksjonsmodus raskt kan
gjeninnstalleres.
lagre innstillinger
Viser informasjon om kilden og projektor status.
gjeninnstallere innstillinger
Slå OSD-innstilling på (display) eller av (gjem) under kildescan.
SPRÅK UNDERMENY
Velg språk for menysystemet og OSD meldinger og
advarsler.
back
store settings
recall settings
back
english
français
Deutsch
español
norsk
svensk
Русский
한국어
日本語
?体中文
繁體中文
português
italiano
65
Page 45

66
english
deutsch
francais
español
STATUS SUB MENU
The status sub menu can be invoked through the menu
system, or directly from the “INFO” key on the remote
control. It gives direct, and easy to understand information
on system and connected source status.
MENU SYSTEM MENÜSYSTEM SYSTEME MENU SISTEMA DE MENÚS
UNTERMENÜ STATUS
Das Untermenü Status wird entweder über das
Menüsystem aufgerufen oder über die Taste INFO an der
Fernbedienung. Es zeigt Ihnen direkte, leicht verständliche
Informationen über das System und den Status der
angeschlossenen Quelle an.
SOUS MENU ÉTAT
Le sous –menu état peut être invoqué par le système de
menu, ou directement à partir de la touche « INFO » de
la télécommande. Cela offre une information directe et
facile à comprendre de l’état du système et de la source
connectée.
SUBMENÚ ESTADO
Al submenú Estado se puede acceder a través del sistema
de menús o directamente con la tecla “INFO” del control
remoto. Proporciona una información directa y fácil de
comprender sobre el estado del sistema y las fuentes
conectadas.
Page 46
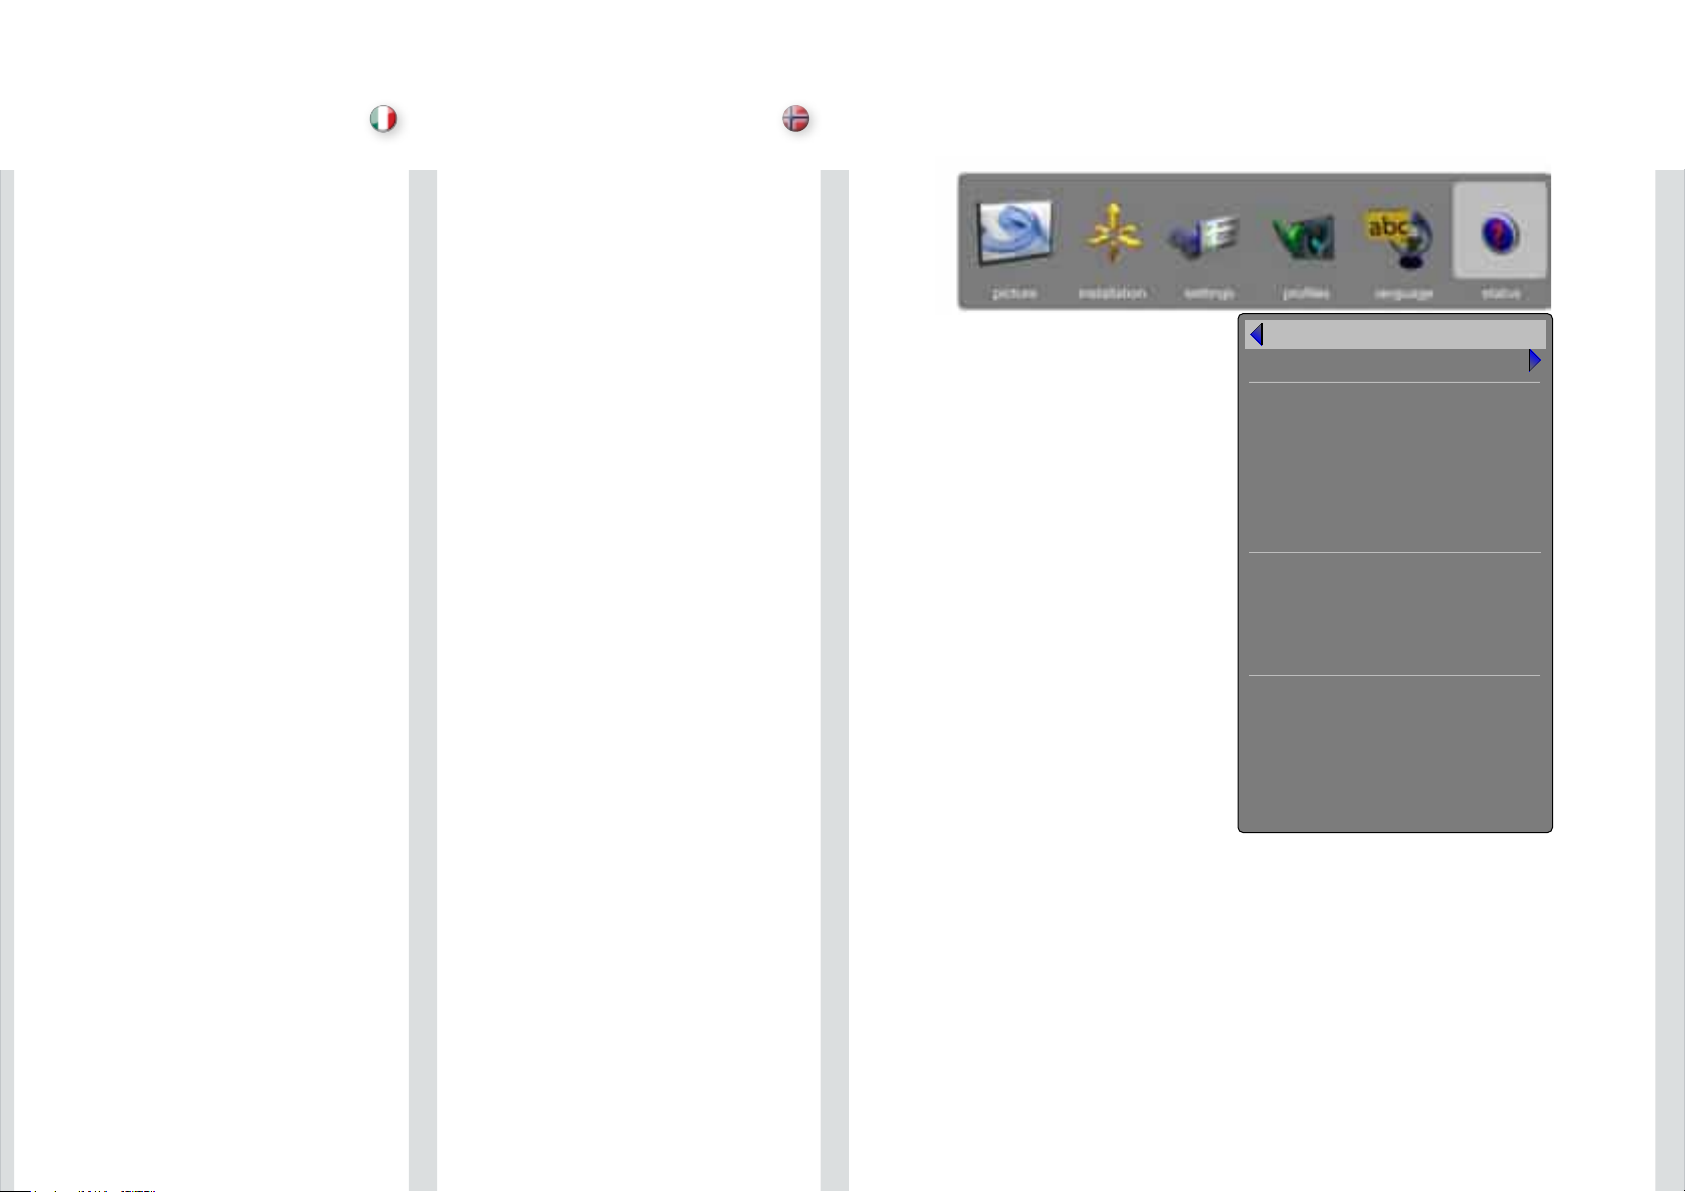
67
italiano
norsk
SISTEMA DEI MENU
MENYSYSTEM
STATUS UNDERMENY
Status undermenyen gir enkel og oversiktlig tilgang til
informasjon om systemet, og tilkoblet kilde.
back
source information
model name
part number
serial number
manufactured (y)
manufactured (w)
software version
lamp remaining
lamp time
total operating
lamp power
MAC address
DHCP
IP address
subnet mask
default gateway
TCP/UDP port
F20 sx+
101-1200-08
072000201
2007
20
001-0134-01
2957 hrs
31 hrs
31 hrs
00-0D-8A-43-2A-0B
o
192.168.1.90
255.255.255.0
198.162.1.1
1025
SOTTOMENU STATO
Il sottomenu stato può essere richiamato tramite il sistema
dei menu oppure direttamente con il tasto “INFO” del
telecomando. Visualizza informazioni semplici e dirette sullo
stato del sistema e della sorgente collegata.
Page 47
english deutsch francais
68
NO IMAGE
No connection:
Check if all connections are properly made.
Source off:
Check if the equipment is powered on.
Lamp dead:
The lamp may need replacement.
Source hibernated:
Engage the source to display and activate image.
Notebook external screen:
Different notebook PC’s use different combinations of keystrokes to enable the
external graphics port.
Source scan off:
Check SOURCE SCAN in the INSTALLATION sub menu. If setting is OFF, the
projector will not search for the next active source, but will remain with the current
source selected.
Lens cap:
Check that the lens cap is off!
TROUBLE SHOOTING PROBLEMBEHEBUNG DÉPANNAGE
KEIN BILD
Keine Verbindung:
Prüfen Sie, ob alle Verbindungen korrekt hergestellt wurden.
Quelle aus:
Prüfen Sie, ob das Gerät eingeschaltet ist.
Lampe brennt nicht:
Die Lampe muss ausgewechselt werden. Prüfen Sie die LEBENSDAUER DER
LAMPE im Untermenü DIENSTPROGRAMME.
Quelle im Ruhezustand:
Nehmen Sie die Quelle in Betrieb, damit sie ein Bild anzeigt und aktiviert.
Externer Notebook-Bildschirm:
Bei den verschiedenen Notebook-Rechnern werden unterschiedliche
Tastekombinationen verwendet, um den externen Graphikanschluss zu
aktivieren.
Quellensuche aus:
Überprüfen Sie die QUELLENSUCHE im Untermenü SETUP. Ist diese auf AUS
gestellt, sucht der Projektor nicht die nächste aktive Quelle, sondern bleibt bei
der gegenwärtig ausgewählten Quelle.
Linsendeckel:
Prüfen Sie, ob der Linsendeckel abgenommen ist.
PAS D’IMAGE
Pas de connexion:
Vérifiez si toutes les branchements sont correctes.
Source éteinte:
Vérifiez si l’appareil est sous tension.
Lampe éteinte:
La lampe a besoin d’être changée. Vérifiez le temps d’utilisation de la lampe dans
le sous-menu UTILITAIRE.
Source en veille:
Enclenchez la source pour afficher et activer l’image.
Ecran à agenda électronique externe:
Différents agendas d’ordinateur utilisent des combinaisons de frappes pour activer
le port graphique externe.
Balayage de la source éteint:
Vérifiez SOURCE SCAN dans le sous menu SET UP. Si le réglage est sur OFF, le
projecteur ne cherche pas la prochaine source active, mais reste sur la source
actuellement sélectionnée.
Cache optique:
Vérifiez si le cache optique est enlevé !
DUNKLES BILD
Alte; verbrauchte Lampe: Die Lampe muss ausgewechselt werden. Überprüfen
Sie die LEBENSDAUER DER LAMPE im Untermenü DIENSTPROGRAMME.
Geringe Einstellung für HELLIGKEIT und KONTRAST:
Gehen Sie mit der Fernbedienung oder dem Menüsystem in das Untermenü
BILD, um den KONTRAST und die HELLIGKEIT einzustellen.
FLIMMERNDES BILD
Defekte Lampe:
Wechseln Sie die Lampe aus. Überprüfen Sie die LEBENSDAUER DER LAMPE
im Untermenü DIENSTPROGRAMME.
UNSCHARFES BILD
Linsen nicht scharf gestellt:
Stellen Sie die Linsen ordnungsgemäß Bild scharf. Möglicherweise wurde die
Trapezverzerrungskorrektur unabsichtlich aktiviert: Teile des Bildes werden
komprimiert, so dass die Anzeige der Graphiken mit dünnen Linien, Texte und
anderer hoch auflösender Bilder beeinträchtigt wird.
Die Auflösung der Quelle stimmt nicht mit der des Projektors überein:
Der Projektor wandelt das Eingangsformat automatisch in die Skala und Größe
der internen Auflösung um. Verwenden Sie einen anderen Skalenfaktor im BILDUntermenü DARSTELLUNG. Evtl. muss die SCHÄRFE nachgestellt werden.
DARK IMAGE
Old, worn lamp:
The lamp may need replacement. Check the lam life time in the STATUS sub
menu.
Low brightness or contrast settings:
Use the remote control or the menu system, PICTURE sub menu for CONTRAST
and BRIGHTNESS adjustment.
FLICKERING IMAGE
Bad lamp:
Replace the lamp. Check the LAMP TIME in the STATUS sub menu.
UNSHARP IMAGE
Lens not focused:
Focus the lens properly. Keystone correction may have been activated
inadvertently: Parts of the image is compressed that affects the display of fine-line
graphics, text and other images of high resolution.
Source resolution is different from projectors native resolution:
The projector will automatically scale and resize the input format to its native
resolution. Use a different scaling factor in the PICTURE sub menu, ASPECT
RATIO. You may also adjust the SHARPNESS.
IMAGE SOMBRE
Lampe ancienne, défectueuse:La lampe a besoin d’être changée. Vérifiez la
durée de la lampe dans le sous-menu UTILITAIRE
Réglages de faible LUMINOSITÉ et CONTRASTE:
Utilisez la télécommande ou le menu système, sous menu PICTURE pour ajuster la
LUMINOSITÉ et le CONTRASTE.
IMAGE OSCILLANTE
La lampe est mauvaise:
Remplacez la lampe. Vérifiez la durée de la lampe dans le sous-menu UTILITAIRE
IMAGE PAS NETTE
Lentille non réglée:
Réglez correctement la lentille. La correction du trapèze a pu être activée par
inadvertance: Des parties d’image sont compressées, ce qui affecte l’affichage
des traits fins des graphiques, de texte et de d’autres images haute résolution.
La résolution de la source est différente selon la résolution initiale des
projecteurs:
Le projecteur réduit et redimensionne automatiquement le format d’entrée de ses
résolutions initiales. Utilisez un facteur de réduction différent dans le sous menu
PICTURE, ASPECT. Vous pouvez aussi ajuster la NETTETÉ.
Page 48
español italiano norsk
69
SOLUCIÓN DE PROBLEMAS RISOLUZIONE DEI PROBLEMI
FEILFINNING
NESSUNA IMMAGINE
Nessuna connessione:
controllare se i collegamenti sono stati eseguiti correttamente.
Sorgente spenta:
controllare se l’apparecchiatura è alimentata.
Lampada spenta:
può essere necessario sostituire la lampada. Controllare LAMP TIME (Durata
lampada) nel sottomenu UTILITIES (Utilità).
Sorgente sospesa:
impegnare la sorgente per visualizzare e attivare l’immagine.
Schermo esterno notebook:
dei PC notebook diversi usano diverse combinazioni di tasti per abilitare la porta
grafica esterna.
Ricerca sorgente disattiva:
controllare SOURCE SCAN (Ricerca sorgente) nel sottomenu SET UP
(Configurazione). Se è su OFF, il proiettore non cerca la sorgente attiva
successiva e rimane selezionata la sorgente corrente.
Copriobiettivo:
controllare se è stato levato il copriobiettivo.
NO HAY IMAGEN
No hay conexión:
Compruebe que todas las conexiones están bien realizadas.
Fuente desactivada:
Compruebe si el equipo está encendido.
Lámpara inactiva:
Es posible que haya que sustituir la lámpara. Compruebe la VIDA ÚTIL DE LA
LÁMPARA en el submenú UTILIDADES.
Fuente en hibernación.
Conecte la fuente para visualizar y activar la imagen.
Pantalla externa del portátil:
Los distintos PC portátiles usan distintas combinaciones de teclas para habilitar el
puerto de gráficos externo.
Búsqueda de fuentes desactivada:
Compruebe la búsqueda de fuentes en el submenú INSTALACIÓN. Si está
seleccionado OFF, el proyector no buscará la siguiente fuente activa y seguirá con
la fuente actualmente seleccionada.
Tapa del objetivo:
compruebe que ha quitado la tapa.
INTET BILDE
Ingen forbindelse:
Sjekk at alle forbindelser er i orden.
Kilde av:
Sjekk om utstyret er skrudd på.
Død lampe:
Lampen må kanskje byttes. Sjekk lampetiden.
Kilde i hvilemodus:
Aktiver kilden.
Bærbar PC skjermutgang:
Bærbare PC’er benytter ulike tastkombinasjoner for å aktivere grafikkutgangen
(CRT/LCD).
Kildesøk av:
Sjekk om kildesøk er på i OPPSETT menyen. Hvis kildesøk er av, vil projektoren
ikke søke etter andre kilder.
Linselokk:
sjekk om linselokket er fjernet.
IMAGEN OSCURA
Lámpara vieja y gastada:
Es posible que haya que sustituir la lámpara. Compruebe la VIDA ÚTIL DE LA
LÁMPARA en el submenú UTILIDADES.
Ajustes de BRILLO y CONTRASTE bajos:
Use el mando a distancia o el submenú IMAGEN del sistema de menús para
ajustar el CONTRASTE y el BRILLO.
PARPADEO DE IMAGEN
Lámpara deficiente: Sustituya la lámpara. Compruebe la VIDA ÚTIL DE LA
LÁMPARA en el submenú UTILIDADES.
IMAGEN POCO NÍTIDA
Objetivo no enfocado:
Enfoque el objetivo correctamente. Es posible que sin darse cuenta haya activado
la corrección de la distorsión trapezoidal: partes de la imagen se han comprimido
afectando la visualización de gráficos de líneas finas, texto y otras imágenes de
alta resolución.
La resolución de la fuente difiere de la resolución original de los proyectores:
El proyector reajustará automáticamente el tamaño del formato de entrada a su
resolución original. Use un factor de reajuste distinto en el apartado FORMATO del
submenú IMAGEN. También puede ajustar la NITIDEZ.
IMMAGINE SCURA
Lampada vecchia e consumata:
può essere necessario sostituire la lampada. Controllare LAMPTIME (Durata
lampada) nel sottomenu UTILITIES (Utilità).
Luminosità e contrasto impostati su valori bassi:
utilizzare il telecomando o li sistema dei menu, sottomenu PICTURE (Immagine)
per regolare contrasto e luminosità.
IMMAGINE TREMOLANTE
Lampada guasta:
sostituire la lampada. Controllare LAMP TIME (Durata lampada) nel sottomenu
UTILITIES (Utilità).
IMMAGINE SFOCATA
Obiettivo non a fuoco:
mettere a fuoco correttamente l’obiettivo. Forse è stata attivata accidentalmente
la correzione trapezio. Questa correzione comprime delle parti dell’immagine,
modificando la rappresentazione di grafica, testi e altri elementi ad alta
risoluzione.
La risoluzione sorgente è diversa dalla risoluzione originale dei proiettori:
il proiettore ridimensiona automaticamente il formato d’ingresso, portandolo
alla risoluzione originale. Utilizzare il fattore di scala nel sottomenu PICTURE
(Immagine), ASPECT (Formato). È possibile regolare anche la nitidezza .
MØRKT BILDE
Gammel, slitt lampe:
Sjekk om lampen er gammel og trenger å byttes. Sjekk lampetiden under INFO.
Lavt innstilt lysstyrke eller kontrast:
Trykk AUTO eller juster i BILDE undermenyen.
FLIMRENDE BILDE
Dårlig lampe:
Bytt lampe. Sjekk lampelevetid.
USKARPT BILDE
Linsen ikke fokusert: Fokuser linsen. Keystone korreksjon (korreksjon av
fortegning) kan være aktiv. Finere detaljer i bildet, som linjer og liten tekst, kan da
bli komprimert og forstyrret.
Kildens oppløsning er forskjellig fra projektorens grunnoppløsning:
Projektoren skalerer automatisk for å tilpasse bildet. Velg eventuelt en annen
skaleringsfaktor som passer bedre i BILDE undermenyen. Juster eventuelt
skarphet og/eller DNR i menyen.
Page 49

english deutsch francais
70
The projector may from time to time need cleaning. Never open the unit, as this will
void any warranties. Refer service and repair to qualified personnel only.
The projector is using lamps that have a limited life time. Please refer to the LAMP
CHANGE section below for further details.
Only the exterior of the unit may be cleaned. Use a damp cloth. Make sure no
liquids enter the inside of the projector Vacuum clean all the air vents (A) regularly
to maintain sufficient air flow.
The projection lens (B) is sensitive to scratches. Use lens cleaning tissue, available
at all photographic stores when cleaning the projection lens. Use lens cap when
not in use.
HEAVY DUTY AND CONTINOUS USE
The projector contains moving parts (such as cooling fans) that have limited lifeexpectancies. When the projector has been used for 8 000 hours, and when the
unit is used in mission-critical applications, it is recommended that the projector is
given preventive maintenance by a qualified service person. This will help ensure
long term stable operation.
MAINTENANCE INSTANDHALTUNG ENTRETIEN
SERVICE INFORMATION WARTUNGSANGABEN INFORMATION SUR LE SERVICE
Der Projektor muss gelegentlich gereinigt werden. Öffnen Sie das Gerät nie,
denn dadurch erlischt jegliche Garantie. Reparatur- und Wartungsarbeiten sollten
nur von qualifiziertem Personal vorgenommen werden.
Im Projektor werden Lampen mit einer begrenzten Lebensdauer eingesetzt.
Lesen Sie bitte im Abschnitt AUSTAUSCH DER LAMPE unten nach, um nähere
Angaben zu erhalten.
Das Gerät darf nur außen gereinigt werden. Nehmen Sie dazu ein feuchtes Tuch.
Versichern Sie sich, dass keine Flüssigkeiten in das Projektorinnere gelangen.
Reinigen Sie alle Belüftungsöffnungen (A) regelmäßig mit einem Staubsauger, um
einen ausreichenden Luftfluss zu gewährleisten.
Die Projektionslinse (B) kann zerkratzt werden. Verwenden Sie zur Reinigung der
Projektionslinse ein in allen Fotogeschäften erhältliches Linsenreinigungstuch.
Setzen Sie den Linsendeckel auf, wenn das Gerät nicht benutzt wird.
EINSATZ UNTER HOHER BEANSPRUCHUNG UND DAUERBETRIEB
Der Projektor enthält bewegliche Teile (wie z.B. den Kühlungsventilator) mit einer
beschränkten Lebenserwartung. Nach 8 000 Betriebsstunden des Projektors,
und wenn das Gerät für kritische Anwendungen eingesetzt wird, sollte der
Projektor von einem qualifizierten Servicetechniker einer vorbeugenden Wartung
unterzogen werden. Die hilft, einen langen störungsfreien Betrieb sicherzustellen.
Le projecteur nécessite un nettoyage de temps en temps. N’ouvrez jamais
l’appareil, ceci peut annuler la garantie. Adressez-vous au service après-vente et
faites réparer uniquement par quelqu’un de qualifié.
Le projecteur utilise des lampes qui ont une durée de vie limitée. Référez-vous à la
partie CHANGEMENT DE LA LAMPE pour plus de détails.
Seul l’extérieur de l’appareil peut être nettoyé. Utilisez un chiffon humide. Assurezvous qu’aucun liquide ne pénètre à l’intérieur du projecteur. Aspirez régulièrement
tous les orifices de ventilation (A) pour maintenir suffisamment de circuit d’air.
L’objectif de projection (B) est sensible aux rayures. Utilisez un chiffon nettoyant
pour objectif, disponible dans tous les magasins photo, pour nettoyer l’objectif de
projection. Mettez le cache optique quand vous ne l’utilisez pas.
USAGE INDUSTRIEL ET USAGE CONTINU
Le projecteur contient des pièces amovibles (comme les ventilateurs de
refroidissement) qui ont une durée de vie estimée limitée Après 8 000 heures
d’utilisation du projecteur, et quand l’appareil est utilisé en fonctionnements
critiques, il est recommandé de confier le projecteur à quelqu’un de qualifié pour
faire un entretien préventif. Celui-ci garantit un fonctionnement stable à long terme.
This product contains no user serviceable parts. If the product fails to function as
expected, please first check that all connections are properly made, and that the
power cord is properly connected. Please check that the projector as well as the
video and computer sources are all switched on. Cables and cords may break
over time. Try to change cables and cords, in case there is a bad or intermittent
connection. Check if the circuit breaker or fuse of your mains is intact. In the event
of product failure, please contact your reseller. You should prepare a description
of the symptoms of failure you experience. Please also state product number and
serial number as printed on the label on the bottom of the projector.
Dieses Produkt enthält keine Teile, die vom Benutzer gewartet werden müssen.
Sollte das Produkt nicht erwartungsgemäß funktionieren, prüfen Sie bitte
zuerst, ob alle Anschlüsse korrekt hergestellt sind, und ob das Stromkabel
richtig eingesteckt ist. Prüfen Sie, ob der Projektor und die Video- bzw.
Computerquellen eingeschaltet sind. Die Kabel können mit der Zeit defekt
werden. Versuchen Sie, die Kabel auszutauschen, wenn eine mangelhafte oder
aussetzende Verbindung auftritt. Prüfen Sie, ob der Leistungsschalter bzw.
die Sicherung der Stromversorgung in Ordnung ist. Sollte das Produkt nicht
funktionieren, setzen Sie sich bitte mit dem Händler in Verbindung. Bereiten Sie
eine Beschreibung der vorgefallenen Defektsymptome vor. Geben Sie bitte auch
die Nummer und Seriennummer vom Etikett an der Unterseite des Projektors an.
Cet appareil ne contient aucune pièce utile pour l’utilisateur. Si cet appareil ne
fonctionne pas comme prévu, vérifiez d’abord que toutes les connexions sont
correctes, et que le cordon d’alimentation est branché correctement. Vérifiez que
le projecteur ainsi que les sources vidéo et informatique sont toutes activées. Les
câbles et les cordons peuvent s’endommager avec le temps. Essayez de changer
les câbles et les cordons, s’il y a une mauvaise connexion ou une connexion
intermittente. Vérifiez si le circuit est endommagé ou si le fusible du secteur
est intact. Si le problème persiste, contactez votre revendeur. Préparez une
description des symptômes d’échec que vous avez testé. Relevez aussi le numéro
de l’appareil et le numéro de série imprimé sur l’étiquette sur le fond du projecteur.
INFORMATION POUR LE PERSONNEL D’ENTRETIEN
MISE EN GARDE
Protégez les yeux et la peau des radiations UV pendant l’entretien
INFORMATIONEN FÜR DAS WARTUNGSPERSONAL
WARNUNG
Verwenden Sie während der Servicearbeiten einen Augen- und Hautschutz
gegen UV-Strahlen
SERVICE PERSONNEL INFORMATION
WARNING
Use UV radiation eye and skin protection during servicing.
Page 50

72
english
deutsch
francais
español
The INDICATOR on the keypad will turn red when lamp life
expires. Change the lamp when lifetime expires. Always
replace lamp with the same type and rating.
Always disconnect the power cord and wait until the
projector has cooled down (60 minutes) before opening the
lamp cover.
WARNING
Be careful not to touch the protective glass when replacing
the lamp house, this may cause the protective glass to
overheat and break while in use.
WARNING
Be extremely careful when removing the lamp module. In the
unlikely event that the bulb ruptures, small glass fragments
may come loose. The lamp module is designed to contain
these fragments, but use caution when removing the lamp
module.
Release the front cover screw.A
Remove the front cover.B
Un-screw the three mounting screws.C
Release the handle and pull the lamp out.D
Replace with a new lamp in reverse order.
Insert a new lamp. Observe the guide pins.E
Fix the three mounting screws firmly. Do not use excess F
force.
Re-position the handle.G
Replace the front cover.H
Fix the front cover screw carefully, but do not use excess I
force.
AUSTAUSCHEN DER LAMPE CHANGEMENT DE LAMPE CAMBIO DE LÁMPARA LAMP CHANGE
Die ANZEIGE auf dem Tastenfeld schaltet auf Rot, sobald
die Lebensdauer der Lampe abgelaufen ist. Tauschen Sie
die Lampe aus, wenn ihre Lebensdauer abgelaufen ist.
Ersetzen Sie die Lampe immer durch eine vom gleiche Typ
und der gleichen Stärke.
Ziehen Sie immer das Stromkabel aus der Steckdose und
warten Sie, bis der Projektor ausgekühlt ist (60 Minuten),
bevor Sie die Lampenabdeckung öffnen.
WARNUNG
Berühren Sie beim Austauschen des Lampengehäuses
nicht das Schutzglas, da dadurch das Schutzglas
überhitzt werden und während dem Betrieb brechen kann.
WARNUNG
Gehen Sie beim Austausch des Lampenmoduls mit
äußerster Vorsicht vor. Im unwahrscheinlichen Fall, dass
die Birne zerbricht, können kleine Glassplitter entstehen.
Das Lampenmodul ist so konzipiert, dass es diese Splitter
auffängt. Beim Ausbau des Lampenmoduls ist aber
Vorsicht gefordert.
Öffnen Sie die Schraube der vorderen Abdeckung.A
Nehmen Sie die vordere Abdeckung ab.B
Drehen Sie die drei Befestigungsschrauben heraus.C
Lösen Sie den Griff und ziehen Sie die Lampe heraus. D
Ersetzen Sie sie durch eine neue Lampe; verfahren Sie
dazu in der umgekehrten Reihenfolge.
Setzen Sie eine neue Lampe ein. Beachten Sie die E
Führungsstifte.
Drehen Sie die drei Befestigungsschrauben hinein. Nicht F
zu viel Kraft ansetzen.
Setzen Sie den Griff wieder ein.G
Setzen Sie die vordere Abdeckung wieder auf.H
Drehen Sie vorsichtig die Schraube der vorderen I
Abdeckung hinein, aber nicht zu fest.
El INDICADOR del teclado cambiará a rojo cuando se
cumpla la vida útil de la lámpara. Cambie la lámpara cuando
termine su vida útil. Sustituya siempre la lámpara por otra de
la misma clase y potencia nominal.
Desenchufe siempre el cable de alimentación y espere a
que el proyector se enfríe (60 minutos) antes de abrir la tapa
de la lámpara.
ADVERTENCIA
Procure no tocar el cristal protector cuando sustituya el
módulo de la lámpara ya que puede hacer que el cristal se
recaliente y se rompa durante el uso.
ADVERTENCIA
Ponga especial cuidado al quitar el módulo de la lámpara.
En el caso poco probable de que la bombilla se rompa,
pueden desprenderse pequeños fragmentos de cristal. El
módulo de la lámpara está diseñado para contener estos
fragmentos pero tenga precaución al quitar dicho módulo.
Afloje el tornillo de la tapa delantera.A
Quite la tapa delantera.B
Desatornillo los tres tornillos de montaje.C
Quite el mango y saque la lámpara. D
Sustituya por una nueva lámpara invirtiendo los pasos
anteriores.
Coloque una lámpara nueva. Observe los pasadores guía.E
Ajuste firmemente los tres tornillos de montaje. No aplique F
una fuerza excesiva.
Vuelva a colocar el mango.G
Vuelva a colocar la tapa delantera.H
Fije con cuidado el tornillo de la tapa delantera, pero no I
use una fuerza excesiva.
L’indicateur sur le clavier passe au rouge quand la durée
de vie de la lampe expire. Changez la lampe quand la
durée de vie expire. Remplacez toujours la lampe par une
autre de même type et de même voltage.
Débranchez toujours le câble d’alimentation et attendez
que le projecteur refroidisse (60 minutes) avant d’ouvrir le
couvercle de la lampe.
MISE EN GARDE
Faites attention de ne pas toucher le verre protecteur
en remettant la lampe dans son logement, ceci peut
provoquer la surchauffe du verre protecteur et le briser
pendant qu’il est en fonctionnement.
MISE EN GARDE
Faites très attention en enlevant le module de la lampe.
Dans le cas improbable de rupture de l’ampoule, il
peut y avoir des débris de verre. Le module lampe est
conçu pour contenir ces débris, mais faites attention en
l’enlevant.
Relâchez la vis du couvercle avant.A
Enlever le couvercle avant.B
Dévissez les trois vis de montage.C
Relâchez la poignée et sortir la lampe. D
Remplacez la par une nouvelle lampe en répétant les
étapes dans l’ordre inverse.
Insérez une nouvelle lampe Observez les fiches guide.E
Serrez fermement les trois vis de montage. Ne pas F
serrer de façon excessive.
Remettez la poignée.G
Remettez le couvercle avant.H
Vissez soigneusement le couvercle avant, mais ne I
serrez pas de façon excessive.
Page 51
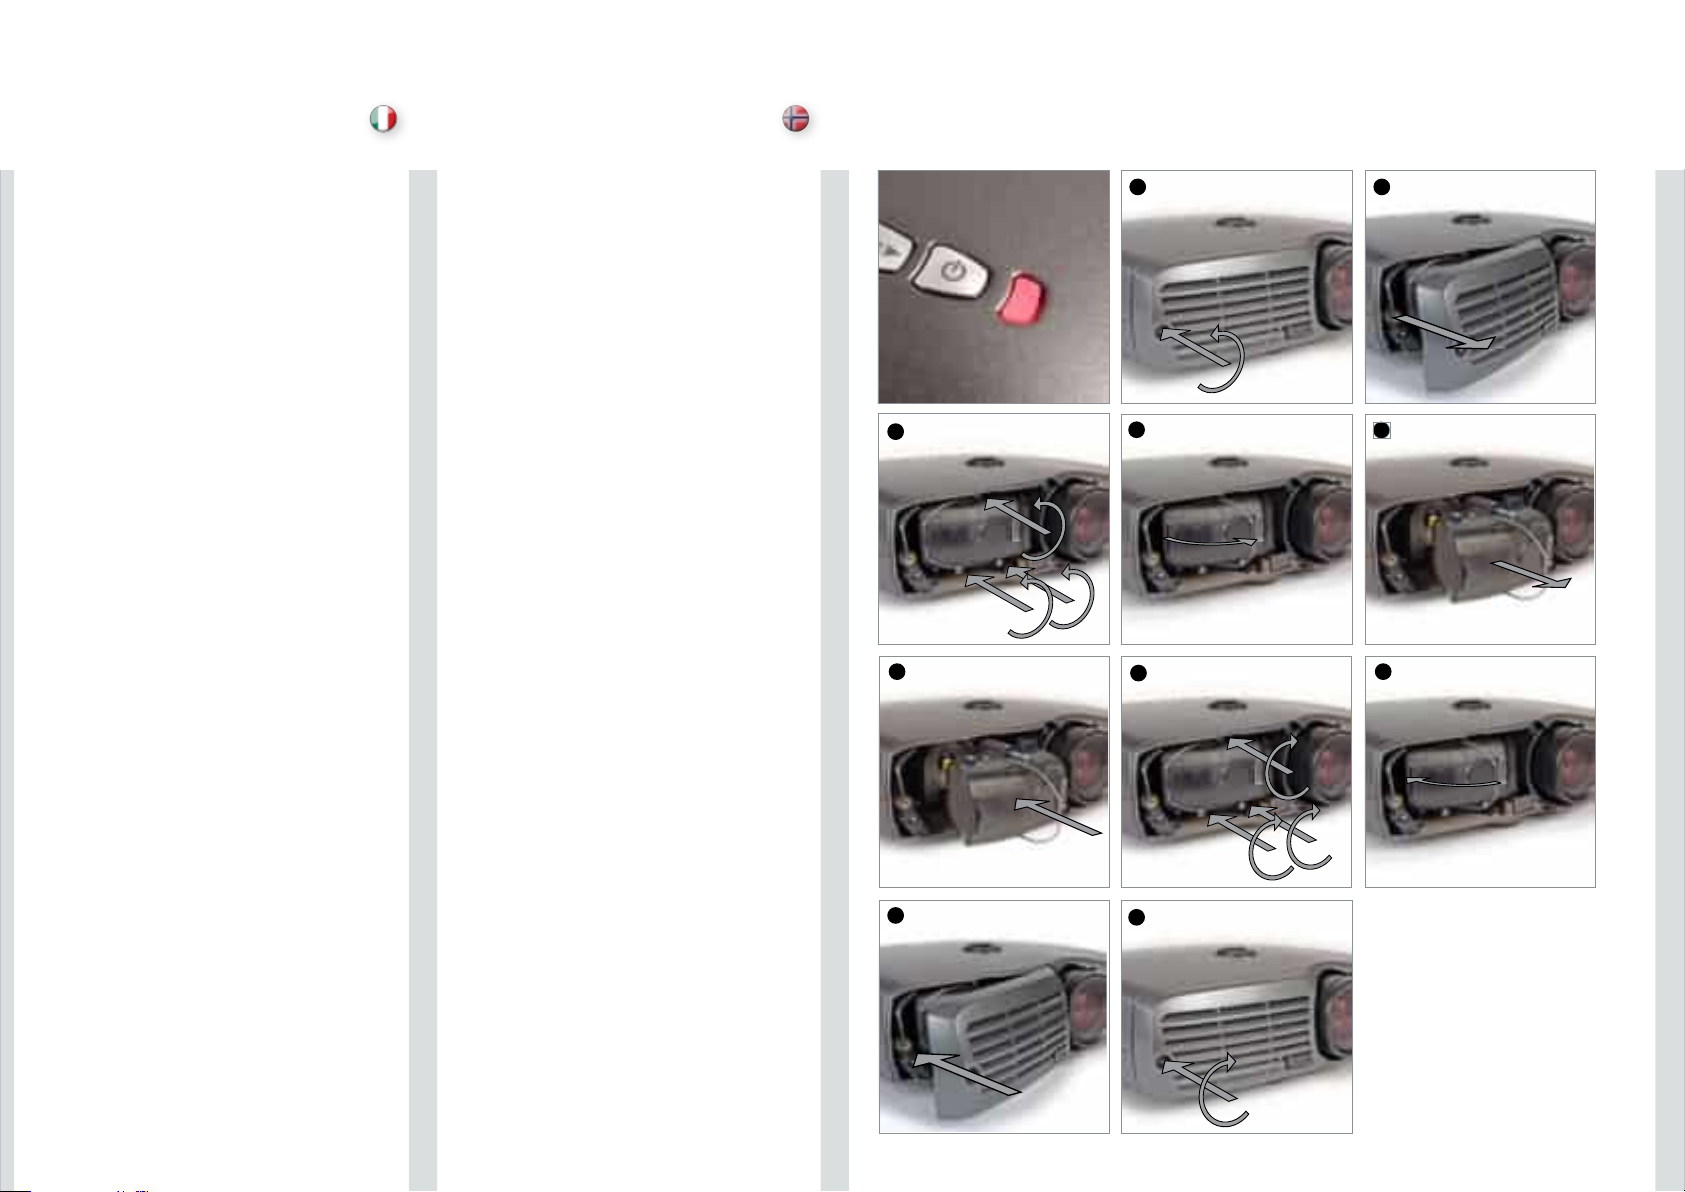
SOSTITUZIONE DELLE LAMPADE
STATUS
STATUS
STATUS
STATUS
italiano
LAMPEBYTTE
norsk
Quando la durata della lampada termina, l’indicatore sul
tastierino diventa rosso. Sostituire le lampade scadute.
Sostituirle sempre con lampade uguali per tipo e potenza.
Staccare sempre il cavo di alimentazione e attendere il
raffreddamento del proiettore (60 minuti) prima di aprire il
coperchio della lampada.
AVVERTENZA
Quando si reinstalla l’alloggiamento della lampada, fare
attenzione a non toccare il vetro protettivo per evitare che
quest’ultimo si surriscaldi e si rompa durante l’uso.
AVVERTENZA
Fare molta attenzione quando si rimuove il modulo della
lampada. Nell’improbabile evento che la lampadina si
rompa, fare attenzione ai frammenti di vetro. Il modulo della
lampada è stato disegnato per contenere questi frammenti,
ma fare attenzione quando lo si rimuove.
Rimuovere la vite del coperchio anteriore.A
Rimuovere il coperchio anteriore.B
Svitare le tre viti di montaggio.C
Sbloccare la maniglia ed estrarre la lampada. D
Sostituire con una lampada nuova, procedendo in ordine
inverso.
Inserire una lampada nuova. Osservare i perni guida.E
Fissare saldamente le tre viti di montaggio. Non stringere F
eccessivamente.
Rimettere in posizione la maniglia.G
Reinstallare il coperchio anteriore.H
Fissare con cautela la vite del coperchio anteriore, ma I
senza utilizzare troppa forza.
Indikatoren ved tastaturet lyser rødt når lampen har nådd
sin nominelle levetid. Bytt lampen når levetiden er ute. Bytt
alltid til samme lampe type og -effekt.
Koble fra strømledningen og sørg for at lampen kjøles ned
før den byttes.
ADVARSEL!
Ikke berør beskyttelsesglasset på den nye lampen, siden
dette kan sette flekker som brenner fast og som kan føre til
overoppheting av lampen slik at den ødelegges.
ADVARSEL!
Vær særdeles forsiktog i forbindelse med lampebytte.
I tilfelle lampen ryker, kan små glasspartikler løsne.
Lampeholderen er konstruert for å holde på slike pertikler,
men vær allikevel forsiktig når du fjerner lampen.
Løsne skruen til lampelokket foranA
Åpne lampelokket.B
Løsne de tre låseskruene ved å skru mot urviseren.C
Frigjør bøylen og trekk lampen ut. D
Bytt lampe i motsatt rekkefølge.
Sett inn ny lampe forsiktig. Observer styrepinnene.E
skru de tre låseskruene godt fast med urviseren. Ikke F
overdriv!
Fell inn bøylen.G
Sett på lampelokket.H
Skru fast lampelokket med urviseren.I
A B
A B
C
E
D
F
D
G
H
I
73
Page 52
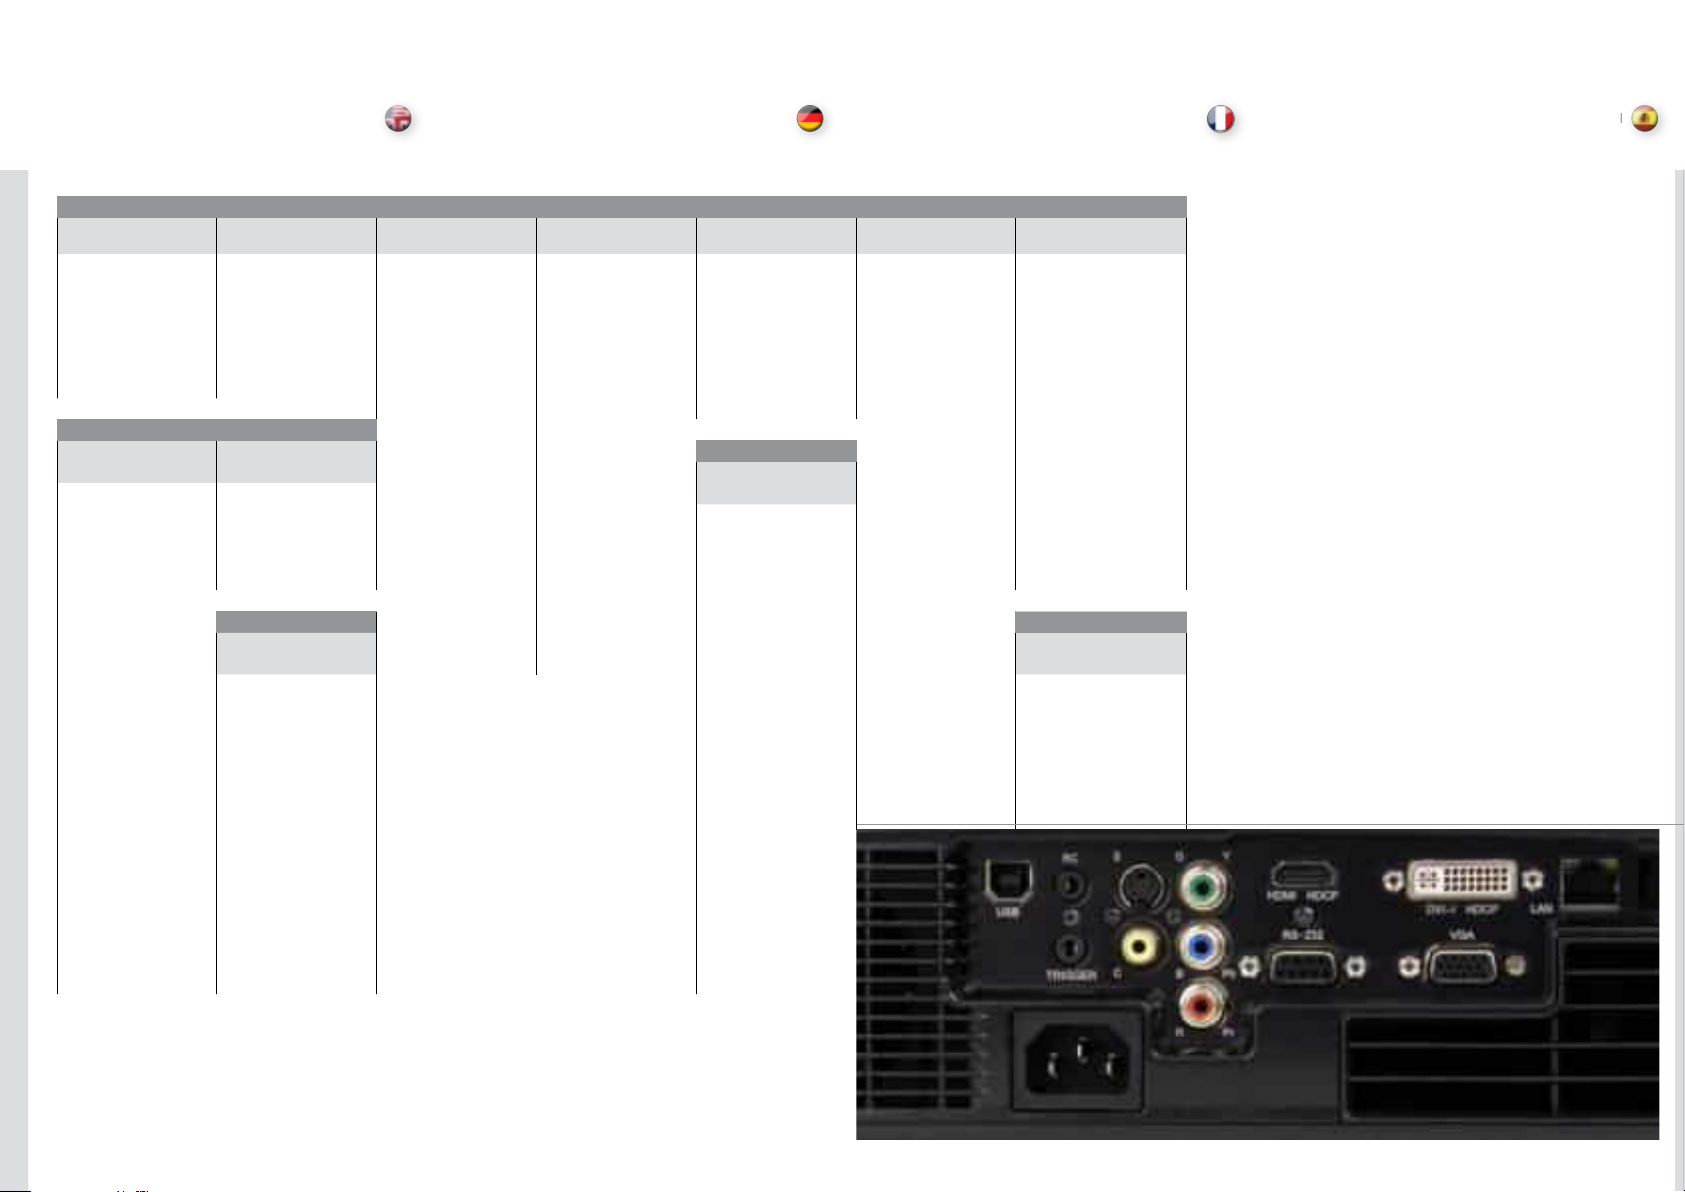
74
english
deutsch
francais
español
74
CONNECTORS / STECKER / CONNECTEURS / CONECTADORES / CONNETTORI / KONTAKTER
S-Video G/Y Computer DVI-I Computer VGA RS-232 RC LAN
4 PIN MINI DIN FEMALE
PHONO/RCA
FEMALE
DVI-I
15 HIGH DENSITY
DSUB FEMALE
9 PIN DSUB FEMALE
3,5mm stereo
mini jack
RJ 45
1 GND STEM GREEN: G/Y 1 TMDS Data 2- 1 Analog R in 1 NC TIP: 5V DC 1TX+
2 GND SHIELD: GND 2 TMDS Data 2+ 2 Analog G in 2 RXD RING: SIGNAL 2TX3 Luma 3 TMDS Data 2/4 Shield 3 Analog B in 3 TXD STEM: GND 3RX+
4 Chroma 4 Not used 4 AGND 4 NC 4GND
5 Not used 5 AGND 5 GND TRIGGER 5GND
6 DDC Clock 6 Analog R GND in 6 NC
3,5mm stereo
mini jack
6RX7 DDC Data 7 Analog G GND in 7 NC 7GND
8 Analog Vertical Sync 8 Analog B GND in 8 NC 8GND
C-Video B/Pb 9 TMDS Data 1- 9 Reserved
PHONO/RCA FEMALE PHONO/RCA FEMALE
10 TMDS Data 1+ 10 Sync GND in HDMI
11 TMDS Data 1/3 Shield 11 AGND
HDMI
STEM YELLOW: STEM BLUE: B/Pb 12 Not used 12 DDC/SDA
Composite SHIELD: GND 13 Not used 13 H Sync in 1 TMDS Data 2 +
SHIELD: GND 14 +5V Power 14 V Sync in 2 TMDS Data 2 Shield
15 DDC/SCL 3 TMDS Data 2 C1 Analog Red 4 TMDS Data 1 +
C2 Analog Blue 5 TMDS Data 1 Shield
R/Pr C3 Analog Green 6 TMDS Data 1 - USB
PHONO/RCA FEMALE
C4 Analog Horiz. Sync 7 TMDS Data 0 +
DIGITAL USB
C5 Analog GND Return 8 TMDS Data 0 Shield
STEM RED: R/Pr 9 TMDS Data 0 - 1 VCC
SHIELD: GND 10 TMDS Clock + 2 -Data
11 TMDS Clock Shield 3 +Data
12 TMDS Clock - 4 GND
13 CEC
14 Not Used
15 DDC Clock
16 DDC Data
17 Ground
18 +5V Power
19 Hot Plug Connect
20 Shell
TECHNISCHE DATENTECHNICAL DATA DONNÉES TECHNIQUES DATOS TÉCNICOS
Page 53
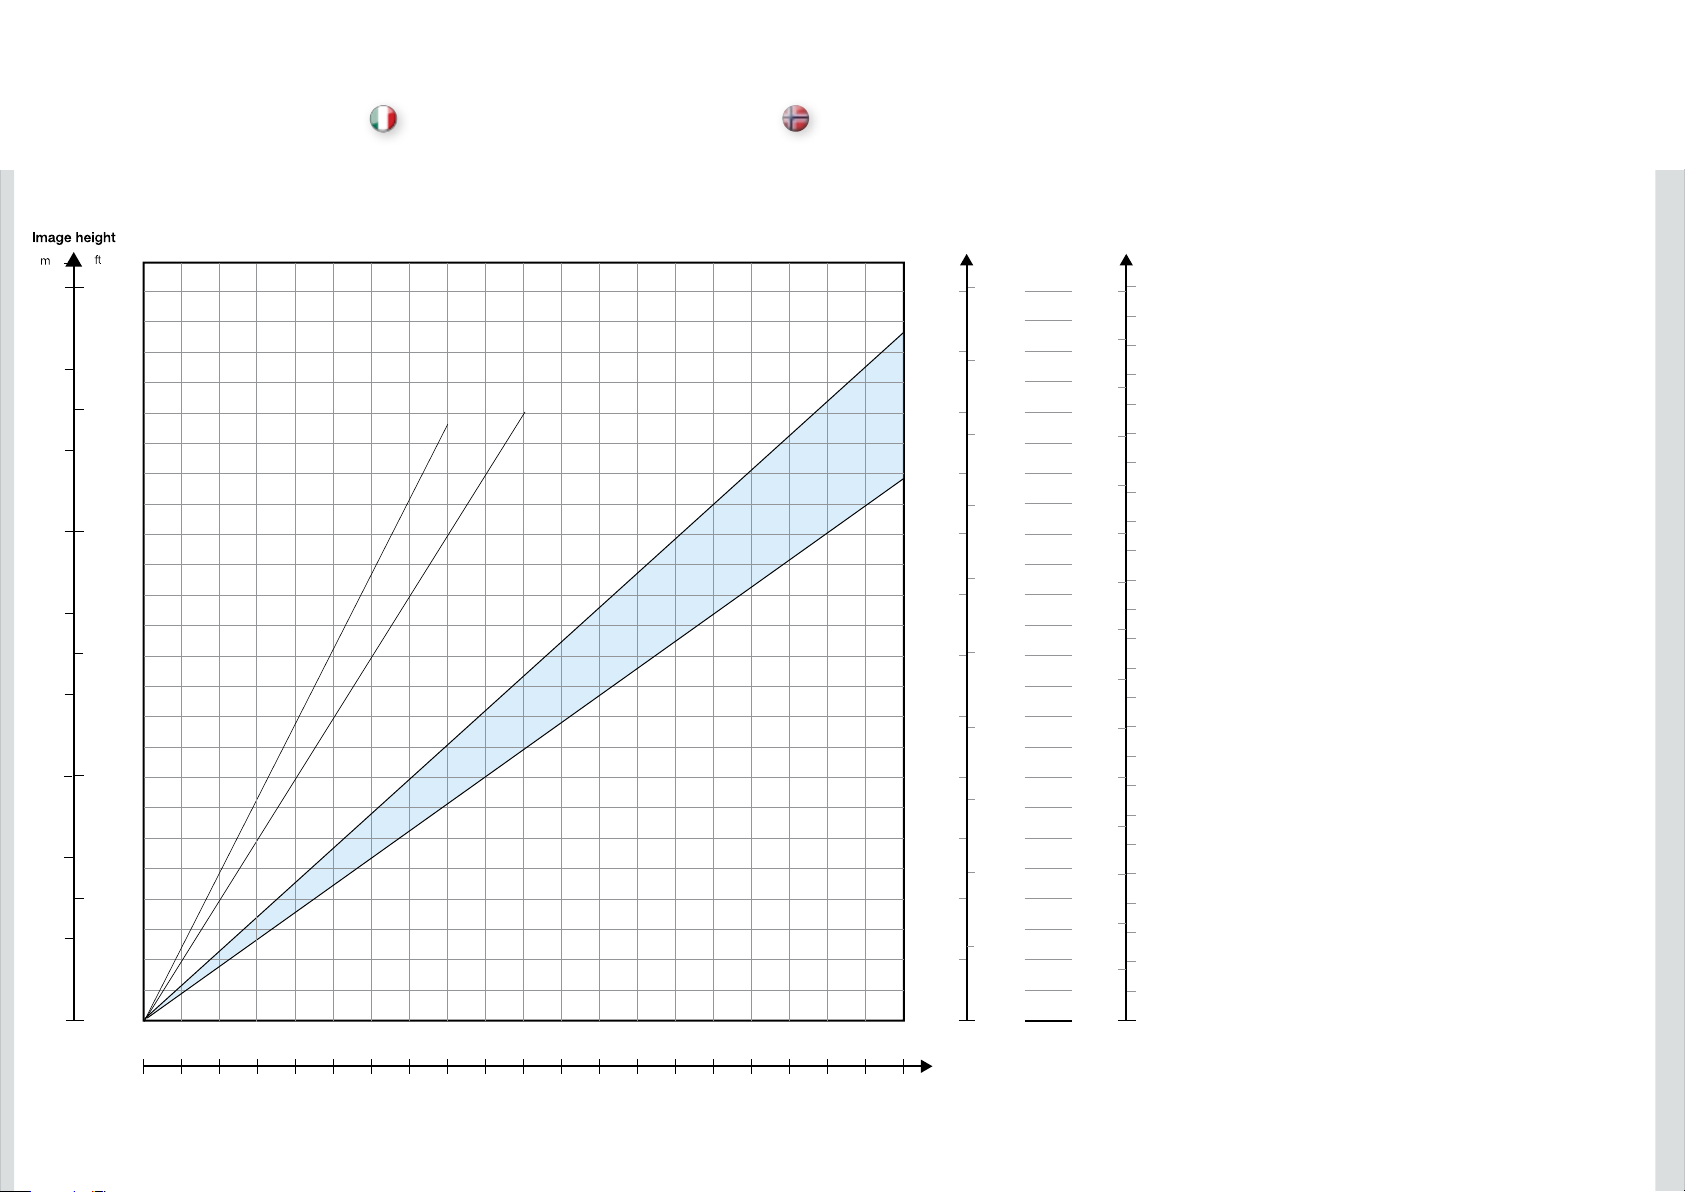
S
DATI TECNICI
SXGA+
italiano
TEKNISKE DATA
norsk
4.50
4.00
3.50
3.00
2.50
2.00
1.50
1.00
0.50
15.0
12.5
10.0
7.5
5.0
2.5
Image width
ft
m
20.0
6.00
5.50
18.0
5.00
16.0
4.50
creen diagonal
m
7.50
7.00
6.50
6.00
5.50
ft
25.0
20.0
14.0
ultra wide angle ens 0.82 : 1
wide angle lens 1.00 : 1
zoom lens 1.78 - 2.23 : 1
4.00
3.50
3.00
2.50
2.00
12.0
10.0
8.0
5.00
4.50
4.00
3.50
3.00
2.50
15.0
10.0
6.0
1.50
4.0
1.00
0.50
2.0
2.00
1.50
1.00
0.50
5.0
0
0
0 1.00 2.00 3.00 4.00 5.00 6.00 7.00 8.00 9.00 10.00 m
0
0
0
0
Projection distance
0 3.30 6.60 9.90 13.20 16.50 19.80 23.10 26.40 29.70 33 .00 ft
75
Page 54
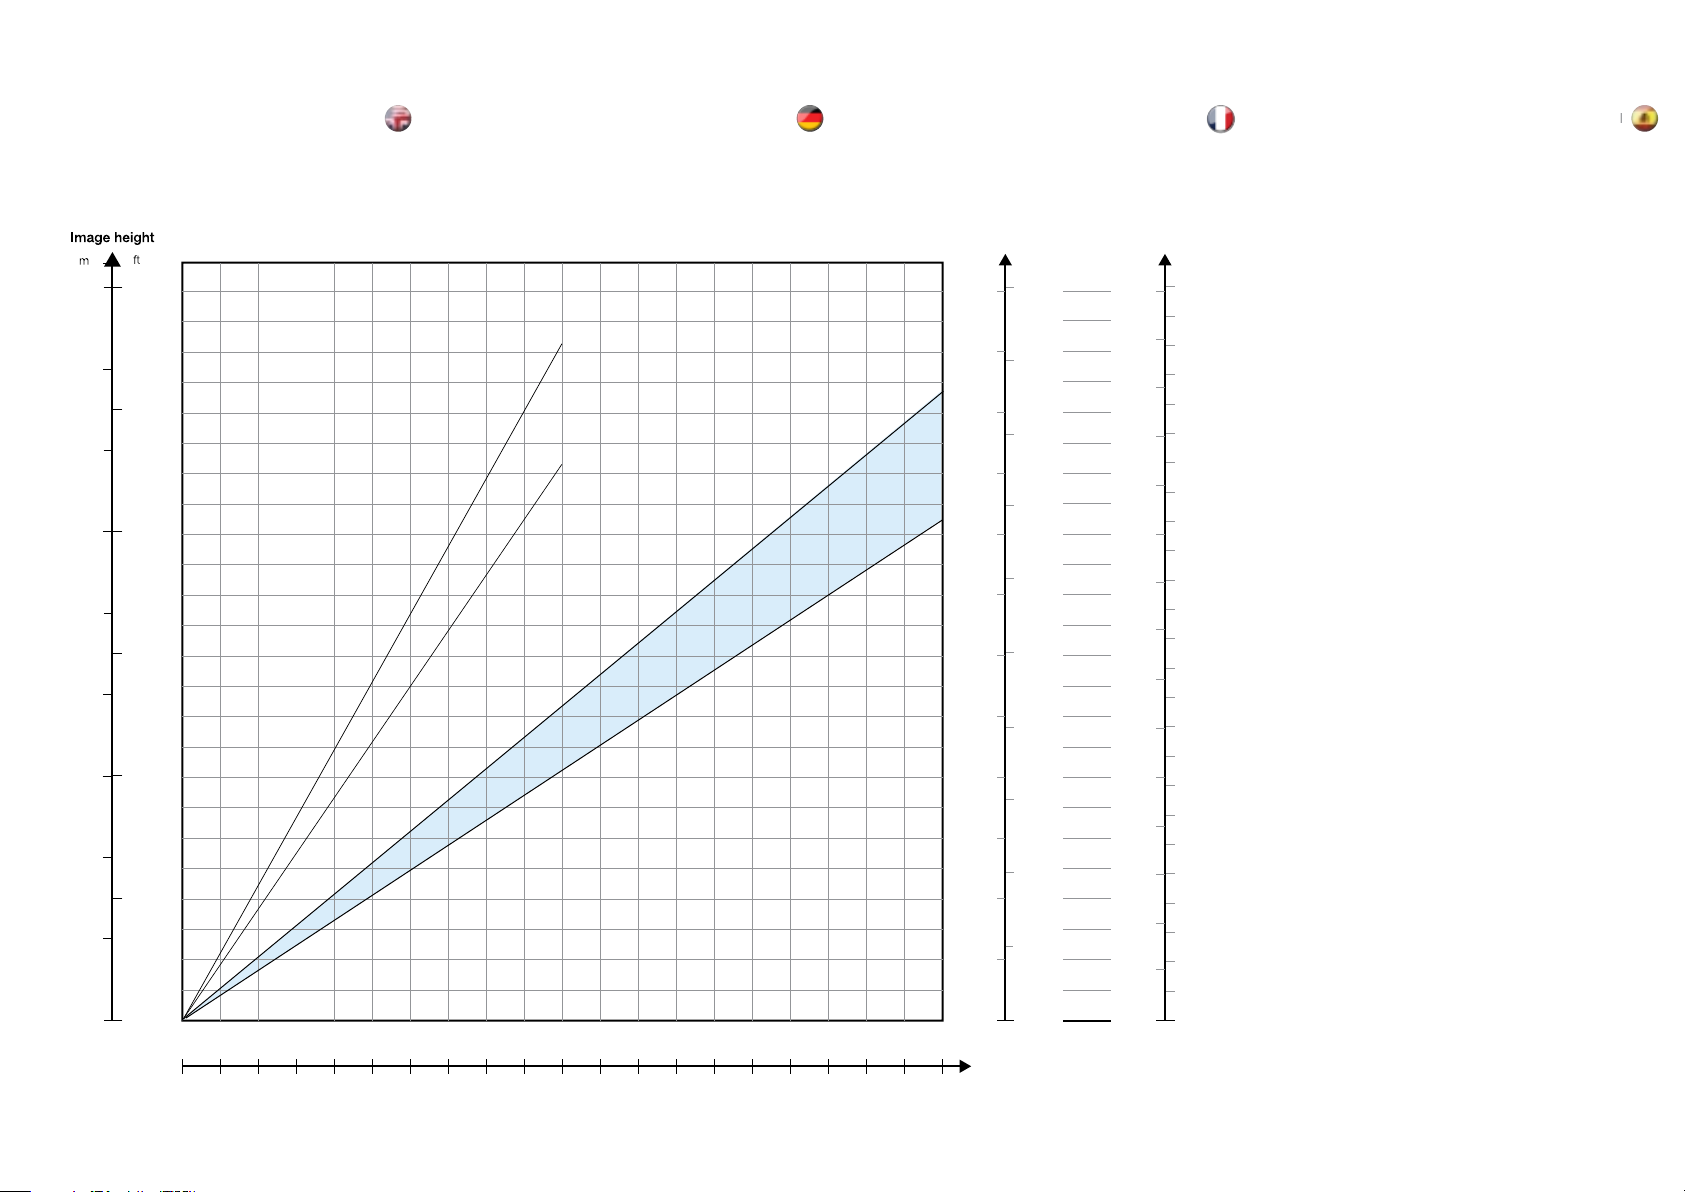
720 HD
english
TECHNISCHE DATENTECHNICAL DATA DONNÉES TECHNIQUES DATOS TÉCNICOS
deutsch
francais
español
4.50
4.00
3.50
3.00
2.50
2.00
1.50
1.00
0.50
15.0
12.5
10.0
7.5
5.0
2.5
Image width
ft
m
20.0
6.00
5.50
18.0
5.00
16.0
4.50
Screen diagonal
m
7.50
7.00
6.50
6.00
5.50
ft
25.0
20.0
14.0
1
ultra wide angle lens 0.90 : 1
wifde angle lens 1.10 :
zoom lens
1.95 - 2.43 :
4.00
12.0
3.50
1
10.0
3.00
2.50
8.0
2.00
5.00
4.50
4.00
3.50
3.00
2.50
15.0
10.0
6.0
1.50
4.0
1.00
0.50
2.0
2.00
1.50
1.00
0.50
5.0
76
0
0
0 1.00 2.00 3.00 4.00 5.00 6.00 7.00 8.00 9.00 10.00 m
0
0
0
0
Projection distance
0 3.30 6.60 9.90 13.20 16.50 19.80 23.10 26.40 29.70 33 .00 ft
Page 55
english deutsch francais
78
ERKLÄRUNGEN DÉCLARATIONSDECLARATIONS
FCC
FCC regulations provide that changes or modifications not expressly approved by the party
responsible manufacturer could void your authority to operate the equipment.
Note: This equipment has been tested and found to comply with the limits for a Class B digital
device, pursuant to part 15 of the FCC Rules. These limits are designed to provide reasonable
protection against harmful interference in a residential installation. This equipment generates,
uses and can radiate radio frequency energy and, if not installed and used in accordance with
the instructions, may cause harmful interference to radio communications. However, there is no
guarantee that interference will not occur in a particular installation. If this equipment does cause
harmful interference to radio or television reception, which can be determined by turning the
equipment off and on, the user is encouraged to try to correct the interference by one or more of
the following measures:
Reorient or relocate the receiving antenna.
Increase the separation between the equipment and receiver.
Connect the equipment into an outlet on a circuit different from that to which the receiver is
connected.
Consult the dealer or an experienced radio/TV technician for help.
This device complies with part 15 of the FCC Rules. Operation is subject to the following two
conditions:
(1) This device may not cause harmful interference, and
(2) this device must accept any interference received, including interference that may cause
undesired operation
CANADA
This Class B digital apparatus complies with Canadian ICES-003. / Cet appareil numérique de la
classe B est conforme à la norme NMB- 003 du Canada.
FCC
Les réglementations FCC prévoient que les changements ou les modifications non homologuées
par le fabricant peuvent annuler votre garantie sur l’appareil.
Remarque: Cet appareil a été testé et déclaré conforme aux limitations des dispositifs numériques
de Classe B, conformément à la section 15 des règlements FCC. Ces limites sont fixées pour
assurer une protection raisonnable contre une interférence novice dans une résidence Cet appareil
produit, utilise, et peut émettre de l’énergie radiofréquence et, s’il n’est pas installé et utilisé
conformément aux instructions, il peut produire une interférence nocive aux radiocommunications.
Néanmoins, il n’est pas garanti qu’une interface ai lieu dans un installation particulière. Si cet
appareil cause une nouvelle interférence à la réception radio ou télévision, qui peut être déterminée
en allumant et en éteignant l’appareil, l’utilisateur peut essayer de corriger l’interférence à l’aide
d’une ou de plusieurs mesures suivantes :
Réorientez ou déplacez l’antenne réceptrice.
Augmentez la distance qui sépare l’appareil et le récepteur.
Connectez l’appareil à un réseau sur un circuit différent de celui où le récepteur est connecté.
Consultez le revendeur ou un technicien radio/TV.
Les changements ou les modifications faites à cet appareil et non homologués par le fabricant peut
annuler la garantie de l’utilisateur pour le fonctionnement de l’appareil.
Cet appareil est conforme à la section 15 des règlements FCC. Le fonctionnement est soumis aux
deux conditions suivantes :
(1) Cet appareil ne peut pas causer d’interférence novice, et
(2) cet appareil peut accepter n’importe qu’elle interférence reçue, même celles qui pourrait
causer un mauvais fonctionnement.
CANADA
Cet appareil numérique de classe B est conforme à la norme ICES-003 du Canada.
FCC
Die FCC-Bestimmungen besagen, dass nicht ausdrücklich vom Hersteller genehmigte
Änderungen oder Modifizierungen die Betriebsgenehmigung für das Gerät ungültig machen
können.
Hinweis: Dieses Gerät wurde getestet und es konnte nachgewiesen werden, dass es den
Einschränkungen eines digitalen Geräts der Klasse B gemäß Teil 15 der FCC-Bestimmungen
genügt. Diese Grenzwerte wurden ermittelt, um einen angemessenen Schutz gegen schädliche
Interferenzen bei Installation in einem Wohnhaus zu bieten. Dieses Gerät erzeugt, verwendet und
kann Radifrequenz-Energie ausstrahlen, und, wenn es nicht gemäß den Anleitungen installiert
und betrieben wird, kann es für die Radiokommunikationen beeinträchtigende Interferenzen
verursachen. Es besteht aber keine Garantie, dass bei einer bestimmten Installation keine
Interferenzen auftreten. Verursacht dieses Gerät schädliche Interferenzen für den Radio- bzw.
Fernsehempfang, was durch Ein- und Ausschalten des Geräts bestätigt werden kann, muss der
Anwender versuchen, die Interferenzen durch eine oder mehrere der nachstehenden Maßnahmen
zu beheben:
Neuausrichtung oder Umstellen der Empfangsantenne.
Vergrößern des Abstands zwischen dem Gerät und dem Empfänger.
Anschluss des Geräts an eine Buchse an einem anderen Kreis als den Empfänger.
Anfrage beim Händler oder einem erfahrenen Radio-/Fernsehtechniker.
Veränderungen oder Modifikationen am Gerät, die nicht ausdrücklich von der für das Gerät
verantwortlichen Partei genehmigt wurden, können die Betriebsgenehmigung für das Gerät
ungültig werden lassen.
Dieses Gerät erfüllt die Auflagen aus Teil 15 der FCC-Bestimmungen. Der Betrieb ist an folgende
zwei Bedingungen gebunden:
(1) Das Gerät darf keine schädlichen Interferenzen erzeugen und
(2) das Gerät muss alle eingehenden Interferenzen annehmen, inklusive Interferenzen, die zu
einem unerwünschten Betrieb führen.
KANADA
Dieses digitale Gerät der Klasse B erfüllt die kanadischen Bestimmungen nach ICES-003.
 Loading...