


EVA- 07S
Single-phase AC charging equipment
User Manual
Lakes Court, La nc as te r Bu si ne ss Park, Newborough R oa d, Ne ed wo od,
Burton Upon Tren t, S ta fford sh ir e DE 13 9 PD
www. pr oj ec te v. co. uk
Projec t EV

Menu
1. Product overview. . . . . . . . . . . . . . . . . . . . 1
2. Features. . . . . . . . . . . . . . . . . . . . . . . . . . . 1
3. Specification. . . . . . . . . . . . . . . . . . . . . . . . 2
4. Operation. . . . . . . . . . . . . . . . . . . . . . . . . . 3
5. . . . . . . . 6
7. Troubleshooting. . . . . . . . . . . . . . . . . . . . . 18
8. Packaging list. . . . . . . . . . . . . . . . . . . . . . . 19
9. Annex. . . . . . . . . . . . . . . . . . . . . . . . . . . . . 20
System Parameter setting. . . . . . .
6. Installation. . . . . . . . . . . . . . . . . . . . . . . . . 11

Safe and Reli ab le
Rel ia ble e le ctric al and an ti- th ie f pro tecti on , The IP65 degr ee allo ws fo r water and
dust pr oof and n or mal ope ra tion in h ar sh envi ronme nt .
Syste m In te grati on
Integ ra te all func ti ons, such as char ging cont rol , HMI, saf ety pro te ct ion , mete ring
into on e sy stem, s im ple str uc ture bu t rel ia ble ope ra tion.
Easy to use
user-f ri endly H MI , simpl e an d easy to o pe rate.
Compa ct d es ign
I The c om pa ct des ig n make s i t s uit ab le for ar ea wit h l im ited u sa ble la nd , e ither wa ll
or poll m ou nted.
Multi pl e co mmuni ca tion type s
Imult ip le comm un icati on p orts in cl uding E th er net por t, W iF i, 3/4G t o provi de reli ab le
conne ct ion to ba ck end ser ve r.
Meter in g an d Bi lling
Integ ra ted me te ri ng and bi ll in g s yst em to pr ovide pr ecise me te ring and bi ll in g
funct io n.
Resis ta nt t o mo istur e, m ildew, sal t- mist and rust
The c ompre hensi ve prote ct ion t o h ar sh environ ment makes it c apa bl e to opera te in
moist ure and s al t-mis t co nditi on .
1.Product overview
EV ser ie s pro du ct is a char gin g ap parat us with user- fr ien dl y HMI a nd func ti ons o f
charg in g cont rol, m et ering an d c omm un ic ati on . e tc. sp ec ially de signe d f or cha rg ing
EV batt er ies.
A
2.Features
Exqui si te a ppear an ce
exqui si te and si mp le exte ri or desi gn
1
2
Model
EVA-07S
Dimension(mm) 510*355*360(L*W*H)
Weight(kg) 8.5
Display LCD
Housing material Stainless steel &Tempered glass
Input
Nominal Voltage AC 230V
Nominal Current 32A
Output
Nominal Voltage AC 230V
Nominal Current 32A
IP Protection degree
IP65
Operating temperature -20℃~+65℃
Humidity 5%~95%
Altitude ≤2 000m
Frequency 50 Hz ±1Hz
Communication E thernet, 3/4G ,WIFI
Payment RF ID/APP
Standby power <8W
Standard IEC62196-2;IEC61851
Mounting type Wall or Poll mounted
Certificate CE
Protection features
Overvoltage 2 87.5V
Undervoltage 184V
Overcurrent 40A
Short-circuit Yes
Leakage current Type A 30mA + 6mA DC
Over temperature Yes
Lightning protection Type II
3.Specification

4
Standb y st at us
The c ha rgi ng equi pment will ente r sta nd by status af ter p ow ering on, the f ol lowin g
inter fa ce will a pp ear on th e LC D,
Swipe ca rd t o st art charging
Plug t he cha rg ing gu n i nto th e vehi cl e inle t a nd s wi pe the ca rd, th e char gi ng
equip me nt will fre eze the credit of the card afte r re cogni zi ng it, the credit will be
unblo ck ed after t he char gi ng. At the mean ti me , the char gi ng equi pme nt will show
the fol lo wing in te rface w it h card ID a nd bala nc e dis pl ay ed.
3
4.Operation
Switc h on th e po we r to po wer ca bl e, t he Red and Gr een st atus i ndica to r wi ll flash to
initi at e and sta rt the control circ uit. The charg in g equip me nt will succ es sfull y st ar t
and be re ady to us e af ter the L ED t ur ns off.
At stan db y statu s, u sers ca n sw ipe car d to chec k credi t ba lance
This in te rface i s sa me with t he i nterf ac e of ba la nc e che ck in g at st an db y sta tu s. .
During t he c ha rging
There w ill be el ec trici ty c onsum pt ion, ti me a nd mo ne y sp ent s ho wi ng on t he d is pla y.
The Gre en stat us i ndica to r will li t co ntinu ou sly d ur in g the c ha rg ing .
Swipe ca rd a ga in to stop chargi ng
Re-sw ip e wit h the sam e car d, the ch argin g equip me nt wi ll b ill a cc ord in g to th e
elect ri city co ns umpti on a nd re le ase the l oc ke d cha rg in g gun, th e bi lling i nt erfac e wi ll
appea r on t he disp la y.
5 6
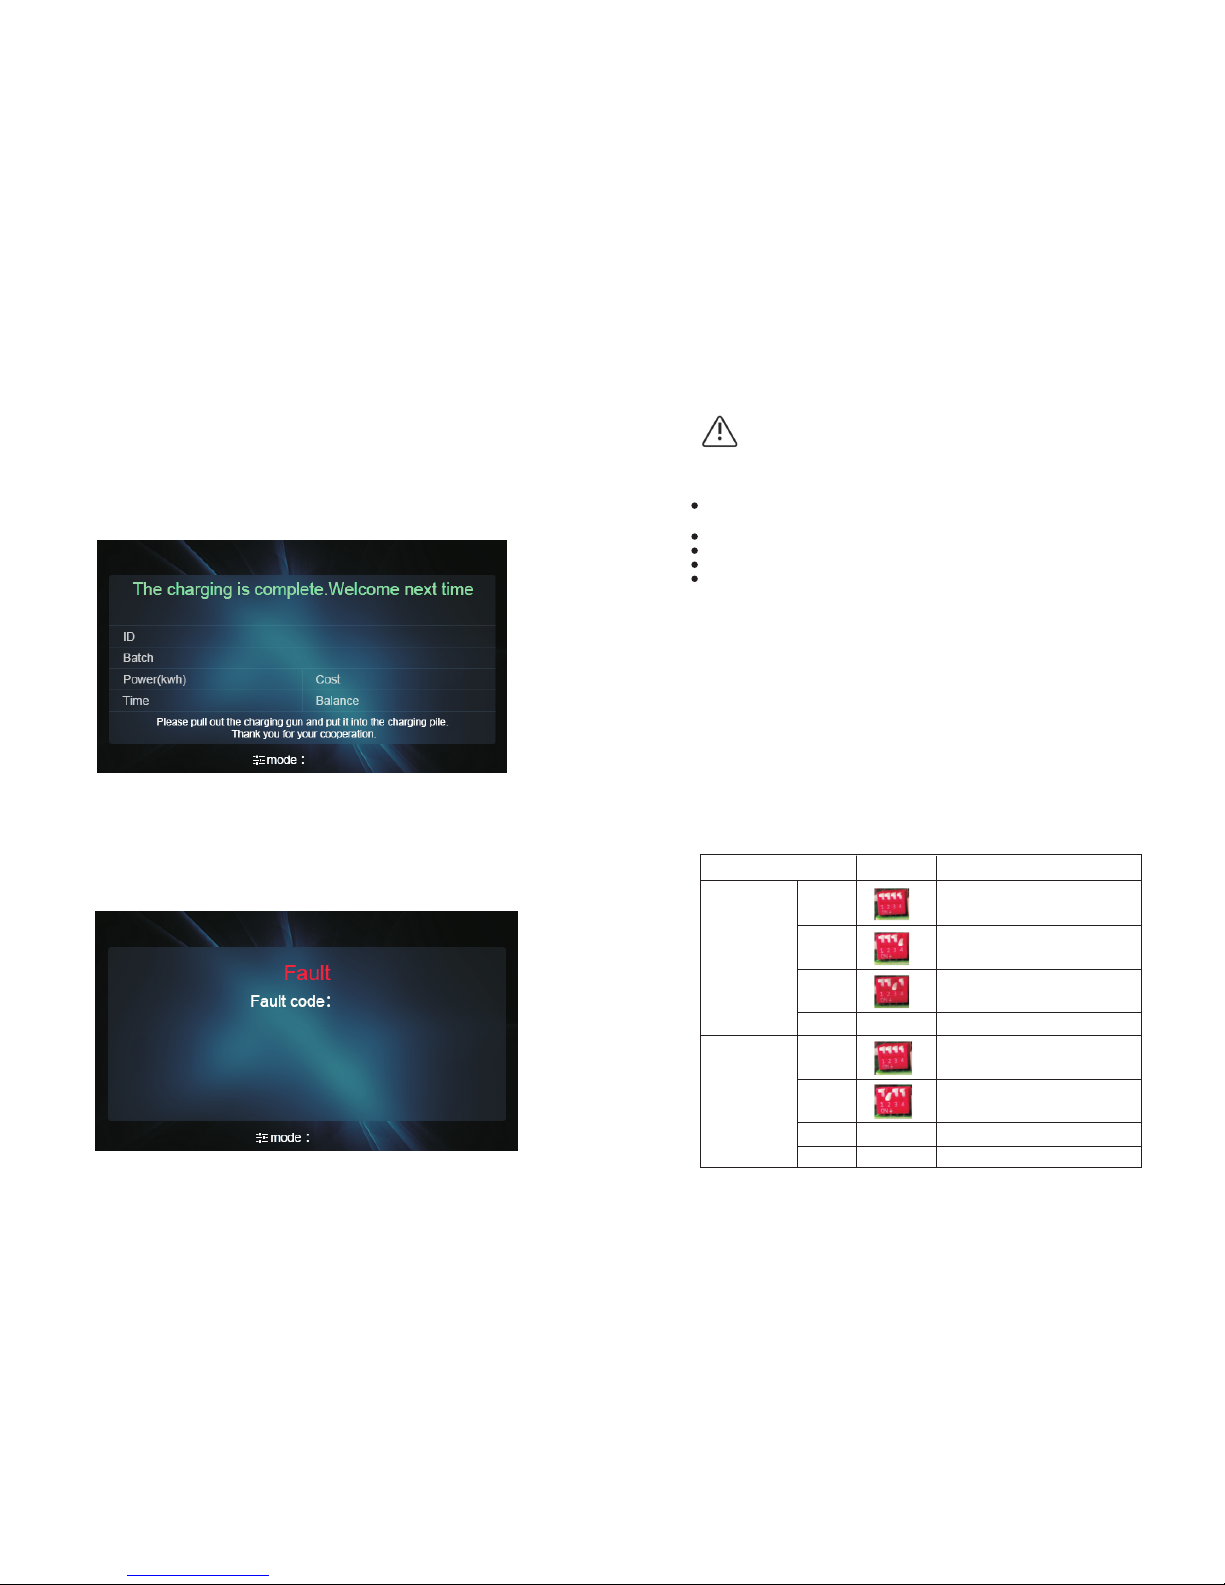
Chargi ng c om plete without r e- sw iping card
Charg in g co mp le te w il l chan ge the di sp lay to the fo ll owing in ter fa ce ind ic at ing us er
to s wipe c ard to bill . Th e card w il l be fro zen if l ea ving with ou t re -sw ip in g. T he f roz en
card can onl y be un lo cke d at this s pecif ic char gi ng eq ui pment b y swipi ng or at
backe nd o ffi ce w here th e card wa s issue d.
Notifi ca ti on interface
The fo ll owing no ti ficat io n i nte rf ac e will co me ou t a t faul t s ta tus or wh en th e
emerg en cy b utton is p us hed . Faul t co de wil l appe ar a lo ng w it h th e Re d st at us
indic at or.
DANGE R
Notic e:
T he char ging equip me nt wi ll only re turn to norm al op erati on on cond it ion o f the
follo wi ng faul ts w hen,
The gri d vo ltage f al ls belo w up per l im it b y 5V at o ve r vo lta ge f au lt;
The gri d vo ltage r is es abov e lo wer l im it b y 5V at u nd er v olt ag e fa ult ;
The cas in g tempe ra ture fa lls bel ow u pper li mi t by 5oC at o ve r tem pe ra tur e fa ult .
Hi gh t em pe rat ur e fa ult wi ll r esult in h al f ou tput p ower. Ov er t em pe rat ur e fa ul t wi ll
stop th e ch argin g.
5. System Parameter setting
Ima ge
Mea ning
XX 00
XX 01
XX 10
XX 11
00X X
The n etwor k conne ction i s via
LAN c able(LA N/WAN)
The n etwor k conne ction i s via Wi Fi
Res erved f or futu re use
Cas e C, cabl ed vers ion cha rger
The n etwor k conne ction i s via 4G
DIP c oding
The DIP switc h h as 4 bit , t he fa rt hest rig ht bit i s b it 0. Po sit io n O n cor respo nd s t o 1 ,
Off m ea ns 0.
DIP codi ng d ef inition
Def initi on for
las t 2 bits
Def initi on for
fir st 2bit s
01X X
10X X
11X X
Cas e B, sock et vers ion cha rger
Res erved f or futu re use
Res erved f or futu re use

Introd uc ti on
There is an in ter nal w eb serve r i ns ide each charger, You c an ac ces s t he in ternal web
serve r via web browser on a P C that is conn ec ted to the charge r usin g a netw or k
cable f or p arame te r setti ng .
The i nterf ac e o f the inte rn al web b rowse r is as be lo w, h erein af ter i t i s ref ered to as
param et er sett in g page.
7 8
The def au lt I P ad dre ss o f th e ch ar ger is 1 92.16 8. 1.5. To ac cess th e pa ra me ter set ti ng
page, y ou n eed to
1.Firs t co nnect t he c harge r to a c omp ut er v ia a ne tw or k cab le .
3.Open the web brow ser and typ e in http :/ /192. 16 8.1.5 :8 080 in the web brows er
and cli ck e nter( 80 80 is por t nu mbe r) , th en th e pa ra met er s et tin g pa ge w ill c om e ou t.
2.Set the compute r’s IP a dd res s to 1 92 .168. 1. x(x can be any valu e be tween 1 and
255 exc ep t for 5).

4.If you c an not get i nt o the par am eter se tt ing pag e af ter sev er al atte mp ts, the
charg er ’s IP may have been s et to o th er valu e, you can r eset the cha rg er to f actor y
setti ng and tr y aga in , the cha rger’s IP w ill b e res to red t o 192 .1 68 .1. 5 af ter the
facto ry rese t.
Long pre ss the bel ow marked res et butt on un ti l t he charger rebo ots , then it wi ll be
res to red t o fa ctory s et ting.
Pleas e note tha t after fa ctory set ti ng, yo u need to reset ch arger ID, whi ch can be
found o n th e label s ti cker on t he l eft h an d si de of t he c ha rge r.
10
Some ke y pa ramet er s:
Firmw ar e Ver sion Nu m: t he char ge r’s fir mw are ver si on
Charg e ID( Ma xLe n 20) : the c har ge r’s ID, wh ic h can al so be foun d on the label
stick er o n the lef t ha nd side o f th e cha rg er.
Charg er I P: the ch ar ger’s IP ad dress , us ed to acc es s the par am ete r se tt ing p ag e
Defau lt G at ewa y, Su bn et Mask , Ch ar ger DNS only ne ed t o be set when th e
charg er u ses net wo rk cabl e fo r serve r co nne ct io n
Langu ag e Set(1 ,2 ,3): Se t la ngu ag e of L CD
Max Cur re nt Set( 7~ 32A): S et t he ma xi mu m cha rg in g cur re nt
Charg e Mo de (Defa ul t 1: APP/R FI D, 2:RF ID , 3: Plug& Ch arge) : Charger ’s cha rg ing
mode.
In Mode 1, c harge r ca n start o r st op by A PP o r RF ID ca rd ;
In mode 2, c hargi ng s tart/ st op can on ly b e con tr oll ed b y sw ipi ng R FI D car d;
In mode 3, C hargi ng w ill sta rt a utoma ti cal ly a ft er co nn ec tin g ca r to t he ch ar ge r.
Serve r URL : Se t t he doma in name or IP a dd res s of th e ser ve r to be conn ected . The
domai n n am e o f G rowat t s er ver i s “ ws:// ch arge. growa tt .com: 80 /ocpp /w s”; I P
addre ss is “ws :/ /47.2 54 .157. 66 :80/o cp p/w s” .
WIFI SS ID a nd WIFI K ey a re us ed f or W iFi con ne ction .
Charg in g Rate: S et c hargi ng f ee per un it o f ele ct ri cit y
DayTime, NightTime, Day-Pri ce an d N ig ht-Pr ic e i s u se d t o s et pe ak and off-pea k
tarri f and p er iod . I f Ch ar gi ng R at e ha s b een se t, the se pea k a nd o ff-pe ak set ti ng wil l
be inva li d.
LCD Time: Se t the c ha rg er’s t im e. If the ch arger ha s s erv er co nnect io n, the ti me wil l
be sync hroni ze d with th e se rver au to matic al ly.
Max Limi t Powe r, Mete rVa lue Inte rv al and Po werLi mi t Opti on is used to set
power a dj ustme nt f uncti on .
Allow Ch argin gTi me : Once se t, cha rg in g can o nl y be ca rr ied ou t w it hin th is perio d
unles s th e force d on/of f butto n is p res se d.
4G Acco un t, 4G Pas sw ord and 4 G AP N is used f or 4 G con ne ct ion ..
9
Reset b ut ton of 7k W ch arger
Some key p ar am eters:

12
Step2: h it t he M 8 interior expa ns io n bolts into th e dr il led holes
Step3: u nf ol d the packaging a nd t ake out all items
Step4: M ou nt a nd fix the bracke t on to t he wall,
7
Step 1: Dr il l on t he wall accordi ng t o th e dimension b el ow
6.Installation
11

13
Step6: T he c om plete install at io n will be as belo w
6.1.Mounting on pole
Step1. D ri ll o n the ground for pole sta nd in g,
Step2: H i t t h e e x p a n s i o n b o l t s i n to the drilled
holes as s h o w n b e l o w ,
14
Step5: H an g th e charging equi pm en t on the mounti ng b ra cket

Step3. Tak e al l th e items out,
Step4. M ou nt t he pole onto the ex pa ns ion bolts in th e
ground and fix wit h th e nuts,
Step5. M ou nt t he cable holder,
15
16
Step6. F ix t he c harging equip me nt o nto the top of th e po le
from the bottom an d fi x with the hex head s crews.
Then the i ns ta llation is comp le te d.

7.Simple troubleshooting
If fau lt ha ppe ns , p lease fi rst ch ec k t he fol lo wing t ab le for si mp le tro ub lesho ot ing. I f
the fault is ou t of the l ist or the fa ul t sti ll pe rs ist s after trou blesh oo ting. Plea se
conta ct your sell er for fu rth er assi st ance. Unqu al ified pers on ne l are not al lowed to
open th e ch argin g eq uipme nt o r rep ai r it!
Fault
Count er measu re s
Fault i nd icato r li t
Check i f em ergen cy b utton i s pu shed
No powe r
Check i f th ere i s po wer goi ng i nto the c ha rging
equip me nt;
Check i f th e RCBO is t ri pped in si de the
charg in g equip me nt
Check i f em ergen cy b utton i s pu shed do wn
No outp ut c urren t
17
18
Fau lt code
Fau lt code
Fau lt desc ripti on
100
Emerg en cy butt on i s pre ss ed
or brok en.
No.
1
7
105
106
Over vo lt age
Under v ol tage
2
3
4
5
6
108
109
110
111
1000
Over cu rrent
Over te mp eratu re
RCD lea ka ge prot ectio n
Rs485 f au lt
Other e rrors
8
19
8.Packaging list
No. Name
Unit
Qty
Remar k
1
2
3
4
pcs
pcs
pcs
pcs
1
1
1
1
Charg in g equip me nt
User ma nu al
QC cert if icate
9.Annex
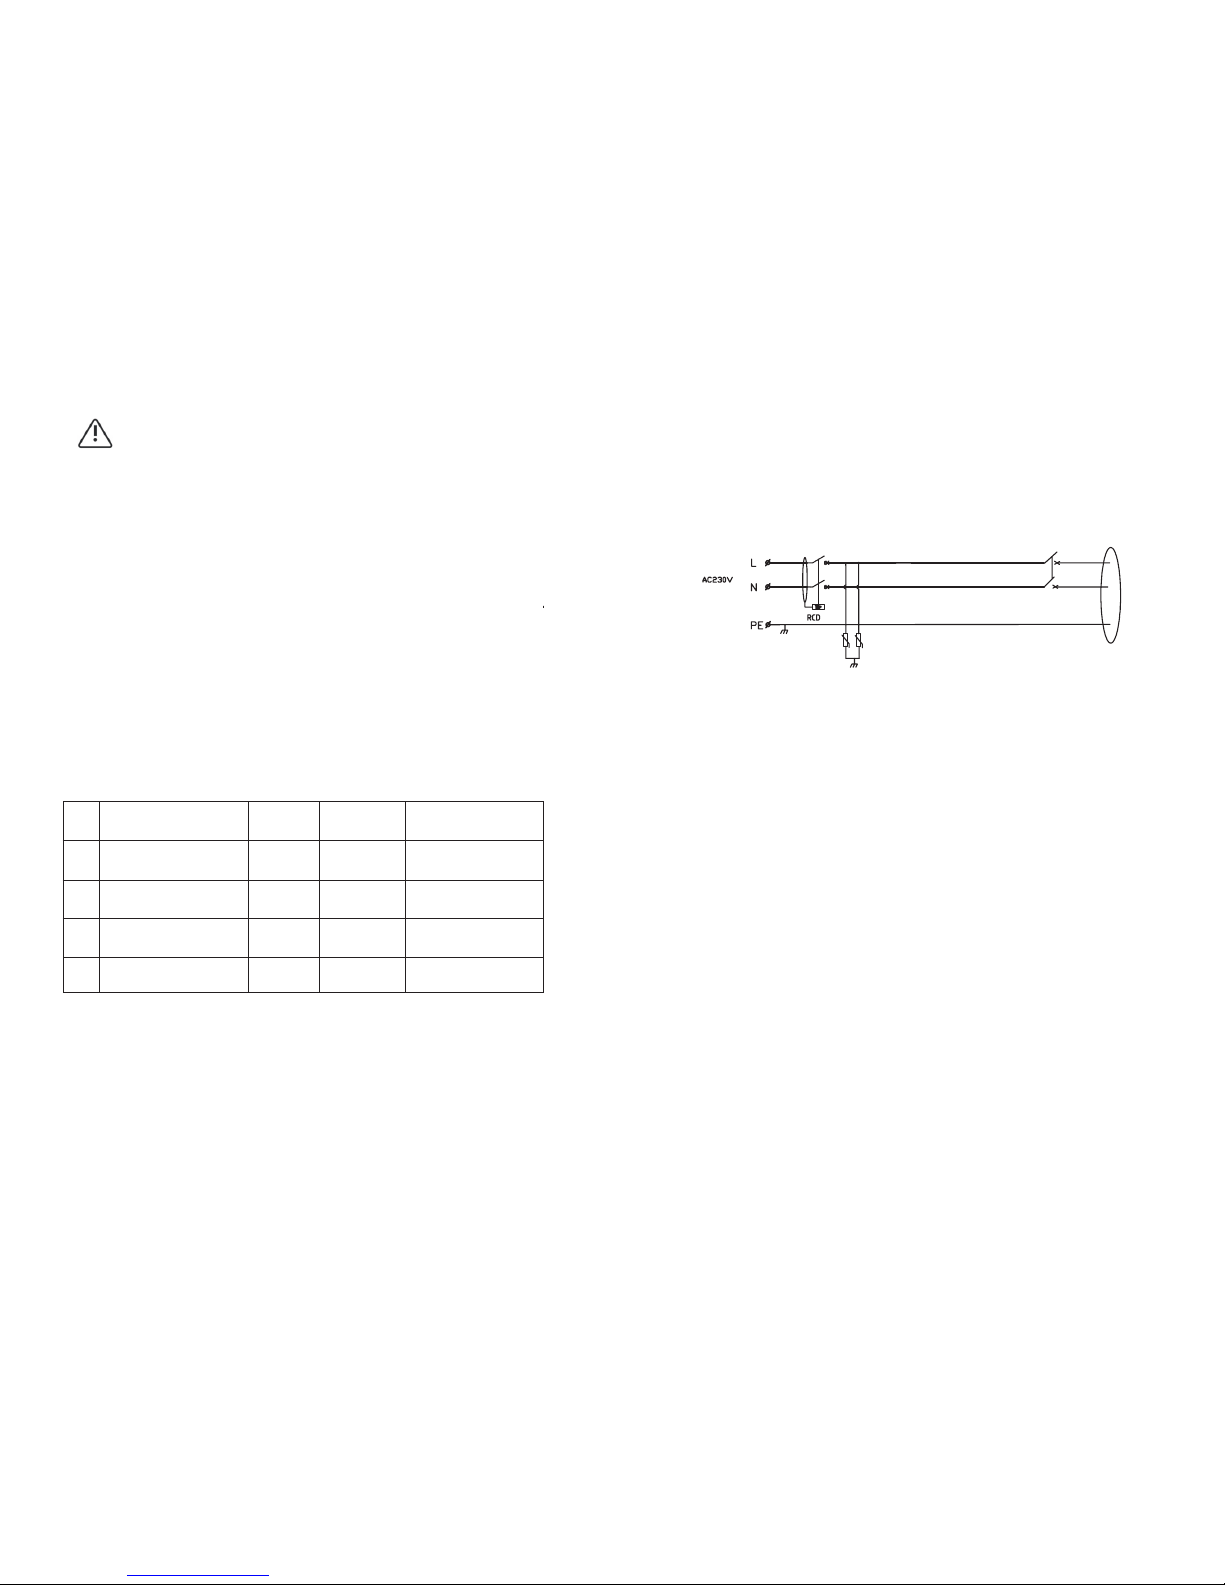
8.1 Elec tr ic al diagram
Fig8- 1. 3 -phas e AC c hargi ng e qui pm en t mai n ci rc uit
AC SPD
AC KM
INPUT
OUTPUT
AC Charge
Gun
Cable h ol der
DANGE R
Notic e:
1.W iring and in stall at ion mu st be c arrie d o ut b y q ual if ie d pe rs onnel , p has e
seque nc e canno t be c onnec te d inc or rectl y!
2.The PE w ire sho ul d be grou nded fi rm ly!
3.No li ve w or ki ng! Th e inco mi ng p ow er s ho ul d be cu t of f be fo re o pe ning t he
charg in g equip me nt.
4.Unqu al ified p er son is no t al lowed t o op en or r ep air !
20
 Loading...