


email: gobo@projectedimage.comweb: www.projectedimage.com
tel:
+44 (0) 191 265 9832
projected image: Unit 17, Hoults Estate, Walker road, Newcastle upon Tyne NE6 2HL
AW 80 Watt LED Projector User Manual
© 2016 Projected Image
• unit 17, Walker Road
hoults estate
newcastle upon tyne, ne6 2hl
• tel: +44 (0)191 2659832
• web: www.projectedimage.com
• email: gobo@projectedimage.com
Gobos & Projection SolutionsGobos & Projection Solutions
email: gobo@projectedimage.comweb: www.projectedimage.com
tel:
+44 (0) 191 265 9832
projected image: Unit 17, Hoults Estate, Walker road, Newcastle upon Tyne NE6 2HL
Please Read This Manual Before Installing Or Operating This Fixture, Follow The Safety Precautions
Listed Below And Observe All Warnings
Table of contents
Safety information -
Introduction -
Before using the product -
Physical installation -
Fastening the fixture to a flat surface -
AC power -
Operation Fixture overview Projecting a gobo
Replacing the gobo
Maintenance
Cleaning
Specifications
A guide to ordering gobos
Terms & Conditions
AW 80 Watt LED Gobo Projector User Manual: Version 1
Information subject to change without notice. Projected Image and all affiliated companies disclaim liability for any injury,
damage, direct or indirect loss, consequential or economicloss or any other loss occasioned by the use of, inability to use or
reliance on the information contained in this manual.
The Projected Image logo, the Projected Image name and all other trademarks in this document pertaining to services or
products by Projected Image or its affiliates and subsidiaries are trademarks owned or licensed by Projected Image or its
affiliates or subsidiaries.
• Super bright 80W ultra bright LED lamp: 12000 lumens and
6000K colour temperature
• Dimensions (cm): 32 long x 20 high x 20 wide Weight: 3.0 Kilo
• Lamp life: 30000 hours
• Default lens: 25 degrees
• Material: rustproof aluminium alloy
• Input: 100V - 240V / 50 - 60 Hz
• Working temperature: -20 to 50 ºC
• Gobo Size: 53.3mm outer diameter and 32mm image diameter
• Rotating gobo function
• Recommended projection distance: maximum 40 metres in dim/dark situations,
20 metres in normal indoor situation (office / shop lighting)
• Recommended maximum image size: 15 meters in diameter or 8 x 8 meters
• Manual focus, ensuring clear projection at all distance.
• One-year warranty
AW 80 Watt LED Projector
© 2016 Projected Image

Safety information
WARNING!
Read the safety precautions in this manual before installing.
The following symbols are used to identify important safety information on the
product and in this manual:
Warning! Safety hazard. Risk of severe injury or death.
Warning! Powerful light emission. Risk of eye injury.
Warning! See user manual for important safety information.
Warning! Hazardous voltage. Risk of lethal or severe electric shock.
Warning! Hot surfaces and fire hazard.
Warning! Risk Group 2
Do not stare directly into the beam. Do not view the light output with optical instruments or any device that
may concentrate or focus the the beam. See safety standards here - http://smartvisionlights.com/wp-
content/uploads/pdf/IEC_62471_summary.pdf
This lighting fixture is for professional use only – it is not for household use. The fixture must be installed by
a qualified person. The safety of the installation is the responsibility of the installer. The fixture presents risks
of severe injury or death due to fire hazards, electric shock and falls. It produces a powerful, concentrated
beam of light that can create a fire hazard or a risk of eye injury if the safety precautions below are not
followed.
If you have any questions about how to install, operate or service the fixture safely, please contact us on
+ 44 00 191 265 9832 or on gobo@projectedimage.com.
Respect all locally applicable laws, codes and regulations when installing, operating or servicing the fixture.
There are no user-serviceable parts inside the fixture. Do not open it. Refer any service or repair operation
not described in this manual to an authorized lighting service technician or return to us. Do not try to carry
out any such operation yourself, as doing so may present a health or safety risk. It may also cause damage
or malfunction and it may void your product warranty.
Install, operate and service the AW 80 Watt LED projector only as directed in their user manuals, or you may
create a safety hazard or cause damage that is not covered by product warranties.
Follow the safety precautions listed below and observe all warnings in this manual and printed on the
product. Keep this user manual for future use. If you sell the product, give this manual to the new owner.
For the latest user documentation and other information for this and all Projected Image products, please
visit the Projected Image website at http://www.projectedimage.com
Protection from electric shock
Do not expose the fixture to rain or moisture.
Disconnect the fixture from AC power before carrying out any installation or maintenance work and when the
fixture is not in use.
Ensure that the fixture is electrically connected to ground (earth).
Use only a source of AC power that complies with local building and electrical codes and has both overload
and ground-fault (earth-fault) protection.
Socket outlets or external power switches used to supply the fixture with power must be located near the
fixture and easily accessible so that the fixture can easily be disconnected from power.
Isolate the fixture from power immediately if the power plug or any seal, cover, cable, or other component is
damaged, defective, deformed, wet or showing signs of overheating. Do not reapply power until repairs have
been completed.
Before using the fixture, check that all power distribution equipment and cables are in perfect condition and
rated for the electrical requirements of all connected devices.
The supplied power input cable is rated 6 A. If you replace this cable, the replacement cable must also be
rated 6 A minimum, have three conductors 18 AWG or 0.75 mm2 minimum conductor size, have an outer
cable diameter of 6 - 15 mm (0.2 - 0.6 in.) and be temperature-rated to suit the application. In the USA and
Canada the cable must be UL listed, type SJT or equivalent. In the EU the cable must be type H05VV-F or
equivalent.
Protection from burns and fire
Do not use the fixture to illuminate surfaces within 200 mm (7.9 in.) of the fixture.
Do not operate the fixture if the ambient temperature (Ta)exceeds 40° C (104° F).
The surface of the product casing can reach up to 60° C (140° F) during operation. Avoid contact by persons
and materials. Allow the fixture to cool for at least 15 minutes before handling.
Keep flammable materials well away from the fixture. Keep all combustible materials (e.g. fabric, wood,
paper) at least 100 mm (4 in.) away from the fixture.
Ensure that there is free and unobstructed airflow around the fixture. Provide a minimum clearance of 100
mm (4 in.).
Do not attempt to bypass thermostatic switches or fuses.
Do not stick filters, masks or other materials onto any optical component.
Use only glass or metal gobos. Do not insert film, plastic, paper, or any other flammable material in the gobo
holder.

Introduction
The AW 80 Watt LED is a dynamic effect lamp that projects sharp images from user-supplied glass or metal
53.3mm gobos. It has a 20W LED engine with long-life white LEDs.
The fixture is supplied with this user manual, a 1.9 m (6 ft.) power cable, an adjustable mounting bracket /
floor stand, a gobo of your choice mounted in the gobo holder.
WARNING! To prevent damage to the LED, always connect the driver cable to the projector FIRST before
plugging it into the power outlet.
Before using the product
1. Read ‘Safety information’ on page 2 before installing, operating or servicing the fixture.
2. Unpack and ensure that there is no transportation damage before using the fixture. Do not attempt to
operate a damaged fixture.
3. If the fixture is not going to be hard-wired to a mains supply, install as directed in this manual a local
power plug (not supplied with EU model) on the supplied power cable.
4. Before operating, ensure that the voltage and frequency of the power supply match the power requirements of the fixture.
5. Check the Projected Image website at www.projectedimage.com for the most recent user documentation
and technical information about the fixture.
Physical installation
Read ‘Safety information’ on page 5 before installing the fixture.
The fixture is designed for use only and must be used in an suitable location and provide an adequate
ventilation. The fixture presents risks of severe injury or death due to fire hazards, electric shock and falls
and is not intended for truss mounting or installation with rigging clamps. The fixture must be installed and
maintained only by qualified personnel or electricians with experience in lighting equipment and general
electrical experience.The safety of the installation is the responsibility of the installer.
Locate the fixture at least 10 cm (4 in.) from adjacent surfaces.
Fasten the fixture to a secure structure or surface. Do not stand it or leave it unfastened where it can be
moved or fall over. When suspending the fixture above ground level, verify that the structure can hold at
least 10 times the weight of all installed devices.
Fastening the fixture to a flat surface
The fixture can be fastened to a hard, fixed, flat surface that is oriented at any angle. Ensure that the surface
and all fasteners used can support at least 10 times the weight of all fixtures and equipment to be installed
on it.
Fasten the fixture securely with at least two fasteners (not supplied) inserted through the 7 mm (1/4 in.)
curved mounting slots in the mounting bracket as shown. The bracket’s 13 mm (1/2 in.) hole may also be
used for fastening.
Use at least two fasteners for installation
AC power
Read ‘Safety information’ before connecting the fixture to AC mains power.
Warning! For protection from electric shock, the fixture must be grounded (earthed). The power
distribution circuit must be equipped with a fuse or circuit breaker and groundfault (earth-fault)
protection.
Protection from eye injury
Do not stare directly into the light output. Ensure that persons are not looking directly into the LEDs when
the product lights up suddenly. This can happen when power is applied.
Do not look at the light output with magnifiers, telescopes, binoculars or similar optical instruments that may
concentrate the light output.
To minimize the risk of eye irritation or injury, disconnect the fixture from power at all times when the fixture
is not in use, and provide well-lit conditions to reduce the pupil diameter of anyone working on or near the
fixture.
Protection from injury
Fasten the fixture securely to a fixed surface or structure with a minimum of two permanent fasteners. Do
not fasten with clamps. The fixture is not portable when installed.
Ensure that any supporting structure and/or hardware used can hold at least 10 times the weight of all the
devices they support.
Check that all external covers and rigging hardware are securely fastened.
Do not operate the fixture with missing or damaged covers, shields or any optical component. If shields,
lenses or ultraviolet screens have become visibly damaged to such an extent that their effectiveness is
impaired, for example by cracks or deep scratches, please contact Projected Image.
Block access below the work area and work from a stable platform whenever installing, servicing or moving
the fixture.
In the event of an operating problem, stop using the fixture immediately and disconnect it from power. Do not
attempt to use a fixture that is obviously damaged.
Do not modify the fixture in any way not described in this manual or install other than parts supplied by
Projected Image.
Socket outlets or external power switches used to supply the fixture with power must be located near the
fixture and easily accessible so that the fixture can easily be disconnected from power.
Connecting the fixture to a switched AC mains circuit provides a convenient way to power the fixture on and
off. Do not use an external dimming system to supply power to the fixture, as this may cause damage to the
fixture that is not covered by the product warranty. The fixture can be hard-wired to a building electrical
installation or a power plug (not supplied with the EU model) that is suitable for the local power outlets can
be installed on the power cable.
If you install a power plug on the power cable, install a grounding type (earthed) plug with integral cable grip
that is rated minimum 250 V, 6 A. Follow the plug manufacturer’s instructions and connect the wires in the
power cable as shown in this table:
Live or L Neutral or N Earth, Ground or US system Black White Green EU system Brown Blue
Yellow/green
The fixture has an auto-ranging power supply that accepts AC mains power at 100V~240V, 50/60Hz. Do not
apply AC mains power at any other voltage or frequency to the fixture.
Operation
Read ‘Before using the product’ before operating the fixture.
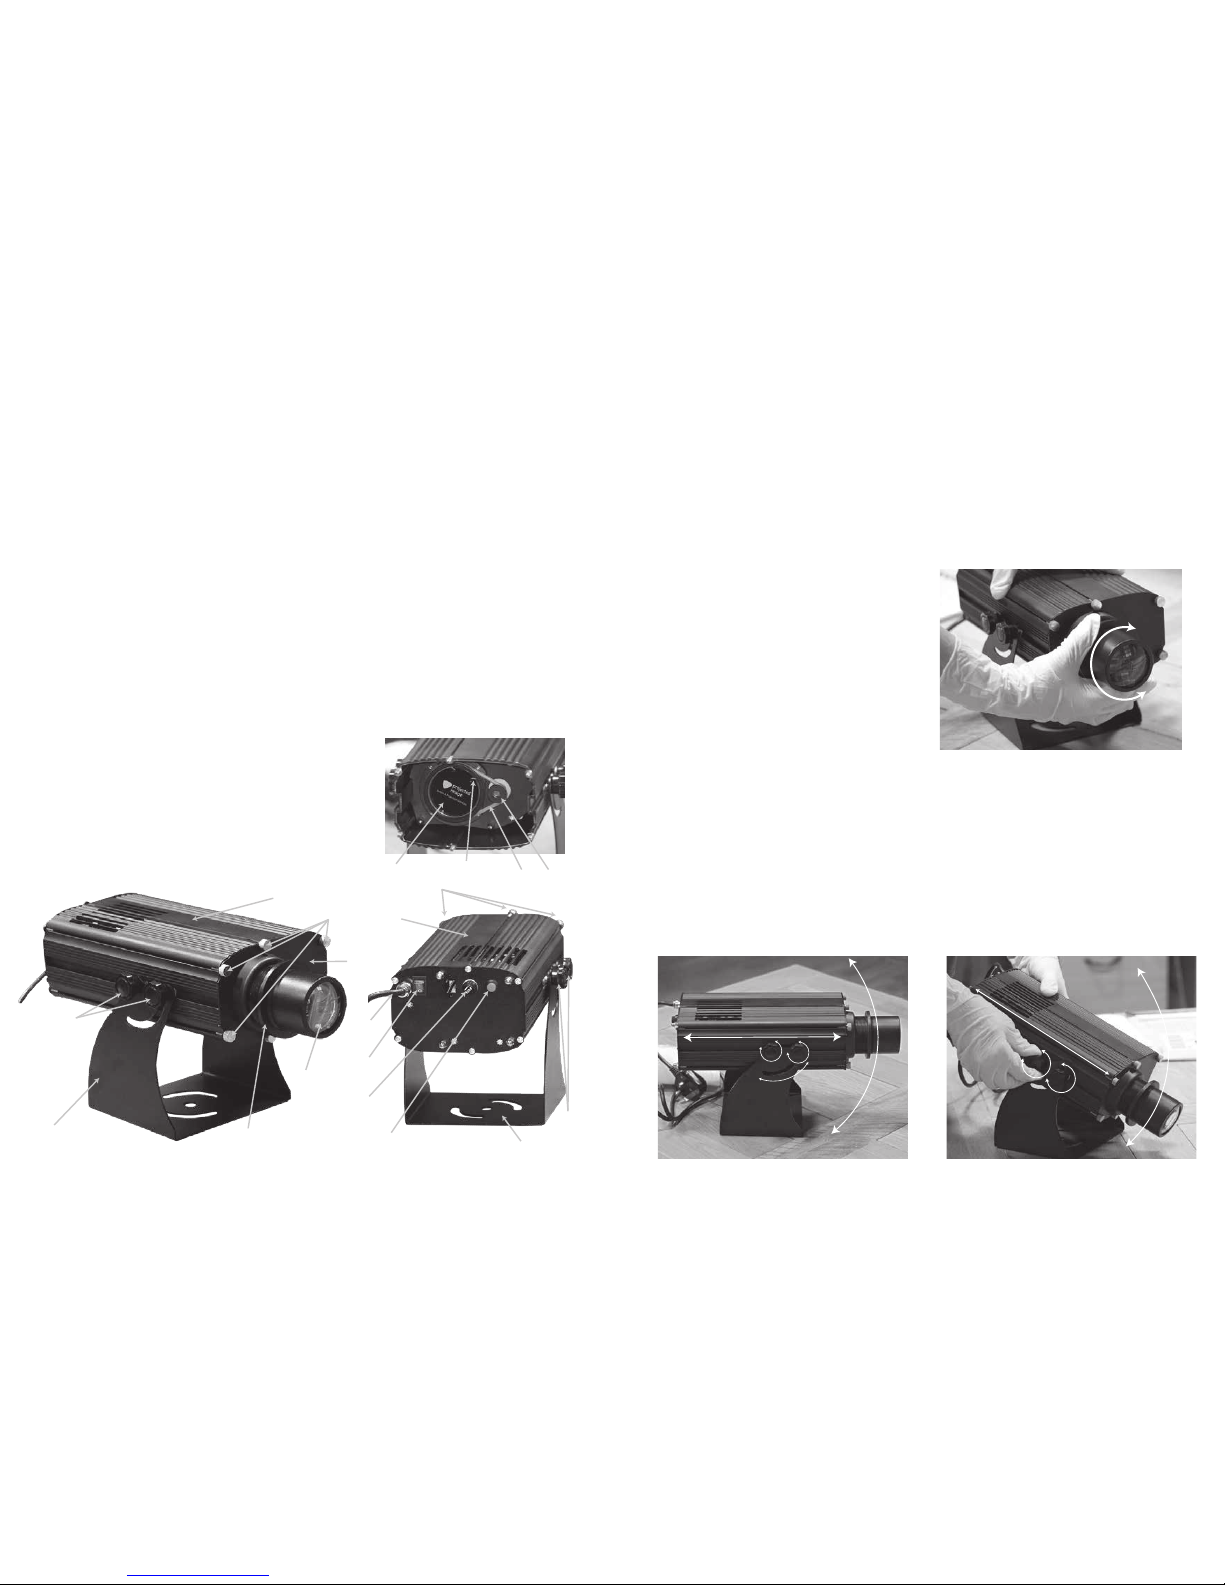
Fixture overview
Key
1. Power button 7. Lens Ring
2. Rotate button 8. Mounting Bracket screws
3. AC power inlet 9. Front panel screws
4. Lens carrier 10. Lens
5. Projector body 11. Fuse
6. Mounting bracket (yoke) 12. Gobo
13. Spring Clip 14. Rotator
15. Rotating Belt
front
9
9
12
13
15
14
4
3
5
5
7
10
6
6
8
1
11
2
8
rear
front interior
Warranty
One Year from Date of Purchase. Keep your receipt for reference and contact us in case of warranty issues.
Projection Lenses
The projector accommodates interchangeable projection lenses to allow optimizing the projection size and
resulting brightness at varying distances. The more narrow the lens, the smaller and brighter the image will
be at a given distance. For example, cutting the projection size in half, will quadruple its brightness.
Focusing
Power up the projector.
If the fixture is equipped with a gobo rotator, turn it on,
once the gobo projects in the desired position, turn it
off.
Focus the projection by twisting the lens in and out
until the image is well focused. When used for the
first time, the lens will often need to be twisted
outwards many rotations to reach the focusing
point. When in doubt, keep going.
Multi-functional Yoke
The yoke can slide over the whole length of the fixture body to accommodate a wide range of pointing
directions.
The yoke can also serve as stand.
The yoke can be screwed to a wall or ceiling or fastened with a C-clamp
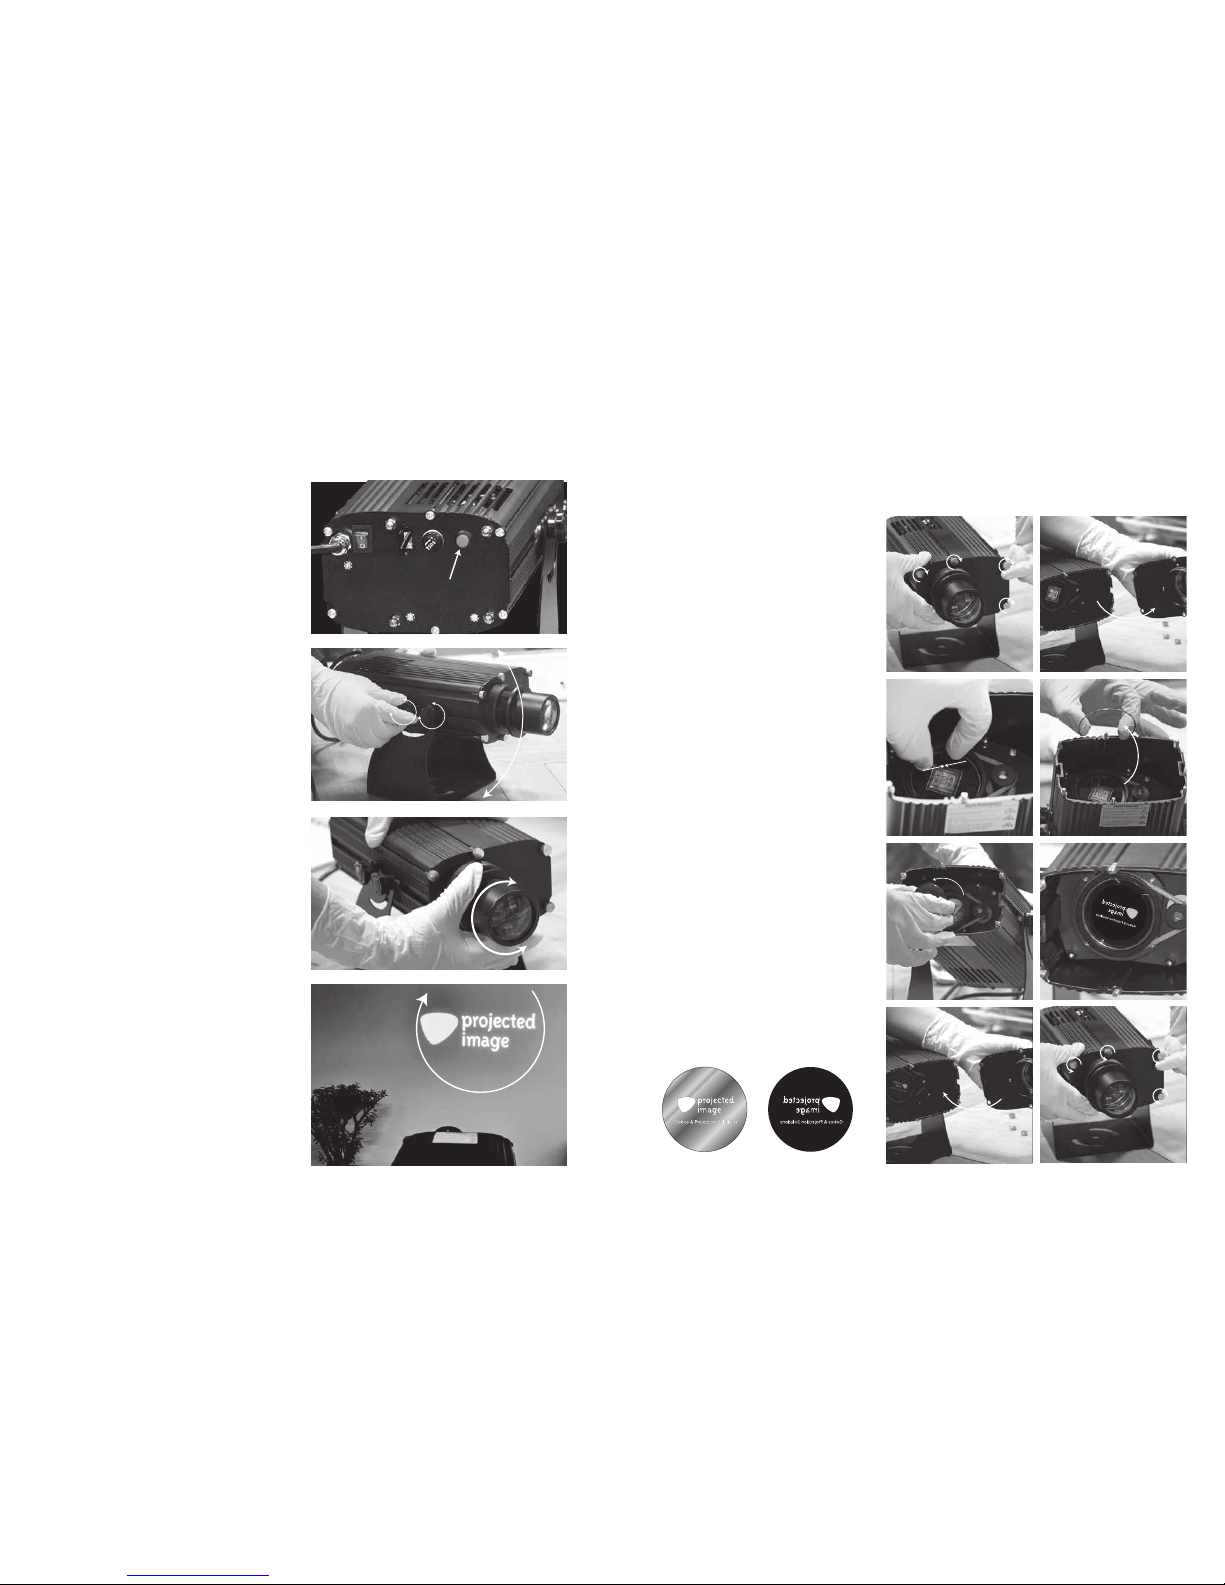
Projecting a gobo
Do not stare directly into the light output. Ensure that persons are not looking directly into the LEDs
when the product lights up suddenly. This can happen when power is applied.
Gobo Rotator
If the fixture is equipped with a gobo rotator, it can be
turned on/off with the red button on the back plate
next of the projector. There are no controls for rotating
speed or direction other than on/off.
To project a gobo and choose a rotation option:
1. Connect the AC power cord to the AC power inlet.
2. Loosen the mounting bracket screws. Aim the
projected image to the desired location. Securely
tighten the mounting bracket screws.
3. Focus the gobo by turning the lens ring on the front
of the lens carrier to obtain the sharpest image.
4. Press the rotation button to set the gobo rotation
which will in turn start to rotate your projection:
Rotation button
Rotation button
Replacing a gobo
The AW 80 Watt LED Gobo Projector accepts 53.3mm glass or metal gobos.
See ‘Gobo’ on page 12 for gobo requirements.
To replace a gobo:
1. Disconnect the fixture from AC power and
allow it to cool for at least 15 minutes after
use.
2. Unscrew the 6 screws on the front of the
projector and remove the front panel and
lens.
3. Remove the metal spring clip from the
gobo holder in the projector body by pinching
together the two ends and removing.
4. Be careful not to touch the surface of the
gobo with un-protected hands, we recommend latex gloves as grease from finger
prints can heat up on the surface of the gobo
resulting in hot spots and cracks. Remove
the gobo.
5. Insert the new gobo in the gobo holder
with the reversed side of the gobo facing the
retaining ring.
6. Place the metal spring clip back into the
gobo holder to hold the gobo in place.
7. Place the front of the projector (includes
Lens) back onto the on the projector body
and screw back in the fixtures.
WARNING: If using a glass gobo the
mirrored side of the gobo always faces
towards the light source to reflect any heat. If
inserted incorrectlythe black side of the gobo
will absorb the heat and eventually burn and
crack.
7. 7.
5. 6.
3. 3.
2. 2.
Mirrored side towards bulb Black side away from bulb

Specifications
Length - 320mm
Width - 200mm
Height - 200mm
Weight - 3.0 kg
Effects
Gobo projection - Static / rotating replaceable gobo
Focus - Manual
Optics and Photometric Data
Light source - 40 W LED array
Beam angle - 20°
Minimum LED lifetime* .................. 30 000 hours (to >70% luminous output)
*Figure obtained under manufacturer´s test conditions
Control
Gobo rotation - On/off
Control input - One onboard control buttons
Construction
Color - Material: rustproof aluminium alloy
Protection rating.- . IP65 (Weatherproof)
Gobo
Size 53.3mm outer diameter and 32mm image diameter
Recommended material - Metal or glass
Maximum thickness - 3.0 mm
Installation
Mounting - Adjustable bracket, surface or floor mount
Location - Indoor or Outdoor use, must be fastened to surface or structure
Orientation - Any
Connections
AC power in - IEC
Electrical
AC power - 100V - 240V / 50 - 60 Hz
Power consumption - 20 W
53.3MM
OUTER DIAMETER
3MM
MAXIMUM
THICKNESS
32MM
IAMGE AREA
Maintenance
Warning! Read ‘Safety information’ before
servicing the fixture.
Refer any service operation not described in this user manual to a lighting technician.
Disconnect mains power before cleaning or servicing the fixture.
Service fixtures in an area where there is no risk of injury from failing parts, tools or other materials.
Cleaning
Excessive dust, smoke fluid, and particle buildup degrades performance, causes overheating and will
damage the fixture. Damage caused by inadequate cleaning or maintenance is not covered by the product
warranty.
The cleaning of external optical lenses must be carried out periodically to optimize light output. Cleaning
schedules for lighting fixtures vary greatly depending on the operating environment. It is therefore impossible
to specify precise cleaning intervals for the fixture. Environmental factors that may result in a need for
frequent cleaning include:
• Use of smoke or fog machines.
• High airflow rates (near air conditioning vents, for example).
• Presence of cigarette smoke.
• Airborne dust.
If one or more of these factors is present, inspect fixtures within their first 100 hours of operation to see
whether cleaning is necessary. Check again at frequent intervals. This procedure will allow you to assess
cleaning requirements in your particular situation. If in doubt, please contact Projected Image about a
suitable maintenance schedule.
Use gentle pressure only when cleaning, and work in a clean, well-lit area. Do not use any product that
contains solvents or abrasives, as these can cause surface damage.
To clean the fixture:
1. Disconnect the fixture from power and allow it to cool for at least 15 minutes.
2. Vacuum or gently blow away dust and loose particles from the outside of the fixture with low-pressure
compressed air.
3. Clean the surfaces by wiping gently with a soft, clean lint-free cloth moistened with a weak detergent
solution. Do not rub glass surfaces hard: lift particles off with a soft repeated press. Dry with a soft, clean,
lint-free cloth or low-pressure compressed air.
Remove stuck particles with an unscented tissue or cotton swab moistened with glass cleaner or distilled
water.
4. Check that the fixture is dry before reapplying power.
Changing the lens
The projector comes with a 25º lens but we can also provide a 10º wide angle lens to acheive larger images
over shorter throw distances.
To replace a lens:
1. Turn the lens housing anti clockwise until the lens detaches from
the front panel.
2. Take the replacement lens and simply screw into the front panel
clockwise until your gobo is focused on the surface you are
projecting onto.

Typical power and current
110 V, 60 Hz - 17.6 W, 0.285 A
230 V, 50 Hz - 17.6 W, 0.163 A
Measurements made at nominal voltage. Allow for a deviation of +/- 10%.
Thermal
Cooling - Convection
Maximum ambient temperature (Ta max.) - 40°C (104°F)
Minimum ambient temperature (Ta min) - 0°C (32°F)
Total heat dissipation* - 65 BTU/hr.
*Calculated, +/- 10%
Approvals
EU safety - EN 60598-2-17 (EN 60598-1), EN 62471, EN 62493
EU EMC - EN 55015, EN 55032, EN 55103-2, EN 61000-3-2,
EN 61000-3-3, EN 61547
US safety - UL 122
US EMC - FCC Part 15 Class A
Canadian safety - CSA C22.2 No. 118-1959
Canadian EMC - ICES-003 Class A
Australia/NZ - C-Tick N4241
Included items
Lens
Custom gobo in gobo holder
Gobo holder clip
Mounting bracket
Power cable, 1.9 m (with mains plug)
Specifications are subject to change without notice. For latest product specifications, see
www.projectedimage.com
Disposing of this product
Products are supplied in compliance with Directive 2012/19/EC of the European Parliament and of the
Council of the European Union on WEEE (Waste Electrical and Electronic Equipment), where applicable.
Help preserve the environment! Ensure that this product is recycled at the end of its life. Your supplier can
give details of local arrangements for the disposal of this projector.
Photobiological Safety Warning
The label shown below is displayed on this product. If it becomes difficult or impossible to read, it must be
replaced using the illustration below to reproduce a new label sized 45 x 18 mm, in black on a yellow
background.
RISK GROUP 2 CAUTION. Possibly hazardous optical radiation emitted from this product. Do not
stare at operating lamp. May be harmful to the eyes.
email: gobo@projectedimage.comweb: www.projectedimage.com
tel:
+44 (0) 191 265 9832
projected image: Unit 17, Hoults Estate, Walker road, Newcastle upon Tyne NE6 2HL
Gobos & Projection Solutions
www.projectedimage.com
Risk in and Ownership of the Goods
Risk in the Goods shall pass to the Buyer on delivery.
Ownership in the Goods shall not pass to the Buyer until the Company has received in full in cleared funds all sums due to the Company in respect of
the Goods and all other sums which are or may become due to the Company from the Buyer on any account.
Until ownership of the Goods has passed to the Buyer, the Buyer shall:
hold the Goods on a duciary basis as the Company’s bailee
store the Goods separately from all other goods of the Buyer or any third party in such a way that they remain identiable as the Company’s property
not destroy or deface any identifying mark on the Goods or their packaging
maintain the Goods in satisfactory condition insured with the Company’s interest noted on the policy and hold any proceeds of such insurance on trust
for the Company and not mix them with any other money.
Warranties
The Company warrants that the Goods are of satisfactory quality.
If the Buyer wishes to make a claim under this warranty, the Buyer shall give written notice to the Company within 30 days of the discovery of the
defect and give the Company a reasonable opportunity to inspect the Goods in question.
The Company shall not be liable for any breach of warranty if the Buyer makes any further use of the Goods after giving such notice or alters or repairs
the Goods without the agreement of the Company.
The Company shall not be liable for any breach of warranty if the Buyer fails to handle the Goods in accordance with the Company’s handling and
installation instructions.
Furthermore, the Goods must be installed by an appropriately qualied technician in accordance with the specications of any projection or lighting
equipment.
The Company’s liability under the warranty shall be limited to repairing or replacing the Goods in question or refunding the price of such Goods.
Exchange and Returns
The Company warrants that the goods are of satisfactory quality. If the Buyer is not satised with the Goods as laid out in the Contract, the Company
may at its sole discretion oer to exchange or re-manufacture said Goods. This is subject to the provisions laid out in paragraph 7 relating to the correct
handling and Installation of the Goods.
Returns Policy
1. All of our projectors come with a 1 year warranty.
2. Goods are NOT supplied on a trial basis.
3. If found to be faulty from new they can be returned for replacement or refund.
4. You have the right to return up to 14 days from the day delivery has been made. Goods that have been made to order or to a chosen specication ( i.e
Gobos) or that have been opened/unsealed cannot be returned under the 14 day "Cooling O Period".
5. You must provide us with written notication either by letter or email giving details of the goods ordered and their delivery where appropriate.
6. Once we have been notied, you must return the goods immediately. You must either return the goods at your own expense or we can arrange
collection of the goods via our courier for a xed fee.
7. The goods must be returned to us in the same condition they were sent out in.
8. Once you have notied us that you wish to return the goods we will refund or re-credit you as soon as possible, but in any event within 30 days, for
any sum that has been paid by you for the goods excluding any extra charges incurred by us at your request, such as Express Delivery Etc.
9. You have a duty of care under these terms to take good care of the goods so that they may be sold again as new. We will claim from you for any
resulting loss in value for goods not kept in such a condition that they may be sold again as new.
10. Refunds will be done within 30 days from cancellation as long as goods have been returned and the sections above have been followed. If the
goods have not been returned refund will not be processed until after the goods have been returned.
9. Limitation of Liability
The Company’s liability in contract, tort or otherwise arising out of the subject matter of the Contract shall not exceed £1,000 and the Company shall
under no circumstances be liable to the Buyer for any consequential, indirect or economic loss or damages.
Terms & Conditions
 Loading...