

Page 1

Pro-Ject Phono Box DS2 USB
INSTRUCTIONS FOR USE
Page 2
2
Dear music lover,
AC outlet voltages vary from country to country. Before connecting to the mains, make sure that the
be used in damp or wet locations, next to a bathtub, sink, swimming pool or any other similar conditions.
gram, disc
RIAA
Never use any other power supply than the one supplied with the unit.
phono 1
Phono 2
Line 3
!
!
!
thank you for purchasing this Pro-Ject Audio phono amplifier.
In order to achieve maximum performance and reliability you should study these instructions for use carefully.
Warning of a hazard for the user, the unit or possible misuse
Important notice
Safety instructions
voltage in your area meets the voltage requirements printed on the power supply.
The power supply is used to disconnect the unit from the mains. Make sure that the power supply is easily
accessible at all times.
Avoid letting liquids enter the device or the power supply. Never place any item containing liquid,
such as a flower vase on or near the device. Never spill any liquid on the device or the power supply.
Never place any naked flame sources, such as lighted candles on or near the device. The product shall not
Never handle the device, the power supply while your hands are wet or damp.
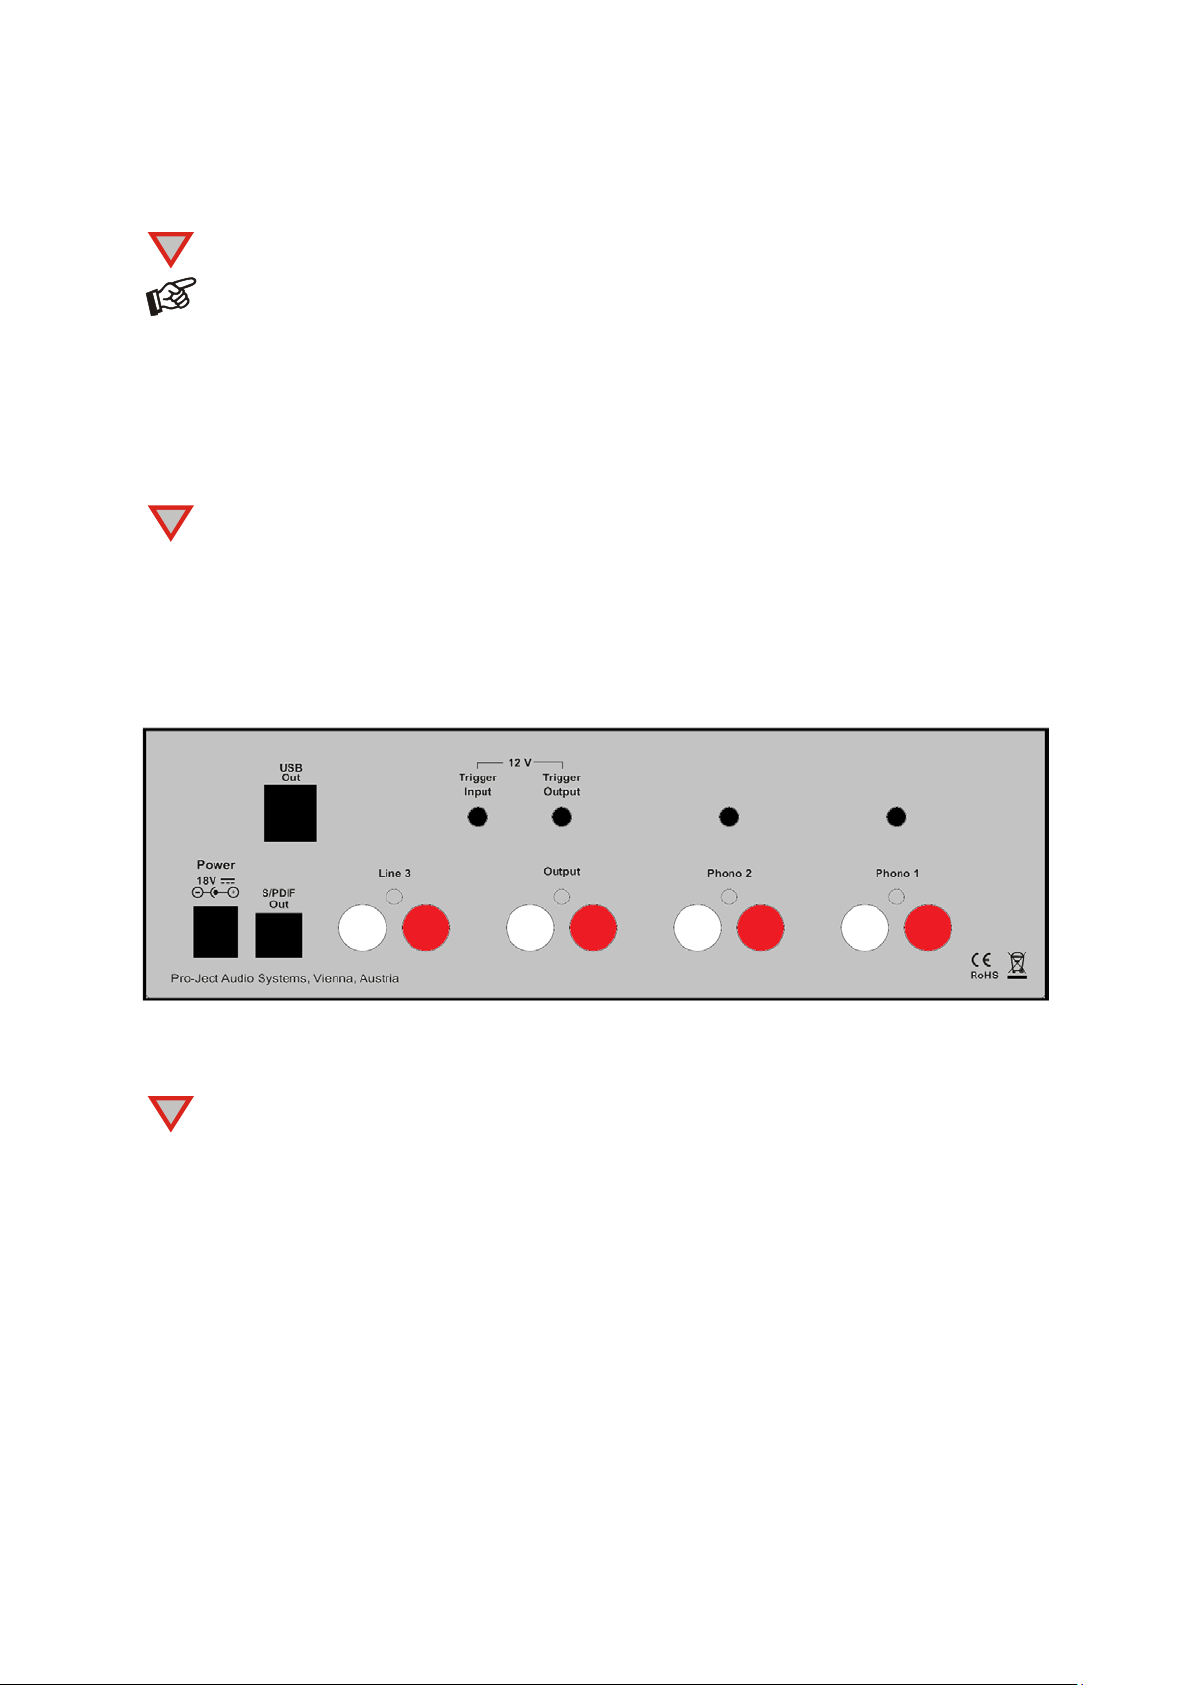
Connectors
Make all connections whilst the phono amplifier is disconnected from the power supply.
Take care to connect the left and right channels correctly. The right channel is usually marked red, the
left channel black or white.
Do not connect the phono amplifiers output to a phono input (sometimes labelled
on the amplifier.
Connecting of record players
Connect left and right channels of the tonearm signal lead to the sockets marked
phono amplifier. It is possible to connect 2 record players at once or connect 2 tonearms from a turntable
equipped by 2 tonearms. The earthing wire(s) may be connected to the screw terminal if you encounter hum
problems when using the record player.
Line level input
Any line level source of signal can be connected to the preamplifier using
and then converted to digital data using coaxial S/PDIF output or USB output.
socket on the backpanel
or
or
)
of the
© Pro-Ject Audio Systems · Pro-Ject Phono Box DS2 USB · Revision 2017.03.31
Page 3
3
Connection to the amplifier
Output
AUX, CD, Tuner, Tape
Video
Power 18V
before
Trigger Input.
Trigger Output
Loading Ω, Loading pF, Gain dB
output MC
idges), into which the
cartridge is designed to work. If in doubt please consult your dealer.
supply and from the mains. Failure to do so may result in damage of the unit.
Connect the
amplifier.
Alternatively connect the S/PDIF digital output to the corresponding digital input of the amplifier or
soundbar.
of the phono amplifier to a line input (such as
or
) on your
Mains power connection and methods to switch the unit on and off
Connect the low voltage plug from the power supply to the
connecting the power supply to the mains. The unit can be switched on and off by using 2 different methods
which are equal in priorities.
socket of the preamplifier
1. Using front pushbutton to switch on or into standby
The pushbutton on the front panel of the unit alternately turns the power on or returns it to standby mode. The
blue LED on the front panel shows that the unit is powered on. If a trigger signal is present the unit can’t be
switched off by the pushbutton.
2. Remote power on - triggers
The unit can be switched on via other Box Design components when a 12V trigger voltage is present at the
2.5mm socket marked
available as accessories. The remote power-on signal can be relayed to further units via the
socket. When the 12V trigger signal is switched off, the unit will also switch off.
Special power-on cables (polarity ) in diverse lengths are
Trigger cables may only be plugged into the sockets when the unit is disconnected from the power
Front panel
Settings
The three function keys
input capacitance and input gain. All settings are stored automatically.
To find out which type your cartridge is, please consult the literature accompanying your cartridge.
The literature for cartridges should also specify the correct input impedance (lowcartridges) and the correct input capacitance (high-output MC and MM cartr
on the right hand side are used to set input impedance,
© Pro-Ject Audio Systems · Pro-Ject Phono Box DS2 USB · Revision 2017.03.31
Page 4
4
Loading Ω (input impedance)
Loading Ω
Loading pF
pF
100, 220
320
Ortofon 2M Red
Ortofon X5-MC
Ortofon Rondo Red
Input
USB Out
Sampling kHz
S/PDIF Out.
USB Out
S/PDIF Out
USB Out.
The button
100Ω-200Ω-1kΩ or 47kΩ for high output MC and MM cartridges)
sets the input impedance to desired value (low output MC cartridges: 10Ω-20Ω-50Ω-
Loading pF (input capacitance)
The button
irrelevant for low-output MC cartridges)
sets the capacitance for high output MC and MM cartridges. (Input capacitance is
- all LEDs off = 47pF. LEDs pF
and
- readout always + 47pF
Gain dB
Gain for the outputs can be set from 40dB to 65dB in steps of 5dB or 10dB. Any change will be automatically stored for the chosen input, when input is changed or the unit is switched into standby mode.
Examples of typical settings
(MM)
(High-Output MC)
(Low-Output MC)
input impedance: 47kohms
input capacitance: 100pF
input gain: 40dB
input impedance: 47kohms
input capacitance: 320pF
input gain: 50dB
input impedance: 10ohms.
input capacitance is irrelevant
input gain: 60dB
Input selector
After the unit is powered on, operating the push button
indicated by the corresponding LED:
1 – Phono 1
2 – Phono 2
3 – Line 3
selects the inputs. The selected input will be
Sampling frequency
If
corresponding LED.
If
192kHz, then
frequency (352,8kHz or 384kHz) deactivate S/PDIF Out and allows to record in DSD128 format. (frequency
always indicated by corresponding LED´s).
is not in use: The push button
Available settings are 48/96/192kHz. The selected frequency will be indicated by the
is connected and active, sampling rate is set from computer. If frequency is set to 48, 96 or
is active and is set to the same frequency as
selects the frequency of digital output signal for
Setting computer to higher
Subsonic
The push button turns on and off subsonic filter
Setting the record level
Record level knob on a front panel set the level of analogue signal going to the A/D converter. Clipping LED
indicates when the level is too high and signal is distorted.
© Pro-Ject Audio Systems · Pro-Ject Phono Box DS2 USB · Revision 2017.03.31
Page 5

5
Connecting to a Computer
USB-hubs or switches can cause problems.
- Phono Box DS2 USB allows following record settings:
1.
2
- VinylStudio Lite record setting:
Check Level:
Input Device:
ASIO Driver:
DSD Input:
Options)
Connect the USB Out of the unit to a free USB-socket on your computer and turn it on/make sure it is
powered on.
* For Windows
Mac OS
Linux operating systems include an USB Audio Class 2 driver from Linux Kernel 2.6.35 and higher.
®
operating systems an USB Class 2 driver (supplied on CD) has to be installed.
®
operating systems do not need an additional driver or setup.
Please note: Connection should be made to an USB-socket of your computer directly. Connecting to
Vinylstudio settings
Pulse-code modulation (PCM):
− 16/24/32-bits at 44.1k / 48k / 88.2k / 96k / 192kHz / 384kHz
. Direct Stream Digital (DSD) over PCM (DoP):
− DSD standard rate: DSD64 at sample rate 176.4kHz
− DSD double rate: DSD128 at sample rate 352.8kHz
− DSD quad rate: DSD256 at sample rate 705.6kHz
−
−
−
ASIO
Project Box ASIO Driver
PCM or DSD (depends on Recording
© Pro-Ject Audio Systems · Pro-Ject Phono Box DS2 USB · Revision 2017.03.31
Page 6

6
Recording Otions:
- AIFF format:
AIFF PCM format:
Check Level:
Recording Options:
AIFF DSD format:
Check Level:
Recording Options:
- DFF format:
Check Level:
Recording Options:
- DSF format:
Check Level:
Recording Options:
- FLAC format:
-
-
−
−
− Enable DoP detection
− DSD Rate: DSD standard / double / quad rate
−
−
− Enable DoP detection
− DSD Rate: DSD standard / double / quad rate
− Available with full license only!
−
−
− Disable DoP detection
− Sample Rate: 44.1k / 48k / 88.2k / 96k / 192kHz / 384kHz
− Bit Depth: 16/24/32-bits
−
−
− Enable DoP detection
− Sample Rate: DSD standard / double / quad rate
− Bit Depth: N/A (24-bits PCM)
DSD Input: DSD standard / double / quad rate
DSD Input: DSD standard / double / quad rate
DSD Input: PCM
DSD Input: DSD standard / double / quad rate
© Pro-Ject Audio Systems · Pro-Ject Phono Box DS2 USB · Revision 2017.03.31
Page 7

7
- FLAC PCM format:
Check Level:
Recording Options:
FLAC DSD format:
Check Level:
Recording Options:
- MP3 format:
Check Level:
Recording Options:
- OGG format:
Check Level:
Recording Options:
- WAV format:
WAV PCM format:
Check Level:
Recording Options:
WAV DSD format:
Check Level:
Recording Options:
-
-
-
−
−
− Disable DoP detection
− Sample Rate: 44.1k / 48k / 88.2k / 96k / 192kHz / 384kHz
− Bit Depth: 16/24/32-bits
− Compression: 0-8
−
−
− Enable DoP detection
− Sample Rate: DSD standard / double / quad rate
− Bit Depth: N/A (24-bits PCM)
− Compression: 0-8
− LAME MP3 Encoder installation and localization required!
−
−
− Disable DoP detection
− Sample Rate: 44.1k / 48kHz
− MP3 Quality: CBR@16-320kbps, ABR@16-320kbps, VBR@0-9
−
−
− Disable DoP detection
− Sample Rate: 44.1k / 48kHz
− Quality: ABR@48-448kbps, VBR@0-10
−
−
−
−
DSD Input: PCM
DSD Input: PCM
− Disable DoP detection
− Sample Rate: 44.1k / 48k / 88.2k / 96k / 192kHz / 384kHz
− Bit Depth: 16/24/32-bits
− Enable DoP detection
− Sample Rate: DSD standard / double / quad rate
− Bit Depth: N/A (24-bits PCM)
DSD Input: PCM
DSD Input: DSD standard / double / quad rate
DSD Input: PCM
DSD Input: DSD standard / double / quad rate
© Pro-Ject Audio Systems · Pro-Ject Phono Box DS2 USB · Revision 2017.03.31
Page 8

8
Change Playback Device:
-
Monitor Recording
Monitor Recording
Monitor Recording
Playback To
cable when units are powered on).
DSD records playback:
If ASIO is used as input device, then playback device can´t run on the same driver.
i.e.: if Pro-Ject USB audio driver shows more connected devices (on the screenshot below is
Device 0 – Recordmaster, Device 1 Maia DS) Then the second device can´t be selected as
a playback device for
− Do not use
signals in optical output
−
(except the case of ASIO described above):
In case of no sound of Monitor Recording try to restart playback USB device. (Do not reconnect USB
can be used for any other playback device available in
, if playback device is Phono Box DS2 USB to avoid mixing
.
list
© Pro-Ject Audio Systems · Pro-Ject Phono Box DS2 USB · Revision 2017.03.31
Page 9

9
- AIFF, FLAC, WAV format:
- DFF, DSF format:
Setting of a recording device in Windows 7/8/10:
− These DSD files with DSD data and DoP markers are possible to play on DACs with ASIO
DoP Marker 0x05/0xFA support
− These files don´t contain DoP markers (Native DSD format), playback is possible with
suitable DAC´s with ASIO Native DSD support and also with DAC´s with ASIO DoP
Marker 0x05/0xFA support if playback software allows this (e.g.: J-River or Foobar2000
with plugin foo_dsd_asio)
Start > Control Panel > Sound > Recording
© Pro-Ject Audio Systems · Pro-Ject Phono Box DS2 USB · Revision 2017.03.31
Page 10

10
Select -Phono Box DS2 USB USB 2.0 Audio In- and go to Properties > Listen
Go to Advanced and select desired sample rate and bit depth
© Pro-Ject Audio Systems · Pro-Ject Phono Box DS2 USB · Revision 2017.03.31
Page 11

11
Technical specifications Pro-Ject Phono Box DS2 USB
A
Typical for low output MC cartridges, B typical for MM or high output MC cartridges
* Input capacitance is irrelevant for low-output MC cartridges
Input impedance: 10, 20, 50, 100, 200ohms, 1000 ohms and 47kohmsA
Input capacitance/impedance: 100pF, 220pF and 320pF */47kohms B
Input gain: 40, 45, 50, 60, 65dB
Noise floor: 80dB (A weighted) at 40dB input gain
THD: <0,02%
RIAA-equalisation curve accuracy: 20Hz - 20kHz / max. 0,3dB
Subsonic filter: at 20Hz with 12dB/octave
Phono Inputs: 2 pairs RCA/phono sockets
Line input: 1 pair RCA/phono sockets
Line output: 1 pair RCA/phono sockets
Digital outputs: 1x USB B-type
1x S/PDIF optical
Outboard power supply: 18V/500mA DC, suitable for your country's mains supply
Power consumption: 100mA DC, <1W in standby
Dimensions W x H x D (D with sockets): 206 x 71 x 226 aluminium
240 x 72 x 227 wood
Weight: 1340g aluminium, 1780g wood (without any accessories)
© Pro-Ject Audio Systems · Pro-Ject Phono Box DS2 USB · Revision 2017.03.31
Page 12

12
Potential incorrect use and fault conditions
The manufacturer accepts no responsibility for damage caused by not adhering to these instructions
manufacturer from any liability over and above the lawful rights of the customer.
Pro-Ject Audio Systems is a registered Trademark of
No signal on one or both channels:
No connection between player and phono amplifier or amplifier. This could be due to a faulty plug,
broken wire or solder joint or simply loose plug/socket connection.
Strong hum:
No earth connection from cartridge or arm, or arm cable to phono amplifier, or earth loop.
Output too quiet or too loud, or distorted:
Input gain incorrectly set - input overloading or insufficiently amplified.
Service
Should you encounter a problem which you are not able to alleviate or identify, please contact your dealer for
further advice. Only if the problem cannot be resolved there, the unit should be sent to the responsible
distributor in your country.
Warranty
for use. Modification or changes to any part of the product by unauthorized persons release the
Copyright, trademarks
H. Lichtenegger.
This guide was produced by: Pro-Ject Audio Systems
Copyright
Windows
Microsoft group of companies. Mac
other countries. DSD and the DSD logo are trademarks of Sony Corporation.
©
2017. All rights reserved.
®
, Windows XP®, Windows Vista®, Windows 7®, Windows 8®, Windows 10® are trademarks of the
®
and Mac OS® are trademarks of Apple Inc., registered in the U.S. and
The information was correct at the time of going to
press. The manufacturer reserves the right to make
changes to the technical specification without prior
notice as deemed necessary to uphold the ongoing
process of technical development.
© Pro-Ject Audio Systems · Pro-Ject Phono Box DS2 USB · Revision 2017.03.31
 Loading...