


6/12/24V 40A 8 STAGE AUTOMATIC
CHARGER & BATTERY MANAGER
WORKSHOP
P/No. HDBM4000

2
IMPORTANT SAFETY INFORMATION
Please read this manual thoroughly before use and store in a safe place for future
reference.
WARNINGS
• Explosive gases. Prevent flames and sparks. Provide adequate ventilation during
charging.
• Before charging, read the instructions.
• For indoor use. Do not expose to rain.
• For charging lead acid batteries ONLY (of the size & voltage specified in the
specifications table).
• Always charge the battery on the correct voltage setting. Never set the charger to a
higher voltage than the battery.
• Disconnect the 240V mains supply before making or breaking the connections to
the battery.
• The battery charger must be plugged into an earthed socket-outlet.
• Connection to supply mains is to be in accordance with National wiring rules.
• Do not attempt to charge non-rechargeable batteries.
• Never charge a frozen battery.
• If the AC cord is damaged do not attempt to use. It must be replaced or repaired by
a qualified person.
• Corrosive substances may escape from the battery during charging and damage
delicate surfaces. Store and charge in a suitable area.
• Ensure all vehicle accessories including lights, heaters, appliances etc are turned off
prior to charging.
• This charger is not intended for use by persons (including children) with reduced
physical, sensory or mental capabilities, or lack of experience and knowledge, unless
they have been given supervision or instruction concerning use of the appliance by a
person responsible for their safety.
• Young children should be supervised to ensure that they do not play with the
appliance
• Only use the hanger bolts provided with the docking station to mount on the back of
the charger

3
INDEX
1. Features Page 4
1.1 Specifications Page 6
1.2 Product Overview Page 7
1.3 Assembly/Set Up Page 9
2. Operation Page 10
2.1 Setting Battery Voltage Page 11
2.2 Pulse –Tronic Charge Page12
2.2.1 Charge Function Modes Page 12
2.2.2.1 Storing Pulse-Tronic Charge Page 14
2.2.2.2 Storing Supply/Diagnostic Mode Page 14
2.3 Battery and Alternator Test Page 15
2.3.1 Battery Test Page 15
2.3.2 Charge System Test (Alternator) Page 16
2.3.3 Battery Starting Charge Capacity (CCA) Page17
2.4 Battery Maintenance Page 18
2.4.1 Desulfation Page 19
2.4.2 Equalisation Page 19
2.5 Power Supply Page 21
2.5.1 Diagnostic Page 22
2.5.2 Supply Page 23
2.6 Engine Start Page 25
2.6.1 Procedure Page 25
2.7 Alarms Page 26
3. FAQ’s Page 27

4
1. FEATURES
AUTOMATIC 8 STAGE CHARGING
Automatic 8 stage charging delivers a complete and thorough charge giving your
batteries longer life & better performance. Once the battery is fully charged, the
battery charger will continue to monitor the battery without the risk of overcharging.
STAGE 1: Checks battery settings with battery
STAGE 2: Desulphation stage is designed to break down sulphation occurring in
batteries that have been left flat for extended periods of time, returning them back
to full charge. Sulphation occurs when lead-sulphate hardens and clogs up the
battery cells.
STAGE 3: Soft Start, This is a preliminary charge process that gently introduces power
to the battery, protecting the battery and increasing battery life.
STAGE 4: Bulk stage reduces charging time by charging the battery at the maximum
rate (constant current) to a set voltage, at which point the battery is approximately
80% charged.
STAGE 5: Absorption stage charges the battery to 100% by adjusting the charge rate
allowing the battery to absorb more power.
STAGE 6: Analysis mode tests the battery to ensure that it has taken the charge;
if the battery passes the test the charger will proceed to the float stage, but if the
battery fails the test, the charger will apply a recondition charge to try to return the
battery to full charge.
STAGE 7: Float stage maintains the battery at 100% charge without overcharging or
damaging the battery.
STAGE 8: Pulse Float, provides a long term storage charge to the battery by only
providing charge when required.
ENGINE START FUNCTION
Starts vehicles with a flat battery after a controlled 5 minute charge.
LCD DISPLAY
The battery charger is fitted with an LCD digital display that displays the,
battery voltage & Amp readings, correct connection and other warning messages
during operation.
V
12345678

5
AUTO/MANUAL ADJUSTABLE OUTPUT
Manually or use the Automatic charge setting feature to adjust the rate of charge to
best suit different battery sizes.
MULTI VOLTAGE OPERATION
Suitable for charging 6V, 12V & 24V batteries.
SHORT CIRCUIT & POLARITY PROTECTION
POWER SUPPLY MODE
Supply Power to the vehicle whilst the battery is being changed.
DIAGNOSTICS POWER SUPPLY
Supplies stabilised power to the vehicles MCU whilst receiving software updates.
BATTERY CHEMISTRY SELECTION
The Multi-Chem function allows you to set the charging profile to suit each battery’s
chemistry type (GEL, AGM, WET and Calcium). This ensures correct and thorough
charging and maximises battery performance and battery life. The following section
describes the charge profiles for each chemistry type.
MANUALY SET EQUALISATION
Manually configure an Equalisation routine to balance all the cells of the battery.
MANUALY SET DESULPHATION
Manually perform Desulphation on the battery.
BATTERY AND ALTERNATOR TESTING
Test Battery Voltage.
Performs a check on the Alternator.
Checks the battery while starting.
SILENT MODE
The charger can run with the fan turned off where it is important for the charger to
be running silent, like a car show room.
OPTIONAL 6 & 10 METRE LEADS
Optional 6 or 10 metre battery leads can be purchased for applications where longer
leads are required.

6
1.1 SPECIFICATIONS
P/No. HDBM4000 6V 12V 24V
Type 8 Stage Automatic
Input 240V, 50Hz, 600W
Output 3-40A 3-40A 3-20A
Engine Start – 70A for 3 sec –
Minimum Start 2.0V 2.0V 2.0V
Voltage
Charge Voltages (Absorption)
AUTO 7.2V 14.4V 28.8V
AUTO i 7.7V 15.4V 30.8V
GEL 7.2V 14.4V 28.8V
AGM 7.35V 14.7V 29.4V
WET 7.7V 15.4V 30.8V
Calcium 8.0V 16.0V 32.0V
Float Voltage 6.7V 13.5V 27.0V
Back Drain 20mA 50mA 80mA
Approvals Electrical Safety, EMC
Type 6 & 12V 24V Time
Battery Range Battery Range
Automotive (CCA) 100 3700 100 2000 6 – 15
Marine (MCA) 120 4600 120 2300 8 – 18
Deep Cycle (AH) 14 600 14 300 7 – 17

7
1.2 PRODUCT OVERVIEW
Figure A
1 2 3 4
5
6
18
17
16
20
19
711 91015 13 1214 8
21 2322
1. Display of the set battery voltage value.
2. Main display. Display: measured battery voltage, current, Ah selection, voltage
value selected for the Supply / Diagnostic / Equalization programs, interface
messages for the operator, alarm codes.
3. Polarity inversion, short circuit, worn out or faulty battery alarm.
4. Set current, voltage and Alarm codes“AL1 - AL9”
5. Battery charge level.
6. Choice of the Pulse Tronic charge current:
AUTO, BOOST, Customised (Ah setting).
7. Low temperature function “COLD”.
8. “SILENT NIGHT” function.
9. EQUALIZATION mode.
10. DESULFATION mode.

8
11. Choice of the battery production technology:
WET: lead-acid batteries with liquid electrolyte;
GEL: lead-acid batteries, sealed, with solid electrolyte;
AGM: lead-acid batteries, sealed, with electrolyte on absorbent material;
PbCa: lead-calcium batteries.
12. SUPPLY mode.
13. DIAGNOSTIC mode.
14. PULSE TRONIC charge process phases.
15. START mode.
16. Automatic charge mode.
17. Pulse Tronic charge.
18. Alternator Test Function.
19. Battery starting capacity test.
20. Battery charge status test.
21. BATTERY VOLTAGE – Settings button:
– Battery voltage 6/12/24V.
– Silent mode.
– Voltage/Current adjustment.
22. MODE – Settings button:
– Pulse Tronic CHARGE (AUTO, AUTO d, WET, GEL, AGM, PbCa).
– TEST (battery status, vehicle alternator, battery starting capacity).
– Advanced Programmes (DESULFATION, EQUALIZATION, DIAGNOSTIC, SUPPLY).
– Voltage/Current adjustment.
23. CHARGE RATE – Settings button:
– Output current (AUTO, BOOST, customised);
– START mode.

9
1.3 ASSEMBLING CHARGING LEADS TO BATTERY CLAMPS
The HDBM400 battery charger is shipped with the battery clamps disconnected from
the positive & negative charging leads.
IMPORTANT:
• The negative (Black) battery clamp must be connected to the charging lead with
the black heat shrink on the lug.
• The positive (Red) battery clamp must be connected to the charging lead with the
red heat shrink on the lug.
To connect both the positive and negative leads to the battery clamps refer to the
instructions below:
1. Remove the M6 Dome head bolt from the clamp.
2. Fit the lug on the end of the charging lead to the battery clamp.
3. Tighten the lug.
1.3.1 CABLE CALIBRATION: the possibility of using different length charging
cables requires initial calibration so as to compensate the drop in voltage along
the cables.
CALIBRATION PROCEDURE
– press and hold the BATTERY VOLTAGE button (fig. A.21) and plug the cable into
the mains socket;
– continue to hold the BATTERY VOLTAGE button (fig. A.21) until the digits “3 m”
or “6 m” or “10 m” flash on the display;
– select the required value using the MODE button (fig. A.22);
– wait 5” for the selection to be confirmed.

10
INITIAL CONDITION
Keep pressed the button “Battery Voltage” and plug into mains socket.
Release button “Battery Voltage” after 7”.
2. OPERATING INSTRUCTIONS
Follow the instructions in the order given below.
1. Remove the battery covers (if present), so that the gas produced during charging
can exit.
ò
7”
+
230V - 1ph 50/60 Hz
7”
BEEP
BATTERY VOLTAGE
BATTERY
VOLTAGE
DEVICE OFF
CABLE CALIBRATION
DISPLAY
DISPLAY

11
a. Make sure the level of electrolyte covers the battery plates; if they are
not covered, add distilled water until they are submerged by 5–10 mm.
ATTENTION! BE VERY CAREFUL WHILE CARRYING OUT THIS OPERATION
BECAUSE THE ELECTROLYTE IS AN EXTREMELY CORROSIVE ACID.
2. Check the polarity of the battery terminals: the (+) symbol is positive, the (- )
symbol is negative.
3. Connect the red clamp to the positive terminal on the vehicle battery (+ symbol).
4. Connect the black clamp to the vehicle chassis. Do not connect near the fuel pipe.
5. If the battery is not installed inside the vehicle, directly connect to the negative
battery terminal (- symbol).
Now the charger can be used to Charge a battery, Test the battery Voltage,
Test the cranking of the vehicle, Test the alternator, Perform equalization,
Sulphation and Power Supply modes (Diagnostic and Powersupply mode).
When finished using the charger
6. Disconnect the battery charger by removing the power cable from the
mains socket.
7. Disconnect the black charge clamps from the vehicle or from the negative battery
terminal (- symbol). Disconnect the red charging clamp from the positive battery
terminal (+ symbol).
8. Return the battery charger to a dry place. Close the battery cells again, using the
relative caps (if present).
2.1 SETTING BATTERY VOLTAGE
Use the “BATTERY VOLTAGE” button (fig. A.21), to set the rated voltage for the
battery (fig. A.1) to be charged.
After connecting the clamps to the battery terminals:
– if the value detected is higher than the set value (fig. A.1), an “AL.2” error
message (fig. A.2) is displayed;
– if the value detected is lower than the set value, the display (fig. A.1) starts
to flash for 5 seconds giving time to change the voltage value displayed in
(fig. A.1).
NOTE. The no battery connected status is indicated by the flashing (fig. A.5) symbol.
BATTERY VOLTAGE
DISPLAY
VOLTAGE SELECTION
12
2.2 PULSE-TRONIC CHARGE
2.2.1 CHARGE FUNCTION MODES
There are various Pulse Tronic charge procedures that depend on the battery
construction technology (T) and the charge current (C). When the battery is charged,
the battery charger switches automatically to maintenance mode.
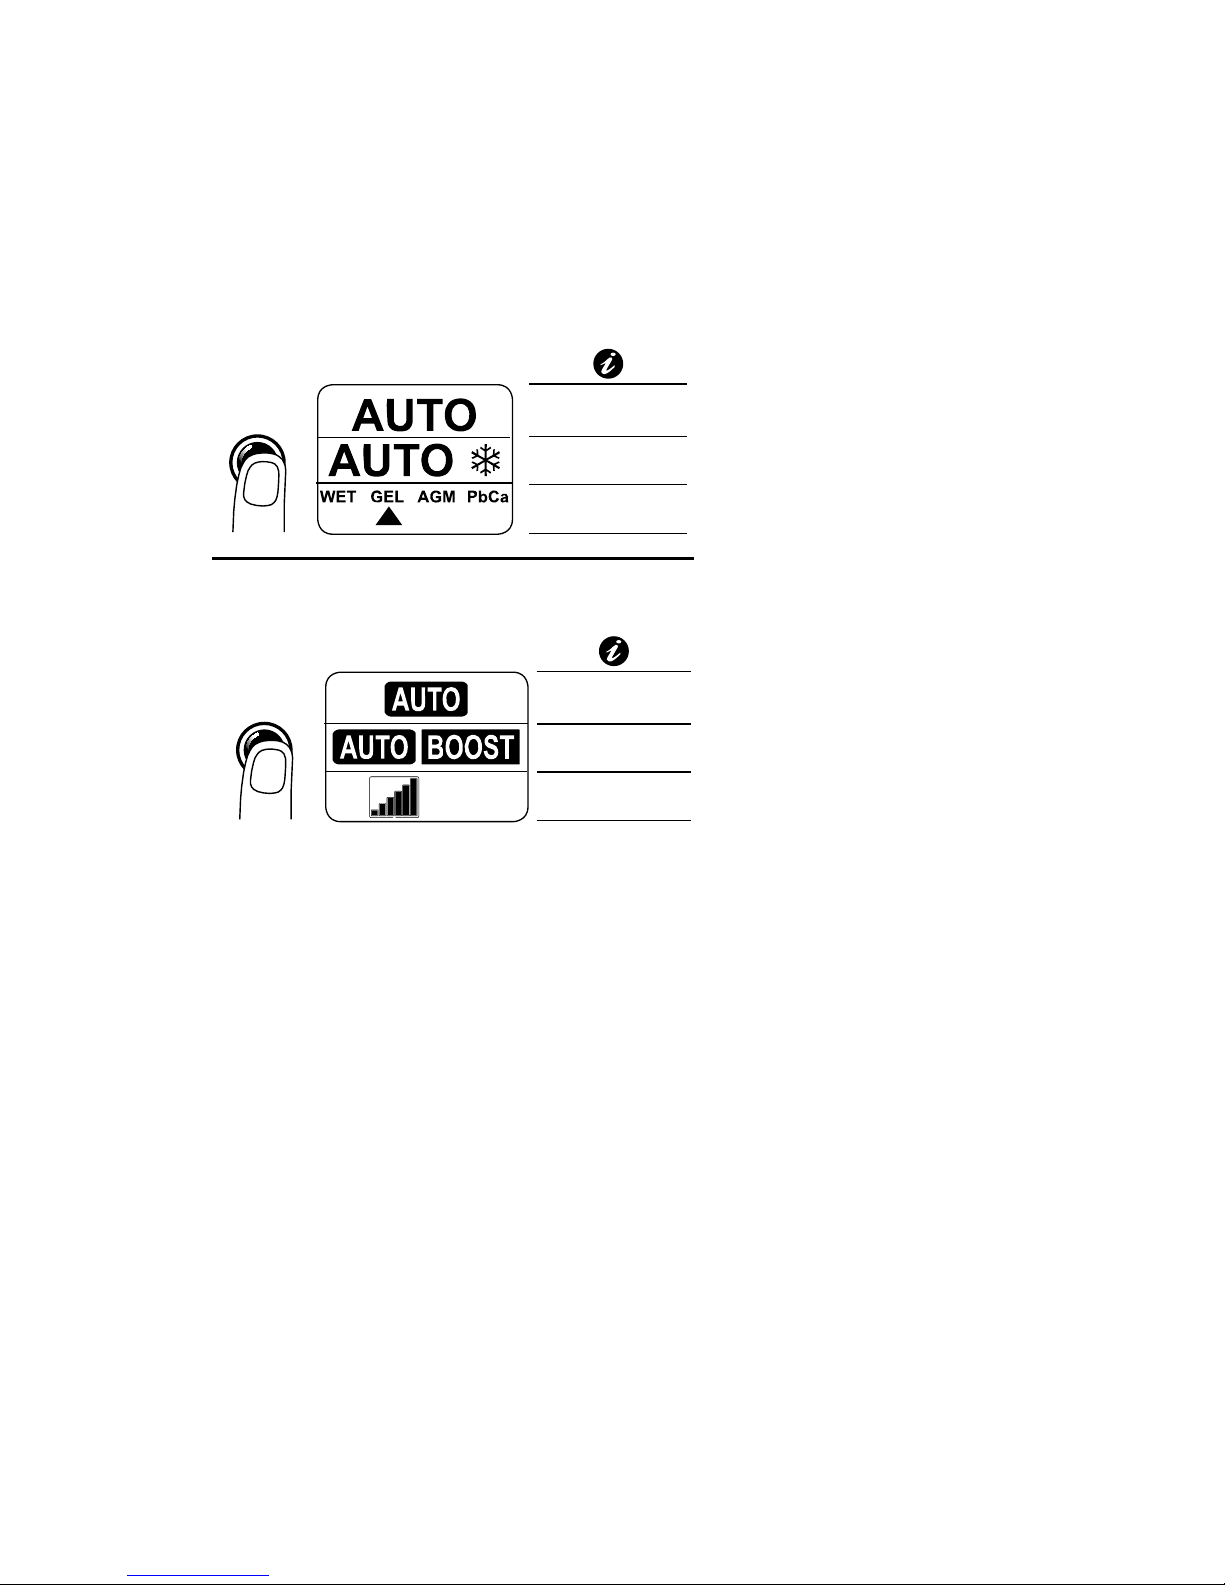
a) AUTOMATIC PULSE-TRONIC
(T) AUTO (C) AUTO
Both the identification of the battery construction technology (fig. A.16)
and the current needed to charge it function in automatic mode (fig. A.6).
This function mode is recommended when there is no information on the
battery type.
b) AUTOMATIC PULSE-TRONIC AT LOW
TEMPERATURES (COLD fig. A.7)
(T) AUTO d (C) AUTO
Mode that improves the battery charge when the temperature is very low.
Low temperature can influence the chemical structure of the battery
components, therefore this function optimises the charge process according
to this reduction in temperature.
This feature applies to the WET, AGM, PbCa batteries only.
When the battery is charged, the battery charger switches automatically to
maintenance mode.
DISPLAY
CHARGE
RATE
MODE
AUTOMATIC
AUTOMATIC
WINTER
T<0°C
MANUAL
CURRENT SELECTION
Ah
DISPLAY
AUTOMATIC
QUICK CHARGE
MANUAL
BATTERY TYPE SELECTION

13
c) CUSTOMISED PULSE-TRONIC
It is possible to select:
– the battery construction technology (fig. A.11)choosing between:“WET, GEL,
AGM, PbCa”
– the charge current (fig.A.6) choosing between:“AUTO” - automatic setting
according to battery conditions;“BOOST” - rapid charge;
– the Ah - customised setting of the battery Ah (fig.A.2) using 6 predefined
values selected using the “CHARGE RATE” button (fig. A.23), adjustable
at 5 Ah intervals using the “BATTERY VOLTAGE” button (fig. A.21),
and“MODE” (fig. A.22).
Note. The final charge voltage depends on the technology of construction of the
battery; to avoid damaging the battery, pay special attention to the technical
specifications given by the manufacturer.
The PULSE TRONIC charge process (fig. A.17) starts when the display stops flashing,
each individual phase is identified on the display (fig.A.14) and terminates with
the message (fig. A.2) “OK”. The battery charge status is displayed graphically in
(fig. A.5). If the charge process is not successful, an alarm message appears on the
display (fig. A.2) (see alarms list). When the battery is charged, the battery charger
switches automatically to maintenance mode.
15Ah 100Ah 300Ah
►
15Ah 100Ah 300Ah
DISPLAY
80Ah
75Ah
70Ah
. . . . .
. . . . .
100Ah
95Ah
90Ah
CHARGE
RATE
MODEBATTERY VOLTAGE
Ah SETTING – EXAMPLE
Charge Rate Amps Amp hours CCA
3 15 90
7 70 420
10 100 600
20 200 1200
30 300 1800
40 600 3600

14
CHARGE COMBINATION CHART
2.2.2 CHARGE FUNCTION MODES
It is possible to store the last function modes, so they are immediately available
after any switching ON/OFF.
2.2.2.1 STORING PULSE-TRONIC CHARGE
Storage of voltage and type of battery, charge mode.
Procedure:
– Check that the charge clamps are not connected to a battery;
– Connect the power cable to the mains socket;
– Set the desired charge mode;
– Disconnect the power cable from the mains socket.
2.2.2.2 STORING SUPPLY/DIAGNOSTIC MODE
Storage of delivered voltage and current.
Procedure:
– Set the chosen mode and adjust the voltage/current values as required;
– Turn on the lock settings by pressing, at the same time, both keys
“BATTERY VOLTAGE” (fig.A.21) and “CHARGE RATE”(fig.A.23) for
3 seconds, on the display (fig.A.2)(fig.A. 4) will appear “LOK on.”
15Ah 100Ah 300Ah
►
15Ah 100Ah 300Ah
DISPLAY
80Ah
75Ah
70Ah
. . . . .
. . . . .
100Ah
95Ah
90Ah
CHARGE
RATE
MODEBATTERY VOLTAGE
Ah SETTING – EXAMPLE
END OF CHARGE – EXAMPLE
Battery Type (T) Battery Current (C)
AUTO Auto
Auto Boost
Manual ‘Ah’
AUTO i Auto
Auto Boost
Manual ‘Ah’
WET, GEL, AGM, PdCa Auto
Auto Boost
Manual ‘Ah’

15
2.3 BATTERY AND ALTERNATOR TEST
The measurements can be performed with the battery connected to the vehicle,
after connecting the clamps. Select the measurement to be performed using the
“MODE” button (fig. A.22). On completing the test(s) disconnect the power cable
from the mains socket and disconnect the clamps from the battery terminals.
NB: it is only possible to perform the tests without a power supply if the tests type
selection is made after connecting the clamps to the battery terminals.
2.3.1 BATTERY TEST
Measure the voltage of the batery terminals.
Procedure
– press the “MODE” button (fig. A.22) to select the function and the battery type
(fig. A.20);
– connect the clamps to the battery terminals;
– press the “BATTERY VOLTAGE” button (fig. A.21) to select the battery voltage
(fig. A.1);
The measured voltage is indicated on the display (fig. A.2) and the battery status is
indicated in graph format (fig. A.5).
MODE
BATTERY TEST SELECTION
DISPLAY
to be charged to be charged
full
LEGEND
END OF TEST - EXAMPLE

16
2.3.2 CHARGE SYSTEM TEST (ALTERNATOR)
Measure the voltage of the batery terminals.
Procedure
– press the “MODE” button (fig. A.22) to select this function (fig. A.18); the
message “Bad”appears on the display (fig. A.2);
– connect the clamps to the battery terminals;
– press the “BATTERY VOLTAGE” button (fig. A.21) to select the battery voltage
(fig. A.1);
– switch on the engine, taking it to approx. 1500 rpm;
– switch on all the lights (full headlights, courtesy lights, etc.) and all the
accessories at maximum level (air conditioning, radio, etc.);
– check the display (fig. A.2) to read the alternator functions and following status:
– “OK” – CHARGING IN PROGRESS;
– “SUF”” – SUFFICIENT CHARGE;
– “BAD”” – INSUFFICIENT CHARGE.
to be charged to be charged
full
DISPLAY
LEGEND
MODE
END OF TEST - EXAMPLE
ALTERNATOR TEST SELECTION
END OF TEST – EXAMPLE
working
sufficient insufficient
LEGEND

17
2.3.3 BATTERY STARTING CHARGE CAPACITY (CCA)
Measure the voltage of the batery terminals.
Procedure
– press the “MODE” button (fig. A.22) to select this function (fig. A.19);
– connect the battery terminal clamps, the message“Go” appears on the display
(fig. A.2);
– press the “BATTERY VOLTAGE” button (fig. A.21) to select the battery voltage
(fig. A.1);
– start the engine;
– check the display (fig. A.2) to read the battery starting capacity and the
following status:
– “OK” - STARTING CAPACITY OK;
– “SUF” - SUFFICIENT STARTING CAPACITY;
– “BAD” - INSUFFICIENT STARTING CAPACITY.
END OF TEST – EXAMPLE
working
sufficient insufficient
LEGEND
MODE
END OF TEST – EXAMPLE
CCA TEST SELECTION
working sufficient insufficient
DISPLAY
LEGEND

18
2.4 BATTERY MAINTENANCE
The device has two advanced operating modes for the maintenance of 6/12/24V
batteries (ADVANCED PROGRAMS), press and hold the “MODE”button for 3
seconds (fig. A.22) recommended for AGM and WET type batteries:
– DESULFATION: recovery of sulphated batteries (fig. A.10);
– EQUALIZATION: reset of optimal battery conditions (fig. A.9).
On completing the selected process, disconnect the power cable from the mains
socket and disconnect the clamps from the battery terminals.
BUTTON LOCK. It is possible to lock and unlock the setting by simultaneously
pressing and holding the “BATTERY VOLTAGE” (fig. A.21) and “CHARGE RATE”
(fig. A.23) buttons for 3 seconds, and (fig. A.2) (fig. A.4) “LOK on” and“LOK off”
will appear respectively on the display.
TO EXIT THE “ADVANCED PROGRAMS” MENU:
Press and hold the “MODE” button (fig. A.22) for 3 seconds.
3"
BEEP
MENU
ADVANCED
PROGRAMS
MODE
ADVANCED MENU SELECTION
3"
BEEP
MENU
ADVANCED
PROGRAMS
3"
DISPLAY
3"
DISPLAY
3"
BEEP
MODE
MODE
BATTERY VOLTAGE CHARGE RATE
BATTERY VOLTAGE CHARGE RATE
ADVANCED MENU SELECTION
KEYBOARD LOCK
KEYBOARD UNLOCK
EXIT – ADVANCED MENU

19
3"
BEEP
MENU
ADVANCED
PROGRAMS
3"
DISPLAY
3"
DISPLAY
3"
BEEP
DISPLAY
MODE
MODE
MODE
ADVANCED MENU SELECTION
KEYBOARD LOCK
KEYBOARD UNLOCK
EXIT – ADVANCED MENU
FUNCTION SELECTION
2.4.1 DESULFATION
Pulse system used to recover sulphated batteries by applying enough voltage to
neutralise the surface layers of oxide and revitalize the underlying plates. It is
advisable to perform this operation with the battery disconnected from the vehicle.
ATTENTION! Pay particular attention to the nominal voltage of the battery
which must correspond to the battery selected using the “BATTERY
VOLTAGE” button and indicated on the display (fig. A.1).
Procedure
– press the “MODE” button (fig. A.22) to select this function (fig. A.10);
– press the “BATTERY VOLTAGE” button (fig. A.21) to select the battery voltage
(fig. A.1);
– connect the clamps to the battery terminals;
– the process starts automatically, with a variable duration depending on the
battery response,displayed in graph format. If the desulfation process is
completed successfully the word “End”will appear on the display (fig. A.2). In
the case of highly sulphated batteries, hence irrecoverable, this process may not
be completed; this condition is indicated when the charge phase continues to
restart and the opening/closing of a relay is audible.
2.4.2 EQUALISATION
This process is recommended for routine battery maintenance, to be performed
periodically according to use.
BEEP
Info
Alarm
DISPLAY
MODE
END OF PROCESS – EXAMPLE
FUNCTION SELECTION

20
ATTENTION! Pay special attention to the type of battery being equalized
(WET, GEL, AGM, PbCa): check the maximum allowed voltage to avoid
damaging the same.
Customising the VOLTAGE
To customise the equalization voltage value simultaneously press and hold the
“BATTERY VOLTAGE” (fig. A.21) and “MODE” (fig. A.22) buttons for 3 seconds,
then use the same buttons to select (decrease using the “BATTERYVOLTAGE”
button and increase using the “MODE” button), the desired voltage value between
6V-8.0V, 12V-16V, 24V-32V respectively for 6V, 12V, 24V batteries.
The factory default voltage value is respectively 6.8V, 13.6V, 27.2V.
The set voltage mode will be exited automatically after a 3” time-out.
Procedure
– press the “MODE” button (fig. A.22) to select this function (fig. A.9);
– press the “BATTERY VOLTAGE” button (fig. A.21) to select the battery voltage
(fig. A.1);
– connect the clamps to the battery terminals;
– the equalization process will run automatically indicating the voltage value on
the display (fig.A.2), along with the current (fig. A.4) output. On completing the
process, the word “End” will appear on the display (fig. A.2).
BEEP
Info
Alarm
DISPLAY
3"
BEEP
DISPLAY
13.3V
13.2V
13.1V
. . . . .
. . . . .
13.7V
13.6V
13.5V
MODE
MODEBATTERY VOLTAGE
END OF PROCESS – EXAMPLE
FUNCTION SELECTION
VOLTAGE ADJUSTMENT – EXAMPLE
BEEP
Info
Alarm
END OF PROCESS – EXAMPLE

21
2.5 POWER SUPPLY
The device foresees 2 operating modes (ADVANCED PROGRAMS) as a generator
stabilised at 6/12/24V:
– DIAGNOSTIC (fig. A.13);
– SUPPLY (fig. A.12).
On completing the selected process, disconnect the power cable from the mains
socket and disconnect the clamps from the battery terminals.
BUTTON LOCK. It is possible to lock and unlock the setting by simultaneously
pressing and holding the“BATTERY VOLTAGE” (fig. A.21) and “CHARGE RATE”
(fig. A.23) buttons for 3 seconds, and (fig. A.2) (fig. A.4) “LOK on” and
“LOK off” will appear respectively on the display.
TO EXIT THE “ADVANCED PROGRAMS” MENU: Press and hold the “MODE” button
for 3 seconds.
BEEP
Info
Alarm
MODE
END OF PROCESS – EXAMPLE
ADVANCED MENU SELECTION
3"
BEEP
MENU
ADVANCED
PROGRAMS
BEEP
Info
Alarm
MODE
BATTERY
VOLTAGE
CHARGE
RATE
BATTERY
VOLTAGE
CHARGE
RATE
END OF PROCESS – EXAMPLE
ADVANCED MENU SELECTION
KEYBOARD LOCK
KEYBOARD UNLOCK
3"
BEEP
MENU
ADVANCED
PROGRAMS
3
DISPLAY
3
DISPLAY

22
2.5.1 DIAGNOSTIC
Disturbance free precision power for supporting the battery during the vehicle
electric system diagnostic operations (function used mainly in workshops).
The set voltage is present on the charge clamps when connected to the
battery.
NOTE. The battery must not be disconnected from the vehicle (so as not
to lose the setup settings) and must have a minimal voltage of 5V to
guarantee the correct functioning of the process.
ATTENTION! Check the maximum permissible voltage on the vehicle
manufacturer’s technical specifications to prevent damage to the on-board
electronics and the battery.
Customising VOLTAGE and CURRENT
VOLTAGE
– press and hold simultaneously the “BATTERY VOLTAGE” (fig.A.21) and “MODE”
buttons (fig. A.22) for 3 seconds;
– use the same buttons to select (decrease using the “BATTERY VOLTAGE” button
and increase using the “FUNCTION” button) the desired voltage value between
6V-7.5V, 12V-15V, 24V-30V respectively for 6V, 12V, 24V batteries; the factory
default voltage value is respectively 6.8V, 13.6V, 27.2V.
The set voltage mode will be exited automatically after a 3” time-out.
MODE
FUNCTION SELECTION
DISPLAY
BATTERY
VOLTAGE
CHARGE
RATE
VOLTAGE ADJUSTMENT – EXAMPLE
3
BEEP
DISPLAY
13.3V
13.2V
13.1V
. . . . .
. . . . .
13.7V
13.6V
13.5V

23
CURRENT
– press the “CHARGE RATE” button (fig. A.23) until the desired value, set as
indicated in step 6, appears on the display (fig. A.4) and on the icon (fig. A.6).
The set current mode will be exited automatically after a 3” time-out.
PROCEDURE
– press the “MODE” button (fig. A.22) to select this desired function (fig. A.13
or fig. A.12); - if necessary or requested by the vehicle manufacturer
specifications, customise the voltage and/or current values as indicated below;
– use the “BATTERY VOLTAGE” button to select the battery voltage;
– connect the clamps to the relative vehicle battery terminals;
– the process will run automatically indicating the voltage value on the
display (fig. A.2), along with the current (fig. A.4) after 5 seconds from the
last operation.
2.5.2 SUPPLY
Constant voltage generator that can be used on BATTERY CHANGES or on batteries
with a very low voltage (below 2V) to try to increase their voltage to a value that is
suitable for starting with a normal charge cycle.
ATTENTION! The set voltage is always present on the charge clamps even
when disconnected from the battery.
ATTENTION! Pay particular attention to the nominal voltage of the battery
which must correspond to the voltage selected using the “VOLT” button
and indicated on the display (fig. A.1). This function DOES NOT HAVE spark
protection on the output clamps and reverse polarity protection.
BATTERY
VOLTAGE
CHARGE
RATE
CHARGE
RATE
VOLTAGE ADJUSTMENT – EXAMPLE
CURRENT ADJUSTMENT – EXAMPLE
3
BEEP
DISPLAY
13.3V
13.2V
13.1V
. . . . .
. . . . .
13.7V
13.6V
13.5V
3A 7A 10A 20A 30A 40A
►
3A 7A 10A 20A 30A 40A
DISPLAY – EXAMPLE
DISPLAY
MODE
FUNCTION SELECTION
DISPLAY – EXAMPLE

24
Customising VOLTAGE and CURRENT
VOLTAGE
– press and hold simultaneously the “BATTERY VOLTAGE” (fig.A.21) and “MODE”
buttons (fig. A.22) for 3 seconds
– use the same buttons to select (decrease using the “BATTERY VOLTAGE” button
and increase using the “MODE” button) the desired voltage value between
6V-7.5V, 12V-15V, 24V-30V respectively for 6V, 12V, 24V batteries; the factory
default voltage value is respectively 6.8V, 13.6V,27.2V.
The set voltage mode will be exited automatically after a 3” time-out.
CURRENT
– press the “CHARGE RATE” button until the desired value, set as indicated in
step 6, appears on the display (fig. A .4) and on the icon (fig. A.6). The set
current mode will be exited automatically after a 3” timeout.
CHANGE BATTERY Procedure
– Press the “MODE” button (fig. A.22) to select the SUPPLY function (fig. A.12);
– if necessary or requested by the vehicle manufacturer specifications, customise
the voltage and/or current values as indicated above;
– press the “BATTERY VOLTAGE” button (fig. A.21) to select the battery voltage
(fig. A.1);
– connect the clamps to the relative vehicle battery terminals;
– change the battery paying particular attention not to disconnect the clamps from
the vehicle terminals so as not to lose the electronic settings.
DISPLAY
VOLTAGE ADJUSTMENT – EXAMPLE
3
BEEP
DISPLAY
13.3V
13.2V
13.1V
. . . . .
. . . . .
13.7V
13.6V
13.5V
MODE
MODE
BATTERY VOLTAGE
FUNCTION SELECTION
DISPLAY – EXAMPLE
DISPLAY
VOLTAGE ADJUSTMENT – EXAMPLE
3
BEEP
DISPLAY
13.3V
13.2V
13.1V
. . . . .
. . . . .
13.7V
13.6V
13.5V
3A 7A 10A 20A 30A 40A
►
3A 7A 10A 20A 30A 40A
MODE
MODE
BATTERY VOLTAGE
CHARGE
RATE
FUNCTION SELECTION
CURRENT ADJUSTMENT – EXAMPLE
DISPLAY – EXAMPLE

25
2.6 ENGINE START – START
START mode (fig. A.15), is available for 12V batteries and supplies 70 A current as
a starter aid. If the battery is completely run down, it is advisable to perform a precharge cycle before proceeding.
2.6.1 Procedure
– Press and hold the “CHARGE RATE” button (fig. A.23) for 3 seconds to select
the “ENGINE START” function;
– connect the vehicle battery terminal clamps (the flashing message “Go” appears
on the display (fig.A.1);
– now start the vehicle; a 30 second timer will engage and will appear on the
display (fig. A.1), at the end of which it will be possible to start the engine
again;
– on completing the selected process, disconnect the power cable from the mains
socket and disconnect the clamps from the battery terminals.
CHARGE
RATE
FUNCTION SELECTION
3"
DISPLAY
CHARGE
RATE
FUNCTION SELECTION
CHARGE
RATE
FUNCTION EXIT
3"
DISPLAY

26
2.7 ALARMS
The alarms are displayed by a graph symbol (fig. A.3) when there is reverse polarity,
short circuit, low or faulty battery.
The alarms will appear on the display (fig. A.2) and have the following meanings:
AL1: Reverse polarity and short circuit;
AL2: Battery voltage incompatible with selection;
AL3: PULSE TRONIC charge: has not completed the Desulphation within the 4 hour
time limit, battery may not be recoverable.
AL4: PULSE TRONIC charge: has not completed Soft Start within the 4 hour time
limit. The battery may not be recoverable;
AL5: PULSE TRONIC charge: has not completed bulk charge within the 18 hour time
limit - The battery may not be recoverable;
AL6: PULSE TRONIC charge: The battery voltage dropped below 12.5V during
analysis stage.
AL7: PULSE TRONIC charge: when the battery voltage is extremely low (<4.5V for
6V, <9.0V for 12V, <18.0 for 24V), the battery charger has 4 hours get above these
voltages.
AL8: PULSE TRONIC charge: The battery has failed during Pulse Float. The battery
may not be recoverable;
AL9: Short circuit in Supply / Diagnostic /Equalization functions.

27
3 FREQUENTLY ASKED QUESTIONS
Q. Why does the LCD screen indicate a fully charged battery straight away?
A. There are two possible reasons why the LCD display may indicate a fully charged
battery (‘OK’) straight away.
1. The battery is fully charged.
2. The battery has taken a surface charge.
Q. What is Surface Charge?
A. Batteries unused or left flat for some time build up a resistance to being
recharged. When the charger is first connected, these batteries will take a
surface charge, and the LCD display will indicate a fully charged battery within
a short while. The battery however is not fully charged, the charger is voltage
sensitive and cannot differentiate between a surface charge and a fully charged
battery. After a few hours the battery may start to accept some charge but most
batteries with this condition will not recover.
Q. What is a Faulty Cell?
A. 12 Volt batteries contain 6 cells and one faulty cell is enough to ruin your
battery. If after eight hours of charging your battery is still flat, you should test
the cells using a hydrometer. If one reading is lower than the rest it indicates a
faulty cell. It is pointless to continue charging, as the battery needs replacing.
Q. What are Volts and Amps?
VOLTS
The term voltage refers to the electrical force or electric potential to do work
between two terminals or a good analogy is water pressure in a pipe. For
example a battery has 12 Volts between the positive and negative terminals.
AMPS
The term AMPS is the unit of measure used for current. This can be described
as the flow of electric charge in a circuit. Again if you use the water analogy
this would refer to how much water is flowing through the pipe. For example
if the current is reading 12 Amps then this is the amount of energy going into
the battery.

Distributed by
AUSTRALIA
Brown & Watson International Pty Ltd
Knoxfield, Victoria 3180
Telephone (03) 9730 6000
Facsimile (03) 9730 6050
National Toll Free 1800 113 443
NEW ZEALAND
Narva New Zealand Ltd
22–24 Olive Road
PO Box 12556 Penrose
Auckland, New Zealand
Telephone (09) 525 4575
Facsimile (09) 579 1192
IS299
Issue 1 10.7.15
WARRANTY STATEMENT
Applicable only to product sold in Australia
Brown & Watson International Pty Ltd of 1500 Ferntree Gully Road, Knoxfield, Vic.,
telephone (03) 9730 6000, fax (03) 9730 6050, warrants that all products described in
its current catalogue (save and except for all bulbs and lenses whether made of glass or
some other substance) will under normal use and service be free of failures in material
and workmanship for a period of one (1) year (unless this period has been extended as
indicated elsewhere) from the date of the original purchase by the consumer as marked
on the invoice. This warranty does not cover ordinary wear and tear, abuse, alteration of
products or damage caused by the consumer.
To make a warranty claim the consumer must deliver the product at their cost to the
original place of purchase or to any other place which may be nominated by either BWI or
the retailer from where the product was bought in order that a warranty assessment may
be performed. The consumer must also deliver the original invoice evidencing the date and
place of purchase together with an explanation in writing as to the nature of the claim.
In the event that the claim is determined to be for a minor failure of the product then
BWI reserves the right to repair or replace it at its discretion. In the event that a major
failure isdetermined the consumer will be entitled to a replacement or a refund as well as
compensation for any other reasonably foreseeable loss or damage.
This warranty is in addition to any other rights or remedies that the consumer may have
under State or Federal legislation.
IMPORTANT NOTE
Our goods come with guarantees that cannot be excluded under the Australian Consumer
Law. You are entitled to a replacement or refund for a major failure and compensation for
any other reasonably foreseeable loss or damage. You are also entitled to have the goods
repaired or replaced if the goods fail to be of acceptable quality and the failure does not
amount to a major failure.
 Loading...