

Page 1

INSTRUCTIONS FOR USE
Pro-Ject Phono Box II USB
Page 2
Dear music lover,
thank you for purchasing a PRO-JECT AUDIO phono amplifier.
In order to achieve maximum performance and reliability you should study these instructions for use carefully.
!
Warning of a hazard for the user, the unit or possible misuse.
Important notice.
Setting the cartridge mode
The phono amplifier must be used in either MM (moving magnet) or MC (moving coil) mode according to the
construction principle of the pickup cartridge to be used. Since most cartridges use the MM (moving magnet)
principle the phono amplifier is factory set to operate in this mode. To find out which type your cartridge is
please consult the literature accompanying your cartridge. The literature for MC cartridges should also specify
the correct impedance and capacity into which the cartridge is designed to work. If in doubt please consult
your dealer.
A switch at the back of the phono amplifier sets the correct level of amplification for the cartridge.
!
Before setting MM / MC mode the unit must be disconnected from the power supply and amplifier.
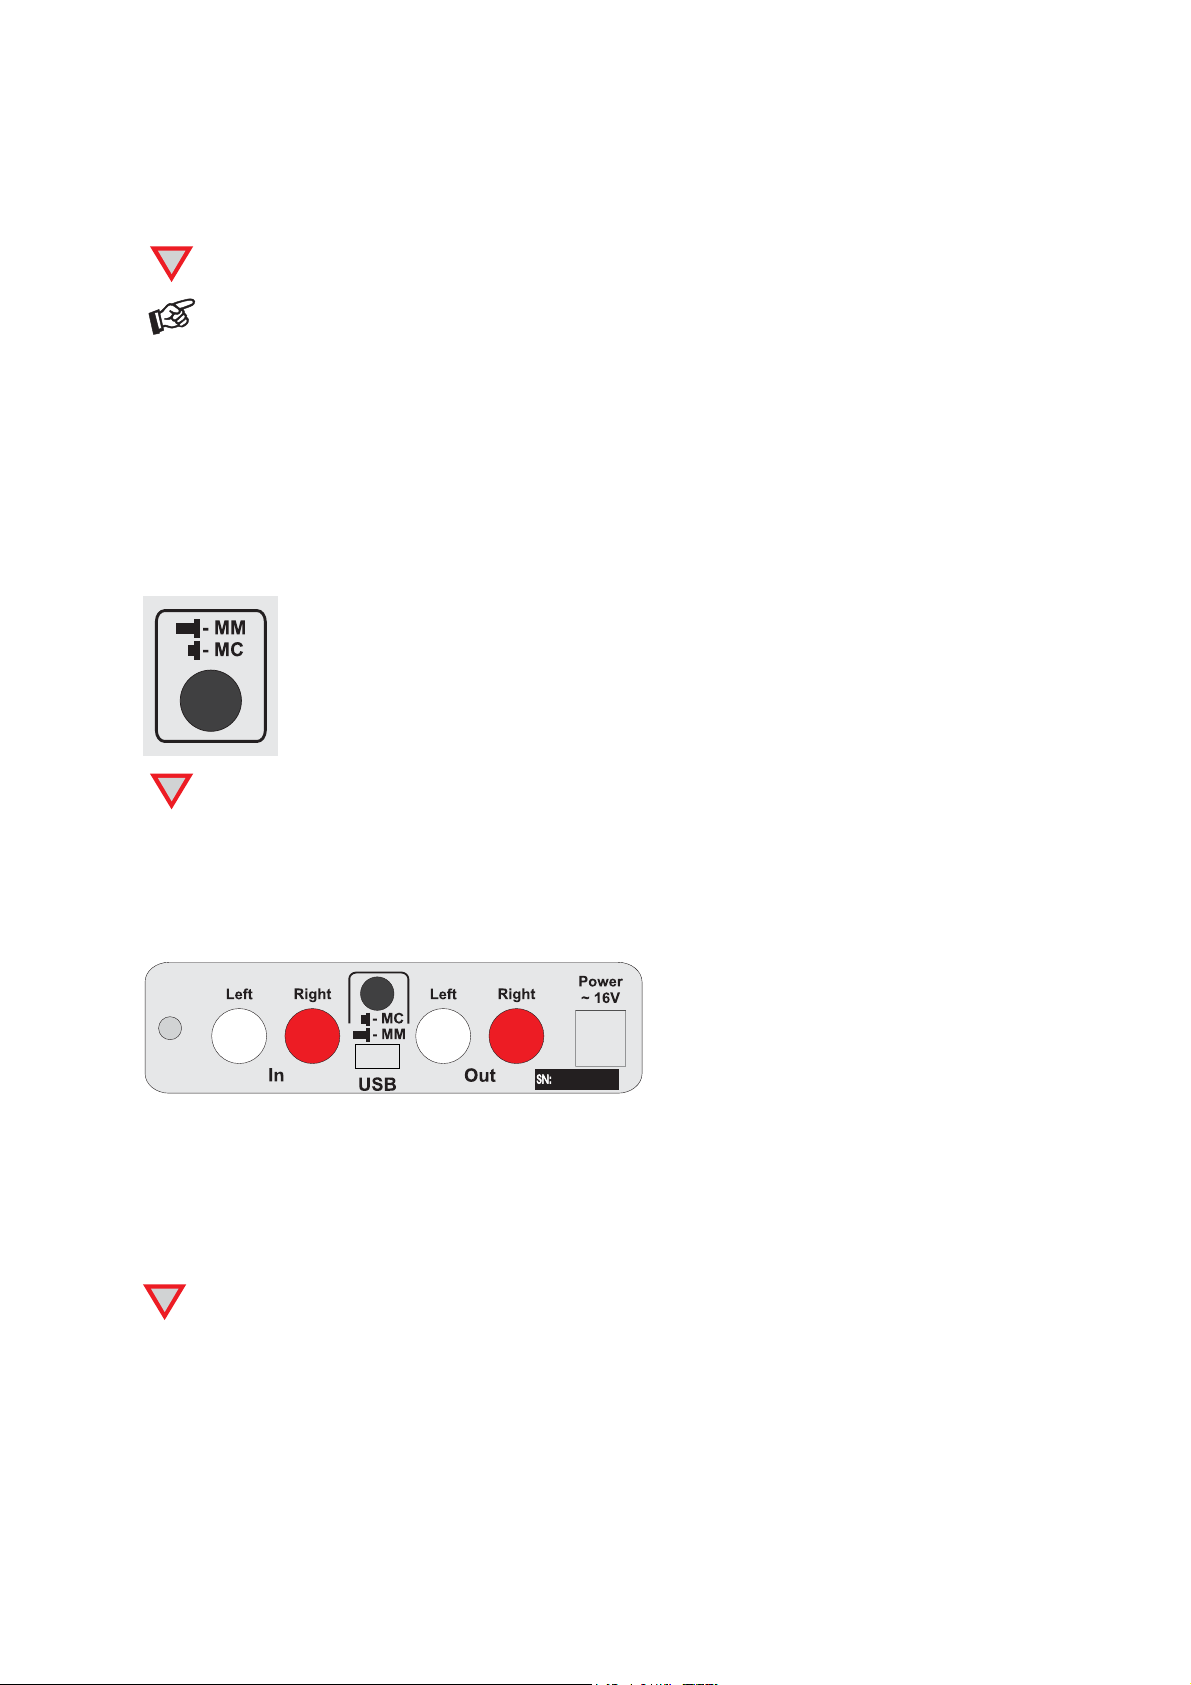
Connecting the record player
Connect the tonearm signal lead to the In of the phono amplifier.
Take care to connect the left and right channels correctly. The right channel is usually marked red, the left
channel black or white. The earthing wire of the tonearm lead should be connected to the earth terminal.
Connection to the amplifier
Connect the Out of the phono amplifier to a line input (such as AUX, CD, Tuner, Tape or Video) on your
amplifier.
Take care to connect the left and right channels correctly. The right channel is usually marked red, the left
channel black or white.
Make all connections whilst the phono amplifier is disconnected from the power supply.
!
Do not connect the phono amplifiers output to a phono input (sometimes labelled gram, disc or RIAA)
on the amplifier.
2
© Audio Trade GmbH · Pro-Ject Phono Box II USB · Revision 15.10.10/15.12.10
Page 3

Connecting to a Computer (Windows XP® operating system)
1. Connect the USB-output of the Phono Box USB to a free USB-socket on your computer and
turn it on/make sure it is powered on.
Please note: Connection should be made to an USB-socket of your computer directly. Connecting to
USB-hubs or switches can cause problems.
2. The “new hardware found assistant“ will automatically detect the unit and announces it as a “USB audio codec”.
3. open the System menu via “Start“ (Windows key)
Settings
Control Panel
Sound and Audio Devices
5. In the Sounds and Audio panel select the Audio
tab. In the Replay section select your sound card
from the pull-down lists (usually preselected).
4. In the control panel open the
“Sound and audio“ menu.
6. Select the USB Audio CODEC from the pull
down list in the Recording section. Make sure
your sound card is selected for Replay.
7. Confirm your selections by clicking the OK button.
8. Close the control panel windows and start your recording programme.
© Audio Trade GmbH · Pro-Ject Phono Box II USB · Revision 15.10.10/15.12.10
3
Page 4

Connecting to a Computer (Windows 7® operating system)
1. Connect the USB-output of the Phono Box USB to a free USB-socket on your computer and
turn it on/make sure it is powered on.
Please note: Connection should be made to an USB-socket of your computer directly. Connecting to
USB-hubs or switches can cause problems.
2. Open the "Recording” panel. Start Control Panel Hardware and Sound Sound Recording
In the “Recording” panel “USB Audio Device” (announced as “Microphone”) should be selected
(usually preselected).
3. Click the OK button and close the control panel windows.
4. Close the control panel windows and start your recording programme.
4
© Audio Trade GmbH · Pro-Ject Phono Box II USB · Revision 15.10.10/15.12.10
Page 5

Connecting to a Computer (Mac OS operating system)
1. Connect the USB-output of the Phono Box USB to a free USB-socket on your computer and
turn it on/make sure it is powered on.
Please note: Connection should be made to an USB-socket of your computer directly. Connecting to
USB-hubs or switches can cause problems.
2. Open the “System Preferences” panel and select “Sound”.
3. In the “Input” panel “USB Audio CODEC” should be selected (usually preselected).
4. Close the control panel windows and start your recording programme.
Recording Programme
In case you do not have a recording programme installed on your computer, you may download one free from
the Internet. Recording programmes may be found by searching Google or Altavista.
Please be aware that downloads from the Internet are made entirely at your own risk. Under no
circumstances can we carry responsibility or provide support for software products sourced from the
internet or for any damage or problems arising from the use thereof. All downloads should be
checked with an up-to-date anti-virus programme. License fees may be applicable.
Mains power connection
The phono amplifier is supplied with a power supply suitable for your country's mains supply. Check the label
before connecting to ensure compliance with the mains rating in your house. Connect the low voltage plug
from the power supply to the Power ~16V socket of the phono amplifier before connecting the power supply
to the mains.
© Audio Trade GmbH · Pro-Ject Phono Box II USB · Revision 15.10.10/15.12.10
5
Page 6

Technical specifications Pro-Ject Phono Box II USB
Input impedance, MM: 47kohms/120pF
Input impedance, MC: 100ohms/120pF
Gain, MM: 40dB
Output voltage typically: 300mV/1kHz at 3mV/1kHz (MM input)
Gain, MC: 60dB
Output voltage typically: 300mV/1kHz at 0,3mV/1kHz (MC input)
Max. output 9,5V (1kHz)
Noise floor, MM: 86dB (94dB - A weighted)
Noise floor, MC: 68dB (75dB - A weighted)
THD, MM: <0,01%
THD, MC: <0,05%
RIAA-equalisation curve accuracy: 20Hz - 20kHz / max. 0,5dB
A/D converter: Burr Brown PCM2904 16-Bit Delta Sigma
Sampling rates: 32, 44,1 and 48kHz
USB output: digital serial data protocol USB 1.1
Operating systems: Windows XP
THD: 0,005%
Noise floor: 96dB
Dynamic range: 93dB
Outboard power supply: 16V/200mA AC, suitable for your country's mains supply
Power consumption: 16V/100mA AC
Dimensions W x H x D (D with sockets): 103 x 36 x 103 (115)mm
Weight: 570g without power supply
®
, Windows VISTA®, Windows 7® and Mac OS
Potential incorrect use and fault conditions
No signal on one or both channels:
No connection between player and phono amplifier ore amplifier. This could be due to a faulty plug,
broken wire or solder joint or simply loose plug/socket connection.
Strong hum:
No earth connection from cartridge or arm or arm cable to phono amplifier, or earth loop.
Output too quiet or too loud, or distorted:
MM / MC mode incorrectly set - input overloading or insufficiently amplified.
Service
Should you encounter a problem which you are not able to alleviate or identify despite the above information,
please contact your dealer for further advice. Only when the problem cannot be resolved there should the
unit be sent to the responsible distributor in your country.
Warranty
The manufacturer accepts no responsibility for damage caused by not adhering to these instructions
for use. Modification or change to any part of the product by unauthorized persons release the
manufacturer from any liability over and above the lawful rights of the customer.
Copyright, trademarks
PRO-JECT is a Registered Trademark of H. Lichtenegger.
This guide was produced by: Audio Trade GmbH
Copyright © 2008. All rights reserved.
Windows XP
Mac and Mac OS are trademarks of Apple Inc., registered in the U.S. and other countries.
®
, Windows Vista® and Windows 7® are trademarks of the Microsoft group of companies.
The information was correct at the time of going to
press. The manufacturer reserves the right to make
changes to the technical specification without prior
notice as deemed necessary to uphold the ongoing
process of technical development.
6
© Audio Trade GmbH · Pro-Ject Phono Box II USB · Revision 15.10.10/15.12.10
 Loading...