

Page 1
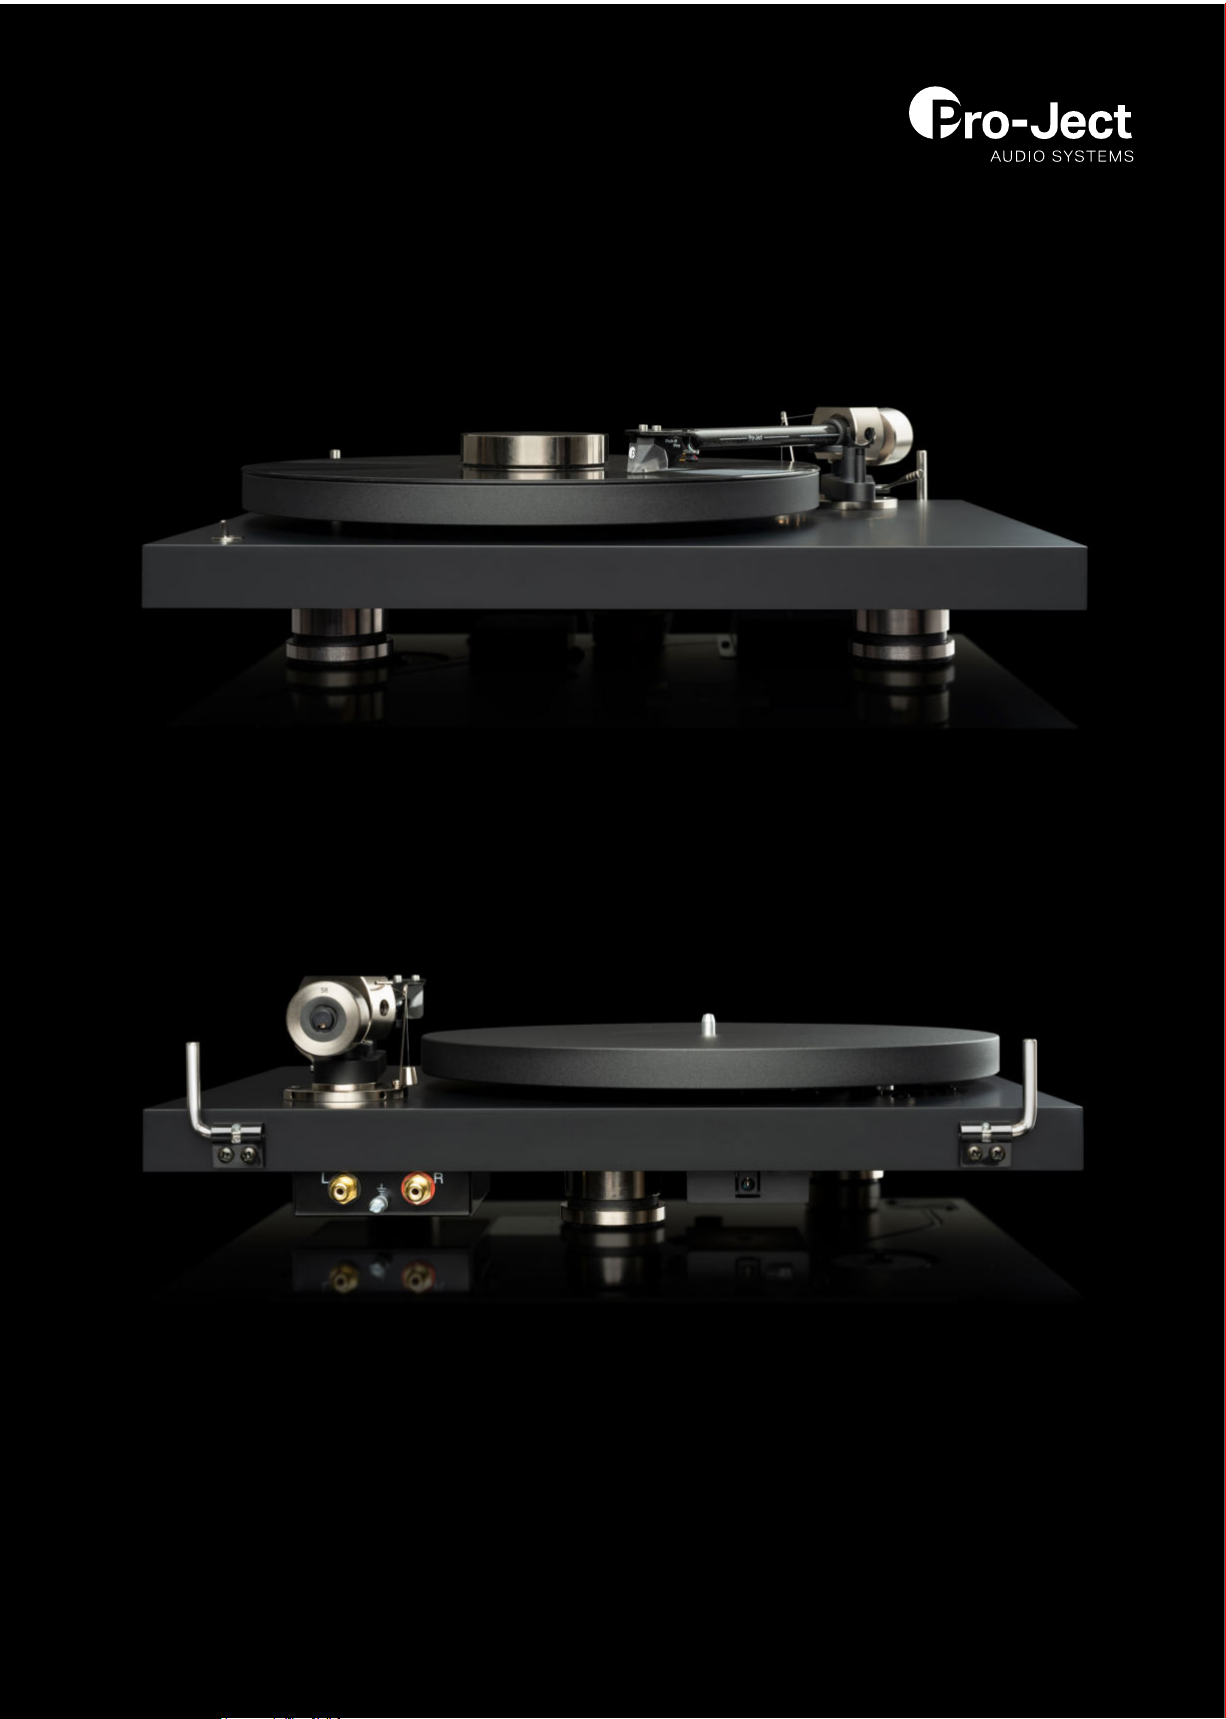
Debut PRO
Manual
Page 2

INSTRUCTIONS FOR USE
Debut PRO
Page 3
© Pro-Ject Audio Systems · Pro-Ject Debut Pro · Revision 2021.09.01
2
Page 4

© Pro-Ject Audio Systems · Pro-Ject Debut Pro · Revision 2021.09.01
3
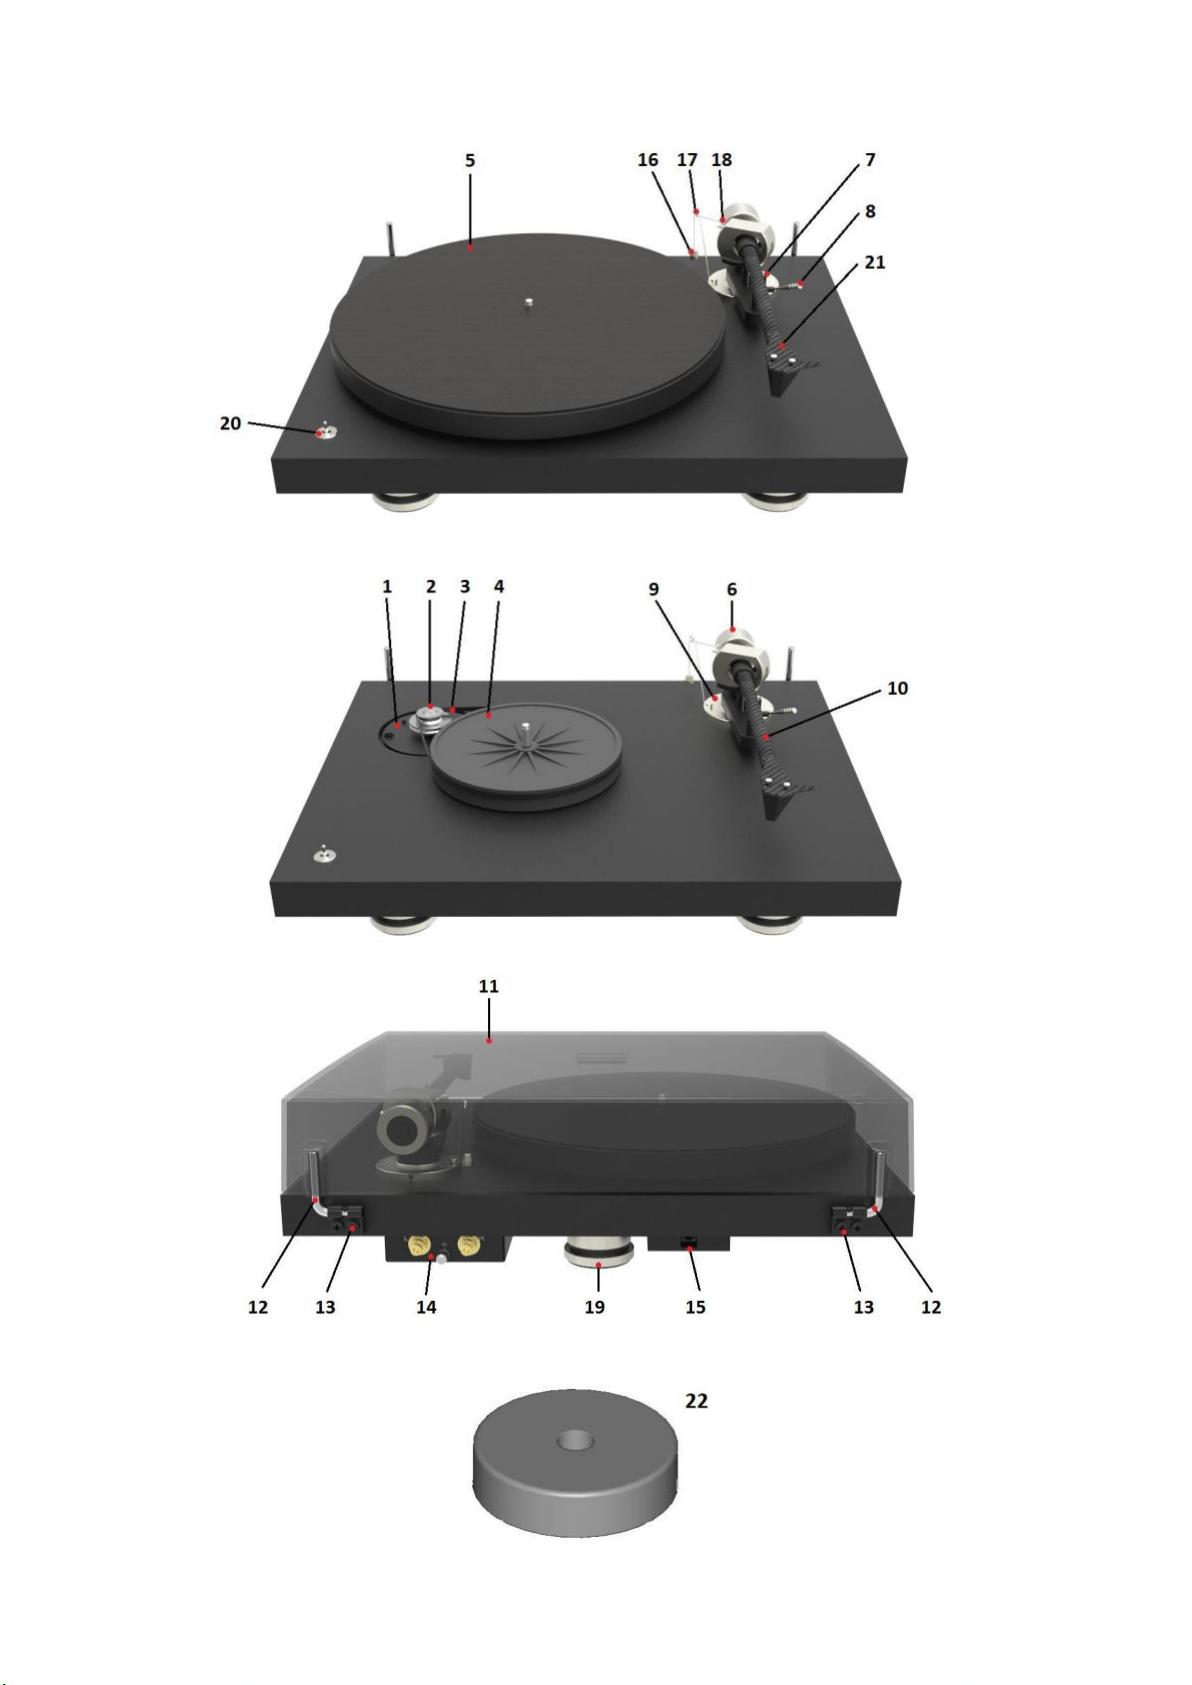
Pro-Ject Debut PRO
Controls, features and connections
1 Motor with TPE damped flange
2 Stepped drive pulley
3 Drive belt
4 Sub-platter
5 Platter with TPE damping and felt mat
6 Tonearm counterweight
7 Tonearm rest and removable transport lock
8 Tonearm lift lever
9 Tonearm base with VTA adjustment
10 Tonearm tube
11 Lid
12 Lid hinges
13 Hinge fasteners
14 Phono output sockets and earth connection
15 Power supply socket
16 Anti-skating weight
17 Anti-skating weight support hoop
18 Anti-skating weight adjustment scale
19 Height adjustable feet with TPE damping
20 Speed selector
21 Headshell with finger lift and fitted Pro-Ject Pick it PRO
22 Single adapter
Phono cable Connect it E (not shown)
Stylus pressure gauge (not shown)
Two-point cartridge alignment protractor (not shown)
Round drive belt (78 RPM)
Flat drive belt (33, 45 RPM)
Allen key 1.5mm, 2mm
During assembly and adjustment of the deck small parts could be lost if not carefully placed in a
suitable receptacle. Before starting to assemble, get familiar with the parts listed above and
correspondingly numbered in the technical drawings above.
Page 5

© Pro-Ject Audio Systems · Pro-Ject Debut Pro · Revision 2021.09.01
4
!
Warning of a hazard for the user, the unit or possible misuse.
Important notice.
!
The power supply is used to connect and disconnect the unit from the mains. Make sure that the plug
is easily accessible at all times. Hold the plug when unplugging the power cord. Never handle the
power cord while your hands are wet or damp.
Avoid letting liquids enter the device. Never place any item containing liquid, like a flower vase, on
or near the device. Never spill any liquid on the device. Never place any naked flame sources, like
lighted candles, on or near the device. The product shall not be used in damp or wet locations, next to
a bathtub, sink, swimming pool or any other similar conditions.
Keep plastic bags away from children to prevent any risk of suffocation.
Dear music lover,
Thank you for purchasing your Debut PRO.
Since 1991 we have been offering high-quality hi-fi products at a reasonable price for discerning music
lovers. We started with turntables because they are the first choice for the most natural and affordable music
reproduction. Our main focus is always on the materials and technology used. The shape and design of our
turntables are always dictated by the functionality.
To this day, our designs have always been kept functional and clean, so the first Pro-Ject product was very
simple but made from the highest quality materials: MDF, steel, aluminium, glass, and carbon. Plastic was
not used for reasons of sound, durability, and the love of the environment.
The result was a high-quality but simple-looking product with great sound at a low price.
After the Debut Carbon EVO revolutionized the Debut series in 2020, the Debut PRO raises the bar even
higher. We designed not only a new turntable, but also a completely new cartridge. Now, for the 30th
anniversary, we are again going back to our roots.
In order to achieve maximum performance and reliability with new Debut PRO please read this guide carefully!
Safety instructions
Page 6

© Pro-Ject Audio Systems · Pro-Ject Debut Pro · Revision 2021.09.01
5
First Set-up – Making your Debut PRO ready for playback
The deck is supplied partially disassembled and carefully packaged for safe transport. The Setup Guide,
included in the packaging with your Debut PRO, explains the setup process step by step with pictures, so be
sure to follow it first and then refer to this guide should you want more detailed explanations. Here, some of
the more technical set-up steps are covered in detail and you will gain a lot of important background
information which will make you more comfortable with everything your new Debut PRO has to offer.
PRO Info provides additional background information and insights into your Debut PRO and can be
skipped for the first setup. Read them later on if you want to know everything about your Debut PRO.
1. Positioning and levelling your turntable
Make sure the surface you wish to use the turntable on
is level (use a spirit level) before placing the turntable
on it. The height adjustable aluminium feet (19) on the
Debut PRO will also allow you to level the turntable
itself, in case you cannot get the surface it is placed on
to be level. Great surfaces to put your record player on
are typically massive, heavy, stable and also as far as
possible away from your speakers. This will avoid the
sound of footsteps and other low frequency rumble
noises to be transmitted via your floor and
furniture/surface and picked up by your turntable. If
your record player is super close to your speakers
and/or placed on the same surface as your speakers are, then the sound from your speakers will be picked up by
your turntable over the sound pressure waves in the air and vibrations from speakers to the surface. It will be a
great idea to decouple the speakers from the surface (for example with our Damp it) and/or get a really heavy,
massive and decoupled surface for your turntable (for example our Ground it range of accessories). Different
locations/rooms/set-up places have different requirements and if you think you might be running into troubles with
your set-up, definitely do check these upgrades out, so your Debut PRO can unfold all of its performance.
2. Cartridge tracking force adjustment (VTF = vertical tracking force)
The counterweight (6) supplied is suitable for cartridges weighing between 7 – 10.5g (
weight no. 58).
When using different cartridges than the ones supplied with the Debut PRO, confirm the exact weight of your
cartridge before you set the VTF.
Pushing carefully, move the
counterweight (6)
end of the counterweight
support rod as shown in the
picture below.
Pro-Ject Pick it PRO -
onto the rear
Page 7

© Pro-Ject Audio Systems · Pro-Ject Debut Pro · Revision 2021.09.01
6
Place the stylus pressure gauge onto the platter. To set the required VTF, lower the tonearm lift lever as
Please note: Adjust the tracking force prior to installing the anti-skating weight.
The recommended tracking force for the Pro-Ject Pick IT PRO cartridge is 20 mN = 2g.
Use electronic tracking force scales (like Measure it E) for more accurate results.
indicated in the illustration and place the tip of the stylus exactly in the point marked 20mN (20mN = 2g). If
the stylus gauge becomes level, then the correct pressure has been achieved. However, if the there is
insufficient or excessive pressure the gauge will either not move or tilt down.
To adjust the amount of pressure, carefully move the counterweight (6) along the support rod, until the stylus
pressure is sufficient to raise the pressure gauge to the level position. Moving the counterweight (6) away
from the cartridge will reduce pressure and towards will increase pressure.
PRO Info: Tracking Force
Cartridges usually have a tracking force range as stated by the manufacturer (for example 1.8 – 2.2 grams).
The recommended tracking force is a result of the individual cartridge placed on the individual tonearm, the
record you play and the wear and age of your stylus. Just to name a few of the most important ones. You are
actually free to move within the range and divert from the recommendations. If your stylus is new you want to
ideally stay pretty much at the recommendation as a starting point. As it gets older (we are talking many,
many thousands of hours playtime) you can apply a little more tracking force. Other reasons why you want
more or less tracking force are old/dirty or badly worn records. Experimenting with a little more force might
enable you to extract more information out of a worn record groove (don’t worry about adding extra wear to
the record groove; the groove will wear if you are at 5g not if you are at 2.5g in our example here). If there
are scratches in the record or your record tends to skip, changing the tracking force a little higher or lower
might also enable you to play these records without skipping.
In general, it is true that if you move beyond the limits of the range as stated by the manufacturer you will
negatively affect the longevity of your stylus/cartridge and records. If you really know what you are doing it is
however possible to also use a little more tracking force beyond the range to get more tracking ability out of
your cartridge. Keep in mind as the tracking force gets higher and higher this will also affect the angle with
which the stylus lies in the record groove. Taking the tracking force to 2.4 grams, if the upper limit it 2.2
grams, you will also need to raise the height of the tonearm (also called the VTA – vertical tracking angle).
Obviously, we would only recommend this to experienced vinyl enthusiasts as correctly figuring out the VTA
setting requires a lot of experience in this case.
Page 8
© Pro-Ject Audio Systems · Pro-Ject Debut Pro · Revision 2021.09.01
7
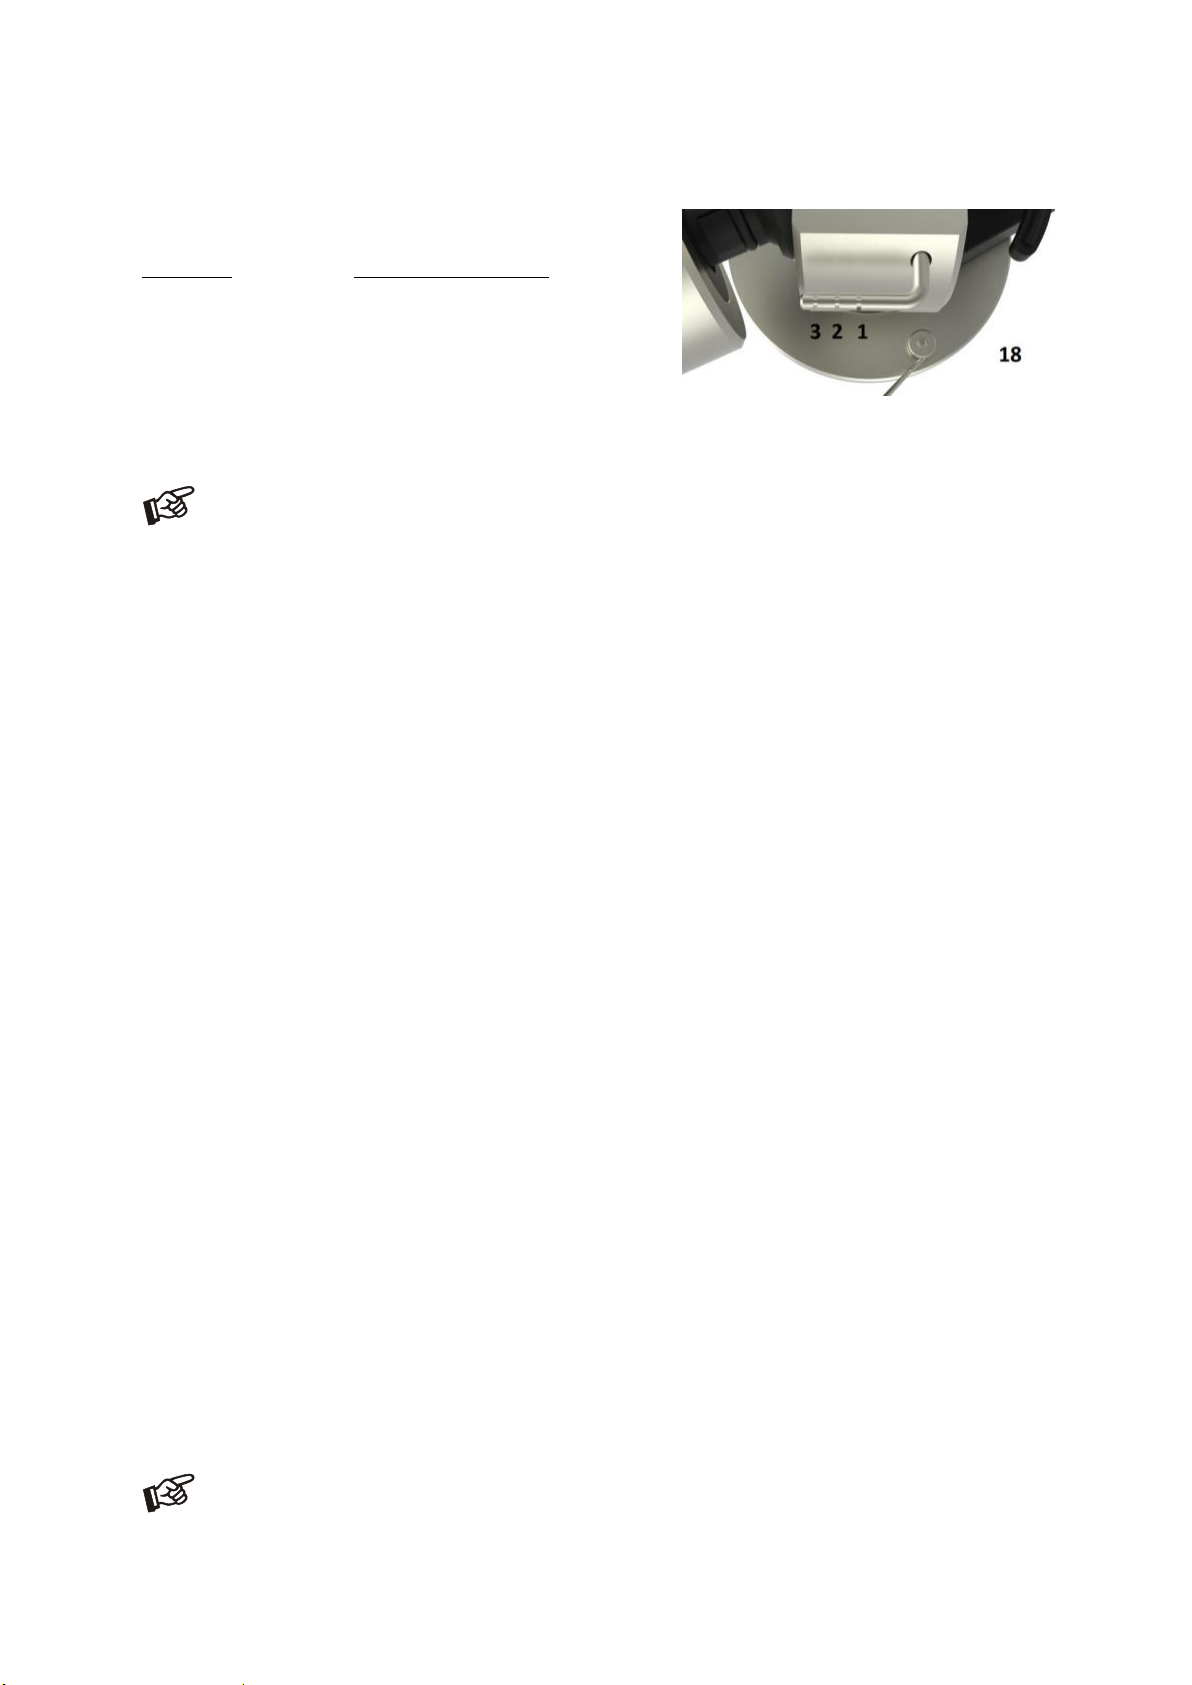
3. Anti-skating force adjustment
The anti-skating force must be adjusted corresponding to the
downforce as follows:
Downforce Groove in the stub (18)
10 - 14mN 1st from bearing rings
15 - 19mN 2nd " " "
20mN and bigger 3rd " " "
The recommended load impedance for the Pick it PRO is: 47 kohms
The recommended load capacitance for the Pick it PRO is:
150 – 300 pF
Check your amplifier documentation!
Slip the loop of the anti-skating weight's thread over the third groove of the stub to set the correct anti-skating
force for the factory-fitted cartridge. Feed the thread through the loop of the wire support (17).
The Pick it PRO cartridge on your new Debut PRO has a recommended tracking force of 20mN (2
grams) so the correct groove for the anti-skating is the 3rd groove.
PRO Info: Anti-skating
The anti-skating force counteracts the natural skating of your tonearm and cartridge towards the center of
your record. How strong this naturally occurring skating is, depends on a few factors such as the actual
physical properties of the record groove, where on the record your tonearm is currently sitting and playing
(the skating on the beginning/outside of the record is different than towards the end/inside of your record)
and the applied tracking force to name a few of the more important factors. The anti-skating mechanism on
your Debut PRO (and other Pro-Ject Audio Systems turntables) is able to vary the applied anti-skating force,
depending on whether the tonearm is on the outside or inside of your record. A lot of other common
implementations, like spring or magnet-based anti-skating mechanisms, are not able to vary the applied
force based on arm position.
There are a few popular ways to measure the anti-skating force and a few totally wrong ones. Totally wrong
would be to use a CD, turn the turntable on and think that anti-skating is set correctly when the tonearm will
stay in its place and not move at all. The groove of a vinyl record will generate different levels of friction for
the tonearm and is not comparable to a CD at all. Please don’t measure the anti-skating force with a CD.
The next better option is to use a test record that is made of actual vinyl. The result of the test record can
vary, so please be sure you know exactly what your test record is doing and interpret the results correctly.
The best way to measure anti-skating is a test record with actual music and test tones and dedicated
professional audio and test equipment to measure the actual channel balance and a whole range of other
attributes. The anti-skating mechanism of your Debut PRO turntable has been designed with this process. If
you are interested in checking anti-skating for yourself, please feel free to buy test records or even use a CD
just for the fun of it, but please also keep in mind that you will not achieve the best and accurate results like
this, so please treat them with a grain of salt.
Correctly set anti-skating will positively affect the left/right balance, the tracking of the record groove
(distortion, frequency response, dynamics) and minimize the wear of record and stylus.
4. Connection to an amplifier (integrated amplifier or phono preamplifier)
The record player has gold plated female RCA Phono sockets (14) on the back. Use the included Connect it E
phono RCA cable to connect your Debut PRO to your amplifier. The cable ends with the yellow markings are
plugged into the phono inputs (sometimes also labelled gram, disc or RIAA) on your amplifier. Make sure that the
phono input offers correct matching and amplification for the type of cartridge used. Line inputs (such as CD,
Tuner, Tape or Video) are not suitable.
Page 9

© Pro-Ject Audio Systems · Pro-Ject Debut Pro · Revision 2021.09.01
8
Take care to connect the left and right channels correctly. The right channel is usually marked red, the left
channel black or white. Check the manual supplied with your amplifier for relevant information. The earthing
wire of the tonearm lead should be connected to the earth terminal on your amplifier.
If your amplifier does not have an input suitable for phono cartridges you will require a separate phono
amplifier stage for MM cartridges which is then connected between the record player and a free line level
input of the amplifier. A separate phono preamplifier can also be helpful if you want to upgrade your sound
experience, as external phono preamps are 100% dedicated to making your turntable sound as good as it
can possibly be. They are not limited by other restrictions typically found in integrated amplifiers, which are
almost always compromising sound quality a bit.
PRO Info: Phono Cable
The included Connect it E phono cable is a semi-balanced phono interconnect cable purpose-engineered
for best-in-class turntable performance. It is terminated with high-conductivity RCA connectors for a tight fit
that won’t come loose when you move your equipment. They’re 24k gold plated for optimum signal transfer
and corrosion resistance. The Connect it E cable is a parallel symmetrical cable where the shield is only
connected on one end. The yellow mark indicates this side. The marked side should always be connected to
the receiving end (i.e. phono stage or amplifier). It is pretty rare to find a cable of these high specifications
included with turntables, but they are absolutely necessary and so critical for phono performance, which is
why Pro-Ject Audio Systems is including them by default. There is no way you can do it without specialised
cables like that. If you wish, you can further substitute the supplied Connect it E with even higher quality cables
such as the separately available
Pro-Ject Connect IT C, CC or Si.
For detailed product information regarding Pro-Ject Audio interconnect cables and phono amplifiers please
refer to the Pro-Ject web site www.project-audio.com.
5. Mains power connection
The turntable is supplied with the universal power supply with 3 exchangeable sockets adapters suitable for
all countries. Select the correct adapter for your country and insert the adapter to the exchangeable part of
the power supply.
Connect the low voltage plug from the power supply to the socket (15) on the rear of the record player before
connecting the power supply to the mains.
PRO Info: Power Supply Upgrade
Your Debut PRO already has a speed control unit built in which at the same time already acts as a clean power
supply. The exact voltage and frequency for the motor are generated by this speed control unit, resulting in the
most accurate playback speeds. Upgrade power supplies (like the High Power it or Power Box DS2 Sources)
provide proper grounding and dramatically reduce ground hum of „floating mass“ systems/amplifiers.
Every turntable needs proper grounding, otherwise electrical hum may be induced. If a turntable is not properly
grounded, it may have a different reference potential than the connected amplifier. Consequently, these
potential differences induce a compensating current which can be heard as hum. Therefore, all good turntables
have a separate ground cable which can be connected to standard amplifiers or phono stages, which usually
have a ground terminal. This way different potentials are equalized and hum is no longer audible. However,
many modern amps, especially most amps of soundbars or streaming speakers have no ground connection.
These systems are referenced as “floating mass systems“. If a standard turntable is connected to such a
„floating mass“ amplifier, audible hum will be the result.
The Power Box DS2 Sources is also a true linear power supply with a big toroidal transformer and will power
other Pro-Ject Audio Systems Box Design HiFi electronics as well.
Page 10
© Pro-Ject Audio Systems · Pro-Ject Debut Pro · Revision 2021.09.01
9
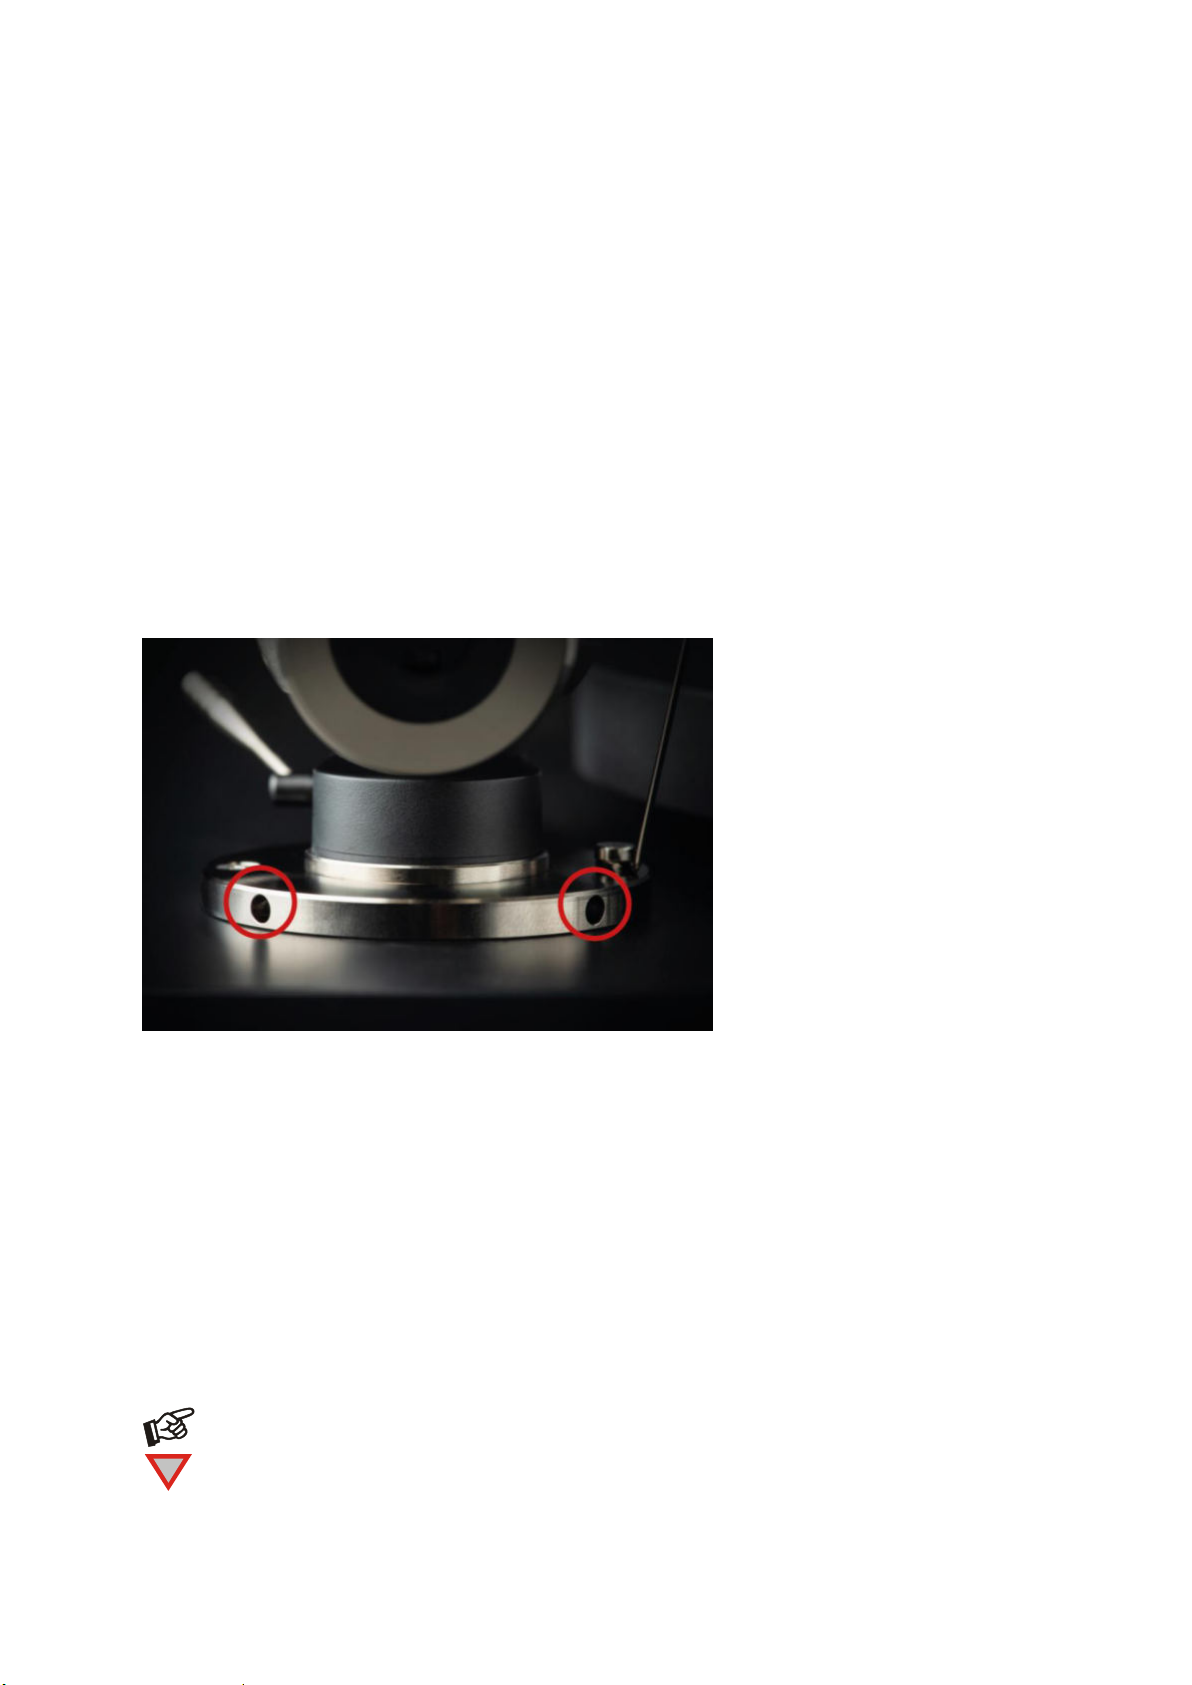
6. Fitting the lid
Fit the lid (dust cover 11) carefully over the hinge prongs and adjust the screws (13) until the lid stays open
where you want it to without being too stiff to open or close.
The lid is not only a dust cover but also a resonant structure likely to be excited by and to pass into the
plinth the acoustic energy emanating from your loudspeakers during replay. Therefore, it is
recommended to remove the lid completely during vinyl playback for achieving a better sound
quality.
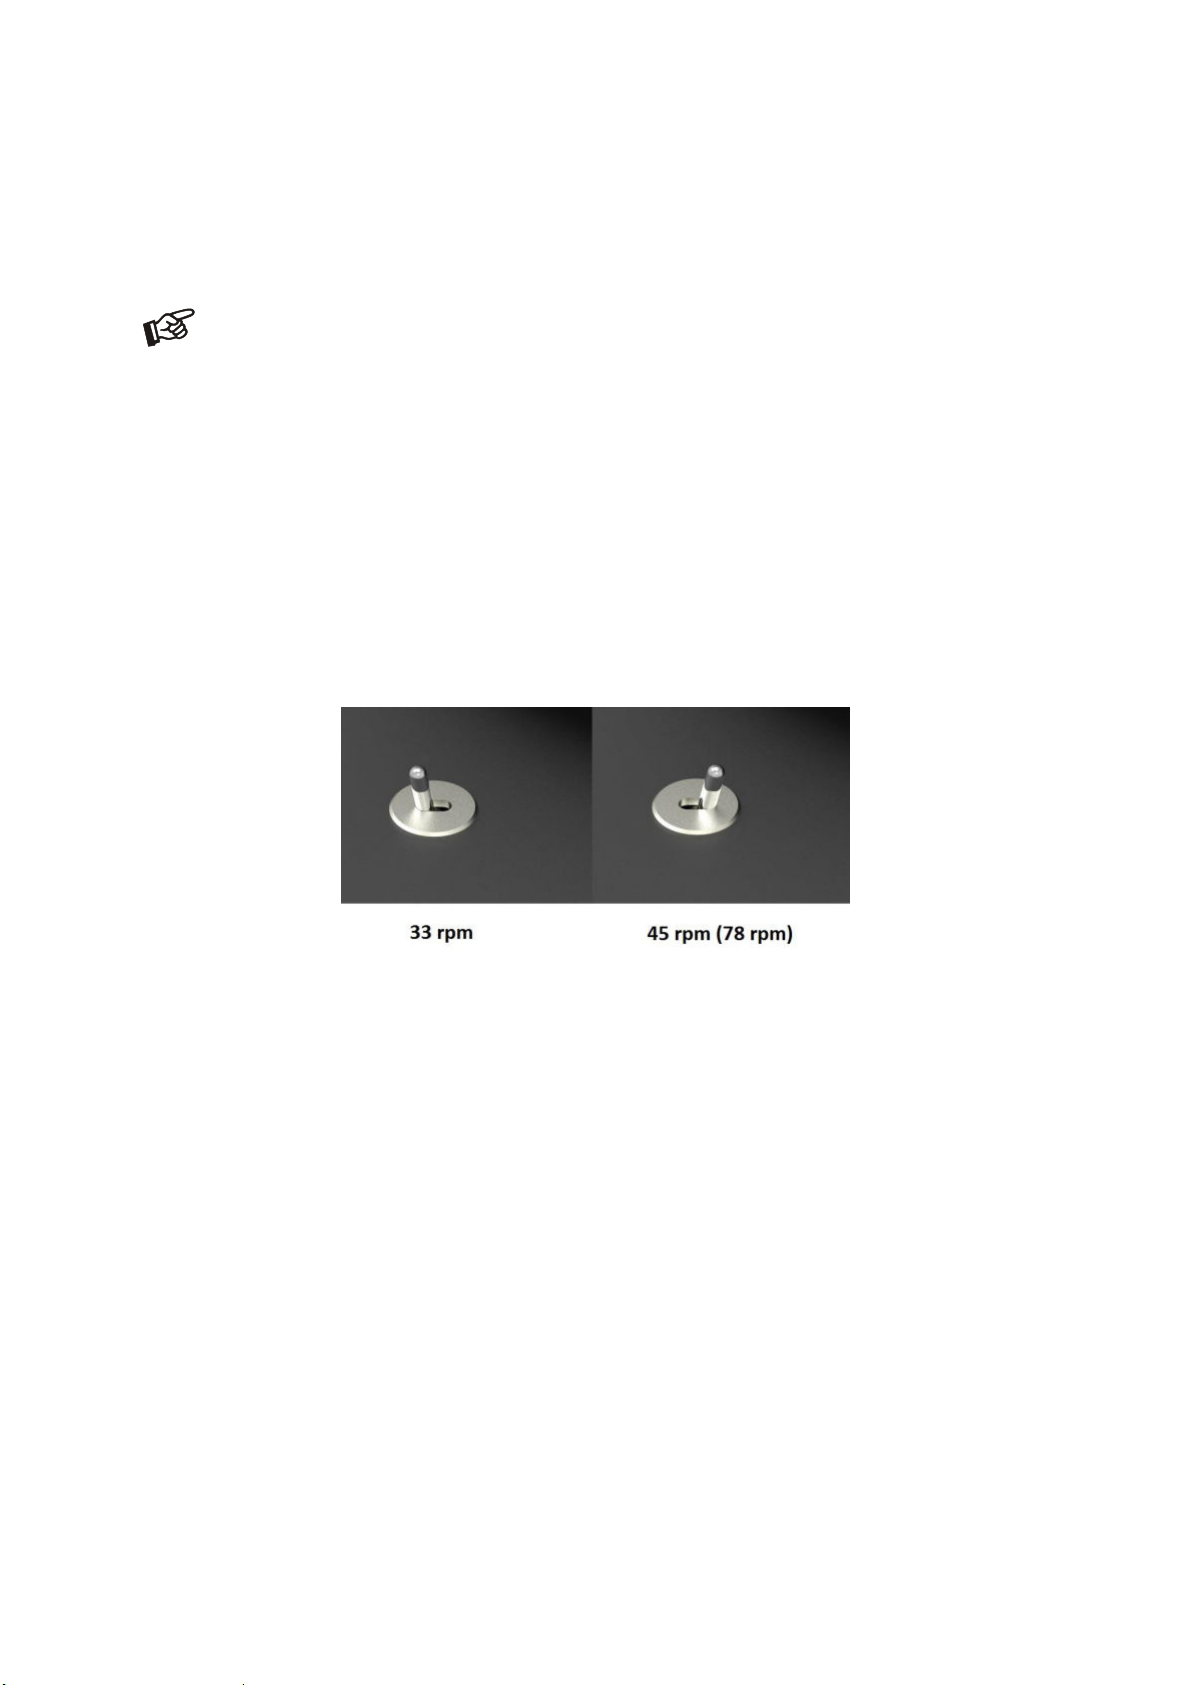
7. Switching on and off, changing replay speed
The turntable is equipped with a rocker switch for electronic speed change. To play records at 33 rpm, move
the rocker switch to the left side. To play records at 45 rpm, move the rocker switch to the right side. To be
able to play 78 rpm the flat drive belt has to be removed and the round drive belt has to be fitted around the
sub-platter (4) and the larger diameter part of the motor pulley (2). To do so, the platter (5) has to be
removed.
After the round drive belt has been fitted, moving the rocker switch to the right selects 78 rpm.
PRO Info: Electronic Speed Control
The speed is electronically controlled with precision motor control unit which guarantees the most accurate
and stable speeds. Each motor runs at a certain voltage and frequency. The frequency (50Hz) is not taken
straight from of your wall power, but cleanly generated by the motor control unit. You will not have any
fluctuations in speed caused by slight variances in the frequency from your mains power. The voltage
describes how silent your motor will run. Too much or too little voltage or fluctuations in voltage will cause
the motor to vibrate, which means that, basically, you are generating noise.
So that no motor vibrations reach the pickup, the Debut PRO has the new, proven motor suspension first
seen in our Debut Carbon EVO, which is responsible for the perfect decoupling of the motor.
Page 11

© Pro-Ject Audio Systems · Pro-Ject Debut Pro · Revision 2021.09.01
10
Advanced Debut PRO adjustment options
The cartridge needle must be vertical in the record groove in order to trace the groove wall modulations
correctly.
The cartridge on your Debut PRO that comes pre-adjusted by the factory, is already correctly set
up and you do not need to adjust the azimuth anymore! You should check and/or re-adjust the
azimuth if you change or upgrade your cartridge.
A small screw at the bearing end of the arm allows incorrect azimuth to be corrected if your needle is not
mounted exactly perpendicular to the cartridge body (which is often the case).
Slacken off the screw just enough to be able to revolve the arm tube without applying force. Please note: do
not remove the screw completely!
Please note: Under no circumstances should the arm tube be adjusted with the needle still in the
record groove! Irreparable damage may be caused to the cantilever suspension! The arm must be
lifted to make each adjustment and lowered afterwards to check it.
The following adjustments are NOT necessary for first time set-up but important later on when
changing or upgrading the cartridge! For the included cartridge these settings are factory set
correctly.
1. Adjusting the azimuth
With the aid of a good magnifying glass adjust the needle until it is vertical in the groove (i.e. perpendicular
to the record's surface). Ideally this should correspond to the top surface of the cartridge body being parallel
to the record surface.
When you are satisfied that the needle is vertical retighten the screw carefully.
Page 12
© Pro-Ject Audio Systems · Pro-Ject Debut Pro · Revision 2021.09.01
11
2. Fitting and connecting a cartridge
Please note: Adjusting a cartridge and tonearm calls for the greatest care in order to avoid damaging
the cartridge or tonearm bearings. Refer to the documentation of the alignment tools you are using
for setting up your cartridge correctly. Leave this work to your dealer if you are in any way unsure of
the necessary steps and precautions to be taken.
The following
by a different model at a later date, the included cartridge comes fully adjusted and aligned from the factory.
** All cartridges with half inch mounting holes can be fitted. Leaving the needle's protection cover on, fit the
cartridge to the headshell using the screws supplied with the cartridge by passing one screw through each
slot in the headshell (20). Do not tighten the nuts yet.
Connect the tonearm wires to the cartridge pins as follows:
white left channel positive (L+)
red right channel pos. (R+)
green right channel return (R -)
blue left channel return (L -)
The full sound quality of the record player can only be achieved if the cartridge is correctly adjusted. Particular
tools like the Pro-Ject alignment tool are required to accomplish this job properly.
If you are not well acquainted with the adjustment of cartridges you are advised to call upon the willing help of
your Pro-Ject dealer to accomplish this task for you.
instructions for fitting and connecting a cartridge are provided in case the cartridge is replaced
PRO Info: Cartridge, Tonearm and Main Platter
Your Debut PRO comes with a new cartridge, specifically developed for the turntable and the new upgrades
and features it received compared to the previous Debut iterations. We have always been looking for the
best price/performance ratio, with perfect manufacturing quality and „Made in Europe“. For this reason, we
decided to work with Ortofon, and specifically, their main head of development, Professor Leif Johannsen, to
develop a unique cartridge. Thanks to the excellent manufacturing skills of Ortofon we were able to produce
a very special cartridge: The Pick it PRO.
Cartridges are electromechanical transducers, where mechanical energy is transformed into an electrical
signal. The real difference in sound happens here. The turntable itself should be as neutral as possible. The
colour and life of the music come from the cartridge.
We, therefore, designed our new Pick it PRO that delivers a more lively and robust sound and convinces with
its big dynamic range. The actual sound of the cartridge depends on how you combine the different
components that make up the cartridge: stylus, cantilever, cantilever suspension, coil material, number of
coil windings, generator, etc.
You cannot judge the cartridge by looking at just one specific part. Experience and the art of fine-tuning
make a cartridge unique and special. The perfect combination of components is the key to achieve the great,
charismatic sound of the Pick it PRO. Intensive research, development, and listening tests have been
necessary to gain the sound we were looking for.
As a result, the internal inductance and impedance have been lowered, which will give it characteristics
typically found in MC cartridges. You will also notice that the output level is lower than comparable MM
cartridges, which will potentially increase the dynamic range, and make it work well with excellent dedicated
phono stages. With the upgraded tonearm bearing, which is now much heavier and sturdier, we saw that the
new carbon/aluminium tonearm works incredibly well even with higher tracking force levels and more mass.
The friction is still so incredibly low, which enabled us to run cartridges with more tracking force (which
naturally puts more strain on the tonearm/bearing system). This was great, because higher tracking force
typically is good for reaching higher tracking ability. With further changes to the suspension and cantilever
(to accommodate the above-mentioned characteristics), the Pick it PRO is a Pro-Ject cartridge like never
before!
Page 13
© Pro-Ject Audio Systems · Pro-Ject Debut Pro · Revision 2021.09.01
12
The new tonearm, bearing and main platter are also perfectly capable of handling high-end MC cartridges!
!
Always disconnect the record player from the mains power supply as a precaution before maintenance!
You can adjust the height of the tonearm to fine tune the VTA for differently sized cartridges. The new platter
is completely anti-magnetic, which is necessary for MC cartridges to work properly. The increased mass of
the carbon/aluminium tonearm will match the demands, which are generally a bit stricter, for MC cartridges
to reach low resonance frequencies between 7 – 10 Hz. No Debut turntable before was able to do all this!
The Debut PRO is your entry into real audiophile customizability.
3. Adjusting the vertical tracking angle (VTA)
Put a record on the platter. When the needle is lowered into the record groove and the tonearm is not resting on
the lift arm, the tube of the tonearm should be parallel to the surface of the record.
If it is not, loosen both hexagon screws in the tonearm base just enough to allow vertical movement of the
arm pillar without force and slide the arm up or down until it is parallel.
Retighten the hexagon screws without applying excessive force (which would deform the arm pillar) – finger
tight is quite sufficient.
4. Maintenance and cleaning
Your record player requires little or no regular maintenance. Remove dust with a slightly moistened antistatic
cloth. Never use a dry cloth because this will create static electricity which attract more dust! Antistatic
cleaning fluids are available at specialist stores but must be applied sparingly to avoid damage to rubber
parts. It is recommended to fit the needle cover before cleaning or maintenance is carried out to avoid damage.
If the player is not used over a long period of time the drive belt can be removed to prevent unequal stretching.
The platter bearing is important for the correct speed and overall lifetime of the turntable. The oil can disappear
by playing regularly or it gets dirty by rubbing of the metal (turns from grey to black). You should continually
check if there is oil on the axle. In any case, it is a good idea to renew the lubrication after 3 years at the latest.
We recommend using Lube it to lubricate your platter bearing.
Page 14

© Pro-Ject Audio Systems · Pro-Ject Debut Pro · Revision 2021.09.01
13
Technical specifications Pro-Ject Debut PRO/ Pro-Ject 8.6 PRO
Nominal speeds
33/45 r.p.m.. *** 78 r.p.m. optional
Speed variance
33: ±0.40% 45: ±0.50%
Wow and flutter
33: ±0.16% 45: ±0.14%
Signal to noise
68dB
Effective tonearm mass
10g
Effective tonearm length
8.6 " ( 218.5mm)
Overhang
18.5 mm
Power consumption
4W/0W in Stand-By
Outboard power supply
15V / 0 – 0.8mA DC (set at 0.5mA), universal power supply
Dimensions (W x H x D)
415 x 118 x 320mm, dust cover open 415 x 365 x 405mm
Weight
6.0kg
Dimensions packaging (W x H x D)
488 x 235 x 393mm
Weight incl. packaging
8.0kg
Frequency range
20-20.000 Hz +/-2 dB
Channel separation
Tracking ability
22dB /1kHz
70µm
Output voltage
4mV
Recommended load impedance
Recommended load capacitance
47kohms
150-300 pF
Compliance/stylus type
12µm/mN – elliptical
Recommended tracking force
Tracking angle
Internal impedance, DC resistance
Internal inductance
20mN (2g)
20°
750 Ohm
450 mH
Weight
7.2g
Technical specifications Pro-Ject Pick it PRO
Page 15

© Pro-Ject Audio Systems · Pro-Ject Debut Pro · Revision 2021.09.01
14
Potential incorrect use and fault conditions
The manufacturer accepts no responsibility for damage caused by not adhering to these instructions
for use and/or by transportation without the original packaging. Modification or change to any part
of the product by unauthorized persons release the manufacturer from any liability over and above
the lawful rights of the customer.
PRO-JECT is a Registered Trademark of H. Lichtenegger.
This guide was produced by: Pro-Ject Audio Systems
Copyright © 2021. All rights reserved.
The information was correct at the time of going to
press. The manufacturer reserves the right to make
changes to the technical specification without prior
notice as deemed necessary to uphold the ongoing
process of technical development.
Pro-Ject turntables are manufactured to the highest standards and undergo strict quality controls before
leaving the factory. Faults that may possibly occur are not necessarily due to material or production faults but
can sometimes be caused by incorrect use or unfortunate circumstances. Therefore, the following list of
common fault symptoms is included.
The platter doesn't turn although the unit is switched on:
The unit is not connected to the mains power supply.
No mains at the socket.
Drive belt is not fitted or has slipped off.
No signal through one or other channel or both channels:
No signal contact from the cartridge to the internal tonearm wiring or from that to the arm lead or
from that to the phono box or between that and the amplifier. This could be due to a faulty plug,
broken wire or solder joint or simply loose plug/socket connection.
Phono input not selected at amplifier.
Amplifier not switched on.
Amplifier or speakers defective or muted.
No connection to the loudspeakers.
Strong hum on phono input:
No earth connection from cartridge or arm or arm cable to amplifier, or earth loop.
Distorted or inconsistent sound from one or both channels:
Record player is connected to wrong input of amplifier, or MM/MC switch incorrectly set.
Needle or cantilever damaged.
Wrong r.p.m., drive belt overstretched or dirty, platter bearing without oil, dirty or damaged.
Service
Should you encounter a problem which you are not able to alleviate or identify despite the above information,
please contact your dealer for further advice. Only when the problem cannot be resolved there should the
unit be sent to the responsible distributor in your country.
Guarantee repairs will only be effected if the unit is returned correctly packaged. For this reason, we recommend
keeping the original packaging.
Never return a record player without making sure that is it safely disassembled and correctly packaged in the
original packaging according to the diagrams on the last page of this user guide. Please remove these parts
and pack them separately: lid (10), counterweight (6), anti-skating weight (15) platter (5) and belt (3). Fit the
cartridge protection cap. Insert the transport lock for the tonearm (8) prior to carefully packaging the record
player.
Warranty
Page 16

© Pro-Ject Audio Systems · Pro-Ject Debut Pro · Revision 2021.09.01
15
 Loading...