

Page 1
INSTRUCTIONS FOR USE
Pro-Ject DAC Box RS
Page 2
Dear music lover,
The power cord is
used to disconnect the unit from the mains. Make sure that the power cord is easily accessible at all
vice or the power supply. Never place any item containing liquid,
such as a flower vase on or near the device. Never spill any liquid on the device or the power
product
be used in damp or wet locations, next to a bathtub, sink, swimming pool or any other similar
except the connection to the computer
, whilst the unit is disconnected from
to the mains and switch it on before connecting it to the
computer
ight channel is usually marked red,
not connect
simultaneously.
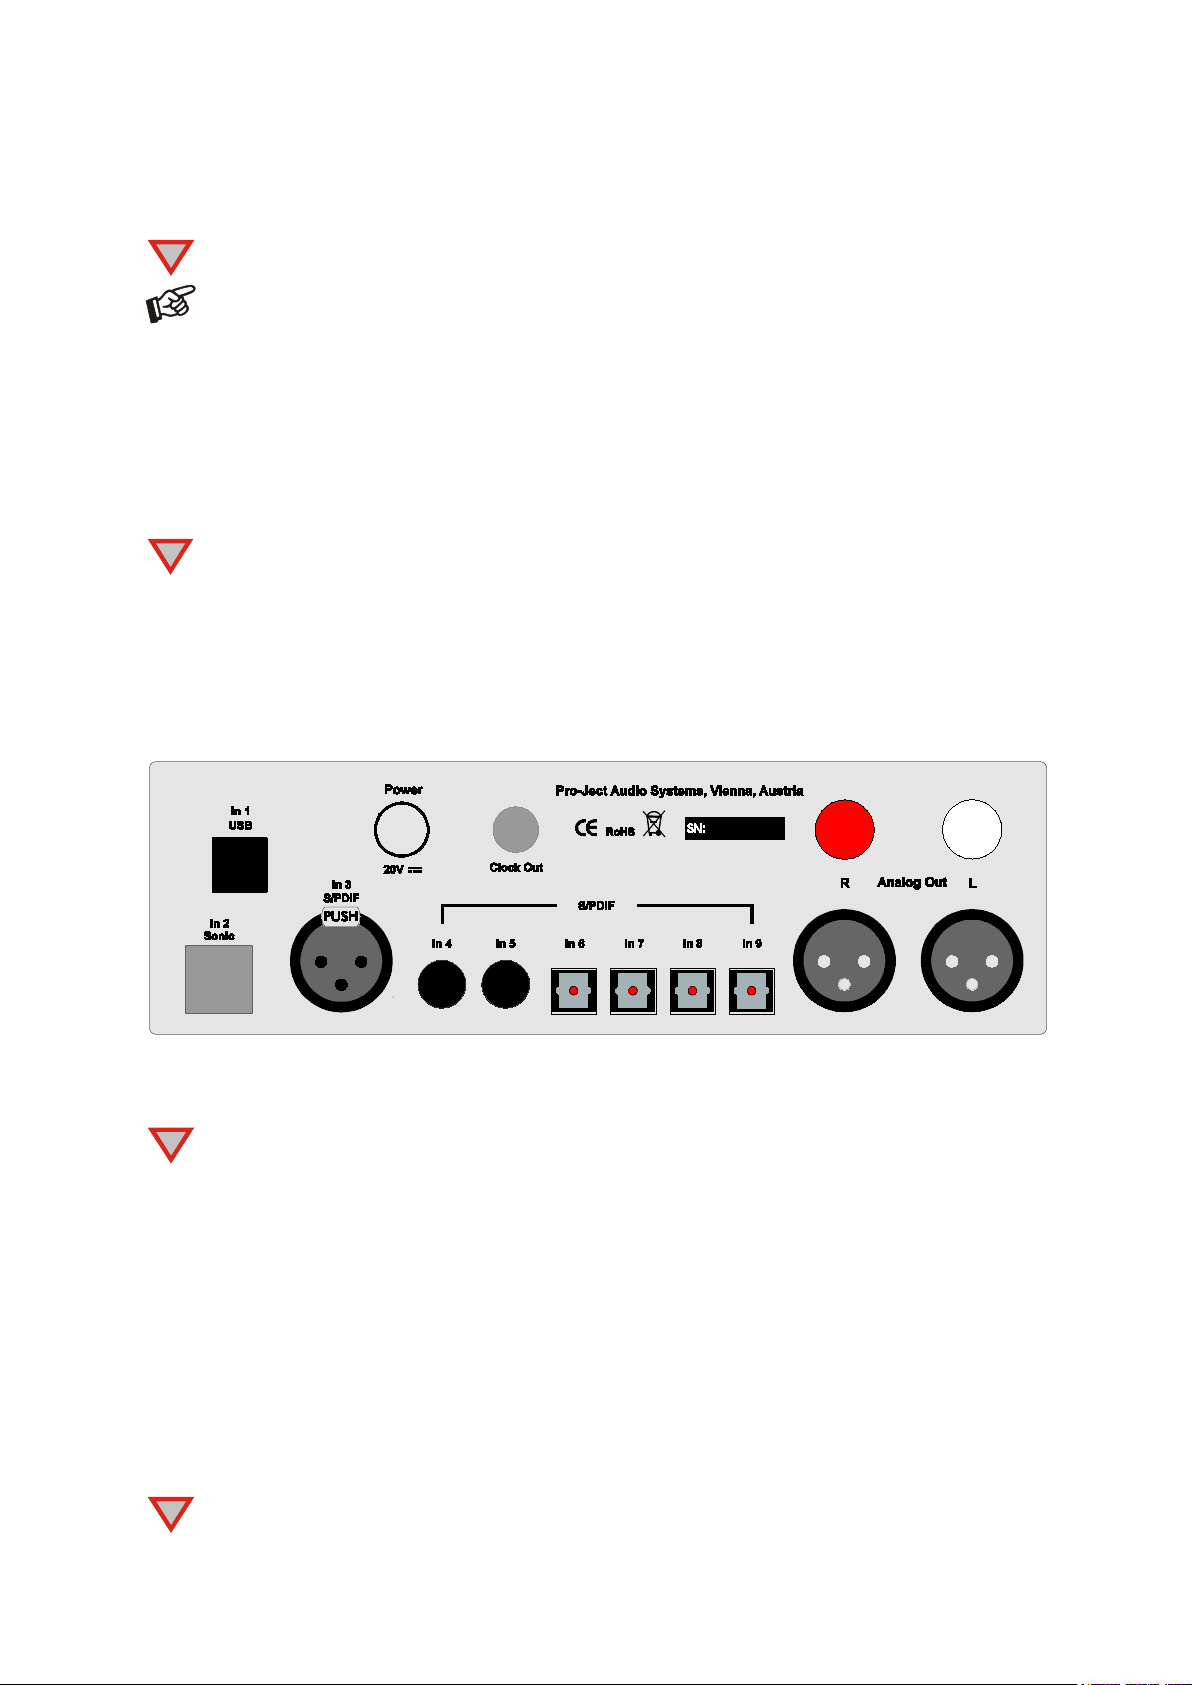
In 2 Sonic
Clock Out
Sonic
Clock
!
!
!
!
thank you for purchasing a Pro-Ject Audio DAC Box RS.
In order to achieve maximum performance and reliability you should study these instructions for use carefully.
Warning of a hazard for the user, the unit or possible misuse.
Important notice.
Safety instructions
AC outlet voltages vary from country to country. Before connecting to the mains, make sure that the
voltage in your area meets the voltage requirements printed on the power supply.
times. Never handle the device, the power cord/power supply while your hands are wet or damp.
Avoid letting liquids enter the de
supply. Never place any naked flame sources, such as lighted candles on or near the device. The
shall not
conditions.
Tubes produce heat. Proper ventilation has to be guaranteed all the time. The unit must not be stacked.
Connectors
Make all connections,
the power supply. Connect the unit
.
Take care to connect the left and right channels correctly. The r
the left channel black or white.
Do
Wiring XLR sockets: 1 ground, 2 “hot” and 3 “cold”.
Never use any other power supply than the one supplied with the unit except of Pro-Ject Power Box.
RCA and XLR outputs
Connection to the amplifier
Connect the Analog Out socket to a line input (such as AUX) on your amplifier.
Connecting the Pro-Ject CD Box RS
To be able to use the Sonic2 playback mode, the input In 2 Sonic
connected to the corresponding connectors on the Pro-Ject CD Box RS.
2
The cable length for
© Pro-Ject Audio Systems · Pro-Ject DAC Box RS · Revision 2014.4.1
(I2S) and
and
can be used with Pro-Ject CD Box RS only.
connection must not be longer than 29,5 inch (75cm).
AND
the input Clock Out have to be
Page 3

Digital inputs
TV satellite/cable receiver or a TV sets with an
up menu of your receiver/TV set, the
ctly. Connecting to
MUTE
CH
CH+
1
!
Sources with an digital output such as a CD player can be connected to the digital inputs (coaxial, optical and
symmetrical). A computer can be connected to the USB input.
The DAC supports PCM (LPCM) and DSD format only. The DAC does not work with audio formats
like DTS
integrated satellite/cable receiver, make sure that in the setformat of the digital signal, relayed to the digital output used is set to PCM.
™
or Dolby® Digital. If the DAC is used with a
Connecting to a Computer
Connect the USB-input of the DAC (unit must be switched on) to a free USB-socket on your computer and
turn it on/make sure it is powered on.
®
* For Windows
systems do not need an additional driver.
operating systems an USB driver (supplied on CD) has to be installed. Mac OS® operating
Please note: Connection should be made to an USB-socket of your computer dire
USB-hubs can cause problems.
Mains power connection
Connect the low voltage plug from the power supply to the Power 20V DC socket before connecting the
power supply to the mains.
Remote control
Blanked out buttons do not carry a function.
To switch on from standby or to standby
POWER turns the unit on or back into standby
Mute
activates and deactivates mute. If mute is engaged, the blue LED
above the ON/OFF switch will flash.
Selecting inputs in turns
- or
select the inputs in turn
Direct access to inputs
- 9 access a specific input directly
© Audio Trade GmbH · Pro-Ject DAC Box RS · Revision 2014.4.1
3
Page 4

Front panel controls
d a short time to
switch is
!
Switching on and off
The switch on the left hand side of the front panel turns the unit on and off. The blue LED above the ON/OFF
switch shows that the unit is switched on.
After switching on (or selecting tube output stage), the circuit and the tubes nee
reach the correct operating temperature. During warm up the blue LED above ON/OFF
flashing.
We recommend to set the volume control of the amplifier to minimum, prior to switching on.
Input selector
Operating ▲/▼repeatedly selects the inputs in turns. The selected input, the sampling frequency or the DSD
mode of the digital input signal will be indicated by the corresponding LED.
Filter
FIL1/ FIL2 will toggle between the two filters, phase optimised and frequency optimised.
Selecting the output stage
Solid /Tube will toggle between the tube and the class-A output stage. If the class-A output stage is switched
on, the heating of the tubes will be switched of after approximately five minutes.
Driver installation (Windows® operating systems only)
* For Windows® operating systems a USB driver (supplied on CD) has to be installed.
Insert the included CD into the drive of you PC and follow the instructions.
Complete the installation by restarting the computer.
After installing the driver, some setting have to be checked/done.
For example - Windows 7® operating system:
Control Panel Hardware and Sound Sound Playback:
Speaker/Project RS USB 2.0 Audio Out
select
Properties Supported Formats: make sure nothing is assigned
Level Sound: setting must be
Enhancements: disable all enhancements Advanced Default Format: set to studio quality 24/192
100
Using Windows 8®, the driver has to be installed in Windows 7® compatibility mode.
4
© Pro-Ject Audio Systems · Pro-Ject DAC Box RS · Revision 2014.4.1
Page 5

DSD playback
Up to now DSD playback on a computer using a Windows® operating system is only reliably possible with
the PC software player Foobar2000.
Nevertheless, this player has to be prepared, out off the box it is not capable to play DSD. Please read the
following instructions how to prepare the player.
You will need to download the following software and drivers from the internet:
The software player Foobar2000
http://www.foobar2000.org/download
The Foobar2000 for ASIO playback
The Foobar2000 for SACD playback
Unzip the enclosed files into a folder of your choice.
The actual windows
choice.
Please install the USB driver first. To do that, in the folder, where you stored the files to, start the installation
by double clicking on
Please install Foobar2000 now by double clicking on the downloaded file. Please start Foobar2000 after that.
Now you have to integrate the downloaded components into Foobar2000. Please do the following: In the
upper menu bar, click on
®
USB driver comes with the units on CD. Store all files on the CD into a folder of your
Setup.exe. Follow the instructions of the installation program.
File and then on Preferences.
http://www.foobar2000.org/components/view/foo_out_asio
http://sourceforge.net/projects/sacddecoder/files/foo_input_sacd/.
© Audio Trade GmbH · Pro-Ject DAC Box RS · Revision 2014.4.1
5
 Loading...