

Page 1

RealVideo
Content Creation Guide
Version 1.0
Progressive Networks, Inc.
Page 2

Information in this document is subject to change without notice. Companies, names, and
data used in examples herein are fictitious unless otherwise noted. No part of this document
may be reproduced or transmitted in any form or by any means, electronic or mechanical,
for any purpose, without the express written permission of Progressive Networks, Inc.
1995-1997 Progressive Networks, Inc. All rights reserved.
RealAudio and Real Audio logo are registered trademarks of Progressive Networks, Inc.
RealVideo and RealVideo logo are registered trademarks of Progressive Networks, Inc.
PowerPC are trademarks of IBM Corporation.
Adobe Premiere is a trademark of Adobe Systems, Inc.
Apple and Macintosh are trademarks of Apple Computer, Inc.
DolbyNet is a trademark of Dolby Laboratories, Inc.
Dolby Digitial AC-3 audio system manufactured under license from Dolby Laboratories
Licensing Corporation.
Macromedia is a registered trademark and Shockwave is a trademark of Macromedia, Inc.
Netscape Netsite is a trademark of Netscape Communications Corp.
O’Reilly Website NT is a trademark of O’Reilly Associates, Inc.
Sonic Foundry and Sound Forge are trademarks of Sonic Foundry, Inc.
SunOS and Solaris are trademarks of Sun Microsystems, Inc.
UNIX is a registered trade mark of X/Open Company Limited.
Windows and Windows NT are trademarks of Microsoft Corp.
SE100 is a trademark of Creative Labs
Wakeboard Multimedia Pro is a trademark of Digital Video Arts
CD30 is a trademark of Miro
Bravado 1000 is a trademark of Truevision
Osprey 1000 is a trademark of Multimedia Access
Seagate AV drives is a trademark of Seagate
Sipro is a trademark of Sipro Lab Telecom, Inc.
Progressive Networks, Inc.
1111 Third Avenue, Suite 2900
Seattle, WA 98101 USA
www.real.com
Printed in the United States of America. Part #: V10-001-970107
Page 3

Contents
Introduction......................................................................................................................... 1
Using this Guide .............................................................................................................. 2
Overview............................................................................................................................. 4
RealVideo Clips ................................ ................................................................ ............... 4
Components of a RealVideo System ................................................................................ 4
RealVideo Files and Metafiles ......................................................................................... 6
Delivering a RealVideo Clip............................................................................................ 7
Delivering Synchronized Multimedia............................................................................... 9
Title, Author, and Copyright........................................................................................... 10
Updating RealVideo Clips...............................................................................................11
Live Encoding and Live Broadcasting.............................................................................11
Installing RealVideo Encoder............................................................................................. 12
Installing Windows Encoder ...........................................................................................13
Installing Macintosh Encoder..........................................................................................15
Installing UNIX Encoder.................................................................................................17
Encoding RealVideo Clips..................................................................................................19
Source Files ....................................................................................................................19
Encoding Templates........................................................................................................26
RealVideo Encoder Plug-in for Adobe Premiere 4.2 .......................................................28
Using RealVideo Encoder for Windows..........................................................................31
Using RealVideo Encoder for UNIX............................................................................... 35
Creating Templates.........................................................................................................36
Delivering Live Content.....................................................................................................41
Setting Up RealServer................................................................................................ .....41
Advertising Your Live Event ..........................................................................................42
Encoding Templates for Delivering Live Content ...........................................................45
Using the Live Encoder for Windows..............................................................................46
Editing Video Files................................................................................................ .............49
Editing Input Files ..........................................................................................................49
Editing RealVideo Files in Windows ..............................................................................49
Command Line Editing of RealVideo Files.....................................................................58
Image Maps ....................................................................................................................66
Modifying RealVideo File Descriptions..........................................................................71
iii
Page 4

RealVideo Content Creation Guide
Managing Content on RealServer .......................................................................................72
Bandwidth Negotiation ...................................................................................................72
Configuring Your Web Site................................................................................................ 80
Making the Most of Your Content................................................................ ...................80
RealVideo Metafiles .......................................................................................................81
HTTP Streaming.............................................................................................................85
Custom Controls for RealVideo ......................................................................................87
Synchronized Multimedia.................................................................................................105
Creating an Events File................................................................................................. 106
Using Synchronized Multimedia with Bandwidth Negotiation ......................................108
Frames: The Basics....................................................................................................... 108
Glossary ...........................................................................................................................112
Index................................................................................................................................114
iv
Page 5

Introduction
Introduction
RealVideo System is today’s most practical solution for streaming real-time
live and on-demand video over the Internet and corporate intranets.
Real-time delivery means that you do not have to wait while a file downloads;
the clip plays as it is delivered. You have complete control over the clip; you
can pause, move forward and back, and start or stop at any time.
RealVideo formats are optimized for low- to medium-speed connections
including 14.4 and 28.8 Kbps modems, ISDN, T1 and LAN. You can also view
RealVideo files stored locally on your computer.
This guide explains how to create and manage content for a RealVideo system.
The content includes all of the clips and multimedia presentations delivered by
RealVideo system, and the support files that make it all work smoothly.
1
Page 6

RealVideo Content Creation Guide
Using this Guide
RealVideo Content Creation Guide is intended for people who are familiar
with operating World Wide Web servers and with Progressive Networks
technology. You do not need previous experience using RealVideo Encoder,
but you do need to know how to create directories or folders, copy files, and
open text files.
Organization
This manual is organized in two sections as follows:
Section 1: Overview
Explains the components and features of a RealVideo system. Diagrams show
the relationships between client and server for video and multimedia delivery.
Section 2: Content Creation
Explains how to create and manage video and multimedia content for delivery
by RealServer and a Web server. The chapters are:
Installing RealVideo Encoder: Explains how to install RealVideo Encoder.
Encoding RealVideo Files: Information about how to prepare files for
encoding, which encoding algorithm to use and how to encode a static file
using RealVideo Encoder or Adobe Premiere.
Delivering Live Content: Explains how to deliver live video, including setting up
RealServer and advertising your event on Timecast: RealMedia Guide.
Editing RealVideo Files: Explains how to use the editing tools to change the
static information in a file, alter the data, and examine the contents of a file.
Managing Content on RealServer: Detailed instructions and examples of
how to use bandwidth negotiation.
Configuring Your Web Site: Explains the many ways you can deliver
RealVideo clips from your web site, including HTTP streaming, Netscape
Plug-in, ActiveX object, and JavaScript.
2
Page 7

Introduction
Synchronized Multimedia: Discusses how to create a synchronized
multimedia presentation.
Conventions
This manual uses the following conventions:
Command Monospace font represents commands to be typed or
information displayed on the screen.
<file name> Angle brackets show where to insert information, such
as the name and location of a file.
[ ] Square brackets show optional command arguments.
Bold Bold font is used for names of files, directories,
commands, and options.
3
Page 8

RealVideo Content Creation Guide
Overview
Before you create and manage content for a RealVideo system, you should
understand how the system works. This chapter describes the primary
components of RealVideo System and explains how they work together.
RealVideo Clips
A RealVideo clip is a file or live broadcast containing sound and video
encoded in RealVideo formats. These formats are highly compressed to deliver
the best possible sound and video over a limited-bandwidth connection.
Because there is no single best format for delivering audio and video,
RealVideo system provides several formats that are optimized differently for
different kinds of content. You can choose to provide a clip in one or more
formats based on the type of content and the available bandwidth. For
example, you would use a different format to deliver speech over a 14.4 Kbps
modem than you would to deliver a music video over an ISDN connection.
Components of a RealVideo System
RealVideo System is a client-server system. The server provides the content to
the client over a network. The basic components of a RealVideo system are:
RealPlayer - The client program that enables users to see and listen to
RealVideo clips. Special purpose player components enable ActiveX and
Netscape Plug-in capabilities.
RealVideo Encoder - The program that creates RealVideo clips. The input to
this program can be a digitized audio clip, a live audio signal, a digitized video
clip or a live video signal.
4
Page 9

Overview
RealVideo Tools - The tools programs that can be used to modify RealVideo
clips, including RMTools, RMMerge, RMEdit, and RMPaste.
RealServer - The server program that delivers RealVideo clips over a
network. One RealServer can deliver clips to many Players at the same time.
Web Browser - The client program that enables users to find most RealVideo
clips. The Web browser is also used to display the visual part of Synchronized
Multimedia presentations. RealVideo system works with all popular Web
browsers.
Web Server - The server program that delivers Web pages. Typically,
RealVideo clips are accessed by clicking a link on a Web page. The Web
server also delivers the visual part of Synchronized Multimedia presentations.
HTTP streaming of RealVideo files enables content providers to stream
RealVideo clips from a World Wide Web server. While this method is not as
robust, it provides a reasonable method for providing short RealVideo content
to a limited number of users. RealVideo System works with all popular Web
servers.
5
Page 10

RealVideo Content Creation Guide
RealVideo Files and Metafiles
RealVideo System uses several file types, each identified by a specific file
extension. The files and their file extensions are:
RealMedia clip (.rm) - Audio and video encoded to RealVideo format. This
file is created with RealVideo Encoder and delivered by RealServer. The .rm
files can contain multiple streams, including audio, video, image maps, and
events.
RealVideo metafile (.ram) - The file that connects a Web page to one or more
RealVideo or RealAudio clips. The metafile is located on a Web server and is
linked by a Web page. The metafile contains the URL of one or more clips
located on a RealServer.
RealPlayer Plug-in metafile (.rpm) - The same as RealVideo metafile, but
used with RealPlayer Plug-in for Netscape Navigator and Internet Explorer 3.0
and later.
RealAudio clip (.ra) - Audio encoded to RealAudio format. This file is
created with RealAudio Encoders and works with RealPlayer, RealAudio
Player, and RealServer.
6
Page 11
Overview
Server
Client
366421315
Delivering a RealVideo Clip
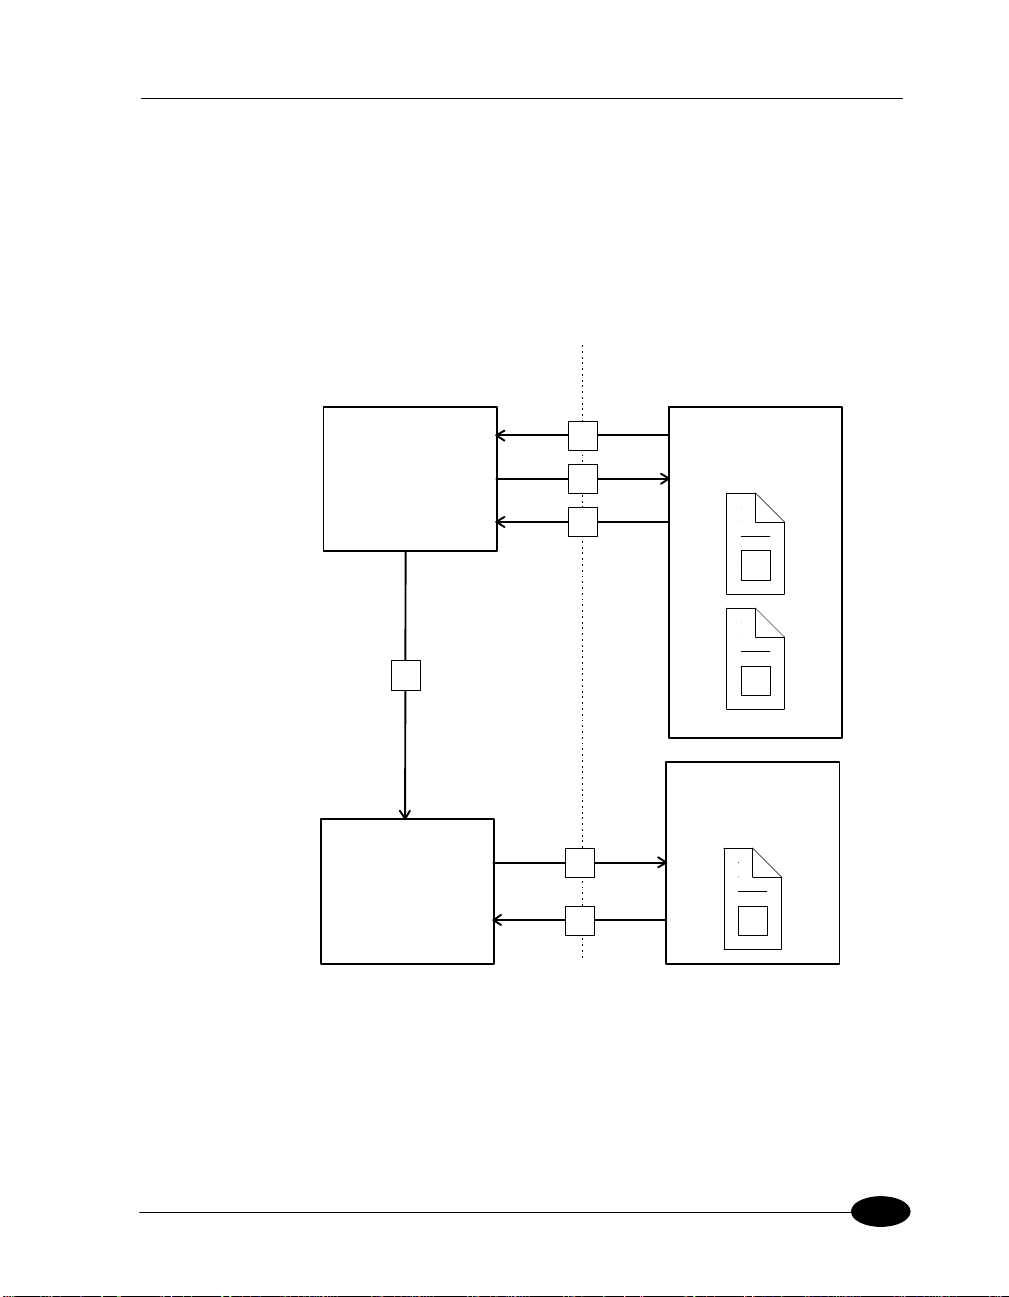
The following figure shows the components of RealVideo system used to
deliver a typical RealVideo clip. The numbers in the figure match the
numbered steps following the figure.
Web
Browser
RealPlayer
Web
Server
RealVideo
Server
RealVideo Delivery System
7
Page 12

RealVideo Content Creation Guide
1. The Web browser displays a Web page that contains a link to a RealVideo
metafile.
2. The user clicks the link. The Web browser requests the metafile from the
Web Server.
3. The Web server delivers RealVideo metafile to the Web browser. Based
on the .ram file extension, the Web server sets the MIME type of the file
to audio/x-pn-RealAudio. For files with a .rpm file extension (RealPlayer
Plug-in), the Web server sets the MIME type of the file to audio/x-pn-
RealAudio-plugin.
4. The Web browser looks up the MIME type of RealVideo metafile. Based
on the MIME type, the Web browser starts RealPlayer as a helper
application and passes it the metafile.
5. RealPlayer reads the first URL from the metafile and requests it from
RealServer.
6. RealServer begins streaming the requested RealVideo or RealAudio clip to
RealPlayer.
Note No messages pass between RealServer and the Web server. The Web
browser provides the URL of RealVideo clip to RealPlayer. RealPlayer does not
require a Web browser to function; users can enter the URL of a .ra, .rm or .ram
file directly into RealPlayer, or use the Preset or Scan buttons on
RealPlayer Plus.
8
Page 13
Overview
Server
Client
3
656
8
2
1
3
174
7
Delivering Synchronized Multimedia
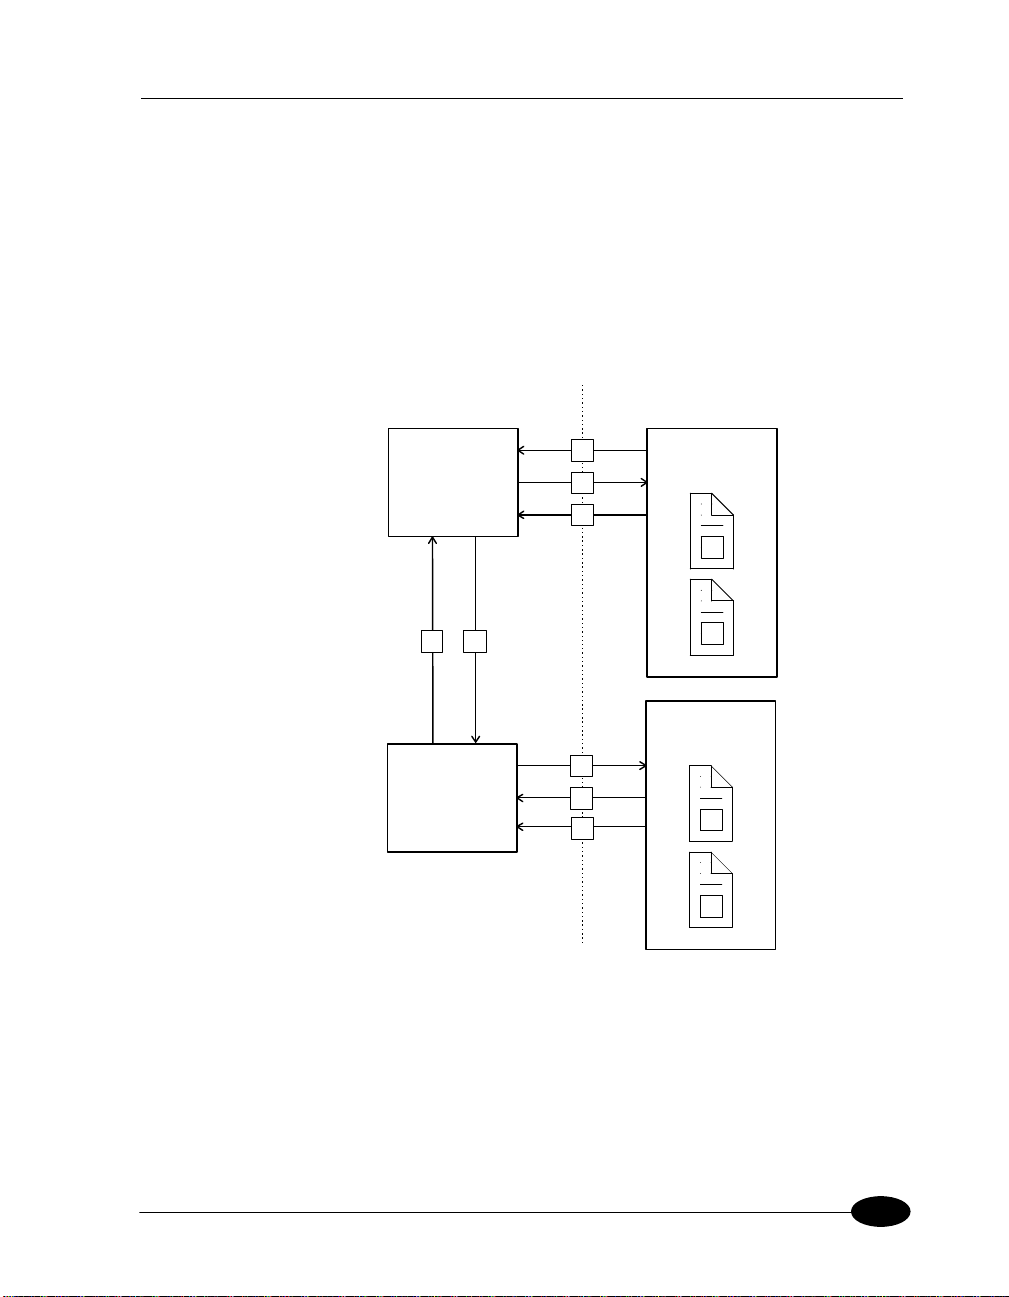
Synchronized Multimedia delivery works like regular RealAudio or RealVideo
delivery, with one extra step between RealPlayer and the Web browser.
The following figure shows the components of RealVideo System used to
deliver a typical RealVideo Synchronized Multimedia presentation. The
numbers in the figure match the numbered steps following the figure.
Web
Browser
RealPlayer
Web
Server
RealVideo
Server
Media Delivery System
1. The Web browser displays a Web page that contains a link to a RealVideo
metafile.
2. The user clicks on the link. The Web browser requests the metafile from
the Web Server.
9
Page 14

RealVideo Content Creation Guide
3. The Web server delivers RealVideo metafile to the Web browser. For files
with a .ram file extension, the Web server sets the MIME type of the file
to audio/x-pn-RealAudio. For files with a .rpm file extension (RealPlayer
Plug-in), the Web server sets the MIME type of the file to audio/x-pn-
RealAudio-plugin.
4. The Web browser looks up the MIME type of RealVideo metafile. Based
on the MIME type, the Web browser starts RealPlayer as a helper
application and passes it the metafile.
5. RealPlayer reads the first URL from the metafile and requests it from
RealServer.
6. RealServer begins streaming the requested RealAudio or RealVideo clip to
RealPlayer.
7. RealServer concurrently notifies RealPlayer when an event should occur.
For more information see “Using Synchronized Multimedia with
Bandwidth Negotiation” on page 108.
8. RealPlayer sends the URL for the event to the default Web browser for
viewing.
Title, Author, and Copyright
RealAudio and RealVideo clips include text strings for the title, author, and
copyright. This text is displayed by RealPlayer when the clip is played.
Although the player usually labels the text as title, author, and copyright, the
player displays whatever text you choose to supply.
Enter the title, author, and copyright text when you encode a clip. You can
override the values encoded with the clip using the metafile. You can also
change the text using RMEdit and RMTools.
For information about changing the Title, Author or Copyright text strings in
encoded files, refer to “Modifying RealVideo File Descriptions” on page 71.
10
Page 15

Overview
Updating RealVideo Clips
When you encode a RealVideo clip, the original file is not modified.
RealVideo Encoder creates a new file with a .rm file extension. It is important
to note that encoding a RealVideo clip is a one-way process; you cannot
convert a RealVideo file back into the original source format. If you want to be
able to encode to other formats in the future, you need to archive the original
source.
It is possible to modify various attributes of RealVideo clips without reencoding them. For information about changing the Title, Author or Copyright
text strings in encoded files; or about enabling or disabling PerfectPlay and
Selective Record, refer to “Modifying RealVideo File Descriptions” on
page 71.
Live Encoding and Live Broadcasting
The source of a RealVideo clip can be prerecorded or live input. The encoded
RealVideo clip can be stored as a file for later use, broadcast live over a
network or it can be simultaneously stored as a file and broadcast live. The last
option allows you to archive the live broadcast.
All versions of RealVideo Encoder can encode a live input source. Live
broadcasting requires a license and RealServer.
11
Page 16

RealVideo Content Creation Guide
Installing RealVideo Encoder
RealVideo Encoder compresses high-bandwidth video signals to a lowbandwidth signal. This compression allows for the real-time transmission of
clips via the Internet, even over a connection as slow as a 14.4 Kbps modem.
RealVideo Encoder is available for the following platforms:
• Windows 95 and Windows NT
• Macintosh
• UNIX (Irix)
12
Page 17

Installing RealVideo Encoder
Installing Windows Encoder
RealVideo Encoder for Windows can do static and live encoding. Whether or
not you will be able to do live encoding depends on the license key for your
RealServer.
RealVideo Encoder for Windows is designed to work under Windows 95 and
Windows NT. It may work under Windows 3.1 and 3.11 with the Win32s
extensions, but this configuration is not supported.
System and Software Requirements
RealVideo Encoder 1.0 beta is designed to work in the Windows 95 and
Windows NT (3.51 or later) environments. The following table explains which
hardware is required. For information about additional requirements for
delivering live content, refer to “Live Encoding” on page 23.
Requirement Minimum Recommended
CPU: Windows 95/NT 486/66 DX Pentium 120
RAM 16 MB 32 MB
Hard Disk space (software) 4 MB 4 MB
Hard Disk space (data) 500 MB 1 GB
Color Display 16-bit 24-bit (TrueColor)
Video Capture Card (not
required to encode an AVI or
Quick Time file)
Sound Card 16-bit sound card
Any card that is compatible with Video for
Windows.
13
Page 18

RealVideo Content Creation Guide
Installing
To download and install the free RealVideo Encoder for Windows:
1. Download the installer from:
http://www.real.com/
2. When prompted, click Save to Disk and specify the temporary directory
for RealVideo installation program. Note where you saved it.
3. In File Manager or Explorer, double-click the icon to activate the
automated installation process.
4. Follow the Setup program instructions.
14
Page 19

Installing RealVideo Encoder
Installing Macintosh Encoder
RealVideo Encoder for Macintosh is available for download from Progressive
Networks web site.
System and Software Requirements
• Power Macintosh Computer
• 16 MB RAM minimum
• System 7.1 or greater (System 7.5.3 or greater is highly recommended)
• MacTCP or Open Transport Installed (Open Transport 1.1.1 or greater is
highly recommended)
68K Macintosh computers are currently not supported.
Installing
To download and install RealVideo Encoder for Macintosh:
1. Download the installer from:
http://www.Real.com/products/
2. When prompted, click Save to Disk and specify the temporary folder for
the RealVideo installation program. Note where you saved it.
3. Double-click the icon to activate the automated installation process.
4. Follow the Install program instructions.
5. When the installation is complete, you need to restart your computer
before you can use RealVideo Encoder.
15
Page 20

RealVideo Content Creation Guide
Installing UNIX Encoder
There is one version of Encoder for UNIX: a free Encoder available for
download from Progressive Networks web site.
RealVideo Encoder for UNIX is designed to work with the Irix operating
system.
System and Software Requirements
• Irix 3.5 or greater
• Standard digital media libraries
Installing
To download and install RealVideo Encoder for UNIX:
16
1. Download the package from:
http://www.real.com/
2. When prompted, click Save to Disk and specify the temporary directory
for RealVideo installation program.
3. Change directories to the directory that contains the downloaded file and
decompress the file by typing: zcat <file name> | tar xvf -
where file name is the name of the downloaded file.
4. Add RealVideo Encoder tool to your path.
• If you are using the csh, zsh, or tsch shell, add the following
command to your .cshrc file after all other set path commands:
set path=($path $HOME/your_encoder_dir_name)
Page 21

Installing RealVideo Encoder
• If you are using the ksh, bash, or bsh shell, add the following
command to your .profile file after all other PATH commands:
PATH=$PATH:$HOME/your_encoder_dir_name
5. Install the codecs anywhere on the system, then update the environment
variable LD_LIBRARY_PATH to include the codecs’ directory. This
distribution includes the following codecs:
libra28_8.so
libradnet.so
librasipr.so
librarv10.so
6. Test RealVideo Encoder by changing directories to the directory specified
in Step 4 and typing: rvencoder -H.
The Encoder prints usage information.
17
Page 22

RealVideo Content Creation Guide
Encoding RealVideo Clips
RealVideo Encoder enables you to compress video files or input from a video
device into one or more RealVideo formats. Output can be sent to a file or
directly to RealServer for live broadcasting. You can select input files by
browsing from within the Encoder, or you can drag-and-drop files for
automated processing. The Encoder window displays information about input
and output file formats and has fields for entering descriptive information.
(UNIX users work in a command line environment.)
This chapter details RealVideo Encoder operations, including supported input
data formats, output options, and how to achieve the best possible audio and
video quality.
Some video editing programs can encode and write files in RealVideo format.
For example a RealPlayer Plug-in is available for Adobe Premiere.
There is a difference between encoding from a live source and broadcasting a
live event. Live encoding requires special license purchased with your
RealServer. For information about serving a live stream refer to “Delivering
Live Content” on page 41.
Source Files
RealVideo content may be created either from previously recorded digital
video files or from an external video source. The Encoder does not support
compressed input files. Use a third-party editing utility to convert nonsupported formats to a supported format.
The following inputs are supported:
• AVI
• QuickTime
18
Page 23
Encoding RealVideo Clips
AVI Files
RealVideo Encoder accepts compressed or uncompressed format (it is
recommended that you use uncompressed formats).
The following are AVI requirements:
• The AVI file must have a color depth of 24-bits.
• Height and width must both be divisible by 16 or can be 160 x 120.
• Indeo drivers must be installed on your machine for the encoder to be able
to open the AVI. Typically, if you captured the AVI on the same machine
as the encoder, the encoder has no problem opening it. Otherwise the
Indeo drivers are available from Intel.
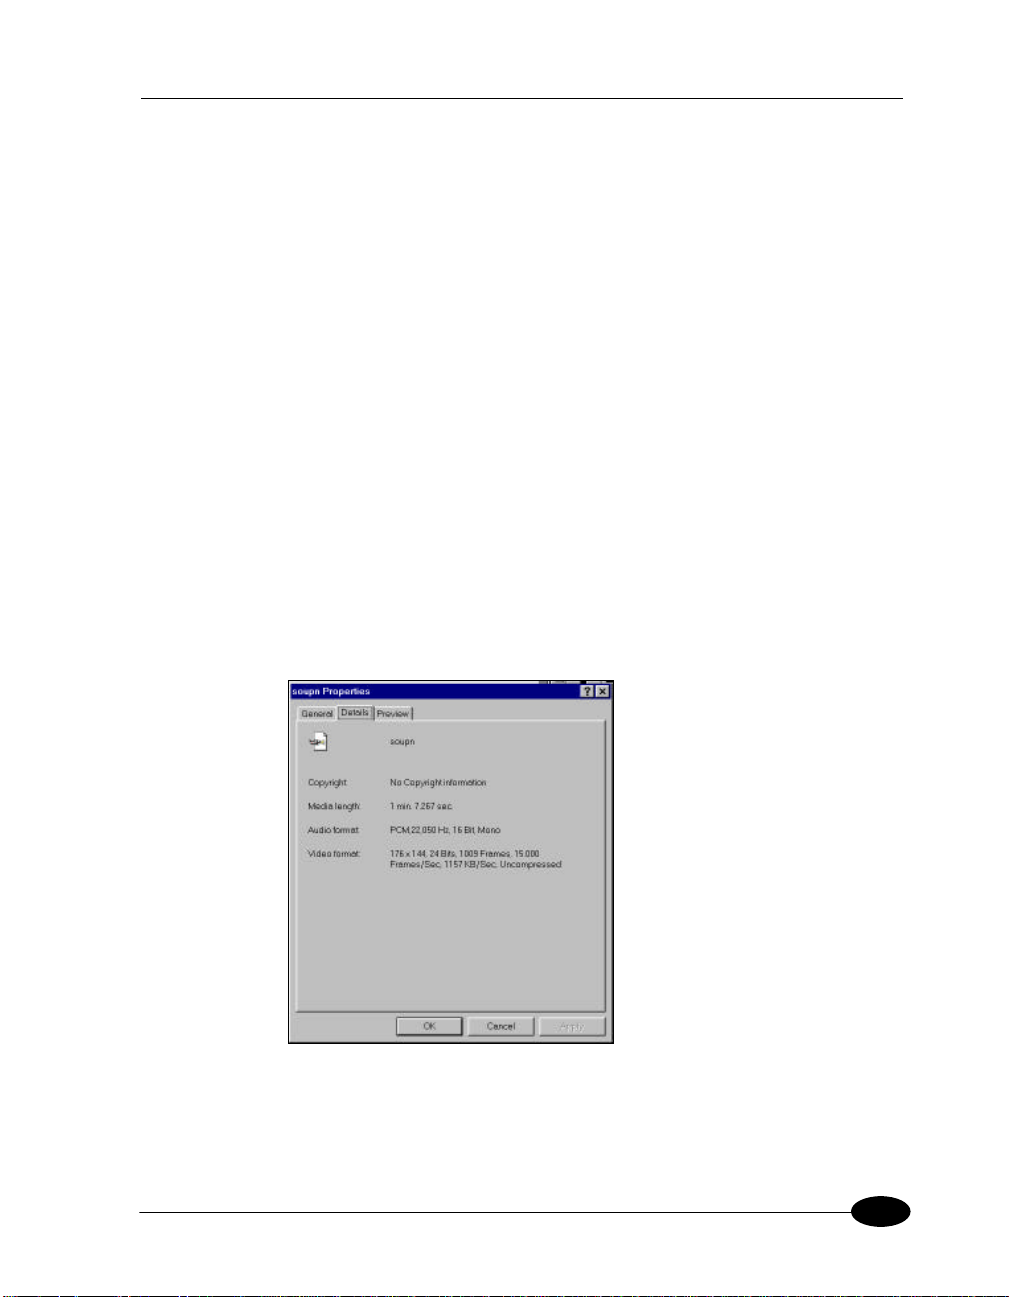
To determine if you have the AVI video codec for a particular AVI file:
1. Right-click the file name.
2. Click Properties.
3. Click the Details tab. Look at the Video Format field.
If the Video Format field says "Unknown format" most likely the
corresponding AVI video codec is not installed.
19
Page 24
RealVideo Content Creation Guide
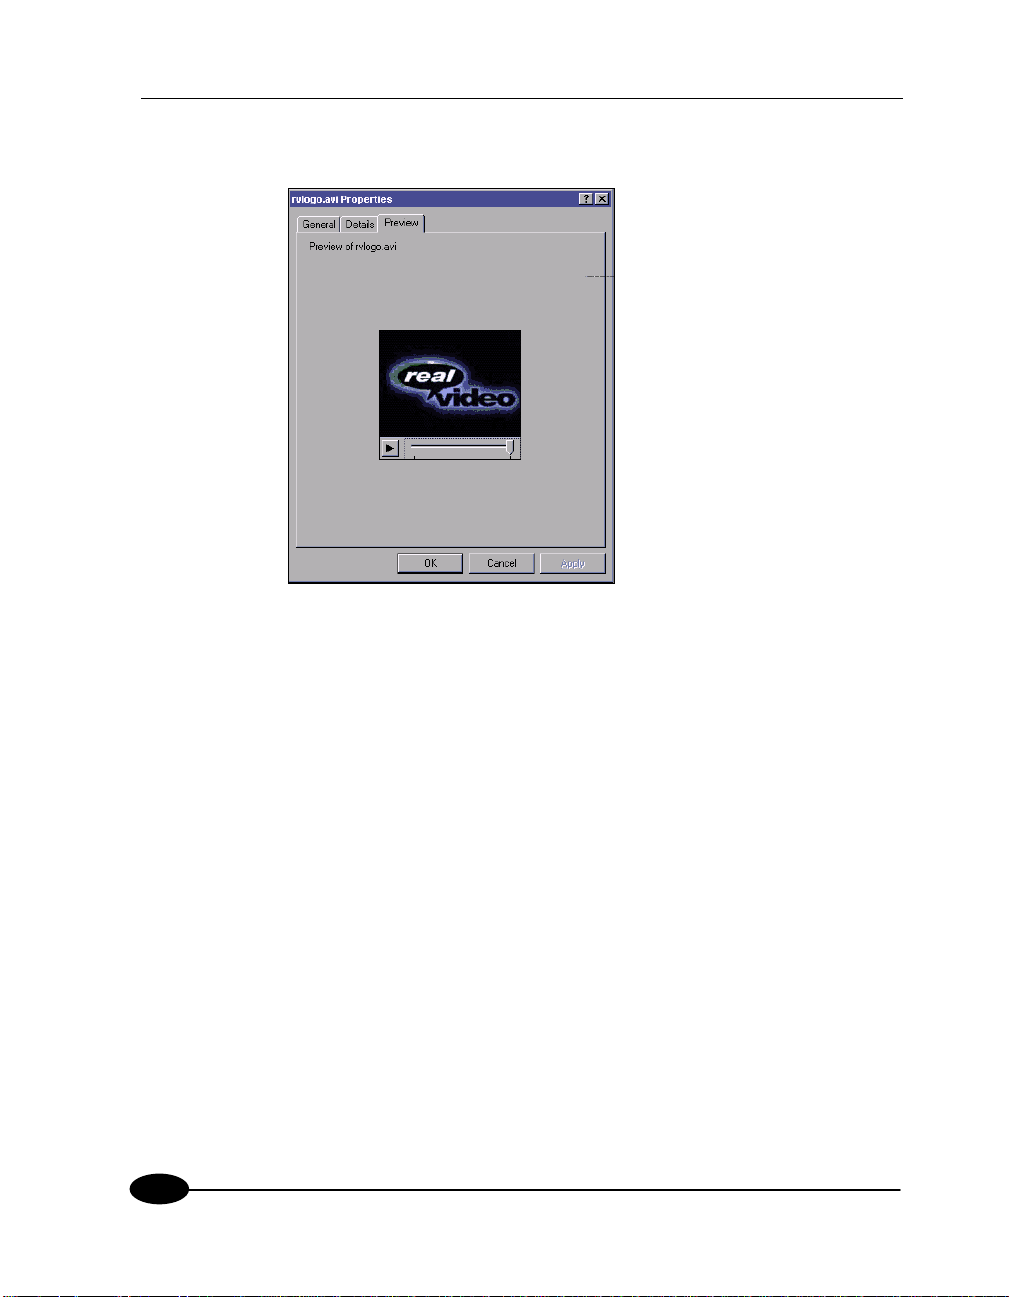
4. If the Video Format field lists a format, click the Preview tab.
You should be able to view the video in the preview window.
Note If you can preview the video, and still receive an error when encoding
the AVI file, the file may not be in 24-bit color. You can convert the file to 24bit file using a third-party video editing tool.
QuickTime or .MOV files
RealVideo Encoder accepts uncompressed 24-bit RGB QuickTime video files
containing 8- or 16-bit mono and stereo audio.
Image Size
RealVideo Encoder 1.0 beta supports any size image that is a multiple of
sixteen pixels. The most standard size is 176 pixels by 144 pixels. An image
size of 160 x 120 is also supported.
20
Page 25

Encoding RealVideo Clips
Producing High Quality Video
To create the best possible streaming video, you must start with the best
possible source material. Different video formats yield different qualities when
digitized. Because RealVideo compression algorithms are lossy, some of the
information contained in your original input is not included in the
reconstructed signal sent to RealPlayer.
The common video formats in order of quality are:
• Betacam-sp, also known simply as Beta. This format is common among
video production professionals.
• Laserdisc
• S-VHS or Super-VHS
• VHS
Satellite television services (e.g. Direct TV) have extremely high quality
video. Their feed quality typically exceeds that of Laserdisc.
Video Capture Cards
Before you can encode RealVideo, you must capture (digitize) your source
material to your computer. To digitize video you need a video capture card. In
general, any card that supports Video for Windows can be used. The following
are capture cards that have been tested by Progressive Networks:
Video Capture Card Manufacturer
SE100 Creative Labs
Wakeboard Multimedia Pro Digital Video Arts
DC30 Miro
Bravado 1000 Truevision
Note If your video card has an audio input in addition to the video input, the
audio input must go into the “line input” jack on the audio card, never into the
video card. If your video card has both an s-video input and a composite input,
use the s-video input.
21
Page 26

RealVideo Content Creation Guide
Computer Hardware
When encoding video, the faster the computer, the faster the video and the
fewer frames are dropped. A Pentium 166 MHz Windows 95 machine gives a
good result. It is possible to use slower equipment, but anything slower than a
Pentium is not recommended.
Capturing video puts a burden on your computer’s ability to write to your hard
drive. Seagate manufactures special hard drives for capturing video called AV
drives. If you do not use one of these special drives, frames may be dropped
during the capture process when the hard drive re-calibrates itself periodically.
If you experience dropped frames with a standard drive, you can re-capture the
video.
Live Encoding
The quality of live encoding depends on the power of your computer system.
Encoding at higher quality takes longer and requires greater computing
resources than encoding at a lower quality. Slower machines give reasonable
results in Slide Show mode, at 1 fps or less. The following lists the minimum
requirement tested as well as the recommended hardware.
22
Requirement Minimum Recommended
CPU Pentium 166 Dual-Pentium Pro 200
OS Windows 95 Windows NT
RAM 32 MB 64 MB
Hard Drive 3 MB AV drive, 3 MB
Editing
Limited video editing tools are available with RealVideo. For more
information, refer to “Editing Video Files” on page 49. For more advanced
editing features the following programs are recommended:
• Adobe Premiere
• In:sync Kohesion
Page 27

Encoding RealVideo Clips
Producing High Quality Audio
• Use high quality source files.
• When possible, digitize the sound to a supported file format. Then pre-
process the file with a sound editing program. Set the amplitude of your
input signal to maximize the use of the available dynamic range.
• Eliminate any DC offset either while recording content or later with an
audio editor. This removes low frequency noise.
• Use a CD quality sampling rate (44.1 kHz), sampling width (16-bit) and
two channels when creating an input file. You can always downsample
and convert to one channel later.
• The source files should contain signals of the maximum allowable
amplitude. If the full amplitude range is not used, the resulting RealVideo
files may sound flat. Adjust the range using a sound editor before
encoding the file. Some sound editors have a Normalize function that
maximizes levels automatically.
• If your original audio file signal exceeds the acceptable amplitude range,
the file may contain “clipping.” Clipping can give rise to clicks or pops on
playback. If your source file contains a clipped signal, your final
RealVideo file will have high-frequency background noise or static.
• When encoding live-source audio, you have less opportunity to manipulate
your input signal. Be sure that volume levels are prepared and tested. If
you are not doing a live broadcast, you may want to record your input as a
.wav or .au file so that you may digitally edit it prior to compression.
• Cut any unnecessarily long silences from the beginning or end of the
output file to conserve space.
For an in-depth discussion concerning pre-processing, read “Improve Sound
Quality in RealVideo Clips” on the Progressive Networks Web site:
http://www.real.com/help/
23
Page 28

RealVideo Content Creation Guide
Encoding Templates
Before you begin encoding, you must make decisions about the appropriate
settings for different types of audio and video input. Progressive Networks has
supplied several pre-defined encoding templates to assist users in making those
decisions. You can select from the pre-defined templates, adjust those templates
or define a new template for the type of content you are encoding. For a list of
templates, refer to “Pre-Defined Templates” on page 26. For information about
creating templates, refer to “Creating Templates” on page 36.
Each template is optimized for a particular type of audio and video content as
well as for bandwidth. Select one or more templates that best suit your needs.
RealServer can deliver clips encoded using multiple templates. In this way,
you can reach the widest possible audience while still providing highbandwidth users with the best listening experience. Using Bandwidth
Negotiation, you can configure your site to automatically serve the
appropriately encoded file.
For more information about Bandwidth Negotiation, refer to “Managing
Content on RealServer” on page 72.
Pre-Defined Templates
Below are the default settings for some common content types found in
RealVideo Encoder. If one of the following templates does not achieve the
effect you are looking for, try creating a new template by basing it on a predefined template and then modifying the settings.
Note It is recommended that you don't modify the pre-defined templates. If
you want to change some of the settings, save the template as a new template.
This way, you don’t overwrite the pre-defined templates.
24
Page 29

Encoding RealVideo Clips
Template Name Target
Bandwidth
High Action (Fractal)
w/Music
High Action 28.8
w/ Music
High Action 28.8
w/ Voice
High Action (Fractal) 56.0 8.5 Kbps
High Action 56
w/ Music
High Action 56
w/ Voice
Music Video 28.8,
Emphasize Audio
Music Video 28.8,
Emphasize Video
Music Video 56,
Emphasize Audio
112 12 Kbps
28.8 8 Kbps music 11.0 19 100 .25
28.8 6.5 Kbps
56.0 16 Kbps
56.0 8 Kbps voice 36.5 45 100 7.5
28.8 12 Kbps
28.8 8 Kbps music 11 19 100 .25
56.0 16 Kbps
Audio Codec Video Bit
music
voice
voice
music, High
response
music
music, High
response
Total Bit
Rate (Kbps)
78 90 70 15
12.5 19 100 .25
36.5 45 70 10
29 45 100 7.5
7 19 100 .25
29 45 100 7.5
Rate (Kbps)
Video
Quality
Frame
Rate (fps)
Music Video 56,
Emphasize Video
Talking Heads 28.8 28.8 6.5 Kbps
Talking Heads 56 56.0 8.5 Kbps
56.0 12 Kbps
music
voice
voice
33 45 100 7.5
12.5 19 100 7.5
36.5 45 100 7.5
* Target Bandwidth indicates the minimum bandwidth necessary to play the file:
28.8 corresponds to a 28.8 Kbps modem
56.0 corresponds to an ISDN or 56 Kbps modem
112 corresponds to a Dual ISDN or T1 line
25
Page 30

RealVideo Content Creation Guide
RealVideo Encoder Plug-in for Adobe
Premiere 4.2
RealVideo Encoder Plug-in for Adobe Premiere 4.2 exists for both Windows
and Macintosh platforms. Currently, the Windows version is installed by
RealVideo Encoder 1.0 beta. The Macintosh version of this plug-in can be
downloaded independently from Progressive Networks Web site. The
Windows Adobe Premiere plug-in is installed in the /Premiere/plugins
directory. The Macintosh Adobe Premiere plug-in is installed in the plug-in
directory in the Premiere folder.
Supported File Formats
RealVideo Encoder Plug-in for Adobe Premiere supports all of the file types
supported by Adobe Premiere.
Movie File Formats Audio File Formats
26
Video for Windows (.avi) Audio Interchange (.aif)
QuickTime for Windows and
Macintosh (.mov)
FilmStrip (.flm)
Audio source files must be sampled at 11, 22, or 44 kHz.
8-bit and 16-bit mono and stereo audio files are supported.
Windows Waveform (.wav)
Page 31

Encoding RealVideo Clips
Encoding with Adobe Premiere 4.2
To encode audio and video files in Adobe Premiere 4.2:
1. Start Adobe Premiere 4.2.
2. Click Open from the File menu.
3. Select one of the supported file types. The file appears in the Clip window.
4. Select the Clip window. Click Export from the File menu and select
RealVideo Encoder. RealVideo Encoder Options window appears
(Windows version):
5. In the media options pane, select one of the pre-installed styles. These
styles are guidelines for creating content containing both audio and video.
You can save your own styles, or delete styles that you do not use. If you
delete a style you created yourself, it will be permanently deleted. If you
delete a style which was installed by RealVideo Encoder, you can get it
back by reinstalling RealVideo Encoder.
6. Once you have selected a style, you can change any of the settings for the
audio codec, the video codec, the total bit rate, the Quality, or the Frame
Rate.
7. In the properties pane, enter the Title, Author, and Copyright information
for your output file. These fields are optional.
27
Page 32

RealVideo Content Creation Guide
8. RealPlayer users with low bandwidth modems can experience files
encoded for a higher bandwidth by partially downloading audio data
before beginning playback. If you want to allow this, click the Allow
PerfectPlay checkbox. This is the default setting.
9. If you want to allow RealPlayer Plus users to save your clip to disk, click
the Allow Selective Record checkbox.
10. In the Marker Options frame, click the appropriate option. Refer to Marker
Options for more information.
11. In the destination pane, click Select and enter the name of the output file.
12. Click the Encode button. Adobe Premiere begins encoding the file.
13. When the file is encoded, a Status dialog box appears, providing details
about the encoded file. Click the OK button.
14. Play the encoded file using RealPlayer 4.0.
Marker Options
28
Marker options allow you to take advantage of the Marker feature in Adobe
Premiere.
• Click Off to encode the entire clip regardless of markers. Choosing this
option means that you don’t have control over which frames get encoded.
• Click Key Frames to encode a marked file. Choosing this option will
ensure that all frames that are marked are encoded.
• Click Slide Show Frames to encode only the marked frames. Choosing
this option allows you to create slide shows out of video files and gives
you control over exactly which frames you want to use.
Refer to your Adobe Premiere documentation for information on how to set
and clear numbered and unnumbered markers. The plug-in recognizes both
Premiere’s numbered (up to 10 available) and unnumbered markers (up to
1000 available).
Page 33
Encoding RealVideo Clips
Using RealVideo Encoder for Windows
RealVideo Encoder for Windows can do static and live encoding. Whether or
not you will be able to do live encoding depends on the license key for your
RealServer.
RealVideo Encoder 1.0 beta converts video in common file formats to RealVideo
format. You specify the input source and output file, and you can specify options
such as the compression type and copyright string to be included in the output
file. For a list of supported input formats, see “Source Files” on page19.
Progressive Networks has supplied several pre-defined encoding templates to
assist users in determining the appropriate settings for different types of video
input. You can select a pre-defined template or define a template specifically
for the type of video you are encoding. For more information, refer to
“Encoding Templates” on page 26 and “Creating Templates” on page 36.
Note If you have the appropriate license key for RealServer, RealVideo
Encoder can deliver live content for broadcasting live events. For information
about RealVideo Live Encoder for Windows, refer to “Using the Live Encoder
for Windows” on page 46.
To encode a file using RealVideo Encoder for Windows:
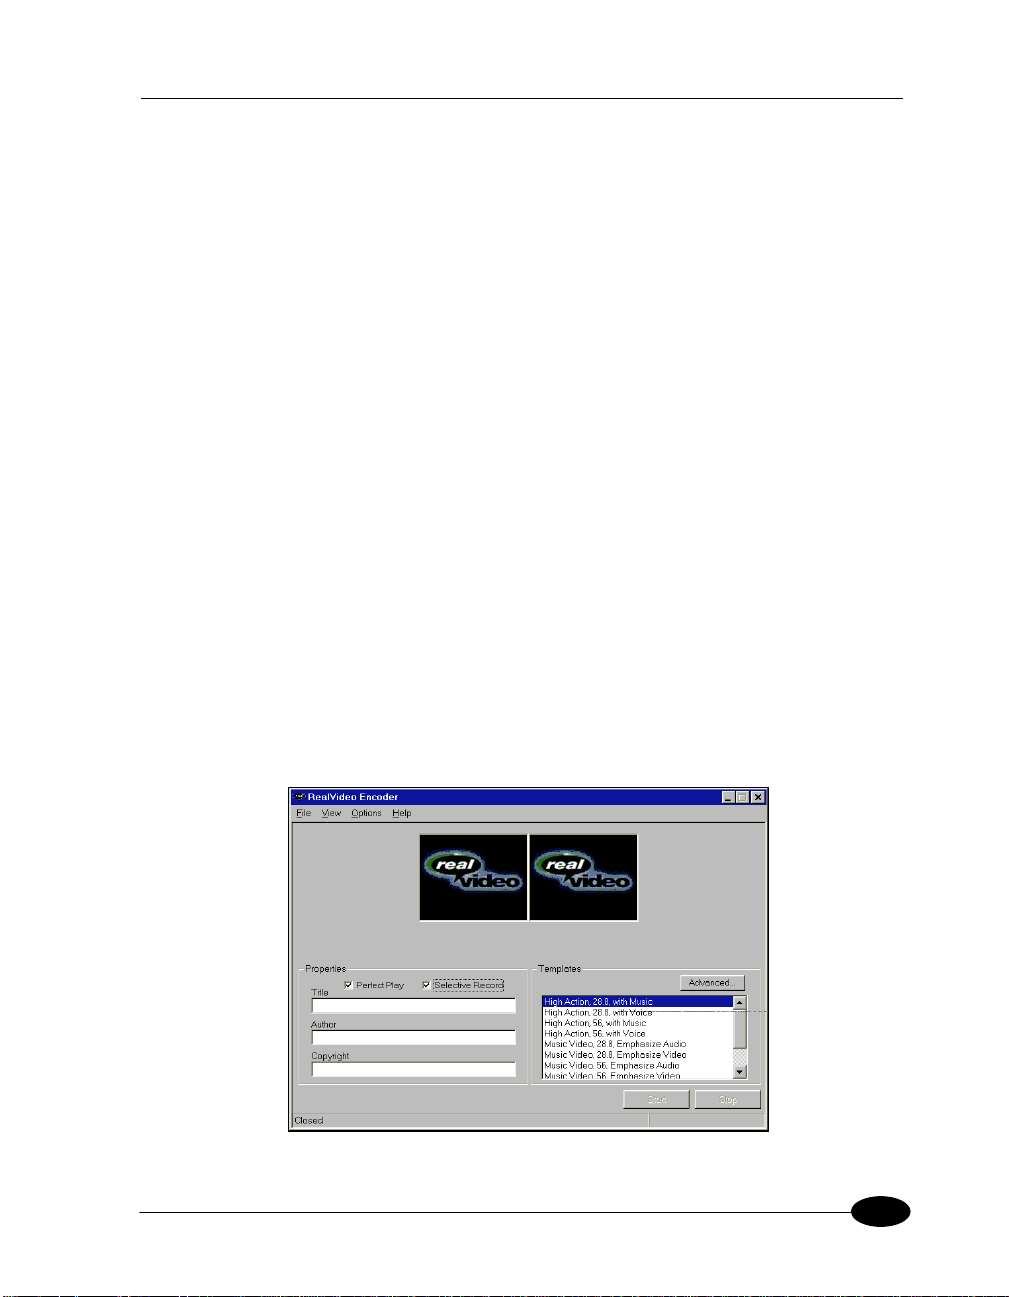
1. Start RealVideo Encoder 1.0 beta. RealVideo Encoder window opens:
29
Page 34
RealVideo Content Creation Guide
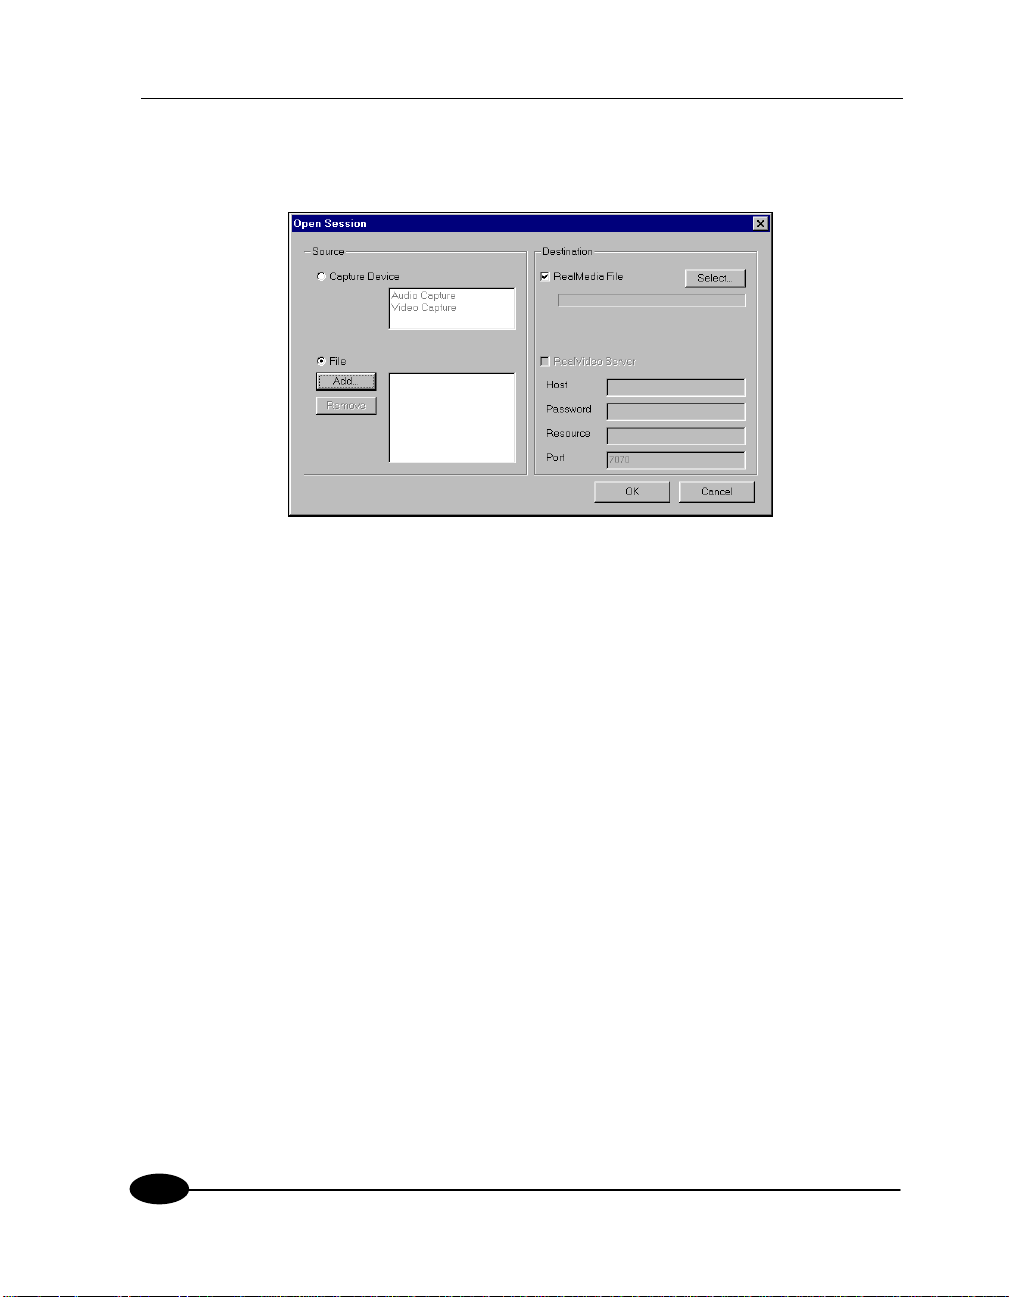
2. Click Open Session from the File menu. The Open Session window
appears:
3. In the source pane, verify that File is selected.
4. Click the Add button. The Add Source File dialog box appears.
5. Select the file you want to encode. Click the Open button.
30
6. In the destination pane, verify that a check appears in RealMedia File
checkbox.
7. Click the Select button. The Select Destination File dialog appears.
8. Enter the destination file name.
9. Click the Save button.
10. Click the OK button. The Open Session window closes.
11. In the properties pane, enter the Title, Author, and Copyright information
for your output file. These fields are optional.
12. If you want to allow RealPlayer Plus users with low bandwidth modems to
experience RealVideo files encoded for a higher bandwidth by partially
downloading video data before beginning playback, click the PerfectPlay
checkbox.
13. If you want to allow RealPlayer and RealPlayer Plus users to save your
RealVideo signal to disk, click the Selective Record checkbox.
Page 35

Encoding RealVideo Clips
14. In the templates pane, select the templates with which to encode the file.
For more information, refer to “Encoding Templates” on page 26.
If you want to create your own template, click the Advanced button. Refer
to “Creating New Templates” on page 39.
15. Click the Start button to start the encoding process. When the file is
encoded, an Encoding Complete message appears indicating the bit rate
achieved.
Note If RealVideo Encoder is unable to encode the file within the
selected bit rate, a message window appears. If the final bit rate is not
acceptable to your needs, you need to re-encode the file with a different
template.
16. View the encoded file with RealPlayer 4.0.
Drag-and-Drop Encoding for Windows
RealVideo Encoder for Windows supports drag-and-drop encoding:
• Click an input-video-file icon and drag it onto an open Encoder window.
This enters path and file name information into the appropriate Encoder
fields. Then, you only need to enter the descriptive information and
settings and click the Start button to begin the encoding process.
31
Page 36

RealVideo Content Creation Guide
Using RealVideo Encoder for UNIX
RealVideo Encoder for UNIX is run from the command line using the
following syntax:
rvencoder options
where options are any of RealVideo Encoder options described below.
Option Description
-I Use this option to specify an Input File
-O Use this option to specify an Output File
-A Use this option to specify an Audio Codec*
-V Use this option to specify a Video Codec*
-F Use this option to specify a Frame Rate
-B Use this option to specify a Total Kbps for clip
-Q Use this option to specify a Quality 1-100
-T Use this option to specify a Clip Title
-U Use this option to specify a Clip Author
-C Use this option to specify a Clip Copyright
-P
-R Use this option to specify Enable Selective Record, 0 = Off, 1=
-X Use this option to specify Enable Audio Encoding, 0 = Off, 1=
-Y Use this option to specify Enable Video Encoding, 0 = Off, 1= On
-H Use this option to specify display this help information
Use this option to specify Enable Perfect Play, 0 = Off, 1= On
On
On
32
*The list of audio and video codecs is displayed when you type RVEncoder H; use the number of the codec when choosing a codec using the -A and -V
flags.
+Frame rate is in frames per second and may a contain decimal, for example
F7.5.
By default, RealVideo Encoder for UNIX displays a progress indicator on your
screen as the file is encoded. If you plan to encode large numbers of files on a
regular schedule, you can write a shell script for batch encoding.
Page 37
Encoding RealVideo Clips
The following is an example of the command line:
rvencode -i foo.mv -A 2 -V 0 -F 1.0 -B 40 -Q 100 -T
The Title -P 1
This example encodes a movie file using audio codec 2, video codec 0, at 1
frame per second, a video quality of 100, a target bandwidth of 40 Kbps, and
with PerfectPlay enabled.
Creating Templates
Each template is comprised of an audio codec, video bit rate, total bit rate,
quality and frame rate. The quality of RealVideo encoding is affected by these
settings and by the actual content. Below are content elements that can affect
the quality of a video encoding at 19 Kbps:
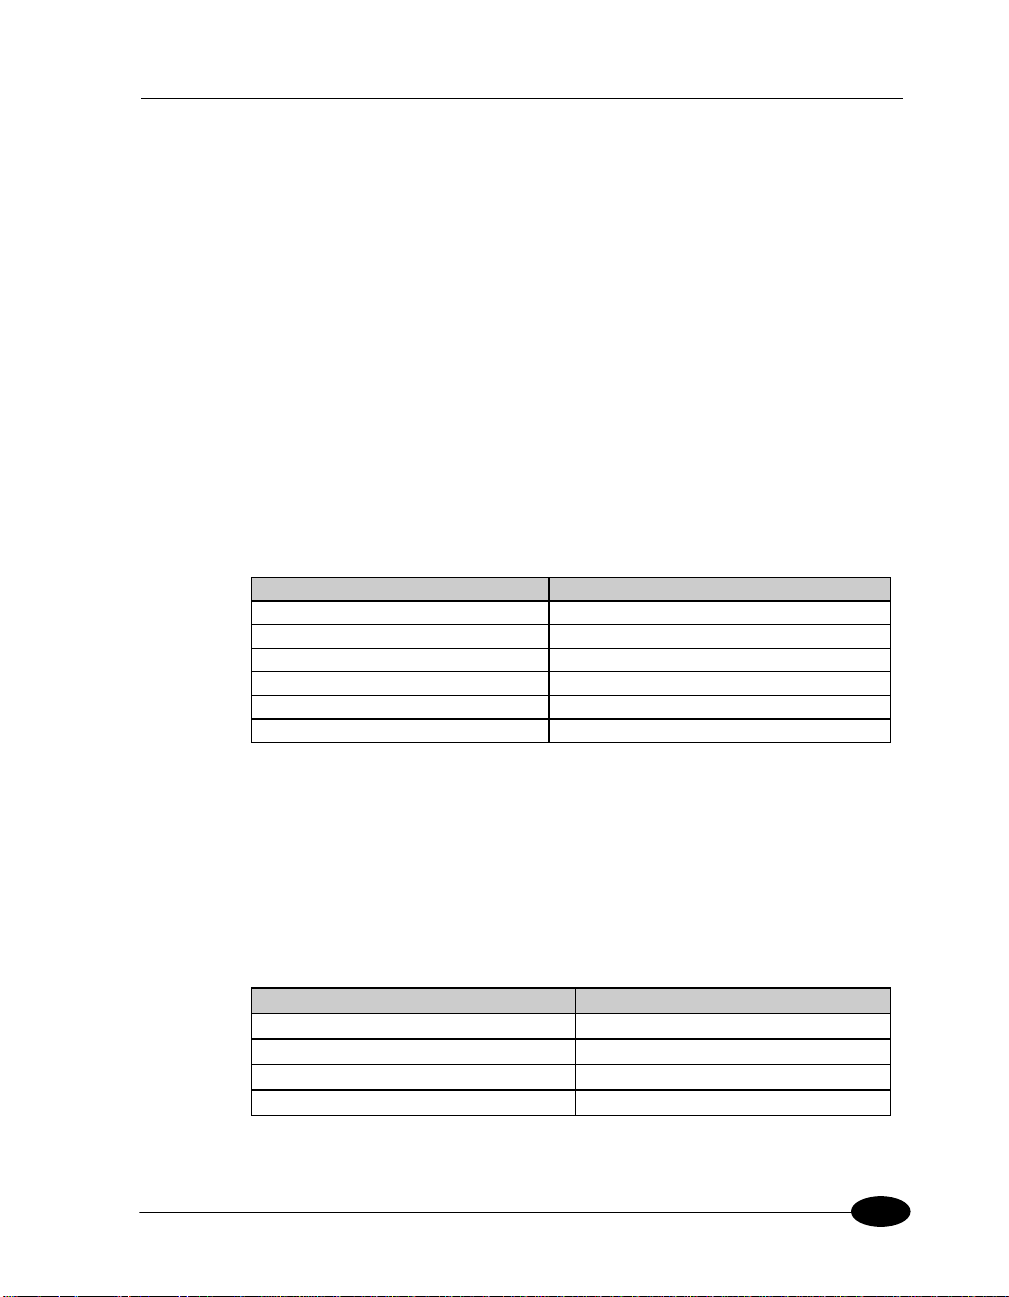
Content Type Expected Encoding Results
Fixed camera shot, low motion Clean frames, with high frame rates
Fixed camera shot, medium motion Clean frames, somewhat lower frame rates
Multiple camera shots, low motion Clean frames with 1 fps or less
Zoom with low motion Clean frames with moderate frame rate
Fixed camera shot, high motion Clean frames with moderate frame rate
Multiple camera shots, high motion Clean frames with less than 1 fps
Subjective results based on content elements
RealVideo encoder produces significantly better frames with higher frame
rates when used with bandwidths higher than 28.8 Kbps.
When deciding which parameters to set, the total bit rate must be considered.
The total bit rate is the actual bit rate at which the AVI is encoded. If the target
bit rate is 28.8 Kbps, then the total bit rate should be 19 Kbps. The following
are the recommended total bit rates for common bandwidths.
Target Bit Rate Total Bit Rate
28.8 Kbps 19 Kbps
56.0 Kbps 45 Kbps
64.0 Kbps 56 Kbps
128.0 Kbps 105 Kbps
Target and total bit rates
33
Page 38

RealVideo Content Creation Guide
After selecting the total bit rate according to the table above, choose an audio
codec.
Parameter Bandwidth Audio Algorithm
0 6500 bps 6.5 Kbps voice
1 8500 bps 8.5 Kbps voice
2 16000 bps 16 Kbps music Low response
3 16000 bps 16 Kbps music Medium response
4 16000 bps 16 Kbps music High response
5 20000 bps 20 Kbps music stereo
6 40000 bps 40 Kbps music mono
7 4000 bps 40 Kbps music stereo
8 80000 bps 80 Kbps music mono
9 80000 bps 80 Kbps music stereo
10 8000 bps 8 Kbps music
11 12000 bps 12 Kbps music
12 15200 bps 15.2 Kbps voice
Since RealAudio codecs have discreet bandwidths, the video bit rate is the
difference between the total bit rate and the bit rate of the chosen audio codec:
Video Bit Rate = (Total Bit Rate) - (Bit Rate of Audio Codec)
34
In RealVideo Encoder, the video bit rate is calculated automatically.
Next choose a frame rate. Not all content types support high frame rates for a
given bandwidth. The highest frame rate that can be achieved at 19 Kbps is 7.5
frames per second (fps) for Talking Head type content. Different content types
require different frame rates. For example, while Talking Heads at 19 Kbps
might support 7.5 fps, music videos only support 1 fps or less.
Page 39
Encoding RealVideo Clips
Creating New Templates
To create a new template:
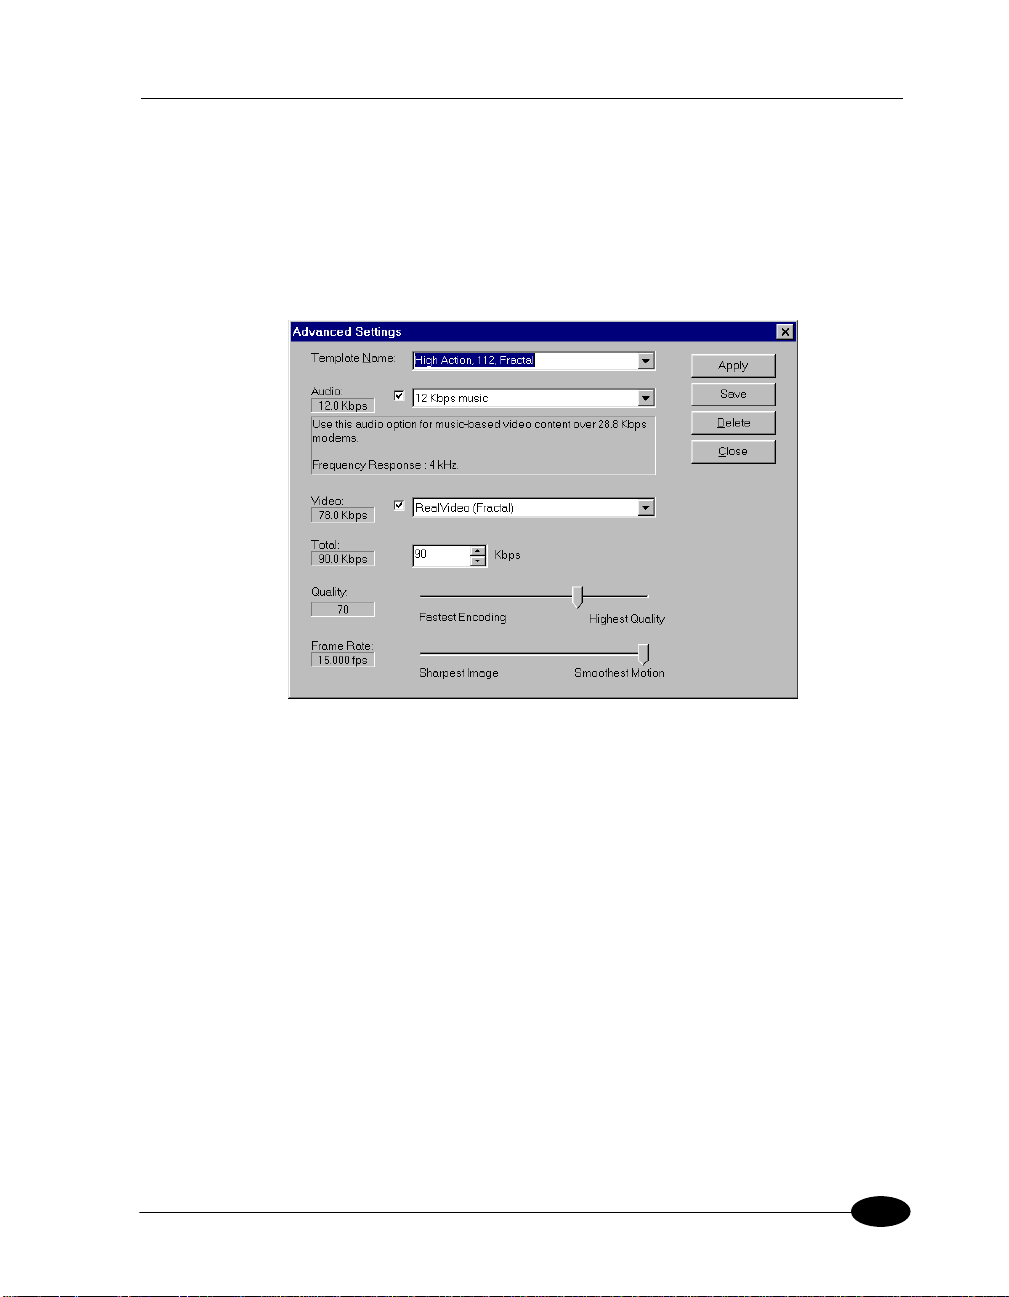
1. In the templates pane, click the Advanced button. The Advanced Setting
window appears:
2. Enter the name of the new template in the Template Name field.
Note It is recommended that you don't modify the pre-defined
templates. If you want to change some of the settings, save the template as
a new template. This way you don’t overwrite the pre-defined templates.
3. Select an Audio codec.
4. Select a Video codec. RealVideo Encoder 1.0 beta has two video codecs
available, RealVideo (Standard) and RealVideo (Fractal). The bit rate of
RealVideo 1.0 codec varies depending on the video codec and total bit rate
selected.
5. Select the total bit rate for the encoded video file.
6. Select the Quality by moving the slider.
7. Select the Frame Rate by moving the slider.
35
Page 40

RealVideo Content Creation Guide
8. Click the Save button to save the template or click the Apply button to
apply the settings without saving the template.
9. Click the Close button to close the Advanced Settings window.
36
Page 41

Delivering Live Content
Delivering Live Content
With the appropriate license key, RealVideo Encoder can deliver live content
for broadcasting live events.
To deliver live content, you need:
• A live video source
• A computer running RealVideo Encoder
• A computer running RealServer
RealVideo Encoder and RealServer computers can be on different platforms.
To deliver live content using bandwidth negotiation, use one computer for each
bandwidth. Run the Live Encoder on each computer connected to one
RealServer. For more information on bandwidth negotiation, refer to
“Managing Content on the RealServer” on page 72.
Setting Up RealServer
To enable live delivery, be sure the following configuration settings are
included in RealServer configuration file:
• PnaPort - the port number to which the Encoder connects
• EncoderPassword - the password the Encoder uses to connect
You have the option of specifying that the Server saves the live content as a
RealVideo file by setting the LiveFileTarget and LiveFilePassword
configuration option.
For more information on setting up RealServer, refer to “Broadcasting Live” in
the Server Administration Guide.
37
Page 42
RealVideo Content Creation Guide
Advertising Your Live Event
If you want to advertise your live event, you can list it in Timecast: RealMedia
Guide (http://www.timecast.com), The Progressive Networks online resource
for RealAudio and RealVideo sites and live events. Thousands of people use
Timecast to determine what broadcasts are available. By listing your live event
on Timecast, you can greatly increase your audience.
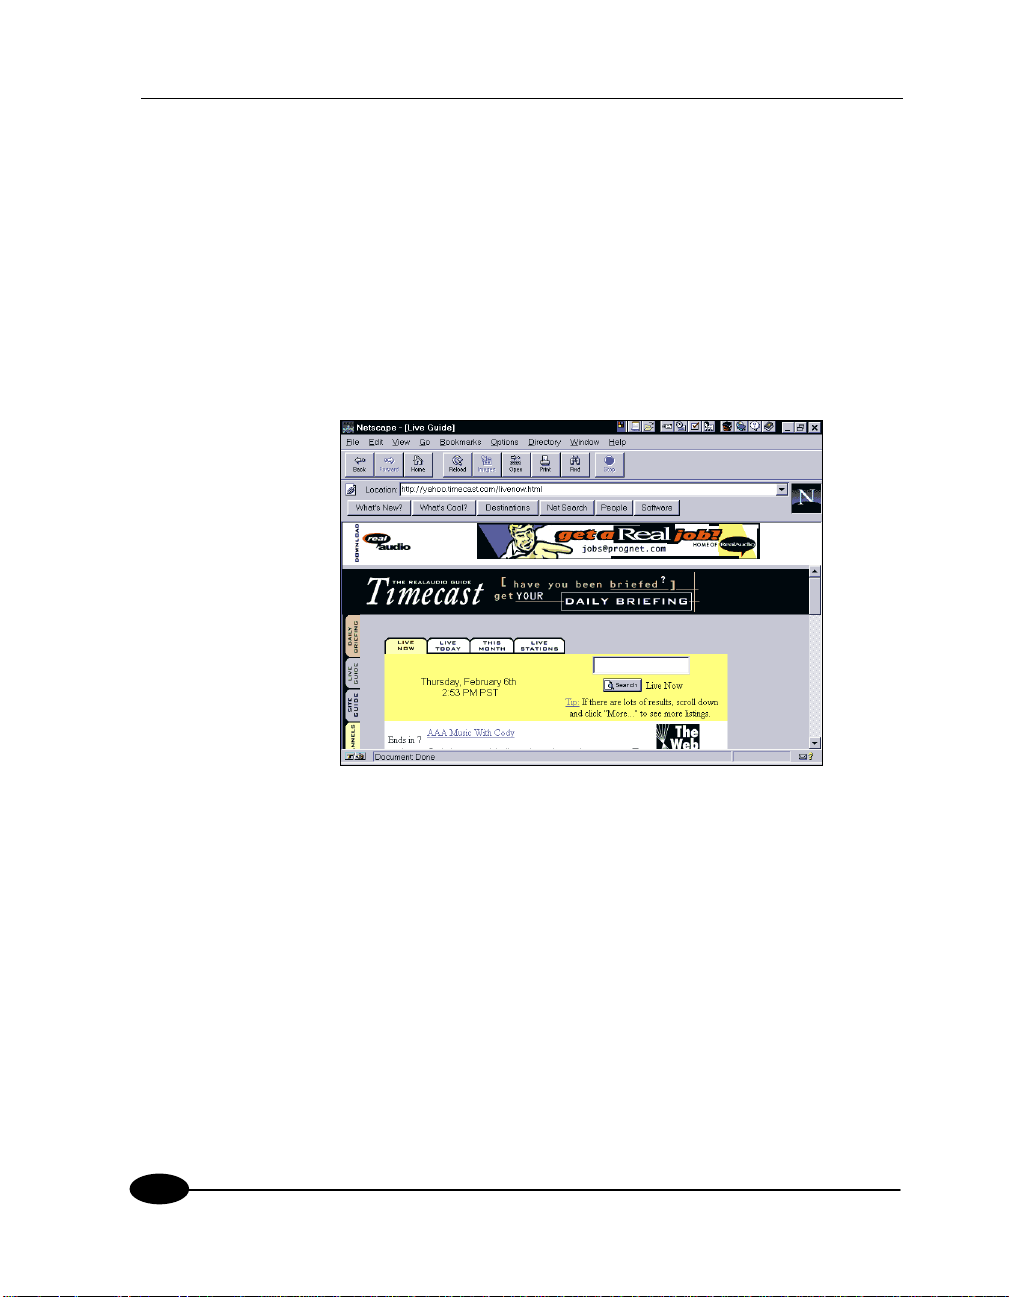
Your listing appears in the Live Guide:
There are two ways to list your live events.
• Fill out a Web form with the relevant information.
• Place special tags in your HTML code.
Filling out a Web Form
Use the Web form (http://www.real.com/live/addlive.html) if you have only a
few events or programs that occur at the same time each day, or each week. On
the Web form, enter basic information about the event, such as name, complete
URL, date and time of the event, and a short description. The data will be
verified and posted on Timecast.
38
Page 43

Delivering Live Content
Place Special Tags in your HTML Code
If you have several different events, you can save time by inserting special
“live tags” in your HTML code. The live tags are placed within comment lines
in the source HTML, so that they are invisible to your users. A software robot
reads the information in the live tags and automatically enters the event(s) in
Timecast.
To advertise your live event using special tags:
1. On the Web page with the link to your live event, insert the live tags using
the following format:
<!--@Rastart event="Brief Event Description"
start="Thu, 11 Apr 1996 20:30:00 EST" -->
(some HTML that describes the event)
<!--@RAend-->
Note For more information about the live tag, refer to:
http://www.real.com/help/content/livetags.html
2. Send e-mail to: [email protected]. Do not enter a subject. In the
body of the e-mail, enter the complete URL for the page containing the
live tags (for example: http://www.real.com/example/tags.html). A
software Robot gathers the information in your live tags. The data will be
verified and posted on Timecast.
Note It is VERY important that you include the full address, including
the “http://” part. If you use frames, be sure to send the address for the
event page that appears within a frame, not the HTML page that creates the
frames.
39
Page 44

RealVideo Content Creation Guide
Encoding Templates for Delivering Live
Content
Live encoding usually requires creating your own template. How you design
your template depends largely on the power of your system. When encoding
video frames that are 160 pixels by 120 pixels, a dual processor 200 MHz
computer gives a good result with a frame rate of 4 fps, Quality 100, or with a
frame rate of 9 fps, Quality 25. A single processor Pentium system gives a
better result when set at 2-3 fps.
For more information about creating templates, refer to “Creating Templates”
on page 36.
System Requirements for Delivering Live Content
The minimum system requirement for delivering live content is a single
processor 200 MHz Pentium. The recommended system requirement is a dual
processor 200 MHz Pentium Pro.
40
Producing High Quality Live Content
• The average bit rate should be higher than the bit rate in the template. If
the average bit rate is lower, you will experience a deterioration in the
video quality.
• Audio quality is important when delivering live content. Setting the
volume too low can result in a weak signal. Setting the volume too high
can cause a distortion of the audio.
• Under no circumstance is loss of audio acceptable. If you experience audio
loss in a live broadcast, lower the frame rate. If necessary, lower the video
quality.
• Latency, the amount of time required for buffering the video, should not
exceed 5-10 seconds when delivering live content.
• View the live content using a Web browser. This allows you to see how
the live content looks when it is delivered.
Page 45
Delivering Live Content
Using the Live Encoder for Windows
RealVideo Encoder for Windows runs on Windows 95 and Windows NT.
To provide content in multiple compression algorithms, run multiple machines
using RealVideo Encoder with the same input signal. All concurrently running
copies of RealVideo Encoder should use identical settings except for
Compression Type. RealServer uses bandwidth negotiation with RealPlayer to
deliver the correct content. Refer to “Bandwidth Negotiation” on page 72.
To encode and broadcast live content in Windows:
1. Start RealVideo Encoder 1.0 beta. RealVideo Encoder window opens.
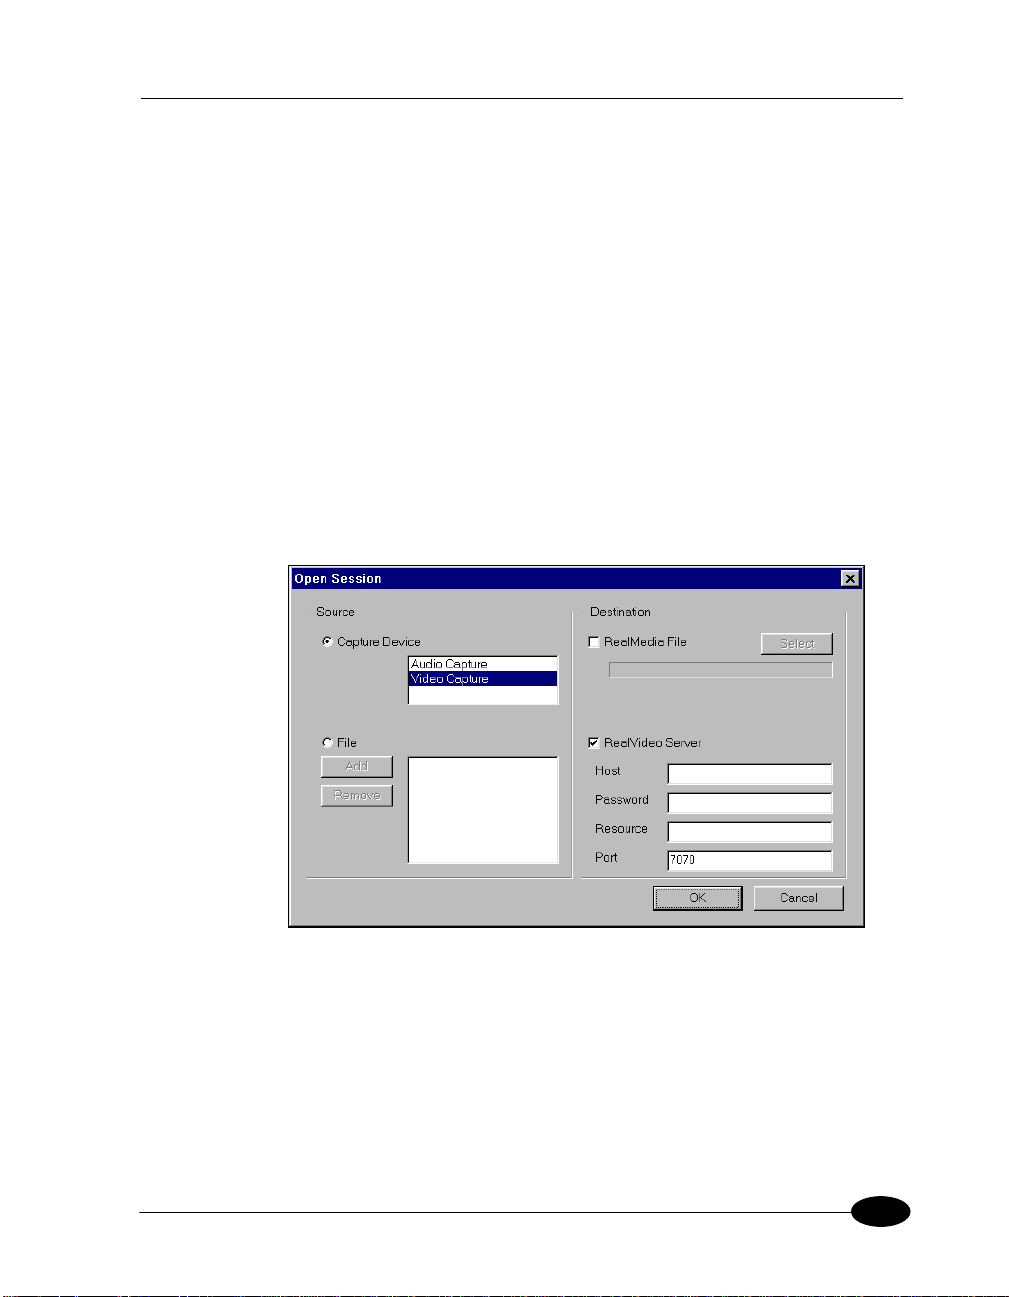
2. Click Open Session on the File menu. The Open Session window appears:
3. In the source pane, click the Capture Device button.
4. Click Audio Capture and Video Capture. Both audio and video must be
captured together.
5. In the destination pane, click RealServer checkbox, a check appears in the
box.
41
Page 46

RealVideo Content Creation Guide
6. In the Host field, type the server name, IP address or machine name.
7. In the Password field, type the password. This field is optional.
8. In the Resource field, type the Web address of the broadcast destination.
9. Click the OK button. The Open Session window closes.
10. In the properties pane, enter the Title, Author, and Copyright information
for your output file. These fields are optional.
11. If you want to allow RealPlayer and RealPlayer Plus users with low
bandwidth modems to experience a RealVideo broadcast encoded for a
higher bandwidth by partially downloading video data before beginning
playback, click the PerfectPlay checkbox.
12. If you want to allow RealPlayer Plus users to save your RealVideo signal
to disk, click the Selective Record checkbox.
13. In the templates pane, select the template to encode the file. For more
information, refer to “Encoding Templates” on page 26.
Delivering live content usually requires that you create your own template.
Refer to “Encoding Templates for Delivering Live Content” on page 45
and “Creating Templates” on page 36.
42
Page 47
Delivering Live Content
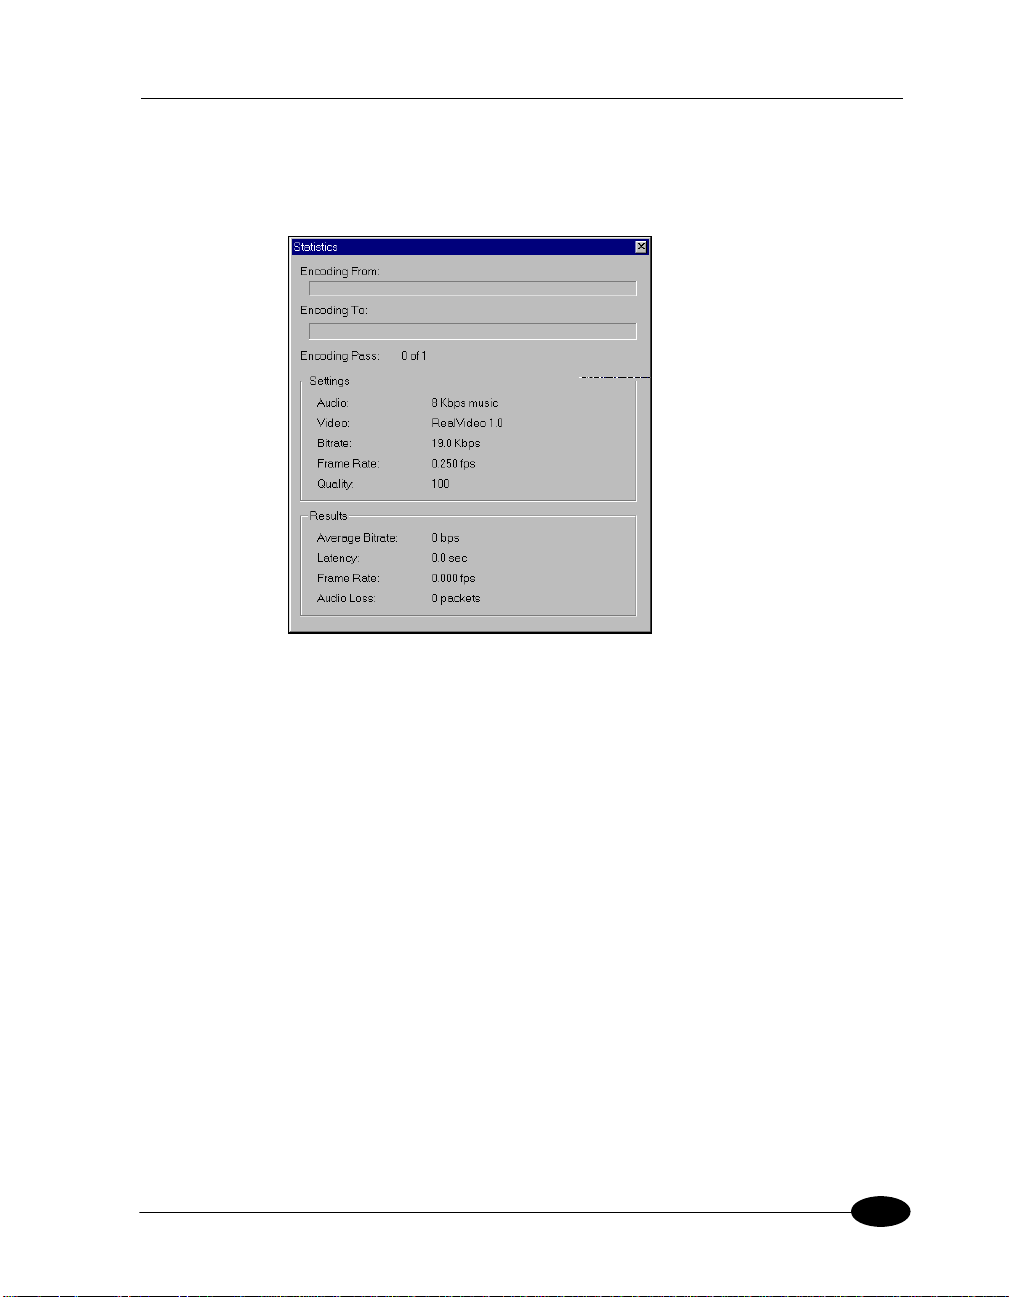
14. Select Statistics from View. The Statistics window appears. The
information displayed in this window during broadcast will help you
evaluate and adjust your template settings.
15. Click the Start button to start the encoding process. The broadcast
previews in the right window.
Note Preview can be turned off to marginally increase performance.
From menu, click Options. Click Show Filtered Output to clear the
selection.
16. Select Set Video Format from Options. You can use this option to adjust
video format settings while delivering live content. Click the OK button to
accept the current settings.
17. In the results pane of the Statistics window, notice the Frame Rate. Wait
while enough data is collected for an average frame rate to be determined.
If the average frame rate is below the frame rate set in your template,
adjust the template setting to a lower frame rate.
18. In the results pane, notice Latency. If latency is greater than 5 or 10
seconds, adjust the template.
19. View the live content in the preview window. Viewing the live content
through your Web browser is strongly recommended.
43
Page 48

RealVideo Content Creation Guide
Editing Video Files
If you want to edit your video files, you have two options—you can edit your
.rm files, or you can edit your original source files.
Editing Input Files
Editing the original source files is the editing method of choice. Encoded video
is stored in indivisible clips of varying duration depending on the encoding
algorithm and the video bit rate. This limits how precisely encoded video can
be cut and pasted.
RealVideo Encoder is distributed with a Windows editing utility, RMTools,
and three command line editing utilities for UNIX and DOS: RMEdit,
RMPaste and RMDump which enable simple editing of RealVideo files.
Editing RealVideo Files in Windows
RMTools, the Windows 95 and Windows NT editing utility, is installed with
RealVideo Encoder. Windows 3.1 is not supported. This utility enables you to
perform three basic editing tasks:
• Edit the file properties
• Examine the contents of a file
• Edit the data of a file.
44
Page 49
Editing Video Files
Editing File Properties
RMTools allows you to edit the static information about the file: title, author,
copyright, and comment; and the stream name and mime type for each
individual stream. You can also enable or disable PerfectPlay or Selective
Record. Editing the file properties does not affect the data.
To edit file properties of RealVideo files using RMTools:
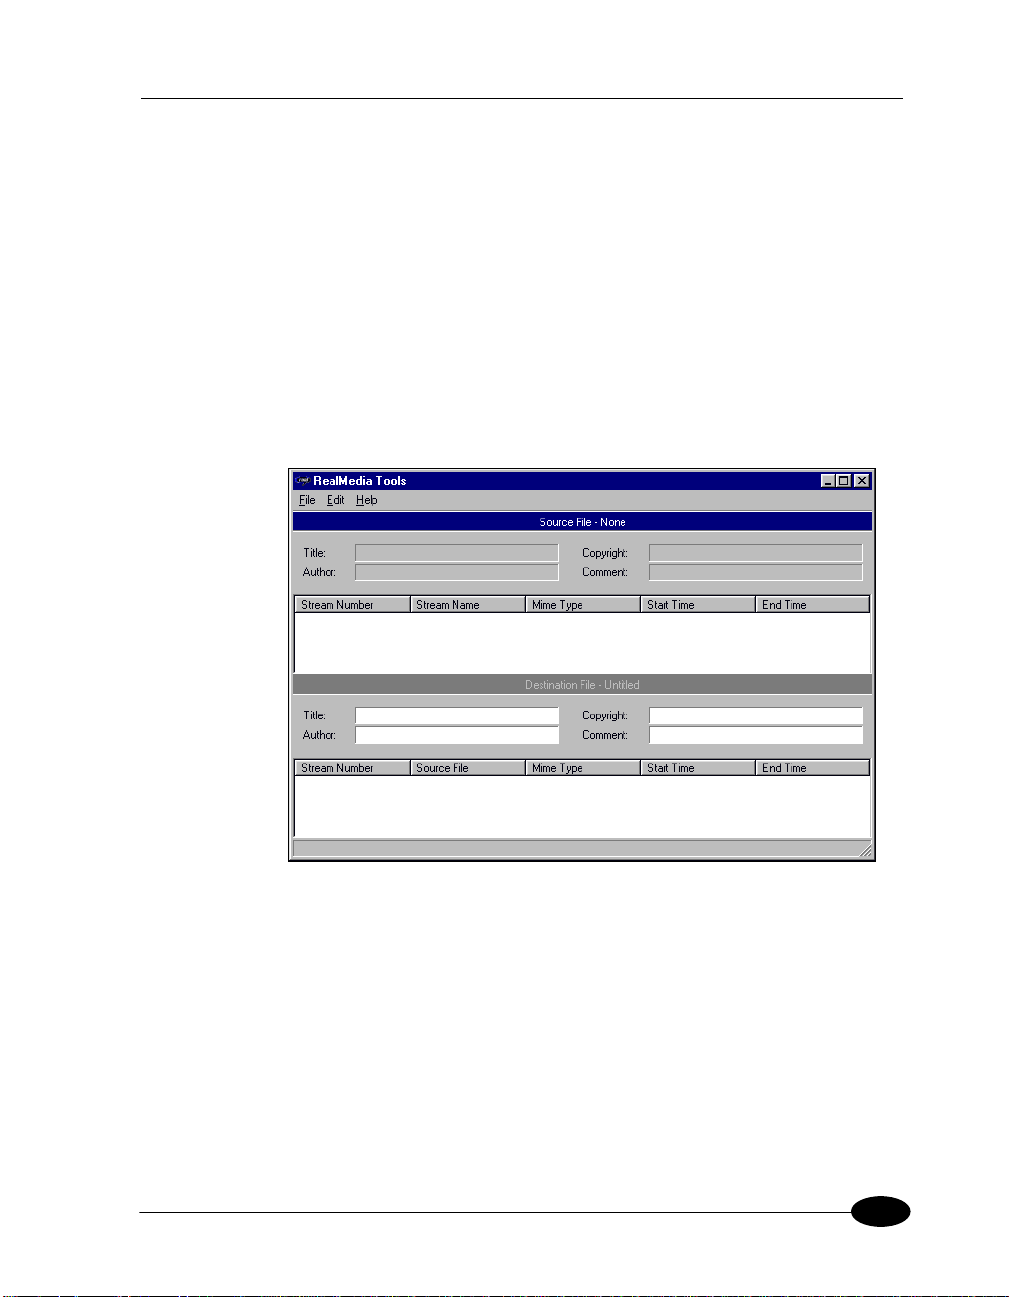
1. From the RVEncode folder, double-click RMTools.exe (or you can
double-click the icon if you create a Windows shortcut). The RealMedia
Tools window appears. Notice the window is divided into two panes, the
source file pane on top and the destination file pane on the bottom.
2. Select Open Source from the File menu. The Open File dialog box
displays. Select the file you want to edit. The file properties information
is displayed in the source file window. To sort by the stream attribute,
click the column. You can also resize the columns by placing the cursor
over the column border and then clicking-and-dragging.
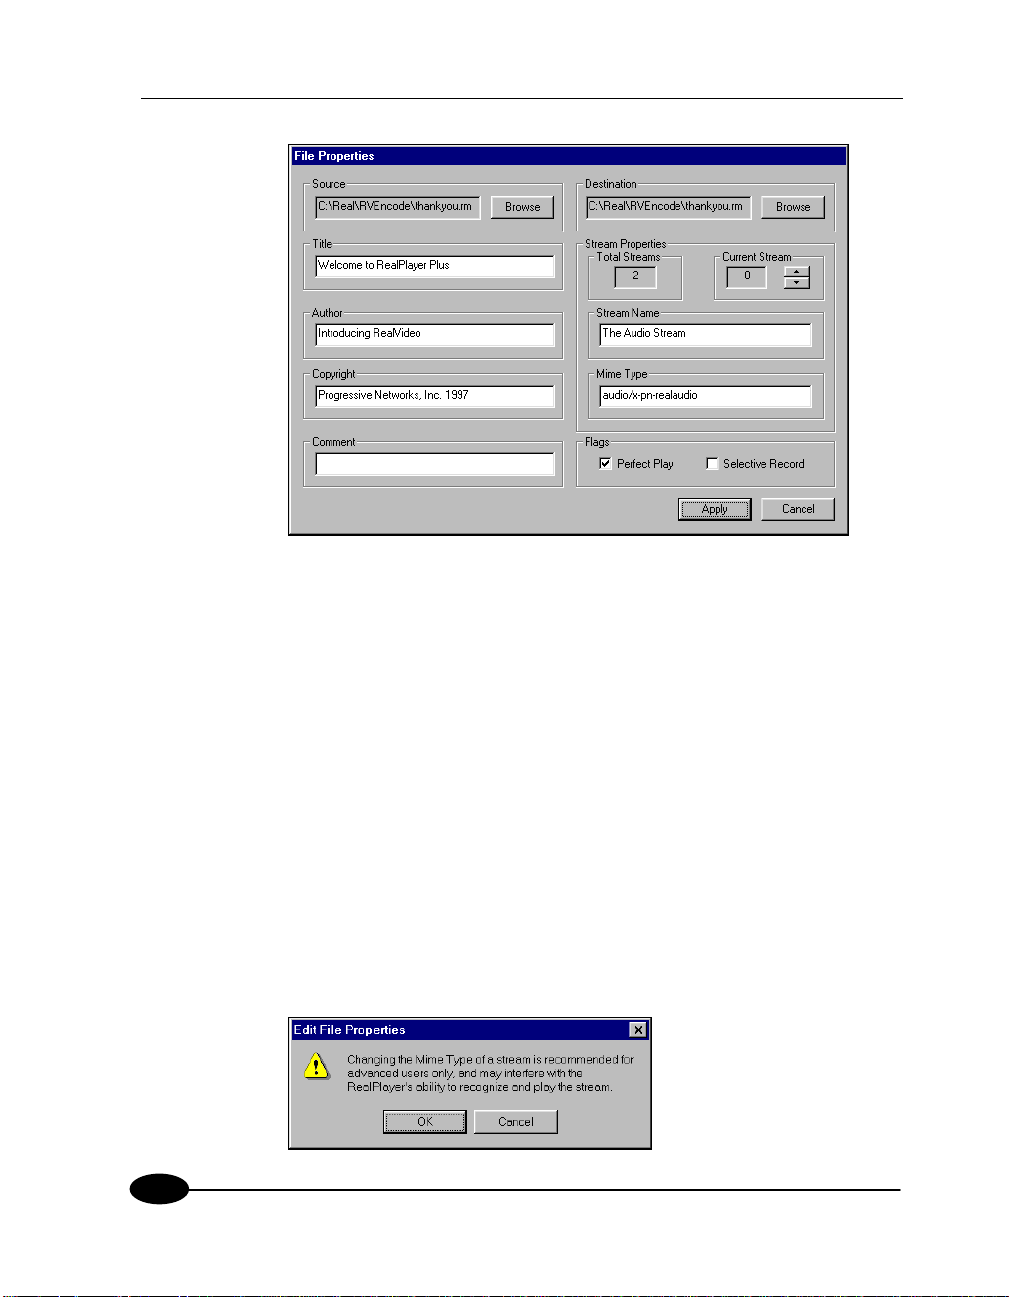
3. Select File Properties from the Edit menu. The File Properties dialog box
appears. The file name is displayed in the source box and in the
destination box. New file names can be selected by clicking Browse and
selecting a new file from the dialog box.
45
Page 50
RealVideo Content Creation Guide
4. To save changes to the existing file, do not change the destination file name.
To save the changes to a new file, click Browse to select or enter a different
name in the destination box.
5. Type the new title name, author, copyright information, and any comment
in the appropriate boxes. (You can also type a new title, author, copyright,
or comment directly in the fields on the source and destination panes.)
46
6. The total number of streams is listed in the Stream Properties box. If you
want to change the name or the mime type of one stream, select the stream
to be changed by clicking the up or down arrow.
7. If you want to change the stream name, type the new name in the Stream
Name box.
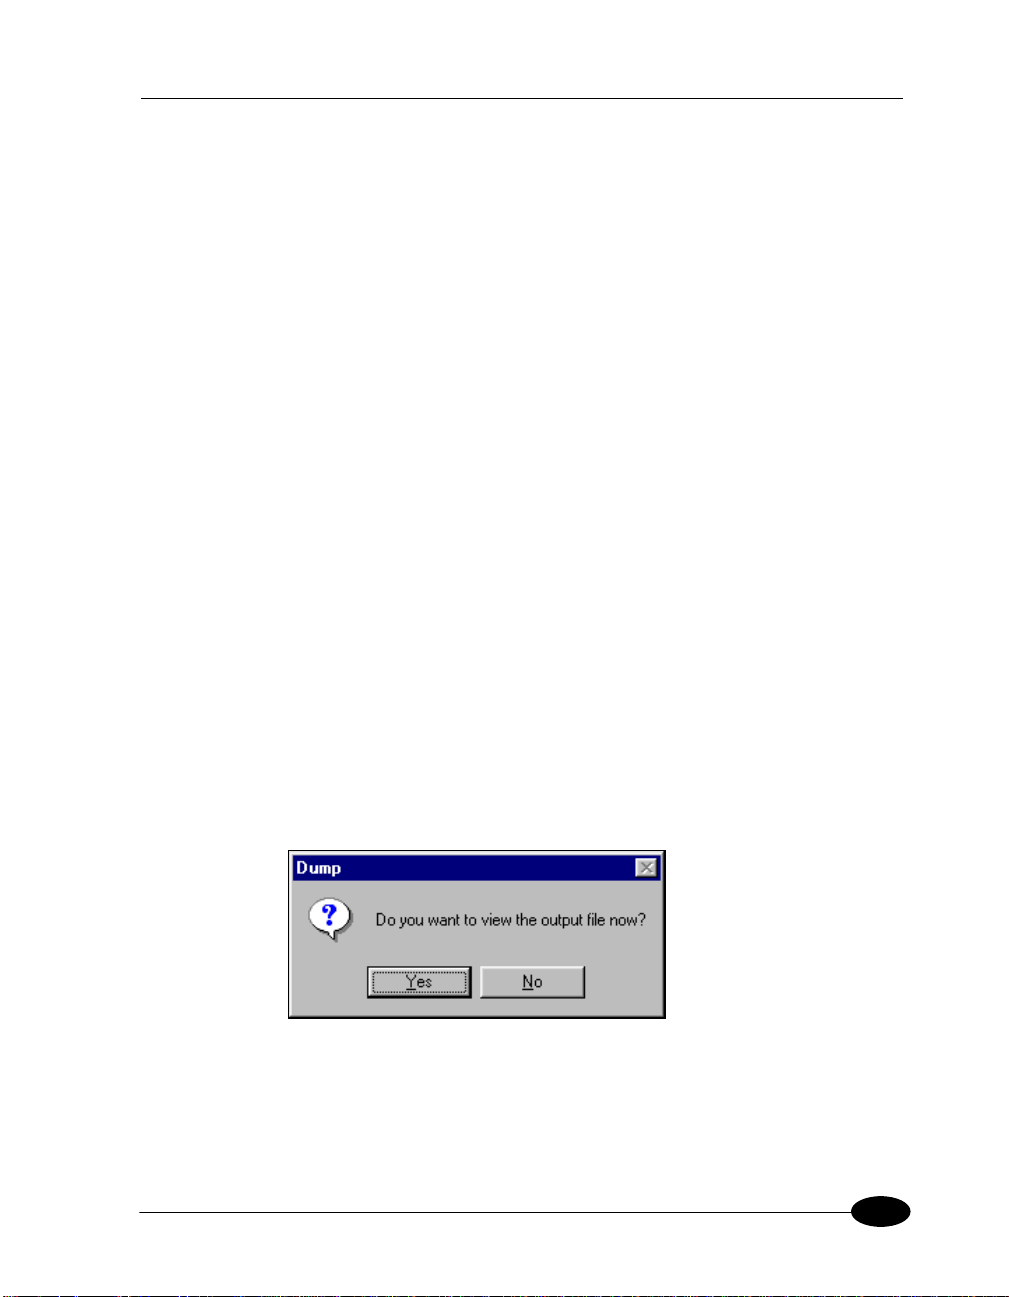
8. Changing the mime type is recommended for advanced users only. If you
are certain you wish to change the mime type, type the new mime type in
the Mime Type box. If you change the mime type, the following warning
will appear after you have applied the changes.
Page 51
Editing Video Files
9. RealPlayer users with low bandwidth modems can experience files
encoded for a higher bandwidth by partially downloading audio data
before beginning playback. If you want to allow this, check the
PerfectPlay checkbox in the Flag box.
10. If you want to allow RealPlayer Plus users to save your clip to disk, check
the Selective Record checkbox.
11. Click Apply. The changes are applied to the file and displayed in the
source file pane of the RealMedia Tools window.
Examining the Contents of a RealVideo File
RMTools enables you to view the contents of an .rm file by dumping the
contents to a text file. You can then edit or print the file as you would any
other text file.
To examine the contents of a RealVideo file:
1. Select New Session from the File menu.
2. Open the Source file from the File menu. The file information is displayed
in the source pane.
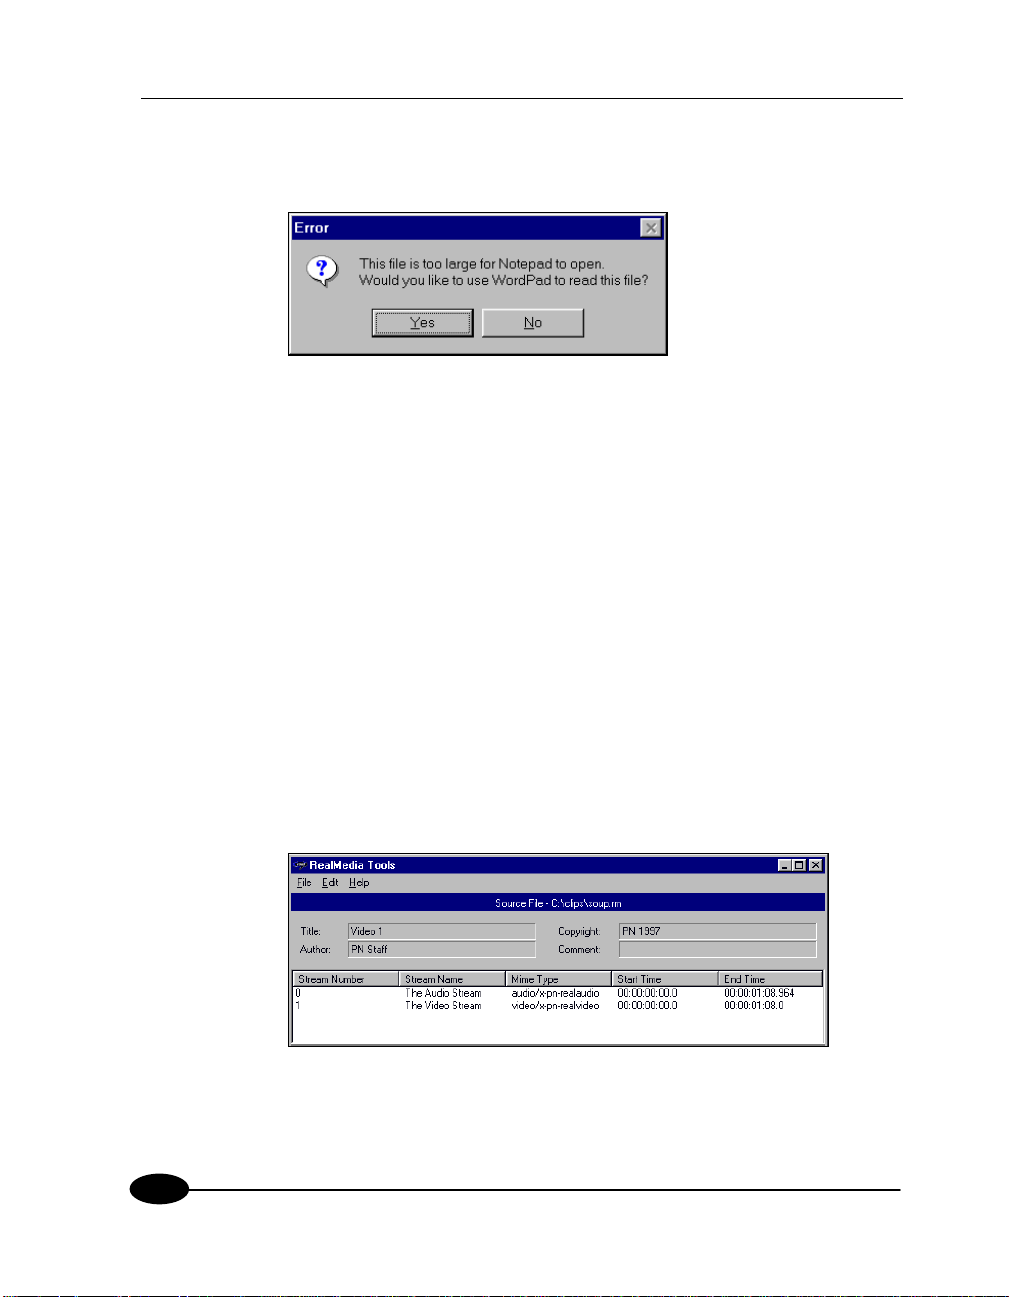
3. Select Dump from the File menu. The Dump As dialog box appears. The
default name is the same as the source file name, with the extension
changed to .txt. You may also select or enter another dump file name.
4. Click Save. You will be prompted to view the file now. Click Yes.
47
Page 52
RealVideo Content Creation Guide
5. The following error message may appear. Click Yes. The Notepad or
WordPad window displays the contents of the file.
6. You can view, edit, and print the file just as you would any other text file.
Editing RealVideo Data
RMTools allows simple editing of .rm files. You can put multiple clips in one
file; you can shorten the length of a clip; and you can take a video stream from
one file and add the audio stream from another file. When working with more
than one file, streams of the same mime type must have the same encoding
parameters if they are going to be pasted together.
To place two RealVideo clips in one file:
48
1. Select New Session from the File menu.
2. Select Open Source from the File menu. The Open File dialog box appears.
3. Select the file you want to edit. Click Open. The source file pane displays
the stream number, the stream name, mime type, and the start and end
times.
Page 53
Editing Video Files
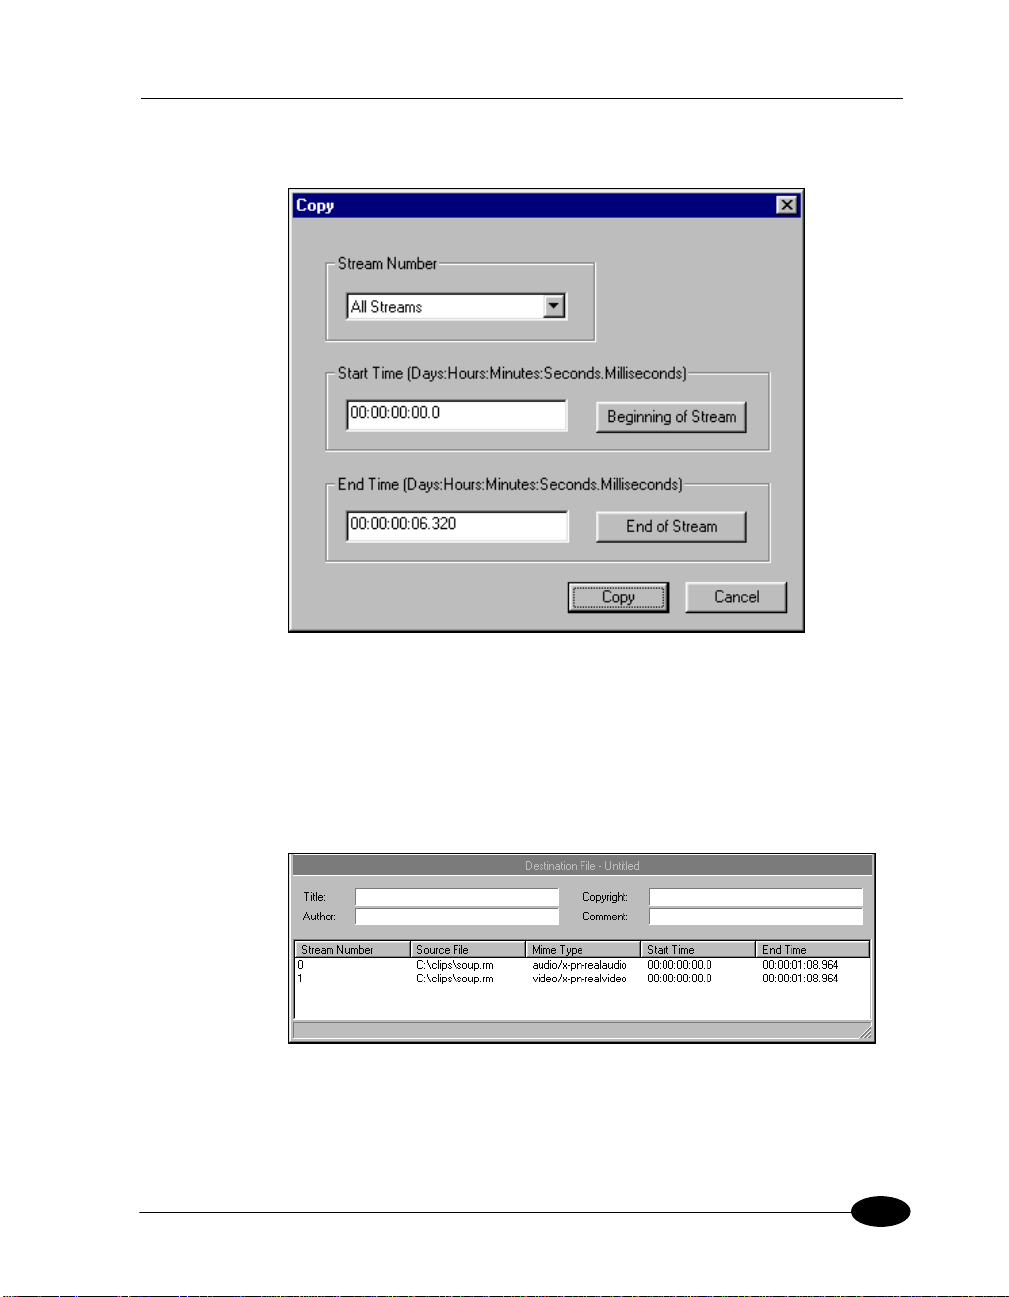
4. Select Copy from the Edit menu. The Copy dialog box appears.
5. In the Stream Number box, accept the default, All Streams.
6. Do not change the start and end times. Click Copy.
7. Select Paste from the Edit menu. The Paste dialog box appears.
8. Click Paste. The destination pane displays the stream number, source file,
mime type, start time and end time.
9. Right-click the source pane. A shortcut menu appears. Click Open
Source. Choose a second clip to be added at the end of the first clip. (Both
clips must have the same encoding parameters.)
49
Page 54

RealVideo Content Creation Guide
10. Click Open. The source pane displays the information from the new file
while the destination pane displays the information from the streams that
were previously pasted.
11. Select Copy from the Edit menu.
12. Accept the default, All Streams, and the start and end times. Click Apply.
13. Right-click the destination pane. A shortcut menu appears. Click Paste.
The Paste dialog box appears. The previous end time displays as the new
start time.
14. Click Paste. The second clip is listed below the first clip.
15. If the following warning displays, you must select a different clip or reencode the clip so that the encoding parameters are the same.
16. Select Save As from the File menu. The Save As dialog box appears.
17. Type the new file name. Click Save.
18. Use RealPlayer to view the new file.
To put the video stream of one file with the audio stream of another:
1. Select New Session from the File menu.
2. Select Open Source from the File menu. The Open File dialog box appears.
3. Select the first file you want to edit. Click Open. The source file pane
displays the information from the file.
4. Select Copy from the Edit menu. The Copy dialog box appears.
5. In the Stream Number box, select the stream that contains the video. Click
Copy.
50
Page 55
Editing Video Files
6. Select Paste from the Edit menu. The Paste dialog box appears.
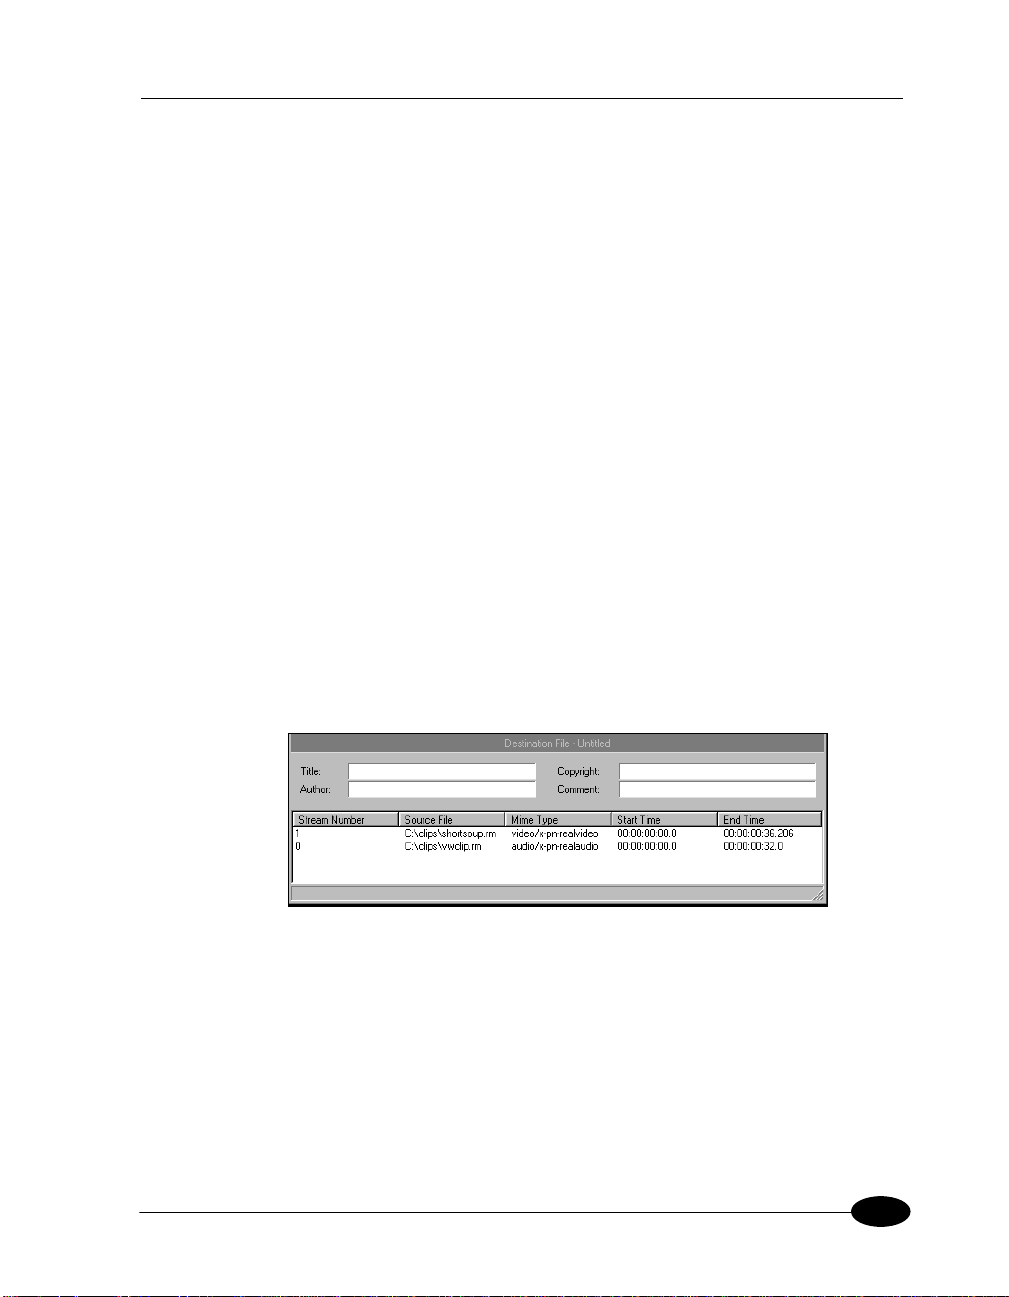
7. Click Paste. The destination pane displays the information from the new
file. Notice only the video stream has been pasted into the destination
pane.
8. Right-click the source file pane. A shortcut menu appears. Click Open
Source.
9. Choose a second file with the same encoding parameters as the first clip,
and of approximately the same duration. Click Open. The source pane
displays the information from the file.
10. Right-click the source pane. A shortcut menu appears. Click Copy. The
Copy dialog box appears.
11. In the Stream Number box, select the stream that contains the audio.
12. Do not change the start and end times. Click Copy.
13. Right-click the destination pane. A shortcut menu appears. Click Paste.
The Paste dialog box appears.
Click Paste. The audio stream is listed below the video stream. Notice
both streams have the same start time, and should have similar end times.
14. Select Save As from the File menu. The Save As dialog box appears.
15. Type the new file name. Click Save.
16. Use RealPlayer to view the new file.
51
Page 56

RealVideo Content Creation Guide
Command Line Editing of RealVideo Files
The RealVideo file editing tools, RMCut, RMPaste, RMEdit, and RMDump
are run from a UNIX or DOS command line. The RMCut tool is used to cut a
specific portion of a RealVideo file without changing the original source. The
RMPaste tool is used to combine two or more RealVideo files. The RMEdit
tool is used to modify the title, author, copyright, comment, mime type, or
stream name. It can also be used to print the current values for the file or
stream. The RMDump tool is used to examine the contents of a RealVideo file.
Editing RealVideo Files
RMEdit has five separate forms. The first form modifies any or all of the title,
author, copyright, and comment for the file.
rmedit -i <input> -o <output> [-t <title>]
[-a <author>] [-c <copyright>] [-C <comment>]
The second form modifies any or all of mime type and stream name for the
selected stream.
rmedit -i <input> -o <output> (-S <stream number>
[-m <mimetype>] [-s <stream name>])
52
The third form prints out the current values for the file and for each stream that
RMEdit is capable of modifying.
rmedit -i <input>
The fourth form sets or clears Perfect Play mode and Selective Record.
rmedit -i <input> -o <output> [-r [ON|OFF]] [-p
[ON|OFF]]
The fifth form prints the RMDump version and copyright notice.
rmedit -v
where:
<input> is the path and file name to the input file.
<output> is the path to the output file that contains the edited file.
Page 57

Editing Video Files
<title> is the title text.
<author> is the author text.
<copyright> is the copyright text.
<comment> is the comment text.
<stream number> is the stream number for the following two
parameters. (May be repeated for any number of streams.)
<mimetype> is the mimetype for a specified stream.
<stream name> is the stream name for a specified stream.
-v prints the RMDump version and copyright notice.
-p is the perfect play mode.
-r is the set/clears selective record.
Note Only valid mime types (those accepted by the player) should be entered
in the mime type field.
Note Input and output file names must not be the same.
The following examples demonstrate the use of the RMEdit tool:
1. To create a new file modifying the title, enter:
rmedit -ioriginal.rm -onewfile.rm -t”My New Title”
2. To change the stream name of stream 1, enter:
rmedit -ioriginal.rm -onewfile.rm -S1 \
-s”New Stream Name”
3. To display the current contents of the file, enter:
rmedit -ioriginal.rm
Note Long file names are acceptable, but file names containing spaces must
be contained in quotes.
Cutting RealVideo Files
Use the RMCut tool to cut a specific portion of a RealVideo file without
modifying the original source. A cut is made by setting the start and end times
for individual streams. Not entering a start time defaults to the beginning of the
file and likewise, not entering an end time defaults to the end of the file.
RMCut can be used without RMPaste to remove the front or end of a file.
53
Page 58

RealVideo Content Creation Guide
To create a copy of a piece of a RealVideo file:
1. View your original RealVideo file to determine the start and end times of
the segment you want to copy (you can read the times on the status bar of
RealPlayer).
2. Create a copy by typing:
rmcut -i <input> ([-S <stream>] [-s <start>] \
[-e <end>]) -o <output> -v
where:
<input> is the path to the input file
<stream> is the stream number. If not specified, all streams are
used. It can be repeated to grab one or more streams.
<start> is the start time in
Days:Hours:Minutes:Seconds.Milliseconds format. If missing, this
parameter defaults to the beginning of the file.
<end> is the end time in Days:Hours:Minutes:Seconds.Milliseconds
format. If missing, this parameter defaults to the end of the start+input
length. (Multiple start end sequences can be used to cut discontinuous
portions of the stream.)
<output> is the path to the output file that contains the edited file.
-v is the print version and copyright notice
54
Note An image map stream’s start and end times must go from the beginning
to the end of the file. Use RMCut to strip out the image map before working
with the RealVideo file. Then, to alter and re-merge the image map file with
the video image, refer to “Image Maps” on page .
The following examples demonstrate the use of the RMCut tool.
1. To create a new file with only stream zero, enter:
rmcut -i source.rm -o cutfile.rm -S0
2. To create a new file with the first 30 seconds of stream 0:
rmcut -i source.rm -o cutfile.rm -s0.0 -e30.0
3. To create a new file with the first 30 second of stream 0 and with the first
45 seconds of stream 1, enter:
Page 59

Editing Video Files
rmcut -i source.rm -o cutfile.rm \
-S0 -s0.0 -S1 -s0.0 -e45.0
Examining the Contents of RealVideo Files
RMDump is used to examine the contents of a RealVideo file. RMDump
accepts two input parameters: the input file and the output file.
To use RMDump, type:
rmdump -i <infile> -o <outfile>
rmdump -v
Where:
<infile> is the input .rm extension file
<outfile> is the output text file (use a text editor to view)
<-v> prints the RMDump version and copyright notice.
An example of how to run RMDump is shown below:
Example
>rmdump -i input.rm -o out.txt
dumping input.rm to out.txt . . .
dumping realmedia headers . . .
dumping stream packets
dumping stream 0 . . .
dumping stream 1 . . .
done
! Elapsed time = 556 milliseconds
The next step is to use an editor like Notepad on Windows NT/95, or vi on
UNIX to examine the contents of the RMDump.
RealMedia File: input.rm
================
RM_HEADER_OBJECT
... deleted to save space ...
====================
RM_PROPERTIES_OBJECT
... deleted to save space ...
====================
RM_CONTENT_OBJECT
... deleted to save space ...
==========================
RM_MEDIA_PROPERTIES_OBJECT
object_id: 0x4D445052 (RPDM)
55
Page 60

RealVideo Content Creation Guide
size: 155 bytes
object version: 0
stream_number: 0
max_bit_rate: 12062 bps
avg_bit_rate: 12062 bps
max_packet_size: 288 bytes
avg_packet_size: 288 bytes
start time: 0 milliseconds
preroll: 191 milliseconds
duration: 224898 milliseconds
stream_name: The Audio Stream
mime_type: audio/x-pn-realaudio
type_specific_length: 73
==========================
RM_MEDIA_PROPERTIES_OBJECT
object_id: 0x4D445052 (RPDM)
size: 116 bytes
object version: 0
stream_number: 1
max_bit_rate: 7000 bps
avg_bit_rate: 7000 bps
max_packet_size: 668 bytes
avg_packet_size: 564 bytes
start time: 0 milliseconds
preroll: 3474 milliseconds
duration: 228000 milliseconds
stream_name: The Video Stream
mime_type: video/x-pn-realvideo
type_specific_length: 34
====================
RM_DATA_OBJECT
... deleted to save space ...
==========================
Seek Time: 1 with reqtime = 0 and actualtime = 0
packet 0: stream 0 timestamp 0 size: 288 keyframe
packet 1: stream 1 timestamp 0 size: 639 keyframe
packet 2: stream 1 timestamp 0 size: 619 keyframe
packet 3: stream 1 timestamp 0 size: 599 keyframe
packet 4: stream 1 timestamp 0 size: 544 keyframe
packet 5: stream 1 timestamp 0 size: 639 keyframe
packet 6: stream 0 timestamp 192 size: 288 keyframe
packet 7: stream 0 timestamp 384 size: 288 keyframe
packet 8: stream 0 timestamp 575 size: 288 keyframe
packet 9: stream 0 timestamp 767 size: 288 keyframe
packet 10: stream 0 timestamp 958 size: 288 keyframe
packet 11: stream 0 timestamp 1150 size: 288 keyframe
packet 12: stream 0 timestamp 1341 size: 288 keyframe
packet 13: stream 0 timestamp 1533 size: 288 keyframe
56
Page 61

Editing Video Files
packet 14: stream 0 timestamp 1724 size: 288 keyframe
packet 15: stream 0 timestamp 1916 size: 288 keyframe
packet 16: stream 0 timestamp 2108 size: 288 keyframe
packet 17: stream 0 timestamp 2299 size: 288 keyframe
packet 18: stream 0 timestamp 2491 size: 288 keyframe
The RM_MEDIA_PROPERTIES_OBJECT sections describe the stream type
and stream number for each stream.
- The keyframe field is used to identify the start of a series of related packets.
- Keyframes are sometimes too large to form a single packet. In this case
multiple keyframes will be seen with the same timestamps.
- Some codecs produce packets with the keyframe flag always set. And
others produce a mixture of keyframe and non keyframe packets.
- Packet sizes can be identical in size or vary in size within a single stream.
- The RM_MEDIA_PROPERTIES_OBJECT sections contain attributes of
each stream which include:
1. The stream number.
2. The stream type.
3. The total stream type (audio or video).
4. The total duration of the stream in milliseconds.
5. The preroll which describes how long to load buffers into the player
before playing the stream.
57
Page 62

RealVideo Content Creation Guide
Combining RealVideo Files
RMPaste assumes that streams on the input side are joined to streams on the
output side based upon their mime types. Start and End times are specified to
map the input file, which may contain one or more streams, to a new time
range in the output file. Only one file can use default start and end times. Start
and end times must not overlap. If streams overlap, packets from both streams
are intermingled based upon timestamp.
rmpaste (-i <input> [-s <start>] [-e <end>]
[-f <from stream> -t <to stream>]) -o <output> -v
where:
<input> is the path to the input file. There can be one or more -i -s -e
parameters sequences.
<start> is the start time in Days:Hours:Minutes:Seconds.Milliseconds
format. If missing this parameter defaults to the beginning of the file.
<end> is the end time in Days:Hours:Minutes:Seconds.Milliseconds
format. If missing this parameter defaults to start+input length.
<output> is the path to the output file that contains the edited file.
<from stream> is the input stream number to be sent to the to stream.
<to stream> is the output stream number.
-v is the print version and copyright notice.
58
Note RMPaste can paste in additional streams and add to existing streams.
When streams are pasted together, the timestamps must not overlap.
Note If multiple streams are in the input file and the timestamps of the
streams do not start at the same time, the start time applies to the earliest
stream in the file. The start time plus the difference between the streams first
packet is used for the remaining streams. See first example.
The following examples demonstrate the use of the RMPaste tool:
1. If you cut three streams from a source file using:
rmcut -i source.rm -o cutfile1.rm \
-S0 -s10.0 -S1 -s20.0 -S2 -s30.0
Page 63

Editing Video Files
resulting in an output file like:
and mapped it using:
rmpaste -i cutfile1.rm -s5.0 \
-i cutfile2.rm -e5.0 \
-o paste.rm
the new stream times for cutfile1.rm would be:
Times
Stream0: 0.3 1.1 ….
Stream1: 10.4 12.4 ….
Stream2: 22.0 32.0 ....
Times
Stream0: 5.3 6.1 ….
Stream1: 15.4 17.4 ….
Stream2: 27.0 37.0 ....
with cutfile2.rm placed from the beginning of the file to 5 seconds into the
file. (packets not shown)
2. To create a new file using the first 60 seconds of the source.rm file
swapping the first 45 seconds with the next 15 seconds in the file enter:
rmcut -i source.rm -o cutfile1.rm -s0.0 -e45.0
rmcut -i source.rm -o cutfile2.rm -s45.0 -e60.0
rmpaste -onewfile.rm -icutfile2.rm -s0.0 -e15.0 \
-icutfile1.rm -s15.0 -e60.0
3. To add a new stream to an existing file:
rmpaste -ioriginal.rm -inewstream.rm -onewfile.rm
59
Page 64

RealVideo Content Creation Guide
Image Maps
"Click-able" image maps allow users to interact with the video content by
adding image-specific video seeking and URL commands. Image maps are
fully customizable; actions can be connected to rectangular, circular or
polygonal content regions and can be varied over specific user defined time
intervals.
To create Image Maps:
1. Create an Image Map File (text file).
2. Merge the Image Map file (with a .rm file).
Creating an Image Map File
Image Map Files are text files that have HTML-like tags which specify the
location and action of each image map. Image map files should be created in a
text editor and saved as text only.
60
All tags shown below are required unless otherwise stated. Negative values for
numbers are not allowed.
DURATION Tag
This tag must be at the beginning of the file. The DURATION tag specifies the
amount of time from the start time of the first map to the end time of the last
map in the file. The format is as follows:
DURATION=x:x:x:x:x
DURATION: Times are specified in the following format:
Days:Hours:Minutes:Seconds:MilliSeconds. All of the these fields must be
present. That means if you don't want to specify a particular setting, fill 0's in
that space.
Page 65

Editing Video Files
MAP Tag
This line describes the overall properties of the image map. The format is as
follows:
<MAP START=x:x:x:x:x END=x:x:x:x:x COORDS=x,y,x1,y1>
START: Times are specified in the following format:
Days:Hours:Minutes:Seconds:MilliSeconds. All of the these fields must be
present. That means if you don't want to specify a particular setting, fill 0's in
that space. If START contains all 0's then the start of the clip is assumed.
END: Times are specified in the following format:
Days:Hours:Minutes:Seconds:MilliSeconds. All of the these fields must be
present. That means if you don't want to specify a particular setting, fill 0's in
that space. If END contains all 0's then the end of clip is assumed.
COORDS: Specifies the rectangle that this entire map is going to occupy. If
you enter an area bigger than the entire display area, the entire area is active.
Any area not located within this rectangle will be clipped.
You may have as many MAP tags in a file as you wish.
AREA Tag
There can be 0 to 40 area lines in an image map. These lines describe the
different regions that are active within an image map.
<AREA START=x:x:x:x:x END=x:x:x:x:x SHAPE=XXXX
COORDS=x0,y0,x1,y1,x2,y2,…xn,yn action_tag ALT="" >
START: Specifies the start time of this area during the map. This field is
optional; if you do not include a START time, the area begins at the beginning
of the map time. Times are specified in the following format:
Days:Hours:Minutes:Seconds:MilliSeconds. All of the these fields must be
present. That means if you don't want to specify a particular setting, fill 0's in
that space. If START contains all 0's then the start of the current map is
assumed.
END: Specifies the end time of this area during the map. This field is optional;
if you do not include an END time, the area ends at the end of the map time.
Times are specified in the following format:
61
Page 66

RealVideo Content Creation Guide
Days:Hours:Minutes:Seconds:MilliSeconds. All of the these fields must be
present. That means if you don't want to specify a particular setting, fill 0's in
that space. If END contains all 0's then the end of map is assumed.
Note If the start and end times of an area are outside the start and end times of
the map, then the start and end times of the map are used.
SHAPE: The XXXX for the SHAPE tag can be one of the following values:
(CIRCLE, RECTANGLE, POLYGON).
CIRCLE - COORDS tag should specify three values:
centerX,centerY,radius
RECTANGLE - COORDs tag should specify four values:
left,top,right,bottom
POLYGON - COORDs tag should specify at least 6 values (x and y
coordinates for at least 3 points). These are the vertices for the
polygon.
action_tag: The action_tag is one of the following: PLAYER, URL, SEEK.
PLAYER - Used to specify a new stream to play with RealPlayer. For
example:
PLAYER="pnm://video.real.com/welcome.rm"
62
URL - Used to specify a new URL to display in a browser. For
example:
URL="http://www.real.com"
SEEK - Used to specify a time within the current clip to seek to. For
example:
SEEK=0:0:0:5:0.
Note the format is just like the START and END tags.
ALT: The ALT tag contains text that appears in the status bar of the player
when the mouse is over this AREA and it is active. If you want no text then
use "" as shown above.
/MAP Tag
This line means you are done with the current image map.
Page 67

Editing Video Files
Example
DURATION=0:0:0:40:0
<MAP START=0:0:0:0:0 END=0:0:0:5:20 COORDS=0,0,100,100>
<AREA SHAPE=CIRCLE COORDS=50,50,10
</MAP>
<MAP START=0:0:0:5:20 END=0:0:0:20:3 COORDS=0,0,100,100>
<AREA SHAPE=RECTANGLE COORDS=0,0,50,50 SEEK=0:0:0:3:98
</MAP>
<MAP START=0:0:0:20:3 END=0:0:0:40:0 COORDS=0,0,100,100>
<AREA END=0:0:0:30:0 SHAPE=POLYGON COORDS=0,50,50,0,100,50
<AREA START=0:0:0:31:0 SHAPE=POLYGON
</MAP>
URL="http://www.real.com" ALT="Home Page">
ALT="Seek to a point in the clip">
PLAYER="pnm://video.real.com/welcome.rm" ALT="">
COORDS=0,25,25,0,100,50 SEEK=0:0:0:0:0 ALT=”Rewind to
Beginning”>
63
Page 68

RealVideo Content Creation Guide
Merging an Image Map file with a Video Image
When you have finished creating the Image Map file, you convert the Image
Map text file into a .rm file using the RMMerge tool that is installed with
RealVideo Encoder. Then, you merge that .rm file with an encoded video (.rm)
file.
To convert the Image Map file into a .rm file:
1. From a DOS command line, change directories to the directory that
RealVideo Encoder was installed, which by default is
C:\REAL\RVENCODE
2. Enter the following command:
rmmerge -f rmimap.dll image_map_text image_map_rm
Done..... appears when the image map text file has been converted to a .rm
file.
Note If you receive the message Error Parsing file, verify that the
Image Map file is saved as text only and the tags are used correctly.
64
3. Merge the Image Map .rm file with a video (.rm) file by typing the
following command:
rmmerge image_map_rm video_rm final_rm
The final_rm file contains your Image Map as well as the audio/video clip.
4. Verify the Image Map by playing the final_rm file with RealPlayer.
Page 69

Editing Video Files
Modifying RealVideo File Descriptions
You can change the Title, Author, or Copyright text, and modify the Selective
Record and PerfectPlay settings in a .rm file using several different methods:
Method Description
RMTools The is the editing tool available for Windows 95 and
Windows NT.
Refer to “Editing File Properties” on page 50.
RMEdit Tool This is a command line tool available for Windows and
UNIX.
Refer to “Editing RealVideo Files” on page 58.
.ram File Set the Title, Author, and Copyright text strings in the
.ram file.
Refer to “RealVideo Metafiles” on page 81.
65
Page 70

RealVideo Content Creation Guide
Managing Content on RealServer
You can configure RealServer to deliver files encoded with different
algorithms based on the bandwidth capability of the user’s RealPlayer. The
Player gets the best quality the connection can handle without having to
explicitly choose among multiple links and Web pages. You can choose to
provide as many versions of each file as you want. The bandwidth negotiation
process is transparent to users.
Bandwidth Negotiation
Bandwidth negotiation requires only one link on your Web site to a particular
clip. To provide content in multiple formats without bandwidth negotiation,
your Web site must have a separate hypertext link and metafile for each
format.
66
For information on using Bandwidth Negotiation with Synchronized
Multimedia presentations, refer to “Using Synchronized Multimedia with
Bandwidth Negotiation” on page 108.
The following diagram shows how RealPlayer and RealServer determine
which file to play based on bandwidth.
Page 71
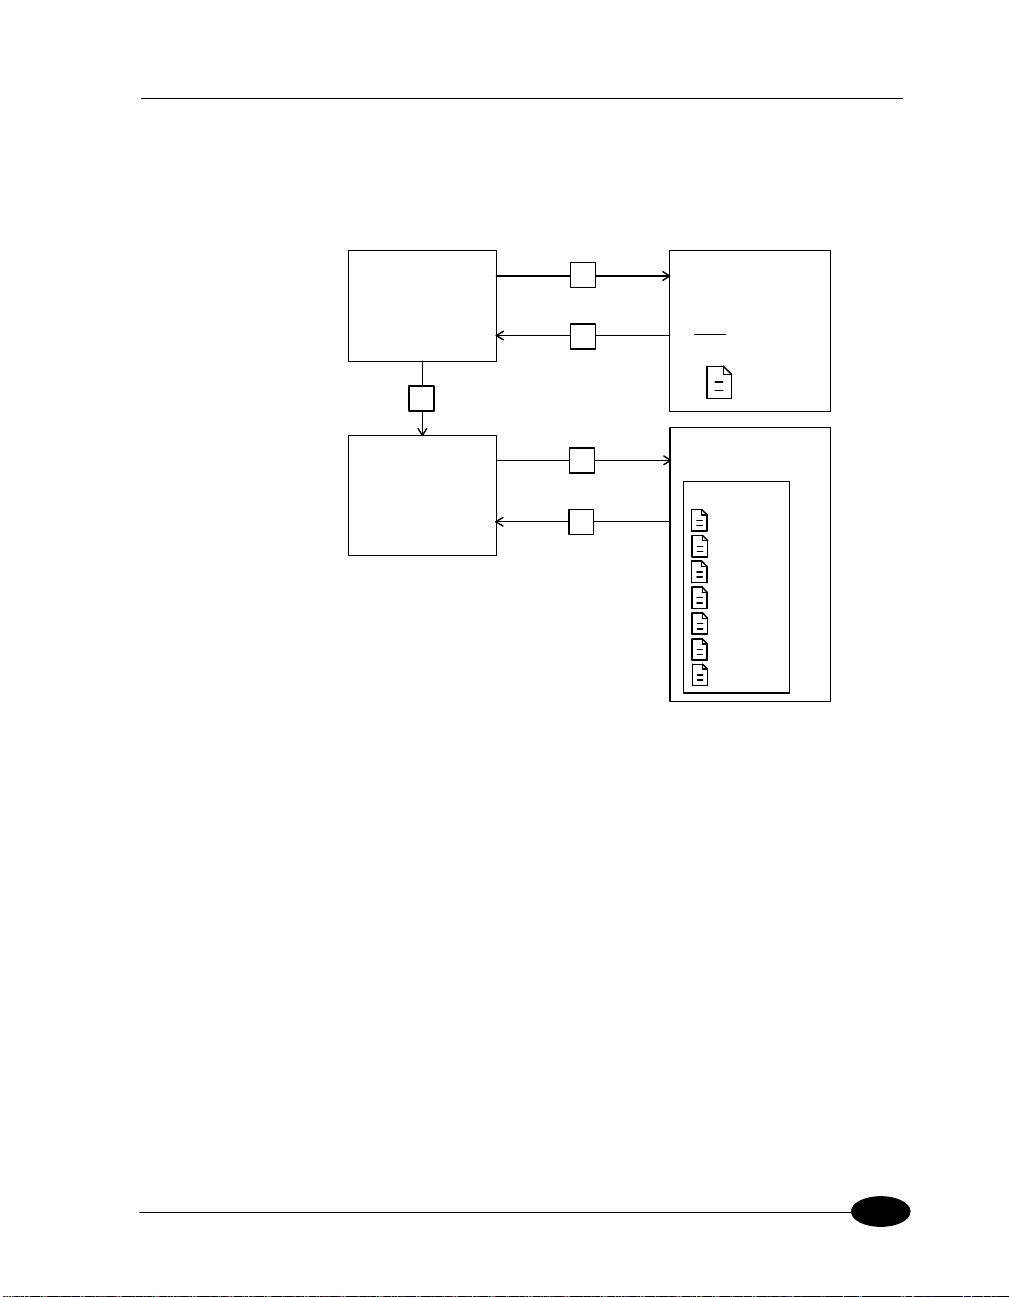
Managing Content on RealServer
1
4
325
File organization is the key to bandwidth negotiation. This figure shows a
single link on a Web page, and seven available RealVideo files encoded using
different algorithms.
Web Browser
RealPlayer
Web Server
Link to Metafile
file.ram
RealServer
Folder
pnrv.1930
pnrv.144
pnrv.70
pnrv.36
pnrv.24
pnrv.18
14_4.18
The following steps correspond to the numbers in the figure:
1. The user clicks a link to a RealVideo metafile on a Web page.
2. The Web server returns the metafile to the Web browser and based on the
.ram file extension, sets the MIME type of the metafile to audio/x-pnRealAudio.
3. The Web browser looks up the MIME type of the metafile, starts
RealPlayer as a helper application, and passes it the metafile.
4. RealPlayer reads the first URL from the metafile and requests it from
RealServer. Based on its preference settings, RealPlayer also sends a list
of RealVideo compression types it supports.
5. RealServer checks the directory specified by the URL and begins
streaming the highest bandwidth file supported by RealPlayer.
67
Page 72

RealVideo Content Creation Guide
The following table shows the metafile for each bandwidth and connection for
RealVideo clips.
Connection Bandwidth (bps) File Name
T1 1544000 pnrv.1930
Dual ISDN 115200 pnrv.144
Single ISDN 56700 pnrv.70
28.8 28800 pnrv.36
19.2 19200 pnrv.24
14.4 14400 pnrv.18
68
Page 73

Managing Content on RealServer
The following table shows the file formats that RealAudio Player version 1.0
through 3.0 requests and in what order they are requested:
Player Version Bandwidth Setting Files Requested
1.0 All 14_4.18
2.0 14.4 14_4.18
2.0 28.8, ISDN, T1 28_8.36
2.1 14.4
2.1 28.8, ISDN, T1 28_8.36
3.0 14.4
3.0 28.8
3.0 ISDN
3.0 T1
14_4.18
14_4.18
14_4.18
14_4.18
dnet.25
dnet.20
28_8.36
14_4.18
dnet.50
dnet.25
dnet.20
28_8.36
14_4.18
dnet.100
dnet.50
28_8.36
dnet.25
dnet.20
14_4.18
Note RealAudio Player 3.0 with a 28.8 Kbps connection always plays
RealAudio 2.0 - 28.8 (28_8.36) format if it is available. If you want to provide
another 28.8 format such as 28.8 Stereo (dnet.25), do not also provide the
28_8.36 format. If you do not provide any format supported by a Player, that
Player receives a message to upgrade to the current Player release.
69
Page 74
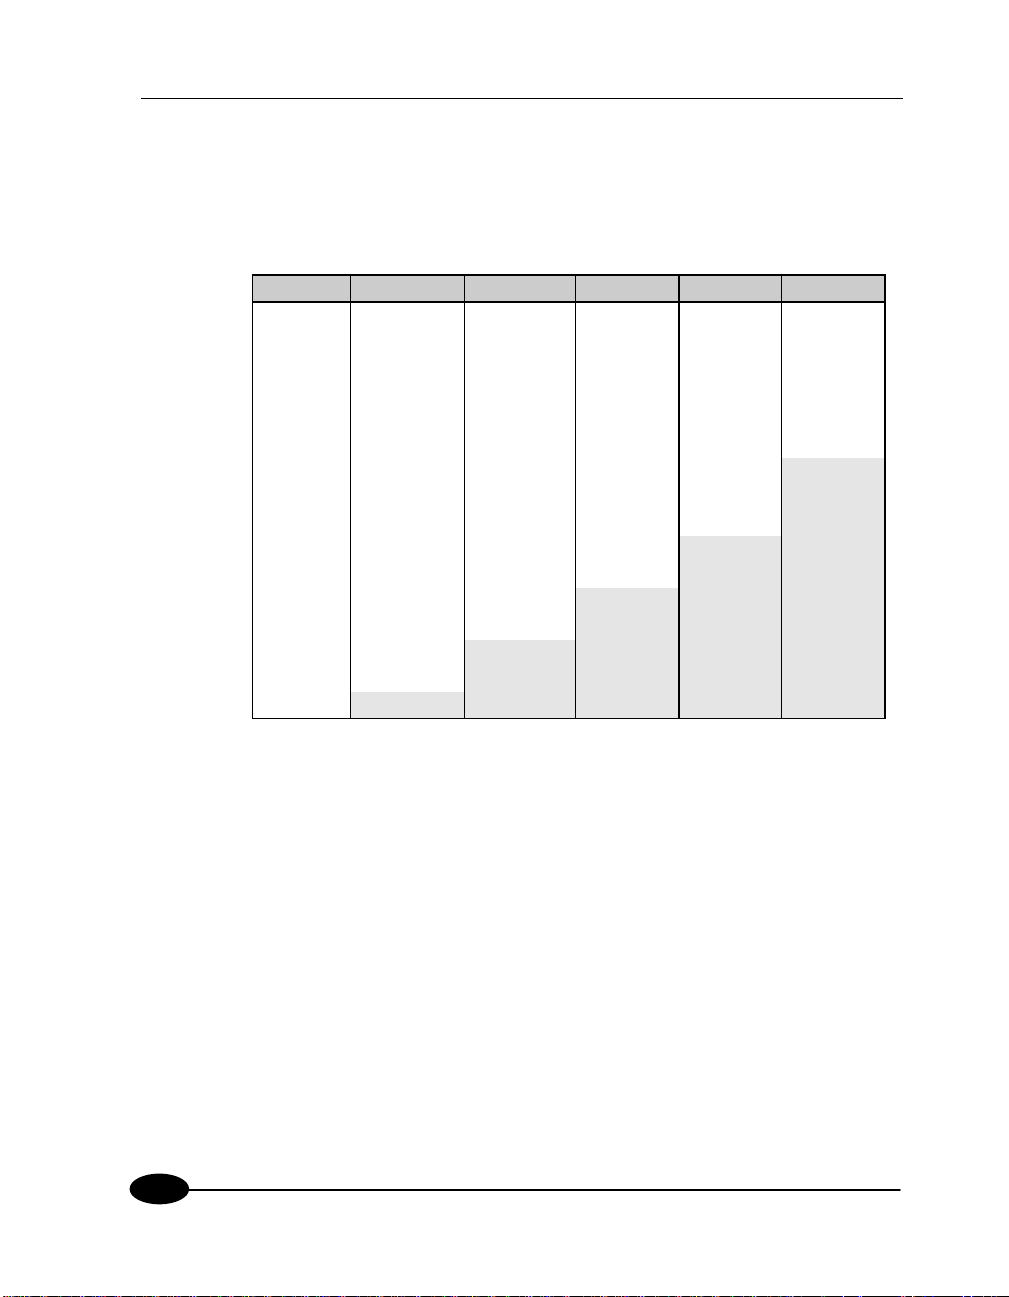
RealVideo Content Creation Guide
The following table shows the file formats that RealPlayer 4.0 requests from
RealAudio servers 1.0 through 3.0, and RealServer in the order they are
requested. The unshaded file formats can be played in real time. The file
formats shaded in gray can be played, but the player will use a buffered
playback mechanism to play the file.
T1/LAN Dual ISDN ISDN 28.8 19.2 14.4
pnrv.1930 pnrv.144 pnrv.70 pnrv.36 pnrv.24 pnrv.18
pnrv.144 dnet.100 dnet.50 dnet.25 dnet.20 dnet.15
dnet.100 pnrv.70 pnrv.36 pnrv.24 28_8.36 sipr.12
pnrv.70 dnet.50 dnet.25 dnet.20 pnrv.18 dnet10
dnet.50 pnrv.36 pnrv.24 28_8.36 dnet.15 sipr.10
pnrv.36 dnet.25 dnet.20 pnrv.18 sipr.12 1pcJ.18
dnet.25 pnrv.24 28_8.36 dnet.15 dnet10 28_8.36
pnrv.24 dnet.20 pnrv.18 sipr.12 sipr.10 dnet.20
dnet.20 28_8.36 dnet.15 dnet10 1pcJ.18 pnrv.24
28_8.36 pnrv.18 sipr.12 sipr.10 dnet.25 dnet.25
pnrv.18 dnet.15 dnet10 1pcJ.18 pnrv.36 pnrv.36
dnet.15 sipr.12 sipr.10 dnet.50 dnet.50 dnet.50
sipr.12 dnet10 1pcJ.18 pnrv.70 pnrv.70 pnrv.70
dnet10 sipr.10 dnet.100 dnet.100 dnet.100 dnet.100
sipr.10 1pcJ.18 pnrv.144 pnrv.144 pnrv.144 pnrv.144
1pcJ.18 pnrv.1930 pnrv.1930 pnrv.1930 pnrv.1930 pnrv.1930
Bandwidth Negotiation Example
In this example, you deliver one of three RealVideo formats depending on the
connection speed and RealPlayer version.
To setup this example:
1. Encode the source file in the following formats:
• RealAudio 2.0 - 14.4
• RealAudio 3.0 - 28.8 Stereo
• RealAudio 3.0 - ISDN Stereo
70
Page 75

Managing Content on RealServer
2. Create a metafile named mozart.ram containing a URL such as:
pnm://www.real.com/music/mozart34.ra
3. Create a link to the metafile in a Web page. The following HTML code is
a typical link:
<A HREF="http://www.real.com/mozart.ram">
Listen to Mozart</A>
4. On RealServer computer, create a directory named mozart34.ra in the
/music directory.
5. In this directory, store the three RealAudio files, renamed 14_4.18,
dnet.25, and dnet.50 as shown in the previous table. You can do this
manually, use the raconv utility described in the next section, or write
your own automation script.
The file that is played depends on the Player connection and version:
• ISDN or faster connection with RealAudio Player 3.0 or later:
RealAudio 3.0 - ISDN Stereo format (dnet.50)
• 28.8 Kbps connection with RealAudio Player 3.0 or later: RealAudio
3.0 - 28.8 Stereo format (dnet.25)
• 14.4 Kbps connection with RealPlayer 3.0 or later: RealAudio 2.0 -
14.4 format (14_4.18)
• 14.4 Kbps or faster connection with RealAudio Player version 2.1 and
earlier: RealAudio 2.0 - 14.4 format (14_4.18)
Note 1 If you do not supply a RealAudio 2.0 - 14.4 or RealAudio 3.0 - 28.8
format file, users with RealAudio Player 2.1 or earlier receive an error message
that they need to upgrade their Player.
Note 2 If you supply a RealAudio 2.0 - 28.8 format file (28_8.36), RealAudio
Player 3.0 or Real Player 4.0 or later with a 28.8 Kbps connection always plays
the 28.8 format file; the 28.8 Stereo format file is never played.
71
Page 76

RealVideo Content Creation Guide
Using the Bandwidth Negotiation Utility
The RAconv utility organizes your files in preparation for bandwidth
negotiation. It generates a directory with the .rm and .ra extension and places
the appropriately renamed files in that directory. The utility uses information
in RealAudio and RealVideo files to determine how to rename the file. Since
the utility renames files, keep a backup of your original files until you are sure
that the process was successful.
Note The RAconv utility does not convert between encoded formats. Use
RealVideo Encoder to create a file in each desired format.
To organize your files for bandwidth negotiation:
1. Encode your RealVideo files in the formats you want to support.
2. Store your encoded files in separate directories, one for each final format
name. For example, RealAudio 3.0 - 28.8 Mono, Low response and
RealAudio 3.0 - 28.8 Mono, Medium response go in the same directory,
because they are both renamed dnet.20. The files that contain the same
source files encoded in different formats must have the same name. For
example, if the URL specifies mozart34.ra, you need a file named
mozart34.ra in each directory.
72
3. Type the command:
raconv <InputFile name> <ContentDirectory>
Where InputFile name is the file to be turned into a directory and
underlying file and ContentDirctory is the directory in which you
want to create the content directories.
4. Repeat the command for each format you encoded.
For example, typing the command:
raconv /28_836files/mozart34.ra /music
creates the directory /music/mozart34.ra, moves the file mozart34.ra
from the 28_836files directory to this new directory, and renames the file
28_8.36.
Page 77

Managing Content on RealServer
If your files are organized by encoding format, you can run RAconv on a
whole directory by entering wildcards for
typing the command:
raconv /28_836files/*.ra /music
This command takes all the files in the directory 28_836files and creates new
directories and files under the directory /music.
The RAconv utility prompts you before overwriting existing files. Use the -f
option to force overwriting without prompting.
You can run RAconv on files in one format to create the directories and then
run RAconv on files in other formats and place them in the appropriate
directory.
InputFile name . For example,
73
Page 78

RealVideo Content Creation Guide
Configuring Your Web Site
After encoding your RealAudio and RealVideo files, you are ready to attach
the files to Web pages. The following sections explain the construction and use
of RealVideo content on your Web site. When you have your RealServer set
up, use this information to showcase audio and video content from your site.
Making the Most of Your Content
To get the most out of your RealVideo content, educate your Web site’s
visitors about RealVideo. Let people know that they can listen and view your
clips instantly, without download delays. Identify each clip with a RealVideo
bubble icon to distinguish it as real-time video.
74
RealVideo bubble icon
You may obtain the above graphic from How to Design a RealVideo Site at:
http://www.real.com/help/
Capture the graphic from within your Web browser by right-clicking
(Windows) or Control-clicking (Macintosh) it and saving it to file.
Make it easy for your visitors to get RealPlayer by providing a link to the
Progressive Networks home page at:
http://www.real.com/
Page 79

Configuring Your Web Site
RealVideo Metafiles
HTML documents use hyperlinks to connect Web pages. RealVideo material is
also reached via links. However, RealVideo links you put into your HTML
pages are not direct references to RealVideo files. Instead they are references
to metafiles which contain information needed to establish a connection
between your RealServer and your listener’s RealPlayer and to initiate
playback.
To create a link between two of your Web pages, you might add the following
text to an HTML document:
<A HREF=”sect2.htm”>Continue to Section 2</A>
A visitor to your site could click the text, and your Web server would then
deliver the appropriate section of your document.
If you employed the same syntax to create a link to a RealVideo file, your
visitor’s click would prompt your Web server to deliver your RealVideo data.
But, your Web server cannot stream RealVideo for real-time playback. Only
your RealServer can do that.
Your Web server can, however, convey information to a user’s RealPlayer that
enables that Player to establish a direct connection to your RealServer. Once in
place, this direct connection is used to stream to the Player and to carry
commands (such as seek or pause) back to your RealServer.
Instead of pointing to a file, your Web page is set up to point to a metafile.
This metafile, in turn, contains the URL (Uniform Resource Locator) of the
file (or files) you want associated with the hyperlink. The user’s browser
passes the URLs to RealPlayer, which retrieves .
RealServer.
rm files from your
75
Page 80

RealVideo Content Creation Guide
Creating Metafiles
Metafiles contain the addresses of RealVideo (.rm) or RealAudio (.ra) files.
These addresses are in the form of URLs. They begin with a locator type,
followed by a specific address. The locator type identifies the protocol used to
exchange information between client and server. Common locator types
include http and ftp.
The locator type used by RealVideo software is pnm (Progressive Networks
Metafile). Addresses you put into a metafile begin with pnm://
To create a metafile:
1. Use a text editor (such as Notepad) to create a file containing a RealVideo
URL. The contents of your file should be in the following form:
pnm://hostname/path
For example, to provide access to a RealVideo file called hello.rm, the
text of your metafile would be:
pnm://www.server1.com/hello.rm
where www.server1.com is the DNS name of the machine running your
RealServer, on which you store your RealVideo files.
76
If you want more than one file to play when the user clicks your link,
create a metafile containing several URLs (on separate lines with no
intervening blank lines). For example, if your metafile contains:
pnm://www.server1.com/hello.rm
pnm://www.server1.com/welcome.rm
pnm://www.server1.com/coolstuff.rm
the Player automatically plays your three files in sequence. A listener can
use the Clip menu on the Player to move forward and backward between
clips (.rm files).
2. Save your metafile in the “Text Only with Line Breaks” format, using a
.ram file name extension.
For example, you could save the three lines shown above in a file named
3track.ram on your Web server.
3. In your HTML document, reference the metafile in a hyperlink, followed
by a reference to RealVideo icon (so that RealVideo icon is displayed to
the left of the file) as follows:
Page 81

Configuring Your Web Site
<A HREF="http://www.real.com/welcome.ram"> <IMG
SRC="http://www.real.com/pics/rvfile.gif"
align=left border=0> Welcome!</A>
where welcome.ram is the metafile.
File name Extensions
Each metafile that you create must be saved with (or renamed to have) a file
name extension. This extension tells your Web server what the metafile is, to
ensure that the enclosed URL is handled properly.
RealVideo System uses two metafile types: .ram and .rpm. These different file
name extensions are passed on by your Web server and, ultimately, tell the
user’s Web browser which application to launch to play the referenced file:
.ram file – Browser launches RealPlayer
.rpm file – Browser launches RealPlayer Plug-in (see below)
Note You must configure your Web server to understand that the extension
.ram refers to the MIME type x-pn-RealAudio (detailed instructions for
configuring a variety of Web servers are available in the Server Administration
Guide).
77
Page 82

RealVideo Content Creation Guide
Customizing Calls to Video and Audio Content
Optional arguments may be added to metafiles to finesse what is seen and
heard by users when they click your RealVideo link. You may alter the point
in a clip at which play starts or ends, or the Title, Author, and Copyright
information is displayed by RealPlayer.
Add the options to your metafile following the URL to which they apply.
Options must be preceded by a ? (question mark) and separated from each
other by an & (ampersand). The syntax is as follows:
pnm://www.real.com/test.rm?[opt1]&[opt2]
Changing Start and Stop Times
To create a link that starts playing a clip from a point other than the beginning
of the file, use the start command. Specify the time into the clip at which play
should begin. For example:
pnm://www.real.com/test.rm?start=”30”
would result in playback starting thirty seconds into the video file.
The format for the start time is as follows:
start=”dd:hh:mm:ss.ss”
78
Tenths of seconds are separated from seconds by a decimal point; the other
units of time are separated by colons. The time is interpreted from right to left,
and it is not necessary to specify days, hours, or minutes if these are not
relevant.
Similar to the start option is the end option. For example, the metafile text:
pnm://www.real.com/test.rm?end=”5:30”
is used to provide for playback of test.ra that terminates five minutes and thirty
seconds from the start of the clip.
Note The end time is always measured from the actual start of the data in the
file, even in the case where playback begins elsewhere. For example, the line:
pnm://www.real.com/test.rm?start=”30”&end=”5:30”
is used to start play of test.rm from the thirty-second mark and to stop play five
minutes later.
Page 83

Configuring Your Web Site
Changing Title, Author, or Copyright Information
The following options exist to change RealVideo descriptive information from
the metafile:
title=”new title”
author=”new author”
copyright=”new copyright”
Strings can be changed independently or in combination.
Changing information in this manner does not change what is stored in your
RealVideo file—only what is displayed when it is accessed through this
particular metafile. This functionality is especially useful if, for example, you
have one large .ra file that contains your band’s entire CD, and you want to
credit the author of each song as it plays. You could create a multi-clip .ram
file as follows:
pnm://www.server/band.rm?end=”5:30”&title=”Song1”
pnm://www.server/band.rm?start=”5:31”&end=”7:45”&
title=”song2”&author=”Joe Smith”
pnm://www.server/band.rm?start=”7:46”&end=”15:01”
&title=”song3”&author=”Jane
Smith”©right=”My Music, 1996”
HTTP Streaming
HTTP streaming enables content providers to stream RealVideo clips from a
World Wide Web server. While this method is not as robust, it provides a
reasonable method for providing short RealVideo content to a limited number
of users.
Before you can stream RealVideo clips through HTTP, you must define the
following MIME types for your World Wide Web server:
audio/x-pn-RealAudio (files with a .ra, .rm or .ram file extension)
audio/x-pn-RealAudio-plugin (files with a .rpm file extension)
Some World Wide Web servers are pre-configured with these MIME types.
Note If you are running a Web page off an ISP server, send mail to the ISP
administrator asking them to configure RealPlayer mime type.
79
Page 84

RealVideo Content Creation Guide
To stream RealVideo content using HTTP:
1. Copy your encoded RealVideo files (files with the .rm extension) to your
World Wide Web server.
2. Use a text editor (such as Notepad) to create a metafile containing a
RealVideo URL. For example, the contents of your file should be in the
following form:
http://hostname/path
where hostname is the name of your World Wide Web server. For
example: www.real.com
Note Refer to “Creating Metafiles” on page 82. This file works
similarly, except it uses http as the protocol instead of pnm.
3. Save your metafile as text using a .ram file name extension.
4. In your HTML document, reference the metafile in a hyperlink. For
example:
<A HREF="file.ram">
<A HREF="http://hostname/file.ram">
80
You can use relative or complete paths. If you use complete paths, you
must include both the hostname and the complete path. For example:
<A HREF="http://www.real.com/home/welcome.ram">
5. When a user clicks on the link, the audio or video file(s) begin to
download. RealPlayer begins playing after a few seconds; it does not need
to wait for the entire file to be downloaded.
Page 85

Configuring Your Web Site
Custom Controls for RealVideo
RealVideo System enables seamless integration of RealPlayer Controls into
your Web page layout. You can place individual interactive components, such
as a play button or image window, anywhere on your page, just as you would
place an image using the <IMG> tag in HTML.
RealVideo offers two products which, in conjunction with the most popular
Web browsers, enable “in page” audio controls.
• RealPlayer Plug-in provides Player-like features to browsers that support
the Netscape Navigator Plug-in architecture. This plug-in also works in
Internet Explorer 3.0.
• RealPlayer Control for ActiveX works with Internet Explorer 3.0 and
Visual Basic applications to provide RealVideo playback capabilities.
Using RealPlayer Plug-in
The Plug-in runs as an adjunct to Web browsers that support Netscape’s Plugin architecture. This RealPlayer Plug-in is included in the Player installation.
The <EMBED> tag specifies Plug-in attributes in HTML pages in much the
same way that the <IMG> tag specifies image attributes. The basic <EMBED>
tag for RealVideo contains only the attributes SRC, WIDTH, and HEIGHT, as
shown below:
<EMBED SRC=metafile.rpm WIDTH=width_value
HEIGHT=height_value>
For example:
<EMBED SRC="sample1.rpm" WIDTH=300 HEIGHT=134>
creates an in-page Player that is 300-pixels wide and 134-pixels high.
For the Plug-in, metafiles are stored with a .rpm file name extension.
The name tag is supported as an option with JavaScript to refer to a specific
plug-in.
Note Do not place the <EMBED> tag within a table.
81
Page 86

RealVideo Content Creation Guide
Feature Description
SRC Attribute The SRC attribute specifies RealVideo metafile to be
accessed. RealPlayer Plug-in is associated with a .rpm file
name extension. This extension tells the user’s Web
browser to load RealPlayer Plug-in rather than the standalone RealPlayer.
For the user’s Web browser to correctly identify .rpm
files, you or your system administrator must first
configure the .rpm MIME type in your Web server. Users
do not need to configure their Web browsers to recognize
the .rpm MIME type. The plug-in architecture
automatically sends .rpm files to RealPlayer Plug-in. Files
with a .rpm extension are identical to .ram files, except
for the extension.
WIDTH and
HEIGHT
Attributes
The WIDTH and HEIGHT attributes specify the size of
the embedded RealVideo component. Unlike images,
Plug-ins do not size automatically. The WIDTH and
HEIGHT can be specified in pixels (the default) or as a
percentage of the Web browser window (for example:
WIDTH=100%).
Note If the WIDTH and HEIGHT attributes are not
included, the Plug-in may appear as a tiny (and useless)
icon with some browsers.
If you want your Plug-in component to maintain an
absolute size, specify HEIGHT and WIDTH in pixels. If
you want the Plug-in graphic to scale with the Web
browser window, specify size as a percentage. For
example, if you want to fit the entire width of the Web
browser window, use WIDTH=100%.
82
Page 87

Configuring Your Web Site
Feature Description
CONTROLS
Attribute
The CONTROLS attribute of the <EMBED> tag allows
you to place individual control elements within your
page. You can use multiple <EMBED> statements to
construct a custom interface, made up of individual
controls. CONTROLS supports the following values: All,
ControlPanel, InfoVolumePanel, InfoPanel, StatusBar,
PlayButton, StopButton, VolumeSlider, PositionSlider,
PositionField, StatusField, ImageWindow.
Preparing HTML Pages for Browsers that Cannot Use the
Plug-in
Some Web browsers do not support plug-ins. You can create HTML pages that
are enhanced for plug-ins but which also work for other browsers. Simply use
the <NOEMBED> tag to include HTML statements for use by Web browsers
that do not support Plug-ins.
The <NOEMBED> command should appear after an <EMBED> command
and take the following syntax:
<NOEMBED> HTML to be ignored </NOEMBED>
For example, the command:
<EMBED SRC="sample1.rpm" WIDTH=300 HEIGHT=134>
<NOEMBED> <A HREF="sample1.ram"> Play the clip
using the stand-alone Player! </A></NOEMBED>
would show a page with the Plug-in if your page were accessed by a browser
supporting Plug-ins, and would otherwise display the message “Play the clip
using the stand-alone Player!” (and allow playback with the standard Player).
83
Page 88

RealVideo Content Creation Guide
Using RealPlayer Control for ActiveX
You can embed RealPlayer Control for ActiveX in HTML pages using the
Object tag.
The following is an example of RealPlayer Control <OBJECT> in an HTML
page.
<OBJECT
ID=RAOCX
CLASSID="clsid:CFCDAA03-8BE4-11cf-B84B-0020AFBBCCFA"
HEIGHT=140
WIDTH=312>
<PARAM NAME="SRC" VALUE="pnm://audio.real.com/file.rm">
<PARAM NAME="CONTROLS" VALUE="all">
</OBJECT>
Note Directory names cannot have spaces.
Embedded Object Parameters
Feature Description
OBJECT Tag is used to embed RealPlayer Control for ActiveX.
There should be one <Object> tag per RealPlayer Control
on the page.
84
CLASSID Specifies the control's CLSID. This value is always
“clsid:CFCDAA03-8BE4-11cf-B84B-0020AFBBCCFA”
for RealPlayer Control for ActiveX.
HEIGHT Specifies the control's height on the HTML page. A value
of 0 makes the control invisible.
WIDTH Specifies the control's width on the HTML page. A value
of 0 makes the control invisible.
PARAM Specially embedded tag for supplying parameters to the
ActiveX object.
Page 89

Configuring Your Web Site
The following properties are available with the PARAM Parameter:
Parameter Description
SRC Sets the source of RealVideo or RealAudio clip. The
CONTROLS Sets the visible components of the control. Valid
CONSOLE Sets a console name used to link multiple control
SRC location can be pnm, file or http protocol. This
parameter is required.
CONTROLS include All, ControlPanel,
InfoVolumePanel, InfoPanel, StatusBar, PlayButton,
StopButton, VolumeSlider, PositionSlider,
PositionField, StatusField, and ImageWindow.
instances. All controls with the same console name
work together. For example, if you have multiple
Play and Stop buttons on the same page, the console
name would enable them to control the same
RealVideo or RealVideo clip. Call this function once
for each instance of the Play or Stop button you want
to link.
The console name. “_master” links to all instances.
“_unique” links to no other instances.
AUTOSTART Sets whether or not the control automatically starts
playing once the source data is available. Valid
values are TRUE or FALSE.
NOLABELS Suppresses the Title, Author, and Copyright label
text in the controls window. The text strings in the
fields are still displayed.
RESET Resets RealPlayer Control for ActiveX playlist.
Valid values are TRUE or FALSE.
AUTOGOTOURL Specifies how a URL is handled. Valid values are
TRUE or FALSE. TRUE indicates that RealPlayer
Control for ActiveX automatically forwards the URL
event to the browser. FALSE indicates that the
OnGotoURL VBScript event is used instead.
85
Page 90
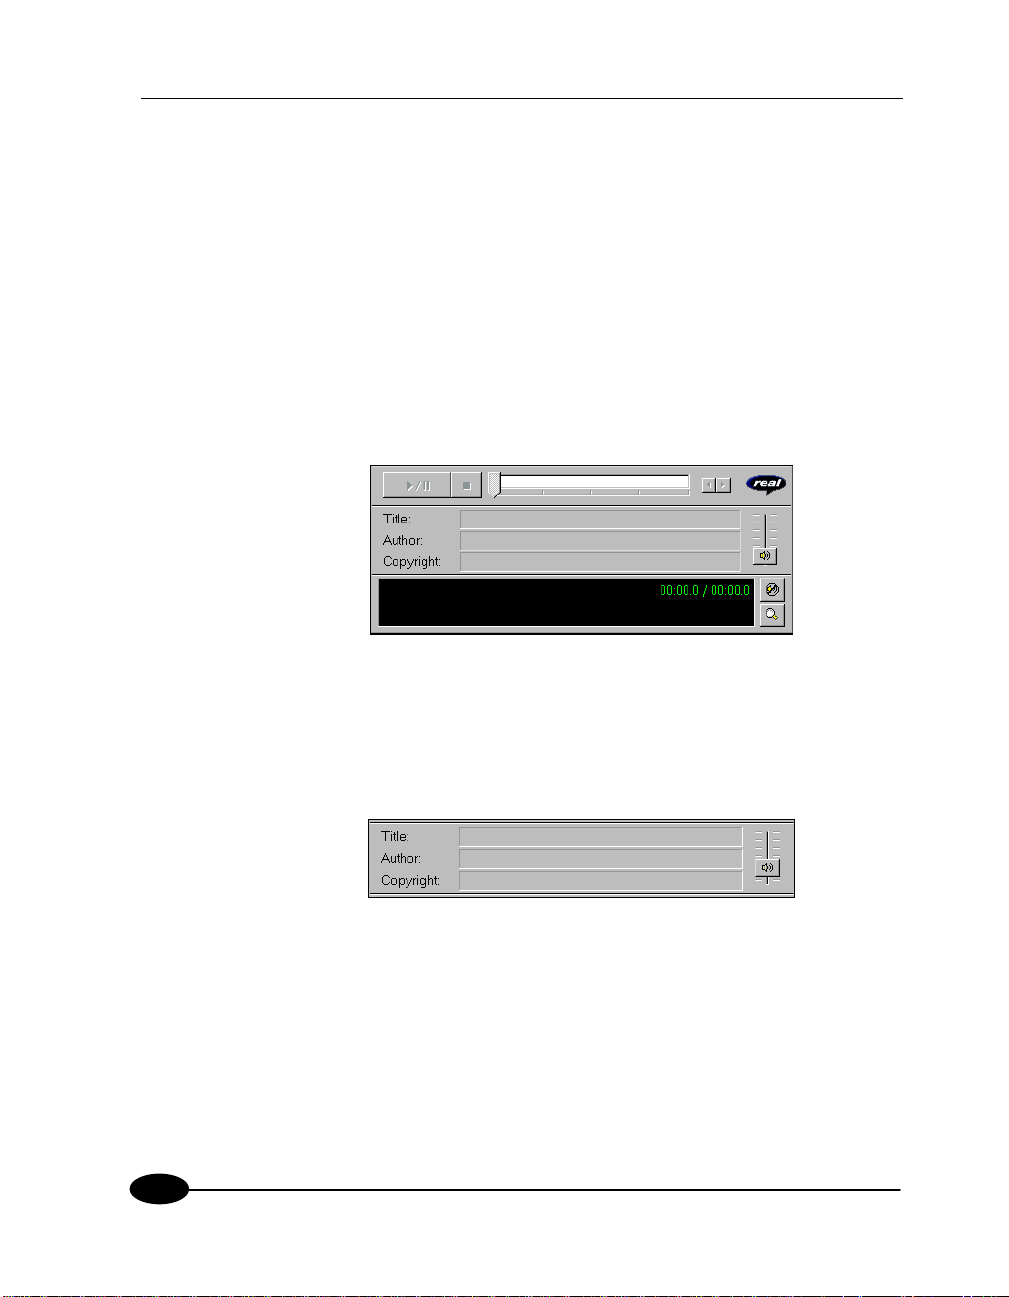
RealVideo Content Creation Guide
Specifying How the Control Should Look
The CONTROLS attribute allows you to place individual control elements
within your page. The CONTROLS attributes for the Netscape Navigator Plugin and RealPlayer ActiveX Control are the same. The following explains the
output of each attribute:
All - Displays a full Player view including the Control Panel, Information-andVolume Panel and Status Bar.
Minimum Width: 21% Maximum Width: 100%
Minimum Height: 23% Maximum Height: 80%
86
InfoVolumePanel - Displays the Title, Author, and Copyright information
panel and the volume slider.
Minimum Width: 21% Maximum Width: 100%
Minimum Height: 12% Maximum Height: 50%
Page 91
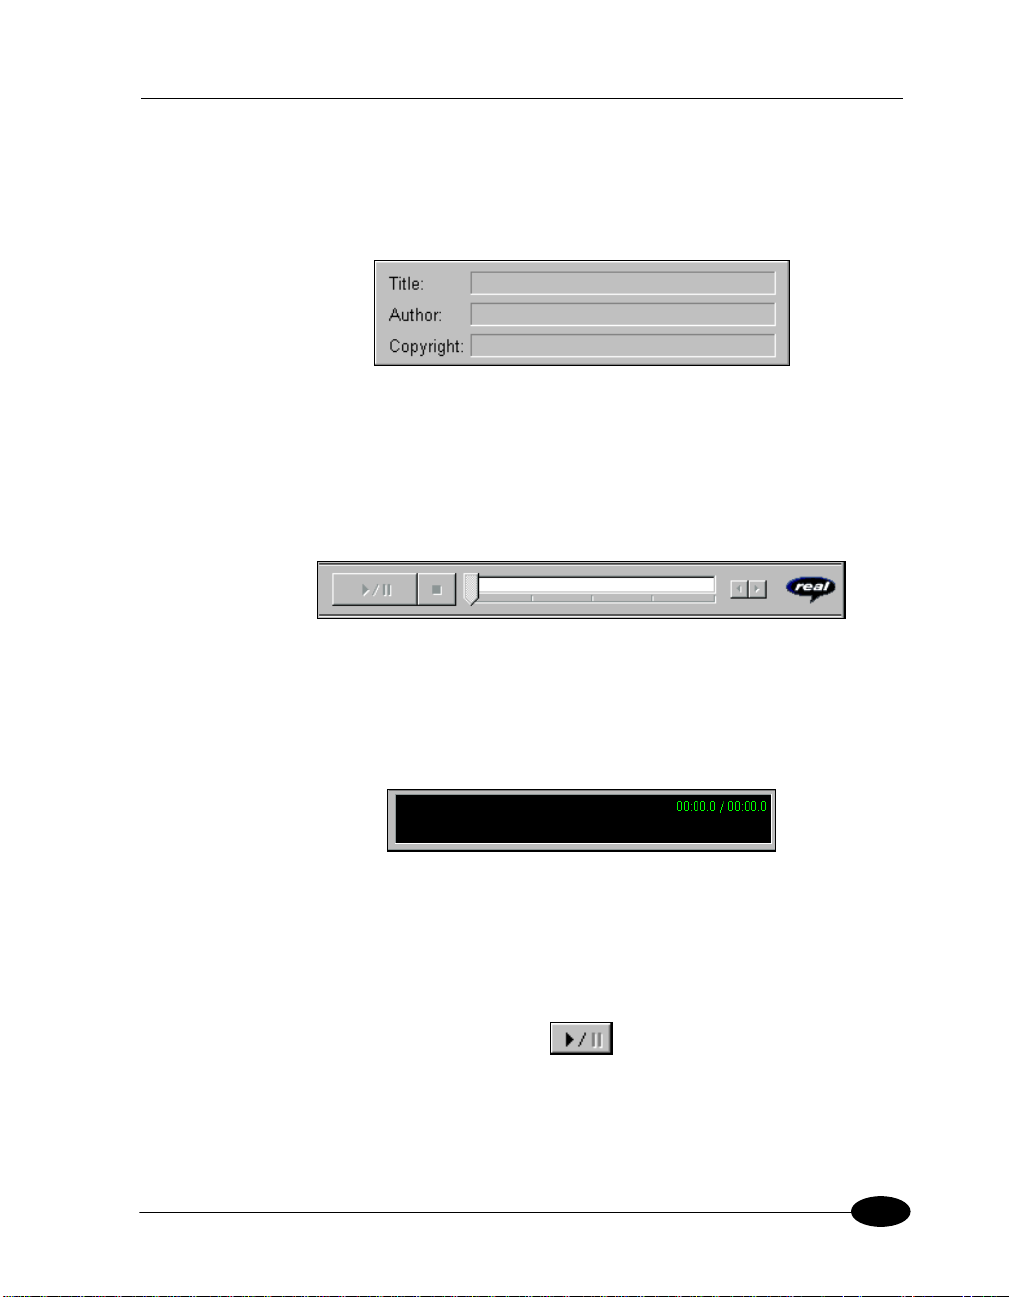
Configuring Your Web Site
InfoPanel - Displays the Title, Author, and Copyright information.
Minimum Width: 20% Maximum Width: 100%
Minimum Height: 10% Maximum Height: 50%
ControlPanel - Displays the play/pause button, the stop button and the
position slider.
Minimum Width: 21% Maximum Width: 100%
Minimum Height: 8% Maximum Height: 25%
StatusPanel - Displays the Status Panel showing informational messages,
current time position, and clip length. If you do not embed a Status Panel in
your page, error messages are displayed in the Web browser’s status bar.
PlayButton - Displays the play/pause button.
Minimum Width: 5% Maximum Width: 100%
Minimum Height: 2% Maximum Height: 25%
87
Page 92
RealVideo Content Creation Guide
StopButton - Displays the stop button.
Minimum Width: 5% Maximum Width: 100%
Minimum Height: 2% Maximum Height: 25%
VolumeSlider - Displays the volume slider.
Minimum Width4% Maximum Width100%
Minimum Height10% Maximum Height100%
PositionSlider - Displays the position slider.
88
Minimum Width 8% Maximum Width 100%
Minimum Height 5% Maximum Height 25%
PositionField - Displays the field of the Status Bar showing position and clip
length.
Minimum Width: 10% Maximum Width: 100%
Minimum Height: 4% Maximum Height: 25%
Page 93

Configuring Your Web Site
StatusField - Displays the message text area of the Status Bar.
Minimum Width: 13% Maximum Width: 100%
Minimum Height: 4% Maximum Height: 15%
ImageWindow - Displays the video image.
Minimum Width: 100% Maximum Width: 100%
Minimum Height: 100% Maximum Height: 100%
StatusBar - Displays the status field, position field, channels (stereo/mono).
Minimum Width: 21% Maximum Width: 100%
Minimum Height: 5% Maximum Height: 14%
89
Page 94

RealVideo Content Creation Guide
ActiveX Methods and Properties
Methods
Methods are functions that control the performance of the Control. Unless otherwise noted,
these methods have no return values and no parameters.
Method Description
DoPlayPause Plays or pauses the current clip. Equivalent to clicking the Play/Pause
button.
DoStop Stops the RealAudio clip. Equivalent to clicking the Stop button.
DoNextItem Skips to the next clip in a .ram file that contains multiple clips. A .ram file
is a RealAudio metafile that points to one or more RealAudio files.
DoPrevItem Skips to the previous clip in a .ram file that contains multiple clips. A
.ram file is a RealAudio metafile that points to one or more RealAudio
files.
CanPlayPause Tests if Play/Pause function is available. Returns TRUE or FALSE
CanStop Tests if Stop function is available. Returns TRUE or FALSE.
HasNextItem Tests if the next clip function is available. The next clip function is
available when the connected source is a .ram file that contains multiple
clips, and the current clip is not the last clip in the .ram file. Returns true
or false.
HasPrevItem Tests if the previous clip function is available. The previous clip function
is available when the connected source is a .ram file that contains multiple
clips, and the current clip is not the first clip in the .ram file. Returns true
or false.
AboutBox Opens the Copyright information for the control.
EditPreferences Opens the Preferences dialog box. Enables the end user to set his/her
RealAudio preferences. These preferences are global to all RealAudio
clients on the machine.
HideShowStatistics Shows or hides the Connection Statistics dialog box.
IsStatisticsVisible Tests if the Connection Statistics dialog box is displayed. Returns true or
false.
90
Page 95

Configuring Your Web Site
DoGotoURL(url,
target)
Causes the control to attempt a navigation to the specified URL in the
specified frame target. The container must support URL browsing.
Parameters: string URL, string target.
91
Page 96

RealVideo Content Creation Guide
Object Properties
The object properties are set within Visual Basic and specify properties about the control.
Property Description
Source Specifies the URL of the RealAudio clip to play. The Source location
can be pnm:, file: or http: protocol.
Controls Returns/Sets the visible components of the control. Valid CONTROLS
include ALL, ControlPanel, InfoVolumePanel, InfoPanel, StatusBar,
PlayButton, StopButton, VolumeSlider, PositionSlider, PositionField,
and StatusField.
Console Sets a console name used to link multiple control instances. All controls
with the same console name work together. For example, if you have
multiple Play and Stop buttons on the same page, the console name
would enable them to control the same RealAudio clip. Call this
function once for each instance of the Play or Stop button you want to
link. The console name master links to all instances while unique links
to no other instances.
Autostart Sets whether or not the control automatically starts playing once the
source data is available. Valid values are TRUE or FALSE.
NoLabels Suppresses the Title, Author, and Copyright label text in the controls
window. The text strings in the fields are still displayed.
AutoGotoURL Specifies how a URL will be handled. Valid values are TRUE or
FALSE. TRUE indicates that the RealAudio ActiveX Control will
automatically forward the URL event to the browser. FALSE indicates
that the OnGotoURL VBScript event will be sent instead.
92
Page 97

Configuring Your Web Site
Java and JavaScript Methods
Methods are functions that control the performance of the Java enabled RealAudio Plug-in.
Method Description
SetSource(String
Source)
SetControlsString(String
ControlsString)
SetConsoleName(String
ConsoleName)
SetAutoStart(Boolean
bAutoStart)
SetNoLabels(Boolean
bNoLabels)
DoPlayPause() Plays or pauses the current clip. Equivalent to clicking the Play/Pause
DoStop() Stops the RealAudio clip. Equivalent to clicking the Stop button.
DoNextItem() Skips to the next clip in a .ram file that contains multiple clips. A .ram file is
DoPrevItem() Skips to the previous clip in a .ram file that contains multiple clips. A .ram
CanPlayPause() Tests if Play/Pause function is available. Returns TRUE or FALSE
CanStop() Tests if Stop function is available. Returns TRUE or FALSE.
HasNextItem() Tests if the next clip function is available. The next clip function is available
HasPrevItem() Tests if the previous clip function is available. The previous clip function is
AboutBox() Opens the Copyright information for the control.
EditPreferences() Opens the Preferences dialog box. Enables the end user to set his/her
Specifies the URL of the RealAudio clip to play. The Source location can be
pnm:, file: or http: protocol.
Returns/Sets the visible components of the control. Valid CONTROLS
include ALL, ControlPanel, InfoVolumePanel, InfoPanel, StatusBar,
PlayButton, StopButton, VolumeSlider, PositionSlider, PositionField, and
StatusField.
Sets a console name used to link multiple RealAudio Plug-in instances. All
RealAudio Plug-ins with the same console name work together. For
example, if you have multiple Play and Stop buttons on the same page, the
console name would enable them to control the same RealAudio clip. Call
this function once for each instance of the Play or Stop button you want to
link. The console name master links to all instances while unique links to no
other instances.
Sets whether or not the RealAudio Plug-in automatically starts playing once
the source data is available. Valid values are TRUE or FALSE.
Suppresses the Title, Author, and Copyright label text in the RealAudio
Plug-in window. The text strings in the fields are still displayed.
button.
a RealAudio metafile that points to one or more RealAudio files.
file is a RealAudio metafile that points to one or more RealAudio files.
when the connected source is a .ram file that contains multiple clips, and the
current clip is not the last clip in the .ram file. Returns true or false.
available when the connected source is a .ram file that contains multiple
clips, and the current clip is not the first clip in the .ram file. Returns true or
false.
RealAudio preferences. These preferences are global to all RealAudio clients
93
Page 98

RealVideo Content Creation Guide
on the machine.
HideShowStatistics() Shows or hides the Connection Statistics dialog box.
IsStatisticsVisible() Tests if the Connection Statistics dialog box is displayed. Returns true or
false.
CallBack Methods
CallBack methods are functions that provide notification from the RealAudio engine.
CallBack methods can only be used with Java applets by implementing the RAObserver
interface.
Method Description
onClipOpened(String
Sent when a clip has been opened.
shortClipname, String
URL)
onClipClosed() Sent to indicate that no clip is currently open.
onShowStatus(String
Sent to indicate that the status text is changing.
status)
setAutoGoToURL(boolean
bAutoGoToURL)
Specifies how a URL will be handled. Valid values are true
or false. True indicates that the RealAudio Plug-in will
automatically forward the URL event to the browser. False
indicates that the OnGoToURL event will be handled by the
Java applet instead.
onGoToURL(String url,
String target)
Sent when a URL event has been encountered for the
currently playing RealAudio clip. This event will only occur
if the AutoGotoURL property is false.
94
Page 99
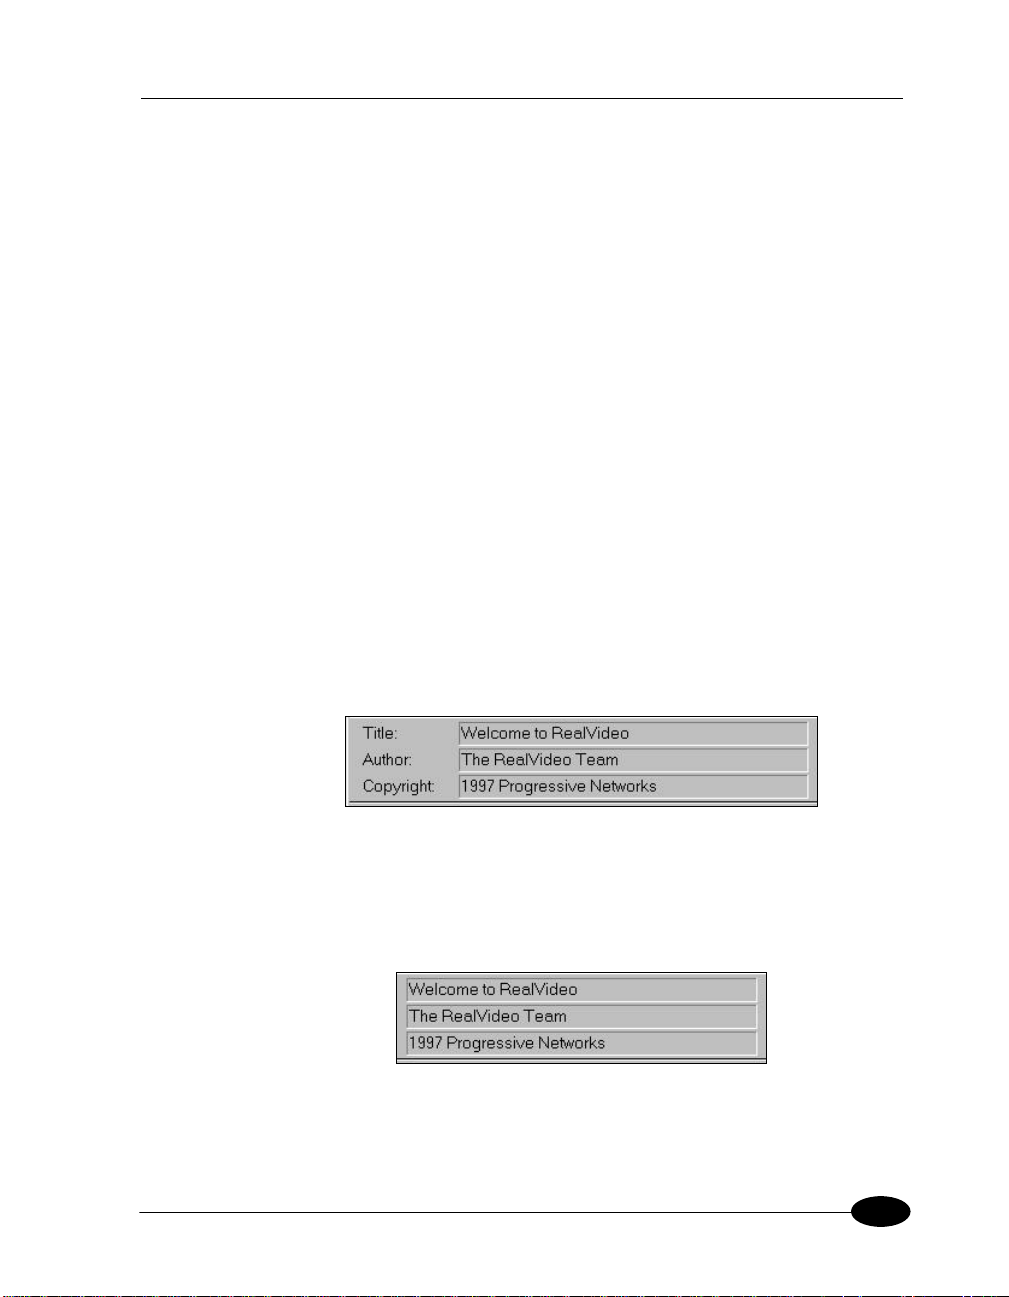
Configuring Your Web Site
Advanced Control Attributes
The more exciting features of RealPlayer Plug-in and RealPlayer Control for
ActiveX may be utilized by specifying custom attributes within your HTML
documents.
Removing Text Labels from Controls
If your Web page is in a language other than English, or if you want to use
RealVideo Description fields to display information other than Title, Author,
and Copyright, you may remove the Title, Author, and Copyright Labels from
the information area. Controls that display Title, Author, and Copyright
information for a clip, support a NOLABELS=TRUE attribute.
For example, allowing the default behavior
<EMBED SRC="use_lbl.rpm" WIDTH=350 HEIGHT=80
CONTROLS=InfoPanel>
or specifying NOLABELS=FALSE
<EMBED SRC="use_lbl.rpm" WIDTH=350 HEIGHT=80
CONTROLS=InfoPanel NOLABELS=FALSE>
results in the following display.
On the other hand, using NOLABELS=TRUE, for example:
<EMBED SRC="no_lbl.rpm" WIDTH=350 HEIGHT=80
CONTROLS=InfoPanel NOLABELS=TRUE>
produces the following InfoPanel:
95
Page 100

RealVideo Content Creation Guide
Starting Clips Automatically
Adding an AUTOSTART=TRUE attribute tells the user’s browser to
automatically begin playing your clip when the page is visited. You can use
this feature to begin narration, to play a welcome message or start a video.
Since only one clip can play at a time, if you specify AUTOSTART for more
than one control instance, only the last control to load will play. The order in
which your files are delivered is dependent on the Web server and on the
browser’s cache size. This is not necessarily the order in which you put them
within your HTML. Therefore, you should specify AUTOSTART for only one
control instance per page.
Playing Clips with a Hidden Control or Plug-in
If you want to play RealVideo or RealAudio clips without having a visible
Plug-in control, you hide the control. By embedding a Plug-in in your page
that has its size set to width=2 height=0, no image appears on your Web page.
You can control the Plug-in with JavaScript.
For example:
<script Language=JavaScript>
function playSource()
{if (navigator.appName == "Netscape")
{document.javaPlug1.DoPlayPause();}
else
{RAOCX.DoPlayPause();}
}
</script>
<A HREF="#" onClick="playSource()"><IMG
RC="button.gif"></A>
<OBJECT ID=RAOCX CLASSID="clsid:CFCDAA03-8BE4-11cf-B84B-
0020AFBBCCFA" WIDTH=2 HEIGHT=0>
<PARAM NAME="SRC" VALUE="pnm://audio.real.com/welcome.rm">
<PARAM NAME="CONTROLS" VALUE="PlayButton">
<embed src="start.rpm" Width=2 Height=0
Controls=PlayButton name=javaPlug1>
</OBJECT>
96
The above example works in both Netscape and Internet Explorer. Only one
control will appear on the Web page.
 Loading...