

Page 1
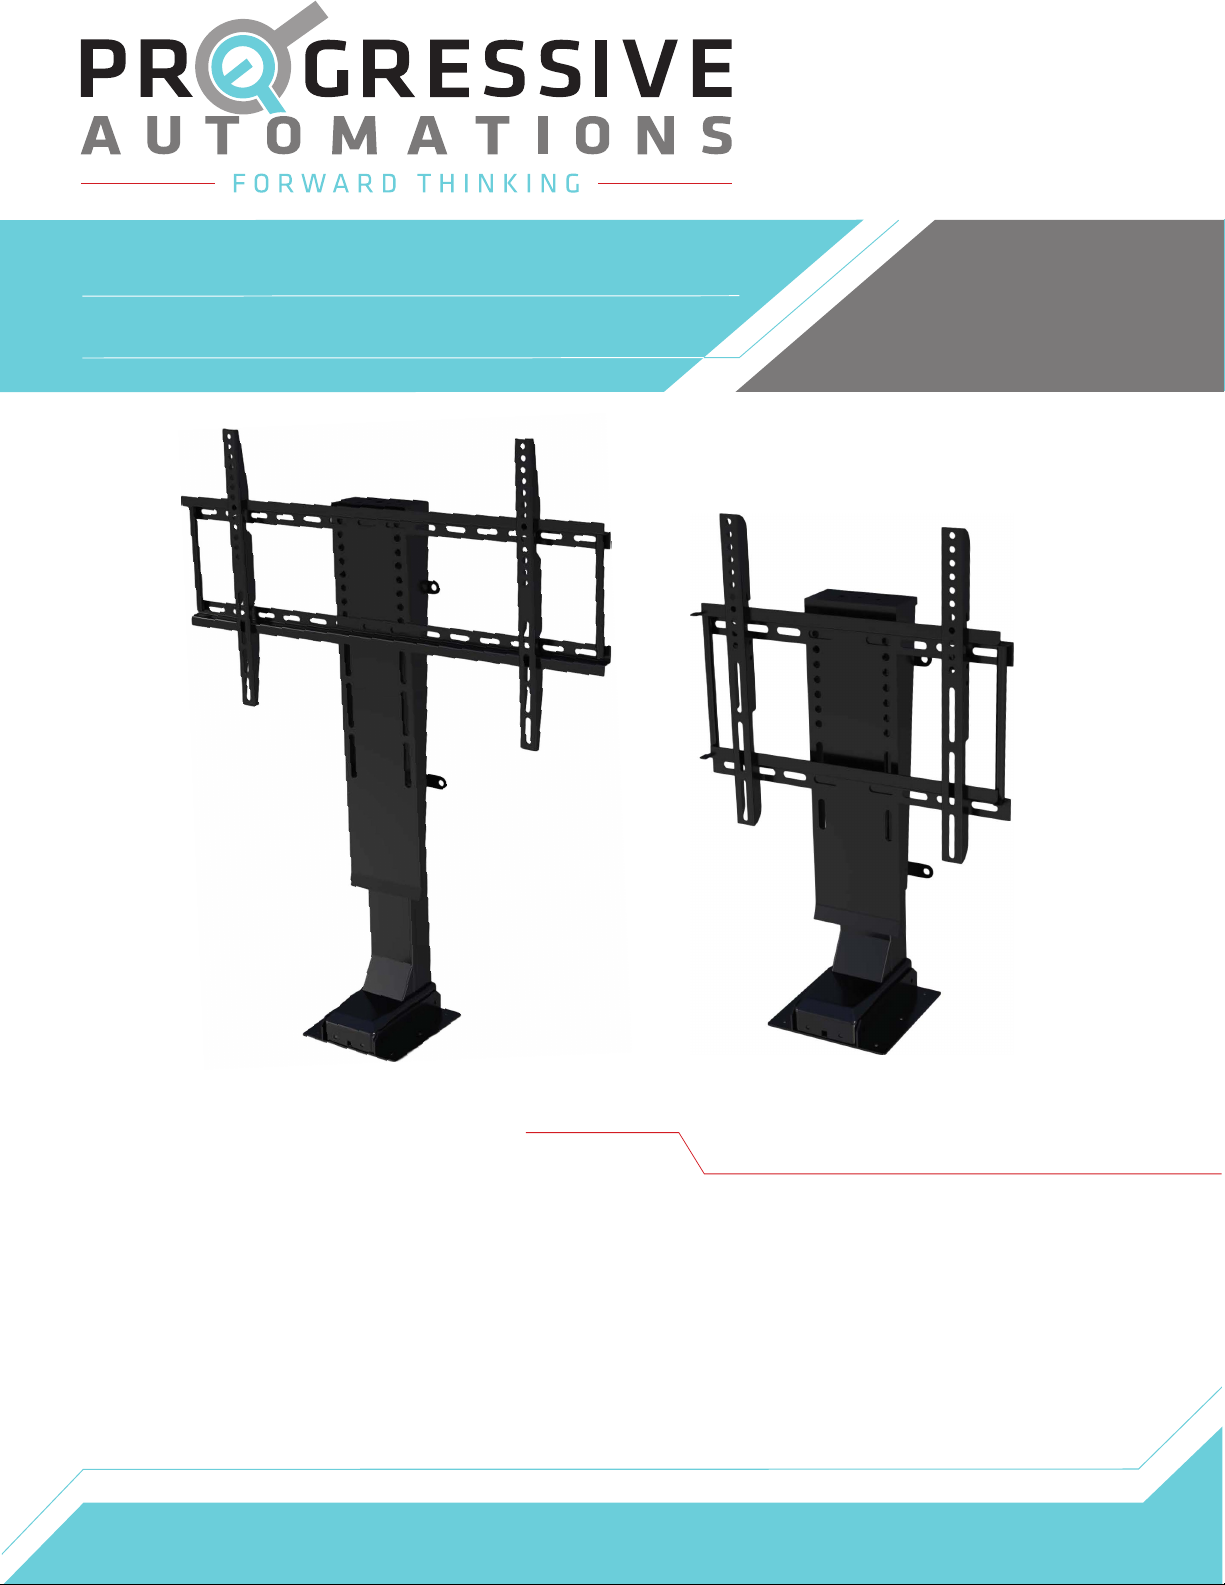
TY-01 / TY-01-25
User Manual
Contents
Caution/Liability
Specifications
Dimensions
Components
Assembly Instructions
Reset Procedure
Pairing Wireless Remote
Page 2
Page 3
Page 4
Page 5
Page 6-7
Page 8
Page 8
Page 2
Caution
Ensure no obstacles are in the TV lift's path. Ensure all
cords are the appropriate length to accommodate the
change in height.
Ensure these instructions are read and acknowledge before use or installation.
Please contact a professional installer for assistance if unsure of installation. Attach to structures
suitable for supporting the TV lift and added load.
Use the appropriate safety equipment and tools. A minimum of two people is required for this
installation.
Do not exceed the maximum load capacity of 135 lbs or else this may result in product failure or
personal injury.
Do not sit or stand on the TV lift. Do not crawl or lie under the TV lift.
Warning:
Pinch point!
Keep hands and
fingers clear.
Before cleaning, unplug the unit from power. Clean with a slightly damp cloth to wipe away any
surface dust. Do not use corrosive or abrasive materials. Keep all electrical components away
from liquids.
Dispose of in accordance with local laws and regulations. There are wires, electronic
components, metal and plastic parts and may not be disposed of as local waste.
Liability
Under no circumstances does the manufacturer accept warranty claims or
liability claims for damages caused by improper use or handling of the TV lift.
2
Page 3

Specifications
Model
Stroke (Movement)
Minimum Height
Maximum Height
Dimensions (LxWxH)
Weight
TV Size Compatibility
Vesa Compatibility
Input Voltage
Control Options
Wireless Remote Range
Wired Remote Cable Length
Dynamic Load
TY-01-25 TY-01
25.4"
22.5"
47.9"
7.09" x 18.19" x 26.88"
33.2 lbs
32" to 60"
Yes - Adjustable
110 VAC, 230 VAC Customizable
Wireless & Wired Remote
Up to 100 ft
Coiled Cable, Up to 6 ft when stretched
7.09" x 28.62" x 36.18"
135 lbs
38.8"
32.1"
70.9"
42.0 lbs
Static Load
Upside Down Dynamic Load
Upside Down Static Load
Speed (No Load)
Speed (Full Load)
Overload Protection
Operational Temperature
Operating Noise
Duty Cycle
IP Rating
Certifications
Color
Frame Material
155 lbs
135 lbs
135 lbs
1.22"/sec
0.98"/sec
PTC Short Circuit Protection
5° to 40°C (41° to 104°F)
<50dB
10% (2 Minutes On, 18 Minutes Off)
IP20
UL for Control System and Lifting Column
Black
Steel
AC Cable Length
Warranty
10 ft
18 Months
3
Page 4
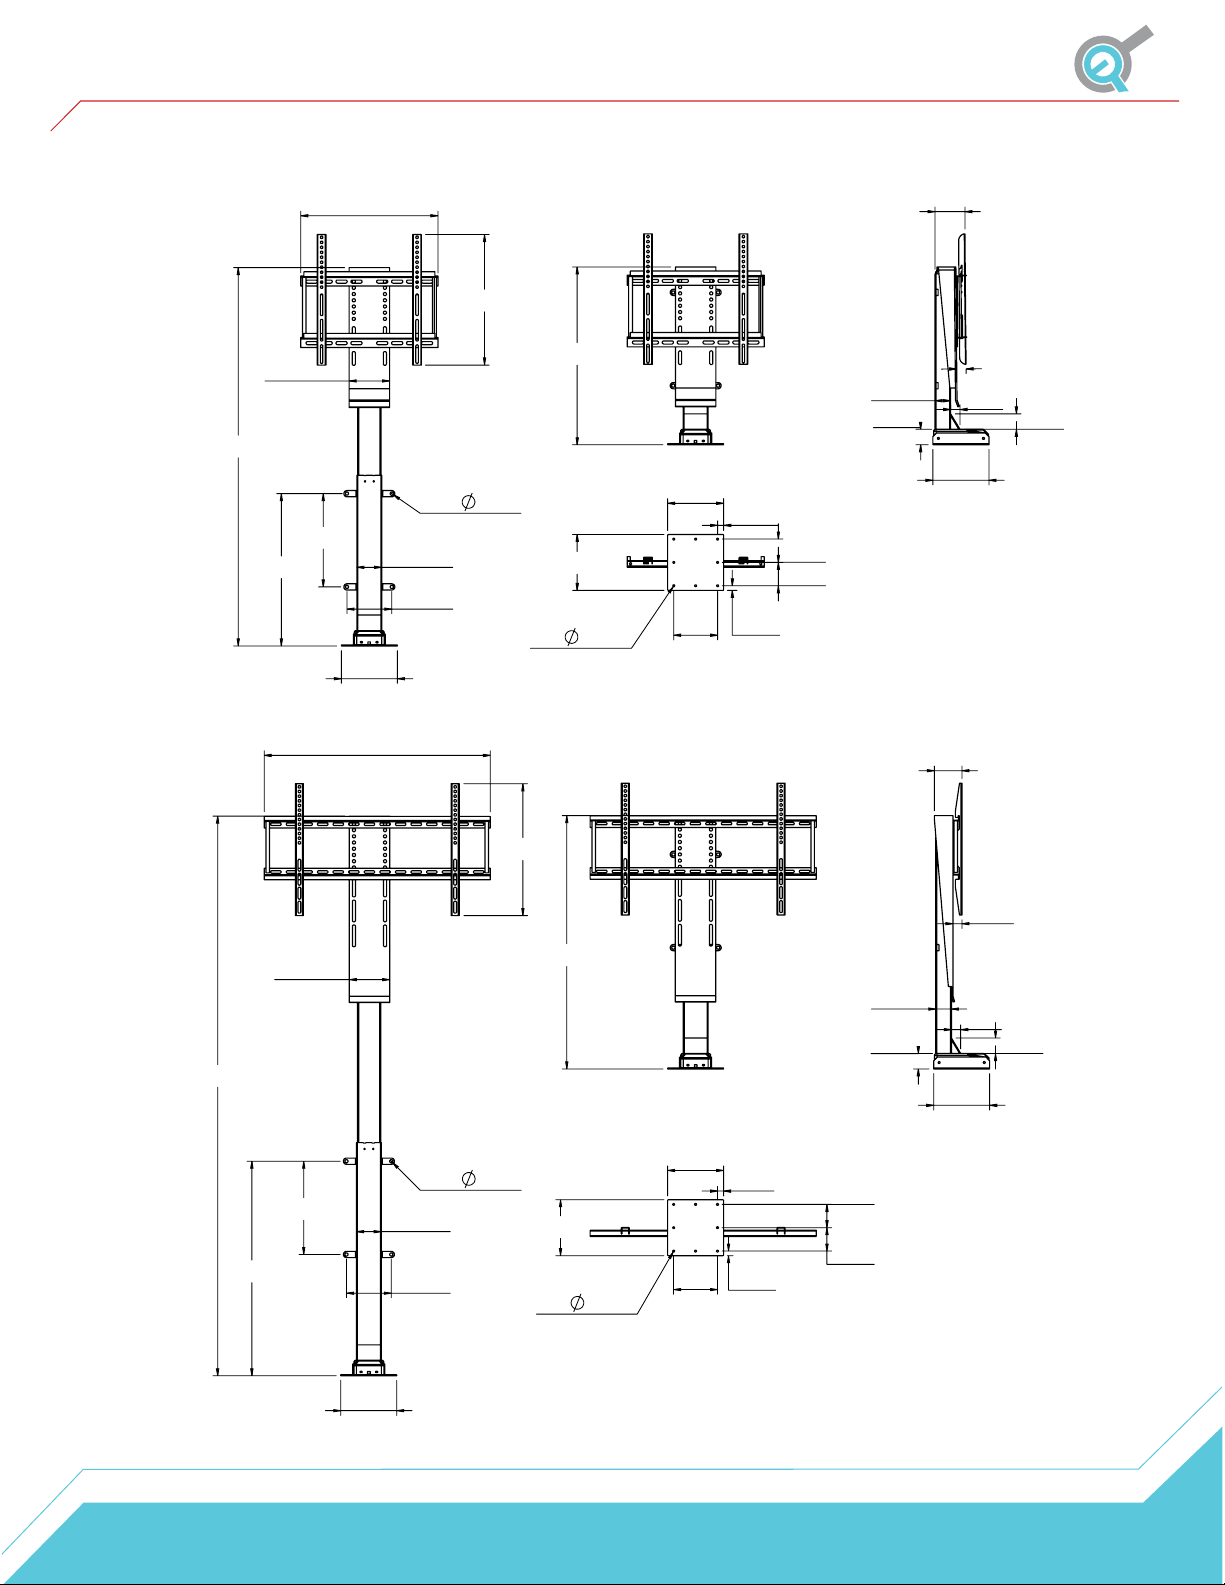
Dimensions
(Dimensions in inches)
TY-01-25
17.36
3.78
16.53
47.9
TY-01
5.12
19.29
11.81
7.09
28.62
4x
3.15
5.67
0.39
16.69
9x
22.5
7.09
0.24
7.09
0.77
5.55 0.59
2.95
2.95
1.97
1.95
1.18
1.18
1.97
7.09
3.50
1.14
70.9
27.17
5.12
11.81
7.09
4x
3.15
5.67
0.39
32.1
7.09
9x
0.24
7.09
5.55
0.77
0.59
2.95
2.95
1.97
1.95
1.18
1.97
7.09
4
Page 5
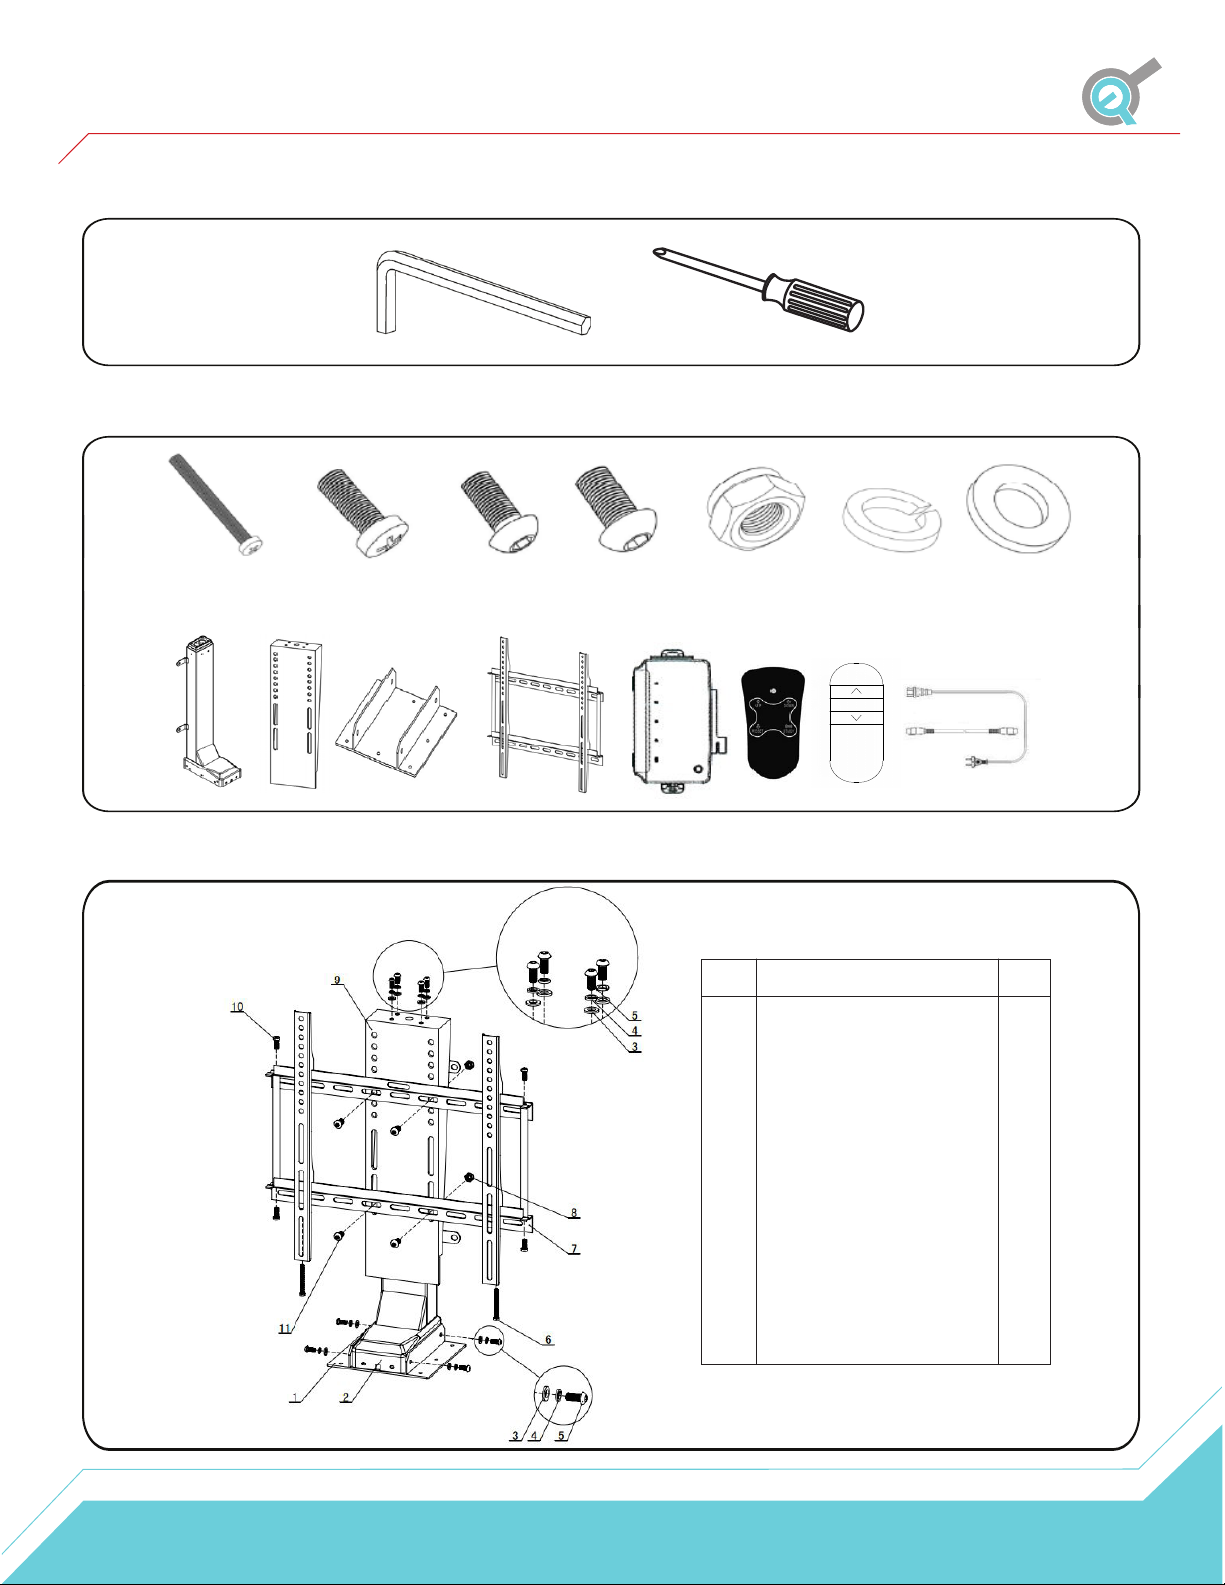
Components
Tools
Hardware
x 2
Screws M5×50
Parts Diagram
x 4
Screws M6×16
x 8
Hex Bolts
M6×14
x 4
Hex Bolts
M8×16
x 4
Nuts M8
Spring washers M6
x 8
COM
x 8
Washers M6
*2 AAA batteries are required for the wireless remote
No. Type Qty
1
Mounting base
2
Column
3
Washers M6
4
Spring washers M6
5
Hex Bolts M6x14
6
Screws M5x50
7
TV mounting bracket
8
Nuts M8
9
Mounting bracket
10
Screws M6x16
11
Screws M8X16
1
1
8
8
8
2
1
4
1
4
4
5
Page 6
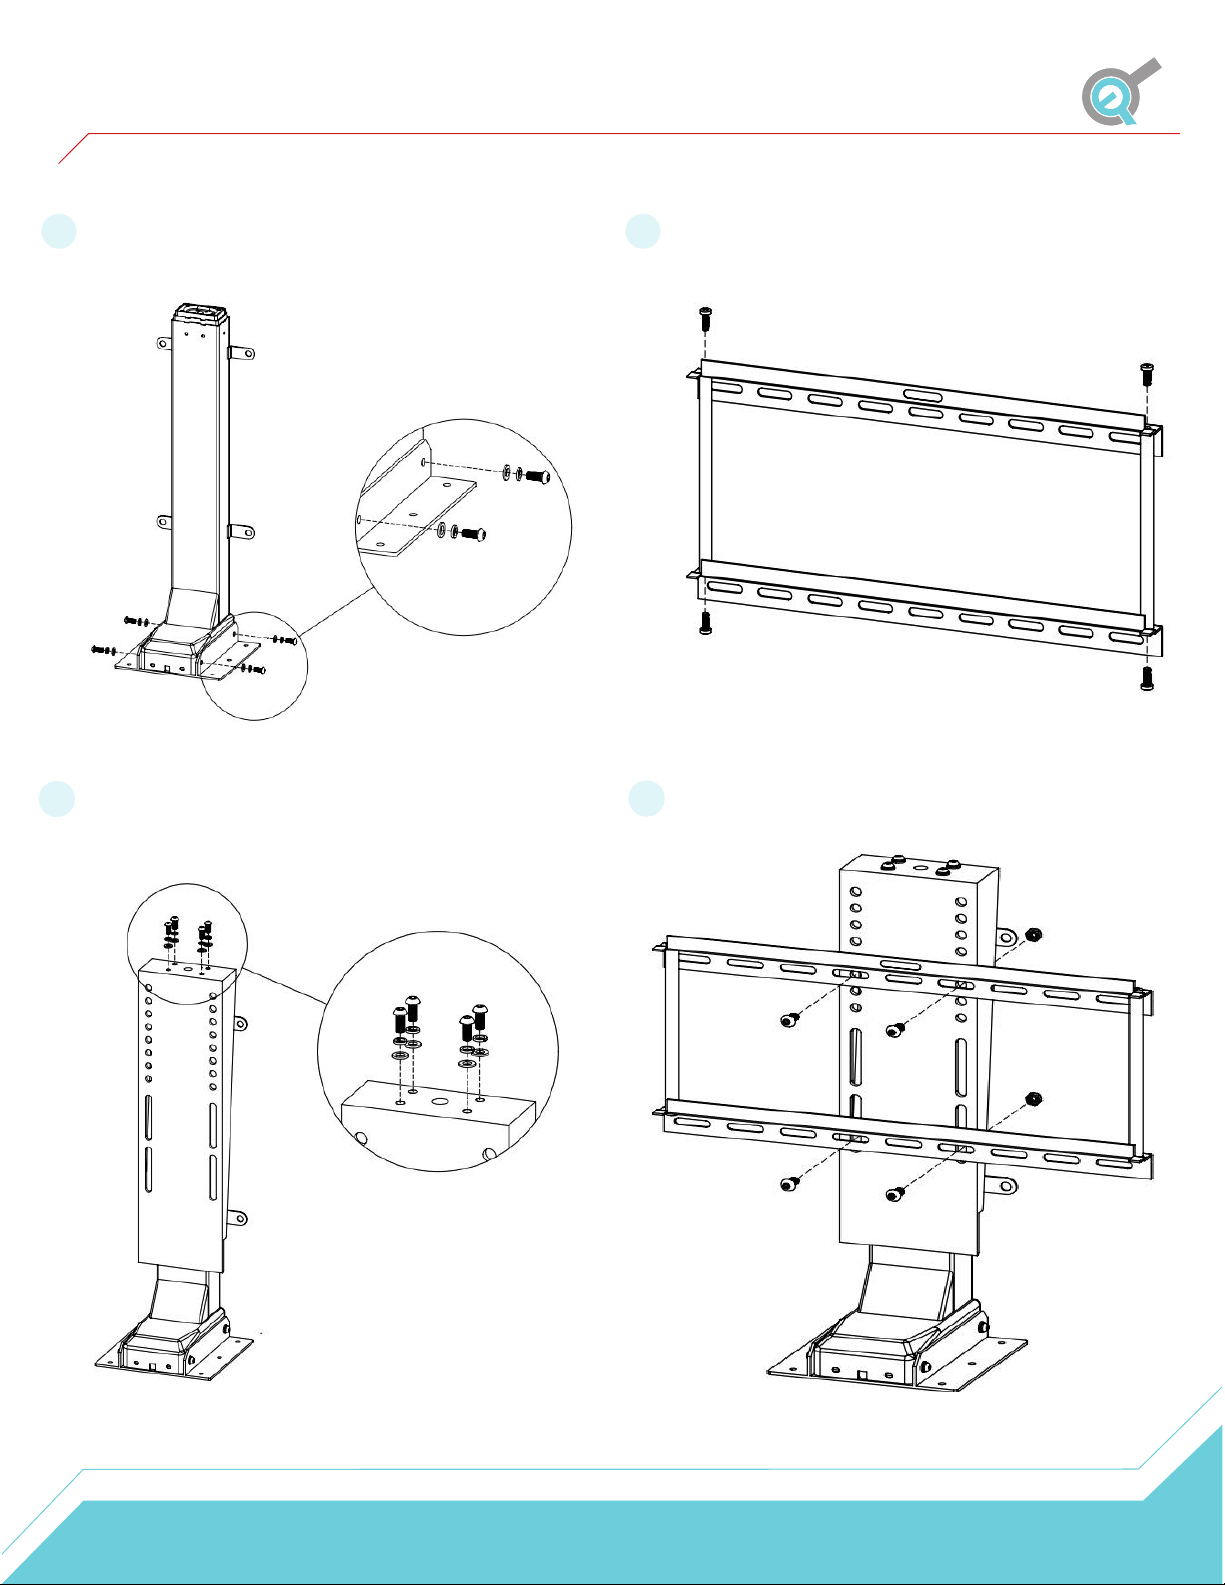
Assembly Instructions
*Please contact our customer service department should you have any questions.*
Use 4 Hex Bolts M6x16, each with Spring washer and Washer,
1
to attach Bases to the bottom of the Column. Tighten the 4
Screws (2 per side).
Use 4 Hex Bolts M6x16, each with Spring washer and Washer,
2
to attach Mounting bracket to the top of the Column. Tighten
the 4 Screws.
Use 4 Screws M6x16, to assemble the TV mounting
3
bracket as following.
Use 4 Hex Bolts M8x16, each with Spring washer and
4
Washer, to attach TV mounting bracket on to the Mounting
bracket. Tighten the 4 Screws.
6
Page 7
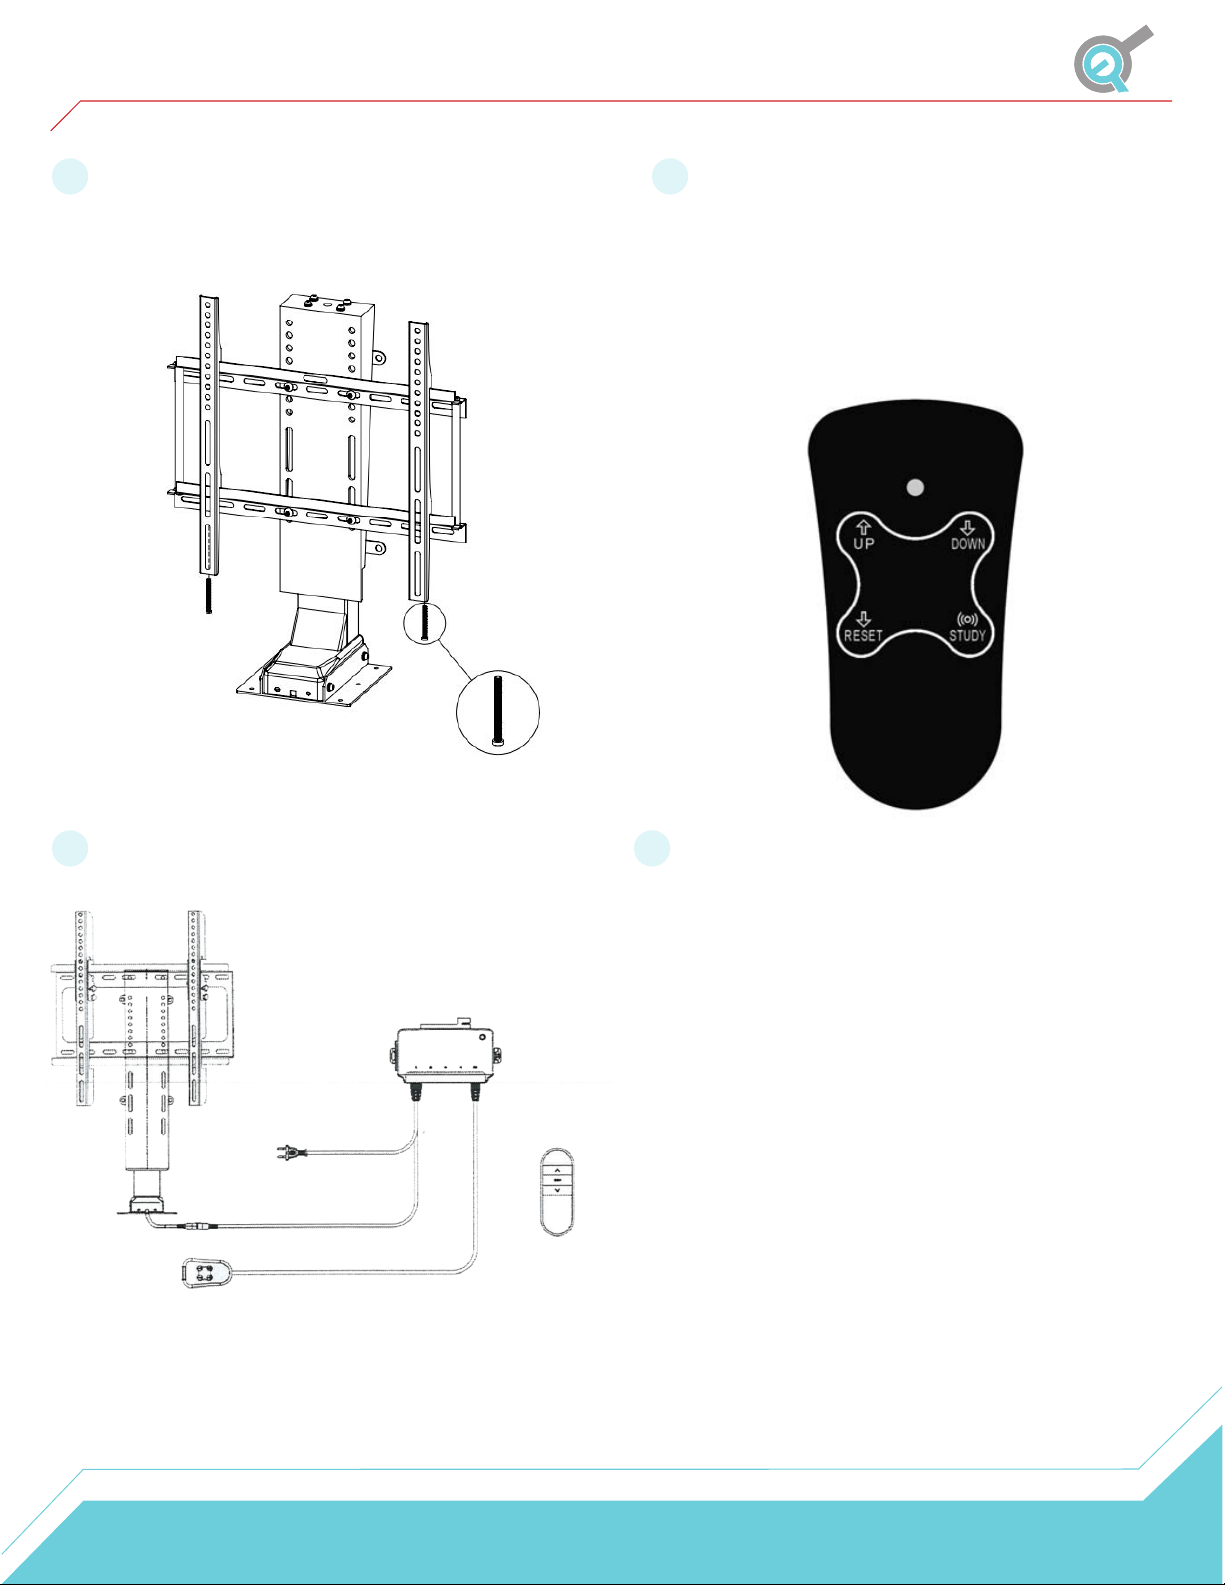
Assembly Instructions
Secure another 2 parts of the TV mounting bracket onto the
5
backside of the TV set with 4 screws included with TV set. And
then hang the TV set onto the TV mounting bracket as
following.
Use 2 M5x50 screws to tighten on the bottom.
Operating: You can use the wireless remote or handset to
7
operate the TV lift.
(1) Remote: Press the UP button to move the TV lift move up,
press the DOWN button to move the TV lift move down.
(2) Handset: Press UP button, TV lift move up, press DOWN
button, TV lift move down. (3) During the movement, you can
press any button on remote or handset (not the RESET button
on handset), TV lift stop at once.
Connect the wires as per the diagram below. A Reset
6
procedure is required before use.
8
Setting the UPPER and LOWER limits:
• To set the UPPER limit position:
Hold UP and RESET for 3 seconds, release both buttons to
stop the rising column at the preferred position. The upper-limit
position is now set.
• To set the LOWER limit position:
Hold the DOWN and RESET for 3 seconds, release both
buttons to stop the descending column at the preferred lower
limit position. The lower-limit position is now set.
• The upper and lower limit set have power down memory, which
means this setting will be saved even if power is removed from
the control box.
7
Page 8
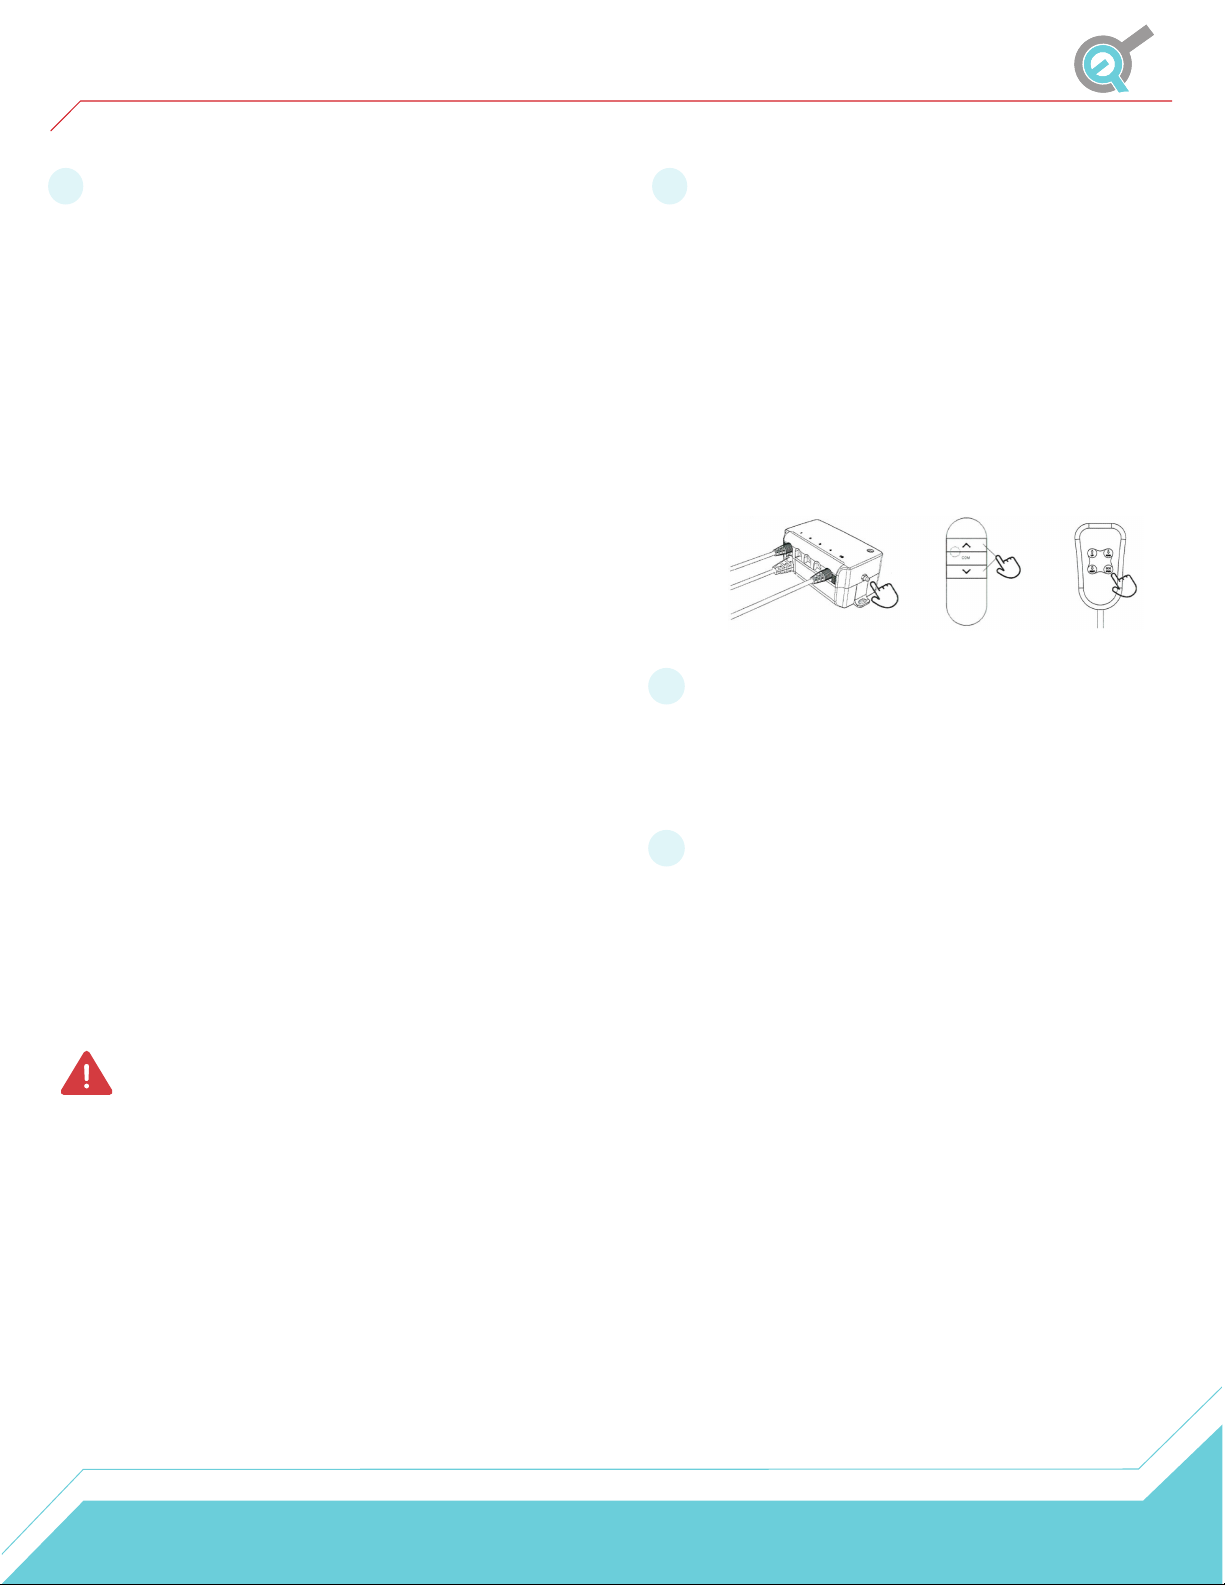
Reset Procedure
*Please contact our customer service department should you have any questions.*
The handset remote has two different modes which indicate
9
the state of the TV lift
• If the red LED is blinking at 0.5 second intervals, the device is
in RESET mode.
• If the red LED is blinking at 3 second intervals, the device is
in OVERHEAT PROTECTION mode.
The device can go into RESET mode automatically if there is an
error, or the RESET mode needs to be activated manually if the
device is not working as intended.
To Enable RESET mode:
1. To enter the RESET procedure, hold the RESET button on
the wired handset remote until the red LED begins blinking
at 0.5 second intervals.
2. Release the RESET Button once the red LED begins
blinking. This takes approximately 5 seconds.
3. Press and hold the RESET button until the TV lift lowers
completely. Continue holding the RESET button until the
TV lift raises back up about 7mm.
4. Once the red LED stops blinking, the device has completed
the RESET procedure.
10
Pairing the Wireless Remote
Pairing the wireless remote is required before use. There
are two options for pairing the wireless remote:
• Press the UP and DOWN buttons on the wireless remote
while simultaneously pressing the STUDY button on the
wired handset remote for 10 seconds.
• Press the UP and DOWN buttons on the wireless remote
while simultaneously pressing the button on the side of the
control box for 10 seconds.
The TV lift may raise after the remote pairing has been
completed.
11
Changing Travel Functionality
To change the wireless remotes travel function from
Momentary to Non-Momentary, hold the COM button for
approximately 10 seconds.
Please note, before the RESET procedure is complete, all
buttons will not be functional except for the RESET button on the
wired handset remote.
12
Basic Troubleshooting
If the TV lift is unresponsive, remove power from the control
box and wait for 15 seconds. Reconnect power to the
control box and check that the green LED light on the
control box is on.
Warning: The TV lift will move to the zero position when RESET. Be sure there is no obstruction under
the TV set.
8
 Loading...