

Page 1

Model
Serial No
Date of Purchase
Retailers Name
Retailers Address
KEEP THIS FOR YOUR RECORDS
TO completed by the Purchaser
City
Attach Your Purchase Receipt Here
Electrolux Floor Care and Small Appliances
Electrolux Pty Ltd ACN 000 015 136
13 Gilbert Park Drive, Knoxfield Victoria,
Australia, 3180. Ph: (03) 8756 7300
www.electrolux.com.au
Electrolux Floor Care and Small Appliances
A division of Electrolux (NZ) Limited
130 Cryers Road, East Tamaki, Auckland
New Zealand. Ph: (09) 273 8340
*Some models may be limited in availability or be available from certain stores
and specifications are available at time of printing and not all models are
available in NZ.See your local Electrolux retailer or call the above phone numbers for
further information if required.
*Due to the Electrolux policy of continual product development; specifications,
colours and details of our products and those mentioned in this manual are
subject to change without notice.
From the Electrolux Group.
State
www.electrolux.co.nz
only. Not all models
OWNERS HANDBOOK
FOR CYLINDER VACUUM CLEANERS
MODELS:Z1650-Z1660-Z1661-Z1670
Welcome to the worldwide club of appliances.
Please read these operating instructions before operating your vacuum cleaner.
Publication 07/2006.
33380735
Page 2
WARRANTY
This page sets out the terms and conditions of product warranties for Electrolux branded vacuums . Please keep with your proof of purchase
documents in a safe place for future reference should you require service for your Electrolux appliance.
General Terms and Conditions
In this warranty Electrolux means Electrolux Pty Ltd ABN 21 000 015 136 in respect of Appliances purchased in Australia and Electrolux (NZ)
Limited in respect of Appliances purchased in New Zealand;
‘Appliance’means any Electrolux branded product purchased by you accompanied by this document;
‘Warranty Period’ means where you use the Appliance for personal, domestic or household purposes in Australia and in New Zealand, the period
of 24 months; where you use the Appliance for commercial purposes, the period of 3 months following the date of original purchase
of the Appliance; ‘you’ means the purchaser of the Appliance not having purchased the appliance for re-sale, and ‘your’ has a corresponding
meaning.
1) This warranty only applies to Electrolux branded appliances purchased and used in Australia or New Zealand and is in addition to (and does not
exclude, restrict, or modify in any way) any non-excludable statutory warranties in Australia or New Zealand.
2) Electrolux warrants that, when dispatched from an Electrolux warehouse,the Electrolux branded appliance is free from defects in materials and
workmanship for the Warranty Period.
3) During the warranty period Electrolux or its Authorised Service Centre will, at no extra charge and subject to these terms and conditions, repair
or replace any parts which it considers to be defective. You agree that any replaced Appliances or parts become the property of Electrolux. This
warranty does not apply to bonus giveaways or batteries, drive belts, filters, accessories or similar consumable parts.
4) You are responsible for paying all service call fees and/or transport charges and/on damages and loss incurred in connection with transportation of this appliance to and from Electrolux or its duly appointed service provider’s premises.
5) Parts and appliances not supplied by Electrolux are not covered by this warranty.
6) Proof of purchase is required before you can make a claim under this warranty
You may not make a claim under this warranty unless the defect claimed is due to faulty or defective parts or workmanship. Elec trolux is not liable
in the following situations (which are not exhaustive):
A)The Appliance is damaged by:
(i) use with anything other than Electrolux genuine spare parts
(ii) accident
(iii) vacuuming up wet materials or construction/building materials that is not normal day to day domestic dry use
(iv) misuse, neglect or abuse, including failure to properly maintain or service
(v) normal wear and tear
(vi) power surges, electrical storm damage or incorrect power supply.
(vii) incomplete or improper installation
(viii) incorrect, improper or inappropriate operation
(ix) insect or vermin infestation.
B) The Appliance is modified without authority from Electrolux in writing.
C) The Appliance’s serial number or warranty seal has been removed or defaced.
D) The Appliance was serviced or repaired by anyone other than Electrolux or its Authorised Service Centres.
This warranty, the contract to which it relates and the relationship between you and Electrolux are governed by the law applicable in the State
where the Appliance is purchased if the Appliance is purchased in Australia or the law applicable in New Zealand if the Appliance is purchased
there. Where the Appliance is purchased in New Zealand for business purposes the Consumer Guarantee Act does not apply.
Limitation of Liability
To the extent permitted by law:
A) Electrolux excludes all warranties other than as contained in this document;
B) Electrolux shall not be liable for any loss or damage whether direct or indirect or consequential arising from your purchase,
use or non-use of the Appliance.
Provisions of the Trade Practices Act and State consumer legislation in Australia, and the Consumer Guarantees Act, the Sale of Goods Act and the
Fair Trading Act in New Zealand, imply warranties or conditions, or impose obligations, upon Electrolux which cannot be excluded, restricted or
modified. To the extent permitted by law, the liability of Electrolux (if any) arising out of or in relation to the Appliance or any services supplied by
Electrolux shall be limited (where it is fair and reasonable to do so),:
in the case of Appliances, at its option, to the replacement or repair of the Appliances or the supply of equivalent products or the payment of the
cost of replacing the Appliances or having the Appliances repaired or of acquiring equivalent Appliances. Upon being replaced, parts and
Appliances become the property of Electrolux; or
in the case of services, at its option, to the supply of the services again or the payment of the cost of having the services re-supplied;
and in the case of Appliances or services supplied in New Zealand, loss or damage whether direct or indirect or consequential that is reasonably
foreseeable.
Privacy
You acknowledge that in the event that you make a warranty claim it will be necessary for Electrolux and its Authorised Service Centres to
exchange information in relation to you to enable Electrolux to meet its obligations under this warranty.
WARRANTY
for sales in Australia and New Zealand
APPLIANCE: ELECTROLUX BRAND VACUUM CLEANERS
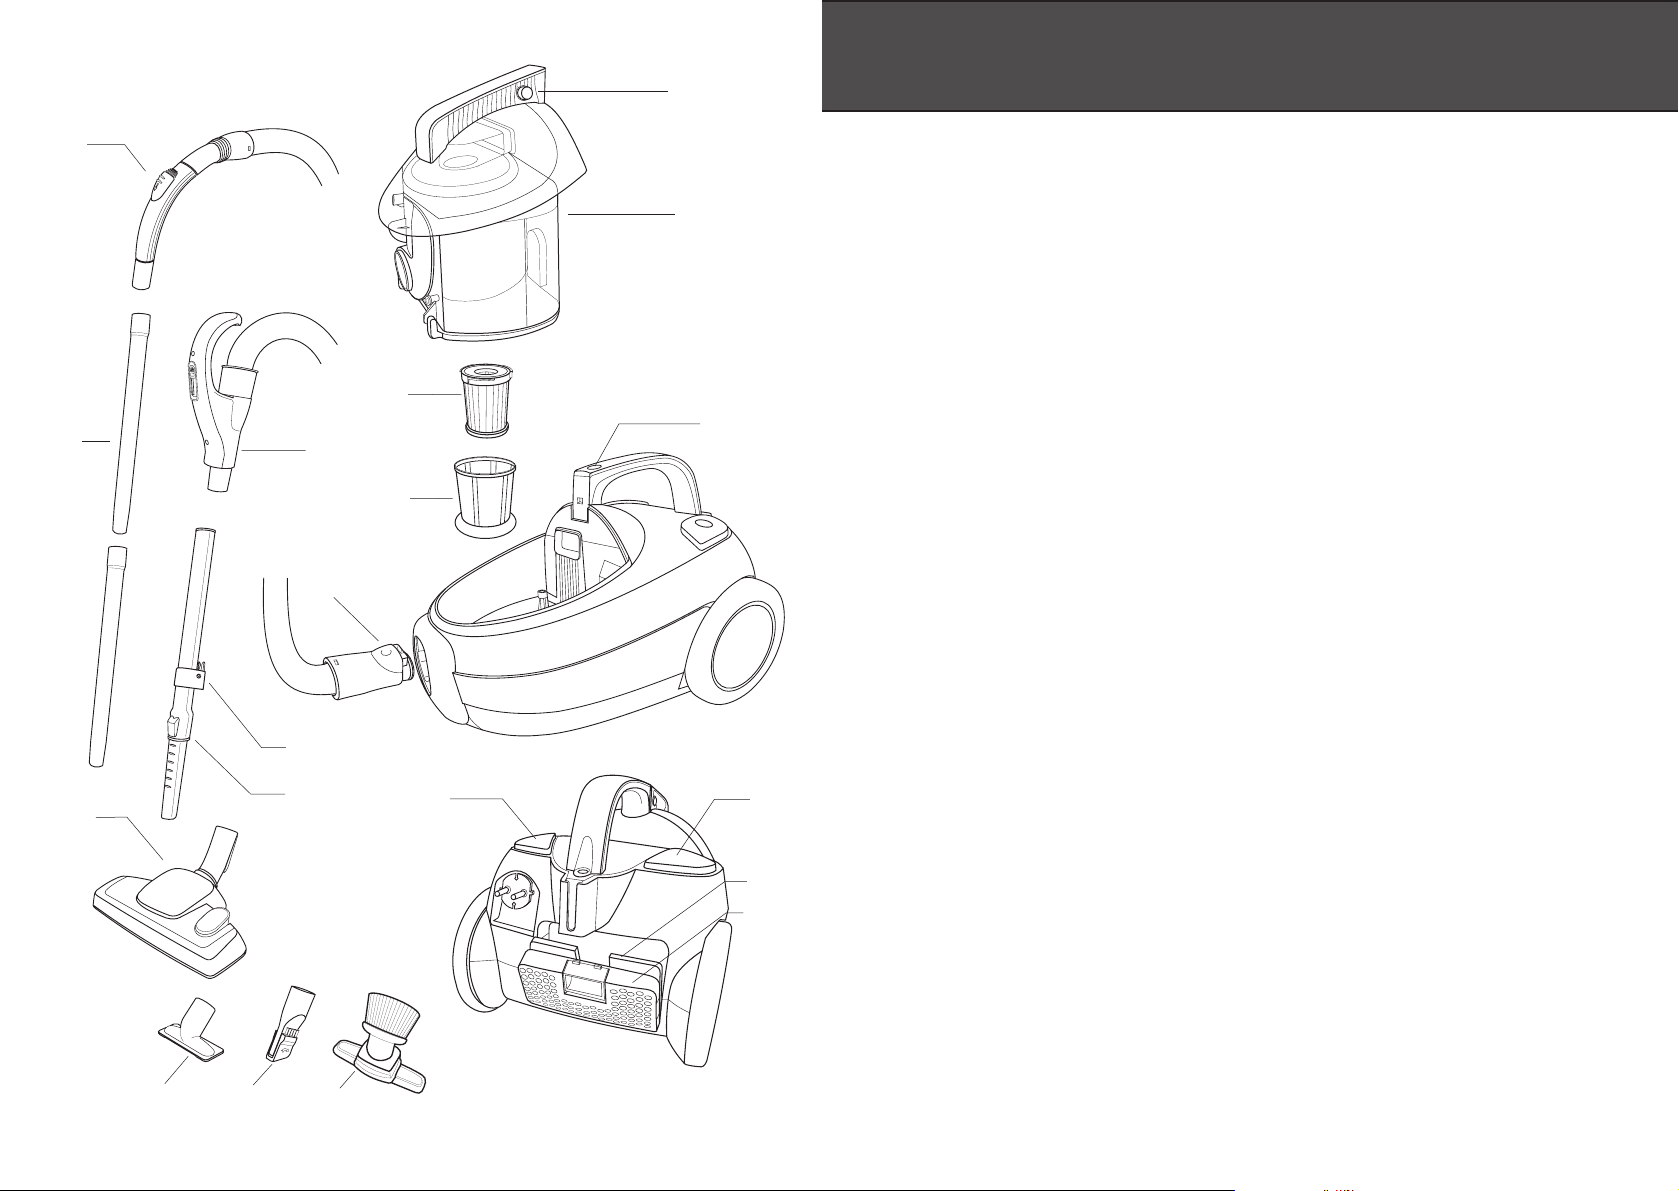
8
7
4
3
21
9
10
6
5
14
15
16
11
12
13
17
18
19
2 11
Page 3

TROUBLE SHOOTING
The appliance does not operate
• The appliance may not be plugged into the wall socket.
• The wall socket may be switched off.
• The hose is not fitted to the cleaner (on model Z1670 only).
Filter indicator lights up and stays on
• The dust container is full. Empty the dust container and check the filters.
1 Combination Upholstery \ Brush
nozzle. (
2 Combination Crevice \ Brush nozzle
3 Upholstery nozzle
4 Combination floor nozzle
5 Telescopic extension tube (Models
Z1660/Z1661 and Z1670)
6 Caddy (Models Z1660/Z1661 and Z1670)
7 Extension tube (2 off)
8 Handle (Manual suction control)
9 Handle (Remote suction control
Model Z1670)
Models Z1660/Z1661 and Z1670
IMPORTANT USER INFORMATION
10 Hose end
)
11 Dust container release button
12 Dust container
13 Filter indicator
14 HEPA filter
15 Cage filter
16 Cord rewind pedal
17 On\Off Pedal switch
18 Exhaust filter
19 Air outlet grille
• The filters are clogged. Clean or replace the filters.
Loss of suction
• The hose, extension tubes or accessories may be blocked.
Switch the cleaner off and unplug it from the wall socket.
Remove the blockage.
• The Filters may be clogged. Clean or replace filters.
• The dust container is full. Empty the dust container and clean or replace
the filters.
Cleaner switches off during operation.
Note: The motor is fitted with a thermal cut-out switch which will
automatically switch off the cleaner if the motor starts to overheat.
Should this happen please do the following:
• Switch the cleaner off by pressing the on\off switch pedal and unplug
it from the wall socket.
• Allow the cleaner to cool down for approximately 40 minutes.
• During this period, check for blockages in the hose, extension tubes and
accessories. Check if the dust container is full or if the filters are clogged.
• Once the cleaner has cooled down, the thermal cut-out switch resets
and the cleaner will be ready for use again.
Should the cleaner fail to operate, please contact your nearest authorized
Electrolux service center.
10
Dear Customer, please read through these operating instructions
carefully. Above all, please observe the safety instructions on the first
few pages of this booklet. Please keep these operating instructions for
later reference and pass them on to any subsequent owner of this
appliance.
The safety standards of Electrolux electrical appliances are in keeping with
the recognised rules of technology and the laws governing the safety of
appliances. Prior to operating this appliance please familiarise yourself with
the following safety instructions:
Safety Instructions
• Read all the instructions and only use the appliance for its intended
purpose.
• The appliance must be switched off before plugging or unplugging it from
the wall socket. Do not pull on the electrical cord to remove the plug from
the wall socket.
• Always remove the plug from the wall socket before attempting any form
of user maintenance or cleaning, as specified in this booklet.
• Do not handle the plug with wet hands.
• Do not operate the appliance with a damaged electrical cord or plug. If
the electrical cord is damaged it must be replaced by returning the product
to an authorised Electrolux service centre or similar qualified person to
avoid a hazard.
• If the appliance has malfunctioned or been damaged in any manner return
the appliance to the nearest authorised Electrolux service centre for
examination, repair or adjustment.
• Do not carry or drag the appliance by the electrical cord.
• Keep the electrical cord away from heat, oil, sharp edges and rough or
3
Page 4

hot surfaces and do not run the appliance over the cord.
• Hold onto the plug when rewinding the electrical cord to prevent the plug
from whipping or hitting hard against the appliance.
• An extension electrical cord may be used provided that it has a higher
rating than the appliance. Please refer to the information provided on the
appliance’s rating plate or consult with your nearest authorized Electrolux
service centre.
• To protect against electric shock do not immerse the electrical cord, plug
or the appliance in water or other liquids.
• Do not expose the appliance to rain.
• Do not use the appliance out of doors.
• Never leave the appliance running unattended.
• This appliance is not intended for use by young children or infirm persons
without supervision.
• Young children must be supervised to ensure that they do not play with
the appliance.
• Close attention is necessary when using the appliance near children.
• Store the appliance away from high heat sources.
• Do not use this appliance to vacuum up the following:
§ Inflammable or combustible substances,
§ Hard pointed objects,
§ Hot ash, lighted cigarette ends or anything that is burning or smoking,
§ Large quantities of fine dust e.g. lime, cement or plaster dust, toner
dust from laser printers etc
§ Liquids or carpet cleaning foams
• Do not operate this appliance in areas where the substances listed above
may be present.
• To prevent the reduction in air flow, ensure that all orifices/vents on this
appliance are kept free from blockages and do not insert any objects into
these orifices/vents.
• Extra care should be taken when vacuuming staircases.
• It is dangerous to alter the specifications or modify the vacuum cleaner,
only use accessories recommended by Electrolux.
• Under no circumstances should the customer attempt to repair the vacuum
cleaner.
• The vacuum cleaner should only be repaired and/or serviced by an
authorized Electrolux service centre and only genuine Electrolux spare
parts should be used. Failure to do so may render the warranty void.
Exhaust filter
1. Open the air-outlet grille by pressing down on the grille latch and pull it
out.
2. Remove the exhaust filter and replace it with a new one.
3. Close the air-outlet grille.
CLEANING AND STORING
Caution: Do not immerse the cleaner, or the remote control hose handle
assembly supplied with model Z1670, in water or other liquids.
Do not wash the dust container in the dishwasher.
Do not use abrasive materials or solvents to clean the appliance as they
may damage the surface finish.
1. Allow the appliance to cool down before cleaning.
2. Empty the dust container and ensure that the filters are cleaned.
3. Wipe the exterior of the appliance and the dust container with a damp
cloth and then wipe it dry.
On models Z1660/Z1661 and Z1670 (supplied with
caddy fitted to telescopic extension tubes) the
combination upholstery \ brush nozzle can be
stored by attaching it to the caddy.
Note: The cleaner can be stored either horizontally or in an upright
position.
With the hose and the extension tube attached to the combination floor
nozzle, slide the parking clip of the floor nozzle onto one of the two parking
positions on the cleaner.
This vacuum cleaner is for household use only.
Important!
This vacuum cleaner must only be connected to a power supply whose
voltage and frequency comply with the specifications given on the
appliance rating plate.
4
9
Page 5

Note: On model Z1670 (fitted with
remote suction control) the suction
Model
Z1670
power can be adjusted by sliding the
knob on the hose handle. The cleaner
will not operate if the hose is not fitted.
When finished cleaning, switch off the cleaner before rewinding the
electrical cord. Unplug the cleaner from the wall socket and press the
cord rewind pedal. Hold the plug with one hand and guide the electrical
cord with the other hand to prevent it from striking you or the cleaner.
SELECTING ACCESSORIES
Combination floor nozzle
The combination floor nozzle can be set for hard
floors or carpets. Press the foot operated toggle
lever on the floor nozzle to select the desired setting.
When the floor nozzle is set for hard floors, the bristles
will extend beyond the base of the floor nozzle. When
the floor nozzle is set for carpets, the bristles will be retracted.
Upholstery nozzle
The upholstery nozzle can be used for cleaning upholstered furniture or
curtains.
EMPTYING THE DUST CONTAINER
Note: The dust container should be emptied after each vacuum cleaning,
or as necessary, and when filter indicator lights up and stays on.
1. To remove the dust container, unlock it by pressing
the two buttons situated on either side of the handle
and pull it out.
2. Press the orange locking lever on the dust container
to open the lid. To prevent dust escaping from the
dust container, place the dust container inside a
plastic bag before opening the lid.
3. Clean the dust container, close the lid ensuring that
the orange locking lever clicks into position.
4. Replace the dust container by pushing it down lightly until the locking
catch clicks into position.
Push
Combination upholstery and brush nozzle
This nozzle can be used for upholstery or brushing.
To clean upholstery, open the two flaps on the nozzle
and attach it with the bristle side facing the extension
tube.
To use the brush side of the nozzle, close the two flaps and attach the
nozzle to the extension tube.
Combination crevice nozzle and dusting brush
This nozzle can be used as a crevice nozzle or as
a dusting brush. To select the desired setting rotate
the end of the nozzle to change from crevice nozzle
to dusting brush.
The crevice nozzle can be used for cleaning crevices, corners, between
cushions or difficult to reach places. The dusting brush can be used to
clean furniture, books, lamp shades and shelves.
CLEANING OR REPLACING THE FILTERS
Caution: Before doing any type of cleaning or maintenance to the
cleaner, always ensure that the cleaner is unplugged from the wall
socket.
Damaged filters must be replaced immediately. Do not operate the
cleaner with damaged or clogged filters.
Do not clean the filters in a washing machine and do not use a hair
dryer to dry the filters.
Do not use cleaning agents or hard bristled brushes as they may damage
the delicate filter surfaces.
Dust container filters
Note: There are two filters in the dust container. A HEPA filter and a fine
mesh cage filter. These two filters must be cleaned regularly. Check and
if necessary clean or replace these filters each time that the dust container
is emptied or when the filter indicator lights up and stays on.
76
Page 6

Clogged filters can impair the performance of the cleaner or lead to
malfunctions.
It is normal for the filter indicator to light up briefly when the cleaner is
in operation.
BEFORE USING THE CLEANER
• Unpack the appliance and remove all the packaging materials.
1. Remove the dust container from the cleaner.
2. Open the dust container lid, twist and pull
out the cage filter.
3. Remove the HEPA filter by rotating it
counter clockwise.
4. Rinse both filters under running lukewarm
water. Start by rinsing the inside of the
filters first and then the outside. Repeat
this operation until the filters are completely
clean.
5. Allow the filters to air dry throughly before
replacing them in the dust container.
6. Rinse and wipe dry the dust container
before replacing the filters.
Note: When fitting the HEPA filter in
the dust container ensure that the pin
on the HEPA filter frame drops inside
the slot at the bottom of the dust
container.
Turn the HEPA filter frame clockwise
to lock into position. This will retract
the safety lever and allow the dust
container to fit into the cleaner.
LOCK
K
LOCK
Safety
Lever
• Carefully study the safety instructions listed in the Important User
Information.
UNL
OC
OPERATING THE CLEANER
Caution: Always ensure that the cleaner is unplugged from the wall
socket before fitting or removing accessories.
Never operate the cleaner without the filters in place or with dirty
and clogged filters.
On model Z1670 (fitted with remote suction control) do not immerse
the hose and handle in water or any other liquids.
Do not operate the cleaner with wet hands.
UNL
OC
K
1. Insert the hose end into the air intake duct and push until the catch clicks
into position. To remove the hose press the catch release button and pull
hose end out of the intake duct.
2. Attach the extension tube to the hose handle and the desired floor nozzle
to the other end of the extension tube. To remove the extension tube or
the accessory twist and pull apart.
Note:
On models Z1660/Z1661 and Z1670 (with telescopic
extension tubes) the length of the extension tubes
can be adjusted by pressing down on the release
button on the outer tube and sliding the inner tube.
3 Pull the required length of electrical cord out of the cleaner and connect
the plug to the wall socket.
Note: The yellow mark on the electrical cord indicates the maximum
length of usable cord. Never unwind the electrical cord beyond the red
mark.
4. Press the on/off foot pedal to switch the cleaner on.
5. The suction power can be adjusted by opening or closing the aperture
on the hose handle.
8
5
 Loading...