

Page 1

user manual
guide de l’utilisateur
gebruikershandleiding
benutzerhandbuch
manual del usuario
brugervejledning
brukerhåndbok
manuale per l’utente
PM175X
PM176X
Page 2

Page 3

CONTENTS
Important safety instructions . . . . . . . . . . . . . . . . . . . . . . . . . . . . . . . . . . . . . . . . . . .4 - 5
Oven & accessories . . . . . . . . . . . . . . . . . . . . . . . . . . . . . . . . . . . . . . . . . . . . . . . . . . .6
Control panel . . . . . . . . . . . . . . . . . . . . . . . . . . . . . . . . . . . . . . . . . . . . . . . . . . . . . . .7
Before operation . . . . . . . . . . . . . . . . . . . . . . . . . . . . . . . . . . . . . . . . . . . . . . . . . . . . .7
Setting the clock . . . . . . . . . . . . . . . . . . . . . . . . . . . . . . . . . . . . . . . . . . . . . . . . . . . . .8
Microwave cooking advice . . . . . . . . . . . . . . . . . . . . . . . . . . . . . . . . . . . . . . . . . .9 - 10
Microwave safe cookware . . . . . . . . . . . . . . . . . . . . . . . . . . . . . . . . . . . . . . . . . . . . .10
Microwave power levels . . . . . . . . . . . . . . . . . . . . . . . . . . . . . . . . . . . . . . . . . . . . . . .11
Manual operation . . . . . . . . . . . . . . . . . . . . . . . . . . . . . . . . . . . . . . . . . . . . . . . . . . .11
Other convenient functions . . . . . . . . . . . . . . . . . . . . . . . . . . . . . . . . . . . . . . . . . .12 - 13
Auto programmes operation . . . . . . . . . . . . . . . . . . . . . . . . . . . . . . . . . . . . . . . . . . . .14
Auto programmes charts . . . . . . . . . . . . . . . . . . . . . . . . . . . . . . . . . . . . . . . . . . .15 - 17
Recipes for auto programmes AC-6 & AC-7 . . . . . . . . . . . . . . . . . . . . . . . . . . . . . .17 - 18
Cooking charts . . . . . . . . . . . . . . . . . . . . . . . . . . . . . . . . . . . . . . . . . . . . . . . . . .19 - 20
Recipes . . . . . . . . . . . . . . . . . . . . . . . . . . . . . . . . . . . . . . . . . . . . . . . . . . . . . . .20 - 22
ENGLISH
Care & cleaning . . . . . . . . . . . . . . . . . . . . . . . . . . . . . . . . . . . . . . . . . . . . . . . . . . . .23
What to do if... . . . . . . . . . . . . . . . . . . . . . . . . . . . . . . . . . . . . . . . . . . . . . . . . . . . . .24
Guarantee/customer service . . . . . . . . . . . . . . . . . . . . . . . . . . . . . . . . . . . . . . . . . . . .25
Specifications . . . . . . . . . . . . . . . . . . . . . . . . . . . . . . . . . . . . . . . . . . . . . . . . . . . . . .26
Important information . . . . . . . . . . . . . . . . . . . . . . . . . . . . . . . . . . . . . . . . . . . . . . . . .26
Installation . . . . . . . . . . . . . . . . . . . . . . . . . . . . . . . . . . . . . . . . . . . . . . . . . . . . .27 - 28
The symbol on the product or on its packaging indicates that this product may not be treated as
household waste. Instead it shall be handed over to the applicable collection point for the recycling of
electrical and electronic equipment. By ensuring this product is disposed of correctly, you will help prevent
potential negative consequences for the environment and human health, which could otherwise be caused
by inappropriate waste handling of this product. For more detailed information about recycling of this
product, please contact your local city office, your household waste disposal service or the shop where
you purchased the product.
3
Page 4

IMPORTANT SAFETY INSTRUCTIONS
IMPORTANT SAFETY INSTRUCTIONS: READ CAREFULLY AND KEEP FOR FUTURE REFERENCE
To avoid the danger of fire.
The microwave oven should not be left
unattended during operation. Power levels
that are too high, or cooking times that are
too long, may overheat foods resulting in a
fire.
The electrical outlet must be readily accessible so that
the unit can be unplugged easily in an emergency.
The AC power supply must be 230 V, 50 Hz, with a
minimum 10 A distribution line fuse, or a minimum 10 A
distribution circuit breaker.
It is recommended that a separate circuit serving only
this appliance be provided.
Do not store or use the oven outdoors.
If food being heated begins to smoke, DO
NOT OPEN THE DOOR. Turn off and unplug
the ove n an d wait un t i l the fo o d has
stopped smoking. Opening the door while
food is smoking may cause a fire.
Only use microwave-safe containers and
utensils. See Page 10.
Do not leave the oven unattended when
using disposable plastic, paper or other
combustible food containers.
Clean th e wavegui d e cover, th e ov en
cavity, the turntable and turntable support
after use. These must be dry and free from
grease. Built-up grease may overheat and
begin to smoke or catch fire.
Do not place flammable materials near the oven or
ventilation openings. Do not block the ventilation
openings.
Remove all metallic seals, wire twists, etc., from food
and food packages. Arcing on metallic surfaces may
cause a fire.
Do not use the microwave oven to heat oil for deep
frying. The temperature cannot be controlled and the
oil may catch fire.
To make popcorn , onl y use spe c ial microwa v e
popcorn makers.
Do not store food or any other items inside the oven.
Check the settings after you start the oven to ensure
the oven is operating as desired.
See the corresponding hints in the operation manual
and the cookery book section.
To avoid the possibility of injury
WARNING:
Do not operate the oven if it is damaged or
alfunctioning. Check the following before use:
m
a)The door; make sure the door closes properly and
ensure it is not misaligned or warped.
b)The hinges and door safety latches; check to make
sure they are not broken or loose.
c) The door seals and sealing surfaces; ensure that
they have not been damaged.
d)Inside the oven cavity or on the door; make sure
there are no dents.
e)The power supply cord and plug; ensure that they
are not damaged.
Never adjust , repair or modify the oven
yourself. It is hazardous for anyone other
than a competent person to carry out any
service or repair operation which involves the
removal of a cover which gives protection
against exposure to microwave energy.
Do not operate the oven with the door open or alter
the door safety latches in any way.
Do not operate the oven if there is an object between
the door seals and sealing surfaces.
Do not allow grease or dirt to build up on the
door seals and adjacent parts. Follow the
instructions for “Care & Cleaning” on page
23. Failure to maintain the oven in a clean
condition could lead to a deterioration of the
surface that could adversely affect the life of
the appli ance and possib ly resu lt in a
hazardous situation.
Individuals with PACEMAKERS should check with their
doctor or the manufacturer of the pacemaker for
precautions regarding microwave ovens.
To avoid the possibility of electric shock
Under no circumstances should you remove the outer
cabinet.
Never spill or insert any objects into the door lock
openings or ventilation openings. In the event of a
spill, turn off and unplug the oven immediately and
call an authorised ELECTROLUX service agent.
Do not immerse the power supply cord or plug in
water or any other liquid.
Do not allow the power supply cord to run over any
hot or sharp surfaces, such as the hot air vent area at
the top rear of the oven.
Do not attempt to replace the oven lamp yourself or
allow anyone who is not authorised by ELECTROLUX
to do so. If the oven lamp fails, please consult your
dealer or an authorised ELECTROLUX service agent.
4
Page 5

IMPORTANT SAFETY INSTRUCTIONS
If th e powe r suppl y cord of th i s app l i a n ce is
damaged, it must be replaced with a special cord.
Th e ex change mus t be mad e by an auth orised
ELECTROLUX service agent.
To avoid the possibility of explosion and
sudden boiling:
WARNING: Liquids and other foods must
not be heated in sealed containers since
they are liable to explode.
Never use sealed containers. Remove seals and lids
before use. Sealed containers can explode due to a build
up of pressure even after the oven has been turned off.
Take care when microwaving liquids. Use a widemouthed container to allow bubbles to escape.
Microwave heating of beverages can result in
delayed eruptive boiling, therefore care has
to be taken when handling the container.
To prevent sudden eruption of boiling liquid and
possible scalding:
1. Stir liquid prior to heating/reheating.
2. It is advisable to insert a glass rod or similar utensil
into the liquid whilst reheating.
3. Let liquid stand for at least 20 seconds in the oven
at the end of cooking time to prevent delayed
eruptive boiling.
Do not cook eggs in their shells, and whole
hard boiled eggs should not be heated in
microwave ovens since they may explode
even after microwave cooking has ended.
To cook or reheat eggs which have not
been scrambled or mixed, pierce the yolks
and the whites, or the eggs may explode.
Shell and slice hard boiled eggs before
reheating them in the microwave oven.
Pierce the skin of such foods as potatoes, sausages
and fruit before cooking, or they may explode.
To avoid the possibility of burns
Use pot holders or oven gloves when removing food
from the oven to prevent burns.
Always open containers, popcorn makers, oven
cooking bags, etc., away from the face and hands to
avoid steam burns.
To avoid burns, always test food temperature
and stir before serving and pay special
attention to the temperature of food and
drink given to babies, children or the elderly.
Temperature of the container is not a true indication of
the temperature of the food or drink; always check the
food temperature.
Always stand back from the oven door when opening
it to avoid burns from escaping steam and heat.
Slice stuffed baked foods after heating to release
steam and avoid burns.
Keep children away from the door to prevent them
burning themselves.
To avoid misuse by children
WARNING: Only allow children to use the
oven without supervision when adequate
instructions have been given so that the child
is able to use the oven in a safe way and
understands the hazards of improper use.
This appliance is not intended for use by persons
(including children) with reduced physical, sensory or
me ntal capab ilitie s, or la ck of ex perien ce and
knowledge, unless they have been given supervision
or instruction concerning use of the appliance by a
person responsible for their safety.
Children should be supervised to ensure that they do
not play with the appliance.
Do not lean or swing on the oven door. Do not play
with the oven or use it as a toy.
Ch i ldren should be taugh t all impo r t ant safety
instructions: use of pot holders, careful removal of
food coverings; paying special attention to packaging
(e.g. self-heating materials) designed to make food
crisp, as they may be extra hot.
Other warnings
Never modify the oven in any way.
This oven is for home food preparation only and may
only be used for cooking food. It is not suitable for
commercial or laboratory use.
To promote trouble-free use of your oven
and avoid damage.
Never operate the oven when it is empty.
When using a browning dish or self-heating material,
always place a heat-resistant insulator such as a
porcelain plate under it to prevent damage to the
turntable and turntable support due to heat stress. The
preheating time specified in the dishes instructions
must not be exceeded.
Do not use metal utensils, which reflect microwaves and
may cause electrical arcing. Do not put cans in the oven.
Only use the turntable and the turntable suppor t
designed for this oven. Do not operate the oven without
the turntable.
To prevent the turntable from breaking:
(a) Before cleaning the turntable with water, leave the
turntable to cool.
(b) Do not put hot foods or hot utensils on a cold
turntable.
(c) Do not put cold foods or cold utensils on a hot
turntable.
Do not place anything on the outer cabinet during
operation.
NOTE:
If you are unsure how to connect your oven, please
consult an authorised, qualified electrician.
Neither the manufacturer nor the dealer can accept
any liability for damage to the oven or personal injury
resulting from failure to observe the correct electrical
connection procedure.
Water vapour or drops may occasionally form on the
oven walls or around the door seals and sealing
surfaces. This is a normal occurrence and is not an
indication of microwave leakage or a malfunction.
ENGLISH
5
Page 6
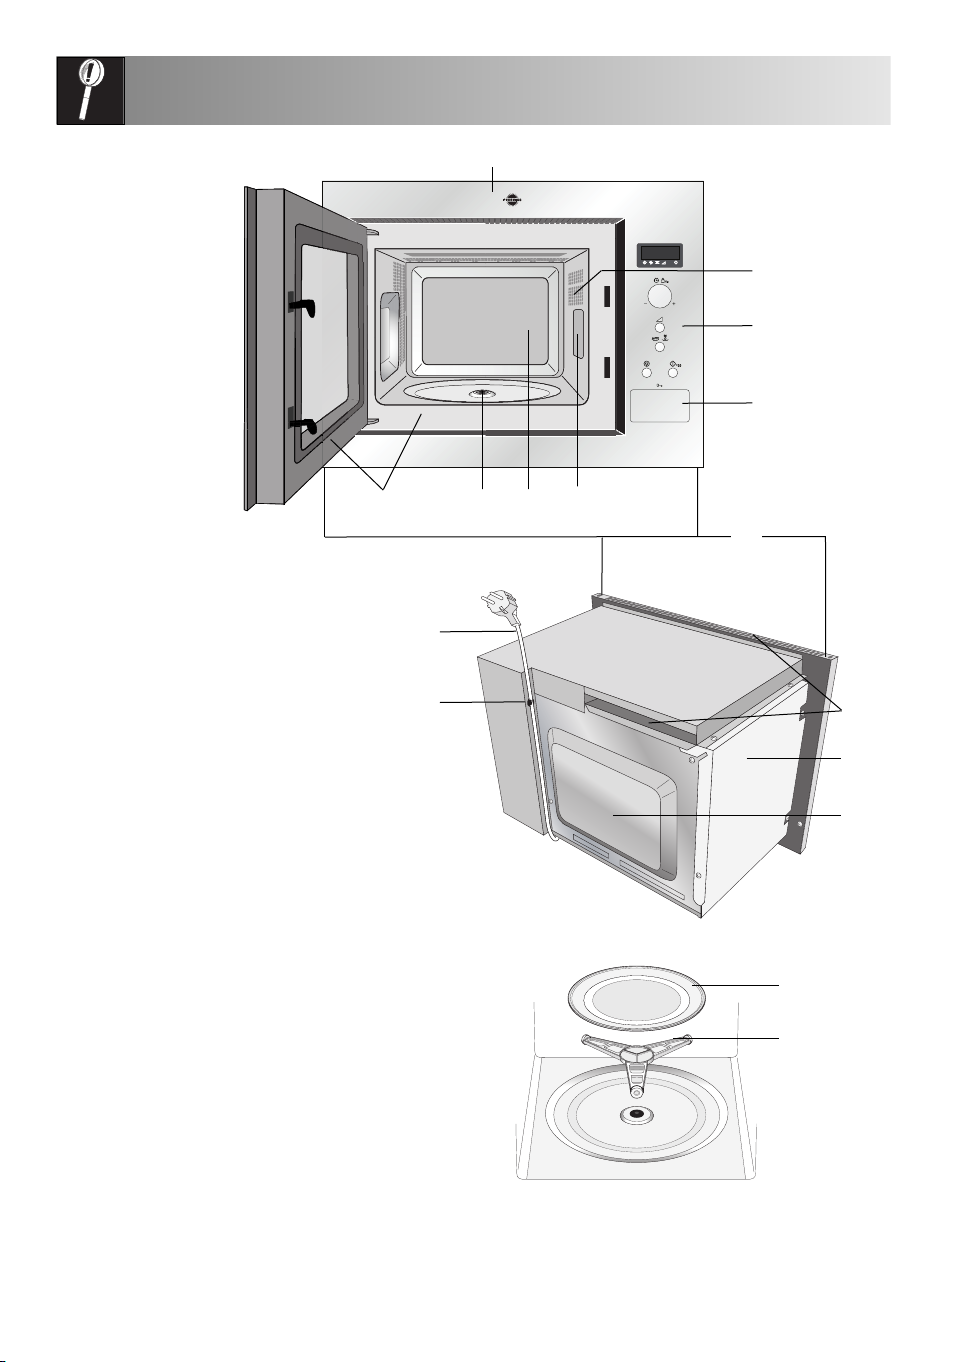
OVEN & ACCESSORIES
1
2
3
4
1. Front trim
2. Oven lamp
3. Control panel
4. Door opening button
5. Waveguide cover
6. Oven cavity
7. Seal packing
8. Door seals and sealing surfaces
9. Fixing points (4 points)
10. Ventilation openings
11. Outer cover
12. Rear cabinet
13. Power supply cord support clip
14. Power supply cord
ACCESSORIES:
Check to make sure the following accessories are
provided:
(15) Turntable (16) Turntable support
(17) 4 fixing screws (not shown).
• Place the turntable support in the seal packing on
the floor of the cavity.
• Then place the turntable on the turntable support.
• To avoid turntable damage, ensure dishes or
containers are lifted clear of the turntable rim when
removing them from the oven.
NOTE: When you order accessories, please mention
two items: part name and model name to your dealer
or
authorised ELECTROLUX service agent.
14
13
78
56
9
10
11
12
15
16
6
Page 7

CONTROL PANEL
1 Digital Display
2 Indicators
1
2
3
4
5
6
7
8
The appropriate indicator will flash or light up,
ju st ab ove each symbol accordi ng to the
instruction. When an indicator is flashing, press
the appropriate button (h aving the same
symbol) or carry out the necessary operation.
Stir
Turn over
Weight
Microwave power level
Cooking in progress
3 TIMER/WEIGHT knob
4 MICROWAVE POWER LEVEL button
5 AUTO PROGRAMMES button
Press to select one of the 12 automatic
programmes.
6 START/+30 button
7 STOP button
8 DOOR OPEN button
ENGLISH
Plug in the oven.
1. The oven display will flash:
2. Touch the STOP button the display will show:
x1
To set the clock, see next page.
BEFORE OPERATION
Using the STOP button
Use the STOP button to:
1. Erase a mistake during programming.
2. Stop the oven temporarily during cooking.
3. Cancel a programme during cooking, touch twice.
7
Page 8
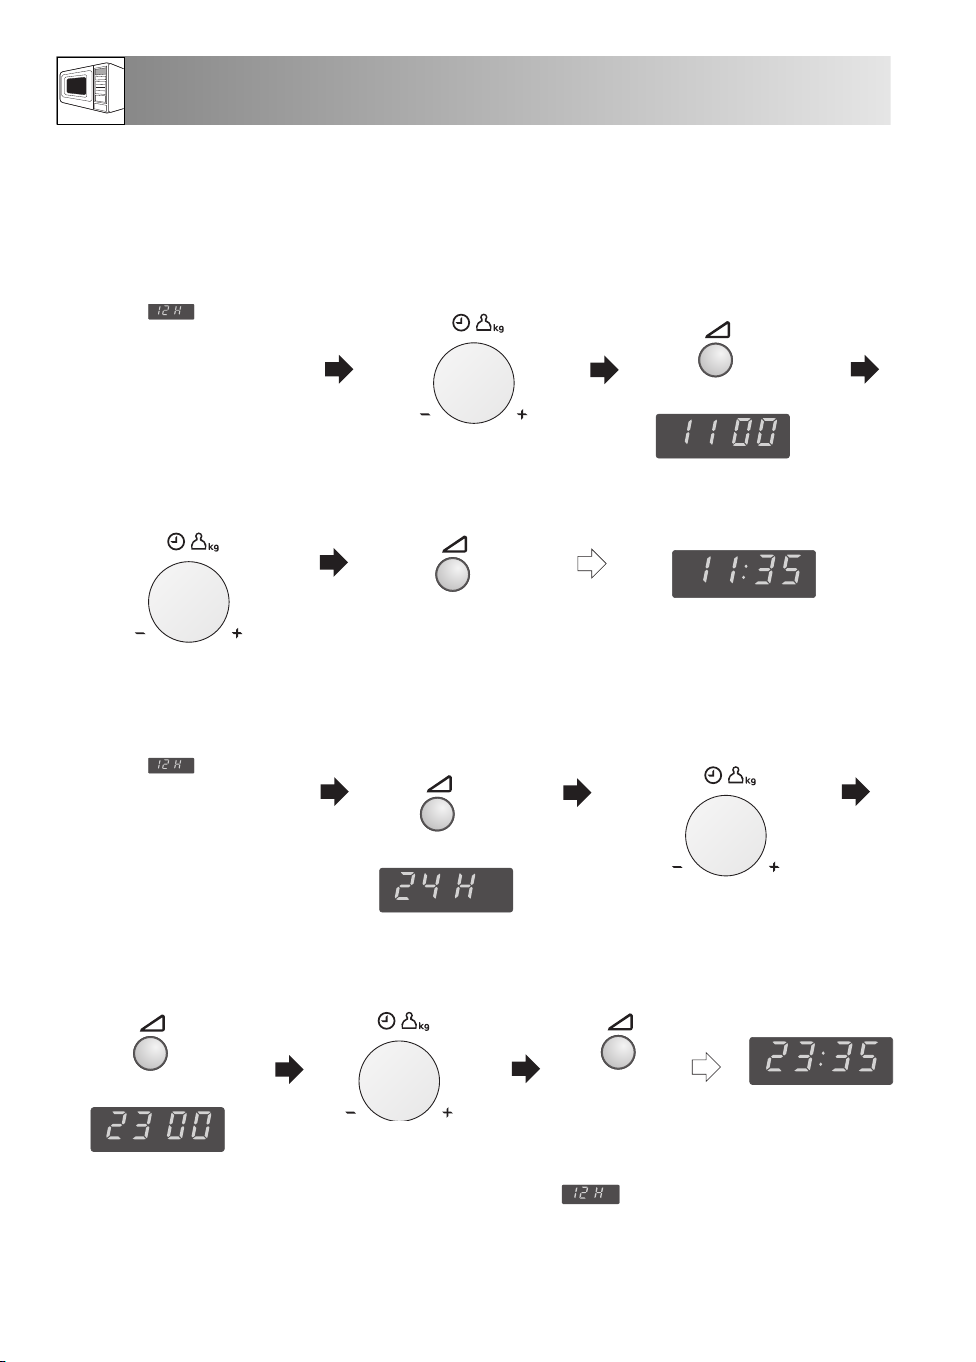
SETTING THE CLOCK
There are two setting modes: 12 hour clock and 24 hour clock.
To set the clock, follow the example below.
Example: To set the 12 hour clock to 11:35.
1.
To set the 12 hour clock, hold
the MICROWAVE POWER
LEVEL button down for 3
seconds. will appear in
the display.
2. Set the hours.
Rotate the TIMER/WEIGHT
knob until the correct hour is
displayed (11).
3. Press the MICROWAVE
POWER LEVEL button
to change from hours to
minutes.
1
x
Check the display.
4. Set the minutes.
Rotate the TIMER/WEIGHT
knob until the correct minute is
displayed (35).
5. Press the MICROWAVE POWER
LEVEL button to start the clock.
Example: To set the 24 hour clock to 23:35.
1.
To set the 24 hour clock, hold
the MICROWAVE POWER
LEVEL button down for 3
seconds. will appear in
the display.
4. Press the MICROWAVE
POWER LEVEL button
to change from hours to
minutes.
5. Set the minutes.
2. Press the MICROWAVE
POWER LEVEL button
to change from 12
hours to 24 hours.
Check the display.
Rotate the TIMER/WEIGHT
knob until the correct minute is
displayed (35).
Check the display.
x1
3. Set the hours.
Rotate the TIMER/WEIGHT
knob until the correct hour is
displayed (23).
x1
6. Press the MICROWAVE
POWER LEVEL button to
start the clock.
Check the display.
x1
Check the display.
NOTE:
1. You can rotate the TIME R/WEIGHT knob
clockwise or counter-clockwise.
2. Press the STOP button if you make a mistake
during programming.
3. If the electrical power supply to your microwave
oven is interrupted, the display will intermittently
x1
show after the power is reinstated. If this
occurs during cooking, the programme will be
erased. The time of day will also be erased.
4. When you want to reset the time of day, follow the
above example again.
8
Page 9

MICROWAVE COOKING ADVICE
Microwaves are energy waves, similar to those used for
TV and radio signals.
Electrical energy is converted into microwave energy,
which is directed into the oven cavity via a waveguide.
To prevent food and grease entering the waveguide it is
protected by the waveguide cover.
Microwaves cannot pass through metal, because of this
the oven cavity is made of metal and there is a fine metal
mesh on the door. During cooking the microwaves
bounce off the sides of the oven cavity at random.
Microwaves will pass through certain materials, such as
glass and plastic, to heat the food. (See ‘Microwave safe
cookware’ on page 10.)
To cook/defrost food in a microwave oven, the
microwave energy must be able to pass through the
container to penetrate the food. Therefore it is important
to choose suitable cookware.
Round/oval dishes are preferable to square/oblong
ones, as the food in the corners tends to overcook.
A variety of cookware can be used as listed on page
10.
Water, sugar and fat in food absorb microwaves which
cause them to vibrate. This creates heat by friction, in the
same way your hands get warm when you rub them
together.
The outer areas of the food are heated by the
microwave energy, then the heat moves to the centre by
conduction, as it does in conventional cooking. It is
important to turn, rearrange or stir food to ensure even
heating.
Once cooking is complete, the oven automatically stops
producing microwaves.
Standing time is necessary after cooking, as it enables the
heat to disperse equally throughout the food.
Microwaves cook food faster than conventional cooking.
It is therefore essential that certain techniques are followed
to ensure good results. Many of the following techniques
are similar to those used in conventional cooking.
FOOD CHARACTERISTICS
Composition Foods high in fat or sugar (e.g. Christmas pudding, mince pies) require less heating time. Care should
be taken as overheating can lead to fire.
Density Food density will affect the amount of cooking time needed. Light porous foods, such as cakes or
bread, cook more quickly than heavy, dense foods, such as roasts and casseroles.
Quantity The cooking time must be increased as the amount of food placed in the oven increases. E.g. Four
potatoes will take longer to cook than two.
Size Small foods and small pieces cook faster than large ones, as microwaves can penetrate from all sides
to the centre. For even cooking make all the pieces the same size.
Shape Foods which are irregular in shape, such as chicken breasts or drumsticks, take longer to cook in the
thicker parts. Round shapes cook more evenly than square shapes when microwave cooking.
Temperature The initial temperature of food affects the amount of cooking time needed. Chilled foods will take
of food longer to cook than food at room temperature. Cut into foods with fillings, e.g. jam doughnuts, to
release heat or steam.
ENGLISH
COOKING TECHNIQUES
Arrange Place the thickest parts of food towards the outside of the dish. E.g. Chicken drumsticks.
Cover Use vented microwave cling film or a suitable lid.
Pierce Foods with a shell, skin or membrane must be pierced in several places before cooking or reheating as
steam will build up and may cause food to explode, e.g. Potatoes, Fish, Chicken, Sausages.
Important: Eggs should not be heated using microwave power as they may explode, even after
cooking has ended, e.g. poached, fried, hard boiled.
Stir, turn and For even cooking it is essential to stir, turn and rearrange food during cooking. Always stir and
rearrange rearrange from the outside towards the centre.
Stand Standing time is necessary after cooking to enable the heat to disperse equally throughout the food.
Shield Some areas of food being defrosted may become warm. Warm areas can be shielded with small
pieces of foil, which reflect microwaves, e.g. legs and wings on a chicken.
9
Page 10

MICROWAVE COOKING ADVICE
USING A FOOD THERMOMETER TO DETERMINE COOKING TIME
Once cooked, every drink and every foodstuff has a
certain internal temperature at which the cooking
process can be switched off and the food will be
Drink / Food Internal temp.at theend of Internal temp. after 10 - 15 min
cooking time standing
Heating drinks (Coffee, Water, Tea, etc.) 65-75oC
Heating milk 60-65oC
Heating soup 75-80oC
Heating stew 75-80oC
Poultry 80-85oC 85-90oC
Lamb Rare 70oC 70-75oC
Well done 75-80oC 80-85oC
Roast beef Rare 50-55oC 55-60oC
Medium 60-65oC 65-70oC
Well done 75-80oC 80-85oC
Pork, Veal 80-85oC 80-85oC
cooked. The internal temperature can be ascertained
with a food thermometer. The most important
temperatures are specified in the temperature table.
MICROWAVE SAFE COOKWARE
Cookware Microwave Comments
Aluminium foil / / Small pieces of aluminium foil can be used to shield food from overheating. Keep foil at
foil containers least 2 cm from the oven walls, as arcing may occur. Foil containers are not
Browning dishes Always follow the manufacturers instructions. Do not exceed heating times given. Be
China and ceramics / Porcelain, pottery, glazed earthenware and bone china are usually suitable, except for
Glassware e.g. Pyrex ® Care should be taken if using fine glassware as it can break or crack if heated suddenly.
Metal It is not recommended to use metal cookware when using microwave power as it will
Plastic / polystyrene Care must be taken as some containers warp, melt or discolour at high temperatures.
e.g. fast food containers
Cling film Should not touch the food and must be pierced to let the steam escape.
Freezer / roasting bags Must be pierced to let steam escape. Ensure bags are suitable for microwave use. Do
Paper - plates, cups Only use for warming or to absorb moisture. Care must be taken as overheating may
and kitchen paper cause fire.
Straw and wooden Always attend the oven when using these materials as overheating may cause fire.
containers
Recycled paper May contain extracts of metal which will cause ‘arcing’ and may lead to fire.
and newspaper
safe
recommended unless specified by the manufacturer, e.g. Microfoil ®, follow instructions
carefully.
very careful as these dishes become very hot.
those with metallic decoration.
arc, which can lead to fire.
not use plastic or metal ties, as they may melt or catch fire due to the metal arcing.
10
Page 11

MICROWAVE POWER LEVELS
Your oven has 5 power levels. To choose the power level
for cooking, follow the advice given in the recipe section.
Generally the following recommendations apply:
800 W used for fast cooking or reheating e.g. soup,
casseroles, canned food, hot beverages, vegetables,
fish, etc.
560 W used for longer cooking of dense foods such as
roast joints, meat loaf and plated meals, also for
sensitive dishes such as cheese sauce and sponge
cakes. At this reduced setting, the sauce will not boil
over and food will cook evenly without over cooking at
the sides.
To set the power, touch the MICROWAVE POWER LEVEL button until the desired level is displayed.
If MICROWAVE POWER LEVEL button is touched once, will be displayed. If you miss your desired
level, continue touching the MICROWAVE POWER LEVEL button until you reach the level again.
If the level is not selected, the level 800 W is automatically set.
400 W for dense foods which require a long cooking
time when cooked conventionally, eg. beef dishes, it is
advisable to use this power setting to ensure the meat
will be tender.
240 W to defrost, select this power setting, to ensure
that the dish defrosts evenly. This setting is also ideal
for simmering rice, pasta, dumplings and cooking egg
custard.
80 W For gentle defrosting, eg. cream gateaux or
pastry.
W = WATT
MANUAL OPERATION
Your oven can be programmed for up to 90 minutes.
(90.00) The input unit of cooking (defrosting) time
varies from 10 seconds to five minutes. It depends on
the total length of the cooking (defrosting) time as
shown on the table.
Cooking time Increasing unit
0-5 minutes 10 seconds
5-10 minutes 30 seconds
10-30 minutes 1 minute
30-90 minutes 5 minutes
ENGLISH
Example:
Suppose you want to heat soup for 2 minutes and 30 seconds on 560 W microwave power.
1. Enter the desired cooking time by
rotating the TIMER/WEIGHT
knob clockwise. (2 min. & 30 sec.)
NOTE:
1. When the door is opened during the cooking process, the cooking time on the digital display stops
automatically. The cooking time starts to count down again when the door is closed and the
START/+30 button is pressed.
2. If you wish to know the power level during cooking, press the MICROWAVE POWER LEVEL button.
As long as your finger is touching the MICROWAVE POWER LEVEL button, the power level will be displayed.
3. You can rotate the TIMER/WEIGHT knob clockwise or counterclockwise. If you rotate the knob
counterclockwise, the cooking time will decrease from 90 minutes by degrees.
2. Choose desired power
by pressing the
MICROWAVE POWER
LEVEL button twice.
x2
3. Press the START/
+30 button to begin
cooking.
x1
Check the display.
11
Page 12

OTHER CONVENIENT FUNCTIONS
1. MULTIPLE SEQUENCE COOKING
A maximum of 3 sequences can be input, consisting of manual cooking time and mode.
Example:
To cook: 5 minutes on 800 W power (Stage 1)
16 minutes on 240 W power (Stage 2)
STAGE 1
1. Enter the desired cooking time
by rotating TIMER/WEIGHT
knob.
2. Choose the desired power level
by pressing the MICROWAVE
POWER LEVEL button once.
x1
STAGE 2
3. Enter desired time by
rotating TIMER/WEIGHT
knob.
(The oven will begin to cook for 5 minutes on 800 W, and then for 16 minutes on 240 W.)
4. Choose the desired power
level by pressing the
MICROWAVE POWER
LEVEL button four times.
x4
5. Press the START/
+30 button once to
begin cooking.
Check the display.
12
x1
Page 13
OTHER CONVENIENT FUNCTIONS
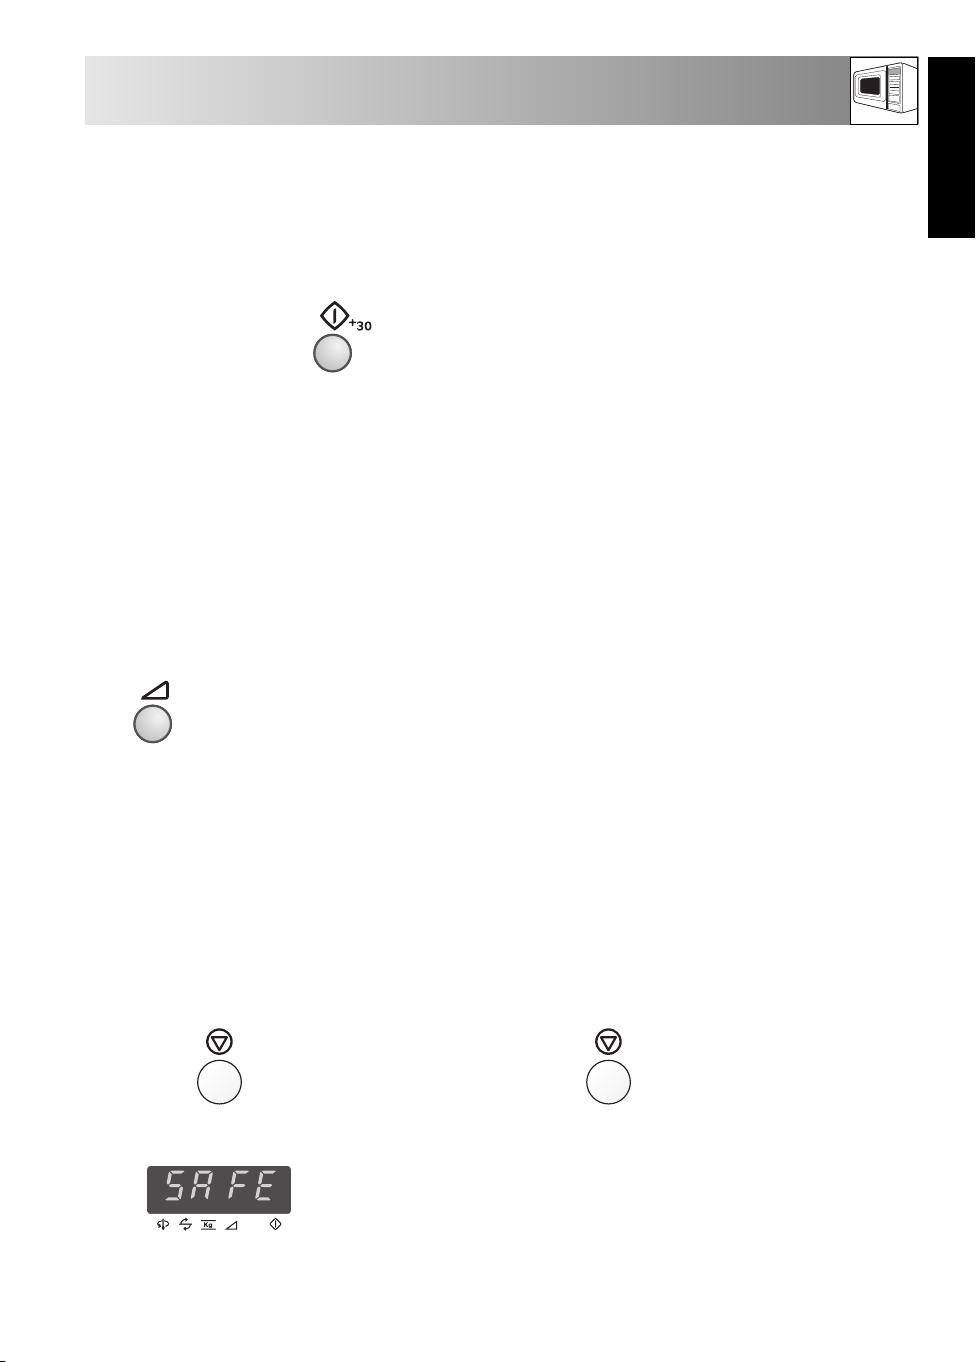
2. ADD 30 SECONDS FUNCTION
The START/+30 button allows you to operate the two following functions:
a. Direct start
You can directly start cooking on 800 W microwave power level for 30 seconds by pressing the
START/+30 button.
NOTE:
To avoid the misuse by children the START/+30 button can be used only within 3 minutes after
preceding operation, i.e., closing the door, pressing the STOP button or cooking completion.
b. Extend the cooking time
You can extend the cooking time during manual cooking for multiples of 30 seconds if the button is
pressed while the oven is in operation.
3. TO CHECK THE POWER LEVEL
To check the microwave power level during cooking press the MICROWAVE POWER LEVEL button.
x1
As long as your finger is touching the MICROWAVE POWER LEVEL button the power level will be
displayed.
ENGLISH
The oven continues to count down although the display shows the power level.
4. SAFETY LOCK FUNCTION
TO SET THE SAFETY LOCK FUNCTION
1. Press and hold the STOP key for 3
seconds.
x1 for 3 seconds x1 for 3 seconds
The display will show:
NOTE: When the Safety Lock is set you cannot input any buttons except the STOP button.
TO CANCEL THE SAFETY LOCK FUNCTION
1. Press and hold the STOP key for 3 seconds.
The display will show the
time of day, if set.
13
Page 14

AUTO PROGRAMMES OPERATION
The AUTO PROGRAMMES function automatically
works out the correct cooking mode and cooking time.
You can choose from 7 AUTO COOK menus and 5
AUTO DEFROST menus. What you need to know
when using this automatic function:
1. Press the AUTO PROGRAMMES button once, the
display will appear as shown.
The menu can be chosen by pressing the AUTO
PROGRAMMES button until the desired menu
number is displayed. See pages 15 - 17 “AUTO
PROGRAMMES charts”.
To select a defrost menu, press the AUTO
PROGRAMMES button at least 8 times. If you press
the button 8 times, will appear in the display.
The menu will be changed automatically by holding
down the AUTO PROGRAMMES button.
2. The weight or quantity of the food can be input by
rotating the TIMER/WEIGHT knob until the desired
weight is displayed.
• Enter the weight of the food only. Do not include the
weight of the container.
• For food weighing more or less than weights given in
the automatic chart, use manual programmes. For
best results, follow the cooking charts on pages 19 -
20.
1.
x1
AUTO PROGRAMMES button
Menu number
2.
TIMER/WEIGHT knob
3.
START/+30 button
3. To start cooking press START/+30 button.
When action is required (e.g. to turn food over), the
oven stops and the audible signals sound, remaining
cooking time and any indicator will flash on the
display. To continue cooking, press the START/+30
button.
Example:
To cook gratin weighing 1,0 kg using AUTO COOK AC-7.
1. Select the menu required by
pressing the AUTO
PROGRAMMES button
seven times.
x7
2. Enter the weight by rotating
the TIMER/WEIGHT knob
clockwise.
14
The final temperature will vary according to the
initial food temperature. Check food is piping hot
after cooking. If necessary, you can extend the
cooking time and change the power level.
3. Press the START/+30
button.
x1
Check the display.
Page 15

AUTO PROGRAMMES CHARTS
BUTTON
x1
x2
x3
x4
x5
AUTO COOK
NO.
AC-1 Cook
Frozen Vegetables
AC-2 Cook
Fresh Vegetables
AC-3 Cook
Frozen Ready
Meals
(Stirrable)
AC-4 Cook
Frozen Gratin
.
AC-5 Cook
Boiled and
Jacket Potatoes
WEIGHT (Increasing
Unit) / UTENSILS
0,1 - 0,6 kg (100 g)
Bowl and lid
0,1 - 0,6 kg (100 g)
Bowl and lid
0,3 - 1,0 kg* (100 g)
Bowl and lid
0,2 - 0,6 kg (100 g)
Shallow, oval gratin dish
and microwave cling
film or original container
and microwave cling
film
0,1 - 0,8 kg (100 g)
Bowl & lid
PROCEDURE
ENGLISH
• Add 1 tbsp water per 100 g and salt as
desired. (For mushrooms no additional water
is necessary).
• Cover with a lid.
• When audible signal sounds, stir and re-cover.
• After cooking, stand for approx. 2 min.
IMPORTANT: If frozen vegetables are
compacted together, cook manually.
• Cut into small pieces, eg. strips, cubes or slices.
• Add 1 tbsp water per 100 g and salt as
desired. (For mushrooms no additional water
is necessary).
• Cover with a lid.
• When audible signal sounds, stir and re-cover.
• After cooking, stand for approx 2 min.
• Transfer meal to suitable microwave-proof dish.
• Cover with a lid.
• Cook without cover if the manufacturer
instructs.
• When audible signal sounds, stir and re-cover.
• After cooking, stir and stand for approx. 2
min.
• Remove the frozen gratin from the package.
If the container is not suitable for microwave
ovens, transfer gratin to a suitable microwave
proof dish.
• Cover with microwave cling film.
• If the container is suitable for microwave
ovens, remove original paper cover and cover
with microwave cling film.
• After cooking, let stand for approx. 5 min.
Boiled Potatoes: Peel the potatoes and cut them
into similar sized pieces.
Jacket Potatoes: Choose potatoes of similar size
and wash them.
• Put the boiled or jacket potatoes into a bowl.
• Add the required amount of water (per 100 g),
approx 2 tbsp and a little salt.
• Cover with a lid.
• When audible signal sounds, stir and re-cover.
• After cooking, stand for approx. 2 min.
Important:Chilledfoods are cookedfrom 5oC,frozen foods arecooked from-18oC.
15
Page 16

AUTO PROGRAMMES CHARTS
BUTTON
BUTTON
AUTO COOK
AC-6 Cook
Fish fillet with
sauce
x6
AC-7 Cook
Gratin
7
x
DEFROST NO.
Ad-1 Defrost
Steak and Chops
x8
NO.
AUTO
WEIGHT (Increasing
Unit) / UTENSILS
0,4 - 1,2 kg* (100 g)
Gratin dish and
microwave cling film
0,5 - 1,5 kg* (100 g)
Gratin dish
WEIGHT(Increasing
Unit) / UTENSILS
0,2 - 0,8 kg (100 g)
Flan dish
(See note on page 17.)
PROCEDURE
• See recipes for “Fish Fillet with Sauce” on
page 17.
* Total weight of all ingredients.
• See recipes for “Gratin” on page 18.
* Total weight of all ingredients.
PROCEDURE
• Place the food in a flan dish in the centre of the
turntable.
• When the audible signal sounds, turn the food
over, rearrange and separate. Shield thin parts and
warm spots with small pieces of aluminium foil.
• After defrosting, wrap in aluminium foil for 10 15 min, until thoroughly defrosted.
• Place the block of minced meat in a flan dish in
the centre of the turntable.
• When the audible signal sounds, turn the food
over. Remove the defrosted parts if possible.
x9
Ad-2 Defrost
Minced Meat
0,2 - 0,8 kg (100 g)
Flan dish
(See note on page 17.)
• After defrosting cover with aluminium foil, stand
for 5 - 10 min, until thoroughly defrosted.
• Place the poultry in a flan dish in the centre of the
turntable.
•
When the audible signal sounds, turn over and
shield thin parts and warm spots with small pieces of
x10
Ad-3 Defrost
Poultry
0,9 - 1,5 kg (100 g)
Flan dish
(See note on page 17.)
aluminium foil.
• After defrosting, rinse with cold water, cover with
aluminium foil and stand for 15 - 30 min until
thoroughly defrosted.
• Finally clean the poultry under running water.
Ad-4 Defrost
Cake
0,1 - 1,4 kg (100 g)
Plate
• Remove all packaging from the cake.
• Place directly on the turntable, or on a plate in the
middle of the turntable.
x11
• After defrosting, cut the cake into similar sized
pieces keeping space between each piece and let
stand for 10 - 30 min until evenly defrosted.
•
Distribute in a flan dish in the centre of the turntable.
For 1,0 kg distribute directly on the turntable.
• When the audible signal sounds, turn over, rearrange and remove defrosted slices.
• After defrosting cover in aluminum foil and stand
x12
Ad-5 Defrost
Bread
0,1 - 1,0 kg (100 g)
Flan dish
(Only sliced bread is
recommended for this
programme.)
for 5 - 15 min, until thoroughly defrosted.
Important:Chilledfoods are cookedfrom 5oC,frozen foods arecooked from-18oC.
16
Page 17

AUTO PROGRAMMES CHARTS
NOTES: Auto Defrost
1. Steaks and Chops should be frozen in one layer.
2. Minced meat should be frozen in a thin shape.
3. After turning over, shield the defrosted portions with small, flat pieces of aluminium foil.
4. The poultry should be processed immediately after defrosting.
5. Gateaux topped and coated with cream are very sensitive to microwave energy. For the best result, if
the cream begins to soften rapidly, it is best to remove it from the oven immediately and stand for 10 30 minutes at room temperature.
RECIPES FOR AUTO PROGRAMMES AC-6 & AC-7
FISH FILLET WITH SAUCE (AC-6)
Fish fillet with piquant sauce
1. Mix ingredients for the sauce.
0,4 kg 0,8 kg 1,2 kg
140 g 280 g 420 g canned tomatoes (drained)
40 g 80 g 120 g corn
4 g 8 g 12 g chilli sauce
12 g 24 g 36 g onion (finely chopped)
1 tsp 1-2 tsp 2 tsp red wine vinegar
mustard, thyme, cayenne pepper
200 g 400 g 600 g fish fillet
salt
2. Place the fish fillet in a round gratin dish with
the thin ends toward the centre and sprinkle
with salt.
3. Spread the sauce on the fish fillet.
4. Cover with microwave cling film and cook on
AUTOCOOK (AC-6), “Fish fillet with sauce”.
5. After cooking, stand for approx. 2 min.
ENGLISH
FISH FILLET WITH SAUCE (AC-6)
Fish fillet with curry sauce
0,4 kg 0,8 kg 1,2 kg
200 g 400 g 600 g fish fillet
salt
40 g 80 g 120 g banana (sliced)
160 g 320 g 480 g ready-made curry sauce
1. Place the fish fillet in a round gratin dish with
the thin ends toward the centre and sprinkle
with salt.
2. Spread the banana and the ready-made curry
sauce on the fish fillet.
3. Cover with microwave cling film and cook on
AUTOCOOK (AC-6), “Fish fillet with sauce”.
4. After cooking, stand for approx. 2 min.
17
Page 18

RECIPES FOR AUTO PROGRAMMES AC-6 & AC-7
GRATIN (AC-7)
Spinach gratin
0,5 kg 1,0 kg 1,5 kg
5 g 10 g 15 g butter or margarine (to
grease the dish)
150 g 300 g 450 g leaf spinach (
15 g 30 g 45 g onion (finely chopped)
salt, pepper & nutmeg
150 g 300 g 450 g boiled potatoes (sliced)
35 g 75 g 110 g cooked ham (diced)
50 g 100 g 150 g crème fraîche
123eggs
40 g 75 g 115 g grated cheese
paprika powder
GRATIN (AC-7)
Potato and courgette gratin
0,5 kg 1,0 kg 1,5 kg
5 g 10 g 15 g butter or margarine (to
grease the dish)
200 g 400 g 600 g boiled potatoes (sliced)
115 g 230 g 345 g courgette (finely sliced)
75 g 150 g 225 g crème fraîche
123eggs
1
/
2 12clove of garlic (crushed)
salt & pepper
40 g 80 g 120 g feta cheese (diced)
10 g 20 g 30 g sunflower kernel
paprika powder
defrosted, drained)
. Mix together the leaf spinach with the onion and
1
season with salt, pepper and nutmeg.
2. Grease the gratin dish. Place alternate layers of
potato slices, diced ham and spinach in the dish.
The top layer should be spinach.
3. Mix the eggs with crème fraiche, add salt and
pepper and pour over the gratin.
4. Cover the gratin with the grated cheese, sprinkle
with paprika powder and cook on AUTOCOOK
(AC-7), “Gratin”.
5. After cooking, stand for 5-10 min.
1. Grease the gratin dish and place alternate layers
of potato slices and courgette in the dish.
2. Mix the eggs with crème fraiche, season with salt,
pepper and garlic and pour over the gratin.
3. Crumble the feta cheese and sprinkle over the
gratin.
4. Finally sprinkle the gratin with sunflower kernels
and paprika powder and cook on AUTOCOOK
(AC-7), “Gratin”.
5. After cooking, stand for 5-10 min.
18
Page 19

tbsp = tablespoon
tsp = teaspoon
Cup = cupful
KG = kilogram
COOKING CHARTS
ABBREVIATIONS USED
g = gram
l = litre
ml = millilitre
cm = centimetre
min = minutes
ENGLISH
Food / Drink Quantity Power Time Method
Coffee, 1 cup 150 800 W approx.1 do not cover
Milk, 1 cup 150 800 W approx.1 do not cover
Water, 1 cup 150 800 W 11/2-2 do not cover
6 cups 900 800 W 10-12 do not cover
1 bowl 1000 800 W 111/2-13 do not cover
One plate meal 400 800 W 3-6 sprinkle some water onto the sauce, cover
(vegetables, meat and trimmings) stir half way through the heating
Stew / Soup 200 800 W 11/2-21/2cover, stir after heating
Vegetables 200 800 W 2-21/2if necessary add some water, cover
Meat, 1 slice* 200 800 W 3-4 thinly spread sauce over the top, cover
Fish fillet* 200 800 W 2-3 cover
Cake, 1 piece 100 400 W
Baby food, 1 glass 190 400 W approx.1 transfer into a suitable microwave container, after
Melting butter or margarine* 50 800 W
Melting chocolate 100 400 W 2-3 stir occasionally
* from chilled
-g/ml- -Setting- -Min-
500 800 W 4-5 stir half way through the heating
1
2
/
place in a flan dish
heating stir well and test the temperature
1
2
/
cover
TABLE: THAWING & COOKING
TABLE: HEATING FOOD & DRINK
Food Quantity Power Cooking time Added water Method Standing time
Fish fillet 300 800 W 10-12 - cover 1-2
One plate meal 400 800 W 9-11 - cover, stir after 6 minutes 2
Broccoli 300 800 W 7-9 3-5
Peas 300 800 W 7-9 3-5
Mixed vegetables 500 800 W 11-13 3-5
-g- -Setting- -Min- -
tbsps
/ml- -Min-
tbsps
tbsps
tbsps
cover, stir half way through cooking 2
cover, stir half way through cooking 2
cover, stir half way through cooking 2
Food Quantity Power Thawing time Method Standing time
Roast meat (e.g. pork, beef, 1500 80 W 58-64 place in a flan dish, turn halfway 30-90
lamb, veal) 1000 80 W 42-48 through defrosting 30-90
Goulash 500 240 W 8-12 stir halfway through defrosting 10-15
Sausages, 8 pieces 600 240 W 6-9 place next to each other, 5-10
4 pieces 300 240 W 4-5 turn half way through defrosting 5-10
Chicken legs 200 240 W 4-5 turn half way through defrosting 10-15
Fish fillet 400 240 W 7-10 turn half way through defrosting 5-10
Bread rolls, 2 pieces 80 240 W approx.1 only partially defrost Cake, 1 slice 150 80 W 2-5 place in a flan dish 5
Fruit e.g. cherries, 250 240 W 4-5 spread them out evenly 5
strawberries, raspberries, plums turn half way through defrosting time
The times shown in the table are guidelines which may vary according to freezing temperature, quality and weight of the
foodstuffs.
-g- -Setting- -Min- -Min-
500 80 W 19-23 30-90
19
TABLE: THAWING
Page 20

COOKING CHARTS
Fish, Poultry Quantity Power Time Method Standing time
& Vegetables -g- -Setting- -Min- -Min-
Roasts 500 800 W 8-10* season to taste, place in a shallow flan dish 10
(pork, 400 W 10-12 turn over after *
veal, lamb) 1000 800 W 19-21* 10
400 W 11-14
1500 800 W 33-36* 10
400 W 13-17
Roast beef (medium) 1000 800 W 9-11* season to taste, place in a flan dish, 10
400 W 5-7 turn over after *
Fish fillet 200 800 W 3-4 season to taste, place in a flan dish, cover 3
Chicken 1200 800 W 21-24 season to taste, place in a shallow flan dish, 3
turn half way through cooking
Chicken legs 200 800 W 3-4 season to taste, place in a flan dish, cover 3
Broccoli 500 800 W 9-11 add 4-5 tbsps water, cover, stir halfway through cooking Peas 500 800 W 9-11 cover, add 4-5 tbsps water, stir halfway through cooking Carrots 500 800 W 10-12 cut into rings, add 4-5 tbsps water, cover, -
300 800 W 7-9 stir halfway through cooking
Boiled Potatoes 500 800 W 9-11 cut into large pieces of a similar size, add a little salt, -
add 150 ml water, cover, stir occasionally during cooking
RECIPES
TABLE: COOKING MEAT, FISH , POULTRY & VEGETABLES
All the recipes in this book are calculated on the basis
of 4 servings - unless otherwise stated.
ADAPTING RECIPES FOR THE MICROWAVE
OVEN
If you would like to adapt your favourite recipes for
the microwave, you should take note of the following:
Shorten cooking times by a third to a half. Follow the
example of the recipes in this book.
Foods which have a high moisture content such as
meat, fish, poultry, vegetables, fruit, stews and soups
can be prepared in your microwave without any
difficulty. Foods which have little moisture, such as
platters of food, should have the surface moistened
prior to heating or cooking.
The amount of liquid to be added to raw foods, which
are to be braised, should be reduced to about two
thirds of the quantity in the original recipe. If
necessary, add more liquid during cooking.
The amount of fat to be added can be reduced
considerably. A small amount of butter, margarine or
oil is sufficient to flavour food. For this reason your
microwave is excellent for preparing low-fat foods as
part of a diet.
MUSHROOM SOUP
Utensil: Bowl with lid (2 l Capacity)
Ingredients
200 g mushrooms, sliced
50 g onion, finely chopped
300 ml meat stock
300 ml cream
25 g flour
25 g butter or margarine (25 g)
salt, pepper
1 egg
150 g cream
1. Place the vegetables and the stock in the bowl, cover
and cook.
8-9 min. 800 W
2. Blend all the ingredients in a mixer.
3. Mix the flour and butter to a paste and blend into the
soup. Season with salt and pepper, cover and cook.
Stir after cooking.
4-6 min. 800 W
4. Mix the egg yolk with the cream, gradually stir into the
soup. Heat for a short time, but do not let it boil!
1-2 min. 800 W
After cooking, stand for approx. 5 min.
20
Page 21

RECIPES
ZÜRICH VEAL STEW
Utensil: Dish with lid (2 l capacity)
ngredients
I
600 g veal fillet
10 g butter or margarine
50 g onion, finely chopped
100 ml white wine
seasoned gravy browning,
for approx.
300 ml cream
1 tbsp parsley, chopped
1
/2l gravy
STUFFED HAM
Utensils: Bowl with lid (2 l capacity)
Oval gratin dish (approx.
26 cm long)
Ingredients
125 g leaf spinach, chopped
125 g fromage frais, 20 % fat content
40 g Emmental cheese, grated
pepper, paprika
6 slices cooked ham (300 g)
125 ml water
125 ml cream
20 g flour
20 g butter or margarine
10 g butter or margarine to grease
the dish
1. Cut the veal into strips.
2. Grease the dish with the butter. Put the meat and
onion into the dish, cover and cook. Stir once during
cooking.
7-10 min. 800 W
3. Add the white wine, gravy browning and cream, stir,
cover and continue cooking. Stir occasionally.
4-5 min. 800 W
4. Stir the mixture after cooking, stand for approx. 5
min. Garnish with parsley.
1. Mix the spinach with the cheese and fromage frais,
season to taste.
2. Place a tablespoon of the filling on top of each slice of
the cooked ham, and roll up. Secure the ham with a
wooden skewer.
3. Make a béchamel sauce; to do this, pour the water
and cream into a bowl and heat.
3-4 min. 800 W
Mix the flour and butter to make a roux, add to the
liquid, and whisk until disolved. Cover, cook until thick.
1 min. 800 W
After cooking, leave to stand for approximately
2 minutes.
Stir and taste.
4. Place the sauce into the greased dish, place the filled
rolls of ham into sauce and cook with lid.
3-4 min. 800 W
After cooking, stand for approx. 5 min.
ENGLISH
LASAGNE
Utensils: Bowl with lid (2 l capacity)
Shallow square gratin dish with lid
(approx 20 x 20 x 6 cm)
Ingredients
300 g tinned tomatoes
50 g ham, chopped
50 g onion, finely chopped
1 clove of garlic, crushed
250 g minced beef
2 tbsp tomato puree
salt, pepper
150 ml crème fraiche
100 ml milk
50 g Parmesan cheese, grated
1 tsp mixed chopped herbs
1 tsp olive oil
1 tsp vegetable oil to grease the dish
125 g lasagne verde
1 tbsp Parmesan cheese, grated
1. Chop the tomatoes, mix with the ham and onion, garlic,
minced meat and tomato puree. Season, cover and
cook.
7-9 min. 800 W
2. Mix the crème fraiche with the milk, Parmesan cheese,
herbs, oil, and spices.
3. Grease the dish and cover the bottom of the mould with
1
about
/3of the pasta. Put half of the minced meat
mixture on the pasta and pour on some sauce. Repeat
and finish with the remaining pasta. Cover the pasta
with sauce and sprinkle with Parmesan cheese. Cook
with the lid on.
15-17 min. 560 W
After cooking, stand for approx. 5-10 min.
21
Page 22

RECIPES
RATATOUILLE
Utensils: Bowl with lid (2 l capacity)
Ingredients
5 tbsp olive oil
1 clove garlic, crushed
50 g onion, sliced
250 g aubergine, cubed
200 g courgette, cubed
200 g pepper, large cubes
75 g fennel, large cubes
1 bouquet garni
200 g tinned artichoke hearts, cut into quarters
salt, pepper
SOLE FILLETS
Utensils: Shallow,oval oven dish with
microwave cling film
(approx. 26 cm long)
Ingredients
400 g sole fillets
1 lemon, whole
150 g tomatoes
10 g butter
1 tbsp vegetable oil
1 tbsp parsley, chopped
salt, pepper
4 tbsps white wine
20 g butter or margarine
1. Place the olive oil and garlic in the bowl. Add the
prepared vegetables, except the artichoke hearts, and
season with pepper. Add the bouquet garni, cover
and cook, stirring once.
19-21 min. 800 W
For the last 5 min, add the artichoke hearts and cook.
2. Season the ratatouille to taste with salt and pepper.
Remove the bouquet garni before serving. After
cooking, stand for appox. 2 min.
Tip: Ratatouille can be served hot with meat dishes.
Served cold, it also makes an excellent starter.
Tip: A bouquet garni consists of: one stalk of parsley, a
bunch of herbs suitable for seasoning soup, one stalk
of lovage, one stalk of thyme, several bay leaves.
1. Wash the fish and pat dry. Remove any bones.
2. Cut the lemon and the tomatoes into thin slices.
3. Grease the oven dish with butter. Place the fish fillets
in the dish and drizzle the vegetable oil
4. Sprinkle parsley over the dish, place the tomato slices
on top and season. Place the lemon slices on top of
the tomatoes and pour the white wine over them.
5. Place small pats of butter on top of the lemon, cover
and cook.
13-16 min. 800 W
After cooking,stand for approx. 2 min.
Tip: This recipe can also be used for Cod, Haddock,
Halibut, Mullet or Plaice.
FRUIT JELLY WITH VANILLA SAUCE
Utensils: Dish with lid (2 l capacity)
Dish with lid (1 l capacity)
Ingredients
150 g redcurrants, washed and stalks removed
150 g strawberries, washed and haulms removed
150 g raspberries, washed and hulls removed
250ml white wine
100 g sugar
50 ml lemon juice
8 gelatin leaves
300 ml milk
1/2 vanilla pod
30 g sugar
15 g cornflour
Tip: You can also use defrosted frozen fruits.
1. Put some of the fruit to one side for decoration. Purée
the rest of the fruit with the white wine, put it into a
dish, cover and heat.
7-9 min. 800 W
2. Stir in the sugar and the lemon juice.
3. Soak the gelatin in cold water for approx. 10 min,
then take it out and squeeze dry. Stir the gelatin in
with the hot purée until it has dissolved. Place the jelly
in the refrigerator and leave to set.
4. To make the vanilla sauce; put the milk into the other
dish. Slit the vanilla pod and remove the insides, stir
this into the milk with the sugar and the cornflour.
Cover and cook, stir during cooking and again at the
end.
3-4 min. 800 W
5. Turn out the jelly onto a plate and decorate with the
whole fruit. Pour the vanilla sauce over the jelly.
22
Page 23

CARE & CLEANING
CAUTION: DO NOT US E CO M M ERCIAL
OVEN C L EANE R S, STE A M CLEA N ERS,
ABRASIVE, HARSH CLEANERS, ANY THAT
CONTAIN S ODIUM HYDRO X IDE O R
SCOURING PADS ON ANY PART OF YOUR
MICROWAVE OVEN.
CLEAN THE OVEN AT REGULAR INTERVALS
AND R E MOVE A NY F O OD DE P OSIT S .
Failure to maintain the oven in a clean
condition could lead to a deterioration of
the surface that could adversely affect the
life of the appliance and possibly result in
a hazardous situation.
Oven exterior
The outside of your oven can be cleaned easily with
mild soap and water. Make sure the soap is wiped
off with a moist cloth, and dry the exterior with a
soft towel.
Oven controls
Open the door before cleaning to de-activate the
oven controls. Care should be taken when cleaning
the oven control. Using a cloth dampened with
water only, gently wipe the panel until it becomes
clean. Avoid using excessive amounts of water. Do
not use any sort of chemical or abrasive cleaner.
Oven Interior
1. For cleaning, wipe any splatters or spills with a
soft damp cloth or sponge after each use while
the oven is still warm. For heavier spills, use a
mild soap and wipe several times with a damp
cloth until all residues are removed. Do not
remove the waveguide cover.
2. Make sure that mild soap or water does not
penetrate the small vents in the walls which may
cause damage to the oven.
3. Do not use spray type cleaners on the oven
interior.
Turntable and turntable support
Remove the turntable and turntable support from the
oven. Wash the turntable and turntable support in
mild soapy water. Dry with a soft cloth. Both the
turntable and the turntable support are dishwasher
safe.
Door
To remove all trace of dirt, regularly clean both
sides of the door, the door seals and sealing
surfaces with a soft, damp cloth. Do not use harsh
abrasive cleaners or sharp metal scrapers to clean
the oven door glass since they can scratch the
surface, which may result in shattering of the glass.
NOTE: A steam cleaner should not be used.
ENGLISH
23
Page 24
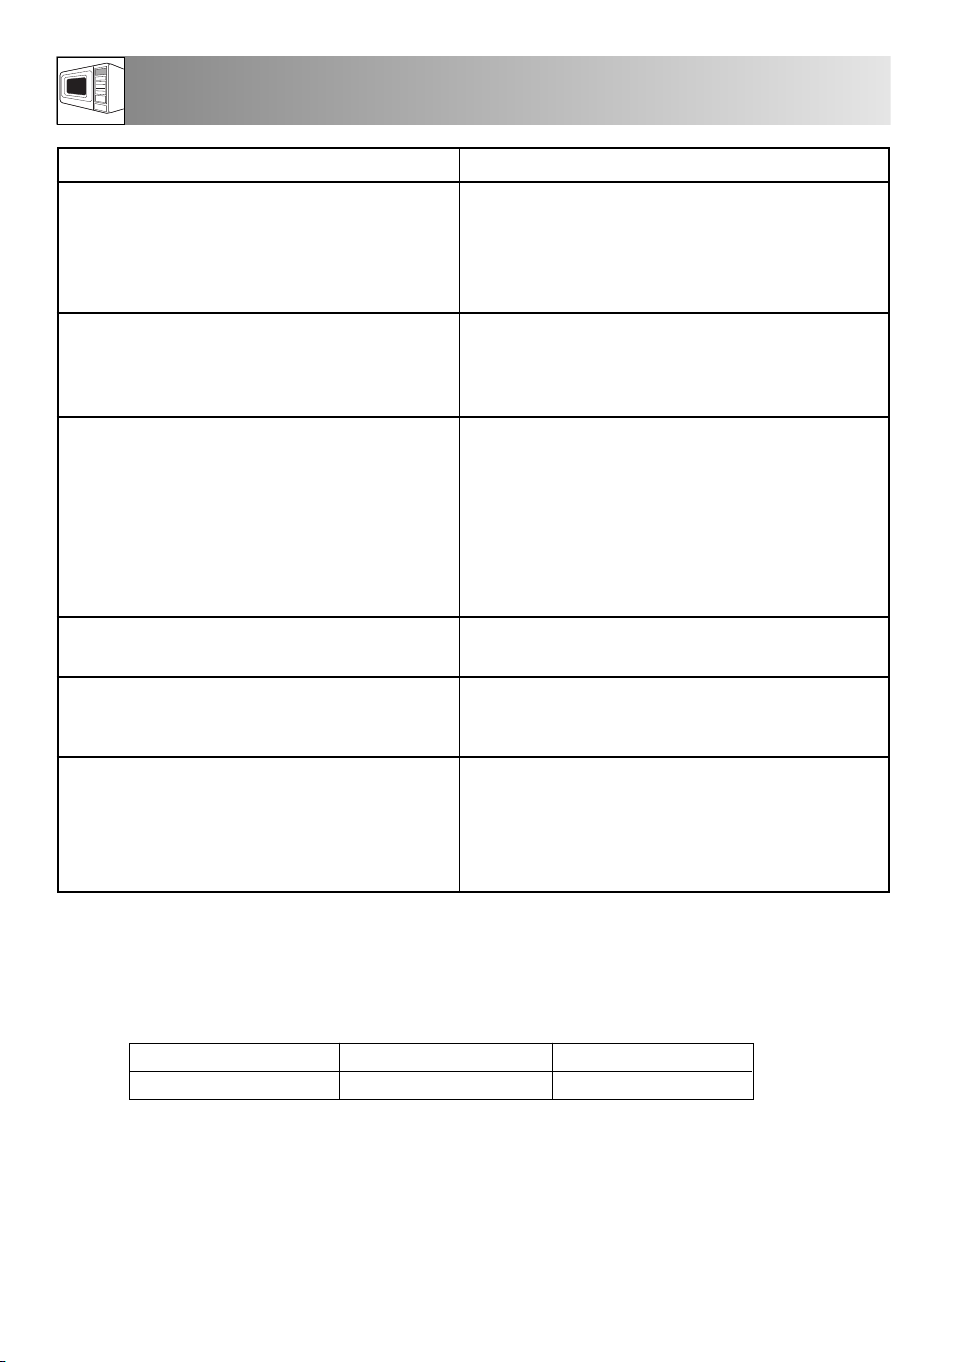
WHAT TO DO IF...
SYMPTOM
... the microwave appliance is not
working properly?
... the microwave mode is not working?
... the turntable is not turning?
... the microwave will not switch off?
... the interior light is not working?
POSSIBLE SYMPTOMS/REMEDIES
Check that
- the fuses in the fuse box are working,
- there has not been a power outage.
- If the fuses continue to blow, please contact a
qualified electrician.
Check that
- the door is properly closed,
- the door seals and their surfaces are clean,
- the START/+30-button has been pressed.
Check that
- the turntable support is correctly connected to the
drive,
- the ovenware does not extend beyond the
turntable,
- food does not extend beyond the edge of the
turntable preventing it from rotating.
- there is nothing in the well beneath the turntable.
- Isolate the appliance from the fuse box.
- Call an authorised ELECTROLUX service agent.
- Call an authorised ELECTROLUX service agent.
The interior light bulb can be exchanged only by
a trained ELECTROLUX service agent.
... the food is taking longer to heat
through and cook than before?
NOTE: If you cook the food over the standard time with only 800 W, the power of the oven will lower
automatically to avoid overheating. (The microwave power level will be reduced to 560 W).
After pausing for 90 seconds, 800 W power can be reset.
Cooking Mode
Microwave 800 W
Standard time
20 minutes
- Set a longer cooking time (double quantity =
nearly double time) or
- if the food is colder than usual, rotate or turn from
time to time or
- set a higher power setting.
Reduced Power
Microwave 560 W
24
Page 25

GUARANTEE/CUSTOMER SERVICE
Standard Guarantee conditions
We, Electrolux, undertake that if within 12 months
of the date of the purchase this Electrolux
appliance or any part thereof is proved to be
defective by reason only of faulty workmanship or
materials, we will, at our option repair or
replace the same FREE OF CHARGE for labour,
materials or carriage on condition that:
• Appliance has been correctly installed and used
only on the electricity supply stated on the rating
plate.
• Appliance has been used for normal domestic
purposes only, in accordance with
manufacturer's instructions.
• Appliance hasn't been serviced, maintained,
repaired, taken apart or tampered with by
person not authorised by us.
• Electrolux Service Force Centre must undertake
all service work under this guarantee
• Any appliance or defective part replaced shall
become the Company's property.
• This guarantee is in addition to your statutory
and other legal rights.
Exclusions
• Damage, calls resulting from transport, improper
use, neglect, light bulbs, removable parts of
glass, plastic.
• Costs for calls to put right appliance which is
improperly installed, calls to appliances outside
United Kingdom.
• Appliances found to be in use within a
commercial environment, plus those which are
subject to rental agreements.
• Products of Electrolux manufacturer that are not
marketed by Electrolux
Service and Spare Parts
If your appliance requires service or spare parts,
contact your local Service Force Centre:
08445 616 616 (Call will be routed to Service
Force Centre covering your postcode area).
For address of local Service Force Centre and
further information, please visit:
www.serviceforce.co.uk
Before calling out an engineer, please ensure you
have read the details under the heading "What to
do if..."
When you contact the Service Force Centre you
will need to give the following details:
Your name, address and postcode, your telephone
number, clear concise details of the fault, model
and serial number of the appliance (found on the
rating plate), the purchase date.
Please note a valid purchase receipt or guarantee
ocumentation is required for in guarantee service
d
calls.
Customer Care
For general enquiries concerning your Electrolux
appliance, or for information on Electrolux
products, contact our Customer
Care Department by letter or telephone at the
address below or visit our website at
www.electrolux.co.uk
Customer Care Department, Electrolux Major
Appliances, Addington Way, Luton, Bedfordshire,
LU4 9QQ
Tel: (Calls may be recorded for training purposes)
0844 5 613 613
For Customer Service in The Republic of
Ireland please contact us at the address below:
Electrolux Group (Irl) Ltd, Long Mile Road, Dublin
12, Republic of Ireland
Tel: 00353 (0)1 4090753, Email:
service.eid@electrolux.ie
European Guarantee
This appliance is guaranteed by Electrolux in each
of the countries listed at the back of this user
manual, for the period
specified in the appliance guarantee or otherwise
by law. If you move from one of these countries to
another of the
countries listed, the appliance guarantee will move
with you subject to the following qualifications:-
• The appliance guarantee starts from the date
you first purchased the appliance which will be
evidenced by production of a valid purchase
document issued by the seller of the appliance.
progress 23
• The appliance guarantee is for the same period
and to the same extent for labour and parts as
exists in your new country of residence for this
particular model or range of appliances.
• The appliance guarantee is personal to the
original purchaser of the appliance and cannot
be transferred to another user.
• The appliance is installed and used in
accordance with instructions issued by Electrolux
and is only used within the home, i.e. is not
used for commercial purposes.
• The appliance is installed in accordance with all
relevant regulations in force within your new
country of residence.
The provisions of this European Guarantee do not
affect any of the rights granted to you by law.
ENGLISH
25
Page 26

SPECIFICATIONS
AC Line Voltage
Distribution line fuse/circuit breaker
AC Power required: Microwave
Output power: Microwave
Microwave Frequency
Outside Dimensions: PM175X
PM176X
Cavity Dimensions
Oven Capacity
Turntable
Weight
Oven lamp
* This Product fulfils the requirement of the European standard EN55011.
In conformity with this standard, this product is classified as group 2 class B equipment.
Group 2 means that the equipment intentionally generates radio-frequency energy in the form of electromagnetic
radiation for the heat treatment of food.
Class B equipment means that the equipment is suitable to be used in domestic establishments.
** Internal capacity is calculated by measuring maximum width, depth and height.
Actual capacity for holding food is less.
This oven complies with the requirements of Directives 2004/108/EC and 2006/95/EC.
SPECIFICATIONS ARE SUBJECT TO CHANGE WITHOUT NOTICE AS PART OF
: 230 V, 50 Hz, single phase
: Minimum 10 A
: 1.2 kW
: 800 W (IEC 60705)
: 2450 MHz * (group2/Class B)
: 492 mm (W) x 370 mm (H) x 316 mm (D)
: 592 mm (W) x 370 mm (H) x 316 mm (D)
: 285 mm (W) x 202 mm (H) x 298 mm (D) **
: 17 litres **
: ø 272 mm, glass
: approx. 15.5 kg
: 25 W/240 - 250 V
CONTINUOUS IMPROVEMENT
IMPORTANT INFORMATION
Ecologically responsible disposal of packaging materials and old
appliances
Packaging materials
Electrolux microwave ovens require effective packaging to protect them during transportation.
Only the minimum packaging necessary is used.
Packaging materials (e.g. foil or styrofoam) can place children at risk.
Danger of suffocation. Keep packaging material away from children.
All packaging materials used are environment friendly and can be recycled. The cardboard is made from
recycled paper and the wooden parts are untreated. Plastic items are marked as follows:
«PE» polyethylene eg packaging film
«PS» polystyrene eg packaging (CFC-free)
«PP» polypropylene eg packaging straps
By using and re-using the packaging, raw materials are saved and waste volume is reduced.
Packaging should be taken to your nearest recycling centre.
Contact your local council for information.
Disposal of old appliances
Old appliances should be made safe before disposal by removing the plug, and cutting off and disposing
of the power cable.
It should then be taken to the nearest recycling centre. Check with your local Council or Environmental
Health Office to see if there are facilities in your area for recycling the appliance.
26
Page 27
E
D
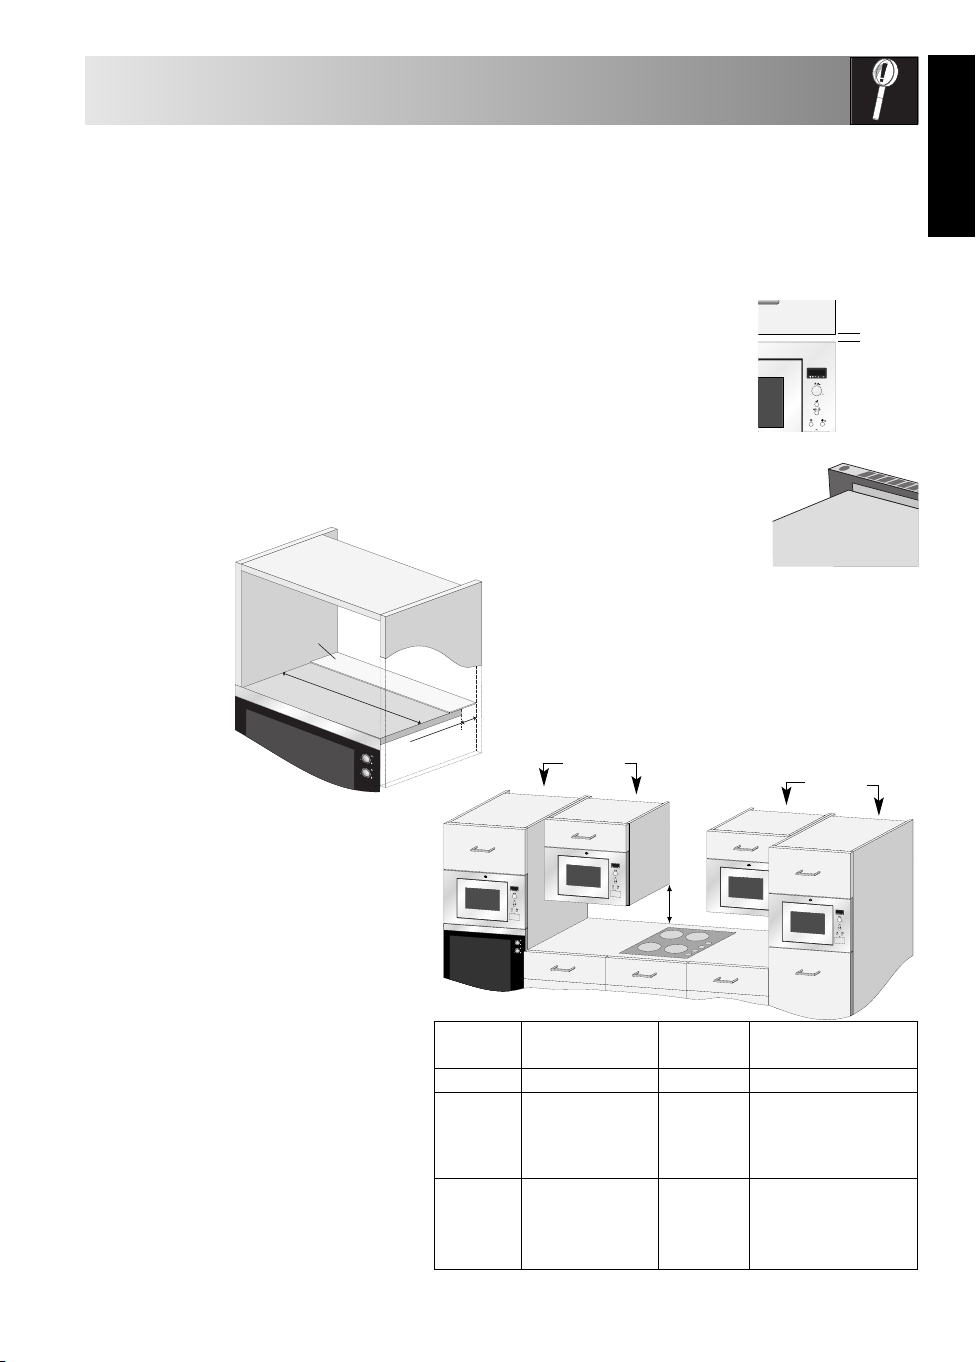
INSTALLING THE APPLIANCE
5 mm
. Remove all packaging and check carefully for
1
any signs of damage.
2. This oven is designed to fit into a 360 mm high
cupboard as standard.
When fitting into a 350 mm high cupboard:Unscrew and remove the 4 feet from the bottom
of the oven. There are 3 tall feet and 1 short
foot. Replace the 3 tall feet with those provided
in the accessory pack. Do not replace the short
foot.
3. If fitting the microwave oven above a
conventional oven (position A) then use the mylar
sheet provided.
a. Cut the Mylar sheet to fit the internal width of
the unit.
b. Peel back the
protective
cover on the
tape and fix
to the rear of
the shelf so
that it covers
the service
gap. (See
diagram.)
Mylar sheet
Conventional
oven
I
n
te
rn
al
wi
dth
p
a
g
rvice
Se
SAFE USE OF THE APPLIANCE
INSTALLATION
. Fit the appliance into the kitchen cupboard
4
slowly, and without force, until the front frame of
the oven seals against the front opening of the
cupboard.
5. Ensure the appliance is
stable and not leaning.
Ensure that a 5 mm gap is
kept between the cupboard
door above and the top of
the frame (see diagram.)
6. Fix the oven in position with
the screws provided.
The fixing points are located
on the top and bottom
corners of the oven (see
diagram, item 9, on page 6).
7. It is important to ensure that the installation of
this product conforms to the instructions in this
operation manual and the hob or conventional
oven manufacturer’s installation instructions.
Position A
Chimney
Position B
Position C
Chimney
Position D
ENGLISH
If fitting the microwave in position B or C:
• The cupboard must be a minimum of
500 mm (E) above the worktop and must
not be installed directly above a hob.
• This appliance has been tested and approved
for use near domestic gas, electric and
induction hobs only.
• Sufficient space between hob and
microwave should be allowed to prevent
overheating of microwave oven,
surrounding cupboard and accessories.
• Do not operate the hob without pans when
the microwave oven is operating.
• Care should be taken when attending to the
microwave oven while the hob is on.
Conventional
oven
POSITION NICHE SIZE CHIMNEY Gap Between
WD H (min) Cupboard & Ceiling
A 560 x 550 x 360 50 50
B + C 460 x 300 x 350 15 50
460 x 300 x 360 15 50
560 x 300 x 350 15 50
560 x 300 x 360 15 50
D 460 x 500 x 350 40 50
460 x 500 x 360 40 50
560 x 500 x 350 40 50
560 x 500 x 360 40 50
Measurements in (mm)
27
Page 28

INSTALLATION
CONNECTING THE APPLIANCE TO THE POWER SUPPLY
• The electrical outlet should be readily accessible so that
the unit can be unplugged easily in an emergency. Or it
should be possible to isolate the oven from the supply by
incorporating a switch in the fixed wiring in accordance
with the wiring rules.
• The socket should not be positioned behind the cupboard.
• The best position is above the cupboard, see (A).
When not connecting the power supply cord to position (A) it should
be removed from the support clip (see diagram, item 13, on page 6)
and routed under the oven.
• Connect the appliance to a single phase 230 V/50 Hz alternating current via a correctly installed earth
socket.
The socket must be fused with a 10 A fuse.
• The power supply cord may only be replaced by an electrician.
• Before installing, tie a piece of string to the power supply cord to facilitate connection to point (A) when
the appliance is being installed.
• When inserting the appliance into the high-sided cupboard, DO NOT crush the power supply cord.
• Do not immerse the power supply cord or plug in water or any other liquid.
A)
(
ELECTRICAL CONNECTIONS
WARNING:
THIS APPLIANCE MUST BE EARTHED
The manufacturer declines any liability
should this safety measure not be
observed.
If the plug that is fitted to your appliance is not
suitable for your socket outlet, you must call your
local Electrolux service agent.
28
Page 29

SOMMAIRE
Avertissements importants de sécurité . . . . . . . . . . . . . . . . . . . . . . . . . . . . . . . . . . .30 - 32
Four et accessoires . . . . . . . . . . . . . . . . . . . . . . . . . . . . . . . . . . . . . . . . . . . . . . . . . . .33
Bandeau de commande . . . . . . . . . . . . . . . . . . . . . . . . . . . . . . . . . . . . . . . . . . . . . . .34
Avant la mise en service . . . . . . . . . . . . . . . . . . . . . . . . . . . . . . . . . . . . . . . . . . . . . . .34
Régler l’horloge . . . . . . . . . . . . . . . . . . . . . . . . . . . . . . . . . . . . . . . . . . . . . . . . . . . . .35
Conseils de cuisson aux micro-ondes . . . . . . . . . . . . . . . . . . . . . . . . . . . . . . . . . . .36 - 37
Vaisselle pour fours à micro-ondes . . . . . . . . . . . . . . . . . . . . . . . . . . . . . . . . . . . . . . . .38
Niveau de puissance du micro-ondes . . . . . . . . . . . . . . . . . . . . . . . . . . . . . . . . . . . . . .39
Fonctionnement manuel . . . . . . . . . . . . . . . . . . . . . . . . . . . . . . . . . . . . . . . . . . . . . . .39
Autres fonctions pratiques . . . . . . . . . . . . . . . . . . . . . . . . . . . . . . . . . . . . . . . . . .40 - 41
Fonctionnement automatique . . . . . . . . . . . . . . . . . . . . . . . . . . . . . . . . . . . . . . . . . . . .42
Tableaux de programmes automatiques . . . . . . . . . . . . . . . . . . . . . . . . . . . . . . . . .43 - 45
Recettes pour programmes automatiques AC-6 et AC-7 . . . . . . . . . . . . . . . . . . . . . .45 - 46
Tableaux de cuisson . . . . . . . . . . . . . . . . . . . . . . . . . . . . . . . . . . . . . . . . . . . . . .47 - 48
Recettes . . . . . . . . . . . . . . . . . . . . . . . . . . . . . . . . . . . . . . . . . . . . . . . . . . . . . . .48 - 50
Entretien et nettoyage . . . . . . . . . . . . . . . . . . . . . . . . . . . . . . . . . . . . . . . . . . . . . . . . .51
Que faire si... . . . . . . . . . . . . . . . . . . . . . . . . . . . . . . . . . . . . . . . . . . . . . . . . . . . . . .52
Garantie/service-clientèle . . . . . . . . . . . . . . . . . . . . . . . . . . . . . . . . . . . . . . . . . . . . . .53
Declaration de conditions de garantie (belgique) . . . . . . . . . . . . . . . . . . . . . . . . . . . . . .54
Caracteristiques . . . . . . . . . . . . . . . . . . . . . . . . . . . . . . . . . . . . . . . . . . . . . . . . . . . . .55
Information importante . . . . . . . . . . . . . . . . . . . . . . . . . . . . . . . . . . . . . . . . . . . . . . . .55
Installation . . . . . . . . . . . . . . . . . . . . . . . . . . . . . . . . . . . . . . . . . . . . . . . . . . . . .56 - 57
FRANÇAIS
Le symbole sur le produit ou son emballage indique que ce produit ne peut être traité comme déchet
ménager. Il doit plutôt être remis au point de ramassage concerné, se chargeant du recyclage du matériel
électrique et électronique. En vous assurant que ce produit est éliminé correctement, vous favorisez la
prévention des conséquences négatives pour l’environnement et la santé humaine qui, sinon, seraient le
résultat d’un traitement inapproprié des déchets de ce produit. Pour obtenir plus de détails sur le recyclage
de ce produit, veuillez prendre contact avec le bureau municipal de votre région, votre service
d’élimination des déchets ménagers ou le magasin où vous avez acheté le produit.
29
Page 30

AVERTISSEMENTS IMPORTANTS DE SÉCURITÉ
AVERTISSEMENTS DE SECURITE IMPORTANTES: LES LIRE ATTENTIVEMENT ET LES
ONSERVER SOIGNEUSEMENT POUR CONSULTATIONS ULTERIEURES.
C
our éviter toutdanger d’incendie
P
Vous devez surveiller le four lorsqu’il est en
fonctionnement. Un niveau de puissance trop
levé, ou un temps de cuisson trop long, peuvent
é
entraîner une augmentation de la température des
aliments conduisant à leur enflammation.
La prise secteurdoit être facilementaccessible de manière à ce
que la fiche du cordon d’alimentation puisse être aisément
débranchéeencasd’urgence.
La tension d’alimentation doit être égale à 230 V, 50 Hz avec
un fusible de distribution de 10 A minimum, ou un disjoncteur
de10A minimum.
Nous conseillons d’alimenter ce four à partir d’un circuit
électriqueindépendant.
Nerangezpas etn’utilisez pasle four à l’extérieur.
Si les aliments que chauffe le four viennent à
fumer, N’OUVREZ PAS LA PORTE. Mettez le four
hors tension, débranchez la prise du cordon
d’alimentation et attendez que la fumée se soit
dissipée. Ouvrez le four alors que les aliments
fument peut entraîner leur enflammation.
N’utilisez jamaisd’eau.
N’utilisez que des récipients et des ustensiles
conçus pour les fours à micro-ondes. Voir la page
38.
Surveillez le four lorsque vous utiliser des
récipients en matière plastique à jeter, des
récipients en papier ou tout autre récipient
pouvant s’enflammer.
Nettoyez le cadre du répartiteur d’ondes, la cavité
du four, le plateau tournant et le pied du plateau
après chaque utilisation du four. Ces pièces doivent
être toujours sèches et dépourvues de graisse. Les
accumulations de graisse peuvent s’échauffer au
point defumeroude s’enflammer.
Ne placez pas des produits susceptibles de s’enflammer au
voisinage dufourou deses ouvertures deventilation.
N’obstruezpas les ouvertures de ventilation.
Retirez toutes les étiquettes, fils, etc. métalliques qui peuvent se
trouver sur l’emballage des aliments. Ces éléments métalliques
peuvent entraînerla formationd’unarcélectrique qui à sontour
peut produire un incendie. N’utilisez pas ce four pour faire de
la friture. La température de l’huile ne peut pasêtre contrôlée et
l’huile peuts’enflammer.
N’employez pas de récipients en matiére plastique, papier,
carton et tous matériaux qui ne supporteraient pas l’effet de la
chaleur dela résistance.
Ne faites rien sécher dans le four a micro-onde. Des objets
peuvent s’enflammer (papierjournal, vêtements...)
Pour faire despopcorns,n’utilisez quelesustensiles conçuspour
les fours à micro-ondes.
Ne conservez aucun aliment ou produit à l’intérieur du four.
Vérifiez les réglages après mise en service du four et assurezvous que le four fonctionne correctement. Lisez et utilisez cette
notice d’utilisation.
Pour éviter toute blessure
VERTISSEMENT:
A
N’utilisezpas lefour s’il est endommagé ou nefonctionne pas
normalement. Vérifiezles points suivants avant tout emploi du
four:
a) La porte: assurez-vous qu’elle ferme correctement, qu’elle
ne présente pas de défaut d’alignement et qu’elle n’est
pas voilée.
b) Les charnières etlesloquets de sécurité:assurez-vous qu’ils
nesontni endommagésnidesserrés.
c) Le joint de porte et la surface de contact: assurez-vous
qu’ils nesontpasendommagés.
d) L’intérieur de la cavité et la porte: assurez-vous qu’ils ne
sont pas cabossés.
e) Le cordond’alimentationet sa prise: assurez-vous qu’ils ne
sont pas endommagés.
Vous ne devez rien réparer ou remplacer vousmême dans le four. Faites appel à un personnel
qualifié. N'essayez pas de démonter l'appareil ni
d'enlever le dispositif de protection contre l'énergie
micro-onde, vous risqueriez d'endommager le
four etde vousblesser.
Ne faites pas fonctionner le four porte ouverte et ne modifier
pas lesloquets de sécurité de laporte.
N’utilisez pas le four si un objet est interposé entre le joint de
porteet lasurface decontact du joint.
Ne laissez pas les dépôts de graisse ou de saleté
s'incruster sur les joints de porte et les surfaces
voisines. Reportez-vous aux instructions de la
section “Entretien et Nettoyage” page 51. Le nonrespect des consignes de nettoyage du four
entraînera une détérioration de la surface
susceptible d'affecter le bon fonctionnement de
l'appareil et de présenterdesrisques.
Si vous avez un STIMULATEUR CARDIAQUE, consultez votre
médecin ou le fabricant du stimulateur afin de connaître les
précautions quevous devez prendrelors de l’utilisation du four.
Dans le cas de petites quantités(une saucisse, uncroissant, etc.)
posezun verred’eau a côtédel’aliment.
Pour éviter toute secousseélectrique
Dans aucun cas vous ne devez déposer la carrosserie
extérieuredufour.
N’introduisez aucun objet ou liquide dans les ouvertures des
verrous de la porte ou dans les ouïes d’aération. Si un liquide
pénètre dans le four, mettez-le immédiatement hors tension,
débranchez la prise du cordon d’alimentation et adressez-vous
à unservice aprés vente.
Ne plongez pas la prise du cordon d’alimentation dans l’eau
outoutautre liquide.
Nelaissez lecordond'alimentationau-dessus d'aucunesurface
chaude oupointue, tellequelazone de ventilation du four.
Netentezpasde remplacer vous-mêmela lampe du fouret ne
laissez personne d'autre qu'un professionnel qualifié faire ce
travail.
Si la lampe du four grille, adressez-vous au revendeur ou à un
service aprés-venteELECTROLUX.
30
Page 31

AVERTISSEMENTS IMPORTANTS DE SÉCURITÉ
Si le cordon d’alimentation de cet appareil est endommagé,
aites-leremplacerparunprofessionnel qualifié.
f
Les interrupteurs de verrouillage de sécurité incorporés
empêchent lefour á micro-ondesde fonctionner lorsque laporte
est ouverte.
N’installez paset n’utilisez pasvotre appareil sicelui-ciprésente
neanomalie lorsdudéballage. Installez oupositionnezcefour
u
uniquement selon les instructions d’installation contenues dans
cettenotice.
Si l’installation électrique nécessite une modification pour le
branchementdevotre appareil,faites appelà unélectricienqualifié.
Pour éviter toute explosion ou ébullition soudaine
AVERTISSEMENT: Lesliquides ou autres alimentsne
doivent pas être réchauffés dans des récipients
ferméscarils risquent d'exploser.
N’utilisez jamais aucun récipient scellé. Retirer les rubans
d’étanchéité et le couvercle avant tout utilisation d’un tel
récipient. Un récipient scellé peut exploser en raison de
l’augmentation depression et ce, même aprèsquele four a été
mis hors service.
Prenez des précautions lorsque vous employez les micro-ondes
pour chauffer des liquides. Utilisez des récipients à large
ouverture demanière quelesbulles puissent s’échapper.
Le chauffage par micro-ondes des boissons peut
avoir comme conséquence l'ébullition éruptive
retardée,doncle soindoit êtrepris enmanipulant le
récipient.
Pour éviter toute ébullition soudaine et toutrisque:
1. Remuez leliquide avantdele chauffer ou dele réchauffer.
2. Placez une tige de verre ou un objet similaire dans le
récipient contenant leliquide.
3. Conservez le liquide quelque temps dans le four pendant
au moins 20 secondes à la fin de la période de chauffage
demanière à évitertoute ébullitionsoudaine différée.
N’utilisez pas de produits chimiques corrosifs dans cet
appareil.
Ne pas cuire les oeufs dans leur coquille et ne pas
réchauffer les oeufsdurs entiers dans lefour microondes car ils risquent d'exploser même après que
le four ait fini de chauffer. Pour cuire ou réchauffer
des œufs qui n’ont pas été brouillés ou mélangés,
percez le jaune et le blanc pour afin d’éviter qu’ils
n’explosent. Retirer la coquille des œufs durs et
coupez-les en tranches avant de les réchauffer
dansun four à micro-ondes.
Percez la peaudes aliments tels que les pommes de terre et les
saucisses avantde les cuire,carils peuventexploser.
Pour éviter toute brûlure
Utilisez un porte-récipient ou des gants de protection lorsque
vous retirezles aliments dufourde façonà évitertoute brûlure.
Ouvrez les récipients, les plats à popcorn, les sacs de cuisson,
etc. de telle manière que la vapeur qui peut s’en échapper ne
puisse vous brûler lesmains oule visage.
Pour éviter toute brûlure, contrôlez la température
des aliments et remuez-les avant de les servir, en
particulier lorsqu’ils sont destinés à des bébés, des
enfants ou des personnes âgées. Réchauffez les
biberons sans la tétine.
Latempérature durécipient est trompeuse et ne reflètepas celle
des alimentsque vousdevez vérifier.
Tenez-vouséloigné du fourau momentoù vous ouvrez saporte
de manière à éviter toute brûlure due à la vapeur ou à la
chaleur.
Coupez en tranches les plats cuisinés farcis après chauffage
afin delaisser s’échapper lavapeuretd’éviterles brûlures.
Veillez à ce que les enfants ne touchent pas la porte du four
pour éviter les brûlures.
Pour éviter toute mauvaise utilisation par les
enfants
AVERTISSEMENT: Ne laisser les enfants utiliser le
four sans surveillance que si des instructions
appropriées ont été données de manière à ce que
les enfants puissent utiliser lefour entoute sécurité
et comprennent les dangers encourus en cas
d'utilisation incorrecte.
L'utilisation de cet appareil n'est pas destinée aux personnes (y
compris les enfants) soufrant d'un handicap physique, sensoriel
ou mental ou ne justifiant pas de l'expérience et des
connaissances nécessaires, à moins qu'elles ne soient
supervisées ou n'aient été formées à l'utilisationde cet appareil
par unepersonne responsable de leursécurité.
Les enfants doivent êtresousconstantesupervision afin d'assurer
qu'ils nejouentpas avecl'appareil.
Le verre à feu, la porcelaine, la faïence, la céramique, la terre
cuite non poreuse résistent aux températures élevées et peuvent
satisfaire à toutes les utilisations. Les récipients de cuisson
peuvent devenir brûlants par conduction de la chaleur des
aliments vers le récipient. Portez des gants de protection pour
les retirer dufour.
Il est recommandé de couvrir les aliments dans la plupart des
cas; ils seront plus savoureux et votre appareil restera propre.
Cependant, avant de cuire des aliments ou de réchauffer des
liquidesdans une bouteilleou unrécipient hermétique, retirez le
bouchon oule couvercle.
Faites attention en retirant les couvercles ou les films de
protection des plats car une vapeur brûlante est soudainement
libérée.
Les enfants ne doivent se servir du four que sous la surveillance
d’un adulte.
Empêchez qu’ils ne s’appuient sur la porte du four. Ne les
laissez pas jouer avec lefourquin’est pasun jouet.
Vous devez enseigner aux enfants les consignes de sécurité
telles: l’usage d’un porte-récipient, leretrait avec précaution des
produits d’emballage des aliments. Vous devez leur dire de
porter une attention particulière aux emballages (par exemple,
ceux qui sont destinés à griller un aliment) dont la température
peut êtretrèsélevée.
Autresavertissement.
Nemodifiez oun’essayezpas demodifier lefour.
Vous ne devez pas déplacer le four pendant son
fonctionnement.
Ce four a été conçu pour la préparation d'aliments et ne doit
être utilisé que pour leur cuisson. Il n’a pas été étudié pour un
usagecommercial ou scientifique.
Pour éviter une anomalie de fonctionnement et pour
éviter d’endommager lefour.
FRANÇAIS
31
Page 32

AVERTISSEMENTS IMPORTANTS DE SÉCURITÉ
e jamais faire fonctionner le four sans plateau tournant ou à
N
vide.Sinon vous risquezd’endommagerle four.
Si vous utilisez un plat brunisseur ou un plat en matière
autochauffante, interposez une protection contrela chaleur (par
exemple, un plat en porcelaine) de manière à ne pas
ndommager le plateau tournant et le pied du plateau. Le
e
temps de préchauffage précisé dans le guide de recette ne doit
pas être dépassé.
Assurez-vous que laporteestbienfermée, que ses surfaces sont
propres. Nettoyez-les réguilièrement avec une éponge humide,
pour éviter l’accumulation de toutes graisses, salissures,
éclaboussures. Ces dépôts absorbent l’énergie et réduisent
d’autant l’efficacité du four. N’utilisez pasla cavitédu four pour
stocker. Ne laissez pas de produits en papier, des ustensilesde
cuisine ou des aliments dans la cavité lorsque l’appareil n’est
pas utilisé.
Ne faites jamais chauffer de bouillote à l’intérieur de four à
micro-ondes.
N’utilisez pas une sonde thermique d’un four traditionnel dans
votre four à micro-ondes. Cependant, afin de connaître la
température de cuisson à cœur, vous pouvez mesurer le degré
de cuisson de l’aliment avec un thermométre <<spécial
viande>>. Ne laissez pas ce thermométre dans le four en
fonctionnement. Débranchez l’appareil s’il n’est pas utilisé
pendant uncertain temps (vacances...).
N’utilisez aucun ustensile métallique car ils réfléchissent les
micro-ondes et peuvent provoquer un arc électrique. N’oubliez
pas d’enlever les liens et les agraphes métalliques. Ne tentez
pas de cuire ou de réchauffer les aliments dans une boîte de
conserve etn’utilisez pasde bouteilles capsulées.
N’utilisez que le plateau tournant et le pied du plateau conçus
pour cefour.N’utilisez jamaisle four sanslaplateau tournant.
Pour éviter decasserleplateau tournant:
(a) Avantdenettoyerleplateau tournant, laissez-le refroidir.
(b) Ne placez pas desalimentschauds ouun plat chaud sur le
plateautournant lorsqu’il est froid.
(c) Ne placez pas des aliments froids ou un plat froid sur le
plateautournant lorsqu’il est chaud.
Ne posez aucun objet sur la carrosserie du four pendant son
fonctionnement.
REMARQUES:
Si vous avez des doutes quant à la manière de brancher le
four, consulter untechnicien qualifié.
Ni le fabricant ni le distributeur ne peuvent être tenus pour
responsable des dommages causés au four ou des blessures
personnelles qui résulteraient de l’inobservation des consignes
debranchement électrique.
Des gouttes d’eau peuvent se formersur les paroisdela cavité du
four, autour des joints etdesportéesd’étanchéité. Cela ne traduit
pas undéfaut defonctionnement nidesfuitesdemicro-ondes.
Des gouttes d’eau peuvent se former sur les parois de la cavité
du four, autour des joints et des portées d’étanchéité. Cela ne
traduit pas un défaut de fonctionnement ni des fuites de microondes.
Assurez-vous également que les décors ne sont pas à base
d’élémentsmétalliques.Dans le doute,n’hésitezpasà procéder
autestdu verred’eau.
• Test du verre d’eau Ce test très simple vous permet de juger
si un récipient est apte à la cuisson par micro-ondes Placez
dans le four le récipient à tester vide et posez à l’intérieur
u à côté de celui-ci un verre rempli d’eau qui absorbera
o
l’énergie micro-ondes. Faites fonctionner le four pendant
1 minute à la puissance maximum. Si le récipient à tester
restefroid,ilconvientà lacuisson par micro-ondes.
• Le papier absorbant vous rendra de grands services, vous
l’utiliserez par exemple pour envelopper le pain, les
brioches, les cakes...à décongler, pourgriller le bacon dontil
absorbera l’excès de matières grasses. Evitez l’emploi des
serviettes en papier de couleur qui pourraient déteindre. Le
papier sulfurisé et le papier paraffiné conviennent
parfaitement pour les cuissons en papillotes et pour couvrir
les plats. Lesassietteset les gobelets encarton seront réservés
pour réchaufferà faibletempérature.
• Lesmatières plastiques (plats, tasses, boîtes decongélationet
emballages en plastique) de qualité alimentaire réagissent
plus ou moins bien aux températures élevées etauxmatières
grasses chaudes. Réservez plutôt ces récipients aux
utilisations à faibles températures et à la décongélation.
Respectez les instructions dufabricanten utilisant duplastique
dans le four. Evitezd’utiliser des matières plastiques avec des
aliments ayant une forte teneur en matières grasses ou en
sucre, (ou des boissons) car ceux-ci atteignent des
températures élevées et pourraient faire fondre certains
plastiques.
Certaines formes de récipients favorisent une pénétration plus
homogènes des micro-ondesdanslesaliments.
Préférez les récipients peu profonds aux angles arrondis (plats
ronds ou ovales), adaptez au mieux les dimensions du plat au
volume des préparations, choisissez un plat de forme circulaire
du genre moule à savarin chaque fois que la nature de la
préparation le permet.
RÉCIPIENTS EN ALUMINIUM
Les barquettes en aluminium peuvent être utilisées en toute
sécurité pour réchauffer des aliments dans le four à microondes, dans les conditions suivantes :
1.Les barquettes en aluminium ne doivent pas dépasser 4 cm
deprofondeur.
2.N’utilisezpas decouvercles enfilmd’aluminium.
3.Les barquettes en aluminium doivent être remplis d’aliments
au moins aux deux tiers. N’utilisez jamais de récipients
vides.
4.Les barquettes en aluminium ne doivent pas être en contact
ou proche des parois du four (distance minimum 1 cm). La
barquette en aluminium devra être placée sur un plat
retournéaliantau four.
5.Les barquettes en aluminium ne doivent jamaisêtre réutilisées
dans lefour à micro-ondes.
6.Si le four à micro-ondes a été utilisé pendant 15 minutes ou
plus,laissez-le refroidir avant dele réutiliser.
7.Lerécipientetle plateautournant peuventdevenir très chauds
pendant leurutilisation.
Utilisezdesgants de protection.
8.Les durées de réchauffage ou de cuisson peuvent être
prolongées avec un récipient en film d’aluminium. Assurezvous que les alimentssontchaudsavant de servir.
32
Page 33
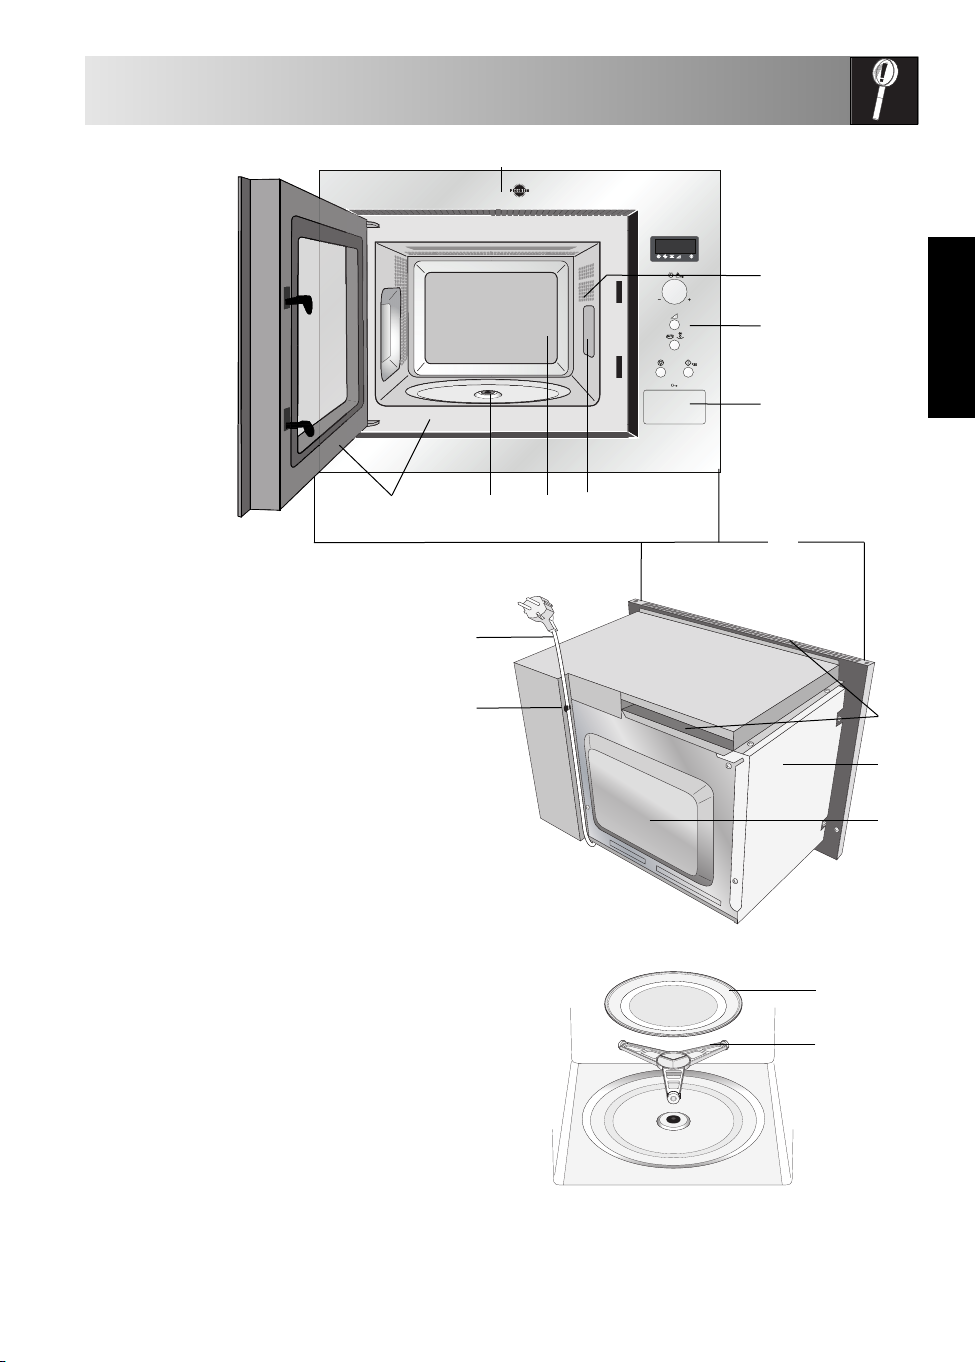
FOUR ET ACCESSOIRES
1
2
3
4
FRANÇAIS
1. Encadrement avant
2. Eclairage du four
3. Bandeau de commande
4. Ouverture de la porte
5. Entraînement
6. Cavité du four
7. Joint de porte et surface de contact du joint
8. Cadre d’ouverture de la porte
9. Points de fixation (x4)
10. Ouvertures de ventilation
11. Enveloppe extérieure
12. Compartiment arrière
13. Cordon d'alimentation clip de support
14. Cordon d'alimentation
ACCESSOIRES:
Vérifiez que les accessoires suivants sont fournis:
(15) Plateau tournant (16) Support d'entraînement
(17) 4 vis de fixation (non visualisées)
• Placez le pied du plateau dans l’entraînement
sur la base inférieure de la cavité.
• Placez ensuite le plateau tournant sur le support
de rotation.
• Pour éviter d’endommager le plateau tournant,
veillez à ce que les plats ou les récipients soient
levés sans toucher le bord du plateau tournant
lorsque vous les enlevez du four.
REMARQUE: Lorsque vous commandez des
accessoires, veuillez mentionner deux éléments:
le nom de la pièce et le nom du modèle à votre
revendeur ou un service aprés ventre
ELECTROLUX.
14
13
78
56
9
10
11
12
15
16
33
Page 34
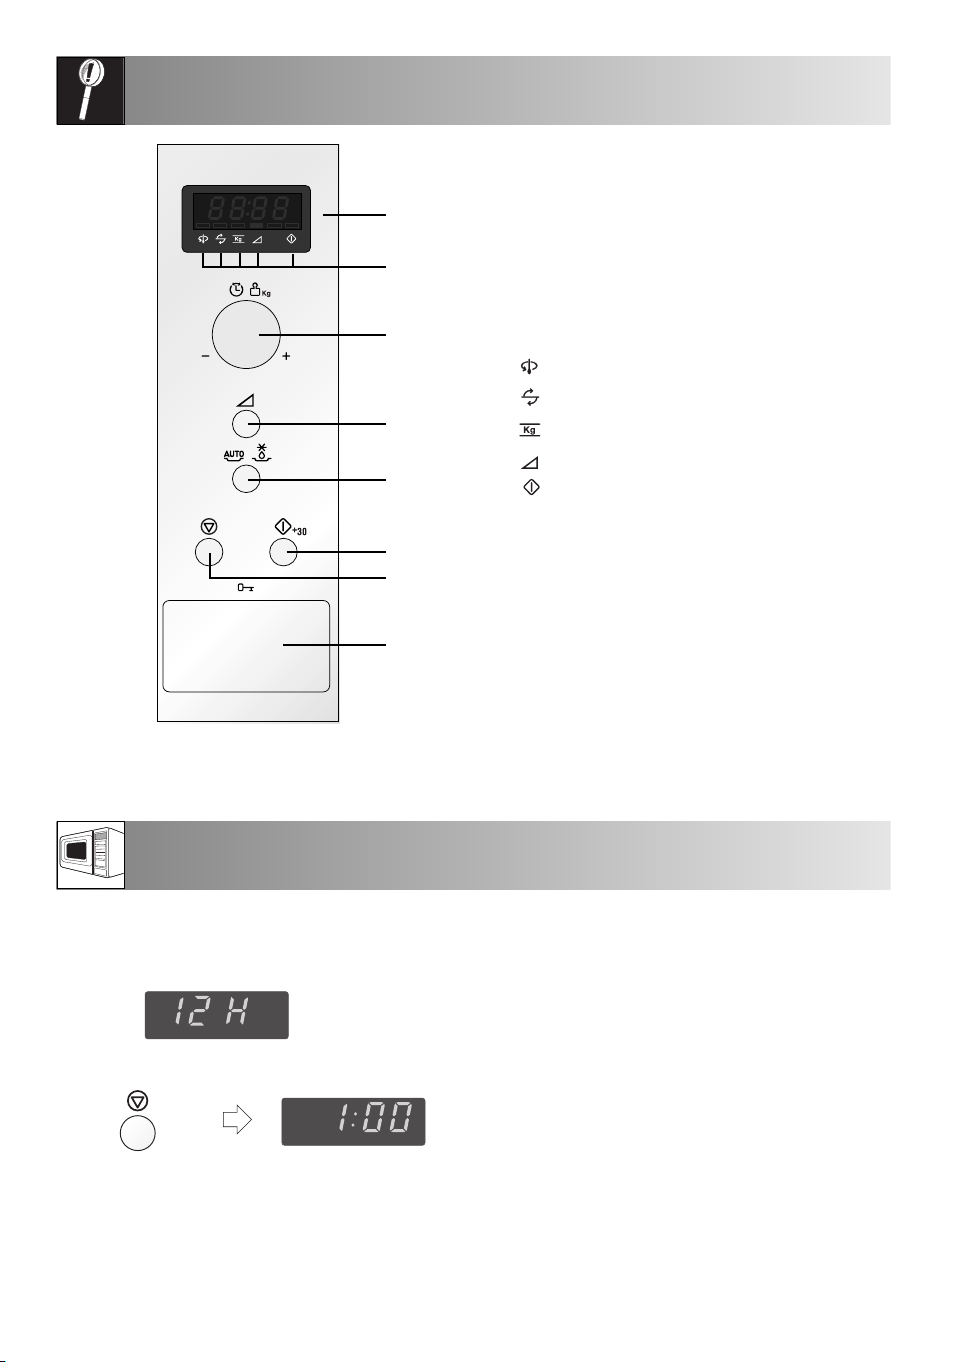
BANDEAU DE COMMANDE
1 Affichage numérique
2 Symboles
1
2
3
4
5
3 Bouton rotatif MINUTEUR/POIDS
6
7
8
4
5 Touche PROGRAMMES AUTOMATIQUES
6 Touche START/+30
7 Touche ARRET
8 Touche OUVERTURE DE LA PORTE
L’indicateur correspondant clignotera ou
s’allumera juste au-dessus du symbole, en
fonction de l’instruction. Lorsqu’un indicateur
clignote, appuyez sur la touche correspondante
(marquée du même symbole) ou effectuez
l’action nécessaire.
Remuer
Retourner
KG/Poids
Niveau de puissance
Cuisson
Touche NIVEAU DE PUISSANCE MICRO-ONDES
Appuyez pour sélectionner l’un des 12
programmes automatiques.
AVANT LA MISE EN SERVICE
Branchez la prise
1. L’affichage indique:
2. Appuyez sur la touche ARRET, l’affichage indique:
x1
Réglez l’horloge comme suit.
Utilisation de la touche ARRET (STOP).
Utilisez la touche ARRET pour:
1. Effacer une erreur durant la programmation du
four.
2. Interrompre momentanément la cuisson.
3. Arrêter un programme de cuisson (dans en ce
cas, appuyez deux fois sur cette touche).
34
Page 35
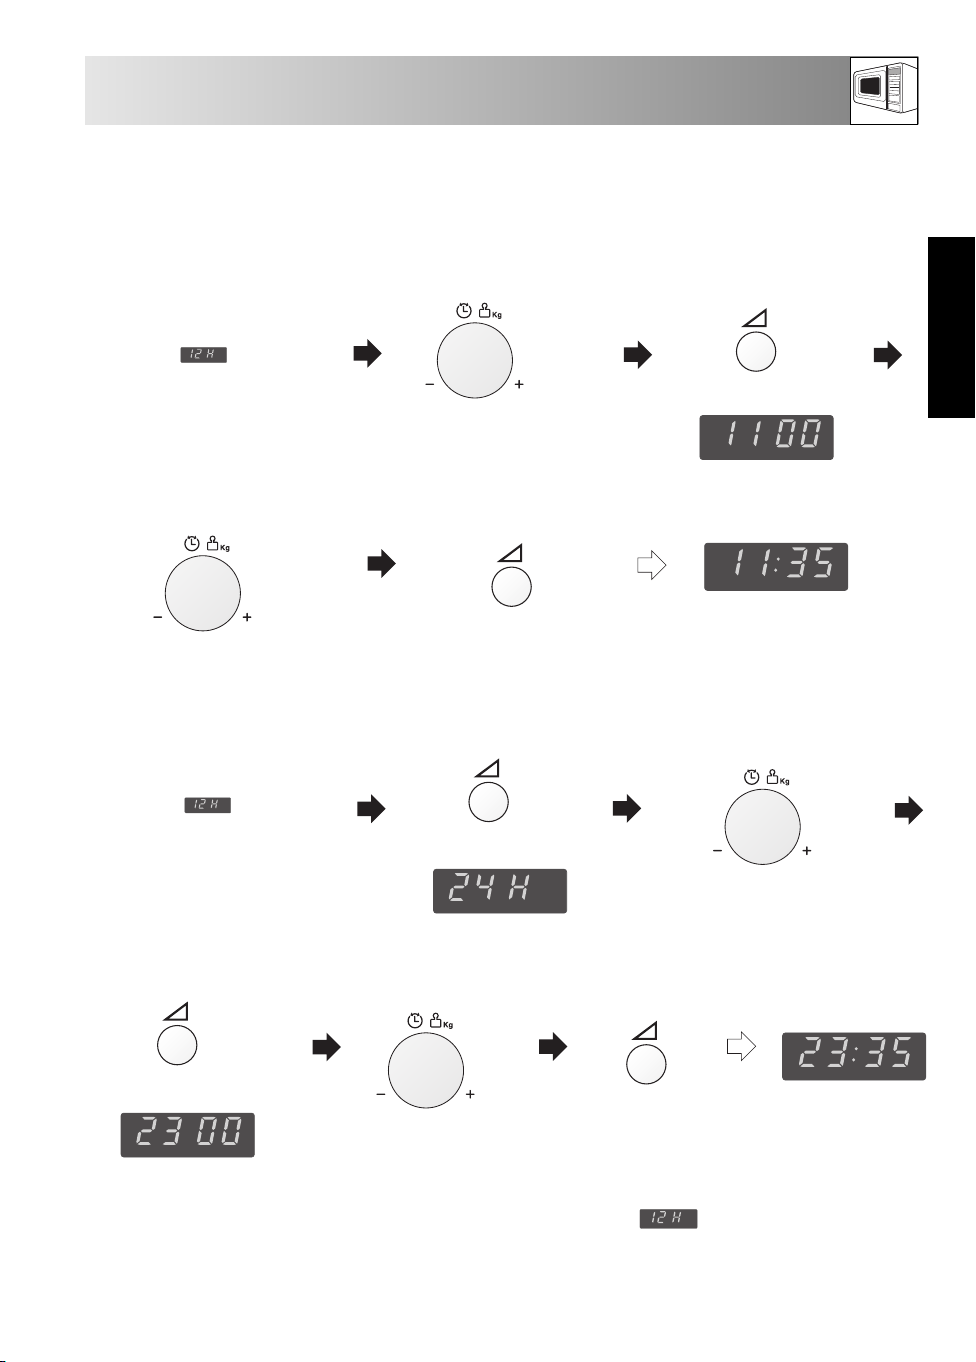
RÉGLER L’HORLOGE
Ily a deux modes de réglage : horloge sur 12 heures et horloge sur 24 heures.
Pour régler l’horloge, suivre l’exemple ci-dessous.
Exemple: Pour régler l’horloge en mode 12 heures à 11:35.
1. Pour sélectionner l’horloge sur
12 heures, maintenez la
touche NIVEAU DE
PUISSANCE MICROONDES enfoncée pendant 3
secondes. apparaît
dans l’affichage.
2. Réglez les heures. Tournez le bouton
rotatif MINUTEUR/POIDS
jusqu’à ce que l’heure correcte
s’affiche (11).
3. Appuyez sur la touche
NIVEAU DE PUISSANCE
MICRO-ONDES POUR
passer des heures auxminutes.
x
Vérifier l’affichage.
1
FRANÇAIS
4. Réglez les minutes. Tournez le bouton
MINUTEUR/POIDS
rotatif
jusqu’à ce que le réglage des minutes
correct s’affiche (35).
5. Appuyez sur la touche NIVEAU DE
PUISSANCE MICRO-ONDES à
pour afficher l’horloge.
Exemple: Pour régler l’horloge en mode 24 heures à 23:35.
1. Pour sélectionner l’horloge sur
24 heures, maintenez la
touche NIVEAU DE
PUISSANCE MICROONDES enfoncée pendant 3
secondes. apparaît
dans l’affichage.
4. Appuyez sur la touche
NIVEAU DE PUISSANCE
MICRO-ONDES POUR
passer des heures auxminutes.
2. Appuyez sur la touche
NIVEAU DE PUISSANCE
MICRO-ONDES POUR
passer des 12 heures aux24
heures.
Vérifier l’affichage.
5. Réglez les minutes. Tournez le
bouton rotatif MINUTEUR/
POIDS
des minutes correct s’affiche (35).
jusqu’à ce que le réglage
x1
Vérifier l’affichage.
x1
3. Réglez les heures. Tournez le bouton
rotatif MINUTEUR/POIDS
jusqu’à ce que l’heure correcte
s’affiche (23).
6. Appuyez sur la touche NIVEAU DE
PUISSANCE MICRO-ONDES à
pour afficher l’horloge.
Vérifier l’affichage.
x1
Vérifier l’affichage.
REMARQUES:
1. Vous pou v e z tour n e r le bo u t o n rot a t i f
MINUTEUR/POIDS dans le sens des aiguilles d’une
montre ou dans le sens contraire.
2. Appuyez sur la touche ARRET (STOP) en cas
d’erreur de programmation.
3. Si l’alimentation électrique de votre four à micro-ondes
x1
est interrompue, l’affichage indiquera par
intermittence après le retour du courant. Si
cela a lieu pendant la cuisson, le programme sera
effacé. L’heure sera également effacée.
4. Pour régler l’heure à nouveau, suivez à nouveau
l’exemple ci-dessus.
35
Page 36

CONSEILS DE CUISSON AUX MICRO-ONDES
Les micro-ondes sont des ondes d'énergie similairesà celles
des signaux de télévision etderadio. L'énergie électrique
est convertieen énergie à micro-ondes.Cette énergie se
propage dans lacavité du fourpar lebiaisd'unguide
d'ondes.
Leguide d'ondes estprotégéparun couvercle afin
d'empêcher toutepénétration de graisseet d'aliments.
Dans lamesureoùles micro-ondes nepeuventpas
traverser le métal, lacavitédu four est enmétal etla porte
est recouverte d'une finegrille métallique. Durantlacuisson,
les micro-ondes rebondissent de manièrealéatoire sur les
parois de lacavitédufour.
Les micro-ondes traversent certains matériaux, tels que
leverre et leplastique, permettant ainsi la cuisson des
aliments(voir Section «Vaisselle pour fours à micro-ondes »
pages38).
L'énergie à micro-ondes doitdoncpouvoirtraverserle
matériaudurécipientpour cuire/décongelerlesaliments
Ilest par conséquentimportant dechoisir des plats
adaptés à lacuisson aufour àmicro-ondes.
Choisissez depréférence desplats ronds/ovales plutôt
que desrécipientscarrés/oulongs, car les aliments placés
dans les angles tendent àêtre trop cuits. Ilestpossible
d'utiliser unvaste éventailde plats(voir liste pages 38).
Les micro-ondes sont absorbées par lesmolécules
d'eau, de graisse et desucre contenuesdans lesaliments.
Sous l'effet des micro-ondes, ces moléculesse mettent à
vibrer.Cette agitationgénère suffisamment dechaleurpour
cuireles aliments (dela même façon quevosmains se
réchauffentlorsquevousles frottez).
L'énergie à micro-ondes chauffel'extérieur desaliments
etla chaleur sepropage au centre par conduction,comme
pour lacuisson conventionnelle.Il est par conséquent
important de retourner, redisposer ou remuer les aliments
durant la cuisson pourassurerunecuissonuniforme.
Une fois la cuissonterminée, lefour cesse
automatiquementde produiredesmicro-ondes.
Ilest nécessairedelaisser les aliments reposeraprès la
cuisson,afinde permettre àlachaleurde sepropager de
manière uniforme.
Les micro-ondes cuisent les alimentsplus rapidement
que lesméthodes de cuissonconventionnelles. Il est par
conséquent essentiel de respecter certaines techniques pour
garantirdebons résultats. Bon nombre des techniques
suivantes sont semblables àcelles utiliséesdansles
méthodesdecuisson traditionnelles.
CARACTÉRISTIQUES DES ALIMENTS
Composition Lesaliments richesengraisse ou ensucre (p. ex. lesplum-puddingsetlespiècesminces)exigent untemps de cuisson
moindre. Procédezavecsoin, car ilspourraient prendrefeuencasdesurchauffe!
Densité La densité des aliments affecteletemps decuisson nécessaire. Lesaliments légers etporeux, tels que les gâteaux etle
pain,cuisent plus rapidement quelesaliments lourds etdenses, tels que lesrôtis etlesragoûts.
Quantité Le temps de cuissons'accroît proportionnellement à laquantitédes aliments placés dans lefour.Il faut ainsiplus de
tempspour cuirequatrepommes deterre que deux.
Taille Lesaliments/morceaux de petitetaille cuisentplus rapidementdansla mesure où les micro-ondes peuventsepropager
aucentredes aliments detouslescôtés. Lacuisson estd'autant plusrégulièrequeles morceaux ontlamême taille.
Forme Les aliments dont la forme est irrégulière, telsque leblanc depouletoulespilonsexigent un temps de cuissonsupérieur
pour leurs partiesles plusépaisses.Les aliments deforme arrondie cuisentdefaçon plusuniforme que les alimentsde
formecarrée.
Température La température initialedes aliments affecteletempsdecuisson nécessaire. Les alimentscongeléscuisentmoins viteque
les alimentsquisetrouventà températureambiante.Faitesune entaille dans les aliments fourrés(beignetsà la
confiture,etc.) pourlaisser la chaleurou la vapeur s'échapper.
36
Page 37

CONSEILS DE CUISSON AUX MICRO-ONDES
TECHNIQUES DE CUISSON
Disposez les Placezles parties lesplus épaissesdes aliments versl'extérieur duplat (p.ex.pilons).
aliments
Recouvrez Utilisezun film alimentaire pourmicro-ondes ouun couvercle adéquat.
Percez Les alimentsquicomportent une coquille, une peau ouunemembrane doiventêtre percésà plusieurs reprisesavant
d'être cuitsou réchauffés, car l'accumulation devapeurpourrait les faireexploser(p. ex. pommes de terre, poisson,
poulet,saucisses).
Important:ilest déconseillé decuireles oeufsaufourà micro-ondes,car ceux-ci risquentd'exploser, mêmeune foisla
cuisson terminée (p. ex. oeufs pochés,frits, durs).
Remuez, Pourobtenir unecuisson uniforme, ilestessentielderemuer, tourner et redisposer lesaliments pendant la cuisson.
tournezet Remuez etredisposez toujours lesalimentsenpartant del'extérieurversle centre.
redisposez
les aliments
Laissez Ilestnécessaire delaisser lesalimentsreposeraprès lacuisson, afindepermettre à lachaleur de sepropager
reposer de manièreuniforme.
Protégez Certaines partiesdes aliments peuvent chauffer quandon lesdécongèle. Protégez cesparties à l'aide depetites s
ectionsdefilm aluminium quirefléterontles micro-ondes (p. ex. lespatteset lesailes d'un poulet).
DÉTERMINATION DU TEMPS DE CUISSON AVEC LE THERMOMÈTRE DE CUISINE
A la fin de la cuisson, chaque boissonet chaque aliment
ont une certainetempératureintérieure (température à
cœur). Une fois cette température atteinte,on peut
arrêterla cuisson, on obtiendra un bon résultat.
Vous pouvez déterminer la température intérieureà
l’aide d’un thermomètre de cuisine. Letableau des
températures ci-dessous indique les températures
principales.
FRANÇAIS
Boisson / aliment Température intérieure Température intérieure
à la fin du temps de aprés un temps de
cuisson repos de 10 - 15 min
Réchauffer des boissons 65-75oC
(Café, thé, eau, etc.)
Réchauffer du lait 60-65oC
Réchauffer des soupes 75-80oC
Réchauffer des potées 75-80oC
Volailles 80-85oC 85-90oC
Viande Saignant 70oC 70-75oC
d’agneaubien cuit 75-80oC 80-85oC
Rosbeef Saignant 50-55oC 55-60oC
Viande de porc, de veau 80-85oC 80-85oC
à point 60-65oC 65-70oC
bien cuit 75-80oC 80-85oC
37
Page 38

VAISSELLE POUR FOURS À MICRO-ONDES
Kochgeschirr Mikrowell Kommentare
Film aluminium/ / Ilest possible d'utiliserde petites sections defilmaluminium pour prévenir la surchauffe des
barquettesen aliments. Lefilm aluminium doit êtredistant de 2 cmau moinsdesparois dufour pour
aluminium éviter laformation d'arcs électriques. Ilestdéconseillé d'utiliser desbarquettes en
Platsbrunisseurs
Porcelaineet
céramique une utilisation en micro-ondes,saufs'ils comportent des décorationsmétalliques.
Platsen verre
(p. ex.Pyrex ®) desefendreen casde changementde température soudain.
Métal
Récipient en Procédez avec soincar certains récipients peuvent sedéformer, fondre ouse décolorer à
plastique/ températureélevée.
polystyrène
(contenants de
restaurationrapide)
Film alimentaire
Sacs de
congélation à une utilisationen micro-ondes.N'utilisez pas d'attachesenplastique ou enmétal,
/brunisseurs car ellesrisqueraient de fondre oude prendrefeu (arcélectrique).
Assiettes,gobelets
essuie-tout en car ilspeuvent prendrefeu encasdesurchauffe.
papier
Récipientsen Ne laissezpas lefour sans surveillance lorsque vousutilisez ces matériauxcar ils peuvent
paille ouenbois prendre feu en cas desurchauffe.
Papier recyclé
journaux de provoquer unincendie.
-ensicher
aluminium,à moins que leur usage ne soitspécifié par le fabricant. Respectez
soigneusement lesconsignesd'utilisation.
Respectez toujours les consignes dufabricant. Nedépassez jamais les temps de cuisson
indiqués. Procédez avecsoincar ces platspeuvent être trèschauds.
/ Les platsen porcelaine, poterie,faïence et porcelaine tendre conviennent généralement à
Procédez avec soinencasd'utilisation deplats enverre fin, car ils risquent de secasserou
L'utilisation de plats en métal dans unfourà micro-ondesest déconseillée, enraisondu
risque d'arcélectrique etd'incendie.
Lefilmnedoit pas être aucontact desaliments etdoit être percépour laisser lavapeur
s'échapper.
Ils doivent êtrepercéspourlaisser la vapeur s'échapper. Vérifiez quelessacsconviennent
Ils ne doivent être utilisés quepour réchaufferouabsorberetl'humidité.Procédez avecsoin
Ilspeuvent contenirdes fragmentsdemétal, susceptibles etde produireun arcélectrique et
38
Page 39

NIVEAU DE PUISSANCE DU MICRO-ONDES
Vous avez le choix entre 5 niveaux de puissance.
Consultez les indications fournies dans les recettes
pour déterminer le niveau de puissance à utiliser.
D’une manière genérale, nous vous conseillons de
procéder comme suit:
800 W Pour une cuisson rapide ou pour réchauffer
un plat (par ex. soupes, ragoûts, conserves, boissons
chaudes, légumes, poisson, etc.)
560 W Pour cuire plus longtemps les aliments plus
denses, tels que les rôtis, les pains de viande, les plats
sur assiettes et les plats délicats tels que les sauces au
fromage et les gâteaux de Savoie.
Ce niveau de puissance réduit évitera de faire
déborder vos sauces et assurera une cuisson uniforme
de vos aliments (les côtés ne seront pas trop cuits).
Pour régler la puissance, appuyez sur la touche de NIVEAU DE PUISSANCE MICRO-ONDES jusqu’à
ce que le niveau désiré soit affiché. Si vous n’appuyez qu’une seule fois sur la touche de NIVEAU DE
PUISSANCE MICRO-ONDES, sera affiché. Si vous dépassez la puissance que vous désirez
utiliser, continuez d’appuyer sur la touche NIVEAU DE PUISSANCE MICRO-ONDES jusqu’à ce que le
niveau de puissance désiré soit à nouveau affiché. Si vous ne choisissez aucun niveau de
puissance, c’est le niveau 800 W qui est automatiquement utilisé.
400 W Convient aux aliments denses nécessitant
une cuisson traditionnelle prolongée (les plats de
bœuf par exemple). Ce niveau de puissance est
recommandé pour obtenir une viande tendre.
240 W Décongélation: utilisez ce niveau de
puissance pour décongeler vos plats de manière
uniforme. Idéal pour faire mijoter le riz, les pâtes,
les boulettes de pâte et cuire la crème renversée.
80 W Pour décongeler délicatement les aliments
tels que les gâteaux à la crème ou les pâtisseries.
W = WATT
FONCTIONNEMENT MANUEL
Vous pouvez choisir le temps de cuisson 90 minutes
(90.00). L’augmentation du temps de cuisson
(décongélation) varie de 10 secondes à cinq
minutes. Elle dépend de la durée totale de cuisson
(décongélation) indiquée dans le tableau.
Temps de cuisson Poids ou volume
0-5 minutes 10 secondes
5-10 minutes 30 secondes
10-30 minutes 1 minute
30-90 minutes 5 minutes
FRANÇAIS
Exemple: Supposons que vous vouliez réchauffer une soupe pendant 2 minutes et 30 secondes à mi-puissance 560 W.
1. Entrez le temps de cuisson souhaité en
tournant le bouton rotatif MINUTEUR/
POIDS dans le sens des aiguilles d’une
montre. (2 min. 30 sec.)
REMARQUES :
1. Quand la porte est ouverte pendant le processus de cuisson, le temps de cuisson de l’affichage numérique
s’arrête automatiquement. Le temps de cuisson reprend le décompte à rebours quand la porte est fermée et
que la touche
2. Si vous voulez connaître le niveau de puissance pendant la cuisson, appuyez sur la touche NIVEAU DE
PUISSANCE MICRO-ONDES. Tant que votre doigt est appuyé sur la touche NIVEAU DE PUISSANCE
MICRO-ONDES, le niveau de puissance est affiché.
3. Vous pouvez tourner le bouton rotatif MINUTEUR/POIDS dans le sens des aiguillesd’unemontre ou en sens inverse.
Si vous tournez le bouton dans le sens inverse, le temps de cuisson diminue par paliers à partir de 90 minutes.
START/+30 est appuyée.
2. Choisissez le niveau de puissance voulu
en appuyant deux fois sur la touche
NIVEAU DE PUISSANCE MICROONDES.
x2
3. Appuyez une fois sur la
START/+30
touche
pour démarrer la cuisson.
x1
Vérifiez l’afficheur.
39
Page 40
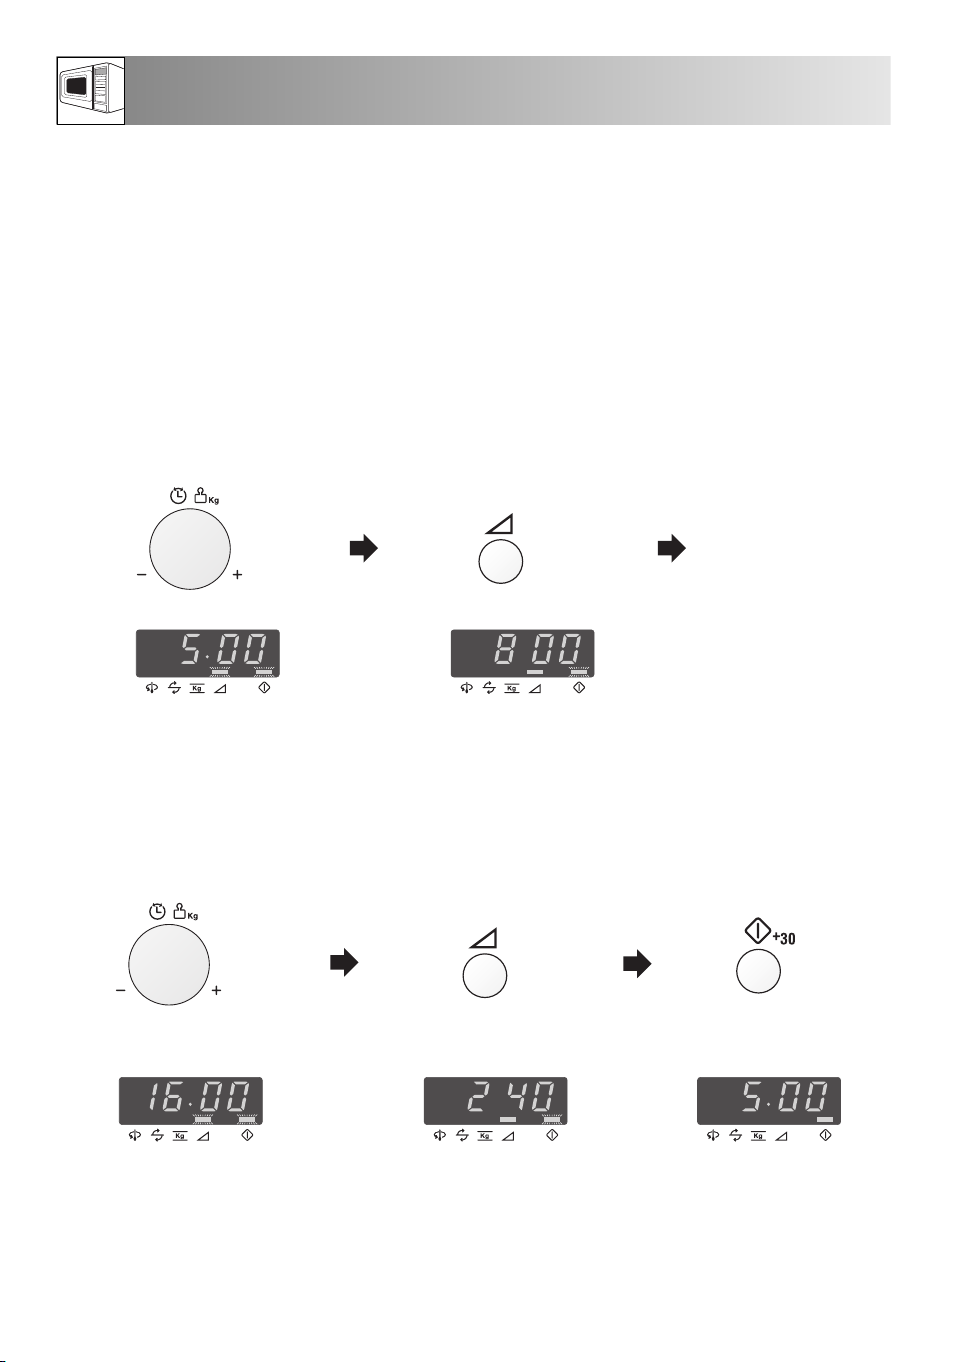
AUTRES FONCTIONS PRATIQUES
1. CUISSON A SEQUENCES MULTIPLES
Il est possible de saisir un maximum de 3 séquences, comprenant le temps et mode de cuisson normale.
Exemple:
Pour cuire: 5 minutes à la puissance 800 W (Etape 1)
16 minutes à la puissance 240 W (Etape 2)
ETAPE 1
1. Entrez le temps de cuisson
souhaité en tournant le
bouton rotatif
MINUTEUR/POIDS.
2. Choisissez le niveau de
puissance voulu en appuyant
une fois sur la touche NIVEAU
DE PUISSANCE MICROONDES.
x1
ETAPE 2
3. Entrez le temps de cuisson
souhaité en tournant le
bouton rotatif MINUTEUR/
POIDS.
(Le four cuira d’abord pendant 5 minutes à puissance 800 W, puis pendant 16 minutes à 240 W.)
4. Choisissez le niveau de
puissance voulu en appuyant
quatre fois sur la touche
NIVEAU DE PUISSANCE
MICRO-ONDES.
x4
5. Appuyez une fois sur la
touche START/+30 pour
démarrer la cuisson.
Vérifier l’affichage.
40
x1
Page 41

AUTRES FONCTIONS PRATIQUES
2. FONCTION AJOUTER 30 SECONDES
La touche START/+30 vous permet d’utiliser les deux fonctions suivantes:
a. Démarrage direct
Vous pouvez commencer directement la cuisson micro-ondes à la puissance 800 W pendant 30 secondes en
appuyant sur la touche START/+30.
REMARQUE:
Pour éviter une manipulation abusive par les enfants, la touche START/+30 peut être utilisée uniquement
dans la 3 minutes qui suit l’opération précédente, par exemple, la fermeture de la porte ou l’appui sur la
touche ARRET (STOP).
b. Augmentation du temps de cuisson
Vous pouvez prolonger le temps de cuisson pendant la cuisson manuelle par paliers de 30 secondes en
appuyant de nouveau sur la touche pendant le fonctionnement du four.
3. VERIFICATION DU NIVEAU DE PUISSANCE
Pour vérifier le niveau de puissance du micro-ondes pendant la cuisson, appuyez sur la touche NIVEAU DE
PUISSANCE MICRO-ONDES.
x1
Tant que vous gardez appuyé la touche NIVEAU DE PUISSANCE MICRO-ONDES, le niveau de
puissance est affiché.
Le four continue le décompte à rebours bien que l’affichage indique le niveau de puissance.
4. VERROUILLAGE DE SECURITE
FRANÇAIS
POUR ETABLIR LA FONCTION
VERROUILLAGE DE SECURITE
1. Appuyez sur la touche STOP et maintenez-la
enfoncée pendant 3 secondes.
x1 et maintenir pour 3 sec.
Vérifier l’affichage.
REMARQUE: Quand la fonction Verrouillage de sécurité est établie vous ne pouvez utiliser aucune
touche autre que la touche STOP.
POUR ANNULER LA FONCTION
VERROUILLAGE DE SECURITE
1. Appuyez sur la touche STOP et maintenez-la
enfoncée pendant 3 secondes.
x1 et maintenir pour 3 sec.
L’affichage indiquera l’heure, si
la fonction est établie.
41
Page 42

FONCTIONNEMENT AUTOMATIQUE
Le fonction AUTOMATIQUE calcule automatiquement le
mode et le temps de cuisson corrects. Vous disposez de 7
programmes de CUISSON AUTOMATIQUE et 5
programmes de DÉCONGÉLATION AUTOMATIQUE.
Ce que vous devez savoir lors de l’utilisation de cette
fonction:
1. Appuyez une fois sur la touche PROGRAMMES
AUTOMATIQUE pour faire apparaître l’affichage
suivant.
Pour choisir le programme voulu, appuyez sur la touche
PROGRAMMES AUTOMATIQUE jusqu'à l’affichage
de ce programme. Voir pages 43 - 45 tableau de
PROGRAMMES AUTOMATIQUE.
Pour sélectionner un menu de décongélation, appuyez
sur le touche PROGRAMMES AUTOMATIQUE 8 fois
au moins. Lorsque vous aurez appuyé sur cette touche 8
fois, s’affichera à l’écran. Vous pouvez
changer le menu automatiquement en maintenant
appuyé le touche PROGRAMMES AUTOMATIQUE.
2. Pour choisir le poids d’aliments, tournez le bouton
MINUTEUR/POIDS jusqu'à l’affichage des
paramètres de poids voulus.
• Indiquez le poids des aliments seulement.
Ne pas inclure le poids du récipient.
• Pour un aliment dont le poids est supérieur ou inférieur aux
quantités données dans le tableaux de automatique,
utilisez les programmes manuels. Pour obtenir les meilleurs
résultats, suivre les tableaux de cuisson (pages 47 - 48).
3. Pour démarrer la cuisson, appuyez sur la touche
START/+30.
Lorsqu’une action de votre part est nécessaire (par
exemple retourner les aliments), le four s’arrête, les
signaux sonores retentissent et le temps restant et le
voyant clignotent sur l’affichage. Pour continuer la
cuisson, appuyez sur le bouton START/+30.
1.
a touche
l
AUTOMATIQUE
x1
Numéro de
menu
2.
le bouton rotatif
MINUTEUR/
POIDS
3.
La température finale varie selon la température
initiale des aliments. Vérifiez que la nourriture
est très chaude après cuisson. Si nécessaire,
vous pouvez rallonger le temps de cuisson et
changer le niveau de puissance.
la touche
START/+30
Exemple:
Pour cuire 1,0 kg de Gratin servez vous CUISSON AUTOMATIQUE AC-7.
1. Sélectionnez le menu nécessaire
en appuyant sept fois sur la
touche PROGRAMMES
AUTOMATIQUE.
x7
2. Entrez le poids en tournant le
bouton rotatif MINUTEUR/POIDS
dans le sens des aiguilles d’une
montre.
42
3. Appuyez sur la touche
START/+30.
x1
Vérifiez l’affichage.
Page 43

TABLEAUX DE PROGRAMMES AUTOMATIQUES
TOUCHE
x1
x2
x3
x4
x5
CUISSON
AUTOMATIQUE
AC-1 Cuisson
Légumes surgelés
AC-2 Cuisson
Légumes frais
AC-3 Cuisson
Plats préparés
surgelés
À remuer
(Mélangeables)
AC-4 Cuisson
Gratin surgelés
AC-5 Cuisson
Pommes de terre
bouillies,
Pommes de terre
en robe des
champs
QUANTITÉ/
UTENSILES
0,1 - 0,6 kg (100 g)
Bol et couvercle
0,1 - 0,6 kg (100 g)
Bol et couvercle
0,3 - 1,0 kg* (100 g)
Bol et couvercle
0,2 - 0,6 kg (100 g)
Plat à gratin ovale peu
profond et couvercle ou
original contenant et
couvercle
0,1 - 0,8 kg (100 g)
Bol et couvercle
PROCÉDURE
• Ajoutez 1 cuillère à soupe d’eau par 100 g et
une pointe de sel. (Pour les champignons, il n’est
pas nécessaire d’ajouter de l’eau).
• Mettez un couvercle.
• Quand que le signal sonore retentit, remuer et
couvrez à nouveau.
• Après cuisson, laissez reposer pendant env. 2
min.
IMPORTANT: Si les légumes surgelés sont
• Coupez les légumes en morceaux (cubes,
tranches, rondelles).
• Ajoutez 1 cuillère à soupe d’eau par 100 g et
une pointe de sel. (Pour les champignons, il n’est
pas nécessaire d’ajouter de l’eau).
• Mettez un couvercle.
• Quand que le signal sonore retentit, remuez et
couvrez à nouveau.
• Après cuisson, laissez reposer pendant env. 2
min.
• Versez le contenu dans un plat conçu pour la
cuisson micro-ondes.
Ajoutez du liquide si le constructeur le recommande.
•
• Mettez un couvercle. Faites cuire à découvert
si le constructeur le recommande.
•
Quand le signal sonore retentit, remuer et
compactés, cuisez-les manuellement.
couvrir à nouveau.
• Après cuisson, laissez reposer pendant env.
2 min.
• Retirez l’emballage du gratin congelé. Si le
contenant ne convient pas pour les fours à microondes, placez le gratin dans un plat à gratin.
•
Mettez un film étirable pour micro-ondes.
• Si le contenant convient pour les fours à microondes, retirez le couvercle d’origine et couvrir
de film étirable pour micro-ondes.
• Après cuisson, laissez reposer pendant env. 5
min.
Pommes de terre bouillies: Pelez les pommes de terre et
les coupez-les en morceaux de taille similaire.
Pommes de terre en robe des champs: Choisissez des
pommes de terre de taille similaire et lavez-les.
• Placez Pommes de terre bouillies ou Pommes
de terre en robe des champs dans un bol.
•
Ajoutez la 2 CS d’eau par 100 g et un peu de sel.
• Recouvrez d’un couvercle
• Quand que le signal sonore retentit, remuez et
couvrez à nouveau.
• Après cuisson, laissez reposer les pommes de
terre pendant 2 min.
FRANÇAIS
Important: La température initiale des aliments réfrigérés est de 5oC. Celle des aliments congelés est de -18oC.
43
Page 44

TABLEAUX DE PROGRAMMES AUTOMATIQUES
TOUCHE
TOUCHE
x9
x10
CUISSON
AUTOMATIQUE
AC-6 Cuisson
Filet de poisson
en sauce
x6
AC-7 Cuisson
Gratin
x7
DÉCONGÉLATION
AUTOMATIQUE
Ad-1
Décongélation
Steaks et
x8
Côtelettes
Ad-2
Décongélation
Viande hachée
Ad-3
Décongélation
Volaille
QUANTITÉ/
UTENSILES
0,4 - 1,2 kg* (100 g)
Plat à gratin et plastique
micro-ondes
0,5 - 1,5 kg* (100 g)
Plat à gratin et plastique
micro-ondes
QUANTITÉ/
UTENSILES
0,2 - 0,8 kg (100 g)
Plat à gratin
(Voir remarque à la
page 45.)
0,2 - 0,8 kg (100 g)
Plat à gratin
(Voir remarque à la
page 45.)
0,9 - 1,5 kg (100 g)
Plat à gratin
(Voir remarque à la
page 45.)
PROCÉDURE
• Voir recettes pour le “Filet de Poisson en
auce” à la pages 45 - 46.
S
* Poids total de tous les ingrédients
• Voir recettes pour le “Gratin” à la page 46.
* Poids total de tous les ingrédients.
PROCÉDURE
• Placer lesaliments dans un platà gratinau centre
duplateautournant.
• Quand que le signal sonore retentit,
retourner les aliments, redisposer et séparer.
Protéger les parties minces et les parties
déjà chaudes avec dupapieraluminium.
• Après décongélation, emballer dans du
papier aluminium pendant 10 - 15 min,
jusqu’à complète décongélation.
• Placez le morceau de viande hachée dans un
plat à gratin au centre du plateau tournant.
• Quand le signal sonore retentit, retourner la
viande. Retirer les parties décongelées si
possible.
• Après décongélation, couvrir de papier
aluminium et laisser reposer pendant 5-10
min, jusqu’à complète décongélation.
• Placer la volailledans un platà gratin, côté poitrail
dessous,aumilieu du plateautournant.
• Quandlesignal sonoreretentit, retourner la
volailleetprotéger les parties mincesetles parties
déjà chaudes avecdespetits morceauxde papier
aluminium.
• Aprèsdécongélation, couvrez d’une feuillede
papier aluminiumetlaissez reposer 15-30 min
jusqu’à complètedécongélation.
• Enfin, lavez lavolaille sous l'eau courante.
Important: La température initiale des aliments réfrigérés est de 5oC. Celle des aliments congelés est de -18oC.
44
Page 45

TABLEAUX DE PROGRAMMES AUTOMATIQUES
TOUCHE
Important: La température initiale des aliments réfrigérés est de 5oC. Celle des aliments congelés est de -18oC.
REMARQUES: Décongélation Automatique
1. Les steaks et côtelettes doivent être congelés en une couche.
2. Congelez la viande hachée en tranches fines.
3. Après avoir retourné, protégez les parties décongelées avec de petits morceaux plats de papier aluminium.
4. La volaille doit être cuite immédiatement après décongélation.
5. Les entremets recouverts de crème fouettée sont très sensibles aux micro-ondes. Pour obtenir les
meilleurs résultats, lorsque la crème commence à se ramollir rapidement, il faut sortir immédiatement
l’entremets du four et terminer sa décongélation à température ambiante pendant 10 à 30 minutes.
DÉCONGÉLATION
AUTOMATIQUE
Ad-4
Décongélation
Gâteau
x11
Ad-5
Décongélation
Pain
x12
QUANTITÉ /
UTENSILES
0,1 - 1,4 kg (100 g)
Plat
0,1 - 1,0 kg (100 g)
Plat à gratin
Ce programme n’est
(
recommandé que pour le pain
en tranches.)
• Retirer tout l’emballage du gâteau.
• Placer directement sur le plateau tournant,
ou sur une assiette au centre du plateau
tournant.
• Après décongélation, couper le gâteau en
portions identiques espacées et laisser
reposer pendant 10-30 min, jusqu’à ce que
le gâteau soit uniformément décongelé.
• Répartir sur un plat à gratin, au centre du
plateau tournant. Pour un pain de 1,0 kg,
disposer directement sur le plateau tournant.
• Quand le signal sonore retentit, retourner,
redisposer et enlever les tranches
décongelées.
• Après décongélation, couvrir de papier
aluminium et laisser reposer pendant 5-15
min, jusqu’à complète décongélation.
PROCÉDURE
FRANÇAIS
RECETTES POUR PROGRAMMES AUTOMATIQUES
AC-6 ET AC-7
FILET DE POISSON EN SAUCE (AC-6)
Filets de poisson avec sauce piquante
0,4 kg 0,8 kg 1,2 kg
140 g 280 g 420 g tomates en boîte (égouttées)
40 g 80 g 120 g mais
4 g 8 g 12 g sauce au Piment
12 g 24 g 36 g oignon (haché menu)
1 tsp 1-2 tsp 2 tsp vinaigre de vin rouge
moustarde,thym, poivrede cayenne
200 g 400 g 600 g filet de poisson (réfrigérer)
sel
1. Mélangez les ingrédients pour la sauce.
2. Mettez le filet de poisson dans le plat avec les
extrémités fines vers le centre et saupoudrez avec
sel.
3. Etalz la sauce préparée sur le filet de poisson.
4. Couvrez avec du plastique micro-ondes et faites
cuire en CUISSON AUTOMATIQUE AC-6
“Filet de Poisson en Sauce”.
5. Après la cuisson, laisser reposer env. 2 min.
45
Page 46

RECETTES POUR PROGRAMMES AUTOMATIQUES
AC-6 ET AC-7
FILET DE POISSON EN SAUCE (AC-6)
ilet de poisson au curry
F
0,4 kg 0,8 kg 1,2 kg
200 g 400 g 600 g de filet de poisson
sel
40 g 80 g 120 g banane (en tranche)
160 g 320 g 480 g sauce curry (prêt à servir)
GRATIN (AC-7)
Gratin d’epinards
0,5 kg 1,0 kg 1,5 kg
5 g 10 g 15 g beurre ou margarine
(beurrer le plat)
150 g 300 g 450 g d’épinards en branches
surgelés (décongeler, égoutter)
15 g 30 g 45 g oignon (haché menu)
150 g 300 g 450 g pommes de terre (coupées
35 g 75 g 110 g jambon cuit (coupé en dés)
50 g 100 g 150 g crème fraîche
123oeufs
40 g 75 g 115 g fromage (râper)
sel, poivre et muscade
en rondelles)
paprika en poudre
1. Mettez lefilet de poisson dansle plat avec les
extrémités fines vers le centre et saupoudrez avec sel.
2. Etalez lasauce prêt à servir et banane sur le filet de
poisson.
3. Couvrez avec du plastique micro-ondes et faites cuire
en CUISSON AUTOMATIQUE AC-6 “Filet de
Poissonen Sauce”.
4. Après la cuisson, laisser reposer env. 2 min.
1. Mélangez les épinards en branches avec l’oignon.
Assaisonnez avec du sel, du poivre et de la noix de
muscade râpée.
2. Beurrez le plat et remplissez-le de rondelles de
pomme de terre, les dés de jambon et les épinards
en couches alternées dans le plat. Terminez par une
couche d’épinards.
3. Mélanger les œufs et la crème fraiche, saler et
poivrer et verser sur le gratin.
4. Saupoudrer le gratin de fromage râpé et de poudre
de paprika et cuire sur CUISSON
AUTOMATIQUE AC-7, “Gratin”.
5. Après cuisson, laissez reposer pendant env. 5-10
min.
GRATIN (AC-7)
Gratin de pommes de terre et courgettes
0,5 kg 1,0 kg 1,5 kg
200 g 400 g 600 g pommes de terre
(coupées en lamelles)
115 g 230 g 345 g courgettes (en tranches fines)
75 g 150 g 225 g crème fraîche
123oeufs
1
/
2 12de ail (pressée)
sel, poivre
40 g 80 g 120 g fromage Gouda (râper)
10 g 20 g 30 g graines de tournesol
paprika en poudre
bouillies
1. Beurrez le plat. Remplissez-le de lamelles de
pomme de terre et de tranches de courgettes
en couches alternées.
2. Mélanger les œufs et la crème fraiche,
assaisonner avec l’ail, le sel et le poivre et
verser sur le gratin.
3. Saupoudrer le Gouda sur le gratin.
4. Enfin, saupoudrer le gratin de graines de
tournesol et de paprika et cuire sur CUISSON
AUTOMATIQUE AC-7,
“Gratin”.
5. Après cuisson, laissez reposer pendant env. 510 min.
46
Page 47

C = cuillerée à café
C
CS = cuillerée à soupe
G = matière grasse
M
kg = kilogramme
TABLEAUX DE CUISSON
ABREVIATIONS UTILISEES
= gramme
g
l = litre
l = millilitre
m
cm = centimètre
in = Minute
M
Boissons/mets Quant Puissance Temps Conseils de préparation
-g/ml- -Niveau- -Min-
Café, 1 Tasse 150 800 W env. 1 ne pas couvrir
Lait, 1 Tasse 150 800 W env. 1 ne pas couvrir
Eau, 1 Tasse 150 800 W 11/2-2 ne pas couvrir
6 Tasses 900 800 W 10-12 ne pas couvrir
1 Terrine 1000 800 W 111/2-13 ne pas couvrir
Une assiette-repas 400 800 W 3-6 asperger lasauce d’eau, couvrir, mélanger à
(Légumes, Viande et Garnitures) mi-réchauffage
Potée / Consommé 200 800 W 11/2-21/2couvrir, remuer après le réchauffage
Légumes 200 800 W 2-21/
500 800 W 4-5 mélanger à mi-réchauffage
Viande 1 Tranche* 200 800 W 3-4 tartiner d’un peudesauce, couvrir
Filet de Poisson* 200 800 W 2-3 couvrir
Gâteau, 1 portion 100 400 W1/
Aliments pour bébés. 1 pot 190 400 W env. 1 transférerdansunrécipientconvenantaux micro-ondes,bien
Faire fondre de la margarine ou du beurre*
Chocolat à fondre 100 400 W 2-3 mélangerde tempsen temps
* température du réfrigérateur
50 800 W1/
2
aubesoin, ajouter del’eau,couvrir et
2
2
poserdans un platà gratin
mélanger aprèsleréchauffageet vérifier la température
couvrir
TABLEAU:DECONGELATION ET CUISSON D’ALIMENTS
Aliments Quant Puissance Temps Addition d’eau Conseilsde préparation Repos
TABLEAU:RECHAUFFAGE DE BOISSONS ET DE METS
-g- -Niveau- -Min- -CS/ml-
Filet de poisson 300 800 W 10-12 - couvrir 1-2
Une assietterepas
Brocoli 300 800 W 7-9 3-5 couvrir, mélanger à mi-cuisson 2
Pois 300 800 W 7-9 3-5 couvrir,mélanger à mi-cuisson 2
Macédoine delégumes
400
500 800 W 11-13 3-5 couvrir,mélangerà mi-cuisson 2
800 W
9-11 -
couvrir, mélanger auboutde 6 minute
-Min-
2
FRANÇAIS
TABLEAU:DECONGELATION D’ALIMENTS
Aliments Quant Puissance Temps Conseils de préparation Repos
-g- -Niveau- -Min-
Viande rôtie (p.ex. porc, boeuf, 1500 80 W 58-64
agneau, veau) 1000 80 W 42-48
500 80 W 19-23 30-90
Goulasch 500 240 W 8-12
Saucisses: 8 600 240 W 6-9
4 300 240 W 4-5
Cuisse de poulet 200 240 W 4-5
Filets de poisson 400 240 W 7-10
2 petits pains 80 240 W env. 1
Gâteau, 1 portion 150 80 W 2-5
Fruit: par ex. cerises, fraises, 250 240 W 4-5
framboises, prunes
Les temps indiqués dans ce tableau sont des valeurs approximatives qui peuvent varier en fonction de la température des aliments surgelés, de
la nature et du poids des aliments.
placer dans unplat à gratin, retourner
à mi-décongélation
mélangerà mi-décongélation
placerl’une àcôté del’autre, retourner
àmi-décongélation
retourneràmi-décongélation
retourneràmi-décongélation
décongeler enpartie seulement
poser dans unplatà gratin
répartir uniformément,retournerà
mi-décongélation
47
-Min-
30-90
30-90
10-15
5-10
5-10
10-15
5-10
5
5
-
Page 48

T TABLEAUX DE CUISSON
TABLEAU:CUISSON DE VIANDES, DE POISSONS, DE VOLAILLES ET LEGUMES FRAIS
Viande, volaille Quant Puissance Temps Conseils de préparation Repos
et légumes -g- -Niveau- -Min- -Min-
Rôtis 500 800 W 8-10* assaisonner,placerdans un platà gratin 10
(p.ex. porc, 400 W 10-12 peu profond,retourner à mi-cuisson
veau, agneau) 1000 800 W 19-21* 10
400 W 11-14
1500 800 W 33-36* 10
400 W 13-17
Rôti debœuf 1000 800 W 9-11* assaisonner, placerdansun plat à gratin, 10
(àpoint) 400 W 5-7 retourner à mi-cuisson
Filet de poisson 200 800 W 3-4 assaisonner,placerdansun plat à gratin,couvrir 3
Poulet 1200 800 W 21-24 assaisonner, placer dansunplat à gratin 3
peu profond,retourner à mi-cuisson
Cuisses de poulet 200 800 W 3-4 assaisonner,placerdans un plat à gratin 3
Brocoli 500 800 W 9-11 sépareren bouquets, ajouter4-5CS d’eau, couvrir, -
remuer detemps entemps pendantlacuisson
Pois 500 800 W 9-11 ajouter 4-5 CS d’eau, couvrir, remuer -
detemps entemps pendantlacuisson
Carottes 500 800 W 10-12 couperen rondelles,couvrir,ajouter 4-5 CS d’eau, -
300 800 W 7-9 couvrir, remuerdetempsentemps pendantla cuisson -
Pommes de terre 500 800 W 9-11 couper engros morceauxde taille égale, ajouter unpeu -
desel,ajouter 150mld’eau, couvrir, remuer detemps en
tempspendant la cuisson
T RECETTES
Toutes les recettes de cette notice sont, à défaut
d’indication contraire, prévues pour quatre personnes.
ADAPTATIONDE RECETTES
CONVENTIONNELLESA LA CUISSON
AUX MICRO-ONDES
Si vous voulez préparer vos recettes favorites avec le
micro-ondes, vous devez respecter les conseils suivants:
réduisez les temps de cuisson d’un tiers à la moitié.
Suivez les indications des recettes de cette notice; les
aliments à forte teneur en liquide comme la viande, le
poisson, les volailles, les légumes, les fruits, les potées et
les soupes peuvent être cuits facilement au micro-ondes.
SOUPE AUX CHAMPIGNONS DE PARIS
Vaisselle: terrine à couvercle (2 litres)
Ingrédients
200 g de champignons de Paris coupés en
tranches
50g oignon, haché menu
300 ml de bouillon de viande
300 ml de crème
25 g de farine
25 g de beurre ou de margarine
sel et poivre
1 jaune d’œuf
150 g de crème fraîche
Il faut humecter la surface des aliments à faible teneur en
humidité comme par exemple les plats cuisinés; pourles
aliments crus qui doivent être cuits à l’étuvée, réduisez
l’addition de liquide aux deux tiers de la quantité
indiquée dans la recette originale. Le cas échéant,
rajoutez du liquide pendant la cuisson ; On peut
considérablement réduire l’addition de graisse. Une
faible quantité de beurre, de margarine ou d’huile suffit
à donner du goût aux mets. Le micro-ondes est donc
idéal pour cuire des plats à faible teneur en matières
grasses, parexemple dansle cadre d’un régime.
1. Mettez les légumes et le bouillon de viande dans
la terrine, couvrez et faites cuire.
8 - 9 Mn. 800 W
2. Réduisez tous les ingrédients en purée au mixer.
Ajoutez la crème.
3. Pétrissez la farine et le beurre et mélangez bien à
la soupe la pâte ainsi obtenue. Salez, poivez, couvrez
et faites cuire. Remuez à la fin du temps de cuisson.
4 - 6 Mn. 800 W
4. Mélangez le jaune d’œuf et la crème fraîche, puis
mélangez-les peu à peu à la soupe. Réchauffez
sans faire bouillir.
1 - 2 Mn. 800 W
Après la cuisson, laissez reposer la soupe environ
5 minutes.
48
Page 49

RECETTES
EMINCÉ DE VEAU À LA ZURICHOISE
Vaisselle: Terrine à couvercle (2 l)
Ingrédients
600 g de filet de veau
1 CS de beurre ou de margarine
50 g oignon, haché menu
100 ml de vin blanc
fond de sauce rôti, pour environ
1
/2I de sauce
300 ml de crème
1 CS de persil haché
JAMBON FARCI
Vaisselle: Plat à gratin ovale
(env. 26 cm de long)
Ingrédients
125 g d’épinards en branches, coupés
125 g de fromage blanc à 20 % MG
40 g d’emmenthal râpé
poivre moulu, paprika
6 tranches de jambon cuit (300 g)
125 ml d’eau
125 ml de crème
20 g de farine
20 g de beurre ou de margarine
10 g de beurre ou de margarine pour
graisser le plat
1. Couper le veau en bandes.
2. Beurrer le plat. Disposer la viande et l’oignon
dans le plat, couvrir et cuire. Remuer une fois en
cours de cuisson.
7 - 10 Mn.. 800 W
3. Ajouter le vin blanc, le fond de sauce et la
crème. Mélanger, couvrir et continuer la cuisson.
Mélanger de temps en temps.
4 - 5 Mn. 800 W
4. Une fois la cuisson terminée, mélanger et laisser
reposer env. 5 min. Saupoudrer de persil.
1. Mélanger les épinards avec le fromage râpé et le
fromage frais, assaisonner.
2. Garnir chaque tranche de jambon avec une
cuillérée à soupe de farce, la rouler et y enfoncer
une pique.
3. Faire une sauce béchamel: verser l’eau et la
crème dans un bol et réchauffer.
3 - 4 Mn. 800 W
Mélanger la farine et le beurre pour faire un roux,
ajouter le liquide et battre au fouet jusqu’à
obtention d’un mélange homogène. Couvrir et
cuire jusqu’à ce que la sauce épaississe.
1 Mn. 800 W
Mélanger et vérifier l’assaisonnement.
4. Verser la sauce dans le plat graissé. Y disposer
les roulades de jambon farcies et cuire avec le
couvercle.
3 - 4 Mn. 800 W
Après la cuisson, laisser reposer env. 5 min.
FRANÇAIS
LASAGNE AU FOUR
Vaisselle: Terrineà couvercle (2 l)
Platcarrépeuprofondavec
couvercle (environ 20x 20x 6cm)
Ingrédients
300 g de tomates en boîte
50 g de jambon, coupé
50 g oignon, haché menu
1 gousse d’ail broyée
250 g de bœuf haché
2 CS de concentré de tomate
sel, poivre
150 ml de crème fraiche
100 ml de lait
50 g de parmesan râpé
1 CC d’herbes variées hachées
1 CC d’huile d’olive
1 CC d’huile végétale pour graisser le plat
125 g de lasagnes vertes
1 CC de parmesan râpé
1. Couper les tomates et les mélanger avec le
jambon, l’oignon, l’ail, le bœuf haché et le
concentré de tomate. Assaisonner, couvrir et
cuire.
7 - 9 Mn. 800 W
2. Mélanger la crème fraîche, le lait, le parmesan,
les herbes, l’huile et les épices.
3. Graisser le plat et couvrir le fond avec environ
1
/3des lasagnes. Disposer la moitié du mélange
de viande hachée sur les lasagnes et verser un
peu de sauce. Recommencer et terminer avec le
reste des lasagnes. Couvrir les lasagnes de sauce
et saupoudrer de parmesan. Cuire avec le
couvercle.
15 - 17 Mn. 560 W
Après la cuisson, laisser reposer env. 5-10 min.
49
Page 50

RECETTES
RATATOUILLE SPECIALE
aisselle:terrine à couvercle (2 litre)
V
Ingrédients
5 CS d’huile d’olive
1 gousse d’ail broyée
50 g oignon, coupé en rondelles
250 g petite aubergine, coupée en gros dés
200 g courgette, coupée en gros dés
200 g poivron, coupés en gros dés
75 g tubercule de fenouil, coupés en gros dés
poivre
1 bouquet garni
200 g boîte de cœurs d’artichaut
sel et poivre
FILETS DE SOLE
Vaisselle: Plat à four ovale peu profond
Ingrédients
400 g de filets de sole
1 citron entier
150 g tomates
10 g de beurre
1 CS d’huile végétale
1 CS de persil haché
4 CS de vin blanc
20 g de beurre ou de margarine
Conseil: Vous pouvez aussi utiliser de la sébaste, du
et film alimentaire pour microondes
(env. 26 cm de long)
sel, poivre
mulet, du carrelet ou du cabillaud.
1. Mettez l’huile d’olive et la gousse d’ail dans la terrine.
Ajoutez les légumes à l’exception des cœurs
d’artichaut, poivrez. Ajoutez le bouquet garni, couvrez
et faites cuire en remuant de temps en temps.
19 - 21 Mn. 800 W
Cinq minutes avant la fin de la cuisson, ajoutez les
cœurs d’artichaut et réchauffez.
2. Salez et poivrez. Retirez le bouquet garni avant de
servir. Après la cuisson laissez la ratatouille
reposer approximativement 2 min.
Conseils:Servez la ratatouille chaude avaec des plats
de viande. Froide, c’est un excellent horsd’œuvre.
Conseils:Un bouquet garni est composé de: une
racine de persil légumes à potage, une
branche de livèche, une branche de thym et
quelques feuilles de laurier.
1. Lavez et séchez les filets de sole. Enlevez les
arêtes.
2. Couper le citron et les tomates en tranches fines.
3. Beurrer le plat. Disposer les filets de poisson dans
le plat et asperger d’huile végétale.
4. Saupoudrer le poisson de persil, le recouvrir des
tranches de tomates et assaisonner. Placer les
tranches de citron sur les tomates et arroser de vin
blanc.
5. Parsemer le citron de noisettes de beurre, couvrir
et cuire.
13 - 16 Mn. 800 W
Après la cuisson, laisser reposer env. 2 min.
GELÉE DE FRUITS ROUGES À LA SAUCE À
LA VANILLE
Vaisselle: 2 terrines à couvercle (2 litres)
Ingrédients
150 g de groseilles
150 g de fraises
150 g de framboises
250 ml de vin blanc
100 g de sucre
50 ml de jus de citron
8 feuilles de gélatine
300 ml de lait
pulpe d’une 1/2 gousse de vanille
30 g de sucre
15 g de fécule
1. Lavez les fruits, équeutez-les et séchez-les. Gardezen quelques-uns pour la décoration. Réduire le
reste des fruits en purée avec le vin blanc, versezles dans la terrine, couvrez et réchauffez.
7 - 9 Mn. 800 W
2. Incorporez le sucre et le jus de citron.
3. Faites tremper la gélatine approximativement 10
minutes dans l’eau puis retirez-la et extrayez l’eau.
Mélangez la gélatine à la purée de fruits chaude
jusqu’à ce qu’elle soit dissoute. Mettez la gelée au
réfrigérateur jusqu’à ce qu’elle soit ferme.
4. Versez le lait dans une terrine. Ouvrez la gousse
de vanille et grattez-en la pulpe. Mélangez la
pulpe de la vanille, le sucre et la fécule au lait,
courez et faites cuire. Remuez de temps en temps
et après la cuisson.
3 - 4 Mn. 800 W
5. Démoulez la gelée sur un plat et garnissez-la avec les
fruits entiers. servez-la avec la sauce à la vanille.
Conseil: Vous pouvez également utiliser des fruits
décongelés.
50
Page 51

ENTRETIEN ET NETTOYAGE
NE PROCÉDEZ AU NETTOYAGE QU’APRÈS
AVOIR DÉBRANCHÉ L’APPAREIL.
ATTENTION: N’UTILISEZ PAS DE DÉCAPE
FOURS VENDUS DANS LE COMMERCE OU
DE PRODUITS ABRASIFS OU AGRESSIFS,
OU DE PRODUITS QUI CONTIENNENT DE
LA SOUDE CAUSTIQUE, OU DE TAMPONS
ABRASIFS SUR UNE PARTIE QUELCONQUE
DE VOTRE FOUR À MICRO-ONDES.
REMA RQUE : VE ILLEZ À CE QUE LE
COUVERCLE DE GUIDE D’ONDES ET LES
ACCESSOIRES SOIENT CONSTAMMENT
PROPRES. Si vous laissez de la graisse
s’accumuler dans la cavité ou sur les
accessoires, celle-ci risquera de chauffer
et de provoquer la formation d’un arc et
de fumée, voire même de prendre feu lors
de l’utilisation suivante du four.
Extérieur du four
Nettoyez l’extérieur du four au savon doux et à
l’eau. Rincez pour éliminer l’eau savonneuse et
séchez avec un chiffon doux.
Bandeau de commande
Ouvrez la porte avant de le nettoyer pour rendre
inopérante le minut eur et le bandeau de
commande. Evitez de mouiller abondamment le
bandeau. N’utilisez pas de produit chimique ou
abrasif.
Intérieur du four
. Pour un nettoyage facile , essuyez les
1
éclaboussures et les dépôts à l’aide d’un chiffon
doux et mouillé ou une éponge après chaque
utilisation et pendant que le four est encore
tiède. Si les tâches résistent à un simple
nettoyage, utilisez de l’eau savoneuse puis
essuyez à plusieurs reprises à l’aide d’un chiffon
mouillé jusqu’à ce que tous les résidus soient
éliminés.
Les éclaboussures accumulées peuvent chauffer,
commencer à fumer, prendre feu et provoquer la
formation d’un arc.
2. Assurez-vous que l’eau savoneuse ou l’eau ne
pénètrent pas dans les petits trous des parois.
Sinon, elle risque de causer des dommages au
four.
3. N’utilisez pas un vaporisateur pour nettoyer
l’intérieur du four.
Plateau tournant et pied du plateau:
Enlevez tout d’abord le plateau tournant et le pied
du plateau. Puis, lavez le plateau tournant et le
pied du plateau au moyen d’eau savonneuse.
Enfin, essuyez le plateau tournant et le pied du
plateau avec un chiffon doux et mettez-les tous
deux sur l’égouttoir à vaisselle avant de les
remettre en place.
Porte
Pour enlever toutes les impuretés, nettoyez
fréquement la porte des deux côtes, le joint de la
porte ainsi que la surface des joints à l’aide d’un
chiffon humide. Il est déconseillé d'utiliser des
produits de nettoyage abrasifs ou des grattoirs en
métal pointus pour nettoyer la vitre de la porte du
four afin de ne pas rayer sa surface ni affaiblir le
verre.
FRANÇAIS
NOTE: Veillez à ne pas utiliser de décape four.
51
Page 52
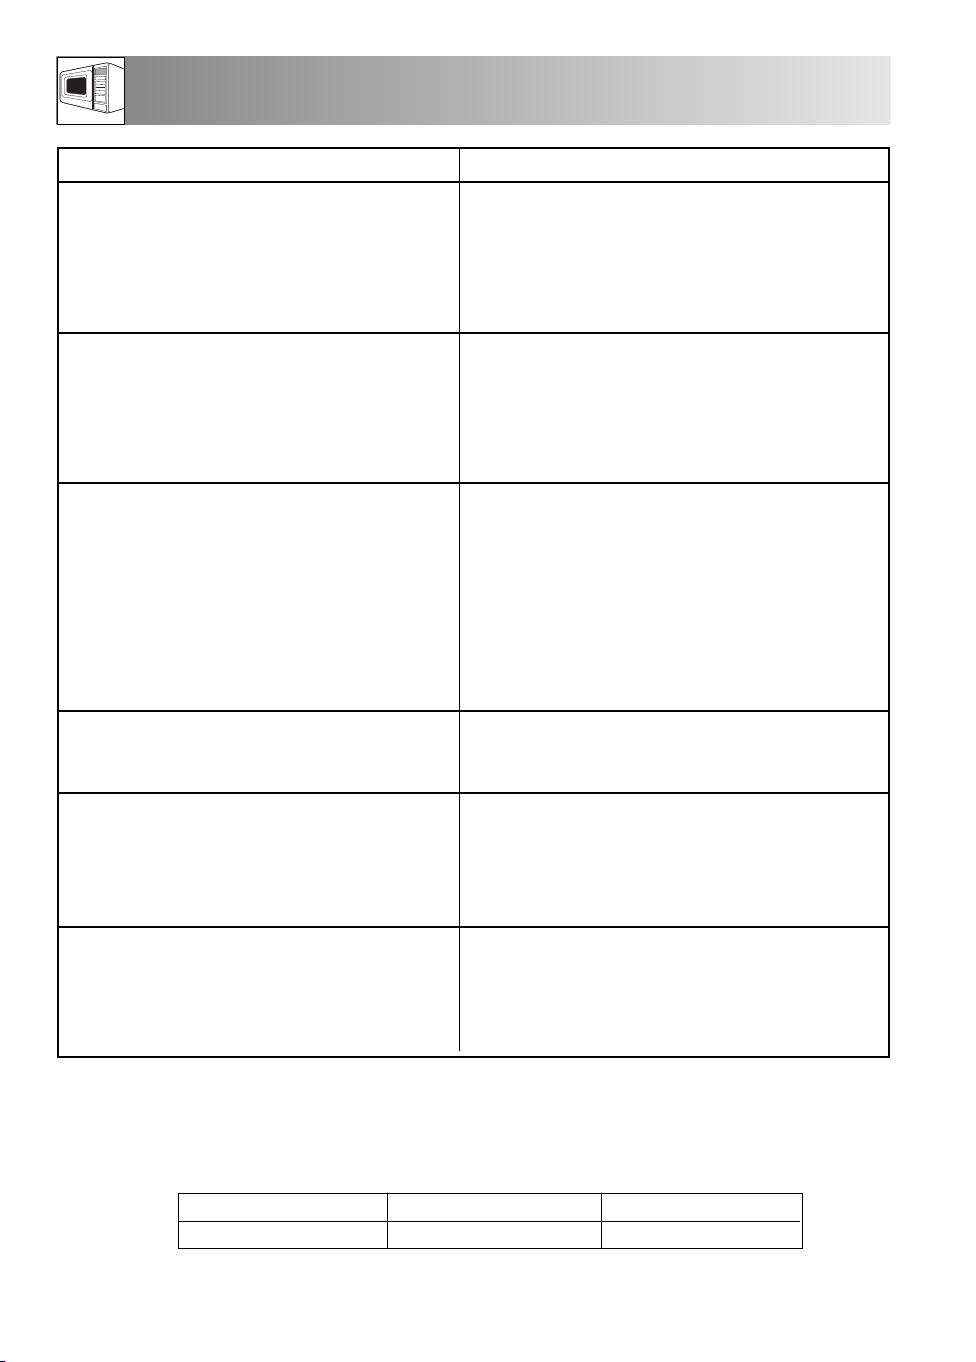
QUE FAIRE SI…
SYMPTÔME
... le four micro-ondes ne fonctionne pas
correctement ?
... le mode micro-ondes ne fonctionne
pas ?
... la plateau tournant ne fonctionne pas ?
... le four à micro-ondes ne s’éteint pas ?
REMÈDES DE SYMPTÔMES POSSIBLES
Vérifiez
- que les fusibles de la boîte à fusibles n’ont pas
sauté,
- qu’il n’y a pas de coupure de courant.
- Si les fusibles continuent de sauter, faites appel à
un électricien qualifié.
Vérifiez
- que la porte est bien fermée,
- que les joints de la porte et leurs surfaces sont
propres,
- que la touche START/+30 (démarrage) a été
enfoncée.
Vérifiez
- que le support du plateau tournant est raccordé
correctement à l’entraînement,
- que le plat de cuisson ne dépasse pas du plateau
tournant,
- que les aliments ne dépassent pas du plateau
tournant l’empêchant de tourner,
- qu’il n’y a rien dans la cavité située sous le
plateau tournante.
- Isolez l’appareil de la boîte à fusibles.
- Contactez votre revendeur ou un service après
vente ELECTROLUX agréé.
... l’éclairage intérieur ne fonctionne pas ?
... les aliments mettent plus longtemps à
chauffer et à cuire qu’auparavant ?
REMARQUE: si vous cuisez les aliments pendant la durée standard avec seulement 800 W, la puissance du
four sera réduite automatiquement pour éviter la surchauffe. (La puissance des micro-ondes sera
réduite à 560 W). Après une pause de 90 secondes, la puissance (800 W) peut être rétablie.
Mode de cuisson
Micro-ondes 800 W
Temps standard
20 minutes
- Contactez votre revendeur ou un service après vente
ELECTROLUX agréé. L’ampoule de l’éclairage
intérieur peut seulement être remplacée par votre
revendeur ou un service après vente ELECTROLUX
agréé.
- Réglez un temps de cuisson plus long (pour
quantité double = temps presque double) ou
- si l’aliment est plus froid que d’habitude, tournezle ou retournez-le de temps en temps ou
- réglez à une puissance de cuisson supérieure.
Puissance réduite
Micro-ondes 560 W
52
Page 53

GARANTIE/SERVICE-CLIENTÈLE
Garantie
Conformément à la Législation en vigueur, votre
Vendeur est tenu, lors de l'acte d'achat de votre
appareil, de vous communiquer par écrit les
conditions de garantie et sa mise en oeuvre
appliquées sur celui-ci.
Sous son entière initiative et responsabilité, votre
Vendeur répondra à toutes vos questions
concernant l'achat de votre appareil et les
garanties qui y sont attachées. N'hésitez pas à le
contacter.
Si vous devez nous contacter
Pour tenir nos engagements, nous écoutons les
Consommateurs Info Conso Electrolux est le lien
privilégié entre la marque et ses Consommateurs. Il
assure en permanence une double mission :
satisfaire au mieux vos exigences et tirer parti de
cette proximité pour améliorer sans cesse les
produits que nous vous proposons.
AVANT L'ACHAT
Toute une équipe répond avec clarté et précision à
vos sollicitations concernant l'éventail de nos
gammes de produits et vous apporte des infos pour
vous aider dans votre choix en fonction de vos
propres besoins.
APRÈS L'ACHAT
Exprimez-vous sur la perception que vous avez de
nos produits et votre satisfaction à l'usage. Mais
interrogez aussi nos spécialistes sur l'utilisation et
l'entretien de vos appareils. C'est alors que notre
mission prend tout son sens.
Ecouter, comprendre, agir : trois temps essentiels
pour tenir l'engagement de la marque dans le plus
grand respect du Consommateur.
Info Conso Electrolux BP 50142 - 60307 SENLIS
CEDEX
Tél. : 08 90 71 03 44 (0,15 € TTC/mn), Fax : 03
44 62 21 54, E-MAIL : info.conso@electrolux.fr
Permanence téléphonique du lundi au vendredi
Pour toute autre question :
Centre Contact Consommateurs, BP 20139 60307 SENLIS CEDEX
Tél. : 08 92 68 24 33 (0,34 € TTC/mn), E-MAIL :
ehp.consommateur@electrolux.fr
Permanence téléphonique du lundi au vendredi
Electrolux Home Products France S.A.S. au capital
de 67 500 000 € - 562 076 125 RCS
COMPIEGNE
Dans le souci d'une amélioration constante de nos
produits, nous nous réservons le droit d'apporter à
leurs caractéristiques toutes modifications liées à
l'évolution technique (décret du 24.03.78).
Garantie Europeenne
Cet appareil est garanti par Electrolux dans chacun
des pays énumérés au dos de cette notice et pour
la période spécifiée par la garantie ou, à défaut,
par la législation en vigueur. Si vous déménagez
d'un pays dans un autre pays repris dans la liste, la
garantie déménagera avec vous dans les
conditions suivantes:
• La garantie commence à la date à laquelle
l'appareil a effectivement été acheté à l'origine
telle qu'elle apparaîtra sur production d'un
document d'achat valable délivré par le
vendeur de l'appareil.
• La garantie est valable pour la même période et
couvre le remplacement de pièces détachées et
la main-d'oeuvre dans les mêmes conditions que
celles prévues pour votre nouveau pays de
résidence pour le type de modèle ou la gamme
d'appareils particuliers.
• La garantie de l'appareil est exclusivement
reconnue à l'acheteur d'origine et ne peut être
cédée à un autre utilisateur de l'appareil.
• L'appareil devra être installé et utilisé
conformément aux instructions fournies par
Electrolux, l'usage étant limité à des
applications ménagères et à des fins non
commerciales.
• L'appareil sera installé conformément à toutes
les prescriptions et législations en vigueur dans
votre nouveau pays de résidence.
Les dispositions de cette garantie européenne
n'affecte en aucune manière les droits qui vous sont
reconnus par la loi.
FRANÇAIS
53
Page 54

DECLARATION DE CONDITIONS
DE GARANTIE (BELGIQUE)
Nos appareils sont produits avec le plus grand soin. Malgré cela,
un défaut peut toujours se présenter. Notre service
lientèle se chargera de réparer ceci sur demande, pendant ou
c
après la période de garantie. La durée de vie de l'appareil
n'en sera pas pour autant amputée. La présente déclaration de
onditions de garantie est basée sur la Directive de
c
'Union Européenne 99/44/CE et les dispositions du Code Civil.
l
Les droits légaux dont le consommateur dispose au
titre de cette législation ne peuvent être altérés par la présente
éclaration de conditions de garantie.
d
Cette déclaration ne porte pas atteinte aux obligations de
garantie du vendeur envers l'utilisateur final. L'appareil est
aranti dans le cadre et dans le respect des conditions suivantes:
g
. Compte tenu des dispositions stipulées aux paragraphes 2 à
1
5, nous remédierons sans frais à toute défectuosité
1
ui se manifeste au cours de la période de 24 mois à
q
compter de la date de livraison de l'appareil au premier
consommateur final. Ces conditions de garantie ne sont pas
d'application en cas d'utilisation à des fins professionnelles
ou de façon équivalente.
2. La prestation sous garantie implique que l'appareil est remis
dans l'état qu'il avait avant que la défectuosité ne
survienne. Les composants défectueux sont remplacés ou
réparés. Les composants remplacés sans frais deviennent
notre propriété.
3. Afin d'éviter des dommages plus sévères, la défectuosité doit
immédiatement être portée à notre connaissance.
4. L'application de la garantie est soumise à la production par le
consommateur des preuves d'achat avec la date
d'achat et/ou la date de livraison.
5. La garantie n'interviendra pas si des dommages causés à des
pièces délicates, telles que le verre (vitrocéramique),
les matières synthétiques et le caoutchouc, résultent d'une
mauvaise utilisation.
6. Il ne peut pas être fait appel à la garantie pour des anomalies
bénignes qui n'affectent pas la valeur et la solidité
générales de l'appareil.
7. L'obligation de garantie perd ses effets lorsque les
défectuosités sont causées par:
– une réaction chimique ou électrochimique provoquée par
l'eau,
– des conditions environnementales anormales en général,
– des conditions de fonctionnement inadaptées,
– un contact avec des produits agressifs.
8. La garantie ne s'applique pas pour les défectuosités, dues au
transport, survenues en dehors de notre responsabilité.
Celles causées par une installation ou un montage inadéquat,
par un manque d'entretien, ou par le nonrespect
des indications de montage et d'utilisation, ne seront pas
davantage couvertes par la garantie.
9. Ne sont pas couvertes par la garantie, les défectuosités qui
proviennent de réparations ou d' interventions pratiquées
par des personnes non qualifiées ou incompétentes, ou qui
ont pour cause l'adjonction d'accessoires ou de pièces de
rechange non d'origine.
10. Les appareils aisément transportables doivent être délivrés ou
envoyés au service clientèle. Les interventions à
domicile ne peuvent s'entrevoir que pour des appareils
volumineux ou pour des appareils encastrables.
11. Si des appareils sont encastrés, sous-encastrés, fixés ou
uspendus de telle sorte que le retrait et la remise en
s
place de ceux-ci dans leur niche d'encastrement prennent plus
d'une demi-heure, les frais de prestation qui en
écoulent seront portés en compte. Les dommages connexes
d
ausés par ces opérations de retrait et de remise
c
en place sont à charge de l'utilisateur.
12. Si au cours de la période de garantie, la réparation répétée
'une même défectuosité n'est pas concluante, ou si
d
les frais de réparations sont jugés disproportionnés, le
remplacement de l'appareil défectueux par un autre de
ême valeur peut être accompli en concertation avec le
m
onsommateur. Dans ce cas nous nous réservons le droit
c
e réclamer une participation financière calculée au prorata
d
e la période d'utilisation écoulée.
d
13. La réparation sous garantie n'entraîne pas de prolongation
de la période normale de garantie, ni le départ d'un
nouveau cycle de garantie.
14. Nous octroyons une garantie de douze mois sur les
réparations, limitée à la même défectuosité.
15. Hormis les cas où une responsabilité est imposée légalement,
cette déclaration de conditions de garantie exclut
toute indemnisation de dommages extérieurs à l'appareil dont
le consommateur voudrait faire prévaloir les droits.
Dans le cas d'une responsabilité reconnue légalement, la
compensation n'excèdera pas la valeur d'achat de
l'appareil.
Ces conditions de garantie sont valables uniquement pour
des appareils achetés et utilisés en Belgique. Pour les
appareils exportés, l'utilisateur doit d'abord s'assurer qu'ils
satisfont aux conditions techniques (p. ex. : la tension, la
fréquence, les prescriptions d'installation, le type de gaz,
etc.) pour le pays concerné, et qu'ils supportent les conditions
climatiques et environnementales locales. Pour les appareils
achetés à l'étranger, l'utilisateur doit d'abord s'assurer qu
'ils répondent bien aux qualifications requises en Belgique.
Des adaptations indispensables ou souhaitées ne sont pas
couvertes par la garantie et ne sont pas possibles dans tous
les cas.
Le service clientèle se tient à votre disposition, également
après expiration de la période de garantie.
Adresse de notre service clientèle:
Belgique / België
Electrolux Home Products Belgium ELECTROLUX SERVICE
Bergensesteenweg 719 1502 Lembeek
Téléphone 02/363.04.44
Téléfax 02/363.04.00 02/363.04.60
E-mail: consumer.services@electrolux.be
Luxembourg / Luxemburg
Grand-Duché de Luxembourg ELECTROLUX HOME PRODUCTS
Rue de Bitbourg. 7 L-1273 Luxembourg-Hamm
Téléphone 00 352 42 431-1
Téléfax 00 352 42 431-360
E-mail: consumer-service.luxembourg@electrolux.lu
54
Page 55

CARACTERISTIQUES
Tension d’alimentation c.a.
Fusible/disjoncteur d’alimentation
Tension c.a. requise
Puissance de sortie
Fréquence des micro-ondes
Dimensions extérieures PM175X
PM176X
Dimensions de la cavité
Capacité du four
Plaque tournante
Poids
Lampe du four
* Ce produit répond aux exigences de la norme européenne EN55011.
Conformément à cette norme, ce produit est un équipement de groupe 2, classe B.
Groupe 2 signifie que cet équipement génère volontairement de l'énergie RF sous forme de
rayonnement électromagnétique pour le traitement thermique d'aliments.
Classe B signifie que l'équipement est adapté à une utilisation domestique.
** La capacité intérieure est calculée en multipliant la largeur, la profondeur et la hauteur maximales.
La contenance réelle pour les aliments est inférieure à celle-ci.
Ce four est conforme aux exigences des Directives 2004/108/EC et 2006/95/EC.
DANS LE CADRE DE NOTRE POLITIQUE D’AMELIORATION CONTINUE LES
CARACTERISTIQUES PEUVENT ETRE MODIFIEES SANS PREAVIS
: 230 V, 50 Hz, monophasé
: Minimum 10 A
: 1.2 kW
: 800 W (IEC 60705)
: 2450 MHz * (groupe 2/classe B)
: 492 mm (W) x 370 mm (H) x 316 mm (D)
: 592 mm (W) x 370 mm (H) x 316 mm (D)
: 285 mm (W) x 202 mm (H) x 298 mm (D) **
: 17 litres **
: ø 272 mm, verre
: env. 15.5 kg
: 25 W/240 - 250 V
FRANÇAIS
INFORMATION IMPORTANTE
Elimination des matériaux d’emballages et des appareils usagés de
façon écologique
Matériaux d’emballage
Les fours à micro-ondes Electrolux dépendent d’un emballage efficace pour leur protection pendant le transport.
Seul l’emballage minimum nécessaire est utilisé.
Les matériaux d’emballage (p. ex. film plastique ou polystyrène expansé) sont un danger pour les enfants.
Risque d’asphyxie. Gardez les matériaux d’emballage hors de la portée des enfants.
Tous les matériaux d’emballages utilisés respectent l’environnement et sont recyclables. Le carton est fabriqué en
papier recyclé et les pièces en bois ne sont pas traitées. Les articles en plastiques sont repérés de la façon
suivante :
«PE» polyéthylène p. ex. film d’emballage
«PS» polystyrène p. ex. emballage (sans CFC)
«PP» polypropylène p. ex. sangles d’emballage
La réutilisation des emballages économise les matières premières et réduit le volume des déchets.
Apportez l’emballage à la déchetterie la plus proche.
Renseignez-vous auprès de votre municipalité pour en savoir plus.
Elimination des appareils usagés
Les appareils usagés doivent être sécurisés avant leur mise au rebut en enlevant la prise, en coupant, et en jetant
le câble d’alimentation électrique.
L’appareil doit ensuite être apporté à la déchetterie la plus proche. Demandez à la municipalité ou à
l’administration responsable de la salubrité publique s’il existe dans la région une déchetterie qui recyclera
l’appareil.
55
Page 56
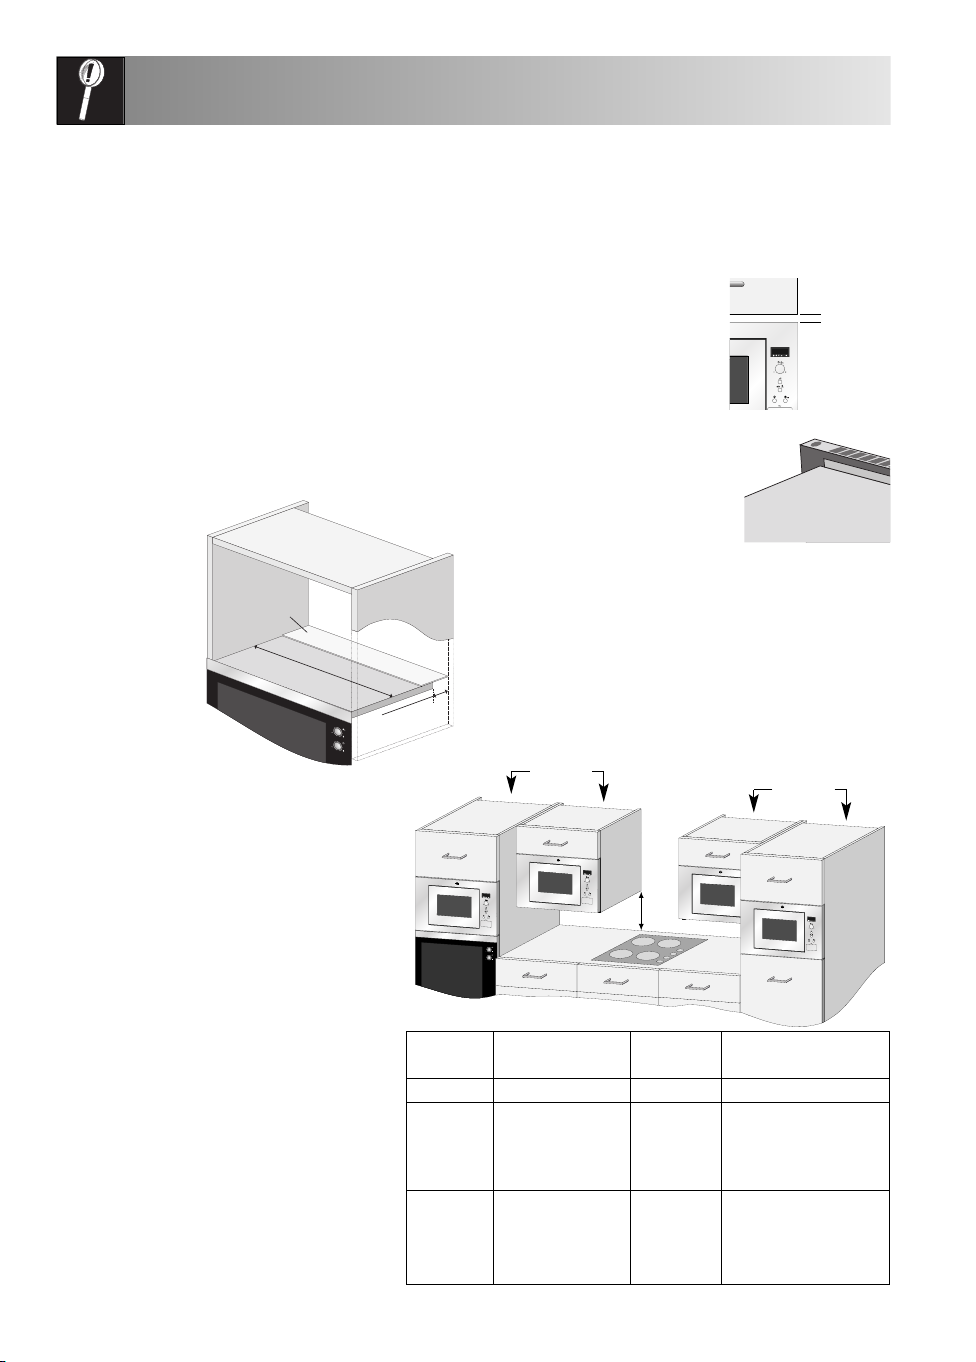
INSTALLATION
5 mm
E
D
INSTALLATION DE L'APPAREIL
1. Retirez tout l’emballage et contrôlez soigneusement
pour détecter les traces de détérioration possibles.
2. Ce four est conçu pour s’adapter de façon
standard dans un élément de cuisine de 360 mm
de haut. Pour l’installation dans un élément de
350 mm de haut : dévissez et retirez les quatre
pieds de la partie inférieure du four. Il y a 3 pieds
longs et un pied court. Remplacez les 3 pieds
longs par ceux qui sont fournis dans le paquet
d’accessoires. Ne remplacez pas le pied court.
3. Si vous installez le four à micro-ondes au-dessus
d’un four conventionnel (position A) utilisez la
feuille en Mylar fournie.
a. Découpez la feuille en Mylar pour qu’elle
corresponde à la
largeur intérieure
de l’appareil.
b. Pelez la
pellicule
protectrice
du ruban
Feuille en Mylar
adhésif et
fixez à
l’arrière de
l’étagère de
façon à
couvrir le
passage de service.
Lar
g
e
u
r
i
n
Four
conventionnel
té
r
i
e
u
r
e
e
d
e
g
sa
s
a
P
rvice
e
s
(voir illustration.)
UTILISATION SURE DE L’APPAREIL
Si vous installez le four à micro-ondes en
position B ou C :
• L’élément de cuisine doit être au minimum à
500 mm (E) au-dessus du plan de travail et il
ne doit pas être installé directement au-
dessus d’une cuisinière ou plaque de cuisson.
• Cet appareil a été testé et homologué pour
l’utilisation à proximité de cuisinières à gaz,
électrique et à induction uniquement.
• Un espace suffisant doit être prévu entre la
cuisinière et le four à micro-ondes pour éviter
la surchauffe du four à micro-ondes, des
éléments de cuisine et des accessoires
environnants.
• Ne laissez pas la cuisinière allumée sans
casserole pendant l’utilisation du four à microondes.
• Procédez avec soin quand vous utilisez le four
à micro-ondes avec la cuisinière allumée.
conventionnel
Position Taille du logement Cheminée Jeu entre
B + C 460 x 300 x 350 15 50
4. Insérez l’appareil dans l’élément de cuisine
lentement et sans forcer, jusqu’à ce que le cadre
avant de l’appareil soit scellé contre l’ouverture
avant de l’élément.
5. Confirmez que l’appareil est
stable et qu’il ne penche pas.
Confirmez qu’il y a bien un
jeu de 5 mm entre la porte
de l’élément de cuisine audessus et le haut du cadre de
l’appareil (voir illustration).
6. Fixez le four en position avec les
vis fournies. Les points de
fixation sont situés au niveau
des coins supérieurs et
inférieurs du four (voir
illustration, repère 9, à la
page 33).
7. Il est important de s’assurer que l’installation de ce
produit est bien conforme aux instructions fournies
dans cette notice et dans les instructions
d’installation du fabricant du four conventionnel.
Cheminée
Position A
Four
Position B
WD H(minimum) élément et plafond
A 560 x 550 x 360 50 50
460 x 300 x 360 15 50
560 x 300 x 350 15 50
560 x 300 x 360 15 50
D 460 x 500 x 350 40 50
460 x 500 x 360 40 50
560 x 500 x 350 40 50
560 x 500 x 360 40 50
Position C
Cheminée
Position D
Mesures en mm
56
Page 57

INSTALLATION
RACCORDEMENT DE L’APPAREIL A L’ALIMENTATION ELECTRIQUE
La prise électrique doit être directement accessible de
•
manière à pouvoir débrancher l’appareil facilement en
cas d’urgence. Sinon, il devrait être possible d’isoler le
four électriquement au niveau du secteur en incorporant
un sectionneur dans le câblage fixe conformément à la
réglementation concernant le câblage.
• La prise ne doit pas se trouver derrière le meuble.
• La meilleure position est au-dessus de meuble comme illustré au
point (A). Si le cordon d’alimentation n’est pas branché à
l’emplacement (A), il doit être retiré du clips de support (voir le point
13, en page 33) et le acheminé sous le four.
• Branchez l’appareil à une prise de terre et de courant alternatif
230 V/50 Hz correctement installée. Cette prise doit contenir un fusible de 10 ampéres.
• Le cordon d’alimentation ne peut être remplacé que par un électricien.
• Avant l’installation, nouez une morceau de ficelle autour du cordon d’alimentation pour faciliter le
branchement au point (A).
• Si l’appareil est encastré dans un meuble haut, n’écrasez pas le cordon d’alimentation.
• N’immergez pas le cordon ni la prise dans de l’eau ou tout autre liquide.
• L’appareil ne doit pas être raccordé à l’aide d’un prolongateur, d’une prise multiple ou d’un
raccordement multiple (risque d’incendie). Vérifiez que la prise de terre est conforme aux réglements en
vigueur.
A)
(
FRANÇAIS
CONNEXIONS ELECTRIQUES
AVERTISSEMENT :
CET APPAREIL DOIT ETRE MIS A LA TERRE
Le fabricant décline toute responsabilité si
cette consigne de sécurité n’est pas respectée.
Si la prise dont est doté votre appareil ne convient pas à
votre prise murale, vous devez contacter votre revendeur
ou réparateur ELECTROLUX agréé.
57
Page 58

INHOUD
Belangrijke aanwijzingen m.b.t. de veiligheid . . . . . . . . . . . . . . . . . . . . . . . . . . . .59 - 61
Apparaat en toebehoren . . . . . . . . . . . . . . . . . . . . . . . . . . . . . . . . . . . . . . . . . . . . . . .62
Bedieningspaneel . . . . . . . . . . . . . . . . . . . . . . . . . . . . . . . . . . . . . . . . . . . . . . . . . . .63
Vóór het in gebruik nemen . . . . . . . . . . . . . . . . . . . . . . . . . . . . . . . . . . . . . . . . . . . . .63
Instellen van de klok . . . . . . . . . . . . . . . . . . . . . . . . . . . . . . . . . . . . . . . . . . . . . . . . . .64
Tips voor het koken in de magnetronoven . . . . . . . . . . . . . . . . . . . . . . . . . . . . . . . .65 - 66
Magnetronbestendig kookgerei . . . . . . . . . . . . . . . . . . . . . . . . . . . . . . . . . . . . . . . . . .67
Vermogensstanden . . . . . . . . . . . . . . . . . . . . . . . . . . . . . . . . . . . . . . . . . . . . . . . . . . .68
Handmatig gebruik . . . . . . . . . . . . . . . . . . . . . . . . . . . . . . . . . . . . . . . . . . . . . . . . . .68
Andere nuttige functies . . . . . . . . . . . . . . . . . . . . . . . . . . . . . . . . . . . . . . . . . . . . .69 - 70
Automatisch gebruik . . . . . . . . . . . . . . . . . . . . . . . . . . . . . . . . . . . . . . . . . . . . . . . . .71
Tabellen automatische programma's . . . . . . . . . . . . . . . . . . . . . . . . . . . . . . . . . . .72 - 74
Recepten voor automatische kookprogramma's AC-6 en AC-7 . . . . . . . . . . . . . . . . .74 - 75
Tabellen . . . . . . . . . . . . . . . . . . . . . . . . . . . . . . . . . . . . . . . . . . . . . . . . . . . . . . .76 - 77
Recepten . . . . . . . . . . . . . . . . . . . . . . . . . . . . . . . . . . . . . . . . . . . . . . . . . . . . . .77 - 79
Reiniging en onderhoud . . . . . . . . . . . . . . . . . . . . . . . . . . . . . . . . . . . . . . . . . . . . . . .80
Wat te doen als . . . . . . . . . . . . . . . . . . . . . . . . . . . . . . . . . . . . . . . . . . . . . . . . . . . . .81
Garantie/serviceafdeling . . . . . . . . . . . . . . . . . . . . . . . . . . . . . . . . . . . . . . . . . . .82 - 84
Garantie/serviceafdeling (Belgie) . . . . . . . . . . . . . . . . . . . . . . . . . . . . . . . . . . . . . . . .85
..
Technische gegevens . . . . . . . . . . . . . . . . . . . . . . . . . . . . . . . . . . . . . . . . . . . . . . . . .86
Belangrijke informatie . . . . . . . . . . . . . . . . . . . . . . . . . . . . . . . . . . . . . . . . . . . . . . . . .86
Installatie-aanwijzing . . . . . . . . . . . . . . . . . . . . . . . . . . . . . . . . . . . . . . . . . . . . . .87 -88
Het symbool op het product of op de verpakking wijst erop dat dit product niet als huishoudafval
mag worden behandeld, maar moet worden afgegeven bij een verzamelpunt waar elektrische en
elektronische apparatuur wordt gerecycled. Als u ervoor zorgt dat dit product op de juiste manier wordt
verwijderd, voorkomt u mogelijke negatieve gevolgen voor mens en milieu die zich zouden kunnen
voordoen in geval van verkeerde afvalverwerking. Voor gedetailleerdere informatie over het recyclen van
dit product, kunt u contact opnemen met de gemeente, de gemeentereiniging of de winkel waar u het
product hebt gekocht.
58
Page 59

BELANGRIJKE AANWIJZINGEN M.B.T. DE VEILIGHEID
BELANGRIJK VOOR UW VEILIGHEID: LEES DE VOLGENDE AANWIJZINGEN GOED DOOR
N BEWAAR DEZE GEBRUIKSAANWIJZING.
E
Om brand te voorkomen
Mag n etronoven s mogen tijden s het
ge bruik niet zonde r toezicht worde n
gelaten. Te hoge vermogens of te lange
bereidingstijden kunnen de levensmiddelen
oververhitten en brand veroorzaken.
Het stopcontact moet altijd bereikbaar zijn, zodat
de stekker er in geval van nood makkelijk kan
worden uitgetrokken. De netspanning moet 230 V
wisselspanning, 50 Hz zijn en de zekering moet
minstens 10 A zijn.
Wij raden u aan het apparaat aan een aparte
stroomkring aan te sluiten.
Het apparaat niet in de open lucht bewaren of
opstellen.
NOOIT DE DEUR OP E N EN, als in het
apparaat verwarmde levensmiddelen
beginnen te roken. Het appa r a at
uitschak e l en, de stekker uit het
stopcontact trekken en wachten tot de
levensmiddelen niet meer roken. Als u de
deur opent tijdens de rookontwikkeling
kan dat brand veroorzaken.
Alleen voor magnetrons geschikt servies
gebruiken, zie pag. 67.
Het apparaat nooit zonder toezicht laten,
als u verpakkingen van kunststof, papier
of ander brandbaar materiaal gebruikt.
De a fde k kin g v a n d e m i crog o lve n gel e ide r, d e o ve n rui m te, he t
draaiplateau en het draaimechanisme na
gebruik van het apparaat reinigen. Deze
onderdelen moeten droog en vetvrij zijn.
Ach t erb l ijv end e v ets p att e n k unn en
ove r ve r hit ra ken , g a an roke n o f
ontbranden.
Geen brandbare materialen in de buurt van het
apparaat of de ventilatie-openingen bewaren.
De ventilatie-openingen nooit blokkeren.
Alle met alen slu itingen, draden enz. van
levensmiddelen en verpakkingen verwijderen.
Vonkvorming op metalen oppervlakken kan tot
brand leiden.
De magnetron niet gebruiken om levensmiddelen in
olie of vet te frituren. De temperatuur kan niet
gecontroleerd worden en het vet kan vlam vatten.
Alleen speciaal daarvoor geschikte popcorn in de
magnetron bereiden.
Geen levensmiddelen of andere voorwerpen in het
apparaat bewaren.
Na het starten van het apparaat de instellingen
controleren om er zeker van te zijn dat het
apparaat zoals gewenst werkt. Deze
gebruiksaanwijzing gebruiken.
Om verwondingen te voorkomen
WAARSCHUWING:
Het apparaat niet gebruiken als het beschadigd
is of niet goed functioneert. Controleer het
volgende voordat u het apparaat inschakelt:
a) De deur moet correct sluiten en mag niet
verkeerd uitgelijnd of vervormd zijn.
b) De scharnieren en veiligheidsvergrendelingen
van de deur mogen niet kapot of los zijn.
c) De deurafdichtingen en afsluitvlakken mogen
niet beschadigd zijn.
d) In de ovenruimte en de deur mogen geen deuken
of andere beschadigingen aanwezig zijn.
e) Het aansluitsnoer en de stekker mogen niet
beschadigd zijn.
Voer in geen geval zelf reparaties of
wijzig i n gen aan uw mag n e tron uit.
Reparaties, vooral reparaties waarbij de
afd e kki n g va n het appa r aat moet
worden verwijderd, mogen alleen door
vak m ens e n w ord e n u i tge voe r d.
Onvakkundige reparaties kunnen tot
aanzienlijke risico’s voor de gebruiker
leiden. Wend u daarom in geval van
storing altijd tot onze service-afdeling.
Alleen originele ELECTROLUX-onderdelen
voldoen aan alle eisen!
Nooit op enigerlei wijze verand eringen
aanbrengen aan de veiligheidsvergrendeling van
de deur.
Het apparaat nooi t inschakelen als zich
voorwerpen tussen de deurafdichtingen en de
afsluitvlakken bevinden.
NEDERLANDS
59
Page 60

BELANGRIJKE AANWIJZINGEN M.B.T. DE VEILIGHEID
Laat vet of vuil zich niet ophopen op de
afd i cht i nge n v an de d e ur of
aangrenzende delen. Volg de instructies
in hoofdstuk “Reiniging en onderhoud”,
Pag. 80. Als u de oven niet schoonhoudt,
kan dat leiden tot aantasting van het
oppervlak, wat de levensduur van het
toe s tel negatie f kan beïnv l o eden en
mog e lij k ge vaa r lij k e s i tu a tie s
veroorzaakt.
Personen met PACEMAKERS moeten bij hun arts of
bij de fabrik ant informeren naar
voorzorgsmaatregelen bij het om gaan met
magnetrons.
Om elektrische schokken te voorkomen
De ommanteling van het apparaat mag in geen
geval worden verwijderd.
Nooit vloeistof in de ope ningen v an de
veiligheidsvergrendeli ngen van de deur of
ventilatieopeningen laten komen of voorwerpen in
deze openingen stek en. Als u grotere
hoeveelheden vloeistof morst, het apparaat direct
uitschakelen, de stekker uit het stopcontact trekken
en contact opnemen met onze service-afdeling.
Het aansluitsnoer en de stekker nooit in water of
andere vloeistof leggen.
Het aansluitsnoer mag niet over hete of scherpe
oppervlakken geleid worden, zoals bijvoorbeeld
de he te ventilatie-openi ngen bovenaan de
achterwand van het apparaat.
In geen geval proberen om de ovenlamp zelf te
vervangen. Dit mag alleen door vakmensen
geschieden.
Als de ovenlamp uitvalt, neem dan contact op met
onze service-afdeling.
Als het aansluitsnoer beschadigd is, moet het door
een nieuw speciaal snoer worden vervangen.
Verv angen mag allee n door v akmensen
geschieden.
Om explosies en plotseling koken te
voorkomen
WAARSCHUW ING: levensmiddelen in
vloeibare en andere vorm mogen niet in
afgesloten bakjes verwarmd worden; ze
zouden kunnen exploderen.
Nooit afgesloten bakjes gebruiken. Sluitingen en
afdekkingen ver wijderen. Afgesloten bakjes
kunnen door de drukv erhoging zelfs na
uitschakelen van het apparaat nog exploderen.
Wees voorzichtig bij het ver warmen van
vloeistoffen.
Kopjes of bekers met een grote opening gebruiken,
opdat luchtbellen kunnen ontsnappen.
Wees bij het verwarmen van vloeistoffen
in de magnetron voorzichtig als u het
kopje of de beker uit de oven neemt; het
kan tot kookpuntvertraging komen en de
vloeistof kan plotseling hevig overkoken
of spatten.
Om verbrandingen door plotseling overkoken
(kookpuntvertraging) te voorkomen:
1. De vloeistof vóór het verwarmen omroeren.
2. Bij het verwarmen van vloeistoffen een glazen
staafje of lepeltje in het glas of kopje zetten.
3. Laat de vloeistof tenminste 20 seconden na het
koken in de oven staan om kookvertraging te
voorkomen.
Eier e n ni et in d e dop k oken.
Hardgekookte eieren mogen niet in de
magnetron verwarmd worden, omdat ze
zelf s na he t ver w a rmen kunne n
expl o deren . Vo o r he t kok e n of
opwarmen van eieren die niet geklutst of
geroe r d wo r den, e idoo i er en e iwit
inpr i kken, zo d at ze niet kunn e n
exploderen. Vóór het opwarmen in de
magnetron de doppen van gekookte
eier e n v e r wij d eren en d e eie r en i n
plakjes snijden.
Levensmiddelen met een schil of vel, zoals
aardappelen, worstjes of fruit, altijd eerst enkele
malen met een vork inprikken, zodat de stoom kan
ontsnappen.
Om verbranding te voorkomen
Gebruik pannenlappen als u levensmiddelen uit de
ovenruimte neemt.
Schalen, popcorn-verpakkingen, braadzakjes enz.
altijd van gezicht en handen afgewend openen om
verbranding door stoom te voorkomen.
60
Page 61

BELANGRIJKE AANWIJZINGEN M.B.T. DE VEILIGHEID
verige aanwijzingen
Om verbrandingen te voorkomen altijd
de temperatuur van de levensmiddelen
con t roleren en ze voor het se r v e r e n
omroeren. Wees extra voorzichtig als de
levensmiddelen of dranken voor baby's,
kinderen of oudere personen bestemd
zijn.
La température du récipient est trompeuse et ne
reflète pas celle des aliments que vous devez
vérifier.
Tenez-vous éloigné du four au moment où vous
ouvrez sa porte de manière à éviter toute brûlure
due à la vapeur ou à la chaleur.
Coupez en tranches les plats cuisinés farcis après
chauffage afin de laisser s’échapper la vapeur et
d’éviter les brûlures.
Veillez à ce que les enfants ne touchent pas la
porte du four pour éviter les brûlures.
Om foutieve bediening door kinderen te
voorkomen
WAARSCHUWING: kinderen mogen het
app a raa t al le e n on d er t o ezi c ht
gebruiken of als ze voldoende instructies
voo r ee n vei l ig gebr u ik hebb e n
gek r ege n en d e ge v are n van
ondeskundig gebruik begrijpen.
Dit apparaat is niet bestemd om gebruikt te worden
door personen (met inbegrip van kinderen) met een
beperkt fysiek, zintuiglijk of geestelijk vermogen, of
gebrek aan ervaring of kennis, tenzij ze het
apparaat gebruiken onder toezicht van een
persoon die voor hun veiligheid verantwoordelijk
is.
Op kinderen moet toezicht worden gehouden om
te voorkomen dat ze met het apparaat spelen.
Niet tegen de ovendeur leunen of aan de deur
hangen.
De magnetron is geen speelgoed!
Kinderen moet u vertrouwd maken met alle
belangrijke aanwijzingen m.b.t. de veiligheid: bijv.
gebruik van pannenlappen en voorzichtig afnemen
van deksels.
Let vooral op verpakkingen die levensmiddelen
knapperig maken (bijv. zelfbruinende gerechten);
deze worden bijzonder heet.
O
reng op geen enkele wijze veranderingen aan het
B
apparaat aan.
Dit apparaat is alleen bedoeld voor huishoudelijk
gebruik en mag alleen voor het bereiden van
levensmiddelen worden gebruikt. Het is niet
geschikt voor industriële doeleinden of voor
gebruik in een laboratorium.
Om foutieve bediening en beschadiging van
het apparaat te voorkomen
Het apparaat nooit inschakelen als er geen
levensmiddelen in staan.
Bij het gebruik van bruiner ingsser vies of
zelfver warmende materialen moet een
hittebestendige isolatie (bijv. een porseleinen bord)
tussen servies en draaiplateau worden gezet.
Daardoor worden beschadigingen door warmte
van het draaiplateau en het draaimechanisme
voorkomen. De aangegeven opwarmtijd voor het
servies mag niet worden overschreden.
Geen metalen servies gebruiken, omdat
microgolven gereflecteerd worden en dit tot
vonkvorming leidt.
Geen conservenblikken in het apparaat zetten.
Alleen het voo r dit apparaat be doelde
draaiplateau en draaimechanisme gebruiken.
Gebruik de oven niet zonder het draaiplateau.
Om te voorkomen dat het draaiplateau barst:
(a)Vóór het reinigen het draaiplateau laten
afkoelen.
(b)Geen hete gerechten of heet servies op het
koude draaiplateau zetten.
(c) Geen koude levensmiddelen of koud servies op
het hete draaiplateau zetten.
Geen voorwerpen op de ommanteling zetten als
het apparaat in werking is.
AANWIJZINGEN:
Wend u met vragen over de aansluiting van het
apparaat tot een erkend installateur.
Zowel de fabrikant als de handelaar kunnen geen
verantwoording op zich nemen v oor
beschadigingen van het apparaat of
verwondingen van personen, die als gevolg van
een foutieve elektrische aansluiting ontstaan.
Op de wanden in de ovenruimte resp. rond de
deurafdichtingen en afsluitvlakken kunnen zich
waterdamp en druppels vormen. Dit is normaal en
is geen aanwijzing dat er microgolven naar buiten
komen of dat er van een andere storing sprake is.
NEDERLANDS
61
Page 62

APPARAAT EN TOEBEHOREN
1
2
3
4
1. Front
2. Ovenlamp
3. Bedieningspaneel
4. Toets om de deur te openen
5. Afdekking van de microgolvengeleider
6. Ovenruimte
7. Aandrijfas
8. Deurafdichtingen en afsluitvlakken
9. Bevestigingspunten (4 plaatsen)
10 Ventilatie-openingen
11. Ommanteling
12. Achterzijde van het apparaat
13. Snoerdrager
14. Aansluitsnoer
TOEBEHOREN:
Controleer of de volgende onderdelen zijn
meegeleverd:
(15) draaiplateau (16) draaimechanisme
(17) 4 bevestigingsschroeven (niet afgebeeld)
• Het draaimechanisme in de aandrijfas in de
bodem van de ovenruimte plaatsen.
• Dan het draaiplateau erop zetten.
• Om schade aan het draaiplateau te voorkomen,
moet u erop letten, dat servies bij het uitnemen
niet de rand van het draaiplateau raakt.
AANWIJZING: Geef bij het bestellen van
onderdelen uw handelaar of onze service-afdeling
de naam van het onderdeel en de
modelaanduiding op.
14
13
78
56
9
10
11
12
15
16
62
Page 63

BEDIENINGSPANEEL
1 display
1
2
3
4
5
6
7
8
2 symbolen
De indicatie boven het symbool knippert of
gaat branden. Als een indicatie knippert, de
betreffende toets (met hetzelfde symbool)
indrukken of de benodigde
bedieningshandeling uitvoeren.
omroeren
omkeren
kg/gewicht
symbool voor vermogensstanden
symbool voor bereidingsproces
3 knop TIJDSCHAKELKLOK/GEWICHT
4 toets VERMOGENSSTAND
5 toets AUTOMATISCHE PROGRAMMA'S
Deze toets indrukken om een van de 12
automatische programma's te kiezen.
6 toets START/+30
7 toets STOP
8 toets om de deur te openen
NEDERLANDS
VÓÓR HET IN GEBRUIK NEMEN
De stekker in het stopcontact steken.
1. De indicatie begint te knipperen.
2. Toets STOP indrukken. Indicatie controleren.
1x
De klok volgens onderstaande aanwijzingen instellen.
Gebruik van toets STOP
1. Wissen van een invoerfout bij het
programmeren.
2. Lopend proces even onderbreken.
3. Wissen van een programma tijdens het lopende
proces door tweemaal indrukken.
63
Page 64
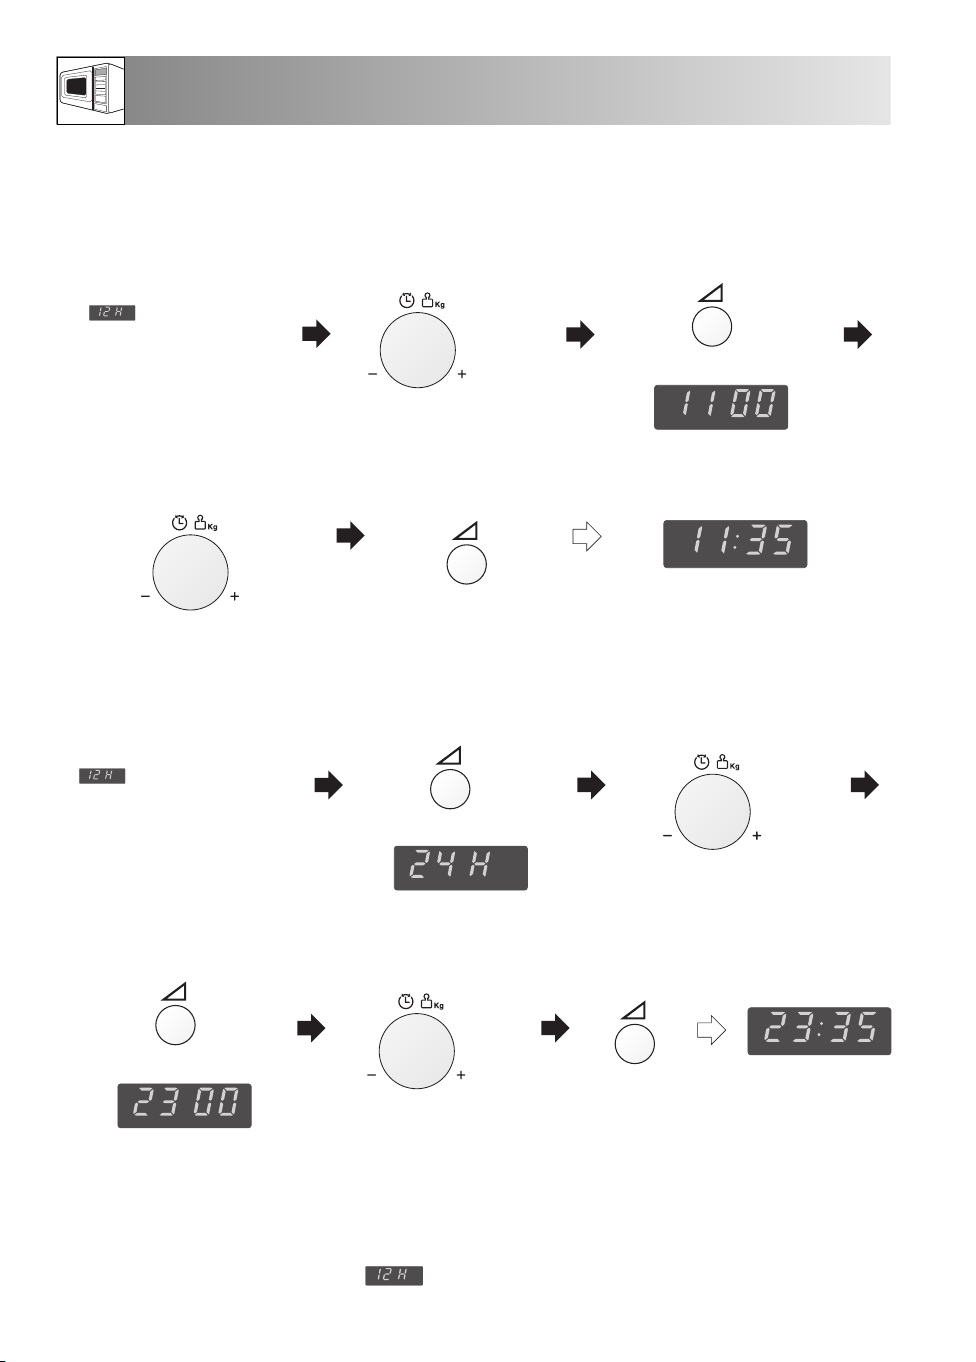
INSTELLEN VAN DE KLOK
Deklokkan als 12-uurs ofals 24-uurs-klok wordeningesteld.
Voorbeeld: Instellen van de 12-uurs-klok op 11:35 uur.
1. Om de 12-uurs-klok in te
stellen toets
VERMOGENSSTAND 3
seconden ingedrukt houden.
verschijnt op het
display.
2. Stel de uren in. Knop
TIJDSCHAKELKLOK/GEWICHT
draaien, tot het juiste uur wordt
aangegeven (11).
3. Toets VERMOGENSSTAND
indrukken om van de uren naar
de minuten te gaan.
1x
Indicatie controleren.
4. De minuten instellen. Knop
TIJDSCHAKELKLOK/GEWICHT
draaien, tot de juiste minuten worden
aangegeven (35).
5. Toets VERMOGENSSTAND
indrukken om de klok te
starten.
Voorbeeld: Instellen van de 24-uurs-klok op 23:35 uur.
1. Om de 24-uurs-klok in te
stellen toets
VERMOGENSSTAND 3
seconden ingedrukt houden.
verschijnt op het
display.
4. Toets VERMOGENSSTAND
indrukken om van de uren naar
de minuten te gaan.
2. Toets VERMOGENSSTAND
indrukken om van de uren naar
de 12 gaan te 24 gaan.
Indicatie controleren.
5. De minuten instellen. Knop
TIJDSCHAKELKLOK/
GEWICHT draaien, tot de juiste
minuten worden aangegeven (35).
Indicatie controleren.
1x
3. Stel de uren in. Knop
TIJDSCHAKELKLOK/GEWICHT
draaien, tot het juiste uur wordt
aangegeven (23).
1x
6. Toets VERMOGENSSTAND
indrukken om de klok te
starten.
Indicatie controleren.
1x
Indicatie controleren.
AANWIJZING:
1. U kunt knop TIJDSCHAKELK L O K / G E W I C HT
rechtsom en linksom draaien.
2. Druk toets STOP in als u bij het programmeren een
fout hebt gemaakt.
3. Als de stroomverzorging naar het apparaat wordt
onderbroken, laat het display regelmatig zien
1x
als de stroomverzorging weer hersteld is. Als dat
tijdens een bereidingsproces gebeurt, wordt het
programma gewist.
4. Als u de dagtijd opnieuw wilt instellen, gaat u te werk
zoals hierboven beschreven.
64
Page 65

TIPS VOOR HET KOKEN IN DE MAGNETRONOVEN
Microgolven zijn energiegolven net als de golven die
voor tv - en radiosignalen worden gebruikt.
Elektrische energie wordt omgezet in
microgolvenenergie die via een geleider naar de
ovenruimte wordt geleid.
Om te voorkomen dat er voedsel en vet in deze komt,
wordt de golfgeleider beschermd door een afdekking.
Metaal laat geen microgolven door en daarom is de
ovenruimte van metaal vervaardigd en is de ovendeur
voorzien van een dunne metalen laag. Tijdens het
koken worden de microgolven door de zijwanden van
de ovenruimte weerkaatst.
Bepaalde materialen zoals glas en kunststof laten
microgolven door om het voedsel op te warmen. (Zie
‘Magnetron-bestendig kookgerei’ op pag. 67).
Om voedsel te bereiden/ontdooien in een
magnetronoven moet het servies microgolven
doorlaten die in het voedsel doordringen.
Daarom is het belangrijk om geschikt servies te
gebruiken.
Ronde/ovale schalen verdienen de voorkeur boven
vierkante/rechthoekige schalen aangezien het voedsel
in de hoeken overgaar wordt. Een verscheid-enheid
aan servies kan worden gebruikt, zoals vermeld op
pag. 67.
Water, suiker en vet in voedsel absorberen
microgolven en gaan hierdoor trillen. Door de wrijving
ontstaat warmte, op dezelfde manier dat je handen
warm worden als je ze tegen elkaar wrijft.
De buitenkant van het voedsel wordt door de
microgolvenenergie verwarmd en hierna verplaatst de
warmte zich door geleiding naar het midden, net als
bij conventioneel koken. Het is belangrijk om het
voedsel om te keren, te herschikken of om te roeren
met het oog op een gelijkmatige verwarming.
Na het koken houdt de oven automatisch op met het
produceren van microgolven.
Na het koken is een bepaalde standtijd nodig
aangezien de warmte zich hierdoor gelijkmatig door
het voedsel verspreidt.
Microgolven koken voedsel sneller dan conventioneel
koken. Daarom is het essentieel dat bepaalde
technieken worden gebruikt om goede resultaten te
garanderen. Een groot aantal van de volgende
technieken zijn gelijk aan de technieken gebruikt bij
conventioneel koken.
NEDERLANDS
EIGENSCHAPPEN VAN LEVENSMIDDELEN
Samenstelling Voedselmeteen hoogvet-ofsuikergehalte(bijv. pasteitjes)vereist eenkortere verwarmingstijd.Voorzichtigheid is
gebodenaangezienoververhitting brandkanveroorzaken.
Dichtheid Dedichtheidvanvoedselheeft invloedop de vereiste kooktijd. Licht, poreusvoedselzoals cakeofbrood,kookt sneller
dan zwaar, compactvoedsel zoals braadstukkenen ovenschotels.
Hoeveelheid Dekooktijd moet verlengd worden naarmate dehoeveelheidvoedsel in deovengroteris. Bijv. vier aardappelen
vereisen eenlangere kooktijddan tweeaardappelen.
Afmetingen Voedselmet kleine afmetingen en kleine stukkenkoken snellerdan grote stukken omdat de microgolven hetvoedsel van
alle kanten tot het midden binnendringen. Zorgervoor datallestukken dezelfdeafmetingen hebben zodat ze
gelijkmatig gaarworden.
Vorm De dikkeregedeeltenvanvoedselmetonregelmatige afmetingenzoals kippenborsten ofkippenpoten, vereiseneen
langerekooktijd.Voedsel met rondevormenwordt gelijkmatiger gaar danvoedsel metvierkante vormentijdens het
kokenin de magnetron.
Temperatuur De oorspronkelijketemperatuurvan het voedsel heeft invloed opde vereistekooktijd.Gekoeld voedsel vereisteen
langerekooktijd dan voedselopkamertemperatuur.Prik meteen vorkinvoedsel met vulling,bijvoorbeeld donutsmet
jam, omde warmte ofstoom telaten ontsnappen.
65
Page 66

TIPS VOOR HET KOKEN IN DE MAGNETRONOVEN
KOOKTECHNIEKEN
Rangschikken Plaatsdedikstegedeelten vanhet voedseldichtbij derand vandeschaal. Bijv. kippenpoten.
Afdekken Gebruik magnetronfolie of een geschiktdeksel.
Doorprikken Voedsel met eenschil ofvelmoetopverschillendeplaatsen worden ingepriktvoorhetkoken of opwarmen aangezien
dehoeveelheidstoom toeneemt en het voedsel kan laten ontploffen. Bijv. aardappelen,vis, kip,worst.
Belangrijk:Eieren mogen niet in demagnetronwordenopgewarmdomdat zekunnenontploffen,zelfs nahet
koken. Bijv. gepocheerde, gebakken of hardgekookte eieren.
Roeren, Voor een gelijkmatig resultaatishetbelangrijk omvoedsel om te roeren, om te kerenen te anders rangschikken tijdens
omkerenen hetkoken.Het voedselaltijdvanaf debuitenkant naar het midden omroeren enherschikken.
anders
rangschikken
Standtijd Standtijd is nodigna hetkoken aangeziendewarmtezich hierdoorgelijkmatigdoorhet voedselverspreidt.
Afdekken Sommige delen van voedseldat wordt ontdooid, kunnen warmworden. De warmedelen kunnen worden afgedekt
met kleinestukjes foliedie demicrogolvenweerkaatsen. Bijv. kippenpotenenkippenvleugels.
VOEDSELTHERMOMETER GEBRUIKEN OM DE BEREIDINGSTIJD TE BEPALEN
De kerntemperatuur van levensmiddelen en dranken
kunt u vaststellen met een voedselthermometer.
Product Kerntemperatuur Kerntemperatuur
Dranken verwarmen (koffie, water, thee, enz.) 65-75oC
Melk verwarmen 60-65oC
Soep verwarmen 75-80oC
Stoofschotel verwarmen 75-80oC
Gevogelte 80-85oC 85-90oC
Lamsvlees roze van binnen 70oC 70-75oC
door en door gaar 75-80oC 80-85oC
Rosbief rood van binnen 50-55oC 55-60oC
roze van binnen 60-65oC 65-70oC
door en door gaar 75-80oC 80-85oC
Varkensvlees, kalfsvlees 80-85oC 80-85oC
In onderstaande tabel vindt u een overzicht van
temperaturen.
ne het bereiden na 10-15 minuten
standtijd
66
Page 67

MAGNETRONBESTENDIG KOOKGEREI
Servies Geschikt voor Opmerkingen
demagnetron
Aluminiumfolie / / Kleinestukjes aluminiumfolie kunnenwordengebruikt omhetvoedsel tegen oververhitting
servies vanfolie tebeschermen.Zorgervoor dat hetfolie minstens2 cm vandeovenwanden is
verwijderd aangezien vonkvormingkan optreden.Servies van folieisniet aanbevolen,
tenzij voorgeschreven doordefabrikant,bijv. Microfoil®.Alle voorschriften
nauwgezet opvolgen.
Bruineringsservies Altijddevoorschriftenvan defabrikant opvolgen. De vermelde kooktijden niet
overschrijden. Oppassen wantdezeschalen kunnenzeer heet worden.
Porselein en / Porselein, keramiek en geglazuurd aardewerk zijn doorgaans geschikt, behalve
keramiek aardewerk met metalenversiering.
Glas bijv. Pyrex ® Wees voorzichtigmetdun glasaangeziendit kan breken ofscheuren als het plotseling
wordtverwarmd.
Metaal Hetis niet aanbevolenom metalenservies inde magnetron tegebruiken. Dit veroorzaakt
vonkvorming enkantot brandleiden.
Kunststof/polystyreen Weesvoorzichtigaangeziendergelijkservieskan vervormen,smeltenof verkleuren
bijv. servieswaarin bijhogetemperaturen.
fastfood wordt verkocht
Huishoudfolie Het huishoudfolie mag het voedselnietaanraken enmoet ingeprikt wordenom de stoom
telaten ontsnappen.
Vries-/braadzakken Moeten ingeprikt wordenom de stoom te latenontsnappen.Controleer ofdezakken
geschikt zijn voor gebruik indemagnetron.Gebruikgeen plastic ofmetalen
binddraad aangeziendit kan smeltenofvlam vatten door vonkvorming vanhet metaal.
Papier – borden, Gebruik papieruitsluitend omop tewarmenofvocht teabsorberen.Wees voorzichtig
kopjes en aangezien oververhitting brand kanveroorzaken.
keukenrol
Stro enhout Letaltijdgoedop bijhetgebruikvandit materiaal aangezienoververhitting brandkan
veroorzaken.
Kringlooppapier Kanstukjes metaalbevatten die vonkvorming veroorzaken entotbrand kunnen leiden.en
enkrantenpapier
NEDERLANDS
67
Page 68
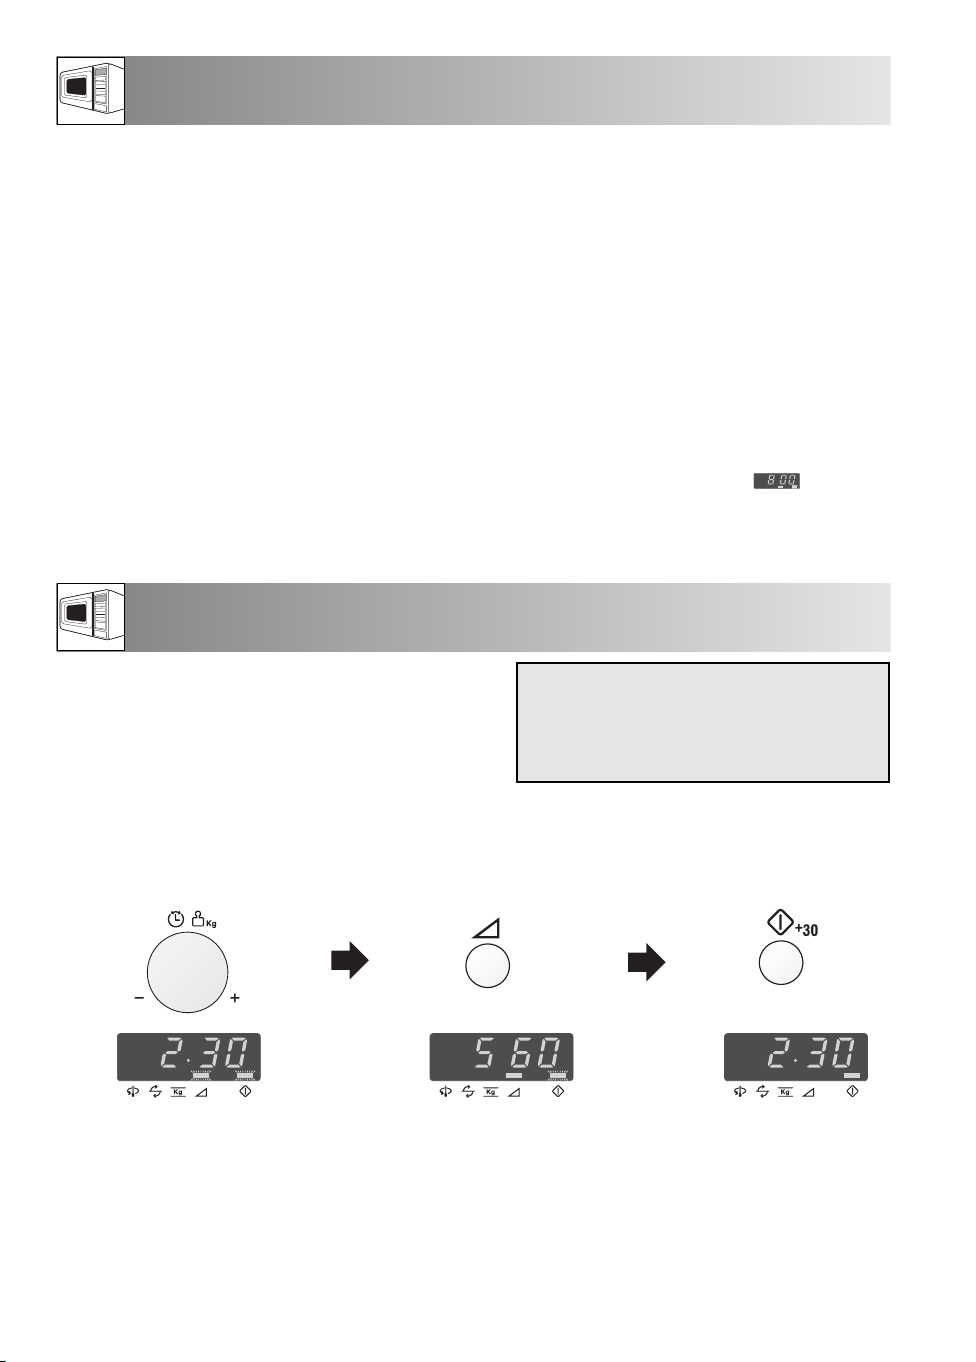
VERMOGENSSTANDEN
Voor het handmatig gebruik kunt u kiezen uit 5
verschillende vermogensstanden. Richt u daarbij
naar de aanwijzingen in de recepten.
In het algemeen gelden de volgende adviezen:
800 watt voor snel koken of verwarmen, bijv.
voor soep, éénpansgerechten, gerechten uit blik,
hete dranken, groente, vis enz.
560 watt voor langer koken van compactere
levensmiddelen zoals vlees en gehakt en voor
400 watt voor compactere gerechten die bij het
bereiden op traditionele wijze een langere tijd
nodig hebben, bijv. rundvleesgerechten. Bij deze
instelling blijft het vlees mals.
240 watt kiest u om gelijkmatig te ontdooien.
Deze stand is ook geschikt om rijst en pasta te
koken.
80 watt voor voorzichtig ontdooien, bijv. voor
slagroomtaart of bladerdeeg.
gerechten als cake. Bij deze lage instelling koken
sauzen niet over en de gerechte n worden
W = WATT
gelijkmatig gaar, zonder dat ze aan de rand hard
worden of overlopen.
Om het vermogen in te stellen toets VERMOGENSSTAND indrukken, tot de gewenste vermogensstand
wordt aangegeven. Als u toets VERMOGENSSTAND één maal indrukt, verschijnt . Als u de
gewenste vermogensstand mist, toets VERMOGENSSTAND zo vaak indrukken, tot de gewenste stand
weer wordt aangegeven. Als u deze toets niet indrukt, werkt het apparaat automatisch met
vol vermogen (800 watt).
HANDMATIG GEBRUIK
Bij handmatig gebruik kunt u een bereidingstijd van
max. 90 minuten (90.00) instellen.
De tijdseenheid varieert van 10 seconden tot 5
minuten, afhankelijk van de totale bereidingstijd
zoals aangegeven in de tabel.
bereidingstijd tijdseenheden
0-5 minuten 10 seconden
5-10 minuten 30 seconden
10-30 minuten 1 minuut
30-90 minuten 5 minuten
Voorbeeld: Soep verwarmen, 2 minuten en 30 seconden met 560 watt vermogen.
1. Voer door knop
TIJDSCHAKELKLOK/GEWICHT
rechtsom te draaien de gewenste
bereidingstijd in.
2. Stel het gewenste vermogen
in door toets
VERMOGENSSTAND
twee maal in te drukken.
2x
3. Start het proces door
toets START/+30 één
maal in te drukken.
1x
Indicatie controleren.
AANWIJZINGEN:
1. Als u de ovendeur tijdens het bereidingsproces opent, wordt de bereidingstijd op het display automatisch
aangehouden. Het terugtellen van de tijd gaat weer verder als u de deur sluit en toets START/+30 indrukt.
2. Als u tijdens het bereidingsproces de vermogensstand wilt controleren, drukt u toets VERMOGENSSTAND
in. Zolang uw vinger deze toets aanraakt, wordt de vermogensstand aangegeven.
3. U kunt knop TIJDSCHAKELKLOK/GEWICHT rechtsom of linksom draaien. Als u de knop linksom draait,
wordt de bereidingstijd trapsgewijze vanaf 90 minuten verminderd.
68
Page 69
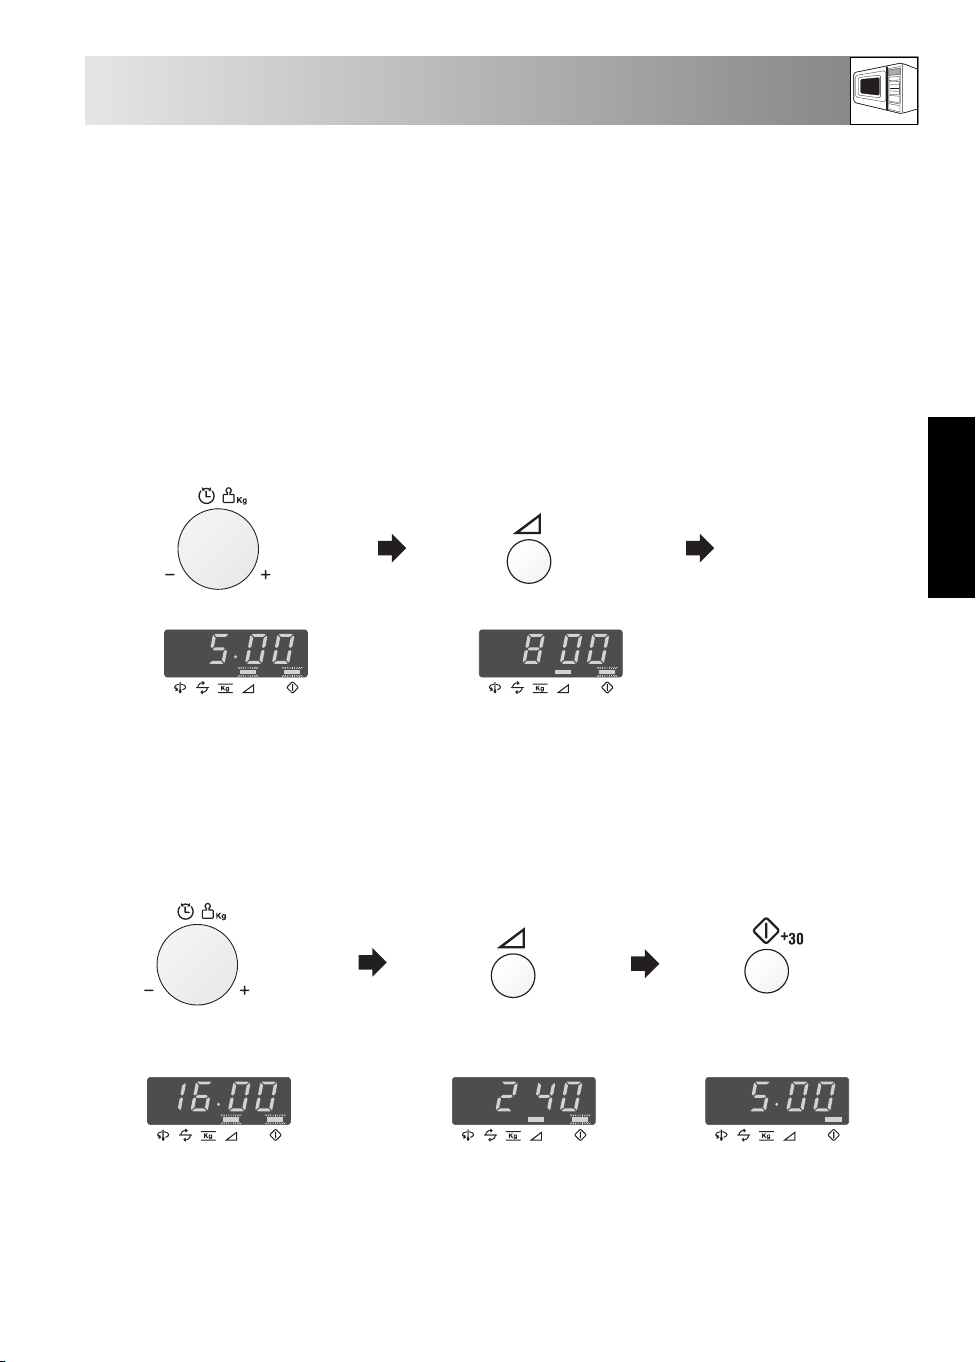
ANDERE NUTTIGE FUNCTIES
1. KOKEN IN VERSCHILLENDE FASES
U kunt een reeks van (maximaal) 3 standen programmeren.
Voorbeeld:
koken: 5 minuten bij 800 watt vermogen (fase 1)
16 minuten bij 240 watt vermogen (fase 2)
FASE 1
1. Voer door knop
TIJDSCHAKELKLOK/
GEWICHT rechtsom te
draaien de gewenste tijd in.
2. Stel het gewenste vermogen
in door één maal toets
VERMOGENSSTAND in te
drukken.
FASE 2
3. Voer door knop
TIJDSCHAKELKLOK/
GEWICHT rechtsom te
draaien de gewenste tijd in.
4. Stel het gewenste
vermogen in door toets
VERMOGENSSTAND
vier maal in te drukken.
4x
1x
NEDERLANDS
5. Start het proces door
toets START/+30 in
te drukken.
1x
Controleer het display.
(Het apparaat werkt nu 5 minuten op 800 watt en aansluitend 16 minuten op 240 watt.)
69
Page 70
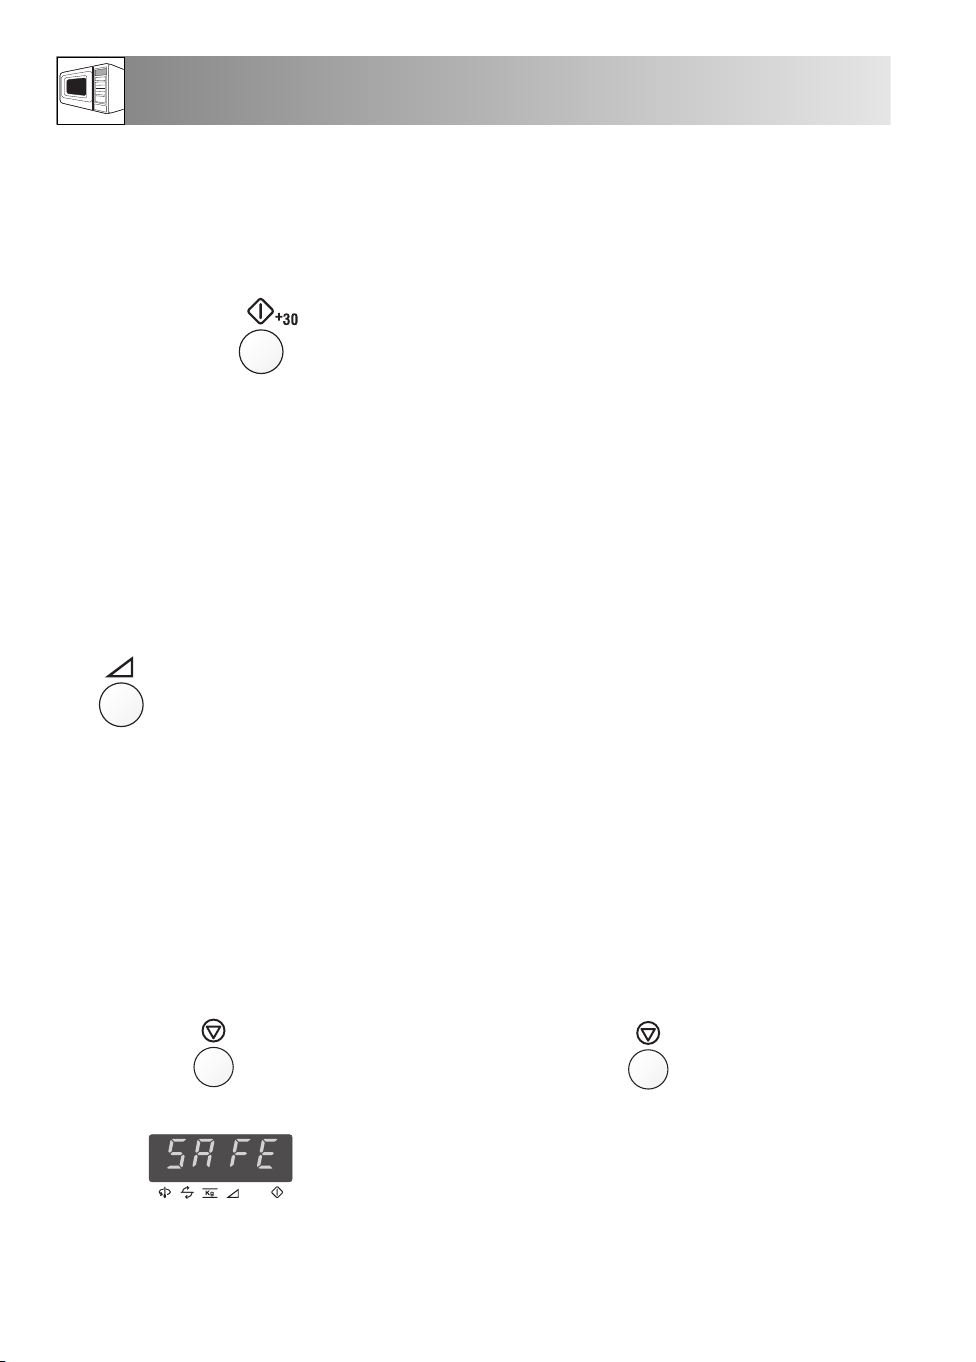
ANDERE NUTTIGE FUNCTIES
2. SNELSTARTFUNCTIE
Met toets START/+30 kunt u de volgende functies bedienen:
a. Direct starten
U kunt direct 30 seconden lang op een vermogen van 800 watt koken, als u toets START/+30 indrukt.
AANWIJZING:
Om misbruik door kinderen te voorkomen, kan toets START/+30 slechts 3 minuten na de voorafgaande
bedieningshandeling, d.w.z. sluiten van de deur of indrukken van toets STOP worden gebruikt.
b. Verlengen van de bereidingstijd
Tijdens handmatig gebruik kunt u de bereidingstijd door herhaald op de toets te drukken steeds met 30
seconden verlengen.
3. CONTROLEREN VAN DE VERMOGENSSTAND
Om tijdens het bereidingsproces de vermogensstand te controleren, drukt u toets VERMOGENSSTAND in.
1x
Zolang u met uw vinger toets VERMOGENSSTAND aanraakt, wordt de vermogensstand aangegeven.
Het terugtellen van de tijd gaat verder, ook als op het display de vermogensstand wordt aangegeven.
4. VEILIGHEIDSFUNCTIE
INSTELLEN VAN DE VERGRENDELFUNCTIE
1. Druk toets STOP 3 seconden lang in.
1x 3 seconden
Controleer het display.
AANWIJZING: als de veiligheidsvergrendeling is ingesteld, kunt u m.u.v. toets STOP geen
toetsen gebruiken.
OPHEFFEN VAN DE VERGRENDELFUNCTIE
1. Druk toets STOP 3 seconden lang in.
1x 3 seconden
Als de veiligheidsfunctie is ingesteld,
geeft het display de dagtijd aan.
70
Page 71
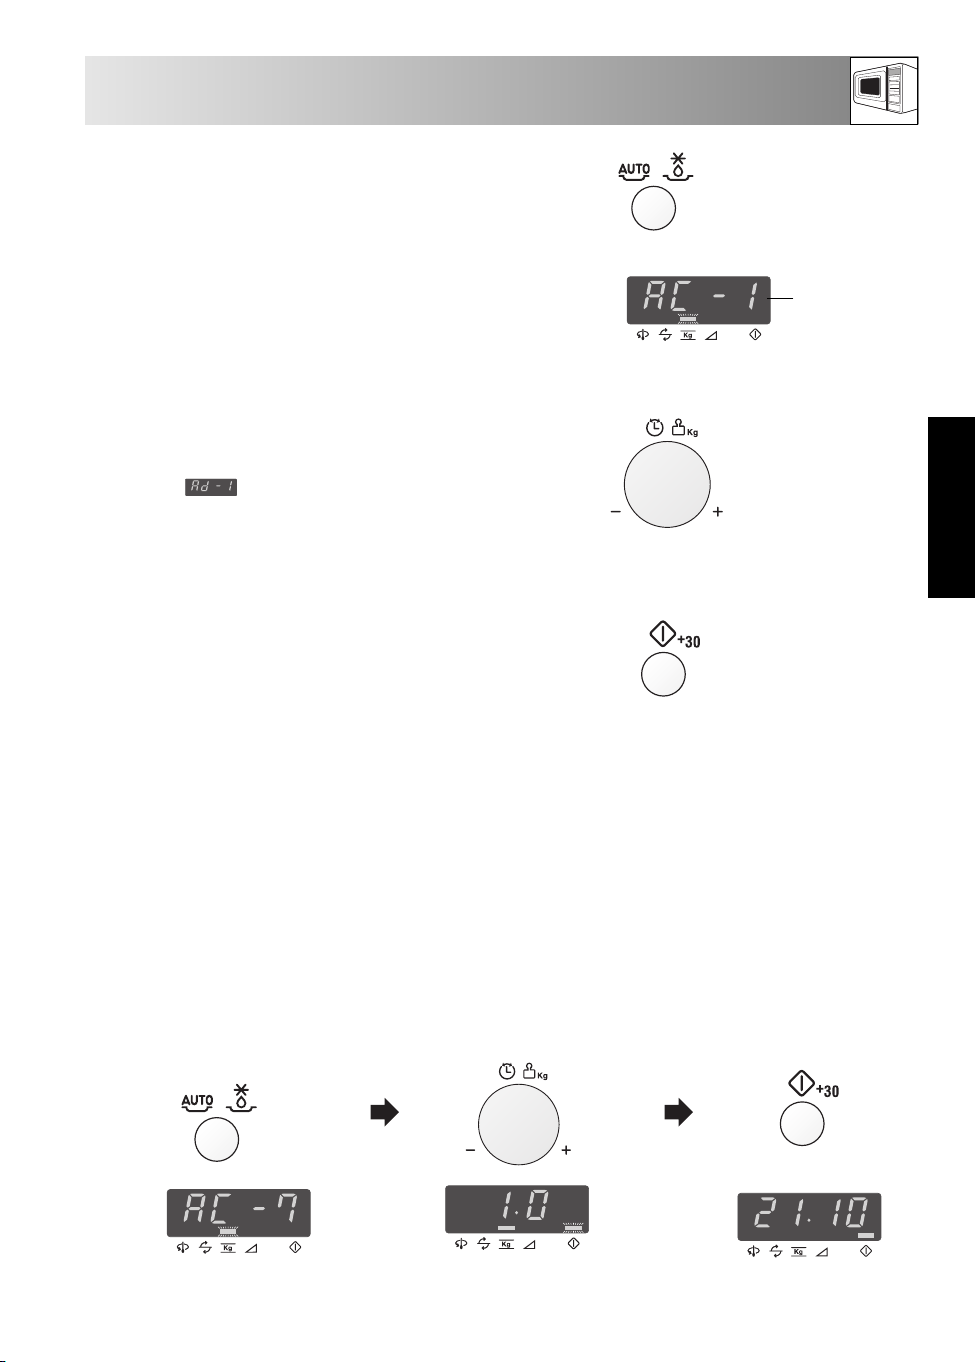
AUTOMATISCH GEBRUIK
De automatische programma's berekenen de juiste
methode en bereidingstijd. U kunt kiezen uit 7
automatische kookprogramma's en 5
automatische ontdooiprogramma's.
Let daarbij op het volgende:
1. Druk toets AUTOMATISCHE PROGRAMMA'S één
maal in, de indicatie komt dan overeen met de
afbeelding.
Het menu kiest u door toets AUTOMATISCHE
PROGRAMMA'S in te drukken tot het gewenste
menunummer wordt aangegeven. Zie pag. 72 - 74,
tabellen AUTOMATISCHE PROGRAMMA'S.
Om een ontdooimenu te kiezen moet u toets
AUTOMATISCHE PROGRAMMA'S minstens 8
maal indrukken. Als u deze toets 8 maal indrukt,
verschijnt in het display. Het menu wijzigt
automatisch, als u toets AUTOMATISCHE
PROGRAMMA'S ingedrukt houdt.
2. Voer door knop TIJDSCHAKELKLOK/GEWICHT
te draaien het gewenste gewicht in.
• Alleen het gewicht van de levensmiddelen invoeren.
Het gewicht van het servies niet meerekenen.
• Voor gerechten met een hoger of lager gewicht dan
in de tabel aangegeven kiest u handmatig gebruik.
Let op de aanwijzingen in de tabel om goede
resultaten te bereiken. Zie pag. 76 - 77.
3. Start het proces door toets START/+30 in te
drukken.
Als een bedieningshandeling noodzakelijk is (bijv.
levensmiddelen omkeren) stopt het apparaat
automatisch, er klinkt een akoestisch signaal, de
resterende bereidingstijd en andere symbolen
worden knipperend aangegeven. Om het proces
voort te zetten toets START/+30 indrukken.
1.
oets AUTOMATISCHE
t
PROGRAMMA'S
x1
menunummer
2.
knop
TIJDSCHAKELKLOK/
GEWICHT
3.
toets START/+30
De temperatuur aan het einde van de
bereidingstijd hangt af van de
uitgangstemperatuur. Controleer of de
levensmiddelen gaar genoeg zijn. Indien
nodig kunt u de bereidingstijd verlengen en
een hoger vermogen instellen.
NEDERLANDS
Voorbeeld: Voor het bereiden van een ovenschotel met een gewicht van 1 kg kiest u AUTOMATISCHE
1. Kies het gewenste menu door
toets AUTOMATISCHE
PROGRAMMA'S 7 maal in
te drukken.
KOOKPROGRAMMA AC-7.
2. Voer door knop
TIJDSCHAKELKLOK/GEWICHT
rechtsom te draaien het gewicht in.
7x
3. Druk toets
START/+30 in.
1x
Controleer het display.
71
Page 72
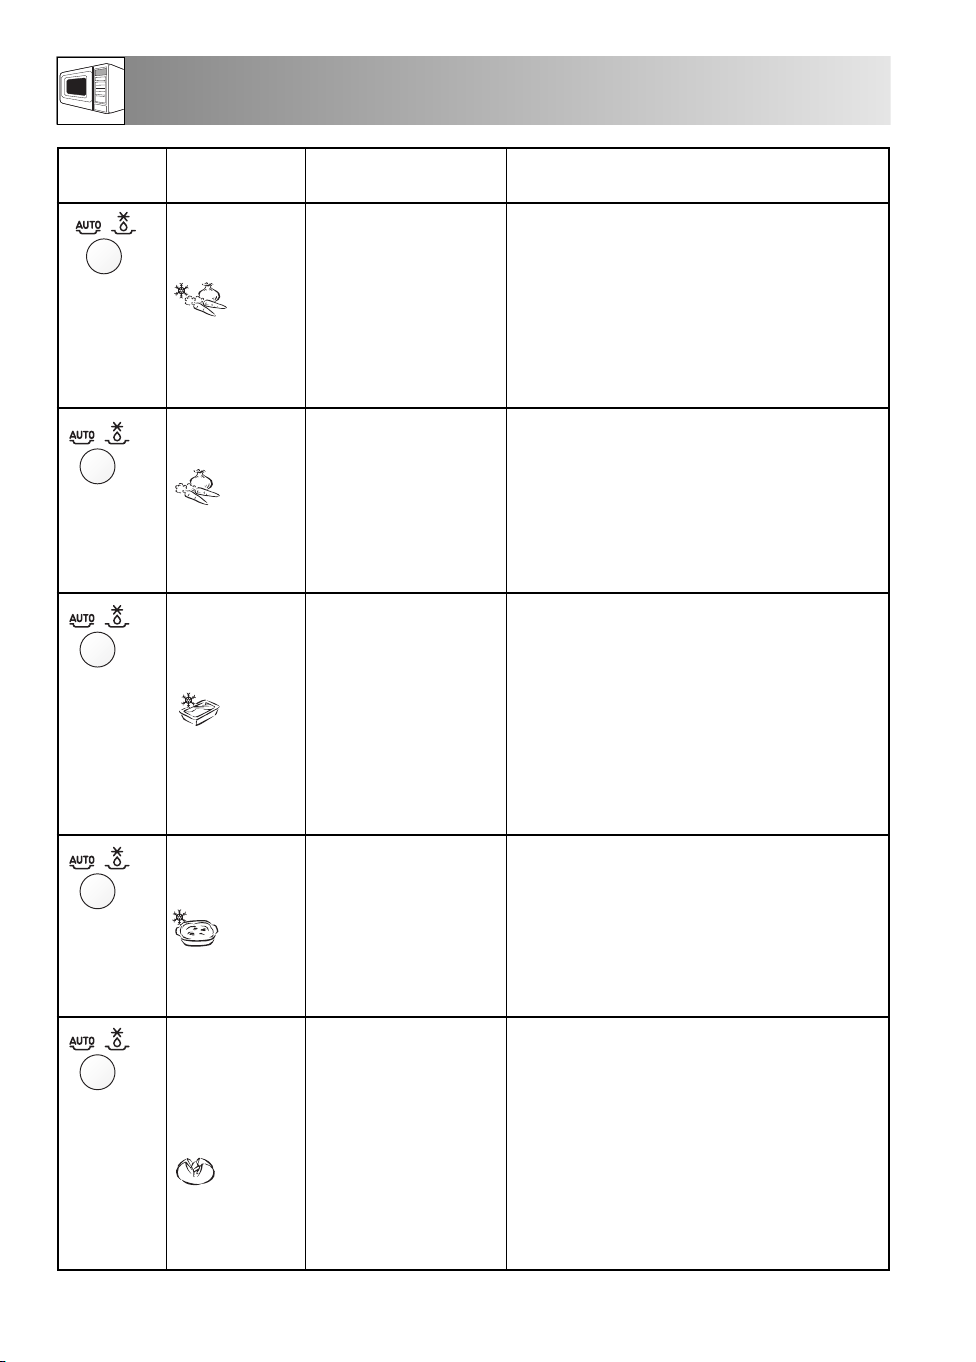
TABELLEN AUTOMATISCHE PROGRAMMA'S
OETS
T
1x
2x
3x
4x
KOOK-
PROGRAMMA
AC-1 koken
Diepgevroren
groente
AC-2 koken
Verse groente
AC-3 koken
Diepgevroren
gerechten
(Roerbaar)
AC-4 koken
Diepgevroren
ovenschotels
HOEVEELHEID (gewichts-
eenheid)/SERVIES
0,1 - 0,6 kg (100 g)
Schaal met deksel
0,1 - 0,6 kg (100 g)
Schaal met deksel
0,3 - 1,0 kg* (100 g)
Schaal met deksel
0,2 - 0,6 kg (100 g)
Platte, ovale ovenschaal
met magnetronfolie of
voor de magnetron
geschikte originele
verpakking met
magnetronfolie
TIPS
• Per 100 g 1 el water en wat zout toevoegen
(voor paddestoelen is geen extra water nodig).
• Met een deksel afdekken.
• Roer het gerecht om als het geluidssignaal
klinkt, en dek het weer af.
• Na het bereiden uit de oven halen en ca. 2
minuten laten staan.
BELANGRIJK: voor compact bevroren groente
handmatig gebruik kiezen.
• In stukjes snijden, bijv. reepjes of plakken.
• Per 100 g 1 el water en wat zout toevoegen
(voor paddestoelen is geen extra water nodig).
• Met een deksel afdekken.
• Roer het gerecht om als het geluidssignaal
klinkt, en dek het weer af.
• Na het bereiden uit de oven halen en ca. 2
minuten laten staan.
• Gerecht in een voor de magnetron geschikte
schaal doen.
• Indien door de fabrikant aangegeven, wat
vloeistof toevoegen.
• Met een deksel afdekken.
• Indien door de fabrikant aangegeven, zonder
deksel koken.
• Roer het gerecht om als het geluidssignaal
klinkt, en dek het weer af. afdekken.
• Na het bereiden uit de oven halen en ca. 2
minuten laten staan.
• Ovenschotel uit de verpakking nemen. Evt. in
een ovenschaal overdoen.
• Met magnetronfolie afdekken.
• Als de verpakking geschikt voor de magnetron
is, papieren deksel verwijderen en met
magnetronfolie afdekken.
• Na het bereiden uit de oven halen en ca. 5
minuten laten staan.
AC-5 koken
Gekookte
aardappelen en
5x
aardappelen in de
schil
0,1 - 0,8 kg (100 g)
Schaal met deksel
Belangrijk: Gekoelde voedingsmiddelen worden vanaf 5
Gekookte aardappelen: aardappelen schillen en
in even grote stukken snijden.
In de schil gekookte aardappelen: aardappelen
van gelijke grootte uitzoeken en wassen.
• Aardappelen in een schaal doen.
• Benodigde hoeveelheid water (ca. 2 el per
100 g) en wat zout toevoegen.
• Met een deksel afdekken.
• Roer het gerecht om als het geluidssignaal
klinkt, en dek het weer af.
• Na het bereiden uit de oven halen en ca. 2
minuten laten staan.
o
C opgewarmd,bevroren voedingsmiddelen vanaf -18oC.
72
Page 73

TABELLEN AUTOMATISCHE PROGRAMMA'S
TOETS
KOOK-
PROGRAMMA
AC-6 koken
Visfilet met saus
6x
AC-7 koken
Ovenschotels
HOEVEELHEID (gewichts-
eenheid)/SERVIES
0,4 - 1,2 kg* (100 g)
Gratinschaal met
magnetronfolie
0,5 - 1,5 kg* (100 g)
Gratinschaal
7x
TOETS
10x
8x
9x
ONTDOOI-
PROGRAMMA
Ad-1
ontdooien
Befstuk en
karbonade
Ad-2
ontdooien
Gehakt
Ad-3
ontdooien
Gevogelte
HOEVEELHEID (gewichts-
eenheid)/SERVIES
0,2 - 0,8 kg (100 g)
Ovenschaal
(zie AANWIJZING op
pag. 74.)
0,2 - 0,8 kg (100 g)
Ovenschaal
(zie AANWIJZING op
pag. 74.)
0,9 - 1,5 kg (100 g)
Ovenschaal
(zie AANWIJZING op
pag. 748.)
Belangrijk: Gekoelde voedingsmiddelen worden vanaf 5
TIPS
• Zie recept "Visfilet met saus" op pag. 74 - 75.
* Totale gewicht van alle ingrediënten.
• Zie recept "Ovenschotels " op pag. 75.
* Totale gewicht van alle ingrediënten.
TIPS
• Leg devoedingsmiddelen opeenplatte schaal inhet
midden vanhet draaiplateau.
• Zodrahet geluidssignaal klinkt,dient het omgedraaid
teworden,dienendedelen van elkaar gehaaldte
worden envervolgens andersneergelegd teworden.
Dek dedunnedelenenwarmeplekkenafmet
aluminiumfolie.
• Wikkel nahetontdooien inaluminiumfolieenlaat 1015minuten staan totdathet volledig is ontdooid.
• Leg het blokgehakt ineenplatte schaal ophet
midden vanhet draaiplateau.
• Draai hetgehakt omzodra het geluidssignaal klinkt.
Verwijderde reedsontdooidedelen indien mogelijk.
• Dek nahetontdooienafmetaluminiumfolie enlaat
het 5-10minuten staan totdathet volledig is ontdooid.
• Leg dekipmet het borststuk naarbenedenin een
platte schaalophetmiddenvan het draaiplateau.
• Keer, zodra hetgeluidssignaal klinkt,het gevogelte en
dek de dunne delenen warmeplekken af met
aluminiumfolie.
• Nahetontdooienmet aluminiumfolie afdekken en 1530minuten laten staan,tot alles volledig ontdooidis.
• Gevogelteonder stromend water afspoelen.
o
C opgewarmd,bevroren voedingsmiddelenvanaf -18oC.
NEDERLANDS
73
Page 74

TABELLEN AUTOMATISCHE PROGRAMMA'S
TOETS
ONTDOOI-
PROGRAMMA
Ad-4
ontdooien
Gebak
11x
Ad-5
ontdooien
Brood
12x
Belangrijk: Gekoelde voedingsmiddelen worden vanaf 5
HOEVEELHEID (gewichts-
eenheid)/SERVIES
0,1 - 1,4 kg (100 g)
Plat bord
0,1 - 1,0 kg (100 g)
Ovenschaal
(Voor dit programma
alleen sneetjes brood.)
o
C opgewarmd,bevroren voedingsmiddelenvanaf -18oC.
TIPS
• Verwijder deverpakking van decake.
• Plaats decake directophetdraaiplateau, of opeen
bord inhetmidden van het draaiplateau.
• Snijd de cake nahetontdooieningelijke plakken en
leg ze iets uit elkaar. Laatde cake 15-30 minuten
staantotdatdecake volledig isontdooid.
• Verdeel de boterhammen overeen platte schaal inhet
midden vanhet draaiplateau.Eenbrood met een
gewicht van 1 kgkunt urechtstreeksoverhet
draaiplateau verdelen.
• Als het geluidssignaal klinkt, dienen deboterhammen
omgedraaidteworden, andersneergelegd te
worden en reedsontdooide
boterhammen uitgenomente worden.
• Dek nahetontdooienafmetaluminiumfolie enlaat
het 5-15minuten staan totdathet volledig is ontdooid.
BELANGRIJK: automatische ontdooiprogramma's
1. Biefstukken en karbonades naast elkaar (in 1 laag) invriezen.
2. Gehakt plat invriezen.
3. Na het omkeren de al ontdooide delen met strookjes aluminiumfolie afdekken.
4. Gevogelte moet meteen na het ontdooien worden bereid.
5. Taarten voorzien van een garnering en room zijn heel gevoelig voor de energie van de magnetron. Als de
room snel ontdooit, dient het direct uit de magnetronoven genomen te worden om 10-30 minuten op
kamertemperatuur te laten staan, om de beste resultaten te krijgen.
RECEPTEN VOOR AUTOMATISCHE
KOOKPROGRAMMA'S AC-6 EN AC-7
VISFILET MET SAUS (AC-6)
visfilet met pikante saus
0,4 kg 0,8 kg 1,2 kg
140 g 280 g 420 g tomaten uit blik (uitgelekt)
40 g 80 g 120 g mais
4 g 8 g 12 g chilisaus
12 g 24 g 36 g uien (gesnipperd)
1 tsp 1-2 tsp 2 tsp rode wijnazijn
mosterd, tijm, cayennepeper
200 g 400 g 600 g visfilet
zout
1. De ingrediëntenvoor de saus doorelkaar mengen.
2. De gezouten visfilets met de dunne einden naar het
midden in een ronde ovenschaal leggen.
3. De saus over de filets gieten.
4. Met magnetronfolie afdekken en met
AUTOMATISCH KOOKPROGRAMMA (AC-
6) “Visfilet met saus”.
5. Laat het gerecht na het koken 2 minuten staan.
74
Page 75

RECEPTEN VOOR AUTOMATISCHE
KOOKPROGRAMMA'S AC-6 EN AC-7
VISFILET MET SAUS (AC-6)
isfilet met kerriesaus
v
0,4 kg 0,8 kg 1,2 kg
200 g 400 g 600 g visfilet
zout
40 g 80 g 120 g bananen (in kleine stukjes)
160 g 320 g 480 g kant-en-klare kerriesaus
OVENSCHOTELS (AC-7)
spinazieschotel
0,5 kg 1,0 kg 1,5 kg
5 g 10 g 15 g boter of margarine (voor het
invetten van de schaal)
150 g 300 g 450 g bladspinazie (ontdooien en
afgieten)
15 g 30 g 45 g uien (gesnipperd)
zout, peper, nootmuskaat
150 g 300 g 450 g aardappelen (in plakjes)
35 g 75 g 110 g gekookte ham (in blokjes)
50 g 100 g 150 g crème fraiche
123ei (eren)
40 g 75 g 115 g geraspte kaas
paprikapoeder
1. De gezouten visfilets met de dunne einden naar het
midden in een ronde ovenschaal leggen.
2. De saus over de filets gieten en de stukjes banaan
erop leggen.
3. Met magnetronfolie afdekken en met
AUTOMATISCH KOOKPROGRAMMA (AC-
6) “Visfilet met saus”.
4. Laat het gerecht na het koken 2 minuten staan.
1. Spinazie en ui met elkaar vermengen en zout,
peper en nootmuskaat toevoegen.
2. Ovenschaal invetten. Om en om laagjes
aardappel, ham en spinazie in de schaal leggen.
De bovenste laag moet spinazie zijn.
3. Meng de eieren met de crème fraiche, voeg zout en
peper toe en giet over de gratin.
4. Met geraspte kaas en paprikapoeder bestrooien.
Met AUTOMATISCH KOOKPROGRAMMA
(AC-7) “Ovenschotels”.
5. Laat het gerecht na het koken 5-10 minuten staan.
NEDERLANDS
OVENSCHOTELS (AC-7)
aardappel-courgetteschotel
0,5 kg 1,0 kg 1,5 kg
5 g 10 g 15 g boter of margarine (voor het
invetten van de schaal)
200 g 400 g 600 g aardappelen (in plakjes)
115 g 230 g 345 g courgettes (in plakjes)
75 g 150 g 225 g crème fraiche
123ei (eren)
1
/
40 g 80 g 120 g kaas (geraspt)
10 g 20 g 30 g zonnebloempitten
12teentjes knoflook (geperst)
2
zout, peper
paprikapoeder
1. Ovenschaal invetten en om en om laagjes
aardappel en courgette in de schaal leggen.
2. Meng de eieren met de crème fraîche, voeg zout,
peper en knoflook toe en giet over de gratin.
3. Met geraspte kaas en paprikapoeder bestrooien.
4. Besprenkel als laatste de gratin met
zonnebloempitten en paprikapoeder en kook op de
stand AUTOMATISCH KOOKPROGRAMMA
(AC-7) “Ovenschotels”.
5. Laat het gerecht na het koken 5-10 minuten staan.
75
Page 76

TABELLEN
GEBRUIKTE AFKORTINGEN
el = eetlepel
tl = theelepel
kp - kopje
kg = kilogram
g = gram
l = liter
ml = milliliter
cm = centimeter
min. = minuten
TABEL: DRANKEN EN GERECHTEN VERWARMEN
Drank/gerecht Hoeveelheid Vermogens- Tijd Tips
Koffie, 1 kopje 150 800 W ca. 1 niet afdekken
Melk, 1 kopje 150 800 W ca. 1 niet afdekken
Water, 1 kopje 150 800 W 11/2-2 niet afdekken
6 kopjes 900 800 W 10-12 niet afdekken
1 kom 1000 800 W 111/2-13 niet afdekken
Gerecht geserveerd op een bord 400 800 W 3-6 watwater op desaus sprenkelen,afdekken,
(groente, vlees en garnituur) halverwege het opwarmprocesroeren
Éénpansgerecht / Soup 200 800 W 11/2-21/2afdekken, nahetverwarmen omroeren
Groente 200 800 W 2-21/
Vlees 1 plak* 200 800 W 3-4 sausdun overdetoplaag verdelen,afdekken
Visfilet * 200 800 W 2-3 afdekken
Gebak, 1 stuk 100 400 W1/
Babyvoeding. 1 potje 190 400 W ca. 1 ineen voordemagnetron geschiktbakje plaatsen,
Margarine of boter smelten* 50 800 W1/
Chocolade smelten 100 400 W 2-3 af entoe roeren
* vanaf koelkasttemperatuur
(g/ml) stand (min.)
2
indien nodigwater toevoegen, afdekken,
500 800 W 4-5 halverwegehet opwarmprocesroeren
2
2
op een rooster leggen
nahet opwarmen goedroeren ende temperatuur testen
afdekken
TABEL: ONTDOOIEN EN KOKEN
Product Hoeveelheid Vermogens- Tijd Water Tips Standtijd
(g) stand (min.) toevoegen(el) (min.)
Visfilet 300 800 W 10-12 - afdekken 1-2
Maaltijd op bord 400 800 W 9-11 - afdekken, na 6 minutenroerentijdomroeren 2
Broccoli 300 800 W 7-9 3-5 afdekken,halverwegedekooktijdomroeren 2
Erwtjes 300 800 W 7-9 3-5 afdekken, halverwege dekooktijd omroeren 2
Gemengde groente 500 800 W 11-13 3-5 afdekken, halverwegede kooktijdomroeren 2
TABEL: ONTDOOIEN
Product Hoeveelheid Vermogens- Tijd Tips Standtijd
(g) stand (min.) (min.)
Geroosterd vlees 1500 80 W 58-64 in een platte schaalleggen, 30-90
(varken, rundvlees, lamsvlees) 1000 80 W 42-48 halverwege de ontdooitijd omkeren 30-90
biefstuk, schnitzel 500 80 W 19-23 30-90
Goulash 500 240 W 8-12 halverwege de ontdooitijd roeren 10-15
Worstjes: 8 stuks 600 240 W 6-9 naastelkaarleggen, halverwegede 5-10
4 stuks 300 240 W 4-5 ontdooitijd omdraaien 5-10
Kippenbout 200 240 W 4-5 halverwegede ontdooitijd omdraaien 10-15
Visfilet 400 240 W 7-10 halverwegedeontdooitijdomdraaien 5-10
Broodjes, 2 stuks 80 240 W env. 1 slechts gedeeltelijk ontdooien Gebak, 1 stuk 100-150 80 W 2-5 plaatsin een platteschaal 5
Fruit, (bijv. kersen, 250 240 W 4-5 gelijkmatigverdelen,halverwegede 5
aardbeien, frambozen, pruimen) ontdooitijd omdraaien
Deinde tabel vermeldetijdenzijnrichtlijnen, dienaargelang devriestemperatuur, kwaliteitengewicht van de levensmiddelenkunnen
variëren.
76
Page 77

TABELLEN
TABEL: VLEES, VIS EN GEVOGELTE BRADEN EN VERSE GROENTE KOKEN
Product Hoeveel Vermogens- Tijd Tips Standtijd
heid (g) stand (min.) (min.)
Vlees 500 800 W 8-10* naar smaak kruiden, in een platte schaal leggen, 10
(varkenslvees, 400 W 10-12 na * omkeren
rundvlees, lamsvlees) 1000 800 W 19-21* 10
400 W 11-14
1500 800 W 33-36* 10
400 W 13-17
Biefstuk (medium) 1000 800 W 9-11* naar smaak kruiden, in een schaal leggen, 10
400 W 5-7 na * omkeren
Visfilet 200 800 W 3-4 opsmaak brengen, inplatteschaalleggen, afdekken 3
Kip 1200 800 W 21-24 opsmaak brengen, inondiepe schaal 3
leggen,halverwegedekooktijdomkeren
Kippenbout 200 800 W 3-4 opsmaak brengen, in een platte schaalleggen 3
Broccoli 500 800 W 9-11 in roosjesverdelen,4-5elwater toevoegen, afdekken, -
tijdenshet koken af entoe roeren
Erwtjes 500 800 W 9-11 afdekken, 4-5 elwater toevoegen,tijdens hetkoken -
afentoeroeren
Wortels 500 800 W 10-12 inplakjes snijden,4-5 elwater toevoegen, afdekken- -
300 800 W 7-9 tijdenshetkoken af entoeroeren
Aardappelen, lekookt 500 800 W 9-11
ingrote gelijkestukken snijden,een beetje zouten150ml -
toevoegen,afdekken, tijdens het koken afen toeroeren
NEDERLANDS
Alle recepten in deze gebruiksaanwijzing zijn, tenzij
anders aangegeven, bedoeld voor 4 porties.
AANPASSEN VAN TRADITIONELE
RECEPTEN
Als u uw vanouds beproefde recepten wilt aanpassen
voor de magnetron, moet u op het volgende letten:
De bereidingstijden met een derde tot de helft
verkorten. Zie ook de recepten in deze
gebruiksaanwijzing. Levensmiddelen met veel vocht
zoals vlees, vis, gevogelte, groente, fruit,
éénpansgerechten en soep kunnen zonder problemen
in de magnetron worden bereid. Bij gerechten met
CHAMPIGNONSOEP
Servies: Schaal met deksel (2 l inhoud)
ingrediënten
200 g champignons, in plakjes
50 g ui, gesnipperd
300 ml vleesbouillon
300 ml room
25 g bloem
25 g boter of margarine
zout, peper
1 eidooier
150 g crème fraiche
RECEPTEN
weinig vloeistof zoals maaltijden op een bord moet u
het oppervlak wat vochtig maken.
Toevoegen van vloeistoffen bij rauwe levensmiddelen
die gestoofd worden, tot ca. tweederde van de
hoeveelheid in het originele recept reduceren. Indien
nodig tijdens het bereidingsproces wat vloeistof
toevoegen.
Toevoegen van vet kan aanzienlijk gereduceerd
worden.
Een kleine hoeveelheid boter, margarine of olie is
voldoende om het gerecht smaak te geven. Daarom is
de magnetron uitstekend geschikt voor het bereiden
van vetarme gerechten.
1. Champignons en bouillon in de schaal doen en
afgedekt koken.
8 - 9 min. 800 W
2. Met een mixer alle ingrediënten pureren. De room
toevoegen.
3. Meng de bloem en de boter tot een deeg en roer door
de soep. Voeg peper en zouttoe en kook de soep met
het deksel erop. Roer na hetkoken.
4 - 6 min. 800 W
4. De eidooier met de crème fraiche vermengen en lepel
voor lepel door desoep mengen. Nogeven
verwarmen, maar niet meer laten koken!
1 - 2 min. 800 W
Na afloop van de kooktijd ca. 2 minuten laten
nagaren.
77
Page 78

RECEPTEN
KALFSVLEES IN ROOMSAUS
Servies: Schaal met deksel (2 l inhoud)
ingrediënten
600 g kalfsfilet
10 g boter of margarine
50 g ui, gesnipperd
100 ml witte wijn
gekruid jusblokje voor ongeveer
300 ml room
1 el peterselie, gehakt
1
GEVULDE HAM
Servies: Schaal met deksel (2 l inhoud)
Ovale ovenschotel (ca. 26 cm lang)
ingrediënten
125 g bladspinazie, fijngehakt
125 g kwark, 6 % vet
40 g Emmentaler kaas, gemalen
peper, paprika
6 plakjes gekookte ham (300 g)
125 ml water
125 ml room
20 gl bloem
20 g boter of margarine
10 g boter of margarine om de schaal in
te vetten
/2liter jus
1. Snij het kalfsvlees in reepjes.
2. Vet de schaal in met boter. Plaats de ui en het vlees
toe in de schaal, dek af en kook. Roer een enkele
keer tijdens het koken.
7 - 10 min. 800 W
3. Voeg de witte wijn, het jusblokje en de room toe, roer,
dek af en laat verder koken. Roer af en toe.
4 - 5 min. 800 W
4. Na afloop van de kooktijd het mengsel omroeren en
ca. 5 minuten laten nagaren. Met peterselie garneren.
1. Vermeng de spinazie met de kaas en kwark, en
breng dit mengsel op smaak.
2. Leg op elk plakje gekookte ham een eetlepel van de
vulling en rol het op. Steek de ham vast met een
houten pen.
3. Maak een bechamelsaus: giet hiervoor het water en
de room in een kom, dek deze af en verwarm.
3 - 4 min. 800 W
Meng de boter met de bloem om een roux te maken,
voeg aan de vloeistof toe en roer met een garde tot
een glad mengsel ontstaat. Dek af, kook tot de roux
dik is.
1 min. 800 W
Roer en proef.
4. Giet de saus in de ingevette schaal, leg de gevulde
hamrolletjes erin en kook het met de deksel erop.
3 - 4 min. 800 W
Na afloop van de kooktijd ca. 5 minuten laten
nagaren.
LASAGNE AL FORNO
Servies: Schaal met deksel (2 l inhoud)
Ondiepe, vierkante schaal met
deksel (ca. 20 x 20 x 6 cm)
ingrediënten
300 g tomaten uit blik
50 g ham, fijngesneden
50 g ui, gesnipperd
1 teentje knoflook, geperst
250 g gehakt
2 el tomatenpuree
zout, peper
150 ml crème fraiche
100 ml melk
50 g Parmezaanse kaas, geraspt
1 tl gemengde kruiden, gehakt
1 tl olijfolie
1 tl plantaardige olie om de schaal in te vetten
125 g groene lasagne
1 el Parmezaanse kaas, geraspt
1. Snij de tomaten in kleine stukjes, meng met de ham,
ui, knoflook, gehakt en tomatenpuree. Op smaak
brengen, afdekken en koken.
7 - 9 min. 800 W
2. Meng de crème fraîche met de melk, Parmezaanse
kaas, kruiden, olie en specerijen.
3. Vet de schaal in en leg 1/3 van de lasagnebladen
op de bodem. Leg de helft van het gehaktmengsel
op de pasta en giet hier wat saus over. Herhaal dit
en zorg dat de laatste laag de resterende pasta is.
Giet de saus over de pasta en bestrooi met
Parmezaanse kaas. Kook het gerecht met gesloten
deksel.
15 - 17 min. 560 W
Na afloop van de kooktijd ca. 5 -10 minuten laten
nagaren.
78
Page 79

RECEPTEN
RATATOUILLE
Servies: Schaal met deksel (2 l inhoud)
ingrediënten
5 el olijfolie
1 teentje knoflook, geperst
50 g ui, in plakjes
250 g aubergine, in blokjes gesneden
250 g courgette, in blokjes gesneden
200 g peper, in grote stukjes gesneden
75 g venkel, in grote stukjes gesneden
1 bouquet garni
200 g artisjokharten uit blik, in vieren
zout, peper
ZEETONGFILET
Servies: Ondiepe, ovale ovenschotel met
magnetronfolie (ca. 26 cm lang)
ingrediënten
400 g tongfilet
1 citroen, heel
150 g tomaten
1 tl boter
1 el plantaardige olie
1 el peterselie, gehakt
zout, peper
4 el witte wijn
20 g boter of margarine
Tip: Voor dit gerecht kunt u ook roodbaars,
heilbot, harder, schol of kabeljauw
gebruiken.
1. Olijfolie en knoflook in de schaal doen. Groente m.u.v.
de artisjokharten toevoegen enmetpeper kruiden.
ouquet garni toevoegen en afgedektstoven. Tussendoor
B
één maal omroeren.
19 - 21 min. 800 W
5 minuten voor heteinde de artisjokharten toevoegen.
2. De ratatouille met zout enpeper op smaak brengen. Het
bouquetgarnivoor het opdienen verwijderen. Na het
stoven ongeveer 2 minuten laten staan.
Tip: Bij vleesgerechten serveren. Het gerecht smaakt koud
uitstekend als voorgerecht.
Tip: Een bouquet garni bestaat uit: takje peterselie,bosje
soepgroente,takje lavas, takjetijm, enkele
laurierbladeren.
1. De filets wassen en droog deppen. Graten
verwijderen.
2. Snijd de citroen en de tomaten in dunne plakjes.
3. Vet de schaal in met boter. Leg de visfilets in de
schotel en besprenkel met plantaardige olie.
4. Strooi peterselie over de vis, leg de plakjes tomaten
erop en breng op smaak. Leg de plakjes citroen
bovenop de tomaten en giet hier witte wijn over.
5. Leg kleine klontjes boter bovenop de citroen, dek af
en kook.
13 - 16 min. 800 W
Na afloop van de kooktijd ca. 2 minuten laten
nagaren.
NEDERLANDS
BESSENGELEI MET VANILLESAUS
Servies: Schalen met deksel (2 l inhoud)
Schalen met deksel (1 l inhoud)
ingrediënten
150g rode aalbessen, gewassen en ontdaan van
kroontjes
150g aardbeien, gewassen en ontdaan van
kroontjes
150g frambozen, gewassen en ontdaan van
kroontjes
250ml witte wijn
100g suiker
50 ml citroensap
8 blaadjes gelatine
300ml melk
1
/
2
30 g suiker
15 g maïsmeel
Tip: U kunt ook diepvriesfruit gebruiken, dat moet dan
vanillestokje
eerst worden ontdooid.
1. Een paar vruchten achterhouden voor de garnering. De
rest met de witte wijn pureren, in de schaal doen en
afgedekt verwarmen.
7 - 9 min. 800 W
2. Suiker en citroensap mengen.
3. Laat de gelatine ongeveer 10 minuten in koud water
weken, haal uit het water en knijp droog. Roer de
gelatine door de warme vruchtenpuree totdat deze
oplost. Zet de gelei in de koelkast en laat stijf worden.
4. Vanillesaus bereiden; giet de melk in de andere schaal.
Snij het vanillestokje open en schraap de vanille uit, roer
dit in de melk met het suikermengsel en de maïsmeel.
Afdekken en koken, tijdens het koken roeren, aan het
einde van de kooktijd nogmaals roeren.
3 - 4 min. 800 W
5. Keer de schaal met de gelei om op een bord en
garneer met het resterende fruit. Giet de vanillesaus over
de gelei.
79
Page 80

REINIGING EN ONDERHOUD
WAARSCHUWING: GEBRUIK GEEN COMMERCIËLE
OVENREINIGERS, STOOMREINIGERS, SCHURENDE
REINIGINGSMIDDELEN, SCHOONMAAKMIDDELEN
DIE NATRIUMHYDROXIDE BEVATTEN OF
SCHUURSPONSJES DIT GELDT VOORALLE DELEN.
VAN UW MAGNETRON.
REINIG DE MAGNETRONOVEN REGELMATIG
EN VERWIJDER ALLE VOEDSELRESTEN. Als u
de oven niet regelmatig reinigt dan kan dit
slijtage van ovenbekleding veroorzaken
waardoor de levensduur van het apparaat
wordt verkort en gevaarlijke situaties
kunnen ontstaan.
Ommanteling
De buitenkant van het apparaat met een mild sopje
schoonmaken. Goed met een droge doek afnemen
en met een handdoek nadrogen.
Bedieningspaneel
Voor het reinigen de deur openen om het
bedieningspaneel te deactiveren.
Het paneel voorzichtig met een vochtige doek
schoonmaken. Nooit te veel water en geen
chemische of schurende reinigingsmiddelen
gebruiken, omdat het bedieningspaneel daardoor
kan worden beschadigd.
Ovenruimte
1. Na elk gebruik het nog warme apparaat met
een zachte, vochtige doek of spons afnemen,
om lichte verontreinigingen te verwijderen.
Voor sterke verontreinigingen een mild sopje
gebruiken en verschillende keren met een
zachte, vochtige doek of spons g rondig
afnemen, tot alle resten volledig verwijderd zijn.
Verwijder no oit de afdekking van de
microgolvengeleider.
2. Let erop dat er geen zeepsop of water door de
kleine openingen in de wand dringt, omdat het
apparaat daardoor beschadigd kan raken.
3. Gebruik geen reinigingsspray in de ovenruimte.
Draaiplateau en draaimechanisme:
Verwijder eerst het d raaiplateau en het
draaimechanisme uit de ovenruimte. Draaiplateau
en mechanisme met een mild sopje schoonmaken
en met een zachte doek afdrogen. Beide delen
kunnen in de afwasautomaat worden gereinigd.
Apparaatdeur
De deur, de deurafdichting en de afsluitvlakken
regelmatig met een vochtige doek afnemen om
verontreinigingen te verwijderen. Gebruik geen
agressieve schuurmiddelen of scherpe metalen
schrapers om de ruit van de ovendeur te reinigen
aangezien hierdoor krassen op het oppervlak
kunnen ontstaan waardoor de ruit kan breken.
AANWIJZING: Gebruik geen stoomreiniger.
80
Page 81

WAT TE DOEN ALS…
SYMPTOOM
… de magnetron niet goed functioneert?
... de magnetron niet werkt?
... het draaiplateau niet draait?
... de magnetron niet uitschakelt?
... de ovenverlichting uitvalt?
DE MOGELIJKE REMEDIES VAN SYMPTOMEN
Controleer of
- de zekering in de huisinstallatie in orde is,
- de stroom misschien uitgevallen is.
- Als de zekeringen in de huisinstallatie meermaals
uitschakelen, neem dan contact op met een
erkend elektro-installateur.
Controleer of
- de deur goed gesloten is,
- de deurafdichtingenen de afsluitvlakken schoon zijn,
- toets START/+30 is ingedrukt.
Controleer of
- het draaimechanisme goed op de aandrijving zit,
- het gebruikte servies niet buiten het draaiplateau
uitsteekt ,
- levensmiddelen niet buiten het draaiplateau uitsteken
en het zo blokkeren,
- zichgeen etensresten onder het draaiplateau
bevinden.
- Trek de stekker uit het stopcontact of schakel de
zekering in de huisinstallatie uit.
- Neem contact op met onze service-afdeling.
- Neem contact op met onze service-afdeling.
Vervangen van de ovenverlichting mag alleen
door vakmensen geschieden.
NEDERLANDS
... de levensmiddelen langzamer heet en
gaar worden dan voorheen?
AANWIJZING: Als u de levensmiddelen langer dan de standaardtijd met steeds 800 W verwarmt, wordt
het vermogen van het apparaat automatisch verlaagd om oververhitting te voorkomen.
(Het magnetronvermogen wordt tot 560 W verlaagd.) Na een pauze van 90 seconden
kan weer een vermogen van 800 W worden ingesteld.
kookmethode
magnetron 800 W
- Stel een langere tijd in (dubbele hoeveelheid =
bijna dubbele tijd) of
- als de levensmiddelen kouder zijn dan anders,
tussendoor omroeren of omkeren of
- een hoger vermogen instellen.
standaardtijd
20 minuten
verlaagd vermogen
magnetron 560 W
81
Page 82

GARANTIE/SERVICEAFDELING
GARANTIEVOORWAARDEN NEDERLAND
Onze producten worden met de grootst mogelijke
zorgvuldigheid geproduceerd. Desondanks kan het
voorkomen dat er een defect optreedt. Onze
servicedienst zal dit op verzoek herstellen, zowel
binnen als buiten de garantietermijn. De
levensduur van het product wordt daardoor niet
negatief beïnvloed. Onderstaande
garantievoorwaarden zijn gestoeld op de EU
Richtlijn 99/44/EG en het Burgerlijk Wetboek. De
daaruit voortvloeiende rechten blijven onverlet.
Ook de garantieverplichtingen van de verkoper
naar de eindgebruiker blijven onaangetast.
Voor dit product verlenen wij garantie volgens
onderstaande voorwaarden:
1. Wij verhelpen kosteloos met inachtneming van
de voorwaarden 2 tot en met 15 gebreken aan
het product die zich openbaren binnen 24
maanden vanaf de datum van levering aan de
eindgebruiker. In geval van professioneel of
daarmee gelijk te stellen gebruik is de garantie
beperkt tot 12 maanden. Voor tweedehands
producten geldt eveneens een termijn van 12
maanden.
2. De garantieprestatie houdt in dat het product
kosteloos wordt teruggebracht in de toestand
die het had voor het defect optrad. Gebrekkige
onderdelen worden hersteld of vervangen.
Kosteloos vervangen onderdelen worden ons
eigendom.
3. Het gebrek moet terstond gemeld worden om
mogelijke verdere schade te voorkomen. De
garantieaanspraak vervalt indien het gebrek
niet binnen twee maanden na vaststelling is
gemeld.
4. Voor een beroep op garantie dient het
aankoopbewijs met aankoop- en/of
leveringsdatum te worden overlegd. Bij
ontbreken daarvan dient ander overtuigend
bewijs te worden overlegd.
5. De garantie heeft geen betrekking op schade
aan kwetsbare onderdelen, zoals
(vitrokeramisch) glas, kunststof, rubber, die
ontstaan is door onzorgvuldig gebruik.
6. De garantie heeft geen betrekking op kleine
afwijkingen van de gestelde kwaliteit die voor
de waarde en deugdelijkheid van het product
onbeduidend zijn.
7. De garantie geldt evenmin voor schade
veroorzaakt door:
– chemische en elektrochemische inwerking van
water,
– abnormale milieuomstandigheden in het
algemeen,
– voor het product oneigenlijke bedrijfsomstan-
digheden,
– contact met agressieve stoffen.
8. De garantie heeft geen betrekking op gebreken
door transportschade die buiten onze
verantwoordelijkheid is ontstaan,
niet-vakkundige installatie of montage, verkeerd
gebruik, gebrekkig onderhoud, of het niet in
acht nemen van de gebruiks- of
montageaanwijzingen.
9. Het recht op garantie vervalt wanneer het defect
werd veroorzaakt door herstelling of ingrepen
door derden die niet bevoegd of niet deskundig
zijn, of wanneer het product voorzien werd van
toebehoren of onderdelen die niet origineel zijn
en daardoor een defect veroorzaken.
10. Producten die gemakkelijk kunnen worden
vervoerd dienen te worden overhandigd aan
of gezonden naar onze servicedienst.
Herstelling ter plaatse kan slechts worden
gevraagd voor grote of ingebouwde
producten.
11. Indien het product zodanig is ingebouwd,
ondergebouwd, opgehangen of geplaatst dat
de benodigde tijd voor het in- en uitbouwen
samen meer dan 30 minuten bedraagt,
worden de hierdoor ontstane extra kosten aan
de gebruiker in rekening gebracht. Schade die
ontstaat door abnormale in- of uitbouw komt
ten laste van de gebruiker.
12. Indien binnen de garantieperiode de
herstelling van hetzelfde defect herhaaldelijk
mislukt of de herstellingkosten disproportioneel
zijn wordt in overleg met de gebruiker een
gelijkwaardige vervanging geleverd. In geval
van vervanging behouden we ons het recht
voor om een vergoeding te rekenen naar rato
van de verstreken gebruiksperiode.
13. Herstelling onder garantie heeft geen
verlenging van de garantietermijn noch
aanvang van een nieuwe garantietermijn
tot gevolg.
14. Op herstellingen geven wij een garantie van
12 maanden, uitsluitend op hetzelfde gebrek.
15. Verdere of andere aanspraken, in het
bijzonder vergoeding van schade ontstaan
buiten het product, zijn uitgesloten voor zover
een aansprakelijkheid niet wettelijk is
vastgelegd.
16. In geval van aansprakelijkheid zal een
vergoeding de aankoopwaarde van het
product niet overtreffen, tenzij wettelijk anders
is bepaald.
Deze garantievoorwaarden gelden voor in
Nederland gekochte en/of in gebruik zijnde
producten. Indien een product naar het buitenland
wordt gebracht dient de gebruiker na te gaan of
het product voldoet aan de technische
voorwaarden ( o.a. spanning, frequentie,
82
Page 83

GARANTIE/SERVICEAFDELING
installatievoorschriften, gassoort,
klimaatomstandigheden) in het betreffende land.
Voor in het buitenland aangeschafte producten
dient de gebruiker zich te vergewissen van de
bepalingen in Nederland. Noodzakelijke
of gewenste aanpassingen vallen niet onder de
garantie, en kunnen niet altijd worden
aangebracht.
Ook na afloop van de garantietermijn staat onze
servicedienst u ter beschikking.
Adres Servicedienst: Electrolux Service,
Vennootsweg 1, 2404 CG ALPHEN AAN DEN
RIJN
Reparatievoorwaarden
Onze reparatievoorwaarden zijn conform de
afspraak tussen de Consumentenbond en Vlehan*.
Art. 1
Aan de consument zal na een melding van
een storing zo mogelijk direct, doch uiterlijk
binnen één werkdag worden medegedeeld op
welke dag het bezoek van de technicus zal
plaatsvinden. De reparatie zal als regel binnen
zeven werkdagen na de melding zijn
uitgevoerd.
Art. 2
a) Alvorens de reparatie wordt verricht zal de
technicus een onderzoek uitvoeren naar de
vermoedelijke oorzaak van de gemelde
storing. Aan de hand hiervan zal hij een zo
nauwkeurig mogelijke, gespecificeerde
begroting maken van de totale reparatiekosten
inclusief voorrijkosten en diagnose-kosten.
Desgevraagd zal deze begroting door de
technicus schriftelijk worden vastgelegd.
b) Indien de consument met het begrote bedrag
niet akkoord gaat, zal op verzoek het te
repareren toestel worden teruggebracht in de
staat waarin het aan de technicus werd
aangeboden. Nadat dit is geschied, zullen
alleen de kosten van voorrijden en arbeidsloon
in rekening worden gebracht op basis van de
werkelijke bestede tijd, danwel van een vooraf
vastgesteld tarief.
Art. 3
Indien tijdens het uitvoeren van de reparatie d
uidelijk wordt dat:
a) de oorspronkelijke reparatie door redelijkerwijs
niet te voorziene omstandigheden niet tegen
het begrote bedrag kan worden uitgevoerd, of
b) ook andere dan in de begroting voorziene
reparaties noodzakelijk zijn, zal overleg met de
consument plaatsvinden en een herziene
kostenbegroting worden gemaakt. In geval de
consument daarmee alsnog niet akkoord gaat,
geldt eveneens het in artikel 2b bepaalde.
Art. 4
De reparatie zal zoveel mogelijk tijdens het
eerste bezoek worden uitgevoerd. Indien om
het toestel in werkende staat te brengen een
tweede bezoek noodzakelijk is, zal:
a) direct, doch uiterlijk binnen één werkdag door
de betreffende service-organisatie of door de
technicus met de consument de datum voor een
tweede bezoek worden afgesproken.
b) een herhalingsbezoek zal als regel binnen tien
werkdagen na de melding plaatsvinden.
c) voor een tweede of daaropvolgend bezoek zal
geen voorrijtarief in rekening worden gebracht,
tenzij de noodzaak voor een herhalingsbezoek
aan de consument is toe te schrijven.
Art. 5
De consument ontvangt een gespecificeerde
rekening met vermelding van type en
serienummer van het apparaat, omschrijving
van de diagnose, toegepaste tarieven,
gebruikte onderdelen en materialen en een
korte omschrijving van de verrichte
werkzaamheden. De betaling van de rekening
dient tegen afgifte van een reparatienota direct
contant of door middel van een gegarandeerd
betaalmiddel plaats te vinden.
Art. 6
Op elke uitgevoerde en betaalde reparatie zal
bij normaal huishoudelijk gebruik een volledige
garantie van minimaal 3 maanden worden
gegeven. Deze garantie omvat het kosteloos
uitvoeren van een hernieuwde reparatie. Op de
uitgewisselde en betaalde onderdelen geldt een
garantietermijn van 12 maanden. Bij een
beroep op garantie op de reparatie dient de
consument op verzoek de gespecificeerde
rekening van de voorgaande reparatie aan de
technicus te overleggen.
Art. 7
Indien na driemaal uitvoeren van eenzelfde
reparatie hetzelfde defect bij normaal
huishoudelijk gebruik opnieuw optreedt binnen
de onder art. 6 bedoelde garantietermijn en
redelijkerwijs een afdoend resultaat bij het
opnieuw uitvoeren van de reparatie niet
verwacht kan worden, zal aan de consument
een nieuw exemplaar of soortgelijk toestel van
hetzelfde merk worden aangeboden tegen
bijbetaling op basis van een per product te
bepalen jaarlijks afschrijvingspercentage.
Art. 8
Vervangen onderdelen stelt de technicus weer
ter beschikking van de consument, met
uitzondering van de onder garantie of tegen
een gereduceerde prijs vervangen onderdelen.
NEDERLANDS
83
Page 84

GARANTIE/SERVICEAFDELING
Art. 9
Een reparatie dient op zodanige wijze te
worden uitgevoerd, dat een toestel daarna
weer volledig voldoet aan de veiligheidsvoorschriften, die op grond van een van
fabriekswege aangebracht veiligheidskeurmerk
gelden, danwel bij het ontbreken daarvan, aan
de wettelijke vereisten terzake. Dit houdt
ondermeer in, dat reparaties moeten worden
uitgevoerd met originele en door de fabrikant
ook terzake van veiligheidskeur-merken en voorschriften gegarandeerde onderdelen.
*) Vereniging Leveranciers van Huishoudelijke
Apparaten in Nederland
Adres service-afdeling, Nederland
AEG fabrieksservice Postbus 120 2400 AC Alphen
aan den Rijn
Service-informatielijn (voor bezoek servicetechnicus
en onderdelen) tel. 0172-468 300
Consumentenbelangen (voor algemene, product- of
gebruiksinformatie) tel. 0172-468 172
Vanzelfsprekend kunt u ook tijdens de lange
levensduur van uw product op ons rekenen.
Daarom nodigen wij u van harte uit uw product
kosteloos te registreren op onze internetsite
www.mijnapparaten.nl. Wij kunnen u dan nog
beter van dienst zijn met informatie over
producten,gebruiksaanwijzingen, tips, innovaties,
oplossingen voor onverhoopte storingen etc.
Europese Garantie
Dit apparaat wordt door Electrolux in elk van de
achter in deze handleiding genoemde landen
gedurende de in het bij het apparaat behorende
garantiebewijs genoemde periode of anderszins bij
de wet gegarandeerd. Als u van een van deze landen
verhuist naar een ander van de hieronder genoemde
landen, verhuist de garantie op het apparaat met u
mee. De volgende beperkingen zijn hierop van
toepassing:
• De garantie op het apparaat begint op de datum
van eerste aankoop van het apparaat. Deze datum
dient te worden aangetoond door overlegging van
een geldig, door de verkoper van het apparaat
afgegeven aankoopbewijs.
• De garantie op het apparaat geldt voor dezelfde
periode en in dezelfde mate voor arbeidsloon en
onderdelen als van toepassing in uw nieuwe land
van vestiging op dit specifieke model of deze
specifieke serie apparaten.
• De garantie op het apparaat is persoonlijk, geldt
dus voor de oorspronkelijke koper van het apparaat
en kan niet worden overgedragen op een andere
gebruiker.
• Het apparaat wordt geïnstalleerd en gebruikt in
overeenstemming met de door Electrolux afgegeven
instructies en wordt alleen in huis gebruikt, dat wil
zeggen, het apparaat wordt niet gebruikt voor
commerciële doeleinden.
• Het apparaat wordt geïnstalleerd in
overeenstemming met alle relevante voorschriften
die in uw nieuwe land van vestiging van kracht
zijn. De voorwaarden van deze Europese garantie
tasten geen van de aan u bij de wet verleende
rechten aan.
84
Page 85

GARANTIE/SERVICEAFDELING (BELGIË)
WAARBORGVOORWAARDEN
nze toestellen worden met de grootst mogelijke
O
zorgvuldigheid geproduceerd. Desondanks kan het
voorkomen dat er een defect optreedt. Onze
klantendienst zal dit op verzoek herstellen, zowel
binnen als buiten de waarborgtermijn.
De levensduur van het toestel wordt daardoor niet
negatief beïnvloed. Onderstaande
waarborgvoorwaarden zijn gestoeld
op de EU Richtlijn 99/44/EG en het Burgerlijk
Wetboek. De daaruit voortvloeiende rechten blijven
onverlet. Ook de waarborgverplichtingen van de
verkoper naar de eindgebruiker blijven onaangetast.
Voor dit toestel verlenen wij waarborg volgens
onderstaande voorwaarden:
1. Wij verhelpen kosteloos met inachtneming van
de voorwaarden 2 tot en met 15 gebreken
aan het toestel die zich openbaren binnen 24
maanden vanaf de datum van levering aan de
eindgebruiker. Deze waarborgvoorwaarden
zijn niet van toepassing in geval van professioneel
of daarmee gelijk te stellen gebruik.
2. De waarborgprestatie houdt in dat het toestel
kosteloos wordt teruggebracht in de toestand
die het had voor het defect optrad.
Gebrekkige onderdelen worden hersteld of
vervangen. Kosteloos vervangen onderdelen
worden ons eigendom.
3. Het gebrek moet terstond gemeld worden, om
mogelijke verdere schade te voorkomen.
4. Voor een beroep op waarborg dient het
aankoopbewijs met aankoop- en/of
leveringsdatum te worden overlegd.
5. De waarborg heeft geen betrekking op schade
aan kwetsbare onderdelen, zoals
(vitrokeramisch) glas, kunststof,rubber, die
ontstaan is door onzorgvuldig gebruik
6. De waarborg heeft geen betrekking op kleine
afwijkingen van de gestelde kwaliteit die voor
de waarde en deugdelijkheid van het toestel
onbeduidend zijn.
7. De waarborg geldt evenmin voor schade
veroorzaakt door:
– chemische en elektrochemische inwerking
van water,
– abnormale milieuomstandigheden in het
algemeen
– voorhettoestel oneigenlijke bedrijfsomstandigheden
– contact met agressieve stoffen.
8. De waarborg heeft geen betrekking op
gebreken door transportschade die buiten
onze verantwoordelijkheid is ontstaan, niet
vakkundige installatie of mo
9. Het recht op waarborg vervalt wanneer het
defect werd veroorzaakt door herstelling of
ingrepen door derden die niet bevoegd of niet
deskundig zijn, of wanneerhet toestel voorzien
werd van toebehoren of onderdelen die niet
origineel zijn en daardoor een defect
veroorzaken.
10. Toestellen die gemakkelijk kunnen worden
vervoerd dienen te worden overhandigd of
gezonden naar onze klantendienst.
Herstelling ter plaatse kan slechts worden
gevraagd voor grote of ingebouwde
toestellen.
11. Indien het toestel zodanig is ingebouwd,
ondergebouwd, opgehangen of geplaatst dat
de benodigde tijd voor het in- en uitbouwen
samen meer dan 30 minuten bedraagt, dan
worden de hierdoor ontstane extra kosten aan
de gebruiker in rekening gebracht. Schade die
ontstaat door abnormale in- of uitbouw komt
ten laste van de gebruiker.
12. Indien binnen de waarborgperiode de
herstelling van hetzelfde gebrek meermaals
mislukt of de herstellingkosten disproportioneel
zijn wordt in overleg met de gebruiker een
gelijkwaardige vervanging geleverd. In geval
van vervanging behouden we ons het recht
voor om een vergoeding te rekenen naar rato
van de verstreken gebruiksperiode.
13. Herstelling onder waarborg heeft geen
verlenging van de waarborgtermijn noch
aanvang van een nieuwe waarborgtermijn
tot gevolg.
14. Op herstellingen geven wij een waarborg van
12 maanden, uitsluitend op hetzelfde gebrek.
15. Verdere of andere rechten, in het bijzonder
vergoeding van schade ontstaan buiten het
toestel, zijn uitgesloten voor zover een
aansprakelijkheid niet wettelijk is vastgelegd.
In geval van aansprakelijkheid zal een
vergoeding de aankoopwaarde van het toestel
niet overtreffen.
Deze waarborgvoorwaarden gelden voor in
België gekochte en/of in gebruik zijnde
toestellen. Indien een toestel naar het
buitenland wordt gebracht dient de gebruiker
na te gaan of het toestel voldoet aan de
technische voorwaarden ( o.a. spanning,
frequentie, installatievoorschriften, gassoort,
klimaatomstandigheden) in het betreffende
land. Voor in het buitenland aangeschafte
toestellen dient de gebruiker zich zelf te
vergewissen van de bepalingen in België.
Noodzakelijke of gewenste aanpassingen
vallen niet onder de waarborg, en kunnen niet
altijd worden aangebracht. Ook na afloop
van de waarborgtermijn staat onze klantendienst
u ter beschikking.ntage, verkeerd gebruik,
gebrekkig onderhoud, of het niet in acht nemen
van de gebruiks- ofmontageaanwijzingen.
NEDERLANDS
85
Page 86

TECHNISCHE GEGEVENS
Aansluiting aan
Zekering
Opgenomen vermogen magnetron
Nuttig vermogen magnetron
Microgolvenfrequentie
Buitenafmetingen PM175X
PM176X
Afmetingen ovenruimte
Inhoud ovenruimte
Draaiplateau
Gewicht
Ovenlamp
* Dit apparaat voldoet aan de eisen van de Europese norm EN55011.
Het apparaat wordt overeenkomstig deze norm als apparaat in groep 2, klasse B geclassificeerd.
Groep 2 betekent dat het apparaat hoogfrequente energie in de vorm van elektromagnetische straling
voortbrengt voor het verwarmen van levensmiddelen.
Apparaat uit klasse B betekent dat het apparaat geschikt is voor huishoudelijk gebruik.
**De inhoud van de ovenruimte wordt bepaald door max. gemeten breedte, diepte en hoogte.
De daadwerkelijke opnamecapaciteit van levensmiddelen is echter geringer.
Dit apparaat voldoet aan de EU-richtlijnen 2004/108/EC en 2006/95/EC.
IN HET KADER VAN DE TECHNISCHE VOORUITGANG KUNNEN DE TECHNISCHE
GEGEVENS TE ALLEN TIJDE ZONDER OPGAVE VAN REDENEN GEWIJZIGD WORDEN.
: 230 V, 50 Hz, één fase
: min. 10 A
: 1,2 kW
: 800 W (IEC 60705)
: 2450 MHz * (groep 2/klasse B)
: breedte x hoogte x diepte: 492 x 370 x 316 mm
: breedte x hoogte x diepte: 592 x 370 x 316 mm
: breedte x hoogte x diepte: 285 x 202 x 298 mm **
: 17 liter **
: ø 272 mm, glas
: ca. 15,5 kg
: 25 W/240 - 250 V
BELANGRIJKE INFORMATIE
Milieuvriendelijke afvalverwerking van verpakking en
oude apparaten
Verpakking
Onze magnetrons moeten worden vervoerd en hebben daarom een effectieve beschermende verpakking
nodig. Daarbij beperken wij ons tot het absoluut noodzakelijke.
Delen van de verpakking (bijv. folie, styropor) kunnen gevaarlijk zijn voor kinderen.
Verstikkingsgevaar! Houd de verpakking uit de buurt van kinderen.
Alle gebruikte verpakkingsmaterialen zijn niet milieu-onvriendelijk en kunnen worden hergebruikt. Het
karton is van oud papier gemaakt, het hout is onbehandeld. De kunststoffen hebben de volgende
aanduidingen:
>PE< voor polyethyleen, bijv. de folieverpakking
>PS< voor geschuimd, cfk-vrij polystyreen, bijv. de hoekbeschermers
>PP< voor polypropyleen, bijv. de verpakkingsbandenn
Door hergebruik van de verpakking hoeven minder grondstoffen te worden gebruikt en wordt de
hoeveelheid afval kleiner.
Informeer bij uw gemeente naar de mogelijkheden voor afvalverwerking in uw woonplaats.
Oude apparaten
Oude apparaten moeten vóór het weggooien onbruikbaar worden gemaakt: stekker uit het stopcontact
trekken en aansluitsnoer afsnijden.
Als u uw oude apparaat afdankt, lever het dan in bij uw vakhandelaar of informeer bij uw gemeente naar
de mogelijkheden voor afvalverwerking in uw woonplaats.
86
Page 87
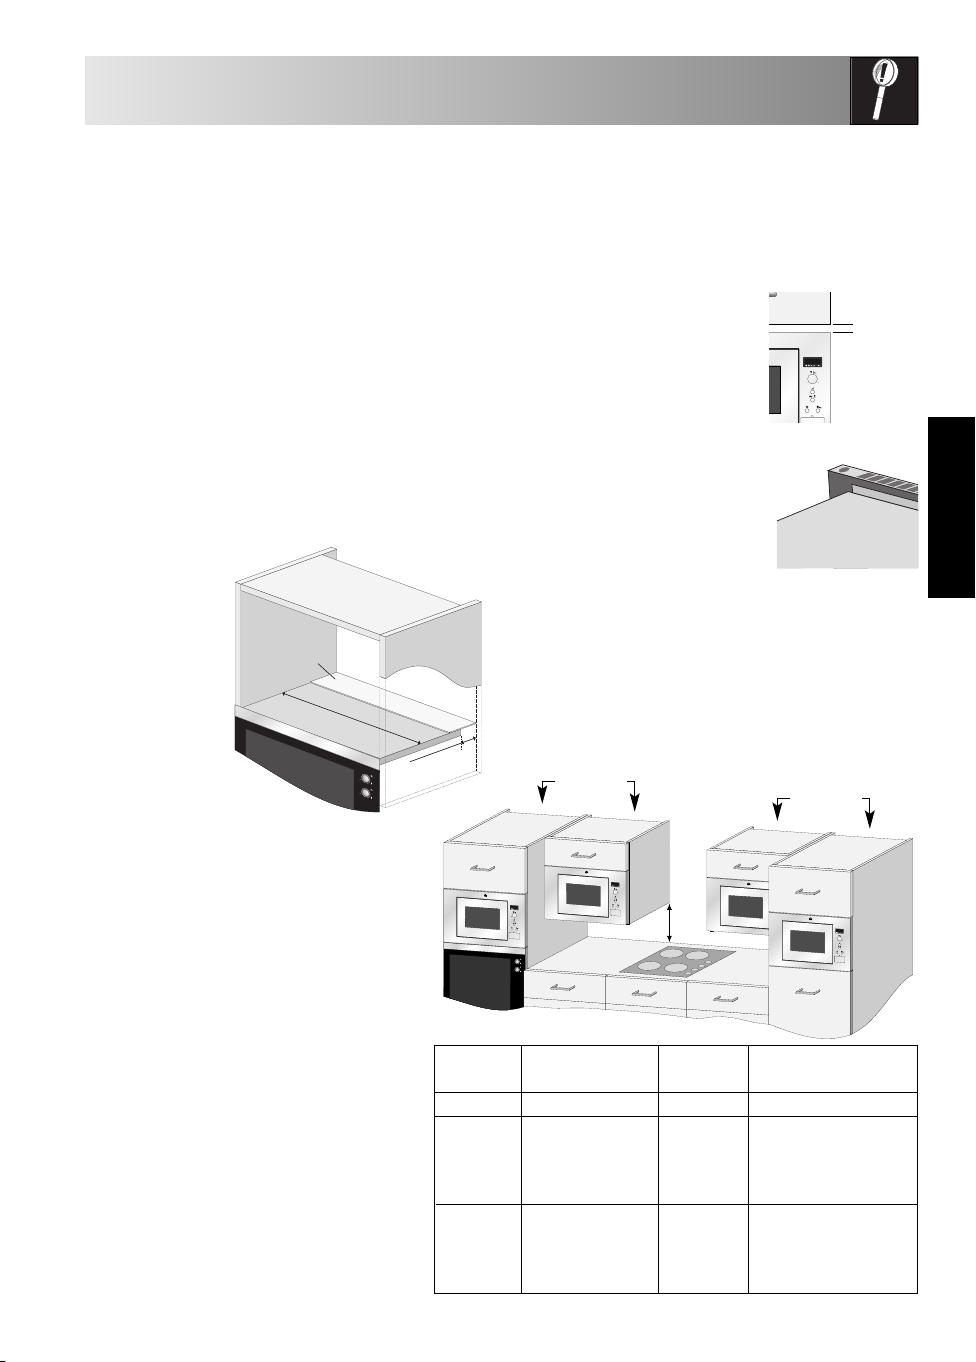
INSTALLATIE-AANWIJZING
5 mm
E
D
INSTALLEREN VAN HET APPARAAT
1. Verwijder de verpakking en controleer het
apparaat op transportschade.
2. Dit apparaat is bedoeld voor inbouw in een kast
van 360 mm hoog. Als het apparaat in een
350 mm hoge kast moet worden ingebouwd:
De 4 voeten (3 hoge en 1 lage) aan de onderkant
van het apparaat losschroeven. De 3 hoge voeten
vervangen door de meegeleverde voeten. De lage
voet hoeft niet te worden vervangen.
3. Als u de magnetron boven een oven (positie A)
inbouwt, moet u de meegeleverde kunststof plaat
gebruiken.
a. De plaat uitsnijden op de inwendige breedte
van de kast.
b. Het beschermfolie van het plakband trekken en
de plaat zodanig aan
de achterste
rand van de
plank
bevestigen,
dat de
serviceopening
wordt
afgedekt (zie
afbeelding.)
kunststof plaat
i
n
we
conventionele
oven
n
di
g
e br
e
e
dt
e
in
n
e
-op
rvice
e
s
VEILIG GEBRUIK VAN HET
APPARAAT
Als u de magnetron in positie B of C
inbouwt:
• De kast moet een afstand van min. 500 mm
(E) tot het werkblad hebben en de magnetron
mag niet direct boven een kookplaat worden
ingebouwd.
• Het apparaat is alleen getest en toegestaan
voor gebruik in de buurt van gaskookplaten,
elektrische kookplaten en inductiekookplaten.
• Tussen kookplaat en magnetron moet genoeg
ruimte worden gelaten om oververhitting van
de magnetron, van de inbouwkast en van de
toebehoren te voorkomen.
• Als de magnetron in gebruik is, schakel dan
de kookplaat niet in als er geen pannen op
staan.
• Wees bij het bedienen van de magnetron
bijzonder voorzichtig als de kookplaat ook
ingeschakeld is.
4. Schuif het apparaat langzaam en zonder geweld
in de inbouwkast, tot de voorste lijst van het
apparaat een naadloze afsluiting vormt met de
voorste opening van de kast.
5. Let erop dat het apparaat
stabiel is en recht staat. Zorg
ervoor dat een afstand van
5 mm tussen de kastdeur
erboven en het bovenste deel
van de lijst wordt
aangehouden (zie afbeelding).
6. Bevestig het apparaat m.b.v. de
meegeleverde schroeven in deze
positie. De bevestigingspunten
bevinden zich in de hoeken
boven en onder (zie afbeelding
9 op pag. 62).
7. Het is belangrijk dat u ervoor zorgt dat de
installatie van dit apparaat voldoet aan de
aanwijzingen in deze gebruiksaanwijzing en de
aanwijzingen van de fabrikant van kookplaat of
oven.
g
rookafvoer
positie A
conventionele
oven
positie nismaat rookafvoer afstand tussen kast
A 560 x 550 x 360 50 50
B + C 460 x 300 x 350 15 50
D 460 x 500 x 350 40 50
positie B
breedte x hoogte x diepte
460 x 300 x 360 15 50
560 x 300 x 350 15 50
560 x 300 x 360 15 50
460 x 500 x 360 40 50
560 x 500 x 350 40 50
560 x 500 x 360 40 50
(min.) en plafond
rookafvoer
positie C
Afmetingen in mm
positie D
87
NEDERLANDS
Page 88
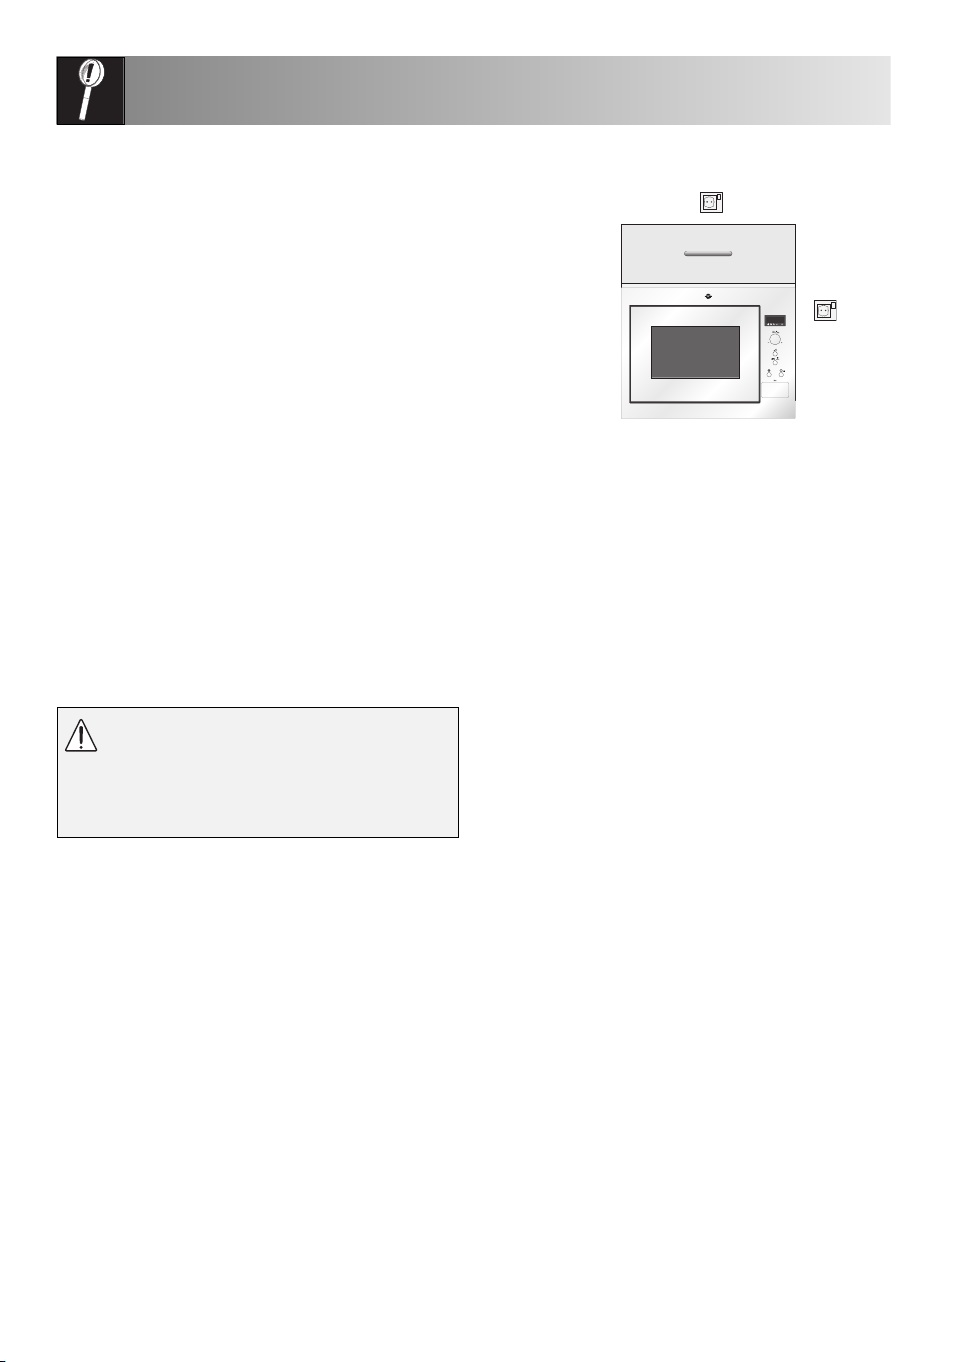
INSTALLATIE-AANWIJZING
AANSLUITING OP HET STROOMNET
Zorg ervoor dat de stekker makkelijk bereikbaar is,
•
zodat hij in geval van nood snel uit het stopcontact kan
worden getrokken. Of het moet mogelijk zijn om de
stroom naar de oven uit te schakelen door middel van
een schakelaar die volgens de bedradingsvoorschriften
is opgenomen in de vaste bedrading.
• Plaats het stopcontact niet achter de kast.
• De best plek is boven de kast (A).
Als het aansluitsnoer niet wordt aangesloten op punt (A), moet het
van de snoerdrager (zie afb. 13 op pag. 62) worden losgenomen en
onder het apparaat door worden geleid.
• Het apparaat aansluiten op een volgens de voorschriften geïnstalleerd stopcontact met randaarde met
een eenfasige wisselspanningaansluiting (230 V/50 Hz). Stopcontact met 10 A zekeren.
• Het aansluitsnoer mag alleen door een erkend installateur worden vervangen.
• Vóór het opstellen een stuk touw aan het aansluitsnoer aanbrengen. Daardoor wordt dan bij het
inbouwen de aansluiting aan punt (A) vereenvoudigd.
• Bij het inschuiven van het apparaat in een hoge kast mag het aansluitsnoer NOOIT beklemd raken.
• Aansluitsnoer of stekker niet in water of andere vloeistof dompelen.
ELEKTRISCHE AANSLUITING
A)
(
WAARSCHUWING:
DIT APPARAAT MOET GEAARD ZIJN
Als deze veiligheidsmaatregel niet
wordt opgevolgd, is de fabrikant niet
aansprakelijk voor schade.
Als de stekker die zich aan het apparaat bevindt
niet in uw stopcontact past, neem dan contact op
met onze serviceafdeling.
88
Page 89

INHALT
Wichtige Sicherheitshinweise . . . . . . . . . . . . . . . . . . . . . . . . . . . . . . . . . . . . . . . .90 - 92
Gerät & Zubehör . . . . . . . . . . . . . . . . . . . . . . . . . . . . . . . . . . . . . . . . . . . . . . . . . . . .93
Bedienblende . . . . . . . . . . . . . . . . . . . . . . . . . . . . . . . . . . . . . . . . . . . . . . . . . . . . . .94
Vor Inbetriebnahme . . . . . . . . . . . . . . . . . . . . . . . . . . . . . . . . . . . . . . . . . . . . . . . . . .94
Einstellen der Uhr . . . . . . . . . . . . . . . . . . . . . . . . . . . . . . . . . . . . . . . . . . . . . . . . . . . .95
Hinweis für das kochen mit mikrowellen. . . . . . . . . . . . . . . . . . . . . . . . . . . . . . . . . 96 - 97
Mikrowellensicheres kochgeschirr . . . . . . . . . . . . . . . . . . . . . . . . . . . . . . . . . . . . . . . .98
Hinweis zur Leistungseinstellung . . . . . . . . . . . . . . . . . . . . . . . . . . . . . . . . . . . . . . . . . .99
Manuelle-Betrieb . . . . . . . . . . . . . . . . . . . . . . . . . . . . . . . . . . . . . . . . . . . . . . . . . . . .99
Andere nützliche Funktionen . . . . . . . . . . . . . . . . . . . . . . . . . . . . . . . . . . . . . . .100 - 101
Automatik-Betrieb . . . . . . . . . . . . . . . . . . . . . . . . . . . . . . . . . . . . . . . . . . . . . . . . . . .102
Automatik-Tabelle . . . . . . . . . . . . . . . . . . . . . . . . . . . . . . . . . . . . . . . . . . . . . .103 - 105
Rezepte für Automatik AC-6 & AC-7 . . . . . . . . . . . . . . . . . . . . . . . . . . . . . . . . . . . . . .106
Gar-Tabellen . . . . . . . . . . . . . . . . . . . . . . . . . . . . . . . . . . . . . . . . . . . . . . . . . .107 - 108
Rezepte . . . . . . . . . . . . . . . . . . . . . . . . . . . . . . . . . . . . . . . . . . . . . . . . . . . . .108 - 110
Reinigung & Pflege . . . . . . . . . . . . . . . . . . . . . . . . . . . . . . . . . . . . . . . . . . . . . . . . . .111
Was tun, wenn… . . . . . . . . . . . . . . . . . . . . . . . . . . . . . . . . . . . . . . . . . . . . . . . . . .112
Garantie/Kundendienst .. . . . . . . . . . . . . . . . . . . . . . . . . . . . . . . . . . . . . . . . . . . . . .113
Garantie/Kundendienst (Belgien) . . . . . . . . . . . . . . . . . . . . . . . . . . . . . . . . . . . . . . . .114
Technishe daten . . . . . . . . . . . . . . . . . . . . . . . . . . . . . . . . . . . . . . . . . . . . . . . . . . . .115
Wichtige Hinweise . . . . . . . . . . . . . . . . . . . . . . . . . . . . . . . . . . . . . . . . . . . . . . . . . .115
Aufstellanweisungen . . . . . . . . . . . . . . . . . . . . . . . . . . . . . . . . . . . . . . . . . . . .116 - 117
Das Symbol auf dem Produkt oder seiner Verpackung weist darauf hin, dass dieses Produkt nicht als
normaler Haushaltsabfall zu behandeln ist, sondern an einem Sammelpunkt für das Recycling von
elektrischen und elektronischen Geräten abgegeben werden muss. Durch Ihren Beitrag zum korrekten
Entsorgen dieses Produkts schützen Sie die Umwelt und die Gesundheit Ihrer Mitmenschen. Umwelt und
Gesundheit werden durch falsches Entsorgen gefährdet. Weitere Informationen über das Recycling dieses
Produkts erhalten Sie von Ihrem Rathaus, Ihrer Müllabfuhr oder dem Geschäft, in dem Sie das Produkt
gekauft haben.
DEUTSCH
89
Page 90

WICHTIGE SICHERHEITSHINWEISE
WICHTIG FÜR IHRE SICHERHEIT: LESEN SIE DIE FOLGENDEN HINWEISE AUFMERKSAM
DURCH, UND BEWAHREN SIE DIE BEDIENUNGSANLEITUNG AUF.
Zur Vermeidung von Feuer
Mikrowellengeräte sollten während des
Betriebs nicht unbeaufsichtigt gelassen
werden. Zu hohe Leistungsstufen oder zu
lange Garzeiten können das Gargut
überhitzen und Feuer verursachen.
Die Steckdose muss ständig zugänglich sein, so
dass de r Netz stecker im Notfall e infach
abgezogen werden kann.
Die Netzspannung muss 230 V Wechselstrom,
50 Hz betragen und sollte mit einer Sicherung von
mindestens 10 A oder einem Sicherungsautomaten
von mindestens 10 A ausgestattet sein.
Es wird empfohlen das Gerät an einen separaten
Stromkreis anzuschließen.
Das Gerät nicht im Freien lagern oder aufstellen.
NIEMALS DIE TÜR ÖFFNEN, wenn im
Gerät erwärmte Lebensmittel zu rauchen
beginnen. Das Gerät ausschalten, den
Netzstecker ziehen und warten, bis die
Lebensmittel nicht mehr rauchen. Öffnen
der Tür während der Rauchentwicklung
kann Feuer verursachen.
Nur für Mikrowellengeräte vorgesehene
Behälter und vorgesehenes Geschirr.
Siehe Seite 98.
Niem als das G erät u nbeaufs icht igt
lassen, wenn Kunststoff-, Papier- oder
andere brennbare Lebensmittelbehälter
verwendet werden.
Den Spritzschutz für den Hohlleiter, den
Garraum, den Drehteller und den
Drehteller-Träger nach der Verwendung
des Gerätes reinigen. Diese Bauteile sollten
trocken und fettfrei sein. Zurückbleibende
Fettspritzer können überhitzen, zu rauchen
beginnen oder sich entzünden.
Keine brennbaren Materialien in der Nähe des
Geräts (einheitliche Wortschreibung verwenden).
Niemals die Lüftungsöffnungen blockieren.
Alle Metallv erschlüsse, Drähte usw. vo n
Lebensmitteln und Verpackungen entfer nen.
Funkenbildung auf Metalloberflächen kann zu
Feuer führen.
Das Mikrowellengerät nicht zum Frittieren von
Lebensm itteln in Öl oder Fett ver wend en.
Temperaturen können nicht kontrolliert werden und
das Fett kann sich entzünden.
Zum Herstellen von Popcorn sollte nur für Mikrowellengeräte vorgesehenes Popcorn-Geschirr
verwendet werden.
Keine Lebensmittel oder andere Gegenstände im
Gerät lagern.
Die Einstellungen nach dem Starten des Geräts
überprüfen um sicherzustellen, dass das Gerät wie
gewünscht arbeitet. Diese Bedienungsanleitung
zusammen verwenden.
Zur Vermeidung von Verletzungen
WARNHINWEIS:
Das Gerät nicht betreiben, wenn es beschädigt ist
oder Fehlfunktionen aufweist. Überprüfen Sie vor
dem Betrieb die folgenden Punkte:
a) Die Tür muss einwandfrei schließen und darf
nicht schlecht ausgerichtet oder verzogen sein.
b) Die Scharniere und Türsicherheitsverriegelungen
dürfen nicht gebrochen oder lose sein.
c) Die Türdichtungen und Dichtungsoberflächen
dürfen nicht beschädigt sein.
d) Im Garraum und an der Tür dürfen keine
Dellen oder andere Beschädi gungen
vorhanden sein.
e) Das Netzkabel und der Netzstecker dürfen
nicht beschädigt sein.
Nehmen Sie unter keinen Umständen
Reparaturen oder Änderungen an
Ihrem Mikrowellenge rät se lbst v or.
Reparaturen, insbesondere solche, bei
denen die Abdeckung des Geräts entfernt
werden muss, dürfen ausschließlich von
entsprechend qualifizierten Technikern
vorgenommen werden.
Das Gerät nicht bei geöffneter Tür oder mit auf
irgendeine Weise veränderter Türsicherheitsverriegelung betreiben.
Niemals das Gerät betreiben, wenn sich Gegenstände zwischen den Türdichtungen und den
abdichtenden Oberflächen befinden.
90
Page 91

WICHTIGE SICHERHEITSHINWEISE
Darauf achten, dass sich weder Fett noch
Schmutz auf den Türdichtungen bzw. den
benachbarten Geräteteilen ansammeln.
Befo lgen Si e die Hinw eise un ter
"Reinigung & Pflege" auf Seite 111. Wird
das Gerät nicht saubergehalten, kann
dies die Oberfläche beeinträchtigen und
sich negativ auf die Lebensdauer des
Geräts auswirken. Schlimmstenfalls
kann die Siche rheit des G erät s
beeinträchtigt werden.
Personen mit HERZSCHRITTMACHERN sollten ihren
Arzt oder den Hersteller des Herzschrittmachers
nach Vorsichtsmaßnahmen beim Umgang mit
Mikrowellengeräten befragen.
Zur Vermeidung von elektrischem Schlag
Unter ke inen Umständen sollte da s äußere
Gehäuse entfernt werden.
Niemals Flüssigkeiten in die Öffnungen der
Türsicherheitsverriegelung oder Lüftungsöffnungen
kommen lassen oder Gegenstände in diese
Öffnungen stecken. Wenn größere Mengen
Flüssigkeiten verschüttet werden, müssen Sie sofort das
Gerät ausschalten, den Netzstecker ziehen und den
ELECTROLUX autorisierten Kundendienst anfordern.
Niemals das Netzkabel bzw. den Netzstecker in
Wasser oder andere Flüssigkeiten legen.
Das Netzkabel darf nicht über heiße oder scharfe
Oberflächen geführt werden, wie zum Beispiel
über den heißen Lüftungsöffnungen an der oberen
Rückwand des Gerätes.
Auf keinen Fall versuchen, die Garraumlampe
selbst auszuwechseln, sondern nur von einem von
ELECTROLUX Kundendienst lassen! Wenn die
Garraumlampe ausfallen sollte, wenden Sie sich
bitte an Ihren Elektrohändler oder eine von
ELECTROLUX autorisierte Kundendienststelle!
Wenn das Netzkabel beschädigt ist, muss es durch
ein neues Spezialkabel ersetzt werden.
Bitte das A uswechseln durch ei nen v on
ELECTROLUX autorisierten Kundendienst vornehmen
lassen.
Zur Vermeidung von Explosionen und
plötzlichem Sieden:
WARNUNG: Speisen in flüssiger und
ande rer Form dü rfe n nic ht in
verschlossenen Gefäßen erhitzt werden,
da sie explodieren könnten.
Niemals verschlossene Behälter ver wenden.
Verschl üsse un d Abdec kungen entferne n.
Verschl ossene Be hälter können dur ch den
Druckanstieg selbst nach dem Ausschalten des
Gerätes noch explodieren.
Beim Erhitzen von Flüssigkeiten vorsichtig sein.
Behälter mit großer Öffnung verwenden, damit
entstehende Blasen entweichen können.
Beim Erhitzen vo n Fl üssi gkei ten in
Mikrowellengeräten beim Entnehmen
des Behälters vorsichtig sein, da es zu
einem verspätetem Aufwallen durch
Siedeverzug kommen kann.
Um Verbrennungen durch plötzliches Überkochen
(Siedeverzug) zu vermeiden:
1. Die Flüssigkeiten vor dem Kochen/Erhitzen
umrühren.
2. Es wird empfohlen, während des Erhitzens einen
Glasstab oder ähnlichen Gegenstand in den
Behälter zu stecken.
Nach dem Erhitzen die Flüssigkeit noch kurze
3.
Zeit im Gerät stehen lassen für mindestens 20
Sekunden, um verspätetes Aufwallen durch
Siedeverzug zu verhindern.
Eier nicht in de r Sch ale k ochen.
Har tgek ocht e Ei er d ürfen n icht in
Mikrowellengeräten erwärmt werden,
da si e sel bst n ach d er Erwärmun g
explodieren können. Zum Kochen oder
Aufwärmen von Eiern, die nicht verquirlt
oder verrührt wurden, das Eigelb und
Eiwe iß anste chen, damit es nich t
explodiert. Vor dem Aufwärmen im
Mikro wellengerät die S chale vo n
gekochten Eiern entfernen und die Eier in
Scheiben schneiden.
Die Schale von Lebensmitteln, z.B. Kartoffeln,
Würstchen oder Obst, vor dem Garen anstechen,
damit der Dampf entweichen kann.
Zur Vermeidung von Verbrennungen
Beim Entnehmen von Gargut aus dem Garraum
sollten Topflappen o.ä. verwendet werden.
Behälter, Popcorngeschirr, Kochbeutel, usw. immer
vom Gesicht und den Händen abgewandt öffnen,
um Verbrennungen durch Dampf zu vermeiden.
DEUTSCH
91
Page 92

WICHTIGE SICHERHEITSHINWEISE
m Verbrennungen zu vermeiden, immer
U
die Lebensmitteltemperatur prüfen und
umrü hren , bevo r Sie da s Gar gut
ser vier en. Beson dere Vorsic ht i st
geboten, wenn die Lebensmittel oder
Getränke an Babys, Kinder oder ältere
Personen weitergereicht werden.
Die Temperatur des Behälters ist kein echter
Hinweis auf die tatsächliche Temperatur des
Lebensmittels oder Getränks; immer die Temperatur
prüfen.
Halten Sie beim Öffnen der Gerätet ür
ausreichenden Abstand, um Verbrennungen durch
austretende Hitze oder Dampf zu vermeiden.
Schneiden Sie gefüllte, gebackene Speisen nach
dem Garen in Sch eiben, um den Dampf
entweichen zu lassen und Verbrennungen zu
vermeiden.
Kinder vom Türglas fernhalten, um Verbrennungen
zu vermeiden.
Zur Vermei dung von Fe hlbed ienun g
durch Kinder
WARNUNG: Kinder dürfen das Gerät
nur unter Aufsicht benutzen oder wenn
sie ausreichen de Anweisu ngen zur
sicheren Benutzung erhalten haben und
die Gefahren eines unsachgemäßen
Gebrauchs verstehen.
Dieses Gerät darf von Personen (einschließlich
Kindern) mit eing eschrän kten physisch en,
sensorischen oder geistigen Fähigkeiten bzw.
mangelnder Erfahrung oder Kenntnissen nur dann
verwendet werden, wenn sie unter Aufsicht einer
für ihre Sicherheit verantwortlichen Person stehen
oder von dieser in der Verwendung des Gerätes
unterwiesen wurden.
Kinder sind zu beaufsichtigen und sollten nicht mit
dem Gerät spielen.
Nicht an die Gerätetür lehnen oder an der Tür
hängend schwingen. Das Mikrowellengerät ist kein
Spielzeug!
Kinder sollte n mi t a llen wichtigen
Sicherheitshinweisen vertraut gemacht werden:
z.B. Verwendung von Topflappen und vorsichtiges
Abnehmen von Deckeln. Beachten Sie besonders
Verpackungen, die Lebensmittel knusprig machen
(z.B. selbstbräunende Materialien), indem sie
besonders heiß werden.
Sonstige Hinweise
Niemals das Gerä t auf ir gendeine Weise
verändern.
Dieses Gerät ist nur für den Hausg ebrauch
vorgese hen u nd da rf nur zum Gare n von
Lebensmitteln verwendet werden. Es eignet sich
nicht für gewerbliche Zwecke oder den Gebrauch
in einem Labor.
Zur Vermeidung von Fehlfunktionen und
Beschädigungen dieses Geräts
Das Gerät niemals leer in Betrieb nehmen.
Bei der Verwendung von Bräunungsgeschirr oder
selbste rwär menden Material ien muss ei ne
wärmefeste Isolierung (z.B. ein Porzellanteller)
zwischen Geschirr und Drehteller gestellt werden.
Dadurch werden Beschädigungen des Drehtellers
und de s Dreht eller-Träger s durch Wärm e
vermieden. Die angegebene Aufheizzeit für das
Geschirr sollte nicht überschritten werden.
Kein Metallgeschirr verwenden, da Mikrowellen
reflektiert werden und dies zu Funkenbildung führt.
Keine Konserven in das Gerät stellen.
Nur den für dieses Gerät vorgesehenen Drehteller
und den Drehteller-Träger verwenden. Benutzen Sie
das Mikrowellengerät nicht ohne den Drehteller.
Um das Zerspringen des Drehtellers zu vermeiden:
(a)Vor dem Reinigen, den Drehteller abkühlen
lassen.
(b)Kein heißes Gargut oder heißes Geschirr auf
den kalten Drehteller stellen.
(c) Kein kalten Lebensmittel oder kaltes Geschirr auf
den heißen Drehteller stellen.
Während das Gerät arbeitet, keine Gegenstände
auf das äußere Gehäuse stellen.
HINWEISE:
Bei Fragen zum Anschluss des Geräts wenden Sie
sich bitte an einen autorisierten Elektrofachmann.
Sowohl der Hersteller als auch der Händler können
keine Verantwortung für Beschädigungen des Geräts
oder Verletzungen von Personen übernehmen, die
als Folge eines falschen elektrischen Anschlusses
entstehen.
Wasserdampf und Tropfen können sich auf den
Wänden im Innenraum bzw. um die Türdichtungen
und Dichtungsoberflächen bilden. Dies ist normal
und ist kein Anzeichen für den Austritt von
Mikrowellen oder einer sonstigen Fehlfunktion.
92
Page 93

GERÄT & ZUBEHÖR
1
2
3
4
1. Gerätefront
2. Innenbeleuchtung
3. Bedienblende
4. Türöffnungs-Taste
5. Spritzschutz für den Hohlleiter
6. Garraum
7. Antrieb
8. Türdichtungen und Dichtungsoberlächen
9. Befestigungspunkte (4 Stellen)
10. Lüftungsöffnungen
11. Gehäuse
12. Geräterückseite
13. Netzkabel-Träger
14. Netzkabel
ZUBEHÖR:
Überprüfen Sie, dass folgende Zubehörteile
mitgeliefert wurden:
(15) Drehteller (16) Drehteller-Träger
(17) 4 Befestigungsschrauben (nicht abgebildet)
• Den Drehteller-Träger in die Antriebswelle am
Garraumboden einsetzen.
• Dann den Drehteller darauf legen.
• Um Schäden am Drehteller zu vermeiden, ist darauf
zu achten, dass Geschirr und Behälter bei der
Entnahme nicht den Rand des Drehtellers berühren.
HINWEIS: Bei der Bestellung von Zubehör,
teilen Sie Ihrem Händler oder dem ELECTROLUX
autorisierten Kundendienst bitte folgende Angaben mit:
Name des Zubehörteils und Bezeichnung des Modells.
14
13
78
56
9
10
DEUTSCH
11
12
15
16
93
Page 94

BEDIENBLENDE
1 Anzeigefeld mit
1
2 Symbolen
Die Anzeige über dem Symbol blinkt oder
2
leuchtet auf. Wenn eine Anzeige blinkt, die
entsprechende Taste (mit demselben Symbol)
drücken oder den erforderlichen
3
Bedienungsschritt durchführen.
Umrühren
Wenden
4
KG/Gewicht
Symbol für Mikrowellen-Leistungsstufen
5
Symbol für Garvorgang
3 ZEITSCHALTUHR/GEWICHT
4 MIKROWELLEN-LEISTUNGSSTUFEN-Taste
6
7
zum Einstellen der Mikrowellenleistung
5 AUTO -Taste für Auftau- und Gar-
Automatikprogramme Diese Taste zur Auswahl
8
von einem der 12 Automatikprogramme
drücken.
6 START/+30-Taste
7 STOP-Taste
8 TÜRÖFFNUNGS-Taste
VOR INBETRIEBNAHME
Das Gerät an eine Steckdose anschließen.
1. Die Anzeige beginnt zu blinken.
2. Die STOP-Taste drücken. Anzeige prüfen.
x1
Die Uhr gemäß der nachstehenden Anleitung einstellen.
Benutzung der STOP-Taste
1. Löschen eines Eingabefehlers beim
Programmieren.
2. Vorübergehendes Unterbrechen des laufenden
Betriebs.
3. Löschen eines Programms während des laufenden
Betriebs durch zweimaliges Drücken.
94
Page 95

Die Uhr läuft im 12 Stunden- oder im 24 Stunden-Format.
Beispiel: Einstellen der 12 Stunden-Uhr auf 11.35 Uhr.
1. Um die Uhr auf das 12
Stunden-Format einzustellen,
die MIKROWELLEN-
LEISTUNGSSTUFEN-Taste
3 Sekunden lang gedrückt
halten. erscheint
auf dem Display.
Stellen Sie die Stunden ein. Den
2.
ZEITSCHALTUHR/ GEWICHT-Knopf drehen,
bis die richtige Stunde angezeigt wird (11).
EINSTELLEN DER UHR
3. Drücken Sie die
MIKROWELLENLEISTUNGSTUFEN-Taste
um von den Stunden zu
den Minuten zu wechseln.
x
Anzeige prüfen.
1
4. Stellen Sie die Minuten ein. Den
ZEITSCHALTUHR/GEWICHT-
Knopf drehen, bis die richtigen
Minuten angezeigt werden (35).
5. Drücken Sie die
MIKROWELLENLEISTUNGSSTUFEN-Taste
um die Uhr zu starten.
Beispiel: Einstellen der 24 Stunden-Uhr auf 23.35 Uhr.
1. Um die Uhr auf das 24
Stunden-Format einzustellen,
die MIKROWELLEN-
LEISTUNGSSTUFEN-Taste
3 Sekunden lang gedrückt
halten. erscheint
auf dem Display.
2. Drücken Sie die
MIKROWELLENLEISTUNGSTUFEN-Taste
um von den 12 Stunden zu
den 24 Stunden zu wechseln.
x1
Anzeige prüfen.
4. Drücken Sie die
MIKROWELLENLEISTUNGSTUFEN-Taste
um von den Stunden zu
den Minuten zu wechseln.
5. Stellen Sie die Minuten ein. Den
ZEITSCHALTUHR/GEWICHT-
Knopf drehen, bis die richtigen
Minuten angezeigt werden (35).
Anzeige prüfen.
x1
3. Stellen Sie die Stunden ein. Den
ZEITSCHALTUHR/ GEWICHT-Knopf drehen,
bis die richtige Stunde angezeigt wird (23).
6.
Drücken Sie die
MIKROWELLENLEISTUNGSSTUFEN-Taste
um die Uhr zu starten.
DEUTSCH
Anzeige prüfen.
x1
Anzeige prüfen.
HINWEIS:
1. Sie können den ZEITSCHALTUHR/GEWICHT-Knopf
im oder gegen den Uhrzeigersinn drehen.
2. Drücken Sie die STOP-Taste, wenn Sie beim
Programmieren einen Fehler gemacht haben.
3. Wenn die Stromversorgung Ihres Mikrowellengerätes
unterbrochen wird, meldet das Display in Abständen
x1
, nachdem die Stromversorgung
wiederhergestellt wurde. Wenn das während des
Garvorgangs passiert, wird das Programm gelöscht. Die
Uhrzeit wird ebenfalls gelöscht.
4. Wenn Sie die Uhrzeit neu einstellen möchten, verfahren
Sie wie im obigen Beispiel.
95
Page 96

HINWEIS FÜR DAS KOCHEN MIT MIKROWELLEN
Mikrowellen sind Energiewellen ähnlich denen, die für
Fernseh- und Radiosignale benutzt werden.
Elektrische Energie wird in Mikrowellenenergie
umgewandelt, welche mittels eines Wellenleiters in den
Herdinnenraum geleitet wird.
Um zu verhindern, dass Speisen und Fett in den
Wellenleiter gelangen, ist dieser durch eine
Abdeckung geschützt.
Mikrowellen können nicht durch Metall dringen, daher
besteht der Herdinnenraum aus Metall und die Tür ist
mit einem feinen Netzwerk aus Metall versehen.
Während des Kochvorgangs werden die Mikrowellen
von den Seiten des Herdinnenraums reflektiert.
Mikrowellen können bestimmte Materialien, wie Glas
oder Kunststoff, durchdringen, um die Speisen zu
erwärmen. (Siehe ‚Mikrowellensicheres Kochgeschirrr’
auf den Seiten 98).
Um Speisen in einem Mikrowellenherd zu
kochen/aufzutauen, muss die Mikrowellenenergie den
Behälter durchdringen können, um in die Speisen
einzudringen.
Es ist daher wichtig, das geeignete Kochgeschirr zu
wählen.
Runde/ovale Schüsseln sind besser geeignet als
quadratische oder rechteckige, da die Speisen in den
Ecken leicht überkocht werden. Eine Vielfalt an
Behältern, die zum Kochen geeignet sind, ist auf den
Seiten 98 aufgeführt.
Die Mikrowellen werden von dem in den Speisen
enthaltenen Wasser, Zucker oder Fett absorbiert und
bringen diese zum vibrieren. Dadurch wird Wärme
durch Reibung erzeugt, ähnliche der Wärme, die
erzeugt wird, wenn Sie Ihre Hände reiben.
Die äußeren Bereiche der Speisen werden durch die
Mikrowellenenergie erwärmt, dann wird die Wärme
durch Konduktion wie beim konventionellen Kochen ins
Innere der Speisen geleitet. Es ist wichtig, die Speisen
gelegentlich zu wenden, umzuarrangieren oder
umzurühren, um eine gleichmäßige Erwärmung zu
gewährleisten.
Sobald der Kochvorgang beendet ist, stellt der Herd
die Produktion von Mikrowellen automatisch ein.
Die Standzeit nach dem Kochen ist erforderlich, damit
die Hitze sich gleichmäßig in den Speisen verteilen
kann.
Mikrowellenherde kochen schneller als konventionelle
Herde. Es ist daher wichtig, dass bestimmte Techniken
eingehalten werden, um ein gutes Ergebnis zu
gewährleisten. Viele der folgenden Techniken sind
dieselben, die auch beim herkömmlichen Kochen
benutzt werden.
CHARAKTERISTIKEN DER NAHRUNGSMITTEL
Zusammen- Nahrungsmittelmit hohem Fett-oderZuckergehalt (z.B. Plumpudding, gefülltesGebäck) benötigen eine geringereZeit
setzung zumErwärmen. Hier sollteSorgfalt walten,da einÜberhitzen Feuer verursachen kann.
Dichte DieDichteder Nahrungsmittel beeinflusstdie Zeit, diezumKochen benötigt wird.Leichte,poröse Nahrungsmittel, wie
Kuchen oder Brot, sind schneller gar als schwere, dichte Nahrungsmittel,wie Braten oderEintöpfe.
Menge Mit zunehmender Menge anNahrungsmitteln,dieindenMikrowellenherd gestelltwerden, muss auchdie Kochzeit
erhöht werden,z. B. vierKartoffeln brauchen länger zum Kochen alszwei.
Größe KleineNahrungsmittelundkleineStücke werden schnellergekocht alsgroße,dadieMikrowellenvon allen Seiten in
die Mitteeindringen können.Damit alle Stücke gleichmäßiggekochtwerden, schneiden Sie sie alle gleichgroß.
Form Nahrungsmittel mit unregelmäßiger Form,wieHühnerbrustoderHähnchenkeule,brauchenlänger, bis die dickeren
Teile gegart sind.Runde Formen sind beimKochenimMikrowellenherd schnellergekocht alsquadratische.
Temperatur Die Ausgangstemperatur der Nahrungsmittel beeinträchtigtdie für sie erforderliche Kochzeit. GekühlteNahrungsmittel
brauchen längerzumKochen als Nahrungsmittelmit Zimmertemperatur. SchneidenSie gefüllte Nahrungsmittel,
wie einenBerliner, ein, umWärme oderDampf entweichenzu lassen.
96
Page 97

HINWEIS FÜR DAS KOCHEN MIT MIKROWELLEN
KOCHTECHNIKEN
Anordnen LegenSie die Nahrungsmittel mit dem dickstenTeilnach außenindieSchüssel.z. B. Hähnchenkeule
Abdecken BenutzenSieMikrowellen-Folieoder einengeeigneten Deckel.
Einstechen NahrungsmittelmitSchale,Haut oder Membranmüssenvor dem Kochen oder AufwärmenanmehrerenStellen
eingestochenwerden, da sichsonst Dampfentwickeln würde, der das Nahrungsmittel zum explodieren bringen
könnte.z.B. Kartoffeln,Fisch, Hühnchen,Würstchen.
Wichtig:Eiersollten nichtmit Mikrowellenenergie gekochtwerden, da sie explodieren können,und diessogar,
nachdemder Kochvorgang abgeschlossen ist;z.B. pochieren,braten, hartkochen.
Umrühren, Fürgleichmäßiges Kochen ist es wichtig, dassdie Nahrungsmittel während des
umdrehen & Kochens umgerührt,umgedrehtundumarrangiert werden. Immer vonaußen zur Mitte hin umrührenund
umarrangieren umarrangieren.
Stehen DieStandzeitnach demKochenist erforderlich, damit dieHitze sichgleichmäßig indenNahrungsmitteln verteilen
kann.
Abdecken Beim Auftauen von Nahrungsmittelnkönnen bestimmteTeiledavon erwärmt werden. WarmeBereichekönnen durch
kleine StückeAlufolie, welchedie Mikrowellen reflektieren, abgedecktund geschütztwerden;z.B.Hühnerflügelund
–beine.
GARZEITBESTIMMUNG MIT DEM SPEISENTHERMOMETER
Jedes Getränk und jede Speise hat nach Ende des
Garvorgangs eine bestimmte Innentemperatur, bei
der der Garvorgang abgeschlossen werden kann
und das Ergebnis gut ist. Die Innentemperatur konnen
Sie mit einem Speisen thermometer feststellen. In der
Temperaturtabelle sind die wichtigsten Temperaturen
angegeben.
Getränk / speise Innentemperatur Innentemperatur
am ende der nach 10 - 15
garzeit minuten standzeit
Getränke erhitzen (Kaffee, Wasser, Tee, etc.) 65-75oC
Milch erhitzen 60-65oC
Suppen erhitzen 75-80oC
Eintöpfe erhitzen 75-80oC
Geflügel 80-85oC 85-90oC
Lammfleisch Leicht angebraten 70oC 70-75oC
Gut durchgebraten 75-80oC 80-85oC
Roastbeef Leicht angebraten 50-55oC 55-60oC
Halb durchgebraten 60-65oC 65-70oC
Gut durchgebraten 75-80oC 80-85oC
Schweine-, Kalbfleisch 80-85oC 80-85oC
DEUTSCH
97
Page 98

MIKROWELLENSICHERES KOCHGESCHIRR
Kochgeschirr Mikrowell Kommentare
Alufolie / / Einkleines StückAlufolie kanndazubenutzt werden, die Nahrungsmittel vor demÜberhitzen
Behälter aus zuschützen.HaltenSie die Foliemindestens 2 cmvon den Herdwänden entfernt, da
Alufolie sonstLichtbögen auftreten können. Behälter aus Alufolie sind nichtzu empfehlen,es seidenn
Anbratschüsseln BefolgenSie immer dieAnweisungendes Herstellers.ÜberschreitenSie nicht die
Porzellan & / Porzellan, Keramik,glasiertesTongeschirr und feines Porzellan. Porzellan sind inderRegel
Keramik geeignet, außer wenn esmit metallischemDekor verziert ist.
Glaswaren, BeiderBenutzungvon GlaswarensollteVorsichtwalten,da diesedurch plötzlicheErhitzung
z.B.Pyrex ® zerbrechenoder springenkönnen.
Metall Kochgeschirre ausMetallsindbeider Benutzung von Mikrowellenenergie nichtzu
Kunststoff/ HierbeiistVorsicht angesagt,da manche Behältersich beihohen Temperaturenverbiegen,
Styropor,z. B. schmelzenoder verfärben.
Fastfood-Behälter
Frischhaltefolie Sollte die Nahrungsmittel nicht berührenundmusseingestochen werden, damit derDampf
Gefrier- / Bratbeutel Müssen eingestochen werden, damitder Dampf entweichenkann. Stellen Sie sicher, dass die
Papiertellerund Nurzum Erwärmenoderzum Absorbieren von Feuchtigkeitbenutzen.Hier sollte Sorgfalt
–tassen& walten, da ein ÜberhitzenFeuer verursachen kann.
Küchenpapier
Stroh- und Behalten Sie den Herd ständigim Auge,daeinÜberhitzen dieser Materialien Feuer
Holzbehälter verursachen kann.
RecyceltesPapier Können u.U. Metallrückstände enthalten,die Lichtbögenverursachenundeinen Brand
& Zeitungen auslösen können.
-ensicher
sie sind vom Herstellerhierfür vorgesehen, wie z. B.Microfoil ® –befolgen Sie die
Anweisungen sorgfältig.
angegebenen Kochzeiten. Nehmen Sie sich inAcht, dadiese Schüsselnsehrheißwerden
können.
empfehlen,da es zur Bildungvon Lichtbögen kommen kann, die einen Brandauslösen
können.
entweichenkann.
Beutel für dieBenutzungin derMikrowelle geeignetsind. Benutzen Siekeine Verschlüsse
aus KunststoffoderMetall, da diese schmelzen oder aufgrund der Bildungvon Lichtbögen
Feuerfangenkönnen.
98
Page 99
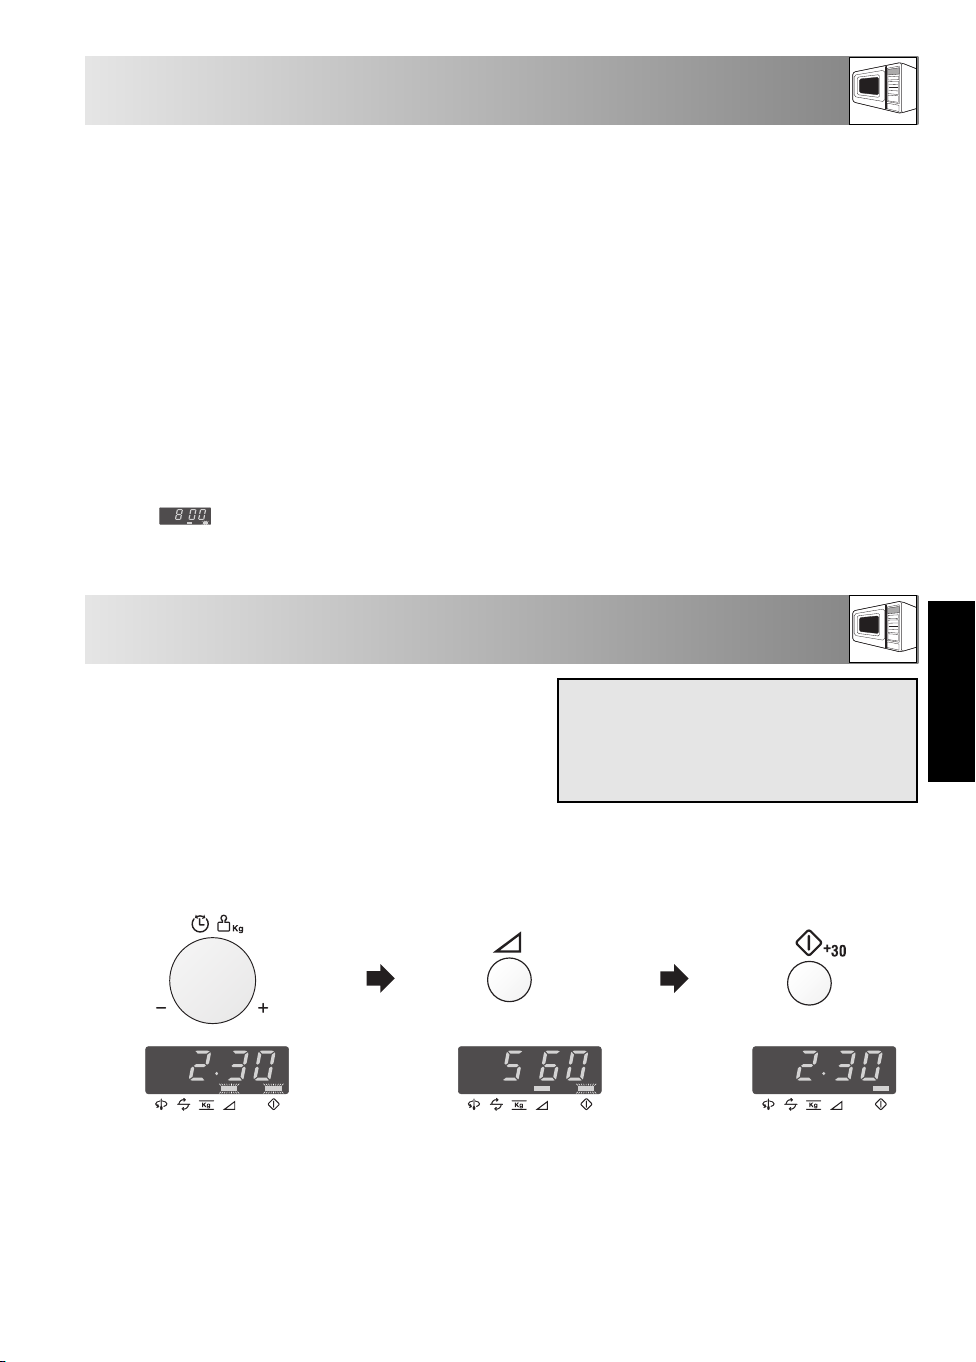
HINWEIS ZUR LEISTUNGSEINSTELLUNG
Für den manuellen Betrieb stehen 5 verschiedene
Leistungsst u f en zur Auswahl. Zu r Wahl de r
Mikrowellenleistung sollten Sie sich an den Angaben
in dem nachfolgenden rezepten orientieren. Generell
gelten folgende Empfehlungen:
800 W Für schnelles Garen oder Erwärmen, z.B. für
Suppen, Eintöpfe, Dosengerichte, heiße Getränke,
Gemüse, Fisch usw.
560 W Zum längeren Garen von kompakteren
Speisen wie Braten, Hackbraten und Tellergerichten,
auch für empfindliche Gerichte wie Käsesoßen oder
Rührkuchen. Mit dieser niedrigeren Einstellung kochen
Soßen nicht über und die Speisen garen gleichmäßig,
ohne am Rand hart zu werden oder überzulaufen.
Um die Leistung einzustellen, die MIKROWELLEN-LEISTUNGSSTUFEN-Taste drücken, bis die gewünschte
Leistungsstufe angezeigt wird. Wenn die MIKROWELLEN-LEISTUNGSSTUFEN-Taste einmal gedrückt wird,
erscheint . Falls die gewünschte Leistungsstufe überschritten wird, die MIKROWELLEN-
LEISTUNGSSTUFEN-Taste so oft drücken bis die gewünschte Stufe wieder angezeigt wird. Wenn die Taste nicht
gedrückt wird, arbeitet das Gerät automatisch mit voller Leistung 800 W.
400 W Für kompaktere Speisen, die beim Garen mit
herkömmlichen Methoden eine lange Garzeit
erfordern, z.B. Rindfleischgerichte, wird diese
Leistungsstufe empfohlen, damit das Fleisch zart
bleibt.
240 W (Auftau-Einstellung) Wählen Sie diese Stufe
zum Auftauen, damit Speisen gleichmäßig auftauen.
Diese Stufe ist auch bestens geeignet, um Reis,
Nudeln und Klöße zu köcheln und gebackenen
Eierpudding zu kochen.
80 W Zum sanften Auftauen, z.B. für Sahnetorten
oder Blätterteig.
W = Watt
MANUELLE-BETRIEB
Der manuelle Betrieb ermöglicht das Einstellen einer Garzeit bis
zu 90 Minuten. (90.00)
Die Zeiteinheit zum Garen (Auftauen) variiert von 10
Sekunden bis fünf Minuten, in Abhängigheit von der
Gesamtgar- oder auftauzeit, wie in der Tabelle aufgeführt.
Beispiel:
Erhitzen von Suppe für 2 Min. 30 Sek. mit 560 W Mikrowellenleistung.
1. Geben Sie durch Drehen des
ZEITSCHALTUHR/GEWICHT-Knopfs im
Uhrzeigersinn die gewünschte Garzeit ein.
2. Die gewünschte Leistung durch
zweimaliges Drücken der
MIKROWELLEN-LEISTUNGSSTUFENTaste einstellen.
Garzeit Zeiteinheiten
0-5 Minuten 10 Sekunden
5-10 Minuten 30 Sekunden
10-30 Minuten 1 Minute
30-90 Minuten 5 Minuten
3. Starten Sie den
Garvorgang durch
einmaliges Drücken der
START/+30-Taste.
DEUTSCH
x2
Anzeige prüfen.
HINWEIS:
1. Wird die Gerätetür während des Garvorgangs geöffnet, wird die Garzeit auf dem Display automatisch angehalten.
Die Rückwärtszählung der Garzeit setzt wieder ein, wenn die Tür geschlossen und die START/+30 -Taste gedrückt
wird.
2. Wenn Sie während des Garvorgangs die Leistungsstufe überprüfen wollen, drücken Sie die MIKROWELLEN-
LEISTUNGSSTUFEN-Taste. Solange Ihr Finger diese Taste berührt, wird die Leistungsstufe angezeigt.
3. Sie können den ZEITSCHALTUHR/GEWICHT-Knopf im oder entgegen dem Uhrzeigersinn drehen. Wenn Sie den
Drehknopf entgegen dem Uhrzeigersinn drehen, wird die Garzeit graduell von 90 Minuten vermindert.
x1
99
Page 100

ANDERE NÜTZLICHE FUNKTIONEN
1. GAREN MIT VERSCHIEDENEN GARFOLGEN
Eine Folge von (maximal) 3 Stufen kann programmiert werden.
Beispiel:
Garen: 5 Minuten bei 800 W Leistung (Stufe 1)
16 Minuten bei 240 W Leistung (Stufe 2)
STUFE 1
1. Geben Sie durch Drehen des
ZEITSCHALTUHR/GEWICHT-Knopfs
im Uhrzeigersinn die gewünschte
Garzeit ein.
STUFE 2
3. Geben Sie durch Drehen des
ZEITSCHALTUHR/GEWICHT-
Knopfs im Uhrzeigersinn die
gewünschte Garzeit ein.
2. Die gewünschte Leistung durch
einmaliges Drücken der
MIKROWELLEN-LEISTUNGSSTUFENTaste wählen.
4. Die gewünschte Leistung
durch viermaliges Drücken
der MIKROWELLEN-
LEISTUNGSSTUFEN-Taste
wählen.
x1
5. Drücken Sie die
START/+30-Taste, um
den Garvorgang zu
starten.
x4
Überprüfen Sie das Display.
(Das Gerät arbeitet nun 5 Minuten lang bei 800 W und anschließend 16 Minuten bei 240 W.)
100
x1
 Loading...