

PC4101
PC4102
PC4103
4602 02 03 01
ifu41_serie.qxd 2002. 10. 31. 10:31 Page 1
ifu41_serie.qxd 2002. 10. 31. 10:31 Page 2
PROGRESS PC 4101, 4102, 4103
Hungarian
Polish
Croatian
Czech
Slovak
Francais
Espanol
Italiano
Nederlands
Portugues
English
Deutsch
Garantia
Esta garantia é um adicional aos seus direitos legais de consumidor.
Os produtos da Progress são cuidadosamente concebidos, fabricados, testados e inspeccionados. Consequentemente, comprometemo-nos a substituir ou
reparar qualquer componente do aparelho com defeito de fabrico sem encargos de peças ou mão de obra para o cliente, no período de um ano a contar
da data de aquisição na Loja.
Esta garantia não é válida nos seguintes casos:
a. Se não forem correctamente seguidas as instruções de instalação e
utilização doméstica do aparelho fornecidas pelo fabricante .
b. Se a manutenção ou reparação do aparelho não forem sempre efec-
tuadas por um Serviço de Assistência Técnica ou agente credenciado
da Progress.
c. Esta garantia pode ser invalidada se forem efectuadas reparações ou
modificações não autorizadas, no aparelho.
A Progress declina qualquer responsabilidade por danos resultantes de negligência, uso inadequado ou alterações introduzidas no aparelho. Esta garantia
não abrange as peças normalmente desgastáveis pelo uso corrente tais como
escovas, sacos do pó, correias de transmissão, dado que a duração destas
peças depende da intensidade e natureza da utilização dada ao aspirador.
Antes de ser fornecido qualquer serviço no âmbito da garantia o cliente deve
apresentar prova da data de aquisição do aspirador.
As moradas e números de telefone dos Serviços de Assistência Técnica
encontram-se em folheto anexo.
Importante:
Para consulta futura sugerimos que registe aqui os seus dados e os guarde
juntamente com a factura e as instruções do aparelho, como prova de
aquisição:
Nome da Loja : _______________________________________________
Data de aquisição _____/____/____ Modº e Nº do aparelho
________________
ifu41_serie.qxd 2002. 10. 31. 10:31 Page 3
English
PROGRESS PC 4101, 4102, 4103
IMPORTANT SAFEGUARDS
¾
Read this instruction booklet carefully.
¾
Before using the appliance, check that the mains power voltage corresponds to the voltage shown on the rat−
ing plate.
¾
Do not switch the appliance on if it appears to be faulty in any way or it has a damaged cord or plug. Do not
try to repair the appliance by yourself. For repairs or accessories, contact Electrolux
Customer Services on 08706 055 055.
¾
Always remove the plug from the power socket when the appliance is not in use and before carrying out any
cleaning or maintenance operations.
¾
Never leave the appliance unattended when it is switched on. Keep the appliance out of reach of children.
¾
This appliance is for domestic use only. Use as described in this instruction booklet.
¾
Do not pull the appliance by the cord. Do not unplug by pulling on the cord.
¾
Do not use appliance on wet surfaces or to vacuum liquids, mud, ash and burning cigarette butts. Do not vac−
uum up any highly flammable or explosive substances or gases.
¾
Do not unplug the vacuum cleaner with wet hands.
¾
Do not operate the vacuum cleaner too close to heaters and radiators, stoves etc.
¾
Before you start using the vacuum cleaner, please remove large or sharp objects from the floor to prevent
damage to the cloth dustbag.
INSTRUCTIONS FORUSE
¾
Before placing into operation make certain that the filters are in the proper position.
¾
Before using the appliance, unwind a sufficient length of cable and insert the plug into the power socket. A
YELLOW mark on the power cable shows the ideal cable length. Do not extend the cable beyond the
REDmark.
¾
Press the ON/OFF button to switch the appliance on. It is advisable to set the power control to MIN before
switching on the appliance.
¾
To rewind the power cable, press the rewind button with foot, and guide the cable with hand to ensure that it
does not whip causing damage.
¾
By moving the variable power control, the suction power can be adjusted.
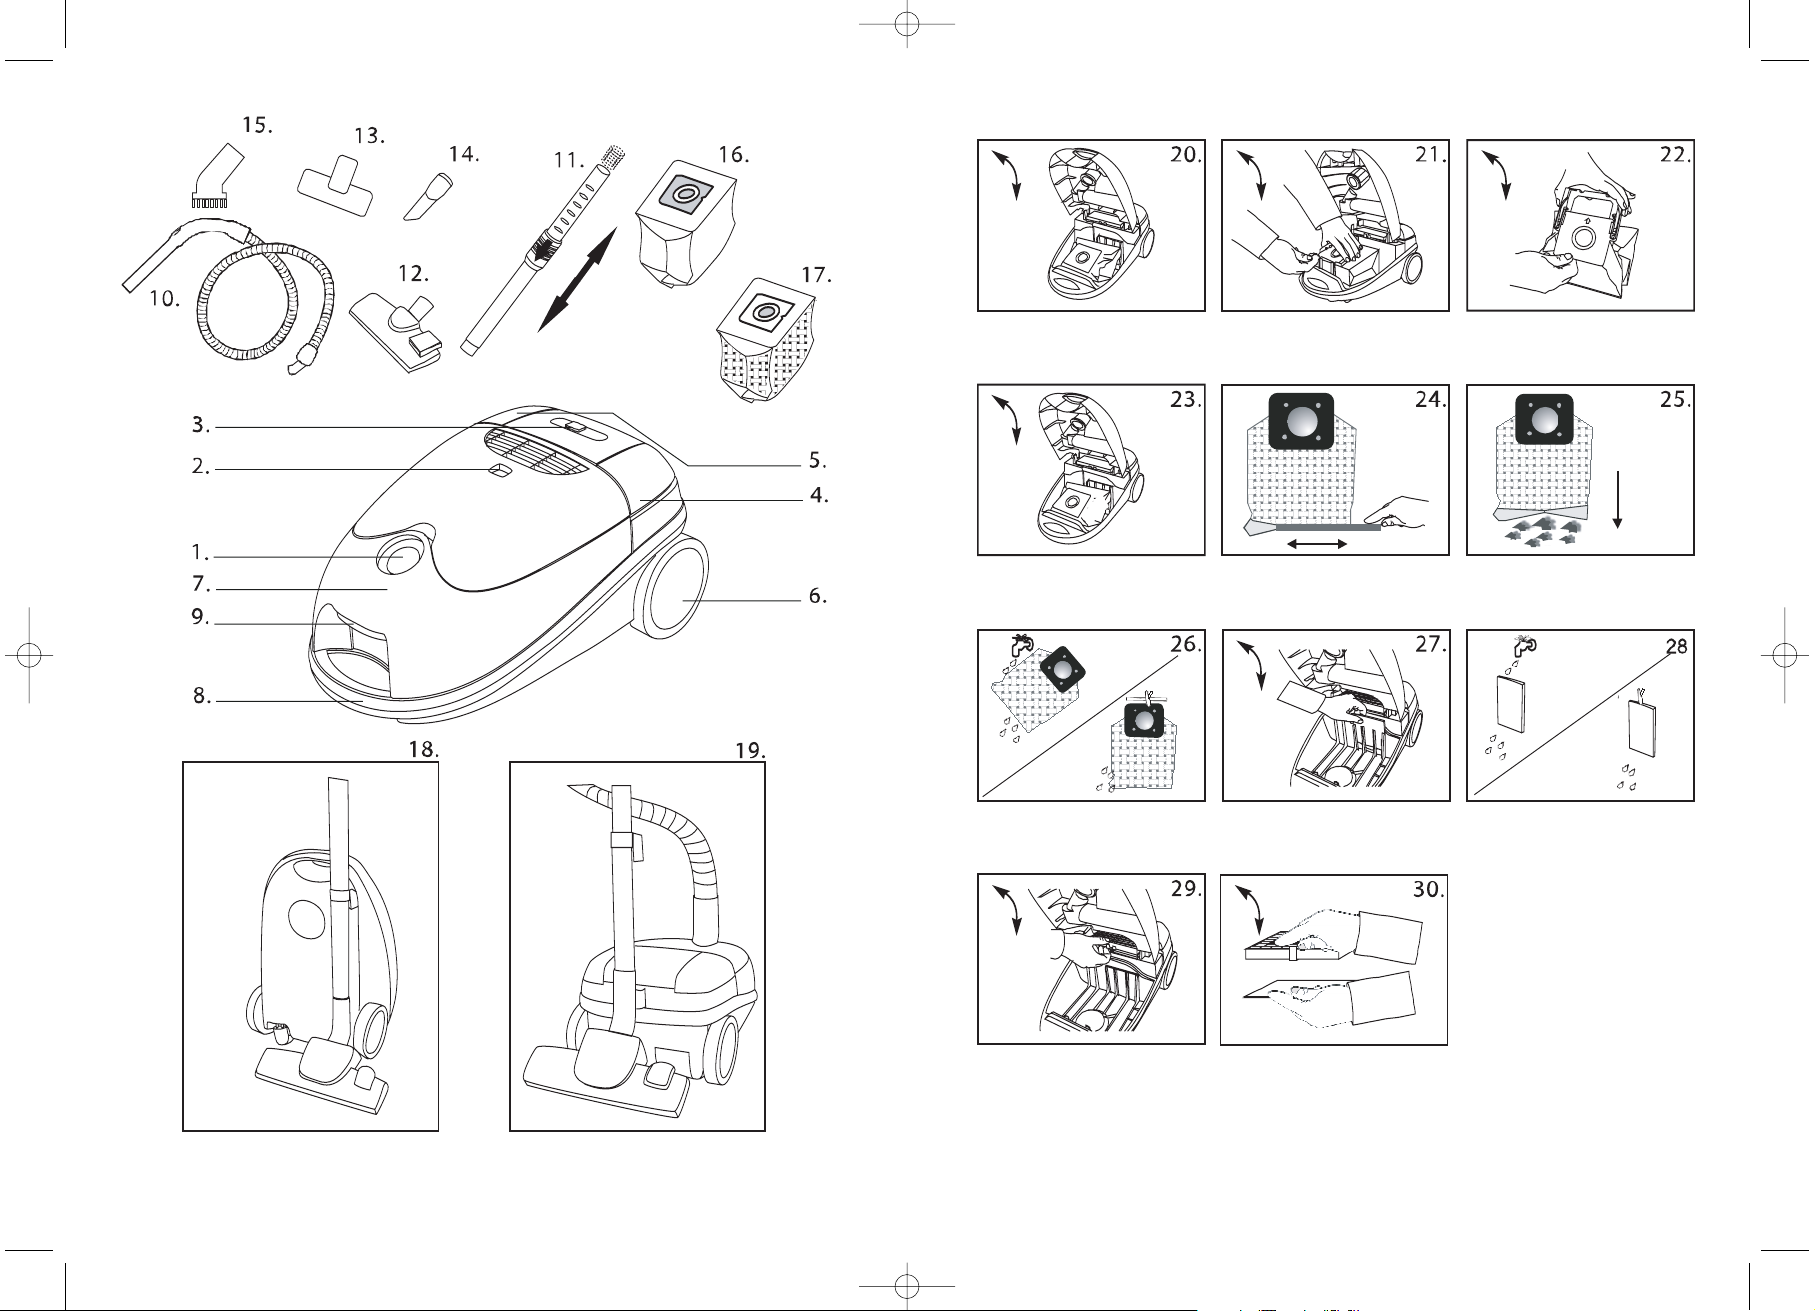
DESCRIPTION
1. Suction inlet
2. Dustbag full indicator
3. Variable power control
4. On/off switch
5. Cable rewind button
6. Wheel
7. Dustbag compartment
8. Carrying handle
9. Compartment open button
10. Hose
11. Telescopic tube
12. Dual purpose floor nozzle
13. Upholstery nozzle
14. Crevice nozzle
15. Dusting brush
16. Dustbag
17. Clothbag
18. Vertical parking
19. Horizontal parking
− 4 − − 29 −
ifu41_serie.qxd 2002. 10. 31. 10:32 Page 4
PROGRESS PC 4101, 4102, 4103
MAINTENANCE
REPLACING THE DUSTBAG
¾
Always operate the cleaner with the dustbag installed.
¾
If you forget to attach the dustbag or attach it in the wrong manner, the dust cover may not close completely.
¾
After removing the flexible hose, open the front cover (fig. 20).
¾
Remove the support of the bag. (fig. 21).
¾
Remove the dustbag and insert a new one (fig. 22).
¾
Close the cover by pressing down until it clicks (fig. 20).
¾
Dustbag reference number: Menalux T218, BT218, CP218
TEXTILE DUST BAG
¾
Remove the textile bag from the holder (fig. 23).
¾
Slide the plastic clip away from the bag to open and empty (fig. 24−25).
¾
Replace the plastic clip ensuring that both sides of the bag are parallel (fig. 24).
¾
Replace the bag into the holder (fig. 23).
Note: The bag may be washed in luke warm water and dried completely. It should not be washed in
washing machine (fig. 26).
¾
Close the cover by pressing down until it clicks (fig. 23).
REPLACING THE FILTERS
¾
The dustbag must be replaced if the window of the dustbag full indicator is completely red when the cleaner is
operating at maximum power and the nozzle is raised from the floor.
¾
Filters should be replaced at least twice a year or when they become visibly soiled.
¾
Always operate the cleaner with filters installed to avoid reduced suction.
¾
Disconnect from electrical outlet before changing the filters.
¾
Do not use a washing machine to rinse filters.
¾
Pull dustbag upward and remove the motor protection filter (fig. 27).
¾
Rinse the filter under tap water and dry it completely. (fig. 28)
¾
Put the filter back into the cleaner (fig. 27.)
¾
Open the front cover and remove the exhaust filter with grill. (fig. 29).
¾
Take the filter out of the grill (fig. 30).
¾
Rinse the filter under tap water and dry it completely. (fig. 28)
¾
Place the filter back into the grill and put it back into the cleaner. (fig. 30, 29)
¾
Close the cover by pressing down until it clicks (fig. 20).
¾
HEPA filter: Take out the filter with grill, and change it for a new one (fig. 29)
PROTECTING THE ENVIRONMENT
¾
Attempt to recycle packaging material and old appliances.
¾
The cardboard packaging can be placed in the waste paper collection.
¾
Deposit the plastic bag made of polyethylene (PE) at the PE collection point for recycling.
Recycling the Appliance at the end of its life:
¾
The plastic components all carry a material identification marking so that, like the other materials, they can
recycled at the end of the life of the appliance.
¾
Please inquire with your local authority.
Blocked air flow and dirty filters:
¾
The cleaner stops automatically if a blockage occurs in the nozzle/tube/hose or if the filters are blocked with dirt.
¾ Disconnect from mains and allow the cleaner to cool for 20−30 minutes. Remove blockage and/or clean filters.
¾
Restart the cleaner.
− 28 − − 5 −
ifu41_serie.qxd 2002. 10. 31. 10:32 Page 5

Deutch
PROGRESS PC 4101, 4102, 4103
FÜR IHRE SICHERHEIT
¾
Lesen Sie diese Bedienungsanleitung sorgfältig
¾
Vor Inbetriebnahme des Geräts prüfen Sie bitte, ob Ihre Netzspannung der auf dem Gerät angegebenen
Netzspannung entspricht
¾
Verwenden Sie das Gerät nicht mit fehlerhaftem Kabel! Beschädigte Kabel sollten in einer Electrolux
Kundendienststelle ausgewechselt werden
¾
Stecken Sie das Gerät immer aus, wenn Sie es nicht verwenden und bevor Sie den Filter oder Staubbeutel
auswechseln
¾
Lassen Sie das Gerät nicht unbeaufsichtigt, wenn es in Betrieb ist. Lassen Sie das Gerät nicht in die
Reichweite von Kindern.
¾
Das Gerät ist nur für den normalen Haushaltsgebrauch – verwenden Sie es nur wie in dieserAnleitung
beschrieben.
¾
Nach Möglichkeit nicht am Hauptkabel zerren!
¾
Nicht zum Aufsaugen von Flüssigkeiten, Schlamm, heißer Asche oder glühender Zigaretten verwenden. Nicht
in der Nähe entflammbarer Gase verwenden
¾
Stecken Sie das Gerät nicht mit nassen Händen an oder aus.
¾
Verwenden Sie den Staubsauger nicht zu nahe an Heizungen, Radiatoren, etc.
¾
Saugen Sie keine großen oder spitzen Objekte vom Boden, da sonst der Staubbeutel beschädigt werden
kann.
INBETRIEBNAHME
¾
Prüfen Sie, ob der Staubbeutel richtig eingesetzt ist
¾
Kabel an die Stromversorgung anschließen. Eine gelbe Markierung am Netzkabel zeigt die ideale Kabellänge.
Ziehen Sie das Kabel nie länger als bis zur roten Markierung.
¾
Zum Einschalten des Geräts den Ein−/Aus−Schalter drücken. Vor dem Einschalten des Gerätes wird emp−
fohlen, den Leistunsregler auf MIN zu stellen.
¾
Zum Zurückspulen des Kabels den Knopf mit dem Fuß drücken und das Kabel mit der Hand führen, damit es
nicht verdreht wird
¾
Zur Erhöhung/Reduzierung der Saugstärke den Leistungsregler verschieben.
BESCHREIBUNG
1. Schlauchanschluß
2. Filterwechselanzeige
3. Leistungsregulierung
4. Ein−/Aus−Schalter
5. Knopf für Kabelaufwicklung
6. Rad
7. Staubbeutelraum
8. Tragegriff
9. Öffnungstaste für Papierfilterfach
10. Schlauch
11. Teleskoprohr
12. Umschaltbare Bodendüse
13. Polsterdüse
14. Fugendüse
15. Nöbelpinsel
16. Staubsauger−Filterbeutel
17. Textil−Staubbeutel
18. Parkposition vertical
19. Parkposition horizontal
− 6 − − 27 −
ÚDRŽBA
Výměna prachového sáčku
¾
Vždy vysavač používejte s nasazeným prachovým sáčkem.
¾
Jestliže zapomenete nasadit prachový sáček,nebo ho vložíte chybně,prachové víčko se nemusí zcela zavřít.
¾
Po vyjmutí ohebné hadice otevřete přední kryt (Obr. 20).
¾
Natočte držák sážku do vertikální polohy (Obr. 21).
¾
Vyjměte prachový sáček ven a vložte dovnitř nový (Obr. 22).
¾
Zatlačením směrem dolů zavřete kryt až zaklapne (Obr. 20).
¾
Objednací číslo prachového sáčku: Menalux T218, BT218, CP218
Textilní prachový sáček
¾
Po vyjmutí ohebné hadice otevřete přední kryt (Obr. 23).
¾
Vyjměte textilní sáček z držáku (Obr. 22).
¾
Odebráním plastového uzávěru otevřete sáček a vyprázdněte ho (Obr.24, 25).
¾
Vložte zpět plastový uzávěr a ujistěte se že jsou strany sáčku srovnány (Obr. 24).
¾
Vložte sáček zpět do držáku (Obr.22).
¾
Zatlačením směrem dolů zavřete kryt až zaklapne (Obr.23).
Poznámka:Sáček se může vyprat ve vlažné vodě a musí být dokonale vysušen (Obr.26).
Nesmí se prát v automatické pračce.
Výměna a čištění filtrů
¾
Jestliže je okénko indikátoru plného sáčku celé červené,když vysavač běží na plný výkon a přitom je hubice
zvednuta od podlahy,prachový sáček se musí vyměnit.
¾
Filtry by se měly čistit alespoŔ dvakrát za rok,nebo když jsou znatelně znečištěné.
¾
Vysavač vždy provozujte s nainstalovanými filtry,aby se nesnižoval sací výkon.
¾
Před čištěním filtrů vysavač odpojte ze zásuvky.
¾
Nepoužívejte k oplachování filtrů pračku.
¾
Nepoužívejte k sušení filtrů vysoušeč vlasů.
¾
Vysuňte prachový sáček směrem nahoru a vyjměte motorový filtr (Obr. 27).
¾
Opláchněte filtry ve vlahé vodě a nechte je úplně vyschnout (Obr. 28).
¾
Umístěte filtr zpět do vysavače (Obr. 27).
¾
Otevřete předni kryt a vyjměte filtr na výstupu vzduchu (Obr. 29).
¾
Vyjměte filtry z mřížky (Obr. 30).
¾
Opláchněte filtry ve vlahé vodě a nechte je úplně vyschnout (Obr. 28).
¾
Položte filtry zpět na mřížku filtru (Obr. 30).
¾
Umistěte filtr zpět do vysavače. (Obr. 29)
¾
Zatlačením směrem dolů zavřete kryt až zaklapne (Obr.23).
¾
HEPA filtr: vyjměte filtr s wřižkou a vyjměnte ho za nový. (Obr. 29)
Ochrana životního prostředí
¾
Obalový materiál ani starý spotřebič nevyhazujte do domovního odpadu.
¾
Lepenkový obalový materiál se může vyhazovat do sběrných nádob na odpadový papír.
¾
Plastikový pytel z polyetylénu (PE)odevzdejte na sběrné místo polyetylénového odpadu k recyklaci.
¾
Na konci životnosti spotřebiče ho nechte recyklovat.
¾
Plastikové součásti mají na sobě označení druhu materiálu,takže podobně jako jiné materiály,se mohou na konci
životnosti spotřebiče recyklovat.
¾
Vyžádejte si prosím konkrétní informace u místních úřadů.
¾
Zanesený vzduchový otvor a znečištěné filtry:
¾
Jestliže dojde k zanesení v hubici,trubkách nebo hadici,vysavač se automaticky zastaví.
¾
Odpojte vysavač ze zásuvky a nechte ho asi 20−30 minut chladnout.Pak odstraŔte překážky volného proudění
vzduchu a/nebo vyčistěte filtry.
¾
Vysavač znovu zapněte.
ifu41_serie.qxd 2002. 10. 31. 10:32 Page 6

Czech
PROGRESS PC 4101, 4102, 4103
VERWENDUNG UND WARTUNG
AUSWECHSELN DES FILTERBEUTELS
¾
Verwenden Sie das Gerät nur mit richtig eingelegtem Filterbeutel
¾
Wenn Sie den Flter vergessen haben oder nicht richtig eingelegt haben, läßt sich der Staubraumdeckel nicht voll−
ständig schließen.
¾
Nach Entfernung des Schlauches öffnen Sie die Abdeckung (Fig. 20)
¾
Ziehen Sie den Staubsack in die vertikale Position (Fig. 21)
¾
Entfernen Sie den Staubsack und setzen Sie einen neuen ein (Fig. 22)
¾
Schließen Sie die Abdeckung durch niederdrücken bis sie einrastet (Fig. 20)
¾
Verwenden Sie nur die Original−Staubbeutel von Menalux T218, BT218, CP218
TEXTIL−STAUBBEUTEL
¾ Nehmen Sie den Textil−Staubbeutel aus der Halterung. (Fig. 23)
¾ Um den Beutel zu entleeren, lösen Sie die Plastikschiene durch seitliches Wegschieben. (Fig. 24−25)
¾ Nach dem Entleeren die Plastikschiene auf dem gleichen Weg wieder zurückführen. Darauf achten, daß beide
Seiten des Textil−Staubbeutels parallel sind. (Fig. 24)
¾ Textil−Staubbeutel wieder in die Halterung zurückführen. (Fig. 23)
Hinweis: der Textil−Staubbeutel kann in lauwarmem Wasser ausgewaschen werden. Vor dem Wiedereinsetzen in den
Staubsauger muß er vollständig trocken sein! Der Beutel ist nicht zum Waschen in der Waschmaschine geeignet. (Fig. 26)
¾
Schließen Sie die Abdeckung durch niederdrücken bis sie einrastet (Fig. 23)
AUSWECHSELN/REINIGEN DER FILTER
¾
Der Filterbeutel muß gewechselt werden, wenn die Filterwechselanzeige komplett rot ist, wenn das Gerät auf
Maximalleistung läuft und die Bürste den Boden nicht berührt
¾
Die Filter sollten zumindest 2mal im Jahr gereinigt werden – oder wenn man sieht, daß sie schmutzig sind
¾
Um eine Beschädigung des Geräts zu vermeiden, nicht ohne Staubbeutel verwenden
¾
Sonst haben Sie eine geringere Saugleistung und der Motor kann zerstört werden
¾
Vor dem Auswechseln der Filter den Stecker aus der Steckdose ziehen
¾
Reinigen Sie die Filter nicht in der Waschmaschine
¾
Trocknen Sie die Filter nicht mit einem Fön
¾ Entfernen Sie den Staubfilter und nehmen Sie den Motorfilter heraus (Fig. 27)
¾
Filter mit warmem Wasser ausspülen und komplett trocknen lassen (Fig. 28)
¾
Den sauberen,trockenen Filter wieder einsetzen (Fig. 27)
¾
Öffnen Sie die Abdeckung und Entfernen Sie die Filter vom Grill (Fig. 29, 30)
¾
Filter mit warmem Wasser ausspülen und komplett trocknen lassen (Fig. 28)
¾
Den sauberen, trockenen Filter wieder einsetzen und schließen Sie die Abdeckung (Fig. 30,29)
¾ HEPA filter:
Nehmen Sie den Filter mit dem Grill aus und tauschen Sie es für einen Neuen. (Fig 29.)
UMWELTSCHUTZ
¾
Werfen Sie das Verpackungsmaterial und Altgeräte nicht einfach weg
¾
Der Verpackungskarton sollte mit dem Altpapier entsorgt werden
¾
Das Plastik (PE)sollte zum Leichtstoff−Recycling. Entsorgen Sie das Gerät an seinem Lebensende
¾ Die Plastikteile haben alle eine Indentifikationsmarkierung,sodaß sie –wie die anderen Materialien –recycelt werden kön−
nen
¾
Beachten Sie die gesetzlichen Vorschriften
¾ Verstopfung/verschmutzte Filter: der Staubsauger kann sich bei einer schweren Verstopfung oder übermäßigen
Filterverschmutzung selbst abschalten. In diesen Fällen den Netzstecker aus der Steckdose ziehen und Gerät 20 – 30
Minuten abkühlen lassen. Verstopfung entfernen bzw. Filter oder Staubbeutel auswechseln und Staubsauger
wieder einschalten
− 26 − − 7 −
DŮLEŽITÁ BEZPEČNOSTNÍ UPOZORNĚNÍ
¾
Řádně si tuto příručku prostudujte.
¾
Před použitím spotřebiče zkontrolujte, zda napájecí napětí vaší elektrické instalace odpovídá napětí uvedené−
mu na typovém štítku spotřebiče.
¾
Nezapínejte spotřebič, jestliže se vám zdá nějak porouchan×, nebo má poškozený přívodní kabel nebo sí.
Čovou zástrčku. Nepokoušejte se opravovat spotřebič sami. V případě opravy nebo potřeby náhradních dílů
se obracejte na svého prodejce nebo na autorizované servisní středisko.
¾
Když spotřebič nebudete používat a před každým čištěním vždy odpojte zástrčku ze zásuvky. Spotřebič musí
být odpojen ze zásuvky i v případě jakékoli opravy.
¾
Nikdy nenechávejte zapnutý spotřebič bez dozoru. Udržujte spotřebič mimo dosah dětí.
¾
Tento spotřebič je určen jen pro použití v domácnosti. Používejte ho v souladu s návodem k obsluze.
¾
Nikdy spotřebič nepřemis. Čujte tahem za elektrický kabel. Nikdy zástrčku neodpojujte ze zásuvky tahem za
kabel.
¾
Nepoužívejte spotřebič na mokrém povrchu ani nevysávejte kapaliny, bláto, popel a hořící cigaretové
nedopalky. Nevysávejte žádné silně vznětlivé ani výbušné látky nebo plyny.
¾
Neodpojujte vysavač ze zásuvky vlhkýma rukama.
¾
Neprovozujte vysavač příliš blízko zdrojů tepla a radiátorů, kamen apod.
¾
Než začnete vysavač používat, odstraŔte z podlahy všechny větší nebo ostré předměty, aby se při vysávání
nepoškodil prachový sáček.
NÁVOD K OBSLUZE
¾
Před uvedením do provozu se přesvědčte, že filtry jsou nasazeny a jsou ve správné poloze.
¾
Před použitím spotřebiče si odviŔte dostatečnou délku kabelu a pak teprve zástrčku zapojujte do zásuvky.
Ideální použitelnou délku kabelu vyznačuje ŽLUTÁ značka. ČERVENÁ značka označuje mezní délku, za kter−
ou byste se neměli snažit kabel odvíjet.
¾
Stiskněte tlačítko hlavního vypínače a vysavač zapněte. Doporučuje se před zapínáním nastavení na značku
MIN.
¾
Když chcete přívodní kabel navinout, stiskněte nohou tlačítko navíjení a kabel rukou přidržujte, aby švihem
nezpůsobil nějakou škodu.
¾
Sací výkon můžete nastavovat tlačítkem regulátoru.
¾ Hladina hluku: 82 dB
POPIS
1. Vstupní otvor sání
2. Indikátor plného sáčku
3. Přívodní kabel
4. Hlavní vypínač
5. Tlačítko navijáku kabelu
6. Kolečko
7. Oddíl prachového sáčku
8. Přenášecí držadlo
9. Tlačítko otevírání oddílu Hadice
10. Trubky
11. Kovová teleskopická trubka
12. Dvoj−účelná podlahová hubice
13. Hubice na čalounění
14. Štűrbinová hubice
15. Rotačni kartáč
16. Prachový sáček
17. Omyvatelný textilní prachový sáček
18. Vertikální parkovací poloha
19. Horizontální parkovací poloha
ifu41_serie.qxd 2002. 10. 31. 10:32 Page 7

French
PROGRESS PC 4101, 4102, 4103
ÚDRŽBA
VÝMENA VRECKA NA PRACH
¾
Vysávač používajte vždy len s inštalovaným vreckom na prach.
¾
Ak zabudnete namontovať vrecko na prach alebo ho vložíte nesprávne, kryt nebude dokonale tesniť.
¾
Po odstránení flexibilnej hadice otvorte predný kryt (obr. 20).
¾
Podstavec filtra otočte do vertikálnej polohy (obr. 21).
¾
Vrecko vyberte a vložte nové (obr. 22).
¾
Zatvorte uzáver zatlačením smerom nadol, kým nezaznie zreteÍné ťuknutie (obr. 20).
¾
Referenčné číslo vrecka na prach: Menalux T218, BT218, CP218
TEXTILNÉ PRACHOVÉ VRECKO
¾
Po odstránení flexibilnej hadice otvorte predný kryt (obr. 23).
¾
Vyberte textilné prachové vrecko z držiaka (obr. 22).
¾
Snímte plastovú príchytku smerom z vrecka, vyberte a vyprázdnite vrecko (obr. 24, 25).
¾ Vložte plastovú príchytku a uistite sa, že sú obe strany vrecka rovnobežné (obr. 24).
¾
Vložte vrecko do držiaka (obr. 22).
¾
Vrecko vyberte a vložte nové (obr. 23).
Upozornenie: Vrecko sa smie preprať vo vlažnej vode a musí sa úplne vysušiť (obr. 26).
Nesmie sa prať v automatickej pračke.
VÝMENA A ČISTENIE FILTROV
¾
Ak je vysávač spustený pri maximálnom výkone, hubica zdvihnutá nad podlahou a indikátor naplnenia pra−
chového vrecka úplne červený, treba vrecko na prach vymeniť.
¾
Filtre treba čistiť aspoň dva razy ročne a vždy, ked’ sú viditeÍne znečistené.
¾
Vysávač používajte vždy len s inštalovanými filtrami, aby ste sa vyhli redukovanému nasávaniu.
¾
Pred čistením filtrov treba vysávač odpojiť od elektrickej siete.
¾
Filtre neperte v práčke.
¾
Filtre nesušte sušičom na vlasy.
¾
Vytiahnite prackové vrecko smerom hore a vyberte motorový filter spolu (obr. 27).
¾
Filter opláchnite vo vlažnej vode a nechajte ho úplne vysušiť (obr. 28).
¾
Umiestnite filter späť na pôvodné miesto (obr. 27).
¾
Ak chcete odstrániť výfukový filter, otvorte predný kryt (obr. 29).
¾
Z mriežky odstráňte filtre (obr. 30).
¾
Filtre opláchnite vo vlažnej vode a nechajte ich úplne vysušiť (obr. 28).
¾
Filtre vráťte späť na filtračnú mriežku (obr. 30).
¾
Umiestnite filter späť na pôvodné miesto (obr. 29).
¾
HEPA filtre: vyberte filter s mriežkou a vymenňte ho za nový. (obr. 29)
Ochrana životného prostredia
¾
Obalový materiál a starý spotrebič nevyhadzujte len tak.
¾
Kartónový obal hod’te do príslušnej zbernej nádoby pre starý papier.
¾
Plastové sáčky z polyetylénu (PE) odovzdajte v príslušnej zberni na recyklovanie.
¾
Recyklovanie vyradeného spotrebiča:
¾
Všetky plastové časti spotrebiča sú označené identifikačnou značkou, aby ich bolo možné recyklovať.
¾
O zberniach recyklovateÍného odpadu sa informujte na miestnom úrade.
¾
Zablokovaný prietok vzduchu a znečistené filtre:
¾
Ak sa hubica, trubica alebo hadica zablokuje alebo sú filtre znečistené, vysávač sa okamžite vypne.
¾
Vysávač odpojte od elektrickej siete a nechajte ho 20−30 minút vychladnúť. Odstráňte predmet, ktorý blokuje
vysávač, a/alebo vyčistite filtre.
¾
Potom mđžete vysávač znovu zapnúť.
− 8 − − 25 −
CONSIGNES DE SECURITE
¾
Lisez attentivement ce mode d’emploi
¾
Avant d’utiliser cet aspirateur,contrôlez que la tension du réseau corresponde à la tension figurant sur
la plaque signalétique se trouvant sous l’appareil.
¾
Ne mettez pas en marche l’aspirateur s’il vous semble qu’il comporte un défaut ou si le cordon d’alimentation, ou la prise sont endommagés. N’essayez en aucun cas de réparer l’appareil vous-même.
Les réparations faites par des personnes non qualifiées ou inexpérimentées peuvent donner lieu à des
blessures et/ou des pannes graves. L’entretien de cet appareil doit être effectué par un Centre Service
Agréé Progress en utilisant que des pièces d’origine.
¾
Débranchez toujours l’appareil, avant toute opération d’entretien ou lorsque vous le transportez.
¾
Gardez toujours l’appareil hors de portée des enfants et veillez à ce qu’il ne soit pas en fonctionnement sans surveillance.
¾
Cet appareil est exclusivement destiné à un usage domestique et pour uniquement des poussières
sèches. Pour l’utilisation, veuillez vous conformez aux instructions figurant sur cette notice.
¾
Ne jamais tirer l’appareil par le cordon d’alimentation. Ne pas tirer sur le cordon pour le débrancher.
¾
N’aspirez pas de liquides. N’aspirez pas d’objets pointus. N’aspirez pas de braises chaudes ou de
mégots incandescents. N’aspirez jamais à proximité de gaz inflammables.
¾
Ne débranchez pas l’appareil avec les mains humides.
¾
Ne pas utiliser trop prêt de chauffage, radiateur, poêles etc.
¾
Avant de commencer à aspirer,assurez vous que de trop gros objets ne se trouvent pas sur la surface
à aspirer et ceci pour éviter d’endommager le sac à poussière
MODE D’EMPLOI
¾
Avant toute utilisation, assurez vous que le sac et les filtres sont bien en place.
¾
Avant toute utilisation, déroulez une longueur de cordon d’alimentation suffisante et brancher l’appareil
sur une prise de courant. Une marque JAUNE sur le câble indique la longueur idéale du cordon. Ne
jamais tirer le cordon au delà de la marque ROUGE.
¾
Appuyez sur la pédale Marche/arrêt pour mettre en marche l’aspirateur. Il est conseillé de positionner
le variateur de puissance sur la position MIN avant de mettre l’aspirateur en marche.
¾
Pour enrouler le cordon d’alimentation, il suffit d’appuyer sur la pédale d’enrouleur de câble après avoir
débranché l’appareil. Il est conseillé de tenir la prise de courant pendant l’enroulement du câble afin
d’éviter qu’elle ne vous heurte ou ne heurte les meubles.
¾
La puissance d’aspiration peut être modulée en actionnant le variateur électronique de puissance.
DESCRIPTION DE VOTRE ASPIRATEUR
1. Connexion du flexible
2. Indicateur de remplissage de sac
3. Variateur électronique de puissance
4. Pédale marche/arrêt
5. Pédale d’enrouleur de câble
6. Roues
7. Compartiment sac à poussière
8. Poignée de transport
9. Bouton d’ouverture du compartiment sac à
poussière
10. Flexible avec réglage de débit d ’air
11. Tube métal telescopique
12. Suceur combiné pour tapis et sols durs
13. Petit suceur
14. Suceur long
15. Brosse meubles
16. Sac à poussiére
17. Sac tissu
18. Parking vertical
19. Parking horizontal
ifu41_serie.qxd 2002. 10. 31. 10:32 Page 8

Slovak
PROGRESS PC 4101, 4102, 4103
ENTRETIEN
CHANGER LE SAC A POUSSIERE
¾
N’utilisez jamais l’appareil sans sac à poussière.
¾
Si vous oubliez de mettre le sac à poussière ou s’il n’est pas correctement mis, le couvercle du compartiment
sac à poussière ne se fermera pas complètement.
¾
Après avoir enlevé le flexible, ouvrir le compartiment sac à poussière (fig. 20)
¾
Faire pivoter le support sac dans la position verticale. (fig. 21)
¾
Enlever le sac à poussière et le jeter. (fig. 22)
¾
Refermer le couvercle du compartiment sac à poussière en le poussant jusqu’au «click » (fig. 20).
¾
Reference des sacs à poussière: Menalux T218, BT218, CP218
SAC TISSU
¾ Enlever le sac tissu du support sac. (fig. 23)
¾ Faire glisser le clip plastique pour ouvrir et vider le sac. (fig. 24, 25)
¾ Remettre en place le clip plastique qui permet aux deux côtés du sac d’être parallèles. (fig. 24)
¾ Remettre le sac tissu sur le support sac. (fig. 22)
Attention: le sac tissu doit être lavé à l’eau tiède et séché complètement. Il ne doit pas être lavé en machine. (fig. 26)
¾ Refermer le couvercle du compartiment sac à poussière en le poussant jusqu’au «click » (fig. 23).
REMPLACEMENT ET NETTOYAGE DES FILTRES
¾
Le sac à poussière doit être changé quand l’indicateur de remplissage de sac est entièrement rouge, l’appareil étant en position maximum d’aspiration et le suceur soulevé du sol.
¾
Les filtres doivent être nettoyés lorsqu’ils sont sales et au moins deux fois par an.
¾
N’utilisez jamais l’appareil sans les filtres, ce qui pourrait provoquer une perte d’efficacité et endommager le moteur.
¾
Débranchez toujours l’aspirateur avant de nettoyer les filtres
¾
Ne pas mettre les filtres dans la machine à laver.
¾
N’utilisez pas de sèche-cheveux pour sécher les filtres.
¾
Faire pivoter le support sac. Enlever le filtre de protection du moteur (fig. 27).
¾
Rincez le filtre à l’eau tiède et laisser le filtre sécher complètement (fig. 28).
¾
Remettez le filtre dans I'aspireteur. (fig. 27)
¾
Ouvir le compartiment sac à poussiére et enlever la grille du filtre de sortie d’air. (fig. 29)
¾
Enlever the filtre de la grille (fig. 30)
¾
Rincez le filtre à l’ean tiède et laisser le filtre sécher complètement (fig. 28)
¾
Remettez le filtre dans la grille et remettez la grille dans l’aspirateur (fig. 30, 29)
¾
HEPA filtre: enlevez le filtre avec sa grille et les remplacer par une nouvelle. (fig. 29.)
POUR LE RESPECT DE L’ENVIRONNEMENT
¾
Ne jetez pas l’emballage, ni les appareils usagés n’importe où!
¾
Le carton d’emballage peut être mis à la collecte des vieux papiers.
¾
Le sac en polyéthylène (PE) peut être remis à un point collecte de PE pour le recyclage.
¾
Renseignez vous auprès des services administratifs de votre commune pour connaître le centre de recyclage
dont dépend votre domicile.
Si vous rencontrez des difficultés pour l’achat des sacs à poussière, ou si vous désirez obtenir
l’adresse du Centre Service Agréé le plus proche de votre domicile, téléphonez au Service Conseil
Consommateurs: 03 44 62 24 24.
Dans le souci d’une amélioration constante de nos produits,nous nous réservons le droit
d’apporter à leurs caractéristiques toutes modifications liées à l’évolution technique.
(décret du 23.03.78).
− 24 − − 9 −
DÔLEÎITÉ BEZPEČNOSTNÉ POKYNY
¾
Tento návod na používanie si dđkladne prečítajte.
¾
Pred zapojením spotrebiča sa ubezpečte, že sieťové napätie zodpovedá napätiu uvedenému na typovom
štítku spotrebiča.
¾
Vysávač nezapínajte, ak je akýmkoťvek spđsobom poškodený alebo je porušený jeho prívodný kábel alebo
zástrčka. Spotrebič sa nepokúšajte opraviť svojpomocne. Servis a náhradné diely smú poskytovať výlučne
autorizované servisné strediská. Zoznam autorizovaných servisných stredísk je priložený.
¾
Po každom použití spotrebič odpojte od elektrickej siete. Pri čistení a údržbe musí byť spotrebič tiež odpojený
od elektrickej siete.
¾
Zapnutý spotrebič nikdy nenechávajte bez dozoru. Dbajte na to, aby sa deti zdržovali vždy v bezpečnej
vzdialenosti.
¾
Tento vysávač je určený výlučne na domáce použitie podťa uvedených pokynov.
¾
Spotrebič neťahajte za prívodný kábel. Pri odpájaní od elektrickej siete uchopte vždy zástrčku a neťahajte za
kábel.
¾
Vysávač nepoužívajte na mokrých povrchoch alebo na vysávanie tekutín, popola alebo tlejúcich cigaretových
špačkov. Vysávač sa tiež nesmie používať na vysávanie vysoko horťavých alebo explozívnych látok alebo ply−
nov.
¾
Dbajte na to, aby ste pri odpájaní spotrebiča od elektrickej siete nemali vlhké ruky.
¾
Spotrebič nepoužívajte veťmi blízko ohrievačov, radiátorov, sporákov atd’.
¾
Pred zahájením vysávania z podlahy odstráŔte veťké ostré predmety, aby ste zabránili poškodeniu vrecka na
prach.
POUÎÍVANIE
¾
Pred uvedením do prevádzky skontrolujte, či sú filtre v správnej polohe.
¾
Pred zapnutím z vysávača vytiahnite dostatočne dlhý kus prívodného kábla a zástrčku zapojte do elektrickej
zásuvky. ŽLTÝ indikátor na prívodnom kábli vás upozorní na ideálnu dťžku. Kábel nevyťahujte za ČERVENÚ
značku.
¾
Vysávač zapnite stlačením spínača zapnúť / vypnúť. Regulátor výkonu odporúčame ešte pred zapnutím nas−
taviť do polohy MIN.
¾
Ak chcete prívodný kábel navinúť, nohou stlačte tlačidlo navíjania a kábel ved’te rukou, aby nespđsobil škody.
¾
Prostredníctvom regulátora výkonu si mđžete sací vÝkon vysávača prispđsobiť svojim požiadavkám.
¾ Hlučnost: 82 dB
OPIS SPOTREBIČA
1. Nasávací otvor
2. Indikátor naplnenia prachového vrecka
3. Regulátor výkonu
4. Spínač zapnúť/vypnúť
5. Tlačidlo navíjania kábla
6. Koliesko
7. Priehradka na prachové vrecko
8. Rukoväť
9. Tlačidlo otvárania priehradky
10. Hadica
11. Kovová teleskopická trubica
12. Kombinovaná podlahová hubica
13. Hubica na čalúnenie
14. Škárová hubica
15. Kefa na prach
16. Vrecko na prach
17. Umývateľné textilné prachové vrecko
18. Vertikálna parkovacia poloha
19. Horizontálna parkovacia poloha
ifu41_serie.qxd 2002. 10. 31. 10:32 Page 9

Spanish
PROGRESS PC 4101, 4102, 4103
NORMAS IMPORTANTES DE SEGURIDAD
¾
Lea detenidamente este folleto de instrucciones
¾
Antes de utilizar el aparato, compruebe que la tensión de alimentación de la red doméstica corresponde a la
tensión indicada en la placa de características del aparato
¾
No conecte el aparato si este presenta alguna anomalía de cualquier tipo, o si tiene el cable o el enchufe
danado. No intente reparar usted mismo el aparato. Para solicitar asistencia técnica o accesorios, opóngase
en contacto con el Servicio de Atención al Cliente
¾
Desenchufe siempre el aparato de la red cuando no lo esté utilizando o cuando lleve a cabo cualquier trabajo
de limpieza o mantenimiento del mismo.
¾
Nunca deje el aparato desatendido cuando se encuentre enchufado. Manténgalo fuera del alcance de los
ninos.
¾
Este aparato es solo para uso doméstico. Solo se debe utilizar siguiendo las instrucciones de este folleto.
¾
No arrastre el aparato tirando del cable. No lo desenchufe tirando del cable.
¾
No utilice el aparato sobre superficies mojadas, ni para aspirar líquidos, barro, cenizas o colillas de cigarrillos
encendidas. No se debe aspirar ninguna sustancia que sea altamente inflamable o explosiva, ni gases.
¾
No desenchufe el aspirador con las manos mojadas
¾
No acerque demasiado el aspirador a fuentes de calor como calefactores, radiadores, estufas, etc.
¾
Antes de comenzar a utilizar el aspirador, retire del suelo cualquier objeto grande o afilado, para evitar que se
dane la bolsa de tela para polvo.
INTRUCCIONES DE USO
¾
Antes de poner el aspirador en marcha, compruebe que los filtros se encuentran colocados correctamente.
¾
Antes de utilizar el aparato, extraiga una longitud suficiente de cable y conecte el enchufe a la red. Una
marca AMARILLA en el cable le indicaré cual es la longitud ideal. No extienda el cable más allá de la marca
ROJA.
¾
Pulse el botón de encendido / apagado para poner el aparato en marcha. Es aconsejable regular la potencia
al MIN. antes de poner el aspirador en marcha
¾
Para recoger el cable de alimentación, pulse con el pie el botón recogecables, y guíe el cable con la mano
para asegurar que el enchufe no golpee causando algún dano.
¾
Moviendo el mando de control variable de potencia, podremos variar la potencia de aspiración
DESCRIPCIÓN
1. Toma manguera aspiración
2. Indicador de llenado de la bolsa
3. Control de potencia variable
4. Interruptor de encendido/apagado
5. Pulsador recogecables
6. Rueda
7. Compartimento bolsa polvo
8. Asa para transporte
9. Manilla apertura compartimento
10. Manguera
11. Tubo telescópico
12. Boquilla de uso dual
13. Boquilla para tapicería
14. Boquilla para rincones
15. Chepillo de limpieza
16. Bolsa de recogida de polvo
17. Boquilla para rincones
18. Parking vertical
19. Parking horizontal
ODRŽAVANJE
Zamjena vrec’ice za prašinu
¾
Prilikom usisavanja u usisivaču uvijek mora biti vrec’ica za prašinu.
¾
U slučaju da ste zaboravili staviti vrec’icu za prašinu ili da ste ju stavili na pogrešan način, poklopac pretinca
se nec’e moc’i potpuno zatvoriti.
¾
Nakon uklanjanja savitljivog crijeva, otvorite prednji pretinac (sl. 20).
¾
Okrenite držač vrec’ice do okomitog položaja (sl. 21).
¾
Izvadite vrec’icu i stavite novu (sl. 22).
¾
Zatvorite poklopac tako da ga pritisnete sve dok se ne zabravi (sl. 20).
¾
Oznaka vrec’ice za prašinu: Menalux T218, BT218, CP218
Tekstilna vrećica za prašinu
¾
Nakon uklanjanja savitljivog crijeva, otvorite prednji pretinac (sl. 23).
¾
Izvadite tekstilnu vrećicu iz držača. (sl. 22).
¾
Izvucite plastičnu kvačicu sa vrećice kako bi vrećicu otvorili i ispraznili. (sl. 24, 25)
¾
Vratite plastičnu kvačicu provjerivši pri tome da su obje strane vrećice paralelne. (sl. 24).
¾
Vratite vrećicu u držač. (sl. 22).
¾
Zatvorite poklopac tako da ga pritisnete sve dok se ne zabravi (sl. 23).
Napomena: Vrećicu možete oprati u mlakoj vodi i potom ju trebate u potpunosti osušiti (sl. 26).
Ne smije prati u perilici.
Zamjena i čiščenje filtera
¾
Kad je usisivač podešen na najvec’u snagu i kad je nastavak za čišc’enje podignut sa poda, a indikator
napunjenosti vrec’ice potpuno crven, potrebno je zamijeniti vrec’icu za prašinu.
¾
Filtere treba očistiti najmanje dvaput godišnje ili kad postanu vidljivo zaprljani.
¾
Filteri trebaju biti uvijek postavljeni u usisivaču kako bi spriječili smanjenje snage usisa.
¾
Prije čiščenja filtera isključite kabel iz mrežnog napajanja.
¾
Filtere nemojte prati u perilici.
¾
Filtere nemojte sušiti sušilom za kosu.
¾
Povucite vrećicu pregma gore i uklonite zaštitni filter motora (sl. 27).
¾
Isperite filter u toploj vodi i potpuno osušite (sl. 28).
¾
Vratite filter natrag u usisivač (sl. 27).
¾
Otvorite prednji pretinac kako bi izvadili filter izlaznog zraka (sl. 29).
¾
Uklonite filtere sa rešetke (sl. 30).
¾
Isperite filtere u toploj vodi i potpuno ih osušite (sl. 28).
¾
Vratite filtere na rešetku filtera i potom sve zajedno u usisivač (sl. 30, 29).
¾
Zatvorite poklopac tako da ga pritisnete sve dok se ne zabravi (sl. 23).
¾
HEPA filter: izvadite filter sa rešetkom i zamjenite ga novim. (sl. 29)
Zaštita okoliša
¾
Molimo da ne bacate u smec’e materijal za pakiranje ili stari usisivač.
¾
Karton odložite na mjesto za prikupljanje starog papira.
¾
Polietilenske vrec’ice (PE) odložite na mjesto za prikupljanje PE materijala.
¾
Predajte dotrajao usisivač na recikliranje.
¾
Plastični dijelovi označeni su brojevima, tako da ih možete poslati na preradu nakon što usisivač nije više
pogodan za uporabu.
¾
Smetnje pri strujanju zraka i zaprljani filteri:
¾
Usisivač se automatski zaustavlja ako je došlo do začepljenja u nastavku/cijevi/crijevu ili ako su filteri
začepljeni nečistoc’om.
¾
Isključite usisivač na 20−30 minuta kako bi se ohladio. Uklonite smetnju i/ili očistite filtere.
¾
Ponovo uključite usisivač.
− 10 − − 23 −
ifu41_serie.qxd 2002. 10. 31. 10:32 Page 10

Croatian
PROGRESS PC 4101, 4102, 4103
MANTENIMIENTO
SUSTITUCIÓN DE LA BOLSA DE POLVO
¾
Siempre utilice el aspirador con la bolsa de polvo instalada
¾
Si olvida colocar la bolsa de polvo, o la coloca mal, la cubierta de la bolsa quizás no se pueda cerrar comple−
tamente.
¾
Después de desconectar la manguera de aspiración, abra la cubierta frontal (Fig. 20)
¾
Retire el soporte de la bolsa. (Fig. 21)
¾
Retire la bolsa usada e inserte una nueva (Fig. 22)
¾
Cierre la cubierta presionándola hasta que suene un clic (Fig.20)
¾
El número de referencia de la bolsa de polvo es Menalux T218, BT218, CP218
BOLSA DE TELA
¾
Retire la bolsa de tela del contenedor. (fig. 23)
¾
Para abrir y vaciar la bolsa levante el clip (fig. 24, 25)
¾
Coloque de nuevo el clip de plastico, asegurandose de que ambos lados de la bolsa queden paralelos (fig. 24)
¾
Coloque la bolsa de nuevo dentro del contenedor (fig. 22)
Nota: se puede lavar la bolsa en agua tibia y secar completamente. No se debe lavar en lavadora. (fig. 26)
¾
Cierre la cubierta presionándola hasta que suene un clic (Fig.23)
SUSTITUCIÓN DE LOS FILTROS
¾
La bolsa de polvo se debe sustituir cuando la ventana del visor de indicación de llenado esté totalmente roja,
con el aspirador en marcha a máxima potencia y la boquilla levantada del suelo.
¾
Los filtros se deben sustituir por lo menos dos veces al ano o cuando estén visiblemente sucios.
¾
Siempre se debe utilizar el aspirador con los filtros colocados para evitar una reducción de aspiración.
¾
Antes de cambiar los filtros, desenchufe el aparatote la red.
¾
No utilice una lavadora para lavar los filtros.
¾
Tire de la bolsa de polvo hacia arriba y retire el filtro de protección del motor (Fig.27).
¾ Aclare el filtro solo con agua templada y sequelo completamente. Inserte el filrto de nuveo en la rejilla. (Fig. 28, 27)
¾
Abra la cubierta frontal y retire el filtro de salida de aire junto con su rejilla (Fig. 29)
¾
Extraiga el filtro de la rejilla (Fig. 30)
¾ Aclare el filtro solo con agua templada y sequelo completamente. (Fig. 28)
¾
Coloque el filtro en su rejilla. (Fig 30)
¾
Coloque en su lugar la rejilla junto con el filtro (Fig. 29)
¾
Cierre la cubierta presionándola hasta que suene un clic (Fig. 23)
¾
HEPA filtro: retire el filtro con su rejilla y cambia con un nuevo. (Fig. 29)
PROTECCIÓN DEL MEDIO AMBIENTE
¾
Intente reciclar tanto el material del embalaje como cualquier aparato antiguo.
¾
La caja del embalaje se puede depositar en el contenedor de papel.
¾
Deposite la bolsa de plástico fabricada de polietileno (PE) en un punto o contenedor de reciclaje.
Reciclaje del Aparato al final su vida útil:
¾
Todos los componentes de plástico llevan marcados un símbolo que identifica el tipo de material del que
están compuestos para poder ser reciclados al final del periodo de uso del aparato.
¾
Por favor, consulte a la autoridad local.
Obstrucción de la circulación del aire y filtros sucios
¾
El aspirador se detiene automáticamente si ocurre alguna obstrucción en la boquilla / tubos / manguera, o si
los filtros se encuentran muy sucios.
¾
Desenchufe el aparato de la red y deje que el aparato se enfríe durante 20 − 30 minutos. Retire la causa de la
obstrucción y/o limpie los filtros.
¾
Vuelva a poner en marcha el aspirador.
− 22 − − 11 −
VAŽNE SIGURNOSNE NAPOMENE
¾
Pažljivo pročitajte upute za uporabu.
¾
Prije uporabe usisivača, provjerite da napon u Vašem kućanstvu odgovara naponu označenom na pločici sa
tehničkim podacima.
¾
Nemojte uključivati usisivač ako postoji vidljivo oštećenje na kućištu ili ako je oštećen mrežni kabel ili utikač. Nemojte
pokušavati sami popravljati usisivač. U slučaju kvara, molimo da se obratite ovlaštenom servisnom centru.
¾
Uvijek kad usisivač nije u uporabi ili prije nego što ga čistite ili održavate, izvucite kabel iz zidne utičnice.
¾
Nikad nemojte ostaviti uključen usisivač bez nadzora. Držite usisivač van dohvata djece.
¾
Pri isključenju usisivača iz mrežnog napajanja, nikada nemojte povlačiti za kabel.
¾
Nemojte koristiti usisivač na mokrim površinama ili kako bi usisali tekućine, blato, pepeo ili opuške cigareta. Nemojte
usisavati visoko zapaljive ili eksplozivne tvari ili plinove.
¾
Ne dirajte usisivač mokrim rukama.
¾
Nemojte usisivač previše približavati grijalicama, radijatorima ili pećima.
¾
Prije usisavanja, pazite da na podu nema oštrih predmeta koji bi mogli oštetiti usisivač ili vrećicu za prašinu.
UPUTE UA UPORABU
¾
Prije uporabe usisivača, provjerite da su filteri pravilno postavljeni.
¾
Izvucite potrebnu duljinu kabla i stavite utikač u zidnu utičnicu. ŽUTA oznaka na kabelu pokazuje idealnu duljinu
kabla. Nemojte produljivati kabel preko CRVENE oznake.
¾
Kako bi uključili usisivač pritisnite tipku UKLJUČENO/ISKLJUČENO. Savjetujemo Vam da prije uključivanja
usisivača podesite kontrolu za snagu usisa na položaj MIN.
¾
Kako bi namotali kabel, pritisnite stopalom tipku za namatanje kabla i pri tome držite rukom kabel kako
bi spriječili da pri uvlačenju nešto ne ošteti.
¾
Snagu možete podesiti pomicanjem kontrole za snagu usisa.
¾
Razina buke: 82 dB
OPIS
1. Otvor za priključenje usisnog crijeva
2. Pokazivač napunjenosti vrećice za prašinu
3. Kontrola snage usisavanja
4. Tipka za uključenje/isključenje
5. Tipka za namotavanje kabela
6. Kotač
7. Pretinac s vrećicom za prašinu
8. Ručka za nošenje
9. Tipka za otvaranje pretinca
10. Crijevo
11. Metalna teleskopska cijev
12. Podni nastavak sa dvostrukom namijenom
13. Metalna teleskopska cijev
14. Nastavak za čišćenje tapeciranog namještaja
15. Četka za prašiny
16. Vrećica za prašinu
17. Tekstilna vrećica za prašinu periva u vodi
18. Okomito parkiranje
19. Vodoravno parkiranje
ifu41_serie.qxd 2002. 10. 31. 10:32 Page 11

Italy
PROGRESS PC 4101, 4102, 4103
KONSERWACJA I CZYSZCZENIE
WYMIANA WORKA NA KURZ
¾ Nie używać odkurzacza bez worka na kurz.
¾ Jeżeli w odkurzaczu nie będzie worka lub będzie żle założony, pokrywa odkurzacza nie będzie całkowicie zamknięta.
¾ Po wyjęciu węża otworzyć pokrywę (rys. 20).
¾ Ustawić uchwyt worka pionowo (rys. 21).
¾ Wyjąć pełny worek i włożyć nowy (rys. 22).
¾ Zamknąć pokrywę, aż do słyszalnego „kliknięcia” (rys. 20).
¾ Kod worka:
Menalux T218, BT218, CP218
TEKSTYLNY WOREK NA KURZ
¾ Po wyjęciu węża otworzyć pokrywę (rys. 23).
¾ Wyjąć worek tekstylny z uchwytu (rys. 22).
¾ Zsunąć plastikowy klips z worka aby go otworzyć. Opróżnić worek (rys. 24, 25).
¾ Założyć plastikowy klips. Upewnić się, że obie strony worka są ułożone równolegle (rys. 24).
¾ Włożyć worek do uchwytu (rys. 22).
¾ Zamknąć pokrywę, aż do słyszalnego „kliknięcia” (rys. 23).
Worek można prać w letniej wodzie. Po praniu należy do całkowicie wysuszyć (rys. 26). Worka nie wolno prać w pralce.
WYMIANA I CZYSZCZENIE FILTRÓW
¾ Worek na kurz należy wymienić, gdy wskaęnik napełnienia worka całkowicie zabarwi się na czerwono
podczas pracy odkurzacza (przy maksymalnej mocy i szczotce uniesionej do góry nad podłogą).
¾ Filtry należy czyścić przynajmniej 2 razy do roku lub wtedy, gdy są widocznie zabrudzone.
¾ Odkurzacza należy używać z założonymi filtrami. Brak filtrów może zredukować siłę zasysania.
¾ Przed czyszczeniem filtrów należy odłączyć odkurzacz od zasilania.
¾ Nie prać filtrów w pralce automatycznej.
¾ Nie używać suszarki do włosów w celu osuszenia filtrów po czyszczeniu.
¾ Wyciągnąć worek na kurz do góry i wyjąć filtr ochronny silnika razem (rys. 27).
¾ Opłukać filtr w lekko ciepłej wodzie i całkowicie wysuszyć (rys. 28).
¾ Filtr w oprawce włożyć do odkurzacza (rys. 27).
¾ Otworzyć pokrywe aby wyjąć filtr wylotowy (rys. 29).
¾ Wyjąć filtry z kratki (rys. 30).
¾ Opłukać filtry w letniej wodzie i całkowicie wysuszyć (rys. 28).
¾ Włożyć filtry do kratki i filtri w oprawce wtożyć do odkurzacza (rys. 30, 29).
¾ Filrt HEPA: wyjąć filtr razem z kratką i wymienić na nowy. (rys. 29)
Ochrona środowiska naturalnego
¾ Zużytego urządzenia oraz elementów opakowania nie wyrzucać z codziennymi śmieciami z gospodarstwa domowego.
¾ Kartonowe elementy opakowania należy oddać do punktu zbiórki surowców wtórnych.
¾ Plastikowe polietylenowe torby (oznaczone symbolem PE) należy oddać do punktu zbiórki surowców wtórnych.
¾ Zużyte urządzenie oddać do punktu zbiórki urządzeń.
¾ Plastikowe elementy odkurzacza, oznaczone odpowiednimi symbolami, mogą być przetworzone
po zakończeniu korzystania z odkurzacza.
¾ Informacji o miejscach zbiórki surowców wtórnych udzielają władze lokalne.
¾ W przypadku zablokowanego przepływu powietrza oraz zabrudzonych filtrów:
¾ Odkurzacz wyłączy się automatycznie jeżeli szczotka / rura / wąż będą zablokowane lub jeżeli filtry będą zabrudzone.
¾ Odłączyć urządzenie od zasilania i pozostawić odkurzacz do ostygnięcia na 20−30 minut.
Usunąć przyczynę zablokowania i / lub oczyścić filtry.
¾ Włączyć odkurzacz.
− 12 − − 21 −
IMPORTANTI INDICAZIONI INERENTI LA SICUREZZA
¾ Leggere attentamente il presente Manuale di istruzioni.
¾ Prima di utilizzare l'apparecchio, controllare che la tensione di alimentazione corrisponda al voltaggio indicato
sulla targhetta di identificazione.
¾ Non accendere l'apparecchio qualora appaia difettoso od evidenzi un cavo od una spina danneggiati. Non cer
care di ripararlo. Per le riparazioni o per richiedere gli accessori, rivolgersi presso i centri di assistenza tecnica
(sulle pagine bianche alla voce "Electrolux Assistenza tecnica" oppure sulle pagine gialle alla voce
"Elettrodomestici Riparazioni e accessori" sotto "Zanussi Servizio Tecnico").
¾ Estrarre sempre la spina dalla presa quando l'aspirapolvere non è in uso e prima di eseguire le operazioni di
pulizia e di manutenzione.
¾ Non lasciare mai incustodito l'apparecchio quando è in funzione. Tenerlo lontano dalla portata dei bambini.
¾ Questo apparecchio è destinato esclusivamente all'uso domestico e deve essere utilizzato in conformita alla
descrizione fornita nel presente Manuale di istruzioni.
¾ Non tirare il cavo dell'apparecchio. Non staccare la spina tirando il cavo.
¾ Non utilizzare l'aspirapolvere sulle superfici bagnate o per aspirare liquidi, fango, cenere e mozziconi di
sigaretta accesi. Non aspirare sostanze o gas altamente infiammabili od esplosivi.
¾ Non disinserire la spina dell'apparecchio con le mani bagnate.
¾ Non utilizzare l'aspirapolvere nelle immediate vicinanze di caloriferi, stufe ed altri oggetti che generano calore.
¾ Prima di iniziare ad utilizzare l'aspirapolvere, spostare gli oggetti di grandi dimensioni od acuminati, al fine di
evitare eventuali danni al tessuto di cui è costituito il sacchetto polvere.
ISTRUZIONI PER L'USO
¾ Prima di mettere in esercizio l'apparecchio, assicurarsi che i filtri si trovino nella posizione giusta.
¾ Prima di utilizzare l'aspirapolvere, svolgere il cavo in modo che presenti una lunghezza sufficiente ed inserire
la spina nella presa. Un segno GIALLO posto sul cavo indica la lunghezza ideale. Non tendere il cavo oltre il
segno ROSSO.
¾ Per accendere l'apparecchio premere il tasto ON/OFF. Si consiglia di impostare il controllo della corrente al
MIN. prima di compiere tale operazione.
¾ Per riavvolgere il cavo, azionare con il piede l'apposito tasto e guidare il cavo con la mano per assicurarsi che
non si avvolga troppo velocemente causando eventuali danni.
¾ La potenza assorbita puo essere regolata spostando l'apposito tasto di comando.
DESCRIZIONE
1. Foro di aspirazione
2. Indicatore di pieno del sacchetto polvere
3. Comando potenza variabile
4. Interruttore ON/OFF
5. Tasto riavvolgimento cavo
6. Ruota
7. Scomparto sacchetto polvere
8. Maniglia per il trasporto
9. Tasto di apertura scomparto
10. Tubo flessibile
11. Tubo telescopico in metallo
12. Ugello per pavimenti a doppio impiego
13. Ugello per imbottiture
14. Ugello per interstizi
15. Spazzola tappeti pavimenti
16. Sacchetto polvere
17. Sacchetto in tessuto
18. Posizionamento verticale
19. Posizionamento orizzontale
ifu41_serie.qxd 2002. 10. 31. 10:32 Page 12

Polish
PROGRESS PC 4101, 4102, 4103
MANUTENZIONE
SOSTITUZIONE DEL SACCHETTO POLVERE
¾ Utilizzare l'aspirapolvere solo se il relativo sacchetto di raccolta polvere è correttamente installato.
¾ Qualora il sacchetto polvere non venga inserito oppure venga installato in modo errato, il coperchio potrebbe
non chiudersi completamente.
¾ In seguito alla rimozione del tubo flessibile, aprire la copertura anteriore (fig. 20).
¾ Rimuovere il supporto del sacchetto (fig. 21).
¾ Estrarre il sacchetto polvere e sostituirlo con uno nuovo. (fig. 22)
¾ Chiudere il coperchio spingendolo verso il basso fino ad avvertire un "clic" (fig. 20).
¾ Numero di riferimento del sacchetto polvere: Menalux T218, BT218, CP218
SACCHETTO IN TESSUTO
¾ Rimuovere il sacchetto in tessuto dal contenitore. (fig. 23)
¾ Far scivolare via la linguetta in plastica e svuotare il sacchetto. (fig. 24, 25)
¾ Rimettere a posto la linguetta in plastica assicurandosi che entrambi le parti siano parallele. (fig. 24)
¾ Rimettere il sacchetto all’interno del contenitore. (fig. 22)
Attenzione: In sacco puo’ essere lavato con acqua tiepida e quindi asciugato. Non deve essere messo
in lavatrice. (fig. 26)
¾ Chiudere il coperchio spingendolo verso il basso fino ad avvertire un "clic" (fig. 23).
SOSTITUZIONE DEI FILTRI
¾ Il sacchetto polvere deve essere sostituito quando la finestrella dell'indicatore di pieno è completamente
rossa, nel momento in cui l'aspirapolvere funziona alla massima potenza e l'ugello è sollevato dal terreno.
¾ I filtri devono essere sostituiti almeno due volte all'anno oppure quando sono visibilmente sporchi.
¾ Azionare l'apparecchio solo con i filtri installati, al fine di evitare una riduzione della capacità di aspirazione.
¾ Disinserire la corrente prima di procedere alla sostituzione dei filtri.
¾ Spingere il sacchetto polvere verso l'alto e rimuovere il filtro di protezione del motore (fig. 27).
¾ Sciacquare il filtro soltalnto sotto l’acqua corrente di rubinetto e asciugarlo completamente. Mettere il filtro all’in-
terno della griglia. (fig. 28, 27)
¾ Aprire la copuerta anteriore e estrarre il filtro di scarico (fig. 29).
¾ Estrarre il filtro dalla griglia (fig. 30).
¾ Sciacquare il filtro soltalnto sotto l’acqua corrente di rubinetto e asciugarlo completamente. Mettere il filtro all’in-
terno della griglia. E mettere la griglia all ’interno del ‘aspirapolvere. (fig. 28, 30, 29)
¾ Chiudere il coperchio spingendolo verso il basso fino ad avvertire un "clic" (fig. 27).
¾ HEPA filtro: togliere il filtro dalla grilla e sustituirlo con un nuovo. (fig. 29)
TUTELA AMBIENTALE
¾ Riciclare, per quanto possibile, i vecchi apparecchi e gli imballaggi.
¾ L'imballaggio in car tone può essere smaltito nel raccoglitore della carta usata.
¾ Depositare il sacchetto in polietilene (PE) nell'apposito punto di raccolta, ai fini del relativo riciclaggio.
Riciclaggio dell'apparecchio:
¾ Tutti i componenti in materia plastica sono dotati di una marcatura di identificazione del materiale, in modo da
poter essere tranquillamente riciclati, come gli altri materiali, nel momento in cui l'apparecchio non viene più
uti lizzato.
¾ Rivolgersi a tale scopo all'Autorità locale responsabile per la tutela ambientale.
Flusso dell'aria bloccato e filtri sporchi:
¾ L'aspirapolvere si arresta automaticamente qualora l'ugello/il tubo/il tubo flessibile risulti ostruito, oppure se i
filtri sono intasati da impurità.
¾ Dopo aver disinserito l'aspirapolvere dall'alimentazione elettrica, lasciarlo raffreddare per 20-30 minuti.
Rimuovere l'eventuale ostruzione e/o pulire i filtri.
¾ Avviare nuovamente l'apparecchio.
− 20 − − 13 −
WSKAZÓWKI DOTYCZŃCE BEZPIECZEˇSTWA
¾ Przed rozpoczęciem korzystania z odkurzacza należy uważnie przeczytać instrukcję obsługi.
¾ Przed podłączeniem odkurzacza należy sprawdzić, czy parametry sieci elektrycznej odpowiadają para−
metrom wskazanym na tabliczce znamionowej odkurzacza.
¾ Nie włączać niesprawnego odkurzacza, także wtedy, gdy przewód zasilający lub wtyczka są uszkodzone.
Nie próbować naprawiać odkurzacza samodzielnie. W razie usterki oddać odkurzacz do naprawy
w autoryzowanym zakładzie serwisowym. Części zamienne i akcesoria można nabyć w serwisach
i sklepach AGD.
¾ Przed przystąpieniem do czyszczenia, konserwacji lub po zako czeniu pracy odkurzacza, należy wyjąć
wtyczkę przewodu zasilającego z gniazdka.
¾ Nie pozostawiać włączonego odkurzacza bez nadzoru. Nie pozwalać dzieciom na przebywanie w pobliżu
włączonego urządzenia. Odkurzacz przechowywać w miejscu niedostępnym dla dzieci.
¾ Urządzenie jest przeznaczone do użytku w warunkach gospodarstwa domowego. Nie używać do innych
celów, niż przedstawiono w instrukcji obsługi.
¾ Nie ciągnąć za przewód zasilający. Odłączając od zasilania, należy trzymać wtyczkę przewodu.
¾ Nie używać odkurzacza do czyszczenia mokrych powierzchni oraz do zbierania cieczy, pyłu, popiołu oraz
niedopałków papierosów. Odkurzaczem nie wolno zbierać materiałów, substancji i gazów łatwopalnych.
¾ Nie wyjmować wtyczki przewodu zasilającego mokrymi rękoma.
¾ Nie używać odkurzacza blisko grzejników, pieców itp.
¾ Przed rozpoczęciem odkurzania, usunąć z podłogi duże i ostre przedmioty, które mogłyby uszkodzić
worek na kurz.
WSKAZÓWKI DOTYCZŃCE OBSŁUGI
¾ Przed włączeniem odkurzacza upewnić się, że filtry i worek na kurz znajdują się we właĘciwym położeniu.
¾ Przed włączeniem odkurzacza wyciągnąć przewód na pożądaną długoĘć i włożyć wtyczkę przewodu do
gniazdka zasilającego. ŻÓŁTY symbol na przewodzie pokazuje wystarczającą długoĘć przewodu. Nie
rozwijać przewodu poza symbol CZERWONY.
¾ Wcisnąć wyłącznik ON/OFF, aby włączyć odkurzacz. Zalecamy ustawienie poziomu mocy na MIN (mini−
mum) przed włączeniem odkurzacza.
¾ Aby zwinąć przewód po zako czeniu pracy, należy wcisnąć przycisk zwijacza przewodu i przytrzymać
przewód z wtyczką dłonią, aby nie uderzył w meble lub użytkownika.
¾ Przesuwanie regulatora mocy powoduje zmianę siły pochłaniania odkurzacza.
¾
Poziom halasu: 82 dB
ELEMENTY ODKURZACZA
1. Otwór na wąż
2. Wskaęnik napełnienia worka
3. Regulacja mocy
4. Wyłącznik On/OFF
5. Przycisk zwijania przewodu
6. Kółko
7. Komora worka na kurz
8. Uchwyt do przenoszenia odkurzacza
9. Przycisk otwierania pokrywy
10. Wąż
11. Metalowa rura teleskopowa
12. Ssawko−szczotka do dywanów / twardej podłogi
13. Ssawka do czyszczenia mebli z tapickerą
14. Ssawka
15. Szczotka do zbierania kurzu
16. Worek na kurz
17. Tekstilny worek na kurz (można prać)
18. Przechowywanie w pozycji pionowej
19. Przechowywanie w pozycji poziomej
ifu41_serie.qxd 2002. 10. 31. 10:32 Page 13

Portugese
PROGRESS PC 4101, 4102, 4103
INSTRUÇOES DE SEGURANÇA
¾
Leia cuidadosamente este livro de instruçoes.
¾
Antes de utilizar o seu aspirador verifique se a tensao da corrente eléctrica doméstica corresponde a tensao
inscrita na placa do aparelho.
¾
Nao ligue o aparelho se lhe parecer que está avariado ou se a ficha ou o cabo eléctrico estiverem danifica−
dos. Nao tente efectuar reparaçoes. Para reparaçoes ou aquisiçao de acessórios contacte os Serviços de
Assistencia Técnica da Electrolux.
¾
Retire sempre a ficha da tomada quando o aparelho nao estiver em uso e antes de efectuar qualquer limpeza
ou operaçao de manutençao.
¾
Nunca deixe o aparelho em funcionamento sem vigilância. Mantenha−o fora do alcance de crianças.
¾
Este aspirador destina−se exclusivamente a uso doméstico. Utilize−o de acordo com as instruçoes.
¾
Nao arraste o seu aspirador nem o desligue da ficha puxando pelo cabo eléctrico.
¾
Nao utilize o aspirador em superfícies molhadas ou para aspirar líquidos, lama, resíduos incandescentes (cin−
zas, brasas, pontas de cigarro … ). Nao aspire substâncias ou gases inflamáveis ou explosivos.
¾
Nao desligue o aparelho com as maos húmidas.
¾
Nao utilize o aparelho demasiado próximo de aquecedores, irradiadores, fogoes de sala, etc..
¾
Antes de utilizar o aspirador remova objectos de grandes dimensoes e objectos pontiagudos ou cortantes,
para evitar danificar o tecido do saco do pó (consoante modelos).
INSTRUÇOES DE UTILIZAÇAO
¾
Antes de utilizar o seu aspirador certifique−se de que os filtros estao correctamente colocados.
¾
Desenrole uma quantidade suficiente de cabo eléctrico e ligue a ficha a tomada de corrente antes de utilizar
o aspirador. Uma marca AMARELA indica a quantidade de cabo ideal. Nao estique o cabo para além da
marca VERMELHA.
¾
Carregue no botao Ligar/Desligar para ligar o aparelho. Aconselha−se a regular a potencia de aspiraçao no
MIN antes de ligar o aparelho.
¾
Para recolher o cabo eléctrico carregue com o pé na tecla de recolha automática e oriente−−o com a mao de
modo a que nao chicoteie, causando estragos.
¾
Movendo o selector de potencia pode ajustar a força de aspiraçao.
DESCRIÇAO
1. Encaixe de sucçao
2. Indicador de saco cheio
3. Selector de potencia de aspiraçao
4. Botao de Ligar/Desligar
5. Tecla de recolha automática do cabo eléctrico
6. Roda
7. Compartimento para o saco do pó
8. Pega de transporte
9. Tecla de abertura do compartimento do saco de
pó e filtros
10. Tubo de aspiraçao
11. Tubo telescópico
12.
Escova de dupla funçao, para carpetes e soalhos
13. Escova para estofos
14. Tubo para frestas e rodapés
15. Escova para móveis
16. Saco de pó
17. Saco de pano
18. Parqueamento na vertical
19. Parqueamento na horizontal
KARBANTARTÁS
A PORZSÁK CSERÉJE
¾ A porzsákot cserélni kell, ha megtelt, vagy nem telt meg, de eltömődött (igen finom por felporszívózásakor
fordulhat elő). Ilyenkor a porzsáktelítettség kijelzője maximális szíváserősség esetén megemelt szívófej
mellett is teljesen bepirosodik. A szívóerő észrevehetően csökken.
¾ A porszívót kizárólag erdeti porzsákkal használja.
¾ A porzsák azonosító száma:
Menalux T218, BT218, CP218
¾ A gégecső eltávolítása után nyissa fel az elülső borítást (20. ábra).
¾ Fordítsa el a zsák támasztóját függőleges pozícióba (21. ábra).
¾ Távolítsa el a porzsákot és tegyen be a helyére egy újat. (22. ábra).
¾ Ha elfelejti rögzíteni a porzsákot, vagy rosszul rögzíti, vagy sérült porzsákot használ, akkor károsodhat a motor.
A garancia nem terjed ki a papírporzsák sérüléséből, kiszakadásából eredő meghibásodások javítására.
¾ Zárja le kattanásig az elülső borítást (20. ábra).
Textilporzsák
¾ A gégecső eltávolítása után nyissa fel az elülső borítást (23. ábra).
¾ Vegye ki a textilporzsákot a tartóból (22. ábra).
¾ Húzza le a műanyag sínt és ürítse ki a zsákot (24., 25. ábra).
¾ Helyezze vissza a sínt, ügyelve arra, hogy a zsák két széle párhuzamos legyen (24. ábra).
¾ Helyezze vissza a zsákot a tartóba (22. ábra)
¾ Zárja le kattanásig az elülső borítást (23. ábra).
Megjegyzés: A textilporzsák kézmeleg vízben mosható, mosás után tökéletesen szárítsa meg (26. ábra).
Ne mossa mosógépben!
A SZŰRŐK TISZTÍTÁSA ÉS CSERÉJE
¾ A szűrőket legalább évente kétszer meg kell tisztítani. A tisztítást akkor is el kell végezni, ha a szűrőkön
látható szennyeződés van.
¾ A porszívót mindig eredeti szűrőkkel használja, hogy a szíváserősség csökkenését elkerülhesse.
¾ A szűrők tisztítása előtt válassza le a készüléket az elektromos hálózatról.
¾ Ne tisztítsa a szűrőket mosógépben.
¾ Ne használjon hajszárítót a szűrők szárítására.
¾ A motorvédő szűrő eltávolításához a gégecső eltávolítása után nyissa fel az elülső borítást.
¾ Húzza felfelé a porzsákot és vegye ki a motorvédő szűrőt (27. ábra)
¾ Kézmeleg vízben öblítse le a szűrőt és hagyja alaposan megszáradni (28. ábra).
¾ Helyezze vissza a szűrőt a porszívóba (27. ábra).
¾
A kifújó szűrő eltávolításához nyissa fel az elülső borítást és vegye ki a szűrőt a szűrőráccsal együtt (23, 29. ábra).
¾ Vegye ki a rácsból a szűrőket (30. ábra).
¾ Kézmeleg vízben öblítse le a szűrőket és hagyja őket alaposan megszáradni (28. ábra).
¾ Száradás után tegye vissza a szűrőket a szűrőrácsba és helyezze vissza a porszívóba (30, 29. ábra).
¾ Zárja le a kattanásig az elülső borítást (23. ábra).
¾ HEPA filter: vegye ki a szűrőt a ráccsal együtt és helyezzen a porszívóba egy újat. (29. ábra)
KÖRNYEZETVÉDELMI TUDNIVALÓK
¾ Ne dobja a szemétbe a csomagoló anyagokat és az öreg készüléket.
¾ A karton csomagolóanyagot a megfelelő papírgyűjtő helyen adja le.
¾ A PE jelzésű polietilén műanyag zacskót a polietilén gyűjtóhelyen adja le újrahasznosításra.
¾ A készülék élettartamának a végén ismételten feldolgozható.
¾ A műanyag alkatrészek mindegyike egy anyagazonosító jelzéssel rendelkezik, így ezek más anyagokhoz
hasonlóan szintén újrafeldolgozhatók a készülék élettartamának a lejárta után.
¾ A megfelelő gyűjtőhelyek címe felől a helyi környezetvédelmi hatóságtól kérhet információt.
¾ Elzárt légáramlás és szennyezett szűrők esetén:
¾ A porszívó automatikusan leáll, ha a szívófejben, a gégecsőben, vagy a csőben valami elzárja a levegő
áramlását, illetve ha a szűrők vagy a porzsák elszennyeződtek, eltömődtek.
¾ Ilyenkor válassza le a készüléket az elektromos hálózatról és 20−30 percig hagyja hűlni.
Utána szüntesse meg az elzáródást, vagy tisztítsa meg a szűrőket, és/vagy cserélje ki a porzsákot.
¾ Indítsa újra a porszívót.
¾ A garancia nem terjed ki az eltömődött részek tisztítására.
− 14 − − 19 −
ifu41_serie.qxd 2002. 10. 31. 10:32 Page 14

Magyar
PROGRESS PC 4101, 4102, 4103
MANUTENÇAO
SUBSTITUIÇAO DO SACO DO PÓ
¾ Utilize sempre o aspirador com o saco de pó correctamente instalado.
¾ Se se esquecer de colocar o saco de pó ou se o colocar de forma incorrecta a tampa do compartimento do saco e
filtros pode nao fechar completamente.
¾ Depois de retirar o tubo de aspiraçao abra a tampa da frente (Fig. 20).
¾ Retire o suporte do saco. (Fig. 21).
¾ Retire o saco e coloque um novo (Fig. 22).
¾ Feche a tampa pressionando−a até ouvir um estalido (Fig. 20).
¾ Saco de Pó Refa Menalux T218, BT218, CP218
SACO DE PANO
¾ Retire o saco de pano do pó do suporte. (Fig. 23)
¾ Faça deslizar o clip de plástico do saco para o abrir e esvaziar. (Fig. 24, 25)
¾ Torne a colocar o clip de plástico assegurando−se que ambos os lados do saco estão paralelos. (Fig. 24)
¾ Volte a colocar o saco no seu suporte. (Fig. 22)
Nota: o saco pode ser lavado em ãgua morna e deve secar completamente antes de voltar a ser utilizado.
Não deve ser lavado na máquina de lavar. (Fig. 26)
¾ Feche a tampa pressionando−a até ouvir um estalido (Fig. 23).
SUBSTITUIÇAO DOS FILTROS
¾ O saco do Pó, deve ser substituído quando o indicador de saco cheio estiver completamente vermelho, com o aspi−
rador ligado na potencia máxima e a escova levantada do chao.
¾ Os filtros devem ser substituídos pelo menos duas vezes por ano ou quando estiverem visivelmente sujos.
¾ Utilize sempre o aspirador com os filtros instalados para evitar reduçao do poder de aspiraçao do aparelho.
¾ Desligue o aparelho da corrente antes de mudar o saco ou os filtros.
¾ Nunca lave os filtros na máquina da louça / roupa.
¾ Puxe o saco do pó para cima e retire o filtro que protege o motor (Fig. 27).
¾ Lave o filtro unicamente debaixo de água morna e segne−o completamente. (Fig.28.)
¾ Coloque um filtro no aspirador. (Fig. 27).
¾ Abra a tampa de trente e retire a grelha posterior para remover o filtro de exaustao (Fig. 29).
¾ Retire o filtro da grelha (Fig. 30).
¾ Lave o filtro unicamente debaixo de água morna e segne−o completamente. (Fig. 28).
¾ Ponha um filtro na grelha e torne a colocá−la no aspirador (Fig. 30, 29).
¾ Feche a tampa pressionando−a até ouvir um estalido (Fig. 27).
¾ HEPA filro: retire o filtro com a grelha e substitua por um novo. (Fig. 29)
PROTECÇAO DO AMBIENTE
¾ Tente reciclar o material de embalagem e os aparelhos fora de uso.
¾ A embalagem de cartao deve ser colocada nos contentores de papel para reciclagem.
¾ Deposite os sacos de plástico de polietileno (PE) nos contentores para plásticos de polietileno.
Reciclagem de aparelhos fora de uso:
¾ Todos componentes de plástico estao identificados com uma marca específica indicando que podem ser reciclados,
tal como outros materiais plásticos, quando o aparelho estiver fora de uso.
¾ Informe−se junto da autarquia da sua residencia, para recolha deste material . Ajude também a proteger o ambiente.
Bloqueio do fluxo de ar e filtros sujos:
¾ O aspirador pára automaticamente se ocorrer um entupimento a nível das escovas/tubos/cano ou se os filtros
estiverem muito sujos.
¾ Nesta circunstância desligue o aspirador da corrente e deixe−o arrefecer durante 20−30 minutos. Remova a causa do entupi−
mento e/ou limpe os filtros. Em caso de necessidade pode sempre recorrer a um Serviço de Assistencia Técnica .
¾ Ligue novamente o aspirador.
− 18 − − 15 −
BIZTONSÁGI ÚTMUTATÁSOK
¾ Gondosan olvassa el ezt a Használati útmutatót.
¾ A készülék használata előtt ellenőrizze, hogy az adattáblán megadott feszültség megegyezik−e
az Ön lakhelyén lévő hálózati feszültséggel.
¾ Ne kapcsolja be a készüléket, ha bármilyen hibát észlel vagy megsérült a csatlakozó vezeték,
illetve
a csatlakozó dugó. Soha ne próbálja meg saját maga megjavítani a készüléket. A meghibásodott
készülék javítását, beleértve a csatlakozó vezeték vagy a dugó cseréjét is, csak a jótállási jegyben
megjelölt szerviz végezheti.
¾ Mindig húzza ki a csatlakozó dugót a konnektorból, ha nem használja a készüléket, szállítás előtt,
vagy ha bármilyen tisztítási munkát végez a készüléken.
¾ Soha ne hagyja a bekapcsolt készüléket felügyelet nélkül. Tartsa távol a készüléket a gyerekektől.
¾ A készülék kizárólag háztartási használatra készült. Mindig a Használati útmutatóban leírtak szerint
használja a készüléket.
¾ Ne húzza a készüléket a csatlakozó vezetéknél megfogva. A konnektorból való kihúzásnál mindig a
dugót fogja meg és sohasem a csatlakozó vezetéket.
¾ Ne használja a készüléket nedves felületen, illetve folyadék, sár vagy égő cigarettacsikk fel−
szívására.
Ne szívjon fel a készülékkel gyúlékony, vagy robbanó anyagot, illetve gázt.
¾ Nedves kézzel ne húzza ki a csatlakozó dugót a konnektorból.
¾ Ne működtesse a porszívót fűtőkészülék, radiátor, tűzhely közvetlen közelében.
¾ A porszívózás megkezdése előtt távolítsa el a földről a nagy, vagy éles tárgyakat, hogy a porzsák
károsodását elkerülhesse.
HASZNÁLATI TUDNIVALÓK
¾ Mielőtt a készüléket használja, győződjön meg arról, hogy a szűrők megfelelően a helyükön vannak−e.
¾ A porszívózás megkezdése előtt húzza ki a megfelelő hosszúságú vezetéket, majd csatlakoztassa
a dugót a konnektorba. A csatlakozó vezetéken lévő SÁRGA jelölés az ideális hosszúságot mutatja.
A csatlakozó vezetéket ne húzza túl a PIROS jelzésen.
¾ A készülék bekapcsolásához nyomja meg a Ki/Be kapcsolót. A bekapcsolást megelőzően ajánlatos
a szíváserősség szabályozót a MIN pozícióba állítani.
¾ A csatlakozó vezeték visszatekercseléséhez nyomja meg lábbal a kábel visszacsévélő gombot, de
közben tartsa meg kézzel a vezetéket, hogy az egyenletes felcsavarodás biztosított legyen és ne
sérülhessen meg a vezeték.
¾ A szíváserősség a szabályzó gombbal állítható be a mindenkori igénynek megfelelően.
¾
Zajszint: 82 dB
FŐ RÉSZEK
1. Beszívó nyílás
2. Porzsáktelítettség kijelző
3. Szíváserősség szabályozó
4. Ki/Be kapcsoló gomb
5. Kábelvisszacsévélő gomb
6. Kerék
7. Porzsáktartó rekesz
8. Hordozó fogantyú
9. Porzsáktartó rekeszt nyitó gomb
10. Gégecső
11. Teleszkópos cső
12. Kétállású padlószívófej
13. Kis szívófej
14. Résszívó
15. Kefés szívófej
16. Porzsák
17. Mosható textilporzsák
18. Függőleges parkolóállás
19. Vízszintes parkolóállás
ifu41_serie.qxd 2002. 10. 31. 10:32 Page 15

Nederlands
PROGRESS PC 4101, 4102, 4103
BELANGRIJKE VEILIGHEIDSINSTRUKTIES
¾
Gelieve de veiligheidsinstrukties aandachtig te lezen.
¾
Controleer of het voltage van het stopcontact en de stofzuiger hetzelfde zijn, voordat u het apparaat gebruikt.
¾
Zet de stofzuiger niet aan indien er ergens een defect is, indien het snoer of de stekker beschadigd is.
Probeer de stofzuiger nooit zelf te herstellen. Voor herstellingen of toebehoren contacteert u de Electrolux
Klantendienst.
¾
Verwijder altijd de stekker uit het stopcontact wanneer de stofzuiger niet in gebruik is, wanneer u het wil reini−
gen of een onderhoudsbeurt wil geven.
¾
Laat de stofzuiger nooit onbewaakt wanneer het ingeschakeld is. Buiten bereik van kinderen houden.
¾
De stofzuiger is alleen geschikt voor huishoudelijk gebruik. Gebruik het zoals aangegeven in de handleiding.
¾
Nooit aan het snoer trekken om de stofzuiger uit te schakelen.
¾
Gebruik de stofzuiger niet op een natte ondergrond of voor het opzuigen van vloeistoffen, modder, assen of
smeulende sigarettenpeuken. Nooit licht−ontvlambare of explosieve zaken opzuigen. Opletten met gassen.
¾
De stekker nooit met natte handen uit het stopcontact verwijderen.
¾
Gebruik de stofzuiger niet te dicht bij verwarmingsinstallaties , radiatoren, kachels enz…
¾
Verwijder alle scherpe en grote voorwerpen van de vloer voordat je de stofzuiger inschakelt. Zo voorkom je
schade aan de stofzak.
RICHTLIJNEN VOOR GEBRUIK
¾
Zorg ervoor dat de filters goed zitten voor u de stofzuiger inschakelt.
¾
Rol voldoende snoer af, stop de stekker in het stopcontact voor u de stofzuiger gebruikt. Een gele markering
duidt de ideale snoerlengte aan. Rol het snoer niet af tot voorbij de rode markering.
¾
Druk op de aan/uit knop om de stofzuiger aan te zetten. Het is raadzaam om de zuigkrachtregelaar op mini−
mum te zetten voordat u de stofzuiger inschakelt.
¾
Om het snoer terug op te rollen, drukt u op het voetpedaal. Houdt de stekker vast zodat deze geen schade
kan veroorzaken.
¾
De zuigkracht kan worden afgesteld met behulp van de zuigkrachtregelaar.
Omschrijving
1. Zuigopening
2. Indicatielampje
3. Zuigkrachtregelaar
4. Aan/Uit schakelaar
5. Snoer
6. Wiel
7. Stofzakcompartement
8. Draaghandgreep
9. Klepvergrendeling voor stofzak en toebehoren
10. Zuigbuis
11. Telescopische buis
12. Mondstuk voor dubbel gebruik
13. Mondstuk voor meubels
14. Mondstuk voor kieren
15. Brostelmoudstuk
16. Stofzak
17. Stoffen stofzak
18. Verticale parkeersand
19. Tijdelijke ruststand tijdens gebruik
ONDERHOUD
¾
Gebruik de stofzuiger altijd met stofzak.
¾
Wanneer u vergeet de stofzak vast te klikken of u bevestigt de stofzak op de verkeerde wijze, zal het deksel
niet volledig sluiten.
¾
Verwijder de slang en open het deksel vooraan. (fig. 20)
¾
Verwijder de steun van de stofzak. (fig. 21)
¾
Verwijder de stofzak en installeer een nieuwe. (fig. 22)
¾
Sluit het deksel (fig. 20)
¾
Referentienumer voor stofzak is Menalux T218, BT218, CP218
STOFFEN STOFZAK
¾
Verwijder de stoffen stofzak van de haak. (fig. 23.)
¾
Verwijder de plastic clip van de stofzak om die te openen en te ledigen. (fig 24, 25.)
¾
Vervang de plastic clip en verzeker u dat de 2 kanten van de stofzak paralel zijn. (fig.24.)
¾
Steek de stofzak terug in de haak. (fig.22.)
Nota: de stofzak mag gewassen worden in lauw water, laat die achteraf volleding drogen. Niet
wassen in een wasmachine. (fig. 26.)
¾
Sluit het deksel (fig 23.)
VERVANGEN VAN FILTERS
¾
De stofzak moet vervangen wanneer het indicatorvenster volledig rood is als de stofzuiger ingesteld is op
maximale zuigkracht en de borstel van de vloer is.
¾
Filters moeten minstens 2x per jaar vervangen worden of wanneer ze zichtbaar vuil zijn.
¾
Zet de stofzuiger altijd aan met geinstalleerde filters voor een optimale zuigkracht.
¾
Haal de stekker uit het stopcontact voordat je de filter vervangt.
¾
Reinig de filters nooit in de wasmachine.
¾
Haal de stofzak naar boven en verwijder de beschermende motorfilter. (fig. 27)
¾
Spoel de filter uit onder warm stromend water en laat de filter drogen. (fig. 28.)
¾
Stop se filter terug in het apparaat. (fig. 27.)
¾
Open het deksel vooraan en haal de uitlaatfilter met houder (fig. 29.)
¾
Haal de filter uit de houder (fig. 30.)
¾
Spoel de filter uit onder warm stromend water en laat de filter drogen. (fig.28.)
¾
Zet de filter terug op de rooster en stop hem terug in het apparaat (fig. 30, 29.)
¾
Sluit het deksel (fig 23.)
¾ HEPA filter: verwijder de filter met de rooster en vervang hep met een nieuwe. (fig 29.)
MILIEUBESCHERMING
¾
De verpakkingsmaterialen zijn recycleerbaar.
¾
Karton kan met papier worden gerecycleerd.
¾
De plasic zak van polyethyleen kan met plastic worden gerecycleerd. Recycleer de stofzuiger aan het einde
van de levensduur.
¾
De kunststof onderdelen zijn allemaal gemerkt zodat ze, zoals alle andere materialen kunnen gerecycleerd
worden.
¾
Vraag de nodige inlichtingen bij uw plaatselijke bevoegdheden.
¾
Bij geblokkeerde luchtstroom en vuile filters:
¾
De stofzuiger stopt automatisch wanneer er een blockage wordt veroorzaakt in de borstel, buis of slang of
wanneer de filters vuil zijn.
¾
Haal de stekker uit het stopcontact en laat de stofzuiger afkoelen gedurende 20 − 30 minuten. Verwijder de
blockage en/of maak de filters schoon.
¾
Zet de stofzuiger aan.
− 16 − − 17 −
ifu41_serie.qxd 2002. 10. 31. 10:32 Page 16
 Loading...