


gebruiksaanwijzing
user manual
notice d'utilisation
benutzerinformation
Oven
Oven
Four
Backofen
PBN1220

2 progress
INHOUD
Veiligheidsinformatie 2
Veiligheidsvoorschriften 3
Beschrijving van het product 5
Voor het eerste gebruik 5
Dagelijks gebruik 6
Extra functies 6
Nuttige aanwijzingen en tips 6
Onderhoud en reiniging 10
Problemen oplossen 13
Technische gegevens 14
Montage 14
Milieubescherming 15
Wijzigingen voorbehouden.
VEILIGHEIDSINFORMATIE
Lees zorgvuldig de meegeleverde instructies voor installatie en
gebruik van het apparaat. De fabrikant is niet verantwoordelijk
voor letsel en schade veroorzaakt door een foutieve installatie.
Bewaar de instructies van het apparaat voor toekomstig gebruik.
Veiligheid van kinderen en kwetsbare mensen
Waarschuwing! Gevaar voor verstikking, letsel of
permanente invaliditeit.
• Dit apparaat kan worden gebruikt door kinderen van 8 jaar
en ouder en door mensen met beperkte lichamelijke, zintuiglijke of verstandelijke vermogens of een gebrek aan ervaring
en kennis, indien zij onder toezicht staan van een volwassene of van iemand die verantwoordelijk is voor hun veiligheid.
• Laat kinderen niet met het apparaat spelen.
• Houd alle verpakkingsmaterialen uit de buurt van kinderen.
• Houd kinderen en huisdieren uit de buurt van het apparaat
als het in werking is of afkoelt. Het apparaat is heet.
• Als het apparaat is uitgerust met een kinderbeveiliging, raden wij aan dit te activeren.
• Reiniging en onderhoud mag niet worden uitgevoerd door
kinderen zonder toezicht.
Algemene veiligheid
• Van binnen wordt het apparaat heet als het in werking is.
Raak de verwarmingselementen in het apparaat niet aan.
Gebruik altijd ovenhandschoenen om accessoires of kookgerei te plaatsen of verwijderen.

progress 3
• Gebruik geen stoomreiniger om het apparaat schoon te maken.
• Zet de stroomtoevoer uit alvorens onderhoud te plegen.
• Gebruik nooit agressieve reinigingsmiddelen of scherpe metalen schrapers om de glazen deur schoon te maken, deze
kunnen krassen veroorzaken op het oppervlak, waardoor
het glas zou kunnen breken.
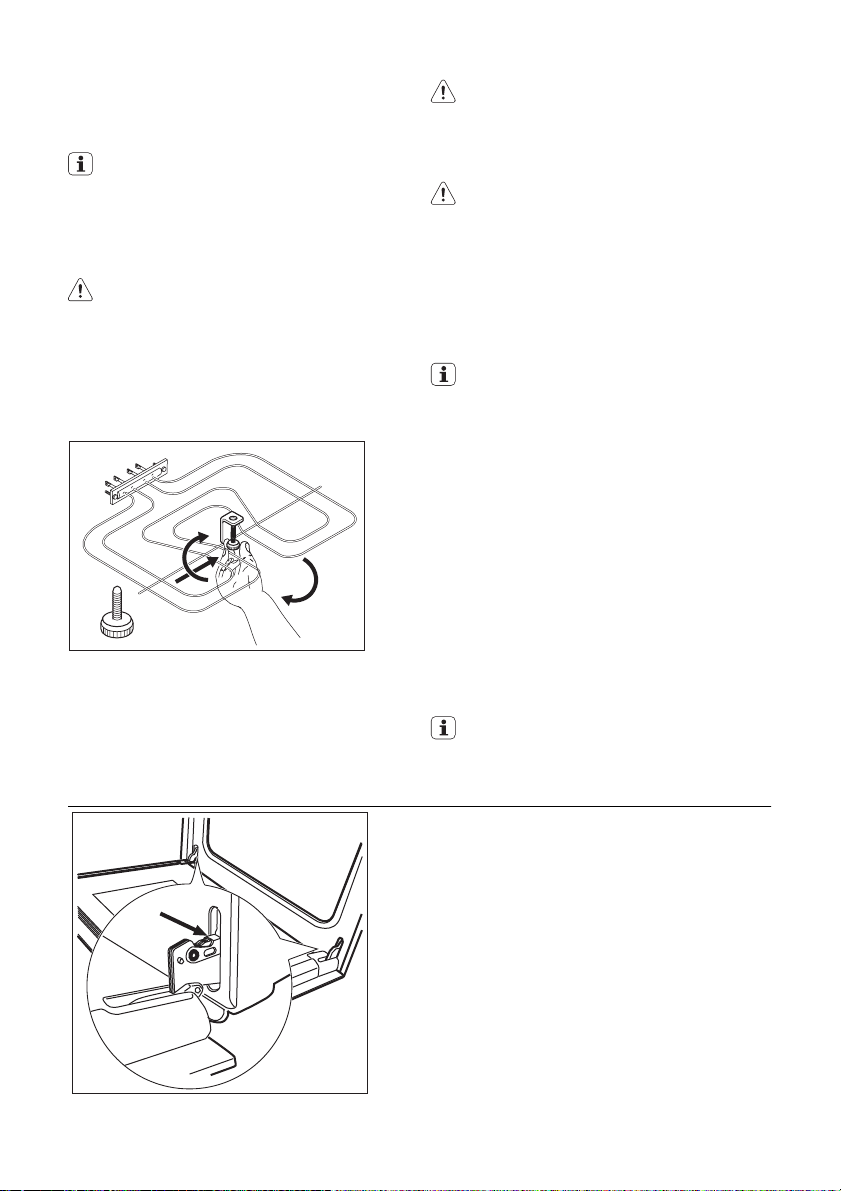
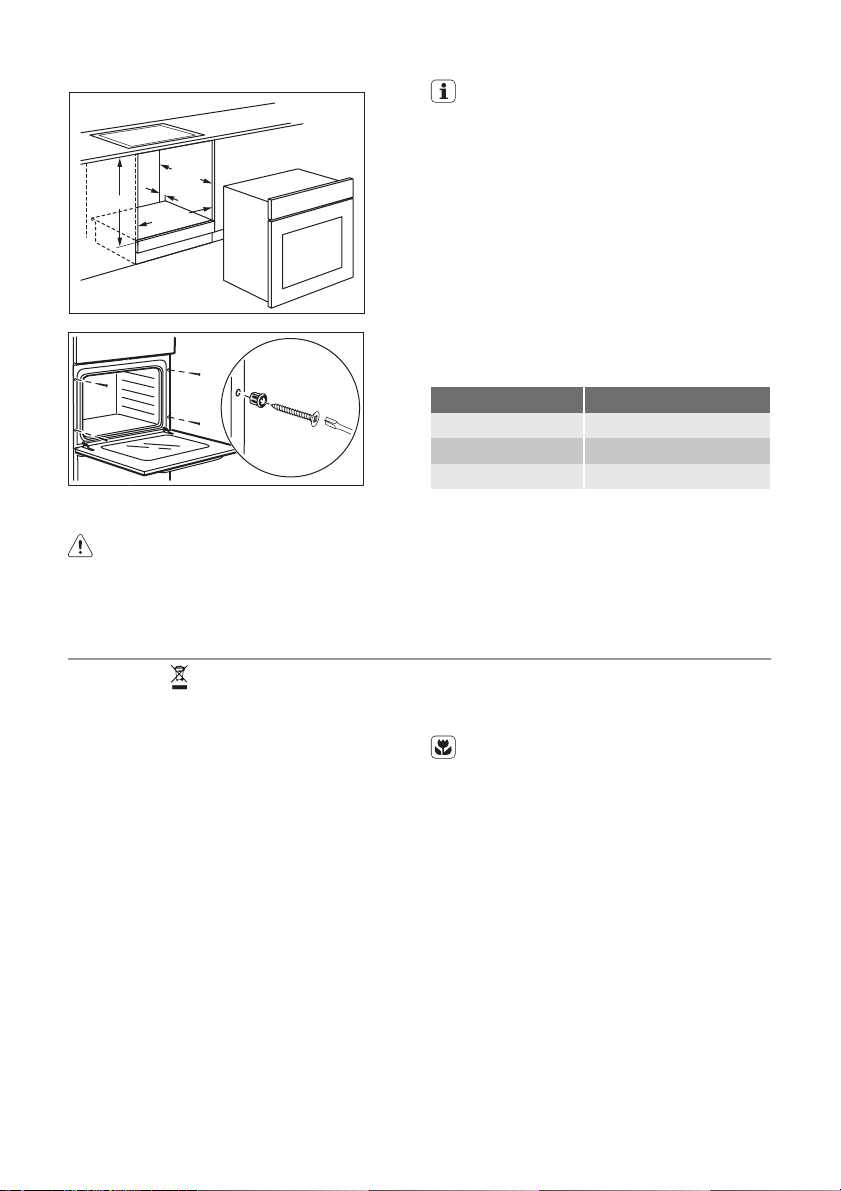
• Om de inschuifrailen te verwijderen trekt u eerst de voorkant
van de inschuifrail en dan de achterkant uit de zijwanden. Installeer de inschuifrail in de omgekeerde volgorde.
VEILIGHEIDSVOORSCHRIFTEN
Montage
Waarschuwing! Alleen een erkende
installatietechnicus mag het apparaat
installeren.
• Verwijder alle verpakkingsmaterialen.
• Installeer en gebruik geen beschadigd
apparaat.
• Volg de installatie-instructies op die zijn
meegeleverd met het apparaat.
• Wees voorzichtig met het verplaatsen van
het apparaat, het is zwaar. Draag altijd
veiligheidshandschoenen.
• Trek het apparaat nooit aan de hand-
greep van zijn plaats.
• Houd de minimumafstand naar andere
apparaten en units in acht.
• Zorg ervoor dat het apparaat onder en
naast veilige installaties wordt geïnstalleerd.
• De zijkanten van het apparaat moeten
naast apparaten of units staan van dezelfde hoogte.
Aansluiting op het elektriciteitsnet
Waarschuwing! Gevaar voor brand en
elektrische schokken.
• Alle elektrische aansluitingen moeten
door een gediplomeerd elektromonteur
worden gemaakt.
• Dit apparaat moet worden aangesloten
op een geaard stopcontact.
• Controleer of de elektrische informatie op
het typeplaatje overeenkomt met de
stroomvoorziening. Zo niet, neem dan
contact op met een elektromonteur.
• Gebruik altijd een correct geïnstalleerd,
schokbestendig stopcontact.
• Gebruik geen meerwegstekkers en verlengsnoeren.
• Zorg dat u de hoofdstekker en kabel niet
beschadigt. Neem contact op met de
service-afdeling of een elektromonteur
om een beschadigde hoofdkabel te vervangen.
• Laat de stroomkabel niet in aanraking komen met de deur van het apparaat, met
name niet als deze heet is.
• De schokbescherming van delen onder
stroom en geïsoleerde delen moet op
zo'n manier worden bevestigd dat het
niet zonder gereedschap kan worden
verplaatst.
• Steek de stekker pas in het stopcontact
als de installatie is voltooid. Zorg ervoor
dat het netsnoer na installatie bereikbaar
is.
• Sluit de stroomstekker niet aan op een
losse stroomaansluiting.
• Trek niet aan het netsnoer om het apparaat los te koppelen. Trek altijd aan de
stekker.
• Gebruik alleen de juiste isolatie-apparaten: stroomonderbrekers, zekeringen
(schroefzekeringen moeten uit de houder
worden verwijderd), aardlekschakelaars
en contactgevers.
• De elektrische installatie moet een isolatieapparaat bevatten waardoor het appa-

4 progress
raat volledig van het lichtnet afgesloten
kan worden. Het isolatieapparaat moet
een contactopening hebben met een minimale breedte van 3 mm.
Gebruik
Waarschuwing! Gevaar op letsel,
brandwonden, elektrische schokken of
een explosie.
• Gebruik dit apparaat in een huishoudelijke omgeving.
• De specificatie van het apparaat mag niet
worden veranderd.
• Zorg ervoor dat de ventilatieopeningen
niet geblokkeerd zijn.
• Laat het apparaat tijdens het gebruik niet
onbeheerd achter.
• Schakel het apparaat telkens na gebruik
uit.
• Van binnen wordt het apparaat heet als
het in werking is. Raak de verwarmingselementen in het apparaat niet aan. Gebruik altijd ovenhandschoenen om accessoires of kookgerei te plaatsen of verwijderen.
• Wees voorzichtig met het openen van de
deur van het apparaat als het apparaat
aan staat. Er kan hete lucht ontsnappen.
• Bedien het apparaat niet met natte handen of als het contact maakt met water.
• Oefen geen kracht uit op een geopende
deur.
• Het apparaat mag niet worden gebruikt
als werkblad of aanrecht.
• Houd de deur van het apparaat altijd
dicht als het apparaat in werking is.
• Open de deur van het apparaat voorzichtig. Als u alcoholische toevoegingen gebruikt, kan er alcohol-luchtmengsel ontstaan.
• Houd vonken of open vlammen uit de
buurt van het apparaat bij het openen
van de deur.
• Plaats geen ontvlambare producten of
items die vochtig zijn door ontvlambare
producten in, bij of op het apparaat.
Waarschuwing! Risico op schade aan
het apparaat.
• Om schade of verkleuring van het emaille
te voorkomen:
– Zeg geen kookgerei of andere voorwerpen direct op de bodem van het apparaat.
- Leg geen aluminiumfolie op de bodem
van het apparaat.
- Plaats geen water direct in het hete apparaat.
- Haal vochtige schotels en eten uit het
apparaat als u klaar bent met koken.
- Wees voorzichtig bij het verwijderen of
bevestigen van accessoires.
• Verkleuring van het emaille heeft geen
ongewenst effect op de werking van het
apparaat. Dit is geen defect dat geldt
voor het recht op garantie.
• Gebruik een diepe braadpan voor vochtige taarten. Fruitsappen kunnen permanente vlekken maken.
Onderhoud en reiniging
Waarschuwing! Gevaar voor letsel,
brand en schade aan het apparaat.
• Schakel het apparaat uit en trek de stekker uit het stopcontact voordat u onderhoudshandelingen verricht.
• Zorg ervoor dat het apparaat is afgekoeld. Er bestaat een risico dat de glasplaten kunnen breken.
• Vervang direct de glazen deurpanelen als
deze beschadigd zijn. Neem contact op
met de service-afdeling.
• Wees voorzichtig bij het verwijderen van
de deur uit het apparaat. De deur is
zwaar!
• Reinig het apparaat regelmatig om te
voorkomen dat het materiaal van het oppervlak achteruitgaat.
• Resterend vet of voedsel in het apparaat
kan brand veroorzaken.
• Maak het apparaat schoon met een
vochtige, zachte doek. Gebruik alleen
neutrale schoonmaakmiddelen. Gebruik
geen schuurmiddelen, schuursponsjes,
oplosmiddelen of metalen voorwerpen.
• Raadpleeg als u een ovenspray gebruikt
eerst de aanwijzingen op de verpakking.
• Reinig niet het katalytisch emaille (indien
van toepassing) met een schoonmaakmiddel.
Binnenverlichting
• De gloeilampen of halogeenlampen in dit
apparaat zijn uitsluitend bedoeld voor ge-
progress 5
bruik in huishoudelijke apparaten. Gebruik deze niet voor andere doeleinden.
Waarschuwing! Gevaar voor
elektrische schokken!
• Haal de stekker uit het stopcontact.
• Snijd het netsnoer van het apparaat af en
• Verwijder de deurgreep om te voorkomen
• Voordat u het lampje vervangt, dient u de
stekker van het apparaat uit het stopcontact te halen.
• Gebruik alleen lampjes met dezelfde specificaties.
Verwijdering
Waarschuwing! Gevaar voor letsel of
verstikking.
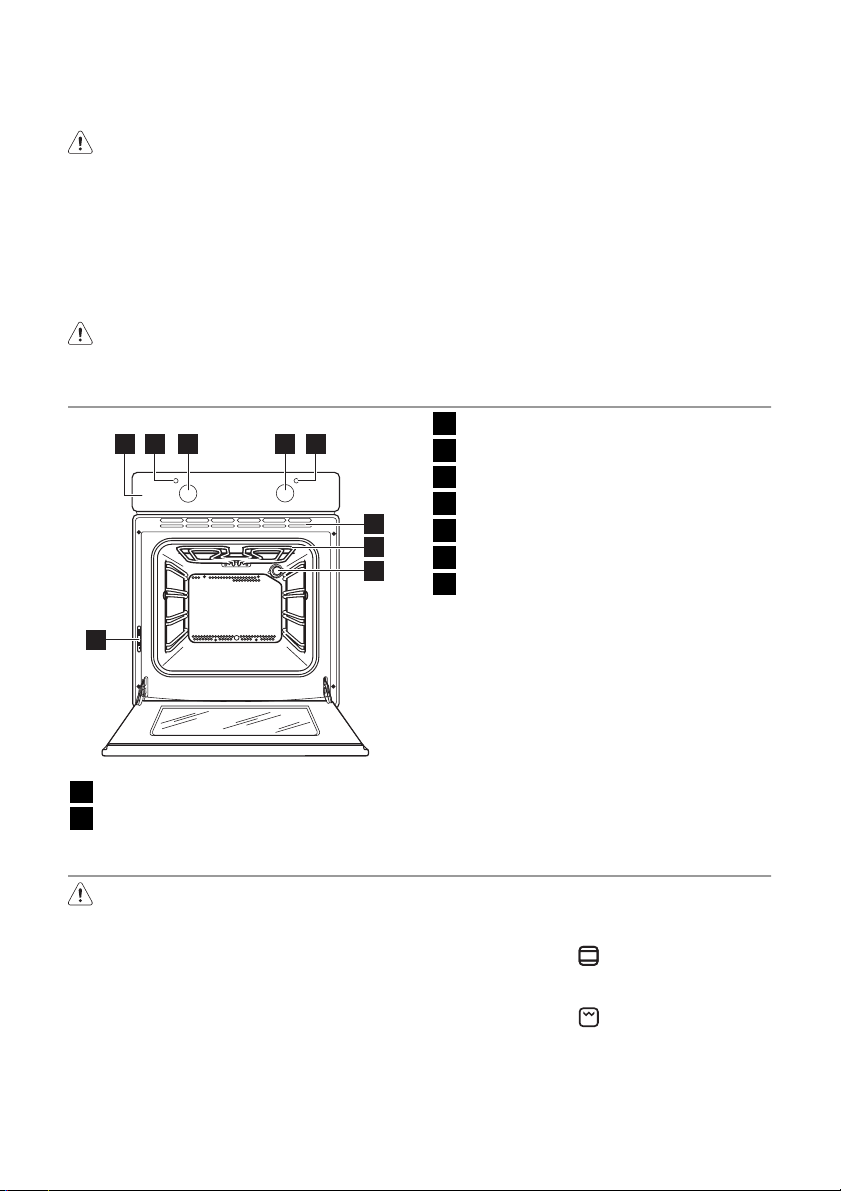
BESCHRIJVING VAN HET PRODUCT
1 2 3 4 5
9
Bedieningspaneel
1
Temperatuurweergave
2
6
7
8
3
4
5
6
7
8
9
Ovenaccessoires
•
• Aluminium bakplaat
•
gooi dit weg.
dat kinderen en huisdieren opgesloten raken in het apparaat.
Knop voor de temperatuur
Knop voor de ovenfuncties
Stroomindicatielampje
Ventilatie-openingen
Grill
Ovenlampje
Typeplaatje
Bakrooster
Voor kookgerei, cake bakblikken en
braadvormen.
Voor gebak en koekjes.
Grill- / Braadpan
Voor braden en roosteren of als schaal
om vet op te vangen.
VOOR HET EERSTE GEBRUIK
Waarschuwing! Zie het hoofdstuk
'Veiligheidsinformatie'.
Eerste reiniging
• Verwijder alle accessoires en verwijderbare inschuifrails (indien van toepassing).
• Reinig het apparaat voor het eerste gebruik.
Belangrijk! Zie het hoofdstuk "Onderhoud
en reiniging".
Voorverwarmen
Verwarm het apparaat voor om het resterende vet weg te branden.
1.
Stel de functie
en de maximumtem-
peratuur in.
2. Laat het apparaat 45 minuten werken.
3.
Stel de functie
en de maximumtem-
peratuur in.
4. Laat het apparaat 15 minuten werken.
Accessoires kunnen heter worden dan normaal. Het apparaat kan een vreemde geur
6 progress
en rook afgeven. Dit is normaal. Zorg dat er
voldoende luchtcirculatie is.
DAGELIJKS GEBRUIK
Waarschuwing! Zie het hoofdstuk
'Veiligheidsinformatie'.
Om het apparaat te bedienen, moet u de
bedieningsknop indrukken. De bedieningsknop komt naar voren.
Het apparaat aan- en uitzetten
1. Draai de knop voor de ovenfuncties
naar een ovenfunctie.
Het stroomindicatielampje gaat aan als
het apparaat in werking is.
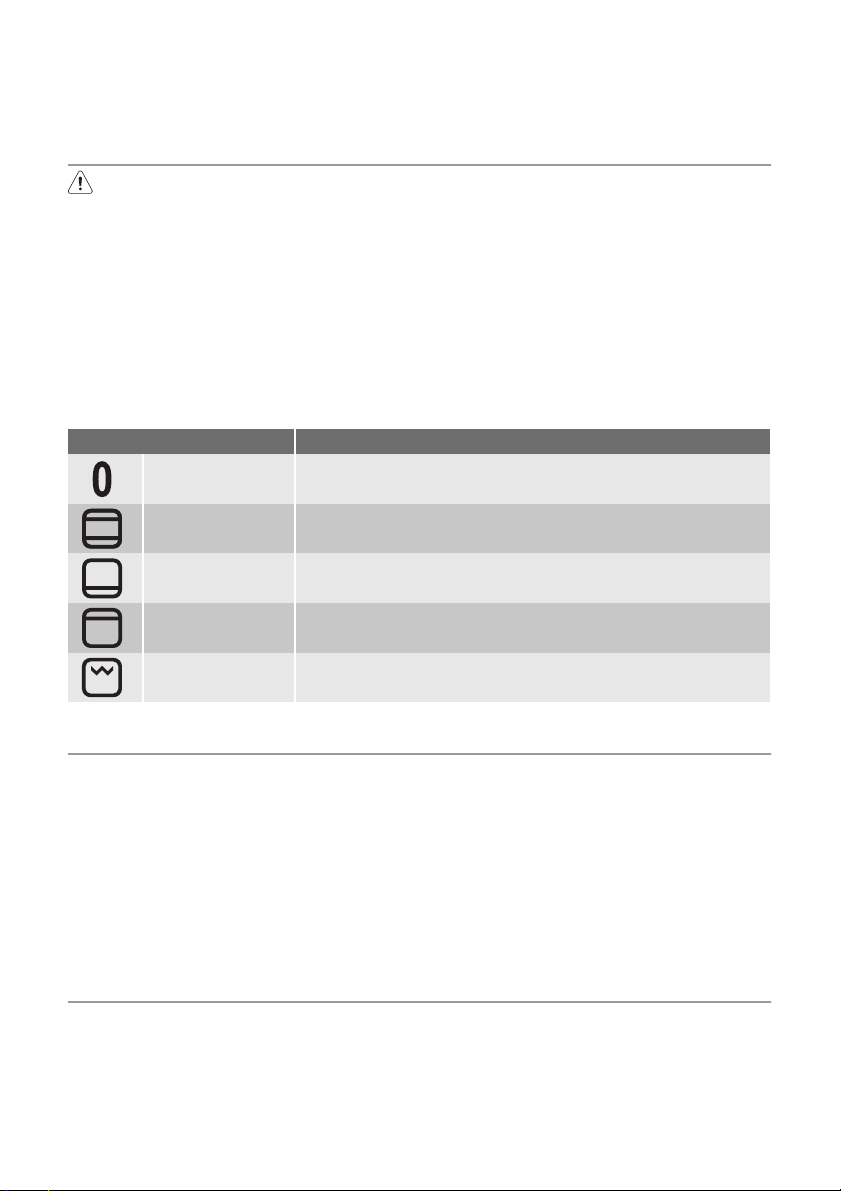
Ovenfuncties
Ovenfunctie Applicatie
Uit-stand Het apparaat staat uit.
2. Draai de knop voor de temperatuur
naar een temperatuur.
Het temperatuurlampje gaat aan zolang
de temperatuur in het apparaat stijgt.
3. Draai om het apparaat uit te schakelen,
de knop voor de ovenfuncties en de
knop voor de temperatuur in de uitstand.
Boven + onder-
warmte
Onderwarmte
Bovenverwarming
Grill
Bakken en braden op 1 ovenniveau. De bovenste en onderste ver-
warmingselementen worden gelijktijdig ingeschakeld.
Voor het bakken van taarten met een knapperige bodem. Alleen
het onderste verwarmingselement werkt.
Voor het afbakken van gare gerechten. Alleen het bovenste ver-
Voor het grillen van plat voedsel in kleine hoeveelheden op het
midden van de rooster. Voor het maken van toast.
EXTRA FUNCTIES
Koelventilator
Als het apparaat in werking is, wordt de
koelventilator automatisch ingeschakeld om
de oppervlakken van het apparaat koel te
houden. Als u het apparaat uit zet, gaat de
koelventilator uit.
Veiligheidsthermostaat
Een onjuiste bediening van het apparaat of
defecte componenten kunnen gevaarlijke
NUTTIGE AANWIJZINGEN EN TIPS
• Het apparaat heeft vier inzetniveaus. Tel
de inzetniveaus vanaf de bodem van het
apparaat.
• Het apparaat heeft een speciaal systeem
dat de lucht circuleert en voor doorlopende recycling van stoom zorgt. Dankzij dit
systeem is het mogelijk om voedsel te
warmingselement brandt.
oververhitting veroorzaken. Om dit te voorkomen is de oven voorzien van een veiligheidsthermostaat die de stroomtoevoer onderbreekt. Zodra de temperatuur is gedaald, wordt de oven automatisch weer ingeschakeld.
bereiden in een atmosfeer met stoom en
worden de gerechten zacht van binnen
en knapperig van buiten. Bovendien worden de bereidingstijd en het energieverbruik tot een minimum beperkt.
• Vocht kan in het apparaat of op de glazen deurpanelen condenseren. Dit is nor-

progress 7
maal. Ga altijd iets terug staan van het
apparaat als u de deur van het apparaat
tijdens de werking opent. Om de condens te verminderen, dient u het apparaat 10 minuten te laten voorverwarmen.
• Veeg na elk gebruik het vocht van het
apparaat.
• Plaats geen voorwerpen direct op de bodem van het apparaat en bedek de bodem tijdens de bereiding niet met aluminiumfolie. Dit kan de bakresultaten veranderen en de emaillelaag beschadigen.
Voor de bereiding van gebak
• De ovendeur mag pas worden geopend
als driekwart van de baktijd is verstreken.
• Als u twee bakplaten tegelijkertijd gebruikt, dient u één niveau ertussen leeg te
• Laat het vlees ongeveer 15 minuten rusten voordat u het aansnijdt, zodat het
vleessap er niet uit stroomt.
• Om te veel rook tijdens het braden in de
oven te vermijden, kunt u een beetje water in de lekbak gieten. Om rook te vermijden, voegt u water toe wanneer het is
opgedroogd.
Bereidingstijden
De bereidingsduur is afhankelijk van het
soort voedsel, de samenstelling en het volume.
Houd in eerste instantie het bereidingsproces in de gaten. Zoek bij het gebruik van dit
apparaat de beste instellingen (temperatuur, bereidingsduur, etc.) voor uw kookgerei, recepten en hoeveelheden.
laten.
Voor de bereiding van vlees en vis
• Gebruik een diepe bak voor erg vet voedsel om te oven te behoeden voor blijvende vetvlekken.
Bak- en braadtabel
GEBAK
Boven + onderwarmte
SOORT GERECHT
Schuimtaart 2 170 45 - 60 In een cakevorm
Zandtaartdeeg 2 170 24 - 34 In een cakevorm
Kwarktaart met kar-
nemelk
Appelgebak (appel-
taart)
Strudel 2 175 60 - 80 Op een bakplaat
Jamtaart 2 170 30 - 40 In een cakevorm van 26 cm
Vruchtencake 2 170 60 - 70 In een cakevorm van 26 cm
Cake, zacht (vetvrije
cake)
Kerstgebak/machti-
ge vruchtencake
Pruimentaart 2 170 50 - 60
Cakejes 3 170 20 - 30 Op een bakplaat
Koekjes 3 150 20 - 30
Schuimgebakjes 3 100 90 - 120 Op een bakplaat
Broodjes 3 190 15 - 20
Ovenniveau
1 170 60 - 80 In een cakevorm van 26 cm
1 170 100 - 120 In twee cakevormen van 20 cm
2 170 35 - 45 In een cakevorm van 26 cm
2 170 50 - 60 In een cakevorm van 20 cm
Temp
[°C]
Bereidings-
tijd [min]
Notities
op een bakrooster
In een broodvorm
Op een bakplaat
Op een bakplaat
1)
1)
1)

8 progress
Boven + onderwarmte
SOORT GERECHT
Ovenniveau
Temp
[°C]
Soesjes 3 190 25 - 35
Bereidings-
tijd [min]
Notities
Op een bakplaat
1)
Taartjes 3 180 45 - 70 In een cakevorm van 20 cm
Victoria-taart met
jamvulling
1) Verwarm de oven 10 minuten voor.
1 of 2 180 40 - 55 In een cakevorm van 20 cm links
+ rechts
BROOD EN PIZZA
Boven + onderwarmte
SOORT GERECHT
Ovenniveau
Temp
[°C]
Witbrood 1 190 60 - 70
Roggebrood 1 190 30 - 45 In een broodvorm
Broodjes 2 190 25 - 40
Pizza 1 190 20 - 30
Scones 3 200 10 - 20
1) Verwarm de oven 10 minuten voor.
Bereidings-
tijd [min]
Notities
1 - 2 stuks, 500 gram per stuk
6 - 8 broodjes op een bakplaat
In een braadpan
Op een bakplaat
1)
1)
HARTIGE OVENGERECHTEN
Boven + onderwarmte
SOORT GERECHT
Ovenniveau
Temp
[°C]
Pastataart 2 180 40 - 50 In een vorm
Hartige groenten-
2 200 45 - 60 In een vorm
taart
Quiches 1 190 40 - 50 In een vorm
Lasagne 2 200 25 - 40 In een vorm
Cannelloni 2 200 25 - 40 In een vorm
Yorkshire pudding 2 220 20 - 30
1) Verwarm de oven 10 minuten voor.
Bereidings-
tijd [min]
Notities
6 puddingvormen
1)
VLEES
Boven + onderwarmte
SOORT GERECHT
Ovenniveau
Temp
[°C]
Rundvlees 2 200 50 - 70 Op een bakrooster en in de
Varkensvlees 2 180 90 - 120 Op een bakrooster en in de
Kalfsvlees 2 190 90 - 120 Op een bakrooster en in de
Engelse biefstuk
2 210 44 - 50 Op een bakrooster en in de
(rood)
Engelse biefstuk
2 210 51 - 55 Op een bakrooster en in de
(medium)
Bereidings-
tijd [min]
Notities
braadpan
braadpan
braadpan
braadpan
braadpan
1)
1)
progress 9
Boven + onderwarmte
SOORT GERECHT
Engelse biefstuk
(gaar)
Schouderkarbonade 2 180 120 - 150 In een braadpan
Varkensschenkel 2 180 100 - 120 2 stuks in de braadpan
Lamsvlees 2 190 110 - 130 Bout
Kip 2 200 70 - 85 Hele
kalkoen 1 180 210 - 240 Hele
eend 2 175 120 - 150 Hele
gans 1 175 150 - 200 Heel
konijn 2 190 60 - 80 In stukken gesneden
haas 2 190 150 - 200 In stukken gesneden
fazant 2 190 90 - 120 Hele
Ovenniveau
2 210 55 - 60 Op een bakrooster en in de
Temp
[°C]
Bereidings-
tijd [min]
Notities
braadpan
VIS
Boven + onderwarmte
SOORT GERECHT
Forel/zeebrasem 2 190 40 - 55 3 - 4 vissen
Tonijn/zalm 2 190 35 - 60 4 - 6 filets
Ovenniveau
Temp
[°C]
Bereidings-
tijd [min]
Notities
Grill
Verwarm de oven vóór de bereiding 10
minuten voor.
Hoeveelheid Grill Bereidingstijd [min]
SOORT GE-
RECHT
Tournedos 4 800 3 250 12 - 15 12 - 14
Biefstuk 4 600 3 250 10 - 12 6 - 8
Worstjes 8 — 3 250 12 - 15 10 - 12
Varkenskotelet 4 600 3 250 12 - 16 12 - 14
Kip (in 2 helften) 2 1000 3 250 30 - 35 25 - 30
Vleesspiesen 4 — 3 250 10 - 15 10 - 12
Kippenborst 4 400 3 250 12 - 15 12 - 14
Hamburger 6 600 3 250 20 - 30 Visfilet 4 400 3 250 12 - 14 10 - 12
Geroosterde sand-
wiches
Geroosterd brood 4 - 6 — 3 250 2 - 4 2 - 3
Informatie over acrylamides
Belangrijk! Volgens recente
wetenschappelijke informatie kan het
Stuks [g] Ovenni-
veau
4 - 6 — 3 250 5 - 7 —
Temp.
[°C]
1e kant 2e kant
intensief bruinen van levensmiddelen (met
name in producten die zetmeel bevatten),
een gezondheidsrisico vormen tengevolge
10 progress
van acrylamides. Om die reden adviseren
wij levensmiddelen zoveel mogelijk bij lage
ONDERHOUD EN REINIGING
Waarschuwing! Zie het hoofdstuk
'Veiligheidsinformatie'.
• Maak de voorkant van het apparaat
schoon met een zachte doek en een
warm sopje.
• Gebruik voor metalen oppervlakken een
universeel reinigingsmiddel.
• Reinig de binnenkant van de oven na elk
gebruik. Vuil laat zich dan het makkelijkst
verwijderen en kan niet aanbranden.
• Verwijder hardnekkig vuil met een speciale ovenreiniger.
• Maak alle ovenaccessoires na gebruik
schoon en laat ze drogen. Gebruik een
zachte doek met warm water en een
schoonmaakmiddel.
• Accessoire met antiaanbaklaag mogen
niet worden schoongemaakt met een
agressief reinigingsmiddel, voorwerpen
met scherpe randen of een afwasautomaat. Hierdoor kan de antiaanbaklaag
onherstelbaar worden beschadigd.
Apparaten van roestvrij staal of
aluminium:
Verwijderen van de inschuifrail
temperaturen gaar te laten worden en de
gerechten niet te veel te bruinen.
Maak de ovendeur alleen met een natte
spons schoon. Droog maken met een
zachte doek.
Gebruik nooit staalwol, zuren of bijtende producten, deze kunnen het ovenoppervlak beschadigen. Maak het bedieningspaneel van de oven net zo
voorzichtig schoon.
De afdichting van de deur
schoonmaken
• Voer regelmatig een controle van de
deurafdichting uit. De afdichting van de
deur bevindt zich rondom het frame aan
de binnenkant van de oven. Gebruik het
apparaat niet als de afdichting van de
deur is beschadigd. Neem contact op
met de service-afdeling.
• Voor meer informatie over het schoonmaken van de deurafdichting, raadpleegt
u de algemene informatie over reiniging.
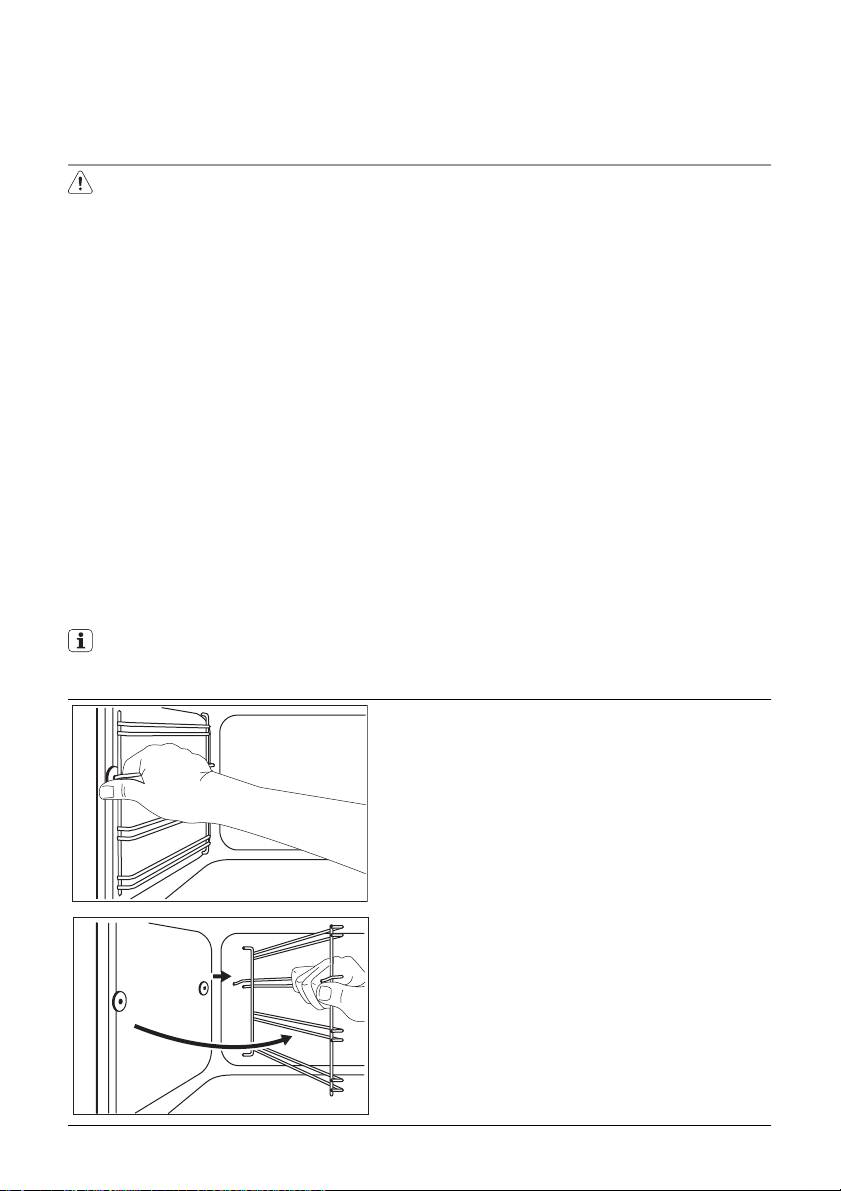
Inschuifrail
U kunt de inschuifrail verwijderen om de zijwanden te reinigen.
1. Trek de inschuifrail bij de voorkant uit
de zijwand.
2. Trek de inschuifrail bij de achterkant uit
de zijwand en verwijder deze.
1
2
progress 11
De inschuifrail installeren
Installeer de inschuifrail in de omgekeerde
volgorde.
De afgeronde uiteinden van de inschuifrails moeten naar voren wijzen.
Plafond van de oven
U kunt de grill verwijderen om het plafond
van de oven gemakkelijker te reinigen.
Waarschuwing! Schakel het apparaat
uit voordat u de grill verwijdert. Zorg
ervoor dat het apparaat is afgekoeld. Er
bestaat gevaar voor brandwonden.
1. Verwijder de schroef waarmee de grill is
bevestigd. Gebruik de eerste keer een
schroevendraaier.
2. Trek de grill voorzichtig omlaag.
3. Maak het plafond van de oven schoon
met een zachte doek en een warm
sopje. Laat dit drogen.
4. Installeer de grill in de omgekeerde
volgorde.
De ovendeur en de glasplaat verwijderen
Waarschuwing! Zorg ervoor dat de
grill goed is geplaatst en niet naar
beneden valt.
Ovenlampje
Waarschuwing! Wees voorzichtig bij
het vervangen van het ovenlampje. Er
bestaat risico op elektrische schokken.
Voordat u het ovenlampje vervangt:
• Schakel de oven uit.
• Verwijder de zekeringen in de zekeringenkast, of schakel de stroomonderbreker uit.
Leg een doek op de bodem van de
oven om schade aan het ovenlampje
en het afdekglaasje te voorkomen.
1. Draai het afdekglas naar links en verwij-
der het.
2. Reinig het afdekglas.
3. Vervang het ovenlampje door een ge-
schikt 300 °C hittebestendig ovenlampje.
Gebruik hetzelfde ovenlamptype.
4. Plaats het afdekglas terug.
De ovendeur reinigen
De ovendeur beschikt over twee glazen panelen. U kunt de ovendeur en de interne
glasplaat verwijderen om het schoon te maken.
De ovendeur kan dichtslaan als u de interne glasplaat probeert te verwijderen
terwijl de deur vast zit.
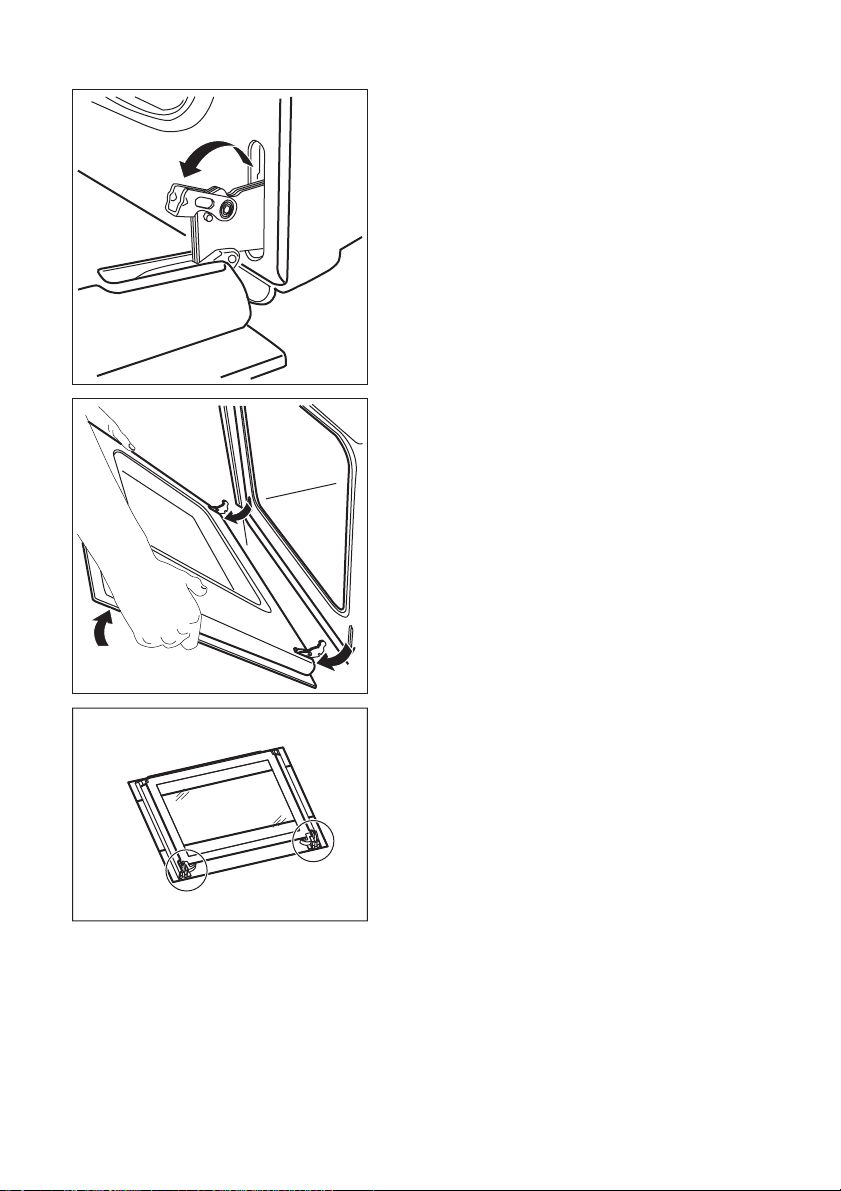
1. Open de deur volledig en houd de
twee deurscharnieren vast.
12 progress
2. Til de hendels op de twee scharnieren
omhoog en draai ze.
3. Sluit de ovendeur in de eerste openingsstand (halfopen). Trek hem daarna naar voren en haal de deur uit zijn
zitting.
4. Leg de deur op een zachte doek op
een stabiele ondergrond.
90°
progress 13
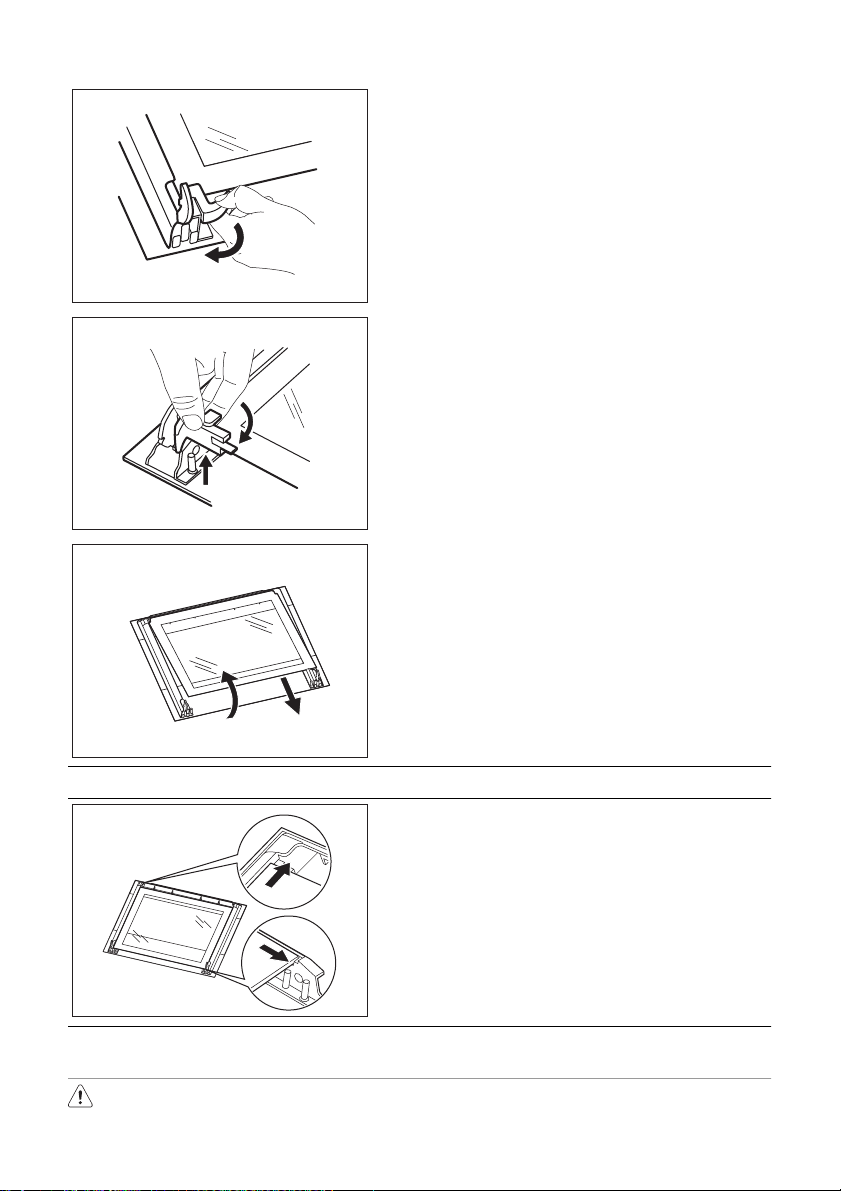
5. Maak het vergrendelingssysteem open
om de interne glasplaat te verwijderen.
6. Draai de twee bevestigingen 90° en
verwijder ze uit hun houders.
7. Til de glasplaat voorzichtig op (stap 1)
en verwijder het glazen paneel (stap 2).
8. Reinig de glasplaat met een sopje.
Droog de glasplaat voorzichtig af.
2
1
De deur en de glasplaten terugplaatsen
PROBLEMEN OPLOSSEN
Waarschuwing! Zie het hoofdstuk
'Veiligheidsinformatie'.
Na het schoonmaken van de glasplaat en
ovendeur plaatst u ze terug. Voer bovenstaande stappen uit in de omgekeerde
volgorde.
De bedrukte zijde moet naar de binnenkant
van de deur gericht zijn. Zorg ervoor dat
het oppervlak van de glasplaat op de bedrukte zijde na de installatie niet ruw aanvoelt.
Zorg dat u de interne glasplaat in de zittingen plaatst. Raadpleeg de illustratie.
14 progress
Probleem Mogelijke oorzaak Oplossing
Het apparaat werkt helemaal
niet.
Het apparaat werkt helemaal
niet.
Het ovenlampje brandt niet. Het ovenlampje is kapot. Vervang het ovenlampje.
Stoom en condens slaan neer
op de gerechten en in de oven.
Als u het probleem niet zelf kunt verhelpen,
neemt u contact op met uw verkoper of de
Het apparaat is niet ingeschakeld.
De zekering in de zekeringkast
is doorgebrand.
Het gerecht heeft te lang in de
oven gestaan.
tje bevindt zich voor aan de binnenkant van
het apparaat.
Schakel het apparaat in. Raadpleeg het hoofdstuk "Dagelijks
gebruik".
Controleer de zekering. Als de
zekering meer dan een keer
doorslaat, raadpleegt u een bevoegde elektricien.
Laat gerechten na het bereiden
niet langer dan 15-20 minuten
in de oven staan.
klantenservice.
De contactgegevens van het servicecentrum staan op het typeplaatje. Het typepla-
Wij adviseren u om de gegevens hier te noteren:
Model (MOD.) .........................................
Productnummer (PNC) .........................................
Serienummer (S.N.) .........................................
TECHNISCHE GEGEVENS
Voltage 230 V
Frequentie 50 Hz
MONTAGE
Waarschuwing! Zie het hoofdstuk
'Veiligheidsinformatie'.
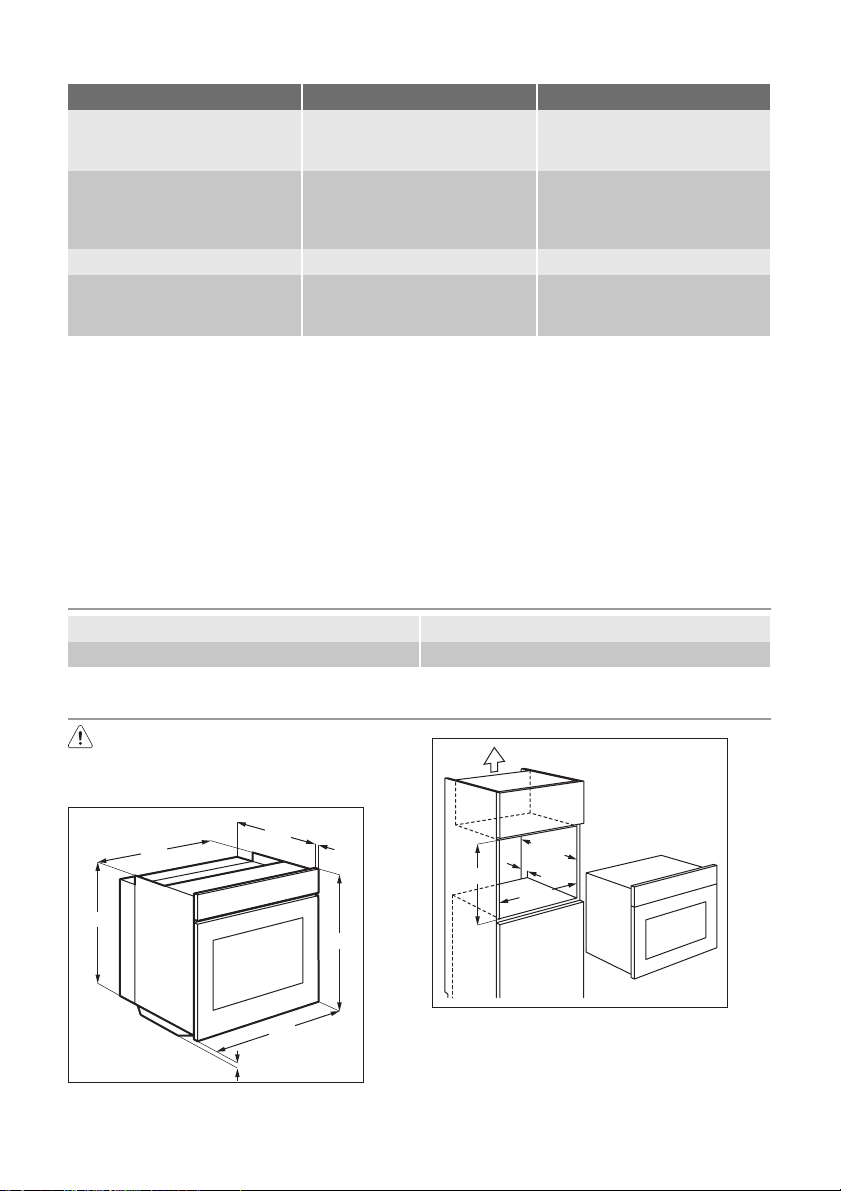
Inbouw
540
560
570
594
7
20
590
590
min. 550
20
min. 560
min. 550
20
600
min. 560
A
Elektrische installatie
Waarschuwing! De elektrische
installatie mag uitsluitend worden
uitgevoerd door een gekwalificeerd
persoon.
progress 15
De fabrikant is niet verantwoordelijk indien u deze veiligheidsmaatregelen uit
hoofdstuk 'Veiligheidsinformatie' niet
opvolgt.
Dit apparaat wordt geleverd met stekker en
netsnoer.
Kabel
Kabeltypes die van toepassing zijn op de
installatie of vervanging: H07 RN-F, H05
RN-F, H05 RRF, H05 VV-F, H05 V2V2-F
(T90), H05 BB-F.
Voor het deel van de kabel raadpleegt u het
totale vermogen (op het typeplaatje) en de
tabel:
B
Totaal vermogen Deel van de kabel
maximaal 1380 W 3 x 0.75 mm²
maximaal 2300 W 3 x 1 mm²
maximaal 3680 W 3 x 1.5 mm²
De massakabel (groene/gele kabel) moet 2
cm langer zijn dan de fase- en neutrale kabels (blauwe en bruine kabels).
MILIEUBESCHERMING
Het symbool op het product of op de
verpakking wijst erop dat dit product niet
als huishoudafval mag worden behandeld,
maar moet worden afgegeven bij een
verzamelpunt waar elektrische en
elektronische apparatuur wordt gerecycled.
Als u ervoor zorgt dat dit product op de
juiste manier wordt verwijderd, voorkomt u
mogelijke negatieve gevolgen voor mens en
milieu die zich zouden kunnen voordoen in
geval van verkeerde afvalverwerking. Voor
gedetailleerdere informatie over het
recyclen van dit product, kunt u contact
opnemen met de gemeente, de
gemeentereiniging of de winkel waar u het
product hebt gekocht.
Verpakkingsmateriaal
Het verpakkingsmateriaal is milieuvriendelijk en geschikt voor hergebruik.
Kunststofonderdelen worden aangeduid met internationale afkortingen,
zoals PE, PS, enz. Gooi het verpakkingsmateriaal weg in de daarvoor bestemde containers van uw vuilnisophaaldienst.

16 progress
CONTENTS
Safety information 16
Safety instructions 17
Product description 19
Before first use 19
Daily use 19
Additional functions 20
Helpful hints and tips 20
Care and cleaning 24
What to do if… 27
Technical data 28
Installation 28
Environment concerns 29
Subject to change without notice.
SAFETY INFORMATION
Before the installation and use of the appliance, carefully read
the supplied instructions. The manufacturer is not responsible
if an incorrect installation and use causes injuries and damages. Always keep the instructions with the appliance for future reference.
Children and vulnerable people safety
Warning! Risk of suffocation, injury or permanent disability.
• This appliance can be used by children aged from 8 years
and above and persons with reduced physical, sensory or
mental capabilities or lack of experience and knowledge if
they are supervised by an adult or a person who is responsible for their safety.
• Do not let children play with the appliance.
• Keep all packaging away from children.
• Keep children and pets away from the appliance when it operates or when it cools down. Accessible parts are hot.
• If the appliance has a child safety device, we recommend
that you activate it.
• Cleaning and user maintenance shall not be made by children without supervision.
General Safety
• Internally the appliance becomes hot when in operation. Do
not touch the heating elements that are in the appliance. Always use oven gloves to remove or put in accessories or
ovenware.
• Do not use a steam cleaner to clean the appliance.
• Before maintenance cut the power supply.

progress 17
• Do not use harsh abrasive cleaners or sharp metal scrapers
to clean the glass door since they can scratch the surface,
which may result in shattering of the glass.
• To remove the shelf supports first pull the front of the shelf
support and then the rear end away from the side walls. Install the shelf supports in the opposite sequence.
SAFETY INSTRUCTIONS
Installation
Warning! Only a qualified person must
install this appliance.
• Remove all the packaging.
• Do not install or use a damaged appli-
ance.
• Obey the installation instruction supplied
with the appliance.
• Always be careful when you move the
appliance because it is heavy. Always
wear safety gloves.
• Do not pull the appliance by the handle.
• Keep the minimum distance from the
other appliances and units.
• Make sure that the appliance is installed
below and adjacent safe structures.
• The sides of the appliance must stay ad-
jacent to appliances or to units with the
same height.
Electrical connection
Warning! Risk of fire and electrical
shock.
• All electrical connections should be made
by a qualified electrician.
• The appliance must be earthed.
• Make sure that the electrical information
on the rating plate agrees with the power
supply. If not, contact an electrician.
• Always use a correctly installed shock-
proof socket.
• Do not use multi-plug adapters and ex-
tension cables.
• Make sure not to cause damage to the
mains plug and to the mains cable. Contact the Service or an electrician to
change a damaged mains cable.
• Do not let mains cables to come in touch
with the appliance door, specially when
the door is hot.
• The shock protection of live and insulated
parts must be fastened in such a way
that it cannot be removed without tools.
• Connect the mains plug to the mains
socket only at the end of the installation.
Make sure that there is access to the
mains plug after the installation.
• If the mains socket is loose, do not connect the mains plug.
• Do not pull the mains cable to disconnect
the appliance. Always pull the mains
plug.
• Use only correct isolation devices: line
protecting cut-outs, fuses (screw type
fuses removed from the holder), earth
leakage trips and contactors.
• The electrical installation must have an
isolation device which lets you disconnect the appliance from the mains at all
poles. The isolation device must have a
contact opening width of minimum 3
mm.
Use
Warning! Risk of injury, burns or
electric shock or explosion.
• Use this appliance in a household environment.
• Do not change the specification of this
appliance.
• Make sure that the ventilation openings
are not blocked.
• Do not let the appliance stay unattended
during operation.
• Deactivate the appliance after each use.
• Internally the appliance becomes hot
when in operation. Do not touch the

18 progress
heating elements that are in the appliance. Always use oven gloves to remove
or put in accessories or ovenware.
• Be careful, when you open the appliance
door while the appliance is in operation.
Hot air can release.
• Do not operate the appliance with wet
hands or when it has contact with water.
• Do not apply pressure on the open door.
• Do not use the appliance as a work surface or as a storage surface.
• Always keep the appliance door closed
when the appliance is in operation.
• Open the appliance door carefully. The
use of ingredients with alcohol can cause
a mixture of alcohol and air.
• Do not let sparks or open flames to come
in contact with the appliance when you
open the door.
• Do not put flammable products or items
that are wet with flammable products in,
near or on the appliance.
Warning! Risk of damage to the
appliance.
• To prevent damage or discoloration to
the enamel:
– Do not put ovenware or other objects in
the appliance directly on the bottom.
– Do not put aluminium foil directly on the
bottom of the appliance.
– do not put water directly into the hot
appliance.
– do not keep moist dishes and food in
the appliance after you finish the cooking.
– be careful when you remove or install
the accessories.
• Discoloration of the enamel has no effect
on the performance of the appliance. It is
not a defect in the sense of the warranty
law.
• Use a deep pan for moist cakes. Fruit juices cause stains that can be permanent.
Care and Cleaning
Warning! Risk of injury, fire or damage
to the appliance.
• Before maintenance, deactivate the appliance and disconnect the mains plug
from the mains socket.
• Make sure the appliance is cold. There is
the risk that the glass panels can break.
• Replace immediately the door glass panels when they are damaged. Contact the
Service.
• Be careful when you remove the door
from the appliance. The door is heavy!
• Clean regularly the appliance to prevent
the deterioration of the surface material.
• Remaining fat or food in the appliance
can cause fire.
• Clean the appliance with a moist soft
cloth. Only use neutral detergents. Do
not use abrasive products, abrasive
cleaning pads, solvents or metal objects.
• If you use an oven spray, obey the safety
instructions on the packaging.
• Do not clean the catalytic enamel (if applicable) with any kind of detergent.
Internal light
• The type of light bulb or halogen lamp
used for this appliance, is only for household appliances. Do not use it for house
lighting.
Warning! Risk of electrical shock.
• Before replacing the lamp, disconnect
the appliance from the power supply.
• Only use lamps with the same specifications.
Disposal
Warning! Risk of injury or suffocation.
• Disconnect the appliance from the mains
supply.
• Cut off the mains cable and discard it.
• Remove the door catch to prevent children and pets to get closed in the appliance.
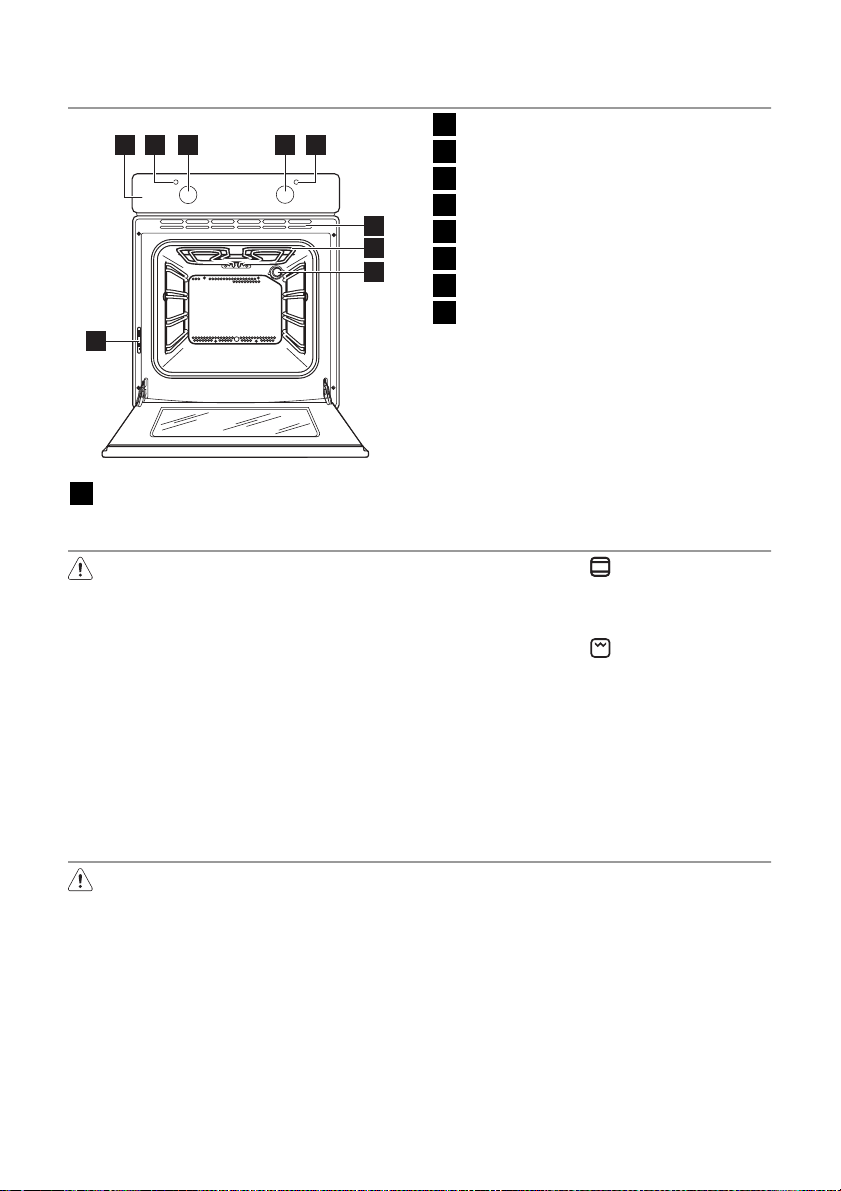
PRODUCT DESCRIPTION
1 2 3 4 5
6
7
8
9
Control panel
1
BEFORE FIRST USE
Warning! Refer to "Safety information"
chapter.
Initial cleaning
• Remove all accessories and removable
shelf supports (if applicable).
• Clean the appliance before first use.
Important! Refer to the chapter "Care and
cleaning".
Preheating
Preheat the empty appliance to burn off the
remaining grease.
progress 19
Temperature indicator
2
Knob for the temperature
3
Knob for the oven functions
4
Power indicator
5
Ventilation openings
6
Grill
7
Oven lamp
8
Rating plate
9
Oven accessories
Wire shelf
•
For cookware, cake tins, roasts.
• Aluminium baking tray
For cakes and biscuits.
Grill- / Roasting pan
•
To bake and roast or as pan to collect
fat.
1.
Set the function
temperature.
2. Let the appliance operate for 45 mi-
nutes.
3.
Set the function
temperature.
4. Let the appliance operate for 15 mi-
nutes.
Accessories can become hotter than usually. The appliance can emit an odour and
smoke. This is normal. Make sure that the
airflow is sufficient.
and the maximum
and the maximum
DAILY USE
Warning! Refer to "Safety information"
chapter.
To use the appliance, push the knob. The
knob comes out.
Activating and deactivating the
appliance
1. Turn the knob for the oven functions to
an oven function.
The power indicator comes on while
the appliance operates.
2. Turn the knob for the temperature to a
temperature.
The temperature indicator comes on
while the temperature in the appliance
increases.
3. To deactivate the appliance, turn the
knob for the oven functions and the
knob for the temperature to the Off position.
20 progress
Oven functions
Oven function Application
Off position The appliance is off.
Conventional
Cooking
Bottom Heat
Top Heat To finish cooked dishes. Only the top heating element operates.
Grilling
To bake and roast on one oven level. The top and bottom heating
To bake cakes with crispy or crusty bottom. Only the bottom heat-
To grill flat food items in small quantities in the middle of the shelf.
ADDITIONAL FUNCTIONS
Cooling fan
When the appliance operates, the cooling
fan activates automatically to keep the surfaces of the appliance cool. If you deactivate the appliance, the cooling fan stops.
Safety thermostat
Incorrect operation of the appliance or defective components can cause dangerous
HELPFUL HINTS AND TIPS
• The appliance has four shelf levels. Count
the shelf levels from the bottom of the
appliance floor.
• The appliance has a special system
which circulates the air and constantly recycles the steam. With this system you
can cook in a steamy environment and
keep the food soft inside and crusty outside. It decreases the cooking time and
energy consumption to a minimum.
• Moisture can condense in the appliance
or on the door glass panels. This is normal. Always stand back from the appliance when you open the appliance door
while cooking. To decrease the condensation, operate the appliance for 10 minutes before cooking.
• Clean the moisture after each use of the
appliance.
• Do not put the objects directly on the appliance floor and do not put aluminium
foil on the components when you cook.
This can change the baking results and
cause damage to the enamel.
elements operate at the same time.
ing element operates.
To make toast.
overheating. To prevent this, the oven has a
safety thermostat which interrupts the power supply. The oven activates again automatically when the temperature drops.
Baking cakes
• Do not open the oven door before 3/4 of
the set cooking time is up.
• If you use two baking trays at the same
time, keep one empty level between
them.
Cooking meat and fish
• Use a deep pan for very fatty food to prevent the oven from stains that can be
permanent.
• Leave the meat for approximately 15 minutes before carving so that the juice
does not seep out.
• To prevent too much smoke in the oven
during roasting, add some water into the
deep pan. To prevent the smoke condensation, add water each time after it
dries up.
Cooking times
Cooking times depend on the type of food,
its consistency, and volume.

progress 21
Initially, monitor the performance when you
cook. Find the best settings (heat setting,
ipes and quantities when you use this appliance.
cooking time, etc.) for your cookware, rec-
Baking and roasting table
CAKES
Conventional Cooking
TYPE OF DISH
Shelf posi-
tion
Temp
[°C]
Whisked recipes 2 170 45 - 60 In a cake mould
Shortbread dough 2 170 24 - 34 In a cake mould
Buttermilk cheese
1 170 60 - 80 In a 26 cm cake mould
cake
Apple cake (Apple
1 170 100 - 120 In two 20 cm cake moulds on a
pie)
Strudel 2 175 60 - 80 In a baking tray
Jam-tart 2 170 30 - 40 In a 26 cm cake mould
Fruit cake 2 170 60 - 70 In a 26 cm cake mould
Sponge cake (Fat-
2 170 35 - 45 In a 26 cm cake mould
less sponge cake)
Christmas cake /
2 170 50 - 60 In a 20 cm cake mould
Rich fruit cake
Plum cake 2 170 50 - 60
Small cakes 3 170 20 - 30 In a baking tray
Biscuits 3 150 20 - 30
Meringues 3 100 90 - 120 In a baking tray
Buns 3 190 15 - 20
Choux 3 190 25 - 35
Plate tarts 3 180 45 - 70 In a 20 cm cake mould
Victoria sandwich 1 or 2 180 40 - 55 Left + right in a 20 cm cake
1) Preheat for 10 minutes.
Cooking
time [min]
Notes
wire shelf
In a bread tin
In a baking tray
In a baking tray
In a baking tray
mould
1)
1)
1)
1)
BREAD AND PIZZA
Conventional Cooking
TYPE OF DISH
Shelf posi-
tion
Temp
[°C]
White bread 1 190 60 - 70
Rye bread 1 190 30 - 45 In a bread tin
Bread rolls 2 190 25 - 40
Pizza 1 190 20 - 30
Scones 3 200 10 - 20
1) Preheat for 10 minutes.
Cooking
time [min]
Notes
1 - 2 pieces, 500 gr per piece
6 - 8 rolls in a baking tray
On a deep pan
In a baking tray
1)
1)
FLANS
1)
1)

22 progress
Conventional Cooking
TYPE OF DISH
Pasta flan 2 180 40 - 50 In a mould
Vegetable flan 2 200 45 - 60 In a mould
Quiches 1 190 40 - 50 In a mould
Lasagne 2 200 25 - 40 In a mould
Cannelloni 2 200 25 - 40 In a mould
Yorkshire pudding 2 220 20 - 30
1) Preheat for 10 minutes.
Shelf posi-
tion
Temp
[°C]
Cooking
time [min]
Notes
6 pudding mould
1)
MEAT
Conventional Cooking
TYPE OF DISH
Beef 2 200 50 - 70 On a wire shelf and a deep pan
Pork 2 180 90 - 120 On a wire shelf and a deep pan
Veal 2 190 90 - 120 On a wire shelf and a deep pan
English roast beef
rare
English roast beef
medium
English roast beef
well done
Shoulder of pork 2 180 120 - 150 On a deep pan
Shin of pork 2 180 100 - 120 2 pieces on a deep pan
Lamb 2 190 110 - 130 Leg
Chicken 2 200 70 - 85 Whole
Turkey 1 180 210 - 240 Whole
Duck 2 175 120 - 150 Whole
Goose 1 175 150 - 200 Whole
Rabbit 2 190 60 - 80 Cut in pieces
Hare 2 190 150 - 200 Cut in pieces
Pheasant 2 190 90 - 120 Whole
Shelf posi-
tion
2 210 44 - 50 On a wire shelf and a deep pan
2 210 51 - 55 On a wire shelf and a deep pan
2 210 55 - 60 On a wire shelf and a deep pan
Temp
[°C]
Cooking
time [min]
Notes
FISH
Conventional Cooking
TYPE OF DISH
Trout / Sea bream 2 190 40 - 55 3 - 4 fish
Tuna fish / Salmon 2 190 35 - 60 4 - 6 fillets
Shelf posi-
tion
Temp
[°C]
Cooking
time [min]
Notes
Grilling
Preheat the empty oven for 10 minutes, before cooking.

progress 23
Quantity Grilling Cooking time [min]
TYPE OF DISH Pieces [g] Shelf posi-
Fillet steaks 4 800 3 250 12 - 15 12 - 14
Beef steaks 4 600 3 250 10 - 12 6 - 8
Sausages 8 — 3 250 12 - 15 10 - 12
Pork chops 4 600 3 250 12 - 16 12 - 14
Chicken (cut in 2) 2 1000 3 250 30 - 35 25 - 30
Kebabs 4 — 3 250 10 - 15 10 - 12
Breast of chicken 4 400 3 250 12 - 15 12 - 14
Hamburger 6 600 3 250 20 - 30 Fish Fillet 4 400 3 250 12 - 14 10 - 12
Toasted sandwich-es4 - 6 — 3 250 5 - 7 —
Toast 4 - 6 — 3 250 2 - 4 2 - 3
Information on acrylamides
Important! According to the newest
scientific knowledge, if you brown food
(specially the one which contains starch),
tion
acrylamides can pose a health risk. Thus,
we recommend that you cook at the lowest
temperatures and do not brown food too
much.
Temp.
[°C]
1st side 2nd side

24 progress
CARE AND CLEANING
Warning! Refer to "Safety information"
chapter.
• Clean the front of the appliance with a
soft cloth with warm water and a cleaning
agent.
• To clean metal surfaces use a usual
cleaning agent.
• Clean the oven interior after each use.
Then you can remove dirt more easily
and it does not burn on.
• Clean stubborn dirt with a special oven
cleaner.
• Clean all oven accessories after each use
and let them dry. Use a soft cloth with
warm water and a cleaning agent.
• If you have nonstick accessories, do not
clean them using aggressive agents,
sharp-edged objects or a dishwasher. It
can destroy nonstick coating.
Stainless steel or aluminium appliances:
Removing the shelf supports
Clean the oven door with a wet sponge
only. Dry it with a soft cloth.
Do not use steel wool, acids or abrasive materials, as they can cause damage to the oven surface. Clean the
oven control panel with the same precautions.
Cleaning the door gasket
• Regularly do a check of the door gasket.
The door gasket is around the frame of
the oven cavity. Do not use the appliance
if the door gasket is damaged. Contact
the Service Centre.
• To clean the door gasket, refer to the
general information about cleaning.
Shelf supports
You can remove the shelf supports to clean
the side walls.
1. Pull the front of the shelf support away
from the side wall.
1
Installing the shelf supports
Install the shelf supports in the opposite sequence.
The rounded ends of the shelf supports
must point to the front.
2
2. Pull the rear end of the shelf support
away from the side wall and remove it.
Oven ceiling
You can remove the grill to clean the oven
ceiling more easily.

progress 25
Warning! Deactivate the appliance
before you remove the grill. Make sure
that the appliance is cold. There is a
Before you change the oven lamp:
• Deactivate the oven.
• Remove the fuses in the fuse box or de-
risk of burns.
1. Remove the screw which holds the grill.
For the first time, use a screwdriver.
1. Turn the glass cover counterclockwise
2. Clean the glass cover.
3. Replace the oven light bulb with an ap-
4. Install the glass cover.
Cleaning the oven door
2. Carefully pull the grill down.
3. Clean the oven ceiling with a soft cloth
with warm water and a cleaning agent,
The oven door has two glass panels. You
can remove the oven door and the internal
glass panel to clean it.
and let it dry.
4. Install the grill in the opposite sequence.
Warning! Make sure that the grill is
correctly installed and that it does not
fall down.
Oven lamp
Warning! Be careful when you change
the oven lamp. There is a risk of
electrical shock.
Removing the oven door and the glass panel
1. Open the door fully and hold the two
activate the circuit breaker.
Put a cloth on the bottom of the oven
to prevent damage to the oven light
and glass cover.
to remove it.
plicable 300 °C heat-resistant oven
light bulb.
Use the same oven lamp type.
The oven door can close if you try to
remove the internal glass panel before
you remove the oven door.
door hinges.

26 progress
2. Lift and turn the levers on the two hinges.
3. Close the oven door to the first opening position (halfway). Then pull forward
and remove the door from its seat.
4. Put the door on a soft cloth on a stable
surface.

90°
progress 27
5. Release the locking system to remove
the internal glass panel.
6. Turn the two fasteners by 90° and remove them from their seats.
7. Carefully lift (step 1) and remove (step
2) the glass panel.
8. Clean the glass panel with water and
soap. Dry the glass panel carefully.
2
1
Installing the door and the glass panel
WHAT TO DO IF…
Warning! Refer to "Safety information"
chapter.
When the cleaning is completed, install the
glass panel and the oven door. Do the
above steps in the opposite sequence.
The screen-printing zone must face the inner side of the door. Make sure that after
the installation the surface of the glass panel frame on the screen-printing zones is not
rough when you touch it.
Make sure that you install the internal glass
panel in the seats correctly. Refer to the illustration.

28 progress
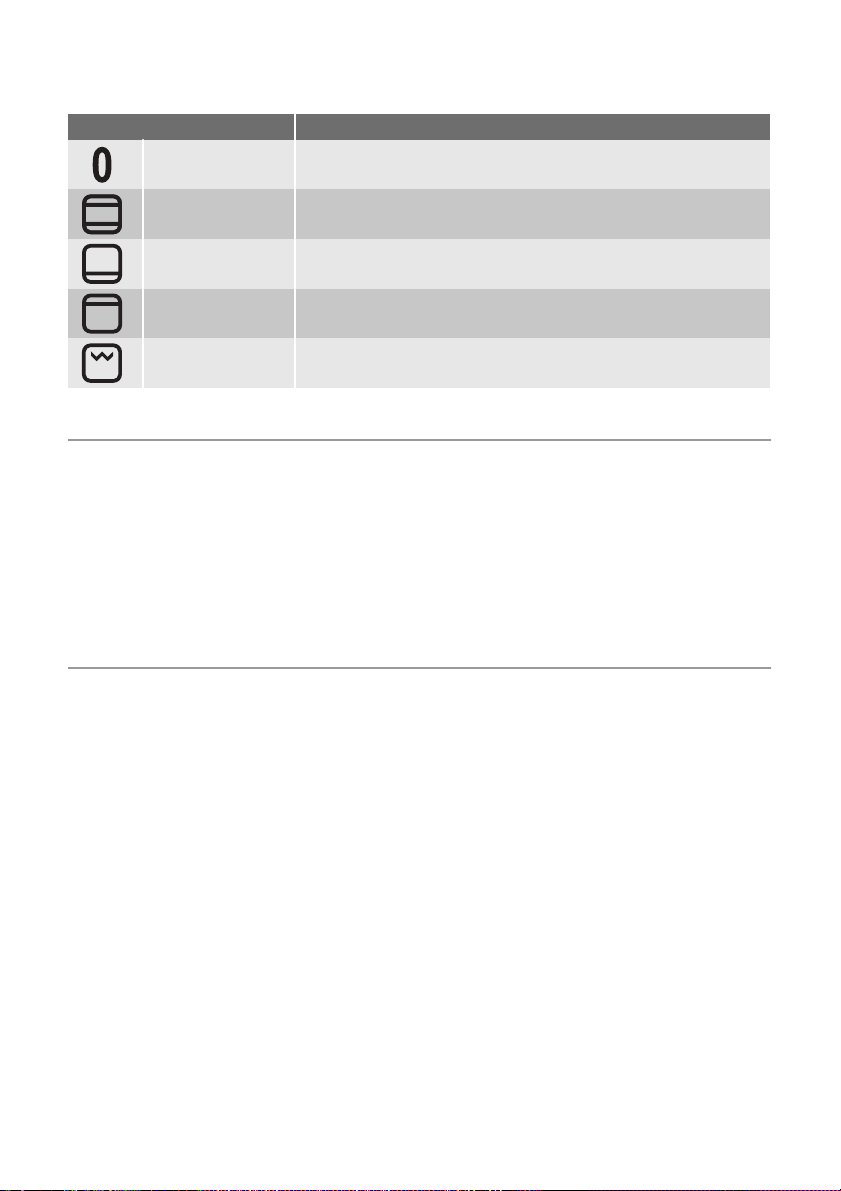
Problem Possible cause Remedy
The appliance does not operate.
The appliance does not operate.
The oven lamp does not operate.
Steam and condensation collect on the food and in the
oven.
If you cannot find a solution to the problem
yourself, contact your dealer or the service
centre.
The appliance is not activated. Activate the appliance. Refer to
The fuse in the fuse box is released.
The oven lamp is defective. Replace the oven lamp.
You left the dish in the oven for
too long.
the chapter "Daily Use".
Do a check of the fuse. If the
fuse is released more than one
time, contact a qualified electrician.
Do not keep the dishes in the
oven for longer than 15 - 20
minutes after the cooking ends.
The necessary data for the service centre is
on the rating plate. The rating plate is on
the front frame of the appliance cavity.
We recommend that you write the data here:
Model (MOD.) .........................................
Product number (PNC) .........................................
Serial number (S.N.) .........................................
TECHNICAL DATA
Voltage 230 V
Frequency 50 Hz
INSTALLATION
Warning! Refer to "Safety information"
chapter.
Building In
540
560
570
7
20
594
590
590
min. 550
20
min. 560

min. 550
20
600
min. 560
A
B
Electrical installation
Warning! Only a qualified person must
do the electrical installation.
ENVIRONMENT CONCERNS
The symbol on the product or on its
packaging indicates that this product may
not be treated as household waste. Instead
it should be taken to the appropriate
collection point for the recycling of electrical
and electronic equipment. By ensuring this
product is disposed of correctly, you will
help prevent potential negative
consequences for the environment and
human health, which could otherwise be
caused by inappropriate waste handling of
this product. For more detailed information
progress 29
The manufacturer is not responsible if
you do not follow the safety precautions from the chapter "Safety Information".
This appliance is supplied with a main plug
and a main cable.
Cable
Cable types applicable for installation or re-
placement: H07 RN-F, H05 RN-F, H05
RRF, H05 VV-F, H05 V2V2-F (T90), H05
BB-F.
For the section of the cable refer to the total
power (on the rating plate) and to the table:
Total power Section of the cable
maximum 1380 W 3 x 0.75 mm²
maximum 2300 W 3 x 1 mm²
maximum 3680 W 3 x 1.5 mm²
The hearth cord (green / yellow cable) must
be 2 cm longer than phase and neutral ca-
bles (blue and brown cables).
about recycling of this product, please
contact your local council, your household
waste disposal service or the shop where
you purchased the product.
Packaging material
The packaging material is environmentally-friendly and recyclable. Plastic
parts are marked with international abbreviations such as PE, PS, etc. Dispose of the packaging material in the
containers provided for this purpose at
your local waste management facility.

30 progress
SOMMAIRE
Consignes de sécurité 30
Instructions de sécurité 31
Description de l'appareil 33
Avant la première utilisation 33
Utilisation quotidienne 34
Fonctions supplémentaires 34
Conseils utiles 35
Entretien et nettoyage 39
En cas d'anomalie de fonctionnement 43
Caractéristiques techniques 43
Installation 44
En matière de protection de
l'environnement 44
Sous réserve de modifications.
CONSIGNES DE SÉCURITÉ
Avant d'installer et d'utiliser cet appareil, lisez soigneusement
les instructions fournies. Le fabricant ne peut être tenu pour
responsable des dommages et blessures liés à une mauvaise
installation ou utilisation. Conservez toujours cette notice avec
votre appareil pour vous y référer ultérieurement.
Sécurité des enfants et des personnes vulnérables
Avertissement Risque d'asphyxie, de blessure ou
d'invalidité permanente.
• Cet appareil peut être utilisé par des enfants de plus de
8 ans, ainsi que des personnes dont les capacités physiques, sensorielles et mentales sont réduites ou dont les
connaissances et l'expérience sont insuffisantes, à condition
d'être surveillés par une personne responsable de leur sécurité.
• Ne laissez pas les enfants jouer avec l'appareil.
• Ne laissez pas les emballages à la portée des enfants.
• Tenez les enfants et les animaux éloignés de l'appareil lorsqu'il est en cours de fonctionnement ou lorsqu'il refroidit.
Les parties accessibles sont chaudes.
• Si l'appareil est équipé d'un dispositif de sécurité enfants,
nous vous recommandons de l'activer.
• Les enfants ne doivent pas nettoyer ni entreprendre une
opération de maintenance sur l'appareil sans surveillance.
Sécurité générale
• L'intérieur de l'appareil devient chaud lorsqu'il est en fonctionnement. Ne touchez pas les éléments chauffants se

progress 31
trouvant dans l'appareil. Utilisez toujours des gants de cuisine pour retirer ou enfourner des accessoires ou des plats allant au four.
• N’utilisez pas de nettoyeur vapeur pour nettoyer l'appareil.
• Avant toute opération de maintenance, déconnectez l'alimentation électrique.
• N'utilisez pas de produits abrasifs ni de racloirs pointus en
métal pour nettoyer la porte en verre car ils peuvent rayer sa
surface, ce qui peut briser le verre.
• Pour retirer les supports de grille, tirez d'abord sur l'avant de
ceux-ci, puis sur l'arrière, pour les écarter des parois extérieures. Installez les supports de grille selon la même procédure, mais dans l'ordre inverse.
INSTRUCTIONS DE SÉCURITÉ
Installation
Avertissement L'appareil doit être
installé uniquement par un
professionnel qualifié.
• Retirez l'intégralité de l'emballage.
• N'installez pas et ne branchez pas un ap-
pareil endommagé.
• Suivez scrupuleusement les instructions
d'installation fournies avec l'appareil.
• L'appareil est lourd, prenez toujours des
précautions lorsque vous le déplacez.
Portez toujours des gants de sécurité.
• Ne tirez jamais l'appareil par la poignée.
• Respectez l'espacement minimal requis
par rapport aux autres appareils.
• Vérifiez que l'appareil est installé sous et
à proximité de structures sûres.
• Les côtés de l'appareil doivent rester à
côté d'appareils ou d'éléments ayant la
même hauteur.
Branchement électrique
Avertissement Risque d'incendie ou
d'électrocution.
• L'ensemble des branchements électri-
ques doit être effectué par un technicien
qualifié.
• L'appareil doit être relié à la terre.
• Vérifiez que les données électriques figurant sur la plaque signalétique correspondent à celles de votre réseau. Si ce n'est
pas le cas, contactez un électricien.
• Utilisez toujours une prise antichoc correctement installée.
• L'appareil ne doit pas être raccordé à
l'aide d'un prolongateur, d'une prise multiple ou d'un raccordement multiple (risque d'incendie).
• Veillez à ne pas endommager la fiche
secteur ni le câble d'alimentation. Contactez un professionnel qualifié ou un
électricien pour remplacer le câble d'alimentation s'il est endommagé.
• Ne laissez pas les câbles d'alimentation
secteur entrer en contact avec la porte
de l'appareil, particulièrement lorsque la
porte est chaude.
• La protection contre les chocs des parties sous tension et isolées doit être fixée
de telle manière qu'elle ne peut pas être
enlevée sans outils.
• Ne branchez la fiche d'alimentation à la
prise de courant qu'à la fin de l'installation. Assurez-vous que la prise de courant est accessible une fois l'appareil installé.
• Si la prise de courant est lâche, ne branchez pas la fiche d'alimentation secteur.

32 progress
• Ne tirez jamais sur le câble d'alimentation
pour débrancher l'appareil. Tirez toujours
sur la fiche.
• N'utilisez que des systèmes d'isolation
appropriés : des coupe-circuits, des fusibles (les fusibles à visser doivent être retirés du support), un disjoncteur différentiel
et des contacteurs.
• L'installation électrique doit être équipée
d'un dispositif d'isolement à coupure omnipolaire. Le dispositif d'isolement doit
présenter une distance d'ouverture des
contacts d'au moins 3 mm.
Utilisation
Avertissement Risque de blessures,
de brûlures, d'électrocution ou
d'explosion.
• Utilisez cet appareil dans un environnement domestique.
• Ne modifiez pas les caractéristiques de
cet appareil.
• Assurez-vous que les orifices de ventilation ne sont pas bouchés.
• Ne laissez jamais l'appareil sans surveillance pendant son fonctionnement.
• Mettez à l'arrêt l'appareil après chaque
utilisation.
• L'intérieur de l'appareil devient chaud
lorsqu'il est en fonctionnement. Ne touchez pas les éléments chauffants se trouvant dans l'appareil. Utilisez toujours des
gants de cuisine pour retirer ou enfourner
des accessoires ou des plats allant au
four.
• Soyez prudent lorsque vous ouvrez la
porte de l'appareil lorsque l'appareil est
en fonctionnement. De l'air brûlant peut
s'en échapper.
• N'utilisez jamais cet appareil avec les
mains mouillées ou lorsqu'il est en contact avec de l'eau.
• N'exercez jamais de pression sur la porte
ouverte.
• N'utilisez jamais l'appareil comme plan
de travail ou comme plan de stockage.
• Maintenez toujours la porte de l'appareil
fermée lorsque l'appareil est en fonctionnement.
• Ouvrez prudemment la porte de l'appareil. Si vous utilisez des ingrédients contenant de l'alcool, un mélange d'alcool et
d'air facilement inflammable peut éventuellement se former.
• Ne laissez pas des étincelles ou des
flammes nues entrer en contact avec
l'appareil lorsque vous ouvrez la porte.
• Ne placez pas de produits inflammables
ou d'éléments imbibés de produits inflammables à l'intérieur ou à proximité de
l'appareil, ni sur celui-ci.
Avertissement Risque de dommage
de l'appareil.
• Pour éviter tout endommagement ou décoloration de l'émail :
– Ne mettez pas de plats allant au four ni
aucun autre objet directement sur le fond
de l'appareil.
– Ne placez jamais de feuilles d'aluminium directement sur le fond de l'appareil.
– Ne versez jamais d'eau directement
dans l'appareil lorsqu'il est chaud.
– Ne laissez jamais d'aliments ni de plats
humides à l'intérieur de l'appareil une fois
la cuisson terminée.
– Faites attention lorsque vous retirez ou
remettez en place les accessoires.
• La décoloration de l'émail est sans effet
sur les performances de l'appareil. Il ne
s'agit pas d'un défaut dans le cadre de la
garantie.
• Utilisez un plat à rôtir pour obtenir des
gâteaux moelleux. Les jus de fruits causent des taches qui peuvent être permanentes.
Entretien et nettoyage
Avertissement Risque de blessure
corporelle, d'incendie ou de dommage
matériel à l'appareil.
• Avant toute opération d'entretien, mettez
à l'arrêt l'appareil et débranchez la fiche
de la prise secteur.
• Vérifiez que l'appareil est froid. Les panneaux de verre risquent de se briser.
• Remplacez immédiatement les vitres de
la porte si elles sont endommagées.
Contactez le service de maintenance.
• Soyez prudent lorsque vous ôtez la porte
de l'appareil. Elle est lourde.
• Nettoyez régulièrement l'appareil afin de
maintenir le revêtement en bon état.

progress 33
• Des graisses ou de la nourriture restant
dans l'appareil peuvent provoquer un incendie.
• Nettoyez l'appareil avec un chiffon doux
humide. Utilisez uniquement des produits
de lavage neutres. N'utilisez pas de produits abrasifs, de tampons à récurer, de
solvants ou d'objets métalliques.
• Si vous utilisez un spray pour four, suivez
les consignes de sécurité figurant sur
l'emballage.
• N'utilisez aucun produit détergent pour
nettoyer l'émail catalytique (le cas
échéant).
Éclairage interne
• Les ampoules classiques ou halogènes
utilisées dans cet appareil sont destinées
uniquement à un usage avec des appareils ménagers. Ne l'utilisez pas pour
éclairer votre logement.
DESCRIPTION DE L'APPAREIL
1 2 3 4 5
6
7
8
9
Bandeau de commande
1
Voyant du thermostat
2
Avertissement Risque
d'électrocution.
• Avant de changer l'ampoule, débranchez
l'appareil de la prise secteur.
• N'utilisez que des ampoules ayant les
mêmes spécifications.
Mise au rebut
Avertissement Risque de blessure ou
d'asphyxie.
• Débranchez l'appareil de l'alimentation
électrique.
• Coupez le câble d'alimentation au ras de
l'appareil et mettez-le au rebut.
• Retirez le dispositif de verrouillage de la
porte pour empêcher les enfants et les
animaux de s'enfermer dans l'appareil.
Manette du thermostat
3
Manette de sélection des fonctions du
4
four
Voyant de mise sous tension
5
Orifices d'aération
6
Gril
7
Éclairage du four
8
Plaque signalétique
9
Accessoires pour four
• Grille métallique
Permet de poser des plats (à rôti, à gratin) et des moules à gâteau/pâtisserie.
Plateau multi-usages en aluminium
•
Pour la cuisson de gâteaux et de biscuits/gâteaux secs.
• Plat à rôtir/gril
Pour cuire et griller ou à utiliser comme
plat pour recueillir la graisse.
AVANT LA PREMIÈRE UTILISATION
Avertissement Reportez-vous au
chapitre « Consignes de sécurité ».
Premier nettoyage
• Retirez tous les accessoires et les supports de grille amovibles (si présents).
• Nettoyez l'appareil avant de l'utiliser pour
la première fois.
Important Reportez-vous au chapitre
« Entretien et nettoyage ».

34 progress
Préchauffage
Préchauffez le four à vide afin de faire brûler
les résidus de graisse.
1.
Sélectionnez la fonction
et la tempé-
rature maximale.
2. Laissez l'appareil en fonctionnement
pendant 45 minutes.
3.
Sélectionnez la fonction
et la tempé-
4. Laissez l'appareil en fonctionnement
Les accessoires peuvent chauffer plus que
d'habitude. Une odeur et de la fumée peuvent s'échapper de l'appareil. Ce phénomène est normal. Vérifiez que la ventilation
environnante est suffisante.
rature maximale.
UTILISATION QUOTIDIENNE
Avertissement Reportez-vous au
chapitre « Consignes de sécurité ».
Pour utiliser l'appareil, appuyez sur la manette. La manette sort alors de son logement.
Activation et désactivation de l'appareil
1. Tournez la manette de sélection des
fonctions du four sur la fonction souhaitée.
Le voyant de mise sous tension s'allume pendant le fonctionnement de l'appareil.
Fonctions du four
Fonction du four Utilisation
Position Arrêt L'appareil est éteint.
2. Tournez la manette du thermostat pour
3. Pour éteindre l'appareil, tournez la ma-
pendant 15 minutes.
sélectionner la température souhaitée.
L'indicateur de température s'allume
lorsque la température du four augmente.
nette de sélection des fonctions du four
et celle du thermostat sur la position
Arrêt.
Convection naturel-lePour cuire et rôtir sur un seul niveau du four. Les résistances supé-
Sole
Voûte
Gril
rieure et inférieure fonctionnent en même temps.
Pour la cuisson de gâteaux à fond croustillant. Seule la résistance
Pour terminer la cuisson des plats. Seule la résistance supérieure
Pour faire griller des aliments peu épais en petites quantités au
centre de la grille. Pour faire griller du pain.
FONCTIONS SUPPLÉMENTAIRES
Ventilateur de refroidissement
Lorsque le four fonctionne, le ventilateur de
refroidissement se met automatiquement
en marche pour refroidir les surfaces de
l'appareil. Si vous mettez à l'arrêt l'appareil,
le ventilateur de refroidissement s'arrête.
Thermostat de sécurité
Un mauvais fonctionnement de l'appareil ou
des composants défectueux peuvent cau-
inférieure fonctionne.
fonctionne.
ser une surchauffe dangereuse. Pour éviter
cela, le four dispose d'un thermostat de sécurité interrompant l'alimentation électrique.
Le four se remet automatiquement en fonctionnement lorsque la température baisse.

progress 35
CONSEILS UTILES
• Le four dispose de quatre niveaux de
gradins. Comptez les niveaux de gradins
à partir du bas de l'appareil.
• L'appareil est doté d'un système spécial
qui permet à l'air de circuler et qui recycle perpétuellement la vapeur. Dans cet
environnement, ce système permet de
cuisiner des plats tout en maintenant
ceux-ci tendres à l'intérieur et croquants
à l'extérieur. Le temps de cuisson et la
consommation énergétique sont donc réduits au minimum.
• De l'humidité peut se déposer dans l'en-
ceinte du four ou sur les vitres de la porte. Ce phénomène est normal. Veillez à
reculer un peu lorsque vous ouvrez la
porte de l'appareil en fonctionnement.
Pour diminuer la condensation, faites
fonctionner l'appareil 10 minutes avant
d'enfourner vos aliments.
• Essuyez la vapeur après chaque utilisa-
tion de l'appareil.
• Ne placez jamais d'aluminium ou tout au-
tre ustensile, plat et accessoire directement en contact avec la sole de votre
four. Cela entraînerait une détérioration
de l'émail et modifierait les résultats de
cuisson.
Cuisson de gâteaux
• N'ouvrez la porte du four qu'aux 3/4 du
temps de cuisson.
Tableau de rôtissage et de cuisson des gâteaux
GÂTEAUX
Convection naturelle
TYPE DE PLAT
Pâtes à gâteaux 2 170 45 - 60 Dans un moule à gâteau
Pâte sablée 2 170 24 - 34 Dans un moule à gâteau
Gâteau au fromage
(au beurre)
Tarte aux pommes 1 170 100 - 120 Dans deux moules à gâteau de
Strudel 2 175 60 - 80 Sur un plateau de cuisson
Tarte à la confiture 2 170 30 - 40 Dans un moule à gâteau de
Cake aux fruits 2 170 60 - 70 Dans un moule à gâteau de
Position de
la grille
1 170 60 - 80 Dans un moule à gâteau de
Temp.
[°C]
• Si vous utilisez deux plateaux de cuisson
en même temps, laissez un niveau libre
entre les deux.
Cuisson de viande et de poisson
• Pour les aliments très gras, utilisez un
plat à rôtir pour éviter de salir le four de
manière irréversible.
• Avant de couper la viande, laissez-la reposer pendant environ 15 minutes afin
d'éviter que le jus ne s'écoule.
• Pour éviter qu'une trop grande quantité
de fumée ne se forme dans le four, ajoutez de l'eau dans le plat à rôtir. Pour éviter que la fumée ne se condense, ajoutez
à nouveau de l'eau dans le plat à rôtir à
chaque fois qu'il n'en contient plus.
Temps de cuisson
Le temps de cuisson varie selon le type
d'aliment, sa consistance et son volume.
Au départ, surveillez la cuisson lorsque
vous cuisinez. Ainsi, vous trouverez les
meilleurs réglages (fonction, temps de cuisson, etc.) pour vos ustensiles, vos recettes
et les quantités lorsque vous utiliserez l'appareil.
Durée de
cuisson
[min]
20 cm sur une grille métallique
Notes
26 cm
26 cm
26 cm

36 progress
TYPE DE PLAT
Génoise/Gâteau Savoie (version allé-
Convection naturelle
Position de
la grille
Temp.
[°C]
2 170 35 - 45 Dans un moule à gâteau de
Durée de
cuisson
[min]
Notes
26 cm
gée)
Gâteau de Noël/Ca-
ke aux fruits
Gâteau aux prunes 2 170 50 - 60
2 170 50 - 60 Dans un moule à gâteau de
20 cm
Dans un moule à pain
1)
Petits gâteaux 3 170 20 - 30 Sur un plateau de cuisson
Biscuits/Gâteaux
secs
3 150 20 - 30
Sur un plateau de cuisson
1)
Meringues 3 100 90 - 120 Sur un plateau de cuisson
Petits pains 3 190 15 - 20
Choux 3 190 25 - 35
Sur un plateau de cuisson
Sur un plateau de cuisson
1)
1)
Tartelettes 3 180 45 - 70 Dans un moule à gâteau de
20 cm
Gâteau à étages 1 ou 2 180 40 - 55 Gauche + droit dans un moule à
gâteau de 20 cm
1) Préchauffez pendant 10 minutes.
PAIN ET PIZZA
Convection naturelle
TYPE DE PLAT
Position de
la grille
Temp.
[°C]
Pain blanc 1 190 60 - 70
Pain de seigle 1 190 30 - 45 Dans un moule à pain
Petits pains 2 190 25 - 40 6 à 8 petits pains sur un plateau
Pizza 1 190 20 - 30
Scones 3 200 10 - 20
1) Préchauffez pendant 10 minutes.
Durée de
cuisson
[min]
Notes
1 à 2 pièces, 500 g par pièce
de cuisson
Dans un plat à rôtir
1)
1)
Sur un plateau de cuisson
1)
PRÉPARATIONS À BASE D'ŒUFS
Convection naturelle
TYPE DE PLAT
Position de
la grille
Temp.
[°C]
Gratin de pâtes 2 180 40 - 50 Dans un moule
Gratin aux légumes 2 200 45 - 60 Dans un moule
Quiches 1 190 40 - 50 Dans un moule
Lasagnes 2 200 25 - 40 Dans un moule
Cannelloni 2 200 25 - 40 Dans un moule
« Yorkshire pud-
2 220 20 - 30
dings »
1) Préchauffez pendant 10 minutes.
Durée de
cuisson
[min]
Notes
6 ramequins
1)
VIANDE
1)

progress 37
Convection naturelle
TYPE DE PLAT
Bœuf 2 200 50 - 70 Sur la grille métallique et dans
Porc 2 180 90 - 120 Sur la grille métallique et dans
Veau 2 190 90 - 120 Sur la grille métallique et dans
Rôti de bœuf, saignant
Rôti de bœuf, à
point
Rôti de bœuf, bien
cuit
Épaule de porc 2 180 120 - 150 Dans un plat à rôtir
Jarret de porc 2 180 100 - 120 2 pièces dans un plat à rôtir
Agneau 2 190 110 - 130 Gigot
Volaille 2 200 70 - 85 Entier
Dinde 1 180 210 - 240 Entière
Canard 2 175 120 - 150 Entier
Oie 1 175 150 - 200 Entière
Lapin 2 190 60 - 80 En morceaux
Lièvre 2 190 150 - 200 En morceaux
Faisan 2 190 90 - 120 Entier
Position de
la grille
2 210 44 - 50 Sur la grille métallique et dans
2 210 51 - 55 Sur la grille métallique et dans
2 210 55 - 60 Sur la grille métallique et dans
Temp.
[°C]
Durée de
cuisson
[min]
Notes
un plat à rôtir
un plat à rôtir
un plat à rôtir
un plat à rôtir
un plat à rôtir
un plat à rôtir
POISSON
Convection naturelle
TYPE DE PLAT
Truite/daurade 2 190 40 - 55 3 - 4 poissons
Thon/saumon 2 190 35 - 60 4 - 6 filets
Position de
la grille
Temp.
[°C]
Durée de
cuisson
[min]
Notes
Gril
Avant la cuisson, faites préchauffer votre four vide pendant 10 minutes.
Quantité Gril Durée de cuisson [min]
TYPE DE PLAT Mor-
Filet de bœuf 4 800 3 250 12 - 15 12 - 14
Steaks de bœuf 4 600 3 250 10 - 12 6 - 8
Saucisses 8 — 3 250 12 - 15 10 - 12
Côtelettes de porc 4 600 3 250 12 - 16 12 - 14
Volaille (coupé en
deux)
ceaux
2 1000 3 250 30 - 35 25 - 30
[g] Position
de la grille
Temp.
[°C]
1re face 2e face

38 progress
Quantité Gril Durée de cuisson [min]
TYPE DE PLAT Mor-
ceaux
Brochettes 4 — 3 250 10 - 15 10 - 12
Escalope de poulet 4 400 3 250 12 - 15 12 - 14
Steak haché 6 600 3 250 20 - 30 Filet de poisson 4 400 3 250 12 - 14 10 - 12
Sandwiches toastés 4 - 6 — 3 250 5 - 7 —
Toasts 4 - 6 — 3 250 2 - 4 2 - 3
[g] Position
de la grille
Temp.
[°C]
1re face 2e face

ENTRETIEN ET NETTOYAGE
Avertissement Reportez-vous au
chapitre « Consignes de sécurité ».
• Nettoyez la façade du four à l'aide d'une
éponge humide additionnée d'eau savonneuse.
• Utilisez les produits spécifiques vendus
dans le commerce pour l'entretien des
surfaces en métal.
• Nettoyez l'intérieur du four après chaque
utilisation. Les salissures s'éliminent alors
plus facilement et ne risquent pas de brûler.
• En cas de salissures importantes, nettoyez à l'aide d'un nettoyant pour four.
• Après chaque utilisation, lavez tous les
accessoires pour four et séchez-les. Utilisez un chiffon doux additionné d'eau savonneuse tiède.
• Si vous avez des accessoires anti-adhérents, ne les nettoyez pas avec des produits agressifs, des objets pointus ni au
lave-vaisselle. Vous risqueriez de détruire
le revêtement anti-adhérent.
Appareils en acier inoxydable ou en
aluminium :
Nettoyez la porte uniquement avec une
éponge humidifiée. Séchez-la avec un
chiffon doux.
Retrait des supports de grille
progress 39
N'utilisez jamais de produits abrasifs ou
corrosifs, d'éponges métalliques ou de
substances acides susceptibles d'endommager le revêtement du four. Nettoyez le bandeau de commande du
four en observant ces mêmes recommandations.
Nettoyez le joint d'étanchéité de la
porte
• Vérifiez régulièrement le joint d'étanchéité
de la porte. Le joint d'étanchéité de la
porte est posé sur l'encadrement de la
cavité du four. N'utilisez pas l'appareil si
le joint d'étanchéité de la porte est endommagé. Contactez le service aprèsvente.
• Pour le nettoyage du joint d'étanchéité
de la porte, consultez les informations
générales concernant le nettoyage.
Supports de grille
Les supports de grille sont amovibles, pour
permettre le nettoyage des parois du four.
1. Écartez l'avant du support de grille de la
paroi latérale.

40 progress
2. Écartez l'arrière du support de grille de
la paroi latérale et retirez le support.
1
2
Remontage des supports de grille
Installez les supports de grille selon la même procédure, mais dans l'ordre inverse.
Les extrémités arrondies des supports
de grille doivent être orientées vers
l'avant !
Voûte du four
Vous pouvez retirer le gril pour nettoyer plus
facilement la voûte du four.
Avertissement Éteignez l'appareil
avant de retirer le gril. Vérifiez que
l'appareil est froid. Risque de brûlure !
1. Retirez la vis maintenant le gril. La première fois, utilisez un tournevis.
2. Tirez doucement le gril vers le bas.
3. Pour ce faire, utilisez un chiffon doux
humidifié avec de l'eau tiède et un produit nettoyant, puis laissez sécher.
4. Installez le gril selon la même procédure, mais dans l'ordre inverse.
Avertissement Assurez-vous que le
gril est correctement installé et qu'il ne
tombe pas.
Éclairage du four
Avertissement Soyez prudent lorsque
vous changez l'éclairage du four. Il
existe un risque d'électrocution.
Avant de remplacer l'éclairage du four :
• Éteignez le four.
• Retirez les fusibles de la boîte à fusibles
ou coupez le disjoncteur.
Placez un chiffon sur la sole du four
afin de protéger l'éclairage du four et le
diffuseur en verre.
1. Tournez le diffuseur en verre vers la
gauche pour le retirer.
2. Nettoyez le diffuseur en verre.
3. Remplacez l'ampoule du four par une
ampoule résistant à une température
de 300 °C.
Utilisez le même type d'ampoule pour
four.
4. Remettez en place le diffuseur en verre.
Nettoyage de la porte du four
La porte du four est dotée de deux panneaux de verre. Vous pouvez retirer la porte
du four ainsi que le panneau de verre intérieur afin de le nettoyer.
Si vous tentez d'extraire le panneau de
verre intérieur sans avoir au préalable
retiré la porte du four, celle-ci peut se
refermer brusquement.

Retrait de la porte du four et du panneau de verre
1. Ouvrez complètement la porte et saisissez les 2 charnières de porte.
2. Soulevez et faites tourner les leviers sur
les 2 charnières.
progress 41
3. Fermez la porte du four à la première
position d'ouverture (mi-parcours). Tirez la porte vers l'avant et retirez-la de
son logement.

42 progress
4. Déposez la porte sur une surface stable recouverte d'un tissu doux.
5. Désengagez le système de verrouillage
afin de retirer le panneau de verre intérieur.
6. Faites pivoter les deux fixations de 90°
et retirez-les de leurs logements.
90°
7. Soulevez doucement (étape 1), puis
sortez (étape 2) le panneau de verre.
8. Lavez le panneau de verre avec un
chiffon humidifié d'eau savonneuse.
Séchez soigneusement le panneau de
verre.
2
1

progress 43
Réinstallation de la porte et du panneau de verre
Une fois le nettoyage terminé, replacez le
panneau de verre et la porte du four. Répétez les étapes ci-dessus dans l'ordre inverse.
La zone imprimée doit faire face à l'intérieur
de la porte. Après l'installation, vérifiez que
la surface du panneau de verre où se trouve la zone imprimée est lisse au toucher (le
relief doit être de l'autre côté).
Veillez à installer correctement le panneau
de verre intérieur dans son logement. Reportez-vous à l'illustration.
EN CAS D'ANOMALIE DE FONCTIONNEMENT
Avertissement Reportez-vous au
chapitre « Consignes de sécurité ».
Problème Cause probable Solution
L'appareil ne fonctionne pas. L'appareil est éteint. Mettez l'appareil en marche.
L'appareil ne fonctionne pas. Le fusible dans la boîte à fusi-
L'éclairage du four ne fonctionne pas.
De la vapeur et de la condensation se déposent sur les aliments et dans le four.
Si vous ne trouvez pas de solution au problème, veuillez contacter votre revendeur
bles a grillé.
L'éclairage du four est défectueux.
Le plat est resté trop longtemps dans le four.
plaque signalétique se trouve sur le cadre
avant de la cavité de l'appareil.
ou le service après-vente.
Les informations à fournir au service aprèsvente figurent sur la plaque signalétique. La
Nous vous recommandons de noter ces informations ici :
Modèle (MOD.) .........................................
Numéro du produit (PNC) .........................................
Numéro de série (S.N.) .........................................
Consultez le chapitre « Utilisation quotidienne ».
Vérifiez le fusible. Si les fusibles
disjonctent plusieurs fois, faites
appel à un électricien qualifié.
Remplacez l'ampoule du four.
Une fois la cuisson terminée,
ne laissez pas les plats dans le
four plus de 15-20 minutes.
CARACTÉRISTIQUES TECHNIQUES
Tension 230 V
Fréquence 50 Hz

44 progress
INSTALLATION
Avertissement Reportez-vous au
chapitre « Consignes de sécurité ».
Encastrement
540
560
A
B
20
570
590
600
min. 550
20
min. 560
min. 550
20
min. 560
Installation électrique
590
Avertissement Le branchement
électrique doit être confié à un
électricien qualifié.
Le fabricant ne pourra être tenu pour
594
7
responsable si vous ne respectez pas
les précautions de sécurité du chapitre
« Consignes de sécurité ».
Cet appareil est fourni avec une fiche d'ali-
mentation et un câble d'alimentation.
Câble
Types de câbles compatibles pour l'installa-
tion ou le remplacement : H07 RN-F, H05
RN-F, H05 RRF, H05 VV-F, H05 V2V2-F
(T90), H05 BB-F.
Pour la section du câble, consultez la puis-
sance totale (sur la plaque signalétique) et
le tableau :
Puissance totale Section du câble
maximum 1 380 W 3 x 0,75 mm²
maximum 2 300 W 3 x 1 mm²
maximum 3 680 W 3 x 1,5 mm²
Le fil de masse (fil jaune/vert) doit faire 2 cm
de plus que les fils de phase et neutre (fils
bleu et marron).
EN MATIÈRE DE PROTECTION DE L'ENVIRONNEMENT
Le symbole sur le produit ou son
emballage indique que ce produit ne peut
être traité comme déchet ménager. Il doit
être remis au point de collecte dédié à cet
effet (collecte et recyclage du matériel
électrique et électronique).

progress 45
En procédant à la mise au rebut de
l'appareil dans les règles de l’art, nous
préservons l'environnement et notre
sécurité, s’assurant ainsi que les déchets
seront traités dans des conditions
optimum.
Pour obtenir plus de détails sur le recyclage
de ce produit, veuillez prendre contact avec
les services de votre commune ou le
magasin où vous avez effectué l'achat.
Matériau d'emballage
Les matériaux d'emballage sont conçus dans le respect de l'environnement
et sont recyclables. Les pièces en plastique sont marquées d'abréviations internationales telles que PE, PS, etc. Jetez les emballages dans les conteneurs
de la commune prévus à cet effet.

46 progress
INHALT
Sicherheitsinformationen 46
Sicherheitshinweise 47
Gerätebeschreibung 49
Vor der ersten Inbetriebnahme 49
Täglicher Gebrauch 50
Zusatzfunktionen 50
Praktische Tipps und Hinweise 50
Reinigung und Pflege 54
Was tun, wenn … 58
Technische Daten 58
Montage 59
Umwelttipps 59
Änderungen vorbehalten.
SICHERHEITSINFORMATIONEN
Lesen Sie vor der Montage und Verwendung des Geräts sorgfältig die mitgelieferte Anleitung. Der Hersteller haftet nicht für
Verletzungen oder Schäden, die durch eine fehlerhafte Montage entstehen. Bewahren Sie die Anleitung zum Nachschlagen
auf.
Sicherheit von Kindern und schutzbedürftigen
Personen
Warnung! Es besteht Erstickungsgefahr, das Risiko von
Verletzungen oder permanenten Behinderungen.
• Dieses Gerät kann dann von Kindern ab 8 Jahren, von Per-
sonen mit eingeschränkten körperlichen, sensorischen oder
geistigen Fähigkeiten sowie von Personen ohne bisherige
Erfahrung im Umgang mit solchen Geräten bedient werden,
wenn sie dabei von einer Person, die für ihre Sicherheit verantwortlich ist, beaufsichtigt werden.
• Kinder dürfen nicht mit dem Gerät spielen.
• Halten Sie das Verpackungsmaterial von Kindern fern.
• Halten Sie Kinder und Haustiere vom Gerät fern, wenn es in
Betrieb oder in der Abkühlphase ist. Berührbare Teile sind
heiss.
• Falls Ihr Gerät mit einer Kindersicherung ausgestattet ist,
empfehlen wir, diese einzuschalten.
• Reinigung und Wartung des Geräts darf nicht von Kindern
ohne Aufsicht erfolgen.
Allgemeine Sicherheit
• Während des Betriebs wird das Geräteinnere heiss. Berüh-
ren Sie nicht die Heizelemente im Gerät. Verwenden Sie

progress 47
zum Anfassen des Zubehörs und der Töpfe wärmeisolierende Handschuhe.
• Benutzen Sie zum Reinigen des Geräts keinen Dampfreini-
ger.
• Unterbrechen Sie vor Wartungsarbeiten die Stromversor-
gung.
• Benutzen Sie keine Scheuermittel oder Metallschwämmchen
zum Reinigen der Ofenglastür; sie können die Glasfläche
verkratzen und zum Zersplittern der Scheibe führen.
• Ziehen Sie die Einhängegitter erst vorne und dann hinten
von der Seitenwand weg und nehmen Sie sie heraus. Führen Sie zum Einsetzen der Einhängegitter die obigen Schritte
in umgekehrter Reihenfolge durch.
SICHERHEITSHINWEISE
Montage
Warnung! Nur eine qualifizierte
Fachkraft darf den Elektroanschluss
des Geräts vornehmen.
• Entfernen Sie das Verpackungsmaterial.
• Stellen Sie ein beschädigtes Gerät nicht
auf und benutzen Sie es nicht.
• Halten Sie sich an die mitgelieferte Mon-
tageanleitung.
• Seien Sie beim Umsetzen des Geräts
vorsichtig, denn es ist schwer. Tragen Sie
stets Sicherheitshandschuhe.
• Ziehen Sie das Gerät nicht am Türgriff.
• Die Mindestabstände zu anderen Gerä-
ten und Küchenmöbeln sind einzuhalten.
• Stellen Sie sicher, dass das Gerät unter-
halb von bzw. zwischen sicheren Konstruktionen montiert wird.
• Die Seiten des Geräts dürfen nur an Ge-
räte oder Einheiten in gleicher Höhe angrenzen.
Elektrischer Anschluss
Warnung! Brand- und
Stromschlaggefahr.
• Alle elektrischen Anschlüsse sind von ei-
nem geprüften Elektriker vorzunehmen.
• Das Gerät muss geerdet werden.
• Stellen Sie sicher, dass die elektrischen
Daten auf dem Typenschild den Daten
Ihrer Stromversorgung entsprechen.
Wenden Sie sich andernfalls an eine
Elektrofachkraft.
• Das Gerät darf ausschließlich an eine
ordnungsgemäß installierte Schutzkontaktsteckdose angeschlossen werden.
• Verwenden Sie keine Mehrfachsteckdosen oder Verlängerungskabel.
• Achten Sie darauf, Netzstecker und Netzkabel nicht zu beschädigen. Wenden Sie
sich zum Austausch des beschädigten
Netzkabels an den Kundendienst oder einen Elektriker.
• Achten Sie darauf, dass das Netzkabel
die Gerätetür nicht berührt, insbesondere
wenn die Tür heiß ist.
• Alle Teile, die gegen direktes Berühren
schützen sowie die isolierten Teile müssen so befestigt werden, dass sie nicht
ohne Werkzeug entfernt werden können.
• Stecken Sie den Netzstecker erst nach
Abschluss der Montage in die Steckdose. Stellen Sie sicher, dass der Netzstecker nach der Montage noch zugänglich
ist.
• Falls die Steckdose lose ist, schließen Sie
den Netzstecker nicht an.
• Ziehen Sie nicht am Netzkabel, um das
Gerät von der Spannungsversorgung zu

48 progress
trennen. Ziehen Sie dazu immer direkt
am Netzstecker.
• Verwenden Sie immer die richtigen
Trenneinrichtungen: Überlastschalter, Sicherungen (Schraubsicherungen müssen
aus dem Halter entfernt werden können),
Fehlerstromschutzschalter und Schütze.
• Die elektrische Installation muss eine
Trenneinrichtung aufweisen, mit der Sie
das Gerät allpolig von der Stromversorgung trennen können. Die Trenneinrichtung muss mit einer Kontaktöffnungsbreite von mindestens 3 mm ausgeführt sein.
Gebrauch
Warnung! Es besteht Verletzungs-,
Verbrennungs-, Stromschlag- oder
Explosionsgefahr.
• Das Gerät ist für die Verwendung im
Haushalt vorgesehen.
• Nehmen Sie keine technischen Änderungen am Gerät vor.
• Die Lüftungsöffnungen dürfen nicht abgedeckt werden.
• Lassen Sie das Gerät bei Betrieb nicht
unbeaufsichtigt.
• Das Gerät nach jedem Gebrauch ausschalten.
• Während des Betriebs wird das Geräteinnere heiß. Berühren Sie nicht die Heizelemente im Geräteinnern. Verwenden Sie
zum Anfassen des Zubehörs und der
Töpfe wärmeisolierende Handschuhe.
• Gehen Sie beim Öffnen der Tür vorsichtig
vor, wenn das Gerät in Betrieb ist. Es
kann heiße Luft austreten.
• Bedienen Sie das Gerät nicht mit feuchten oder nassen Händen oder wenn es
mit Wasser in Kontakt gekommen ist.
• Üben Sie keinen Druck auf die geöffnete
Gerätetür aus.
• Benutzen Sie das Gerät nicht als Arbeitsoder Abstellfläche.
• Halten Sie die Tür immer geschlossen,
wenn das Gerät in Betrieb ist.
• Öffnen Sie die Gerätetür vorsichtig. Wenn
Sie Zutaten mit Alkohol verwenden, kann
ein Alkohol-Luftgemisch entstehen.
• Achten Sie beim Öffnen der Tür darauf,
dass keine Funken oder offenen Flammen in das Geräts gelangen.
• Platzieren Sie keine entflammbaren Produkte oder Gegenstände, die mit ent-
flammbaren Produkten benetzt sind, im
Gerät, auf dem Gerät oder in der Nähe
des Geräts.
Warnung! Das Gerät könnte
beschädigt werden.
• Um Beschädigungen oder Verfärbungen
der Emailbeschichtung zu vermeiden:
– Stellen Sie Kochgeschirr oder andere
Gegenstände nicht direkt auf den Boden
des Gerätes.
– Legen Sie keine Alufolie direkt auf den
Boden des Gerätes.
– Stellen Sie kein Wasser in das heiße
Gerät.
– Lassen Sie nach dem Abschalten des
Geräts kein feuchtes Geschirr oder
feuchte Speisen im Backofeninnenraum
stehen.
– Gehen Sie beim Herausnehmen oder
Einsetzen der Innenausstattung sorgfältig
vor.
• Verfärbungen der Emailbeschichtung haben keine Auswirkung auf die Leistung
des Geräts. Sie stellen keinen Mangel im
Sinne des Gewährleistungsrechtes dar.
• Verwenden Sie für feuchte Kuchen die
Brat- und Fettpfanne. Fruchtsäfte verursachen bleibende Flecken.
Reinigung und Pflege
Warnung! Risiko von Verletzungen,
Brand oder Beschädigungen am Gerät.
• Schalten Sie vor Reinigungsarbeiten immer das Gerät aus und ziehen Sie den
Netzstecker aus der Steckdose.
• Vergewissern Sie sich, dass das Gerät
abgekühlt ist. Zusätzlich besteht die Gefahr, dass die Glasscheiben brechen.
• Ersetzen Sie die Glasscheiben der Tür
umgehend, wenn sie beschädigt sind.
Wenden Sie sich hierzu an den Kundendienst.
• Gehen Sie beim Aushängen der Tür
sorgsam vor. Die Tür ist schwer!
• Reinigen Sie das Gerät regelmäßig, um
eine Abnutzung des Oberflächenmaterials zu verhindern.
• Fett- oder Speisereste im Gerät können
einen Brand verursachen.
• Reinigen Sie das Geräts mit einem weichen, feuchten Tuch. Verwenden Sie nur
neutrale Reinigungsmittel. Benutzen Sie

progress 49
keine Scheuermittel, scheuernde Reinigungsschwämmchen, Lösungsmittel
oder Metallgegenstände.
• Falls Sie ein Backofenspray verwenden,
befolgen Sie bitte unbedingt die Anweisungen auf der Verpackung.
• Reinigen Sie die katalytische Emailbeschichtung (falls vorhanden) nicht mit Reinigungsmitteln.
Innenbeleuchtung
• Die Leuchtmittel in diesem Gerät sind nur
für Haushaltsgeräte geeignet. Benutzen
Sie sie nicht für die Raumbeleuchtung.
Warnung! Stromschlaggefahr.
• Trennen Sie das Gerät von der Stromversorgung, bevor Sie die Lampe austauschen.
GERÄTEBESCHREIBUNG
1 2 3 4 5
6
7
8
9
Bedienfeld
1
• Verwenden Sie dazu eine Lampe mit der
gleichen Leistung.
Entsorgung
Warnung! Verletzungs- und
Erstickungsgefahr.
• Trennen Sie das Gerät von der Stromversorgung.
• Schneiden Sie das Netzkabel ab und entsorgen Sie es.
• Entfernen Sie das Türschloss, um zu verhindern, dass sich Kinder oder Haustiere
in dem Gerät einschließen.
Temperaturanzeige
2
Temperaturwahlknopf
3
Backofen-Einstellknopf
4
Betriebs-Kontrolllampe
5
Lüftungsöffnungen
6
Grillelement
7
Backofenlampe
8
Typenschild
9
Backofenzubehör
Kombirost
•
Für Geschirr, Kuchenformen, Braten.
• Aluminiumbackblech
Für Kuchen und Plätzchen.
Brat- und Fettpfanne
•
Zum Backen und Braten oder zum Auffangen von austretendem Fett.
VOR DER ERSTEN INBETRIEBNAHME
Warnung! Siehe Kapitel
„Sicherheitshinweise“.
Erste Reinigung
• Entfernen Sie alle Zubehörteile und die
herausnehmbaren Einhängegitter (falls
vorhanden).
• Reinigen Sie das Gerät vor der ersten Inbetriebnahme.
Wichtig! Siehe Kapitel „Reinigung und
Pflege“.
Aufheizen
Heizen Sie das leere Gerät vor, um Fettreste zu verbrennen.
1.
Stellen Sie die Funktion
Höchsttemperatur ein.
und die

50 progress
2. Lassen Sie das Gerät 45 Minuten lang
eingeschaltet.
3.
Stellen Sie die Funktion
und die
Höchsttemperatur ein.
4. Lassen Sie das Gerät 15 Minuten lang
Das Zubehör kann heißer werden als beim
normalen Gebrauch. Das Gerät kann Geruch und Rauch verströmen. Das ist normal. Sorgen Sie für eine ausreichende Belüftung.
eingeschaltet.
TÄGLICHER GEBRAUCH
Warnung! Siehe Kapitel
„Sicherheitshinweise“.
Drücken Sie zum Benutzen des Geräts den
versenkbaren Knopf. Der Knopf kommt
dann heraus.
Ein- und Ausschalten des Geräts
1. Drehen Sie den Backofen-Einstellknopf
auf die gewünschte Backofenfunktion.
Die Betriebs-Kontrolllampe leuchtet,
solange das Gerät in Betrieb ist.
Backofenfunktionen
Backofenfunktion Anwendung
Stellung „Aus“ Das Gerät ist ausgeschaltet.
Ober-/Unterhitze
Unterhitze
Oberhitze
Grillstufe 1
Zum Backen und Braten auf einer Ebene. Die Heizelemente für
Ober- und Unterhitze sind gleichzeitig eingeschaltet.
Zum Backen von Kuchen mit krossen Böden. Nur das Heizele-
Zum Bräunen bereits fertiger Gerichte. Nur das Heizelement für
Zum Grillen flacher Lebensmittel in kleinen Mengen in der Mitte
2. Drehen Sie den Temperaturwahlknopf
auf die gewünschte Temperatur.
Die Temperatur-Kontrolllampe leuchtet,
solange die Temperatur im Gerät ansteigt.
3. Drehen Sie zum Ausschalten des Geräts den Backofen-Einstellknopf und
den Temperaturwahlknopf in die Position Aus.
ment für Unterhitze ist eingeschaltet.
Oberhitze ist eingeschaltet.
des Rostes. Zum Toasten.
ZUSATZFUNKTIONEN
Kühlgebläse
Wenn das Gerät in Betrieb ist, wird automatisch das Kühlgebläse eingeschaltet, um die
Geräteflächen zu kühlen. Wenn Sie das Gerät ausschalten, stoppt das Kühlgebläse.
Sicherheits-Thermostat
Ein unsachgemäßer Gebrauch des Geräts
oder defekte Bauteile können zu einer ge-
fährlichen Überhitzung führen. Um dies zu
verhindern, ist der Backofen mit einem Sicherheitsthermostat ausgestattet, der die
Stromzufuhr unterbrechen kann. Die Wiedereinschaltung erfolgt automatisch bei einen Temperaturabfall.
PRAKTISCHE TIPPS UND HINWEISE
• Das Gerät hat vier Einschubebenen. Die
Einschubebenen werden vom Boden des
Backofens aus gezählt.
• Das Gerät hat ein exklusives Umluft- und
Dampfsystem, das die Luft umwälzt und
den Dampf wieder aufbereitet. Das Garen
mit Dampf macht Ihre Speisen innen

progress 51
weich und außen knusprig. Gardauer und
Energieverbrauch werden dabei auf ein
Minimum reduziert.
• Es kann sich Feuchtigkeit im Gerät oder
an den Glastüren niederschlagen. Das ist
normal. Stehen Sie beim Öffnen der Tür
während des Betriebs stets in sicherer
Entfernung zum Gerät. Um die Kondensation zu reduzieren, heizen Sie vor dem
Garen den Backofen immer 10 Minuten
vor.
• Nach jedem Gebrauch des Geräts die
Feuchtigkeit abwischen.
• Stellen Sie keine Gegenstände direkt auf
den Backofenboden und bedecken Sie
das Kochgeschirr nicht mit Alu-Folie. Dies
könnte das Garergebnis beeinträchtigen
und die Emailbeschichtung beschädigen.
Backen von Kuchen
• Die Backofentür nicht öffnen, bevor 3/4
der Backzeit abgelaufen ist
• Wenn Sie zwei Backbleche gleichzeitig
nutzen, lassen Sie eine Ebene dazwi-
Garen von Fleisch und Fisch
• Setzen Sie beim Garen von Speisen mit
hohem Fettgehalt eine Brat- und Fettpfanne ein, damit keine dauerhaften Flecken im Backofen verbleiben.
• Das Fleisch vor dem Anschneiden mindestens 15 Minuten ruhen lassen, damit
der Fleischsaft nicht ausläuft.
• Um Rauchentwicklung beim Braten zu
vermindern, geben Sie etwas Wasser in
die Brat- und Fettpfanne. Um Kondensierung des Rauchs zu vermeiden, Wasser
zugeben, wenn die Brat- und Fettpfanne
ausgetrocknet ist.
Garzeiten
Die Garzeiten hängen von der Art des Garguts, seiner Konsistenz und der Menge ab.
Achten Sie beim Garen anfangs immer auf
das Gargut. Finden Sie selbst die besten
Einstellungen (Garstufe, Garzeit, usw.) für
Kochgeschirr, Rezepte und Mengen bei der
Verwendung dieses Geräts heraus.
schen frei.
Back- und Brattabelle
KUCHEN
Ober-/Unterhitze
GERICHT
Rührteig 2 170 45 - 60 Kuchenform
Mürbeteig 2 170 24 - 34 Kuchenform
Buttermilch-Käse-
kuchen
Apfelkuchen 1 170 100 - 120 2 Kuchenformen (20 cm) auf
Strudel/Stollen 2 175 60 - 80 Backblech
Marmeladenkuchen 2 170 30 - 40 Kuchenform (26 cm)
Früchtebrot 2 170 60 - 70 Kuchenform (26 cm)
Biskuitkuchen (Bis-
kuit ohne Butter)
Stollen/üppiger
Früchtekuchen
Rosinenkuchen 2 170 50 - 60
Kleingebäck 3 170 20 - 30 Backblech
Plätzchen 3 150 20 - 30
Baiser 3 100 90 - 120 Backblech
Einschub-
ebene
1 170 60 - 80 Kuchenform (26 cm)
2 170 35 - 45 Kuchenform (26 cm)
2 170 50 - 60 Kuchenform (20 cm)
Tempe-
ratur
[°C]
Garzeit
[Min.]
Raum für Notizen
dem Kombirost
Brotform
Backblech
1)
1)

52 progress
Ober-/Unterhitze
GERICHT
Einschub-
ebene
Tempe-
ratur
[°C]
Rosinenbrötchen 3 190 15 - 20
Brandteig 3 190 25 - 35
Garzeit
[Min.]
Raum für Notizen
Backblech
Backblech
1)
1)
Törtchen 3 180 45 - 70 Kuchenform (20 cm)
Englischer Sand-
wichkuchen à la
1 oder 2 180 40 - 55 Links + rechts, Kuchenform, 20
cm
Victoria
1) 10 Minuten vorheizen.
BROT UND PIZZA
Ober-/Unterhitze
GERICHT
Einschub-
ebene
Tempe-
ratur
[°C]
Weißbrot 1 190 60 - 70
Garzeit
[Min.]
Raum für Notizen
1 - 2 Stück, 500 g pro Stück
Roggenbrot 1 190 30 - 45 Brotform
Brötchen 2 190 25 - 40
Pizza 1 190 20 - 30
Mürbeteigplätzchen 3 200 10 - 20
1) 10 Minuten vorheizen.
6 - 8 Brötchen auf Backblech
Brat- und Fettpfanne
Backblech
1)
1)
AUFLÄUFE
Ober-/Unterhitze
GERICHT
Einschub-
ebene
Tempe-
ratur
[°C]
Garzeit
[Min.]
Raum für Notizen
Nudelauflauf 2 180 40 - 50 Auflaufform
Gemüseauflauf 2 200 45 - 60 Auflaufform
Quiche 1 190 40 - 50 Auflaufform
Lasagne 2 200 25 - 40 Auflaufform
Cannelloni 2 200 25 - 40 Auflaufform
Yorkshire-Pudding 2 220 20 - 30
1) 10 Minuten vorheizen.
6 Puddingformen
1)
FLEISCH
Ober-/Unterhitze
GERICHT
Einschub-
ebene
Tempe-
ratur
[°C]
Rindfleisch 2 200 50 - 70 Kombirost und Brat- und Fett-
Schweinefleisch 2 180 90 - 120 Kombirost und Brat- und Fett-
Kalb 2 190 90 - 120 Kombirost und Brat- und Fett-
Garzeit
[Min.]
Raum für Notizen
pfanne
pfanne
pfanne
1)
1)

progress 53
Ober-/Unterhitze
GERICHT
Roastbeef, englisch,
rosa
Roastbeef, englisch,
medium
Roastbeef, englisch,
durch
Schweineschulter 2 180 120 - 150 Brat- und Fettpfanne
Schweinshaxe 2 180 100 - 120 2 Stück in Brat- und Fettpfanne
Lamm 2 190 110 - 130 Keule
Hähnchen 2 200 70 - 85 ganz
Pute 1 180 210 - 240 ganz
Ente 2 175 120 - 150 ganz
Gans 1 175 150 - 200 ganz
Hasenbraten 2 190 60 - 80 zerlegt
Hase 2 190 150 - 200 zerlegt
Fasan 2 190 90 - 120 ganz
Einschub-
ebene
2 210 44 - 50 Kombirost und Brat- und Fett-
2 210 51 - 55 Kombirost und Brat- und Fett-
2 210 55 - 60 Kombirost und Brat- und Fett-
Tempe-
ratur
[°C]
Garzeit
[Min.]
Raum für Notizen
pfanne
pfanne
pfanne
FISCH
Ober-/Unterhitze
GERICHT
Forelle/Seebrasse 2 190 40 - 55 3 - 4 Fische
Thunfisch/Lachs 2 190 35 - 60 4 - 6 Filets
Einschub-
ebene
Tempe-
ratur
[°C]
Garzeit
[Min.]
Raum für Notizen
Grillstufe 1
Den leeren Backofen 10 Minuten vorheizen.
Menge Grillstufe 1 Garzeit [Min.]
GERICHT Stück [g] Einschub-
Filetsteaks 4 800 3 250 12 - 15 12 - 14
Beefsteaks 4 600 3 250 10 - 12 6 - 8
Würstchen 8 — 3 250 12 - 15 10 - 12
Schweinekotelett 4 600 3 250 12 - 16 12 - 14
Hähnchen (in zwei
Hälften)
Spieße 4 — 3 250 10 - 15 10 - 12
Hähnchenbrustfilet 4 400 3 250 12 - 15 12 - 14
Hamburger 6 600 3 250 20 - 30 Fischfilets 4 400 3 250 12 - 14 10 - 12
2 1000 3 250 30 - 35 25 - 30
ebene
Temp.
[°C]
Erste Sei-teZweite
Seite

54 progress
Menge Grillstufe 1 Garzeit [Min.]
GERICHT Stück [g] Einschub-
Belegte Toastbrote 4 - 6 — 3 250 5 - 7 —
Toast 4 - 6 — 3 250 2 - 4 2 - 3
Informationen zu Acrylamiden
Wichtig! Nach neuesten
wissenschaftlichen Erkenntnissen kann die
Bräunung von Lebensmitteln, speziell bei
stärkehaltigen Produkten, eine
ebene
gesundheitliche Gefährdung durch
Acrylamid verursachen. Daher empfehlen
wir, bei möglichst niedrigen Temperaturen
zu garen und die Speisen nicht zu stark zu
bräunen.
Temp.
[°C]
Erste Sei-teZweite
Seite
REINIGUNG UND PFLEGE
Warnung! Siehe Kapitel
„Sicherheitshinweise“.
• Feuchten Sie ein weiches Tuch mit warmem Wasser und etwas Reinigungsmittel
an, und reinigen Sie damit die Vorderseite
des Geräts.
• Reinigen Sie die Metalloberflächen mit einem handelsüblichen Reinigungsmittel.
• Reinigen Sie den Innenraum des Backofens nach jedem Gebrauch. So lassen
sich Verschmutzungen leichter entfernen
und es kann nichts einbrennen.
• Entfernen Sie hartnäckige Verschmutzungen mit speziellen Backofenreinigern.
• Reinigen Sie alle Zubehörteile nach jedem
Gebrauch und lassen Sie sie trocknen.
Feuchten Sie ein weiches Tuch mit warmem Wasser und etwas Spülmittel an.
• Zubehörteile mit Antihaftbeschichtung
dürfen nicht mit aggressiven Reinigungsmitteln, scharfkantigen Gegenständen
oder im Geschirrspüler gereinigt werden.
Die Antihaftbeschichtung kann dadurch
zerstört werden.
Geräte mit Edelstahl- oder Aluminiumfront:
Abnehmen der Einhängegitter
Reinigen Sie die Backofentür nur mit einem nassen Schwamm und trocknen
Sie sie mit einem weichen Tuch ab.
Verwenden Sie keine Stahlwolle, Säuren oder Scheuermittel, da diese die
Oberflächen beschädigen können. Reinigen Sie das Bedienfeld auf gleiche
Weise.
Reinigen der Türdichtung
• Die Türdichtung muss regelmäßig überprüft werden. Die Türdichtung ist im Rahmen des Garraums angebracht. Nehmen
Sie das Gerät nicht in Betrieb, wenn die
Türdichtung beschädigt ist. Wenden Sie
sich an den Kundendienst.
• Für die Reinigung der Türdichtung lesen
Sie bitte in den allgemeinen Informationen zur Reinigung nach.
Einhängegitter
Die Einhängegitter können zur Reinigung
der Seitenwände entfernt werden.
1. Ziehen Sie das vordere Ende des Einhängegitters von der Seitenwand weg.

progress 55
2. Ziehen Sie das hintere Ende des Ein-
hängegitters von der Seitenwand weg,
und nehmen Sie das Einhängegitter
1
2
heraus.
Einsetzen der Einhängegitter
Führen Sie zum Einsetzen der Einhängegitter die oben beschriebenen Schritte in umgekehrter Reihenfolge durch.
Die abgerundeten Enden der Einhängegitter müssen nach vorn zeigen.
Backofendecke
Sie können das Grillelement herausnehmen,
um die Backofendecke leichter reinigen zu
können.
Warnung! Schalten Sie das Gerät aus,
bevor Sie das Grillelement
herausnehmen. Vergewissern Sie sich,
dass das Gerät abgekühlt ist. Es
besteht Verbrennungsgefahr!
1. Lösen Sie die Befestigungsschraube
des Grillelements. Wenn Sie das Grillelement zum ersten Mal herausnehmen, benutzen Sie zum Lösen der
Schraube einen Schraubendreher.
2. Ziehen Sie das Grillelement vorsichtig
nach unten.
3. Reinigen Sie die Backofendecke mit einem weichen Tuch, warmem Wasser
und einem Reinigungsmittel, und lassen
Sie sie trocknen.
4. Führen Sie zum Einsetzen des Grilllements die oben beschriebenen Schritte
in umgekehrter Reihenfolge durch.
Warnung! Stellen Sie sicher, dass das
Grillelement ordnungsgemäß eingesetzt
ist und nicht herunterfallen kann.
Backofenlampe
Warnung! Vorsicht beim Austausch
der Backofenlampe. Es besteht die
Gefahr eines elektrischen Schlags.
Bevor Sie die Backofenlampe
austauschen:
• Schalten Sie den Backofen aus.
• Entfernen Sie die Sicherungen aus dem
Sicherungskasten, oder schalten Sie den
Schutzschalter aus.
Legen Sie ein Tuch auf den Backofenboden, um die Lampe und das Glas zu
schützen.
1. Drehen Sie die Glasabdeckung gegen
den Uhrzeigersinn und nehmen Sie sie
ab.
2. Reinigen Sie die Glasabdeckung.
3. Ersetzen Sie die Backofenlampe durch
eine geeignete 300 °C hitzebeständige
Backofenlampe.
Verwenden Sie dazu eine Backofenlampe mit der gleichen Leistung.
4. Bringen Sie die Glasabdeckung wieder
an.
Reinigung der Backofen-Tür
Die Backofentür ist mit zwei Glasscheiben
ausgestattet. Die Backofentür und die innere Glasscheibe können zur Reinigung ausgebaut werden.

56 progress
Wenn Sie versuchen, die Glasscheiben
abzunehmen, solange die Backofentür
Ausbau von Backofen-Tür und Glasscheibe
noch am Gerät montiert ist, kann diese
zuklappen.
1. Klappen Sie die Backofen-Tür ganz auf
und greifen Sie an die beiden Türscharniere.
2. Heben Sie die Hebel an den beiden
Scharnieren an und klappen Sie sie
nach vorne.
3. Schließen Sie die Backofentür bis zur
ersten Raststellung (halb). Anschließend ziehen Sie sie nach vorn aus der
Halterung heraus.

progress 57
4. Legen Sie die Backofentür auf einer
ebenen Fläche auf ein weiches Tuch.
5. Lösen Sie das Verriegelungssystem,
um die Glasscheiben zu entfernen.
6. Drehen Sie die 2 Befestigungselemente
um 90° und nehmen Sie sie aus der
Halterung.
90°
7. Heben Sie die Glasscheibe vorsichtig
an (Schritt 1) und entfernen Sie sie
(Schritt 2).
8. Reinigen Sie die Glasscheibe mit Wasser und Spülmittel Trocknen Sie die
Glasscheibe sorgfältig ab.
2
1

58 progress
Einbau der Backofentür und der Glasscheibe
Nach der Reinigung müssen die Backofentür und Glasscheibe wieder eingebaut werden. Führen Sie die obigen Schritte in umgekehrter Reihenfolge durch.
Der bedruckte Bereich muss zur Innenseite
der Tür weisen. Versichern Sie sich nach
dem Einsetzen, dass sich der Glasscheibenrahmen in den bedruckten Bereichen
nicht rau anfühlt.
Achten Sie darauf, die innere Glasscheibe
korrekt in die Halterung einzusetzen. Orientieren Sie sich an der Abbildung.
WAS TUN, WENN …
Warnung! Siehe Kapitel
„Sicherheitshinweise“.
Problem Mögliche Ursache Abhilfe
Das Gerät funktioniert überhaupt nicht.
Das Gerät funktioniert überhaupt nicht.
Die Backofenlampe leuchtet
nicht.
Dampf und Kondenswasser
schlagen sich auf Speisen und
im Backofen nieder.
Wenn Sie das Problem nicht selbst lösen
können, wenden Sie sich an Ihren Fachhändler oder Kundendienst.
Die vom Kundendienst benötigten Daten
finden Sie auf dem Typenschild. Das Ty-
Wir empfehlen, dass Sie folgende Daten hier notieren:
Modell (MOD.) .........................................
Produktnummer (PNC) .........................................
Seriennummer (S.N.) .........................................
Das Gerät ist nicht eingeschaltet.
Die Sicherung im Sicherungskasten hat ausgelöst.
Die Backofenlampe ist defekt. Ersetzen Sie die Backofenlam-
Die Speisen standen zu lange
im Backofen.
Schalten Sie das Gerät ein.
Siehe Kapitel „Täglicher Gebrauch“.
Prüfen Sie die Sicherung. Falls
die Sicherung öfter als einmal
auslöst, wenden Sie sich an eine Elektrofachkraft.
pe.
Speisen nach Beendigung des
Gar- oder Backvorgangs nicht
länger als 15 - 20 Minuten im
Backofen lassen.
penschild befindet sich am Frontrahmen
des Garraums.
TECHNISCHE DATEN
Spannung 230 V
Frequenz 50 Hz

MONTAGE
Warnung! Siehe Kapitel
„Sicherheitshinweise“.
Einbau
560
540
progress 59
A
B
20
570
590
600
min. 550
20
min. 560
min. 550
20
min. 560
Elektroinstallation
590
Warnung! Der elektrische Anschluss
muss von einer qualifizierten Fachkraft
vorgenommen werden.
Der Hersteller haftet nicht für Schäden,
594
7
die aufgrund der Nichtbeachtung der
Sicherheitsvorkehrungen des Kapitels
„Sicherheitshinweise“ entstehen.
Das Gerät wird mit einem Netzstecker und
Netzkabel geliefert.
Kabel
Einsetzbare Kabeltypen für Einbau oder
Austausch: H07 RN-F, H05 RN-F, H05
RRF, H05 VV-F, H05 V2V2-F (T90), H05
BB-F.
Näheres zum Kabelquerschnitt siehe Gesamtleistung (auf dem Typenschild) und in
der Tabelle:
Gesamte Leis-
tungsaufnahme
maximal 1380 W 3 x 0,75 mm²
maximal 2300 W 3 x 1 mm²
maximal 3680 W 3 x 1,5 mm²
Kabelquerschnitt
Die Erdleitung (gelb-grünes Kabel) muss 2
cm länger sein als die Phasenleitung und
der Nullleiter (blaues und braunes Kabel).
UMWELTTIPPS
Das Symbol auf dem Produkt oder
seiner Verpackung weist darauf hin, dass
dieses Produkt nicht als normaler
Haushaltsabfall zu behandeln ist, sondern

60 progress
an einem Sammelpunkt für das Recycling
von elektrischen und elektronischen
Geräten abgegeben werden muss. Durch
Ihren Beitrag zum korrekten Entsorgen
dieses Produkts schützen Sie die Umwelt
und die Gesundheit Ihrer Mitmenschen.
Umwelt und Gesundheit werden durch
falsches Entsorgen gefährdet. Weitere
Informationen über das Recycling dieses
Produkts erhalten Sie von Ihrer Gemeinde,
Ihrer Müllabfuhr oder dem Geschäft, in dem
Sie das Produkt gekauft haben.
Verpackungsmaterial
Das Verpackungsmaterial ist umweltfreundlich und wieder verwertbar.
Kunststoffteile sind mit internationalen
Abkürzungen wie PE, PS usw. gekennzeichnet. Entsorgen Sie das Verpackungsmaterial in den dafür vorgesehenen Behältern der kommunalen Entsorgungsstellen.

progress 61

62 progress

progress 63

www.progress-hausgeraete.de
892936965-A-232012
 Loading...