

Page 1

User information
Notice d’utilisation
Bedienungs-
und Installationsanleitung
Gebruiksaanwijzing en
installatievoorschrift
BE
Gas hob
Table de cuisson
Kochmulde
Gaskookplaat
PAG 6430 E
Page 2
2
progress
Contents
Important Safety Information ............................................................................................ 3
Hob burner control knobs ................................................................................................ 5
Using the hob .................................................................................................................. 7
Cleaning and Maintenance ............................................................................................... 8
Technical data ................................................................................................................ 10
Installation ...................................................................................................................... 11
Adaptation to different types of gas ................................................................................ 12
Electrical Connection ..................................................................................................... 13
Building In ...................................................................................................................... 15
Possibilities for insertion ................................................................................................. 17
Technical assistance and spare parts ............................................................................. 18
Guide to Use the instructions
The following symbols will be found in the text to guide you throughout the Instructions:
Safety Instructions
)
MANUFACTURER:
ELECTROLUX HOME PRODUCTS ITALY S.p.A.
Viale Bologna, 298
47100 FORLÌ (Italy)
It is very important that this instruction book should be kept safely for future consultation. If the
appliance should be sold or given to another person, please ensure that the booklet goes
together with it, so that the new owner can know of the functions of the machine and also be
aware of the warnings.
These instructions are only for the countries stated by the symbol printed on the front cover of
this instruction book.
Step by step instructions for an operation
Hints and Tips
Environmental information
This appliance complies with the following E.E.C. Directives:
••
• 2006/95
••
••
• 89/336 (Electromagnetical Compatibility Directive);
••
••
• 90/396 (Gas Appliances);
••
••
• 93/68 (General Directives) and subsequent modifications.
••
(Low Voltage Directive);
Page 3

progress 3
English
Important safety information
This warnings has been given for the safety of you and others. We therefore ask you to
carefully read the procedures of installing and using this cooker.
Installation
z The work of installation must be carried out
by competent and qualified installers
according to the regulations in force.
• Any modifications to the domestic
electrical mains which may be necessary
for the installation of the appliance
should be carried out only by competent
personnel.
During Operation
• This appliance has been designed for
non professional purpose in private
houses only. It is meant to cook edible
foodstuff only and must not be used for
any other purposes.
• It is dangerous to alter the specification in
any way.
• For hygiene and safety reasons, this
appliance should be kept clean at all
times. A build-up of fats or other foodstuff
could result in a fire.
• Under no circumstances should you
attempt to repair the appliance yourself.
Repairs carried out by unexperienced
persons may cause injury or serious
malfunctioning. Refer to your local
Service Centre. Always insist on genuine
spare parts.
• Ensure that all control knobs are in the
OFF position when not in use.
• Should you connect any electrical tool to
a plug near this cooking appliance,
ensure that electric cables are not in
contact with it and keep them far enough
from the heated parts of this appliance.
• If the appliance is out of order,
disconnect it from the electric supply.
People Safety
• This appliance has been designed to be
operated by adults and children under
supervision. Young children must not be
allowed to tamper with the controls or
play near or with the oven.
• This appliance is not intended for use by
children or other persons whose physical,
sensory or mental capabilities or lack of
experience and knowledge prevents
them from using the appliance safely
without supervision or instruction by a
responsible person to ensure that they
can use the appliance safely.
• Accessible parts of this appliance may
become hot when it is in use. Children
should be kept away until it has cooled.
About Installation, Cleaning and
Maintenance
• It is mandatory that all operations
required for the installation are carried out
by a qualified or competent person, in
accordance with existing rules and
regulations.
• Disconnect the appliance from the
electrical supply, before carrying out any
cleaning or manteinance work.
• Ensure a good ventilation around the
appliance. A poor air supply could cause
lack of oxygen.
• Ensure that the gas supply complies with
the gas type stated on the identification
label, placed near the gas supply pipe.
• This appliance is not connected to a
combustion products evacuation device.
It must be installed and connected in
accordance with current installation
Page 4
4
progress
regulations. Particular attention shall be
given to the relevant requirements
regarding ventilation.
• The use of a gas cooking appliance
results in the production of heat and
moisture in the room in which it is
installed. Ensure that the kitchen is
well ventilated: keep natural
ventilation holes open or install a
mechanical ventilation device
(mechanical extractor hood).
• Prolonged intensive use of the
appliance may call for additional
ventilation, for example opening of a
window, or more effective
ventilation, for example increasing
the level of mechanical ventilation
where present.
• Once you removed all packaging from
the appliance, ensure that it is not
damaged and the electric cable is in
perfect conditions. Otherwise, contact
your dealer before proceeding with the
installation.
• The manufacturer disclaims any
responsability should all the safety
measures not be carried out.
The symbol
on its packaging indicates that this product
may not be treated as household waste.
Instead it shall be handed over to the
applicable collection point for the recycling of
electrical and electronic equipment. By
ensuring this product is disposed of
correctly, you will help prevent potential
negative consequences for the environment
and human health, which could otherwise be
caused by inappropriate waste handling of
this product. For more detailed information
about recycling of this product, please
contact your local city office, your household
waste disposal service or the shop where
you purchased the product.
on the product or
Service
• Under no circumstances should you
attempt to repair the appliance yourself.
Repairs carried out by unexperienced
persons may cause injury or serious
malfunctioning. Refer to your local Service
Centre. Always insist on genuine spare
parts.
Environmental Information
• After installation, please dispose of the
packaging with due regard to safety and
the environment.
• When disposing of an old appliance,
make it unusable, by cutting off the
cable.
Page 5
Hob burner control knobs
Once the hob has been installed,
it is important to remove any
protective materials, which were
put on in the factory. The
manufacturer will not accept
liability, should the above
instructions or any of the other
safety instructions incorporated in
this book be ignored.
The symbols on the knobs mean:
= no gas supply
= maximum gas supply
= minimum gas supply
For easier lighting, proceed before
putting a pan on the pan support.
Lighting the burners
)
To light a burner, turn the relevant knob
anticlockwise to maximum position and
push down the knob to ignite.
After lighting the flame, keep the knob
pushed down for about 5 seconds. This will
allow the "thermocouple" (Fig.1 - lett. D) to
be heated and the safety device to be
switched off, otherwise the gas supply would
be interrupted. Then, check the flame is
regular and adjust it as required.
If you cannot light the flame even after several
attempts, check the "cap" (Fig.1 - lett. A) and
the"crown" (Fig.1 - lett. B) are in the correct
position.
In the absence of electricity, ignition can
occur without the electrical device; in this
case approach the burner with a flame, push
the relevant knob down and turn it anticlockwise until it reaches the "maximum"
position.
To switch off burners
)
To put the flame out, turn the knob to the
symbol (
z).
Triple crown
C
A - Burner cap
B - Burner crown
C - Ignition candle
D - Thermocouple
progress 5
A
B
D
Fig. 1
Page 6
6
progress
Take care when frying food in hot
oil or fat, as the overheated
splashes could easily ignite.
When switching on the mains, after
installation or a power cut, it is quite
normal for the spark generator to be
activated automatically.
If the burner does not ignite, turn the
control knob to zero, and try again.
Do not keep the control knob
pressed for more than 15 seconds.
If the burner does not light even after 15
seconds, release the control knob, turn
it the “off” position and wait for at least
one minute before trying to light the
burner again.
If the burner accidentally goes out,
urn the control knob to the “off”
t
position and wait for at least 1
minute before trying to light the
burner again.
Page 7

Using the hob correctly
progress 7
To ensure maximum burner efficiency, you
should only use pots and pans with a flat
bottom fitting the size of the burner used
(see table below).
• For easier lighting, proceed before putting
a pan on the pan support.
• Use only pans or pots with flat bottom.
• Take care when frying food in hot oil
or fat, as the overheated splashes
could easily ignite.
• If you use a saucepan which is smaller
than the recommended size, the flame will
spread beyond the bottom of the vessel,
causing the handle to overheat.
• Prolonged cooking with potstones,
earthenware pans or cast-iron plates
is inadvisable. Also, do not use
aluminium foil to protect the top
during use.
• Make sure pots do not protrude over the
edges of the cooktop and that they are
centrally positioned on the rings in order to
obtain lower gas consumption.
• Do not place unstable or deformed pots
on the rings: they could tip over or spill their
contents, causing accidents.
• Pots must not enter the control zone.
• If the control knobs become difficult to
turn, please contact your local Service
Force Centre.
• As soon as a liquid starts boiling, turn
down the flame so that it will barely keep
the liquid simmering.
Burner Minimum Maximum
diameter diameter
Triple crown burner 180 mm 260 mm
Semirapid burner
rear 120 mm 220 mm
front 120 mm 180 mm
Auxiliary burner 80 mm 160 mm
Page 8

8
progress
Cleaning and Mainteinance
Disconnect the appliance from
the electrical supply, before
carrying out any cleaning or
manteinance work.
The hob is best cleaned whilst it is
still warm, as spillage can be
removed more easily than if it is
left to cool.
This appliance cannot be cleaned
with steam or with a steam
cleaning machine.
The burners
z The burner caps and crowns can be
removed for cleaning.
z Wash the burners taps and crowns
using hot soapy water, and remove
marks with a mild paste cleaner. A well
moistened soap impregnated steel wool
pad can be used with caution, if the
marks are particularly difficult to remove.
z After cleaning, be sure to wipe dry with a
soft cloth.
z Frequently wash the "caps" and the
"crowns" with hot soapy water, carefully
taking away any built-up of food.
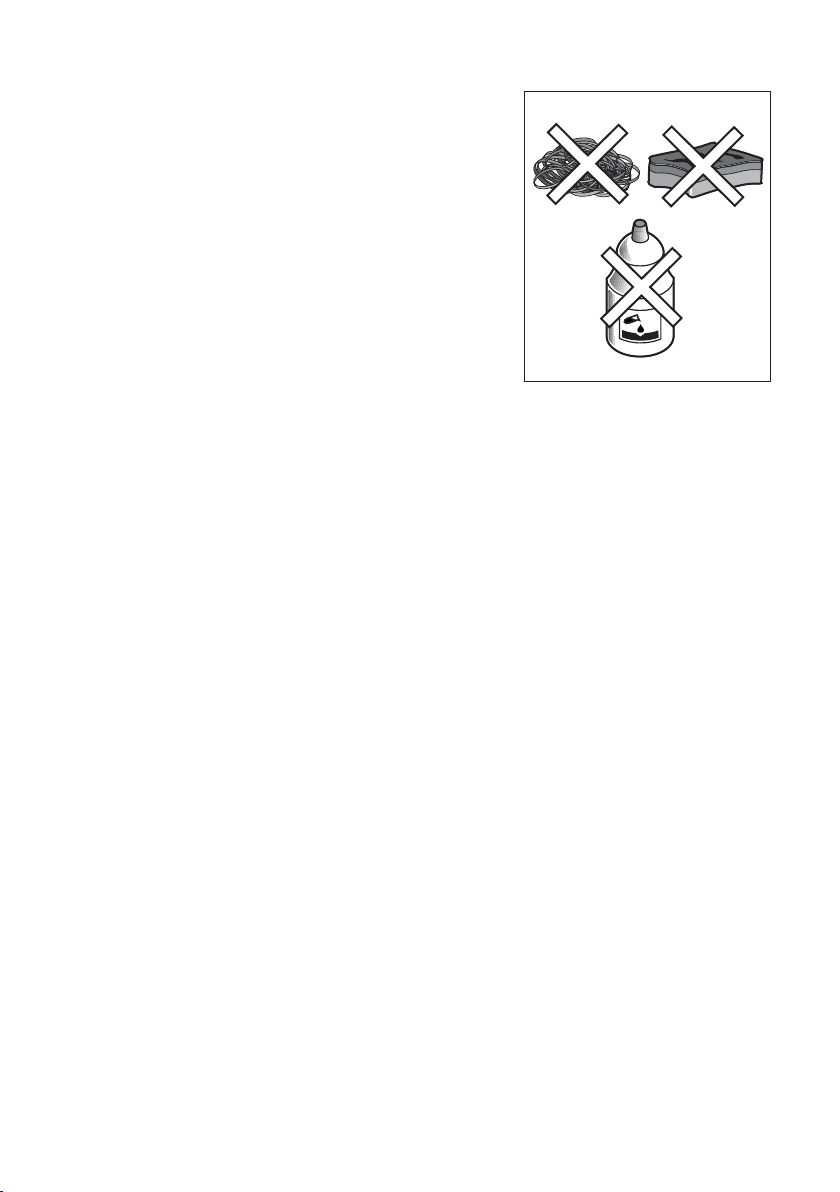
YES
The pan supports
z The enamelled grills can be cleaned with
warm soapy water.
Take care when drying them as the
enamelling process occasionally leaves
rough edges. If necessay, remove
stubborn stains using a paste cleaner.
z After cleaning, make sure that the pan
supports are correctly positioned.
z To make burners work properly, ensure
that pan supports are placed in a way
that the arms are centred upon the
burner as shown in the picture.
z Pay attention when replacing the
pan supports in order to avoid
damaging the hob top.
NO
Page 9
The Hob Top
z Regularly wipe over the hob top using a
soft cloth well wrung out in warm water
to which a little wasing up liquid has
been added. Avoid the use of the
following:
- household detergent and bleaches;
- impregnated pads unsuitable for nonstick saucepans;
- steel wool pads;
- bath/sink stain removers.
z Do not leave acid or alkaline
substances (e.g. vinegar, salt, lemon
juice, etc.) on the cooktop.
The Ignition electrode
The electric ignition is obtained through
a ceramic electrode with a metal electrode
inside (Fig.1 - C). Keep these components
very clean, to avoid difficult lighting, and
check that the burner crown holes (Fig.1 - B)
are not obstructed.
progress 9
Page 10
10
progress
Technical data
Cut out dimensions
(see chapter “Building In”)
Width: 560 mm
Depth: 480 mm
Heat Input
Triple Crown burner 4,0 kW
Semi-rapid burner 2,0 kW
Auxiliary burner 1,0 kW
Overall dimensions
Width: 594 mm
Depth: 510 mm
Electric supply: 230 V ~ 50 Hz
Category: II2E+3+
Gas supply: G20/G25 (2E+) 20/25 mbar
Appliance class 3
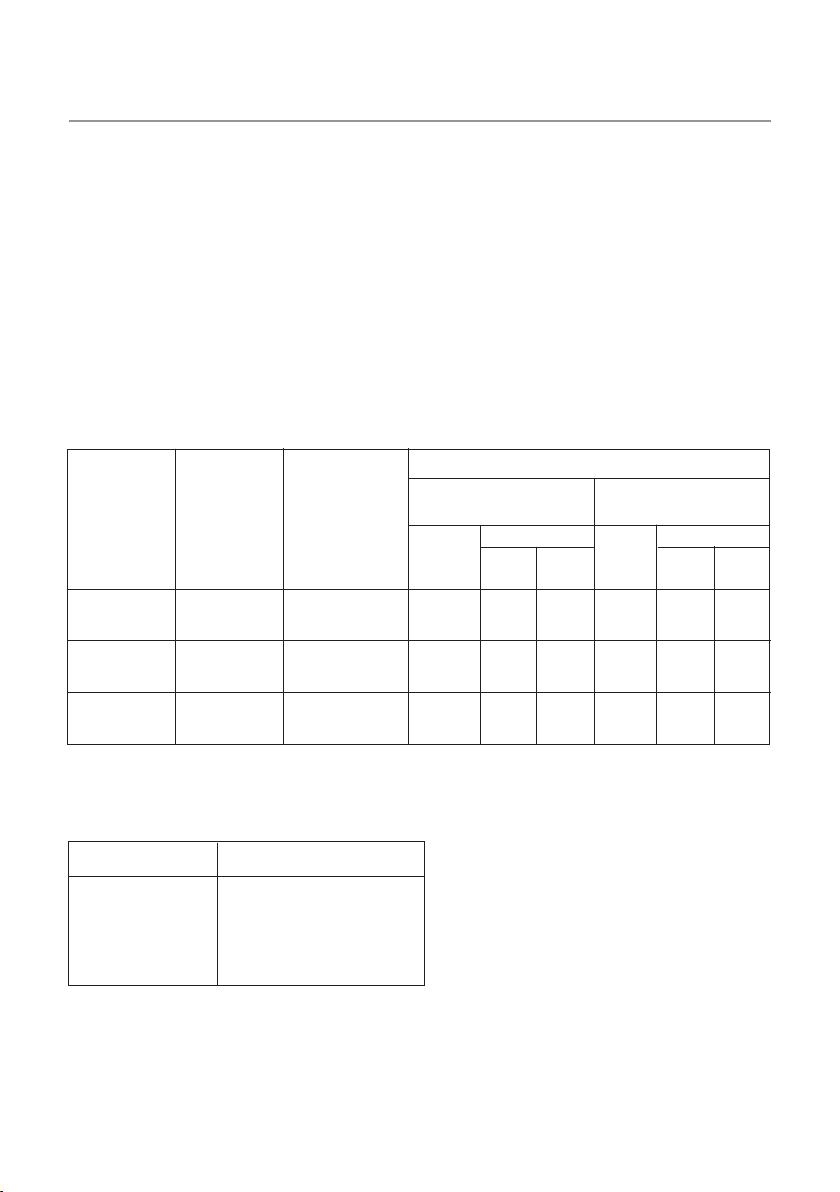
BURNER NORMAL REDUCED NORMAL POWER
Auxiliary 1,0 0,33 70 0,095 0,111 50 73 71
Semi-rapid 2,0 0,45 96 0,190 0,221 71 145 143
Triple crown 4,0 1,2 146 0,381 0,443 98 291 286
POWER POWER
kW kW NATURALPOWER LPG
3
m
inj.
100/mm 20 mbar 25 mbar 100/mm
/h g/h
G20 G25
28-30/37 mbar
inj.
G30 G31
By-pass diameters
Burner Ø By-pass in 1/100 mm.
Auxiliary 28
Semi-rapid 32
Triple crown 56
Page 11

Installation
progress 11
z The following instructions about
installation and maintenance must
be carried out by qualified personnel
in compliance with the regulation in
force. The regulation to be applied
for this type of installation is NBN D
5I.003 : "Installations functioning
with combustible gas lighter than
air".
z The side walls of the unit in which
the hob is going to be installed, must
not exceed the height of the working
top.
z Avoid installing the appliance in the
proximity of inflammable materials
(e.g. curtains, tea towels etc.).
z The appliance must be electrically
disconnected before all
interventions. If any electric supply
to the appliance is required to carry
out the work, ensure all the
necessary precautions are followed.
Gas Connection
It is indispensible that the connection to the
gas mains are carried out by means of an
AGB tap. Choose fixed connections or use a
flexible pipe in AGB (stainless steel).
If using flexible metallic pipes, be careful they
do not come in contact with mobile parts or
they are not squeezed. Use the same
attention when the hob is combinated with
an oven.
This hob can be operated by Slochteren gas
(G25) with a nominal pressure of 25 mbar or
by natural gas with nominal pressure of 20
mbar. No regulation is required for use by
these two types of gas. Before fitting the
appliance ensure that the installation has the
correct voltage for the appliance. At full
capacity, the drop in pressure must not
exceed 5%. Such a drop in pressure is
caused by the following parameters:
- maximum capacity of meter;
- diameter and lenght of the tube in
front and behind the meter;
- section of transit of variuos tubes
positioned on the circuit;
- diameter of eventual connections.
To ensure a correct operation, a saving of
energy and the long-life of the appliance, the
voltage pressure of the appliance must
correspond to the recommended values.
The adjustable connection is fixed to the
comprehensive ramp by means of a
threaded nut G 1/2". All the components
shown in the figure have already been
assembled in the factory.
The appliance, before leaving the factory, has
been tested in order to give you the best
results.
Important
When the final connection has been made, it
is essential that a thorough leak test is carried
out on the hob and installation. Use some
soapy water, never a flame.
A - Ramp with ending nut
B - Seal
C - Adjustable connection
Page 12
12
progress
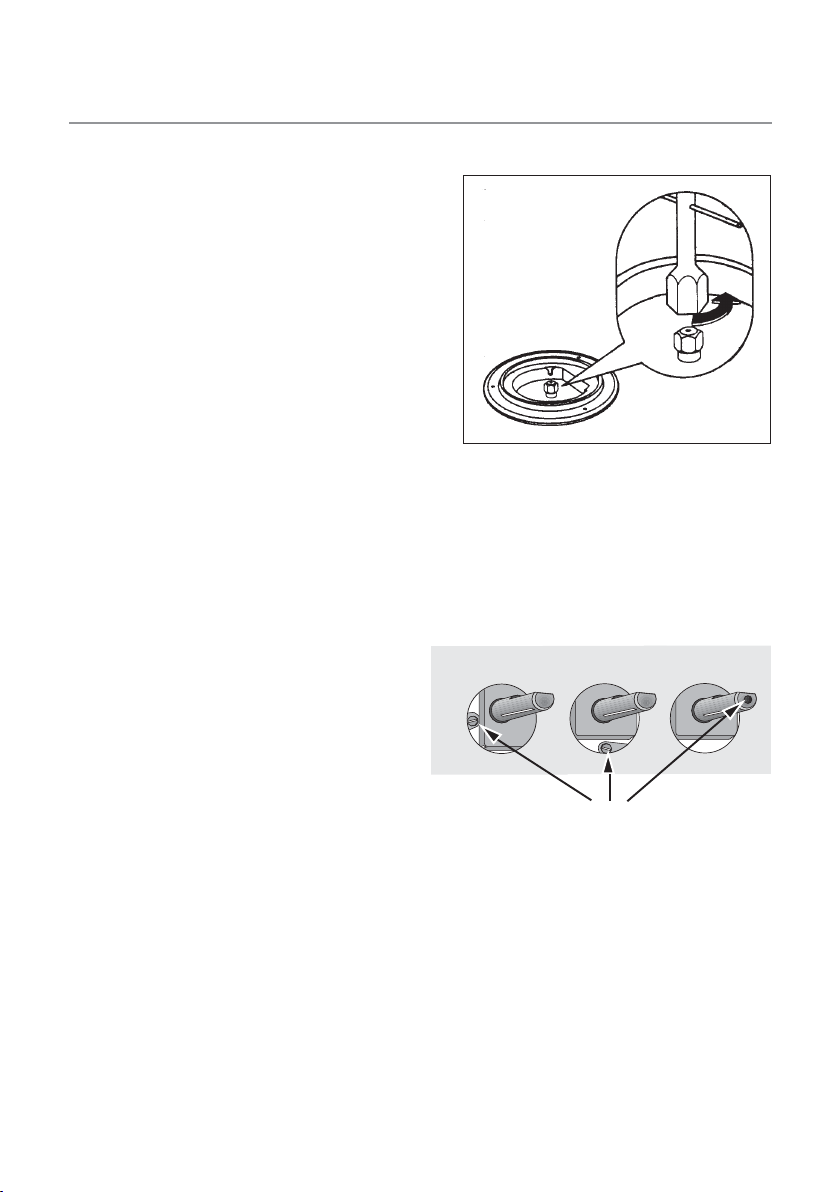
Adaptation to different types of gas
Injectors replacement
)
• Remove the pan supports.
• Remove the burner's caps and crowns.
• With a socket spanner 7 unscrew and
remove the injectors (Fig. 2), and replace
them with the ones required for the type
of gas in use.
• Reassemble the parts, following the
same procedure backwards.
• Replace the rating label (placed near the
gas supply pipe) with the relevant one for
the new type of gas supply. You can find
this label in the package of the injectors
supplied with the appliance.
Should the feeding gas pressure be different
or variable compared with the required
pressure, an appropriate pressure adjuster
must be fitted on the gas supply pipe, in
compliance with the rules in force.
Adjustment of minimum level
)
To adjust the minimum level of the burners,
proceed as follows:
• Light the burner.
• Turn the knob on the minimum position.
• Remove the knob.
• With a thin screwdriver, adjust the bypass screw (Fig. 3). If changing from
natural gas to LPG, completely tighten
clockwise the screw, until a small regular
flame is obtained.
• If changing from LPG to natural gas
unscrew about 1/4 turn the by-pass
screw, until a small regular flame is
obtained.
• Finally check the flame does not go out
when quickly turning the knob from the
maximum position to the minimum
position.
This procedure can easily be carried out,
anyhow the hob has been positioned or built
in the working top.
Fig. 2
Fig. 3
Bypass-screw
Page 13

Electrical connection
The appliance is designed to be
connected to 230 V monophase electricity
supply.
The connection must be carried out in
compliance with the laws and regulations in
force.
Before the appliance is connected:
1. check that the main fuse and the
domestic installation can support the
load (see the rating label);
2. check that the power supply is properly
earthed in compliance with the current
rules;
3. check the socket or the double pole
switch used for the electrical connection
can be easily reached with the appliance
built in the forniture unit.
The appliance is supplied with a connection
cable and the relevant plug.
The plug has to be fitted in a proper socket.
If connecting the appliance directly to the
electric system, it is necessary that you install
a double pole switch between the appliance
and the electricity supply, with a minimum
gap of 3 mm. between the switch contacts
and of a type suitable for the required load in
compliance with the current rules.
The connection cable has to be placed in
order that, in each part, it cannot reach a
temperature higher than 90°C.
The brown coloured phase cable (fitted in
the terminal block contact marked with "L")
must always be connected to the network
phase.
progress 13
Page 14
14
progress
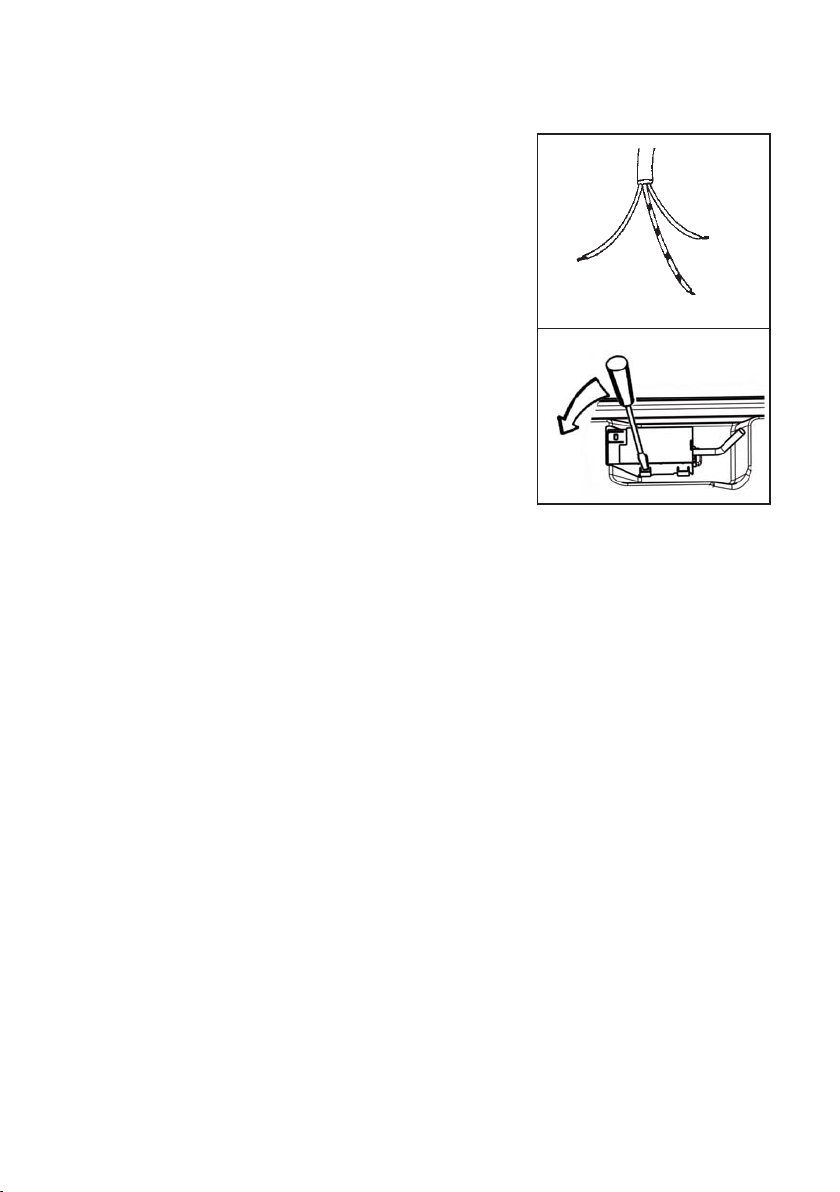
Remplacement of the voltage cable
The connection of the voltage cable to
the appliance's terminal block is of type "Y".
This means that its replacement requires the
specific equipment of a technician. In this
case, only cable type H05V2V2-F T90 must
be used. The cable section must be suitable
to the voltage and the working temperature.
The yellow/green earth wire must be
approximately 2 cm. longer than the phase
wires (Fig. 4-a).
To open the terminal block and reach the
terminals, proceed as follows:
z insert the point of a screwdriver into the
visible protrunding part of the terminal
block;
z exert a light pressure and lift (Fig. 4-b)
Fig. 4-a
Fig. 4-b
Neutral
Earth
(yellow/green))
Page 15
Building In
SR
SR
594
A = Auxiliary burner
SR = Semi-rapid burner
TC = Triple Crown burner
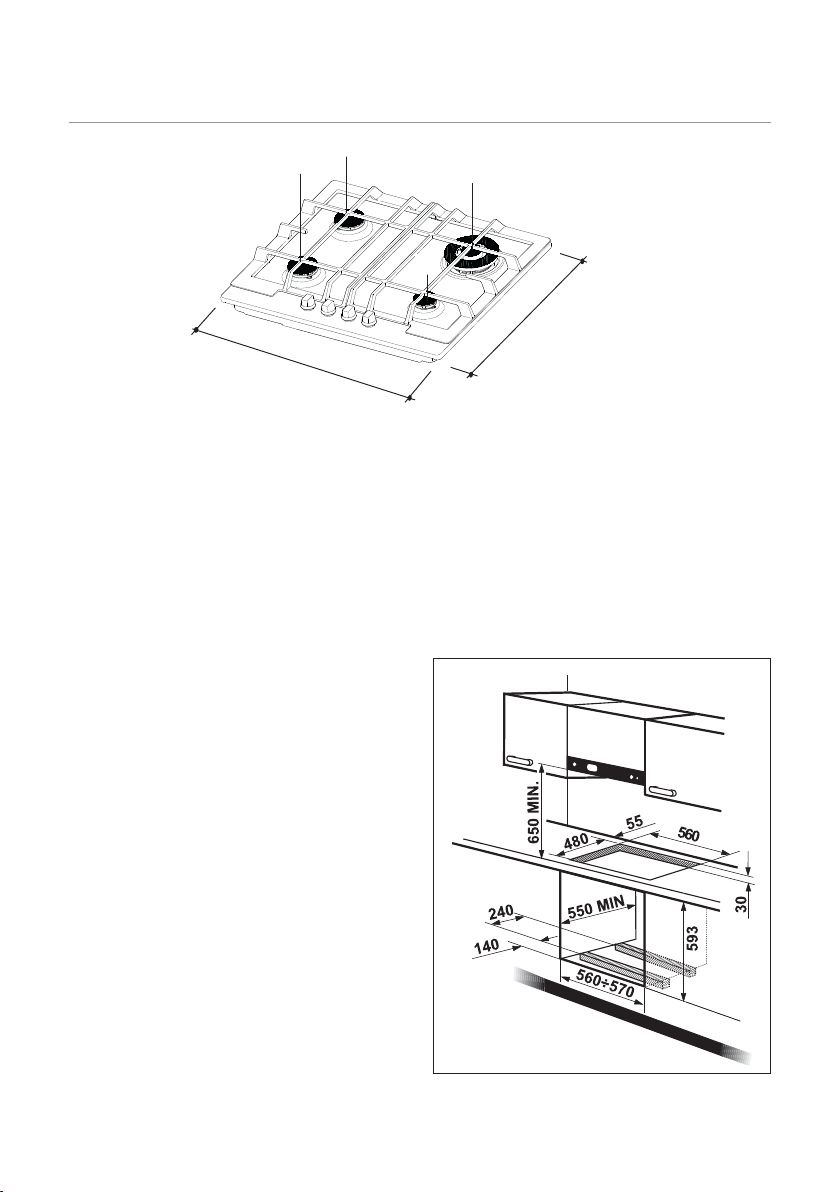
These hobs can be inserted in a built-in
kitchen unit whose depth is between 550
and 600 mm. The hobs dimensions are
shown in Fig. 5.
The cut out dimensions are shown in Fig. 6.
The edge of the cut out must have a
minimum distance from the rear wall of 55
mm.
If there are side walls, or sides of the
furniture unit near the hob, the cut out edges
must have a minimum distance of 100 mm.
Hanging forniture units or hoods must be
placed at 650 mm. minimum from the hob.
Fitting the hob to the worktop
Carry out the building in of the hob as
follows:
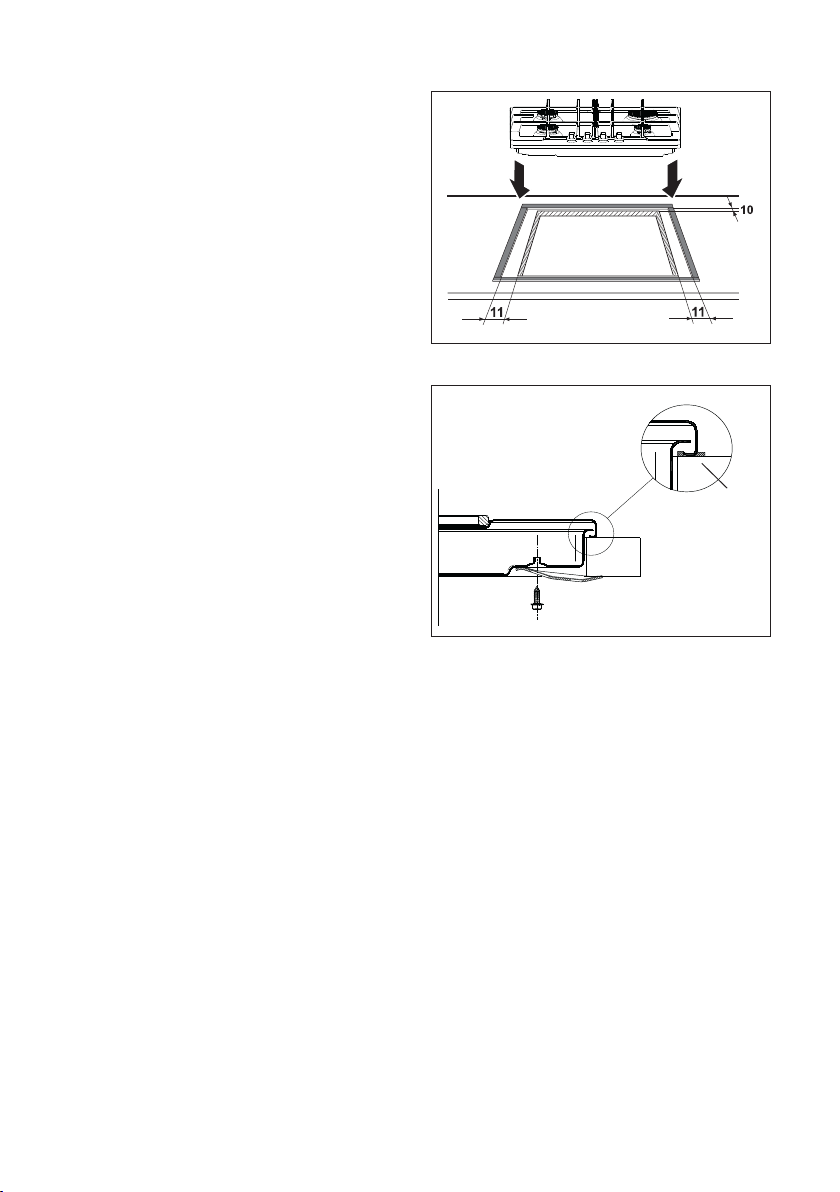
1. Place the seals supplied with the hob on
the front edge of the cut out. Then, place
them at 11 mm from the side edges and
at 10 mm from the rear edge, as shown
in the diagram, taking care that the seals
meet without overlapping.
2. Place the hob in the cut out, taking care
that it is centred.
3. Fix the hob with the relevant fixing
progress 15
TC
A
510
Fig. 5
Dimensions are given in millimeters
Fig. 6
Page 16
16
progress
clamps, supplied with the injectors kit
(see diagram). When the fixing brackets
have been tightened, the excess seal
can be removed.
The overlaying sealing material should be
removed using a wooden or plastic knife
in order to avoid damaging the worktop.
To completely remove the sealing
material please position the plastic knife
at an angle (Position at an angle of 45°C).
The edge of the hob forms a double seal
which prevents the ingress of liquids.
Fig. 7
a
a) seal
Fig.8
Page 17
Possibilities for insertion
Kitchen unit with door
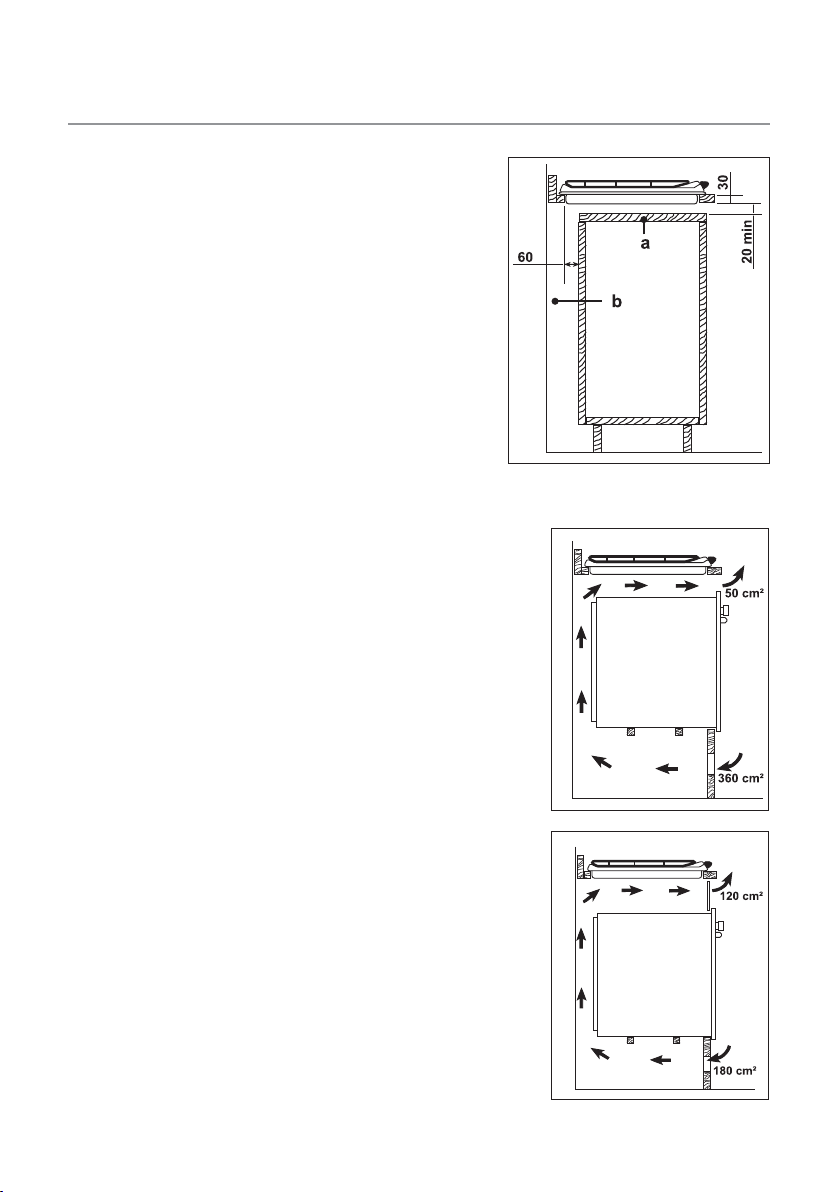
Proper arrangements must be taken in
designing the forniture unit, in order to avoid
any contact with the bottom of the hob
which can be heated when it is operated.
The recommended solution is shown in Fig.
9. The panel fitted under the hob should be
easily removable to allow an easy access if a
technical assistance intervention is needed.
Kitchen unit with oven
The hob recess dimensions must comply
the indication given in Figs. 10 and 11 and
must be provided with brackets to allow a
continuous supply of air.
The hob's electric connection and the
oven's one must be carried out separately,
both for safety reasons and to allow the
oven to be easily taken off the unit.
Wall units or extractor hoods must be at least
650 mm from the cooktop (Fig. 6).
progress 17
Fig. 9
a) Removable panel
b) Space for connections
Fig. 10
Fig. 11
Page 18

18
progress
Technical assistance and spare parts
Before leaving the factory this appliance was
tested and verified by specialized personnel,
in order to ensure best performance. Any
repairs or intervention which may become
necessary, must be carried out with utmost
care and attention.
For this reason, this hob should only be
r
epaired or serviced by an authorised Service
Engineer and only genuine approved spare
parts should be used.
For Assistance, please contact your dealer
or an authorized Service Centre, specifying
the type of problem, the appliance model
(Mod.), the product number (Prod. No.) and
the serial number (Ser. No.). This information
is given on the dataplate which is supplied
in the accessories plastic bag.
Page 19

electrolux 19
Sommaire
Avertissements importants ............................................................................................. 20
Utilisation de votre table de cuisson ............................................................................... 23
Conseils d'utilisation....................................................................................................... 25
Entretien et nettoyage .................................................................................................... 26
Caractéristiques techniques .......................................................................................... 28
Installation ...................................................................................................................... 29
Adaptation des brûleurs au gaz utilisé ............................................................................ 33
Encastrement ................................................................................................................. 35
Possibilités d'encastrement ............................................................................................ 37
Plaque signalétique ........................................................................................................ 38
Comment lire votre notice d'utilisation?
Les symboles suivants vous guideront tout au long de la lecture de votre notice:
Instructions de sécurité
Descriptions d'opérations
)
Conseils et recommandations
Informations sur l'environnement
Cet appareil est conforme aux Directives Communitaires CEE suivantes :
2006/95 (Basse Tension) ;
•
•
90/396 (Appareil Gaz)
89/336 (Compatibilité Electromagnétique) ;
•
93/68 (Directives Générales) et modifications successives.
•
FABRICANT:
ELECTROLUX HOME PRODUCTS ITALY S.p.A.
Viale Bologna, 298
47100 FORLÌ (Italie)
Ces instructions sont valables uniquement pour les pays dont les symboles d'identification
figurent sur la couverture de cette notice d'utilisation et sur l'appareil lui-même.
Conservez cette notice d’utilisation avec votre appareil. Si l’appareil devait être vendu ou
cédé à une autre personne, assurez-vous que la notice d’utilisation l’accompagne. Le
nouvel utilisateur pourra alors être informé du fonctionnement de celui-ci et des avertissements s’y rapportant. Ces avertissements ont été rédigés pour votre sécurité et celle
d’autrui.
Page 20

20 electrolux
Français
Avertissements importants
Cet appareil doit être installé par une personne qualifiée et selon les normes en vigueur.
Veuillez maintenant lire attentivement cette notice pour une utilisation optimale de votre
appareil.
Nous déclinons toute responsabilité en cas de dommages ou d’accident provoqués par
l’appareil du fait du non-respect de ces avertissements.
Utilisation
• Cet appareil a été conçu pour être utilisé
par des adultes. Veillez à ce que les
enfants n’y touchent pas et ne l’utilisent
pas comme un jouet.
• A la réception de l’appareil, déballez-le ou
faites-le déballer immédiatement. Vérifiez
son aspect général. Faites les éventuelles
réserves
sur le bon d’enlèvement dont vous
garderez un exemplaire.
• Votre appareil est destiné à un usage
domestique normal. Ne l’utilisez pas à des
fins commerciales ou industrielles ou pour
d’autres buts que celui pour lequel il a été
conçu.
• Ne modifiez pas ou n’essayez pas de
modifier les caractéristiques de cet
appareil. Cela représenterait un danger
pour vous.
• Avant d’utiliser votre appareil, assurezvous qu’il a été correctement raccordé
pour le type de gaz distribué.
• Cet appareil n'est pas destiné à être utilisé
par des enfants ou des personnes dont les
capacités physiques, sensorielles ou
mentales, ou le manque d'expérience et
de connaissance les empêchent d'utiliser
l'appareil sans risque lorsqu'ils sont sans
surveillance ou en l'absence d'instruction
d'une personne responsable qui puisse
leur assurer une utilisation de l'appareil
sans danger.
• Tenez les enfants à distance pendant le
fonctionnement : la table de cuisson et les
par écrit sur le bon de livraison ou
récipients s’échauffent et peuvent rester
chauds longtemps après l’arrêt de
l’appareil.
• Baissez ou éteignez toujours la flamme
d’un brûleur avant de retirer un récipient.
• N’utilisez jamais votre table à vide (sans
récipient dessus)
• Assurez-vous que les manettes sont
toujours en position arrêt «
l’appareil n’est pas utilisé.
• N’utilisez pas de récipients instables ou
déformés : ils peuvent se renverser et
provoquer un accident.
• Les réparations ne doivent être effectuées
que par un service après vente qualifié.
Une réparation non conforme peut être la
cause de graves dommages.
• Ne conservez pas à proximité de l’appareil
des produits inflammables sensibles aux
températures (exemples: produits de
nettoyage, bombe aérosols, ..)
• Assurez-vous que les enfants ne manipulent pas commandes.
• Ne laissez rien sur la table de cuisson. Une
mise en fonctionnement accidentelle
pourrait provoquer un incendie.
• Si vous utilisez un appareil électrique à
proximité de votre table de cuisson, veillez
a ce que le câble d’alimentation de cet
appareil électrique ne soit pas en contact
avec la surface chaude de la table.
• Surveillez attentivement la cuisson lors de
z » lorsque
Page 21

electrolux 21
friture dans l’huile ou la graisse.
• Evitez tout courant d’air. Si un brûleur ne
présente pas une flamme régulière,
nettoyez-le soigneusement. Si l’inconvénient subsiste, faites appel au service
après-vente.
• Si la table est équipée d’un couvercle,
nettoyez-le soigneusement et ne le fermez
qu’après que les brûleurs ont refroidi.
• Nettoyez l’appareil après chaque utilisation : vous prolongerez ainsi sa durée de
vie et vous éviterez un mauvais
fonctionnement des brûleurs et des
bougies d’allumage.
• Avant tout nettoyage ou intervention
technique, assurez-vous que l’appareil est
débranché électriquement et complètement refroidi.
• L’appareil ne peut être nettoyé à la vapeur
chaude ni avec appareil à jet de vapeur
chaude.
• L’utilisation d’un appareil de cuisson au
gaz conduit à la production de chaleur et
d’humidité dans la pièce où il est installé.
Veillez à assurer une bonne aération de la
cuisine : maintenez ouverts les orifices
d’aération naturelle ou installez un
dispositif d’aération mécanique.
• Une utilisation intensive et prolongée de
l’appareil peut nécessiter une aération
supplémentaire en ouvrant la fenêtre, ou
une aération plus efficace, par exemple en
augmentant la puissance de la ventilation
mécanique si elle existe.
• Cet appareil n’est pas raccordé à un
dispositif d’évacuation des produits de
combustion. Il doit être installé et raccordé
conformément aux règles d’installation en
vigueur. Une attention particulière sera
accordée aux dispositions applicables en
matière de ventilation.
• Veillez à ne rien laisser sur la table pendant
et après l’utilisation des zone de cuisson
(torchons, feuilles d’aluminium, plastique,
etc.).
• Changez le tuyau d’arrivée du gaz un peu
avant l’expiration de la date de vieillissement indiquée sur celui-ci.
• N’utilisez jamais de bouteille de propane
dans votre cuisine ou autre local fermé.
• N’utilisez que les accessoires livrés avec
votre appareil (un diffuseur de chaleur, par
exemple, endommagerait la table de
cuisson).
Installation
• Les opérations d’installation et de
branchement doivent être effectuées par
un personnel qualifié et suivant les normes
en vigueur.
• Si l’installation électrique de votre
habitation nécessite une modification pour
le branchement de votre appareil, faites
appel à un électricien qualifié.
• Assurez-vous que l’appareil est installé
dans une pièce correctement aérée : une
mauvaise ventilation peut entraîner un
manque d’oxygène. Consultez un
installateur qualifié ou adressez-vous à la
compagnie de distribution du gaz de votre
région.
• Cette table est conçue pour fonctionner en
230 V monophasé. Un éventuel
branchement polyphasé sans neutre (400
V) peut provoquer la destruction des
foyers.
Page 22

22 electrolux
Protection de
l’environnement
Tous les matériaux marqués par le symbole sont recyclables. Déposez-les dans
une déchetterie prévue à cet effet (renseignez-
vous auprès des services de votre commune)
pour qu’ils puissent être récupérés et recyclés.
En cas d’anomalie de fonctionnement, le vendeur de votre appareil est le
premier habilité à intervenir. A défaut (déménagement de votre part, fermeture du magasin
où vous avez effectué l’achat ...), veuillez
consulter le Centre Contact Consomma-
teurs qui vous communiquera alors l’adresse
d’un Service Après Vente.
En cas d’intervention sur l’appareil,
exigez du service après vente les pièces
de rechange certifiées Constructeur.
Le symbole
emballage indique que ce produit ne peut être
traité comme déchet ménager. Il doit être remis au point de collecte dédié à cet effet (collecte et recyclage du matériel électrique et
électronique). En procédant à la miseau rebut
de l'appareil dans les règles de l’art, nous préservons l'environnement et notre sécurité,
s'assurant ainsi que le déchets seront traités
dans des conditions optimum. Pour obtenir
plus de détails sur le recyclage de ce produit,
veuillez prendre contact avec les services de
votre commune ou le magasin où vous avez
effectué l'achat.
sur le produit ou son
Page 23

Utilisation de votre table de cuisson
Les commandes
Les manettes qui commandent les brûleurs sont dotées de 3 positions principales
d’utilisation :
= position arrêt
= débit maximum
electrolux 23
Chaque brûleur est contrôlé par un robinet
à verrouillage de sécurité, il est impossible
de tourner la manette sans la pousser.
)
1. Appuyez sur la commande du brûleur
choisi, et tournez-la vers la gauche
jusqu’au repère de débit maximum.
Maintenez la commande enfoncée, pen-
dant 5 secondes environ après
l’apparition de la flamme pour activer la
sécurité thermocouple.
En cas de coupure d’électricité, vous
pouvez utiliser votre table de cuisson
sans avoir recours au système automa-
tique. Pour cela, présentez une flamme
au brûleur.
2. Placez le récipient sur le brûleur.
3. Réglez le débit selon les nécessités de
votre préparation, en vous assurant que
la flamme ne déborde pas du fond.
)
Tournez la commande dans le sens des
aiguilles d’une montre jusqu’à la butée, sur la
position arrêt (
Lorsque vous faites des fritures,
surveillez attentivement la cuisson
car l’huile ou la graisse pourrait
facilement s’enflammer par suite
d’une surchauffe.
= débit minimum
Pour allumer un brûleur
Pour éteindre les brûleurs
z).
Triple couronne
A
B
D
C
A - Chapeau du brûleur
B - Coronne du brûleur
C - Bougie d’allumage
D - Sécurité thermocouple
Ne maintenez pas la manette de
commande pressée plus de 15
secondes.
Si le brûleur ne s'allume pas au
bout de 15 secondes, relâchez la
manette et positionnez-la sur la
position "arrêt". Attendez au
moins 1 minute avant d'essayer
une nouvelle fois d'allumer le
brûleur.
Fig. 1
Page 24

24 electrolux
Si le brûleur s'éteint accidentellement, tournez la manette de
commande sur la position "arrêt"
et attendez au moins 1 minute
avant d'essayer une nouvelle fois
d'allumer le brûleur.
Avant la première utilisation de votre appareil
Avant la premiére utilisation de votre
appareil, retirez toutes les étiquettes
publicitaires et le autocollants (sauf la
plaque signaletique) qui pourraient
se trouver sur le plan de cuisson.
Page 25

Conseils d'utilisation
electrolux 25
• Ne placez un récipient sur un brûleur
qu’après avoir allumé celui-ci.
• N’utilisez que des récipients creux.
• Assurez-vous que la flamme ne déborde
pas du fond du récipient.
• Lors de l’utilisation de la table de cuisson,
il est impératif de respecter les diamètres
indiqués puor chaque zone de cuisson,
afin d’éviter la détérioration des manettes
de commande.
• Surveillez attentivement la cuisson
lorsque vous faites des fritures : l’huile
ou la graisse peuvent facilement s’enflammer par suite d’une surchauffe.
• Si vous utilisez une casserole dont le
diamètre est plus petit que celui qui est
recommandé, la flamme va s’étendre audelà de la base inférieure du reécipient,
causant une surchauffe au niveau de la
poignée du récipient.
• Si la flamme d’un brûleur s’éteint accidentellement, ramenez la manette correspondante sur la position arrêt et attendez une
minute avant de rallumer le brûleur.
• Les surfaces en acier inoxydable
peuvent ternir s’ils sont
excessivement chauffés. La cuisson
prolongée avec des casseroles en
faïence ou des plats en fonte n’est pas
recommandée. De plus, n’utilisez pas
de papier d’alluminium pour recouvrir
les récipients pendant leur utilisation.
• Veillez à ce que les récipients ne
débordent pas du plan de cuisson et à
centrer vos récipients sur les zones de
cuisson.
• N’utilisez pas de récipients instables ou
déformés: ils peuvent se renverser et
provoquer un accident.
• Les récipients ne doivent pas entrer en
contact avec les commandes.
• L’utilisation continue et intensive de votre
table de cuisson demande une aération
supplémentaire : ouvrez une fenêtre ou
augmentez la puissance d’aspiration
mécanique (si existante).
Afin d’obtenir un rendement maximum de
chaque brûleur, utilisez des récipients
adaptés au diamètre des brûleurs.
Brûleur Diamètre Diamètre
minimum maximum
Brûleur triple couronne 180 mm 260 mm
Brûleur semi - rapide
avant 120 mm 220 mm
arrière 120 mm 180 mm
Brûleur auxiliaire 80 mm 160 mm
Page 26

26 electrolux
Entretien et nettoyage
Avant de procéder au nettoyage :
débranchez électriquement
l’appareil, assurez-vous que
toutes les manettes sont sur la
position arrêt «
l’appareil soit refroidi.
Les brûleurs
z Lavez les chapeaux de brûleurs avec de
l’eau chaude et un détergent doux, en
prenant soin d’enlever toute incrustation. Si nécessaire, vous pouvez utiliser
une petite brosse en acier.
z Gardez les couronnes des brûleurs en
parfait état de propreté: leur encrassement peut causer des difficultés d’allumage.
z Si vous avez démonté les brûleurs pour
les nettoyer, veillez à remettre
correctement en place les couronnes et
chapeaux de brûleurs parfaitement
secs.
Les grilles
z Les grilles émaillées peuvent être
nettoyées à l’aide d’une solution d’eau
chaude et de savon ou détergent doux.
Utilisez si besoin un produit légèrement
abrasif.
z Après le nettoyage, veillez à ce que les
grilles soient correctement positionnées.
z Pour que les brûleurs fonctionnent
correctement, placez les grilles comme
indiqué sur la figure ci-contre: les fils de
la grille doivent être centrés par rapport
aux brûleurs.
Veillez à ne pas endommager la
table de cuisson lors de la mise
en place des grilles.
z» et attendez que
OUI
NON
Les manettes
z Utilisez une éponge très légèrement im-
bibée d’eau savonneuse. Rincez et séchez soigneusement.
z Pour un meilleur nettoyage du plan de
cuisson, les manettes sont amovibles.
z Assurez-vous que la manette soit sur la
position arrêt «
z» .
Page 27

z Retirez la manette.
z Après le nettoyage, remettez en place la
manette dans sa position initiale.
Lors du nettoyage, en aucun cas
du liquide ou du produit
d’entretien ne doit pénétrer à
l’intérieur du caisson où se
situent le les éléments
électriques.
Le dessus de la table de cuisson
z Passez une éponge légèrement imbibée
d’eau tiède (et, si nécessaire, de
détergent doux) après chaque utilisation.
z Evitez tout écoulement dans les orifices
de la table.
z Utilisez, si nécessaire, un racloir spécial
et des produits spécifiques vendus dans
le commerce.
z N’utilisez pas d’objet tranchant (cou-
teau, grattoir, tournevis, etc.) ou
d’éponge à face abrasive.
z N’utilisez pas de détergents abrasifs ou
corrosifs tels que : bombes aérosols
pour four, produits détachants, produits
anti-rouille, poudres à récurer.
z Enlevez rapidement de la table de
cuisson les taches de vinaigre,
citron, sel et les substances acides
et alcalines en général.
electrolux 27
Nettoyage de la bougie d’allumage
Ces appareils sont munis d’allumeurs
électriques. L’allumage est assuré par une
“bougie” en céramique et une électrode
métallique (Fig.1 - lettre C). Pour éviter les
difficultés d’allumage, maintenir ces deux
éléments en parfait état de propreté et
veillez à ce que les orifice des brûleurs ne
soient pas obstrués.
Page 28

28 electrolux
Caractéristiques techniques
Dimensions de l’ouverture pour
l’encastrement dans le plan de travail
(voir chapitre “Encastrement”)
Largeur: 560 mm
Profondeur: 480 mm
Dimensions de l’appareil
Largeur: 594 mm
Profondeur: 510 mm
Puissance des brûleurs
Brûleur Triple Couronne 4,0 kW
Brûleurs Semi-rapide 2,0 kW
Brûleur Auxiliaire 1,0 kW
Alimentation: 230 V ~ 50 Hz
3
Air nécessaire à la combustion 16 m
Catégorie: II2E+3+
Appareil de classe 3
/h
Appareil réglé en Usine pour fonctionner avec
gaz type G20/G25 (2E+) 20/25 mbar
Tableau n°1
TYPE DE DÉBIT DÉBIT DÉBIT CALORIFIQUE NOMINAL
BRÛLEUR CALORIFIQUE CALORIFIQUE
Auxiliaire (Petit) 1,0 0,33 70 0,095 0,111 50 73 71
Semi-rapide 2,0 0,45 96 0,190 0,221 71 145 143
Triple Couronne
NOMINAL MINIMUM GAZ NATUREL GAZ BUT.-PROP.
kW kW 28-30/37 mbar
Repère m3/h Repère g/h
injecteur
100/mm 20 mbar 25 mbar 100/mm
4,0 1,2 146 0,381 0,443 98 291 286
G20 G25
injecteur
G30 G31
Page 29

Installation
electrolux 29
Emplacement
Cet appareil appartient à la catégorie
d’isolation thermique "X" et il a été conçu
pour être encastré ou placé à côté d'autres
meubles selon la norme en vigueur (I.E.C.
335.2.6).
Les meubles juxtaposés auc côtés de la
table de cuisson ne doivent pas dépasser la
hauteur de celle-ci.
Les bords latéraux de la découpe pratiquée
doivent se trouver à au moins 100 mm. des
murs ou des meubles latéraux.
Les meubles suspendus ou les hottes
doivent être installés à une hauteur
minimale de 650 mm. au dessus de la table
de cuisson.
N’installez pas l'appareil près de matériaux
inflammables (par ex.: rideaux, torchons,
etc.).
Débranchez l'appareil avant toute
intervention.
Important
z L'installation et le branchement de l'ap-
pareil doivent être effectués par un
personnel qualifié con-formément aux
textes réglementaires et règles de l'art en
vigueur, notamment:
z La norme applicable pour ce type
d’installation est NBN D 51.003
“Installations alimentées en gaz
combustible plus léger que l’air”.
Recommandation
z Vérifiez que le débit du compteur et le
diamètre des canalisations sont
suffisants pour alimenter tous les
appareils de l'installation et vérifiez que
tous les raccords sont bien étanches;
z N'omettez pas d'installer un robinet de
barrage visible et accessible.
Raccordement gaz
Raccordez la table à la bouteille ou à
l'installation selon les prescriptions
légales en la matière.
z L’installation d’un robinet d’arrêt agréé
AGB est indispensable. Donnez la
préférence aux raccordements fixes,
sinon utilisez un flexible métallique AGB.
En cas d’utilisation de tuyaux métaliques
flexibles, assurez-vous qu’ils n’entrent
pas en contact avec des parties mobiles
ou qu’ils ne soient écrasés. Faites preuve
de la même prudence lorsque la table de
cuisson est utilisée en combinaison avec
un four.
z Ces tables de cuisson peuvent
fonctionner aussi bien avec du gaz de
Slochteren (G25) à la pression nominale
de 25 mbar, qu’avec du gaz naturel
(G20) à la pression nominale de 20 mbar.
Le fonctionnement avec ces deux gaz ne
réclame aucun réglage.
z Avant de monter l’appareil, vérifiez que
l’installation est en mesure d’assurer une
alimentation correcte de l’appareil. A
pleine capacité, la chute de pression ne
doit pas dépasser 5%. Cette perte de
charge est fonction des paramètres
suivants:
- débit maximal du compteur,
- diamètre et longueur des tuyauteries
en amont et en aval du compteur,
- section de passage des divers
robinets intercalés dans le circuit,
- diamètre des raccords éventuels.
Page 30

30 electrolux
Important
Assurez-vous que l'appareil est réglé
pour le type de gaz auquel il sera
alimenté. Pour le passage d'un gaz à
un autre, reportez-vous au
paragraphe "Adaptation des
brûleurs au gaz utilisé”.
Pour un fonctionnement correct, une
consommation réduite et une plus grande
durée de vie de l'appareil, assurez-vous que la
pression d'alimentation correspond aux
valeurs indiquées dans le tableau.
Si l'appareil est alimenté en gaz Butane ou
Propane (bouteille), contrôlez que le
régulateur de pression débite le gaz à une
pression de 28 mbar pour le Butane et 37
mbar pour le Propane.
Avant de sortir de nos ateliers, cet appareil a
été testé et mis au point par un personnel
expert et spécialisé de façon à vous donner
un fonctionnement le meilleur possible.
Le raccord orientable est dejà fixé à la
rampe d'alimentation de l'appareil par un
écrou fileté G 1/2". Les pièces indiquées à
la Fig. 2 ont été montées dans l'usine.
1. Effectuez ensuite le raccordement
)
du tube d'arrivée de gaz.
2. Contrôlez la parfaite étanchéité du raccord et de l'embout en utilisant une solution
savonneuse.
3. Fixez l'appareil au meuble.
A) Ecrou situé à l'extrémite
de la rampe
B) Joint
C) Raccord orientable
Fig. 2
Page 31

Entretien
Contrôlez périodiquement le
tuyau d'arrivée du gaz et
l'éventuel régulateur de pression.
En cas d'anomalie remplacez la
pièce défectueuse.
Pour garantir un bon fonctionnement
et une bonne sécurité, il est
nécessaire de procéder
périodiquement au graissage des
robinets de réglage du gaz. Confiez
cette opération à un technicien
qualifié.
Branchement électrique
Reliez l'appareil à la terre,
conformément aux prescriptions de
la norme NF.C 15100 et aux
règlements en vigueur.
Avant d’effectuer le branchement s’as-
surer que:
- le disjoncteur et l’installation électrique
peuvent supporter la charge de
l’appareil (voir la plaque signalétique);
- l’installation d’alimentation soit équipée
d’une prise de terre efficace selon les
normes en vigueur;
- la prise ou l’interrupteur principal soient
facilement accessibles.
L’appareil ne doit pas être raccordé à l’aide
d’un prolongateur, d’une prise multiple ou
d’un raccordement multiple (risque
d’incendie).
Vérifiez que la prise de terre est conforme
aux règlements en vigueur.
Les tables de cuisson sont équipées d’un
câble d’alimentation et sont aptes au
fonctionnement en 230V ~ 50 Hz.
Branchez la fiche à une prise adéquate.
Si l’on désire un branchement direct au
réseau (branchement fixe) il faut intercaler
entre l’appareil et le réseau un dispositif
possédant des contacts à coupure
omnipolaire ayant une distance d’ouverture
des contacts d’au moins 3 mm.
Le câble de terre jaune-vert ne doit pas être
interrompu par l’interrupteur et doit être relié
à la borne du conducteur de protection.
electrolux 31
Page 32

32 electrolux
Le câble de phase de couleur marron
(provenant de la borne “L” de la planchette à
bornes) doit toujours être relié à la phase du
réseau d’alimentation.
Le câble d’alimentation doit être placé de
telle manière qu’il ne touche aucune partie
chaude.
Après le branchement essayez les éléments
chauffants en les faisant fonctionner
pendant 3 minutes environ.
Notre responsabilité ne saurait
être engagée en cas d'accidents
ou d'incidents provoqués par une
mise à la terre inexistante ou défectueuse.
Remplacement du câble d'alimentation
Le câble d’alimentation ne doit être remplacé que par un professionnel qualifié selon
les normes en vigueur. Utilisez un câble de
type H05 V2V2 d’une section adaptée à la
charge.
En outre, il faut que le câble de terre jaunevert soit plus long d’environ 2 cm que les
câbles de phase et neutre (Fig.3a).
Le câble d'alimentation sera
positionné de façon à ce qu'en
aucun point sa température
n'excède 90°C.
Pour ouvrir la trappe d'accès à la
barrette secteur et avoir accès aux bornes
de raccordement, procéder comme décrit
ci-dessous:
z insérez l'extrémité d'un tournevis
dans les saillies situées sur le côté à
l’intérieur de l'appareil (Fig.3b);
z exercez una faible pression et faites
levier vers le haut.
Fig. 3a
Fig. 3b
Neutre
Terre
(jaune/vert)
Page 33

Adaptation des brûleurs au gaz utilisé
Pour la conversion de l'appareil d'un type de
gaz à l'autre, opérez comme suit:
Remplacement des injecteurs
1. Otez les grilles.
2. Enlevez les brûleurs.
3. Avec une clé de 7 dévissez les injecteurs
(Fig. 4) et remplacez-les par ceux
convenant au type de gaz utilisé (voir
tableau 1).
4. Remplacez l'étiquette d'étallonage
(collée à côté du tuyau d'alimentation en
gaz) par celle correspondant au nouveau
type de gaz. Elle se trouve dans
l'emballage des injecteurs fournis avec la
table.
electrolux 33
FO 0392
Fig. 4
Page 34

34 electrolux
Réglage du ralenti
1. Allumez chacun des brûleurs.
2. Tournez les manettes jusqu'à l'obtention
du débit réduit.
3. Retirez les manettes.
Alimentation en gaz naturel
)
Agissez sur la vis de réglage (Fig. 5)
jusqu'à l'obtention d'une petite flamme
régulière.
Alimentation en gaz Butane ou
)
Propane
Vissez à fond la vis (Fig. 5), celle-ci étant
déjà prévue pour assurer le débit
minimum.
Contrôlez en tournant la manette de la
position de débit minimum et vice versa,
que la flamme ne s'éteint pas.
Remarque : La vis de réglage est de
petite dimension, utilisez un tournevis
plat très fin.
4. Remontez les manettes en effectuant les
opérations dans l'ordre inverse.
Les opérations ci-dessus peuvent être
effectuées aisément après encastrement de
la table de cuisson dans le meuble de
cuisine.
Fig. 5
Vis de réglage
Tableau n°2
Diamètre de la vis de réglage
Brûleur Ø By-pass 1/100 mm.
Auxiliaire 28
Semi-rapide 32
Triple Couronne 56
Page 35

Encastrement
A = Brûleur auxiliaire
SR = Brûleur semi-rapide
TC = Triple Couronne
SR
594
electrolux 35
SR
TC
A
510
Fig. 6
Les dimensions sont indiquées en
millimètres.
Ces tables de cuisson sont prévues pour être
encastrées dans des meubles de cuisine
ayant une profondeur de 550 à 600 mm.
Page 36

36 electrolux
Côtés d'encastrement
Les tables de cuisson peuvent être
montées dans un meuble ayant une ouverture pour l’encastrement des dimensions
indiqués dans la Fig.7.
La fixation de la table au meuble doit
)
être effectuée de la façon suivante:
• placez les joints fournis sur les bords de
la découpe: positionnez-les exactement
sur les bords avant, à 11 mm des bords
latéraux et à 10 mm de bord arrière en
veillant à ce que les extrémités des joints
se joignent parfaitement, sans se
chevaucher (Fig. 8);
• placez la table dans la niche
d'encastrement en la centrant
correctement;
• fixez la table au meuble à l'aide des
pattes de serrage prévues à cet effet
(Fig. 9). Les pattes de serragese trouve
dans l'emballage des injecteurs fournis
avec la table. La traction exercée par les
vis est suffisante pour tracer un sillon
dans le joint d'étanchéité, que l'on
pourra aisément enlever.
Le joint d’étanchéité au-dessus doit être
enlevé avec un mor
couteau en plastique pour éviter
d’endommager le plan de travail.
Pour enlever complètement le joint
d’étanchéité, introduire le couteau en
plastique de façon inclinée (angle de 45°).
L'encastrement de la table de
cuisson au dessus d'un lavevaisselle, d'un réfrigérateur, d'un
congélateur, d'un four, ou d'un
lave linge est déconseillé lorsque
le constructeur de ces appareils
électroménagers ne l’a pas
formellement prévu.
ceau de bois ou un
Fig. 7
Fig. 8
joint
d'étanchéité
Fig.9
Page 37

Possibilités d’encastrement
Dans un meuble de cuisine avec porte
Le meuble destiné à recevoir la table de
cuisson devra être fabriqué de façon que le
contact avec les parties métalliques
chaudes soit évité.
La distance minimum entre le fond de la
table de cuisson et le plancher de
l’encastrement doit être de 20 mm.
Reportez vous à la Fig. 10.
La tablette sous la table de cuisson doit être
aisément démontable pour avoir facilement
accès à l'appareil en cas de réparation.
electrolux 37
Au-dessus d'un four
Pour les côtes d'encastrement reportez
vous à la Fig. 7. Prévoir deux supports pour
l'aération. Les figures 11 et 12 illustrent
deux solutions possibles.
Les raccordements électriques du four et de
la table doivent rester accessibles et être
effetués séparément.
Les meubles suspendus ou les hottes
doivent être installés à une hauteur minimale
de 650 mm au-dessus de la table de
cuisson (Figure 7).
Fig. 10
a) Tablette amovible
b) Espace éventuel pour
les raccordements
Fig. 11
Fig. 12
Page 38

38 electrolux
Plaque signalétique
En appelant un Service Après Vente,
indiquez-lui le modèle, le numéro de pro-
duit et le numéro de série de l’appareil.
Ces indications figurent sur la plaque signalétique située sur votre appareil.
Page 39

progress 39
Inhaltsverzeichnis
Warnungen und wichtige Hinweise .................................................................................. 40
Bedienung des Gerätes .................................................................................................. 42
Korrekter Gebrauch der Kochmulde ................................................................................ 44
Pflege und Wartung ........................................................................................................ 45
Regelmäßige Wartung..................................................................................................... 46
Störung, was tun? .......................................................................................................... 47
Technische Daten ........................................................................................................... 48
Montageanleitung ........................................................................................................... 49
Elektrischer Anschluß ...................................................................................................... 51
Umstellung auf eine andere Gasart .................................................................................. 53
Einbau in Küchenanbaumöbeln ....................................................................................... 55
Einbaumöglichkeiten ....................................................................................................... 57
Kundendienst und Ersatzteile .......................................................................................... 58
Anleitung zur Gebrauchsanweisung
Sicherheitshinweise
Schritt-für-Schritt-Anleitung
)
Praktische Tipps
Hinweise zum Umweltschutz
Dieses Gerät entspricht den folgenden EWG-Richtlinien:
- 2006/95 (Niederspannungsrichtlinie);
- 89/336 (EMV-Richtlinie);
- 90/396 (GAZ-Richtlinie);
- 93/68 (Allgemeine Richtlinie);
und nachfolgende Änderungen.
HERSTELLER:
ELECTROLUX HOME PRODUCTS ITALY S.p.A.
Viale Bologna, 298
47100 FORL
Die vorliegende Gebrauchs-anweisung ist nur in jenen Bestimmungsländern gültig, deren Kennzeichen
auf dem Titelblatt der Bedienungsanleitung sowie auf dem Gerät abgebildet ist.
Bewaren Sie diese Broschüre unbedingt so zusammen mit dem Gerät auf, daß Sie sie jederzeit
problemlos zu Rate ziehen können. Sollten Sie das Gerät verkaufen oder einer anderen Person
überlassen, so händigen Sie bitte auch diese Broschüre aus, damit sich der neue Benützer über den
Betrieb und die Warnungen und Hinweise informieren kann.
Ì (Italien)
Page 40

40
progress
Deutsch
Warnungen und wichtige Hinweise
Ihr neues Gerät ist einfach zu bedienen. Dennoch sollte diese Anleitung vor Installation und
erstmaligem Gebrauch des Gerätes vollständig durchgelesen werden. Auf diese Weise
vermeiden Sie Bedienungsfehler und garantieren den absolut sicheren Betrieb Ihres Gerätes
bei optimierten Leistungen sowie eine umweltgerechte Entsorgung. Diese
Bedienungsanleitung muss gemeinsam mit dem Gerät aufbewahrt werden, damit Sie sie
jederzeit zu Rate ziehen können. Sollten Sie das Gerät verkaufen oder einer anderen Person
überlassen, so händigen Sie bitte auch diese Bedienungsanleitung aus, damit sich der
neue Besitzer über den Betrieb und die Warnungen und Hinweise informieren kann.
Installation
z Die Installation des Gerätes und der
Anschluss an die elektrische Stromversorgung dürfen ausschließlich durch
FACHPERSONAL durchgeführt
werden. Vor der Durchführung jeglicher
Arbeiten muss das Gerät von der
elektrischen Stromversorgung
GETRENNT werden.
z Stellen Sie sicher, dass die Luft frei um das
Gerät zirkulieren kann. Eine ungenügende
Belüftung führt zur Verringerung des Sauerstoffgehaltes.
z Betreiben Sie das Gerät nur mit der Gasart,
die auf dem aufgeklebten kleinen
Typenschild, das sich neben dem
Gasanschlussrohr befindet, angegeben ist.
z Dieses Gerät ist nicht an eine Vorrichtung
für die Abgasabführung angeschlossen.
Diese muss gemäß den geltenden
einschlägigen Bestimmungen installiert und
angeschlossen werden. Die Vorschriften
zur Lüftung müssen besonders aufmerksam befolgt werden.
zz
z Beim Gebrauch einer Kochmulde mit
zz
Gasbetrieb entstehen im Installationsraum des Gerätes Wärme und
Feuchtigkeit. Der Raum muss entweder über natürliche Öffnungen belüftet
werden oder es muss eine
Abzugshaube installiert werden, deren Rohr direkt ins Freie führt.
zz
z Bei intensivem oder länger andau-
zz
erndem Gebrauch des Gerätes muss
die Belüftung z. B. durch das Öffnen
eines Fensters verbessert oder der
mechanische Abzug durch Erhöhen
der Leistungsstufe der Abzugshaube
(sofern vorhanden) verstärkt werden.
z Nach dem Auspacken des Gerätes
sicherstellen, dass dieses nicht beschädigt und dass das Elektrokabel in
einwandfreiem Zustand ist. Andernfalls vor
dem Fortsetzen der Installationsarbeiten
den Händler informieren.
z Der Hersteller lehnt jegliche Verant-
wortung für den Fall ab, dass nicht
alle Sicherheitsmaßnahmen getroffen wurden.
Sicherheit der Benutzer
z Dieses Gerät darf nur durch von Erwachse-
nen benutzt werden. Kindern darf es nicht
erlaubt sein, sich an den Knebeln zu
schaffen zu machen oder mit dem Gerät
zu spielen.
z Kinder und Personen , die aufgrund ihrer
physischen, sensorischen oder geistigen
Fähigkeiten oder ihrer Unerfahrenheit oder
Unkenntnis nicht in der Lage sind, das
Gerät sicher zu benutzen, sollten dieses Gerät
nicht ohne Aufsicht oder Anweisung durch
eine verantwortliche Person benutzen.
z Zugängliche Teile dieses Gerätes werden
während des Betriebs heiß und bleiben auch
nach dem Ausschalten noch eine gewisse
Zeit heiß. Kinder sollten bis zur
Abkühlung ferngehalten werden.
Page 41

Während des Gerätebetriebs
z Dieses Produkt wurde zum nicht professi-
onellen Kochen von Speisen in normalen
Haushalten entwickelt. Benutzen Sie es
für keinen anderen Zweck.
z Es ist gefährlich, die Gerätespezifikationen
irgendwie zu ändern.
z Halten Sie das Gerät stets sauber.
Nahrungsmittelrückstände könnten einen
Brand verursachen.
z Für die Reinigung des Gerätes keinen Dampf
oder Dampfreiniger verwenden.
z Nach der Benutzung des Gerätes sicher
stellen, dass alle Knebel auf “AUS” stehen.
z Falls Sie eine Stromsteckdose in der Nähe
dieses Gerätes benutzen, achten Sie darauf,
dass die Kabel der jeweiligen Elektrogeräte
das Gerät nicht berühren und weit genug
entfernt von den heißen Geräteflächen
sind.
Service
z Bei Betriebsstörungen sollte unter keinen
Umständen versucht werden, das
Gerät selbst zu reparieren. Reparaturen
durch unerfahrene Personen können zu
Verletzung oder zu schwerwiegenden Funktionsstörungen führen. Konsultieren Sie
zunächst diese Bedienungsanleitung. Falls
Sie die gewünschten Informationen nicht
finden, kontaktieren Sie das zuständi-
ge Electrolux Service Center in ihrer
Nähe. Servicearbeiten an diesem Gerät
dürfen ausschließlich durch eine autorisierte Kundendienststelle durchgeführt werden. Immer auf Original-Electrolux-Ersatzteilen bestehen.
progress 41
z Das Symbol auf dem Produkt oder
seiner Verpackung weist weist darauf hin,
dass dieses Produkt nicht wie als normaler
Haushaltsabfall zu behandeln ist, sondern
an einem Sammelpunkt für das Recycling
von elektrischen und elektronischen Geräten
abgegeben werden muss. Durch Ihren
Beitrag zum korrekten Entsorgen dieses
Produkts schützen Sie die Umwelt und die
Gesundheit Ihrer Mitmenschen. Umwelt
und Gesundheit werden durch falsches
Entsorgen gefährdet. Weitere Informationen über das Recycling dieses Produkts
erhalten Sie von Ihrem Rathaus, Ihrer Müllabfuhr oder dem Geschäft, in dem sie das
Produkt gekauft haben.
Informationen zum Umweltschutz
z Alle verwendeten Materialien sind umwelt-
verträglich und recyclebar. Leisten Sie bitte
Ihren Beitrag zum Umweltschutz, indem
Sie das Altgerät durch differenzierte Mülltrennung sachgerecht entsorgen lassen.
z Wenn Sie ein Altgerät entsorgen,
machen Sie es zuvor unbrauchbar,
indem Sie das Kabel abschneiden.
Page 42

42
progress
Bedienung des Gerätes
Entfernen Sie vor Gebrauch des
Gerätes das gesamte Verpackungsmaterial einschließlich
Werbeaufklebern und eventueller
Schutzfolien.
Schaltelemente an der
Bedienungsleiste
Die Wahlschalter können in drei verschiendene
Stellungen gedreht werden:
keine Gaszufuhr
maximale Gaszufuhr
minimale Gaszufuhr
Entzünden der Gasbrenner
Der Brenner wird eingeschaltet,
bevor man Töpfe oder Pfannen
aufsetzt.
Drücken Sie den Knopf mit einem aufgezeichneten kleinen Funken. Drücken Sie den
Drehknopf für die entsprechende Kochstelle
nach unten und drehen ihn gegen den
Uhrzeigersinn zum Symbol "maximale Zufuhr".
Halten Sie nach Entzünden der Flamme den
Drehknopf noch für etwa 5 Sekunden
gedrückt; diese Zeit ist nötig, um das
“Thermoelement” (Abb. 1 - D) zu erwärmen
und das Sicherheitsventil auszuschalten, das
andernfalls die Gaszufuhr unterbrechen
würde. Kontrollieren Sie sodann,ob die
Flamme gleichmäßig ist, und drehen den
Drehknopf auf die gewünschte Stärke. Sollte
sich der Brenner trotz mehrmaligen Versuchen
nicht entzünden lassen, so vergewissern Sie
sich daß der Flammenverteilerring (Abb.1 - B)
und die Brennenkappe (Abb. 1 - A) richtig
aufliegen. Drehen Sie zur Unterbrechung der
Gaszufuhr den Drehschalter im Uhrzeigersinn
bis zur Position "
z".
Dreikreisbrenner
C
A - Brennerkappe
B - Flammenverteilerring
C - Zündkerze
D - Thermoelement
A
B
D
Abb. 1
Page 43

Den Steuerungsknebel nicht länger
als 15 Sekunden gedrückt halten.
Falls die Flamme auch nach 15
Sekunden nicht angeht, den Knebel
loslassen und auf Position " Aus " (z)
drehen, mindestens 1 Minute
vergehen lassen bevor man versucht
den Brenner nochmals zu zünden.
Bei Stromausfall kann der Brenner
auch manuell angezündet werden.
Bringen Sie dazu eine Flamme an die
Gaskochstelle, drücken Sie den
Drehknopf für die entsprechende
Kochstelle nach unten und drehen ihn
gegen den Uhrzeigersinn zum Symbol
“maximaler Gasaustritt”.
• Drehen Sie die Flamme immer zurück
oder löschen Sie sie, bevor Sie die
Gefäße von den Kochstellen
nehmen.
Damit die Flamme optimal ausgenutzt wird,
sollten Töpfe verwendet werden, deren
Durchmesser zu dem der Brenner paßt. Die
Flamme soll nicht über den Rand des Töpfes
hinausgehen.
Zudem sollte, sobald eine Flüssigkeit zu kochen beginnt, die Flamme soweit reduziert
werden, daß sie den Kochvorgang gerade
noch aufrechterhält.
Benutzen Sie nur Gefäße mit
ebenem Boden.
progress 43
Wenn Sie Fett oder Öl verwenden,
dürfen Sie es wahrend des
Kochvorgangs nicht aus den
Augen lassen, da es sich bei
Erhitzen entzünden kann.
Page 44

44
progress
Korrekter Gebrauch der Kochmulde
Für einen geringeren Gasverbrauch und
verbesserten Wirkungsgrad nur Kochgeschirr
mit flachem Boden und einem für die
Kochstelle geeigneten Durchmesser
verwenden, vgl. untenstehende Tabelle. Zudem
sollte, sobald eine Flüssigkeit zu kochen
beginnt, die Flamme soweit reduziert werden,
dass sie den Kochvorgang gerade noch
aufrecht erhält.
Edelstahl wird bei starker Erhitzung
mit der Zeit bräunlich. Von
Langzeitgaren mit Topfsteinen,
Römertöpfen oder Gusseisenplatten wird daher abgeraten. Von
der Verwendung von Aluminiumfolie während des Betriebs zum
Schutz der Kochmulde ist ebenfalls
abzusehen.
Stellen Sie sicher, dass die Kochgefäße nicht über den Rand der
Kochmulde heraus stehen und mittig auf den Kochstellen stehen, um
einen geringeren Gasverbrauch zu
erzielen.
Stellen Sie keine instabilen oder
verformten Gefäße auf die
Kochstellen: sie stellen eine
Unfallgefahr dar, da sie kippen
oder ihr Inhalt auslaufen könnte.
Die Töpfe müssen in
ausr
eichendem Abstand von den
Bedienelementen bleiben.
Tabelle mit den Mindest- und Höchstdurchmessern der Töpfe auf den einzelnen Brennern.
Brenner Mindest- Höchst-
Dreikreisbrenner 180 mm 260 mm
Normalbrenner
hinten 120 mm 220 mm
vorn 120 mm 180 mm
Hilfsbrenner 80 mm 160 mm
durchmesser durchmesser
Page 45

Pflege und Wartung
Ziehen Sie vor jeder Reinigungsarbeit den Netzstecker des
Gerätes und lassen Sie dieses
abkühlen.
Reinigung der Kochmulde
Waschen Sie die emaillierten Teile mit
lauwarmem Wasser und Spülmittel; benutzen Sie keine scheuernden Produkte, die zu
Beschädigungen führen könnten.
Waschen Sie die Flammenverteilerringe und
Brennerköpfe häufig mit heißem Wasser und
Spülmittel und achten Sie darauf, dass alle
Verkrustungen entfernt werden. Spülen Sie
die Edelstahlteile nach Gebrauch gut mit
Wasser ab und trocknen sie mit einem
weichen Lappen. Benutzen Sie für
hartnäckige Flecken die üblichen, nicht
scheuernden Putzmittel oder
Spezialprodukte, die überall im Handel
erhältlich sind. Für die Reinigung keine
Topfkratzer, Stahlwolle oder Säuren
verwenden.
z Auf der Kochmulde sollten keine sau-
ren oder alkalischen Rückstände verbleiben (z. B. Essig, Salz, Zitronensaft
usw...).
progress 45
A
C
O
I
D
Abb. 2
Abstellroste der Kochmulde
Die Kochmulden sind mit leichten emaillierten Eisenrosten oder mit stärkeren und
schweren Gusseisenrosten ausgestattet.
Die Roste können für die Reinigung von der
Kochmulde abgenommen werden.
Achten Sie bitte darauf, die Gusseisenroste auf der Kochmulde nur in die
vorgesehenen Aufnahmen zu legen, um
die Kochmulde nicht zu zerkratzen oder
zu beschädigen.
Die emaillierten Roste können mit warmer
Seifenlauge gereinigt werden.
Nach dem Waschen die Roste wieder
einsetzen und ihre korrekte Position überprüfen.
Page 46

46
progress
Für einen korrekten Betrieb der Brenner muss
das Rostgitter wie in Abb. 3 gezeigt mittig
über den Kochstellen angebracht werden.
Elektrozünder
Bei den Herden mit automatischer Zündung
wird diese Funktion durch eine Keramik“Zündkerze” und eine Metallelektrode in
ihrem Innern gewährleistet (siehe Abb. 1 Buchstabe C). Nehmen Sie von Zeit zu Zeit
eine gründliche Reinigung dieser Teile vor.
Kontrollieren Sie außerdem zur Vermeidung
von Zündschwierigkeiten, ob die Löcher des
Flammenverteilerrings (Abb. 1 - Buchstabe
B) nicht verstopft sind.
JA
Abb. 3
NEIN
Regelmäßige Wartung
Lassen Sie regelmäßig den ordnungsgemäßen Zustand und die Funktionstüchtigkeit der
Gaszuleitung und, falls vorhanden, des
Gasdruckreglers überprüfen. Bei schlechtem
Zustand oder Betrieb keine Reparaturen,
sondern die Ersetzung des defekten Teils
veranlassen.
Abb. 4
Page 47

progress 47
Störung, was tun?
Führen Sie bei einer Störung folgende Kontrollen aus, bevor Sie den lokalen Electrolux Kundendienst rufen.
STÖRUNG
Keine Funken beim Betätigen der
elektrischen Zündung.
Der Gasbrenner brennt
ungleichmäßig.
ABHILFE
Kontrollieren Sie, dass der Stecker
korrekt eingesteckt ist und der Schalter
auf ON steht
.
Sicherstellen, dass der
Sicherheitsschalter nicht ausgelöst ist
(falls installiert).
Die Hauptsicherungen kontrollieren.
Kontrollieren, ob der Brennerdeckel und
der Kranz nach dem Reinigen richtig
eingesetzt sind.
Kontrollieren, dass die Hauptdüse nicht
blockiert und der Brennerkranz nicht
durch Speisereste verstopft sind.
Kontrollieren, ob der Brennerdeckel und
der Kranz nach dem Reinigen richtig
eingesetzt sind.
Page 48

48
progress
Technische Daten
Leistung der Brenner
Dreikreisbrenner 4,0 kW
Normalbrenner 2,0 kW
Hilfsbrenner 1,0 kW
Kategorie II2E+3+
Geräteeinstellung G20/G25 (2E+) 20/25 mbar
Versorgungsspannung 230 V~ 50 Hz
Geräteklasse 3
Abmessungen der Kochmulde
Breite 594 mm
Tiefe 510 mm
Abmessungen der Einbauöffnung
Breite 560 mm
Tiefe 480 mm
Tabelle 1 - Wärmebelastung, Gasdurchgang, Düsenkennzeichung
BRENNER VOLL KLEIN VOLLWÄRMELEISTUNG
Hilfsbrenner 1,0 0,33 70 0,095 0,111 50 73 71
Normalbrenner 2,0 0,45 96 0,190 0,221 71 145 143
Dreikreisbrenner 4,0 1,2 146 0,381 0,443 98 291 286
WÄRME- WÄRME-
BELASTUNG BELASTUNG ERDGAS FLÜSSIGAS
kW kW 28-30/37 mbar
Düsen
100/mm 20 mbar 25 mbar 100/mm
3
m
/h g/h
G20 G25
Düsen
G30 G31
Tabelle 2 - Durchmesser des by-pass
Brenner Ø By-pass in Hunderstel
Hilfsbrenner 28
Normalbrenner 32
Dreikreisbrenner 56
Page 49

Montageanleitung
Wichtige Hinweise für den Installateur
• Die Seitenflächen der Mobel dürfen die
Arbeitsfläche des Gerätes in ihrer Höhe
nicht überschreiten.
• Die Installation des Gerätes in der Nähe
von brennbarem Material (z.B. Vorhänge,
Tücher etc.) muß vermieden werden.
• Die im Folgenden beschriebenen
Installations- und Wartungsarbeiten
müssen von Fachpersonen und gemäß
den geltenden Richtlinien ausgeführt
werden. Für diese Installation ist die
Richtlinie NBN D 51.003 “Anschlüsse mit
brennbarem Gas, das leichter ist als Luft”
maßgebend.
• Vor jedem Eingriff muß das Gerät vom
Stromnetz abgeschlossen werden. Sollte
es unbedingt nötig sein, das Gerät unter
Spannung zu lassen, müssen die nötigen
Vorsichtsmalssnahmen getroffen werden.
progress 49
Page 50

50
progress
Gasanschluss
Der Gasanschluß darf ausschließlich unter
Verwendung eines AGB Hahnes ausgeführt
werden. Vorgezogen werden starre
Verbindungen oder biegsame Schläuche aus
rostfreiem Edelstahl AGB. Vergewissern Sie
sich bei Benutzung von Metallschläuchen,
daß diese nicht mit beweglichen Teilen in
Berührung kommen oder gequetscht werden.
Gehen Sie bei einer Kombination KochflächeHerd mit derselben Vorsicht vor. Diese
Kochmulde wird entweder mit Slochteren Gas
(G25) mit einem Nominaldruck von 25 mbar
oder mit Erdgas mit einem Druck von 20 mbar
versorgt. Bei Verwendung dieser zwei
Gasarten braucht nichts eingestellt zu werden.
Bevor das Gerät montiert wird, muß man
überprüfen, ob eine korrekte Versorgung des
Gerätes gewährleistet ist. Bei voller Leistung
darf die Druckverminderung nicht höher als
5% betragen. Der Druckverlust hängt von
folgenden Eigenschaften ab:
• maximale Leistung des Zählers,
• Durchmesser und Länge des Rohres vor
und nach dem Zähler,
• Durchlaßquerschnitt der verschiedenen
Hähne im Kreislauf,
• Durchmesser eventueller
Anschlußstücke.
unsere Fabrik verließ, wurde es von
spezialisierten Fachleuten so getestet und
einreguliert, daß Ihnen der bestmögliche
Betrieb sicher ist.
WICHTIG! Sobald die Installation
beendet ist, muß die Dichtheit aller
Verbindungs-stücke mitSeifenlösung
überprüft werden. Niemals eine
Flamme dazu benutzen.
A - Überwurfmutter
B - Dichtung
C - Anschlusswinkel
Abb. 5
Wichtig - Zur Gewährleistung eines
korrekten Betriebes, einer Energieersparnis
sowie einer langen Lebensdauer des Gerätes,
muß der Speisedruck des Gerätes den
empfohlenen Werten entsprechen.
Die Anschlußverschraubung für den
Gaseintritt in das Gerät besitzt ein Gewinde
G1/2". Beim Anschluß sind Belastungen jeder
Art am Gerät zu vermeiden.
Auf dem Endstück der Rampe mit
Schraubenmutter GJ 1/2" wird zwischen die
Teile ein Dichtungsring eingesetzt. Die
Messingteile mit Kegelgewinde werden zuerst
leicht angeschraubt, dann wird das
Anschlußstück in die gewünschte Richtung
gebracht und anschließend zieht man alles
fest an.
Die in der Abb.5 dargestellten Teile werden
direkt in der Fabrik montiert. Bevor das Gerät
Page 51

Elektrischer Anschluß
Das Gerat ist fur den Betrieb mit einer
Spannung von 230 V Einphasenstrom
vorgesehen.
Der Anschluß muß entsprechend der
geltenden Normen und Vorschriften
durchgefuhrt werden.
Vor Anschluß des Gerätes:
1.Sicherstellen, daß die Hauptsicherung
sowie die Hausinstallation ausreichend
ausgelegt sind;
2.Sicherstellen, daß die Stromversorgung
gemäß den geltenden Regeln ordentlich
geerdet ist;
3. Sicherstellen, daß die Steckdose oder der
für den Elektro-Anschluß benutzte
zweipolige Umschalter nach dem Einbau
in den Schrank leicht zugängig sind.
Das Gerät wird steckerfertig geliefert. Die
vorhandene Netzanschlussleitung mit
Stecker ist an eine Schutzkontaktsteckdose
(230 V~, 50 Hz) anzuschließen.
Die Schutzkontaktsteckdose muss vorschriftsmäßig installiert sein und abgesichert
sein.
Wenn das Gerät direkt ans Netz angeschlossen wird, ist es erforderlich, einen
zweipoligen Umschalter zwischen dem Gerät
und der Stromzufuhr zu installieren, und zwar
mit einer Kontaktöffnungsweite von 3 mm
und so ausgelegt, daß er der erforderlichen
Belastung gemäß den geltenden Regeln
entspricht.
Das Anschlußkabel muß so verlegt sein, daß
in keinem Teil eine Temperatur von 90°C
übersteigt.
Das braune Phasenkabel (das von der
Klemme “L” der Klemmleiste kommt) muß
immer mit der Phase des Stromnetzes
verbunden werden.
progress 51
Page 52

52
progress
Auswechseln des Anschlußkabels
Die Kochmulde ist mit einer dreipoligen
Klemmleiste ausgestattet, deren Kabel für
einen Betrieb mit 230 V Einphasenstrom
vorgesehen sind.
Das Erdungskabel wird mit der mit dem
Symbol
verbunden. Nachdem das Kabel mit der
Klemmleiste verbunden wurde, wird es mit
der Kabelbefestigung fixiert.
Sollte es notwendig sein, das Kabel auszutauschen, so dürfen ausschlieBlich Kabel des
Typs H05V2V2-F T90 verwendet werden,
deren Querschnitt der Belastung und der
Betriebstemperatur standhalten. Weiters
muß das gelbgrüne Erdungskabel ca. 2 cm
länger sein als die Phasenkabel (Abb. 6).
Um Zugang zu den Klemmen zu bekommen,
öffnen Sie die Abdeckung der Klemmleiste
wiefolgt:
1. Führen Sie die Spitze eines Schraubenzie-
hers unter die Vorsprünge an der
sichtbaren Seite des Klemmkastens ein
(Abb. 7);
2. Drücken Sie leicht und führen Sie eine
Hebelbewegung nach oben aus.
Dann Anschluß der Netzanschlußleitung mit
Spezialwerkzeug vornehmen.
gekennzeichneten Klemme
Nulleiter
Erdungskabel
(gelb/grün)
Abb. 6
Abb. 7
Page 53

Umstellung auf eine andere Gasart
Auswechseln der brennerdüsen
• Zuerst die Roste entfernen;
• Danach die Abschlußkappen und die
Flammenverteiler von den
Brennernabnehmen;
• Mit einem 7 mm Steckschlüssel die
Düsen aufschrauben, abnehmen und
durch die, dem verwendeten Gas
entsprechenden Düsen ersetzen (siehe
Tabelle 1 - Technische Daten);
• Die Teile werden in umgekehrter
Reihenfolge der beschriebenen
Schrittewieder zusammengesetzt.
• Danach muß das Eichschild, welches
sich neben der Gasanschluß-öffnung
befindet, mit dem, der neuen Gasart
ensprechenden Schild ausgetauscht
werden. Dieses befindet sich im
Zubehörmit den Düsen.
Einstellung des Minimums
• Zum Einstellen der Kleinstelldüse wird
der Hahn auf kleinste Flamme gedreht.
• Den Wahlschalter abnehmen.
• Handelt es sich um einen Hahn mit Bypassnadel im Inneren des Stabes, so
reicht es, je nach Gasart fester oder
lockerer zu schrauben. Im nächsten
Absatz finden Sie die ensprende
Anleitung.
- Bei Umstellung von Erdgas auf
Flüssiggas die Bypassnadel der
Gashähne ganz anschrauben.
Bei Umstellung von Flüssiggas auf
Erdgas die Bypassnadel um etwa eine
Vierteldrehung auf schrauben, bis man
eine gleichmäßige kleine Flamme erhält.
• Zuletzt wird kontrolliert, daß der Brenner
beim raschen Wechsel von größter zu
kleinster Flamme nicht erlischt.
• Die Teile werden dann in umgekehrter
Reihenfolge der beschriebenen Schritte
wieder zusammen-gesetzt.
• Die beschriebenen Schritte zur
Anpassung können mühelos
durchgeführt werden, wie auch immer
progress 53
Abb. 8
Abb. 9
Bypass-
nadel
Page 54

54
progress
die Kochmulde positioniert oder fixiert
ist.
Sicherheitshinweise fur den Einbau der
Mulde
• Bei den Einbaumöbeln müssen Furniere
oder Kunststoffbeläge mit
hitzebeständigem Kleber (100 Grad C)
verarbeitet sein. Sind Kunststoffbeläge
oder Kleber nicht genügend
temperaturbeständig, so kann sich der
Belag verformen oder lösen.
• Die Verwendung von HolzWandabschlußleisten aus Massivholz auf
Arbeitsplatten, hinter den Kochstellen ist
zulässig, sofern die Mindestabstände
eingehalten werden.
• Unter der Gasmulde muß mit einem
Mindestabstand von 50 mm. ein nur mit
Werkzeug herausnehmbarer
Zwischenboden angebracht werden. Der
Zugang für den Fachmann muß möglich
sein.
• Unterhalb der Kochmulde darf kein
Backofen eigebaut werden.
• Bei Einbau direkt neben einem
Hochschrank ist ein Sicherheitsabstand
von mind. 50 mm einzuhalten. Die
Seitenfläche des Hochschranks ist mit
wärmefestem Material zu verkleiden.
• Der Seitenabstand zu Hochschränken
sollte aus arbeitstechnischen
Erfordernissen jedoch mindestens 300
mm betragen.
• Der Abstand zur Rückwand muß
mindestens 55 mm betragen, seitlich zur
Wand 80 mm.
• Es ist dafür zu sorgen, daß wegen
Brandgefahr keine feuergefähr-lichen
oder leicht entzündbaren oder durch
Wärme verformbaren Gegenstände
direkt unter der Mulde angeordnet bzw.
gelegt werden.
• Der Unterbauschrank unter der
Gasmulde muß falls sich bei raschem
Öffnen oder Schließen der Möbeltür die
Flamme der Gasbrenner unruhig verhält
oder erlischt, mit einer Rückwand
versehen werden. Unterbauschrank und
Kochfeld sind dadurch lufttechnisch
getrennt.
• Das Gerät entspricht dem Typ “Y”.
Geräte dieses Typs dürfen nur einseitig
neben höheren Küchen-möbeln, Geräten
oder Wänden eingebaut werden.
Page 55

Einbau in Küchenanbaumöbeln
Maßangaben in mm
N
N
Abb. 10
594
H = Hilfsbrenner
N = Normalbrenner
D = Dreikreisbrenner
progress 55
D
H
510
Diese Kochmulde kann in Kücheneinbaumöbel eingesetzt werden, die eine Tiefe
zwischen 550 und 600 mm. sowie die
geforderten Eigenschaften aufweisen.
Die Maße der Kochmulde sind in Abb. 10
angegeben.
Page 56

56
progress
Einbau und Befestigung
Die Kochmulde kann in ein Möbel eingesetzt
werden, das eine Einbauöffnung mit den in
Abb. 11 angegebenen Abmessungen
aufweist. Die Einbauöffnung muss
mindestens 55 mm von der Rückwand
entfernt sein. Eine eventuell vorhandene
Seitenwand rechts oder links, die über die
Höhe der Kochmulde hinausgeht, muss
mindestens 100 mm von der Öffnung im Top
entfernt sein.
Die Befestigung der Kochmulde auf
)
dem Unterbau muss wie folgt
durchgeführt werden:
• bringen Sie die spezielle mitgelieferte
Dichtung auf dem Rand der Vorderseite
der Einbauöffnung, 11 mm von den
Seitenrändern bzw. 10 mm vom hinteren
Rand an, wobei darauf zu achten ist, dass
die Enden genau aufeinander passen und
sich nicht überlappen (siehe Abb. 12);
• danach die Kochmulde korrekt
ausgerichtet in die Öffnung im Möbel
einsetzen;
• zuletzt die Kochmulde anhand der
mitgelieferten Befestigungswinkel
am Möbel befestigen (siehe Abb. 13).
Beim Anziehen der Befestigungswinkel
durchdringen die Kanten der Kochmulde die
Dichtungsmasse.
Die überstehende Dichtungsmasse sollte mit
einem Holz oder Kunststoffmesser entfernt
werden um Beschädigungen an der
Arbeitsplatte zu vermeiden.
Zur Vollständigen Entfernung der
Dichtungsmasse bitte das Kunstoffmesser
schräg ansetzen ( 45°C Winkel ansetzen).
Der Rand der Kochmulde bildet eine doppelte
Labyrinthdichtung, die eine absolute Garantie
gegen Flüssigkeitseinritt darstellt.
Abb. 11
Abb. 12
Dichtung
Abb. 13
Page 57

Einbaumöglichkeit
Auf Unterbau mit Tür
Bei der Konstruktion des Unterbaumöbels
müssen geeignete Vorkehrungen getroffen
werden, damit mögliche Berührungen mit der
Struktur der heißen Kochmulde während des
Betriebs vermieden werden. Die empfohlene
Lösung zur Vermeidung dieses Problems ist
in der Abbildung 14 dargestellt.
Die Platte unterhalb der Kochmulde muss
leicht zu entfernen sein, damit die
Befestigung und das Lösen der Kochmulde
durch den Kundendienst gewährleistet ist.
progress 57
Auf Unterbau mit Backofen
Der Unterbau muss die in Abb. 11 angegebenen Abmessungen aufweisen und über
Halterungen für eine wirksame Belüftung
verfügen.
Zur Vermeidung übermäßig hoher Temperaturen sollte die Installation gemäß den Abb.
15 und 16 ausgeführt werden.
Die elektrischen Anschlüsse der Kochmulde
und des Ofens müssen sowohl aus
technischen Gründen als auch zur
Erleichterung der frontalen Entnahme des
Ofens getrennt ausgeführt werden.
Hängeschränke oder Dunstabzugshauben
müssen sich mindestens 650 mm über der
Kochmulde befinden (Abb. 11).
Abb. 14
a) Abnehmbare Platte des Möbels
b) Raum für eventuelle Anschlüsse
Abb. 15
Abb. 16
Page 58

58
progress
Kundendienst und Ersatzteile
Dieses Gerät wurde vor Verlassen des Werks
einer Endabnahme und Einstellarbeiten
durch Fachpersonal unterzogen, um den
einwandfreien Betrieb zu gewährleisten. Alle
in der Folge notwendigen Reparaturen oder
Einstellarbeiten sind mit höchster Sorgfalt
auszuführen.
Sie sollten sich aus diesem Grund stets an
die Verkaufsstelle oder das Electrolux Service
Center in ihrer Nähe wenden und die Art der
Störung, das Gerätemodell (Mod.), die
Gerätenummer (angeben No.) sowie die
Seriennummer (Ser. No.).Diese Daten
könnten Sie dem Schild entnehmen, das in
der mitgelieferten Schutzhülle der Gasdüsen
enthalten ist.
Page 59

electrolux 59
Inhoud
Waarschuwingen en adviezen ........................................................................................ 60
Aanwijzingen voor de gebruiker ...................................................................................... 62
Optimaal rendement ...................................................................................................... 64
Onderhoud .................................................................................................................... 65
Technische gegevens ..................................................................................................... 67
Elektrische aansluiting .................................................................................................... 68
Gasaansluiting ............................................................................................................... 69
Ombouw naar vloeibaar gas........................................................................................... 71
Inbouw ........................................................................................................................... 73
Inbouw en montage ....................................................................................................... 74
Inbouwmogelijkheden .................................................................................................... 75
Service en originele onderdelen...................................................................................... 76
Over deze gebruiksaanwijzing
Aanwijzingen m.b.t. de veiligheid
Aanwijzingen m.b.t. het gebruik
)
Adviezen en tips
Informatie m.b.t. het milieu
Dit apparaat voldoet aan de EU-richtlijnen:
2006/95 - 89/336 - 90/396 - 93/68
en de daarbij behorende besluiten.
FABRIKANT:
ELECTROLUX HOME PRODUCTS ITALY S.p.A.
Viale Bologna, 298
47100 FORLÌ (Italie)
Het is uiterst belangrijk dat het bij het apparaat behorende instructieboekje bewaard blijft. Zou het
apparaat door u aan iemand anders gegeven of verkocht worden, of zou het apparaat in het huis van
waaruit u verhuist achterblijven, dan dient de nieuwe gebruik(st)er over het instuctieboekje en de daarin
opgenomen waarschuwingen te kunnen beschikken.
Deze instructies gelden alleen voor de landen waarvan het identificatiesymbool is aangebracht op het
titelblad van het instructieboekje en het apparaat zelf.
Page 60

60 electrolux
Nederlands
Waarschuwingen en adviezen
Deze waarschuwingen zijn bedoeld voor uw en andermans veiligheid. U wordt geacht ze
gelezen te hebben, alvorens u het apparaat installeert en/of in gebruik neemt.
Installatie
• Het installeren en aansluiten van het
apparaat dient door een erkend
installateur te geschieden.
• Sluit het apparaat aan op het juiste type
gas, zoals vermeld op de sticker naast de
gasaansluiting van de kookplaat.
• Tijdens het gebruik produceert de
kookplaat warmte en vocht. Zeker tijdens
een langdurig gebruik. Zorg dan voor een
goede ventilatie door de afzuigkap in te
schakelen of door een raam open te
zetten.
• Controleer het apparaat na het uitpakken
op beschadigingen. Controleer ook het
aansluitsnoer op beschadigingen. Neem
in geval van beschadiging contact op met
uw leverancier.
• De fabrikant wijst elke aansprakelijkheid
ten aanzien van schade of letsel af, indien
bovenstaande veiligheidsmaatregelen niet
zijn getroffen of in acht genomen.
Tijdens het gebruik
• Dit apparaat is bedoeld voor het gebruik
door volwassenen. Het is gevaarlijk om
kinderen het apparaat te laten bedienen of
als speelgoed te laten gebruiken.
• Dit apparat is bedoeld en gemaakt voor
het bereiden van voedsel in het
huishouden; gebruik het nergens anders
voor.
• Het is gevaarlijk om, in welke vorm dan
ook, dit apparaat of eigenschappen
daarvan te veranderen.
• Om hygiënische en veiligheidsredenen
moet het apparaat altijd schoon worden
gehouden. Vet- en/of voedselresten
kunnen brand veroorzaken.
• Controleer altijd of de bedieningsknoppen
in de “UIT” stand staan, als de kookplaat
niet meer wordt gebruikt.
• Mocht er in de buurt van de kookplaat een
stopcontact zijn, waarop af en toe een
ander huishoudelijk apparaat wordt
aangesloten, zorg er dan voor, dat het
snoer niet in contact komt met hete delen
van de kookplaat.
• Als de kookplaat niet wordt gebruikt, trek
dan de stekker van de vonkontsteking uit
het stopcontact.
• Trek altijd de stekker van de
vonkontsteking uit het stopcontact bij het
schoonmaken en onderhoud van de
kookplaat.
• Zorg altijd voor voldoende ventilatie.
Gebrek aan ventilatie kan gebrek aan
zuurstof veroorzaken.
Veiligheid van kinderen
• Houd tijdens het in gebruik zijn van de
kookplaat kinderen uit de buurt. Ook na
het uitschakelen blijft het apparaat lang
heet. Let op dat kinderen de warme delen
niet aanraken tijdens het afkoelen.
• Dit apparaat mag niet gebruikt worden
door kinderen of andere personen wiens
lichamelijke, motorische of geestelijke
gesteldheid of gebrek aan ervaring en
kennis die daardoor het apparaat niet
kunnen gebruiken zonder supervisie of
instructies van een verantwoordelijk
persoon om zeker te zijn van dat het
apparaat veilig kan worden gebruikt.
Service
• Reparaties aan het apparaat mogen alleen
door vakmensen worden uitgevoerd.
Onvakkundige reparaties kunnen tot
aanzienlijke risico's leiden.
Page 61

Informatie m.b.t. het milieu
Houd bij het weggooien van de verpakking
rekening met de veiligheid en het milieu.
Als u een oud apparaat afdankt, maak het
dan onbruikbaar door het aansluitsnoer af te
snijden.
electrolux 61
Het symbool
de verpakking wijst erop dat dit product niet
als huishoudafval mag worden behandeld. Het
moet echter naar een plaats worden gebracht
waar elektrische en elektronische apparatuur
wordt gerecycled. Als u ervoor zorgt dat dit
product op de correcte manier wordt
verwijderd, voorkomt u mogelijk voor mens en
milieu negatieve gevolgen die zich zouden
kunnen voordoen in geval van verkeerde
afvalbehandeling. Voor meer details in
verband met het recyclen van dit product,
neemt u het best contact op met de
gemeentelijke instanties, het bedrijf of de
dienst belast met de verwijdering van
huishoudafval of de winkel waar u het product
hebt gekocht.
op het product of op
Page 62

62 electrolux
Aanwijzingen voor de gebruiker
Bedieningsknoppen
De bedieningsknoppen van de branders
hebben drie standen:
gesloten - uit
maximale gastoevoer
minimale gastoevoer
Aansteken van de branders
Steek de brander altijd aan
voordat u er een pan opzet.
• Geïntegreerde ontsteking
)
Steek een lucifer aan. Druk de knop van
de betreffende brander in en draai hem
linksom. Steek de brander direct aan.
Maar houdt vervolgens de knop nog 5
seconden geheel ingedrukt. Dat is nodig
om de vlambeveiliging in te schakelen. De
vlam beveiliging voorkomt, dat het gas blijft
doorstromen, als de vlam uitwaait of uitgaat
door een storing in het gasnet. Zet
vervolgens de knop in de gewenste stand.
Om de brander uit te schakelen draait u
de knop rechtsom op de UIT "
• Het ontstekingsmechanisme mag
niet langer dan 15 seconden inge-
drukt worden. Als de brander niet
aan is na 15 seconden, wacht dan
minstens 1 minuut voordat u het
nogmaals probeert.
• Als de brander per ongeluk dooft,
zet dan de knop op UIT en wacht
minstens 1 minuut voordat u het
nogmaals probeert.
Luciferontsteking
Steek de lucifer aan. Druk de knop
van de betreffendebrander in en draai
hem linksom. Steek de brander direkt
aan.
Zet vervolgens de knop in de
gewenste stand.
" stand.
Wokbrander
A
B
D
C
A - Branderdeksel
B - Vlamverdeler
C - Vonkontsteking
D - Vlambeveiliging
• Zet altijd eerst de brander lager of uit
voordat u de pan van de brander
neemt.
• Het apparaat is voorzien van
regelkranen waardoor een betere
vlammenregeling mogelijk is.
afb. 1
Page 63

Waarschuwing
Druk nooit op de knop van de
brander als het branderdeksel niet op
de brander ligt. Doet u dat wel, dan
kan de ontstekingsunit z’n zeer hoge
spanning niet kwijt hetgeen tot
beschadiging van de ontstekingsunit
kan leiden.
Belangrijk: Ontsteek eerst de
brander en plaats dan de pan boven
de brander.
electrolux 63
Page 64

64 electrolux
Optimaal rendement
Voor een optimaal rendement moet de
diameter van de pan aangepast zijn aan de
brander, zodat de vlammen niet langs de
zijkant uitslaan (zie tabel). Wij adviseren ook
om de vlam lager te zetten zodra het kookpunt
bereikt is.
• Gebruik alleen pannen met een vlakke
bodem.
Wees voorzichtig als u olie of
andere vetstoffen gebruikt (zoals
bij het frituren). Olie en vet
ontbranden gemakkelijk bij oververhitting.
Voor een juist gebruik van de kookplaat
Om minder gas te verbruiken en een beter
rendement te behalen, alleen pannen
gebruiken met een platte bodem en met
afmetingen die geschikt zijn voor de branders,
zoals aangegeven in de tabel onderaan deze
pagina. Let er bovendien op dat u, zodra een
vloeistof gaat koken, de vlam lager zet op een
stand die voldoende is om de vloeistof aan de
kook te houden.
Tijdens bereidingsmethoden waarbij
vetten of oliën gebruikt worden uw gerechten
goed in de gaten houden; deze stoffen
kunnen, wanneer ze op hoge temperatuur
gebracht worden, in brand vliegen.
Roestvrij staal kan, als het blootgesteld
wordt aan extreme hitte, bruin worden.
Daarom raden wij langdurig gebruik van een
grillsteen, schaal van ongeglazuurd aardewerk
of pan van gietijzer af. Vermijd het gebruik van
aluminiumfolie om de kookplaat tijdens het
gebruik te beschermen.
Vergewis u ervan dat de pannen niet
uitsteken buiten de randen van de kookplaat
en dat ze midden op de branders staan
teneinde minder gas te verbruiken.
Zet geen onstabiele of vervormde pannen
op de branders: ze zouden om kunnen vallen
of de inhoud zou over de rand kunnen lopen,
waardoor ongelukken kunnen ontstaan.
De pannen mogen niet op de
bedieningszone staan.
Brander minimale maximale
diameter diameter
Wok 180 mm 260 mm
Normaal achter 120 mm 220 mm
voor 120 mm 180 mm
Sudder 80 mm 160 mm
Page 65

Onderhoud
Trek voordat u de kookplaat gaat
schoonmaken altijd eerst de
stekker uit het stopcontact en
laat de kookplaat afkoelen.
Voor het reinigen van de emaille delen
mag nooit een agressief middel gebruikt
worden. Maak een sopje van warm water
met afwasmiddel.
Maak zeer regelmatig de branders
schoon, verwijder voedselresten, maak de
branderringen en -deksels goed droog met
een zacht doekje voordat u ze weer terug
zet.
De pannendragers ook met een sopje
van afwasmiddel schoonmaken.
Gebruik voor het verwijderen van lastige
vlekken nooit een pannenspons van
staalwol, een agressief schoonmaakmiddel
of een pannenspons met een harde laag.
Gebruik voor het verwijderen van hardnekkig
vuil daarvoor in de handel zijnde
schoonmaakmiddelen zonder schurende
werking.
Kookplaten met gietijzeren
pannendragers: plaats na het
schoonmaken de pannendragers
weer op hun plaats. Om ze correct
terug te plaatsen, plaatst u eerst de
zij-pannendragers en daarna de
middelste.
A
C
I
D
electrolux 65
O
De pannendragers van de kookplaat
De kookplaten zijn voorzien van
pannendragers van geëmailleerd ijzer, die
dun en licht zijn of van gietijzer, die dikker en
zwaarder zijn.
De pannendragers kunnen van de
kookplaat verwijderd worden zodat ze beter
kunnen worden schoongemaakt.
Wij adviseren u de gietijzeren
pannendragers niet op de kookplaat
neer te zetten om te voorkomen dat
deze bekrast wordt of beschadigd
raakt.
De geëmailleerde roosters kunnen met
warm zeepsop worden gereinigd.
Page 66

66 electrolux
Zet de pannendragers, nadat ze
gereinigd zijn, terug op hun plaats en
controleer of ze goed staan.
Voor een juiste werking van de branders
moet u ervoor zorgen dat de pannendragers
met de concentrische spaken op de brander
staan, zoals afgebeeld in figuur 2.
Vonkontsteking
De vonkontsteking, bestaand uit een
elektrode gevat in een keramisch omhulsel,
moet vrij worden gehouden van
voedselresten en vocht, omdat anders de
ontsteking niet functioneert (afb. 1 - C).
Controleer of de branderring poorten
schoon zijn.
JA
afb. 2
GEEN
afb. 3
Page 67

Technische gegevens
electrolux 67
Vermogen gasbranders
Wokbrander 4,0 kW
Normaalbrander 2,0 kW
Uitsnijmaat
Breedte 560 mm
Diepte 480 mm
Sudderbrander 1,0 kW
Kookplaat
Categorie II2E+3+
Voeding gas
Breedte 594 mm
Diepte 510 mm
Aardgas G20/G25 (2E+) 20/25 mbar
Aansluiting aan 230 V~50 Hz
Apparaat klasse 3
Tabel 1: Inspuitstukken
TYPE MAXIMALE MINIMALE NOMINALE AFGIFTE
BRANDER WARMTE- WARMTE-
Sudderbrander 1,0 0,33 70 0,095 0,111 50 73 71
AFGIFTE AFGIFTE AARDGAS GAS LPG
kW kW 28-30/37 mbar
Sproieres
100/mm 20 mbar 25 mbar 100/mm
3
m
/h g/h
G20 G25
Sproieres
G30 G31
Normaalbrander 2,0 0,45 96 0,190 0,221 71 145 143
Wokbrander
4,0 1,2 146 0,381 0,443 98 291 286
Tabel 2: Diameters bypass afregelschroeven
Brander Ø Bypass 1/100 mm.
Sudderbrander 28
Normaalbrander 32
Wokbrander 56
Page 68

68 electrolux
Elektrische aansluiting
• De aansluiting moet volgens NEN 1010
en eventuele speciale voorschriften van
het plaatselijke energiebedrijf worden
uitgevoerd.
• Controleer of de zekeringen en de
huisinstallatie de belasting van het
apparaat kunnen verdragen (zie
typeplaatje).
• Het stopcontact moet geaard zijn.
• Het stopcontact of de meerpolige
schakelaar moeten makkelijk
toegankelijk zijn.
• Als u het apparaat direct aan het net
aansluit, moet tussen net en apparaat
een meerpolige schakelaar worden
aangebracht die tussen de contacten
een opening van minimaal 3 mm heeft.
De aardleiding mag nooit worden
onderbroken (geel/groene draad).
• Het aansluitsnoer moet zodanig worden
geïnstalleerd dat het niet heter kan
worden dan 90°C.
De gaskookplaat is voorzien van een 3-
aderig aansluitsnoer met randaardestekker.
De netspanning moet 230 V 50Hz zijn.
Vervangen van het aansluitsnoer
Het aansluitsnoer mag alleen door een
erkend installateur worden vervangen.
Voor het vervangen van het snoer mag
alleen type H05V2V2-F T9 worden gebruikt,
aangepast aan temperatuur en belasting.
Bovendien moet de groen/gele
aardleiding zo’n 2 cm langer zijn dan de
faseleiding en de nulleiding (afb. 4).
Om de klep van het klemmenbord te
openen gaat u te werk als in afb. 4-a.
afb. 4
Nulleiding
Aardleiding (groen/geel)
afb. 4-a
Page 69

Gasaansluiting
De volgende gebruiksaanwijzingen zijn tot een
gekwalificeerd technicus gericht,
die de installatie uitvoert, zodat
hij de installatie en de
verbindingen op de juiste manier
kan uitvoeren, de huidige wetten
en normen in acht nemende.
Iedere tussenkomst na
aansluiting dient te worden
uitgevoerd met afgekoppelde of
uit-geschakelde stroomtoevoer.
De installatie en de elektrische
aansluiting van het apparaat
moeten door een erkend vakman
gebeuren.
• De zijwanden van de meubels mogen
niet hoger komen dat het werkvlak
van het toestel.
•
Plaats het toestel niet in de buurt van
ontvlambare materialen (zoals
gordijnen, handdoeken enz.).
• De hierna volgende instructies zijn
bestemd voor de erkende
installateurs, om ervoor te zorgen dat
installatie en onderhoud optimaal
verlopen, volgens de geldende
normen. De installatie moet conform
de norm NBN D 51.003 “Installaties
gevoed met stoolgas lichter dan
lucht” worden uitgevoerd.
• Ontkoppel het kookplateau van de
stroomtoevoer. Ingeval het plateau op
de stroomtoevoer aangesloten moet
blijven, moeten alle nodige
voorzorgsmaatregelen worden
getroffen.
Monteer een afsluitkraan die erkend is
door de AGB. Starre aansluitingen verdienen
de voorkeur. Bij gebruik van een gasslang
moet een door de AGB erkende slang met
metalen omhulsel worden gebruikt.
Bij het gebruiken van flexiebele vaste
verbindingen moet men er op letten dat de
pijpen niet kunnen worden geplet of
dichtgekneppen en niet in aanraking komen
electrolux 69
Page 70

70 electrolux
met bewegende delen. Let hier ook op
wanneer de kookplaat wordt gecombineerd
met een oven.
Deze kookplateaus kunnen zowel
worden gevoed met gas van Slochteren
(G25) met een nominale druk van 25 mbar
als met aardgas (G20) met een nominale druk
van 20 mbar. Om te werken met deze twee
soorten gas is geen extra afstelling nodig.
Alvorens de installatie uit te voeren moet
u nagaan of de gastoevoer volstaat voor de
correcte voeding van het plateau. Bij
maximum verbruik mag de drukdaling
maximum 5% bedragen. Deze drukdaling is
afhankelijk van volgende factoren:
- maximum debiet van de gasmeter;
- diameter en lengte van de leidingen
voor en achter de meter;
- doorgangsopeningen van de
verschillende kranen in het circuit;
- diameter van de eventuele
tussenstukken.
Belangrijk - Voor een correcte
werking, een zuinig verbruik en een
grotere levensduur van het
kookplateau moet u ervoor zorgen
dat de toevoerdruk overeenstemt met
de waarden in de tabel.
Gasaansluiting
De verstelbare aansluiting wordt door middel
van een 1/2" moer vast gezet. Alle
componenten zoals weergegeven in de
afbeelding zijn reeds in de fabriek
gemonteerd (afb.5).
Om een optimaal resultaat te garanderen, is
het toestel voor vertek uit de fabriek getest.
Belangrijk - Om de installatie te
voltooien, kijk altijd de perfecte
dirchtheid van de verbindingsstukken
na door een zeepachtige oplossing
te gebruiken, nooit een vlaam.
afb. 5
FO 2365
A) Aansluitpijp met wartel
B) Ringetje
C) Haakse fitting
Page 71

Ombouw naar vloeibaar gas
Aanwijzingen m.b.t. de veiligheid
Het ingestelde type gas is aangegeven
op een sticker naast de gasaansluiting. Bij
ombouw moet de sticker worden vervangen.
Het ombouwen van gasinstallaties
mag alleen door een erkend installateur
uitgevoerd worden.
Vóór het ombouwen moet het apparaat
worden losgekoppeld van gas- en
stroomvoorziening: draai de gaskraan dicht
en schakel de zekeringen in de huisinstallatie
uit.
Vervangen van de sproeiers
• Verwijder de roosters.
• Neem het bovenste gedeelte en de
gasontstekers.
• Met een steeksleutel van 7 schroeft U de
gassproeiers los en neemt U ze weg, om
ze te vervangen door diegene die
overeenstemmen met het type gas (afb.
6).
• Hermonteer de delen door dezelfde
handelingen te volgen, in tegengestelde
zin.
• Vervang het indentificatieplaatje
(geplaatst vlakbij de gastoevoerpijp) door
het plaatje dat oveneenstemt met het
nieuwe gastype. Dit identificatieplaatje
vindt u in de verpakking van het
inspuitstuk meegeleverd met het toestel.
Indien de gasdruk verschillend is (of
variabel) van dewelke voorzien, is het
noodzakelijk een gepaste drukregelaar te
plaatsen op de inlaattube, conform aan de
normen.
electrolux 71
afb. 6
Page 72

72 electrolux
Regeling gaspitten
• Ontsteek de brander.
• Breng de toets op de positie van de
kleinste vlam.
• Verwijder de toets.
• Regel de bypass vijs met een dunne
schroevendraaier (afb. 7).
In geval van transformatie van aardgas
noor flessengas, het by-pass schroofje
van de kranen goed vastschroeven.
In geval van transformatie van flessengas
noor aardgas, het by-pass schroofje
ongeveer 1/4 draai losschroeven, totdat
men een kleine regelmatige vlam
verkrijgt.
• Controleer tenslotte of er geen
uitdovingen van de gaspit zijn door snel
de toets van de maximale stand op de
minimum stand te draaien.
afb. 7
bypass afregelschroef
Page 73

Inbouw
N
electrolux 73
N
W
Su
510
afb. 8
Su = sudderbrander
N = normaalbrander
W = wokbrander
Deze kookplaten zijn bestemd om te worden ingebouwd in geschikte werkbladen met een
diepte tussen 550 en 600 mm.De afmetingen van de kookplaat zijn aangegeven in figuur 8.
594
Afmetingen wordenge
gevenin millimeters
Page 74

74 electrolux
Inbouw en montage
Inbouw in en bevestiging in het werkblad
De kookplaat kan gemonteerd worden in
een werkblad met uitsnijmaten zoals
aangegeven in figuur 9. De afstand van de
uitsnede tot de achterwand moet minstens
55 mm zijn. De afstand tussen de uitsnede
en een eventuele rechter of linker zijwand die
hoger is dan de kookplaat dient minstens
100 mm te bedragen.
De bevestiging van de kookplaat in het
werkblad dient als volgt te worden
uitgevoerd:
• plaats de bijgeleverde afdichting op de
rand van de voorkant van de uitsnede op
11 millimeter van de zijkanten en op 10
mm van de achterkant, waarbij u erop let
dat de uiteinden elkaar raken zonder
elkaar te overlappen (zie fig. 10);
• plaats de kookplaat goed in het midden
van de opening in het werkblad;
• bevestig de kookplaat in het werkblad
met de daarvoor bestemde bijgeleverde
haken (zie fig. 11).
Het uitstekende dichtingsmateriaal moet
met een mes van hout of kunststof
worden verwijderd om beschadigingen
aan de werkplaat te voorkomen.
Om het dichtingsmateriaal volledig te
kunnen verwijderen, dient u het
kunststofmes schuin te houden (in een
hoek van 45°C houden).
Het aandraaien van de schroeven is
voldoende om de afdichting te laten
hechten, het teveel aan afdichtingsma-
teriaal kan makkelijk worden verwijderd.
De rand van de kookplaat zorgt voor een
dubbele afdichting die een absolute garantie
biedt tegen het binnendringen van
vloeistoffen.
afb. 9
afb. 10
afdichting
afb. 11
Page 75

Inbouwmogelijkheden
Op een keukenmeubel met deur
Zorg er altijd voor, dat de onderzijde van
de kookplaat minimaal 20 mm verwijderd is
van onderliggende kastdelen of voorwerpen.
Een aanbevolen oplossing ziet u in afb.
9. Het paneel onder de kookplaat moet
eenvoudig kunnen worden verwijderd, zodat
bij evt. reparatie de kookplaat kan worden
losgekoppeld.
Boven een oven
Voor de inbouwopeningen, zie afb. 9.
Er zijn twee ventilatie-openingen vereist.
De afbeeldingen 13 en 14 tonen twee
mogelijke oplossingen.
De elektrische aansluitingen voor de
oven en de kookplaat moeten toegankelijk
blijven en afzonderlijk gelegd worden.
Zorg ervoor dat de onderzijde van een
bovenkast altijd minimaal 650 mm verwijderd
is van de kookplaat (afb. 9).
Indien boven de kookplaat een afzuigkap
van 60 cm wordt geplaatst, zorg er dan voor,
dat de bovenkasten links en rechts van de
kap minimaal 550 mm afstand hebben
tussen de onderkant van de kasten en het
werkblad.
Dit om te voorkomen dat eventueel de
afdekplaat niet geplaatst kan worden.
afb. 12
afb. 13
electrolux 75
FO 2044
afb. 14
Page 76

76 electrolux
Service en originele onderdelen
Deze machine is voor het verlaten van de
fabriek getest en bestudeerd door experts en
specialisten, om u het beste resultaat te
geven.
Eventuele reparatiewerkzaamheden
moeten met de grootste zorg en attentie
gedaan worden.
Daarom adviseren wij dat in het geval van
problemen u contact opneemt met de
dichtsbijzijnde Service Centre en opgave
doet van de aard van het probleem, het
model (Mod.), het produktnummer
(Prod.No.) en het serienummer (Ser.No)
aangegeven op het typeplaatje in de
inspuitset.
Originele onderdelen, goedgekeurd door
de fabrikant en met dit symbool zijn alleen
verkrijgbaar bij ons Service Centre en
erkende onderdelen winkels.
Page 77

electrolux 77
Page 78

78 electrolux
Page 79

electrolux 79
Page 80

www.progress-hausgeraete.de
35906-4001 06/08 R.A
 Loading...