

Page 1
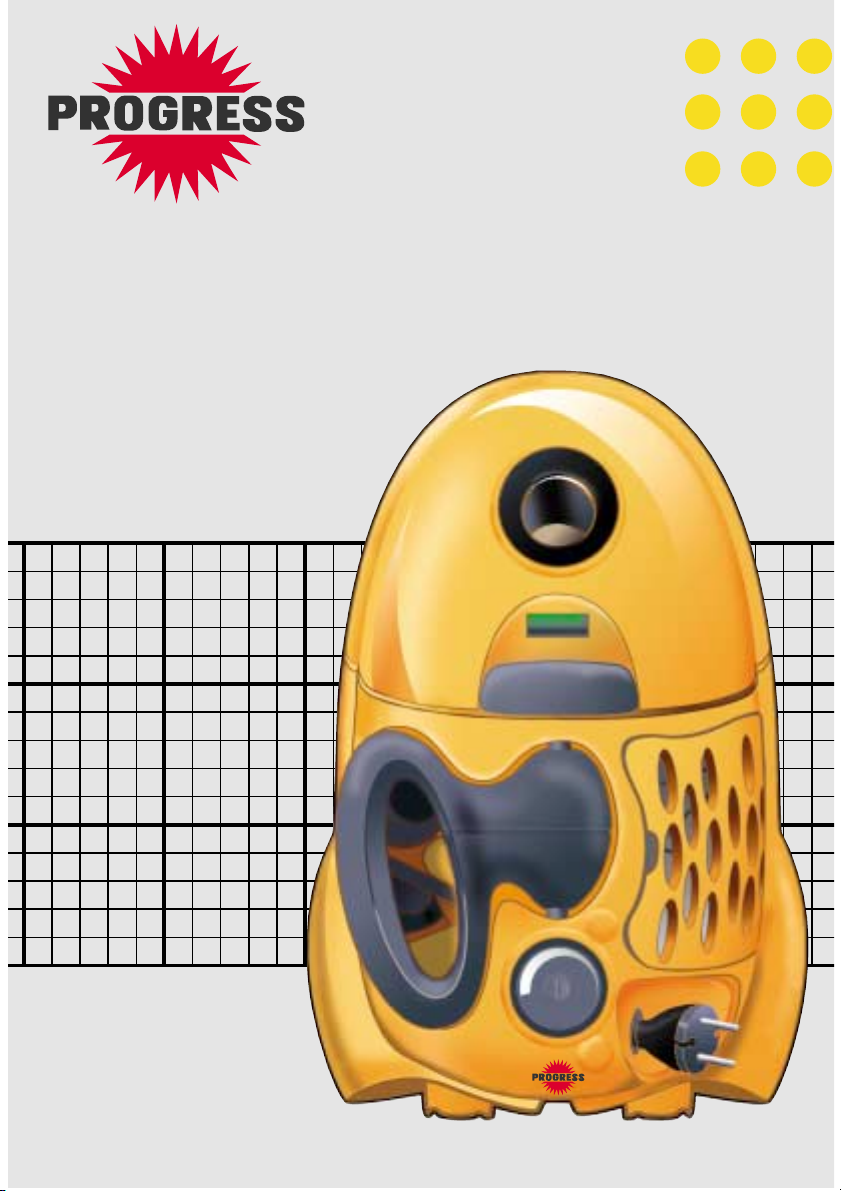
Y
Page 2
Page 3
I
J
K
E
F
H
G
D
A
B
C
Page 4

English: Thank you for choosing a Progress vacuum
cleaner. To ensure total satisfaction, read this Instruction
book carefully. Retain for reference.
Deutsch: Danke, daß Sie sich für einen Progress-
Staubsauger entschieden haben. Um maximale
Zufriedenheit mit Ihrem Staubsauger zu gewährleisten,
sollten Sie diese Gebrauchsanleitung sorgfältig
durchlesen und als Nachschlagehilfe aufbewahren.
Français: Nous vous remercions d’avoir choisi un
aspirateur Progress. Pour garantir une satisfaction totale,
lire attentivement ce mode d’emploi. A conserver pour s’y
référer.
Español: Le agradecemos que haya elegido un aspirador
Progress. Para su absoluta satisfacción, lea
detenidamente este folleto de instrucciones
y consérvelo como referencia.
Italiano: Vi ringraziamo di aver scelto un aspirapolvere
della Progress. Per garantire la massima soddisfazione,
leggere attentamente questo libretto di istruzioni.
Conservarlo per farvi riferimento.
Português: Obrigado por escolher o aspirador de pó
Progress. Para garantir satisfação total, leia este livro de
instruções com cuidado. Guarde para referência futura.
Nederlands: Hartelijk dank voor het kiezen van een
Progress stofzuiger. Om geheel aan uw behoeften te
voldoen is het raadzaam het instructieboekje grondig
door te lezen. Bewaar dit ter referentie.
Page 5

English 2
Deutsch 4
Français 6
Español 8
Italiano 10
Português 12
Nederlands 14
ONYX 132 • 135 • 137
Page 6
P130
Français
Please keep both cover flaps open and cross reference
pictures with text where necessary
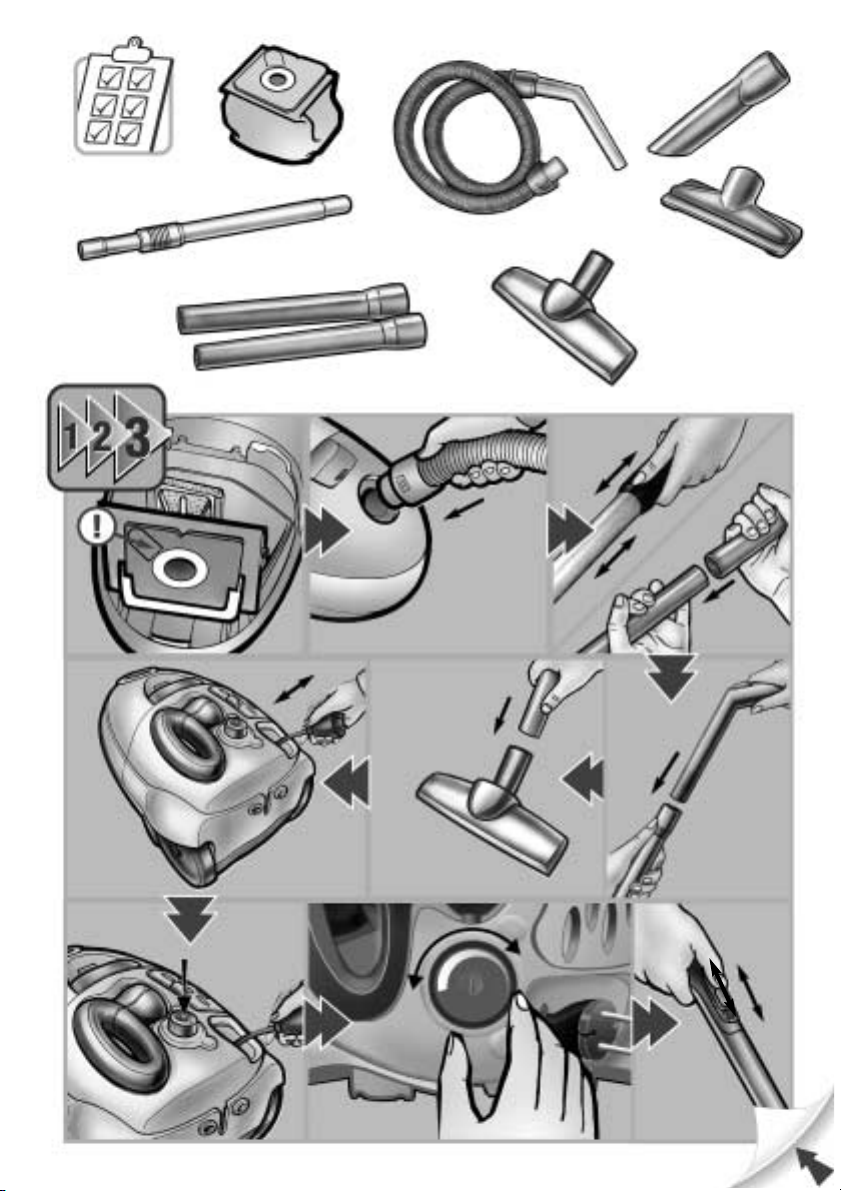
Tools for your Vacuum Cleaner
C
Dust bags
B
Extension tubes (x2) (some models)
C
Telecopic tube (some models)
D
Swivel hose and handle with manual suction control
J
All purpose floor nozzle
G
Narrow crevice nozzle
H
Upholstery nozzle
Ensuring your safety
The cleaner is for domestic use only and has been designed
to ensure maximum safety and performance. Please follow
these simple precautions:
L
The cleaner is double-insulated so it must not
be earthed
M
The cleaner is only to be used by adults
N
Always store in a dry place
O
Do not use to pick up liquids
P
Avoid sharp objects
Q
Do not pick up hot cinders or lighted cigarette ends
R
Do not use near flammable gases
S
Avoid tugging on the mains cable and check cable
regularly for damage
T
Note: Do not use cleaner with a damaged cable. If
damaged the cable should be replaced at a
Progress Service Centre
U
The plug must be removed from the socket-outlet
before cleaning or maintaining the appliance
W
All service and repairs must be carried out by
authorised Progress service staff
Getting Started
•
Check the dust bag is in place.
•
Insert the hose until the catches click to engage.
(Press catches inwards to release).
•
Attach tubes to the hose handle and floor
nozzle by pushing and twisting together
(Twist and pull apart to dismantle).
•
Extend the cable and connect to mains. Progress fitted
with cable rewind, ensure cable is not twisted before use
(To rewind cable press symbol on handle.
Note: Please
hold the plug to prevent it striking you or the
machine
).
•
Press the On/Off button to activate the cleaner.
•
To decrease/increase suction, rotate the On/Off button.
Suction can also be regulated on the hose handle by
opening/closing the aperture.
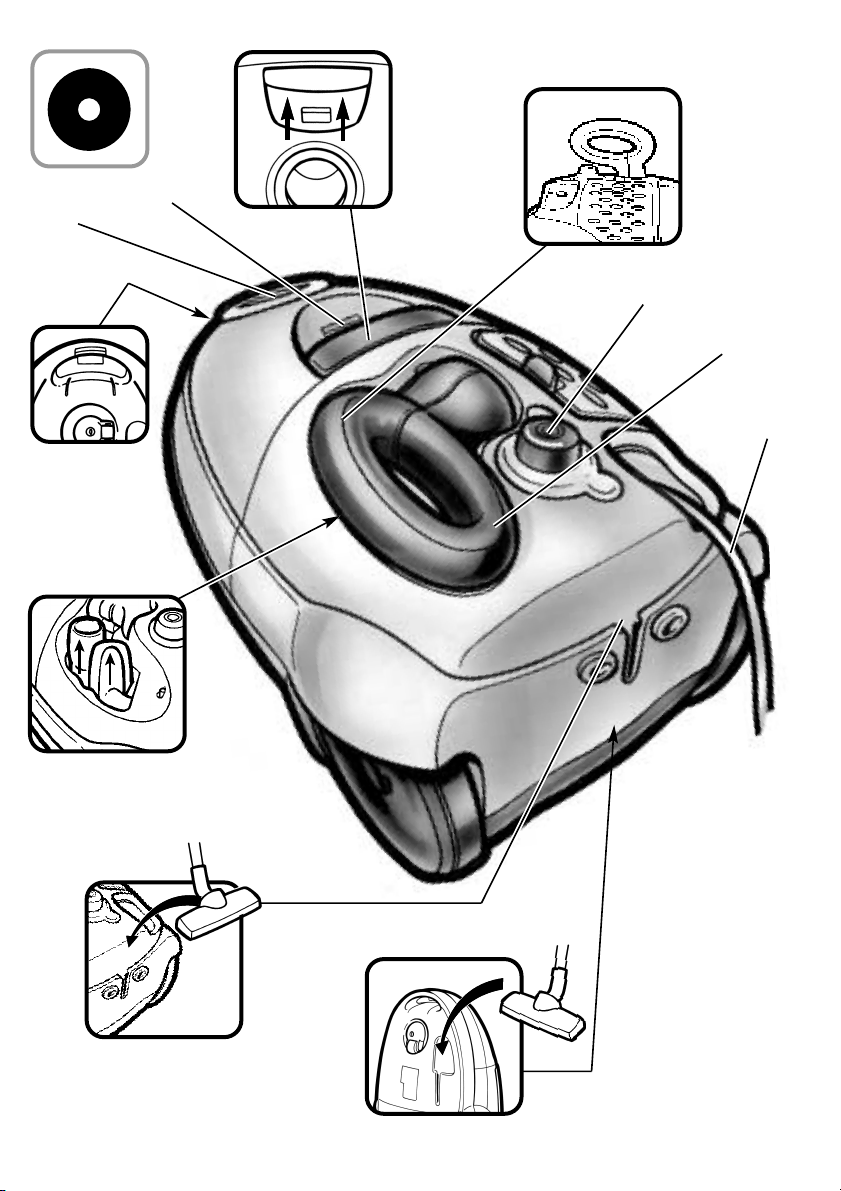
Your Vacuum Cleaner features
AXMains cable
B
Y
Cable rewind button
C
i
On/off button and suction control
D Multifunction handle
E
F
Cover release catch for dust bag compartment
F
d
Dust bag indicator
G
e
Hose connection
H
A
Carrying Handle
I
G
Accessory compartment (for narrow crevice nozzle
and upholstery nozzle)
J
H
Storage slot for floor nozzle and extention tubes
when not in use
K
I
Storage slot for floor nozzle and extention tubes
when in use
English
Page 7

4
Getting the best results
J
The nozzle is designed to vacuum hard floors, rugs
and carpets.
To avoid blockages and maintain suction efficiency,
the floor nozzle should be cleaned regularly using the
hose handle.
p
Loose rugs/curtains/lightweight fabrics: Reduce
the suction power. Use the floor nozzle for loose rugs
and the upholstery nozzle for curtains, cushions etc.
r
Confined areas: Use the crevice nozzle for crevices,
corners and radiators.
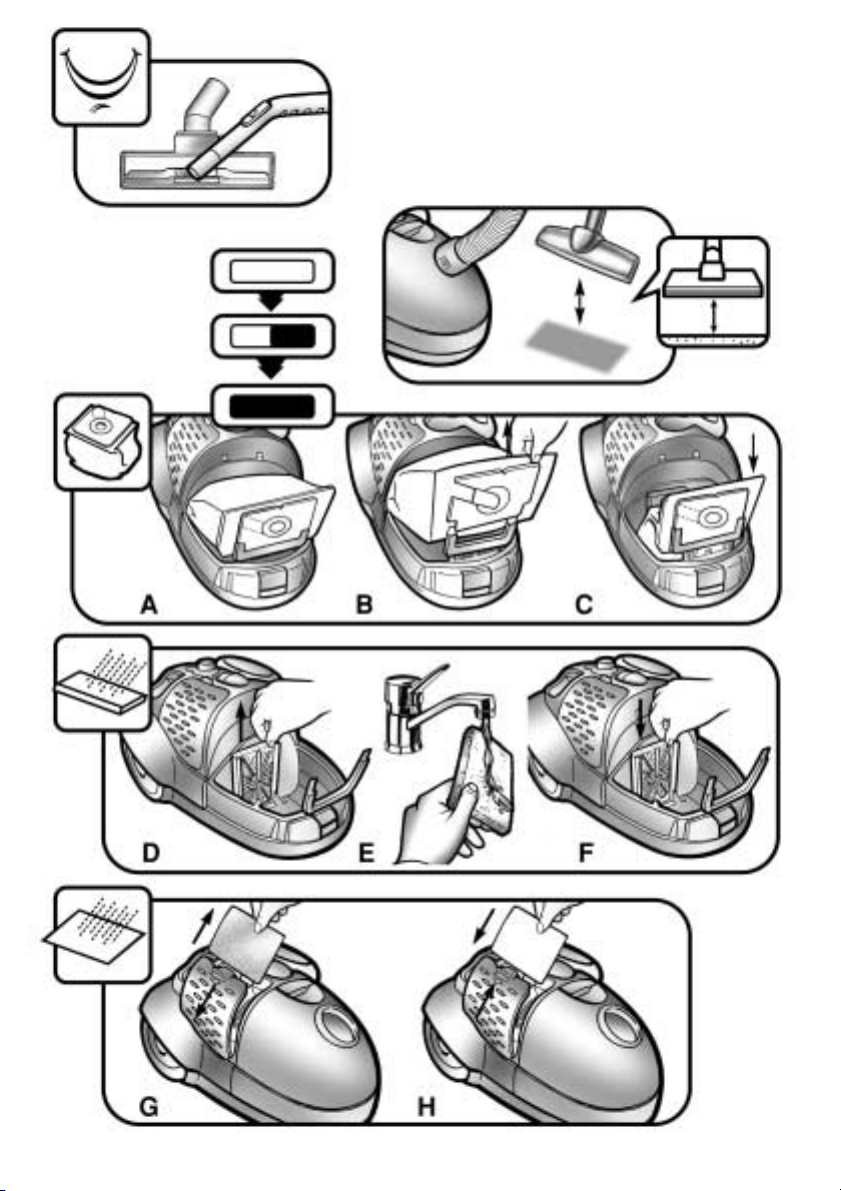
Dust bag indicator and changing the dust bag
For peak performance the dust bag must be changed
when full. Check the dust bag regularly and replace
when necessary. The dust bag indicator window will
gradually turn red when filling and completely red
when full. If the dust bag should accidentally get
broken in the cleaner, take cleaner to Progress
Service Centre for cleaning.
To check the dust bag, the cleaner must be switched
on, with all attachments connected and off the floor.
The dust bag full indicator may signify that the bag is
blocked (occasionally caused by very fine dust) which
will cause loss of suction and may result in
overheating. If this occurs change the dust bag even if
it is not full.
To change the dust bag:
A Release catch and remove lid. Before removing the
dust bag, bend the tab into the hole to prevent dust
escaping.
B Remove the dust bag.
C Insert new dust bag by sliding the bag slots into the
holder. Close lid.
We recommend the dust bag is changed:
*
after using a carpet cleaning powder.
*
if there is a bad smell from the cleaner, then you
should also change the filter.
Note: use only Progress original dust bags
and filters:
5 Dust bags and 1 Micro filter (Ref T196)
Dust bag safety device
To avoid damaging the cleaner, do not use it without a
dust bag. A safety device is fitted which prevents the
cover closing without a dust bag. Do not attempt to
force cover shut.
Changing/Cleaning the filters
There are two filters inside your cleaner. Never use
the cleaner without the filters in place.
To clean Motor Protection filter:
The Motor Protection filter should be cleaned when
dirty.
D Release catch, remove lid and filter.
E Wash filter in warm water.
F Allow to dry and re-insert clean filter. Close lid.
To change Micro filter:
The Micro filter should be changed every fifth dust bag.
G Release catch, open the filter cover and
remove filter.
H Insert new filter and close cover.
Troubleshooting
1. Power: If the electric power does not come on,
disconnect from mains and check plugs, cable and
fuses where appropriate.
2. Blockages/dirty filters: The cleaner may switch
itself off in the event of a severe blockage or
excessively dirty filter(s). In such cases, disconnect
from mains and allow to cool for 20-30 minutes.
Clear blockage and/or replace filter(s) and restart. The
clearing of blocked hoses is not covered by the
guarantee.
3. Water: If water is sucked into the cleaner the motor
must be changed at a Progress Service Centre.
See additional Progress information towards the back
of this booklet.
For healthier
homes
2
Page 8

P130
Français
Beim Lesen bitte beide Klappen offen lassen und bei Bedarf –
in Ergänzung zum Text – die Zeichnungen anschauen.
Zubehör für Ihren Staubsauger
C
Staubbeutel
B
Verlängerungsrohre (2 Stück) (diverse modelle)
C
Teleskoprohr (diverse modelle)
D
Drehbarer Schlauch und Griff mit manueller
Saugleistungsregulierung
J
Mehrzweckbodendüse
G
Fugendüse
H
Polsterdüse
Für Ihre Sicherheit
Der Staubsauger ist nur für den privaten Einsatz gedacht und für
maximale Sicherheit und Leistung konzipiert. Bitte beachten Sie die
folgenden einfachen Sicherheitsvorkehrungen:
L
Der Staubsauger ist doppelt isoliert und darf deshalb nicht
geerdet werden.
M
Der Staubsauger ist nur von Erwachsenen zu bedienen
N
Stets an einem trockenen Ort aufbewahren
O
Nicht zum Aufsaugen von Flüssigkeiten verwenden
P
Scharfe Objekte nicht aufsaugen
Q
Keine heiße Asche oder glühende Zigarettenspitzen
aufsaugen
R
Nicht in der Nähe entflammbarer Gase verwenden
S
Nach Möglichkeit nicht am Hauptkabel zerren; das Kabel
regelmäßig auf Schäden überprüfen
T
Hinweis: Den Staubsauger nicht mit fehlerhaftem Kabel
verwenden. Beschädigte Kabel sollten in einer Progress
Kundendienststelle ausgewechselt werden
U
Vor dem Auswechseln des Filters oder des Staubbeutels
den Stecker aus der Steckdose ziehen
W
Alle Wartungs- und Reparaturarbeiten sind von zugelassenen
Progress Kundendienstmitarbeitern durchzuführen
Inbetriebnahme
•
Prüfen, ob der Staubbeutel eingesetzt ist.
•
Schlauch so weit einschieben, bis er hörbar einrastet.
(Zum Lösen nach innen drücken.)
•
Rohre auf Schlauchgriff und Bodendüse stecken und drehen.
Zum Abbau drehen und auseinanderziehen.
•
Kabel an die Stromversorgung anschließen. Progress mit
Kabelautomatik – vor dem Einsatz darauf achten, daß das
Kabel nicht verdreht ist. (Zum Zurückspulen des Kabels Knopf an
Schlauchgriff drücken. Hinweis: Bitte den Stecker festhalten,
damit er nicht Sie oder die Maschine trifft.)
•
Zum Einschalten des Staubsaugers den Ein-/Aus-Schalter
drücken.
•
Zur Erhöhung/Reduzierung der Saugstärke, Ein-/Aus-Schalter
drehen. Die Saugstärke kann auch durch Öffnen/Schließen der
Öffnung am Schlauchgriff reguliert werden.
Ausstattung Ihres Staubsaugers
AXNetzkabel
B
Y
Kabelautomatikknopf
C
i
Ein-/Aus-Schalter und Saugsteuerung
D Multifunktionsgriff
E
F
Öffnungstaste für Zubehörfach
F
d
Mechanische Filterwechselanzeige
G
e
Schlauchanschluß
H
A
Tragegriff
I
G
Zubehörfach (für Fugen- und Polsterdüse)
J
H
Stellhilfe für nicht benutzte Bodendüse und
Verlängerungsrohre
K
I
Parkposition für benutzte Bodendüse und
Verlängerungsrohre
Deutsch
Page 9

4
Die besten Ergebnisse erzielen:
J
Die Bodendüse ist für das Staubsaugen von harten Böden
und Teppichen geeignet.
Um Verstopfungen zu vermeiden und eine wirksame
Saugleistung zu gewährleisten, sollte die Bodendüse
regelmäßig mit Hilfe des Schlauchgriffs abgesaugt werden.
p
Lose Teppiche/Gardinen/leichte Stoffe: Saugleistung
reduzieren. Bodendüse für lose Teppiche und Polsterdüse
für Gardinen, Kissen usw. verwenden.
r
Enge Räume: Fugendüse für Ritzen, Ecken und
Heizkörper verwenden.
Filterwechselanzeige und Auswechseln des Staubbeutels
Optimale Leistung ist nur möglich, wenn volle Staubbeutel
rechtzeitig ausgewechselt werden. Staubbeutel regelmäßig
überprüfen und bei Bedarf auswechseln. Die
Filterwechselanzeige wird beim Füllen des Staubbeutels
allmählich rot und ist bei vollem Staubbeutel ganz rot. Wenn
der Staubbeutel im Staubsauger aus Versehen reißt, lassen
Sie den Staubsauger in einer Progress
Kundendienstzentrale reinigen.
Zum Prüfen der Filterwechselanzeige muß der Staubsauger
eingeschaltet sein. Alle Geräteteile müssen angeschlossen
sein und dürfen keinen Bodenkontakt haben.
Die Anzeige für einen vollen Staubbeutel kann auch auf einen
verstopften Staubbeutel hinweisen (gelegentlich durch sehr
feinen Staub verursacht). Eine Verstopfung reduziert die
Saugleistung und könnte zu Überhitzung führen. In diesem
Fall den Staubbeutel auswechseln, auch wenn er noch nicht
ganz voll ist.
Auswechseln des Staubbeutels:
A Öffnungstaste betätigen und Abdeckung öffnen. Vor
Entnehmen des Staubbeutels Lasche in die Öffnung
umlegen, um ein Entweichen von Staub zu vermeiden
B Staubbeutel enfernen
C Zum Einlegen des neuen Staubbeutels diesen in die
Führungshalterung schieben. Abdeckung schließen.
Wir empfehlen den Staubbeutel auszuwechseln:
*
nach Verwendung eines Teppichreinigungspulvers
*
wenn ein vom Staubsauger ausgehender, unangenehmer
Geruch feststellbar ist; in diesem Fall sollten Sie auch
den Filter auswechseln.
Hinweis: Nur Originalstaubbeutel und -filter von
Progress verwenden. 5 Staubbeutel und 1
Mikrofilter (T196).
Staubbeutel-Sicherheitsvorrichtung
Um eine Beschädigung des Geräts zu vermeiden,
nicht ohne Staubbeutel verwenden. Der vorhandene
Sicherheitsmechanismus verhindert ein Schließen der
Abdeckung ohne eingelegten Staubbeutel. Nicht versuchen,
die Abdeckung mit Gewalt zu schließen.
Auswechseln/Reinigen der Filter
Ihr Staubsauger ist mit zwei Filtern ausgestattet. Den
Staubsauger nie ohne Filter benutzen.
Reinigen des Motorschutzfilters:
Der Motorschutzfilter sollte gereinigt werden, sobald er
verschmutzt ist.
D) Öffnungstaste betätigen, Abdeckung und Filter entfernen.
E) Filter mit warmem Wasser ausspülen.
F) Trocknen lassen und sauberen Filter wieder einsetzen.
Abdeckung schließen.
Auswechseln des Mikrofilters:
Der Mikrofilter sollte jeweils nach fünf Staubbeuteln
ausgewechselt werden.
G) Öffnungstaste betätigen, Filterabdeckung öffnen und
Filter entfernen.
H) Neuen Filter einsetzen und Abdeckung schließen.
Fehlersuche und -behebung
1. Strom: Sollte keine Stromzufuhr vorhanden sein,
Netzstecker rausziehen und entsprechende Stecker,
Kabel und Sicherungen überprüfen.
2. Verstopfung/verschmutzte Filter: Der Staubsauger kann
sich bei einer schweren Verstopfung oder übermäßigen
Filterverschmutzung selbst abschalten. In diesen Fällen
Staubsaugerstecker aus der Steckdose ziehen und Gerät
20-30 Minuten abkühlen lassen. Verstopfung entfernen bzw.
Filter oder Staubbeutel auswechseln und Staubsauger
wieder einschalten. Das Säubern verstopfter Schläuche ist
nicht durch die Garantieleistung gedeckt.
3. Wasser: Wenn Wasser in den Staubsauger aufgesaugt
wird, muß der Motor in einer Progress Kundendienststelle
ausgewechselt werden.
Bitte auch die zusätzlichen Progress-Informationen weiter
hinten in dieser Anleitung lesen.
4
Page 10

Français
Veuillez laisser les deux rabats ouverts afin de pouvoir vous
reporter aux illustrations pendant la lecture de ce mode
d’emploi.
Les accessoires de votre Aspirateur
C
Sacs à poussière
B
Tubes rallonge (x2) (suivant les modèles)
C
Tube télescopique (suivant les modèles)
D
Tuyau flexible avec réglage de débit d’air sur la poignée
J
Suceur tapis/sol durs
G
Suceur long
H
Petit suceur
Assurer votre sécurité
L’aspirateur est réservé uniquement à l’utilisation domestique et a été
conçu pour assurer une sécurité et des performances maximales.
Veuillez suivre ces simples précautions:
L
L’aspirateur a une double isolation et ne doit donc pas être
relié à la terre
M
L’aspirateur ne doit être utilisé que par des adultes
N
Toujours ranger l’aspirateur dans un endroit sec
O
Ne pas aspirer de liquides
P
Ne pas aspirer d’objets pointus
Q
Ne pas aspirer de braises chaudes ou de mégots
incandescents
R
Ne jamais aspirer à proximité de gaz inflammables
S
Éviter de tirer sur le cordon d’alimentation et vérifier
régulièrement qu’il ne soit pas endommagé
T
A noter: Ne pas utiliser votre aspirateur avec un cordon
endommagé. Si le cordon est endommagé, il doit être
remplacé par un centre service agréé Progress
U
Débrancher l’appareil avant toute opération d’entretien
W
Toutes les révisions et réparations doivent être effectuées
par le personnel des centres services agréés Progress
Mise en marche
•
Vérifier que le sac à poussière est en place.
•
Insérer le tuyau flexible jusqu’à ce que les cliquets s’enclenchent.
(Appuyer sur les cliquets pour le dégager).
•
Raccorder les tubes sur la poignée du flexible et au suceur en les
tournant d’un quart de tour. (Pour le démontage tirer sur les tubes
en les faisant tourner.)
•
Tirer sur le cordon d’alimentation et le brancher sur le secteur.
Les modèles sont équipés d’un enrouleur de câble, s’assurer que
le câble n’est pas tordu avant l’utilisation. (Pour enrouler le câble,
appuyer sur la poignée multifonctions.)
A noter: Veuillez tenir la prise pour l’empêcher de vous
heurter ou de heurter l’appareil.
•
Appuyer sur le bouton marche/arrêt pour la mise en marche de
l’aspirateur.
•
La puissance d’aspiration peut être modulée à l’aide du
régulateur de débit d’air se trouvant sur la poignée du flexible.
L’aspirateur est également équipé d’un variateur électronique de
puissance. Pour faire varier la puissance, il suffit de tourner le
bouton marche/arrêt.
Votre aspirateur possède les
caractéristiques suivantes
AXCordon d’alimentation
B
Y
Enrouleur automatique de câble
C
i
Bouton marche/arrêt et variateur de puissance
D Poignée multi-fonctions
E
F
Cliquet de dégagement du couvercle du compartiment
contenant le sac à poussière
F
d
Indicateur mécanique de remplissage du sac à poussière
G
e
Raccord pour tuyau flexible
H
g
Poignée de transport
I
G
Compartiment accessoires (suceur long et petit suceur)
J
H
Parking horizontal
K
I
Parking vertical
ELECTROLUX L.D.A. 43, avenue Félix Louat – 60300 SENLIS
tél: 03 44 62 24 24 – Telex: 1555530 ELUX FR – Télécopieur: 03 44 62 23 94
SNC au capital de 150 000 Euros. – R.C.S. SENLIS B 409 547 585
Page 11

6
Comment obtenir les meilleurs
résultats
J
Le suceur est conçu pour aspirer aussi bien sur sols durs
que sur les tapis et moquettes.
Afin d’éviter les blocages et maintenir l’efficacité de
l’aspiration, le suceur combiné doit être régulièrement
nettoyé en utilisant la poignée du tuyau flexible.
p
Tapis/rideaux/tissus légers: Réduire la puissance
d’aspiration. Utiliser le suceur combiné pour les tapis et le
petit suceur pour les rideaux, les coussins etc.
r
Espaces restreints: Utiliser le suceur long pour les fentes,
les coins et les radiateurs.
Indicateur de remplissage du sac à poussière et
comment changer le sac à poussière
Pour un fonctionnement optimal, il convient de changer le sac
à poussière lorsqu’il est plein. Vérifier régulièrement le sac à
poussière et le remplacer lorsque cela est nécessaire.
L’indicateur de remplissage du sac à poussière deviendra
rouge à mesure qu’il se remplit, et il sera complètement
rouge lorsqu’il sera plein. Si le sac à poussière se rompt
accidentellement dans l’aspirateur, il faut le faire nettoyer dans
un centre service agréé Progress.
Pour vérifier le remplissage du sac à poussière, l’appareil
doit être branché, avec les accessoires raccordés et non en
contact avec le sol.
L’indicateur de remplissage du sac à poussière peut indiquer
que le sac est colmaté (de temps à autre ceci est causé par de
la poussière très fine) ce qui entraîne une perte d’aspiration et
peut provoquer une surchauffe. Si cela se produit, il convient
de changer le sac à poussière même s’il n’est pas plein.
Pour changer le sac à poussière:
A Dégager le cliquet pour retirer le couvercle. Avant de
retirer le sac à poussière, plier la patte cartonnée afin de
fermer l’orifice d’aspiration pour éviter que la poussière
ne s’échappe.
B Enlever le sac à poussière
C Mettre en place le sac neuf en le plaçant sur les ergots
prévus à cet effet. Fermer le couvercle.
Nous recommandons de changer le sac à poussière:
*
après l’utilisation d’une poudre de nettoyage pour
moquette
*
si une mauvaise odeur émane de l’aspirateur, les filtres
devront aussi être nettoyés/changés.
Note : N’utiliser que des sacs à poussière et des filtres
originaux Menalux réf. T196 (5 sacs à poussière et un
microfiltre).
Si vous rencontrez des difficultés pour l’achat des sacs
à poussière et des filtres, ou si vous désirez obtenir
l’adresse du Centre Service Agréé le plus proche de
votre domicile, téléphonez au Service Conseil
Consommateurs: 03 44 62 24 24.
Sécurité de présence du sac à poussière
Afin d’éviter d’endommager l’aspirateur, ne jamais l’utiliser
sans sac à poussière. Il est muni d’un dispositif de sécurité
pour empêcher que le couvercle ne se referme sans sac à
poussière. N’essayer pas de fermer le couvercle en forçant.
Changer/Nettoyer les filtres
Il y a deux filtres à l’intérieur de votre aspirateur. Il ne faut
jamais utiliser l’aspirateur sans que les filtres de protection
soient en place.
Pour nettoyer le filtre de protection du moteur:
Le filtre de protection du moteur doit être nettoyé lorsqu’il est
sale.
D) Dégager le cliquet, retirer le couvercle et le filtre.
E) Laver le filtre à l’eau chaude.
F) Laisser sécher et remettre le filtre propre en place.
Fermer le couvercle.
Pour changer le microfiltre:
Le microfiltre doit être changé tous les cinq sacs à poussière.
G) Dégager le cliquet, ouvrir le couvercle du filtre et retirer le
filtre.
H) Insérer le nouveau filtre et fermer le couvercle.
Gestion des pannes
1. Alimentation: Si le courant électrique n’arrive pas,
débrancher l’appareil et vérifier les prises, le câble et les
fusibles si nécessaire.
2. Blocages/filtres sales: L’aspirateur peut s’arrêter en cas
de blocage grave ou si un ou des filtre(s) est/sont
excessivement sale(s). Dans de tels cas, débrancher
l’appareil et laisser refroidir pendant 20-30 minutes. Enlever
ce qui cause le blocage et/ou remplacer le(les) filtre(s) et
remettre l’appareil en marche. Le débouchage des tuyaux
flexibles bloqués n’est pas couvert par la garantie.
3. Eau: Si de l’eau est aspirée dans l’aspirateur, il est
nécessaire de faire changer le moteur par un centre service
agréé Progress. Cette intervention n'est pas prise en charge
dans le cadre de la garantie.
Veuillez également vous reporter à la fin de cette brochure
pour plus d’informations sur Progress.
Page 12

Español
Mantenga ambas tapas abiertas y remítase a los dibujos y al
texto a la vez cuando sea necesario.
Accesorios para su aspirador
C
Bolsas de recogida de polvo
B
Tubos de extensión (x2) (algunos modelos)
C
Tubo telescpicoó (algunos modelos)
D
Tubo orientable y mango con control manual de potencia
J
Boquilla de suelo para todos los propósitos
G
Boquilla para rincones estrechos
H
Boquilla para tapicerías
Para garantizar su seguridad
El aspirador es sólo para uso doméstico y ha sido diseñado para
garantizar la máxima seguridad y el mayor rendimiento. Le rogamos
que siga estas sencillas precauciones:
L
El aspirador lleva doble aislamiento y el enchufe no debe
conectarse a tierra
M
Sólo personas adultas deben usar el aspirador
N
Se debe guardar siempre en un lugar seco
O
No se debe usar para recoger líquidos
P
Evítense objetos afilados
Q
No se debe recoger ceniza caliente ni colillas encendidas
R
No se debe usar cerca de gases inflamables
S
Se debe evitar pasar sobre el cable de conexión, el cual
se debe revisar regularmente para comprobar que no
está dañado
T
Nota: Su aspirador no se debe usar con el cable
dañado. En caso de que el cable esté dañado, acuda a
un Servicio Técnico Progress
U
Desenchúfese el aspirador de la toma de corriente antes
de realizar operaciones de limpieza o mantenimiento en
el mismo
W
Todo servicio y reparaciones las deben efecturar personal
autorizado por Progress
Listo para comenzar
•
Cerciórese de que la bolsa de recogida de polvo está en su sitio.
•
Introdúzca el tubo hasta oír un clic.
(Presione los topes hacia adentro para soltarla).
•
Acople los tubos al mango del tubo y a la boquilla para el suelo,
empujando y enroscándolos. (Retuerza y separe para su
desmontaje).
•
Extienda el cable y conéctelo a la red de suministro. Para los
equipados con rebobinado de cable, cerciórese de que no esté
retorcido. (Para rebobinar el cable, presione el botón del mango.
Nota: Sujete el enchufe para evitar que golpee).
•
Presione el botón de encendido/apagado para activar el
aspirador.
•
Para aumentar/reducir la aspiración, gire el botón de
encendido/apagado. La succión también se puede regular en el
mango del tubo flexible abriendo/cerrando la abertura que hay
en el mismo.
Características del aspirador
AXCable de suministro principal
B
Y
Botón de rebobinado del cable
C
i
Botón de encendido apagado y regulador de potencia de
aspiración
D Mango multifunciones
E
F
Cubierta de desenganche para el compartimento de
llenado de bolsa
F
d
Indicador mecánico de llenado de bolsa
G
e
Conexión de tubo
H
A
Asa de transporte
I
G
Compartimento de accesorios (boquilla para rincones
estrechos y boquilla para tapicerías)
J
H
Ranura de posicionamlento de la boquilla para suelo y los
tubos de extensión cuando no está en funcionamiento
K
I
Ranura de posicionamlento de la boquilla para suelo con
los tubos extensibles mientras se esta usando
Page 13

8
Cómo obtener los mejores
resultados
J
La boquilla se ha diseñado para aspirar suelos duros,
alfombras, y moquetas.
Para evitar bloqueos y mantener la eficacia de succión, la
boquilla para el suelo se debe limpiar con regularidad
utilizando el mango del tubo flexible.
p
Alfombras/cortinas/telas ligeras: Reduzca la potencia de
succión. Use la boquilla para suelo en alfombras ligeras y la
boquilla para tapicería en cortinas, cojines, etc.
r
Areas reducidas: Use la boquilla para hendiduras,
esquinas y radiadores.
Indicador de llenado de bolsa de polvo y sustitucion
de ésta
Para obtener el mayor rendimiento, la bolsa de recogida de
polvo se debe cambiar cuando esté llena. En los modelos
compruebe el estado de la bolsa de recogida de polvo con
regularidad y cámbiela cuando sea necesario. En el la
ventanilla indicadora del llenado de bolsa se pondrá rojo
paulatinamente al llenarse hasta que esté completamente de
ese color, lo que quiere decir que está llena. Si la bolsa de
recogida de polvo se rompiese accidentalmente dentro del
aspirador, lleve el aspirador a un Servicio Técnico Progress
para su limpieza.
Para comprobar el estado de la bolsa, el aspirador debe
estar encendido y separado del suelo.
A veces el indicador podría señalar que la bolsa de recogida
de polvo está llena, aunque lo que ocurre es que ésta se
ha bloqueado (en ocasiones, causado por polvo muy fino) lo
que podría causar pérdida de succión y provocar
sobrecalentamiento. En estos casos se debe cambiar la
bolsa de recogida de polvo a pesar de que no esté llena.
Para cambiar la bolsa de recogida de polvo:
A Suelte el pasador y retire la tapa. Antes de retirar la
bolsa de recogida de polvo, doble la lengüeta dentro de
ese agujero para impedir que el polvo se salga.
B Retire la bolsa de recogida de polvo.
C Introduzca la nueva bolsa de recogida de polvo encajando
las ranuras de la misma sobre los soportes. Cierre la tapa.
Recomendamos que se cambie la bolsa de recogida
de polvo:
*
después de utilizar polvos para la limpieza de moquetas
*
si el aspirador despide un olor desagradable, (en este
caso también se debe cambiar el filtro.)
Nota: Use sólo bolsas de recogida de polvo y filtros
originales Progress. 5 bolsas de recogida de polvo y un
Micro filtro (Ref.T196).
Dispositivo de seguridad de la bolsa de recogida
de polvo
Para evitar dañar el aspirador no lo use sin bolsa de recogida
de polvo. El aspirador va equipado con un dispositivo de
seguridad que evita que se cierre la cubierta sin bolsa de
recogida de polvo. No intente cerrar la cubierta a la fuerza.
Cambio/limpieza de los filtros
Hay dos filtros dentro de su aspirador. Nunca use el
aspirador sin los filtros en su lugar adecuado.
Modo de limpiar el filtro de protección de motor:
El filtro de protección del motor debe limpiarse cuando esté
sucio.
D) Suelte el pasador, retire la tapa y el filtro.
E) Lave el filtro en agua templada.
F) Deje secar el filtro limpio y vuelva a introducirlo. Cierre
la tapa.
Para cambiar el Micro filtro:
El Micro filtro debe cambiarse a cada cinco bolsas de polvo.
G) Suelte el pasador, abra la cubierta del filtro y retire el filtro.
H) Introduzca el nuevo filtro y cierre la cubierta.
Reparación de averías
1. Suministro eléctrico: Si no hay señal de corriente
eléctrica, desconéctelo de la red y compruebe el estado del
enchufe, cables y fusibles donde sea conveniente.
2. Bloqueo/filtros sucios: El aspirador se podría apagar por
sí solo en caso de bloqueo grave o filtro(s) excesivamente
sucio(s). En tal caso, desconéctelo de la red y déjelo enfriar
de unos 20 a 30 minutos. Elimine el bloqueo y/o sustituya
el/los filtro(s) y vuélvalo a encender. La limpieza de tubos
atascados no se cubre en la garantía.
3. Agua: Si ha entrado agua al aspirador avise al Servicio
Tecnico Progress.
Véase también información adicional de Progress al final de
este libro de instrucciones
Page 14

Italiano
Tenere aperti entrambi i risvolti e riferire le illustrazioni al testo
ove necessario.
Accessori dell’aspirapolvere
C
Sacchetti per la polvere
B
Tubi di prolunga (x2) (alcuni modelli)
C
Tubo telescopico (alcuni modelli)
D
Tubo flessibile girevole e impugnatura con comando
manuale dell’aspirazione
J
Spazzola multiuso per pavimenti
G
Bocchetta per fessure
H
Bocchetta multiuso (divani/poltrone)
Per la vostra sicurezza
Questo aspirapolvere è solo per uso domestico ed è stato ideato in
modo da offrire la massima sicurezza e le migliori prestazioni.
Osservare queste semplici precauzioni:
L
L’aspirapolvere ha un doppio isolamento quindi non deve
avere la messa a terra.
M
L’aspirapolvere deve essere usato solo da adulti
N
Riporre solo in luogo asciutto
O
Non usarlo per aspirare liquidi
P
Evitare oggetti appuntiti
Q
Non aspirare ceneri calde o mozziconi accesi di sigarette
R
Da non usare vicino a gas infiammabili
S
Evitare di tirare il cavo elettrico e controllare regolarmente se
presenti segni di danneggiamento
T
Nota: non usare l’aspirapolvere se il cavo è danneggiato.
Se lo fosse, sostituirlo presso un Centro assistenza
Progress. (Per l’Italia: Centro assistenza Progress
Zanussi.)
U
Prima di procedere alla pulizia o alla manutenzione
dell’apparecchio, staccare la spina dalla presa
W
Ogni genere di manutenzione e di riparazione deve essere
eseguita da personale autorizzato per l’assistenza della
Progress
Per cominciare
•
Controllare che il sacchetto sia stato inserito.
•
Inserire il tubo flessibile finché i fermi si bloccano con uno scatto.
(Per rilasciarli, premere i fermi verso l’interno).
•
Applicare i tubi all’impugnatura del tubo flessibile e spazzola
doppio uso spingendoli uno nell’altro con un movimento rotatorio
(per lo smontaggio, staccarli con un movimento rotatorio).
•
Svolgere il cavo e collegarlo alla presa d’elettricità. Con dotati di
riavvolgimento del cavo, controllare che questo non sia
attorcigliato prima dell’uso. (Per riavvolgere il cavo, premere il
pulsante sull’impugnatura. Nota: tenere in mano la spina, per
evitare che colpisca la persona o l’apparecchio).
•
Per mettere in funzione l’aspirapolvere, premere il pulsante
Acceso/Spento.
•
Per aumentare/ridurre l’aspirazione, ruotare il pulsante
Acceso/Spento. Si può regolare l’aspirazione meccanicamente
anche aprendo/chiudendo l’apertura sull’impugnatura del tubo
flessibile.
Le caratteristiche dell’aspirapolvere
AXCavo elettrico
B
Y
Pulsante per il riavvolgimento del cavo
C
i
Pulsante Acceso/Spento e regolatore di controllo
dell’aspirazione
D Impugnatura multifunzione
E
F
Coperchio del fermo a scatto per lo scomparto degli
accessori
F
d
Indicatore meccanico di sacchetto pieno per
G
e
Attacco del tubo flessibile
H
A
Maniglia per il trasporto
I
G
Scomparto accessori (per la bocchetta per fessure e la
bocchetta multiuso)
J
H
Fessura per riporre l’accessorio per il pavimento e i tubi di
prolunga dopo l’uso
K
I
Fessura per riporre la spazzola doppio uso e i tubi di
prolunga in posizione di parcheggio
Page 15

10
Per ottenere i migliori risultati
J
Bocchetta per pulire pavimenti duri, tappeti e moquettes.
Per evitare gli intasamenti e mantenere un’aspirazione
efficiente, l’accessorio per pavimenti va pulito regolarmente
usando l’impugnatura del tubo flessibile.
p
Tappeti/tende/tessuti leggeri: ridurre la potenza
d’aspirazione. Usare l’accessorio per pavimenti per pulire i
tappeti e l’accessorio per la tappezzeria per tende, cuscini ecc.
r
Spazi ristretti: usare la bocchetta per fessure, negli angoli
e intorno ai caloriferi.
Indicatore di sacchetto pieno e come cambiare
il sacchetto
Per una prestazione ottimale, il sacchetto va cambiato
quando è pieno. Col modello controllare regolarmente il
sacchetto e sostituirlo quando necessario. Con i modelli
l’indicatore di sacchetto pieno diventerà gradualmente rosso
mentre il sacchetto si riempe e completamente rosso
quando il sacchetto è pieno. Se il sacchetto per la polvere
dovesse rompersi accidentalmente all’interno
dell’aspirapolvere, portare l’aspirapolvere presso un Centro
assistenza Progress per farlo pulire. (Per l’Italia: Centro
assistenza Progress Zanussi).
Per controllare lo stato di riempimento del sacchetto,
l’aspirapolvere deve essere acceso, con tutti gli accessori
collegati e sollevati dal pavimento.
L’indicatore di sacchetto pieno può segnalare che il
sacchetto è bloccato (occasionalmente a causa di polvere
molto fine), situazione che riduce l’aspirazione e può
provocare un surriscaldamento. Se ciò dovesse verificarsi,
cambiare il sacchetto anche se non fosse pieno.
Per cambiare il sacchetto:
A Rilasciare il fermo e togliere il coperchio. Prima di
togliere il sacchetto, piegare la linguetta e inserirla nel
foro per evitare una fuoriuscita di polvere.
B Estrarre il sacchetto.
C Inserire il sacchetto nuovo facendo scorrere le guide del
sacchetto sui supporti. Chiudere il coperchio.
Raccomandiamo di cambiare il sacchetto della polvere:
*
dopo avere usato un detergente in polvere per la pulizia
delle moquettes
*
se l’aspirapolvere emana un cattivo odore, nel qual caso
cambiare anche il filtro.
Nota: usare solo i sacchetti e i filtri originali Progress. 5
sacchetti per la polvere e 1 Microfiltro (rif. T196).
Dispositivo di sicurezza per il sacchetto
Per evitare di danneggiare l’aspirapolvere non usarlo senza
sacchetto. Esiste un dispositivo di sicurezza che impedisce al
coperchio di chiudersi se non c’è un sacchetto. Non cercare
di forzare la chiusura del coperchio.
Cambio/Pulizia dei filtri
All’interno dell’aspirapolvere sono presenti due filtri. Non
usare mai l’aspirapolvere senza i filtri.
Per pulire il filtro di protezione del motore
Il filtro di protezione del motore va pulito quando è sporco.
D) Rilasciare il fermo, togliere il coperchio e il filtro.
E) Lavare il filtro in acqua tiepida.
F) Lasciare asciugare e reinserire il filtro pulito. Chiudere il
coperchio.
Per cambiare il Microfiltro:
Il Microfiltro va cambiato ogni cinque cambi del sacchetto.
G) Rilasciare il fermo, aprire il coperchio del filtro e
rimuovere il filtro.
H) Inserire il nuovo filtro e chiudere il coperchio.
Diagnosi dei guasti
1. Elettricità: se l’apparecchio non si accende, scollegarlo
dall’elettricità e controllare prima le prese ed il cavo ed
eventualmente i fusibili.
2. Intasamenti/Filtri sporchi: l’aspirapolvere si può
spegnere da solo in caso di eccessivo intasamento o
sporcizia dei filtri. In tali casi, scollegarlo dall’elettricità e
lasciarlo raffreddare per 20-30 minuti. Eliminare
l’intasamento e/o sostituire i filtri, quindi riaccendere.
Lo sbloccaggio dei tubi flessibili intasati non è coperto
dalla garanzia.
3. Acqua: se viene aspirata dell’acqua all’interno
dell’aspirapolvere il motore deve essere cambiato presso
un Centro assistenza Progress. (Per l’Italia: Centro
assistenza Progress Zanussi.)
Fare riferimento anche ad ulteriori informazioni sui prodotti
Progress verso la fine di questo libretto.
Page 16

Português
Mantenha as duas tampas abertas e comparar os desenhos
com o texto, quando for necessário.
Acessórios para o seu Aspirador de Pó
C
Sacos de pó
B
Tubos de extensão (x2) (alguns modelos)
C
Tubo telescópico (alguns modelos)
D
Mangueira giratória e pega com controlo manual de sucção
J
Escova para pavimento, para todos os fins, nos modelos
G
Bocal para fendas
H
Bocal para estofos
Certifique-se da sua segurança
O aspirador destina-se apenas a uso doméstico e foi concebido
para assegurar a máxima segurança e desempenho. Siga estas
precauções simples:
L
O aspirador tem isolamento duplo, portanto não é
necessário estar ligado à terra
M
O aspirador deve ser utilizado apenas por adultos
N
Guarde-o sempre num local seco
O
Não o utilize para aspirar líquidos
P
Evite objectos afiados
Q
Não aspire cinzas quentes ou pontas de cigarro acesas
R
Não o utilize junto de gases inflamáveis
S
Evite puxar o cabo e verifique-o com regularidade para
detectar quaisquer danos
T
Nota: Não utilize o seu aspirador com o cabo
danificado. Se este estiver danificado deve ser
substituído num Centro de Assistência da Progress
U
Antes de limpar o aparelho ou executar a sua manutenção,
retire a ficha da tomada de rede
W
Toda a assistência e reparações devem ser efectuadas por
técnicos da Progress ou por concessionários autorizados
Preparação Inicial
•
Verifique se o saco de pó está no lugar respectivo.
•
Introduza a mangueira até as patilhas encaixarem.
(Prima as patilhas para dentro para a soltar).
•
Ligue os tubos, à pega da mangueira e à escova para
pavimentos empurrando e encaixando um contra o outro
(Desencaixe e separe-os para desmontar).
•
Puxe o cabo para fora e ligue-o à rede. Os modelos estão
equipados com enrolador de cabo; certifique-se de que este não
está torcido antes de o utilizar. (Para desenrolar o cabo, prima o
botão que está na pega. Nota: Segure na ficha para impedir
que esta o atinja ou bata no aparelho).
•
Prima o botão Ligar/Desligar para activar o aspirador.
•
Para aumentar/reduzir a sucção, rode o botão Ligar/Desligar.
A sucção também pode ser regulada na pega da mangueira
abrindo/fechando a abertura.
As características do seu Aspirador
de Pó
AXCabo de rede
B
Y
Botão para enrolamento do cabo
C
i
Botão Ligar/Desligar e regulador do controlo de sucção
D Pega com funções múltiplas
E
F
Patilha de soltar a tampa para o compartimento dos
acessórios
F
d
Indicador mecânico do saco de pó nos modelos
G
e
Ligação da mangueira
H
A
Pega de transporte
I
G
Compartimento de Acessórios (para bocal para fendas e
bocal para estofos)
J
H
Parqueamento para a escova e tubos de extensão quando
não estiverem em utilização
K
I
Parqueamento para a escova e tubos de extensão quando
estiverem em utilização
Page 17

12
Como conseguir os melhores
resultados
J
O bocal está desenhado para aspirar pavimentos duros,
tapetes e alcatifas.
Para evitar entupimentos e manter o rendimento da sucção,
a escova deve ser limpa regularmente utilizando a pega da
mangueira.
p
Tapetes/cortinas/tecidos leves: Reduza a sucção. Use a
escova para pavimentos na posição para tapetes e o bocal
de estofos para cortinas, almofadas etc.
r
Áreas restritas: use o bocal de fendas para frestas,
cantos e radiadores.
Indicador do saco de pó e mudança do saco de pó
Para um desempenho óptimo o saco de pó deve ser
mudado quando estiver cheio. Nos modelos verifique o
saco de pó com regularidade e substitua-o sempre que for
necessário. Nos modelos a janela do indicador do saco de
pó ficará gradualmente vermelha à medida que o saco se
for enchendo e completamente vermelha quando estiver
cheio. Se o saco de pó arrebentar acidentalmente dentro do
aspirador, leve o aspirador ao Centro de Assistência
Progress para ser limpo.
Para verificar se o saco de pó está cheio o aspirador deve
estar ligado, com todos os acessórios montados e a escova
levantada do chão.
O indicador de saco de pó cheio pode significar que o saco
está bloqueado (ocasionalmente provocado por poeira
muito fina) o que causará perda de sucção e que poderá
resultar em sobreaquecimento. Se isto ocorrer mude o saco
de pó, mesmo que este não esteja cheio.
Para mudar o saco de pó:
A Solte a patilha e remova a tampa. Antes de remover o
saco de pó, dobre a aba para dentro do furo a fim de
prevenir que o pó se escape.
B Retire o saco de pó.
C Introduza novo saco de pó colocando as ranhuras do
saco sobre os suportes. Feche a tampa.
Recomendamos a mudança do saco de pó:
*
depois de utilizar um produto em pó para a limpeza de
alcatifas
*
se o aspirador tiver mau cheiro deverá também mudar
o filtro.
Nota: Use apenas sacos de pó e filtros originais
Progress. 5 sacos de pó e 1 filtro Micro (ref T196).
Dispositivo de segurança do saco de pó
Para evitar danificar o aspirador não o utilize sem um saco
de pó. O aparelho tem um dispositivo de segurança instalado
que impede a tampa de fechar sem um saco de pó colocado.
Não tente fechar a tampa à força.
Mudança/ Limpeza dos filtros
Há dois filtros dentro do seu aspirador. Nunca utilize o
aspirador sem os filtros no lugar respectivo.
Para limpar o filtro de protecção do motor
O filtro de Protecção do Motor deve ser limpo quando
estiver sujo.
D) Solte a patilha, remova a tampa e o filtro.
E) Lave o filtro com água morna.
F) Deixe o filtro limpo secar e o insira de novo . Feche a
tampa.
Para mudar o Microfiltro:
O filtro Micro deve ser mudado para cada cinco sacos de
pó utilizados.
G) Solte a patilha, levante a tampa do filtro e remova o
filtro.
H) Insira o filtro novo e feche a tampa.
Identificação e resolução de
problemas
1. Ligação: Se não houver corrente no aparelho,
desligue-o da rede e verifique as fichas, cabo e fusíveis.
2. Entupimentos/filtros sujos: O aspirador pode-se
desligar por si só se houver um entupimento sério ou se
o(s) filtro(s) estiver(em) excessivamente sujo(s). Nessas
circunstâncias, desligue da rede e deixe arrefecer durante
20 a 30 minutos. Desentupa e/ou substitua o(s) filtro(s) e
volte a pôr em funcionamento. A limpeza de mangueiras
entupidas não está coberta pela garantia.
3. Água: Se aspirar água para dentro do aspirador deve
trocar o motor num Centro de Assistência Progress.
Veja também as informações adicionais de Progress perto
do final deste folheto.
Page 18

Nederlands
Vouw beide zijflappen open en leg de juiste afbeeldingen naast
de tekst.
Hulpstukken voor uw stofzuiger
C
Stofzakken
B
Zuigbuizen (2x) (bepaalde modellen)
C
Telescopische zuigbuis (bepaalde modellen)
D
Slang met draaitopbevestiging en pistoolgreep met
handmatige zuigregeling
J
Vloermondstuk voor alle doeleinden
G
Kierenmondstuk
H
Meubelmondstuk
Veiligheid voorop
Deze stofzuiger is alleen voor huishoudelijk gebruik en werd
speciaal ontworpen met het oog op maximale veiligheid en prestatie.
Volg a.u.b. de volgende eenvoudige voorzorgsmaatregelen:
L
De stofzuiger is dubbel geïsoleerd en hoeft daarom niet
geaard te worden
M
De stofzuiger mag alleen door volwassenen gebruikt worden
N
Berg het apparaat altijd op een droge plaats op
O
Gebruik het apparaat niet om vloeistoffen mee op te zuigen
P
Vermijd scherpe voorwerpen
Q
Zuig geen hete as naar binnen of brandende sigarettenpeuken
R
Gebruik het apparaat niet in de nabijheid van ontvlambare
gassen
S
Vermijd rukken aan het snoer en controleer het snoer
regelmatig
T
NB: Gebruik het apparaat niet wanneer het snoer
beschadigd is. Wanneer dit beschadigd is, dient het
te worden vervangen door de Elgroep Fabrieksservice
U
U dient de stekker uit het stopcontact te halen, voordat u het
apparaat schoonmaakt of er onderhoudswerkzaamheden
aan verricht
W
Alle service en reparaties dienen te worden uitgevoerd door
uw vakhandelaar of door de ELGROEP
FABRIEKSSERVICE
Voordat u begint
•
Ga na of de stofzak zich op zijn plaats bevindt.
•
Duw de zuigbuis op de stofzulger totdat u een klik hoort.
(Druk de vergrendelingen in om hem los te krijgen.)
•
Bevestig de zuigbuis aan de pistoolgreep van de slang en aan het
buisje van het mondstuk door deze al draaiend samen te drukken
(de buizen draaien en van elkaar aftrekken om ze uit elkaar te
halen).
•
Trek het snoer uit en steek de stekker in het stopcontact. Zijn
uitgerust met automatische snoeropwinder. Zorg dat het snoer niet
gedraaid is voordat u begint te werken. (Druk op de knop op het
handvat om het snoer op te rollen. Houd de knop ingedrukt om te
voorkomen dat het snoer u niet raakt.)
•
Druk op de Aan/Uit-knop om de stofzuiger aan te zetten.
•
Om de zuigkracht te verminderen/verhogen, draai de Aan/Uit-knop.
De zuigkracht kan ook geregeld worden door de opening op de
slanggreep te openen of te sluiten.
De kenmerken van uw stofzuiger
AXElektriciteitssnoer
B
Y
Snoerknop
C
i
Aan/Uit-knop en zuigkrachtregelaar
D Multifunctioneel handvat
E
F
Afsluitbare klep voor ruimte met accessoires
F
d
Mechanische stofzakindicator
G
e
Pijpverbinding
H
A
Draaghandgreep
I
G
Compartiment voor accessoires (voor het kierenmondstuk
en voor het meubelmondstuk)
J
H
Opslagruimte voor vloermondstuk en zuigbuizen wanneer
niet in gebruik
K
I
Opslagruimte voor vloermondstuk en zuigbuizen wanneer
in gebruik
Page 19

14
Optimale resultaten
J
Het mondstuk is ontworpen om harde vloeren, tapijten en
vloerbedekking te stofzuigen.
Om blokkades te voorkomen en de zuigkracht te
handhaven, dient het vloermondstuk regelmatig
schoongemaakt te worden met de pistoolgreep van de
slang.
p
Losse vloerkleden/gordijnen/lichtgewichtstoffen:
Verminder de zuigkracht. Gebruik het vloermondstuk voor
losse vloerkleden en het meubelmondstuk voor gordijnen,
kussens etcetera.
r
Besloten gebieden: Gebruik het kierenmondstuk voor
kieren, hoeken en radiatoren.
De stofzakindicator en het verwisselen van de stofzak
Voor optimaal functioneren dient de stofzak verwijderd te
worden wanneer deze vol is. Controleer de stofzak
regelmatig en vervang deze wanneer noodzakelijk. Het
stofzakindicatorvenster wordt gaandeweg rood wanneer
deze gevuld wordt en wordt geheel rood wanneer de stofzak
vol is. Mocht de stofzak per ongeluk in de stofzuiger
barsten, laat het apparaat dan door Elgroep Fabrieksservice
schoonmaken.
Als u de stofzak wilt controleren, dient het apparaat aan te
staan, waarbij alle toebehoren verbonden zijn en zich niet
op de grond bevinden.
De indicator voor de volle stofzak kan ook betekenen dat de
zak geblokkeerd is (soms veroorzaakt door zeer fijne
stofdeeltjes), wat verlies aan zuigkracht veroorzaakt en
oververhitting tot gevolg kan hebben. Gebeurt dit,
verwissel de stofzak dan toch, ook al is deze niet vol.
Als u de stofzak wilt verwisselen:
A Het deksel losmaken en verwijderen. Voordat u de
stofzak uit de stofzuiger haalt, duwt u het lipje in het gat,
zodat er geen stof ontsnapt.
B Verwijder de stofzak.
C Breng de nieuwe stofzak aan door de zaksleuven over
de houders te trekken. Het deksel weer sluiten.
Wij raden u aan om de stofzak te vervangen:
*
na het gebruik van een tapijtschoonmaakmiddel
*
wanneer er een onaangename reuk van de stofzuiger
komt. U dient dan tevens het filter te vervangen
NB: Gebruik alleen originele Progress stofzakken
en filters. 5 stofzakken en 1 mictofilter (T196).
Stofzakbeveiliging
Om schade aan de stofzuiger te voorkomen dient u deze niet
te gebruiken zonder stofzak. Er is een veiligheidsapparaat in
de stofzuiger dat voorkomt dat de deksel sluit zonder
stofzak. Probeer niet geforceerd de deksel te sluiten.
De filters vervangen/schoonmaken
Er zitten twee filters in uw stofzuiger. Gebruik de stofzuiger
nooit zonder dat de filters zijn geïnstalleerd.
Het motorbeschermfilter schoonmaken:
Het motorbeschermfilter moet worden schoongemaakt als
het vuil is.
D) Het deksel losmaken en zowel het deksel als het filter
verwijderen.
E) Het filter in warm water schoonmaken.
F) Laten drogen en het schone filter weer op zijn plaats
zetten. Het deksel weer sluiten.
Het Microfilter vervangen:
Na elke vijfde stofzak moet het microfilter vervangen
worden.
G) Het deksel losmaken, het filterdeksel openen en het filter
verwijderen.
H) Het nieuwe filter op zijn plaats zetten en het deksel weer
sluiten.
Problemen oplossen
1. Elektriciteit: Werkt de aansluiting met het lichtnet niet,
trek dan de stekker uit het stopcontact en controleer stekker,
snoer en zekeringen in de huisinstallatie.
2. Blokkades/vuile filters: De stofzuiger kan automatisch
uitgeschakeld worden wanneer er een ernstige blokkade
optreedt of uitzonderlijk vuile filter(s) gebruikt worden.
In zulke gevallen trekt u de stekker uit het stopcontact en
laat de machine 20-30 minuten afkoelen. Hef de blokkade
op en/of vervang het filter/de filters en begin opnieuw. Het
schoonmaken van geblokkeerde onderdelen valt niet onder
de garantie.
3. Water: Wordt water opgezogen in de stofzuiger, dan dient
de motor te worden vervangen door de
ELGROEP FABRIEKSSERVICE.
Lees ook de extra Progress informatie achterin dit boekje.
Page 20

Page 21

English: Progress decline all responsibility for all damages
arising from any improper use of the appliance or in cases
of tampering with the appliance.
Progress reserve the right to alter product appearance
and/or specifications without notice. Not all models
featured are available in all countries.
Progress vacuum cleaner features and accessories are
protected worldwide by Patents or Registered Designs.
Deutsch: Progress übernimmt keine Verantwortung für
Schäden, die durch den unsachgemäßen Einsatz des
Geräts oder unbefugten Eingriff in den Staubsauger
entstehen.
Progress behält sich das Recht vor, Form bzw.
Eigenschaften des Geräts ohne Vorankündigung zu
ändern. Alle abgebildeten Modelle sind nicht in allen
Ländern erhältlich.
Progress Staubsaugereigenschaften und Zubehörteile sind
weltweit durch Patente oder eingetragene Designs
geschützt.
Français: Progress décline toute responsabilité
concernant tous les dommages découlant d’une mauvaise
utilisation de l’appareil ou en cas de modification de
l’appareil.
Progress se réserve le droit de modifier l’aspect du produit
et/ou les caractéristiques sans préavis. Tous les modèles
présentés ne sont pas disponibles dans tous les pays.
L’aspirateur Progr ess et ses accessoir es sont pr otégés dans
le monde entier par des Brevets ou des Modèles Déposés.
Español: Progress declina toda responsabilidad de
cualquier daño ocasionado por el uso incorrecto de este
aparato o en casos en que se haya reformado
indebidamente.
Progress se reserva el derecho de alterar la apariencia del
producto y/o las especificaciones sin previo aviso.
No todos los modelos presentados se hayan a disposición
en todos los países.
Las funciones del aspirador y los accesorios Progress
están protegidos en todo el mundo por Patentes o
Diseños Registrados.
Italiano:
Progress declina ogni responsabilità per i danni
derivati dall’uso improprio dell’apparecchio o se stesso
èstato manomesso.
Progress si riserva il diritto di modificare l’aspetto del
prodotto e/o le sue caratteristiche tecniche senza preavviso.
Non tutti i modelli descritti sono disponibili in tutti i Paesi.
Le caratteristiche e gli accessori degli aspirapolvere
Progress sono protetti in tutto il mondo da brevetti o come
modelli depositati.
Português: A Progress não aceita qualquer
responsabilidade por danos resultantes do uso impróprio
do aparelho ou em casos de interferência indevida com o
mesmo.
A Progress reserva-se o direito de alterar o aspecto do
produto e/ou as especificações sem qualquer aviso.
Nem todos os modelos apresentados estão disponíveis
em todos os países.
As características e acessórios dos aspiradores
Progress estão protegidos mundialmente por Patentes ou
Designs Registados.
Nederlands: Progress wijst alle verantwoordelijkheid af
voor eventuele schade die voortkomt uit het niet-geëigend
gebruik van het apparaat of in gevallen waarbij op het
apparaat krachtig wordt gedrukt.
Progress behoudt zich het recht voor om het uiterlijk
van het product of specificaties zonder wederbericht te
veranderen. Alle modellen die besproken worden zijn
niet verkrijgbaar in alle landen.
De functies van de Progress stofzuiger zijn beschermd
door patenten of gedeponeerde ontwerpen.
Page 22
Page 23

English: This product is designed with the environment
in mind. All plastic parts are marked for recycling
purposes.
Deutsch: Das Design dieses Produkts ist
umweltfreundlich. Alle Kunststoffteile sind zur
Wiederverwertung gekennzeichnet.
Français: Ce produit a été conçu dans le respect de
l’environnement. Toutes les pièces plastiques sont
marquées dans le but de les recycler.
Español: Este producto ha sido diseñado teniendo en
cuenta el medio ambiente. Todas las piezas de plástico
llevan el distintivo de reciclaje.
Italiano: Questo prodotto è stato ideato tenendo presente
considerazioni ambientali. Tutte le parti in plastica sono
contrassegnate a scopo di riciclaggio.
Português: Este produto foi projectado pensando-se no
meio ambiente. T odos as partes de plástico estão marcadas
para serem recicladas.
Nederlands: Dit product werd ontworpen met zorg voor
het milieu. Alle plastic onderdelen kunnen hergebruikt
worden.
Page 24

219 05 16-41
 Loading...