

Progress DIAMANT 812.0, DIAMANT 211.0, DIAMANT 800.5, DIAMANT 800, DIAMANT 800.1 User Manual
...Page 1
Gebrauchsanweisung
Operating Instructions
Mode d’emploi
Gebruiksaanwijzing
Istruzioni per l’uso
Istrucciones para el uso
Instruçðes de utilição
ПдзгЯет чсЮпзт
Bodenstaubsauger
Vacuum Floor Cleaner
Aspirateur-traîneau
Bodemstofzuiger
Aspirapolvere
Aspirador de polvo para suelos
Aspirador de pó para chão
ЗлекфсйкЭт укпэрет дбрЭдпх
Diamant ...
Page 2
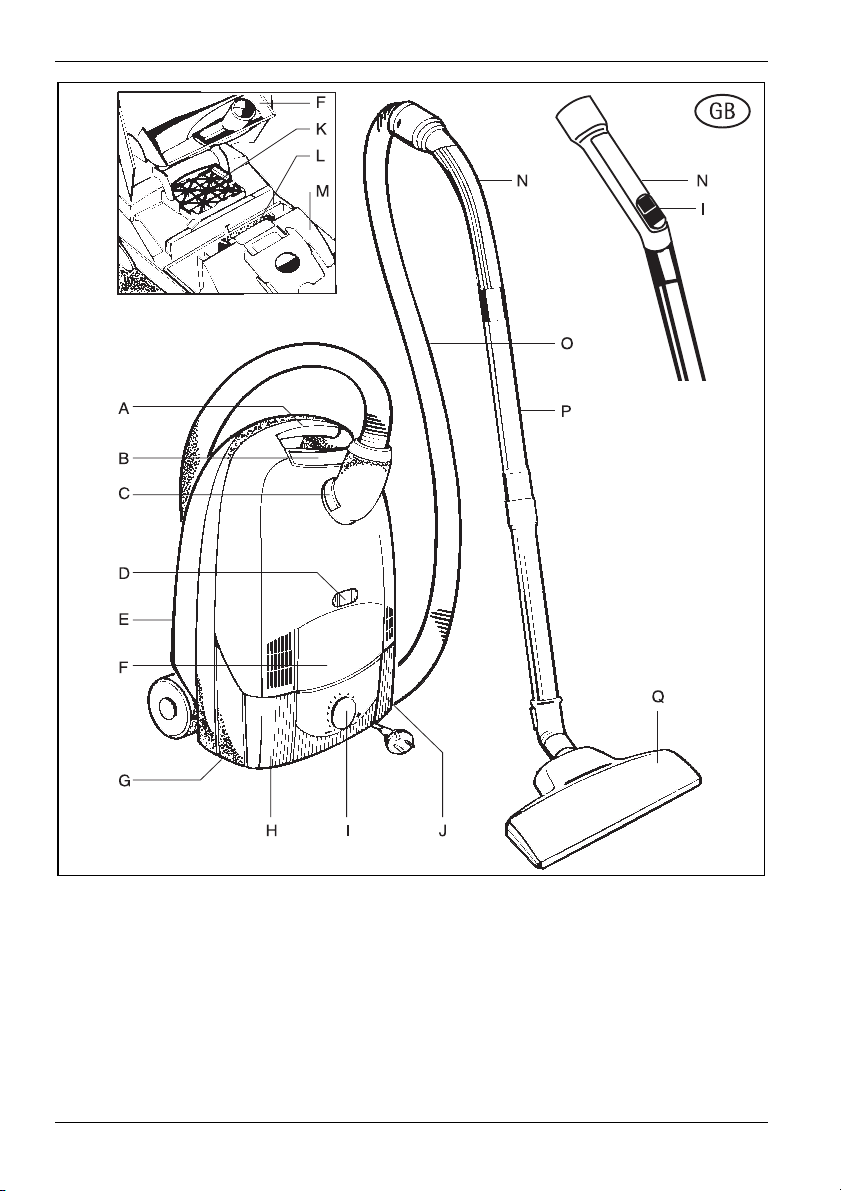
A = Carrying handle
B = Button to open the paper filter compartment
C = Hose release button
D = Filter replacement indicator
E= Tool rail
F = Accessories compartment*
G= Parking rail
H = On/Off button
I= Power adjuster*
8
J = Cable retraction button
K = Microfilter
L = HEPA filter
M = Paper filter
N= Handle*
O= Suction hose
P= Suction tube
Q = Nozzle
*depending on model
Page 3

Contents
Appliance description. . . . . . . . . . . . . . . . . .8
Before using for the first time. . . . . . . . . . .9
Protecting the environment. . . . . . . . . . . . .9
Safety instructions for the user . . . . . . . . . . 9
Preparing the vacuum cleaner for use . . . . 10
Using the nozzles . . . . . . . . . . . . . . . . . . . .10
Switching on . . . . . . . . . . . . . . . . . . . . . . . 11
Maintenance and cleaning. . . . . . . . . . . . .12
Paper filter. . . . . . . . . . . . . . . . . . . . . . . . .13
What do I do, if . . . . . . . . . . . . . . . . . . . . .13
Before using for the first time
Please read the following information carefully. It
provides important information on the safety, use
and maintenance of the appliance. Keep the
operating instructions in a safe place and pass
them on to any subsequent owners.
Protecting the environment
Do not simply throw away packaging material
and old appliances.
Equipment packaging:
• The cardboard packaging can be deposited at
a waste paper recycling point.
• Deposit the recyclable polyethylene (PE) bag
at a PE recycling point.
Recycling the appliance at the end of its life:
• The plastic components all carry a material
identification marking so that, like the other
materials, they can be recycled at the end of
the life of the appliance.
Please ask your local authority about your local
recycling centre.
Safety instructions
; This appliance complies with the following
EC directives: – 73/23/EC dated 21. 02. 1973 –
Low Voltage Directive – 89/336/EEC dated
03. 05. 1989 (including Amending Directive
92/31/EEC) – EMC Directive.
• Only connect the appliance to – 220/230 Volt
– alternating current.
• The mains circuit for the socket used must be
protected with a fuse with a rating of at least
10 A.
• Never remove the mains plug from the socket
by pulling on the cable.
• Do not use the appliance if:
– the cable is damaged.
– the housing shows visible signs of damage.
• Avoid running over the mains lead with the
appliance or the vacuum brush. The insulation
could be damaged.
• The cover cannot be closed unless a paper
filter has been inserted. Please do not use
force!
• Always ensure that a paper filter as well as a
MICROFILTER and a HEPA filter are inserted.
• Toner dust from laser printers and copiers
must not be vacuumed using normal household vacuum cleaners.
• This is a domestic vacuum cleaner and should
only be used to vacuum dry dust. People and
animals must not be vacuumed using the
appliance.
Keep children away from electrical appliances.
• The manufacturer is not liable for any damage caused by incorrect use or operation.
• Leave wet shampooed carpets to dry completely. Otherwise the vacuum cleaner will be
damaged. Such action might also reduce protection against electric shock.
• Do not vacuum matches, glowing ashes or
cigarette ends using the appliance. Avoid
picking up hard, pointed objects as these may
damage the appliance or the paper filter.
• Do not expose the appliance to the effects of
the weather, humidity or sources of heat.
• Should the mains lead be defective, the complete cable roller must be replaced by
PROGRESS customer service or an authorised
repair centre.
• Repairs to electrical appliances may only be
carried out by qualified specialists. Improperly
effected repairs may result in significant risk
to the user.
• For this reason, if there is a malfunction in
your appliance please contact your specialist
dealer or PROGRESS customer service directly.
9
Page 4

Preparing the vacuum cleaner for
use
The accessories can be connected by pushing
and twisting, and can be disconnected by pulling them apart and twisting.
Connecting the suction hose and suction
tube.
Join the suction hose handle firmly to the suction tube.
Mains connection/Cable rewind
The mains cable is in the cable compartment.
Pull out the cable and insert the plug into the
mains socket. Remove plug from the mains
socket. Press the foot button; the cable rewinds
automatically when vacuuming has been completed.
Using the nozzles
Connecting the suction tubes
Join the two tubes.
Attaching the suction hose
Insert the suction hose connector in the suction
inlet. It locks in place and can be rotated all the
way around.
Press the release button and pull out the connector in order to remove the suction hose.
10
Using the floor nozzle*
For the daily care of carpets and hard floors.
Without being changed over manually, the floor
nozzle is entirely suited for daily vacuuming of
carpets and hard floor surfaces such as parquet,
tiles, linoleum, etc.
Using the floor nozzle*
For the daily care of carpets and hard floors. The
floor nozzle may be changed over manually. The
brushes can be extended for smooth floors and
retracted for carpets.
Page 5

Crevice and upholstery nozzle stored in the
appliance
For specific cleaning requirements, two additional parts are included with the vacuum
cleaner in an integrated accessories compartment*. Open the compartment by pressing gently as shown in the figure.
The nozzles may be attached to the suction tube
or the handle on the suction hose, depending on
requirements.
Switching on
Switching on and off
You can switch the appliance on and off
by pressing the On/Off button.
Power adjustment:
Power adjustment - Rotary control*
The suction power can be varied to suit individual vacuuming requirements using the electronic power adjuster.
Crevice nozzle
For vacuuming crevices, gaps and corners.
Upholstery nozzle
For vacuum cleaning all upholstered furniture,
mattresses, etc.
The thread lifting strips on the nozzle even pick
up thread and lint.
*depending on model
Power adjuster – Secondary air regulator*
Using the regulator on the handle, you can
reduce the suction power, e.g. when vacuuming
light items (net curtains, rugs). The wider you
open the regulator, the lower the suction power
at the nozzle becomes
11
Page 6

Maintenance and cleaning
Prior to maintenance or cleaning, ensure that
the appliance is switched off and that the mains
plug has been removed from the socket:
Changing the paper filter
The paper filter must be replaced if the window
on the filter replacement indicator is completely
red when the appliance is operating at maximum power and the nozzle is raised from the
floor.
The paper filter should be replaced even if it
does not appear to be full because fine dust can
block the pores in the surface of the filter.
Bags full of normal household dust may be disposed of with household waste.
Insert the new paper filter as far as it will go in
the guide rails; only then can the lid be closed.
The cover cannot be closed unless a paper filter
has been inserted. Please do not use force!
Changing the microfilter
We recommend replacing the microfilter at
each fifth paper filter replacement, and at the
latest when there is a clean dust bag and the
dust level indicator is completely red with the
nozzle raised.
Open the lid and fold up. Remove the used
microfilter by means of the clean hygienic tabs
(figure) and dispose of it with the household
waste. Insert the new microfilter and close the
cassette.
The cover can be opened by pressing the button
and folding back until it locks.
Hygienic filter change: When removing the full
filter bag, pull the closing tab to automatically
close the opening. There will be slight resistance
when the tab is pulled.
12
HEPA filter
A highly effective special filter belonging to
Class “S”. This filter offers relief and assistance to
allergy sufferers. The HEPA filter should be
replaced after one year.
HEPA filter – further supplies available from
Progress customer service.
Page 7

Cleaning
As required, wipe the housing and the paper filter compartment with a damp cloth. Do not use
any scourers or any solvents. Occasionally vacuum the floor nozzle and brush-heads with the
crevice nozzle.
Paper filter
Progress P58
Carrying and Storage
To make the appliance easier to store and carry,
slide the floor nozzle into the tool rail.
What do I do, if ...
... it is difficult to push the nozzle
Reduce the power setting on the appliance. This
will not reduce cleaning efficiency.
... the motor thermal cut-out is activated
If the motor is overloaded, e.g. due to a full filter bag or blocked accessory, the thermal cutout shuts down the motor. In this case, switch
off the appliance, unplug from the mains, and
leave the motor to cool down.
Check paper filter bag, suction tube and suction
hose; remove any blockage.
The appliance can be switched on again after
approximately 30 minutes.
... the fuse has blown
The fuse may blow if you use other electrical
appliances with high power consumption on the
same electric circuit at the same time as the
vacuum cleaner is in use.
This can be avoided if you set the electronic
power adjuster to the lowest power level and
then select a higher level after switching the
appliance on.
Your vacuum cleaner can be fitted with a gentle
start-up control which reduces the starting current to the motor and therefore prevents the
electric circuit cut-out being triggered under
normal conditions. It is possible that there will
be a delay of about 4 seconds in the appliance
starting up on the lowest power level.
Parking System
For storing the suction pipe and nozzle during
short pauses in vacuuming. The bracket on the
nozzle is slid into the parking rail on the appliance.
… the paper filter is damaged at some stage
and the HEPA filter is dirtied
Remove the HEPA filter, clean (tap out) and
replace.
Insert new paper filter.
13
Page 8

PROGRESS Kundenservice
In Deutschland
Für diesen PROGRESS Staubsauger bieten wir Ihnen kompetenten Kundendienst über unsere Kleingeräte-Zentralwerkstätten. Sollte dieses Gerät wider Erwarten nicht
funktionieren, senden Sie es bitte an die für Sie zuständige
Adresse:
Beginnt die Postleitzahl Ihres Wohnortes
mit 2 - 3 - 4 - 5
Kleingeräte-Zentralwerkstatt
Firma Elektro Stefan Irsen
Sachtlebenstraße 1, 41541 Dormagen
Beginnt die Postleitzahl Ihres Wohnortes
mit 0 - 1 - 6 - 7 - 8 - 9
Kleingeräte-Zentralwerkstatt
Firma Trepesch GmbH
Steinstraße 500, 90419 Nürnberg
In Deutschland stehen wir Ihnen für Fragen,
Anregungen oder bei Problemen rund um unsere
Raumpflegegeräte
montags bis freitags von 8 bis 18 Uhr
zur Verfügung.
PROGRESS Serviceline unter 01805-30 60 80*
Fax: 0911/ 3 23-49 19 30
E-Mail: info.service@progress-staubsauger.de
*(Deutsche Telekom 0,12 Euro/min.)
Staubbeutel, Filter und Zubehör
Zum Erhalt der vollen Leistungsfähigkeit Ihres PROGRESS
Staubsaugers empfehlen wir die Verwendung von PROGRESS Original-Staubbeuteln P58. Diese können Sie über
unser Service Center unter 01801-20 30 90 bestellen. Weitere Informationen erhalten Sie im Internet unter
www.progress-staubsauger.de
Garantiebedingungen
Der Endabnehmer dieses Geräts (Verbraucher) hat bei einem Kauf dieses Geräts von einem Unternehmer (Händler)
in Deutschland im Rahmen der Vorschriften über den Verbrauchsgüterkauf
gesetzliche Rechte, die durch diese Garantie nicht eingeschränkt werden. Diese
Garantie räumt dem Verbraucher also
zusätzliche Rechte ein. Dies vorausgeschickt, leisten wir, AEG Hausgeräte
GmbH, gegenüber dem Verbraucher Ga-
rantie für dieses Gerät für den Zeitraum von 24 Monaten ab Übergabe zu
den folgenden Bedingungen:
1. Mit dieser Garantie haften wir dafür,
dass dieses neu hergestellte Gerät im
Zeitpunkt der Übergabe vom Händler
an den Verbraucher die in unserer
Produktbeschreibung für dieses
Gerät aufgeführten Eigenschaften
aufweist. Ein Mangel liegt nur dann
vor, wenn der Wert oder die
Gebrauchstauglichkeit dieses Geräts
erheblich gemindert ist. Zeigt sich
der Mangel nach Ablauf von sechs
(6) Monaten ab dem Übergabezeitpunkt, so hat der Verbraucher nachzuweisen, dass das Gerät bereits im
Übergabezeitpunkt mangelhaft war.
Nicht unter diese Garantie fallen
Schäden oder Mängel aus nicht vorschriftsmäßiger Handhabung sowie
Nichtbeachtung der Gebrauchsanweisungen.
2. Dieses Gerät fällt nur dann unter
diese Garantie, wenn es in einem der
Mitgliedsstaaten der Europäischen
Union gekauft wurde, es bei Auftreten des Mangels in Deutschland
betrieben wird und Garantieleistungen auch in Deutschland erbracht
werden können. Mängel müssen uns
innerhalb von zwei (2) Monaten nach
dessen Kenntnis angezeigt werden.
3. Mängel dieses Geräts werden wir
innerhalb angemessener Frist nach
Mitteilung des Mangels unentgeltlich
beseitigen; die zu diesem Zweck
erforderlichen Aufwendungen, insbesondere Arbeits- und Materialkosten werden von uns getragen. Über
diese Nachbesserung hinausgehende
Ansprüche werden durch diese
Garantie dem Verbraucher nicht eingeräumt.
4. Im Garantiefall ist das Gerät vom
Verbraucher an die für seinen Wohnort zuständige AEG-Zentralwerkstatt
zu versenden, wobei das Gerät gut zu
Other Countries
Further after sales service
In these countries our sales organisations own warranty
conditions are applicable. Please obtain further details direct.
Autres agences étrangères assurant le service après vente
Dans ces pays, les conditions de garantie des concessionnaires
de la région sont valables. Vous pouvez les consulter sur place.
France, 60307 Senlis, 03-44 62 24 24
Italy, 33080 Porcia (PN), 0434 39 41
Great Britain, 08705 929 929
Ireland, 01 45 65 222
Belgium, 1502 Lembeek, 02/363 05 41
Netherlands, Alphen aan den Rijn, 0172-468 300
Austria, 4010 Linz, 0732/770101-30
Hellas, Thessaloniki 0310 561 970/Athens, 010 985 48 76
Poland, 02-034 Warszawa, 022-874-33-33
verpacken ist und die vollständige
Anschrift des Verbrauchers zusammen mit einer kurzen Fehlerbeschreibung in das Paket zu legen ist. Zum
Nachweis des Garantie-Anspruchs ist
der Sendung der Original-Kaufbeleg
(Kassenzettel, Rechnung) beizufügen.
5. Garantieleistungen bewirken weder
eine Verlängerung noch einen Neubeginn der Garantiezeit für dieses
Gerät; ausgewechselte Teile gehen in
unser Eigentum über.
6. Mängelansprüche aus dieser Garantie
verjähren in zwei (2) Jahren ab dem
Zeitpunkt der Übergabe des Geräts
vom Händler an den Verbraucher, der
durch den Original-Kaufbeleg (Kassenzettel, Rechnung) zu belegen ist;
wenn dieses Gerät gewerblich
genutzt wird, beträgt die Verjährungsfrist sechs (6) Monate.
 Loading...