


N-380
SiRF star III
GPS GPRS ENTERTAINMNET
User Manual
ProGin Technology Inc.
12F-1,No.5,Lane 7,De-an St.,Lingya District,
Kaohsiung 802,Taiwan
TEL:886-7-7278885 WEB:www.progin.com.tw
FAX:886-7-7214117 E-mail:info@progin.com.tw

N-380 User Manual
08/18/2008 V1.0
Copyright© 1998-2008 ProGin
1
Preface
Precautions
For safety, we strongly recommend that you never operate the GPS navigation system
while driving.
Furthermore, attention should be paid to the following basic precautions when operating the
ProGin N-380:
● The SD card should be removed only after you press the power button to shut down the unit.
Never pull out the SD card while the N-380 is operating.
● Never press the power button repeatedly or continuously. Otherwise, the unit could be
damaged.
● Never expose the ProGin N-380 to strong sunlight or heat for extended periods of time. The
acceptable operating environment of the ProGin N-380 is 0~70°C and 0~90% humidity. The
acceptable storage environment is -10~80°C and 0~90% humidity.
Also, when operating the GPS functions of the ProGin N-380, these additional precautions apply:
● This system functions as a reference for navigation only, and should never be used for
accurate measurements of direction, distance, location, etc.
● For GPS satellite positioning to work, stay at the same location until the positioning process is
complete. It is best to stay in an open, uncovered location. This positioning process may need
more than 10 minutes.
● When the system is located in a building or a tunnel, or is close to a high obstacle, the system
may temporarily be unable to provide positioning and navigation information.
● Any radio transmitters (including mobile phones) might interfere with GPS satellite signals,
thereby resulting in incorrect positioning information.
● If your car is equipped with sheathing paper or explosion-proof plaster, these features might
interfere with the quality of the GPS signal.

N-380 User Manual
08/18/2008 V1.0
Copyright© 1998-2008 ProGin
2
● Route planning advice is for reference only. Road properties (such as one-way status and turn
restrictions) may change according to local conditions, and therefore may not be consistent
with the information given by the N-380. You should comply with all local traffic regulations and
drive as local road conditions require. When the ProGin N-380 is placed inside a car, it should
be positioned in place by means of a car tripod. Avoid positioning the ProGin N-380 in the
positions below:
Driver’s line-of-sight Any position where it is not fixed in place
A position where an airbag is located
Getting Started
1.
External Components
1.1
Front

N-380 User Manual
08/18/2008 V1.0
Copyright© 1998-2008 ProGin
3
No. Assembly Components Description
(1) 4.3″Touch Screen TFT LCD
Displays menus, lists, photos, videos and more.
The screen is touch sensitive.
(2) Power Indicator light Indictes whether the unit is power on
1.2 Back
No. Assembly Components Description
(1) Built-In Speaker Play Stereo sound when earphone is not plug in
(2) JTAG Port To interface the firmware of the unit
(3) Reset Key Forcibly resets the unit to its factory default settings
(4) BNC antenna adapter For external antenna connection
(5) Pen/Stylus Use to control the unit through the touch screen
(6) Holder Slot Position to attach the surface mounting adapter

N-380 User Manual
08/18/2008 V1.0
Copyright© 1998-2008 ProGin
4
1.3 Right
2
3
1
No. Assembly Components Description
(1)
USB Interface Connects the N-380 to a PC and to recharge the
battery
(2)
Adjustment Knob Adjustment Knob Adjusts sound volume and
backlight brightness
(3)
Earphone Jack Earphone Jack Connects the unit to stereo
headphones (3.5 mm)
AC/DC Power Adapter Specifications:
Dimension 76mm(L)×43mm(W)×30mm(H)
Input Voltage
100V~240V
Output Voltage 4.75~5.25V
Net Weight 130 g
Storage Temperature 0°C ~ +40°C
Operating Temperature 0 ~ +40°C
Storage relative temperature 45 ~ 85%
Operating relative humidity
45~85%

N-380 User Manual
08/18/2008 V1.0
Copyright© 1998-2008 ProGin
5
1.4 Top
1 3
4
2
No. Assembly Components Description
(1)
Pen/Stylus Use to control the unit through the touch
screen
(2) Internal GPS Antenna Receives GPS satellite signals
(3) External Antenna Jack
Allows for connection of an optional external
antenna for better GPS signal reception.
(4)
Power Button Used to power the unit on and off
1.5 Left
1
2
No. Assembly Components Description
(1)
SD Card Slot Used to expand the memory of the unit
with an SD Card [See Note 2]
(2) SIM Card Slot Insert SIM card will perform GPRS functions
[Note 2] The ProGin N-380 can support an SD card with a maximum capacity of 4GB

N-380 User Manual
08/18/2008 V1.0
Copyright© 1998-2008 ProGin
6
[Inserting an SD Card]
With the card facing forward, align the card with the slot to insert it in place.
When removing the SD card, first confirm that the SD card is idle and then press its top edge
slightly to release it. Finally pull out the card.
[Notice]
● Do not place anything other than an SD card in the SD Card Slot.
● When outside the N-380, the SD card should be repacked properly to avoid dust and humidity.
1.6 Bottom
2. Powering the ProGin N-380
2.1 Power On
2
1
To power the ProGin N-380, press the Power Button (1) gently and wait for approximately 5
seconds. The Power Indicator Light (2) will glow green. This means the unit is ready to use.
2.2 Power Off

N-380 User Manual
08/18/2008 V1.0
Copyright© 1998-2008 ProGin
7
2
1
To shut down the ProGin N-380, press the power button (1). The unit and power indicator light (2)
will shut down immediately.
3. Accessories
3.1 USB Charger Adaptor (Optional)
The USB Charger Adaptor is used to recharge the battery of the ProGin N-380. To use the
adapter, insert the USB plug into the adapter. Insert the other end of the cable (mini USB) into
the unit’s USB port. Then plug the adapter into a standard 100V~240V AC power outlet, as
shown in the figure below.
If the N-380 is turned on during charging, the Power Indicator Light will glow red. Once charging
starts leave the adapter connected until the Power Indicator Light glows green. This means that
the battery is fully charged. If the N-380 is turned off during charging, the Power Indicator Light will
not glow, but the battery will still be charged. The charging process may need several hours.

N-380 User Manual
08/18/2008 V1.0
Copyright© 1998-2008 ProGin
8
3.1.1 USB Cable Charger
3.2 Automobile Adapter
[Notice] The Automobile Adapter should not be connected to a vehicle when the vehicle is being
started. Otherwise, the instantaneous current impact might damage the N-380.
The Automobile Adapter is used to recharge the battery of the ProGin N-380 from the power
available in vehicle cigarette lighters. To use the adapter, plug the adapter into the USB port of
the N-380. Then plug the adapter into a standard 12VDC vehicle cigarette lighter.
If the N-380 is turned on during charging, the Power Indicator Light will glow red. Once charging
starts, leave the adapter connected until the Power Indicator Light glows green. This means that
the battery is fully charged. If the N-380 is turned off during charging, the Power Indicator Light will

N-380 User Manual
08/18/2008 V1.0
Copyright© 1998-2008 ProGin
9
not glow, but the battery will still be charged. The charging process may need several hours.
3.3 Mounting System
A mounting system is included with the ProGin N-380. The parts of this system are:
1. A suction cup mount with swivel and tilt arms
2. A base plate(Optional)
The suction cup mount will attach the N-380 to a surface. In case the desired mounting surface is
not capable of holding the suction cup, the base plate (2) may be used to provide an appropriate
mounting surface.
[Notice] Some local ordinances do not allow objects to be mounted to an automobile windshield
or other automobile windows. If you wish to use the N-380 in an automobile and such
ordinances exist in the jurisdictions in which you will be driving, then mount the N-380 to
the automobile’s dashboard
.
1
2
Optional base plate
3.3.1 Assembling the Mounting System
1. Align the clip on at one end of the suction cup mount with the slot on the back of the
unit.
2. Push the clip into the narrow section of the slot until it snaps into place.
Suction Cup
Slot
Clip
Tilt and swivel

N-380 User Manual
08/18/2008 V1.0
Copyright© 1998-2008 ProGin
10
3.3.2 Mounting Instructions
1. For a tight grip, the mounting surface should be cleaned of dirt and oil.
2. If the mounting surface cannot be used with the suction cup, it may be possible to use the
base plate to create an appropriate surface. If so, use the adhesive on the base plate to
attach the plate to the mounting surface. (Note that the adhesive on the base plate is
difficult to remove once it is mounted.)
3. Place and press the suction cup against the mounting surface or base plate. While
maintaining pressure, push on the lever near the suction cup until the suction cup grips the
surface tightly.
4. Adjust the swivel/tilt arms by loosening the adjustment nuts and turning the swivel cradle to
obtain the best viewing and GPS reception position. Then tighten the nuts to hold the arm
in place once it is snapped into the slop of the unit.
Windshield Mounting Position Dashboard Mounting Position
3.3.3 Disassembling the Mounting System
• To remove the suction cup from the mount surface, push the level near the suction cup in the
opposite direction from that used to attach it and pull on the suction release tab to break the
vacuum seal.
• To remove the unit from the suction cup mount, release the clip and slide the clip to the wide
portion of the slot.
Caution: Be sure to check the adhesiveness of the suction cup every time the mounting system is
used. Aging and temperature fluctuation inside a car will eventually loosen the seal of the suction
cup. A loose seal could allow the N-380 to fall.

N-380 User Manual
08/18/2008 V1.0
Copyright© 1998-2008 ProGin
11
Connecting the ProGin N-380 to a Computer
1.Using N-380 as Card Reader Device
Under Windows XP version or higher there are no drivers required, all devices will be
auto-detected including SD Card drive.
1.1 Connecting to a Computer via USB
Insert an SD card as shown below
(1) Correct insertion direction of SD Card
Correct insertion
direction of SD
Card
(2) Connect the unit via USB to a computer as show below。
(3)
Once the unit is connected to a computer using operating system of Window XP or higher via

N-380 User Manual
08/18/2008 V1.0
Copyright© 1998-2008 ProGin
12
USB cable, the computer will auto detect the unit and its SD card drives if present.
2. Transferring Files with an SD Card
For large files such as movies, it may be faster to transfer files to the N-380 by writing them directly
from a computer to an SD card (not included). To do this, place the SD card into an SD card
reader/writer (not included) and connect the reader/writer to the computer. The computer should
be able to recognize the reader/writer and should automatically mount the file system stored on
the card. (If this does not happen, consult the documentation for your reader/writer.) When the
file system is mounted, the files can be transferred via typical file operations. When all files are
transferred, unmount the card’s file system and remove the reader/writer from the computer.
Then remove the card from the reader/writer and insert the card into the N-380. The files will
then be available for use.
3.
File Format Conversion Software
In order for some files to play on the ProGin N-380, they must be converted into formats that the
unit can read. To convert files, use the following steps:
1. Refer to the “shareware reference” folder on the included CD to select a software download
website. Visit the site using a Web browser.
2. Select and download conversion software for the file formats you want to convert (for example,
converting RealMedia format to MPEG-4 or MP3 format).
3. Install the downloaded software.
4. Use the software to convert your files.
5. Copy the converted files to the ProGin N-380 or to an SD card.
[Remark] The use of downloaded software may be restricted to a trial period. If you want to use it
for longer than this period, you should register or purchase the software.
Operating Instructions
1. Introduction
1.1 Common Interface Items

N-380 User Manual
08/18/2008 V1.0
Copyright© 1998-2008 ProGin
13
Many screens used in the N-380 have the same basic structure. Some of the items common to
many N-380 screens are shown below:
1.2 Popup Menus
Many of the functions of the ProGin N-380 have file-browsing capabilities. On a browsing screen,
pressing the File Operation button (shown below) will bring up a popup menu listing all of the
operations that can be performed on the file. These functions may include: Copy to Flash, Copy
to Storage and Delete.
Use the popup menus as follows:
● Press the touch screen on the File Operation button to activate the popup menu.
● Press the touch screen on the appropriate item in the menu to perform the function you want.
A confirmation dialog box will be displayed. To continue with the operation, press the touch
screen on the Yes button.
● Press the touch screen on the Exit button to close the menu.

N-380 User Manual
08/18/2008 V1.0
Copyright© 1998-2008 ProGin
14
Popup menu
File Operation
button
To confirm the
operation,
Press the Yes
button
2. Main Menu

N-380 User Manual
08/18/2008 V1.0
Copyright© 1998-2008 ProGin
15
No. Function Description
(1)
GPS
Pressing this activates the GPS system, which provides
clear directions with intelligent turn-by-turn voice
instructions, point-to-point maps, zoom-in/out, and
scrolling
(2)
Movie
Pressing this activates the movie browser, which allows
you to play videos stored on the N-380
(3)
Music
Pressing this activates the music browser, which allows
you to play audio files stored on the N-380

N-380 User Manual
08/18/2008 V1.0
Copyright© 1998-2008 ProGin
16
(4)
Photo
Pressing this activates the photo browser, which allows
you to see photos stored on the N-380
(5)
eBook
Pressing this activates the eBook browser, which allows
you to read text files stored on the N-380
(6)
Internet (optional)
Pressing this activates the web browser for Internet
connection, which allows you to use the mobile online
services. The first time connection requires one-time
setup of GPRS configuration according to the
requirements of your network/service operator.
(7) e-Mail Box (optional)
Pressing this to activate email functions via Internet
connections
(8)
Next Page
Pressing this to display the next page of System Setting
menu.
(9)
ProGin logo
Pressing this displays basic information about the N-380
unit
(10)
Signal Strength
Indicator (optional)
Displays the signal strength of the GPRS networks at the
current location. Pressing this displays the menu of
GPRS configuration setting.
(11)
Power
Pressing this displays the current charge state of the
battery
(12)
Sound
Displays the current volume level. Pressing this displays
the sound settings screen
(13)
Clock
Displays the current time of day. Pressing this displays
the Clock settings screen
(14)
Bluetooth (optional) Mobile phone hand free
(15)
System
Pressing this displays the System Settings menu, which
allows you to view and change system parameters,
including sound, backlight, memory, time and date and
power management
(16)
Previous Page
Pressing this to display the first page of System Setting
menu.
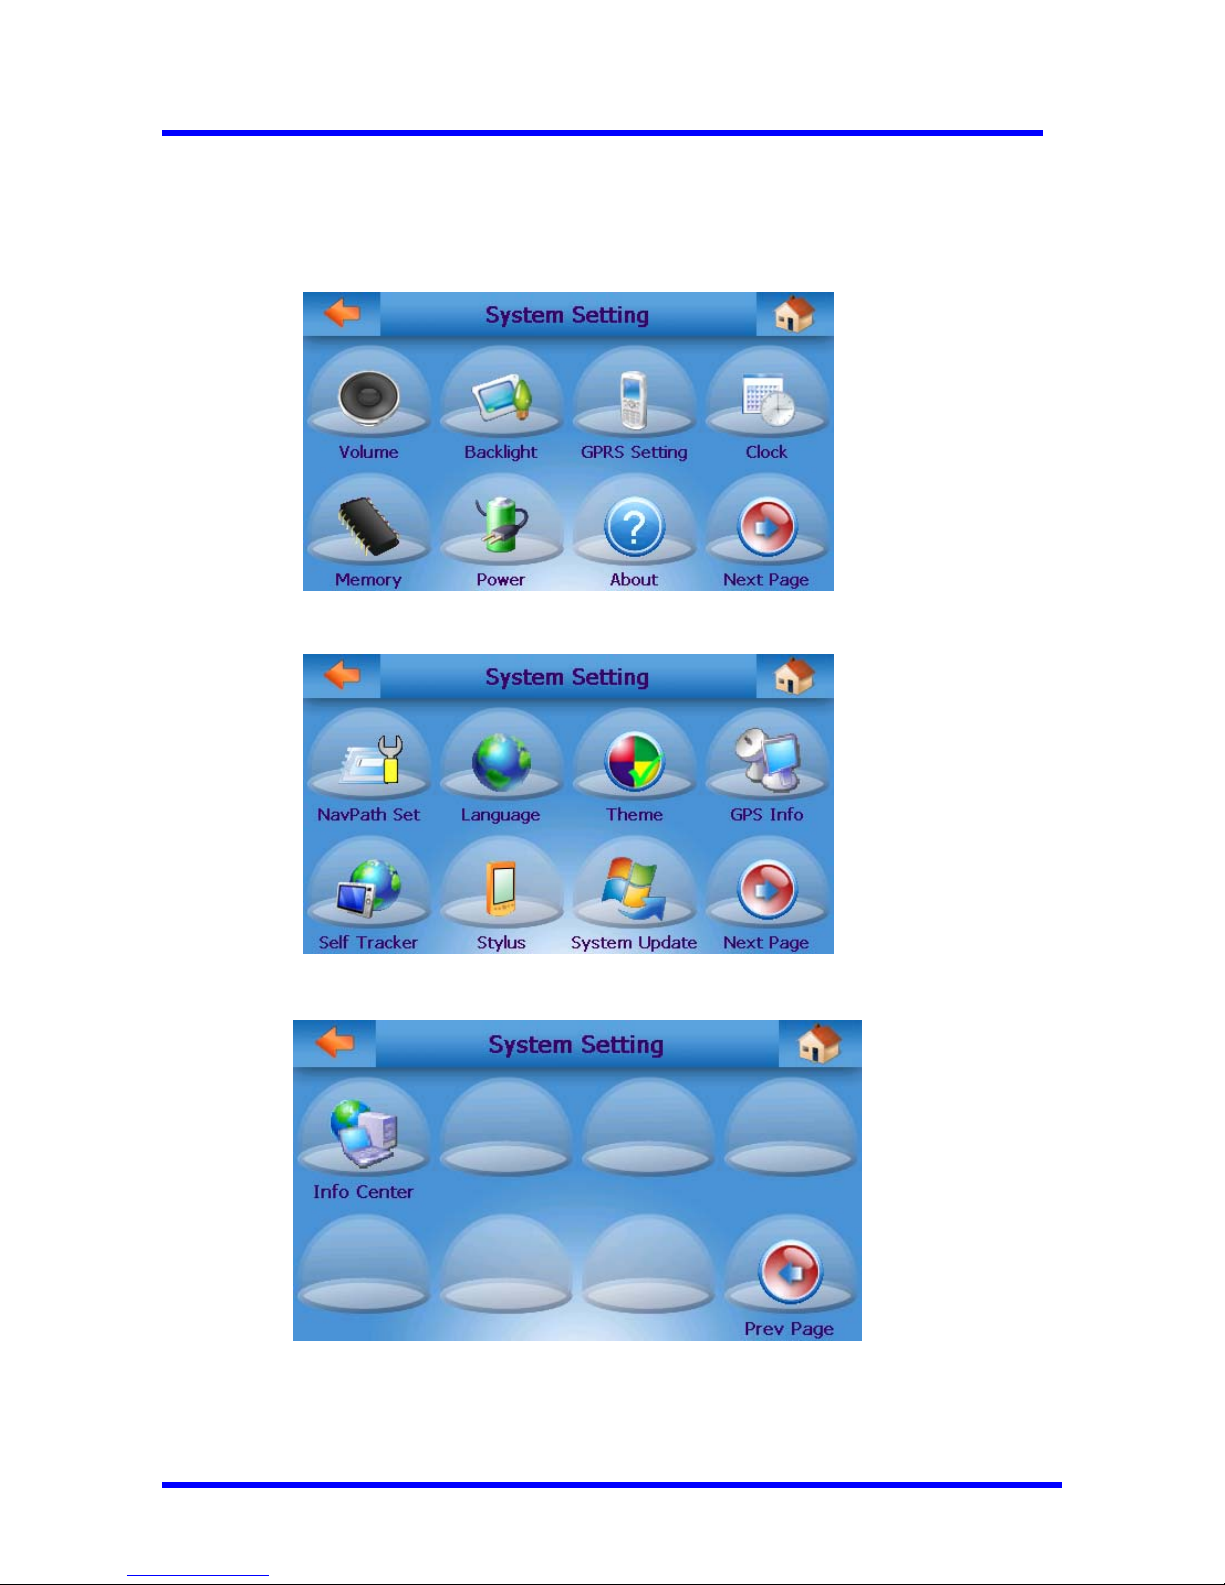
3. System Settings
Press the System button in the main menu to display the System Settings menu. Each of the
buttons on this menu leads to another screen that displays information about the current system
N-380 User Manual
08/18/2008 V1.0
Copyright© 1998-2008 ProGin
17
configuration and, in some cases, allows you to change it. Use the Next Page and Prev Page
buttons to navigate between the two pages of the menu. All of the screens accessible from this
menu are described in this section.

N-380 User Manual
08/18/2008 V1.0
Copyright© 1998-2008 ProGin
18
3.1 Volume
Drag this slider
to adjust sound
volume
Use this to
indicate whether
a sound will be
played when the
touch screen is
tapped. If the
spot is green,
then the sound
will be played
3.2 Backlight
Use this to
indicate whether
the backlight
should be turned
off under
different power
sources. A green
spot indicates
that the backlight
will be disabled
These set
the backlight
timeout
Drag this slider
to adjust the
backlight
brightness

N-380 User Manual
08/18/2008 V1.0
Copyright© 1998-2008 ProGin
19
3.3 Date/Time
Use the pull
down menus
to adjust time
zone region,
date and time
The green spot
indicates the
daylight savings
time function is
on.
3.4 Memory
Shows the
portion of
NAND flash
memory
currently
being used
Shows the
portion of SD
card memory
currently being
used
3.5 Power
Indicates the
current state of
the charge on
the battery
N-380 User Manual
08/18/2008 V1.0
Copyright© 1998-2008 ProGin
20
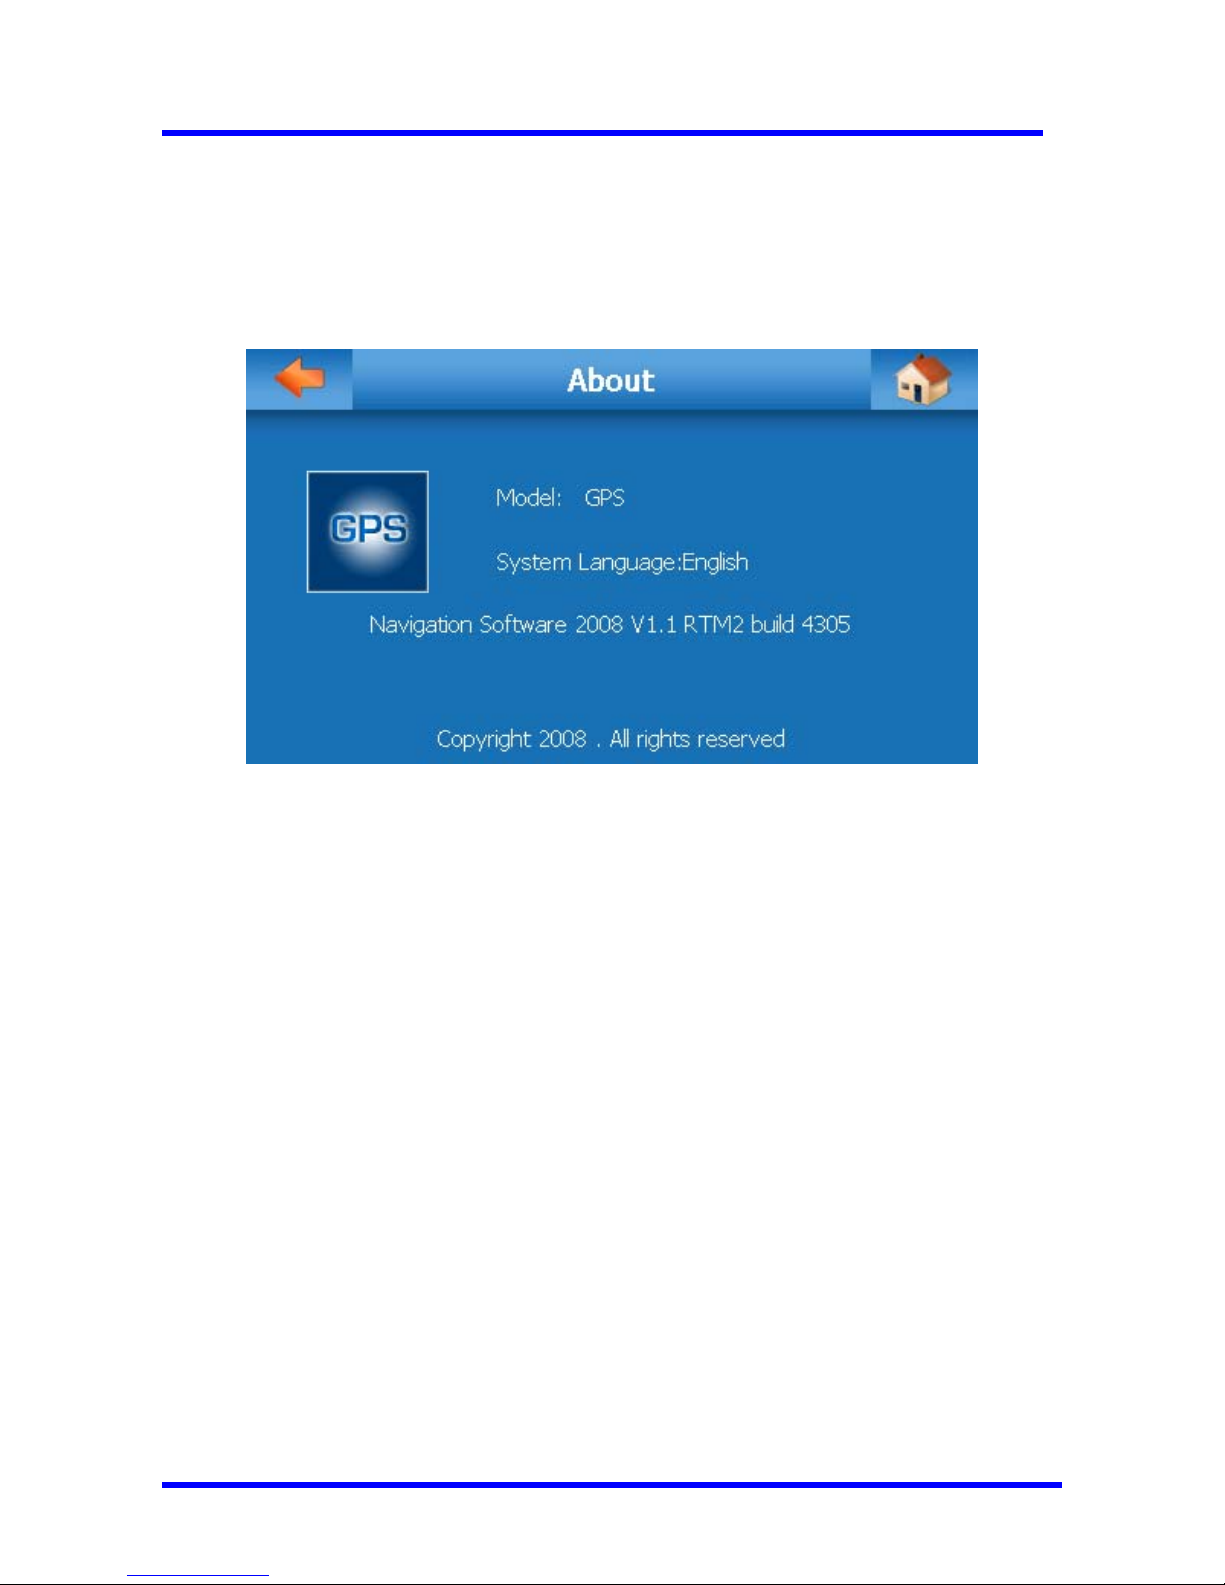
3.6 About

N-380 User Manual
08/18/2008 V1.0
Copyright© 1998-2008 ProGin
21
3.7 Navigation
Press here to
select the
executable file
of the GPS
navigation
software
installed.
This option
enables GPS
navigation
software to
launch and
autorun at
system startup.
A green spot
indicates this
function is
activated.
3.8 Language
Use this to
change the
interface
language

N-380 User Manual
08/18/2008 V1.0
Copyright© 1998-2008 ProGin
22
3.9 Theme
Changes the
theme of the
interface
Changes the
desktop
background
image (see
below)
Pressing “Desktop Background” button, the following screen appears. The background image can be
replaced by any selectable, pre-installed images with display resolution of 480X272 pixels.
Preview of the
selected backgroun
d
image
Select an
image here
Resets the
desktop
background to
the default
background
Sets the selected
image as the
desktop
background image
3.10 GPS Info

N-380 User Manual
08/18/2008 V1.0
Copyright© 1998-2008 ProGin
23
N
EMA data
logging and
monitoring
GPS
Synchronization
Clock
Displays the
current locatio n i n
GPS parameters
(Latitude/Longitud
e and Altitude) and
almanac data
contains orbit
informati on on all
satellites, clock
corrections, and
atmospheri c delay
parameters
3.11 Stylus
To re-calibrate the touchscreen, follow the directions given on the screen
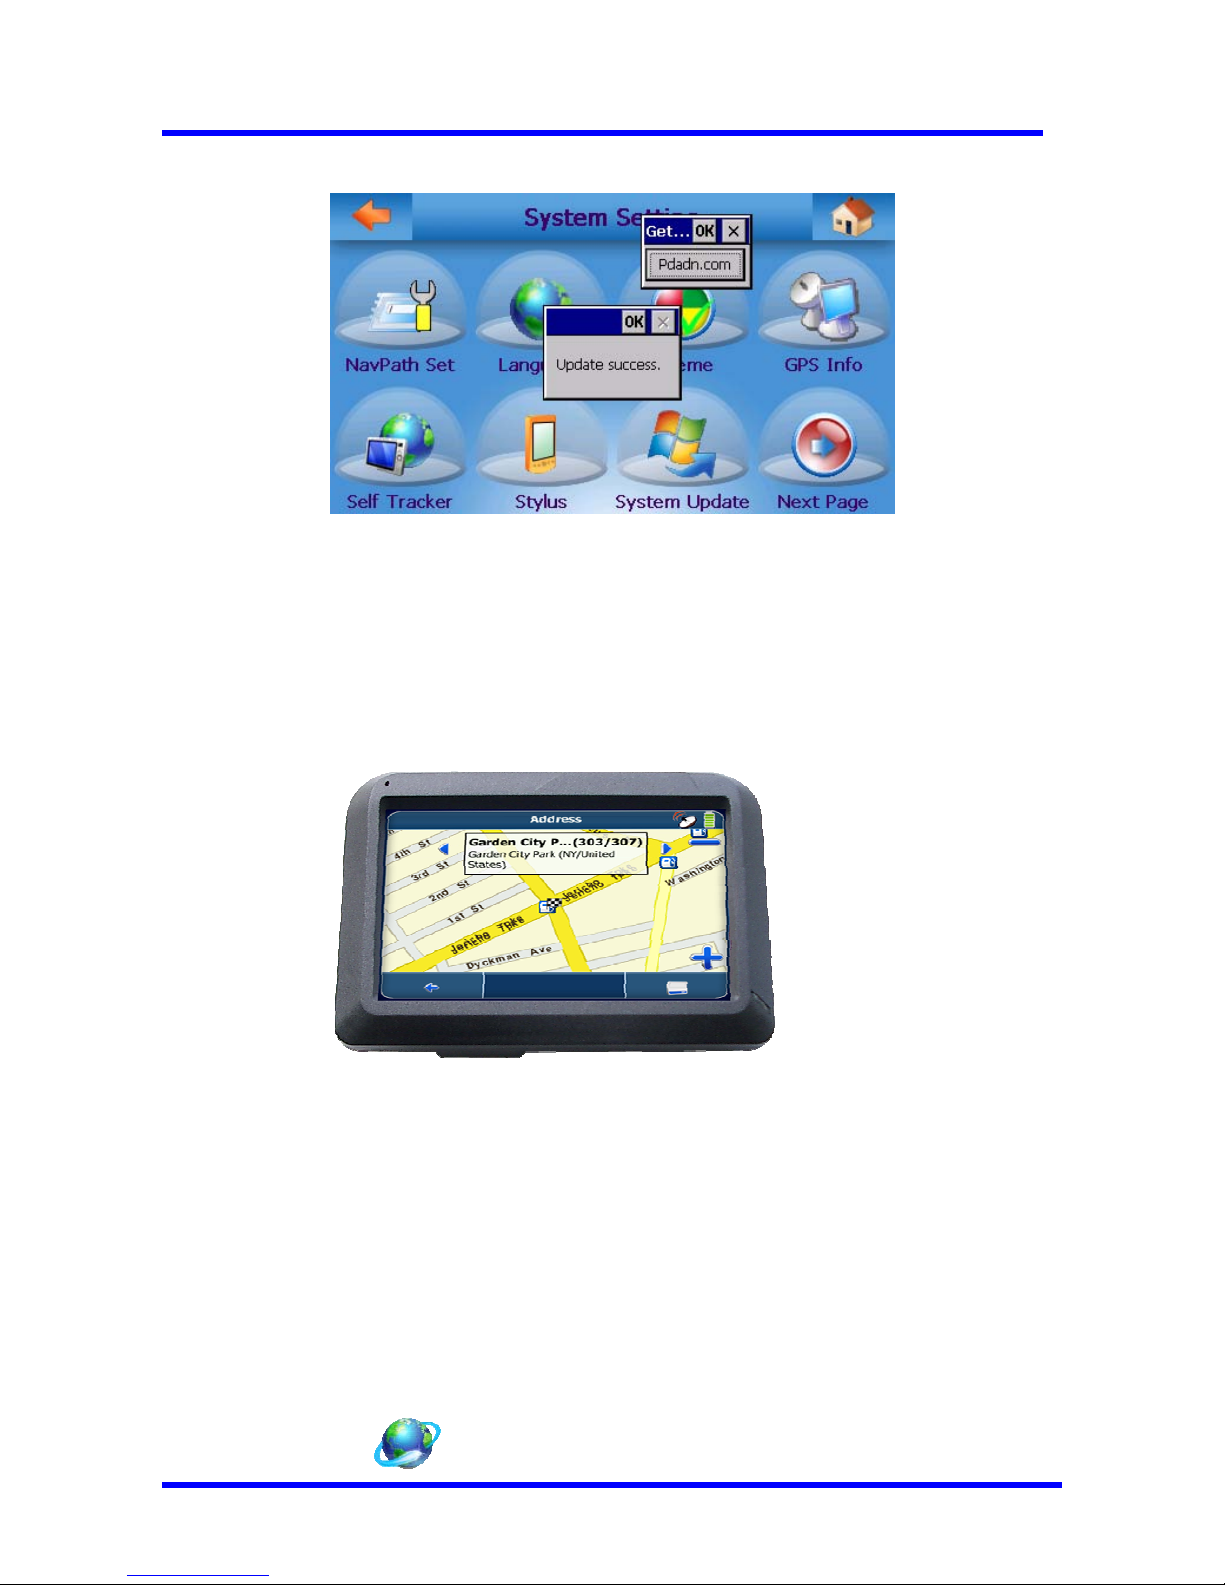
3.12 System Update
Download the latest N-380 firmware update module from the manufacturer
2]Decompress and unpack the update module, if required, and save the entire contents of the
module (including the directory created during the unpacking process) to the root directory of the
SD card.
3]Insert the SD card into the N-380 turn on the power to the N-380.
4]Press the System button on the Main Menu and press the Next Page button to go to the
second page of the System Settings menu.
5]Press the System Update button to begin the update. At this point, the N-380 will search the
SD card for an update directory and, if one is found, the current firmware version and the version
press and briefly hold stylus on the center of the
target
repeat as the target moves around the screen
press the Ese key to cancel.

N-380 User Manual
08/18/2008 V1.0
Copyright© 1998-2008 ProGin
24
of the updated firmware will be displayed as shown below:
If there is no update module present on the SD card, or if the module was copied incorrectly,
the N-380 will display the following error:
If the update succeeds, the N-380 will display a confirmation message as shown below.
Press the OK button to end the update procedure.
N-380 User Manual
08/18/2008 V1.0
Copyright© 1998-2008 ProGin
25
4.
GPS Navigation Function
For safety, It is strongly recommend that never operate the GPS navigation system while
driving. Make certain that the inserted SD card contains the appropriate navigation
software and setup the destination ahead of time.
For further instructions, refer to the manual provided by our navigation map provider
①
Pressing this icon activates the GPS system

N-380 User Manual
08/18/2008 V1.0
Copyright© 1998-2008 ProGin
26
5. Movie
5.1 Browser
If a red checkmark is present,
then the movie is selected for
display. To select an
unchecked movie for display,
press the number to cause a
checkmark to appear. To
deselect a movie, press the
number to make the
checkmark disappear
This indicates the place where
the movie is stored, which can
be either flash memory or an
SD card
To show all selected movies, press
here
To deselect all
movies, press here
File Operation button.
See “Popup Menus”
section
To go to the next page in
the list, press here
To go to the previous page
in the list, press here
This shows the name of a
movie in memory
Shows the current page
number on the top and the
total number of pages on
the bottom
5.2 Player

N-380 User Manual
08/18/2008 V1.0
Copyright© 1998-2008 ProGin
27
Go to next file
o to previous file
Enter
fullscreen
mode
Repeat all files
Stop
Play/pause
Press or drag
slider to control
play location
Play/pause
Return to
normal
viewing mode
USE OF THIS PRODUCT IN ANY MANNER THAT COMPLIES WITH THE MPEG-4 VISUAL
STANDARD IS PROHIBITED, EXCEPT FOR USE DIRECTLY RELATED TO (a) DATA OR
INFORMATION (i) GENERATED BY AND OBTAINED WITHOUT CHARGE FROM A
CONSUMER NOT THEREBY ENGAGED IN A BUSINESS ENTERPRISE, AND (ii) FOR
PERSONAL USE ONLY; AND (b) OTHER USES SPECIFICALLY AND SEPARATELY
LICENSED BY MPEG LA, L.L.C.
6. Music

N-380 User Manual
08/18/2008 V1.0
Copyright© 1998-2008 ProGin
28
6.1 Browser
If a red checkmark is present,
then the movie is selected for
display. To select an
unchecked movie for display,
press the number to cause a
checkmark to appear. To
deselect a movie, press the
number to make the
checkmark disappear
This indicates the place where
the movie is stored, which can
be either flash memory or an
SD card
To show all selected movies, press
here
To deselect all
movies, press here
To go to the next page in
the list, press here
To go to the previous page
in the list, press here
This shows the name of a
movie in memory
Shows the current page
number on the top and the
total number of pages on
the bottom
File Operation
button. See
“Popup Menus”
section
Turn background
music on/off here
6.2 Player
Currently playing
file number and
total number of files
to be played
Go to next file
o to previous file
Show photos
concurrently
with music
Repeat all files
Stop
Play/pause
Press or drag
slider to control
play location
Current position in file and
total length of file
7. Photo

N-380 User Manual
08/18/2008 V1.0
Copyright© 1998-2008 ProGin
29
7.1 Browser
If a red checkmark is present,
then the movie is selected for
display. To select an
unchecked movie for display,
press the number to cause a
checkmark to appear. To
deselect a movie, press the
number to make the
checkmark disappear
This indicates the place where
the movie is stored, which can
be either flash memory or an
SD card
To show all selected movies, press
here
To deselect all
movies, press here
To go to the next page in
the list, press here
To go to the previous page
in the list, press here
This shows the name of a
movie in memory
Shows the current page
number on the top and the
total number of pages on
the bottom
File Operation
button. See
“Popup Menus”
section
7.2 Player
To move the phot
to another positio
n
drag it using the
touchscreen
Enter full-screen
mode
Select
background
music
Start/stop
slidesho
w
Zoom in
Zoom out
Next picture
Previous picture
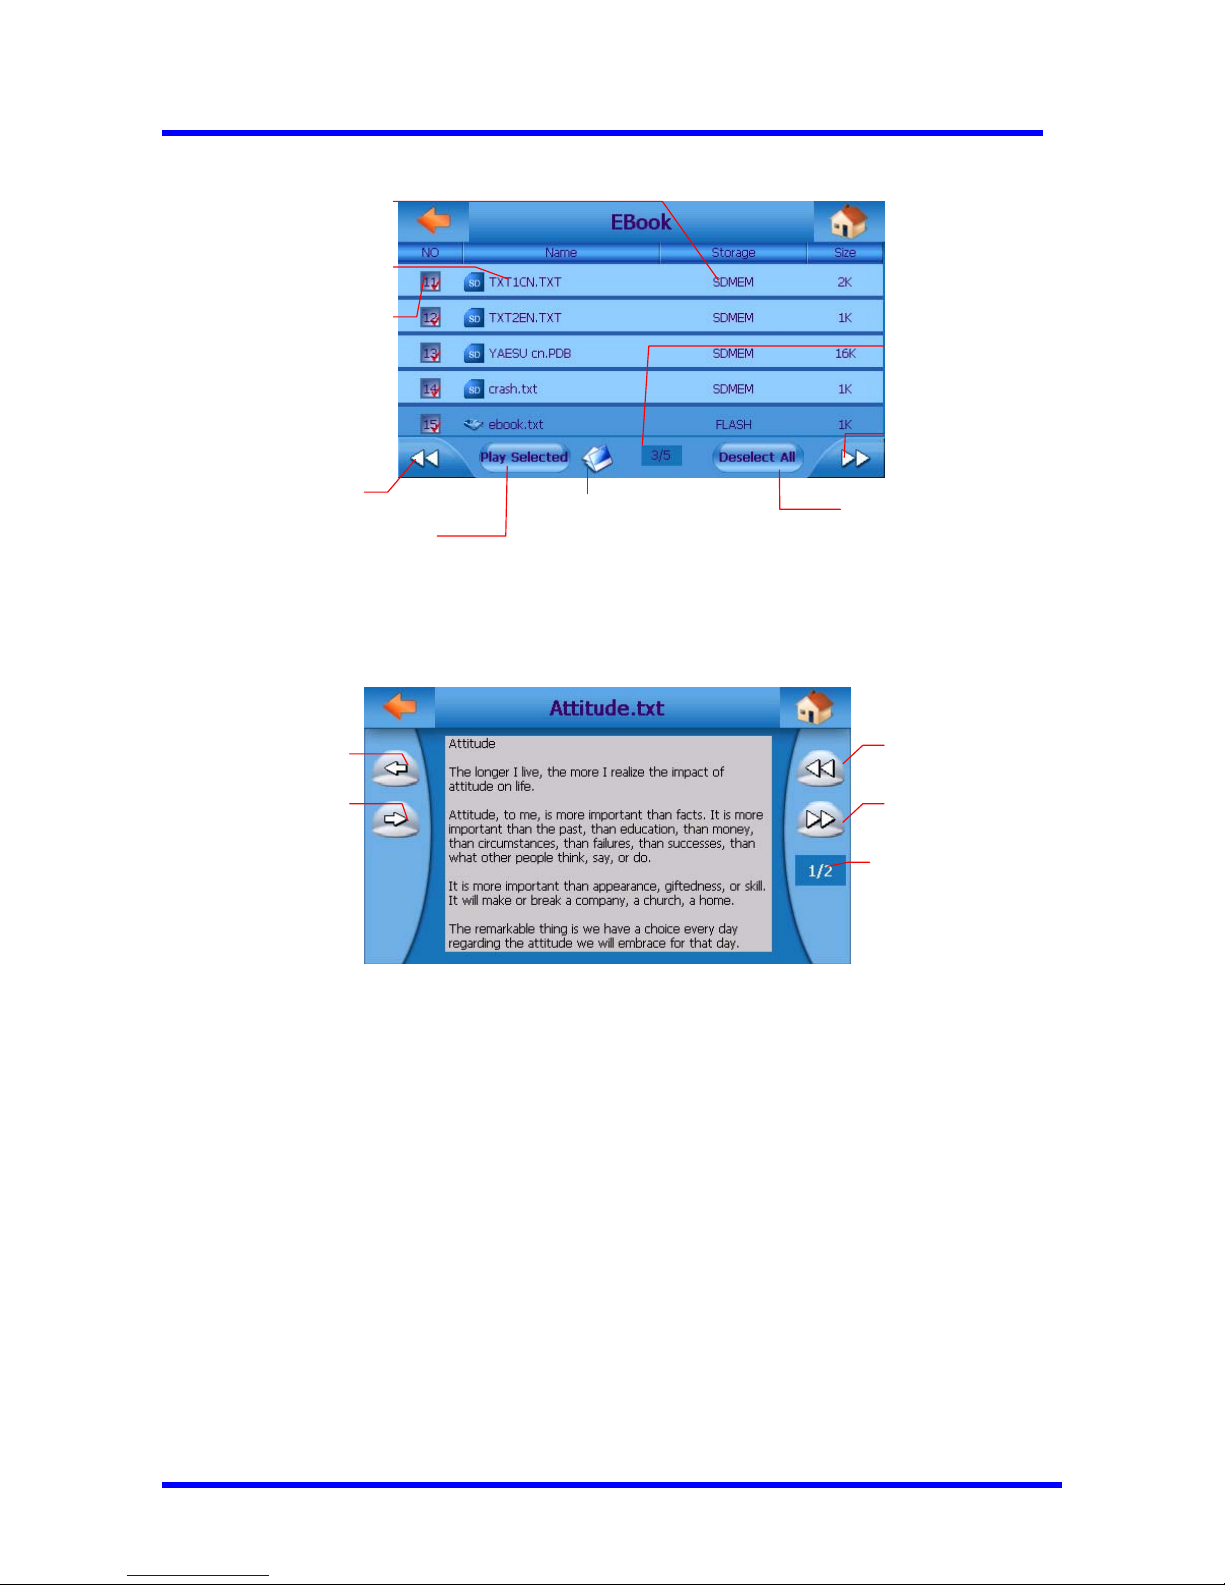
8. EBook
8.2 Browser
N-380 User Manual
08/18/2008 V1.0
Copyright© 1998-2008 ProGin
30
If a red checkmark is present,
then the movie is selected for
display. To select an
unchecked movie for display,
press the number to cause a
checkmark to appear. To
deselect a movie, press the
number to make the
checkmark disappear
This indicates the place where
the movie is stored, which can
be either flash memory or an
SD card
To show all selected movies, press
here
To deselect all
movies, press here
To go to the next page in
the list, press here
To go to the previous page
in the list, press here
This shows the name of a
movie in memory
Shows the current page
number on the top and the
total number of pages on
the bottom
File Operation button. See
“Popup Menus” section
8.2 Reader
Current page
number and
total number of
pages. Press
here to select a
new page
Go to previous file
Go to next file
Go to previous
page
Go to next
page
To jump to a specific page within the current file, press the page number. This will cause a
numeric keyboard to be displayed as shown below. Enter the desired page number and press
the Enter button.
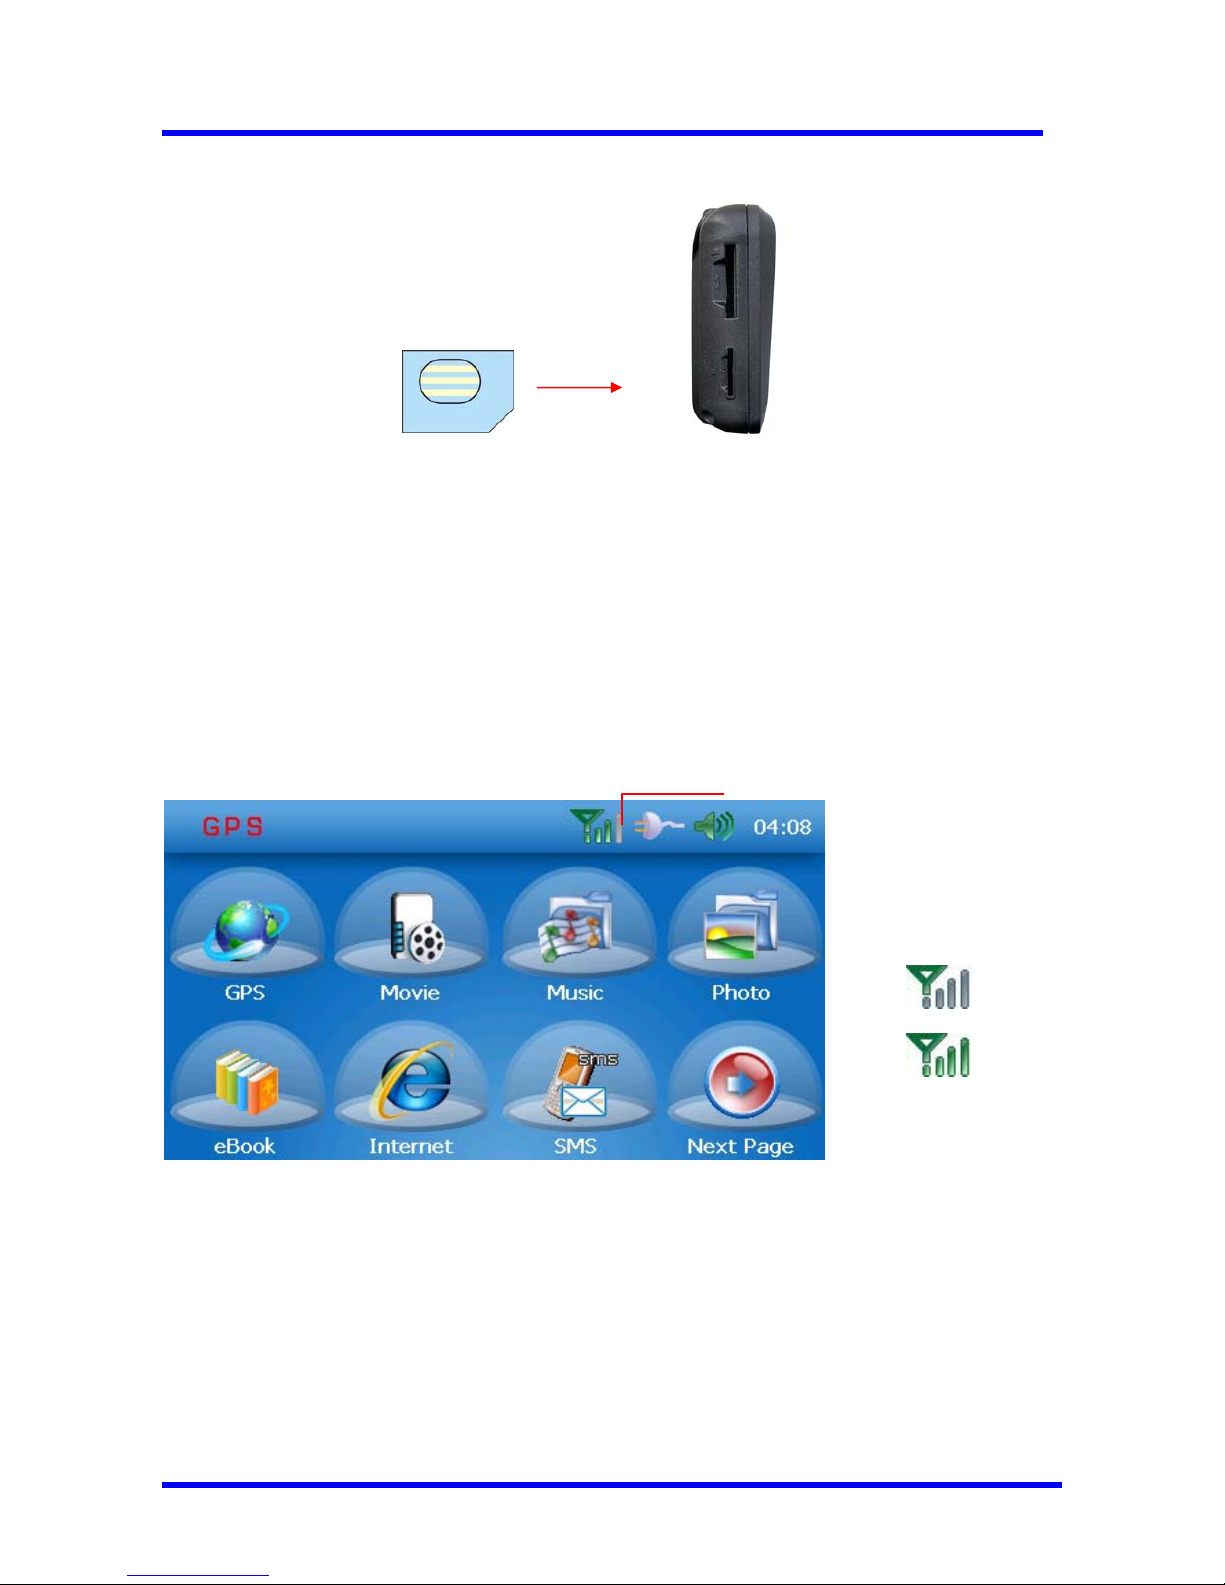
9. GPRS FUNCTION
9.1 SIM Card Insert
Please insert the SIM card before you turn on the machine. Make sure the SIM card can be used
for data transfer.
N-380 User Manual
08/18/2008 V1.0
Copyright© 1998-2008 ProGin
31
Normal GPRS signal must need at
least 3 stripes at the signal indicator.
Correct direction of SIM card insert
Press the Power button for 3 seconds until you see a flash in the screen and Loading begin. The
machine is ON.
9.2 Check the GPRS Network status to ensure the GPRS function is enabled.
Since there might be communication lead time between the network service provider and the device,
network might not be connected promptly. Re-connect again if connection is failed.
No Signal
Full Signal
N-380 User Manual
08/18/2008 V1.0
Copyright© 1998-2008 ProGin
32
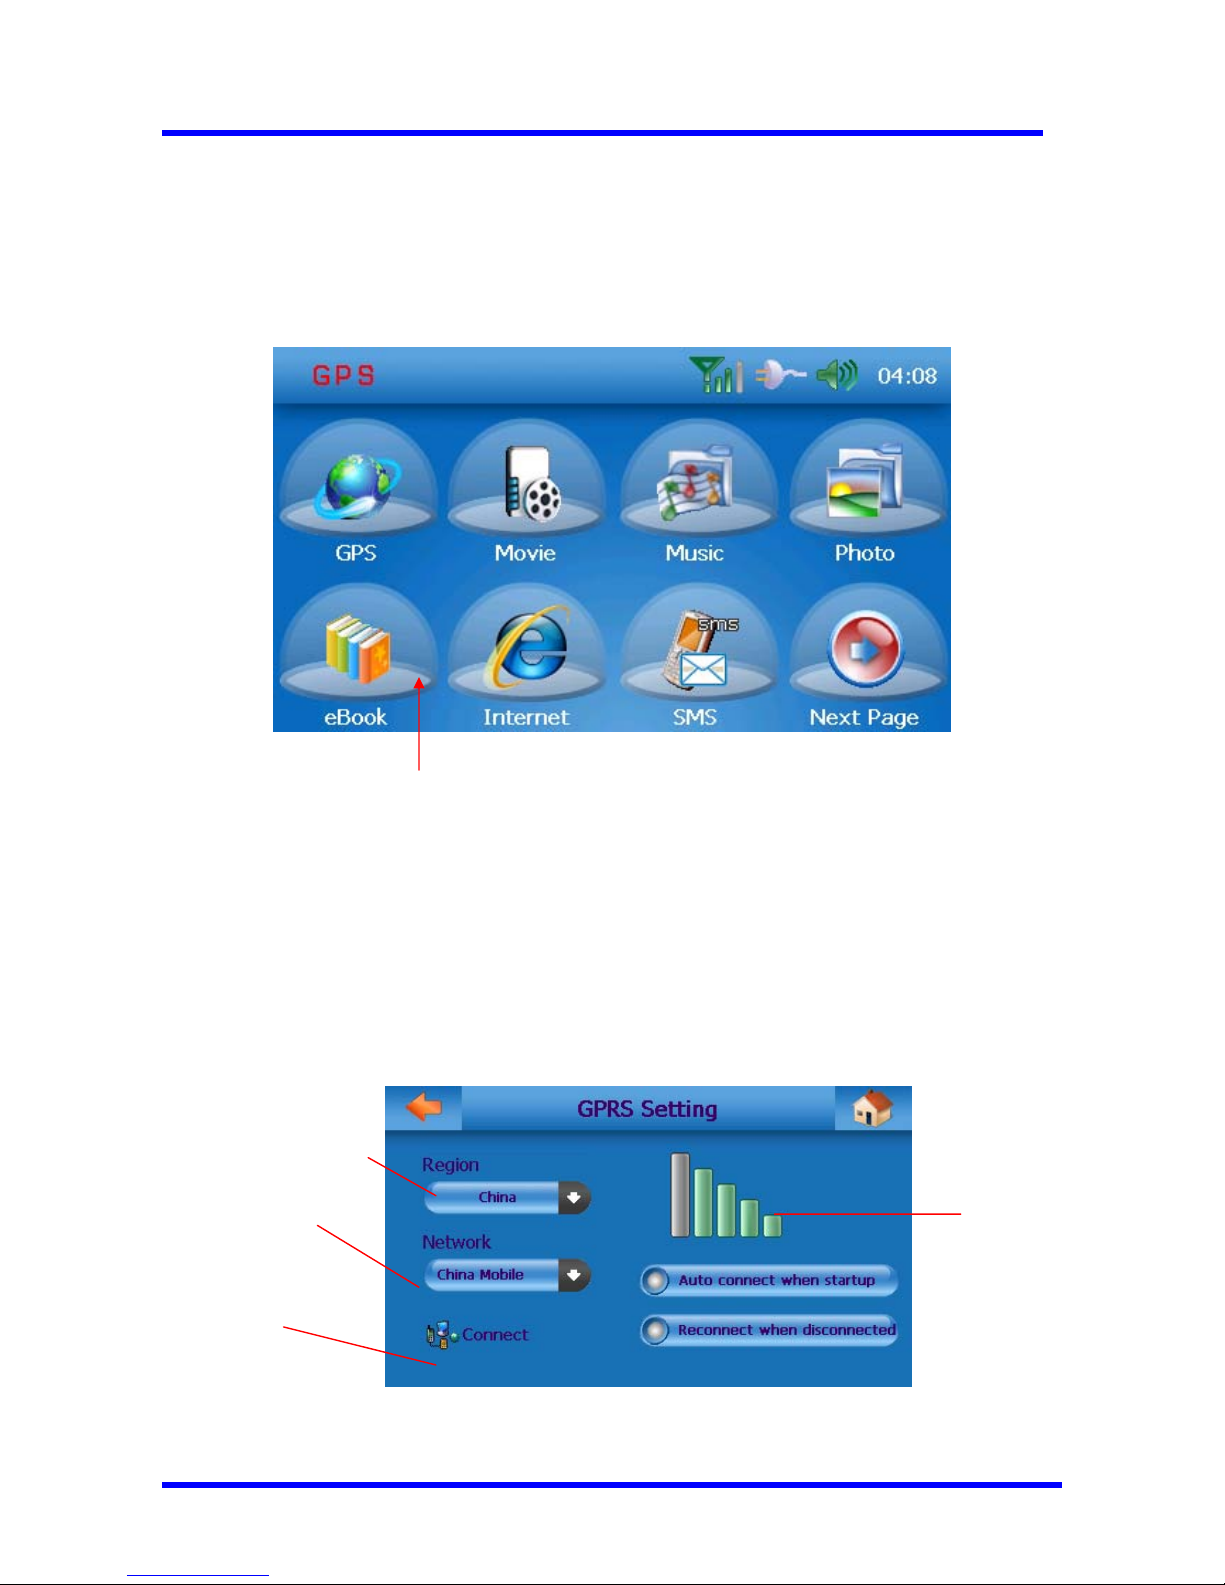
9.3 Network Connection
Click “Internet” at the main screen for network connection.
9.3.1 GPRS Setting
The following screen will come out upon the “Internet” icon have been pressed. Please select
appropriate “Region” and “Network” for GPRS connection.
Select a country where
GPRS service is provided
Select a network of the
Country selected
Click here to
connect network
Network signal
indicator
Click here!

N-380 User Manual
08/18/2008 V1.0
Copyright© 1998-2008 ProGin
33
Connection in process
indication
9.3.2 Connection in Process
9.3.3 Connection Succeeded Indicator
9.4 Internet
Click “Internet” for internet browsing:

N-380 User Manual
08/18/2008 V1.0
Copyright© 1998-2008 ProGin
34
INTERNET
9.4.1 Preset Groupings
Preset grouping of Web sites for similar category. When groupings are over five categories,
arrows to move backward and forward shall appear on the bottom of the screen for additional
groupings display.
When one of the grouping is selected (except blank grouping), following screen appears which
shows all URL listed under such grouping.
Click any one of the enlisted URL in the same grouping for direct linking to its web site.

N-380 User Manual
08/18/2008 V1.0
Copyright© 1998-2008 ProGin
35
Blank site
9.4.2 Internet browsing
Click any link to enter!

N-380 User Manual
08/18/2008 V1.0
Copyright© 1998-2008 ProGin
36
Hidden
Keyboard – click to open.
9.4.3 “Add Favorite” Folder
Stop loading
Network status
Return to previous page
Must click “GO” after displayed
URL linkage have been entered
Save the present site to
favorite.
Category selection
Delete the selected site Add into favorite

N-380 User Manual
08/18/2008 V1.0
Copyright© 1998-2008 ProGin
37
9.5 E-mail
Click the “Mail Box” to activate the e-mail function. (GPRS network must be connected before the
e-mail can be functioned; otherwise the system will go back to network connection process again.)
9.5.1 Mail send/receive interface
9.5.2 POP Settings
Please enter the POP setting before using e-mail! Please enter appropriate SMTP Server, POP3
Serve, MAIL ACCOUNT, and POSSWORD!
E-mail

N-380 User Manual
08/18/2008 V1.0
Copyright© 1998-2008 ProGin
38
Keyboard
9.5.3 Receiving E-Mails
Return to send/receive interface after mail box set up.
Click the “Get Mail” to receive e-mail and double click to read the mail.
9.5.4 Sending E-Mails
Receive mail

N-380 User Manual
08/18/2008 V1.0
Copyright© 1998-2008 ProGin
39
Open or close the
keyboard
Confirmation of
mail sent
List of copy of sent mails (from the device):
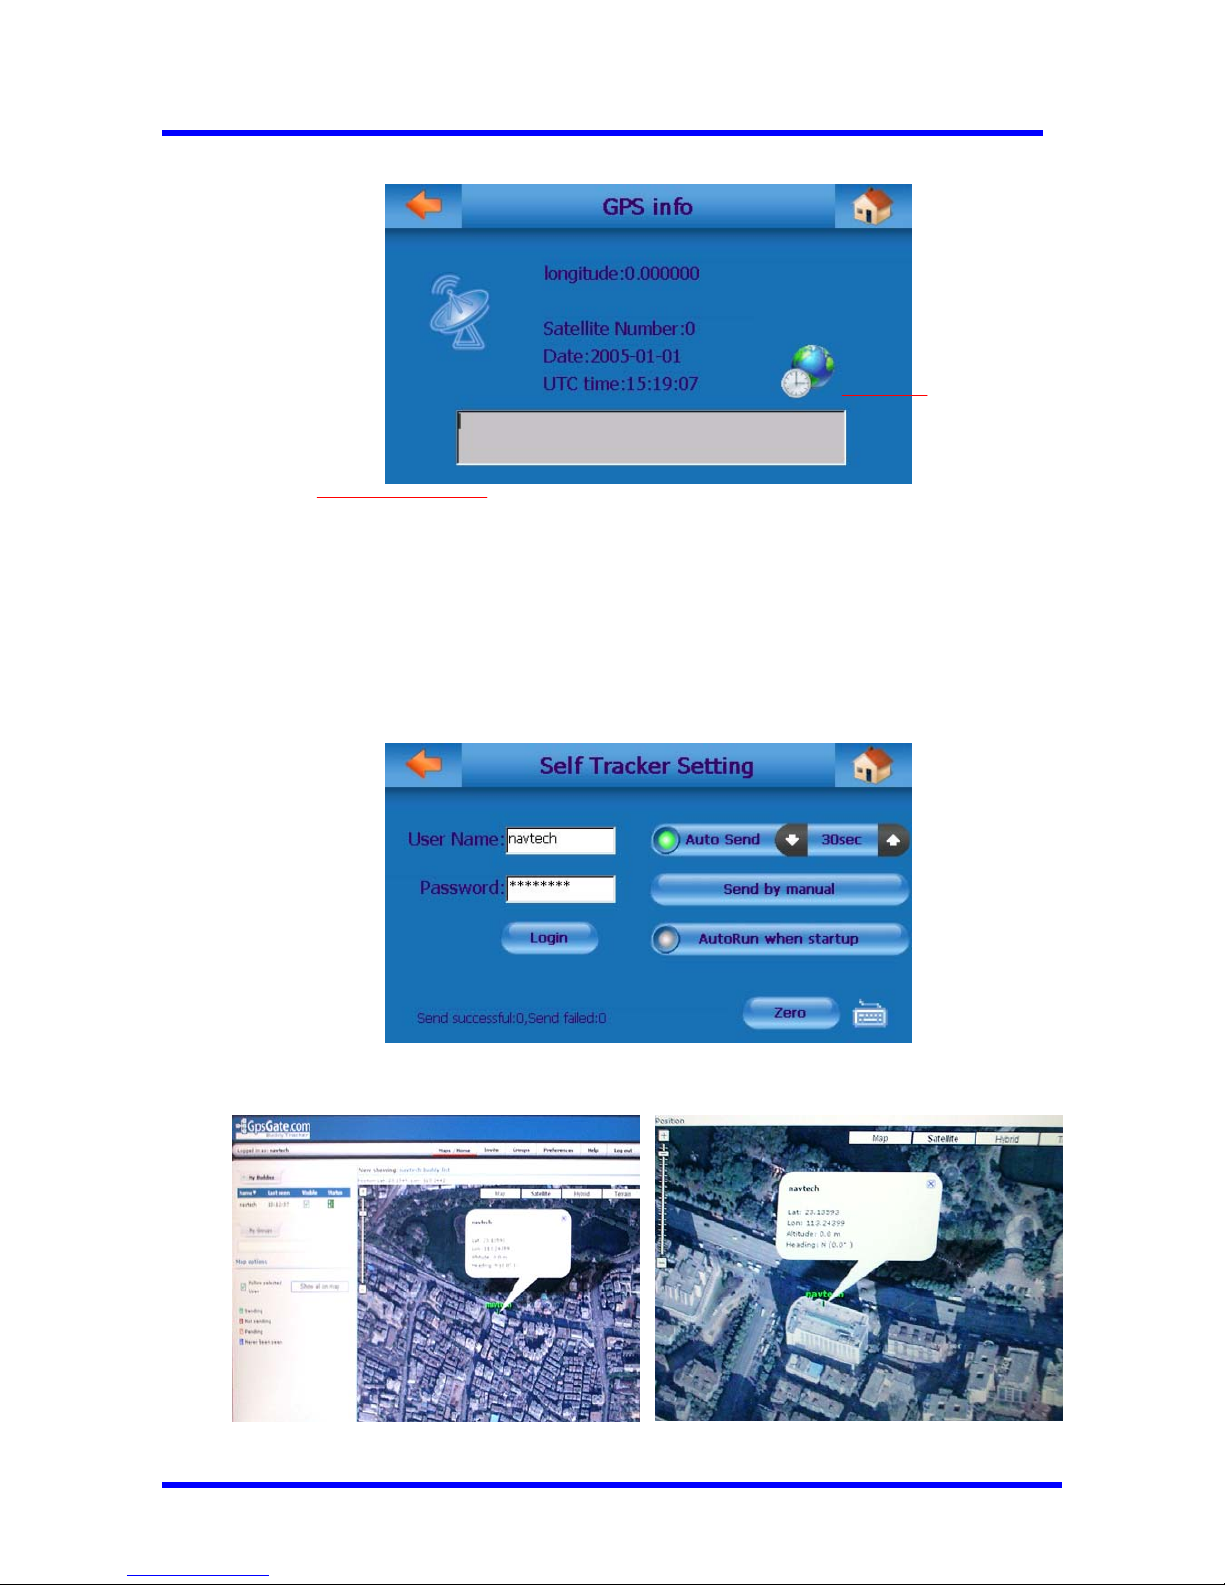
9.6 Self tracker
Display the current location in GPS parameters (Latitude, Longitude and Altitude) and almanac data
contains orbit information on all satellites, clock corrections, and atmospheric delay parameters.
Important Notice: This function requires the GPRS is connected, AND GPS signal reception is good.
List of sent
mails
N-380 User Manual
08/18/2008 V1.0
Copyright© 1998-2008 ProGin
40
GPS
Synchronizatio
n
NEMA data logging Clock
And monitoring
Check GPS reception status (Satellite number must over 3 to be considered normal)
9.6.1 Self Tracker Setting

N-380 User Manual
08/18/2008 V1.0
Copyright© 1998-2008 ProGin
41
DEVICE
9.6.2 Self Tracker Setting Process
9.7 SMS
Click the “SMS” icon at the main screen and enter into SMS function. (Please make sure the GPRS
connection is off before using this function.)
9.7.1 Compose SMS Message Select “Send” to write SMS message:
1. User first registers at
www.gpsgate.com
3. LOGIN
When GPRS and GPS is set, location of the device will be
uploaded to GPSM sever. Go to www.gpsgate.com and
login, the location of the device can be located at the PC by
Google Map or Google Earth.
3. LOGIN
2. Self tracker setting
Web gps gate
Check the present
location by PC

N-380 User Manual
08/18/2008 V1.0
Copyright© 1998-2008 ProGin
42
9.7.2 Receive SMS message
Select “Get Msg” to receive message:
9/7.3 Telephone Book
Click “Tel Book” to enter telephone book
Write SMS message
here
Open telephone
book
Phone number
Contents of
message
Phone number of
sender
Add the sender phone number
into telephone book

N-380 User Manual
08/18/2008 V1.0
Copyright© 1998-2008 ProGin
43
9.7.4 SMS Center
Click “Center” to enter SMS Center:
10 Information Center
Message can be sent from service server to the device in the form of word or voice message.
Communication protocol between the service server and device must be set before it comes into
function.
Name and
telephone number
Set up the default SMS
center number

N-380 User Manual
08/18/2008 V1.0
Copyright© 1998-2008 ProGin
44
1
2
5
3/4
5 5
6
To fill in IP address
Provided by Network
Provider
To input assigned
Port number as open
Connection
Automatically reconnect a disconnected internet connection.
A green spot indicates this function is activated
SERVER
GPRS
DEVICE
TCP/IP protocol
Send message
IP&PORT
When it is active
INFO CENTER
Display word or
voice message

N-380 User Manual
08/18/2008 V1.0
Copyright© 1998-2008 ProGin
45
10.1 Information Center Set up Process:
1. Set up service server.
2. Make sure the device is GPRS connected.
3. Set up IP&PORT at the INFO CENTER.
4. Click “INFO CENTER” to activate the function.
5. Send simple message from the service SERVER.
6. The device shows the same message on the screen or voice message thru the speaker.
Enter
Currently
entered page
number appears
here
Enter page
number using
the number
buttons
Backspace
11. Bluetooth

N-380 User Manual
08/18/2008 V1.0
Copyright© 1998-2008 ProGin
46
Pressing this to
activate
Bluetooth-toGPS
synchronizatio
Events log of
devices
synchronization
Bluetooth
settings
Phone function
is active when
synchronizatio
n process is
completed
between
Bluetooth and
GPS
11.1 Bluetooth Settings
Enable
Bluetooth-toGPS
synchronization
11.2 Phone Dialing

N-380 User Manual
08/18/2008 V1.0
Copyright© 1998-2008 ProGin
47
Return key
Displays
phone
number
Calls
Records
N
umeric
Keyboard
Phone
Dialing
Following displays phone dialing in progress:
Signal of
phone
dialing
Displays
phone
number
Phone
hangup
N
umeric
keyboard
Volume
increase
Volume
decrease
11.3 Incoming/Outgoing Call Records
Following displays the Call Records Details
Dialed
number
record
Display
phone
number
Phone
dialing
Receiving
calls record

N-380 User Manual
08/18/2008 V1.0
Copyright© 1998-2008 ProGin
48
11.4 Devices Synchronization Record
Connecting
devices for
synchronization
Event log of
device
synchronization
Delete all event
log records
Disconnecting
devices for
synchronization
11.5 Bluetooth Synchronization Settings
Create a name for
the Bluetooth
device
Auto answer
incoming
calls
Setting the
PIN code
A green light
indicates the
Blueto oth is
on.
Hidden keyboard
12.
Volume Overlays
Pressing the adjustment knob will cause the appearance of an overlay that allows you to adjust the
sound volume or backlight brightness of the ProGin N-380.

N-380 User Manual
08/18/2008 V1.0
Copyright© 1998-2008 ProGin
49
Function Description
Adjustment Knob (Up) Increase Volume
Adjustment Knob (Down) Decrease Volume
GPS Navigation
1. Usage Instructions
When you use the GPS function for the first time, the ProGin N-380 will prompt you to activate the
Navigation software. For further instructions, refer to the manual provided by our navigation map

N-380 User Manual
08/18/2008 V1.0
Copyright© 1998-2008 ProGin
50
provider. After the software is activated, you may use it as described below.
Press the GPS icon in the Main Menu of the ProGin N-380 to go to the menu of the navigation system.
(Note that the exact look of the navigation system will depend on the map source you chose when
activating the software.)
2. GPS Issues
● Signal reception problems. Under some circumstances, the N-380 may be unable to receive the
GPS satellite signals. These include:
☆ Inside a tunnel, under a bridge or inside a building.
☆ In a downtown area, where signal reception could be adversely influenced by high buildings or
obstacles
☆ In a dense forest, where signal reception could be adversely influenced by thick foliage.
☆ In a car with certain types of sheathing paper that can block the signals.
☆ Because of a change in US Department of Defense policy, this may reduce the precision or
availability of the GPS signals.
☆ Immediately after activating the system, as it may take a few minutes for the unit to locate and
synchronize with the satellite signals.
● Position inaccuracy. Under some circumstances, the N-380 may display inaccurate position
information. These include:
☆ On an express highway, where speed and surrounding vehicles may cause small signal distortions.
☆ In a city road grid, where the reported position might be located on a nearby road if the distance
between the two roads is less than GPS’s maximum deviation distance.
☆ In an enclosed space, such as a ferry, where the satellite signal may be blocked or distorted.
☆ At a road split with a small angle, where the reported position might be on the other side of the split.
● Voice prompt. Under some circumstances, the navigation system’s voice prompt may not function
as expected. These include:
☆ When you are driving on a limited access highway, the system may not detect if you are driving on
an exit ramp.
☆ If you merge onto a road with a different name, the system may give extraneous turn information.
3. Preventing GPS Signal Problems
Never operate the system close to a radio transmitter, as this can lead to abnormal operation.
As with any electronic equipment, never place it in an environment with static electricity or strong

N-380 User Manual
08/18/2008 V1.0
Copyright© 1998-2008 ProGin
51
electrical fields.
Avoid the following areas, as they may lead to unreliable GPS operation.
● In a tunnel or basement
● In a parking garage
● Indoors
● Under a bridge
● In a dense forest
Troubleshooting
[Note] If the measures described in this section fail, contact our Service Center for assistance.
Malfunction Troubleshooting
The unit does not
power on after the
power button is
pressed.
z Attach the unit to a USB power adapter. (This should allow the
unit to operate as well as charge the battery for mobile operation.)
z Wait at least 5 seconds after powering on to see if the display
appears.
z Increase the brightness of the backlight.
z Connect the unit to a USB power adapter. If this succeeds, then
the battery may be low on power. Keep the unit connected to the
USB power adapter to remedy this situation.
Nothing displays on
the screen after the
unit is powered on.
z Briefly press the “reset” button on the back of the unit to reset it.
Note that this will delete data.
The unit suddenly
shuts off.
z Ensure that the lithium battery is fully charged.

N-380 User Manual
08/18/2008 V1.0
Copyright© 1998-2008 ProGin
52
z Keep the unit connected to a USB power adapter when not in use.
The battery drains
quickly.
z Decrease the brightness of the backlight.
z Ensure that there is enough available internal memory. Exit any
unused application programs.
The unit has a slow
response time.
z Restart the system. If this fails to correct the problem, press the
“reset” button on the back of the unit. Note that this will delete
data.
z Go to [System Setup] → [Backlight Setup] to adjust the backlight
brightness.
Backlight is always off.
z Restart the system.
Battery cannot be
recharged.
z Ensure that the USB power adapter is not damaged, that the input
end has power and that the output end is connected correctly.
z Ensure that the earphones are not damaged and that they are
connected correctly.
No sound is emitted
from the earphones or
speakers.
z Increase the sound volume setting.
Photos cannot be
opened.
z Ensure that the formats of the photos are supported by the system.
Videos cannot be
opened.
z Ensure that the formats of the videos are supported by the system.
Music files cannot be
opened.
z Ensure that the format of the sound file is supported by the system.
e-Book files cannot be
opened.
z Ensure that the format of the e-Book file is supported by the
system.
Preventative Measures
Proper maintenance of the ProGin N-380 may extend its service life and reduce the risk of damage.

N-380 User Manual
08/18/2008 V1.0
Copyright© 1998-2008 ProGin
53
1. General Rules
● Avoid exposing the ProGin N-380 to extreme humidity.
● Avoid exposing the ProGin N-380 to strong sunlight or strong UV light for extended periods.
● Do not use the ProGin N-380 outdoors during a thunderstorm.
● Do not place or drop any object onto the ProGin N-380.
● Never drop or shake the ProGin N-380.
● Place the ProGin N-380 into its protective cover when not in use.
● Avoid exposing the ProGin N-380 to dramatic changes in temperature, because this might lead to
moisture condensation inside the unit, which may cause damage. In the event that moisture does
condense inside the ProGin N-380, allow the unit to dry completely before using.
● Do not sit on the ProGin N-380.
● When you are traveling and not using the ProGin N-380, remove the SD card from its slot to
prevent loss or damage.
● Do not allow any sharp object to touch the screen of the ProGin N-380.
● Do not open, disassemble, modify or attempt to repair the ProGin N-380; otherwise the warranty
may be null and void; furthermore this might cause damage to the ProGin N-380, and may cause
injury or loss.
2. Travel Instructions
● Before leaving, back up important data, and, if needed, bring a backup with you.
● Before leaving, ensure that the battery is charged fully.
● Bring a power adapter.
● When traveling, power off the unit and remove all cables.
● When taking a flight, do not place the unit in checked luggage, as the temperatures in an aircraft
cargo hold may damage it.
● When taking a flight, consult the airline staff before using the unit in flight, as there may be
restrictions against its use.
● When traveling to another country, ensure that you have an appropriate power transformer to

N-380 User Manual
08/18/2008 V1.0
Copyright© 1998-2008 ProGin
54
convert the standard electrical supply in that country to the specifications required by the ProGin
N-380.
3. Energy-saving tips
The following tips may help to conserve battery power on the ProGin N-380:
● Fast switch-off
Shorten the timeouts to shut off the backlight and system. Use [System Setup] → [Backlight Setup]
and [System Setup] → [Power Management] to set these.
● Adjust sound settings.
- Decrease volume
- Turn off unnecessary sound effects. Use [System Setup] → [Sound Setup] to set these.
● Avoid energy consumption, for example:
- When using an SD card (some memory cards consume a lot of energy).
- When playing videos or music.
- When connected to a desktop computer. (When the ProGin N-380 is connected to a
computer, it won’t turn off automatically).
Safety Precautions
1. Recharging
This product is provided with power adapters with a minimum rated output of +5VDC/1.0A. Use only
the power adapters that come with the ProGin N-380. Any other adapter might cause damage or injury.
2. Power Adapter
Never use a power adapter in a humid environment. Never touch a power adapter when your hands

N-380 User Manual
08/18/2008 V1.0
Copyright© 1998-2008 ProGin
55
are wet.
Only use the power adapter in a well-ventilated environment. Never cover the adapter or restrict the
airflow around the adapter, as this may reduce its ability to cool itself.
Only connect a power adapter to an electrical supply for which it was designed. The voltage and
ground requirements for an adapter are indicated on its case.
Never use a damaged power adapter.
Do not attempt to repair a power adapter. If an adapter is damaged, have it professionally serviced by
our Service Center or replaced
3. Battery
Use only the recharging methods prescribed by this manual. Use only the lithium battery provided with
the ProGin N-380. To avoid damage or injury, never disassemble, impale, impact or throw the battery
or expose it to fire or water; otherwise the battery might break, explode or release harmful chemical
substances.
Warning
To reduce risk of damage or injury, never disassemble, break or impale the battery or cause a short
circuit. Never expose the battery to water or fire. Improper replacement of the battery might cause an
explosion. Only replace the battery with an identical battery.
A used battery should not be put in the garbage.
Local governments may provide for the collection of used batteries. For details, please contact local
authorities.

N-380 User Manual
08/18/2008 V1.0
Copyright© 1998-2008 ProGin
56
Technical Specifications
Processor 400MHZ ARM920T 32 bit RISC AMBA
Display
4.3″TFT LCD; with LED background light; touchable screen,
Image 480x272 pixel; 65k real color; QVGA
User Interface Digital touchable screen
External Memory Card External SD card slot; supports SD card with max capacity 4G
Built-in Memory
SDRAM 64MB; FLASH/ROM 64MB/128MB/512MB/1GB/2GB
(optional various storage size)
Power Supply 1350mAh lithium–polymer battery
External Power 110~220V AC input; 5V output; AC/DC transformer
Battery Life 3~5hrs for video; 3~6hrs for audio
USB USB1.1 protocol; transmission rate of 12M bit/s
GPS Standard 20 channels; SIRFIII GPS receiver w/built-in antenna
Video Support
WMV, MPEG-1, MPEG-4, ASF (some CODECS may not be
supported)
Photo Support JPEG (JFIF), GIF, BMP
Audio Support
WAV, WMA, MP3, MP2, MPA (some CODECS may not be
supported)
Audio Output Interface 3.5mm stereo earphone; built-in dual speakers
Operating Temperature 0°C ~ +70°C
Storage Temperature -10°C ~ +80°C
Operating System Microsoft Windows CE 4.2
Buttons/Keys Power, volume/backlight adjustment
Dimensions (L×H×W) 93mm×80mm×24 mm

N-380 User Manual
08/18/2008 V1.0
Copyright© 1998-2008 ProGin
57
Weight 170 g
Included Accessories:
5V output USB power adapter
DC automobile cigarette lighter adapter
Suction Mounting Accessories
USB cable
Pair of earphones
Installation CD (including manual and bundled software)
Quick setup guide
Pen/Stylus
A face plate in black

N-380 User Manual
08/18/2008 V1.0
Copyright© 1998-2008 ProGin
58
PC Requirements
The software included with the ProGin N-380 requires a computer with the following minimum
specifications:
● Operating System: Microsoft Windows ME, Windows 2000, Windows XP or later.
● At least 64MB memory and 250MB of available disk space.
● Intel Pentium II (or compatible) processor or higher; 266MHz or faster.
● 2X DVD-ROM drive or faster
● USB 1.1 port
*This document is subject to change without notice.
 Loading...