

Page 1
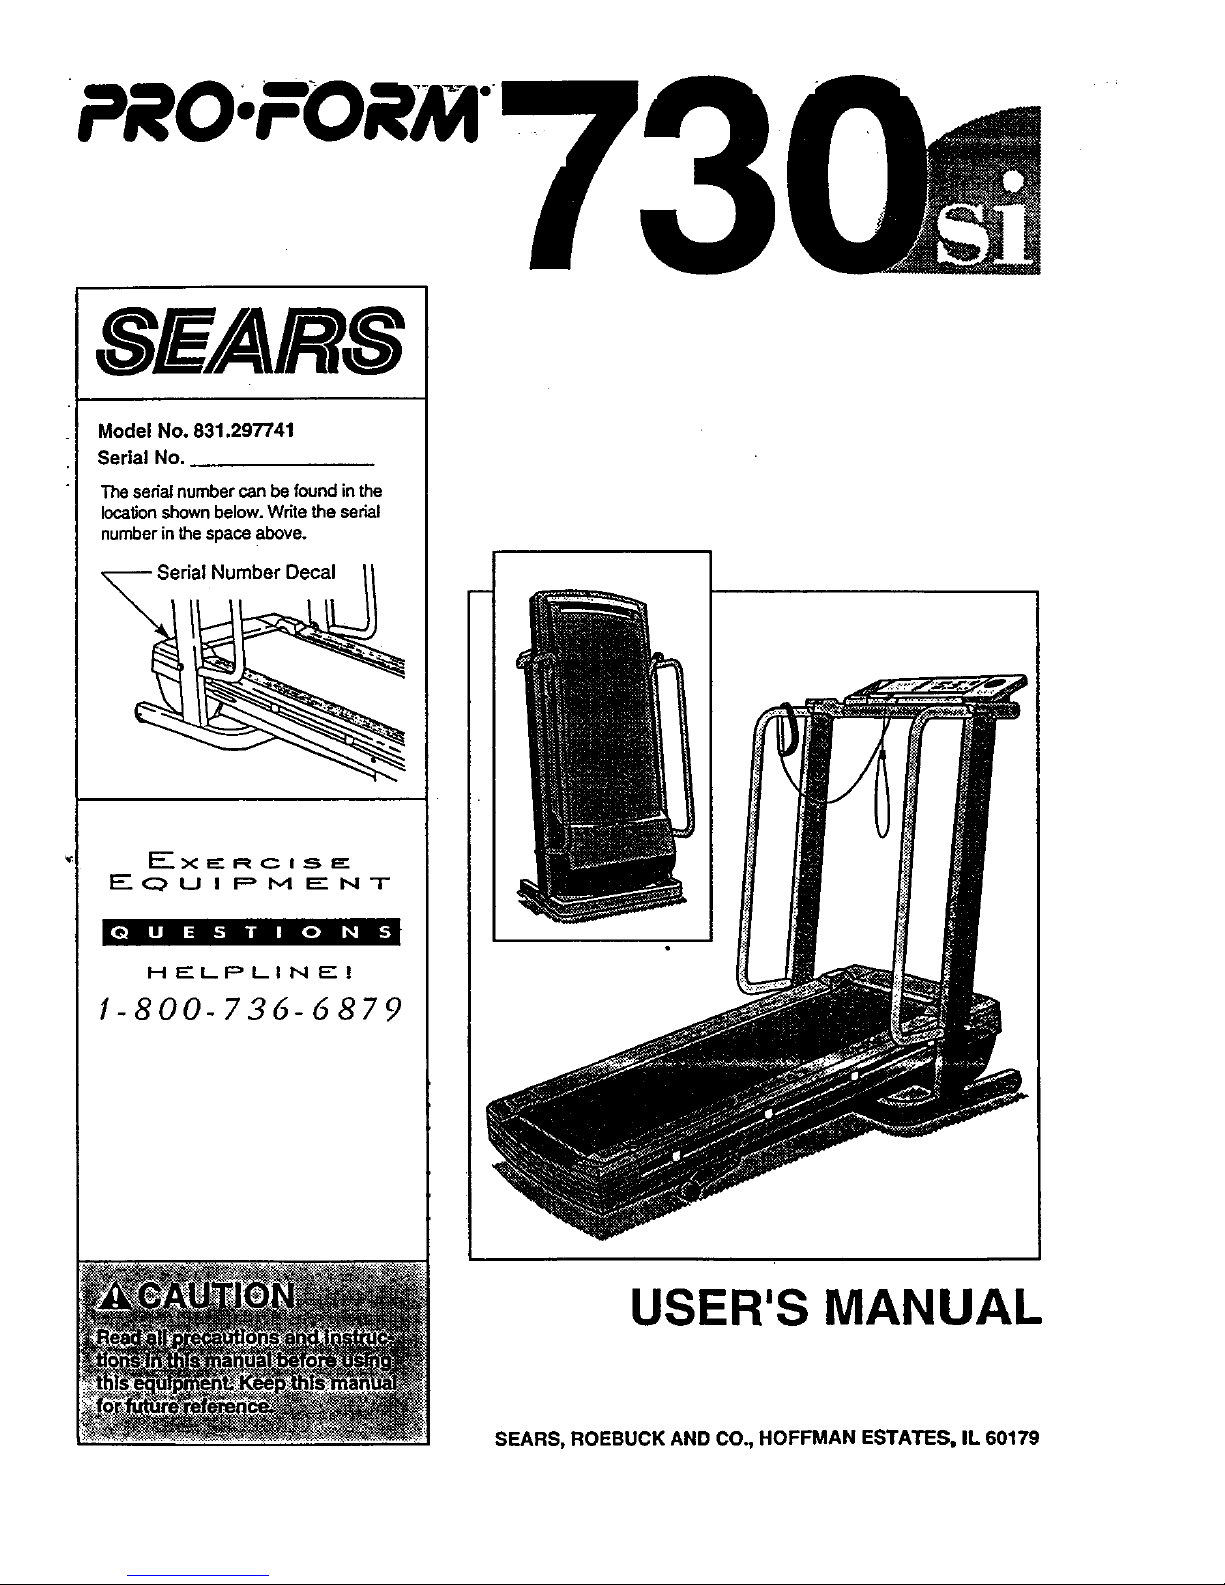
SEARS
Model No. 831.297741
Serial No.
The serial number can be found in the
locationshown below. Write the serial
number in the space above.
E_X z=" R C I S _"
EQ u i F, I,,.4 i=- I,,4T
11Oil I _1 i Iol _ 11-I
HELPLINE!
1-800-736-6879
USER'S MANUAL
SEARS, ROEBUCK AND CO., HOFFMAN ESTATES, IL 60179
Page 2
PRO;FORM
TABLE OF CONTENTS
• IMPORTANT PRECAUTIONS ....................................
•BEFORE YOU BEGIN ..........................................
"ASSEMBLY ..................................................
HOW TO USE THE PULSE SENSOR ..............................
OPERATION AND ADJUSTMENT ................................
" HOW TO USE THE MANUAL MODE ............................
HOW TO USE PROGRAMS A, B, C, AND D ......................
HOW TO USE THE FAT BURN AND AEROBIC PROGRAMS ........
HOW TO USE THE FITNESS I'EST PROGRAM ...................
HOW TO FOLD AND MOVE THE TREADMILL ......................
TROUBLE-SHOOTING .........................................
CONDITIONING GUIDELINES ....................................
°*oo.°.oo.°.o.o..o.*
°°.oo.°..o°.°°......
°°°°*.°oo..o°.°oo°.o
.°°°°o°°.oo.°oo°.°o,
o°oo..°.oo°.oo,°°oo*
°°ooo°°°o°°°o°°°ooo°
°.°o*°*,°°°°.°,.,..,,°°°o°.,3
.°o°,°°_°°.°°°°.,*o°.o°..°°°.4
°°°°°,o°°*oo°.°.o°°.o°o°o°..5
°°°.o°,°.° .... °..,,o.°.o°...8
°,°°°°°,°,°°°o°°..°°°°°°°,°°9
...... 11
...... 13
...... 15
...... 16
...... 18
...... 20
.......................,..22
ORDERING REPLACEMENT PARTS .................................................. Back Cover
FULL 90 DAY WARRANTY ........................................................... Back Cover
Note: An EXPLODED DRAWING and a PART LIST are attached to the center of this manual. Save the
EXPLODED DRAWING and PART LIST for future reference.
2"
Page 3

IMPORTANT PRECAUTIONS
Page 4
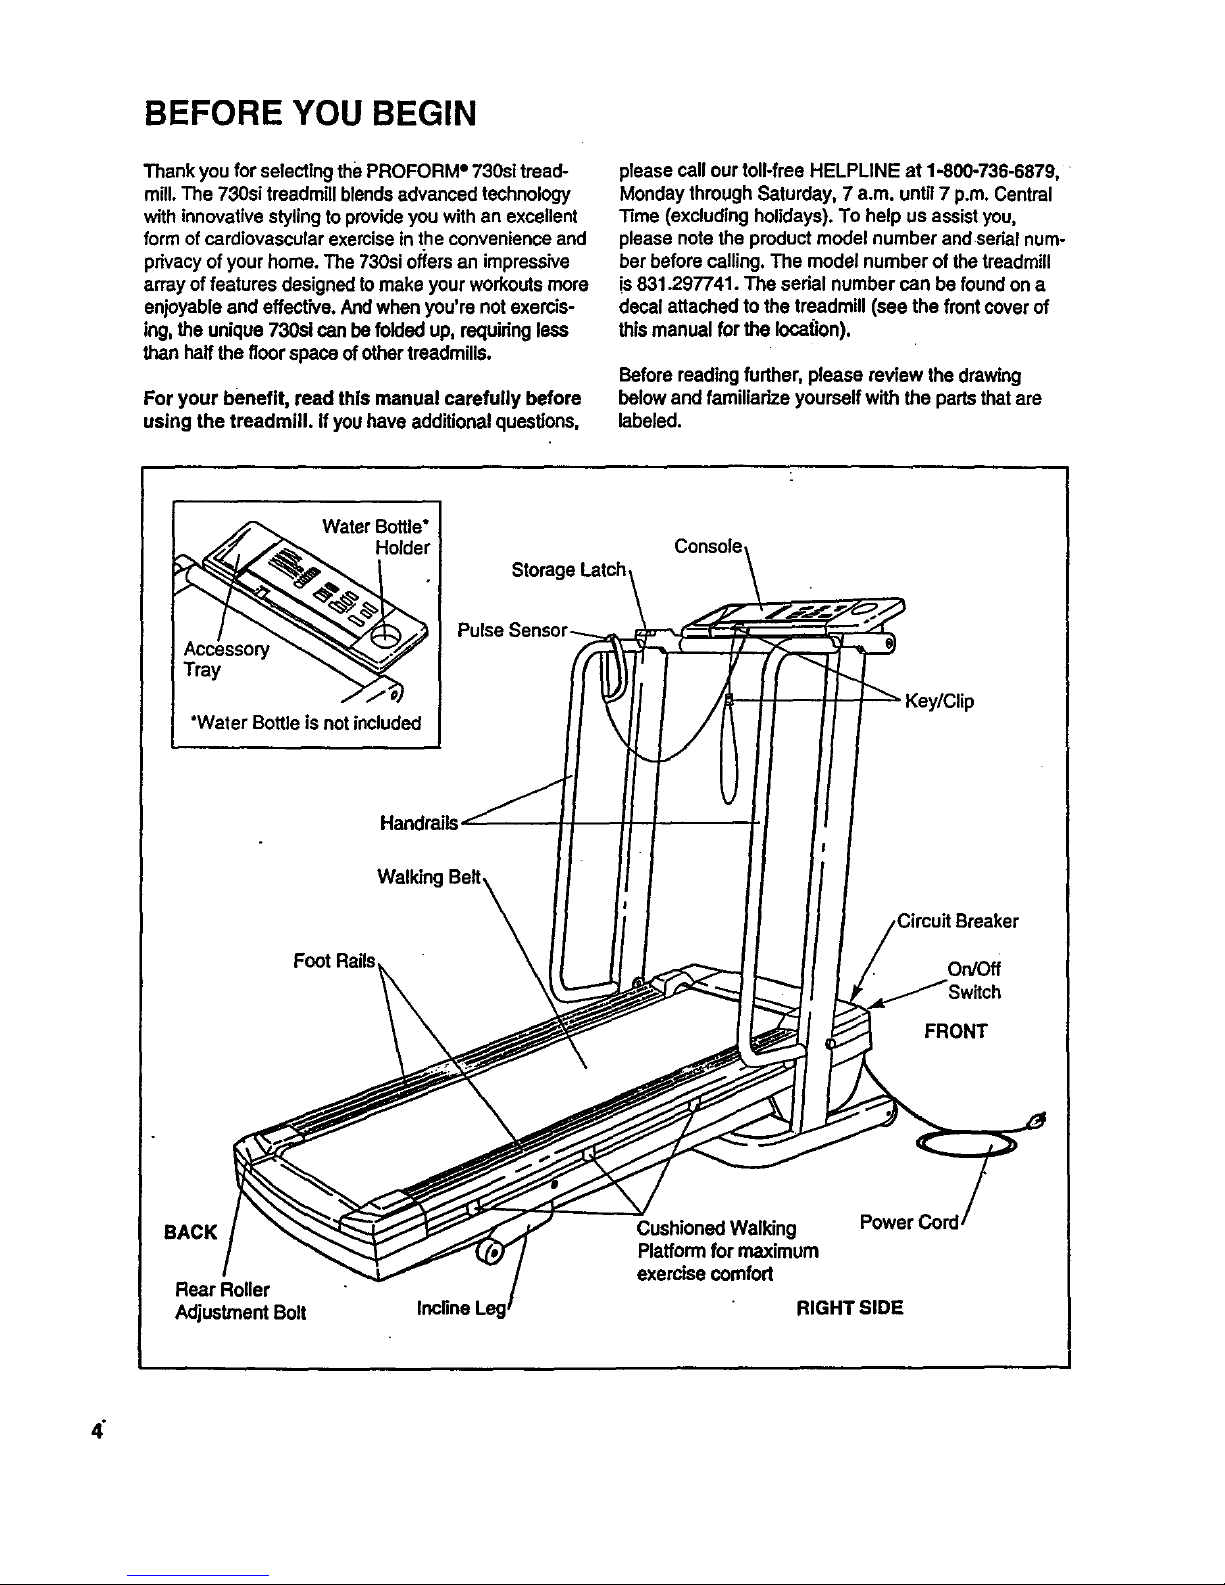
BEFORE YOU BEGIN
Thank you for selectingthe PROFORM" 730si tread-
mill.The 730si treadmill blendsadvanced technology
with innovativestylingto provideyou with an excellent
form of cardiovascular exercise in the convenience and
privacyof your home. The 730si offers an impressive
array of features designed to make your workouts more
enjoyable and effective. And when you're notexercis-
ing, the unique 730sl can be folded up, requiring less
than half the floor space of other treadmills.
For your benefit, read this manual carefully before
using the treadmill. Ifyou have additional questions,
please call our toll-free HELPLINE at 1-800-736-6879,
Monday through Saturday, 7 a.m. until 7 p.m. Central
13me(excluding holidays). To help us assist you,
please note the product model number and serial num-
ber before calling. The model number of the treadmill
is831.297741. The serial number can be found on a
decal attached to the treadmill (see the frontcover of
this manual for the location).
Before reading further, please review the drawing
below and familiarize yourself with the pads that are
labeled.
Water Bottle*
Holder
Tray
*Water Bottle isnot included
Storage Latch,
Console
Key/Clip
Handrails,
Walking Belt,
Foot Rails
Circuit Breaker
On/Off
FRONT
BACK
Rear Roller
Adjustment Bolt
Cushioned Walking
Platform for maximum
exercise comfod
RIGHT SIDE
4"
Page 5
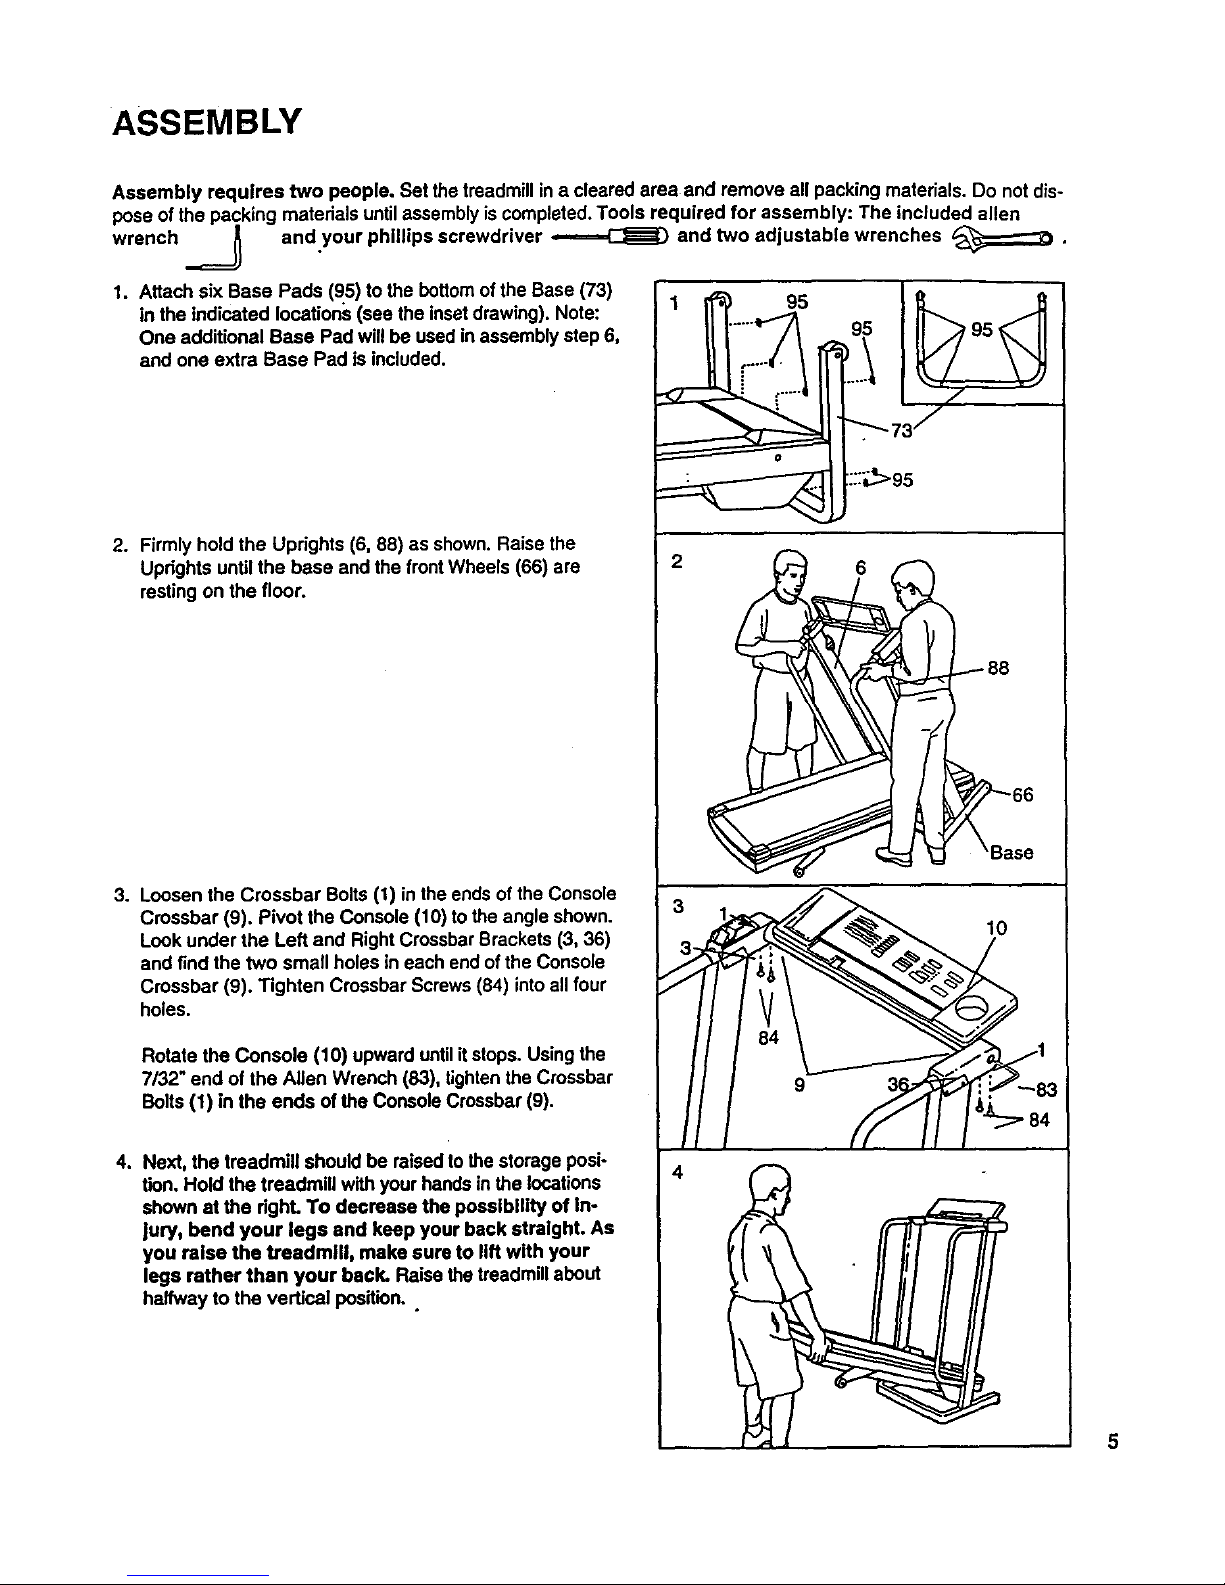
ASSEMBLY
Assembly requires two people. Set the treadmill in a cleared area and remove all packing materials. Do notdis-
pose of the packing materials until assembly iscompleted. Tools required for assembly: The included allen
wrench _ andyour phillips screwdriver _ and two adjustable wrenches _ .
1. Attach six Base Pads (95) to the bottom of the Base (73)
in the indicated locations (see the insetdrawing). Note:
One additional Base Pad will be used in assembly step 6,
and one extra Base Pad is included.
2. Firmly hold the Uprights (6, 88) as shown. Raise the
Uprights until the base and the front Wheels (66) are
resting on the floor.
3. Loosen the Crossbar Bolts (t) in the ends of the Console
Crossbar (9). Pivot the Console (10) to the angle shown.
Look under the Left and Right Crossbar Brackets (3, 36)
and find the two small holes in each end of the Console
Crossbar (9). Tighten Crossbar Screws (84) into all four
holes.
Rotate the Console (10) upward untilit stops. Usingthe
7/32" end of the Allen Wrench (83), tighten the Crossbar
Bolts (1) in the ends of the Console Crossbar (9).
4. Next, the treadmill should be raised to the storage posi-
tion. Hold the treadmill with your hands in the locations
shown at the righL To decrease the possibility of In-
jury, bend your legs and keep your back stralght. As
you raise the treadmill, make sure to lift with your
legs rather than your back. Raise the treadmill about
halfway to the vertical position..
::::_>95
2 6
10
4
5
Page 6
6"
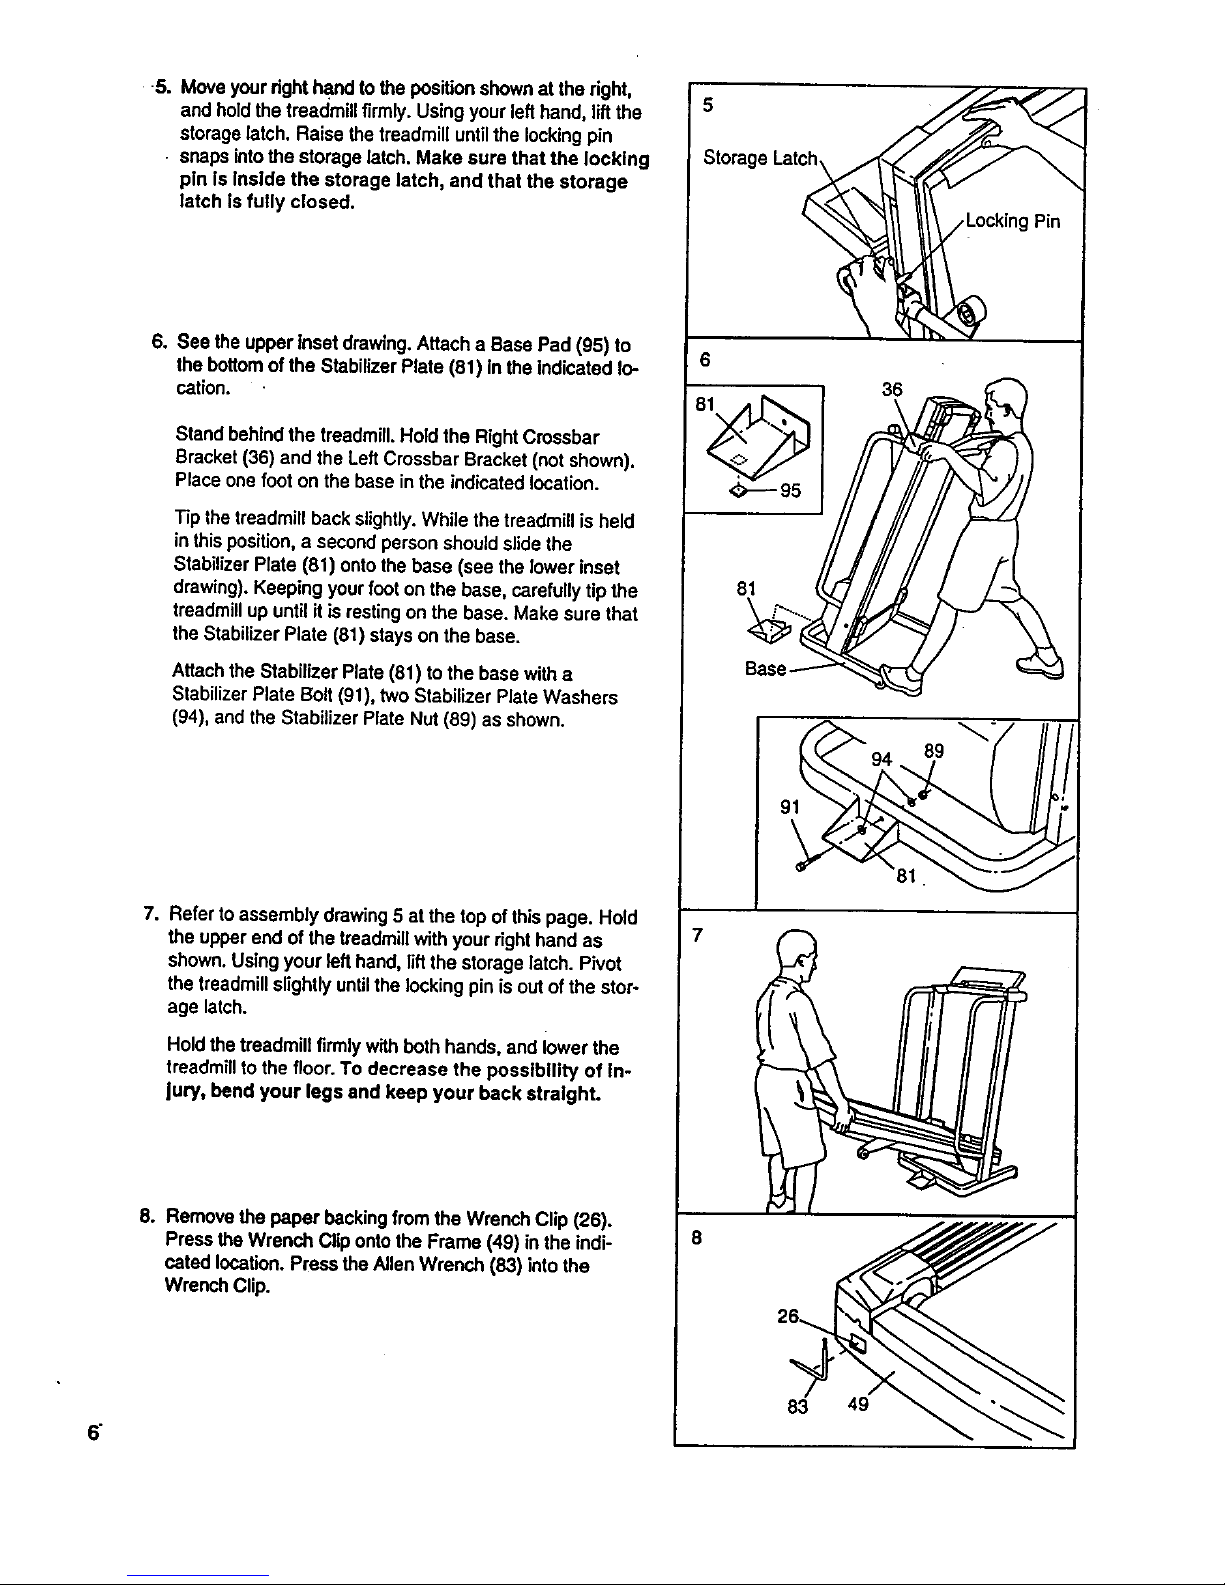
5. Move yourdght hand to the position shown at the right,
and hold the treadmiti firmly. Using your left hand, rift the
storage latch. Raise the treadmill untilthe lockingpin
• snaps intothe storage latch. Make sure that the locking
pln Is Inslde the storage latch, and that the storage
latch Is fully closed.
.
See the upper Inset drawing.Attach a Base Pad (95) to
the bottomof the Stabilizer Plate (81) in the indicated lo-
cation.
Stand behind the lreadmilL Hold the RightCrossbar
Bracket (36) and the LeftCrossbar Bracket (not shown).
Place onefoot on the base inthe indicated location.
Tip the treadmill back slightly.While the treadmill is held
in this position,a second person should slidethe
Stabilizer Plate (81) onto the base (see the lower inset
drawing). Keeping your foot on the base, carefully tip the
treadmillup untilit is restingon the base. Make sure that
the Stabilizer Plate (81) stays on the base.
Attach the Stabilizer Plate (81) to the base with a
Stabilizer Plate Bolt (91), two Stabilizer Plate Washers
(94), and the Stabilizer Plate Nut (89) as shown.
7.
Refer to assembly drawing 5 at the top of this page. Hold
the upper end of the treadmillwith your right hand as
shown. Using your left hand, liftthe storage latch. Pivot
the treadmill slightlyuntilthe locking pin is out of the stor-
age latch.
Hold the treadmill firmlywith both hands, and iower the
treadmill to the floor. To decrease the possibility of In-
Jury, bend your legs and keep your back stralght.
8. Remove the paper backingfrom the Wrench Clip (28).
Press the Wrench Clip ontothe Frame (49) in the indi-
cated location. Press the Allen Wrench (83) intothe
Wrench Clip.
Storage Latc_
6
36
7
8
89 If
26_
Page 7
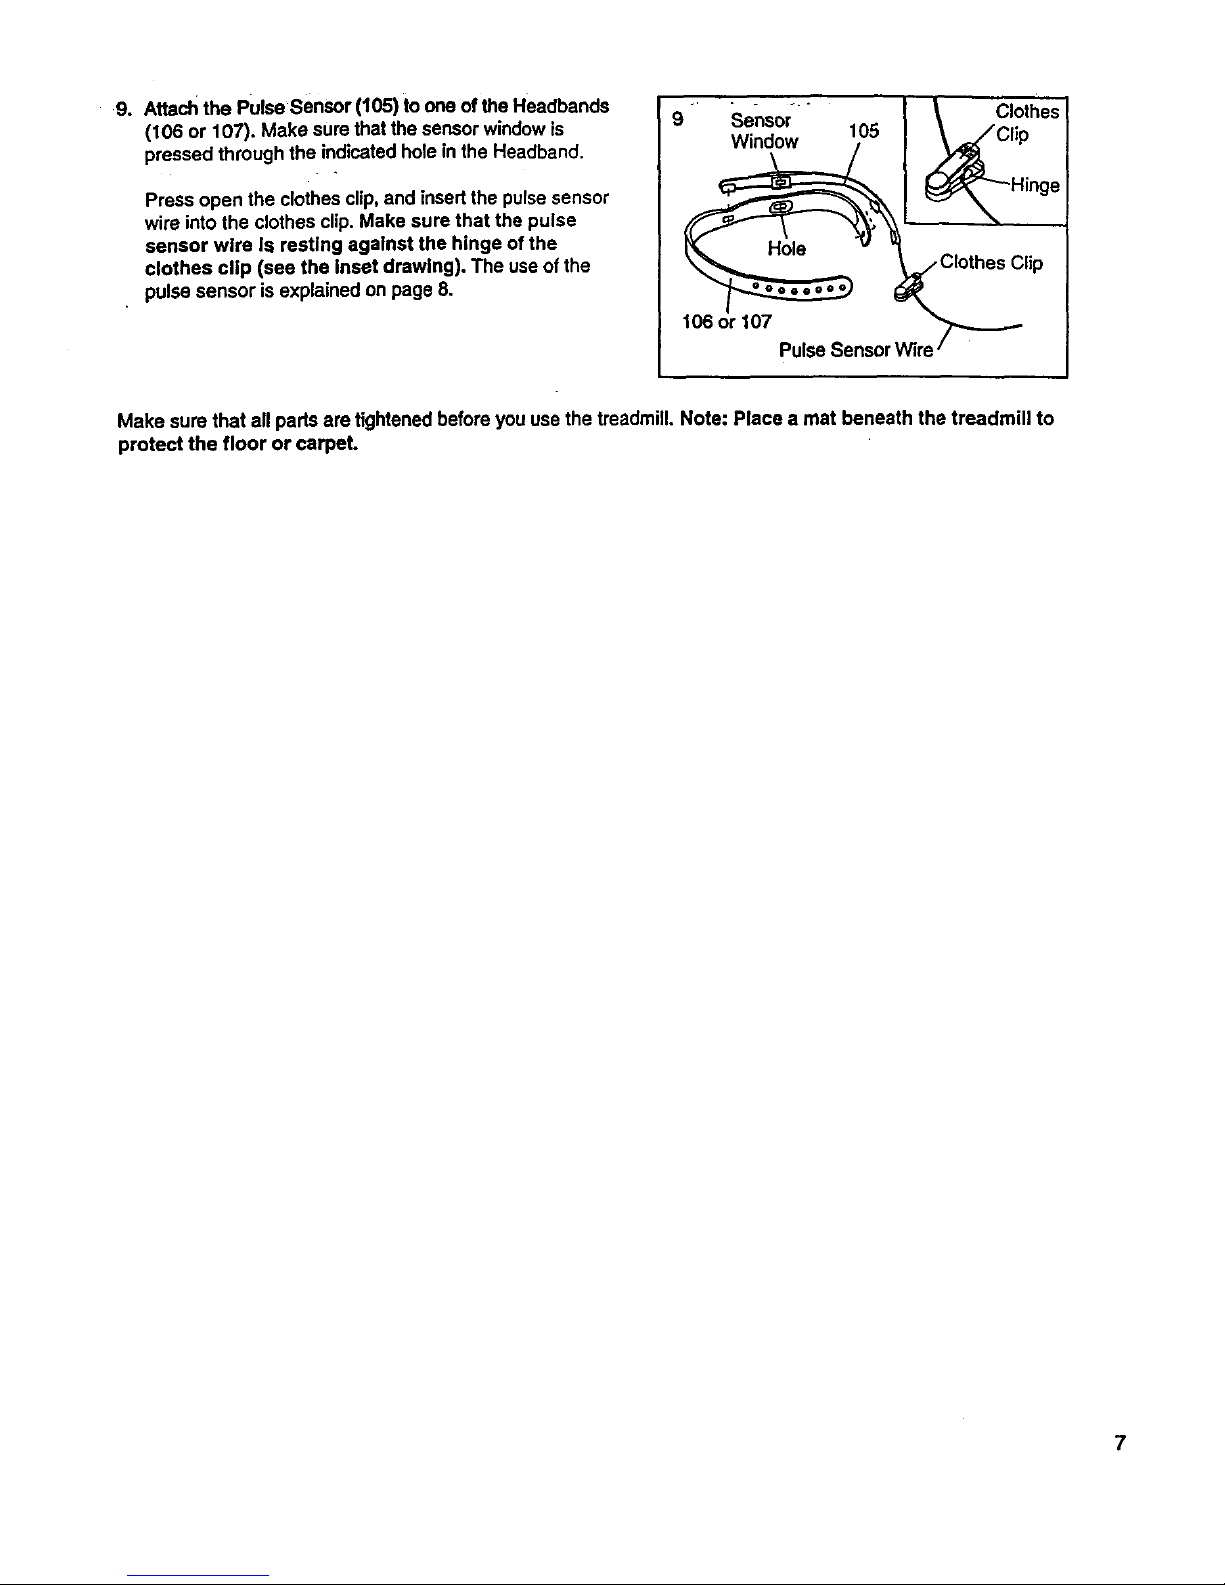
9. AttachthePulsesensor(105)toonectthe Headbands
(106 or 107). Make sure that the sensor window is
pressed through the indicated hole inthe Headband.
Press open the clothes clip, and insed the pulse sensor
wire into the clothes clip. Make sure that the pulse
sensor wire Is resting agalnst the hinge of the
clothes clip (see the Inset drawing), The use of the
pulse sensor is explained on page 8.
_" " - Clothes
9 Sensor 105
Window
107
Pulse Sensor Wire
Make sure that all pads are tightened before you use the treadmill. Note: Place a mat beneath the treadmill to
protect the floor or carpet.
7
Page 8
'HOLYTO'USE THE PULSE'SENSOR
8"
The uniqueheadband-stTle pulse sensor Is specta ly
designedfor greater accuracy, comfod, and durability.
To get the best performance from the pulse sen-
sor, please read the f611owing Instructions.
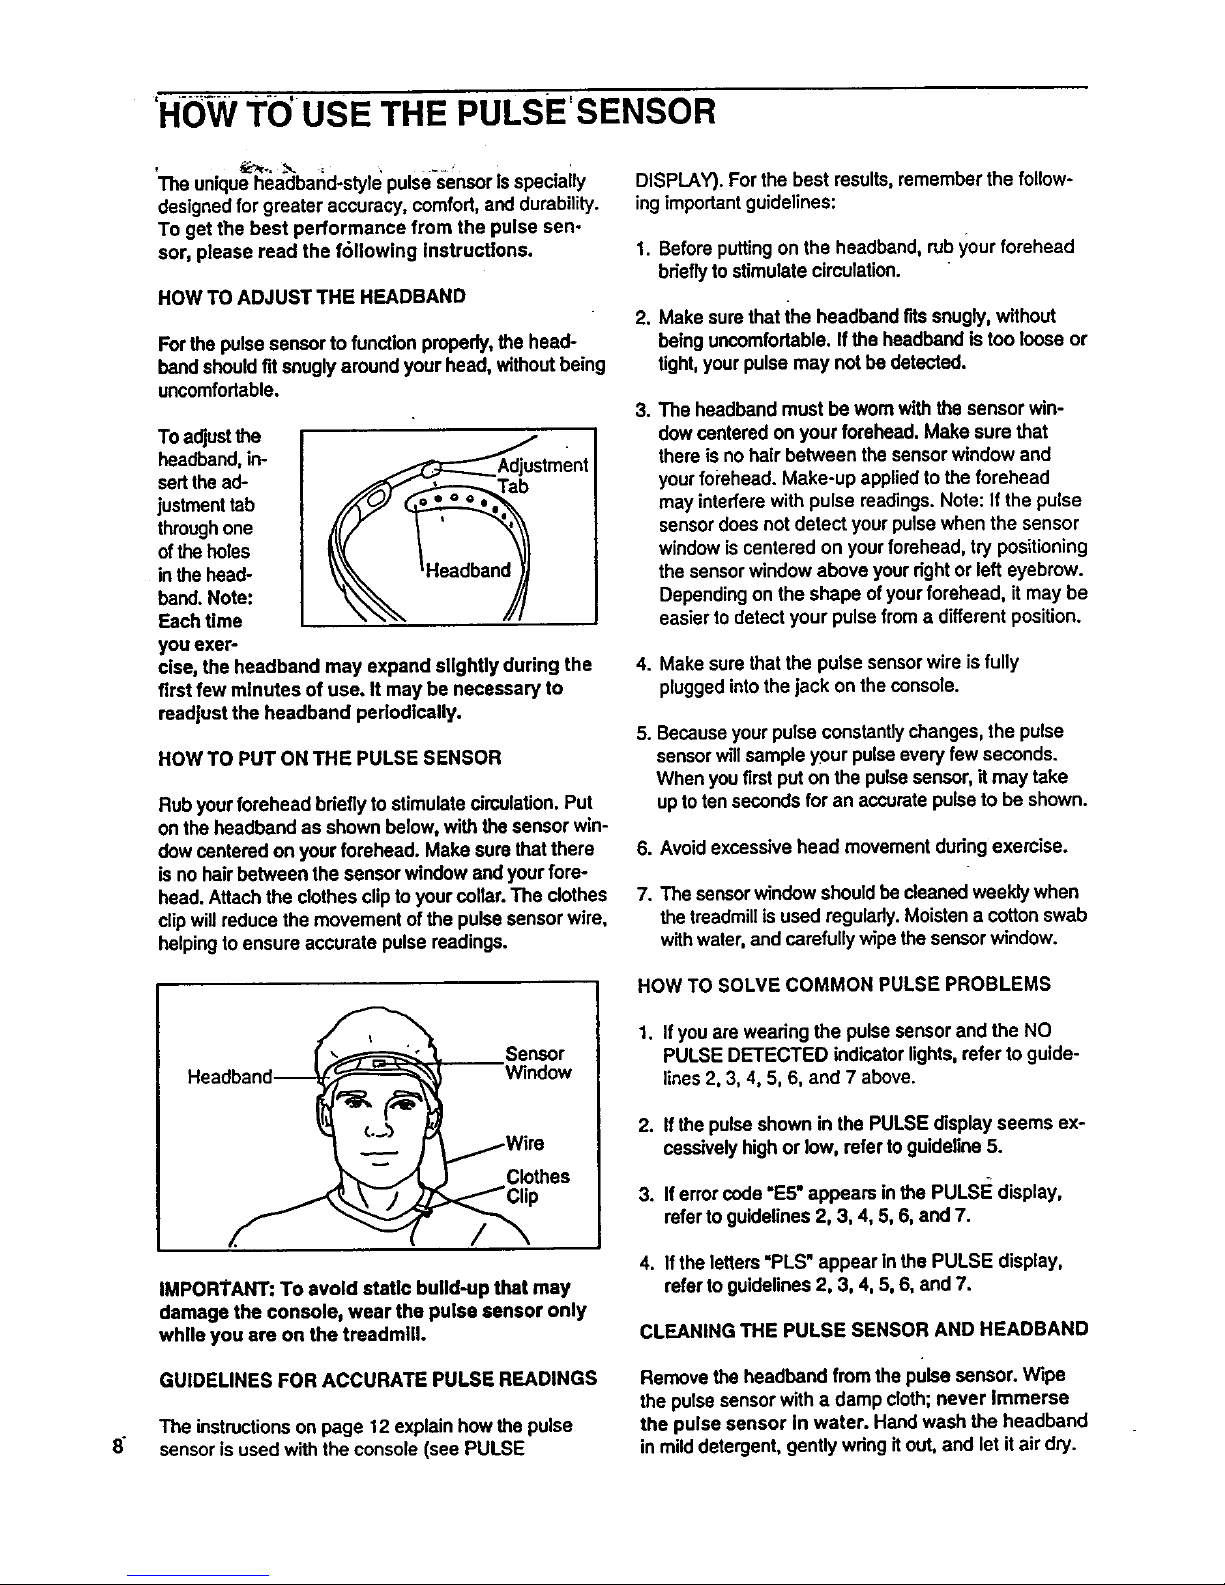
HOW TO ADJUST THE HEADBAND
Forthe pulse sensor to function properly, the head-
band should fitsnugly around your head, without being
uncomfortable.
To a_ust the
headband, in-
sed the ad-
justmenttab
throughone
ofthe holes
in the head-
band. Note:
Each time
you exer-
cise, the headband may expand slightly during the
first few minutes of use. It may be necessary to
readjust the headband periodically.
HOW TO PUT ON THE PULSE SENSOR
Rub your forehead bdefly to stimulate circulation.Put
on the headband as shown below, with the sensor win-
dow centered on your forehead. Make sure that there
is no hair between the sensor window and your fore°
head. Attachthe clothes clip to your collar. The clothes
clipwill reduce the movement of the pulse sensor wire,
helping to ensure accurate pulse readings.
Sensor
Window
Clothes
L /
IMPORTANT: To avoid static build-up that may
damage the console, wear the pulse sensor only
while you are on the treadmill.
GUIDELINES FOR ACCURATE PULSE READINGS
The instructionson page 12 explainhow the pulse
sensor is used with the console (see PULSE
DISPLAY). For the best results, remember the follow-
ingimpodant guidelines:
1. Before puttingon the headband, rub yourforehead
brieflyto stimulate circulation.
2. Make surethat the headband t'dssnugly, without
being uncomfortable. If the headband is too loose or
tight, yourpulse may not be detected.
.
The headband must be wornwith the sensor win-
dow centered onyour forehead. Make sure that
there is no hair between the sensor window and
yourfo_'ehead.Make-up appliedto the forehead
may interfere with pulse readings. Note: If the pulse
sensor does notdetect your pulse when the sensor
window is centered on yourforehead, try positioning
the sensor window above your dght or left eyebrow.
Dependingon the shape ofyourforehead, it may be
easier to detect your pulsefrom a different position.
4. Make sure that the pulse sensor wire is fully
plugged intothe jack onthe console.
5. Because yourpulse constantlychanges, the pulse
sensorwill sample your pulse every few seconds.
When you first put on the pulsesensor, itmay take
up to ten seconds for an accurate pulseto be shown.
6. Avoid excessive head movement during exercise.
7. The sensorwindow should be cleaned weekly when
the treadmillis used regularly. Moisten a cotton swab
withwater, and carefully wipe the sensorwindow.
HOW TO SOLVE COMMON PULSE PROBLEMS
1. If you are weadng the pulse sensor and the NO
PULSE DETECTED indicatorlights,refer to guide-
I_nes2, 3, 4, 5, 6, and 7 above.
.
3.
If the pulseshown in the PULSE display seems ex-
cessivelyhigh or low, refer to guideline 5.
If error code "E5" appears in the PULSIE display,
refer to guidelines 2, 3, 4, 5, 6, and 7.
4. If the letters =PLS" appear In the PULSE display,
refer to guidelines 2, 3, 4, 5, 6, and 7.
CLEANING THE PULSE SENSOR AND HEADBAND
Remove the headband from the pulse sensor. Wipe
the pulse sensorwith a damp cloth; never Immerse
the pulse sensor In water. Hand wash the headband
in milddetergent, gently wdng it out, and let itair dry.
Page 9

•OPERATION AND ADJUSTMENT ....."
THE PERFORMANT LUBE TM WALKING BELT
Your treadmill features a walking belt coated with
PERFORMANT LUBE _', a high-performance lubricant.
IMPORTANT: Never apply silicone spray or other
substances to the walking belt or the walking plat-
form. They will deteriorate the walking belt and
cause excessive wear.
HOW TO PLUG IN THE POWER CORD
DANGER:improper connection
of the equipment-grounding conductor can
result In an increased risk of electric shock.
check wit h a qualified electrician or service-
i man If you are in doubt as :towhether the
product Is properly grounded. Do not modify
the plug provided with the Product--if it will
not fit the outlet, have a proper outlet in-
stalled by a qualified electrician,
Your treadmill, like any other type of sophisticated
electronic equipment, can be seriously damaged by
sudden voltage changes in your home's power.
Voltage surges, spikes, and noise interference can re-
sult from weather conditions or from other appliances
being turned on or off.
To decrease the pos-
V . Q
_lblhty of your tread 1
mill being damaged,
always use a surge
protector (not In-
cluded) with your
treadmill.
Surge protectors are
sold at most hardware
stores and department
stores. Use only a UL-
listed surge protector,
rated at 15 amps, with a
14-gauge cord of five
feet or less Inlength.
This product must be
grounded. If it should
malfunction or break
down, grounding pro-
vides a path of least re*
sistance for electric cur-
rent to reduce the risk of
electric shock. This product is equipped with a cord
having an equipment-grounding conductor and a
grounding plug. Plug the power cord into a surge
protector, and plug the surge protector into an ap-
propriate outlet that ls properly installed and
grounded in accordance with all local codes and
•ordinances.
This product is for use on a nominal 120-volt circuit,
and has a grounding plug that looks like the plug illus-
trated In drawing 1 below. A temporary adapter that
lookslike the adapter illustrated in drawing 2 may be
used to connect the surge protector to a 2-pole recep-
tacle as shown indrawing 2 ifa properly grounded out-
letis not available.
The temporary adapter should be used only until a
properly grounded outlet (drawing 1) can be installed
by a qualified electrician.
The green-colored rigid ear, lug, or the like extending
from the adapter must be connected to a permanent
ground such as a properly grounded outlet box cover.
Whenever the adapter is used itmust be held in place
by a metal screw. Some 2-pole receptacle outlet box
covers are not grounded. Contact a qualified elec-
trlclan to determine If the outlet box cover Is
grounded before using an adapter.
/ Grounded Outlet Box ff
/ Treadmill Power Cord-. ///
..r_ /Grounding Pin (
I!._ "_",>._Grcunding Plug Grounding Plug,. j
=rounded Outlet L_ _ <o - "_ _, _)
Ground,noP,ug Surge Protector
Page 10
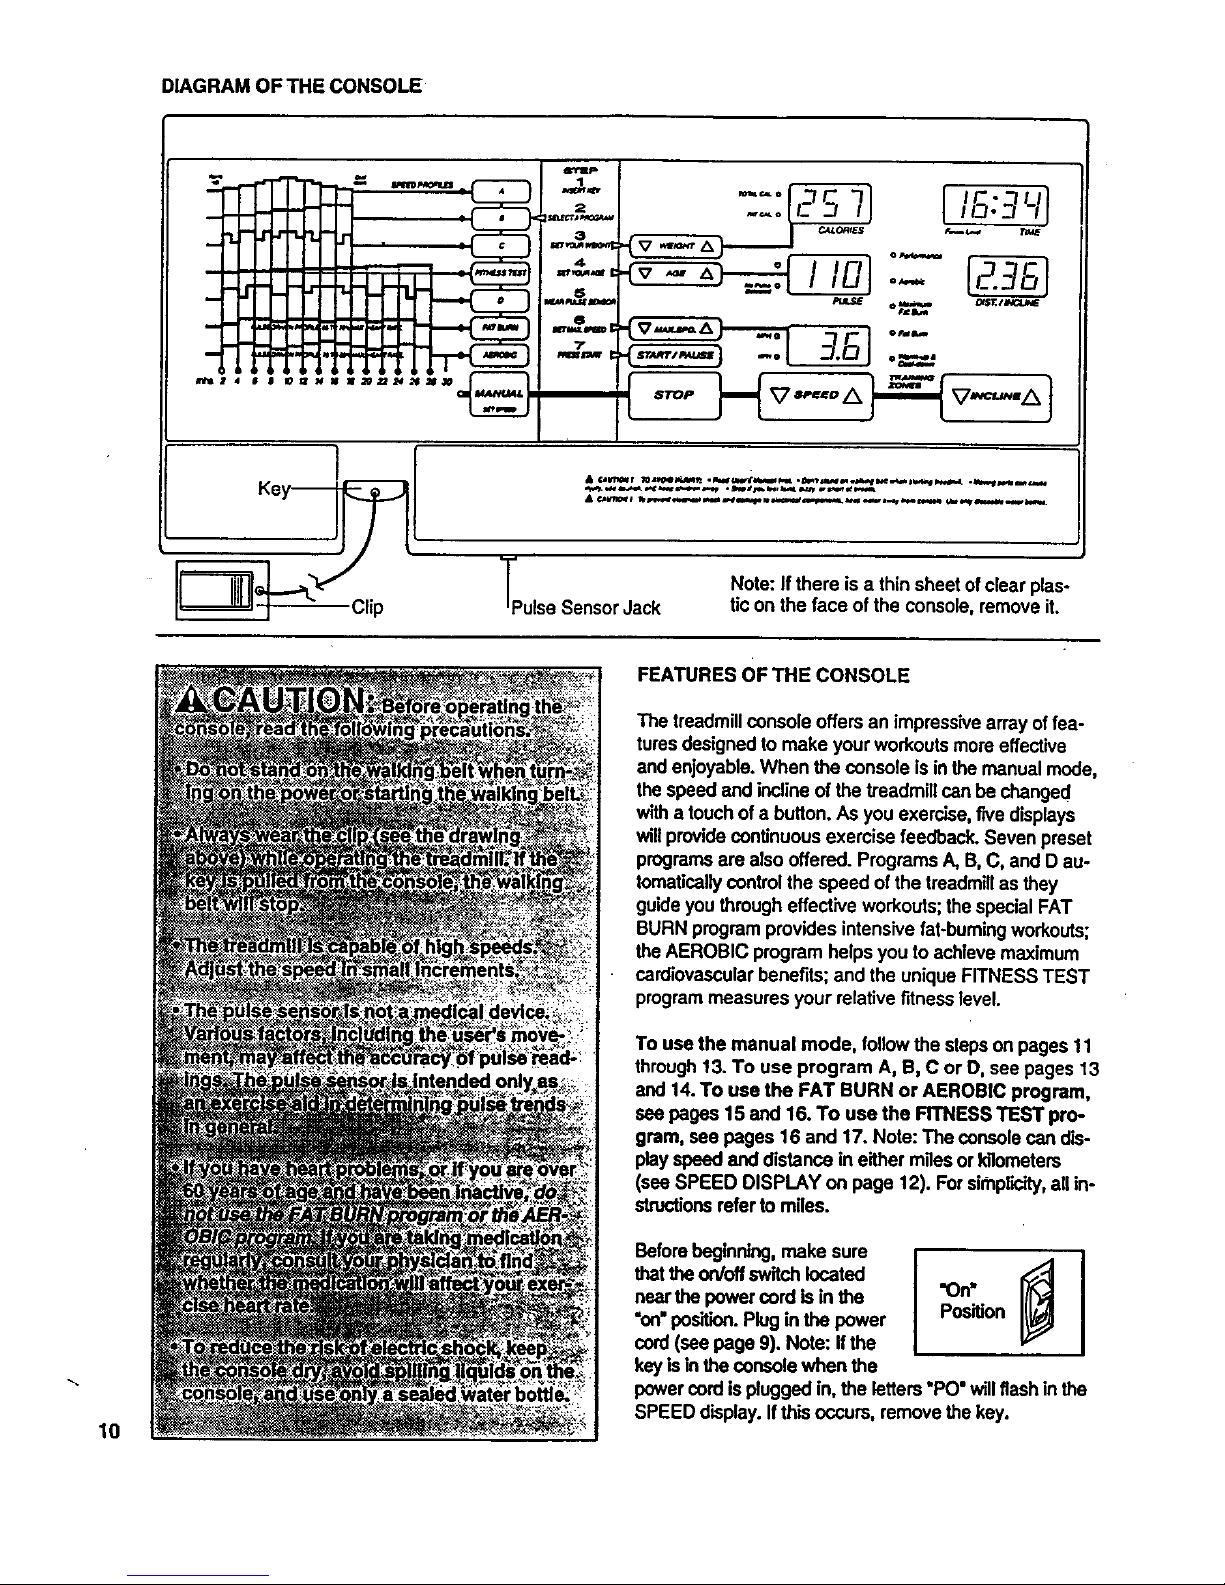
DIAGRAMOFTHECONSOLE
!'-
_2481_=Niumn__
c,:: ,_--'57 "159
"(z_"*'___.h----',r _o,,,,., _-=
.-
owlU_m _E/A_C_ff
-. 3.5J
Tp Note: Ifthere is a thin sheet ofclear plaso
ulse SensorJack tic on the face of the console, remove it.
10
FEATURES OF THE CONSOLE
The treadmillconsoleoffers an impressive array offee-
turesdesigned to make your workouts more effective
and enjoyable. When the console is in the manual mode,
thespeed and incline ofthe treadmill canbe changed
with a touchof a button. As you exercise, five displays
will providecontinuous exercise feedback. Seven preset
programsare also offered. Programs A, B,C, and D au-
tomatically control the speed of the treadmill as they
guide you through effective workouts; the special FAT
BURN program provides intensive fat-burning workouts;
the AEROBIC program helps you to achieve maximum
cardiovascular benefits; and the unique FITNESS TEST
programmeasures your relative fitness level.
To use the manual mode, follow the steps on pages 11
through13. To use program A, B, C or D, see pages 13
and 14. To use the FAT BURN or AEROBIC program,
see pages 15 and 16. To use the FITNESS TEST pro-
gram, see pages 16 and 17. Note: The console can dis-
play speed and distance ineither milesor kilometers
(see SPEED DISPLAY on page 12). Forsimplicity,all in-
stroctionsreferto miles.
Beforebeginning, make sure
thatthe on/off switch located
nearthe powercord is in the
"on" position.Pluginthe power
cord(see page 9). Note: Ifthe
keyis in the console when the
Position
powercord isplugged in,the letters "PO" will flash in the
SPEED display.If this occurs, remove the key.
Page 11

B Insert the key fully Into the console.
Stand on the foot rails
and insertthe key.
Various displays and in-
dicatorswill light. Find
the dip attached to the
key, and slide itonto the
waistband of your cloth-
ing.
B
Select the MANUAL mode.
When the key is in-
serted, the manual
mode will automatically
be selected. The indica-
tor beside the MANUAL
buttonwill light. Note: if
a preset program has
been selected, press the MANUAL buttonto select
the manual mode.
B
Enter your weight, if desired.
Althoughit is not necessaryto enter your weight and
age to use the manual mode,the CALORIES dis-
play will be more accurate if yourweight and age
are entered. To enter your weight:
• Press the
WEIGHT in-
crease or de-
crease button.
The letters
"Lb.S,_,ill
flash in the
CALORIES display. Press one of the WEIGHT
buttonsagain. The currentweight settingwill then
be shown. Press the WEIGHT buttons again to
enter your weight. Each time one of the buttonsis
pressed, the weight setting will change by 1
pound. Ifone of the buttonsis held down, the
weight settingwill change in increments of 5
pounds. After you have entered your weight, your
weight will be shown in the CALORIES display for
three seconds.
B Enter your age, If desired.
To enter your age:
buttons again to enter your age. Each time one of
the buttons is pressed, the age settingwill change
by I year. If one of the buttons is held down, the
age setting will change inincrements of 5 years.
After you have entered your age, your age will be
shown in the PULSE display for three seconds.
Note: Once you have entered Yourweight and age,
the numbers will be saved inthe console's memory,
even ifthe power cord is unplugged.
13
Put on the pulse sensor, if desired.
For the PULSE display to show your pulse, the
pulse sensor mustbe worn. To put on the pulse
sensor, see HOW TO
USE THE PULSE
SENSOR on page8.
Plug the pulse sensor
wire fully into the jack
on the front of the
console.
3 Press the SPEED Increase button to start the
walking belt.
The speed of
the walking
belt is con-
trolled with
the SPEED
increase and
decrease but-
tons. Each time one of the buttons is pressed,the
speed will change by0.1 mile per hour (mph). The
buttons can be held down to change the speed more
quickly.The speed range is 0.5 mph to 10 mph.
Press the SPEED increase button untilthe walking
belt begins to move at slow speed. Hold the
handrails and carefully begin walking. Change the
speed of the walking belt as desired by pressing the
SPEED buttons. Note:The walking beltcan also be
started by pressing the START/PAUSE button. The
walking belt will begin to move at 0.5 mph. The
speed can then be adjusted with the SPEED buttons.
To stop the walking belt, press the START/PAUSE
button. All displays will pause and the TIME display
will begin to flash. To restart the walking belt, press
the SPEED buttonsor the START/PAUSE buttonas
described above. Note:The walking beltcan also be
stopped by pressing the STOP button. To restartthe
walking belt, press the SPEED buttons or the
START/PAUSE buttonas described above.
• Press the AGE increase ordecrease button.The
letters "AGE" willflash in the PULSE display.
Press one of the AGE buttonsagain. The current
age setting will then be shown. Press the AGE
Note: When the SPEED buttons are pressed, the
SPEED display will show the selected speed setting
for seven seconds. The display will then show the
actual speed of the walking belt.
11
Page 12
12
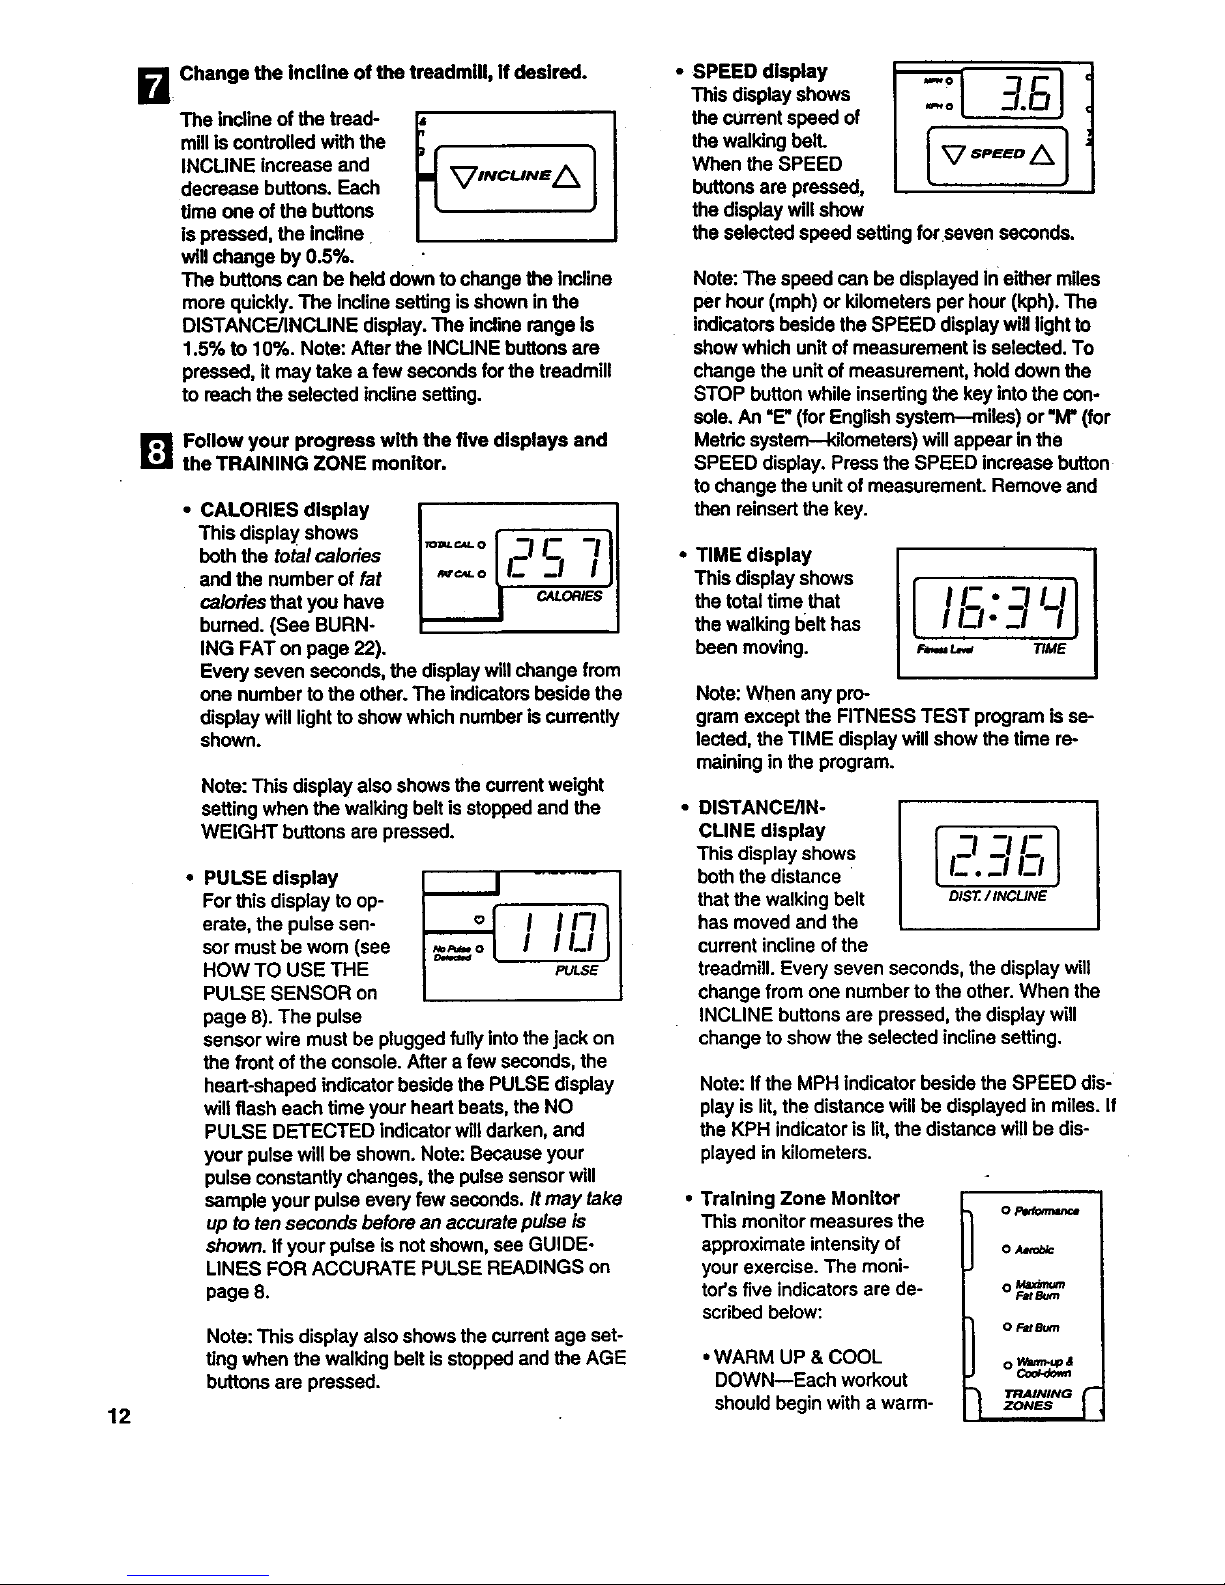
B Change the incline of the treadmill, if desired.
The incline of the tread-
millis controlled withthe
INCLINE increase and t_INCUNE_I
decrease buttons. Each
time one of the buttons
is pressed, the incline
will change by 0.5%.
The buttons can be held down to change the incline
more quickly. The incline setting is shown in the
DISTANCE/INCLINE display. The incline range Is
1.5% to 10%. Note: After the INCUNE buttons are
pressed, it may take a few seconds for the treadmill
to reach the selected incline setting.
_1 Follow your progress with the five displays and
the TRAINING ZONE monitor.
• CALORIES display
This display shows
both the total calories
and the number of fat
calories that you have
burned. (See BURN-
ING FAT on page 22).
Every seven seconds, the display will change from
one number to the other. The indicators beside the
display will light to show which number is currently
shown.
Note: This display also showsthe current weight
setting when the walking belt is stopped and the
WEIGHT buttons are pressed.
• PULSE display
For this display to op-
erate, the pulse sen- _,,,_.._ .I .I I-.I I
sot must be worn (see
i ir-i
HOW TO USE THE PULSe
PULSE SENSOR on
page 8). The pulse
sensor wire must be plugged fully intothe jack on
the front ofthe console. After a few seconds, the
heart-shaped indicator beside the PULSE display
will flash each time your heart beats, the NO
PULSE DETECTED indicatorwill darken, and
your pulse will be shown. Note: Because your
pulse constantly changes, the pulse sensor will
sample your pulse every few seconds. It may take
up to ten seconds before an accuratepulse is
shown. If your pulse is not shown, see GUIDE-
LINES FOR ACCURATE PULSE READINGS on
page 8.
Note: This display also shows the current age set-
ling when the walking belt is stopped and the AGE
buttons are pressed.
• SPEED display
This display shows
the current speed of
the walking bell
When the SPEED
buttons are pressed,
the display will show
the selected speed setting for seven seconds.
Note: The speed can be displayed in either miles
per hour (mph) or kilometers per hour (kph). The
indicators beside the SPEED display will light to
show which unitof measurement is selected. To
change the unitof measurement, hold down the
STOP button while insertingthe key into the con-
sole. An =E" (for English system--miles) or'M* (for
Metdc system---kilometers) will appear inthe
SPEED display. Press the SPEED increase button
to change the unit of measurement. Remove and
then reinsert the key.
TIME display
This display shows
the totaltime that
the walking belt has
been moving.
[,,: ,-/[
i1-1. _11
Fro,=_ TIME
Note: When any pro-
gram except the FITNESS TEST program is se-
lected, the TIME display will show the time re-
maining inthe program.
DISTANCE/IN-
CLINE display I ]
This display shows _-I --! ._-_
both the distance _-. _1 rl
that the walking belt DIST./INCUNE
has moved and the
current incline ofthe
treadmill. Every seven seconds, the display will
change from one number to the other. When the
INCLINE buttons are pressed, the display will
change to show the selected incline setting.
Note: If the MPH indicator beside the SPEED dis-
play is lit,the distance will be displayed in miles. If
the KPH indicator is lit, the distance will be dis-
played in kilometers.
Training Zone Monitor
This monitor measures the
approximate intensityof
your exercise. The moni-
tor's five indicators are de-
scribed below:
• WARM UP & COOL
DOWN--Each workout
should begin with a warm-
o Fedom1_nce
o Maxir_m
FM Bum
O FmtSum
TRAINING F
ZONES
Page 13
up period and enclwith a cool-down period.(See
WORKOUT GUIDEUNES on pages 22 and 23.)
The WARM-UP & COOL-DOWN indicator will
lightwhen your workout intensity is Ideal for
warming up or cooling down.
• FAT BURN and MAXIMUM FAT BURN.--To
bum fat effectively, you must exercise at a rela-
tively low intensity level for a sustained periodof
time. (See BURNING FAT on page 22.) If you
are exercising at the proper Intensity levelfor
burning fat, the FAT BURN or MAXIMUM FAT
BURN indicator willlight.
• AEROBIC--If your goal isto strengthen your
cardiovascular system, your exercise mustbe
"aerobic." (See AEROBIC EXERCISE on page
22.) If you are exercising at the proper intensity
level for aerobic exercise, the AEROBIC indica-
tor will light.
• PERFORMANCE--If your goal Is high perfor-
mance athletic conditioning, you will need to ex-
ercise at a high intensity level. If you are exercis-
ing at the proper intensity level, the PERFOR-
MANCE indicatorwill light.
L_lWhen you are finished exercising, stop the walk.
ing belt and remove the key.
Step ontothe foot rails, stop the walking belt, and re-
move the key from the console. Store the key ina
secure place. In addition, move the on/off switchto
the "off'position. (See the drawing near the bottom
of page 10.)
Programs A, B, C, and D automatically controlthe
speed of the walking belt as they guide you through ef-
fective workouts. Programs A, B, and C are 20-minute
programs; program D is a 30-minute program.The
speed profileson the leftside ofthe console show how
the speed will change dudngeach program. During pro-
gram A, for example, the speed will graduallyir_rease
during the first 10 minutes, and then graduallydecrease
dudng the last 10 minutes. Each program beginswith a
2-minute warm-up period,and ends with a2-minute
cool-down period.
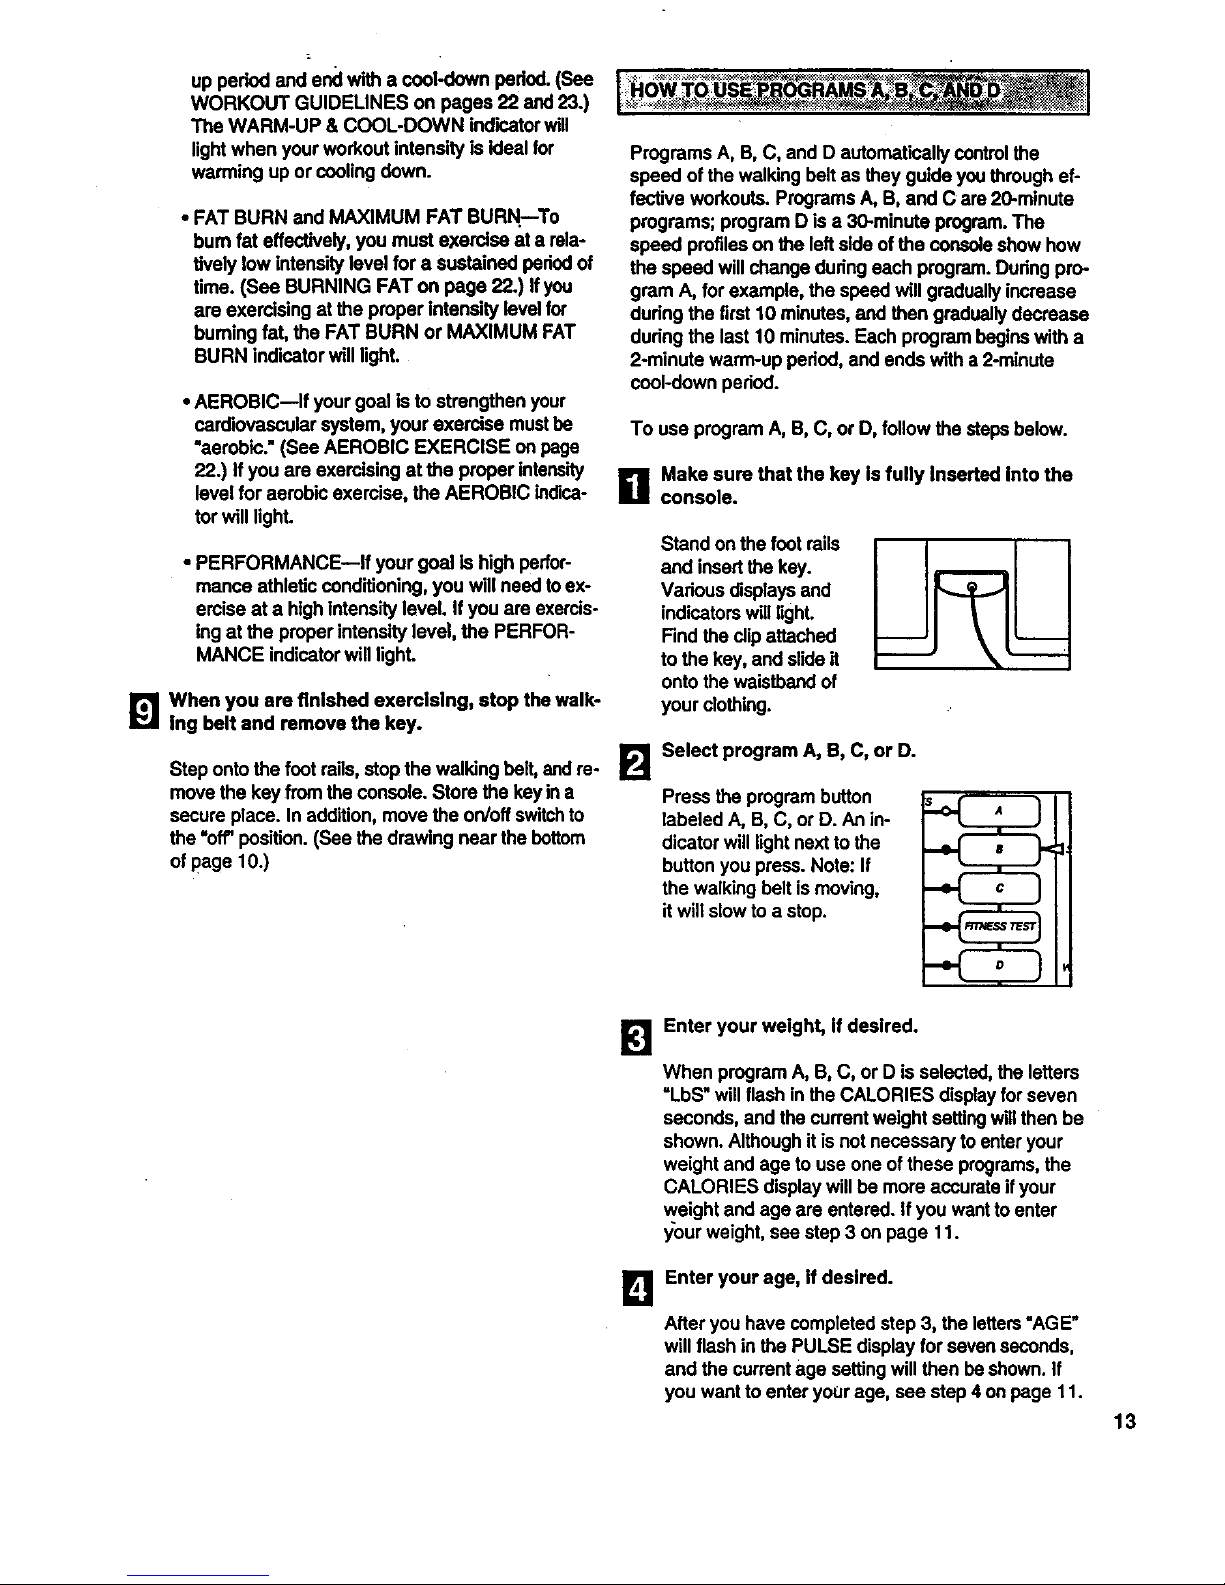
To use program A, B, C, or D, followthe steps below.
R Make sure that the key is fully Inserted into the
console.
Stand on the foot rails
and insertthe key.
Various displays and
indicatorswilllight.
Find the clipattached
to the key, and slide it
onto the waistband of
your clothing.
E]
Select program A, B, C, or D.
Press the programbutton
labeled A, B, C, or D. An in-
dicator will light next to the
button you press. Note: If
the walking belt is moving,
it will slow to a stop.
k'l
B
Enter your weight, if desired.
When program A, B, C, or D is selected, the letters
"LbS" will flash in the CALORIES displayfor seven
seconds, and the current weight setting willthen be
shown. Althoughit is not necessary to enter your
weight and age to use one of these programs,the
CALORIES displaywill be more accurate if your
weight and age are entered. If you want to enter
_;ourweight, see step 3 on page t 1.
Enter your age, if desired.
After you have completed step 3, the letters"AGE"
will flash inthe PULSE display for seven seconds,
and the current age setting will then be shown. If
you want to enter yoUr age, see step 4 on page 11.
13
Page 14

O
Put on the pulse sensor, if desired.
Forthe PULSE display
to show your pulse, the
pulse sensor must be
worn. To put on the
pulse sensor, see HOW
TO USE THE PULSE
SENSOR on page 8. Plug the pulse sensor wire
fully into the jack on the front of the console.
Set e maximum speed for the program.
After you have
completed step
4,.a number will
appear In the
SPEED display
and flash for
seven seconds.
I
This number shows the maximum speed that the
walking belt will move during the program. The max-
imum speed setting can be from 3.0 mph up to 8.5
mph. If you want to change the maximum speed set-
ring, press the MAX. SPD. increase or decrease but-
ton. Note: The maximum speed setting will change
by 0.3 mph each time one of the MAX. SPD. buttons
is pressed, until it reaches 4.5 mph; the maximum
speed setting will then change by 0.5 mph each time
one of the buttons is pressed.
The indicators
below the
speed profiles
willshow the
progress of
the program.
During the
-I-I +tl
mP_ 2 4 6 8 10 12 14 161
first 2 minutes of the program, the indicator above
the number 2 will lighLAfter 2 minutes, the indica-
tors above the numbers 2 and 4 will lighLAfter 4
minutes, the indicatorsabove the numbers 4 and 6
will light, and so on. The speed of the walking belt
will change periodically during the program as
shown by the speed profiles.The program will con-
tinue in this manner untilthe time shown inthe TIME
display reaches zero. The walking belt will then slow
to a stopand the program will be completed.
Note: The SPEED buttonswill not respondwhile pro-
gram A, B, C, or D is selected. If the program is too
easy or too challenging,press the MAX. SPD. but-
tons to set a new maximum speed. The new maxi-
mum speed settingwillbe shown in the SPEED dis-
play for 3 seconds. To stopthe program temporarily,
press the START/PAUSE button.The TIME display
will beginto flash. To restartthe program, press the
START/PAUSE buttonagain. The program will re-
sume and the walking belt will return to the latest
speed setting. To terminate the program before the
programis completed, press the STOP button.
If the maximum speed setting is between 3.0 mph
and 5.0 mph, the walking belt will move at 1.5 mph
during the first 2 minutes and the last 2 minutes of
the program (the warm-up and cool-down periods).
The speed range dudng the rest of the program will
be 1.5 mph. For example, if the maximum speed
setting is 5.0 mph, the speed range will be 3.5 mph
to 5.0 mph (a difference of 1.5 mph).
[]
Change the Incline of thetreadmill, If desired.
When program A, B, C, or D isselected, the incline
of the treadmill can be changed with the INCLINE
buttons. See step 7 on page 12.
1_'1 Follow your progress with the five displays and
the TRAINING ZONE monitor.
If the maximum speed setting is between 5.5 mph
and 8.5 mph, the walking belt will move at 3.0 mph
dudng the first 2 minutes and the last 2 minutes of
the program. The speedrange dudng the rest ofthe
program will be 2.0 mph.
See TRAINING ZONE MONITOR on pages 12 and
13.
_] When you are finished exercising, stop the
walklng belt and remove the key.
14
B Press the START/PAUSE button to start the pro-
gram.
When the
START/PAUSE
button is
pressed, the
TIME display
will begin count-
ing down from
_o
20 minutes (or 30 minutes if program D is selected).
After a moment, the walking belt will begin to move.
Hold the handrails and carefully begin walking.
Step onto the footrails,stopthe walking belt, and re-
move the key from the console. Store the key ina
secure place. Inaddition, move the on/off switch to
the =off" position.(See the drawing near the bottom
of page 10.)
Page 15

The FAT BURN and AEROBIC programs automatically
control the speed and incline of the treadmill to keep
your pulse within a predetermined range during your
workouts. Both programs are 30-minute programs. The
speed profiles on the left side of the console show how
your pulse will change during each program. Each pro-
gram begins with a warm-up period, and ends with a
cool-down period.
To use one of these programs, follow the steps below.
U Make sure that the key Is fully Inserted Into the
console.
Stand on the foot rails
and insert the key.
Various displays and in-
dicators will light. Find
the clip attached to the
key, and slide it onto the
waistband of your cloth-
ing.
V
"%
Select the FAT BURN or AEROBIC program.
Press the FAT BURN or
AEROBIC button. An in-
dicator will light next to
the button you press.
Note: If the walking belt
is moving, it will slow to
a stop.
El
Enter your welghL
When the FAT BURN or AEROBIC program isse-
lected, the letters "LbS" will flash in the CALORIES
display. You must enter your weight and age before
either of these programs can be started. To enter
your weight, see step 3 on page 11. If you have al-
ready entered your weight, you must press one of
the WEIGHT buttons to verify the weight setting.
B
Enter your age.
After you have completed step 3, the letters =AGE"
will flash in the PULSE display. To enter your age,
see step 4 on page 11. If you have already entered
your age, you must press one ofthe AGE buttons to
verify the age setting.
[_'.! Put on the pulse sensor.
The pulse sensor must be worn when the FAT BURN
or AEROBIC program isused. To puton the i_ulse
.... sensor_see HOW TOJ-_r_t ,,_:_., _=_,.'_, _,v. I
USE THE PULSE I l
SENSOR on page 8. , | T I
Plug the pulse sensor_,_ _ _ '_ _ ' I
wire fullyintothe jack I I
on the front of the con- I _"_
sole. Note: The FAT
BURN and AEROBIC programs can be startedwith-
out your pulse being detected; however, the pro-
grams will automatically stop ifyour pulse isnot de-
tected 2 minutes after the programs are started.
r_ Press the START/PAUSE button to start the pro-
gram.
When the START/
PAUSE button is
pressed, the TIME dis-
play will begin count-
ing down from 30 min-
utes. After a moment,
the walking belt will
STOP
begin to move. Hold the handrails and carefully
begin walking.
The indicators
below the
speed profiles
will show the
progress of
the program.
During the first
2 minutes of the program, the indicator above the
number 2 will light. After 2 minutes, the indicators
above the numbers 2 and 4 will light.After 4 min-
utes, the indicators above the numbers 4 and 6 will
light, and so on. The speed and inclineof the tread-
mill will change periodically to keep your pulse
within a predetermined range, shown by the speed
profiles. When the time shown in the TIME display
reaches zero, the walking belt will slow to a stop and
the program will be completed.
Note: If your pulse is
not detected during
the program, the NO
PULSE DETECTED
indicator will light and
the letters "PLS" will
flash in the PULSE
display. (See GUIDELINES FOR ACCURATE
PULSE READINGS on page 8.) If your pulse isnot
detected at the end of any 2-minute period during
the program (after 2 minutes, after 4 minutes, after 6
minutes, etc.), the program will automatically stop.
PULSE
Note: Minor adjustments can be made tothe speed
or incline ofthe treadmill during the program by
pressing the SPEED or INCLINE buttons. However,
15
Page 16

16
ifyou increase the speed, the inclinewill automati-
cally decrease; ifyou decrease the speed, the in-
cline willautomatically increase. If you increase the
incline, the speed willautomatically decrease; if you
decrease the incline, the speed will automatically in-
crease. The console willalways attemptto keep
your pulse near a predetermined setting. When the
incline reaches the highestsetting,the speed can-
not be decreased any further. When the incline
reaches the lowestsetting, thespeed cannot be in-
creased any further.
Note: To terminatethe program before the programis
completed, pressthe STOP button.
B Follow your progress with the five displays and
the TRAINING ZONE monitor.
See TRAINING ZONE MONITOR on pages 12 and
13.
_1 When you are finished exercising, stop the walk-
Ing belt and remove the key.
Step onto the foot rails, stopthe walkingbelt, and re-
move the key from the console.Store the key in a
secure place. In addition, movethe on/oft switchto
the =off" position.(See the drawing near the bottom
of page t 0.)
The FITNESS TEST program is designedtomeasure
your relative fitness level. For the best results,the
FITNESS TEST should betaken at a time when your
energy level is high. The FITNESS TEST should not be
taken if you have already exercised duringthe day.
The FITNESS TEST program consistsof seven 4-
minute periods, and is followed by a 2-minute cool-
down period. The speed and/or inclineof thetreadmill
will automatically increase at the beginning of each 4-
minute period.
To use the FITNESS TEST program, followthe steps
below.
B Make sure that the key Is fully Inserted Into the
console.
Stand on the footrails
and _sert the key.
Various displaysand indi-
cators will light.Rnd the
dip attached to the key,
andslide it ontothe waist-
band ofyour clothing.
B Select the FITNESS TEST program.
Press the FITNESS
TEST button.The in-
dicatorbeside the
buttonwill light. Note:
If the walking belt is
moving,itwill slow to
a stop.
[_'1 Enter your weight.
When the FITNESS TEST program isselected, the
letters "LbS"will flash in the CALORIES display.
You mustenter your weight and age before this pro-
gram can be staded. To enter your weight, see step
3 on page 1.1.If you have already entered your
weight, you must press one of the WEIGHT buttons
to verify the weight setting.
B
Enter your age,
After you have completed step 3, the letters"AGE"
will flash inthe PULSE display. To enter your age,
see step4 on page 11. Ifyou have already entered
your age, you must press one of the AGE buttonsto
verify the age setting.
[]
Put on the pulse sensor.
The pulsesensor
must be wom when
the FITNESS TEST
program is used. To
put on the pulse sen-
sor, see HOW TO
USE THE PULSE
SENSOR on page 8. Plug the pulsesensor wire
fullyinto the jack on the front of the console. Note:
The FITNESS TEST program can be started without
your pulse being detected; however, the program
willautomatically stop if your pulse is not detected 4
minutesafter the program is staded.
r.,,1 Press the START/PAUSE button to start the pro-
gram,
When the START/
PAUSE button is
pressed, the TIME
display willbegin
countingup. The
CALORIES display
willshow '1. 1" (level
1), indicatingthat the first4-minute period of the
FITNESS TEST program has begun. The inclineof
the treadmill will automatically adjust to 3.0%, and
the walking belt will begin to move at 1.5 mph. Hold
the handrailsand carefully begin walking.
Page 17

WhentheTIMEdisplayreaches4 m!nutes, the ... seconds of any 4-minute pedod (after 4 minutes
CALORIES display will show "L 2," indicafing th'at ..... _ after; 8 rnlnutes, e'tc_),-the'walkih_bel_w_li_1_' fo a_
the second 4-minute period has begun. The incline
will increase to 4°/=, and the speed will increase to
2.5 mph. At the beginning of each 4-minute period,
the speed and/or incline of the treadmill will auto-
matically increase. The FITNESS TEST will continue
in this manner untilyour pulse reaches 70% ofyour
maximum heart rate, and the current 4-minute period
iscompleted. The FITNESS TEST will then be com-
pleted, regardless of how many periods remain.
When the FITNESS TEST program is completed, the
letter"C" will be shown in the CALORIES display, in-.
dicatingthat the cool-down period has begun. The
TIME display will count down from 2 minutes. When
the cool-down period is completed, the walking belt
will slow to a stop, and your fitness level will be
shown in the TIME dis-
play. There are ten fit-
ness levels--fitness [[--[_.1-,1
level 10 (FL:10) is the • I_1 5
highest. Remember,
the FITNESS TEST is F,,,,,u._ TIME
intended only to indi-
cate your relative fit-
ness level.
Note: The SPEED and INCLINE buttons will not re-
spondwhile the FITNESS TEST program is selected.
Ifyour pulse is not de-
tected during the pro.
gram, the NO PULSE
DETECTED indicator
will light and the letters
"PLS" will flash in the
PULSE display. If your
pulse is not detected
during the last thirty
CALORIES
I II-I
_,_..o I ILl
PULSE
stop, the FITNESS TEST will end, and the TIME dis-
play willshow a fitness level of 0 (FL:00). (See
GUIDELINES FOR ACCURATE PULSE READ-' -'"
INGS on page 8.) The FITNESS TEST program can
be stopped at any time by pressing the STOP but-
ton. The TIME display will then show an estimated
fitness level. Ifthe STOP button is pressed a second
time, the MANUAL mode will be selected.
B When you are finished exercising, stop the walk-
Ing belt and remove the key.
Step onto the foot rails,stop the walking belt, and re-
move the key from the console. Store the key in a
secure place. In addition, move the on/off switch to
the "o_ position. (See the drawing near the bottom
of page 10.)
HOW TO SELECT THE INFORMATION MODE
The console features an information mode that keeps
track of the total time and distance accumulated on the
treadmill.
To access the information mode, hold down the STOP
button while inseding the key intothe console. The
TIME display will show the total time accumulated on
the treadmill, in hours.The DISTANCE/INCLINE display
willshow the total distance, in miles (ifthe total distance
exceeds 999, the thousands and ten thousands digits
willbe shown in the PULSE display). Note: The SPEED
display will show an "E" (for English system--miles) or
"M" (for Metric system--kilometers) (see SPEED DIS-
PLAY on page 12).
To exit the informationmode, remove the key.
17
Page 18

HOWTO'FOLD AND MOVE THE TREADMILL .................
HOW TO FOLD THE TREADMILL FOR STORAGE
Before folding the treadmill for storage, unplugthe power
cord. To prevent damage to tSe pulse sensor, be sure to
unplug the pulse sensor from the console. Caution: You
must be able to safely lift 45 pounds (20 kg) In order to
raise, lower, or move the treadmill.
1. Hold the treadmill, with your hands in the locationsshown
at the dght. To decrease the possibility of Injury, bend
your legs and keep your back stralghL As you raise
the treedmlll, make sure to lift with your legs rather
than your back. Raise the treadmill about halfway to the
vertical position.
• .,,J
.
Move your righthand to the positionshown at the right,
and hold the treadmill firmly. Using your left hand, liftthe
storage latch. Raise the treadmill untilthe locking pin
snaps intothe storage latch. Make sure that the locking
pin Is Inside the storage latcli, and that the storage
latch Is fully closed.
To protect the floor or carpet from damage, place a
met under the treadmill. Keep the treadmill out of di-
rect sunllghL Do not leave the treadmill In the stor-
age position in temperatures above 85" Fahrenheit.
Storage_
Latch
18
HOW TO MOVE THE TREADMILL
Before movingthe treadmill, convert the treadmillto the stor-
age position as described above.
1. Hold one console bracket with each hand. Place one foot
on the base crossbar as shown.
2. Tilt the treadmill back until it rollsfreely onthe front
wheels. Carefully move the treadmill to the desired loca-
tion. To reduce the rlsk of Injury, use extreme caution
while moving the treadmill. Do not attempt to move
the treadmill over an uneven surface.
3. Place one foot on the base crossbar, and carefully lower
the treadmill untilit is resting in the storage position.
Crossbar
ket
Font hee s
Page 19
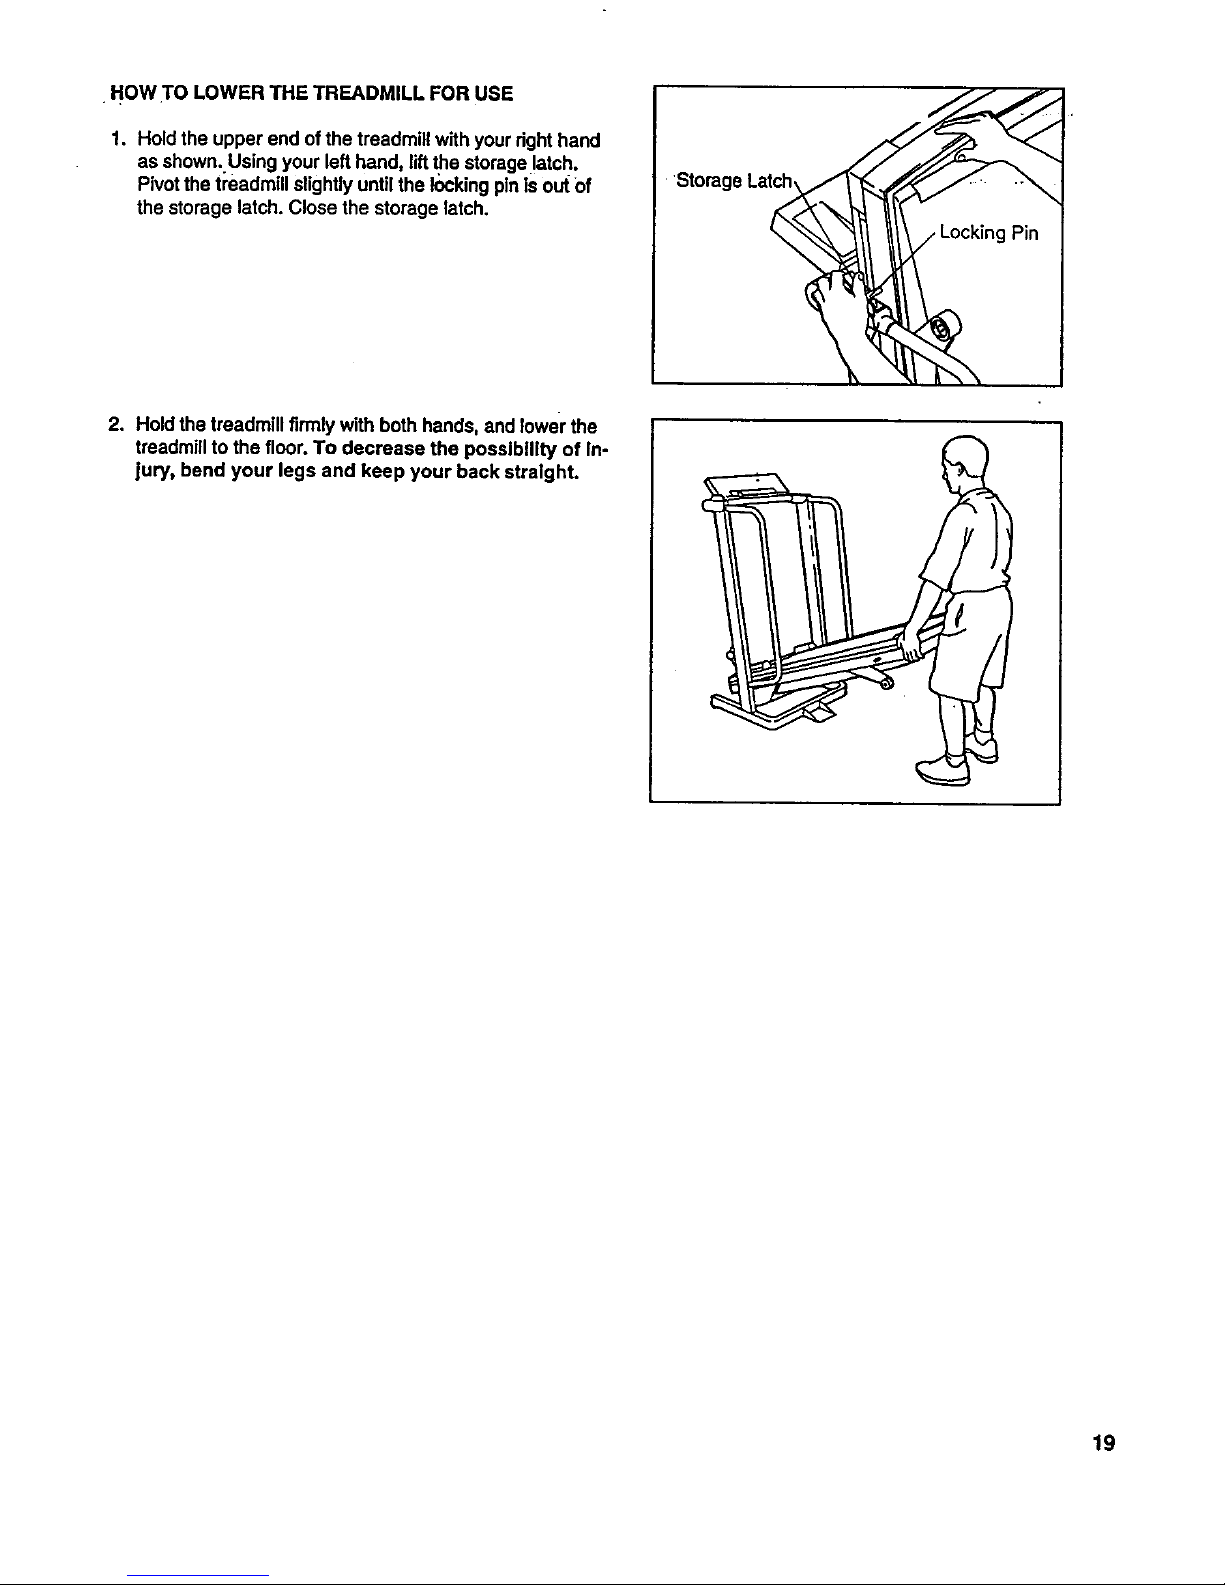
•HOWTOLOWERTHETREADMILLFORUSE
1. Holdtheupperendofthetreadmillwithyourrighthand
asshown..Usingyourlefthand,liftthestoragelatch.
PivotthetreadmillslightlyuntiltheI_kingplnisoutOf
thestoragelatch.Closethestoragelatch.
2. Holdthetreadmillfirmly with both hands, and lower the
treadmill to the floor. To decrease the possibility of In-
jury, bend your legs and keep your back stralght.
Storage Lat_
19
Page 20

TROUBI E:SHOOTING " " '
2O
Most treadmill problems r.an be solved by following the Simple Steps below. Rnd the sym'p|omthat ap-- ....
plies, and follow the steps listed.
If further assistance Is needed, call bur toll-free HELPLINE at 1-800-736-6879, Monday through Saturday, 7
a.m. until 7 p.m. Central Time (excluding holidays).
1. SYMPTOM: THE POWER DOES NOT TURN ON
a. Make sure that the power cord is plugged intoa surge protector, and that the surge protector is plugged into
a propedy grounded outlet. (See HOW TO PLUG IN THE POWER CORD on page 9.) Use only a UL-listed
surge protector, rated at 15 amps, with a 14-gauge cord of five feet or less in length.
b. After the power cord hasbeen plugged in, make sure that the key isfully inseded intothe console. Various
indicators on the console should light. (See step 1 page 11.)
c. Check the circuitbreaker located on the treadmill near the
power cord. If the switchprotrudes as shown, the circuit
breaker has tripped. To reset the circuit breaker, wait for five
minutes and then press the switch back in.
d. Check the on/off switchlocated at the front of the treadmill
near the power cord. The switch must be in the =on" position.
2. SYMPTOM: THE POWER TURNS OFF DURING USE
Tdpped
"On" "_
Position
a. Check the cimuifbreaker located on the treadmill near the power cord (see 1. c. above). If the circuit breaker
has tripped, wait for five minutesand then press the switch back in.
b. Make sure that the power cord is plugged in.
c. Remove the key fromthe console, and reinsed itfully into the console. (See step I on page 11.)
d. Check to make sure that the on/off switch is in the =on"position. (See 1. d. above.)
e. If the treadmill stillwill notrun, please call our toll-free HELPLINE.
3. SYMPTOM: THE WALKING BELT SLOWS WHEN WALKED ON
a. Use only a UL-listed surge protector, rated at 15 amps, witha 14-gauge cord of fntefeet or less In length.
b. Ifthe walking belt stillslowswhen walked on, please call our tolHree HELPLINE.
4. SYMPTOM: AN ERROR CODE ("El," "E2," "E3," "E4," OR "ES") APPEARS ON THE CONSOLE
a. If errorcode "El" appears in the DISTANCE/INCLINE display, a malfunction may have occurred in the in-
cline system. Remove the key, wait for ten seconds, and then reinsed it. If the error cede appears again, call
our toll-free HELPLINE. Do not operate the treadmilluntilthe problem is corrected.
b. Error code "E2" may appear inthe SPEED display ifthe SPEED increase or START/PAUSE button is
pressed and no movementof the walking belt is detected within seven seconds.Remove the key, wait for
ten seconds, and then reinsertit. Make sure that you stand on the foot roilsof the treadmill each timeyou
stad the walking belt. If the error code appears again, call our toll-free HELPUNE. Do notoperate the tread-
mill until the problem is corrected.
Page 21

. c.-Errorcode-"E3" may appear in the SPEED display ifthe speed of the walking beltsurges above the selected
speed setting. Remove the key, waitfor ten seconds, and then reinsertit. If the errorcode appears again, call
ourtoll-free HELPLINE. Do notoperate the treadmill untilthe problem is corrected.
d. Error code "E4" may appear in the SPEED display if the walking boll is moving at a slow speed, and there is
excessive stress on the motor.Remove the key, wait for ten seconds, and then reinsert it.If you weigh over
200 pounds, it may be helpfulto increase the inclineof the treadmill. If the error code appears again, call our
toll*free HELPLINE. Do not operate the treadmill untilthe problem is corrected.
e. Error code "E5" may appear in the PULSE display if a pulse error occurs. See HOW TO USE THE PULSE
SENSOR on pages 8 and 9, and PULSE DISPLAY on page 12.
5. SYMPTOM: THE PULSE SENSOR DOES NOT FUNCTION PROPERLY
a. See HOW TO USE THE PULSE SENSOR on page 8, and PULSE DISPLAY on page 12.
_. SYMPTOM: THE WALKING BELT IS OFF-CENTER OR SLIPS WHEN WALKED:ON
a. If the walking belt has shiftedto the left, first remove the key
and UNPLUG THE POWER CORD. Using the 3/16" end of the
allen wrench, turn the left rear rolleradjustment bolt clockwise
1/4 of a turn. Plug in the power cord, insert the key and run the
treadmill for a few minutes. Repeat until the walking beltis can-
tered.
a
b. If the walking belt has shiftedto the right, first remove the key
and UNPLUG THE POWER CORD. Using the 3/16" end of the
allen wrench, turn the left rear roller adjustment bolt counter-
clockwise 1/4 of a turn. Plug in the power cord, insert the key
and run the treadmill for a few minutes. Repeat until the walking
belt is centered.
21
Page 22

CONDiTIONINGGUiDELINES ....
The followingguidelines willhelp you to planyour ex-
emise program. Remember--these are general guide-
lines. For more detailed informationabout exercise,
obtain a reputable book or consultyour physician.
EXERCISE INTENSITY
Whether you want to bum fat, strengthenyour cardio-
vascular system, or increase yourathletic perfor-
mance, you can tailor your exerciseto your specific
goals. The key to achieving the desired results isto ex-
"ercise with the proper intensity.
Burning Fat
To bum fat effectively, youmust exercise at a relatively
low intensitylevel for a sustained period of time.
During the firstfew minutes of exemise, your body
uses easily accessible carbohydrate calories for en-
ergy. Onlyafter the firstfew minutes of exercise does
your bodybegin to use stored fatca/odes for energy.
If your goal isto bum fat, adjustthe speed and incline
ofthe treadmill until the FAT BURN indicator is lit. (See
TRAINING ZONE MONITOR on pages 12 and 13.)
Aerobic Exercise
If your goal isto strengthen yourcardiovascular sys-
tam, your exercise must be "aerobic."Aerobic exercise
isactivity that requires large amountsof oxygen for
prolonged periodsof time. This increases the demand
on the heart to pump blood to the muscles, and on the
lungs to oxygenate the blood. The proper intensity
level for aerobic exercise can be found by using your
pulse as a guide. As you exercise, your pulse should
be kept at a level between 70% and 85% of your maxi-
mum possibleheart rate. This is known as yourtrain-
ing zone. You can find your trainingzone in the table
at the top of this page. Training zones are listed ac-
cording to age and physical condition.
22 During thefirst few months of yourexercise program
Training Zone (Beats/MIn.)
Age Unconditioned
20 138-167
25 136-166
30 136-164
35 134-162
40 132-161
45 131-159
50 129-156
55 127-155
60 126-153
65 125-151
70 123-150
75 122-147
80 120-146
85 118-144
Conditioned
133-162
132o160
130-158
129-156
127-155
125-153
: 124-150
122-149
121-147
119-145
118-144
117-142
115-140
114-139
keep your pulse near the low end of your trainingzone
as you exercise. After a few months of regular exer-
cise, your pulse can be gradually increased until itis
near the middle of your training zone as you exercise.
You can measure your pulse using the pulse sensor.
Exercise for aboutfour minutes, and then measure
your pulse immediately. Ifyour pulse is too high or too
low, adjust the intensityof your exercise. It may also
he helpfulto adjustthe speed and incline of the tread-
milluntilthe AEROBIC indicatoris lit. (Sea TRAINING
ZONE MONITOR on pages 12 and 13.)
Performance Training
Ifyour goal is highperformance athletic conditioning,
adjustthe speed and incline ofthe treadmill untilthe
PERFORMANCE indicatoris lit.(See TRAINING
ZONE MONITOR on pages 12 and 13.)
WORKOUT GUIDELINES
Each workout should includethree pads: (1) a warm-
up, (2) trainingzone exercise, and (3) a cool-down.
Warm-up
Warming upprepares the bodyfor exercise by increas-
ingcirculation,deliveringmore oxygen to the muscles
and raisingthe bodytemperature. Begin each workout
with 5 to 10 minutes of stretching and light exercise to
warm up (see SUGGESTED STRETCHES on page 23).
Page 23

Training Zone Exercise
After warming up, increase the intensityof your exer-
cise until your pulse is in your trainingzone for 20 to
60 minutes. (During the firstfew weeks of your exer-
cise program, do not keep your pulse inyour training
zone for longer than 20 minutes.) Breathe regularly
and deeply as you exercise---never hold your breath.
Cool-down
Finish each workout with 5 to 10 minutes of stretching
to cool down. This will increase the flexibilityof your
muscles and willhelp to prevent post-exercise problems.
Exercise Frequency
To maintain or improve your condition, complete three
workouts each week, with at least one day of rest be-
tween workouts. After a few months, you may com-
plete up to five workouts each week ifdesired.
The key to success is tomake exercise a regular and
enjoyable part of your everyday life.
SUGGESTED STRETCHES
The correct form for several basic stretches isshown in the
drawings below. Move slowly as you stretch--never bounce.
1. Toe Touch Stretch
Stand with your knees bent slightly and slowly bend forward
from your hips. Allow your back and shoulders to relax as you
reach down toward your toes as far as possible. Hold for 15
counts, then relax. Repeat 3 times. Stretches: Hamstrings,
back of knees and back.
2. Hamstring Stretch
Sit with one leg extended. Bring the sole of the opposite foot
toward you and rest itagainst the inner thigh of your extended
leg. Reach toward your toes asfar as possible. Hold for 15
counts, then relax. Repeat 3 times for both legs. Stretches:
_..Hamstdngs, lower back and groin.
3. Calf/Achilles Stretch
With one leg infront of the other, reach forward and place your
hands against a wall. Keep your back leg straightand your
back footflat on the floor. Bend your front leg, lean forward and
move your hips toward the wall. Hold for 15 counts,then relax.
Repeat 3 times for both legs. To cause further stretching of the
achilles tendons, bend your back leg as well. Stretches:
Calves, achilles tendons and ankles.
4. Quadriceps Stretch
With one hand against a wail for balance, reach back and
grasp one foot with your other hand. Bdng your heel as close
to your buttocks as possible. Hold for 15 counts, then relax.
Repeat 3 times for both legs. Stretches: Quaddceps and hip
muscles.
5. Inner Thigh Stretch
Sit with the soles of your feet together and your knees outward.
Pull your feet toward your groin area as far as possible. Hold
for 15 counts, then relax. Repeat 3 times. Stretches:
Quadriceps and hip muscles.
3
2
4
23
Page 24

Model No. 831.297741
QUESTIONS?
If you find that:
• you need help assembling or
operatthg the PROFORM e730sl
treadmill
• a part is missing
• or you need to schedule repair
service
call our toll-free HELPLINE
1-800-736-6879
Monday-Saturday, 7 am-7 pm
Central Time (excluding holidays)
REPLACEMENT
:PARTS
If parts become worn end need •
to be repla_:ed, call the following
toll-free number
1-800-FON-PART
(1-800-366-7278)
The model number and serial number of your PROFORM ®730si
treadmill are listed on a decal attached to the frame. See the front
cover of this manual to find the location of the decal.
All replacement pads are available for immediate purchase or
special order when you visityour nearest SEARS Service Center.
To request service orto order pads by telephone, call the toll-free
numbers listed at the left.
When requesting help or service, or orderingpads, please be pre-
pared to providethe following information:
• The NAME OF THE PRODUCT (PROFORM • 730si
treadmill)
• The MODEL NUMBER OF THE PRODUCT (831.297741)
• The PART NUMBER OF THE PART (see the EXPLODED
DRAWING and PART LIST attached to the center of this manual)
• The DESCRIPTION OF THE PART (see the EXPLODED DRAW-
ING and PART LIST attached tothe center of this manual)
I FULL 90 DAY WARRANTY I
For 90 days from the date of purchase, if failure occurs due to defect in material or workmanship in this
SEARS TREADMILL EXERCISER, contact the nearest SEARS Service Center throughout the United
States and SEARS will repair or replace the TREADMILL EXERCISER, free ofcharge.
This warranty does not applywhen the TREADMILL EXERCISER is used commerdally or for rental pur-
poses.
This warranty gives youspecific legal dghts, and you may alsohave other rightswhich vary from state
to state.
SEARS, ROEBUCK AND CO., DEPT. 817WA, HOFFMAN ESTATES, IL 60179
Part No. 129445 F00370-C R0296A Pdnted in USA © 1996 Sears, Roebuck and Co.
 Loading...