

Page 1
www.proform.com
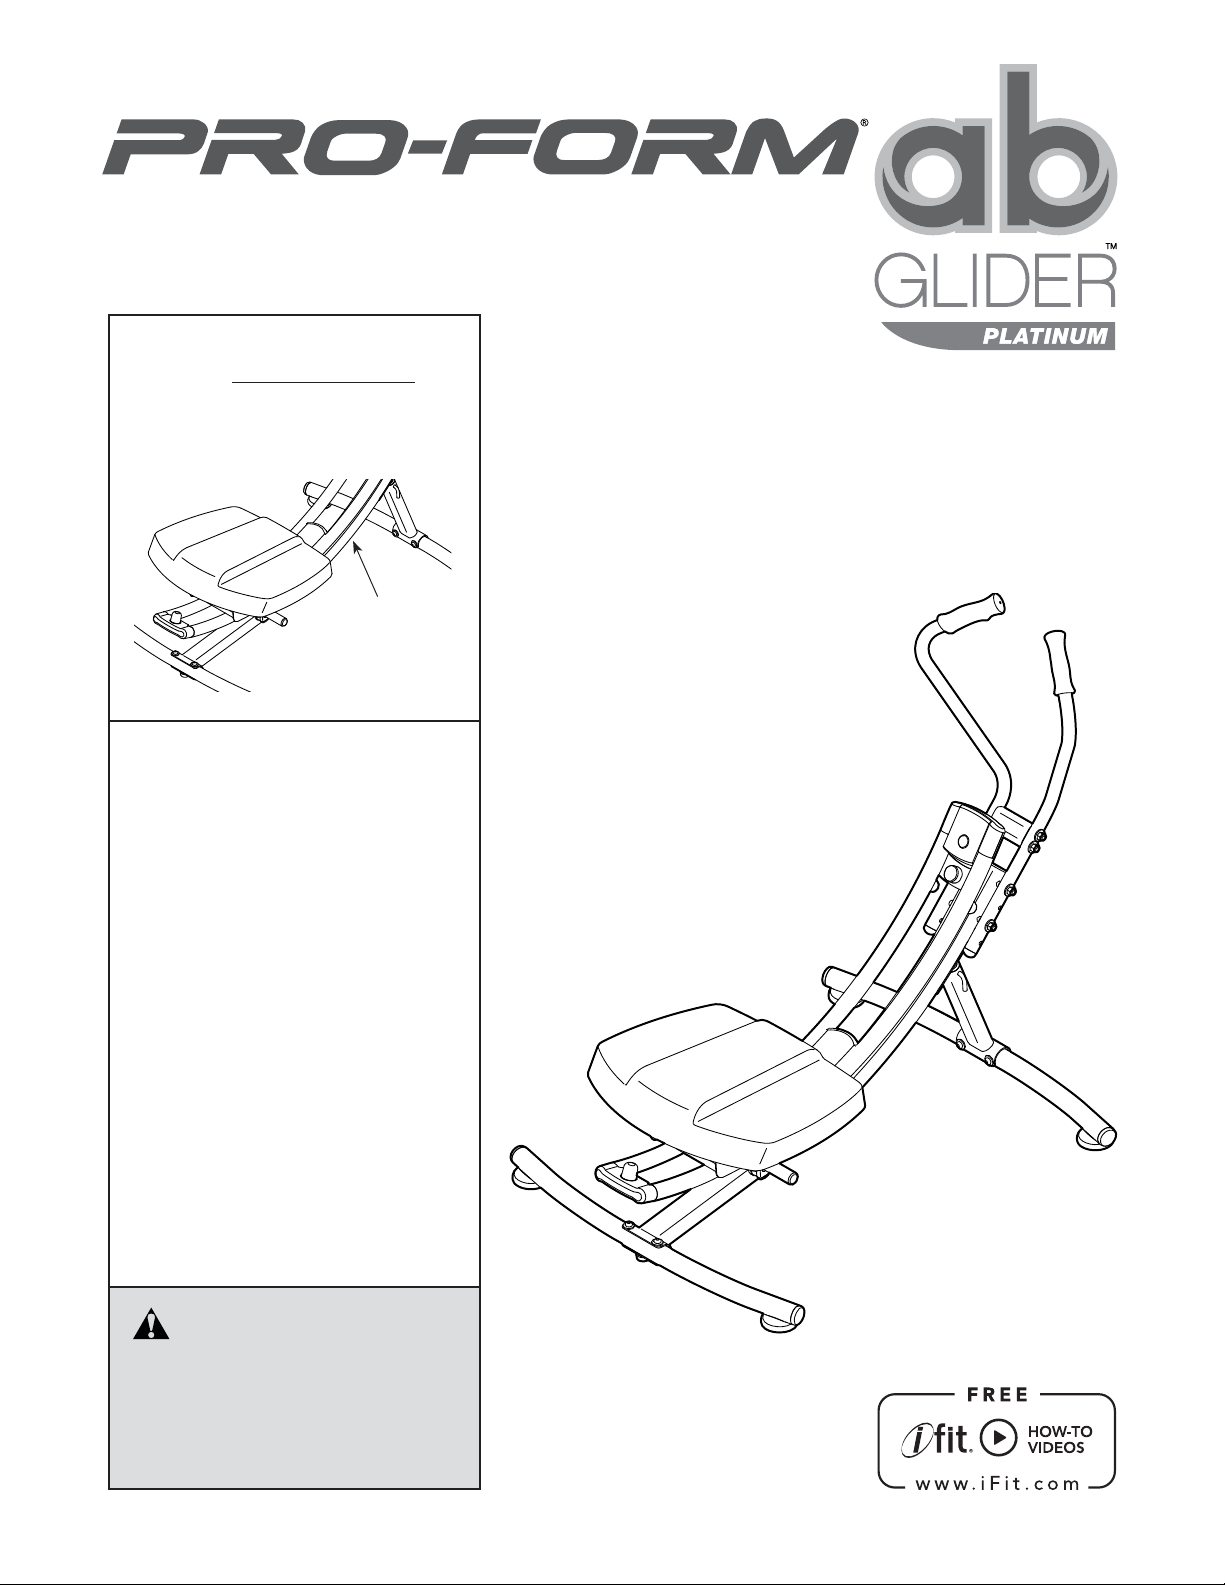
Model No. PFBE19611.0
Serial No.
Write the serial number in the space
above for reference.
Serial Number
Decal
QUESTIONS?
If you have questions, or if parts
are damaged or missing, DO NOT
CONTACT THE STORE; please
contact Customer Care.
USER’S MANUAL
IMPORTANT: Please register this
product (see the limited warranty
on the back cover of this manual)
before contacting Customer Care.
CALL TOLL-FREE:
1-888-533-1333
Mon.–Fri. 6 a.m.–6 p.m. MT
Sat. 8 a.m.–4 p.m. MT
ON THE WEB:
www.proformservice.com
CAUTION
Read all precautions and instructions in this manual before using
this equipment. Keep this manual
for future reference.
Page 2
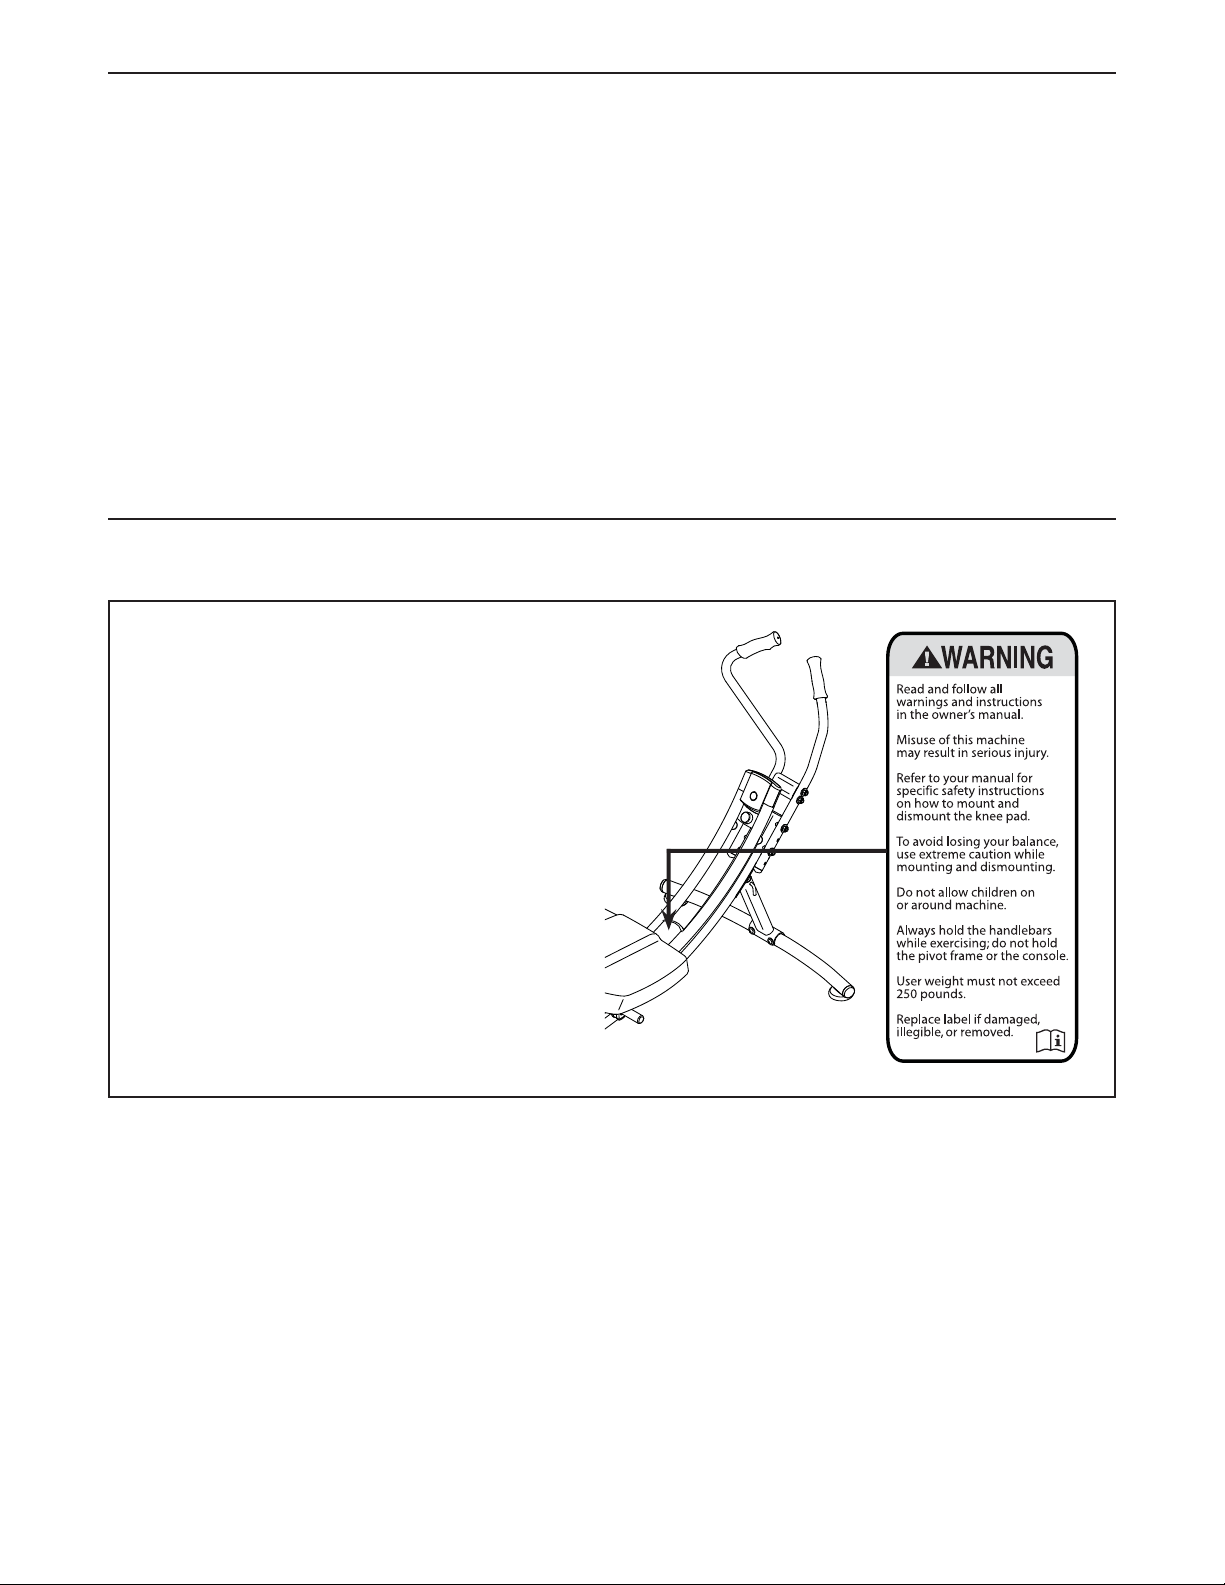
TABLE OF CONTENTS
WARNING DECAL PLACEMENT . . . . . . . . . . . . . . . . . . . . . . . . . . . . . . . . . . . . . . . . . . . . . . . . . . . . . . . . . . . . . . .2
IMPORTANT PRECAUTIONS . . . . . . . . . . . . . . . . . . . . . . . . . . . . . . . . . . . . . . . . . . . . . . . . . . . . . . . . . . . . . . . . . .3
BEFORE YOU BEGIN. . . . . . . . . . . . . . . . . . . . . . . . . . . . . . . . . . . . . . . . . . . . . . . . . . . . . . . . . . . . . . . . . . . . . . . . 4
PART IDENTIFICATION CHART. . . . . . . . . . . . . . . . . . . . . . . . . . . . . . . . . . . . . . . . . . . . . . . . . . . . . . . . . . . . . . . .5
ASSEMBLY . . . . . . . . . . . . . . . . . . . . . . . . . . . . . . . . . . . . . . . . . . . . . . . . . . . . . . . . . . . . . . . . . . . . . . . . . . . . . . . .6
HOW TO USE THE ABDOMINAL EXERCISER . . . . . . . . . . . . . . . . . . . . . . . . . . . . . . . . . . . . . . . . . . . . . . . . . . . 11
EXERCISE GUIDELINES . . . . . . . . . . . . . . . . . . . . . . . . . . . . . . . . . . . . . . . . . . . . . . . . . . . . . . . . . . . . . . . . . . . .13
PART LIST. . . . . . . . . . . . . . . . . . . . . . . . . . . . . . . . . . . . . . . . . . . . . . . . . . . . . . . . . . . . . . . . . . . . . . . . . . . . . . . .14
EXPLODED DRAWING. . . . . . . . . . . . . . . . . . . . . . . . . . . . . . . . . . . . . . . . . . . . . . . . . . . . . . . . . . . . . . . . . . . . . .15
ORDERING REPLACEMENT PARTS . . . . . . . . . . . . . . . . . . . . . . . . . . . . . . . . . . . . . . . . . . . . . . . . . . Back Cover
LIMITED WARRANTY. . . . . . . . . . . . . . . . . . . . . . . . . . . . . . . . . . . . . . . . . . . . . . . . . . . . . . . . . . . . . . . Back Cover
WARNING DECAL PLACEMENT
This drawing shows the location(s) of the
warning decal(s). If a decal is missing or
illegible, see the front cover of this manual
and request a free replacement decal. Apply
the decal in the location shown. Note: The
decal(s) may not be shown at actual size.
PROFORM is a registered trademark of ICON IP, Inc.
2
Page 3

IMPORTANT PRECAUTIONS
WARNING: To reduce the risk of serious injury, read all important precautions and
instructions in this manual and all warnings on your abdominal exerciser before using your abdominal exerciser. ICON assumes no responsibility for personal injury or property damage sustained by
or through the use of this product.
1. Before beginning any exercise program,
consult your physician. This is especially
important for persons over age 35 or persons with pre-existing health problems.
2. Use the abdominal exerciser only as
described in this manual.
3. It is the responsibility of the owner to ensure
that all users of the abdominal exerciser are
adequately informed of all precautions.
4. The abdominal exerciser is intended for
home use only. Do not use the abdominal
exerciser in any commercial, rental, or institutional setting.
5. Keep the abdominal exerciser indoors, away
from moisture and dust. Place the abdominal
exerciser on a level surface, with carpet or a
non-slip mat beneath it.
6. Make sure that there is enough clearance
around the abdominal exerciser to mount,
dismount, and use the abdominal exerciser.
7. Inspect and properly tighten all parts regularly. Replace any worn parts immediately.
9. The abdominal exerciser should not be used
by persons weighing more than 250 lbs.
(113 kg).
10. Wear appropriate clothes while exercising;
do not wear loose clothes that could become
caught on the abdominal exerciser. Always
wear athletic shoes for foot protection while
exercising.
11. Use extreme caution while mounting and dismounting the abdominal exerciser (see HOW
TO MOUNT AND DISMOUNT on page 11).
Always hold the handlebars while exercising;
do not hold the pivot frame or the console.
12. Keep hands and feet away from moving
parts.
13. When using the optional weights on the
weight tubes (see page 4), always secure the
weights with the weight retainers.
14. Over exercising may result in serious injury
or death. If you feel faint or if you experience
pain while exercising, stop immediately and
cool down.
8. Keep children under age 12 and pets away
from the abdominal exerciser at all times.
3
Page 4
BEFORE YOU BEGIN
Thank you for selecting the PROFORM® AB GLIDER
PLATINUM abdominal exerciser. The versatile AB
GLIDER PLATINUM abdominal exerciser is designed
to help you develop your core muscles, improve your
muscle tone, achieve a shapelier fi gure, and increase
your overall fi tness.
For your benefi t, read this manual carefully before
using the abdominal exerciser. If you have ques-
Length: 3 ft. 11 in. (119 cm)
Width: 2 ft. 7 in. (79 cm)
Weight: 41 lbs. (19 kg)
Console
Lock Pin
tions after reading this manual, please see the front
cover of this manual. To help us assist you, note the
product model number and serial number before contacting us. The model number and the location of the
serial number decal are shown on the front cover of
this manual.
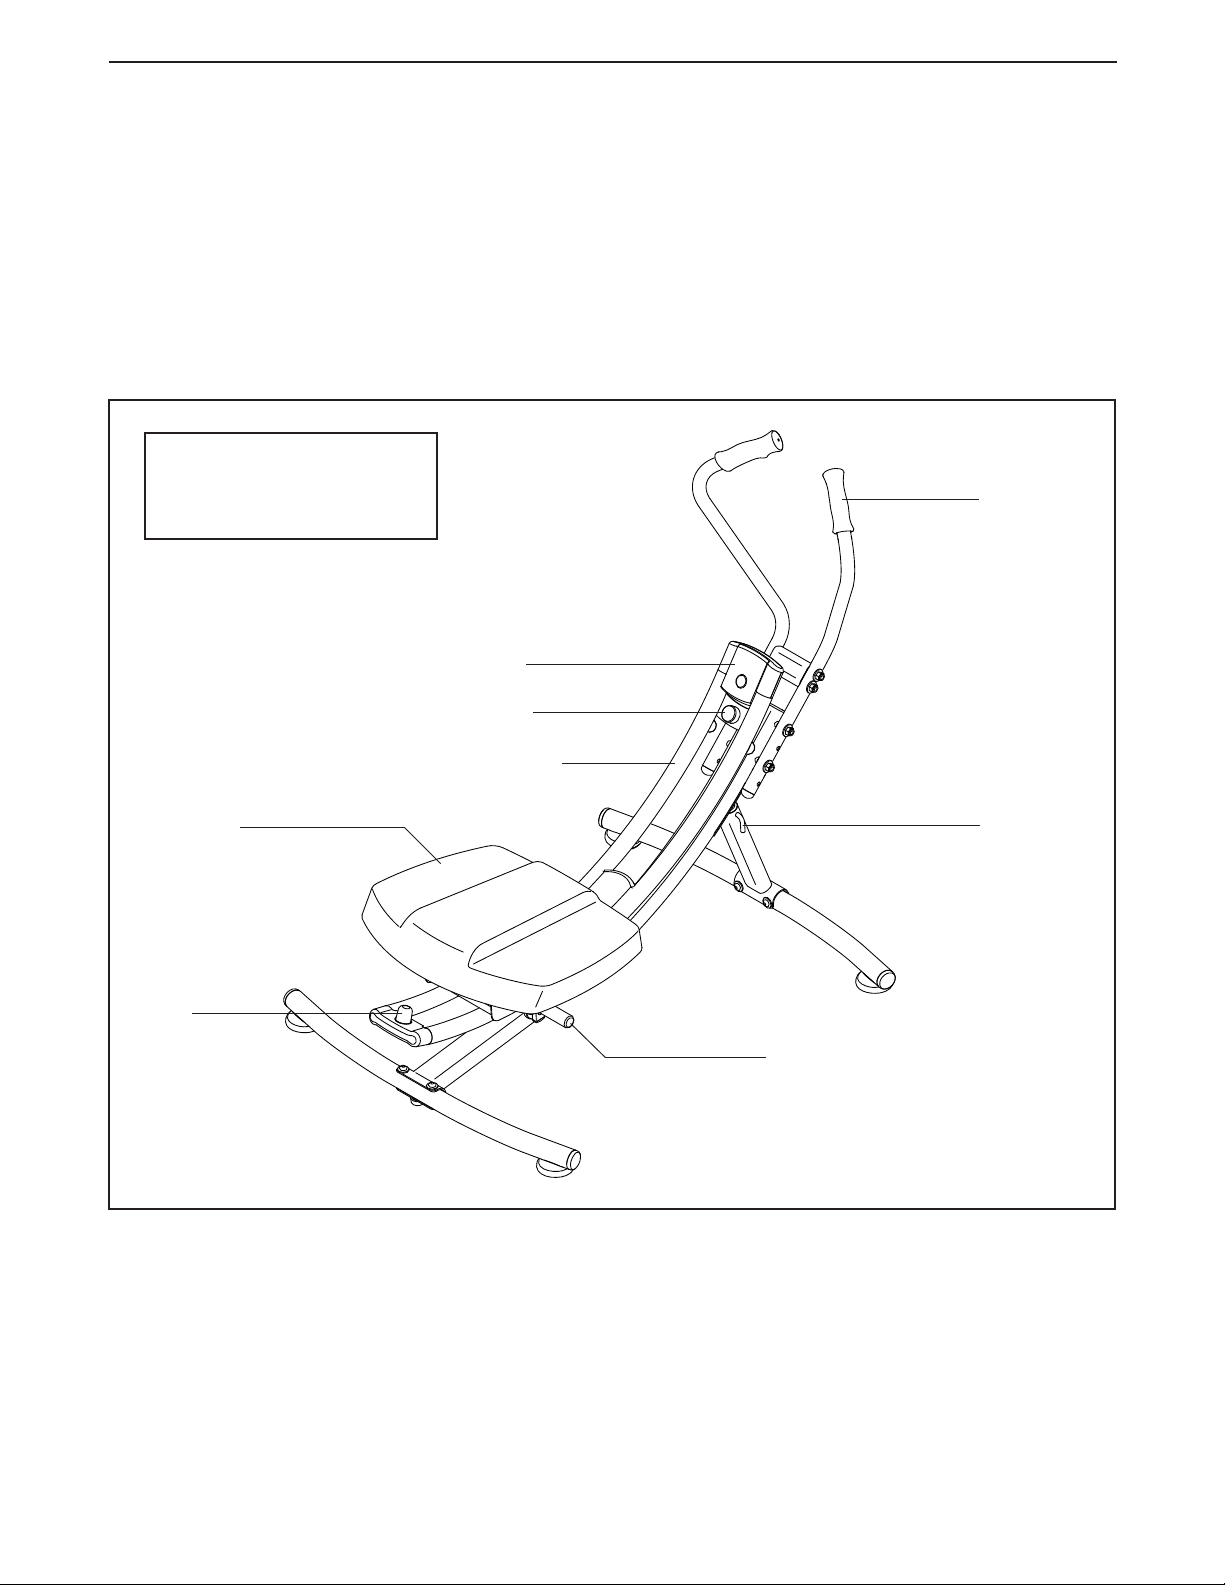
Before reading further, please review the drawing
below and familiarize yourself with the labeled parts.
Handlebar
Knee Pad
Stop
Pivot Frame
Incline Pin
Weight Tube*
* To order the optional weight kit, see
the front cover of this manual.
4
Page 5
PART IDENTIFICATION CHART
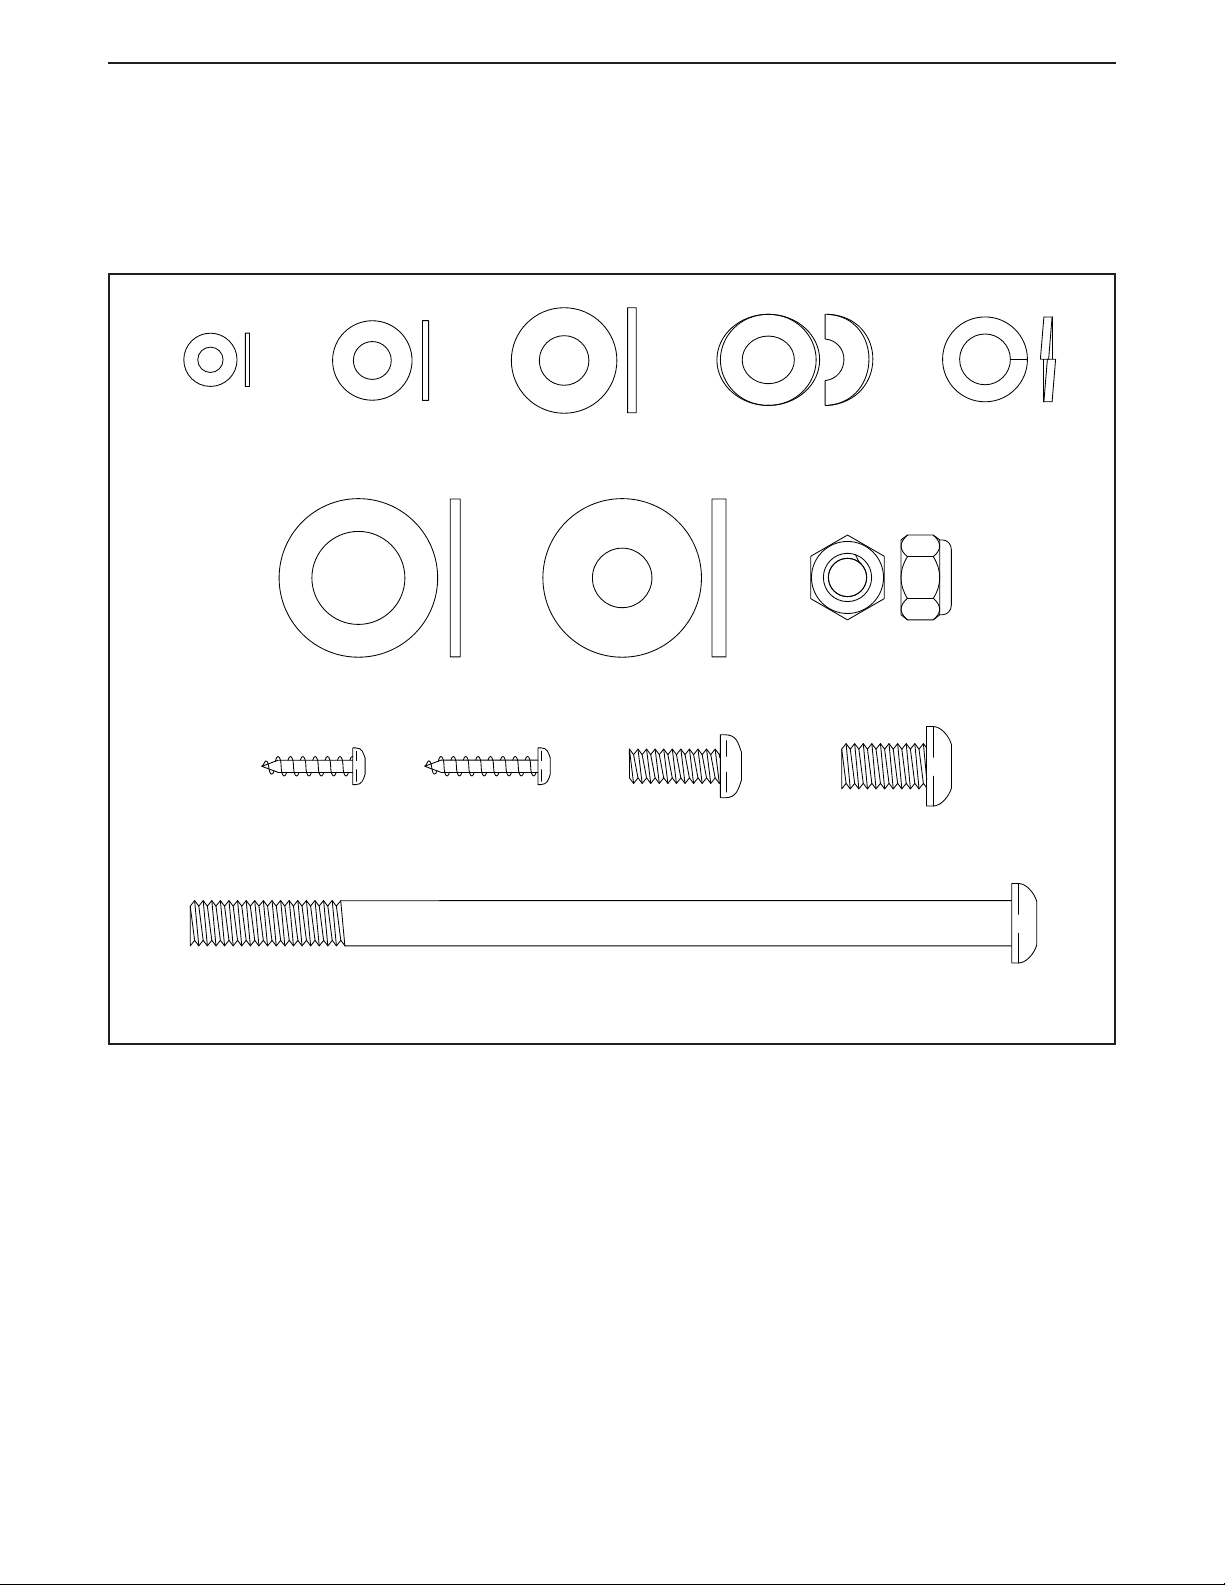
Use the drawings below to identify the small parts needed for assembly. The number in parentheses below each
drawing is the key number of the part, from the PART LIST near the end of this manual. The number following the
key number is the quantity needed for assembly. Note: If a part is not in the hardware kit, check to see if it
has been preassembled. Extra parts may be included.
M4 Washer
(48)–3
Screw (31)–1
M6 Washer
Pivot Washer
(43)–1
M4 x 16mm
(35)–4
M8 Washer
M4 x 20mm
Screw (53)–2
M8 x 145mm Bolt
(34)–10
Large Washer
(41)–1
M6 x 15mm Screw
(30)–4
(28)–4
M8 Curved
Washer (39)–8
M8 Locknut
M8 x 15mm Screw
M8 Split
Washer (56)–2
(38)–4
(29)–11
5
Page 6

ASSEMBLY
• To hire an authorized service technician to assemble the abdominal exerciser, call 1-800-445-2480.
• Assembly requires two persons.
• Place all parts in a cleared area and remove the
packing materials. Do not dispose of the packing
materials until you fi nish all assembly steps.
1. Identify the Rear Stabilizer (2), which has holes
in the top and bottom, and orient it as shown.
Attach the Rear Stabilizer (2) to the Main Frame
(1) with four M8 x 15mm Screws (29) and four
M8 Washers (34). Start all four Screws, and
then tighten them.
Then, attach the Frame Foot (11) to the under-
side of the Main Frame (1) with an M4 x 16mm
Screw (31) and an M4 Washer (48).
• In addition to the included tool(s), assembly
requires the following tools:
one Phillips screwdriver
one adjustable wrench
Assembly may be easier if you have a set of
wrenches. To avoid damaging parts, do not use
power tools.
1
29
34
1
2
29
34
2. Insert the Leg Sleeve (14) into the Front Leg
(26).
Next, orient the Incline Leg (50) and the Front
Leg (26) as shown, and insert the Incline Leg
into the Front Leg. Then, insert the Incline Pin
(51) into the Front Leg and into one of the three
adjustment holes in the Incline Leg.
Next, orient the Front Stabilizer (4) as shown.
Attach the Front Stabilizer (4) to the Front Leg
(26) with four M8 x 15mm Screws (29) and four
M8 Washers (34). Start all four Screws, and
then tighten them.
34
11
2
50
4
14
26
29
29
48
31
Adjustment Holes
51
34
34
29
6
Page 7

3. Attach the Incline Leg (50) to the Main Frame (1)
with two M8 x 15mm Screws (29), two M8 Split
Washers (56), and two M8 Washers (34). Start
both Screws, and then tighten them.
3
1
50
34
56
29
34
56
29
4. Using a small plastic bag to keep your hand
clean, apply a small amount of the included
grease to both sides of a Pivot Washer (43) and
to the axle on the Pivot Frame (3).
Slide the Pivot Washer (43) onto the axle on the
Pivot Frame (3). Then, insert the Pivot Frame
into the Main Frame (1).
Attach the Pivot Frame (3) with an M8 x 15mm
Screw (29) and a Large Washer (41). Do not
overtighten the Screw; the Pivot Frame must
pivot freely.
4
3
Grease
43
1
41
29
7
Page 8
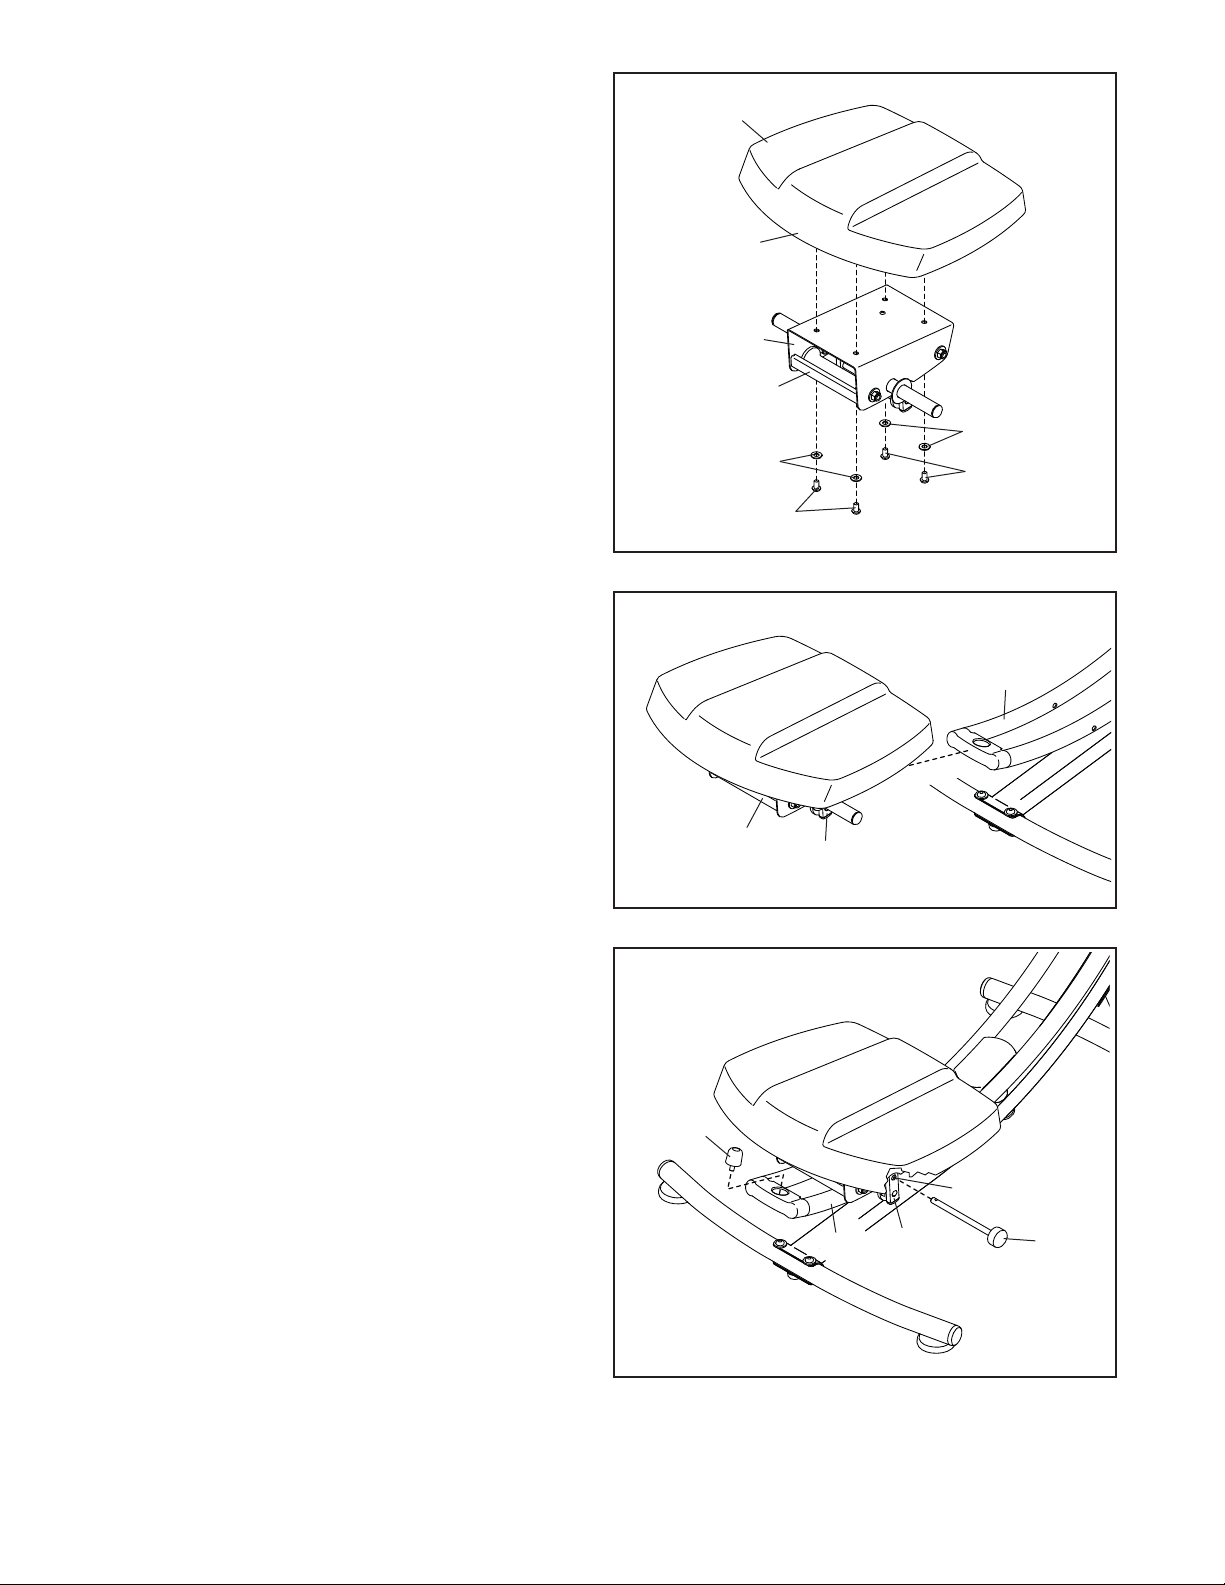
5. Orient the Knee Pad (7) and the Carriage (6) as
shown.
Attach the Knee Pad (7) to the Carriage (6)
with four M6 x 15mm Screws (28) and four M6
Washers (35).
5
7
Wide
End
6
Welded
Bar
35
35
28
28
6. Orient the Carriage (6) as shown. Slide the
Carriage onto the Pivot Frame (3).
7. Move the Carriage (6) to the position shown,
and align the indicated hole in the Carriage with
the corresponding hole (not shown) in the Pivot
Frame (3).
Insert the Lock Pin (27) into the Carriage (6) and
the Pivot Frame (3).
Then, tighten the Stop (16) into the Pivot Frame
(3).
6
3
Welded
Bar
7
16
6
Hole
3
6
27
8
Page 9
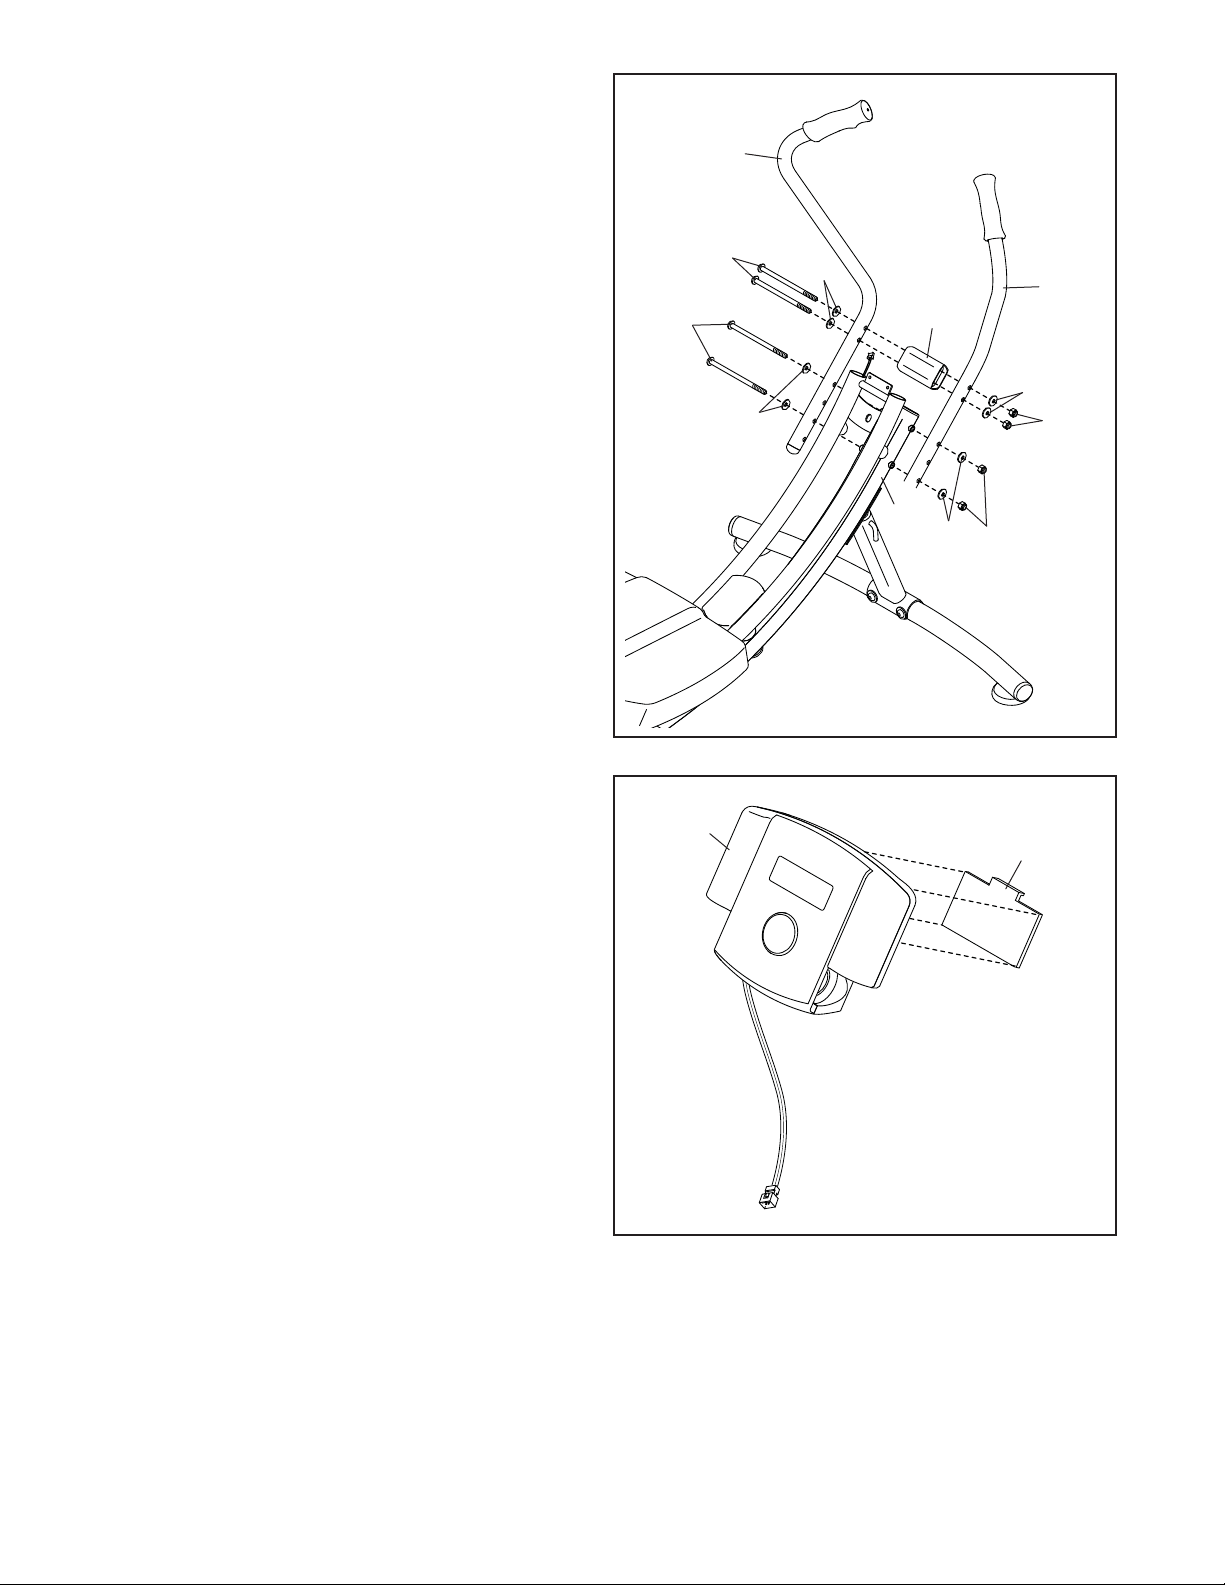
8. Note: There are two sets of holes near the lower
ends of the Handlebars (5, 9); the Handlebars
can be attached at either of two heights.
Attach the Handlebars (5, 9) to the Handlebar
Brace (47) with two M8 x 145mm Bolts (30), four
M8 Curved Washers (39), and two M8 Locknuts
(38). Do not tighten the Locknuts yet.
Next, attach the Handlebars (5, 9) to the Main
Frame (1) with two M8 x 145mm Bolts (30), four
M8 Curved Washers (39), and two M8 Locknuts
(38).
Tip: It may be helpful to use a hex key to
turn each M8 x 145mm Bolt (30) while you
insert it through the Handlebars (5, 9) and
the Main Frame (1).
Then, tighten the fi rst two M8 Locknuts (38) that
you used in this step.
8
9
30
30
39
39
5
47
39
38
1
39
38
9. The Console (8) requires one AA battery (not
included); an alkaline battery is recommended.
IMPORTANT: If the console has been
exposed to cold temperatures, allow it to
warm to room temperature before you insert
a battery. Otherwise, you may damage the
display or other electronic components.
Remove the battery cover from the back of
the Console (8). Next, insert a battery into the
Console; make sure that the battery is ori-
ented as shown by the markings inside the
Console. Then, reattach the battery cover.
9
8
Battery
Cover
9
Page 10

10. Remove the three M3 x 15mm Screws (24) from
the Console (8), and remove the back of the
Console.
Connect the wire on the Console (8) to the Reed
Switch Wire (18) inside of the Pivot Frame (3).
Then, insert the wires downward into the Pivot
Frame.
10
8
8
18
24
53
3
Tip: Avoid pinching the wires. Attach the front
and back of the Console (8) to the upper end
of the Pivot Frame (3) as shown with two M4 x
20mm Screws (53) and two M4 Washers (48).
Then, tighten the three M3 x 15mm Screws (24)
into the Console (8).
11. Make sure that all parts are properly tightened before you use the abdominal exerciser. Note: After
assembly is completed, extra parts may be left over. Place a mat beneath the abdominal exerciser to protect
the floor.
Avoid pinching
48
the wires
10
Page 11

HOW TO USE THE ABDOMINAL EXERCISER
HOW TO MOUNT AND DISMOUNT
The pivot frame can swivel from side to side, and
the knee pad can move forward and backward; to
avoid losing your balance, use extreme caution
while mounting and dismounting the abdominal
exerciser.
First, make sure that the Pivot Frame (3) is in the position shown in the drawing below. Do not rotate the
Pivot Frame so that the Console (8) is near the
fl oor as shown in the inset drawing.
9
3
8
7
8
3
5
HOW TO LOCK THE PIVOT FRAME
To prevent the
Pivot Frame (3)
from swiveling
from side to side,
insert the Lock
Pin (27) into the
Pivot Frame and
the Main Frame
(1).
HOW TO LOCK THE KNEE PAD
To prevent the
Knee Pad (7)
from moving
forward and
backward, insert
the Lock Pin (27)
into the Carriage
(6) and the Pivot
Frame (3).
27
3
7
3
1
27
6
Next, stand beside the abdominal exerciser and hold
the Handlebars (5, 9) fi rmly with both hands. Place
one knee on the Knee Pad (7), halfway between the
front of the Knee Pad and the back of the Knee Pad.
Then, place your other knee on the Knee Pad. Always
hold the Handlebars while exercising; do not hold
the Pivot Frame (3) or the Console (8).
To dismount, hold the Handlebars (5, 9) and place one
foot at a time on the fl oor beside the Knee Pad (7).
HOW TO ADD WEIGHT
To increase the intensity of your exercise, you can add
optional weights to the weight tubes on the carriage
(see page 4). To order the optional weight kit, see
the front cover of this manual.
HOW TO CHANGE THE INCLINE
To change
the incline of
the abdominal
exerciser, fi rst
remove the
Incline Pin (51).
Then, raise or
lower the Main
Frame (1) to the
desired height,
and fully insert
the Incline Pin into the Front Leg (26) and into one of
the three adjustment holes in the Incline Leg (50).
1
50
51
26
11
Page 12

FEATURES OF THE CONSOLE
The console features fi ve modes that provide instant
exercise feedback during your workouts:
Scan—This mode
displays the Time,
Calorie, and Reps/
Min modes in a
repeating cycle.
Time—This mode
displays the elapsed
time.
3. Begin exercising and follow your progress with
the display.
As you exercise, the console will provide instant
exercise feedback.
4. Reset the console, if desired.
To reset the console display, press and hold the
console button for several seconds until zeros
appear in the display.
5. When you are fi nished exercising, the console
will turn off automatically.
Count—This mode displays the number of repetitions
completed during the current workout.
Calorie—This mode displays the approximate number
of calories burned.
Reps/Min—This mode displays the number of repetitions being completed per minute.
HOW TO USE THE CONSOLE
Note: Make sure that a battery is installed (see assembly step 9 on page 9). If there is a sheet of clear
plastic on the display, remove the plastic.
1. Turn on the console.
Press the console button or begin exercising to
turn on the console.
2. Select a mode for display.
Scan mode—To
select the scan
mode, press the
console button
repeatedly until
an arrow appears
next to the word
SCAN.
Time, Calorie, or Reps/Min mode—To select one
of these modes for continuous display, press the
console button repeatedly until an arrow appears
next to the desired selection. Make sure that
there is not an arrow next to the word SCAN.
If you do not move the knee pad and do not press
the console button for a few minutes, the console
will turn off automatically.
HOW TO USE THE ABDOMINAL EXERCISER
The abdominal exerciser can be used with the pivot
frame locked or unlocked (see HOW TO LOCK THE
PIVOT FRAME on page 11). In addition, the abdominal exerciser can be used with the knee pad locked
or unlocked (see HOW TO LOCK THE KNEE PAD on
page 11).
With the pivot frame and the knee pad unlocked,
the pivot frame can swivel from side to side and the
knee pad can move forward and backward. To exercise, use your core muscles to swivel the pivot frame
from side to side and/or to move the knee pad forward
and backward.
With the pivot frame locked and the knee pad
unlocked, the pivot frame will not swivel from side to
side, but the knee pad will move forward and backward. To exercise, use your core muscles to move the
knee pad forward and backward.
With the pivot frame unlocked and the knee pad
locked, the pivot frame can swivel from side to side,
but the knee pad will not move forward and backward.
To exercise, use your core muscles to swivel the pivot
frame from side to side.
For more information, see the included workout DVD.
12
Page 13

EXERCISE GUIDELINES
WARNING: Before beginning this
or any exercise program, consult your physician. This is especially important for persons
over age 35 or persons with pre-existing
health problems.
Aerobic Exercise—If your goal is to strengthen your
cardiovascular system, you must perform aerobic
exercise, which is activity that requires large amounts
of oxygen for prolonged periods of time. For aerobic
exercise, adjust the intensity of your exercise until your
heart rate is near the highest number in your training
zone.
These guidelines will help you to plan your exercise
program. For detailed exercise information, obtain a
reputable book or consult your physician. Remember,
proper nutrition and adequate rest are essential for
successful results.
EXERCISE INTENSITY
Whether your goal is to burn fat or to strengthen your
cardiovascular system, exercising at the proper intensity is the key to achieving results. You can use your
heart rate as a guide to find the proper intensity level.
The chart below shows recommended heart rates for
fat burning and aerobic exercise.
To find the proper intensity level, find your age at the
bottom of the chart (ages are rounded off to the nearest ten years). The three numbers listed above your
age define your “training zone.” The lowest number is
the heart rate for fat burning, the middle number is the
heart rate for maximum fat burning, and the highest
number is the heart rate for aerobic exercise.
HOW TO MEASURE YOUR HEART RATE
To measure your heart
rate, exercise for at least
four minutes. Then, stop
exercising and place
two fingers on your
wrist as shown. Take a
six-second heartbeat
count, and multiply the
result by 10 to find your heart rate. For example, if your
six-second heartbeat count is 14, your heart rate is 140
beats per minute.
WORKOUT GUIDELINES
Warming Up—Start with 5 to 10 minutes of stretch-
ing and light exercise. A warm-up increases your body
temperature, heart rate, and circulation in preparation
for exercise.
Training Zone Exercise—Exercise for 20 to 30 minutes with your heart rate in your training zone. (During
the first few weeks of your exercise program, do not
keep your heart rate in your training zone for longer
than 20 minutes.) Breathe regularly and deeply as you
exercise—never hold your breath.
Cooling Down—Finish with 5 to 10 minutes of stretching. Stretching increases the flexibility of your muscles
and helps to prevent post-exercise problems.
EXERCISE FREQUENCY
Burning Fat—To burn fat effectively, you must exer-
cise at a low intensity level for a sustained period of
time. During the first few minutes of exercise, your
body uses carbohydrate calories for energy. Only after
the first few minutes of exercise does your body begin
to use stored fat calories for energy. If your goal is to
burn fat, adjust the intensity of your exercise until your
heart rate is near the lowest number in your training
zone. For maximum fat burning, exercise with your
heart rate near the middle number in your training
zone.
To maintain or improve your condition, complete three
workouts each week, with at least one day of rest
between workouts. After a few months of regular exercise, you may complete up to five workouts each week,
if desired. Remember, the key to success is to make
exercise a regular and enjoyable part of your everyday
life.
13
Page 14

PART LIST
Key No. Qty. Description Key No. Qty. Description
Model No. PFBE19611.0 R1111A
1 1 Main Frame
2 1 Rear Stabilizer
3 1 Pivot Frame
4 1 Front Stabilizer
5 1 Right Handlebar
6 1 Carriage
7 1 Knee Pad
8 1 Console
9 1 Left Handlebar
10 4 Stabilizer Foot
11 1 Frame Foot
12 2 Bumper
13 1 Pivot Frame Cap
14 1 Leg Sleeve
15 1 Main Frame Cap
16 1 Stop
17 2 Handgrip
18 1 Reed Switch/Wire
19 2 Upper Roller
20 2 Lower Roller
21 2 Carriage Cap
22 1 Large Magnet Mount
23 1 Small Magnet Mount
24 3 M3 x 15mm Screw
25 4 Roller Spacer
26 1 Front Leg
27 1 Lock Pin
28 4 M6 x 15mm Screw
29 11 M8 x 15mm Screw
30 4 M8 x 145mm Bolt
31 11 M4 x 16mm Screw
32 2 Roller Axle
33 1 Pivot Frame Cover
34 16 M8 Washer
35 4 M6 Washer
36 1 M4 x 12mm Screw
37 1 M4 x 40mm Screw
38 10 M8 Locknut
39 8 M8 Curved Washer
40 1 Upper Bushing
41 1 Large Washer
42 2 Lower Handlebar Cap
43 1 Pivot Washer
44 4 Stabilizer Cap
45 2 M13 Washer
46 1 Lower Bushing
47 1 Handlebar Brace
48 11 M4 Washer
49 2 M5 Washer
50 1 Incline Leg
51 1 Incline Pin
52 2 Weight Tube Cap
53 4 M4 x 20mm Screw
54 4 Foot Insert
55 2 M5 x 20mm Screw
56 2 M8 Split Washer
* – Assembly Tool
* – Grease Packet
* – DVD
* – User’s Manual
Note: Specifications are subject to change without notice. For information about ordering replacement parts, see
the back cover of this manual. *These parts are not illustrated.
14
Page 15

EXPLODED DRAWING
Model No. PFBE19611.0 R1111A
13
31
38
25
45
10
54
32
34
20
16
31
19
44
34
33
18
25
48
52
38
2
10
34
21
34
34
6
11
20
27
36
29
22
45
53
48
31
52
34
29
25
34
53
19
43
3
38
40
25
8
44
46
35
12
41
23
28
29
49
49
1
34
37
56
10
54
48
24
24
31
55
29
28
48
44
30
15
50
35
53
30
29
7
42
26
39
34
9
39
56
14
34
29
17
42
10
54
51
4
31
47
39
29
34
17
5
38
39
38
44
48
54
48
31
15
Page 16

ORDERING REPLACEMENT PARTS
To order replacement parts, please see the front cover of this manual. To help us assist you, be prepared to
provide the following information when contacting us:
• the model number and serial number of the product (see the front cover of this manual)
• the name of the product (see the front cover of this manual)
• the key number and description of the replacement part(s) (see the PART LIST and the EXPLODED
DRAWING near the end of this manual)
LIMITED WARRANTY
IMPORTANT: You must register this product within 30 days of the purchase date to avoid added
fees for service needed under warranty. Go to www.proformservice.com/registration.
ICON Health & Fitness, Inc. (ICON) warrants this product to be free from defects in workmanship and
material, under normal use and service conditions. Parts and labor are warranted for one (1) year from
the date of purchase.
This warranty extends only to the original purchaser (customer). ICON’s obligation under this warranty is
limited to repairing or replacing, at ICON’s option, the product through one of its authorized service centers.
All repairs for which warranty claims are made must be preauthorized by ICON. If the product is shipped
to a service center, freight charges to and from the service center will be the customer’s responsibility. If
replacement parts are shipped while the product is under warranty, the customer will be responsible for a
minimal handling charge. For in-home service, the customer will be responsible for a minimal trip charge.
This warranty does not extend to freight damage to the product. This warranty will automatically be voided
if the product is used as a store display model, if the product is purchased or transported outside the USA,
if all instructions in this manual are not followed, if the product is abused or improperly or abnormally used,
or if the product is used for commercial or rental purposes. No other warranty beyond that specifically set
forth above is authorized by ICON.
ICON is not responsible or liable for indirect, special, or consequential damages arising out of or in connection with the use or performance of the product; damages with respect to any economic loss, loss of
property, loss of revenues or profits, loss of enjoyment or use, or costs of removal or installation; or other
consequential damages of any kind. Some states do not allow the exclusion or limitation of incidental or
consequential damages. Accordingly, the above limitation may not apply to the customer.
The warranty extended hereunder is in lieu of any and all other warranties, and any implied warranties of
merchantability or fitness for a particular purpose are limited in their scope and duration to the terms set
forth herein. Some states do not allow limitations on how long an implied warranty lasts. Accordingly, the
above limitation may not apply to the customer.
This warranty provides specific legal rights; the customer may have other rights that vary from state to
state.
ICON Health & Fitness, Inc., 1500 S. 1000 W., Logan, UT 84321-9813
Part No. 322713 R1111A Printed in China © 2011 ICON IP, Inc.
 Loading...