

ProForm PETL32570 User Manual

USER'S MANUAL
Model No. PETL32570
Serial No.
Write the serial number in the space
above for future reference.
CAUTION
Read all precautions and instructions in this manual before using
this equipment. Save this manual
for future reference.
Serial Number Decal
QUESTIONS?
As a manufacturer, we are
committed to providing complete
customer satisfaction. If you
have questions, or if there are
missing or damaged parts, we
will guarantee complete satisfaction through our Customer
Service Department.
Please CALL:
0345-089009
Or WRITE:
ICON Fitness Lifestyle Ltd.
Greenwich House
223 North Street
Sheepscar
Leeds LS7 2AA
West Yorkshire
Class H C
Fitness Product

2
TABLE OF CONTENTS
IMPORTANT PRECAUTIONS . . . . . . . . . . . . . . . . . . . . . . . . . . . . . . . . . . . . . . . . . . . . . . . . . . . . . . . . . . . . . 2
BEFORE YOU BEGIN . . . . . . . . . . . . . . . . . . . . . . . . . . . . . . . . . . . . . . . . . . . . . . . . . . . . . . . . . . . . . . . . . . . 4
ASSEMBLY . . . . . . . . . . . . . . . . . . . . . . . . . . . . . . . . . . . . . . . . . . . . . . . . . . . . . . . . . . . . . . . . . . . . . . . . . . . 5
OPERATION AND ADJUSTMENT . . . . . . . . . . . . . . . . . . . . . . . . . . . . . . . . . . . . . . . . . . . . . . . . . . . . . . . . . . 7
HOW TO FOLD AND MOVE THE TREADMILL . . . . . . . . . . . . . . . . . . . . . . . . . . . . . . . . . . . . . . . . . . . . . . .10
MAINTENANCE AND TROUBLE-SHOOTING . . . . . . . . . . . . . . . . . . . . . . . . . . . . . . . . . . . . . . . . . . . . . . . .12
CONDITIONING GUIDELINES . . . . . . . . . . . . . . . . . . . . . . . . . . . . . . . . . . . . . . . . . . . . . . . . . . . . . . . . . . . 14
ORDERING REPLACEMENT PARTS . . . . . . . . . . . . . . . . . . . . . . . . . . . . . . . . . . . . . . . . . . . . . . . Back Cover
Note: A PART LIST and an EXPLODED DRAWING are attached in the centre of this manual. Remove the PART
LIST and EXPLODED DRAWING before beginning assembly.
1. It is the responsibility of the owner to ensure
that all users of this treadmill are adequately
informed of all warnings and precautions.
2. Use the treadmill only as described in this
manual.
3. Place the treadmill on a level surface, with 8
feet (2 m) of clearance behind it. Do not place
the treadmill on a surface that blocks any air
openings. To protect the floor or carpet from
damage, place a mat under the treadmill.
4. Keep the treadmill indoors, away from moisture and dust. Do not put the treadmill in a
garage or covered patio, or near water.
5. Do not operate the treadmill where aerosol
products are used or where oxygen is being
administered.
6. Keep children under the age of 12 and pets
away from the treadmill at all times.
7. The treadmill should not be used by persons
weighing more than 250 pounds (115 kg).
8. Never allow more than one person on the
treadmill at a time.
9. Wear appropriate exercise clothing when
using the treadmill. Do not wear loose
clothing that could become caught in the
treadmill. Athletic support clothes are recom-
mended for both men and women. Always
wear athletic shoes. Never use the treadmill
with bare feet, wearing only stockings, or in
sandals.
10. When connecting the power cord (see HOW
TO PLUG IN THE POWER CORD on page 7),
plug the power cord into an earthed circuit.
No other appliance should be on the same
circuit. When replacing the fuse, an ASTA
approved BS1362 type should be fitted to the
fuse carrier; a 13 amp fuse should be used.
11. If an extension cord is needed, use only a 14gauge cord of 5 feet (1,5 m) or less in length.
12. Keep the power cord away from heated surfaces.
13. Never move the walking belt whilst the power
is turned off. Do not operate the treadmill if
the power cord or plug is damaged, or if the
treadmill is not working properly. (See
BEFORE YOU BEGIN on page 4 if the treadmill is not working properly.)
14. Never start the treadmill whilst you are standing on the walking belt. Always hold the
handrails whilst using the treadmill.
15. The treadmill is capable of high speeds.
Adjust the speed in small increments to
avoid sudden jumps in speed.
IMPORTANT PRECAUTIONS
WARNING:
To reduce the risk of burns, fire, electric shock, or injury to persons, read
the following important precautions and information before operating the treadmill.
3
16. To reduce the possibility of the treadmill
overheating, do not operate the treadmill
continuously for longer than one hour.
17. Never leave the treadmill unattended whilst it
is running. Always remove the key when the
treadmill is not in use.
18. Do not attempt to raise, lower, or move the
treadmill until it is properly assembled. (See
ASSEMBLY on page 5, and HOW TO MOVE
THE TREADMILL on page 10.) You must be
able to safely lift 45 pounds (20 kg) to raise,
lower, or move the treadmill.
19. When moving the treadmill or folding the
treadmill to the storage position, make sure
that the storage latch is fully closed.
20. The roller guards must be 1/8 inch (3 mm)
from the rear roller (see the drawing on page
4). Unplug the power cord and adjust the
roller guards, if necessary.
21. Inspect and tighten all parts of the treadmill
every three months.
22. Never insert any object into any opening.
23. Do not attempt to modify the incline of the
treadmill by placing objects under the front
or rear of the treadmill.
24. Always unplug the power cord before performing the maintenance and adjustment
procedures described in this manual. Never
remove the motor hood unless instructed to
do so by an authorised service representative. Servicing other than the procedures in
this manual should be performed by an
authorised service representative only.
25. This treadmill is intended for in-home use
only. Do not use this treadmill in any commercial, rental, or institutional setting.
WARNING: Before beginning this or any exercise program, consult your physician.
This is especially important for persons over the age of 35 or persons with pre-existing health problems. Read all instructions before using. ICON assumes no responsibility for personal injury or property damage sustained by or through the use of this product.
SAVE THESE INSTRUCTIONS
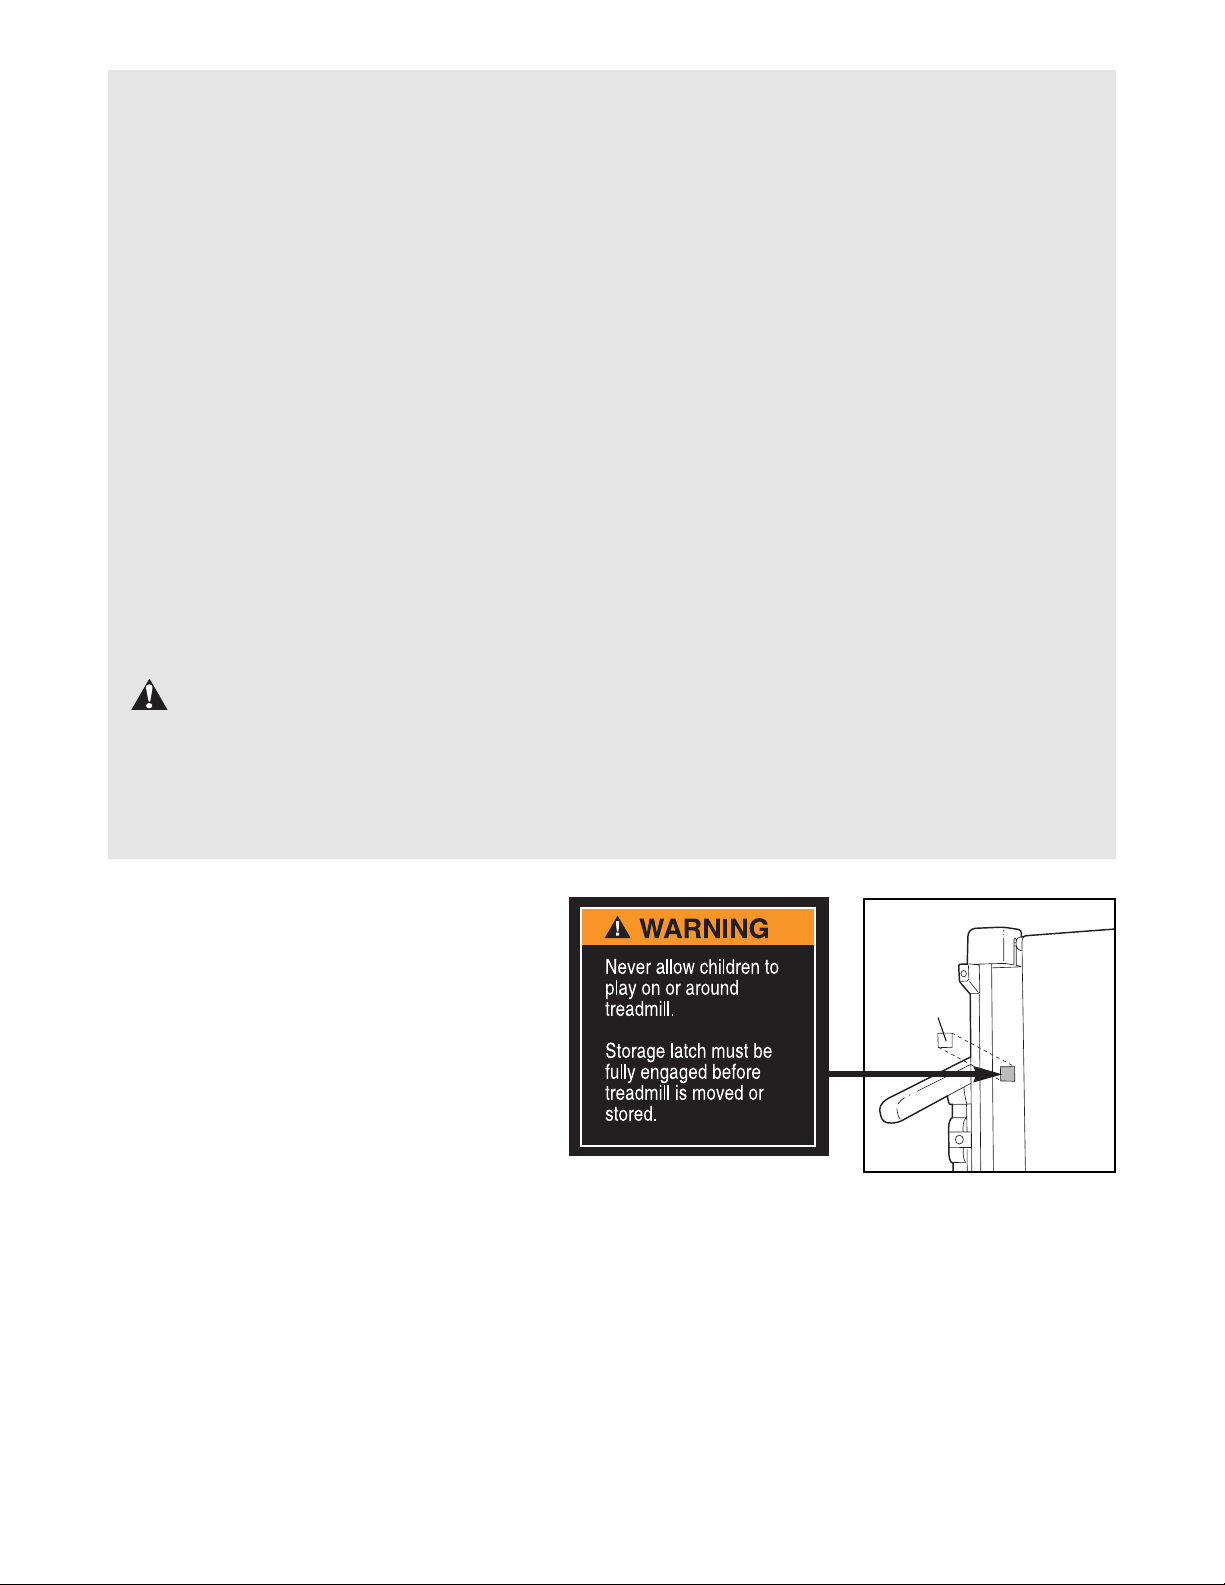
Decal
Refer to the drawing at the right. Locate
the indicated warning decal on the treadmill. The text on the warning decal is in
English. If English is not your native
language, find the sheet of square decals
included with the treadmill. Peel off the
decal that is in your native language, and
press it onto the warning decal so that it
covers the English text.
IMPORTANT: If the warning decal is missing, or if it is not legible, please call our
Customer Service Department to order a
free replacement decal. Apply the decal
in the location shown.
4
BEFORE YOU BEGIN
Thank you for selecting the PROFORM¨325E treadmill. The 325E treadmill combines advanced technology with innovative design to let you enjoy an excellent
form of cardiovascular exercise in the convenience
and privacy of your home. And when youÕre not exercising, the unique 325E can be folded up, requiring
less than half the floor space of other treadmills.
For your benefit, read this manual carefully before
using the treadmill. If you have additional questions,
please call our Customer Service Department at
0345-089009. To help us assist you, please note the
product model number and serial number before calling. The model number of the treadmill is PETL32570.
The serial number can be found on a decal attached
to the treadmill (see the front cover of this manual for
the location).
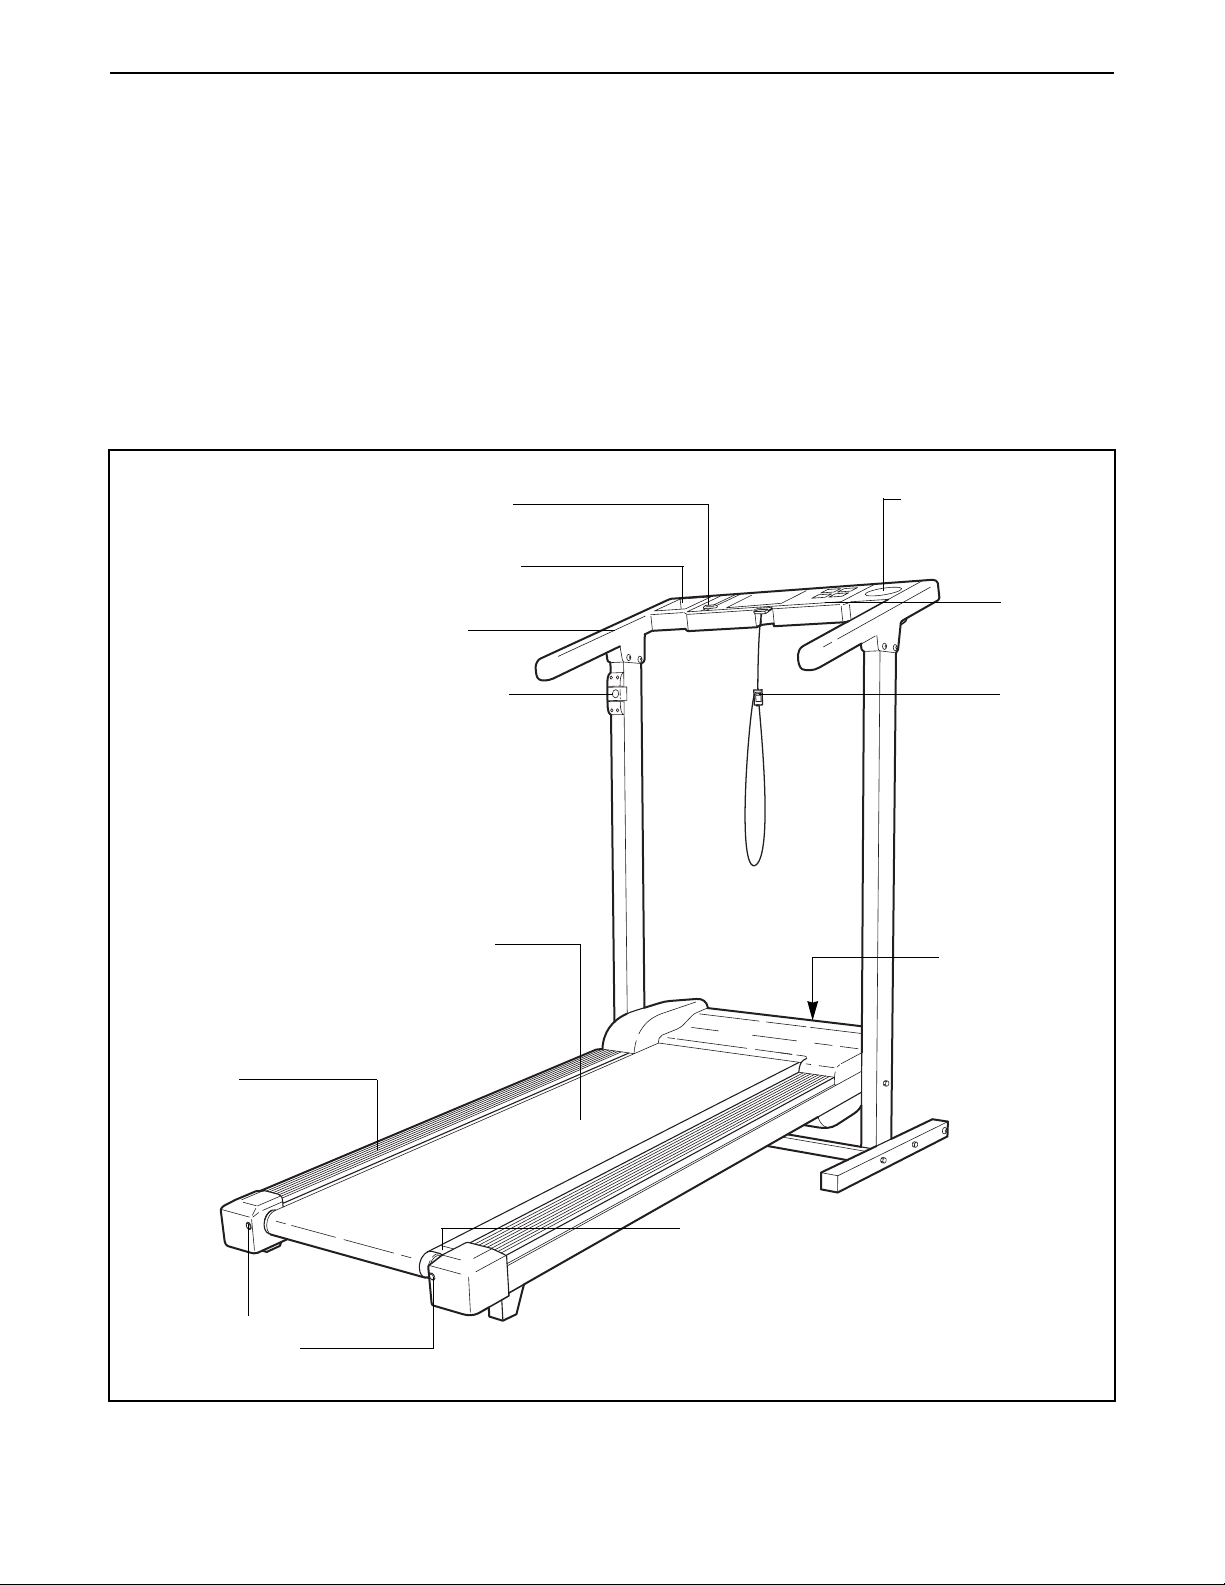
Before reading further, please review the drawing
below and familiarise yourself with the parts that are
labelled.
Handrails
Console
Storage Latch
Speed Control
Key/Clip
Circuit Breaker
Walking Belt
Foot Rails
FRONT
BACK
RIGHT SIDE
Rear Roller
Adjustment Bolts
Water Bottle Holder
(Bottle not included)
Accessory Tray
Roller Guards
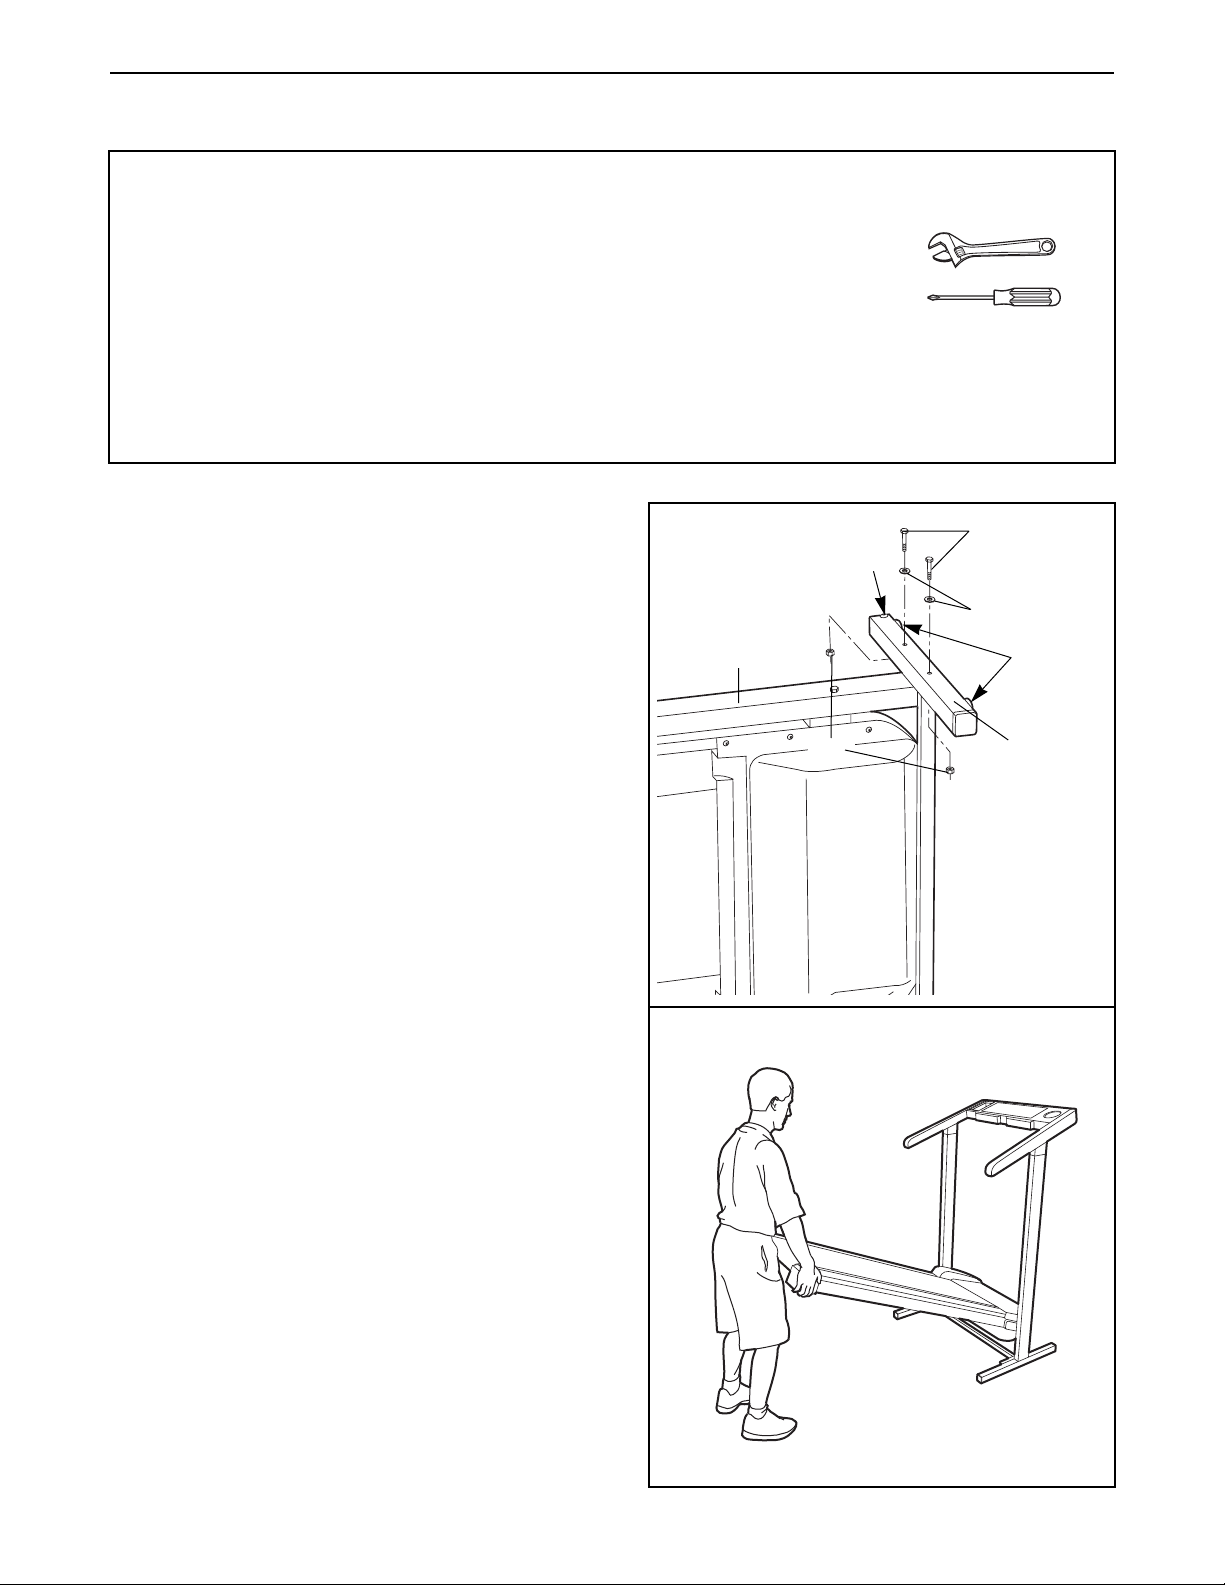
1. With the help of a second person, carefully lay the
treadmill on its side. Position one of the Base Legs
(55) on the base of the Upright (37) as shown. Make
sure that the Base Leg Pads (31) and the Wheel
(34) are in the indicated positions. Attach the Base
Leg with two Base Leg Bolts (28), two Base Leg
Washers (68), and two Base Leg Nuts (61).
Carefully turn the treadmill onto its other side.
Assemble the other Base Leg (55) as described
above.
With the help of a second person, carefully raise the
treadmill to the upright position so the Base Legs
(55) are resting flat on the floor.
2. Hold the treadmill firmly with both hands, and lower
the treadmill to the floor. To decrease the possibili-
ty of injury, bend your legs and keep your back
straight.
2
1
5
ASSEMBLY
Before beginning assembly, carefully read the
following information and instructions:
¥ Assembly requires two people.
¥ Place all parts in a cleared area and remove the
packing materials; do not dispose of the packing
materials until assembly is completed.
¥ As you assemble the treadmill, be sure that all
parts are oriented as shown in the drawings.
The following tools (not included) are required
for assembly:
¥ Two (2) adjustable spanners
¥ One (1) phillips screwdriver
28
68
31
55
34
37
61
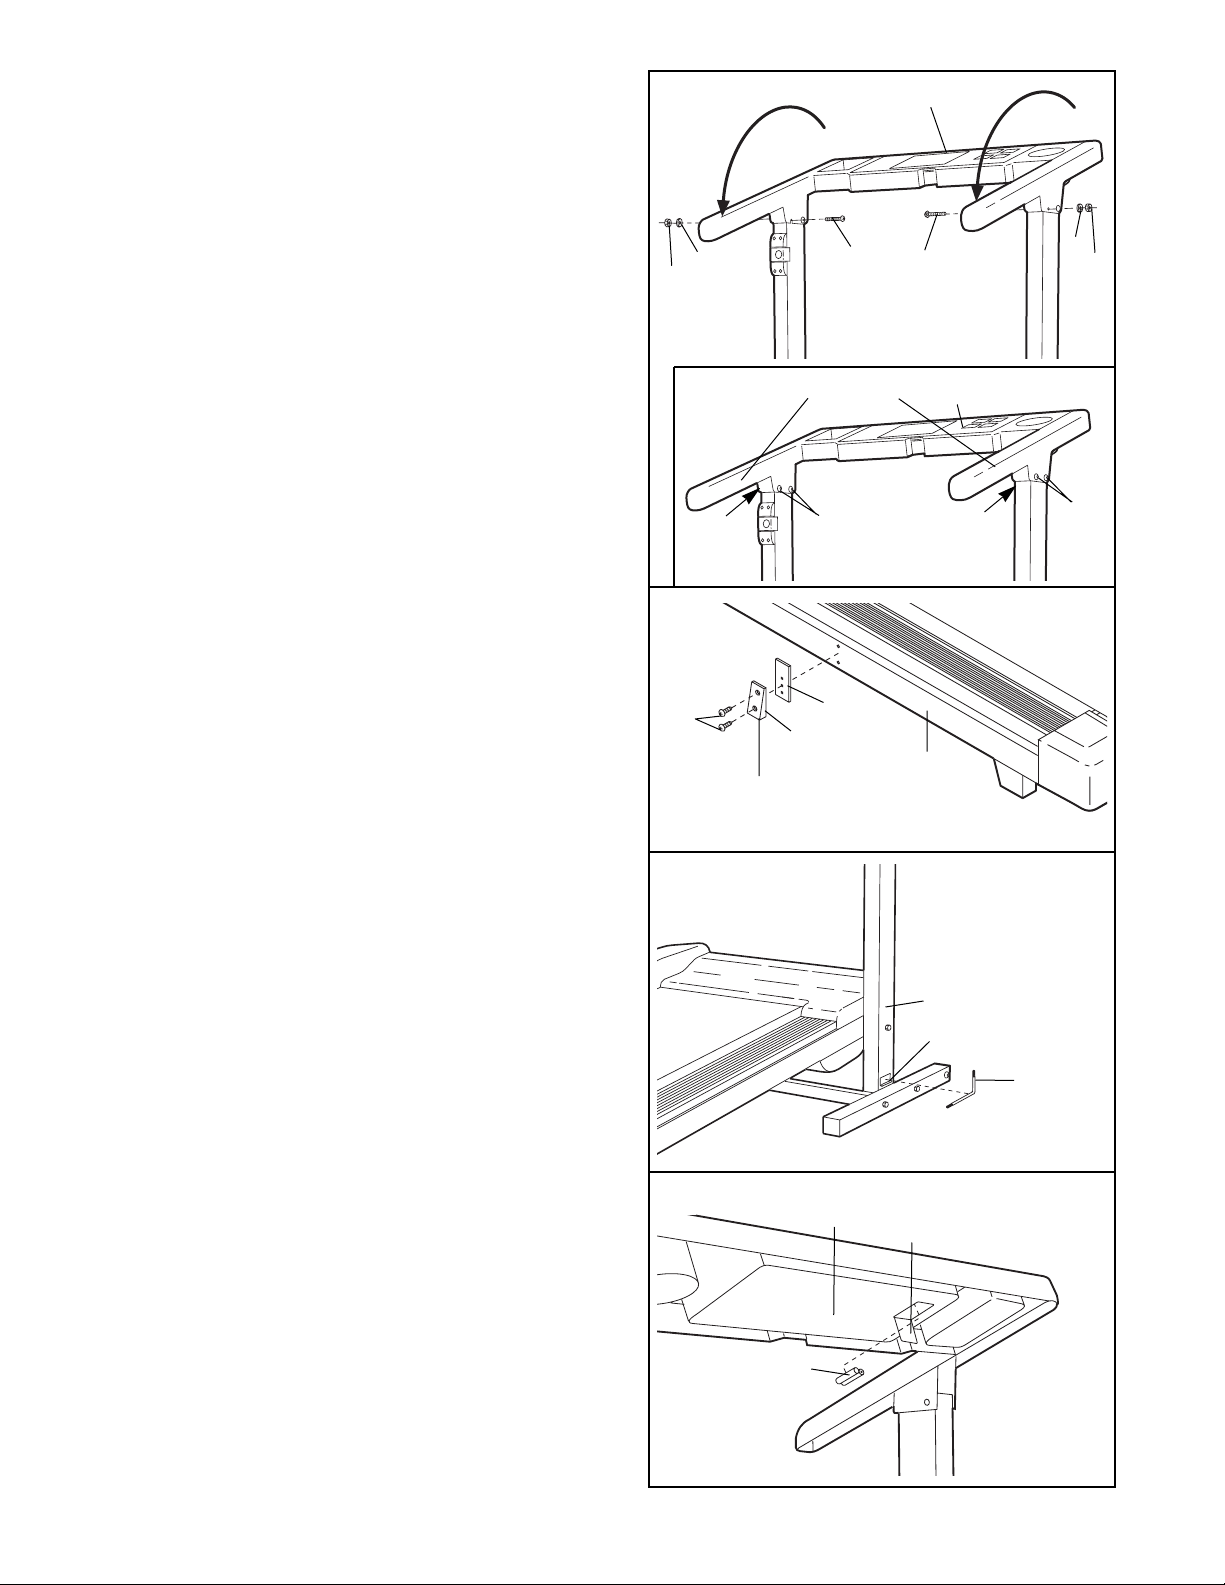
3. Carefully rotate the Console Base (45) to the position shown. Secure the Console Base with two
Console Base Bolts (91), two Console Base
Washers (90), and two Console Base Nuts (11) as
shown.
Refer to the inset drawing. Tighten all four
Console Base Bolts (91) and Console Base Nuts
(11) as tightly as possible. Carefully lift up and
push down on the handrails to make sure that
the Console Base (45) does not move. Regularly
inspect and tighten all four Console Base Bolts
and Console Base Nuts.
4. Attach the Frame Guide (66) and the Frame Guide
Spacer (46) to the left side of the Frame (21) with
two Guide Screws (25). Note: Be careful not to overtighten the Guide Screws. Make sure that the thick
end of the Frame Guide is at the bottom.
5. Remove the backing from the Adhesive Clip (2).
Press the Adhesive Clip onto the base of the Upright
(37) in the indicated location. Press the Allen
Wrench (35) into the Adhesive Clip.
6. The Console (49) requires two "AA" batteries (not
included); alkaline batteries are recommended.
Open the Battery Cover (48) as shown. Press two
batteries into the battery compartment, with the negative ends of the batteries (marked ÒÐÓ) touching the
springs. Close the Battery Cover.
7. Make sure that all parts are properly tightened
before you use the treadmill. To protect the floor or
carpet from damage, place a mat under the
treadmill.
6
3
4
5
6
45
90
11
11
91
91
90
21
35
48
49
Batteries
37
2
66
46
Thick end
25
91
11
91
11
45
Handrails
 Loading...