

Proform 831299262 Owner’s Manual
PRO.FORM
Model No. 831.299262
Serlal No.
Find the serial number In the location
shown below. Write the sedal number
in the space above for reference.
Serial
Number
Decal
E x IE: R C I -%_ I_
EQUIPMENT
USER'S MANUAL
HELPLINE!
1-800-736-6879
SEARS, ROEBUCK AND CO.
HOFFMAN ESTATES, IL 60179
ACAUTION
Read all precautions and Instnm-
Uons intMs manual before using
this equipment. Save tMs manual
for future r_emnce.
Patent Pending
www.proform.com
new products, prizes,
fitness tips, and much more!

PRO.FORM
TABLE OF CONTENTS
IMPORTANT PRECAUTIONS ................................................................. 3
BEFORE YOU BEGIN ....................................................................... 5
ASSEMBLY ............................................................................... 6
OPERATION AND ADJUSTMENT ............................................................. 8
HOW TO FOLD AND MOVE THE TREADMILL .................................................. 19
TROUBLE-SHOOTING ..................................................................... 20
CONDITIONING GUIDELINES ............................................................... 22
PART LIST ............................................................................... 23
ORDERING REPLACEMENT PARTS .................................................. Back Cover
FULL 90-DAY WARRANTY ........................................................... BackCover
Note: An EXPLODED DRAWING isattachedinthe centerof this manual.
2

IMPORTANT PRECAUTIONS
a, WARNING: To the ofb.m e ds orInJ. top o=, ..d ..
following Important precautfons and informatlun be/ore operating the tnmdmliL
1. It Is the responsibility of the owner to ensure
that all users of this treadmill me adequately
Informed of all warnings and precautions.
2. Use the treadmill only as deacdbed.
3. Place the "m_dmlll on a level surface, with at
least eight feet of clearance behind it. Do cot
place the treadmill on any surface that blocks
airoponfogs.Toprotectthefloor or cerpet
from damage, plsce a mat under the treadmill
4> Keet: the treadmill Indoors, sway from mois-
ture and dust. Do not put the treadmill In a
garage or covered patio, sr near water,
5. Do not operate the tmiKImill where earceol
products are used or where Oxygen Is being
admlnlutm,ed.
IS. Kcep children under the age of 12 and pats
away front the treadmill at all Umes.
7. The treadmill should not heuead b/persons
weighing more than 250 pounds.
8. Never allow more than one person on the
treadmill at a time_
9. Wear appropriate exll_lea ling wha.
using the treadmill DO not wear Is_ ufoll-
lug that could become caught In the treadmill.
Athle6c support clothes am recommended for
both men end women. Always weor athletic
shoes. Never use the treadmill with bare feat,
wearing only atocldngs, or Insandals,
10. When cennectlng the power cord (see page 8),
I_ug the power cerd Into s surge suppressor
(not Included) and plug the surge suppressor
Into s grounded drcult capable of carrying lS
or more amps. No other appliance shOuld he
on the eamecirculL Donor uea an extension
cord.
patlon of 450 Joules,The surge suppressor
- m_ he Mecb'lueily rated for 120 volts AC and
15 ampa. To purchase a suede suppressor, see
your local PROFORM dealur or ceil 1-800-366-
7278 and order part m_mbor146148.
12. Keep the power cord and the surge suppres-
sor sway from heated surfaea_
13. Nevor move the weiMng be!t while the powor
Is turmxl off. Oo nof Ol:_lhe _IU If
the power cord or plug is damaged, or If the
tremJmlli Is not working properly. (See
BEFORE YOU BEGIN ot_page 5 ff the tnmd-
rol!! Is cot working wopesty.)
14. Never start thetremlndll widlu you are slund-
IngontheweiMngbeiL Alwaysholdthe •
handreils while ueing the treadmill.
15. Thet,_admlll Is capable of high speeds.
AdJuatthe spoed In small Inc_mts to avofd
sudden lumps In speed.
16. The pulse sensor Is not a medlcei deMce.
Vsrluus factors, including the ume_snlmve-
ment, may affeat the accuracy of heart rate
rendlugs. The pulse sensor lu Infopded ordy
mssu exerclue aid In de_erminlng heart rate
trends in generei.
17. Never _ the tmedmlll une_ended whllu It
Is running= Alwm_ remove the key, unplug
thepmmr ce_d and move the on/off switch to
the off position when the treadmill Is not In
use. (SeeUm drawing on page 5 for the luce-
tion of the on/off switch.)
16. DO not attempt fo rabe, lower, or rcove the
treadmill until It is properly _ (Sco
ASSEMBLY on page 6, and HOW'TO FOLD
AND MOVE THE TR_ on page 19.) You
must be able to sat_ Itft 45 pounds (29 kg) In
ordm'to raLse,lower, or move the tmadmm.
11. Use only a single-outlut surge suppressor that
Is UL 1449 limed as a transient voltage surge
suppressor ('rvss). The surge suppressor
must have a UL suppressed voltage rating of
400 volts or less and s minimum surge dlssl-
19. DOnot change the Incline of the tmedmlll by
plsclng objects tmda_ the treadmill
20. When folding or moving the trNdmlll, make
sure that the storage latch is fully closed.
3
21. When using I-FILcom CD'n and videos, an
eisctt_nic "chirping" sound wlH alert you
when the speed ar_for incline of the tmadmgl
Is about to change. Always listen for the
"chirp" and be prepared for speed and/or In-
cgne changes. In some Instances, the speed
end/or Incline may change before the per-
sonal tndner descdbes the change.
24. Inspect and Ughten all parts of the treadmill
regu_dy.
25. Neve_ Insert or drop any object Into any
opening.
2e.DANGER: Amy, th,pew,r
cord I_istely after use, before cleaning
the treadmill,and beforeperformingthe main-
22. When using PRt.com CD'n and videos, you
can manually override the speed and Incline
settings at any time by pressing the speed
end Incline buttons. However, when the next
"chirp" Is heard, the speed amVor incline will
change to the next eeffings of the CD or video
program.
23. Always remove I-FItJ:om CD'e and videes 27.This treadmill is Intended for In-home use
from your CD player or VCR when you are not only. Do not use this treedmlll in any commeP
using them. cisl, rental, or lestflutional estUng.
tenanes and adjustment procedures de-
scdbed in this manual Never remove the
motor hood unises Instructed to do so by an
sut_riz_ se_lca _ Se_islng
other than theprocadures In this manual
should be pedonned by an authorized esrvica
repmsan_e oNy.
I WARNING: _ beg_nlng this or any exercise Program, comer your physician. This
Is especially impoltant for persons over the age of 35 or persons wlthpre-uisgng health problmmL
Reed el! Instructions before using. SEARS semen no responsibility for pemonal Injury or property
damage sustained by or through the use of this product.
SAVE THESE INSTRUCTIONS
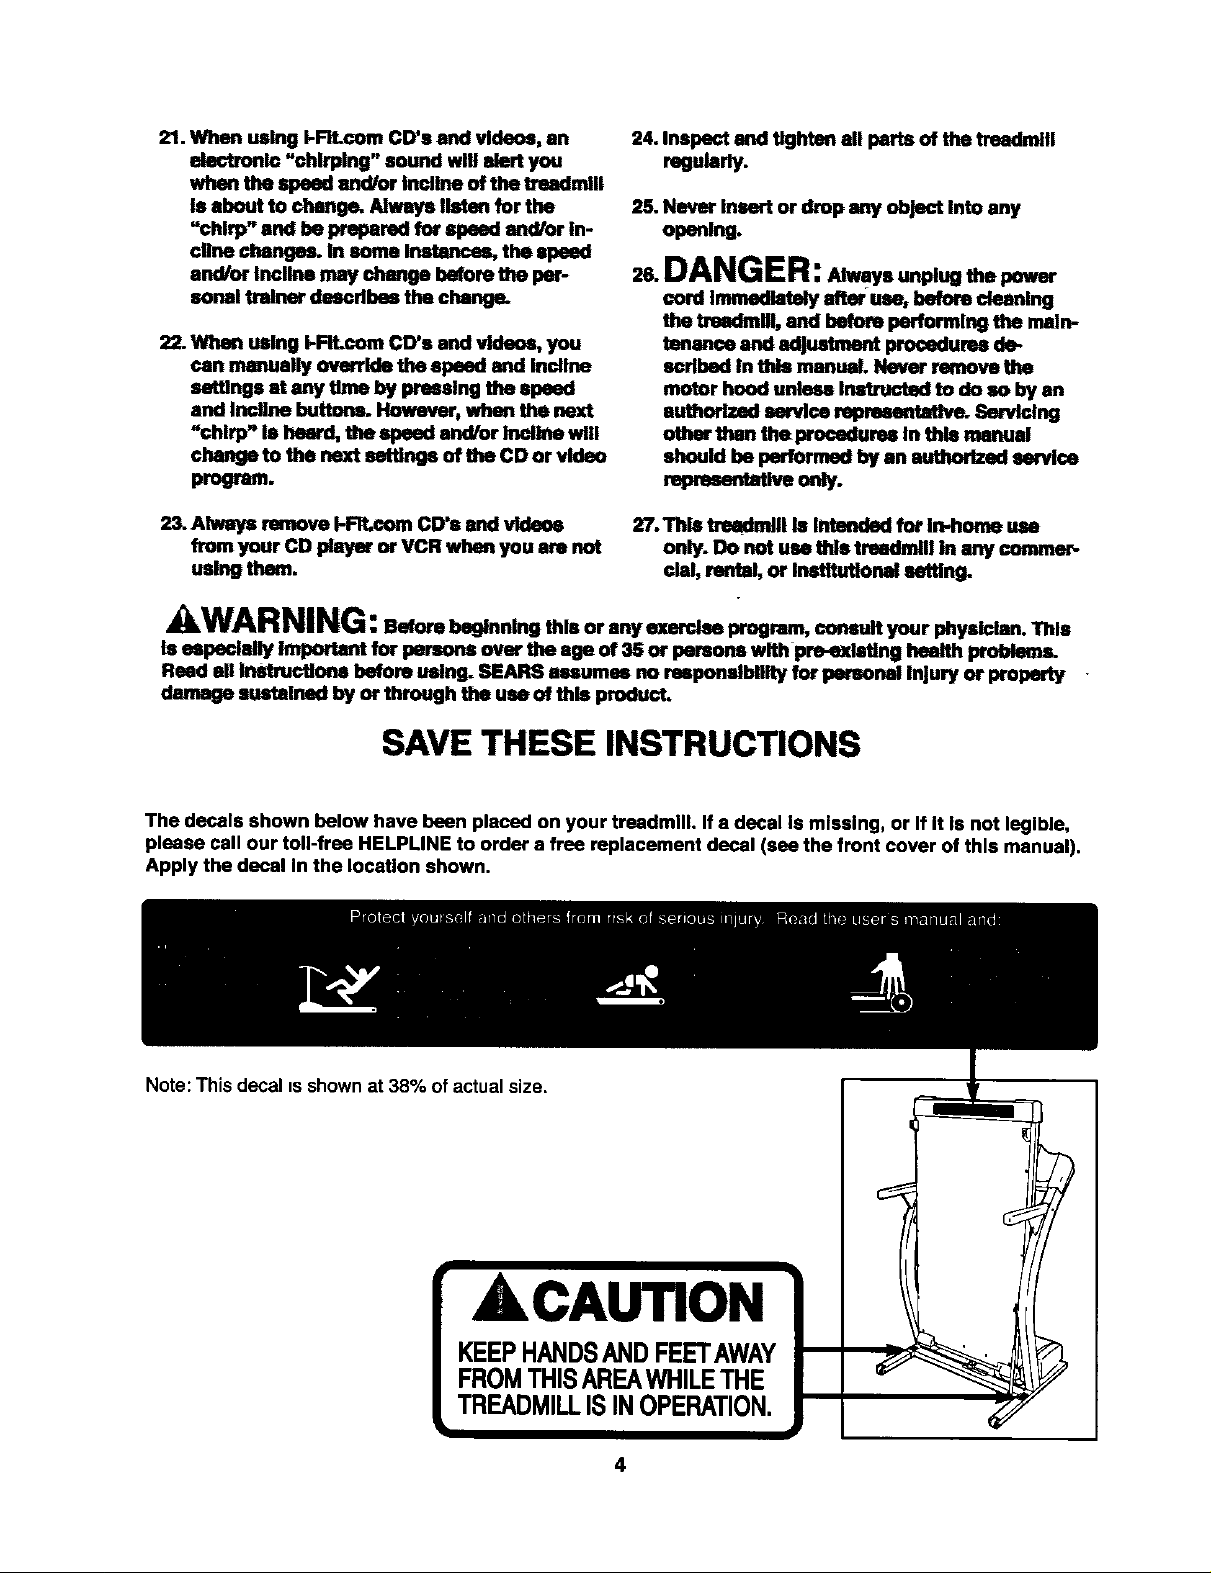
The decals shown below have been placed on your treadmill. If a decal Is missing, or If It Is not legible,
please call our toll-free HELPLINE to order a free replacement decal (see the front cover of this manual).
Apply the decal In the location shown.
Note: This decal is shownat 38% of actual size.
ACAUTION
4
BEFORE YOU BEGIN
Thank you for selectingthe revolutionaryPROFORM ®
735CS treadmill. The 735CS treadmill combinesad-
vanced technologywith innovativedesignto help you
getthe mostfrom yourexercise programin the conve-
nienceand privacyof your home. Andwhen you'renot
exercising,the unique735CS can be folded up, requir-
ingless than half thefloor spaceofothertreadmills.
For your benefit, read this manual carefully before
using the treadmill. Ifyou have additionalquestions,
please call ourtoll-free HELPLINE at 1-800-736-6879,
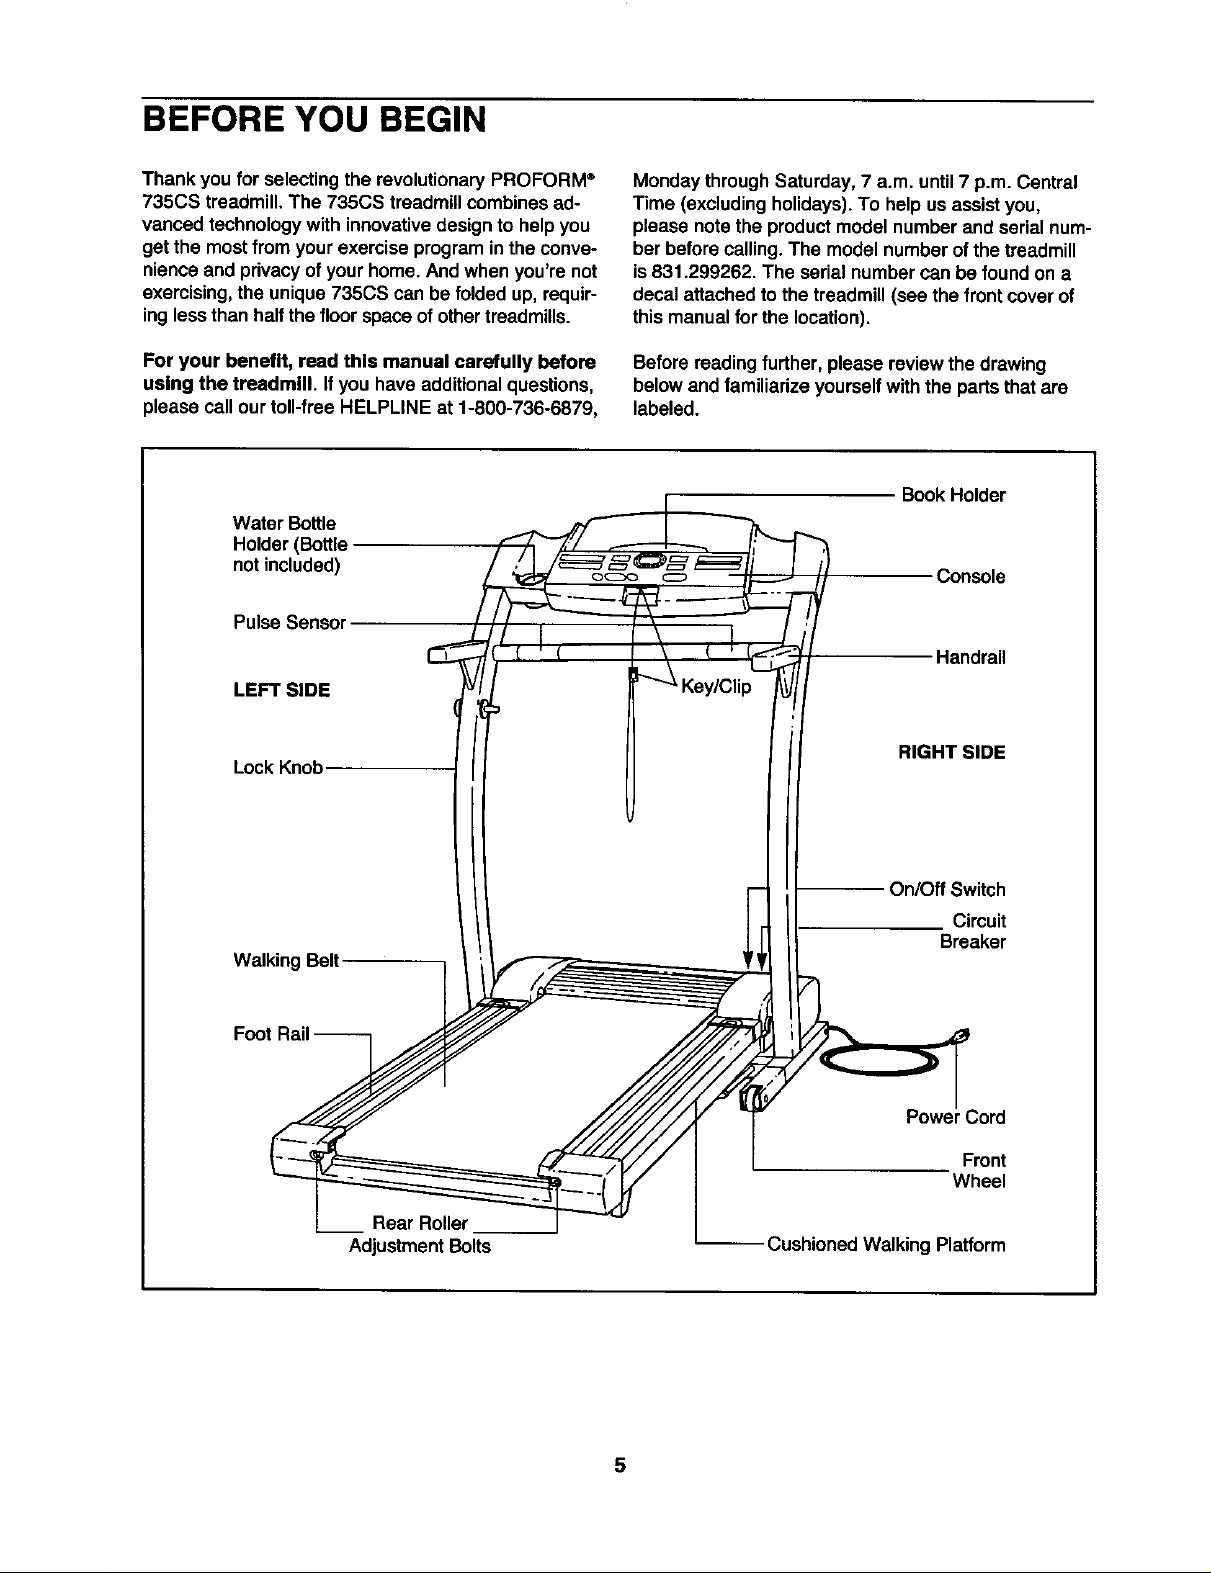
Water Bottle
Holder(Bottle
not included)
PulseSensor
LEFT SIDE
LockKnob
Monday throughSaturday, 7 a.m. until7 p.m. Central
Time (excludingholidays).To help usassistyou,
please notethe productmodel numberand serial num-
ber before calling.The modelnumberof the treadmill
is831.299262. The serial numbercan be foundon a
decal attached to the treadmill (see the front coverof
this manualfor the location).
Before readingfurther, please reviewthe drawing
belowand familiarize yourselfwith the partsthat are
labeled.
BookHolder
Console
Handrail
RIGHT SIDE
Walking Belt
Foot
Rear Roller
AdjustmentBolts
On/Off Switch
Circuit
Breaker
Powe Cord
Front
Wheel
-- Cushioned Walking Platform
5
ASSEMBLY
Assembly requlrea two people. Set the treadmillin a cleared area and remove all packingmaterials. Do not
dispose of the packing materials untilassembly is completed.Assembly requires the Included allen wrenc._
and your own phillips screwdriver (_B_ ===_=..
Note: The undersideof the treadmill walkingbelt is coated withhigh-performance lubricant. During shipping,a
small amount of lubricantmay be transferredtothe top of the walking beltor the shippingcarton.This is a normal
condition anddoes not affect treadmillperformance.If there is lubricanton top of the walking belt, simplywipe off
the lubricantwith a softclothand a mild, non-abrasivecleaner.
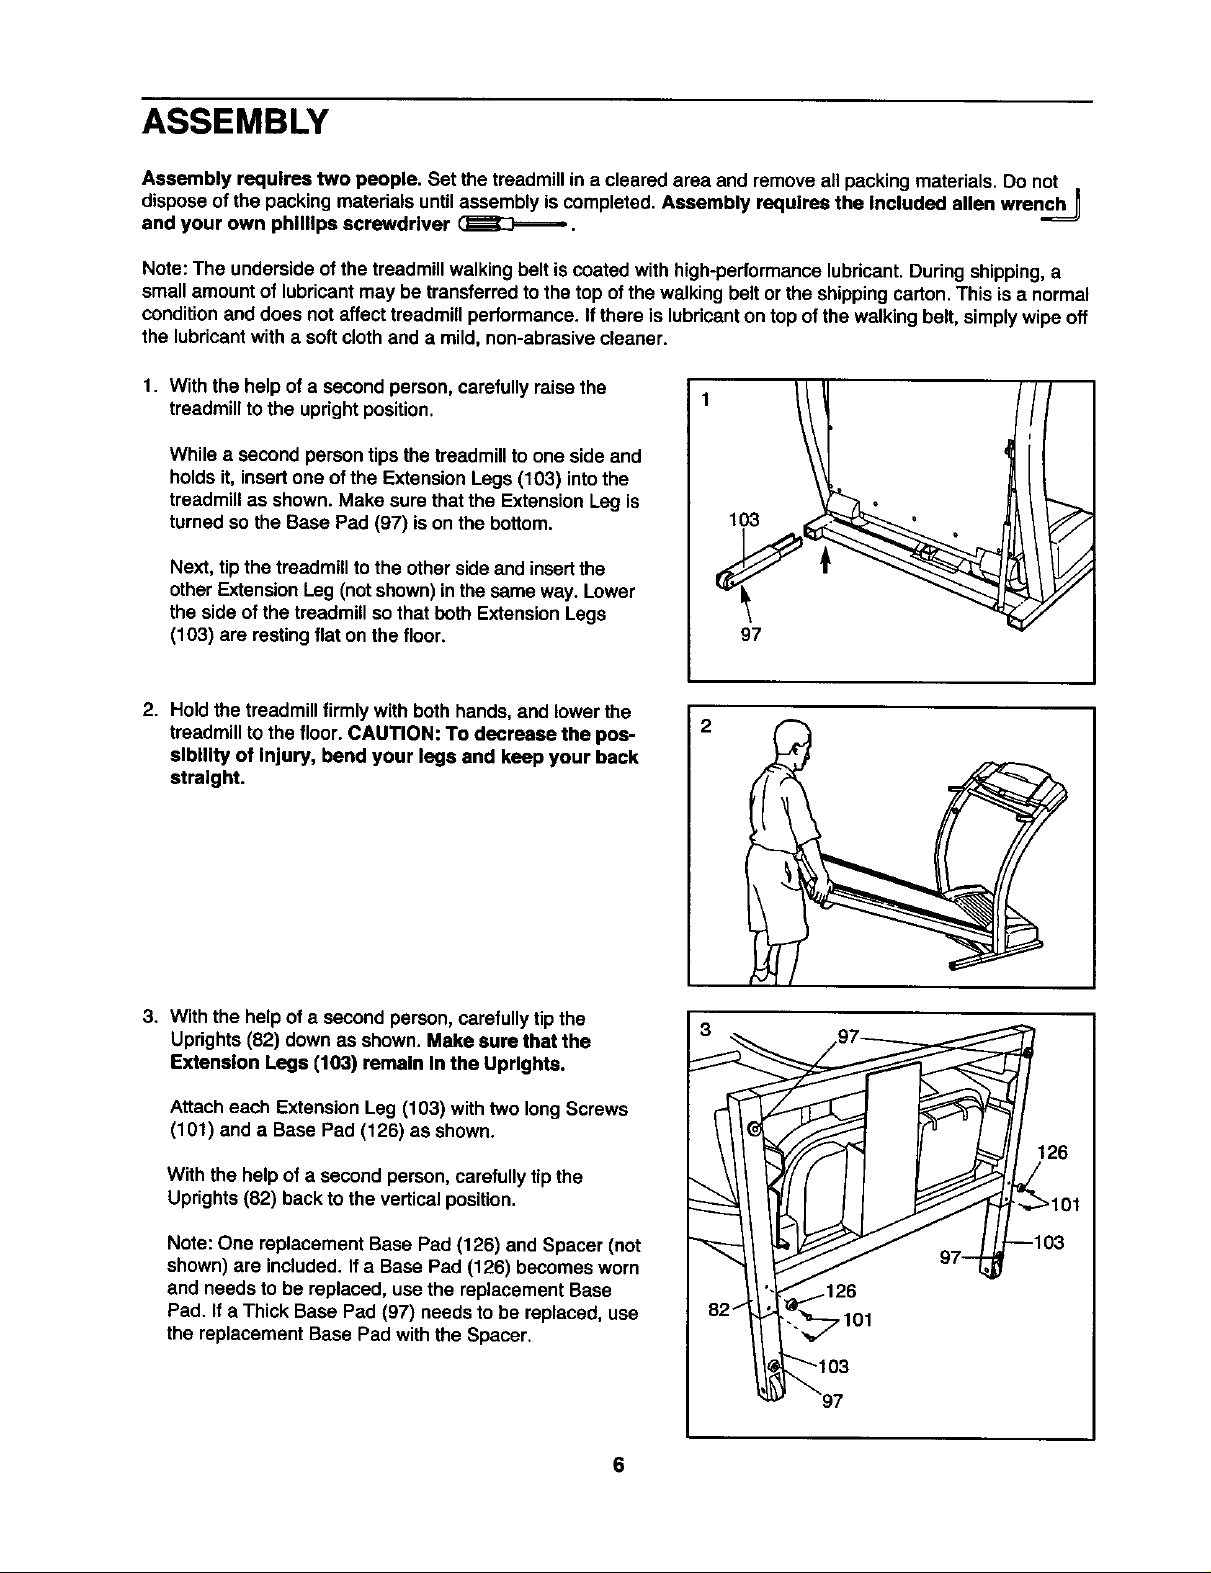
1. With the helpof a second person,carefully raisethe
treadmillto the uprightposition.
While a secondpersontips the treadmillto one side and
holds it, insert one ofthe ExtensionLegs (103) intothe
treadmillas shown. Make sure that the ExtensionLeg is
turned so the Base Pad (97) is onthe bottom.
Next, tip the treadmill to the othersideand insertthe
otherExtensionLeg (notshown)in the same way.Lower
the side of the treadmillso that both ExtensionLegs
(103) are restingflat on the floor.
97
o
2. Holdthe treadmillfirmly with both hands, and lower the
treadmillto the floor. CAUTION: To decrease the pos-
sibility o1 Injury, bend your legs and keep your back
straight.
3. With the helpof a second person,carefullytip the
Uprights(82) down as shown. Make sure that the
Extension Legs (103) remain In the Uprights.
Attach each ExtensionLeg (103) withtwo long Screws
(101) and a Base Pad (126) as shown.
With the helpof a secondperson, carefullytipthe
Uprights(82) backto the verticalposition.
Note: One replacement Base Pad (126) and Spacer (not
shown)are included. If a Base Pad (126) becomesworn
and needs to be replaced, usethe replacementBase
Pad. Ifa Thick Base Pad (97) needs to be replaced, use
the replacement Base Pad withthe Spacer.
2
,101
97
6
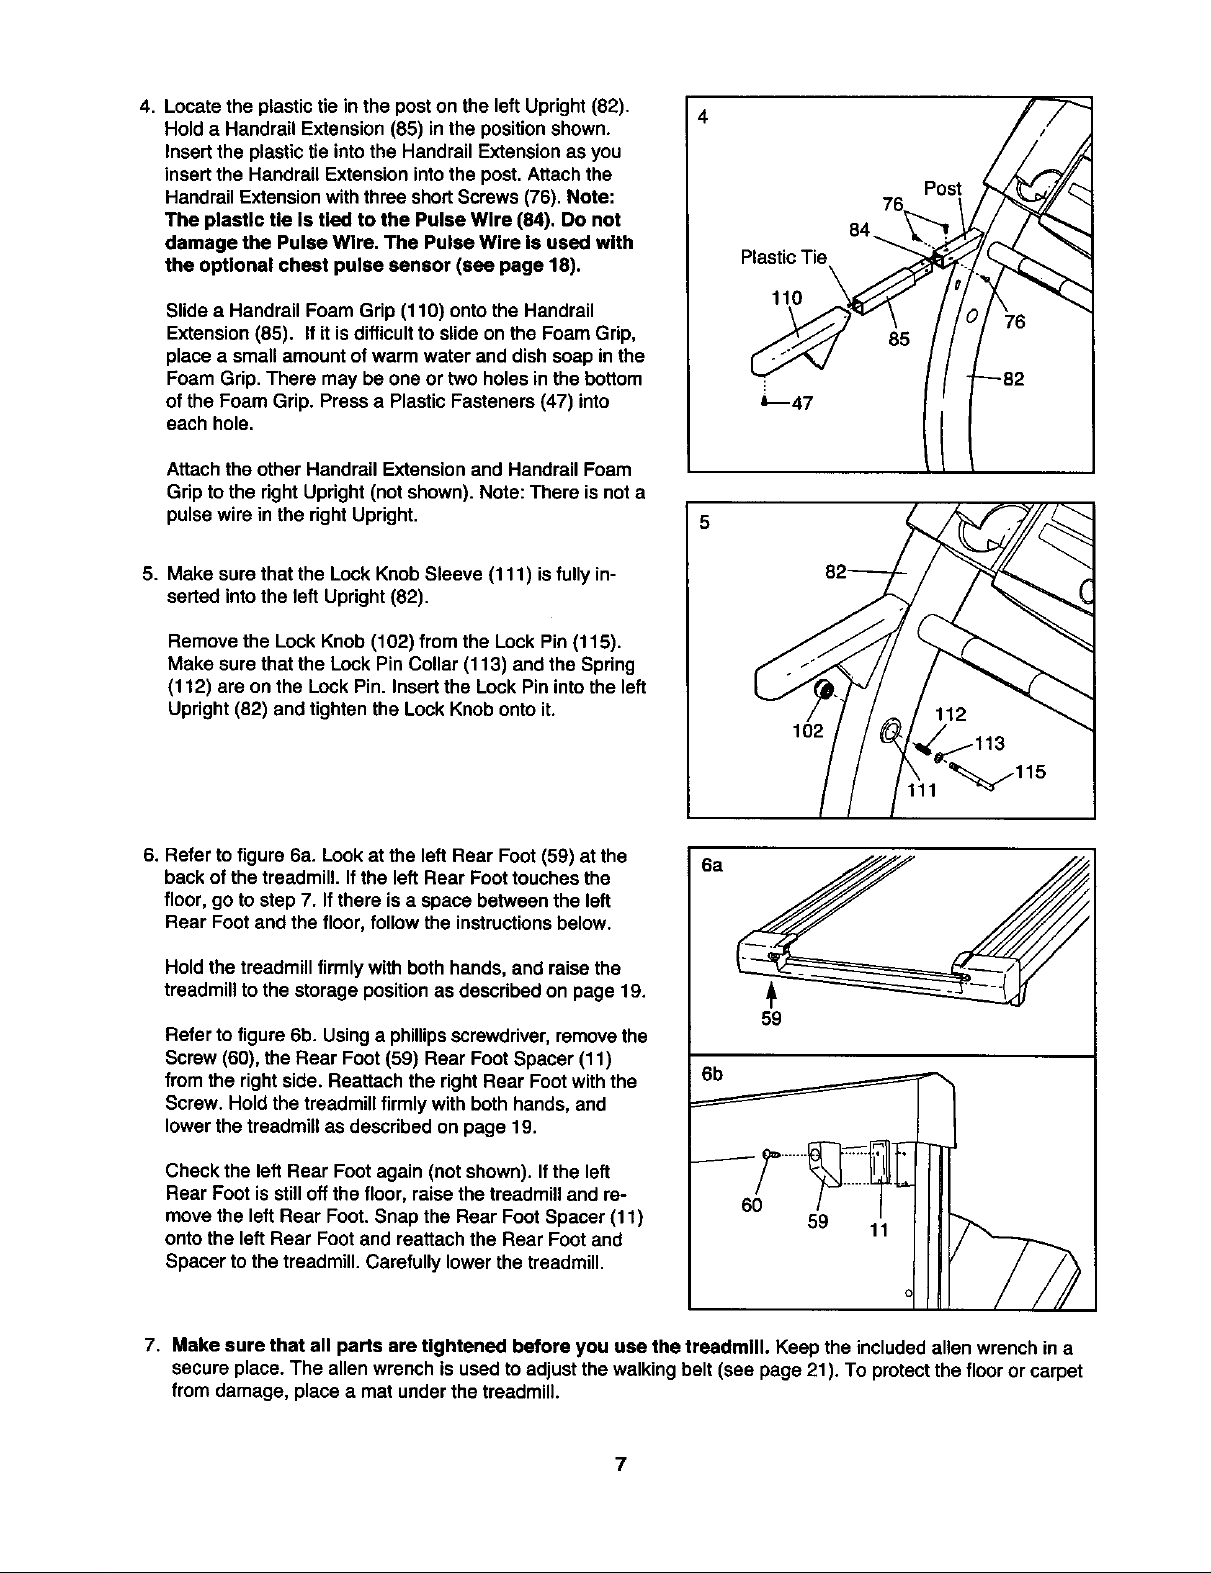
4. Locate the plastictie in the poston the left Upright (82).
Hold a Handrail Extension (85) in the positionshown.
Insertthe plastic tie intothe Handrail Extensionas you
insertthe Handrail Extension intothe post. Attachthe
HandrailExtensionwiththree shortScrews (76). Note:
The plastic Ue Is tied to the Pulse Wire (84). Do not
damage the Pulse Wire. The Pulse Wire Is used with
the optional chest pulse sensor (see page 18).
Slidea Handrail Foam Grip (110) ontothe Handrail
Extension(85). I1it isdifficultto slide on the Foam Grip,
place a small amountofwarm water and dish soap inthe
Foam Grip.There may be one or two holesin the bottom
of the Foam Grip. Pressa PlasticFasteners (47) into
each hole.
Attachthe other Handrail Extensionand HandrailFoam
Gripto the rightUpright (not shown). Note: There isnot a
pulsewire in the right Upright.
5. Make sure thatthe LockKnob Sleeve (111) is fully in-
serted into the left Upright(82).
Remove the Lock Knob (102) from the Lock Pin (115).
Make sure that the Lock Pin Collar(113) and the Spring
(112) are on the Lock Pin. Insertthe Lock Pinintothe left
Upright(82) and tighten the Lock Knobonto it.
Post
PlasticTie
110
76
85
-82
5
102
-115
6. Refer tofigure 6a. Lookat the left Rear Foot (59) at the
backof the treadmill. Ifthe left Rear Foottouchesthe
6a
floor, go tostep 7. Ifthere is a space between the left
Rear Footand the floor, follow the instructionsbelow.
Hold the treadmillfirmly with both hands,and raise the
treadmillto the storage positionas describedon page 19.
59
Refer to figure 6b. Usinga phillipsscrewdriver,removethe
Screw (60), theRear Foot (59) Rear FootSpacer (11)
from the rightside. Reattach the rightRear Footwiththe
6b
Screw. Hold thetreadmill firmly with bothhands, and
lowerthe treadmill as described on page 19.
Check the left Rear Foot again (not shown). If the left
Rear Foot is still off the floor, raise the treadmill and re-
move the left Rear Foot. Snap the Rear Foot Spacer (11)
60
onto the left Rear Foot and reattach the Rear Foot and
Spacer to the treadmill. Carefully lower the treadmill.
7. Make sure that all parts are tightened before you use the treadmill. Keepthe includedallen wrenchin a
secure place.The allenwrench is used to adjust the walkingbelt (see page 21).To protectthe flooror carpet
from damage, place a mat underthe treadmill.
7

OPERATION AND ADJUSTMENT
THE PERFORMANT LUBE TM WALKING BELT
Your treadmill features a walking belt coated with
PERFORMANT LUBE", a high-performancelubricant.
IMPORTANT: Never apply silicone spray or other
substances to the welklng belt or the welklng plat-
form. Such substances will deteriorate the walking
belt and cause excessive wear.
HOW TO PLUG INTHE POWER CORD
DANGER: ,mprope, onm=o.
of the equipment-grounding conductor can
reeult In an inc4"easedrisk of electric shock.
Check with a qualified efecb4cism or sm'vlce.
man If you are In doubt as to whefher the
product is properly grounded. Do not modify
plug i_'ovided with the product--if It will
not fit the outlet, havea proper ouUet
installed by s qualmed electdelam
Yourtreadmill, likeany othertype of sophisticated
electronicequipment,can be seriouslydamaged by
suddenvoltage changesin your home's power.
Voltage surges,spikes,and noiseinterferencecan
resultfromweather conditionsorfrom other appliances
beingturned on or off. To decrease the possibility of
your treadmill being damaged, always use a surge
suppressor with your tresdmlll (sea drawing 1at
the right).
This product is for use on a nominal120-volt circuit,
and has a groundingplugthat looks likethe plug illus-
trated in drawing 1 below. A temporaryadapter that
lookslike the adapter illustratedindrawing2 may be
usedto connectthe surge suppressorto a 2-pole
receptacleas shownin drawing2 ifa properly
groundedoutlet is notavailable.
_-Grounded Outlet Box
_ _._ _SurgeSuppressor
_ _'_...Groundmg Pin
GroundingPm_
GroundedOutlet (_roundingPlug'_
--Grounded OutletBox
J=_,_._da Surge Suppressor
Adapter
To purchase a surge suppressor, sea your local
PROFORM dealer or call toll-free 1-800-366-7278
and order part number 146148. Use only a single-
outletsurge suppressorthat is UL 1449 listed as a
transientvoltage surgesuppressor(TVSS). The surge
suppressormusthave a UL suppressed voltageratmg
of400 volts or lessand a minimumsurgedissipationof
450 joules. The surge suppressormustbe electrically
rated for 120 voltsAC and 15 amps,
This product must be grounded. If it should malfunc-
tionor break down, groundingprovidesa path of least
resistancefor electriccurrentto reduce the riskof elec-
tric shock.Thisproduct is equipped witha cordhaving
an equipment-groundingconductorand a grounding
plug,Plug the power cord Into a surge suppressor,
and plug the surge suppressor Into an appropriate
outlet that Is properly Installed and grounded In
accordance with all local codes and ordinances.
Important: The treadmill Is not compatible with
GFCl-equlpped outlets.
The temporary adaptershould be used only untila
properlygroundedoutlet (drawing 1) can be installed
bya qualifiedelectncian.
The green-coloredrigid ear, lug, orthe likeextending
from the adapter must be connectedtoa permanent
groundsuch as a properlygrounded outletbox cover.
Whenever the adapter is used itmust be heldin place
by a metal screw. Some 2-pole receptacle outlet box
covers are not grounded. Contact a quellfled elec-
trfclan to determine If the outlet boxcover Is
grounded before using an adapter.
8
 Loading...