

Page 1
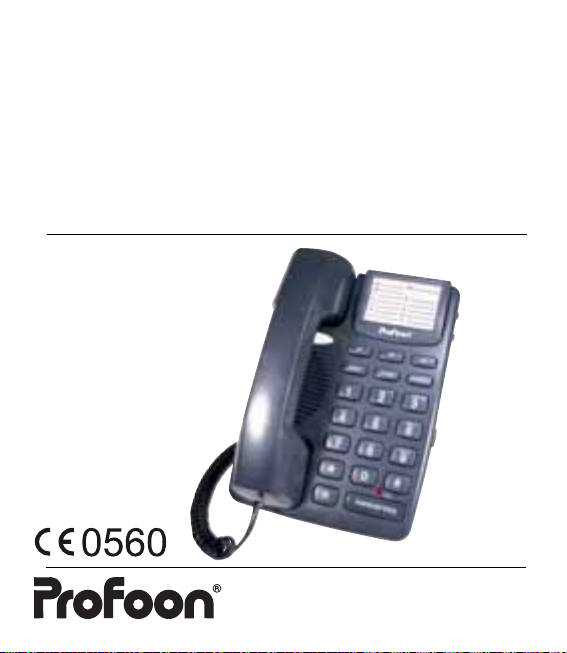
GEBRUIKSAANWIJZING
MODE D’EMPLOI
USERS MANUAL
GEBRAUCHSANWEISUNG
MODO DE EMPLEO
MANUAL DE UTILIZAÇÃO
TX-555
Page 2

2
Page 3
NL: HET TOESTEL VERWIJDEREN (MILIEU)
Op het einde van de levenscyclus van het product mag u dit product niet bij het normale
huishoudelijke afval gooien, maar moet u het naar een inzamelpunt brengen voor de
recycling van elektrische en elektronische apparatuur.
FR: MISE AU REBUT DE L’APPAREIL (ENVIRONNEMENT)
Au terme du cycle de vie de ce produit, vous ne devez pas jeter le produit dans les déchets
ménagers ordinaires mais le déposer dans un point de collecte pour le recyclage des équipements
électriques et électroniques.
GB: DISPOSAL OF THE DEVICE (ENVIRONMENT)
At the end of the product lifecycle, you should not throw this product into the normal household
garbage but bring the product to a collection point for the recycling of electrical and electronic
equipments.
D: ENTSORGUNG DES GERÄTS (UMWELTSHUTZ)
Am Ende der Lebensdauer des Produkts sollten Sie dieses Produkt nicht in den normalen
Hausmüll werfen, sondern bei einer Sammelstelle für die Aufbereitung von elektrischen und
elektronischen Geräten abgeben.
ES: ELIMINACIÓN DEL EQUIPO (MEDIO AMBIENTE)
Al fi nal del ciclo de la vida del producto, no debe tirarlo a la basura normal de la casa, sino llevarlo
a un punto de recogida para reciclaje de productos eléctricos y electrónicos.
PT: AMBIENTE
Tenha em conta que quando este equipamento já não tiver uso, deve ir para reciclagem. Não
coloque este produto juntamente com lixo doméstico.
Service
Aziëlaan 12
Help
‘s-Hertogenbosch
WWW.HESDO-SERVICE.NL
[email protected]
+31 (0) 73 6411 355
3
3
Page 4

Verklaring van netwerkcompatibiliteit . . . . . . . . . . . . . . . . . . . . . . . . . . . . . . . . . . . . . 4
NL
Verklaring van conformiteit. . . . . . . . . . . . . . . . . . . . . . . . . . . . . . . . . . . . . . . . . . . . . 4
Installatie . . . . . . . . . . . . . . . . . . . . . . . . . . . . . . . . . . . . . . . . . . . . . . . . . . . . . . . . . . 4
Gebruik. . . . . . . . . . . . . . . . . . . . . . . . . . . . . . . . . . . . . . . . . . . . . . . . . . . . . . . . . . . . 5
Geheugens. . . . . . . . . . . . . . . . . . . . . . . . . . . . . . . . . . . . . . . . . . . . . . . . . . . . . . . . . 6
Voice Mail. . . . . . . . . . . . . . . . . . . . . . . . . . . . . . . . . . . . . . . . . . . . . . . . . . . . . . . . . . 7
Onderhoud . . . . . . . . . . . . . . . . . . . . . . . . . . . . . . . . . . . . . . . . . . . . . . . . . . . . . . . . . 7
Déclaration de comptabilité de réseau . . . . . . . . . . . . . . . . . . . . . . . . . . . . . . . . . . . . 8
FR
Déclaration de conformité . . . . . . . . . . . . . . . . . . . . . . . . . . . . . . . . . . . . . . . . . . . . . 8
Installation . . . . . . . . . . . . . . . . . . . . . . . . . . . . . . . . . . . . . . . . . . . . . . . . . . . . . . . . . 8
Utilisation . . . . . . . . . . . . . . . . . . . . . . . . . . . . . . . . . . . . . . . . . . . . . . . . . . . . . . . . . . 9
Mémoires . . . . . . . . . . . . . . . . . . . . . . . . . . . . . . . . . . . . . . . . . . . . . . . . . . . . . . . . . . 10
Voice Mail. . . . . . . . . . . . . . . . . . . . . . . . . . . . . . . . . . . . . . . . . . . . . . . . . . . . . . . . . . 11
Entretien . . . . . . . . . . . . . . . . . . . . . . . . . . . . . . . . . . . . . . . . . . . . . . . . . . . . . . . . . . . 11
Declaration of networkcompatibility . . . . . . . . . . . . . . . . . . . . . . . . . . . . . . . . . . . . . . 12
Declaration of conformity . . . . . . . . . . . . . . . . . . . . . . . . . . . . . . . . . . . . . . . . . . . . . . 12
GB
Installation . . . . . . . . . . . . . . . . . . . . . . . . . . . . . . . . . . . . . . . . . . . . . . . . . . . . . . . . . 12
How to use . . . . . . . . . . . . . . . . . . . . . . . . . . . . . . . . . . . . . . . . . . . . . . . . . . . . . . . . . 13
Memories . . . . . . . . . . . . . . . . . . . . . . . . . . . . . . . . . . . . . . . . . . . . . . . . . . . . . . . . . . 14
Voice Mail (Message waiting). . . . . . . . . . . . . . . . . . . . . . . . . . . . . . . . . . . . . . . . . . . 14
Maintenance. . . . . . . . . . . . . . . . . . . . . . . . . . . . . . . . . . . . . . . . . . . . . . . . . . . . . . . . 15
Erklärung betreffend Netzwerk-Vereinbarkeit. . . . . . . . . . . . . . . . . . . . . . . . . . . . . . . 16
Erklärung zur Konformität. . . . . . . . . . . . . . . . . . . . . . . . . . . . . . . . . . . . . . . . . . . . . . 16
D
Installation . . . . . . . . . . . . . . . . . . . . . . . . . . . . . . . . . . . . . . . . . . . . . . . . . . . . . . . . . 16
Gebrauch . . . . . . . . . . . . . . . . . . . . . . . . . . . . . . . . . . . . . . . . . . . . . . . . . . . . . . . . . . 17
Voice Mail. . . . . . . . . . . . . . . . . . . . . . . . . . . . . . . . . . . . . . . . . . . . . . . . . . . . . . . . . . 18
Speicher . . . . . . . . . . . . . . . . . . . . . . . . . . . . . . . . . . . . . . . . . . . . . . . . . . . . . . . . . . . 18
Wartung . . . . . . . . . . . . . . . . . . . . . . . . . . . . . . . . . . . . . . . . . . . . . . . . . . . . . . . . . . . 19
Declaración de compatibilidad con redes . . . . . . . . . . . . . . . . . . . . . . . . . . . . . . . . . 20
Declaración de conformidad. . . . . . . . . . . . . . . . . . . . . . . . . . . . . . . . . . . . . . . . . . . . 20
E
Instalación . . . . . . . . . . . . . . . . . . . . . . . . . . . . . . . . . . . . . . . . . . . . . . . . . . . . . . . . . 20
Instrucciones para su uso . . . . . . . . . . . . . . . . . . . . . . . . . . . . . . . . . . . . . . . . . . . . . 21
Memorias . . . . . . . . . . . . . . . . . . . . . . . . . . . . . . . . . . . . . . . . . . . . . . . . . . . . . . . . . . 22
Buzon de vos . . . . . . . . . . . . . . . . . . . . . . . . . . . . . . . . . . . . . . . . . . . . . . . . . . . . . . . 23
Mantenimiento . . . . . . . . . . . . . . . . . . . . . . . . . . . . . . . . . . . . . . . . . . . . . . . . . . . . . . 23
Declaração de compatibilidade de rede . . . . . . . . . . . . . . . . . . . . . . . . . . . . . . . . . . . 24
Declaração de conformidade . . . . . . . . . . . . . . . . . . . . . . . . . . . . . . . . . . . . . . . . . . . 24
PT
Instalação . . . . . . . . . . . . . . . . . . . . . . . . . . . . . . . . . . . . . . . . . . . . . . . . . . . . . . . . . . 24
Utilização . . . . . . . . . . . . . . . . . . . . . . . . . . . . . . . . . . . . . . . . . . . . . . . . . . . . . . . . . . 25
Memória . . . . . . . . . . . . . . . . . . . . . . . . . . . . . . . . . . . . . . . . . . . . . . . . . . . . . . . . . . . 26
Mensagem de voz . . . . . . . . . . . . . . . . . . . . . . . . . . . . . . . . . . . . . . . . . . . . . . . . . . . 26
Manutenção . . . . . . . . . . . . . . . . . . . . . . . . . . . . . . . . . . . . . . . . . . . . . . . . . . . . . . . . 26
4
4
Page 5

NL
VERKLARING VAN
NETWERKCOMPATIBILITEIT
De Profoon TX-555 is ontworpen voor
gebruik op de ‘openbare geschakelde
telefonie netwerken (analoog enkellijns)’ van telefonie- en kabelmaatschappijen binnen de Europese Unie.
Per land danwel provider kan een
ander aansluitsnoer met stekker
benodigd zijn.
De Profoon TX-555 voldoet aan de
essentiële voorwaarden en voorzieningen zoals omschreven in de
Europese richtlijn 1999/5/EC.
VERKLARING VAN CONFORMITEIT
De verklaring van
conformiteit is
beschikbaar op
de website WWW.PROFOON.COM
INSTALLATIE
HOORN:
Het krulsnoer onder in de telefoonhoorn pluggen en de andere zijde
aan de linkerzijde van het basisdeel
inpluggen. De stekkertjes aandrukken
totdat deze vastklikken.
TELEFOON:
Het modulaire stekkertje aan het
telefoonsnoer inpluggen aan de achterzijde van het basisdeel (TEL.LINE).
De telefoonsteker in uw telefoon contactdoos steken.
WANDMONTAGE:
De TX-555 kan als wandtoestel
gebruikt worden. Boor boven elkaar
en met een onderlinge afstand van
8.3cm twee gaten in de wand en
plaats hierin plug en schroef. Laat de
kop van de schroef enkele millimeters
uitsteken.
Hang de telefoon op door de uitsparingen aan de achterzijde van
het toestel over de schroeven in de
muur te schuiven en de telefoon naar
beneden te drukken. Eventueel het
telefoon aansluitsnoer netjes met
kabelbeugeltjes wegwerken.
DATA POORT:
De TX-555 is aan de achterzijde voorzien van een DATA POORT. Gebruik
deze aansluiting om een
computer-modem, een
DATA PORT
B A
fax, een NummerMelder,
en dergelijke op de telefoonlijn aan te sluiten.
De aansluiting is voor
een 6P2C modulair
plugje (RJ11).
5
5
aansluiting
DATA P ORT
in TX-555
Page 6
Let op dat, zodra en zolang het op
de DATA POORT aangesloten toestel
verbinding heeft met de telefoonlijn, u
de TX-555 niet kunt gebruiken. Dit om
te voorkomen dat de data-overdracht
gestoord wordt.
TOON/PULS:
De TX-555 is geschikt om telefoonnummers te kiezen met toontjes
(DTMF) of met puls (het draaischijfprincipe). Met de TONE/PULSE
schakelaar aan de achterzijde van de
telefoon kunt u het gewenste systeem
instellen.
GEBRUIK
OPGEBELD WORDEN:
Het volume van de bel is instelbaar
met de HI-LO-OFF schakelaar.
Neem de hoorn op en beantwoord de
oproep.
UITBELLEN:
Neem de hoorn op, wacht op de kiestoon en toets via het toetsenbord het
telefoonnummer in.
HANDENVRIJ:
Druk toets HANDSFREE in om de
handenvrij functie in te schakelen. Het
volume is instelbaar met de schuifregelaar aan de rechterzijde van de
telefoon.
LAATSTE NUMMER GEHEUGEN:
Voor het geval de andere kant in
gesprek was of u wilt het nummer
nogmaals kiezen, wordt het laatst
gekozen nummer door de TX-555
onthouden:
1. neem de hoorn op en wacht op de
kiestoon
2. druk eenmaal op toets P/REDIAL;
het laatst gekozen nummer wordt
nu automatisch opnieuw gekozen
De lengte van dit geheugen bedraagt
32 cijfers.
GESPREKKEN DOORVERBINDEN:
Gebruik de R-toets om op sommige
(huis- of kantoor-) centrales gesprekken door te verbinden. Afhankelijk
van uw centrale kunt u dit doen met
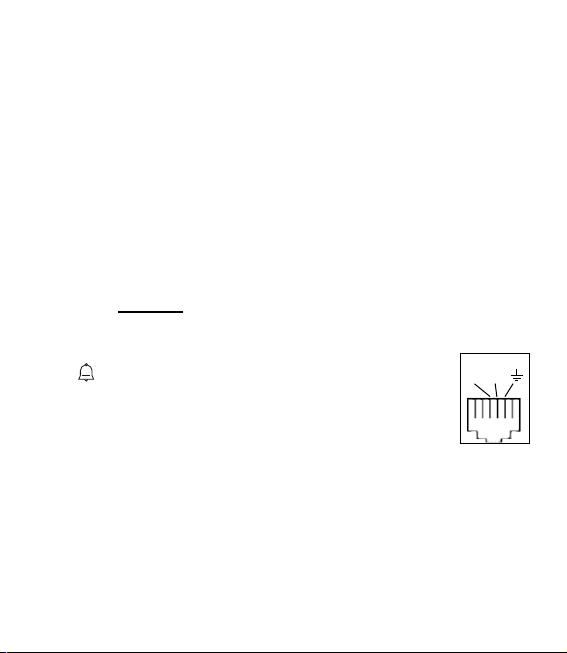
‘AARDE’ of met ‘FLASH’.
Raadpleeg hiervoor
de gebruiksaanwijzing
TEL LINE
B A
van uw huis- of kantoorcentrale. Met de keuzeschakelaar aan de
onderzijde van de
telefoon stelt u deze
functie in.
aansluiting
AARDE in
TX-555
Bij keuze FLASH: De verbrekingstijd
bedraagt 100mS.
6
6
Page 7

PAUZE:
Indien u telefoneert via een huis- of
kantoorcentrale is het raadzaam om
na het nummer voor de buitenlijn
(meestal een 0 of een 9) een pauze
mee te programmeren; druk hiertoe
tijdens het telefoneren eenmaal op
toets P/REDIAL.
TELEDIENSTEN:
De toetsen * (sterretje) en # (hekje)
zijn functietoetsen bij diverse telediensten (teleshoppen, telebankieren, etc)
en informatienummers. Ook kunnen
deze toetsen nodig zijn bij het uitvoeren van diverse functies bij huis- of
kantoorcentrales of andere telecommunicatie apparaten. Raadpleeg
hiervoor de betreffende gebruiksaanwijzing of dienst.
HOORNVERSTERKING:
Met de NORM HIGH schakelaar
aan de rechterzijde kunt u het ontvangst-volume van de hoorn extra
versterkt laten klinken. Selecteer
stand HIGH voor een hard volume;
selecteer stand NORM voor een normaal ontvangst volume.
GEHEUGENS
De TX-555 heeft een direct toegankelijk nummergeheugen voor 3 zeer fre-
quent gekozen telefoonnummers en
een geheugen voor 10 zogeheten
2-toets nummergeheugens die via het
toetsenbord toegankelijk zijn.
De lengte van elk geheugennummer
mag maximaal 16 cijfers bedragen.
PROGRAMMEREN:
1. neem de hoorn op en leg deze
naast het toestel
2. druk eenmaal op knop STORE
3. voer via het toetsenbord het
telefoonnummer in
4. druk nogmaals op STORE
5. druk een van de drie directe
geheugentoetsen (M-1, M-2, M-3)
of druk een van de 10 toetsen (0-9)
van het toetsenbord in om het
nummer als een indirect geheugen nummer op te slaan
6. herhaal stap 2-5 voor de overige
nummers
7. leg de hoorn neer.
UITKIEZEN DIRECTE GEHEUGENS:
1. neem de hoorn op of druk toets
HANDSFREE en wacht op de
kiestoon
2. druk op een van de gewenste
direct-geheugentoetsen (M-1, M-2
of M-3)
3. het nummer wordt nu automatisch
gekozen.
7
7
Page 8

UITKIEZEN 2-TOETS GEHEUGENS:
1. neem de hoorn op en wacht op de
kiestoon
2. druk eenmaal op toets MEMO
3. druk op de gewenste toets (0-9)
van het toetsenbord
4. het nummer wordt nu automatisch
gekozen.
Opmerkingen:
Bij het telefoneren via een huis- of
kantoor centrale is het raadzaam om
een pauze mee te programmeren; zie
hiervoor het hoofdstuk “PAUZE”.
Het is niet mogelijk een geheugen te
wissen. Wel kan een nieuw nummer
over het oude nummer geprogrammeerd worden, dit oude nummer
vervalt dan.
VOICE MAIL
Indien u uw Voice Mail heeft ingeschakeld, dan wordt de opbeller na
5 belsignalen doorgeschakeld naar
uw persoonlijke mail-box alwaar hij/zij
een boodschap voor u kan achterlaten.
Bij de TX-555 wordt dit aangegeven
door het knipperen van het lampje
met het Voice Mail symbool ( ).
Let op dat de Voice Mail melding ook
geactiveerd wordt indien de opbeller
geen bericht achterlaat of als u uw
VoiceMail bij de telefoonmaatschappij
niet heeft ingeschakeld.
Zodra u de hoorn van deze TX-555
opneemt stopt het lampje met knipperen (stopt de Voice Mail Indicatie);
het is dus aan te raden om als eerste
gesprek uw Voice Mail af te luisteren.
ONDERHOUD
• Plaats de telefoon niet in direct
zonlicht of in een vochtige ruimte.
• Het kabinet alleen reinigen met
een vochtige doek, nooit chemi sche reinigingsmiddelen gebruiken.
• Plaats de TX-555 niet op met
cellulose behandelde oppervlak ken; de rubberen voetjes kunnen
hierop sporen achterlaten.
• Onder bepaalde omstandigheden
kan het geluid van de TX-555
beïnvloed worden door het elektro magnetische veld van zware elek trische apparaten of radio/TV zen ders die zich in de nabijheid van de
telefoon bevinden.
Verplaatsing van de telefoon of van
het toestel dat de storing veroor zaakt kan in zo’n geval verbetering
bieden.
8
8
Page 9
FR
DÉCLARATION DE
COMPTABILITÉ DE RÉSEAU
Le PROFOON TX-555 est projeté
aux “réseaux téléphoniques publics
(analogue, une seule ligne)” des
distributeurs de téléphonie et télédistributions, dans l’Europe.
Le câble de raccordement et la fiche
téléphonique dépendent du pays ou
l’opérateur.
Le PROFOON TX-555 répond aux
conditions et équipements essentiels,
définiés par la directive européenne
1999/5/EC.
DÉCLARATION DE CONFORMITÉ
Vous retrouverez
la déclaration de
conformité sur le
website WWW.PROFOON.COM
INSTALLATION
COMBINÉ :
Il faut tamponner le fil spiralé en bas
du combiné et à l’autre côté à gauche
du téléphone. Poussez ces fiches
jusqu’au clic.
TÉLÉPHONE :
Il faut tamponner la fiche modulaire
du fil téléphonique au arrière-côté du
TX-555 (TEL.LINE). Mettez la fiche
téléphonique dans la prise téléphonique.
FIXATION MURALE :
On peut se servir du TX-555 comme
poste mural. Percez deux trous dans
le mur, l’un 8.3cm au-dessus de
l’autre, et mettez-y les chevilles et les
vis, dont les têtes dépassent les trous
de quelques millimètres.
Accrochez le téléphone en poussant
les échancrures dans le fond de la
base sur les vis dans le mur en en
poussant le téléphone en bas.
On peut éventuellement écarter le fil
téléphonique à l’aide des anneaux
de câble.
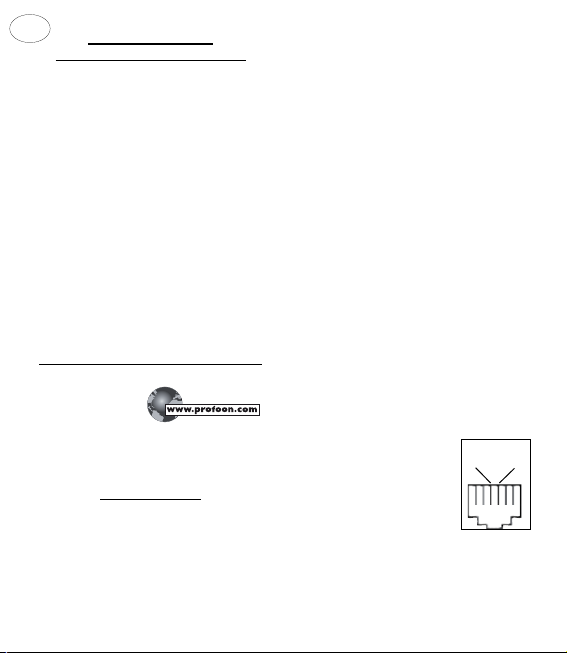
PORTE DE DONNÉES :
Le TX-555 est muni d’une PORTE DE
DONNEES à l’arrière de
l’appareil. On peut s’en
servir afin d’y brancher
DATA PORT
B A
un fax, un répondeur, un
modem, un Indicateur
Numéro, etc. Il faut utiliser une cheville modulaire 6P2C (RJ11).
Il faut faire attention que
connection
DATA PORT
TX-555
dès que et autant qu’il y a une communication entre l’appareilbranché sur
99
Page 10
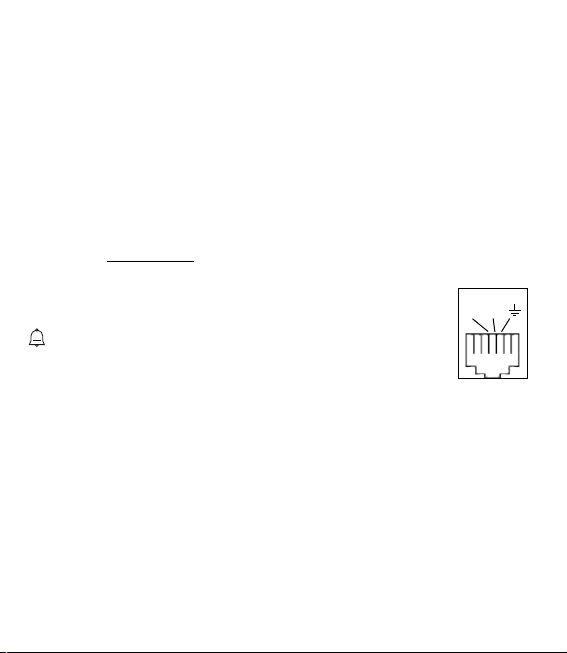
la PORTE DE DONNEES et la ligne
téléphonique, on ne puisse se servir
du TX-555. Cela pour éviter une perturbation du transfert des données
SON/ IMPULSION :
Le TX-555 est apte à composer des
numéros à l’aide du son (DTMF) ou
de l’impulsion (cadran). Le régulateur
TONE/PULSE vous permet de régler
le système voulu.
UTILISATION
RECEVOIR DES APPELS :
On peut régler le volume de la sonnerie à l’aide du commutateur
HI/LO/OFF, décrochez et répondez
à l’appel.
EMETTRE DES APPELS :
Décrochez, attendez la tonalité et
composez le numéro à l’aide du
clavier. Raccrochez à la fin de la conversation.
MAIN LIBRE :
Appuyez sur la touche HANDSFREE
afin de brancher la fonction main
libre. Le volume se fait régler à l’aide
du régulateur à droit du téléphone. Il
faut appuyer encore une fois sur la
touche HANDSFREE afin de débrancher cette fonction.
MÉMOIRE DU DERNIER NUMÉRO :
Si la ligne était occupée ou si vous
voulez recomposer le numéro, le
TX-555 composera automatiquement
le dernier numéro:
1. décrochez et attendez la tonalité
2. appuyez une fois sur la touche
P/REDIAL; le dernier numéro se
recomposera automatiquement
La capacité de cette mémoire est de
32 ciffres.
PASSER LA COMMUNICATION :
Il faut utiliser touche R afin de passer
la communication (dans certains centraux domestique ou de
bureau). Cela dépend
de votre central s’il faut
TEL LINE
B A
utiliser TERRE (EARTH)
ou FLASH.
A cet effet il faut consulter le mode d’emploi de
votre central domestique
ou de bureau ou votre
connection
EARTH
TX-555
fournisseur.
Vous pouvez brancher cette fonction
à l’aide du régulateur EARTH/FLASH.
En cas de FLASH: La durée de
coupure de la fonction Flash est de
100mS.
10
10
Page 11

PAUSE :
S’il vous faut demander la ligne
extérieure par l’intermédiare d’un
central domestique ou de bureau,
il est à conseiller d’appuyer -après
cette demande- une fois sur la touche
P/REDIAL.
TÉLÉSERVICES :
Les touches * (étoile) et # (clôture)
servent comme touches de fonction
en cas de certains téléservices (téléshopping, services bancaires etc.)
et comme numéros d’information.
On peut également se servir de ces
touches en exécutant des fonctions
différentes aux centraux domestiques
ou de bureau ou aux autres appareils
de télécommunication.
AMPLIFICATEUR DU COMBINÉ :
On peut amplifier le volume réception
du combiné à l’aide du commutateur
NORM HIGH sur le côté droit.
Sélectionnez l’état HIGH afin d’obtenir
un volume haut et NORM pour un
volume normal.
MÉMOIRES
Le TX-555 dispose d’une mémoire
interne ayant les spécifications suivantes: une mémoire de numéro
accesible directement pour les trois
numéros souvent composés et les 10
mémoires de numéro de deux touches accesibles à l’aide du clavier.
La longueur des numéros de mémoire
s’éleve au maximum à 16 chiffres.
PROGRAMMER :
1. décrochez et mettez le récepteur à
côté de l’appareil
2. appuyez une fois sur la touche
STORE
3. composez le numéro à l’aide du
clavier
4. appuyez encore une fois sur
STORE
5. appuyez sur l’une des trois touches
de mémoire (M-1, M-2, M-3) ou
appuyez sur l’une des dix touches
(0-9) du clavier afin de stocker le
numéro comme un numéro de
mémoire indirect
6. répétez cette procédure à partir de
2 afin d’enregistrer les autres
numéros
7. raccrochez
CHOISIR LES MÉMOIRES DIRECT :
1. décrochez ou appuyez sur la
touche HANDSFREE et attendez
la tonalité
2. appuyez sur l’une des touches
désirées de mémoire directe M-1,
M-2 ou M-3
3. le numéro sera composé automa tiquement
11
11
Page 12

CHOISIR LES MÉMOIRES DE 2
TOUCHES :
1. décrochez ou appuyez sur la
touche HANDSFREE
2. appuyez une fois sur la touche
MEMO
3. appuyez sur la touche désirée
(0-9) du clavier
4. le numéro sera composé automa tiquement
Remarques:
Si vous utilsez un central domestique
ou de bureau, il est à conseiller
d’enregister une pause (voir le chapitre “PAUSE”).
Il n’est pas possible d’effacer un
numéro. Il est possible d’enregister un
nouveau numéro au lieu d’un numéro
déjà enregistré; à ce moment ce vieux
numéro sera effacé.
VOICE MAIL
En activant le ‘Voice Mail’, vous permettez votre correspondant de laisser
une message à votre ‘Mail Box’ personnel. La ligne du correspondant est
transférée à votre ‘Mail Box’ après 5
signaux que vous ne répondez pas.
Le clignoteur ‘ ‘ de l’appareil
TX-555 annonce une (ou plusiers)
messages(s) au ‘Mail Box’.
Attention: si le correspondant ne
laisse aucune message, le ‘Voice
Mail’ est quand même activé; même
si vous n’avez pas activé votre ‘Voice
Mail’.
Du moment que vous raccrochez
le combiné de l’appareil TX-555, le
clignoteur s’éteint. On vous conseille
d’ecouter le(s) message(s) avant
d’appeler un correspondant.
ENTRETIEN
• N’exposez pas le téléphone en
pleine lumière ou dans un endroit
humide.
• Il ne faut nettoyer le cabinet que
d’un torchon humide et n’utilisez
jamais de produits chimiques.
• Ne mettez pas le TX-555 sur des
surfaces traitées de cellulose; les
pieds en caoutchouc peuvent y
laisser des traces.
• Dans certaines circonstances le
son du TX-555 peut être influencé
par le champ électromagnétique
des appareils lourds et électriques
ou par des émetteurs radio/télé se
trouvant près du téléphone.
• En cas pareil il est à conseiller de
déplacer le téléphone ou l’appareil
causant l’ennuie.
12
12
Page 13
GB
DECLARATION OF
NETWORKCOMPATIBILITY
The Profoon TX-555 is designed for
use on the ‘public switched telephone
networks (analogue single-line)’ of
telephone- and cable-companies
inside the EU.
Each country and/or provider might
require a different telephoneplug.
The Profoon TX-555 complies with
the essential requirements and provisions as described in the European
Directive 1999/5/EC.
DECLARATION OF CONFORMITY
The declaration
of conformity is
available on the
website WWW.PROFOON.COM
INSTALLATION
TELEPHONECORD &
HANDSETCORD:
1. Connect the supplied handsetcord
between the handset and base
2. Connect the telephonecord to the
backside of the telephone
(TEL.LINE)
3. Plug the telephone plug into your
telephone outlet
WALL MOUNT:
1. Drill two holes in the wall with a
distance of 8.3cm and insert two
screws. Let the heads of the
screws stick out a few millimeters
of the wall
2. Hang the unit on the wall and fixate
the telephone wire by means of
cable-clips
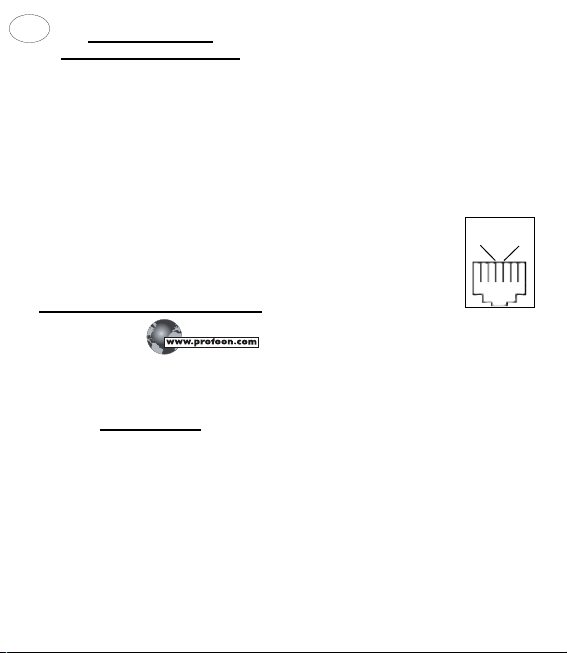
DATA PORT:
The TX-555 is equipped
with a second jack that
DATA PORT
B A
allows you to connect a
communication device,
such as a computer
modem, answering
machine, Caller-ID, or
fax-machine, to a tele-
connection
DATA PORT
phone line. This jack is
suited for 6P2C modular plugs (RJ11).
To use this feature connect a telephone line cord (not included) from the
communication device to the second
jack on the telephone.
Note: Because a computer modem
and a fax machine transmit through
the telephone line, you will not be
able to use your telephone while
these devices are in use in the
second jack. Once you are done
using the modem or fax machine, the
telephone can be used.
13
13
TX-555
Page 14
TONE/PULSE DIALING:
The TX-555 is capable to dial telephonenumbers with TONE (DTMF dialing)
or PULSE (rotary dialing). Use the
TONE/PULSE switch on the backside
of the telephone to set the required
dial-mode.
HOW TO USE
INCOMING CALL:
Adjust the ringer volume with the
HI-LO-OFF switch. Lift the handset
and start the conversation.
OUTGOING CALL:
Lift the handset. Wait for the dial tone
and key-in the desired telephone
number. Replace the handset when
the conversation is finished.
REDIAL:
In case the person you were calling
was busy or you want to dial the last
dialed number again, this number is
stored in memory:
1. pick up the handset and wait for
the dialtone
2. press the button P/REDIAL; the
last dialed number will be redialed
This number can be as long as 32
digits.
SPEAKERPHONE:
Press button HANDSFREE to switchon the speakerphone. The volume
can be adjusted with the slider on
the rightside of the telephone. Press
HANDSFREE again to switch-off the
speakerphone.
PAUSE:
When dialing through a PABX, it is
recommendable to insert a dialpause
direct behind the prefix (mostly a 0).
Use key P/REDIAL to insert a pause.
CALL TRANSFER:
Use the R-key to transfer a call in
case you are connected through a
PABX.
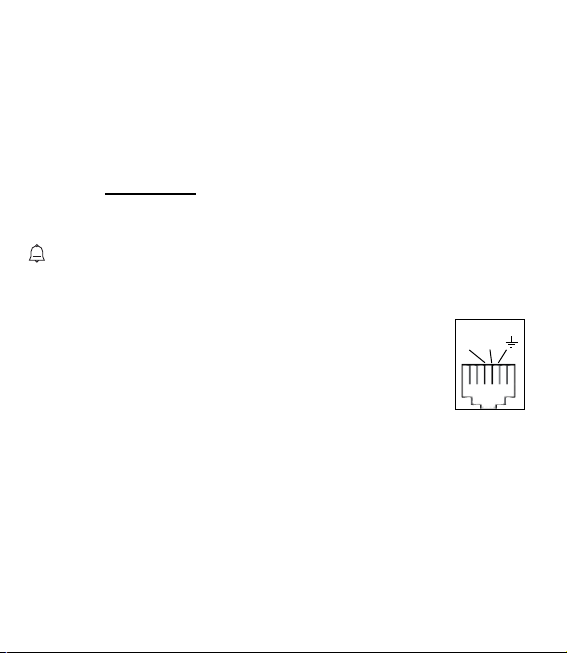
Dependent on the used
PABX, you may have
TEL LINE
B A
to transfer a call with
‘EARTH RECALL’ or
with ‘TIMED BREAK
RECALL’. Please consult the manual of the
exchange.
connection
EARTH
TX-555
Use the EARTH/FLASH switch on the
bottomside to set the desired transfermode. The FLASH time is 100mS.
14
14
Page 15

TELESERVICES:
The buttons * and # are functionbuttons, needed for divers telecomservices (teleshopping, telebanking,
etc) or to control divers telecom
devices (PABX, answering machines,
etc). Refer to the concerning manual.
RECEIVER VOLUME CONTROL:
The receiver volume control is located
on the base of your phone. This enables you to adjust the receiver volume
from normal to high for a more comfortable listening level.
MEMORIES
The TX-555 has an internal memory
with the following specifications:
3 one-touch memories for frequently
dialed numbers
10 two-touch memories for telephonenumbers
Each telephonenumber can be as
long as 16 digits maximum
PROGRAMMING:
1. pick up the handset and put it
aside
2. press the STORE button and
release it
3. key in the telephone number on the
keyboard (max 16 digits)
4. press STORE again
5. press one of the three memory
buttons (M1, M2 or M3) or one of
the keys (0-9) on the keyboard
6. repeat steps 2 to 5 for the other
memory positions
7. replace the handset
DIALING FROM MEMORY:
1. pick up the handset or press the
HANDSFREE button and wait for
the dialtone
2. press one of the three memory
buttons (M1, M2 or M3) or press
button MEMO followed by one of
the keys (0-9) on the keyboard
3. the programmed number will
automatically be dialed
Remarks:
When your telephone is connected
to a PABX system, it is advised to
include a dialing-pause in the number.
Refer to the chapter “PAUSE”.
It’s not possible to erase a memory
position, just reprogram it to erase the
present number.
VOICE MAIL (MESSAGE WAITING)
When you have activated your personal Voice Mail, after 5 rings the caller
will be connected to your mailbox and
has the possibility to leave a message.
15
15
Page 16

The TX-555 has a LED lamp ( )
which starts to flash, indicating that
someone might have left a message.
Please note that in case the caller
does not leave a message or in case
you have not activated the Voice
Mail, after 5 rings this LED will flash
anyway.
As soon as you lift the handset of this
telephone, the LED will go OFF so
it is recommendable to first dial the
number of your Voice Mail to check
whether someone has left a message
for you.
If you have questions concerning the
Voice Mail feature, please contact
your telephone company.
MAINTENANCE
Do not locate the telephone in direct
sunlight or in a moist environment.
Never use chemical cleansers to
clean the cabinet, the cabinet may
only be cleaned with a moist cloth.
Don’t place the TX-555 on furniture
with cellulose based coating; the
rubber feet will leave stains on the
cellulose.
Under certain circumstances the
sound of the TX-555 might be influenced by electromagnetic fields of
electronic devices like TV, computer
or radio transmitters close to the
telephone. Relocate the telephone to
gain better results in such cases.
16
16
Page 17
D
ERKLÄRUNG BETREFFEND
NETZWERK-VEREINBARKEIT
Das Profoon TX-555 ist entwurfen fur
benutzung an die ‘öffentliche geschaltene Fernsprechnetze (analog einfach) von Telefon und Kabelgesellschaften innerhalb der EU.
Pro Land und/oder pro Provider
kann es sein, daß ein anderer Typ
Anschlußkabel und Stecker benötigt
wird.
Das Profoon TX-555 entspricht
die notwendige bedingungen der
Europaïsche Richtlinie 1999/5/EC.
ERKLÄRUNG ZUR KONFORMITÄT
Deklaration der
Conformität steht
zur verfügung auf
der website WWW.PROFOON.COM
INSTALLATION
HÖRER:
Verbinden Sie mit der beiliegenden
Höreranschlußschnur Gerät und
Hörer. Die Höreranschlußschnur wird
in die Buchse eingerastet.
TELEFON:
Rasten Sie den modulairen Stecker
auf der Hinterseite des Telefons ein
(TEL.LINE). Stecken Sie den TAEStecker in die Telefonsteckdose.
WANDMONTAGE:
Das TX-555 kann an einer Wand hängend betrieben werden.
Bohren Sie übereinander in einem
Abstand von 8.3cm zwei Löcher
in die Wand. Befestigen Sie in
den Bohrungen zwei Dübel und
Schrauben. Die Köpfe der Schrauben
lassen Sie ein paar Millimeter hervorstehen.
Befestigen Sie das Telefon, indem Sie
die Aussparungen im Geräteboden
über die Schraubenköpfe schieben
und das Telefon nach unten zu ziehen.
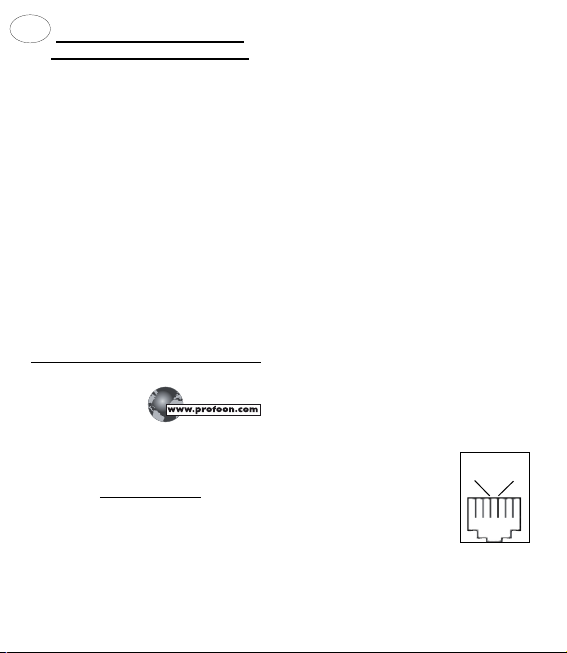
DATA ANSCHLUSS:
Am Hinterseite der TX-555 befindet
sich ein Data-Anschluss
(DATA PORT).
DATA PORT
B A
Verwenden Sie diese
Anschluss für der
Verbindung mit einem
Fax, Anrufbeantworter,
Rufnummermelder oder
Computer Modem.
Anschluss
DATA PORT
TX-555
Anschluss mittels 6p2c
Stecker (RJ11).
17
17
Page 18
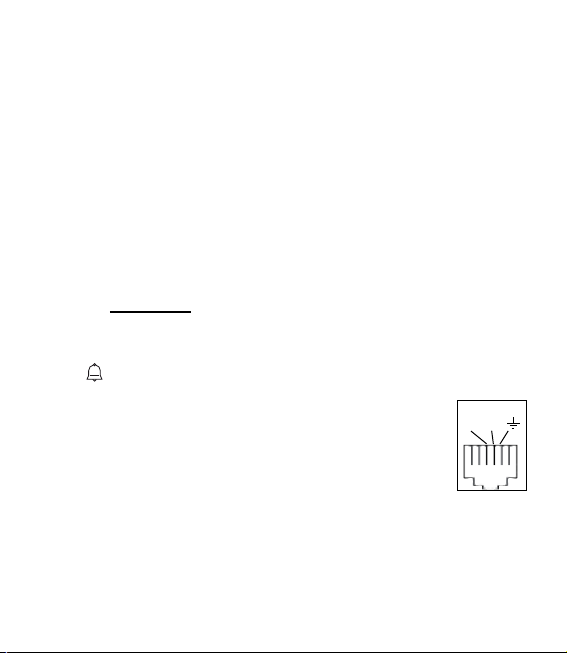
Achten Sie darauf dass Sie das
TX-555 nicht verwenden können,
solange das am Telefon angeschlossene Gerät verbunden ist mit das
Telefonnetz. Dies um zu verhüten das
der Data-Sendung gestört wird.
TON/PULS:
Das TX-555 ist für das Wählen von
Rufnummer mit Töne (DTMF) oder
mit Puls (Drehscheibe) geeignet.
Mittels der TONE/PULSE Schalter am
Hinterseite können Sie das erwünschte System einstellen.
GEBRAUCH
EINGEHENDE ANRUFE:
Die Klingellautstärke ist mittels die
Schalter HI/LO/OFF einstellbar.
Heben Sie den Hörer ab und beginnen das Gespräch.
ABGEHENDE ANRUFE:
Heben Sie den Hörer ab und geben
Sie die gewünschte Rufnummer an
der Tastatur ein.
HANDSFREE:
Mittels Drücken der HANDSFREETaste wird die Handsfree-Funktion
aktiviert. Die Lautstärke ist mittels die
Lautstärkeregler auf die rechte Seite
des Telefons einstellbar.
WAHLWIEDERHOLUNG:
Die zuletzt gewählte Rufnummer wird
automatisch gespeichert.
1. Heben Sie den Hörer ab und
warten bis der Wählton ertönt.
2. Drücken Sie die P/REDIAL Taste;
die zuletzt gewählte Rufnummer
wird automatisch nochmal gewählt.
Die Speicherkapazität beträgt 32
Ziffern.
PAUSE:
Wenn Sie das Telefon über eine
Haus- oder Bürozentrale betreiben,
ist es ratsam nach dem ersten 0 oder
9 eine Pause mit zu wahlen. Drücken
Sie einmahl die Taste P/REDIAL um
eine Pause hinzufügen.
WEITERLEITEN:
Wenn Ihr Telefon an einer Haus- oder
Bürozentrale angeschlossen ist, können Sie mittels die
R-Taste Gespräche
TEL LINE
B A
weiterleiten.
Abhängig von der
jeweiligen Telefonanlage
können Sie das tun mittels ‘Erde’ oder ‘Flash’.
Ziehen Sie hierzu die
Bedieningsanleitung
Anschluss
EARTH
TX-555
Ihrer Haus- oder Burozentrale zu
Rate. Mittels der Earth/Flash-Schalter
am Unterseite des Gerätes können
Sie diese Funktion eingeben.
18
18
Page 19

TELEDIENSTEN:
Die Tasten * und # sind Funktionstasten, die Sie bei der Nutzung von
Telediensten (Teleshopping, Telebanking u.s.w.) und Informations-rufnummern benötigen.
Diese Tasten können auch bei der
Betätigung verschiedener Funktionen
von Haus- oder Bürozentralen sowie
anderer Telekommunikationsgeräte
nützlich sein.
LAUTSTÄRKEREGLER:
Mittels HIGH NORM Schalter
bestimmen Sie die Lautstärke des
Hörers.
VOICE MAIL
Wenn Sie Ihre Voice Mail eingeschaltet haben, wird der Anrufer nach 5
Klingelsignalen durchgeschaltet nach
Ihre persönlichen Mail-Box, wo er
eine Nachricht hinterlassen kann.
Auf das TX-555 wird dies angezeigt
mittels das Blinken der Voice MailLED ( ).
Achten Sie darauf daß der Voice
Mail-Meldung auch aktiviert wird falls
der Anrufer keine nachricht hinterläßt oder wenn Sie das Voice MailVerfahren nicht eingeschaltet haben.
Sobald Sie aufheben wird das LED
aufhören mit blinken, und der Voice
Mail-Anzeige wird gestoppt. Es ist
also ratsam, befor Sie weiter telefonieren, erstmal das Voice Mail
abzuhören.
Mit Fragen über Voice Mail können
Sie sich wenden an Ihre Telefongesellschaft
SPEICHER
Das TX-555 verfügt über einen
integrierten Speicher mit folgenden
Spezifikationen:
- Ein sofort zugänglicher Zielwahl speicher für 3 oft gewählte
Rufnummern.
- Ein Kurzwahlspeicher, der mittels
Tastatur zugänglich ist.
Die Länge der Rufnummern darf
maximal 16 Ziffern betragen.
PROGRAMMIEREN:
1. Heben Sie den Hörer ab und legen
Ihn neben das Gerät.
2. Drücken Sie die STORE-Taste.
3. Geben Sie die Rufnummer mittels
Tastatur ein.
4. Drücken Sie nochmal die STORE Taste.
5. Drücken Sie eine der 3 Speicher tasten (M-1, M-2, M-3) oder einer
von der Wahltasten (0-9).
19
19
Page 20

6. Wiederholen Sie Schritt 2-5 für die
restlichen Rufnummern.
7. Legen Sie den Hörer auf.
DAS WÄHLEN GESPEICHERTER
RUFNUMMERN:
1. Heben Sie den Hörer ab oder
drücken Sie der HANDSFREE Taste und warten Sie bis der
Wählton ertönt.
2. Drücken Sie die Speichertaste
M1/M3, oder die MEMO-Taste und
anschließend die gewünschte
Speichertaste 0-9.
3. Die Rufnummer wird jetzt auto matisch gewählt.
ANMERKUNG:
Bei z.B. Auslandsgesprächen
oder Gesprächen via Haus-oder
Bürozentrale ist es ratsam, eine
Pause zu speichern (siehe Kapitel
PAUSE).
Est ist nicht möglich, eine gespeicherte Rufnummer zu löschen aber
Sie können eine neue Rufnummer
speichern, die alte Nummer fällt dan
weg.
WARTUNG
Setzen Sie das Telefon nicht direkter
Sonneneinstrahlung oder Feuchtigkeit
aus.
Reinigen Sie das Gerät nur mit
einem leicht angefeuchteten Tuch.
Verwenden Sie nie chemische
Reinigungsmittel.
Stellen Sie das TX-555 nicht auf mit
Zellulose behandelte Oberflächen. Die
Gummifüße könnten hierauf Spuren
hinterlassen.
Die Klanqualität des TX-555 kann
durch magnetische Felder, verursacht durch große elektrische Geräte,
Radio- und Fernsehsender, die sich
in der Nähe des Telefons befinden,
negativ beeinflußt werden. Ein
Standortwechsel des Telefons oder
des Gerätes, daß die Störung verursacht, kann in so einem Fall eine
Verbesserung bringen.
20
20
Page 21
E
DECLARACIÓN DE
COMPATIBILIDAD CON REDES
Profoon TX-555 ha sido diseñado
para ser usado conectado a redes de
teléfono públicas (líneas analógicas
sencillas) de compañías telefónicas y
de cable dentro de EU.
Es posible que cada país y/o proveedor necesiten un modelo de clavija
diferente para conectar el teléfono a
la red.
Profoon TX-555 cumple con todos los
requisitos y provisiones esenciales
descritas en la directiva europea
1999/5/EC.
DECLARACIÓN DE CONFORMIDAD
La declaración de
conformidad está
disponible en la
web WWW.PROFOON.COM
INSTALACIÓN
AURICULAR & CORDON DEL
TELÉFONO:
1. Conecte el auricular a la base
2. Conecte el cordon del teléfono a
la base
3. Conecte en conector del teléfono
a la toma del teléfono
MONTAJE EN LA PARED:
Los TX-555 se pueden colocar
colgados en la pared. Taladrar dos
agujeros en la pared a una distancia
de 8.3cm y insertar dos tornillos;
dejando que las dos cabezas
sobresalgan unos milímetros de la
pared. Colocar la unidad a la pared y
fijar los cables del teléfono mediante
grapas.
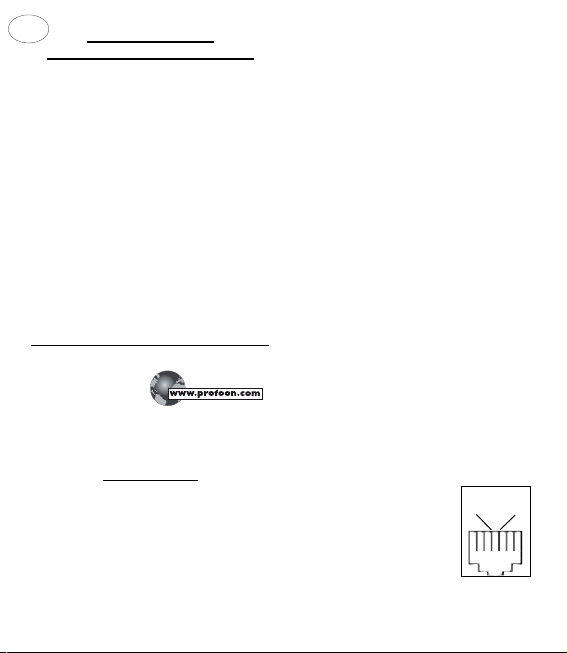
PUERTO PARA ACCESO DE DATOS:
Este teléfono viene equipado con
un segundo enschufe que le permite
conectar un dispositivo de comunicación, tal y como un módem de
computadora, máquina contestadora,
identificator de llamadas o máquina
de fax, a una linea telefónica. Para
usar esta caracteristica, conecte
el cable telefónico (no incluido) del
equipo de comunicación al segundo
enschufe en el teléfono.
Nota: Puesto que el módem de computadora y la máquina de fax transmiten a través de la linea telefónica,
usted no podrá usar su
teléfono mientras estos
DATA PORT
B A
equipos estén en uso
en el segundo enschufe.
Una vez que termine
de usar el módem o la
máquina de fax, el teléfono puede ser usado.
21
21
DATA PORT
Enchufe
TX-555
Page 22
MARCACIÓN POR TONOS/
IMPULSOS:
El TX-555 es capaz de marcar
números de teléfono por tonos
(DTMF) o por impulsos. Utilice el
conmutador TONE/PULSE en la parte
trasera del teléfono para elegir el sistema de marcación deseado.
INSTRUCCIONES PARA SU USO
LLAMADA ENTRANTE:
Ajustar el volumen del timbre mediante el control HI/LO/OFF. Levantar
el microteléfono y empezar la conversación.
LLAMADA SALIENTE:
Levantar el microteléfono. Esperar
hasta oír el tono de línea y marcar el
número de teléfono deseado. Colgar
el microteléfono cuando la conversación haya terminado.
TÉLEPHONO CON BOCINA:
Oprima en la tecla bocina (HANDSFREE) y espere el tono para marcar.
Marque el número telefónico deseado.
Al serle contestada su llamada, usted
escuchará a la persona mediante
la bocina. Ajuste el volumen al nivel
deseado.
Al terminar su conversación y para
colgar el teléfono, oprima en la tecla
bocina (HANDSFREE) nuevamente.
RELLAMADA:
En caso de que la persona que usted
lame esté ocupada o si usted quiere
volver a marcar el último número
marcado, este número se guarda en
memoria:
1. Coger el microteléfono y esperar
hasta oír el tono.
2. Apretar el botón P/REDIAL y el
teléfono le marcará el último
número marcado.
Este número puede tener un total de
32 dígitos.
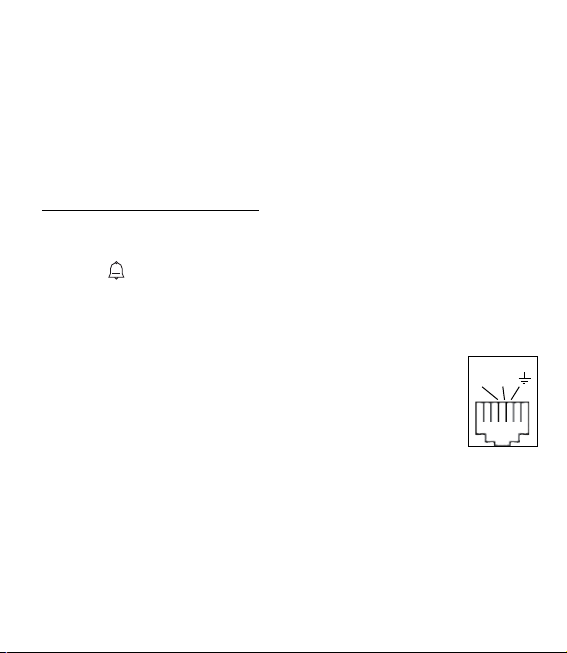
TRANSFERIR UNA LLAMADA:
Utilice la tecla “R” para
transferir una llamada
si esta conectado a una
TEL LINE
B A
centralita. Según centralita utilizada se puede
transferir llamadas utilizando “rellamada tierra” o
“rellamada tiempo retardo”. Consulte manual de
Enchufe
EARTH
TX-555
su centralita o su proveedor de red.
Coloque el conmutador en la parte
inferior “EARTH/FLASH” en la posición deseada. En modo “FLASH” la
interrupción es de 100mS.
22
22
Page 23

PAUSA:
En caso de marcar a través un PABX
(centralita), es recomendable
introducir una pausa de marcación
después del prefijo (0 ó 9).
Últice tecla P/REDIAL para introducir
pausa.
TELESERVICES:
Los botones “*” y “#” son de función;
necesarios en varios servicios de telefonía (tele-tienda, tele-banco, etc.)
o para controlar otros dispositivos de
telefonía (PABX, máquinas contestadoras, etc.). Para más información
consulten el manual apropiado.
CONTROL DEL VOLUMEN DEL
RECEPTOR:
El control del volumen del receptor se
encuentra en la base de su teléfono.
Esto le permite ajustar el control del
volumen del receptor de normal a
alto para un nivel más agradable de
sonido.
MEMORIAS
Su teléfono TX-555 viene con 13
memorias (tres de prioridad, diez en
el teclado) para poder programar
aquellos números que usted marca
con mayor frequencia.
Al seguir los siguientes pasos, usted
puede guardar hasta 16 digitos en
cada tecla de prioridad (M1, M2 or
M3), o en cada una de las teclas
numéricas del 0 al 9.
1. Levante el auricular (desengan chando el interruptor para colgar).
2. Oprima y suelte la tecla Guardar
(STORE).
3. Marque el número telefónico qeu
desee guardar en la memoria.
4. Oprima y suelte nuevamente la
tecla Guadarm (STORE).
5. Oprima la tecla de prioridad (M1,
M2 o M3) o una de las teclas
numéricas (del 0-9) donde desee
guardar ese número telefónico.
6. Su número fue guardado en la
memoria.
7. Para cambiar un número
guardado, repita el mismo proceso.
El nuevo número reemplazará al
antiguo número guardado.
Se proporciona una Tarjeta Directorio
de Memorias que se encuentra arriba
de las teclas de funciones, para anotar el nombre de la persona/compañia
correspondiente.
23
23
Page 24

PARA EFECTUAR LLAMADAS
USANDO NÚMEROS DE LA
MEMORIA:
Teclas de prioridad:
Las teclas de prioridad son teclas
para efectuar llamadas directas con
sólo oprimir una sola tecla. Levante
el auricular y oprima la tecla de prioridad correspondiente al número telefónico que desee marcar. Su llamada
será marcada automáticamente.
Memorias en el teclado numérico:
Para efectuar llamadas usando aquellos números telefónicos guardados en
las teclas numéricas, levante el auricular y oprima en la tecla Memoria
(MEMO). Luego oprima la tecla
numérica (del 0-9) correspondiente al
número telefónico que desee marcar.
Su llamada será marcada automáticamente.
BUZON DE VOZ
Si esta activado su buzón de voz el
llamante será conectado a su buzón
después de 5 tonos con la posibilidad
de dejar un mensaje.
El TX-555 tiene un indicador ( )
para indicar si alguien ha dejado un
mensaje. Hay que tener en cuenta
que el indicador LED si activa tam-
bién en caso de que el llamante no
deja ningún mensaje o en el caso de
5 tonos sin tener activado su buzón.
El indicador LED se apaga en cuanto
se descuelgue el TX-555. Se recomienda consultar primero se buzón
de voz.
Para preguntas sobre su buzón de
voz consulte su compañía de teléfonos.
MANTENIMIENTO
• No colocar el teléfono bajo luz solar
directa o en un ambiente húmedo.
• No usar limpiadores químicos para
limpiar el aparato, éste sólo se puede
limpiar con una tela húmeda.
• No poner el TX-555 sobre muebles
que tengan un acabado con una base
de celulosa; los topes de caucho
del teléfono dejarán manchas en la
celulosa.
• Bajo ciertas circunstancias el sonido
de los TX-555 puede quedar afectado
por campos electromagnéticos de
dispositivos electrónicos tales como
televisores, ordenadores o aparatos
de radio que se hallen cerca del
teléfono. En tales casos, colocar el
teléfono en otro lugar para obtener
mejores resultados.
24
24
Page 25
PT
DECLARAÇÃO DE
COMPATIBILIDADE DE REDE
O Profoon TX-555 foi desenvolvido
para utilização nas “redes de telefone
de comutação públicas (monolinha
analógica)” das empresas de telefone
e de cabo dentro da União Europeia.
Por país ou fornecedor de serviço
pode ser necessário um cabo com
ficha diferente.
O Protofoon TX-555 satisfaz as condições e funcionalidades essenciais
como descrito na directiva europeia
1999/5/CE.
DECLARAÇÃO DE
CONFORMIDADE
A declaração de
conformidade
está disponível
no website WWW.PROFOON.COM
INSTALAÇÃO
Introduza o cabo em espiral no auscultador do telefone e na ficha no
lado esquerdo da base. Introduza as
fichas até clicarem e ficarem presas
TELEFONE:
Introduza a ficha modular no cabo
de telefone na parte de trás da base
(TEl.LINE). Introduza a ficha do telefone na tomada de telefone.
MONTAGEM NA PAREDE:
O TX-555 pode ser utilizado como
unidade de parede. Fure um acima
do outro a uma distância de 8,3 cm
dois furos na parede e coloque neles
a bucha e parafuso. Aparafuse até
a cabeça do parafuso ficar a alguns
milímetros da parede.
Pendure o telefone colocando as
aberturas na parte de trás do telefone
por cima dos parafusos na parede
e deslize o telefone para baixo.
Eventualmente aprumar o cabo de
ligação com clipes de cabo.
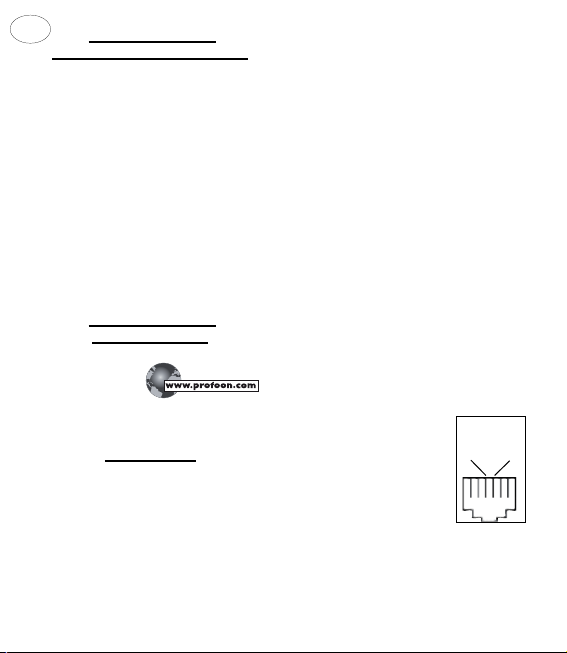
PORTA DE DADOS:
O TX-555 tem na parte
de trás uma PORTA
PORTA DE
DADOS
B A
DE DADOS. Use esta
ligação para ligar um
modem de computador,
um fax, um Indicador
de número ou outro
dispositivo semelhante
à linha de telefone.
ligação
PORTA DE
DADOS no
TX-555
A ligação é para uma ficha modular
6P2C (RJ11).
25
Page 26
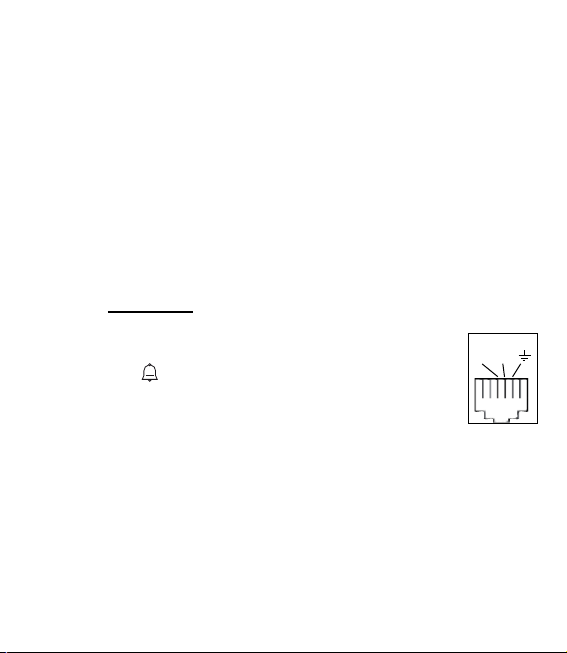
Tenha em atenção que enquanto o
equipamento na PORTA DE DADOS
tiver ligação à linha de telefone não
pode utilizar o TX-555. Isto para
evitar que a passagem de dados
seja interrompida.
TOM/IMPULSO:
O TX-555 é apropriado para marcar
números de telefone com tons
(DTMF) ou por impulsos (princípio do
disco rotativo de marcação).
Com o interruptor TONE/PULSE na
parte de trás do telefone pode definir
o sistema pretendido.
UTILIZAÇÃO
RECEBER CHAMADA:
O volume da campainha é regulável
com o interruptor
HI-LO-OFF. Tire
o auscultador do descanso e atenda
a chamada.
FAZER CHAMADA:
Levante o auscultador, espere pelo
tom de marcação e através do teclado
marque o número de telefone.
MÃOS-LIVRES:
Prima a tecla HANDSFREE para
activar a função de mãos-livres.
O volume é regulável no regulador de
deslize na parte de trás do telefone.
MEMÓRIA DO ÚLTIMO NÚMERO:
No caso do outro número estar ocupado ou pretender marcar de novo
o mesmo número, é memorizado o
último número marcado no TX-555:
1. tire o auscultador do descanso e
espere pelo tom de chamada
2. prima uma vez a tecla P/REDIAL;
o último número marcado é agora
automaticamente remarcado
O comprimento desta memória é de
32 algarismos.
PASSAR CHAMADAS:
Use a tecla R para em algumas
centrais (casa ou escritório) passar
chamadas. Consoante a sua central
pode fazer isto com “TERRA” ou com
“FLASH”.
Para isso consulte o
TEL LINE
B A
manual da central de casa
ou escritório. Define esta
função com o interruptor
de selecção na parte de
trás.
Na escolha FLASH:
ligação
TERRA no
TX-555
Tempo de interrupção é 100mS.
26
Page 27

INTERVALO:
Caso telefone através duma central
de casa ou do escritório aconselha-se
depois do número para ligação externa
(por vezes 0 ou 9) introduzir um
intervalo; para isso prima durante o
telefonema uma vez a tecla P/REDIAL.
TELESERVIÇOS:
As teclas * (asterisco) e # (cardinal)
são teclas de função em vários teleserviços (televendas, telebanco, etc)
e números de informação. Estas teclas
também podem ser necessárias
para várias funções nas centrais de
casa ou escritório ou doutros
aparelhos de telecomunicação.
Consulte para isso as respectivas
instruções de uso ou do serviço.
AMPLIFICAÇÃO DO AUSCULTADOR:
Com o interruptor
no lado direito pode amplificar o som
no auscultador. Seleccione a posição
HIGH para o volume máximo;
seleccione a posição NORM para
o volume normal no auscultador.
O TX-555 tem números de memória
directamente acessíveis para
3 números de telefone que mais
vezes marca e uma memória para
teclado (Max 16 dígitos)
NORM HIGH
MEMÓRIAS
10 números de telefone chamados
memória de 2-teclas acessíveis
através do teclado.
O comprimento de cada um dos
números memorizados é de
16 algarismos.
PROGRAMAR:
1. levante o auscultador e coloque-o
ao lado do aparelho
2. prima uma vez o botão STORE
3. com o teclado introduza o número
de telefone
4. prima novamente em STORE
5. prima uma das três teclas de
memória directa (M-1, M-2, M-3)
ou prima uma das 10 teclas (0-9)
do teclado para memorizar o
número como número de memória
indirecto
6. repita o passo 2 a 5 para os outros
números
7. coloque o auscultador no descanso.
MARCAR MEMÓRIA DIRECTA:
1. levante o auscultador e prima a
tecla de HANDSFREE e espere
pelo tom de chamada
2. agora prima uma das teclas de
memória directa (M-1, M-2 ou M-3)
3. o número é agora automaticamente
marcado
27
Page 28

MARCAR MEMÓRIAS DE 2 TECLAS:
1. tire o auscultador do descanso e
espere pelo tom de chamada
2. prima de novo a tecla MEMO
3. prima a tecla desejada (0-9) do
teclado
4. o número é agora automaticamente
marcado.
Observações:
Ao telefonar através duma central
de casa ou escritório aconselha-se
introduzir um intervalo; veja o capítulo
“INTERVALO”
Não é possível apagar uma memória.
O que pode ser feito é introduzir um
número novo por cima do velho,
apagando assim o velho.
MENSAGEM DE VOZ
Se tiver activado um Voice Mail, então
a pessoa que lhe telefona é após 5
toques de chamada passada para a
sua caixa de mensagens onde ela
pode deixar uma mensagem de voz
para si.
No TX-555 isto é indicado através da
luz de Voice Mail a piscar (
Tenha em atenção que esta
mensagem de Voice Mail também
é activada mesmo que quem lhe
telefone não grave mensagem no
).
seu VoiceMail ou se a empresa de
telecomunicações não tiver o seu
VoiceMail activo.
Logo que levante o auscultador deste
TX-555 a luz deixa de piscar (e pára
a indicação de Mensagem de Voz);
Aconselha-se por isso escutar primeiro a mensagem de voz do seu
VoiceMail.
MANUTENÇÃO
• Nunca coloque o telefone exposto
à luz directa do sol ou num
ambiente húmido.
• Para limpar use apenas um pano
húmido, nunca usar produtos de
limpeza químicos.
• Não coloque o TX-555 numa superfície tratada com celulose; Porque
os pés de borracha podem deixar
riscos nessa superfície.
• Sob determinadas condições o som
do TX-555 pode ser influenciado
pelo campo electromagnético de
equipamento eléctrico ou emissores de rádio/TV que estejam na
proximidade do telefone. Deslocar
o telefone ou o aparelho que
provoca a interferência melhora o
problema.
28
Page 29

Naam / nom: Bewaar hier uw kassa
Adres / adresse: of aankoopbon
Postcode / code postal:
Plaats / domicile: Attachez ici votre bon
Telefoon / Téléphone: de caisse ou d’achat
Op de Profoon TX-555 heeft u een garantie van 24 MAANDEN na aankoopdatum.
Wij garanderen gedurende die periode de
kosteloze herstelling van defecten ontstaan
door materiaal- en constructiefouten. Een
en ander ter uiteindelijke beoordeling van
de importeur.
HOE TE HANDELEN:
Bemerkt u een defect, raadpleeg dan eerst
de gebruiksaanwijzing. Geeft deze hieromtrent geen uitsluitsel, raadpleeg dan uw
dealer met een duidelijke klachtomschrijving. Deze zal het apparaat tezamen met dit
garantiebewijs en de gedateerde aankoopbon innemen en voor spoedige reparatie,
resp. franco verzending naar de importeur
zorgdragen.
DE GARANTIE VERVALT:
Bij ondeskundig gebruik, foutieve aansluiting, gebruik van niet originele onderdelen
of toebehoren, verwaarlozing en bij defecten
ontstaan door vuur, overstroming, blikseminslag en natuurrampen. Bij onbevoegde
wijzigingen en/of reparaties door derden. Bij
onjuist transport van het apparaat zonder
geschikte verpakking en indien het apparaat
niet vergezeld is van dit garantiebewijs en
de aankoopbon. Aansluitsnoeren en stekkers vallen niet onder de garantie.
Iedere verdere aansprakelijkheid, met name
voor eventuele gevolgschade, is uitgesloten.
GARANTIEBEWIJS / BON DE GARANTIE
Vous avez une garantie de 24 mois après la
date d’achat sur le Profoon TX-555.
Pendant cette période nous vous garantissons la réparation sans frais des défauts
dûs aux fautes de matériaux et de construction. Il vous faut consulter votre importateur
à ce sujet.
COMMENT AGIR:
Si vous constatez un défaut, il faut consulter
d’abord le mode d’emploi. Si celui-ci ne
vous donne pas d’explication, il faut consulter votre fournisseur en lui expiquant clairement le défaut. Celui-ci prendra l’appareil, la
carte de garantie et le bon d’achat daté et
prendra soin d’un réparation rapide, respectivement d’un envoi à l’importateur.
LA GARANTIE ECHOIT:
En cas d’une utilisation ignorante,d’un branchement fautif, d’une utilisation des pièces
ou accessoires pas originaux et en cas des
défauts dûs à un incendie, à une inondation,
à un coup de foudre et à des cataclysmes.
En cas de modifications incompétantes
et/ou de réparations par tiers. En cas d’un
transport de l’appareil sans emballage propre. En cas où l’appareil n’a pas été accompagné de cette carte de garantie et du bon
d’achat. Les fils de branchement et les
fiches ne sont pas compris à la garantie.
Toute autre responsabilité notamment pour
des dégats éventuels de suite a été excluse.
29
Page 30

Name / Name: Attach here your
Address / Adresse purchase ticket
Zipcode / Postleitzahl:
City / Ort: Bewahren Sie hier
Telephone / Telefonnummer: Ihren Kassenschein
You have a guarantee of 24 months after the
date of purchase of this Telephone. We guarantee during this period the free repair of defects
caused by material- and construction faults.
This at the importers discretion. It is only possible to claim to the guarantee when you enclose
your purchase ticket with the TX-555.
HOW TO ACT:
If you notice a defect, consult the manual
first. If this manual gives you no definite
answer, consult your dealer with a clear description of your complaint. He will collect the
device together with this guarantee card and
the dated purchase ticket and he will take
care of a prompt repair, respectively free
sending to the importer.
THE GUARANTEE EXPIRES:
When used inexpert, faulty connections, use
of unoriginal parts or accessories, negligence
and defects caused by fire, flood, stroke of
lightning and natural disasters. With unqualified modifications or repairs by third persons.
With incorrect transport without a suitable
packing. If the device is not handed in with
the correct filled in guarantee card and the
purchase ticket.
NOT UNDER THIS GUARANTEE: cords and
plugs. All further responsibilities, in particular
subsequent damages, are excluded.
WARRANTYCARD / GARANTIESCHEIN TX-555
Auf den Profoon TX-555 erhalten Sie eine
Garantie von 24 Monate ab Kaufdatum.
Wir garantieren während dieser Zeit die
kostenlose Reparatur von Defekten,
die bedingt sind durch Material- und
Konstruktionsfehler, nach Beurteiling durch
den Importör.
WIE HANDELN:
Wenn Sie einen Defekt bemerken, ziehen
Sie zu erst die Bedienungsanleitung zu
rate. Läßt sich der Fehler nicht beheben,
dann wenden Sie sich an Ihren Händler.
DIE GARANTIE ENTFALLT:
Bei nicht fachgerechtem Gebrauch,
falschem Anschluß, Verwendung
von nicht originalen Unterteilen oder
Zurbehör, Vernachlässigung und
Defekte die durch Feuer entsanden
sind, Überschwemmungen, Blitzschlag
und Naturkatastropfen. Bei unbefugten
Änderungen und/oder Reparatur durch
Dritte. Bei unsachgemäßem Transport
des Gerätes ohne geeignete Verpackung.
Wenn zu dem Gerät dieser Garantieschein
und der Kaufbeleg fehlt.
Anschlußkabel und Stecker fallen nicht
unter die Garantie.
Jede weitere Haftung, spezifisch für eventuelle Folgeschäden, ist ausgeschlossen.
30
Page 31

CERTIFICADO DE GARANTIA
Nome:
Endereço:
Código Postal:
Local:
Telefone:
O seu Profoon TX-555 tem uma garantia de
24 MESES após a data de compra. Durante
esse período, garantimos a reparação
gratuita de defeitos que surjam devido
a falhas materiais ou da construção.
Sujeito à avaliação final do importador.
O QUE FAZER:
Se detectar um defeito, consulte primeiro
o manual de utilização. Se não encontrar
nenhuma solução no manual, consulte
o vendedor com uma detalhada descrição
do problema. Este recolherá o equipamento
juntamente com a garantia e o talão de compra datado e para ajudar no processamento
da reparação, cuidar do envio ao importador.
A GARANTIA CESSA:
No caso de utilização inadequada, ligações
erradas, utilização de componentes ou
acessórios não originais, negligência e
defeitos que resultem de humidade, fogo,
submersão, raios e desastres naturais.
Alterações não autorizadas e/ou reparações
feitas por terceiros. Transporte incorrecto
do aparelho sem a embalagem apropriada
e caso o aparelho não seja acompanhado
do certificado de garantia e da prova de
compra. Cabos e fichas não estão abrangidos pela garantia.
Está excluída qualquer responsabilidade por
eventuais danos resultantes.
Guarde aqui o
talão de compra
31
Page 32

323334
Page 33

Page 34
Service Help
Aziëlaan 12
‘s-Hertogenbosch
WWW.HESDO-SERVICE.NL
[email protected]
+31 (0) 73 6411 355
ver2.1
 Loading...