

Page 1
TX-2 5 5
USER'S MANUAL
Page 2

FEATURE LIST
SAFETY INSTRUCTIONS
INTRODUCTION
LOCATION OF CONTROLS
INSTALL THE BRACKET
FUNCTION BUTTONS
OPERATIONS
CALLER ID SYSTEM OPERATIONS
TROUBLESHOOTING
FUNCTION
RECEIVING CALL RECORDS
REVIEWING DISPLAY MESSAGES
1
2
3
4
6
7
10
15
15
17
19
TABLE OF CONTENTS
Page 3

1. FSK and DTMF dual system Caller ID
2. Stores minimum 76 incoming calls name & number,
date & time
3. Stores up to 10 outgoing calls number
4. Stores up to 70 names & numbers in phone book
5. LCD displays calling name and number
6. Call back function
7. Delete individual or all records
8. Real time clock (Set time)
9. New call indicator
10. Area & long distance code setting
11. Languages selection
12. Message waiting function
13. Last number redial
14. Speakerphone
15. 10 two-touch memories
16. 3 one-touch memories
17. Flash, Pause, Mute
18. Timer
19. LCD back light
1
FEATURE LIST
Page 4

Carefully read the instructions in this manual.
Follow all warnings and instructions marked on the unit.
When cleaning, unplug the telephone jack from the wall outlet. Use
a damp cloth. use liquid or aerosol cleaners.
Do not use this equipment near water, eg: near a kitchen sink,
bathtub, washbowl, laundry rub, swimming pool or in a wet
basement.
Install in a protected location. Ensure all lines and cords are away
from foot traffic. place objects on the line cord that may
cause damage or abrasion.
Avoid spilling any liquid on the unit. This may cause internal
shorting, fire or shock and is not covered under your warranty.
Do not overload wall outlets and extension cords as this can result
in the risk of fire or electrical shock.
Never push objects of any kind into this telephone as they can
touch dangerous voltage points or short out parts that could result
in a risk of fire or electrical shock.
Take the phone to a qualified technician when it requires repair
work or service. To reduce the risk of electrical shock, do not
disassemble the telephone. Opening or removing covers can
expose you to dangerous voltages or other risks. Incorrect reassembly can cause electrical shock during subsequent use.
Avoid using the telephone during an electrical storm. There can be
a slight risk of electrical shock from lightning.
use the telephone to report a gas leak, if in the vicinity of
the leak.
Unplug this telephone from the wall outlet and refer servicing to
qualified service personnel under the following conditions:
If liquid is spilled into the unit.
If the unit is exposed to rain or water.
If the unit does not operate normally by following the
operating Instructions.
If the unit is dropped or the casing is damaged.
If the unit exhibits a distinct change in performance.
DO NOT
DO NOT
DO NOT
l
l
l
l
l
1.
To reduce the risk of fire, electrical shock, and injury, please follow
these basic safety precautions before you use this equipment.
2.
3.
4.
5.
6.
7.
8.
9.
10.
11.
12.
SAFETY INSTRUCTIONS
2
19
Check the line cord. Connect the telephone cord. Check
batteries, Check adaptor.
Call your telephone company to verify that your Caller ID
services are active.
You may have too many communication devices hooked
to a single line. A communication device can be a phone,
modem or facsimile (FAX) machine. Contact your
telephone company for help in calculating the limit for
your residence or business line.
Verify that the line cord is plugged in correctly.
Verify that the line cord connection is correct and tightly
secured.
Call your telephone company to verify that your caller ID
services are active.
If you have an answering machine connected to this
Phone, ensure that your answering machine is set to
answer after at least two rings.
You answer the call before two rings.
Contact your telephone company if the problem
continues for more than 24 hours. The telephone
company may be experience temporary line.
If you have experienced a power failure when using
optional AC adaptor, the batteries for memory back up
could become weak or dead. If the power is restored and
the display screen does not respond then You must
replace the batteries with new ones.
TROUBLESHOOTING
BLANK OR
FAINT
SCREEN
CALLER ID
WILL NOT
WORK
PROPERLY
PHONE
WILL NOT
RING
NO DIAL
TONE
NO DATA
SENT
NO RESPONSE ON
LCD DISPLAY
If you have problems with your phone, please check below
for helpful hints:
l
l
l
l
l
l
l
l
l
l
Page 5

CHECK THE CONTENTS OF THE BOX
BATTERY INSTALLATION
NOTE:
CONNECTING LINE CORDS
Box should contain:
Handset with handset cord and phone base
Telephone line cord
4 AA size 1.5V batteries
User's manual
Bracket
The Caller ID phone requires four 1.5V AA size batteries for LCD display.
1. Remove the battery cover from the back of your Caller ID phone
2. Insert four 1.5V AA size batteries by observing the +/- polarity
marked in the compartment.
3. Replace battery compartment cover.
You can also insert an adaptor for the LCD display (optional).
Plug one end of the supplied modular cord into the line jack. Then
plug the other end into telephone line jack.
l
l
l
l
l
INTRODUCTION
3
l
the
the
the
Using the call back feature
A. Call back the dialled number: The unit can store up to 10 dialled
numbers.
B. Call back the called number: The unit can store minimum 76
called numbers.
(NOTE: If the number is blocked or is
not available, it can not be call backed.)
1. In the state of on-hook, press the button once, the last dialled
number will show on the LCD, then use button to select the
number that you want to dial out.
2. Pick up the handset or press button, the phone number can be
dialled out automatically.
1.Lift the handset or press button, listen for a dial tone.
2. Select the caller that you want to call back by pressing
button.
3. Press the button to dial the phone number shows on the LCD .
In the state of on-hook, use button to select the call you
want to call back, then pick up the handset or press the button, the
phone number can be dialled out automatically.
Or
or
or
or
18
Page 6
LOCATION OF CONTROLS
4
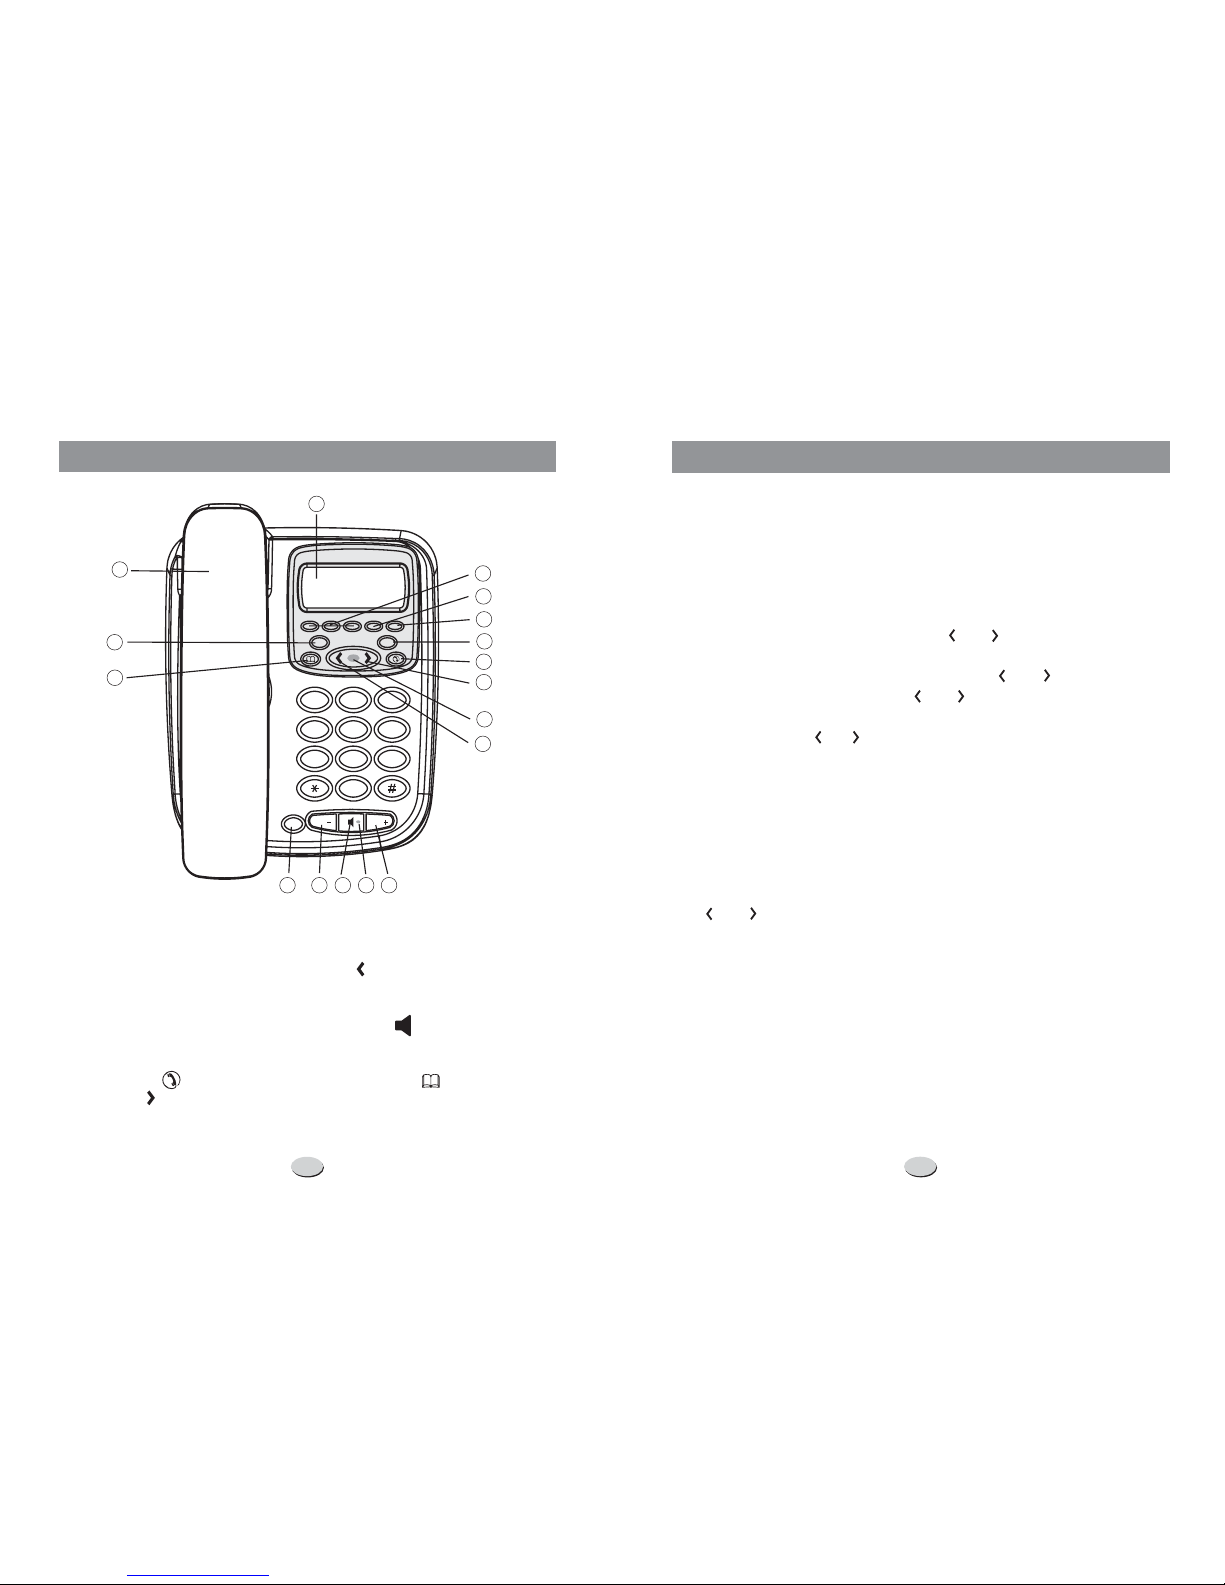
1. Handset
2. LCD
3. M1~M3 button
4. Flash button
5. Auto button
6. Mute button
7.Callback( )button
8. Down ( ) button
9. New call indicator
10.Up( )button
11.Volume+( )button
12.Inuseindicator
13. S p e a k e r ( ) b u t t o n
14.Volume-( )button
15.Redial&pause( )button
16. Phonebook ( ) button
17.Delete( )button
VOL +
VOL -
RD./P
DEL
M1 M2 M3
RD./P
FLASH AUTO
MUTEDEL
1
4
7
2
5
8
0
3
6
9
ABC DEF
MNO
JKL
GHI
PQRS
TUV
WXYZ
VOL VOL
1
3
4
2
5
6
7
8
9
16
1112131714
10
Subscription to Caller ID service from your local phone
company is required before the first use.
New call indicator
Review our call records
END OF LIST
Save call records
NOTE
Delete single or all record number(s) -
DEL DEL? DEL
DEL ALL DEL?
DEL NO
CALL.
DEL
l
l
l
l
- The red indicator light of your phone will flash
to indicate that you have new calls until all the new calls have been
reviewed.
y - Use the button to scroll browse
through the caller list. If the call is more than 13 digits, the arrow will
show on the bottom right of LCD, press the button once to
review the other digits, press the button again to review next
call. At the end of the call record lis t, you will see the
message. Press the button to continue.
- Save specific calls by deleting old or unnecessary
call records.
: Your phone stores minimum 76 call records before the memory
becomes full. When the next call comes in, the oldest record
automatically drops off to make room for the new call record.
In the state of on-hook, use
the button to select the number which you want to remove,
press the button, the LCD will show and then press the
button again to remove this number, press other button to exit. If press
the button for about 6 seconds, the LCD will show and
press the button to remove all numbers and the LCD will show
When your Caller ID phone is in use mode, you can press the
button once to stop the timer, press it once more to restart it.
or
or
or
or
or
NOTE:
17
CALLER ID SYSTEM OPERATIONS
15
Page 7
5
16
NO CALLS
NO CALL
- When all calls have been
deleted. The LCD will show .
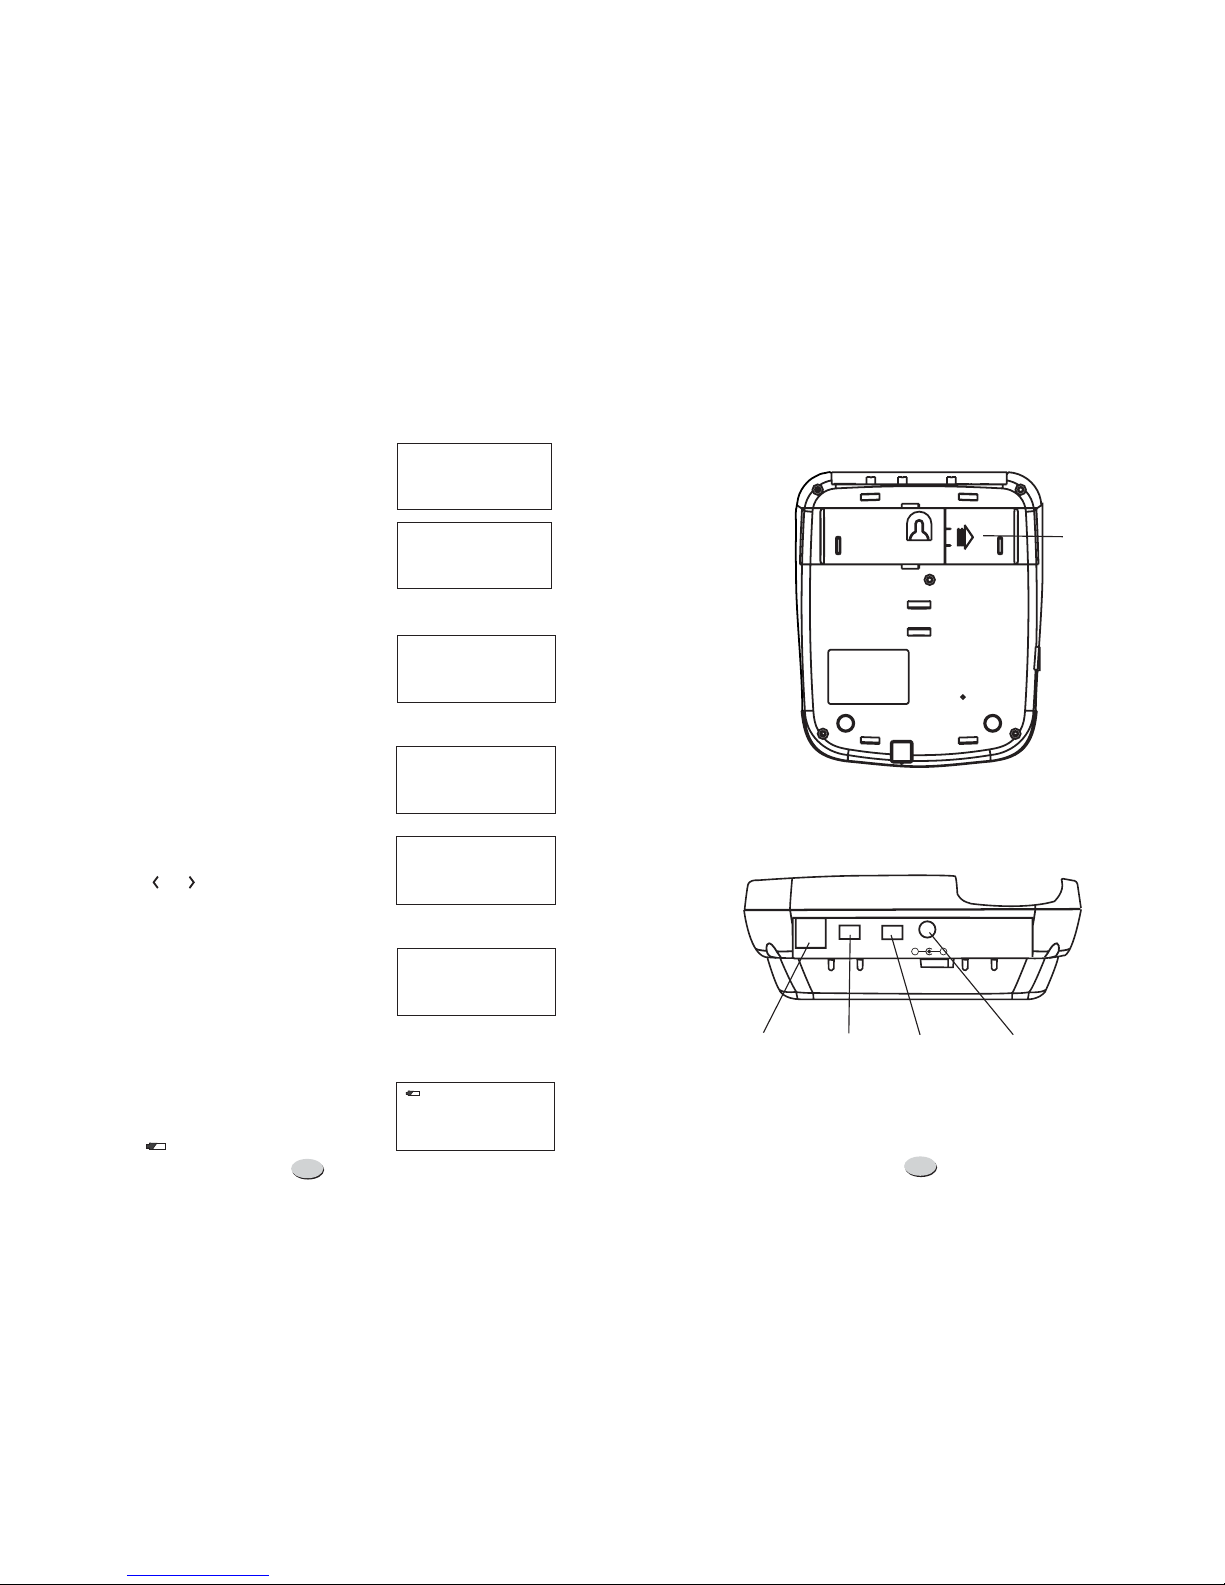
TOTAL & NEW CALLS
PRIVATE
PRIVATE
REPEAT CALLS
REPEAT
END OF LIST
NO CALL
OUT OF AREA
LOW BATTERY INDICATOR:
- This shows you the
total and new calls to be reviewed. In this
example, you have a total of 4 calls which
include 2 new calls and it is MONDAY.
- If the caller has exercised the
option to prevent his name and number
from being sent, will show on the
screen.
- If a call comes repeatedly,
the display will show icon in the
upper right corner of the LCD.
- This message displays when
reaching the top (end) of the call history list
by using the or button. If there is no call,
then LCD shows .
- This message will display
when some one calls from an area where
the telephone company is not offering the
caller identification services or is not yet
providing number delivery to your area via
the long distance net work.
If there is no
battery or the battery power is low, the low
battery icon will turn on and flash .
END OF LIST
9:52 9/12
PRIVATE
9:52 9/12
03
CALL#
OUT OF AREA
9:52 9/12
04
CALL#
TOTAL10MON
9:52 9/12
02
NEW
9:52 9/12
03
CALL#
REPEAT
TOTAL 04 MON
9:52 9/12
NEW
02
12274612345
NO CALL
9:52 9/12
00
CALL#
Battery
compartment
Telep hone
line
jack
Ringer
volume
switch
Dialling
mode
switch
Adaptor
jack
LINE
HI LO
HI LO
PT
P T
DC 7.5V
DC 7. 5V
-
+
Page 8
6
15
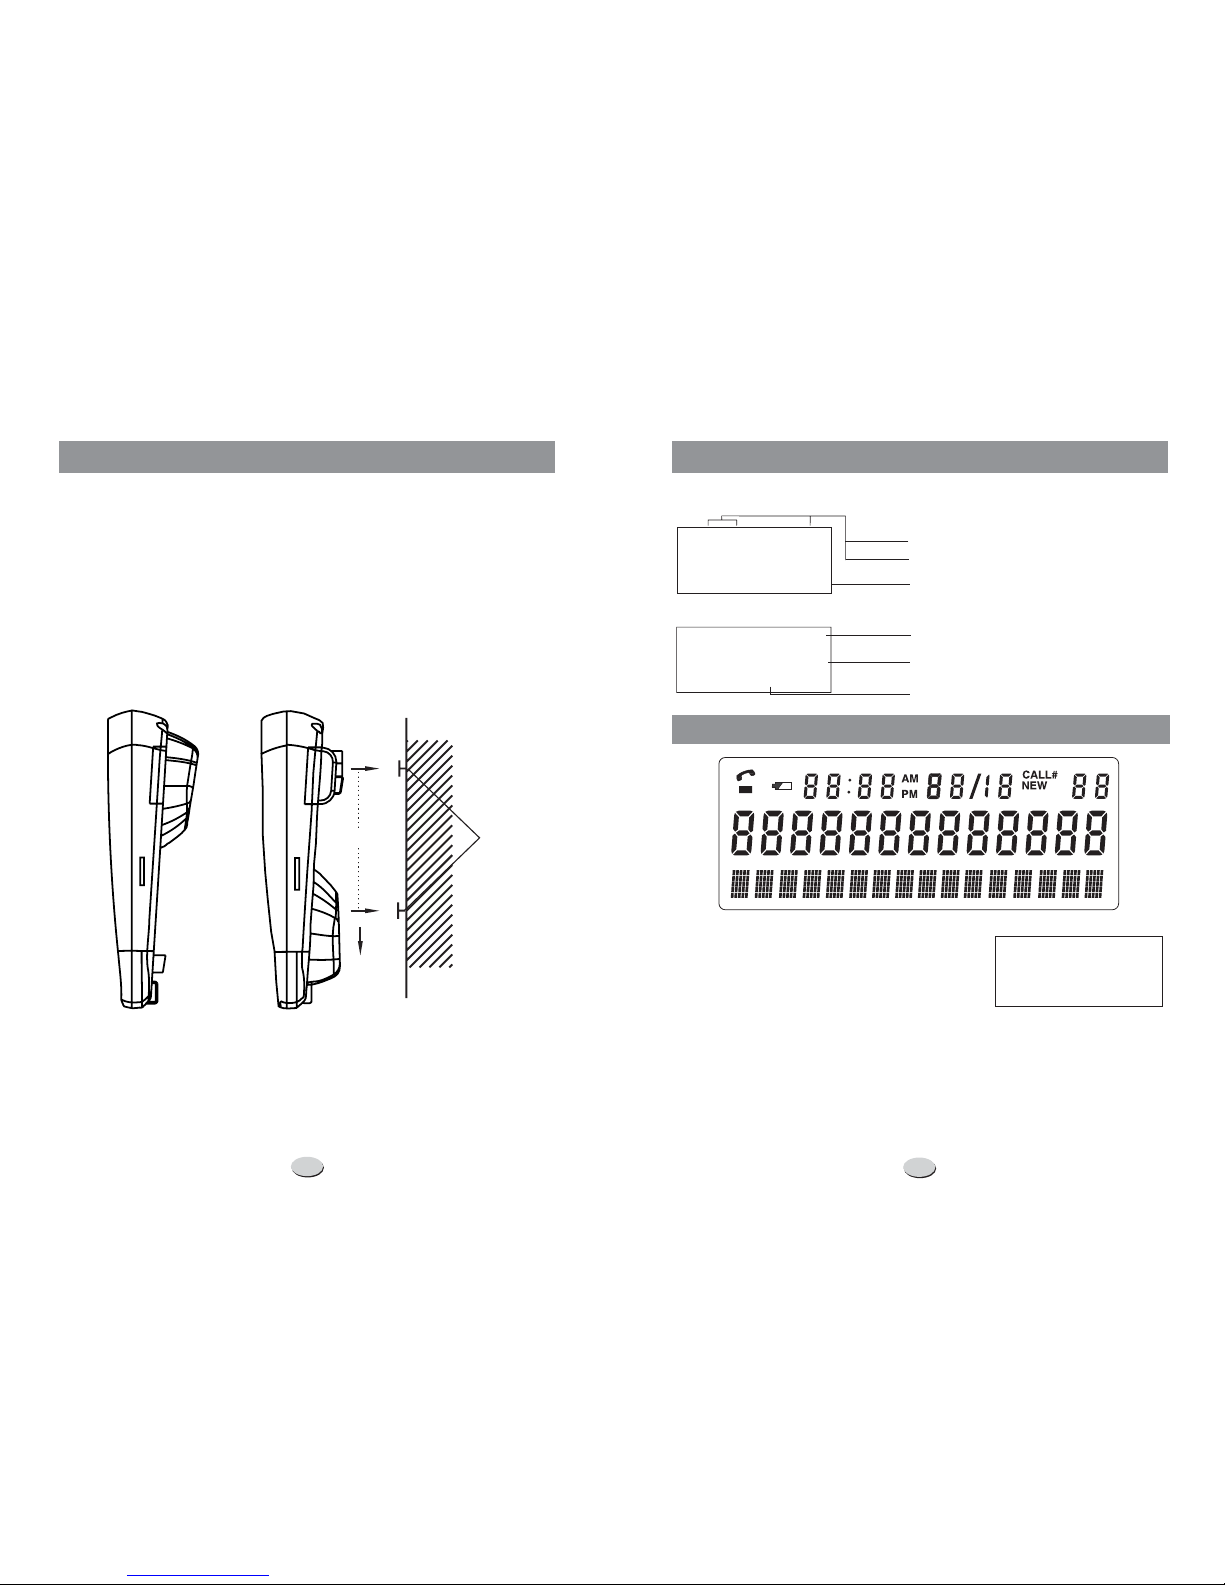
The total number of new calls
Time and Date
TOTAL 04 MON
9:52 9/12
NEW
02
9:52 9/12
02
12274612345
Caller's number
Total number of calls and
the week day
A caller ID record consists of the following information:
The serial number of caller lis t
REVIEWING DISPLAY MESSAGES
JOHN SMITH
Caller's name
RECEIVING CALL RECORDS
MESSAGE WAITING
MESSAGE WAITING MSG
*NOTE: This function should be
supported by your telephone company.
- If you have voice mail
service from your telephone company and
a recorded message is left, the screen will
display . The will
appear in the upper left corner. The icon
will remain until you have retrieved your
voice mail and the MESSAGE WAITING will
be saved as a call.
MESSAGE WAITING
9:52 9/12
02
CALL#
msg
MOUNTING
PINS
Figure 2
83mm
Figure 1
1. If you would like to put your phone on the desktop, please install
the bracket as figure 1.
2. If you prefer to mount the phone on the wall, please do the
following steps and see figure 2.
a. Install the two self-tapping screws (not supplied) at a distance of
83mm from each other and located on a vertical centre line.
b. Slowly slide the unit down until it snaps into place.
INSTALL THE BRACKET
CALL#
REPEAT
msg
CW
Page 9

7
1. Ringer Volume Selection
2. Redial Function
3. Speaker Function
4. Flash Function
5.Mute Function
6. Pause Function
HI/LO
HI
LO
RD./P
FLASH
NOTE:
FLASH
MUTE
MUTE. MUTE
Set the ringer volume switch to the desired position ( ) to select
the ringer volume. To have the maximum ringer volume, move the
ringer volume switch to the position. If you would prefer a gentle
ringer volume, move the ringer volume switch to the position.
Lift the handset or press the button, then press the button to
redial the last dialled number.
To switch your call to speakerphone, press the button and hang up
the handset. To revert back, just pick up the handset. In speaker state,
you can dial the number and receive the call, also you can answer the
call.
Press the button to terminate a call and institute a dialling tone
for another call or to get another call from "Call Waiting" (a special
telephone service).
If you do not have any special telephone service, such as Call
Waiting, pressing the button during a call may disconnect your
current conversation.
If you wish to speak privately to someone else in the room without
your caller overhearing, press the button once then the LCD will
display To resume normal conversation, just press the
button again.
Allows you to insert a temporary pause during dialling sequence. For
example, dialling an international number (eg: 011-886-22-795-1234),
some telephone company systems will not register the entire number
FUNCTION BUTTONS
14
6. FLASH TIME SETTING
7. HOUR FORMAT SELECTION
8. DATE FORMAT SELECTION
Press the button to enter this setting when the LCD shows
and then the current value will display.
Use the button to set the flash time (100ms/120ms/300ms/
600ms). Press the button to confirm and exit.
Press the button to enter this setting when the LCD shows
and then the current value will display.
Use the button to select the hour format (12H/24H). Press
the button to confirm and exit.
Press the button to enter this setting when the LCD shows
and then the current value will display.
Use the button to select the date format (DD-MM/MM-DD).
Press the button to confirm and exit.
In the DD-MM mode, the time display sequence is day-month and
in the MM-DD mode, the sequence is month-day.
SET
FLASH
HOUR
FORMAT
DATE
FORMAT
or
or
or
Page 10

8
entry without a pause between the prefix numbers. You may have to
dial 011- , dial 886 - . This allows adequate timing for the
phone number to register with the telephone company's system and
complete the call.
You can store 10 numbers in two-touch memory in the state of on-hook,
Press and hold the button until the LCD shows - - >. Then enter
the telephone number you want to store. Press the button once
more and the LCD shows - - >?. Press the desired location button( 0 9)
and the LCD shows .
If you want to update the stored number, you need to store a
new number to replace the old one.
Lift the handset or press the button, press the button, then
press the desired location button(0 9) to dial the number.
In the state of on-hook, press and hold one of location button (0 9)
or press the button once then press the location button (0 9) ,
the LCD will show the number that is stored in two-touch memory.
In the state of on-hook, press the hold the button until the
LCDshows-->.Then enter the telephone number you want to store.
Press the desired location button (M1~M3) and the LCD shows
.
Or
Enter the number you want to store at first, then press and hold the
desired location button (M1~M3) until the LCD shows .
If you want to update the stored number, you need to store a
new number to replace the old one.
RD./P RD./P
A. Two-touch memory
To store a number in two-touch memory
AUTO
AUTO
SAVE OK
NOTE:
To dial a number from two-touch memory
AUTO
To review a number in two-touch memory
AUTO
B. One-touch memory
To store a number in one-touch memory
AUTO
SAVE
OK
SAVE OK
NOTE:
7. Memory Dialling
l
l
l
l
~
~
~
~
13
Press the button when the LCD show to enter
the setting.
Press or button to select the correct digit.
Press the button to confirm and enter the next digit setting.
When the area code setting has been completed, press the
button to confirm and the LCD displays . The unit
enters the long distance code setting.
Repeat the step 2 3 to finish the setting for LDS code and press
the button to exit.
SET AREA & LDS
SET LDS CODE
DEL
~
1.
2.
3.
4.
5.
4. LANGUAGES SELECTING
English1, Greek,
Australian, English2, Spanish, Dutch, French,
German, Polish, Swedish, Danish, Finnish Norwegian
5. AREA & LONG DISTANCE CODE SETTING
The unit support multi languages, including
and .
Press the button when the LCD shows to enter the
languages setting. Use or button to select the language. Press
the button to confirm and exit.
(Only under "English1", "English2", "Greek", "Australian", "Czech",
"Slovak", "Polish" and "Turkish" language and in on-hook state, the
setting can be done.)
SET LANGUAGE
Czech, Slovak, Turkish,
When you use this phone for the first time, or move to an area that has
different area code, you must enter your area code. This is necessary
because the phone must distinguish local or long dis tance calls to
properly dial calls from the Caller ID list.
For example: If you set the long distance and area code 0592, and
the incoming number is 05926036442. When you call back the
number, the LCD only show 6036442.
Page 11

9
12
e. Todelete a single number in the phone book:
f. To copy the Caller ID numbers and last 10 dialled numbers to
phonebook
During the reviewing process, use button to select the
number you want to delete, press the button once, the LCD
shows Press the button again to delete it.
When the LCD shows the CID or last 10 dialled number, press and hold
button for about 3 seconds to add the number to phonebook. The
first character of the name will flash to indicate you can modify it, you
can do it then press the button to confirm and enter the next new
number adding, press the button to exit.
the
DEL
DEL? DEL
DEL
DEL
or
Press the button to enter the LCD contrast setting when the LCD
shows , then the current contrast level ( ) will
show on the LCD. Press or button to make a selection, press
the button to confirm and exit.
Press the button when the LCD shows , use or button
to select the correct number. Press the button to confirm and move
to the next digit, press button to exit.
2. LCD CONTRAST SETTING
3. TIME SETTING
LCD CONTRAST HI/LO
SET TIME
NOTE:
When you receive a call to this unit, time and date will be
set automatically if you have Caller ID service (FSK standard).
or
The setting sequence is
After the setting, the cursor for will flash, you can use
the button to activate/deactivate this setting. If it is activated,
the will set automatically,or in stead of showing the week day,
the LCD will only show the in the standby state.
The need to be selected to ensure the week displays correct.
hour - minute - month - day - year - week.
year week
week
year
TOTAL CALLS XX
1.
l
l
l
Review the number in one-touch memory
Dial a number from the one-touch memory
Copy the CID or last 10 dialled or phone book number to
M1~M3
SAVE OK
VOL+ VOL-
P/T
P
T
In the state of on-hook, press the location button (M1~M3) once,
the LCD will show the matching number.
Lift the handset or press the button, then press the location
button (M1~M3) to dial the number.
*When the number shows on the LCD, press and hold the location
button (M1~M3) until the LCD shows , now the number
has been stored in the memory.
You can store 70 numbers and names in the phone book, refer to
"FUNCTION OPERATIONS", section "PHONEBOOK" for details.
During conversation with handset or speakerphone, you can press the
or button to adjust the desired handset receiving or
speaker volume (there are 4 levels for selecting).
Set the dialling mode switch to the desired position ( ) to select the
dialling mode. For tone dialling mode, move the switch to the
position. For pulse dialling mode, move the switch to the position.
8. Phone Book Function
9. Handset Receiving And Speaker Volume Adjustment
10. Dialling Mode Selection
2.
3.
Page 12
10
FUNCTION OPERATION
This unit contains the following special function, quickly press the
button to enter the setting mode and press button to
select one. The setting sequence is
he
DEL
twice
DEL
PHONE BOOK-LCD CONTRAST SET TIME - SET LANGUAGE - SET AREA& LDS - SET FLASH - HOUR
FORMAT- DATE FORMAT.
a. Toadd number and name to the phone book
or
Press the button to confirm or press t
button to exit.
1. PHONE BOOK
Press the button to select the phonebook menu and the LCD
will show: . Press the to select the
menu. Press the button to enter the function of adding name
and number. (You can enter it directly by pressing and holding
the button.)
Enter the telephone number by keypad. Press the button to
delete the previous digit. The maximum number of digits to be
entered is , if the number exceeds , the LCD will show
and the exceeding digits will not be stored.
After finishing the number setting, press and hold button for
about 3 seconds (or press the button once) to enter the name
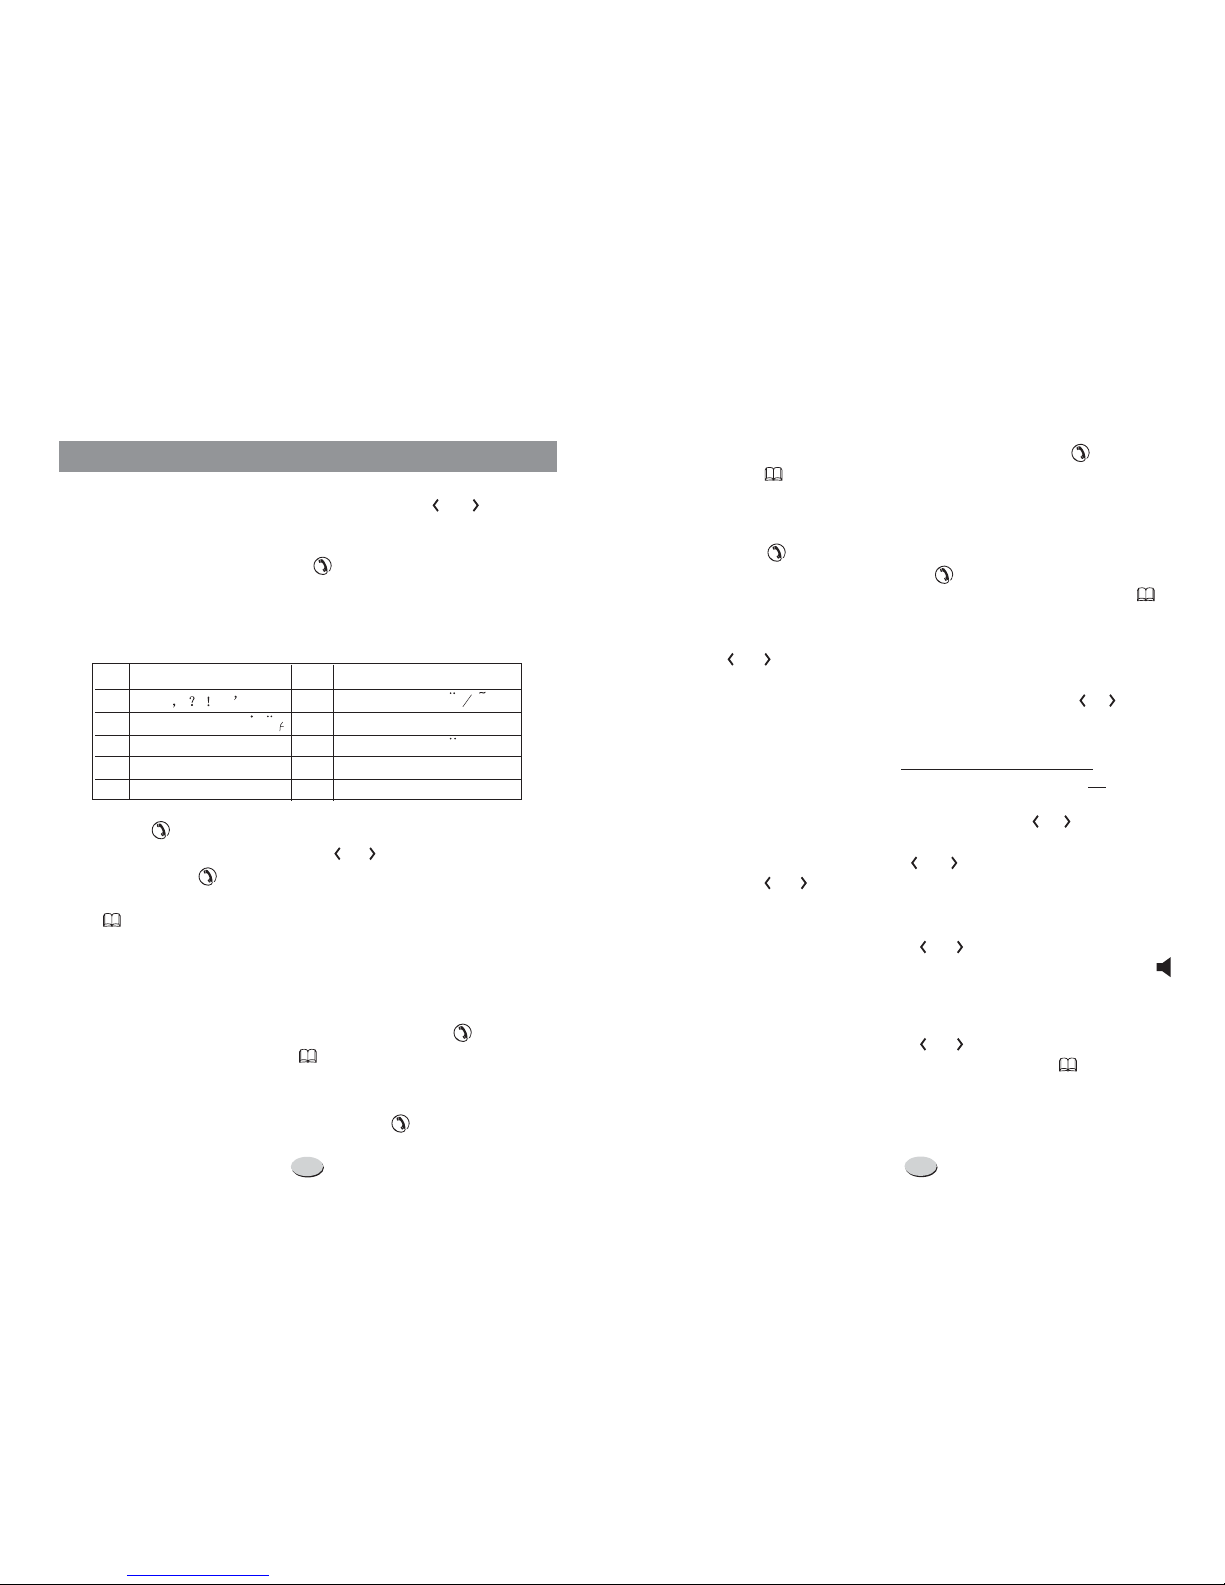
setting, press the appropriate keypad to get the following
characters, if the next character is on the same button as the
previous one, you will first
REVIEW >> ADD >>
DEL
20 20
DEL
need to press button before the
entering,press button to delete the previous character.
or
TOO
LONG
1.
2.
3.
11. -"()
2 A B Cabc2AAE
3 D E Fdef3
4 GHIghi4
5 J K Ljkl5
6 MNOmno6OON
7 PQRSpqrs7
8 TUVtuv8U
9 W X Y Zwxyz9
0 0 + & @/$%
Key Characters
Key Characters
FUNCTION OPERATIONS
11
NOTE: If the number is more than 13 digits, an arrow will show on
the bottom right of LCD, press button to review the other
digits, press button again to review the next call.
During the reviewing process, use button to select the number
you want, when it shows on the LCD, pick up the handset or press the
button to dial.
During the reviewing process, use button to select the number
you want. When it shows on the LCD, press and hold button for 3
seconds more, then the first character of the name will flash to
indicate you enter the function of name modification.
c. Tospeed dial the number from the phone book
d. Tomodify phone book name:
or
or
or
or
Press the button to select the phonebook menu and the LCD
will show . Press the button to enter the function
of reviewing the name and number. (Also you can press the
button once, then the last record in the phone book will show
on the LCD.)
Use button to review. You can also quickly review the call
by the first letter of name, when press the first letter of name,
the LCD will display the matching name(s), then use button
to get the right one.
In the state of on-hook, press to review.
Eg: If you want to review the seventh number, just press , the LCD
will show the seventh number and name. In this state, you can
continue review the other numbers by pressing button.
REVIEW >>
sequence of the number+#
7#
or
or
or
2.
When the setting is completed, press and hold the button (or
press the button once) to store the records and meanwhile
enter the next number presetting.
4.
1.
b. To review the number/name in phone book
 Loading...