

Page 1
USER’S MANUAL
TX-180
Page 2
1 INSTALLATION
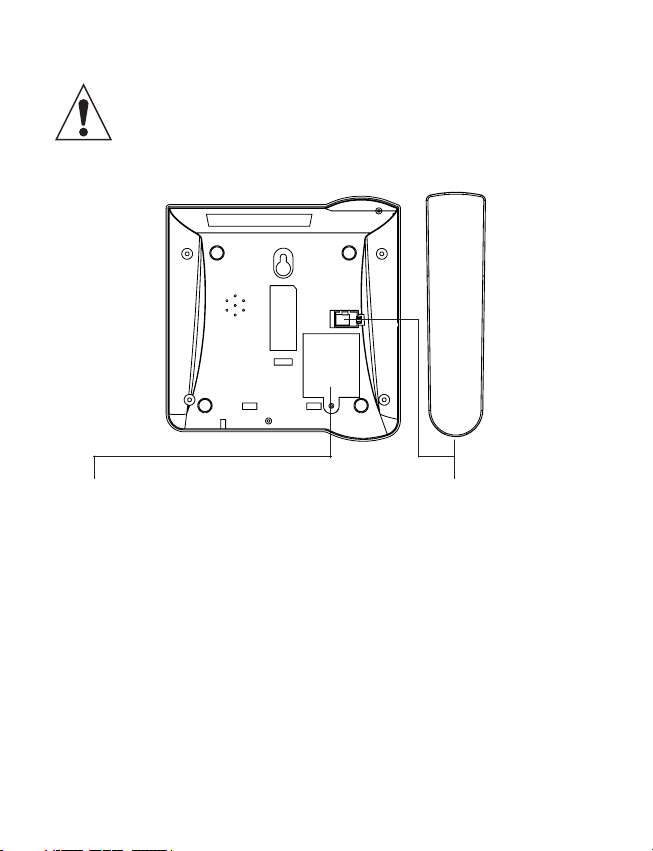
ATTENTION: When installing or replacing the batteries, always disconnect the telephone line from the
telephone wall socket rst, to avoid the risk of electric
shocks due to high voltage on the telephone network.
1.1 BATTERIES: (not incl.)
Here you can install 4 batter-
ies to provide the telephone
with power in case the adaptor
power supply fails. Only install
alkaline batteries of 1.5 Volts,
size AAA (pencil cell). Because of their lower voltage,
rechargeable batteries are not
suitable for this telephone.
1.2 SPIRAL CORD:
Connect the receiver with
the telephone by clicking
one side of the spiral cord
into the bottom of the re-
ceiver and the other side into
the bottom of the telephone.
Depress the plugs until you
hear a ‘click’.
2
Page 3
1.3 POWER ADAPTOR
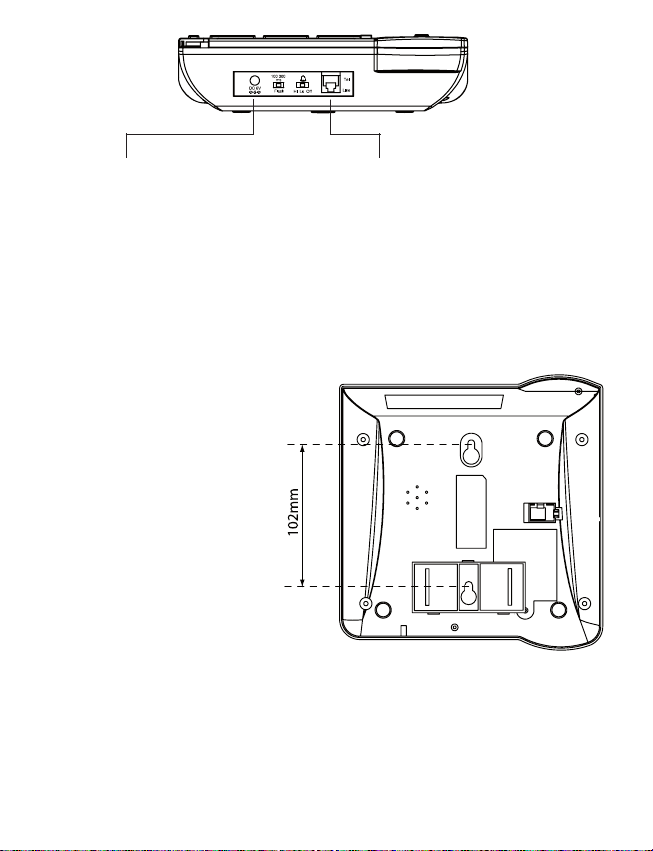
Here you can connect
the supplied 6V power
adaptor. The adaptor itself
must be inserted into a
230V AC wall socket.
1.5 WALL-MOUNTING:
Above each other and
at a distance of 102mm,
drill 2 holes in the wall
and insert plugs and
screws; let the head of
the screws protrude for
5 millimetres.
Click the supplied wall
bracket onto the rear of
the telephone.
Use the key holes to
hang the telephone over the screws and press the telephone
downward.
1.4 TELEPHONE CONNECTION:
The modular plug of the telephone line must be inserted into the
TEL LINE input of the telephone.
The other side of the telephone
line must be inserted into the
telephone wall socket.
Afterwards, you can x the telephone line and adaptor cable
to the wall using cable-ties.
Page 4
2 TELEPHONE OVERVIEW
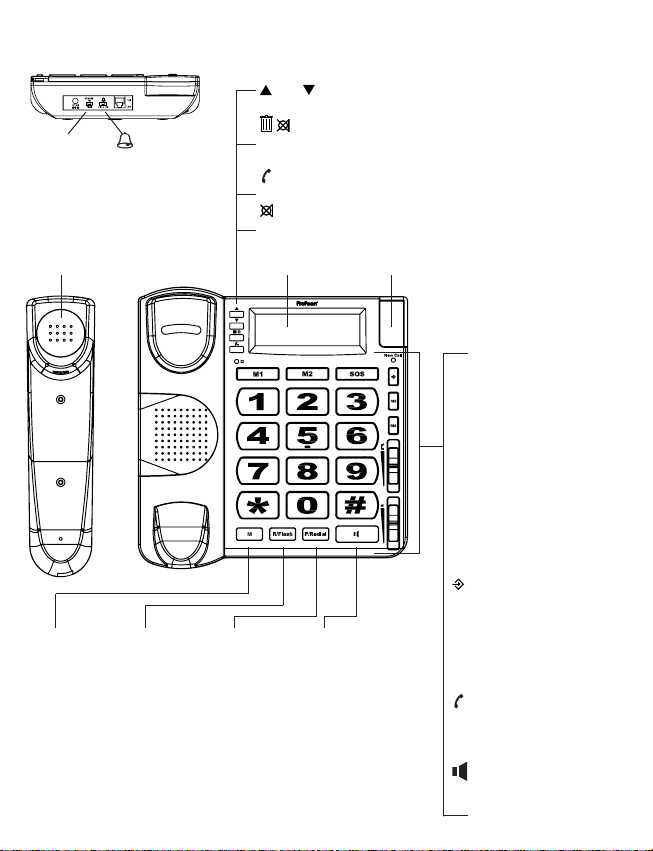
and button: to scroll memories and settings
Flash:
selector for
the ash
time (see
paragraph
7.2)
Receiver
M button:
to dial the
2-button
memories
: ring
volume
switch
R/Flash button: to insert
a Flash
pulse, e.g.
for the ‘Call-
Waiting’
function
P/Redial
button: to
insert a dial-
ling pause /
to redial the
last dialled
numbers
/ button: to delete memories and to switch off the
microphone
button: to dial memory numbers
indicator: illuminates when the microphone is
switched off
Display
speaker
button: to
enable the
speaker
function
call indicator, illuminates when
receiving incoming calls
the ‘New Call’ symbol
illuminates when
you’ve received new
calls
M1 and M2 button:
direct memory buttons
1 and 2
SOS button: to
automatically dial
emergency numbers
button: to program
memories
M3 and M4 button:
direct memory buttons
3 and 4
volume control: to
adjust the receiver
volume
volume control: to
adjust the speaker
volume
4
Page 5
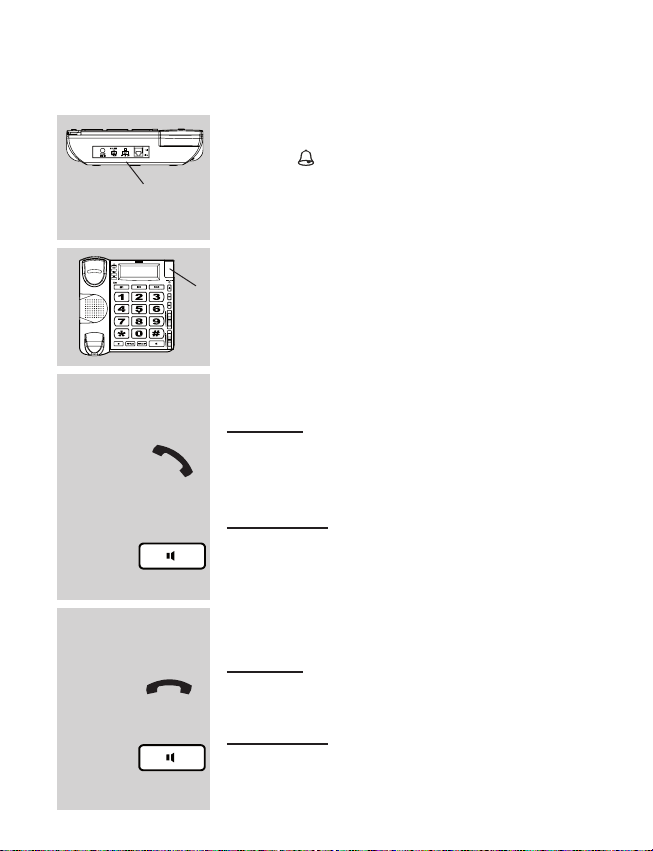
3 USING THE TELEPHONE
3.1 INCOMING CALLS:
3.1.1 ring volume:
use the switch at the rear of the tele-
phone to adjust the ring volume
3.1.2 call indicator:
the call indicator illuminates when receiving an incoming call
3.1.3 to answer a call
receiver:
pick up the receiver to answer the call with
the receiver
hands-free:
or
press the speaker button to answer the
call hands-free
3.1.4 to disconnect a call:
receiver:
put the receiver back onto the telephone
hands-free:
or
press the speaker button again
55
Page 6
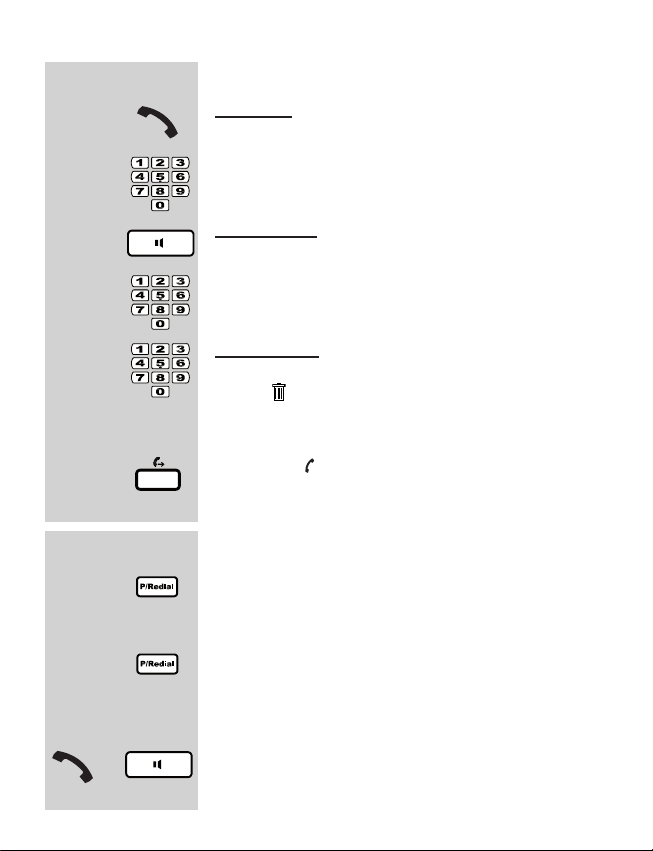
3.2 OUTGOING CALLS:
3.2.1 to dial numbers:
receiver:
pick up the receiver
enter the phone number using the keypad
or
hands-free:
press the speaker button
enter the phone number using the keypad
or
pre-dialling:
enter the phone number using the keypad
use the button to delete any incorrect input and
use the P/Redial button to insert a pause
press the button to dial the number
hands-free
3.2.2 to redial numbers:
press the P/Redial button; the last dialled
number will appear in the display
repeatedly press P/Redial to select one of
the 5 last dialled numbers
or
pick up the receiver or press the speaker
button to dial the selected number
6
Page 7
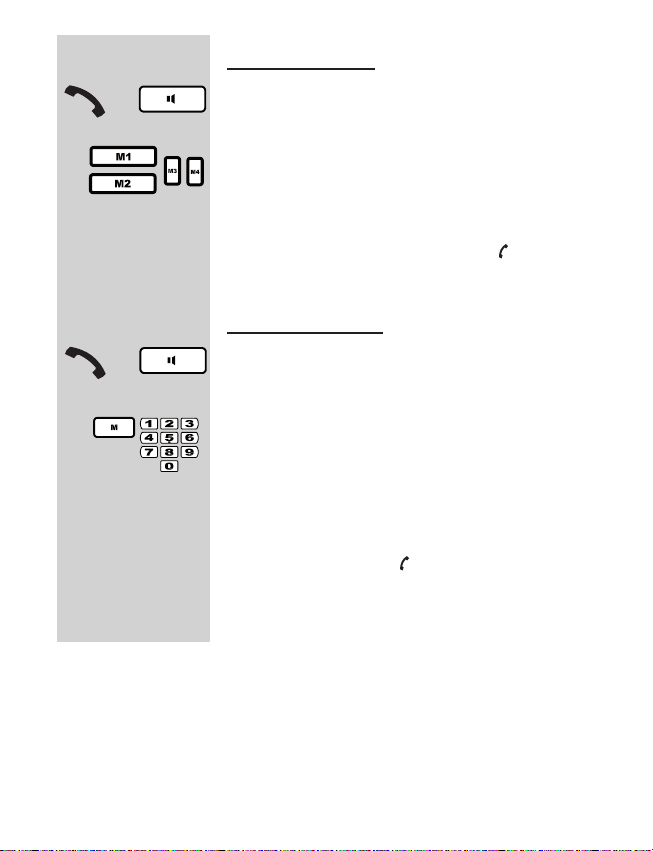
3.2.3 to dial from memories:
direct memories:
or
pick up the receiver or press the speaker
button
press the desired memory button (M1 ~
M4) to dial the related number
(you can also press the desired memory
button rst and then press the button to
dial the number hands-free)
2-button memory:
or
pick up the receiver or press the speaker
button
press the M button followed by one of the
10 buttons on the keypad under which
you’ve stored a number to dial that number
(you can also press the M button followed
by one of the buttons on the keypad rst
and then press the button to dial the
number hands-free)
See paragraph 4.2 for programming the memories.
Page 8
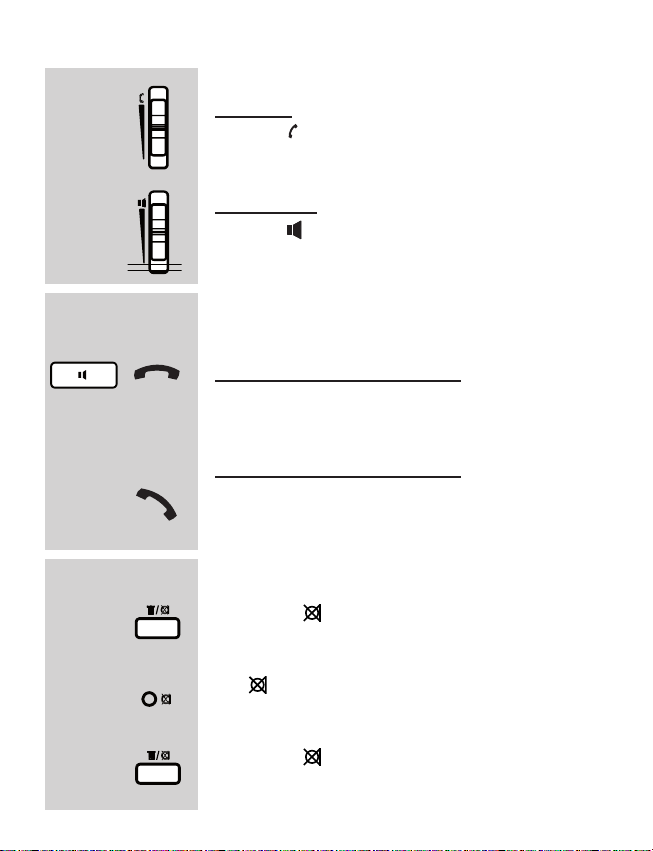
3.3 FUNCTIONS DURING A CALL:
3.3.1 volume:
receiver:
use the control to adjust the receiver
volume
hands-free:
use the control to adjust the volume of
the speaker
3.3.2 switching between receiver /
hands-free:
from receiver to hands-free:
press the speaker button and put down the
receiver to continue the call hands-free
from hands-free to receiver:
pick up the receiver during a call to continue the conversation through the receiver
3.3.3 mute (microphone off):
press the button to switch off the microphone
the indicator remains lit for as long as
the microphone is switched off
press the button again to switch the
microphone back on
8
Page 9
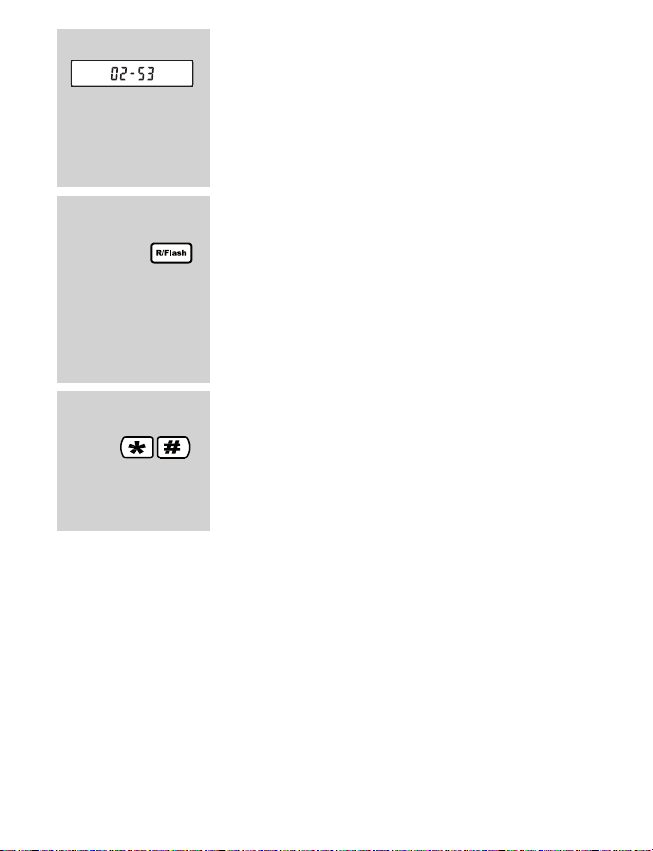
3.3.4 call timer:
the display of the telephone keeps track of
the call duration
this timer will disappear as soon as you
disconnect your call
3.3.5 call transfer / R function:
use the R/Flash button to transfer calls
when calling via a home switchboard or
using telecom services (e.g. to answer a
waiting call), see also paragraph 7.2
3.3.6 telecom services:
the * (asterisk) and # (pound) buttons are
telecom service buttons when calling a
telecom service, such as tele-banking
9
Page 10
4 MEMORIES
4.1 INTRODUCTION:
The TX-180 is provided with 4 direct memories which you can
dial with a single press on a button and 10 2-button memories
which you can dial by pressing the M button followed by one
of the 10 buttons on the keypad.
4.2 PROGRAMMING:
4.2.1 direct memories:
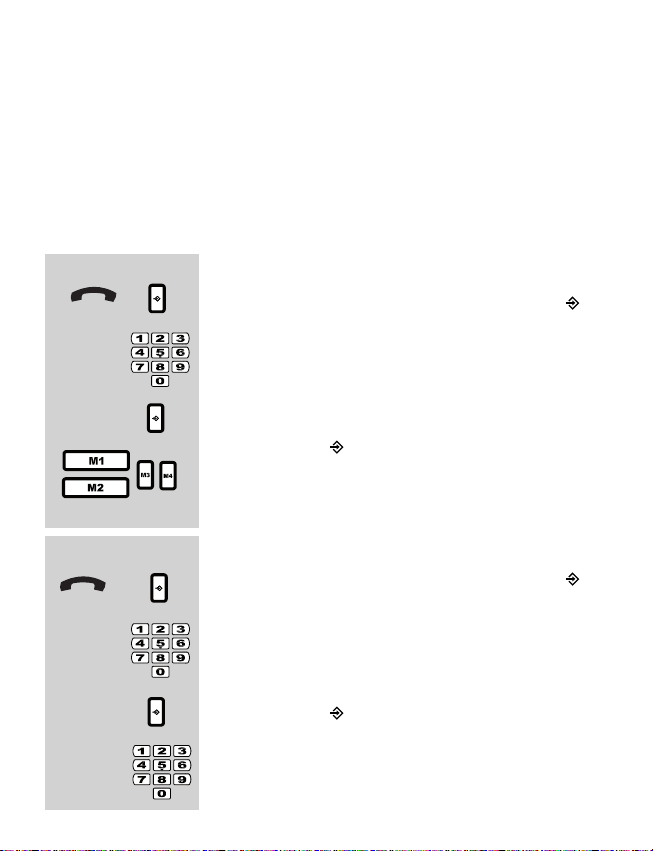
put down the receiver and press 1x the
button
use the keypad to enter the phone number
(max. 24 digits)
press 1x the button
press the desired memory button M1 ~M4
4.2.2 2-button memories:
put down the receiver and press 1x the
button
use the keypad to enter the phone number
(max. 24 digits)
press 1x the button
pres one of the buttons on the keypad
10
Page 11
4.3 DELETING:
4.2.3 pause:
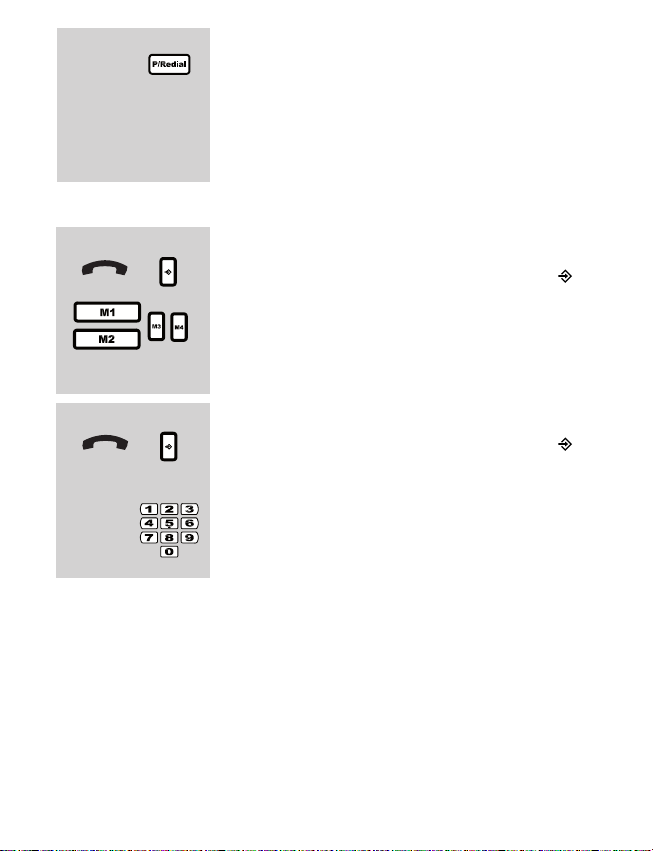
if you’d like to insert a pause into a memo-
ry number, e.g. because you’re dialling via
a home or ofce switchboard, press the
P/Redial button at the desired place to
insert a dialling pause of 3 seconds
2x
4.3.1 direct memories:
put down the receiver and press 2x the
button
press the memory button M1 ~M4 that you
want to delete
2x
4.3.2 2-button memories:
put down the receiver and press 2x the
button
press the numeric button on the keypad that
you want to delete
4.4 CORRECTING:
You van overwrite an old number by programming a new and
correct number in its place, as explained in paragraph 4.2.
4.5 DIALLING:
For this, see paragraph 3.2.3.
11
Page 12
5 CALLER-ID
5.1 INTRODUCTION:
When receiving an incoming call, the display of your telephone
will show the phone number of that subscriber.
The memory for those incoming calls can store 55 numbers,
including the date and time of the call.
The Caller-ID function is linked with the dialling function of the
telephone. When checking the memory, you can call back any
subscriber with a single action.
The TX-180 is suitable for the DTMF system, offered by the
Dutch KPN, and for the FSK system, offered by the Belgian PTT
and by the Dutch and Belgian telephone providers for as far as
they provide telephone services.
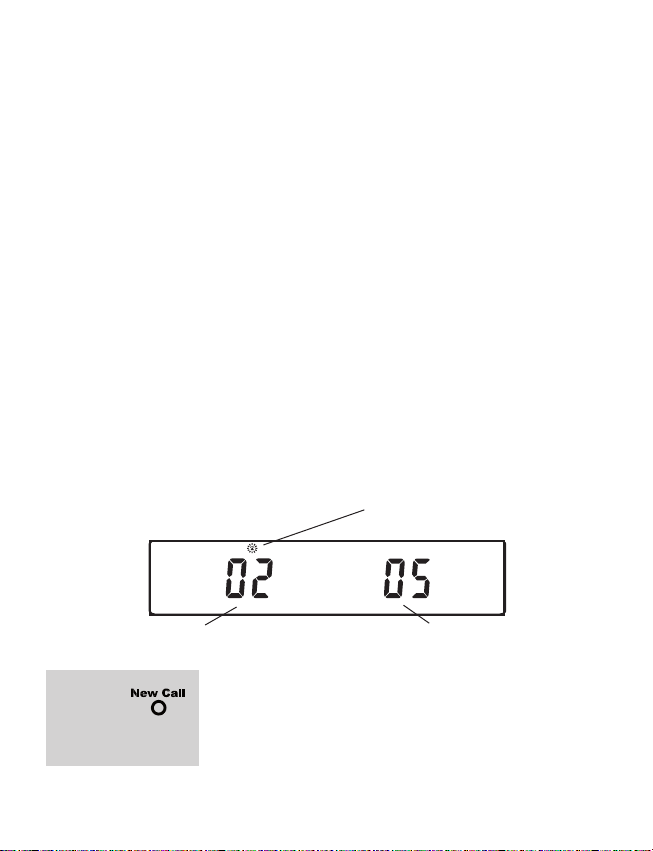
5.2 NEW CALL INDICATION:
ashes when the memory
contains new calls
number of new and unread
calls
the ‘New Call’ indicator on the telephone will
ash as well
total number of calls in the
memoryn
12
Page 13
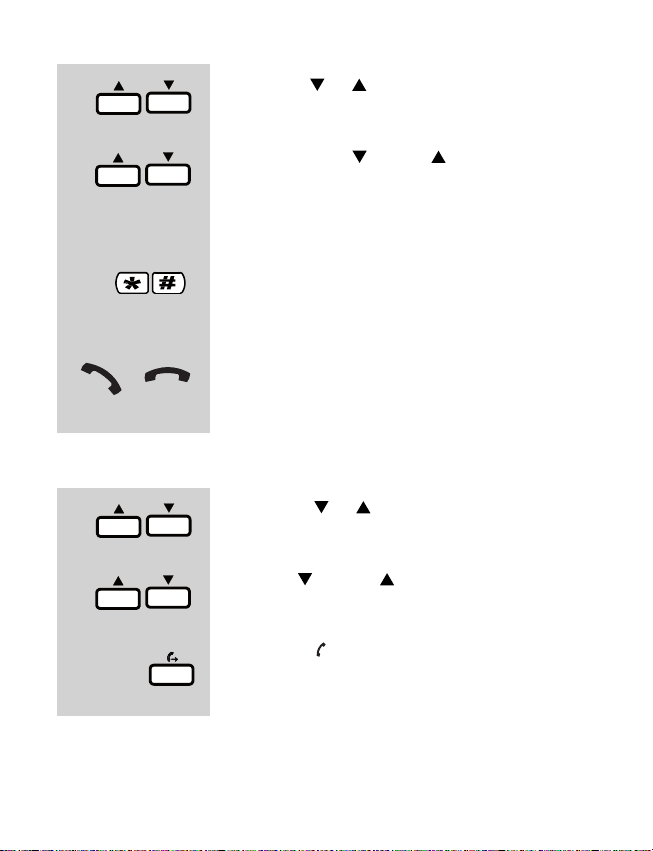
5.3 CHECKING THE MEMORY:
press the or button to open the Caller-ID
memory
use the button and/or to scroll the
memory
(while scrolling, the number of the call will briey appear
at the left in the display)
press the # button to check the time of the
selected call (press * to show the number
again)
briey pick up the receiver and put it down
again to leave the memory
5.4 CALLING BACK:
press the
or
button to open the Caller-
ID memory
use the and/or buttons to search for
the desired number
press the button to dial the number
hands-free
Page 14
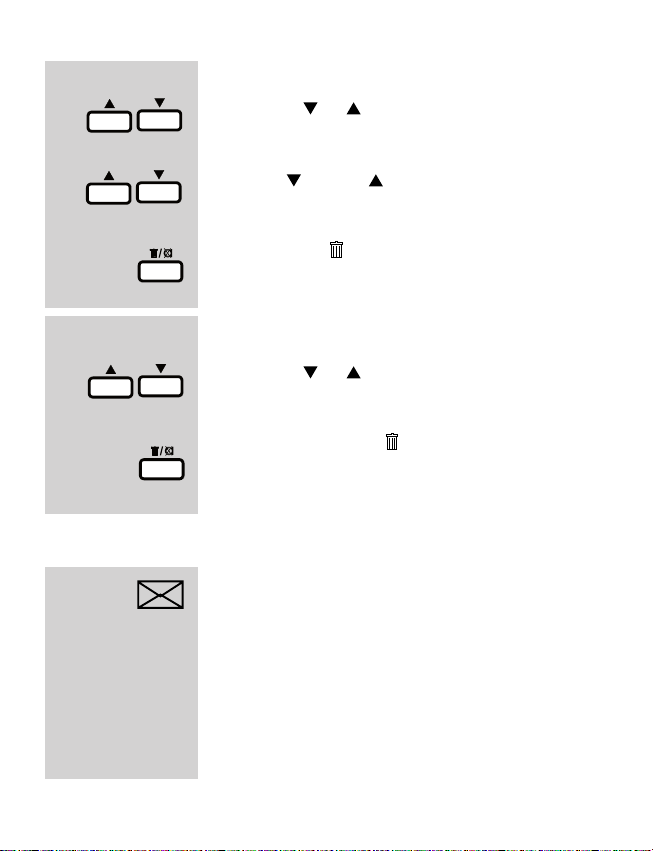
5.5 TO DELETE:
5.5.1 to delete single calls:
press the or button to open the CallerID memory
use the and/or buttons to search for
the call you’d like to delete
2x
ed number
5.5.2 to delete all calls:
press the or button to open the CallerID memory
press and hold the button for at least
press 2x the button to delete the select-
4 sec
4 seconds to delete the entire Caller-ID
memory
5.6 VOICEMAIL NOTIFICATION: (only for FSK systems)
In case you’ve received a voicemail message, an envelope will illuminate in the
display to notify you.
After you’ve listened to this message, the
network will make sure that this notication
disappears.
14
Page 15

5.7 REMARKS:
5.7.1 time & date:
When using a telephone service that transmits the Caller-ID
signals via the FSK system, you’ll automatically receive the
correct time and date when receiving an incoming call.
When receiving the signals via the DTMF system, the telephone uses the time you’ve programmed yourself (for this,
see paragraph 7.1).
5.7.2 unknown subscriber:
If the display shows ‘0000000000’ or ‘----------’, the subscriber
has blocked sending his or her number.
5.7.3 subscription:
Keep in mind that for certain telephone service providers you
must subscribe to this service; please contact your telephone
provider.
Page 16
6 EMERGENCY CALL
6.1 INTRODUCTION:
As soon as you press the red SOS button, the telephone
automatically dials 3 pre-programmed emergency numbers. If
the call to the 1st number is not answered, the 2nd number will
be dialled and then the 3rd number. This cycle is repeated up
to 10 times. However, if the call is answered, you can explain
your situation to the person you’ve called via the receiver or
hands-free function and ask for help.
You can set how long the telephone must wait for an answer
before the call is disconnected and the next number is dialled.
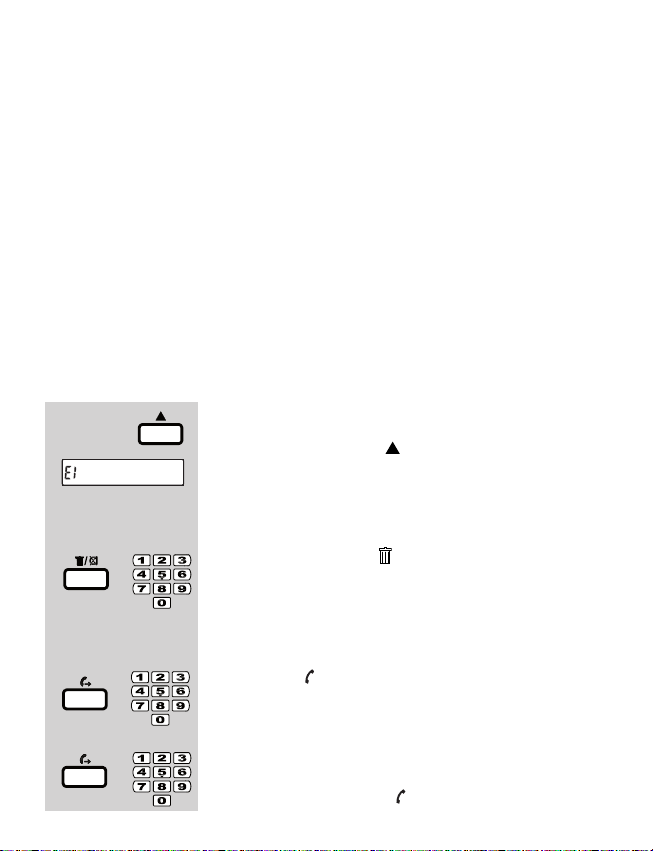
6.2 TO PROGRAM EMERGENCY NUMBERS AND DIALLING TIME:
3 sec
6.2.1 to program emergency numbers:
press and hold the button for 3 seconds
until ‘E1’ appears in the display
(if an emergency number is already programmed, this
number will be shown behind ‘E1’)
if desired, use the button to delete any
old emergency number and use the keypad to enter the emergency number that
must be dialled rst
press the button, the display will show
‘E2’ and you can now program the 2nd
emergency number
repeat this for the 3rd emergency number
(‘E3’) and press the button
16
Page 17
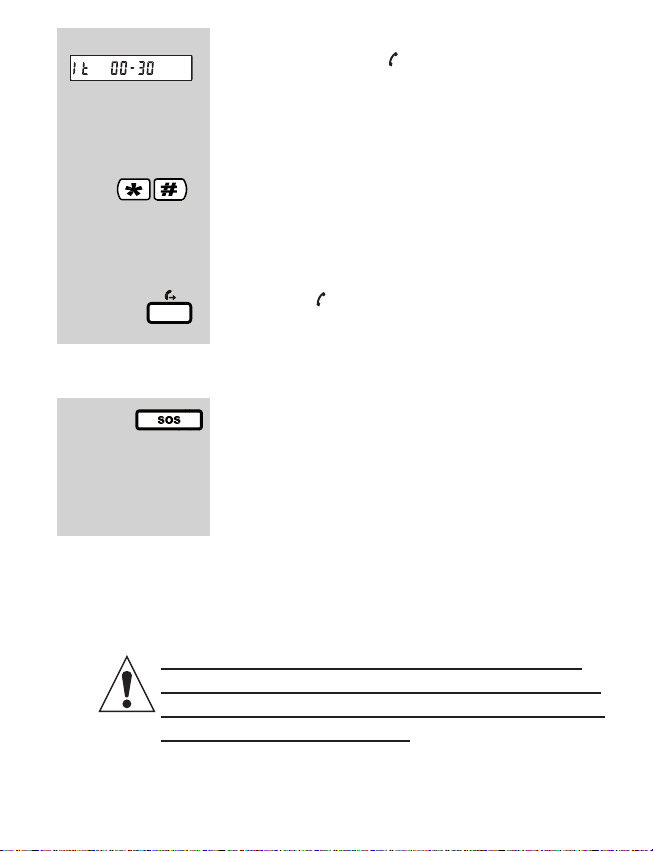
6.2.2 to program the dialling time:
after pressing the button for the 3rd time,
the display will show ‘1t’ followed by the
time the telephone is allowed to wait for an
answer
use the * and # buttons to set the dialling
time; you can choose from 30 seconds
(00-30), 60 seconds (01-00), 90 seconds
(01-30) and 120 seconds (02-00)
press the button to save the emergency
numbers and dialling time
6.3 OPERATION:
6.3.1 to activate the alarm:
press the red SOS button to start an emergency call, the speaker function will be
enabled and the rst emergency number
is dialled
6.3.2 when the call is answered:
a. you can now pick up the receiver of your telephone or
press the speaker button to cancel the alarm mode of the
telephone
attention: if you don’t do this, the telephone will
disconnect after the programmed dialling time (or
after several seconds of silence) and start dialling
the next emergency number
b. you can now explain your situation and ask for help
c. put down the receiver or press the speaker button to
disconnect the call
Page 18

6.3.3 when the call is not answered:
a. the telephone will keep the line open for the programmed
dialling time while the telephone is ringing on the other
side
b. after the programmed dialling time, the call will be con-
nected and the 2nd emergency number will be dialled
immediately
c. like point ‘b’ but the 3rd number is dialled
d. this is repeated for up to 10 times, the telephone will then
cancel the alarm mode and return to standby
6.3.4 other call situations:
a. the dialled party is busy:
the telephone detects the busy tone, disconnects the
call after several seconds and dials the next emergency
number
b. the call is answered by an answering machine or by
voicemail:
after the programmed dialling time of 30, 60, 90 or
120 seconds (or after several seconds of silence), the call
is disconnected and the next number will be dialled
7 SETUP:
7.1 TIME, DATE AND CONTRAST:
In standby mode, the display of your telephone will show the
time and date and when receiving an incoming call, the time
and date of the call, together with the number, will be regis-
tered in the Caller-ID memory.
You can also adjust the contrast of the display to make sure
the display is readable in any circumstances.
18
Page 19
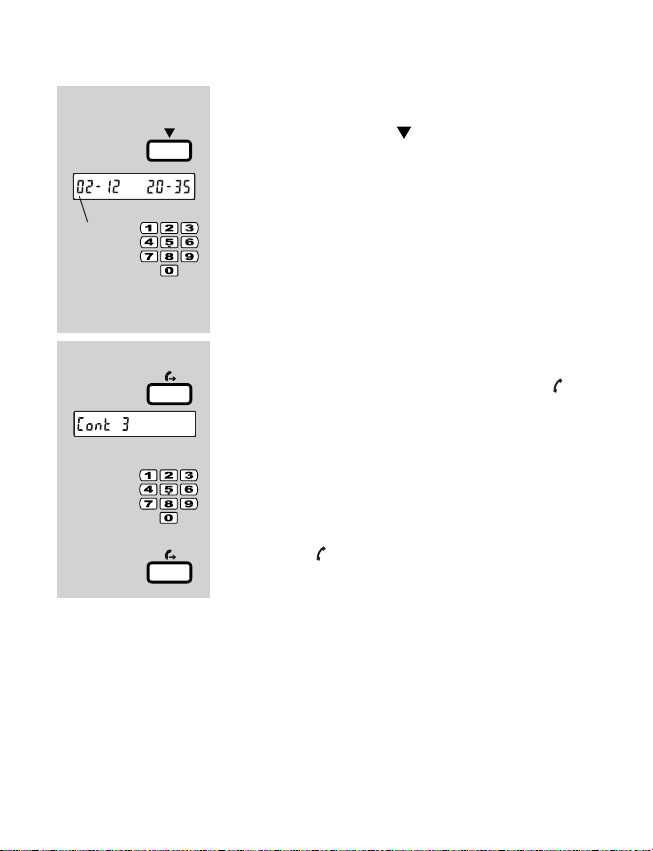
Attention: the batteries must be installed when setting the
time, date and contrast.
7.1.1 time and date:
press and hold the button for 3 seconds;
3 sec
the rst digit starts ashing in the display
use the keypad to enter the following: day
ash
- month - hours - minutes
use 2 digits for each input and use the 24-hours time
format
now set the contrast as follows:
7.1.2 contrast:
after setting the time/date, press the button and the display will indicate the current
contrast setting
use the 1 ~ 6 buttons on the keypad to set
the desired level (level 1~6)
press the button to save your settings
Page 20

7.2 FLASH:
The FLASH function briefly interrupts the telephone connec-
tion. This interruption is used for activating telecom services
(e.g. Call-Waiting) or for transferring calls in case of certain
home or office switchboards.
You can set the interruption duration to
100mS or 300mS at the rear of the telephone
Ask your telecom provider or the supplier of your home or office switchboard for the most
suitable interruption duration. The 100mS setting is most commonly used in the Benelux
and also preset by the factory.
20
Page 21

8 WARNINGS AND USER TIPS
8.1 INSTALLATION:
* Only connect/disconnect the telephone wire with/from the
telephone when the telephone plug is removed from the
wall socket.
* Never install the telephone during thunder storms.
* Never install telephone connecting terminals in wet or
moist environments.
* Never touch non-insulated telephone wires unless
disconnected from the telephone network
8.2 PLACEMENT:
* The phone is powered by a power adapter. A 230 Volt
mains socket shall be available at the location where the
phone is placed.
* Preferably, do not place the device on surfaces that have
been treated with cellulose; the rubber feet can leave
traces on these.
* Do not place the phone in the direct vicinity of other
phones or other electronic (medical) devices, TL tubes
and other gas discharge lamps; The emitted radio waves
of these products may interfere with the receipt of the
alarm signal of the remote control.
8.3 POWER OUTAGE & BATTERIES:
* During a power outage or when disconnecting the
adaptor from the wall socket, the telephone is fully
powered by the 4 batteries you can install in the bottom
of the phone (see paragraph 1.1).
* If you don’t install any batteries, you will NOT be able to
use the telephone during a power outage.
Page 22

* The memories are stored in ash memory chips that don’t
require any backup power supply. This means that these
memories will not be deleted in case of a power outage
and no batteries are installed; however, you’ll need to set
the time again.
8.4 SYSTEM ERROR:
* In case of a possible system error, disconnect the power
adaptor and telephone line from the telephone and
remove the batteries. Wait for at least 20 minutes and
then connect everything again (see also the previous
page, item ‘Power outage’).
* When in doubt, connect a different telephone to your
telephone wall socket to determine whether the problem
is caused by your telephone, the connection or the
telephone service provider.
* If you cannot solve the problem, please contact the
PROFOON customer service at phone number
073-6411355 or the supplier of this telephone.
22
Page 23

9 NETWORK COMPATIBILITY
This telephone is designed for use on the ‘public switched
telephone networks (analogue single line)’ of telephony and
cable companies in all countries of the EU. However, each
provider could require a different connecting wire with plug.
This device meets the essential requirements and other
relevant provisions as stipulated by the European Guideline
1999/5/EC.
10 SPECIFICATIONS
Dialling: DTMF (TONE)
R/FLASH: 100 & 300mS (adjustable)
Caller-ID: DTMF & FSK (automatic detection)
55 memories
Power supply phone. 6V DC 100 mA
(through power adapter incl.)
Backup power: 4 x 1.5 Volt batteries, size AAA
alkaline (not incl.)
Operational temperature: 0°C to 40°C
Storage temperature: -20°C to 60°C
Page 24

13 TABLE OF CONTENTS
1 INSTALLATION
1.1 BATTERIES ............................................................................................ 2
1.2 SPIRAL CORD ....................................................................................... 2
1.3 POWER ADAPTOR ................................................................................ 3
1.4 TELEPHONE CONNECTION ................................................................. 3
1.5 WALL-MOUNTING ................................................................................. 3
2 TELEPHONE OVERVIEW .............................................................................. 4
3 USING THE TELEPHONE
3.1 INCOMING CALLS
3.1.1 ring volume .................................................................................... 5
3.1.2 call indicator ................................................................................... 5
3.1.3 to answer a call .............................................................................. 5
3.1.4 to disconnect a call ........................................................................ 5
3.2 OUTGOING CALLS
3.2.1 to dial numbers .............................................................................. 6
3.2.2 to redial numbers ........................................................................... 6
3.2.3 to dial from memories .................................................................... 7
3.3 FUNCTIONS DURING A CALL
3.3.1 volume ........................................................................................... 8
3.3.2 switching between receiver / hands-free ....................................... 8
3.3.3 mute (microphone off) ................................................................... 8
3.3.4 call timer ........................................................................................ 9
3.3.5 call transfer / R function ................................................................. 9
3.3.6 telecom services ............................................................................ 9
4 MEMORIES
4.1 INTRODUCTION .................................................................................. 10
4.2 PROGRAMMING
4.2.1 direct memories ........................................................................... 10
4.2.2 2-button memories ....................................................................... 10
4.2.3 pause ............................................................................................ 11
4.3 DELETING
4.3.1 direct memories ............................................................................ 11
4.3.2 2-button memories ........................................................................ 11
4.4 CORRECTING ...................................................................................... 11
4.5 DIALLING .............................................................................................. 11
5 CALLER-ID
5.1 INTRODUCTION .................................................................................. 12
5.2 NEW CALL INDICATION ...................................................................... 12
5.3 CHECKING THE MEMORY ................................................................. 13
24
Page 25

5.4 CALLING BACK ................................................................................... 13
5.5 TO DELETE
5.5.1 to delete single calls .................................................................... 14
5.5.2 to delete all calls .......................................................................... 14
5.6 VOICEMAIL NOTIFICATION (only for FSK systems) ........................... 14
5.7 REMARKS
5.7.1 time & date .................................................................................. 15
5.7.2 unknown subscriber ..................................................................... 15
5.7.3 subscription ................................................................................. 15
6 EMERGENCY CALL
6.1 INTRODUCTION .................................................................................. 16
6.2 TO PROGRAM EMERGENCY NUMBERS AND DIALLING TIME
6.2.1 to program emergency numbers ................................................. 16
6.2.2 to program the dialling time ......................................................... 17
6.3 OPERATION
6.3.1 to activate the alarm .................................................................... 17
6.3.2 when the call is answered ........................................................... 17
6.3.3 when the call is not answered ..................................................... 18
6.3.4 other call situations ...................................................................... 18
7 SETUP
7.1 TIME, DATE AND CONTRAST............................................................. 18
7.1.1 time and date ............................................................................... 19
7.1.2 contrast ........................................................................................ 19
7.2 FLASH .................................................................................................. 20
8 WARNINGS AND USER TIPS
8.1 INSTALLATION..................................................................................... 21
8.2 PLACEMENT ........................................................................................ 21
8.3 POWER OUTAGE & BATTERIES ........................................................ 21
8.4 SYSTEM ERROR ................................................................................. 22
9 NETWORK COMPATIBILITY ....................................................................... 23
11 SPECIFICATIONS ........................................................................................ 23
13 TABLE OF CONTENTS ................................................................................ 24
Page 26

26
Page 27

Page 28
Service Help
WWW.PROFOON.COM
[email protected]
NL 073 6411 355
(Lokaal tarief)
BE 03 238 5666
(Lokaal tarief)
(Tarif local)
DE 0180 503 0085
Lokale Festnetzkosten
Hesdo, Australiëlaan 1
5232 BB, ‘s-Hertogenbosch
The Netherlands
V1.0
28
 Loading...