

Page 1
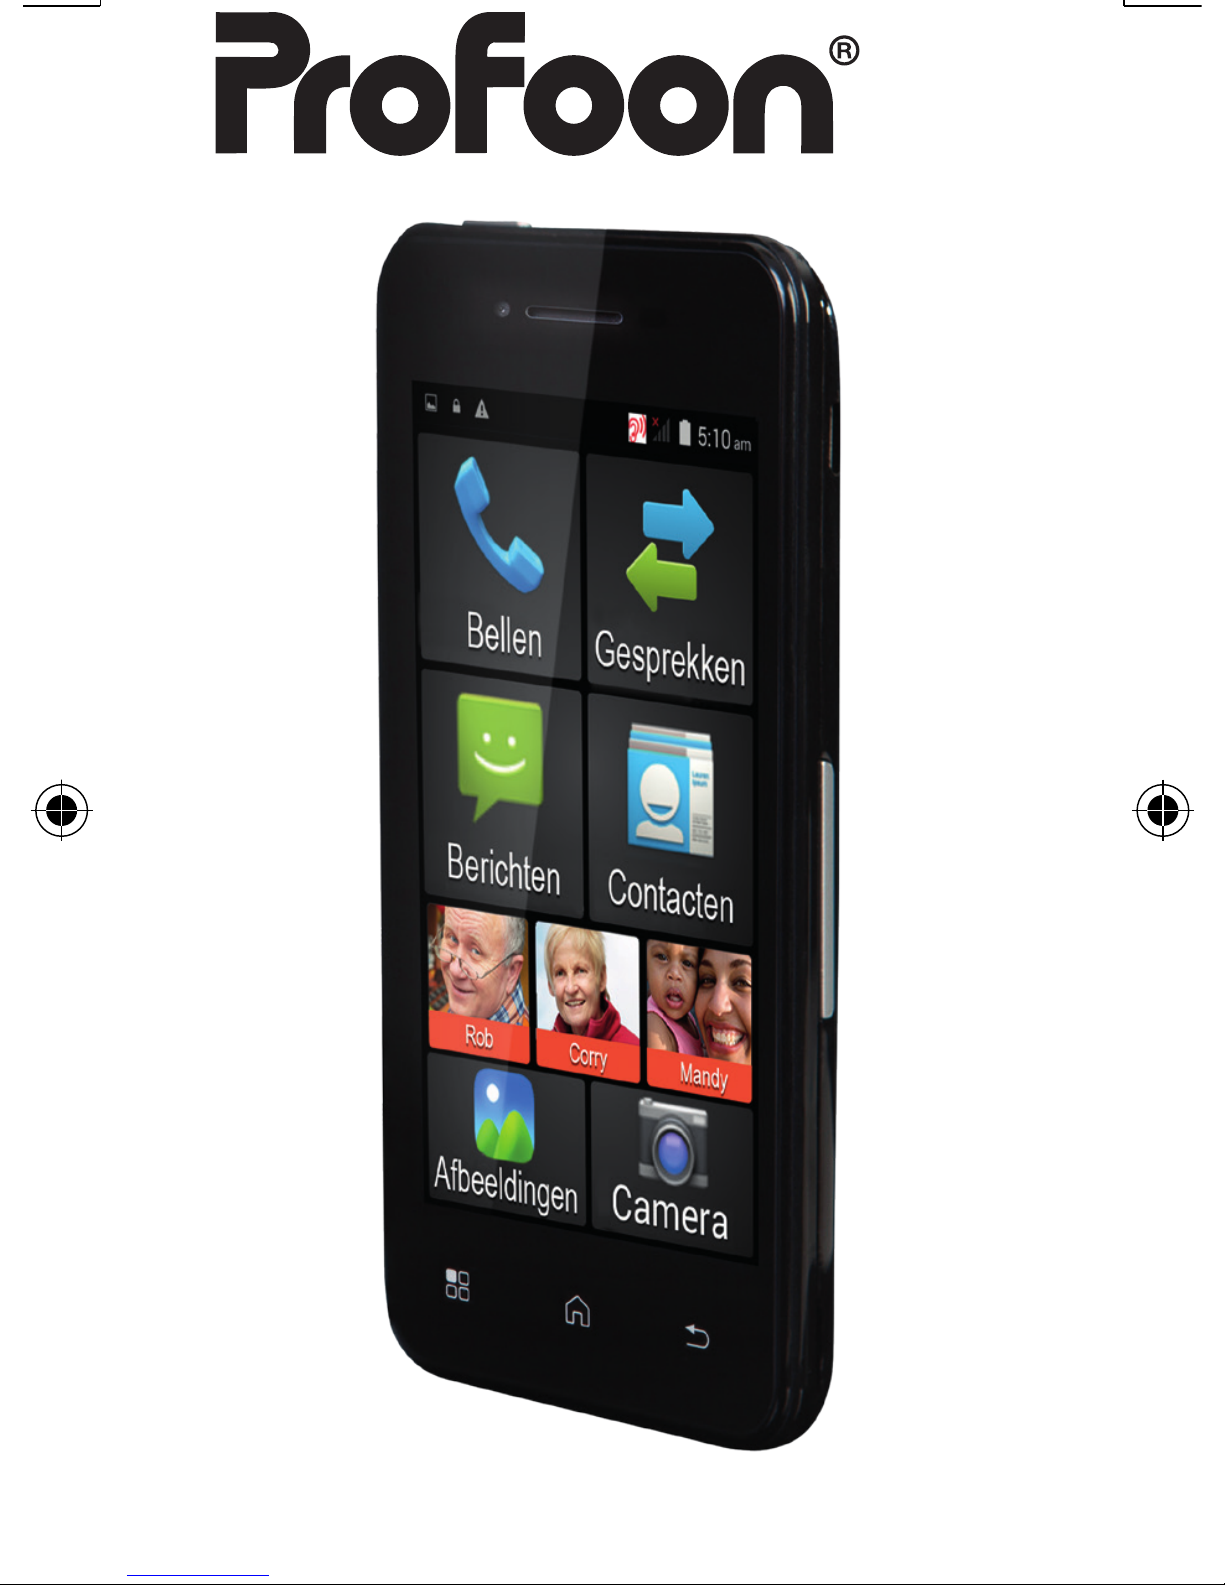
User’s manual
PMA-1000
Page 2

2
To be able to make full use of
this phone, a SIM card must be
inserted (not included). Without
this SIM card, most functions
of this phone are unavailable.
This manual assumes you’ve
already installed the SIM card
according to the installation
guide.
• Chapter 1 contains an overview of the contents of the
packaging. p.4
• Chapter 2 explains various
terms with regards to your
mobile phone. p.5
• Chapter 3 described the basic
operation of this phone. p.15
Page 3

3
• Chapter 4 provides information regarding the use of the
included battery. p.29
• Chapter 5 describes the
operation of the basic functions of the phone. p.33
• Chapter 6 explains the use
and setup of all functions
available in the menu. p.51
• Chapter 7 contains safety
precautions to be followed
when using this phone. p.115
• Chapter 8 lists the specific tions of the device. p.125
• Chapter 9 provides a detailed
table of contents. p.126
Page 4

4
1 CONTENTS OF THE
PACKAGING
• Mobile phone
• Battery
• Power adaptor
• User’s manual
• Starting guide
• USB cable
We may remotely improve the
functions of this device.
Because we’re continuously
working on making the operation
easier, you might notice small
differences between this manual
and the latest software version.
Always visit our website for the
latest version (see the back).
Page 5

5
2 CONCEPTS
Provider:
‘Provider’ is another name for
‘Telephone Company’.
The documentation accompanying the SIM or the SIM card
itself will show through which
provider you’re calling.
SIM card:
A SIM (‘Subscriber Identity Module’) is a small card containing a
chip. The number is programmed
in this chip and it also allows you
to store several numbers and
messages, so you can take this
information with you when you
install the SIM card into another
phone.
Page 6

6
SIM cards are provider-specific.
Ask your provider for a regular
size SIM card. The smaller Mini
SIM and Micro SIM variants will
not fit in this phone
SIM-LOCK-free:
This phone is SIM-LOCKFREE. This means the phone
is not bound to SIM cards of a
certain provider, allowing you to
choose any desired telephone
company.
PIN code / PUK code:
Each SIM can be secured using
a PIN. This PIN code helps you
to prevent unauthorised persons from using your phone.
Page 7

7
In most cases, the documentation accompanying the SIM
card will show a PIN set by
default. You can change this
PIN yourself.
After you’ve entered an incorrect PIN for up to three times,
the SIM card will be locked.
You then need the PUK code
of the SIM card to unlock the
card again. Also the PUK code
is usually mentioned in the
documentation your supplier
provided with the SIM card. If
this information is not available,
please contact the help desk of
your supplier.
Page 8

8
Prepaid or subscription:
This determines how you pay
for your phone bill. In short:
using the prepaid option, you’re
paying beforehand, in the case
of a subscription, you’re paying
afterwards.
This payment method is linked
to your SIM. Ask the help desk
of your provider about all of
your options.
Voicemail:
Voicemail is an answering
machine at the telephone exchange of the provider. It allows
callers to leave you a message
when you can’t or won’t answer
their call.
Page 9

9
Ask the help desk of your provider about all of your options.
Car kit:
A car kit allows you to make
phone calls in your car keeping
your hands free for driving. Ask
the supplier of your car kit abut
connection options. You can of
course also connect a headset
in your car.
Headset:
A headset is a small ear phone
with a microphone attached to
a bracket or wire. It allows you
to make calls or listen to music
without holding the phone to
your ear.
Page 10

10
This phone is suitable for headsets with a 4-pin 3.5mm connector.
Warning: Using earphones or headphones
for long periods of
time at high volume can lead
to permanent hearing damage.
To protect your hearing, please
keep the following in mind:
Increase the volume starting at
the minimum up to a comfortable level. Don’t listen for long
periods of time at high volumes.
Never increase the volume to
ignore or outdo environmental
noise. Decrease the volume
when you can’t hear the people
around you.
Page 11

11
Mobile data:
Mobile data (cellular data) is a
method to use the internet via the
mobile phone. If this function is
not automatically set, please ask
your provider for these settings or
for releasing the use of internet.
Attention: if you don’t agree to
a data subscription, this mobile
data can lead to high costs.
WiFi:
This standard in wireless internet
is a method for your phone to
connect to the internet. It allows
you to login to your local wireless
modem and then use the internet
functions of this phone at no additional costs.
Page 12

12
GPS:
Using this function, it’s possible
to determine the location of the
phone. By scanning for contact
through satellites, the position
of the phone can be accurately
determined. Amongst others, this
function can be used for navigation. Inside buildings and in small
streets, contact with the satellites
can be affected, causing this
function to be inaccurate or to be
unavailable.
AGPS:
Using this function, it’s possible
to determine the location of the
phone. By establishing a connection with the antennas of
your network, the position of the
phone can be determined with
an accuracy of 1300 meters.
Page 13

13
Amongst others, it can help with
navigation when no satellites can
be found (e.g. inside buildings).
This function works via the internet service (mobile data). Ask
your provider for its costs.
Apps:
Apps are computer programs
especially written for smartphones and tablets. All functions on this phone work via
Apps. You can also use the
Google Play™ store to install
additional Apps and further
expand the functionality of this
phone.
Page 14

14
Bluetooth® (Optional)
Bluetooth® wireless technology
is a standard to wirelessly connect two devices at a short distance. This way you could e.g.
exchange files between phones
or you can equip the phone with
a wireless, Bluetooth-enabled
headset.
The Bluetooth® word mark and logos are registered trademarks owned by Bluetooth SIG, Inc.
and any use of such marks is under license.
Page 15

15
3 BASIC OPERATION
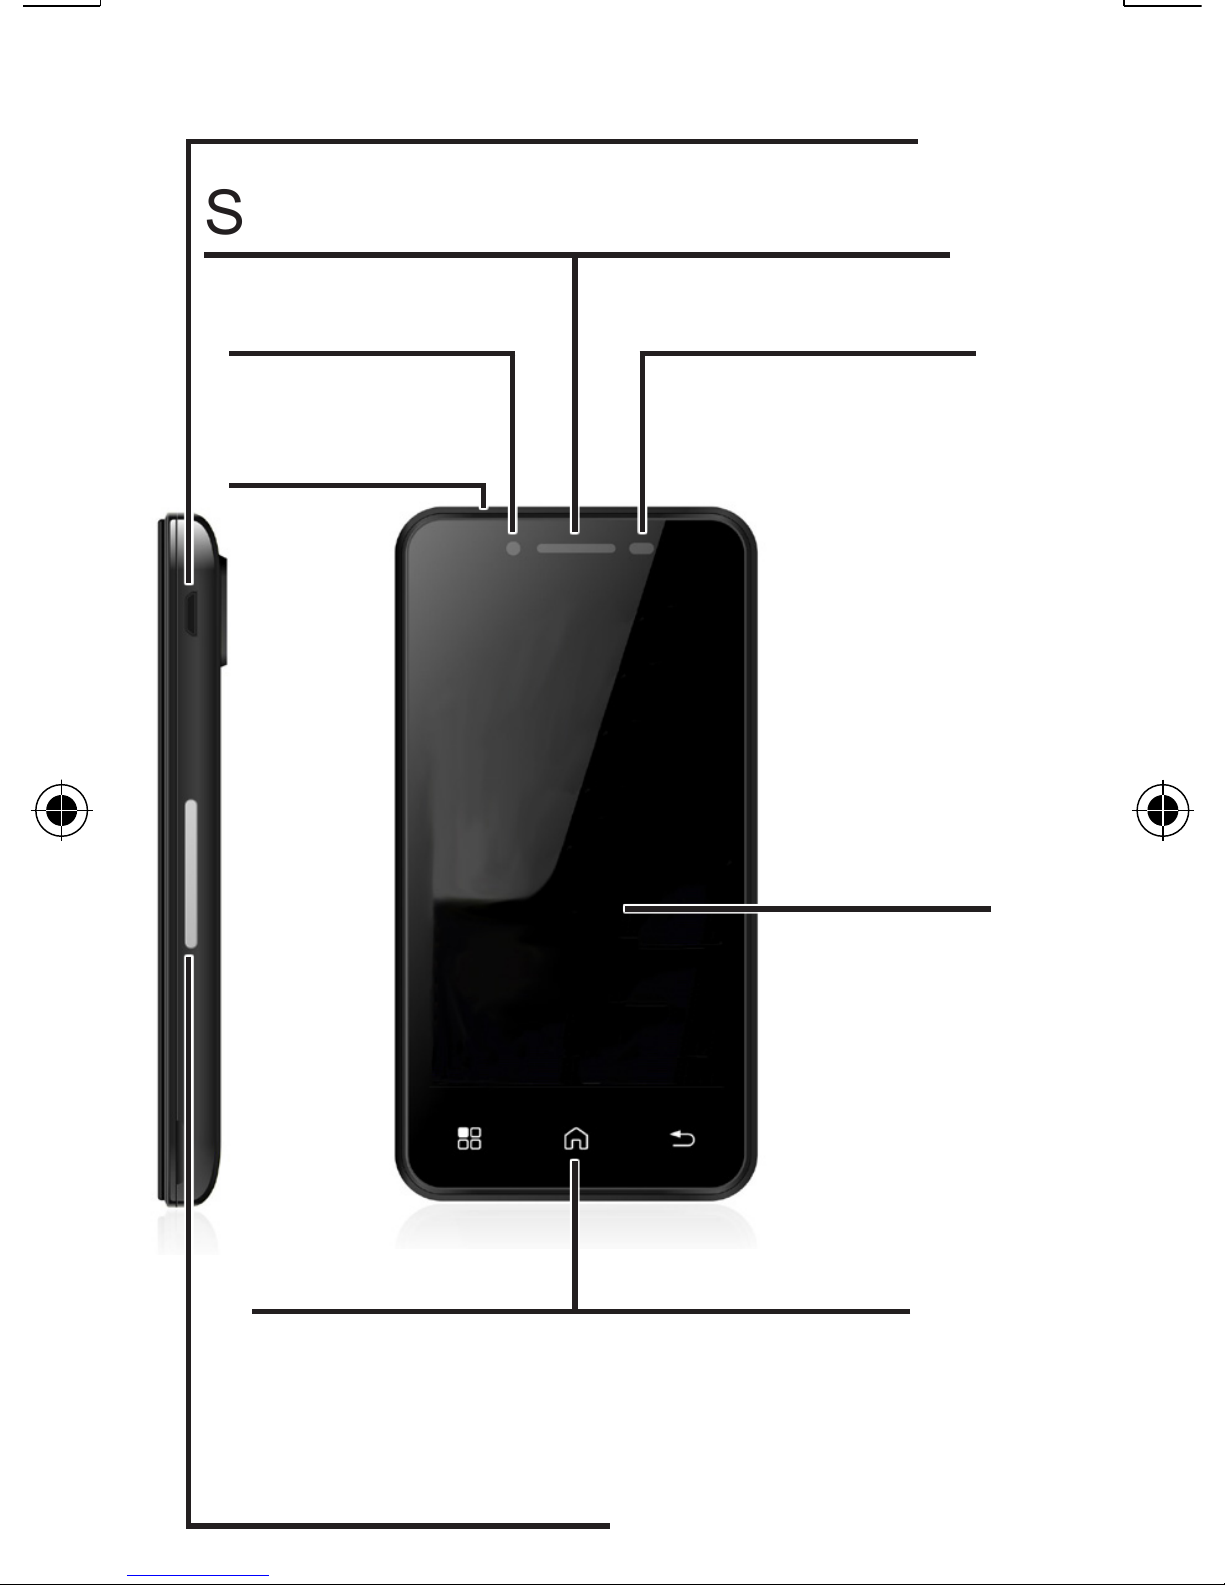
This phone is provided with
four physical buttons, three
touch-sensitive buttons and a
touch-screen you can use for
the majority of the functions by
simply touching or dragging the
screen.
On the adjacent page,
you’ll find an overview of all
possibilities this phone has to
offer. The next page will explain
these in more detail.
Page 16
16
Camera
Speakers for conversations
Light sensor
USB port for charging or PC
Volume button
Touch-sensitive buttons
Display
Power
button
Page 17
17
USB port:
On the left side of the phone
you’ll find a port for connecting
the included cable. The other
side of this cable fits into
an adaptor for charging the
phone or into a computer for
exchanging files
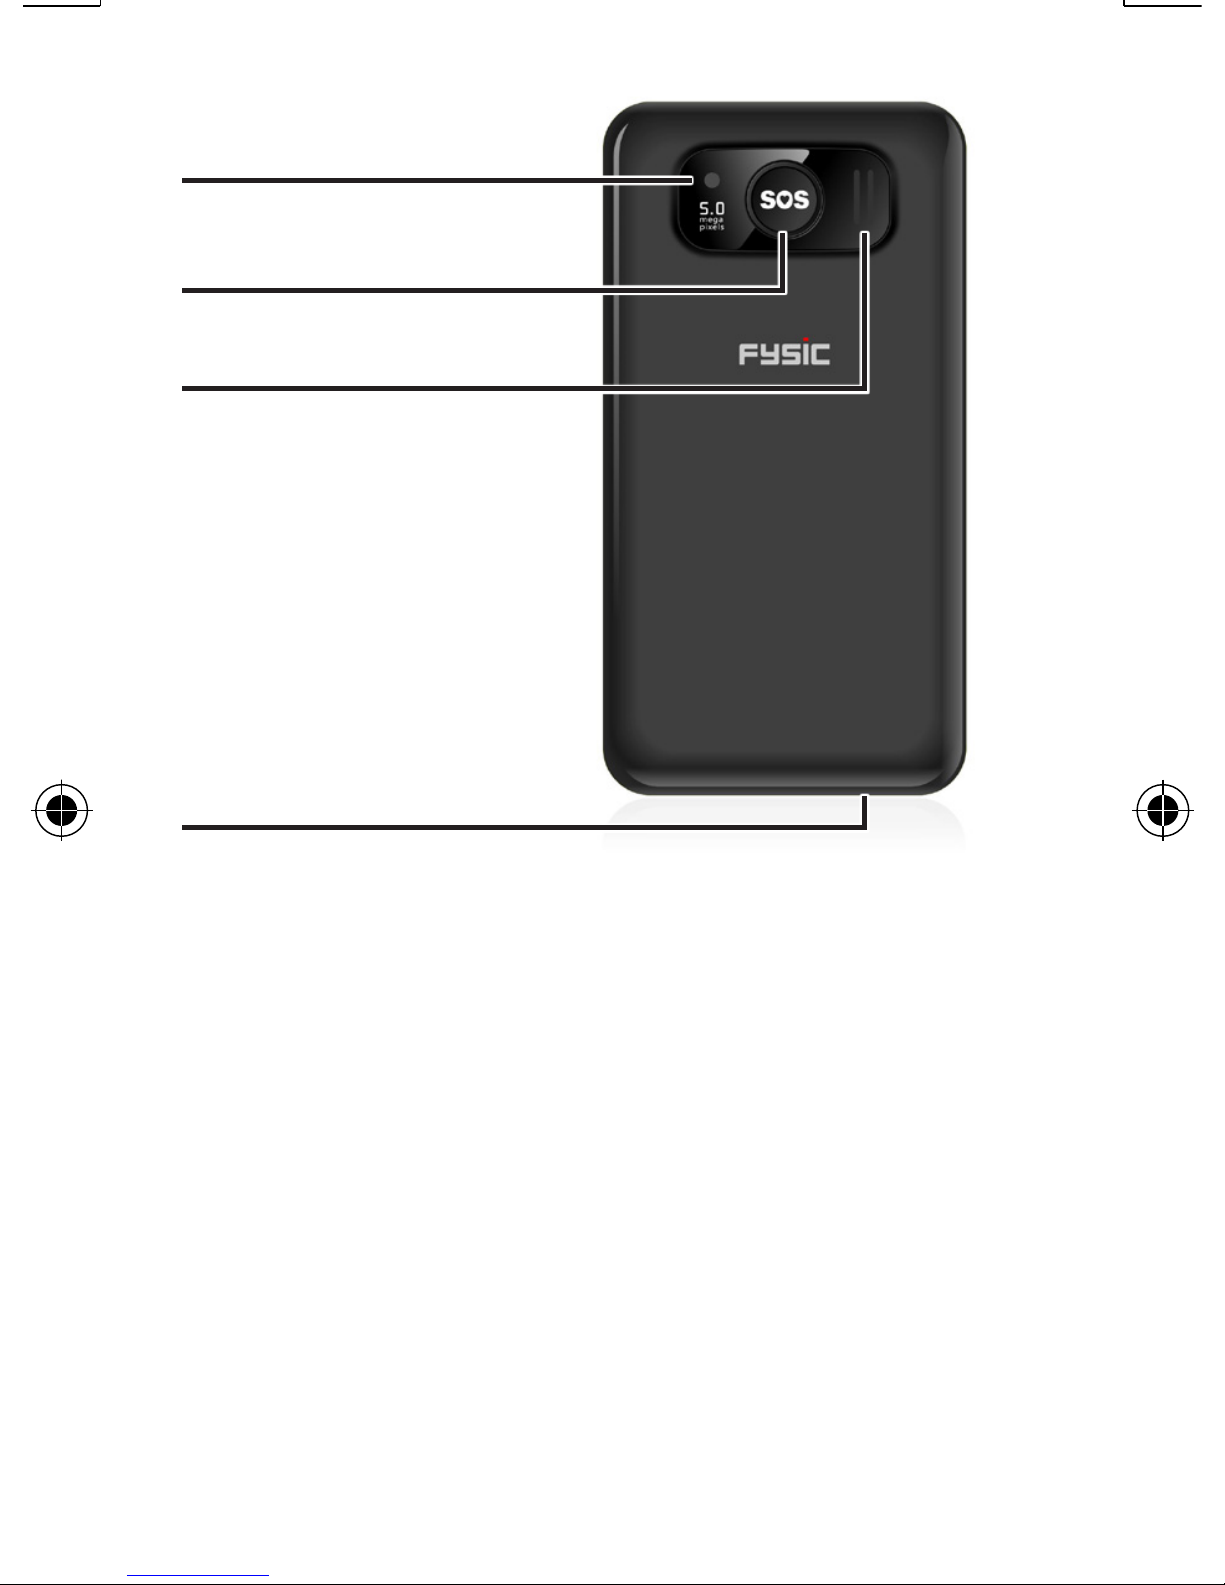
Camera
SOS button
Speaker
Headset
output
Page 18

18
Speaker for conversations:
This speaker is only used while
having telephone conversations.
Camera:
This camera comes equipped
with two cameras – one of
these is located on the screen
side and can be used for video
conferences, photos of yourself
and sometimes for games you
can play via the internet.
At the rear of the phone you’ll
find the second camera. This
one is meant for making photos
and videos, which is why it has
a higher picture quality. See
also page 73.
Page 19

19
Light sensor:
The light sensor of this phone
is used to save battery power.
By monitoring how much environmental light is available
this sensor adjusts the brightness of the screen, ensuring a
longer battery operating time.
For more information about this
automatic light adjustment, see
also page 87.
Power button:
Press this button to turn on the
phone.
When the phone is switched on,
briefly press this button to turn th
display off or on.
Press and hold the button and an
option will appear to completely
turn off the phone.
Page 20

20
Display:
This colour screen is touchsensitive. You can operate
this phone by simply touching
the screen. By tapping (also
called ‘touching’) the screen or
by swiping (often called ‘dragging’), you can adjust and use
most of the functions of this
phone.
Page 21
21
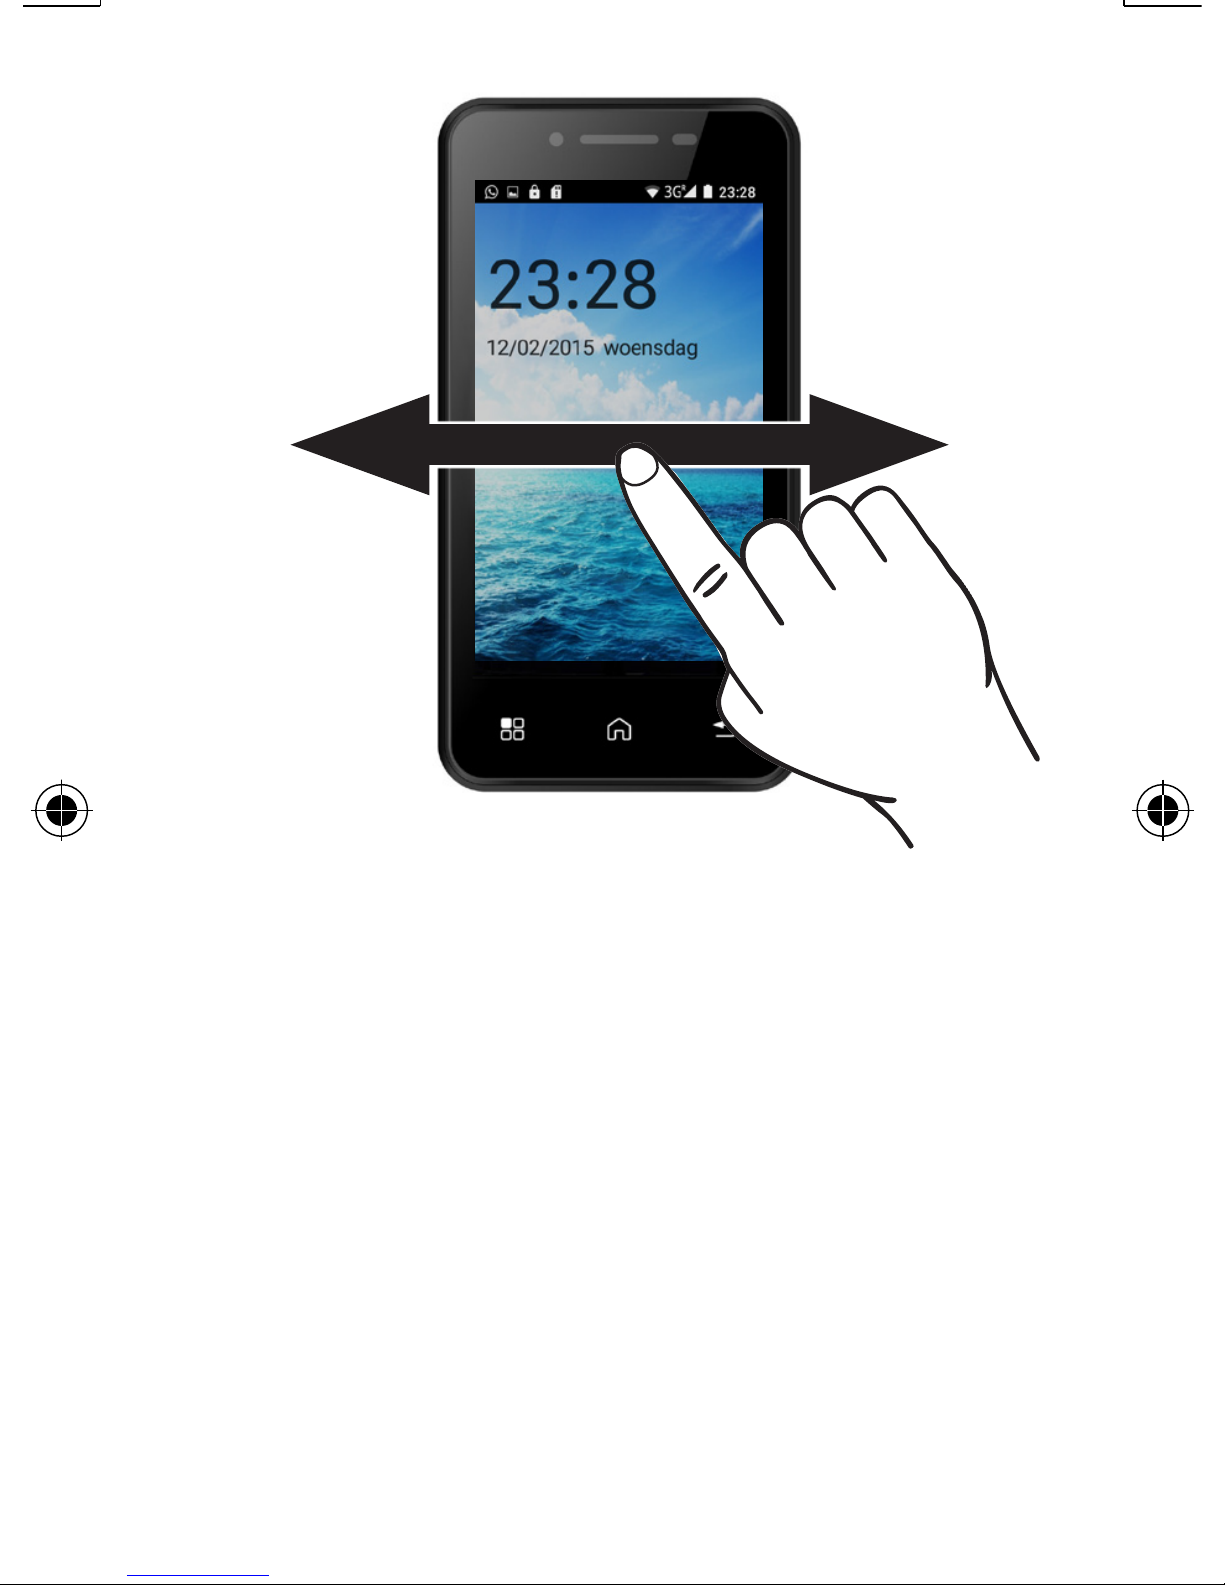
Swiping:
By dragging a finger across the
screen from left to right (without
letting go of the screen), you
can scroll the pages of the main
menu.
Page 22
22
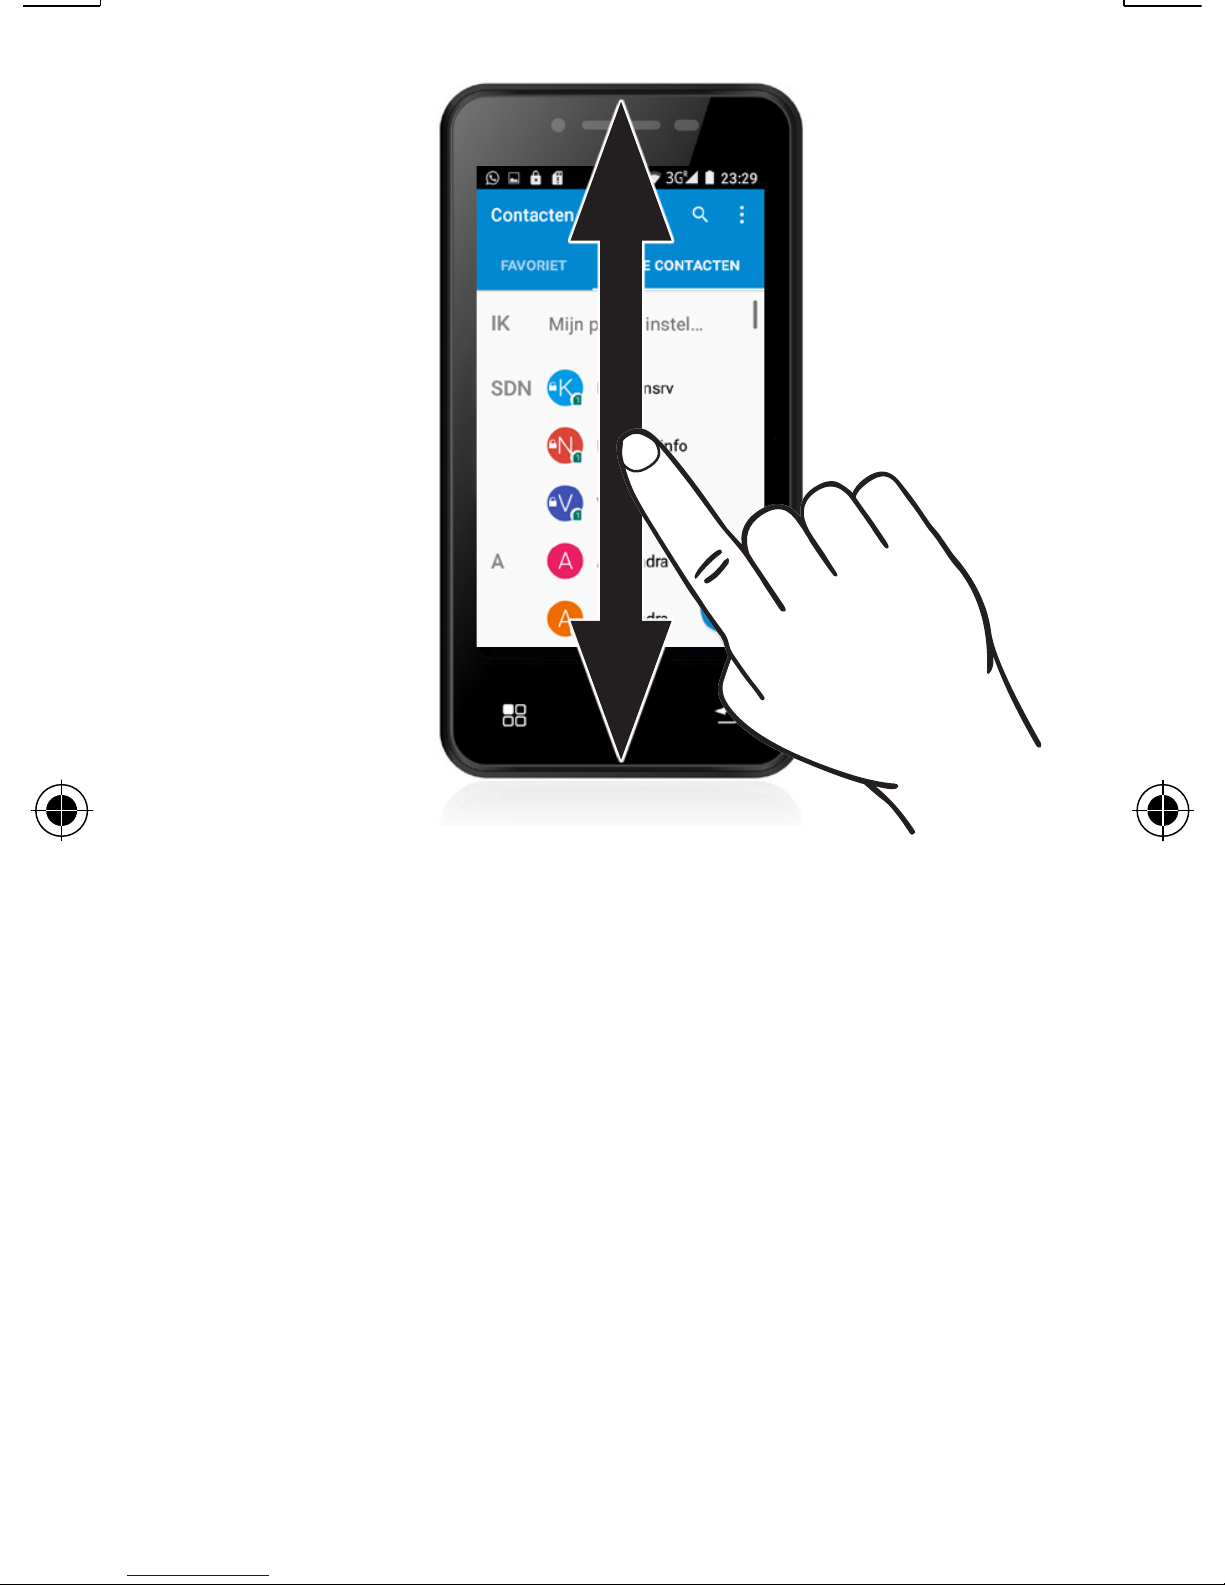
By swiping a finger across
the screen from the bottom to
the top (without releasing the
screen), you can expand most
menus to see and select more
options.
The screen unlock function is
also operated by swiping.
Page 23
23
Touch the lock and slide it up.
You can adjust the method for
unlocking the screen at any
time, see page 92.
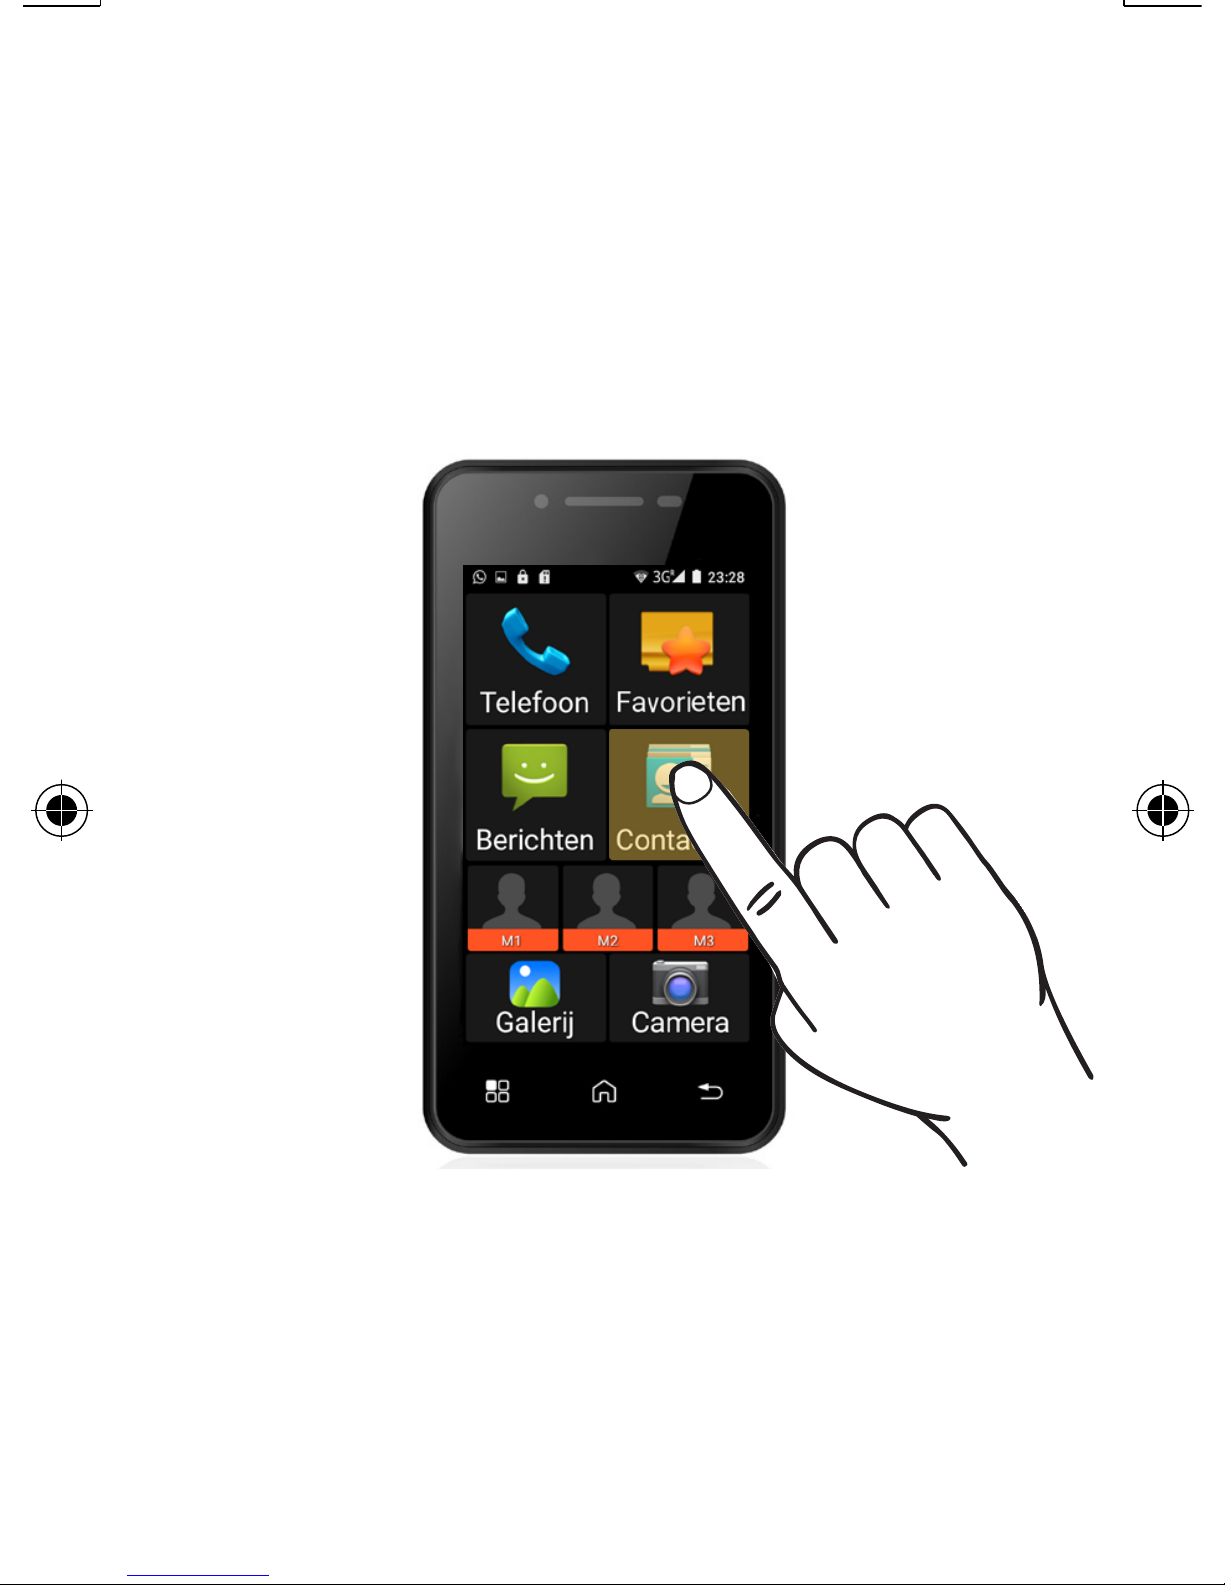
Tapping:
By briefly pressing a finger on
word or icon, you can open the
corresponding item.
Page 24
24
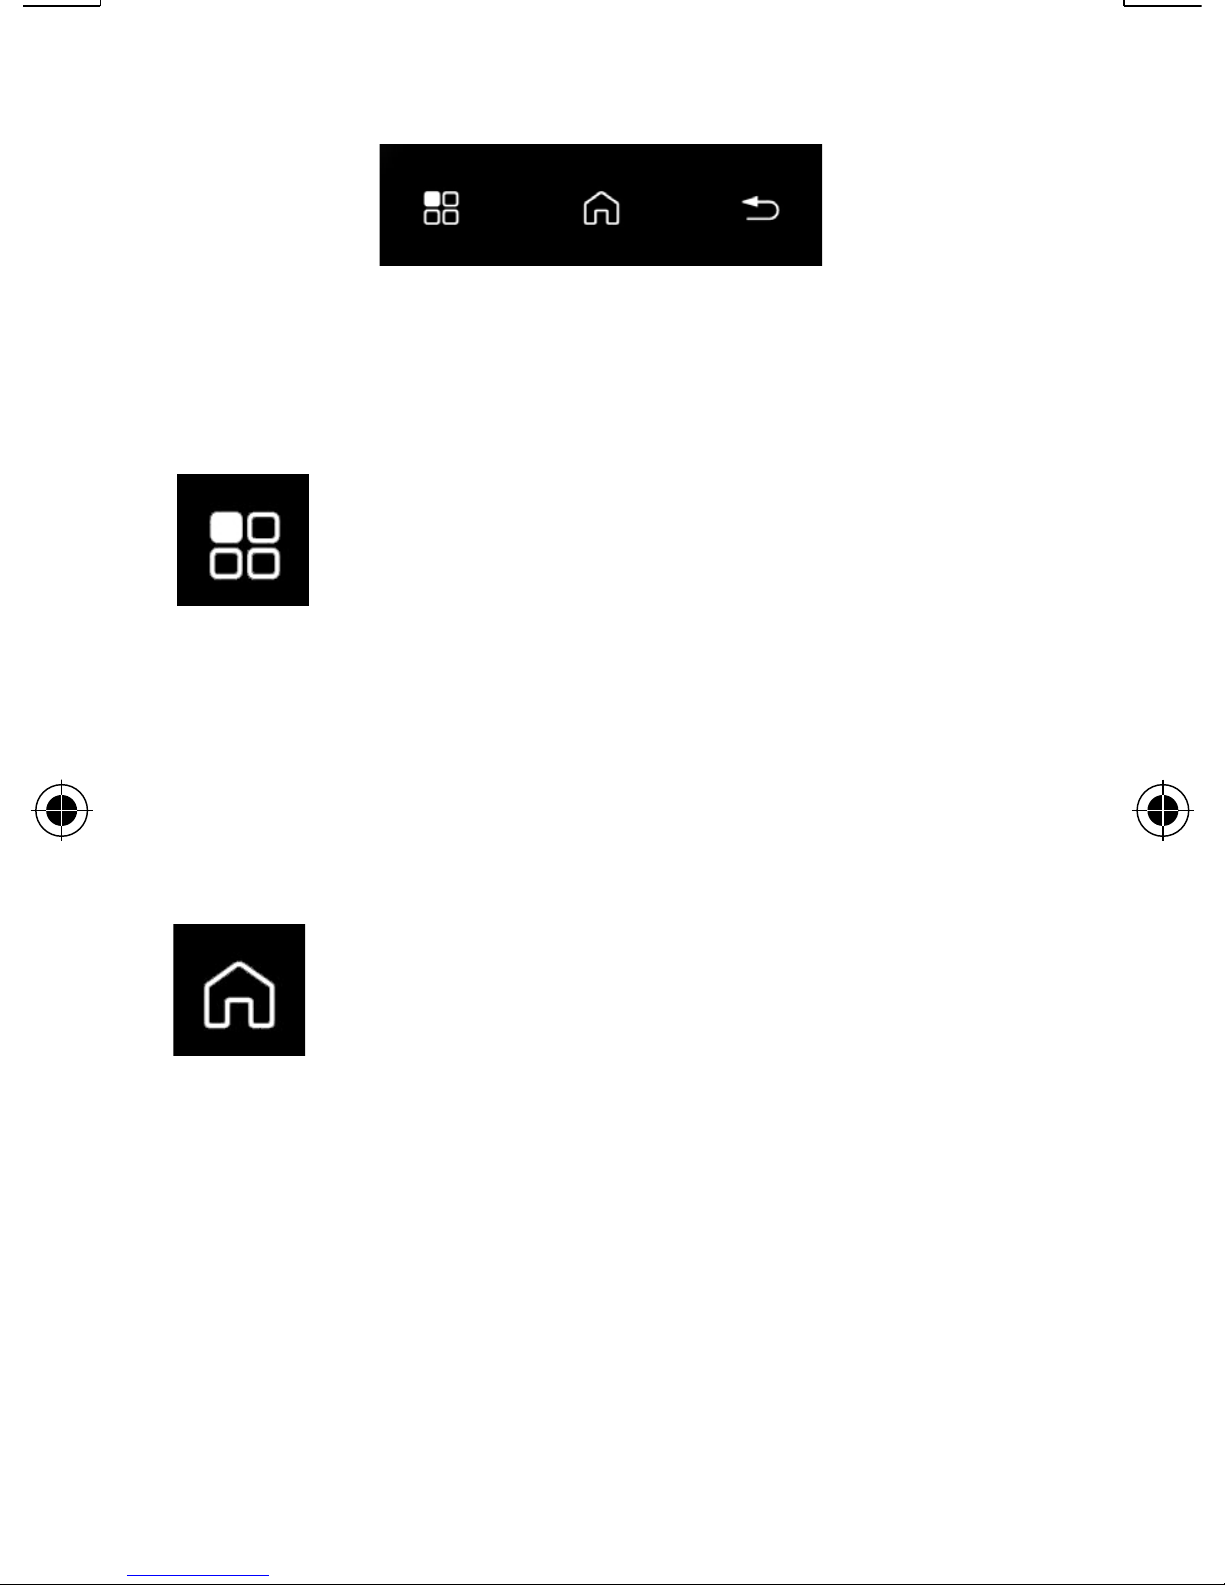
Touch-sensitive buttons:
Underneath the screen you’ll
find three buttons which are
sensitive to light touches.
The functionality of this button varies per application you’re
using. In most cases, it will open
an options menu to customize the
current application.
This button is used to
return to the main menu. All
opened screens will disappear,
so you don’t have to click them
away individually. However, the
apps you have opened will keep
working in the background.
Page 25
25
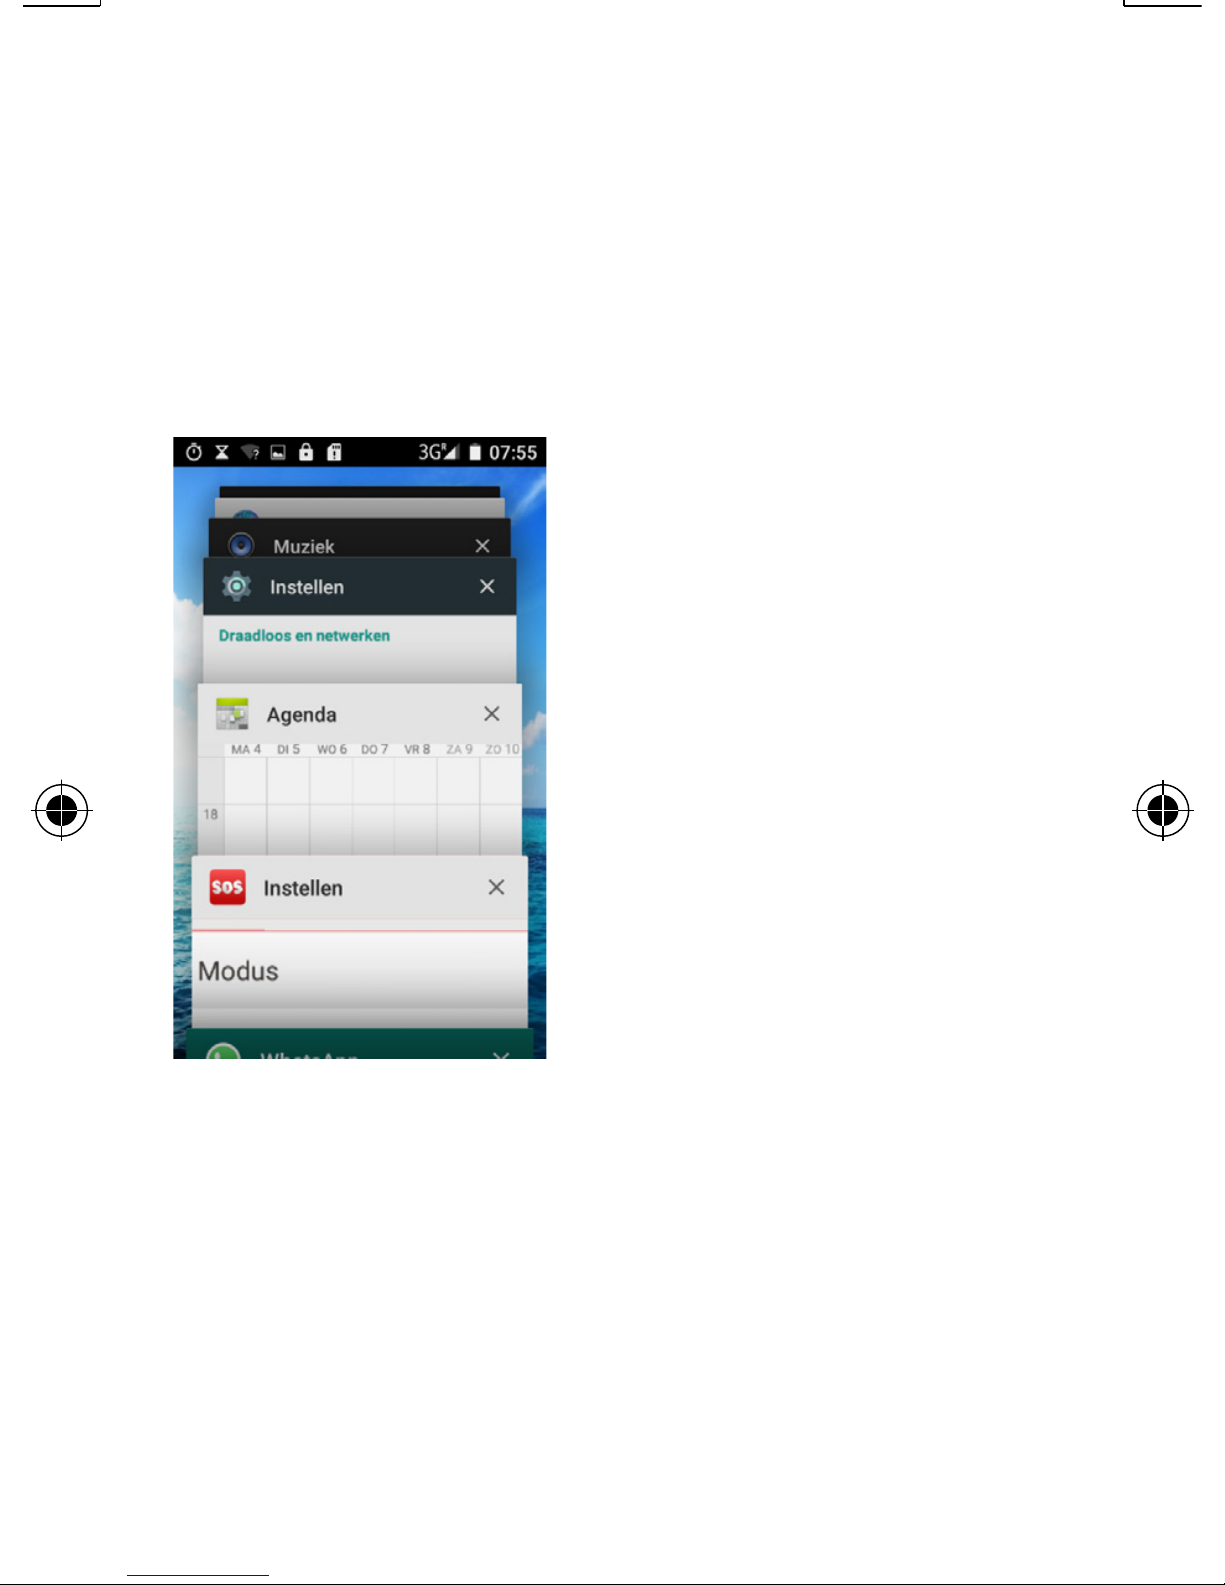
To see which apps are currently
active, you can press and hold
this button for several seconds
to see the following screen:
By tapping one
of the apps you’ll
see an example
of what you were
working on.
Tap the app again
to open it.
Tap the X at the right side to
close a program.
Page 26

26
This button is used to go
back to a previous screen or to
undo the current input. The exact
operation often varies per program; in the SOS menu, you’ll
return to the main menu using this
button, but in the browser this button brings you back to the previ-
ous internet page.
Volume button:
You can adjust the volume at
any time by using the volume
button at the side of the phone.
You can set several volumes independently from each other; for
a conversation, for ringtones or
for watching movies and playing
games.
Page 27

27
The volume button will always
adjust the volume of the function currently being used; this
means that when you’re using
the button during a conversation, it’ll adjust the call volume.
SOS button:
By keeping this button depressed for several seconds,
you’ll activate the SOS mode.
This function will perform several
consecutive actions to inform a
contact you’re in need of help.
These actions can be pre-programmed, please see page 109.
Speaker:
The speaker at the rear of the
phone is used for all sounds, with
the exception of telephone conversations, unless the hands-free
mode is activated.
Page 28

28
Headphones connection:
By connecting headphones
with the phone, all sounds will
be heard through those headphones. This way you can use
the phone as a radio, for music
or for films without disturbin
those around you.
When connecting headphones
with a microphone, you can also
use these to have telephone
conversations.
This phone supports headphones and headsets with a
3.5mm connector. Both 3-pin
and 4-pin headphones are supported, however not all 4-pin
headphones will work.
Page 29

29
4 BATTERY
Charging:
Attention! Only use the included
battery. Using other models
could cause damage to the
phone which is not covered by
the warranty conditions. Never
charge the phone with the back
cover of the phone removed.
Insert the small adaptor plug
directly at the right side into the
phone. You can now insert the
larger plug into the adaptor and
then plug the adaptor into a
230 Volt wall socket.
Page 30

30
As soon as the screen indicates
that the battery is fully charged
(a full battery is displayed), you
can remove the adaptor from
the wall socket and disconnect it
from the phone. You can charge
the battery both with the phone
switched on and switched off.
It takes approx. 4 hours to fully
charge an empty battery.
Operating time:
A fully charged battery kept in
a good state offers a standby
time of up to 30 hours and a
call time of up to 2.5 hours.
When this time shortens considerably, it’s time to replace
the battery.
Page 31

31
The operating time depends
on the provider (when far away
from the radio tower, the phone
consumes more transmission
power) and on the use of the
phone (sound volume, display
lighting, active programs, use
of Bluetooth®, WiFi and mobile
data).
If the operation time of the
phone shortens considerably
while being used as normal, it’s
time to charge the battery.
Battery replacement:
If your battery needs replacing,
please turn off the phone and
remove the back cover.
Page 32

32
You can use your nail to lift up
the battery and take it out of the
phone.
New batteries can be obtained
as a service part via the service
number +31(0)736411355.
Never damage or disassemble
the battery. Always bring defect
or exhausted batteries directly
to your local depot for chemical
waste.
Discard the old battery in an
environment-friendly way by
bringing it to a collection porint
for small chemical waste.
Page 33
33
5 OPERATION
Turning the phone on/off:
Turning on:
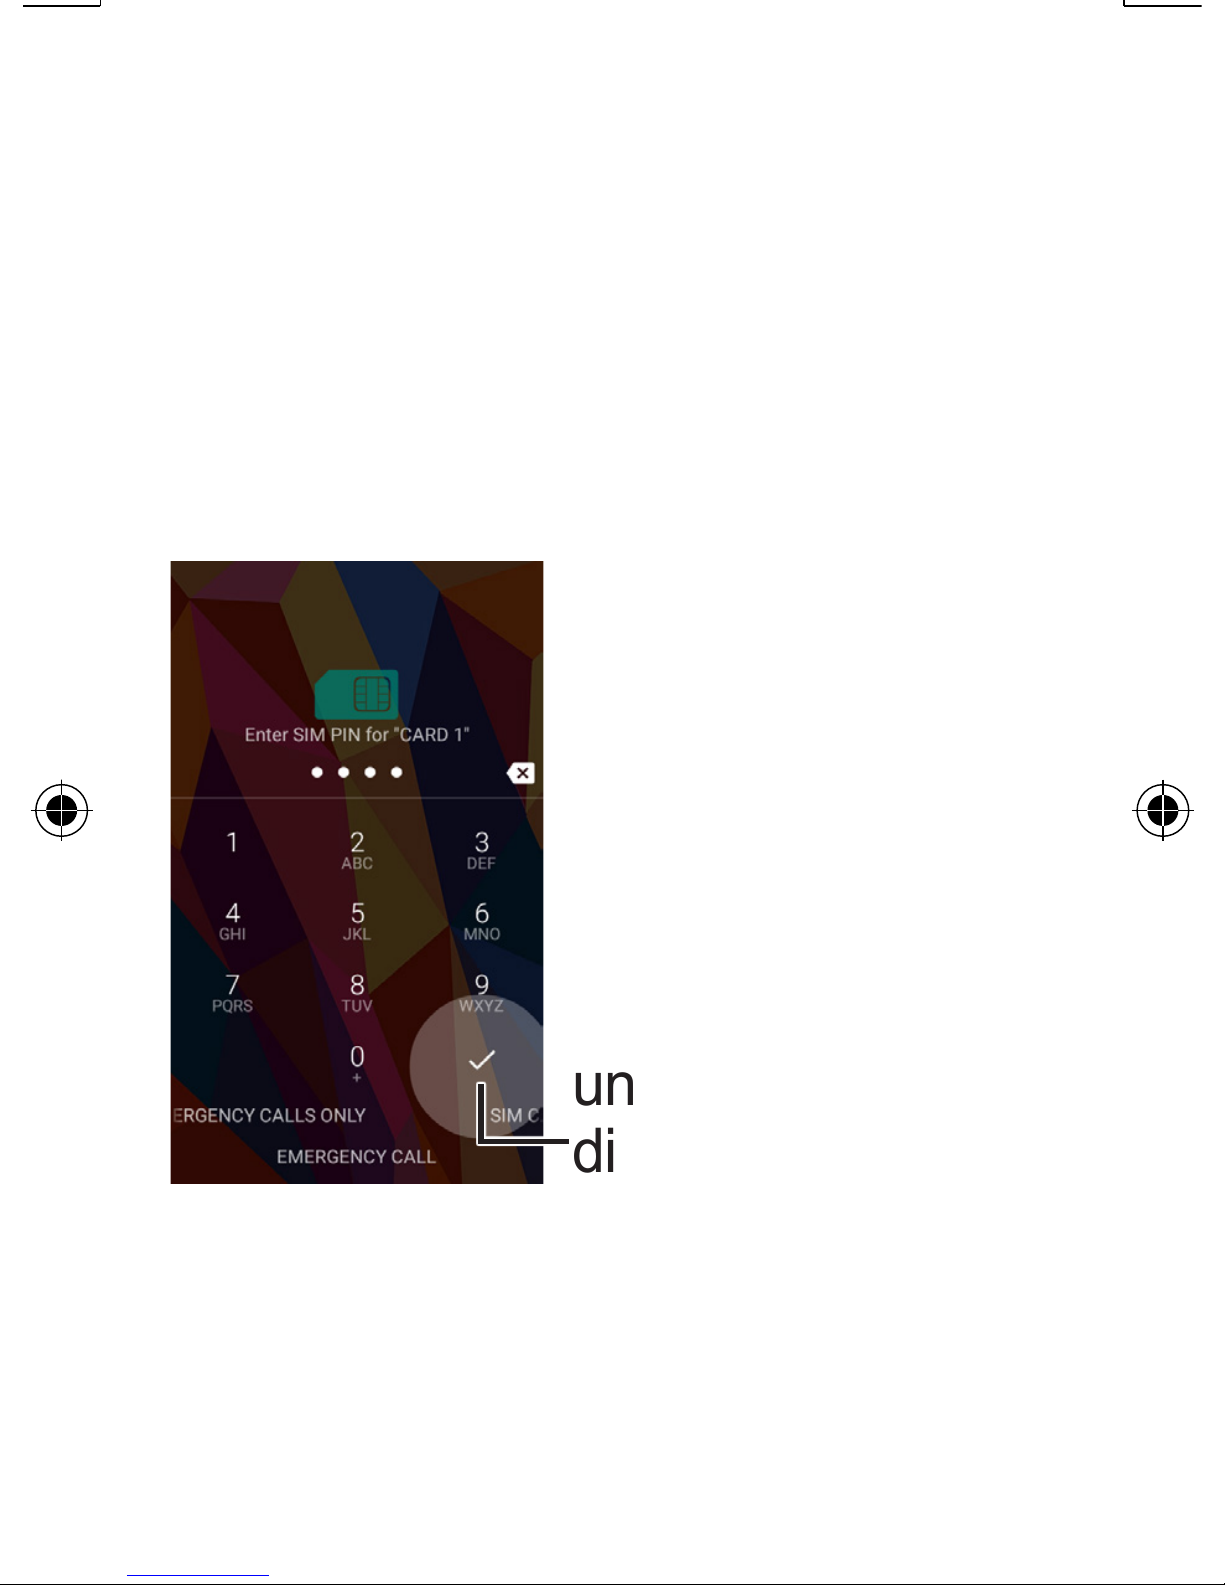
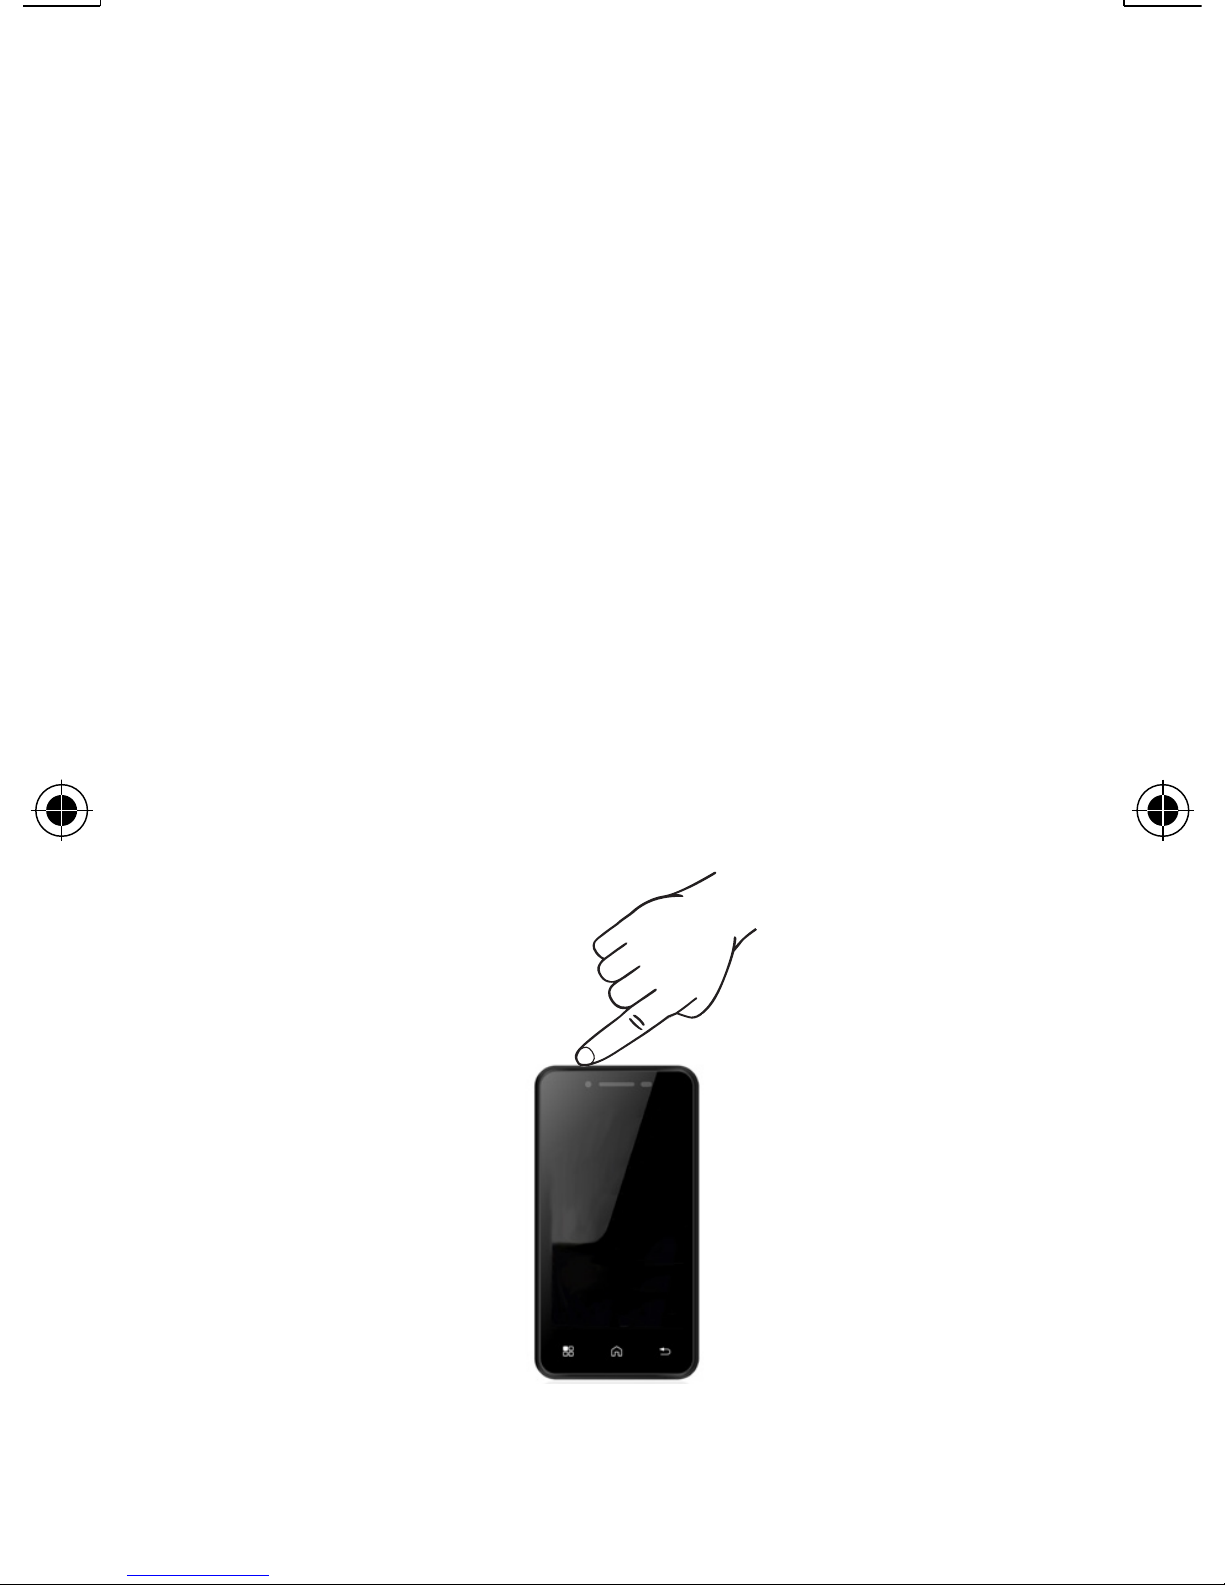
Press and hold the power button at the top of the phone for
three seconds.
If required, enter
the PIN code of
your SIM card by
pressing the digits
on the display and
then tapping the
tick at the right
underneath these
digits.
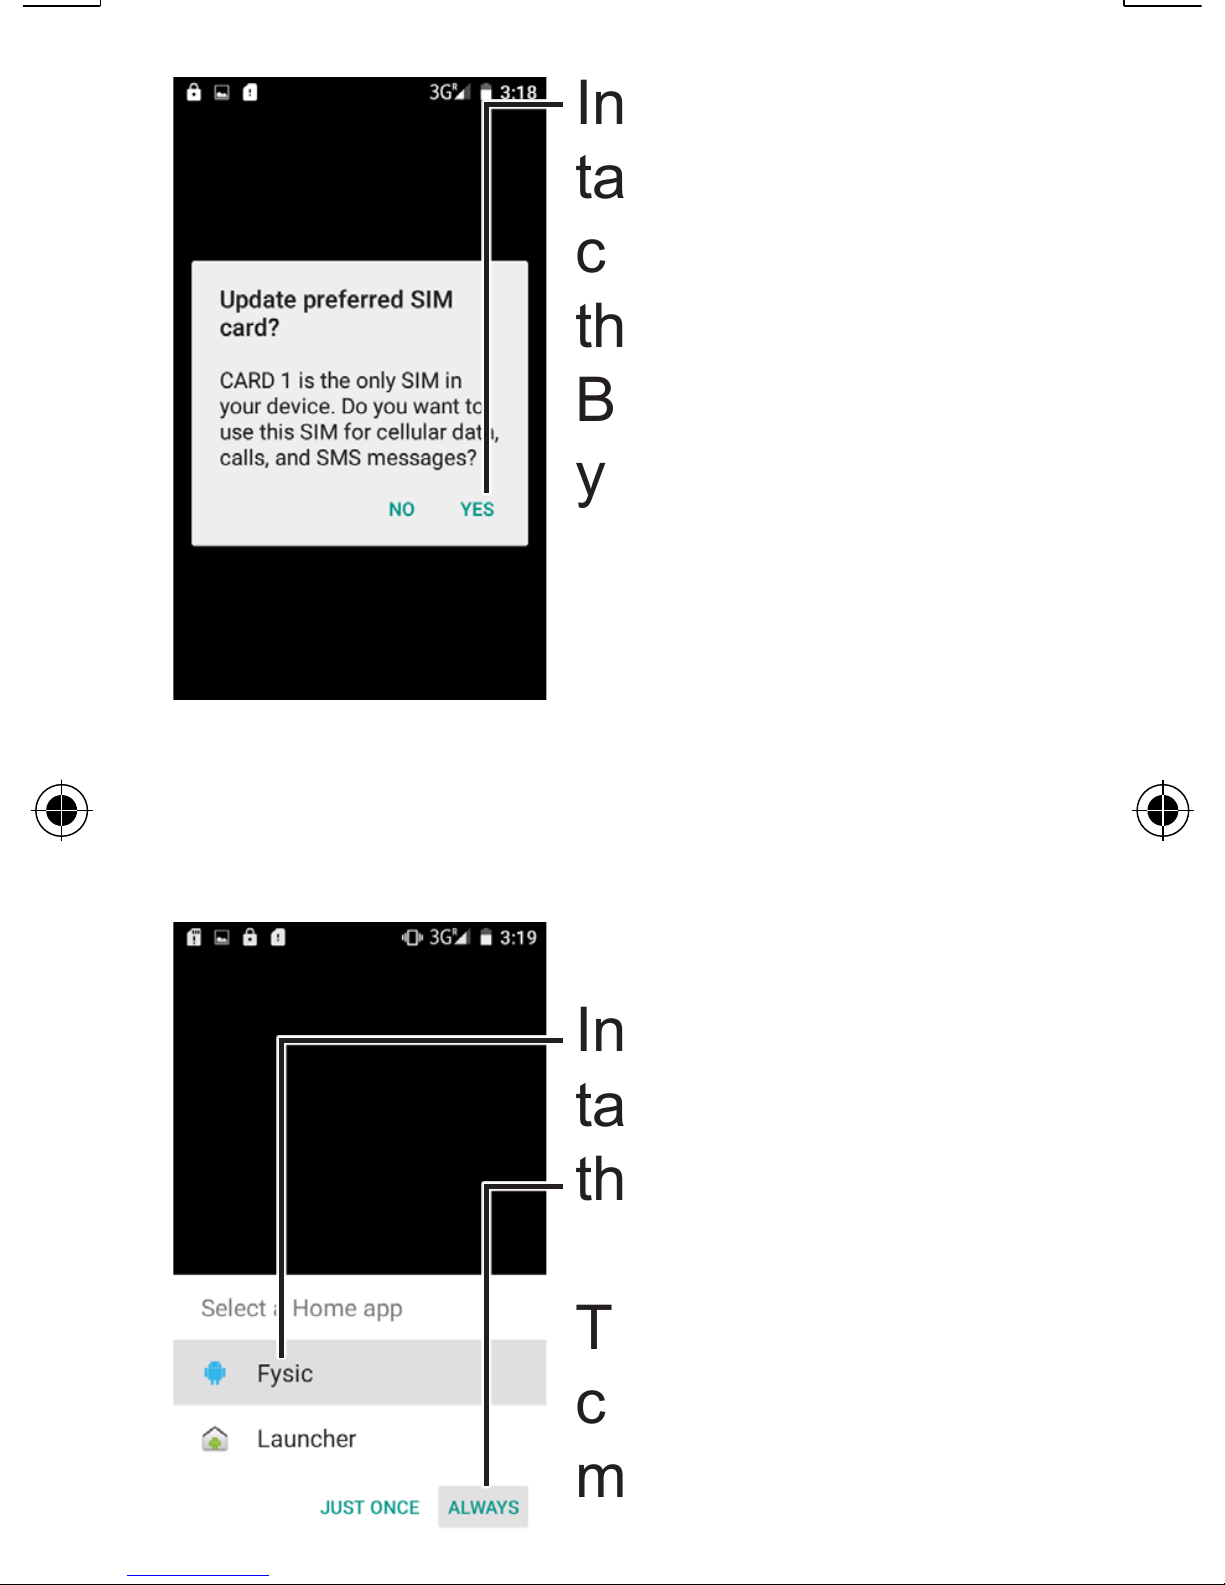
After this, and when using only
one SIM card, the following
screen will appear only once:
Page 34
34
In this screen,
tap YES. You
can later adjust
this in the menu.
By doing so,
you’ve released
the SIM card
for use with this
phone.
After this, the following screen
will appear only once:
In this screen,
tap Fysic and
then Always.
This option is for
choosing a main
menu.
Page 35

35
If you choose Launcher over
here, you’ll get the standard
Android™ menu.
This menu is very elaborate
and is explained later in this
manual. If you’re unfamiliar with
smartphones, we recommend
you to first try out the Fysic
menu to get to know the diverse
functions this phone has to offer.
In some cases, this phone initially starts in English.
You can set it to Dutch as follows:
Page 36
36
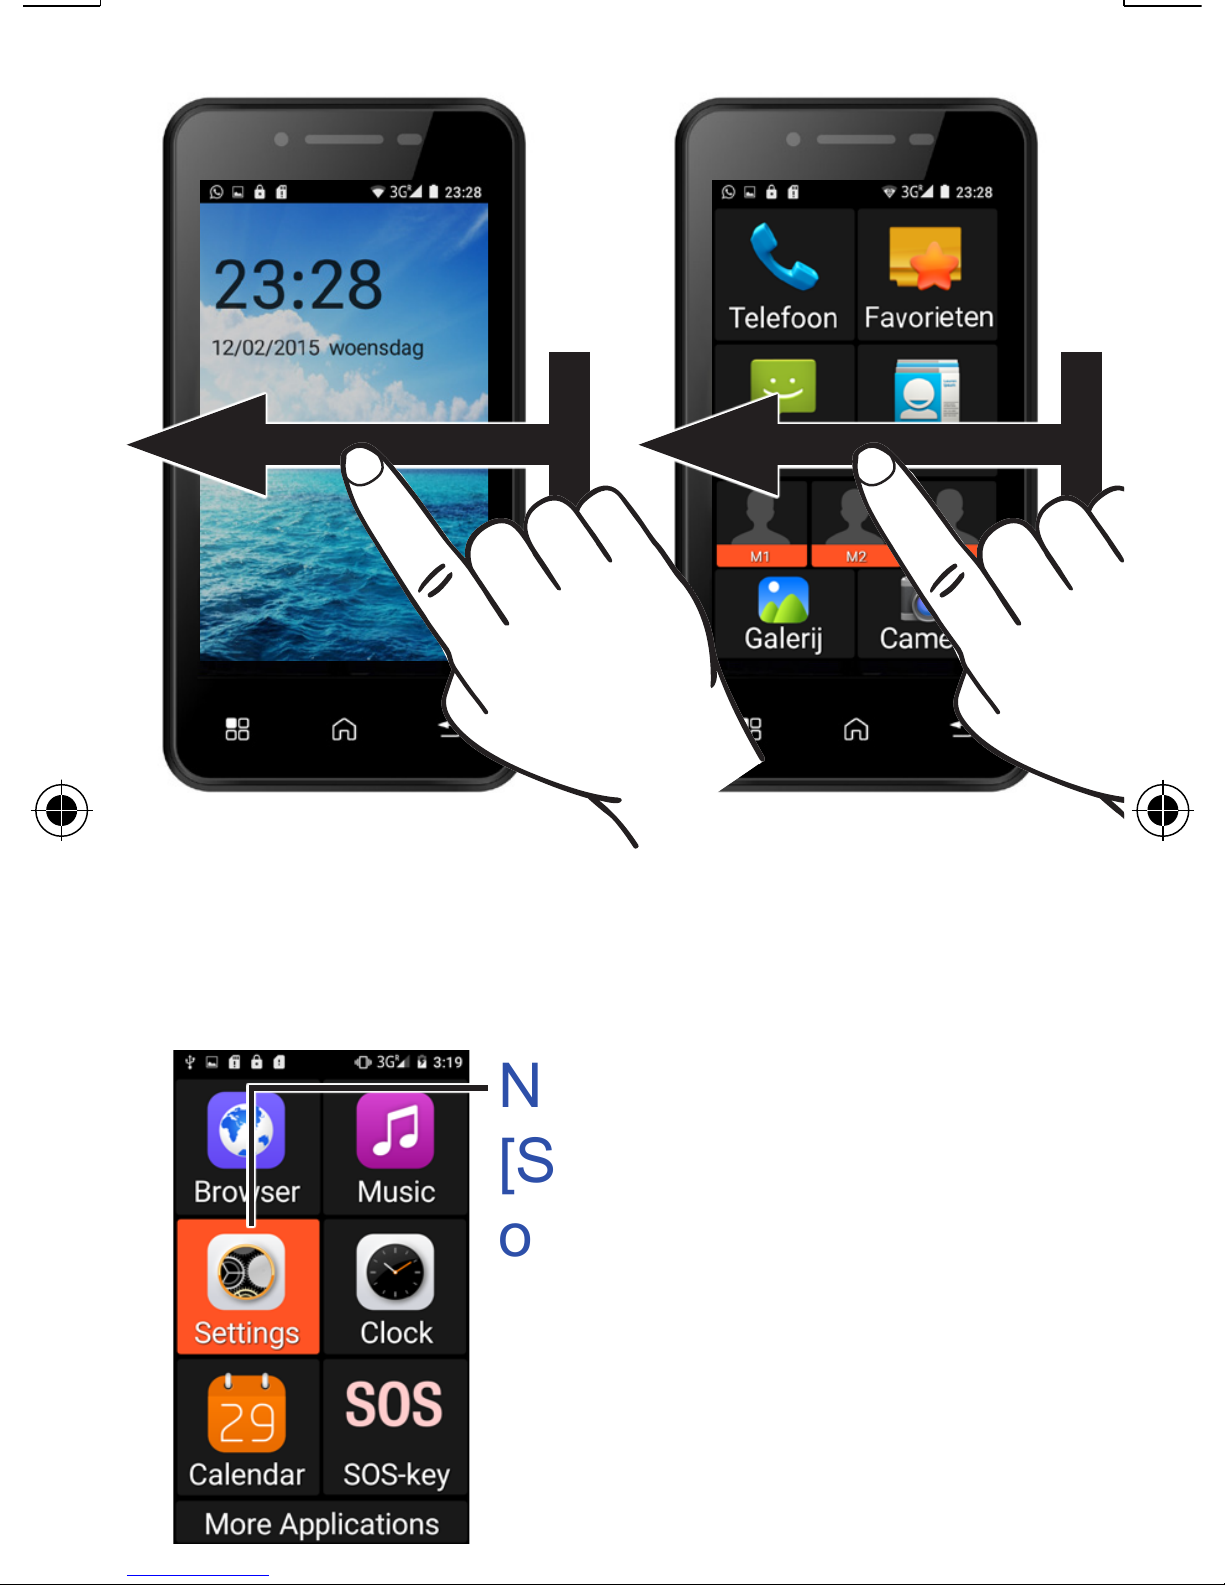
Uitschakelen:
Swipe from right to left twice to
open the following screen:
Now tap the option
[Settings] and you’ll
open the screen
shown on the next
page:
Page 37
37
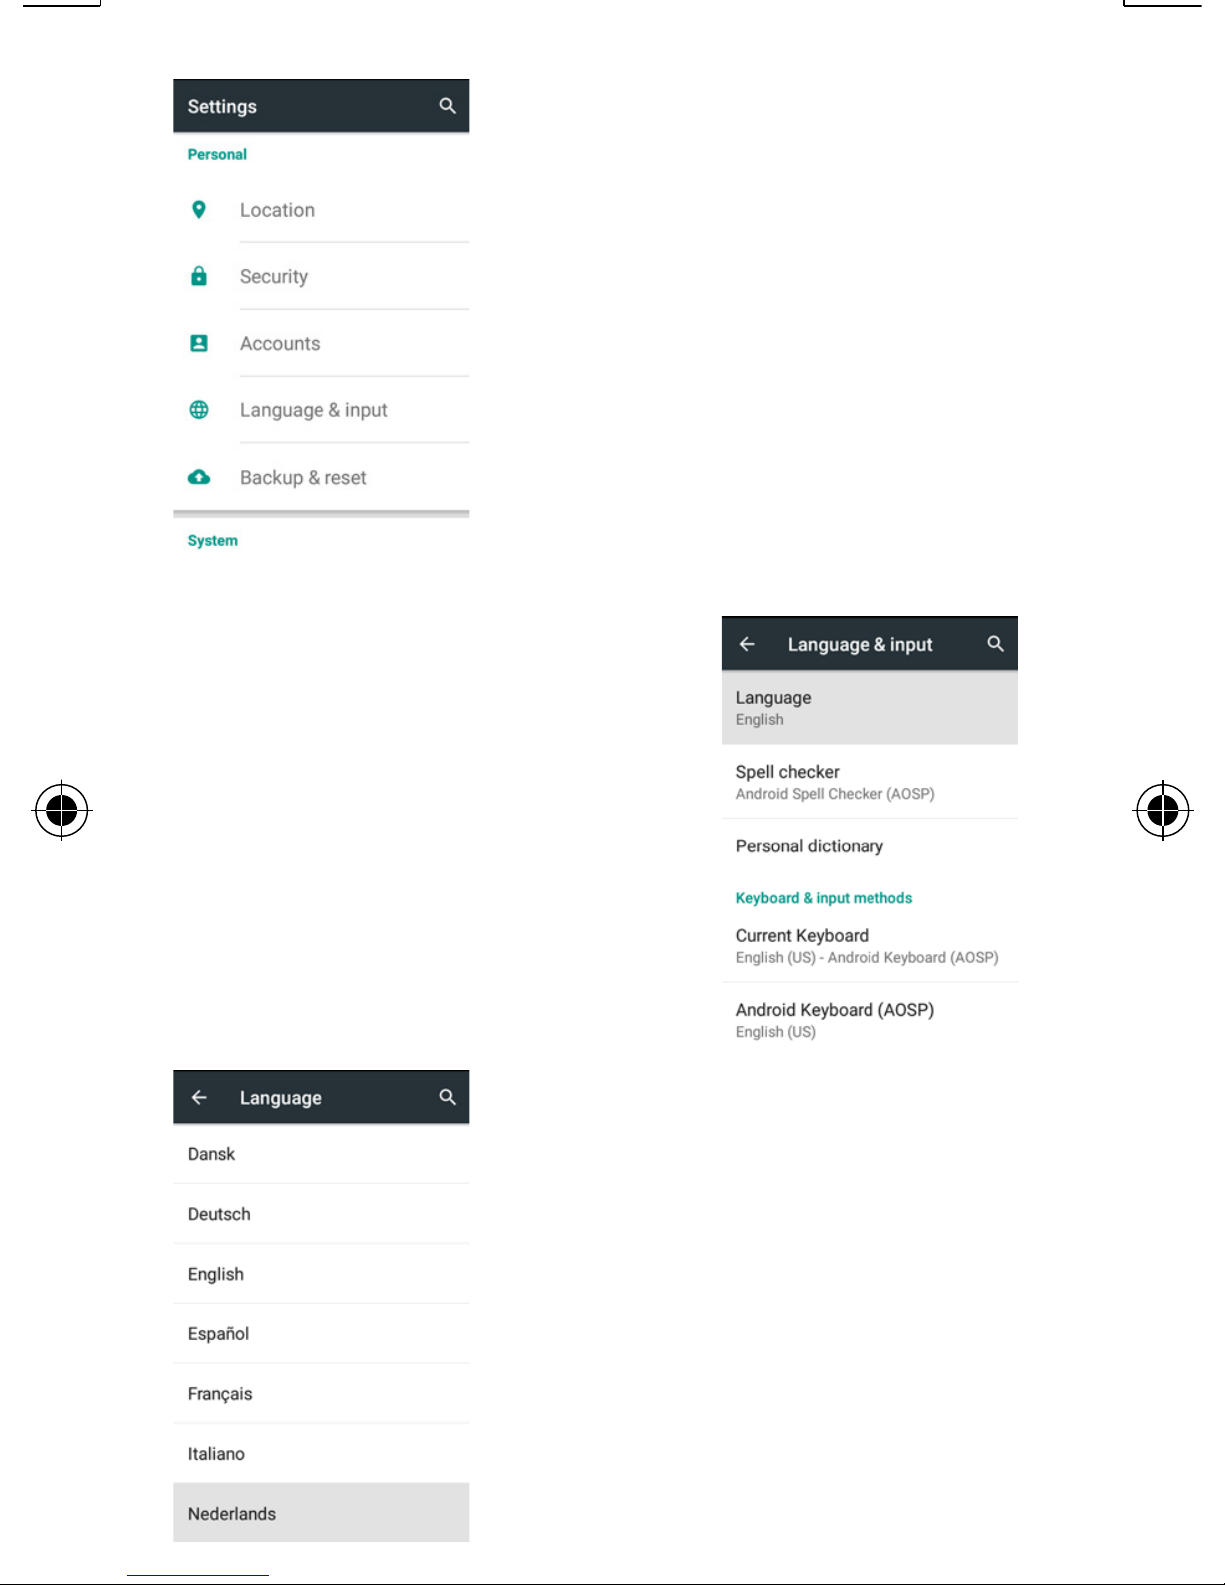
This menu is too large
to fit on one screen
scroll down (swipe
from the bottom to the
top of the screen) until you see the option
[Language and input]
as shown here.
Tap this option
and you’ll see the
screen shown here.
Now tap [Language].
In this menu you
can select [Nederlands].
Page 38
38
Answering calls
You can answer an incoming
call in two ways: one when the
phone is locked and another
during normal use.
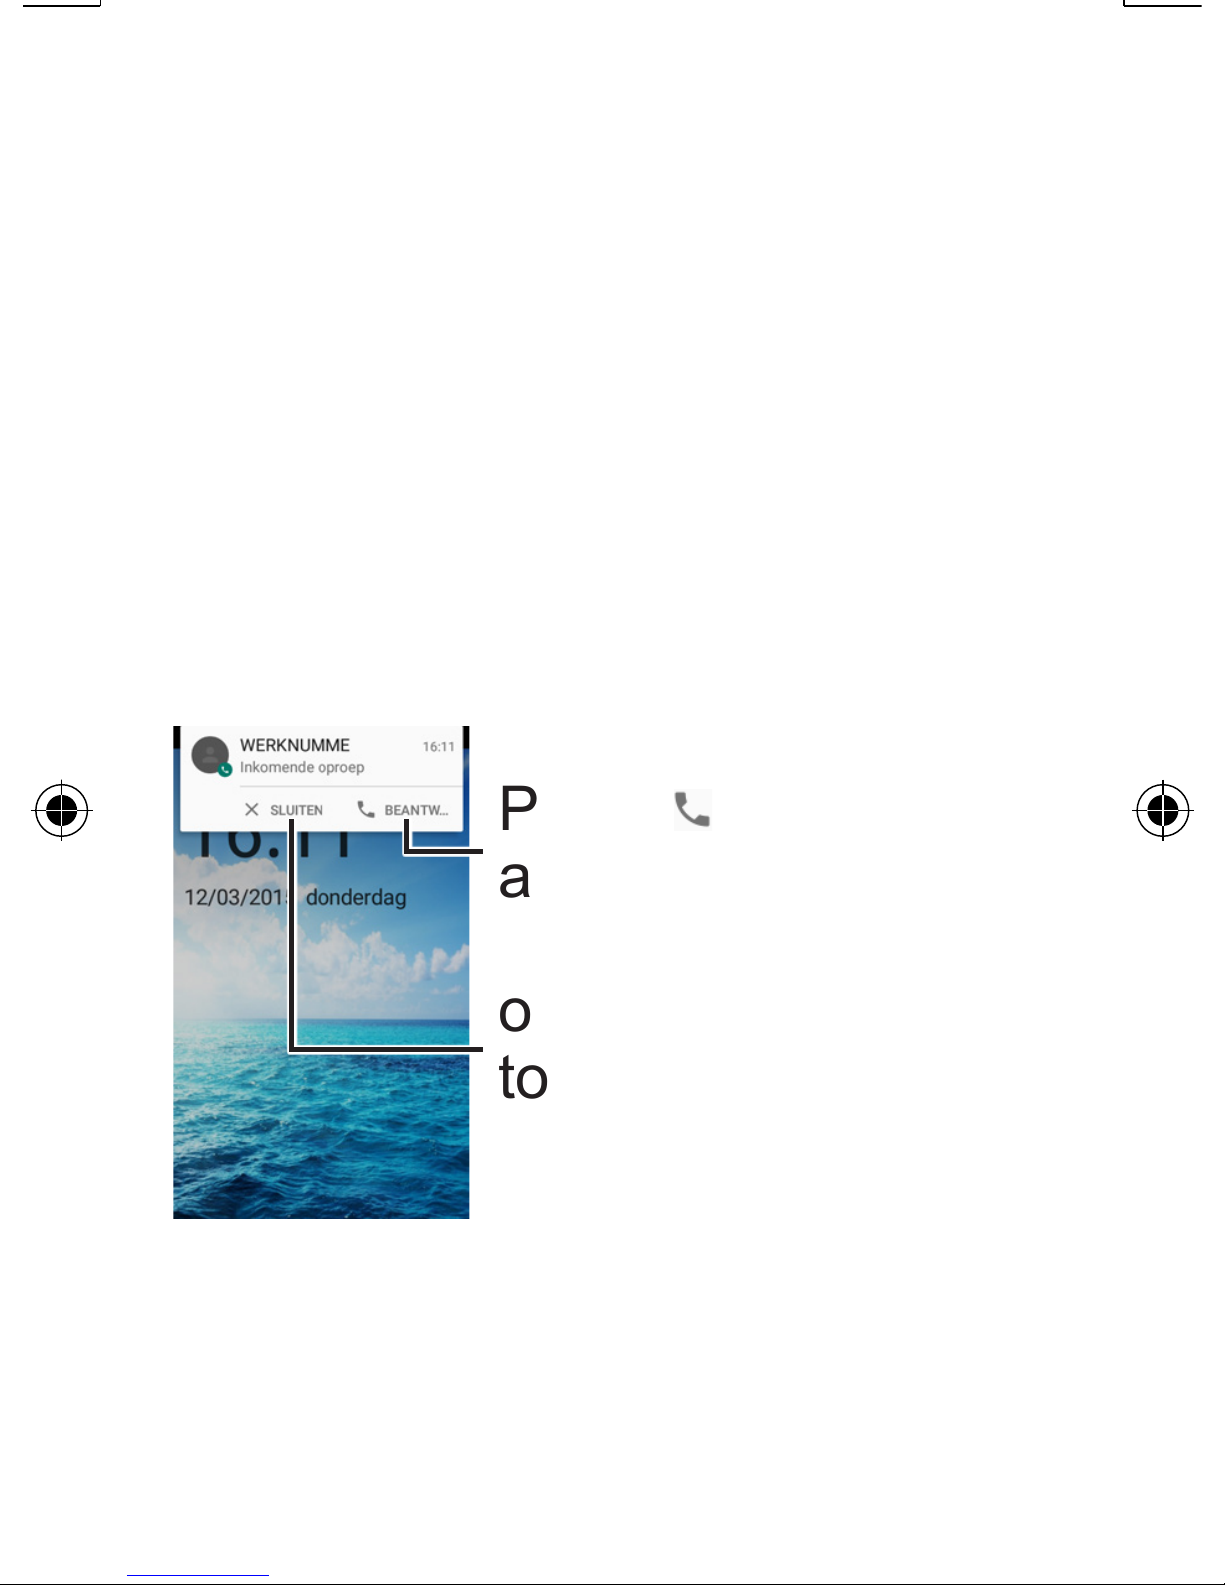
When the phone is locked, the
screen will turn on and display
the following:
Press answer... to
answer the call
or press [X Close]
to refuse the call.
By tapping the caller’s name,
you’ll open the same screen as
when the phone would not be
locked.
Page 39
39
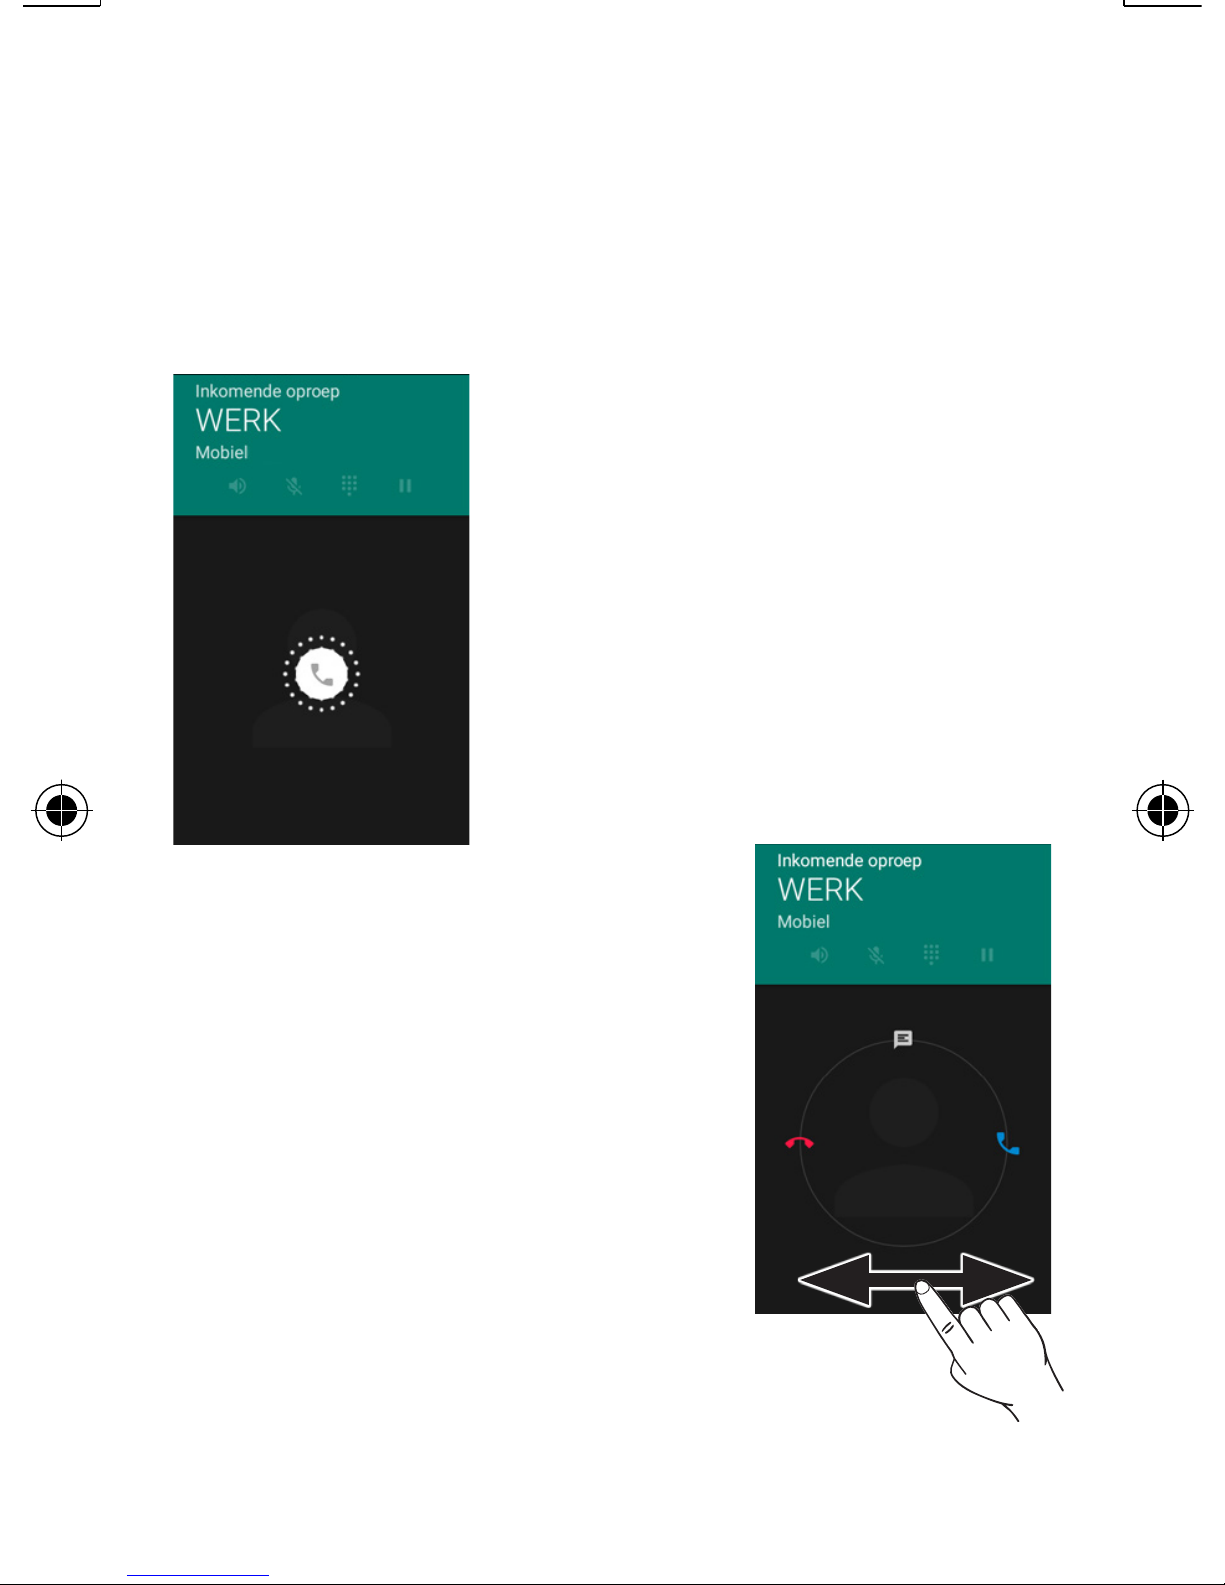
When the phone is not locked,
the following will appear when
you receive an incoming call:
Press and hold the
white, round icon
in the middle and
the following will be
displayed:
You can now swipe
to the right to answer the call or you
swipe to the left to
refuse the call. If you
swipe up, you’ll open
a menu with quick
texts; You can
use these to quickly send a
Page 40
40
SMS to the person trying to call
you.
Making outgoing calls
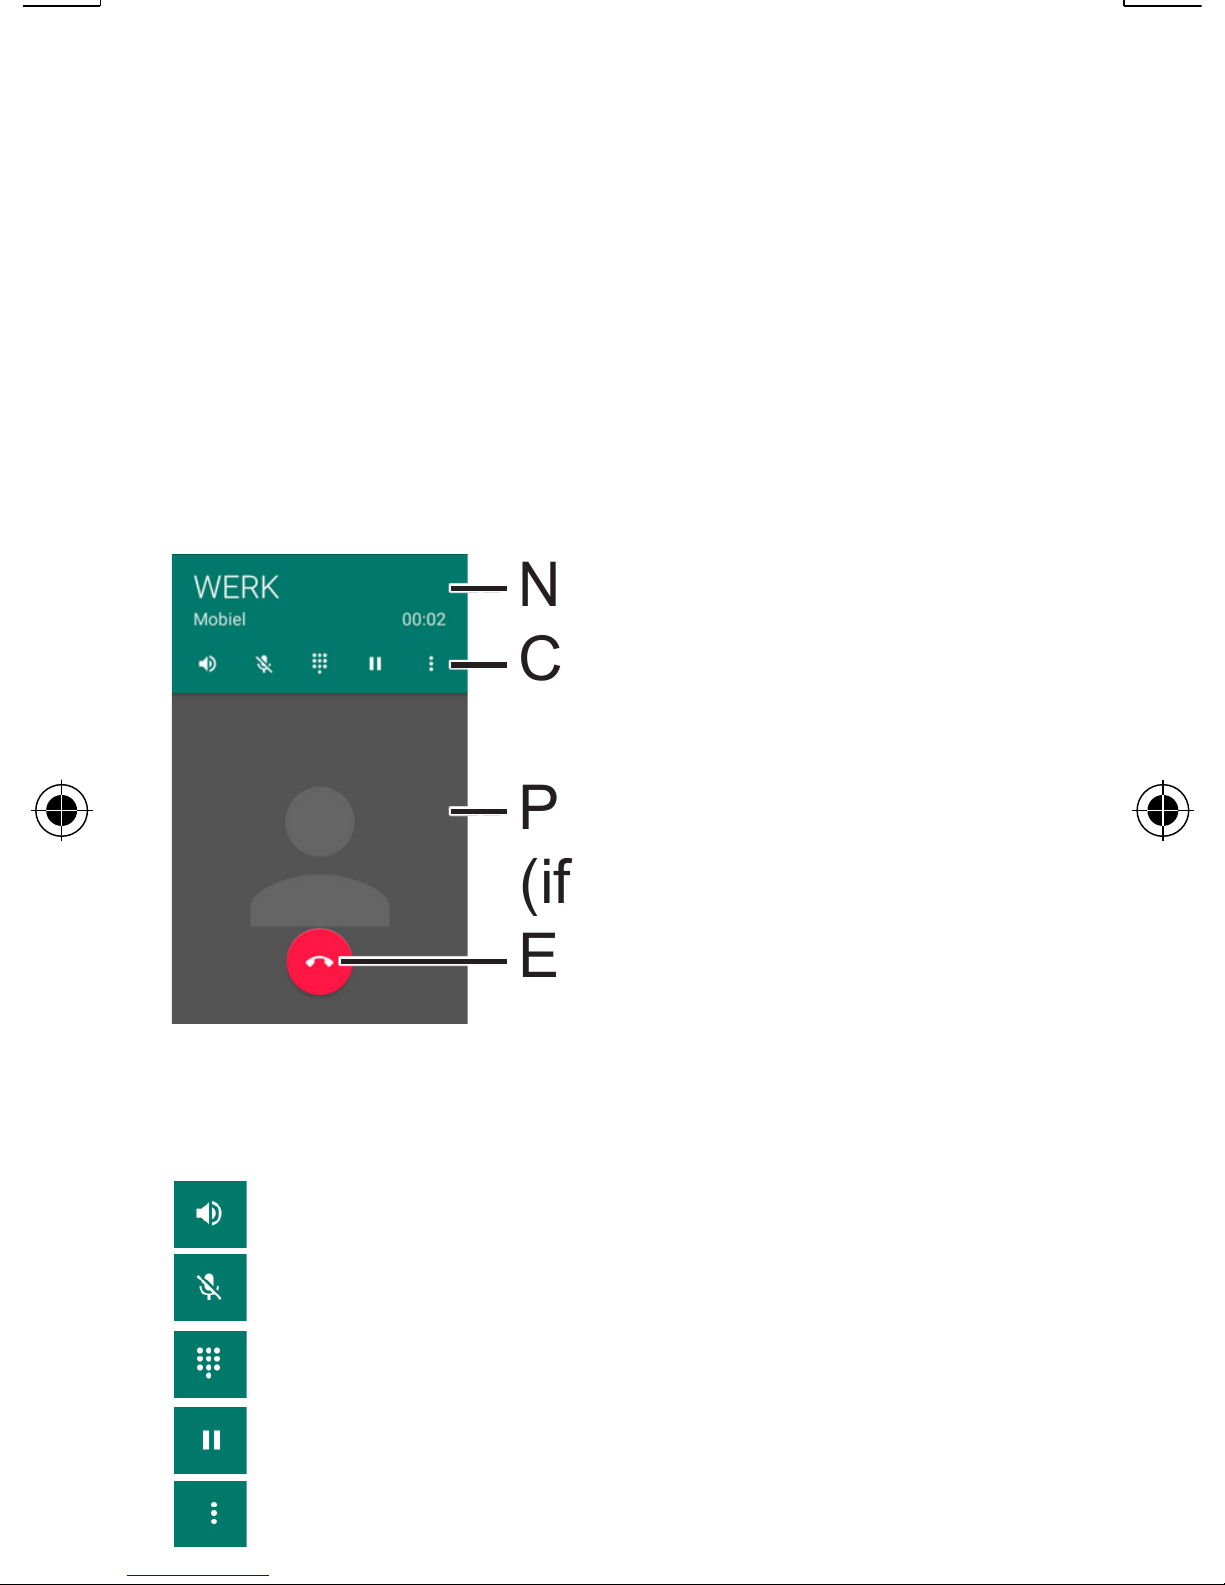
While calling, the following
screen will be displayed:
--
Number and call time
-- Call options
-- Photo of contact
(if set)
-------- End call
From left to right, the call options are:
Turn on hands-free
Mute (microphone off)
Show numeric buttons
Put call on hold
Start recording or conference
Page 41
41
During your conversation, you
can use the volume button to
set the sound level; the set
level will be displayed on the
screen.
Shortcuts
With the phone in standby
mode, you can quickly open
several basic functions.
While in standby, press the
power button.
The screen will switch on en
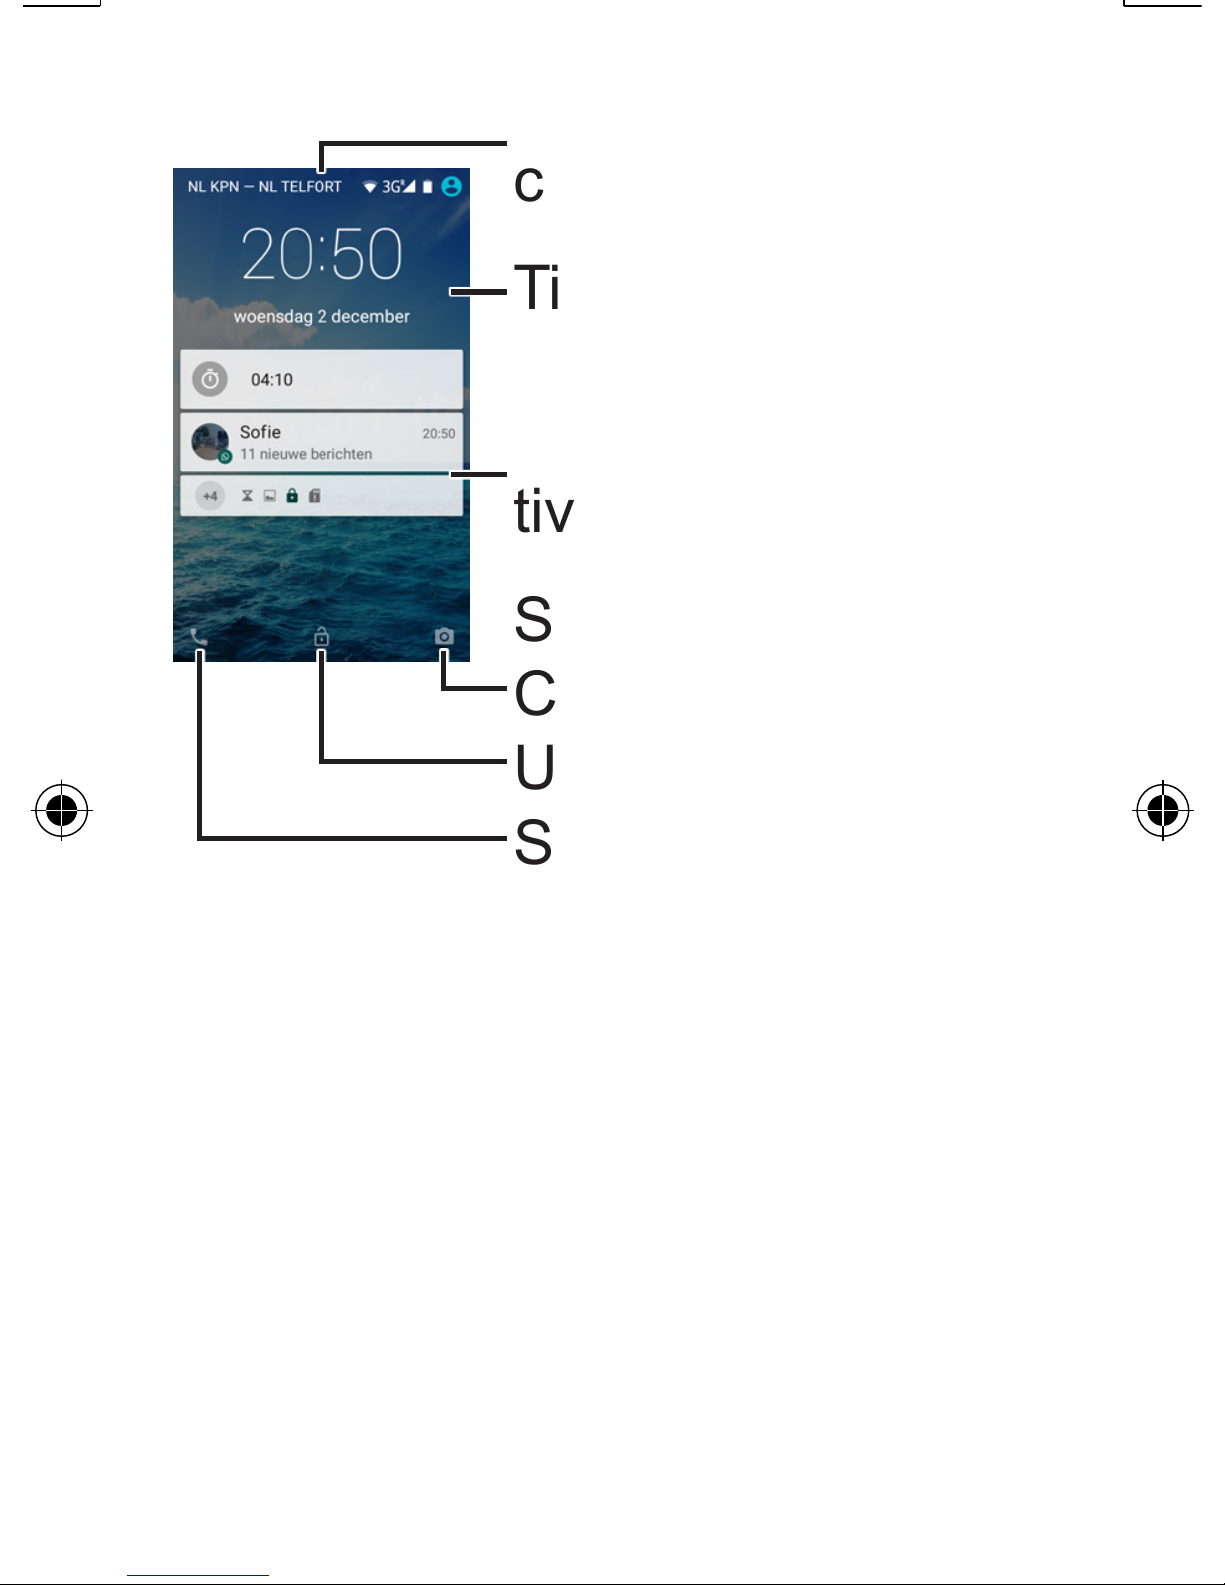
display the following:
Page 42
42
Status: wireless
connections
Time and date
Messages from active apps
Shortcut key:
Camera
Unlock
Shortcut key: Call
Status: wireless connections
This shows the current telephone network, the status of
your WiFi connection, the type
of connection, the connection
strength of the telephone network, the battery, etc.
Page 43
43
The available icons here don’t
only depend on active functions, but also on the apps
present in the phone.
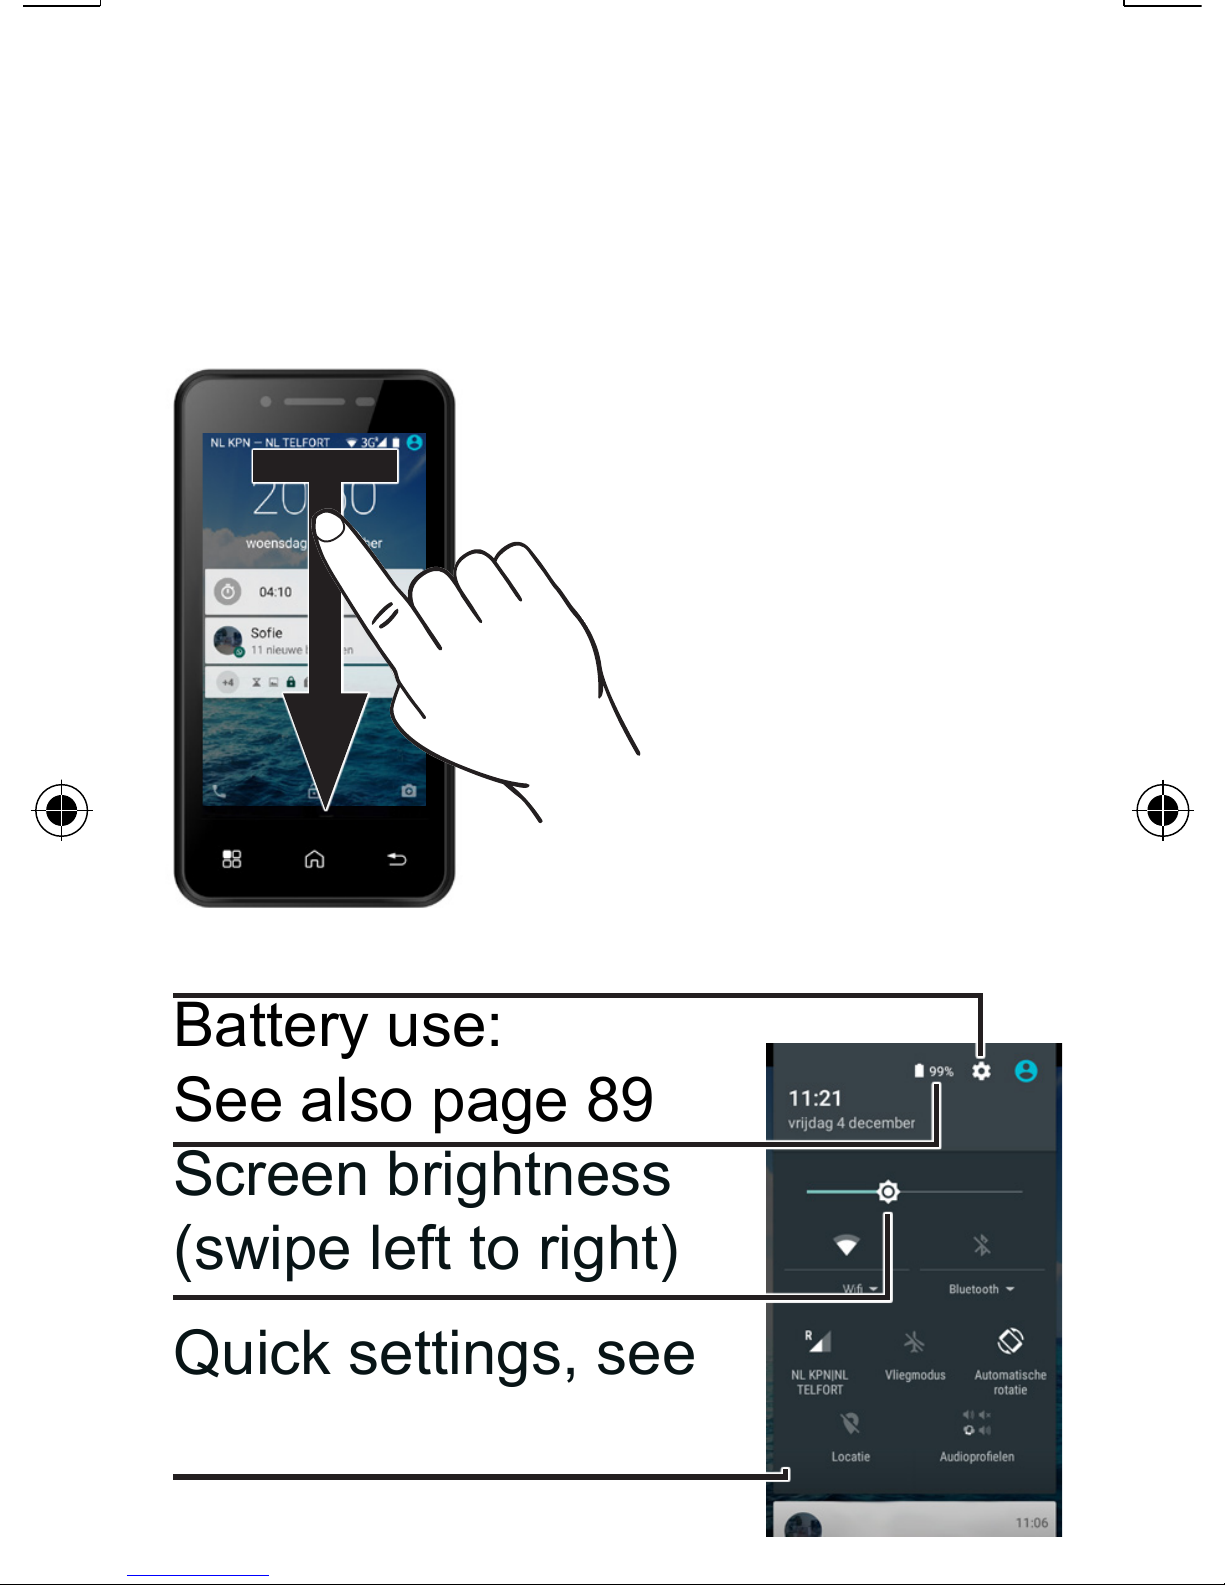
Swipe from this
top bar down-
wards to open
the following
men:
Settings: See also page 81
Battery use:
See also page 89
Screen brightness
(swipe left to right)
Quick settings, see
next page
Page 44
44
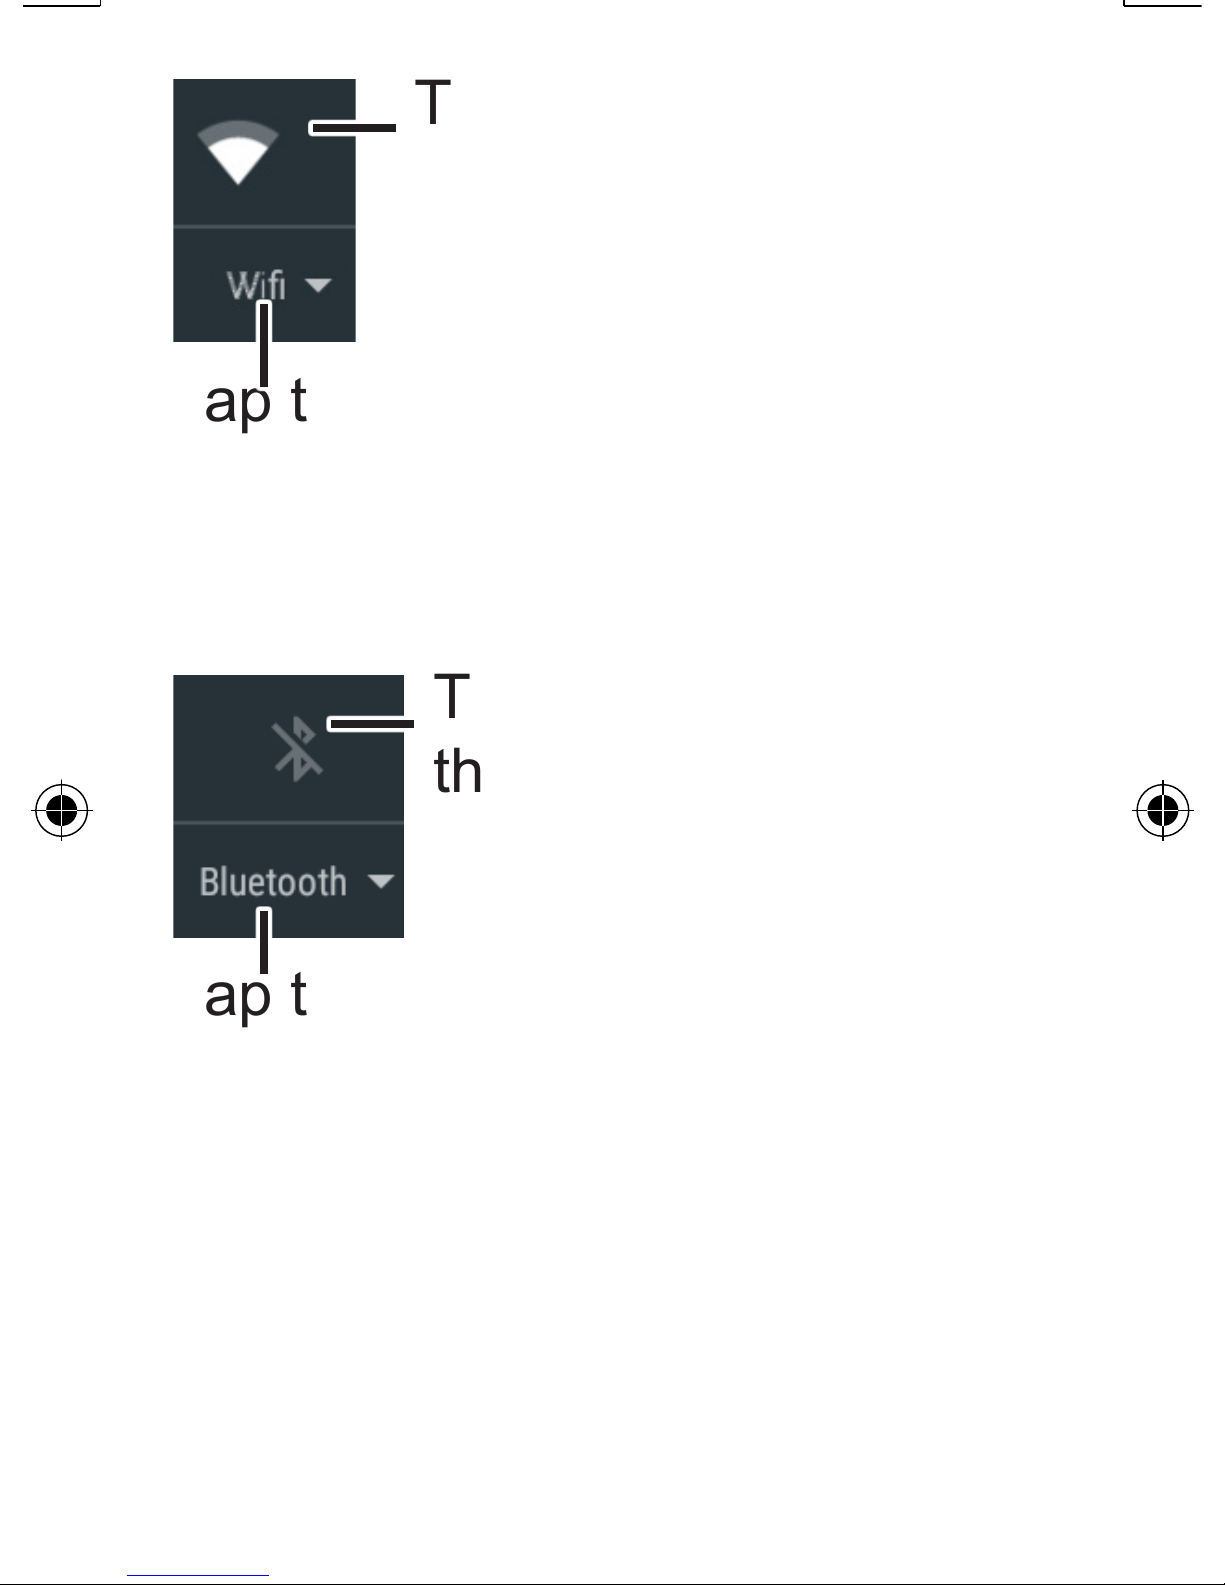
Tap the icon to turn
WiFi (wireless internet)
on or off.
Tap the text underneath the
icon to setup a WiFi connection.
See also page 81
Tap the icon to turn
the wireless connection via Bluetooth® on
or off.
Tap the text to search for other
devices supporting a wireless
connection via Bluetooth® and
to establish a connection with
them. See also page 82
Page 45
45
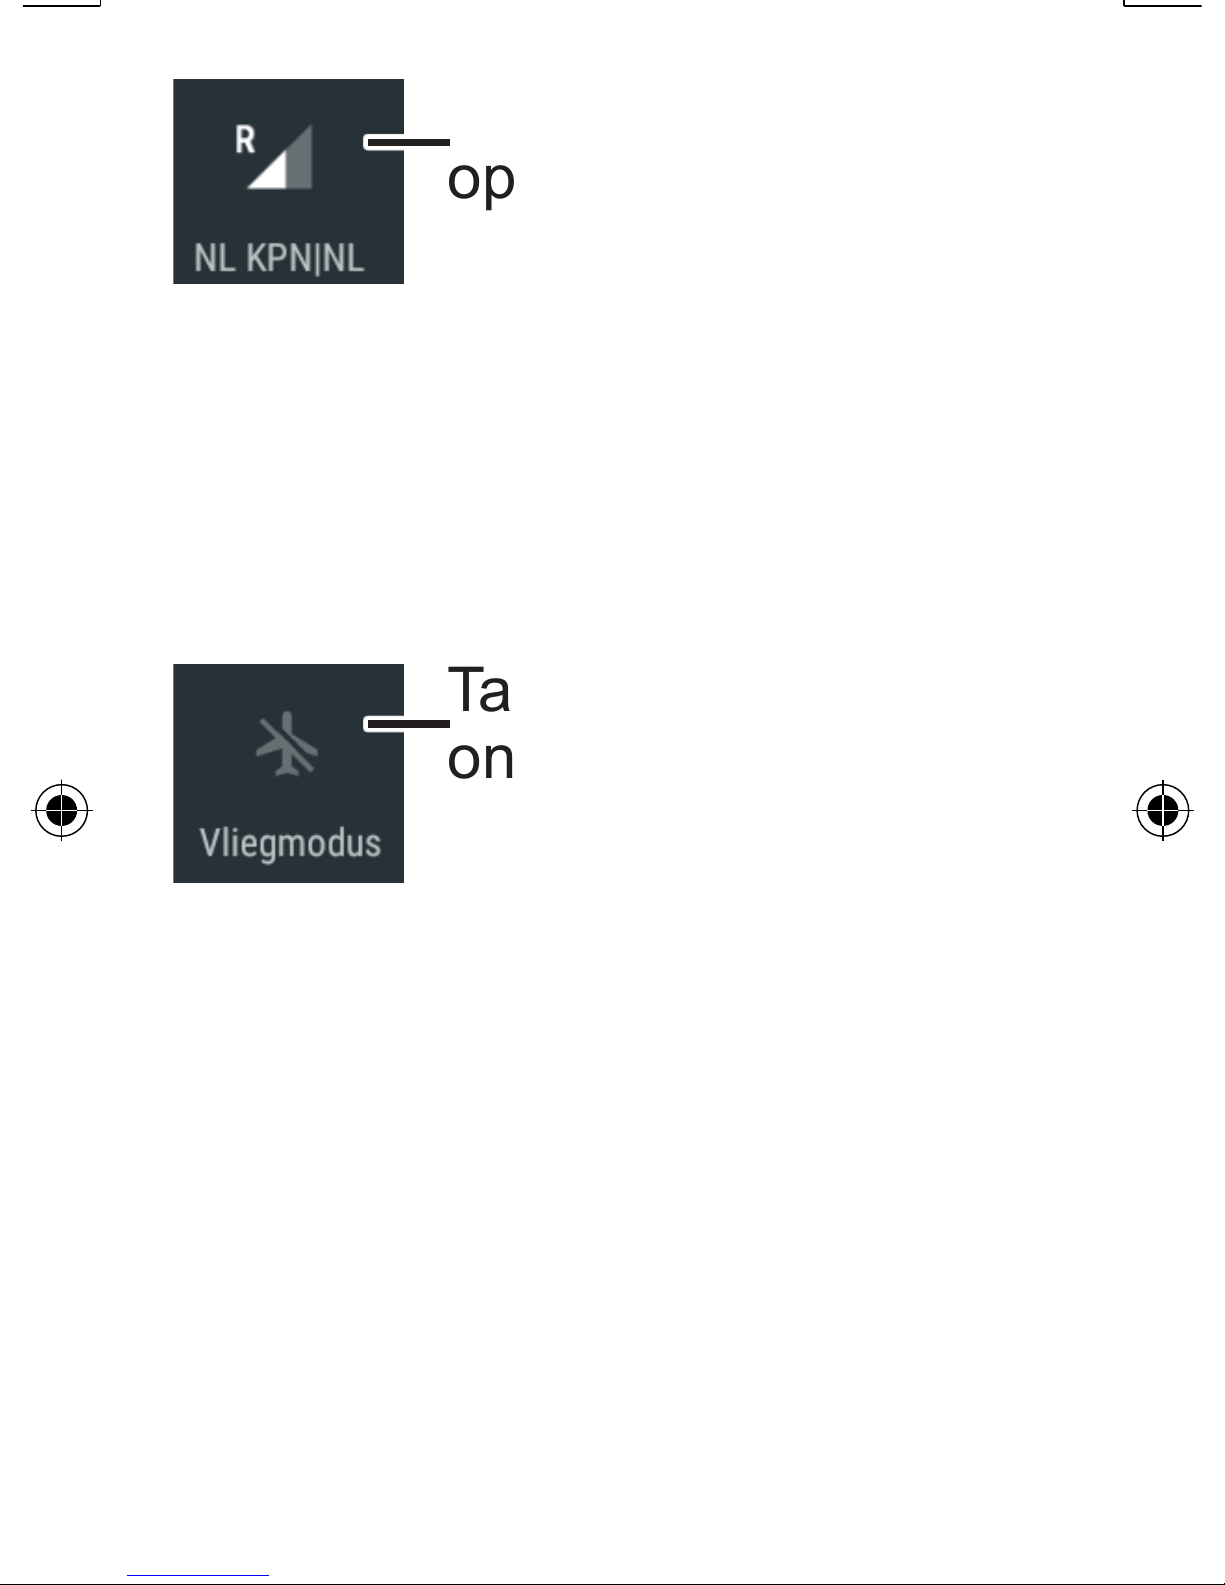
Tap the icon or text to
open a menu where
you can turn mobile
data on or off and
view information about your
data usage. See also page 84
Tap this icon to turn
on the flight mode. By
doing so, all wire-
less connections will
be switched off, allowing you
to safely use your phone in
airplanes, hospitals and other
places where the use of transmitting equipment is forbidden.
For as long as the flight mode is
active, you’ll not be able to call
or use the internet.
Page 46
46
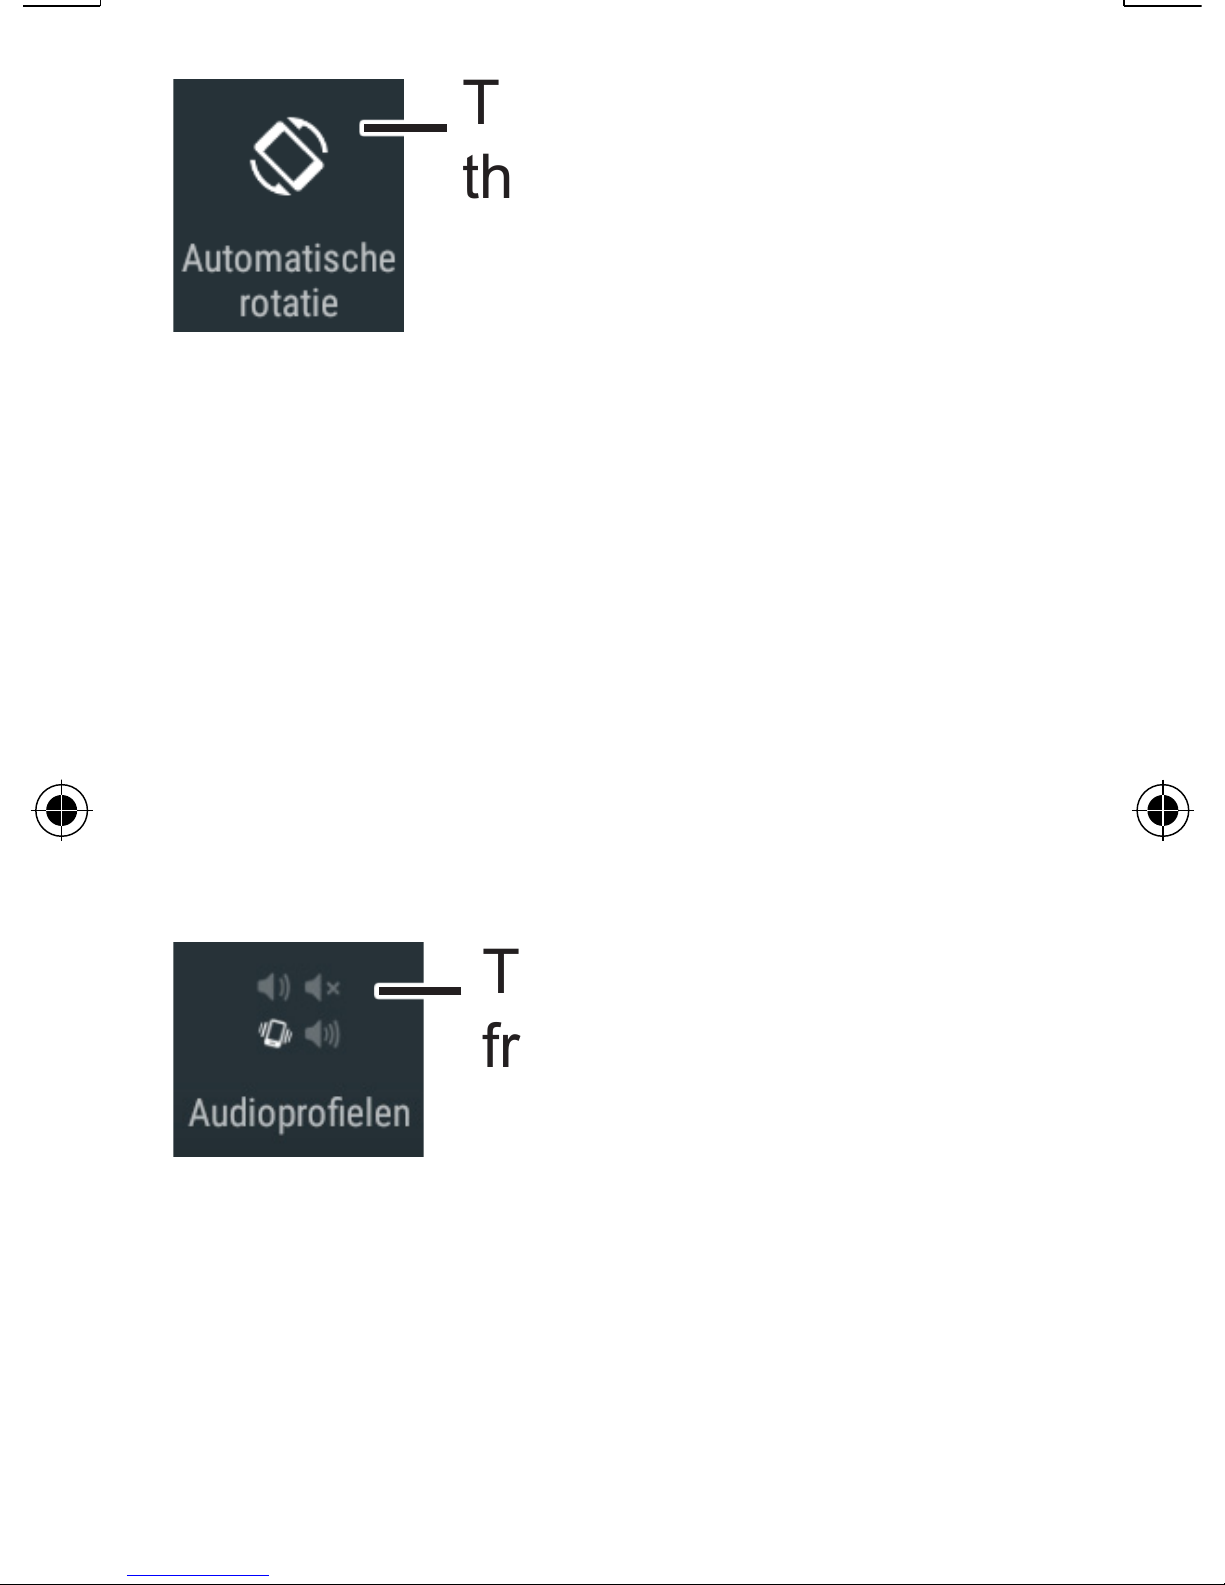
Tap this icon to turn
the automatic screen
adjustment on or off.
When this function is turned on,
the screen will rotate as you turn
the phone. This allows you to
get a wide screen when needed.
Please keep in mind that this
function is not supported by
every App.
Tap here to choose
from four different
preset audio pro-
files.
This way you can quickly adjust
the volume of your ringtone and
call volume based on your surroundings.
Page 47
47
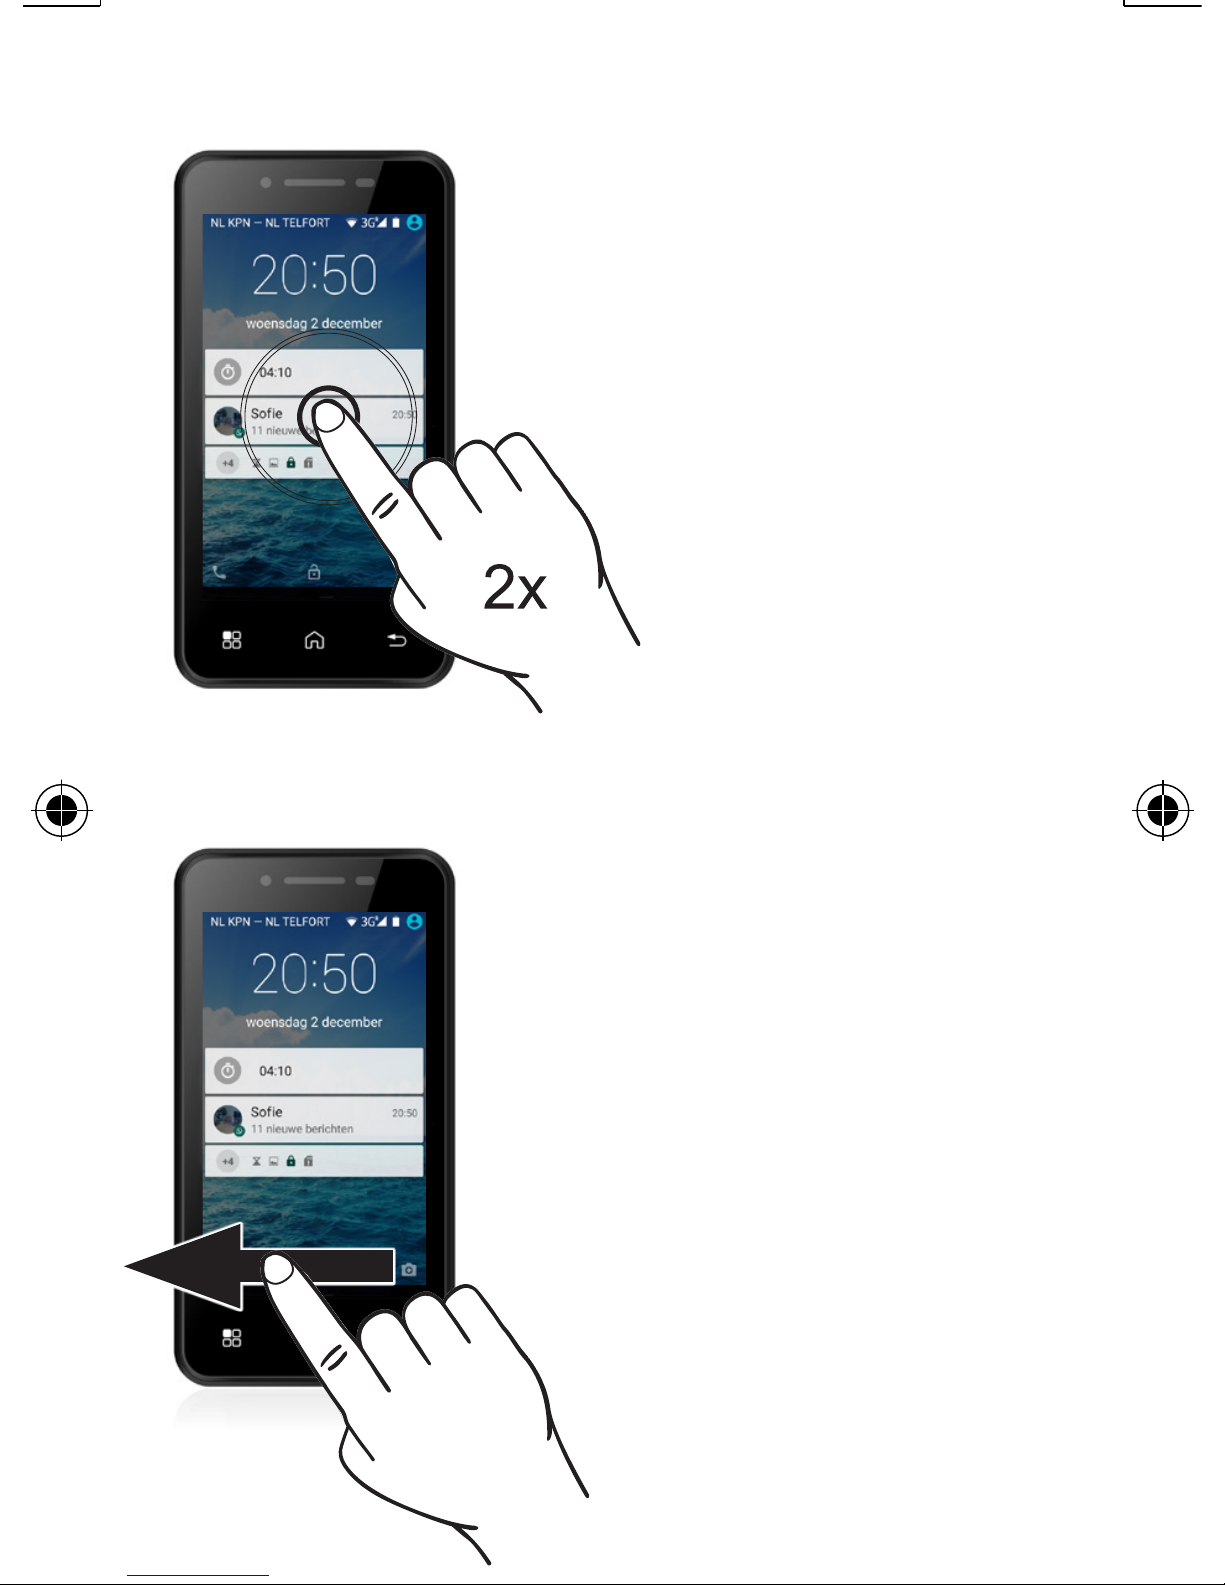
Messages from active apps:
Most apps that give
you messages can
be opened directly
by double-clicking
the message.
Shortcut key:
Camera
To use the shortcut
key for the camera,
swipe from the icon
in the lower right
corner to the left.
See also page 73
Page 48
48
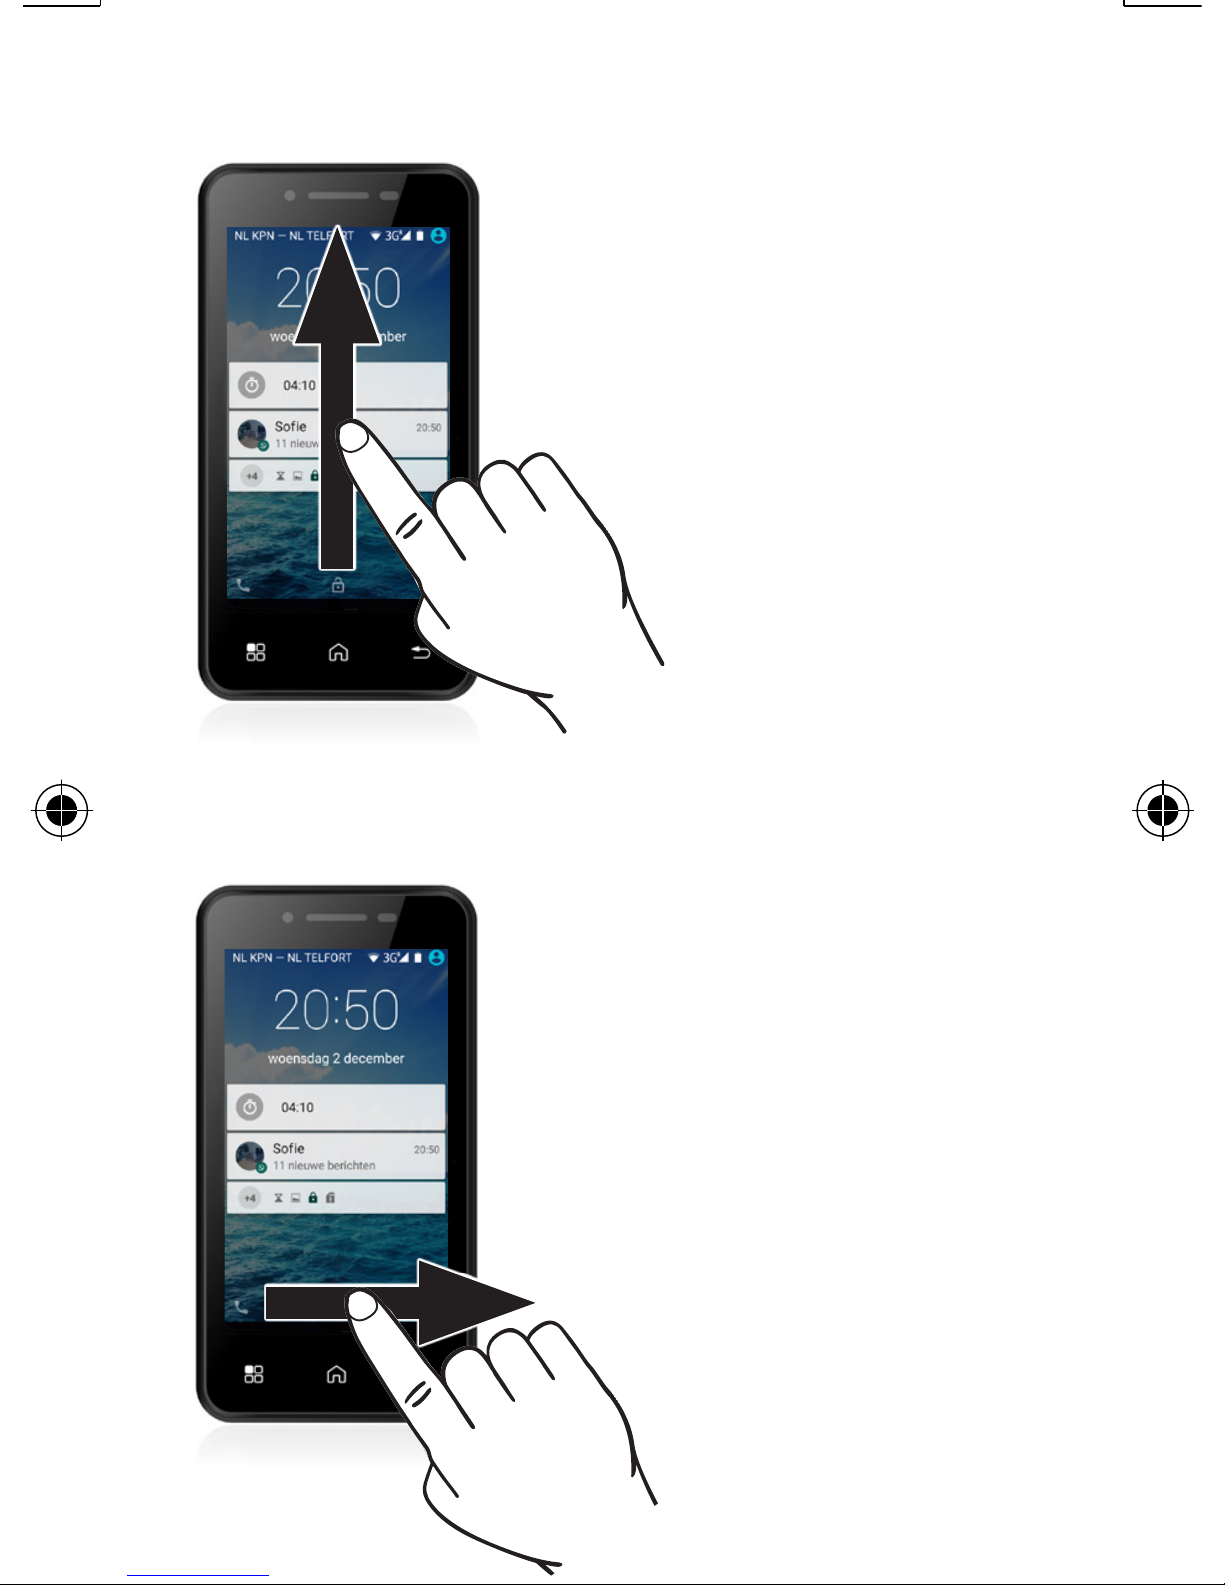
Unlock:
You must unlock
the phone to use
additional func-
tions. To do this,
swipe the lower
middle icon
upwards.
Shortcut key: Call
To use the call
shortcut key, swipe
from the icon in the
lower left corner to
the right. See also
page 51
Page 49
49
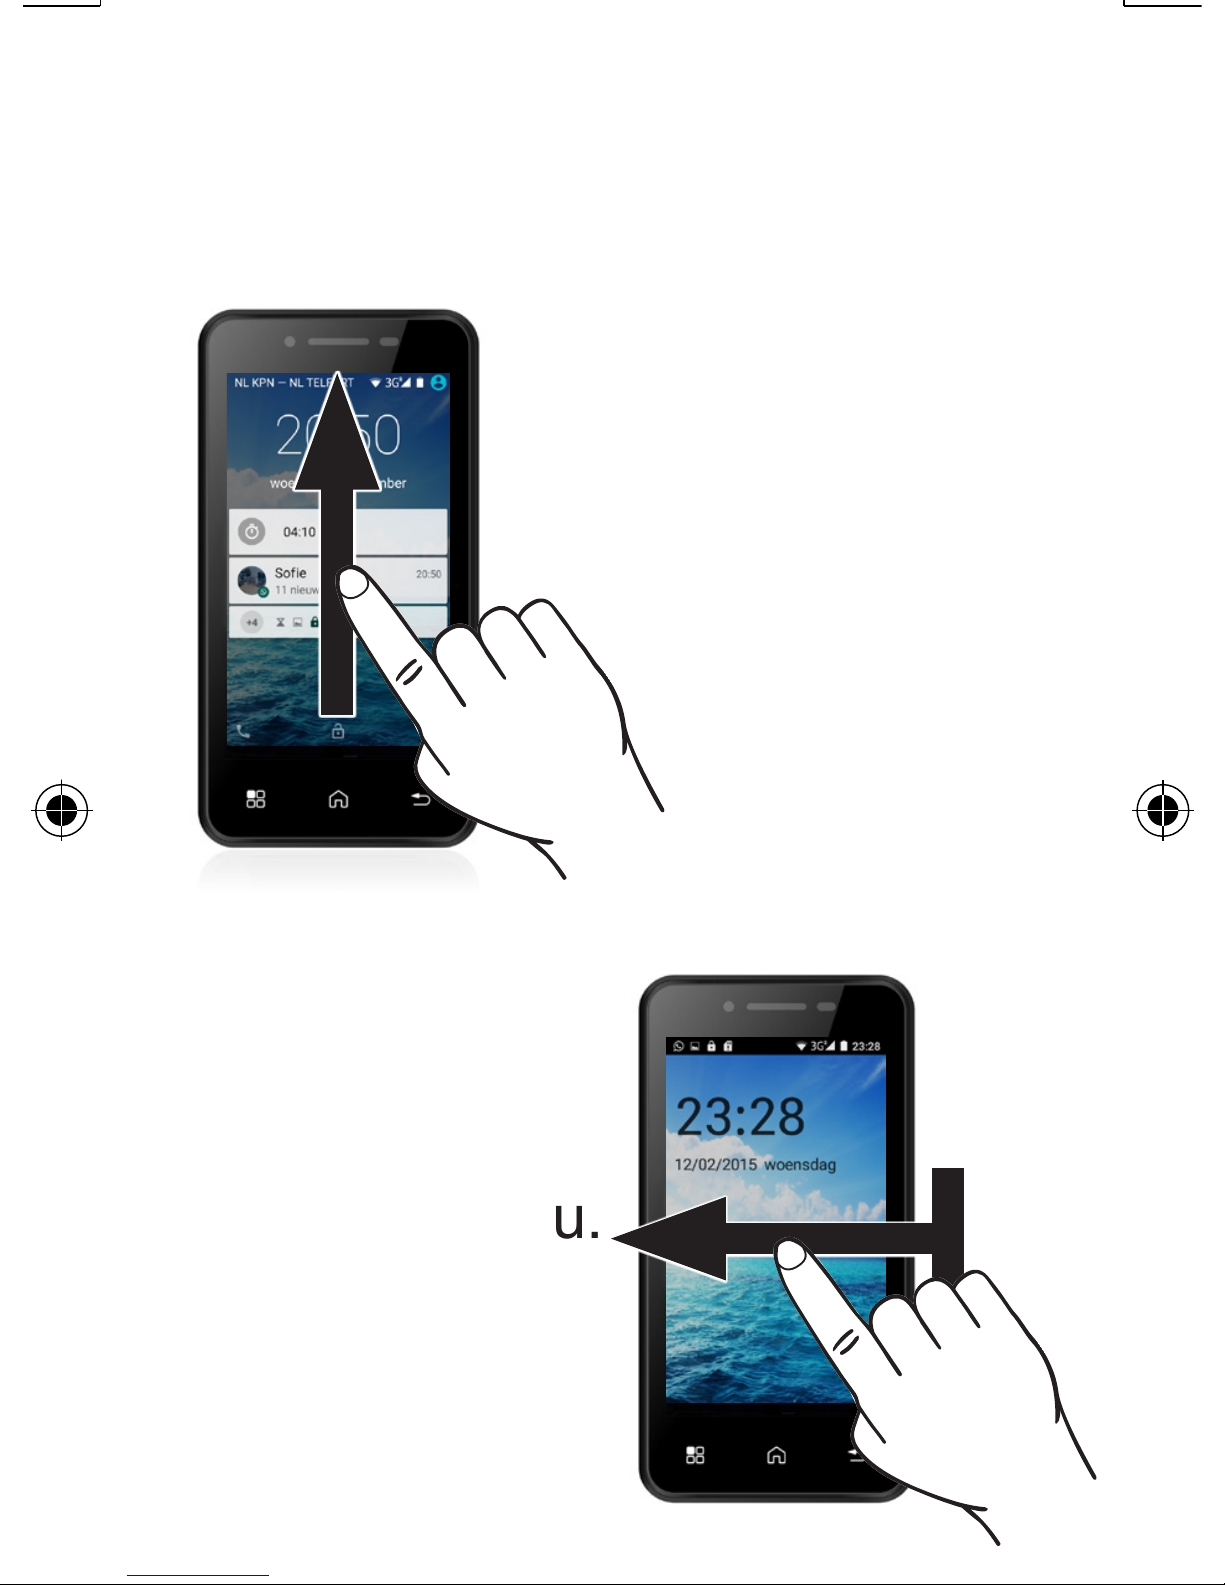
Open menu:
Make sure to unlock the phone
first by briefly pressing th
power button and
then swiping the
lock in the lower
part of the screen
upwards.
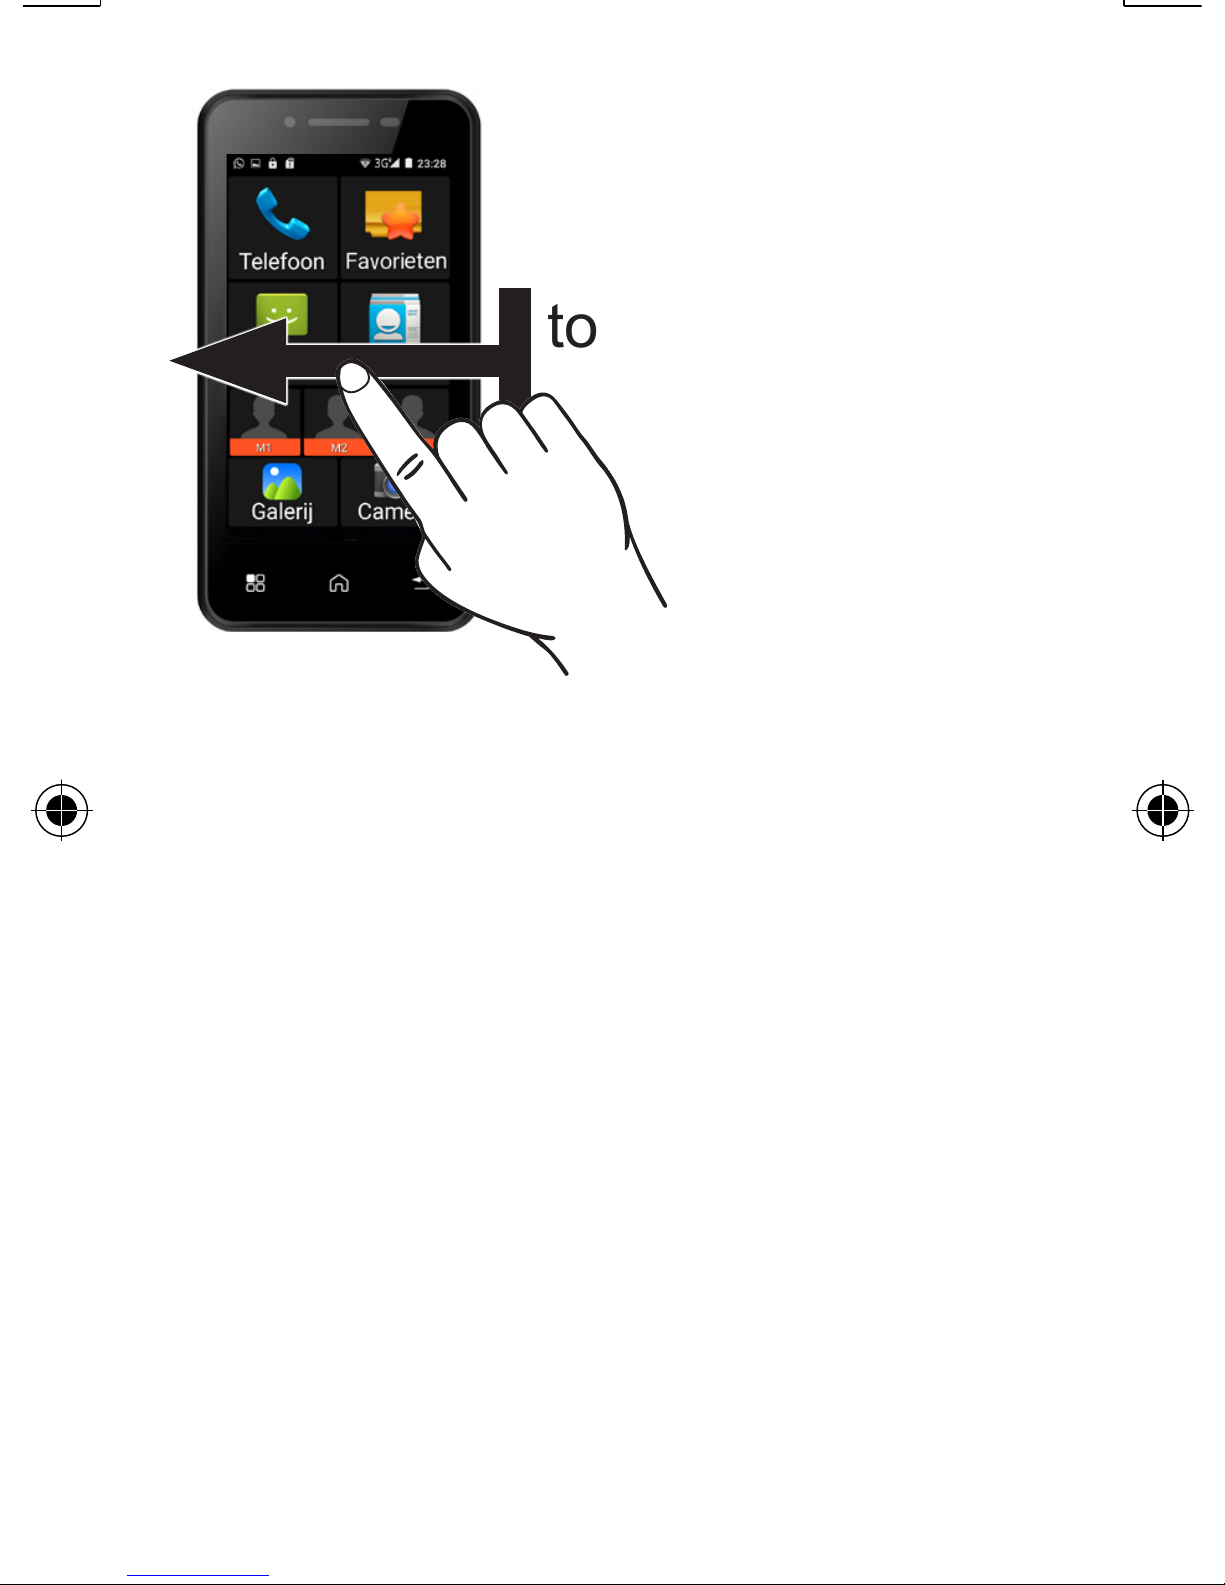
Now swipe from
right to left over
the screen to
open the menu.
Page 50
50
You can find a
second page by
swiping from right
to left over the
screen again.
Open the
functions in
the menu
by tapping
them.
Chapter 6 explains all functions
in this menu in further detail.
Page 51
51
6
MENU AND FUNCTIONS
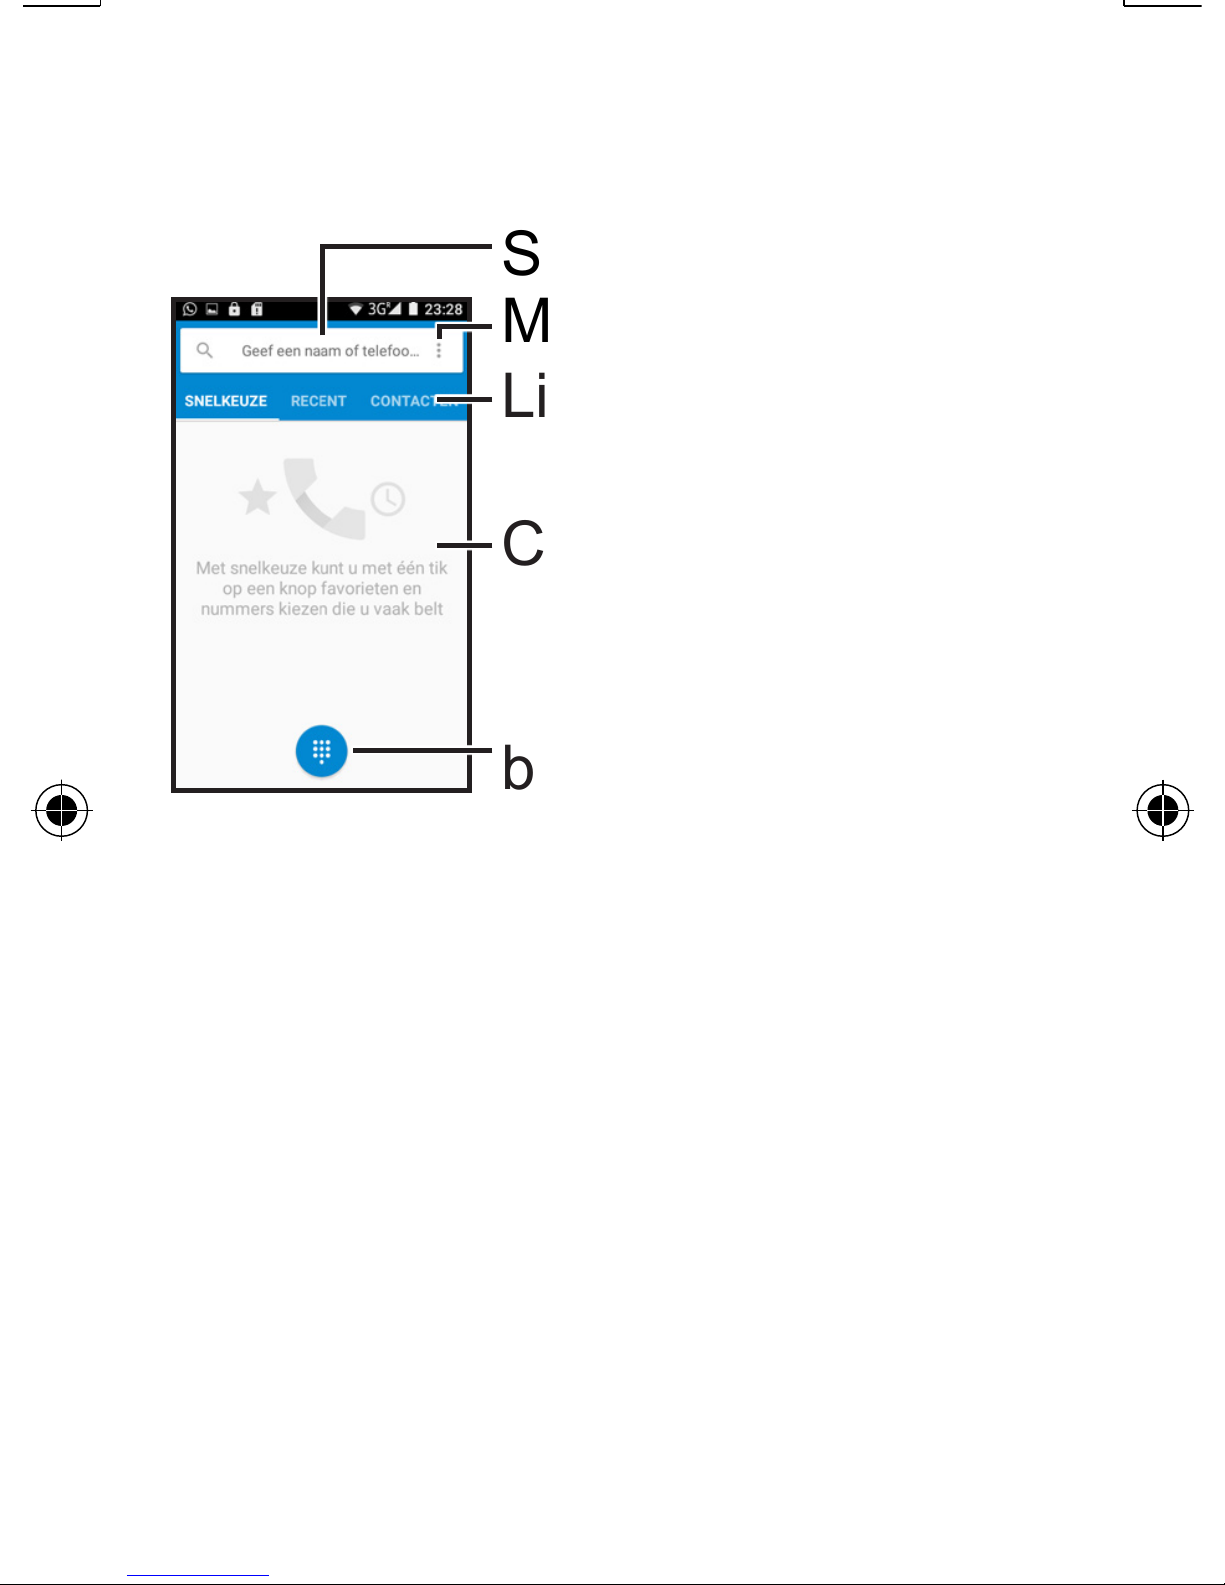
6.1 Telephone
Search bar
More options
List type
Contacts overview
Show numeric
buttons
Search bar:
Tap this bar to open a keyboard
and type in a name. When you
have a lot of contacts saved,
you can quickly find a contact
by entering the first letters of
the name.
Page 52
52
More options:
Tap
to open a menu with
three options;
Call log: This opens the call log,
where you can tap the blue bar
and choose to view all calls or
only your missed calls.
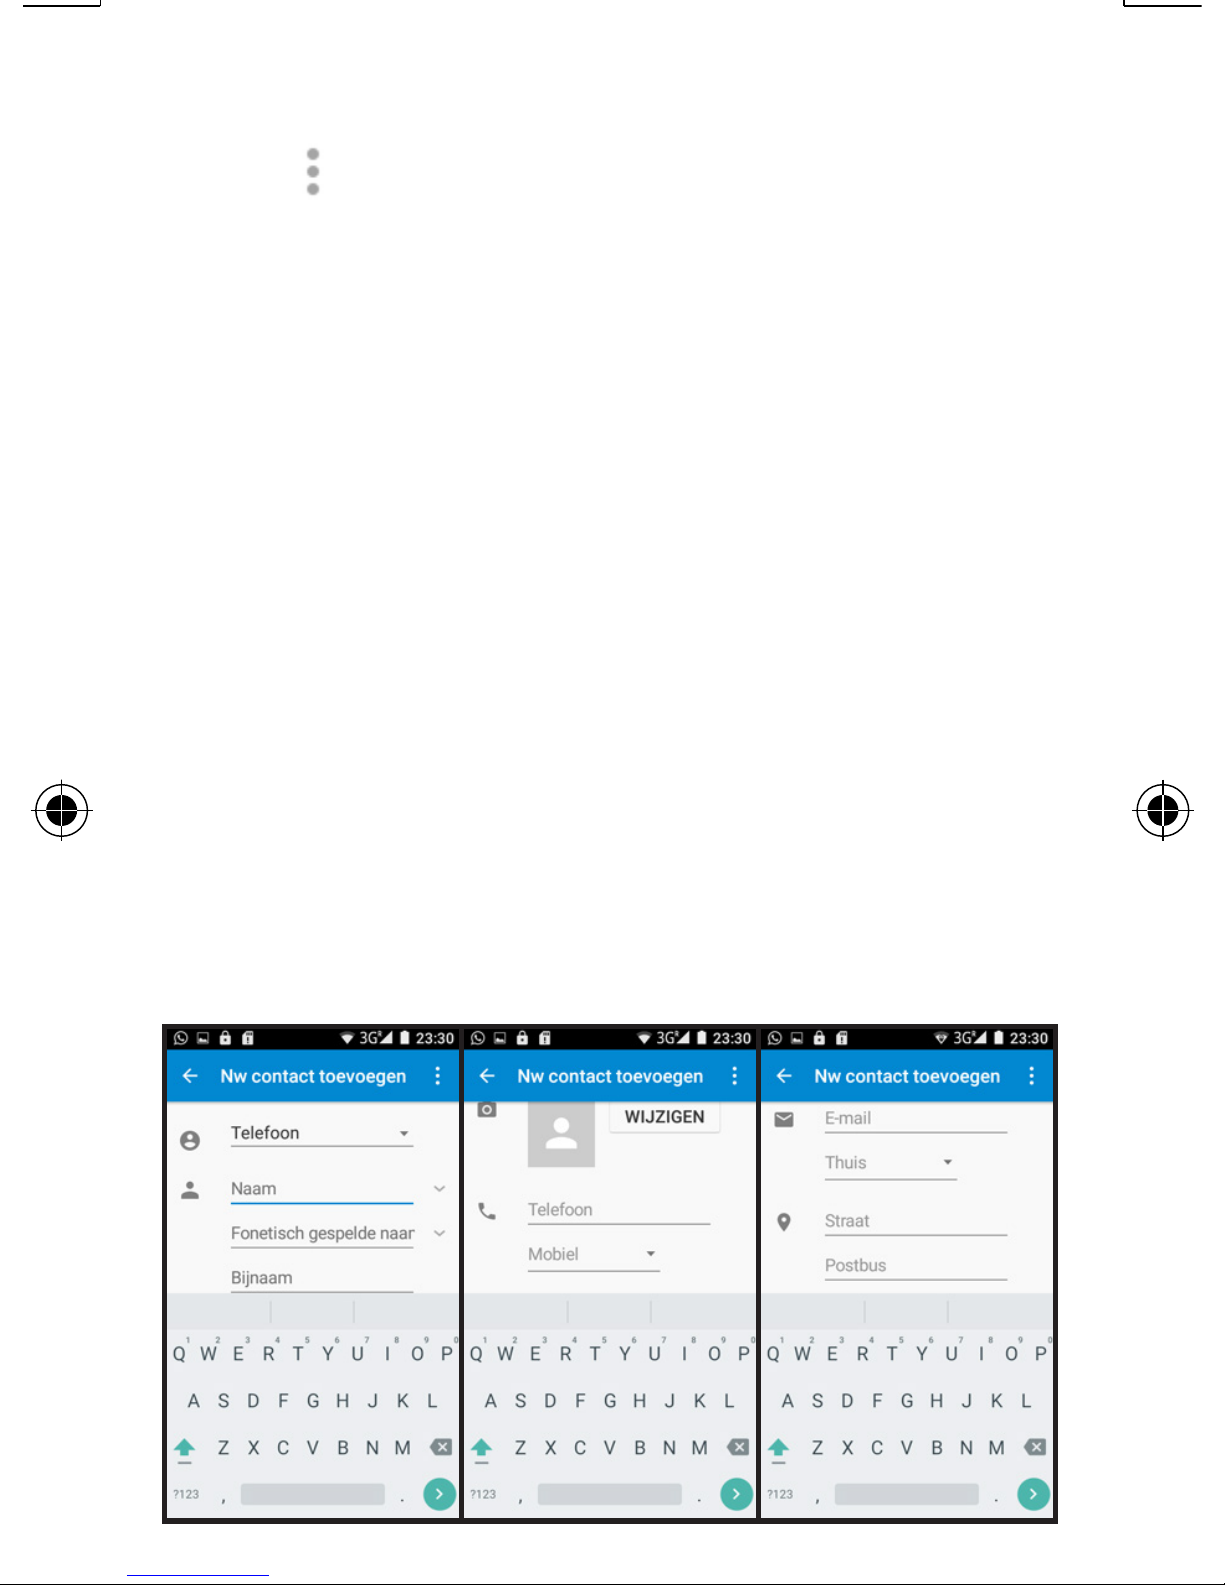
New contact: This opens a
menu which allows you to add
new contacts.
Page 53

53
In this list, which you can view
by swiping up or down, you’ll
find many options you can set
Use the upper option
to
determine whether to save this
contact in your SIM card, in the
phone memory or in a Google
account.
By tapping the text [Name]
or [Phone], you can input the
name and telephone number,
but you can also add a photo.
As a reminder, you can further add an address and more
personal information – this additional information cannot be
saved on a SIM card.
Page 54

54
After you’ve entered all information, tap in the upper left
corner of the screen to save
your input or tap
to undo your
settings.
Settings: Here you can adjust all
general settings and the settings
of call accounts. The general
settings determine the sorting of
names, ringtones, button tones
(required for many tele-services)
and the contents of the quick
SMS reactions to incoming calls.
In the call account settings, you’ll
find settings specifically for yo
provider and settings for an internet based provider.
Page 55
55
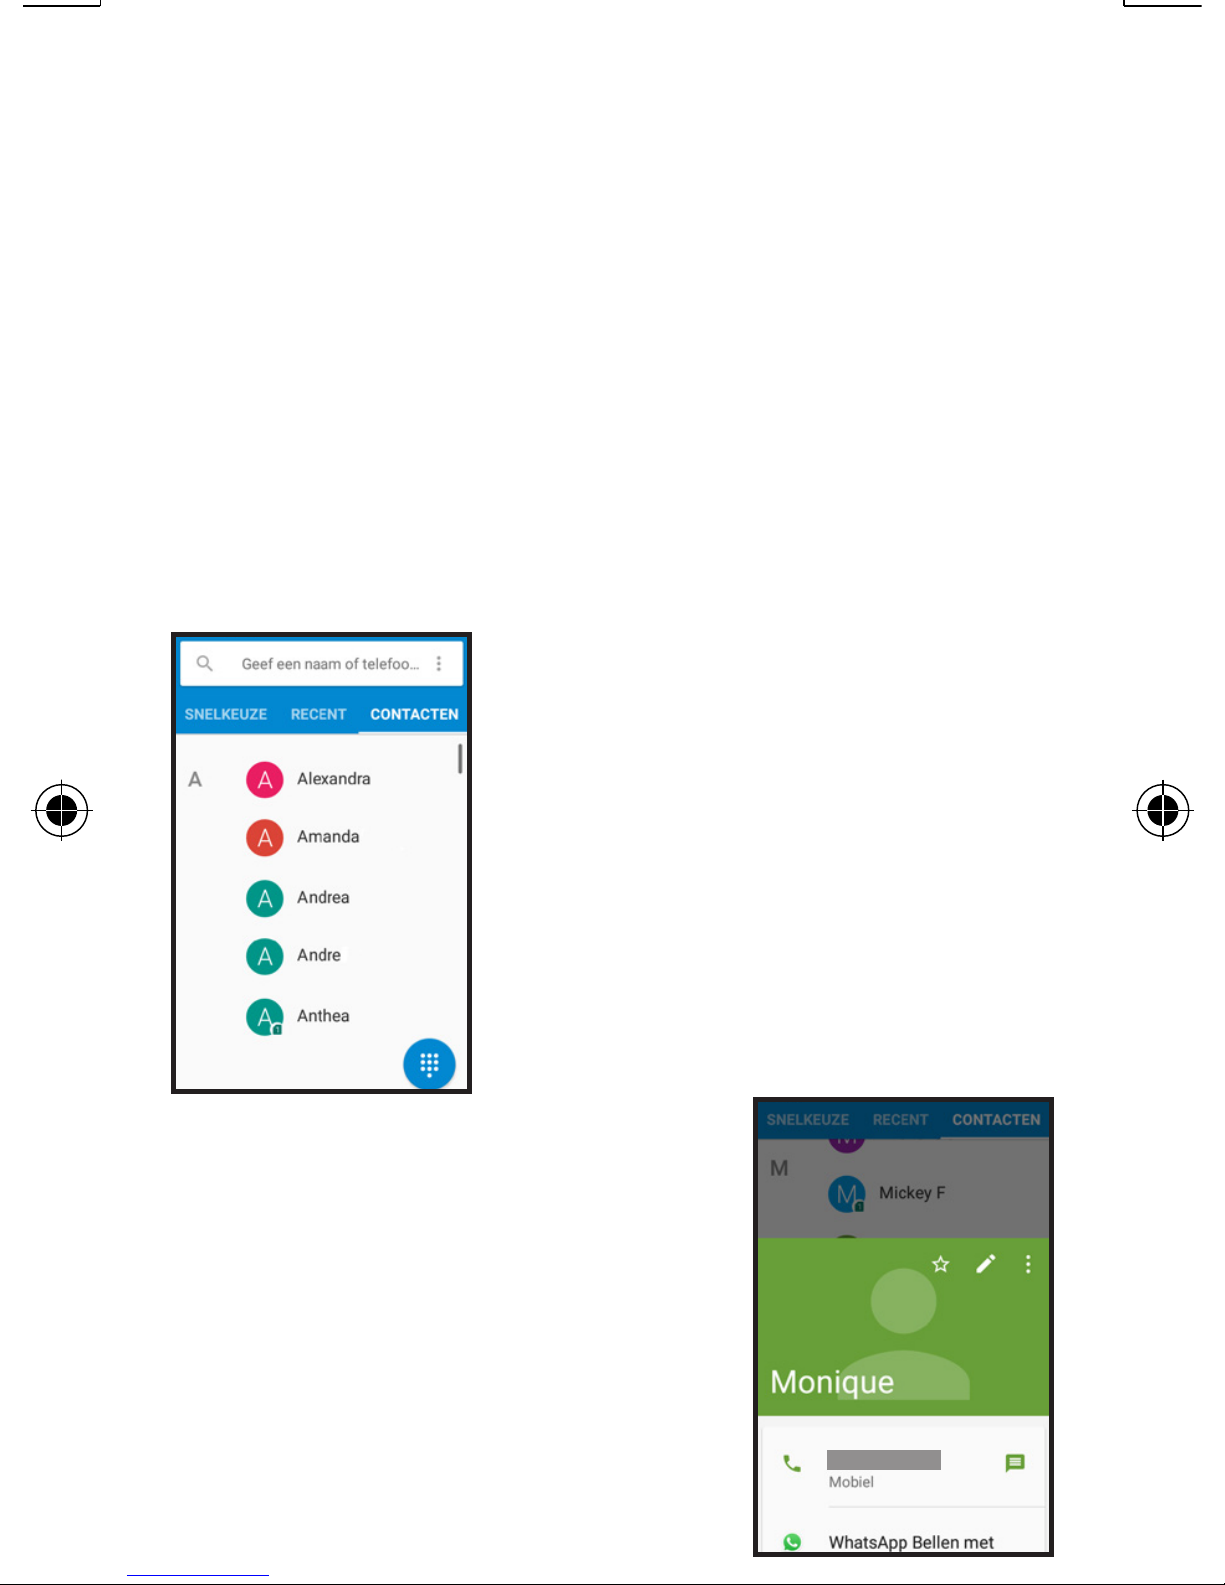
List type:
Tap the text in the blue bar to
change the ringtone for numbers
you often call via the speed dial
menu, recent calls and a list with
all saved contacts.
Contacts overview:
Tap on a name in
the contacts overview to open the
corresponding contact information.
You can now swipe
upwards to see
when you’ve last
spoken to this contact.
Page 56
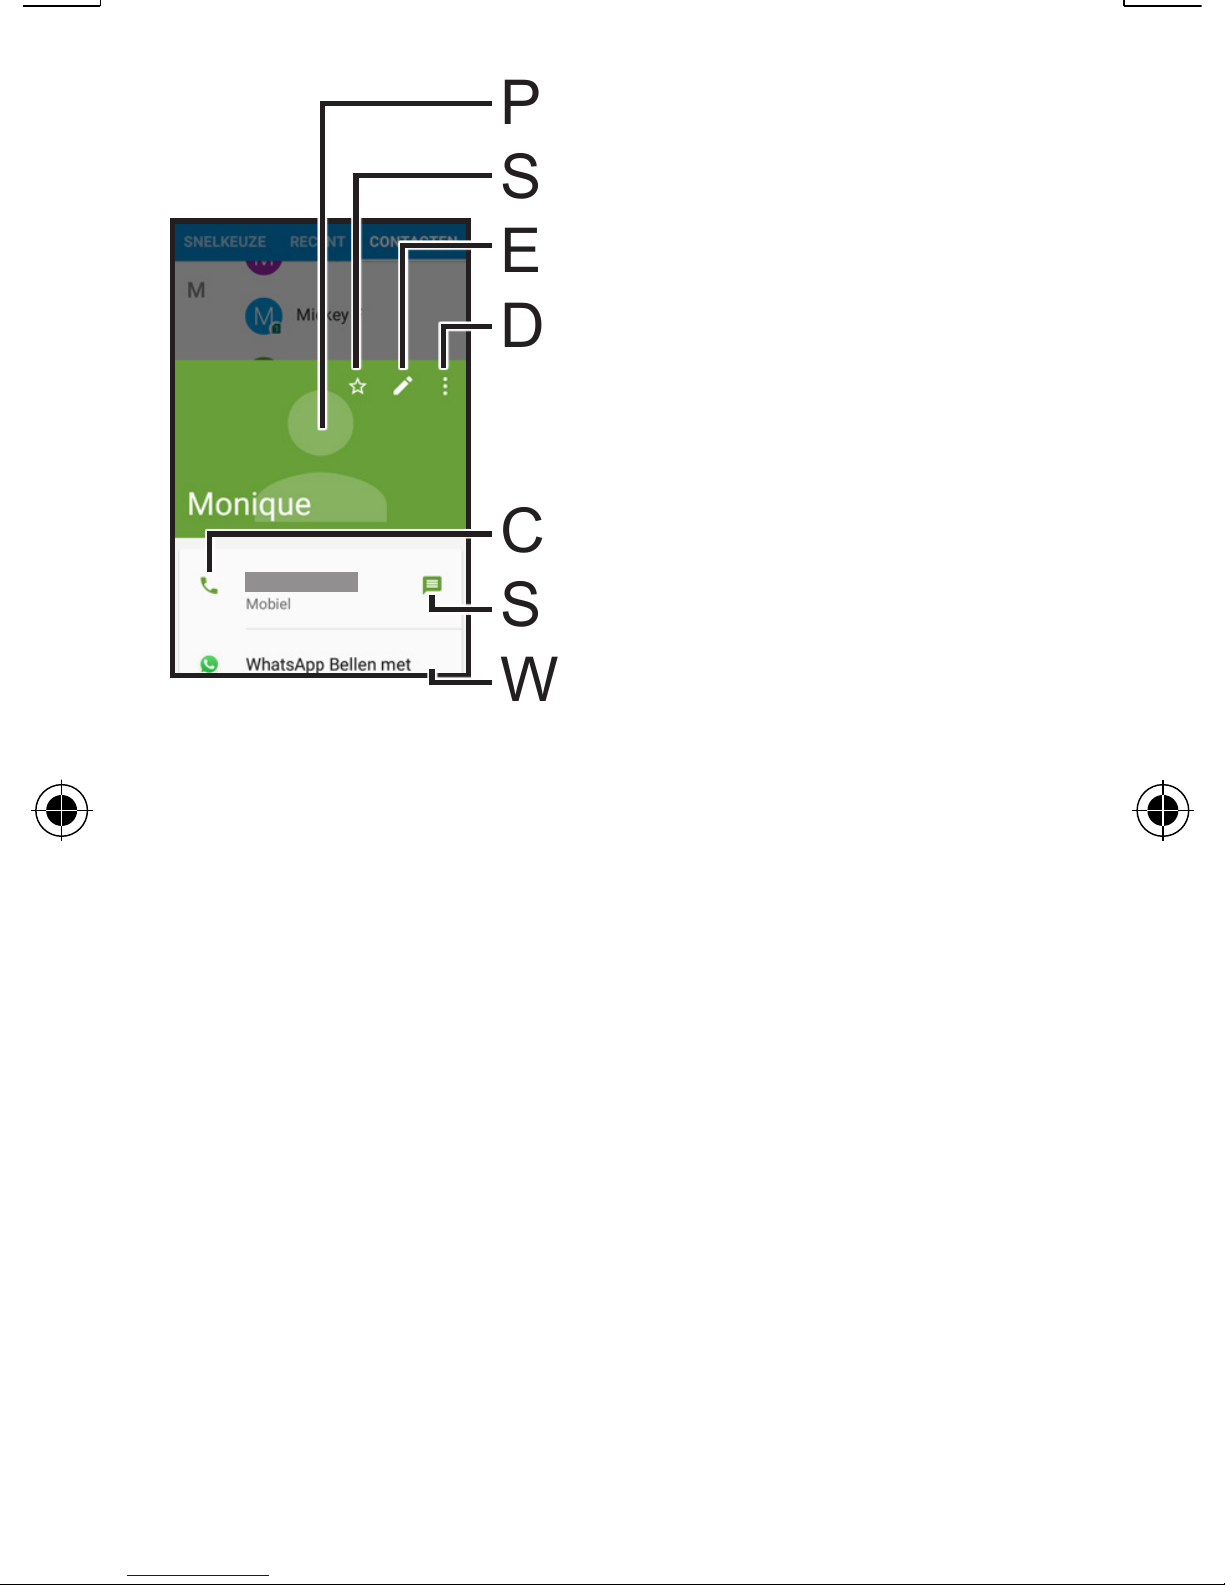
56
Photo (optional)
Set as favourite
Edit contact
Delete or share
Call
Send message
Whatsapp options
Photo: Here you can assign a
photo to a contact when already
saved in your phone.
Set as favourite: This allows
you to always make this contact available in the ‘Speed dial’
section.
Page 57

57
Edit contact: Change the contact information. This editing
procedure is the same as adding a new contact. See also
page 52.
Delete or share: This options
menu allows you to delete the
contact or to send it to others
via messaging, email or Bluetooth.
Call: Use this option to call the
current contact. The options
while calling are the same as
the options available when
receiving an incoming call. See
also page 40.
Page 58
58
Send message: Use this option to
send a SMS message to the selected contact. See also page 60.
Whatsapp options: Call or send
a message with Whatsapp to
this contact – only visible when
the selected contact also uses
Whatsapp. See also page 104.
Show numeric buttons:
By pressing this icon, you can
display the numeric buttons
from every menu to manually
enter telephone numbers.
Page 59
59
6.2 Favourites
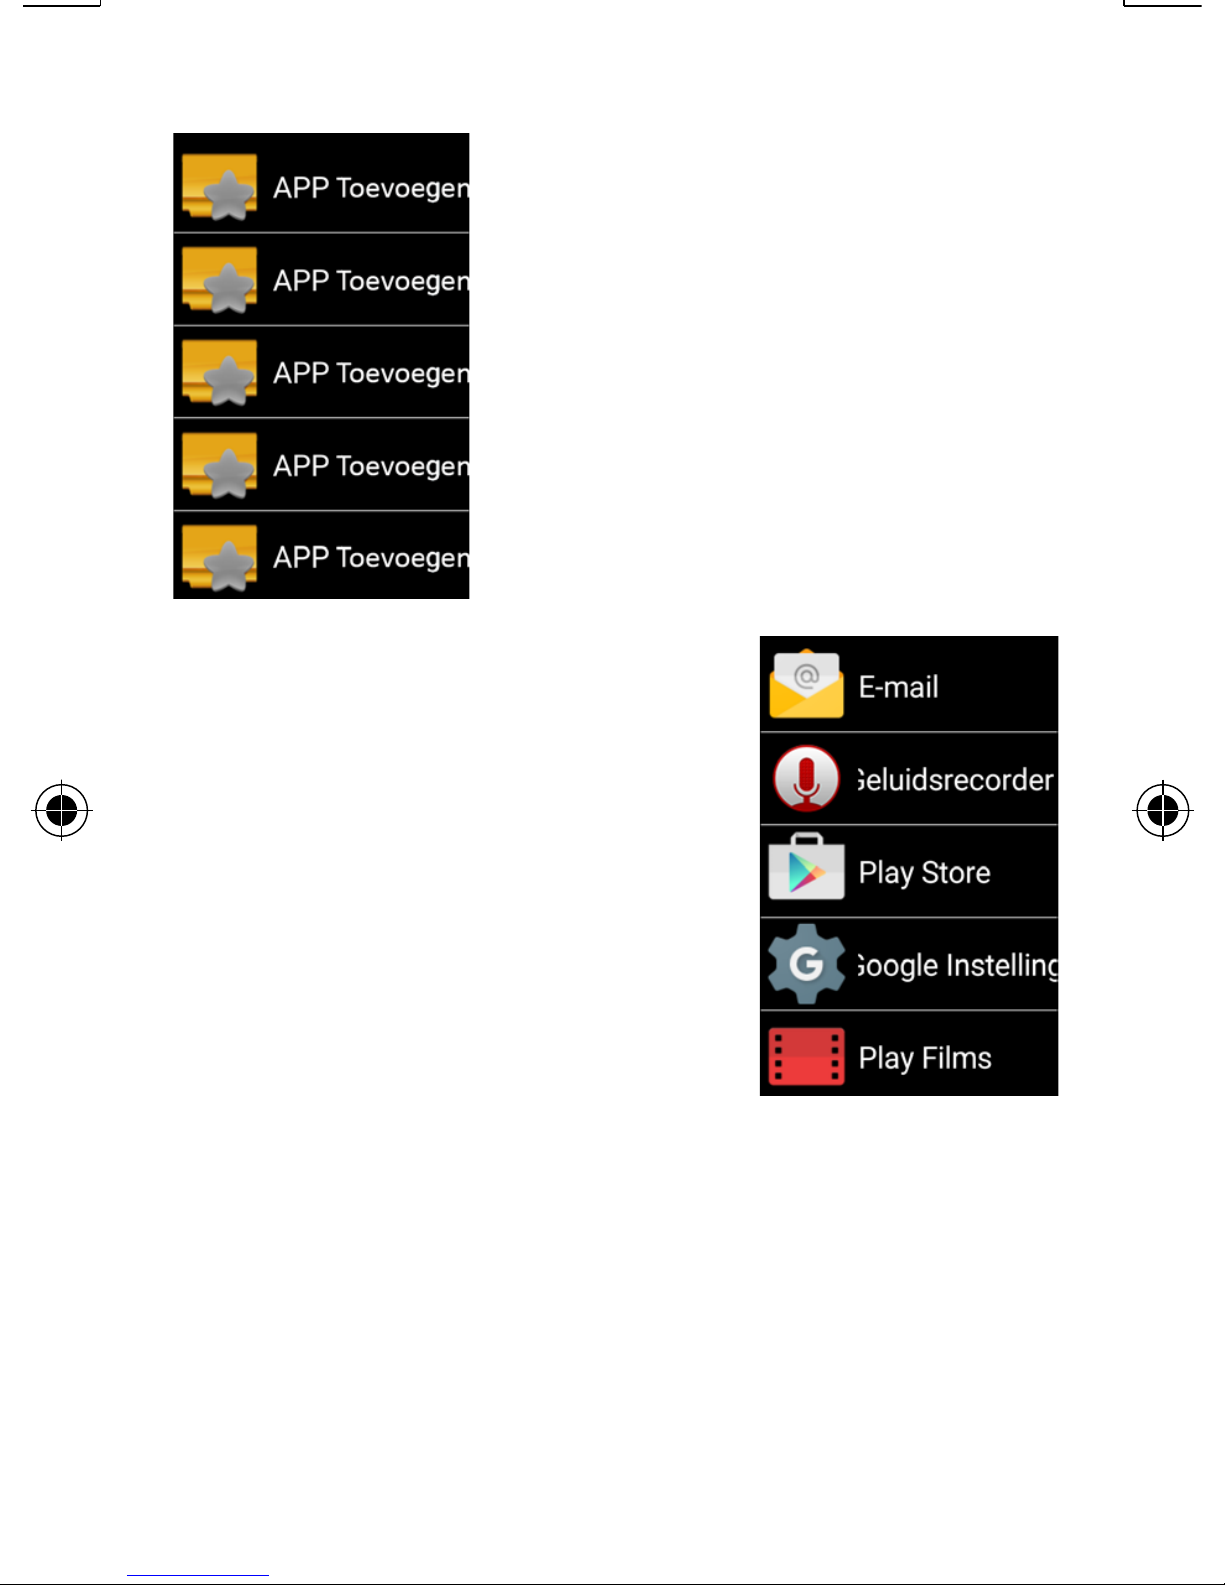
In this menu, you
can quickly find
your five favourite
apps.
Tap [add APP] once
and use the following menu to choose
which app you’d like
to add to the list. As
soon as you tap your
desired app, you’ll
return to the previous menu.
When you now tap the added
app, it’ll be opened directly.
Page 60
60
You can set this shortcut again,
by pressing and holding the app
in the quick menu for several
seconds instead of briefly ta ping the app, to remove it from
your favourites.
6.3 Messaging
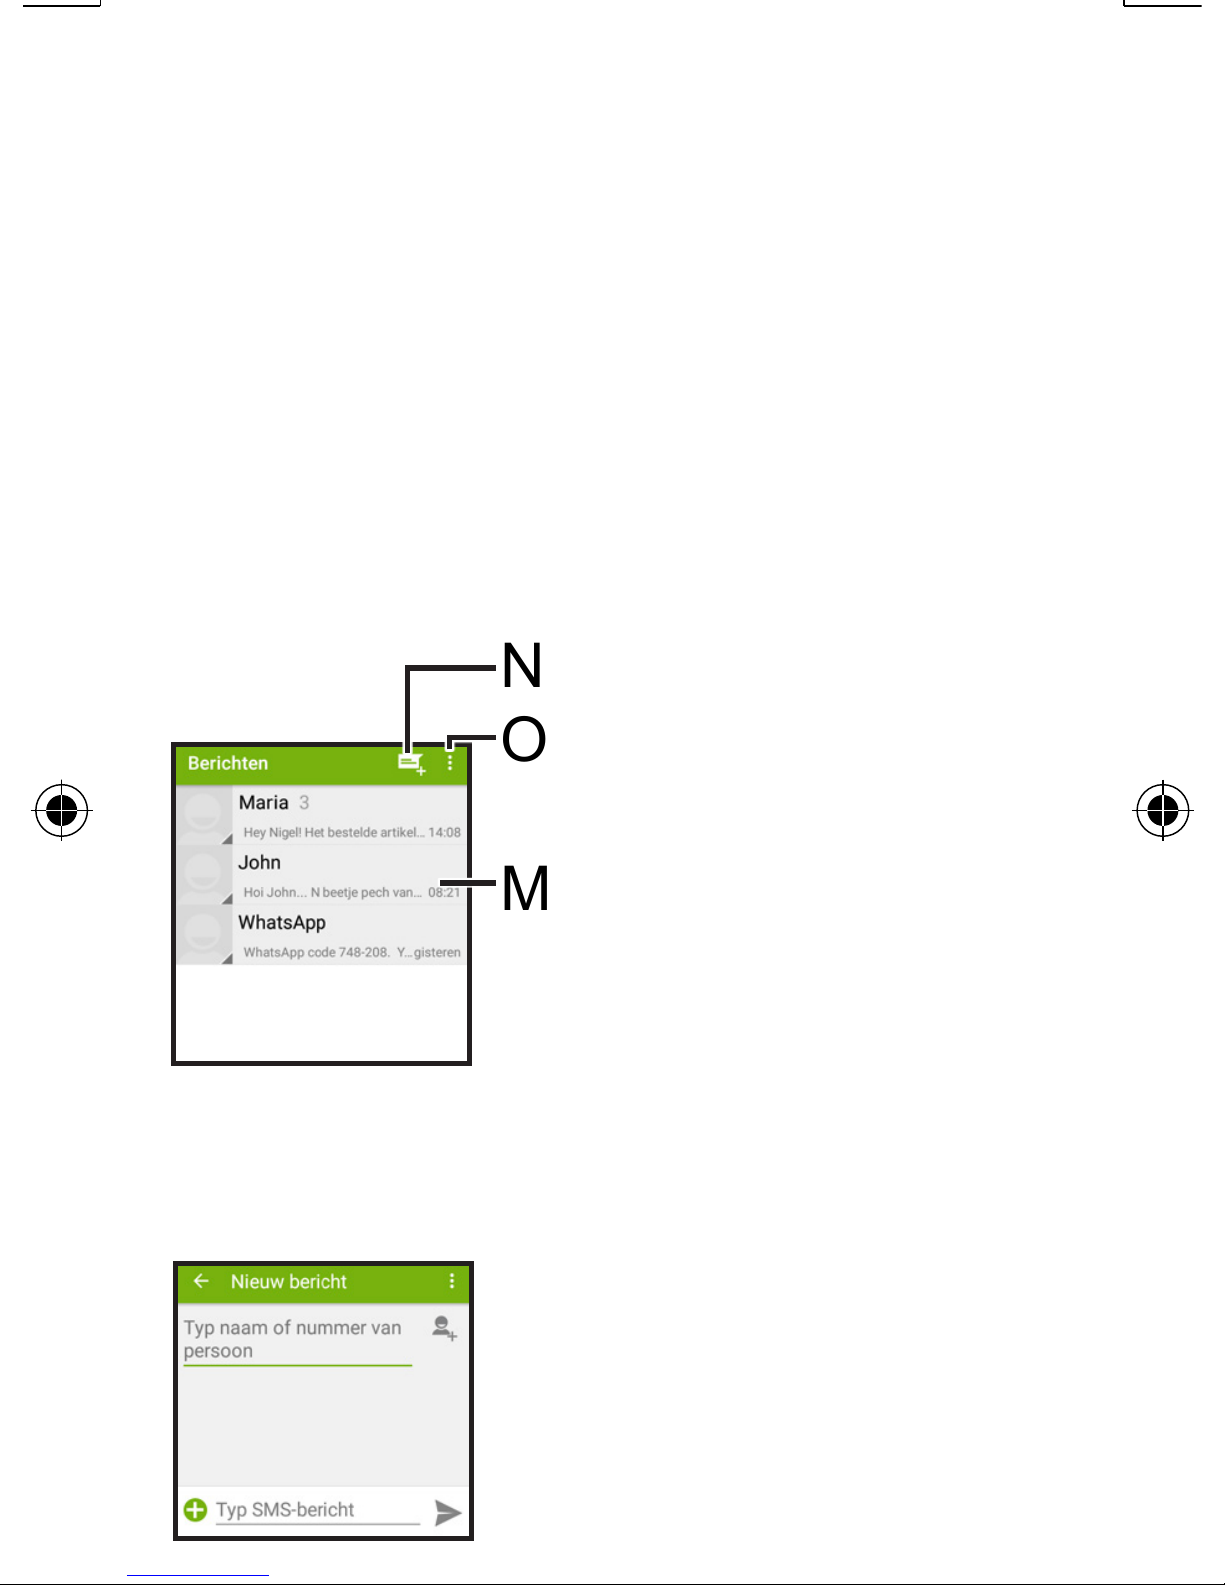
New message
Options menu
Messages (sorted
per contact)
New message:
By tapping [enter
name or number of
person],
Page 61

61
a keyboard will appear on
screen to enter a name – this
way you can search directly for
the correct contact or you can
enter a number. You can also
tap to choose a contact from
your contacts list.
Now tap [Type SMS message]
to compose a message and,
as soon as it’s ready, tap to
send your message.
Additionally, you can use the
options menu to add a subject,
use your quick texts or send
somebody else’s number along
with the message.
Page 62

62
Options menu:
Via the options menu you can
search for a certain word in all
messages, choose to delete
all messages and find various
settings for messaging.
The settings you’ll find here
for SMS and MMS are usually
setup correctly by your
telephone provider in the SIM
card already.
By tapping [Text message
(SMS)] in the settings menu,
you can find the option to edit
quick texts in addition to these
preset options.
Page 63

63
By tapping [Messages] in the
settings menu, you can change or
turn off the ringtone for receiving
messages or choose to have this
shown on the screen.
Use the option [General] to
change the letter fonts of
messages and to turn on [Cell
Broadcast].
Cell broadcast is the technique
used by government service NL
alert. For more information, visit
the government website:
http://www.nlalert.nl
Open [Cell broadcast] and tap
[Add channel].
Page 64
64
The buttons will now appear
already. Now tap: NL Alert.
Now swipe from top to bottom
to be able to type underneath
[Channel number]. Here enter:
919
Now tap the little square next
to [Switch on channel] and tap
[OK]
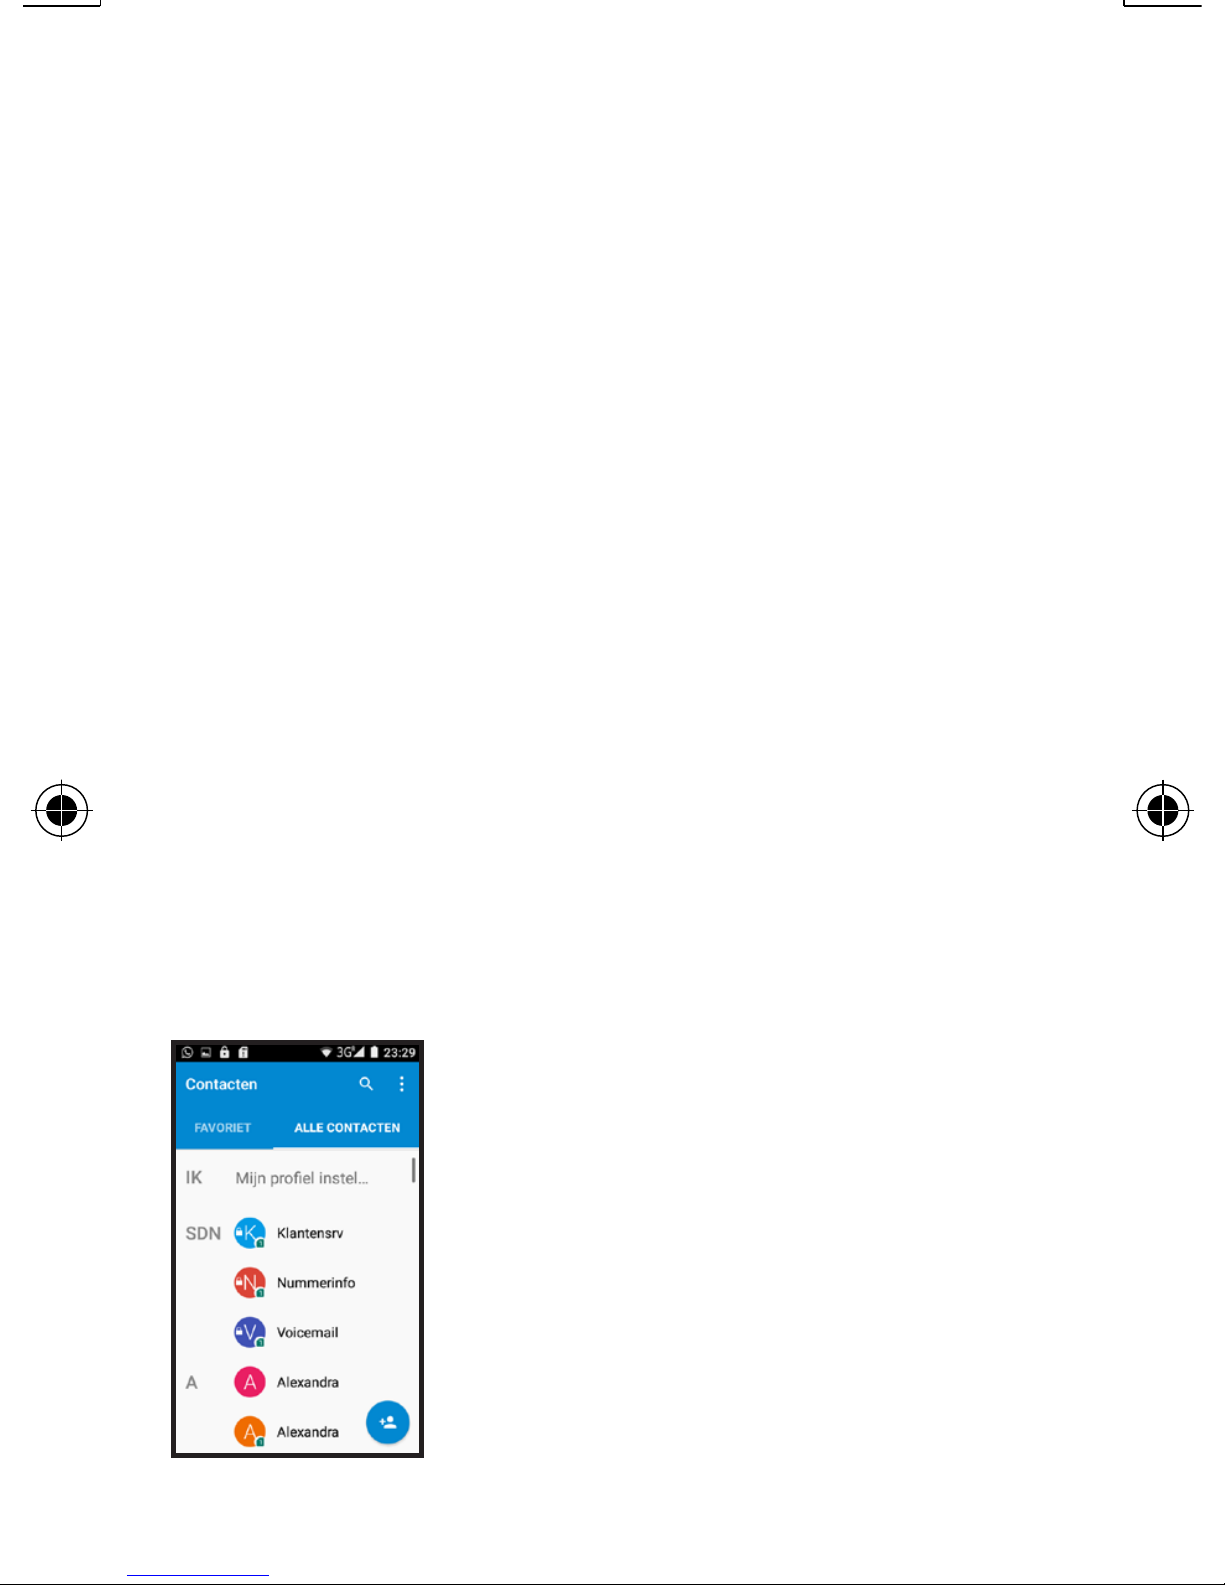
6.4 Contacts
The Contacts menu
is almost similar to
the contacts menu
you find in the
Telephone menu,
See page 55.
Page 65

65
The difference being that the
options menu in Contacts is
more elaborate than the same
menu you find in the Telephone
menu.
Namely, the Contacts menu
doesn’t only offer a view of the
contacts in your SIM or Phone,
but also an overview of your
email contacts and the contacts
of other linked services.
Use the options [Visible
contacts] to choose from which
service you want to show the
contacts and use [Import/
Export] to directly save all
contacts from e.g. your email
into the phone memory.
Page 66
66
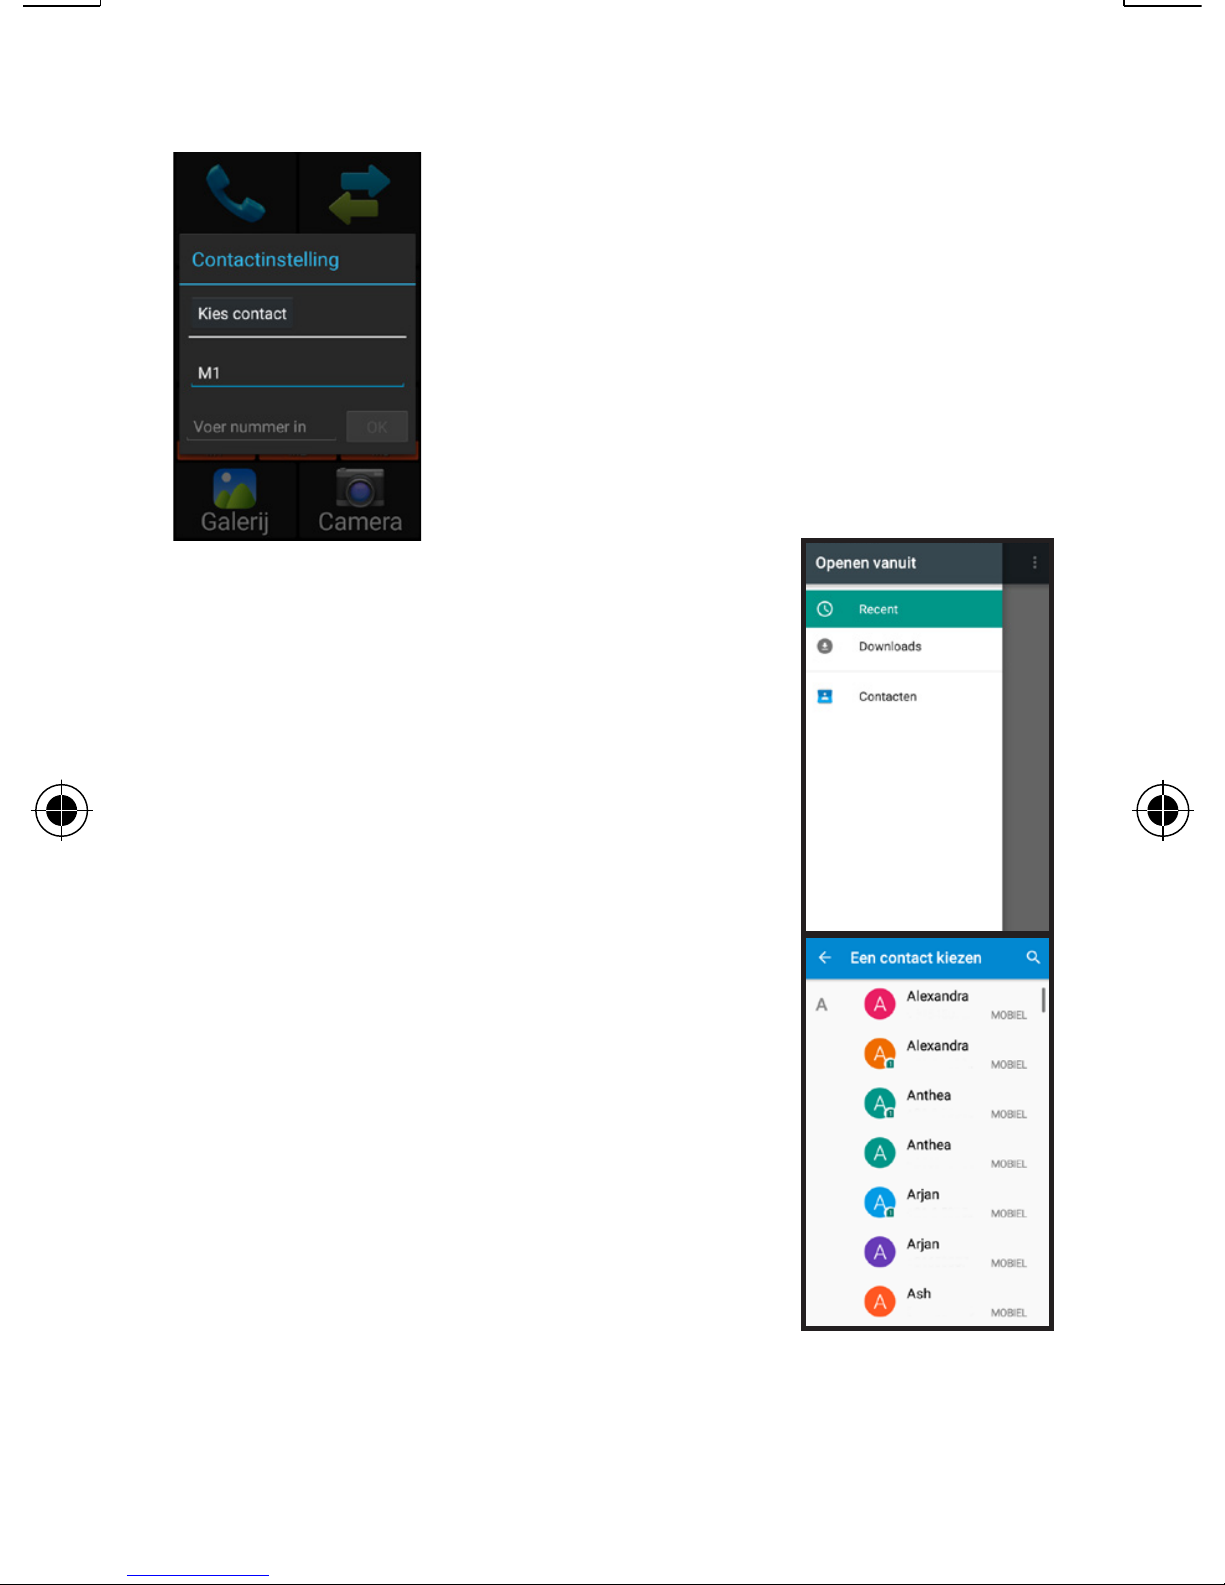
6.5 Shortcut key M1-M3
As soon as you press
M1, M2 or M3 you can
set a name (press M1)
and number (press
[Enter number]).
You can also tap
the button [Choose
contact] to set a
contact from your
contact list or recent
calls.
If you have saved
a photo with this
contact, the photo will
appear instead of the
icon.
Page 67
67
Each time you now tap this
icon, you’ll open an options
menu which allows you to
delete this memory (the contact
will not be deleted), to change
this memory, to call or send a
message.
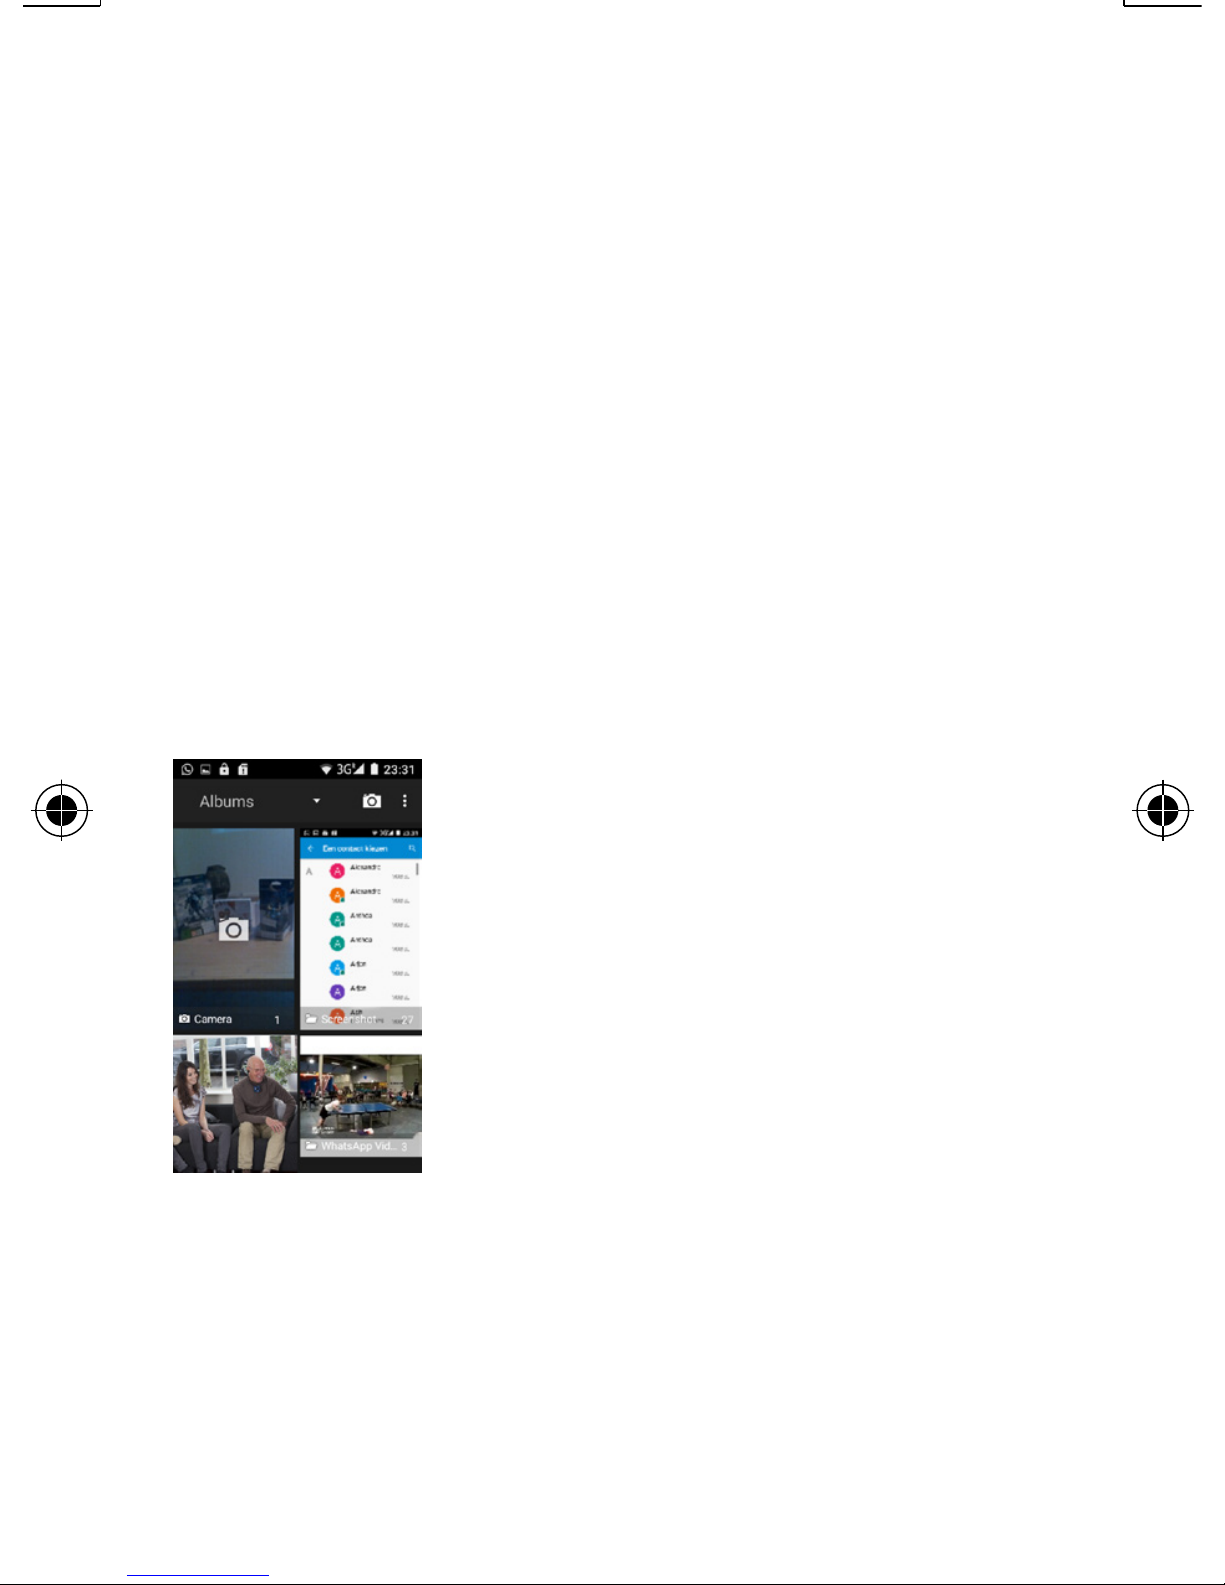
6.6 Gallery
Here you can view
your illustrations,
photos and videos
you’ve made or
received with
this phone, e.g.
via Bluetooth or
Whatsapp. By default, all
illustrations are sorted by album.
Each program can create its own
album.
Page 68
68
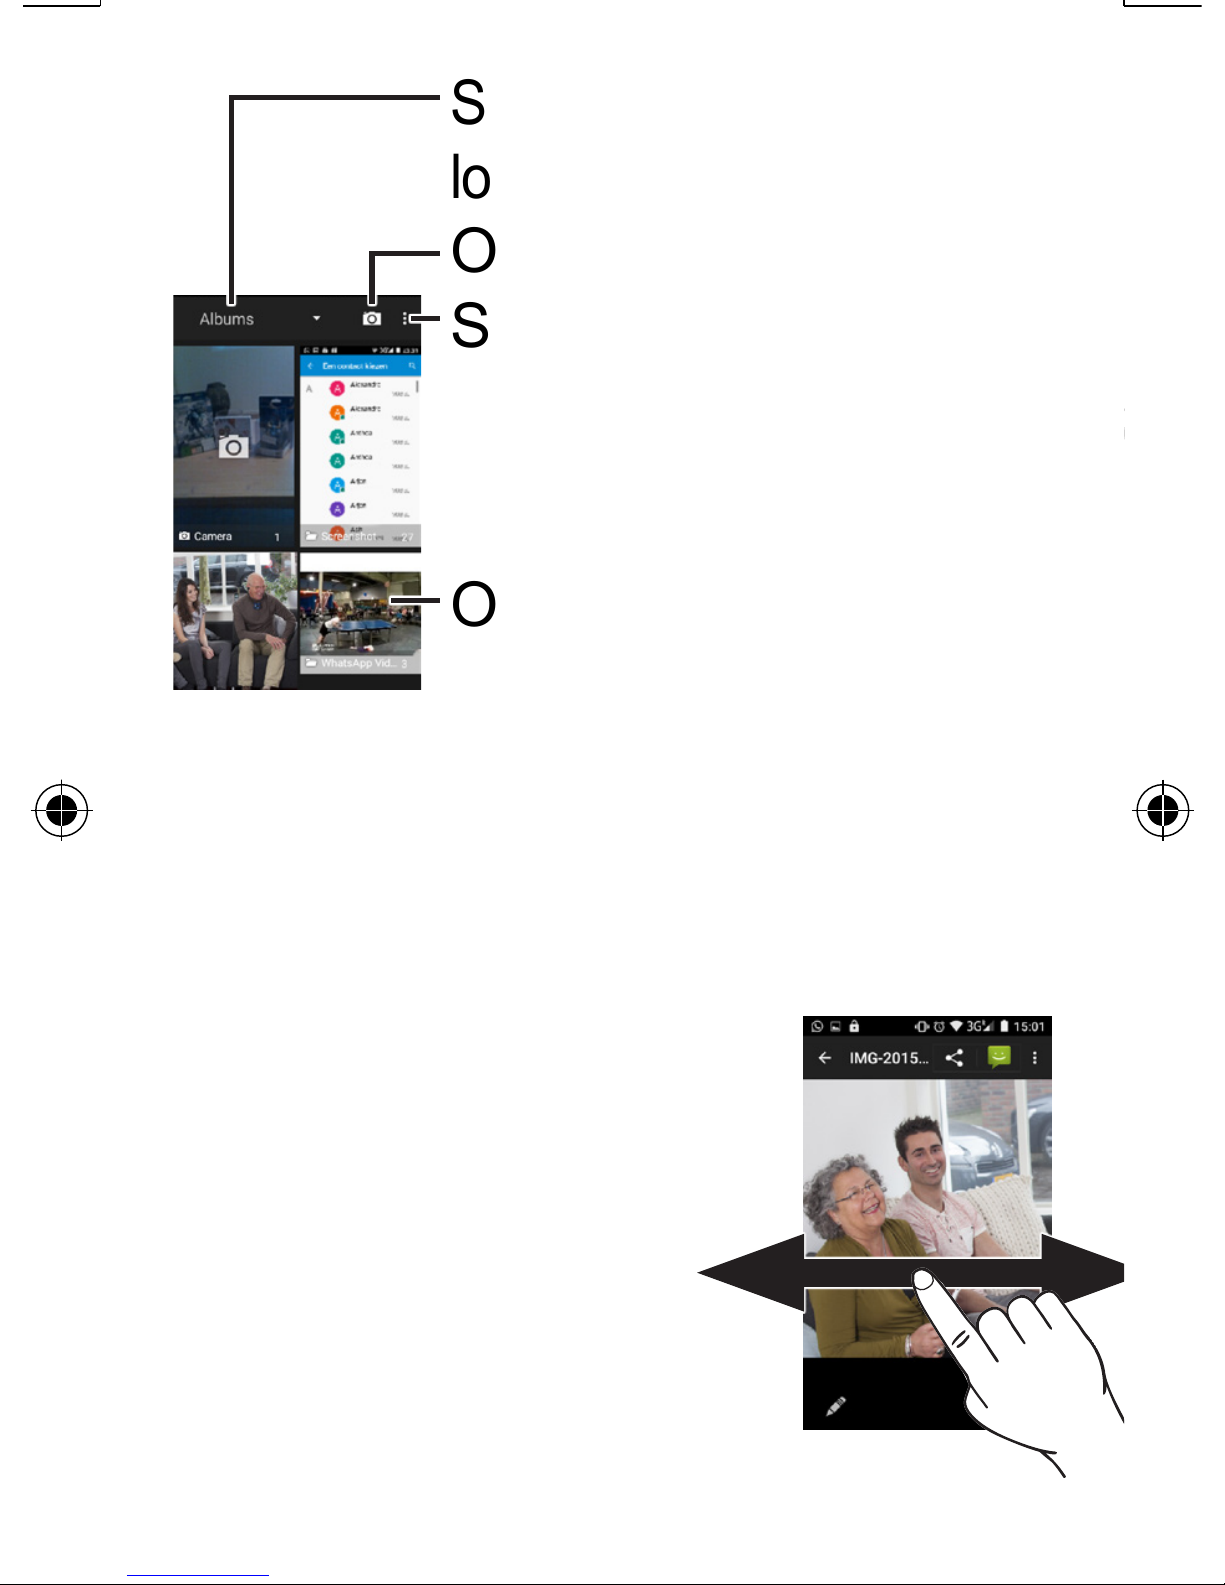
Switch between albums,
location or recording time
Open camera menu
Select multiple
albums to send or
delete simultaneously.
Overview of albums
and photos, tap to
open album – swipe
from top to bottom to
view more photos.
While viewing
photos, you can
swipe to the left or
right to view the
previous or next
photo.
Page 69
69
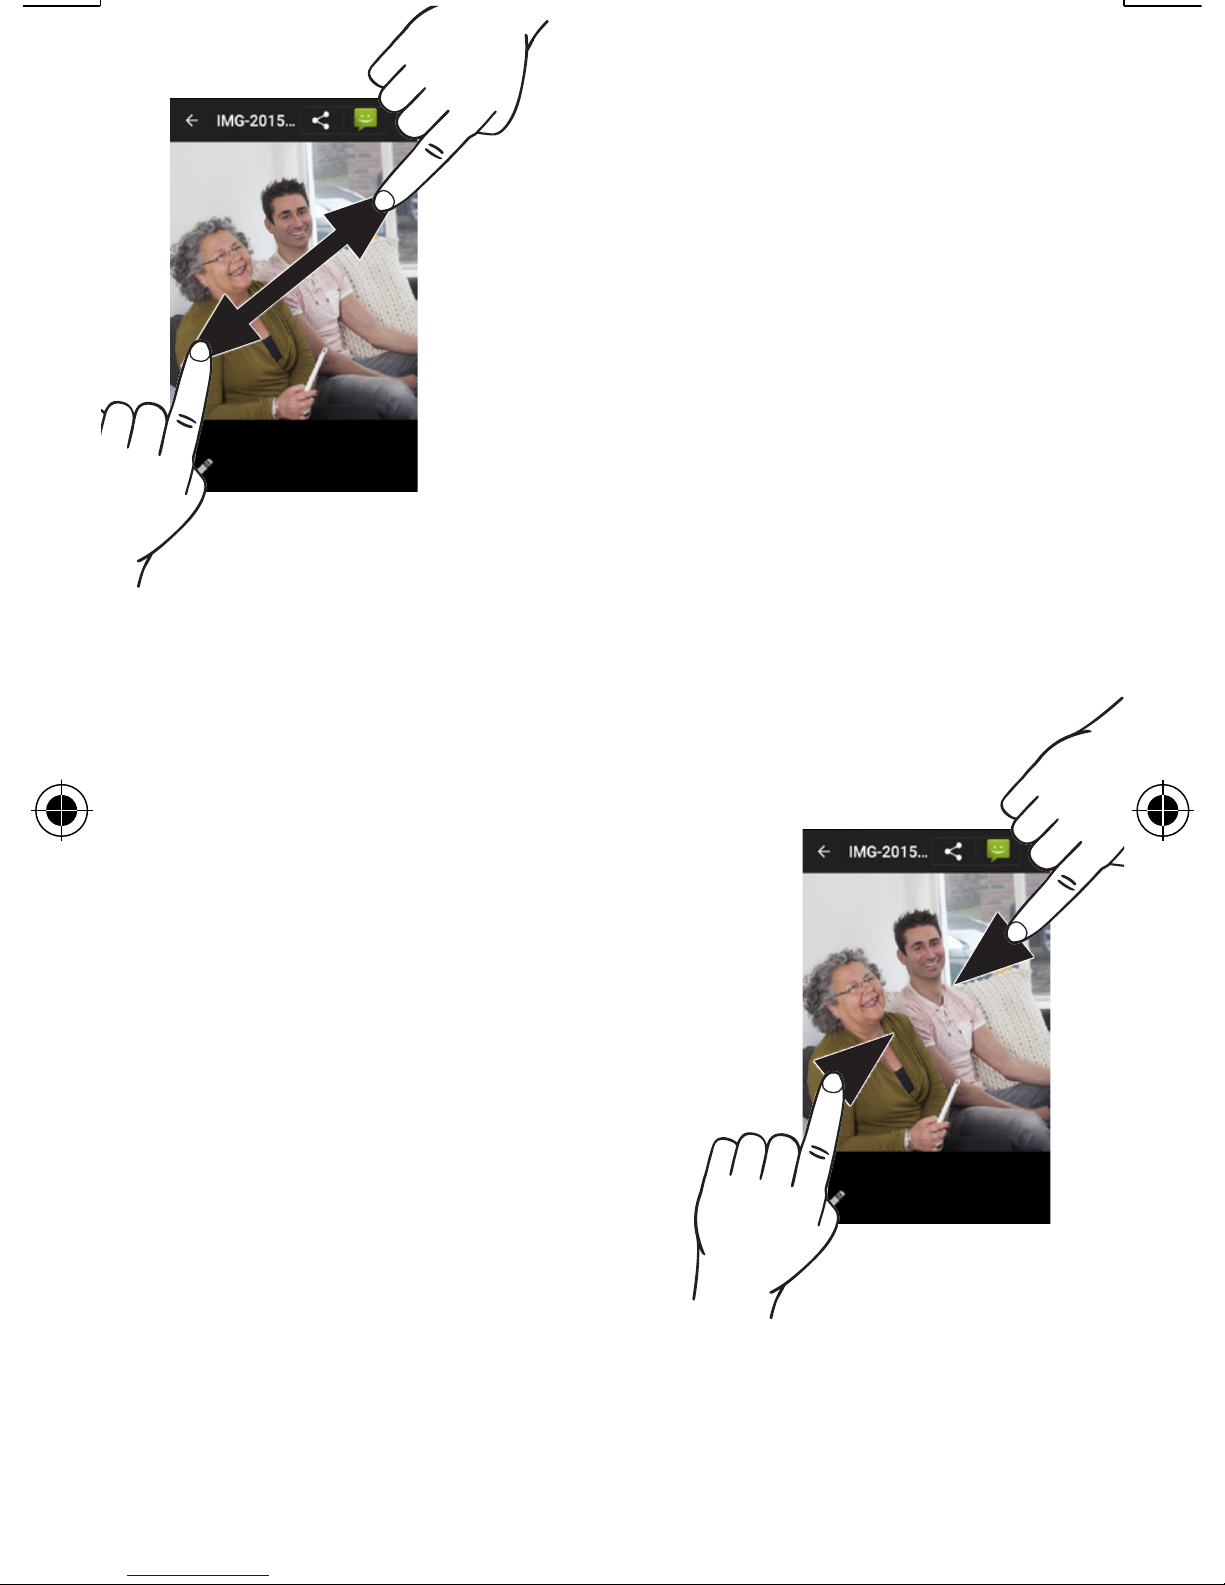
You can operate
the screen with two
fingers while viewin
photos. By holding
two fingers on th
screen and spreading
them out, you can zoom in on
a photo.
By holding two fingers
on the screen and
then swiping them
together, you can
zoom out.
Page 70
70
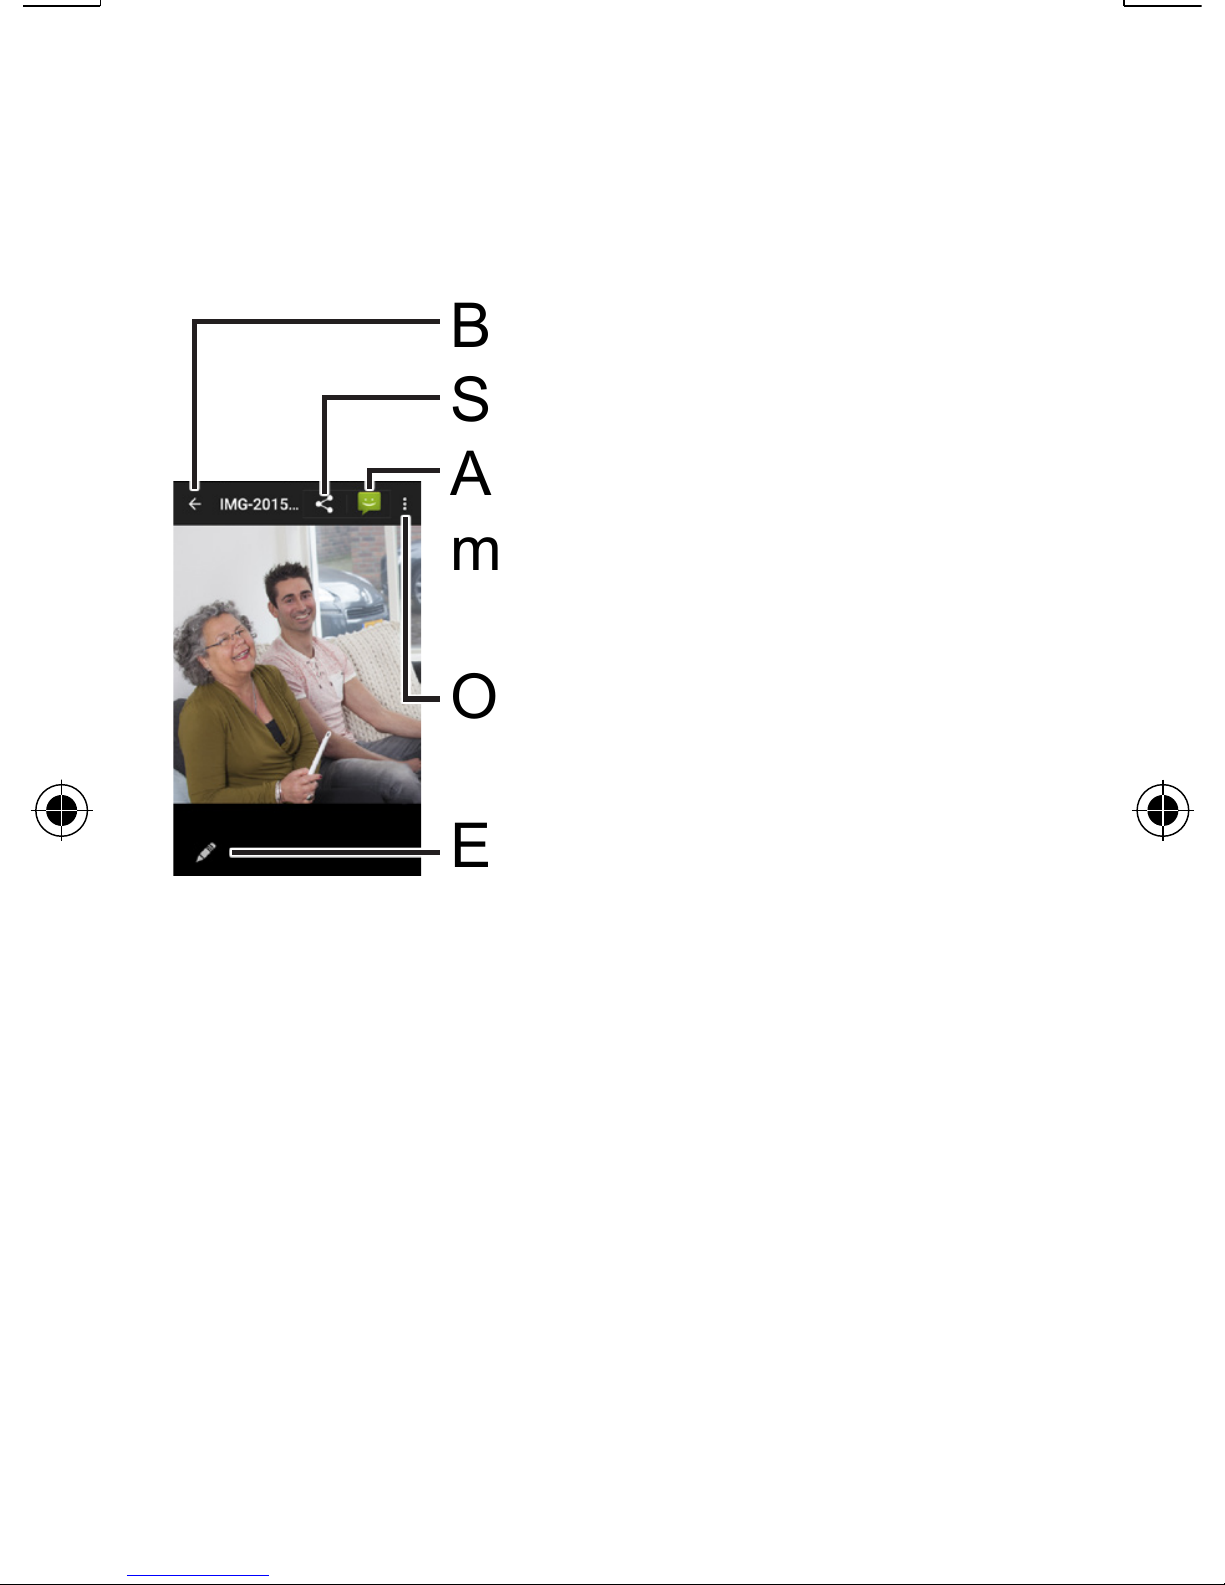
While viewing photos, you
can also tap the screen for the
following options:
Back to albums
Send photo
Add photo to
message
Options menu
Edit photo
Send photo: The options here
available depend on the Apps
you’ve installed. By default, you
can send a photo via Bluetooth,
as an email attachment or via
Whatsapp.
Page 71

71
Add photo to message: This
options opens a new message
including the photo. See also
page 60.
Options menu: This menu offers
the following photo options:
• Delete
• Use with other photos in a
slideshow, in which all pictures
appear on screen one after the
other.
• Edit
• Rotate
• Crop
• Set as profile picture, contac
picture or background.
• View details
• Print via a printer connected to
the wireless network.
Page 72

72
Edit photo: Use this menu to
crop, mirror or rotate a photo,
add colour filters, draw over
photo or adjust the exposure.
All the way at the bottom of the
screen you can tap for icons to
switch between colour filters,
frames, edits and exposure.
The bar above that offers
various options. Tap these to
see their effects on the photo or
swipe the bar from left to right
to view additional options.
Page 73
73
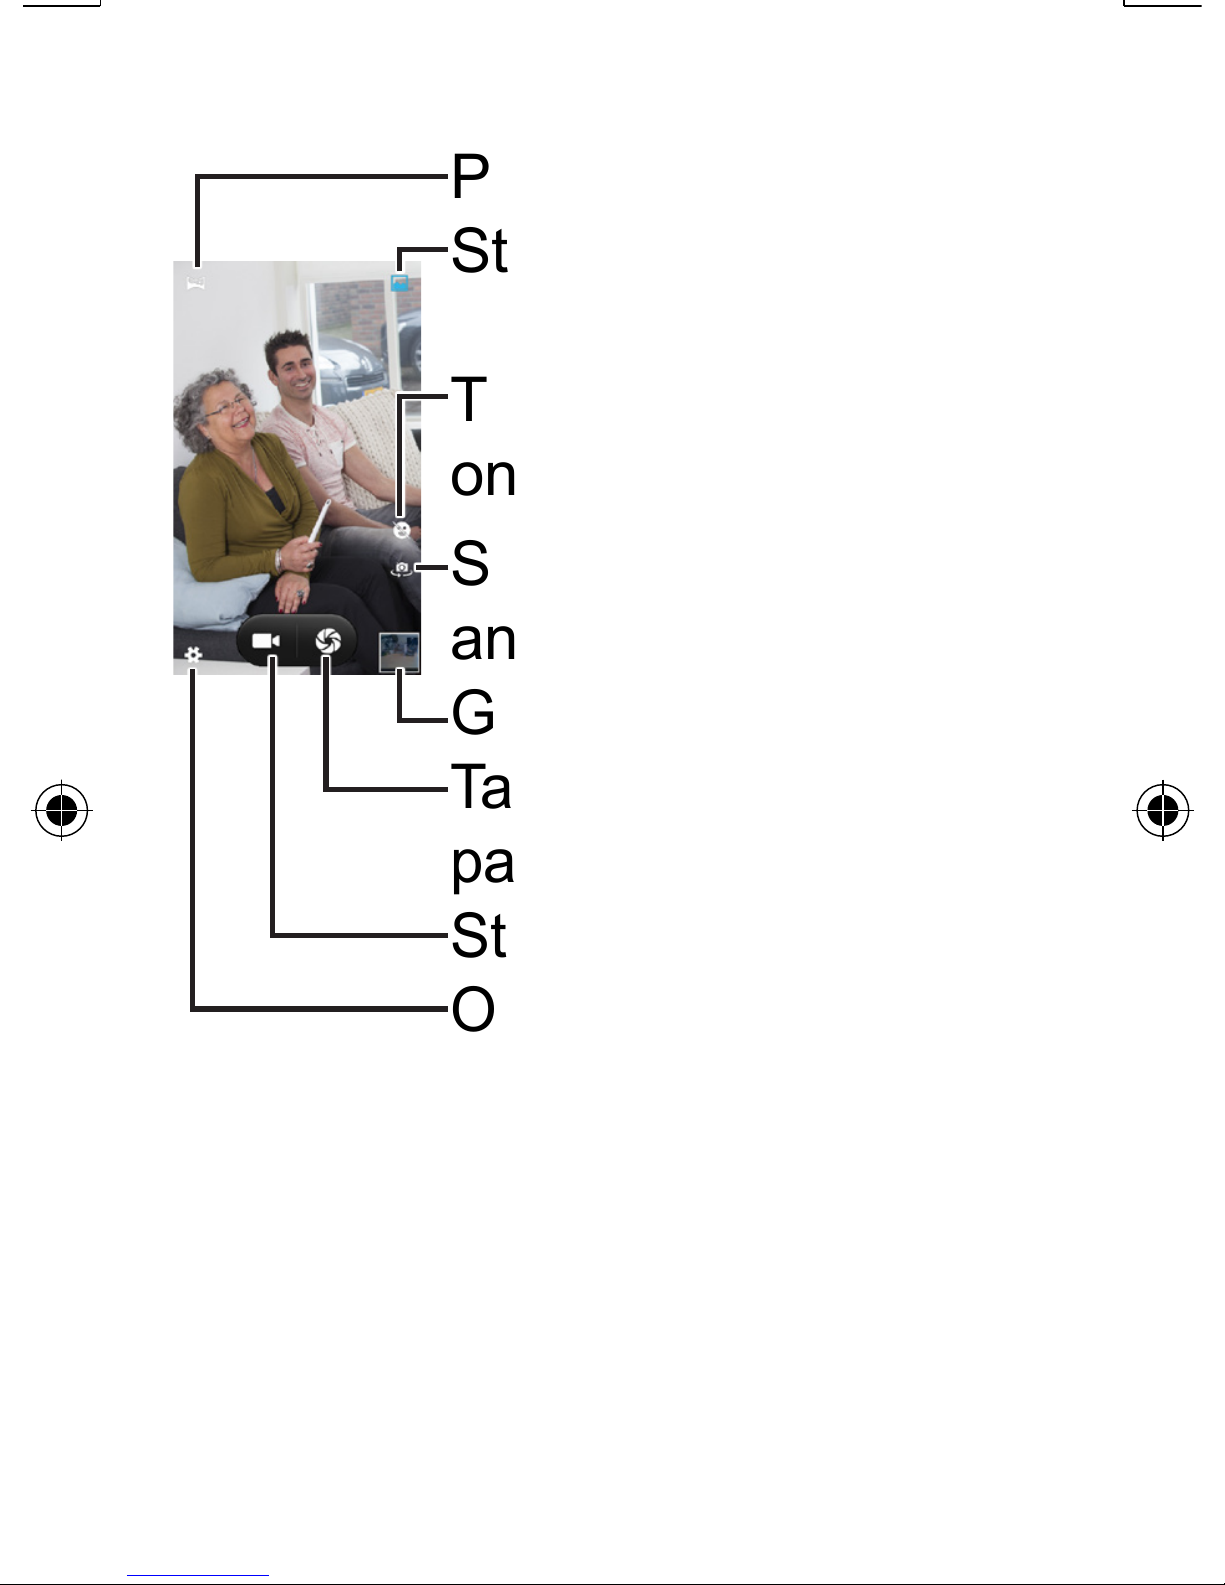
6.7 Camera
Panorama mode
Standard mode
Turn smile detection
on/off
Switch between front
and rear camera
Go to gallery, see p.66
Take photo / start
panorama recording
Start video recording
Options menu
Just like when viewing photos,
you can zoom in by holding
two fingers on the screen and
spread them out. When using
the camera for the first time,
this will be shown in a short
demonstration video.
Page 74
74
Panorama mode: As soon as
you press the button for starting
a recording, a white and blue
arrow will appear on screen.
Move the entire phone until the
arrows overlap and until the
blue arrow changes location.
Repeat this until your panorama
recording is completed.
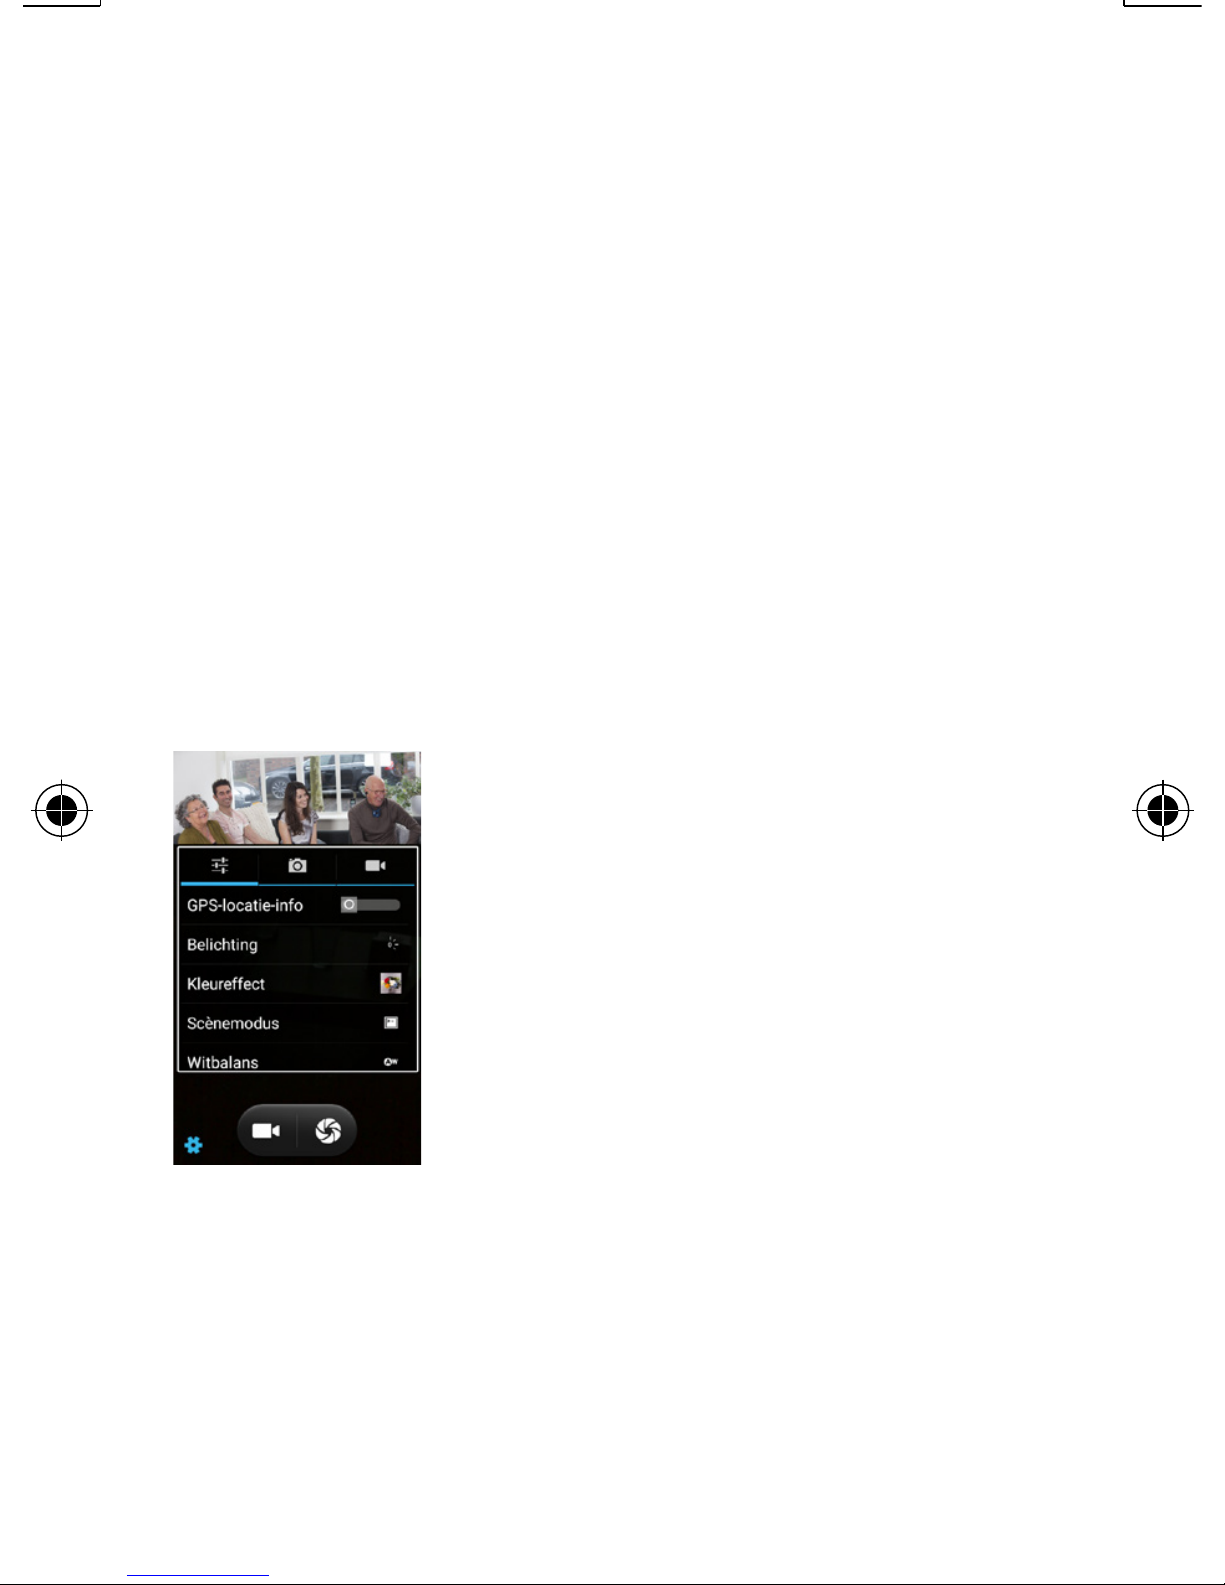
Options menu: Use
the options menu
to adjust screen
features, but also to
choose whether to
use the GPS location
in your photos; this
way you can show at which
location each photo was taken.
Page 75
75
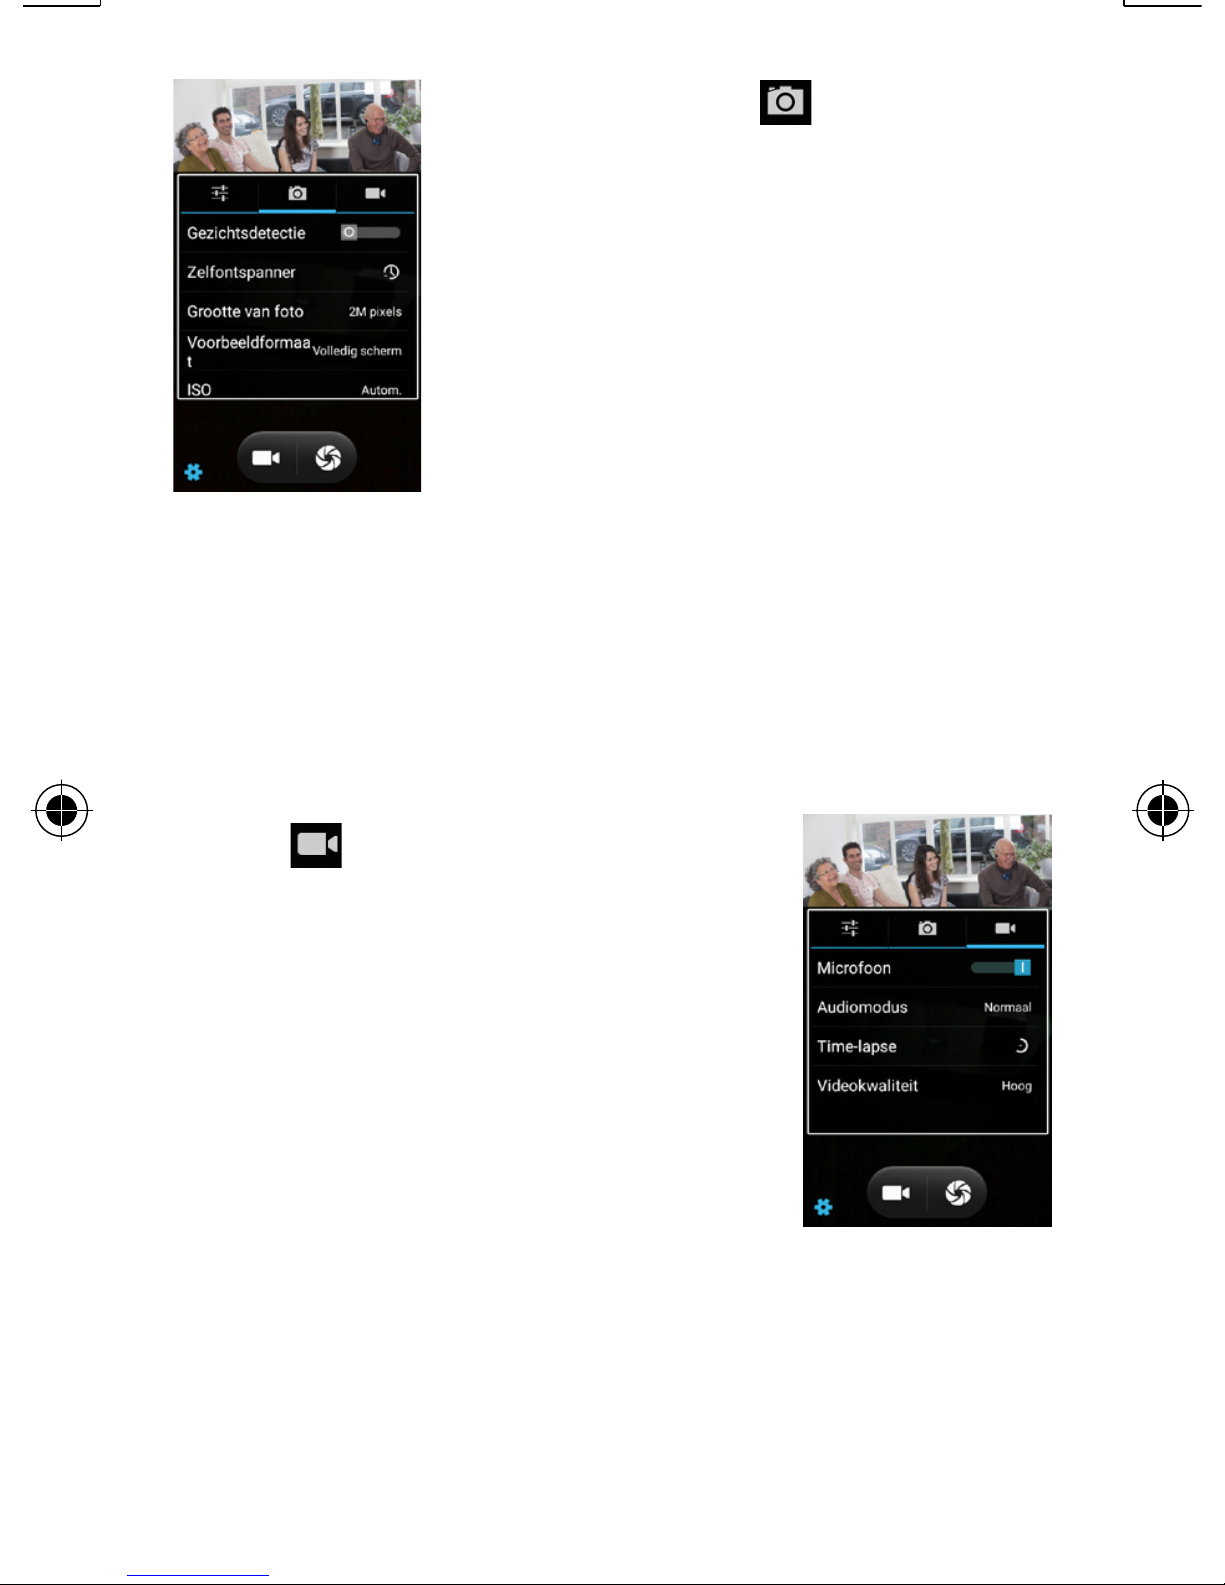
By tapping you can
turn on the smile
detection and
automatically focus
faces. You can also
set a self-timer, select
a lower quality but smaller
photo size and adjust the ISO
setting.
Tap to set options
for video recordings,
such as video quality
and the use of the
microphone.
Page 76
76
6.8 Browser
You can use the browser for
opening internet pages.
Make sure to turn on mobile
data or WiFi and to have an
active internet connection.
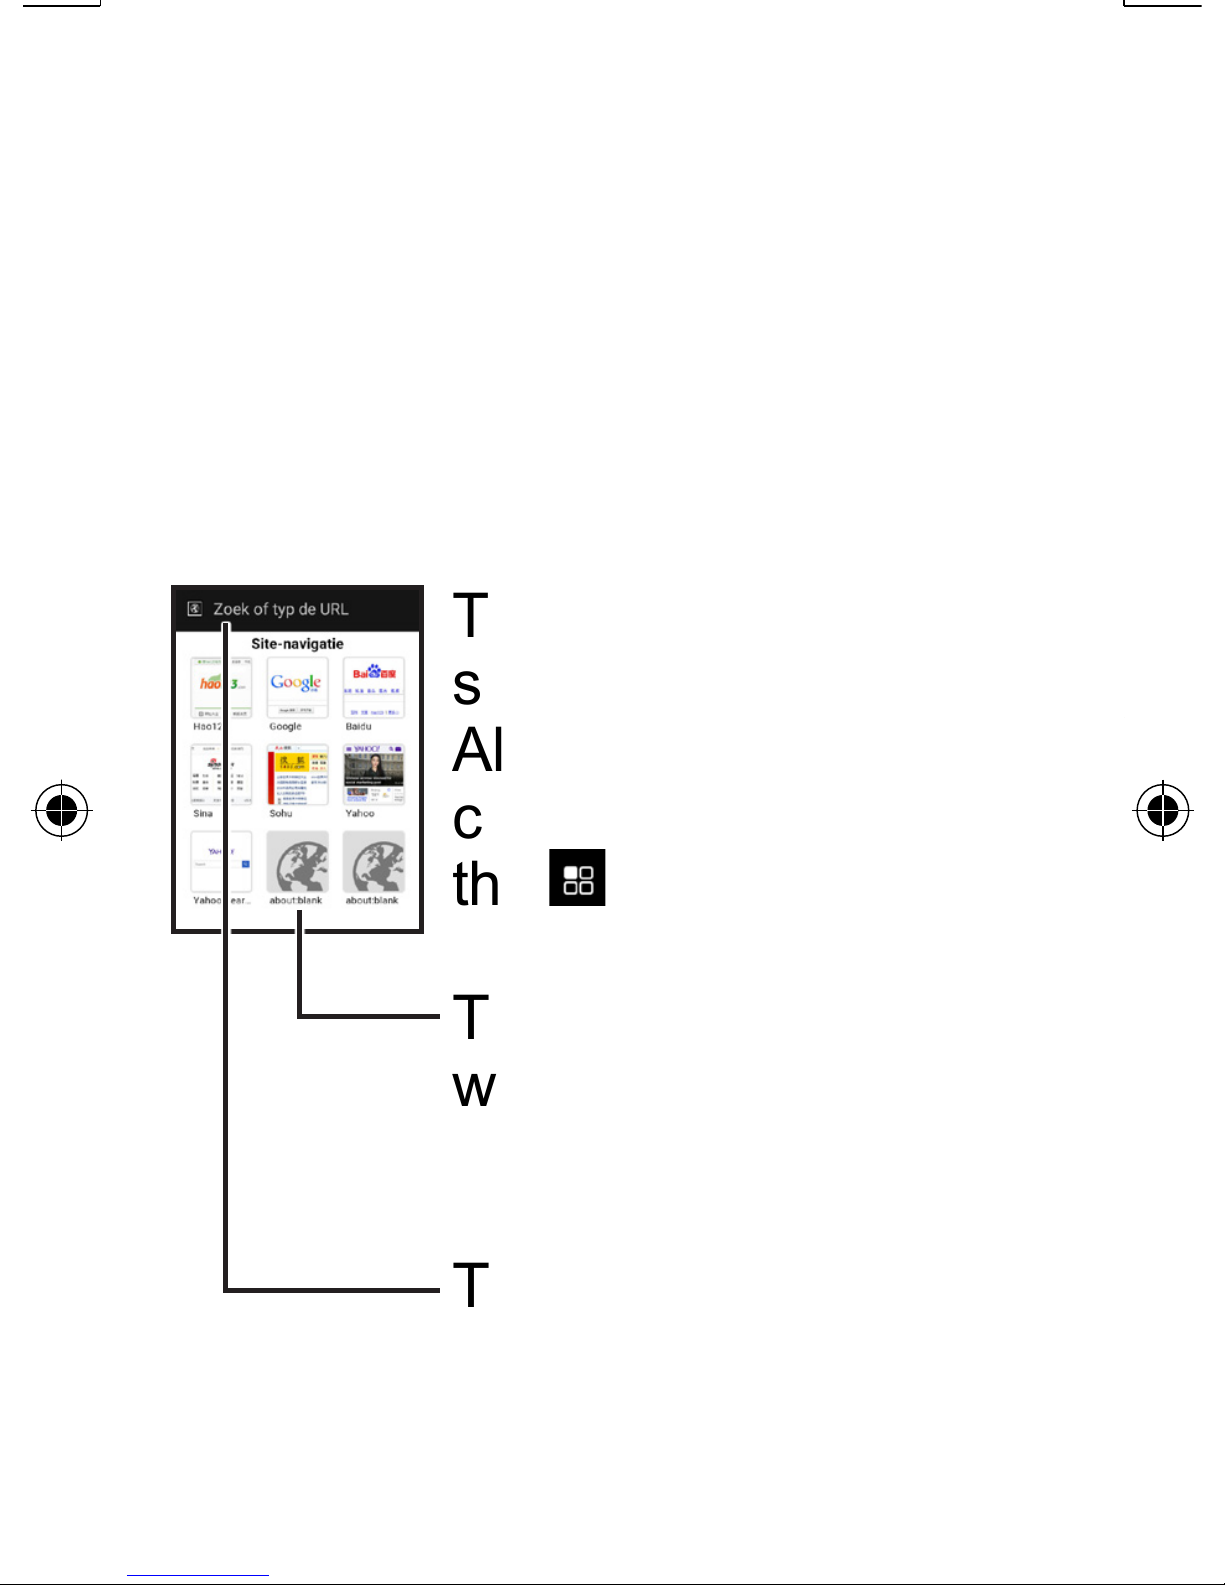
The homepage will
show several websites.
Also this homepage
can be set by pressing
the
icon.
Tap one of the
websites to open it.
Tap her to enter a web
address using the
keyboard.
Page 77
77
The available navigation
options can vary, because every
website is different. On the
majority of websites, you can
perform the following actions:
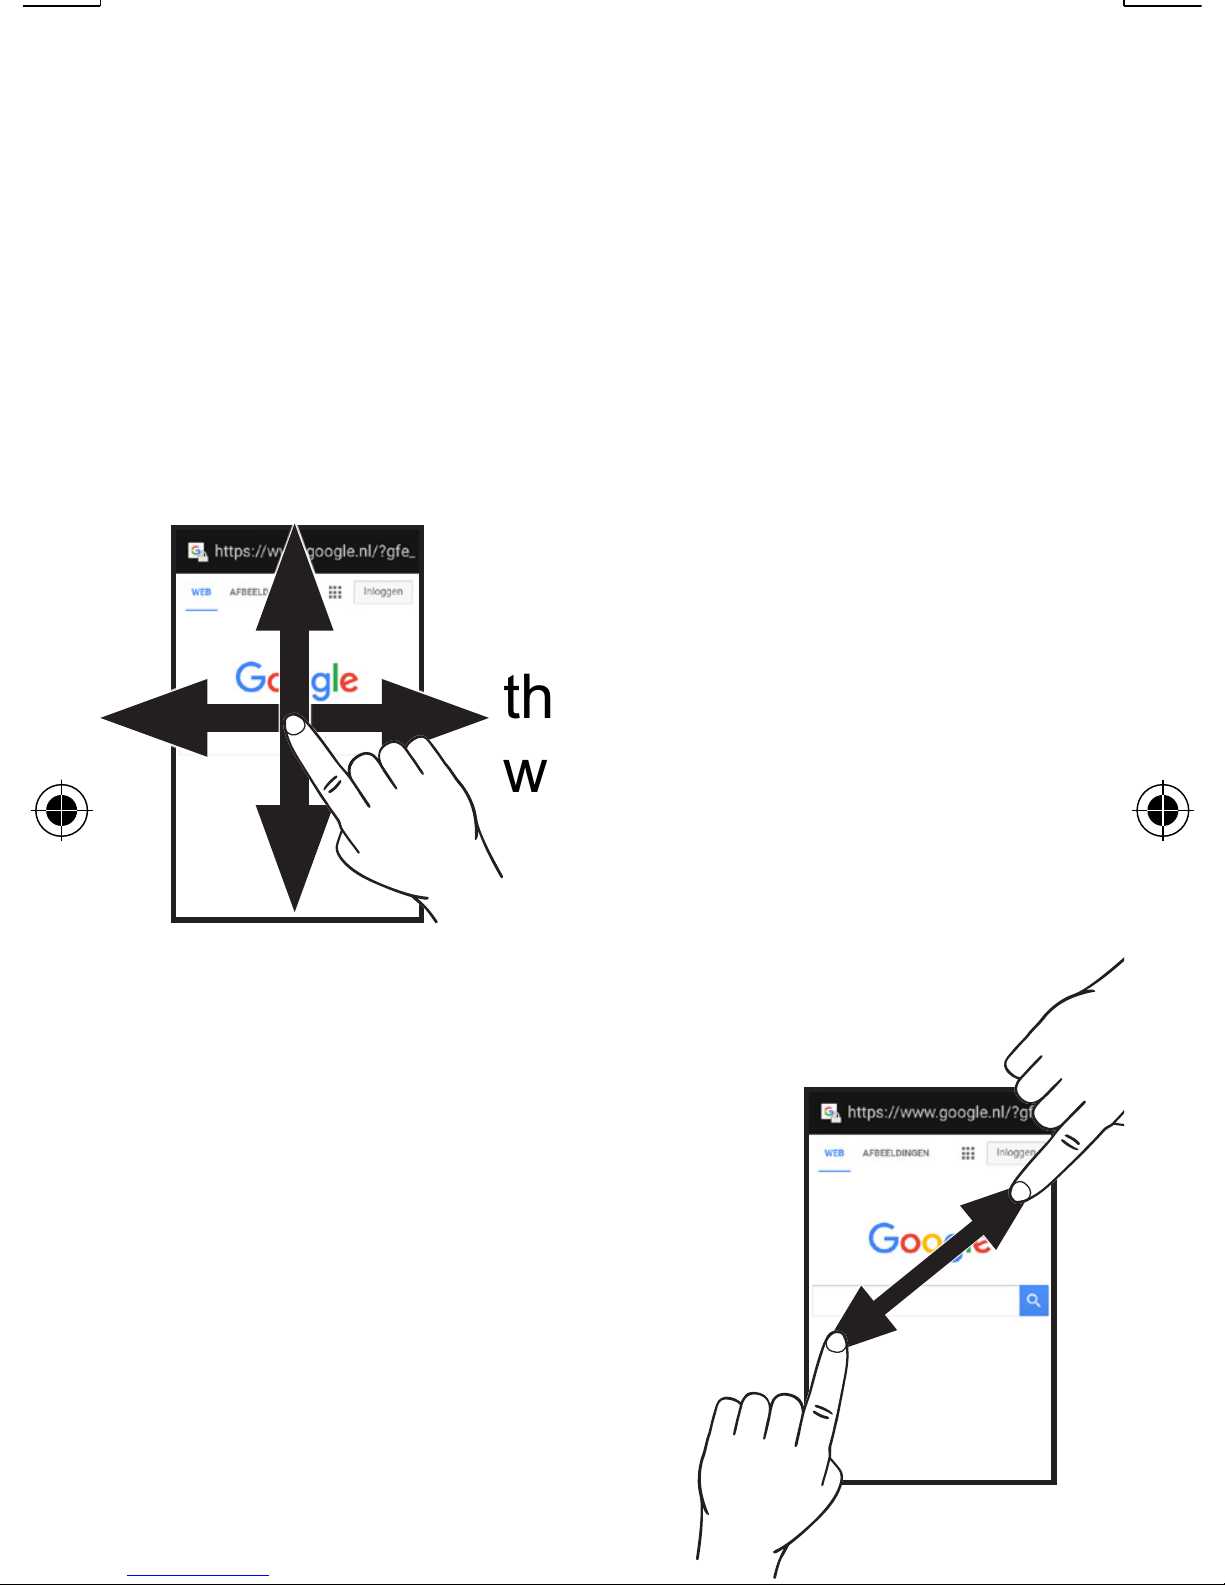
Swipe: To parts of
the site that won’t fit
the screen (many
websites also call
this ‘Scrolling’).
Two-finger-swipe:
Zoom in and zoom
out. Allows you to
enlarge text and
pictures.
Page 78
78
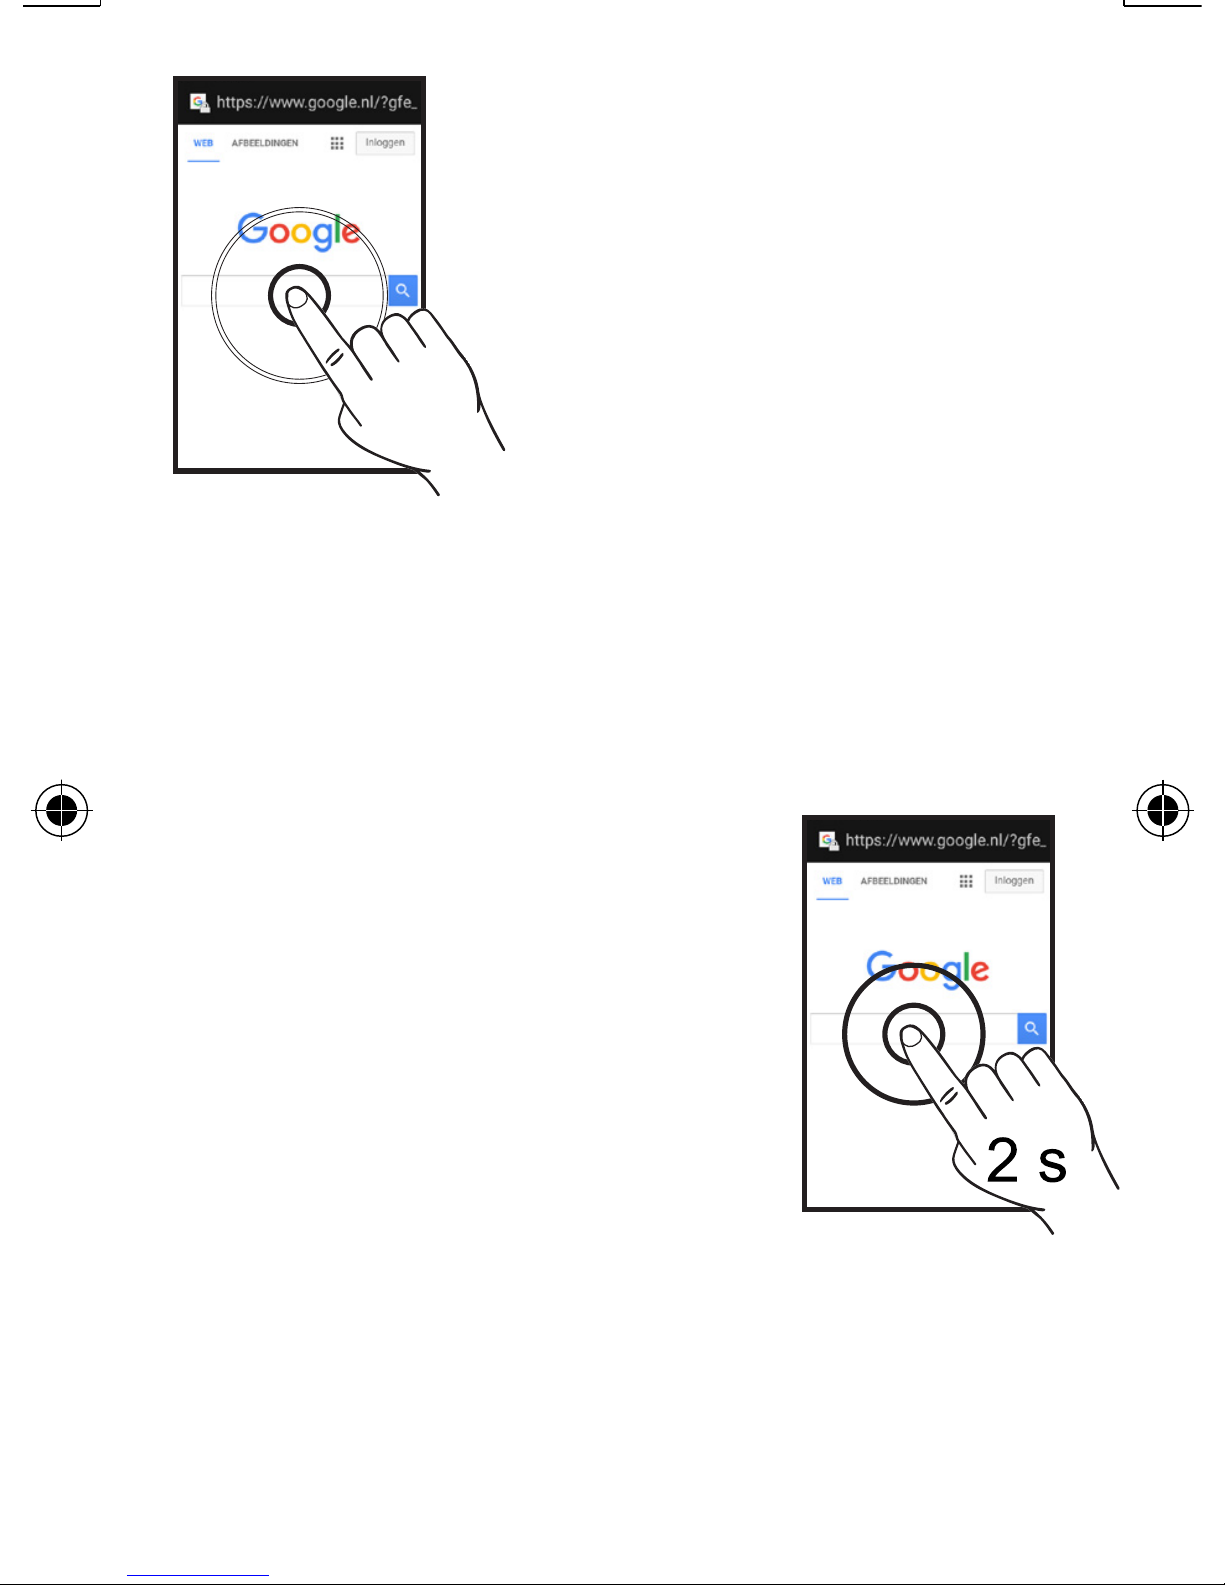
Tap: By tapping text
and illustrations, you
can go to another
page. When tapping
the search field,
a keyboard will
appear on the screen
allowing you to enter text.
Hold: By touching
certain parts of a
webpage and then
briefly hold the screen,
you can open a menu
with options to open
a page on a second
screen or to save it.
Page 79

79
6.9 Music
When you receive music files
via a PC, Bluetooth or internet,
you can play these with your
phone. When you connect your
phone with a PC using a USB
cable, make sure to connect
your phone as being a Media
device.
On your PC, you can choose to
open the phone as a directory.
After opening this directory, you
can drag your music files on
your PC to the folder ‘Music’.
You can play a file by tapping
it and scroll through the list by
swiping.
Page 80

80
During playback, you can e.g.
pause or skip a track by tapping
the icons at the bottom of the
screen.
When touching these icons,
a description of the current
setting will be shown on screen.
At the right side of the screen
you’ll find options for repeating
tracks or for playing tracks in a
random order.
You can use the options menu
to use a track as your ringtone,
to make playlists or to delete
tracks.
Page 81
81
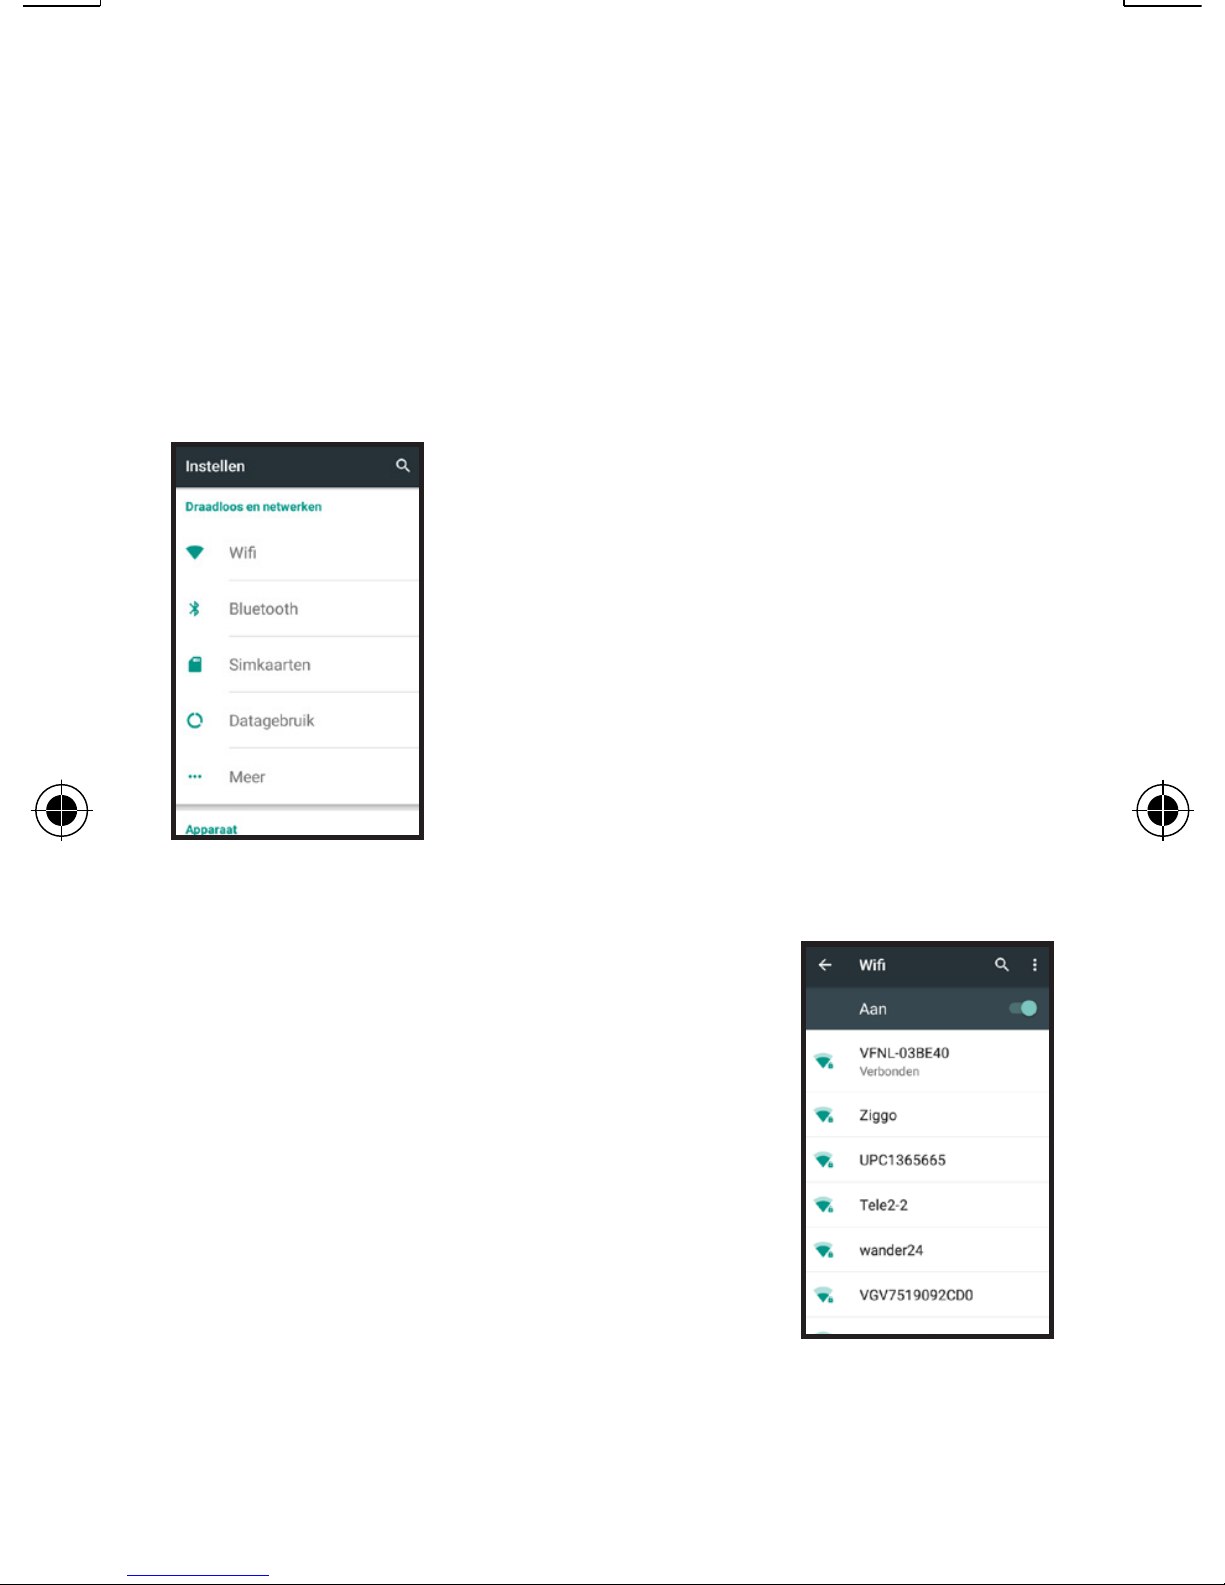
6.10 Setup
The menu for setting up the
phone is very elaborate.
Below we’ll highlight the most
important settings.
WiFi: Use this option
to set your home
internet connection.
When tapping this
option, you’ll see the
following screen:
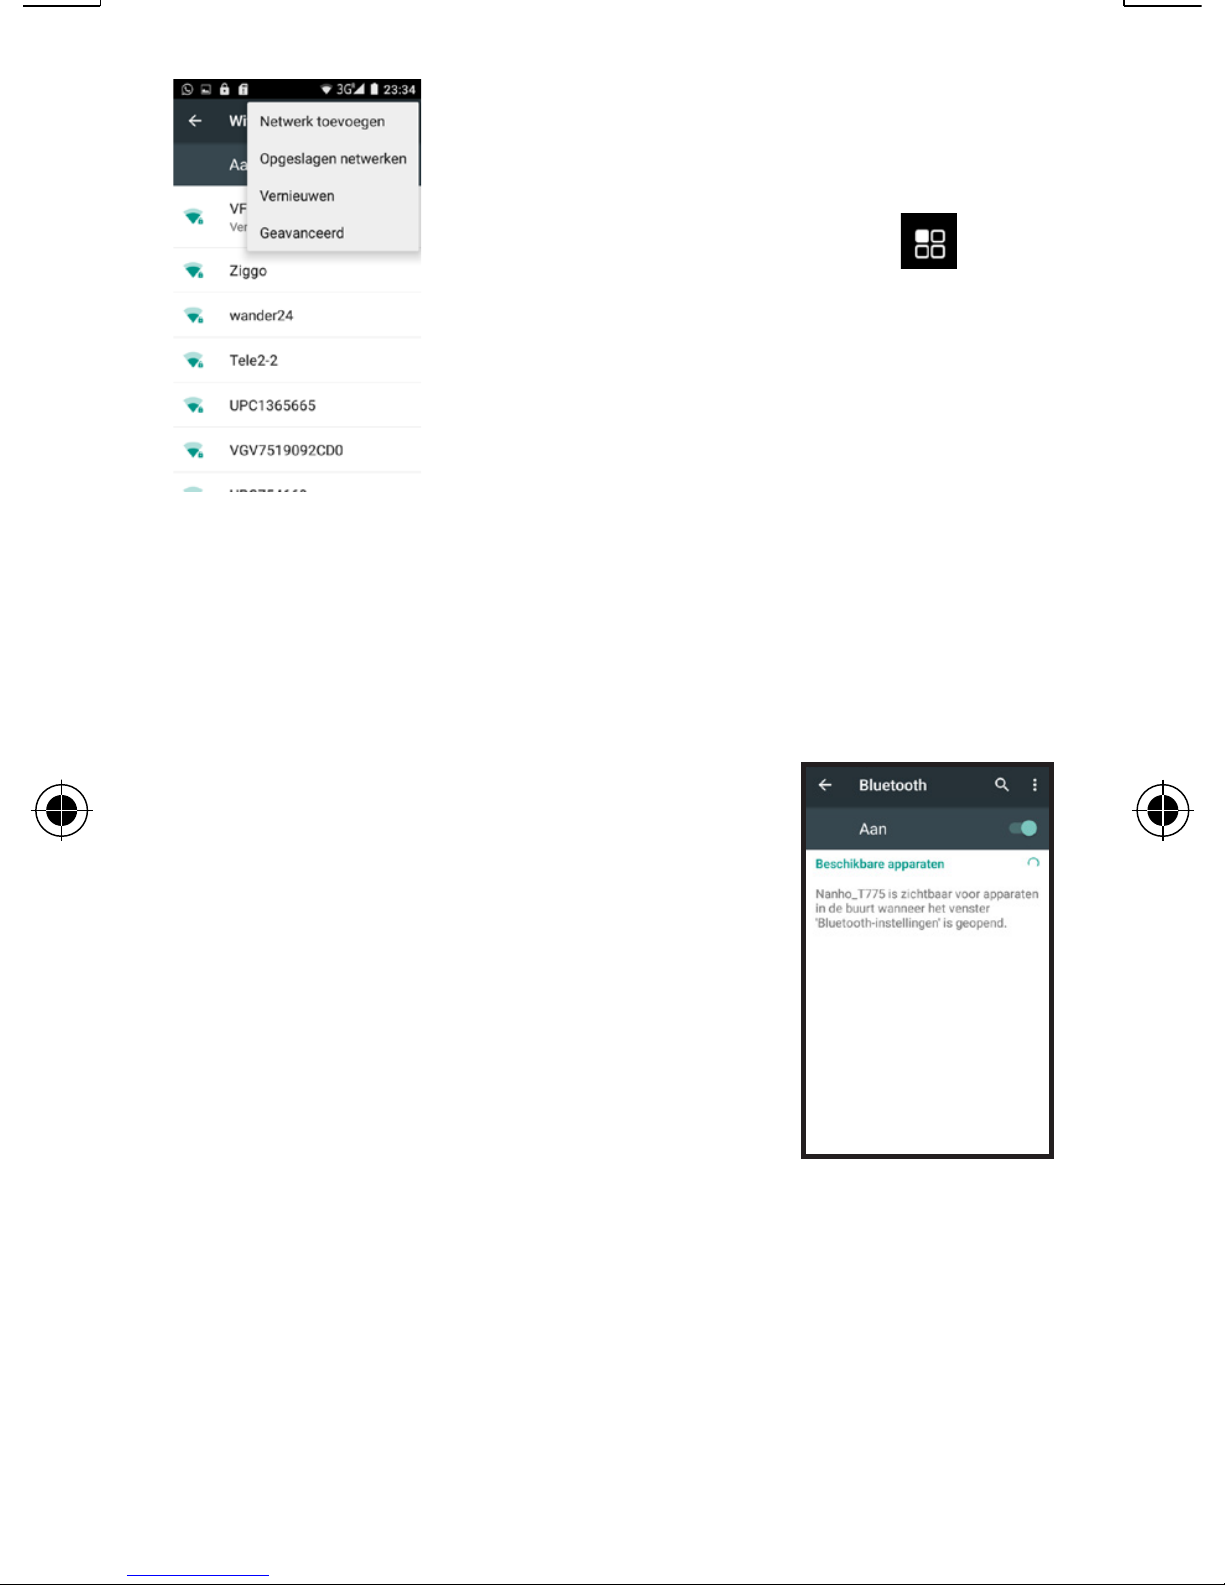
As soon as you
switch on WiFi, it
will automatically
search for nearby
connections. Tap your
connection in this list
and, if required, enter your WiFi
password.
Page 82
82
If your WiFi is not
shown in the list,
please press the
button and choose
the refresh option to
search again. You can
also select the option
Add Network to manually enter
your network name.
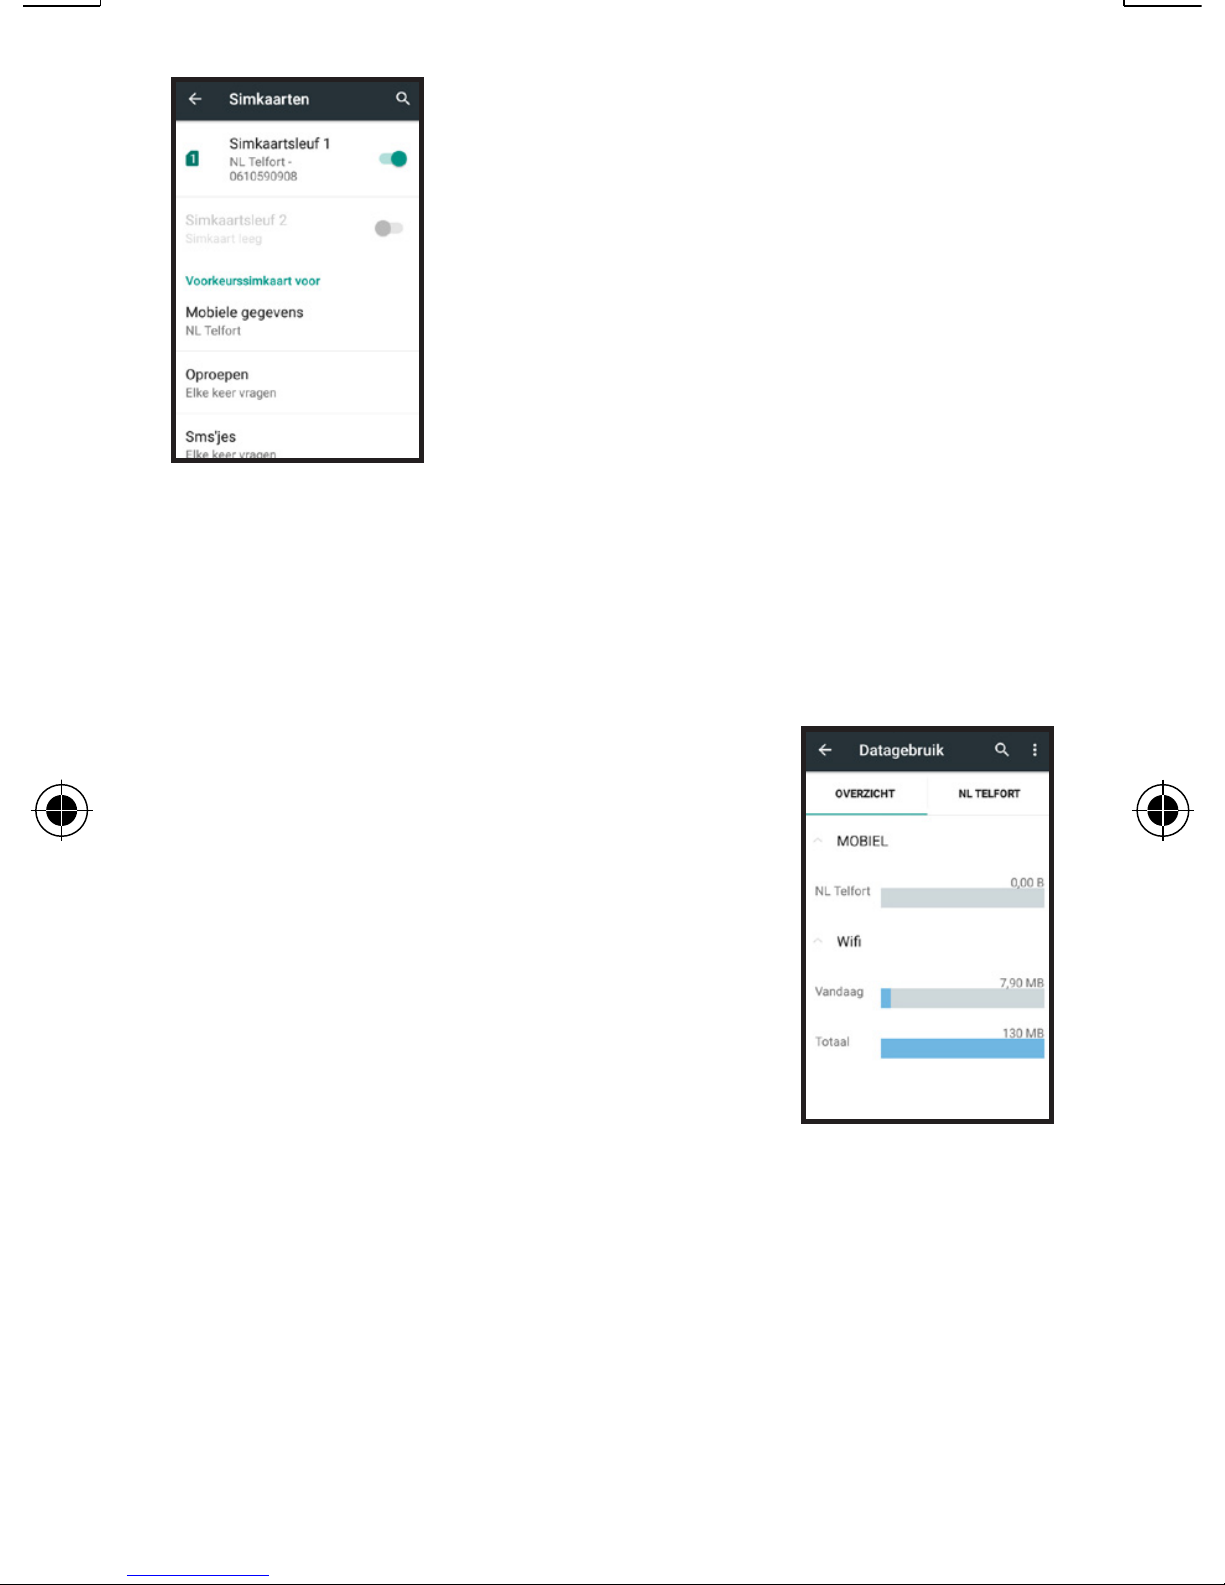
Bluetooth: This option
allows your phone to
connect with other
Bluetooth-enabled
wireless devices. When
you select this option,
a list will appear with all nearby
devices. These devices must be
set to pairing mode before they’ll
appear in the list
Page 83

83
When the device is shown, tap
it and, if required, enter the
corresponding device code.
Devices that can be paired are,
amongst others:
• Keyboard
• Speaker
• Headset
• Alarm
bracelet
• Hands-free car kit
• Other phones
Use the button to open a
menu in which you can refresh
the list with detected devices,
change the name displayed for
other devices or view received
files
Page 84
84
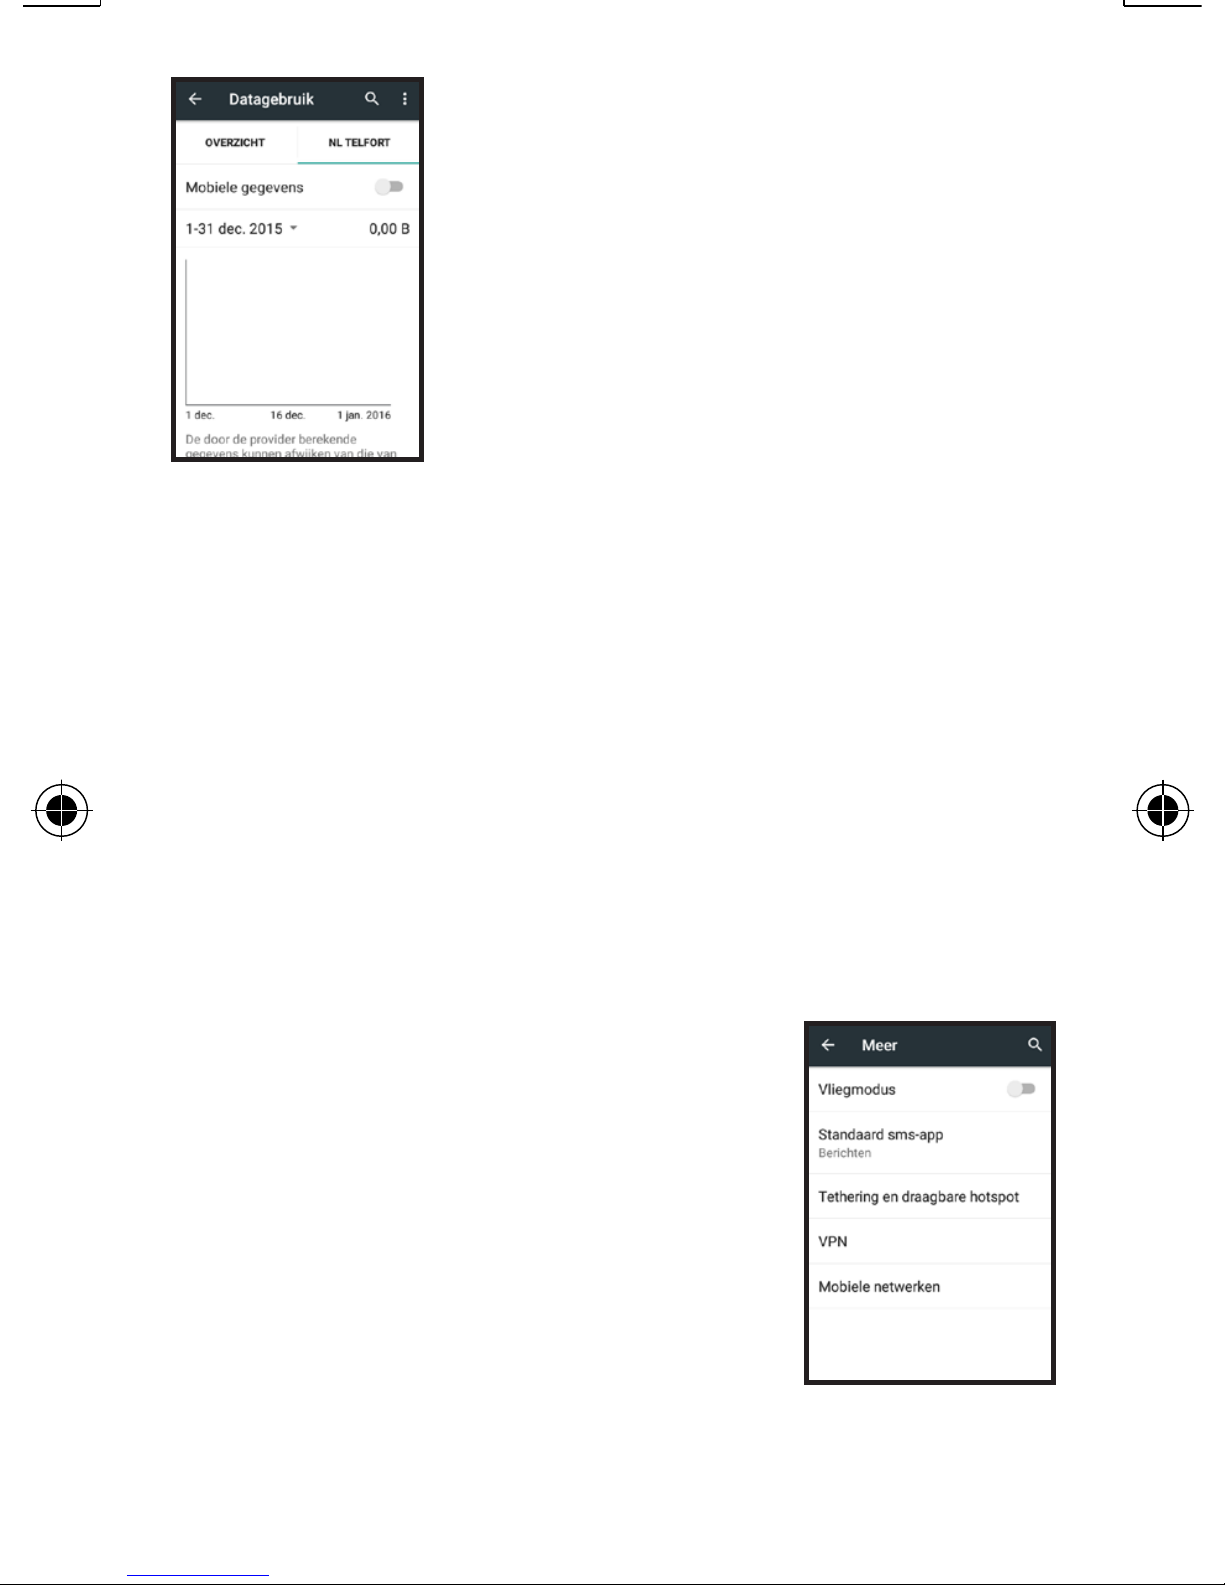
SIM cards: In this
menu you can turn
off one or both SIM
cards. You can also
set a SIM preference
for calls, text
messages or internet
use.
Data use: Here you’ll
find various overviews
with regards to the
internet use on your
phone. This is divided
in data used via your
SIM and via your WiFi.
Page 85
85
By tapping the name
of your provider, you’ll
open a graph showing
data use for data used
via your SIM, allowing
you to check your
bill. Here you can also turn off
data use on your SIM to prevent
any costs. By swiping this
graph downwards, you’ll find a
overview of the data use of each
App.
More: Use this option
to turn on flight mode
to choose a different
app for receiving text
messages and to
adjust network settings
(depending on provider).
Page 86
86
You’ll also find an option to
create a WiFi hotspot of the
phone. When you turn this
option on, your phone becomes
a WiFi modem and you can
then use another device to login
and use the internet. A data
connection via your SIM card is
required to use this function.
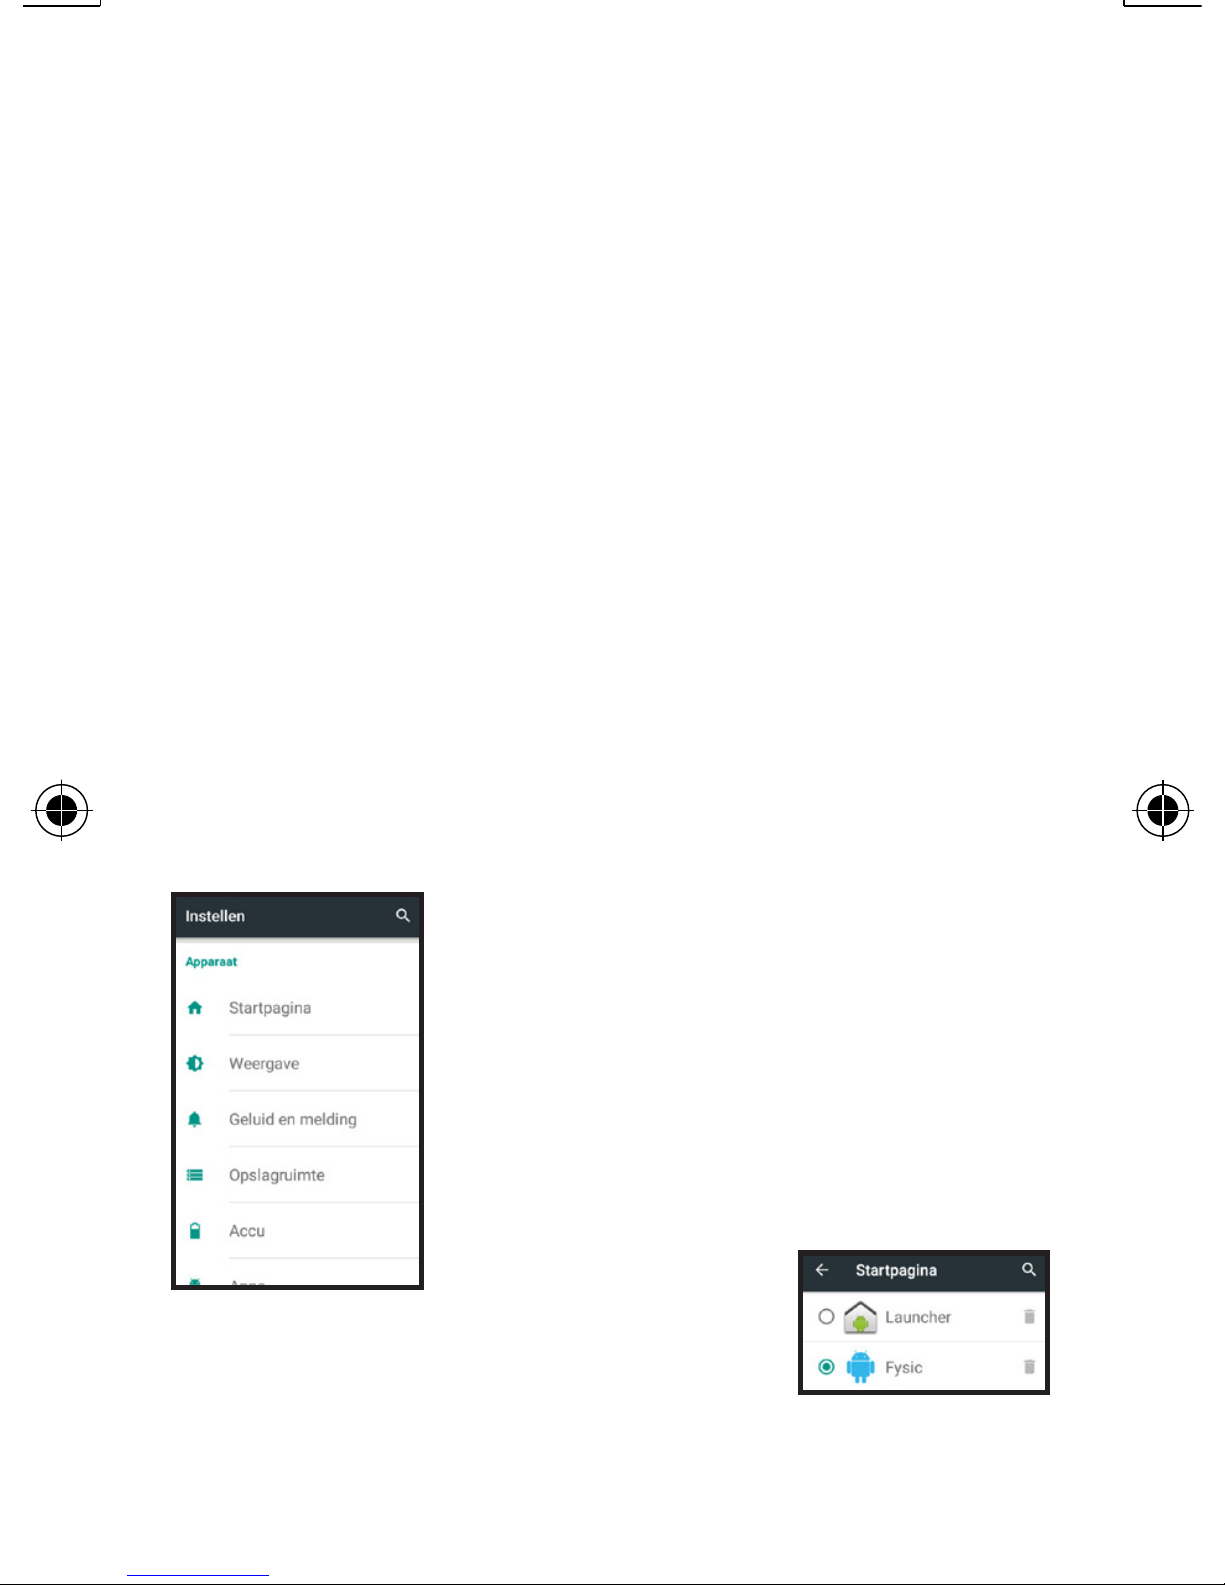
Homepage:
Use this option to
switch between the
standard Android™
menu and the Fysic
version, described
earlier in
this manual.
Page 87
87
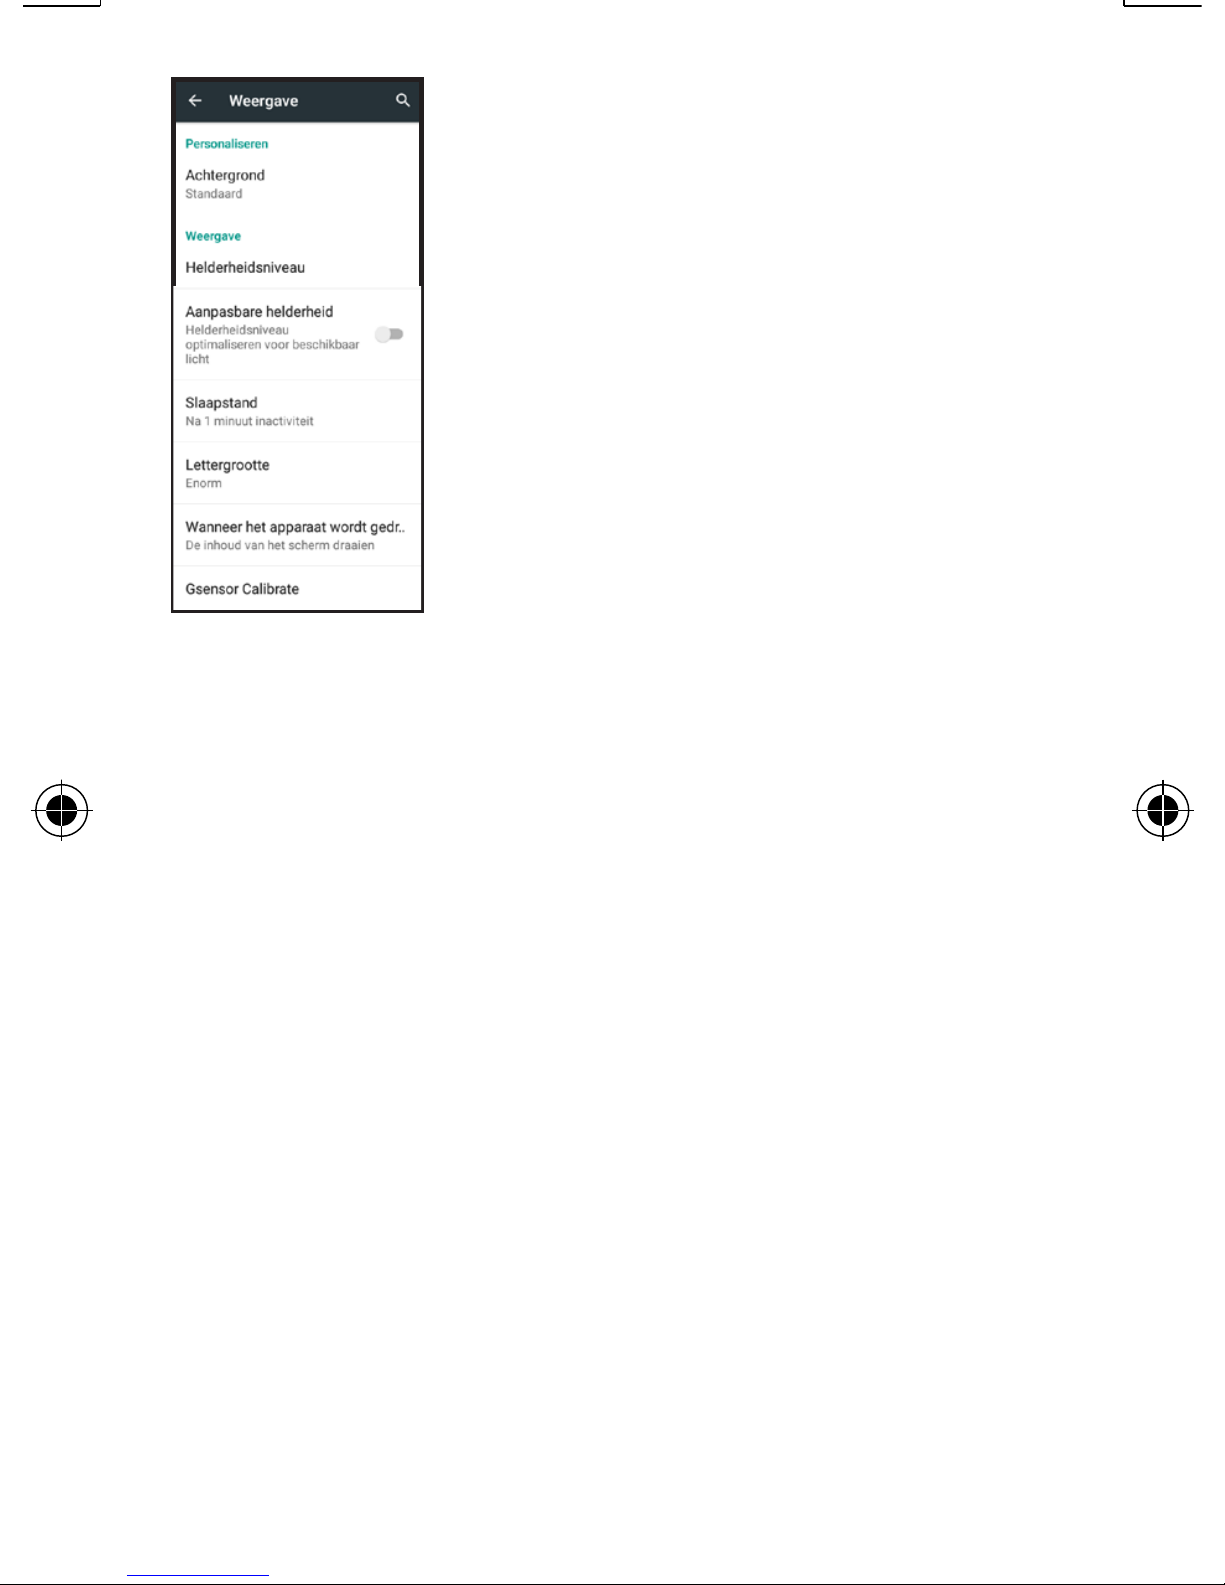
Display: Use
this option to
customize your
display. A different
background will only
be shown when
you’re using the
Launcher homepage.
Furthermore, you can adjust
the brightness, turn off the
automatic light adjustment,
set the time before the screen
turns off, select a letter font
and choose whether the screen
must rotate as you turn your
phone.
Page 88
88
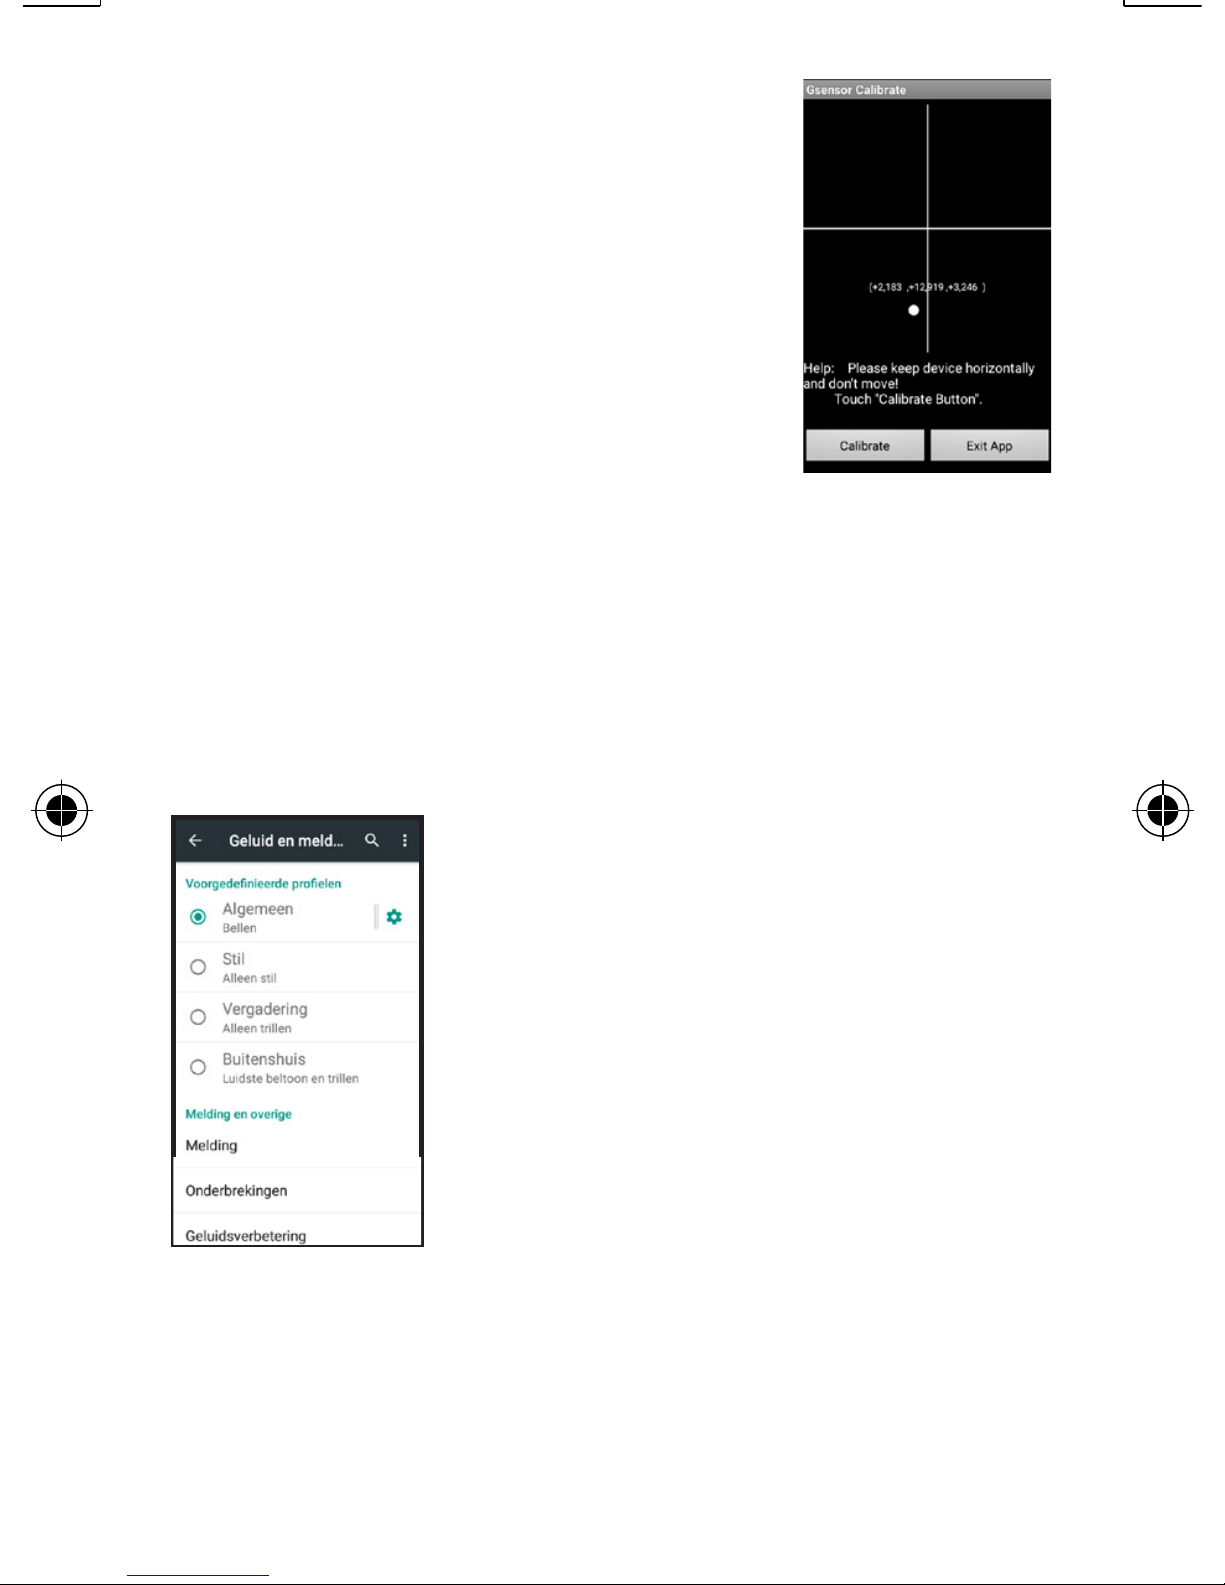
The last option,
G-sensor calibration,
you can use when the
movement-controlled
functions are no longer
functioning correctly.
Open this function, place the
phone flat on a table and tap
‘Calibrate’.
Sound and
messages: Use
this option to set
the sound volumes
and ringtones for
the various sound
profiles. You can also use
Sound Amplification to set a
louder call volume or speaker
volume.
Page 89
89
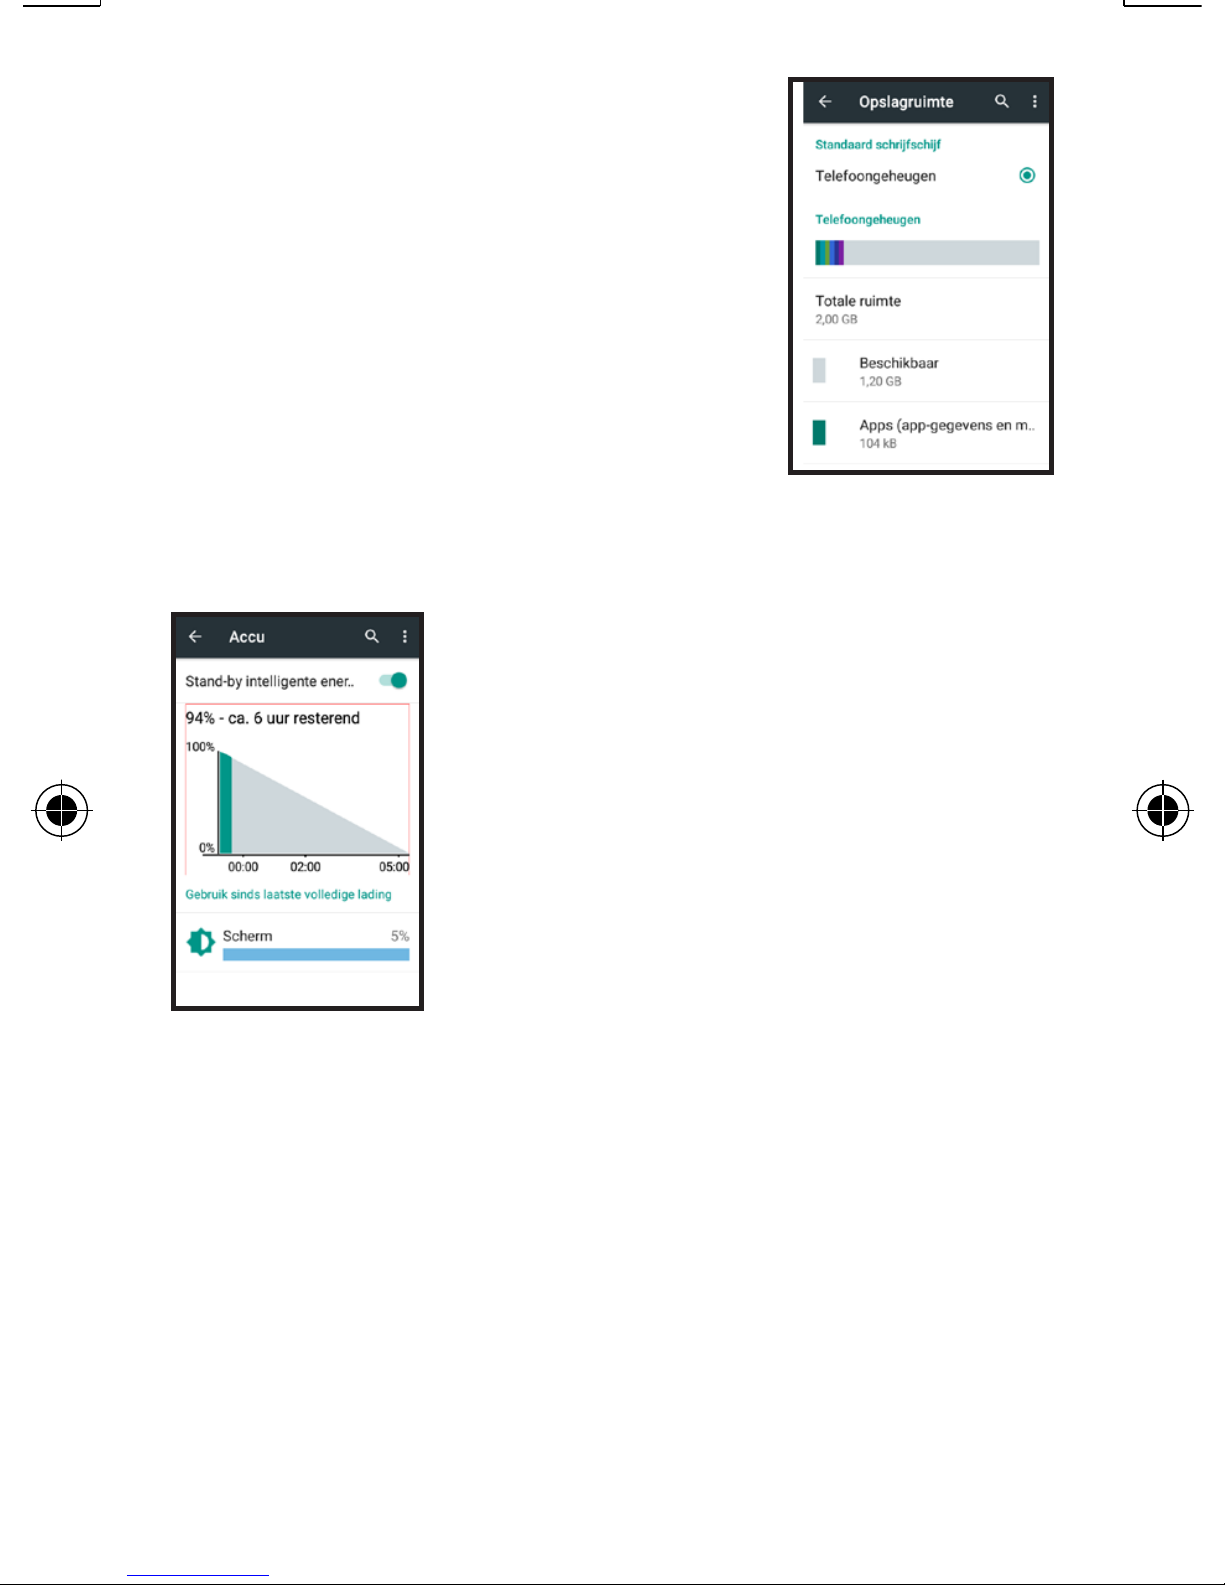
Memory space: This
shows how much
memory has been
used, what this
memory has been
used for and how
much is left.
Battery: This shows
how much energy
you have left. Keep in
mind that this is only
an estimate.
You’ll also find which function
of the phone consumes most
energy. Furthermore, you can
use the intelligent standby
energy function to turn certain
energy consuming functions off
while in standby mode.
Page 90
90
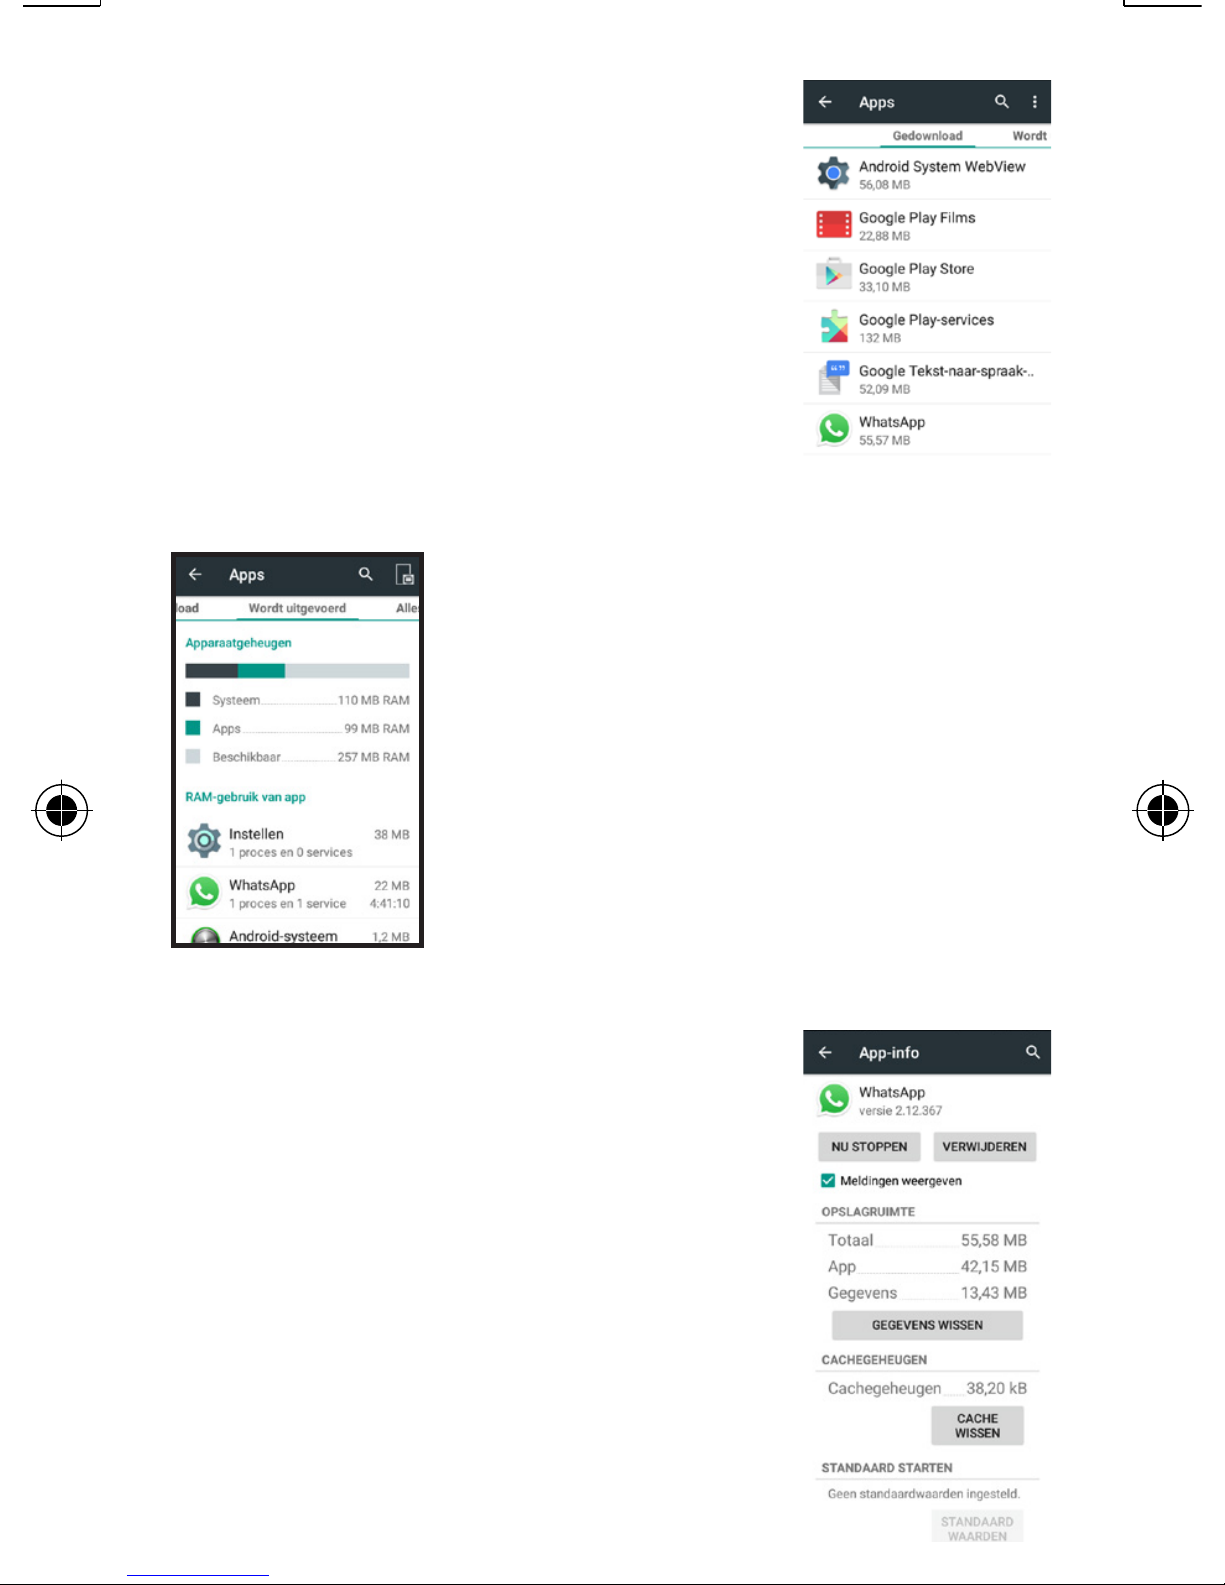
Apps: This shows your
downloaded apps. You
can view the entire list
by swiping from top to
bottom.
By swiping from left
to right, you can
switch between
downloaded, active
and all apps.
Tap an app to open
an overview screen
where you can close
an app, delete it or
reset it via ‘Delete
data’.
Page 91
91
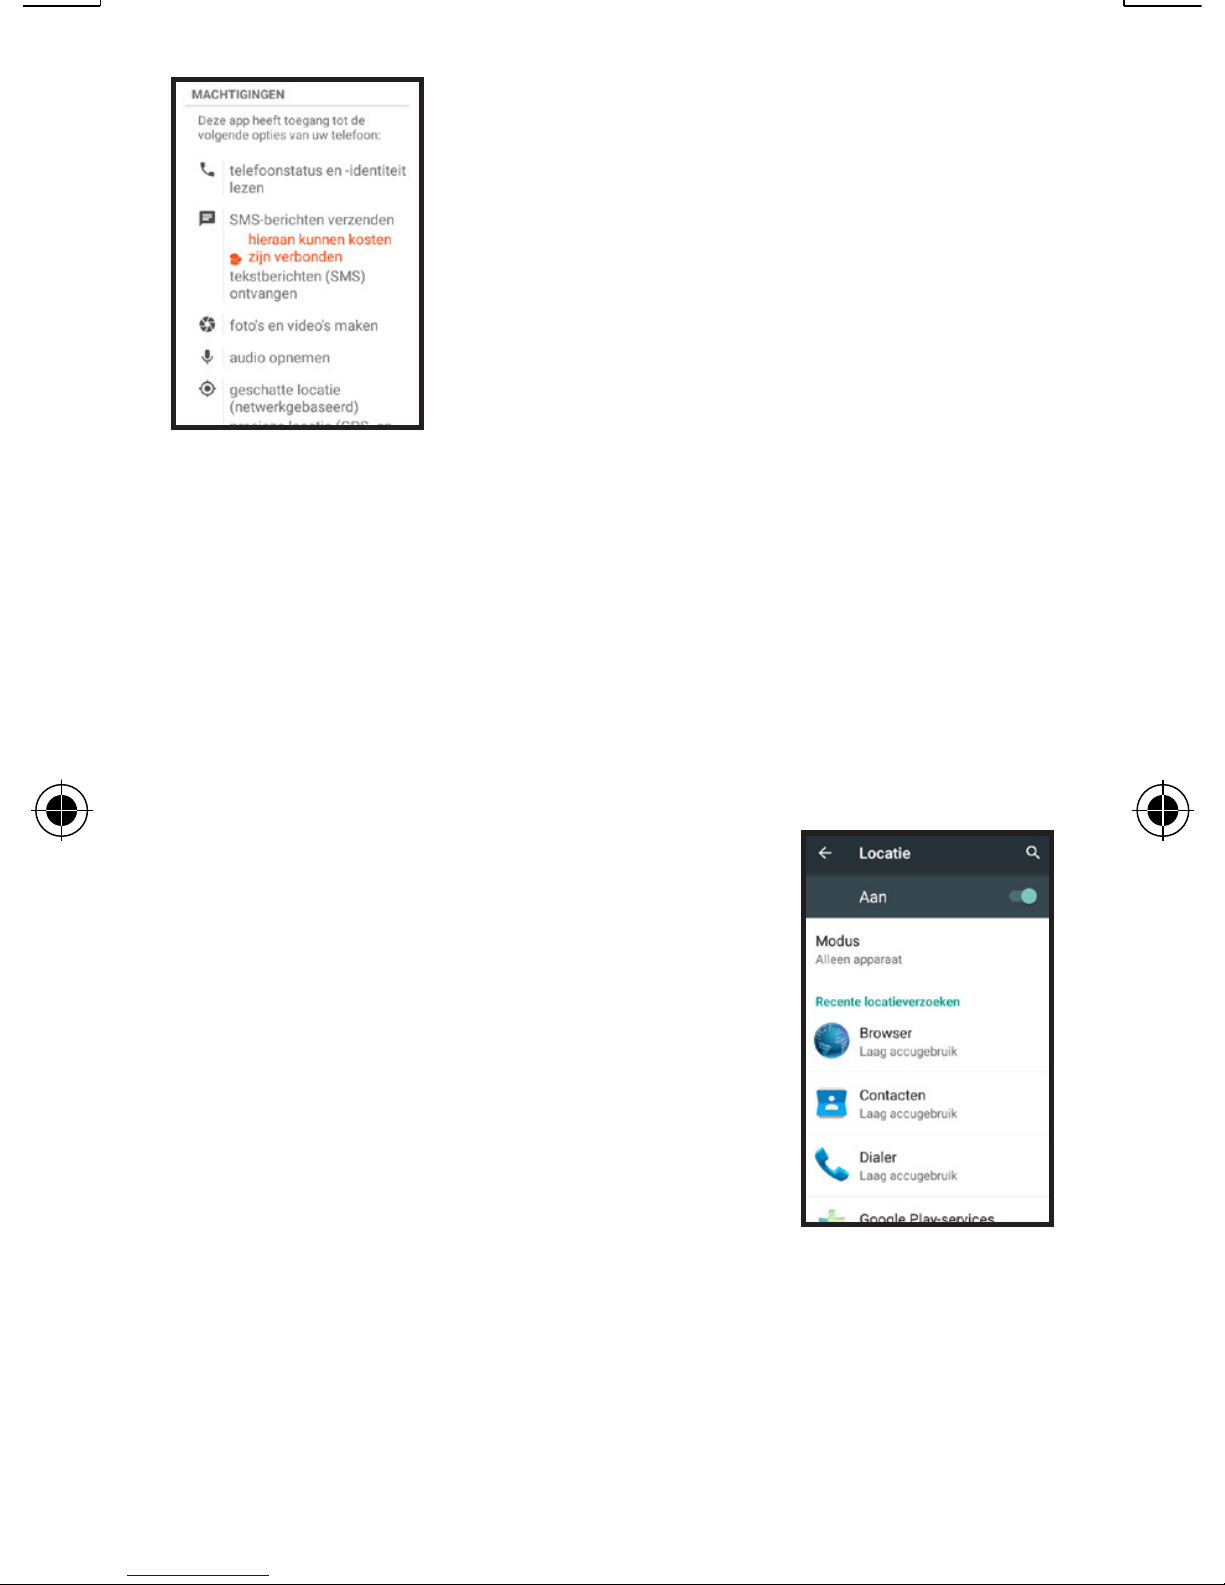
You can also view
which permissions an
app has by swiping
upwards. This means
that a program has
the possibility to manage other
functions of the phone, such as
using the camera or turning on
a data connection.
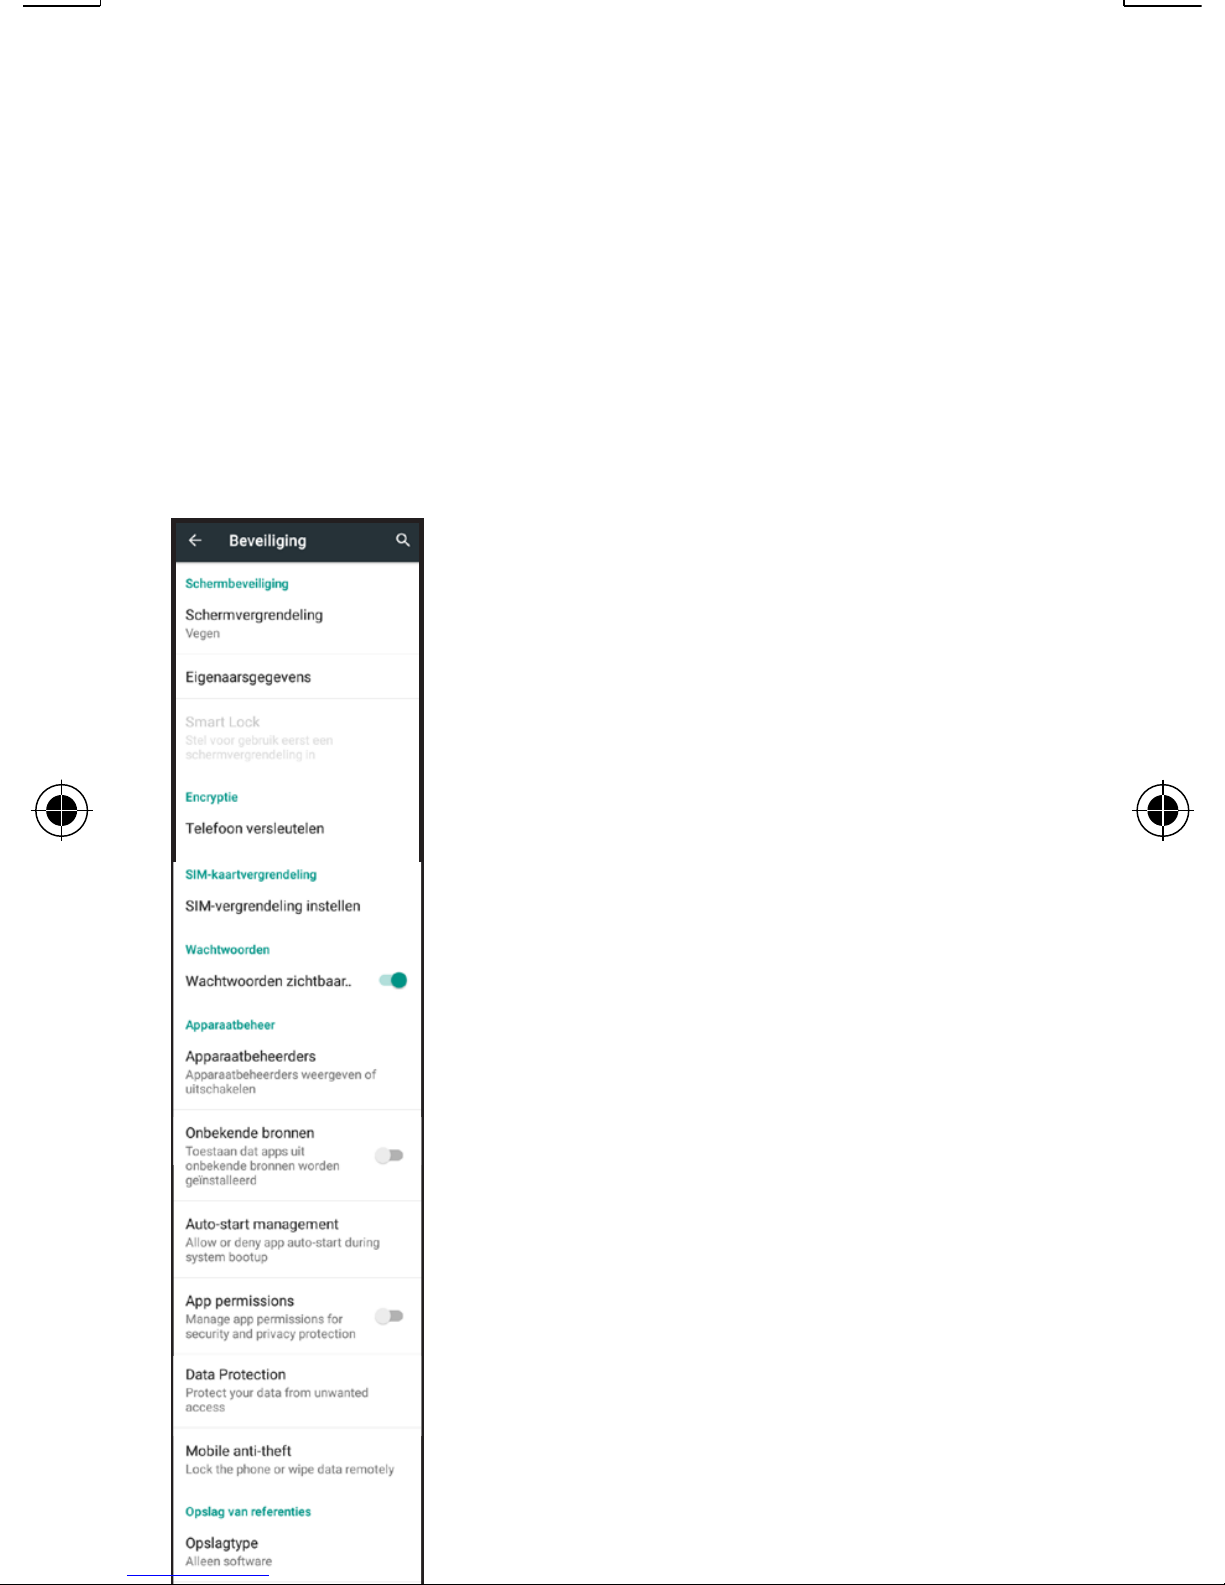
Location: Use this
option to turn on the
search function for
your location and to
check which programs
are using this function.
This allows you to use your
phone, in combination with
other Apps and the internet,
Page 92
92
to determine where you’ve
taken pictures, as a navigation
system or to instantly find
nearby restaurants when
searching for places to eat on
the internet.
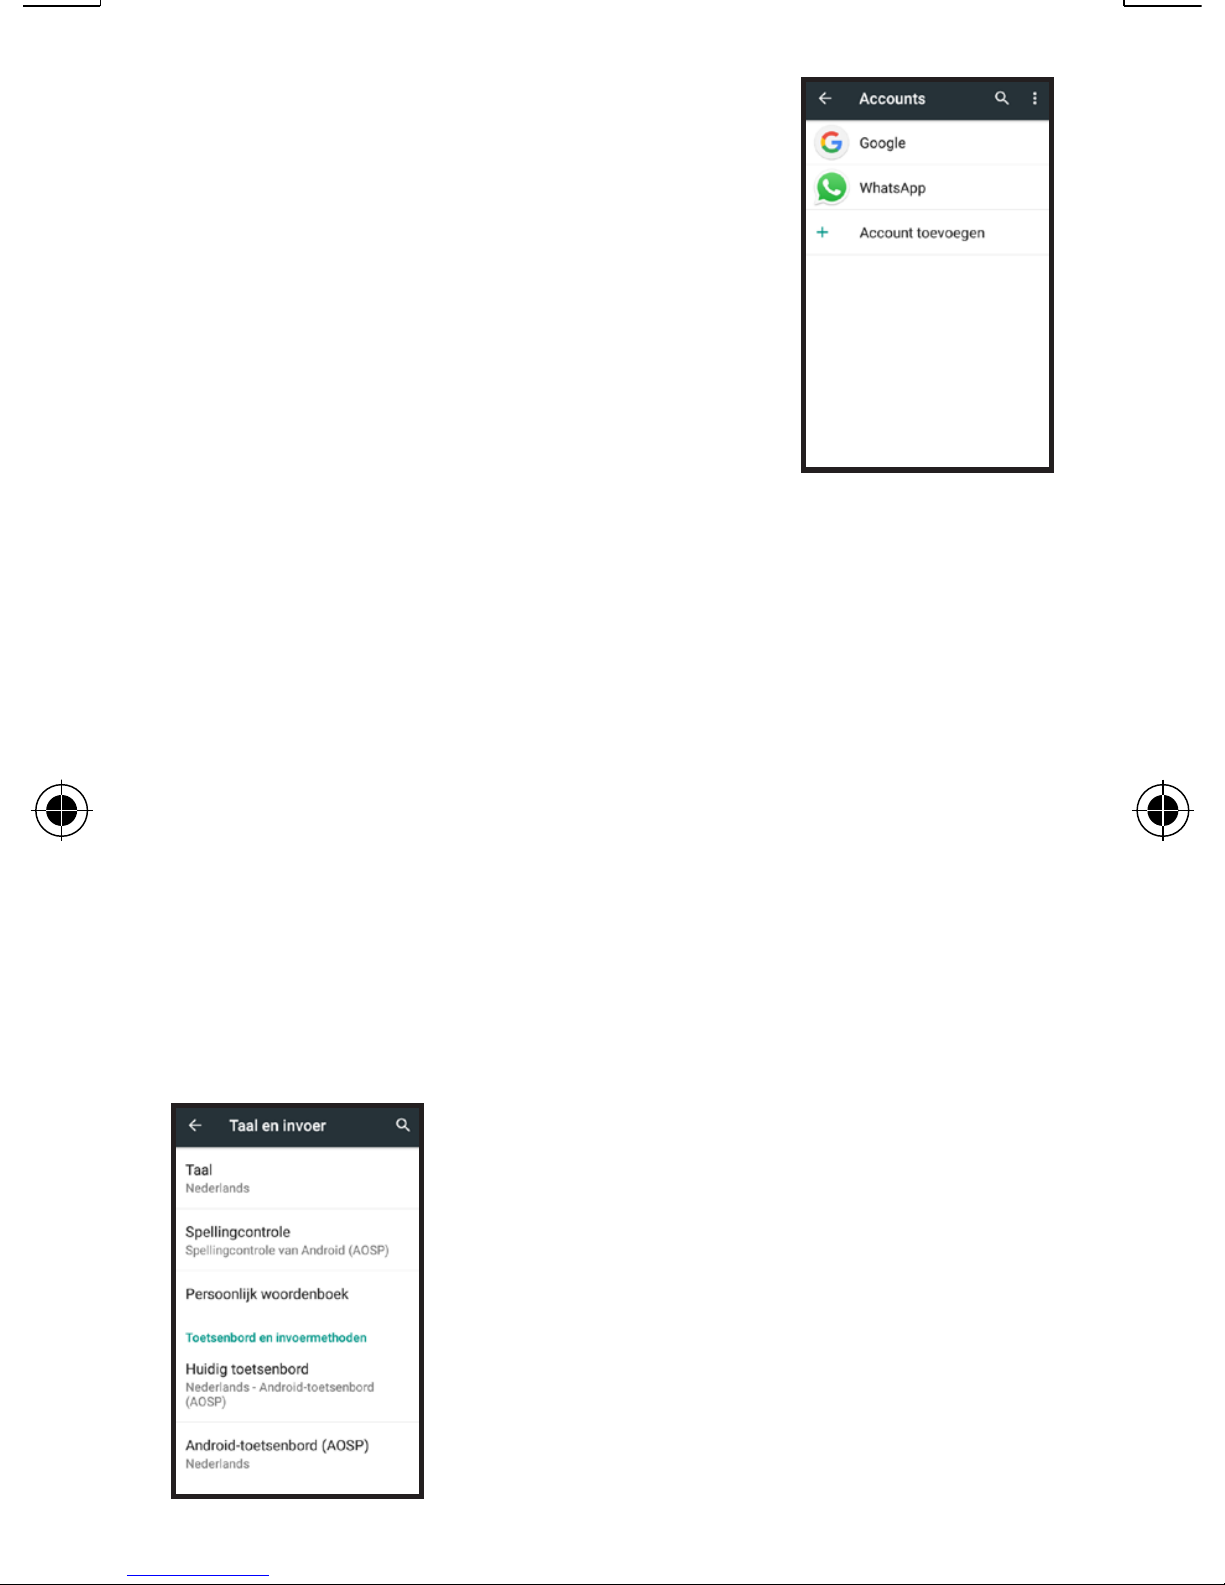
Security: This offers
various options for
securing your data.
Instead of unlocking
the screen by
dragging the lock
upwards, you can
choose to wake your
phone from sleep
mode by drawing a
pattern, entering a
password or using a
voice command.
Page 93

93
At Owner’s Information you can
enter a text that will be shown
on the lock-up screen.
You can also encrypt your
accounts and SIM card. This
also allows you to choose
whether Apps may be installed
that are not checked by Google.
Another option allows you to
remotely retrieve data from
the phone at a later time and
making your phone no longer
usable to prevent theft.
Page 94
94
Accounts: This shows
an overview of the
various memberships
you have, such as
the free membership
required to access
the Google Play™ store or the
free membership to access
Whatsapp.
The available settings for each
account depend on the service
to which that account has
access to.
Language and input:
This allows you to set
the display language.
Here you can also
turn on the spell-
checker and choose
Page 95
95
another keyboard in case
you’ve purchased one from the
Play store.
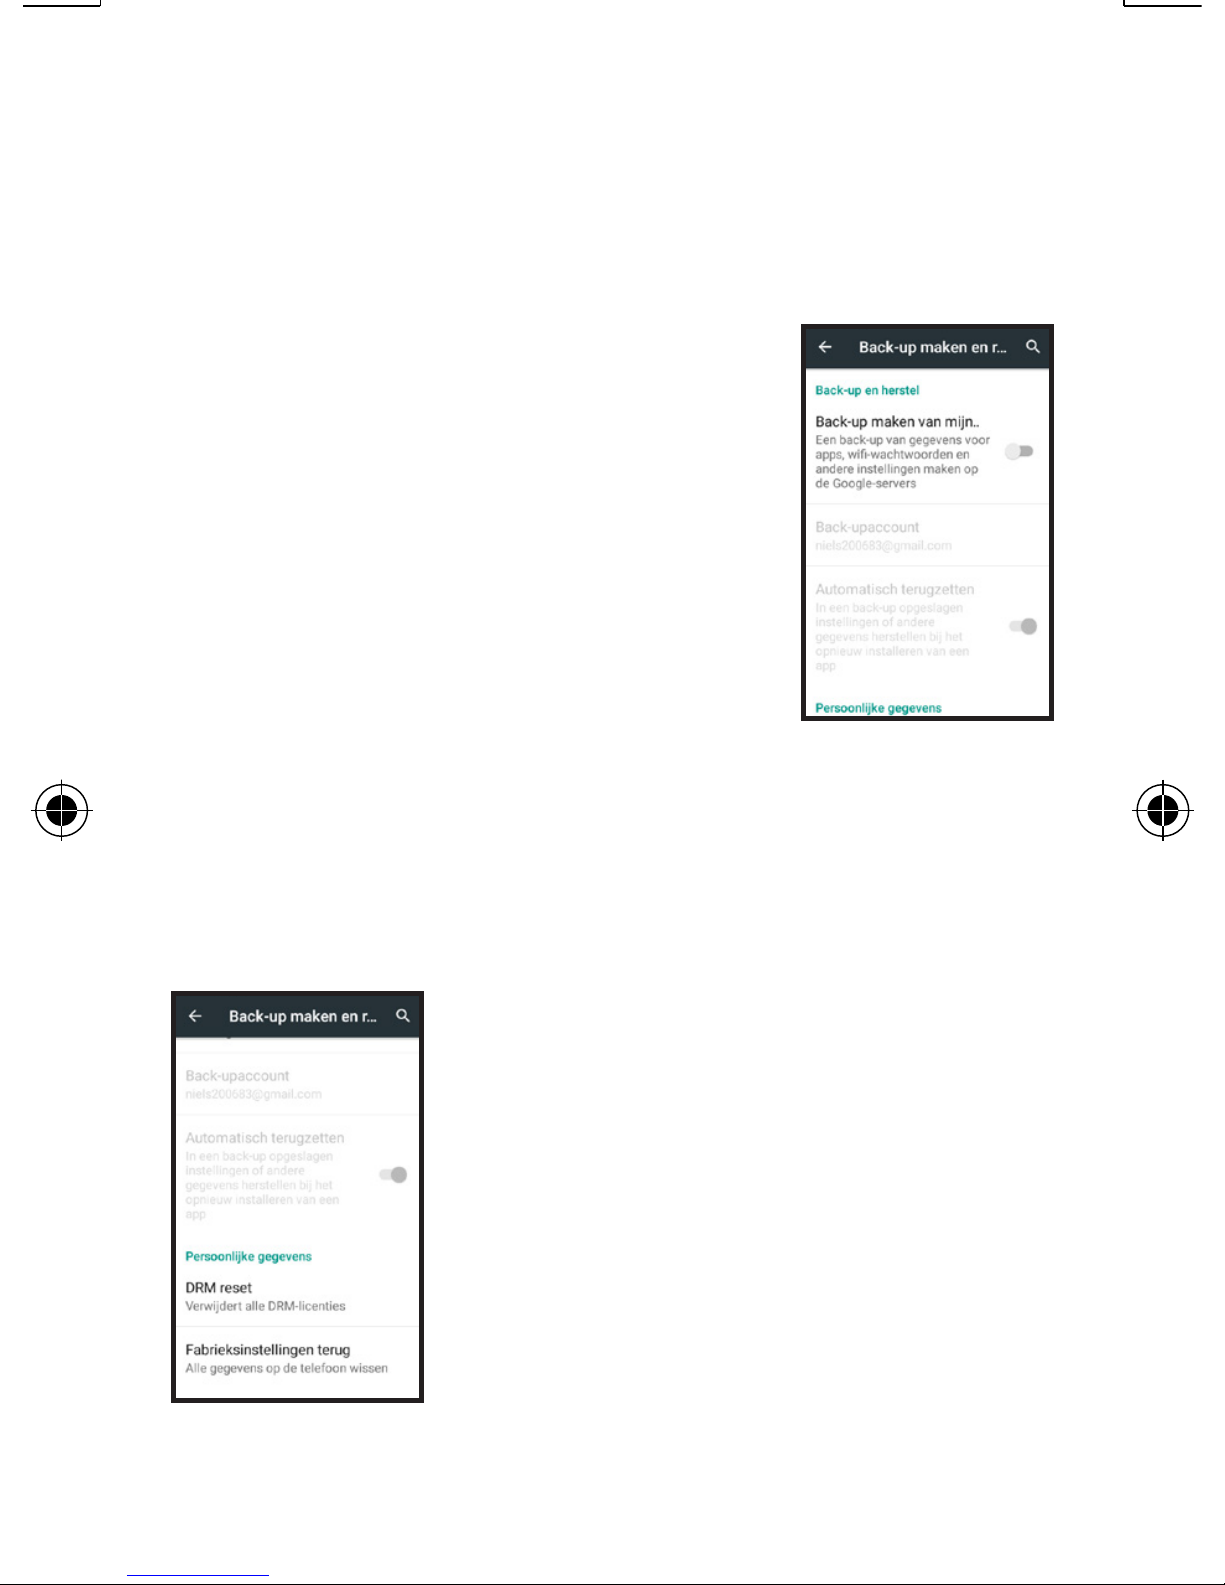
Create backup: If
you own a Google
account, you can
store all your data on
the internet. In case
something goes wrong
you’re your data, you can
automatically retrieve them.
You can use this
menu also to reset
your phone to the
standard factory
settings. Attention:
without a backup,
you’ll lose all your data.
Page 96
96
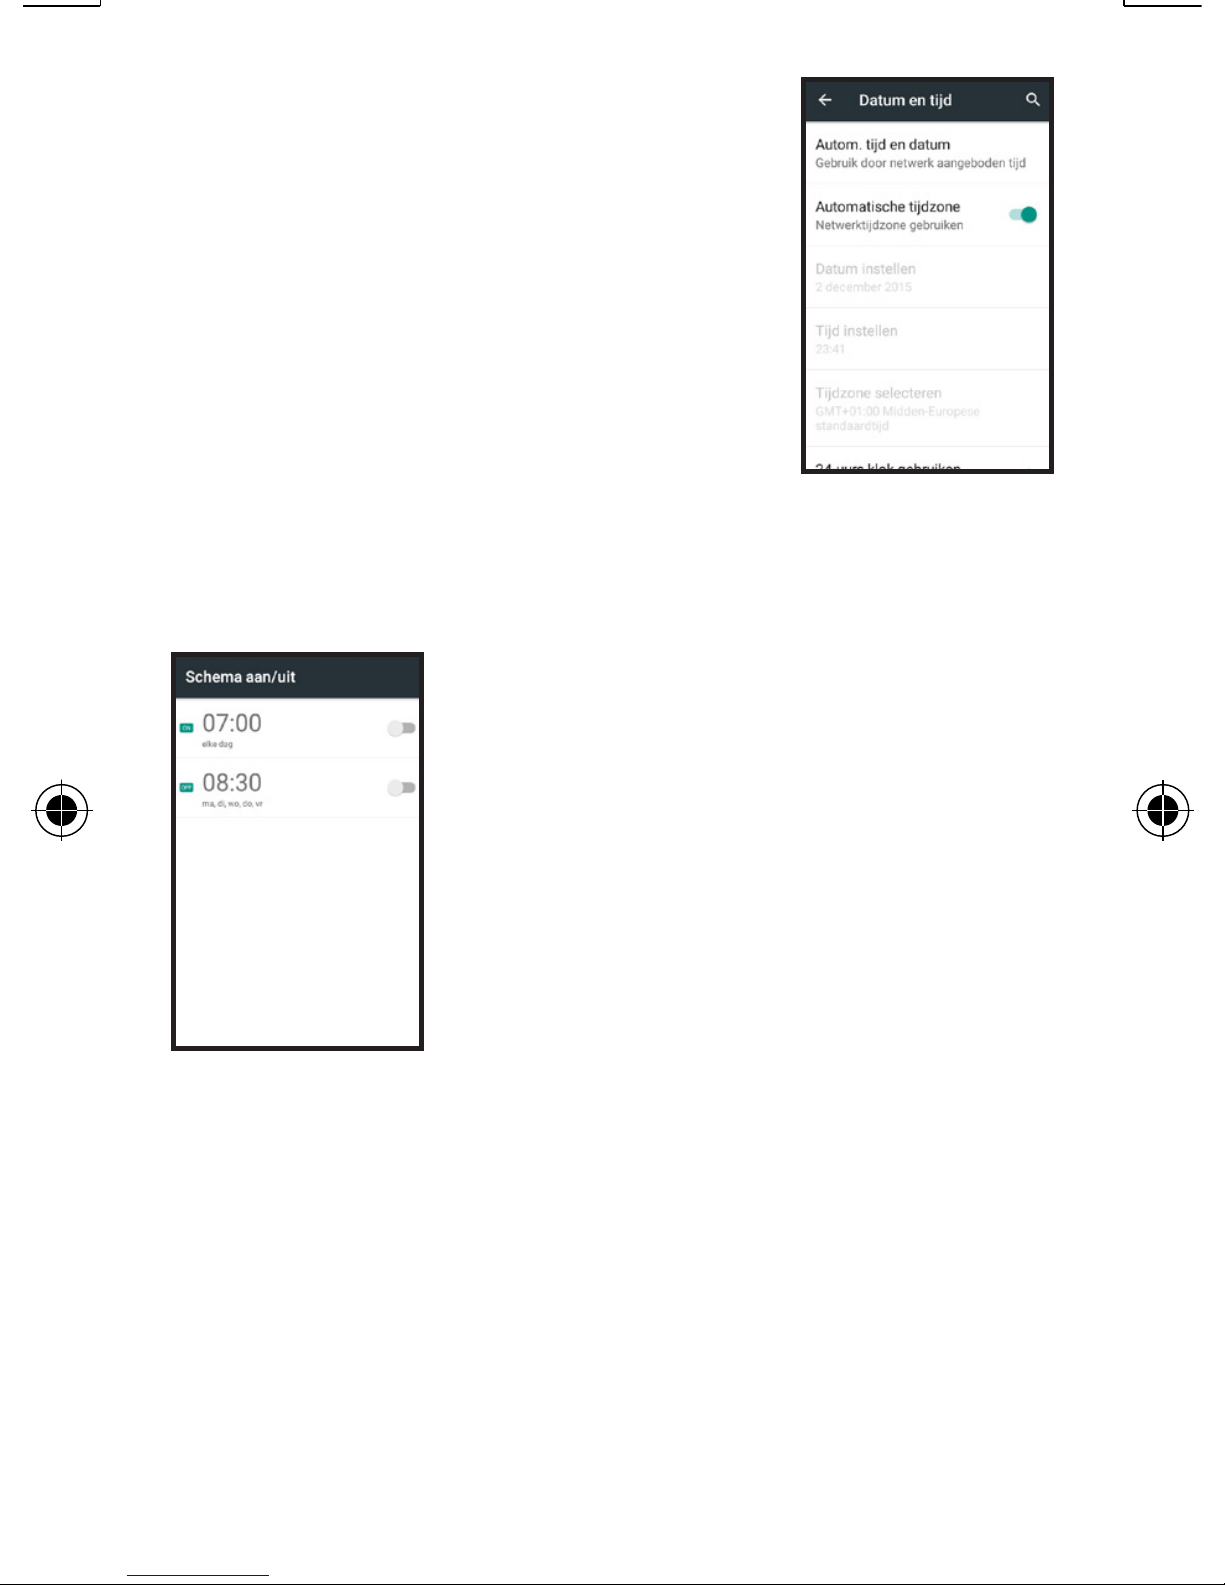
Date and time: Use
this option to set
the date and time.
However, by default
the network will
manage these settings
and adjust them when required.
On/off schedule:
This allows you to
set different times
in combination with
the status ‘turn on’
or ‘turn off’. This
ensures your phone
will turn on and off at
fixed times
Page 97
97
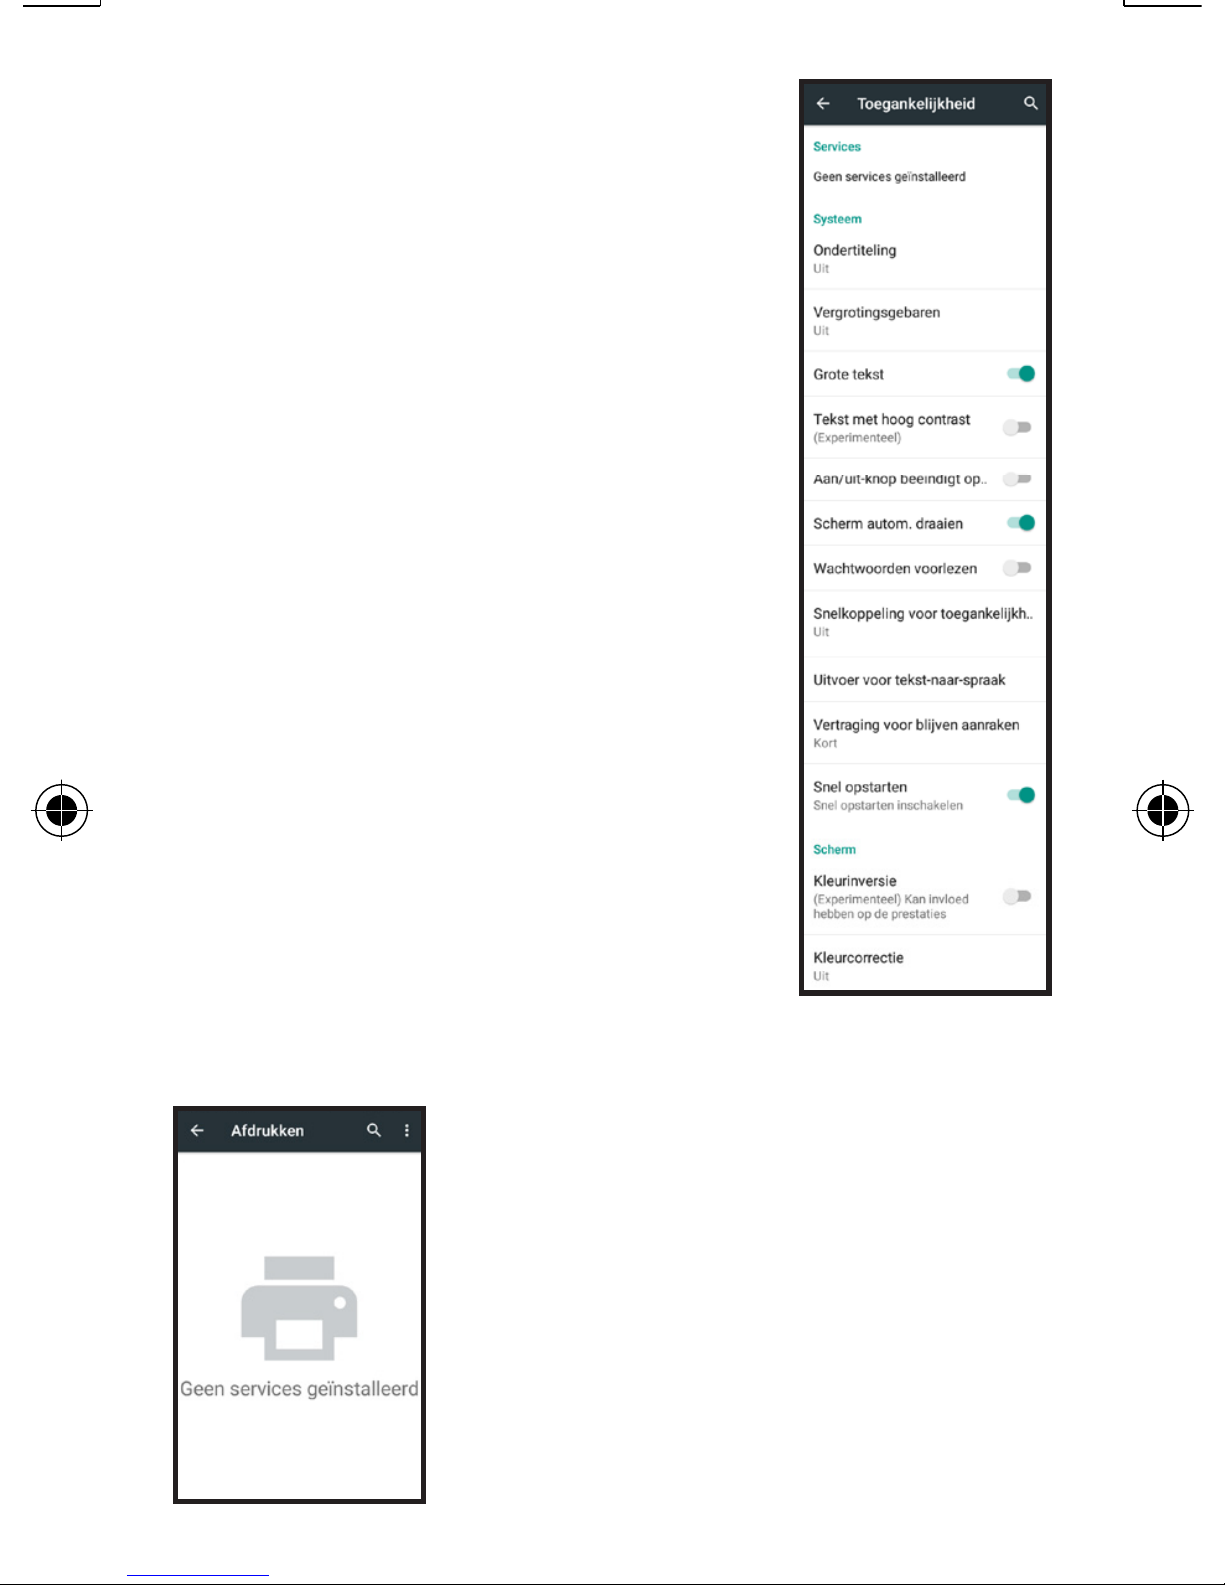
Accessibility: This
offers various options
to make using the
standard Android™
easier.
Keep in mind that
these functions have
no effect on the main
menu, unless you
switch to the Launcher
menu.
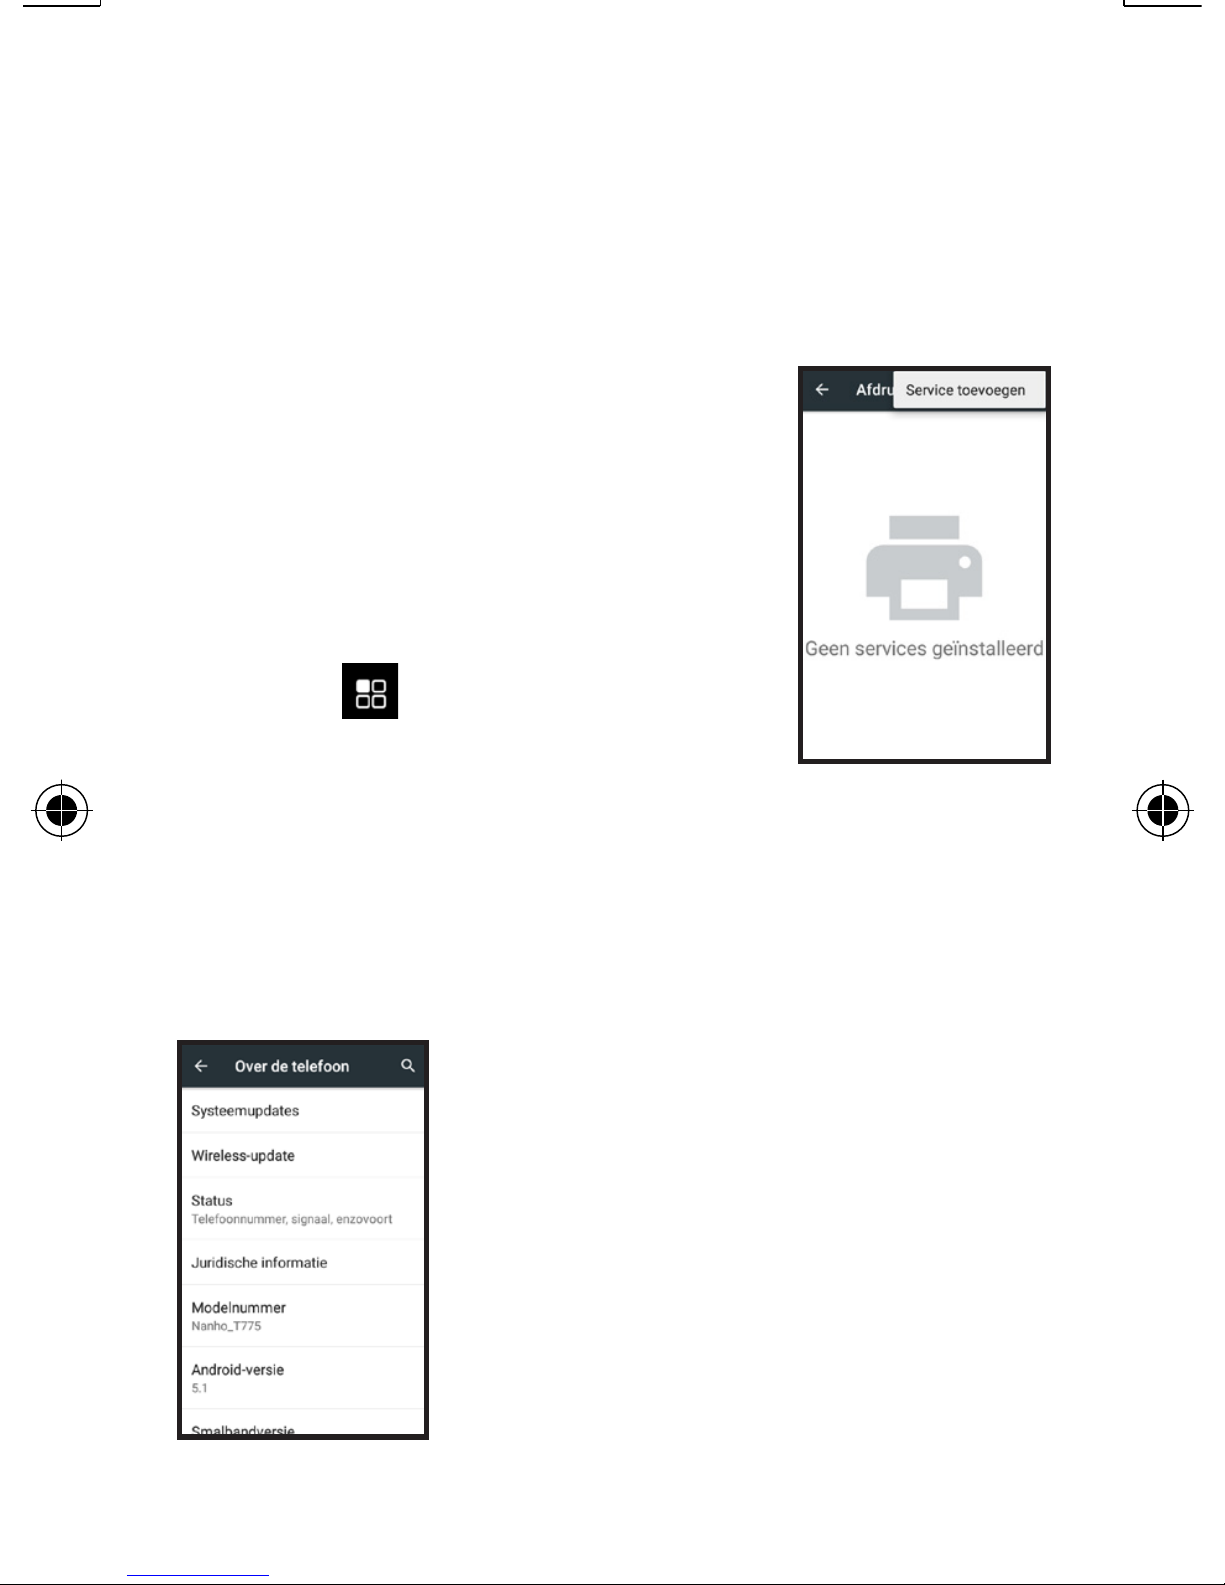
Print: This allows
you to add a printer
service to be used on
your phone.
Page 98
98
This can be a photo printer
service or a printer on your
network managed by an App.
If you have an App
suitable for printing
documents or photos
saved on your phone,
press followed
by ‘Add service’ to
choose the appropriate App
from the list.
About the phone:
Here you’ll find
different information
about your phone,
such as the
Android™ version.
Page 99
99
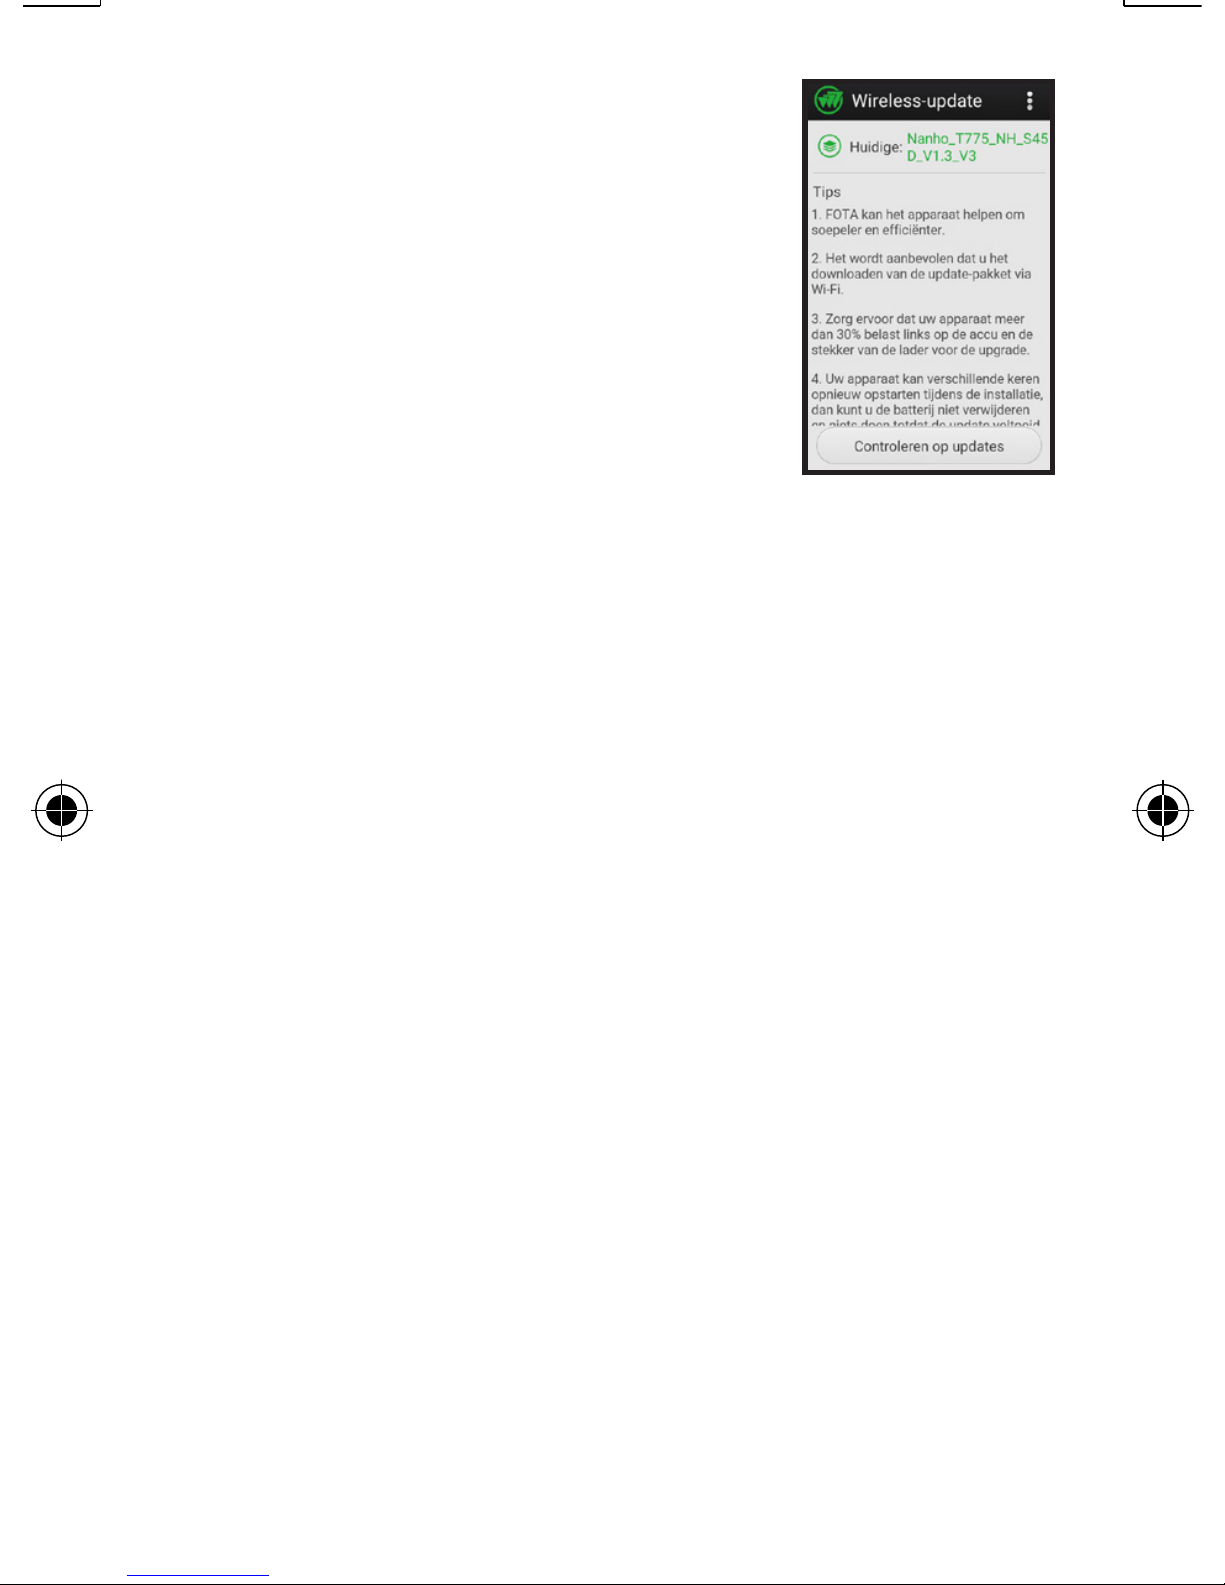
This menu also offers
the option Wireless
Update. By default,
this option is set to
check for new updates
for this phone on a
weekly basis. You can adjust
this in the options menu.
We recommend you to always
install the latest update to
improve your user experience.
You can check directly whether
an update is available by
pressing the ‘Check for updates’
button at the bottom of the
screen.
Page 100
100
6.11 Clock
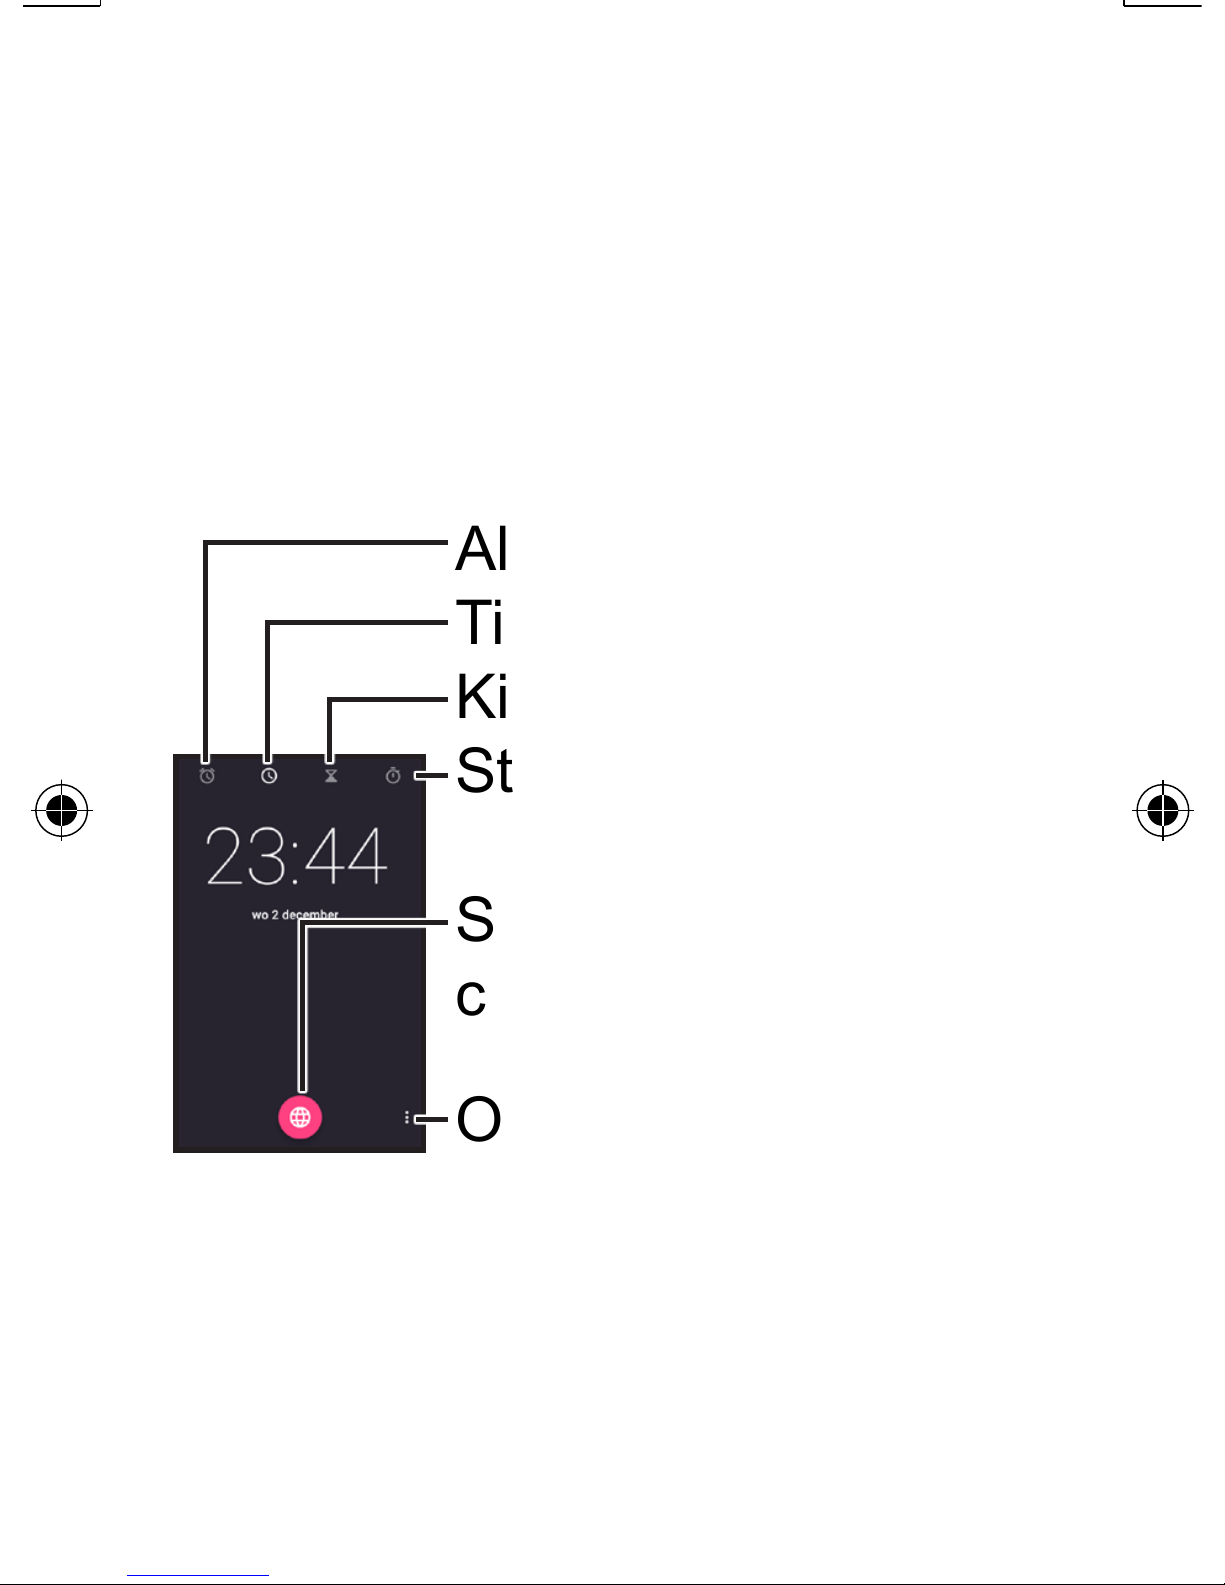
This phone is provided with
an elaborate clock function,
including alarm and stopwatch
options.
Alarm setup
Time display
Kitchen timer
Stopwatch
Set or view different
country
Options menu
By default, opens the time display.
You can switch display by tapping
in the upper part of the screen or
by swiping from left to right.
 Loading...