

Page 1
-1-
USER’S MANUAL
PDX-8400
PDX-8420
Page 2

-2-
1 TABLE OF CONTENTS ............................................................... 2
2 OVERVIEWS
2.1 Handset ........................................................................................ 4
2.2 Display.......................................................................................... 5
2.3 Base ............................................................................................. 5
2.4 Charger ........................................................................................ 5
3 INSTALLATION
3.1 Base station.................................................................................. 6
3.2 Handset ........................................................................................ 6
3.3 Extra handsets and chargers ....................................................... 7
4 OPERATION
4.1 Hands-free.................................................................................... 8
4.2 Answering calls ............................................................................ 8
4.3 Making calls.................................................................................. 8
4.4 End the call................................................................................... 8
4.5 Handset volume ........................................................................... 9
4.6 R/Flash ......................................................................................... 9
4.7 Mute (microphone off) .................................................................. 9
4.8 Search handset ............................................................................ 9
4.9 Key lock ........................................................................................ 9
4.10 Call timer ...................................................................................... 9
4.11 Quick key bell off .......................................................................... 9
5 PHONE BOOK MEMORY
5.1 Introduction................................................................................. 10
5.2 Programming .............................................................................. 10
5.3 Dialing ........................................................................................ 10
5.4 Changes ..................................................................................... 10
5.5 Delete memory selectively ..........................................................11
5.6 Delete memory completely ..........................................................11
5.7 Memory status .............................................................................11
6 LAST NUMBER MEMORY
6.1 Introduction................................................................................. 12
6.2 Redialling.................................................................................... 12
6.3 Copying to the phone book memory .......................................... 12
6.4 Delete last dialed number selectively ......................................... 12
6.5 Delete the complete last number memory.................................. 12
7 CALLER IDENTIFICATION
7.1 Introduction................................................................................. 13
7.2 Indication new calls .................................................................... 13
7.3 View memory and callback ......................................................... 13
7.4 Copying to the phone book memory .......................................... 13
7.5 Delete call selectively ................................................................. 13
7.6 Delete complete call history ....................................................... 14
7.7 Additional information ................................................................. 14
Page 3

-3-
8 VOICEMAIL INDICATION .......................................................... 14
9 MULTIPLE HANDSETS
9.1 Introduction................................................................................. 15
9.2 Intercom ..................................................................................... 15
9.3 Forwarding/conference............................................................... 15
9.4 Registering additional handsets ................................................. 16
9.5 Deregistration of handsets ......................................................... 16
10 PHONE SETTINGS
10.1 Introduction................................................................................. 17
10.2 Menu structure ........................................................................... 17
10.3 Base Settings:
To remove the handset (de-registering) ..................................... 17
Flash time ................................................................................... 17
PIN code..................................................................................... 17
ECO MODE ................................................................................ 17
10.4 Handset Instellingen:
Alarm (alarm function) ................................................................ 18
Ring tones handset .................................................................... 18
Handset tones ............................................................................ 18
Language ................................................................................... 19
Name handset ............................................................................ 19
Answering automatically............................................................. 19
Date and time ............................................................................. 19
10.5 Factory settings .......................................................................... 20
11 TIPS AND WARNINGS
11.1 General....................................................................................... 21
11.2 Installation .................................................................................. 21
11.3 Placement .................................................................................. 21
11.4 Range ......................................................................................... 22
11.5 Power failure .............................................................................. 22
11.6 Hearing aids ............................................................................... 22
11.7 Eavesdropping ........................................................................... 22
11.8 Maintenance ............................................................................... 22
11.9 Medical equipment ..................................................................... 22
11.10 Power supply handset ................................................................ 23
11.11 Environment ............................................................................... 23
12 POSSIBLE PROBLEMS AND SOLUTIONS ............................. 24
13 FORGOT PIN CODE .................................................................. 25
14 SPECIFICATIONS ..................................................................... 26
15 DECLARATION OF CONFORMITY .......................................... 26
16 WARRANTY ............................................................................... 27
Page 4
-4-
2 OVERVIEWS
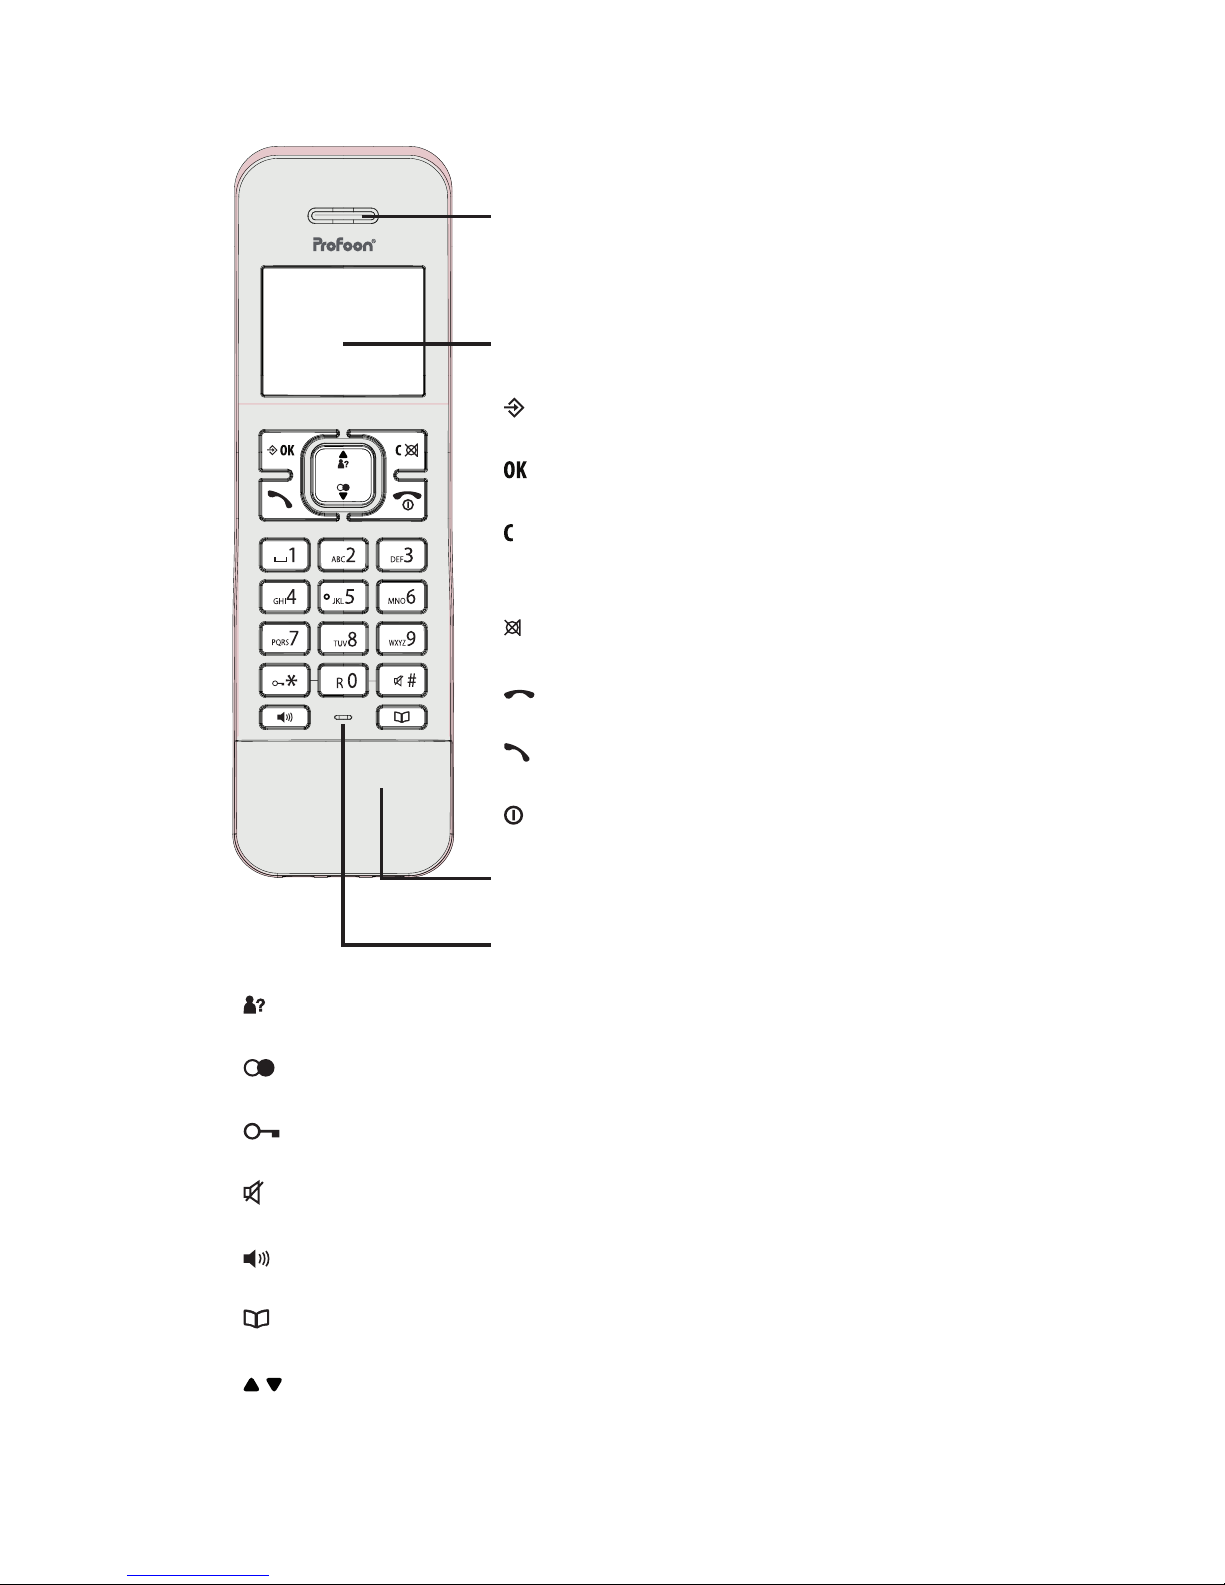
2.1 Handset:
built-in speaker
display, see the next paragraph
: program button
: OK button while programming
: correction button during name or number
input
: to mute the microphone
: call button
: end button
: to switch off the handset (briey press and
hold the button)
battery cover
built-in microphone
: to open the Caller-ID memory
: to open the last dialled number memory
: briey press and hold to lock the keypad
: to disable the ringtone (briey press and hold the button)
: to switch on the speaker function
: to open the phonebook memory
: to scroll settings and memories
Page 5
-5-
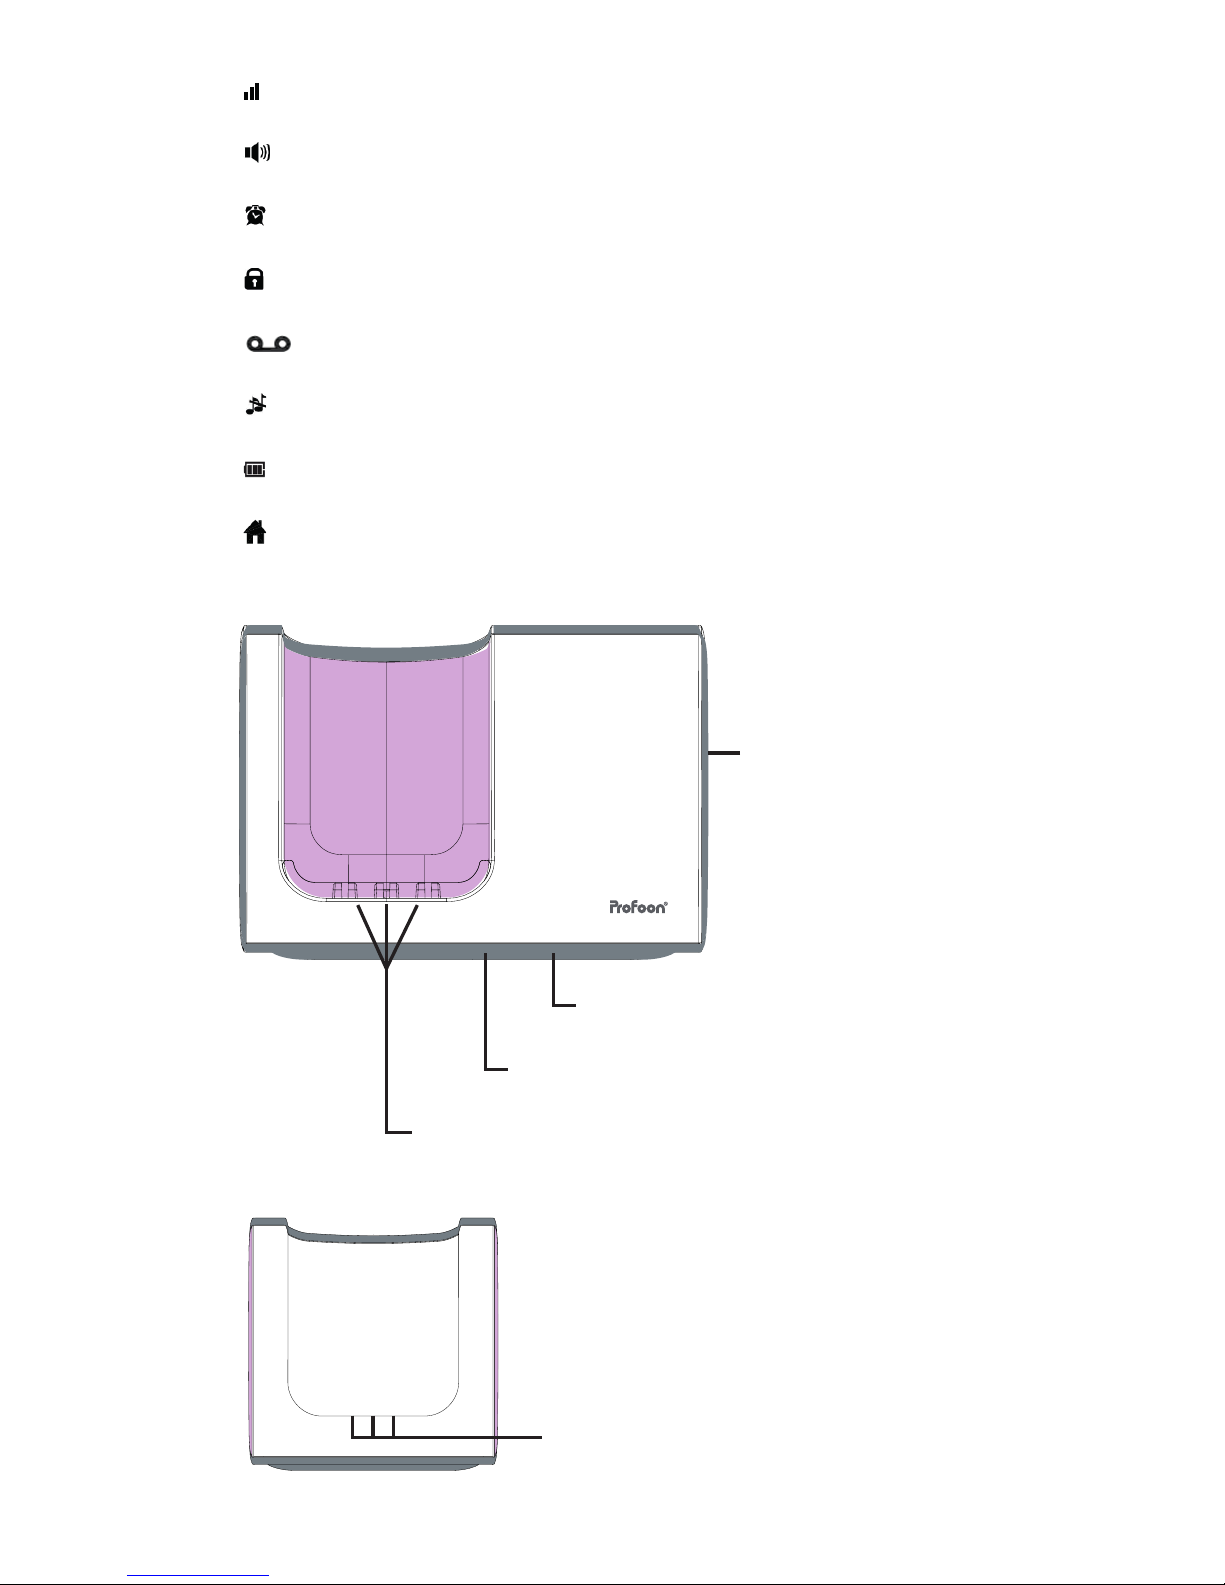
2.2 Display:
: illuminates when the handset is within reach of the base
: speaker function is enabled
: (wake-up) alarm is enabled
: keypad is locked
: you have new messages in your Voicemail
: ringtone is disabled
: battery charge state
: ashes when receiving a call, remains lit during a call
2.3 Base:
handset scan button
phone line input (rear)
power adaptor input (rear)
contacts for charging the handset
2.4 Charger: (only for models with additional handsets)
contacts for charging additional handsets
Page 6
-6-
3 INSTALLATION
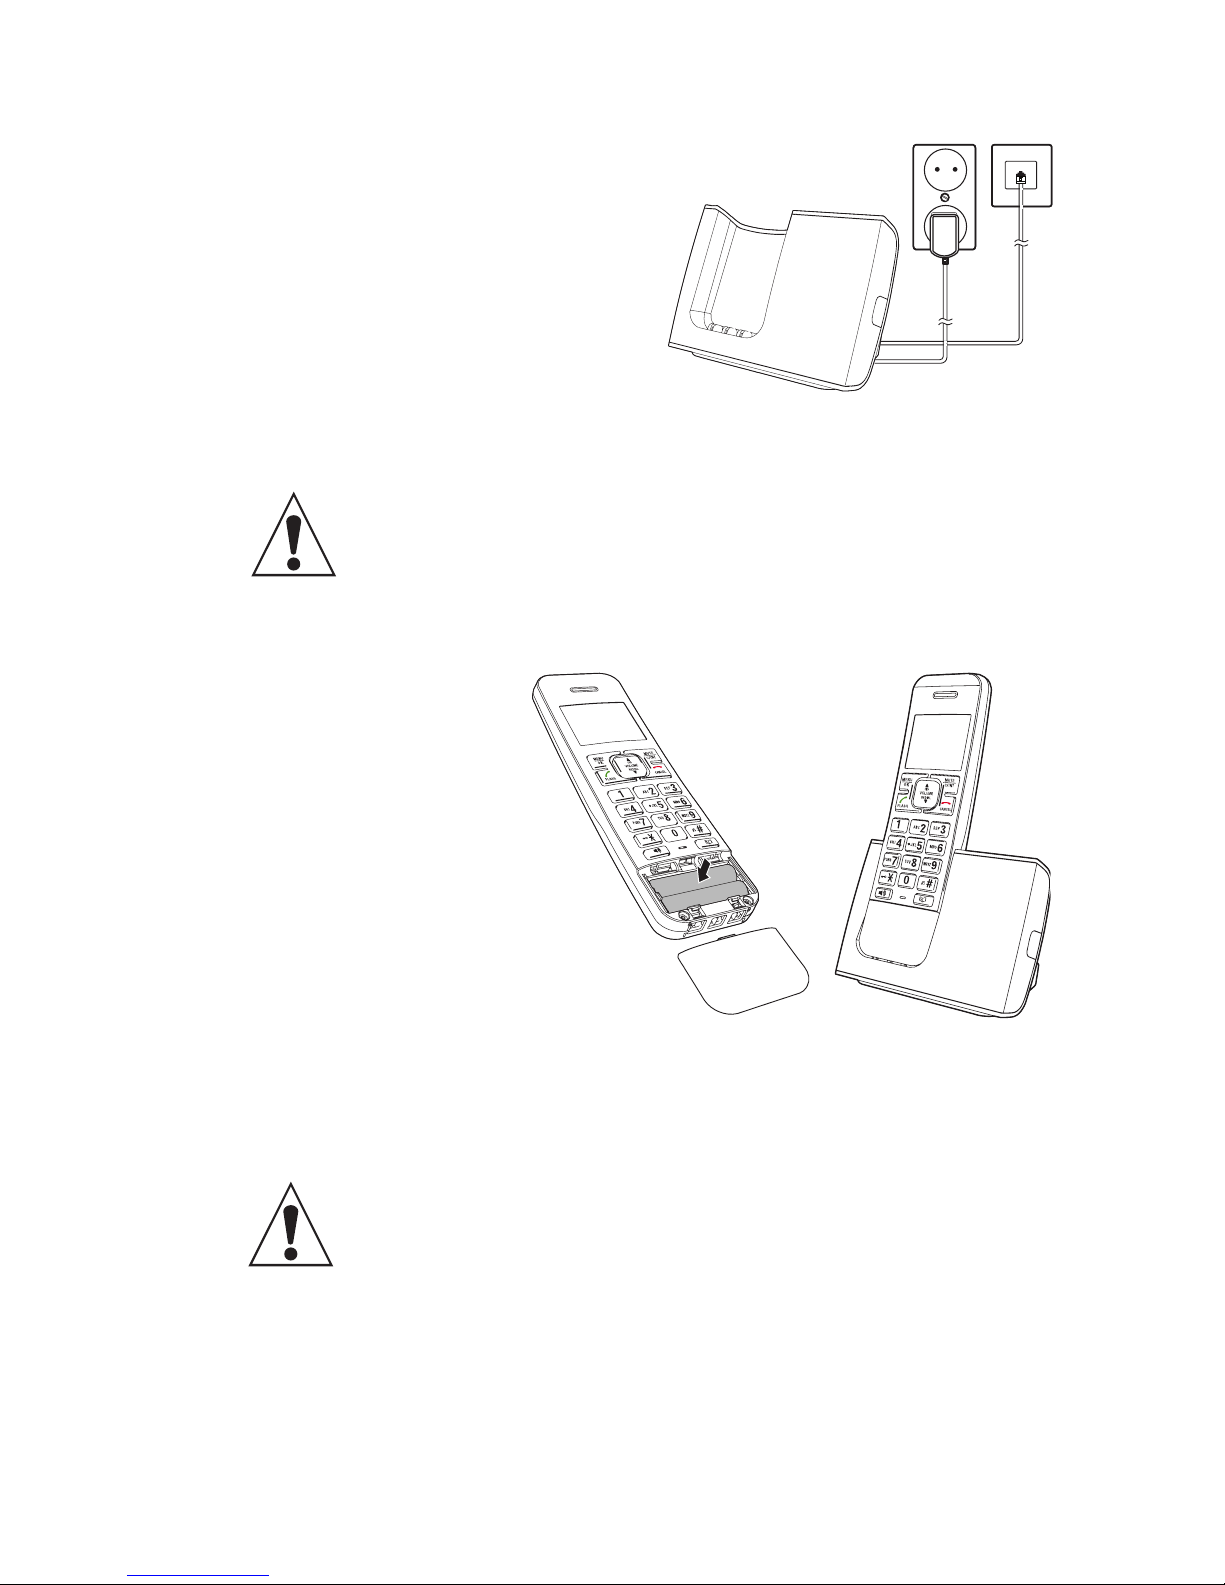
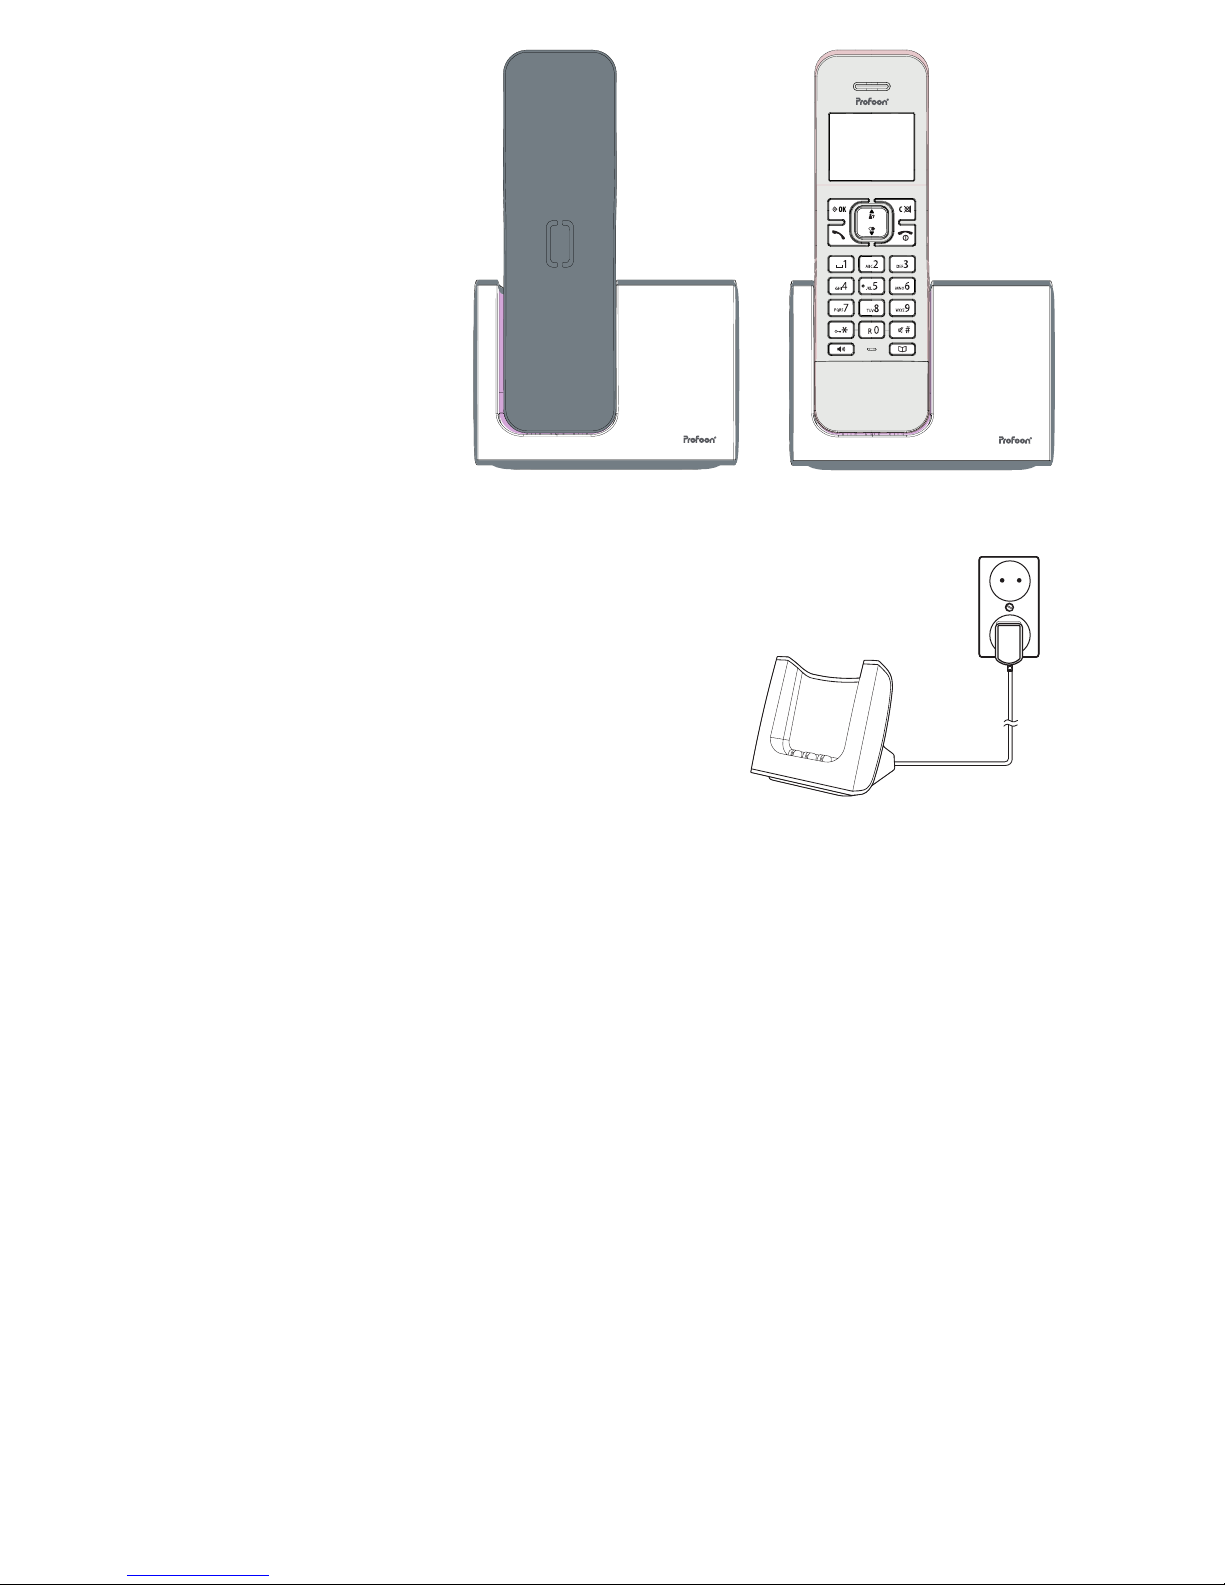
3.1 Base station:
1. Plug the small connector at the
phone cable into the back of the
base station (press the connector
until you hear a click).
2. Plug the phone connector into the
phone socket.
3. Plug the low voltage connector of
the adapter into the backside of
the phone, and plug the adapter
into a 230 Volt mains socket.
ONLY CONNECT THE INCLUDED ADAPTER. CONNECTING OTHER ADAPTERS MAY RESULT IN DANGEROUS
SITUATIONS OR MAY CAUSE DAMAGE TO THE ELEC-
TRONICS OF THE PHONE.
3.2 Handset:
1. Open the battery
compartment of the
handset, by sliding the
battery cover down.
2. Insert the batteries into the battery
compartment; at this,
pay attention to the
polarity (+ and -).
3. Slide the battery cover
back onto the handset
and place the handset
on the base station.
4. Leave the handset continuously during 15 hours on the base station, to charge the batteries properly.
INSERT ONLY RECHARGEABLE NiMH (NICKEL METAL
HYDRIDE) BATTERIES. THE USE OF NOT RECHARGEABLE BATTERIES MAY CAUSE DANGEROUS SITUA-
TIONS OR EXPLOSION HAZARD.
PAGE
PAG
E
Page 7
-7-
You can choose to
place the handset
onto the base/
charger aimed to
the front or to the
back to charge the
batteries.
3.3 Extra handsets and chargers:
If your phone has been delivered with
multiple handsets, 2 batteries and a
charger with adapter will be included for
every handset. Plug the adapter of these
chargers in a 230 Volt mains socket, insert
the batteries into the handset(s) and place
the handset(s) 15 hours of continuous in
the charger(s) to charge the batteries.
Page 8

-8-
4 OPERATION
4.1 Hands-free:
You can make calls holding the handset to your ear or via the built-in
speaker function.
1. press the button to switch on the speaker function
2. press the
button again to switch off the speaker function (the
call remains connected)
4.2 Answering calls:
1. Press the key phone-on to accept a call.
See the item Automatic answer in paragraph 10.4 to answer calls
directly by simply picking up the handset from the base.
4.3 Making calls:
Block dialing:
1. Enter the phone number through the keyboard. You can delete
an incorrect entry with key , briey press and hold the # button to
insert a dialling pause.
2. Press the phone-on key to dial the number.
Direct dialing:
1. Press the phone-on key and wait for the dial tone.
2. Enter the phone number through the keyboard; this number will be
dialed directly.
dialling from the phonebook memory: (see also chapter 5)
1. Press the key
2. Search the desired contact, using keys
and
.
3. Press the phone-on key to dial the number.
dialling from the last dialled number memory: (see also chapter 6)
1. Press the key
2. Search the desired memory, using keys
and
.
3. Press the phone-on key to dial the number.
dialling from the Caller-ID memory: (see also chapter 7)
1. Press the key
2. Search the desired memory, using keys
and
.
3. Press the phone-on key to dial the number.
4.4 End the call:
1. Press the key phone-off to end a call
The end the call, you can also place the handset back on the base
station or the charger.
Page 9

-9-
4.5 Handset volume:
1. During the call, press the keys or , to increase or decrease the
volume.
4.6 R/Flash:
1. During the call, shortly press the key R to give a FLASH pulse. The
interruption time of the FLASH pulse is adjustable; for this, see the
item Flash duration in paragraph 10.3
4.7 Mute (microphone off):
1. To disable the microphone, shortly press the key during the call
You can still hear the other party, but they cannot hear you.
2. To enable the microphone again, shortly press the key again.
4.8 Search handset:
1. Shortly press the key on the base station.
During 60 seconds, a signal will sound from the handset, and the
word ‘PAGING’ ashes on the display of the handset. Press the key
phone-off to end the signal prematurely.
4.9 Key lock:
1. To enable the key lock, keep the key pressed for more than
2 seconds, a locked keypad is indicated in the display by the
symbol
2. To disable the key lock, keep the key pressed for more than
2 seconds again.
4.10 Call timer:
1. During the phone call, the elapsed call duration is displayed on the
display.
4.11 Quick key bell off:
1. To disable the bell of the handset, press key during more than
2 seconds.
when the ringtone is disabled, the symbol will appear in the
display
2. To enable the bell again, press key during more than 2 seconds.
Page 10

-10-
5 PHONE BOOK MEMORY
5.1 Introduction:
The handset is provided with a phonebook memory with a capacity of
20 contacts, each with a phonenumber of up to 24 digits and a name of
up to 12 characters.
The phone book memory in the handset is connected to the function
Caller Identication. When you are called by somebody, whose name
and number you have programmed in the memory, the name of this
person is also displayed beside the number on the display of your
handset. However, for this you need to subscribe to the service Caller
Identication.
5.2 Programming:
1. press the key .
2. use the and button to select the option PHONEBOOK
3. press 3x the key .
4. Enter the name through the keyboard (see the ABC on the dial
keys).
press the 1 and 0 buttons to insert various special characters and
press the button to delete any incorrect input
5. press the key
6. Enter the number through the keyboard.You can delete an incorrect input with key .
briey press and hold the # button to insert a dialling pause
7. press the key
8. Select the desired VIP ring tone for this number, using and .
9. Press the key to store the memory.
5.3 Dialing:
1. press the key .
2. Search the desired memory, using keys and .
3. Press on the phone key to dial this number.
5.4 Changes:
1. Press the key .
2.
Search the desired memory, using keys and and press the key
3. Search the option [ EDIT ] with the keys and , press the key
4. Use key to delete the old name and enter the new name through
the keyboard.
5. Press the key
6. Use key to delete the old number and enter the new number
through the keyboard.
Page 11

-11-
7. Press the key
8. Select the desired VIP ring tone for this number with and and
press the key to save the corrected memory.
5.5 Delete memory selectively:
1. Press the key .
2.
Search the desired memory, using keys and and press the key .
3. Search the option [ DELETE ] with the keys and .
4. Press key to delete this memory.
5.6 Delete memory completely:
1. Press the key .
2. Press the key
3. Search the option [ DELETE ALL ] with the keys and .
4. Press key twice to delete the memory completely.
5.7 Memory status:
You can see how many storage locations you have available:
1. Press the key .
2. Press the key
3. Search the option [PB STATUS] with the keys and .
4. Press the key ; the following appears on the display: 15/50 USED
(15 of the 50 memories are in use)
5. Press 3x the key phone-off to return to the idle mode of the handset.
Page 12

-12-
6 LAST NUMBER MEMORY
6.1 Introduction:
The handset remembers the last 10 numbers you’ve dialled using the
handset. These numbers can be redialled, copied to the phonebook
memory or deleted with a single action.
6.2 Redialling:
1. press the button, the last number you’ve dialled will appear in
the display
2. Search the desired number with and .
3. press the Call button to dial this number
6.3 Copying to the phone book memory:
1. Press the key .
2. Search the desired number with and .
3. Press the key twice.
4. Enter the name through the keyboard.
5. Press the key twice.
6. Select the desired VIP ring tone for this number with and .
7. Press the key to store the memory.
6.4 Delete last dialed number selectively:
1. Press the key .
2. Search the desired number with and
3. Press the key
4. Select the option [ DELETE ] with and .
5. Press the key to delete this memory.
6.5 Delete the complete last number memory:
1. Press the key .
2. Press the key
3. Select the option [ DELETE ALL ] with and .
4. Press the key twice, to delete the complete last number memory.
Page 13

-13-
7 CALLER IDENTIFICATION
7.1 Introduction:
If you have the service Caller Identication at your disposal, the number of the calling party is displayed on the display of your handset(s).
If your carrier also transmits names, or you have programmed this
number including name and the phone book memory of the handset,
the name is also displayed on the display. The Caller Identication
memory has a capacity of 20 numbers. Attention: when this memory
is full, every following incoming call will overwrite the oldest call in the
memory.
7.2 Indication new calls:
This display indicates whether and how many new calls are stored in
the Caller Identication memory that you have not seen yet. As soon
as you have viewed the memory, this notication goes off.
7.3 View memory and callback:
1. Press the key ; the name or the number of the last received call
appears on the display.
2. Browse through the memory by using and .
press the key OK twice to view the time and date of the call
3. Press the phone-off key to call back this subscriber.
7.4 Copying to the phone book memory:
1. Press the key : the name of the number of the last received call
appears on the display.
2. Search the desired call with and .
3. press the button and use and to select the option [ ADD TO
PB ], press the button
4. Enter the name through the keyboard; and press button twice.
5. Select the desired VIP ring tone with and and press the button
7.5 Delete call selectively:
1. Press the key ; the name or the number of the last received call
appears on the display.
2. Search the desired call with and .
3. Press the key and select the option [ DELETE ] with and .
4. Press the key to delete this call.
Page 14

-14-
7.6 Delete complete call history:
1. Press the key ; the name or the number of the last received call
appears on the display.
2.
Press the key and select the option [ DELETE ALL ] with and .
3. Press the key twice, to delete the complete call history.
7.7 Additional information:
• The Caller-ID service often requires an additional subscription;
please contact your telephone service provider for more information.
• Each handset has a capacity of 20 incoming calls. Attention: when
this memory is full, any incoming call will overwrite the oldest call
in this memory. The memory must be deleted separately in each
handset.
• If the display shows [WITHHELD], [PRIVATE] or [0000000000],
the calling subscriber has blocked sending his or her name and
number.
• The names/numbers of the calls you’ve answered are also saved.
• Name display:
− the DTMF system doesn’t send any names; the name will
only appear in the display when you’ve programmed it in the
phonebook memory of the handset
− the FSK system does send names (ask your telephone service
provider for more information)
• Time and date of calls:
− the FSK system sends the date and time of the calls
− the DTMF system does NOT send time / date information, but
uses the time and date you’ve set yourself (see paragraph 10.4)
8 VOICEMAIL INDICATION: (
)
In case the carrier left a Voicemail message for you, this is shown on
the display with an illuminating
. This symbol goes off as soon as
you have listened to this message.
Attention: this function is only available on the FSK system and when
this is supported by the carrier.
Page 15

-15-
9 MULTIPLE HANDSETS
9.1 Introduction:
You can connect (register) up to 5 wireless handsets to the PDX-8400.
With multiple registered handsets, you can call each other for free in
and around the house and forward calls or even call with three people.
If the phone has been delivered with one handset, u can purchase
extra handsets (*), which you shall register rst (see the concerning
instructions further in this user manual). If the phone has been delivered with multiple handsets, you can make internal calls and forward
calls directly.
9.2 Intercom:
1. Press the key
2. 2 handsets in use:
In case 2 handsets have been
registered with your phone, the
other handset will ring immediately.
More than 2 handsets in use:
In case more than 2 handsets have
been registered with your phone,
you’ll rst have to select the desired
handset using the and buttons
and then press
3. You can make the intercom call, as soon as the called handset
answers.
When receiving a call from an outside line during an intercom call, the
handsets will emit a special notification tone. You can end your call,
wait for the normal ringtone and then answer the outside call. When
you’ve registered more than 2 handsets to the base, you can also
answer the outside call using one of the other handsets
9.3 Forwarding/conference:
1. During the call with the outside line, press the key twice.
2. 2 handsets in use:
In case 2 handsets have been
registered with your phone, the
other handset will ring immediately.
More than 2 handsets in use:
In case more than 2 handsets have
been registered with your phone,
you’ll rst have to select the desire
handset using the and buttons
and then press
3. Forwarding:
As soon as the called handset
answers, press on the phoneoff key; the outside line is now
forwarded.
Conference:
As soon as the called handset
answers, press the key * (star) during
2 seconds; the outside line is now
included.
Page 16

-16-
9.4 Registering additional handsets:
1. press the button on the new handset and select the option
[ REGISTER ]
2. press the key and enter the PIN code (de factory code 0000 or
your own PIN code) and press the key . The handset will search
for the concerning base station.
3. now press and hold the button on the base for 5 seconds.
4. After a few seconds a beep tone will sound from the handset, and
the handset has been registered. At the right side of the display the
internal number of this handset is displayed (1~5).
9.5 Deregistration of handsets:
Handsets that are faulty shall be deregistered.
1. Press the key and select buttons and the option [ BS SET-
TINGS ].
2. Press the key twice, and enter the PIN code (de factory code
0000 or your own PIN code).
3. Press the key and select buttons and , the handset that you
want to deregister (*).
4. Press the key ; the selected handset is deregistered now.
* You can only deregister other handsets; you cannot deregister your
own handset.
Page 17

-17-
10 PHONE SETTINGS
10.1 Introduction:
You can use the menu in the handset to fully customize the handset
to your preferences.
1. Open the menu by pressing the key .
2. Browse through the menu options by using and .
3. Press the key to open the desired option.
4. Make a choice or select ‘on’ or ‘off’ with the keys and .
5. Finally, press the key to save the settings.
10.2 Menu structure:
The menu structure of the PDX-8400 series looks as follows:
CALL LIST
PHONEBOOK
BS SETTINGS
DELETE HS
FLASH TIME
CHANGE PIN
ECO MODE
HS SETTINGS
ALARM
RING SETUP
EXT. RING
INT. RING
RING VOLUME
TONE SETUP
LANGUAGE
RENAME HS
AUTO ANSWER
DATE & TIME
REGISTRATION
DEFAULT
10.3 Base Settings:
To remove the handset: (de-registering)
This function is explained in detail in paragraph 9.5.
Flash time:
A flash pulse is a very short interruption the phone connection.
You can set the interruption time of the FLASH pulse on [ SHORT ]
(100 ms), [ MEDIUM ] (300 ms) or [ LONG ] (600 ms).
Page 18

-18-
Refer to the user manual of your home or ofce switchboard or consult
your carrier concerning the desired interruption time. 100 ms is the
standardized interruption time, and this time is set at the factory.
CHANGE PIN:
You can change the PIN code, which you need with registering and
deregistering of (new) handset, with [CHANGE PIN]. The factory PIN
code is 0000.
See chapter 13 (forget PIN code), in case you have lost or forgotten
the new PIN code.
ECO MODE:
When setting the ECO Mode to ON, you decrease the transmitting
power of the handset and base. This results in a lower emission, but
also a shorter range (+/- 50%).
10.4 Handset Instellingen:
Alarm: (alarm function)
You can set the phone to sound an alarm tone during 45 seconds at
a preset moment (or press any key to switch off the signal prematurely).
Select ON to enable this function, and enter the alarm time through
the keyboard (24 hour system). After this, you can enable or disable
the snooze function (7 minutes snooze).The alarm must be reset
daily.
Ring tones handset:
Select the option [ RING SETUP ] to set the ring tones of the handset:
• You can set different melodies for intercom calls and calls from
outside.
• At [ INT. RING ] and [ EXT. RING ], you can choose from 10 differ-
ent melodies.
• At [ RING VOLUME ], you can choose from 5 volume levels and
‘volume-off’.
Handset tones:
You can enable or disable the following tones through the option
[ TONE SETUP ]:
• [ KEY TONE ]: the tones that sound when you press a key.
• [ BATTERY TONE ]: the tones that sound when the batteries are
low.
• [ OUT OF RANGE ]: the tones that sound when you get out of
reach.
Page 19

-19-
Language:
Here you can set the language in which the various instructions are
displayed on the display.
Instructions to revert to the English language, in case you have set a
foreign language accidentally:
1. Press the key ‘phone-off’ 3 times.
2. Press the key once.
3. Press key 3 times.
4. Press the key once.
5. Press key 3 times.
6. Press the key once.
7. Select the English language with and .
8. Press the key once.
9. Press the key phone-off to return to the idle mode of the handset.
Name handset:
You can name your handset through the option (RENAME HS). Use
key to delete the old name and enter the new name of at most 10
characters through the keyboard. Press the key to save the name.
Answering automatically
When the function [ AUTO ANSWER ] is enabled, you can accept calls
by only taking the handset from the base station or charger; then you
do not need to use the phone key. Attention: In case the handset is not
placed on the base station or the charger, you always need to press the
phone-on to accept a call.
Date and time:
At idle, you can display the time on the display of the handset, an at
Caller Identification, the time and date of the call are registered. Enter
the time and the date at the respective options [ SET TIME ] and
[ SET DATE ].
You can chose from the formats day-month-year or month-day-year
at [ DATE FORMAT ], and you can chose from 12 hour or 24 hour
time format at [ TIME FORMAT ].
When using multiple handsets: you only have to set the time/date
in one handset, the other handset(s) will be automatically set to the
same time.
Page 20

-20-
10.5 Factory settings:
You can reset the settings the way they were when the phone left the
factory, through the option [ DEFAULT ]:
Name handset: handset
Display language: Dutch
Ring volume: level 3
Call melody external call: melody 6
Call melody internal call: melody 1
Reception volume: level 3
Show handset: on
Key lock: off
Alarm: off
Auto answer: off
Date format: day-month-year
Hour format: 24 hours
Flash time: short (100 ms)
Redialling memory: empty
Caller-ID memory: empty
PIN code: 0000
The memories stay undisturbed with this reset instruction.
Page 21

-21-
11 TIPS AND WARNINGS
11.1 General:
• Read the user manual carefully and follow all instructions.
• Never place or use the phone in a wet or moist room or
environment.
• Take care of proper heat dissipation; never cover the phone and/or
the power supply adapter(s), and do not place them directly beside
a heat source.
• Use only the included adapter(s); connecting another type of
adapter may cause damage to the electronics.
• Take care that the cable of the phone and the adapter do not get
damaged, and prevent that they cause tripping or falling.
• Never disassemble the base station, the handset(s), the charger(s)
and the adapter(s). This may only be done by qualified personnel.
11.2 Installation:
• Connect or disconnect the cables of the phone and the power
supply adapter only to the base station when the power supply
adapter has been unplugged from the mains socket, and the phone
connector has been disconnected from the phone socket.
• Do not install the phone during a lightning storm.
• Do not install a phone connection point in a wet or moist
environment.
• Do not touch uninsulated phone or adapter cables, unless they are
disconnected from the phone network or the mains power.
11.3 Placement:
• Preferably, do not place the device on surfaces that have been
treated with cellulose; the rubber feet can leave traces on these.
• Do not place the phone in the direct vicinity of other phones
or other electronic (medical) devices, TL tubes and other gas
discharge lamps; the emitted radio waves of these (and other)
wireless phone(s) may disrupt the functioning of the equipment, or
the emitted signals of the equipment disrupt the functioning of the
phone.
Page 22

-22-
11.4 Range:
• The range of the phone is up to 300 meters in the open field and
up to 50 meters inside; the range depends on local circumstances.
When you get out of range of the base, the symbol will disappear
and the text [ OUT OF RANGE ] starts flashing in the display. In
case the power supply adapter of the base station is unplugged
from the mains socket, the handset will lose contact with the base
station, the display will display [SEARCHING], and the antenna
symbol will start flashing. The handset will restore contact with the
base station within several minutes after the power supply adapter
has been plugged in again.
11.5 Power failure:
• This phone obtains its power supply from the mains power. In case
of failure of the mains power, this phone cannot be used. Therefore
it is advisable to keep a wired phone in reserve.
11.6 Hearing aids:
• Users of older generation hearing aids always shall keep into
account a possible uncomfortable buzzing tone when using DECT
phones.
11.7 Eavesdropping:
• Eavesdropping on a DECT phone is virtually impossible. Not only
shall one be within reach of the DECT phone, one also needs
expensive equipment.
11.8 Maintenance:
• Clean the phone only with a moist cloth; do not use any chemical
detergents.
• The adapter and the phone cable shall be disconnected before
cleaning.
11.9 Medical equipment:
• It is possible that enabled DECT phones interfere with sensitive
medical equipment. When the phone is kept in the vicinity of the
medical device, interference can occur. Do not place a DECT phone
on or near a medical device, not even when it is in standby mode.
Page 23

-23-
11.10 Power supply handset:
•
The display of the handset is provided with a built-in battery
capacity meterWhen the battery symbol is full (
), the battery is
fully charged; when the battery symbol is empty ( ), the battery
should be charged. While charging, the symbol will keep scrolling
until the battery is fully charged.
•
We recommend placing the handset every evening on the base
station or charger, for optimal use. This does not have an adverse
effect on the rechargeable batteries.
•
Rechargeable batteries or battery packs shall not be exposed to
re or extreme heat.
•
Never cut open batteries of battery packs. The content is chemical
and poisonous.
11.11 Environment:
•
The packaging of this telephone can be collected as old paper.
However, we recommend you to save it, to adequately protect the
phone during transport.
•
When replacing this telephone, please return it to the supplier to
ensure environment-friendly processing.
•
You shall dispose of faulty or exhausted batteries at your
local depot for small chemical waste, or at the specially
designated battery collection points.
•
Never dispose of batteries with the household waste.
Page 24

-24-
12 POSSIBLE PROBLEMS AND SOLUTIONS
Problems with incoming calls:
• No notification of incoming calls:
− The bell is disabled; enable it.
• You are continuously busy:
− Check whether a 2nd phone or a 2nd handset that has been
registered with the base station, is using the line.
− Connect another phone to your phone connection, and use
this to check whether the malfunction originates from your
connection or your carrier.
Problems with outgoing calls:
• Beep tones sound only when pressing a button:
− The key lock function is enabled. Press and hold the button
for 2 seconds to disable the key lock function.
Problems during calling:
• Beep tones during an intercom call:
− You are called from outside during an intercom call; end this
call, wait until the phone rings normally and answer the call.
• Noise and other distortions:
− You are getting out of reach of the base station; reduce the
distance.
− There are other electrical devices in the vicinity that interfere
with the radio waves of your DECT phone; try another location.
Problems with Caller Identification:
• You do not receive Name or Caller Identification information on the
display of your handset.
− Check whether your carrier transmits these signals (you shall
subscribe to this service with some providers).
• You do receive the numbers on the display of your phone, but not
the name.
− The carrier does not forward names; consult your carrier for this.
− The name has not been programmed in the memory of your
handset; program it.
− The name has been programmed in the memory, but the
accompanying phone number has been programmed without area
code; program the number including area code.
Page 25

-25-
Other:
• The display stays blank:
− The batteries are empty. Place the handset on the base station
or on the charger to charge the batteries, and let the handset
charge during at least 15 hours uninterrupted.
• The handset does not switch on:
− The battery voltage is too low; place the handset on the base
station or the charger and charge the batteries for 15 hours.
− The batteries have not been inserted; check this.
• The batteries get low too fast:
− Check the charging contacts of the base station or the charger
and of the handset, and clean them if necessary.
− The batteries shall be replaced; replace them.
• The handset does not have contact with the base station:
− You are too far from the base station; reduce the distance.
− The base station has been switched off (adapter from the mains
socket); correct this.
− The handset is not registered with the base station (anymore);
register it (again).
In case the failure has not been solved with aforementioned
solutions:
• Remove the batteries from the handset, and unplug the power
supply adapter and the phone connector from their sockets;
connect everything again after several minutes.
• You can also contact the Profoon service center on phone number
+31 (0) 73 6411 355 or 03 238 5666 (Belgium) of with the supplier
of this phone.
13 FORGOT PIN CODE
If you have lost or forgotten the new PIN code, you can restore the
factory code 0000 as follows.
Keep in mind that this action deletes ALL phonebook memories,
last dialled number memories and Caller-ID memrories.
1. Press the key
2. Now press the buttons - # - # - * - * - 7 - 9 - 3 one after the other
The text ‘PLEASE WAIT’ will appear in the display, followed by ‘OK’.
The PIN code is now 0000 again.
Page 26

-26-
14 SPECIFICATIONS
Protocol: DECT / GAP, 5 handsets
Call history:
DTMF & FSK, auto recognition, 20 memories
Dialling: tone (DTMF)
FLASH : 100/300/600mS, adjustable.
Phone book: 20 memories
Power supply base station: through adapter AC100 - 240V
in: 100 - 240 VAC 50 Hz
off: 6 VDC, 450 mA,
Power supply charger: through 2 batteries
voltage: 1.2 V
capacity: 400 mAh
material: NiMH
format: AAA
Power supply charger: through adapter
in: 100 - 240 VAC, 50Hz
off: 6VDC, 4500mA
Range: (*) 50 m indoors / 300 m outdoors
Operational life (with full batteries): (**)
Standby:> 100 hours / use:> 10 hours
Connection factor:
12.5 (according to the old method, this
corresponds with a connection factor of 0.5)
Operational temperature: 0°C to 40°C
Storage temperature: -20°C to 60°C
*: depends on local situations
**: depends on the battery condition and usage
15 DECLARATION OF CONFORMITY
This device meets the essential requirements and other relevant
provisions as stipulated by the European Guideline 1999/5/EC.
The declaration of conformity is available on
the website WWW.PROFOON.COM
Page 27

-27-
16 WARRANTY
For the PDX-8400 series DECT telephone you have a warranty
of 24 months from the date of purchase. During this period, we
guarantee the free repair of defects caused by material and
workmanship errors. All this subjected to the final assessment of the
importer. If you notice any defect, first refer to the user’s manual.
Please contact the supplier of this telephone or contact customer
service of Profoon on telephone number +31 (0) 73 6411 355
(Netherlands) or 03 238 5666 (Belgium)
THE WARRANTY BECOMES NULL AND VOID: In case of improper
use, incorrect connections, leaking and/or incorrectly installed
batteries, use of unoriginal parts or accessories, negligence and
in case of defects caused by moisture, fire, flooding, lightning and
natural disasters. In case of unauthorised modifications and/or
repairs performed by third parties. In case of incorrect transportation
of the device without adequate packaging and when the device is
not accompanied by this warranty card and proof of purchase. The
warranty does not cover connecting cables, plugs and batteries. All
further liability, especially concerning any consequential damages, is
excluded.
Page 28
-28-
v1.2
Service Help
WWW.PROFOON.COM
[email protected]
NL 073 6411 355
(Lokaal tarief)
BE 03 238 5666
(Lokaal tarief)
(Tarif local)
DE 0180 503 0085
Lokale Festnetzkosten
Hesdo, Australiëlaan 1
5232 BB, ‘s-Hertogenbosch
The Netherlands
 Loading...