

Page 1
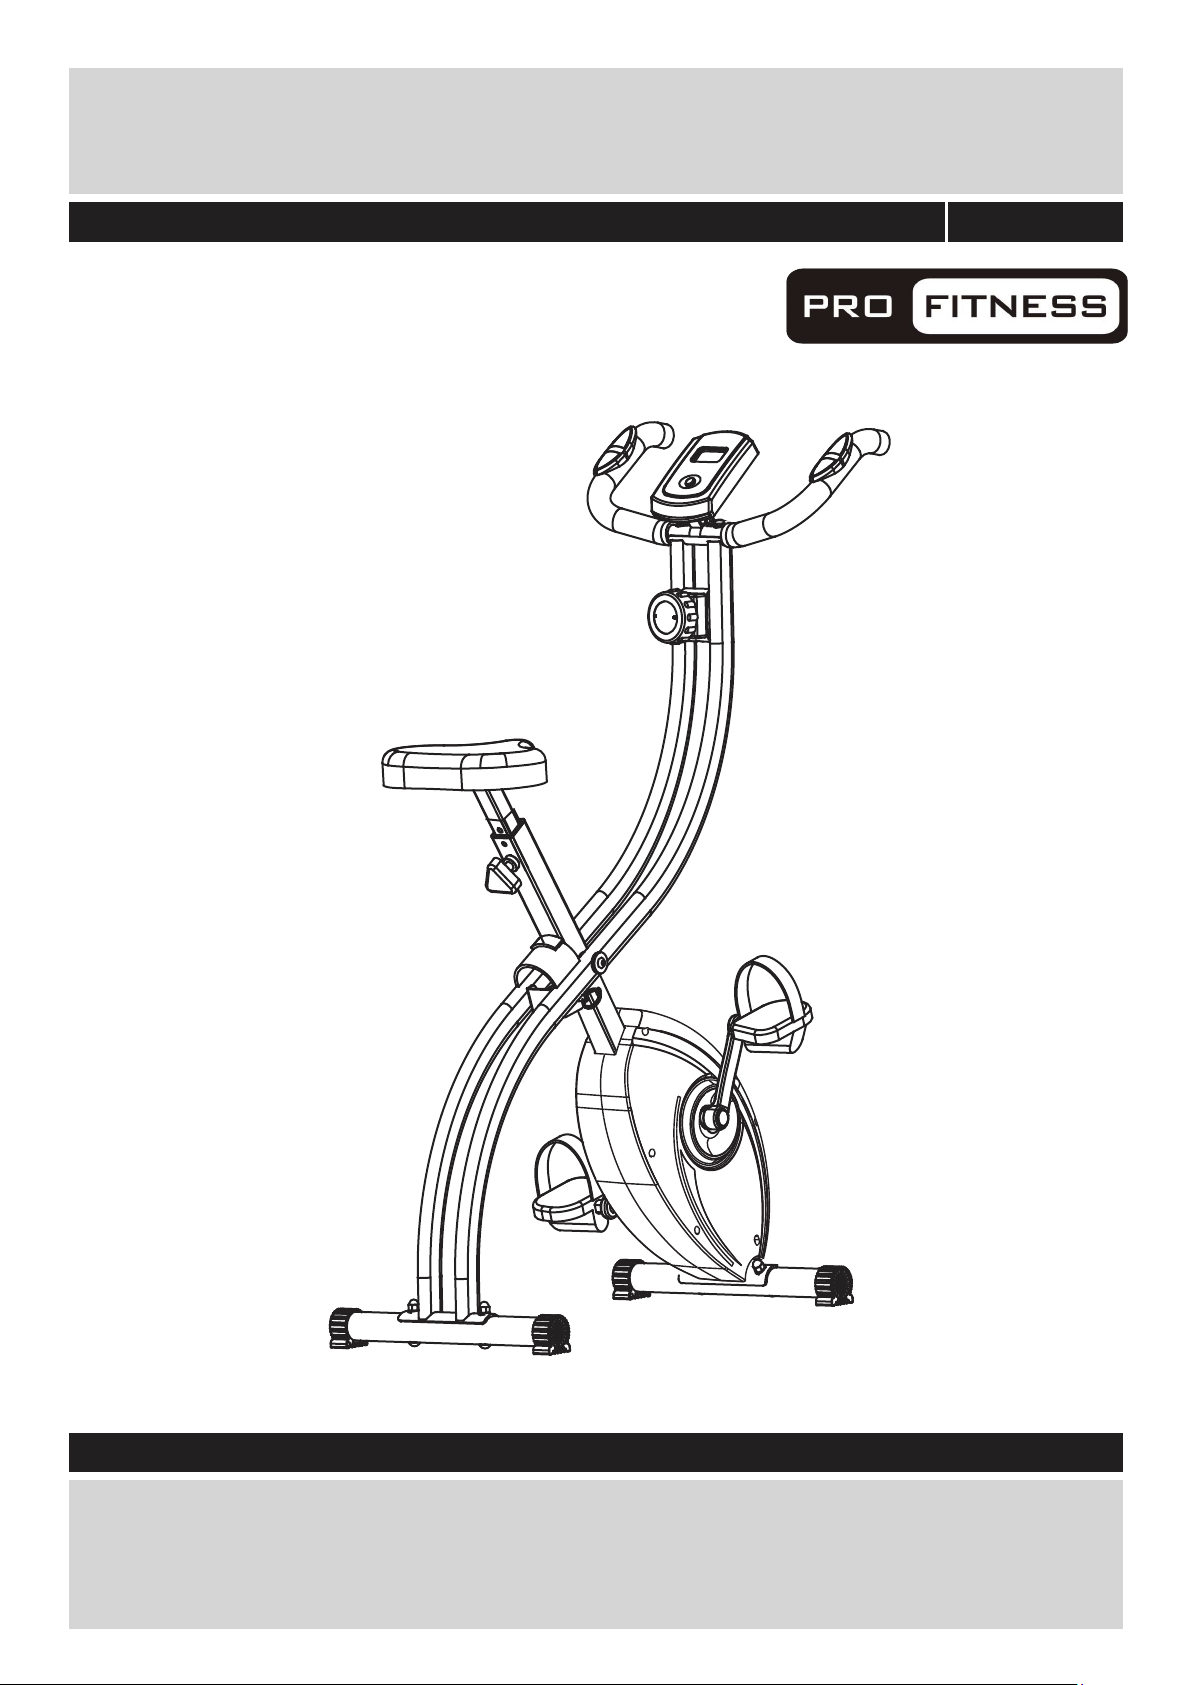
PRO FITNESS FEB1000 Folding X Bike
Assembly & User Instructions - Please keep for future reference
789/0457
Important – Please read these instructions fully before assembly or use
These instructions contain important information which will help you get the best from your
equipment and ensure safe and correct assembly, use and maintenance.
If you need help or have damaged or missing parts, call the Customer Helpline: 0345 600 1714
or visit www.argos-support.co.uk
Page 2
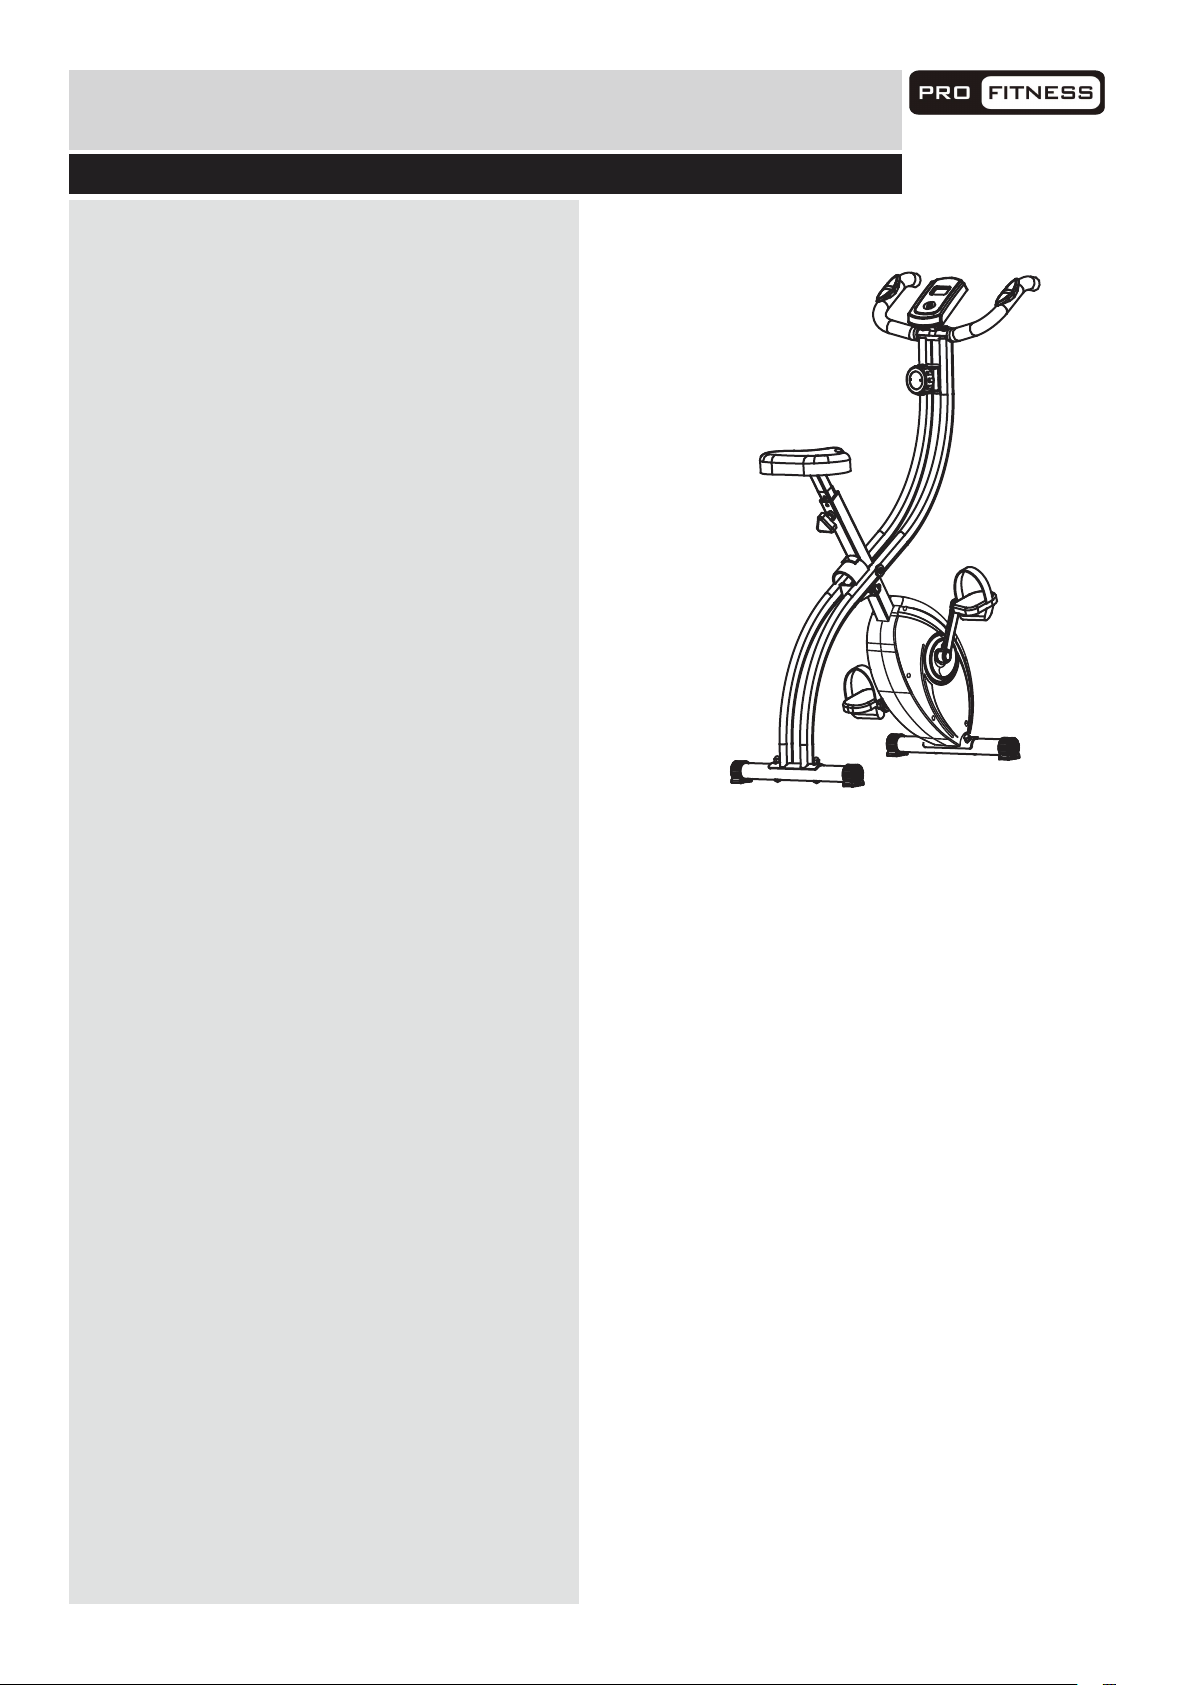
Contents
1
Safety Information
Components - Parts
Components - Fixings
Assembly Instructions
Workout area
Exercise Information
Before starting
Muscle chart
Warming up and cooling down
Console Operation
Adjustment of Resistance
Adjustment of Seat Height
Folding away your Exercise Cycle
Care and Maintenance
2-3
4
5
6-8
9
10-16
10
11
12-13
14
15
15
16
17
Exploded Parts Diagram
Parts List
18
19
Page 3
Safety Information
2
Important
This exercise equipment is built for optimum safety. However, certain precautions apply whenever you
operate a piece of exercise equipment. Be sure to read the entire manual before you assemble, operate
or use this equipment.
– Please read fully before assembly or use
Assembly
• The product must be installed on a stable and
level surface. To protect the floor or carpet from
damage, place a mat under the exercise bike.
• Make sure you have enough space to layout the
parts before starting.
• Keep children and animals away from the work
area, small parts could pose a choking hazard if
swallowed.
• Dispose of all packaging carefully and responsibly.
• Check you have all the components and tools
listed in the parts list, bearing in mind that, for ease
of assembly, some components are pre-assembled.
• The assembly of this equipment is best carried out
by 2 people.
Using
• It is the responsibility of the owner to ensure that
all users of this product are properly informed as to
how to use this product safely.
• This product is intended for domestic use only.
Do not use in any commercial, rental, or institutional
setting.
• Use the equipment only for intended use, as
described in this manual. Do not use attachments
not recommended by the manufacturer.
• Keep this equipment indoors, away from moisture
and dust. Do not put the equipment in a garage,
outbuilding, covered patio, or near water.
• Your product is intended for use in clean dry
conditions. You should avoid storage in excessively
cold or damp places as this may lead to corrosion
and other related problems that are outside our
control.
• Keep unsupervised children away from the equipment.
• Disabled persons should not use the equipment
without a qualified person or doctor in attendance.
• Always wear appropriate workout clothing when
exercising. Do not wear loose or baggy clothing, as it
may get caught in the equipment. Wear trainers to
protect your feet while exercising.
• Do not place any sharp objects around the equipment.
• Keep hands away from all moving parts.
• If any of the adjustment devices are left projecting,
they could interfere with the user’s movement.
• Before using the equipment to exercise, always
perform stretching exercises to properly warm up.
• Only one person at a time should use the equipment.
• If the user experiences dizziness, nausea, chest
pain, or other abnormal symptoms stop the workout
and seek immediate medical attention.
• Injuries to health may result from incorrect or excessive training.
• This product is suitable for a maximum user weight
of: 100kg.
• This product conforms to: BS EN ISO 20957-1 and
-5 Class (H) - Home Use - Class (C).
• This stationary training equipment is not suitable for
high accuracy purposes.
• The braking system is adjustable.
Battery safety
• Warning: Batteries are to be inserted with the correct
polarity. Incorrect installation of batteries may cause battery
leakage and corrosion, resulting in damage to the computer.
• Do not mix old and new batteries, or batteries of different
types.
• Do not dispose of batteries in a fire.
• Do not dispose of batteries with normal household waste,
take to a local recycling centre.
• Non-rechargeable batteries are not to be recharged.
• Rechargeable batteries are to be charged under adult
supervision.
• Exhausted batteries are to be removed from the product.
• Supply terminals are not to be short-circuited.
Page 4
Safety Information
3
Important – Please read fully before assembly or use
Warning: Before beginning any exercise program, consult your Doctor. This is especially
important for persons over the age of 35 or persons with pre-existing health problems.
no responsibility for personal injury or property damage sustained by or through the use of this product.
Over exercising may result in serious injury or death. If you feel faint stop exercising immediately.
Warning! Heart rate monitoring systems may be inaccurate. For the most accurate heart rate measure,
please hold both hand pulse sensors continuously during any programme.
Page 5
If you have damaged or missing components,
4
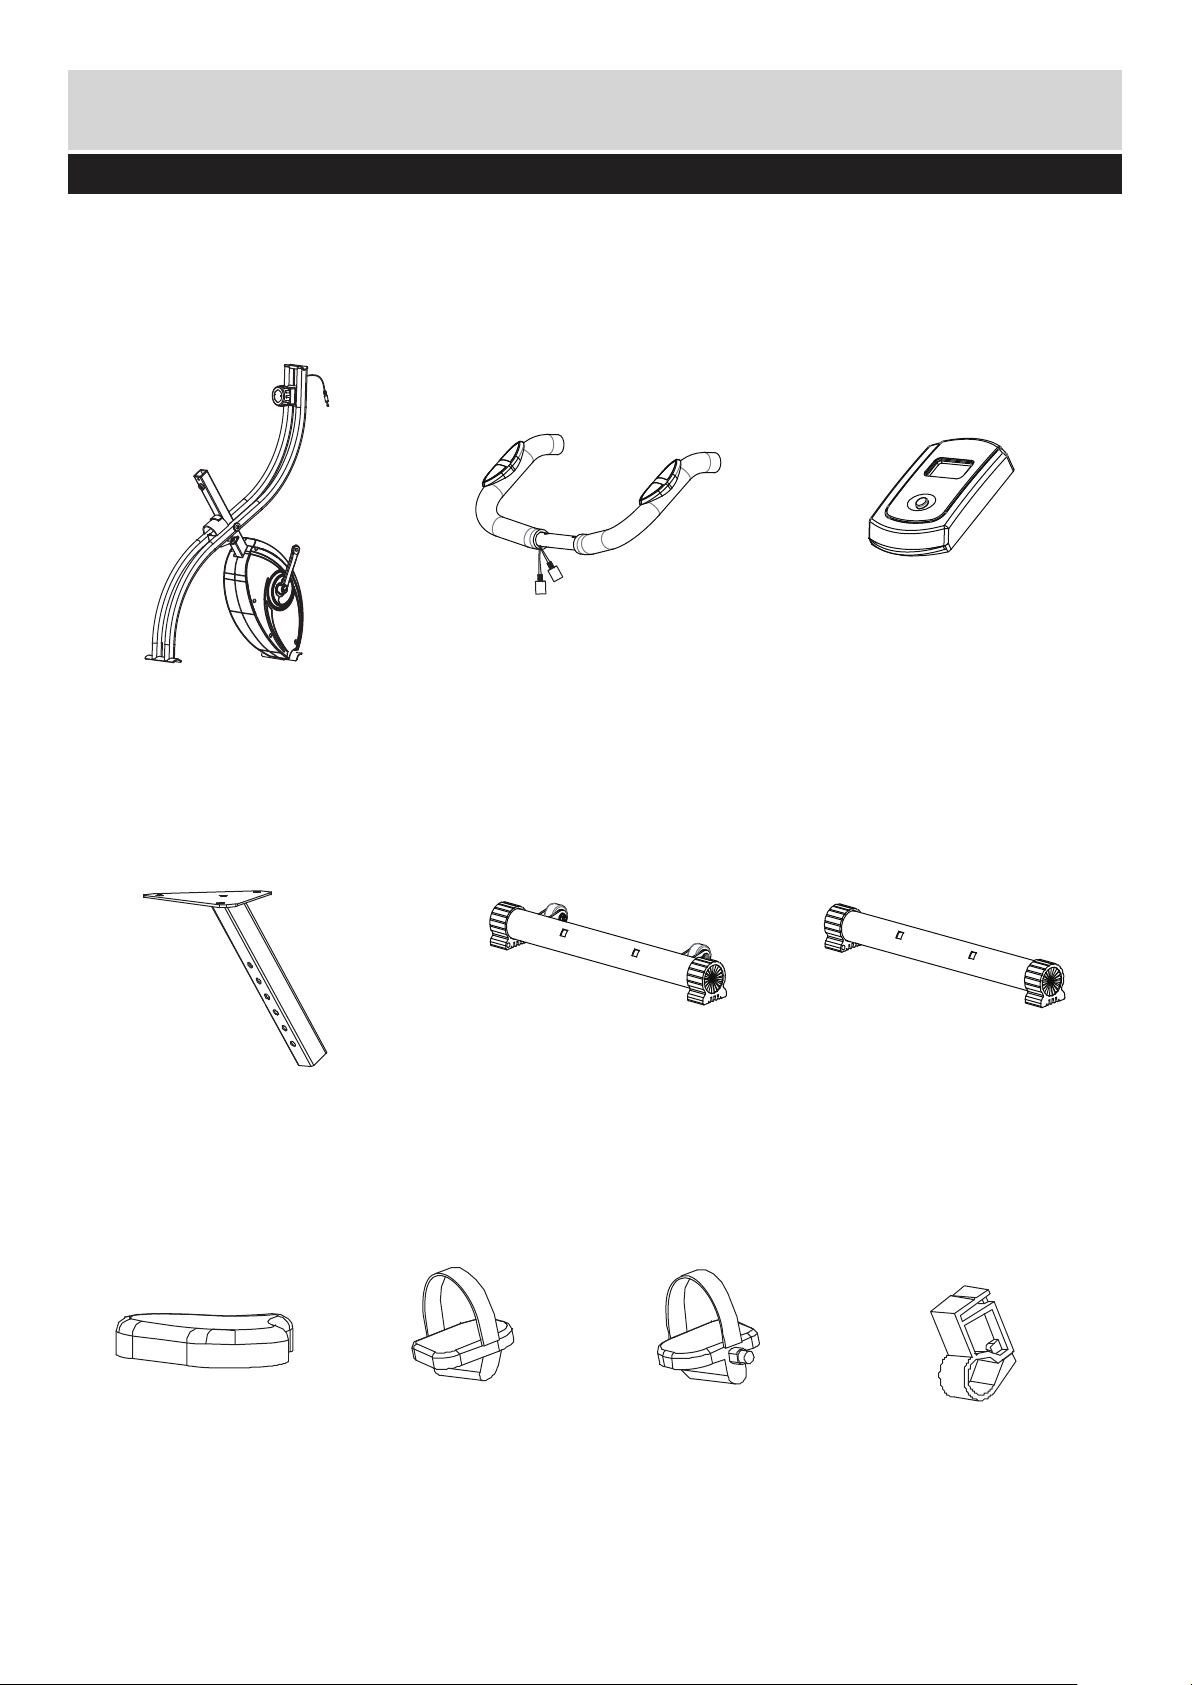
Components - Parts
call the
Customer contact number: 0345 600 1714
Please check you have all the parts listed below
Note: Some of the smaller components may be pre-fitted to larger components.Please check carefully
before contacting Argos regarding any missing components.
21. Main frame x 1
15. Seat post x 1
1. HandleBar x 1
50-1. Front Stabiliser x 1 50-2. Rear Stabiliser x 1
5. Console x 1
74. Pedal (L) x 110. Saddle x 1
39. Pedal (R) x 1
6. Console Holder x 1
Page 6
Components - Fixings
5
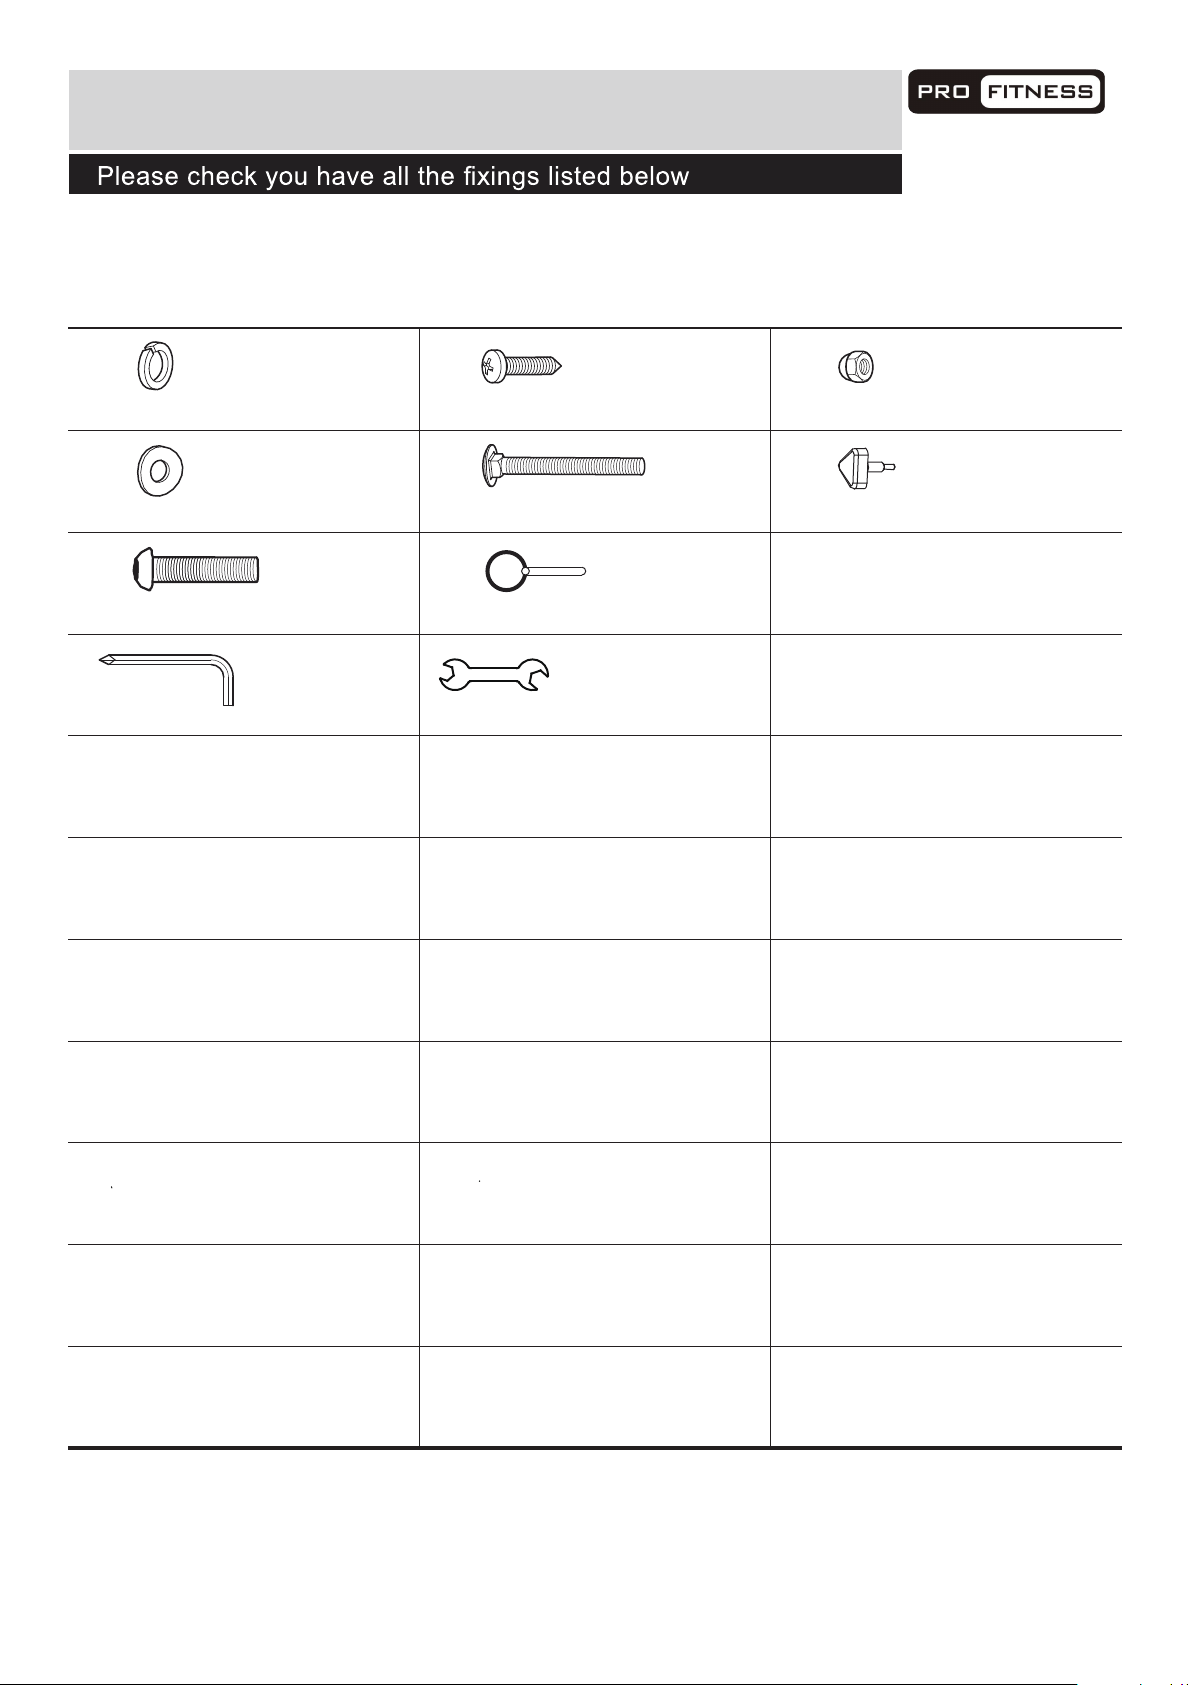
Note:
The quantities below are the correct amount to complete the assembly. In some cases more
hardware may be supplied than are required. Some of the fixings are pre-fitted to the larger components.
Please check carefully before contacting Argos regarding any missing fixings.
8
M8 Spring washer x 2
59
M8 Curved washer x 6
7
M8 x 35mm Allen Bolt x 2
Allen key x 1
11
Screw x 1
51
M8 x50mm Carriage Bolt x 4
27
Pin x 1
Spanner x 1
58
M8 Dome nut x 4
22
Lock knob x 1
Page 7
Assembly Instructions
6
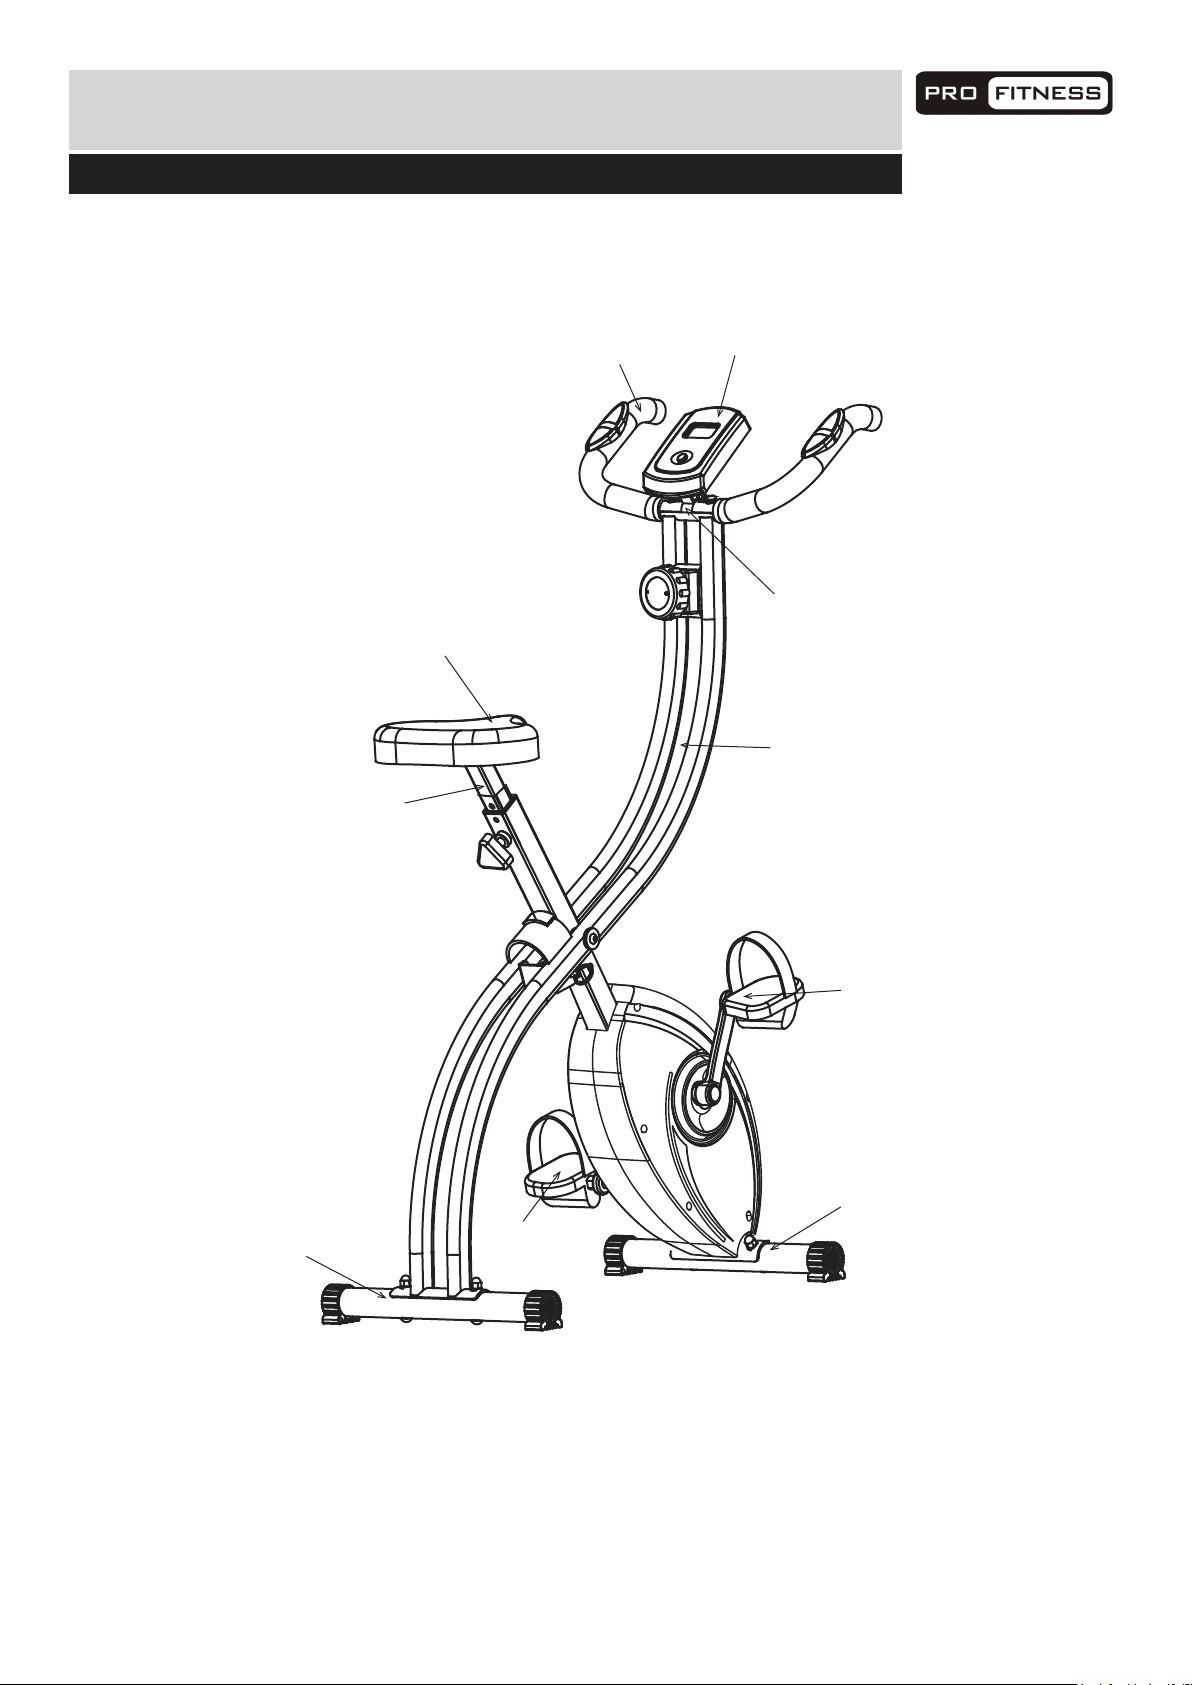
Total mass of the product is 15.3 kg.
Total size of the equipment is (width) 41.5cm x (depth) 78.5cm x (height) 120cm.
15
1
5
6
10
21
50-2
1. Handlebar
5. Console
6. Console Holder
74
10. Saddle
15. Seat post
21. Main frame
39
50-1
39. Pedal(R)
74. Pedal(L) 50-1. Front stabilizer
50-2. Rear stabilizer
Page 8
Assembly Instructions
7
21
58
27
1
59
51
51
58
59
59
50-1
50-2
51
51
39
74
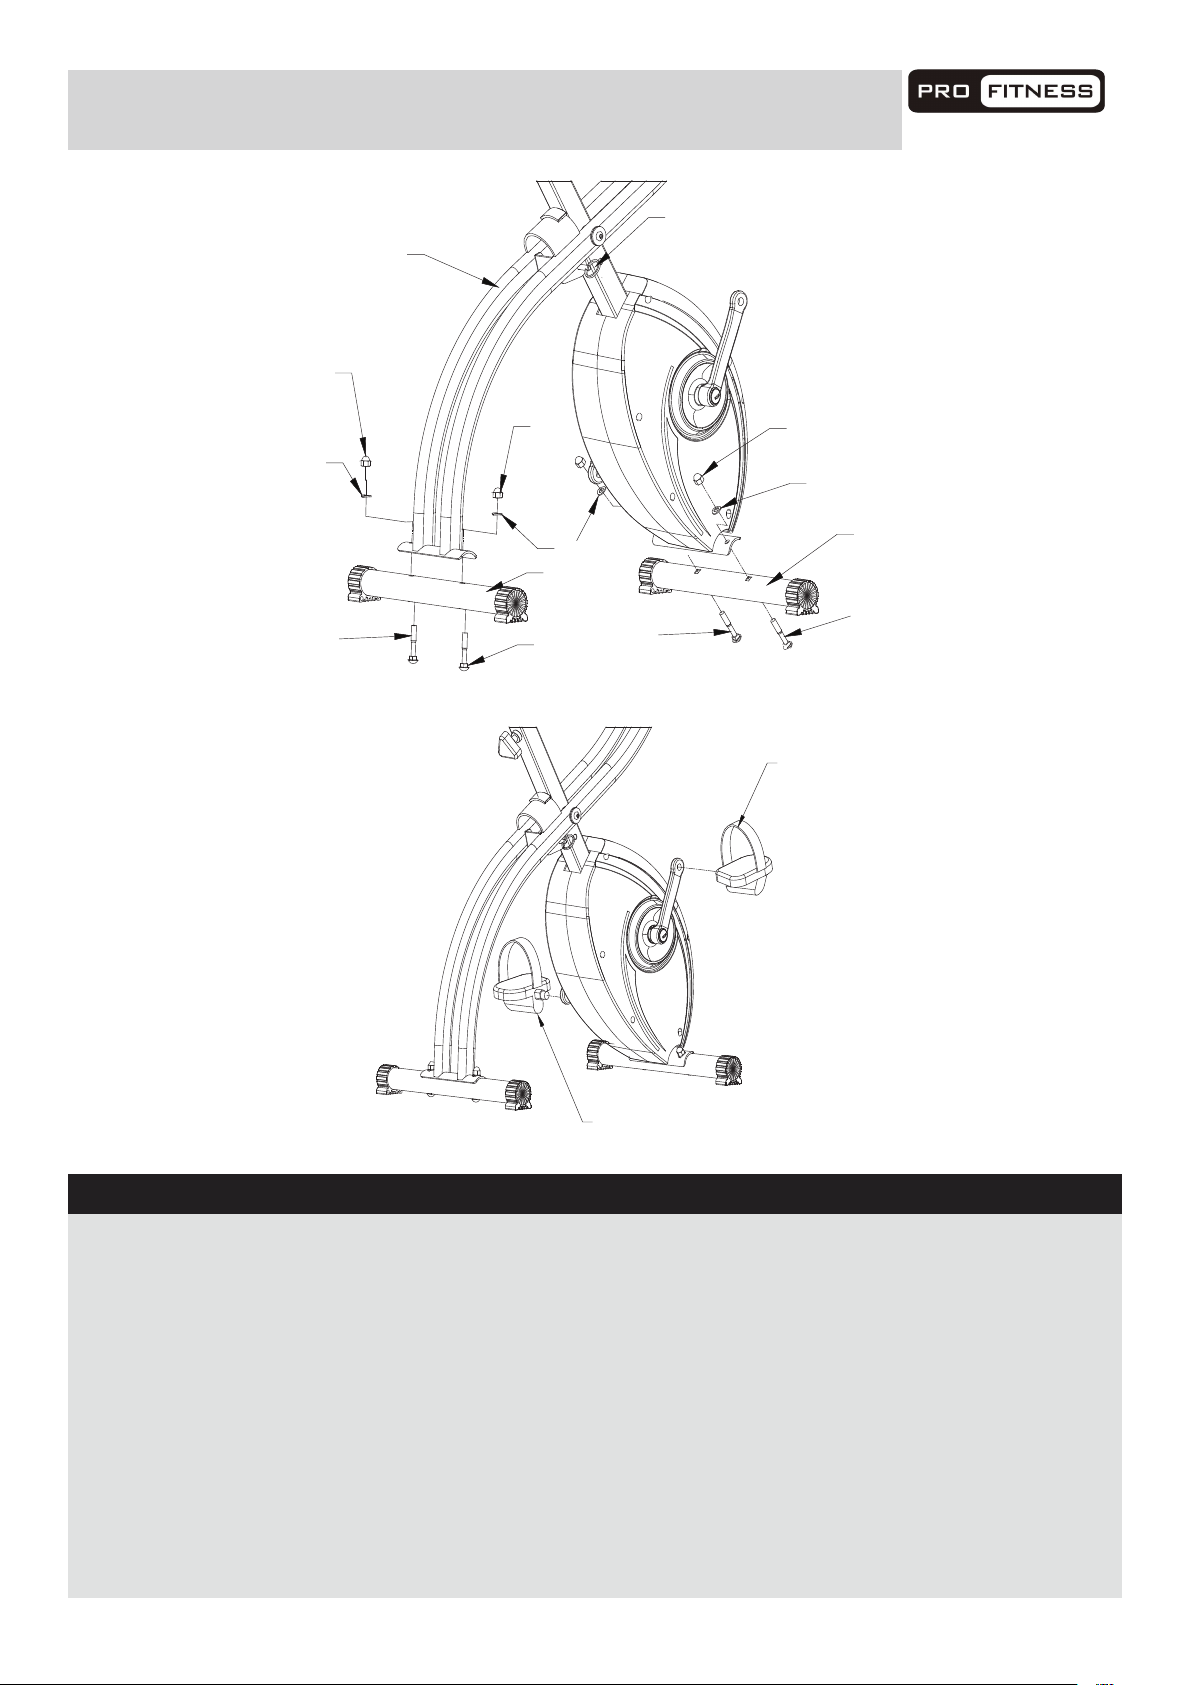
Step 1
Unfold the Main Frame
(21).Lock it into the use
position with the Pin (27).
Attach the Stabilizers (50-1 &
50-2) to the Main Frame (21)
using 4 x Carriage Bolt (51), 4
x Curved Washer (59) and 4 x
M8 Dome Nut (58).
Note: The flat surface of the
stabilizers must be placed flat
horizontally on the ground.
Assemble the Left Pedal (74)
and the Right Pedal (39) to the
Pedal Crank. Both Pedals
MUST be tightened securely
otherwise damage may occur
to the Crank.
Turn clockwise to assemble
the Right Pedal (39) and
counter-clockwise for the Left
Pedal (74).
Page 9
Assembly Instructions
8
15
16
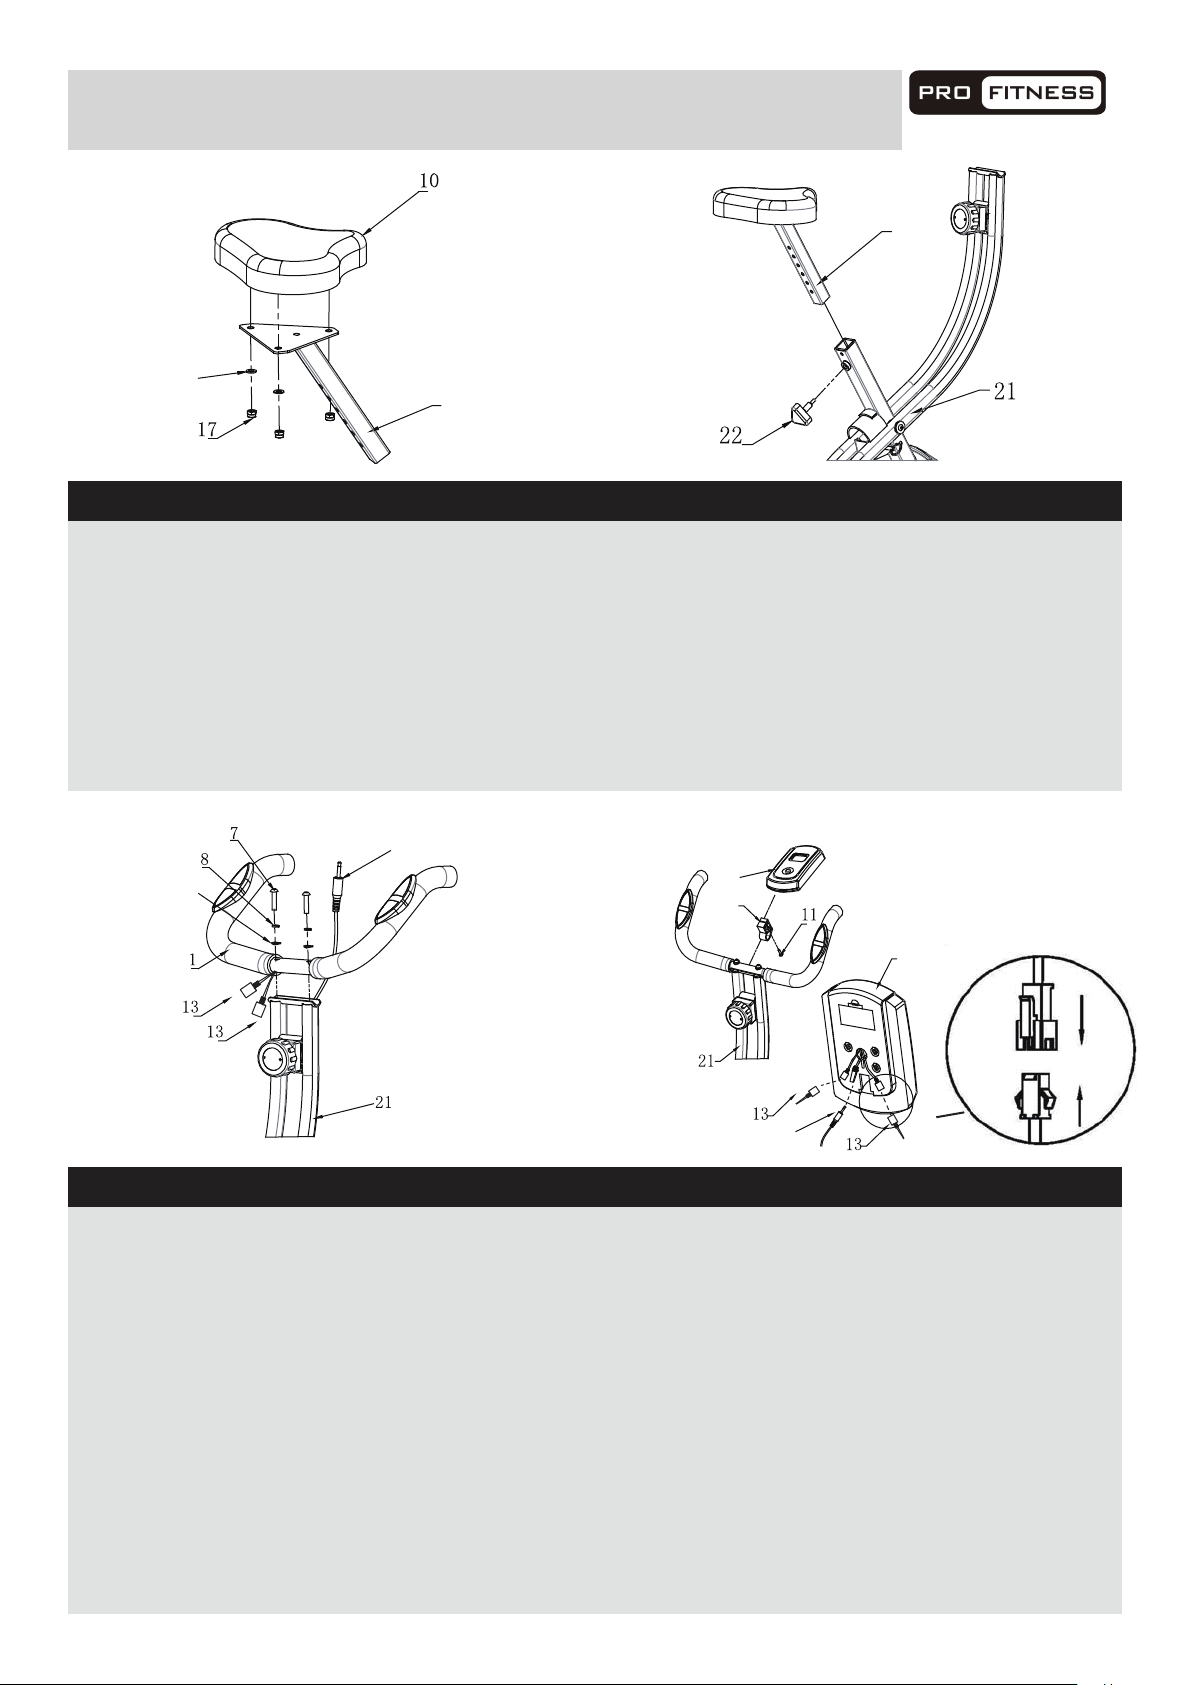
Step 2
The 3 x M8 Nut (17) and 3 x
Saddle Washer (16) are
pre-assembled on the Saddle
(10).
Remove them before the
assembly of the Saddle (10)
to the Seat post (15).
59
15
Fix the Saddle (10) to the Seat
post(15) by re-fitting the 3 x
Saddle Washer (16) and 3 x M8
Nut (17) previously removed.
57
Insert the Seat Post (15) into the
Main frame (21). Position the
Seat Post (15) upward and
downward at your required and
secure with the Lock knob (22).
Note: The seat height is correct
when the knee is slightly angled
with the pedal vertically down
and the foot parallel to the floor.
5
6
5
57
Step 3
Connect the Handlebar (1) to
the Main Frame (21) using
2 x M8 x 25mm Allen Bolt (7),
2 x M8 Spring Washer (8) and
2 x M8 Curved Washer (59).
ATTENTION!
The Sensor Wire (57) is a
single-wire and the Pulse Wire
(13) is a double-wire. Please
connect these wires to the
wires from the back of the
console(5) as shown in the
diagram.
Attach the Console Holder (6)
onto the Handlebar (1) and
insert the Console (5) onto the
Console Holder (6). Adjust the
angle of the Console(5) as
your desired and fix the
Console Holder with Screw
(11).
Page 10
Workout Area
9
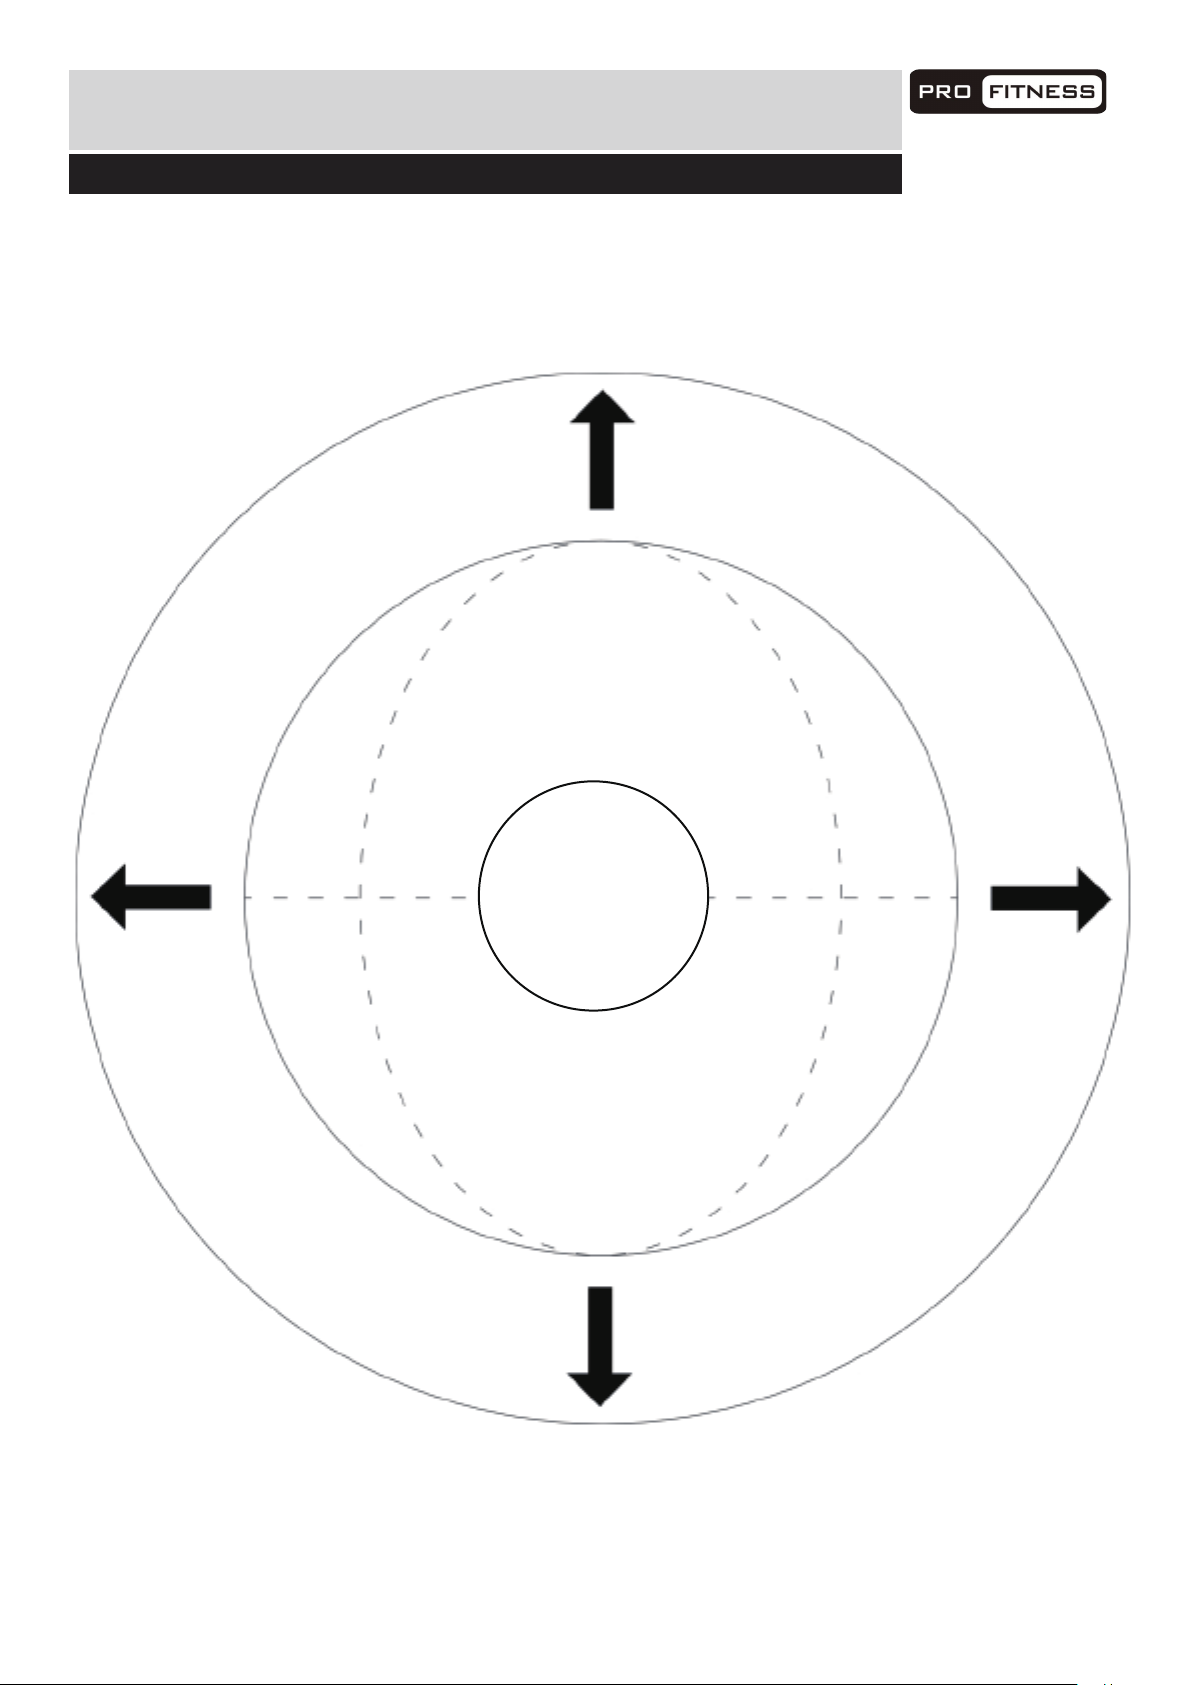
The free area must be at least 0.6m greater than the training area. This is a space where you can safely
dismount, without obstruction, in case of an emergency. Where two pieces of equipment are positioned
adjacent to each other the free area may be shared.
0.6m
(Free area)
0.6m
(Free area)
0.6m
(Free area)
Folding
Exercise Bike
Training
area
3.7m
0.6m
(Free area)
Only one person should be within the training area when the equipment is in use.
Page 11
Exercise Information
10
Before star
Tailor your exercise program according to your physical condition. If you have been inactive for several years,
or are overweight, you must start slowly and increase your time on the equipment; a few minutes per workout
increase is advisable.
Initially, you may be able to exercise only for a few minutes in your target zone, however, your aerobic fitness
will improve over the next six to eight weeks. Don’t be discouraged if it takes longer. It’s important to work at
your own pace.
Please remember these essentials:
• Have your doctor review your training and diet programs to advise you of a workout routine you should adopt.
• Begin your training program slowly with realistic goals.
• Monitor your pulse frequently. Establish your target heart rate based on your age and condition.
• Set up your equipment on a flat even surface with adequate training area, as prescribed in this manual.
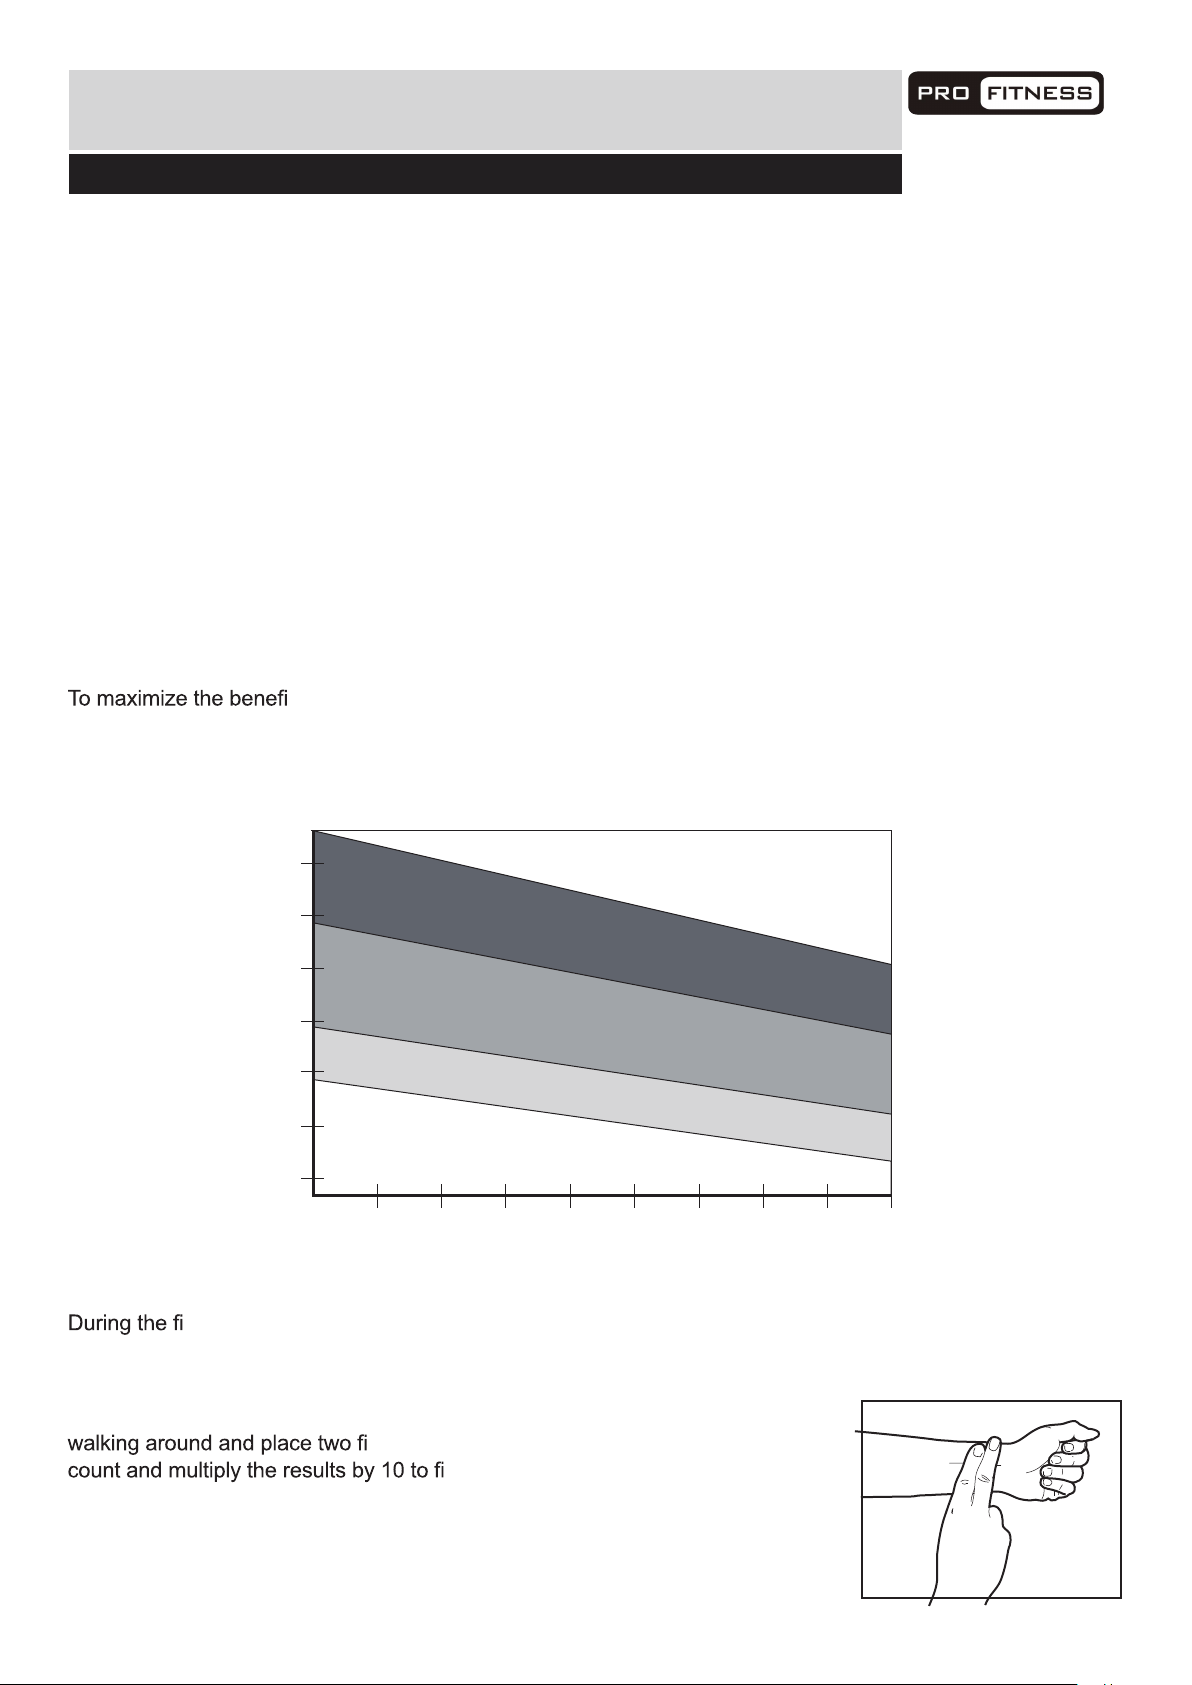
Exercise intensity
be found by using your heart rate as a guide. For effective aerobic exercise, your heart rate should be maintained
at a level between 65% and 85% of your maximum heart rate as you exercise. This is known as your target zone.
You can find your target zone in the table below.
ting
ts of exercising, it is important to exercise with the proper intensity. The intensity level can
200
180
85% to Max
160
Cardiovascular
140
120
100
Beats per minute (bpm)
80
25
rst few months of your exercise program, keep your heart rate near the low end of your target zone
as you exercise. After a few months, your heart rate can be increased gradually until it is near the middle of
your target zone as you exercise.
To measure your heart rate, stop exercising but continue moving your legs or
ngers on your wrist. Take a six-second heartbeat
six-second heartbeat count is 14, your head rate is 140 beats per minute.
(A six-seconds count is used because your heart rate will drop rapidly when you
stop exercising.) Adjust the intensity of your exercise until your heart rate is at the
required level.
30 35 40 45 50 55 60 70
nd your heart rate. For example, if your
65% to 85%
55% to 65%
Up to 55%
Age
performance
Intermediate aerobic
Effective fat burning
Page 12
Exercise Information
11
Muscle chart
Aerobic Exercise
tness of your lungs and heart - your body’s most important muscle. Aerobic
tness is promoted by any activity that uses your large muscles (arms, legs, or buttock, for example).
Weight Training
Along with aerobic exercising which helps get rid of and keep off the excess fat that our bodies can store,
weight training is an essential part of the exercise routine process. Weight training helps tone, build and
strengthen muscle. If you are working above your target zone, you may want to do a lower number of reps.
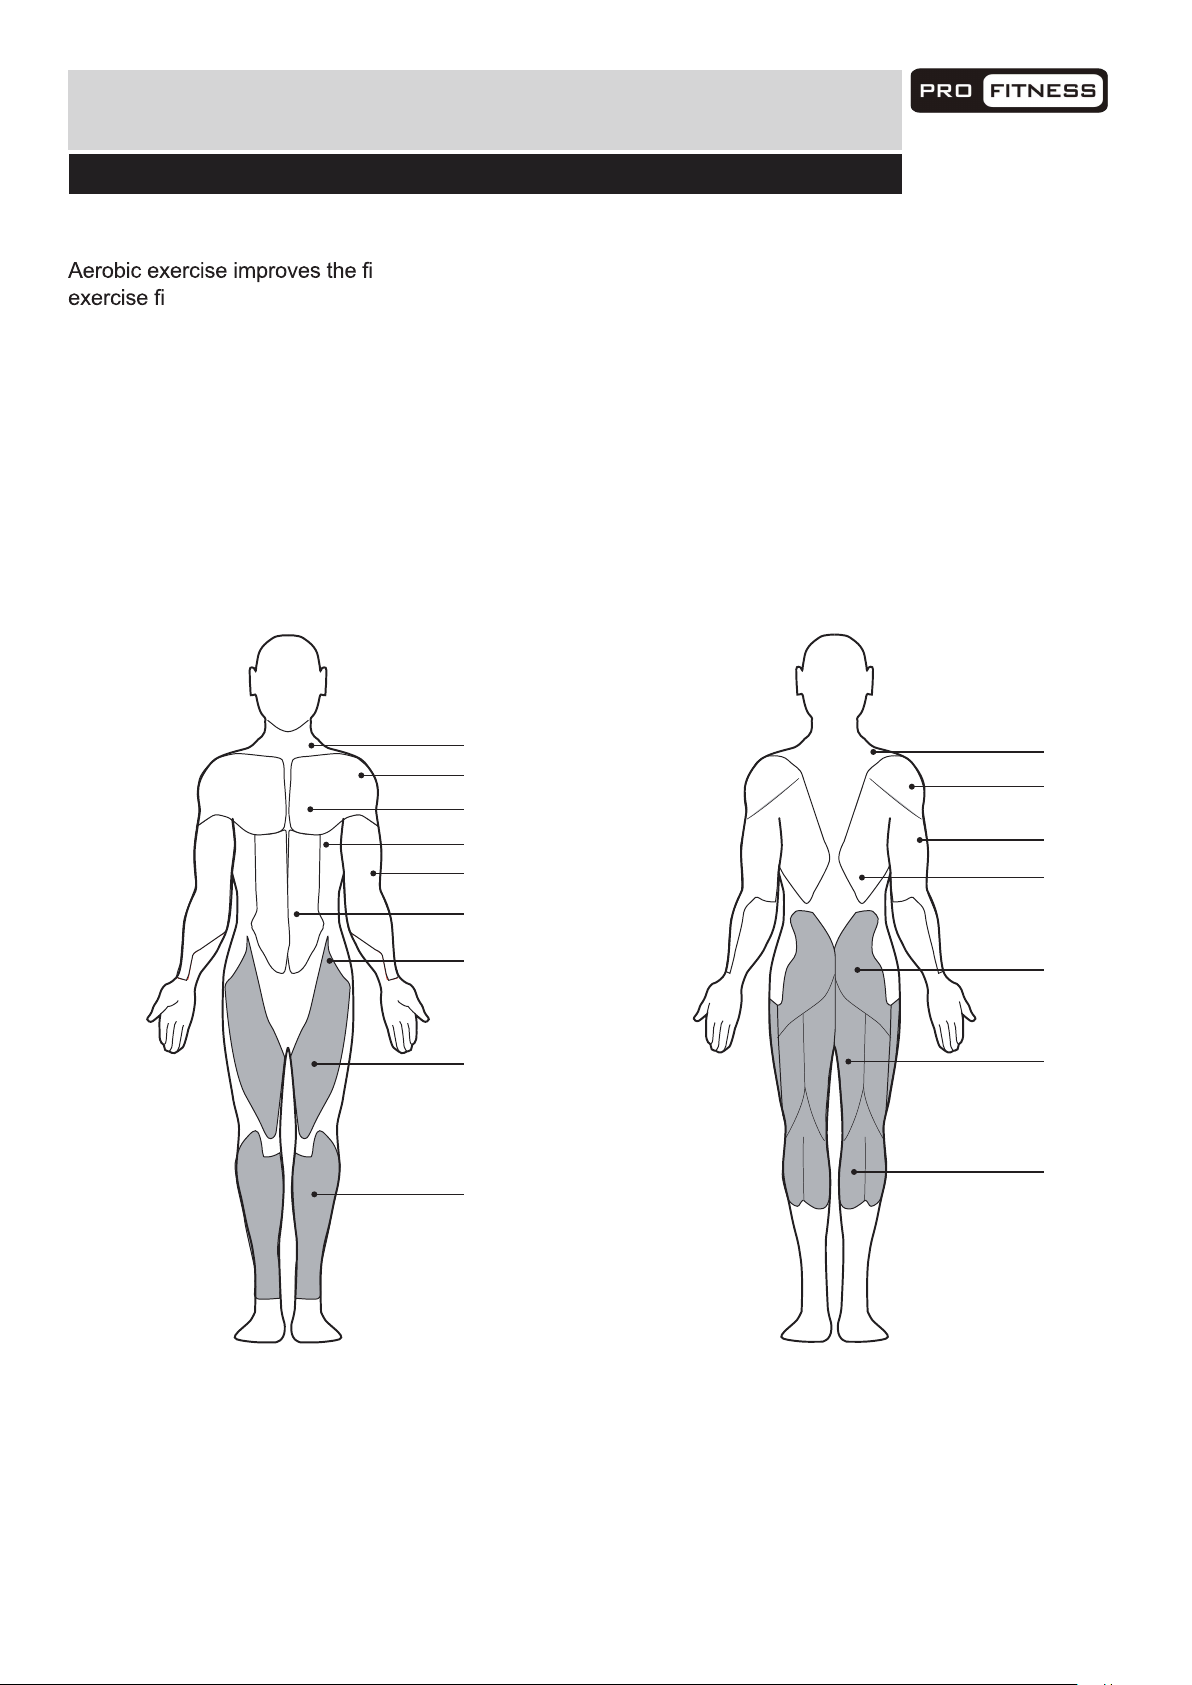
Targeted Muscle Groups
The exercise routine that is performed on the exercise bike will develop the upper and lower body muscle
groups. These muscle groups are highlighted on the muscle chart below.
A
B
C
D
E
F
G
H
I
J
K
L
M
N
O
P
A: Trapezius
B: Anterior Deltoid
C: Pectoralis Major
D: Serratus Anterior
E: Biceps
F: Abdominal
G: Sartorius
H: Quadriceps
I: Tibialis Anterior
BackFront
J: Trapezius
K: Posterior Deltoid
L: Triceps
M: Latissimus Dorsi
N: Gluteals
O: Hamstrings
P: Gastrocnemius
Page 13
Exercise Information
12
Warming up and Cooling down
Each workout should include the following three parts:
1. A warm-up, consisting of 5 to 10 minutes of light exercise. A proper warm-up increases your body
temperature, heart rate, and circulation in preparation for exercise.
2. Training zone exercise, consisting of 20 to 30 minutes of exercising with your heart rate in your training
zone. (Note
zone for longer than 20 minutes.)
rst few weeks of your exercise program, do not keep your heart rate in your training
3.
to reduce post-exercise muscle soreness.
Exercise Frequency
To maintain or improve your condition, plan three workouts each week, with at least one day of rest between
Remember, the key to success is make exercise a regular and enjoyable part of your everyday life.
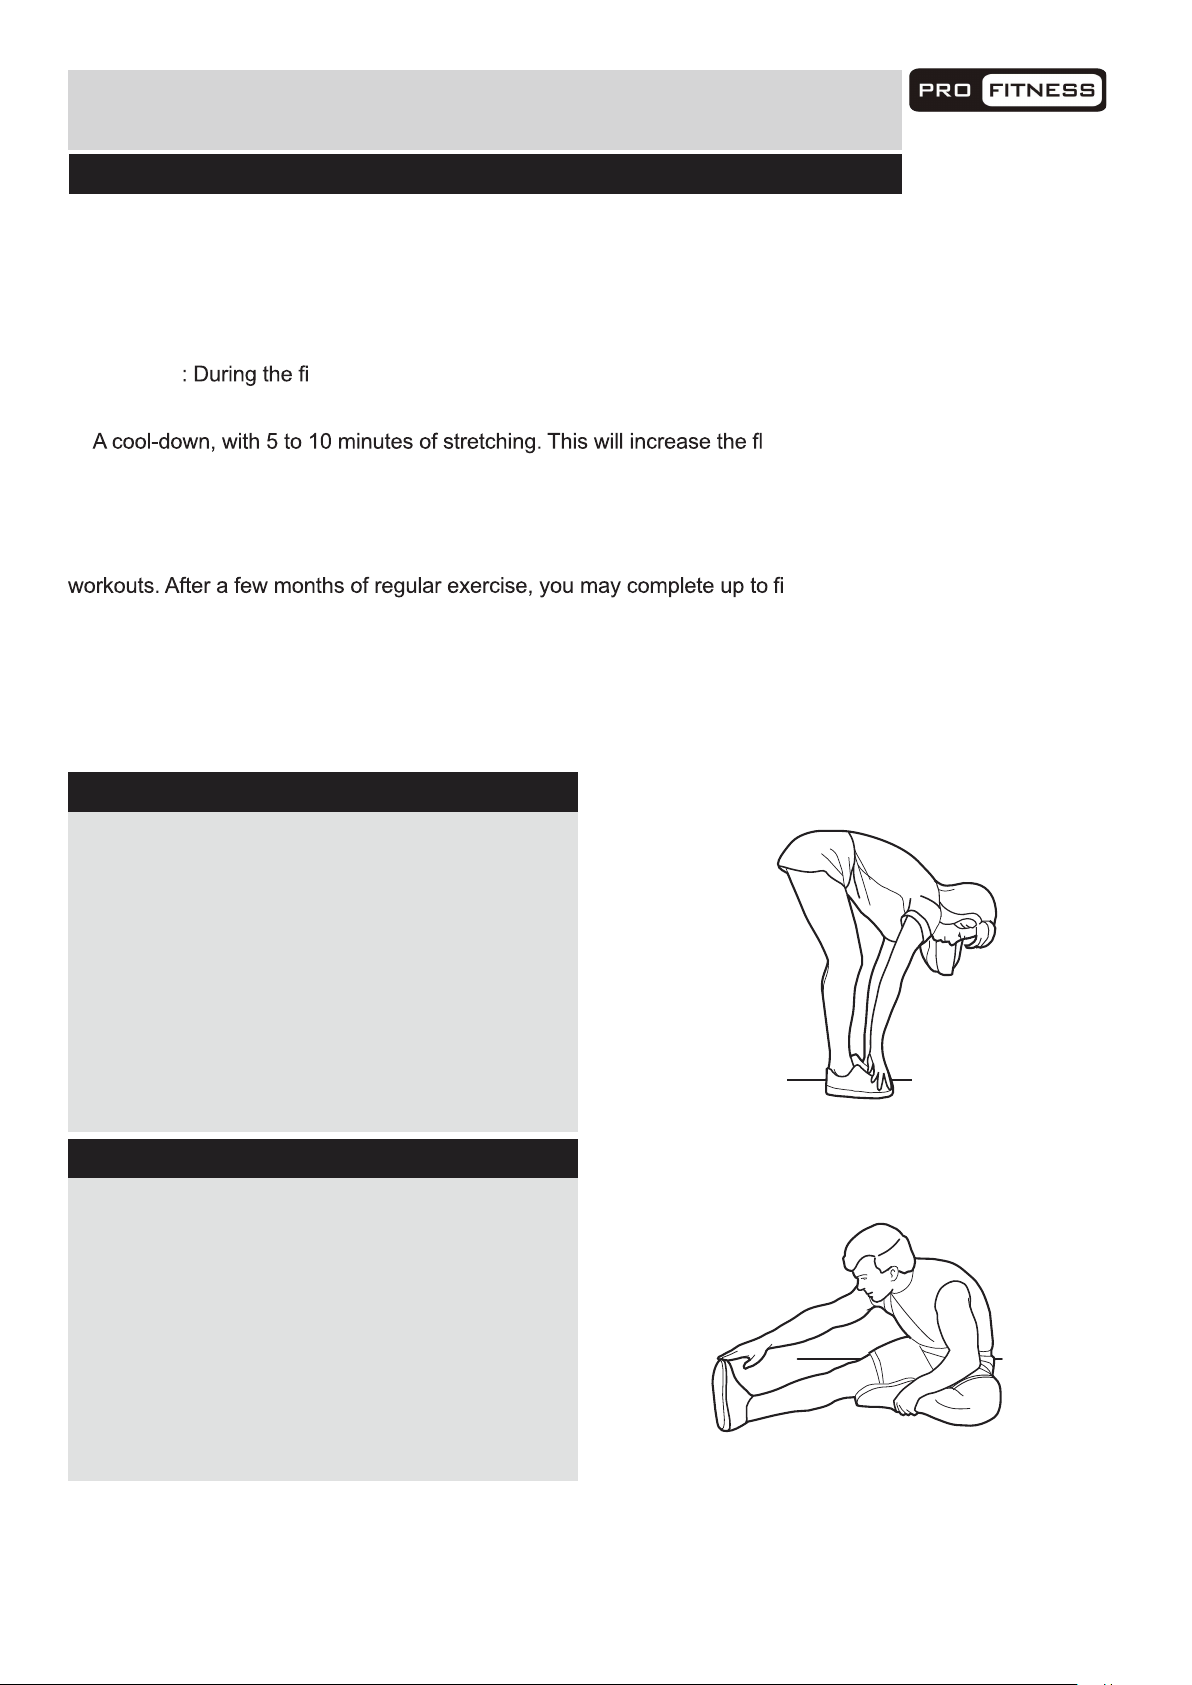
Suggested Stretches
For a correct warm up, see the following basic stretching exercises. Move slowly as you stretch, never bounce.
exibility of your muscles and will help
ve workouts each week, if desired.
Toe touch stretch
Stand with your knees bent slightly and slowly
bend forward from your hips. Allow your back
and shoulders to relax as you reach down
toward your toes as far as possible.
Hold for 15 counts, then relax.
Repeat 3 times.
Stretches: Hamstrings, back of knees and back.
Hamstring stretch
Sit with one leg extended. Bring the sole of the
opposite foot toward you and rest it against the
inner thigh of your extended leg. Reach toward
your toes as far as possible.
Hold for 15 counts, then relax.
Repeat 3 times for each leg.
Stretches: Hamstrings, lower back and groin.
Page 14
Exercise Information
13
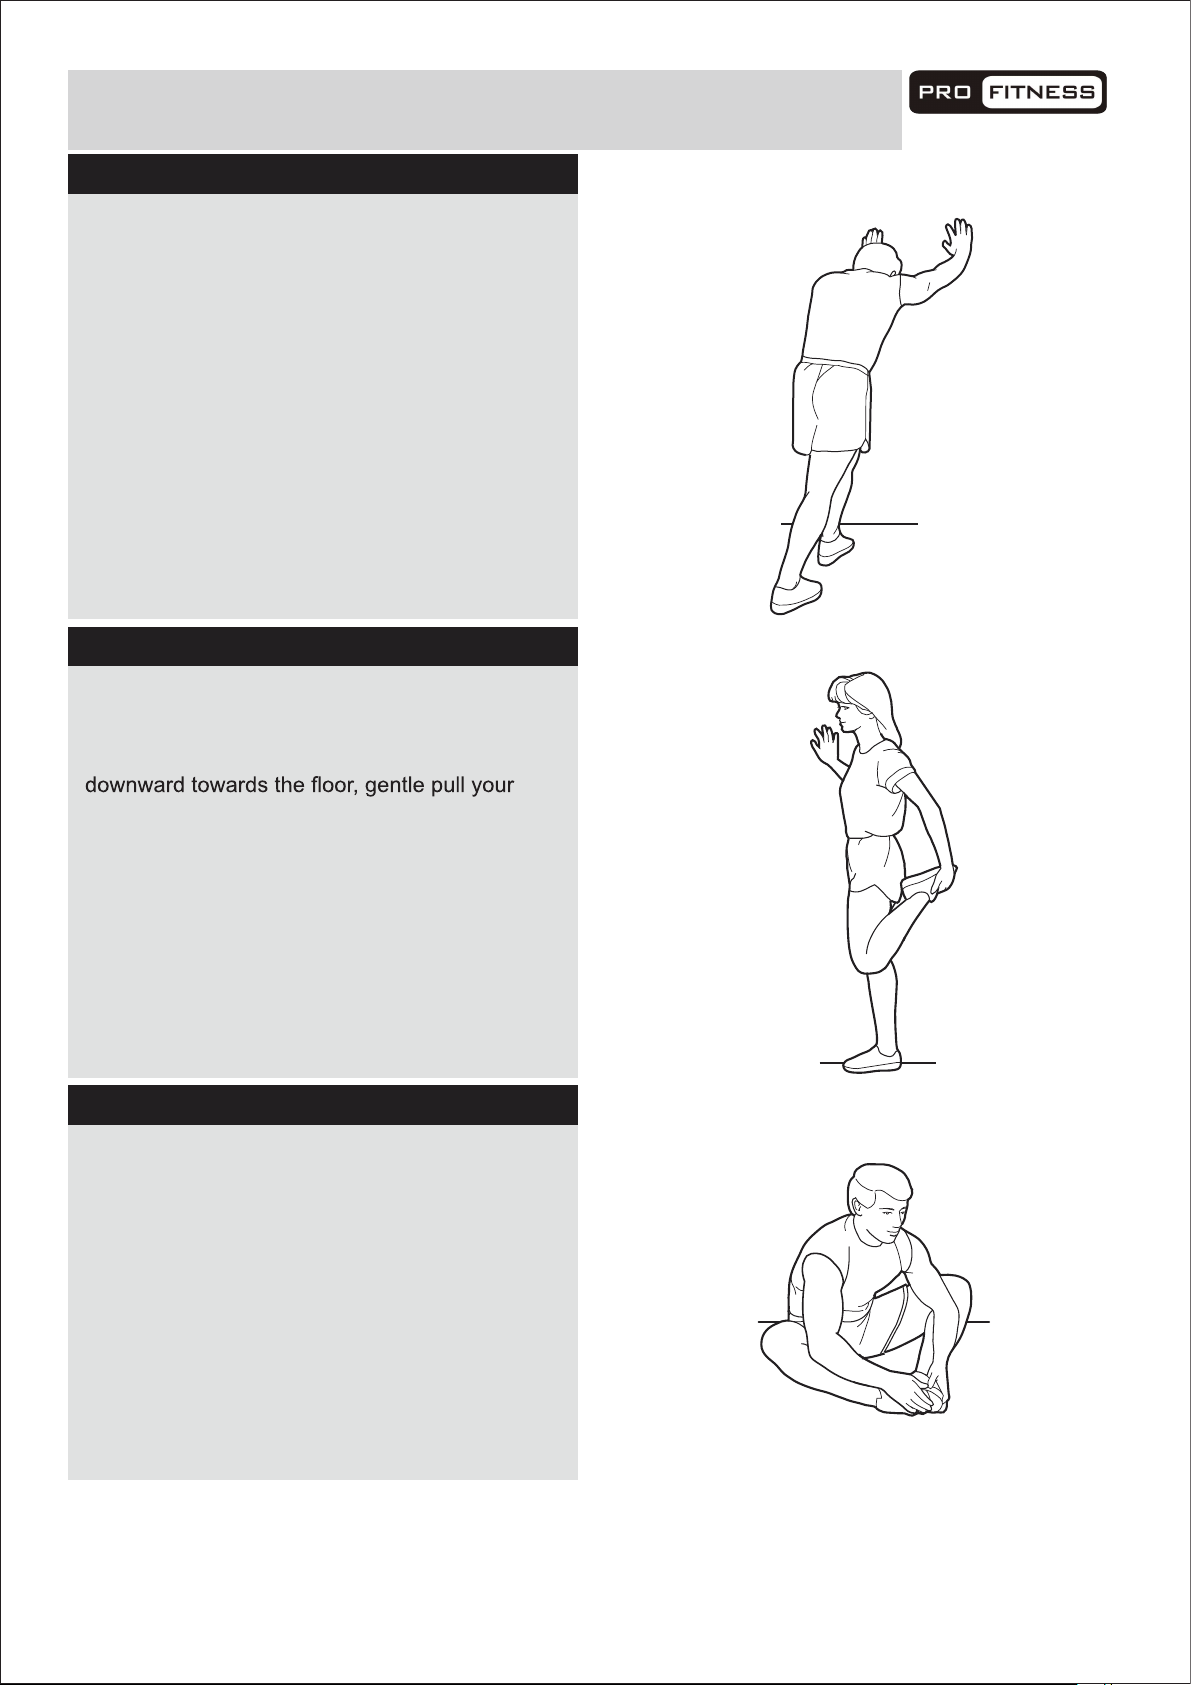
Calf/achilles stretch
With one leg in front of the other, reach forward
and place your hands against a wall. Keep your
back leg straight and your back foot flat on the
floor. Bend your front leg, lean forward and move
your hips toward the wall.
Hold for 15 counts, then relax.
Repeat 3 times for each leg. To cause further
stretching of the achilles tendons, bend your
back leg as well.
Stretches: Calves, achilles tendons and ankles.
Quadriceps stretch
With one hand against the wall for balance,
reach back and grasp one foot with your other
hand. Keeping your bent knee pointing directly
heel towards your buttock until you feel a gentle
stretch in the target area.
Hold for 15 counts, then relax.
Repeat 3 times for each leg.
Stretches: Quadriceps and hip muscles.
Inner thigh stretch
Sit with the soles of your feet together and your
knees outward. Pull your feet toward your groin
area as far as possible.
Hold for 15 counts, then relax.
Repeat 3 times.
Stretches: Quadriceps and hip muscles.
Page 15
Exercise Information
Auto Scan
Every 6 seconds
Time
0:00-99:59 (Minute: Second)
Speed
0.0-99.9 km/h
Distance
0.0-999.9 km
Calories
ODO
Pulse
Battery type 2 x SIZE-AAA (not included)
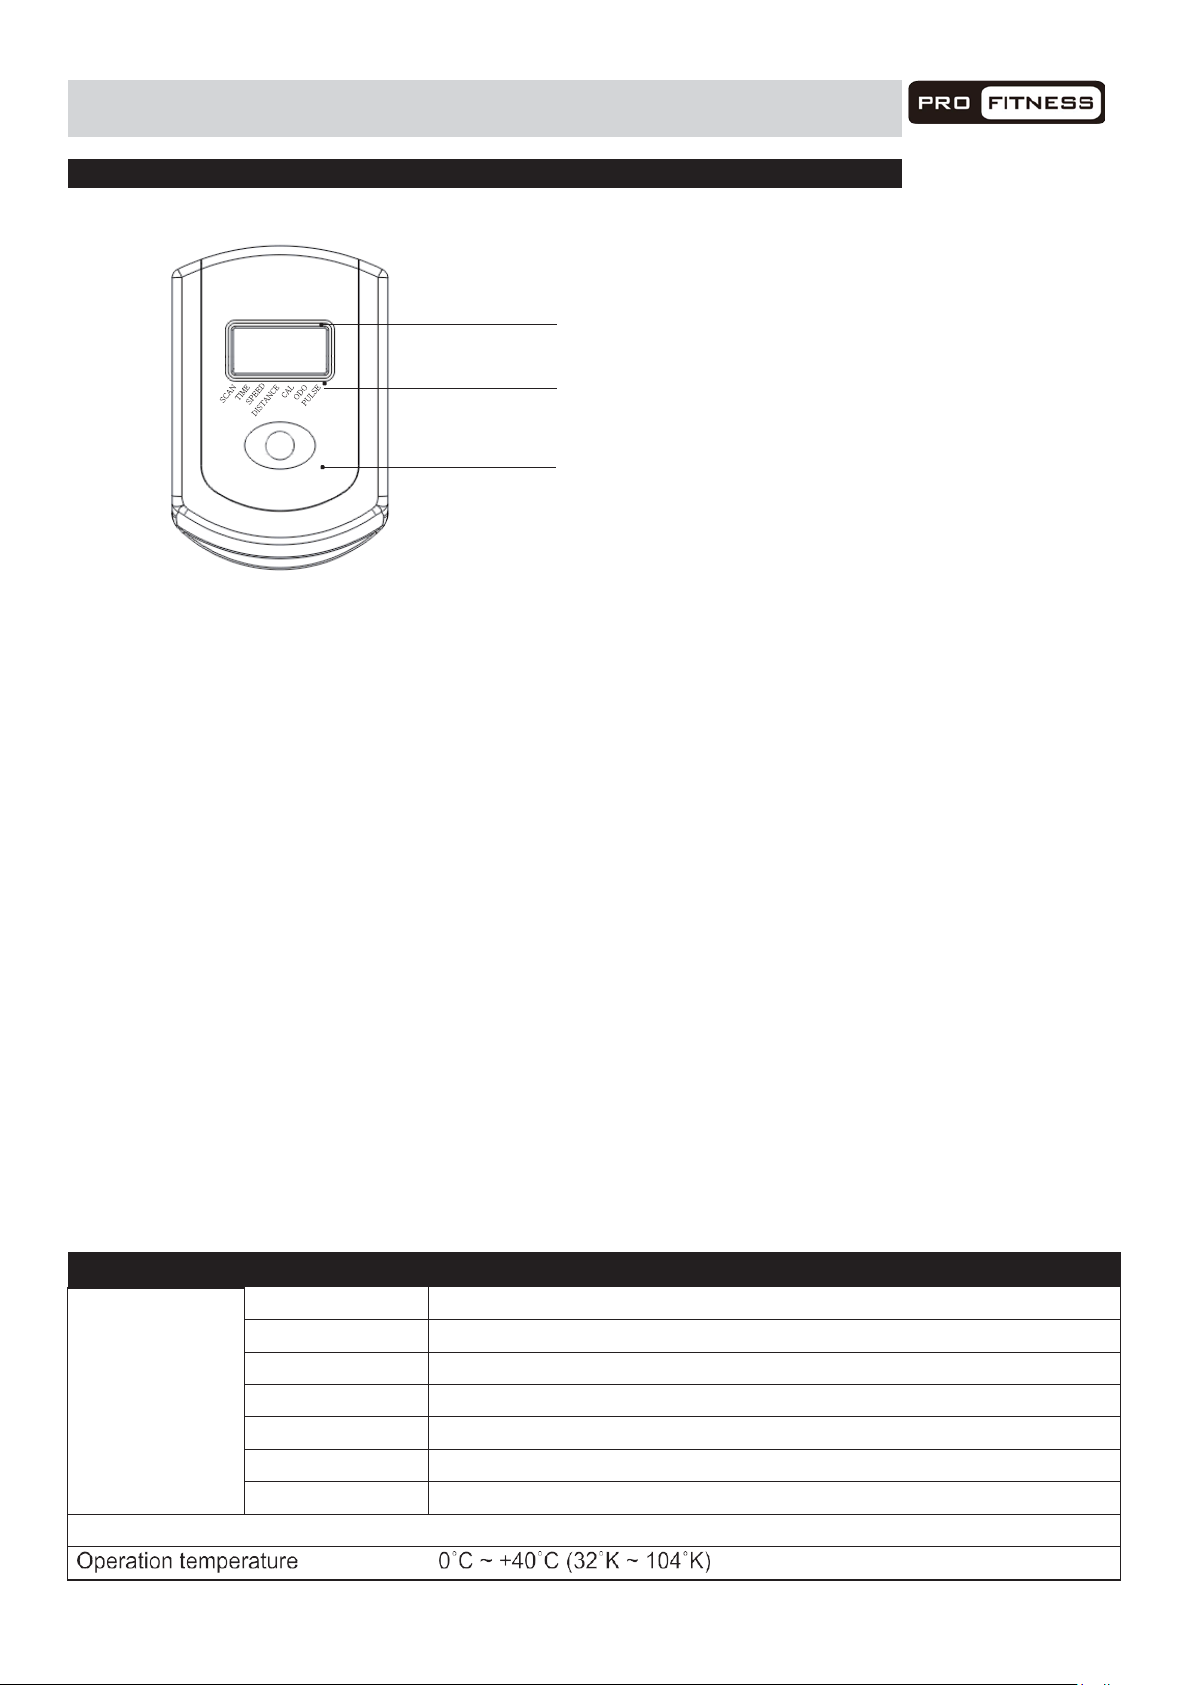
Console Operation
Functions:
Mode
MODE: Press to select the function.
AUTO ON /OFF: The system turns on when any key is
pressed or when it receives a signal input from the speed
sensor.
The system turns off automatically when the sensor has
no signal input or no key is pressed for approximately 4
minutes.
RESET: The unit can be reset by either changing the
battery or pressing the Mode key for 3 seconds.
Functions
SCAN: Display the below functions in turn every 6
seconds: TIME----SPEED----DISTANCE---- CALORIES---ODO----PULSE (repeat).
TIME: Workout time
Display
SCAN / TIME / SPEED / DISTANCE / CALORIES
ODO / PULSE
Mode
DISTANCE: Workout distance.
CALORIES : Calories burnt
Pulse: Heart Beat Rate.To get a pre-exercise pulse rate,
simply hold both Hand Pulse Sensors on either side of
the Handlebar Supports for 5 seconds. The Pulse
Range is between 40 ~ 240 Beats per Minute.
Note: The readings displayed by the computer should
not be used for therapeutic purposes as they can vary
due to the sensitivity of the equipment and the available
pulse signal in your palms. To get the most accurate
readings, keep your hands firmly on the pulse pads for
10 to 20 seconds. WARNING! Heart rate monitoring
systems may be inaccurate. Over exercising may result
in serious injury or death. If you feel faint stop exercising
immediately. For the most accurate heart rate measure,
please hold both hand pulse sensors continuously
during this programme
SPEED:Current speed .
ODO: Accumulated distance.
cations
Function
0-9999 kcal
0-9999 km
40-240 bpm
14
Page 16
Ex
15
ercise Information
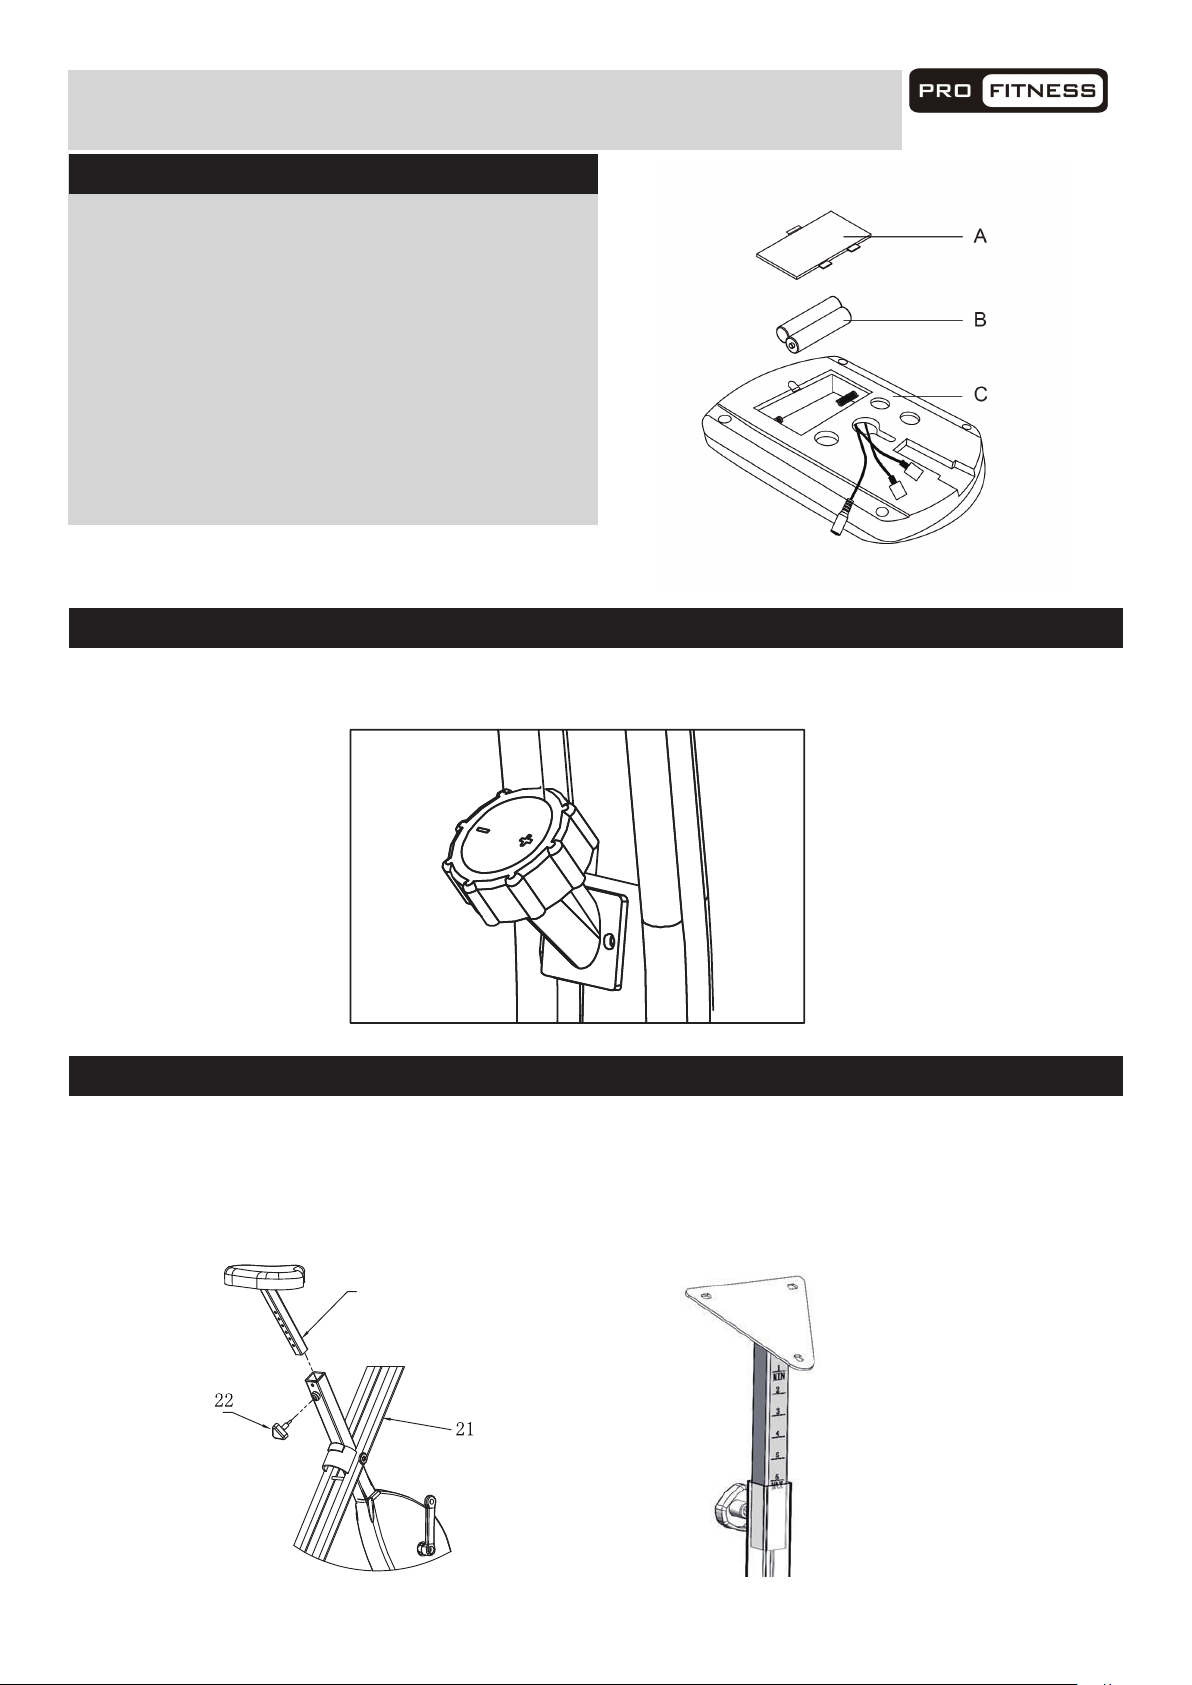
Replacing the batteries
Remove the Back Cover (A) of the Console (5)
A
and install 2 x AAA battery (B) into the battery
compartment.
B
Replace the Back cover (A) to the Console (5).
Note: The 2 pcs of AAA battery are not included
with the equipment.
C
Adjustment of Resistance
Adjustment of Resistance level by turning the 8-level tension knob either to the right (increase) or
left (decrease).
5
6
4
3
7
2
1
8
Adjustment of Seat Height
Unlock the Lock Knob (22) and position the Seat Post (15) upwards or downwards at your required and
secure with the Lock Knob (22).
Do not pull the Seat Post (15) beyond the MAX mark or below the MIN mark on the Seat Post (15).
Note: The seat height is correct when the knee is slightly angled with the pedal vertically down and the foot
parallel to the floor.
15
Page 17
Exercise Information
16
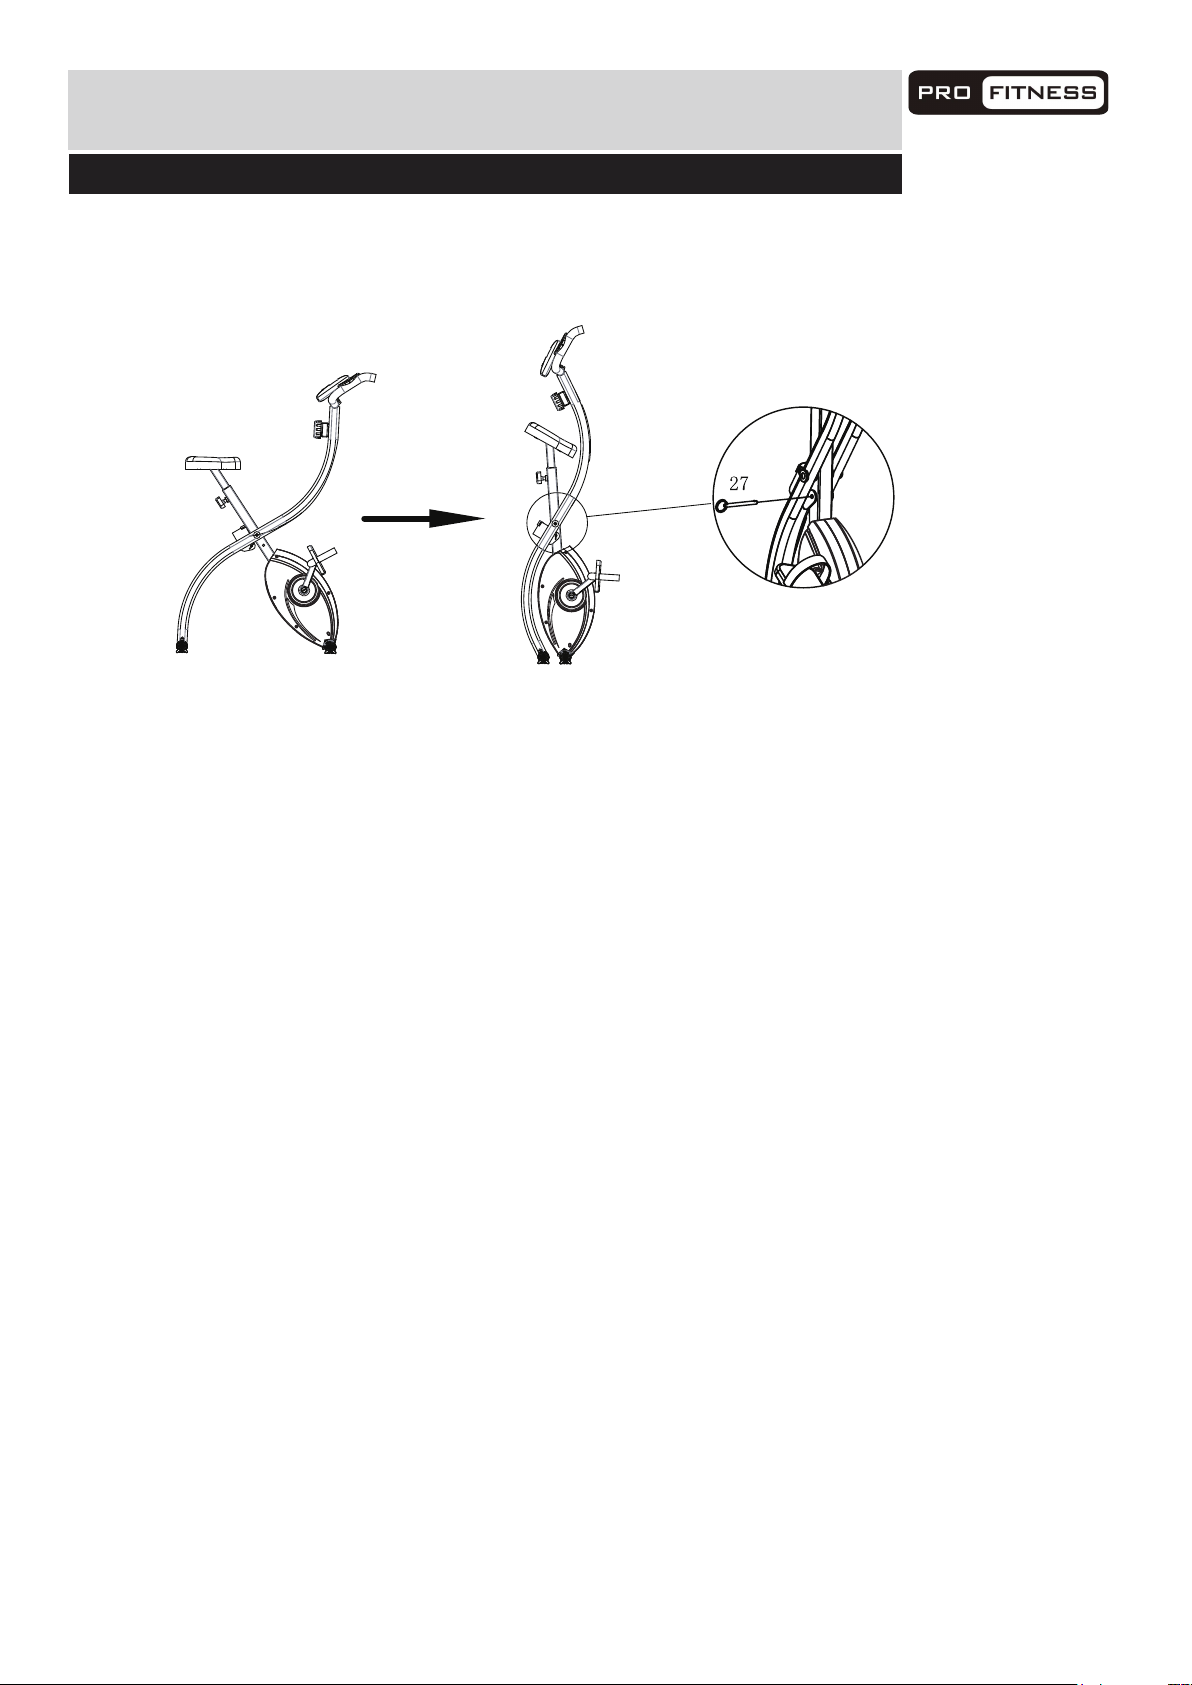
Folding away your Exercise Cycle
Insert the Pin (27) through the holes to lock the exercise bike in folding position as shown
in the below diagram.
Folded dimension of the exercise cycle is 42 x 42.5 x 138 (H) cm.
Page 18
Care and Maintenance
17
1. The safety level of the equipment can only be
maintained if it is examined regularly for damage
and wear e. g. ropes, pulleys and connection
points.
2. Lubricate moving parts with light oil periodically to
prevent premature wear. To prevent damage to the
computer, keep liquids away and keep it out of
direct sunlight.
3. Inspect and tighten all parts before using the
equipment. Replace defective components
immediately and/or keep the equipment out of use
until repair. Pay special attention to components
most susceptible to wear.
4. The equipment can be cleaned using a damp cloth
and mild non - abrasive detergent.
Do not use solvents.
5. Do not attempt to repair this equipment
yourself. Should you have any difficulty with
assembly, operation or use of your exercise
product or if you think that you may have
parts missing, contact the manufacturer,
their approved service agent or the
Customer Helpline:
0345 600 1714 www.argos-support.co.uk
Guarantee:
For guarantee purposes, please retain
your purchase receipt.
Information for Users on Disposal of old Equipment and Batteries
These symbols indicate that equipment with these
symbols should not be disposed of as general household
waste. If you want to dispose of the product or battery,
please consider the collection systems or facilities for
appropriate recycling.
Notice: The sign Pb below
the symbol for batteries
indicates that this battery
contains lead.
Battery
Products
Page 19
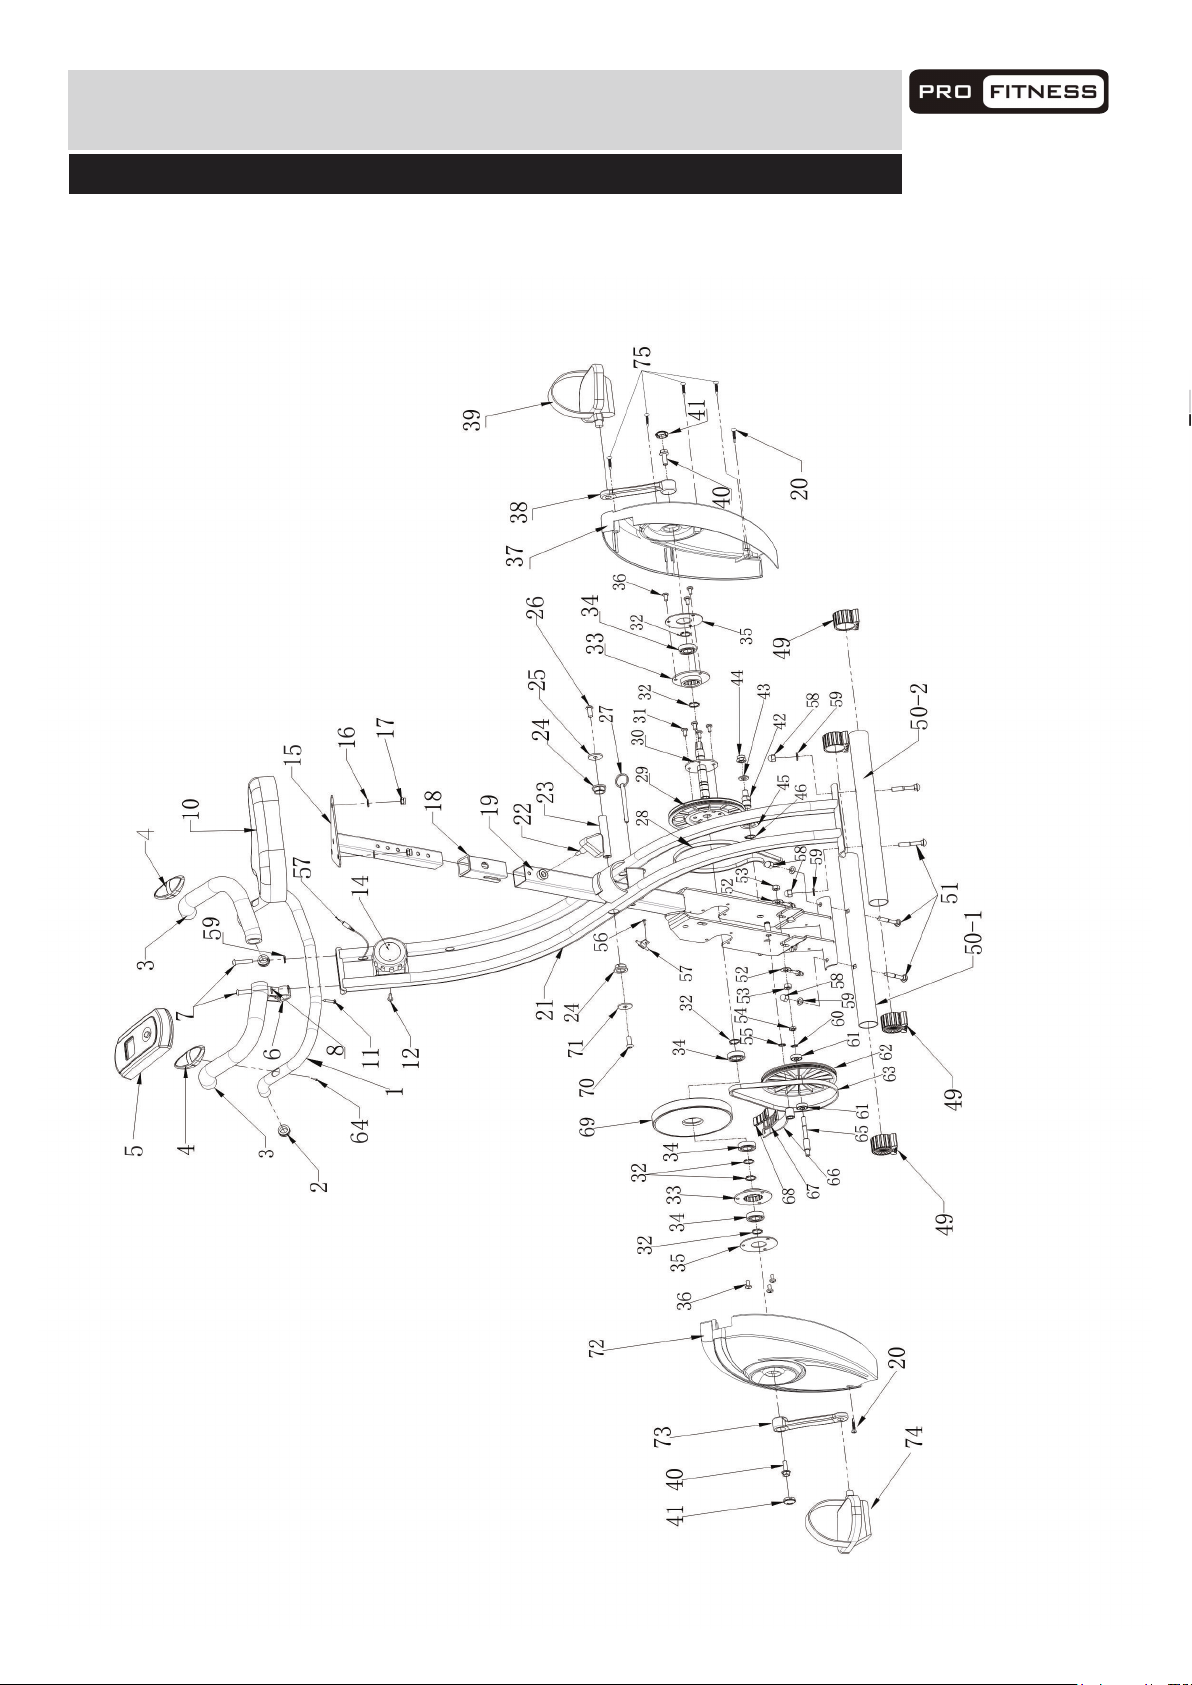
Exploded Parts Diagram
18
Page 20
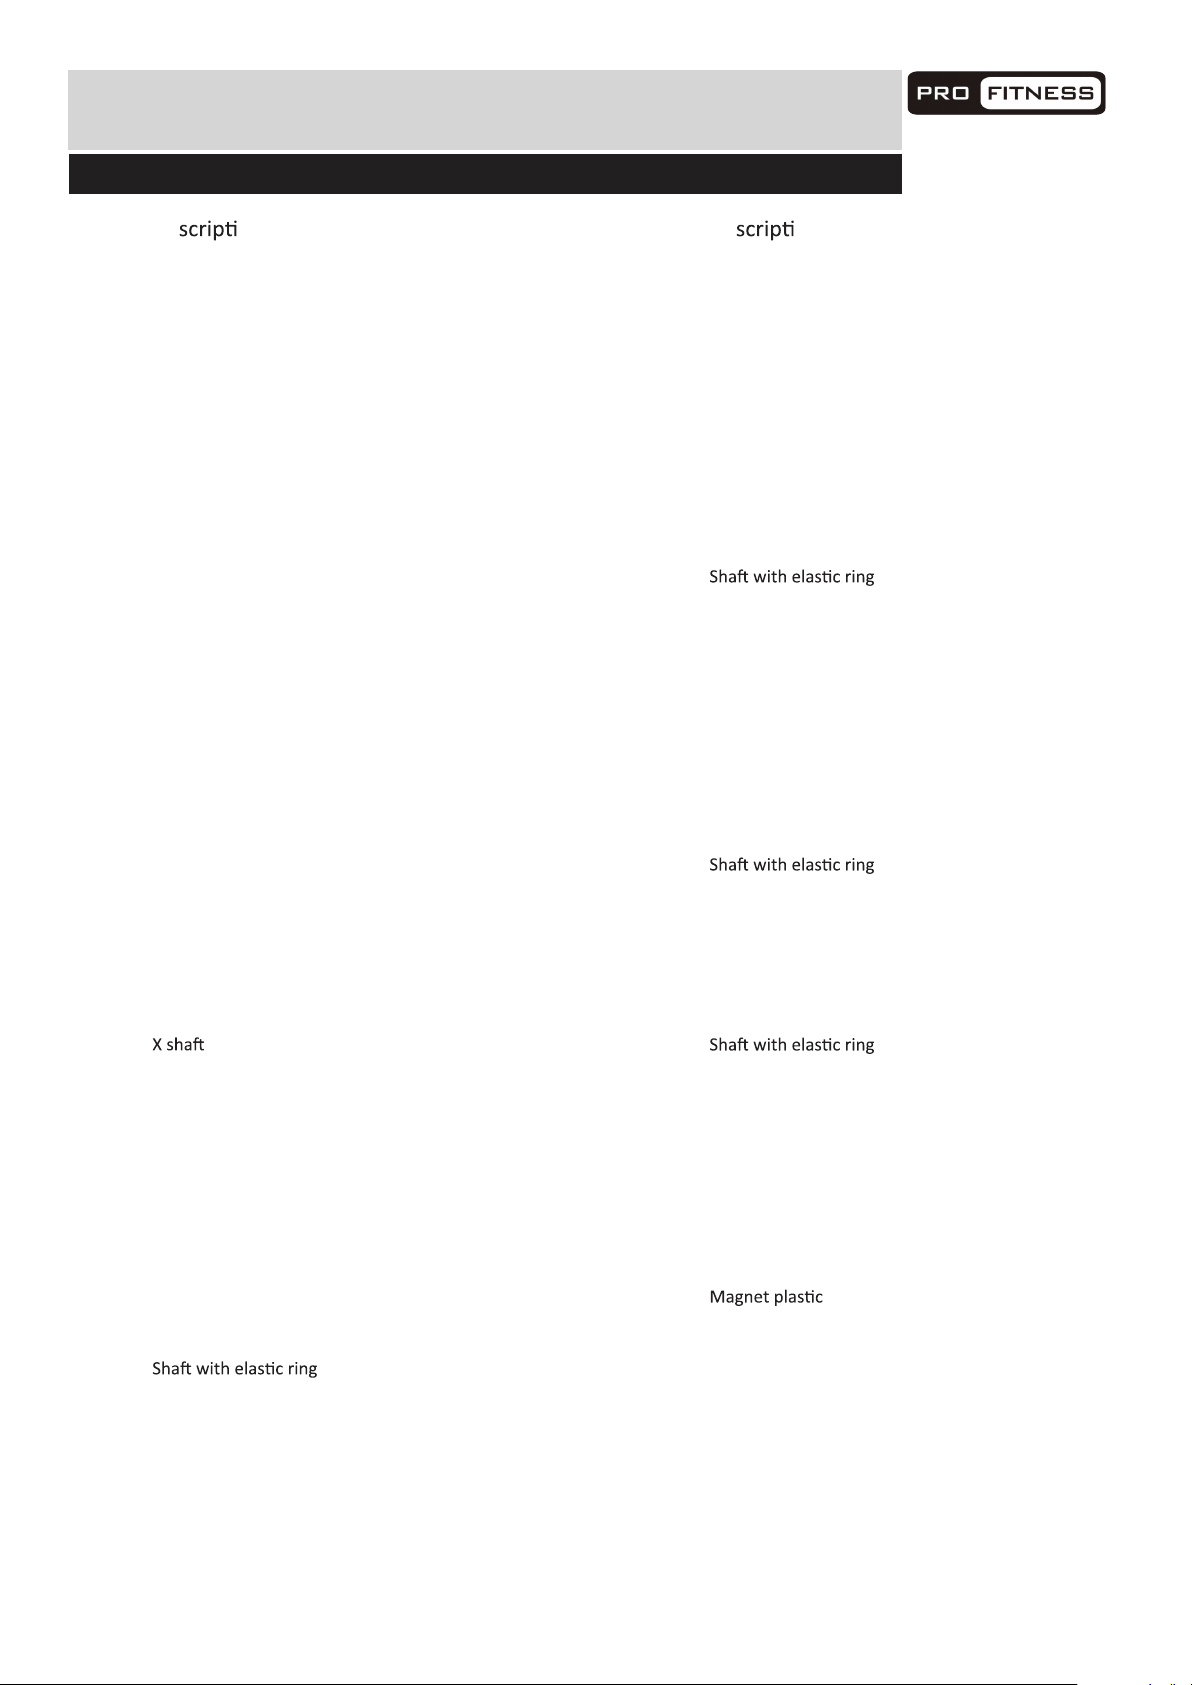
Parts List
19
Part
1
2
3
4
5
6
7
8
10
11
12
13
14
15
16
Handlebar
Handlebar cap
Foam
Pulse sensor
Console
Console holder
Allen bolt
Spring washer
Saddle
Screw
Screw
Pulse wire
Spout plug
Seat post
Washer
Ø22XT1.2X793
Ø30XØ20X342
M8*35
Ø8.1*4.2
ST4*25
M4*25
Ø18*1.5
Qty Size/mm Part De on
1
2
2
2
1
1
2
6
1
1
1
1
1
1
7
38
39
40
41
42
43
44
45
46
49
50-1
50-2
51
52
53
Crank(R)
Pedal(R)
Crank Screw
Crank Cover
Axis
Washer
Nut
Axis wheel
Cap
Front stabilizer
Rear stabilizer
Carriage Blot
Screw Group
Nut
M8*25
Ø17*35.5
Ø20*Ø10.2*T1.5
M10
Ø10
M8*50
M8
Qty Size/mmDe on
1
1
2
2
1
1
1
1
1
4
1
1
4
2
2
Nut
17
Bushing
18
Driving unit frame
19
Screw
20
Main frame
21
Lock knob
22
23
Bushing
24
washer
25
Allen Bolt
26
Pin
27
Belt
28
Belt Pulley
29
Crank axis frame
30
Allen Bolt
31
32
Block
33
M8
M4×27
Ø16*92
Ø25*Ø8.5*T2.0
M8*15
240J
M6*12
Ø17
6
1
1
2
1
1
1
6
1
1
1
1
1
1
4
6
2
54
55
56
57
58
59
60
51
62
63
64
65
66
67
68
69
70
Nut
Sensor fixed screw
Sensor wire
Dome nut
Curved washer
Bearing
Ø 150 belt pulley
Belt
Tapping Screw
150 Axis of belt pulley
Magnets bracket
Magnet
Flywheel
Allen Bolt
M8
Ø10
M4*8
M8
Ø20*1.5
Ø8
608
230J
ST4*15
18*9*5
Ø160
M8*15
1
1
1
1
4
6
1
2
1
1
2
1
1
1
5
1
1
Bearing
34
Metal plate for reinforcing
35
Allen Bolt
36
Chain cover(R)
37
6003
M6*10
4
2
6
1
71
72
73
74
75
Washer
Chain cover(L)
Crank(L)
Pedal(L)
Screw
Ø25*Ø8.5*T2.0
M4×27
1
1
1
1
4
Page 21
Guarantee
20
This product is guaranteed against manufacturing defects for a period of
Product Guarantee
Year
This product is guaranteed for twelve months from the date of original purchase.
Any defect that arises due to faulty materials or workmanship will either be replaced,
refunded or repaired free of charge where possible during this period by the dealer
from whom you purchased the unit.
The guarantee is subject to the following provisions:
• The guarantee does not cover accidental damage, misuse, cabinet parts, knobs
or consumable items.
• The product must be correctly installed and operated in accordance with the
instructions contained in this manual.
• It must be used solely for domestic purpose.
• The guarantee will be rendered invalided if the product is re-sold or has been
damaged by inexpert repair.
• Specifications are subject to change without notice.
• The manufacturer disclaims any liability for the incidental or consequential damages.
• The guarantee is in addition to, and does not diminish your statutory or legal rights.
• In the event of a problem with the product with in the guarantee period call the
Customer contact number: 0345 600 1714 www.argos-support.co.uk
Guarantor: Argos Ltd
489 - 499 Avebury Boulevard
Central Milton Keynes
MK9 2NW
 Loading...