

Page 1
PBM1000W-001_v01
A
2
4
3
15
11
1
20
18
16
17
19
1
8
14
4
5
6
13
12
7
6
9
10
TR EN
1. Güç: 650 W 2. Baget için ekstra pişirme haznesi
3. Pişirme süresince malzeme ekleyebilme imkanı
4. Yapışmaz yüzeyli
1. Power: 650 W 2. Additional moulds for baking
baguettes 3. Adding additional ingredients during
baking 4. Non-stick coating
1
3
2
4
PBM1000W
KULLANIM KILAVUZU
EKMEK YAPMA MAKİNESİ
USER MANUAL
BREAD BAKING MACHINE
TR
EN
Sze bırakmayan akıllı ekmek
yapma maknes
Advanced bread maker performing
all actions by himself
6–17
18–29
www.pro lo.com.tr
bread baking machine
EKMEK YAPMA MAKİNESİ
PBM1000W
bread baking machine
EKMEK YAPMA MAKİNESİ
PBM1000W
www.pro lo.com.tr
Page 2
6
Değerli Müşterilerimiz!
Cihazımızı seçtiğiniz için tebrik ederiz. PROFiLO kullanıcıları
arasına hoş geldiniz.
Kılavuzu dikkatli okuyun. Kazaları ve zararı önlemek için,
önemli güvenlik talimatlarını özellikle dikkate alın. Kullanım
kılavuzu, ileride danışmak üzere saklanmalıdır.
Güvenli kullanım talimatları
Cihazı kullanmadan önce, kullanım kılavuzunun bütün
içeriğini okuyun.
Aşağıdaki talimatları anladığınızdan emin olun.
● Kullanılmadığında ve temizlemeden
önce, cihazın şini prizden sökün.
● Hareketli parçaları kullanmadan
önce, cihazı kapatın.
● Kablonun, masanın kenarından
sarkmasından ve sıcak yüzeylere
temasından kaçının.
● Dolu ekmek kalıbını cihazdan
çıkarırken, tencere tutacakları veya
koruma bezi kullanın. Ekmek kalıbı
ve ekmek çok sıcaktır.
● Özellikle kuru malzeme dağıtıcısı ve
havalandırma çevresindeki bölgeler
gibi, cihazın sıcak yüzeylerine
dokunmayın. Tencere tutacakları
kullanın. Pişirme işleminin sonunda
cihaz çok ısınır.
● Cihaz çalıştığında, dış yüzeylerin
sıcaklığı yüksek olabilir.
● Demonte edilmeden ve temizlenmeden
önce, cihaz soğumalıdır. Cihaz, ısı
yalıtımlı, soğuk kalan dış yapıya
sahiptir. Cihaz çalıştığında, metal
parçaları sıcaktır.
● Özellikle içinde sıcak bir madde
bulunduğu zaman, cihaza
dokunduğunuzda dikkatli olun.
TEHLİKE! / DİKKAT!
Sağlık riski
● 8 yaşından büyük çocuklar, ziksel,
duyumsal veya ruhsal olarak engelli
olan veya tecrübeye ve bilgiye sahip
olmayan kişiler, kontrolün sağlanması,
cihazı güvenli olarak kullanma
konusunda talimatların verilmesi ve
mevcut tehlikelerini anlamaları şartı
ile, cihazı kullanabilirler. Çocukların
cihaz ile oynaması yasaktır.
Temizleme ve bakımı, kontrol
altında olmayan çocuklar tarafından
gerçekleştirilemez.
● Cihaz ve kablosu, 8 yaşından küçük
çocukların ulaşamayacağı bir yerde
saklanmalıdır.
● Eğer cihazın kablosu arızalı veya
hasarlı ise, cihazı kullanmayın.
● Elektrik kablosunun arızalı
olması halinde, tehlikeyi önlemek
için imalatçı, yetkili servis veya
benzer yetkili personel tarafından
değiştirilmesi gerekir.
● Cihaz, sadece yetkili personel
tarafından tamir edilebilir. Yanlış tamir,
kullanıcıya ciddi tehlike oluşturur.
Ciddi hasarların oluşması halinde,
çağrı merkezi ile irtibata geçin.
DİKKAT!
Cihaz zarar görebilir
●
Cihazın, daima anma değerleri etiketinde bulunan
değere uygun voltaja sahip olan, topraklanmış elektrik
prizine bağlanması gerekir.
●
Cihaz harici bir zamanlayıcı ya da kumanda sistemi
vasıtasıyla kullanılmak üzere tasarlanmamıştır.
●
Yoğun hamur yoğrulurken cihazın düşmemesi için,
daima düz bir yüzeyde çalıştırılmalıdır. Bu, özellikle
programlanmış fonksiyonlar yerine getirilirken ve cihaz
kontrolsüz bırakıldığında önemlidir. Kaygan bir yüzeye
koyulması durumunda, cihaz lastik bir korumanın
üzerine koyulmalıdır.
●
Cihaz çalıştığında, diğer objelerden en az 10 cm
uzaklığında bulunmalıdır.
PBM1000W-001_v01
TR
1 2 11 12
9 10 19 20
7 8
17 18
5 6 15 16
3 4 13 14
B
• Cihaz›n›z; kullanma k›lavuzunda gösterildi€i flekilde kullan›lmas› ve yetkili k›ld›€›m›z teknik servis elemanlar› d›fl›ndaki flah›slar taraf›ndan bak›m, onar›m veya baflka bir nedenle
müdahale edilmemifl olmas› flart›yla bütün parçalar› dahil olmak üzere tamamen malzeme, iflçilik ve üretim hatalar›na karfl› 2 (‹K‹) YIL SÜRE ‹LE GARANT‹ ED‹LM‹fiT‹R.
• Ar›zalar›n giderilmesi konusunda uygulanacak teknik yöntemlerin tespiti ile de€ifltirilecek parçalar›n saptanmas› tamamen rmam›za aittir.
• Mal›n tesliminden sonraki yükleme, boflaltma ve sevkiyat an›nda meydana gelecek ar›zalar garanti kapsam› d›fl›ndad›r.
• Belge üzerine tahrifat yap›ld›€›, cihaz›n üzerindeki orjinal seri numaras› kald›r›ld›€› veya tahrifat yap›ld›€› takdirde garanti geçersizdir.
GARANT‹ fiARTLARI
1. Garanti süresi mal›n teslim tarihinden itibaren bafllar ve 2 y›ld›r.
2. Mal›n bütün parçalar› dahil olmak üzere tamam› rmam›z›n garantisi kapsam›ndad›r.
3. Mal›n garanti süresi içerisinde ar›zalanmas› durumunda, tamirde geçen süre garanti süresine eklenir. Mal›n tamir süresi en fazla 20 ifl günüdür. Bu süre, mala iliflkin ar›zan›n servis
istasyonuna, servis istasyonunun olmamas› durumunda, mal›n sat›c›s›, bayii, acentas›, temsilcili€i, ithalatç›s› veya imalatç›s›ndan birisine bildirim tarihinden itibaren bafllar. Sanayii
mal›n›n ar›zas›n›n 10 iflgünü içerisinde giderilmemesi halinde üretici veya ithalatç›, tamir tamamlan›ncaya kadar, benzer özelliklerdeki baflka bir ürünü tüketiciye tahsis edecektir.
4. Mal›n garanti süresi içerisinde, gerek malzeme ve iflçilik gerekse montaj hatalar›ndan dolay› ar›zalanmas› halinde, iflçilik masraf›, de€ifltirilen parça bedeli ya da baflka herhangi bir ad
alt›nda hiçbir ücret talep etmeksizin tamiri yap›lacakt›r.
5. Tüketicinin onar›m hakk›n› kullanmas›na ra€men mal›n;
– Tüketiciye teslim edild€i tarihten itibaren, garanti süresi içinde kalmak kaydıyla, bir yıl içerisinde en az dört defa veya imalatçı-üretici ve/veya ithalatçı tarafından belirlenen garanti
süresi içerisinde altı defa arızalanmasının yanı sıra, bu arızaların maldan yararlanamamayı sürekli kılması,
– Tamiri için gereken azami sürenin afl›lmas›,
– Firman›n servis istasyonunun, servis istasyonunun mevcut olmamas› halinde s›ras›yla sat›c›s›, bayii, acentesi, temsilcili€i, ithalatç›s› veya imalatç›-üreticisinden birisinin düzenleyece€i
raporla ar›zan›n tamiri mümkün bulunmad›€›n›n belirlenmesi,durumlar›nda, tüketici mal›n ücretsiz de€ifltirilmesini, bedel iadesi veya ay›p oran›nda bedel indirimi talep edebilir.
6. Mal›n kullanma k›lavuzunda yer alan hususlara ayk›r› kullan›lmas›ndan kaynaklanan ar›zalar garanti kapsam› d›fl›ndad›r.
7. Garanti belgesi ile ilgili olarak ç›kabilecek sorunlar için T.C. Gümrük ve Ticaret Bakanl›€›, Tüketicinin Korunmas› ve Piyasa Gözetimi Genel Müdürlü€ü’ne baflvurabilir.
Bu belgenin kullan›lmas›nda; 4077 say›l› Tüketicinin Korunmas› Hakk›nda Kanun ve bu Kanun’a dayan›larak yürürlü€e konulan Garanti Belgesi Uygulanma Esaslar›na Dair Yönetmelik
uyar›nca, T.C. Gümrük ve Ticaret Bakanl›€› Tüketicinin Korunmas› ve Piyasa Gözetimi Genel Müdürlü€ü taraf›ndanizin verilmifltir.
Bu ürün PROF‹LO için BSH Ev Aletleri Sanayi ve Ticaret A.fi. taraf›ndan ithal edilmektedir.
BSH Ev Aletleri Sanayi ve Ticaret A.fi. bir BOSCH UND SIEMENS HAUSGERÃTE GMBH kurulufludur.
D‹KKAT
Garanti süresinin anlaflmazl›k durumunda fatura tarihi esas al›naca€›ndan bu belge ile birlikte faturan›n veya okunakl› fotokopisinin saklanmas› gereklidir.
YETK‹L‹ SATICI BSH EV ALETLER‹ SAN. VE T‹C. A.fi.
‹mza ve kaflesi
MALIN
Cinsi : KÜÇÜK EV ALETLER‹
Markas› : PROF‹LO
Modeli :
Bandrol ve Seri No. :
Teslim tarihi ve yeri :
Azami tamir süresi :
Cihaz ömrü :
Kullan›m Süresi : 7 YIL (Ürünün fonksiyonunu yerine getirebilmesi için
SATICI F‹RMANIN
Ünvan› :
Adresi :
Telefonu :
Telefaks› :
Tarih / ‹mza / Kafle
Üretici Firma:
BSH Bosch und
Siemens Hausgeräte GmbH
Carl-Wery-Str. 34
D-81739 München
Phone: +49 (89) 45 90 01
Fax: +49 (89) 45 90 21 28
BSH EV ALETLER‹ SANAY‹
ve T‹CARET A.fi.
Fatih Sultan Mehmet Mah.
Balkan Cad. No.51 34771
Ümraniye - ‹STANBUL
Tel : 0216 528 90 00
Fax : 0216 528 91 88
Gümrük ve Ticaret Bakanl›€› Garanti Belgesi
Marka Ürün ‹smi Belge Belge
Numaras› Onay Tarihi
Prolo Meyve Sebze S›kaca€› 114946 24.07.2012
Prolo Su Is›t›c›s› 115286 03.08.2012
Prolo Mutfak Robotu 87053 13.07.2010
Prolo Ütü 90605 07.09.2010
Prolo Çay Makinas› 88663 06.08.2010
Prolo fiarjl› El Süpürgesi 85224 18.06.2010
Prolo Saç fiekillendirme Cihaz› 107013 18.11.2011
Prolo Tost Makinas› 116313 03.09.2012
Prolo Saç Kurutma Makinas› 87183 15.07.2010
Prolo Meyve Sebze S›kaca€› 114946 24.07.2012
Prolo Kar›flt›r›c› 115406 07.08.2012
Prolo Blender 88662 06.08.2010
Prolo Saç fiekillendirme Cihaz› 107013 18.11.2011
PBM1000W-001_v01
Page 3
7
●
Cihazı, doğal gaz veya elektrik ocağına ya da fırına
yakın bir yere asla koymayın.
●
Cihaz çalıştığında, ekmek kalıbını asla sökmeyin.
●
Yangına veya kısa devreye sebep olabildiği için,
cihazın içine alüminyum folyo ya da pişirme
malzemelerinden başka maddeleri asla koymayın.
●
Cihaz çalıştığında, havlu veya herhangi başka bir
örtü ile asla örtülemez. Sıcak ve buhar, cihazın
dışına serbest olarak çıkabilmelidir. Eğer cihaz yanar
malzemeler ile örtülürse veya perde gibi malzemeler
ile temasa geçerse, yangın tehlikesi mevcuttur.
●
Cihazı elde yıkamayın. Cihazı ve kablosunu suya
daldırmayın.
●
Cihazın temizliğinde emülsiyon, krem deterjanı, cila
gibi aşındırıcı maddeler kullanmayın. Bu maddeler,
ölçüler, işaretler, uyarı sembolleri gibi grak bilgileri
silebilir.
●
Cihazın metal parçalarını bulaşık makinesinde
yıkamayın. Bulaşık makinelerinde kullanılan kuvvetli
deterjanlar parçaların kararmasına sebep olur. Bulaşık
deterjanı kullanarak, elde yıkayın.
●
İmalatçının tavsiye etmediği aletlerin kullanılması,
cihazın zarar görmesine sebep olabilir.
●
Ekmek tutuşabilir, o yüzden cihazı yanan maddelere
yakın bir yerde veya tutuşabilen malzemelerin (örneğin
perdelerin) altında asla kullanmayın.
●
Fişini prizden çıkarırken kablosundan tutup çekmeyin.
Teknik parametreler
Teknik parametreler, anma değerleri etiketinde bulunmaktadır.
Ekmek pişirme makinesi, topraklanmış kabloya ve
topraklanmış şe sahip olan, I sınıf cihazdır.
Cihaz, yürürlükte olan standartların gereksinimlerine uygundur.
Cihaz, aşağıdaki yönetmeliklerin gereksinimlerini yerine getirir:
– Belirli gerilim sınırları dahilinde kullanılmak üzere
tasarlanmış elektrikli teçhizat ile ilgili yönetmelik (LVD)
– 2006/95/EC.
– Elektromanyetik Uygunluk (EMC) – 2004/108/EC.
Cihazın anma değerleri plakasında CE işareti bulunmaktadır.
Cihazın özellikleri
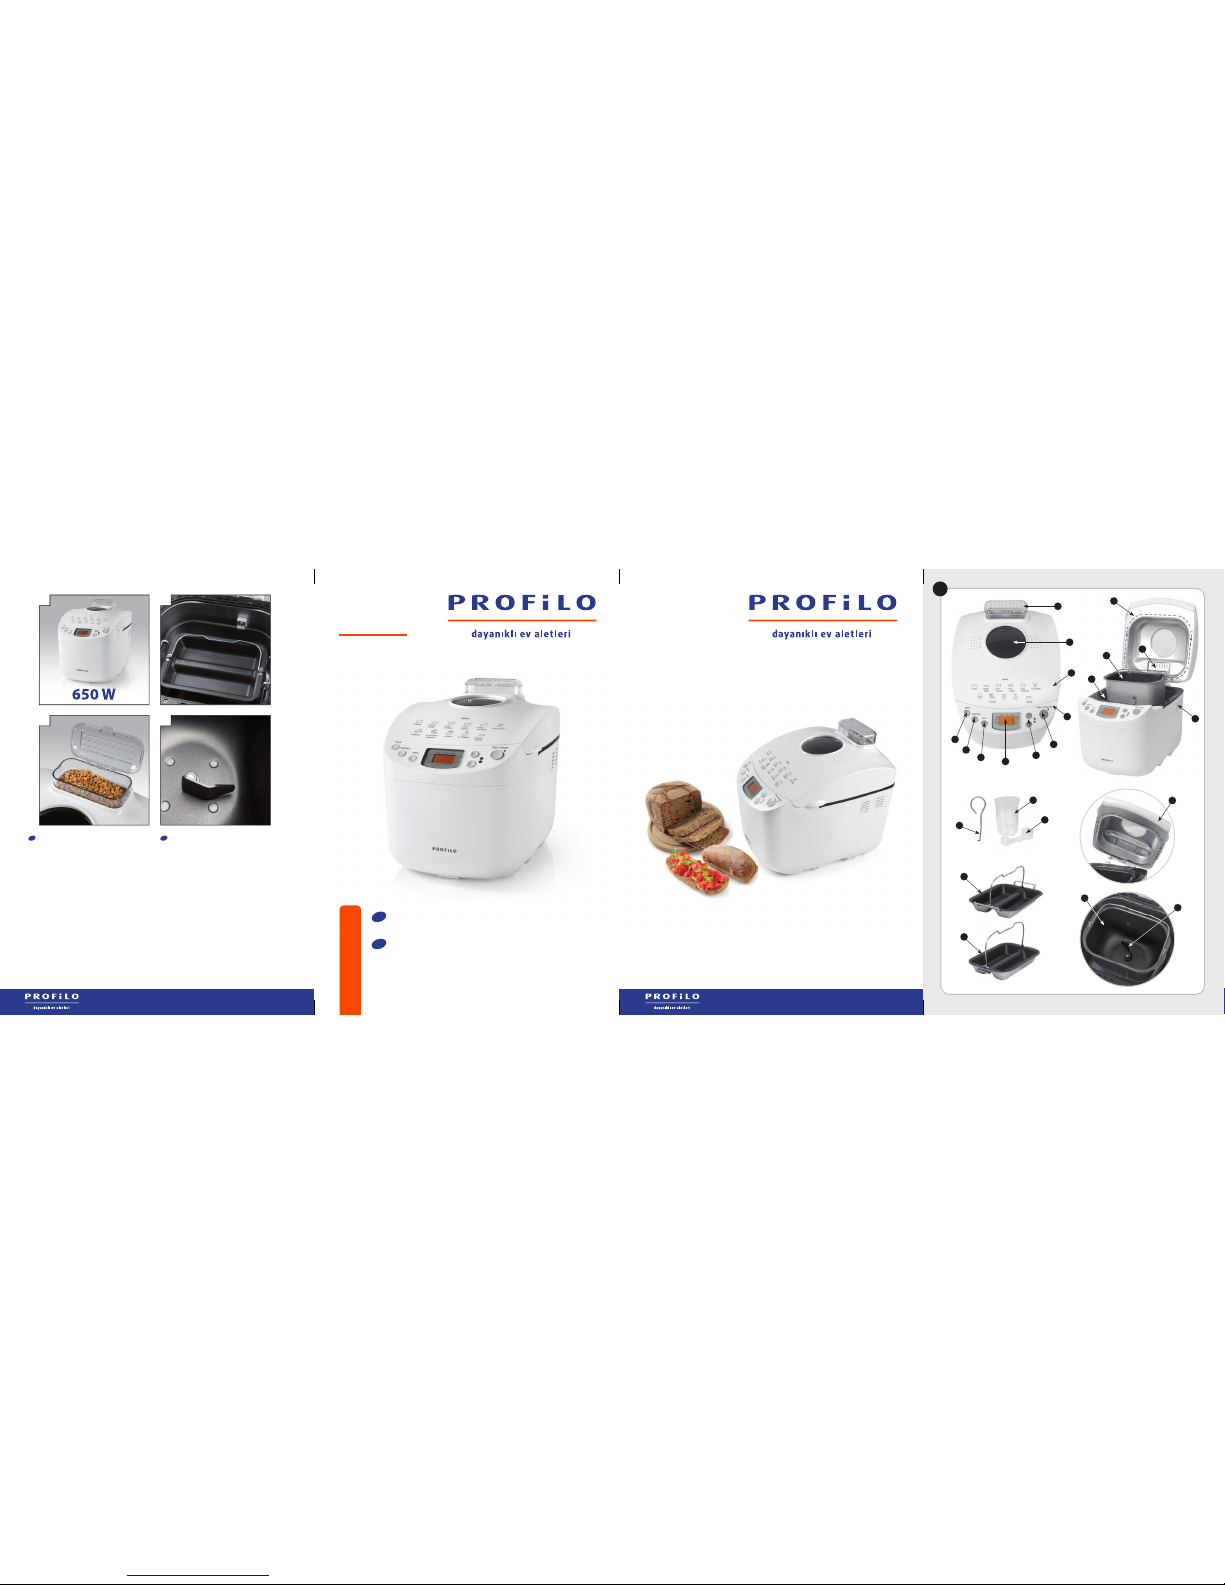
CİHAZIN PARÇALARI
1
Sökülebilir kapak
2
Tutamaç
3
İzleme penceresi
4
Gevşek malzeme dağıtıcısı
5
Havalındırma
6
Ekmek kalıbı
7
Hamur karıştırma kolu
8
Pişirme bölümü
9
Alt baget pişirme kalıbı
10
Üst baget pişirme kalıbı
11
Kontrol paneli
AKSESUAR
12
Ölçü kaşığı
13
Ölçü kabı
14
Hamur karıştırma kolunu çıkarmak için kullanılan
kanca
KONTROL PANELİ
15
LCD ekranı
Ekmek makinesi elektrik şebekesine bağlanınca, ekranda
“1 3:25” sembolü gösterilir. “1” sayısı, seçilmiş programı
gösterir, “3:25” sembolü ise seçilmiş programın süresini
belirtir. İki işaretin konumu, seçilmiş esmerleşme seviyesini
ve ağırlığı gösterir. Cihazı çalıştırdıktan sonraki varsayılan
ayar, “yüksek ağırlık” (1000 g) ve “orta esmerleşme seviyesi”
(ORTA). Pişirme süreci hakkındaki bilgi, cihaz çalıştığında
ekranda gösterilecektir. Ekranda gösterilen süre gittikçe
azalacaktır. Süre, ön ısıtma, yoğurma, durdurma, hamur
kabarma, pişirme ve ısıtma fonksiyonları ve program sonu ile
ilgili bilgiler de ekranda gösterilecektir.
16
BAŞLA/DURDUR düğmesi – programı başlatır ve
durdurur
17
SÜRE – saati kurar.
18
ESMERLİK düğmesi – istenen esmerleşme seviyesini
ayarlamak için kullanılır.
19
MENU düğmesi – programı seçmek için kullanılır.
20
GRAM düğmesi – aşağıdaki tarife göre ağırlık belirtir.
A
İPUCU
Ürün ile ilgili bilgiler ve
kullanıma dair ipuçları
●
Cihaz, ancak ev kullanımına ve kapalı mekanlarda
kullanıma uygundur. Eğer cihaz gastronomide
kullanılırsa, garanti şartları değişir.
●
Kılavuzda verilen tarierin öngördüğü malzemelerin
miktarından daha fazlasını asla kullanmayın. Aksi
takdirde ekmek eşit olarak pişmeyecek veya hamur
taşacaktır. Kılavuzdaki talimatlara uyun.
●
Bir çeşit ekmeği cihazda gece bırakarak pişirmeyi
denemeden önce, malzemelerin miktarlarının doğru,
hamurun fazla kalın ya da ince olup olmadığını ve
taşıp taşmayacağını kontrol etmek amacı ile, ilk olarak
cihaza bakarak tari deneyin.
●
Pişirme bitince, cihazının şini elektrik prizinden sökün.
PBM1000W-001_v01
Page 4
8
Cihazın fonksiyonları
SESLİ SİNYAL FONKSİYONU
Sesli uyarı aşağıdaki durumlarda açılır:
●
Program düğmelerine basarken.
●
Cihaz çalışırken sesli uyarı kullanıcıya, fındık, ayçiçeği
tohumu, kuru üzüm gibi malzemelerin eklenmesi
gerektiğini bildirir ve hatırlatır.
●
Program sona erdiğinde.
BAŞLA/DURDUR düğmesine basarak sesi
kapatabilirsiniz. Bunu gerçekleştirmek için, iki
SÜRE düğmesine de basıp yaklaşık 2 saniye
basılı tutun. Eğer iki SÜRE düğmesine de basıp
bir saniye basılı tutarsanız, sesin yeniden açık
olduğunu belirten sesli sinyali duyacaksınız.
HAFIZA FONKSİYONU
On beş dakikaya kadar süren elektrik kesintisi durumunda,
program konumu kaydedilir ve elektrik gelince cihaz
kaydedilen konumdan yeniden başlatılabilir. Bu, ancak
programın yoğurma aşamasına geçmeden önce cihazın
durdurulması durumunda mümkündür. Aksi takdirde, yeniden
başlamanız gerekecektir.
MALZEMELERİN OTOMATİK DOZLANMASI
Cihazın kapağında, işlem sırasında malzeme ekleyebilmek
için giriş bulunmaktadır (4). Meyve, fındık, kuru üzüm ve
hububat gibi malzemeler, pişirme sırasında eklenebilir.
Bunu gerçekleştirmek için, pişirmeden önce istediğiniz
malzemeyi dağıtıcıya koymanız gerekir (detaylar 4. bölümde
bulunmaktadır). Kek karıştırma ve yoğurma aşamalarında
cihaz, malzemeleri keke otomatik olarak ekler.
Başka malzemeler, kekin üst kısmına serpilmek üzere
eklenebilir. Bu malzemelerin, pişirme aşamasının sonundan
yaklaşık 30 dakika önce dağıtıcıya koyulması tavsiye
edilir. Bu ilave malzemelerin eklenmesi, sesli sinyal ile
bildirilecektir. Bu fonksiyonun kullanıldığı programlar, cihazın
çalışma aşamaları ile ilgili cetvellerde açıklanmıştır.
GÜVENLİK FONKSİYONLARI
Cihaz, kullanıldıktan sonra yeni bir programa başlamak için
fazla sıcak ise, BAŞLA düğmesine basınca ekranda E 01
sembolü gösterilecektir. Uyarı sesi de duyulacaktır. Böyle
bir durumda, E 01 sembolü ekrandan kaybolana ve genel
ayarlar ekranda belirene kadar BAŞLA/DURDUR düğmesini
basılı tutun. Ekmek kalıbını söküp cihaz soğuyana kadar
bekleyin.
PİŞİRME programı, cihaz hala sıcaksa da,
hemen başlatılabilir.
Kullanma talimatları
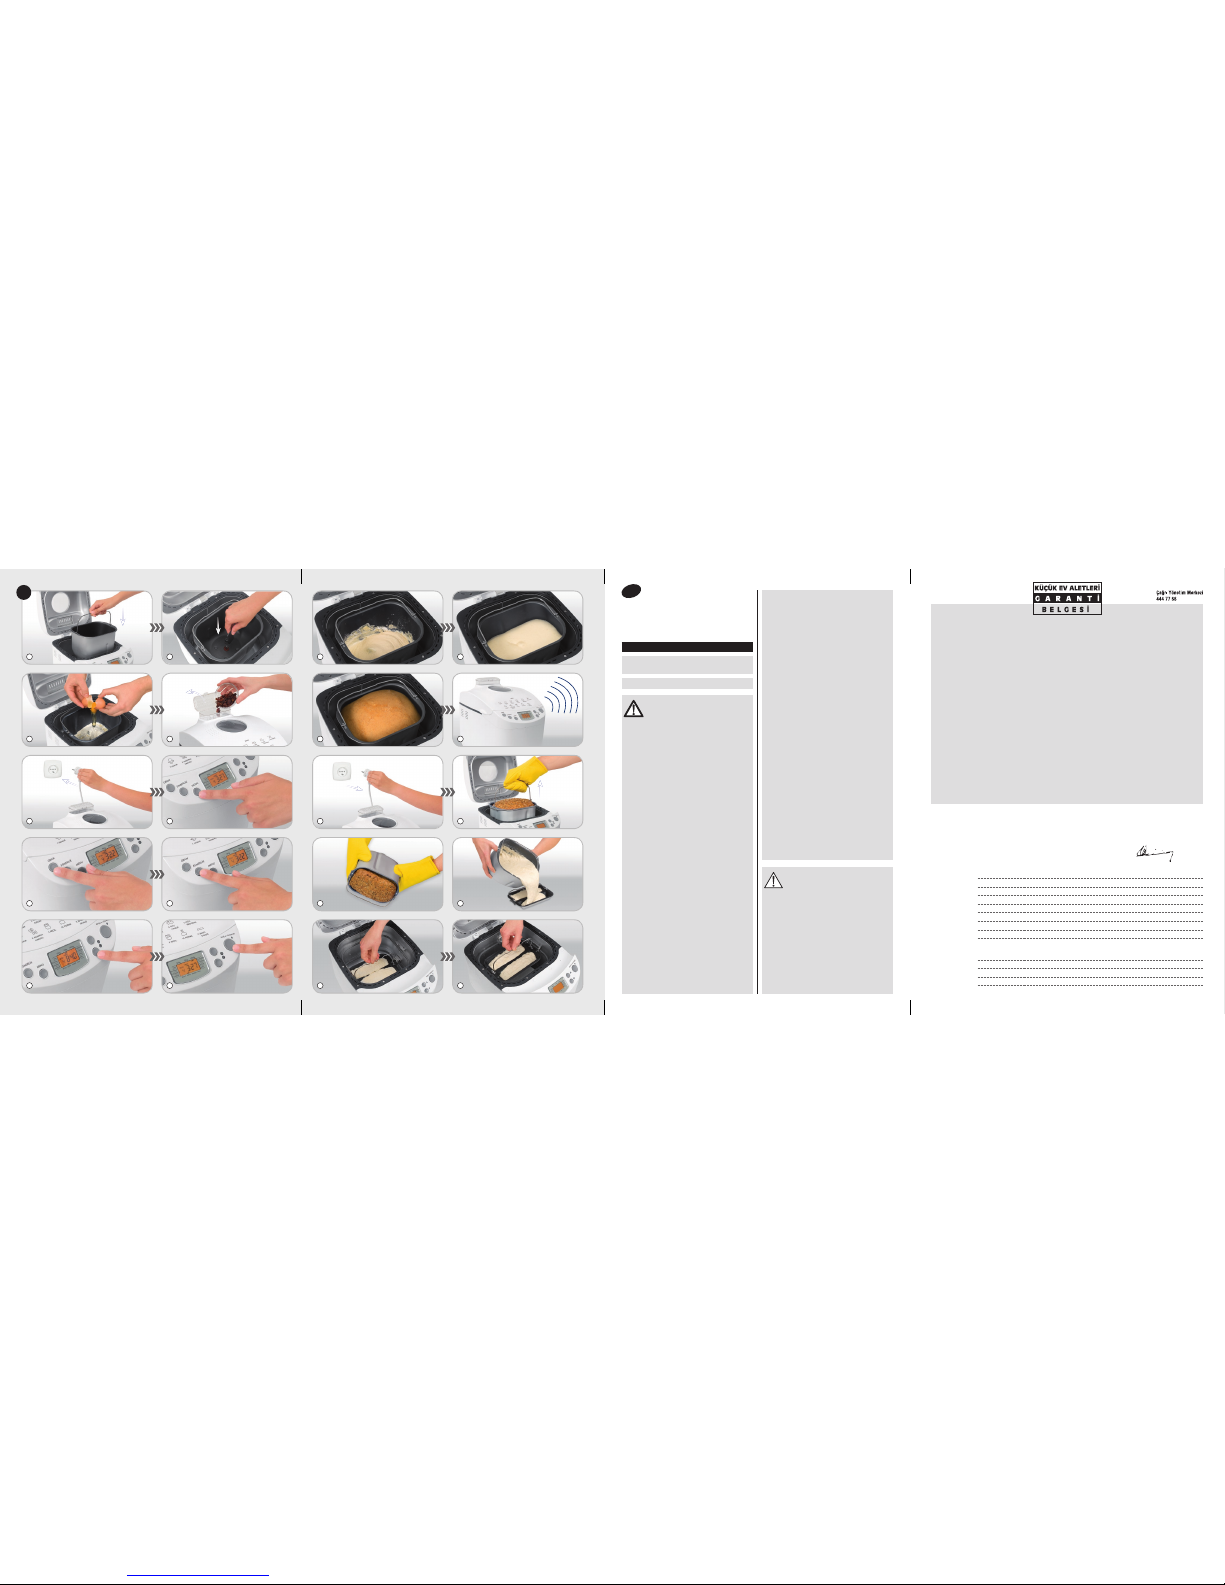
1
Ekmek kalıbını takın.
Ekmek kalıbı, yapışmaz yüzeylidir. Ekmek kalıbını, cihazın
içindeki zeminin tam ortasına yerleştirin. Kap kilitlenene
kadar, yavaşça saat yönünde çevirin.
Pişirme bitince tutamaç sıcaktır. Tencere
tutacakları kullanın.
2
Hamur karıştırma kolunu takın.
Ekmek kalıbındaki mili, hamur karıştırma kolunun deliğine
sokarak, yoğurma çubuğunu yerleştirin.
3
Malzemeleri koyun.
Malzemelerin, ilgili tarifte belirtilmiş olan, uygun sırada
ekmek kalıbına koyulması gerekir. Tarierin örnekleri, bu
kılavuzda bulunmaktadır.
4
Ekstra malzemeleri dağıtıcıya koyun (opsiyonel).
Dağıtıcıyı tamamlamak için, kapağını kaldırıp, meyve, fındık,
kuru üzüm, fasulye gibi maddelerin uygun miktarını koyun.
Katkı maddelerinin miktarı, kullanıcının tercihine bağlıdır.
Bundan sonra, tık sesini duyana kadar kapağı kapatın.
5
Cihazın şini prize takın.
6
MENU düğmesini kullanarak istediğiniz programı
seçin.
MENU düğmesi, aşağıda belirtilmiş olan programları seçmek
için kullanılır.
Beyaz, buğday ve çavdar ekmek için. Bu en sık kullanılan
programdır.
Çok haf beyaz ekmek pişirmek için kullanılır.
Kepekli ekmek için kullanılır.
Tatlı, mayalı hamur hazırlamak için kullanılır.
Glutensiz ekmek yapmak için.
Hamur yapmak için.
B
PBM1000W-001_v01
Page 5
9
Esmer ekmek ya da kek pişirmek için kullanılır.
7
İlgili programa uygun bir ağırlık seçin.
GRAM düğmesi ekmeğin ağırlığını seçmek için kullanılır:
500 g = 500 g kadar küçük ekmek için
750 g = 750 g kadar orta ekmek için
1000 g = 1000 g kadar büyük ekmek için
8
İstediğiniz esmerleşme seviyesini seçin.
ESMERLİK düğmesi, istenen esmerleşme seviyesini belirtmek
için kullanılır. BEYAZ, ORTA, ESMER, HIZLI.
9
SÜRE programındaki düğmeler aracılığıyla, programın
başlangıç zamanını ayarlayın.
Örnek:
Akşam saat 20:30’dur, ertesi sabah 07:00’ye kadar, yani
10 saat 30 dakika sonra ekmeğin hazır olması gerekir. 10.30
sembolü gözükene kadar SÜRE düğmesine basın. LCD
ekranında 10:30 yazısını görene kadar, program düğmelerine
basın – bu saat, 20:30’dan itibaren hesaplanan, ekmeğin
hazır olacağı zamandır. Süre fonksiyonunu kullandığınız
zaman, süt, yumurta, meyve, yoğurt, soğan gibi çabuk
çürüyen malzemeleri asla kullanmayın.
10
BAŞLA/DURDUR düğmesine basın.
BAŞLA/DURDUR düğmesine basarak sesi
kapatabilirsiniz. Bunu gerçekleştirmek için, iki
SÜRE düğmesine de basıp yaklaşık 2 saniye
basılı tutun. Eğer iki SÜRE düğmesine de basıp
bir saniye basılı tutarsanız, sesin yeniden açık
olduğunu belirten sesli sinyali duyacaksınız.
BAŞLA/DURDUR düğmesi, herhangi bir anda programı
durdurmak için de kullanılır. Bunu gerçekleştirmek için,
BAŞLA/DURDUR düğmesine basıp, sesli sinyali duyana
kadar, yaklaşık 3 saniye tutun. Seçilmiş programın başlangıç
konumu ekranda gösterilecektir. Eğer başka bir programı
kullanmak istiyorsanız, MENU düğmesini kullanarak programı
seçin.
11
Hamuru karıştırın ve yoğurun.
Ekmek makinesi, hamur uygun yoğunluğu kazanana kadar
otomatik olarak karıştırır ve yoğurur.
Hamurun karıştırıldığı ve yoğrulduğu aşamada
cihazın kapağı kapalı olmalıdır. Bu aşamada,
küçük miktarlarda suyun, sıvının ve diğer
malzemelerin eklenmesi mümkündür.
12
Hamurun kabarması için bekletin.
Son yoğurma devrinden sonra, ekmek makinesi hamurun
kabarması için uygun sıcaklığa kadar ısıtılır.
Ekmeğin kabardığı aşamada kapağı kapatıp,
ekmek hazır olana kadar açmayın. Resimler,
sadece hamurun kabarma aşamalarını
göstermek amacı ile eklenmiştir.
13
Pişirme.
Ekmek makinesi, pişirme sıcaklığını ve süresini otomatik
olarak ayarlar. Programın sonunda ekmek fazla beyaz ise,
onu esmerleştirmek için PİŞİRME programını kullanın. Bunu
gerçekleştirmek için, BAŞLA/DURDUR düğmesine basıp
yaklaşık 3 saniye tutun (sesli sinyali duyana kadar). Bundan
sonra PİŞİRME düğmesine basın. İstediğiniz esmerleşme
seviyesi kazanılınca, BAŞLA/DURDUR düğmesine basıp,
sesli sinyali duyana kadar, yaklaşık 3 saniye tutararak süreci
durdurun.
Hamur piştiğinde kapağı kapatıp, ekmek
hazır olana kadar açmayın. Resimler, sadece
hamurun pişme aşamalarını göstermek amacı
ile eklenmiştir.
14
Isıtma.
Pişirme bitince sesli sinyal, ekmeğin cihazdan çıkarmaya
hazır olduğunu bildirir. Bundan hemen sonra, 1 saatlik ısıtma
süresi başlar.
15
Program aşamalarının sonu.
Cihazın çalışması sona erince, şini prizden sökün.
16
Tencere tutacakları kullanarak ekmek kalıbını çıkarıp
devirin.
17
Eğer ekmek kalıptan çıkmazsa, dışarıya çıkana kadar
ekmek kalıbını hafçe sarsın.
Eğer hamur karıştırma ucu ekmeğin içinde
kalırsa, ekmeği hafçe kesip çubuğu çıkarın.
Ucu çıkarmak için, kancayı da kullanabilirsiniz.
18
Baget hazırlama.
Hamur, 7 HAMUR programını kullanarak hazırladıktan
sonra, baget hazırlamaya kullanılan kalıplara koyulmalıdır
(9) ve (10). Bundan sonra, hamur ile doldurulmuş kalıplar,
pişirme kalıbı yerine pişirme bölümüne yerleştirilmelidir.
19
Alt pişirme kalıbının (9) ekmek makinesine
yerleştirilmesi.
Pişirme kalıbı sökülünce, hamur ile dolu kek kalıbı, pişirme
bölümünde bulunan alt tutucuların içine sıkıca basılmalıdır.
Kalıpları ekmek makinesine yerleştirirken,
bütün tutamaçların, kalıpların yüzeyine göre
dik olarak kaldırılmış olduğundan emin olun.
Bu sayede, kalıpların cihazdan sökülmesi daha
kolay olacaktır.
PBM1000W-001_v01
Page 6
10
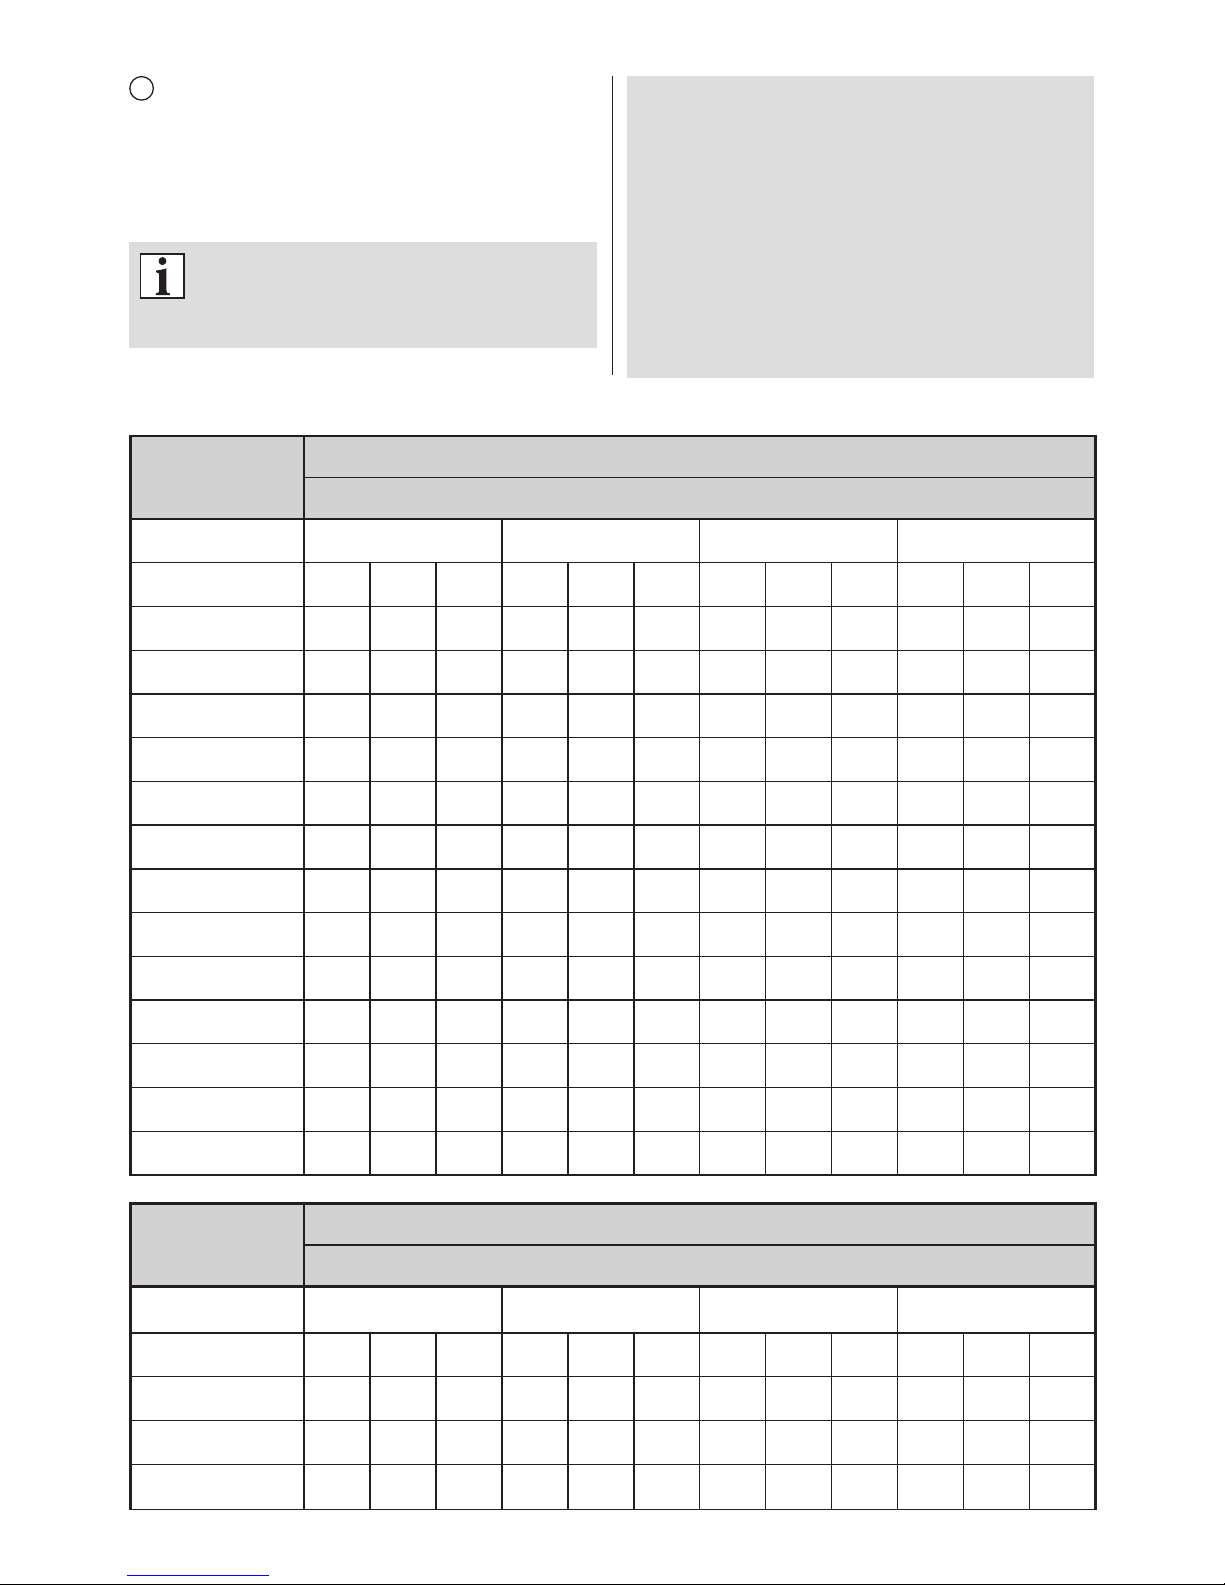
CİHAZIN ÇALIŞMASININ AŞAMALARI
FONKSİYON
1
GENEL*
PİŞİRME BEYAZ ORTA ESMER HIZLI
GRAM 500 g 750 g 1000 g 500 g 750 g 1000 g 500 g 750 g 1000 g 500 g 750 g 1000 g
ZAMANLAYICI 15:00 15:00 15:00 15:00 15:00 15:00 15:00 15:00 15:00 15:00 15:00 15:00
ÖN ISITMA
YOĞURMA 1 5 m 5 m 5 m 5 m 5 m 5 m 5 m 5 m 5 m 5 m 5 m 5 m
DURDUR 5 m 5 m 5 m 5 m 5 m 5 m 5 m 5 m 5 m 5 m 5 m 5 m
YOĞURMA 2 20 m 20 m 20 m 20 m 20 m 20 m 20 m 20 m 20 m 20 m 20 m 20 m
KABARMA 1 40 m 40 m 40 m 40 m 40 m 40 m 40 m 40 m 40 m 15 m 15 m 15 m
YOĞURMA 3 10 s 10 s 10 s 10 s 10 s 10 s 10 s 10 s 10 s 10 s 10 s 10 s
KABARMA 2 25 m 25 m 25 m 25 m 25 m 25 m 25 m 25 m 25 m 9 m 9 m 9 m
YOĞURMA 4 10 s 10 s 10 s 10 s 10 s 10 s 10 s 10 s 10 s 10 s 10 s 10 s
KABARMA 3 50 m 50 m 50 m 50 m 50 m 50 m 50 m 50 m 50 m 30 m 30 m 30 m
PİŞİRME 46 m 51m 58 m 48 m 53 m 60 m 53 m 58 m 65 m 48 m 53 m 60 m
SICAK 1 saat 1 saat 1 saat 1 saat 1 saat 1 saat 1 saat 1 saat 1 saat 1 saat 1 saat 1 saat
TOPLAM SÜRE
3:11 3:16 3:23 3:13 3:18 3:25 3:18 3:23 3:30 2:12 2:17 2:24
FONKSİYON
2
BEYAZ EKMEK*
PİŞİRME BEYAZ ORTA ESMER HIZLI
GRAM 500 g 750 g 1000 g 500 g 750 g 1000 g 500 g 750 g 1000 g 500 g 750 g 1000 g
ZAMANLAYICI 15:00 15:00 15:00 15:00 15:00 15:00 15:00 15:00 15:00 15:00 15:00 15:00
ÖN ISITMA
YOĞURMA 1 5 m 5 m 5 m 5 m 5 m 5 m 5 m 5 m 5 m 5 m 5 m 5 m
20
Üst pişirme kalıbının (10) ekmek makinesine
yerleştirilmesi.
Üst pişirme kalıbı, pişirme bölümünün üst kısmında
bulunan metal kancalara asılmalıdır. Bundan sonra, pişirme
durumunda olduğu gibi adımları yerine getirin (13 – 15
aşamaları) veya 10 PİŞİRME programını başlatın.
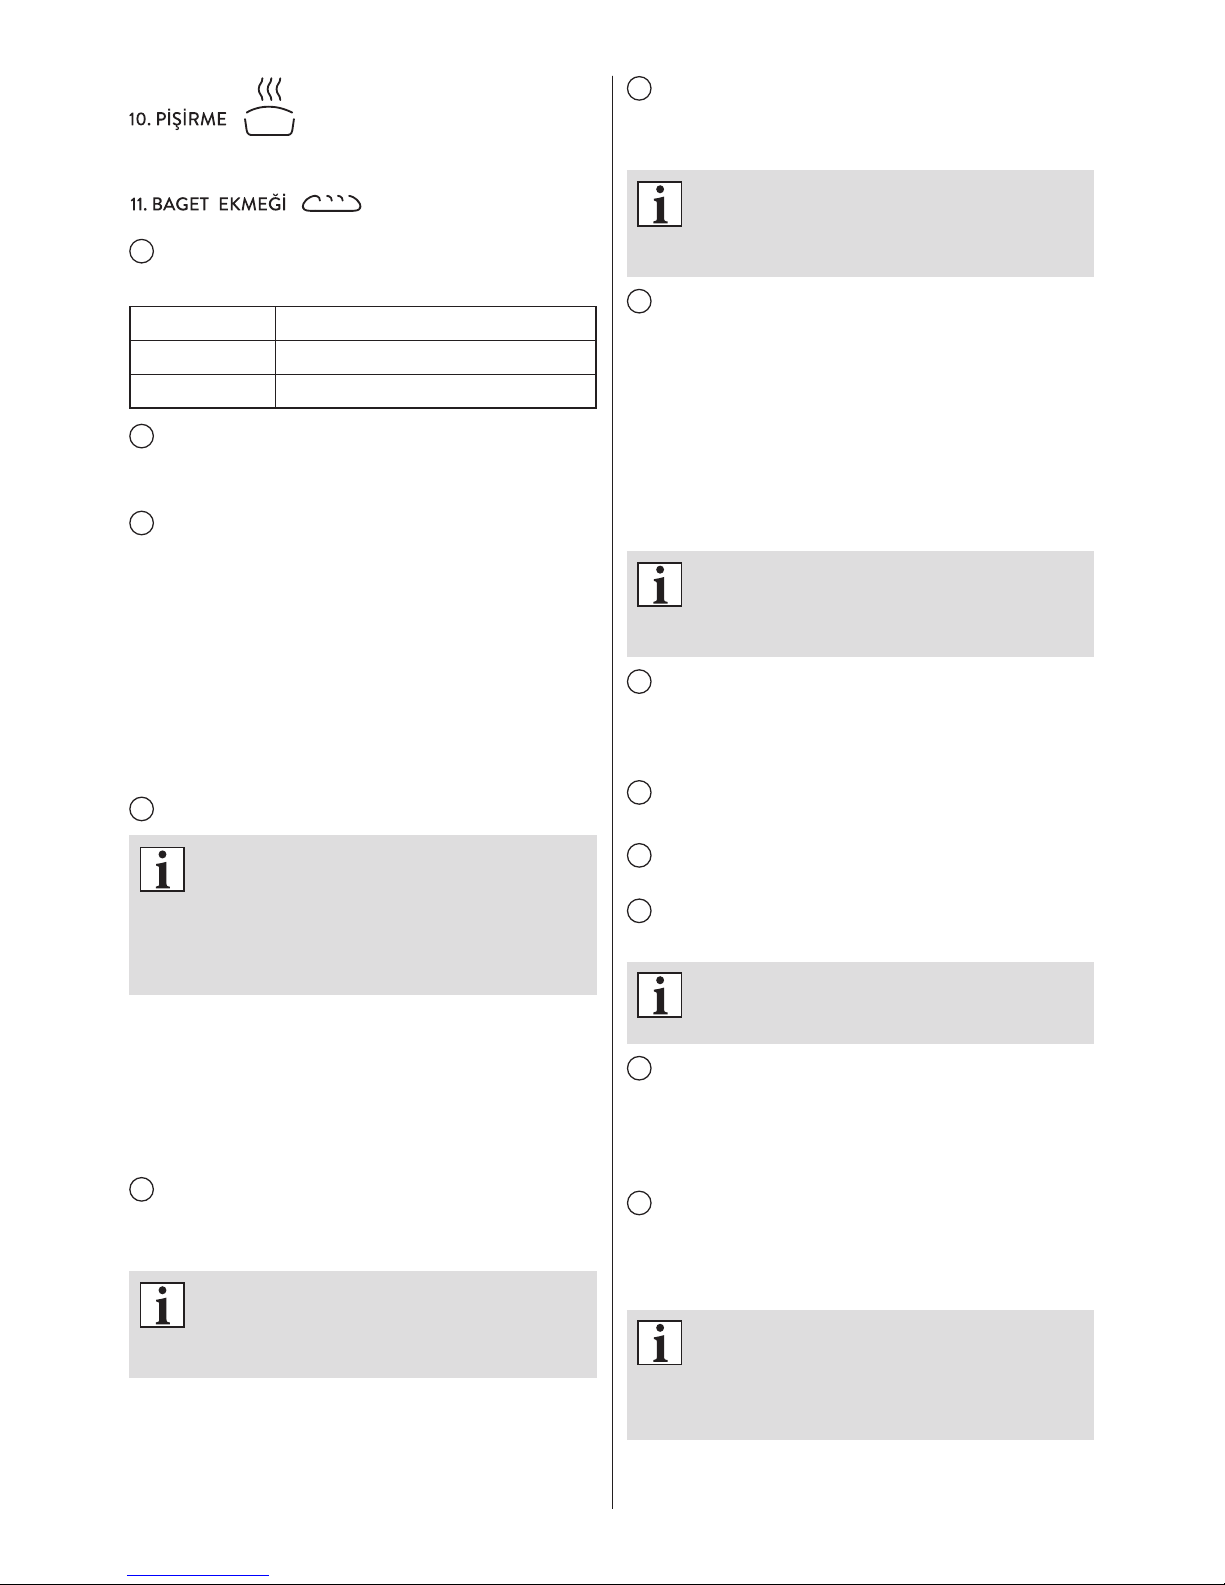
Baget ekmeği hazırlamak için, 11 BAGET
EKMEĞİ programını da kullanabilirsiniz.
Bu program, iki aşamaya bölünmüştür. İlk
aşama sırasında, hamur karıştırılıp, yoğrulup
kabarır. İkinci aşama sırasında baget ekmekleri
kabarmaya devam eder ve sonunda pişmiş ve
gevrek olur. İlk aşamadan sonra cihaz durur,
kullanıcının, hamuru baget kalıplarına koyması
gerektiğini bildiren sesli sinyali çıkarır. Hamuru
kalıplara koyduktan sonra (bu işlemin detaylı
tari 18.,19. ve 20. bölümlerde bulunmaktadır),
BAŞLA/DURDUR düğmesine basarak programın
yeniden çalıştırılması gerekir. Bu, ikinci aşamayı
başlatır. Programın bireysel aşamaları ile ilgili
detaylı bilgi, CİHAZIN ÇALIŞMA AŞAMALARI
cetvelinde bulunmaktadır.
PBM1000W-001_v01
Page 7
11
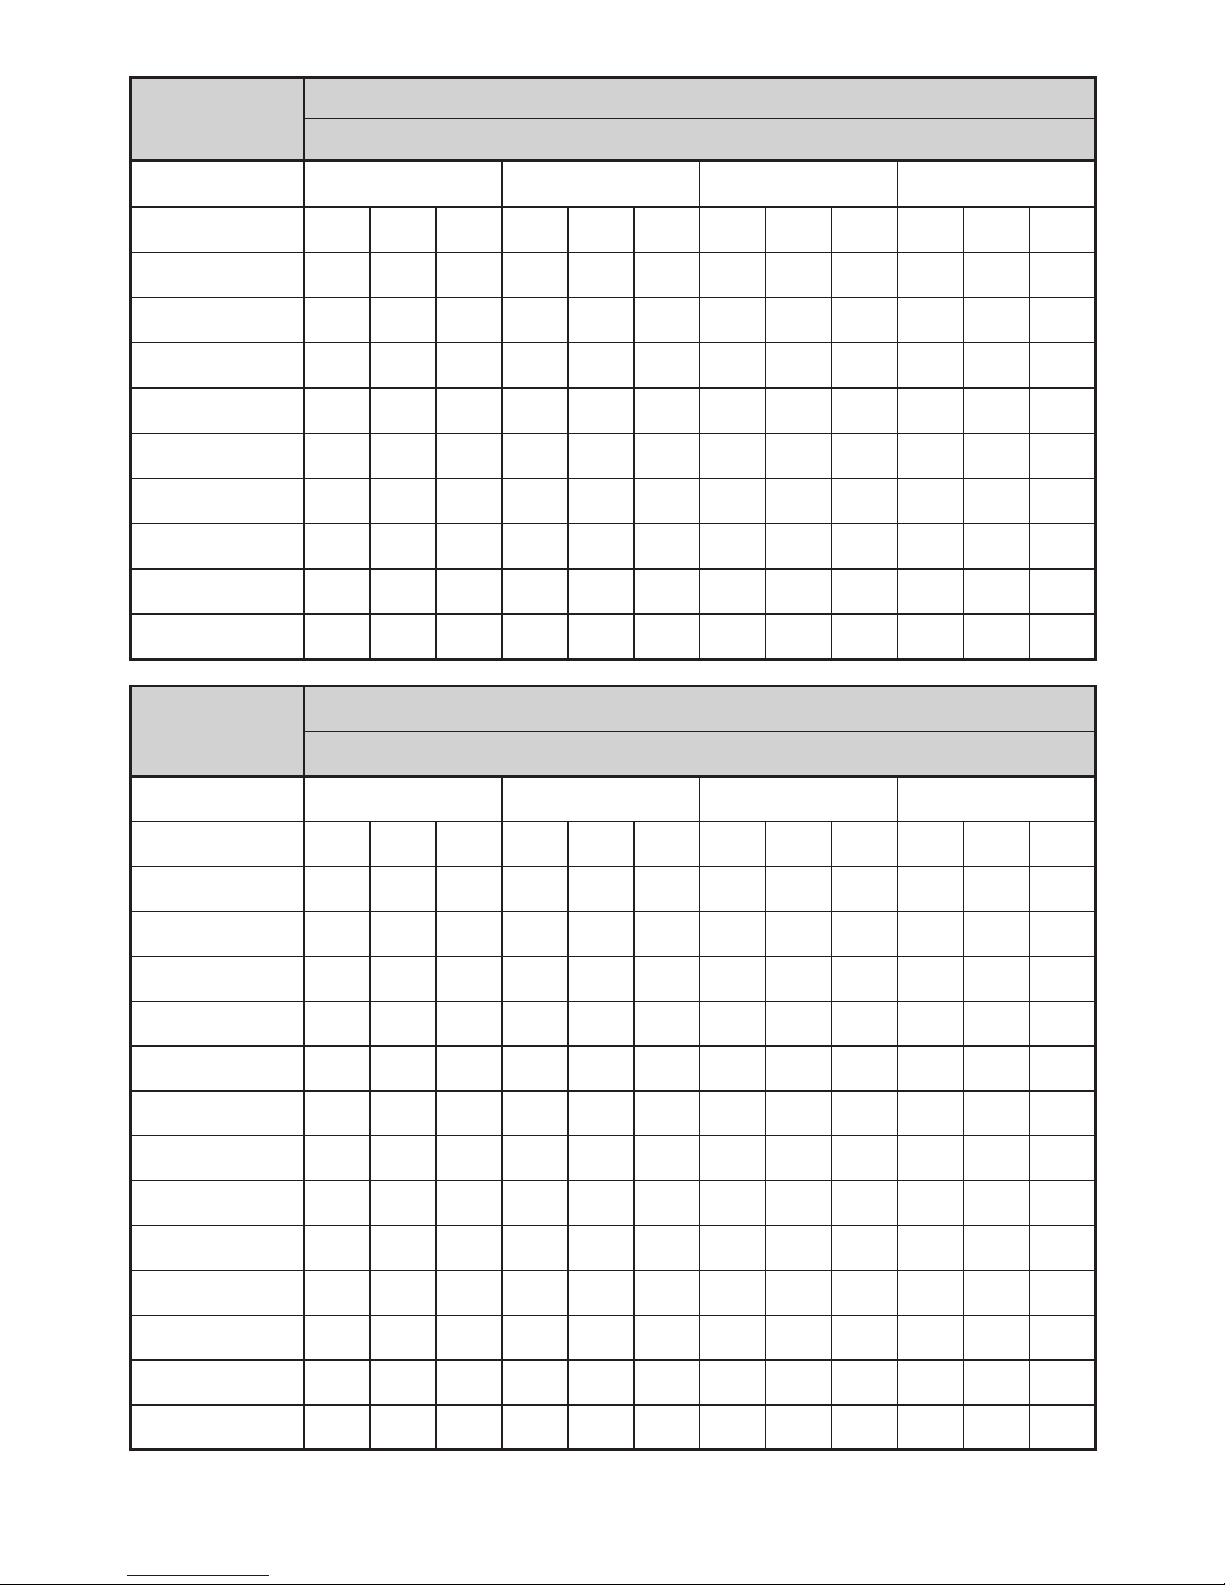
FONKSİYON
2
BEYAZ EKMEK*
PİŞİRME BEYAZ ORTA ESMER HIZLI
DURDUR 5 m 5 m 5 m 5 m 5 m 5 m 5 m 5 m 5 m 5 m 5 m 5 m
YOĞURMA 2 20 m 20 m 20 m 20 m 20 m 20 m 20 m 20 m 20 m 20 m 20 m 20 m
KABARMA 1 39 m 39 m 39 m 39 m 39 m 39 m 39 m 39 m 39 m 15 m 15 m 15 m
YOĞURMA 3 10 s 10 s 10 s 10 s 10 s 10 s 10 s 10 s 10 s 10 s 10 s 10 s
KABARMA 2 31 m 31 m 31 m 31 m 31 m 31 m 31 m 31 m 31 m 15 m 15 m 15 m
YOĞURMA 4 10 s 10 s 10 s 10 s 10 s 10 s 10 s 10 s 10 s 5 s 5 s 5 s
KABARMA 3 60 m 60 m 60 m 60 m 60 m 60 m 60 m 60 m 60 m 30 m 30 m 30 m
PİŞİRME 48 m 50 m 53 m 50 m 52 m 55 m 55 m 57 m 60 m 50 m 52 m 55 m
SICAK 1 saat 1 saat 1 saat 1 saat 1 saat 1 saat 1 saat 1 saat 1 saat 1 saat 1 saat 1 saat
TOPLAM SÜRE
3:28 3:30 3:33 3:30 3:32 3:35 3:35 3:37 3:40 2:35 2:37 2:40
FONKSİYON
3
TAM BUĞDAY*
PİŞİRME BEYAZ ORTA ESMER HIZLI
GRAM 500 g 750 g 1000 g 500 g 750 g 1000 g 500 g 750 g 1000 g 500 g 750 g 1000 g
ZAMANLAYICI 15:00 15:00 15:00 15:00 15:00 15:00 15:00 15:00 15:00 15:00 15:00 15:00
ÖN ISITMA 30 m 30 m 30 m 30 m 30 m 30 m 30 m 30 m 30 m 5 m 5 m 5 m
YOĞURMA 1 5 m 5 m 5 m 5 m 5 m 5 m 5 m 5 m 5 m 5 m 5 m 5 m
DURDUR 5 m 5 m 5 m 5 m 5 m 5 m 5 m 5 m 5 m 5 m 5 m 5 m
YOĞURMA 2 15 m 15 m 15 m 15 m 15 m 15 m 15 m 15 m 15 m 15 m 15 m 15 m
KABARMA 1 49 m 49 m 49 m 49 m 49 m 49 m 49 m 49 m 49 m 24 m 24 m 24 m
YOĞURMA 3 10 s 10 s 10 s 10 s 10 s 10 s 10 s 10 s 10 s 10 s 10 s 10 s
KABARMA 2 26 m 26 m 26 m 26 m 26 m 26 m 26 m 26 m 26 m 11 m 11 m 11 m
YOĞURMA 4 10 s 10 s 10 s 10 s 10 s 10 s 10 s 10 s 10 s 10 s 10 s 10 s
KABARMA 3 45 m 45 m 45 m 45 m 45 m 45 m 45 m 45 m 45 m 35 m 35 m 35 m
PİŞİRME 48 m 50 m 53 m 50 m 52 m 55 m 55 m 57 m 60 m 50 m 52m 55 m
SICAK 1 saat 1 saat 1 saat 1 saat 1 saat 1 saat 1 saat 1 saat 1 saat 1 saat 1 saat 1 saat
TOPLAM SÜRE
3:43 3:45 3:48 3:45 3:47 3:50 3:50 3:52 3:55 2:30 2:32 2:35
PBM1000W-001_v01
Page 8
12
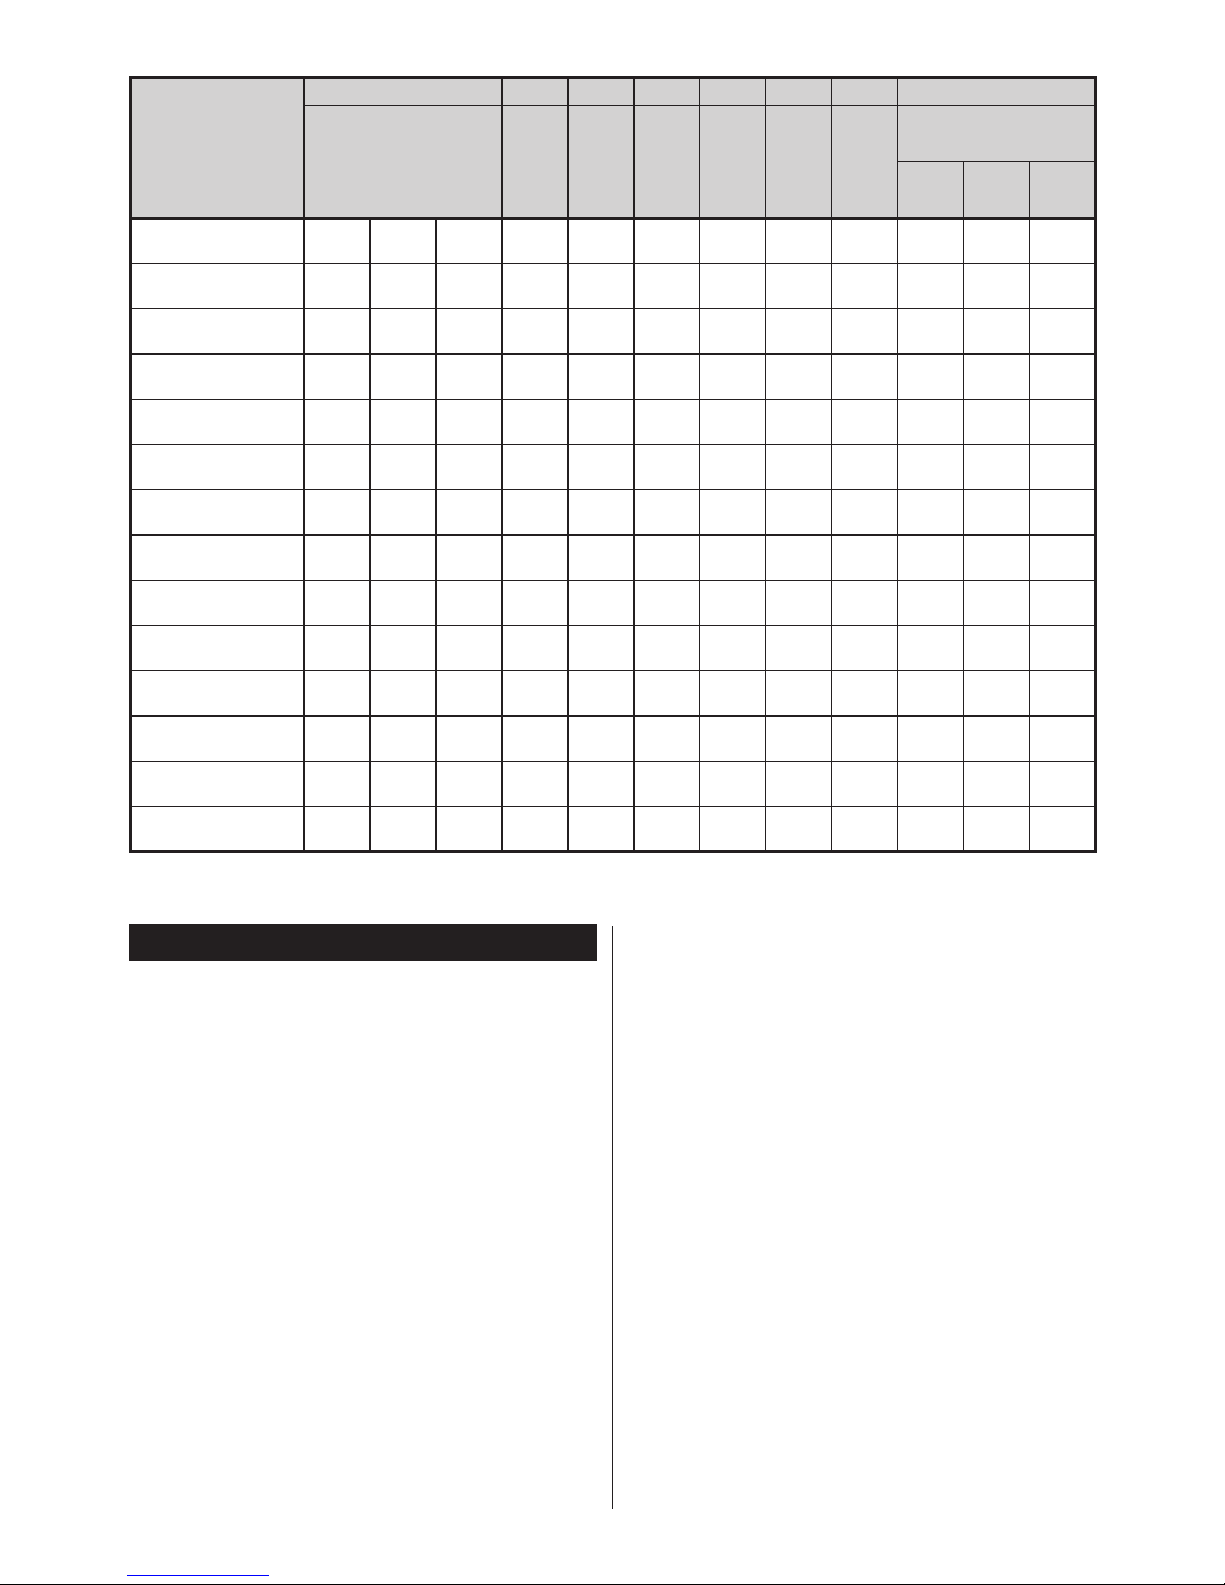
FONKSİYON
4 5 6 7 8 9 10 11
TATLI
HAMUR*
HIZLI*
GLUTENSİZ*
HAMUR*
MAKARNA
HAMURU
REÇEL
PİŞİRME
BAGET EKMEĞİ*
BEYAZ ORTA ESMER
GRAM 500 g 750 g 1000 g 1000 g - - - - - - - -
ZAMANLAYICI 15:00 15:00 15:00 - - 15:00 - 15:00 - 15:00 15:00 15:00
ÖN ISITMA 0 m
YOĞURMA 1 5 m 5 m 5 m 5 m 5 m 5 m 3 m 5 m 5 m 5 m 5 m
DURDUR 5 m 5 m 5 m 0 m 5 m 0 m 0m 0 m 0m
YOĞURMA 2 20 m 20 m 20 m 15 m 10 m 20 m 11 m 10 m 20 m 20 m 20 m
KABARMA 1 39 m 39 m 39 m 12 m 0 m 60 m 0 m 55 m 55 m 55 m
YOĞURMA 3 10 s 10 s 10 s 0 0 s 0 s 0 s 0 s
KABARMA 2 26 m 26 m 26 m 0 0 0 m 0 m 0 m
YOĞURMA 4 5 s 5 s 5 s 0 0 s 0 s 0 s 0 s
KABARMA 3 52 m 52 m 52 m 60 m 0 m 0 15 m 15 m 15 m
PİŞİRME 50 m 55 m 60 m 48 m 55 m 0 m 70 m 60-90 m 52 m 57 m 62 m
SICAK 1 saat 1 saat 1 saat 1 saat 1 saat - - 1 saat 1 saat 1saat 1 saat
TOPLAM SÜRE
3:17 3:22 3:27 1:20 2:10 1:30 0:14 1:25 1:00 2:27 2:32 2:37
* – İsteğe bağlı olarak malzemeler dağıtıcıya eklenebilir.
Temizleme ve bakım
●
Cihazın ilk kullanımından önce, ekmek kabını, kalıpları
ve karıştırma ucunu yumuşak deterjan ile dikkatlice
yıkayın (ekmek kabını suya DALDIRMAYIN).
●
İlk kullanımdan önce, yeni ekmek kabını, kalıpları ve
karıştırma ucunu ısıya dayanıklı yağ ile kaplayıp fırında
yaklaşık 10 dakika ısıtın. Ekmek kalıbı soğuyunca,
üzerindeki yağı kağıt havlu ile temizleyin. Bu sayede,
yapışmaz kaplama korunacaktır. Bu işlemi zaman
zaman tekrarlayın.
●
Ekmek makinesini saklamadan ya da temizlemeden
önce, soğuması için bekletin. Cihazın soğuması ve
tekrar pişirmeye ve yoğurmaya hazır olması için,
yaklaşık yarım saat gereklidir.
●
Cihazı temizlemeden önce, şini prizden çıkarıp
soğuyana kadar bekleyin. Yumuşak bir deterjan
kullanın. Kimyasal temizlik deterjanları, benzin, fırın
temizlik deterjanları veya kaplamayı çizebilecek ya da
bozabilecek herhangi bir deterjan asla kullanmayın.
●
Kapağın ve kasanın üzerinde ve pişirme bölümünde
bulunan malzemeleri ve kırıntıları nemli bir havlu ile
temizleyin. Cihazı asla suya daldırmayın ve pişirme
bölümünü asla su ile doldurmayın!
●
Kolay temizlik için, kapak düşey konuma getirilip
çekilerek sökülebilir.
●
Ekmek kalıbının dış kısmını nemli bir bez ile temizleyin.
Kalıbın iç kısmı bulaşık deterjanı ile yıkanabilir. Kalıbı
suya daldırmayın.
●
Hamur karıştırma ucunu ve milini kullandıktan hemen
sonra temizleyin. Karıştırma ucu kalıbın içinde kalırsa,
çıkarılması zor olacaktır. Böyle bir durumda, kalıbı su ile
doldurup 30 dakika bekleyin. Bundan sonra uçları sökün.
●
Pişirme kalıbı, yapışmaz kaplamaya sahiptir. Kaplamayı
çizebilen keskin aletler kullanmayın. Cihaz kullanıldıkça
kaplamanın rengi değişecektir. Bu durum normaldir.
Bu değişim, kaplamanın verimliliğini herhangi bir şekilde
etkilemez.
●
Saklamadan önce, cihazın tamamen soğuk ve kuru
oluğundan emin olun. Cihaz, kapağı kapalı şekilde
saklanmalıdır.
PBM1000W-001_v01
Page 9
13
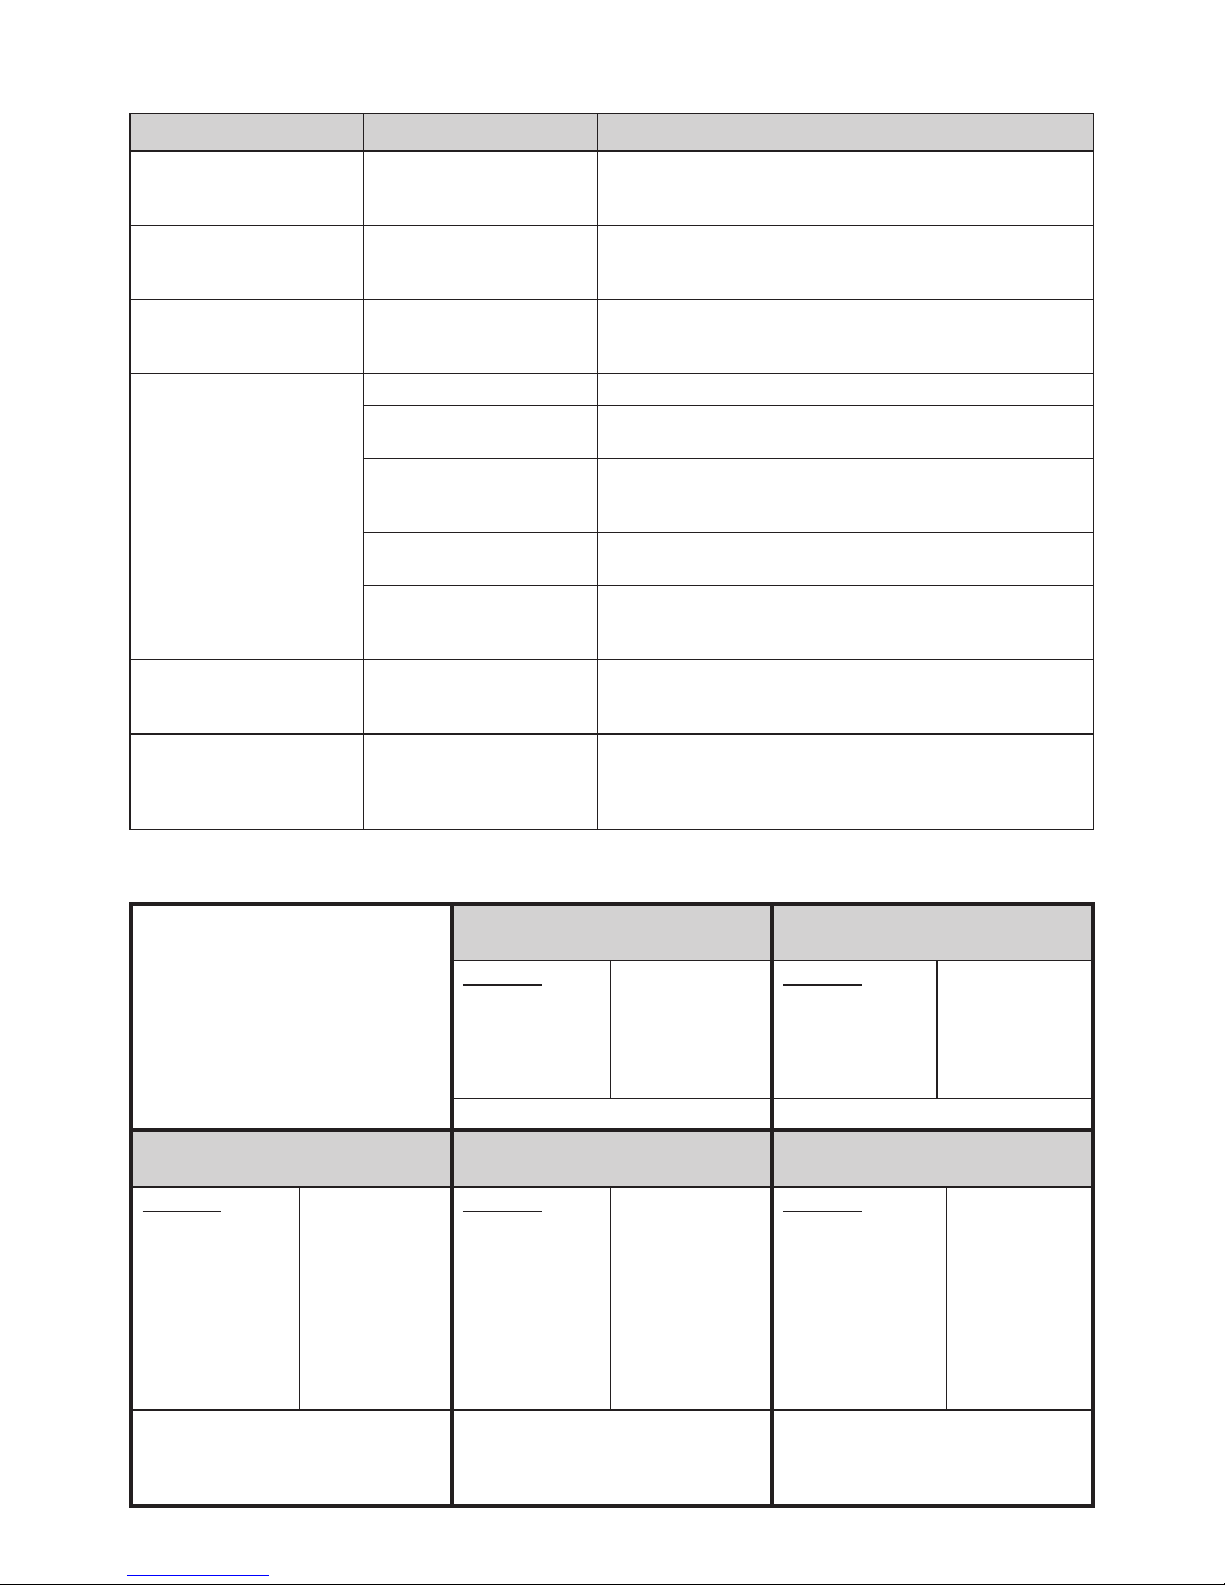
CİHAZ İLE İLGİLİ SORULAR İLE CEVAPLAR
SORUN NEDEN ÇÖZÜM
Pişirme bölümünden veya
havalıktan duman çıkar.
Malzemeler, pişirme bölümünde
veya ekmek kalıbının dışında
kalmıştır.
Cihazın şini prizden çıkarıp, ekmek kalıbının dış kısmını veya pişirme
bölümünü temizleyin.
Ekmeğin ortası çökmüş ve alt
kısmı nemlidir.
Pişirme ve ısıtma aşamalarından
sonra, ekmek kalıpta fazla uzun
süre bırakılmıştır.
Ekmeği, ısıtma aşaması bitmeden kalıptan çıkarın.
Ekmeği kalıptan çıkarmak
zordur.
Bütün alt kısım yoğurma
çubuğuna yapışmıştır.
Bir sonraki ekmek pişirmeden önce, yoğurma çubuğunu ve milini
temizleyin. Gerekirse, kabı sıcak su ile doldurup, 30 dakika bekletin.
Böylece, yoğurma çubukları kolayca sökülüp temizlenebilir.
Malzemeler yeterince
karıştırılmamış ya da ekmek
yeterince pişmemiştir.
Yanlış program ayarı. Seçilmiş menüyü ve diğer ayarları kontrol edin.
Makine çalışırken BAŞLAMA/
DURDUR düğmesine basılmıştır.
Malzemeleri kullanmayın ve bütün süreci yeniden başlatın.
Makine çalışırken kapağı birkaç
kere açılmıştır.
Kapak, ancak ekranda gösterilen, kalan süre 1:30’tan uzun olduğunda
açılabilir (sadece 1,2,3,4 programları devam ettiği zaman).
Kapağın doğru kapandığından emin olun.
Makine çalışırken elektrikler
uzun süre için kesilmiştir.
Malzemeleri kullanmayın ve bütün süreci yeniden başlayın.
Yoğurma çubuklarının devri
engellenmiştir.
Yoğurma çubuklarının, örneğin tohumlar tarafından engellenip
engellenmediğini kontrol edin. Ekmek kalıbını çıkarıp, millerin dönüp
dönmediğini kontrol edin. Eğer dönmezse, yetkili servise başvurun.
Cihaz çalıştırılamaz. Sesli sinyal
duyulur. Ekranda E 01 sembolü
gösterilmektedir.
Cihaz, önceki pişirme
sürecinden sonra hala sıcaktır.
Ekranda normal program kodu gözükene kadar, BAŞLA/DURDUR
düğmesini basılı tutun. Cihazın şini prizden sökün. Ekmek kalıbını çıkarıp
ev sıcaklığında soğutun. Cihazın şini yeniden prize takıp çalıştırın.
Ekranda, “EEE” sembolü
gösterilir.
Program veya elektronik hatası.
Test modunda çalıştırın. Menu düğmesini basılı tutun, cihazın şini
prizden söküp yeniden takın. Düğmeyi bırakın. Cihaz test modunda
çalışacaktır. Cihazın şini tekrar prizden çıkarın. Ekranda normal
program kodu gösterilmelidir. Eğer dönmezse, yetkili servise başvurun.
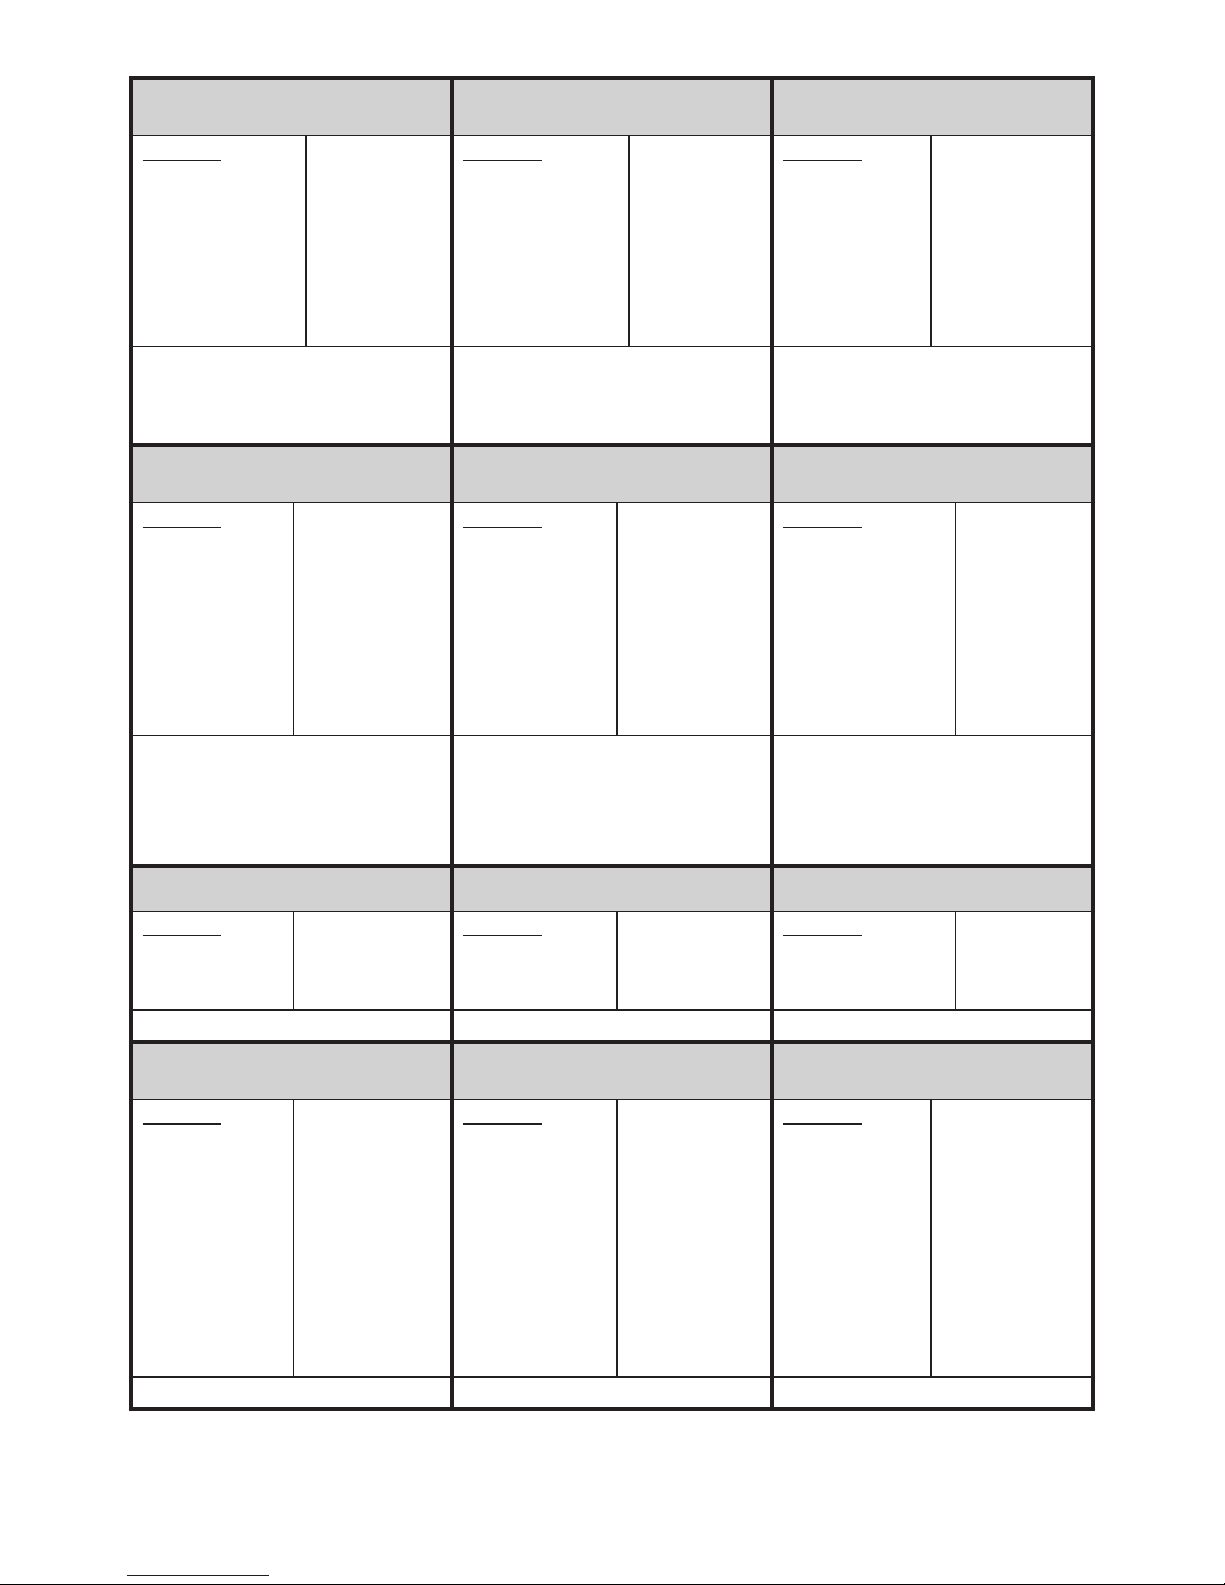
KLASİK TARİFLER
Özellikle dükkanlardan alınabilen hazır
tarier cihaz için uygundur.
BEYAZ EKMEK
(ekmek ağırlığı yaklaşık 900 g)
AYRAN EKMEĞİ
(ekmek ağırlığı yaklaşık 900 g)
Malzemeler
Su ya da süt
Tuz
Şeker
500 tipi un
Kuru maya
425 ml
1½ çay kaşığı
1½ çay kaşığı
600 g
1 çay kaşığı
Malzemeler
Yayık ayranı
Tuz
Şeker
500 tipi un
Kuru maya
375 ml
1 çay kaşığı
1 çay kaşığı
500 g
1 çay kaşığı
Program: GENEL ya da BEYAZ EKMEK Program: GENEL ya da BEYAZ EKMEK
FINDIK VE KURU ÜZÜM EKMEĞİ
(ekmek ağırlığı yaklaşık 900 g)
AYÇİÇEKLİ EKMEK
(ekmek ağırlığı yaklaşık 900 g)
7 TAHILLI EKMEK
(ekmek ağırlığı yaklaşık 700 g)
Malzemeler
Su ya da süt
Margarin ya da
tereyağı
Tuz
Şeker
500 tipi un
Kuru maya
Kuru üzüm
Öğütülmüş fındık
350 ml
1 ½ çorba kaşığı
1 çay kaşığı
2 çorba kaşığı
540 g
1 çay kaşığı
100 g
3 çorba kaşığı
Malzemeler
Su
Tereyağı
550 tipi un
Sunower seeds
Tuz
Şeker
Kuru maya
350 ml
1 çorba kaşığı
540 g
5 çorba kaşığı
1 çay kaşığı
1 çorba kaşığı
1 çay kaşığı
Malzemeler
Su ya da süt
Margarin ya da tereyağı
Tuz
Şeker
550 tipi un
Tam buğday unu
7 tohum gevreği
Kuru maya
300 ml
1 ½ çorba kaşığı
1 çay kaşığı
2 ½ çorba kaşığı
240 g
240 g
60 g
1 çay kaşığı
Program: GENEL
Program: GENEL
İpucu: Ayçiçeği çekirdeği yerine, kabak
çekirdeği kullanılabilir. Çekirdeğin tadını
arttırmak için, tavada kızartın.
Program: TAM BUĞDAY
Bütün çekirdekleri kullandığınızda, suda
bekletin.
PBM1000W-001_v01
Page 10
14
SOĞANLI EKMEK
(ekmek ağırlığı yaklaşık 900 g)
TAM BUĞDAY EKMEĞİ
(ekmek ağırlığı yaklaşık 900 g)
ÇİKOLATA VE FINDIK EKMEĞİ
(ekmek ağırlığı yaklaşık 700 g)
Malzemeler
Su ya da süt
Margarin ya da tereyağı
Tuz
Şeker
Büyük, doğranmış
soğan
550 tipi un
Kuru maya
250 ml
1 çorba kaşığı
1 çay kaşığı
2 çorba kaşığı
1
540 g
1 çay kaşığı
Malzemeler
Su ya da süt
Margarin ya da tereyağı
Yumurta
Tuz
Şeker
550 tipi un
Tam buğday unu
Kuru maya
300 ml
1½ çorba kaşığı
1
1 çay kaşığı
2 çay kaşığı
360 g
180 g
1 çay kaşığı
Malzemeler
Su
Çikolata-fındık
ezmesi
Tuz
Pudra şekeri
500 tipi un
Katkısız un
Kuru maya
275 ml
90 ml
1½ çay kaşığı
1½ çay kaşığı
300 g
150 g
1 çay kaşığı
Program: GENEL
Bu ekmeği hemen pişirin.
Program: TAM BUĞDAY
NOT: “GECİKME SÜRESİ” programını
kullandığınızda, yumurta yerine daha fazla
su koyun.
Program: BEYAZ EKMEK
BİBERİYE VE SARIMSAK FOCACCİA
FRANSIZ BAGETİ
(ekmek ağırlığı yaklaşık 900 g)
PİZZA HAMURU
(3 adet pizza için malzemeler)
Malzemeler
Su
Zeytin yağı
Taze, doğranmış
biberiye
Soyulmuş ve
öğütülmüş sarımsak
500 tipi un
Tuz
Kuru maya
200 ml
1 çorba kaşığı
2 çorba kaşığı
3 diş
350 g
1 çay kaşığı
½ çay kaşığı
Malzemeler
Su
bal
Tuz
Şeker
550 tipi un
Kuru maya
300 ml
1 çorba kaşığı
1 çay kaşığı
1 çay kaşığı
540 g
1 çay kaşığı
Malzemeler
Su
Tuz
Zeytin yağı
500 tipi un
Şeker
Kuru maya
300 ml
¾ çay kaşığı
1 çorba kaşığı
450 g
2 çay kaşığı
1 çay kaşığı
Program: HAMUR
Program: BAGET EKMEĞİ
Hazırlanmış hamuru yoğurduktan sonra,
2-4’e bölün. Uzun somun şekilleri oluşturup,
kalıplarına yerleştirin. Hamurda çapraz
kesikler yapıp, ekmek makinesine yerleştirin.
Program: HAMUR
Yoğurma bitince, hamuru açıp, yuvarlak
şekli oluşturup, 10 dakika bekletin. Sosu
yayıp, istediğiniz dolguyu koyun. Fırında
yaklaşık 20 dakika pişirin.
PORTAKAL REÇELİ ÇİLEK REÇELİ AHUDUDU REÇELİ
Malzemeler
Portakal
Limon
2:1 jelleştirici şeker
400 g
100 g
250 g
Malzemeler
Yıkanmış ve sapsız
çilek
Jelleştirici şeker
450 g
450 g
Malzemeler
Yıkanmış taze ahududu
Jelleştirici şeker
450 g
450 g
Program: REÇEL Program: REÇEL Program: REÇEL
KAYISI REÇELİ
VİŞNE EKMEĞİ
(ekmeğin ağırlığı yaklaşık 700 g)
GLUTENSİZ EKMEK
(ekmek ağırlığı yaklaşık 900 g)
Malzemeler
Yıkanmış taze kayısı
Soğuk su
Jelleştirici şeker
Rendelenmiş kabuk
ve meyve suyu
450 g
2 çorba kaşığı
450 g
½ limondan
Malzemeler
Vişne suyu
Süt
Bal
Tereyağı
Vişne yoğurt
Çekirdeksiz vişne
550 tipi un
Kuru maya
Kabartma tozu
Tuz
Şeker
75 ml
20 ml
15 g
15 g
135 g
20 g
410 g
1 çay kaşığı
½ çorba kaşığı
½ çay kaşığı
1 çay kaşığı
Malzemeler
Su ya da süt
Tuz
Şeker
500 tipi un
Kuru maya
425 ml
1½ çay kaşığı
1½ çay kaşığı
Glutensiz un 500 g
1 çay kaşığı
Program: REÇEL Program: GENEL ya da TATLI HAMUR Program: GENEL ya da BEYAZ EKMEK
Cetveller, tarif örneklerini ve ortalama malzeme miktarlarını içerir. Bu bilgiler, yemek kitabı olarak algılanmamalıdır. Pişirme sırasında, kendi
tarierinizi veya uzman kitaplarında bulduğunuz tarieri kullanmanızı ve kendi tercihlerinize göre pişirmenizi tavsiye ederiz.
PBM1000W-001_v01
Page 11

15
TARİFLERİN AYARLANDIĞI DURUMLAR
SORUN OLASI NEDEN
ÇÖZÜM
(AÇIKLAMA AŞAĞIDA
BULUNMAKTADIR)
Ekmek çabuk kabarır. - Fazla maya, fazla un, az tuz. a/b
Ekmek kabarmaz ya da az
kabarır.
- Hiç maya eklenmemiştir ya da az maya eklenmiştir. a/b
- Eski ya da bayat maya. e
- Sıvı fazla sıcaktır. c
- Maya, sıvı ile temasa geçmiştir. d
- Yanlış un tipi ya da bayat un. e
- Fazla ya da az sıvı. a/b/g
- Az şeker. a/b
Hamur fazla kabarır ve ekmek
kalıbından taşar.
- Eğer su fazla yumuşak ise, mayalanma daha aktiftir. f
- Fazla süt mayalanmayı etkiler. c
Ekmeğin orta kısmı çöker.
- Hamur hacmi kalıptan büyük ve ekmek çöker. a/f
- Suyun ya da pişirme bölümünün aşırı sıcaklığı veya aşırı nem nedeni ile
mayalanma fazla kısa ya da fazla hızlıdır.
c/h/i
- Tuz eklenmemiş ya da az şeker eklenmiştir. a/b
- Fazla sıvı eklenmiştir. h
Ağır, pütürlü ekmek yapısı.
- Fazla un ya da az sıvı. a/b/g
- Az maya ya da şeker. a/b
- Fazla meyve, kepekli un ya da başka bir malzeme. b
- Eski ya da bayat un. e
Ekmeğin orta kısmı pişmemiş.
- Fazla ya da az sıvı. a/b/g
- Fazla nem. h
- Yoğurt gibi nemli malzemeleri içeren tarier. g
Ekmeğin yapısı kaba ya da
fazla deliklidir.
- Fazla su. g
- Tuz yoktur. b
- Yüksek nem, fazla sıcak su. h/i
- Fazla sıvı eklenmiştir. c
Mantarsı, pişmemiş yüzey.
- Ekmeğin hacmi kalıptan büyüktür. a/f
- Özellikle beyaz ekmek için fazla un. f
- Fazla maya ya da az tuz. a/b
- Fazla şeker. a/b
- Şekerden başka tatlı malzemeler. b
Dilimler düzenli değil ya da
içinde topak bulunmaktadır.
- Ekmek yeterince soğumamıştır (buhar çıkmamıştır). j
Ekmek kabuğunda un
birikintileri bulunmaktadır.
- Yoğurma sırasında yanlarda bulunan un yeterince yoğrulmamıştır. g/i
Yukarıdaki sorunların çözümleri
a) Malzemeleri doğru ölçün.
b) Malzemelerin miktarlarını ayarlayın ve bütün
malzemelerin eklendiğinden emin olun.
c) Başka bir sıvı kullanın veya ev sıcaklığında soğutun.
Malzemelerin, ilgili tarifte belirttiği sırada koyulması
gerekir. Unun ortasında küçük bir çukur açıp, içine
ufalanmış ya da kuru maya koyun. Mayanın sıvı ile
doğrudan temasa geçmesine izin vermeyin.
d) Sadece taze ve doğru şekilde depolanmış malzemeler
kullanın.
e) Toplam malzeme miktarını azaltın, tarifte belirtilen
un miktarından daha fazlasını kullanmayın. Bütün
malzemelerin miktarlarını ⅓ oranında azaltın.
f) Sıvı miktarını azaltın. Eğer su içeren malzemeler
kullanılırsa, sıvı miktarını azaltın.
g) Çok nemli hava durumunda, 1-2 çorba kaşığı daha az su
koyun.
h) Sıcak hava durumunda süre fonksiyonu kullanmayın.
Soğuk sıvılar kullanın.
i) Pişirdikten hemen sonra ekmeği kalıptan çıkarıp,
kesmeden önce 15 dakika bekletin.
j) Maya veya bütün malzemelerin miktarını ¼ oranında
azaltın.
PBM1000W-001_v01
Page 12

16
●
Buğday gluteni, buğday proteinlerinden kaynaklanan
doğal bir katkı maddesidir. Ekmeğin daha haf ve hacimli
olmasını sağlar. Ekmek daha nadiren oturur ve daha
kolay sindirilir. Eğer kepekli ve diğer unlu mamuller evde
öğütülmüş undan yapılırsa, daha lezzetli sonuçlar elde
edilir.
●
Bazı tarierde kullanılan siyah malt, esmer, kavrulmuş
arpa malttır. Ekmeğin kabuğunun ve iç kısmının daha
esmer olması için, örneğin esmer ekmekte kullanılır.
Çavdar malt da kullanabilirsiniz.
●
Katkısız lesitin tozu, ekmeğin daha hacimli ve iç kısmının
daha yumuşak ve haf olmasını sağlayan, doğal bir
emülgatördür. Ekmek, daha uzun süre tazeliğini korur.
2. Malzemelerin miktarlarının ayarlanması
Malzemelerin miktarının azaltılması veya arttırılması
gerekirse, orijinal tarifte bulunan oranların korunduğundan
emin olun. İdeal sonucu sağlamak için, aşağıdaki malzeme
miktarları ayarlama kurallarını yerine getirin:
●
Sıvılar / un: hamur, yumuşak (ama fazla yumuşak değil)
ve yoğrulması kolay olmalıdır. Hamur lii olmamalıdır.
Hamurdan top yapmak mümkün olmalıdır. Bu kural,
çavdar kepekli veya tahıl ekmek gibi ağır hamur
için geçerli değildir. İlk yoğurma aşamasından beş
dakika sonra bunu kontrol edin. Fazla nemli ise, doğru
yoğunluğu kazanana kadar biraz un ekleyin. Hamur fazla
kuru ise, yoğurma sırasında zaman zaman bir kaşık su
ekleyin.
●
Bir sıvının yerine başka bir sıvın kullanılması: Lor
peyniri ya da yoğurt gibi, malzemeler kullandığınızda,
eklenen sıvı miktarı azaltılmalıdır. Yumurta eklediğinizde,
ölçme bardağında çırpıp, sıvıların miktarını kontrol etmek
için bardağı diğer gerekli sıvılar ile doldurun. Yüksek
rakımda bulunan (750 metreden daha yüksek) bir
yerde hazırlanan hamur daha çabuk kabarır. Hamurun
kabarmasını orantılı olarak azaltmak için, maya miktarını
¼ – ½ oranında azaltabilirsiniz. Aynı kural, çok yumuşak
suya sahip olan yerler için geçerlidir.
3. Malzemelerin eklenmesi ve miktarlarının
ölçülmesi
●
Sıvı, daima ilk olarak koyulmalıdır. Maya, son olarak
eklenmelidir. Özellikle süre fonksiyonunu kullandığınız
zaman, mayanın çabuk kabarmasını önlemek için, sıvı
ile temasa geçmesine izin vermeyin.
●
Malzemeleri ölçtüğünüz zaman, aynı ölçü birimlerini
kullanın. Malzemeleri eklenmiş olan ölçü kaşığı ile
ölçün. Eğer tarif, malzemelerin çorba kaşıkları ve
çay kaşıkları olarak ölçülmesini gerektirirse, evde
kullandığınız kaşıkları kullanın.
●
Gram olarak belirtilmiş olan malzemeleri tarife uygun
olarak ölçün.
●
Mililitre ölçüleri için, 30 – 300 ml ölçeğine sahip,
sağlanmış olan kabı kullanın.
●
Meyvenin, fındığın ve tahılın eklenmesi. İlgili programları
kullandığınızda, sesli sinyali duyduktan sonra bu
malzemeleri ekleyebilirsiniz. Bu malzemeleri daha erken
eklerseniz, yoğurma sırasında ezilecektir.
Tarier ile ilgili notlar
1. Malzemeler
●
Her malzemenin, başarılı ekmek pişirmekte kendine
özgü bir rolü olduğu için, doğru ölçme ve malzemelerin
eklendiği sıra çok önemlidir.
●
Sıvı, tuz, şeker ve (ister kuru, ister taze) maya gibi
en önemli malzemeler, hamurun ve ekmeğin doğru
hazırlanmasını etkiler. Daima doğru miktarları doğru
oranlarında kullanın.
●
Hamurun hızlı hazırlanması gerektiği durumda, ılık
malzemeler kullanın. Eğer program aşaması süresi
fonksiyonunu kullanmak isterseniz, mayanın fazla çabuk
kabarmaması için, soğuk malzemelerin kullanılması
tavsiye edilir.
●
Margarin, tereyağı ve süt, ekmeğin tadını etkiler.
●
Kabuğun daha açık renkli ve ince olmasını sağlamak
için, başarılı pişirme sonucunu etkilemeden, şeker
miktarı %20 oranında azaltılabilir. Eğer kabuğun daha
yumuşak ve açık renkli olmasını isterseniz, şeker yerine
bal kullanabilirsiniz.
●
Yoğurma sırasında unda üretilen gluten, ekmeğin
yapısını sağlar. İdeal un karışımı, %40 kepekli un ve
%60 beyaz un içerir.
●
Tahıl tanelerini eklemek isterseniz, gece boyunca suda
bekletin. Un ve sıvı miktarını azaltın (1/5 oranına kadar
daha az).
●
Çavdar unu kullanıldığında, mayalı hamurun kullanılması
gerekir. İçinde bulunan süt ve asetobakteri sayesinde
ekmek daha haftir ve iyice mayalanır. Mayalı hamuru
kendiniz yapabilirsiniz, ancak bu iş zaman alıcıdır.
O yüzden, aşağıdaki tarierde mayalı hamur konsantresi
kullanılmaktadır. Toz, 15g paketleri olarak satılmaktadır
(1 kg un için). Aşağıdaki tarieri kullanmanızı tavsiye
ederiz (½, ¾ ya da 1 paket). Eğer tarifte belirtilen
miktardan daha az mayalı hamur eklerseniz, ekmek
ufalanır.
●
Eğer başka yoğunluk seviyesine (1 kg un için 100 g
paket) sahip olan mayalı hamur tozu kullanılırsa, un
miktarının, 1 kg için 80 g oranında azaltılması gerekir.
●
Sıvı şeklinde mayalı hamur da kullanılabilir. Pakette
bulunan miktarları kullanın. Ölçme bardağını sıvı mayalı
hamur ile doldurup, içine tarifte belirtilen miktarlarda
diğer sıvı malzemeleri koyun.
●
Mayalı buğday hamuru, sık sık kuru şekilde satılır.
Hamurun yoğrulabilirliğini, tazeliğini ve tadının iyi
olmasını sağlar. Mayalı çavdar hamurundan daha haftir.
●
Mayalı hamurlu ekmek pişirdiğiniz zaman, GENEL veya
TAM BUĞDAY programını kullanın.
●
Mayalı hamur yerine maya özü de kullanabilirsiniz. Tek
fark, ekmeğin tadıdır. Maya özü, ekmek makinesinde
kullanılabilir.
●
Eğer ekmeğin daha haf ve selüloz seviyesinin
daha yüksek olmasını isterseniz, buğday kepeği
ekleyebilirsiniz. 500 g un için 1 çorba kaşığı kepek koyun
ve sıvı miktarını ½ çorba kaşığı oranında arttırın.
PBM1000W-001_v01
Page 13
17
4. Ekmek makinesi için tarier
Yukarıda belirtilmiş olan tarier, çeşitli ekmek boylarına
uygundur. Toplam ağırlık 1000 gramdan fazla olmamalıdır.
Eğer ağırlık ile ilgili detaylı talimatlar verilmedi ise, bir
programda hem küçük, hem de büyük malzeme miktarı
kullanılabilir. Çok hızlı programda, tavsiye edilen ekmek
ağırlığı yaklaşık 750 gramdır.
5. Ekmeğin ağırlığı ve hacmi
●
Ekmeğin ağırlığı, tarierde detaylı olarak belirtilmiştir.
Gördüğünüz gibi, katkısız beyaz ekmeğin ağırlığı,
kepekli ekmeğin ağırlığından düşüktür. Bunun nedeni,
beyaz unun daha hızlı kabarmasıdır. O yüzden, pişirme
sırasında ekmeğin kontrol edilmesi gerekir.
●
Ağırlık ile ilgili bilgilerin detaylı olmasına rağmen,
küçük farklar mümkündür. Ekmeğin gerçek ağırlığı,
hazırlanması sırasında evdeki nem seviyesine yüksek
derecede bağlıdır.
●
Yüksek miktarda buğday içeren ekmek hep hacimlidir ve
malzemelerin doğru ölçülmesine rağmen, son kabarma
aşamasından sonra kalıbın kenarından daha yüksektir.
Ekmek taşmaz. Kalıbın dışında kalan ekmeğin kısmı,
kalıbın içindeki kısımdan daha kolay esmerleşir.
●
Ekmeğin daha haf olması için, tatlı ekmek pişirmek
için tavsiye edilen HIZLI programında, TATLI HAMUR
programı için belirtilmiş olan malzeme miktarından daha
az miktar kullanabilirsiniz.
6. Pişirme sonuçları
●
Pişirme sonuçları, su sertliği, hava nemi, rakım,
malzemelerin yoğunluğu gibi şartlara bağlıdır. Bu nedenle,
tarierdeki miktarlar, belirli koşullarda değiştirilebilen
referans noktaları olarak algılanmalıdır. Eğer pişirme
sonuçları başarılı olmazsa, hevesinizi yitirmeyin.
Başarısızlığın nedenini bulmaya çalışın ve değiştirilmiş
malzeme miktarları ile yeniden pişirmeyi deneyin.
●
Eğer pişirme sonrasında ekmek esmer değilse, cihazın
içinde bekleterek esmerlik programını kullanabilirsiniz.
●
Geceleyin ekmek pişirmek için süre fonksiyonunu
kullanmadan önce, gerekli olabilen ayarları yapmak için
bir test ekmeği pişirmeniz tavsiye edilir.
Ekoloji – Çevreyi koruma
Her kullanıcı doğayı koruyabilir. Bu ne zor,
ne de pahalıdır.
Bunu gerçekleştirmek için, karton ambalajı,
kağıt ürünler geri dönüşüm çöp kutusuna,
polietilen (PE) poşetleri ise, plastik ürünler çöp
kutusuna atın.
Cihaz eskidiğinde yerel bir imha merkezine teslim edin,
bu cihazdaki bazı parçalar çevre için zararlı olabilir.
Diğer evsel atıklarınız ile beraber atmayın!!!
İthalatçı/imalatçı, tesadü veya yanlış kullanımdan kaynaklanan
arızalardan sorumluluğu kabul etmez.
İthalatçının/imalatçının, ürünün geçerli mevzuata, standartlara veya
yönetmeliklere uygun olması için, ya da yapı, ticaret, estetik veya
diğer etkenlerden dolayı, üründe değişiklik yapma hakkı saklıdır.
PBM1000W-001_v01
Page 14
18
Dear Customers!
Congratulations on your choice of our appliance, and
welcome among the users of PROFiLO products.
Please read these instructions carefully. Pay special
attention to important safety instructions in order to prevent
accidents and/or avoid damage. Keep this User’s Guide for
future reference.
Safety operation instructions
Before starting to use the appliance, become familiar
with the whole content of this user manual.
Make sure that you understand the instructions given
below.
of defects please contact a qualied
service center.
● Unplug the appliance when not in
use and before cleaning.
● Switch off the appliance before
handling movable parts.
● The cord cannot hang over the edge
of the table or counter and cannot
touch hot surfaces.
● Use special pot holders or
a protective cloth while removing the
baking tin with the bread from the
appliance. The baking tin and the
bread are very hot.
● Do not touch hot surfaces of the
appliance, particularly dry product
dispenser and areas around
the vents. Use pot holders. The
appliance is very hot after the end of
the baking process.
● The temperature of accessible
surfaces may be high when the
appliance is operating.
● Allow the appliance to cool before
dismantling and cleaning. The
appliance has a heat-insulated cool
touch housing. The metal parts
become hot during use.
● Pay special attention while handling
the appliance, especially if it is full of
hot substances.
DANGER! / WARNING!
Risk of injury
● This appliance can be used by
children aged from 8 years and
above and persons with reduced
physical, sensory or mental
capabilities or lack of experience and
knowledge if they have been given
supervision or instruction concerning
use of the appliance in a safe
way and understand the hazards
involved. Children shall not play with
the appliance. Cleaning and user
maintenance shall not be made by
children without supervision.
● Keep the appliance and its cord out of
reach of children less than 8 years.
● Do not operate the appliance if it has
a damaged cord or if the housing is
visibly damaged.
● If the supply cord is damaged, it must
be replaced by the manufacturer, its
service agent or similarly qualied
persons in order to avoid a hazard.
● The appliance can only be repaired
by qualied service personnel.
Improper servicing may cause
a serious hazard to the user. In case
WARNING!
Risk of property damage
●
Plug the appliance only to a grounded electrical outlet
with the voltage corresponding to the voltage indicated
on the rating plate.
●
The appliance is not intended to be operated by means
of an external timer or separate remote-control system.
●
Always place the appliance on a at, even surface
so it does not fall during the kneading process of
thick dough. It is especially important while using the
PBM1000W-001_v01
EN
Page 15
19
programmed functions and when the appliance is left
unattended. In case of extremely smooth surfaces,
place the appliance on a thin rubber pad.
●
When in operation, the unit should be placed at least
10 cm from other objects.
●
Never place the appliance near a gas or electric
cooker or hot oven.
●
Never remove the baking tin while the appliance is
working.
●
Never put into the unit any aluminium foil or any
materials other than baking products, as this can
cause a re or short circuit.
●
Never cover the appliance with towels or other
materials during use. The heat and steam must be
free to escape. Danger of re arises if the appliance is
covered with ammable materials or comes in contact
with curtains, etc.
●
Do not wash under running water. Do not immerse the
appliance and the cord into water.
●
Do not use abrasive detergents such as emulsions,
cream cleaners, polishes, etc. to clean the housing.
They may remove the graphic information symbols
such as: scales, marks, warning signs etc.
●
Do not wash metal parts in the dishwasher. Aggressive
detergents used in the dishwasher cause these parts
to darken. Wash them manually using traditional
dishwashing liquids.
●
The use of accessories not recommended by the
manufacturer may cause damage to the appliance.
●
Bread can catch re, therefore never use the unit near
any inammable materials or beneath anything that
can catch re (for example curtains).
●
Do not unplug by pulling on cord.
Technical parameters
The technical parameters are indicated on the rating label.
The bread baking machine is a I class appliance equipped
with a cord having a grounding wire with a grounding plug.
The appliance meets the requirements of the applicable norms.
The appliance is in conformity with the requirements of the
directives:
– Electrical equipment designed for use within specic
voltage limits (LVD) – 2006/95/EC.
– Electromagnetic compatibility (EMC) – 2004/108/EC.
The appliance was marked by a CE sign on the rating label.
Appliance features
APPLIANCE ELEMENTS
1
Removable cover
2
Handle
3
Viewing window
4
Loose ingredients dispenser
5
Vents
6
Baking tin
7
Kneading peg
8
Baking compartment
9
Bottom mould for baking baguettes
10
Upper mould for baking baguettes
11
Control panel
ACCESSORIES
12
Spoon to measure the components
13
Container to measure the components
14
Hook for taking out the kneading paddle
CONTROL PANEL
15
LCD display
After connecting the bread maker to power, the display
shows a symbol “1 3:25”. The number “1” indicates the
selected program, the symbol “3:25” indicates the duration
of the selected program. The position of the two markings
indicates the selected browning level and the weight. The
default setting after switching the appliance on is “superior
weight” (1000 g) and “medium browning level” (ORTA).
Information concerning the baking process will be shown on
the display while the appliance is operating. The time shown
on the display will gradually decrease. Other information
concerning the timer, preheating, kneading, pause, dough
rising, baking, the keep warm function and the end of the
program will also appear on the display.
16
BAŞLA/DURDUR button – starts and stops the program.
17
SÜRE – sets the clock.
18
ESMERLİK button – is used to set the desired browning level.
19
MENU button – is used to select the program.
20
GRAM button – setting the weight according to the
description below.
A
HINT
Information on the product and
hints on its use
●
The appliance is intended for household use only. The
warranty conditions change if the appliance is used in
gastronomic business.
●
Never use more ingredients than given in the recipes
provided in these instructions. Otherwise bread will
be baked unevenly or dough will spill over. Follow the
recommendations in these instructions.
●
Before trying to bake a given type of bread overnight,
rst try the recipe while keeping an eye on the
appliance to make sure that the doses of ingredients
are correct, the dough is not too thick or thin, its
quantity is appropriate and the dough does not
overow.
●
When nished baking, unplug the unit from the mains
socket.
PBM1000W-001_v01
Page 16
20
Appliance functions
BUZZER FUNCTION
The buzzer goes off:
●
When pressing the program buttons.
●
During operation a sound signal will come off informing
and reminding the user to add nuts, sunower seeds,
raisins etc.
●
When the end of the program is reached.
After pressing the BAŞLA/DURDUR button
you can turn off the sound. In order to do this
press and hold both of the SÜRE buttons for
approx. 2 seconds. If you press and hold both
of the SÜRE buttons for a second time, you will
hear a sound signal informing that sound is on
again.
MEMORY FUNCTION
If there is a brief power cut of up to approximately 15 minutes
the program position is stored and the machine can continue
from this position when power is restored. This is possible
only if the program was stopped before the kneading phase
was reached. Otherwise you will have to start from the
beginning.
AUTO DOSING OF LOOSE ADDITIVES
Within the cover of this device there is a dispenser of bulk
additives (4). Loose ingredients, such as fruits, nuts, raisins,
grains, may be added to baking. In order to this, you have
to place a given product in the dispenser before the baking
process (details provided in paragraph 4). The device
automatically adds products to a cake in an appropriate
moment during cake mixing and kneading.
Additional ingredients may also be added to sprinkle the
upper part of the cake. It is best to place these ingredients
into the dispenser for loose ingredients ca. 30 minutes
before the end of the baking process. Adding the additional
ingredients shall be indicated by a sound signal. Programs in
which this feature is used, are described in tables referring to
phases of device operation.
SAFETY FUNCTIONS
If the temperature of the appliance is still too high to start
a new program after using the appliance previously, the
symbol E 01 will appear on the display after you press the
BAŞLA button again, you will also hear a beep. In such
a case, press and hold the BAŞLA/DURDUR button until
the E 01 symbol disappears from the display and the basic
setting appears on the display. Remove the baking tin and
wait for the appliance to cool.
The PİŞİRME program can be started
immediately even if the appliance is still hot.
Operating instructions
1
Insert the baking tin.
The baking tin is covered with a non-stick layer. Place
the baking tin exactly in the middle of the base inside the
appliance. Turn gently the container clockwise until it is
blocked.
The handle is hot after baking. Use pot holders.
2
Insert the kneading peg.
Insert the kneading peg by placing the shank of the baking
tin in the opening of the kneading peg.
3
Put the ingredients.
The ingredients must be put into the baking tin the order
specied in the relevant recipe. Examples of recipes can be
found in this instruction manual.
4
Fill in the bulk additive dispenser (optional).
In order to complement the dispenser, lift the lid of dispenser
and pour the optimum amount of additives (fruit, nuts, raisins,
beans). The quantity of additives depends on individual
preferences. Then close the lid until you hear a click.
5
Plug in the appliance.
6
Select the desired program using the MENU button.
The MENU button is used to select the programs described
below.
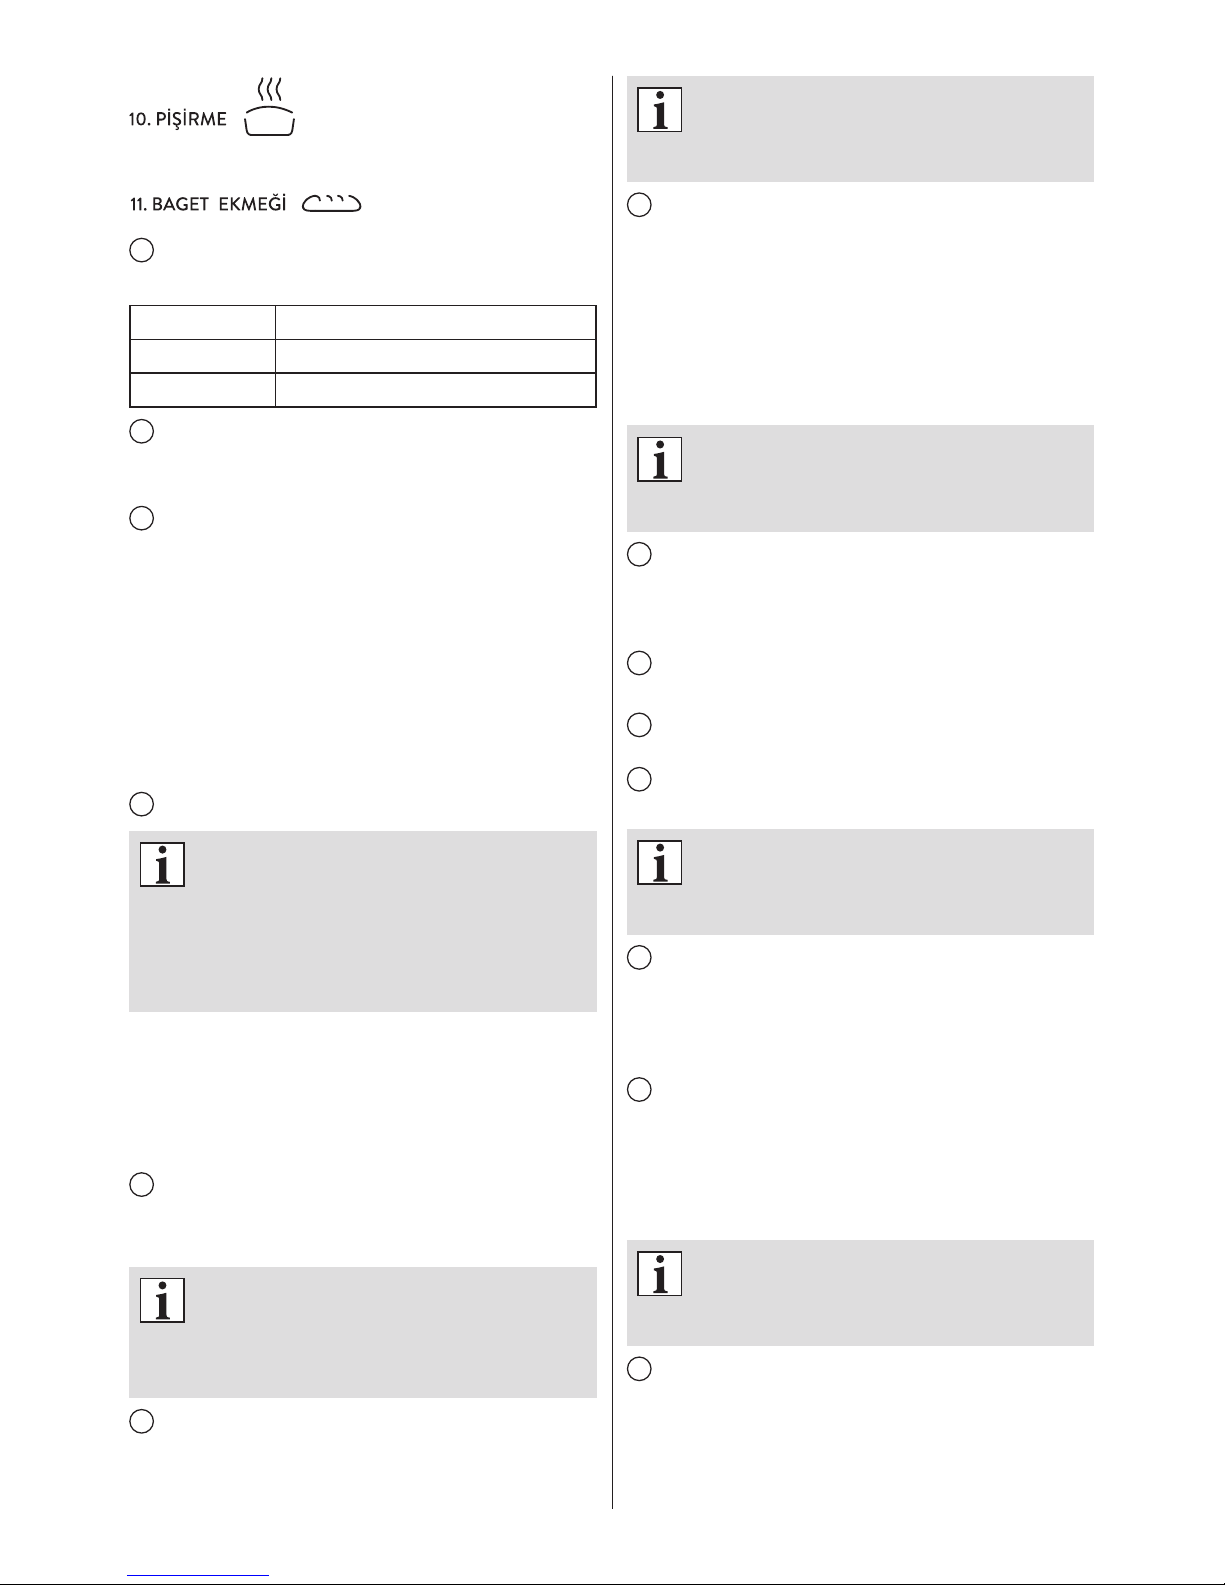
For white, wheat and rye bread. This is the most commonly
used program.
For the preparation of a particularly light white bread.
For whole meal bread.
For preparing e.g. sweet leavened dough.
For making gluten free bread.
For making dough.
B
PBM1000W-001_v01
Page 17
21
To brown bread or cakes.
7
Select the weight appropriate for the given program.
GRAM button is used to set the weight of the bread (see table):
500 g = for small bread up to 500 g
750 g = for medium bread up to 750 g
1000 g = for large bread up to 1000 g
8
Select the desired browning level.
The ESMERLİK button is used to set the desired browning
level. BEYAZ, ORTA, ESMER, HIZLI.
9
Set the program start time by means of SÜRE
program selector buttons.
Example:
It is 8.30 p.m. and the bread must be ready for the next
morning by 7.00 a.m., i.e, in 10 hours and 30 minutes. Press
the SÜRE button until the symbol 10.30 appears on Press
the program selector buttons, until you see 10:30 on the LCD
- it is the time from now (20:30) to the moment, when the
bread is ready. When working with the timing function never
use perishable ingredients such as milk, eggs, fruits, yogurt,
onions, etc.
10
Press the BAŞLA/DURDUR button.
After pressing the BAŞLA/DURDUR button
you can turn off the sound. In order to do this
press and hold both of the SÜRE buttons for
approx. 2 seconds. If you press and hold both
of the SÜRE buttons for a second time, you will
hear a sound signal informing that sound is on
again.
The BAŞLA/DURDUR button is also used to stop the
program at any time. In order to do so, press and hold the
BAŞLA/DURDUR button for about 3 seconds until you hear
a beep. The initial position of the selected program will show
on the display. If you want to use a different program, select
the program using the MENU button.
11
Mix and knead the dough.
The bread baking machine mixes and kneads the dough
automatically until it reaches the right consistency.
During the phase of stirring and kneading
of dough, the lid of the appliance should be
closed. During this phase it is possible to
add small amounts of water, liquid or other
ingredients.
12
Leave the dough to rise.
After the last kneading cycle the bread baking machine is
heated to the optimal temperature for the rising of the dough.
During the dough growing phase close the
lid and do not open it until the end of baking
bread. The photos are only intended to present
the phases of the dough growth.
13
Baking.
The bread baking machine automatically sets the baking
temperature and time. If the bread is too light at the end of
program, use the PİŞİRME program to brown the bread.
In order to do so, press and hold the BAŞLA/DURDUR button
for about 3 seconds (until you hear a beep). Then press the
PİŞİRME button. When the desired browning level is reached,
stop the process by pressing and holding the BAŞLA/
DURDUR button for about 3 seconds (until you hear a beep).
During dough baking phase lose the lid and
do not open it until the end of baking bread.
The photos are only intended to present the
phase of baking.
14
Warming.
Once the baking process is over, the buzzer goes off to
signal that the bread can be taken out from the appliance.
The 1 hour warming time starts immediately.
15
End of the program phases.
After the end of operation, unplug the appliance.
16
Take out the baking tin using pot holders and turn
the baking tin over.
17
If the bread does not fall out of the baking tin, gently
shake the baking tin until the bread falls out.
If the kneading peg remains inside the bread,
slightly cut the bread and remove the peg.
You can also use the hook for taking out the
kneading paddle.
18
Preparation baguettes.
After preparing the dough using the program 7 HAMUR,
it should be put into the a mould cups for baguette baking (9)
and (10). Then, the moulds lled with the dough should be
placed in cooking chamber instead of the container for baking.
19
Placing the bottom baking mould (9) into bread
maker.
After removing the container for baking, cake mould with
the containing dough should be pressed between the lower
catches in the baking chamber so as to rmly adhered to the
catches.
When placing the molds in the bread-
maker make sure all the handles are lifted
(perpendicularly to the surface of molds). This
will facilitate taking the molds out of the device.
20
Placing the upper mould for baking (10) into bread
maker.
The upper mould for baking should be hung on metal hooks
at the top of the baking chamber. Next close the lid and
follow the steps as in case of baking bread (phases 13 to 15)
or start the 10 PİŞİRME program.
PBM1000W-001_v01
Page 18
22
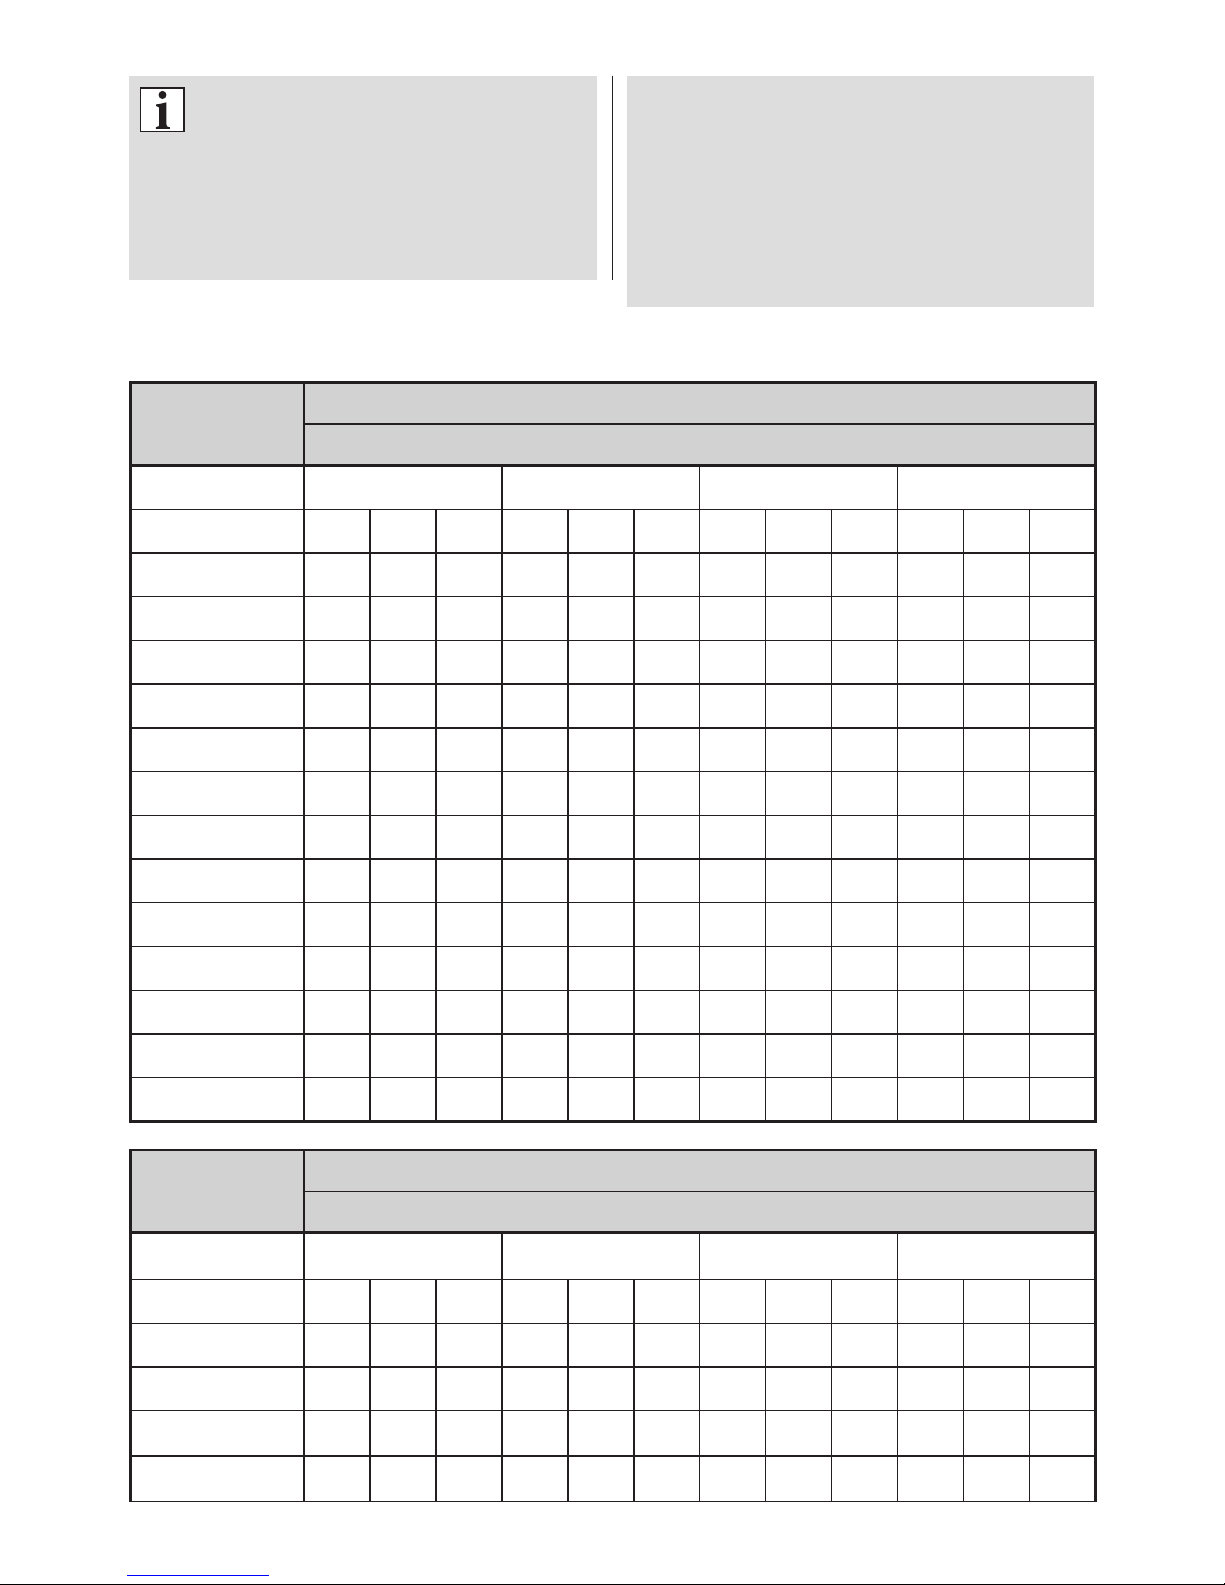
PHASES OF DEVICE OPERATION
FUNCTION
1
GENEL*
PİŞİRME BEYAZ ORTA ESMER HIZLI
GRAM 500 g 750 g 1000 g 500 g 750 g 1000 g 500 g 750 g 1000 g 500 g 750 g 1000 g
DELAY TIME 15:00 15:00 15:00 15:00 15:00 15:00 15:00 15:00 15:00 15:00 15:00 15:00
ÖN ISITMA
YOĞURMA 1 5 m 5 m 5 m 5 m 5 m 5 m 5 m 5 m 5 m 5 m 5 m 5 m
DURDUR 5 m 5 m 5 m 5 m 5 m 5 m 5 m 5 m 5 m 5 m 5 m 5 m
YOĞURMA 2 20 m 20 m 20 m 20 m 20 m 20 m 20 m 20 m 20 m 20 m 20 m 20 m
KABARMA 1 40 m 40 m 40 m 40 m 40 m 40 m 40 m 40 m 40 m 15 m 15 m 15 m
YOĞURMA 3 10 s 10 s 10 s 10 s 10 s 10 s 10 s 10 s 10 s 10 s 10 s 10 s
KABARMA 2 25 m 25 m 25 m 25 m 25 m 25 m 25 m 25 m 25 m 9 m 9 m 9 m
YOĞURMA 4 10 s 10 s 10 s 10 s 10 s 10 s 10 s 10 s 10 s 10 s 10 s 10 s
KABARMA 3 50 m 50 m 50 m 50 m 50 m 50 m 50 m 50 m 50 m 30 m 30 m 30 m
PİŞİRME 46 m 51m 58 m 48 m 53 m 60 m 53 m 58 m 65 m 48 m 53 m 60 m
SICAK 1 h 1 h 1 h 1 h 1 h 1 h 1 h 1 h 1 h 1 h 1 h 1 h
TOTAL TIME
3:11 3:16 3:23 3:13 3:18 3:25 3:18 3:23 3:30 2:12 2:17 2:24
FUNCTION
2
BEYAZ EKMEK*
PİŞİRME BEYAZ ORTA ESMER HIZLI
GRAM 500 g 750 g 1000 g 500 g 750 g 1000 g 500 g 750 g 1000 g 500 g 750 g 1000 g
DELAY TIME 15:00 15:00 15:00 15:00 15:00 15:00 15:00 15:00 15:00 15:00 15:00 15:00
ÖN ISITMA
YOĞURMA 1 5 m 5 m 5 m 5 m 5 m 5 m 5 m 5 m 5 m 5 m 5 m 5 m
DURDUR 5 m 5 m 5 m 5 m 5 m 5 m 5 m 5 m 5 m 5 m 5 m 5 m
In order to prepare baguettes, you can also use
the 11 BAGET EKMEĞİ program. This program
is divided into two stages. In the rst stage
the dough is stirred and kneaded, and then
risen. In the second stage the baguettes still
are risen, and then nally baked until crusty.
After the rst stage the device stops, and emits
a sound signal informing the user to put the
dough into baguette molds. After putting the
dough into the molds (detailed description
of the process can be found in paragraphs
18, 19, and 20), it is necessary to resume the
program by pressing the BAŞLA/DURDUR
button. This starts the second stage. Detailed
information concerning the individual stages of
the program are presented in the table entitled
DEVICE WORK STAGES.
PBM1000W-001_v01
Page 19
23
FUNCTION
2
BEYAZ EKMEK*
PİŞİRME BEYAZ ORTA ESMER HIZLI
YOĞURMA 2 20 m 20 m 20 m 20 m 20 m 20 m 20 m 20 m 20 m 20 m 20 m 20 m
KABARMA 1 39 m 39 m 39 m 39 m 39 m 39 m 39 m 39 m 39 m 15 m 15 m 15 m
YOĞURMA 3 10 s 10 s 10 s 10 s 10 s 10 s 10 s 10 s 10 s 10 s 10 s 10 s
KABARMA 2 31 m 31 m 31 m 31 m 31 m 31 m 31 m 31 m 31 m 15 m 15 m 15 m
YOĞURMA 4 10 s 10 s 10 s 10 s 10 s 10 s 10 s 10 s 10 s 5 s 5 s 5 s
KABARMA 3 60 m 60 m 60 m 60 m 60 m 60 m 60 m 60 m 60 m 30 m 30 m 30 m
PİŞİRME 48 m 50 m 53 m 50 m 52 m 55 m 55 m 57 m 60 m 50 m 52 m 55 m
SICAK 1 h 1 h 1 h 1 h 1 h 1 h 1 h 1 h 1 h 1 h 1 h 1 h
TOTAL TIME
3:28 3:30 3:33 3:30 3:32 3:35 3:35 3:37 3:40 2:35 2:37 2:40
FUNCTION
3
TAM BUĞDAY*
PİŞİRME BEYAZ ORTA ESMER HIZLI
GRAM 500 g 750 g 1000 g 500 g 750 g 1000 g 500 g 750 g 1000 g 500 g 750 g 1000 g
DELAY TIME 15:00 15:00 15:00 15:00 15:00 15:00 15:00 15:00 15:00 15:00 15:00 15:00
ÖN ISITMA 30 m 30 m 30 m 30 m 30 m 30 m 30 m 30 m 30 m 5 m 5 m 5 m
YOĞURMA 1 5 m 5 m 5 m 5 m 5 m 5 m 5 m 5 m 5 m 5 m 5 m 5 m
DURDUR 5 m 5 m 5 m 5 m 5 m 5 m 5 m 5 m 5 m 5 m 5 m 5 m
YOĞURMA 2 15 m 15 m 15 m 15 m 15 m 15 m 15 m 15 m 15 m 15 m 15 m 15 m
KABARMA 1 49 m 49 m 49 m 49 m 49 m 49 m 49 m 49 m 49 m 24 m 24 m 24 m
YOĞURMA 3 10 s 10 s 10 s 10 s 10 s 10 s 10 s 10 s 10 s 10 s 10 s 10 s
KABARMA 2 26 m 26 m 26 m 26 m 26 m 26 m 26 m 26 m 26 m 11 m 11 m 11 m
YOĞURMA 4 10 s 10 s 10 s 10 s 10 s 10 s 10 s 10 s 10 s 10 s 10 s 10 s
KABARMA 3 45 m 45 m 45 m 45 m 45 m 45 m 45 m 45 m 45 m 35 m 35 m 35 m
PİŞİRME 48 m 50 m 53 m 50 m 52 m 55 m 55 m 57 m 60 m 50 m 52m 55 m
SICAK 1 h 1 h 1 h 1 h 1 h 1 h 1 h 1 h 1 h 1 h 1 h 1 h
TOTAL TIME
3:43 3:45 3:48 3:45 3:47 3:50 3:50 3:52 3:55 2:30 2:32 2:35
PBM1000W-001_v01
Page 20
24
FUNCTION
4 5 6 7 8 9 10 11
TATLI
HAMUR*
HIZLI*
GLUTENSİZ*
HAMUR*
MAKARNA
HAMURU
REÇEL
PİŞİRME
BAGET EKMEĞİ*
BEYAZ ORTA ESMER
GRAM 500 g 750 g 1000 g 1000 g - - - - - - - -
DELAY TIME 15:00 15:00 15:00 - - 15:00 - 15:00 - 15:00 15:00 15:00
ÖN ISITMA 0 m
YOĞURMA 1 5 m 5 m 5 m 5 m 5 m 5 m 3 m 5 m 5 m 5 m 5 m
DURDUR 5 m 5 m 5 m 0 m 5 m 0 m 0m 0 m 0m
YOĞURMA 2 20 m 20 m 20 m 15 m 10 m 20 m 11 m 10 m 20 m 20 m 20 m
KABARMA 1 39 m 39 m 39 m 12 m 0 m 60 m 0 m 55 m 55 m 55 m
YOĞURMA 3 10 s 10 s 10 s 0 0 s 0 s 0 s 0 s
KABARMA 2 26 m 26 m 26 m 0 0 0 m 0 m 0 m
YOĞURMA 4 5 s 5 s 5 s 0 0 s 0 s 0 s 0 s
KABARMA 3 52 m 52 m 52 m 60 m 0 m 0 15 m 15 m 15 m
PİŞİRME 50 m 55 m 60 m 48 m 55 m 0 m 70 m 60-90 m 52 m 57 m 62 m
SICAK 1 h 1 h 1 h 1 h 1 h - - 1 h 1 h 1h 1 h
TOTAL TIME
3:17 3:22 3:27 1:20 2:10 1:30 0:14 1:25 1:00 2:27 2:32 2:37
* – Automatic dispenser for loose ingredients is available as an option.
Cleaning and maintenance
●
Before using the device for the rst time, clean the
baking container, the molds, and the stirring spatula
by means of a gentle detergent (DO NOT immerse the
baking container in water).
●
Before using the device for the rst time, grease the new
baking container, the molds, and the stirring spatula with
a heat-resistant grease, and preheat them in the oven
for ca. 10 minutes. After cooling down, remove the fat
from the baking tin using a paper towel. Thanks to this
operation, the non-stick coating will be protected. Repeat
this operation from time to time.
●
Before storing or cleaning wait to cool down the bread
maker. It takes about half an hour for the appliance to
cool and to be ready again for baking and kneading.
●
Unplug the appliance and wait until it cools down before
cleaning. Use a mild detergent. Never use chemical
cleaning agents, gasoline, oven cleaners or any
detergent that can scratch or damage the coating.
●
Remove all the ingredients and crumbs from the lid,
casing and baking compartment with a moist towel.
Never immerse the appliance into water or ll the baking
compartment with water!
●
For easy cleaning the lid can be removed by positioning
it vertically and pulling it out.
●
Wipe the outside of the baking tin with a damp cloth. The
inside of the tin can be washed with dishwashing liquid.
Do not immerse the tin into water.
●
Clean the kneading pegs and the drive shaft immediately
after use. If the kneading pegs remain in the tin, it will
be difcult to remove them afterwards. In such a case ll
the container with warm water and leave for 30 minutes.
Next remove the kneading pegs.
●
The baking tin has a non-stick coating. Do not use
metal objects that could scratch the coating. The color
of the coating will change during the course of use. This
is a normal situation. This change does not affect the
effectiveness of the coating in any way.
●
Make sure the appliance has completely cooled down
and is dry before storing. Store the appliance with the
lid closed.
PBM1000W-001_v01
Page 21
25
QUESTIONS AND ANSWERS CONCERNING THE APPLIANCE
PROBLEM CAUSE SOLUTION
Smoke comes out of the baking
compartment or the vents.
The ingredients stuck to the
baking compartment or to the
outside of the baking tin.
Unplug the appliance and clean the outside of the baking tin or the
baking compartment.
The bread goes down in the
middle and is moist on the
bottom.
The bread was left for too long
in the baking tin after baking
and warming.
Take the bread out off the baking tin before the end of the warming
function.
It is difcult to take the bread
out of the baking tin.
The bottom of the total is stuck
to the kneading peg.
Clean the kneading peg and shaft before the next time you bake bread.
If necessary, ll the container with warm water and leave for 30 minutes.
This way the kneading pegs can be easily removed and cleaned.
The ingredients are not mixed
or the bread is not baked
properly.
Incorrect program setting. Check the selected menu and other settings.
The BAŞLA/DURDUR button
was pressed while the
machine was working.
Do not use the ingredients and start the whole process again.
The lid opened several
times while the machine was
working.
The lid can only be opened if the time left on the display is more than
1:30 (this concerns only programs 1,2,3,4).
Make sure the lid was closed properly.
Long blackout while the
machine was working.
Do not use the ingredients and start the whole process again.
The rotation of the kneading
pegs is blocked.
Check if the kneading pegs are not blocked by for example grains, etc.
Pull out the baking tin and check if the drivers turn. If this is not the
case, return the appliance to a service point.
The appliance does not start.
The audible signal goes off. The
display shows the symbol E 01.
The appliance is still hot after
the previous baking process.
Press and hold the BAŞLA/DURDUR button until the normal program code
appears on the display. Unplug the appliance. Take out the baking tin and
leave to cool at room temperature. Plug in and restart the appliance.
The display shows the symbol
“EEE”.
Program or electronic error.
Start the test run. Press and hold the menu button, unplug the appliance and
then plug it in again. Release the button. The appliance will perform a test
run. Unplug the appliance again. The normal program code should appear
on the display. If this is not the case, return the appliance to a service point.
CLASSIC RECIPES
Ready-made bread mixtures available
in shops can be especially used in the
appliance.
WHITE BREAD
(bread weight approx. 900 g)
BUTTERMILK BREAD
(bread weight approx. 900 g)
Ingredients
Water or milk
Salt
Sugar
Flour type 500
Dry yeast
425 ml
1½ teaspoon
1½ teaspoon
600 g
1 teaspoon
Ingredients
Buttermilk
Salt
Sugar
Flour type 500
Dry yeast
375 ml
1 teaspoon
1 teaspoon
500 g
1 teaspoon
Program: GENEL or BEYAZ EKMEK Program: GENEL or BEYAZ EKMEK
NUT AND RAISIN BREAD
(bread weight approx. 900 g)
SUNFLOWER BREAD
(bread weight approx. 900 g)
7 GRAIN CEREAL BREAD
(bread weight approx. 700 g)
Ingredients
Water or milk
Margarine or butter
Salt
Sugar
Flour type 500
Dry yeast
Raisins
Crushed nuts
350 ml
1 ½ tablespoon
1 teaspoon
2 tablespoons
540 g
1 teaspoon
100 g
3 tablespoons
Ingredients
Water
Butter
Flour type 550
Sunower seeds
Salt
Sugar
Dry yeast
350 ml
1 tablespoon
540 g
5 tablespoons
1 teaspoon
1 tablespoon
1 teaspoon
Ingredients
Water or milk
Margarine or butter
Salt
Sugar
Flour type 550
Whole wheat our
7-grain akes
Dry yeast
300 ml
1 ½ tablespoon
1 teaspoon
2 ½ tablespoon
240 g
240 g
60 g
1 teaspoon
Program: GENEL
Program: GENEL
Tip: Sunower seeds can be replaced with
pumpkin seeds. Toast the seeds in a frying
pan to give them a more intense avor.
Program: TAM BUĞDAY
When using whole grains, soak them rst.
PBM1000W-001_v01
Page 22
26
ONION BREAD
(bread weight approx. 900 g)
WHOLE WHEAT BREAD
(bread weight approx. 900 g)
CHOCOLATE AND NUT BREAD
(bread weight approx. 700 g)
Ingredients
Water or milk
Margarine or butter
Salt
Sugar
Large, chopped onion
Flour type 550
Dry yeast
250 ml
1 tablespoon
1 teaspoon
2 tablespoons
1
540 g
1 teaspoon
Ingredients
Water or milk
Margarine or butter
Eggs
Salt
Sugar
Flour type 550
Whole wheat our
Dry yeast
300 ml
1½ tablespoon
1
1 teaspoon
2 teaspoons
360 g
180 g
1 teaspoon
Ingredients
Water
Chocolate-nut
spread
Salt
Caster sugar
Flour type 500
Plain our
Dry yeast
275 ml
90 ml
1½ teaspoons
1½ teaspoons
300 g
150 g
1 teaspoon
Program: GENEL
Bake this bread immediately.
Program: TAM BUĞDAY
NOTE: While using the “DELAY TIMER”
program, add more water instead of eggs.
Program: BEYAZ EKMEK
ROSEMARY AND GARLIC FOCACCIA
BREAD
FRENCH BAUGETTES
(bread weight approx. 900 g)
PIZZA DOUGH
(ingredients for 3 pizzas)
Ingredients
Water
Olive oil
Fresh, chopped
rosemary
Garlic, peeled and
crushed
Flour type 500
Salt
Dry yeast
200 ml
1 tablespoon
2 tablespoons
3 cloves
350 g
1 teaspoon
½ teaspoon
Ingredients
Water
Honey
Salt
Sugar
Flour type 550
Dry yeast
300 ml
1 tablespoon
1 teaspoon
1 teaspoon
540 g
1 teaspoon
Ingredients
Water
Salt
Olive oil
Flour type 500
Sugar
Dry yeast
300 ml
¾ teaspoon
1 tablespoon
450 g
2 teaspoons
1 teaspoon
Program: HAMUR
Program: BAGET EKMEĞİ
After kneading split the prepared dough into
2-4 pieces. Form long loaves, and place
them in molds. Make the diagonal incises on
the dough and place it in bread maker.
Program: HAMUR
After the kneading process, spread the
dough, form a round shape and leave to
rest for 10 minutes. Spread the sauce and
add the desired lling. Bake in the oven for
20 minutes.
ORANGE JAM STRAWBERRY JAM RASPBERRY JAM
Ingredients
Oranges
Lemons
2:1 jellifying sugar
400 g
100 g
250 g
Ingredients
Strawberries, washed
and stalks removed
Jellifying sugar
450 g
450 g
Ingredients
Fresh raspberries,
washed
Jellifying sugar
450g
450g
Program REÇEL Program REÇEL Program REÇEL
APRICOT JAM
CHERRY BREAD
(bread weight ca. 700 g)
BREAD OF GLUTEN-FREE FLOUR
(bread weight approx. 900 g)
Ingredients
Fresh apricots,
washed
Cold water
Jellifying sugar
Grated rind and juice
450 g
2 tablespoons
450 g
from ½ lemon
Ingredients:
Cherry juice
Milk
Honey
Butter
Cherry yoghurt
Cherries without
stones
Flour of 550 type
Dried yeast
Baking powder
Salt
Sugar
75 ml
20 ml
15 g
15 g
135 g
20 g
410 g
1 tsp
½ tbsp
½ tsp
1 tsp
Ingredients
Water or milk
Salt
Sugar
Flour type 500
Dry yeast
425 ml
1½ teaspoon
1½ teaspoon
Gluten-free our
500 g
1 teaspoon
Program REÇEL Program: GENEL or TATLI HAMUR Program: GENEL or BEYAZ EKMEK
The tables include examples of recipes and approximate amounts of ingredients. These information should not be treated as a cookery book.
While baking we encourage everyone to use their own recipes or these found in specialist literature, and stick to one’s likings.
PBM1000W-001_v01
Page 23

27
WHEN TO ADJUST RECIPES
PROBLEM PROBABLE CAUSE
SOLUTION
(DESCRIPTION BELOW)
The bread rises too fast. - Too much yeast, too much our, not enough salt. a/b
The bread does not rise at all
or not enough.
- No or too little yeast. a/b
- Old or stale yeast. e
- Liquid too hot. c
- The yeast has come into contact with the liquid. d
- Wrong our type or stale our. e
- Too much or not enough liquid. a/b/g
- Not enough sugar. a/b
The dough rises too much
and spills over the baking tin.
- If the water is too soft the yeast ferments more. f
- Too much milk affects the fermentation of the yeast. c
The bread goes down in the
middle.
- The dough volume is larger than the tin and the bread goes down. a/f
- The fermentation is too short or too fast due to the excessive temperature of the
water or the baking chamber or due to the excessive moistness.
c/h/i
- No salt or not enough sugar. a/b
- Too much liquid. h
Heavy, lumpy structure of
bread.
- Too much our or not enough liquid. a/b/g
- Not enough yeast or sugar. a/b
- Too much fruit, whole meal our or another ingredient. b
- Old or stale our. e
The bread is not baked in
the center.
- Too much or not enough liquid. a/b/g
- Too much humidity. h
- Recipes with moist ingredients, e.g. yogurt. g
Coarse structure or too many
holes in bread.
- Too much water. g
- No salt. b
- Great humidity, too hot water. h/i
- Too much liquid. c
Mushroom-like, unbaked
surface.
- Bread volume too big for the tin. a/f
- Too much our, especially for white bread. f
- Too much yeast or not enough salt. a/b
- Too much sugar. a/b
- Other sweet ingredients apart from sugar. b
The slices are uneven or
there lumps in the middle.
- The bread did not cool enough (the vapor has not escaped). j
Flour deposits on the bread
crust.
- The our was not worked well on the sides during kneading. g/i
Solutions to the above problems
a) Measure the ingredients correctly.
b) Adjust the ingredient doses and check that all the
ingredients have been added.
c) Use another liquid or leave it to cool at room temperature.
The ingredients must added the order specied in the
relevant recipe. Make a small ditch in the middle of the
our and put crumbled or dry yeast inside. Do not allow
the yeast to come into direct contact with the liquid.
d) Use only fresh and properly stored ingredients.
e) Reduce the total amount of the ingredients, do not use
more our than specied in the recipe. Reduce all the
ingredients by ⅓.
f) Reduce the amount of liquid. Reduce the amount of
liquid, if ingredients containing water are used.
g) In case of very humid weather add 1-2 tablespoons of
water less.
PBM1000W-001_v01
Page 24

28
●
You can replace leaven with baking ferment. The only
difference is in the taste. You can use the ferment in the
bread baking machine.
●
You can add wheat bran to the dough if you want the
bread to be lighter and richer in roughage. Add one
tablespoon of bran for 500 g of our and increase the
amount of liquid by ½ tablespoon.
●
Wheat gluten is a natural additive obtained from wheat
proteins. It makes the bread lighter, the bread also has
more volume. The bread falls more rarely and is easier to
digest. The effect can be easily appreciated when baking
whole meal and other bakery products made of homemilled our.
●
Black malt used is some recipes is dark-roasted barley
malt. It is used to obtain a darker bread crust and soft
part (e.g. brown bread). You can also use rye malt, but it
is not as dark. Both products can be purchased in whole
food shops.
●
Pure lecithin powder is a natural emulsier which
improves the bread volume, makes the soft part softer
and lighter. The bread retains its freshness for longer.
2. Adjusting the amount of the ingredients
If the doses need to be increased or reduced, make sure
that the proportions of the original recipe are maintained.
To obtain a perfect result, follow the rules on adjusting the
amount of the ingredients below:
●
Liquids / our: the dough should be soft (but not too
soft) and easy to knead. The dough should not be
stringy. It should be possible to easily make a ball out
of the dough. This is not the case with heavy dough like
rye whole meal or cereal bread. Check the dough ve
minutes after the rst kneading phase. If it is too moist,
add some our until it reaches the right consistency.
If the dough is too dry add a spoonful of water at a time
during the kneading process.
●
Replacing liquids: When using ingredients containing
liquid (e.g. crud cheese, yoghurt, etc.) the amount of
liquid added should be reduced. When adding eggs,
beat them in the measuring beaker and ll the beaker
with the other required liquids to control the amount.
Dough prepared in a place located at a high altitude
(above 750 meters) will rise faster. You can reduce the
amount of yeast by ¼ to ½ teaspoon, to proportionally
reduce the rising of the dough. The same concerns
places with particularly soft water.
3. Adding and measuring the ingredients and
quantities
●
Always add the liquid rst. Add yeast at the end.
Do not allow the yeast to come into contact with liquid to
avoid fast rising of the yeast (especially when using the
timing function).
●
Use the same measuring units while measuring the
ingredients, that is measure the ingredients with the
included measuring spoon or spoons used at home,
if the recipe requires measuring the ingredients in
tablespoons and teaspoons.
●
Measure the ingredients given in grams correctly.
h) In case of warm weather do not use the timing function.
Use cool liquids.
i) Take the bread out of the tin immediately after baking
and leave to rest for at least 15 minutes before cutting.
j) Reduce the amount of yeast or all ingredients by ¼.
Remarks on recipes
1. Ingredients
●
Since each ingredient plays a specic role for the
successful baking of the bread, the correct measuring is
just as important as the order in which the ingredients
are added.
●
The most important ingredients such as the liquid
our, salt, sugar and yeast (either dry or fresh yeast
can be used) inuence the successful outcome of the
preparation of the dough and the bread. Always use the
right quantities in the right proportions.
●
Use lukewarm ingredients if the dough needs to be
prepared immediately. If you wish to set the program
phase timing function, it is advisable to use cold
ingredients to avoid the yeast to start rising too soon.
●
Margarine, butter and milk have an inuence on the
avor of the bread.
●
Sugar can be reduced by 20% to make the crust lighter
and thinner without affecting the successful outcome of
the baking. You can replace sugar with honey if you want
the crust to be softer and lighter.
●
Gluten which is produced in the our during the kneading
provides the structure of the bread. The ideal our
mixture is composed of 40% whole meal our and 60%of
white our.
●
If you wish to add cereals grains, leave them to soak
overnight. Reduce the quantity of our and liquid (up to
1/5 less).
●
It is necessary to use leaven with rye our. It contains
milk and acetobacteria thanks to which the bread is
lighter and it ferments thoroughly. You can make leaven
by yourself, however it is time consuming. Therefore,
concentrated leaven powder is used in the recipes
below. The powder is sold in 15g packets (for 1 kg of
our). We recommend to follow the recipes below (½, ¾
or 1 packet). The bread will crumble if you add less
leaven than indicated in the recipe.
●
If leaven powder with a different concentration is used
(100g packet for 1 kg of our) the quantity of our must
be reduced by 80g for 1 kg of our.
●
You can also use liquid leaven. Follow the doses
indicated on the package. Fill the measuring beaker with
the liquid leaven and top it up with other liquid ingredients
in the right doses as specied in the recipe.
●
Wheat leaven is more often sold in the dry form.
It improves the workability of the dough, its freshness
and taste. It is also milder than rye leaven.
●
Use the GENEL or TAM BUĞDAY program when baking
leavened bread.
PBM1000W-001_v01
Page 25

29
Ecology – environment protection
Each user can protect the natural environment.
It is neither difcult nor expensive.
In order to do it: put the cardboard packing into
recycling paper container; put the polyethylene
(PE) bags into container for plastic.
When worn out, dispose the appliance to particular disposal
centre, because of the dangerous elements of this appliance,
which can be hazardous for natural environment.
Do not dispose into the domestic waste disposal!!!
●
For the milliliter indications you can use the supplied
measuring beaker which has a graduated scale from 30
to 300 ml.
●
Adding fruits, nuts or cereals. You can add these
ingredients while using specied programs after you
hear a beep. If you add these ingredients too early, they
will be crushed during the kneading process.
4. Recipes for the bread baking machine
The above-mentioned recipes are for various bread sizes.
The total weight should not exceed 1000 grams. If no specic
instructions concerning the weight are given, it means that
both a small and a large amount of the ingredients may
be used for the given program. In case of the super rapid
program the recommended weight of the loaf is about 750
grams.
5. Bread weight and volume
●
The weight of the bread is precisely indicated in the
recipes. It is easy to see, that the weight of the pure
weight bread is lower than the weight of whole meal
bread. This is because white our rises more quickly,
therefore it is necessary to control the bread during the
baking process.
●
Despite the precise weight indications there may be
slight differences. The actual weight of the bread
depends to a large extent on the air humidity in the room
at the moment of preparation.
●
Breads with a large wheat content always have a large
volume and they exceed the container edge after the
last rising phase even if the ingredients are precisely
measured. The bread does not spill over. The part of the
bread outside the tin is more easily browned than the
bread inside the tin.
●
For the bread to be lighter, in the HIZLI program
recommended for baking sweet bread, you can use
a smaller amount of ingredients than in the TATLI
HAMUR program.
6. Baking results
●
The result of the baking depends on the conditions
(the hardness of the water, air humidity, altitude, the
consistency of the ingredients, etc.). Therefore, the
recipe indications should serve rather as a reference
point, which can be modied depending on the
given conditions. Do not get discouraged in case of
unsuccessful baking attempts. Try to nd the cause of
the failure and try once again with changed proportions.
●
If the bread is not brown enough after baking, you can
leave it in the appliance and use the browning program.
●
It is recommended to bake a test bread before setting
the timing function for baking overnight to make the
necessary adjustments if needed.
The manufacturer/importer does not accept any liability for any
damages resulting from unintended use or improper handling.
The manufacturer/importer reserves his rights to modify the product
any time in order to adjust it to law regulations, norms, directives,
or due to construction, trade, aesthetic or other reasons, without
notifying in advance.
PBM1000W-001_v01
Page 26
(Sabit telefonlardan veya cep telefonlarından alan kodu çevirmeden)
Sabit telefonlardan yap›lan aramalarda kullanmakta olduğunuz tarife üzerinden, cep telefonu ile
yap›lan aramalarda ise kay›tl› olduğunuz GSM operatörünün tarifesi üzerinden ücretlendirme yap›lmaktad›r.
De€erli müflterimiz,
Prolo Ça€r› Yönetim Merkezi, 444 77 66 no’lu telefon numaras› ile, 7 gün 24 saat hizmet vermektedir.
Do€rudan bu numaray› çevirerek size en yak›n yetkili servis telefonunu ö€renebilir veya arzu etti€iniz
hizmeti talep edebilirsiniz.
Ayr›ca, Prolo Ça€r› Yönetim Merkezi’ne www.prolo.com.tr adresindeki Müflteri Hizmetleri bölümünde
bulunan yaz›flma formunu doldurarak ya da 216 528 91 88 nolu telefona faks çekerek ulaflabilirsiniz.
Afla€›da yer alan konulara özen göstermenizi önemle rica ederiz.
1. Cihaz›n›z› mutlaka kullanma k›lavuzunda belirtilen hususlara dikkat ederek kullan›n›z.
2. Ürününüzle ilgili herhangi bir hizmet talebiniz oldu€unda, yukar›da belirtilen telefonlardan Ça€r›
Yönetim Merkezi’ni aray›n›z.
3. Hizmet için gelen teknisyene “PROF‹LO YETK‹L‹ SERV‹S” kimlik kart›n› sorunuz. Bu kimlik kart›,
18yafl›ndan küçük elemanlara verilmemektedir.
4. Yetkili servisimiz, cihaz›n›zda yap›lan herhangi bir ifllemden sonra size servis flini düzenleyip
vermek zorundad›r. Bu servis flini mutlaka isteyiniz ve kesinlikle saklay›n›z.
BSH Ev Aletleri Sanayi ve Ticaret A.fi.
Fatih Sultan Mehmet Mahallesi, Balkan Caddesi No:51 34771 Ümraniye, ‹stanbul
T: 216 528 90 00 F: 216 528 91 88
PBM1000W-001_v01
 Loading...