


USER
MANUAL
Dash Camera
V1
Please read this manual before operating your car dash camera,
and keep it for further reference.

CONTENTS
FCC ID:S5V-AKXCV1
What’s in The Box
Icon Introduction
Charging the Battery
Video Mode Settings
Setup
Language
Tips
Akaso Car APP Introduction
Setting
Play Videos on Computer
Specifications
Precautions
Troubleshooting
Contact US
1
1
2
3
4
5
5
5
9
9
10
10
10
12
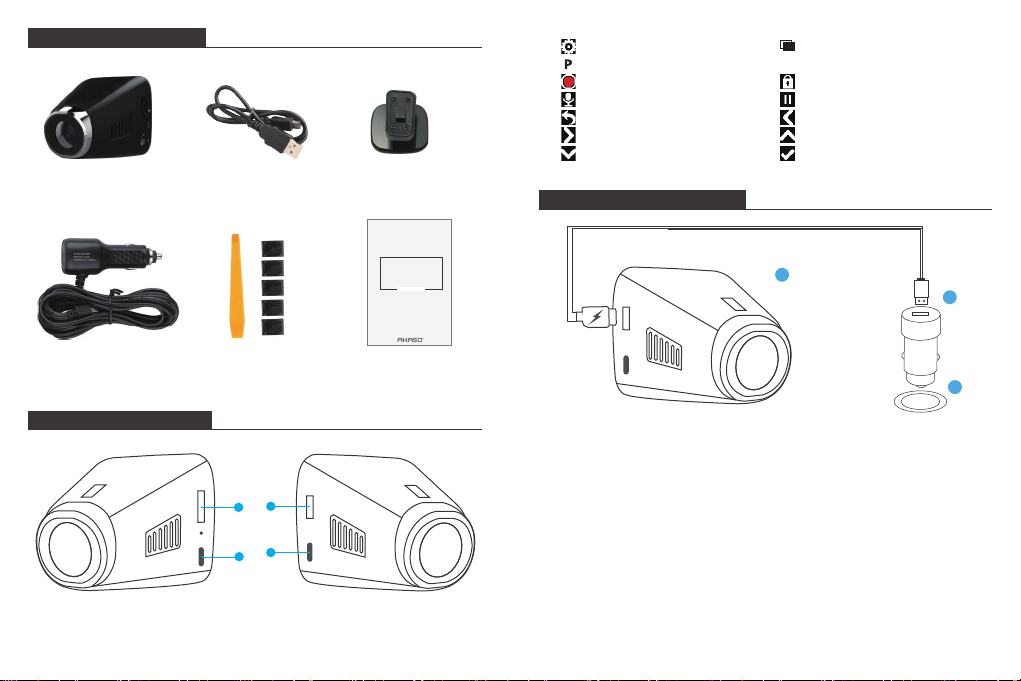
WHAT’S IN THE BOX?
D1 Dash Camera
: Setup : Playback
: the shortcut key of Parking Monitor
: Start to recording : Lock the video
: MIC : Stop recording
: Back : Backward
: Forward : Up
: Down : OK or Confirm
USB Cable Bracket * 2
CHARGING THE BATTERY
Car Charger Adapter
Hardwire Kit +
Five Cable Clips
ICON INTRODUCTION
3
1
4
2
1. Micro SD Card Port 3. USB Charging
2. Open Wi-Fi Button 4. Screen Power Button
1
USER
MANUAL
V1 Car Dash Camera
Quick Reference Guide
3
2
1
① Insert the USB car charger into your car’s cigarette lighter socket.
② Insert the USB end of the USB power cord into the USB car charger.
③ Insert the Micro USB into the dash cam USB port
(Charger Specification: In: DC 12-24V, Out: DC 5V 2A)
PLEASE NOTE:
1. The battery takes about two hours to be charged fully.
2. When the battery is charging, the indicator light on the top of the screen will be
stayed red; When it charged fully, the light goes off.
3. To avoid damage to the device, please do not charge the battery via the USB data
cable with other adapters.
2
VIDEO MODE SETTINGS
1. Resolution
- 1296P 1728 x 1296 / 1080FHD 1920 x 1080 / 720P 1280 x 720 three optional.
- Default setting is 1080FHD 1920 x 1080.
2. Loop Recording
- off / 1 minute / 3 minutes / 5 minutes four optional.
- Default setting is 3 minutes.
- The files will be saved every 3 minutes if you choose 3 minutes. When the memory
card is full, the new files will cover the old one if the loop recording is on, if it is off,
then the camera won’t work any more, please format the SD card or change a new
one.
3. WDR (Wide Dynamic Range)
- Default is on.
- Balance light and darkness in driving to get the best image automatically.
4. Record Audio
- Default is on.
- Allows you to enable or disable audio recording with your videos.
5. Date Stamp
- Default is on.
- Stamp the date and time to the videos.
6. G-SENSOR
- off / low / medium / high four optional.
- Default is low.
- Gravity Sensor means any collision will activate the camera to record, and the videos
will be locked which will never be covered by new files.
- The video is stored as a file every three minutes. When driving, if the road is bumpy,
please adjust it to low or turn off it directly to prevent the camera doesn’t work
because of the memory card is full. When parking, recommend you to adjust it to.
medium.
SETUP
1. Data / Time
- Press and to adjust the data and time, press to confirm at the each option,
press to back the settings interface.
2. Parking Monitor (default is off)
- Default is off.
- When there is no power input and the camera has been turned off, the camera will
be turned on automatically and start recording, the video will be saved and the
camera automatic shutdown after 30 seconds.
3. Beep Sound
- Default is on
- Turn on or off the button sound
4. Frequency
- 50HZ / 60HZ two optional
- Default is 60HZ
5. Format
- Every time you insert a SD card, please format it in the camera to ensure that the SD
card is compatible with the camera.
6. Default settings
- Restore the original settings
7. Version
- Check the camera’s version
3
4

LANGUAGE
Default is English
Tips
1. Blue light flash means the camera is recording
2. Red light means the camera is charging.
3. The green icon flash means the GPS function is not opened.
AKASO CAR APP INTRODUCTION
1. Connect to Dash Cam
Wi-Fi Button
Open Wi-Fi
Press the silver button on the left of camera to enter Wi-Fi settings interface.
Please Note:
The Wi-Fi can be turned on in the main interface, when the camera is in settings or
playback, it can’t be turned on.
For your safety, GPS will
be disabled while
WIFI is in use.
SSID: DV000b6a263078
PWD: 12345678
Refresh WiFi_OFF
Step 1
Step 2
Step 3
Step 4
SSID is Wi-Fi name, PWD is password.
Step 1: Press the silver button on the left of camera to enter Wi-Fi settings interface.
Step 2: Click “CONNECT CAR DVR”
Step 3: Enter to phone Wi-Fi system, find the camera’s SSID and input the PWD to
connect the camera.
Step 4: Back to “Akaso Car”, click “CONNECT CAR DVR” to enter video interface.
00:00:27
5
6
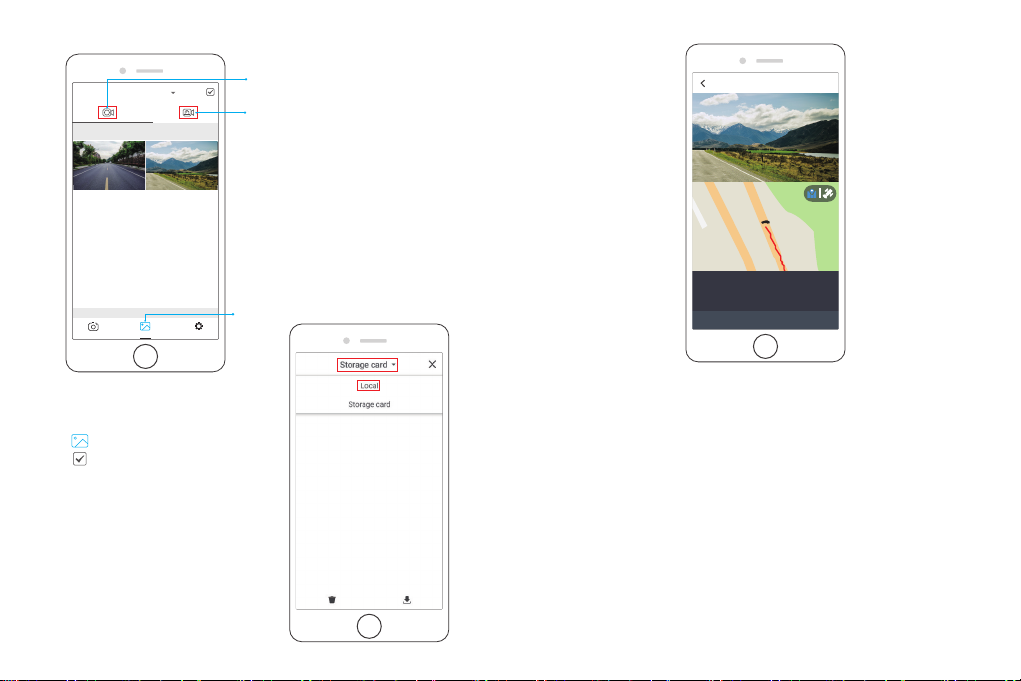
2. Playback Videos
15.65 Km/h
LAT: 22.566227
LON: 114.013565
DATA: 06/05/2018 TIME: 08:33:57
video playback
Storage card
06-08-2018
① Click to enter to playback interface.
② Click to choose some videos and
download them.
③ Click on the top of the interface ‘Storage
Card’, choose ‘local’ and turn off the
camera’s Wi-Fi. Click videos to play.
Loop Recordings
Eeergency Videos
Playback
Please Note:
① When watch the download videos, it must be turn off the camera's Wi-Fi to get the
GPS track.
② When open the Wi-Fi, it will interfere with the GPS function. So please close the
Wi-Fi before driving to ensure the videos record GPS track.
③ When you parking at outside, the GPS need about 3 minutes to search and
positioning, please wait patiently.
7 8

SETTING
WDR
EV
Record Audio
Date Stamp
GSENSOR
LOW >
0.0 >
Other Setting
Parking Monitor
Language
WIFI Setting
Format
Default Setting
Setting
SPECIFICATIONS
00:00:27
① Click to enter to setting interface. It will be synchronized to the camera directly
when you adjust the setting information on APP.
② The ‘WIFI Setting’ means you can customize the camera’s Wi-Fi name and password
on APP.
PLAY VIDEOS ON COMPUTER
Please click the following link to download the dedicated player.
www.amazon.com/clouddrive/share/8VPghV1Q4S8H5PSRmCVgt2YhghxiH8xCMoIGdWNMxsy
9
Name
Resolution
Speaker
Screen
Micro SD Card
AKASO V1 Dash Cam
1296P / 1080P / 720P
8Ω 1W
1.5’ HD LCD display
8GB-32GB
(not in package)
Model
Lens Angle
Working Temperature
Battery
Car Charger Output
V1
170°
14℉ - 140℉
300mAh
5V/2A, length
3.5 meters
PRECAUTIONS
1. Please safekeeping, prevent the lens from scratching and dirty.
2. Please pay attention to anti-fouling and moisture-proof.
3. Do not exposure the machine to the sun directly, prevent the built-in battery from
damage.
TROUBLESHOOTING
Q: The bracket is easy to fall off.
A: Please tear off the film on the bracket, and clean the windshield with a dry cloth.
Q: The image is blurry.
A: The windshield will reflect the light, please adjust the camera.
Q: The camera lose power often.
A: Due to different vehicle designs, please rotate the car charger to adjust it keep stable.
Q: The camera unable to be turned on.
A: Please make sure that whether the charge indicator light is on or off, if off, please
re-insert the car charger and reset the camera.
Q: All buttons are not responding.
A: Please reset the camera to restart.
10

Q: The camera doesn’t record automatically after turning on.
A: 1, Check whether the memory card is full or no.
2, Reformat the card, if this problem exists, please change a new card with class 10 &
above.
Q: The video has no voice.
A: 1. Please Check the voice icon is not .
2. In recording mode, press button to turn on / off the voice.
Q: When connect to computer, there is no external storage device.
A: Please replace another USB data cable to try.
Q: Menu button ‘M’ was no responding.
A: Because when the camera is recording, you can not operate the menu button, please
press button to stop recording.
Q: The camera keeps turning on and off automatically.
A: Please charge the camera via USB car charger, do not charge the battery via the USB
data cable with other adapters.
Q: Cannot download the ‘Akaso Car’ app.
Please check your device’s version whether it is Android 4.4 & above or iOS & above.
A: 1.
2. Change another mobile phone.
Q: Cannot connect to camera’s Wi-Fi
A: 1. Please make sure the phone’s Wi-Fi keep on.
2. Check the SSID and PWD is same with the content of the camera.
Q: There is no GPS track on video.
A: 1. The GPS icon is flashing, indicating no positioning. Please wait for about
3 minutes to fix the position.
2. You need to download AKASO dedicated player to play videos.
3. Please turn off camera’s Wi-Fi to download the videos in playback, keep your
mobile phone online to show GPS track.
11 12
Contact US
For any inquires, issue or comments concerning our products, please send E-mail to the
address below, and we will respond as soon as possible.
E-mail: cs@akasotech.com
US customer service line: (301)670-7335
8am-5pm EST
Monday-Friday (except holidays)
 Loading...