

Page 1
1
PORTABLE AIR CONDITIONER
Model: PEL00461
Page 2
2
CONTENTS
Page No. Details
3 Important Safety Information
4 Introduction
4 Positioning
4 Installation
5 Control Panel
6 Remote Control
6 Operation Modes
7 Water Drainage
7 Maintenance
8 Troubleshooting
8 Cleaning
Page 3

3
IMPORTANT SAFETY INFORMATION
• When using electrical appliances basic safety precautions should always be
followed.
• Check that the voltage indicated on the rating plate corresponds with that of the
local network before connecting the appliance to the mains power supply.
• This appliance is intended for domestic use only. It should not be used for
commercial purposes.
• This appliance is designed for indoor use only.
• This appliance can be used by children from aged 8 years and above and persons
with reduced physical, sensory, or mental capabilities or a lack of experience and
knowledge if they have been given supervision or instruction concerning use of the
appliance in a safe way and understand the hazards involved.
• Children shall not play with the appliance.
• Cleaning and maintenance shall not be made by children without supervision.
• There are no user-serviceable parts in this product. Refer servicing to qualified
personnel.
• Do not operate this appliance with a damaged plug or cord, after a malfunction or
after being dropped or damaged in any way.
• If the supply cord is damaged, it must be replaced by the manufacturer, its service
agent or similarly qualified persons in order to avoid a hazard
• Do not insert anything through the air outlet grille when the air conditioner is
connected to the supply.
• Make sure that the air conditioner is on a stable surface when operating.
• Disconnect from the supply when not in use, or during maintenance or cleaning.
• For the remote control, only use the batteries recommended (2 x AAA, not
provided).
• Ensure that the batteries are inserted correctly, observing the plus and minus
marks on both the batteries and the compartment.
• Fit a full set of batteries at one time.
• Remove dead batteries from the remote control, or if it is not going to be used for a
long period of time.
• Never mix old and new batteries together, or different types of batteries.
• Never dispose of batteries in a fire, or attempt to recharge ordinary batteries.
Please read these instructions carefully before use and retain for future
reference.
Page 4
4
INTRODUCTION
POSITIONING
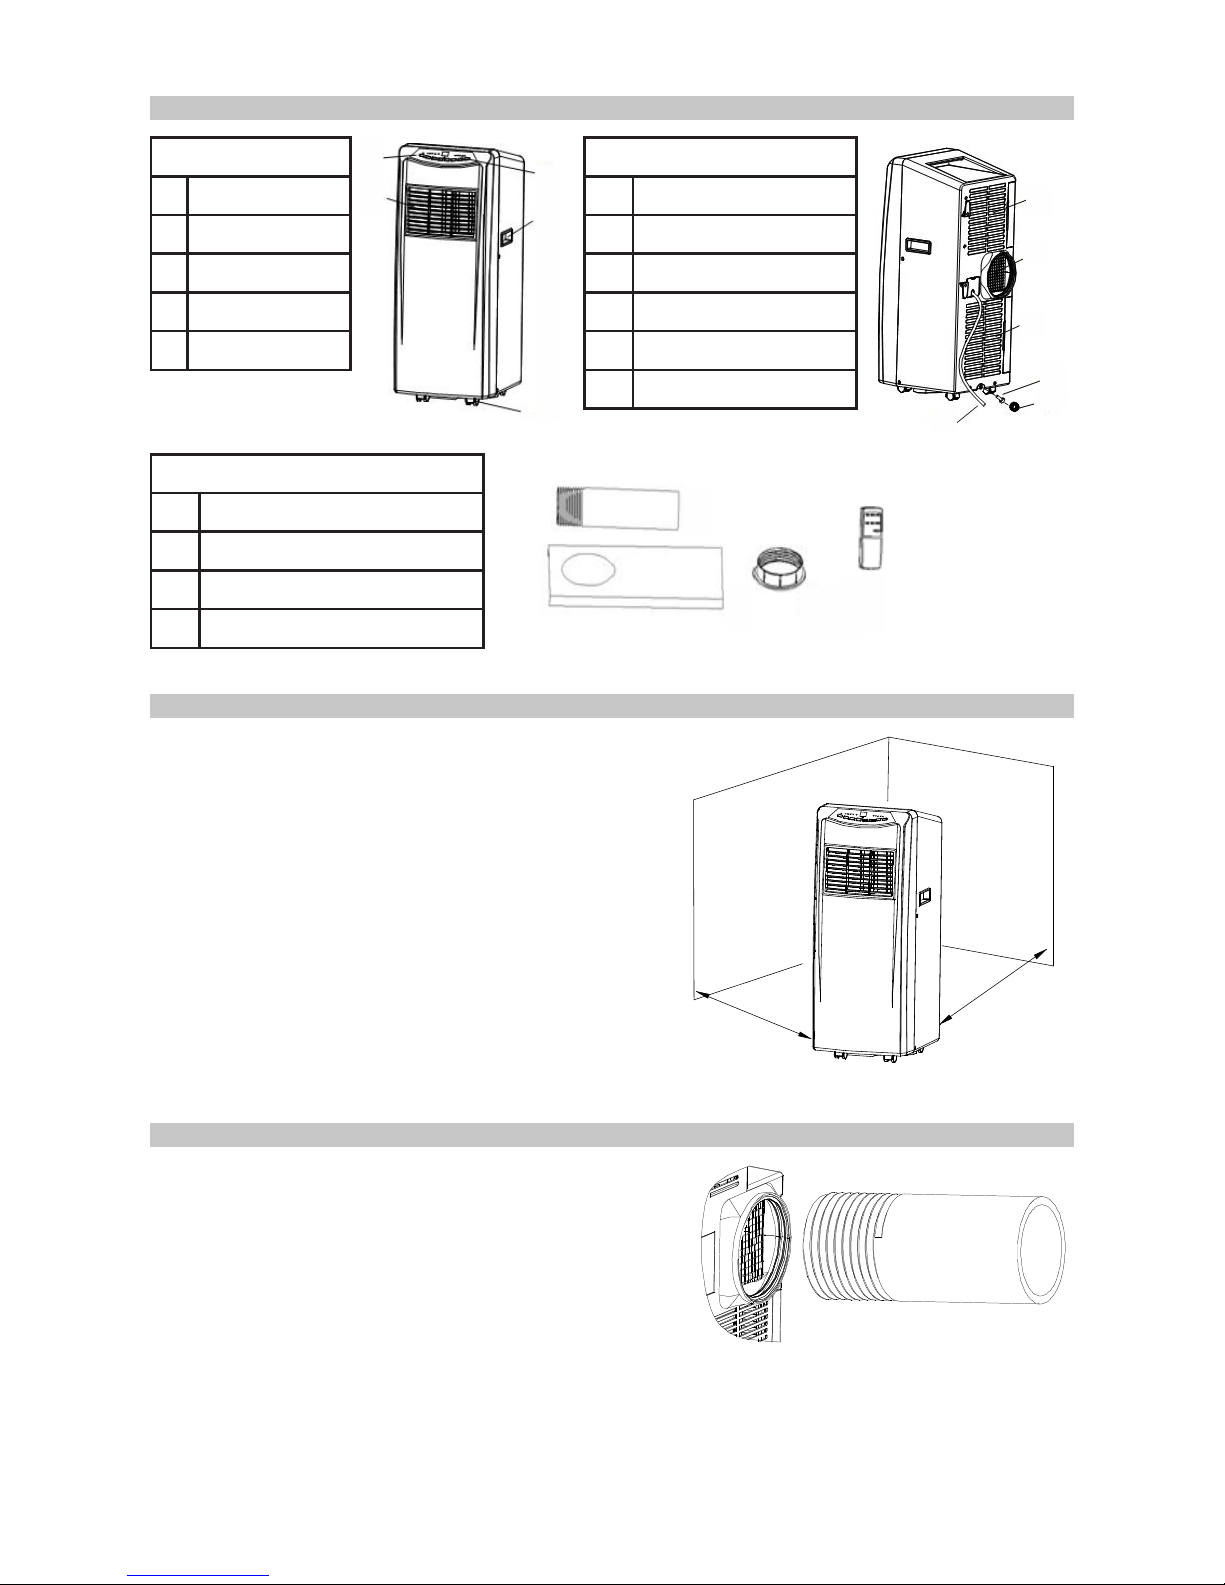
• The air conditioner must stand upright on a
flat surface
• Do not position near a bath, shower, sink or
other permanently damp or wet areas.
• Place the air conditioner at least 50cm
away from any wall, curtains or heat
sources to ensure adequate air circulation
(Fig.1).
• Ensure that the mains socket outlet remains
accessible when the air conditioner is in
use.
• Ensure that there is free access to the airinlet and air-outlet vents.
INSTALLATION
• Screw the exhaust hose onto the exhaust
hose adapter, turning the hose anticlockwise.
• Screw the exhaust hose onto the exhaust
connector on the rear of the air conditioner,
turning anti-clockwise (Fig.2).
• Adjust the length of the window guide to fi
the width of your window. The length of the guide is adjustable. If it is too long it
can be cut to size.
• Fit the exhaust hose adapter into the window guide.
• Close the window onto the window guide so that is securely held in place.
Front
1 Control panel
2 Air-outlet
3 Power button
4 Handle
5 Castor
Back
6 Filter frame upper
7 Exhaust connector
8 Filter frame lower
9 Rubber plug
10 Plug cap
11 Power cord
Accessories
12 Exhaust hose
13 Adjustable window guide
14 Exhaust hose adapter
15 Remote control
1
2
3
4
5
6
7
8
9
10
11
12
13
14
15
Fig.1
50cm
50cm
Fig.2
.
t
Page 5
5
Installation Errors
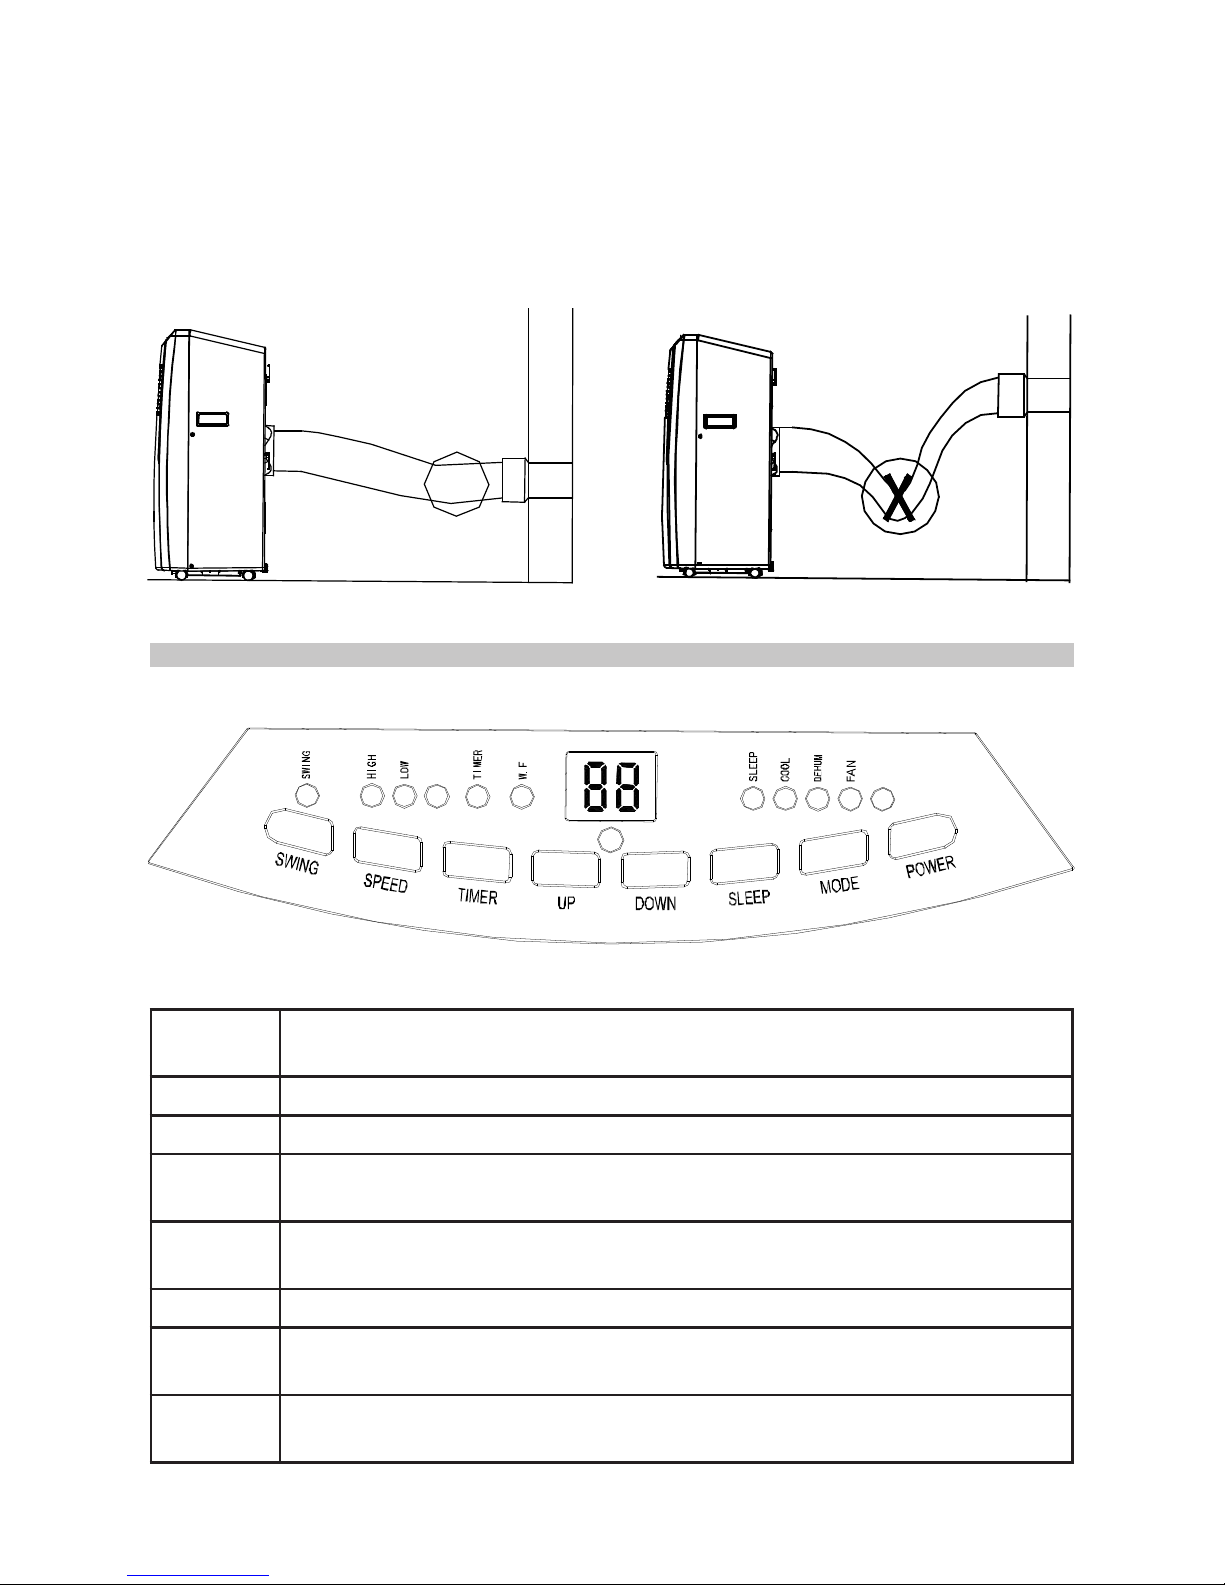
• In order to operate efficiently, the air must be able to flow freely in the exhaust
pipe.
• Avoid any sharp bends in the exhaust pipe (Fig.3).
• Keep it as level as possible.
• Keep its length as short as possible. The maximum extension length of the
exhaust pipe is 1.5m. Do not try to lengthen it.
CONTROL PANEL
POWER
Press to turn the air conditioner on or off. When it turns on, it will do so in
the default mode of cooling with low fan speed.
MODE Press to select cooling, dehumidifying and fan mode.
SPEED Press to select fan speed (high or low).
DOWN
In cooling mode, press to reduce the temperature. Note: Temperature
range is 16°C to 31°C.
UP
In cooling mode, press to increase temperature. Note: Temperature
range is 16°C to 31°C.
SLEEP In cooling mode, press to turn on/off the sleep mode function.
TIMER
In power-on or standby mode, press to set up on/off delay time from 1 to
24 hours.
SWING
Press once and the louvre will swing continuously left and right. Press
the button again and the louvre will stop moving.
Fig.
3
Page 6
6
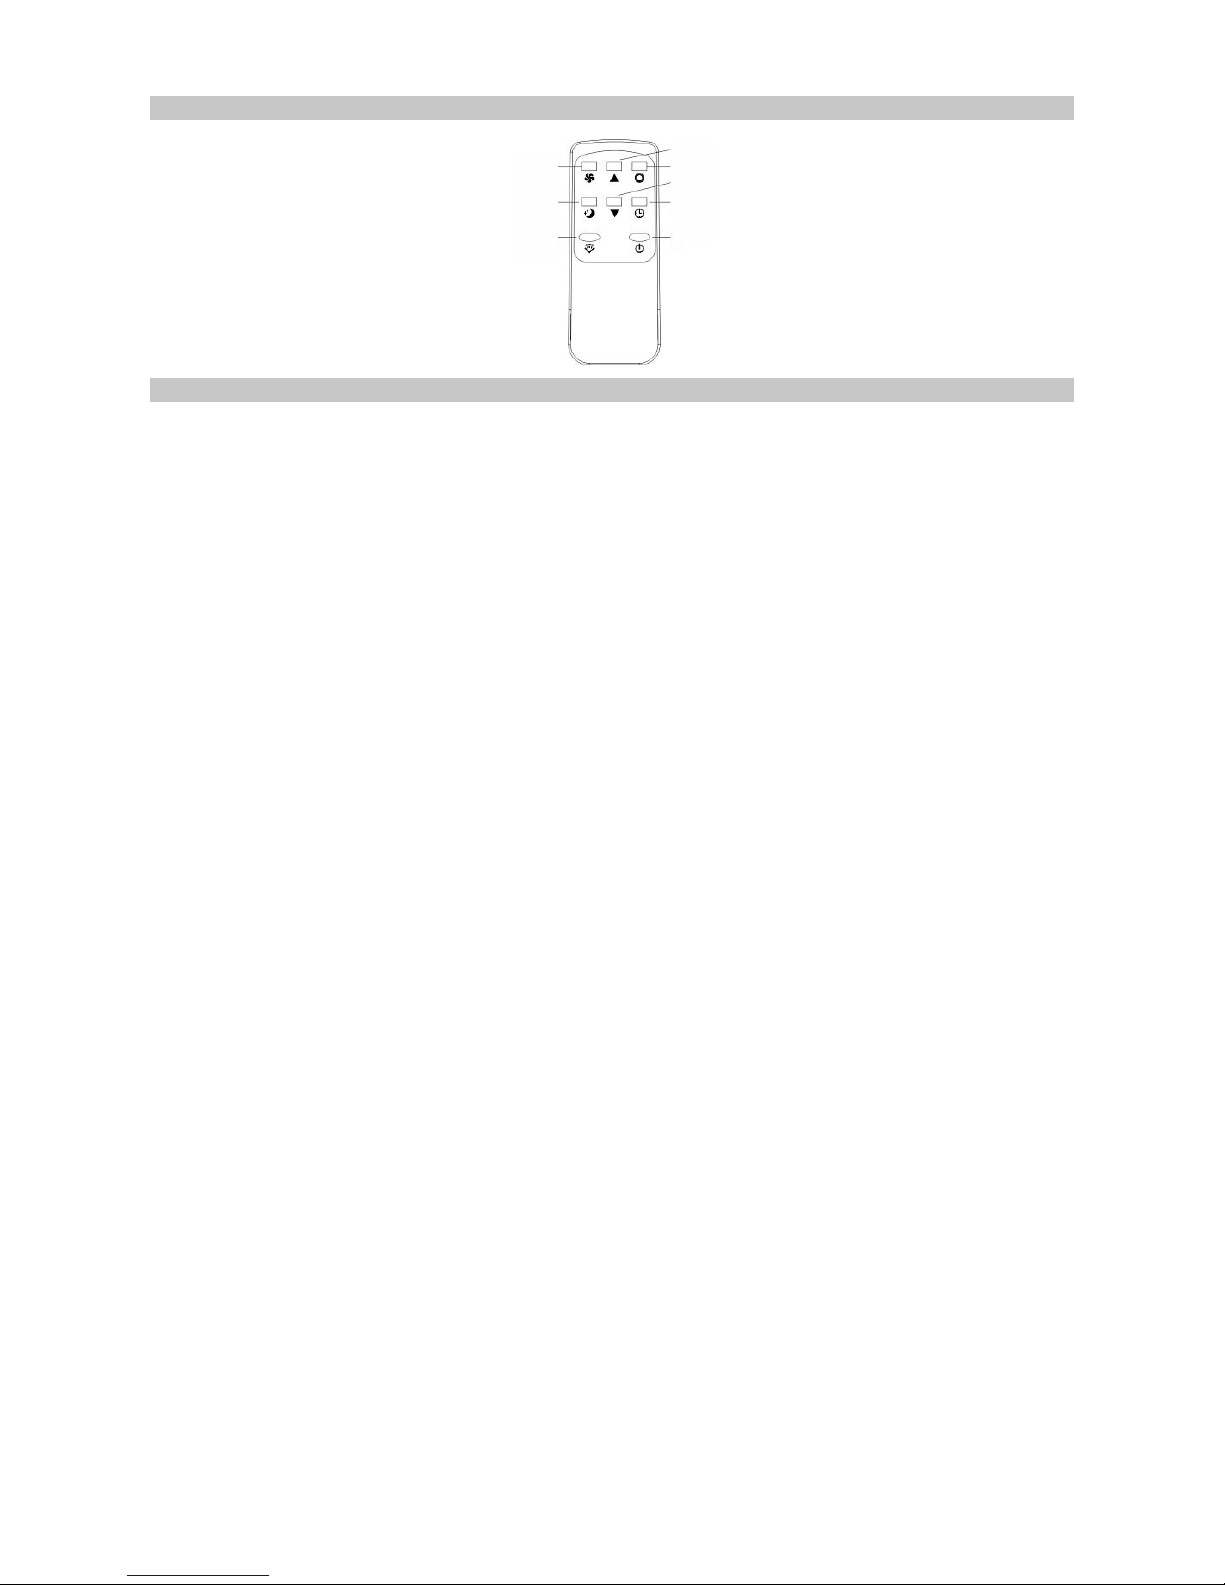
REMOTE CONTROL
OPERATION MODES
Cooling Mode
• After the air conditioner turns on, the default setting is cooling mode with a
temperature of 22°C and low fan speed.
• Press MODE to select cooling mode and the cooling mode indicator turns on.
• Press UP or DOWN to adjust temperature from 16°C to 31°C.
• Press FAN to select high or low fan speed.
Fan Mode
• Press MODE to select fan mode and the fan mode indicator turns on.
• Press FAN to select high speed or low speed.
Note: When in fan mode, the temperature and sleep function cannot be set.
Timer Mode
• In standby mode, press TIMER to set the number of hours to when the unit turns
on. The timer mode indicator turns on. The length of time is adjustable from 1 to 24
hours.
• In power-on mode, press TIMER to set the number of hours to when the unit
goes into standby mode. The timer mode indicator turns on. The length of time is
adjustable from 1 to 24 hours.
Dehumidifying Mode
• Press MODE to select dehumidifying mode and the dehumidifying indicator turns
on.
Note: In dehumidifying mode, the sleep function cannot be set up and the fan
speed is low.
Sleep Mode
• Press SLEEP to enter into sleep mode; the default value of the fan speed is low.
• When sleep mode turns on, in cooling mode, after the first hour the temperature
setting will increase by 1°C. After the second hour, the temperature will go up a
further 1°C and then remain the same.
Note: Sleep mode is not available in dehumidifying and fan mode.
Compressor Protection
After powering on, or a restart, there is a three minute delay before the compressor
starts to operate. This helps to prolong the life of the compressor.
Power
Timer
Down
Mode
Up
Fan
Sleep
Swing
Page 7

7
WATER DRAINAGE
The air conditioner has an internal water tank to collect water that condenses during
the cooling process. This tank will need to be emptied periodically.
When the internal water tank is full, the WATER FULL indicator will flash on the screen
and a buzzer will sound.
The air conditioner will go into standby mode, the compressor will stop and all the key
functions will be disabled.
The water tank will need to be emptied before normal operation can be resumed:
• Unplug the air conditioner from the mains supply.
• Under the drainage plug on the rear of the unit, place a shallow container to collect
the water. Use this only for temporary drainage of the unit. Do not allow the water
to drop continuously into the container, as it will overflow.
• Remove the plug cap and the drainage plug to empty the tank.
• When the tank is empty, refit the drainage plug and cap.
• Reconnect the air conditioner to the mains supply and press the POWER button,
on either the front panel or remote control. The air conditioner will restart and
operate normally.
MAINTENANCE
IMPORTANT: In order to avoid an electric shock, power-off the air conditioner and
disconnect the mains plug before performing any cleaning or maintenance.
Cleaning
• Unplug from the mains supply before cleaning.
• Do not splash water into the air conditioner.
• Clean the outside of the air conditioner with a damp cloth, then dry it thoroughly
before using.
• Do not use any chemicals, abrasives or solvents that could damage the air
conditioner.
Filters
• Clean the filters every two weeks. If the filters become blocked with dust, the
efficiency of the air conditioner will be reduced.
• Remove the air filters on the rear of the unit.
• Run a vacuum cleaner lightly over the surface of the filters to remove any dust. If
the filters are exceptionally dirty, wash them in warm water and a mild detergent
and allow to dry thoroughly before refitting.
Note: Do not operate the air conditioner without filters.
Seasonal Cleaning
If the air conditioner is not going to be used for a long time, follow the below steps:
• Unplug the air conditioner from the mains.
• Remove the drainage plug and empty the internal water tank.
• Plug the air conditioner into the mains and turn the power on. Select ‘fan’ mode
and run for two hours to allow the air conditioner to dry out.
• Turn off and unplug from the mains.
• Clean and dry the filters and reinstall them.
• Put the air conditioner back in the original carton and store in a dry, cool place.
Page 8
8
INFORMATION ON WASTE DISPOSAL FOR CONSUMERS OF
ELECTRICAL & ELECTRONIC EQUIPMENT.
When this product has reached the end of its life it must be treated as Waste
Electrical & Electronic Equipment (WEEE). Any WEEE marked products
must not be mixed with general household waste, but kept separate for the
treatment, recovery and recycling of the materials used. Contact your local
authority for details of recycling schemes in your area.
Made in China. PR2 9PP
V 1.1
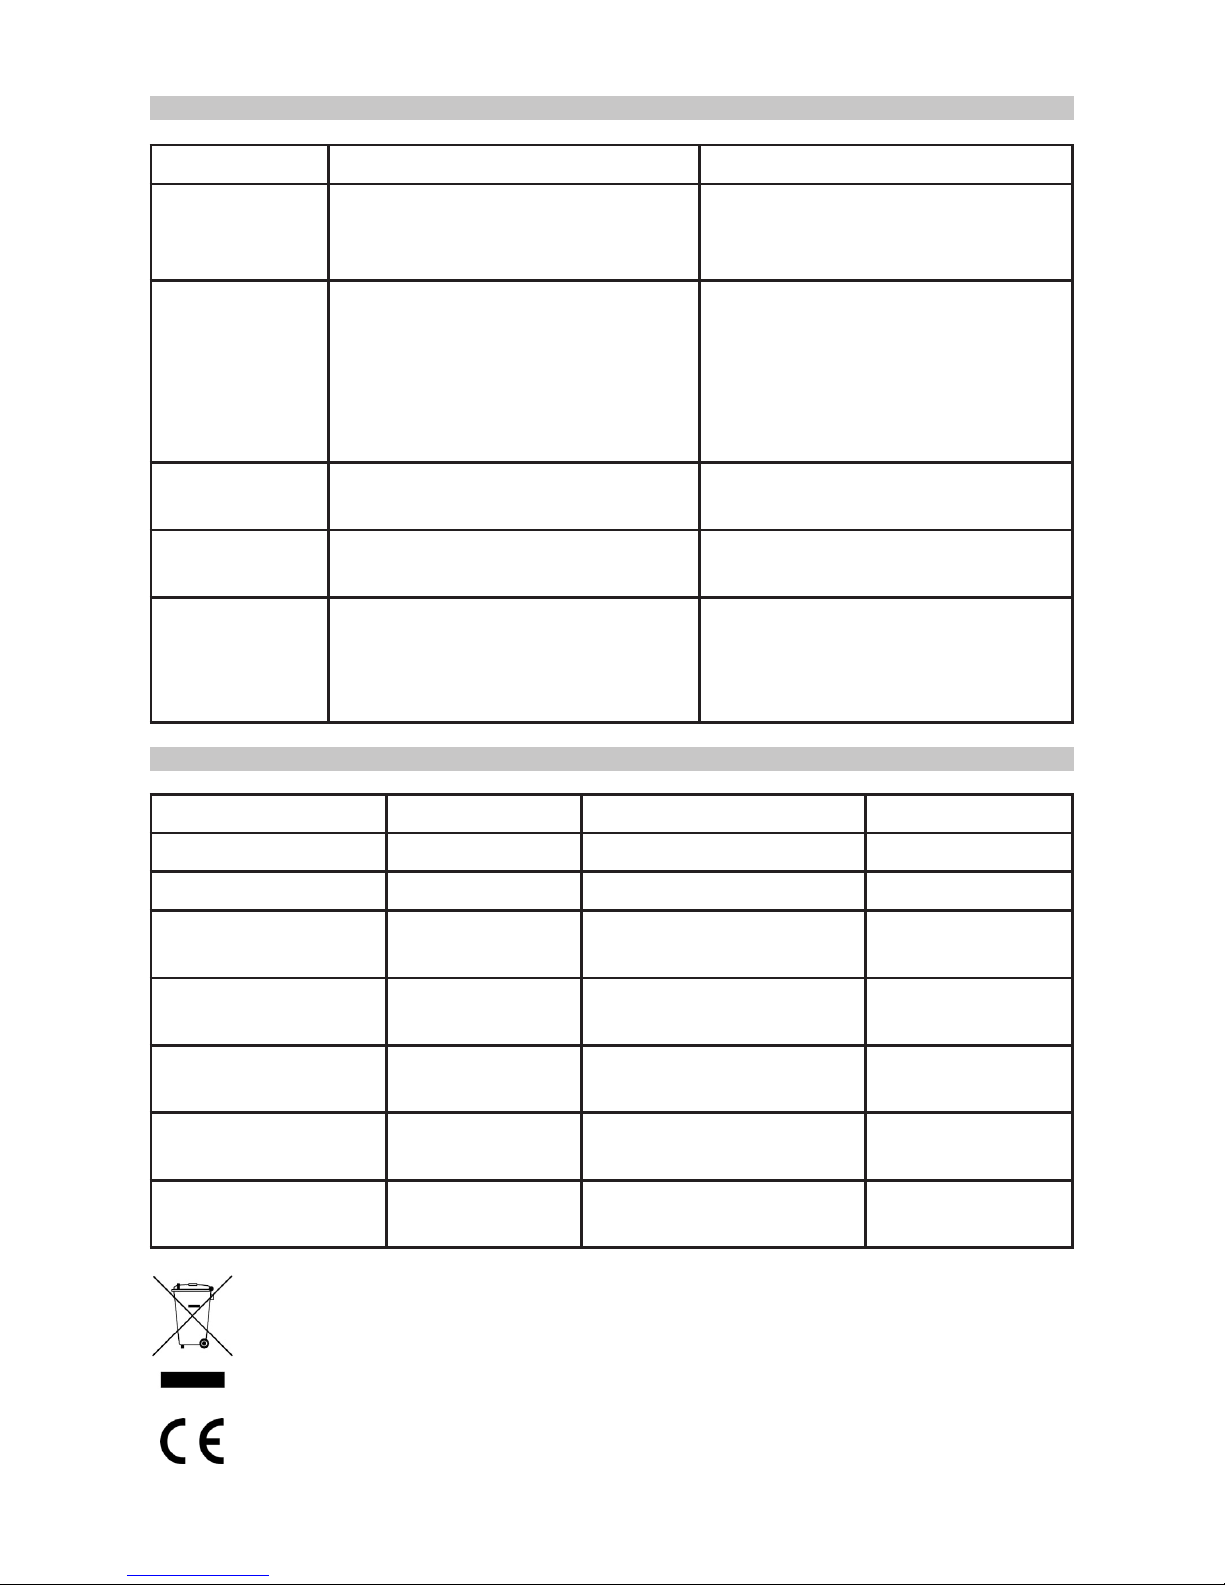
TROUBLESHOOTING
Trouble Cause Solution
Machine does
not work.
• Power off.
• Water-full indicator is on.
• Timer function is active.
• Power on.
• Drain internal water tank.
• Deactivate TIMER function.
Machine
auto-restarts
frequently.
• The unit is in direct sunlight.
• Doors and windows are open,
or other heat sources are in the
room.
• Filters are too dirty.
• Air-inlet/air-outlet is blocked.
• Reposition the air conditioner.
• Close the door and windows
and remove other heat sources.
• Clean or replace filters.
• Remove blockage.
Too noisy.
• Machine is not on a level
surface.
• Place it on a flat, solid floor t
avoid vibration.
Compressor
does not work.
• Compressor time-delay
protection is on.
• Wait for 3 minutes, then restart
the air conditioner.
Remote
control does
not work.
• Distance too great.
• Remote control signal not
detected by control panel.
• The batteries are drained.
• Make sure that the remote
control is correctly aimed at the
control panel.
• Replace the batteries.
SPECIFICATIONS
Main voltage 220-240V~50Hz Global warming potential 1975 kgCO2 eq.
Rated input power 1340W Efficiency ratio (EER 2.62
Power in standby 1.0W Efficiency clas A
Cooling capacity
3.53kW
(12,000BTU/h)
Fan speeds 2
Dehumidifying
capacity
50L/24hr Thermostat 16-31°C
Air ow 380m³/hr
Max. extension length of
exhaust hose
1.5m
Sound power level 65dB (A)
Recommended floor
area
16-22m²
Charge R410A/520g
Dimensions (WxHxD)
Weight
325x830x370mm
27kg
 Loading...