

Page 1
June 2016
Rev. 1.4
Last valid version 2.0.6
Page 2

Prodys S.L. Tel: +34 91 6896880 Θ Fax: +34 91 6943777 Θ Email: [email protected] Θ Web: www.prodys.com
Page 2
Index
Index 2
What’s Quantum LITE 4
I.1 Introduction .......................................................................... 4
I.2 Quantum Lite Features ............................................................. 5
Quick quide 6
II.1 Handheld codec. Power On. ...................................................... 6
II.2 Main menu ........................................................................... 7
II.3 Some facts before you might proceed using your handheld codec.......... 9
II.3.1 Installing the QLST at the studio site ....................................... 9
II.3.2 UMTS /LTE settings for the handheld codec ..............................10
II.3.3 Address BOOK..................................................................12
II.4 Dial-in your studio.................................................................13
Audio controls 15
III.1 <IN> audio control ................................................................15
III.2 <Local> and <Return> audio controls .......................................... 15
Recalling presets & call with Profiles 16
IV.1 Profiles ............................................................................. 16
IV.2 Factory default list of Profiles..................................................17
Recording and file operations 19
V.1 Rec menu ........................................................................... 19
V.2 Play menu ..........................................................................20
V.3 Upload menu ....................................................................... 20
Appendix 22
VI.1 Wi-Fi configuration ............................................................... 22
Page 3

Prodys S.L. Tel: +34 91 6896880 Θ Fax: +34 91 6943777 Θ Email: [email protected] Θ Web: www.prodys.com
Page 3
Picture index 26
Page 4
Prodys S.L. Tel: +34 91 6896880 Θ Fax: +34 91 6943777 Θ Email: [email protected] Θ Web: www.prodys.com
Page 4
WHAT’S QUANTUM LITE
I.1 Introduction
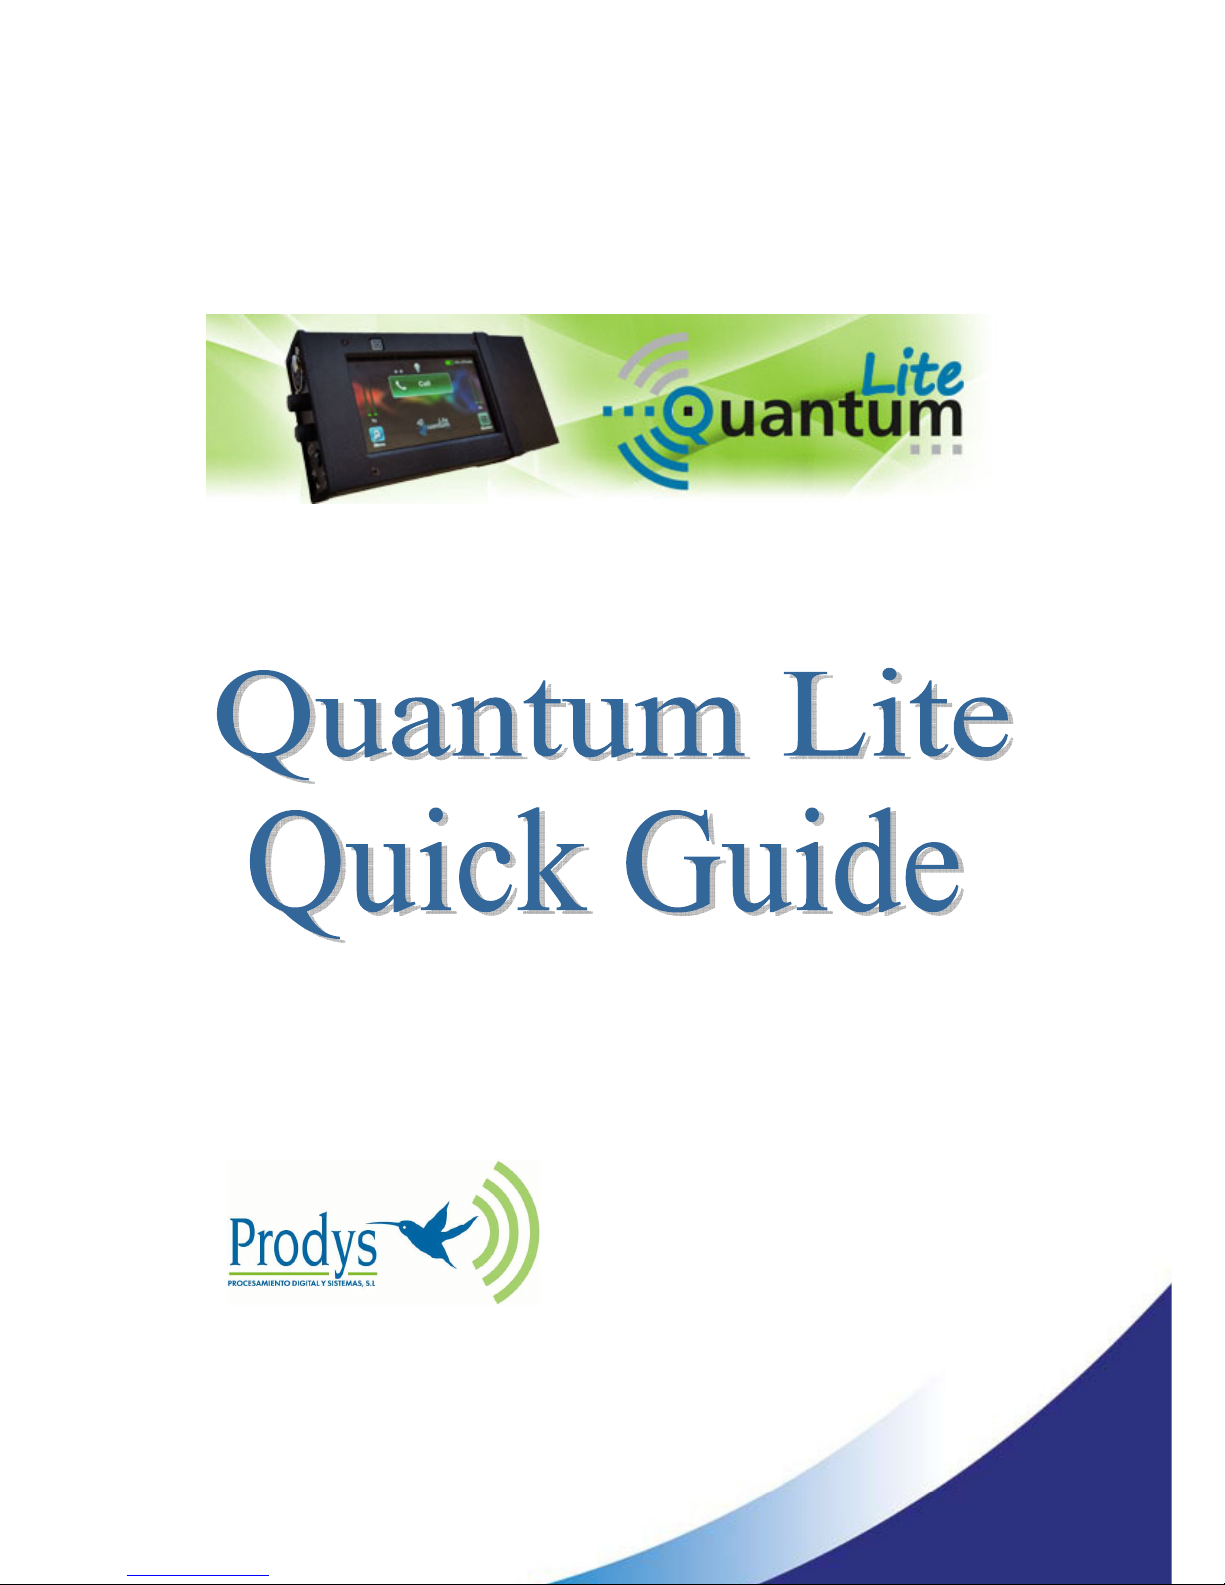
Picture 1. Quantum Lite codec.
Quantum Lite is a new-generation handheld reporter codec that inherits worldclass IP technology from Prodys Ikusnet Video Codec Family and ProntoNet
Audio Codec Family.
Lightweight and handy this product will fill the application gap between multiuser and mixing commentary codecs and the best-effort smartphone app.
This unit can be controlled from its built-in web graphical interface, its front
panel display menu, or from ProdysControlPlus application.
Chapter I
Page 5

Prodys S.L. Tel: +34 91 6896880 Θ Fax: +34 91 6943777 Θ Email: [email protected] Θ Web: www.prodys.com
Page 5
I.2 Quantum Lite Features
Among Quantum Lite most remarkable features are:
Compression algorithms: Quantum Lite is equipped with the best of low
delay compression algorithms from voice frequencies encoding until full
20kHz bandwidth: OPUS and Enhanced apt-X
Communications:
Double UMTS /LTE internal modems. The SIM card slots (micro
SIM) are located on the sides of the device.
Ethernet interface. The codec might use Local Area Networks with
direct access to the internet for the communication.
Wi-Fi interface is supported by means of an external Wi-Fi modem
connected to the USB slot on the head side.
Streaming protocol: The streaming protocol is the highly performing
BRAVE protocol. This protocol enables using and combining any IP connection
(two UMTS /LTE, Wi-Fi and LAN) for an extremely reliable audio contribution.
Control and monitoring: A large touch screen provides the management
options, making usage quite simple for any user. It is also possible to control
the unit remotely with ProdysControlPlus application as long as the unit is
connected to the Internet, and even when the unit is connected to the
Internet behind a firewall.
Page 6
Prodys S.L. Tel: +34 91 6896880 Θ Fax: +34 91 6943777 Θ Email: [email protected] Θ Web: www.prodys.com
Page 6
QUICK QUIDE
II.1 Handheld codec. Power On.
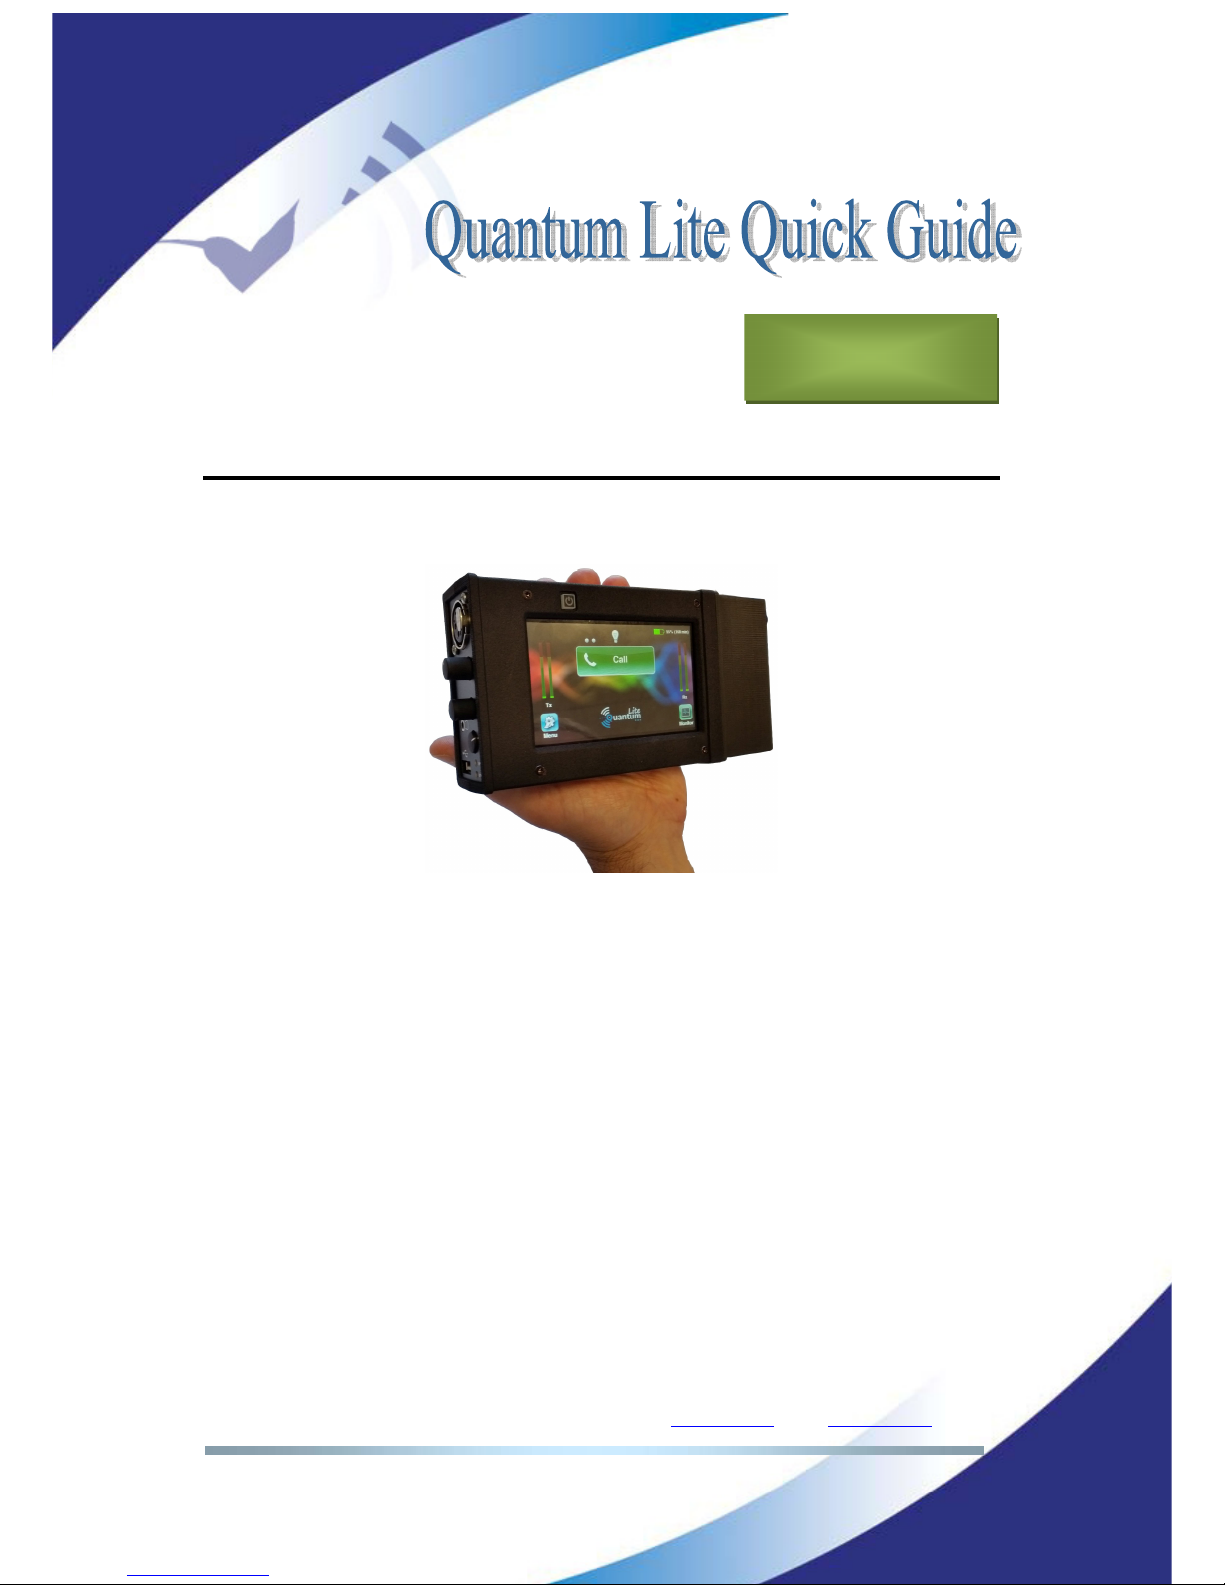
The handheld codec is typically used together with the battery bloc engaged at
the bottom side. Operation without the battery is possible if the VDC power
supply is feeding the device meanwhile.
Picture 2: Codec + battery bloc split off
The device is powered on pressing the square push button over the touch
screen for at least 3 seconds. The codec is operable 20s later.
Powering off the device is possible in any circumstance by just pressing the
same button for 8 seconds until the screen turns totally black.
Remark: Following procedures are applicable for the device with factory default
configuration. It might be possible that some procedures are disabled or use
short-cuts enabled by your company codec administrator.
An invitation for login with password is the first screen after start up is shown.
Chapter II
Page 7
Prodys S.L. Tel: +34 91 6896880 Θ Fax: +34 91 6943777 Θ Email: [email protected] Θ Web: www.prodys.com
Page 7
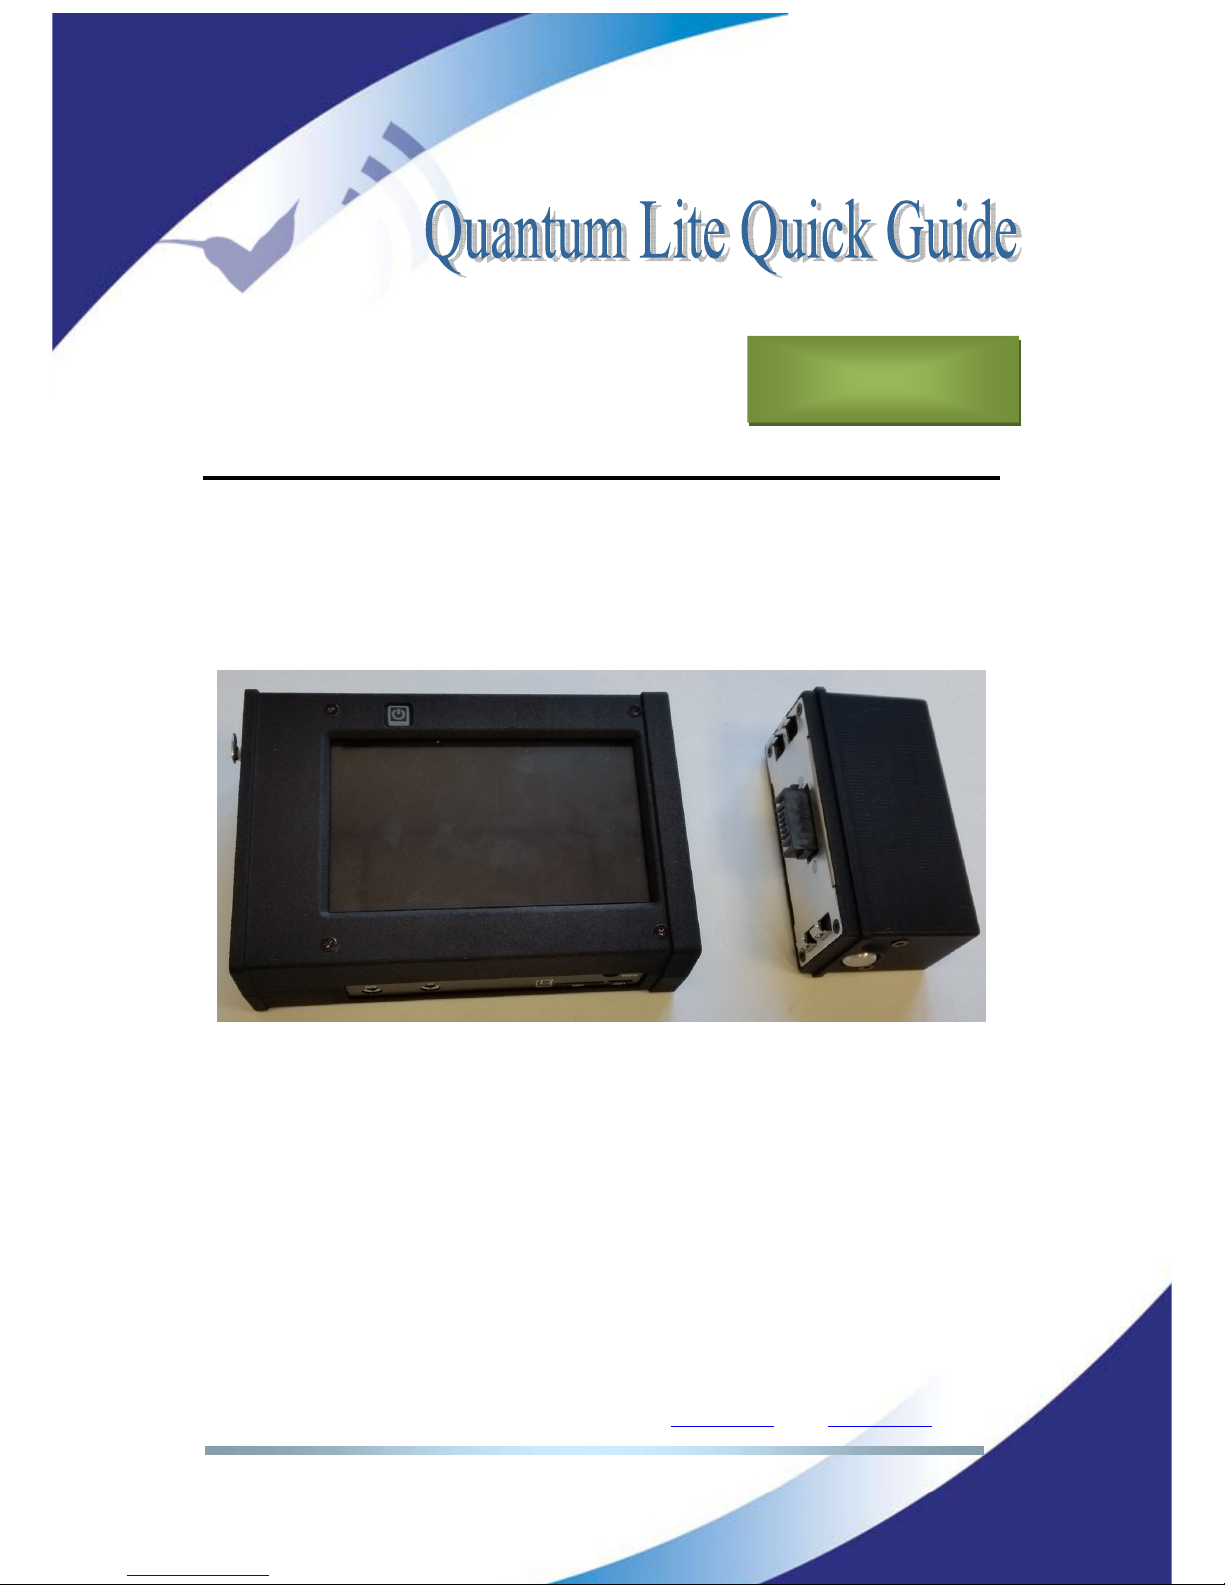
Remark: The factory default login is <Administrator> without any password. Just
press <login>.
Picture 3: Login
Remark: The touch screen of handheld codec turns dark (power optimization)
after 120s lacking of any user touch. Just touch the screen to awake the GUI
again.
II.2 Main menu
The main menu provides a simple overview of the device and communication
status, as well as control for initiating or stopping your communication with the
studio.
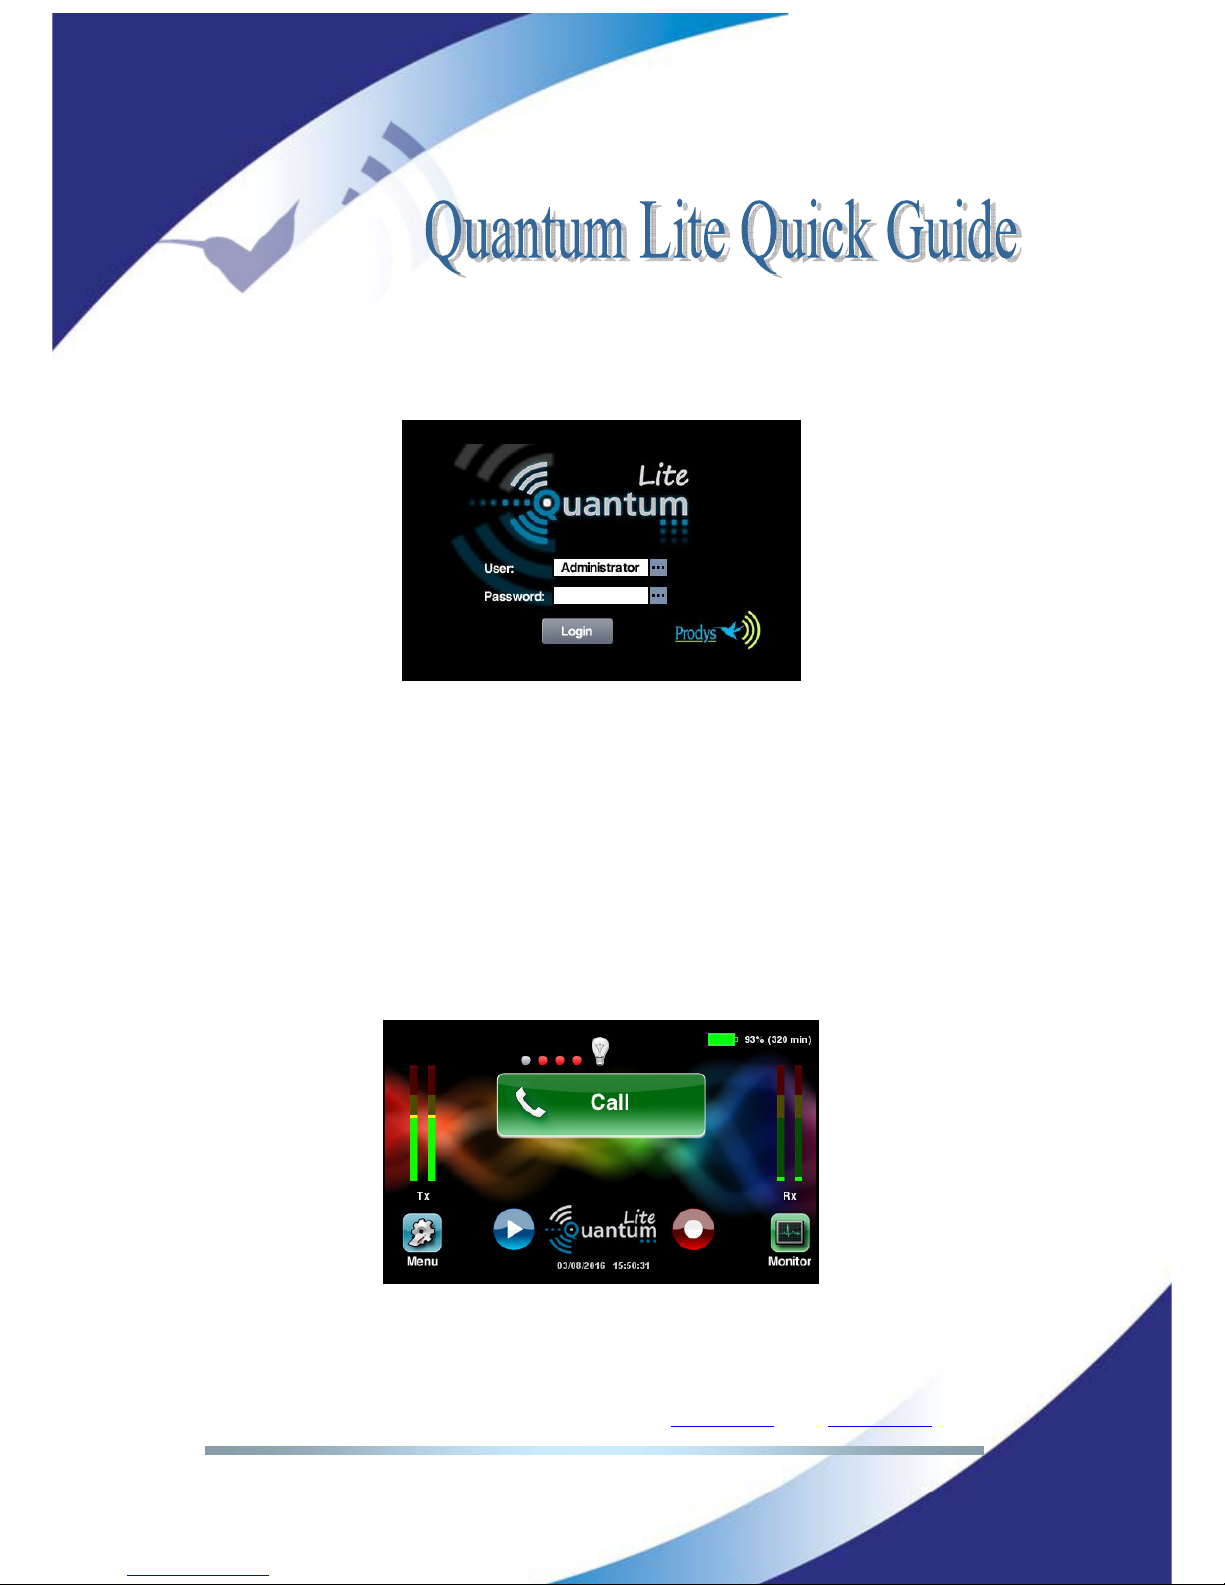
Picture 4: Green status – communication not in progress yet
Page 8
Prodys S.L. Tel: +34 91 6896880 Θ Fax: +34 91 6943777 Θ Email: [email protected] Θ Web: www.prodys.com
Page 8
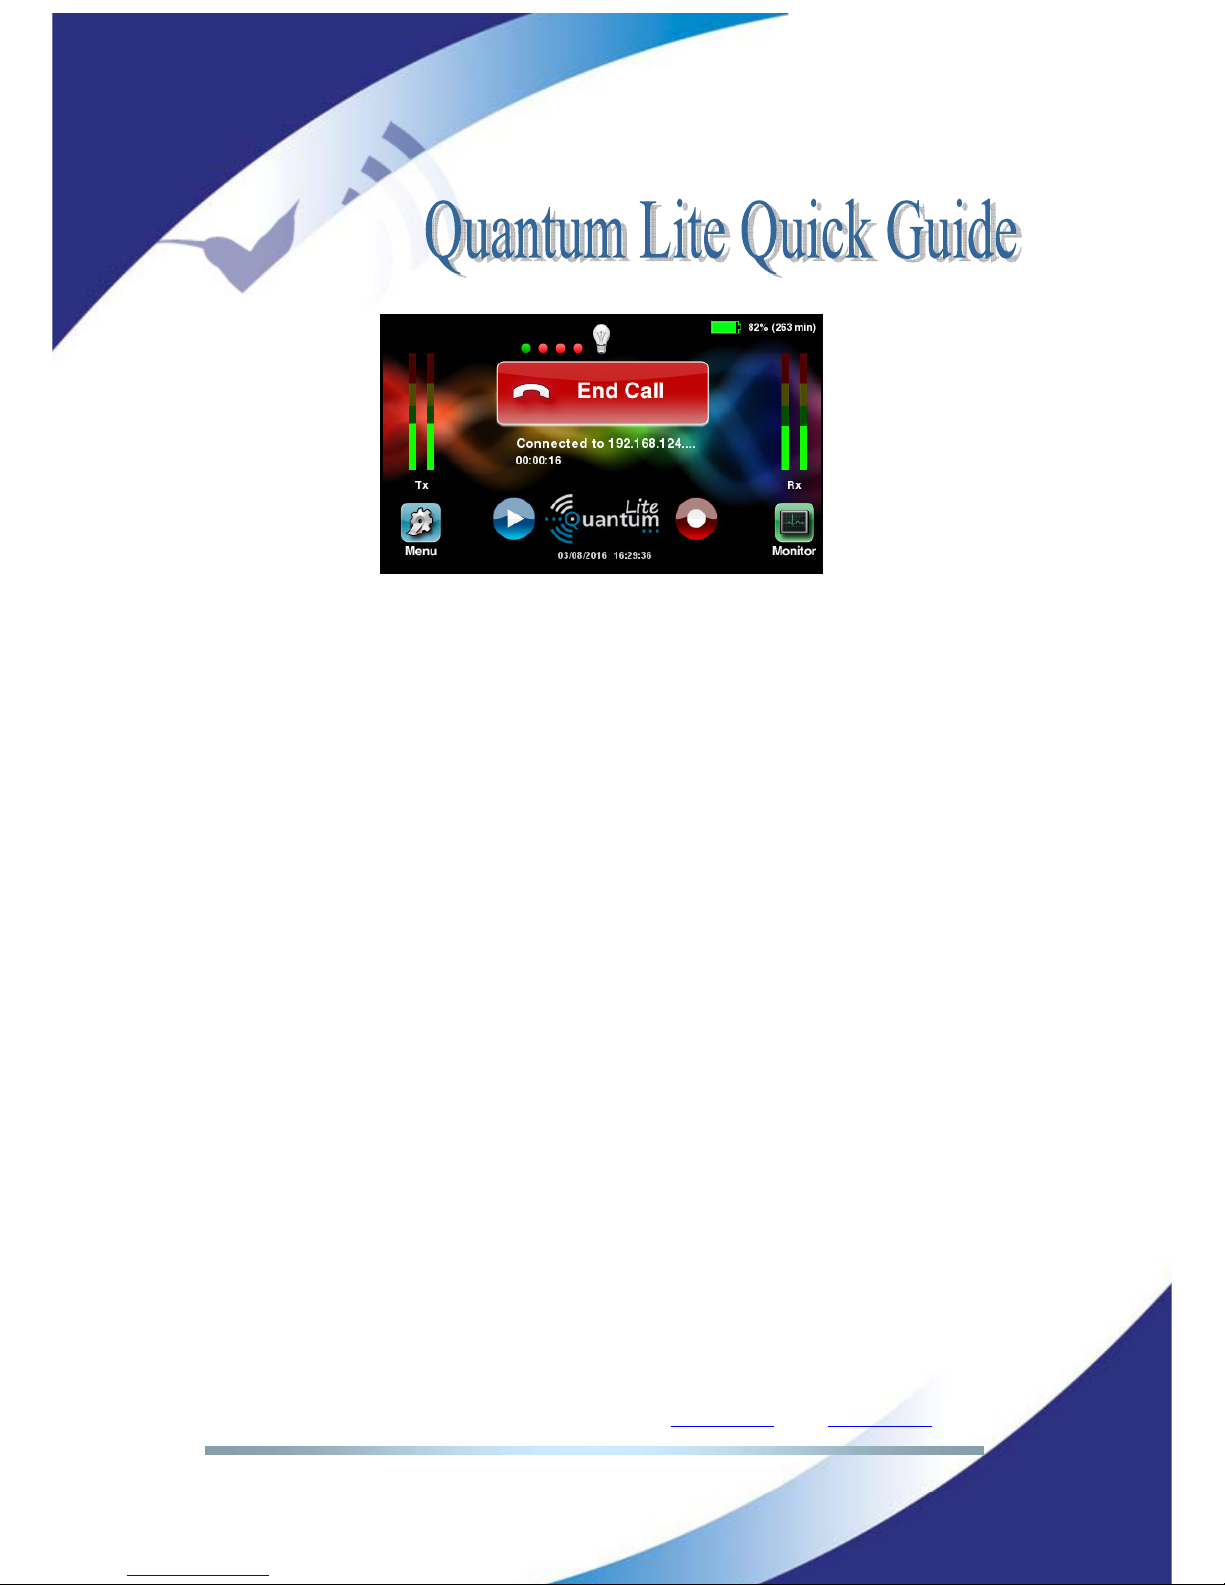
Picture 5: Red status – communication in progress.
Main key:
o Green indicates the communication to the studio is not in progress
yet. You are invited to dial your destination.
o Red indicates that a communication with the studio is in progress.
You might stop it with double acknowledgment at any time.
Small dots over the main key. Each dot represents a communication
interface (UMTS /LTE modems, Wi-Fi and Ethernet). The possible status
is:
o Red indicates that the interface is not ready for communication.
The SIM cards might not be inserted or well configured or the
Ethernet cable might not be plugged.
o Grey indicates that the interface is ready for communication
(please refer to the section II.3.2 for details).
o Green indicates that the interface is streaming the audio data to
the destination.
o Blinking indicates the the link using this interface is unavailable at
this moment but the device is trying to recover the connection.
Battery time left is indicated on the right upper corner of the display.
Audio input and output levels are indicated at the left and right side.
TX is microphone input signal. RX is the received audio signal available for
the headphones. Please notice the final sound pressure on your
headphone should be adjusted with volume knobs (<LOCAL> &
<RETURN>) and does not modify the digital measurement on the RX
meter.
Page 9
Prodys S.L. Tel: +34 91 6896880 Θ Fax: +34 91 6943777 Θ Email: [email protected] Θ Web: www.prodys.com
Page 9
The <Menu> icon accesses to the configuration parameters if required.
The <Monitor> icon accesses the status information for the current
communication if desired.
Remark: You might skip one menu back or go directly to the main menu from
any deeper menu level with following controls, located in the upper left side of
any menu window.
II.3 Some facts before you might proceed using your handheld codec
Some settings must be provided for the handheld codec and its companion QLST
at your studio before any communication is possible. If these preparations
already took place, please refer to the next section.
II.3.1 Installing the QLST at the studio site
The QLST device must be connected to your Local Area Network and the access
for external TCP/UDP ports must be granted. Please request at your company IT
department assignation for your public IP address router (Port Forwarding at
your Internet router) for port 53000 TCP & UDP service.
Remark: Please notice if several QLST devices are going to be used behind the
same Internet router, each QLST should get a different port assignment. Small
offsets would let addressing each QLST individually. E.g. first QLSTport 53000,
second QLSTport 53010, third QLSTport 53020, etc.
In QLST the factory default Ethernet port to be used is labeled LAN1. For any
other arrangement please check document “QLST Hardware and Reference
Manual”.
Page 10
Prodys S.L. Tel: +34 91 6896880 Θ Fax: +34 91 6943777 Θ Email: [email protected] Θ Web: www.prodys.com
Page 10
II.3.2 UMTS /LTE settings for the handheld codec
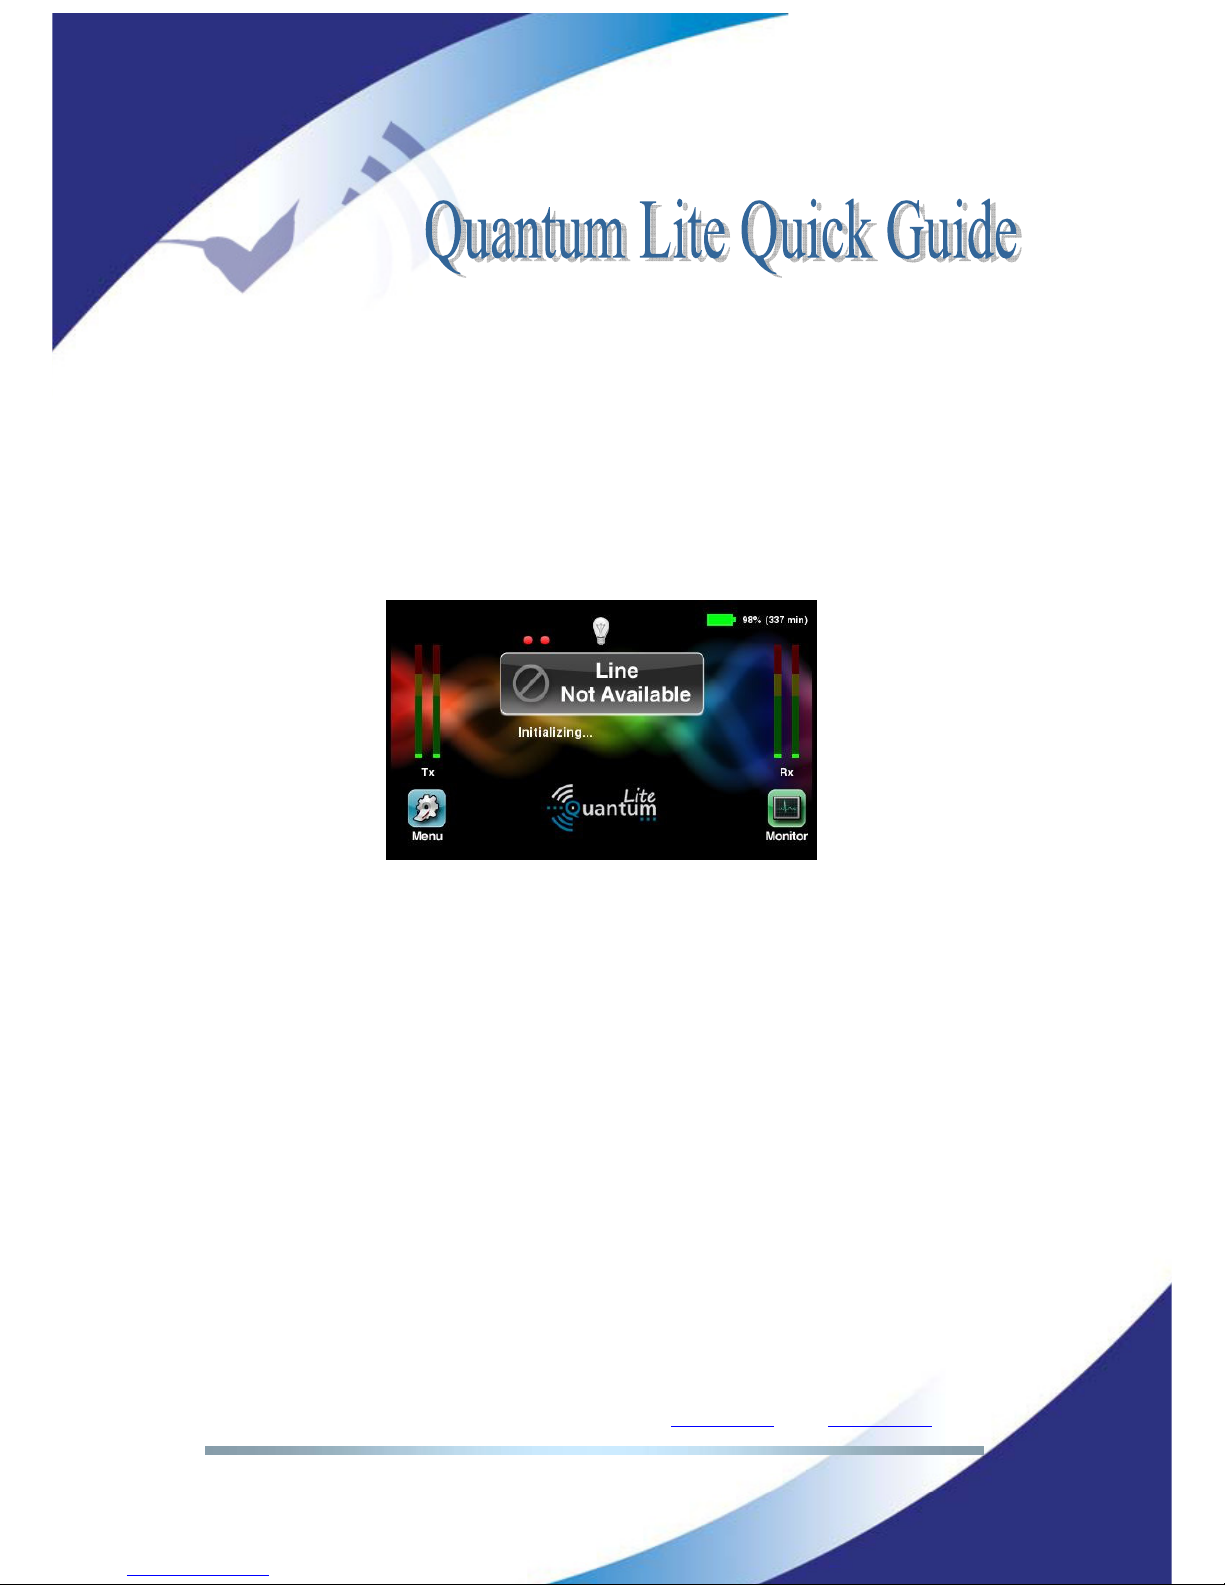
Quantum Lite must get the SIM cards inserted and identify the local UMTS /LTE
service provider as any cell phone would require. Service Provider identification
should be an automated internal process taking less than 10 seconds. However
the automated identification might be disturbed, finishing unsuccessfully. You
might realize this disturbance if any of the small dots keeps on blinking red for
more than 10s.
Remark: Please advice the SIM card slots accept micro sized SIM cards only
Picture 6: Internal modems registering to UMTS /LTE network
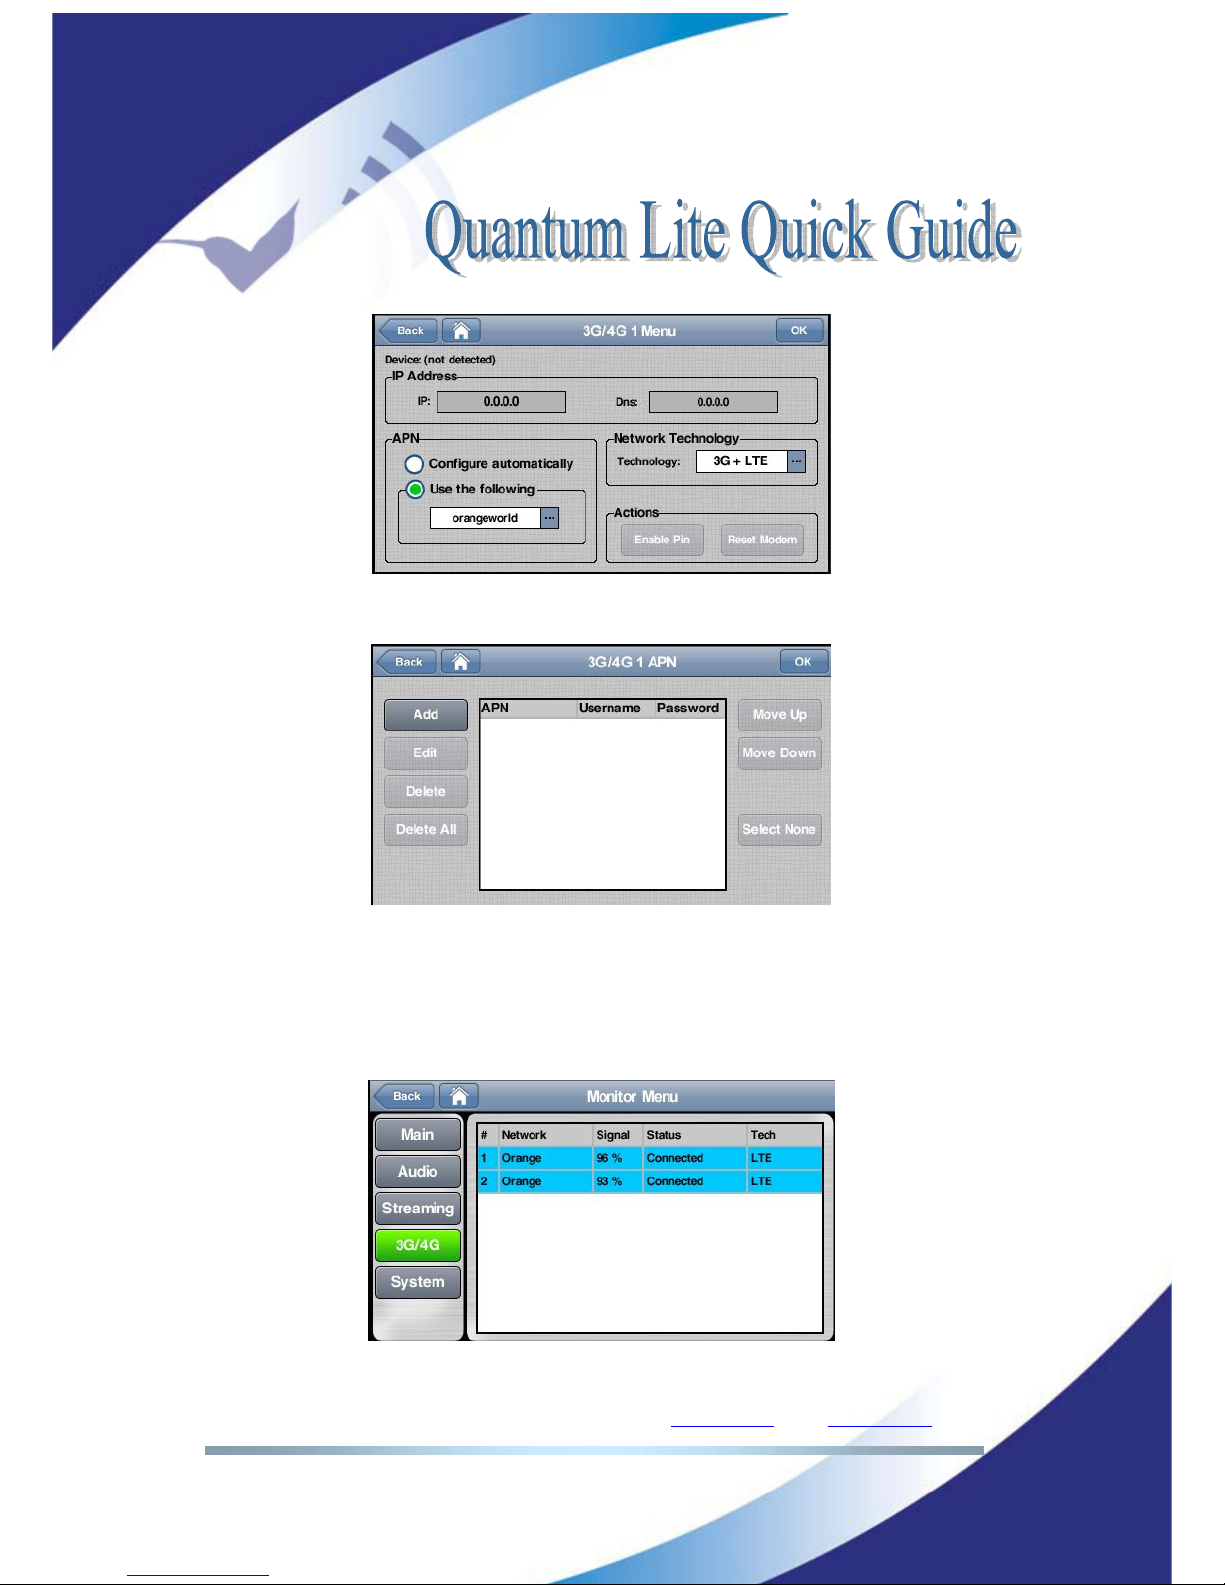
In this case you might assist manually the codec for a successful Service Provider
identification. Please type manually your local APN for the SIM cards 1 and 2.
Following procedure is required:
1. Go to
Menu>Conf>Interfaces>3G/4G
2. Choose internal modem 1 or 2
3. Provide the correct APN of this Service Provider as the example of pictures
7 and 8. If you are using two different Service Providers for SIM card 1
and 2, please remind using the proper APN for each modem.
Page 11
Prodys S.L. Tel: +34 91 6896880 Θ Fax: +34 91 6943777 Θ Email: [email protected] Θ Web: www.prodys.com
Page 11
Picture 7: <Use the following …APN>
Picture 8: Add or Edit your local APN code
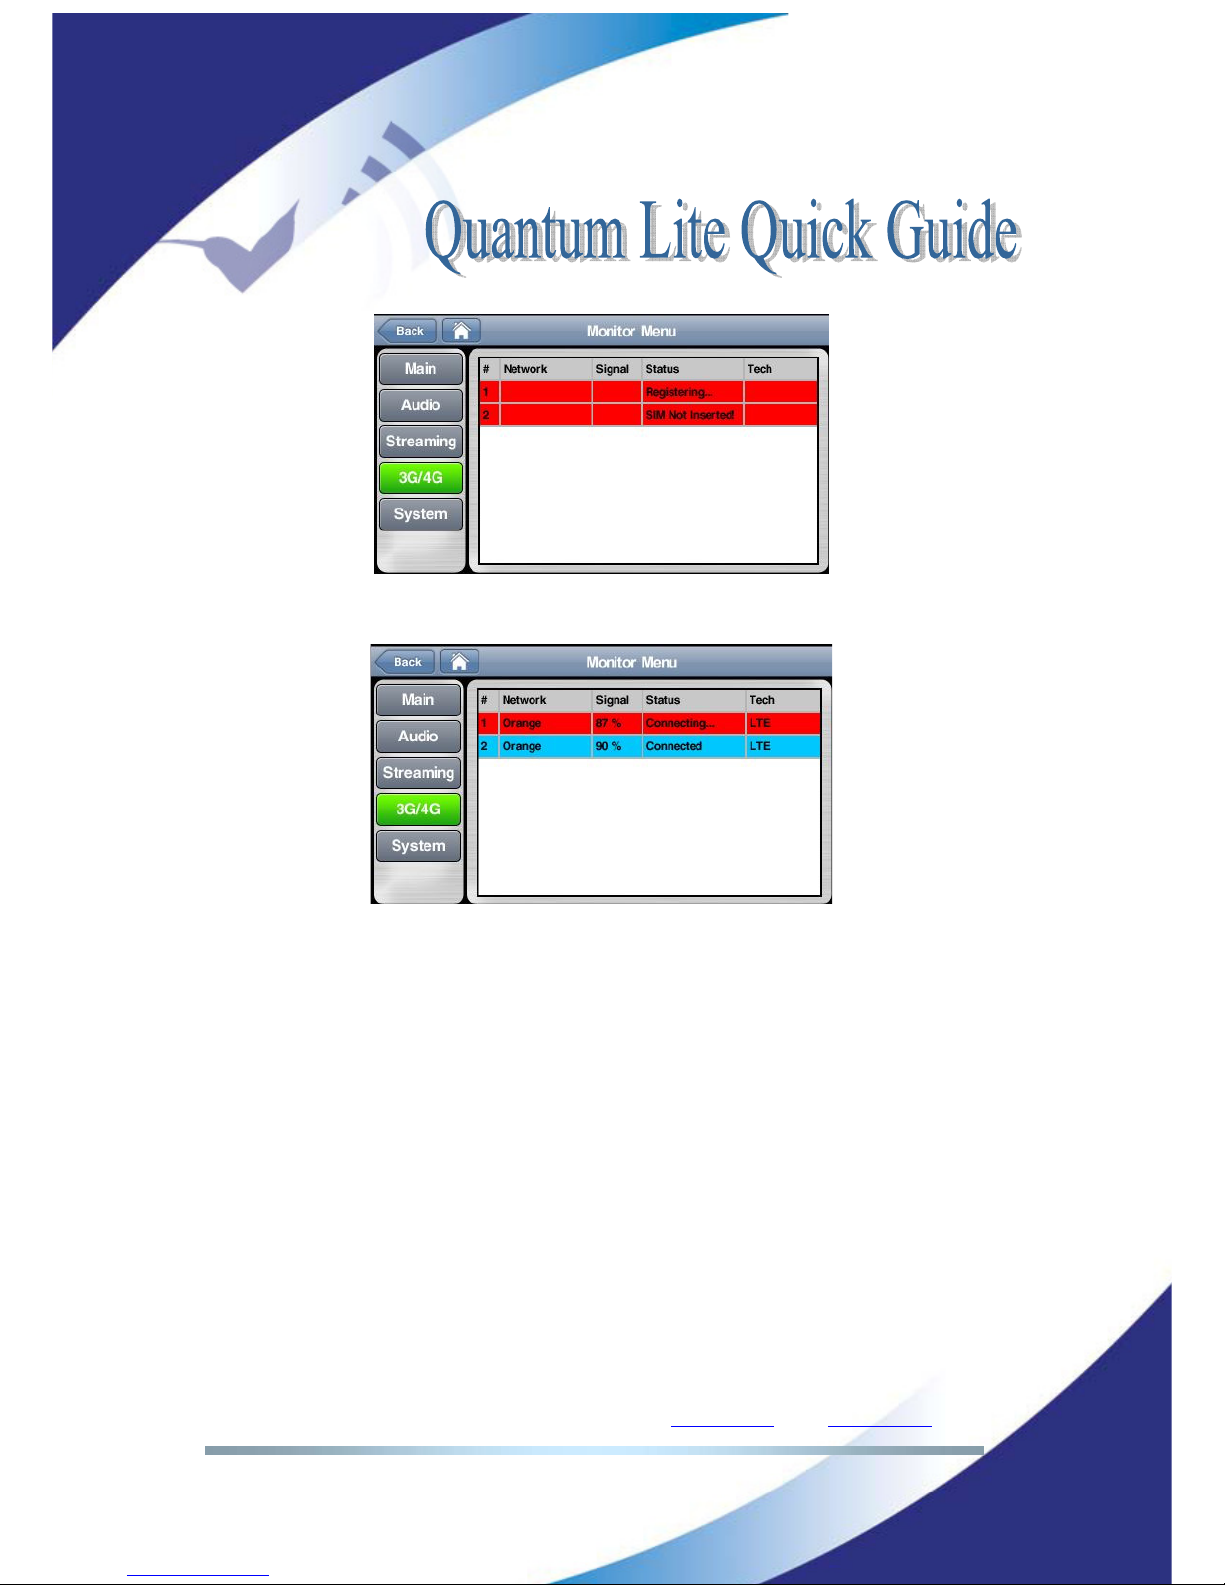
You might check detailed information about your current UMTS /LTE capability at
Monitor>3G/4G
. Below there are some example pictures about possible
indications.
Picture 9: Blue colour indicates the UMTS /LTE network access is available
Page 12
Prodys S.L. Tel: +34 91 6896880 Θ Fax: +34 91 6943777 Θ Email: [email protected] Θ Web: www.prodys.com
Page 12
Picture 10: Red colour indicates the network access is not ready yet.
Picture 11: Mixed colours indicate you might proceed with your audio
communication restricted to the blue capacities.
II.3.3 Address BOOK
Either you just have the same destination to call (i.e. one QLST at your studio),
or several possible destinations are available, you might prefer keeping the
numbers to dial ready in your Quantum Lite internal agenda or address BOOK.
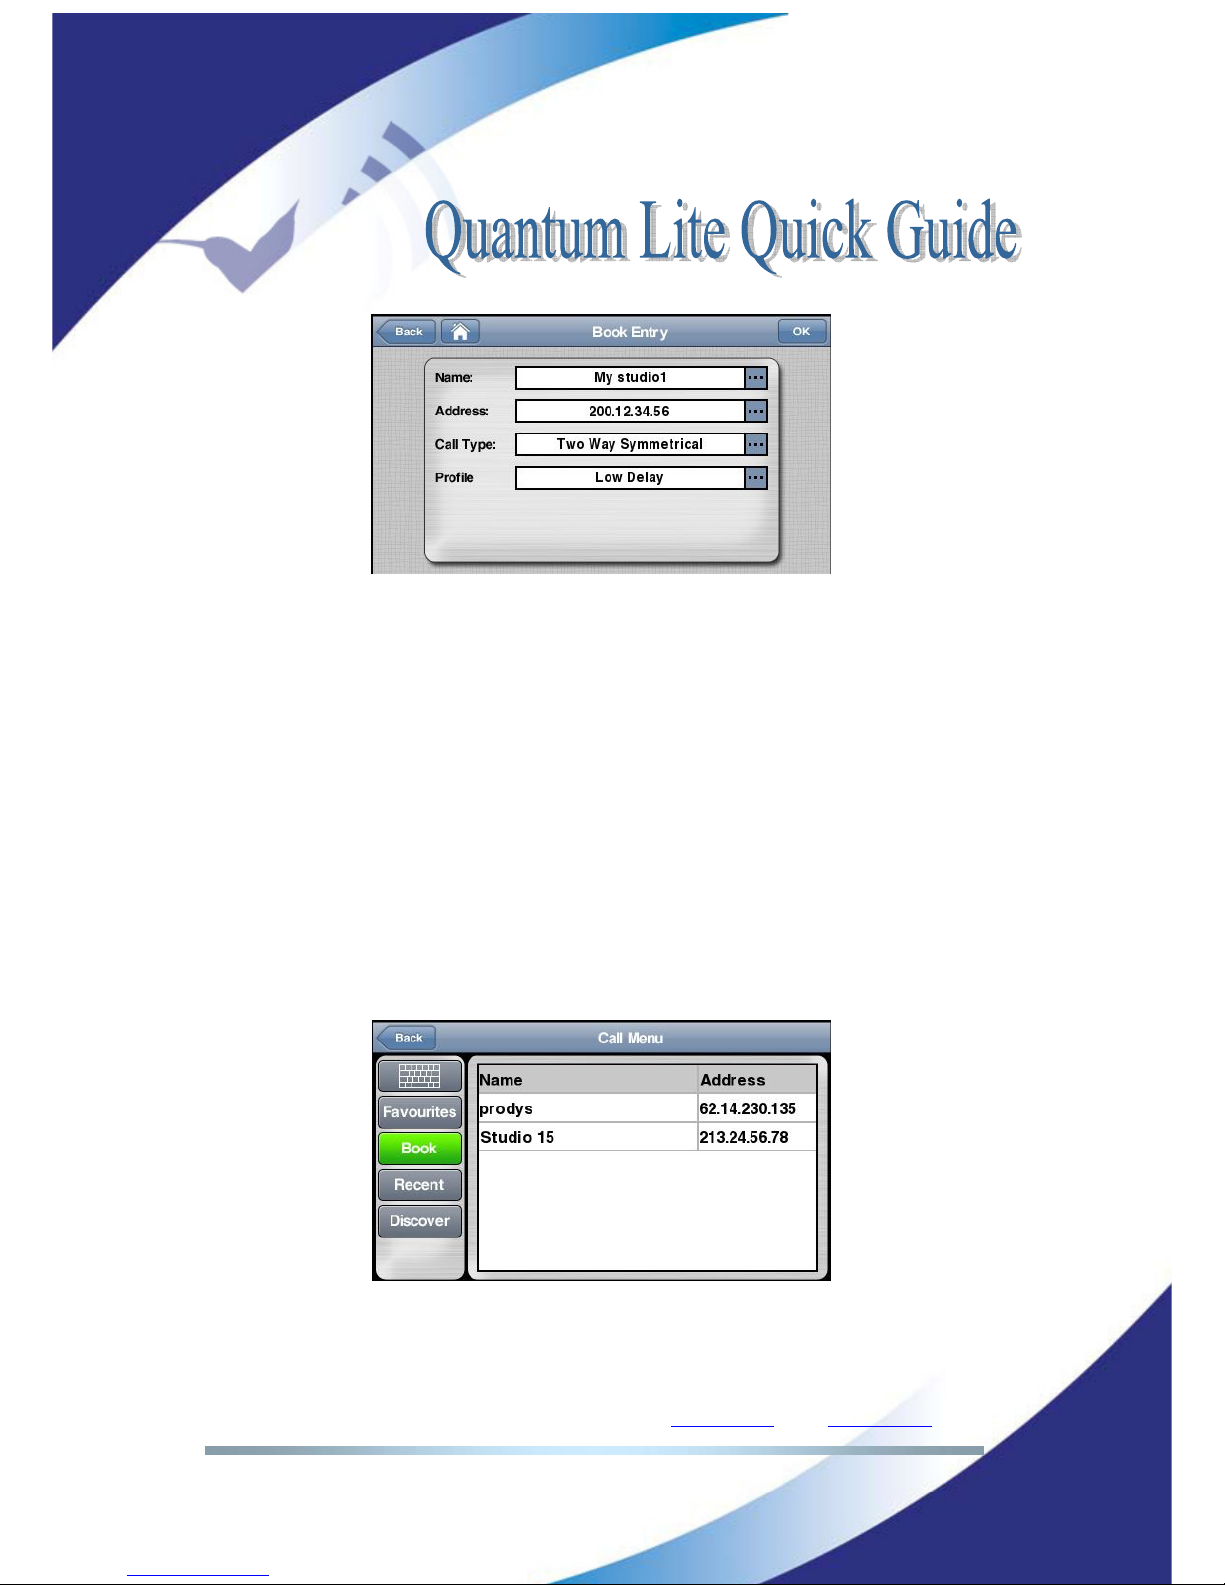
The recording of addresses in the address book is done through the Book Entry
menu. To get there follow
Menu >Book >New
Page 13
Prodys S.L. Tel: +34 91 6896880 Θ Fax: +34 91 6943777 Θ Email: [email protected] Θ Web: www.prodys.com
Page 13
Picture 12: A new book entry
The <address> field must be the public IP address for the destination codec.
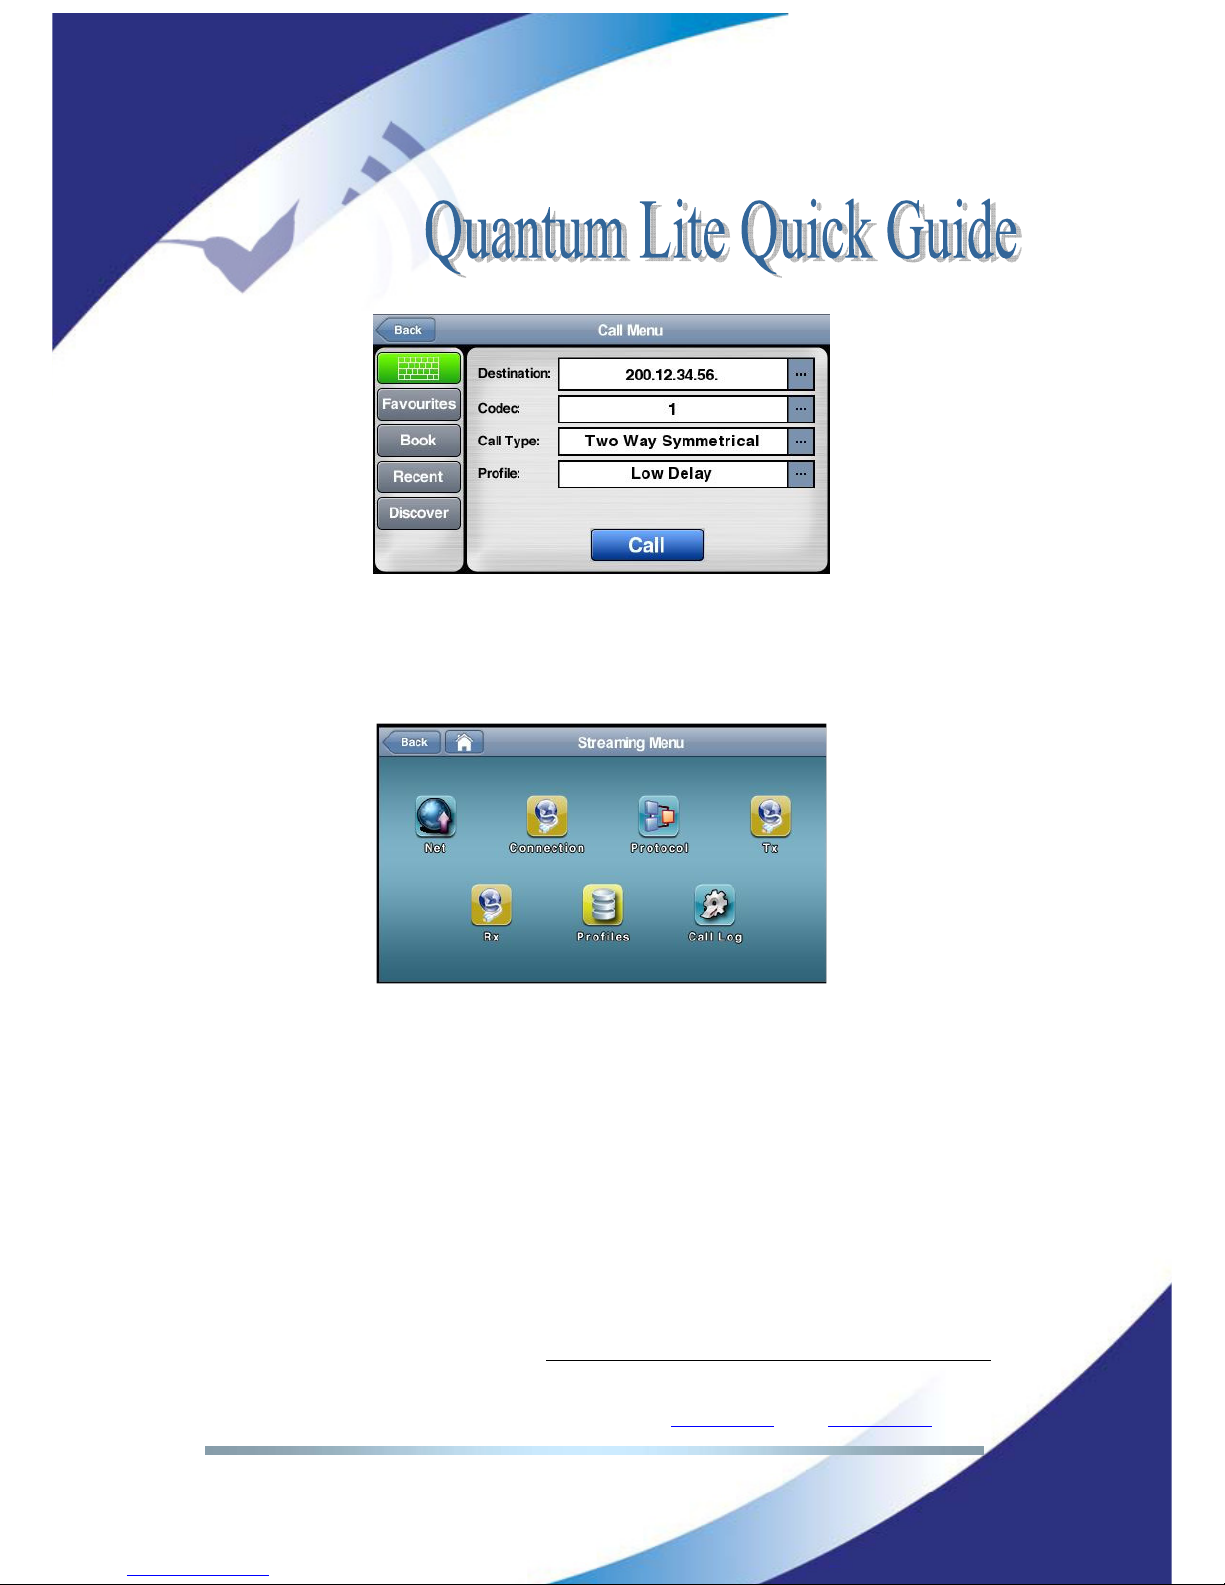
Usually you prefer <Low Delay> profile for your voice communication. Anyhow
you might select another profile at calling time.
II.4 Dial-in your studio
After all those initial settings, which likely remain the same for years, you are
able to start you first communication to the studio.
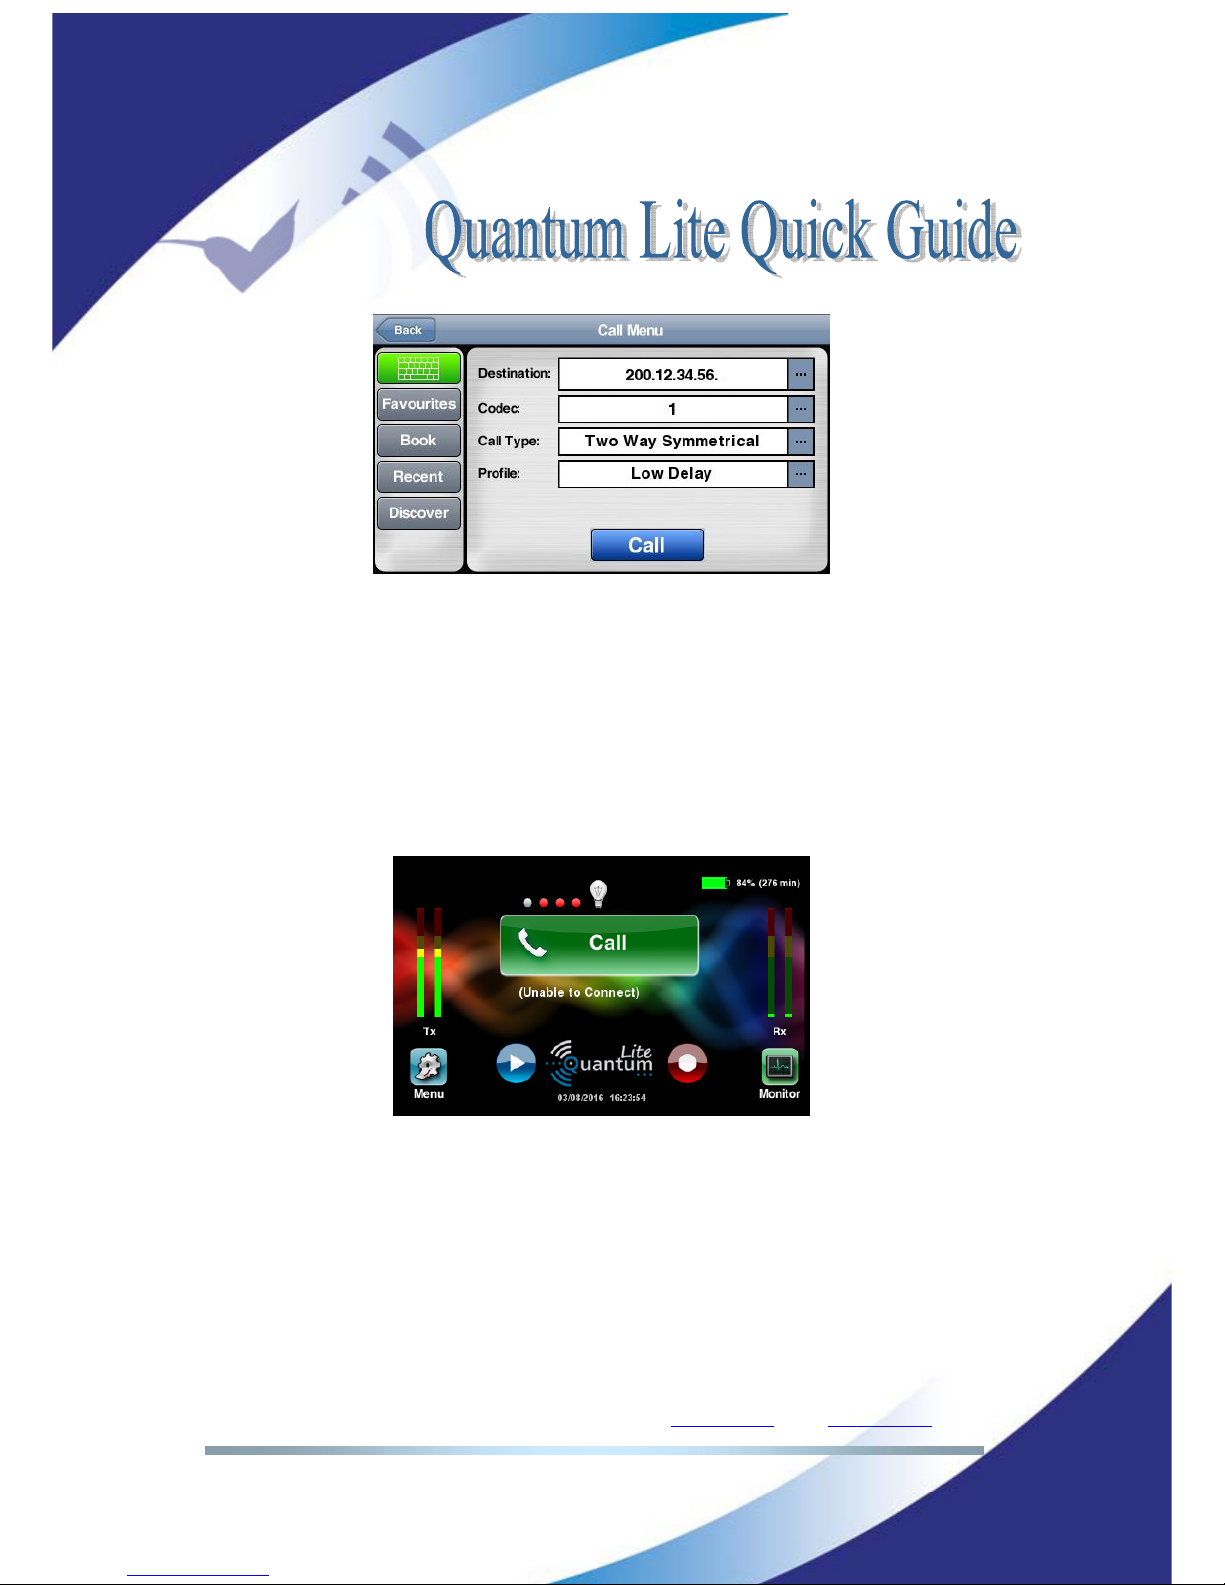
1. Press the big green button to dial. (Please refer to picture 4)
2. Choose your BOOK destination to dial or type manually the address.
Picture 13: Dial-in from your BOOK list
Page 14
Prodys S.L. Tel: +34 91 6896880 Θ Fax: +34 91 6943777 Θ Email: [email protected] Θ Web: www.prodys.com
Page 14
Picture 14: Dial-in typing the destination address
3. Now your communication is progressing. You should get confirmation with
a big red button as picture 5.
Remark: Unsuccessful dial attempts would indicate “unable to connect”. The big
green button offers you another attempt. This result might indicate either your
studio codec is busy, you dialled a wrong destination or the “port forwarding” at
your studio internet router is incorrect.
Picture 15: Unable to connect. Remote is busy or wrong address.
Remark: About the best suitable call profile, please refer to section IV.1
(“Profiles”) for more details.
Page 15
Prodys S.L. Tel: +34 91 6896880 Θ Fax: +34 91 6943777 Θ Email: [email protected] Θ Web: www.prodys.com
Page 15
AUDIO CONTROLS
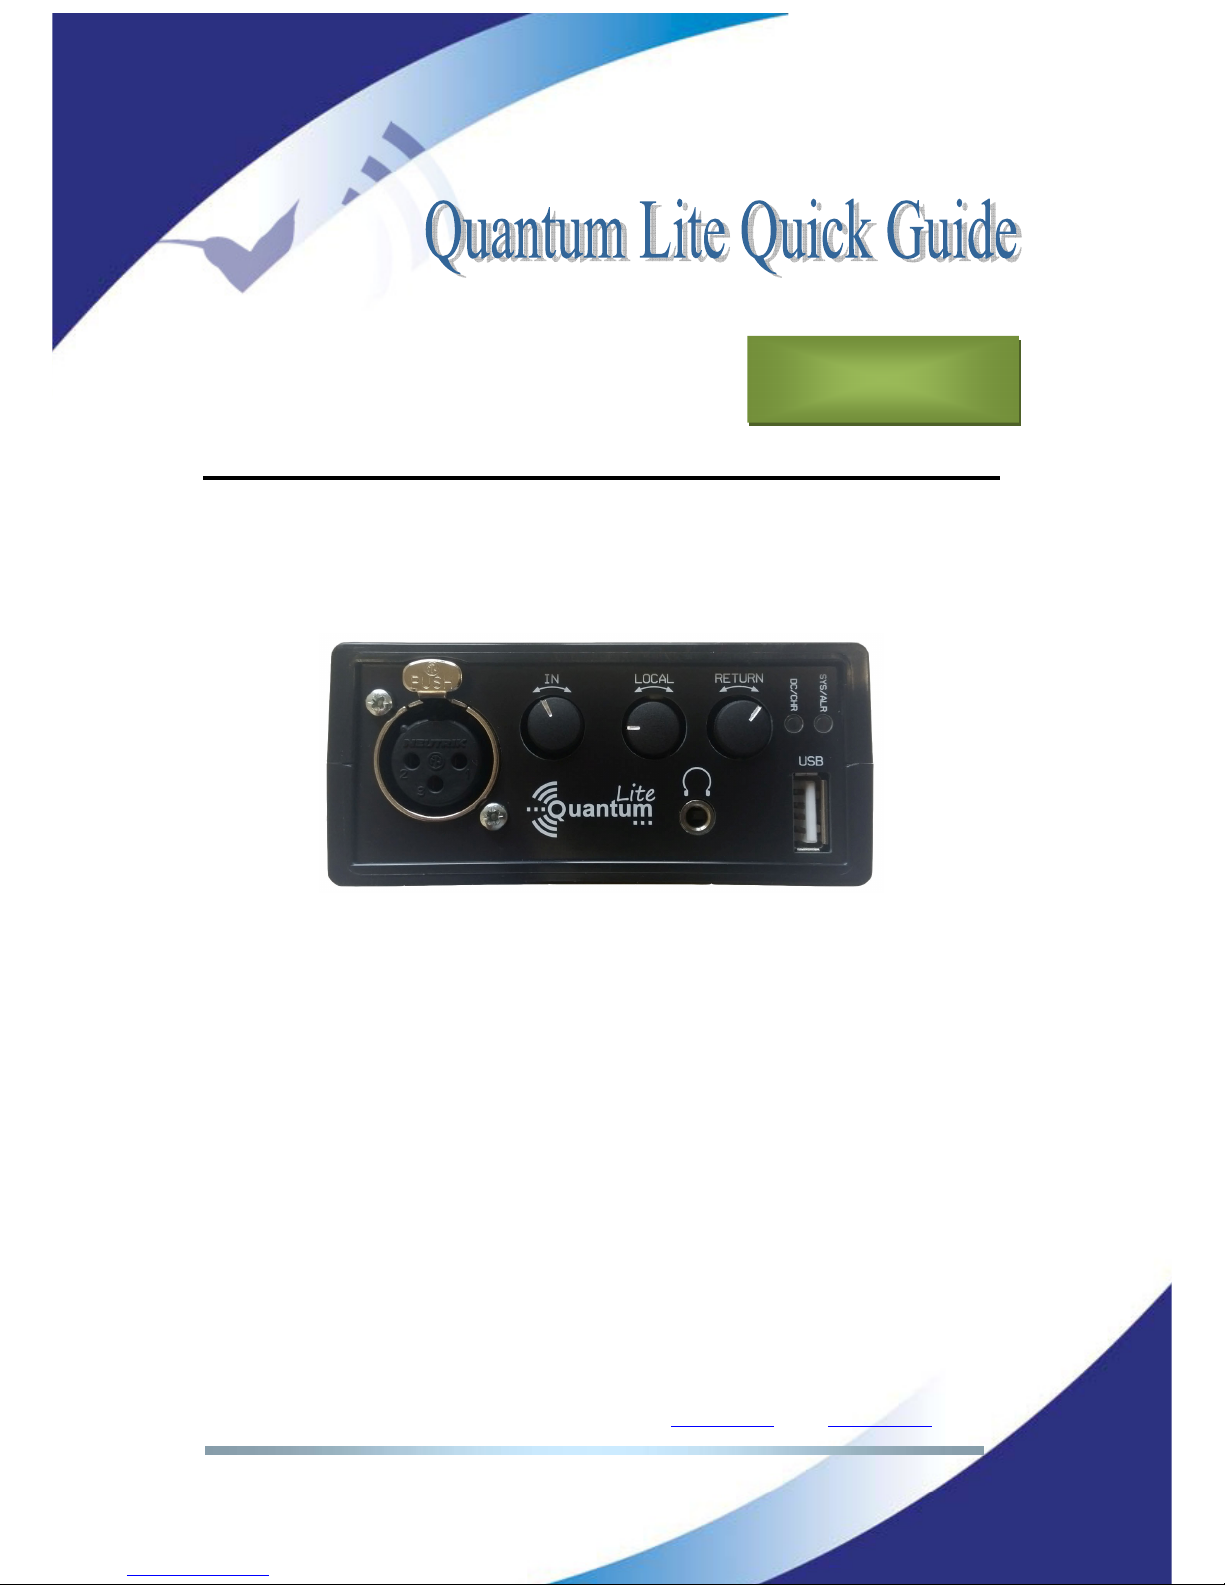
The codec top provides microphone and headphone connectors. Three push-lock
controls adjust the input gain as well the headphone output gain. For operation
push and unlock the knobs.
Picture 16: Quantum Lite Top.
III.1 <IN> audio control
This knob sets the mic preamp gain.
Remark: Please remind phantom power might be required or your mic at the
audio menu. In this case please enable phantom power at:
Menu >Conf >Audio >Input
III.2 <Local> and <Return> audio controls
Those controls affect only the sound on your headphone.
<Local> emphasizes your own voice or input audio on your headphone.
<Return> emphasizes the return signal from the studio
The overall sound you will hear on the headphones is the sum of <Local>
+ <Return>.
Chapter III
Page 16

Prodys S.L. Tel: +34 91 6896880 Θ Fax: +34 91 6943777 Θ Email: [email protected] Θ Web: www.prodys.com
Page 16
RECALLING PRESETS & CALL WITH PROFILES
With your Quantum Lite you will included a choice of equipment configuration
ready to use. Those got the name <Preset>
Please press this sequence to access to the preset menu:
Menu > Preset
The default list of presets might be enhanced or modified by you or your
company codec administrator for the sake of supporting your most common
applications for Quantum Lite.
The current firmware version does not offer any factory default profile.
IV.1 Profiles
The <Profiles> instead lead to some temporally configuration changes the user
will apply only for the next call only. Once the call finished, the codec recovers its
original configuration. Therefore <Profiles> is useful for a quick adjustment of
the audio delay (jitter buffer) for the handheld and the studio codecs, or for
switching quickly the compression algorithm (therefore the audio quality) just at
the moment the destination is dialled.
Remark: Using any profile from the handheld device, this selection is applied
synchronously to the handheld as well to studio unit automatically.
Chapter IV
Page 17
Prodys S.L. Tel: +34 91 6896880 Θ Fax: +34 91 6943777 Θ Email: [email protected] Θ Web: www.prodys.com
Page 17
Picture 17: Profile selection at the Call Dialog is possible
New user profiles might be added to the factory default list using the <Profiles>
menu of the overall <Streaming> menu. (the complete path is Menu >
Streaming > Profiles > New or Edit)
Picture 18: New profiles might set up by the user
IV.2 Factory default list of Profiles
Current default profiles available are:
• Low Delay (
The buffer on each end will be set to 100ms. Applicable for pretty
good LTE or LAN connections
)
• Mid Delay (
The buffer on each end will be set to 300ms. Applicable for any
UMTS /LTE connection.
)
• High Delay (
The buffer on each end will be set to 500ms. Applicable for any
difficult or risky connection.
)
• Opus MN 64 Mid Delay Bonding
(
The next audio connection is using Opus
mono 64kbps with 300ms delay and sharing the total bandwidth among any
possible data paths enabled. This is profile is “streaming bandwidth efficient”
.
Applicable for small bandwidth connections or crowded areas.
)
Page 18

Prodys S.L. Tel: +34 91 6896880 Θ Fax: +34 91 6943777 Θ Email: [email protected] Θ Web: www.prodys.com
Page 18
• Opus MN 64 Mid Delay Diversity
(
The next audio connection is using
Opus mono 64kbps with 300ms delay and copying the audio stream other every
data path enabled. Should be the default profile for any UMTS /LTE connection
.
)
• Aptx MN 128 Low Delay Diversity
(
The next audio connection is using
enhanced Aptx mono 128kbps with 100ms delay and copying the audio stream
other every data path enabled. This is the audio communication with minimum
delay. Applicable for pretty good LTE connections.
)
Page 19
Prodys S.L. Tel: +34 91 6896880 Θ Fax: +34 91 6943777 Θ Email: [email protected] Θ Web: www.prodys.com
Page 19
RECORDING AND FILE OPERATIONS
Recording and audio file operation are outstanding complementary features of
Quantum Lite.
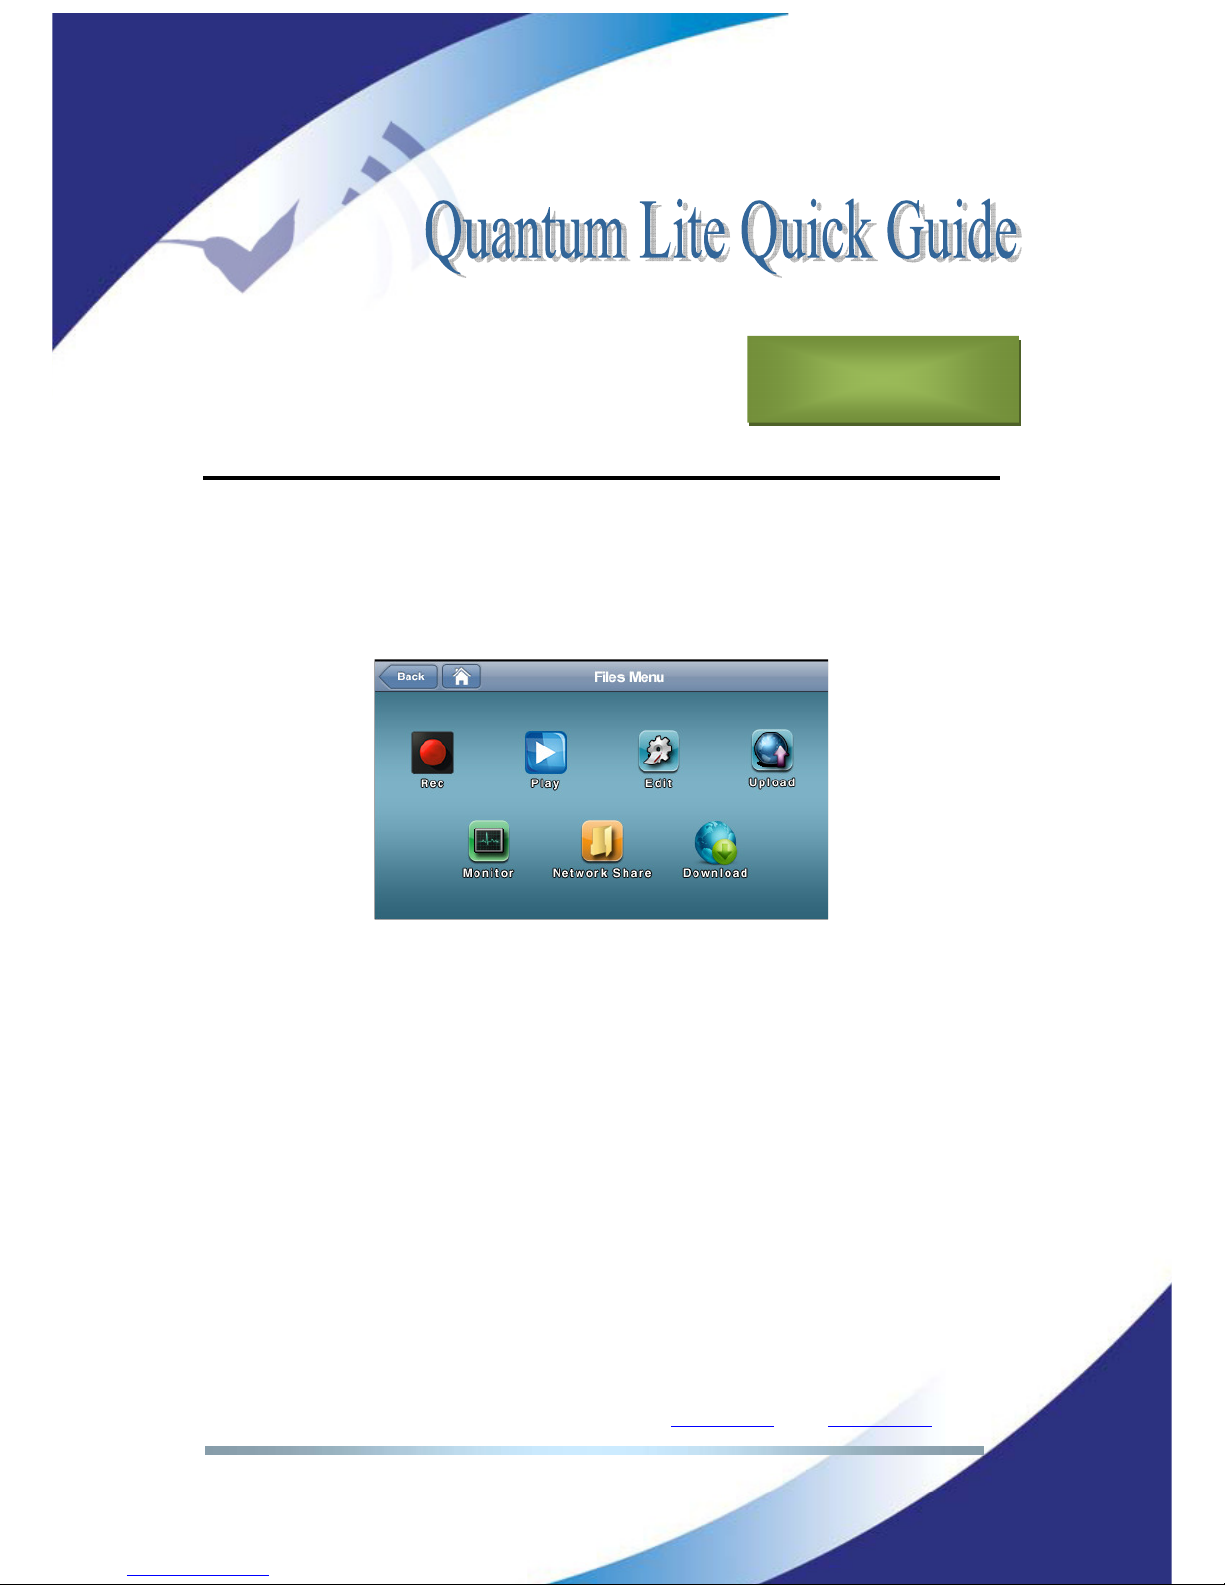
You might operate those functions at
Menu >Conf >Files
Picture 19: Recording and file operations
Remark: Please remind function <Network Share> is visible only browsing the
menu thru Ethernet access.
V.1 Rec menu
You might set the device for recording your input sound on demand or each time
you start a new communication with your studio. You might press the red round
recording icon on the bottom line from the main menu to proceed if only
encoded or decoded or both signals should be recorded.
Chapter V
Page 20
Prodys S.L. Tel: +34 91 6896880 Θ Fax: +34 91 6943777 Θ Email: [email protected] Θ Web: www.prodys.com
Page 20
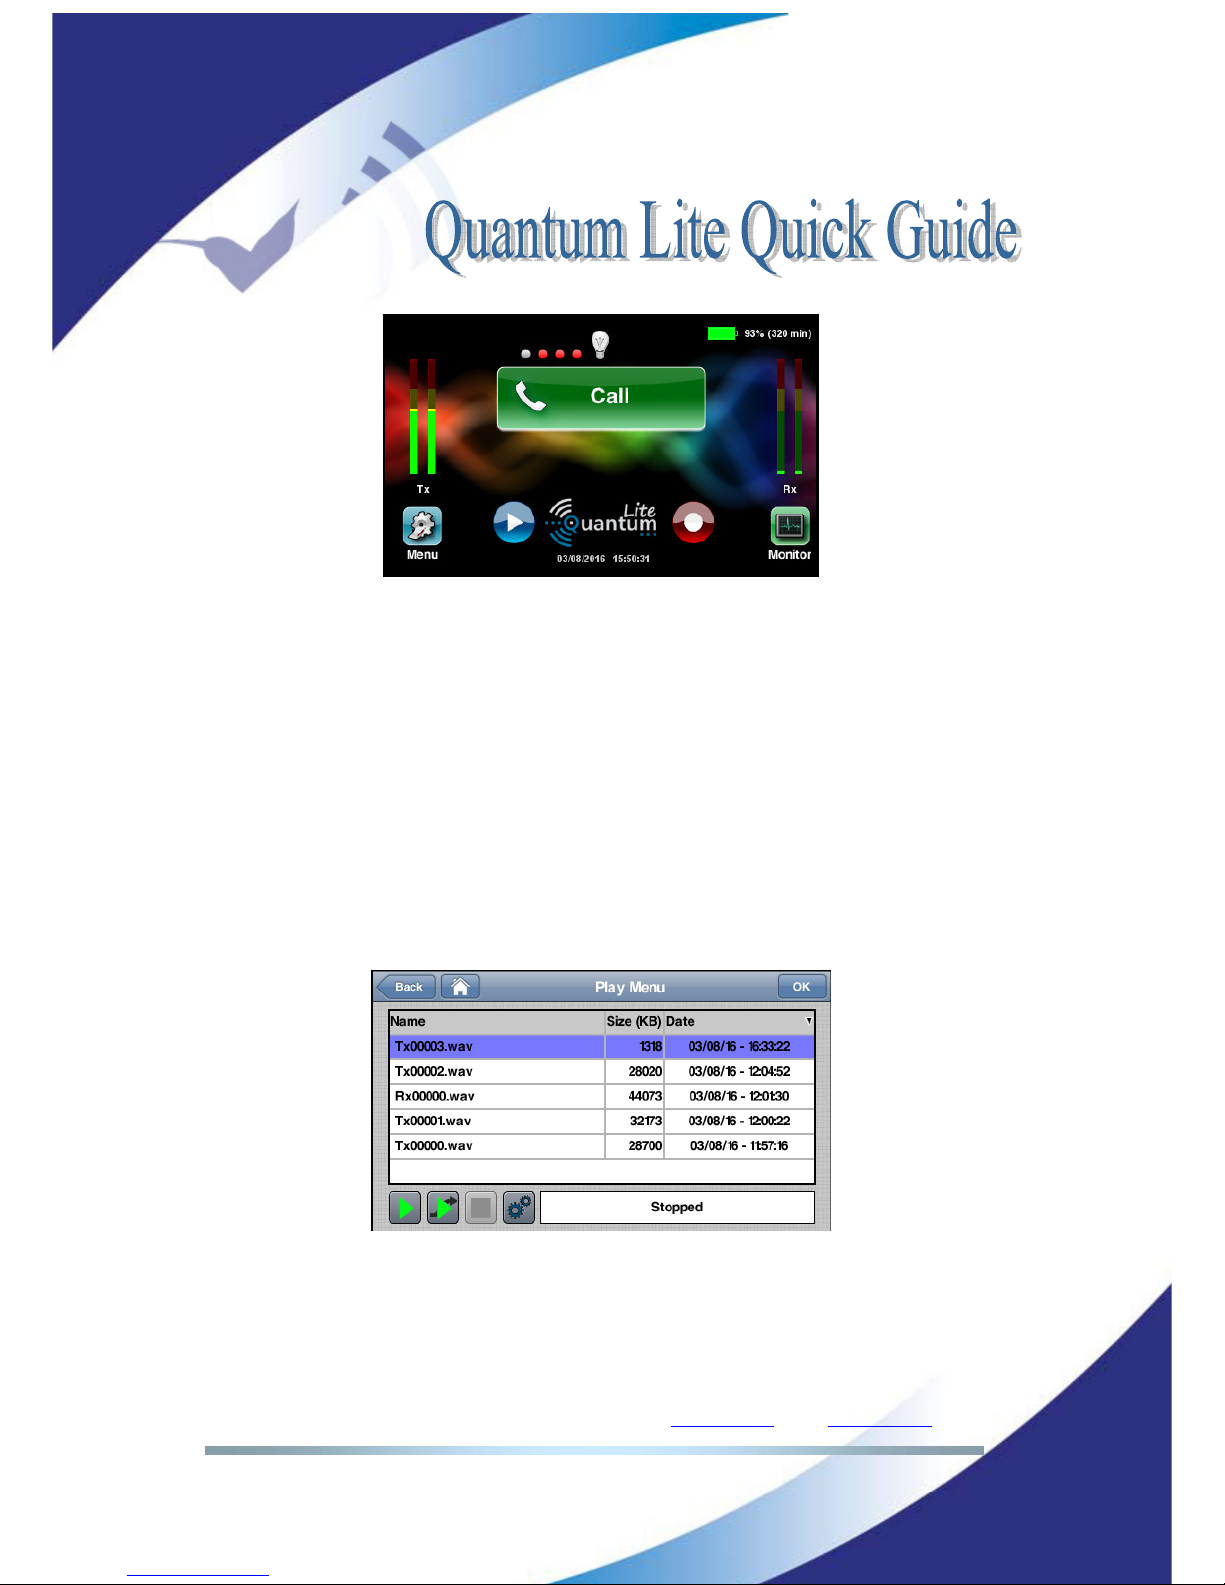
Picture 20: Recording and playout controls from the main menu.
V.2 Play menu
The playout menu is available using the main menu playout icon. Two playout
applications are available upon file selection:
1. Most left green icon would give a local playout without disturbing ongoing streaming of the mic input.
2. Second left green icon would mix the playout with the input microphone.
Remark: Please remind matching the input gain for the recorded matter and the
live mic for the optimal audio mix.
Picture 21: Local playout versus playout & streaming option
V.3 Upload menu
You can transfer quickly any of your recorded files to the FTP server of your
choice or to a memory device plugged to the QLST receiver at your studio. The
Page 21
Prodys S.L. Tel: +34 91 6896880 Θ Fax: +34 91 6943777 Θ Email: [email protected] Θ Web: www.prodys.com
Page 21
file transfer will progress while the device keeps powered on and any Internet
link to your studio is still available.
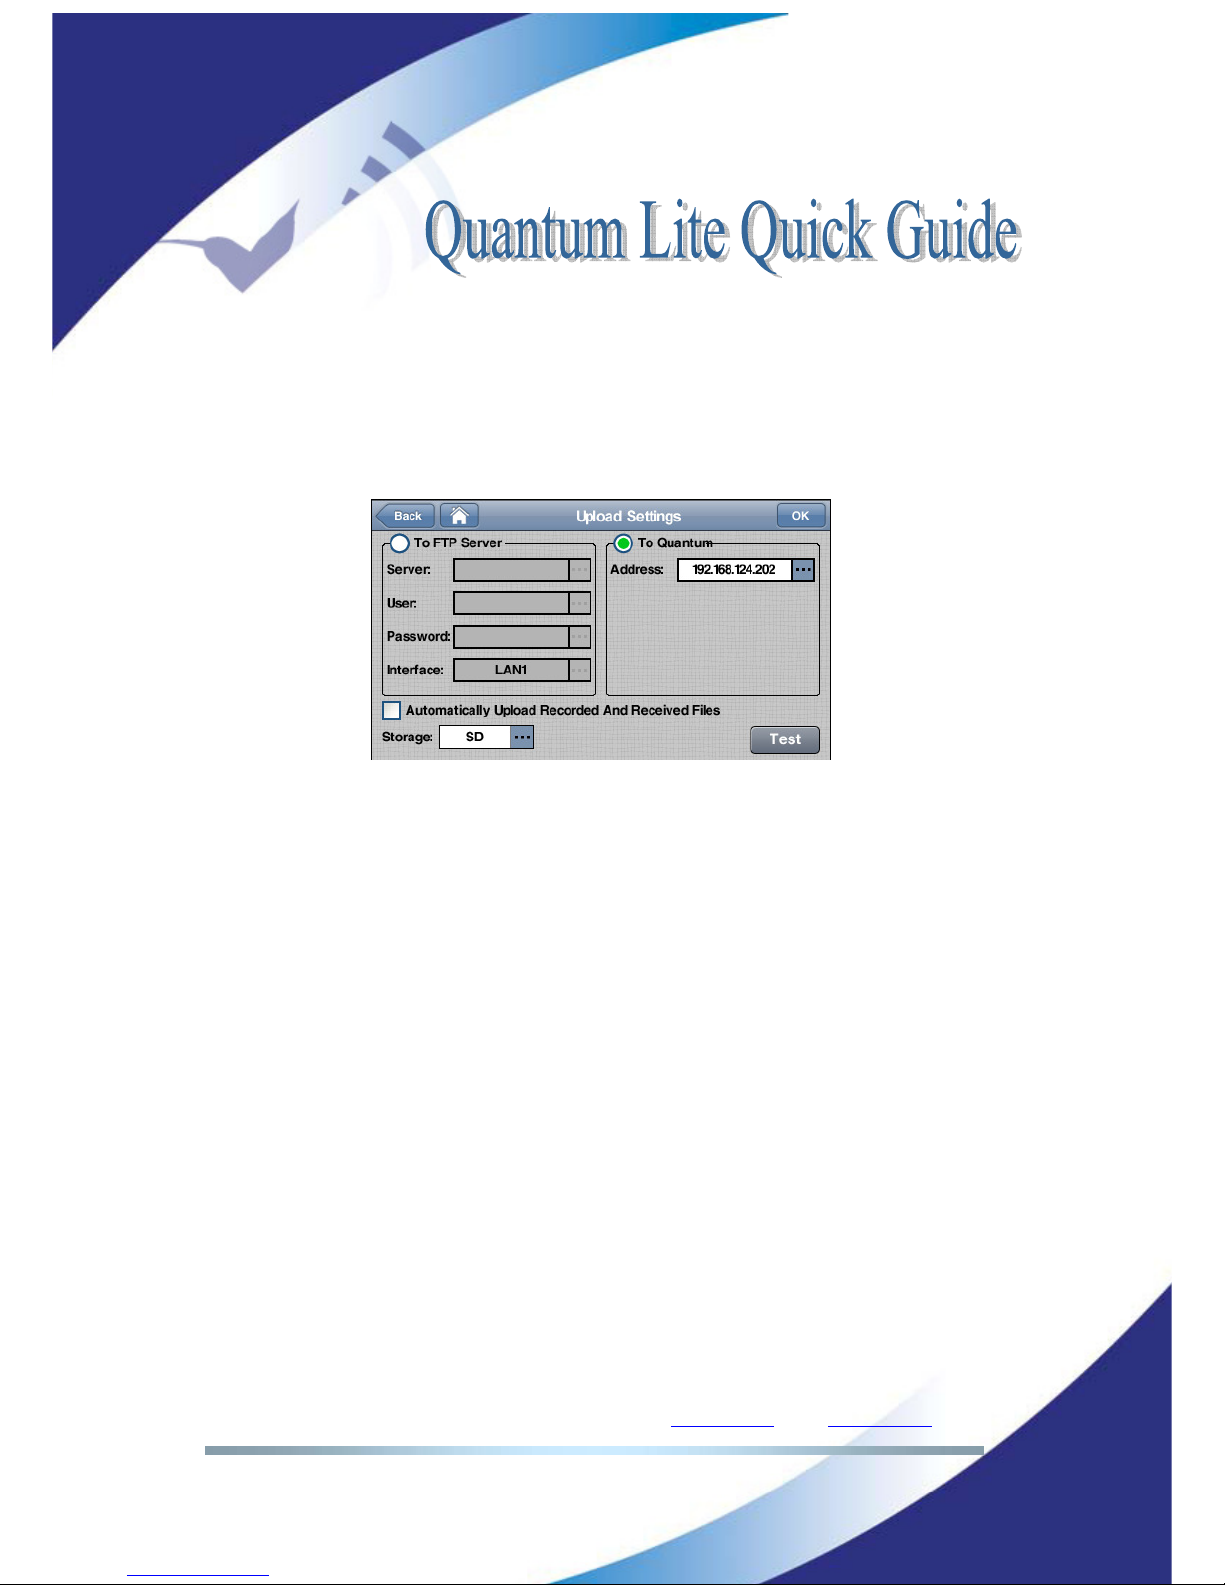
Alternatively you might push your collection of recorded audio files to any FTP
server. Following picture gives the clue how to address one or other destination.
Menu >Conf >Files > Upload >Settings
Picture 22: File Upload Settings menu
Page 22
Prodys S.L. Tel: +34 91 6896880 Θ Fax: +34 91 6943777 Θ Email: [email protected] Θ Web: www.prodys.com
Page 22
APPENDIX
Detailed information about configuration and functions are available at the
Quantum User Manual. However some additional information is made available
here too.
VI.1 Wi-Fi configuration
Quantum units can be equipped with an external USB Wi-Fi module. This chapter
describes how to configure this interface. The user has to provide the setting of
this interface before using this wireless link.
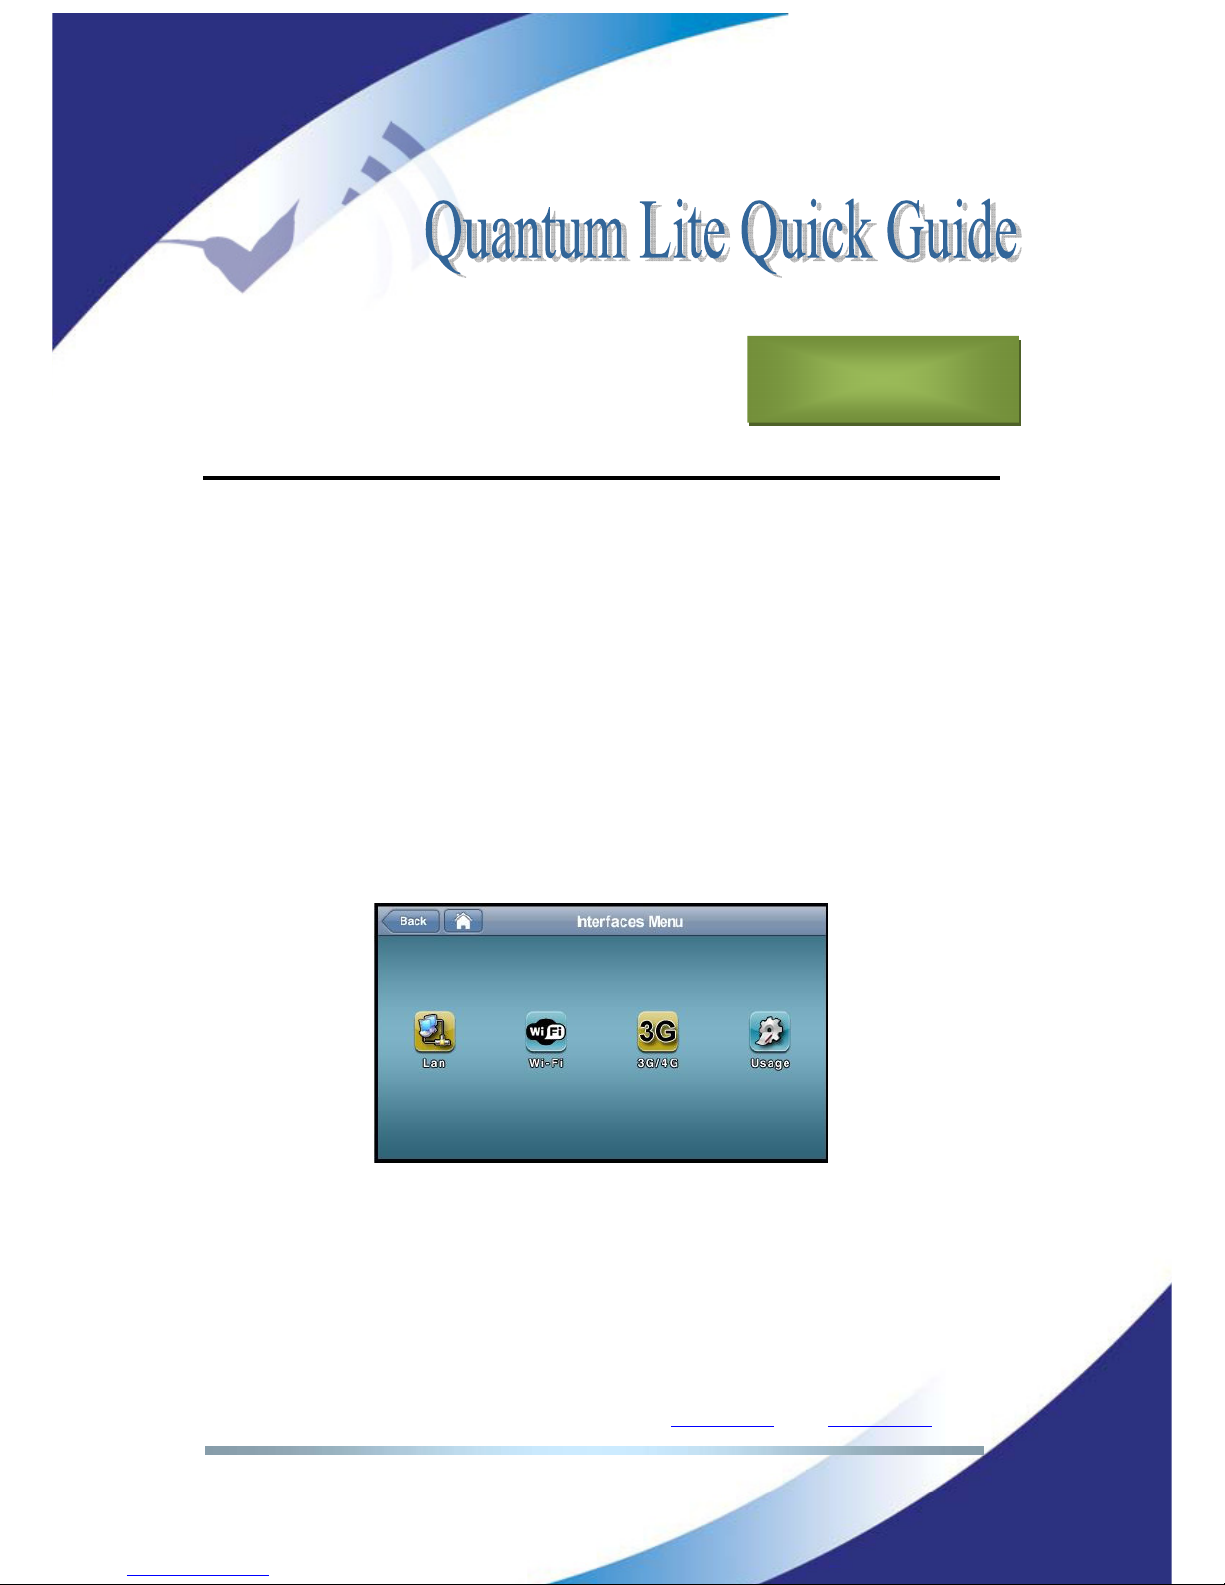
The access to the Wi-Fi configuration menu is provided by
Menu>Conf>Interfaces>Wi-Fi
Picture 23: Configuration of interfaces
Please take a look at the picture below. It shows the main Wi-Fi configuration
menu:
Chapter VI
Page 23
Prodys S.L. Tel: +34 91 6896880 Θ Fax: +34 91 6943777 Θ Email: [email protected] Θ Web: www.prodys.com
Page 23
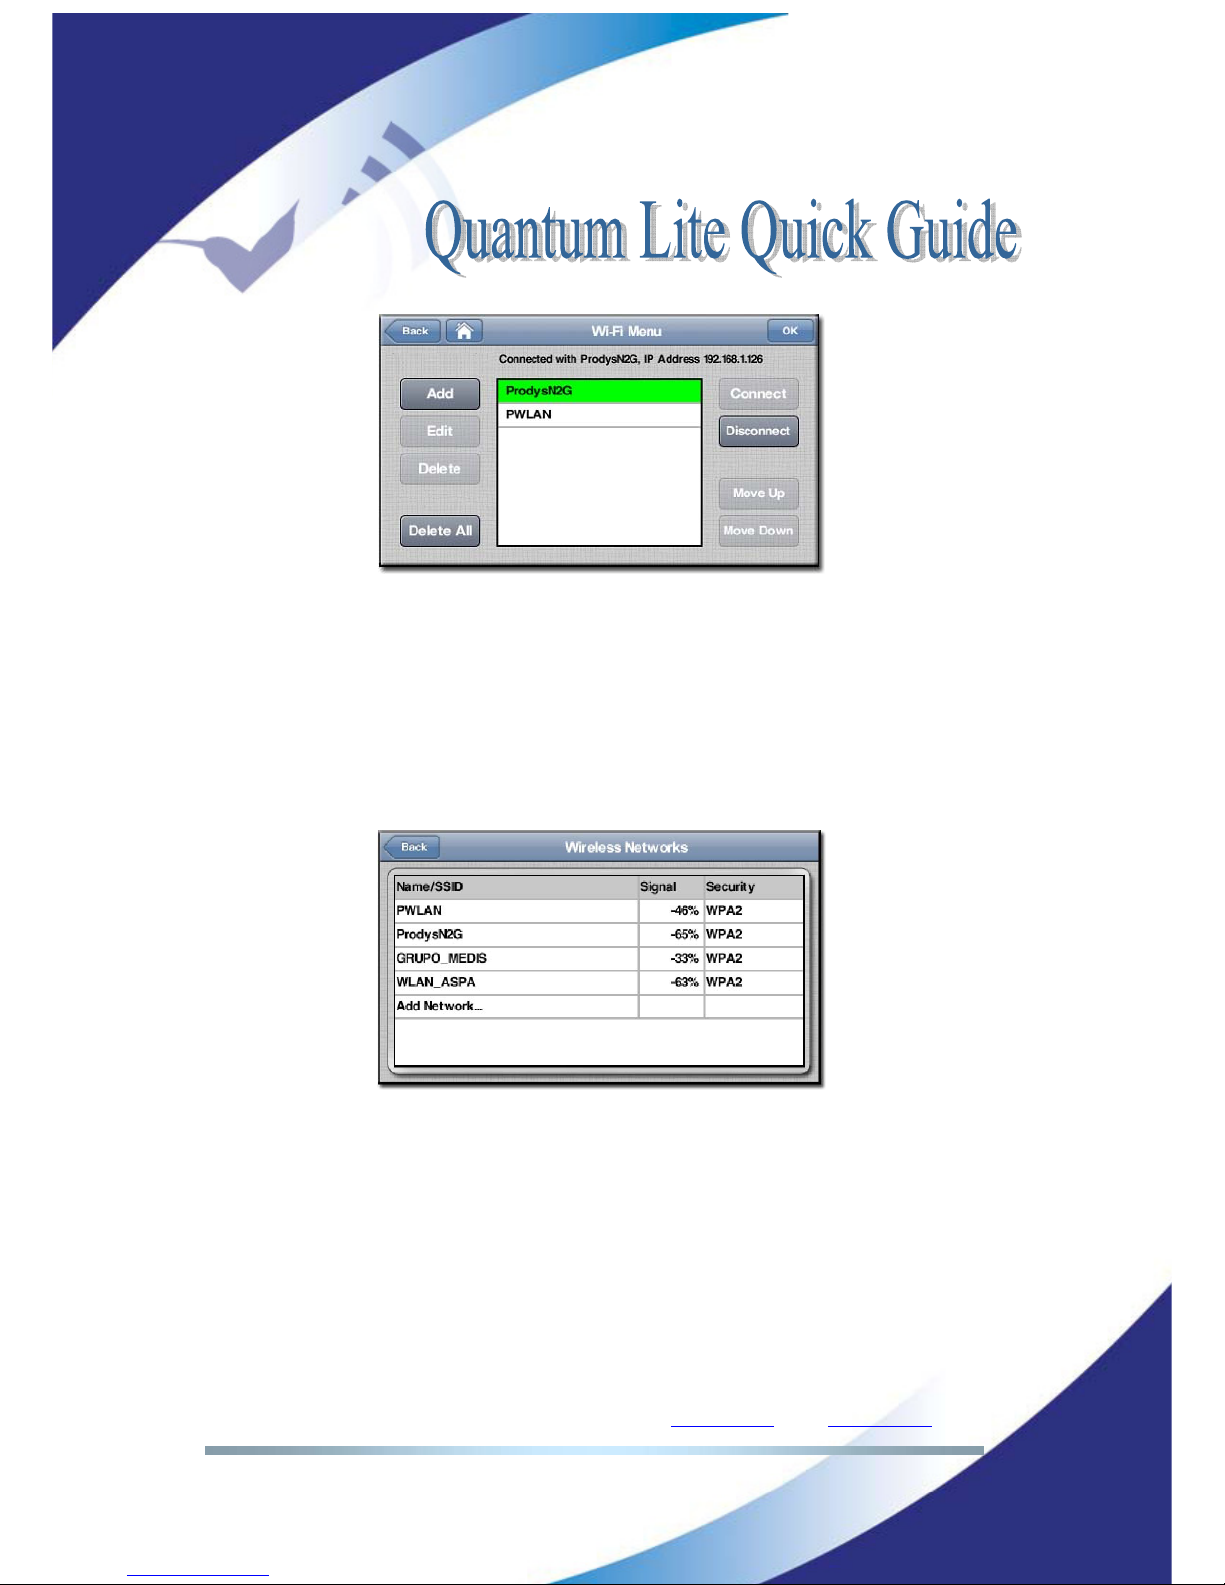
Picture 24: Selection of Wi-Fi provider
From this menu the user can select what Wi-Fi network will connect to. By
pressing the Add button it is possible to access the Wireless Networks Menu
where the different Wi-Fi networks automatically detected by the unit will
appear, so that the user can just select any of them and add them to the list of
Wi-Fi networks on the main Wi-Fi menu. The type of encryption and the quality
of reception will be shown for each of the available networks.
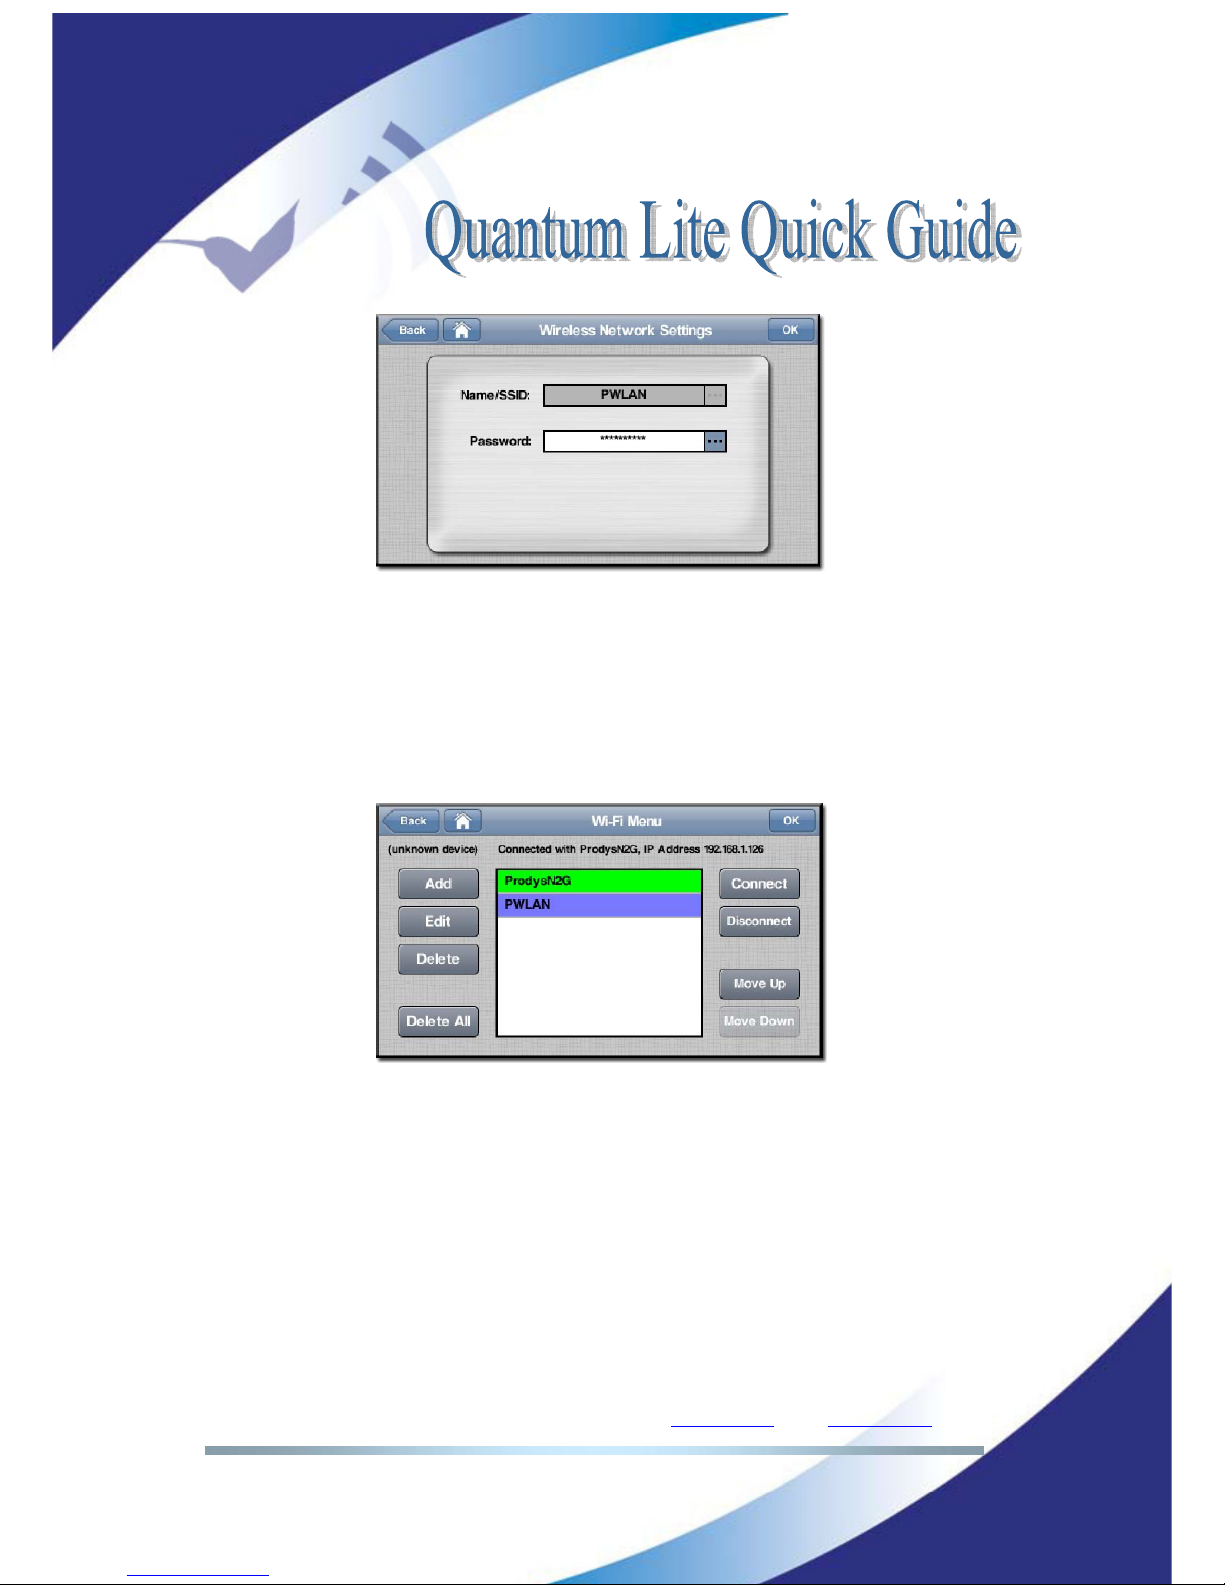
Picture 25: Wi-Fi information
Once in the main Wi-Fi menu, just clicking on any of the Wi-Fi networks available
in the list, the user will edit the password settings for that specific network.
Page 24
Prodys S.L. Tel: +34 91 6896880 Θ Fax: +34 91 6943777 Θ Email: [email protected] Θ Web: www.prodys.com
Page 24
Picture 26: Wi-Fi settings
Once all networks in the list have been configured with their corresponding
security settings, the user has to click on the desired network and press the
Connect button. The current Wi-Fi network in use will be shown on a green
background colour, whilst the currently selected Wi-Fi network will be shown on
a purple background colour.
Picture 27: Wi-Fi main menu
In the picture above, ProdysN2G is the current Wi-Fi network in use, whilst the
PWLAN network is currently selected by the user. By clicking on the Disconnect
button the user can disconnect the unit from the current Wi-Fi network.
To delete a network, just select one network and press the Delete button. The
system will ask for a confirmation.
To end with, it is also possible to define the priority of the Wi-Fi networks. The
unit will try to connect first to the Wi-Fi network at the top of the list. The user
Page 25

Prodys S.L. Tel: +34 91 6896880 Θ Fax: +34 91 6943777 Θ Email: [email protected] Θ Web: www.prodys.com
Page 25
can change the order of the different networks in the list by means of the Move
Up and Move Down buttons.
Once all networks in the main list have been defined (password configured), and
the user has selected one of the available networks, just by pressing on the
Connect button the unit will try to connect to that network. Once the unit is
connected, a message like ‘Connected to WIFIx network’ will appear at the top of
the window.
Remark: In order for the user to configure the Wi-Fi interface, this interface must
be configured as one of the IP interfaces to be used for the streaming, be it
alone or along with others, like 3G/4G links for example.
Page 26

Prodys S.L. Tel: +34 91 6896880 Θ Fax: +34 91 6943777 Θ Email: [email protected] Θ Web: www.prodys.com
Page 26
PICTURE INDEX
Picture 1. Quantum Lite codec.........................................................................4
Picture 2: Codec + battery bloc split off ...........................................................6
Picture 3: Login ..............................................................................................7
Picture 4: Green status – communication not in progress yet.............................7
Picture 5: Red status – communication in progress. ..........................................8
Picture 6: Internal modems registering to UMTS /LTE network ........................ 10
Picture 7: <Use the following …APN> ............................................................ 11
Picture 8: Add or Edit your local APN code .....................................................11
Picture 9: Blue colour indicates the UMTS /LTE network access is available ...... 11
Picture 10: Red colour indicates the network access is not ready yet. ..............12
Picture 11: Mixed colours indicate you might proceed with your audio
communication restricted to the blue capacities.............................................. 12
Picture 12: A new book entry ........................................................................ 13
Picture 13: Dial-in from your BOOK list........................................................... 13
Picture 14: Dial-in typing the destination address ........................................... 14
Picture 15: Unable to connect. Remote is busy or wrong address. ................... 14
Picture 16: Quantum Lite Top........................................................................ 15
Picture 17: Profile selection at the Call Dialog is possible................................. 17
Picture 18: New profiles might set up by the user...........................................17
Picture 19: Recording and file operations .......................................................19
Picture 20: Recording and playout controls from the main menu. .................... 20
Picture 21: Local playout versus playout & streaming option ........................... 20
Picture 22: File Upload Settings menu............................................................21
Picture 23: Configuration of interfaces ........................................................... 22
Picture 24: Selection of Wi-Fi provider ........................................................... 23
Picture 25: Wi-Fi information ......................................................................... 23
Picture 26: Wi-Fi settings ..............................................................................24
Picture 27: Wi-Fi main menu .........................................................................24
 Loading...