

Page 1

Blood Glucose Monitoring System - User’s Manual
Dear PRODIGY Voice System Owner:
This manual contains important information you must know about the
system. Please read it thoroughly and carefully.
The greatest feature of the Voice system is its speaking function which is an
acoustic aid for users especially with visual disability. Please note that this
function is optional.
Another unique feature is its autocode function which means no need
to calibrate your meter, therefore making it easier for you to monitor your
blood glucose at home.
Diagnostic Devices, Inc www.prodigymeter.com 1.800.243.2636
1
Page 2

Blood Glucose Monitoring System - User’s Manual
IMPORTANT SAFETY INSTRUCTIONS
READ THIS BEFORE USING
The following basic safety precautions should always be taken.
1. Close supervision is necessary when the device is used by, on,
or near children, handicapped persons or invalids.
2. Use the device only for the intended use described in this manual.
3. Do not use strips and control solutions which are not supplied by
the manufacturer.
4. Do not use the device if it is not working properly, or if it has suffered
any damage.
5. Before using any product to test your blood glucose, read all instructions thoroughly and
practice the test. Do all quality control checks as directed and consult with a diabetes
healthcare professional.
KEEP THESE INSTRUCTIONS
Diagnostic Devices, Inc www.prodigymeter.com 1.800.243.2636
2
Page 3

Blood Glucose Monitoring System - User’s Manual
TABLE OF CONTENTS
IMPORTANT SAFETY INSTRUCTIONS 03
IMPORTANT INFORMATION 04
ABOUT ATERNATIVE SITE TESTING (AST) 05
INTRODUCTION OF THE SYSTEM 07
Intended Use
Principle of Measurement 07
Contents of the System 08
Appearance and Key Function of the Meter 09
Meter Display Segments 10
Appearance of the Test Strip 11
PREPARATION BEFORE USE 12
Battery Replacement 12
Setting the Meter and Deleting the Memory 14
BEFORE TESTING 18
About Prodigy
®
Control Solutions 18
Important Control Solution Information 19
How to Perform a Control Solution Test 20
TESTING YOUR BLOOD 23
Testing Procedure 24
Expected Test Results 31
COMPARING METER AND LABORATORY RESULTS 32
USING THE METER MEMORY 33
Viewing Results on the Meter 33
Viewing Results on a Personal Computer 37
CARING FOR YOUR METER AND TEST STRIPS 38
Cleaning 38
Storage 39
PROBLEM-SOLVING GUIDE 41
Special Message 42
Error Message 43
Problem in Operation 45
SPECIFICATIONS 47
Diagnostic Devices, Inc www.prodigymeter.com 1.800.243.2636
3
Page 4

Blood Glucose Monitoring System - User’s Manual
IMPORTANT INFORMATION
• Severe dehydration and excessive water loss may cause false low results. If you believe
you are suffering from severe dehydration, consult your healthcare professional
immediately.
• Test results below 60 mg/dL (3.3mmol/L)*1mean low blood glucose (hypoglycemia). Test
results greater than 240 mg/dL (13.3mmol/L)*2mean high blood glucose (hyperglycemia).
If you get results below 60 mg/dL or above 240 mg/dL, and do not have symptoms, first
repeat the test. If you have symptoms or continue to get results that fall below 60 mg/dL or
above 240 mg/dL, follow the treatment advice of your healthcare professional.
• Apply only capillary whole blood sample to test your blood glucose.Applying other
substances will cause wrong results.
• If you are experiencing symptoms that are not consistent with your blood glucose test
results and you have followed all instructions described in this owner’s manual, consult
your healthcare professional.
• Inaccurate results may occur in severely hypotensive individuals or patients in shock.
Inaccurate low results may occur for individuals experiencing a hyperglycemichyperosmolar state, with or without ketosis. Critically ill patients should not be tested
with blood glucose meters.
• Please refer to your test strip package insert for additional important information.
*1: Kahn, R., and Weir, G.: Joslinís Diabetes Mellitus, 13th ed. Philadelphia: Lea and Febiger
(1994), 489.
*2: Krall, L.P., and Beaser, R.S.: Joslin Diabetes Manual. Philadelphia: Lea and Febiger
(1989), 261-263.
Diagnostic Devices, Inc www.prodigymeter.com 1.800.243.2636
4
Page 5
Blood Glucose Monitoring System - User’s Manual
ABOUT ALTERNATIVE SITE TESTING (AST)
Important: There are limitations for doing AST.
Please consult your healthcare professional before you do AST.
What is AST?
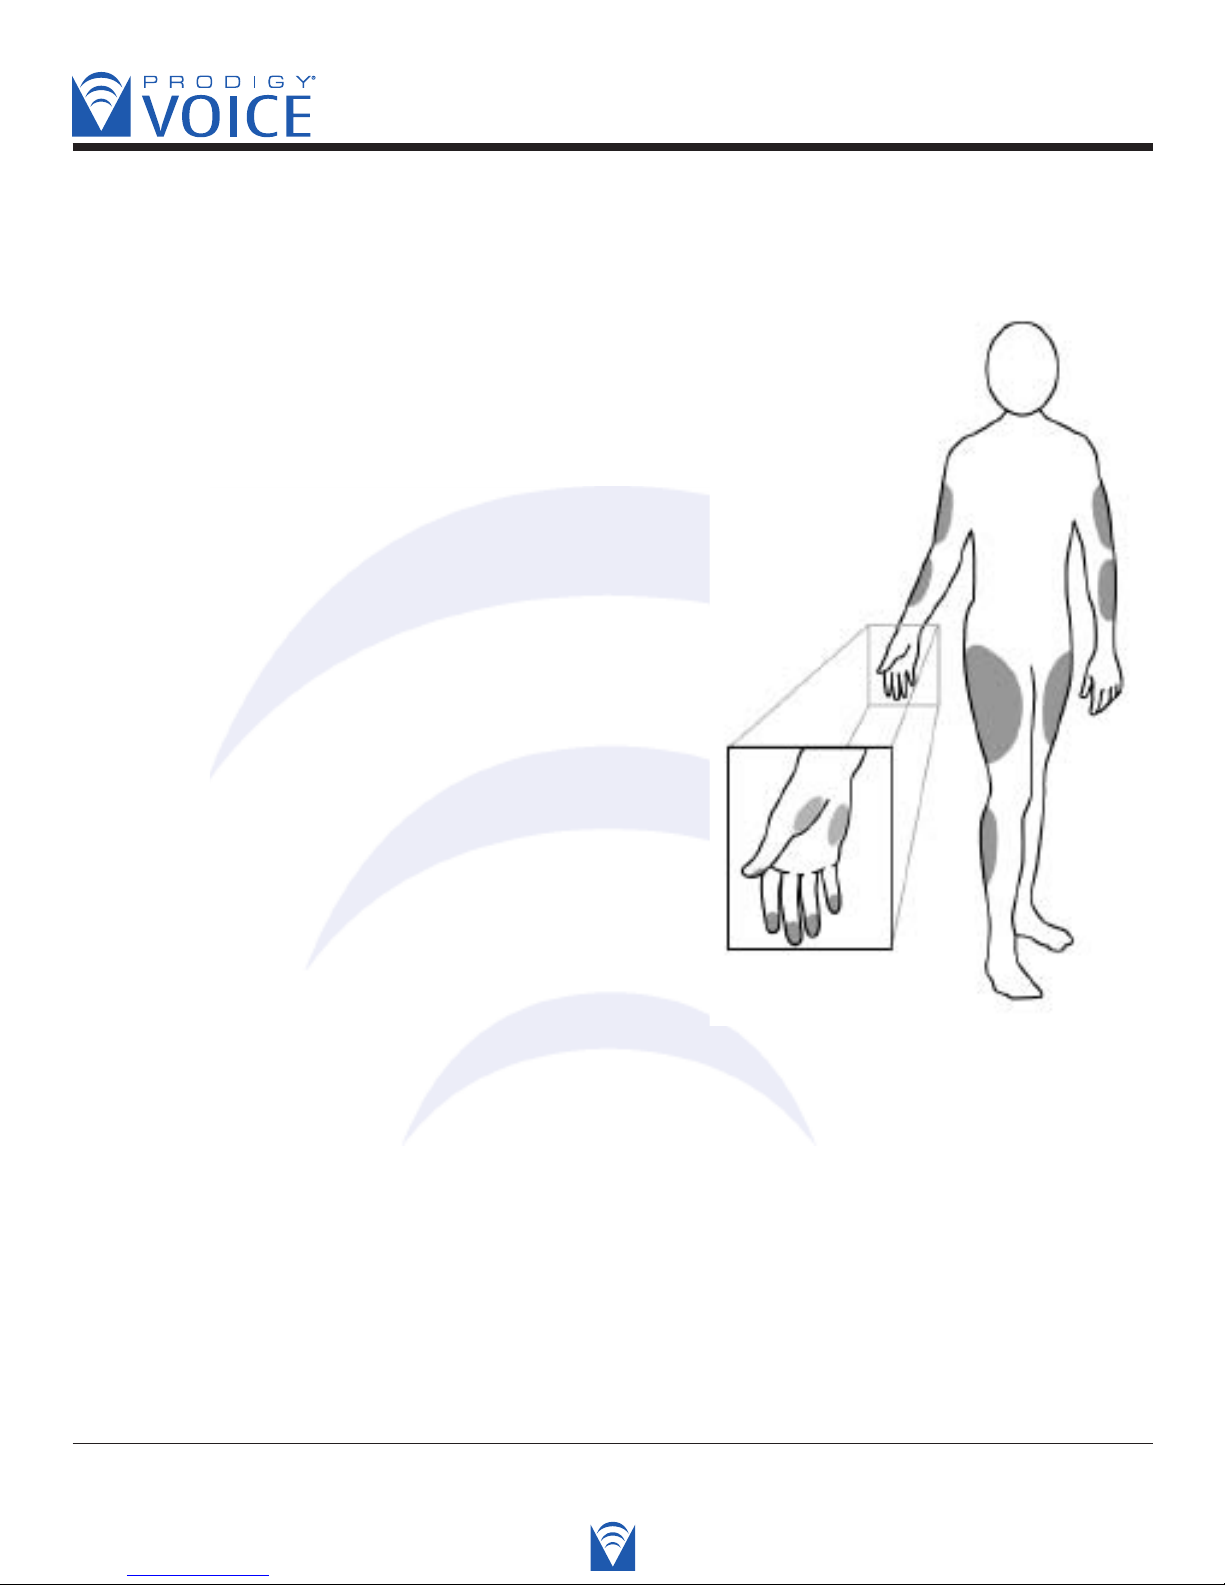
Alternative site testing (AST) means that people use
parts of the body other than fingertips to check their
blood glucose levels. This system allows you to test on
the palm, the forearm, the upper arm, the calf, or the
thigh with the equivalent results to fingertip testing.
What is the advantage?
Fingertips feel pain more readily because they are full
of nerve endings (receptors).At other body sites, since
nerve endings were not so condensed, you will not feel
as much pain as at the fingertip.
When to use AST?
Food, medication, illness, stress and exercise can
affect blood glucose levels. Capillary blood at fingertip
reflects these changes faster than capillary blood at
other sites. Therefore when testing blood glucose
during or immediately after meal, physical exercise,
or any other event, take blood sample from your finger only.
We strongly recommend you do AST ONLY in the following intervals:
• In a pre-meal or fasting state (more than 2 hours since the last meal).
• Two hours or more after taking insulin.
• Two hours or more after exercise.
Diagnostic Devices, Inc www.prodigymeter.com 1.800.243.2636
5
Page 6

Blood Glucose Monitoring System - User’s Manual
Do NOT use AST if:
• You think your blood glucose is low.
• You are unaware of hypoglycemia.
• Your AST results do not match the way you feel.
• You are testing for hyperglycemia.
• Your routine glucose results are often fluctuating.
• You are pregnant.
How to increase the accuracy?
Stimulating blood perfusion by rubbing the puncture site prior to blood extraction has
a significant influence on the glucose value obtained.
Blood from the site without rubbing exhibits a measurably different glucose concentration
than blood from the finger. When the puncture site was rubbed prior to blood extraction, the
difference was significantly reduced.
Please follow suggestions below before getting a drop of blood:
• Rub the puncture site about 20 seconds before puncturing your skin to get enough blood
from the puncture site.
• Use a clear cap (included in the kit) instead of the lancing device cap.
Diagnostic Devices, Inc www.prodigymeter.com 1.800.243.2636
6
Page 7

Blood Glucose Monitoring System - User’s Manual
INTRODUCTION OF THE SYSTEM
• Intended Use
The system is intended for use outside the body (in vitro diagnostic use only). It should be
used only for testing glucose (sugar) and only with fresh capillary whole blood samples (from
the finger, the palm, the forearm, the upper arm, the calf and the thigh). The system is
intended for use in the home and in clinical settings. It should not be used for the diagnosis
of diabetes or for the testing of newborns.
AST in this system can be used only during steady-state blood glucose conditions described
in the “About AST” section.
• Principle of Measurement
The test is based on the measurement of electrical current generated by the reaction of
glucose with the reagent of the strip. The meter measures the current and displays the
corresponding blood glucose level. The strength of the current produced by the reaction
depends on the amount of glucose in the blood sample.
Diagnostic Devices, Inc www.prodigymeter.com 1.800.243.2636
7
Page 8
Blood Glucose Monitoring System - User’s Manual
WARR ANTY CARD
BloodGlucose Monitoring System
• Contents of the System
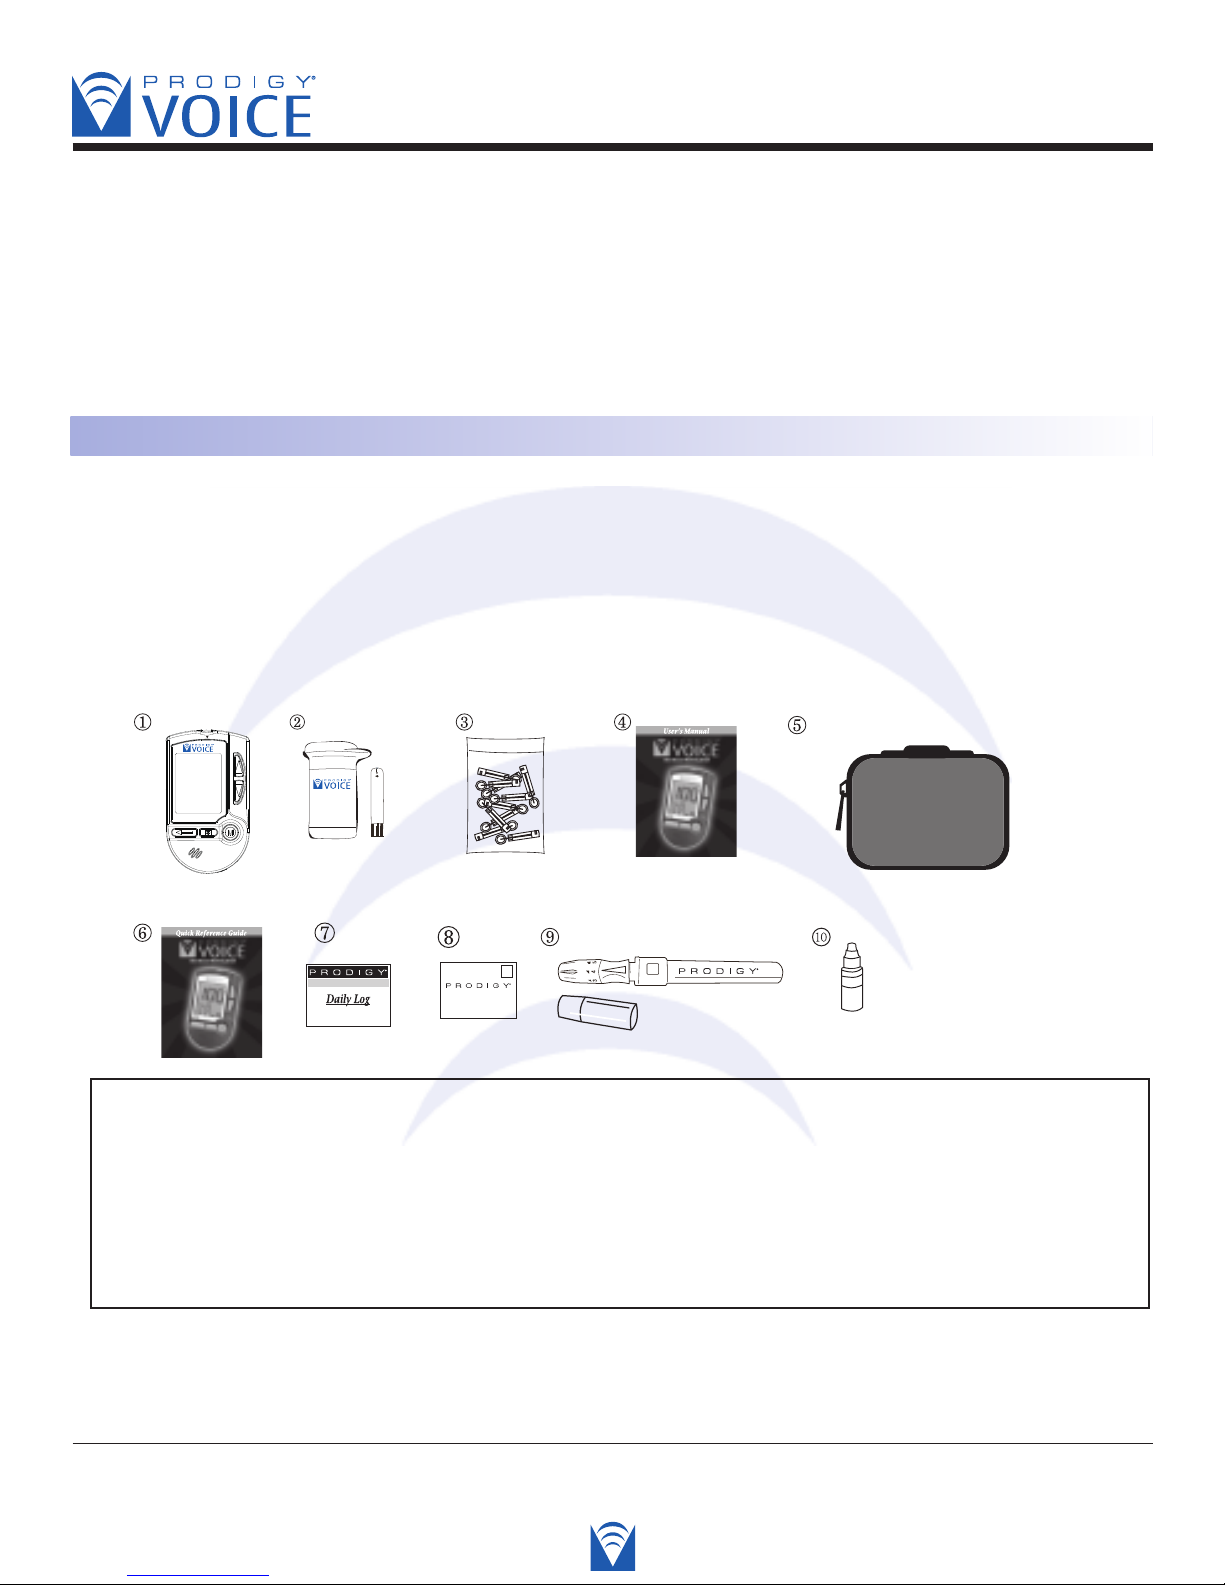
The Prodigy®Voice system consists of three main products: Prodigy®Voice blood glucose meter,
Prodigy®Voice test strips, and a Prodigy®control solution. These products have been designed,
tested, and proven to work together as a system to produce accurate blood glucose test results.
Use only Prodigy®Voice test strips and Prodigy®control solution with Prodigy®Voice meter.
Your system includes:
1) Prodigy
2) Prodigy
®
Voice Meter 7) Daily log book
®
Voice Test strips 8) Lancing device with clear cap for Alternative Site Testing
3) Sterile lancets 9) Warranty card
4) User’s manual 10) (1) Prodigy
5) Carrying case 11) Prodigy
®
Control Solution
®
Voice Manual CD (not shown)
6) Quick Reference Guide 12) (2) 1.5v AAA alkaline batteries (not shown)
PLEASE NOTE
1. Check your box to be sure that it is was unopened prior to use, and that it contains all items listed
above. If either of these conditions occurred, please return your system to the place of purchase.
2. There are 2 levels for PRODIGY®control solutions: low and high. Please note that only one control solution
is included in the standard kit, the other is optional. Please ask your local Customer Service for availability.
Diagnostic Devices, Inc www.prodigymeter.com 1.800.243.2636
8
Page 9
Blood Glucose Monitoring System - User’s Manual
1
2
11
10
3
4
8
9
5
6
7
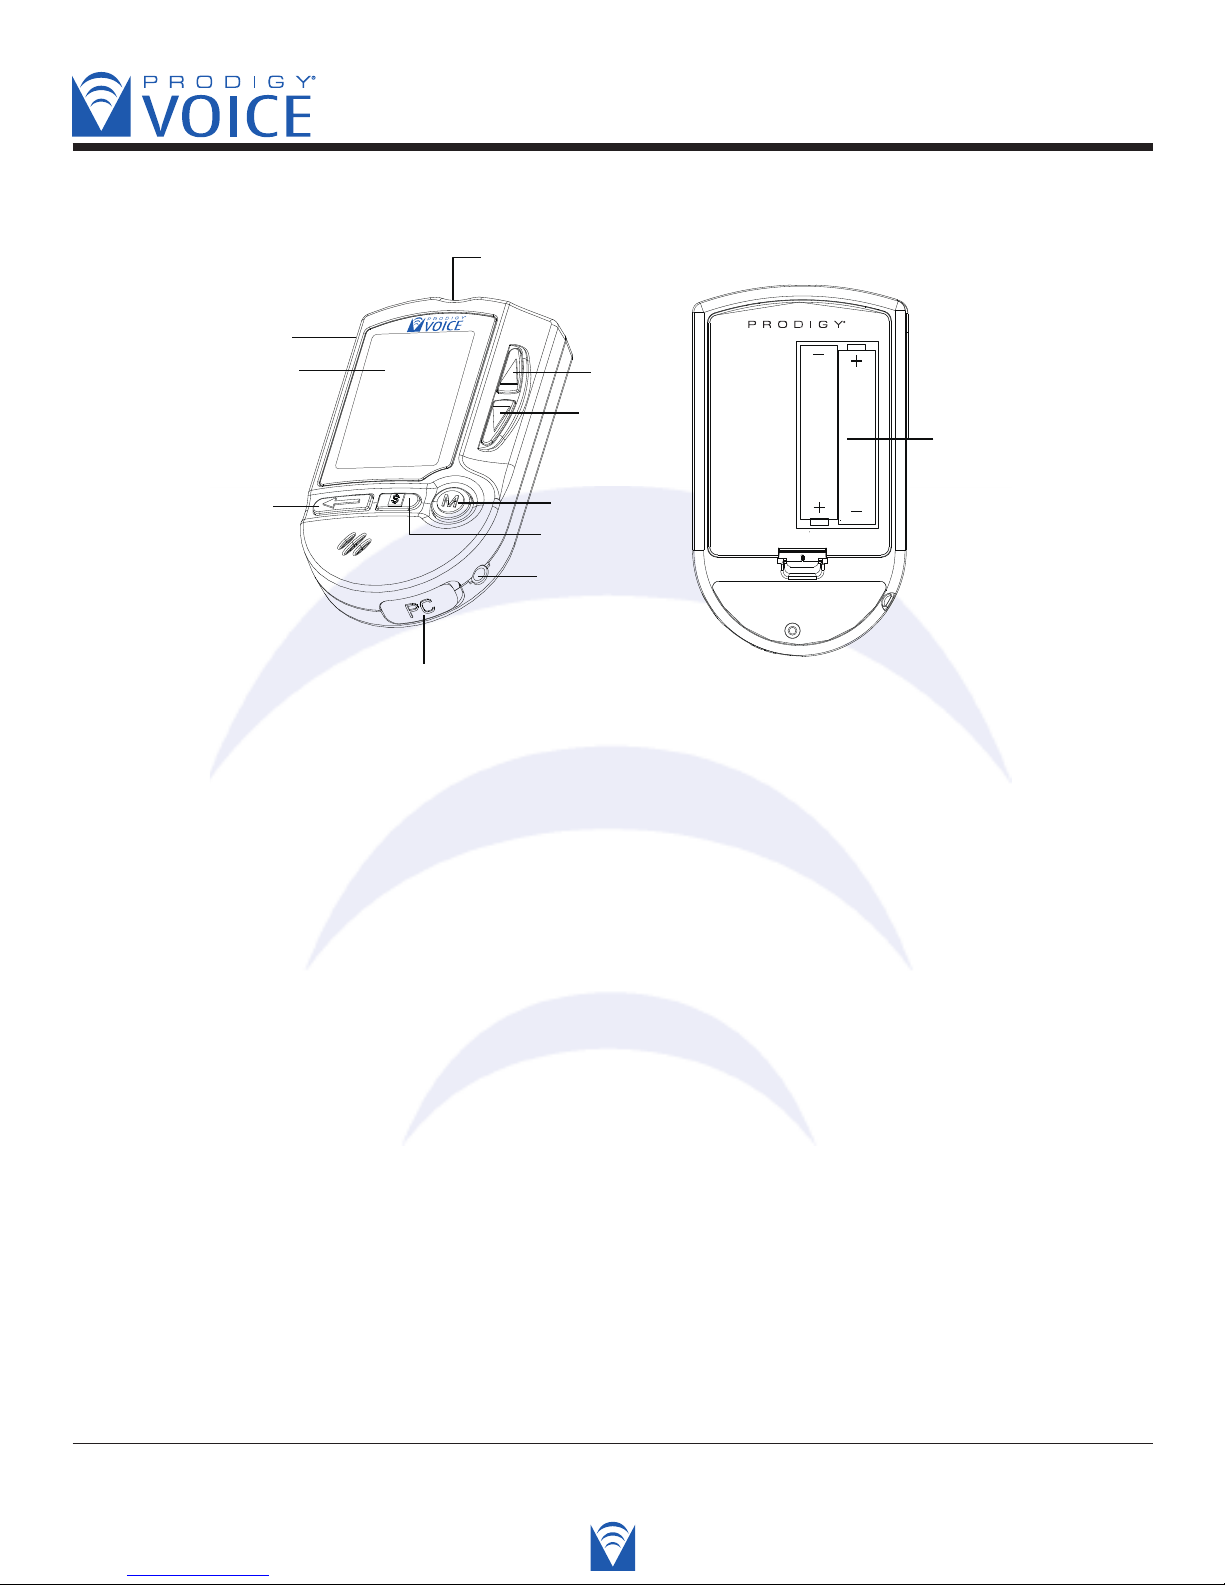
• Appearance and Key Function of the Meter
1. LCD DISPLAY- Guides you through the test using symbols and simple messages.
2. STRIP-EJECT BUTTON- The used strip will be ejected after you push up the button.
3. TEST SLOT- Insert the test strip into the slot and the meter will automatically turn on.
4. UP BUTTON-
5. DOWN BUTTON-
Is used to increase the value of the current setting and the speaking volume.
Is used to decrease the value of the current setting and the speaking volume.
6. M BUTTON- “M” is also refered to as the main button. Press it to turn on the meter and
enter the memory or perform other functions described in the manual.
7. SET BUTTON- Is used to set up the meter.
8. EARPHONE JACK- Used to the hear results with a earphone (headset).
9. DATA PORT-
Is for cable connection to your personal computer (cable required - sold separately).
10. REPEAT BUTTON- Is used to replay the previous recording that you want to hear again
while operating the meter.
11. BATTERY COMPARTMENT- Where batteries are located.
Diagnostic Devices, Inc www.prodigymeter.com 1.800.243.2636
9
Page 10
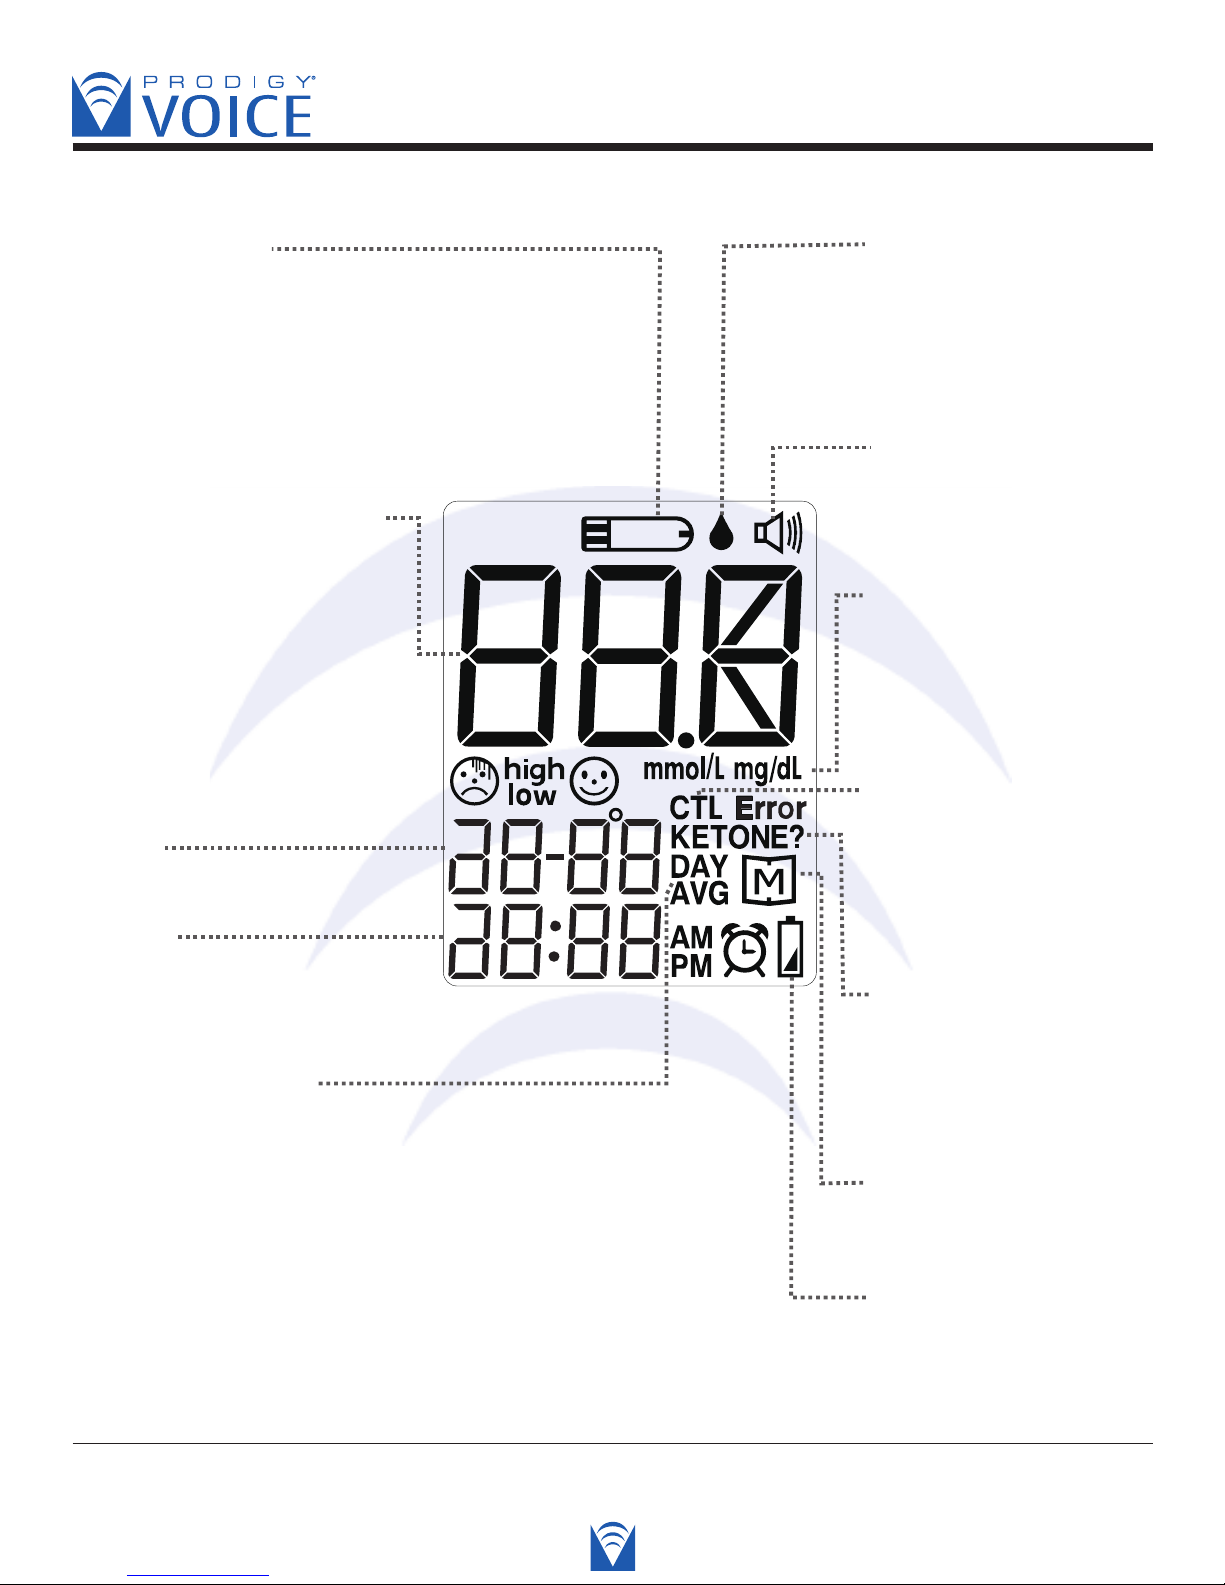
• Meter Display Segments
TEST STRIP
SYMBOL
Appears when the meter
is turned on.
BLOOD DROP
SYMBOL
Flashes when it is
ready to apply the
sample.
VOICE SYMBOL
Indicates if audio
function is on or off.
TEST RESULT AREA
TIME
DATE
Displays glucose results.
A decimal point appears
when the measurement
unit is mmol/L.
LOW BATTERY
SYMBOL
Appears when the
battery power is low.
CTL SYMBOL
Appears when doing a
control solution test.
The result will not be
stored in the memory.
MEASUREMENT
UNIT
Appears with the test
result either in mg/dL
or in mmol/L .
KETONE WARNING
Appears when the
test result is equal or
higher than 240mg/dL
(13.3mmol/L).
MEMORY SYMBOL
Appears when you review
the memory.
DAY AVERAGE
Indicates that the displayed
result is an average.
Blood Glucose Monitoring System - User’s Manual
Diagnostic Devices, Inc www.prodigymeter.com 1.800.243.2636
10
Page 11
Blood Glucose Monitoring System - User’s Manual
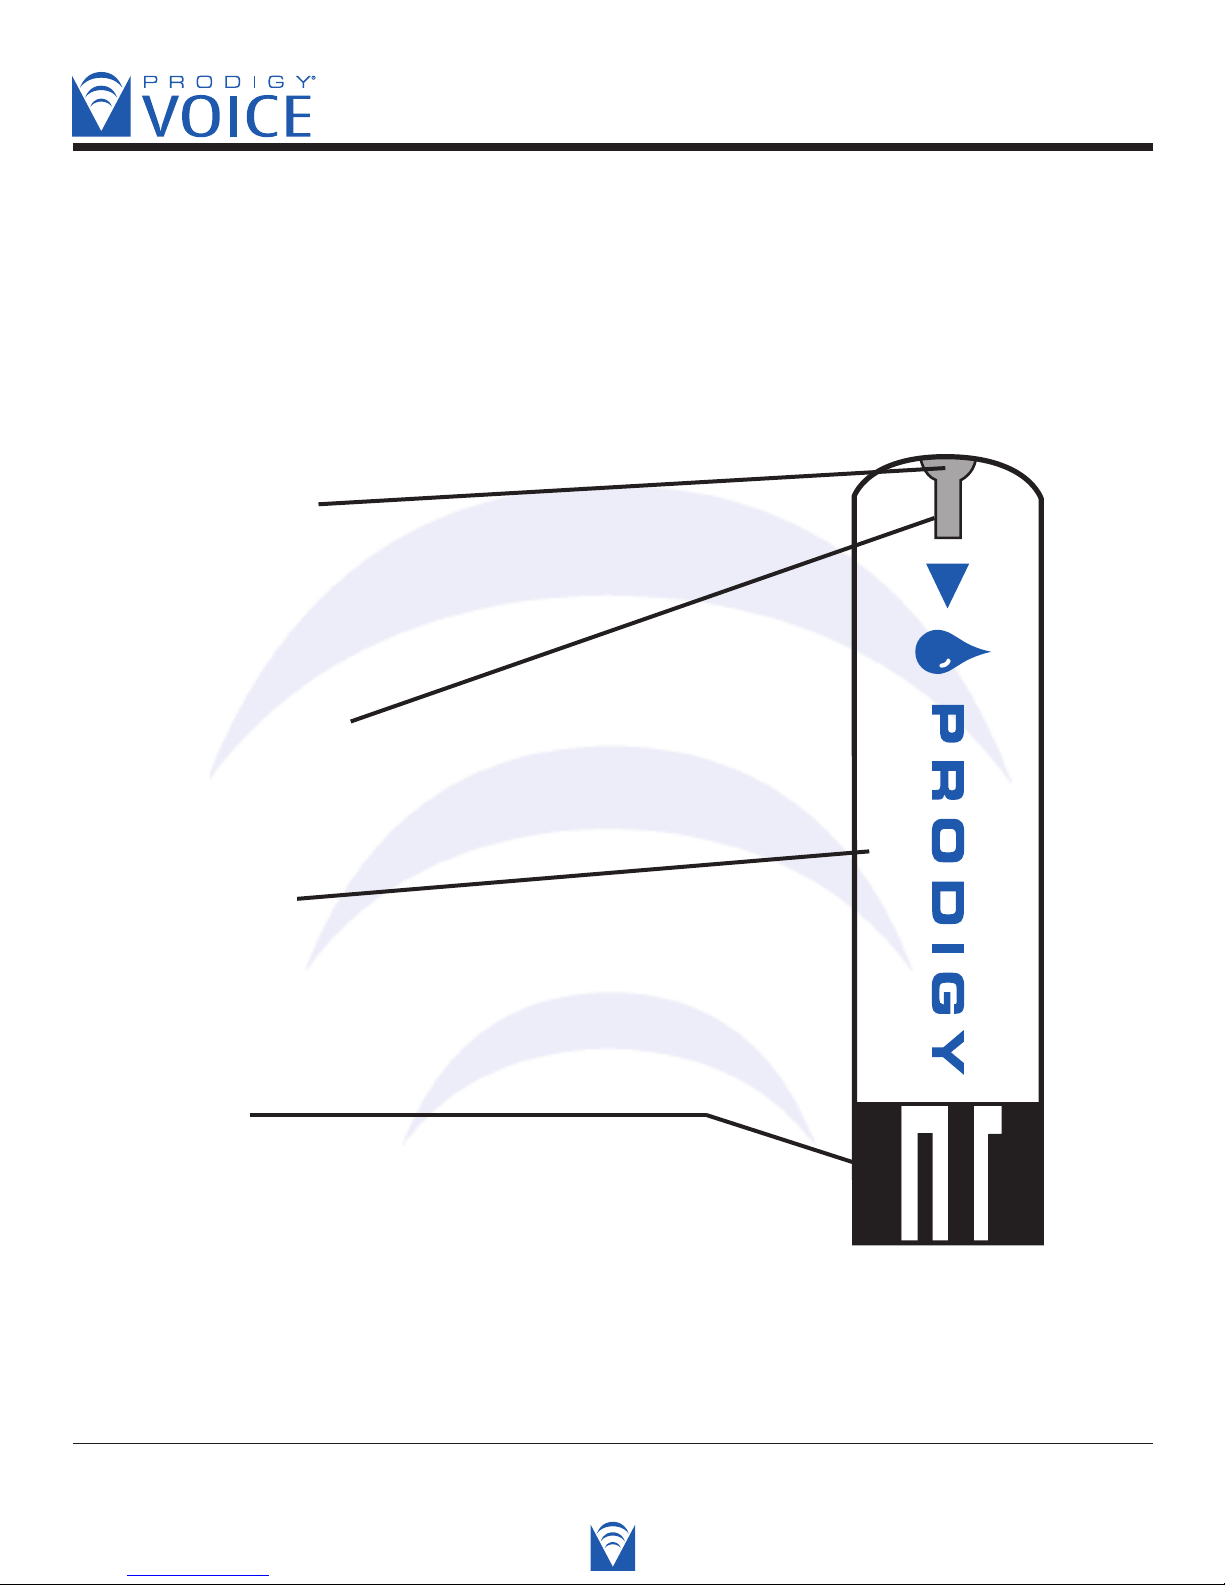
• Appearance of the Test Strip
Your system measures the amount of sugar (glucose) in whole blood. Blood is applied to the
absorbent channel of the test strip and is automatically drawn into the reaction cell where a
chemical reaction takes place.
The test strip consists of the following parts:
Absorbent Channel
Apply a drop of blood here,
The blood will be drawn up automatically.
Confirmation Window
This is where you confirm if enough blood
has been drawn into the absorbent channel of the strip.
Test Strip Handle
Hold this part to insert the test strip into the meter slot.
Contact Bars
Insert this end of the test strip into the meter.
Push it in firmly until it will go no further.
See pages 24~29,“TESTING YOUR BLOOD”, section for complete instructions.
Diagnostic Devices, Inc www.prodigymeter.com 1.800.243.2636
11
Page 12
Blood Glucose Monitoring System - User’s Manual
PREPARATION BEFORE USE
• Battery Replacement
Your meter comes with two (2) 1.5V AAA size alkaline batteries.
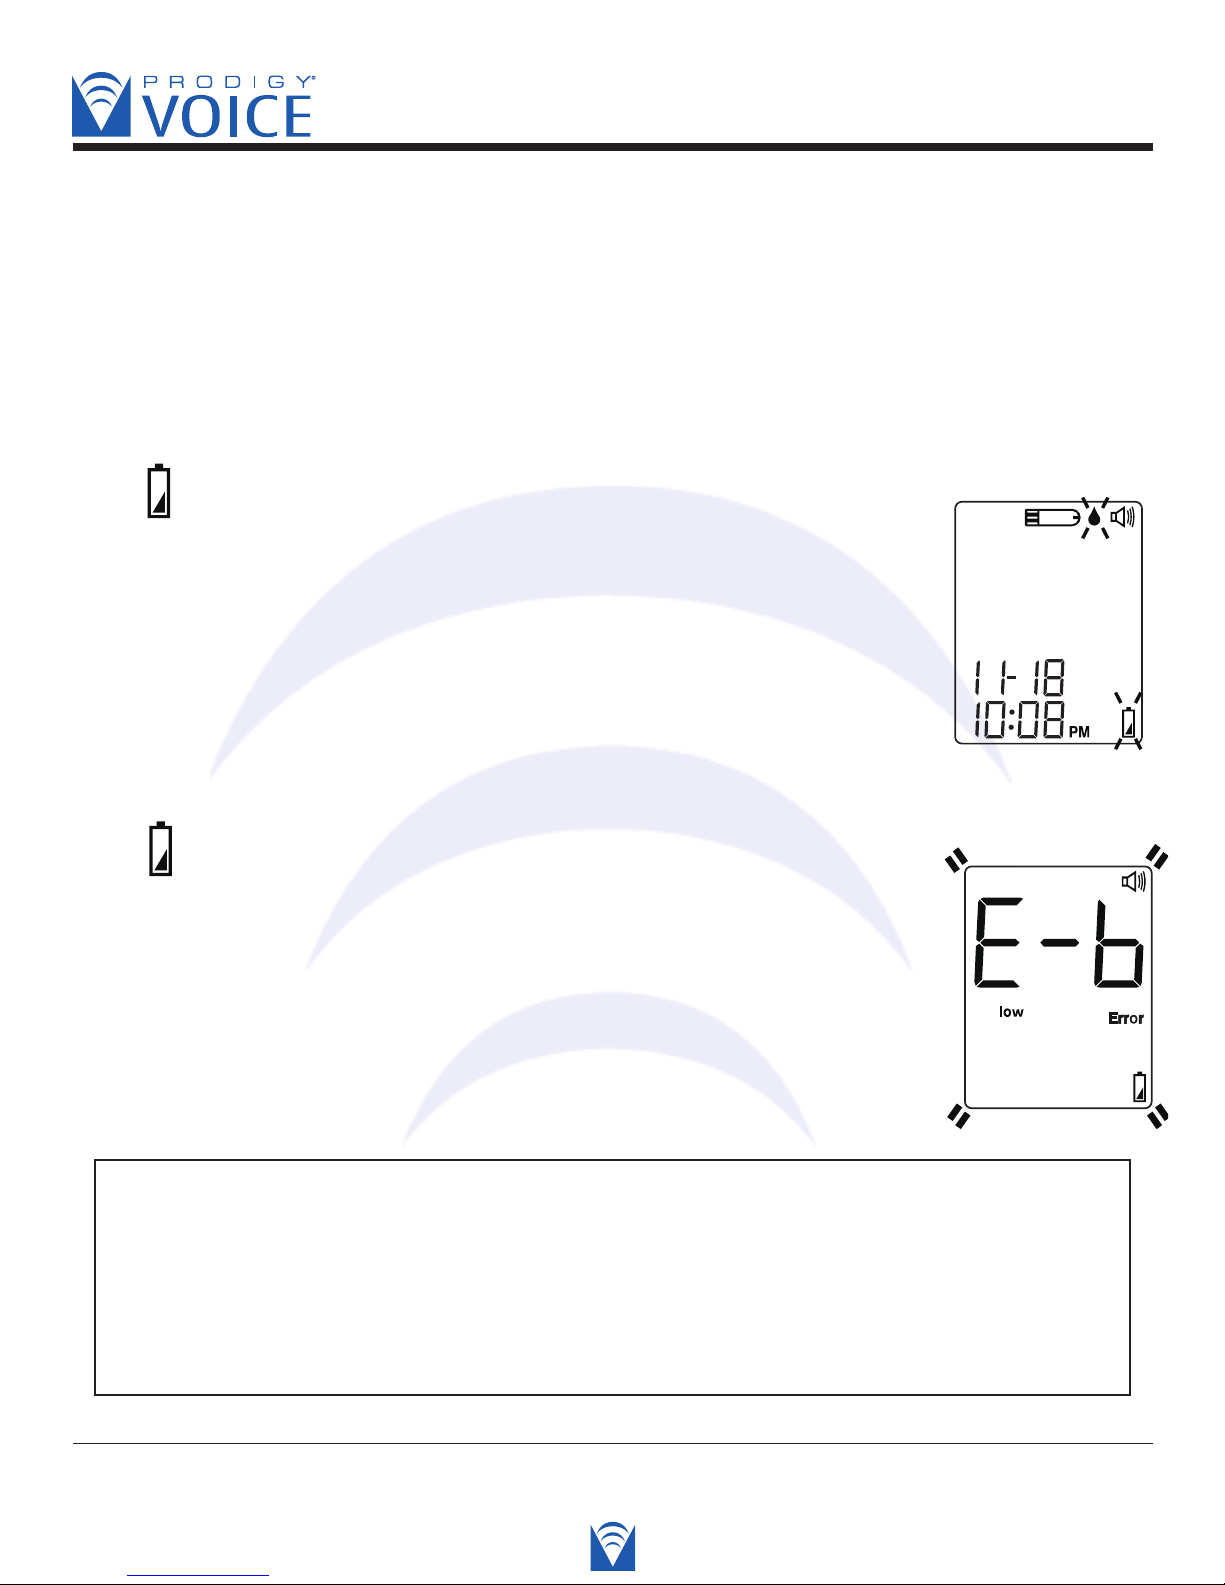
The meter will alert you when the power is getting low by
displaying two different messages:
1. The symbol appears together with other display messages: the
meter is functional and the result remains accurate, but it is time to
change the batteries.
Voice SPEAKS: “Battery is low, please replace.”
2. The symbol appears with the “E-b” symbol,“Error” and “low”:
the batteries can not provide enough power to do a test.You must
change the batteries immediately. (Whole screen is blinking).
Voice SPEAKS: “Battery is dead, please replace.”
PLEASE NOTE
• Replacing the batteries does not affect the test results stored in memory. However,
the time, date and unit settings may need to be re-set.
• Batteries might leak chemicals if not used for a long time. Remove the batteries if you
are not going to use the device for an extended period (i.e., 3 months or more).
• Please discard dead batteries properly.
Diagnostic Devices, Inc www.prodigymeter.com 1.800.243.2636
12
Page 13
Blood Glucose Monitoring System - User’s Manual
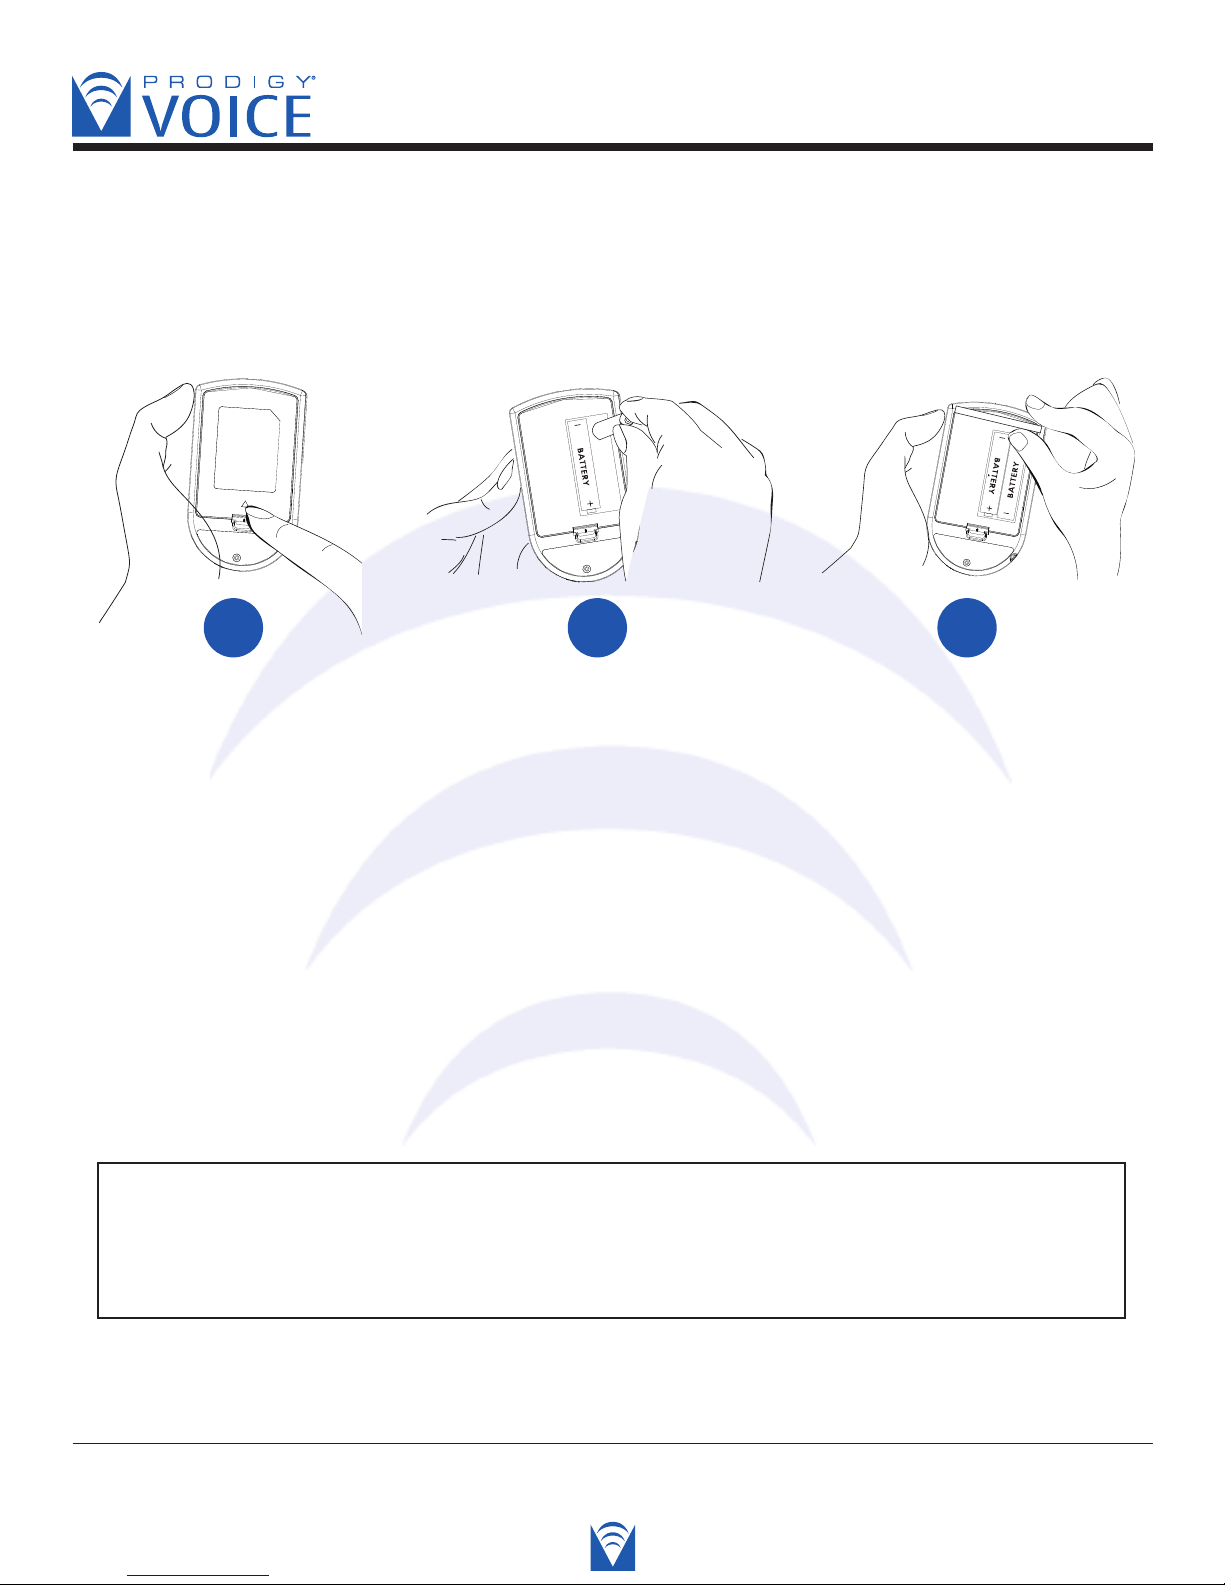
To replace the batteries, make sure that the meter is turned off.
1
Press the edge of the
battery cover and lift
it up to remove.
WARNING
2
Remove the old
batteries and replace
with two (2) new
1.5V AAA size
alkaline batteries.
3
Close the battery
cover. If the batteries
are inserted correctly,
you will hear a
“beep” sound.
As with all small objects, the batteries should be kept away from small children as
a safety precaution. If the batteries are swallowed, seek medical assitance
immediately.
Diagnostic Devices, Inc www.prodigymeter.com 1.800.243.2636
13
Page 14
Blood Glucose Monitoring System - User’s Manual
• Setting the Meter and Deleting the Memory
Your meter comes with the time, date, unit of measurement, unit of temperature preset,
speaking function and memory deletion. If you need to set these parameters, please follow
steps below.
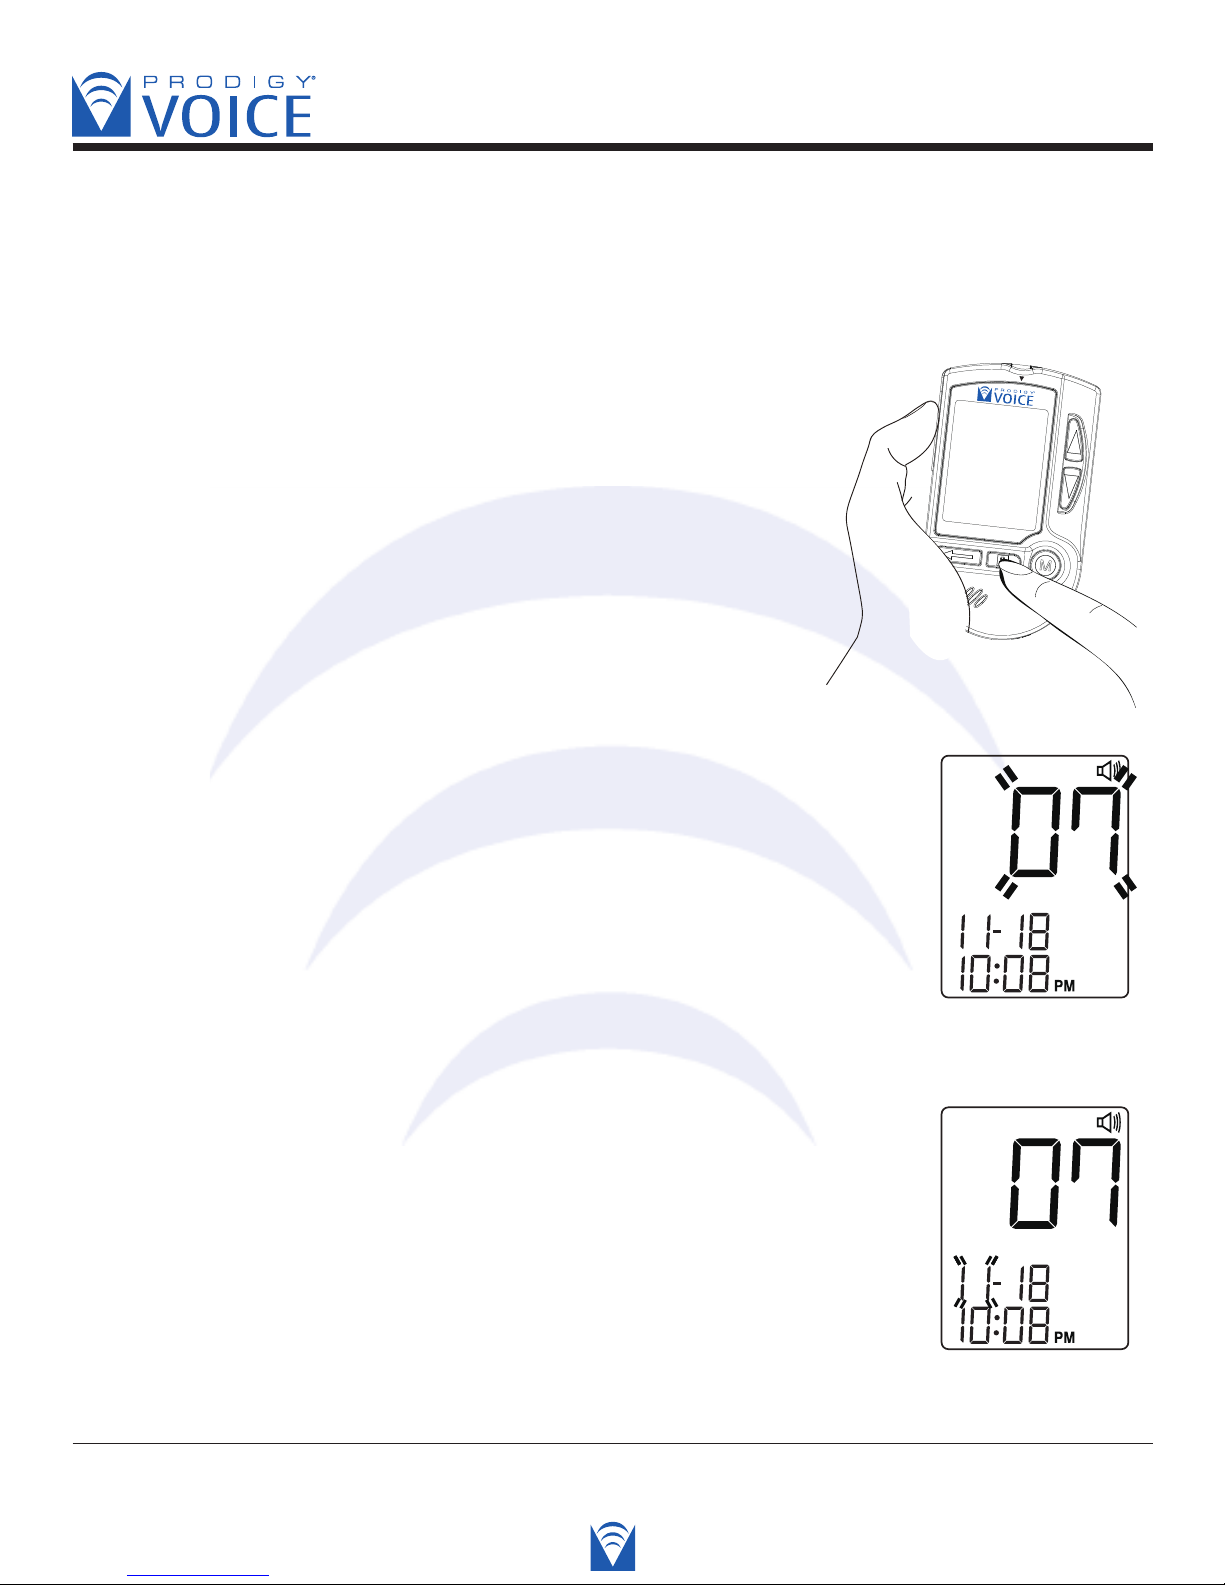
Start with the meter off. Then press and hold the
set button. The meter is now in the setting mode.
You can start setting up the meter.
STEP 1 Set the Year
Press the “Up” or “Down” button until the desired year appears.
Press the S button and then the month segment flashes.
Voice SPEAKS: “You are now in setting mode. The year is 2007.”
STEP 2 Set the Month
Press the “Up” or “Down” button until the desired month appears.
Press the S button and then the day segment flashes.
Voice SPEAKS: “The month is November”
Diagnostic Devices, Inc www.prodigymeter.com 1.800.243.2636
14
Page 15
Blood Glucose Monitoring System - User’s Manual
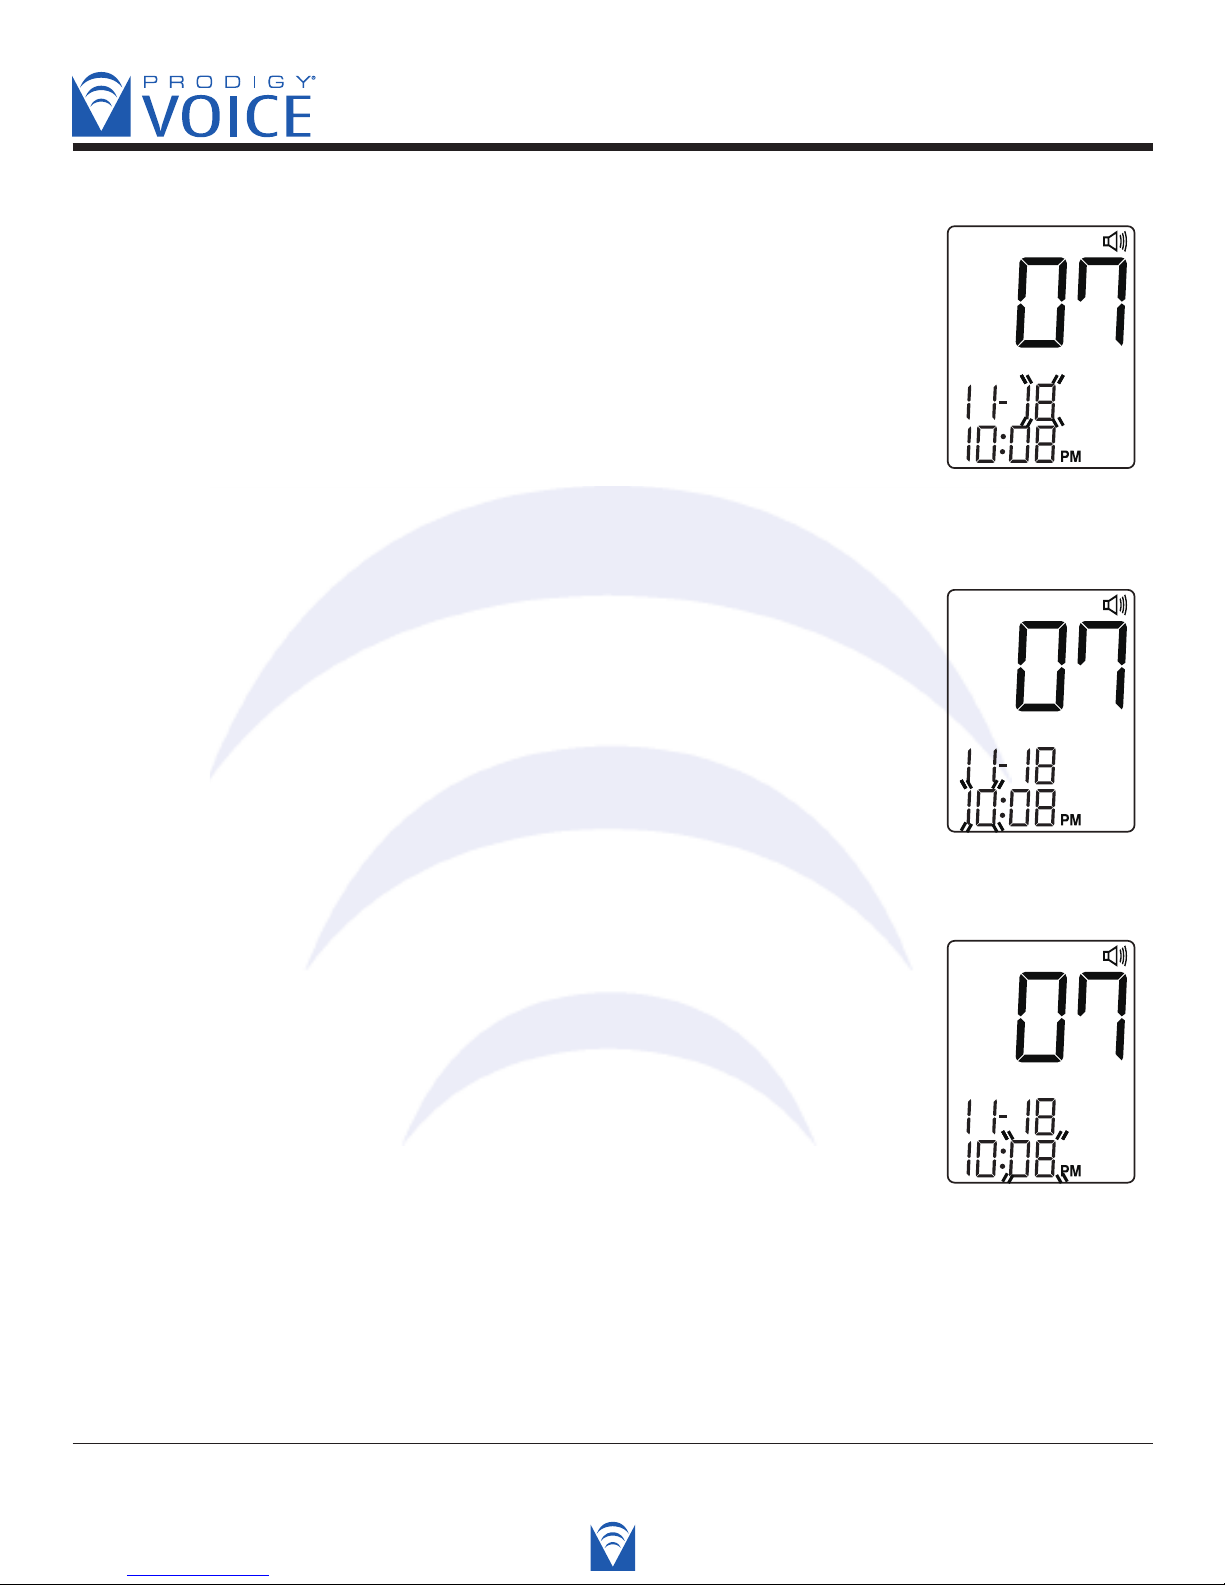
STEP 3 Set the Day
Press the “Up” or “Down” button until the desired day appears.
Press the S button and then the hour segment flashes.
Voice SPEAKS: “The day is the 18th.”
STEP 4 Set the Hour
Press the “Up” or “Down” button until the desired hour appears.
Press the S button and then the minute segment flashes.
Voice SPEAKS: “The hour is 10 PM.”
STEP 5 Set the Minutes.
Press the “Up” or “Down” button until the desired minute appears.
Press the S button and then the current unit of measurement
flashes.
Voice SPEAKS: “The minute is 08.”
Diagnostic Devices, Inc www.prodigymeter.com 1.800.243.2636
15
Page 16
Blood Glucose Monitoring System - User’s Manual
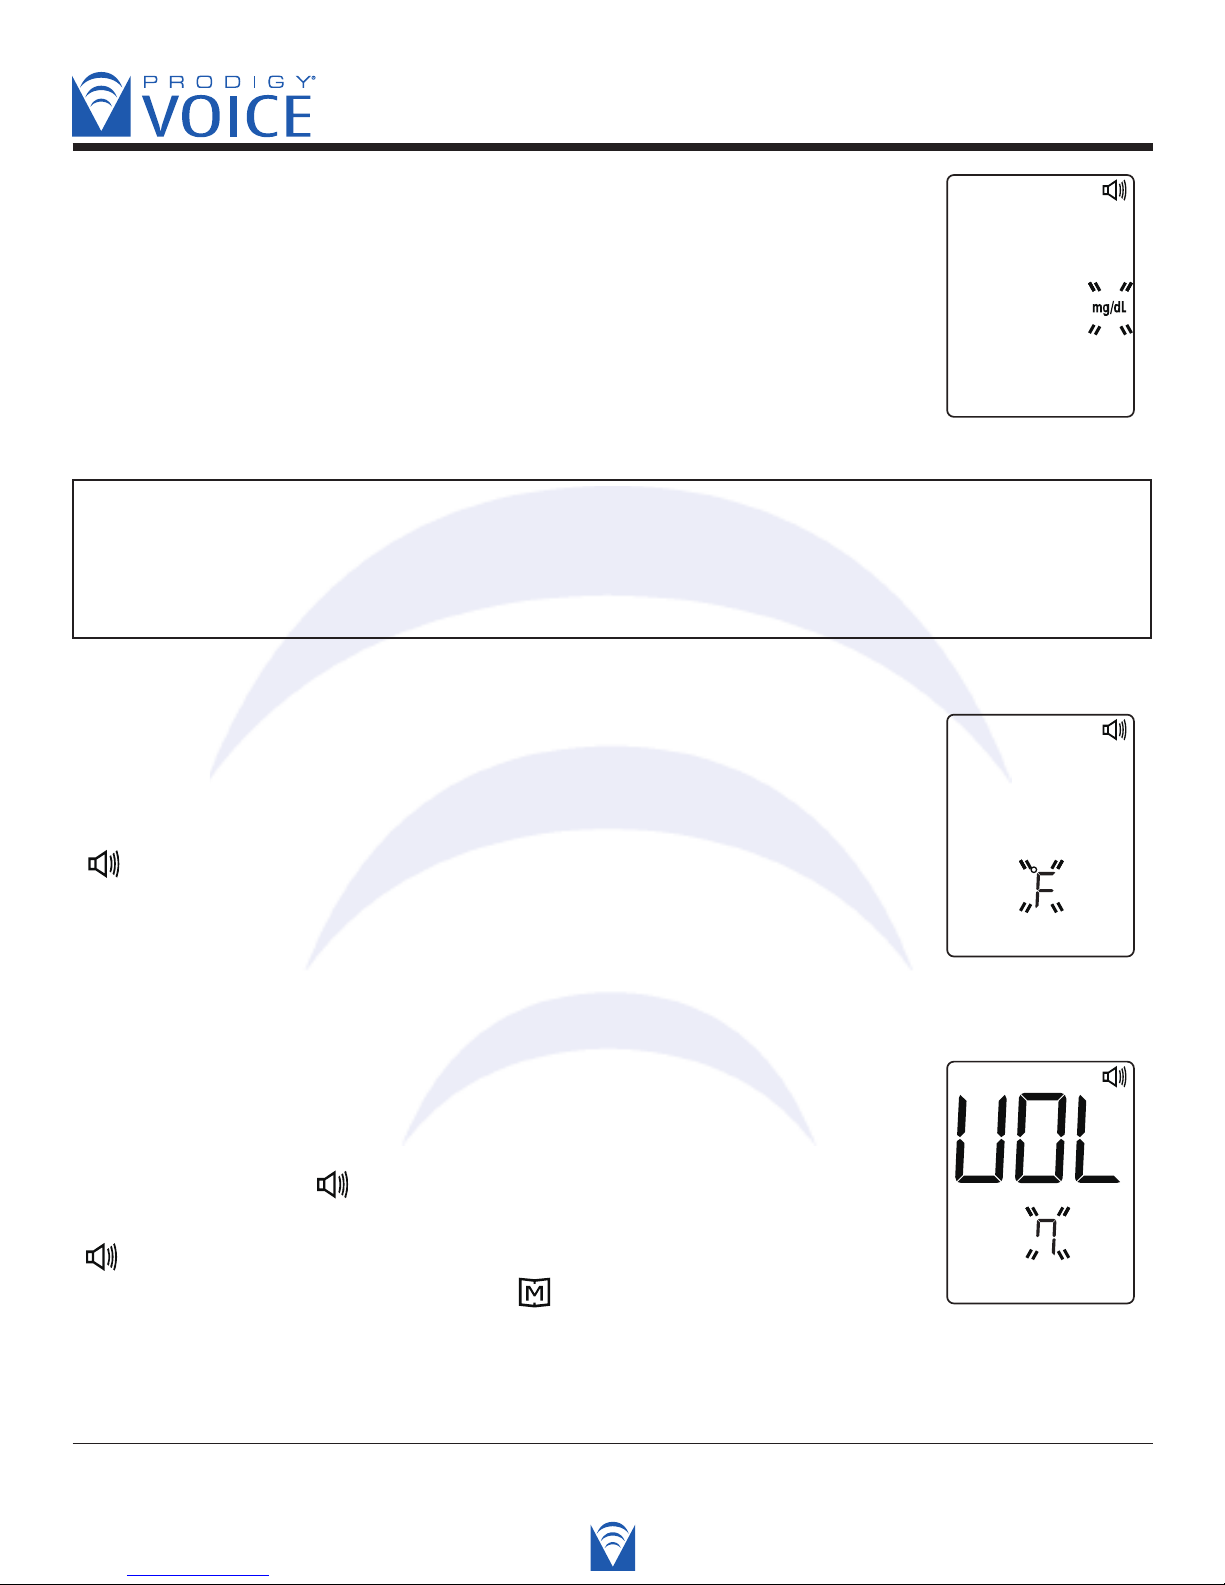
STEP 6 Select mg/dL or mmol/L
Press the “Up” or “Down” button to select the unit of measurement
you want to use. Press the S button and then the current unit
of temperature flashes.
WARNING
The milligram per deciliter (mg/dL) is the standard unit in the United States. The millimole
per liter (mmol/L) is the standard unit in Canada. Use of the wrong unit of measure may
cause you to misinterpret your blood glucose level, and may lead to incorrect treatment.
STEP 7 Select “ ºF ” for Fahrenheit or “ ºC ” for Celsius
Press the “Up” or “Down” button to select the unit of temperature
you want to use. Press the S button and the meter will display “VOL”,
“ ” and a flashing number.
Voice SPEAKS: “Temperture unit is degrees Fahrenheit.”
STEP 8 Select Speaking Function & Volume
Press the “Up” and “Down” buttons until you hear the desired
speaking volume. Number 0 indicates that the speaking function
is turned off, where “ ” does not display on LCD during testing.
Number 1 to 7 indicates speaking volume from low to high, where
“ ” displays on LCD during testing. Press the S button and the
meter will display “dEL” with flashing “ ” symbol.
Voice SPEAKS: “Voice volume is 7.”
Diagnostic Devices, Inc www.prodigymeter.com 1.800.243.2636
16
Page 17
Blood Glucose Monitoring System - User’s Manual
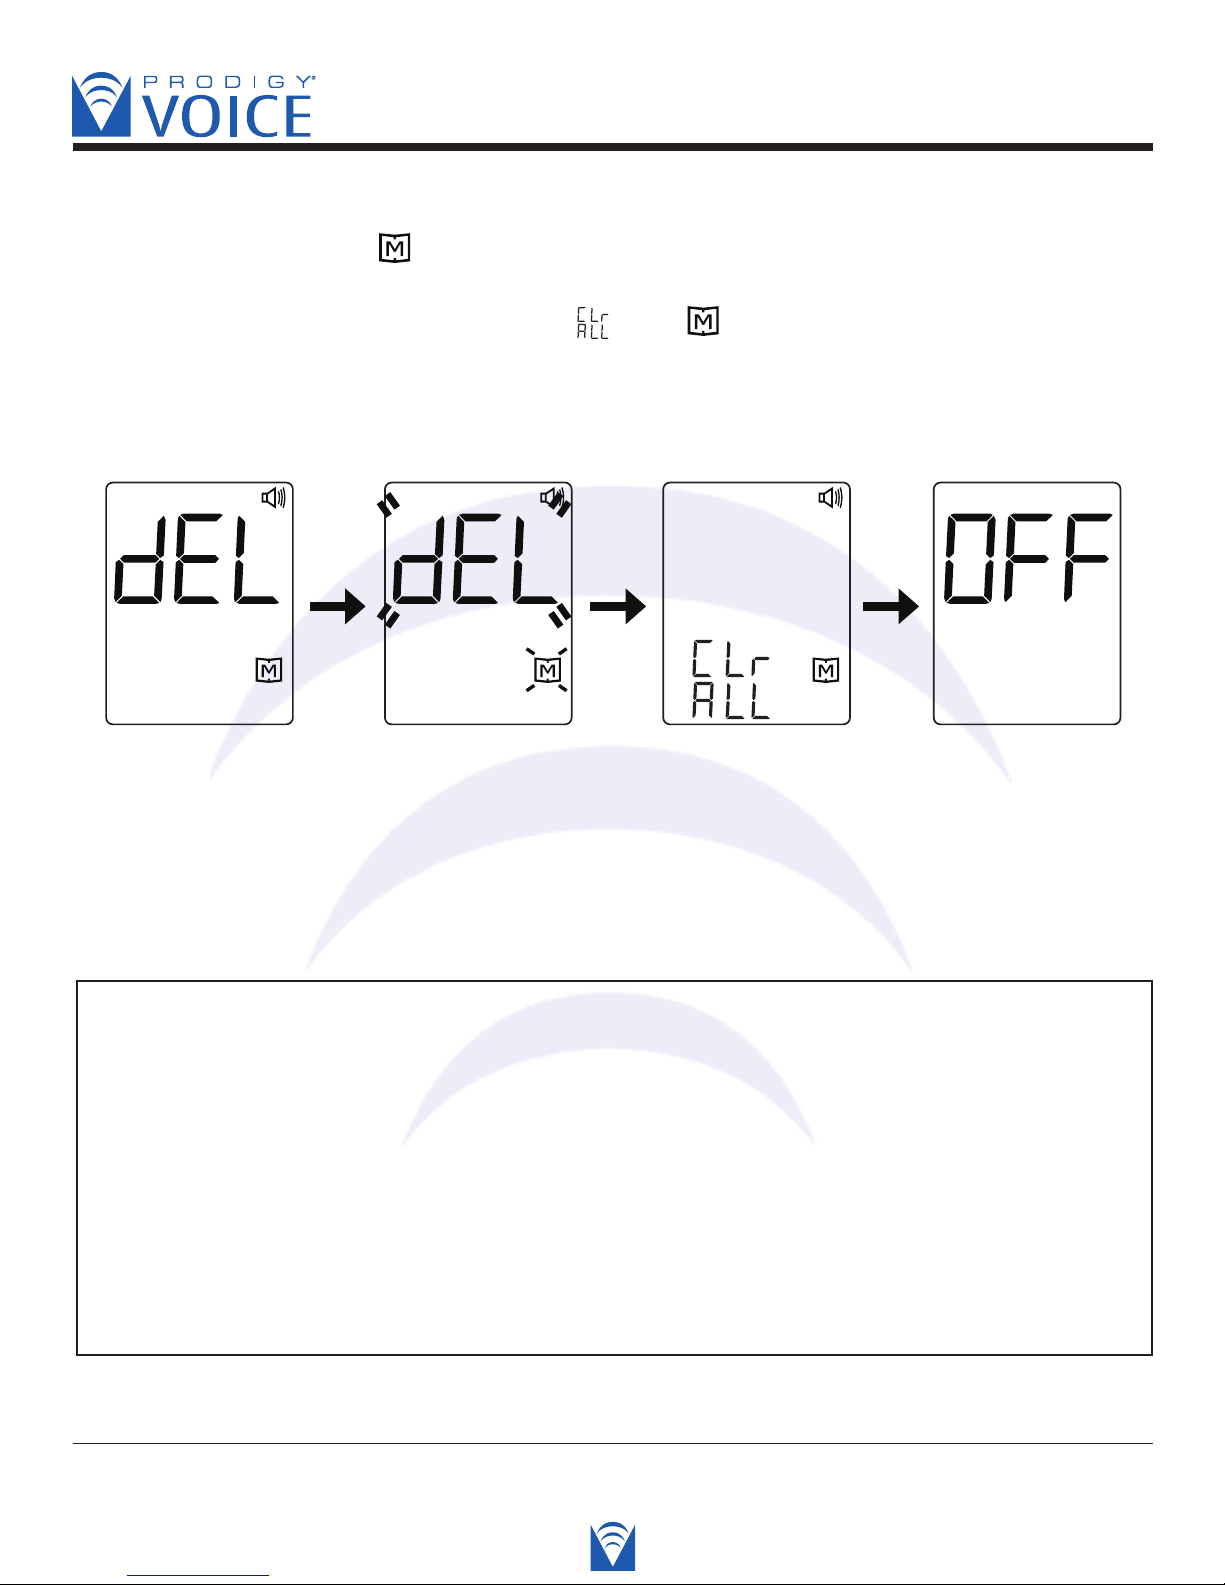
STEP 9 Delete the Memory
When “dEL” and blinking “ ” symbol is displayed, if you do not want to delete memory,
press the S button again to skip this step and turn off the meter. If you would like to delete
ALL memory, press the “Up” button twice. “ ”and “ ” are displayed on the meter, which
means that all data stored are deleted. The memory of this meter is empty now. The meter
will automatically turn off.
Voice SPEAKS: “Delete memory record function. Press “up” button to clear all records.
Are you sure you want to delete ALL records? Press “up” button again to
clear all records.”
PLEASE NOTE
• The time, date, unit of measurement and unit of temperature can ONLY be changed in
the setting mode. Therefore, when you perform a glucose testing, it is not possible to
change those parameters.
• Your meter displays 7, 14, 21, 28, 60 and 90 day averages which you can access
from the meter memory. These averages are calculated from results obtained during
the 7, 14, 21, 28, 60 and 90 days preceding the current date and time settings.When
the date and time are changed, the 7, 14, 21, 28, 60 and 90 day averages may change.
• While the meter is in the setting mode, if no button is pressed for 3 minutes, the meter
will turn off automatically.
Diagnostic Devices, Inc www.prodigymeter.com 1.800.243.2636
17
Page 18

Blood Glucose Monitoring System - User’s Manual
BEFORE TESTING
• About Prodigy®Control Solutions
PRODIGY®control solutions contain a known amount of glucose that reacts with Prodigy
®
test strips. By testing your control solution and comparing the test results with the expected
range printed on the test strip vial label, you can make sure that the meter and the test strips
are working properly together as a system and that you are performing the test correctly. It is
very important that you do this simple check routinely to make sure you get accurate results.
How often should the control solution test be performed?
• When you use this system to test your blood for the first time, practice the procedure using
control solution. When you can do three tests in a row that are within the expected range,
you are ready to test your blood.
• For routinely check the meter and test strips, perform a single test for each level of control
solution at least once a week.
When should the control solution test be performed?
• When you first get your Prodigy®Voice meter.
• When you begin using a new vial of test strips.
• Whenever you suspect that the meter or test strips are not working properly.
• When your blood glucose test results are not consistent with how you feel, or when you
think your results are not accurate.
• When your test strips are exposed to extreme environmental conditions (See “Storage”
section of this manual).
• When you want to practice performing the test.
• If you drop the meter.
• After changing the batteries.
Diagnostic Devices, Inc www.prodigymeter.com 1.800.243.2636
18
Page 19
Blood Glucose Monitoring System - User’s Manual
• Important Control Solution Information
• Use only Prodigy®Control Solutions.
• Check the expiration date on the control solution bottle. Do not use if expired.
• Control solution, meter, and test strips should come to room temperature
(68-77º F/20-25º C) before testing.
• Shake the bottle before use, discard the first drop of control solution after squeezing,
wipe off the dispenser tip to avoid contanimation.These steps ensure you will get a good
sample and an accurate result.
• Use within a period of 90 dyas from the date opened. Record the discard date (date opened
plus 90 days) on the control solution bottle. Discard after 90 dyas.
• Store the control solution tightly closed at temperatures below 86ºF (30ºC).
Do not refrigerate.
PLEASE NOTE
The control solution range printed on the test strip vial is for Prodigy®control solutions only.
It is used to test meter and test strip performance. It is not recommended range for your
blood glucose level.
Diagnostic Devices, Inc www.prodigymeter.com 1.800.243.2636
19
Page 20
Blood Glucose Monitoring System - User’s Manual
• How to Perform a Control Solution Test
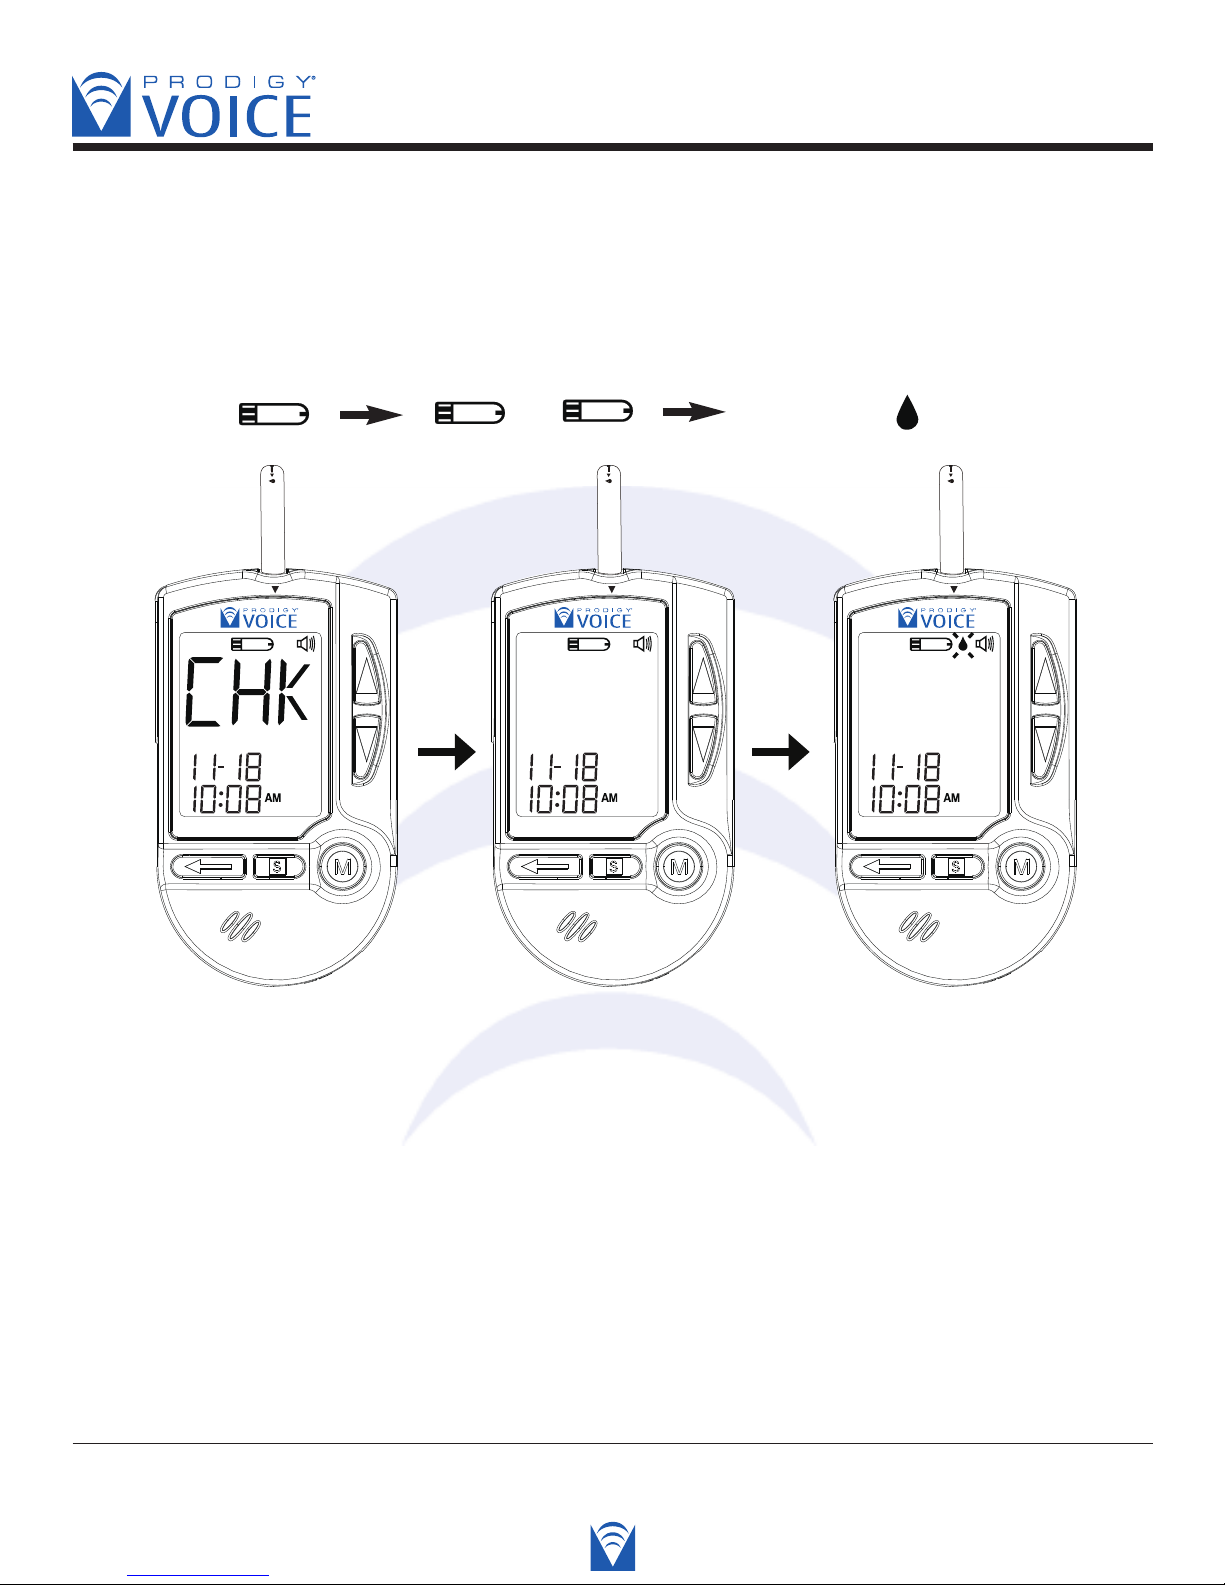
STEP 1 Insert the Test Strip
Insert a test strip with contact bars end first and facing up, into the test slot. The meter turns
on automatically and displays the followings in sequence:
“CHK” and “ ” “ ” “ ” and flashing “ ”
Voice SPEAKS: “Thank you for using Prodigy Voice.”
Test Strip inserted.
Today’s date is (Today’s date; Example: November 18th, 2007).
The time is (The time it is at time of test, Example: 10:08AM).
Prodigy Voice works only with the Prodigy Voice test strips.
Please apply blood to the test strip.”
Diagnostic Devices, Inc www.prodigymeter.com 1.800.243.2636
20
Page 21
Blood Glucose Monitoring System - User’s Manual
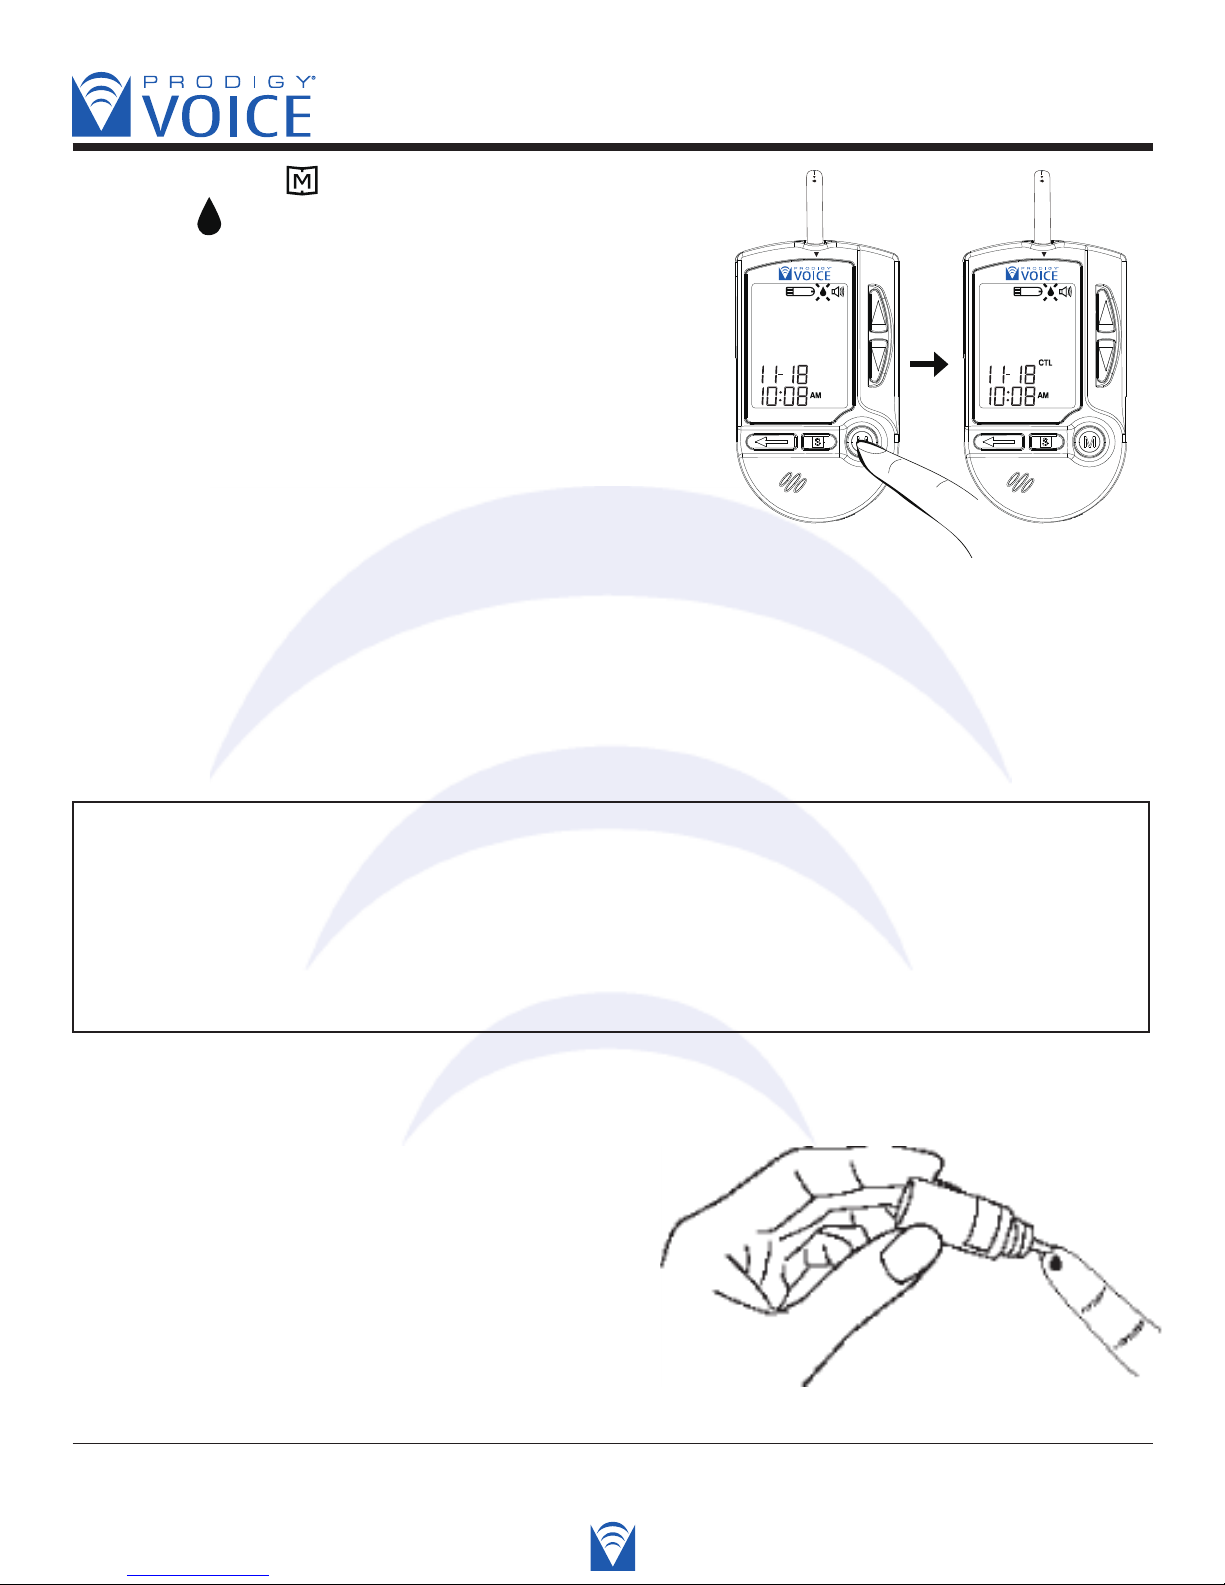
STEP 2 Press the button
While the “ ” symbol appears on the display, press
the “M” button and then “CTL” will appear on the
display. With the “CTL” symbol on the display, the
meter will not store your test result in memory.
Voice SPEAKS: “You are now in
control solution mode.”
If you decide not to perform a control solution test, press
the “M” button again, and the “CTL” symbol will disappear, you are now in the testing mode.
Voice SPEAKS: “You are now in testing mode.”
At this point you may test your blood glucose or turn the meter off by removing the test strip.
WARNING
• Contact bars must be inserted all the way into the meter or you may get an inaccurate
test result.
• Every time you perform a control solution test, you must enter into the “CTL” test mode
so that the test result will not be stored in the meter memory. Failure to do so will confuse
the blood glucose test result with the control solution test result in memory.
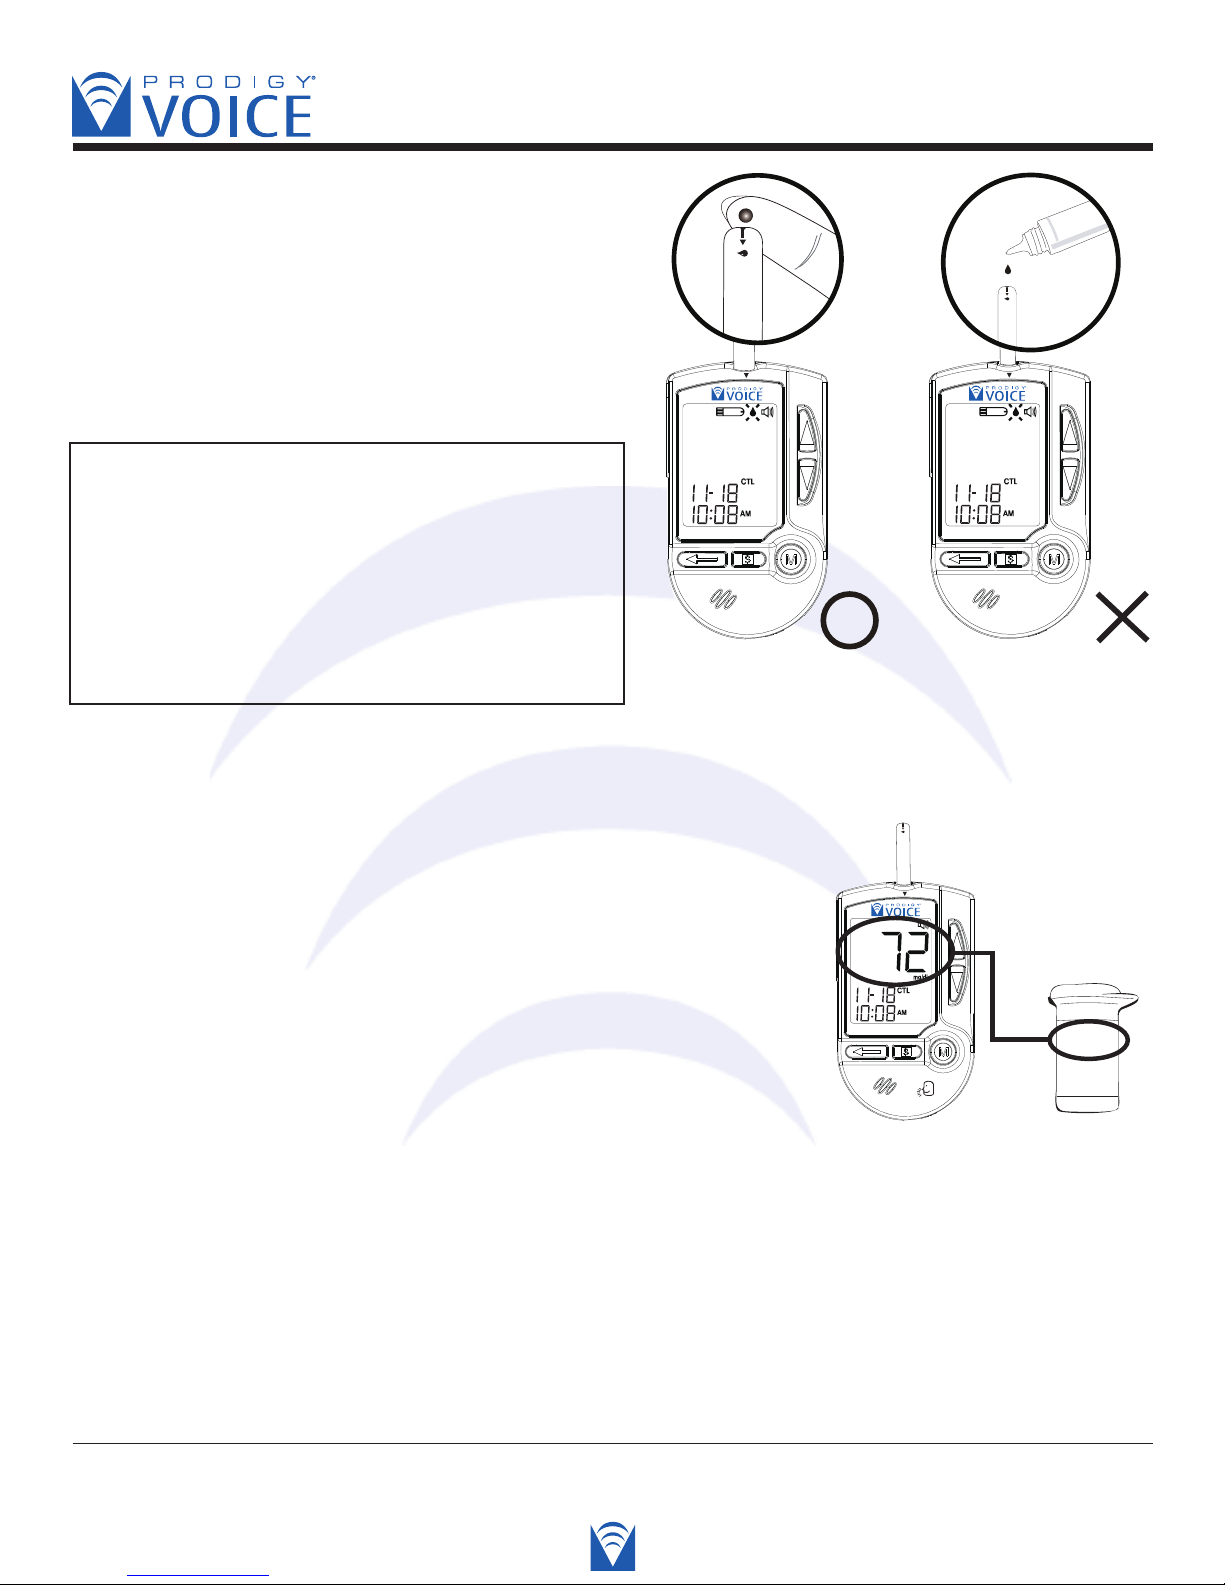
STEP 3 Apply Control Solution
Shake the control solution bottle well. Remove the
cap. Squeeze the bottle, discard the first drop and
wipe off the dispenser tip with a clean tissue paper
or cotton swab. Squeeze a drop on a clean nonabsorbent surface or on your finger tip first.Then,
apply the drop to the test strip absorbent channel,
Diagnostic Devices, Inc www.prodigymeter.com 1.800.243.2636
21
Page 22
Blood Glucose Monitoring System - User’s Manual
Low
60 - 96
(where it meets the narow channel) until the
drop is drawn into the test strip and the
confirmation window is filled. The meter begins
to count down.
Voice SPEAKS: “Now testing.”
CAUTION: To avoid contaminating the control
solution with the content of the test strip, you
have to place a drop of control solution on
a clean surface or on your clean finger tip first,
then touch the strip to the drop.
DO NOT APPLY THE CONTROL SOLUTION
DIRECTLY TO THE TEST STRIP!
Correct Incorrect
STEP 4 Read and Compare the Result
After counting from 6 to 0, the test result of control solution
is shown on the screen. Compare this result with the range
printed on the test strip vial. It should fall within this range.
Voice SPEAKS: “Your blood glucose is sevemty two
milligrams per deciliter.”
Out-of-range results
If test results fall outside the range printed on the test strip vial, check the section of
“Problem in Operation” section in troubleshooting guide and repeat the test. If you continue to
get out-of-range results, it means that the system may not be working properly. Do NOT
test your blood glucose. If you are unable to resolve the problem, contact the Technical
Support line at 800-243-2636.
Diagnostic Devices, Inc www.prodigymeter.com 1.800.243.2636
22
Page 23
Blood Glucose Monitoring System - User’s Manual
AB
C
DE
TESTING YOUR BLOOD
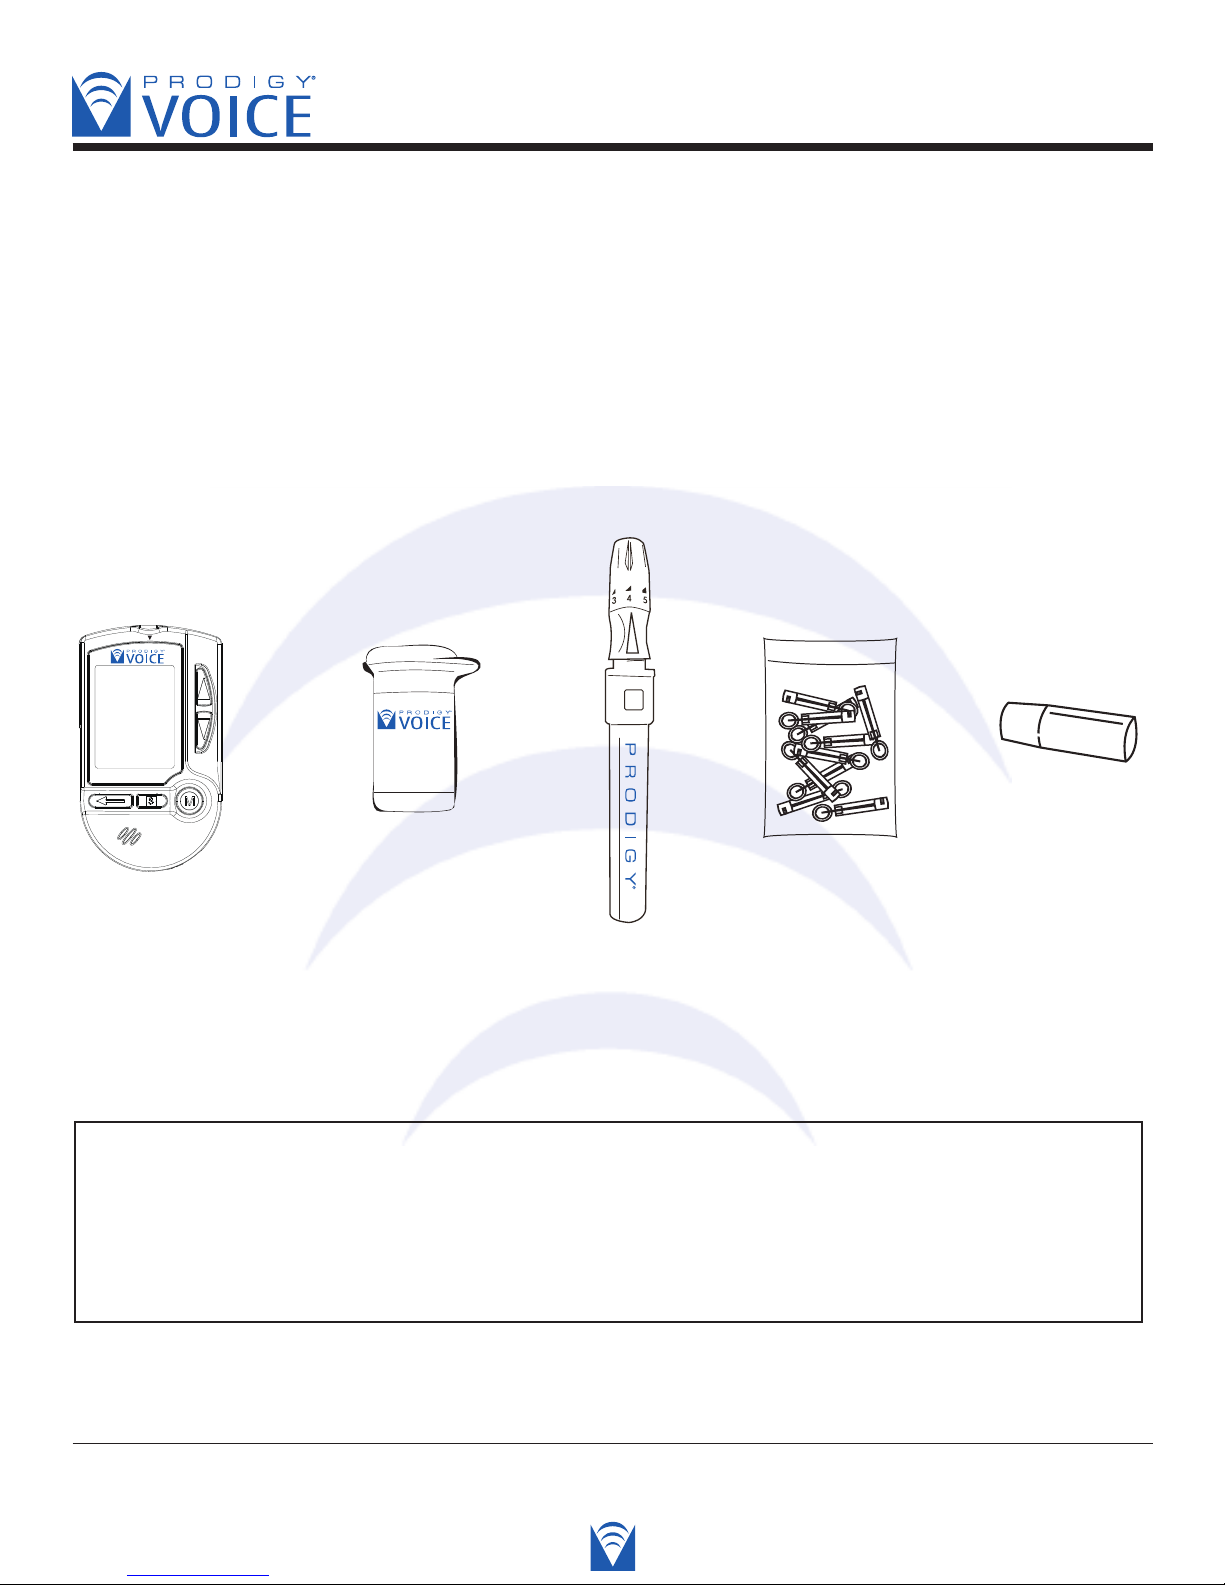
Be sure to read this section and the test strip package insert found in the test strip box
carefully before testing. Make sure you have all items needed to test:
A. Blood Glucose Meter
B. Test Strip
C. Lancing Device
D. Sterile Lancet
E. Clear Cap (For AST use)
WARNING
To reduce the chance of infection:
• Never share a lancet or the lancet device with anyone.
• Always use a new, sterile lancet. Lancets are for single use only.
• Avoid getting hand lotion, oils, dirt, or debris in or on the lancets and the lancing device.
Diagnostic Devices, Inc www.prodigymeter.com 1.800.243.2636
23
Page 24
Blood Glucose Monitoring System - User’s Manual
• Testing Procedure
Wash and dry your hands first, before start testing.
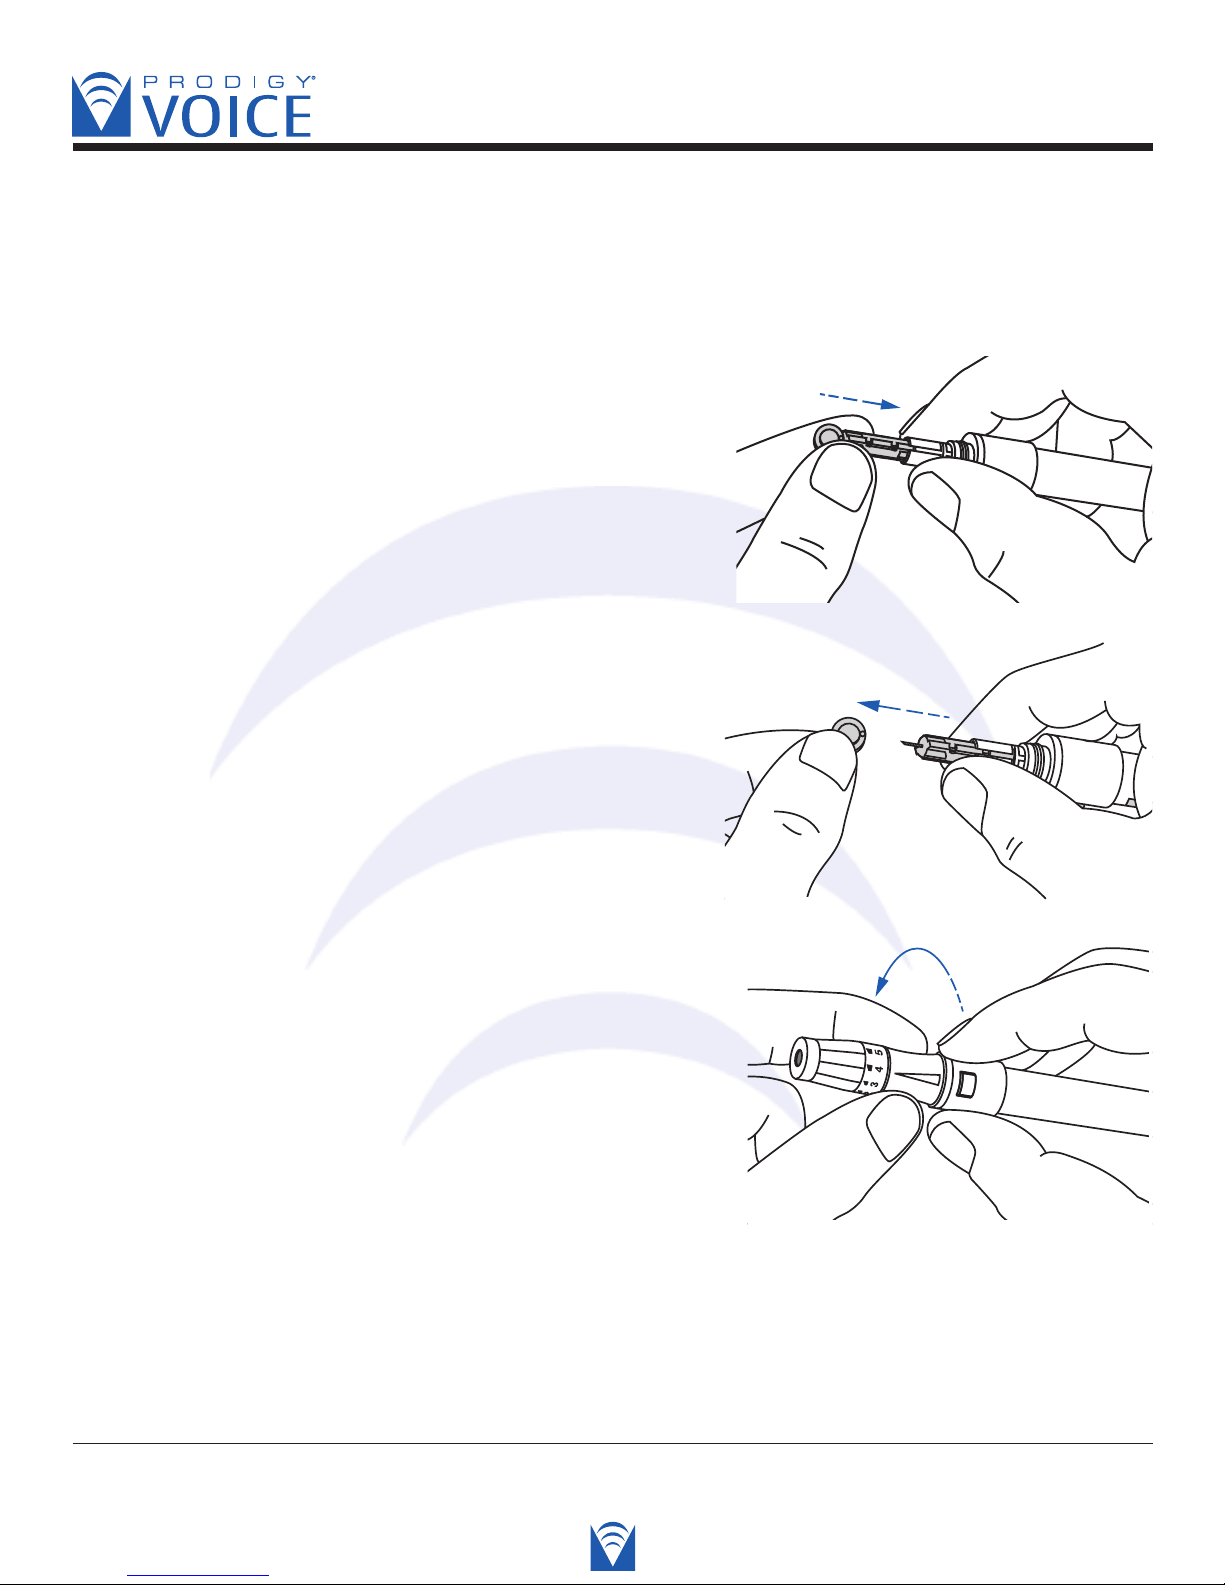
STEP 1 Set the Lancing Device
Insert a lancet in the adjustable lancing device.
Screw off the cap of lancing device. Insert a lancet
into the lancet holder and push down firmly
until it is fully seated.
Twist and pull the protective cap until it separates from
the lancet.
Replace the lancet device cap. Turn the cap until
it is snug but not too tight.
The adjustable tip offers 5 levels of skin penetration.
Twist the adjustable tip in either direction until the
number lines up with the Arrow. Select the best depth:
1-2 for soft or thin skin,
3 for average skin,
4-5 for thick or calloused skin.
Diagnostic Devices, Inc www.prodigymeter.com 1.800.243.2636
24
Page 25
Blood Glucose Monitoring System - User’s Manual
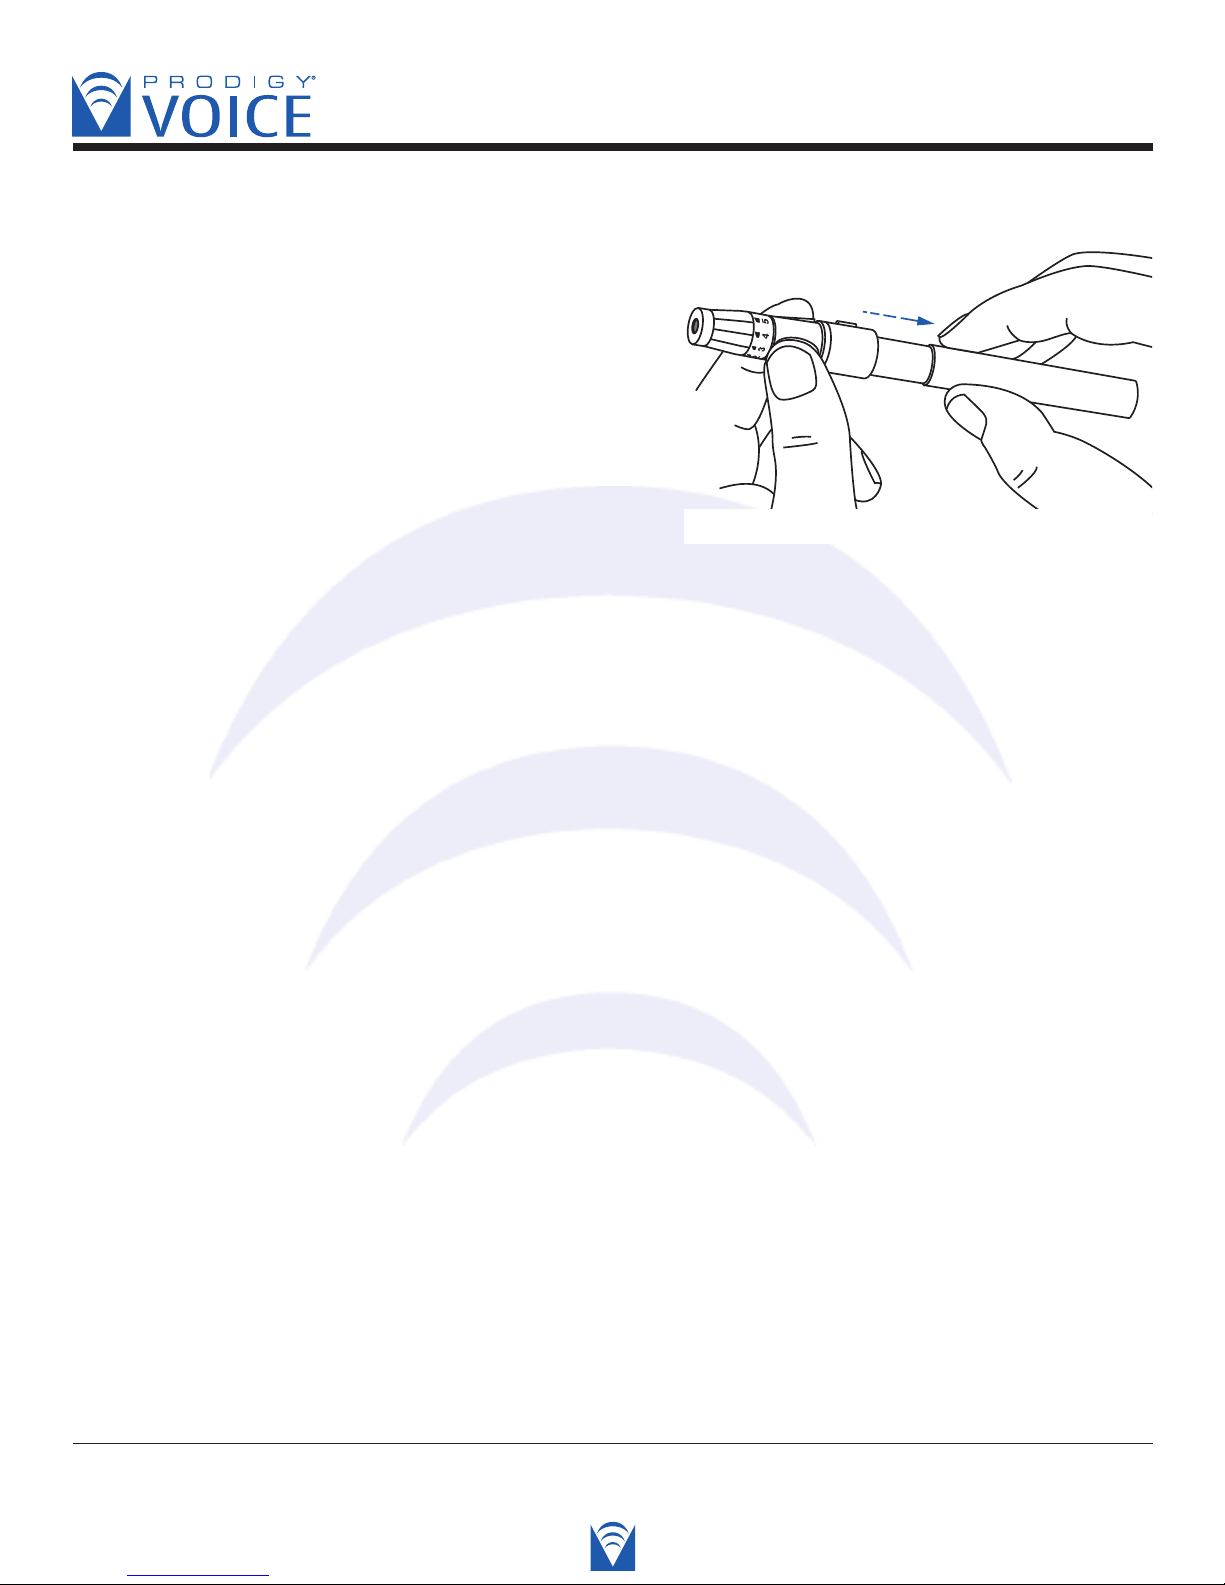
Cock the lancing device
Slide the ejection/cocking control back until it clicks.
If it does not click the device may have been cocked
when the lancet was inserted.
AST - Alternative Site Testing
* Blood from sites other than the fingertip
A clear cap, included in the kit, makes it easier to get a drop of blood for AST.
When you want to obtain blood from sites other than the finger, replace the lancet
device cap with the clear cap. Turn the clear cap until it is snug but not too tight, and
then slide the ejection/cocking control back until it clicks.
The lancing device is now ready for use. Set it aside for later use.
Diagnostic Devices, Inc www.prodigymeter.com 1.800.243.2636
25
Page 26
Blood Glucose Monitoring System - User’s Manual
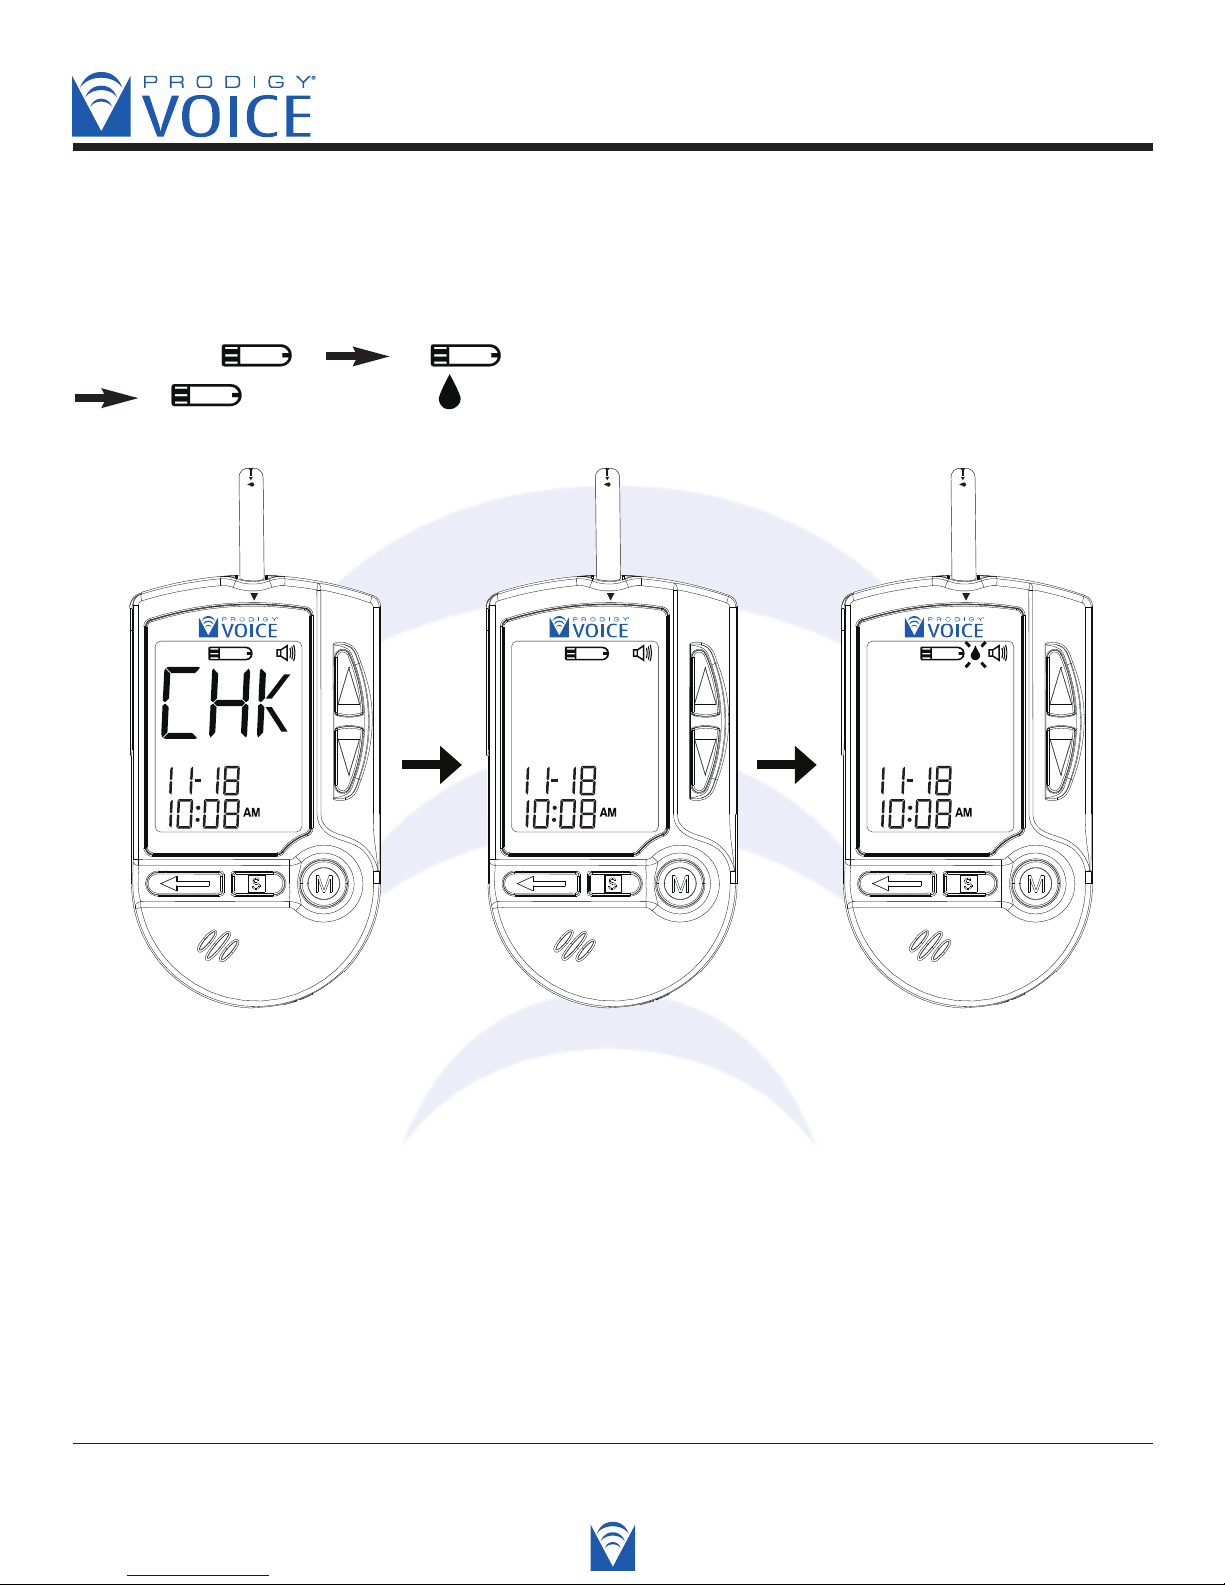
STEP 2 Insert Test Strip
Insert a test strip with contact bars end first and facing up, into the test slot. The meter turns
on automatically and displays the followings in sequence:
“CHK” and “ ” “ ”
“ ”, and flashing “ ”
Voice SPEAKS: “Thank you for using Prodigy Voice.
Test Strip Inserted.
Today’s date is (today’s date). The time is (the time).
Prodigy Voice works only with the Prodigy Voice test strips.
Please apply blood into the test strip.”
Diagnostic Devices, Inc www.prodigymeter.com 1.800.243.2636
26
Page 27
Blood Glucose Monitoring System - User’s Manual
STEP 3 Get a Drop of Blood
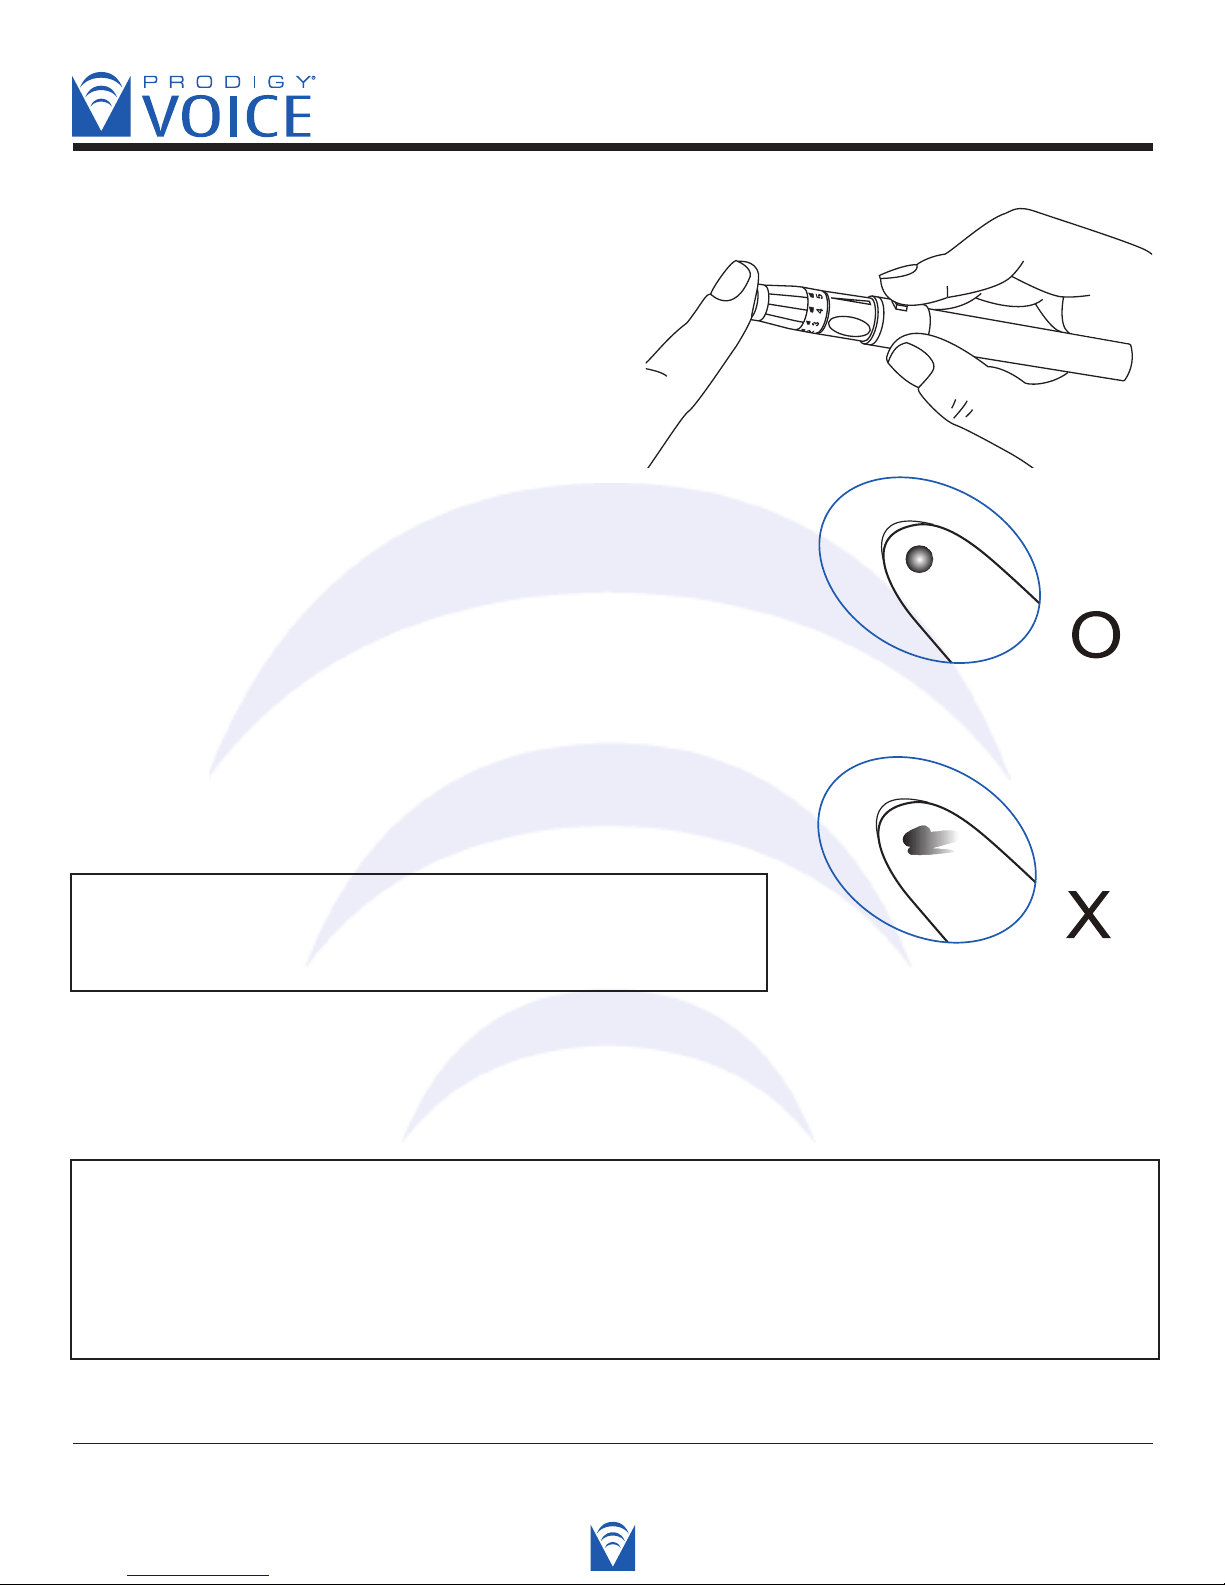
Select the puncture site either in fingertip or in
other parts (AST).Wash your hands and the
puncture site. Use warm, soapy water. Rinse
and dry thoroughly.
• Fingertip
Hold the lancing device firmly against the side
of your finger. Press the release button.You will hear
a click, indicating that the puncture is complete.
• Gently Massage the Area
Do not smear the blood sample. To obtain best accurate
Correct
results, the first drop of blood should be discarded with
a clean tissue paper or cotton. Use the second drop of blood
for testing. The required blood sample in 0.6 microliter
in volume.
WARNING: The first drop of blood usually contains tissue
fluid and serum, which may affect the result. It should be
discarded.
Incorrect
• Sites other than fingertip
Please refer to the of “About AST” section for available testing sites. Please consult your
health care professional before obtaining blood from sites other than your fingertips.
WARNING: The system requires a very small blood drop to perform a test.You can obtain it
from a fingertip. Choose a different spot each time you test. Repeated punctures in the same
spot may cause soreness and calluses.
Before you decide to do palm testing, please consult your health care professional.
Diagnostic Devices, Inc www.prodigymeter.com 1.800.243.2636
27
Page 28
Blood Glucose Monitoring System - User’s Manual
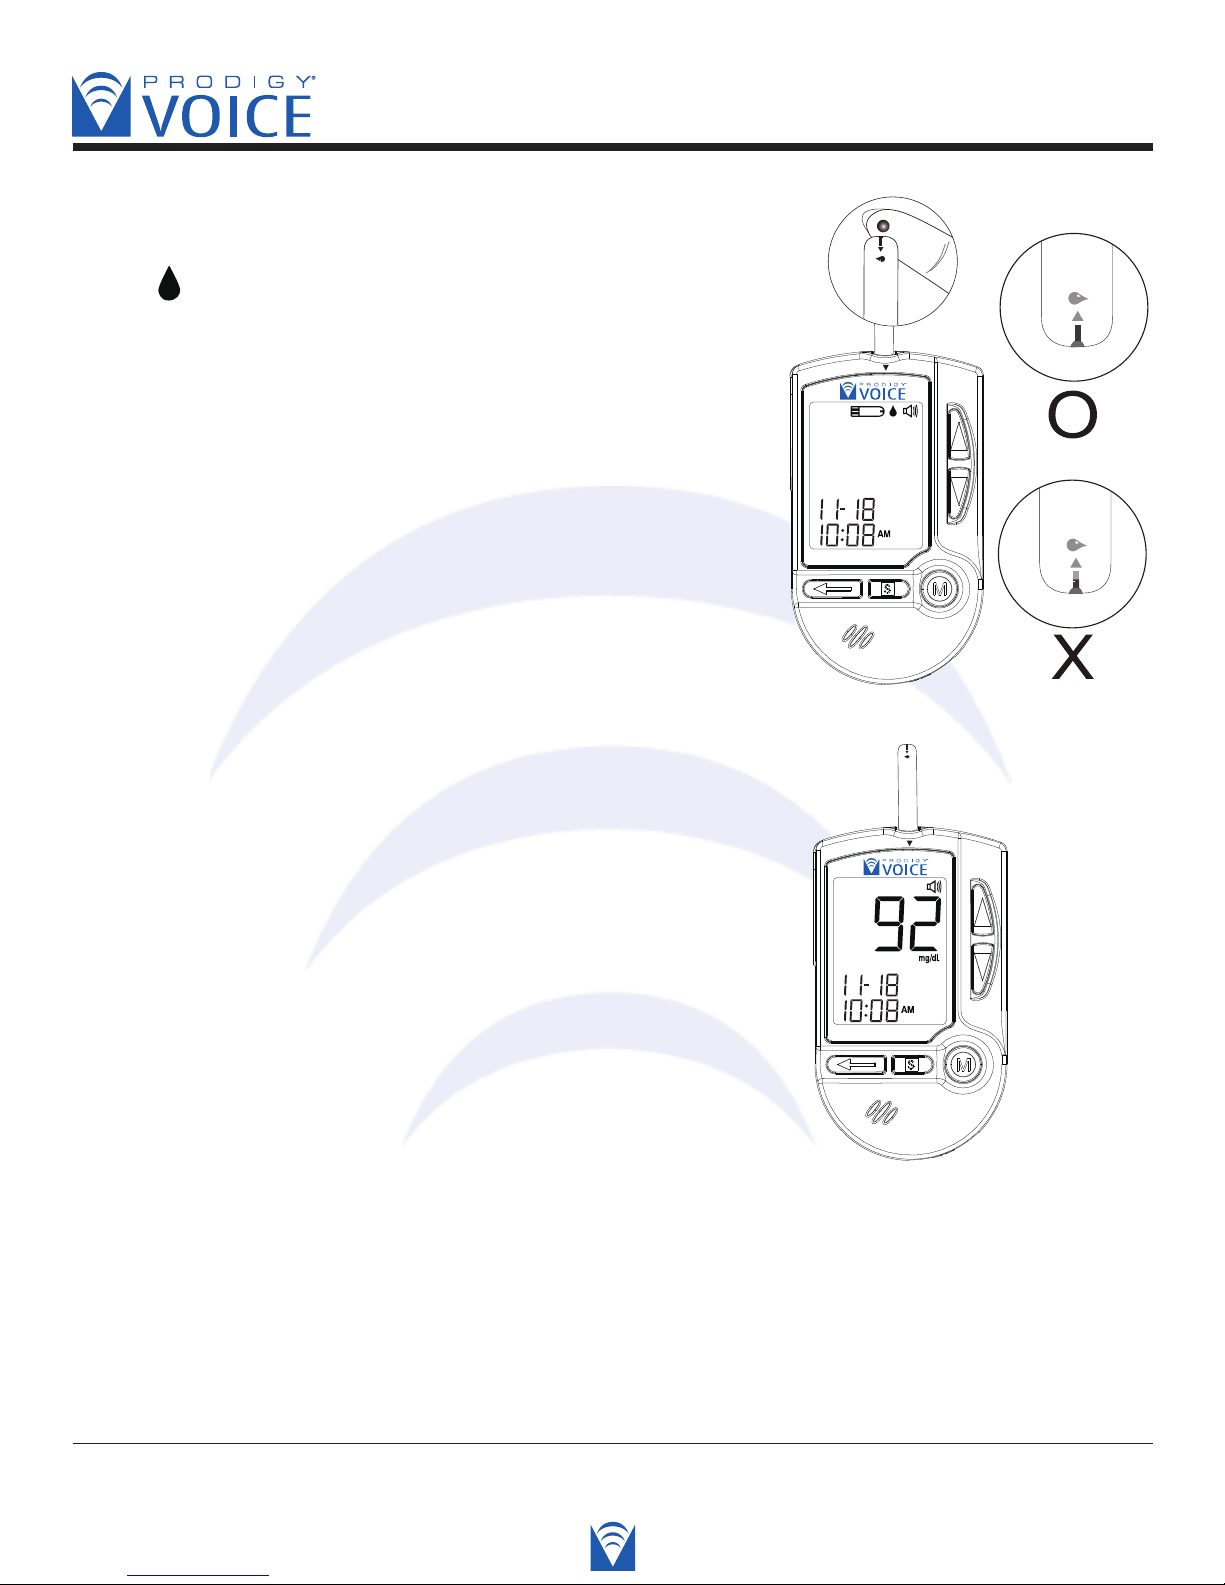
STEP 4 Apply Blood into the Test Strip
When “ ” is flashing on the screen, apply your blood
to the absorbent channel of the test strip until the
confirmation window is fully covered with blood. The
meter then begins to count down automatically.
Voice SPEAKS: “Now Testing.”
Correct
STEP 5 Obtain an Accurate Result in 6 Seconds
The result of your blood glucose test is shown after
the meter counts from 6 to 0. This reading is
automatically stored in the meter.
Voice SPEAKS: “Your blood glucose is ninety-two
milligrams per deciliter.”
Incorrect
Diagnostic Devices, Inc www.prodigymeter.com 1.800.243.2636
28
Page 29
Blood Glucose Monitoring System - User’s Manual
PLEASE NOTE
• Do not push your finger (with blood on it) against the test strip or try to apply a smeared
sample on the test strip.
• If you do not apply a blood sample to the test strip within 3 minutes, the meter will
automatically turn off. You must remove and reinsert the test strip to restart the test
procedure.
• Anytime you can press the “M” button to skip the current voice message and go to the
next step.
• If you want to hear the previous voice message, you can press the “Repeat” button
to replay it.
• The blood should be completely fill the confirmation window before the meter begins
to count down. If you find that the confirmation window is not filled with blood when the
meter is counting, NEVER try to add more blood to the test strip. Discard the test strip
and retest with a new one.
• If you have trouble filling the test strip, please contact the Technical Support for help.
STEP 6 Eject the Used Test Strip
After finishing the measurement, you can either take
out the used strip by simply pushing up the Strip-Eject
button or remove the test strip directly with your hand.
“OFF” is shown after the used strip is ejected and the
meter will shut off automatically afterward.
Voice SPEAKS: “Have a nice day.”
PLEASE NOTE
Please make sure the eject button is pointed into a disposal container.
Diagnostic Devices, Inc www.prodigymeter.com 1.800.243.2636
29
Page 30
Blood Glucose Monitoring System - User’s Manual
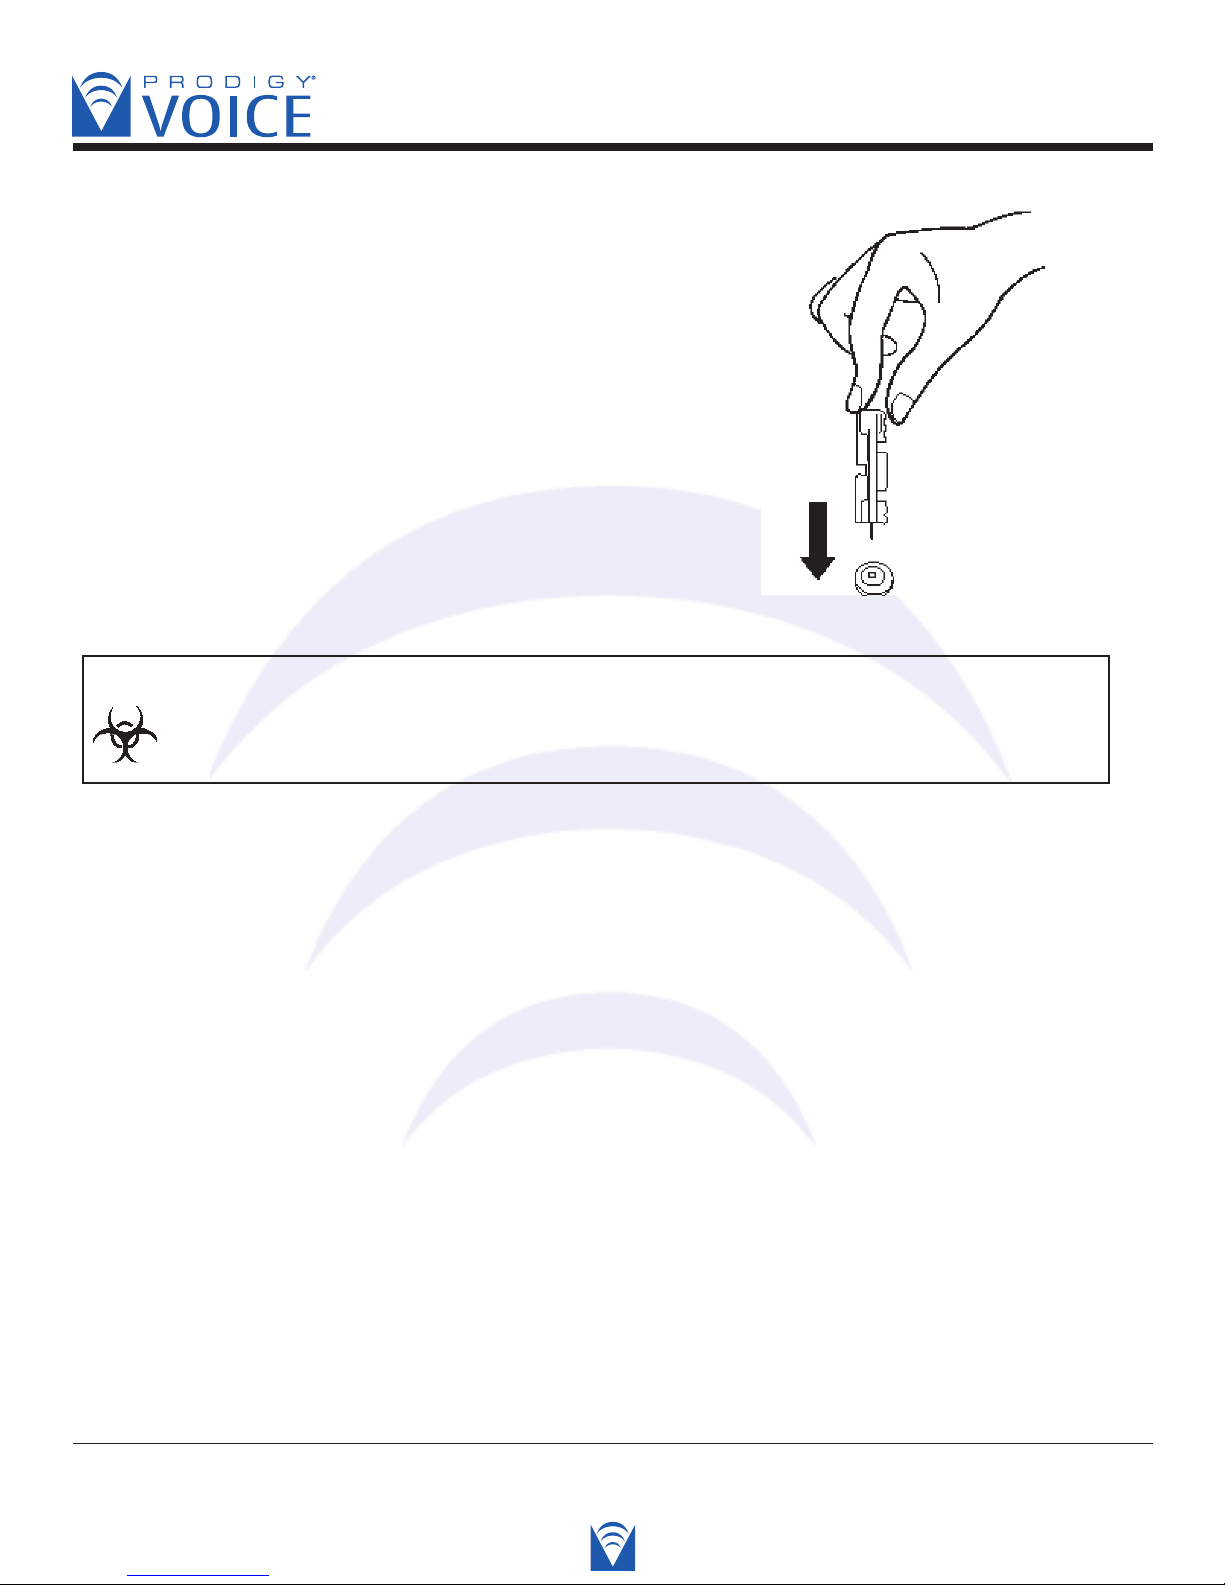
STEP 7 Remove the Lancet
Always use caution when removing the lancet.
Take the lancet out carefully. Place the protective cap
back on the lancet exposed tip or if using a twist lancet
place the cap on a hard surface and push the exposed
tip into protective cap and discard properly.
WARNING
The used lancet and the used test strip may be a potentially biohazard.
Please discard it carefully according to your local regulations.
Diagnostic Devices, Inc www.prodigymeter.com 1.800.243.2636
30
Page 31
Blood Glucose Monitoring System - User’s Manual
• Expected Test Results
Blood glucose monitoring plays an important role in diabetes control.A long-term study
showed that keeping blood glucose levels close to normal can reduce the risk of diabetes
complications by up to 60%*3. The results you get with the PRODIGY Voice system can help
you and your healthcare professional monitor and adjust your treatment plan to gain better
control of your diabetes.
Time of day Plasma glucose range Your target range
(mg/dL) for people (mg/dL)
without diabetes
Fasting and before meal Less than 110
2 hours after meals Less than 140
Bedtime Not specified
Between 2 AM and 4AM Not specified
Source:ADA Clinical Practice Recommendations 2003
Please work with your doctor to determine a target range that works best for you.
*3:American Diabetes Association position statement on the Diabetes Control and Complications Trial (1993).
Diagnostic Devices, Inc www.prodigymeter.com 1.800.243.2636
31
Page 32

Blood Glucose Monitoring System - User’s Manual
COMPARING METER AND LABORATORY RESULTS
The result you obtain from your meter may differ somewhat from your laboratory result due to
normal variation. Meter results can be affected by factors and conditions that do not affect
laboratory results in the same way (See test strip package insert for typical accuracy and precision data, and for important information on limitations). To make an accurate comparison
between meter and laboratory results, follow the guidelines below.
Before you go to the lab:
• Perform a control solution test to make sure that the meter is working properly.
• It is best to fast for at least eight (8) hours before doing comparison tests.
• Take your meter with you to the lab.
While at the lab:
Make sure that the samples for both tests (the meter test and the lab test are taken and
tested within 15 minutes of each other).
• Wash your hands before obtaining a blood sample.
• Never use your meter with blood that has been collected in a gray-top test tube.
• Use fresh capillary blood only.
You may still have a variation from the result because blood glucose levels can change
significantly over short periods of time, especially if you have recently eaten, exercised, taken
medication, or experienced stress*4. In addition, if you have eaten recently, the blood glucose
level from a finger stick can be up to 70 mg/dL (3.9 mmol/L) higher than blood drawn from
a vein (venous sample) used for a lab test*5. Therefore, it is best to fast for eight hours before
doing comparison tests. Factors such as the amount of red blood cells in the blood (a high or
low hematocrit) or the loss of body fluid (severe dehydration) may also cause a meter result
to be different from a laboratory result.
References
*4: Surwit, R.S., and Feinglos, M.N.: Diabetes Forecast (1988), April, 49-51.
*5: Sacks, D.B.: “Carbohydrates. “ Burtis, C.A., and Ashwood, E.R.( ed.),Tietz Textbook of Clinical Chemistry. Philadelphia:
W.B. Saunders Company (1994), 959.
Diagnostic Devices, Inc www.prodigymeter.com 1.800.243.2636
32
Page 33
Blood Glucose Monitoring System - User’s Manual
USING THE METER MEMORY
• View Results on the Meter
The Prodigy®Voice stores the 450 most recent blood glucose test results with date and time
in its memory. It also provides you with 7, 14, 21, 28, 60 and 90 day averages of your blood
glucose test results. You can review the test results in memory with these easy steps.
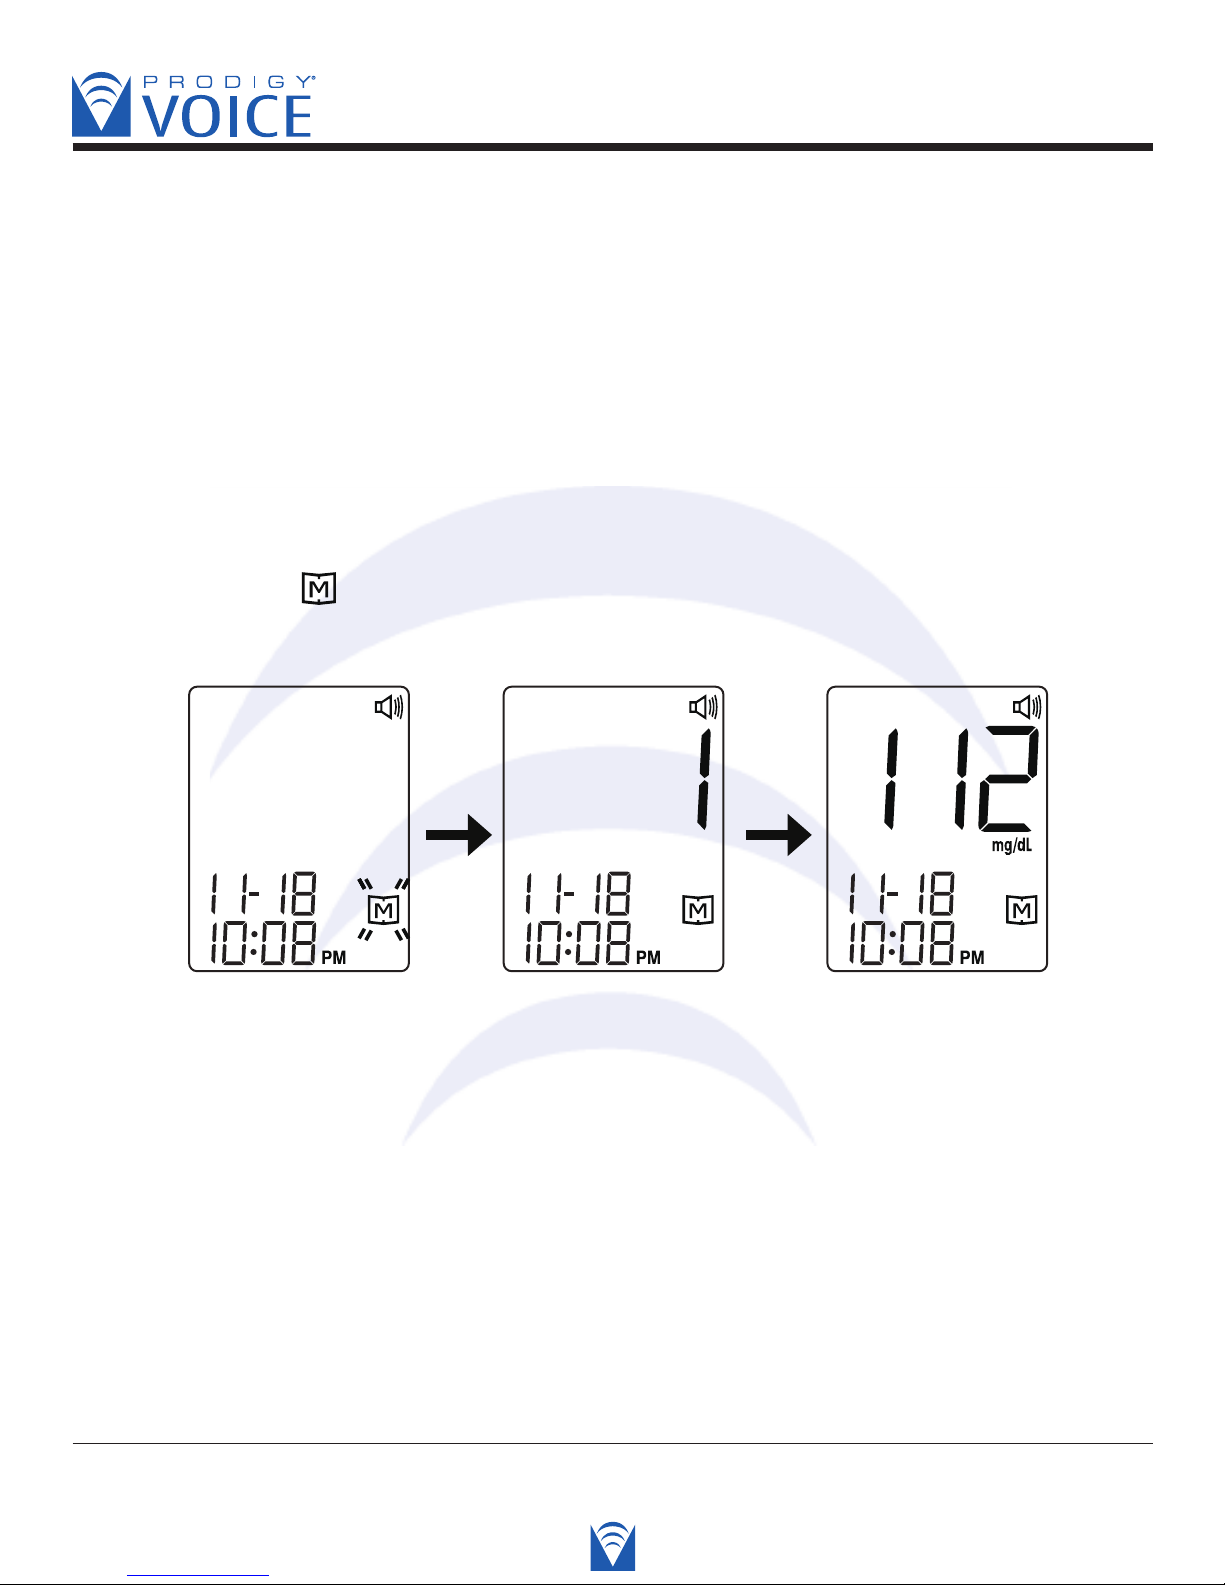
1. Recall the Stored Test Results
STEP 1. When the meter is off, press and release the M button.
The screen shows “ ”. Press the M button again, “1” appears first and then the latest
glucose result along with date and time will be shown on the screen.
Voice SPEAKS: “Thank you for using Prodigy Voice.
Today’s date is (today’s date). The time is (the time).
Press “M” key for memory recall mode.”
Diagnostic Devices, Inc www.prodigymeter.com 1.800.243.2636
33
Page 34
Blood Glucose Monitoring System - User’s Manual
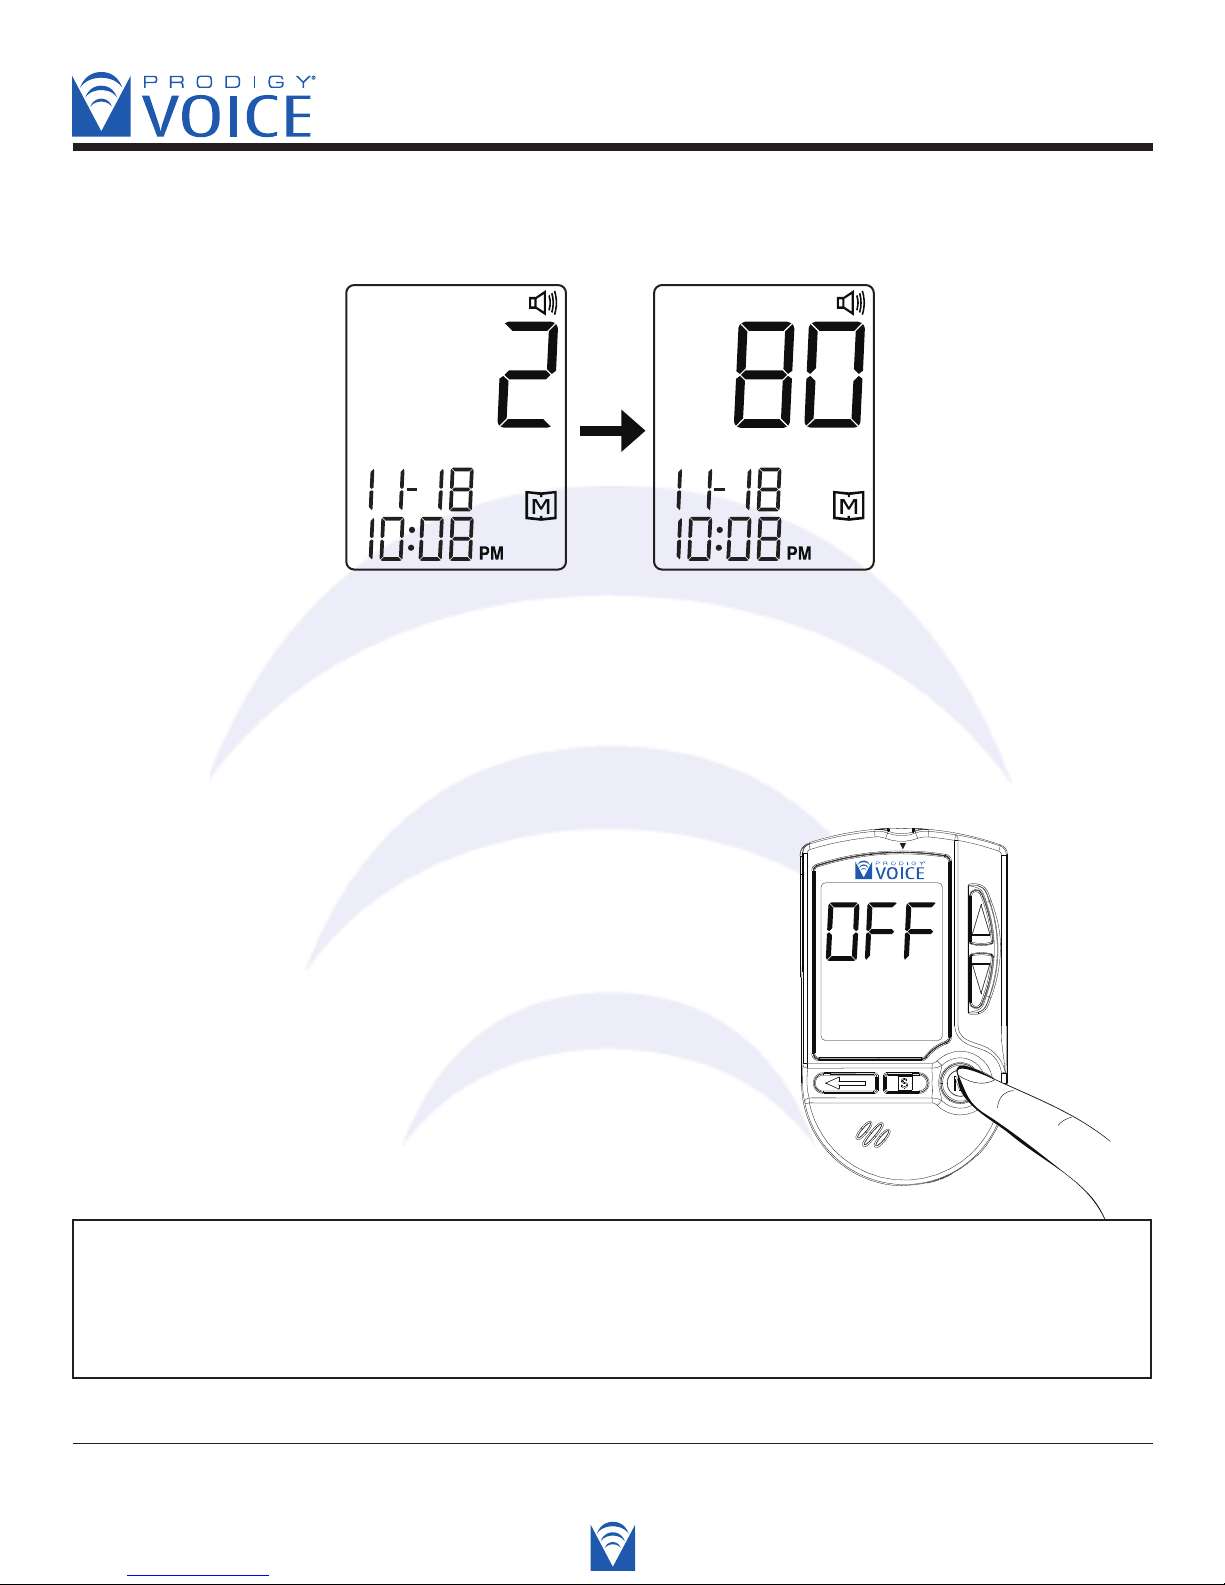
STEP 2. Press the “Up” and “Down” button to recall the test results stored in the meter.
Voice SPEAKS: “Memory Record for August 23rd, 2007. 8:36 AM.Your blood
glucose was 80 milligrams per deciliter.”
STEP 3. Exit the memory mode, press and hold down
the “M” button and the meter will be turned off.
Voice SPEAKS: “Have a nice day.”
NOTE
If you leave the meter alone without any action for 3 minutes, the meter will
turn off automatically.
Diagnostic Devices, Inc www.prodigymeter.com 1.800.243.2636
34
Page 35
Blood Glucose Monitoring System - User’s Manual
2. Read the Average of Blood Glucose Results
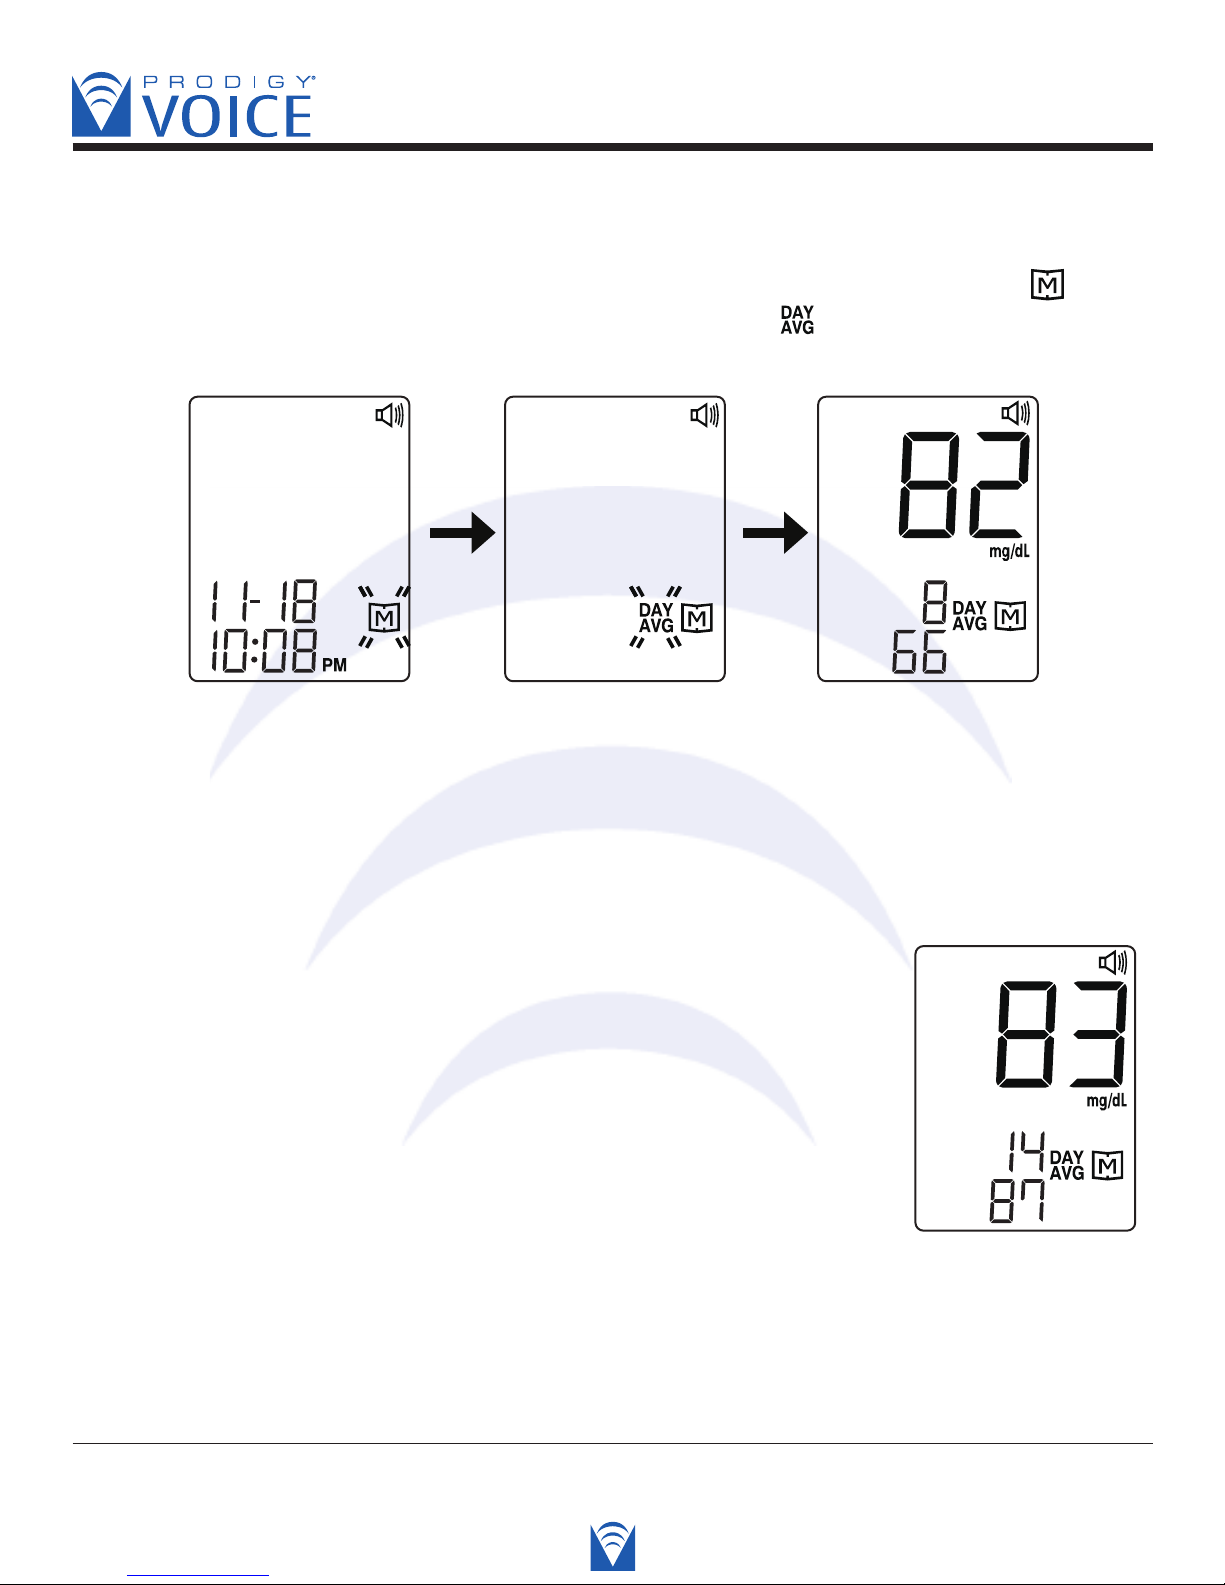
STEP 1. When the meter is off, press and release the M button.The screen shows “ ”.
Keep pressing the “M” button for 2-3 seconds, until blinking “ ” appears. Release the “M”
button and then the 7-day average result will appear on the screen.
Voice SPEAKS: “Thank you for using Prodigy Voice.
Today’s date is (today’s date). The time is (the time).
Press “M” key for memory recall mode.”
STEP 2. Press the “Up” and “Down” buttons to review
the 14, 21, 28, 60 and 90 day average. Like the 7-day
average, the 14- day average and the times of performing
test in the past 14 days will be shown on the screen.
Voice SPEAKS: “The fourteen day average is eighty-three
milligrams per deciliter for eighty-seven records.”
Diagnostic Devices, Inc www.prodigymeter.com 1.800.243.2636
35
Page 36
Blood Glucose Monitoring System - User’s Manual
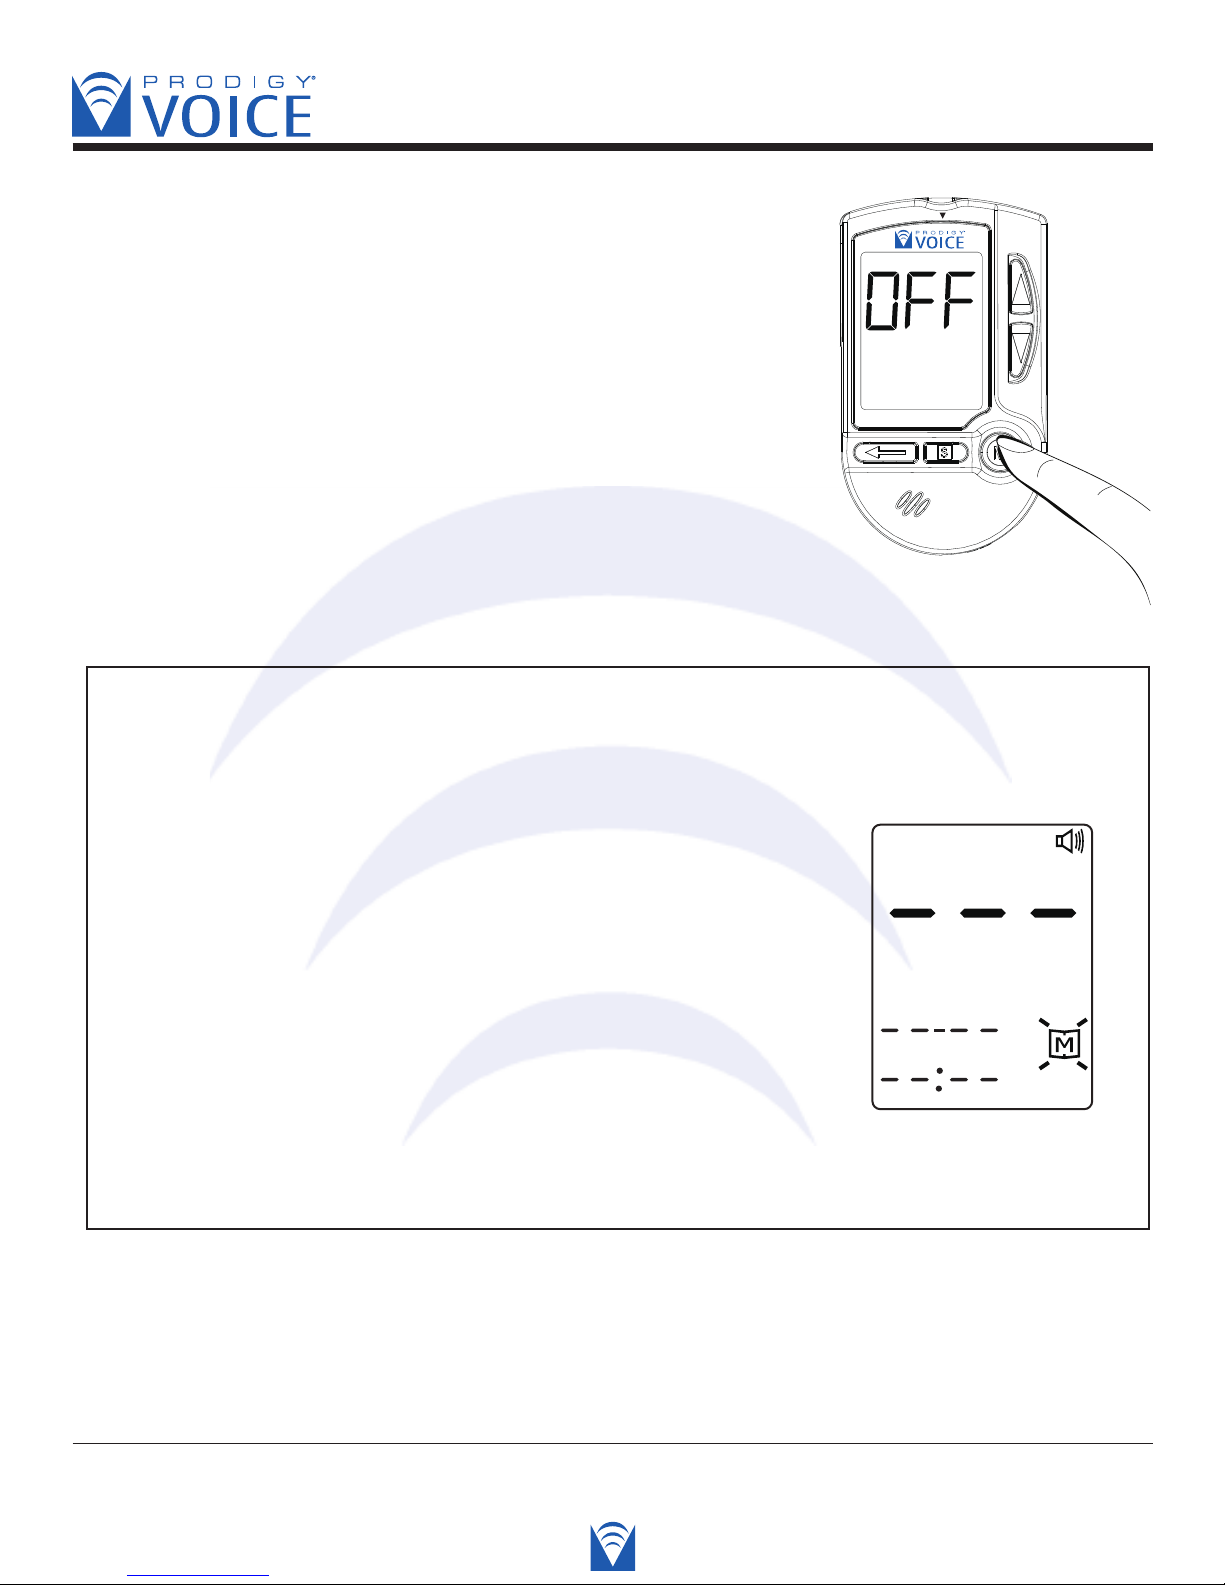
STEP 3. Exit the memory mode, press and hold down the “M”
button, and the meter will turn off.
Voice SPEAKS: “Have a nice day.”
NOTE
• The control solution results are NOT stored in the memory (please turn to page 22-23
for WARNING information).The list of past results and the result average are for blood
glucose results only.
• When using the meter for the first time,“—-” is
displayed when you recall the test results or review
the average result. It means that there is no test
result in memory.
Voice SPEAKS: “No memory record available.”
• Any time you want to exit the memory mode, keep pressing the M button for 5 seconds
or leave it without any action for 3 minutes. The meter will turn off automatically.
Diagnostic Devices, Inc www.prodigymeter.com 1.800.243.2636
36
Page 37
Blood Glucose Monitoring System - User’s Manual
• Viewing Results on a Personal Computer
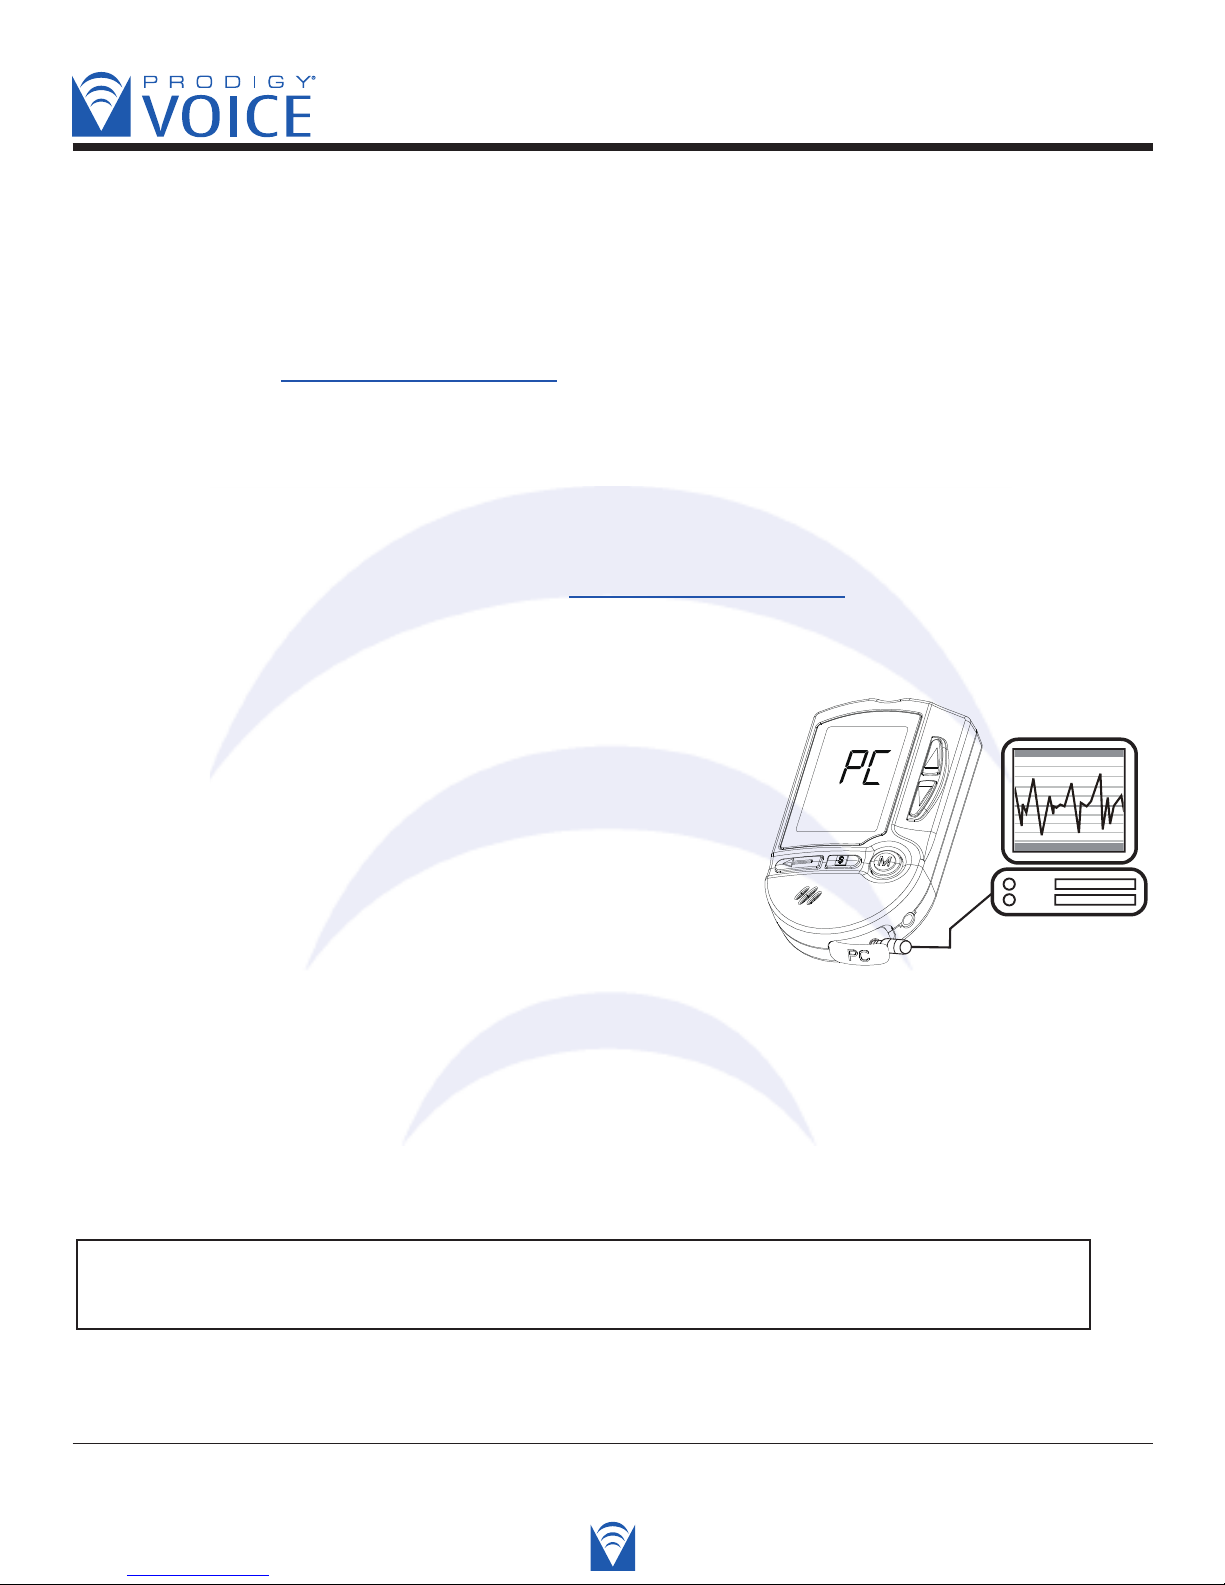
Results in memory can be transmitted to a personal computer. Prodigy Diabetes Management
Software and an Interface Cable are required before installation.The software can be
downloaded from www.prodigymeter.com. The interface cable is an optional accessory.
To learn more about Prodigy Diabetes Management Software or to obtain an Interface Cable
sold separately, please contact your local retailer or distributor.
STEP 1 Install Software
Install Prodigy Diabetes Management Software on your Computer by following the
instructions provided on Prodigy’s website: www.prodigymeter.com
STEP 2 Connect to Personal Computer
Connect the Interface Cable to your computer.
With the meter turned off, connect the Interface Cable to the
Data Port of the meter. Which is hidden by a plastic cover
on the bottom right side panel of the meter. “PC” will
appear on the display, indicating that the meter is ready
to transmit data.
STEP 3 Transmit Data
Follow the instructions provided in the software to transmit data. Results transmitted will
include date and time. Remove the cable and the meter will automatically turn off.
PLEASE NOTE
While the meter is connected to the PC, it is unable to perform a blood glucose test.
Diagnostic Devices, Inc www.prodigymeter.com 1.800.243.2636
37
Page 38
Blood Glucose Monitoring System - User’s Manual
CARING FOR YOUR METER AND TEST STRIPS
To avoid the meter and test strips getting dirt, dust or other contaminants, please wash and
dry your hands thoroughly before use.
• Cleaning
Your meter does not require special maintenance.As long as no blood or control solution
comes in direct contact with the meter, there is no special cleaning required.
1. To clean the meter exterior, wipe with a cloth moistened with tap water or a mild
cleaning agent, then dry the device with a soft and dry cloth. Do not flush with water.
2. Do not use organic solvents to clean the meter.
- Your meter is a precision instrument. Please handle it with care.
• Storage
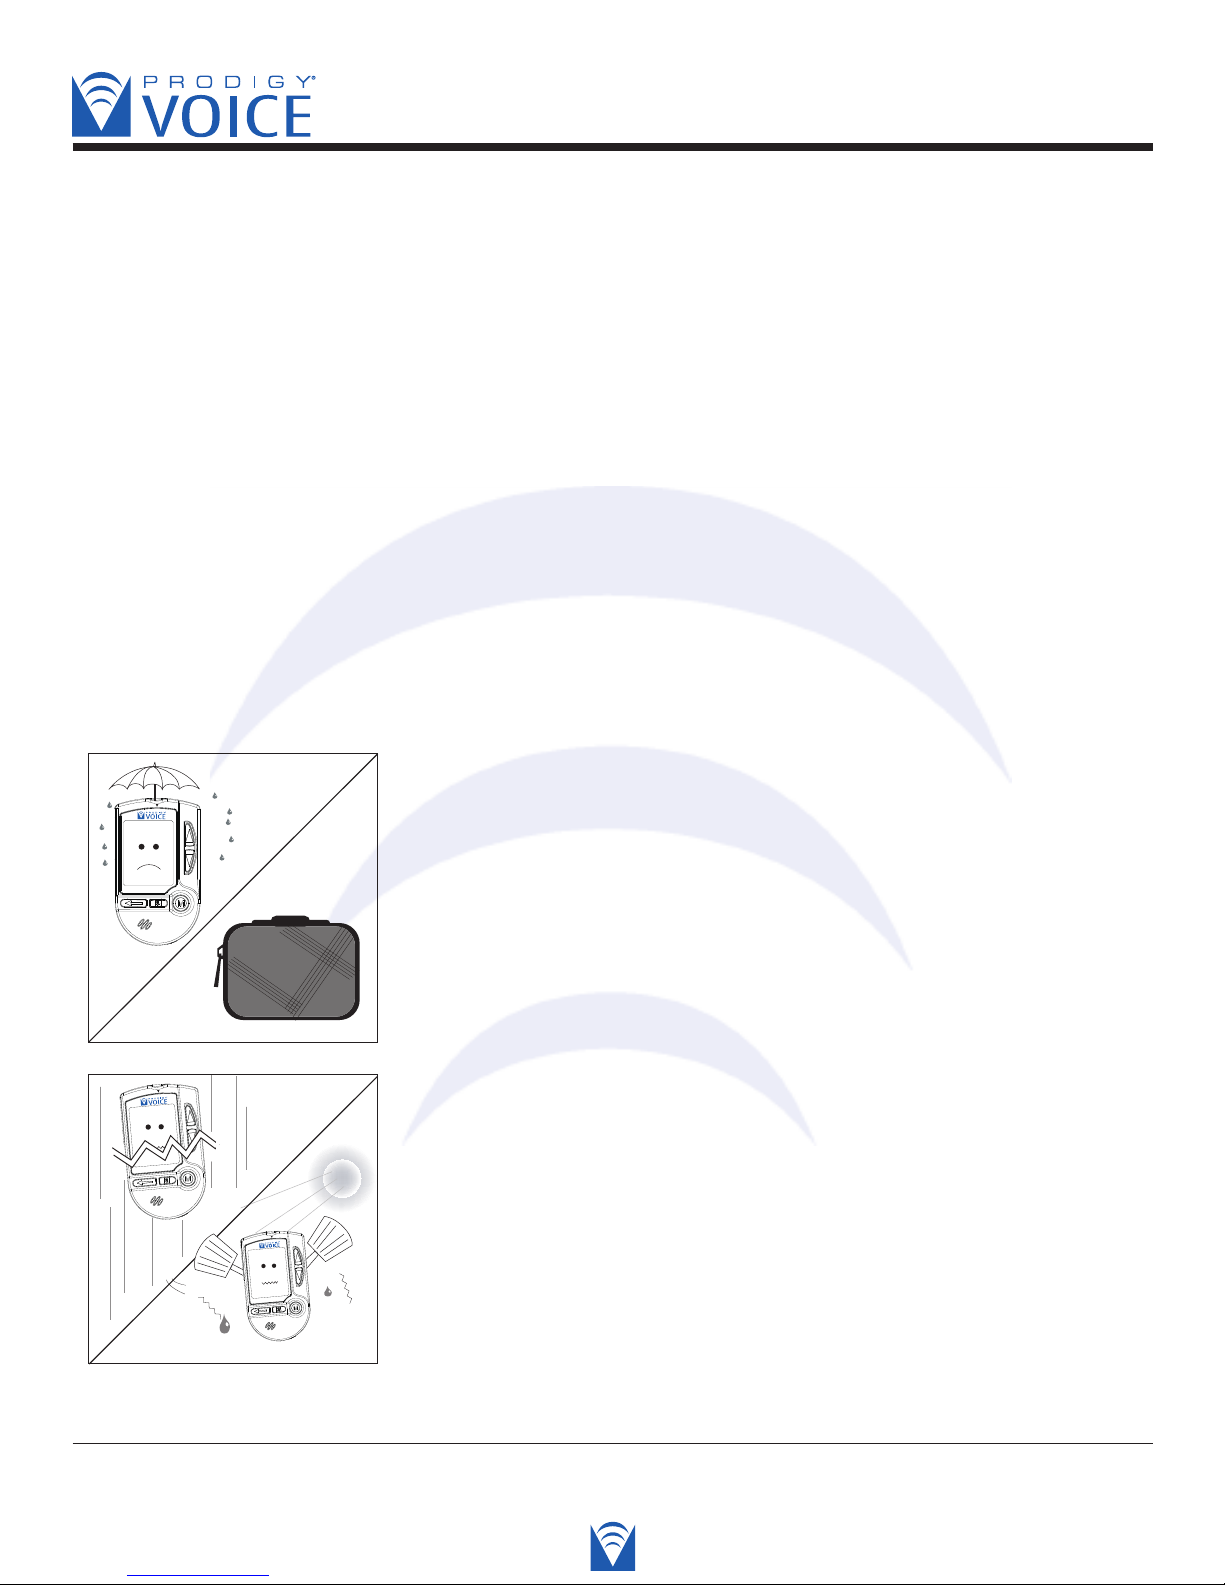
1. Meter Storage
• Storage condition: -4ºF~140ºF (-20ºC~60ºC), below 95%
relative humidity.
• Always store or transport the meter in its original storage case.
• Avoid dropping and strong impact.
• Avoid direct sunlight and humidity.
Diagnostic Devices, Inc www.prodigymeter.com 1.800.243.2636
38
Page 39
2. Strip Storage
Blood Glucose Monitoring System - User’s Manual
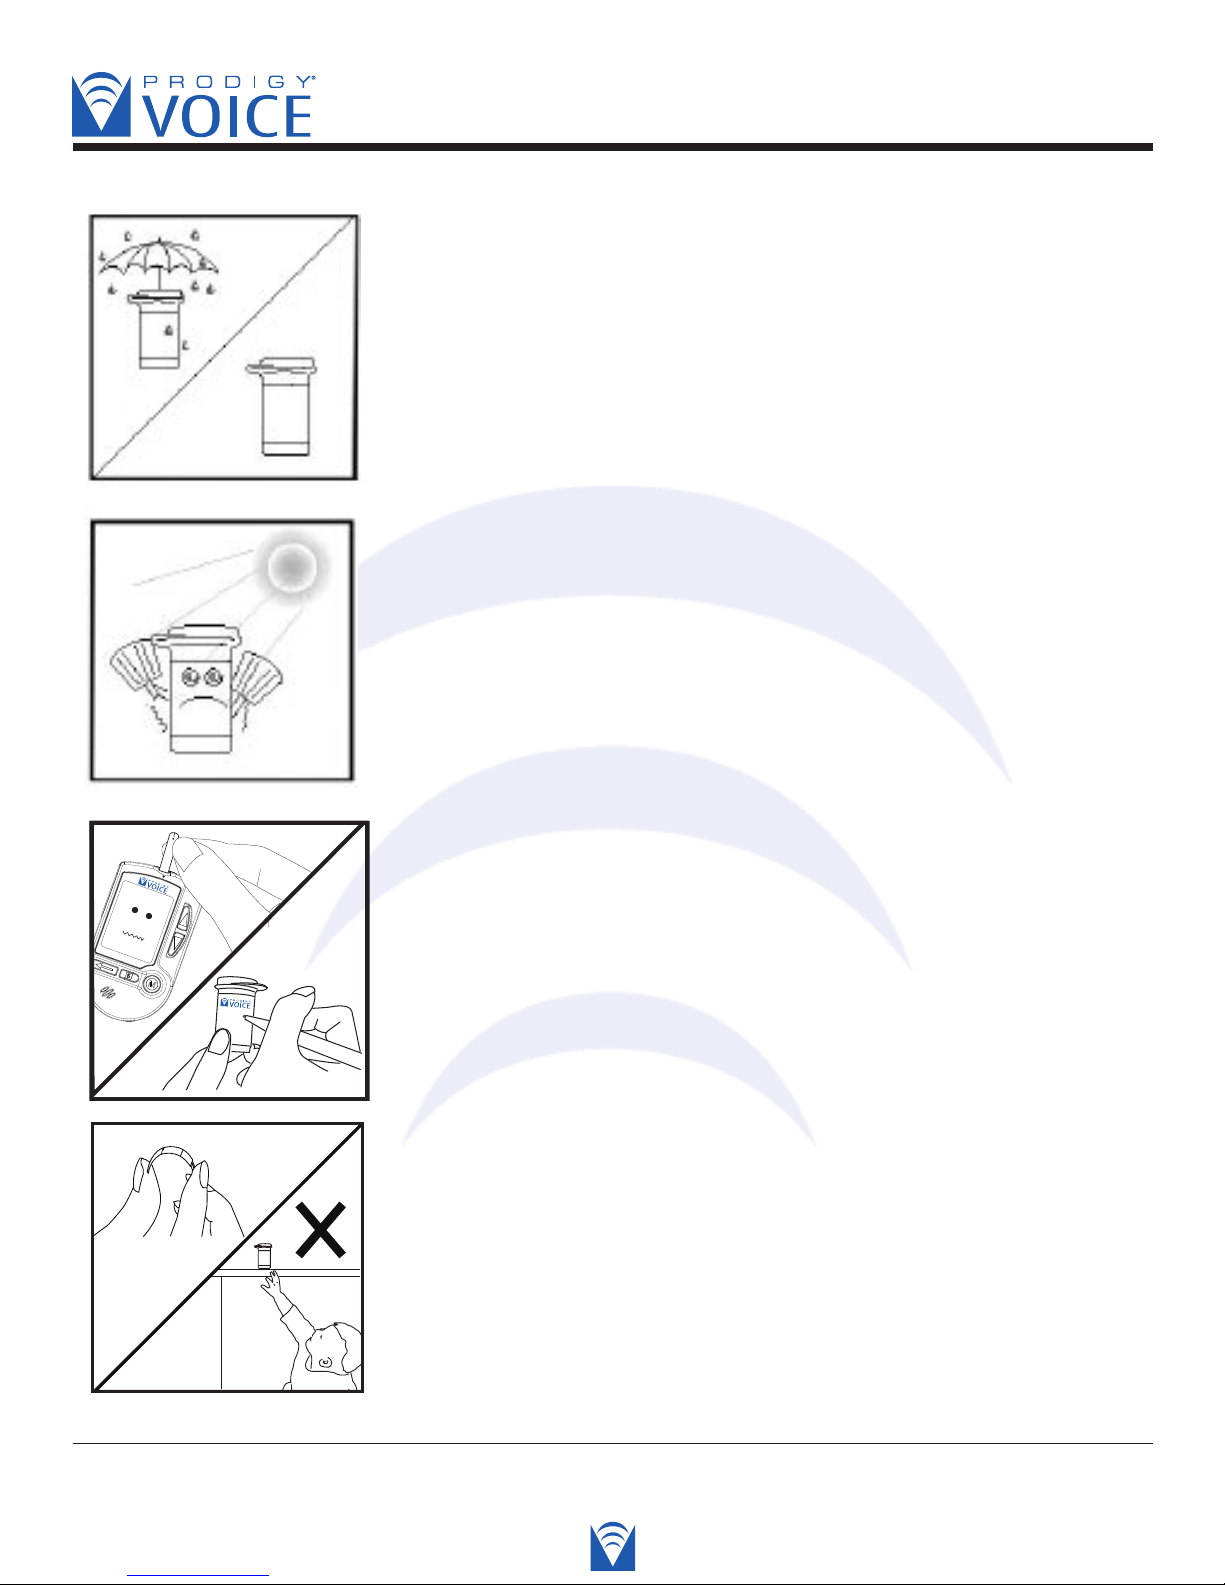
• Storage condition: 39.2ºF~104ºF (4ºC~40ºC), below 85%
relative humidity. Do not refrigerate.
• Store your test strips in their original vial only.
Do not transfer to other container.
• Store test strip packages in a cool and dry place. Keep away
from direct sunlight and heat.
• After removing a test strip from the vial, immediately replace
the vial cap and close it tightly.
• Touch the test strip with clean and dry hands.
• You may touch the test strip anywhere with clean, dry hands
when removing it from the vial or inserting it into the meter.
• Use each test strip immediately after removing it from the vial.
• Write the discard date (the date opened plus 90 days) on the
vial label when you first open it. Discard remaining test strips
90 days after first opening date.
• Do not bend, cut, or alter a test strip in any way.
• Keep the strip vial away from children since the cap and the
test strip can be a potential choking hazard. If swallowed,
Diagnostic Devices, Inc www.prodigymeter.com 1.800.243.2636
please seek medical assitance immediately.
39
Page 40
3. Control solution storage
Blood Glucose Monitoring System - User’s Manual
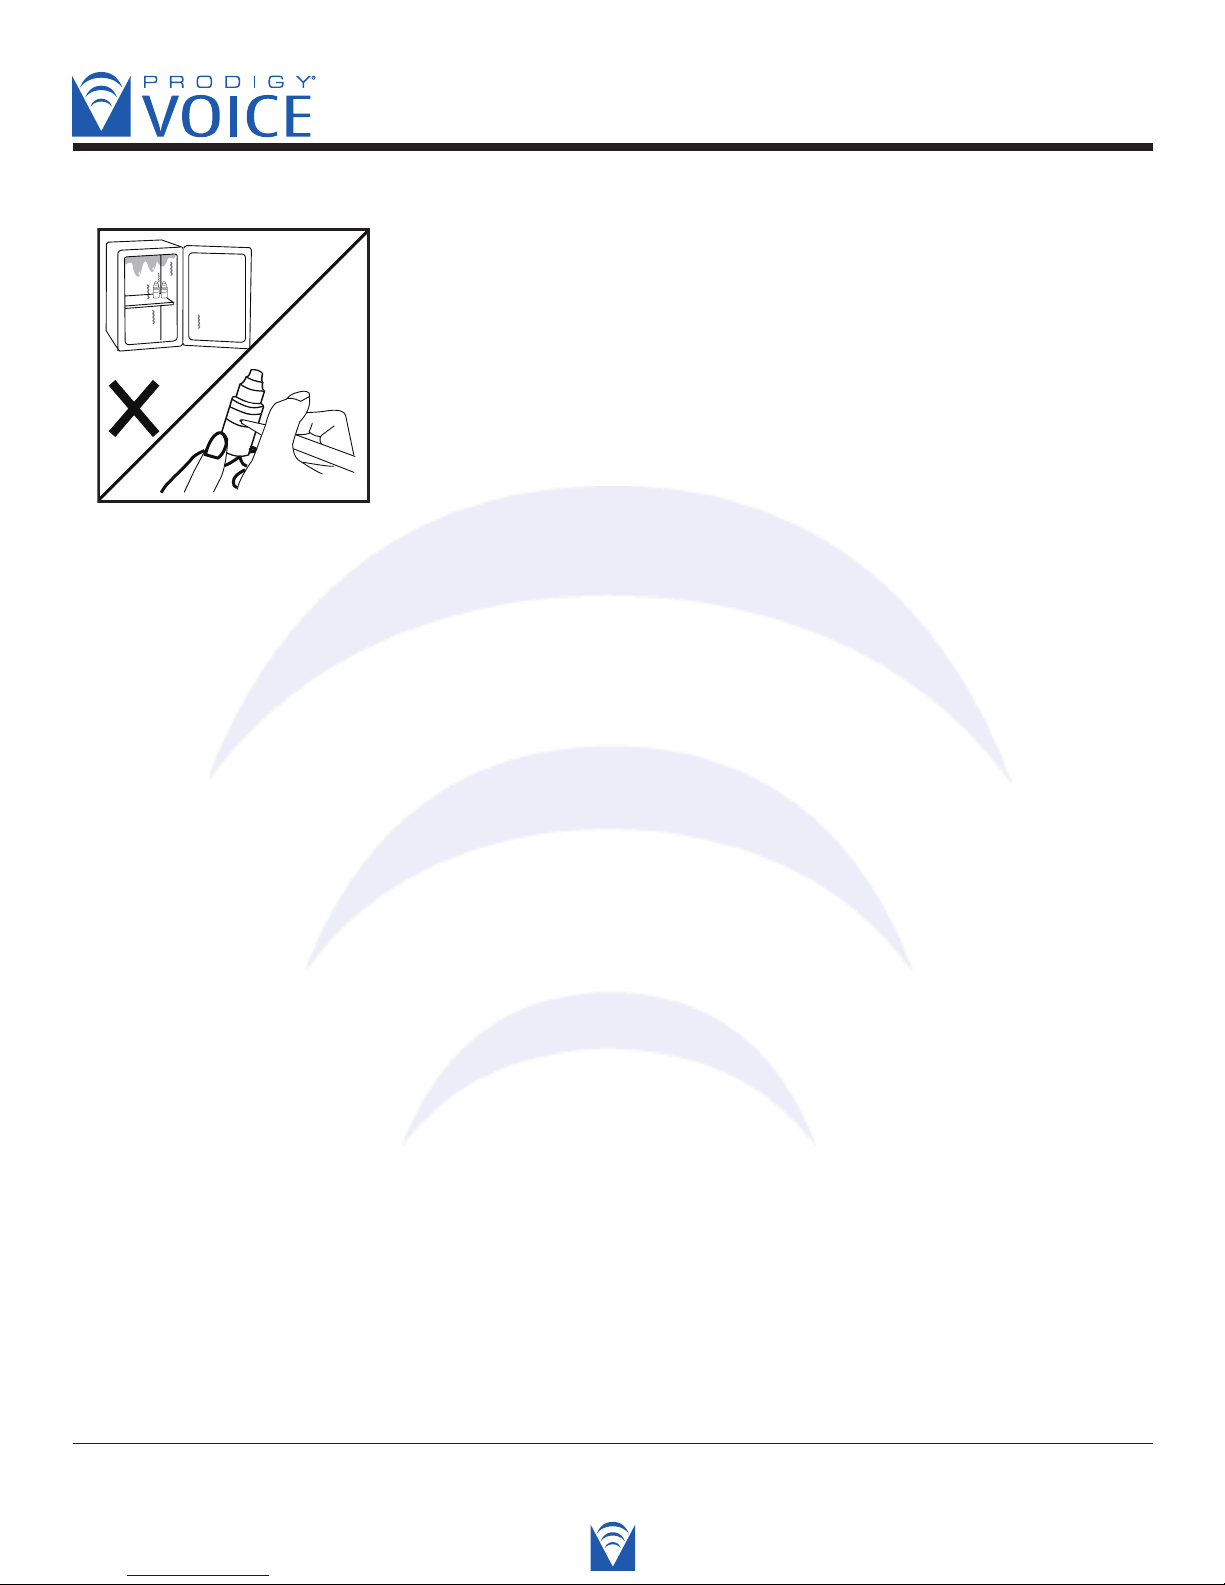
• Storage condition: Store the control solution tightly closed at
temperatures below 86ºF (30ºC). Do not refrigerate.
• Record the discard date (date opened plus 90 days) on the
control solution vial. Discard after 90 days.
Diagnostic Devices, Inc www.prodigymeter.com 1.800.243.2636
40
Page 41
Blood Glucose Monitoring System - User’s Manual
PROBLEM-SOLVING GUIDE
The following is a summary of some display messages and symbols.These messages help
to identify certain problems but do not appear in all cases when a problem has occurred.
Improper use may cause an inaccurate result without producing an error message.
In the event of a problem, refer to the information under “action”.
Never try to disassemble the meter in any circumstances. If you encounter any error
messages not listed below or if you have followed the actions recommended but
the problem remains unsolved, please call the Technical Support 1-800-243-2636.
Diagnostic Devices, Inc www.prodigymeter.com 1.800.243.2636
41
Page 42
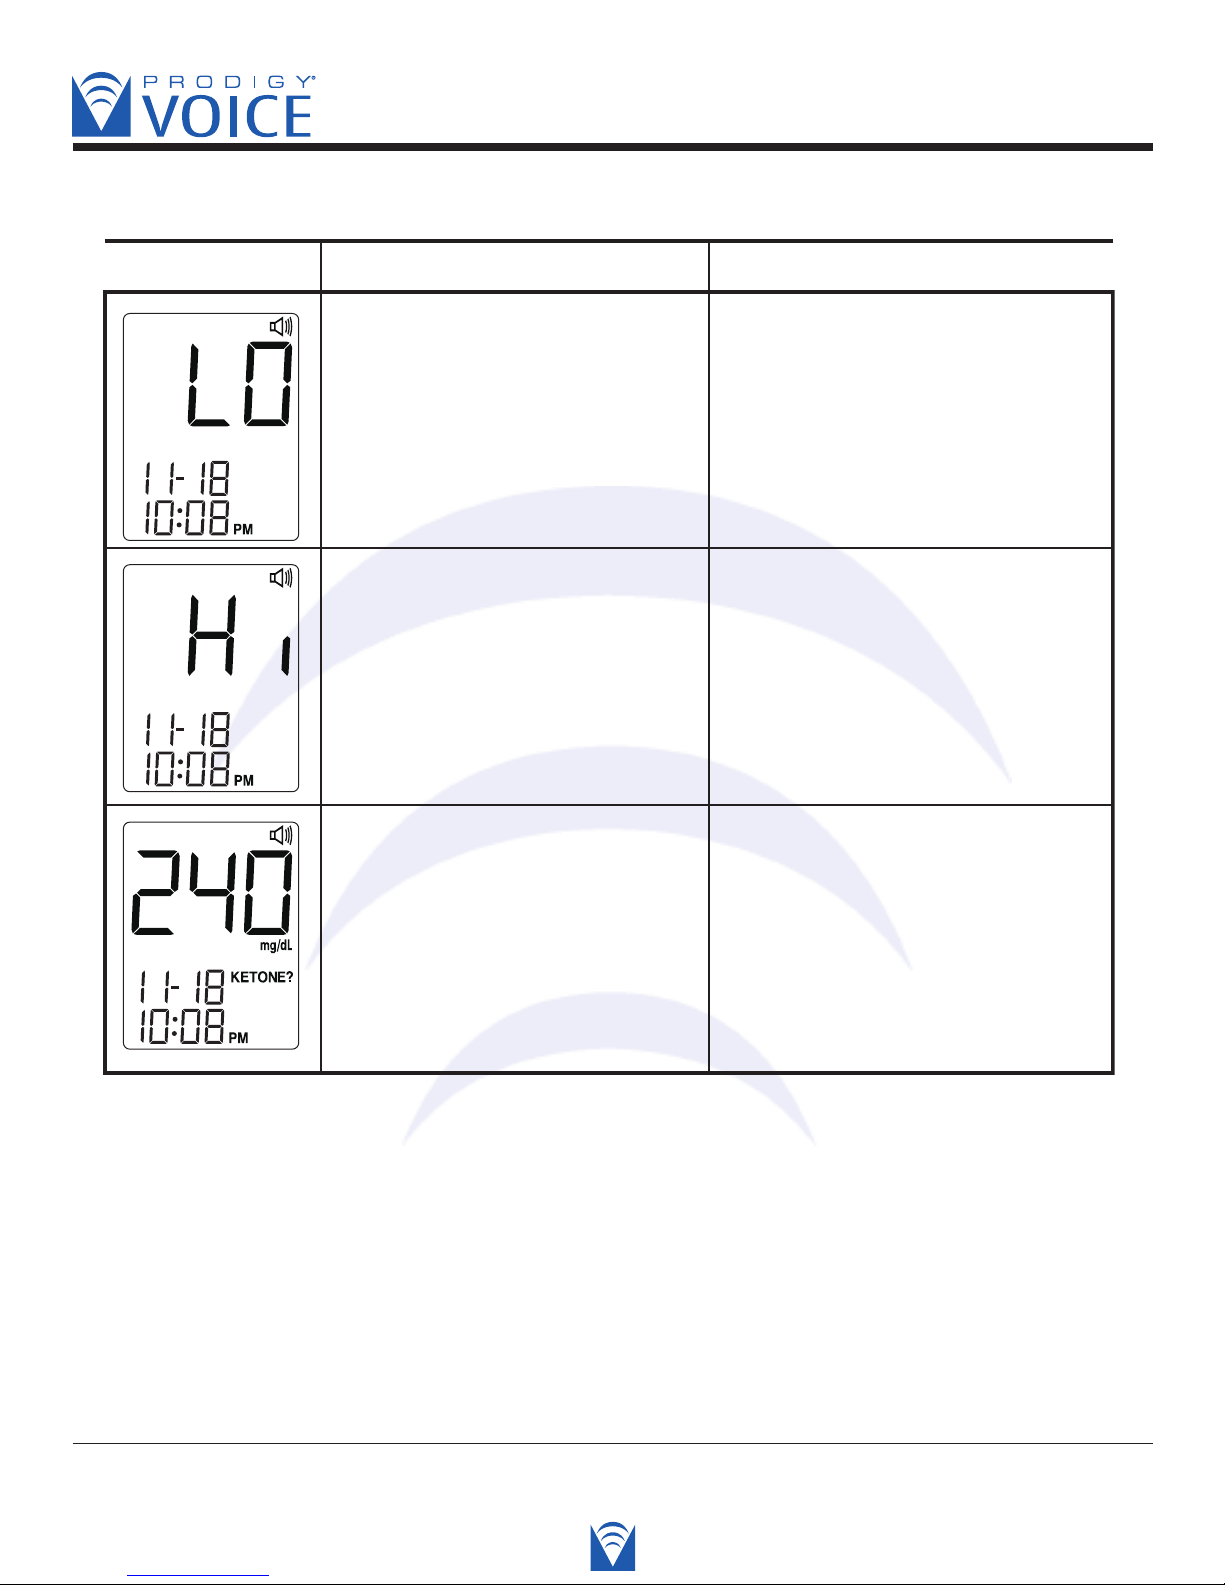
• Special Message
Appears when your result is
below measurement limit, which
is less than 20 mg/dL.
(1.1 mmol/L)
MESSAGE WHAT IT MEANS ACTION
Appears when your result is
above measurement limit, which
is higher than 600 mg/dL.
(33.3 mmol/L)
KETONE? appears when your
result is equal or higher than
240 mg/dL. (13.3 mmol/L)
This indicates hypoglycemia
(low blood glucose.)
You should immediately treat
hypoglycemia as recommended
by your healthcare professional.
This indicates severe
hyperglycemia (high blood
glucose).
Please seek medical assistance
immediately.
This indicates there is a
possibility of ketone accumulation
if you have Type 1 diabetes.
Please seek medical assistance
immediately.
Blood Glucose Monitoring System - User’s Manual
Diagnostic Devices, Inc www.prodigymeter.com 1.800.243.2636
42
Page 43
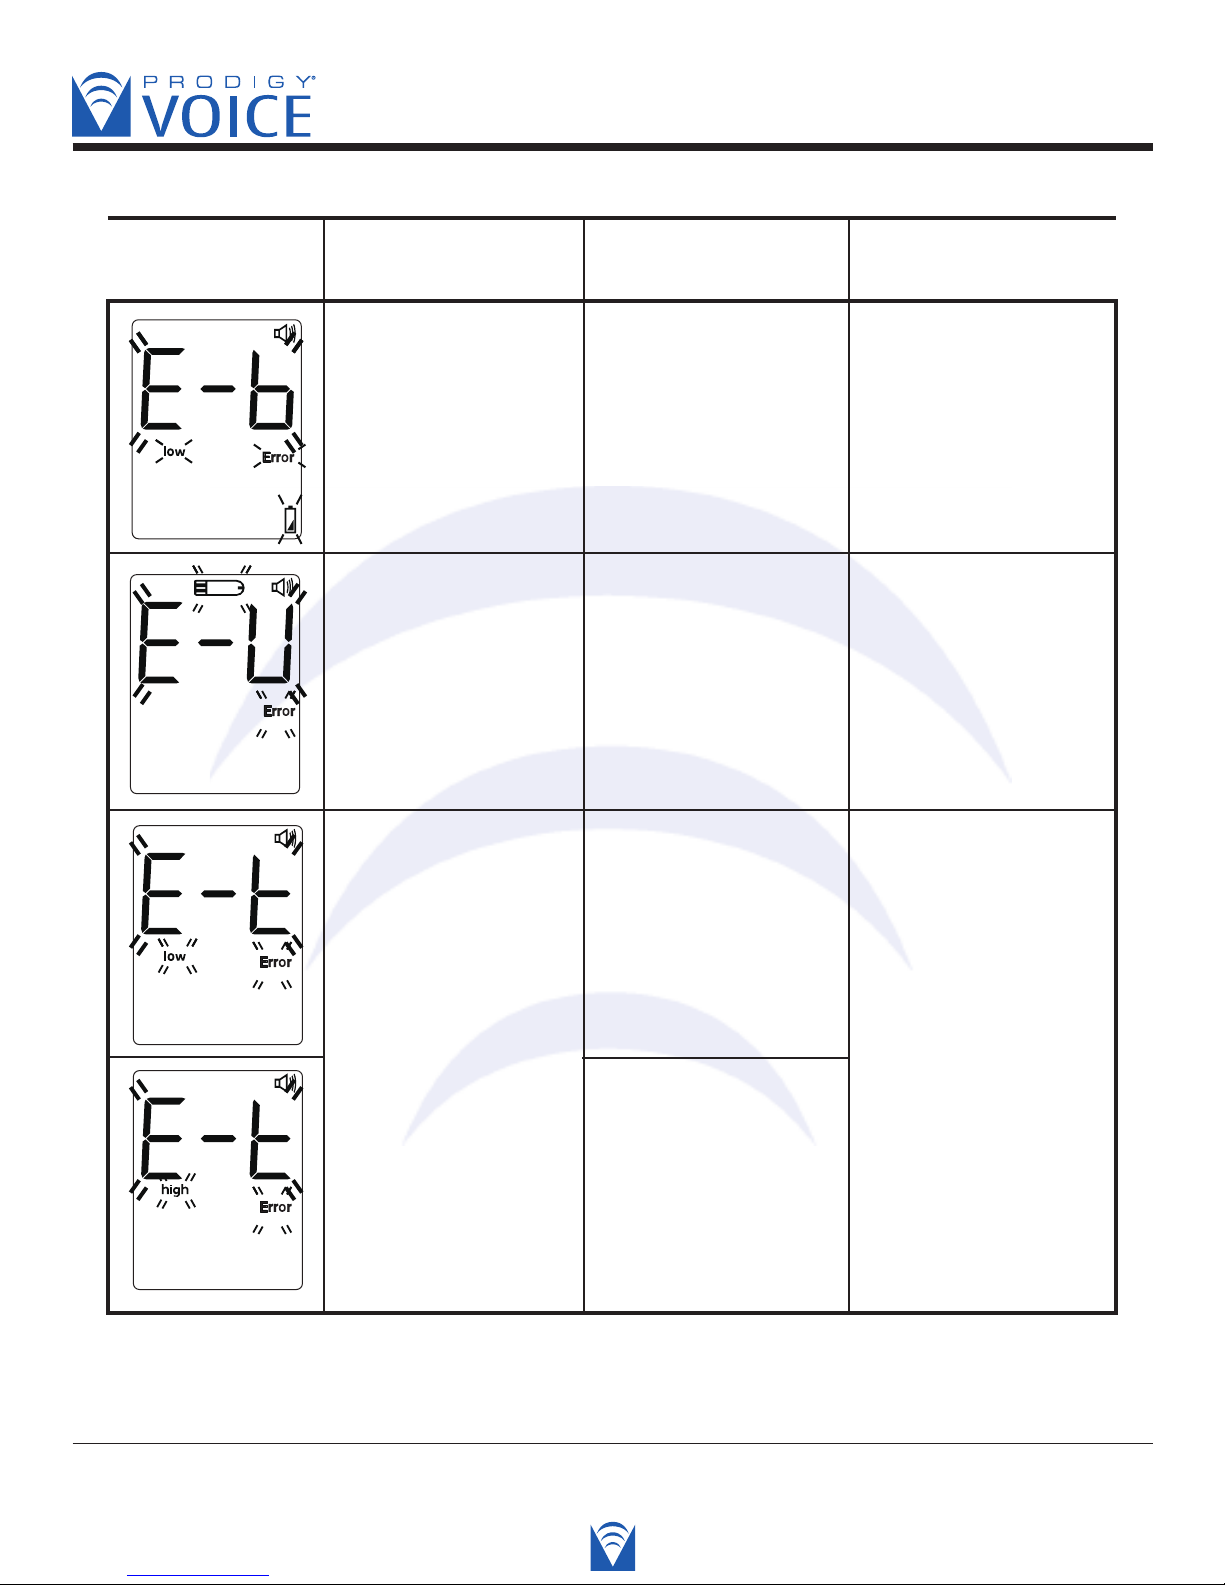
• Error Message
Battery is dead.
Please replace.
MESSAGE
WHAT DOES WHAT IT
ACTION
METER SAY? MEANS
Strip has been used.
Please replace.
The room
temperature is out
of range.
Thus unable to
measure.
Appears when the
batteries cannot
provide enough
power for a test.
Replace the batteries
immediately.
Appears when
inserting a used test
strip.
Test with a new
test strip.
Appears when
ambient temperature
is below system
operation range.
50º F (10º C)
Appears when
ambient temperature
is above system
operation range.
104º F (40º C)
System operation
range is 50ºF~104ºF
(10ºC~40ºC). Repeat
the test after the
meter and test strip
have reached the
above temperature.
Blood Glucose Monitoring System - User’s Manual
Diagnostic Devices, Inc www.prodigymeter.com 1.800.243.2636
43
Page 44
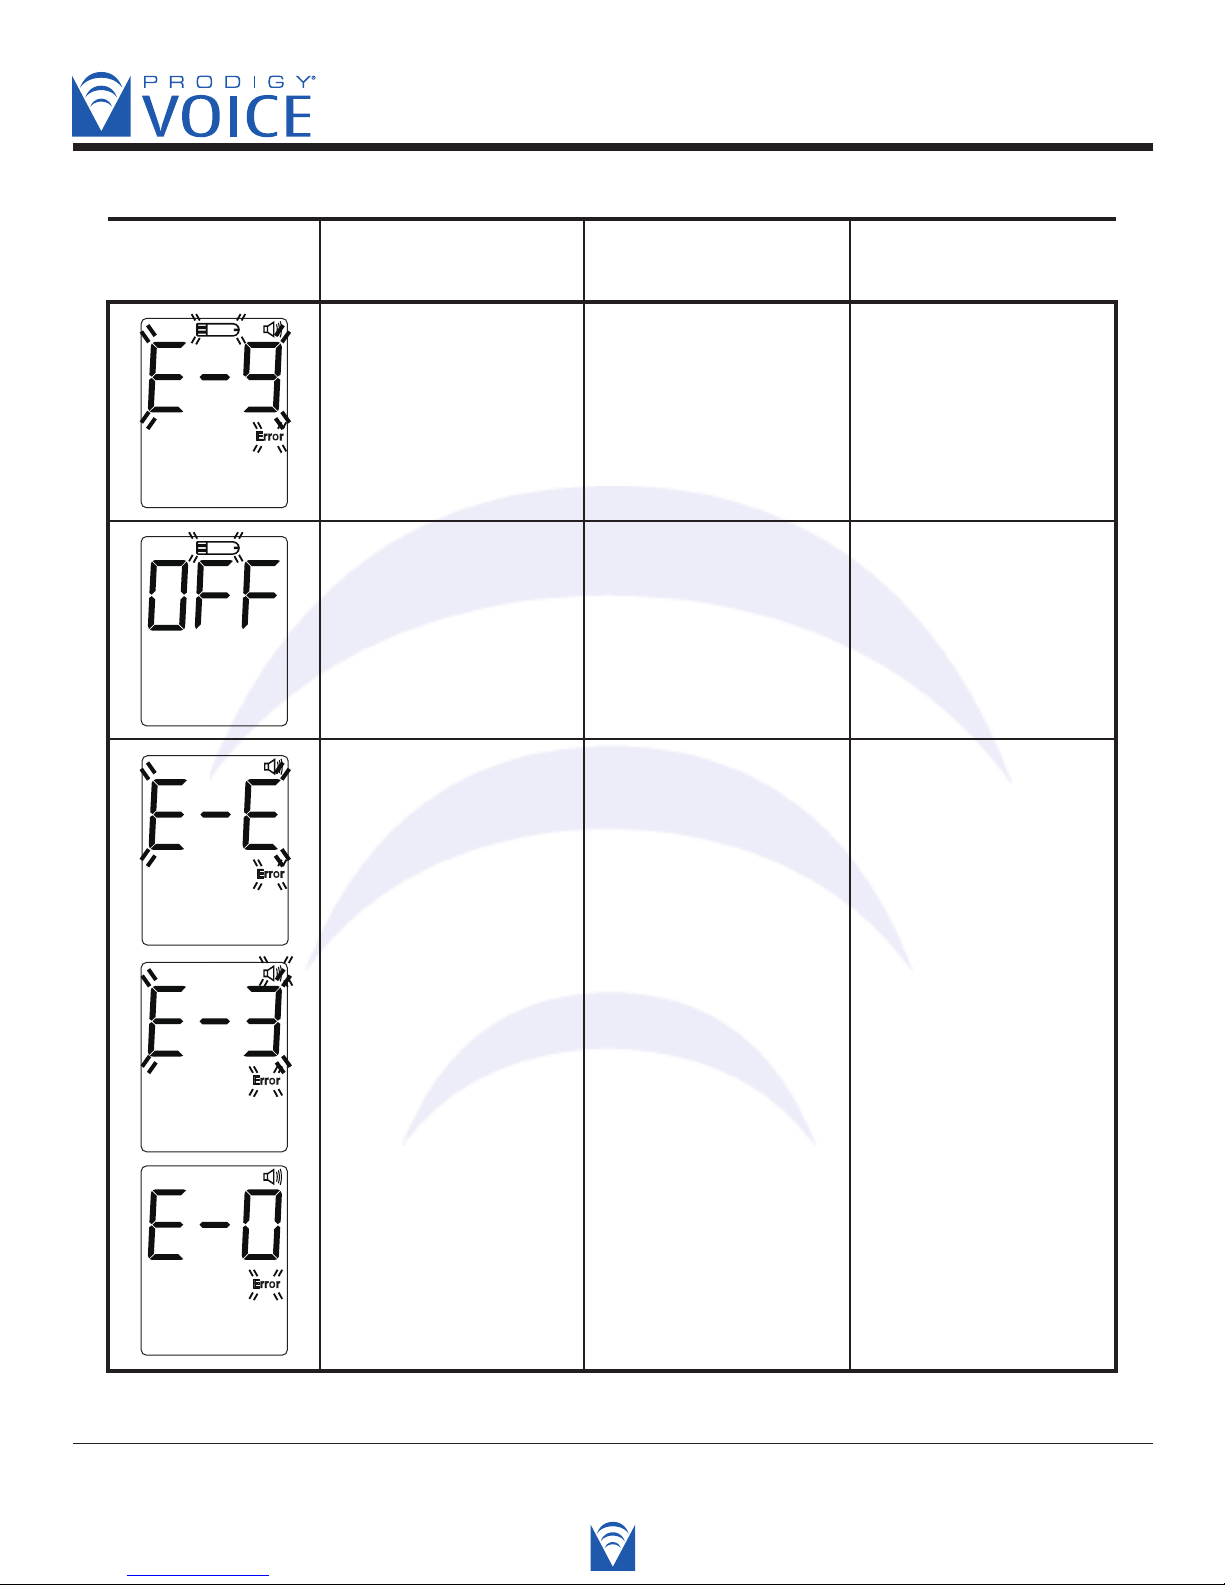
Please ensure proper
operation then try
again.
MESSAGE
WHAT DOES WHAT IT
ACTION
METER SAY? MEANS
Please remove strip.
Meter malfunction.
Please contact local
distributor.
Remove the strip
after applying blood
to the absorbent
channel.
Re-test with a new
test strip.
Test strip is inserted
after the meter turns
off.
Remove the test
strip.
Problem with the
meter.
Review the
instructions and
re-test with a new
test strip. If the above
steps do not work,
please contact
technical support for
help.
Blood Glucose Monitoring System - User’s Manual
Diagnostic Devices, Inc www.prodigymeter.com 1.800.243.2636
44
Page 45
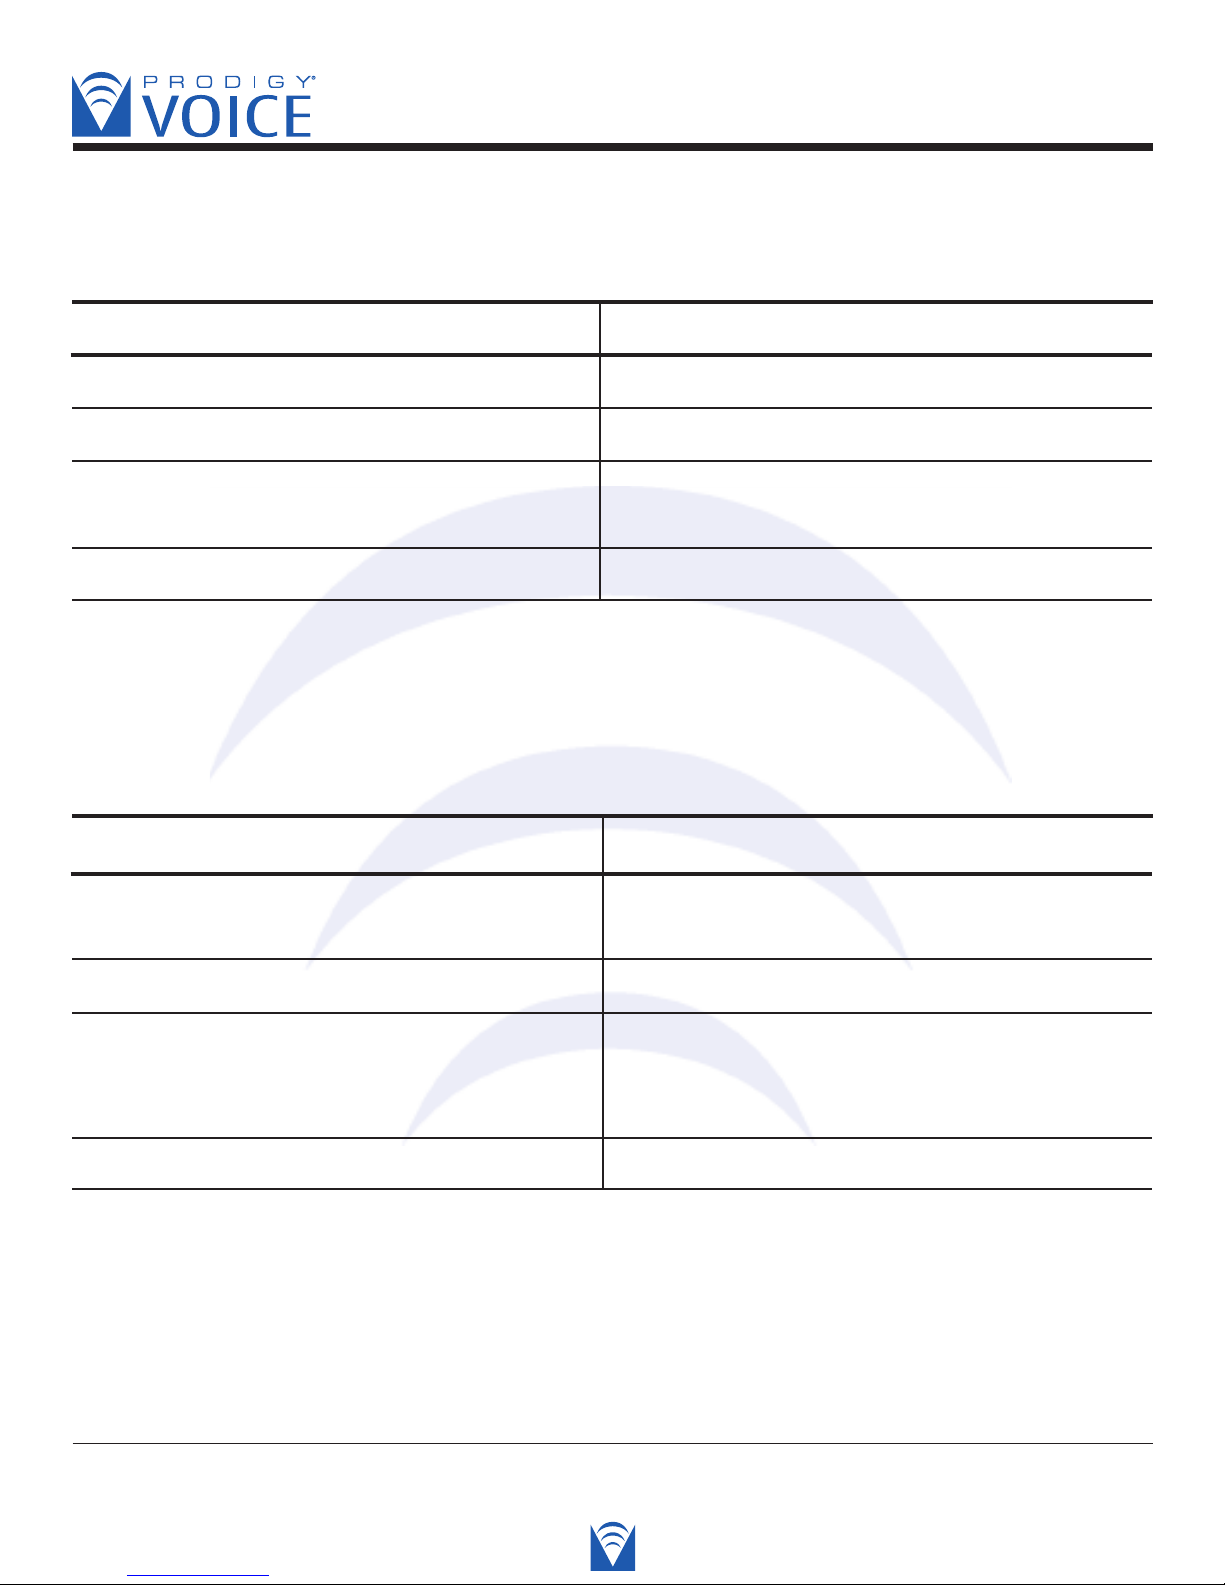
Blood Glucose Monitoring System - User’s Manual
• Problem in Operation
1. If the meter does not display a message after inserting a test strip:
PROBABLE CAUSE WHAT TO DO
Battery exhausted. Replace the batteries.
Battery incorrectly installed or absent. Check that the battery is correctly installed.
Test strip inserted upside down, Insert the test strip correctly with the
incompletely or incorrectly. contact bars end first and facing up.
Defective meter. Please contact Technical Support for help.
2. If the test does not start after applying the sample:
PROBABLE CAUSE WHAT TO DO
Insufficient blood sample. Repeat the test using a new test strip with
larger volume of blood sample.
Defective test strip. Repeat the test with a new test strip.
Sample applied after automatically shut off Repeat the test with a new test strip.
(3 minutes after last user action). Apply sample only when flashing blood
symbol appears on the display.
Defective meter. Please contact Technical Support for help.
Diagnostic Devices, Inc www.prodigymeter.com 1.800.243.2636
45
Page 46
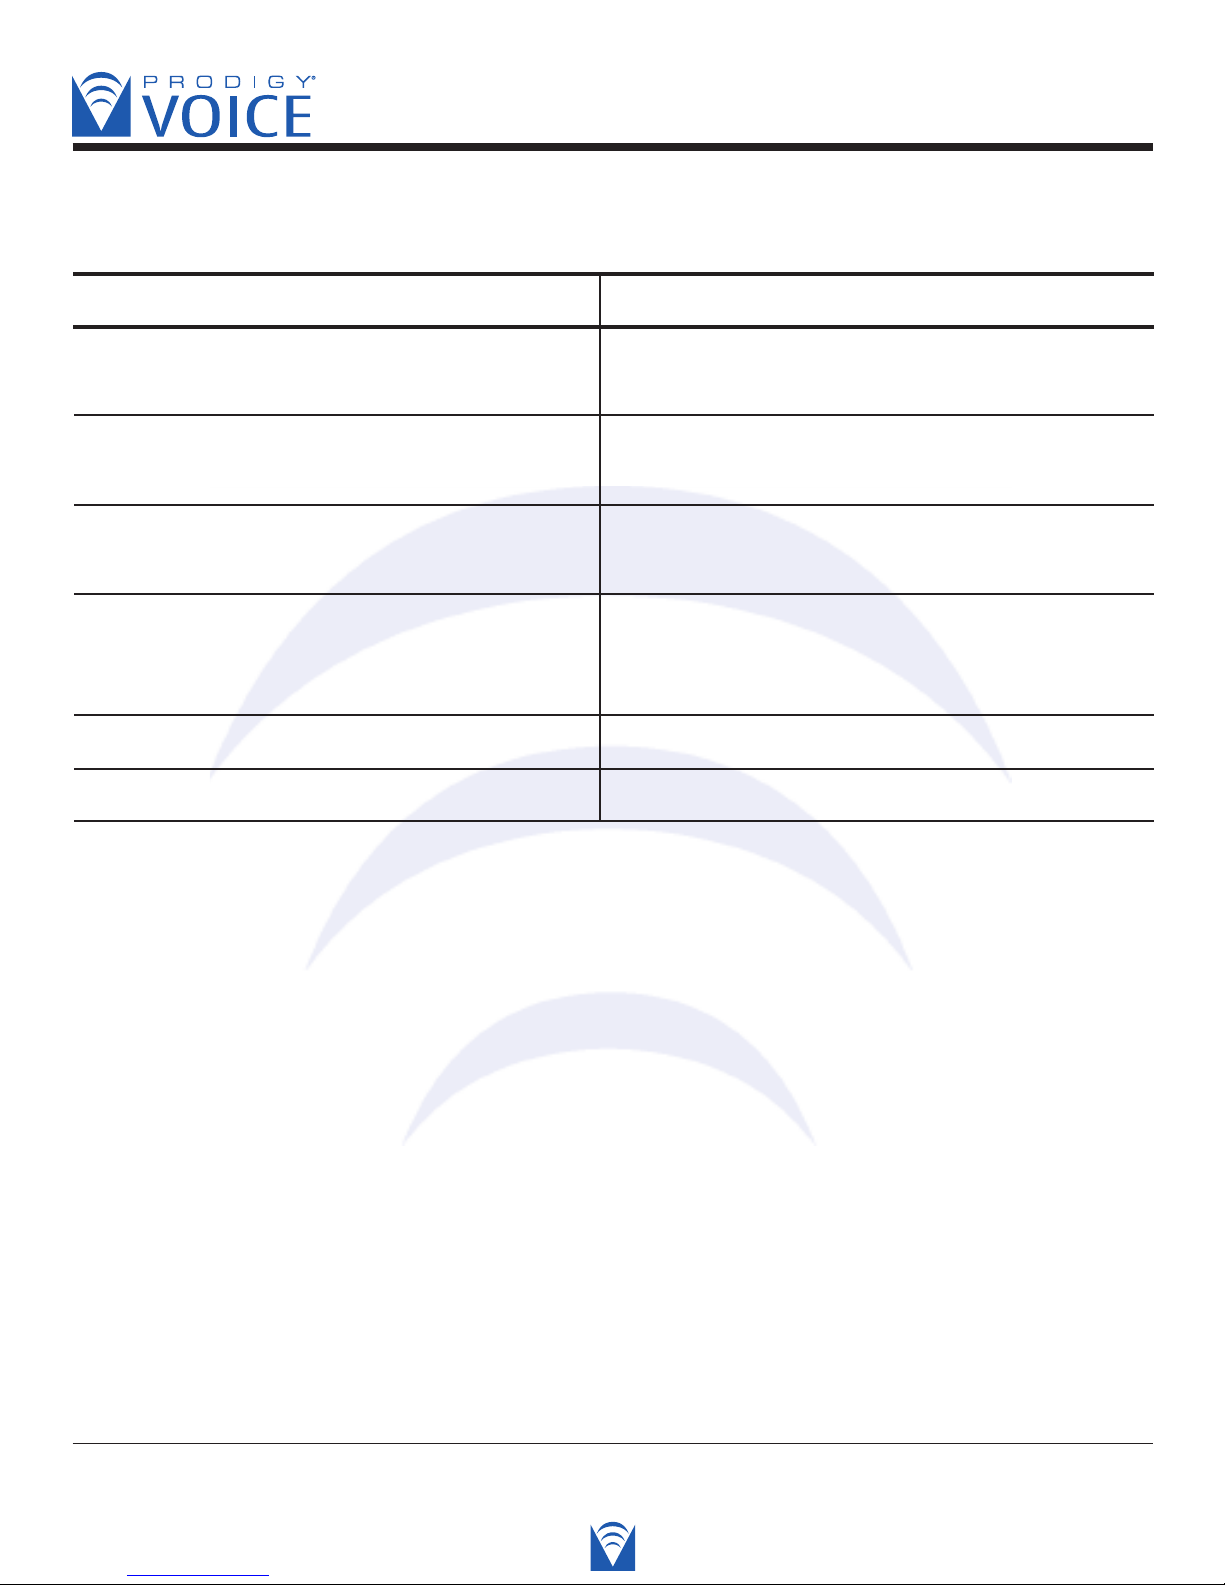
Blood Glucose Monitoring System - User’s Manual
3. If the control solution test result is out of range.
POSSIBLE CAUSE WHAT TO DO
Error in performing the test. Read the instruction thoroughly and
repeat the test again.
Did not shake the control solution Shake the control solution vigorously
bottle very well. and repeat the test again.
Expired or contaminated control solution. Check the expiration date or the discarded
date of the control solution.
Control solution that is too warm or too cold. Control solution, meter, and test strips
should come to room temperature (68-77ºF
/20-25ºC) before testing.
Test strip deterioration. Repeat the test with a new test strip.
Meter malfunction. Please contact Technical Support for help.
Diagnostic Devices, Inc www.prodigymeter.com 1.800.243.2636
46
Page 47
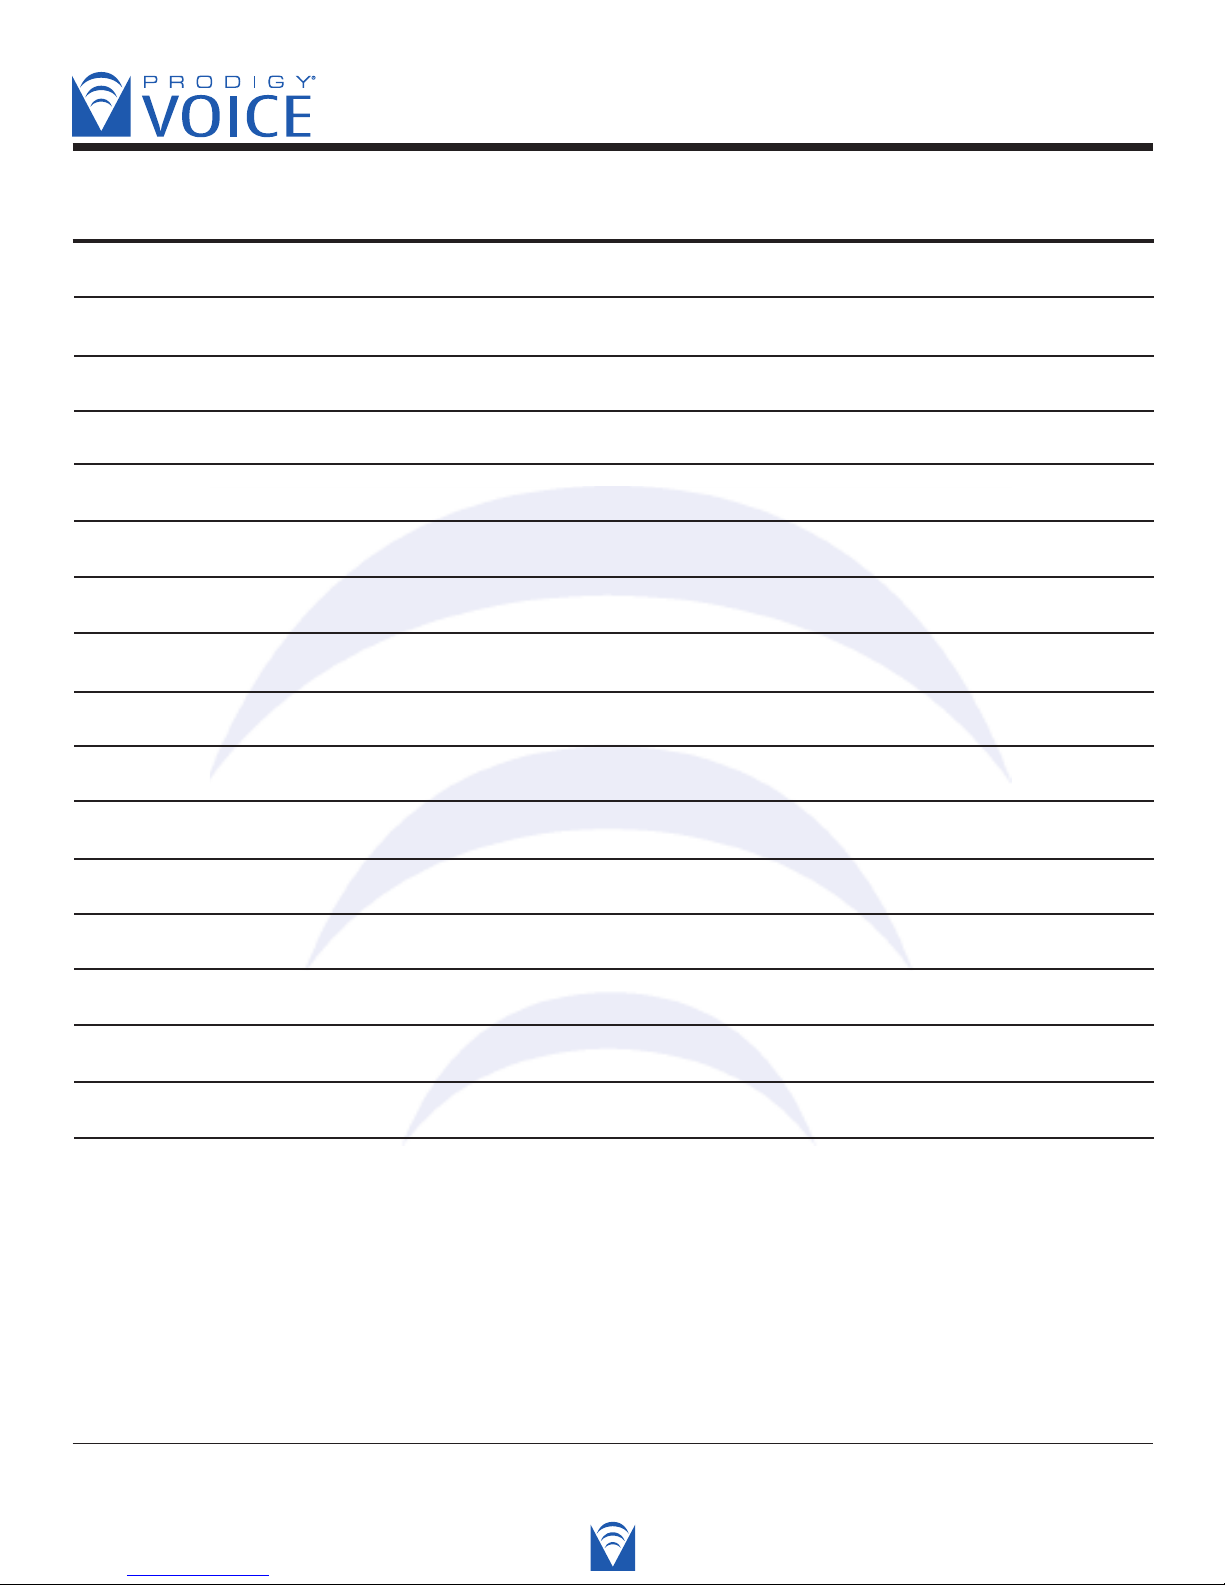
Blood Glucose Monitoring System - User’s Manual
SPECIFICATIONS
Model No.: 51900
Dimension & Weight: 3.74”(L) x 2.17”(W) x 0.71(H) 2.6 oz.
95mm(L) x 55mm(W) x 18mm(H), 75 g
Power Source: two(2) 1.5V AAA alkaline batteries
Display: LCD
Memory: 450 measurement results with date and time
External output: RS232 PC interface
Auto electrode inserting detection
Auto sample loading detection
Auto reaction time count-down
Auto turn-off after 3 minutes without action
Temperature Warning
Operating Condition: 50ºF~104ºF (10ºC~40ºC), below 85% R.H. (non-condensing)
Storage/Transportation Condition: 39.2ºF~104ºF (4ºF~40ºF), below 85% R.H.
Measurement Units: either mg/dL or mmol/L
Measurement Range: 20~600mg/dL (1.1~33.3mmol/L)
The specifications may be changed without prior notice.
The device has been certified to meet the electrical and safety requirements of:
IEC 60601-1, EN 60601-1, IEC 61010-1, EN 61010-1, EN 61010-2-101, EN 60601-1-2, EN 61326.
Diagnostic Devices, Inc www.prodigymeter.com 1.800.243.2636
47
Page 48

Blood Glucose Monitoring System - User’s Manual
Diagnostic Devices, Inc www.prodigymeter.com 1.800.243.2636
48
Page 49

Blood Glucose Monitoring System - User’s Manual
Diagnostic Devices, Inc www.prodigymeter.com 1.800.243.2636
49
 Loading...