

Page 1

Configuration Guide
www.procurve.com
ProCurve Network Access Controller 800
Page 2

Page 3

ProCurve Network Access
Controller 800
Configuration Guide
April 2008
1.0-30398
Page 4

© Copyright 2008 Hewlett-Packard Development Company, L.P.
The information contained herein is subject to change without
notice. All Rights Reserved.
This document contains proprietary information, which is
protected by copyright. No part of this document may be
photocopied, reproduced, or translated into another
language without the prior written consent of HewlettPackard.
Publication Number
5991-8618
April 2008
Applicable Products
Network Access Controller 800 (J9065A)
Trademark Credits
Microsoft, Windows, Windows NT, and Windows XP are U.S.
registered trademarks of Microsoft Corporation.
Disclaimer
HEWLETT-PACKARD COMPANY MAKES NO WARRANTY
OF ANY KIND WITH REGARD TO THIS MATERIAL,
INCLUDING, BUT NOT LIMITED TO, THE IMPLIED
WARRANTIES OF MERCHANTABILITY AND FITNESS
FOR A PARTICULAR PURPOSE. Hewlett-Packard shall not
be liable for errors contained herein or for incidental or
consequential damages in connection with the furnishing,
performance, or use of this material.
The only warranties for HP products and services are set
forth in the express warranty statements accompanying
such products and services. Nothing herein should be
construed as constituting an additional warranty. HP shall
not be liable for technical or editorial errors or omissions
contained herein.
Hewlett-Packard assumes no responsibility for the use or
reliability of its software on equipment that is not furnished
by Hewlett-Packard.
Warranty
See the Customer Support/Warranty booklet included with
the product.
A copy of the specific warranty terms applicable to your
Hewlett-Packard products and replacement parts can be
obtained from your HP Sales and Service Office or
authorized dealer.
Hewlett-Packard Company
8000 Foothills Boulevard
Roseville, California 95747
http://www.procurve.com/
Open Source Software Acknowledgment
Statement
This software incorporates open source components that
are governed by the GNU General Public License (GPL),
version 2. In accordance with this license, ProCurve
Networking will make available a complete, machinereadable copy of the source code components covered by
the GNU GPL upon receipt of a written request. Send a
request to:
Hewlett-Packard Company, L.P.
Wireless Edge Services xl Module Program
GNU GPL Source Code
Attn: ProCurve Networking Support
MS: 5550
Roseville, CA 95747 USA
Page 5

Contents
1 Overview of the ProCurve NAC 800
Contents . . . . . . . . . . . . . . . . . . . . . . . . . . . . . . . . . . . . . . . . . . . . . . . . . . . . . . 1-1
Introduction . . . . . . . . . . . . . . . . . . . . . . . . . . . . . . . . . . . . . . . . . . . . . . . . . . 1-4
Hardware Overview . . . . . . . . . . . . . . . . . . . . . . . . . . . . . . . . . . . . . . . . . . . 1-5
LEDs . . . . . . . . . . . . . . . . . . . . . . . . . . . . . . . . . . . . . . . . . . . . . . . . . . . . . . 1-5
Console Ethernet Port . . . . . . . . . . . . . . . . . . . . . . . . . . . . . . . . . . . . . . . 1-6
Panel LCD and Buttons . . . . . . . . . . . . . . . . . . . . . . . . . . . . . . . . . . . . . . 1-6
Serial Number and MAC Address . . . . . . . . . . . . . . . . . . . . . . . . . . . . . . 1-6
Ethernet Ports . . . . . . . . . . . . . . . . . . . . . . . . . . . . . . . . . . . . . . . . . . . . . . 1-7
Port 1 . . . . . . . . . . . . . . . . . . . . . . . . . . . . . . . . . . . . . . . . . . . . . . . . . . 1-7
Port 2 . . . . . . . . . . . . . . . . . . . . . . . . . . . . . . . . . . . . . . . . . . . . . . . . . . 1-7
Server Types . . . . . . . . . . . . . . . . . . . . . . . . . . . . . . . . . . . . . . . . . . . . . . . . . . 1-8
Choosing the Server Type . . . . . . . . . . . . . . . . . . . . . . . . . . . . . . . . . . . . 1-8
Deployment of One MS and Multiple ESs . . . . . . . . . . . . . . . . . . . . 1-8
CS Deployment . . . . . . . . . . . . . . . . . . . . . . . . . . . . . . . . . . . . . . . . . 1-11
Management Server (MS) . . . . . . . . . . . . . . . . . . . . . . . . . . . . . . . . . . . . 1-12
Enforcement Server (ES) . . . . . . . . . . . . . . . . . . . . . . . . . . . . . . . . . . . . 1-14
Combination Server (CS) . . . . . . . . . . . . . . . . . . . . . . . . . . . . . . . . . . . . 1-14
Changing the Server Type . . . . . . . . . . . . . . . . . . . . . . . . . . . . . . . . . . . 1-15
Enforcement Clusters . . . . . . . . . . . . . . . . . . . . . . . . . . . . . . . . . . . . . . . . 1-16
Enforcement Clusters for an MS and ESs . . . . . . . . . . . . . . . . . . . . . . 1-16
Enforcement Clusters for a CS . . . . . . . . . . . . . . . . . . . . . . . . . . . . . . . 1-16
Endpoint Integrity . . . . . . . . . . . . . . . . . . . . . . . . . . . . . . . . . . . . . . . . . . . 1-17
Endpoint Integrity Capabilities of the NAC 800 . . . . . . . . . . . . . . . . . 1-18
NAC Tests . . . . . . . . . . . . . . . . . . . . . . . . . . . . . . . . . . . . . . . . . . . . . 1-18
NAC Policies . . . . . . . . . . . . . . . . . . . . . . . . . . . . . . . . . . . . . . . . . . . 1-20
NAC Policy Groups . . . . . . . . . . . . . . . . . . . . . . . . . . . . . . . . . . . . . 1-23
i
Page 6

Testing Methods . . . . . . . . . . . . . . . . . . . . . . . . . . . . . . . . . . . . . . . . . . . 1-24
NAC EI Agent . . . . . . . . . . . . . . . . . . . . . . . . . . . . . . . . . . . . . . . . . . 1-25
ActiveX . . . . . . . . . . . . . . . . . . . . . . . . . . . . . . . . . . . . . . . . . . . . . . . 1-26
Agentless . . . . . . . . . . . . . . . . . . . . . . . . . . . . . . . . . . . . . . . . . . . . . . 1-27
Endpoint Integrity Posture . . . . . . . . . . . . . . . . . . . . . . . . . . . . . . . . . . . 1-28
Accessible Services . . . . . . . . . . . . . . . . . . . . . . . . . . . . . . . . . . . . . . . . . 1-28
Performance Implications of Endpoint Integrity Checks . . . . . . . . . 1-29
Post-Connect Testing . . . . . . . . . . . . . . . . . . . . . . . . . . . . . . . . . . . . . . . 1-29
RADIUS Server . . . . . . . . . . . . . . . . . . . . . . . . . . . . . . . . . . . . . . . . . . . . . . . 1-30
ProCurve NAC 800 RADIUS Capabilities . . . . . . . . . . . . . . . . . . . . . . . 1-31
RADIUS Capabilities of the NAC 800 Integrated with IDM . . . . . . . . 1-32
Deployment Methods . . . . . . . . . . . . . . . . . . . . . . . . . . . . . . . . . . . . . . . . . 1-33
802.1X Deployment Method . . . . . . . . . . . . . . . . . . . . . . . . . . . . . . . . . . 1-34
802.1X Overview . . . . . . . . . . . . . . . . . . . . . . . . . . . . . . . . . . . . . . . . 1-34
Types of Access Control Provided by the NAC 800 . . . . . . . . . . . 1-35
802.1X Deployment Method—Endpoint Integrity With
or Without RADIUS . . . . . . . . . . . . . . . . . . . . . . . . . . . . . . . . . . . . . . . . . 1-36
How the NAC 800 Quarantines Endpoints . . . . . . . . . . . . . . . . . . 1-36
How and Where to Deploy the NAC 800 . . . . . . . . . . . . . . . . . . . . 1-38
802.1X Deployment Method—RADIUS Server Only . . . . . . . . . . . . . . 1-43
How and Where to Deploy the NAC 800 . . . . . . . . . . . . . . . . . . . . 1-43
DHCP Deployment Method . . . . . . . . . . . . . . . . . . . . . . . . . . . . . . . . . . 1-44
Types of Access Control Provided By the NAC 800 . . . . . . . . . . 1-45
Two Options for a DHCP Deployment . . . . . . . . . . . . . . . . . . . . . 1-45
How and Where to Deploy the NAC 800 for a DHCP Inline
Deployment . . . . . . . . . . . . . . . . . . . . . . . . . . . . . . . . . . . . . . . . . . . . 1-45
How and Where to Deploy the NAC 800 for a DHCP Plug-in
Deployment . . . . . . . . . . . . . . . . . . . . . . . . . . . . . . . . . . . . . . . . . . . . 1-47
How the NAC 800 Quarantines Endpoints for a DHCP
Deployment . . . . . . . . . . . . . . . . . . . . . . . . . . . . . . . . . . . . . . . . . . . . 1-48
Enforcement Methods for DHCP Quarantining . . . . . . . . . . . . . . 1-51
Designing the Quarantine Subnet . . . . . . . . . . . . . . . . . . . . . . . . . 1-52
Inline Deployment Method . . . . . . . . . . . . . . . . . . . . . . . . . . . . . . . . . . . 1-56
Types of Access Control Provided by the NAC 800 . . . . . . . . . . . 1-57
How the NAC 800 Quarantines Endpoints . . . . . . . . . . . . . . . . . . 1-57
Configuring Accessible Services for Inline Method . . . . . . . . . . . 1-57
How and Where to Deploy the NAC 800 . . . . . . . . . . . . . . . . . . . . 1-58
ii
Page 7

2 Management Options for the ProCurve NAC 800
Contents . . . . . . . . . . . . . . . . . . . . . . . . . . . . . . . . . . . . . . . . . . . . . . . . . . . . . . 2-1
Overview . . . . . . . . . . . . . . . . . . . . . . . . . . . . . . . . . . . . . . . . . . . . . . . . . . . . . 2-3
Menu Interface and Panel LCD . . . . . . . . . . . . . . . . . . . . . . . . . . . . . . . . . 2-5
Access the Menu Interface . . . . . . . . . . . . . . . . . . . . . . . . . . . . . . . . . . . . 2-5
Console Session . . . . . . . . . . . . . . . . . . . . . . . . . . . . . . . . . . . . . . . . . 2-5
SSH Session . . . . . . . . . . . . . . . . . . . . . . . . . . . . . . . . . . . . . . . . . . . . 2-7
Navigate the Menu Interface . . . . . . . . . . . . . . . . . . . . . . . . . . . . . . . . . . 2-8
Configure Initial Settings with the Menu Interface . . . . . . . . . . . . . . . . 2-9
Set the Server Type with the Menu Interface . . . . . . . . . . . . . . . . 2-10
Set the IP Address with the Menu Interface . . . . . . . . . . . . . . . . . 2-12
Test IP Settings (Ping) . . . . . . . . . . . . . . . . . . . . . . . . . . . . . . . . . . . 2-13
Change the Password to the Menu Interface . . . . . . . . . . . . . . . . . . . . 2-15
Complete Other Tasks in the Menu Interface . . . . . . . . . . . . . . . . . . . 2-17
Reboot the NAC 800 in the Menu Interface . . . . . . . . . . . . . . . . . 2-18
Shut Down the NAC 800 in the Menu Interface . . . . . . . . . . . . . . 2-19
Turn the Locator LED On and Off . . . . . . . . . . . . . . . . . . . . . . . . . 2-20
View System Information . . . . . . . . . . . . . . . . . . . . . . . . . . . . . . . . 2-21
Access the Panel LCD Menu . . . . . . . . . . . . . . . . . . . . . . . . . . . . . . . . . 2-22
Navigate the Panel LCD Menu . . . . . . . . . . . . . . . . . . . . . . . . . . . . . . . . 2-23
Configure Initial Settings with the Panel LCD Menu . . . . . . . . . . . . . 2-24
Set the Server Type with the Panel LCD Menu . . . . . . . . . . . . . . 2-24
Set the IP Address with the Panel LCD Menu . . . . . . . . . . . . . . . 2-26
Test IP Settings (Ping) with the Panel LCD Menu . . . . . . . . . . . . 2-28
Complete Other Tasks Using the Panel LCD Menu . . . . . . . . . . . . . . 2-29
Reboot the NAC 800 Using the Panel LCD Menu . . . . . . . . . . . . . 2-30
Shut Down the NAC 800 Using the Panel LCD . . . . . . . . . . . . . . . 2-31
Set the Ports Speed and Duplex Settings . . . . . . . . . . . . . . . . . . . 2-32
Root Access to the NAC 800 . . . . . . . . . . . . . . . . . . . . . . . . . . . . . . . . . . 2-35
Web Browser Interface . . . . . . . . . . . . . . . . . . . . . . . . . . . . . . . . . . . . . . . 2-37
Access the Web Browser Interface . . . . . . . . . . . . . . . . . . . . . . . . . . . . 2-37
Requirements on the NAC 800 . . . . . . . . . . . . . . . . . . . . . . . . . . . . 2-37
Requirements on the Management Station . . . . . . . . . . . . . . . . . . 2-38
Steps for Accessing the Web Browser Interface . . . . . . . . . . . . . 2-39
iii
Page 8

Navigate the Web Browser Interface . . . . . . . . . . . . . . . . . . . . . . . . . . 2-39
Home Window . . . . . . . . . . . . . . . . . . . . . . . . . . . . . . . . . . . . . . . . . 2-39
Common Features in Web Browser Interface Windows . . . . . . . 2-44
Following Instructions to Navigate the Web Browser Interface 2-46
ProCurve Manager (PCM) Plus . . . . . . . . . . . . . . . . . . . . . . . . . . . . . . . 2-48
Enable PCM Plus to Detect the NAC 800 . . . . . . . . . . . . . . . . . . . . . . . 2-48
Capabilities of PCM Plus for Managing the NAC 800 . . . . . . . . . . . . . 2-49
IDM . . . . . . . . . . . . . . . . . . . . . . . . . . . . . . . . . . . . . . . . . . . . . . . . . . . . . . . . . 2-50
Enable IDM to Detect the NAC 800 . . . . . . . . . . . . . . . . . . . . . . . . . . . . 2-50
Capabilities of IDM for Managing the NAC 800 . . . . . . . . . . . . . . . . . . 2-53
3 Initial Setup of the ProCurve NAC 800
Contents . . . . . . . . . . . . . . . . . . . . . . . . . . . . . . . . . . . . . . . . . . . . . . . . . . . . . . 3-1
System Settings . . . . . . . . . . . . . . . . . . . . . . . . . . . . . . . . . . . . . . . . . . . . . . . 3-3
System Settings—Initial Configuration . . . . . . . . . . . . . . . . . . . . . . . . . 3-4
Initial Configuration of CS or MS Settings . . . . . . . . . . . . . . . . . . . 3-4
Initial Configuration of ES Settings . . . . . . . . . . . . . . . . . . . . . . . . . 3-9
Edit System Settings . . . . . . . . . . . . . . . . . . . . . . . . . . . . . . . . . . . . . . . . 3-16
Edit System Settings on an MS or a CS . . . . . . . . . . . . . . . . . . . . . 3-16
Edit System Settings on an ES . . . . . . . . . . . . . . . . . . . . . . . . . . . . 3-33
iv
Licenses . . . . . . . . . . . . . . . . . . . . . . . . . . . . . . . . . . . . . . . . . . . . . . . . . . . . . 3-41
Management and Maintenance . . . . . . . . . . . . . . . . . . . . . . . . . . . . . . . . 3-41
Upgrade the Software . . . . . . . . . . . . . . . . . . . . . . . . . . . . . . . . . . . . . . . 3-41
Create Management Users . . . . . . . . . . . . . . . . . . . . . . . . . . . . . . . . . . . 3-43
Create User Accounts . . . . . . . . . . . . . . . . . . . . . . . . . . . . . . . . . . . 3-44
Configure User Roles . . . . . . . . . . . . . . . . . . . . . . . . . . . . . . . . . . . . 3-47
Digital Certificates . . . . . . . . . . . . . . . . . . . . . . . . . . . . . . . . . . . . . . . . . . . 3-54
Install a CA-Signed Certificate for HTTPS . . . . . . . . . . . . . . . . . . . . . . 3-55
Generate a Key . . . . . . . . . . . . . . . . . . . . . . . . . . . . . . . . . . . . . . . . . 3-56
Install the Root CA Certificate . . . . . . . . . . . . . . . . . . . . . . . . . . . . 3-57
Create a Certificate Request and Transfer It off the NAC 800 . . 3-58
Download and Install the Signed Certificate . . . . . . . . . . . . . . . . 3-60
Restart the HTTPS Server . . . . . . . . . . . . . . . . . . . . . . . . . . . . . . . . 3-61
Page 9

Install a New Self-Signed Certificate for HTTPS . . . . . . . . . . . . . . . . . 3-61
Generate the Self-Certificate and Key . . . . . . . . . . . . . . . . . . . . . . 3-62
Export the Self-signed Certificate to a File . . . . . . . . . . . . . . . . . 3-63
Install the Self-signed Certificate as a Trusted Root
Certificate . . . . . . . . . . . . . . . . . . . . . . . . . . . . . . . . . . . . . . . . . . . . . 3-63
Restart the HTTPS Server . . . . . . . . . . . . . . . . . . . . . . . . . . . . . . . . 3-64
Install the Self-signed Certificate as a Trusted Root
Certificate on Endpoints . . . . . . . . . . . . . . . . . . . . . . . . . . . . . . . . . 3-64
4 Configuring the RADIUS Server—Integrated with
ProCurve Identity Driven Manager
Contents . . . . . . . . . . . . . . . . . . . . . . . . . . . . . . . . . . . . . . . . . . . . . . . . . . . . . . 4-1
Overview . . . . . . . . . . . . . . . . . . . . . . . . . . . . . . . . . . . . . . . . . . . . . . . . . . . . . 4-3
RADIUS Overview . . . . . . . . . . . . . . . . . . . . . . . . . . . . . . . . . . . . . . . . . . . 4-3
Authentication Protocols . . . . . . . . . . . . . . . . . . . . . . . . . . . . . . . . . 4-4
Dynamic or User-Based Settings . . . . . . . . . . . . . . . . . . . . . . . . . . . 4-4
IDM Overview . . . . . . . . . . . . . . . . . . . . . . . . . . . . . . . . . . . . . . . . . . . . . . 4-5
Data Store Overview . . . . . . . . . . . . . . . . . . . . . . . . . . . . . . . . . . . . . . . . . 4-6
Local Database . . . . . . . . . . . . . . . . . . . . . . . . . . . . . . . . . . . . . . . . . . 4-7
AD (Windows Domain) . . . . . . . . . . . . . . . . . . . . . . . . . . . . . . . . . . . 4-7
LDAP Server . . . . . . . . . . . . . . . . . . . . . . . . . . . . . . . . . . . . . . . . . . . . 4-8
Proxy RADIUS Server . . . . . . . . . . . . . . . . . . . . . . . . . . . . . . . . . . . . 4-9
Configure the NAC 800 as a RADIUS Server . . . . . . . . . . . . . . . . . . . 4-11
Specify the Quarantine Method (802.1X) . . . . . . . . . . . . . . . . . . . . . . . 4-12
Configure Authentication Settings . . . . . . . . . . . . . . . . . . . . . . . . . . . . 4-14
Configure Authentication to the NAC 800’s Local Database . . . 4-14
Configure Authentication to a Windows Domain . . . . . . . . . . . . 4-16
Configure Authentication to an LDAP Server . . . . . . . . . . . . . . . 4-20
Configure Authentication to a Proxy RADIUS Server . . . . . . . . . 4-30
Test Authentication Settings . . . . . . . . . . . . . . . . . . . . . . . . . . . . . 4-35
Add NASs as 802.1X Devices . . . . . . . . . . . . . . . . . . . . . . . . . . . . . . . . . 4-40
Apply Changes . . . . . . . . . . . . . . . . . . . . . . . . . . . . . . . . . . . . . . . . . . . . . 4-44
Restart the RADIUS Server . . . . . . . . . . . . . . . . . . . . . . . . . . . . . . . . . . 4-44
v
Page 10

Manage Digital Certificates for RADIUS . . . . . . . . . . . . . . . . . . . . . . . 4-48
Install the CA Root Certificate on the NAC 800 . . . . . . . . . . . . . . . . . 4-49
Install a Server Certificate for RADIUS . . . . . . . . . . . . . . . . . . . . . . . . 4-50
Create a Self-Signed Certificate . . . . . . . . . . . . . . . . . . . . . . . . . . . 4-51
Install a CA-Signed Certificate Using a Request Generated
on the NAC 800 . . . . . . . . . . . . . . . . . . . . . . . . . . . . . . . . . . . . . . . . . 4-53
Install a CA-Signed Certificate Using a Request Generated
on Behalf of the NAC 800 . . . . . . . . . . . . . . . . . . . . . . . . . . . . . . . . 4-58
Manage Certificates on Endpoints . . . . . . . . . . . . . . . . . . . . . . . . . . . . 4-62
Disable Server Validation on Endpoints . . . . . . . . . . . . . . . . . . . . . . . . 4-62
5 Configuring the RADIUS Server—Without Identity Driven
Manager
Contents . . . . . . . . . . . . . . . . . . . . . . . . . . . . . . . . . . . . . . . . . . . . . . . . . . . . . . 5-1
Overview . . . . . . . . . . . . . . . . . . . . . . . . . . . . . . . . . . . . . . . . . . . . . . . . . . . . . 5-3
RADIUS Overview . . . . . . . . . . . . . . . . . . . . . . . . . . . . . . . . . . . . . . . . . . . 5-3
Authentication Protocols . . . . . . . . . . . . . . . . . . . . . . . . . . . . . . . . . 5-4
Dynamic or User-Based Settings . . . . . . . . . . . . . . . . . . . . . . . . . . . 5-4
Data Store Overview . . . . . . . . . . . . . . . . . . . . . . . . . . . . . . . . . . . . . . . . . 5-5
AD (Windows Domain) . . . . . . . . . . . . . . . . . . . . . . . . . . . . . . . . . . . 5-5
LDAP Server . . . . . . . . . . . . . . . . . . . . . . . . . . . . . . . . . . . . . . . . . . . . 5-6
Proxy RADIUS Server . . . . . . . . . . . . . . . . . . . . . . . . . . . . . . . . . . . . 5-6
vi
Configure the NAC 800 as a RADIUS Server . . . . . . . . . . . . . . . . . . . . 5-8
Specify the Quarantine Method (802.1X) . . . . . . . . . . . . . . . . . . . . . . . . 5-8
Configure Authentication Settings . . . . . . . . . . . . . . . . . . . . . . . . . . . . 5-10
Configure Authentication to a Windows Domain . . . . . . . . . . . . 5-10
Configure Authentication to an LDAP Server . . . . . . . . . . . . . . . 5-14
Configure Authentication to a Proxy RADIUS Server . . . . . . . . . 5-23
Test Authentication Settings . . . . . . . . . . . . . . . . . . . . . . . . . . . . . 5-28
Add NASs as 802.1X Devices . . . . . . . . . . . . . . . . . . . . . . . . . . . . . . . . . 5-34
Apply Changes . . . . . . . . . . . . . . . . . . . . . . . . . . . . . . . . . . . . . . . . . . . . . 5-38
Restart the RADIUS Server . . . . . . . . . . . . . . . . . . . . . . . . . . . . . . . . . . 5-38
Page 11

Manage Digital Certificates for RADIUS . . . . . . . . . . . . . . . . . . . . . . . 5-42
Install the CA Root Certificate on the NAC 800 . . . . . . . . . . . . . . . . . 5-43
Install a Server Certificate for RADIUS . . . . . . . . . . . . . . . . . . . . . . . . 5-45
Create a Self-Signed Certificate . . . . . . . . . . . . . . . . . . . . . . . . . . . 5-45
Install a CA-Signed Certificate Using a Request Generated
on the NAC 800 . . . . . . . . . . . . . . . . . . . . . . . . . . . . . . . . . . . . . . . . . 5-47
Install a CA-Signed Certificate Using a Request Generated
on Behalf of the NAC 800 . . . . . . . . . . . . . . . . . . . . . . . . . . . . . . . . 5-52
Manage Certificates on Endpoints . . . . . . . . . . . . . . . . . . . . . . . . . . . . 5-56
Disable Server Validation on Endpoints . . . . . . . . . . . . . . . . . . . . . . . . 5-56
6 Disabling Endpoint Integrity Testing
Contents . . . . . . . . . . . . . . . . . . . . . . . . . . . . . . . . . . . . . . . . . . . . . . . . . . . . . . 6-1
Overview . . . . . . . . . . . . . . . . . . . . . . . . . . . . . . . . . . . . . . . . . . . . . . . . . . . . . 6-2
Configure Exceptions . . . . . . . . . . . . . . . . . . . . . . . . . . . . . . . . . . . . . . . . 6-2
Configure Exceptions for the Cluster Default Settings . . . . . . . . . 6-3
Configure Exceptions for a Particular Cluster . . . . . . . . . . . . . . . . 6-5
7 Redundancy and Backup for RADIUS Services
Contents . . . . . . . . . . . . . . . . . . . . . . . . . . . . . . . . . . . . . . . . . . . . . . . . . . . . . . 7-1
Redundancy . . . . . . . . . . . . . . . . . . . . . . . . . . . . . . . . . . . . . . . . . . . . . . . . . . . 7-2
Planning Redundancy for RADIUS-Only Deployments . . . . . . . . . . . . 7-2
Place the RADIUS Servers . . . . . . . . . . . . . . . . . . . . . . . . . . . . . . . . 7-3
Provide Duplicate Network Pathways . . . . . . . . . . . . . . . . . . . . . . 7-4
Configuring Network Devices for Redundant RADIUS Servers . . . . . 7-4
Configure the NASs . . . . . . . . . . . . . . . . . . . . . . . . . . . . . . . . . . . . . . 7-5
Configure Multiple LDAP Servers on the NAC 800 . . . . . . . . . . . . 7-6
Use IDM to Configure the Usernames and Passwords . . . . . . . . 7-11
Test Your Redundant Configurations . . . . . . . . . . . . . . . . . . . . . . . . . . 7-11
Back Up Your NAC 800 Configuration . . . . . . . . . . . . . . . . . . . . . . . . . 7-12
Configure the Web Browser So That It Allows You to
Save Files . . . . . . . . . . . . . . . . . . . . . . . . . . . . . . . . . . . . . . . . . . . . . 7-14
Restore the System from the Backup File . . . . . . . . . . . . . . . . . . . . . . 7-15
vii
Page 12

A Appendix A: Glossary
B Appendix B: Linux Commands
Contents . . . . . . . . . . . . . . . . . . . . . . . . . . . . . . . . . . . . . . . . . . . . . . . . . . . . . B-1
Common Linux Commands . . . . . . . . . . . . . . . . . . . . . . . . . . . . . . . . . . . . B-2
vi Editor . . . . . . . . . . . . . . . . . . . . . . . . . . . . . . . . . . . . . . . . . . . . . . . . . . . . . B-4
Command Mode . . . . . . . . . . . . . . . . . . . . . . . . . . . . . . . . . . . . . . . . B-4
Insert Mode . . . . . . . . . . . . . . . . . . . . . . . . . . . . . . . . . . . . . . . . . . . . B-5
keytool . . . . . . . . . . . . . . . . . . . . . . . . . . . . . . . . . . . . . . . . . . . . . . . . . . . . . . B-6
openssl . . . . . . . . . . . . . . . . . . . . . . . . . . . . . . . . . . . . . . . . . . . . . . . . . . . . . . B-9
Service Commands . . . . . . . . . . . . . . . . . . . . . . . . . . . . . . . . . . . . . . . . . . B-12
viii
Page 13

Overview of the ProCurve NAC 800
Contents
Introduction . . . . . . . . . . . . . . . . . . . . . . . . . . . . . . . . . . . . . . . . . . . . . . . . . . . 1-4
Hardware Overview . . . . . . . . . . . . . . . . . . . . . . . . . . . . . . . . . . . . . . . . . . . . . 1-5
LEDs . . . . . . . . . . . . . . . . . . . . . . . . . . . . . . . . . . . . . . . . . . . . . . . . . . . . . . 1-5
Console Ethernet Port . . . . . . . . . . . . . . . . . . . . . . . . . . . . . . . . . . . . . . . 1-6
Panel LCD and Buttons . . . . . . . . . . . . . . . . . . . . . . . . . . . . . . . . . . . . . . 1-6
Serial Number and MAC Address . . . . . . . . . . . . . . . . . . . . . . . . . . . . . . 1-6
Ethernet Ports . . . . . . . . . . . . . . . . . . . . . . . . . . . . . . . . . . . . . . . . . . . . . . 1-7
Port 1 . . . . . . . . . . . . . . . . . . . . . . . . . . . . . . . . . . . . . . . . . . . . . . . . . . 1-7
Port 2 . . . . . . . . . . . . . . . . . . . . . . . . . . . . . . . . . . . . . . . . . . . . . . . . . . 1-7
Overview of the ProCurve NAC 800
Contents
1
Server Types . . . . . . . . . . . . . . . . . . . . . . . . . . . . . . . . . . . . . . . . . . . . . . . . . . . 1-8
Choosing the Server Type . . . . . . . . . . . . . . . . . . . . . . . . . . . . . . . . . . . . 1-8
Deployment of One MS and Multiple ESs . . . . . . . . . . . . . . . . . . . . 1-8
CS Deployment . . . . . . . . . . . . . . . . . . . . . . . . . . . . . . . . . . . . . . . . . 1-11
Management Server (MS) . . . . . . . . . . . . . . . . . . . . . . . . . . . . . . . . . . . . 1-12
Enforcement Server (ES) . . . . . . . . . . . . . . . . . . . . . . . . . . . . . . . . . . . . 1-14
Combination Server (CS) . . . . . . . . . . . . . . . . . . . . . . . . . . . . . . . . . . . . 1-14
Changing the Server Type . . . . . . . . . . . . . . . . . . . . . . . . . . . . . . . . . . . 1-15
Enforcement Clusters . . . . . . . . . . . . . . . . . . . . . . . . . . . . . . . . . . . . . . . . . . 1-16
Enforcement Clusters for an MS and ESs . . . . . . . . . . . . . . . . . . . . . . 1-16
Enforcement Clusters for a CS . . . . . . . . . . . . . . . . . . . . . . . . . . . . . . . 1-16
1-1
Page 14

Overview of the ProCurve NAC 800
Contents
Endpoint Integrity . . . . . . . . . . . . . . . . . . . . . . . . . . . . . . . . . . . . . . . . . . . . . 1-17
Endpoint Integrity Capabilities of the NAC 800 . . . . . . . . . . . . . . . . . 1-18
Testing Methods . . . . . . . . . . . . . . . . . . . . . . . . . . . . . . . . . . . . . . . . . . . 1-24
Endpoint Integrity Posture . . . . . . . . . . . . . . . . . . . . . . . . . . . . . . . . . . . 1-28
Accessible Services . . . . . . . . . . . . . . . . . . . . . . . . . . . . . . . . . . . . . . . . . 1-28
Performance Implications of Endpoint Integrity Checks . . . . . . . . . 1-29
Post-Connect Testing . . . . . . . . . . . . . . . . . . . . . . . . . . . . . . . . . . . . . . . 1-29
RADIUS Server . . . . . . . . . . . . . . . . . . . . . . . . . . . . . . . . . . . . . . . . . . . . . . . . 1-30
ProCurve NAC 800 RADIUS Capabilities . . . . . . . . . . . . . . . . . . . . . . . 1-31
RADIUS Capabilities of the NAC 800 Integrated with IDM . . . . . . . . 1-32
NAC Tests . . . . . . . . . . . . . . . . . . . . . . . . . . . . . . . . . . . . . . . . . . . . . 1-18
NAC Policies . . . . . . . . . . . . . . . . . . . . . . . . . . . . . . . . . . . . . . . . . . . 1-20
NAC Policy Groups . . . . . . . . . . . . . . . . . . . . . . . . . . . . . . . . . . . . . 1-23
NAC EI Agent . . . . . . . . . . . . . . . . . . . . . . . . . . . . . . . . . . . . . . . . . . 1-25
ActiveX . . . . . . . . . . . . . . . . . . . . . . . . . . . . . . . . . . . . . . . . . . . . . . . 1-26
Agentless . . . . . . . . . . . . . . . . . . . . . . . . . . . . . . . . . . . . . . . . . . . . . . 1-27
Deployment Methods . . . . . . . . . . . . . . . . . . . . . . . . . . . . . . . . . . . . . . . . . . . 1-33
802.1X Deployment Method . . . . . . . . . . . . . . . . . . . . . . . . . . . . . . . . . . 1-34
802.1X Overview . . . . . . . . . . . . . . . . . . . . . . . . . . . . . . . . . . . . . . . . 1-34
Types of Access Control Provided by the NAC 800 . . . . . . . . . . . 1-35
802.1X Deployment Method—Endpoint Integrity With or
Without RADIUS . . . . . . . . . . . . . . . . . . . . . . . . . . . . . . . . . . . . . . . . . . . 1-36
How the NAC 800 Quarantines Endpoints . . . . . . . . . . . . . . . . . . 1-36
How and Where to Deploy the NAC 800 . . . . . . . . . . . . . . . . . . . . 1-38
802.1X Deployment Method—RADIUS Server Only . . . . . . . . . . . . . . 1-43
How and Where to Deploy the NAC 800 . . . . . . . . . . . . . . . . . . . . 1-43
DHCP Deployment Method . . . . . . . . . . . . . . . . . . . . . . . . . . . . . . . . . . 1-44
Types of Access Control Provided By the NAC 800 . . . . . . . . . . 1-45
Two Options for a DHCP Deployment . . . . . . . . . . . . . . . . . . . . . 1-45
How and Where to Deploy the NAC 800 for a DHCP Inline
Deployment . . . . . . . . . . . . . . . . . . . . . . . . . . . . . . . . . . . . . . . . . . . . 1-45
How and Where to Deploy the NAC 800 for a DHCP
Plug-in Deployment . . . . . . . . . . . . . . . . . . . . . . . . . . . . . . . . . . . . . 1-47
How the NAC 800 Quarantines Endpoints for a DHCP
Deployment . . . . . . . . . . . . . . . . . . . . . . . . . . . . . . . . . . . . . . . . . . . . 1-48
Enforcement Methods for DHCP Quarantining . . . . . . . . . . . . . . 1-51
Designing the Quarantine Subnet . . . . . . . . . . . . . . . . . . . . . . . . . 1-52
1-2
Page 15

Overview of the ProCurve NAC 800
Contents
Inline Deployment Method . . . . . . . . . . . . . . . . . . . . . . . . . . . . . . . . . . . 1-56
Types of Access Control Provided by the NAC 800 . . . . . . . . . . . 1-57
How the NAC 800 Quarantines Endpoints . . . . . . . . . . . . . . . . . . 1-57
Configuring Accessible Services for Inline Method . . . . . . . . . . . 1-57
How and Where to Deploy the NAC 800 . . . . . . . . . . . . . . . . . . . . . . . . . . . 1-58
1-3
Page 16

Overview of the ProCurve NAC 800
Introduction
Introduction
The ProCurve Network Access Controller (NAC) 800 is a hardware appliance
that controls endpoints’ access to your network.
It provides these capabilities:
■ Endpoint integrity testing—tests endpoints for compliance with a
network’s security policies
■ Quarantining—isolates non-compliant endpoints, preventing them from
compromising the network
■ Remediation—allows quarantined endpoints access to services that help
them become compliant
■ Reporting—documents endpoints’ status and test results
■ Authentication—acts as a RADIUS server and checks users’ credentials
■ Post-connect NAC testing—supports additional testing by other secu-
rity software such as an Intrusion Detection System (IDS)/Intrusion Prevention System (IPS)
You will learn about all of these capabilities in this overview chapter.
The remainder of this management and configuration guide will focus on the
final capability: the NAC 800 as a RADIUS server, either integrated with
ProCurve Identity Driven Manager (IDM) or acting on its own.
To learn more about setting up other capabilities, see the ProCurve Network
Access Controller 800 Users’ Guide.
1-4
Page 17

Overview of the ProCurve NAC 800
Hardware Overview
Hardware Overview
The ProCurve NAC 800 is a hardware appliance that comes in a single model
(J9065A). The device is 1U and mounts on a 19
You plug the power source into the back panel’s AC power connector.
See the ProCurve Network Access Controller 800 Hardware Installation
Guide for more information on mounting and powering the NAC 800.
All other ports, controls, and information displays are on the front panel for
easy access. These include:
■ LEDs
■ Console port
■ Panel LCD
■ Panel buttons
■ USB port, which will be supported in future software releases
■ Serial number and MAC address
■ Two Ethernet ports
” rack.
Figure 1-1. NAC 800 Front Panel
LEDs
The NAC 800 has three LEDs on its left front panel:
■ Power LED—glows green when the device is powered on.
■ Fault LED—blinks orange to indicate a problem with the device
■ Locator LED—glows blue when you turn the LED on through the menu
interface, identifying which device you are configuring
See “Turn the Locator LED On and Off” on page 2-20 of Chapter 2:
“Management Options for the ProCurve NAC 800.”
■ Ethernet Link and Mode LEDs—indicate an open connection, as well
the connection speed
1-5
Page 18

Overview of the ProCurve NAC 800
Hardware Overview
For more information on LEDs, see the ProCurve Network Access Controller
800 Hardware Installation Guide.
Console Ethernet Port
The console Ethernet port is located beneath the front panel LEDs and enables
out-of-band management. The port accepts an RJ45 connector; use the RJ45
Connector/Console Cable (5188-6699) that ships with your NAC 800. The other
end of this cable connects to a standard console port. Plug it in to your
workstation and open a console terminal session to access the NAC 800’s
menu interface.
Panel LCD and Buttons
The NAC 800’s front panel features an LCD, which initially displays this
information:
■ Server type (for example, Combination Server)
■ IP address
In addition, the panel has six buttons which you use to interact with the LCD:
■ Four arrow buttons (left, right, up, and down)
■ An accept button (a checkmark)
■ A cancel button (an X)
You can press the accept button to access the panel LCD menu interface and
complete tasks such as:
■ Set the server type
■ Configure IP settings
■ Reboot and shutdown the device
For more information, see “Menu Interface and Panel LCD” on page 2-5 of
Chapter 2: “Management Options for the ProCurve NAC 800.”
Serial Number and MAC Address
The front panel of your NAC 800 displays the device’s serial number, necessary
for generating licenses, and its MAC address.
1-6
Page 19

Overview of the ProCurve NAC 800
Hardware Overview
Ethernet Ports
The ProCurve NAC 800 contains two 10/100/1000 Base-T ports labelled:
• 1 (left port)
• 2 (right port)
Pay careful attention to which port you connect to a segment of the network:
the NAC 800 handles traffic differently depending on the port on which it
arrives.
To the right of the ports, the NAC 800’s panel features text reminding you of
the purpose of each port, which differs according to the device’s deployment
method. (See “Deployment Methods” on page 1-33.)
Port 1
Port 1 is the port with the NAC 800’s IP address; generally, this port connects
to the network to which the NAC 800 controls access.
The following communications are transmitted and received on port 1:
■ Management traffic:
• HTTPS traffic to the NAC 800’s Web browser interface
• SSH traffic
■ RADIUS authentication traffic
■ Endpoint integrity checking traffic
Port 2
Port 2’s function depends on the selected quarantine method. You will learn
more about the three methods in “Deployment Methods” on page 1-33.
1-7
Page 20

Overview of the ProCurve NAC 800
Server Types
Server Types
The ProCurve NAC 800 can function as one of three types of server:
■ Management server (MS)
■ Enforcement server (ES)
■ Combination server (CS)
Choosing the Server Type
A NAC 800 deployment can consist of either:
■ One MS and multiple ESs
■ One CS
Deployment of One MS and Multiple ESs
Set your NAC 800s to the MS and ES types when you require multiple NAC 800s
for your endpoint integrity solution.
To ensure adequate performance, ProCurve Networking recommends that a
single NAC 800 provide integrity testing for no more than 3000 endpoints. An
enforcement cluster of multiple NAC 800s answers the needs of a network
with more users. A enforcement cluster consists of a single MS and multiple
ESs (recommended, between two and five). (See “Enforcement Clusters” on
page 1-16 for a more detailed definition of a cluster.)
Neither an MS nor an ES can function on its own. The MS co-ordinates settings
for all clusters in a system while the ESs test endpoint integrity, or authenticate
users, or both.
The ESs load balance endpoints among themselves; a cluster with five ESs
can provide timely testing for up to 15,000 endpoints (80 percent of the
endpoints in under 30 seconds). A cluster of ESs also provides high availability; if one fails, the others continue providing services.
Figure 1-2 illustrates, at a high level, a deployment of multiple NAC 800s.
1-8
Page 21
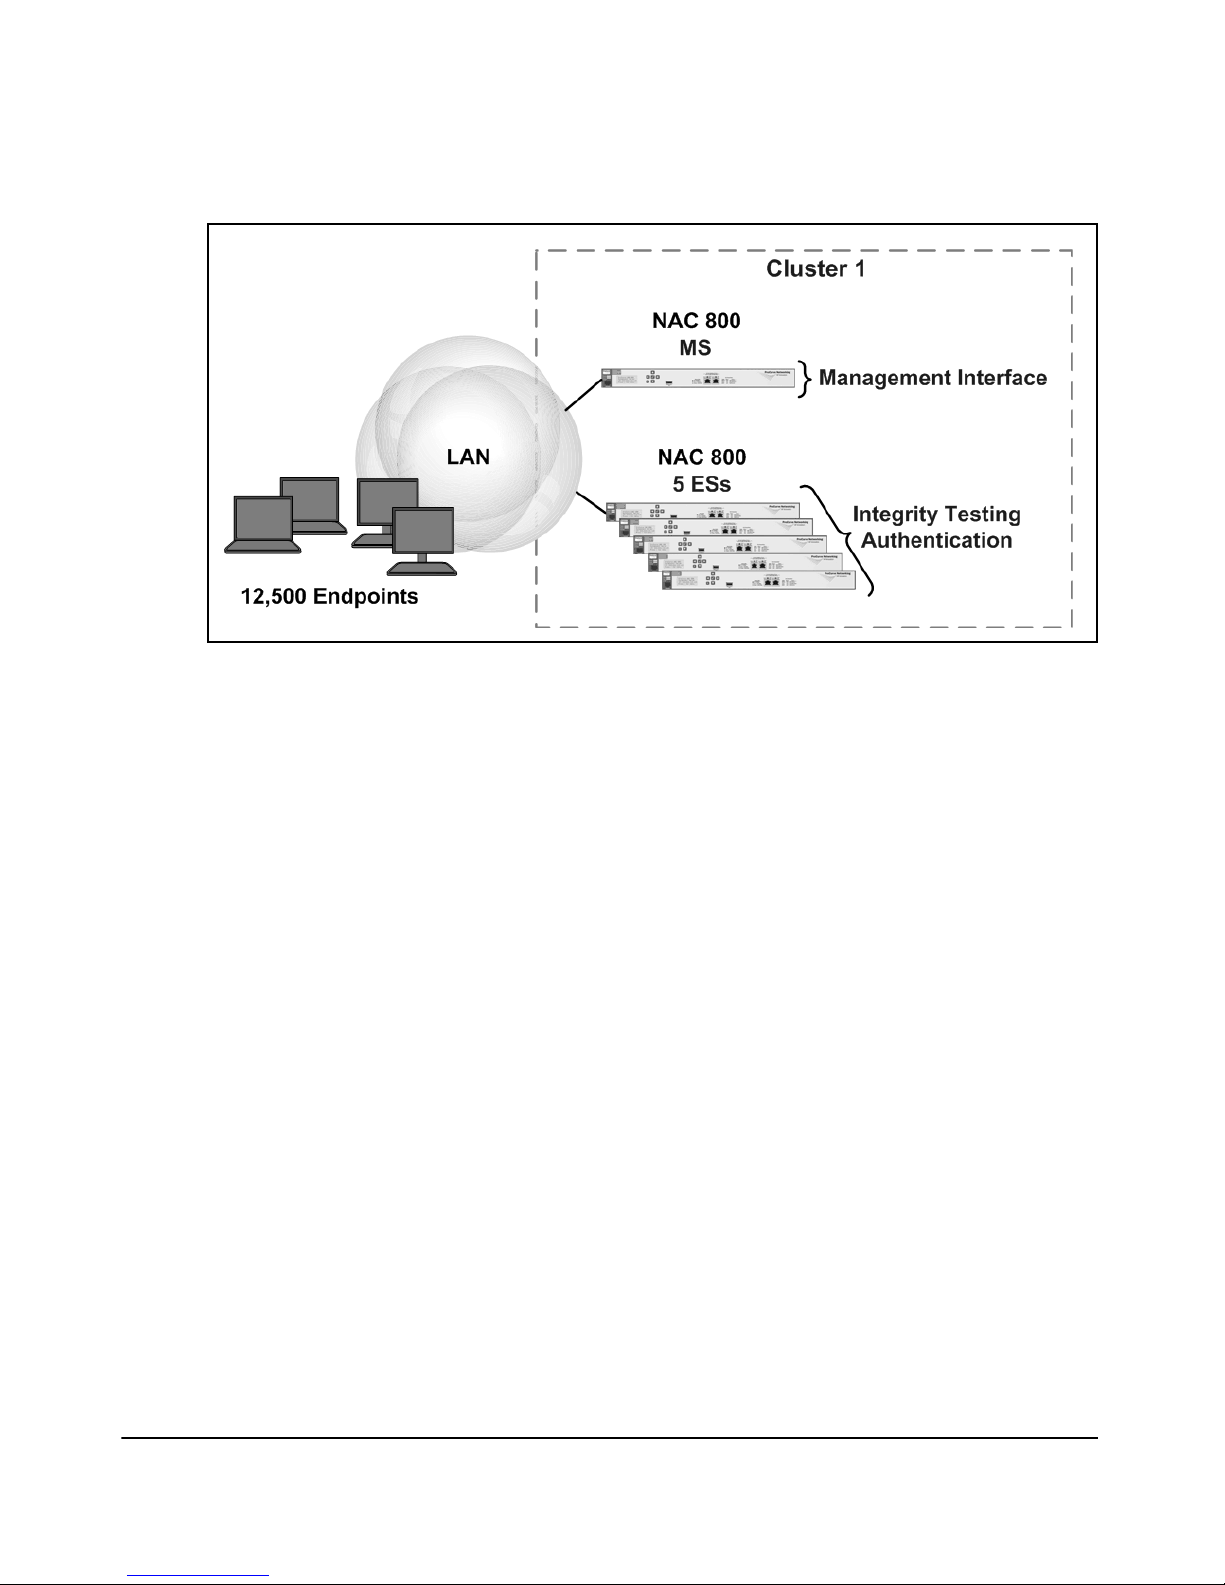
Figure 1-2. Deployment with Multiple NAC 800s
Overview of the ProCurve NAC 800
Server Types
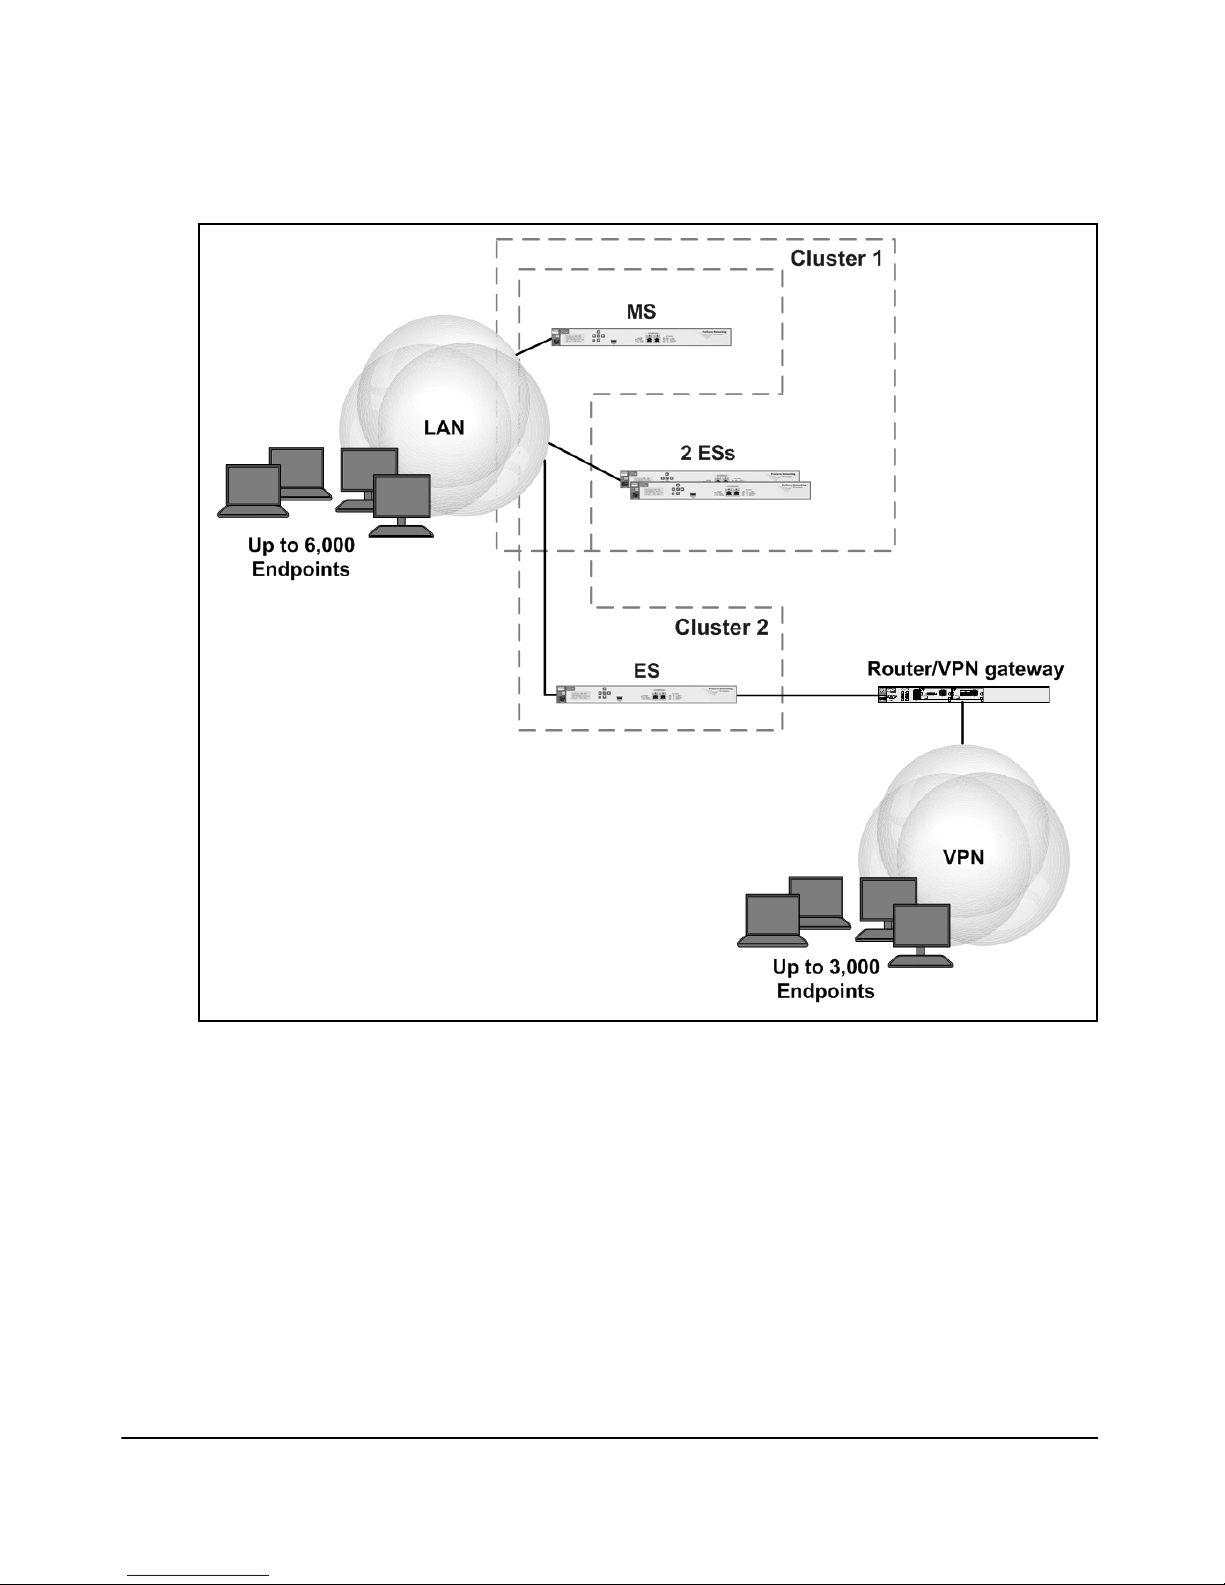
An MS can support multiple enforcement clusters, each of which implements
a different quarantine method. Quarantine methods determine how ESs control non-compliant endpoints, as well as where ESs are deployed. (“Deployment Methods” on page 1-33 discusses the quarantine methods in more detail.)
Your network might require multiple quarantine methods (and so multiple
clusters) because particular methods are better suited for controlling particular types of access.
In all of its clusters together, the MS should support no more than 10 ESs.
Figure 1-3 illustrates, at a high level, a network with multiple clusters.
1-9
Page 22
Overview of the ProCurve NAC 800
Server Types
Figure 1-3. Deployment with Multiple Clusters
Note that it is best practice to use an MS and clusters of ESs even when the
individual clusters may require only one ES. For example, a network might
require one NAC 800 to enforce endpoint integrity on 2000 Ethernet endpoints
and one NAC 800 to enforce endpoint integrity on 700 remote endpoints. It is
recommended that you use one MS and two ESs for such an environment,
rather than two CSs, for two reasons:
■ The MS helps you to co-ordinate NAC policies and other settings.
■ The cluster deployment allows your NAC 800s to share licenses.
1-10
Page 23

Overview of the ProCurve NAC 800
Server Types
For more information about roles performed by MSs and ESs, see “Management Server (MS)” on page 1-12 and “Enforcement Server (ES)” on page 1-14.
You should also read more about enforcement clusters in “Enforcement
Clusters” on page 1-16.
CS Deployment
A CS both controls and enforces settings; it functions on its own. You should
set your NAC 800 to the CS type in either of these circumstances:
■ Your network requires integrity testing for under 3000 endpoints.
■ Your NAC 800 functions as a RADIUS server only and does not test
endpoint integrity.
A RADIUS-only NAC 800 can support more than 3000 endpoints. The precise
number varies, of course, depending on your environment. For example, do
all users log in at roughly the same time or do they log in at various times
throughout the day? How often do network infrastructure devices force users
to re-authenticate? As the answers to these questions vary, so varies the
burden placed on the NAC 800. Under typical usage, a single NAC 800 can
support authentication for 10,000 ports.
Figure 1-4. CS Deployment
1-11
Page 24

Overview of the ProCurve NAC 800
Server Types
Note Your network might require multiple NAC 800s that function as RADIUS
servers—to provide more timely service and redundancy. (See Chapter 7:
“Redundancy and Backup for RADIUS Services.”)
However, you do not need to place the NAC 800s in a cluster; both should still
be CSs.
Figure 1-5. Two NAC 800s Acting as RADIUS Servers
For more information about roles performed by a CS, see “Combination Server
(CS)” on page 1-14. You should also read more about enforcement clusters in
“Enforcement Clusters” on page 1-16.
Management Server (MS)
The MS manages settings for your NAC 800s on a system-wide level. You
choose one NAC 800 to act as the MS, set all other NAC 800s to be ES, and add
the ESs to the MS’s configuration.
For the best performance an MS should support no more than 10 ESs and no
more than 5 ESs in a single cluster.
The MS runs the Web browser interface, which you access to manage and
configure your NAC 800s. (This management and configuration guide focuses
on completing tasks using this interface.) When you configure a setting on the
MS, the MS transmits it to its ESs, as appropriate.
1-12
Page 25

Overview of the ProCurve NAC 800
Server Types
The MS handles these system-wide settings:
■ Endpoint integrity licenses
■ Connection to the Internet
■ Clock—The MS can use its internal clock or act as a Network Time
Protocol (NTP) client and receive its clock from an NTP server. The MS
is the NTP server for all of its ESs.
■ Software upgrades—The MS downloads new software; it upgrades first
itself and then all ESs.
■ Tes t u pda te s—The MS (if properly licensed) automatically checks for
and downloads test updates at the frequency you specify.
■ NAC policies—The MS stores the list of tests that the ESs run on
endpoints, as well as other properties related to those tests.
■ Post-connect testing—The MS stores the settings for any post-connect
services (such as an IDS/IPS) that you define. The MS also receives testing
results and log information from the post-connect services.
The MS stores these settings and configures them on its ESs:
■ Individual ES settings:
• IP address
•Hostname
• Root password (allows access to the ES’s OS)
• Time zone
■ Quarantining settings
The MS also serves as the repository for information collected about endpoints throughout the network. In the MS Web browser interface, you can:
■ Track:
• Detected endpoints
• Endpoint activity:
– Endpoints’ access control status
– Endpoints’ test status
■ Change endpoints access control status
■ Generate reports
1-13
Page 26

Overview of the ProCurve NAC 800
Server Types
Enforcement Server (ES)
While you configure access control settings on the MS, the ESs take responsibility for enforcing those controls.
An ES:
■ Authenticates endpoints, if operating as a RADIUS server
■ Tests endpoints for integrity
■ Controls endpoints’ access control status based on test (and, possibly,
authentication and post-connect testing) results
Combination Server (CS)
A CS has all the capabilities of an MS and an ES.
Note A CS, of course, does not have the processing power or high availability of a
system of multiple ESs and an MS.
The CS supports these features and settings:
■ Endpoint integrity licenses
■ Connection to the Internet
■ Clock—The CS can use its internal clock or act as a Network Time
Protocol (NTP) client and receive its clock from an NTP server.
■ Software upgrades—The CS downloads new software and upgrade
itself.
■ Tes t u pda te s—The CS (if properly licensed) automatically checks for
and downloads test updates at the frequency you specify.
■ NAC policies—The CS stores a list of tests to run on endpoints, as well
as other properties related to those tests.
■ Post-connect testing—The CS stores the settings for any post-connect
services (such as an IDS/IPS) that you define. The CS also receives testing
results and log information from the post-connect services.
■ Individual settings, including:
• IP address
• hostname
• root password (allows access to its OS)
• time zone
■ Quarantining settings
1-14
Page 27

Overview of the ProCurve NAC 800
Server Types
The CS also enforces access control settings:
■ Authenticates endpoints, if operating as a RADIUS server
■ Tests endpoints for integrity
■ Controls endpoints’ access control status based on test (and, sometimes,
authentication or post-connect testing) results
Finally, the CS serves as the repository for information collected about endpoints throughout the network. In the Web browser interface, you can:
■ Track:
• Detected endpoints
• Endpoint activity:
– Endpoints’ access control status
– Endpoints’ test status
■ Change endpoints access control status.
■ Generate reports.
Changing the Server Type
You can change your device’s server type at any time. However, changing the
type causes the NAC 800 to reset to its factory default settings, keeping only its:
■ IP address
■ Hostname
■ Default gateway
■ DNS server
■ NTP server
■ Time zone
Note Setting the server type always resets the NAC 800 to factory defaults even if
you set the device to its current type. In fact, setting the server type is a quick
way to reset the NAC 800 to factory defaults.
1-15
Page 28

Overview of the ProCurve NAC 800
Enforcement Clusters
Enforcement Clusters
An enforcement cluster is a group of ESs (or a single CS) that tests, quarantines, and otherwise controls the same group of endpoints.
Enforcement Clusters for an MS and ESs
An MS groups ESs into enforcement clusters. Each cluster enforces the same
access control settings using the same quarantine method. (See “Deployment
Methods” on page 1-33 for more information about quarantine methods.)
A cluster that consists of a group of ESs has these advantages over a single CS:
■ It can test more endpoints—3000 per ES (up to 15,000 total) as opposed
to 3000 total—load balancing the endpoints among themselves.
■ It provides redundancy, each ES testing up to 5000 endpoints should one
of its fellow ESs fail.
The following settings are configured per cluster:
■ Quarantine method
■ Testing methods
■ Accessible services for quarantined endpoints
■ Exceptions (domains and endpoints that are not tested)
■ Notifications (the email address of the administrator informed when
endpoints fail tests)
■ End-user windows, which users see as they are tested
■ Agentless credentials (administrator username and password for end-
points in a domain)
■ NAC policy group (the set of policies and test applied to users)
■ Post-connect testing (the name, URL, and login information for the post-
connect service, such as an IDS/IPS)
Enforcement Clusters for a CS
A CS has a single enforcement cluster and is itself the single ES within that
cluster. The cluster is automatically configured at factory default settings; you
cannot delete the cluster or create additional clusters.
1-16
Page 29

Overview of the ProCurve NAC 800
Endpoint Integrity
The same settings that, on an MS, are configurable per-cluster are also configured on the CS’s single cluster. However, this cluster is always selected, so you
can ignore this fact.
Endpoint Integrity
Viruses and other malware continue to become ever more pervasive—temporarily bringing down networks, interferring with productivity, and exposing
potentially sensitive information to hackers. A traditional network acknowledges one primary entrance for these threats—the Internet—and guards
against them with a firewall between the WAN router and the private network.
However, viruses and malware infilitrate networks from many sources. For
example:
■ An increasingly mobile workforce carries laptops in and out of your
company’s private network. A virus picked up over a home Internet
connection can infiltrate your private network when an employee returns
the infected laptop to work.
■ Users—intentionally or intentionally—accept unsafe traffic over the
Internet. For example, a user might choose to download a trojan, which
is a seemingly innocent application actually intended to cause harm.
■ Users fail to keep their stations updated with patches, leaving them
exposed to malware.
■ Users lower their browser’s security settings so that they can visit unsafe
sites and use unsafe applications.
As you can see, end-users and endpoints play on important role in protecting
your network on all fronts. A network is only as safe as its endpoints exhibit
integrity—that is, meet criteria such as:
■ Having a firewall and other anti-virus software
■ Downloading and installing current patches
■ Enforcing proper browser security settings
■ Being clear of viruses and other malware
But endpoint integrity is a piece of the security puzzle that is particularly hard
to manage. Even if network administrators could ensure that every endpoint
had necessary security settings and solutions, they would find it hard to
prevent users from tampering with those settings.
1-17
Page 30

Overview of the ProCurve NAC 800
Endpoint Integrity
An endpoint integrity solution automates the process of checking whether an
endpoint meets security standards, and it enforces the standards—imposing
penalties if an endpoint fails the integrity check. The ProCurve NAC 800
provides such a solution.
Endpoint Integrity Capabilities of the NAC 800
The NAC 800 supports endpoint integrity as follows:
■ When it detects a new endpoint, it subjects it to a series of tests to ensure
that the endpoint meets your organization’s security policies.
■ It handles endpoints according to the results of these tests:
• It allows “healthy” endpoints (those that pass all tests) full access.
• It takes action against endpoints that fail tests, quarantining them
• It allows quarantined endpoints to reach “accessible services,” which
immediately or granting them temporary access, as you choose.
help in remediation.
The following sections describe the components of the endpoint integrity
solution in more detail.
NAC Tests
The NAC 800 supports many different tests; each test checks for a particular
setting or component on an endpoint. For example, the Windows XP hotfixes
test checks the patches and updates installed on a Windows XP station. And
the IE Internet Security Zone test checks the security level that the endpoint’s
IE browser enforces for Internet Web sites.
The NAC 800 can also integrate with Microsoft Systems Management Software
(SMS) for patch management. If an endpoint requires a patch, NAC 800
contacts SMS to ensure that the patch has been applied.
Tests are organized into the following categories:
■ Security Settings—Windows
These tests examine an endpoint’s security settings, checking, among
other settings:
• Enabled services
• Networks to which the endpoint connects
• Security settings for macros
• Local security settings, which determine how users are allowed to
access the endpoint
1-18
Page 31

Overview of the ProCurve NAC 800
Endpoint Integrity
■ Security Settings—Other OSs
These tests examine security settings for a Mac endpoint, including:
• Wireless client settings
• Enabled services
• Firewall enabled and Internet sharing disabled
■ Software—Windows
These tests check software installed on an endpoint. Some tests look for
required software, such as personal firewalls and anti-virus software.
Other tests look for prohibited software, such as file sharing software.
Another test scans for viruses and other malware.
■ Operating System—Windows
These tests examine a Windows endpoint’s OS, verifying that all required
hotfixes and patches are installed.
■ Browser Security Policy—Windows
These tests verify that an endpoint’s Web browser enforces the proper
level of security for various zones (Internet sites, local sites, trusted sites,
and untrusted sites). The NAC 800 scans Internet Explorer (IE) settings
only.
NAC Test Properties. All NAC tests have properties, which are the criteria
that an endpoint must meet to pass the test. For example, the required
software test checks the software installed on the endpoint. The required
software test properties consist of a list of software. If the endpoint does not
have this software, it fails the test.
Properties can be configurable or unconfigurable. For example, the required
software test properties are configurable: you choose which software is
required in your network. On the other hand, the Mac airport WEP enabled
test has unconfigurable properties. If an endpoint has WEP enabled, it always
passes; if WEP is disabled, the endpoint always fails.
For more information about configuring test properties, see “Appendix: Tests
Help” in the ProCurve Network Access Controller 800 Users’ Guide.
1-19
Page 32

Overview of the ProCurve NAC 800
Endpoint Integrity
NAC Test Updates. As new threats emerge, ProCurve Networking updates
the NAC 800’s tests. It might add an entirely new test. Or it might add a property
to an existing test—for example, a new hotfix to the list of Windows XP
hotfixes. The NAC 800 automatically checks for and installs the new tests and
properties as long as it has:
■ A valid endpoint integrity license
■ A working connection to the Internet
For information about scheduling test updates, see Chapter 3: “System Configuration” in the ProCurve Network Access Controller 800 Users’ Guide.
NAC Test Actions. When an endpoint fails a test, the NAC 800 takes one or
both of these actions:
■ Sends a notification email
■ Quarantines the endpoint, either:
• Immediately
• After a temporary access period (configurable in length)
You choose the actions for each test. For example, the NAC 800 might
immediately quarantine an endpoint with a virus, but grant temporary access
to an endpoint that needs updated patches. And it might only send a notification email if the endpoint has prohibited software.
NAC Policies
On the ProCurve NAC 800, NAC tests are organized into NAC policies. A NAC
policy dictates how the NAC 800 checks endpoint integrity for particular
endpoints. The policy includes these settings:
■ Name and description
■ Policy for handling endpoints with OSs that the NAC 800 cannot test
■ Retest frequency
■ Policy for handling inactive endpoints
■ List of endpoints to which the policy applies
■ List of activated tests, including the properties and actions particular to
each test
Finally, a NAC policy is defined by its group. See “NAC Policy Groups” on
page 1-23.
1-20
Page 33

Overview of the ProCurve NAC 800
Endpoint Integrity
The sections below provide more information about each of these settings.
For instructions on configuring them in the Web browser interface of an
MS or CS, see Chapter 6: “NAC Policies” in the ProCurve Network Access
Controller 800 Users’ Guide.
Name and Description. These settings identify the policy and are entirely
configurable.
Policy for Endpoints with Untestable OSs. The NAC 800 can test endpoints with these OSs:
■ Windows Vista Ultimate
■ Windows Vista Home Premium
■ Windows Vista Home Basic
■ Windows Vista Business
■ Windows Vista Enterprise
■ Windows 2000
■ Windows XP Professional
■ Windows XP Home
■ Windows Server 2000 or 2003
By default, endpoints that cannot be tested are quarantined. However, you can
choose to grant access to the untestable endpoints. Untestable endpoints fall
into these categories, and you set the policy for handling the endpoints per
category:
■ Windows 95 or ME
■ Windows 98
■ Windows NT
■ Unix
■ Any other OS (including Linux)
Note Consider the security implications of granting an endpoint access without
checking its integrity—particularly older endpoints, which often have limited
security capabilities.
The access granted to untestable endpoints is permanent. Even if you later
change the policy, an already-connected endpoint will not be affected until:
■ The endpoint renews its IP address (DHCP quarantine method).
How often this occurs depends on the lease time for the endpoint’s DHCP
address, which is set on the DHCP server.
1-21
Page 34

Overview of the ProCurve NAC 800
Endpoint Integrity
■ The endpoint is re-authenticated (802.1X quarantine method).
How often this occurs depends on the re-authentication period, typically
set on the 802.1X authenticator (an access point, such as a switch or
wireless AP).
■ The endpoint disconnects and reconnects.
Retest Frequency. The NAC 800 supports both pre-connect and post-connect integrity checks. In other words, to connect to your network, an endpoint
must meet certain criteria, and to stay connected, it must continue to meet
the criteria.
Post-connect checking is an key component of a true endpoint integrity
solution. Without it, end-users quickly learn that they can—for example—raise their browser security settings, connect to the network, and immediately lower the settings again.
In addition to post-connect checking by the NAC 800 itself, you can configure
post-connect NAC testing. You can use this feature to have other security
devices such as an IDS/IPS perform additional testing and monitoring to detect
attacks or other threats. If an endpoint fails this additional testing, the security
device can send a request to the NAC 800, which will then quarantine the
endpoint.
The retest frequency determines how often the NAC 800 implements postconnect integrity checks. The higher the frequency, the greater the security—although, of course, integrity checks add some overhead to network
traffic.
The quarantining method (about which you will learn more later) affects postconnect testing. For DHCP quarantining, a changed status does not take effect
until the endpoint sends a new DHCP request. So you should set the lease time
for scopes on your DHCP server quite low—hours rather than days.
For inline or 802.1X quarantining, the changed status takes immediate effect.
For example, with 802.1X quarantining, the NAC 800 commands the device to
which the endpoint connects to re-authenticate the endpoint, which then
receives the new VLAN assignment.
Policy for Inactive Endpoints. This setting applies only when you have
granted access to endpoints with unsupported OSs.
After the NAC 800 grants an unsupported endpoint network access, it cannot
track it in the same way that it does testable endpoints. Instead it listens for
traffic from the unsupported endpoint. As long as the endpoint continues to
generate traffic, the NAC 800 assumes that it is connected and keeps the
1-22
Page 35

Overview of the ProCurve NAC 800
Endpoint Integrity
firewall rule that granted the endpoint access. If the NAC 800 does not detect
traffic from the endpoint for a certain configurable period, it clears out
the rule, denying access.
List of Endpoints to Which the Policy Applies. Because you can create
multiple NAC policies on your NAC 800s, you should specify to which endpoints a particular policy applies.
You can apply the policy to:
■ An entire domain or domains (including every endpoint within the
domains)
■ Individual endpoints, identified by:
• IP address
• MAC address
•NetBIOS name
•Hostname
Note A policy does not affect specified endpoints until its group is assigned to a
cluster. See “NAC Policy Groups” on page 1-23.
List of Tests. In each NAC policy, you choose which tests are enforced.
Test properties and actions are configurable per policy. That is, you can create
one list of required software in NAC policy A, but a different list in policy B.
And you could de-activate the required software test entirely in policy C. In
addition, the penalty for failing the test could be immediate quarantining in
policy A, but temporary access in policy B.
NAC Policy Groups
NAC 800s organize NAC policies in NAC policy groups. Each CS or cluster of
ESs is assigned a single policy group and enforces the policies in that group.
A NAC policy group includes these settings:
■ Name
■ List of clusters
Multiple clusters can use the same NAC policy group. (A CS, of course,
has a single cluster). On the other hand, each CS cluster or cluster of ESs
is assigned a single NAC policy group. If you add a cluster to one policy
group, the cluster is removed from a previous policy group.
1-23
Page 36

Overview of the ProCurve NAC 800
Endpoint Integrity
■ List of policies
The NAC policy group can include any number of policies. Clusters
assigned to this group determine which policy to apply to a particular
endpoint based on:
• Lists of domains and endpoints specified in the policies—The
• Policy priority—If the endpoint doesn’t match a policy, or matches
Testing Methods
The discussion of endpoint integrity tests has not yet addressed a crucial
question: how does the NAC 800 actually run the test? For example, how does
the NAC 800 determine whether the endpoint has a firewall? How does it know
which software the endpoint has installed?
NAC 800 matches the endpoint’s domain name, IP or MAC address,
NetBios name, or hostname to a policy.
multiple policies, the NAC 800 enforces the policy with highest
priority.
The NAC 800 must ask the endpoint to report information about itself, and the
endpoint must respond. To converse in this way, both the NAC 800 and the
endpoint need compatible mechanisms in place.
One mechanism that allows an endpoint to respond to the NAC 800’s tests is
called an agent; the agent must be installed on the endpoint prior to the test.
Agents fall into two general categories:
■ Permanent agents—once installed remain on the endpoint permanently
■ Transient agents—install on the endpoint temporarily each time the
endpoint is tested
As an alternative to a specific agent designed for endpoint integrity checking,
a NAC can leverage an application that already exists on endpoints.
The NAC 800 offers flexible support for endpoint integrity in a variety of
environments because it supports all three common testing methods:
■ NAC Endpoint Integrity (EI) agent (permanent agent)
■ ActiveX (transient agent)
■ Agentless (with Microsoft’s Remote Procedure Call [RPC] protocol)
While each method may require some initial setup on the endpoint
(depending on your environment), once set in place, testing can proceed
smoothly and—as long as the endpoint passes all tests—even without the
end-user’s knowledge.
1-24
Page 37

Overview of the ProCurve NAC 800
Endpoint Integrity
NAC EI Agent
The NAC 800 stores the ProCurve NAC EI agent application. An end-user can
download and install this agent to his or her endpoint in these ways:
■ Automatically before testing—For example, you can use network
management tools to deploy the agent to many endpoints.
■ Automatically at initial testing—When a NAC 800 that uses the NAC
agent testing method detects an endpoint that does not have the agent, it
installs the agent to the endpoint automatically. The user sees the window
in Figure 1-6 and, unless he or she cancels the installation, the agent is
installed permanently.
The automatic installation uses ActiveX.
Figure 1-6. InstallShield Wizard for the NAC EI Agent
■ Manually—You can instruct users to access the NAC 800 and download
the NAC EI agent manually. The NAC 800 makes the agent available at
this URL:
https://<CS or ES IP address>:89/setup.exe
A user might choose this option because he or she does not want to enable
ActiveX (required for automatic installation).
After the agent is installed, the NAC 800 can test the endpoint as often as
necessary without further end-user interaction.
1-25
Page 38

Overview of the ProCurve NAC 800
Endpoint Integrity
Requirements for NAC Agent Testing. The agent must be installed on the
endpoint. For the NAC 800 to download the agent to endpoints automatically,
the endpoints must allow ActiveX content from the NAC 800.
Otherwise, either the IT staff or the user must install the NAC agent on the
endpoint before the user attempts to connect to the network.
If a router lies between the NAC 800 and the endpoints, the router must keep
port 1500 open. In most cases, the NAC 800 can automatically open the correct
ports through the endpoints’ firewall.
Note This rule has one exception. You must open port 1500 on an endpoint that
meets these three conditions:
■ Is unmanaged
■ Runs Windows XP
■ Uses a non-SP2 firewall such as Norton
Advantages and Disadvantages of NAC Agent Testing. The NAC agent
can be installed on any Windows station capable of being tested (OS
version 2000 or higher). Once installed, the NAC agent allows the NAC 800 to
test the endpoint in the background at any time. In addition, the NAC agent
automatically receives updates from the NAC 800. Finally, the NAC 800 can
test an endpoint through its firewall, generally opening the necessary ports
automatically.
1-26
However, the NAC agent does require the initial setup and user interaction
described above.
ActiveX
When using the ActiveX method, the NAC 800 automatically downloads and
installs the ActiveX agent on the endpoint to be tested. Unlike the NAC agent,
after the check is complete, the ActiveX agent is removed from the endpoint.
Requirements for ActiveX Testing. The ActiveX agent uses ActiveX content and Java script. The endpoint’s browser security settings must allow such
content from the NAC 800.
ActiveX testing requires the endpoint’s Web browser to be open for every test.
The Web browser must be IE version 6.0 or later.
If a router lies between the NAC 800 and the endpoints, it must keep port 1500
open. In most cases, the NAC 800 can automatically open the correct ports
through the endpoints’ firewall.
Page 39

Overview of the ProCurve NAC 800
Endpoint Integrity
Note This rule has one exception. You must open port 1500 on an endpoint that
meets these three conditions:
■ Is unmanaged
■ Runs Windows XP
■ Uses a non-SP2 firewall such as Norton
Advantages and Disadvantages of ActiveX Testing. The ActiveX agent
does not remain on the endpoint and does not require maintenance or
upgrades—saving overhead. Generally, the NAC 800 can test an endpoint
through its firewall, automatically opening the necessary ports.
However, while the NAC agent requires a one-time installation and user
interaction, the ActiveX agent requires that interaction every time an endpoint
connects. Although the user may not notice the installation if the endpoint
allows ActiveX content without prompting, the installation does add overhead
to network traffic.
IE must be open for the NAC 800 to test the endpoint. If a user closes IE after
his or her endpoint has gained access, the NAC 800 cannot retest the endpoint.
The user can continue to connect to the network—even if the endpoint
becomes non-compliant—for as long as IE is closed.
Agentless
RPC was designed to provide a flexible framework for a variety of communications between remote devices. The NAC 800 uses RPC to run endpoint
integrity checks on endpoints, which must also support RPC.
In order for an endpoint to accept the RPC messages, the NAC 800 must submit
credentials for an administrator of that endpoint. On the NAC 800, these
credentials are called agentless credentials and can be:
■ Configured in cluster settings—Enter the credentials of an adminis-
trator in the endpoint’s domain.
■ Submitted by the end-user—This option allows agentless testing of a
user who is not a member of your domain. However, because users often
do not know, or are reluctant to share, the proper credentials, this option
is not generally recommended.
Caution Never make agentless testing the only method available to test non-domain
members.
1-27
Page 40

Overview of the ProCurve NAC 800
Endpoint Integrity
Requirements for Agentless Testing. To undergo agentless testing, the
endpoint must make its RPC service available to the NAC 800. The endpoint
must meet these requirements:
■ RPC service supported (native on all testable Windows OS) and activate
■ File and print sharing enabled—On the firewall, ports 137, 138, 139, and
445 are open to the NAC 800
For the user to view all end-user windows, the endpoint’s browser security
settings must allow Java scripting from the NAC 800.
In addition, as discussed above, the NAC 800 requires administrator credentials for the endpoint (typically, those of a domain administrator).
Advantages and Disadvantages of Agentless Testing. Agentless testing
does not require any installation on the endpoint, so it is easy to deploy and
maintain and involves little administrative overhead. In addition, the testing
can occur—from beginning to end—without user interaction.
However, you must ensure that the endpoints meet the requirements listed
above, and you must know the correct agentless credentials. For these reasons, agentless testing works best on managed endpoints that are members
of your domain.
Endpoint Integrity Posture
As the NAC 800 tests an endpoint, it assigns it an endpoint integrity posture
based on the results of tests:
■ Unknown—not yet tested
■ Healthy—passed all tests
■ Check-up—failed at least one test but allowed temporary access
■ Quarantine—failed at least one test for which the penalty is quarantining
(and a temporary access period, if allowed, has expired); or was incapable
of being tested (and your network quarantines untestable endpoints)
■ Infected—infected with malware (failed the Worms, Viruses, and
Trojans test)
Accessible Services
The NAC 800 allows quarantined endpoints to access the limited set of
resources listed on its Home > System configuration > Accessible ser-
vices window. By default, the window lists Web sites from which endpoints
1-28
Page 41

Overview of the ProCurve NAC 800
can download service packs, patches, and so forth. You can add hostnames
and IP addresses to the list in order to provide additional services for the
quarantined endpoints.
Note On an MS, you can customize accessible services per cluster.
The means by which the NAC 800 restricts quarantined endpoints to the
accessible services differs based on the deployment method. In addition, you
might need to set up your network infrastructure to support the NAC 800’s
restrictions. “Deployment Methods” on page 1-33 explains in more depth.
Performance Implications of Endpoint Integrity Checks
The time and bandwidth required to complete an endpoint integrity check
depends on the NAC policy. The more tests, clearly, the longer the check
will take.
The High Security NAC policy, a pre-defined policy that includes approximately 20 tests, can be taken as a general high mark. The NAC 800 passes
approximately 9 to 16 kilobytes of total data between itself and an endpoint
to complete a single testing session with this policy. On a typical LAN, the
testing process would typically take between 5 and 10 seconds.
Endpoint Integrity
Post-Connect Testing
Integrity checking ensures that endpoints adhere to your company’s security
policy before they are allowed onto the network. To protect your network,
however, security cannot stop there. For example, some of the users who are
granted access to your network may not be completely trustworthy. Partners,
guests, and even disgruntled employees may launch attacks on your network.
In addition, some users may share their login credentials with others, thereby
compromising your network and opening it to attack.
For these reasons, many companies implement additional protections such as
an IDS/IPS, which can use signatures, behavior-based monitoring, and anomaly detection to identify attacks. The NAC 800 integrates with such security
devices. After the NAC 800 has tested a device to ensure that it meets your
standards for endpoint integrity, it is allowed onto the network, and the postconnect testing can occur. If a security device, such as an IDS/IPS, detects a
problem with a particular endpoint, it can send a message to the NAC 800,
requesting that the NAC 800 quarantine the endpoint.
1-29
Page 42

Overview of the ProCurve NAC 800
RADIUS Server
By integrating such security devices with the NAC 800, you can implement
consistent security policies and manage quarantined devices from a central
location.
RADIUS Server
The Remote Access Dial-In User Service (RADIUS) protocol is an
authentication, authorization, and accounting (AAA) protocol. It allows
your network to:
■ Authenticate end-users—verify that users are who they claim to be
■ Authorize end-users—grant users rights based on their identities
■ Create accounting records—collect information about end-user activ-
ity, including when users connect, how long they connect, and which
resources they consume
RADIUS regulates communications between Network Access Servers (NASs)
and RADIUS servers.
The NASs are the points of access for endpoints—for example, switch ports
or wireless access points (APs). When an end-user attempts to connect to a
NAS, the NAS sends an authentication request to its authentication (RADIUS)
server.
The RADIUS server:
■ Verifies the end-user’s identity
■ Decides:
• Whether the user can connect
• Which rights to grant the user
■ Communicates its decisions to the NAS, which enforces them
If the RADIUS server is also an accounting server, it can receive reports about
the user’s activity from the NAS.
The NAC 800 supports the RADIUS protocol and can act as your network’s
RADIUS server. It supports RADIUS as a stand-alone access control solution
(see “802.1X Deployment Method—RADIUS Server Only” on page 1-43). Or it
can integrate its RADIUS capabilities with endpoint integrity checking (see
“802.1X Deployment Method—Endpoint Integrity With or Without RADIUS”
on page 1-36).
1-30
Page 43

Overview of the ProCurve NAC 800
RADIUS Server
ProCurve NAC 800 RADIUS Capabilities
The ProCurve NAC 800 supports the following RADIUS capabilities:
■ Authenticating users against accounts stored in a variety of locations,
including:
• Windows domain controllers (Active Directory [AD])
• An OpenLDAP server
• An eDirectory server
• Another RADIUS server (proxying requests)
■ Authenticating users with a variety of protocols, including:
• Extensible Authentication Protocol (EAP):
– Protected EAP (PEAP) with Microsoft CHAP version 2
(MS-CHAPv2)
– Transport Layer Security (TLS)
– Tunneled TLS (TTLS) with Message Digest 5 (MD5)
– Generic Token Card (GTC)
– Lightweight EAP (LEAP)
■ Granting users rights, as follows:
• Assigning users to a VLAN based on their endpoint integrity posture
■ Logging activity
The NAC 800 logs RADIUS events to this file: /var/log/radius/radius.log.
By default, the file stores a week’s worth of logs. Every month, the NAC
creates a new log file, and it saves up to four files.
RADIUS logs include:
• Failed authentication attempts
• Successful authentication attempts
• Authentication requests from unknown NASs
■ Accounting
The NAC 800 can also act as a RADIUS accounting server. RADIUS
accounting reports are logged as files in this directory: /var/log/radius/
radacct.
1-31
Page 44

Overview of the ProCurve NAC 800
RADIUS Server
RADIUS Capabilities of the NAC 800 Integrated
with IDM
ProCurve IDM is a centralized, easy-to-use solution for assigning network
rights to users based on their identity. IDM manages RADIUS servers, including NAC 800s.
When you manage a NAC 800 with IDM, the NAC 800 has all the capabilities
listed in the section above with these additions:
■ Authenticating users against an easily managed local database
■ Granting users rights, as follows:
• Assigning dynamic settings based on identity, access time, access
■ Logging activity to a centralized location and easily-browsed interface
location, and endpoint integrity posture
Dynamic settings include:
– VLAN assignment
– ACLs (which control access to network resources)
–Rate limit
Information tracked includes:
• Lists of successful and failed authentication attempts
• Lists of currently connected users
1-32
Page 45

Overview of the ProCurve NAC 800
Deployment Methods
Deployment Methods
The NAC 800 can control network access in variety of ways. It can make
decisions based on who is connecting (authentication) as well as on what is
connecting and the risks that device might pose (endpoint integrity).
In addition, the NAC 800 can control network access for endpoints connecting
from a variety of locations, including:
■ A Virtual Private Network (VPN) connection
■ A Wide Area Network (WAN) connection
■ A wireless connection
■ A LAN connection
Finally, the NAC 800 is suitable for a variety of environments featuring
different types of equipment and security capabilities. For example, the NAC
800 can add endpoint integrity testing to a network that already enforces
authentication and access control. Or the NAC 800 can test for endpoint
integrity in a network with fewer capabilities and an older infrastructure.
You must consider all of these factors—which type of access control you
desire for which users in a network with which capabilities—as you determine
how and where to deploy your NAC 800s.
Deployment methods are also called enforcement options or quarantine methods because how the NAC 800 enforces access control determines how and
where you must deploy it.
The NAC 800 has three deployment (quarantine) methods:
■ 802.1X
■ DHCP
■ Inline
The sections below describe these methods in more detail.
Note When you purchase your NAC 800, you also purchase the ProCurve Network
Access Controller 800 Implementation Start-up Service. Your ProCurve solutions provider will help you think through options and plan your deployment.
1-33
Page 46

Overview of the ProCurve NAC 800
Deployment Methods
802.1X Deployment Method
802.1X is a standard method for enforcing access control in Ethernet and
wireless networks. It provides a framework for linking the status of endpoint's
access port (open or closed) to the end-user's authentication status.
The NAC 800 adds endpoint integrity to the framework.
A brief overview of 802.1X will help you understand how the NAC 800 interacts
with other components of an 802.1X solution.
802.1X Overview
Traditionally, 802.1X features three components:
■ Supplicant—The endpoint attempting to connect to the network. The
supplicant must authenticate itself to the network by submitting a username and either a password or a digital certificate.
■ Authenticator—The access point or the port to which the endpoint
connects. The authenticator can be a switch, an AP, or a Wireless Edge
Services Module. The port is a switch port or an 802.11 association with
a wireless station. The authenticator is responsible for enforcing all
access decisions-opening and closing the port, as well as customizing the
port with dynamic settings such as VLAN assignments.
■ Authentication server—A RADIUS server. The RADIUS server makes
all access decisions. It validates the end-user's credentials, and, if the
credentials check out, it determines whether the user is connecting in an
appropriate manner. (Depending on the RADIUS server's capabilities, the
server consider factors such as access time and location and type of
access.) Finally, the RADIUS server can match particular users to particular dynamic settings, such as VLAN assignments, which it forwards to
the authenticator.
1-34
Page 47

Overview of the ProCurve NAC 800
Deployment Methods
Figure 1-7. 802.1X Components
The NAC 800 enters the 802.1X framework as either an authentication server
or a supplement to the authentication server. It adds endpoint integrity to the
process of making access decisions. In other words, the authentication
server’s decision is now based on these factors:
■ End-user identity
■ Other factors such as the time and the endpoint’s location
■ Endpoint integrity (whether the endpoint passes the tests listed in the
NAC policy)
Types of Access Control Provided by the NAC 800
The NAC 800 can provide these types of access control with the 802.1X
deployment method:
■ Authentication only—The NAC 800 acts as a traditional RADIUS server.
■ Endpoint integrity only—The NAC 800 integrates with a Microsoft
Internet Authentication Service (IAS) server. The IAS server provides
authentication, and the NAC 800 provides endpoint integrity testing.
Note IAS is the only option for a system that uses the NAC 800 for endpoint
integrity only. If your network already includes a non-IAS RADIUS server,
however, you can configure the NAC 800 to act as a RADIUS server, but
proxy requests to the existing server (or bind to an existing directory).
■ Both—The NAC 800 authenticates the endpoint like a traditional RADIUS
server. However, it also tests the endpoint's integrity and factors test
results into its access decisions.
Further discussion of the 802.1X deployment method will divide into two
categories:
■ NAC 800 provides endpoint integrity (with or without its internal RADIUS
server).
■ NAC 800 provides RADIUS services only.
1-35
Page 48

Overview of the ProCurve NAC 800
Deployment Methods
802.1X Deployment Method—Endpoint Integrity With
or Without RADIUS
The following sections describe how the NAC 800 uses 802.1X to quarantine
endpoints; they also explain, at a high level, how to set up your network to
support such quarantining.
How the NAC 800 Quarantines Endpoints
As discussed earlier, 802.1X helps network devices apply dynamic VLAN
assignments to endpoints. When using the 802.1X method, the NAC 800
quarantines endpoints by assigning them to the appropriate VLAN based on
their integrity posture.
Exactly how the NAC 800 assigns users to VLANs depends on several factors,
including whether it integrates with IDM. The rest of this section explains the
available options.
VLAN Assignment After Initial Authentication. After the endpoint
completes the traditional, first-phase of 802.1X authentication, it has the
Unknown posture. The NAC 800 places it in a “guest” or “test” VLAN, which is:
■ If you are using IDM (recommended), the VLAN associated with the
Unknown status via a access policy group rule
■ If you are not using IDM, the VLAN associated with the Unknown posture
in the:
• /etc/raddb/SAFreeRadiusConnector.conf file
• SAIASConnector.ini file (if using the IAS plug-in)
You might make this VLAN identical to the quarantine VLAN, or you might
create a different VLAN. In either case, set up the VLAN in the network
infrastructure and complete these steps:
1. Configure your DHCP server to specify the NAC 800 as the DNS server for
this VLAN.
2. Configure network infrastructure devices to restrict endpoints in this
VLAN to services necessary for testing.
VLAN Assignment After Endpoint Integrity Testing. When the testing
is complete, the endpoint has gained one of the other three postures.
1-36
Page 49

Overview of the ProCurve NAC 800
Deployment Methods
If the endpoint has the Healthy or Check-up posture, the NAC 800 allows it to
receive the standard (production) VLAN assignment for that user in that
network:
■ The VLAN assigned through IDM for the Pass status if you have integrated
the NAC 800 with IDM
■ The VLAN assigned through OpenLDAP, eDirectory, or a proxy RADIUS
server if the NAC 800 is configured to authenticate users against one of
those sources
■ The VLAN assigned through IAS if your network uses the IAS plug-in
■ The VLAN configured in /etc/raddb/SAFreeRadiusConnector.conf file
if you are authenticating to the local database or a Windows domain
without IDM
■ The static or default VLAN on the authenticator if your network does not
use dynamic settings
If, on the other hand, the endpoint has the Quarantine or Infected posture, the
NAC 800 places it in the quarantine VLAN:
■ If you are using IDM (recommended), the VLAN associated with the Fail
or Infected status via a policy group rule
■ If you are not using IDM, the VLAN associated with the Quarantine or
Infected posture in the:
• /etc/raddb/SAFreeRadiusConnector.conf file
• SAIASConnector.ini file (if using the IAS plug-in)
Note If you desire, you can place infected endpoints in a separate VLAN from other
quarantined endpoints.
As for the guest VLAN, scopes on the network’s DHCP servers should specify
the NAC 800 as DNS server for the quarantine VLAN.
It is by acting as the DNS server that the NAC 800 controls the quarantined
endpoints. Whenever a quarantined user attempts to navigate to a Web page,
its endpoint sends a DNS request to the NAC 800. If the requested hostname
(or the IP address to which that hostname resolves) is on the accessible
services list, the NAC 800 sends a DNS response with the correct IP address.
The user reaches the Web page. On the other hand, if the requested hostname
is not on the list, the NAC 800 sends its own IP address in the response,
redirecting the user to a Web page such as the one shown in Figure 1-8.
1-37
Page 50

Overview of the ProCurve NAC 800
Deployment Methods
Figure 1-8. End-User Redirect Window
The user cannot reach non-accessible Web sites until he or she has fixed the
problem.
You could also set up ACLs on network infrastructure devices that limit
endpoints in the quarantine VLAN. For example, you might deny the quarantine subnet access to all private addresses except for the NAC 800’s and a
DHCP server. The NAC 800 handles controlling the quarantined endpoints
access to external sites.
How and Where to Deploy the NAC 800
One of the advantages of 802.1X is that, although access control decisions are
made at certain centralized points, enforcement occurs at the edge. In other
words, you can install the NAC 800 anywhere in your network. It needs
connectivity with the endpoints (it must detect them), but it does not need to
stand between them and the production network: the authenticators do that.
To properly implement the 802.1X method, you must either:
■ Install the Device Activity Capture (DAC) utility on the Windows DHCP
server. Because the utility is installed on a remote device, it is referred to
as the remote DAC(RDAC) utility. The RDAC utility listens for DHCP
traffic and sends DHCP-related information to the NAC 800.
1-38
Page 51

Overview of the ProCurve NAC 800
Deployment Methods
■ Receive mirrored traffic from the DHCP server. (See Figure 1-9.) This
allows the NAC 800 to discover an endpoint’s IP address after it connects
and is placed in a VLAN. The NAC 800 can then test and re-test the device
as necessary.
Figure 1-9. Deploying a NAC 800 in 802.1X Quarantine Mode
Note The following deployment instructions apply to CSs and ESs. An MS simply
requires connectivity to ESs. To deploy an MS, connect its port 1 to an
infrastructure switch.
If you are using a cluster deployment, only one ES in the 802.1X enforcement
cluster needs to receive mirrored DHCP traffic. However, you should mirror
traffic to two ESs for the sake of redundancy.
Deploy a NAC 800 That Provides RADIUS and Endpoint Integrity
Services. Take these steps to deploy a NAC 800 that provides RADIUS
services as well as endpoint integrity checking:
1. Install the NAC 800, connecting its ports as follows:
• RDAC deployment—If you will install RDAC on your DHCP servers,
simply connect port 1 on the NAC 800 to any port in your production
network, determining the location just as you would for any RADIUS
server. You will not use the second port on the NAC 800.
1-39
Page 52

Overview of the ProCurve NAC 800
Deployment Methods
• Mirroring deployment
2. Give the NAC 800 an IP address in the appropriate VLAN.
3. On the authenticators (switch, APs, and so forth), specify the NAC 800’s
IP address as one of the RADIUS servers.
4. Determine the source of credentials and take any steps necessary to allow
the NAC 800 to access this source:
• NAC 800’s local database—ProCurve Networking recommends
• Proxy RADIUS server—Add the NAC 800 to the proxy server’s
– Port 1—to any port in your production network, determining the
location just as you would for any RADIUS server
– Port 2—to a port that can receive mirrored DHCP traffic
Unless your network devices support remote mirroring, this port
should be on the same switch to which the DHCP server connects.
that you always use IDM to configure the local database.
See “Configure Authentication to the NAC 800’s Local Database” on
page 4-14 of Chapter 4: “Configuring the RADIUS Server—Integrated
with ProCurve Identity Driven Manager.”
client list.
Set up the NAC 800 as described in “Configure Authentication to a
Proxy RADIUS Server” on page 4-30 of Chapter 4: “Configuring the
RADIUS Server—Integrated with ProCurve Identity Driven Manager”
or “Configure Authentication to a Proxy RADIUS Server” on page 5-23
of Chapter 5: “Configuring the RADIUS Server—Without Identity
Driven Manager.”
• Active Directory (AD), OpenLDAP, or eDirectory—In the
NAC 800’s Web browser interface, bind it to the directory.
If using IDM, see “Configure Authentication to a Windows Domain”
on page 4-16 or “Configure Authentication to an LDAP Server” on page
4-20 of Chapter 4: “Configuring the RADIUS Server—Integrated with
ProCurve Identity Driven Manager.”
If not using IDM, see “Configure Authentication to a Windows
Domain” on page 5-10 or “Configure Authentication to an LDAP
Server” on page 5-14 of Chapter 5: “Configuring the RADIUS
Server—Without Identity Driven Manager.”
1-40
Page 53

Overview of the ProCurve NAC 800
Deployment Methods
5. Send DHCP traffic to the NAC 800. Either:
• Have RDAC on your DHCP server send DHCP traffic to the NAC 800.
• Send mirrored traffic if you did not install RDAC on you DHCP server.
– Connect the NAC 800’s port 2 to the same switch to which the
DHCP server is connected. Make the NAC 800’s switch port the
mirror port, and the DHCP server’s port the monitored port.
– If you cannot connect the NAC 800’s port 2 to the DHCP server’s
switch, you must set up remote mirroring. For instructions on
setting up this capability on a ProCurve Switch 3500yl/5400zl/
6200yl Series, see the Management and Configuration Guide for
the ProCurve Series 3500yl, 6200yl, and 5400zl Switches.
6. Throughout the network, set up the guest VLAN (for not-yet-tested endpoints) and the quarantine VLAN:
a. Configure the appropriate VLAN ID for each integrity posture:
– If you are using IDM, create policy group rules to match the
Unknown, Fail, and Infected postures to the profile with the
appropriate VLAN assignment.
See the ProCurve Identity Driven Manager Users’ Guide.
– If you are not using IDM, set the VLAN IDs in the /etc/raddb/
SAFreeRadiusConnector.conf file on the NAC 800.
b. If the VLANs selected for untested or failed endpoints do not yet exist,
create them on network infrastructure devices such as routers and
switches. Apply ACLs to restrict traffic routed in and out of the
VLANs.
c. Create DHCP scopes for the guest and quarantine VLANs. Specify the
NAC 800 as the DNS server.
7. Set up NAC policies and testing methods.
See the ProCurve Network Access Controller 800 Users’ Guide.
Deploy a NAC 800 That Provides Endpoint Integrity Only. For a NAC
800 that enforces endpoint integrity with the 802.1X quarantine method, but
relies on IAS to authenticate users, follow these steps:
1. Install the NAC 800, connecting its ports as follows:
• RDAC deployment—If you will install RDAC on your DHCP servers,
simply connect port 1 on the NAC 800 to any port in your production
network, determining the location just as you would for any RADIUS
server. You will not use the second port on the NAC 800.
1-41
Page 54

Overview of the ProCurve NAC 800
Deployment Methods
• Mirroring deployment
2. Give the NAC 800 an IP address in the appropriate VLAN.
3. Send DHCP traffic to the NAC 800. Either:
• Have RDAC on your DHCP server send DHCP traffic to the NAC 800.
• Send mirrored traffic if you did not install RDAC on you DHCP server.
– Port 1—to any port in your production network
– Port 2—to a port that can receive mirrored DHCP traffic
Unless your network devices support remote mirroring, this port
should be on the same switch to which the DHCP server connects.
– Connect the NAC 800’s port 2 to the same switch to which the
DHCP server is connected. Make the NAC 800’s switch port the
mirror port, and the DHCP server’s port the monitored port.
– If you cannot connect the NAC 800’s port 2 to the DHCP server’s
switch, you must set up remote mirroring. For instructions on
setting up this capability on a ProCurve Switch 3500yl/5400zl/
6200yl Series, see the Management and Configuration Guide for
the ProCurve Series 3500yl, 6200yl, and 5400zl Switches.
4. Set up the IAS server to work with the NAC 800:
a. Download two files from http://www.procurve.com/nactools:
– SAIASConnector.ini
– SAIASConnector.dll
b. Install these files on the IAS server.
c. Modify the SAIASConnector.ini file to include the correct VLAN
assignments for various endpoint integrity postures.
d. Modify the IAS server’s registry to include the SAIASConnector.dll
file.
e. Load the NAC 800’s digital certificate to the IAS server’s trusted CA
certificates store.
For instructions on completing these tasks, see “Using the NAC 800 IAS
Plug-in to the Microsoft IAS RADIUS Server” in Chapter 11: “802.1X
Quarantine Method” of the ProCurve Network Access Controller 800
Users’ Guide.
5. Set up the network to support the VLANs configured in step 4-c:
a. If the VLANs do not yet exist, create them on network infrastructure
devices such as routers and switches. Apply ACLs to restrict traffic
routed in and out of the VLANs.
b. Create DHCP scopes for the guest and quarantine VLANs. Specify the
NAC 800 as the DNS server.
1-42
Page 55

Overview of the ProCurve NAC 800
Deployment Methods
6. Set up NAC policies and testing methods.
See the ProCurve Network Access Controller 800 Users’ Guide.
802.1X Deployment Method—RADIUS Server Only
You can disable the NAC 800’s endpoint integrity capabilities and use the
device as a stand-alone RADIUS appliance.
Switches, APs, and other NASs contact the NAC 800 when an end-user
attempts to connect to the network. The NAC 800 checks the user’s credentials
against its local database, another RADIUS server, or a directory. Then it
informs the NAS whether the endpoint can connect.
If you use IDM to manage the NAC 800, the NAC 800 can also factor access
time and location into its decisions, as well as send dynamic VLAN assignments, ACLs, and rate limits.
How and Where to Deploy the NAC 800
For this deployment method, you place the NAC 800 as you would any RADIUS
server. NASs throughout the network will need to contact the NAC 800, so you
should typically place it in the network core in a server VLAN.
Figure 1-10. Deploy a RADIUS-Only NAC 800
Follow these steps:
1. Connect the NAC 800’s port 1 to a port in your production network. Give
the NAC 800 an IP address in the appropriate VLAN.
You do not need to connect the NAC 800’s port 2.
1-43
Page 56

Overview of the ProCurve NAC 800
Deployment Methods
2. On the authenticators, specify the NAC 800’s IP address as one of the
RADIUS servers.
3. Determine the source of credentials and take any steps necessary to allow
the NAC 800 to access this source:
• NAC 800’s local database—ProCurve Networking recommends
• Proxy RADIUS server—Add the NAC 800 to the proxy server’s
• Active Directory (AD), OpenLDAP, or eDirectory—In the
that you always use IDM to configure the local database.
See “Configure Authentication to the NAC 800’s Local Database” on
page 4-14 of Chapter 4: “Configuring the RADIUS Server—Integrated
with ProCurve Identity Driven Manager.”
client list.
Set up the NAC 800 as described in “Configure Authentication to a
Proxy RADIUS Server” on page 4-30 of Chapter 4: “Configuring the
RADIUS Server—Integrated with ProCurve Identity Driven Manager”
or “Configure Authentication to a Proxy RADIUS Server” on page 5-23
of Chapter 5: “Configuring the RADIUS Server—Without Identity
Driven Manager.”
NAC 800’s Web browser interface, bind it to the directory.
If using IDM, see “Configure Authentication to a Windows Domain”
on page 4-16 or “Configure Authentication to an LDAP Server” on page
4-20 of Chapter 4: “Configuring the RADIUS Server—Integrated with
ProCurve Identity Driven Manager.”
If not using IDM, see “Configure Authentication to a Windows
Domain” on page 5-10 or “Configure Authentication to an LDAP
Server” on page 5-14 of Chapter 5: “Configuring the RADIUS
Server—Without Identity Driven Manager.”
DHCP Deployment Method
The DHCP deployment method is designed primarily for networks with equipment that is not 802.1X capable. Any endpoint is allowed to connect to the
network. However, the NAC 800 prevents non-compliant endpoints from
receiving a valid IP address in the production network. Instead, these endpoints receive an address in a quarantine subnet, in which they have access
only to resources necessary for remediation (accessible services).
1-44
Page 57

Overview of the ProCurve NAC 800
Deployment Methods
Types of Access Control Provided By the NAC 800
When using the DHCP deployment method, the NAC 800 provides access
control based only on endpoint integrity.
Your network may not enforce authentication, or it may enforce it through a
directory service; in either case, authentication is outside the purview of this
NAC 800 solution.
Two Options for a DHCP Deployment
When you choose a DHCP deployment, you have two options:
■ DHCP inline
■ DHCP plug-in
You can use the DHCP inline deployment if one of the following applies:
■ Your network has one DHCP server.
■ Your network has multiple DHCP servers, but they are on the same subnet
and can be connected to the same switch.
You can use the DHCP plug-in deployment method if you have multiple
Windows 2003 DHCP servers that are:
■ attached to different switches
■ located on different subnets than the NAC 800
How and Where to Deploy the NAC 800 for a DHCP Inline
Deployment
For this DHCP deployment method, the NAC 800 must stand between the
production network and DHCP servers.
The simplest scenario is a network with a single DHCP server and fewer than
3000 users. This network requires a single NAC 800, which is set to the CS
type. The NAC 800’s port 1 connects to a switch in the production network,
and its port 2 connects to the DHCP server. The NAC 800 and the DHCP server
require IP addresses on the same subnet.
Figure 1-11 illustrates this design.
1-45
Page 58

Overview of the ProCurve NAC 800
Deployment Methods
Figure 1-11. DHCP Inline Deployment—Single NAC 800 and Single DHCP Server
If your network uses more than one DHCP server, you can connect the servers
to the same switch. You then connect the NAC 800’s port 2 to that switch as
well. Do not connect any other devices to the switch as those devices could
then circumvent the NAC 800. As shown in Figure 1-12, the NAC 800’s port 1
connects to a switch that links it to the rest of the network.
Figure 1-12. DHCP Inline Deployment—Single NAC 800 and Multiple DHCP Servers
1-46
That Are Attached to the Same Switch
Page 59

Overview of the ProCurve NAC 800
Deployment Methods
You can modify the design as necessary for a larger network. For example,
you might install several NAC 800s in a cluster deployment to support a
network with a large number of users. Install the MS wherever you desire.
Then install at least one ES between the DHCP servers and the rest of the
network.
One ES standing between the network and the DHCP servers is sufficient. That
ES shares information with the other ESs, which can test the endpoints from
anywhere in the network. However, to provide redundancy, at least two ESs
should be able to intercept the DHCP traffic.
How and Where to Deploy the NAC 800 for a DHCP Plug-in
Deployment
Unlike a DHCP inline deployment, the DHCP plug-in deployment does not
require the NAC 800 to be placed between the network and the Windows 2003
DHCP servers. Instead, the DHCP servers can be located on any subnet
anywhere on the network, as long as they can communicate with the NAC 800.
In other words, your network must be set up to route traffic between the DHCP
servers and the NAC 800.
1-47
Page 60

Overview of the ProCurve NAC 800
Deployment Methods
Figure 1-13. DHCP Plug-in Deployment—Single NAC 800 and Multiple
DHCP Servers
You must then configure the DHCP plug-in as described in the ProCurve
Network Access Controller 800 Users’ Guide.
How the NAC 800 Quarantines Endpoints for a DHCP
Deployment
As soon as an endpoint connects to a network, it typically sends a DHCP
request for a valid IP address for itself, the IP address of its default gateway
and DNS server, and all the other configurations necessary for full
connectivity. The way the NAC 800 detects these communications varies,
depending on if you are using a DHCP inline deployment or a DHCP plug-in
deployment.
DHCP Inline Deployment. The NAC 800 stands between endpoints and the
DHCP server, intercepting and responding to DHCP requests based on endpoints’ integrity postures.
1-48
Page 61

Overview of the ProCurve NAC 800
Deployment Methods
Note The NAC 800 forwards all non-DHCP traffic to the server without interferring
with it.
The NAC 800 forwards DHCP requests from endpoints with the Healthy or the
Check-up posture on to the DHCP server, which issues the endpoints IP
addresses and other configurations just as it would were the NAC 800 not
present.
However, the NAC 800 intercepts DHCP requests from endpoints with the
Unknown, Quarantine, or Infected postures and responds to these requests in
lieu of the network DHCP server. To do so, the NAC 800 uses the configuration
for the quarantine area, which includes:
■ The quarantine subnet address and range of IP addresses available for
endpoints within that subnet
■ Default router for the quarantine subnet
The NAC 800 automatically specifies itself as the DNS server.
Because the endpoints do not have valid IP addresses in a production subnet,
they cannot truly connect to the production network. However, you must take
additional steps to limit network access in the quarantine subnet, as described
in the following section.
Acting as the DNS server allows the NAC 800 to inform quarantined users why
they cannot reach the sites they are attempting to reach. When a quarantined
user opens a Web browser and attempts to reach a non-accessible Web site
(not on the accessible services list), the NAC 800 receives the DNS request to
resolve the hostname. It sends its own IP address to the user’s endpoint, and
the user sees the page such as the one shown in Figure 1-14, which helps him
or her begin to remediate the endpoint.
1-49
Page 62

Overview of the ProCurve NAC 800
Deployment Methods
Figure 1-14. End-User Redirect Window
Note An end-user who has the technical savvy to give his or her station a valid IP
address can circumvent DHCP quarantining. This is one reason that 802.1X is
the recommended option for high security.
DHCP Plug-in Deployment. When the NAC 800 boots, it tries to connect to
the DHCP servers you have defined for the DHCP plug-in deployment. If the
NAC 800 cannot communicate with a particular DHCP server, it will continue
to try to contact that server at regular intervals—not stopping until it either
reaches the DHCP server or you remove that DHCP server’s information from
the NAC 800’s configuration settings.
If a DHCP server cannot communicate with the NAC 800, the DHCP server
activates the failover parameters that you have configured. It either allows all
traffic or denies all traffic.
To enable the DHCP plug-in deployment method, you must install the Device
Activity Capture (DAC) utility on the Windows DHCP server. Because the
utility is installed on a remote device, it is referred to as the remote
DAC(RDAC) utility. The RDAC utility listens for DHCP traffic and sends
DHCP-related information to the NAC 800.
1-50
Page 63

Overview of the ProCurve NAC 800
Deployment Methods
This information allows the NAC 800 to discover endpoints that are requesting
a dynamic IP address in order to access the network. The NAC 800 then tests
these endpoints and, based on the results, takes one of the following actions:
■ Failed—If the endpoint fails the testing, the NAC 800 assigns it an IP
address in the quarantined subnet.
■ Passed—If the endpoint passes the testing, the NAC 800 adds the end-
point’s MAC address to the access control list (ACL) for the appropriate
DHCP server. It then sends the updated ACL to the DHCP server.
In addition to running to the RDAC utility, the DHCP server requires the
Microsoft DHCP plug-in. Installed on each DHCP server on your network, the
DHCP plug-in allows the DHCP server to process or ignore DHCP requests
based on the ACL that the NAC 800 sends it. If an endpoint’s MAC address is
on the ACL, the DHCP server will send it an IP address. If not, the DHCP server
will not respond to the endpoint’s DHCP requests. As mentioned earlier, the
NAC 800 will respond to the DHCP request, giving the endpoint an IP address
in the quarantine network.
If at any time the DHCP server loses its connection with the NAC 800 server,
the DHCP server discards the existing ACL. When the connection to the NAC
800 is re-established, the NAC 800 resends the entire ACL to the DHCP server.
(For information about configuring the DHCP plug-in deployment method, see
Chapter 13: “DHCP Plug-in” of the ProCurve Network Access Controller 800
Users’ Guide.)
Enforcement Methods for DHCP Quarantining
You have two options for limiting network access in the quarantine subnet:
■ ACLs—This option relies on the network infrastructure to impose con-
trols on the quarantine subnet.
Routers and switches apply ACLs to the quarantine subnet or associated
VLAN. Access control entries (ACEs) in these ACLs determine which
services are accessible to endpoints in the quarantine subnet.
You might select this option if your network already includes a VLAN
designed to limit access in the ways a quarantine VLAN should.
ACLs should:
• Allow traffic between the quarantine subnet and the NAC 800 CS or
ESs (in both directions)
• Allow traffic between the quarantine subnet and the IP addresses and
ports of servers in the accessible services list (in both directions)
• Deny all other traffic to and from the quarantine subnet
1-51
Page 64

Overview of the ProCurve NAC 800
Deployment Methods
■ Static routes—This option relies on the NAC 800 to impose controls on
the quarantine subnet.
When you select this option, the NAC 800 omits the default gateway
address from DHCP configurations sent to quarantined endpoints; the
NAC 800 also sets the subnet mask to 255.255.255.255. (The NAC 800 does
so no matter what you specify for the gateway address and subnet mask
in the quarantine area configuration.) Isolated in its own subnet without
a gateway, the endpoint cannot transmit traffic.
As part of the DHCP configuration, the NAC 800 sends a static route to
itself, which allows the endpoints to send it DNS requests. The NAC 800
also acts as a proxy Web server for quarantined endpoints, allowing them
to reach accessible services when they request them.
The static route access control option offers easy setup: you do not have
to configure any device except for the NAC 800, and the NAC 800 automatically enables access to all services required to for endpoints to update
patches and so forth. Adding another service is also easy: simply add it to
the list in the Home > System configuration > Accessible services
window. (See Chapter 3: “System Configuration” of the ProCurve Network
Access Controller 800 Users’ Guide.)
Designing the Quarantine Subnet
As you should now understand, the quarantine subnet is a special subnet that
is tightly controlled and separated from production subnets. However, for
quarantined endpoints to reach the few resources to which they do need
access, you must include the quarantine subnet in your production network
architecture.
You have two options:
■ Configuring the quarantine subnet as a part of an existing subnet
■ Configuring the quarantine subnet using multinetting
If your network’s DHCP servers must receive requests from VLANs not their
own, you must set up helper addresses.
Configuring the Quarantine Subnet as Part of an Existing Subnet.
Your network probably already includes several production (or user) VLANs,
each with its own subnet. However, users might not require every available IP
address in a subnet. A good network design often reserves certain addresses
in each subnet for future use. You can now exploit those reserved IP addresses
for a quarantine subnet.
1-52
Page 65

Overview of the ProCurve NAC 800
Deployment Methods
For example, your network might include three Class C user subnets, each
with 100 users:
■ 10.1.2.0/24
■ 10.1.3.0/24
■ 10.1.4.0/24
Currently, your DHCP server assigns users addresses in the 25 to 125 rangefor example, 10.1.2.25 to 10.1.2.125. This means that the second half of each
subnet (10.1.X.128/25) is available for quarantined endpoints:
On the NAC 800, you must set up a separate quarantine area for each production subnet. Specify the quarantine subnets for the areas as follows:
■ Area 1—Quarantine subnet = 10.1.2.128/25
■ Area 2—Quarantine subnet = 10.1.3.128/25
■ Area 3—Quarantine subnet = 10.1.4.128/25
For the quarantine subnet’s default router, specify the IP address of the router
in the associated production subnet. It does not matter that this IP address is
outside the range of the quarantine subnet because, in actual fact, the network
infrastructure considers the quarantine subnet to be part of the production
subnet.
You will set the non-quarantine subnet for each quarantine area as the portion
of the associated production VLAN that is already in use. All healthy endpoints, all network servers, and the NAC 800 require address in one of these
ranges:
■ Area 1—Non-quarantine subnet = 10.1.2.0/25
■ Area 2—Non-quarantine subnet = 10.1.3.0/25
■ Area 3—Non-quarantine subnet = 10.1.4.0/25
The network DHCP server continues to assign IP addresses from the complete
Class C network. It is very important, of course, that the range exclude IP
addresses designated for quarantined endpoints.
■ Scope 1
Network = 10.1.2.0/24
Range = 10.1.2.25-10.1.2.125
■ Scope 2
Network = 10.1.2.0/24
Range 10.1.2.25-10.1.2.125
1-53
Page 66

Overview of the ProCurve NAC 800
Deployment Methods
■ Scope 3
You do not have to add quarantine subnets to the network infrastructure
because infrastructure devices include the “quarantine subnets” as part of
existing subnets.
Of course, if you have selected the ACL option for network access control,
you must apply ACLs to the production VLANs in order to control traffic from
IP addresses in the quarantine range.
The static route option can be attractive because you do not have to alter
configurations on existing infrastructure devices.
Configuring the Quarantine Subnet Using Multinetting. With the
multinetting option, you actually add the quarantine subnets to your network
design. You might choose this option when most of the IP addresses in your
production subnets are already in use.
Network = 10.1.4.0/24
Range = 10.1.4.25-10.1.4.125
For example, your network might include two Class C subnets, each with
250 users:
■ 192.168.8.0/24
■ 192.168.12.0/24
For each existing Class C subnet, you will add new Class C subnet for the
quarantine subnet.
On the NAC 800, you set up two quarantine areas and specify one quarantine
subnet for each production subnet:
■ Area 1
Quarantine subnet = 192.168.9.0/24
Non-quarantine subnet = 192.168.8.0/24
■ Area 2
Quarantine subnet = 192.168.13.0/24
Non-quarantine subnet = 192.168.12.0/24
With this option, quarantined endpoints are placed in a truly separate subnet.
Therefore, they require a default gateway with an IP address in that subnet.
For example:
■ Area 1—Default gateway = 192.168.9.1
■ Area 2—Default gateway = 192.168.13.1
1-54
Page 67

Overview of the ProCurve NAC 800
Deployment Methods
On the infrastructure devices that act as default gateways, set up multinetting
on the production VLANs. For example, a routing switch might have this
existing configuration:
■ VLAN 2—IP address = 192.168.8.1/24
■ VLAN 3—IP address = 192.168.12.1/24
You should now add the IP addresses you specified for quarantine subnets’
default gateways:
VLAN 2
IP address = 192.168.8.1/24
IP address = 192.168.9.1/24
VLAN 3
IP address = 192.168.12.1/24
IP address = 192.168.13.1/24
VLAN tagging should already be in place to support the endpoint whether it
is in the quarantine or the subnet VLAN. And the DHCP server can continue
to use its existing scopes.
As always, remember to apply the appropriate ACLs to VLANs on infrastructure devices if you have selected the ACL option for access control.
Setting up Helper Addresses. If your network includes multiple VLANs,
its infrastructure devices probably already use helper addresses to forward
DHCP requests from endpoints on one VLAN to a server on another VLAN.
However you establish the quarantine subnets, the infrastructure devices now
require two helper addresses:
■ The network DHCP server’s
■ The NAC 800’s (the CS or the ES that is connected to the DHCP server)
Which device should act as the DHCP server changes as an endpoint’s integrity
posture changes. However, the NAC 800 handles this issue: it simply drops the
request if it is destined to the wrong IP address. (See Table 1-1).
1-55
Page 68

Overview of the ProCurve NAC 800
Deployment Methods
Table 1-1. How the NAC 800 Handles DHCP Requests
DHCP Request Destination Endpoint Integrity Posture NAC 800 Action
DHCP server Unknown, Quarantine, or Infected Block the request
DHCP server Healthy or Check-up Forward the request
NAC 800 Unknown, Quarantine, or Infected Answer the request
NAC 800 Healthy or Check-up Ignore the request
For example, should the switch (or other device) send a DHCP request from
a healthy station to the NAC 800’s address, the NAC 800 simply ignores it. The
switch, not receiving a reply, next sends the request to the DHCP server’s
address; because the endpoint is healthy, the NAC 800 forwards the request
to the server.
Inline Deployment Method
In an inline deployment, perhaps the most straightforward of the three deployment methods, a NAC 800 physically separates endpoints from the production
network.
Clearly, you cannot deploy an individual NAC 800 between every endpoint and
its switch port. Inline quarantining is a viable option only when many endpoints connect to your network through a single point of access. Examples
include:
■ A VPN—Remote users access the production network through the Inter-
net. Each remote user sets up a secure tunnel with the VPN gateway device
at the production network. Checking the integrity of the remote endpoints
is particularly important as they are otherwise beyond your control.
■ A WAN—A WAN is network that connects several sites over private
connections such as T1 or E1 cable or ADSL lines. For example, branch
offices might connect to a company headquarters. For whatever reason,
you might want to test the integrity of endpoints at a remote office before
they connect to the segment of the WAN under your control.
■ A wireless network—A device such as the ProCurve Wireless Edge
Services Module controls many RPs and may provide many wireless users
their access point to the production network. Especially when the wireless users connect with their own equipment, the network should test
their integrity. Even non-coordinated APs, which support fewer users, can
act as choke points.
1-56
Page 69

Overview of the ProCurve NAC 800
Deployment Methods
Typically, however, you would not use the inline method to control a
wireless network for several reasons:
• The Wireless Edge Services Module and ProCurve APs support 802.1X
authentication, and, for a wireless network that takes advantage of
that option, you should choose the 802.1X deployment method.
• All traffic from the module or the APs must be forwarded through the
NAC 800 in the same VLAN.
However, some networks use an alternative such as WPA-PSK and place
all users in the same VLAN. In this case, inline quarantining might provide
a higher security option than DHCP.
Types of Access Control Provided by the NAC 800
When enforcing inline quarantining, the NAC 800 tests endpoints’ compliance
with NAC policies and controls network access according to the results.
The NAC 800 plays no role in authenticating endpoints; this service is
typically handled by the VPN gateway (or wireless AP or Wireless Edge
Service Module).
How the NAC 800 Quarantines Endpoints
With inline quarantining, the NAC 800 acts as a Layer 2 bridge that imposes a
firewall between its two ports. The NAC 800 does not forward traffic received
on port 2 out port 1 unless the source endpoint has the Healthy or Check-up
posture. And it does not forward traffic from port 1 to quarantined or unknown
endpoints.
In other words, endpoints on the port 2 side of the NAC 800 can access any
resources that are also on the port 2 side. However, they cannot access any
resources on the port 1 side until they have proved compliance with the
appropriate NAC policies.
Exceptions, as always, include the list of accessible services, which any
endpoint, no matter where it is installed and what its status, can reach.
Configuring Accessible Services for Inline Method
Because, by default, all traffic except for the testing services are blocked from
the port 1 side, you must add accessible services to allow infrastructure traffic
to traverse the bridge. For example, the NAC 800 lies inline between your LAN
and its router/VPN gateway. You want to manage the router from within the
LAN. So you must allow the management traffic in the accessible service list.
1-57
Page 70

Overview of the ProCurve NAC 800
Deployment Methods
For inline quarantining, you must specify IP addresses rather than host names
in the accessible services list. You can specify a port number to allow a specific
service. For example, to manage a router with IP address 10.1.44.50 using
SNMP, add this line to the accessible services list:
10.1.44.50:161
Remember to permit other necessary traffic such as routing protocols.
How and Where to Deploy the NAC 800
You must install a CS or an ES (for a cluster deployment) between the
endpoints to be tested and the production network. The exact design differs
according to the way endpoints access the network.
VPN Endpoints (Remote Users). Figure 1-15 shows a typical design for
deploying a NAC 800 to control remote endpoints that connect through a VPN.
You connect port 2 of the NAC 800 directly to the gateway device. You connect
the NAC 800’s port 1 to the rest of the network, typically a core switch.
Figure 1-15. Inline Deployment—VPN With a Single NAC 800
Then set the server type to CS or ES. Choose CS if the NAC 800 will act on its
own—typically because:
■ Your network supports fewer than 3000 remote users
■ You only want to test remote endpoints
Choose ES if your network includes other NAC 800s enforcing a different
quarantine method, and you want to manage all NAC 800s centrally. This NAC
800 will be the sole ES in its cluster.
1-58
Page 71

Overview of the ProCurve NAC 800
Deployment Methods
If the VPN supports more than 3000 users, you should deploy a cluster of ESs
to test the remote endpoints. Connect the ESs to switches on their port 2; then
connect the VPN gateway to all of these switches. This design, with its
redundant connections, creates a network loop. It is very important to activate
Spanning Tree Protocol (STP) or Rapid STP (RSTP) on the switches to prevent
broadcast storms.
Figure 1-16 shows a sample design for a cluster of inline ESs.
Figure 1-16. Inline Deployment—VPN with a Cluster of NAC 800s
WAN Endpoints (Users at a Remote Site). This scenario is somewhat
similar to that of a VPN. However, instead of connecting to your network over
a VPN tunnel and a public network, users connect over a private WAN
connection.
You deploy the NAC 800 in a similar position. Connect its port 2 to the WAN
router and its port 1 to a core switch. Then set the type to CS or ES, basing
your decision on the factors discussed in the previous section.
Figure 1-17 shows a typical design.
1-59
Page 72

Overview of the ProCurve NAC 800
Deployment Methods
Figure 1-17. Inline Deployment—WAN
Wireless Endpoints. An AP or a Wireless Edge Services Module can act as
a “choke point” for many users.
If you are controlling wireless endpoints that connect through an AP, simply
deploy the NAC 800 as described in the previous sections, with the AP in the
place of the VPN gateway or the WAN router. Or connect several APs to a
switch and then place the NAC 800 between that switch and the rest of the
network. Make sure that the APs forward all traffic into the network in the
same VLAN.
See Figure 1-18.
Figure 1-18. Inline Deployment—Wireless Network (APs)
1-60
Page 73

Overview of the ProCurve NAC 800
Deployment Methods
Because a Wireless Edge Service Module connects to the rest of the network
on an internal uplink port, you cannot connect that port directly to the NAC
800. Instead, connect the NAC 800’s port 2 to the wireless services-enabled
switch. Connect the NAC 800’s port 1 to another switch. Make sure that the
wireless services enabled-switch connects only to other endpoints, not to
other switches, otherwise the wireless endpoints could access the production
network without passing through the NAC 800. The wireless network should
be on the same VLAN as the wired endpoints. (You can test the integrity of the
wired endpoints, or you can except them from testing, as you choose).
See Figure 1-19.
Figure 1-19. Inline Deployment—Wireless Network (Wireless Edge Services
Note The RPs can be installed anywhere in the network. They encapsulate all
wireless traffic and forward it to the Wireless Edge Services Module. Logically,
therefore the module is the single point of access for the wireless endpoints.
You will need to set up Layer 3 adoption for the RPs so that they can become
adopted through the NAC 800. See the Wireless Edge Services xl Module
Management and Configuration Guide or the Wireless Edge Services zl
Module Management and Configuration Guide.
Module)
1-61
Page 74

Overview of the ProCurve NAC 800
Deployment Methods
1-62
Page 75

Management Options for the ProCurve NAC 800
Management Options for the ProCurve
NAC 800
Contents
Overview . . . . . . . . . . . . . . . . . . . . . . . . . . . . . . . . . . . . . . . . . . . . . . . . . . . . . . 2-3
Menu Interface and Panel LCD . . . . . . . . . . . . . . . . . . . . . . . . . . . . . . . . . . . . 2-5
Access the Menu Interface . . . . . . . . . . . . . . . . . . . . . . . . . . . . . . . . . . . . 2-5
Console Session . . . . . . . . . . . . . . . . . . . . . . . . . . . . . . . . . . . . . . . . . 2-5
SSH Session . . . . . . . . . . . . . . . . . . . . . . . . . . . . . . . . . . . . . . . . . . . . 2-7
Navigate the Menu Interface . . . . . . . . . . . . . . . . . . . . . . . . . . . . . . . . . . 2-8
Configure Initial Settings with the Menu Interface . . . . . . . . . . . . . . . . 2-9
Set the Server Type with the Menu Interface . . . . . . . . . . . . . . . . 2-10
Set the IP Address with the Menu Interface . . . . . . . . . . . . . . . . . 2-12
Test IP Settings (Ping) . . . . . . . . . . . . . . . . . . . . . . . . . . . . . . . . . . . 2-13
Change the Password to the Menu Interface . . . . . . . . . . . . . . . . . . . . 2-15
Complete Other Tasks in the Menu Interface . . . . . . . . . . . . . . . . . . . 2-17
Reboot the NAC 800 in the Menu Interface . . . . . . . . . . . . . . . . . 2-18
Shut Down the NAC 800 in the Menu Interface . . . . . . . . . . . . . . 2-19
Turn the Locator LED On and Off . . . . . . . . . . . . . . . . . . . . . . . . . 2-20
View System Information . . . . . . . . . . . . . . . . . . . . . . . . . . . . . . . . 2-21
Access the Panel LCD Menu . . . . . . . . . . . . . . . . . . . . . . . . . . . . . . . . . 2-22
Navigate the Panel LCD Menu . . . . . . . . . . . . . . . . . . . . . . . . . . . . . . . . 2-23
Configure Initial Settings with the Panel LCD Menu . . . . . . . . . . . . . 2-24
Set the Server Type with the Panel LCD Menu . . . . . . . . . . . . . . 2-24
Set the IP Address with the Panel LCD Menu . . . . . . . . . . . . . . . 2-26
Test IP Settings (Ping) with the Panel LCD Menu . . . . . . . . . . . . 2-28
Contents
2
2-1
Page 76

Management Options for the ProCurve NAC 800
Contents
Complete Other Tasks Using the Panel LCD Menu . . . . . . . . . . . . . . 2-29
Reboot the NAC 800 Using the Panel LCD Menu . . . . . . . . . . . . . 2-30
Shut Down the NAC 800 Using the Panel LCD . . . . . . . . . . . . . . . 2-31
Set the Ports Speed and Duplex Settings . . . . . . . . . . . . . . . . . . . 2-32
Root Access to the NAC 800 . . . . . . . . . . . . . . . . . . . . . . . . . . . . . . . . . . . . . 2-35
Web Browser Interface . . . . . . . . . . . . . . . . . . . . . . . . . . . . . . . . . . . . . . . . . 2-37
Access the Web Browser Interface . . . . . . . . . . . . . . . . . . . . . . . . . . . . 2-37
Requirements on the NAC 800 . . . . . . . . . . . . . . . . . . . . . . . . . . . . 2-37
Requirements on the Management Station . . . . . . . . . . . . . . . . . . 2-38
Steps for Accessing the Web Browser Interface . . . . . . . . . . . . . 2-39
Navigate the Web Browser Interface . . . . . . . . . . . . . . . . . . . . . . . . . . 2-39
Home Window . . . . . . . . . . . . . . . . . . . . . . . . . . . . . . . . . . . . . . . . . 2-39
Common Features in Web Browser Interface Windows . . . . . . . 2-44
Following Instructions to Navigate the Web Browser
Interface . . . . . . . . . . . . . . . . . . . . . . . . . . . . . . . . . . . . . . . . . . . . . . 2-46
ProCurve Manager (PCM) Plus . . . . . . . . . . . . . . . . . . . . . . . . . . . . . . . . . . . 2-48
Enable PCM Plus to Detect the NAC 800 . . . . . . . . . . . . . . . . . . . . . . . 2-48
Capabilities of PCM Plus for Managing the NAC 800 . . . . . . . . . . . . . 2-49
IDM . . . . . . . . . . . . . . . . . . . . . . . . . . . . . . . . . . . . . . . . . . . . . . . . . . . . . . . . . . 2-50
Enable IDM to Detect the NAC 800 . . . . . . . . . . . . . . . . . . . . . . . . . . . . 2-50
Capabilities of IDM for Managing the NAC 800 . . . . . . . . . . . . . . . . . . . . . 2-53
2-2
Page 77

Management Options for the ProCurve NAC 800
Overview
Overview
This chapter introduces you to the options for managing and configuring the
ProCurve NAC 800.
The available options depend on your NAC 800’s server type, which can be:
■ Management server (MS)
■ Enforcement server (ES)
■ Combination server (CS)
See Chapter 1: “Overview of the ProCurve NAC 800.” for more information on
the roles played by each server type.
Most configuration for an ES is handled through its MS. So an ES itself has
only these management options:
■ A menu interface
■ Panel LCD and buttons
■ Root access to the OS
■ ProCurve Identity Driven Manager (IDM) (when the ES acts as a Remote
Authentication Dial-In User Service [RADIUS] server in an 802.1X deployment)
You can manage an MS or a CS with any of these options:
■ A menu interface
■ Panel LCD and buttons
■ A Web browser interface (also called a Graphical User Interface [GUI])
■ Root access to the OS
■ ProCurve Manager (PCM) and PCM Plus
■ IDM
The following sections of this chapter guide you through the process of
accessing and navigating each management option.
Note You must use the menu interface or panel LCD menu to set up some basic
options before you can access the Web browser interface.
2-3
Page 78

Management Options for the ProCurve NAC 800
Overview
Note All instructions assume that you have installed and powered on the NAC 800,
as explained in the ProCurve Network Access Controller 800 Hardware
Installation Guide.
The remaining chapters of the management and configuration guide focus on
the Web browser interface. However, these chapters also explain how to
complete some tasks by logging in to the OS root, when necessary.
In addition, in Chapter 4: “Configuring the RADIUS Server—Integrated with
ProCurve Identity Driven Manager,” you will learn about integrating the NAC
800’s RADIUS server with IDM. IDM is required to configure certain RADIUS
capabilities on the NAC 800, and it simplifies the configuration of other
RADIUS capabilities. You should refer to the ProCurve Identity Driven
Manager Users’ Guide for complete instructions on using IDM to manage your
NAC 800.
2-4
Page 79

Management Options for the ProCurve NAC 800
Menu Interface and Panel LCD
Menu Interface and Panel LCD
The menu interface and panel LCD support a limited number of management
and configuration tasks, including:
■ Setting the server type
■ Configuring IP settings
■ Testing connectivity (pinging)
■ Rebooting the NAC 800
■ Shutting down the NAC 800
■ Turning the locator LED on and off (menu interface only)
■ Setting port speed and duplex settings (panel LCD only)
Primarily, these management options serve to:
■ Ready the NAC 800 for management through another option
■ Shut down and reboot the NAC 800
Access the Menu Interface
You can access the menu interface in two ways:
■ Console session—requires physical access to the ProCurve NAC 800
■ Secure Shell (SSH) session—requires a reachable IP address on the
NAC 800
Console Session
Follow these steps to access the menu interface through a console session:
1. Your NAC 800 ships with a console cable. Plug the cable’s Ethernet (RJ45)
connector into the Console Ethernet port, which is located on the left
front panel of the NAC 800.
2. Plug the cable’s DB-9 connector into a console port on your management
workstation.
2-5
Page 80

Management Options for the ProCurve NAC 800
Menu Interface and Panel LCD
Figure 2-1. Accessing the Menu Interface with a Console Session
3. Use terminal session software such as Tera Term to open a console session
with the NAC 800. Use the following settings:
• Baud rate = 9600
•Bits = 8
• Stop rate = 1
• Parity = None
• Flow control = None
• For the Windows Terminal program, disable (uncheck) the “Use
Function, Arrow, and Ctrl Keys for Windows” option.
• For the Hilgraeve HyperTerminal program, select the “Terminal keys”
option for the “Function, arrow, and ctrl keys act as” parameter.
4. When prompted for your username, enter admin.
5. When prompted, enter your password (default, procurve).
You should now see the Application Main Menu.
Figure 2-2. Application Main Menu
2-6
Page 81

Management Options for the ProCurve NAC 800
Menu Interface and Panel LCD
SSH Session
Follow these steps to access the menu interface through an SSH session:
1. Open an SSH session with the NAC 800.
Use an SSH-capable terminal session application such as Tera Term or
PuTTY.
You must specify the NAC 800’s IP address. Its default address is
192.168.0.2, and the NAC 800 does not initially have a default gateway.
Unless you can reach the default IP address, you must set the NAC 800’s
IP address (using either a console session or the panel LCD) before you
can open the SSH session. (See “Configure Initial Settings with the Menu
Interface” on page 2-9 or “Configure Initial Settings with the Panel LCD
Menu” on page 2-24.)
2. When prompted for your username, enter admin.
3. When prompted, enter your password (default, procurve).
Figure 2-3. Accessing the Menu Interface with an SSH Session
You should now see the Application Main Menu.
Figure 2-4. Application Main Menu
2-7
Page 82

Management Options for the ProCurve NAC 800
Menu Interface and Panel LCD
Navigate the Menu Interface
The top of a window in the menu interface displays the window name—for
example, Application Main Menu.
Below the window name are listed various options. Press a number to select
the option and move to a new window.
Note In this management and configuration guide, the following instructions indi-
cate that you should simply press a key on your keyboard:
Press [
keyname].
The following instructions, on the other hand, indicate that you should type
in the indicated string and then press [
Enter]:
Enter <string>.
Instructions for using the menu interface include figures. The figure caption
lists the options that you must select to reach the illustrated window from the
Application Main Menu.
For example, Figure 2-5 shows the Server Type window. To reach this window,
you must press
[1] twice from the Application Main Menu.
Figure 2-5. Application Main Menu > 1. Configuration > 1. Server Type
In any window, you can press [
Application Main Menu to log out of the menu interface.
Figure 2-6 illustrates the architecture of the menu interface.
2-8
0] to move back one window. Press [0] in the
Page 83

Management Options for the ProCurve NAC 800
Menu Interface and Panel LCD
Figure 2-6. Menu Interface Architecture
Configure Initial Settings with the Menu Interface
Before you can configure your NAC 800 through the Web browser interface,
you must configure some initial settings, including server type and IP settings.
You should also immediately change the menu password to secure access to
the device.
The menu interface is one option for configuring these settings.
Before completing the instructions in the sections below, access the menu
interface as described in “Access the Menu Interface” on page 2-5.
2-9
Page 84

Management Options for the ProCurve NAC 800
Menu Interface and Panel LCD
Figure 2-7. Application Main Menu
Set the Server Type with the Menu Interface
When you set the server type, the NAC 800 erases:
■ All databases
■ All licenses
■ All configurations except for:
• IP address
•Hostname
• Default gateway
• Domain Name System (DNS) server
• Network Time Protocol (NTP) server and time zone
Note An exception is when you change the server type from MS to ES, in which
case all settings are erased.
Setting the server type always resets the NAC 800’s configuration even if you
set it to the device’s current type. In fact, setting the server type is an easy way
to return to factory default settings (but keep your current IP settings).
Follow these steps to set the server type from the menu interface:
1. In the main menu, press
2-10
[1] for Configuration.
Page 85

Management Options for the ProCurve NAC 800
Figure 2-8. Main Menu > 1. Configuration
Menu Interface and Panel LCD
2. Press
[1] for Server Type.
Figure 2-9. Application Main Menu > 1. Configuration > 1. Server Type
3. Choose the server’s type: CS, MS, or ES.
Press
[1] for Combination Server if your NAC 800 is a stand-alone
device. This is the typical choice for a NAC 800 that functions only as a
RADIUS server.
If your NAC 800 is part of a cluster deployment (see Chapter 1: “Overview
of the ProCurve NAC 800” for more information), choose either MS or ES:
• On one NAC 800, press
• On the other NAC 800s, press
[2] for Management Server.
[3] for Enforcement Server.
2-11
Page 86

Management Options for the ProCurve NAC 800
Menu Interface and Panel LCD
Set the IP Address with the Menu Interface
Follow these steps to set a NAC 800’s IP address using the menu interface:
1. Access the Configuration menu (Main Menu > 1. Configuration).
Figure 2-10. Application Main Menu > 1. Configuration
2. Press
[2] for IP Configuration.
Figure 2-11. Application Main Menu > 1. Configuration > 2. IP Configuration
3. The window displays the NAC 800’s current settings. Enter the new IP
address (or press
[Enter] to accept the current address). For example:
10.1.1.20
Figure 2-12. Application Main Menu > 1. Configuration > 2. IP Configuration
2-12
Page 87

Management Options for the ProCurve NAC 800
Menu Interface and Panel LCD
4. Enter the subnet mask for the NAC 800’s subnetwork.
For example, for a /26 network, enter:
255.255.255.192
For a list of the masks that correspond to subnets of various lengths, see
“Entering Networks Using CIDR Format” in Chapter 15: System Administration of the ProCurve Network Access Controller 800 Users’ Guide.
5. Enter the IP address of the default router on the NAC 800’s subnet.
By default, the menu interface suggests the lowest IP address in the
subnet. Press
[Enter] to accept the default. Otherwise, enter the correct
IP address. For example:
10.1.1.2
6. When asked to confirm the settings, check them and (if they are correct),
press
[y] and press [Enter].
Test IP Settings (Ping)
After you set the IP address, you should verify connectivity by pinging:
■ The NAC 800’s default gateway
■ Your management station
■ The NAC 800’s DNS server
■ Several IP addresses for Network Access Servers (NASs) such as edge
switches and wireless access points (APs)
Note For security reasons, the NAC 800 does not respond to pings that it does not
initiate. Therefore, you must always test connectivity between the NAC 800
and another device from the NAC 800’s management interface.
Follow these steps to conduct the ping test:
1. Press
[0] until you reach the Application Main Menu.
2-13
Page 88

Management Options for the ProCurve NAC 800
Menu Interface and Panel LCD
Figure 2-13. Application Main Menu
2. Press
[2] for Diagnostics.
Figure 2-14. Application Main Menu > 2. Diagnostics
3. Press
[1] for Ping test.
4. Enter the IP address to which you want to confirm connectivity.
Or press
[Enter] to ping the default gateway.
Figure 2-15. Application Main Menu > 2. Diagnostics > 3. Ping Test
2-14
Page 89

Management Options for the ProCurve NAC 800
Menu Interface and Panel LCD
5. The results of the ping, including the times for the round trip, are
displayed.
Figure 2-16. Application Main Menu > 2. Ping test > Results
By default, the NAC 800 sends out five pings. You can stop the ping test
at any time, however, by pressing
6. When you have finished looking at the results, press
[Ctrl+c].
[Enter] to continue
configuring the device.
Change the Password to the Menu Interface
The username with which you access the menu interface is admin, and the
default password is procurve. To protect access to your NAC 800’s menu
interface, you should always change the password.
Follow these steps to change the password:
1. In the main menu, press
[1] for Configuration.
2-15
Page 90

Management Options for the ProCurve NAC 800
Menu Interface and Panel LCD
Figure 2-17. Main Menu > 1. Configuration
2. Press
[3] for Change Password.
Figure 2-18. Main Menu > 1. Configuration > 3. Change Password
3. Enter y to confirm that you want to change the password.
4. Enter a password 8 characters or longer. The password can include
alphanumeric and special characters, but does not have specific complexity requirements.
2-16
Page 91

Management Options for the ProCurve NAC 800
Menu Interface and Panel LCD
Note When you initially access the Web browser interface, you create a user-
name and password for an administrator with access to that interface. You
can, if you so desire, set these to match the username and password for
the menu interface. However, passwords for Web browser managers must
meet these requirements:
• At least 8 characters
• Mixed letters and numbers
Therefore, if you plan to use the same password to access the menu
interface and the Web browser interface, the password created in step 4
must include a mix of letters and numbers.
5. When prompted, re-enter the same password.
Figure 2-19. Application Main Menu
6. Press
Complete Other Tasks in the Menu Interface
Besides configuring initial settings as described in the previous section, you
can complete the following management tasks from the menu interface:
■ Reboot the NAC 800
■ Shut down the NAC 800
■ Turn the locator LED on and off
■ View system information
[Enter].
2-17
Page 92

Management Options for the ProCurve NAC 800
Menu Interface and Panel LCD
Reboot the NAC 800 in the Menu Interface
When you reboot the NAC 800, the device shuts down and immediately
restarts, booting from its primary software and startup-config.
Generally, you must reboot the NAC 800 when you update its software.
Note You do not need to worry about saving your configurations because the NAC
800 OS automatically saves configurations to its startup-config as they are
made. However, you should periodically back up your system as explained in
Chapter 7: “Redundancy and Backup for RADIUS Services.”
Follow these steps to reboot the NAC 800:
1. Press
[0] until you reach the Application Main Menu.
Figure 2-20. Application Main Menu
2. Press
[3] for Reboot.
Figure 2-21. Application Main Menu > 3. Reboot
2-18
Page 93

3. Enter y to confirm the reboot.
Management Options for the ProCurve NAC 800
Menu Interface and Panel LCD
The NAC 800 restarts as soon as you press
[Enter].
Shut Down the NAC 800 in the Menu Interface
When you shut down the NAC 800, the device powers down and remains down
until manually restarted. You can restart the NAC 800 by removing and then
restoring power.
Note You do not need to worry about saving your configurations because the NAC
800 OS automatically saves configurations to its startup-config as they are
made. However, you should periodically backup your system as explained in
Chapter 7: “Redundancy and Backup for RADIUS Services.”
Follow these steps to shut down the NAC 800:
1. Press
[0] until you reach the Application Main Menu.
Figure 2-22. Application Main Menu
2. Press
[4] for Shutdown.
2-19
Page 94

Management Options for the ProCurve NAC 800
Menu Interface and Panel LCD
Figure 2-23. Application Main Menu > 4. Shutdown
3. Enter y to confirm the shutdown.
The NAC 800 shuts down as soon as you press
[Enter].
To restart the NAC 800, remove power and then return it.
Turn the Locator LED On and Off
The locator LED helps you to pick out a device that is installed among many
devices. For example, you may be configuring a NAC 800 through a remote
SSH session. You decide that you need to access the device physically, so you
turn on the locator LED to quickly find the correct device.
The locator LED is most useful if you generally keep it off on all devices (which
it is by default). Then, when you turn it on for a particular device, you are sure
that you are seeing the LED of the device in question.
Follow these steps to turn the locator LED on or off:
1. In the main menu, press
[2] for Diagnostics.
Figure 2-24. Application Main Menu > 2. Diagnostics
2-20
Page 95

Management Options for the ProCurve NAC 800
Menu Interface and Panel LCD
2. Press [2] for Locator LED.
Figure 2-25. Application Main Menu > 2. Diagnostics > 3. Locator LED
3. Press
4. Press
[0] to turn the LED off or [1] to turn it on.
[Enter] to continue configuring the device.
View System Information
You can view the following information about the NAC 800 in the menu
interface:
■ Server type
■ Software version
■ Date of last update of the software
■ Operating system version
■ Hardware ID (serial number)
■ Time zone
Follow these steps:
1. In the main menu, press
[1] for Configuration.
2-21
Page 96

Management Options for the ProCurve NAC 800
Menu Interface and Panel LCD
Figure 2-26. Main Menu > 1. Configuration
2. Press
[4] for System Information.
Figure 2-27. Main Menu > 1. Configuration > 4. System Information
3. Press
[Enter] when you are finished viewing the information.
Access the Panel LCD Menu
The panel LCD is located on the front of the ProCurve NAC 800. To use the
LCD menu, you must, of course, have physical access to the device.
In addition to the LCD, the panel includes six buttons:
■ Four arrow buttons (left, right, up, and down)
■ An accept button (a checkmark)
■ A cancel button (an X)
You use these buttons to interact with the panel LCD.
2-22
Page 97

Management Options for the ProCurve NAC 800
Menu Interface and Panel LCD
Initially, the panel LCD lists the following information:
■ Server type (for example, Combination Server)
■ IP address
Figure 2-28. Panel LCD
Press the accept button to make LCD display the menu interface.
Navigate the Panel LCD Menu
The architecture of the panel LCD menu is similar to that of the menu interface.
See Figure 2-29.
Figure 2-29. Panel LCD Menu Interface Architecture
2-23
Page 98

Management Options for the ProCurve NAC 800
Menu Interface and Panel LCD
Navigating the panel LCD menu is easy: for the most part, you can follow the
instructions indicated on the panel window.
Use the up and down arrows to scroll the cursor through options. When the
cursor reaches your option, select it by pressing the accept button. In the
following sections, “select Option” indicates that you should scroll to the
indicated option and click the accept button.
Press the cancel button to move back a window. (Sometimes you must press
the left button instead. The window will indicate when this is the case.)
When you are presented with a choice—for example, whether to accept a
setting—press the accept button (for yes) or the cancel button (for no).
Configure Initial Settings with the Panel LCD Menu
Before you can configure your NAC 800 through the Web browser interface,
you must configure some initial settings, including server type and IP settings.
The panel LCD menu is one option for configuring these settings.
Note Even if you choose to configure initial settings through the panel LCD menu,
you should access the menu interface and change the menu password. Otherwise an unauthorized user might gain access your NAC 800. (See “Change the
Password to the Menu Interface” on page 2-15.)
Set the Server Type with the Panel LCD Menu
When you set the server type, the NAC 800 erases:
■ All databases
■ All configurations except for:
• IP address
•Hostname
• Default gateway
• DNS server
• NTP server and time zone
Note Setting the server type always resets the NAC 800’s configuration even if you
set it to the device’s current type. In fact, setting the server type is an easy way
to return to factory default settings (but keep your current IP settings).
2-24
Page 99

Management Options for the ProCurve NAC 800
Menu Interface and Panel LCD
Follow these steps to set the server type from the menu interface:
1. Access the menu. (If the panel currently shows the NAC 800’s server type
and IP address, press the accept button.)
Figure 2-30. Panel LCD Menu
2. Select Configuration.
Figure 2-31. Panel LCD Menu > Configuration
3. Select Server Type.
Figure 2-32. Panel LCD Menu > Configuration
4. Choose the server’s type: CS, MS, or ES.
Select Combination Server if your NAC 800 is a stand-alone device. This
is the typical choice for a NAC 800 that functions only as a RADIUS server.
If your NAC 800s are part of a cluster deployment (see Chapter 1: “Overview of the ProCurve NAC 800” for more information), choose either MS
or ES:
• On one NAC 800, select Management Server.
• On the other NAC 800s, select Enforcement Server.
2-25
Page 100

Management Options for the ProCurve NAC 800
Menu Interface and Panel LCD
5. Your selection is displayed. Push the accept button.
Set the IP Address with the Panel LCD Menu
Follow these steps to set a NAC 800’s IP address using the panel LCD menu:
1. Access the Configuration menu (Panel LCD Menu > Configuration).
If necessary, press the cancel button to move back a window or the accept
button to access the main menu.
Figure 2-33. Panel LCD Menu > Configuration
2. Select IP Address—Port 1.
Figure 2-34. Panel LCD Menu > Configuration >
IP Address—Port 1
3. Set the NAC 800’s IP address.
An IP address includes, of course, twelve digits. Use the left and right
arrow buttons to move the cursor from digit to digit. Then use the up and
down arrow buttons to alter the selected digit.
Note that the NAC 800 treats each set of three digits as a single number.
For example, if the first three digits currently display 009, and with your
cursor at the third digit you press the up arrow button, the digits then
display 010.
2-26
 Loading...