

PROCTOR DESIGNS Topper Owner's Manual

Topper Owners Manual
Owners manual Topper 8/2/06 12:34 Page 1
H
K
L
M
N
Q
J
R
I
A
F
D
B
C
G
E
P
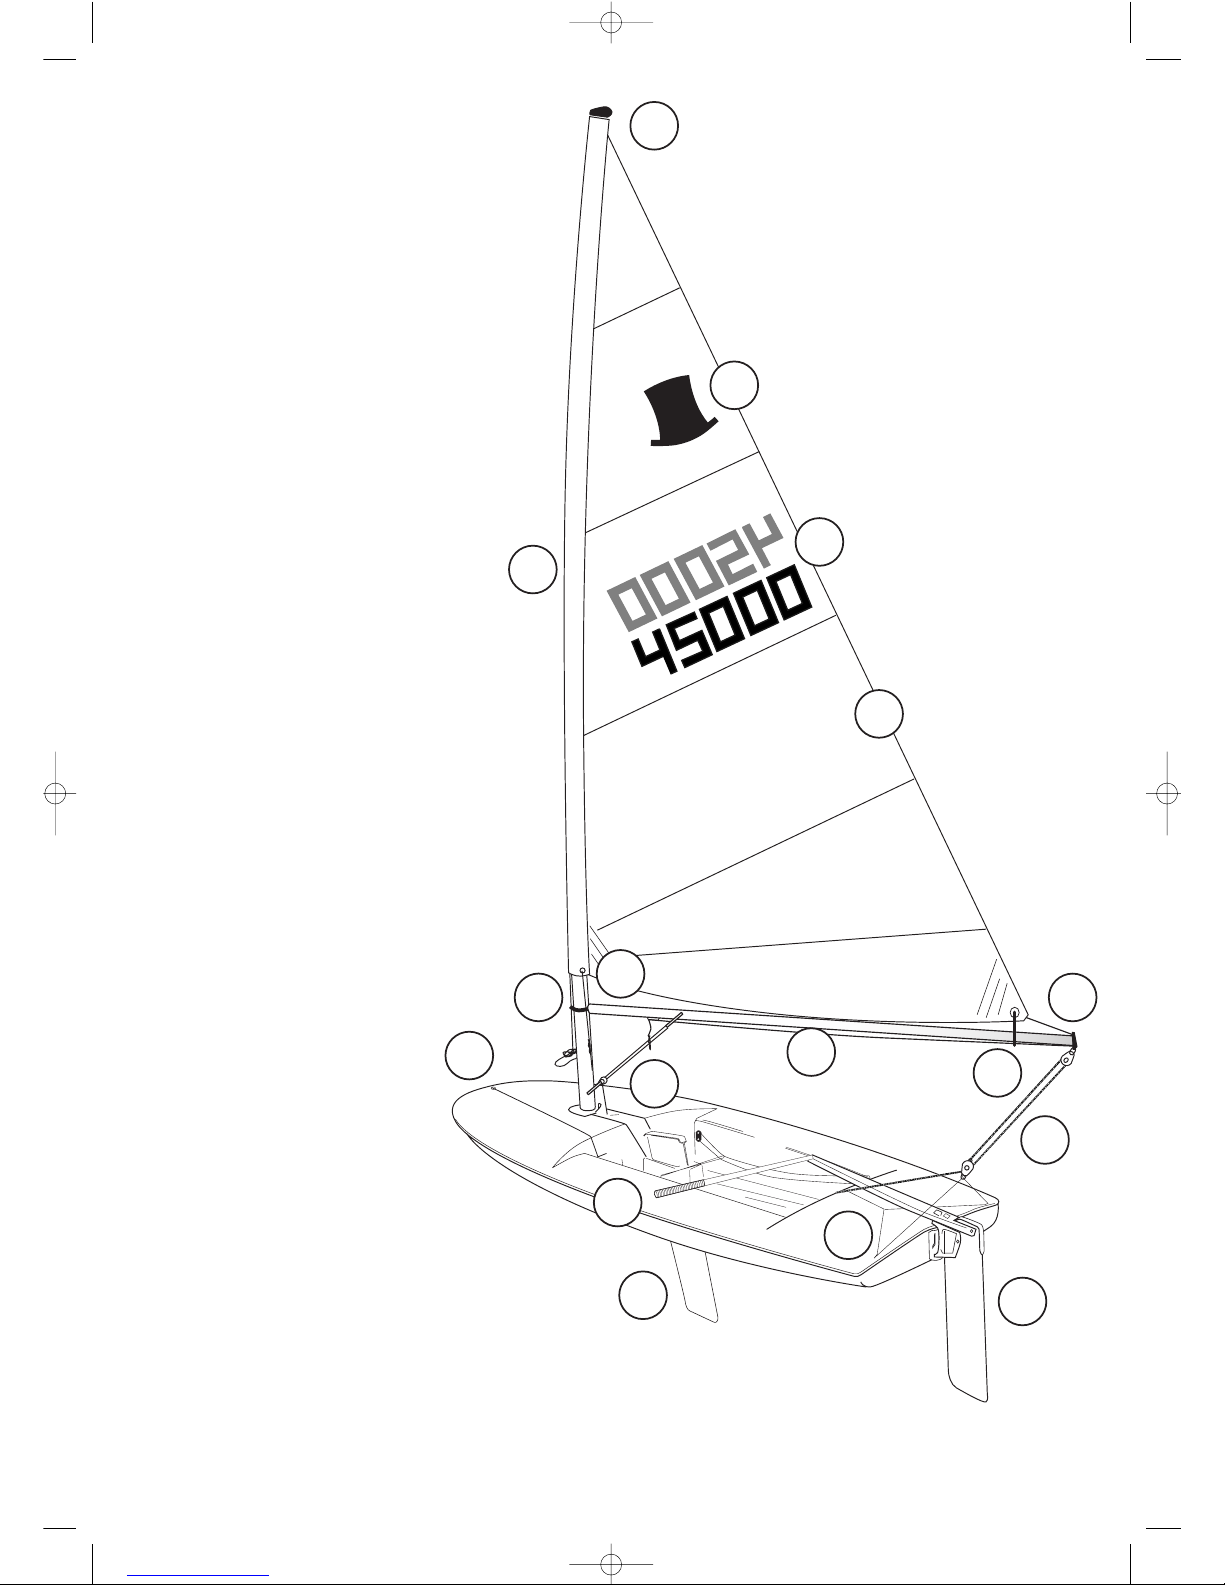
P2. Components
Each of the components of your new Topper
sailing dinghy has a special name and a place.
We recommend that you study the diagrams and
the instructions given in the handbook before
setting sail.
A. Halyard loop
B. Kicking Strap (Boom Vang)
C. Downhaul
D. Mainsheet Assembly
E. Bow Painter
F. Outhaul
G. Rope Horse
H. Clew Strop
I. Masthead Crane
J. 2-part Aluminium Mast
K. Topper Sail Insignia
L. Self-Adhesive sail numbers
M. Mainsail
N. Aluminium Boom
P. Daggerboard
Q. Rudder and Tiller Assembly
R. Tiller Extension
S. Locking Mastgate
T. Daggerboard Casing
U. Self Bailer
V. Toe Strap Cord
W. Side Toe Strap
X. Centre Toe Strap
Y. Transom Plate
Owners manual Topper 8/2/06 12:34 Page 2
The Topper is built to the One-Design of Ian Proctor under
licence of the Copyright from Ian Proctor Designs Limited.
Topper is a registered Trade Mark of Ian Proctor Designs Ltd.
S
U
V
W
X
Y
T
Owners manual Topper 8/2/06 12:34 Page 3
P4. Contents
Your Topper
p5. The Control Lines - Identification
p6-7. Sail Numbers - How to apply them
p8. Preparing the mast
Sleeving the sail
p9. Stepping the mast
Fitting the boom
p10. Mainsheet & Rope Horse
Downhaul and Kicking Strap
p11. Rudder and Daggerboard
Reefing the sail
p12. The Topper Race Pack
p16. Adjusting the Sail
p17. Tuning for Performance
p18. Car Topping
p19. Care and maintenance
p20. Guarantee
Join the Club! - ITCA
p21. ITCA membership
Register of Guarantee
I.B.C. Declaration of Conformity
back cover Topper International contact details
Welcome to the
Topper Class
Congratulations on becoming the owner of a brand new
Topper sailboat. We at Topper International believe that
Topper’s advanced design and sophisticated construction
process will ensure that you enjoy many years of troublefree and exciting sailing.
To enhance the enjoyment of your new Topper we
have arranged for new Topper owners to receive FREE
membership of the Topper International Class Association
for the first year of ownership.
There are many benefits and full details are included in this
Owner’s Manual.
If you should incur any problems with your Topper, our sales
staff will be pleased to offer advice and supply any spare
parts and accessories you may need. Your International
Topper Class Secretary will be pleased to advise you on the
many aspects of Topper ownership.
Owners manual Topper 8/2/06 12:34 Page 4
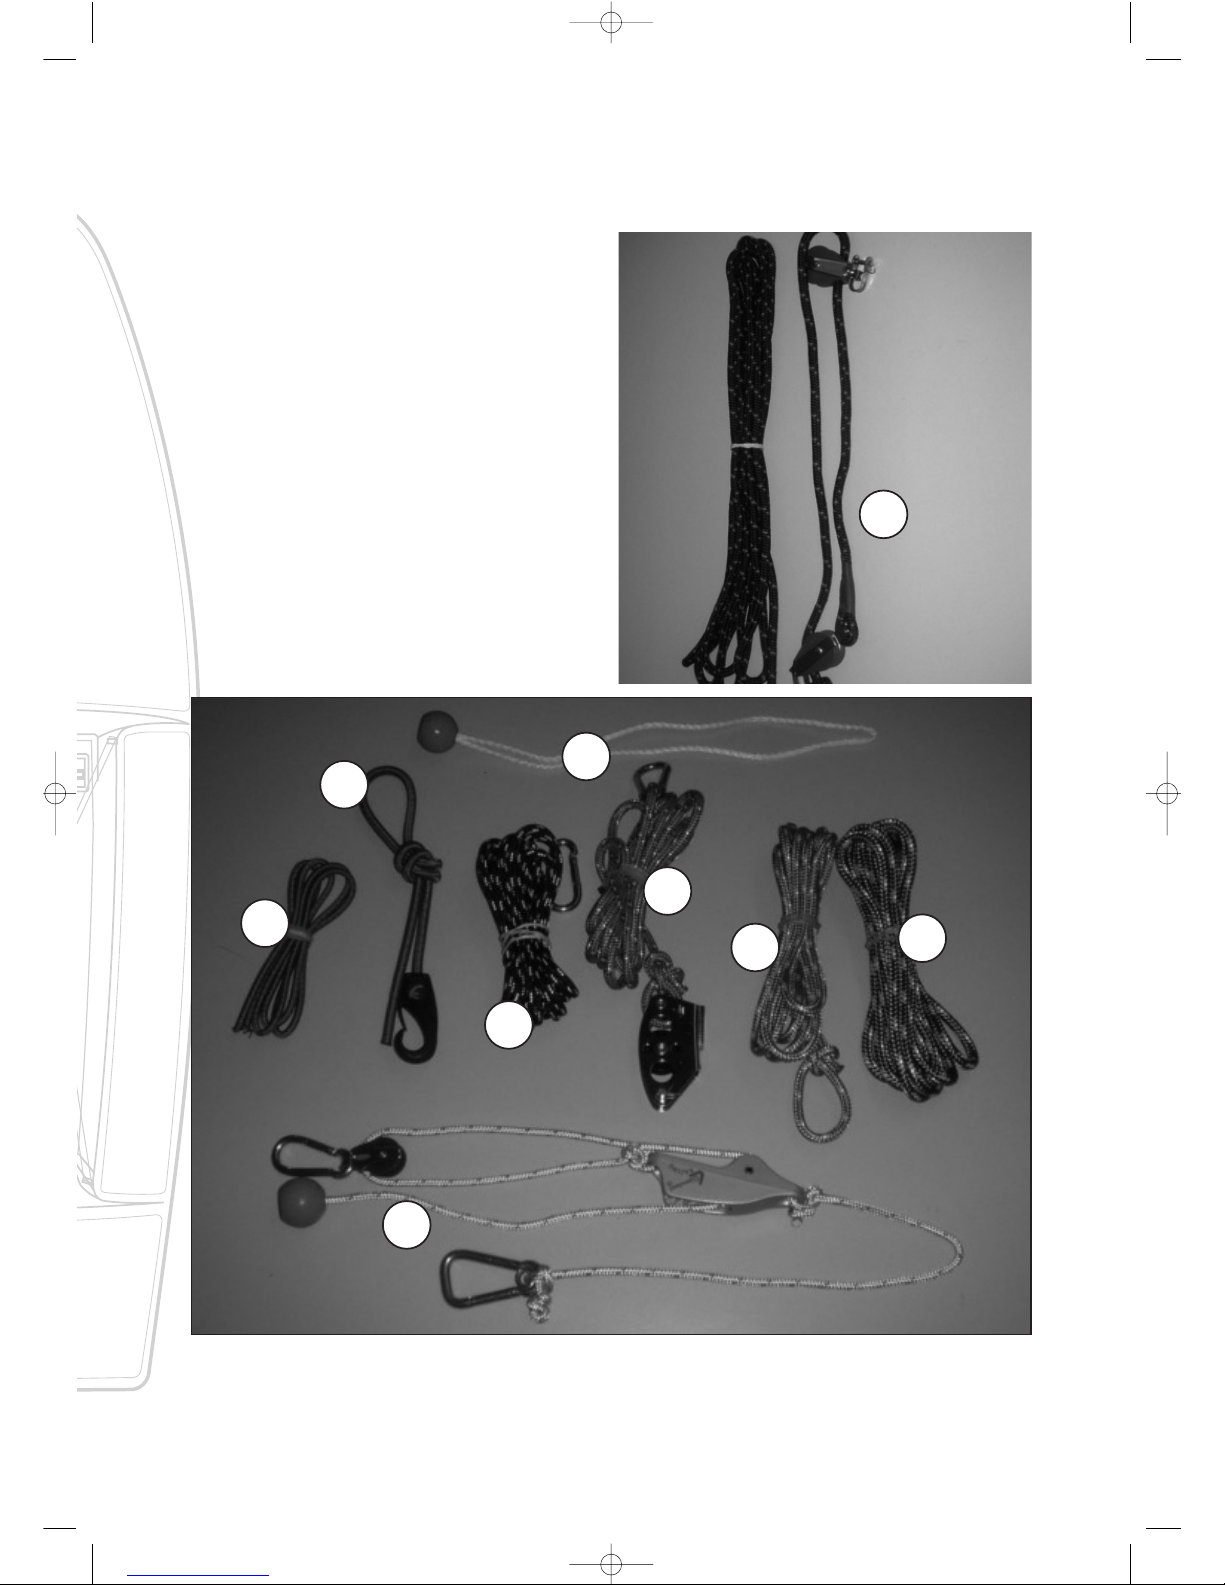
P5. Control lines
Before attempting to assemble your Topper, carefully study
the diagram on the inside front cover of this handbook and
thoroughly familiarise yourself with all the components, their
correct names and places on the boat.
If you follow these rigging instructions, stage-by-stage you
will find Topper incredibly simple and quick to prepare for
the water. When you have unpacked everything, lay out the
various control lines on the foredeck and identify them:
A. Main Halyard Loop
B. Kicking Strap
C. Downhaul
D. Mainsheet
E. Bow Painter
F. Outhaul
G. Traveller
H. Daggerboard Shockcord
I. Toe Strap Shockcord
A Centre Mainsheet and an Aft Rigged Mainsheet are
available. The Aft Rigged Mainsheet kit is pictured below.
The Centre Mainsheet kit is pictured on page 12.
On the following pages we have continued this coding
system on the photographs so that you can immediately
identify each control line.
A
B
F
G
H
I
D
C
E
Owners manual Topper 8/2/06 12:34 Page 5
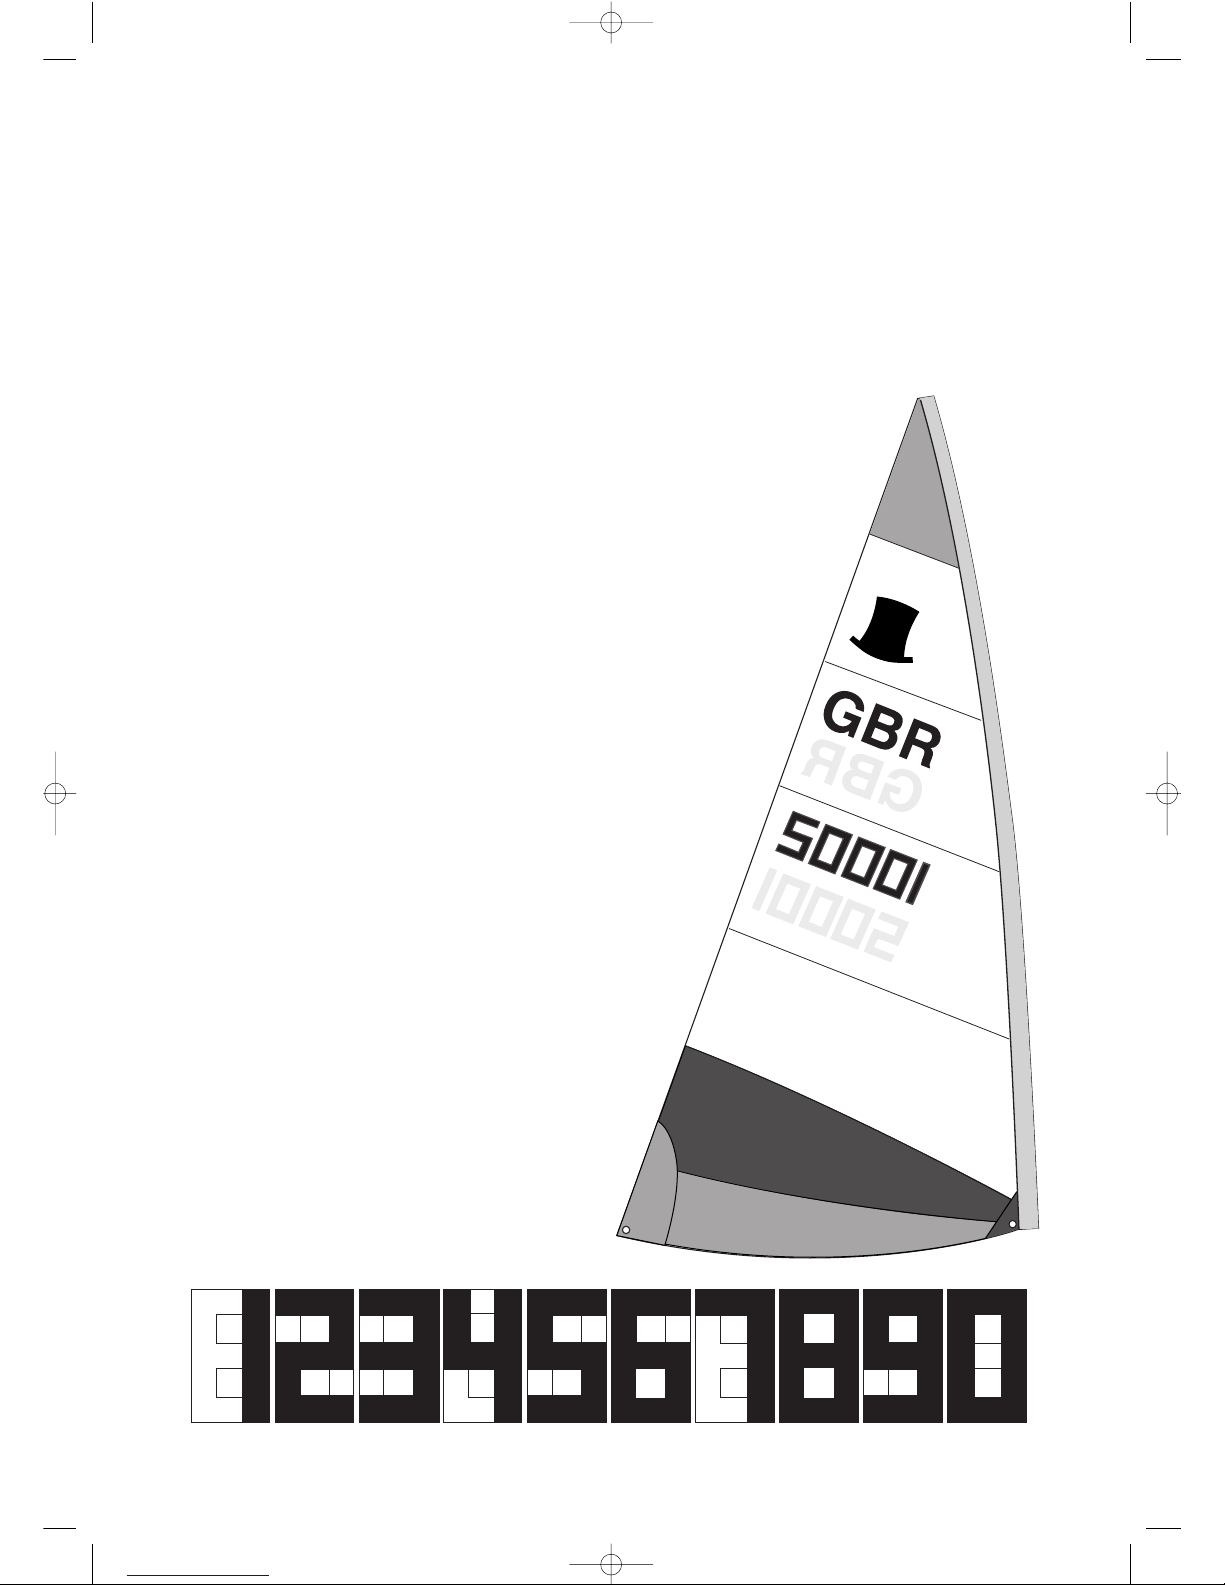
P6. Standard Topper
Sail numbers and
National lettering
SAIL NUMBERS (please note all measurements are
minimums)
- Should be placed on both sides of the sail with the
numbers on the starboard side being above the ones on the
port side.
- They should be placed two panels below the Top
Hat logo.
- The height of the numbers should be 230mm.
- The numbers are supplied as ‘digital eights’ from which
you can produce your own sail number.
- The preferred style of cutting numbers from ‘digital eights’
is shown below.
- There should be 45mm between each element of the
complete number.
- The numbers should be in a contrasting colour to the
white sailcloth.
STARBOARD SIDE
- The upper edge of the numbers should be placed 45mm
from the upper seam of that panel.
- They should start 45mm from the back of the sail.
PORT SIDE
- The upper edge of the port numbers should be 45mm
below the starboard side numbers.
- They should finish 45mm from the back of the sail.
GBR LETTERS
- Should be placed on both sides of the sail with the letters
on the starboard side being above the ones on the port
side.
- They should be placed in the panel beneath the Top Hat
logo.
- The height of the letters should be 230mm.
- They should be pre-formed letters at least as clear as
helvetica.
- There should be 45mm between each element of the
complete letter.
- The letters should be the same colour as the sail numbers.
STARBOARD SIDE
- The upper edge of the letters should be placed 45mm
from the upper seam of that panel.
- They should start 45mm from the back of the sail.
PORT SIDE
- The upper edge of the port letters should be 45mm below
the ones on the starboard side.
- They should finish 45mm from the back of the sail.
ATTACHING NUMBERS & LETTERS
In our experience the best way to stick
the numbers down is to peel away a
corner, line up the letter and then
attach the corner. Pull away the
backing paper slowly as you push
the number onto the sail. Fiddly
but it works!
If in doubt please ask
* NOTE: TOPPER Sail Numbers are derived from digital 8 numbers. Ten digital 8 numbers are supplied, from which any
number from 0-9 can be obtained. Above you will find a simple chart showing how to obtain the number you require.
Owners manual Topper 8/2/06 12:34 Page 6

P7. Championship
Sail numbers
Before you sail your new boat for the first time, it is most
important to apply the self-adhesive numbers to the sail.
The sail numbers are exclusive to the boat and correspond
with the serial number/sail number plate. These are always
located inside the boat attached to the toe strap.
Follow these instructions carefully it is not a job to be
hurried.
CHAMPIONSHIP NUMBERS
(please note all measurements are minimums)
- Should be placed on both sides of the sail with the
numbers on the starboard side being above the ones on the
port side.
- The height of the numbers should be 230mm.
- The numbers are supplied as ‘digital eights’ from which
you can produce your own sail number.
- The preferred style of cutting numbers from ‘digital eights’
is shown below.
- The outside corners should be snipped as shown above.
- There should be 45mm between each element of the
complete number.
- Both sets of numbers should be in the 2nd coloured panel
from the
bottom of the sail.
- The numbers should be in a contrasting colour to the
sailcloth.
- Use white numbers on red/ dark blue/purple sail panels.
- Use black numbers on grey/ light blue/ yellow/ orange sail
panels.
STARBOARD SIDE
- The start of the number should be placed 45mm from the
leech of the sail.
- The upper edge of the number should be 45mm from the
upper seam of the panel.
PORT SIDE
- On the port side of the sail, the upper edge of the
numbers should be 45mm from the lower edge of the
starboard numbers.
- The end of the last number should finish 20mm from the
reinforcement patch.
ATTACHING NUMBERS
In our experience the best way to stick the numbers down
is to peel away a corner, line up the letter and then attach
the corner. Pull away the backing paper slowly as you push
the number onto the sail. Fiddly but it works!
If in doubt please ask
Snip 2/3mm off the corner of
all championship numbers
Panel Number
Red White
Dark Blue White
Light Blue Black
Grey Black
Yellow Black
Purple White
Orange Black
Owners manual Topper 8/2/06 12:34 Page 7

P8. Preparing the
mast
1. Slot the two mast sections together, making sure that the
slots in the upper section have properly engaged with the
rivets in the lower section.
sleeving the sail
1. Unfold the sail and lay it on the ground with the bottom
edge of the luff sleeve adjacent to the top of the mast.
2. Insert the mast into the luff sleeve and pull the sail down
the mast. If it is windy, keep your back to the wind!
3. Continue until the whole sail is sleeved and the masthead
has appeared through the top of the sail.
4. Use the Halyard Loop to attach the sail to the top of the
mast as shown.
5. Tuck any surplus rope neatly inside the luff sleeve and
insert the burgee into the special socket.
Preparing the mast
1.
Sleeving the sail
2.
2-3.
4.
A
A
Owners manual Topper 8/2/06 12:34 Page 8
 Loading...