


PROCOOL LLC
procool
AV cooling system
installation instructions

procool
AV Cooling Solutions
2
The first thing to do is decide
where to mount your new ProCooL
AV Cooling System.
The fan location(s) depend on the
number of fans you have with your
system. Example “a” to the right
shows a 2 fan system
configuration. If your cabinet is
fully enclosed typically you would
want one fan blowing into the
cabinet and the other blowing out
to achieve good air circulation.
If the front of your cabinet is open
you might consider mounting both
fans to blow into the cabinet and
onto your hotter components.
You can also directly cool your
components as shown in figure 4
on page 5.
Examples “b” and “c” show more
configurations for cabinets with
multiple compartments and for
multiple fan systems.
Essentially the fan positions are
your choice. Most important is to
create air circulation, cool your
components and to remove the
hot air.
Example “d” shows a typical layout
for a cabinet with doors enclosing
the front. Typically there is a space
between the front of the shelf and
the inside of the cabinet door. This
air space will allow unobstructed
airflow from bottom to top. This is
the recommended set up for this
type of cabinet.
procool
AV Cooling Solutions
3
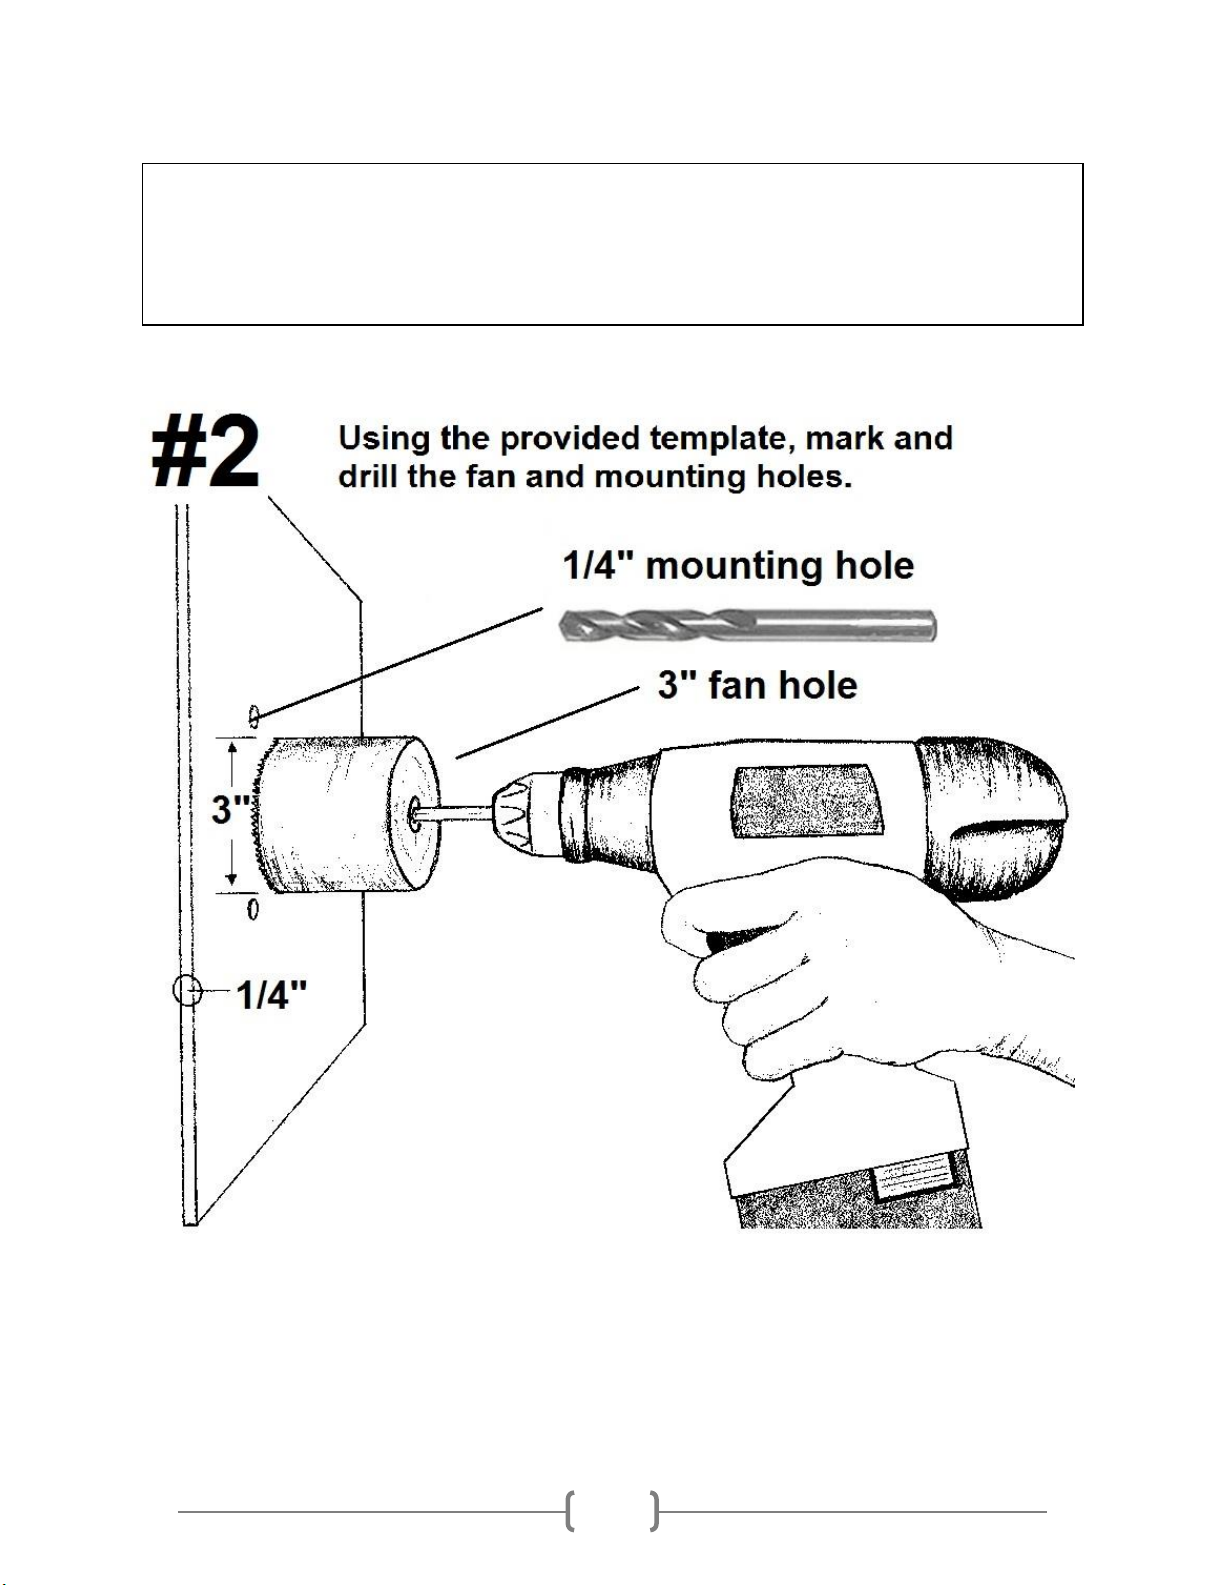
If using mounting plates, Cut out the included template below and tape to the desired location
on the cabinet. Using a jigsaw, cut out the center square hole for the fan. If using wood screws
to mount the plate to the cabinet, do not drill out the mounting holes for the plate.
Mounting the fans
The fans can be mounted onto the cabinet or mounting plates can be used.
Below are instructions and a template for both methods.

procool
AV Cooling Solutions
4
After all of the holes are drilled you can mount the fans. Screws or Silicone rubber soft mounts can be
used. If your cabinet wall is thicker you will need to supply longer mounts. Mounting plates shown
below are ideal for easy installation in thicker walled cabinets.

procool
AV Cooling Solutions
5
Another solution is to directly cool your components as seen in example #4 below.
Again like with the cabinets you can choose to blow air in or exhaust out.
Silicone rubber mounts work great as non slip feet. Simply pull them completely through the fans
mounting holes. This will also protect the top of your component from scratches. (Sold Seperately)

procool
AV Cooling Solutions
6
#5 Connect to the power supply
Once the fans are mounted, you
can route the wiring to the
power supply. The fan power
wire length is 24”. Power wire
extensions are available at
www.rackfans.com if needed.
For AVP systems with the fan
controller see page 8 for
connection instructions.
The power supply can be
plugged into a switched outlet
on the back of your receiver.
This allows the fans to be shut
off with your AV system.
Connect the fans to complete
the assembly.
Positioning the
Thermistor probe
For more precision cooling,
locate the thermistor probe near
the heat source. You can also
locate the probe at the top of
the cabinet.

procool
AV Cooling Solutions
7
AVP & AVX Systems

procool
AV Cooling Solutions
8
Multi Fan Controller Connections

procool
AV Cooling Solutions
9
Maintenance
For best performance, clean the fan blades often. More often if
in a dusty environment is better. A can of compressed air works
well for frequent cleaning. If dust is visible on the blade it is best
to clean it before it builds up. Excess dust/dirt on the fan blades
can decrease the fans performance and cause the fan to make
noise.
For more thorough cleaning the blade prop can be removed.
Grasp the blade prop evenly and pull firmly, straight out of the
housing. Use a damp cloth or paper towel to wipe away dust
from the blades. Avoid wiping the grease from the shaft.
The shaft can be lubricated using light grease if needed. Apply a
thin layer evenly on the shaft. Re-insert the blade prop into the
fan housing. Press in firmly on center of blade prop until it snaps
into place. NOTE
If the fan does not power on, ensure the blade prop is snapped into place. Hard impacts can cause the blade to
pop loose and not function. Press IN firmly on the center of the blade prop until it snaps into place. If it does not
snap in, pull blade prop out and insert it again. Press until it snaps into place. Once in place the fan will run
normally. When the fans are new and if the temp is below 70°F the thermistor probe may need to be warmed by
hand slightly to get the fan to spin.

procool
AV Cooling Solutions
10
 Loading...