

Page 1

DevCom User Manual
QUICK START
DevCom uses Device Descriptions (DDs) to access data stored in the memory of the smart field device. These DDs
are developed by the manufacturer for their products and, in turn, distributed by the FieldComm Group (FCG)
worldwide. The latest DDs are included as part of the DevCom installation. Visit the FCG website
(www.fieldcommgroup.org) or the ProComSol website (www.procomsol.com) for update information.
The following steps will allow you to install and quickly begin using DevCom:
Step 1: Install the DevCom App
1. Go to the Apple App store on your iOS device.
2. Purchase and install the DevCom App. A 10 day trial is free.
Step 2: Activate DevCom
Launch DevCom by selecting the DevCom icon.
You will be shown the number of days you can run before activation is required. You can use it for up to 10 days
before you need to activate it. Activation only needs to occur once. See Section 4.3 for details.
Step 3: Install the DD Library
After DevCom is licensed or Demo mode is entered, you will be prompted to download the DD Library. The
Install could take up to 15 minutes based on your internet speed. See Section 4.2.2 for details.
Step 4: Connect the communication interface
Connecting to a HART device requires special interface hardware. These interfaces ("HART Modems") are
available from ProComSol, Ltd. The interface should be connected and configured. The required interface is a
Bluetooth Low Energy HART Modem - ProComSol, Ltd model HM-BLE. See Section 4.2.3 for details.
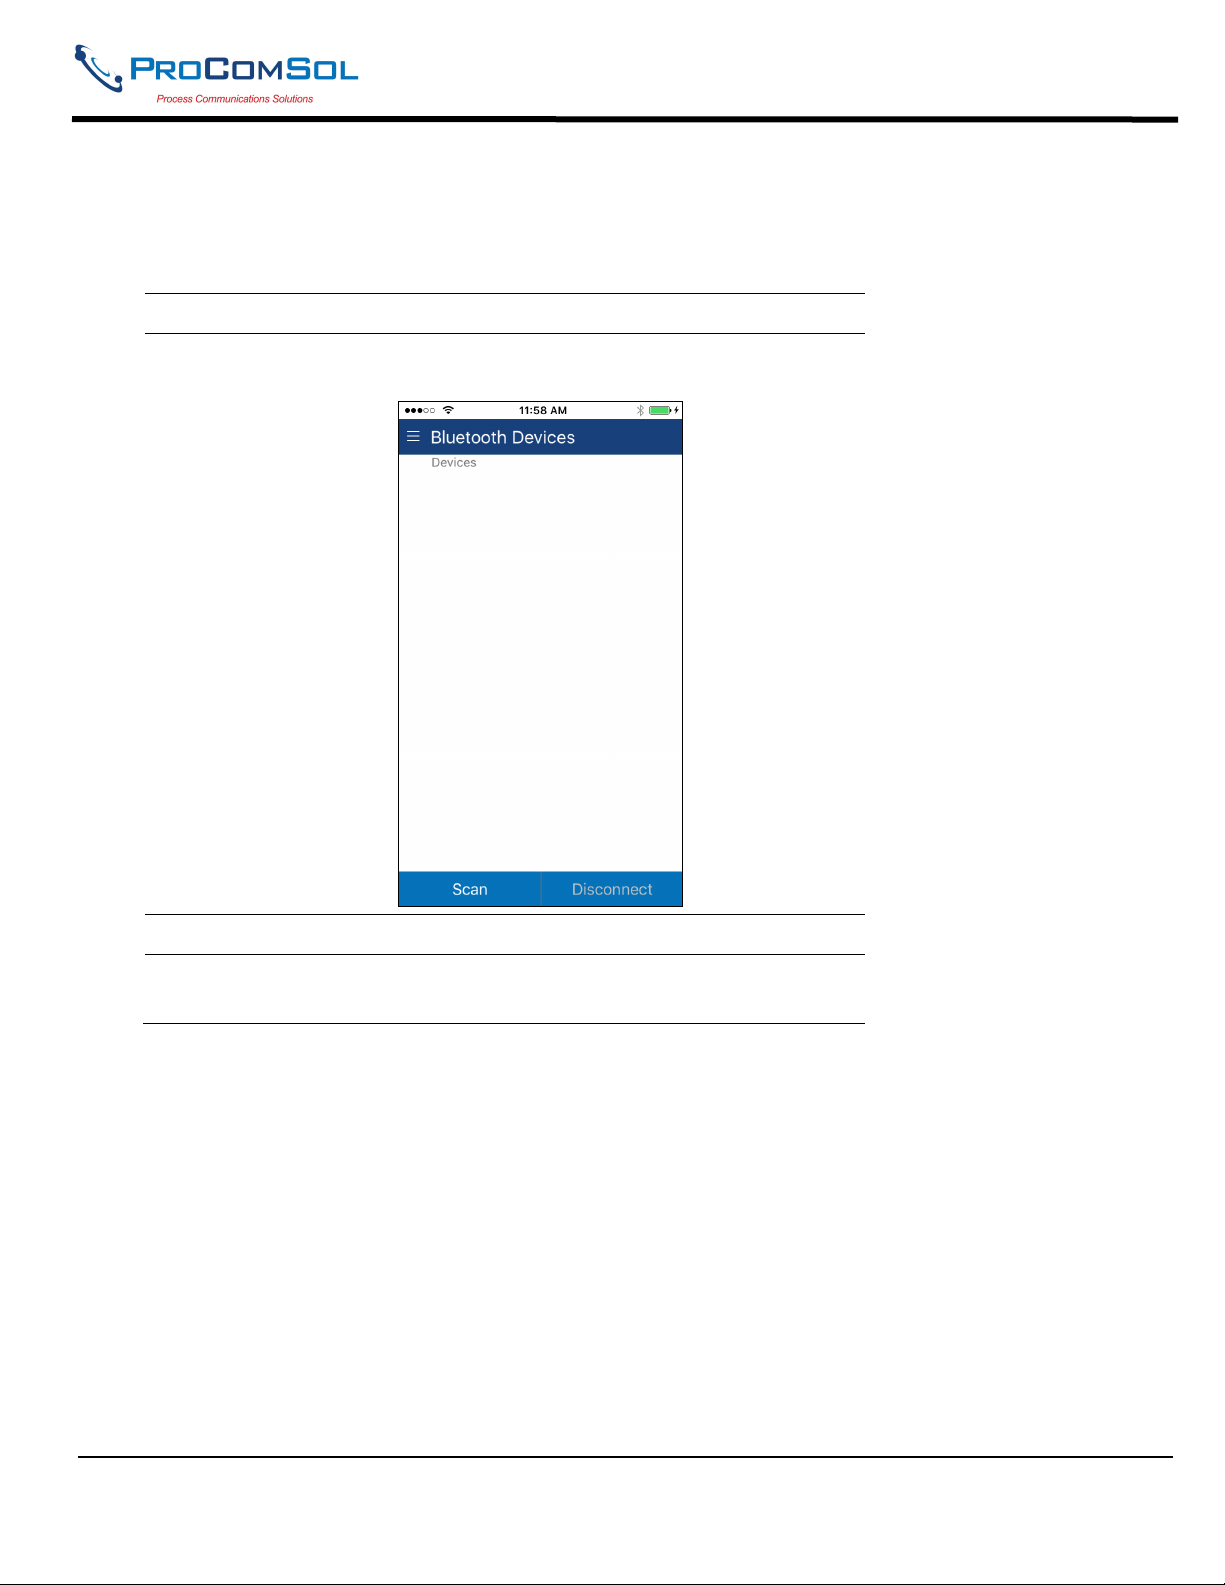
On initial start the App will prompt you for a HART modem to use. Make sure your modem is turned on and press
the “Scan for Bluetooth Devices” button in DevCom. Select your HART Modem after the scan is complete.
Step 5: Connect to the field device
Find a connection point for the device’s 2-wire 4-20mA loop you wish to communicate with. For communications
you must have a suitable load resistance or a 250Ω resistor must be placed in series with the device. Using the clips
from the HART modem, connect to the HART device. While the HART Communication signal is available
anywhere along the 4-20mA wiring, it is often easiest to connect across the field device's terminals (caution should
be observed when working in a hazardous area, many iOS devices are not rated for intrinsic safety and should only
be connected in a safe area).
Step 6: Browse the Device
On initial start, DevCom sends a command to the field device, establishes a connection, and learns its identity.
Once DevCom knows the device identity, it locates the device's DD in the library and loads it. From this point
forward operation of DevCom is determined by the DD provided by the device manufacturer. If a DD for the
device is not present, a generic DD will be used.
MAN-1048 01/11/2018 Our Quality Management System is Page 1
ISO 9001:2008 Certified
Page 2

DevCom User Manual
Menus and data are presented using a tree scheme. The organization of the data in the display window is dictated
by the device DD. The display shows menus and data. To navigate to a different menu simply select it. To return
to the previous menu, press the “Back” icon on the device.
Step 7: Modify the Device's Configuration
The Menu tree allows access to all of the data exactly as described by the device manufacturer’s DD. When you
find elements of the field device's configuration you want to change, simply click and edit the data. Once you have
changed the configuration to suit your needs, press the “Commit” button to send the new data to the HART field
device.
Step 8: Performing Maintenance and Testing the Field Device
Many devices perform Methods or Standard Operating Procedures (SOPs) that may need to be performed to ensure
the device is in peak condition. These Methods may include calibrating the loop current, trimming the transducer
values or performing some diagnostic test on the field device. Methods appear on the screen just like menus, but
have a blue background. Click on the Method and it will start running in a new window. The Method will guide
you through the process ensuring the procedure is completely and consistently performed. When the Method is
complete the window will disappear.
Step 9: Exit
When you are through working on the field device simply exit DevCom. Once the App exits, you can then
disconnect the HART interface hardware.
MAN-1048 01/11/2018 Our Quality Management System is Page 2
ISO 9001:2008 Certified
Page 3

DevCom User Manual
Table of Contents
QUICK START .....................................................................................................................................1
1 Introduction ......................................................................................................................................4
1.1 Acronyms and Definitions ...................................................................................................4
1.2 Conventions Used in This Manual .......................................................................................4
1.3 Document Organization .......................................................................................................5
1.4 Getting Help .........................................................................................................................5
2 Overview of DevCom ......................................................................................................................6
3 System Requirements.......................................................................................................................7
4 DevCom Installation ........................................................................................................................8
4.1 Prerequisites .........................................................................................................................8
4.2 Installing the DevCom Application .....................................................................................8
4.3 Connecting to the HART Network ....................................................................................12
4.4 Uninstalling the DevCom Application...............................................................................13
5 Using DevCom...............................................................................................................................14
5.1 Starting DevCom ...............................................................................................................14
5.2 Getting Familiarized with DevCom ...................................................................................15
6 Functions and Basic Operations.....................................................................................................19
6.1 Overview ............................................................................................................................19
6.2 Configuring Device Information........................................................................................19
6.3 Calibrating HART Field Devices.......................................................................................32
6.4 Viewing the Device Status .................................................................................................32
6.5 Window Detailed Description............................................................................................34
6.6 Mac Interface to Mobile Device ........................................................................................55
6.7 DD Library Updates ...........................................................................................................56
6.8 HART-IP Interface.............................................................................................................56
Appendix A Troubleshooting Guide ...................................................................................................62
Appendix B Contact Information.........................................................................................................63
MAN-1048 01/11/2018 Our Quality Management System is Page 3
ISO 9001:2008 Certified
Page 4
DevCom User Manual
1 INTRODUCTION
The Smart Device Communicator (DevCom) allows access to and management of a HART compatible field
device's configuration and calibration. This manual provides the information about the Hardware setup,
Communication with Smart devices, and functions of DevCom.
DevCom is unique in that it uses the DD of the connected device to determine what information to display, what
variables are available for edit, and what procedures to follow for calibration, setup, and maintenance.
1.1 Acronyms and Definitions
Acronym Definition
DD Device Description File. This contains the device
information.
DDL Device Description Language
FCG FieldComm Group, formerly the HART
Communication Foundation (HCF)
DevCom Smart Device Communicator
Window select button (aka Hamburger Button)
1.2 Conventions Used in This Manual
Following formatting conventions are used in this guide:
Convention Description
Words in bold type Field names including buttons in the display,
or important phrases.
Arrow Window select button followed by the
selection to make are separated by .
For example, select New Device to
connect to a new device.
UPPERCASE Acronyms
UPPERCASE within
angle brackets
Command keys
For example, press <BACK>.
“Parenthesis” Names of window elements, like “OK”.
MAN-1048 01/11/2018 Our Quality Management System is Page 4
ISO 9001:2008 Certified
Page 5
DevCom User Manual
1.3 Document Organization
DevCom user manual is organized into the following sections:
Section 1
Describes the scope and objective of DevCom user manual
along with the organization of the remaining part of the
manual.
Section 2
Provides an overview of the DevCom application and its
architecture.
Section 3
Provides the information pertaining to hardware and
software requirements for the DevCom application.
Section 4
Provides the steps to install, activate, and uninstall the
DevCom application.
Section 5
Provides the steps to start the DevCom application and
connecting to field devices.
Section 6
This section explains different aspects of the DevCom
application and its functionalities.
1.4 Getting Help
If you need help or encounter problems when using DevCom or this guide, please contact ProComSol, Ltd. See
Appendix C for contact information. Please provide the following information.
Create a text description of the problem. If possible, provide the text in event sequence, which will enable
the duplication of the problem. Provide information about the system. This information must include:
• DevCom version
• Mobile device information: make, model, and iOS version
• HART Device information: make, model, and device revision
• Point of contact: name, telephone number, and e-mail address,
MAN-1048 01/11/2018 Our Quality Management System is Page 5
ISO 9001:2008 Certified
Page 6

DevCom User Manual
2 OVERVIEW OF DEVCOM
Field devices such as flow, pressure, level, temperature transmitters, and valve positioners provide the physical
connection to the process. These devices allow the control system to monitor and manipulate process conditions.
HART devices maintain a real-time database of process, configuration, identification, and diagnostic information.
This information can be accessed using the HART Field Communications Protocol.
HART devices are capable of providing functions and features far beyond the basic task of providing a process
input or accepting a control output to manipulate process conditions. Many HART compatible device manufactures
create a DD (Device Description) describing all of these functions and features specific to that device. The DD also
provides information essential to the successful configuration and calibration of the device.
DevCom uses these DD’s to access the data stored in a device, providing full configuration and setup support for all
registered HART DD’s.
DevCom accesses and presents field device data based solely on its DD. No other files, information or custom
drivers are required. DevCom is intended to monitor and configure a single device at a time, it is directly connected
to the current loop (or HART-IP) of the particular device and:
• Provides user interface to configure the HART field device,
• Provides a means to configure and view all the parameters related to HART field device, and
• Provides an option to view the detailed status and diagnostic capability of the device.
DevCom allows viewing and modifying of field device parameters based on the DD. Using the device’s DD,
DevCom performs various tests to verify the proper operation of the HART device. DevCom runs as a standalone
software application and must have a HART compatible modem attached to the system to interrogate the HART
device.
MAN-1048 01/11/2018 Our Quality Management System is Page 6
ISO 9001:2008 Certified
Page 7
DevCom User Manual
3 SYSTEM REQUIREMENTS
The following minimum system requirements are recommended for operation of DevCom.
Mobile Device
Processor: ARM64
Memory RAM: 1 GB
Memory ROM: 2 GB
HART Modem ProComSol HM-BLE
Communication Port Bluetooth 4.0
Operating System iOS 10
MAN-1048 01/11/2018 Our Quality Management System is Page 7
ISO 9001:2008 Certified
Page 8

DevCom User Manual
4 DEVCOM INSTALLATION
4.1 Prerequisites
You need to be familiar with the basic functions of the following when installing DevCom:
• iOS operating system
• HART communication interface
• HART field device
4.2 Installing the DevCom Application
4.2.1 DevCom Application
To install the DevCom application, perform the following steps:
Step Action
1
Purchase DevCom from the Apple App Store
2 Install following the screen prompts
Activating DevCom
DevCom must be activated for use within 10 days. The following procedure will activate the App (this only needs
to occur one time):
Step Action
1 Launch the DevCom App. The following Licensing Window is
displayed after accepting the License Agreement:
MAN-1048 01/11/2018 Our Quality Management System is Page 8
ISO 9001:2008 Certified
Page 9
DevCom User Manual
Step Action
2 Tap “Purchase License”.
3 Enter your App Store login credentials if prompted.
4 Tap “Buy” to purchase the App
5 To proceed in Evaluation mode, press “Evaluation”. You can
use the App for 10 days before activation is required.
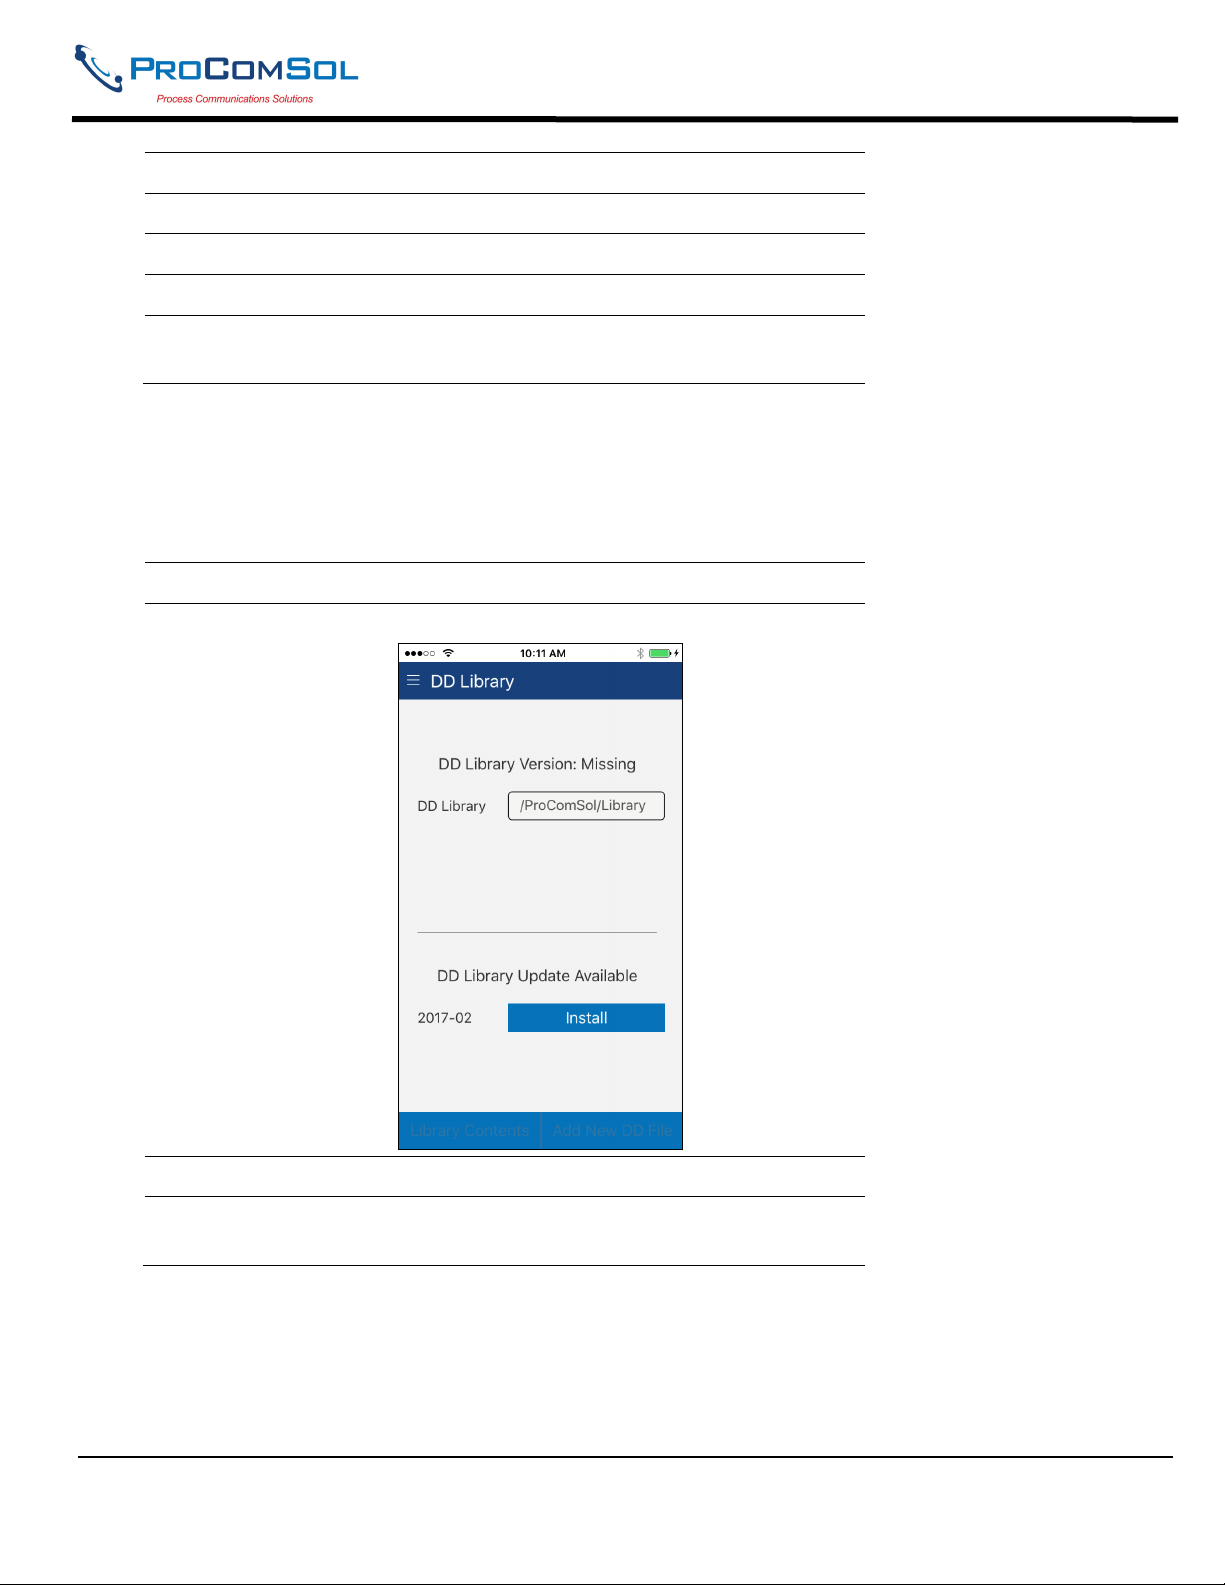
4.2.2 Installing the DD Library
The DD Library is required for App function. Perform the following to download the latest DD Library to your
device:
Step Action
1 The following Window is shown after the Licensing Window:
2 Select “Install”
3 The following screen will appear. Note that the full DD Library
download takes about 15 minutes. Do not close this screen!
MAN-1048 01/11/2018 Our Quality Management System is Page 9
ISO 9001:2008 Certified
Page 10

DevCom User Manual
Step Action
4 The following screen will appear when the DD Library install is
successfully completed:
MAN-1048 01/11/2018 Our Quality Management System is Page 10
ISO 9001:2008 Certified
Page 11
DevCom User Manual
4.2.3 Selecting a HART Modem
A HART Modem is required for communication to your HART device. The following procedure is used to select
the modem (this only needs to occur one time):
Step Action
1 The following Window is shown after the DD Library Download
Window:
2 Turn on your HART modem and press “Scan”.
3 The Window will show all available Bluetooth Low Energy
devices.
MAN-1048 01/11/2018 Our Quality Management System is Page 11
ISO 9001:2008 Certified
Page 12

DevCom User Manual
Step Action
4 Tap your HART Modem. Once a modem is selected, this
Window will not appear during start up.
4.3 Connecting to the HART Network
The DevCom application communicates with the HART Field Devices through a HART compatible
communication interface (e.g., a "HART Modem"). Using this communication interface you will transmit real-time
HART data between DevCom and the connected HART compatible field device.
The DevCom App for iOS currently only works with the HM-BLE, HART Modem Bluetooth Low Energy,
manufactured by ProComSol.
Turn the HM-BLE on. Using the clips on the wires from the HART modem, connect to the device across the 420ma signal. If a suitable load resistance is not available, a 250Ω resistor must be placed in series with the device
power supply.
MAN-1048 01/11/2018 Our Quality Management System is Page 12
ISO 9001:2008 Certified
Page 13

DevCom User Manual
Figure 1 Typical DevCom Hardware Setup
4.4 Uninstalling the DevCom Application
To uninstall the DevCom application, perform the following steps on the iOS Device:
Step Action
1 Press and hold the DevCom icon on the screen
2 The icons will start shaking and have a small “x” in the corner
3 Tap the “x” on the DevCom icon.
MAN-1048 01/11/2018 Our Quality Management System is Page 13
ISO 9001:2008 Certified
Page 14

DevCom User Manual
5 USING DEVCOM
5.1 Starting DevCom
Establish the physical connection between the field device and the HART Modem. With the physical connection
established, launch DevCom by pressing the DevCom icon on your device screen.
Step Action
1 Start the DevCom App. The following application window is
displayed:
DevCom will then automatically identify the field device and
begin communicating with the field device.
2 When the field device is successfully connected to DevCom, the
Device Explorer window appears with the root menu of the
device DD shown.
MAN-1048 01/11/2018 Our Quality Management System is Page 14
ISO 9001:2008 Certified
Page 15

DevCom User Manual
Step Action
The DevCom windows shown in this document are only an
example of what you may see when connected to your field
device. What you will see is controlled by the DD and the
device. The menus, data, status and configurations displayed are
specified by the device's manufacturer in the DD itself.
3 Select the required menu to configure or review the field
device's data.
5.2 Getting Familiarized with DevCom
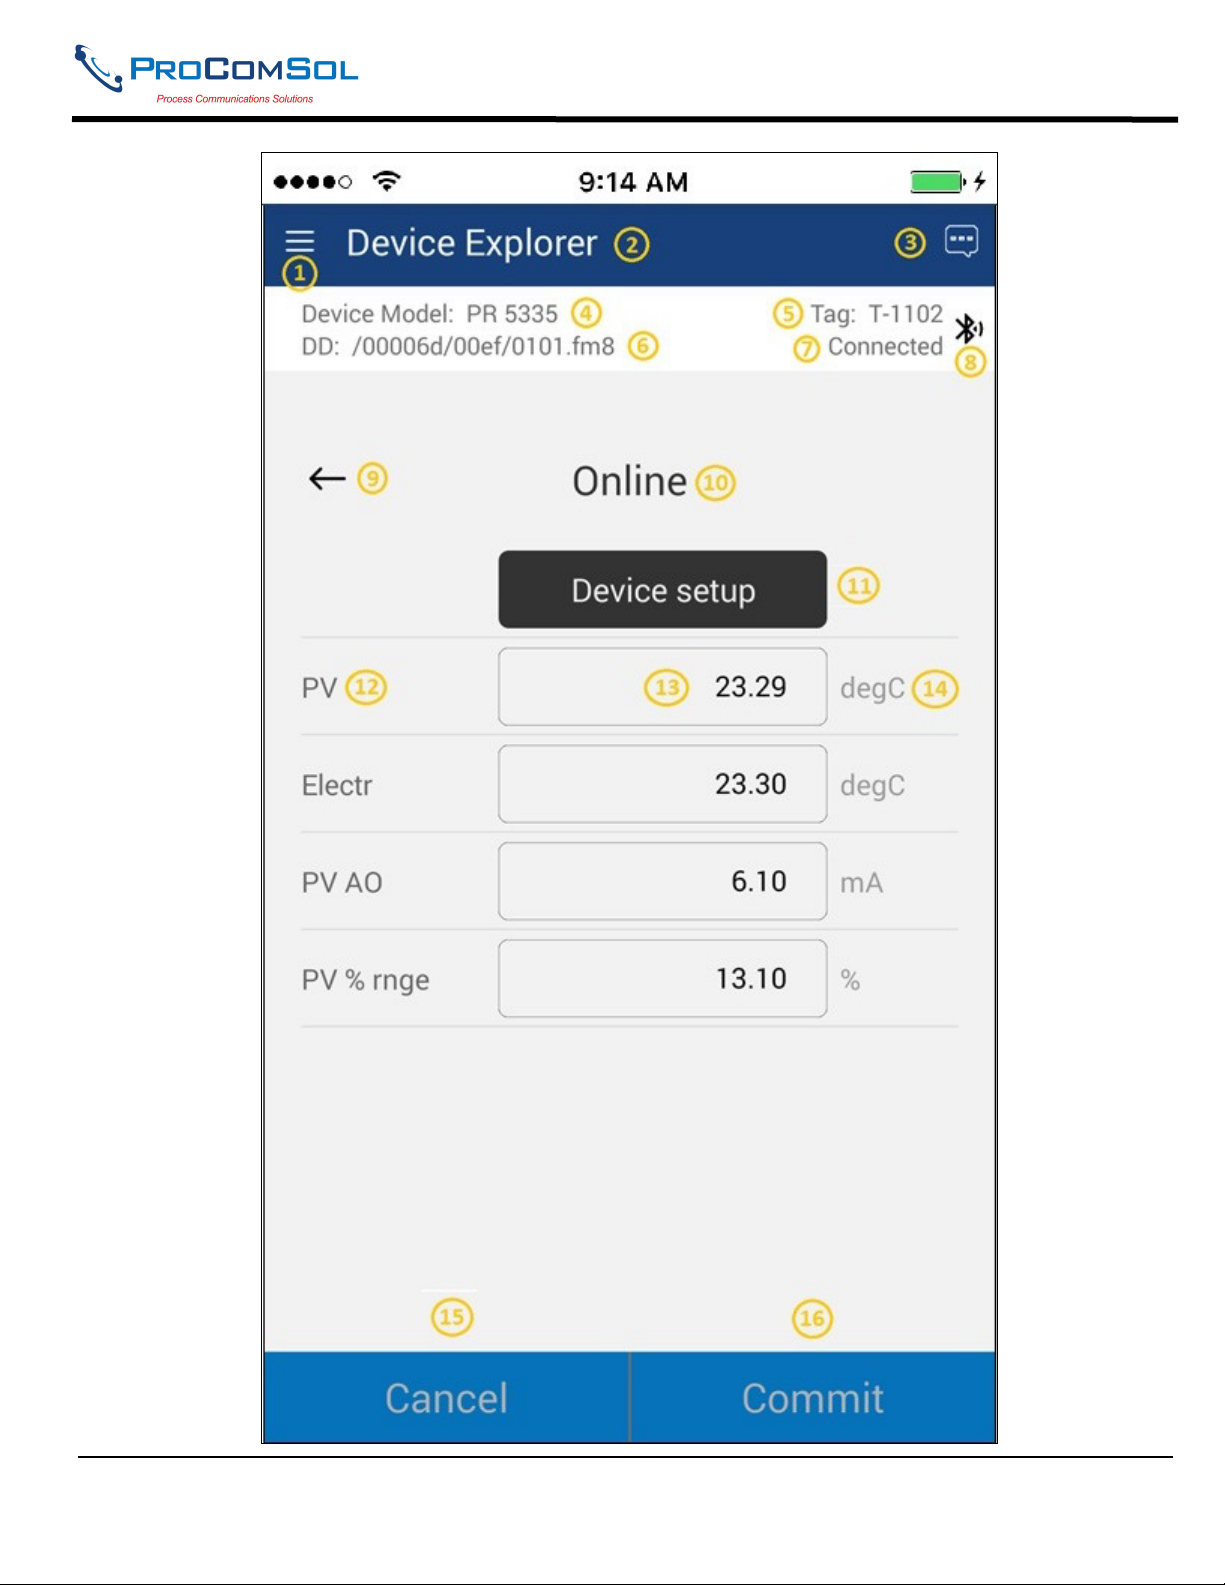
5.2.1 The Device Explorer Window Fields
The DevCom Device Explorer window is designed to provide the operator with valuable information in order to
make work quick and easy. Below is a typical Device Explorer window with each field described:
MAN-1048 01/11/2018 Our Quality Management System is Page 15
ISO 9001:2008 Certified
Page 16
DevCom User Manual
MAN-1048 01/11/2018 Our Quality Management System is Page 16
ISO 9001:2008 Certified
Page 17

DevCom User Manual
1 - Window Navigation icon, aka “Hamburger” icon
2 - Window name
3 - Device Status Icon
4 - Device model of connected HART device
5 - Tag name of connected HART device
6 - DD loaded for connected HART device
7 - Modem status
8 - Communication indication
9 - Back softkey for menu navigation
10 - Menu title for current menu
11 - Sub menu
12 - Label
13 - Data
14 - Units
15 - Cancel, return edit changes to original value
16 - Commit, save edit changes to connected HART device
5.2.2 Navigating the Window Menus using the icon (aka “Hamburger”)
DevCom has several windows with specialized information. Press the Hamburger icon and the following Window
appears, details in Section 6.5: Note that the red icon indicates the active Window when the Hamburger icon was
pressed. This helps the user return to the previous window.
Menu Explanation
DevCom – App name
New Device - Connect to a new device or
reconnect to the same device.
Device Explorer – Main device window
with device data
Settings – Launches Settings Window
Bluetooth Devices – Launches Bluetooth
Selection Window
Document Device – Launches the
Document Device Window
Download Config – Launches the Saved
Configurations Window
DD Library – Launches the DD Library
Window.
Licensing – Launches the License
Window.
About – Shows copyright information,
support information, and revision levels.
Exit - Exit DevCom.
MAN-1048 01/11/2018 Our Quality Management System is Page 17
ISO 9001:2008 Certified
Page 18
DevCom User Manual
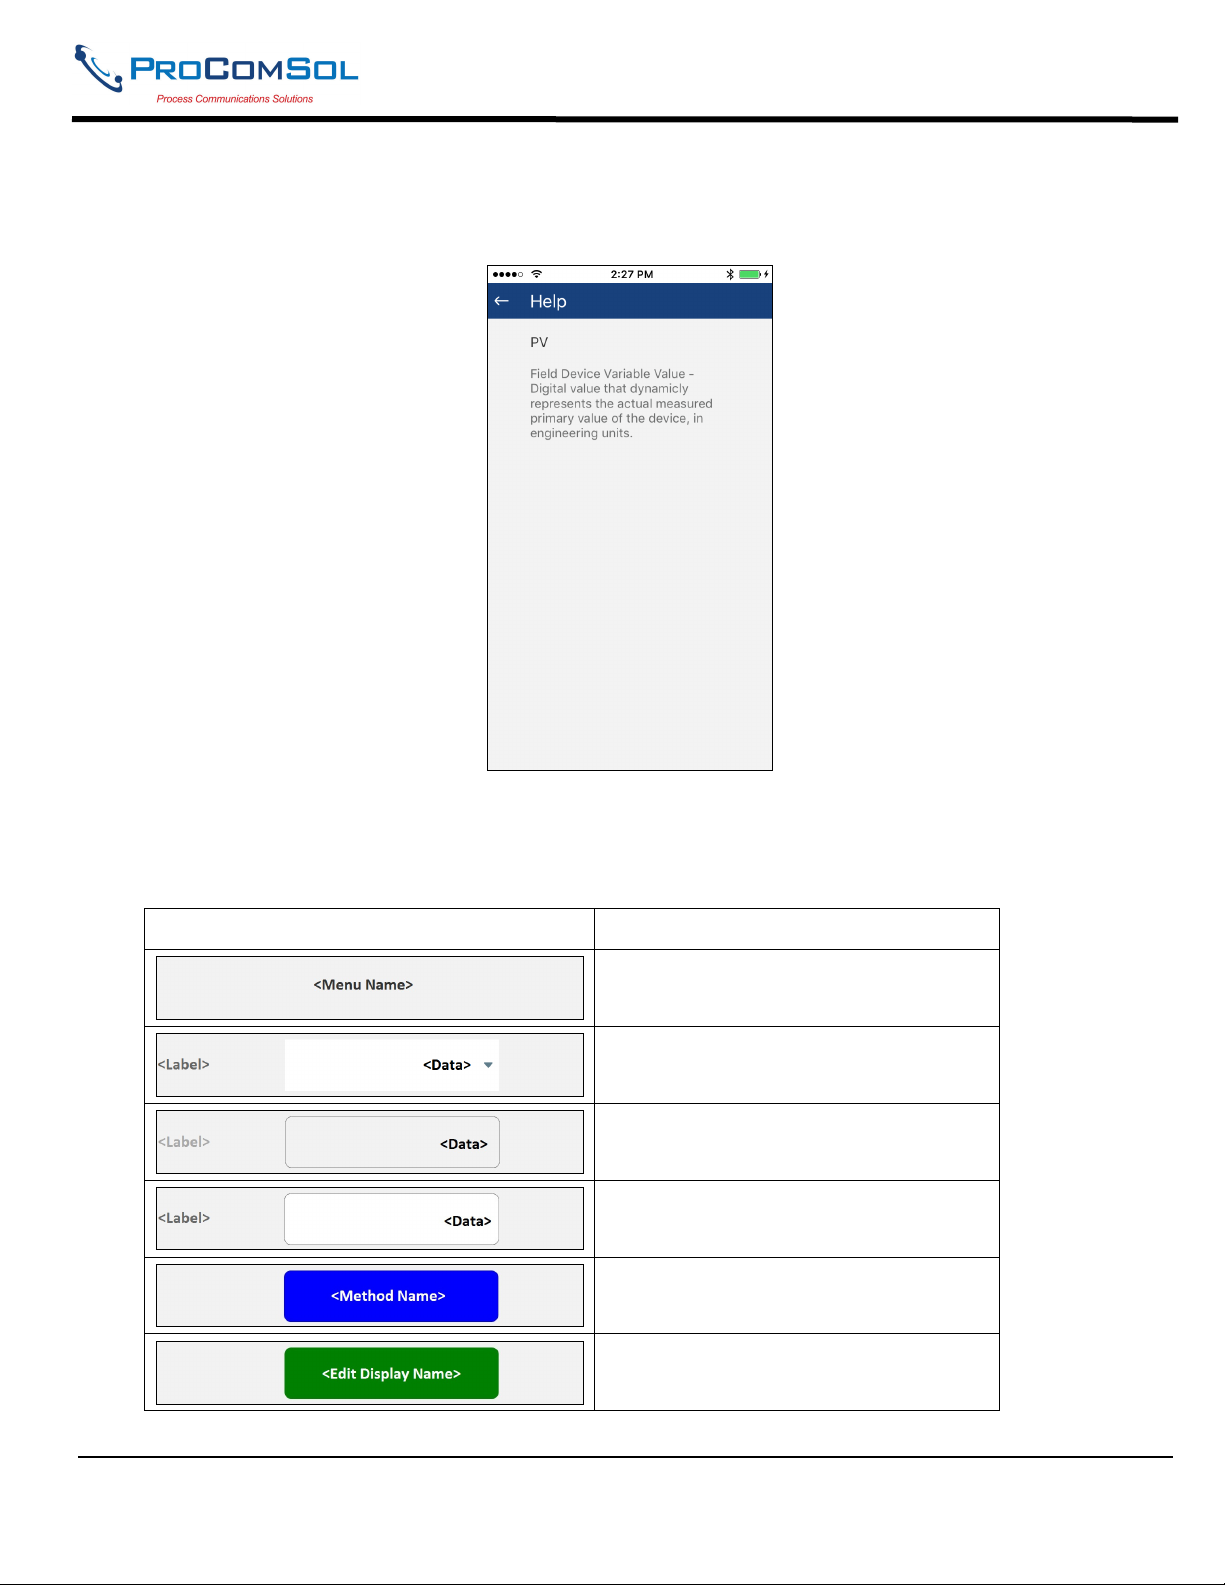
5.2.3 Using the Help Menus
When you select a parameter label, a window will appear with information about the parameter. Below is an
example:
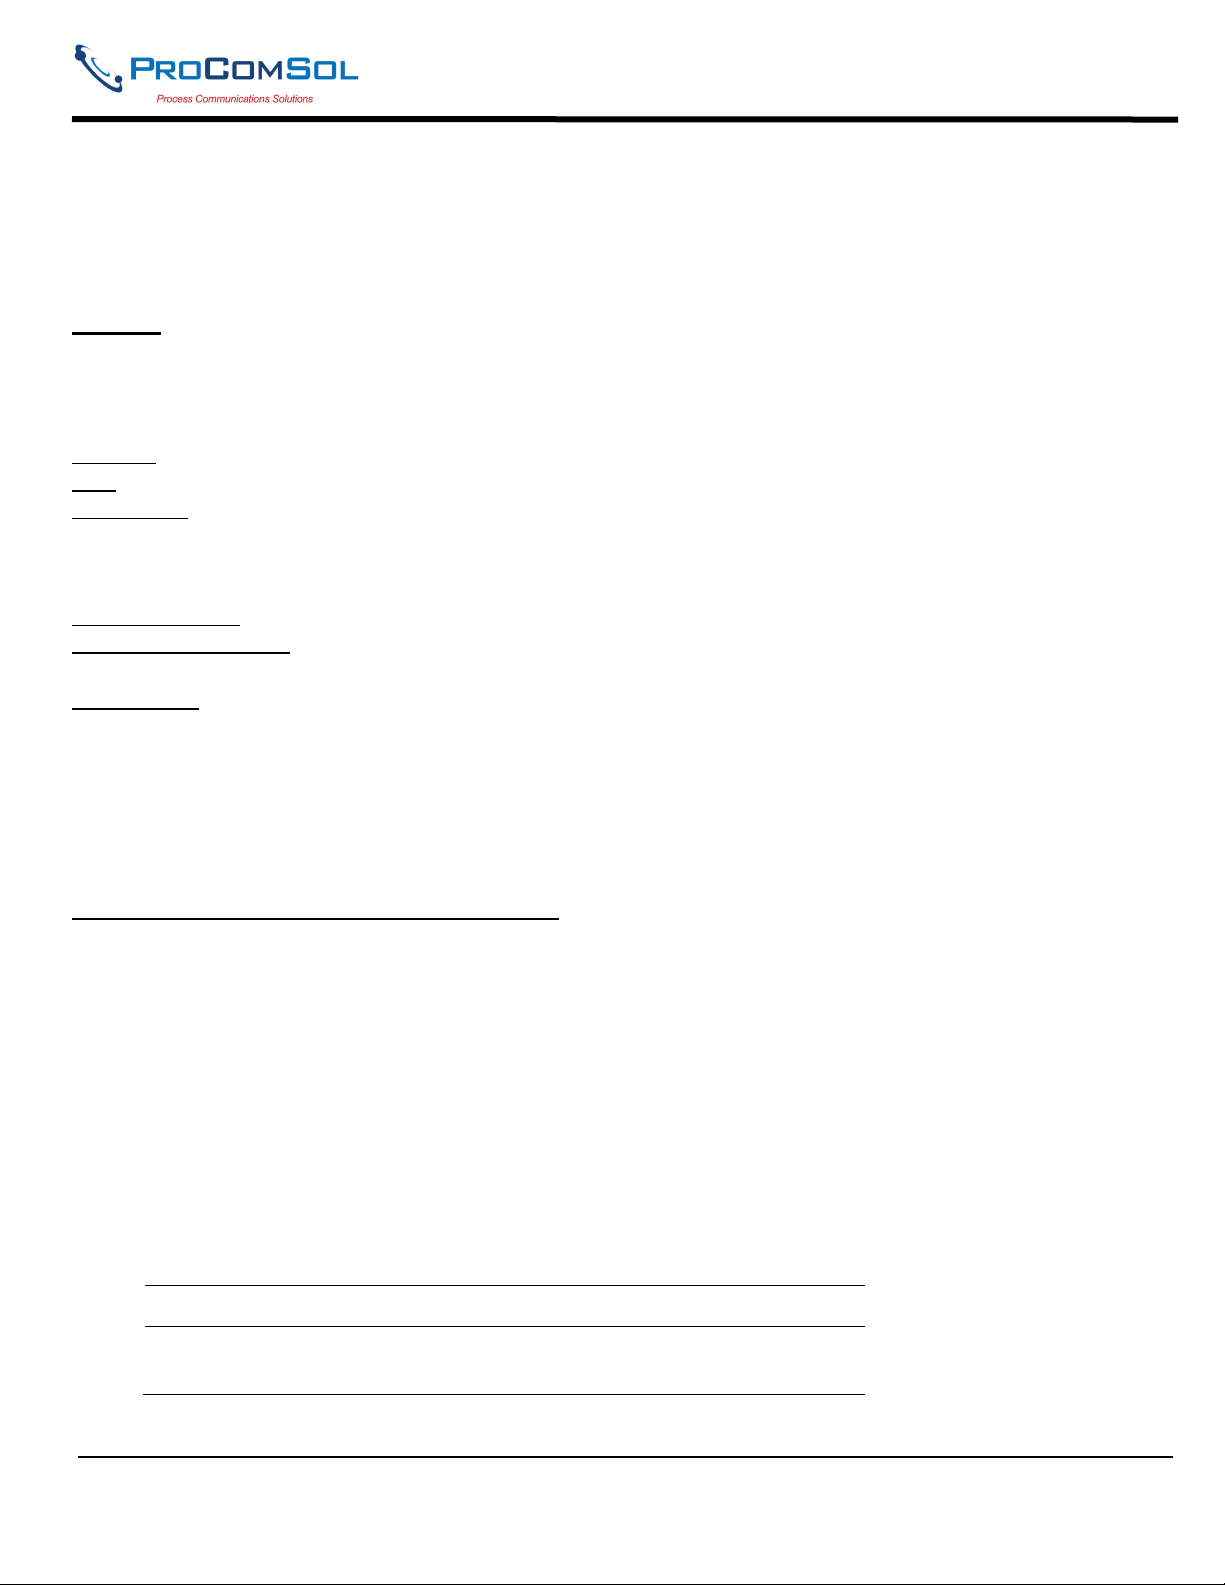
5.2.4 Menu Color Scheme
DevCom application uses different colors to represent different elements of the application. The following table
lists the colors and their meanings:
Color Example Meaning
Indicates a menu in the navigation tree
Indicates an “Enumerated Variable”
item (Note the triangle)
Indicates a Read Only “Variable” item
(Note the data background is gray)
Indicates an Editable “Variable” item
(Note the data background is white)
Indicates a “Method” (Standard
Operating Procedure) item
Indicates an “Edit Display” item
MAN-1048 01/11/2018 Our Quality Management System is Page 18
ISO 9001:2008 Certified
Page 19
DevCom User Manual
6 FUNCTIONS AND BASIC OPERATIONS
6.1 Overview
DevCom allows the user to monitor and configure a single device at a time in the field. Each device had a DD that
determines what device information is present. A DD may contain any of the following parameters/elements:
Variable
A variable is defined as the data contained in the device (e.g. Device Firmware Version). There are three types of
variables:
Numeric – Variable data consists of numbers
Text – Variable data consists of text and/or numbers
Enumerated – Variable data is from a list of valid data points.
The above variables are further definable as follows:
Editable Variable – It allows the operator to modify the value and download it to the device.
Non-Editable Variable – It is a read-only data from the device.
Edit Display
This option is used to view a group of parameters. You can also modify a single parameter from this group, based
on which other parameters of the device get altered.
For example, if the Engineering Unit of the device is modified, the corresponding Low Limits and High Limits
change as per the Engineering Unit set.
Method / Standard Operating Procedure (SOP)
This option helps to perform various tests on the device for instance, Self Test and Loop Test. A Method or SOP is
a series of steps that are executed in a sequence results in the completion of some device related tasks. When a
method gets invoked, it gives various warning messages and options to the user, by which the user can thoroughly
test the device. If a test is aborted by operator command at any stage of the sequence, the method invokes
additional steps to bring the device back to its original state before the test.
6.2 Configuring Device Information
6.2.1 Overview
DevCom allows you to view and configure the field device parameters based on the device description (DD). The
related variables are grouped under various menus of different levels as defined in the DD file. The following table
describes the details about the device configuration:
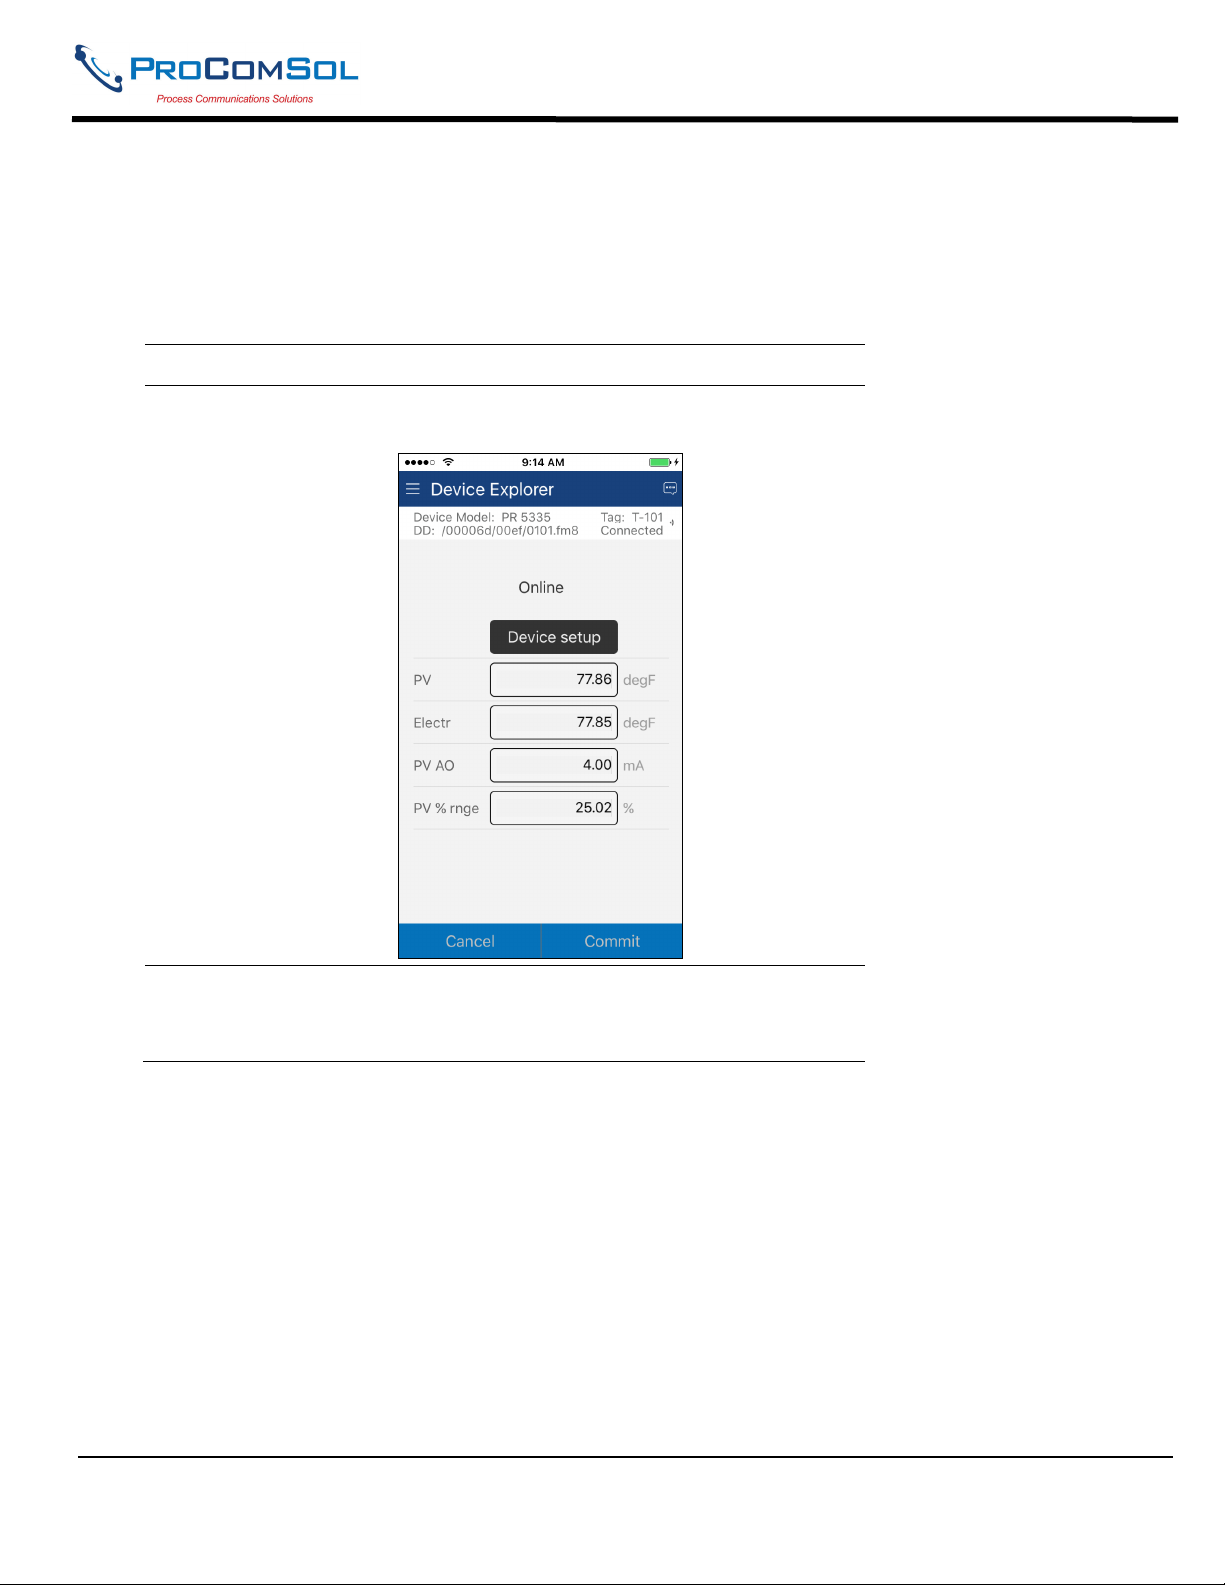
Step Action
1 Ensure that the application is running and communications have
been established:
MAN-1048 01/11/2018 Our Quality Management System is Page 19
ISO 9001:2008 Certified
Page 20
DevCom User Manual
Step Action
2 There are three types of variables: Numeric, Text, and
Enumerated. In turn these variables can be read/write and read
only. Dynamic variables are also read only.
Following points describe how the device parameters represents
their status when connected to DevCom:
White Data Background: Modifiable Values
Gray Data Background: Read only Values
Data field with gray triangle: Enumerated data
MAN-1048 01/11/2018 Our Quality Management System is Page 20
ISO 9001:2008 Certified
Page 21
DevCom User Manual
Step Action
3 Select the parameter and configure the values, as required.
4 The subsequent topics explain how to configure device
parameters.
6.2.2 Variable Edit
To edit a parameter of the connected device, perform the following steps:
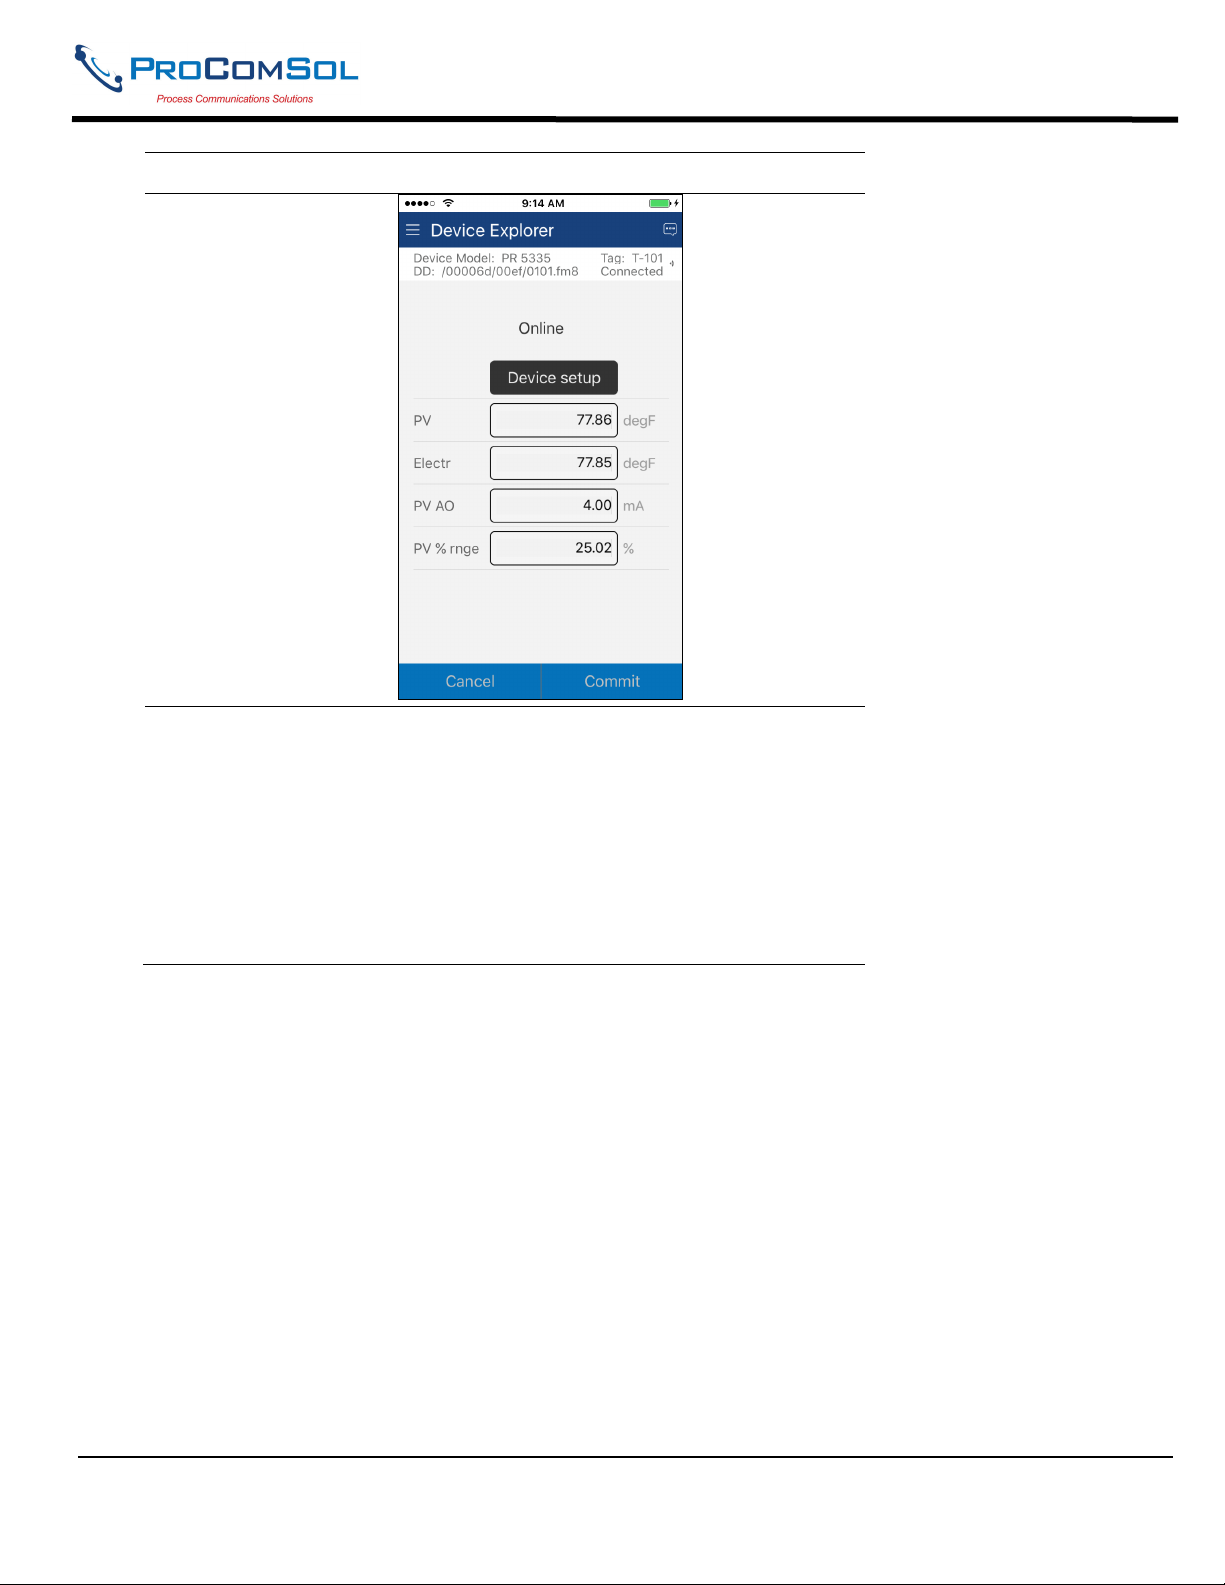
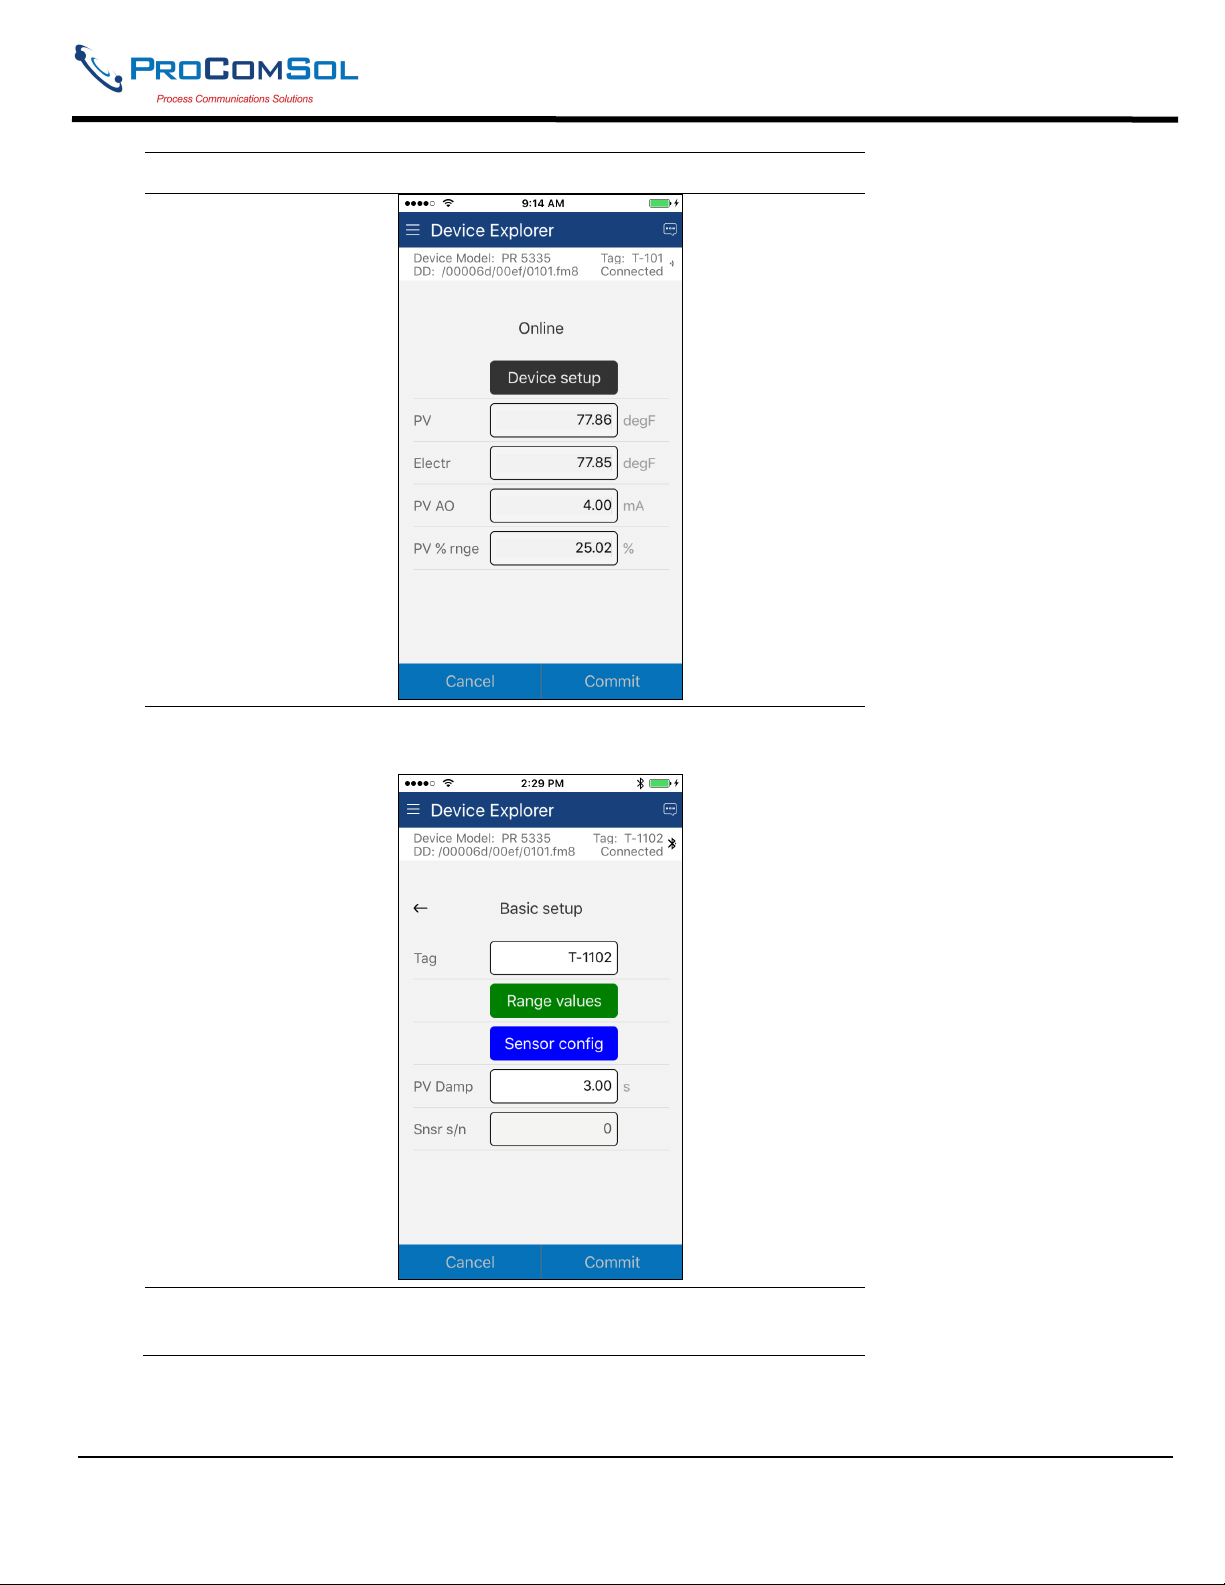
Step Action
1 Ensure that the application is running and communications have
been established:
MAN-1048 01/11/2018 Our Quality Management System is Page 21
ISO 9001:2008 Certified
Page 22
DevCom User Manual
Step Action
2 Select the menu where the editable parameter is present as
shown below. For this example we are editing PV Damp:
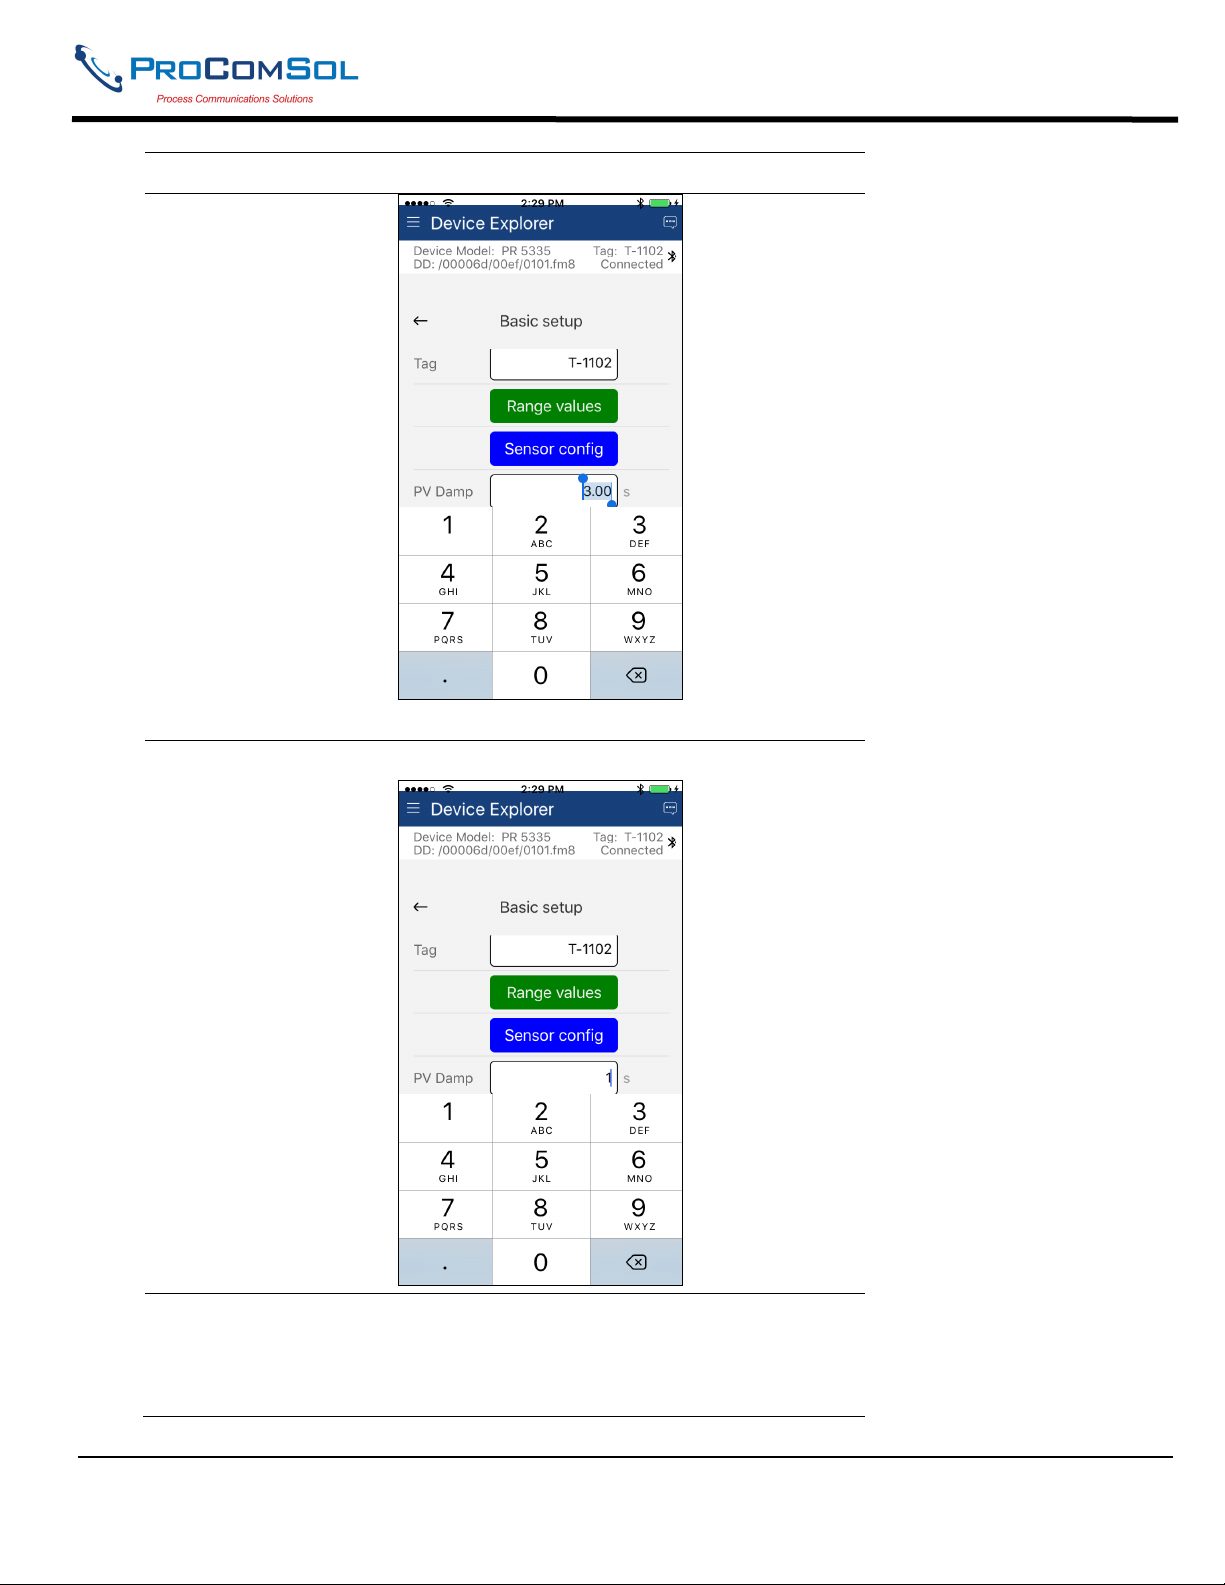
3 Select the variable data to edit it. The existing data will be
highlighted and an appropriate soft keyboard will appear:
MAN-1048 01/11/2018 Our Quality Management System is Page 22
ISO 9001:2008 Certified
Page 23
DevCom User Manual
Step Action
4 Make the changes to the parameter value, as required.
5 Tap anywhere on the screen other than the keyboard to remove
the keyboard. Note that the changed variable data background is
now Yellow and the “Commit” and “Cancel” button text are also
Yellow:
MAN-1048 01/11/2018 Our Quality Management System is Page 23
ISO 9001:2008 Certified
Page 24

DevCom User Manual
Step Action
6 Click on the “Commit” button to send the new value to the
device. The buttons and data background return to white when
complete:
7 For Enumerated variables, the process is very similar. Start by
selecting the menu where the desired parameter is located:
MAN-1048 01/11/2018 Our Quality Management System is Page 24
ISO 9001:2008 Certified
Page 25

DevCom User Manual
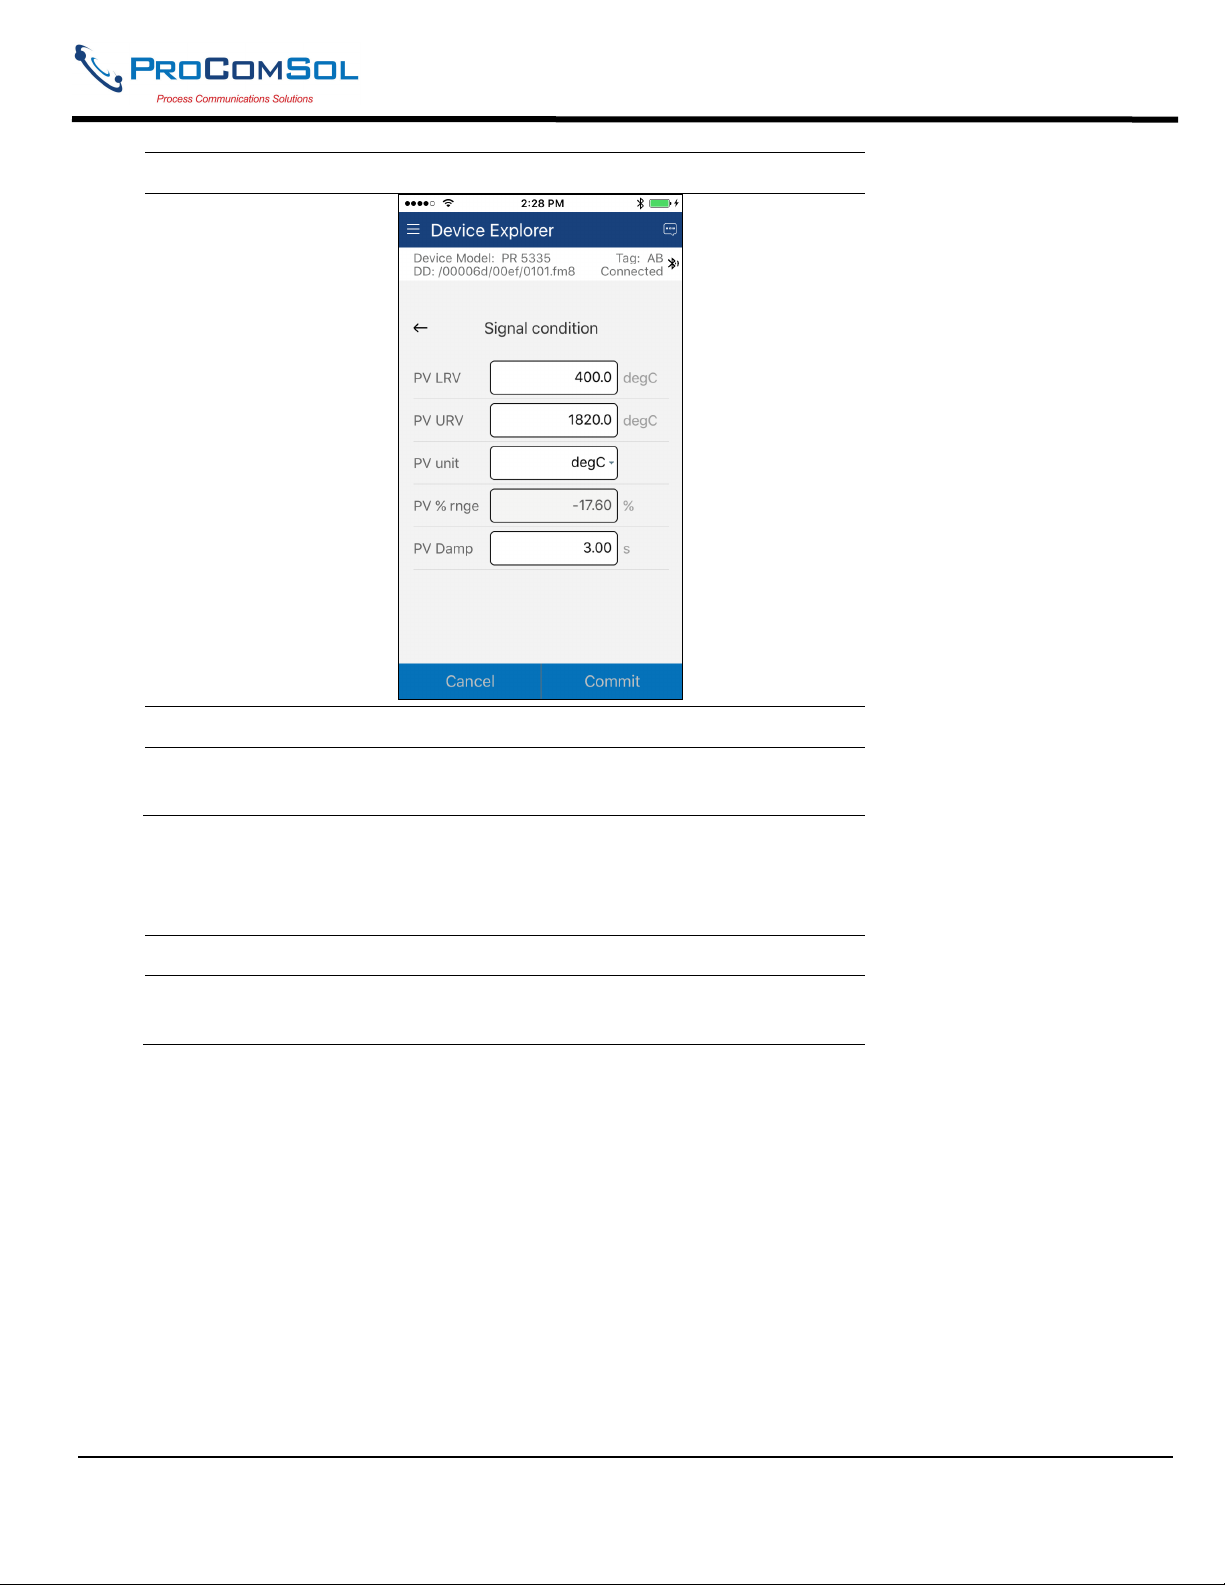
Step Action
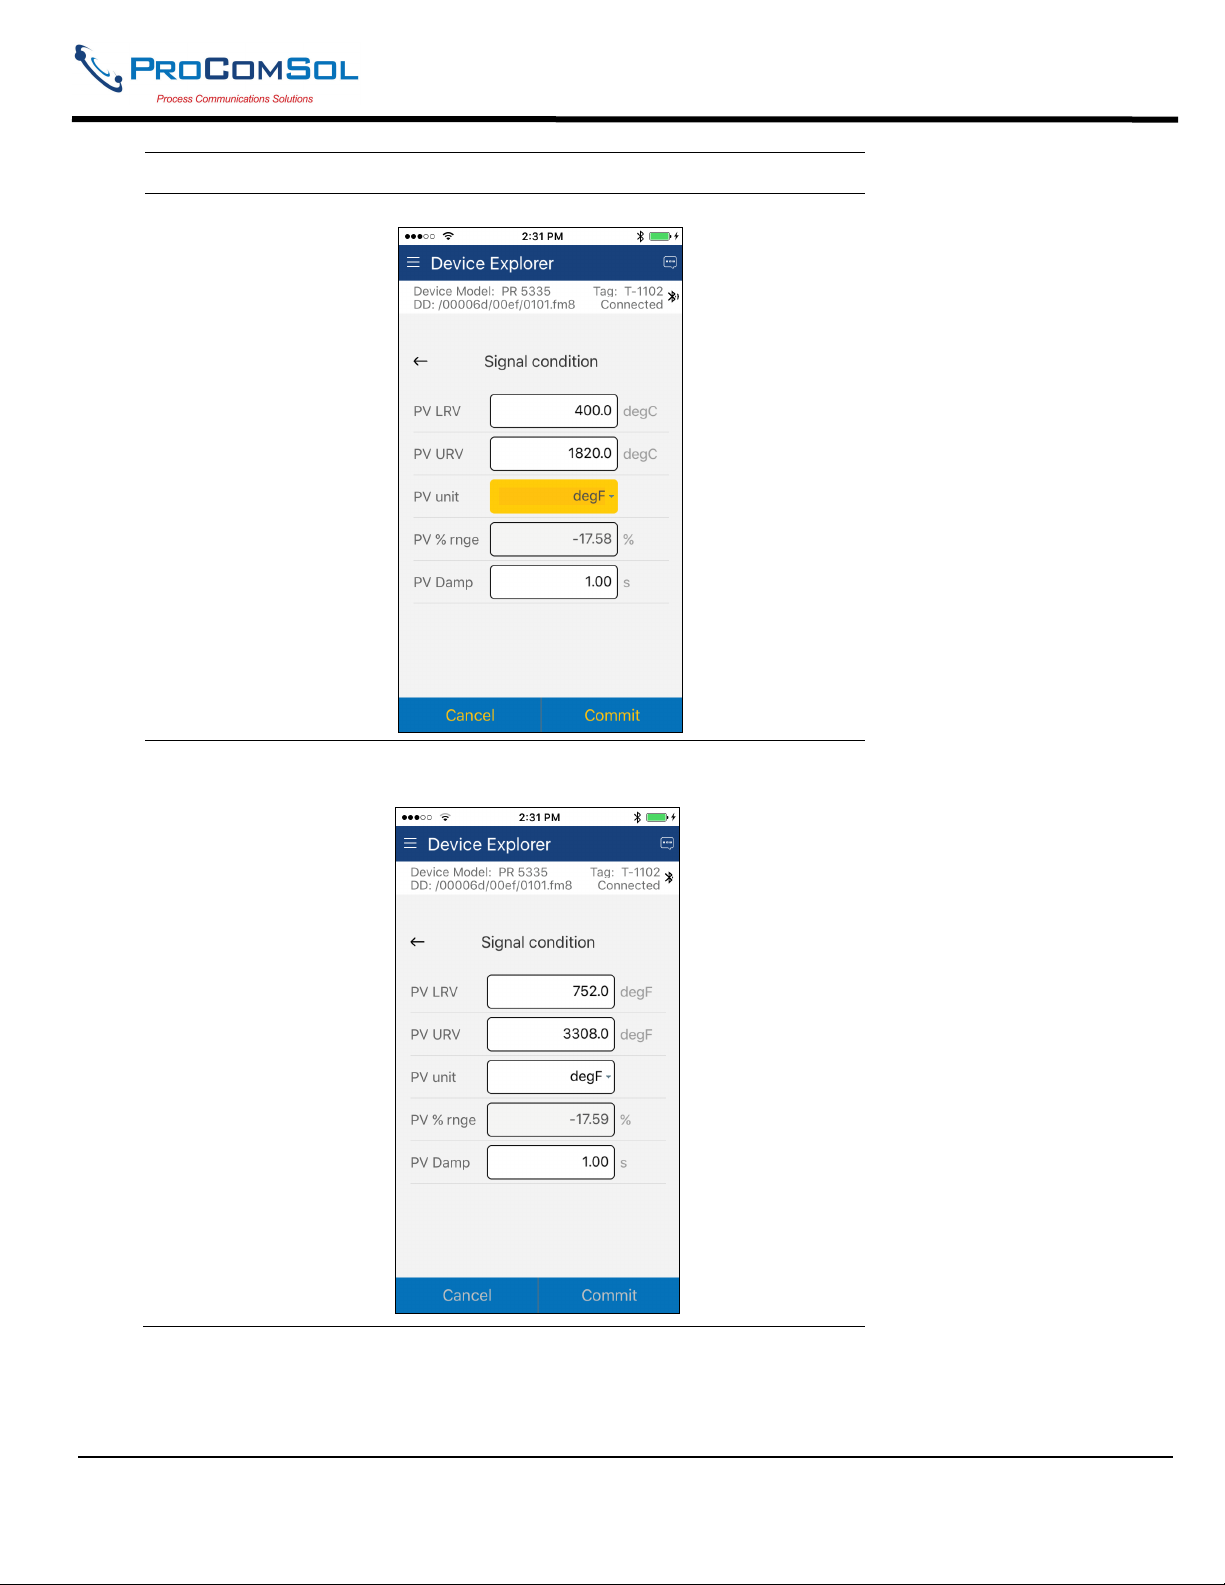
8 Select the variable data to edit it. In this case “PV unit”. A list
will appear with the valid values available:
9 Select the value you wish to use.
10 Once selected, the list will disappear and the new value will be
inserted into the data field. Note that the changed variable
background is now Yellow and the “Commit” and “Cancel”
MAN-1048 01/11/2018 Our Quality Management System is Page 25
ISO 9001:2008 Certified
Page 26
DevCom User Manual
Step Action
buttons are also Yellow:
11 Click on the “Commit” button to send the new value to the
device:
.
MAN-1048 01/11/2018 Our Quality Management System is Page 26
ISO 9001:2008 Certified
Page 27
DevCom User Manual
6.2.3 Edit Display
The Edit Display is a variation on the Variable edit. An additional window helps the user view a group of
parameters based on the DD. You can also modify a single parameter from this group. Parameters linked to the
edited field will be updated automatically
To view and configure these variables, perform the following steps:
Step Action
1 Ensure that the application is running and communications have
been established:
2 Select the menu where the editable parameter is present as
shown below. For this example we want to edit URV from the
Range Values Edit Display:
MAN-1048 01/11/2018 Our Quality Management System is Page 27
ISO 9001:2008 Certified
Page 28

DevCom User Manual
Step Action
3 Once selected, the Edit Display looks like a regular menu as
seen here:
4 Select the parameter you wish to edit from within the Edit
Display box. The following dialog box appears on the screen:
MAN-1048 01/11/2018 Our Quality Management System is Page 28
ISO 9001:2008 Certified
Page 29

DevCom User Manual
Step Action
5 Make the change to the value, as required.
6 Click on the “Commit” button to send the new value to the
device.
6.2.4 Executing Methods or Standard Operating Procedures
Methods are defined in the DD file for the device that DevCom is connected to. You can select the Method and
execute it for calibrating the device, trouble shooting, etc. Method execution leads you through a number of steps,
like in a wizard.
A Few examples of methods include,
Set high and low range calibration points
Calibrate the device
Run the advanced diagnostic test procedure
Execute tests to gather information on device operation.
To execute a Method, perform the following steps:
Step Action
1 Ensure that the application is running and communications have
been established:
MAN-1048 01/11/2018 Our Quality Management System is Page 29
ISO 9001:2008 Certified
Page 30

DevCom User Manual
Step Action
2 Select the menu where the method is present and select the
desired Method:
3 Below is an example of a Method window:
MAN-1048 01/11/2018 Our Quality Management System is Page 30
ISO 9001:2008 Certified
Page 31

DevCom User Manual
Step Action
4 Click “OK” to move to the next dialog in the Method sequence.
Some methods require more user input such as selecting an
enumerated value as below:
5 Click “Abort” to cancel the Method execution.
6 Click “Help” to get specific help for that step of the Method.
This Help information is provided by the device DD.
MAN-1048 01/11/2018 Our Quality Management System is Page 31
ISO 9001:2008 Certified
Page 32
DevCom User Manual
6.3 Calibrating HART Field Devices
Calibration of field devices and loop test are achieved by executing the Methods or Standard Operating Procedures
that are specific to device. Methods are defined based on the test parameters specific to the device, providing
information for the calibration of that device.
See the previous section for Method execution.
6.4 Viewing the Device Status
DevCom provides the user with the ability to monitor the device specific status of the device.
To view the device and status, perform the following steps:
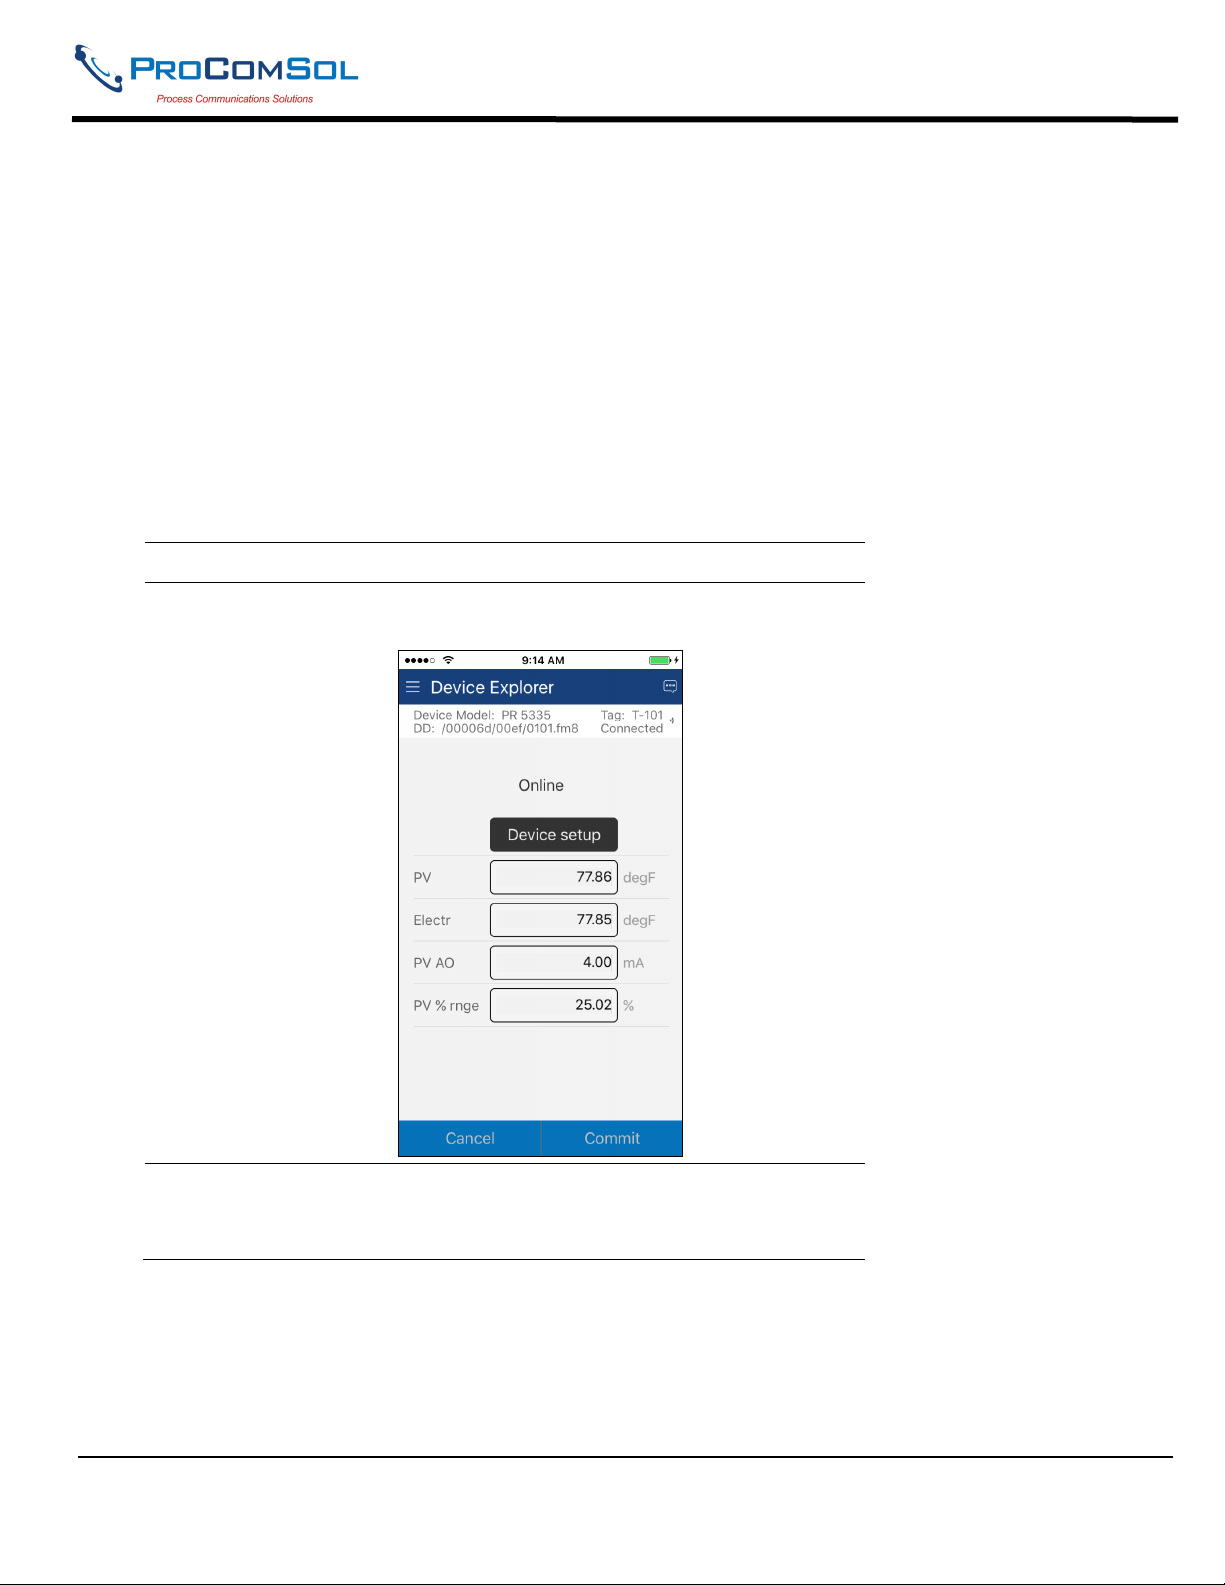
Step Action
1 Ensure that the application is running and communications have
been established:
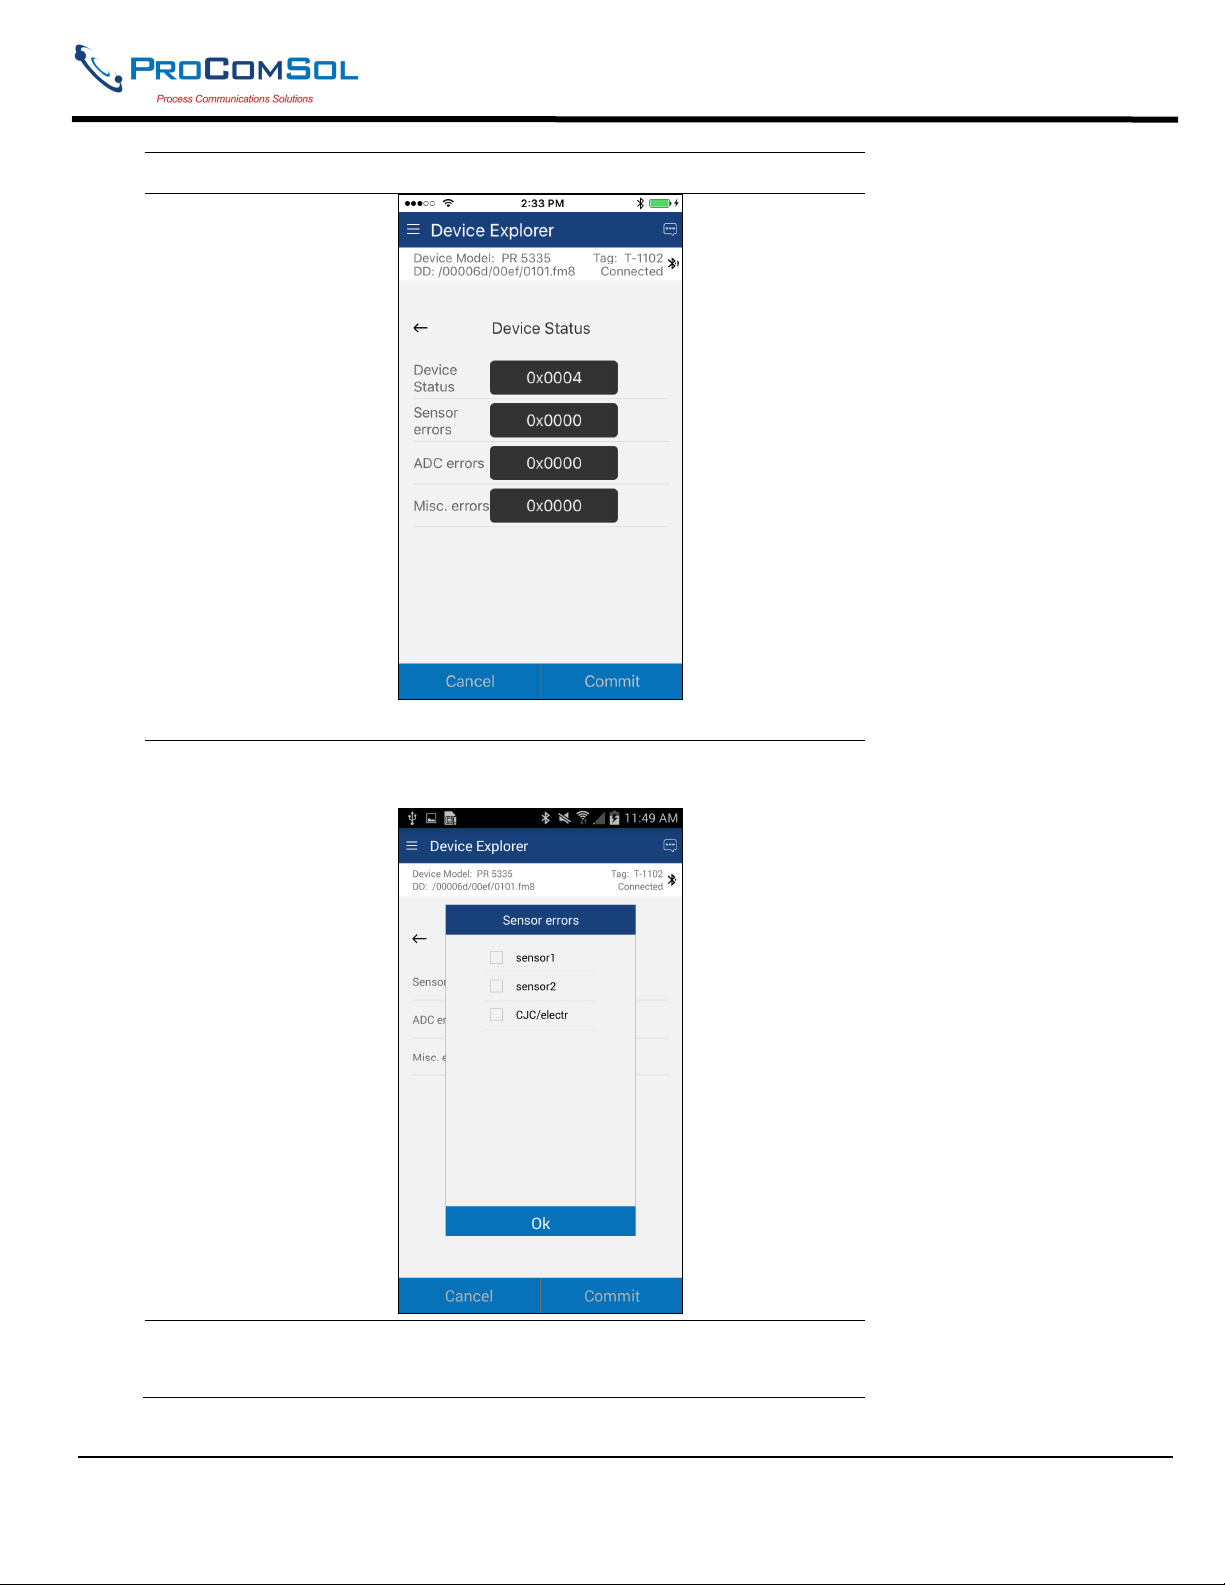
2 Select the Device Status icon at the upper right of the screen.
The following window is displayed (Note that this information is
DD dependent and will be different for your device):
MAN-1048 01/11/2018 Our Quality Management System is Page 32
ISO 9001:2008 Certified
Page 33
DevCom User Manual
Step Action
The status byte is shown for each status point.
3 To see more details on which status point is active, select the
status data. Here is a sample:
4
Press the Back soft key (← soft key) to close the Device Status
window.
MAN-1048 01/11/2018 Our Quality Management System is Page 33
ISO 9001:2008 Certified
Page 34
DevCom User Manual
6.5 Window Detailed Description
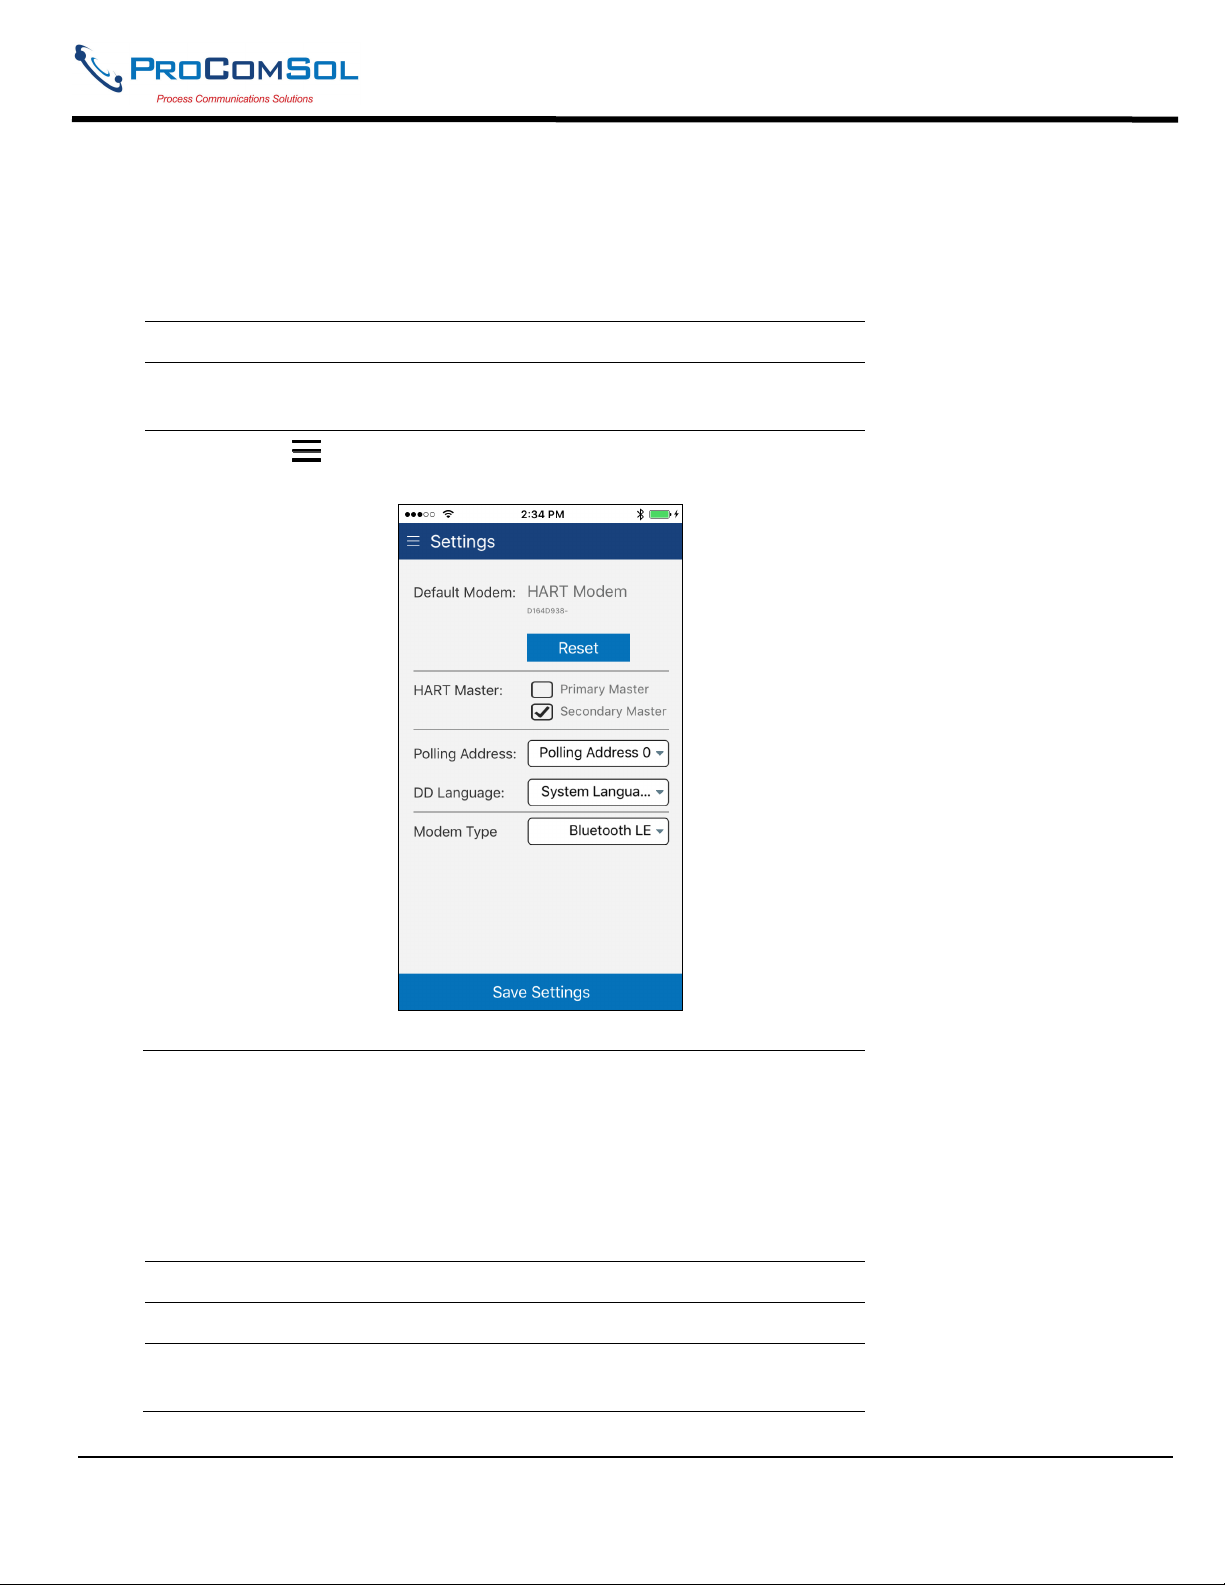
6.5.1 Settings
There are several Settings that may need to be changed by the user to perform a desired activity. Below is a
description of what Settings are available:
Step Action
1 Ensure that the application is running. Communications do
NOT need to have been established.
2
Select Settings from the main window. The Settings
window is displayed:
Each Setting is explained below.
6.5.1.1 Default Modem
This option allows the user to disconnect the modem. Press “Reset” to clear the modem from App memory.
6.5.1.2 HART Master
This option allows the user to select Primary Master or Secondary Master for Multi-master systems.
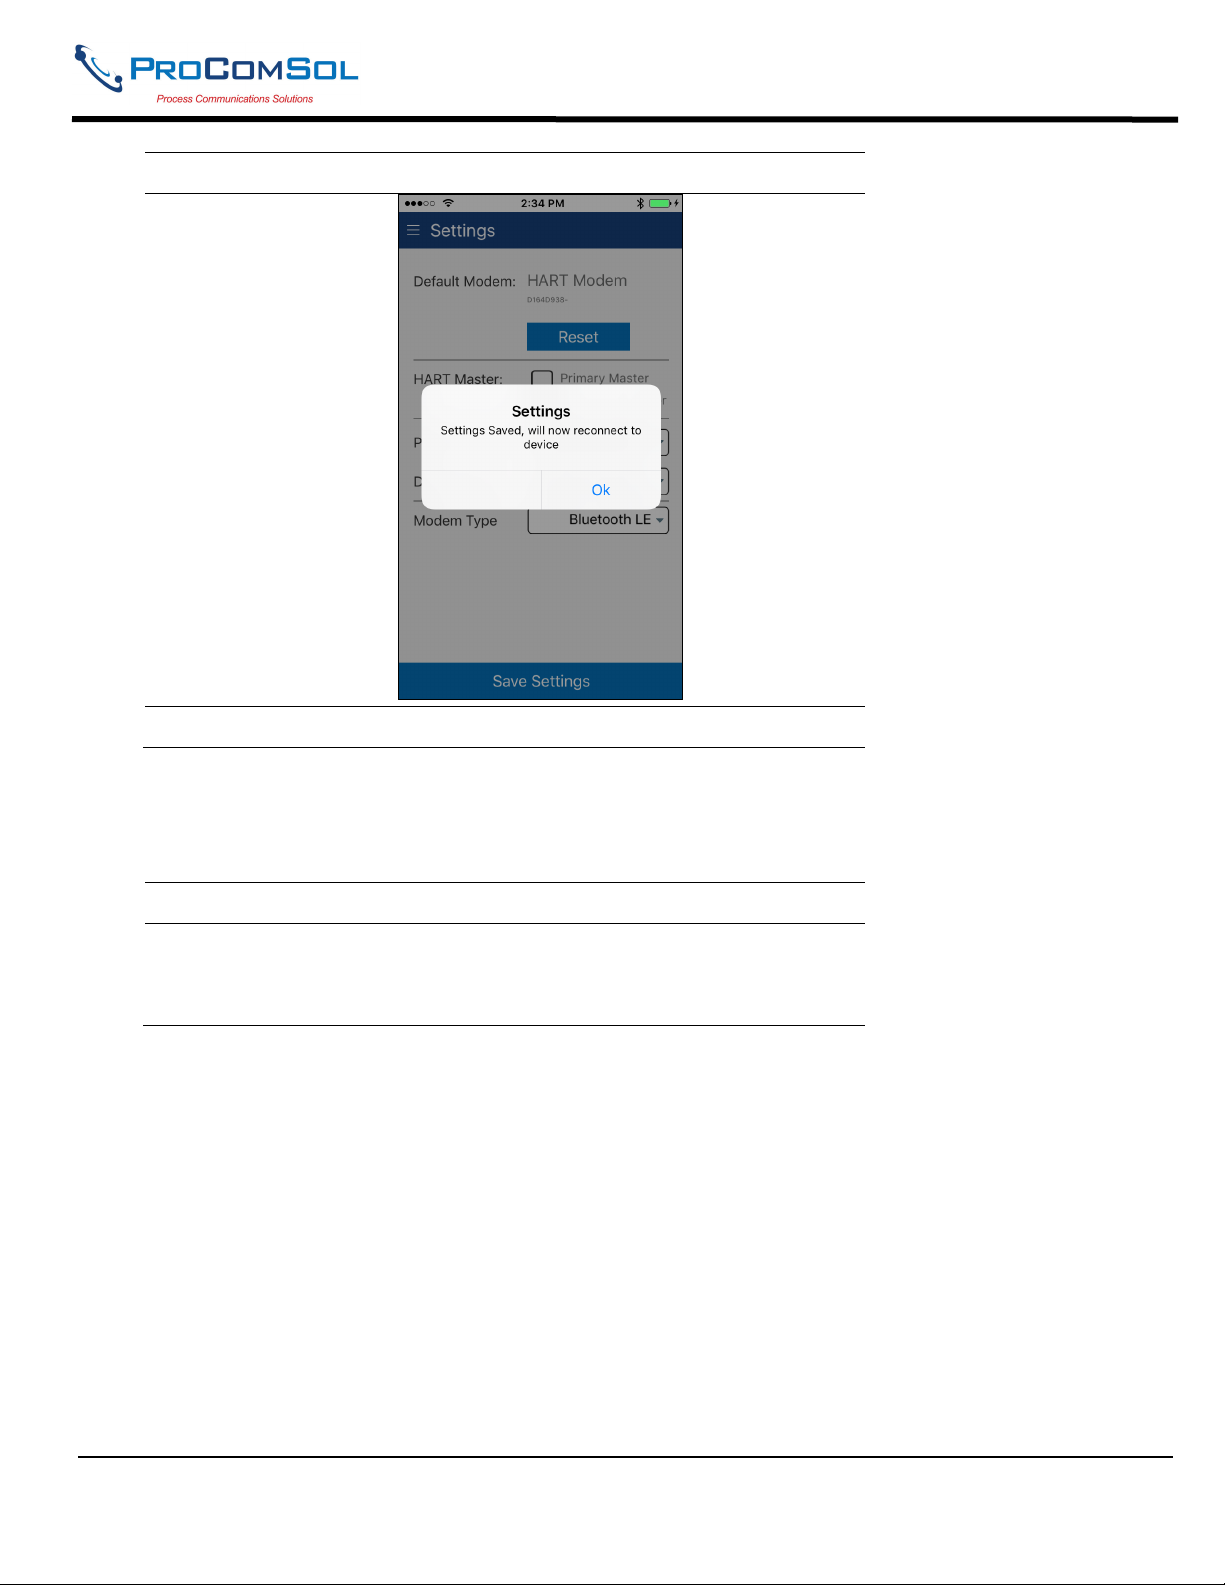
Step Action
1 Select desired HART Master.
2 Press “Save Settings” If a new HART Master was selected the
following message will be shown:
MAN-1048 01/11/2018 Our Quality Management System is Page 34
ISO 9001:2008 Certified
Page 35

DevCom User Manual
Step Action
3 Press “OK” to return to the Device Explorer window.
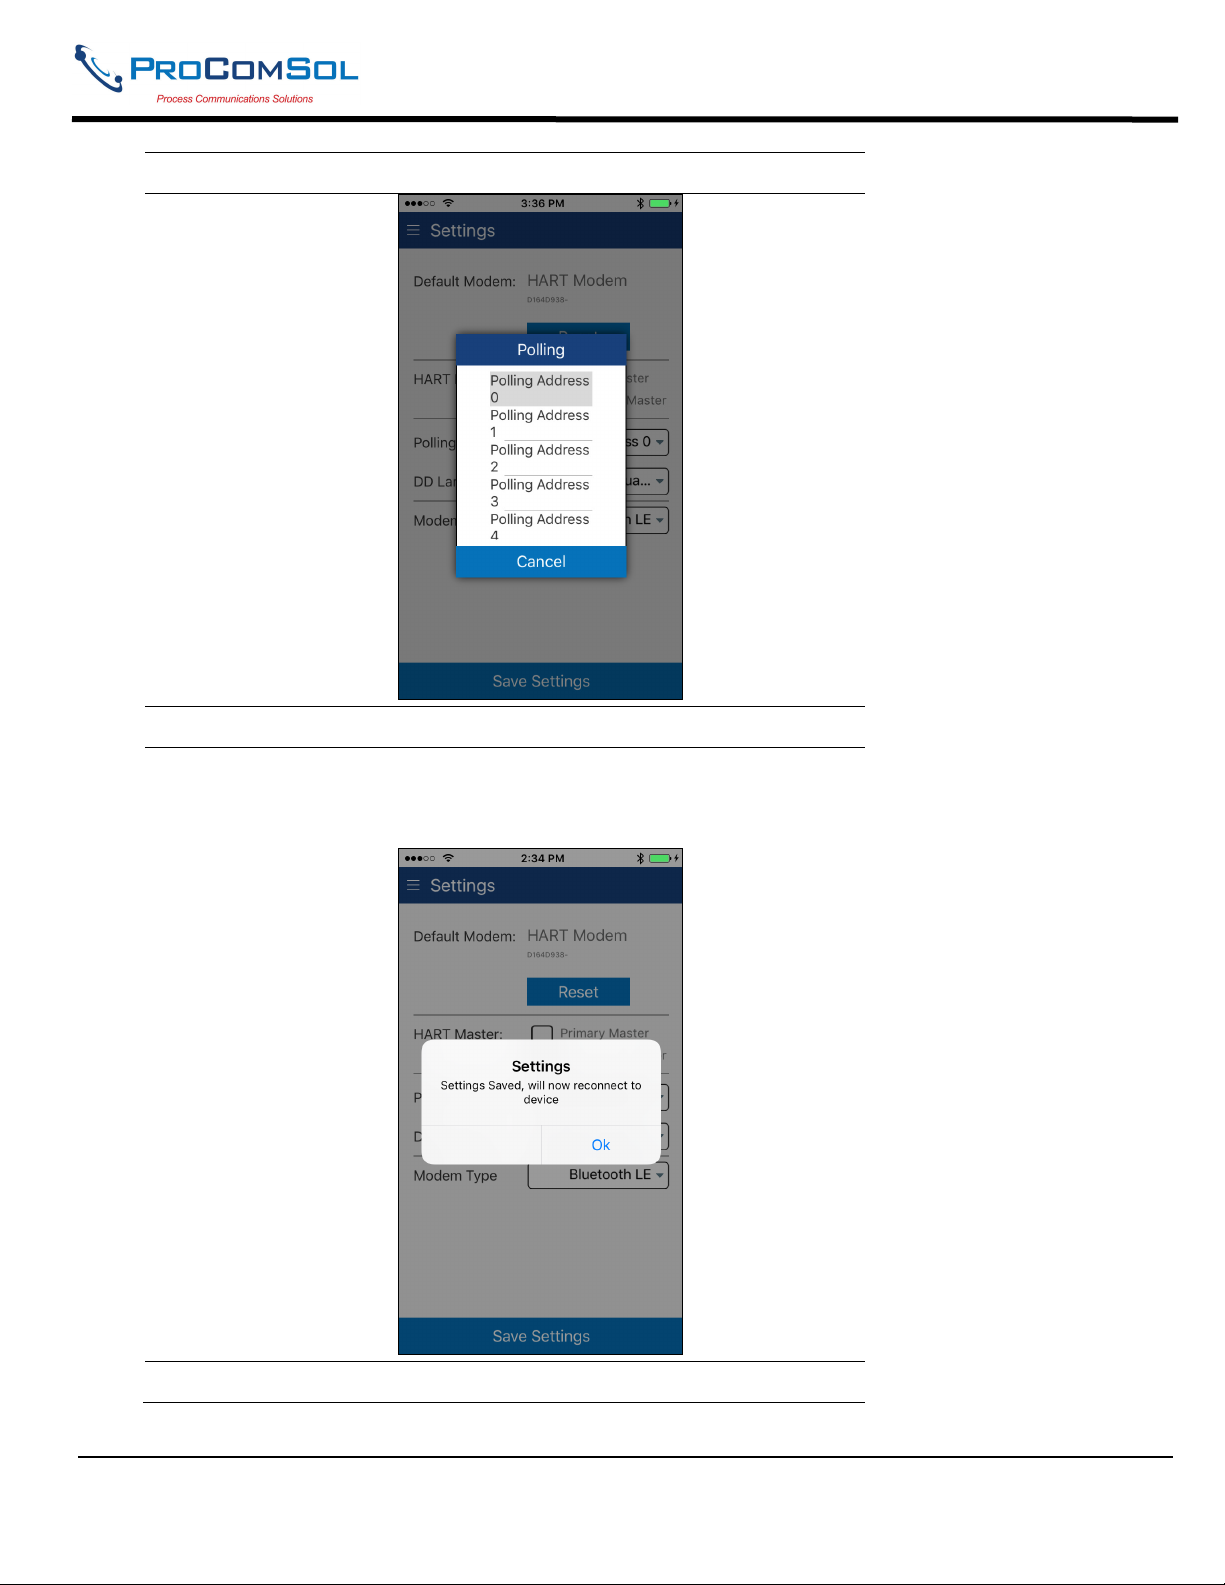
6.5.1.3 Polling Address
This option allows the user to set the address to look for devices on Multi-drop networks. The default is address 0.
Step Action
1 Press the triangle next to the current Polling Address selection.
A drop down list will appear with all the valid Polling
Addresses. You may need to scroll to view the address you
want.
MAN-1048 01/11/2018 Our Quality Management System is Page 35
ISO 9001:2008 Certified
Page 36
DevCom User Manual
Step Action
2 Press the desired Polling Address.
3 Press “Save Settings”. If a new Polling Address was selected
the following message will be shown:
4 Press “OK” to return to the Device Explorer window.
MAN-1048 01/11/2018 Our Quality Management System is Page 36
ISO 9001:2008 Certified
Page 37

DevCom User Manual
6.5.1.4 DD Language
This option allows the user to select which language the DD data will be presented. Note that all DD’s do not have
each of these languages. In this case, English will be used. Also note that only the DD data is affected. DevCom
specific items have been translated into various languages. The language used is set by the language of the iOS
device. For example, if the iOS device is set for Spanish, the DevCom text will be in Spanish.
Step Action
1 Press the triangle next to the current DD Language. A drop
down list will appear with all the valid DD Languages. You
may need to scroll to view the language you want.
2 Press the desired DD Language.
3 Press “Save Settings”. If a new DD Language was selected the
following message will be shown:
MAN-1048 01/11/2018 Our Quality Management System is Page 37
ISO 9001:2008 Certified
Page 38
DevCom User Manual
Step Action
4 Press “OK” to return to the Device Explorer window.
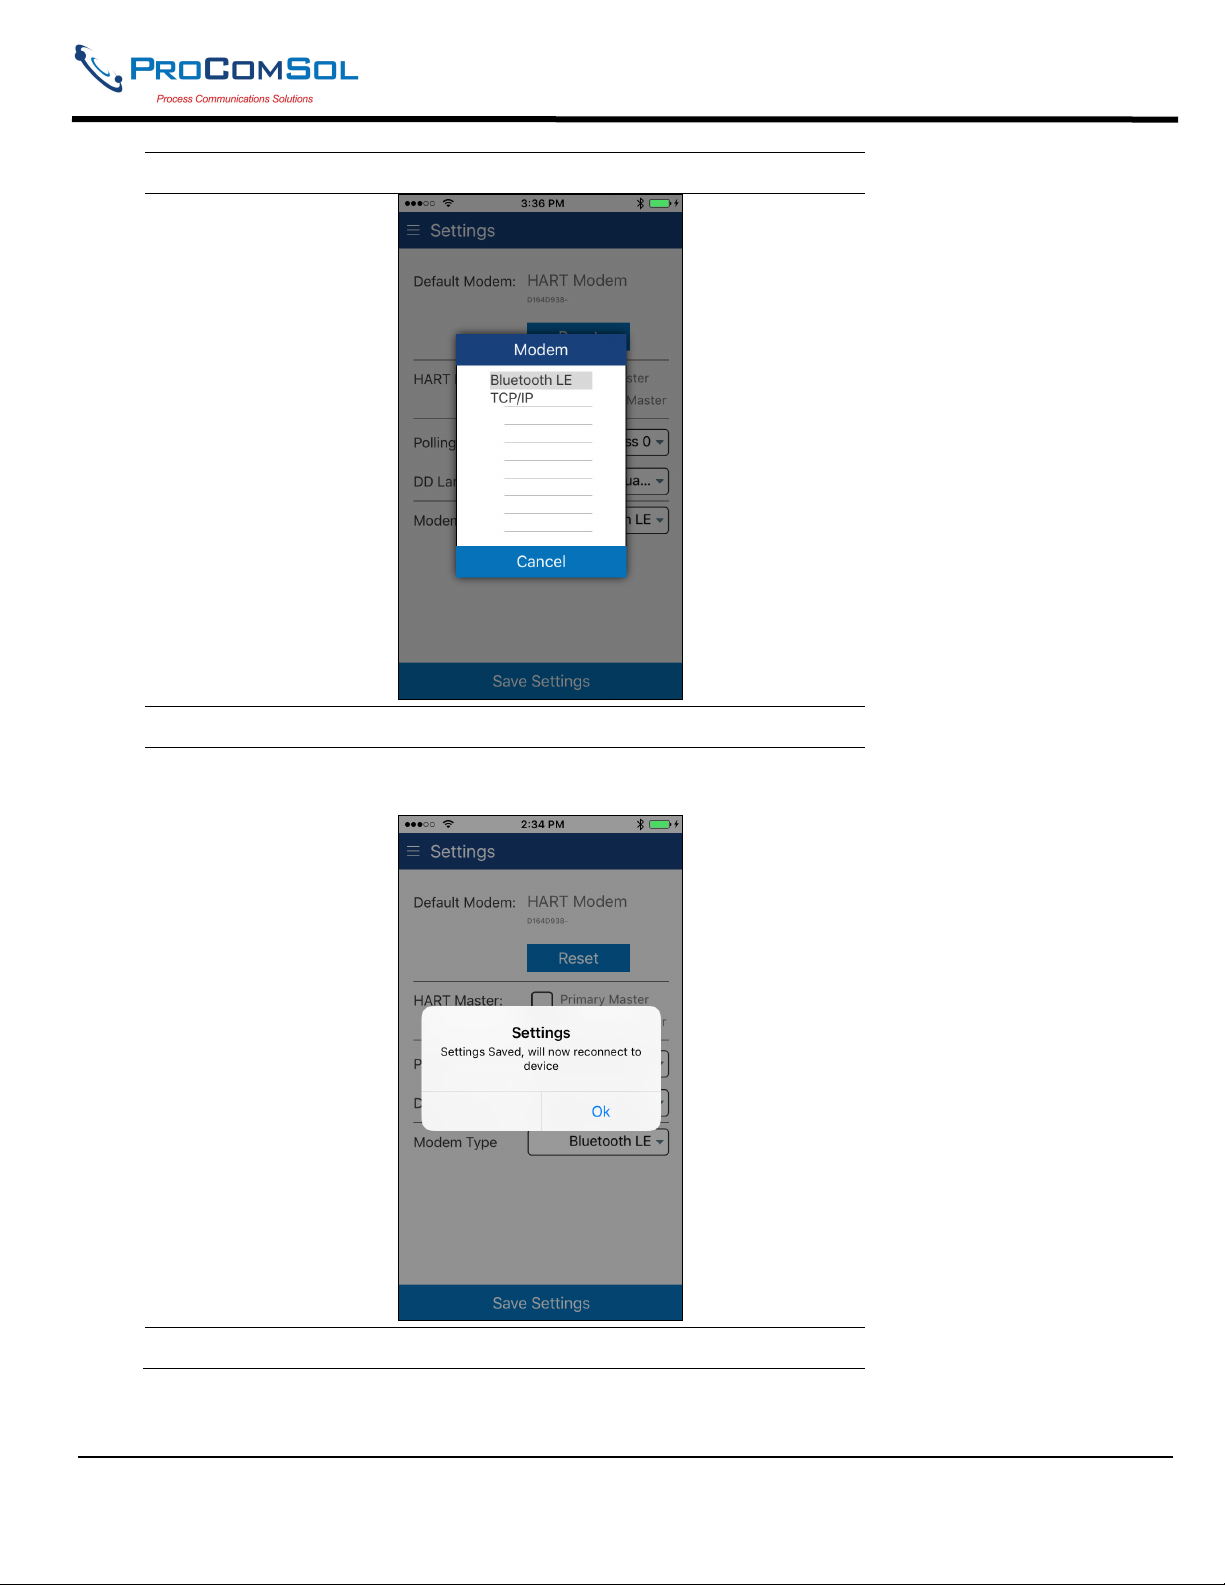
6.5.1.5 Modem Type
This option allows the user to select which modem to use to connect to the HART Network. See Section 6.8 for
HART-IP and the TCP/IP modem type.
Step Action
1 Press the triangle next to the current Modem. A drop down list
will appear with all the valid Modem types.
MAN-1048 01/11/2018 Our Quality Management System is Page 38
ISO 9001:2008 Certified
Page 39
DevCom User Manual
Step Action
2 Press the desired Modem Type.
3 Press “Save Settings”. If a new Modem Type was selected the
following message will be shown:
4 Press “OK” to return to the Device Explorer window.
MAN-1048 01/11/2018 Our Quality Management System is Page 39
ISO 9001:2008 Certified
Page 40
DevCom User Manual
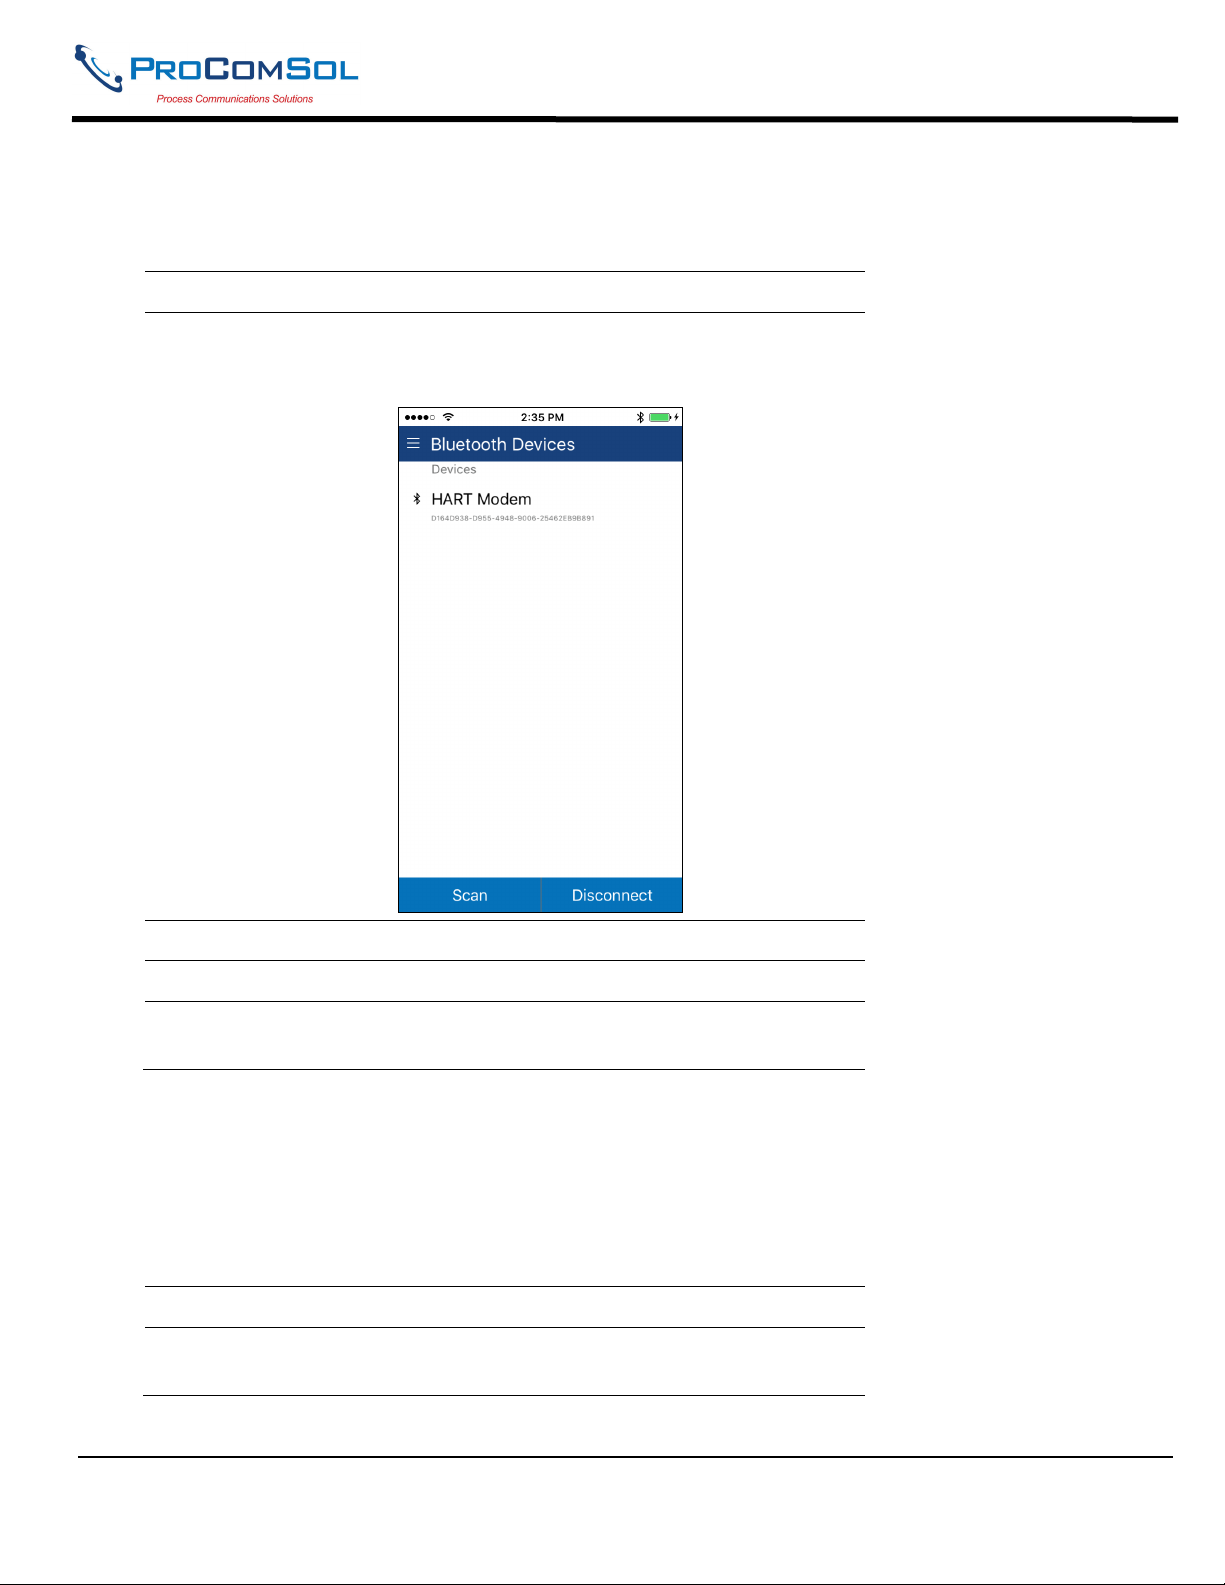
6.5.2 Bluetooth Devices
This window allows the user to view the current modem or to change what modem to use for communications.
Step Action
1 The Window will show all available Bluetooth devices with the
current selected modem highlighted and/or marked with the
Bluetooth icon.
2 Tapping the current HART Modem will restart the connection.
3 Tapping “Scan” will look for nearby Bluetooth devices.
4 Tapping “Disconnect” will remove the connection to the current
HART Modem.
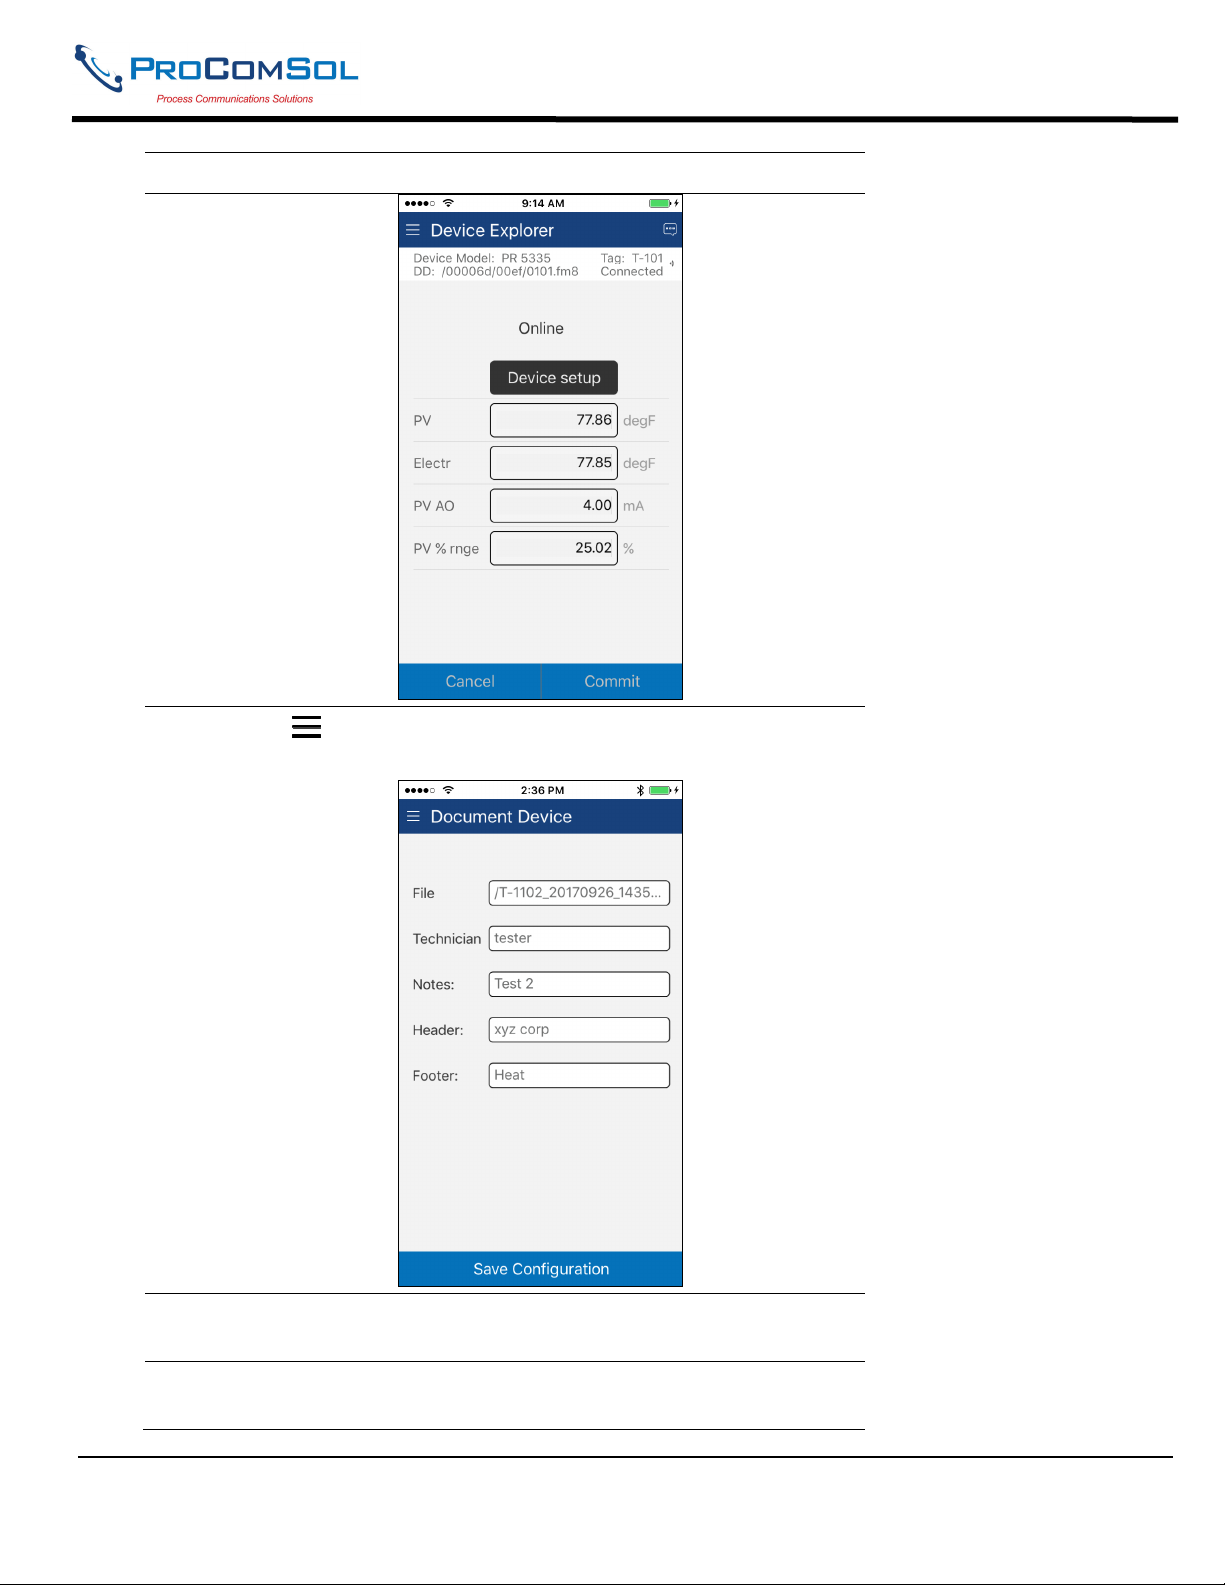
6.5.3 Document Device
HART Device configurations can be saved to memory as a comma delimited text file and formatted PDF file to
document the device.
To save device configurations to disk, perform the following steps:
Step Action
1 Ensure that the application is running and communications have
been established:
MAN-1048 01/11/2018 Our Quality Management System is Page 40
ISO 9001:2008 Certified
Page 41
DevCom User Manual
Step Action
2
Select Document Device from the main window. The
Document Device window is displayed:
3 The default file name is Tag_Date_Time. The filename can be
changed by the user. Edit the filename as needed.
4 Enter Notes in the Notes field if desired. Enter Technician name
in the Technician field if desired.
MAN-1048 01/11/2018 Our Quality Management System is Page 41
ISO 9001:2008 Certified
Page 42

DevCom User Manual
Step Action
5 Enter Header and Footer information for the PDF file if desired.
6 Press the “Save Configuration” button to save device
configuration to text file and pdf file.
7 When complete, the Configuration Save Complete message will
be displayed. Use the Download Config function to display the
saved .pdf file.
MAN-1048 01/11/2018 Our Quality Management System is Page 42
ISO 9001:2008 Certified
Page 43

DevCom User Manual
6.5.4 Download Config
The saved HART Device configurations can be viewed and even downloaded to other devices.
To view saved device configurations, perform the following steps:
Step Action
1
Select Download Config from the main window. The
Saved Configurations window is displayed:
2 The saved configurations are shown in the order they were
created. You can scroll up and down the list if necessary.
3 Tap a configuration to view details of the configuration. When
tapped, the Configuration Detail window is displayed:
MAN-1048 01/11/2018 Our Quality Management System is Page 43
ISO 9001:2008 Certified
Page 44

DevCom User Manual
Step Action
This window shows the details of the saved configuration.
6.5.4.1 View Saved Configuration
Step Action
1 From the Configuration Detail window, press View.
2 The PDF file for the saved configuration is shown using the iOS
device PDF viewer:
MAN-1048 01/11/2018 Our Quality Management System is Page 44
ISO 9001:2008 Certified
Page 45

DevCom User Manual
Step Action
3 Press the Back key to dismiss. Or use the iOS Home key.
6.5.4.2 Configuration Write
Step Action
1 Ensure that the application is running and communications have
been established.
2 From the Configuration Detail window, press Download. The
following Prompt is displayed:
MAN-1048 01/11/2018 Our Quality Management System is Page 45
ISO 9001:2008 Certified
Page 46

DevCom User Manual
Step Action
3 Press Yes to continue or No to go back to the Configuration
Detail window.
4 If Yes, pressed, the following prompt appears:
This alerts the user that a configuration change can upset the
process and the device should not be connected to the process.
5 Press OK when device is not connected to the process.
MAN-1048 01/11/2018 Our Quality Management System is Page 46
ISO 9001:2008 Certified
Page 47

DevCom User Manual
Step Action
6 When the configuration write is complete, the following prompt
will be displayed:
Also note that the connection to the device has been reinitialized
in order to refresh the data in the App memory.
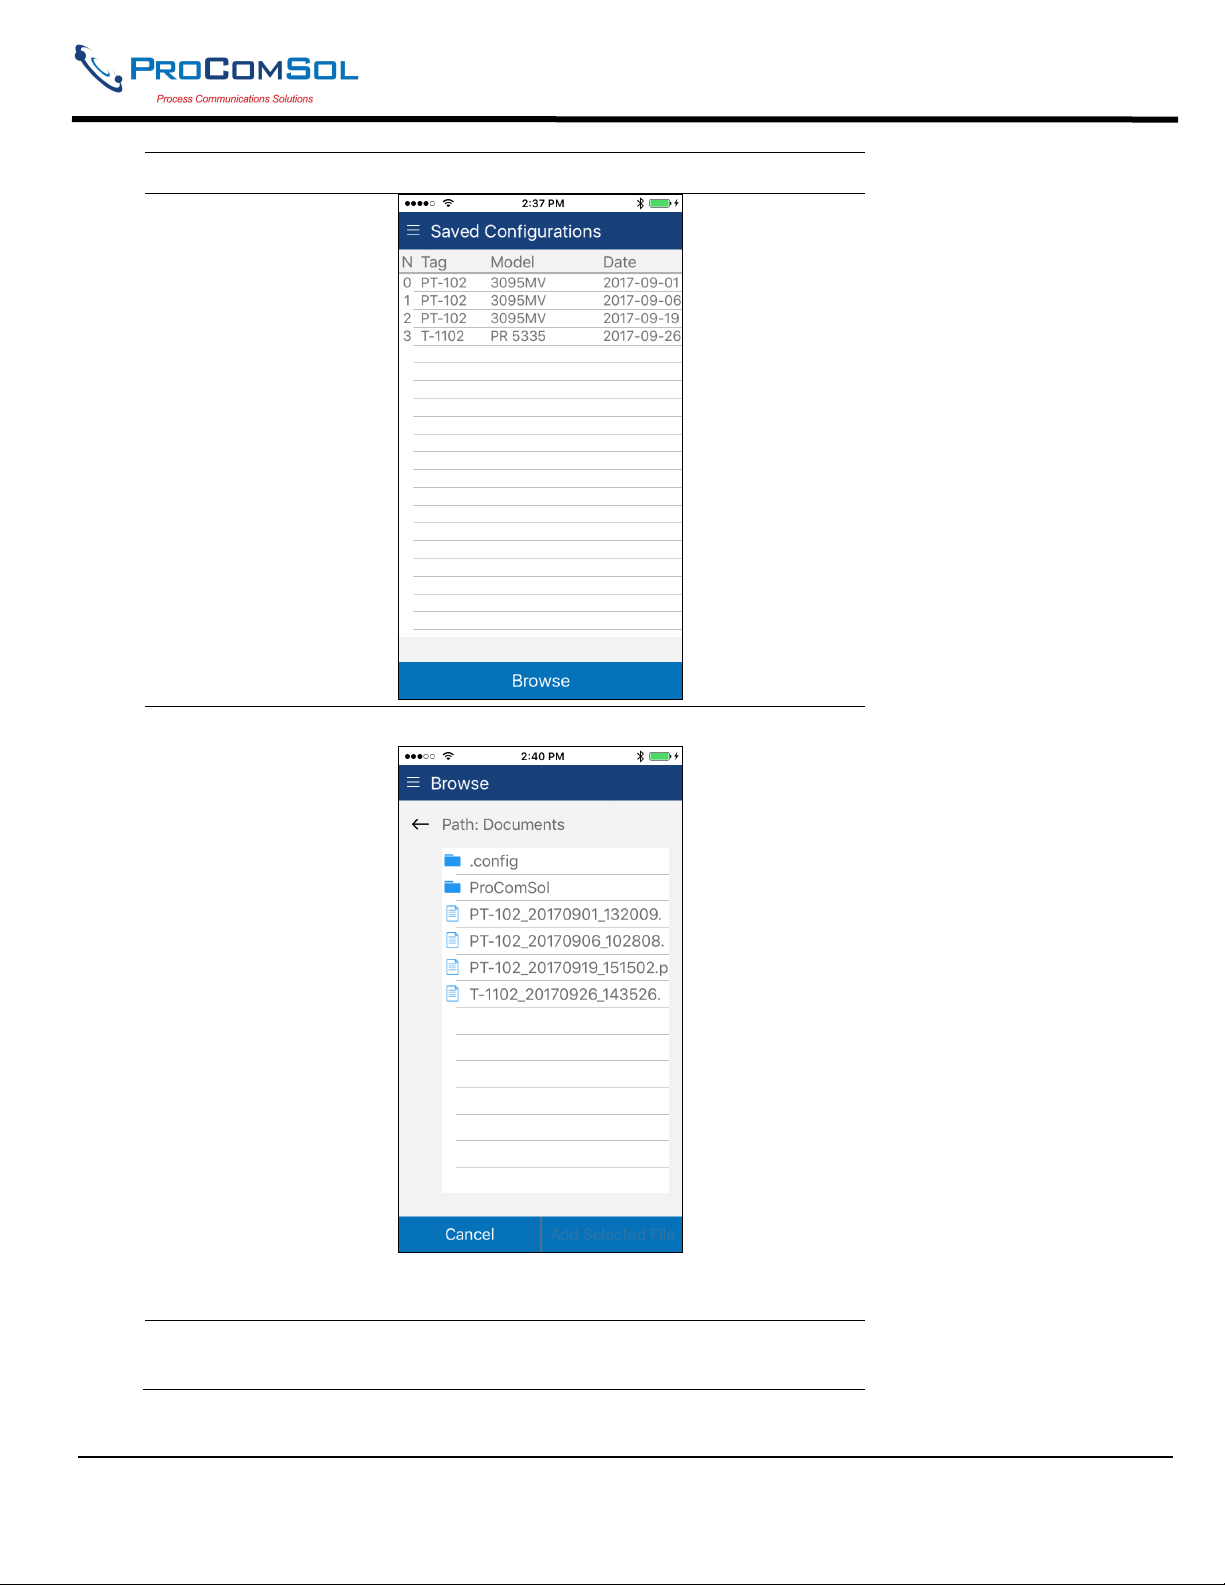
6.5.4.3 Configuration Browse
This function allows the user to bring configurations saved from another source into their device. The other source
can be other DevComDroid users or even DevCom2000 users.
Step Action
1 Copy the zzz.pdf, zzz.dc, and zzz.txt (where zzz is the
configuration root file name) files to the iOS device. The
recommended directory is the /Download directory
2
Select Download Config from the main window. The
Saved Configurations window is displayed:
MAN-1048 01/11/2018 Our Quality Management System is Page 47
ISO 9001:2008 Certified
Page 48
DevCom User Manual
Step Action
3 Press Browse. The Browse window is displayed:
This window will just show the .pdf files. You can navigate to
other directories using the Back key.
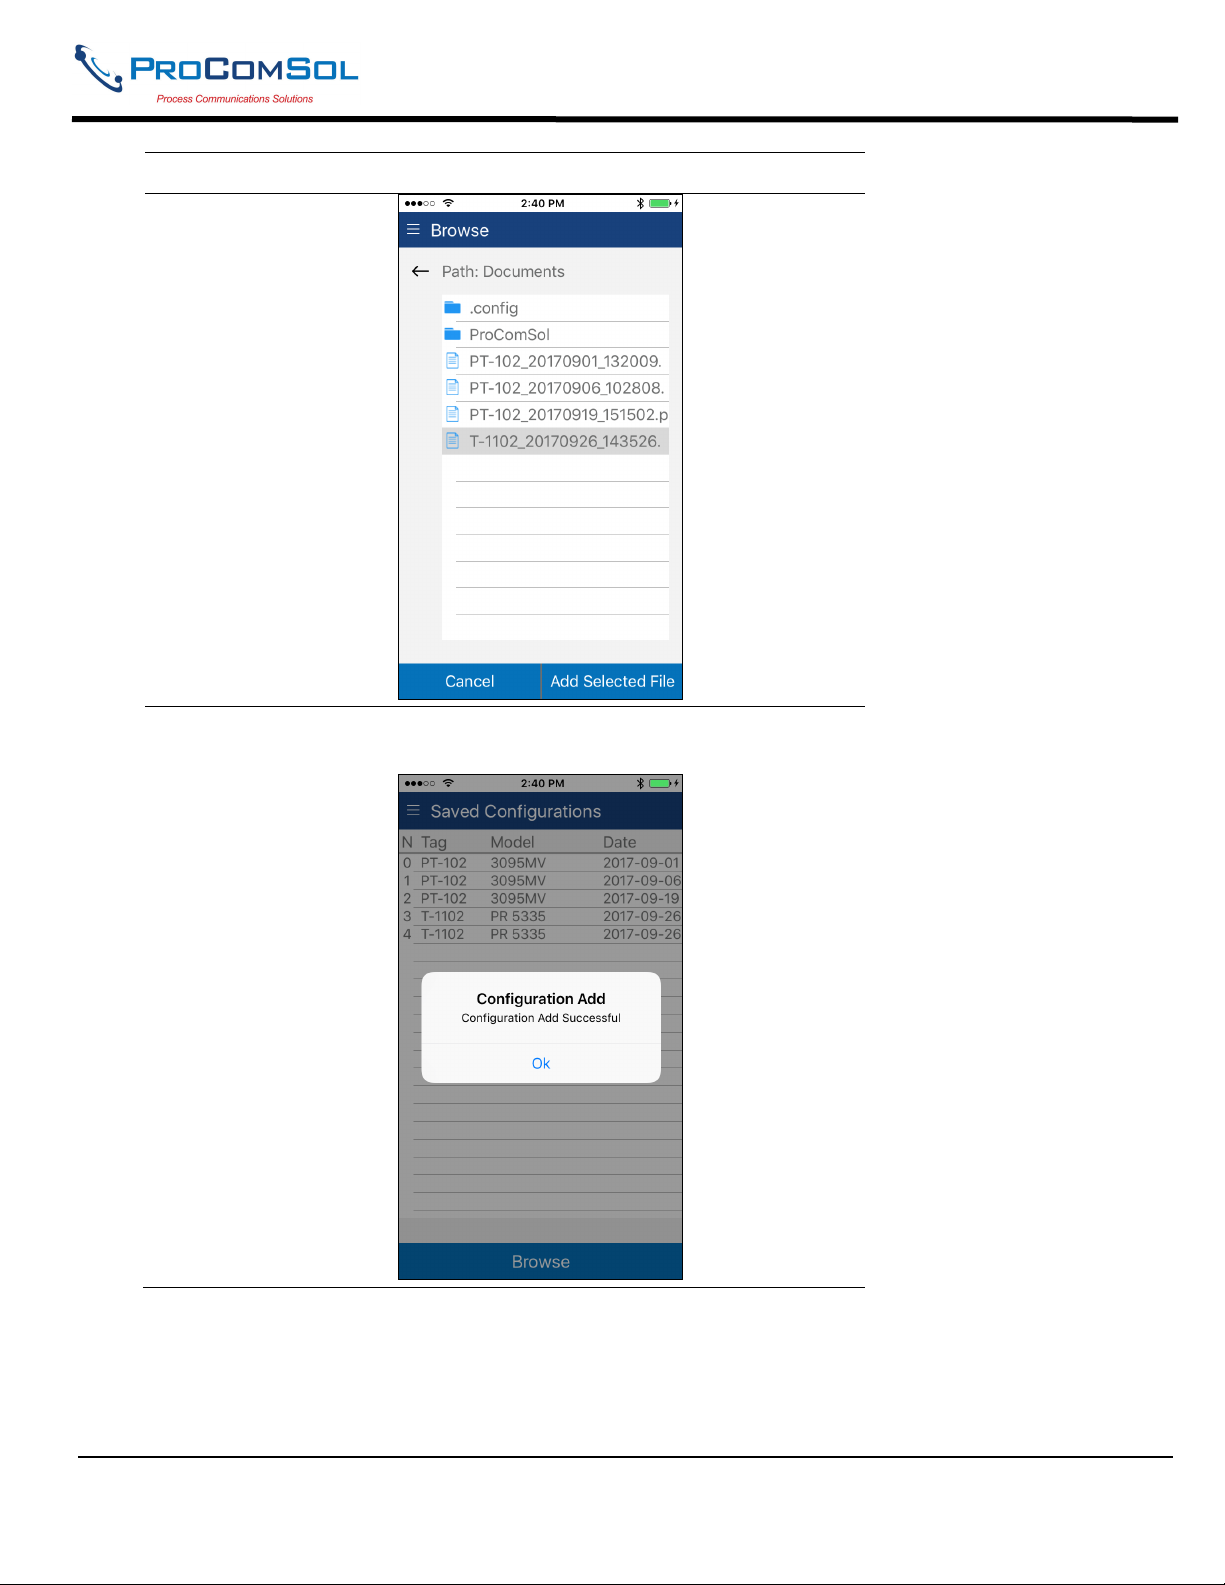
4 Select the desired configuration to add to the device. Once
selected the Add Selected button becomes active:
MAN-1048 01/11/2018 Our Quality Management System is Page 48
ISO 9001:2008 Certified
Page 49
DevCom User Manual
Step Action
5 Press Add Selected, and the following prompt appears when the
Configuration Add is complete:
6.5.5 DD Library
This window allows the user to view the DD Library location, view the library contents, and even add new DD files
to the library.
MAN-1048 01/11/2018 Our Quality Management System is Page 49
ISO 9001:2008 Certified
Page 50
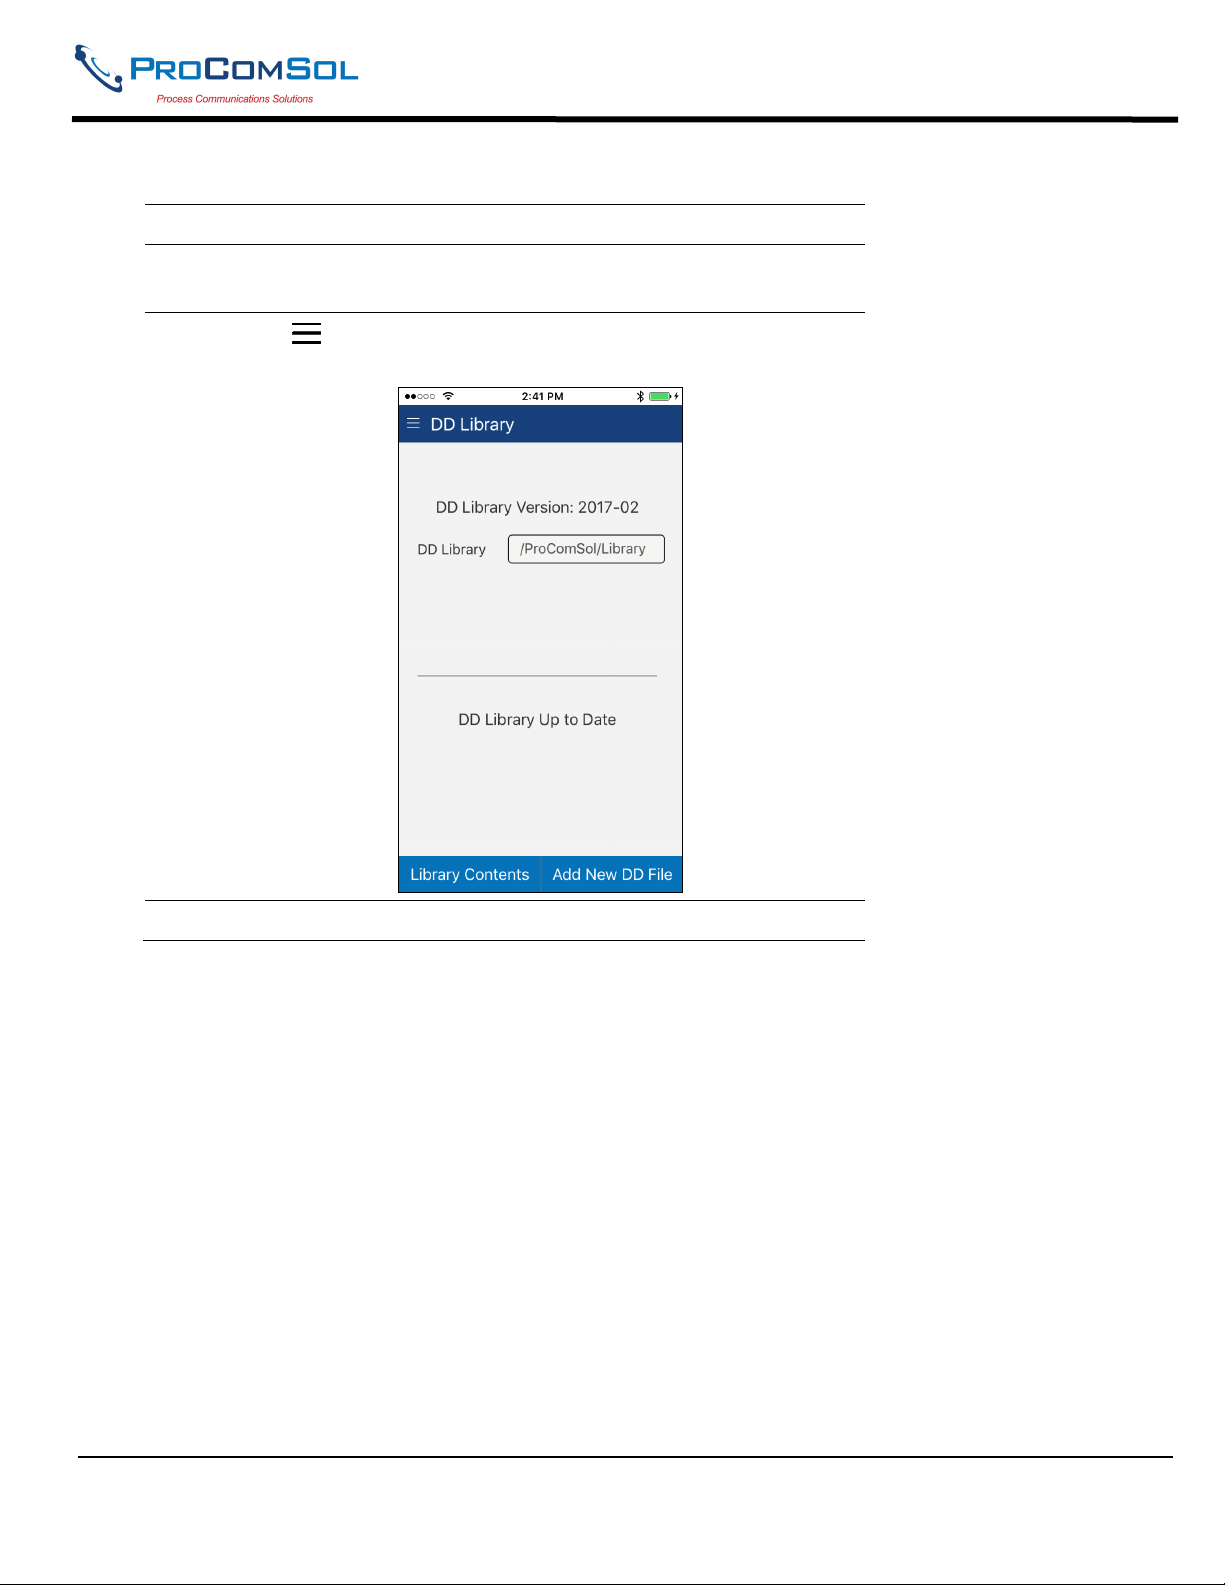
6.5.5.1 View DD Library
Step Action
1 Ensure that the application is running. Communications do
NOT need to have been established.
DevCom User Manual
2
Select DD Library. The DD Library Window is
displayed:
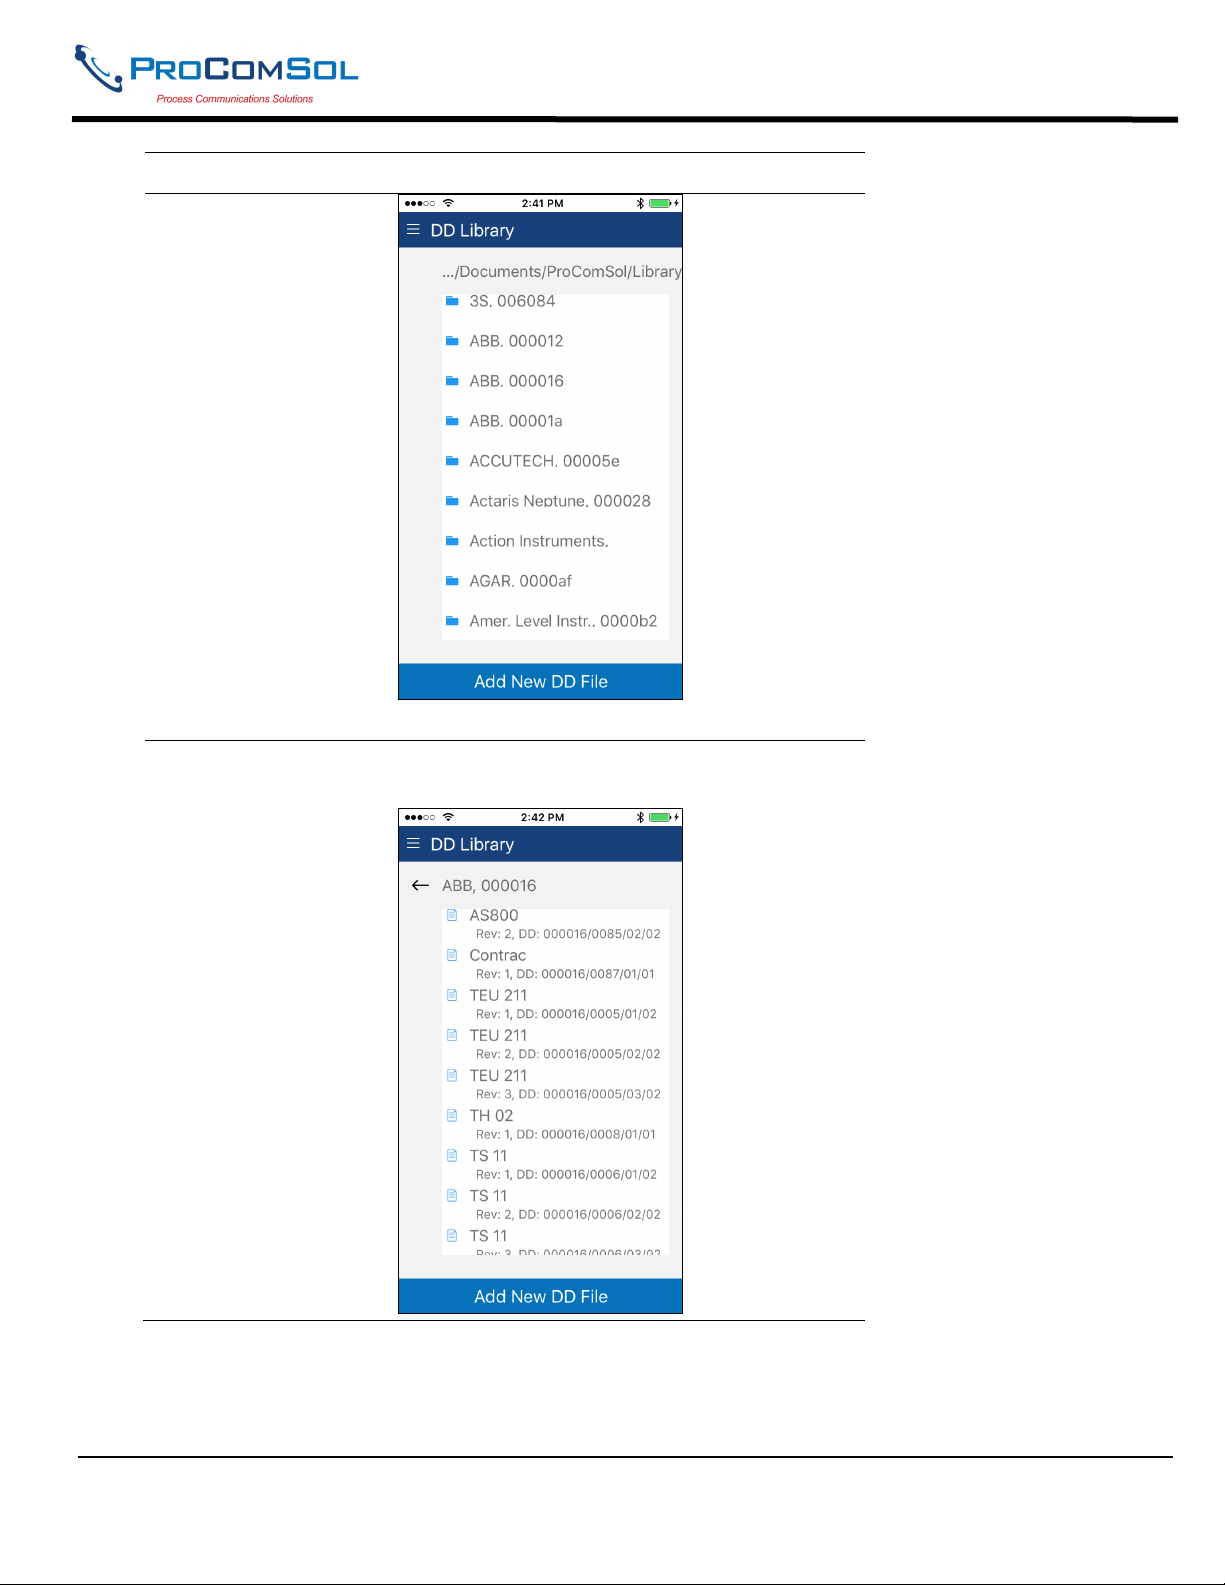
3 Tap “Library Contents” The following Window is displayed:
MAN-1048 01/11/2018 Our Quality Management System is Page 50
ISO 9001:2008 Certified
Page 51
DevCom User Manual
Step Action
The list of manufacturers is shown in alphabetic order.
4 Select a manufacture and the list of devices for that manufacturer
are displayed:
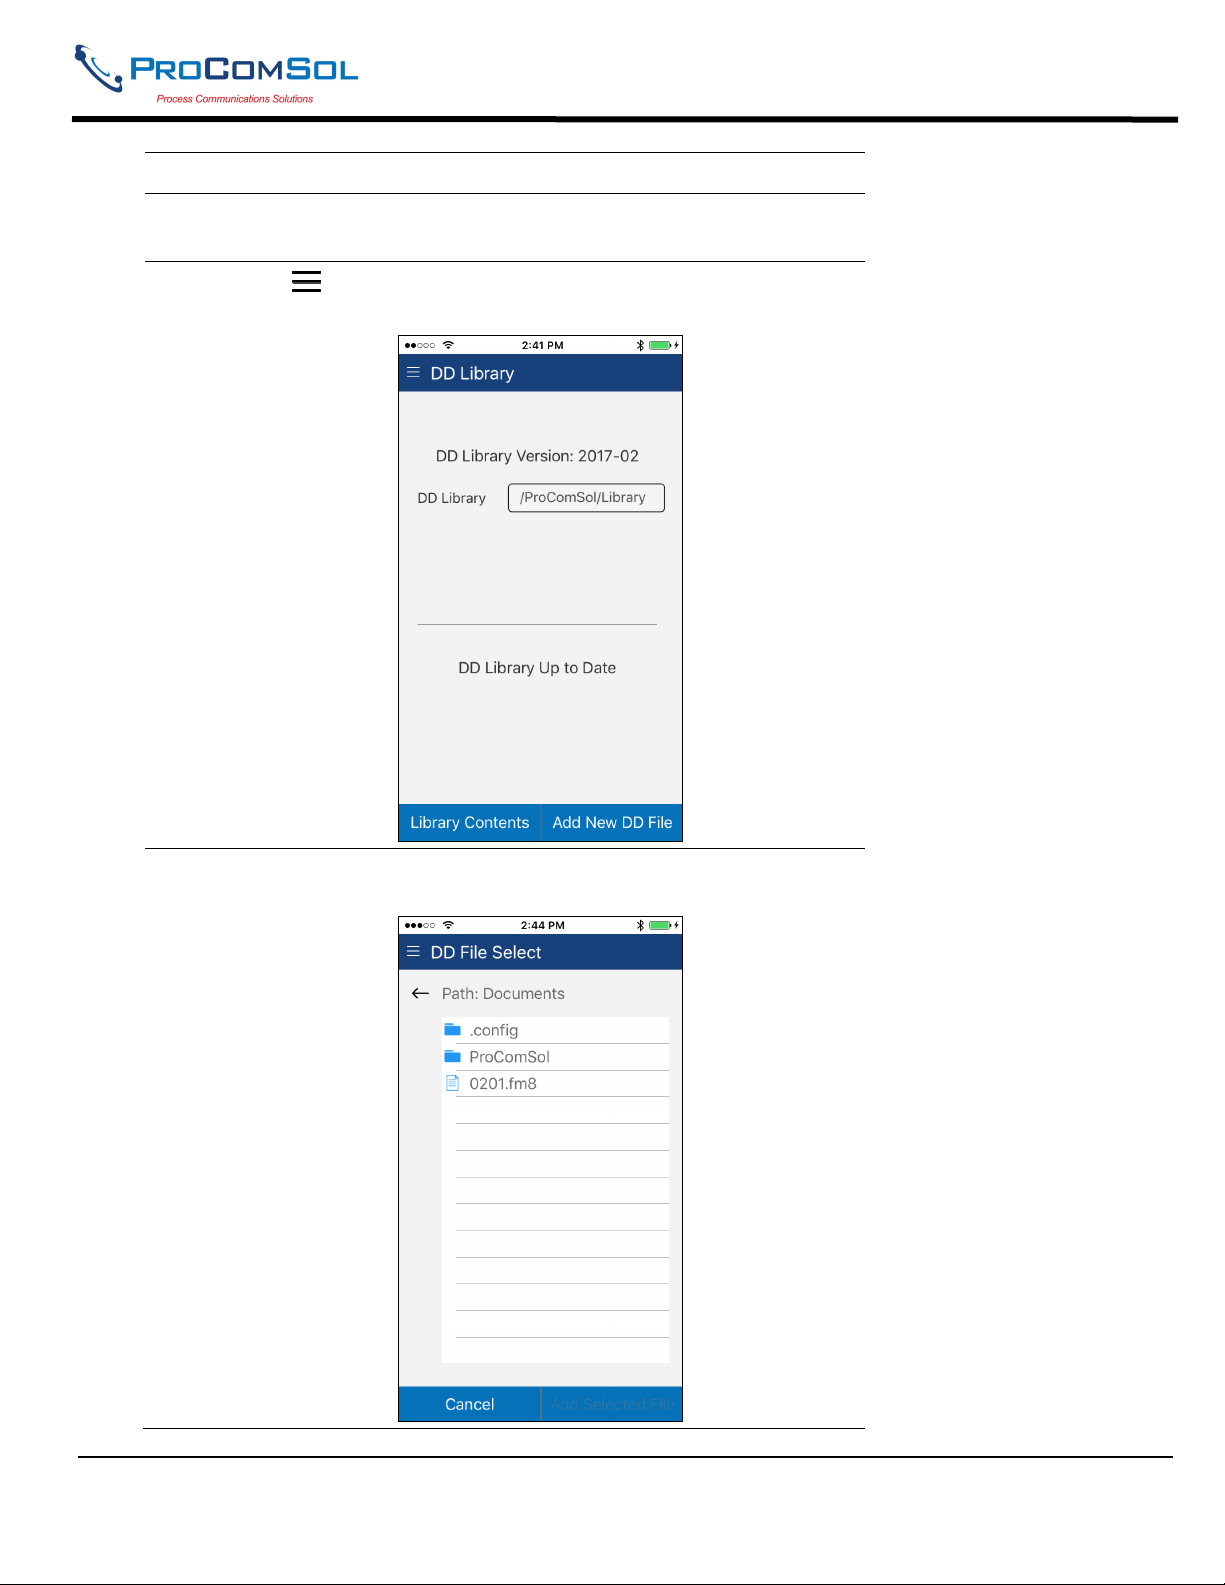
6.5.5.3 Add File to DD Library
MAN-1048 01/11/2018 Our Quality Management System is Page 51
ISO 9001:2008 Certified
Page 52
DevCom User Manual
Step Action
1 Ensure that the application is running. Communications do
NOT need to have been established.
2
Select DD Library. The DD Library Window is
displayed:
3 Tap “Add New DD File” The following file selection Window
is displayed:
MAN-1048 01/11/2018 Our Quality Management System is Page 52
ISO 9001:2008 Certified
Page 53

DevCom User Manual
Step Action
Use the <- key to navigate the device file structure until you find
the file you would like to add.
4 Once the desired file is found, select it to activate the “Add
Selected” Button.
Tap “Add Selected File” to add the file to the DD Library.
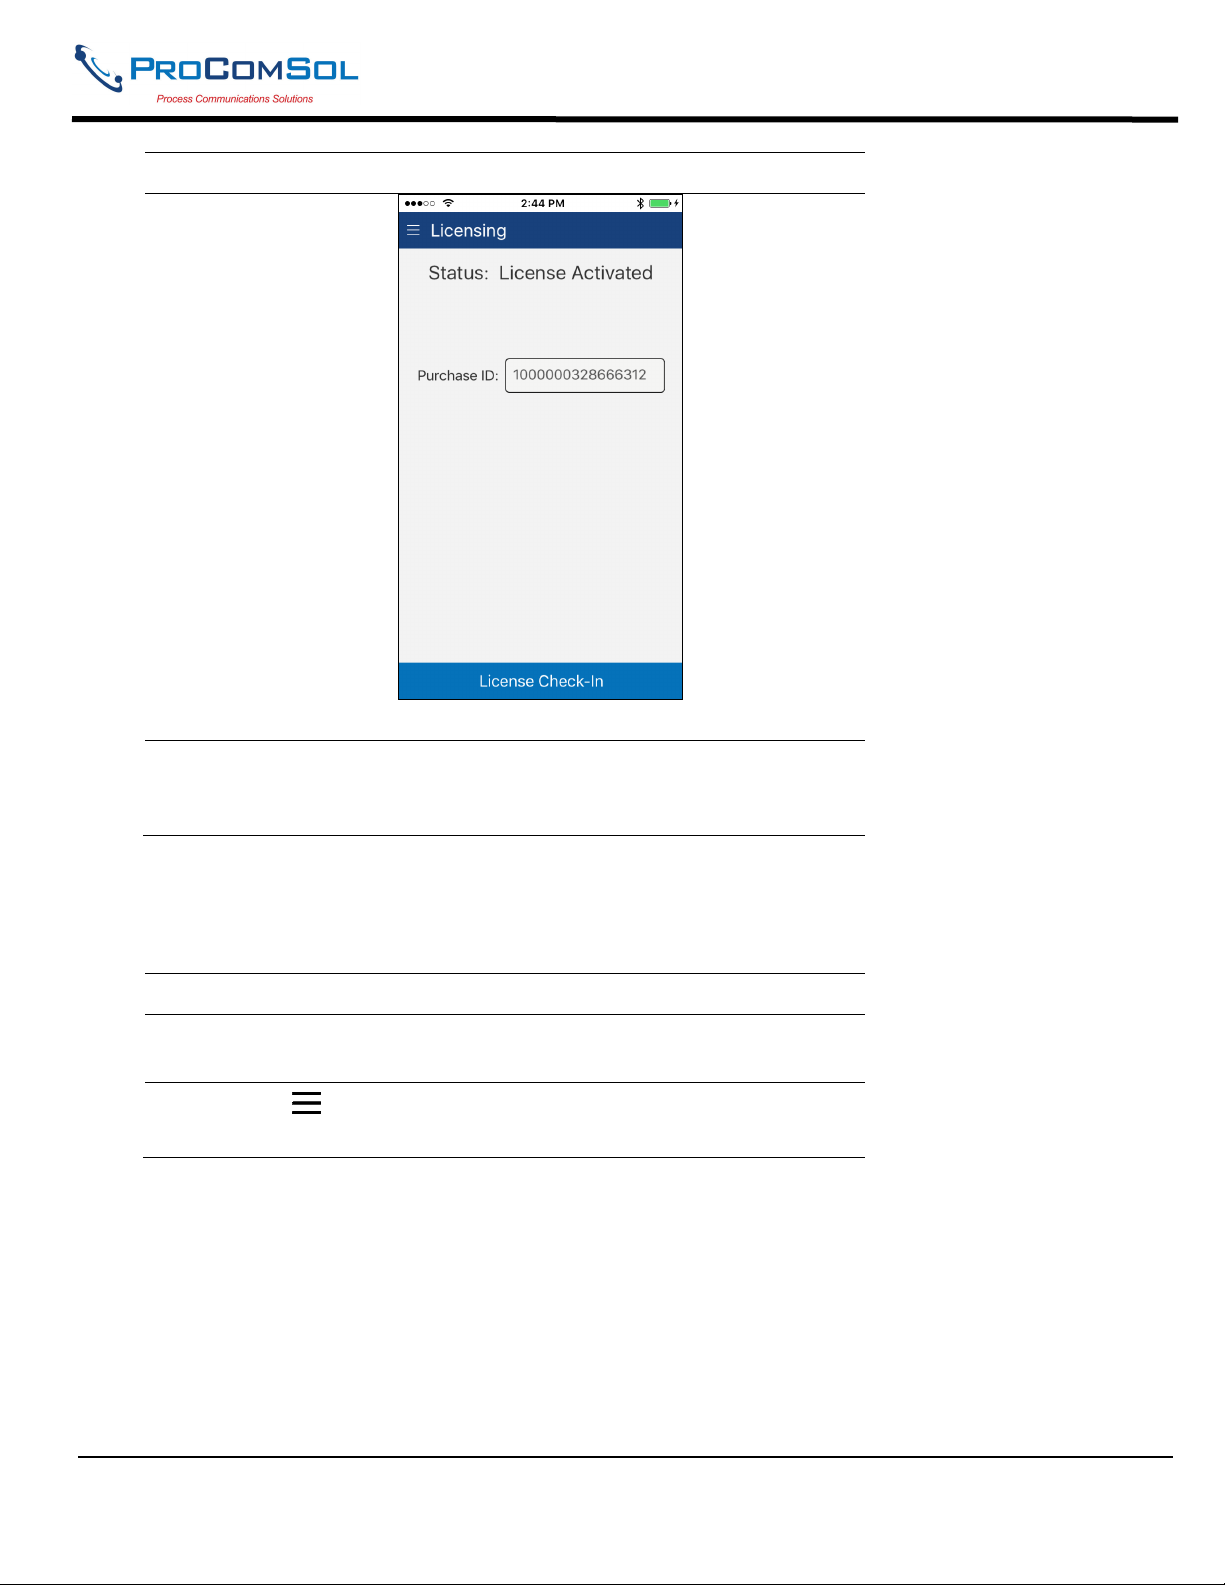
6.5.6 Licensing
The user may need to review license status to get the number of days left in the evaluation for example. This
window shows License details.
Step Action
1 Ensure that the application is running. Communications do
NOT need to have been established.
2
Select Licensing. The Licensing Window is displayed:
MAN-1048 01/11/2018 Our Quality Management System is Page 53
ISO 9001:2008 Certified
Page 54
DevCom User Manual
Step Action
This image shows an Activated license.
3 Press the “License Check-In” to send the license back to our
server. It can then be used on another iOS device. This makes
sharing licenses easy and convenient.
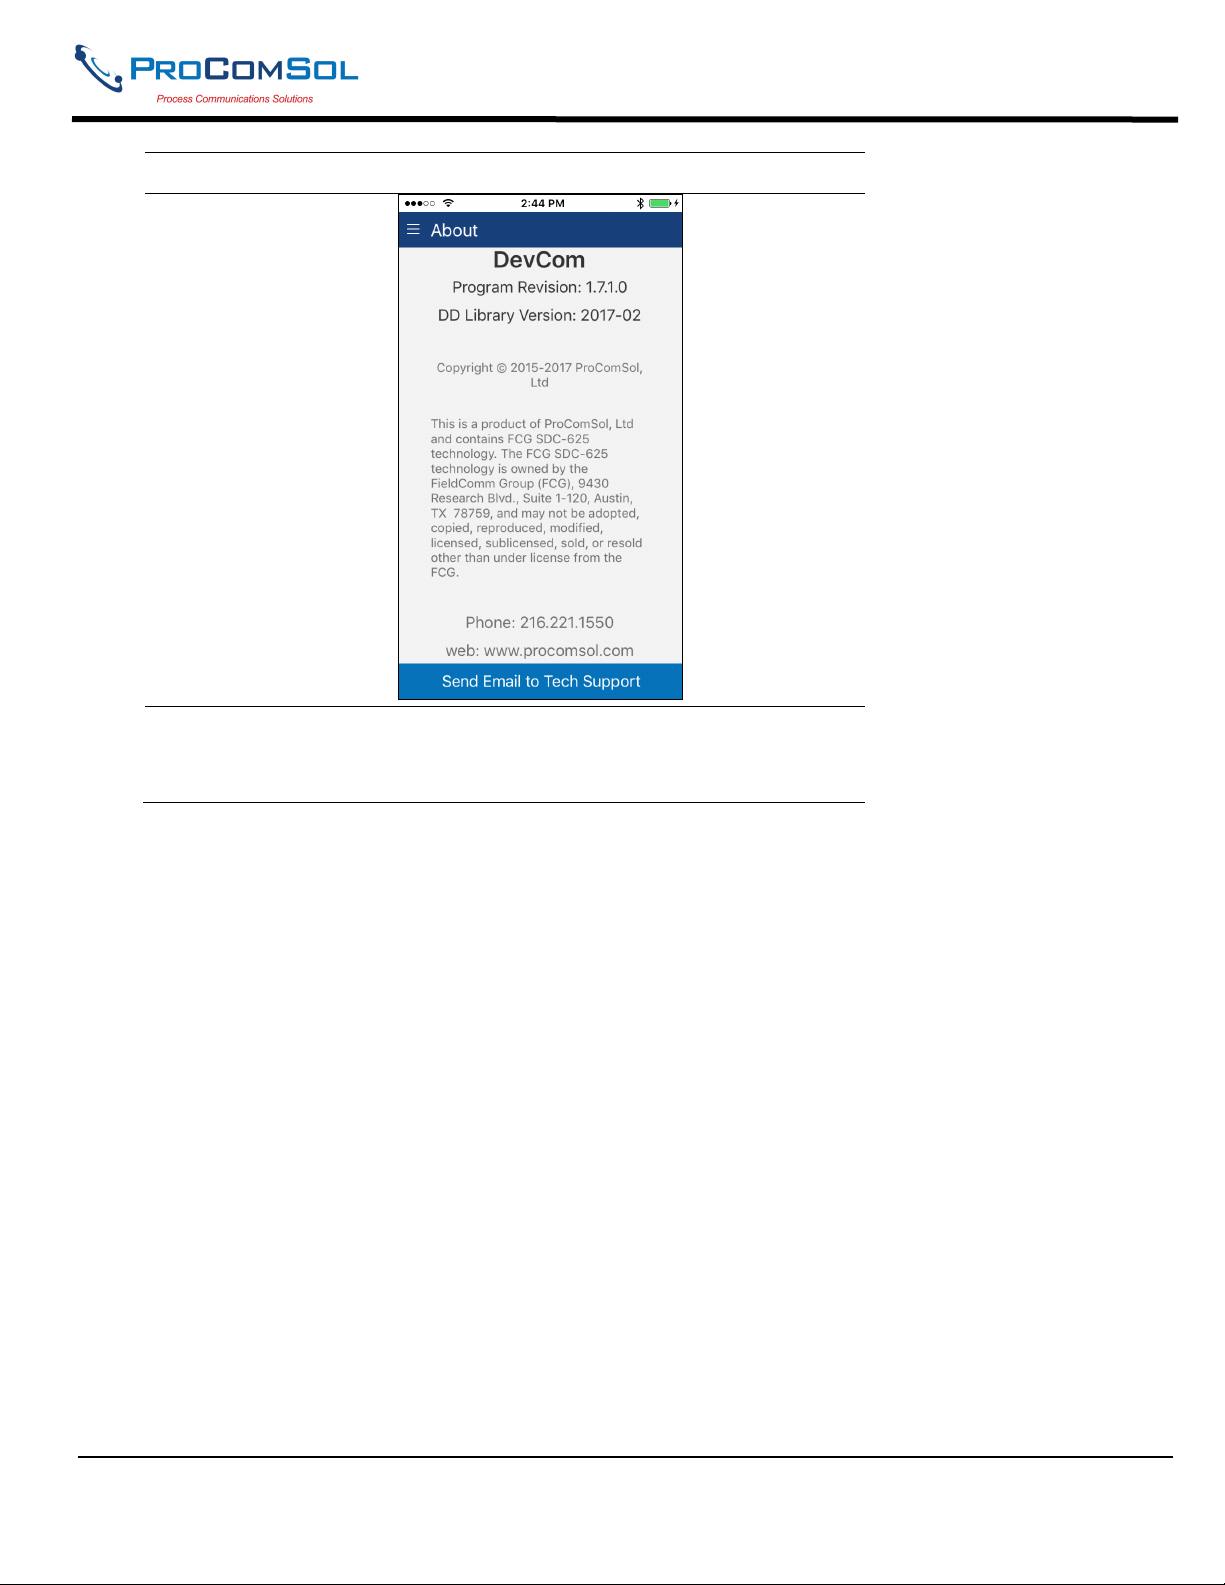
6.5.7 About
This window summarizes revision status and provides support contact information for the DevCom App:
Step Action
1 Ensure that the application is running. Communications do
NOT need to have been established.
2
Select About from the main window. The About window
is displayed:
MAN-1048 01/11/2018 Our Quality Management System is Page 54
ISO 9001:2008 Certified
Page 55
DevCom User Manual
Step Action
3 Press the “Send email to Tech Support” to bring up your Email
App which you can then send to ProComSol to get help for your
issue.
6.6 Mac Interface to Mobile Device
Use iTunes on your Mac to manage files generated by the App. Select your device, then Apps to bring up a screen
similar the one below:
MAN-1048 01/11/2018 Our Quality Management System is Page 55
ISO 9001:2008 Certified
Page 56
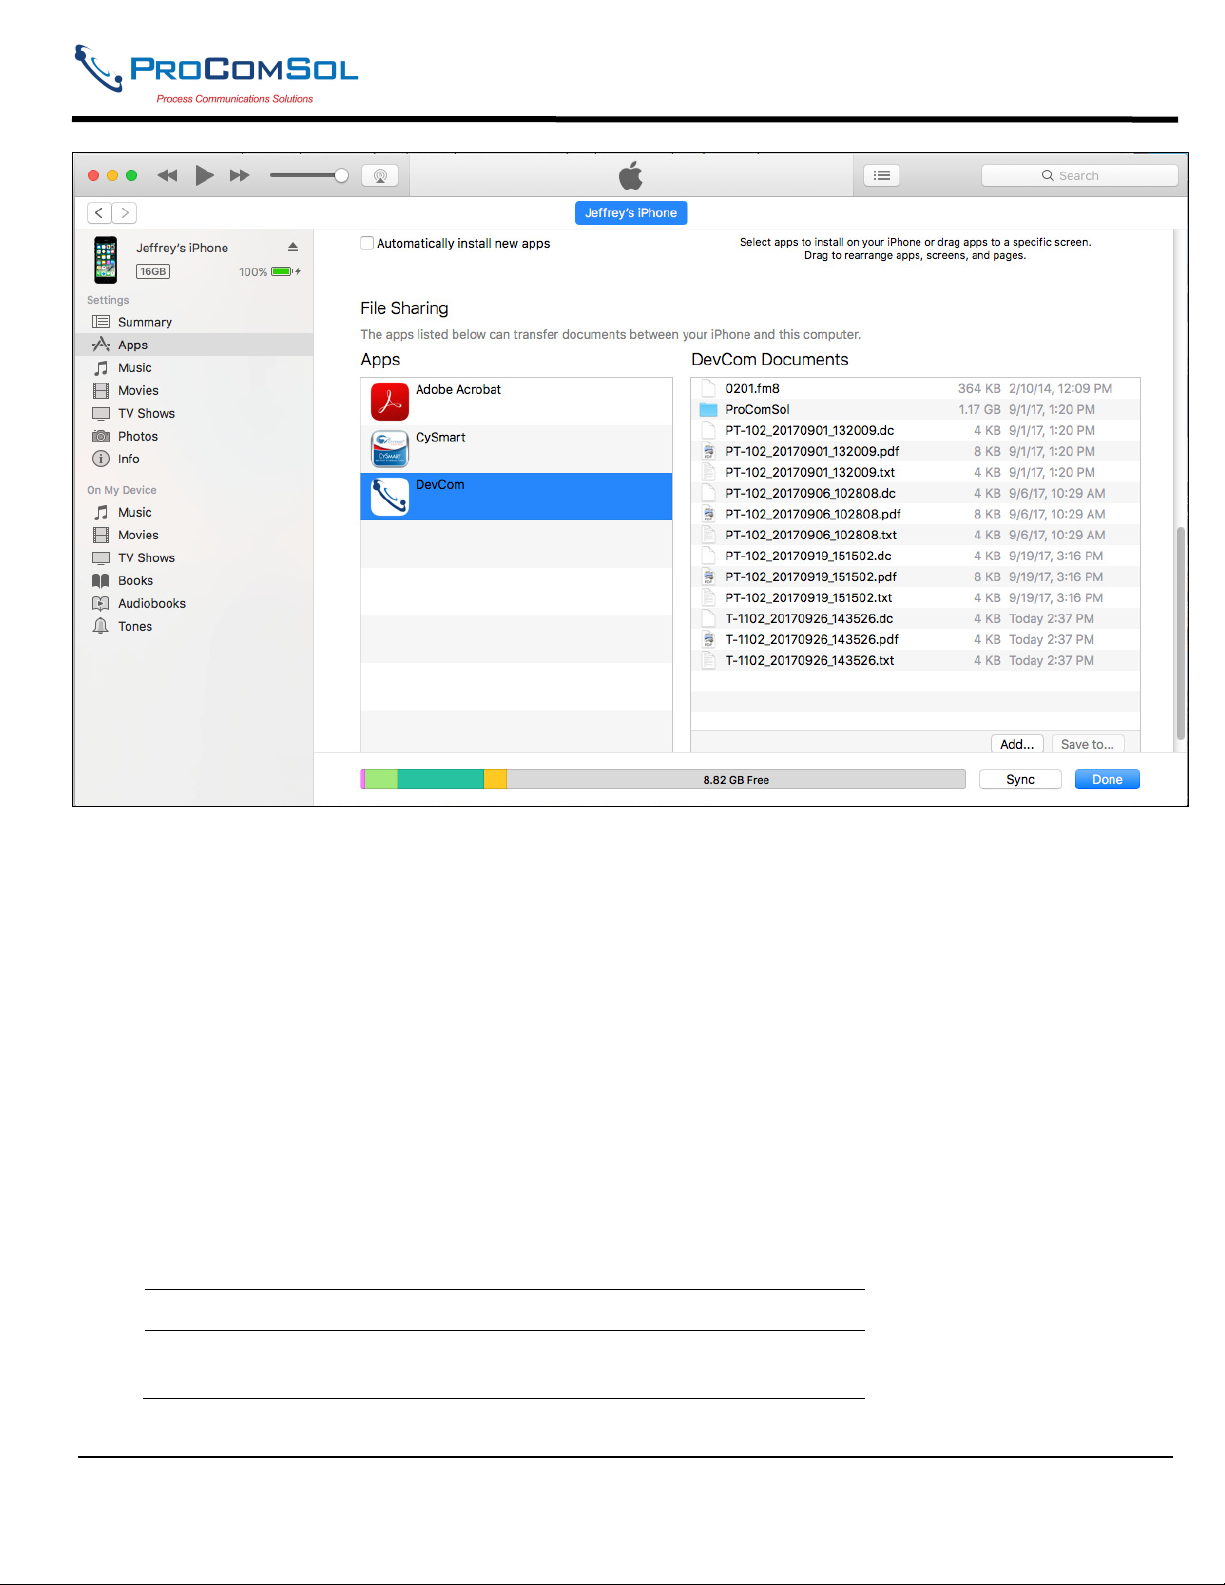
DevCom User Manual
The default location for the saved configuration files is the directory “\DevCom Documents”. Simply highlight the
desired files and copy to your Mac. Once on the Mac, they can be viewed or imported into many different software
packages.
6.7 DD Library Updates
Users who provide their Email address to ProComSol will be notified when DD Library Updates are available. The
Email will provide detailed instructions on how to obtain the update. To update the DD Library, follow Section
4.2.1, Install DD Library.
6.8 HART-IP Interface
6.8.1 Setup
DevCom allows you to connect to your WirelessHART network using HART-IP over an Ethernet connection to the
networks WirelessHART Gateway. Once connected to a device, DevCom behaves just like connected via a
modem. You can view data, edit parameters, etc. Below is the procedure for setting DevCom to use HART-IP and
for connecting to a HART device:
Step Action
1 Go to the Settings Menu and change the Modem Type to
TCP/IP:
MAN-1048 01/11/2018 Our Quality Management System is Page 56
ISO 9001:2008 Certified
Page 57

DevCom User Manual
Step Action
2 Press “Save Settings” to make the setting change.
3 The default network IP address is our demo WirelessHART
network. It is used to demonstrate the HART-IP features of the
DevCom App. If you would like to connect to your network, go
to the Settings Menu again. You will then see this:
MAN-1048 01/11/2018 Our Quality Management System is Page 57
ISO 9001:2008 Certified
Page 58

DevCom User Manual
Step Action
4 Tap “Configure” to bring up the HART-IP Setup Menu:
5 Make the necessary edits for your WirelessHART Gateway and
press “Save Settings”.
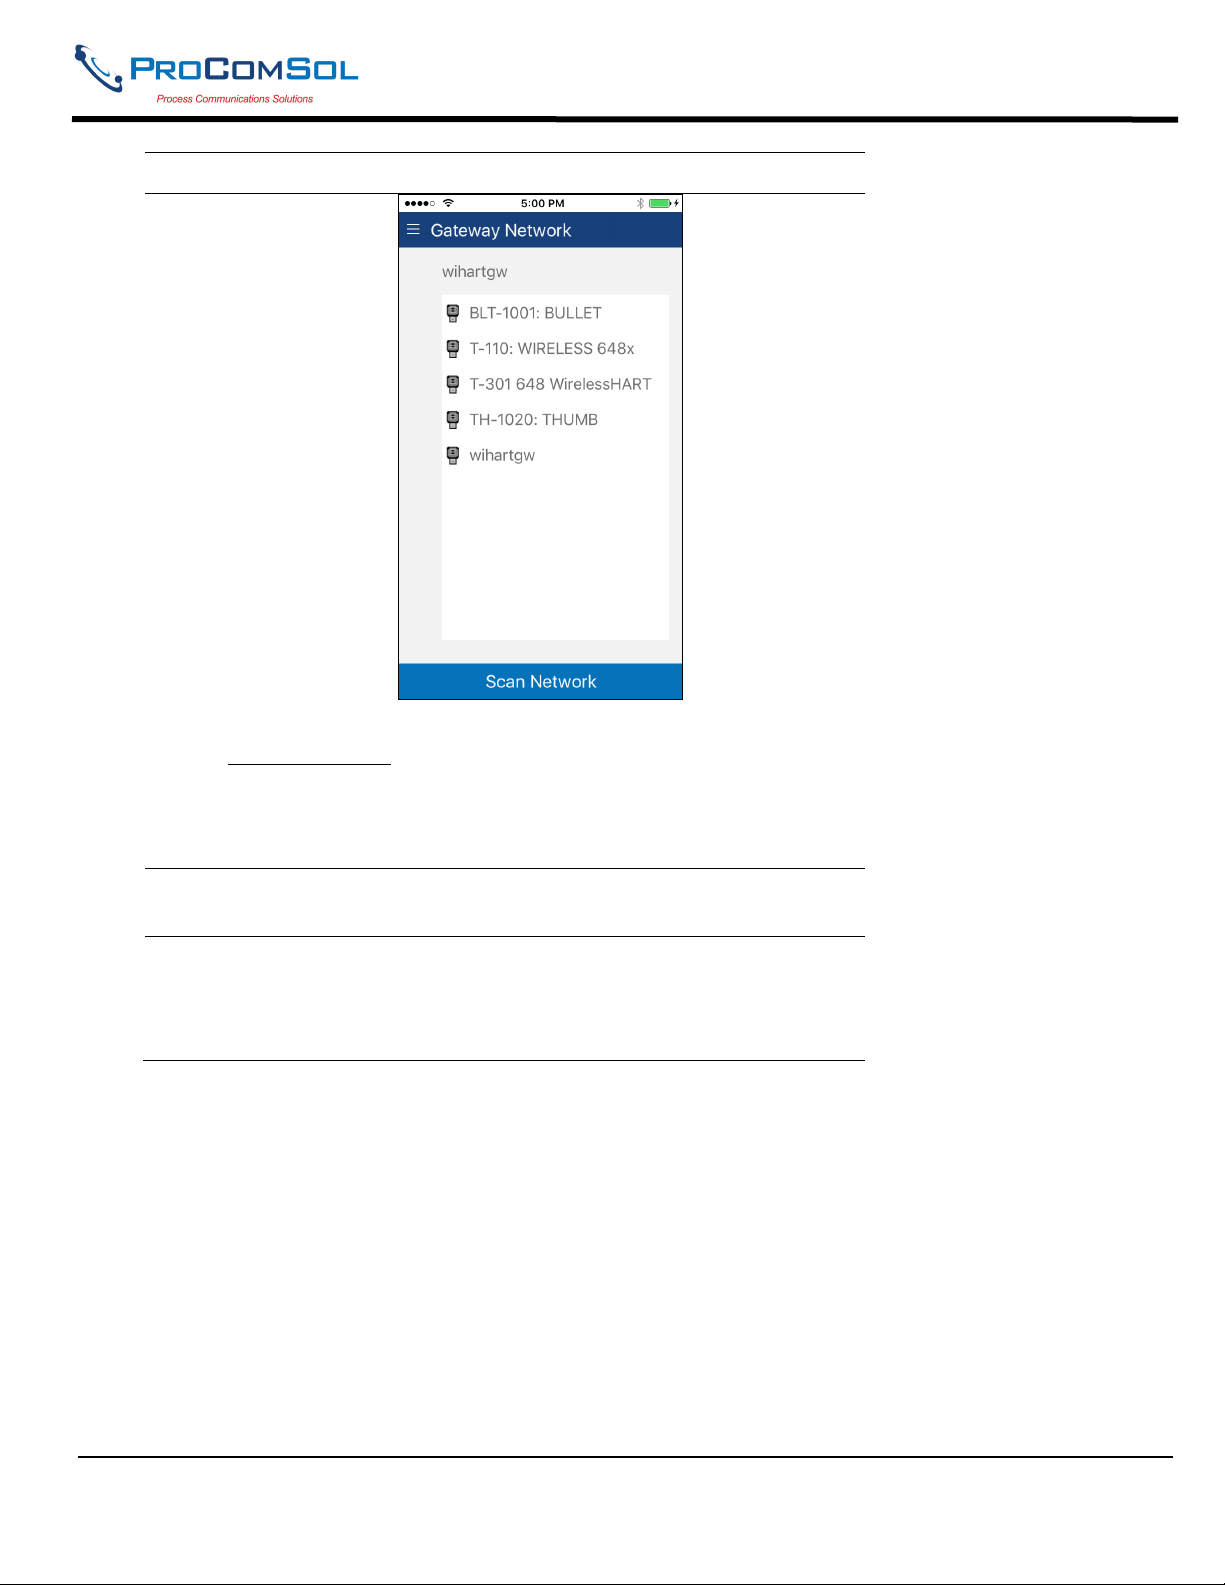
6.8.2 Connecting to a Device
Once the connection to the WirelessHART Gateway is configured, restart DevCom. The App will then connect to
the WirelessHART Gateway and retrieve network hierarchy information. This section describes how to then
connect to the desired device.
Step Action
1 Once the network hierarchy information is retrieved, it is
displayed in the Gateway Network Menu. Note that the example
below if for the ProComSol Demo network and that your
network will look different:
MAN-1048 01/11/2018 Our Quality Management System is Page 58
ISO 9001:2008 Certified
Page 59
DevCom User Manual
Step Action
Item description:
Wihartgw – is the Tag for the WirelessHART Gateway
BLT-1001:BULLET and others are devices on the
WirelessHART network that have sub devices.
2 Press “Scan Network” if you want to refresh the Gateway
Network Menu.
3 Tap a device to show the sub-devices connected to it. Note that
native WirelessHART devices will have itself as a sub-device.
Below is the screen that shows after BLT-1001:BULLET is
tapped. Again this is on our Demo network:
MAN-1048 01/11/2018 Our Quality Management System is Page 59
ISO 9001:2008 Certified
Page 60

DevCom User Manual
Step Action
Item description:
BLT-1001:BULLET – is the root device
P-1001: 3095 and others are the sub-devices connected to the
root device.
4 Tap any of the sub-devices to connect to that device. The
display then looks just like a modem connected device. The
only difference is that the Bluetooth Activity icon is now the
Wireless Activity icon as seen here:
MAN-1048 01/11/2018 Our Quality Management System is Page 60
ISO 9001:2008 Certified
Page 61

DevCom User Manual
Step Action
5 You are now connected to the device and can perform any
DevCom function you like as if you were connected locally
through a modem.
MAN-1048 01/11/2018 Our Quality Management System is Page 61
ISO 9001:2008 Certified
Page 62

DevCom User Manual
Appendix A
Troubleshooting Guide
Problem:
Will not communicate
Hardware Check:
Verify the following:
1. Paired to correct HART Modem
2. Loop power supply is on.
3. Loop resistance between 250 ohms and 1Kohms.
4. Loop current within HART limits.
5. If multi drop configuration, all transmitters in loop have unique addresses.
6. HART interface hardware connected across loop resistor or across transmitter terminals.
MAN-1048 01/11/2018 Our Quality Management System is Page 62
ISO 9001:2008 Certified
Page 63

DevCom User Manual
Appendix B
Contact Information
ProComSol, Ltd
Process Communications Solutions
13001 Athens Ave
Suite 220
Lakewood, OH 44107
USA
Phone: 216.221.1550
Fax: 216.221.1554
Email: sales@procomsol.com
support@procomsol.com
Web: www.procomsol.com
MAN-1048 01/11/2018 Our Quality Management System is Page 63
ISO 9001:2008 Certified
 Loading...