


BIW1Aseries
~0~
Safety and Regulatory Information
Notice for the USA
FCC Part 15: This equipment has been tested and found to comply with
the limits for a class B digital device, pursuant to Part 15 of the FCC Rules.
These limits are designed to provide reasonable protection against harmful
interference in a residential installation. This equipment generates, uses, and
can radiate radio frequency energy and, if not installed and used in
accordance with the instructions, may cause harmful interference to radio
communications. However, this notice is not a guarantee that interference
will not occur in a particular installation.
CAUTION: To comply with the limits for the class B device, pursuant
to Part 15 of the FCC Rules, this device must be installed in computer
equipment certified to comply with the Class B limits.
All cables used to connect the computer and peripherals must be shielded and
grounded. Operation with non-certified computers or non-shielded cables
may result in interference to radio or television reception.
Any changes or modifications not expressly approved by the grantee of
this device could void the user’ s authority to operate the device.
COPYRIGHT: This publication, including all photographs, illustrations
and software, is protected under international copyright laws, with all rights
reserved. Neither this manual, nor any of the material contained herein, may
be reproduced without the express written consent of the manufacturer.
DISCLAIMER: The information in this document is subject to change
without notice. The manufacture makes no representations or warranties with
respect to the contents hereof and specifically disclaims any implied
warranties of merchantability or fitness for any particular purpose.

BIW1Aseries
~1~
TABLE OF CONTENTS
CH1. MOTHERBOARD FEATURE ..................................................... 2
1.1 ABOUT THE MANUAL ...................................................... 4
1.2 SPECIFICATIONS............................................................. 5
1.3 DIFINITION OF BVC1A
series MODEL ............................... 7
1.4 POWER OFF CONTROL SOFTWARE ............................ 7
1.5 PACKAGING CHECK LIST............................................... 8
CH2. SETUP GUIDE............................................................................ 9
2.1 MOTHERBOARD LAYOUT............................................... 9
2.2 CONNECTOR & JUMPER REFERENCE CHART ......... 10
2.3 THE SETUP STEPS........................................................ 11
2.3-1 JUMPER & CONNECTOR SETTING ................... 11
2.3-2 MEMORY INSTALLATION.................................... 22
2.3-3 HOW TO INSTALL THE CPU ............................... 25
2.3-4 INSTALLING THE MOTHERBOARD.................... 27
2.3-5 INSTALLING THE INTERFACE CARD ................ 28
2.3-6 INSTALLING ACCESSORY CABLES .................. 29
CH3. AWARD BIOS SETUP ............................................................. 31
3.1 THE MAIN MENU............................................................ 33
3.2 STANDARD CMOS SETUP............................................ 35
3.3 ADVANCED BIOS FEATURES SETUP.......................... 37
3.4 ADVANCED CHIPSET FEATURES SETUP .................. 40
3.5 INTEGRATED PERIPHERALS ....................................... 43
3.6 POWER MANAGEMENT SETUP ................................... 46
3.7 PNP / PCI CONFIGURATION SETUP............................ 49
3.8 PC HEALTH STATUS ..................................................... 50
3.9 FREQUENCY / VOLTAGE CONTROL ........................... 51
3.10
LOAD FAIL-SAFE DEFAULTS...................................... 52
3.11
LOAD OPTIMIZED DEFAULTS.................................... 52
3.12 SUPERVISOR/USER PASSWORD SETTING ............. 52
3.13 SAVE AND EXIT SETUP OPTION ............................... 53
3.14 EXIT WITHOUT SAVING OPTION ............................... 49
CH4. SOFTWARE SETUP ................................................................ 54
4.1 INSTALLING THE IDE BUS MASTER DRIVER ............. 54
4.2 INSTALLING THE INTEL 810 VGA DRIVER.................. 56
4.3 INSTALLING THE ADI 1881 AUDIO DRIVER....................57

BIW1Aseries
~2~
Based on Intel’s 810 GMCHset & ICH (82810-DC100 + 82801)
chipsets, the BIW1A is an advanced motherboard that comes with onboard
audio and video capabilities, an audio modem riser slot, a 4MB BIOS that
includes built-in anti-virus protection and UltraDMA/66 technology for
lightning-fast IDE transfer speeds.
The BIW1A is an ATX-sized motherboard, measuring 305mm by 173
mm, and it uses a four-layer printed circuit board. Designed for a Socket 370
CPU, the BIW1A also includes two DIMM sockets for the addition of up to
512MB of memory. The bus system supports speeds of 66MHz to 100MHz,
which means either inexpensive 66MHz or high-performance 100MHz
memory modules can be added to the system.
In addition to its 32-bit onboard sound functionality, the BIW1A comes
with an integrated VGA adapter with 2D and 3D graphics engines and 4MB
of onboard video memory. An audio modem riser slot is included as well as
hardware monitoring and wake-on LAN capabilities. Built-in anti-virus
protection ensures you will maintain a clean operating environment free of
unwanted viruses. The BIW1A also features UltraDMA/66 technology,
which allows for Master IDE transfer rates of up to 66MB/sec.
The BIW1A is a powerful platform that leverages the benefits of a lowcost system with high-performance functionality, and we are confident you
will see for yourself how convenient this motherboard is when you assemble
your system.
FEATURES
Full-function Processing -
Intel’ s new-generation chipset—t he Intel 810 GMCHset —supports all Socket
370 and compatible processors. The motherboard comes with many excellent
functions built in, such as an audio modem riser slot, onboard 3D graphics,
UltraDMA/66 support and built-in anti-virus protection. The motherboard
enables users to move up to optimized performance at a low cost. Processor
Chapter 1
Motherboard Feature Introduction

BIW1Aseries
~3~
speed configurations are automatically set through the board’ s firmware,
which means changing switch or jumper settings on the motherboard is not
necessary.
High Performance -
The board has two DIMM sockets for the installation of 168-pin, 3.3V nonbuffered DIMM memory modules. The DIMM memory modules must be
SDRAM memory chips. The board supports a memory bus of 100/66MHz,
and each DIMM socket can accept modules up to 256MB in capacity for up
to 512MB of total system memory.
3D Graphic VGA & Clear 32-bit Audio Built In -
Full multimedia function is integrated onto the motherboard, which means
you won’ t need to spend extra money on additional adapters, processors and
cards. Either 2D or 3D graphics can be displayed, and the motherboard
comes with a 4MB onboard SDRAM display cache that supports 1024 X 768
X 16-bit 3D graphics and 1600 X 1200 X 8-bit color 2D graphics. AC’97
DAC/ADC, which is built into the audio CODEC, reduces noise and results
in improved audio quality and performance for a signal to noise ratio of
+90dB. These features greatly improve voice synthesis and recognition.
Double or Quadruple IDE Transfer Speeds -
IDE transfers using UltraDMA/33 Bus Master IDE technology can handle
rates of up to 33MB/sec., while UltraDMA/66 technology supports IDE
transfer speeds of 66MB/sec. Best of all, this technology is compatible with
existing ATA-2 IDE specifications, so there is no need to upgrade current
IDE devices or cables.
Slot Expansion Options -
The motherboard has a full set of expansion slots, with five usable slots: four
32-bit PCI slots and one 8/16-bit ISA slot. The ISA slot and one PCI slot
share the same physical area, which means you cannot use both at the same
time.(BIW1A-I only)
Integrated I/O -
With its built-in Windbond I/O chip, this motherboard has a comprehensive
set of integrated I/O ports. The I/O port array features PS/2 keyboard and
mouse ports, a parallel port, two USB ports, two serial ports, a monitor port,
a game/MIDI port, and three audio jacks. You may also use the built-in

BIW1Aseries
~4~
motherboard header to add in an infrared port. In addition, the motherboard
has two PCI-IDE channels and a floppy disk drive interface.
ACPI Ready -
APCI (Advanced Configuration and Power Interface) technology provides
for more energy saving functions for future operating systems supporting OS
Director Power Management (OSPM) functionality. With these features
implemented in the operating system, your system can be ready around the
clock while meeting all energy-saving standards.
Programmable Firmware -
The motherboard includes a 4MB Award BIOS that allows CPU
parameters to be set through the BIOS. The firmware BIOS includes a new,
easy-to-use interface that gives users more control over their system’ s
performance. The fully programmable firmware provides enhanced system
features and allows users to set power management, CPU and memory timing
levels, as well as LAN and modem wake-up alarms.
1.1 ABOUT THE MANUAL
The manual consist of the following chapters:
CH1. Motherboard features introduction – Introduce the features of
BIW1A
series and the checklist of items that are shipped with the
package.
CH2. Setup guide – Let you learn how to install the motherboard and get
your system up and running.
CH3.
Award BIOS setup – Configure the BIOS of motherboard for optimum
performance.
CH4.
Software setup – Let you learn how to install the software drivers and
support programs that are provided with this motherboard.

BIW1Aseries
~5~
1.2 SPECIFICATIONS
Chipset
Intel 810 GMCHset & ICH (82810-DC100 + 82801)
solution.
Processor
Socket 370 Support.
Intel Celeron processor 300MHz ~ 500MHz and higher.
Bus
Architecture
PCI/ISA.
Clock Generator
66.8, 68.3, 70, 75, 100 up to 150 MHz.
DRAM Modules
2 x 168 pin DIMM Sockets
Support Maximum Memory Size to 512 MB SDRAM
PC100 SDRAM.
BIOS
4Mbit Firmware Hub (82802AB).
Award PnP BIOS with enhanced ACPI feature for PC98
compliance
Supports 120MB ATAPI floppy disk.
Supports ZIP disk drive.
Supports multi-boot from IDE, SCSI, CD-ROM and
FDD.
Supports software clock frequency control.
On Board VGA
Port
Graphics and Memory Controller Hub (82810-DC100
GMCH).
Gamma Corrected Video.
DDC2B Compliant.
Integrated 2D & 3D Graphics Engines.
2D Graphics Up to 1600 x 1200 in 8bit Color at 85Hz
Refresh.
4M Display Cache.
Integrated 24 bit 230MHz DAC.
On Board Sounds
AC97 Codec Compliant.
1 x CD audio in.
1 x Mic in.
1 x Line in.
1 x Speaker out.

BIW1Aseries
~6~
On Board I/O
1 x Digital Video.
1 x Floppy port (up to 2.88MB, 3 mode floppy supported
& LS-120).
2 x Serial ports.
1 x Parallel port (SPP/EPP/ECP).
2 x USB.
1 x PS/2 mouse.
1 x PS/2 keyboard.
1 x IrDA.
1 x Joystick.
On Board IDE
Port
Dual Ultra DMA66 IDE ports.
ATAPI IDE CD-ROM & LS-120.
Expansion slot
1 x AMR Riser slot
4 x 32-bit PCI slots.
1 x 16-bit ISA slot. (Optional)
ICH
I/O Controller Hub (82801AA I/O).
Supports PCI Rev 2.2 Specification.
Supports PCI 6 Master Devices on PCI.
Supports IDE Ultra DMA66 Mode.
AC 97 2.1 Link Compliant.
Low Pin Count (LPC) I/F.
SMbus Interface.
Power Management Logic.
Firmware Hub I/F.
LPC I/F Chip &
Hardware
Monitoring
Winbond W83627HF.
PCI to ISA Bridge
set
W83628F & W83629D. (Optional)
Advanced
Features
1. Supports keyboard & mouse power on feature with
ATX power V2.01
3. Ring Indicate header.
4. ACPI 1.0 Compliant.
5. APM Rev 1.2 Compliant.
Form Factor
ATX Size (173mm x 305mm)

BIW1Aseries
~7~
1.3 DEFINITION OF BIW1Aseries MODEL
BIW1Aseries have different function for meeting customer demand. When you
purchase the motherboard of BIW1A
series you just follow below description to
know which extra function you have.
1. Find the model of BIW1A
series you have purchased.
2. Check having any words after the “Dash” mark of model.
3. Review these words show what Extra functions / Optional Functions.
Codes Definition
Code Description
I ISA Slot
Example:
♦ BIW1A-I Ш There is a word “I” after the Dash mark, so the extra function
is with ISA Slot.
It is easily to differentiate between varieties of BIW1A
series motherboards.
1.4 POWER OFF CONTROL SOFTWARE
The motherboard design supports the software power off Control feature
through the SMI code in the BIOS under WIN98/95 operating system
environment. It is an ATX form factor, so you should use ATX power
supply.
First, connect the power switch cable (provided by the ATX case
Supplier) to the connector [ PWBT ] on the motherboard (Please refer to the
following illustration). In the BIOS screen of “POWER MANAGEMENT
SETUP”, choose “User Defined”(or min power saving or Max power saving)
in “POWER MANAGEMENT” and choose “Yes” in “PM Control by APM”.
BIW1Aseries
~8~
Note: BIOS Setup. Please refer the “Chapter 3 Award BIOS Setup”
In Windows 98/95, under the “SHUT DOWN” option, the computer’ s
power will switch off automatically and put the PC in a suspend mode. This
will be indicated by a blinking power light. To restart the system, simply
press the Power Button.
1.5 PACKAGING CHECK LIST
The Motherboard comes securely packed in a gift box and shipping carton.
If any of the above items are missing or damaged, please contact your
supplier.
The motherboard contains:
Q’ TY Description
1 Motherboard : With Intel 810 GMCHset & ICH
(82810-DC100 + 82801) chipset
1 Driver : CD-Title w/Installation label
• PC-Cillin Software
• Motherboard Bus master Driver
• Audio Driver
1 Cable : IDE Cable
1 Cable : Floppy Cable
1 Cable : COM2 Cable
1 User’ s guide : PC-Cillin
1 Manual : User’ s manual
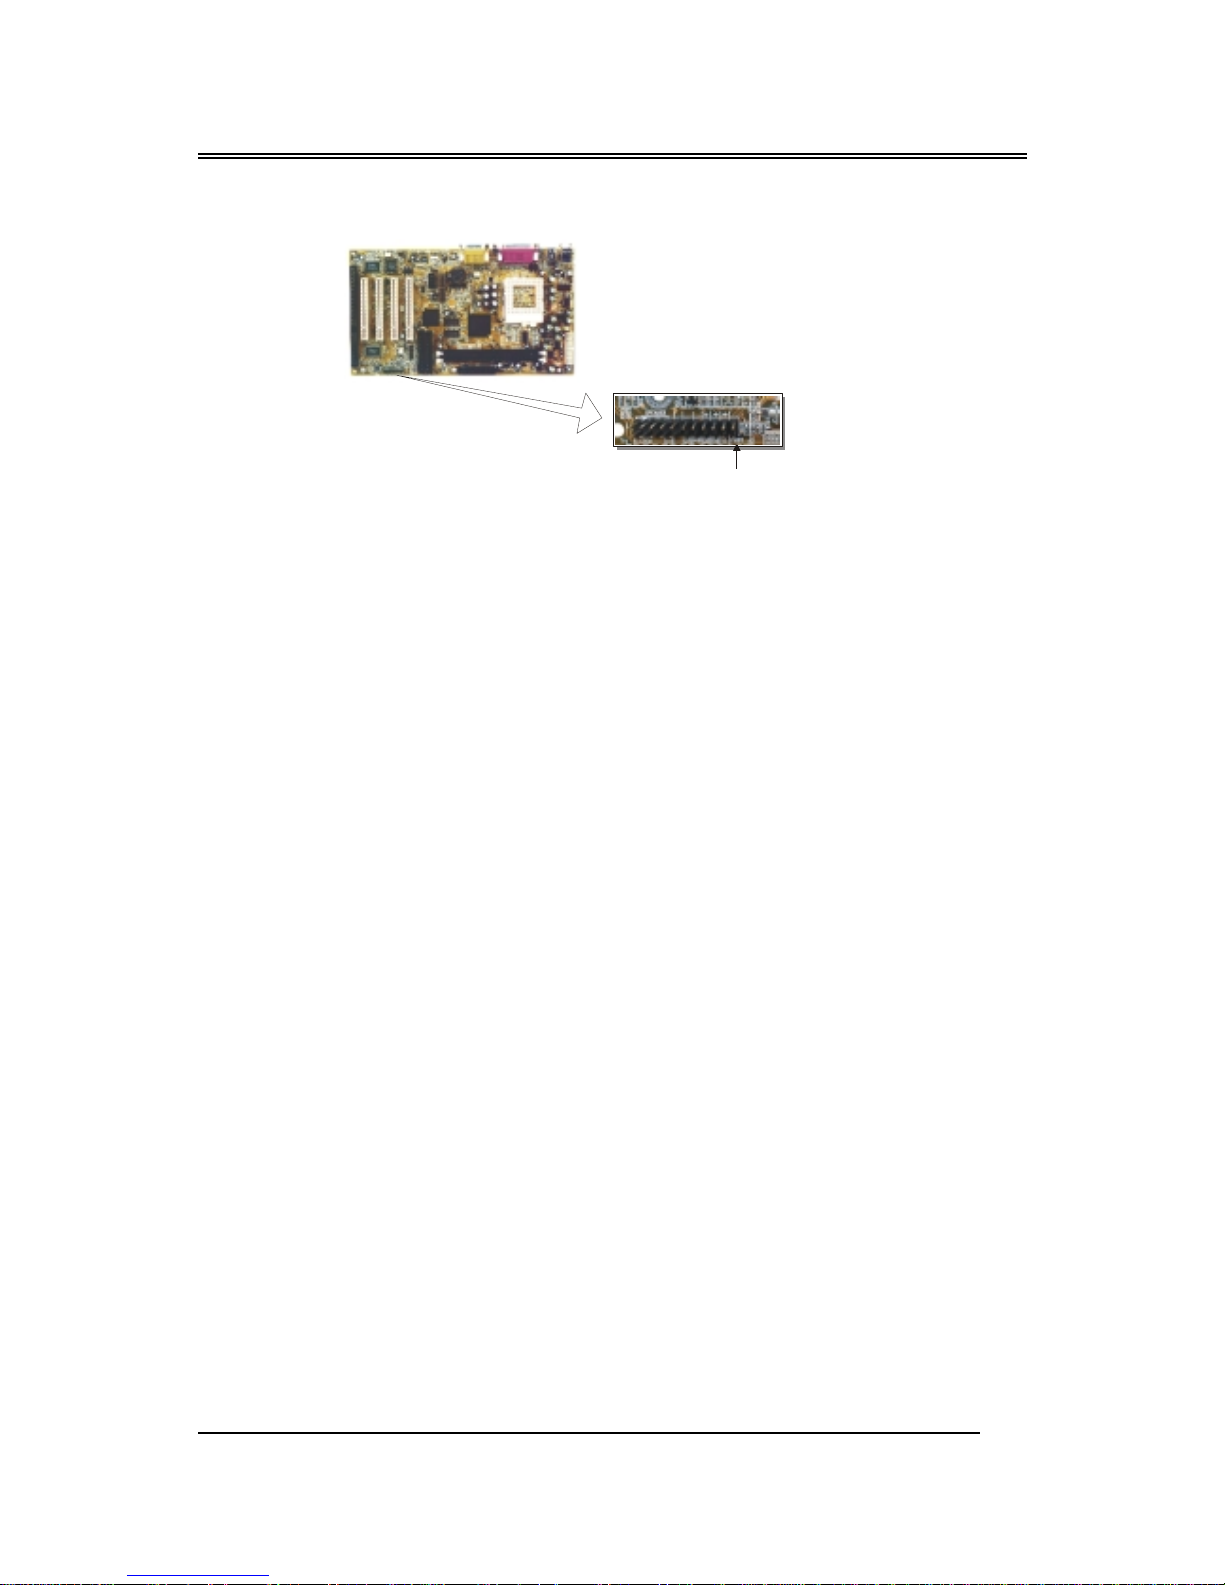
PS_BT
BIW1Aseries
~9~
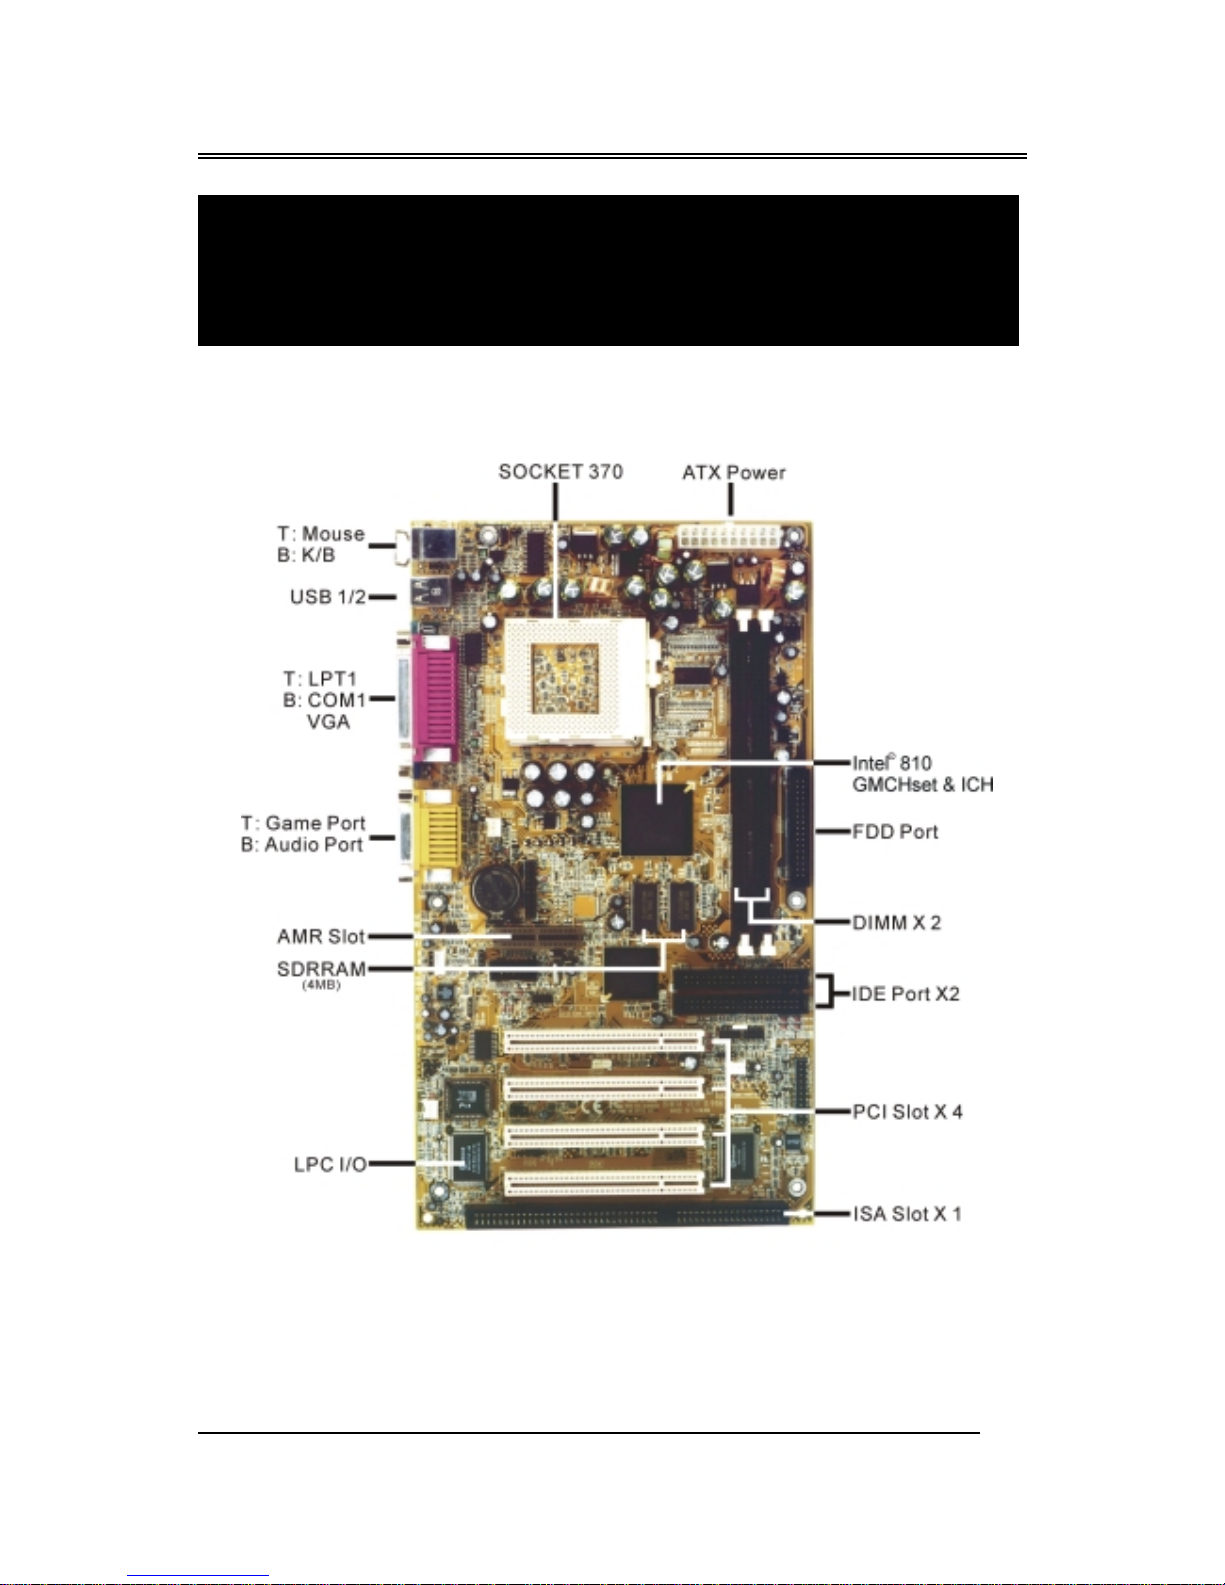
2.1 Motherboard layout
Chapter 2
Setup Guide

BIW1Aseries
~10~
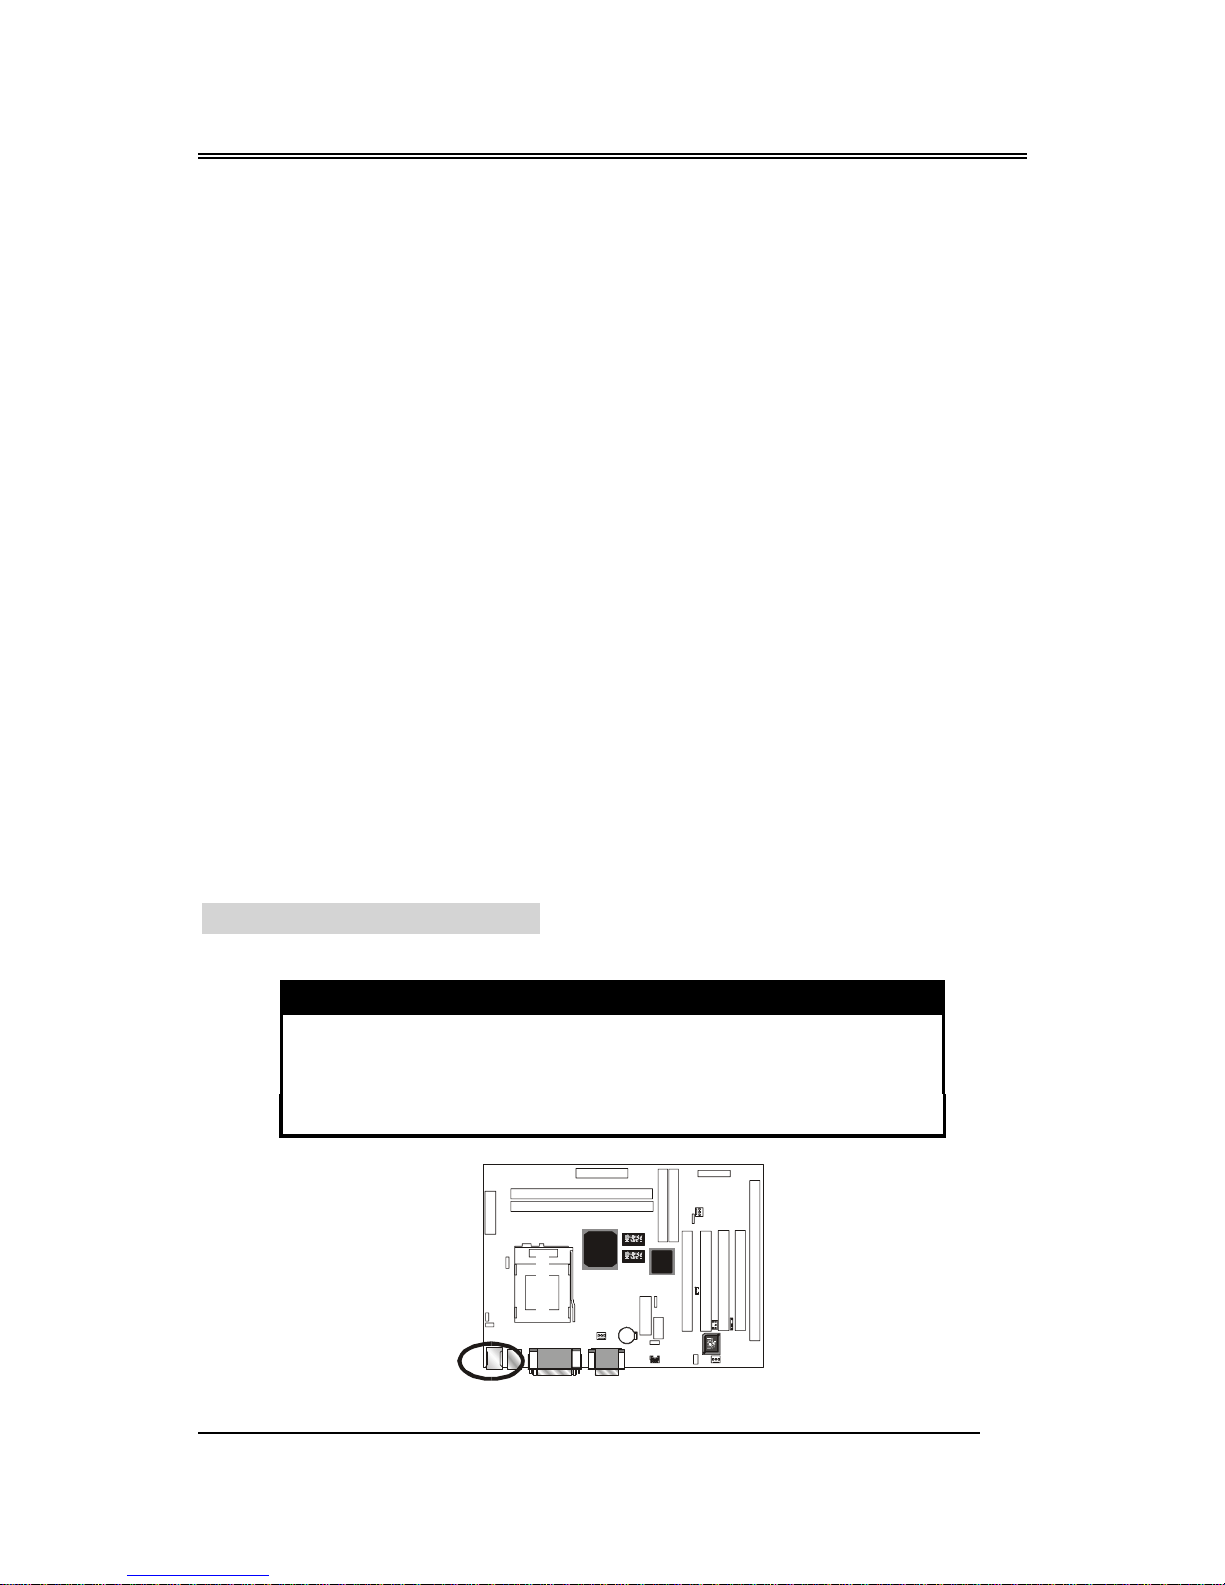
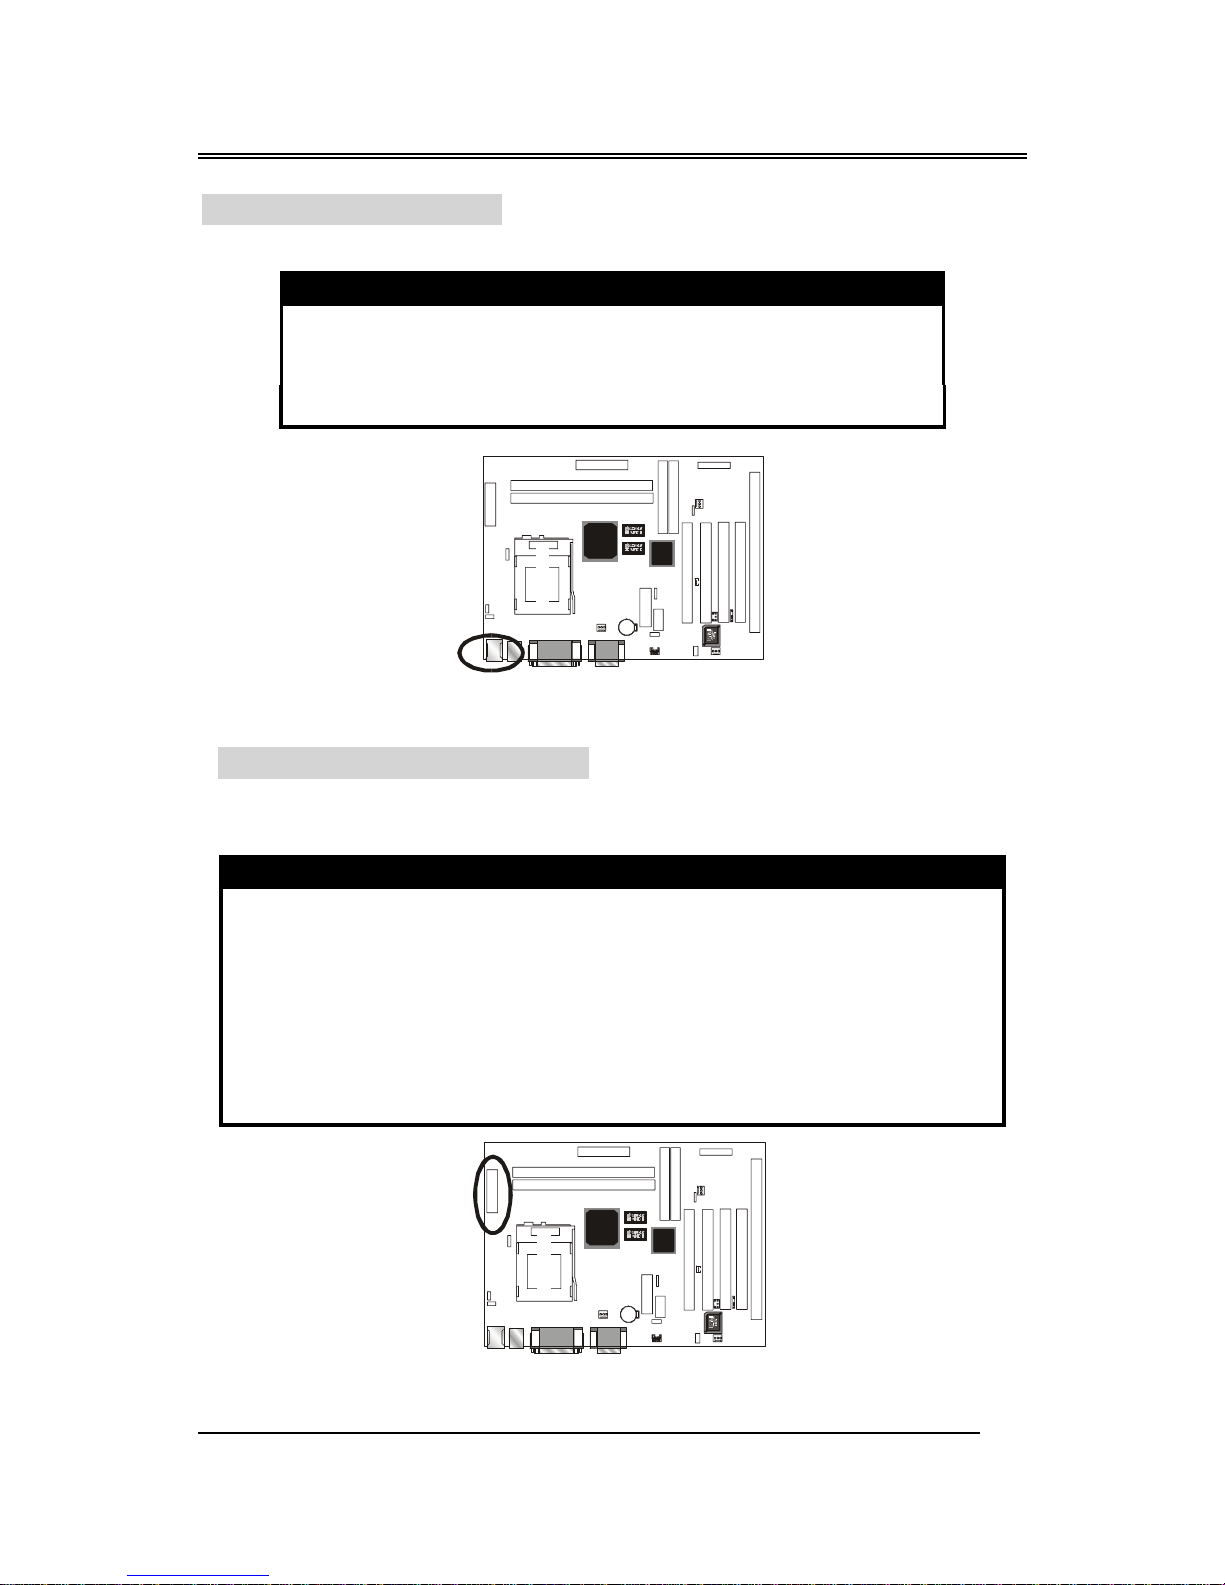
2.2 Connector & Jumper Reference Chart
Intel
810 GMCH
set
S
USB 1/2
T: LPT1
B: COM1
VGA
T : Mouse
B : K/B
T: Game Port
B: Audio Port
PCI 2
KB
USB COM1
VGA
MS
LPT
Speaker out
Line In
MIC
MIDI/Game port
Connector Front View
ISA 1
PCI 1
3V
Battery
Socket 370
JP1
JP2
JP9
CPU FAN
AMR
COM2
J15
CD-IN
JP3
KQ2
KQ3
KQ4
KQ2
KQ3
KQ4
PCI 3
PCI 4
JP4
FAN3
FAN2
JP6
WOL
IDAr
J23
BIW1Aseries
~11~
2.3 The setup steps
Please refer to the following steps to setup your computer:
I. Refer to the Jumper Setup section to set up the jumpers correctly.
II. Install the DIMM modules on the motherboard; be sure to set up
safely.
III. Install the CPU on the motherboard (please refer to the CPU
installation manual).
IV. Choose a case and install the motherboard into this case.
V. Plug in all the interface cards of your system equipment.
VI. Connect the cable, power supply and other message lines in the
correct position.
VII. Reboot, and enter the Award BIOS setup Menu to correct the
definitions.
VIII. Turn on the power and set up your computer system software.
2.3-1 Jumper & Connector Setting
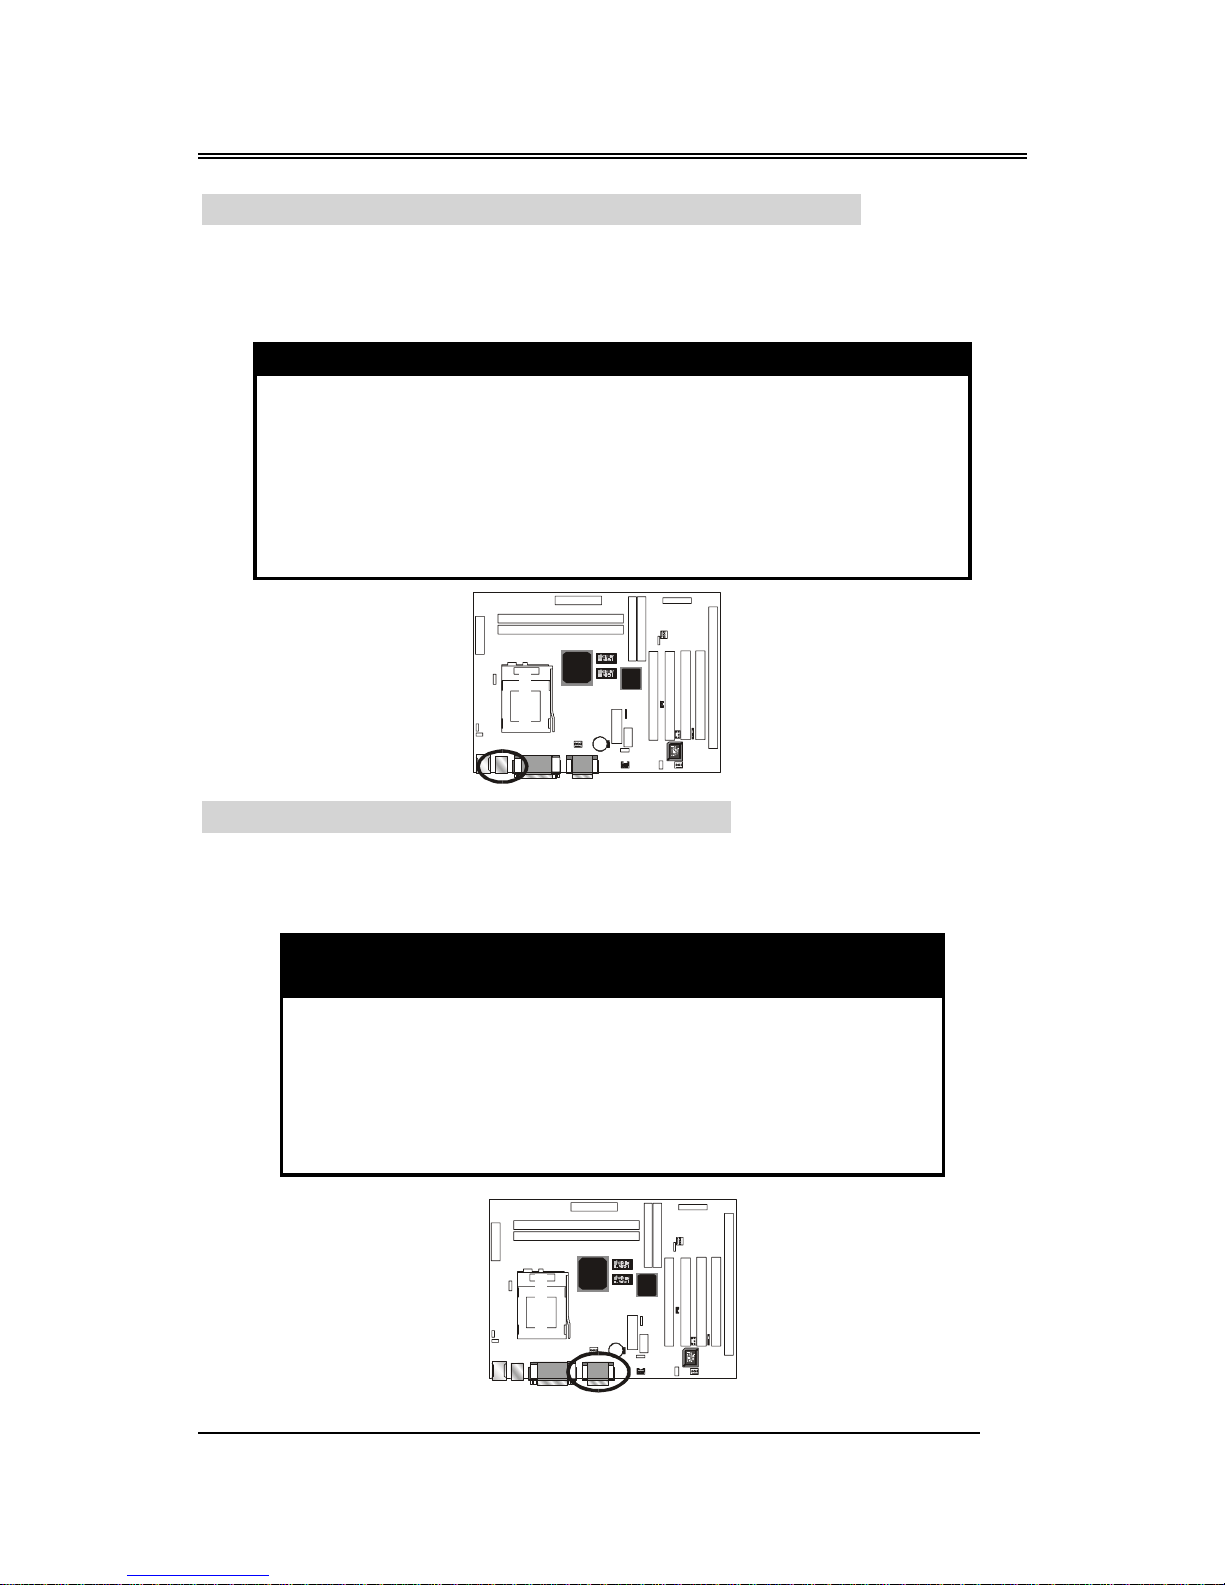
PS/2 Keyboard Connector Color : Purple ; Panton : 2715C
This connector can connect PS/2 Keyboard and has better performance.
Pin Description Pin Description
1 Keyboard Data 2,6 N.C.
3 Ground 4 +5V
5 Keyboard Clock
Int el
810 GM CH
set
S
3V
Battery
Socket 370
KQ2
KQ3
KQ4
KQ2
KQ3
KQ4
JP6
IDAr
BIW1Aseries
~12~
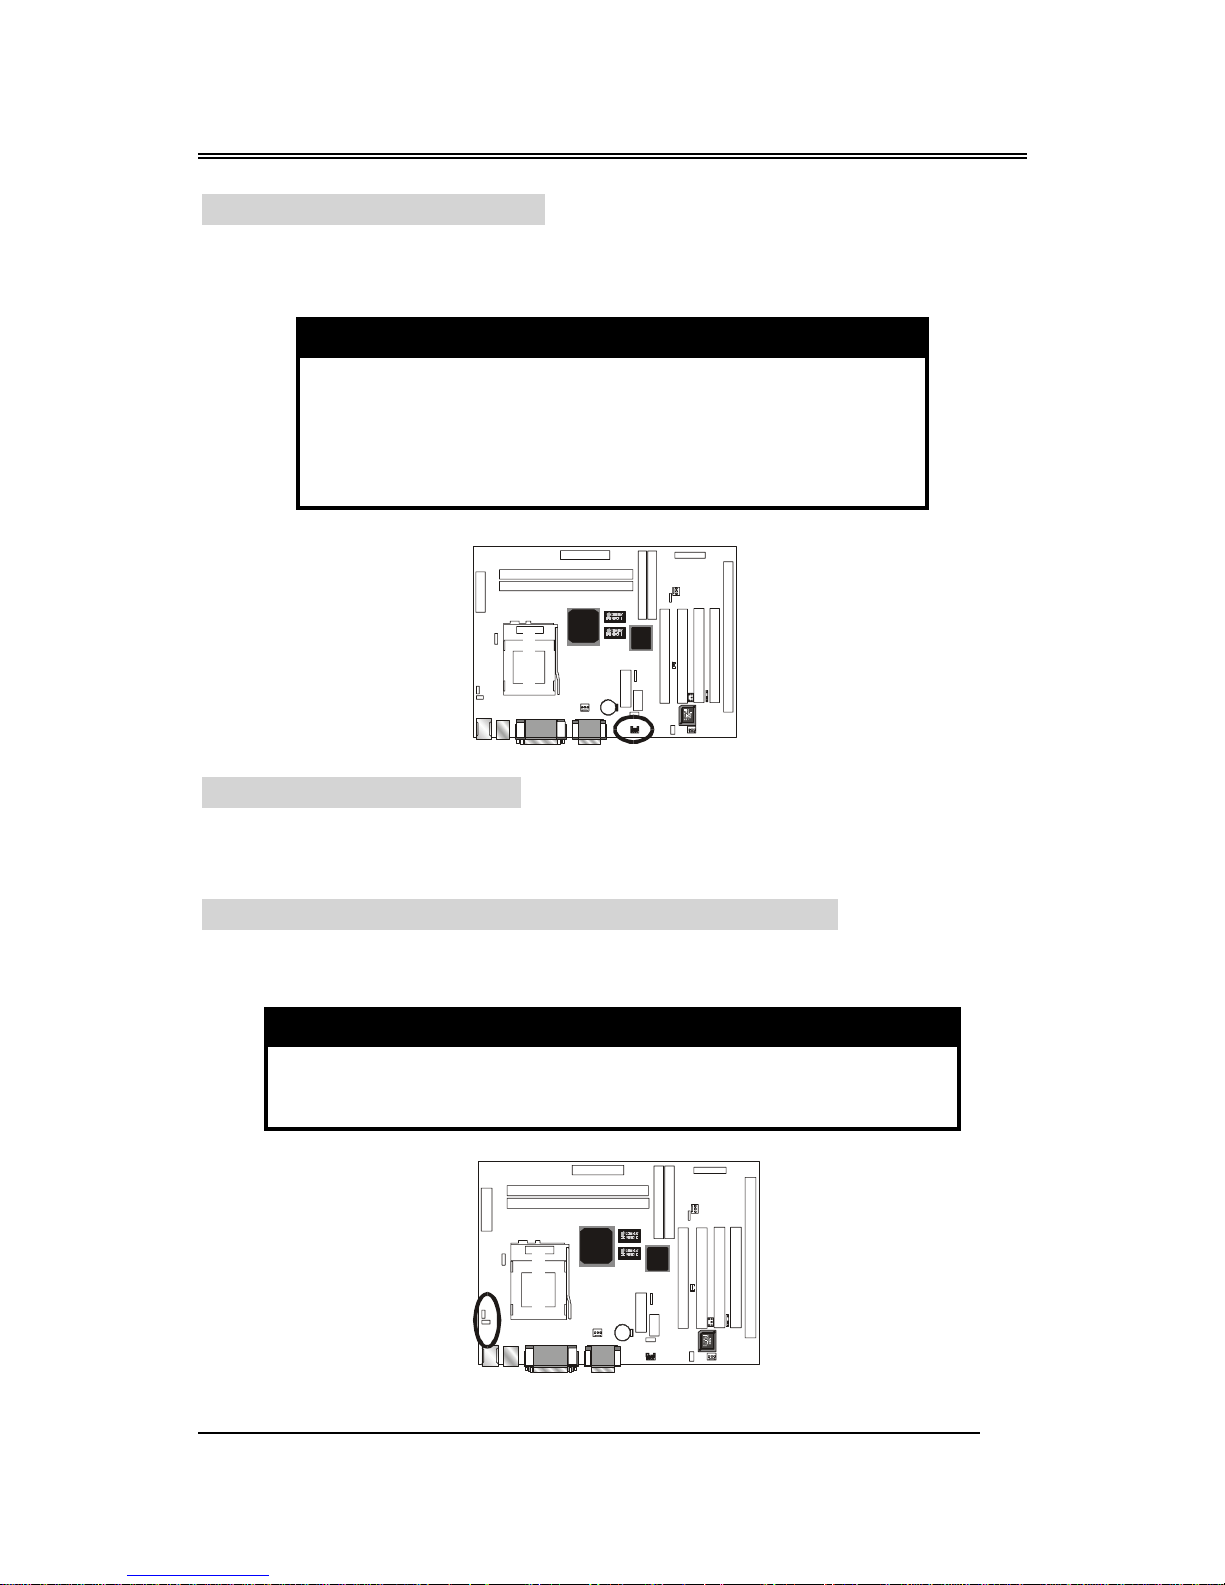
PS/2 Mouse Connector Color : Green ; Panton : 3395C
This connector can connect PS/2 Mouse and has better performance.
Pin Description Pin Description
1 Mouse Data 2,6 N.C.
3 Ground 4 +5V
5 Mouse Clock
ATX Power Supply Connector
This connector allows the motherboard to draw the power form ATX
power supply. It requires an ATX power supply of 250 watt at least.
Pin Description Pin Description
1,2,11 + 3.3 V 3,5,7,13,
15,16,17
Ground
4,6,19,20 + 5 V 8 POWER GOOD
9 5VSB 10 +12 V
12 -12 V 14 PS-ON
18 - 5 V
Int el
810 GM CH
set
S
3V
Battery
Socket 370
KQ2
KQ3
KQ4
KQ2
KQ3
KQ4
JP6
IDAr
Intel
810 GM CH
set
S
3V
Battery
Socket 370
KQ2
KQ3
KQ4
KQ2
KQ3
KQ4
JP6
IDAr

BIW1Aseries
~13~
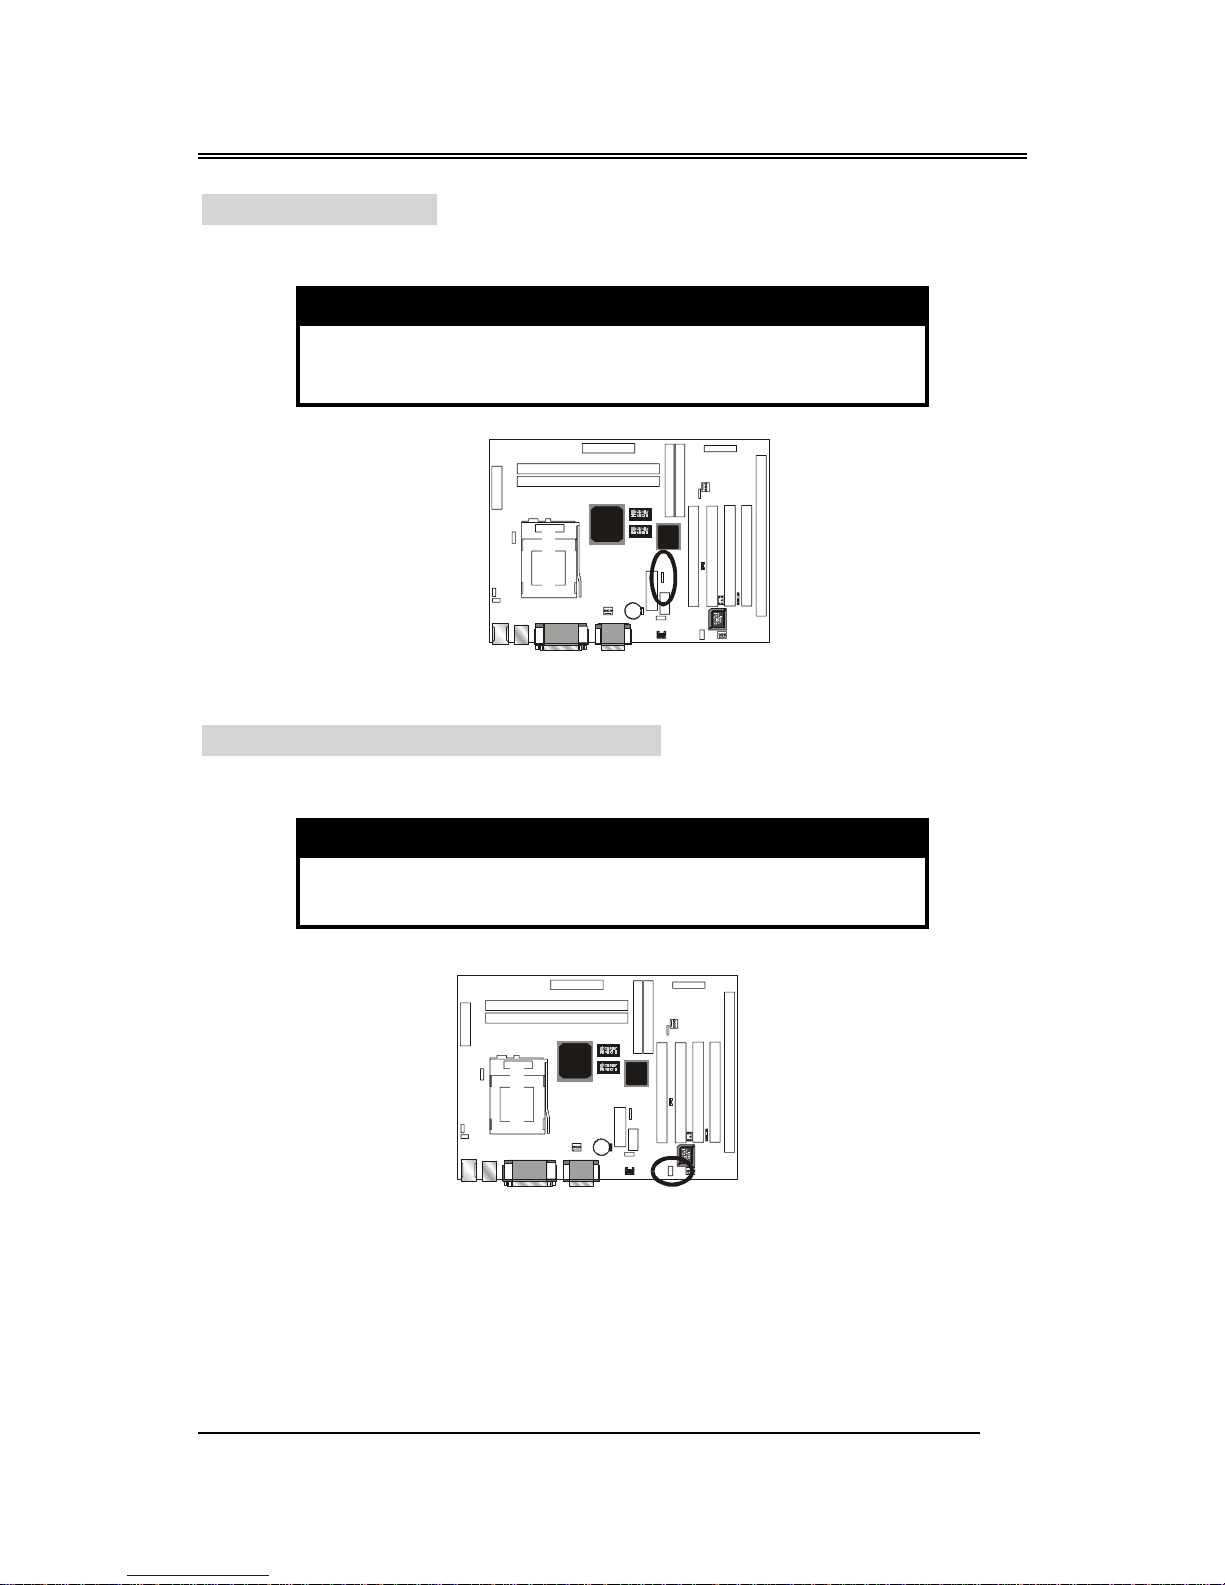
Printer Connector Color : Burgundy ; Panton : 235C
This Connector can transfer the data to printer for printing on paper.
Pin Signal Name Pin Signal Name
1 Strobe- 14 AFD
2 Data Bit 0 15 Error
3 Data Bit 1 16 INIT
4 Data Bit 2 17 SLCTIN
5 Data Bit 3 18 GND
6 Data Bit 4 19 GND
7 Data Bit 5 20 GND
8 Data Bit 6 21 GND
9 Data Bit 7 22 GND
10 ACK 23 GND
11 Busy 24 GND
12 PE 25 GND
13 SLCT 26 GND
Intel
810 GM CH
set
S
3V
Battery
Socket 370
KQ2
KQ3
KQ4
KQ2
KQ3
KQ4
JP6
IDAr

BIW1Aseries
~14~
COM1–Serial Connectors Color : Turquoise ; Panton : 322C
These connectors allow mouse or the other device which use this type
connector for transferring data between computer and devices.
Pin Signal Name Pin Signal Name
1 DCD 6 DSR
2 SIN 7 RTS
3 SOUT 8 CTS
4 DTR 9 RI
5 GND 10 NC
VGA – VGA Out Connector Color : Blue ; Panton : 661C
This connector is for the external monitor. Use this port to connect to a
VGA or higher resolution display monitor.
Pin Signal Name Pin Signal Name
1 RED Signal 9 N.C.
2 GREEN Signal 10 GND
3 BLUE Signal 11 N.C.
4 N.C. 12 Display data channel data
5 GND 13 Horizontal Sync
6 GND 14 Vertical Sync
7 GND 15 Display data channel clock
8 GND
Intel
810 GMCH
set
S
3V
Battery
Socket 370
KQ2
KQ3
KQ4
KQ2
KQ3
KQ4
JP6
IDAr
Intel
810 GMC H
set
S
3V
Battery
Socket 370
KQ2
KQ3
KQ4
KQ2
KQ3
KQ4
JP6
IDAr
BIW1Aseries
~15~
USB- Universal Serial Bus (USB1, USB2) Connectors
Color : Black ; Panton : 426C
These connectors allow the device which use this type connector for
transferring information between computer and devices.
USB1 Pin Signal Name USB2 Pin Signal Name
1 USB VCC 0 1 USB VCC 1
2 USB Data - 2 USB Data -
3 USB Data + 3 USB Data +
4 USB GND 0 4 USB GND 1
5 GND 5 GND
GAME/MIDI – For Game or MIDI Connector
Color: Gold ; Panton : 131C
You can use this port to connect a joystick or a MIDI device to your
system.
Pin
Signal
Name
Pin
Signal
Name
Pin
Signal
Name
1VCC6 TB 11 TC
2 SWA 7 SWD 12 MSD
3TA8VCC 13 TD
4 GND 9 VCC 14 SWD
5 GND 10 SWC 15 MSI
Inte l
810 GMC H
set
S
3V
Bat t er y
Socket 370
KQ2
KQ3
KQ4
KQ2
KQ3
KQ4
JP6
IDAr
Intel
810 GM CH
set
S
3V
Battery
Socket 370
KQ2
KQ3
KQ4
KQ2
KQ3
KQ4
JP6
IDAr

BIW1Aseries
~16~
IrDA - Infrared Connector: IR
This connector is used to connect IR Device.
Pin Signal Name
1VCC
2NC
3 SIRRX
4 GND
5 IRTX
WOL – Wake-up On LAN Connector
This connector is used to connect an add-in NIC ( Network Interface
Card ) which gives WOL function to the motherboard. Enable this function
for remotely managing PC on a network. When a PC receives the wake up
command during sleep, the LAN controller will wake up the PC.
Pin Signal Name
1 5VSB
2 GND
3 LID
Intel
810 GM CH
set
S
3V
Battery
Socket 370
KQ2
KQ3
KQ4
KQ2
KQ3
KQ4
JP6
IDAr
Intel
810 GM CH
set
S
3V
Battery
Socket 370
KQ2
KQ3
KQ4
KQ2
KQ3
KQ4
JP6
IDAr
BIW1Aseries
~17~
CD-IN: CD audio Connector
This connector is used to connect CD-ROM audio output to
motherboard, through this, the CD audio can output to audio chip directly.
Pin Description
1 Left
2 Ground
3 Ground
4 Right
JP1: Jump for Cyrix CPU
This jump only is reserved for Cyrix CPU, but the Cyrix CPU is not
available yet.
JP2 – Keyboard & PS/2 Mouse ON NOW Connector
This connector is used to enable keyboard & PS/2 mouse power on with
hot keys or mouse button.
Pin Signal Name
1-2 Enable
2-3 Disable
Intel
810 GM CH
set
S
3V
Battery
Socket 370
KQ2
KQ3
KQ4
KQ2
KQ3
KQ4
JP6
IDAr
Intel
810 GMCH
set
S
3V
Battery
Socket 370
KQ2
KQ3
KQ4
KQ2
KQ3
KQ4
JP6
IDAr
BIW1Aseries
~18~
JP3 – CMOS Clear
This jumper is able to clear the current data stored in the CMOS
memory.
Pin Description
1-2 Normal (default)
2-3 Clear CMOS
JP4 – On Board AC97 Sound Switch
This jumper is able to Open/Close the on board sound function.
Pin Description
1-2 Disable
2-3 Enable (Default)
Intel
810 GM CH
set
S
3V
Battery
Socket 370
KQ2
KQ3
KQ4
KQ2
KQ3
KQ4
JP6
IDAr
Intel
810 GM CH
set
S
3V
Battery
Socket 370
KQ2
KQ3
KQ4
KQ2
KQ3
KQ4
JP6
IDAr

BIW1Aseries
~19~
JP6 – Password Power on Jump Select
This jumper is able to Open/Close the Power On by Password function.
Your system will be under security, when you use this function. (When you
want to use this function, you should check the Integrated Peripherals of
BIOS utility is setup firstly.)
Pin Description
1-2 Enable (Default)
2-3 disable
JP9 – CPU Frequency Select Jump
JP9 can set your motherboard's external bus speed to 100MHz. Even if
your Intel Pentium
®
CPU doesn't support an external bus speed of 100MHz.
(The Socket 370 processor supports external bus frequencies of both 66MHz
and 100MHz, but not all Intel Pentium
®
CPUs can support both frequencies.
Please refer to your CPU specifications before setting the bus speed on your
motherboard.)
Pin 9 Description
Short 1-2 66 MHz
Short 2-3 Auto Detect (Default)
Open Jumper 100MHz
Intel
810 GM CH
set
S
3V
Battery
Socket 370
KQ2
KQ3
KQ4
KQ2
KQ3
KQ4
JP6
IDAr
Intel
810 GMCH
set
S
3V
Battery
Socket 370
KQ2
KQ3
KQ4
KQ2
KQ3
KQ4
JP6
IDAr

BIW1Aseries
~20~
PANEL CONNECTORS SETTING
Locate the bank of switch and indicator connectors. These connectors
provide control functions to your system case. Such as Speaker, HD LED,
Power LED, Key Lock, SMI Switch, SMI ED and Reset … etc. Please use
the cable below to make the connections.
Pin Name Description
1 – 2 PWBT Power Buttom
3 – 4 RST Reset
5 – 6 PWR LED Power LED
7 – 8 HDD LED HDD LED
9 – 10 EXT SMI EXT SMI
11 – 12 ACPI ACPI
14 – 18 PWR LED Power LED
20 – 22 K-LOCK KEY LOCK
15 – 21 SPEAKER Speaker
P2
P1
SPEAKER
K-LOCK
PWR
LED
P21
P22
HDD
LED
PWR
LED
RST
PWBT
,,
,,
,
ACPI
LED
EXT
SMI
,
Intel
810 GMCH
set
S
3V
Battery
Socket 370
KQ2
KQ3
KQ4
KQ2
KQ3
KQ4
JP6
IDAr

BIW1Aseries
~21~
FAN1, FAN2, FAN3 - FAN CONNECTORS
These connectors allow the fans of CPU and system to draw the power from
the motherboard.
FAN1 : CPU FAN CONNECTOR.
FAN2 : For SYSTEM COOL FAN CONNECTOR.
FAN3 : For SYSTEM COOL FAN CONNECTOR.
CPU TYPE SELECT
The Socket 370 processor supports external bus frequencies of
both 66MHz and 100MHz, but not all Intel Pentium
®
CPUs can
support both frequencies. Please refer to your CPU specifications
before setting the bus speed on your motherboard.
BIW1A will auto-detect the CPU type without any jumper setting. So
you just need to install your CPU on Socket 370 and your system will help
!
Intel
810 GMCH
set
S
PCI 2
ISA 1
PCI 1
3V
Battery
Socket 370
COM2
KQ2
KQ3
KQ4
KQ2
KQ3
KQ4
PCI 3
PCI 4
FAN3
WOL
Fan Out
GND
Fan Out
CPU FAN
SYS-FAN
(FAN2, FAN3)
GND
+V
+V

BIW1Aseries
~22~
you to find the CPU type.
The Clock Frequency is 66 by default. But you can change the
frequency in the BIOS Setup, so you can refer 3.3 - Chipset Features setup of
Chapter 3. That’ s mean Even if your Intel Pentium
®
CPU doesn't support an
external bus speed of 100MHz, you can still set your motherboard's external
bus speed to 100MHz.
2.3-2 Memory installation
No jumper setting is necessary for DRAM setting; BIOS will check
DRAM type and size automatically. This motherboard contains 2 by 168-pin
DIMM socket (DIMM1, DIMM2). The motherboard has a table-free (or
auto-bank) feature; the user can install DIMM into any bank. The two DIMM
Sockets permit system memory expansion from 8MB to 512MB. Each bank
provides a 64-bit wide data path. You can install 100MHz SPD RAM or
66MHz SDRAM into the motherboard, using your CPU clock to make the
selection.
If you want to install more memory and there are no sockets available,
you must remove some installed modules and replace them with the upgrade
modules.
If you have to do this, be sure to identify what type of memory is already
installed. In some cases, there may be a mix of module types. You can
confirm this by checking the configuration screen that appears while the
computer is starting up. Press the pause key to temporarily interrupt the startup so that you have more time to read the screen. When you’re done, press
any key to resume.
Remove the lowest performance and smallest size modules and replace
them with the upgrades.
168-pin DIMM Module
Intel
810 GM CH
set
S
3V
Battery
Socket 370
KQ2
KQ3
KQ4
KQ2
KQ3
KQ4
JP6
IDAr

BIW1Aseries
~23~
How to Install DIMM Modules on Motherboard
1. The SDRAM sockets are keyed with notches and the DIMMs are keyed
with cut-outs so that they cannot be installed incorrectly. Check that the
cut-outs on the DIMM edge connector match the notches in the SDRAM
socket. In other words, before inserting the DIMM, make sure the pin1 of
the DIMM matches with the pin1 on the DIMM socket.
2. Push down the latches on each side of the SDRAM socket.
3. Install the DIMM into the socket and press it carefully but firmly down so
that it seats correctly. The latches at either side of the socket will be
levered upwards and latch on the edges of the DIMM when it is installed
correctly.
How to Remove DIMM Modules from Motherboard
1. Press the holding latches at either side of the socket outward to release the
DIMM.
2. Gently pull the DIMM out of the socket.

BIW1Aseries
~24~
NOTE: Samples of System Memory Combinations Options
DIMM1 DIMM2 TOTAL
8MB ------ 8MBytes
------ 8MB 8MBytes
8MB 8MB 16MBytes
------ 16MB 16MBytes
16MB ------ 16MBytes
16MB 8MB 24MBytes
8MB 16MB 24MBytes
16MB 16MB 32MBytes
32MB ------ 32MBytes
------ 32MB 32MBytes
8MB 32MB 40MBytes
32MB 32MB 64MBytes
------ 64MB 64MBytes
64MB ------ 64MBytes
64MB 64MB 128MBytes
:: :
:: :
128MB 128MB 256MBytes
256MB 256MB 512MBytes
DIMM type : 3.3V, unbuffered or registered, 64/72-bit Synchronous DRAM
with SPD. Supports Single/Double-side 16/32/64/128 Mbytes
module size with parity or non-parity.

BIW1Aseries
~25~
Motherboard
With Socket 370
Bar
2.3-3 How to install the CPU
Prepare the motherboard by installing the supplied CPU-Socket 370, then
install the CPU according to the instructions supplied. Complete the
processor installation by installing the supplied heat-sink support, and
connecting the heat sink power cable to the motherboard connector.
Referential Steps of installing the Socket 370 CPU
This section is only for CPU installation, the motherboard in the picture is not
the BIW1A
series. Regarding the heat-sink, please refer to the instructions
supplied.
1. Review the CPU and motherboard.
2. Pull the lever sideways away from the socket then raise the lever up to a
90-degree angle.
Socket 370 CPU

BIW1Aseries
~26~
Socket 370
3. Locate Pin 1 in the socket and look for the cut edge in the CPU, match
Pin 1 with the cut edge then insert the CPU. It should be inserted easily.
4. Press the lever down to lock the CPU into the socket.
Note:
Regarding the heatsink
installation, please refer to the
instruction of the supplier.
Cut edge

BIW1Aseries
~27~
CPU & Power Supply Fan Connectors (3-pin FanPWR)
These connectors support cooling fans of 500mAMP (6 watts) or less.
Position the fans so that the heat-sink fins allow the airflow to go across the
onboard heat-sink(s) instead of the expansion slots. Depending on the fan
manufacturer, the wiring and plug may be different. The red wire should be
positive, while the black one should be grounded. Connect the fan's plug to
the board, taking into consideration the polarity of this connector.
The CPU and motherboard will overheat if the hot air generated
by the CPU does not flow across the onboard heat-sinks, and the
CPU fan and motherboard can be damaged if these pins are used
improperly.
2.3-4 Installing the Motherboard
The BIW1Aseries motherboard complies with the specifications for an ATX
board, so you can also install this kind of board into a full-size ATX case.
Some features on the motherboard are implemented by cabling connectors on
the motherboard to indicators and switches on the system case. Ensure that
your case supports all the features required. The BIW1A
series motherboard
can support one or two floppy diskette drives and four enhanced IDE drives.
Ensure that your case has sufficient power and space for all the drives that
you intend to install.
! Caution: Make sure that you have already installed the system
board components like the CPU and memory, and have set the appropriate
jumpers before you proceed.
The "rotation" signal is to be used only by a specially designed fan with a
rotation signal.
!

BIW1Aseries
~28~
2.3-5 Installing the interface card
This section explains how to install new interface cards on your
motherboard. It covers installing ISA cards and PCI cards. There are five
expansion card slots on the motherboard, four PCI slots and one ISA
slots.(BIW1A-Ionly) When you get an expansion card, it will come with
instructions on how to install it, so this section covers relevant information
for the motherboard only.
PCI Cards and Slots
With very few exceptions, any PCI expansion card you are likely to get
will be Plug and Play compliant. If you are using an Operating System that
supports PnP, such as Windows 98/95, you should be able to follow the
installation instructions that come with the card and have the Operating
System automatically recognize and configure the card.
The PCI slots on the motherboard all have “Bus Master” capability. For
installed PCI cards to use this feature, an Operating system specific Bus
Master software driver that comes with this motherboard must be installed
under your Operating System. These drivers are located on the support Disk.
ISA Cards and Slots (BIW1A-I only)
ISA expansion cards often use system resources in the form of IRQs and
DMA channels. Newer cards that comply with the Plug and Play (PnP)
standard are designed to allow the Operating System to automatically
configure system resources. Cards that do not support PnP may require
manual configuration of both the card hardware and settings in the CMOS
Setup Utility.
If you have a PnP compliant card to install, there should be little to do
other than follow the installation instructions. If, however, you have a nonPnP card and it requires configuring system resources, you may need to setup
the configuring expansion card resources in CMOS Setup.

BIW1Aseries
~29~
2.3-6 Installing Accessory Cables
This section describes how to connect the accessory cable that motherboard
or system housing supports. In the case of ATX, there is no need to use a
bracket to extend the connectors to the rear panel, so here we will discuss
only the installation instructions for Floppy, IDE. Power supply and Front
Panel switch/LED cables.
! Caution: Make sure that the power supply is OFF before
connecting or disconnecting any bracket or cable.
ATX Power Cable
The 20-pin ATX power cable supports 5V standby current and soft
power-on switch. The soft power switch can be either momentary or toggle
type and must comply with the ATX specification.
Plug in the power cable to the onboard power connector.
Front Panel Switch and LED Cables
Normally, the front-panel housing has power switch, power LED, reset
switch, suspend switch, speaker, keylock and HDD LED. These accessories
are included in the housing package.
Refer to the 2.3-1 “PANEL CONNECTORS SETTING” for proper
location of the connector.
Intel
810 G MCH
set
S
3V
Battery
Socket 370
KQ2
KQ3
KQ4
KQ2
KQ3
KQ4
JP6
IDAr

BIW1Aseries
~30~
Floppy Cable
The floppy cable for floppy drives is a 34-pin flat cable with 5
connectors classified as follows:
1. Female header (For floppy connector onboard)
2. Female header and Edge connector (For driver B)
3. Female header and Edge connector (For driver A)
The end-most connector cable is twisted to support floppy drive A,
while the middle connectors are for floppy drive B. The drive B connectors
are designed to accommodate both 1.44MB and 1.2MB drives. The female
header supports the 1.44MB drive, while the female edge connector supports
the 1.2MB drive. When connecting the drive, make sure that pin1 of the cable
(ie., the red-colored wire) matches pin1 of the drive.
IDE Cables for HDD and CDROM
The motherboard comes with two IDE interfaces; primary IDE and
secondary IDE connectors. Each channel supports two IDE devices via 34pin flat cable, thus enabling the system to accommodate a maximum of four
devices.
Intel
810 GM CH
set
S
3V
Battery
Socket 370
KQ2
KQ3
KQ4
KQ2
KQ3
KQ4
JP6
IDAr
Intel
810 GMCH
set
S
3V
Battery
Socket 370
KQ2
KQ3
KQ4
KQ2
KQ3
KQ4
JP6
IDAr

BIW1Aseries
~31~
This chapter explains how to use and modify the BIOS setup utility that
is stored on the motherboard. The setup utility stores information about the
motherboard components, and the configuration of other devices that are
connected to it. The system uses this information to test and initialize
components when it is started up, and to make sure everything runs property
when the system is operating.
The setup utility is installed with a set of default values. The default
values are designed to ensure that the system will operate adequately. You
will probably have to make changes to the setup utility whenever you add
new components to your system such as new disk drives. You may be able to
generate increased performance by changing some of the timing values in the
setup, but this can be limited by the kind of hardware you are using, for
example the rating of your memory chips. In certain circumstances, the
system may generate an error message which asks you to make changes to
the setup utility. This happens when the system finds an error during the
POST (power on self test) that it carries out at start up.
Starting the Setup Utility
You can only start the setup utility shortly after the computer has been
turned on. A prompt appears on the computer display which says " Press
DEL to run Setup”. When you see this prompt press the Delete key, and the
system will start the setup utility and display ft main menu of the utility.
Using the Setup Utility
When you press the Delete key to start setup, the main menu of the
utility appears.
The main menu of the setup utility shows a list of the options that are
available in the utility. A highlight shows which option is currently selected.
You can use the cursor arrow keys to move the highlight to other options.
Chapter 3
Award BIOS Setup

BIW1Aseries
~32~
When an option is highlighted, you can execute the option by pressing the
Enter key. Some options lead to dialog boxes which ask you verify that that
you wish to execute that option. You usually answer these dialogs by typing
Y for yes and N for no.
Some options lead to dialog boxes which ask for more information.
Setting the User Password or Supervisor Password have this kind of dialog
box.
PRESS F1 TO CONTINUE, CTRL-ALT-ESC OR DEL TO ENTER
SETUP
Control Keys
Up Arrow Move to previous item
Down Arrow Move to next item
Left Arrow Move to the item in the left hand
Right Arrow Move to the item in the right hand
Esc Key
Main Menu: Quit without saving changes
Submenus: Exit Current page to the next higher level
menu
PgUp Key Increase the numeric value or make changes
+ key Increase the numeric value or make changes
- key Decrease the numeric value or make changes
PgDn Key Decrease the numeric value or make changes
F1 Key General help, only for Status Page Setup Menu and Option
Setup Menu
F5 Key
Load previous values from CMOS
F6 Key Load the default CMOS value from BIOS default table, only
for Option Page Setup Menu
F7 Key Load the default
F8 Key Reserved
F9 Key Reserved
F10 Key Save all the CMOS changes, only for Main Menu

BIW1Aseries
~33~
3.1 The Main Menu
Once you enter Award BIOS CMOS Setup Utility, the Main Menu will
appear on the Screen.. Use arrow keys to select among the items and press to
accept or enter the sub-menu.
Some options lead to tables of items. These items usually have a value
on the right side. The value of the fust item is highlighted, and you can use
the cursor arrow keys to select any of the other values in the table of items.
When an item is highlighted, you can change the value by pressing the
PageUp or PageDown keys, or the Plus or Minus keys. The PageUp and
Plus keys cycle forward through the available values, the PageDown and
Minus keys cycle backwards through the values.
CMOS Setup Utility - Copyright ( C ) 1984-1998
Standard CMOS Features
Advanced BIOS Features
Advanced Chipset Features
Integrated Peripherals
Power Management Setup
PnP/PCI Configurations
PC Health Status
Frequency/Voltage Control
Load Fail-Safe Default
Load Optimized Defaults
Set Supervisor Password
Set User Password
Save & Exit Setup
Exit Without Saving
Esc : Quit ↑ ↓ → ← : Select Item
F10 : Save & Exit Setup
Time, Date, Hard Disk Type….
Standard CMOS Setup
This setup page includes all the items in a standard compatible BIOS.
Advanced BIOS Features
This setup page includes all the items of Advanced Features available on
your system.

BIW1Aseries
~34~
Advanced Chipset Features
This setup page includes all the items of chipset special features.
Integrated Peripherals
This section page includes all the items of IDE hard drive and Programmed
Input / Output features.
Power Management Setup
This menu provides functions for Green products by allowing users to set the
timeout value for monitor and HDD.
PnP / PCI Configurations
This menu allows the user to modify PNP / PCI configuration function.
PC Health Status
This menu allows users to monitor PC Health status
Frequency/Voltage Control
This menu to specify your settings for frequency/voltage control
Load Fail-Save Defaults
Use this menu to load the BIOS default values for the minimal/stable
performance for your system to operate.
Load Optimized Defaults
Use this menu to load the BIOS default values that are factory settings for
optimal performance system operations. While Award has designed the
custom BIOS to maximize performance, the factory has the right to change
these defaults to meet their needs.
Supervisor / User Password Setting
Change, set, or disable password. It allows you to limit access to the system
and Setup, or just to setup.
Save & Exit Setup
Save CMOS value changes to CMOS and exit setup.
Exit Without Saving
Abandon all CMOS value changes and exit setup.

BIW1Aseries
~35~
3.2 Standard CMOS Setup
The item in Standard CMOS Setup Menu are divided into several
categories. Each category includes no, one or more than one setup items.
Use the arrow keys to highlight the item and then use the <PgUp> or
<PgDn> keys to select the value you want in each item.
Standard CMOS Features
Date(mm:dd:yy) Mon,
Jul 8 1999
Time(hh:mm:ss) 16:19:20
! IDE Primary Master Press Enter 2557 MB
! IDE Primary Slave Press Enter None
! IDE Secondary Master Press Enter None
! IDE Secondary Slave Press Enter None
Drive A 1.44M, 3.5 in.
Drive B None
Floppy 3 Mode Support Disabled
Video EGA/VGA
Halt On All Errors
Based Memory 640K
Extended Memory 64512K
Total Memory 65536K
Item Help
Menu Level !
Change the day, month,
year and century
↑↓←→Move Enter: Select +/-/PU/PD: Value F10:Save ESC: Exit F1:General Help
F5:Previous Values F6:Fail-safe defaults F7:Optimized Defaults
Date and Time
The Date and Time items show the current date and time held by your
computer. If you are running a Windows operating system, these items will
automatically be updated whenever you make changes to the Windows Date
and Time Properties utility.
Hard Disks
Default: Auto
These items show the characteristics of any hard disk drives on the four
available IDE channels. (Note that SCSI hard disk drives do not appear here.)
You can automatically install most modem hard disks using the IDE HDD
Auto Detect Option from the main menu. However, if you find that a drive

BIW1Aseries
~36~
cannot be automatically detected, you can use these items to select USER,
and then manually enter the characteristics of the drive. The documentation
provided with your drive provides the data you need to fill in the values for
CYLS (cylinders), HEAD (read/write heads), and so on.
The documentation provided with the drive may not tell you what value to
use under the MODE heading. If the drive is smaller than 528 NM, set
MODE to Normal. If the drive is larger dm 528 NM and it supports Logical
Block Addressing, set MODE to LBA- Very few high-capacity drives do not
support Logical Block Addressing. If you have such a drive, you might be
able to configure it by setting the MODE to Large. If you're not sure which
MODE setting is required by your drive, set MODE to Auto and let the setup
utility try to determine the mode automatically.
Drive A and Drive B
Default: 1.44M, 3.5 in., None
These items define the characteristics of any diskette drive attached to the
system. You can connect one or two diskette drives.
Floppy 3 Mode Support
Default: Disabled
Floppy 3 mode refers to a 3.5" diskette with a capacity of 1.2MB. Floppy 3
mode is sometimes used in Japan.
Video
Default: EGA/VGA
This item defines the video mode of the system. This motherboard has a
built-in VGA graphics system so you must leave this item at the default
value.
Halt On
Default: All. But Keyboard
This item defines the operation of the system POST (Power On Self Test)
routine. You can use this item to select which kind of errors in the POST are
sufficient to halt the system.
Base, Extended and Other Memory
Default: Auto Detect
These items show how much memory is available on the system. They are
automatically detected by the system so you cannot manually make changes
to these items.

BIW1Aseries
~37~
3.3 Advanced BIOS Features
This section allows you to configure your system for basic operation.
You have the opportunity to select the system’ s default speed, boot-up
sequence, keyboard operation, shadowing and security.
CMOS Setup Utility – Copyright © 1984 – 1998 Award Software
Advanced BIOS Features
Anti-Virus Protection Enabled
CPU Internal Cache Enabled
External Cache Enabled
CPU L2 Cache ECC Checking Enabled
Quick Power On Self Test Enabled
First Boot device Floppy
Second Boot device HDD-0
Third Boot device LS/ZIP
Boot other device Enabled
Swap Floppy Drive Disabled
Boot Up Floppy Seek Disabled
Boot Up NumLock Status On
Gate A20 Option Normal
Typematic Rate Setting Disabled
Typematic Rate (Chars/Sec) 6
Typematic Delay (Msec) 250
Security Option Setup
OS Select For DRAM > 64MB Non-OS2
BIOS Write Protect Disabled
HDD S.M.A.R.T. Capability Enabled
Report NO FDD For Win 95 No
Item Help
Menu Level !
Allows you to choose the VIRUS
warning feature for IDE Hard
Disk boot sector protection.
If this function is enabled
and someone attempt to write
data into this area, BIOS will
show a warning message on
screen and alarm beep
↑↓←→Move Enter: Select +/-/PU/PD: Value F10:Save ESC: Exit F1:General Help
F5:Previous Values F6:Fail-safe defaults F7:Optimized Defaults
Anti-Virus Protection Default: Enabled
Anti-Virus program could locate and remove the problem before any
damage is done. So when this item is enabled, the Award BIOS will monitor
the boot sector and partition table of the hard disk drive for any attempt at
modification. If an attempt is made, the Anti-Virus program built-in the BIOS
will be run for protecting your system to be clean.
! WARNING:
Disk boot sector is to be modified
Type 'Y' to accept write or 'N' to abort write
Award Software, Inc.

BIW1Aseries
~38~
Enabled : Activates automatically when the system boots up, if anything
attempts to access the boot sector or hard disk partition table will
cause a warning message to appear.
Disabled : No warning message will appear when anything attempts to access
the boot sector or hard disk partition table.
Many disk diagnostic programs which attempt to access the boot sector table
can cause the above warning message.
CPU Internal Cache
Default: Enabled
All the processors that can be installed in this motherboard use internal (level
1) cache memory to improve performance. Leave this item at the default
value Enabled for better performance.
External Cache
Default: Enabled
Most of the processor cartridges that can be installed in this
motherboard have (level 2) external cache memory (the Celeron266MHz is an exception). Only enable this item if your processor
cartridge has external cache memory.
CPU L2 Cache ECC Checking
Default: Enabled
This item can be used to enable ECC (Error Checking Code) for the level-2
cache memory. We recommend that you leave this item at the default value
Enabled.
Quick Power On Self Test
Default: Enabled
You can enable this item to shorten the power on testing and have your
system start up a little faster.
First/Second/Third Boot Device
Default: Floppy,HDD-0,LS/ZIP
The BIOS attempts to load the operating system from the devices in the
sequence selected in these items.
Swap Floppy Drive
Default: Disabled
If you have two floppy diskette drives in your system, this item allows
you to swap around the assigned drive letters so that drive A becomes
drive B, and drive B becomes drive A.

BIW1Aseries
~39~
Boot Up Floppy Seek
Default: Disabled
During POST, BIOS will determine if the Floppy disk drive installed is 40 or
80 tracks. 360 K type is 40 tracks while 720K, 1.2M and 1.44M drive type as
they are all 80 tracks.
Enabled: BIOS searches for floppy disk drive to determine if it is 40
or 80 tracks. Note that BIOS can not tell from 720K, 1.2M or
1.44M drive type as they are all 80 tracks.
Disabled:
BIOS will not search for the type of floppy disk drive by
track number. Note that there will not be any warning
message if the drive installed is 360K.
Boot Up NumLock Status
Default: On
This item defines if the keyboard Num Lock key is active when your system
is started.
Gate A20 Option
Default: Fast
This option provides compatibility with older software written for the 286
processor. Leave this item at the default value Fast.
Typematic Rate Setting
Default: Disabled
This determines if the typematic rate is to be used. When disabled,
continually holding down a key on your keyboard will generate only one key
instance. In other words, the BIOS will only report that the key is down.
When the typematic rate is enabled, the BIOS will report as before, but it will
then wait a moment, and, if the key is still down, it will begin the report that
the key has been depressed repeatedly. For example, you would use such a
feature to accelerate cursor movements with the arrow keys.
Typematic Rate (Chars/Sec)
Default: 6
When the typematic rate is enabled, this section allows you select the rate at
which the keys are repeat.
6 6 characters per second
15 15 characters per second
8 8 characters per second 20 20 characters per second
1 0 1 0 characters per second 24 24 characters per second
12 12 characters per second 30 30 characters per second
Typematic Delay (Msec)
Default: 250
When the typematic rate is enabled, this section allows you select the delay
between when the key was first depressed and when the acceleration begins.

BIW1Aseries
~40~
250 250 msec
500 500 msec
750 750 msec
1000 1000 msec
Security Option
Default: Setup
If you have installed password protection, this item defines if the password is
required at system start up, or if it is only required when a user tries to enter
the setup utility.
OS Select For DRAM > 64 MB
Default: Non-OS2
This item is required if you have installed more than 64 NM of memory and
you are running the OS/2 operating system. Otherwise, leave this item at the
default Non-OS2.
BIOS Write Protect
Default: Disabled
This item allow users to protect the BIOS been writed
HDD S.M.A.R.T Capability
Default: Enabled
S.M.A.R.T is an industry acronym for Self-monitoring, Analysis and
Reporting Technology. If the documentation of your hard disk states that
S.M.A.R.T. is supported, you can enable this item.
Report No FDD For WIN 95
Default: No
Set this item to Yes BIOS will report FDD to Win95. If in standard CMOS
setup, set Drive A to none, and set this item to yes. Inside Win95, My
Computer and File manager Disk(A:) will show Removable Disk (A:).
3.4 Advanced Chipset Features
This section allows you to configure the system based on the specific features
of the installed chipset. This chipset manages bus speeds and access to
system memory resources, such as DRAM and the external cache. It also
coordinates communications between the conventional ISA bus and the PCI
bus. It must be stated that these items should never need to be altered.
The default settings have been chosen because they provide the best
operating conditions for your system. The only time you might consider
making any changes would be if you discovered that data was being lost
while using your system.

BIW1Aseries
~41~
CMOS Setup Utility – Copyright © 1984 – 1998 Award Software
Advanced Chipset Features
SDRAM CAS Latency Time
3
SDRAM Cycle Time Tras/Trc 6/8
SDRAM RAS-to-CAS Delay 3
SDRAM RAS Precharge Time 3
System BIOS Cacheable Enabled
Video BIOS Cacheable Enabled
Memory Hole At 15M-16M Disabled
CPU Latency Timer Disabled
Delay Transaction Enabled
On-Chip Video Window Size 64MB
Use VGA BIOS in VBU Block Enabled
* Onboard Display Cache Setting *
Initial Display Cache Enabled
CAS# Latency 3
Paging Mode Control Open
RAS-to-CAS Override by CAS# LT
RAS# Timing Fast
RAS# Precharge Timing Fast
Item Help
Menu Level !
↑↓←→Move Enter: Select +/-/PU/PD: Value F10:Save ESC: Exit F1:General Help
F5:Previous Values F6:Fail-safe defaults F7:Optimized Defaults
SDRAM CAS Latency Time
Default: 3
When synchronous DRAM is installed, the number of clock cycles of CAS
latency depends on the DRAM timing.
SDRAM Cycle Time Tras/Trc
Default: 6/8
Select the number of SCLKs for an access cycle. ging them.
SDRAM RAS-to-CAS Delay
Default: 3
This field lets you insert a timing delay between the CAS and RAS strobe
signals, used when DRAM is written to, read from, or refreshed. Fast gives
faster performance; and Slow gives more stable performance. This field
applies only when synchronous DRAM is installed in the system.
SDRAM RAS Precharge Time
Default: 3
If an insufficient number of cycles is allowed for the RAS to accumulate its
charge before DRAM refresh, the refresh may be incomplete and the DRAM
may fail to retain data. This field applies only when synchronous DRAM is

BIW1Aseries
~42~
installed in the system.
System BIOS Cacheable
Default: Enabled
Selecting Enabled allows caching of the system BIOS ROM at F0000hFFFFFh, resulting in better system performance. However, if any program
writes to this memory area, a system error may result.
Video BIOS Cacheable
Default: Enabled
Select Enabled allows caching of the video BIOS , resulting in better system
performance. However, if any program writes to this memory area, a
system error may result.
Memory Hole At 15M-16M
Default: Disabled
You can reserve this area of system memory for ISA adapter ROM. When
this area is reserved, it cannot be cached. The user information of peripherals
that need to use this area of system memory usually discusses their memory
requirements.
Delayed Transaction
Default: Enabled
This chipset has an embedded 32-bit posted write buffer to support deadly
transactions cycles. Select Enabled to support compliance with PCI
specification version 2. 1.
On-Chip Video Window Size
Default: 64MB
Select the on-chip video window size for VGA driver use.
* Onboard Display Cache Setting *
Setting the onboard display cache timing..
CAS# Latency
Default: 3
Select the local memory clock periods.
Paging Mode Control
Default:Open
Select the paging mode control.
RAS-to-CAS Override
Default:by CAS# LT
Select the display cache clock periods control.
RAS# Timing
Default:Fast
This item controls RAS# active to Protegra, and refresh to RAS# active delay
( in local memory clocks).

BIW1Aseries
~43~
RAS# Precharge Timing
Default:Fast
This item controls RAS# precharge (in local memory clocks).
3.5 Integrated Peripherals
This option displays a list of items which defines the operation of some
peripheral items on the system's input/output ports.
CMOS Setup Utility – Copyright © 1984 – 1998 Award Software
Integrated Peripherals
OnChip Primary PCI IDE Enabled
OnChip Secondary PCI IDE Enabled
IDE 32-bit Transfer Mode Enabled
IDE Primary Master PIO Auto
IDE Primary Slave PIO Auto
IDE Secondary Master PIO Auto
IDE Secondary Slave PIO Auto
IDE Primary Master UDMA Auto
IDE Primary Slave UDMA Auto
IDE Secondary Master UDMA Auto
IDE Secondary Slave UDMA Auto
USB Controller Enabled
USB Keyboard Support disabled
Init Display First PCI Slot
AC97 Audio Enabled
AC97 Modem Enabled
IDE HDD Block Mode
Enabled
POWER ON Function Button Only
KB Power ON Password Enter
Hot Key Power On Ctrl-F1
Onboard FDC Controller Enabled
Onboard Serial Port 1 3F8/IRQ4
Onboard Serial Port 2 2F8/IRQ3
UART Mode Select Nomal
Onboard Parallel Port 378/IRQ7
Parallel Port Mode ECP+EPP
EPP Mode Select EPP1.9
ECP Mode Use DMA 3
PWRON After PWR-Fail Off
Game Port Address 201
Midi Port Address Disabled
Midi Port IRQ 10
Item Help
Menu Level !
If your IDE hard drive
supports block mode select
Enabled for automatic
detection of the optimal
number of block read/write
per sector the drive can
support
↑↓←→ Move Enter: Select +/-/PU/PD: Value F10:Save ESC: Exit F1:General Help
F5:Previous Values F6:Fail-safe defaults F7:Optimized Defaults

BIW1Aseries
~44~
On-Chip Primary/Secondary PCI IDE
Default: Enabled
This setup item allows you to either enable or disable the primary/secondary
controller. You might choose to disable he controller if you were to add
higher performance or specialized controller..
IDE Primary/Secondary Master/Slave
PIO
Default: Auto
The four IDE PIO (Programmed Input/Output) fields let you set a PIO mode
(0-4) for each of the four IDE devices that the onboard IDE interface supports.
Modes 0 through 4 provide successively increased performance. In Auto
mode, the system automatically determines the best mode for each device.
IDE Primary/Secondary Master/Slave
UDMA
Default: Auto
Ultra DMA/33 implementation is possible only if your IDE hard drive
supports it and the operating environment includes a DMA driver (Windows
95 OSR2 or a third-party IDE bus master driver). If your hard drive and your
system software both support Ultra DMA/33, select Auto to enable BIOS
support.
USB Controller
Default: Enabled
Select Enabled if your system contains a Universal Serial Bus (USB)
controller and you have USB peripherals
USB Keyboard Support
Default: Disabled
Select Enabled if your system contains a Universal Serial Bus (USB)
controller and you have a USB keyboard.
Init Display First
Default: PCI Slot
This item allows you to decide to active whether PCI Slot or on-chip VGA
first.
AC97 Audio/Modem
Default: Auto
This item allows you to decide to enable/disable the 810 chipset family to
support AC97 Audio/Modem.
IDE HDD Block Mode
Default: Enabled
Block mode is also called block transfer, multiple commands, or multiple
sector read/write. If your IDE hard drive supports block mode (most new
drives do), select Enabled for automatic detection of the optimal number of
block read/writes per sector the drive can support.

BIW1Aseries
~45~
POWER ON Function
Default: BUTTON ONLY
The Power On Function item allows you to power on the system by pressing
hot-keys. If you set this item to Hot Key, you can use the item Hot Key
Power On to choose which hot keys are installed.If you set this item to
Password, you can use the item KB Power On Password to choose which
password are installed.
Onboard FDC Controller
Default: Enabled
This item will enable or disable the floppy disk controller.
FDC Write Protect
Default: Disabled
To enable/disable the write protection of floppy.
Onboard Serial Port 1/Port 2
Default: 3F8/IRQ4
Select an address and corresponding interrupt for the first and second serial
ports. Note : Set to Auto is not recommended.
UART Mode Select
Default: Normal
This lets you select the Infrared mode. Choices are Standard, HPIR, and
ASKIR. If you choose BPIR or ASKIR mode, the screen will show another
two lines to let you choose 'IR Function Duplex' (Full or Half) and “ RxD
TxD Active” (Hi Lo; Lo Hi; Hi Hi-,Lo Lo).
Onboard Parallel Port
Default: 378/IRQ7
This item lets you disable the built-in parallel port, or enable it by assigning
an 1/0 address and an Interrupt Request Line (IRQ).
EPP Mode Select
Default: EPP1.9
Select EPP mode for the port.
ECP Mode Use DMA
Default: 3
Select a DMA channel for the port. Choices are 3, 1.

BIW1Aseries
~46~
3.6 Power Management Setup
CMOS Setup Utility – Copyright © 1984 – 1998 Award Software
Power Management Setup
ACPI function Enabled
ACPI Suspend S1(POS)
Power Management User Define
Video Off Method DPMS
Video Off In Suspend YES
Suspend Type Stop Grant
MODEM Use IRQ 3
Suspend Mode Disabled
HDD Power Down Disabled
Soft-Off by PWRBTN Instant-off
Wake-up by PCI Card Disabled
Power on by Ring Disabled
CPU THRM-Throttling 62.5%
Resume by Alarm Disable
Date(of Month) Alarm 0
Time(hh:mm:ss) Alarm 0 0 0
** Reload Global Timer Events **
Primary IDE 0 Disabled
Primary IDE 1 Disabled
Secondary IDE 0 Disabled
Secondary IDE 1 Disabled
FDD, COM, LPT Port Disabled
PCI PIRQ [A-D]# Disabled
Item Help
Menu Level !
↑↓←→Move Enter: Select +/-/PU/PD: Value F10:Save ESC: Exit F1:General Help
F5:Previous Values F6:Fail-safe defaults F7:Optimized Defaults
ACPI function
Default: Enabled
When Enabled, this function can save the power of your system.
Power Management
Default: User Define
This category allows you to select the type (or degree) of power saving and is
directly related to the following modes : Doze; Standby; Suspend; HDD
Power Down.
Min.Power Minimum power management. Doze =I hr.;
Saving Standby= I hr.; Suspend= I hr.; HDD Power Down=15min
Max. Power Maximum power management only
Saving available for SL CPU.Doze=lmin.;
Standby=lmin.;Suspend=l min.;HDD Power Down= l min

BIW1Aseries
~47~
User Allows you to set each mode individually.
Defined When not disabled, each of the ranges are from I min. to I
hr. except for HDD Power Down which ranges from I to
15min. and disable
If you would like to use Software Power-off Control function, you cannot
choose" Disabled "here, and should select "Yes" in PM Control by APM.
Video Off Method
Default: DPMS
This determines the manner in which the monitor is blanked.
V/H SYNC+ Blank This selection will cause the system to turn off the
vertical and horizontal sync. ports and write
blanks to the video buffer
Blank This option only writes blanks to the
Screen video buffer
DPMS Initial display power management signaling
Video Off In Suspend
Default: Yes
This determines the manner in which the monitor is blanked.
Suspend Type
Default: Stop Grant
Select the Suspend Type.
The choice: PWRON Suspend, Stop Grant.
MODEM Use IRQ
Default: 3
This item determines the IRQ in which the MODEM can be used.
The choice: 3,4,5,7,9, 10,11,N/A.
Suspend Mode
Default: Disable
If you have selected User Define for the Power Management item, you can
set this item to a selection of timeouts from 20 seconds to 40 minutes.
HDD Power Down
Default: Disable
When enabled and after the set time of system inactivity, the hard disk drive
will be powered down while all other devices remain active.
Soft-off by PWR-BTTN
Default: Instant-off
Under ACPI (advanced configuration and power interface) the system can be
turned off mechanically (by the power button) or it can undergo a software
power off. If the system has been turned off by software, the system can be
resumed by a LAN, MODEM or ALARM wake up signal. This item allows
you to define a software power off using the power button. If the value is set
to Instant-Off, the power button will automatically cause a software power

BIW1Aseries
~48~
off. If the value is set to Delay 4 Sec. the power button must be held down for
a full four seconds to cause a software power off.
PowerOn by Ring
Default: Disabled
Enabled: when system in suspend mode, it can be wake up by modem.
Disabled: it cannot be wake up by modem.
Wake Up On LAN
Default: Enabled
Enabled: If you have installed LDCM administrator software, and any client
side is powered off, you can wake up by LAN through the LDCM
mechanism.
Resume by Alarm
Default: Disabled
When Enabled, two additional lines will be added to the screen Date (of
Month) Alarm; Time (hh:mm:ss) Alarm to let user set the desired date and
time. After power off, the system will automatic power on at the specified
date and time.
Reload Global Timer Events
When enabled, an event occurring on each device listed below restarts the
global time for Standby mode.
IRQ [3 -7, 9-15], NM;
Primary IDE 0;
Primary IDE 1;
Secondary IDEO;
Secondary IDEL;
FDD,COM,LPT Port
PCI PIRQ[A-D]#

BIW1Aseries
~49~
3.7 PNP/PCI Configuration Setup
The PNP/PCI Configuration Setup allows you to configure the ISA and PCI
devices installed in your system. The following screen appears if you select
the option PNP/PCI Configuration setup from the main menu.
CMOS Setup Utility – Copyright © 1984-1998 Award Software
PnP/PCI Configurations
PnP OS Installed No
Reset Configuration Data
Disabled
Resources Controlled By Auto(ESCD)
IRQ Resources Press Enter
DMA Resources Press Enter
PCI/VGA Palette Snoop Disabled
Assign IRQ For VGA Disabled
Assign IRQ For USB Enabled
NCR/SYMBIOS SCSI ROM Auto
Item Help
Menu Level !
Default is Disabled.
Select Enabled to reset
Extended System
Configuration Data(ESCD)
when you exit Setup if you
have installed a new
add-on and the system
reconfiguration has
caused such a serious
conflict that the OS
cannot boot
↑↓←→Move Enter: Select +/-/PU/PD: Value F10:Save ESC: Exit F1:General Help
F5:Previous Values F6:Fail-safe defaults F7:Optimized Defaults
PNP OS Installed (BIW1A-I Only)
Default: No
If you have installed a Plug and Play operating system such as Windows 95 or 98,
you can change this item to Yes. When the item is set to Yes you can use the Device
Manager utility in the operating system to make changes to the configuration of
expansion cards.
Resources Controlled By
Default: Auto(ESCD)
You should leave this item at the default Auto. If you find that you cannot get
a particular expansion card to work properly, you might be able to solve the
problem by changing this item to Manual, and defining the characteristics of
the card in the new items which appear.
If you change this item to Manual, the display will list a series of items that
allow you to define the assignments of the system interrupt lines (IRQS) and
Direct Memory Access (DMA) channels. As a default, these items are set to
PCI/ISA PnP. If you install an ISA Bus card that does not support PNP, and it

BIW1Aseries
~50~
requires a special IRQ and DMA, you can modify the list of assignments.
Change the values of the IRQ and DMA that are required to Legacy ISA.
IRQ 3/4/5/7/9/10/11/12/14/15
DMA 0/1/3/5/6/7 (BIW1A-I Only)
This item allows you to determine the IRQ/DMA assigned to the ISA bus and
is not available to any PCI slot. Choices are Legacy ISA and PCI/ISA PnP.
Assign IRQ For VGA
Default: Enabled
To assign a IRQ to VGA card if you enable this item.
Assign IRQ For USB
Default: Enabled
To assign a IRQ to USB Ports if you enable this item.
3.8 PC Health Status
This option displays a list of PC health status which are detected by on board
sensor chips.
CMOS Setup Utility – Copyright © 1984-1998 Award Software
Frequency/Voltage Control
CPU Warning Temperature Disabled
Current System Temp. 400C/1040F
Current CPU1 Temperature 40
0
C/1040F
Current CPUFAN1 Speed 5037 RPM
Current CPUFAN2 Speed 0 RPM
Current CPUFAN3 Speed 0 RPM
IN0(V) 2.01 V
IN2(V) 2.48 V
IN2(V) 3.42 V
+ 5 V 4.99 V
+12 V 11.97 V
-12 V -11.86 V
- 5 V - 5.09 V
VBAT(V) 3.22 V
5VSB(V) 5.45 V
Shutdown Temperature 60
0
C/1400F
Item Help
Menu Level !
↑↓←→ Move Enter: Select +/-/PU/PD: Value F10:Save ESC: Exit F1:General Help
F5:Previous Values F6:Fail-safe defaults F7:Optimized Defaults

BIW1Aseries
~51~
CPU Warning Temperature
Default: Disabled
When this item is enabled, we can set the CPU warning temperature . If the
CPU temperature is higher than the setting temperature, the system will beep.
Current System Temp.
This field displays the current system temperature.
Current CPU1 Temperature
It shows the current CPU temperature.
Current CPUFAN1 Speed
Current CPUFAN2 Speed
Current CPUFAN3 Speed
It shows the running speed of the system fan, Chassis fan and power fan.
The value will be changing when the system is running. If you do not
install the fan, the value will show 0.
Shutdown Temperature
Default: 60OC/140OF
When the system temperature up to 60OC/140OF, it will be shutdown.
3.9 Frequency/Voltage Control
CMOS Setup Utility – Copyright © 1984-1998 Award Software
Frequency/Voltage Control
Auto Detect DIMM/PCI CLK Enabled
Spread Spectrum Disabled
CPU/SDRAM/PCI Clock Default
CPU Ratio X 3
Item Help
Menu Level
!
↑↓←→ Move Enter: Select +/-/PU/PD: Value F10:Save ESC: Exit F1:General Help
F5:Previous Values F6:Fail-safe defaults F7:Optimized Defaults
Auto Detect DIMM/PCI Clk
Default: Enabled
This item allows you to enable/disable auto detect DIMM/PCI Clock.

BIW1Aseries
~52~
Spread Spectrum Modulated
Default: Disabled
Enable / Disable this item the BIOS will Enable / Disable the clock generator
spread spectrum .
CPU/SDRAM/PCI Clock
Default: Default
This item allows you to select the CPU/SDRam/PCI frequency.We
recommend that you leave this item at the default value.
CPU Clock Ratio
Default: X 3
This item allows you to select the CPU frequency.
3.10 Load Fail-Safe Defaults
When you press <Enter> on this item you get a confirmation dialog box with
a message similar to:
Load Fail-Safe Defaults (Y/N) ? N
Pressing ‘ Y’ loads the BIOS default values for the most stable, minimalperformance system operations.
3.11 Load Optimized Defaults
When you press <Enter> on this item you get a confirmation dialog box with
a message similar to:
Load Optimized Defaults (Y/N) ? N
Pressing ‘ Y’ loads the default values that are factory settings for optimal
performance system operations.
3.12 Supervisor/User Password Setting
These two items can be used to install a Supervisor Password and a User
Password. If you log on as Supervisor, you have full access to the system,
and you can restrict the permissions granted to someone who logs on as User.
For example, a Supervisor can restrict a User from entering the setup utility.

BIW1Aseries
~53~
To install a Supervisor or User Password, follow these steps:
1. Highlight the item Supervisor/User password on the main menu and press
Enter.
2. The password dialog box will appear.
3. If you are installing a new password, carefully 4W in the password. You
cannot use more than 8 characters or numbers. The password will
differentiate between upper case and lower characters. Press Enter after
you have typed in the password. If you are deleting a password that is
already installed just press Enter when the password dialog box appears.
4. The system will ask you to confirm the new password by asking you to
type it in a second time, Carefully type the password again and press Enter,
or just press Enter if you are deleting a password that is already installed.
5. If you type the password correctly, the password will be installed.
3.13 Save and Exit Setup Option
This allows you to save the new setting values in the CMOS memory
and continue with the booting process. Select what you want to do, press
<Enter>.
3.14 Exit Without Saving Option
This allows you to exit the BIOS setup utility without recording any new
values or changing old ones.
Highlight this item and press Enter to save the change that you have made in
the setup utility and exit the setup program. When the Save and Exit dialog
box appears, press Y to discard changes and exit, or press N to return to the
setup main menu.

BIW1Aseries
~54~
The support software for this motherboard may be supplied on a CDTitle, or it may be supplied on diskettes. All the support programs are stored
in separate folders, so you can find the program you need easily enough. The
support software contains the following programs:
" IDE Bus Master drivers for Win 98/Win 95/NT.
" Intel 810 VGA driver.
" ADI 1881 Audio driver.
" PC-Cillin 98 Software.
Note: Please refer the PC-Cillin 98 installation guide for installing the PC-
Cillin 98.
4.1 Installing the IDE Bus Master Driver
After you have finished the hardware setup, you have to install the IDE
Bus Master software of the motherboard, then you can enjoy the advance
Motherboard.
According the follow steps for IDE Bus Master driver installation:
1. Turn on your PC then put the “CD title” into your CD-ROM drive.
(Please make sure it’ s under Win98/95 mode)
2. The CD title will be auto-run. If not, please click the “start” button and
select “Run” item. Then type-> D:\setup (D is assigned your CDROM Device)
Chapter 4
Software Setup

BIW1Aseries
~55~
3. Press “Intel Chip” button.
4. Press “Win9x INF Update for Bus Master” and follow the
instructions to this software. Then Re-boot your PC.
5. Click Next when the Welcome screen appears.
6. Follow the instructions to complete the software installation, then re-
boot your PC.
Intel Chip button
Win9x INF Update for Bus Master
button

BIW1Aseries
~56~
4.2 Installing the Intel 810 VGA Driver
According the follow steps for Intel 810 graphics driver installation:
1. Turn on your PC then put the “CD title” into your CD-ROM drive.
(Please make sure it’ s under Win98/95 mode)
2. The CD title will be auto-run. If not, please click the “start” button
and select “Run” item. Then type-> D:\setup (D is assigned your
CD-ROM Device)
3. Press “Intel Chip” button.
4. Press “Intel 810 VGA driver” button.
5. Press “Win9x Intel 810 VGA driver” button.
Intel Chip button
Intel 810 VGA driver button
Win9x Intel 810 VGA driver
button

BIW1Aseries
~57~
6. Follow the instructions to complete the software installation, then
re-boot your PC.
4.3 Installing the ADI 1881 Audio Driver
According the follow steps for ADI 1881 audio driver installation:
1. Turn on your PC then put the “CD title” into your CD-ROM drive.
(Please make sure it’ s under Win98/95 mode)
2. The CD title will be auto-run. If not, please click the “start” button
and select “Run” item. Then type-> D:\setup (D is assigned your
CD-ROM Device)
3. Press “Audio” button.
4. Press “ADI 1881” button.
Audio button
ADI 1881 button

BIW1Aseries
~58~
5. Press “Win 98 [WDM]” button.
Note: If your O.S. is Win95, please press “Win95 [Vxd] & Win95
Wavetable” button to install the audio driver.
6. Follow the instructions to complete the software installation, then
re-boot your PC.
Win 98 [WDM] button

BIW1Aseries
~59~

BIW1Aseries
~60~
This page was intentionally left blan

BIW1Aseries
~61~
This page was intentionally left blank
 Loading...