

Probuilt Professional Lighting IN120LB User Manual

SmithLight IN120LB Quick-Start Guide
Adjusting the Light Head
1. Remove the SmithLight from its packaging.
2. To raise the light head, press the black button on the handle and simultaneously pull the
light head up. When the light head reaches its maximum height, release the black
button and the light head will automatically lock into place.
Note: YOU MUST INITIALLY PULL THE LIGHT HEAD TO ITS MAXIMUM HEIGHT. (The
light head cannot be brought to its middle setting without first going to the maximum
setting).
3. Remove the protective film from both sides of the lens.
4. While the light head is raised you may adjust the angle by indexing the light head in the
direction shown by the side arrows. The light head will rotate down about 60 degrees.
5. To lower the light head to its middle height setting, click the black button (but do not
hold it in), then lower the light head and it will automatically lock into the middle height
setting.
6. To completely lower the light head into the housing, make sure the light head is not
rotated down. Click the black button and lower the light head until it automatically
locks into place in the housing.
Charging
Your SmithLight unit should be charged upon receipt and before any prolonged use.
1. Raise the light head to its maximum setting and open the small storage compartment in
the bottom of the housing to remove the charging adapter and cables.
2. Remove the threaded metal cap from the charging port on the back of the SmithLight
and connect the threaded metal connector of the charging cable.
3. Connect the 120V plug to the charging adapter and plug into 120VAC power source.
4. The charge status light on both sides of the light head will illuminate red while the unit is
charging and it will turn green when the unit is fully charged.
5.
For peak performance it is recommended that the SmithLight be kept on charge when
not in use. The charging adapter will switch to a trickle mode to maintain 100%
charge while in storage.
6.
To check the battery status while in use, depress the red button for several seconds on
the back of the housing. The LED indicator may first light up green, and then illuminate
red (low), yellow (medium) or green (full) to indicate the approximate battery level.
(continued on reverse)
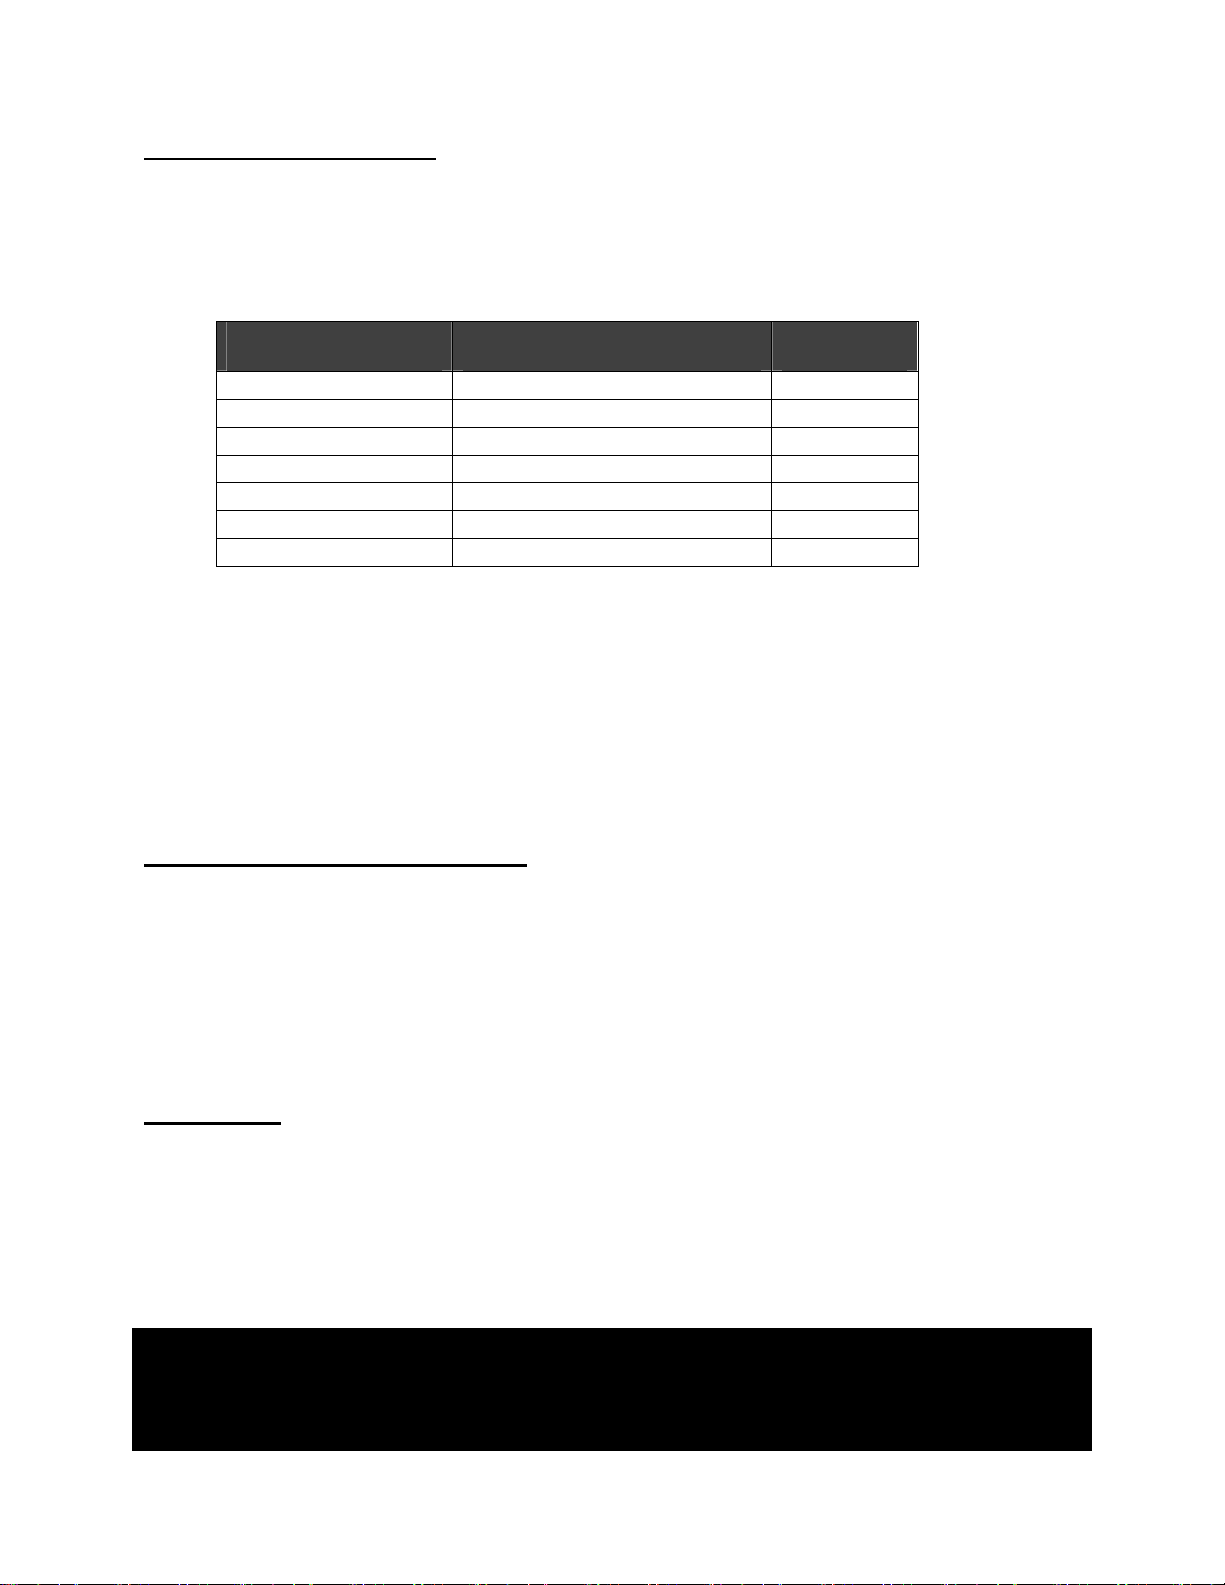
Operating the Light Head
Press Red
Light Head
Light
None (Default “on”)
Front
Steady
Once
Back
Steady
Twice
Front & Back
Steady
Three
times
Front
Flash
Four
times
Back
Flash
Five
times
Front & Back
Flash
Six times
Front (b
ack to default
) Steady
1. Press the black circular rocker switch on the underside of the light head to turn the
SmithLight ON and the front of the light head will illuminate. The light head can now be
cycled through six different settings by pressing the red button next to the ON/OFF
switch as follows:
Button
Note: the SmithLight will “beep” as it moves through each setting
Illuminates
Mode
2. The light head will continue to operate on the chosen setting even if it is completely
lowered into the housing. When combined with the Flash setting this feature provides
for a unique hazard warning system.
3. Press the black circular rocker switch to turn the SmithLight OFF.
4. NOTE: If the unit is being charged it will only allow one side of the light head to be
illuminated. This feature insures that the unit will still properly charge while in use,
although charge time will be extended.
SmithLight IN120LB Key Features
· No assembly, no loose parts and no set-up required
· Up to 30 hours of continuous run time on a full charge (one side illuminated)
· IP65 weather proof and dust proof
· cUL listed (ETL File No. 4002373)
· VRLA gelled acid battery – leak proof and spill proof, even if punctured
· Battery status indicators and warnings for recharge and operation
Precautions
· Do not allow the battery to sit in a completely discharged state for a period longer
than seven days as this may cause damage to the battery.
· Use only the charging cables and adapter provided.
· See the User Manual provided for complete instructions, features and precautions.
QUESTIONS or PROBLEMS?
Contact ProBuilt Professional Lighting
877-707-0800
customerservice@probuiltlighting.com
 Loading...