


de Bedienungsanleitung Easycutter
en Operating manual: Easycutter
fr Mode d’emploi Easycutter
it Istruzioni per l’uso Easycutter
1
DE Easycutter
EN Easycutter
FR Easycutter
IT Easycutter
2
A
B
M6
1x
B + D
C
D6
1x
A
M6 x 20
4x
DE SCHNEIDEDRAHT
EN CUTTING WIRES
FR FILS DE COUPE
IT FILI DI TAGLIO
3

SICHERHEITSHINWEISE
DEUTSCH
Lesen Sie alle Sicherheitshinweise und Anweisungen. Versäumnisse können elektrischen Schlag, Brand, Explosion oder Verletzungen verursachen. Bewahren Sie alle Sicherheitshinweise und Anweisungen für die Zukunft
auf. Die in den Sicherheitshinweisen verwendete Begriff „Elektrowerkzeug“ beziehen sich auf den Hartschaumschneider. Der Begriff: „Einsatzwerkzeug“ bezieht sich auf das Zubehör, z.B. auf die Schneidedrähte, Klingen, etc.
ARBEITSPLATZSICHERHEIT
BRANDSCHUTZ UND GESUNDHEIT: BESONDERE SICHERHEITSHINWEISE IM UMGANG MIT HARTSCHÄUMEN
AUS EXPANDIERTEM POLYSTYROL (EPS, STYRODUR©, STYROPOR®), POLYSTYROL-EXTRUDERSCHAUM-
STOFF (XPS) ODER ÄHNLICHEM IM BEZUG AUF EXPLOSIONSGEFAHR UND GEFÄHRLICHE DÄMPFE.
1. Beachten Sie, dass Aufbewahrung, Handhabung und Anbringen von Hartschäumen
besonderen Sicherheitsbestimmungen unterliegt. Lesen und befolgen Sie alle Sicherheits-
hinweise und Anweisungen des Hartschaumherstellers.
2. Beachten Sie, dass während der Verarbeitung von Hartschäumen, besonders beim
Schneiden mit erhitzten Drähten oder Klingen, entzündlichen oder gesundheitsbedenklichen oder gesundheitsschädlichen Dämpfe wie z.B. Pentan, Styrol etc. entweichen
können. Lesen Sie dazu die Hinweise des Herstellers, beachten Sie die MAK-Werte und
befolgen Sie diesbezüglichen Anweisungen des Herstellers. Desweiteren sorgen Sie vor
jeder Inbetriebnahme und Reinigung für einen sicheren Arbeitsbereich, indem Sie fol-
gende Hinweise befolgen:
2.1 Keine Materialien mit einer Erweichungstemperatur von unter 100 °C (212 °F) verwenden.
2.2 Keine Materialien mit einer Zündtemperatur unter 300 °C (572 °F) verwenden.
2.3 Keine selbstentzündliche und keine leichtent ammbare Materialien nach der Norm
EN 13501-1 / DIN 4102-1 verwenden.
2.4 Keine Materialien verwenden, die explosionsgefährlich oder brandfördernd sein
können.
2.5 Das gesamte Arbeitsumfeld muss frei von jeglichen Zündquellen sein, wie z.B. andere eingeschaltete elektromotorbetriebene Elektrowerkzeuge (Funkenbildung), offenes
Feuer, angezündete Zigaretten oder Ähnliches.
2.6 Halten Sie Ihr Arbeitsumfeld sauber, staubfrei, gut beleuchtet, um Brand- und Explosionsgefahr sowie Gesundheitsschädigungen durch Dämpfe zu vermeiden.
Inbetriebnahme bei geschlossenen Türen und Fenstern ist nicht gestattet. Halten Sie
Ihren Arbeitsumfeld gut belüftet, um das Einsammeln von entzündlichen und/oder ge-
sundheitsgefährdenden Dämpfen zu vermeiden.
Berücksichtigen Sie, dass die entzündlichen Dämpfe in der Regel schwerer sind als Luft
und sich in Bodennähe stauen können. Sorgen Sie daher für die ausreichende Absaugung der entstehenden Dämpfe sowie für gute Raumbelüftung auch im Bodenbereich.
Berücksichtigen Sie, dass die Lichtbogenbildung nicht ausgeschlossen werden kann.
2.7 Während eines Schneidvorgangs können sich am Elektrowerkzeug elektrostatische
Au adungen bilden, die zu einer Funke- oder Flammenbildung führen können.
Sie dürfen das Elektrowerkzeug nicht verwenden, wenn der Arbeitsbereich durch brennbare Gase, Stäube oder Flüssigkeiten explosionsgefährdet ist oder wenn der Arbeitsbe-
reich unter Explosionsschutz-Verordnung gestellt wurde.
ELEKTRISCHE SICHERHEIT
3. Überprüfen Sie das Netzkabel vor jeder Inbetriebnahme auf Beschädigungen. Gehen Sie
4

mit dem Netzkabel sorgfältig um: Vermeiden Sie ein enges Aufrollen/Verbiegen des Kabels, ziehen Sie Netzkabel immer am Stecker aus der Steckdose, halten Sie das Kabel fern
von Hitze, Öl, und scharfkantigen Ecken, lagern Sie das Kabel nicht als Kabelsalat.
4. Stellen Sie sicher, dass Sie den Anschlussstecker an ein ordnungsgemäß geerdetes
Stromnetz mit Schutzleiter anschließen. Der Anschlussstecker muss in die Steckdose
passen. Beachten Sie die Netzspannung! Die Spannung der Stromquelle muss mit den
Angaben auf dem Typenschild des Ladegerätes übereinstimmen.
5. Es wird ein Leitungsschutzschalter C16 A oder stärker empfohlen.
6. Wenn Sie mit dem Gerät im Freien arbeiten müssen, verwenden Sie nur Verlängerungskabel, die auch für den Außenbereich zugelassen sind.
Schützen Sie sich vor Stromschlägen!
7. Während das Gerät am Stromnetz angeschlossen ist, verhindern Sie den Körperkontakt
zu geerdeten Oberächen, z.B. Rohren, Heizkörpern, Kühlschränke etc..
8. Beim Arbeiten halten Sie das Gerät an den isolierten Griffächen.
9. Das Gerät darf während der Vorbereitung der Inbetriebnahme, der Wartung
und Reinigung nicht ans Stromnetz angeschlossen sein.
10. Bei Nässe dürfen weder Personen im Arbeitsbereich noch das Gerät mit dem ausgetretenem Wasser in Kontakt kommen. Sorgen Sie dafür, dass kein Regen oder Nässe in das
Elektrowerkzeug eindringt. Nassbetrieb ist strikt verboten.
11. Das Gerät ist ohne Personenschutzschalter. Bearbeiten Sie deshalb keine angefeuchteten
Materialien, feuchte Flächen, arbeiten Sie nicht in einer feuchten Umgebung.
12. Gleichzeitiger Betrieb von mehreren Elektrowerkzeugen führt zu Überlastungen und kann
ggf. einen Brand, Kurzschluss und irreparablen Geräteschaden auslösen.
13. Reinigen Sie regelmäßig die Geräteoberäche sowie die Lüftungsschlitze des Elektrowerkzeugs. Beachten Sie, dass das Motorgebläse Staub in das Gehäuse zieht. Eine starke
Ansammlung von leitfähigem Staub (zum Beispiel Metallstaub, feuchtem Staub) kann unter
Umständen einen elektrischen Schlag verursachen.
SICHERHEIT VON PERSONEN
14. Sobald das Gerät an Stromnetz angeschlossen ist, berühren Sie nie mit Körperteilen
das Einsatzwerkzeug, Klinge oder den Schneidedraht. Während der Verwendung des
Elektrowerkzeuges greifen Sie nie unter die Hartschaumplatte bzw. halten Sie nie die
Hartschaumplatte in der Hand oder über das Bein fest. Andersfalls riskieren Sie starke
Verletzungen. Beachten Sie, dass die Handschuhe oder Kleidung keinen sicheren Schutz
vor Verletzungen oder Verbrennungen durch erhitztes Einsatzwerkzeug bieten. Beachten
Sie nach dem Trennen des Elektrowerkzeuges vom Stromnetz die Abkühlzeit der Einsatzwerkzeuge.
15. Vermeiden Sie ungewolltes Anschalten.
Bevor Sie das Gerät an Stromversorgung anschließen, stellen Sie sicher, dass der
Schalter auf AUS steht und das Einsatzwerkzeug still steht und abgekühlt ist.
Das Gerät muss ausgeschaltet werden und das Einsatzwerkzeug abgekühlt, bevor Sie
das Gerät ablegen oder das Werkstück wechseln.
Vor jedem Wechsel der Einsatzwerkzeuge, Wartung- und Reinigung muss der Netz-
stecker gezogen werden. Beachten Sie, dass das Einsatzwerkzeug nicht gleich mit dem
Ausschalten des Gerätes kalt wird. Warten Sie, bis das Einsatzwerkzeug zum Stillstand
gekommen ist und abgekühlt hat.
16. Das Einsatzwerkzeug muss komplett montiert und verriegelt werden, bevor das Gerät
eingeschaltet wird. Verwenden Sie ausschließlich die Originaleinsatzwerkzeuge.
5

17. Sichern Sie die Hartschaumplatte gegen das Verrutschen, um nicht versehentlich mit
dem erhitzten Einsatzwerkzeug in Berührung zu kommen.
18. Entfernen Sie Einstellwerkzeuge (z.B. Schraubenschlüssel) und halten Sie den Arbeits-
bereich sauber, bevor Sie das Gerät einschalten.
19. Beim Schneiden von Hartschäumen können Dämpfe entstehen, die zur Haut-, Au-
gen- und/oder zur Atemwegeirritationen führen können. Tragen Sie daher entsprechende
Schutzkleidung, Handschuhe, Schutzbrille und eine Mund-Nase-Filtermaske.
20. Gehen Sie vorsichtig mit beweglichen Teilen des Gerätes um. Binden Sie Ihr Haar zu-
sammen, tragen Sie keinen Schmuck oder weite Kleidung. Andernfalls können sich diese
in bewegenden Geräten oder Einsatzwerkzeugen verfangen.
21. Während der Arbeit achten Sie auf einen ausbalancierten festen Stand und Griff. Arbei-
ten Sie nicht auf einer Leiter.
22. Achten Sie auf jegliche Anzeichen von Ermüdung Ihres Körpers und brechen Sie die
Arbeit bei Ermüdungserscheinung ab.
23. Sollten Sie unter Schlafentzug leiden oder unter dem Einuss von Alkohol, Rauschmitteln
oder Medikamenten stehen, dürfen Sie das Elektrowerkzeug nicht verwenden.
24. Lassen Sie erwachsene Personen das Gerät nicht benutzen, die diese Anweisungen
nicht gelesen haben oder nicht befolgen können.
25. Kinder und Jugendliche dürfen das Gerät und Einsatzwerkzeuge nicht benutzen. Unter-
weisen Sie die Kinder, dass Sie mit den oben genannten Gegenständen nicht spielen dürfen.
Bewahren Sie diese Gegenstände außerhalb der Reichweite von Kindern auf.
VERWENDUNG DES ELEKTROWERKZEUGES UND DER EINSATZWERKZEUGE
26. Überlasten Sie das Gerät nicht und verwenden Sie das Gerät und seine Einsatzwerk-
zeuge entsprechend diesen Anweisungen und des bestimmungsgemäßen Gebrauchs.
Andernfalls bestehen Risiken für Gesundheit und Leben.
27. Vor jeder Benutzung des Gerätes müssen Sie alle Schutzvorrichtungen, Kabelverbin-
dungen, Zubehörteile und Einsatzwerkzeuge gründlich auf Beschädigungen überprüfen,
um sicherzustellen, dass das Gerät und seine Einsatzwerkzeuge ordnungsgemäß und
mit allen Funktionen arbeiten. Führen Sie folgende Schritte durch:
27.1 Bei Elektrowerkzeugen mit Klingen und Aufsätzen: Ziehen Sie lockeren Schrauben
an. Bei Elektrowerkzeugen mit Draht: Überprüfen Sie die Federn und Spannung des
Schneidedrahtes. Beachten Sie, dass insbesondere der Draht unter Spannung eingesetzt
wird. Ein verschlissener Draht kann schlagartig zerspringen und ernsthafte Verletzungen
verursachen. Tragen Sie daher immer eine Schutzbrille!
27.2 Überprüfen Sie das Gerät vor jedem Gebrauch auf Beschädigungen, Risse, Verformun-
gen oder auffällige Verschleißspuren. Wenn vorhanden, verwenden Sie das Gerät nicht.
27.3 Überprüfen Sie die Ausrichtung und Verbindungen der Einsatzwerkzeuge und aller
beweglichen Teilen sowie die des Kabels auf Brüche, stärkere Verschleißspuren, sonstige
Beeinträchtigungen und jegliche anderen Umstände, die den Betrieb beeinussen können. Wenn vorhanden, verwenden Sie das Gerät und/oder die Einsatzwerkzeuge nicht.
27.4 Verschlissene Schutzvorrichtungen oder andere defekte Teile müssen durch eine au-
torisierte Werkstatt fachgerecht repariert oder ersetzt werden. Beschädigte oder verschlissene Einsatzwerkzeuge dürfen nicht repariert werden, sondern müssen ersetzt werden.
27.5 Wenn Sie das Einsatzwerkzeug überprüft und eingesetzt haben, führen Sie Test-
schritte wie in dem Abschnitt „Inbetriebnahme“ beschrieben durch, um die eventuell
6

unentdeckten Beschädigungen an den Einsatzwerkzeugen im Testlauf zu identizieren.
Andere Personen während des Tests fernhalten.
28. Einsatzwerkzeuge müssen genau in die Werkzeugaufnahme passen und dürfen nur
für die empfohlenen Einsatzmöglichkeiten verwendet werden. Verwenden Sie kein Einsatzwerkzeug, das vom Hersteller nicht speziell für dieses Elektrowerkzeug vorgesehen
wurde. Im Fall, wenn ein Einsatzwerkzeug aus nicht autorisierter Herstellung an dem
Elektrowerkzeug befestigt wird, ist eine Garantie für sichere Verwendung ausgeschlossen. Die Verwendung von Zwischenlagen, Reduzierbuchsen oder Adapter ist untersagt.
29. Verbrennungsgefahr: Halten Sie nie die Hand vor dem erhitzten Einsatzwerkzeug.
Berühren Sie nie mit Körperteilen das erhitzte Einsatzwerkzeug. Während der Verwendung
des Elektrowerkzeuges greifen Sie nie unter die Hartschaumplatte bzw. halten Sie nie die
Hartschaumplatte in der Hand oder über das Bein fest. Andersfalls riskieren Sie starke Verbrennungen durch das versehentliche Berühren des erhitzten Einsatzwerkzeuges. Beachten Sie, dass die Handschuhe oder Kleidung keinen sicheren Schutz vor Verletzungen oder
Verbrennungen durch stark erhitztes Einsatzwerkzeug bieten. Nach dem Ausschalten beachten Sie die Abkühlzeit des Einsatzwerkzeuges, bevor Sie das Elektrowerkzeug ablegen.
30. Gesundheitsgefährdende Werkstücke wie z.B. Asbest dürfen nicht verarbeitet werden.
SERVICE
40. Das Gerät darf ausschließlich von qualiziertem Fachpersonal und mit Original-
Ersatzteilen repariert werden. Einsatzwerkzeuge dürfen nicht repariert werden, sondern
müssen ersetzt werden.
Technische Daten Easycutter I Easycutter II
Schnittlänge 1.070 mm 1.350 mm
Schnitttiefe 320 mm 320 mm
Gewicht 10 kg 10 kg
Trafo mit
Thermosicherung
40 V / 160 Watt / 230V – 50/60Hz /
IP 54
40 V / 200 Watt / 230V – 50/60Hz /
IP 68
BESTIMMUNGSGEMÄSSER GEBRAUCH
Das Gerät ist zum Schneiden von Polystyrol-Hartschaumplatten (z.B. Styropor oder Styrodur)
für Gebäudedämmung bestimmt. Die Hartschaumplatten sollen dabei frei von Kleber, Kleberrückständen und anderen Verunreinigungen sein.
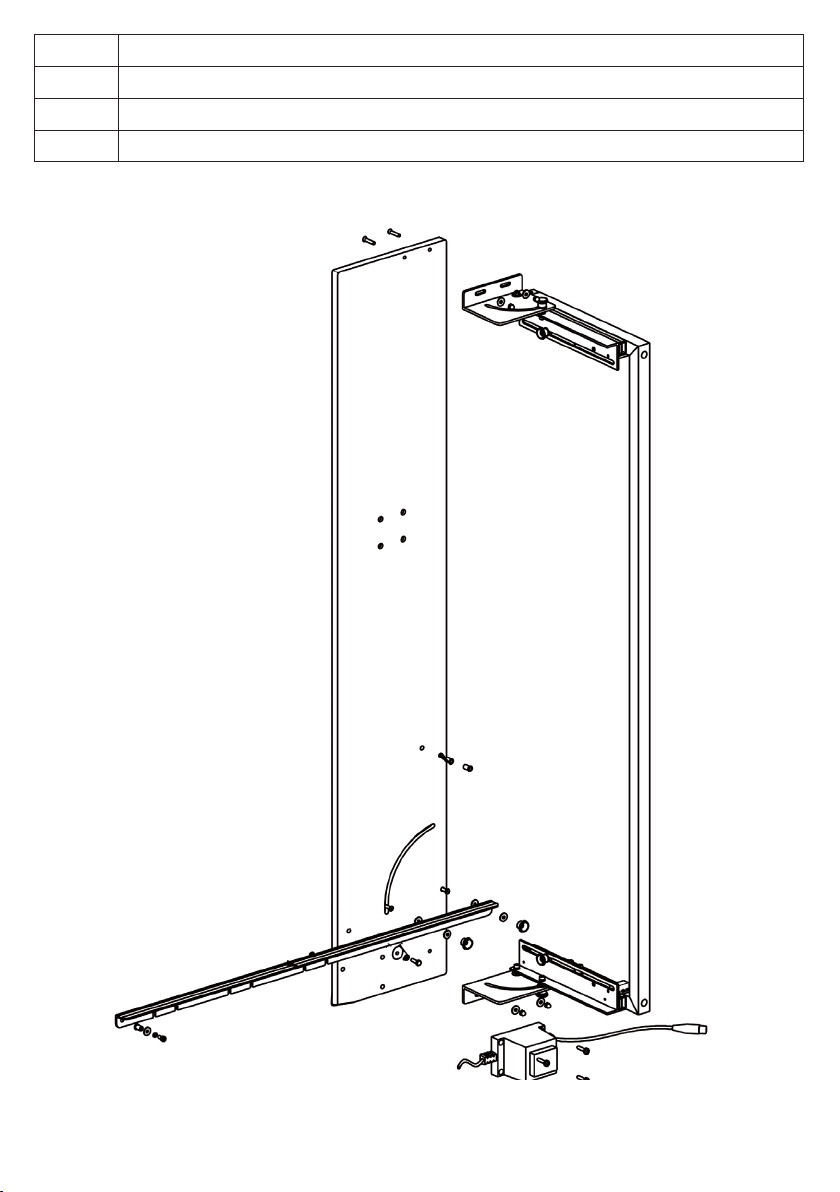
MONTAGE
Ziehen Sie den Stecker und lesen Sie alle Sicherheitshinweise vor der Montage. Versäumnisse
können elektrischen Schlag, Geräteschaden oder sehr schwere Verletzungen verursachen.
Die folgende Aufbauanleitung beschreibt alle Modelle und Sonderausstattungen
des Easycutters. Bitte beachten Sie, dass Ihr Gerät nicht mit allen beschriebenen
i
Bauteilen/Zubehör ausgestattet sein könnte. Genauen Lieferumfang entnehmen
Sie bitte Ihrer Bestellbestätigung.
Aufbauanleitung: Seiten 2-3
7
INBETRIEBNAHME
Lesen Sie alle Sicherheitshinweise und Anweisungen vor der Inbetriebnahme. Versäumnisse können
elektrischen Schlag, Geräteschaden oder sehr schwere Verletzungen verursachen.
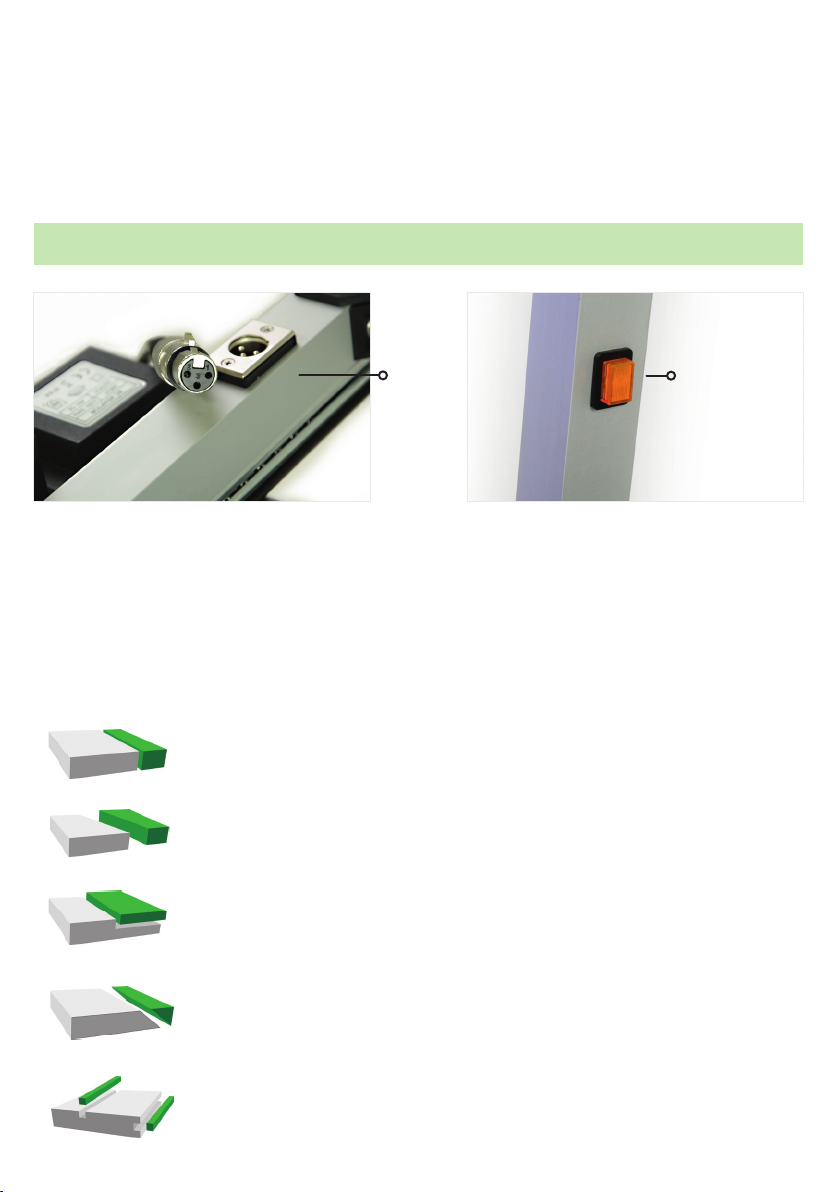
Ein- und Ausschalten
1. Trafokabel mit XLR-Stecker (1) in den Bügel einstecken.
2. Den Ein-und-Ausschalter (2) im Bügel drücken.
Der Schneidedraht innerhalb von Millisekunden auf seine Betriebstemperatur.
3. Bügel in Richtung Material schieben - Material wird geschnitten.
4. Achtung: Brandgefahr: Nach jedem erfolgten Schnitt den Ein-und Ausschalter
loslassen, der Schneidedraht kühlt in wenigen Sekunden ab.
1
2
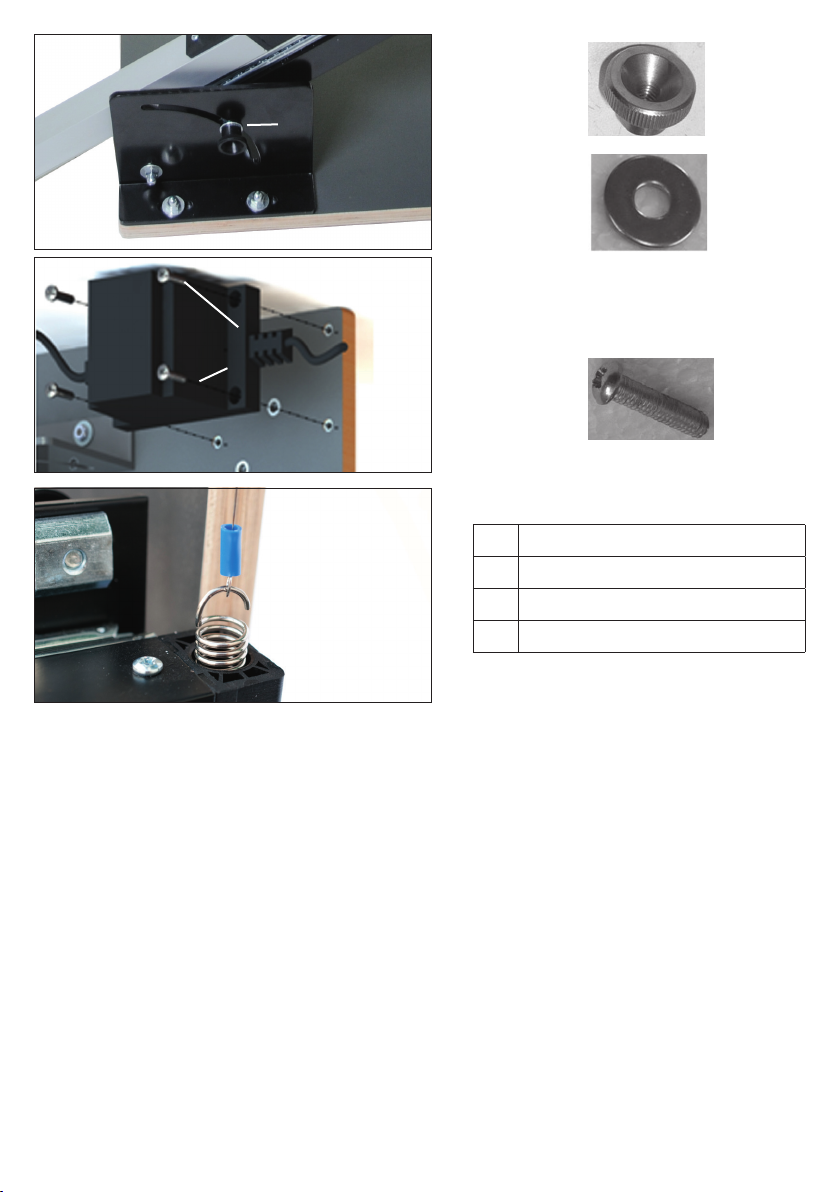
DRAHTWECHSEL
Lesen Sie alle Sicherheitshinweise und Anweisungen vor der Wartung oder Drahtwechsel. Versäumnisse können elektrischen Schlag, Explosion, Geräteschaden oder sehr schwere Verletzungen verursachen.
1. Drahtreste durch Aushängen an der oberen und unteren Drahtaufnahme entfernen.
2. Der neue Draht wird zuerst auf der einen Seite in die Feder eingehängt und dann unter
Zugspannung auf der gegenüberliegenden Seite eingehängt.
SCHNITTVARIANTEN
GERADER SCHNITT
Bügel-Winkel links und rechts auf 0 Grad einstellen und gewünschtes Abschnittmaß
auf der Polystyrolplatte anzeichnen.
SCHRÄGSCHNITT
Bügel – Winkel links und rechts auf 0 Grad einstellen und gewünschten Winkel mit
dem Anschlaglineal einstellen.
STUFENSCHNITT
Bügel–Winkel links und rechts auf 0 Grad einstellen und gewünschte Stufe (Höhe und
Länge) auf der Polystyrolplatte anzeichnen. Bügel anheben, um die Hartschaumplatte
unter dem Schneidedraht bis an die angezeichnete Länge durch zuschieben.
GEHRUNGSSCHNITT
Bügel Winkel links und rechts auf das gewünschte Winkelmaß einstellen. Dazu wird
der mit gelieferte Winkelanschlag verwendet.
Bügel anheben, um die Hartschaumplatte unter dem Schneidedraht bis an den Schnittanfang zuschieben.
HOHLKEHLENSCHNITT
Bügel – Winkel links und rechts auf 0 Grad einstellen und gewünschte Hohlkehle auf
der Polystyrolplatte anzeichnen. Bügel anheben, um die Hartschaumplatte unter dem
Schneidedraht bis an die angezeichnete Stelle durchzuschieben.
8

STÖRUNGSBESEITIGUNG, REINIGUNG, ENTSORGUNG
Ziehen Sie den Stecker bevor Sie das Gerät reinigen, Lesen Sie alle Sicherheitshinweise. Versäumnisse können elektrischen Schlag, Geräteschaden oder sehr schwere Verletzungen verursachen.
Störungsbeseitung
Sollte das Gerät – vor allem nach längerer ununterbrochener Nutzung – nicht mehr heiß
werden, dann muss der Trafo kurz abkühlen (dieser ist mit einer thermischen Sicherung
versehen).
Reinigung
Besonders Lüftungsöffnungen und die Werkzeugaufnahme sollen nach jedem Gebrauch
mit einem Tuch und Pinsel gereinigt werden. Kommt Druckluft zum Einsatz, sollen 3 bar
nicht überschritten werden. Kunststoffteile nicht mit Lösungsmitteln abwischen.
Entsorgung
Werfen Sie Elektrowerkzeuge nicht in den Hausmüll! Gemäss Europäischer Richtlinie über
Elektro- und Elektronik-Altgeräte und Umsetzung in nationales Recht müssen verbrauchte
Elektrowerkzeuge getrennt gesammelt und einer umweltgerechten Wiederverwertung
zugeführt werden.
Konformitätserklärung
Hiermit erklären wir, dass folgendes Produkt den Bestimmungen der unten gekennzeichneten Richtlinien - einschließlich deren zum Zeitpunkt der Erklärung geltenden Änderungen entspricht. Ein nicht mit uns abgestimmter Umbau oder Änderung der Maschine
seitens unautorisierter Dritter beinhaltet den sofortigen Verlust der Gültigkeit dieser
Erklärung.
Produkt: Polystyrolschneider
Einschlägige EG-Richtlinien
98/37/EG
73/23/EWG
2004/108/EC
2006/95/EC
Angewandte Normen
EN 55014-1 (VDE 875 Teil 14-1): 2003-09; EN 55014-1:2000 + A1:2001 + A2:2002
EN 55014-2 (VDE 875 Teil 14-2): 2002-08; EN 55014-2:1997 + A1:2001
EN 61000-3-2 (VDE 838 Teil 2): 2001-12; EN 61000-3-2:2000
EN 61000-3-3 (VDE 838 Teil 3): 2002-05; EN 61000-3-3:1995 + Cor.:1997 + A1:2001
EN 60335-1 (VDE 07000-1):2007-02; EN 60335-1:2002+A11+A1+A12+Corr.:+A2:2006
EN 60335-2-45 (VDE 0700 Teil 45): 2003-06; EN 60335-2-45:2002
EN 50366 (VDE 0700-366):2006-11; EN 50366:2003+A1:2006
Angewandte harmonisierte Normen
EN ISO 12100-1
EN ISO 12100-2
____________
Andre Rahe
Geschäftsführer Bielefeld, 23.08.2011
Pro Bauteam Vertriebs- & Produktionsgesellschaft mbH
Grafenheider Strasse 103 Telefon: 0 521 - 9774401
33729 Bielefeld/ Deutschland Fax: 0 521 - 9774406
9

SAFETY NOTES
ENGLISH
Read all safety information and instructions. Failure to comply with these instructions may result in an electric
shock, fire, explosion or injury. Retain all safety information and instructions for future reference.
The terms “electric power tool” and “equipment” used in the safety information and instructions relate to foam
cutter. The term: “application tool” relates to the accessories.
WORK AREA SAFETY
FIRE PROTECTION AND HEALTH: SPECIAL SAFETY INFORMATION WHEN HANDLING RIGID FOAMS MADE
FROM EXPANDED POLYSTYRENE (EPS, STYRODUR©, STYROPOR®), EXTRUDED POLYSTYRENE FOAM (XPS)
OR SIMILAR MATERIALS, IN RELATION TO THE RISK OF EXPLOSIONS AND HAZARDOUS VAPOURS.
1. Please note that the storage, handling and attachment of rigid foams is subject to spe-
cial safety regulations. Read and observe all safety information and instructions from the
rigid foam manufacturer.
2. Please note that during the processing of rigid foams, and particularly when cutting
with heated wires or blades, ammable, potentially harmful or harmful vapours may escape, such as pentane, styrene, etc. For this, please read the manufacturer‘s information,
observe the MAK values and follow the manufacturer’s instruction which relate to this. In
addition, make sure that the work area is safe before every operation and cleaning proce-
dure by following these instructions:
2.1 Do not use any materials with a softening temperature of less than 100 °C (212 °F).
2.2 Do not use any materials with an ignition temperature of less than 300 °C (572 °F). .
2.3 Do not use any self-igniting or easily ammable materials in accordance with the
standard EN 13501-1 / DIN 4102-1.
2.4 Do not use any materials which may be explosive or oxidising.
2.5 The entire work environment must be free from any sources of ignition such as other
electrically-driven power tools that are switched on (spark formation), open ames, lit
cigarettes or similar.
2.6 Keep your work environment clean, dust-free and well-lit in order to prevent the risk
of re and explosions, as well as damage to health, due to vapours.
Operation is not permitted when doors and windows are closed. Keep your work en-
vironment well-ventilated in order to prevent ammable and/or harmful vapours from
collecting.
Bear in mind that the ammable vapours are generally heavier than air and can accumulate near to the ground. For this reason, make sure that any vapours which arise are
sufciently suctioned away, and also ensure that the oor area of the room is well-ventilated.
2.7 Keep your work environment clean, dust-free, well-lit, well-ventilated, and free from
ignition sources (such as electric power tools that are switched-on - due to spark formation - open ames, lit cigarettes) in order to prevent the risk of re, explosion or damage to health due to vapours or dust. Working in potentially explosive environments is
prohibited.
ELECTRICAL SAFETY
3. Inspect the power cable for damage before the start of each operation. Handle the po-
wer cable with care: Avoid tightly rolling-up/twisting the cable, always pull the cable from
the socket by holding the plug, keep it away from heat, oil and sharp edges, do not store
the cable in a tangled mess.
10

4. Make sure that you connect the plug to a properly earthed mains supply with a pro-
tective ground conductor. The connecting plug must t in the socket. Observe the mains
voltage! The voltage of the power source must correspond to the information on the type
label of the charging device.
5. It is recommended to use a C16 A circuit breaker, or one more powerful.
6. If you have to work outdoors with the equipment, only use an extension cord authorised
for use in outdoor areas.
Protect yourself against electric shocks!
7. While the device is connected to the mains supply, prevent it coming into physical con-
tact with earthed surfaces, e.g. pipes, radiators, refrigerators, etc.
8. When working, hold the device at the insulated gripping surfaces.
9. The device must not be connected to the mains supply during preparation for use,
maintenance and cleaning.
10. In wet conditions, neither persons in the work area, nor the equipment may come into
contact with any water which has leaked out. Ensure that no rain or moisture enters the
electric power tool. Operation in wet conditions is strictly prohibited.
11. The equipment does not have a safety switch. For this reason, do not work on any
damp materials or surfaces and do not work in a damp environment.
12. The simultaneous operation of several electric power tools will result in overloading
and can potentially cause a re, short circuit and irreparable damage to the equipment.
13. Clean the surface of the equipment regularly, as well as the ventilation slots on the
electric power tool. Please note that the motor fan pulls dust into the casing. A large buildup of conductive dust (for example, metallic dust, or moist dust) could potentially create
an electric shock.
PERSONAL SAFETY
14. Never let the application tool come into contact with any parts of your body once the
equipment is connected to the mains supply. During use of the electric power tool, never
reach under the workpiece or hold the workpiece in your hand or over your leg. Otherwise you will risk serious injury. Please note that gloves or clothing do not offer reliable
protection against injuries or burns from the heated rotating application tool. Observe
the cool-down time of the application tool after disconnecting the electric power tool
from the mains supply.
15. Avoid turning on the equipment unintentionally.
Before connecting the equipment to the power supply, ensure that the switch is set to
OFF and the application tool is at a standstill and has cooled down.
The equipment must be turned off and the application tool must have cooled down
before you put the equipment down or change workpiece.
The power plug must be pulled out before every change of application tool, and each
maintenance and cleaning operation. Please note that the application tool won‘t immediately cool down upon switching off the equipment. Wait until the application tool has
come to a standstill and cooled down.
16. The application tool must be completely assembled and locked before the equipment
is turned on. Only use the original application tools.
17. Secure the workpiece from slipping out of place to avoid accidentally coming into
contact with the application tool.
11

18. Remove the adjustment tools (e.g. screw wrenches) and keep the work area clean
before turning on the equipment.
19. Dust may be created during works, which may lead to skin, eye and/or respiratory
irritation. For this reason, wear appropriate protective clothing, gloves, safety shoes and
a safety mask. Wear safety goggles which correspond to ANSI requirements and offer
protection against ying particles both from the front as well as from the side.
20. Handle the equipment’s moving parts with care. Tie your hair back and do not wear
any jewellery or loose clothing. Otherwise, it might get caught in moving equipment or
application tools.
21. During work, ensure that your grip and stance are balanced and stable. Do not work on
a ladder.
22. Look out for any signs of your body becoming fatigued and stop working if these signs
of fatigue occur.
23. You must not use the electric power tool if you are suffering from sleep deprivation or are
under the inuence of alcohol, intoxicants or medication.
24. Do not allow adults to use the equipment if they have not read these instructions or
are unable to follow them.
25. Children and young people are not permitted to use the equipment and application
tools. Instruct children that they are not allowed to play with the objects mentioned above.
Keep these objects out of the reach of children.
USE OF THE ELECTRIC POWER TOOL AND THE APPLICATION TOOLS
26. Do not overload the equipment, and use the equipment and its application tools in
accordance with these instructions and their intended use. Otherwise, there may be risk
to health and life.
27. Before each use of the equipment, all protective devices, cable connections, accesso-
ries and application tools must be thoroughly checked for damage in order to ensure that
the equipment and its application tools are working properly, with all of their functions.
Perform the following steps:
27.1 For electric power tools with blades and attachments: Tighten any loose screws. For
electric power tools with a wire: Inspect the springs and the tension of the cutting wire.
Please note that the wire in particular is used under tension. A worn-out wire can sud-
denly break and cause serious injury. For this reason, always wear safety goggles!
27.2 Before each use, inspect the equipment for damages, cracks, deformation or notice-
able traces of wear and tear. Do not use the device if any of these are present.
27.3 Inspect the orientation and connections of the application tools and all moving parts,
as well as the cable, for breakages, strong traces of wear and tear, other impairments,
and any other circumstances which may affect operation. If these are present, do not use
the equipment and/or the application tools.
27.4 Worn-out protective devices or other faulty parts must be replaced, or professi-
onally repaired by an authorised workshop. Damaged or worn-out application tools
must not be repaired; they must be replaced.
27.5 If you have inspected and used the application tool, you should carry out the
test steps as described in the paragraph entitled “Initial operation” in order to identify possible undetected damages to the application tools during the test run. Keep
other people away during the test.
12

28. Application tools must t exactly into the tool holder and must only be used for the
recommended applications. Do not use any application tools that the manufacturer has
not specically intended for this electric power tool. In the event that an application tool
from a non-authorised manufacturer is attached to the electric power tool, a warranty
for safe use is excluded. The use of intermediate layers, reducing bushings or adapters is
prohibited.
29. Risk of burns: Never hold your hand in front of the heated application tool, Never let
the heated application tool come into contact with any parts of the body. During use of the
electric power tool, never reach under the rigid foam sheet or hold it in your hand or over
your leg. Otherwise you will risk serious burns due to accidentally touching the heated
application tool. Please note that gloves or clothing do not offer reliable protection against
injuries or burns from the extremely heated application tool. After switching-off, observe
the cool-down time of the application tool before placing the electric power tool down.
30. Workpieces which pose a danger to health, such as asbestos, must not be handled.
SAFETY INFORMATION FOR BATTERIES
31. Only charge the batteries in the charging device provided.
32. Only the supplied battery recommended by the manufacturer should be used in the
electric power tool.
33. Protect the unused battery from metallic objects (e.g. coins, keys, etc.). Metallic objects
can create a bridging of contacts and, as a consequence, lead to short circuits which could
irreversibly damage the battery.
34. Risk to health: The battery must not be opened. It is essential that mechanical damage
to the battery is avoided. Failing this, there will be a risk of short circuits and a risk to health:
If liquid leaks from the battery, this can lead to severe skin irritation. In the event of accidental contact with the skin, immediately rinse thoroughly with water. If the liquid gets into the
eyes, medical treatment is necessary. In the event that vapours are inhaled, immediately
seek fresh air. In the event of persistent symptoms, seek immediate medical treatment.
35. Risk of explosion: Do not expose the battery to water/moisture or heat (e.g. constant
sun exposure, re, radiators).
36. Do not use any damaged or worn-out batteries.
SAFETY INFORMATION WHEN HANDLING CHARGING DEVICES
37. The charging device is also an electrical tool. Observe the general safety information
when handling electrical tools, particularly in relation to electrical safety and the safety of
persons.
38. The charging device is only suitable for indoor operation: do not use it outdoors. Keep
it clean and away from moisture and rain.
39. Do not operate the charging device on ammable surfaces (e.g. paper).
SERVICE
40. The equipment must only be repaired by qualied personnel using original spare
parts. Application tools must not be repaired, rather they must be replaced.
13

Technical data
Easycutter I Easycutter II
Cut length
Cut depth 320 mm 320 mm
Weight
Power with thermoprotection
1.070 mm 1.350 mm
10 kg 10 kg
40 V / 160 Watt / 230V – 50/60Hz /
IP 54
40 V / 200 Watt / 230V – 50/60Hz /
IP 68
INTENDET USE
The machine is intended for the cutting of non-plasticized foam (for example Polystyrene or
Styrodur) for the thermal insulation of buildings. The non-plasticized foam slabs must be free
of adhesive, adhesive residues or any other kind of contamination.
ASSEMBLY
Before any work on the machine itself, pull the mains plug and read all the instructions. Non-obser-
vance of the instructions below can cause electric shock, re and or serious personal injuries.
The following assembly instruction describes all models and all optional equipment
available for your foamcutter. Please note that your foamcutter may not be equipped with
all of the described functions and accessories. A complete overview of accessories can be
found in our accessory program.
Assembly, Pages: 2-3
Wire
Contrary to new spare wires, the originally installed wire in the Easycutter is not copper
coloured anymore but dark. This does not constitute a defect, but is a sign that the cutter
was checked in hot condition for its proper functioning before leaving the factory.
STARTING OPERATION
Before starting operation read all the instructions. Non-observance of the instructions below
can cause electric shock, re and or serious personal injuries.
Switching On and Off
1. For start up it is only necessary to plug in the XLR-connector (1) of the transformer into
the corresponding socket on the bow and connect the power plug to the power socket.
2. Press the On/Off switch (2) and keep it depressed. The cutting wire is fully functional
within seconds.
3. Pull bow in direction of the material – material will be cut.
4. Fire risk! Release the On/Off switch after every cut has been implemented; the cutting
wire cools down within a few seconds.
14
10

1
2
REPLACING THE HOT WIRE
Before any work on the machine itself, pull the mains plug and read all the instructions. Non-obser-
vance of the instructions below can cause electric shock, re and or serious personal injuries.
1. Carefully remove any remaining old hot wire.
2. Hook the new hot wire to one of the springs and then under tension to the opposite
spring. Be careful not to bend or damage the new hot wire during installation.
TROUBLESHOOTING
Should the cutter – especially after a long uninterrupted use – not get hot, the transformer
has to cool down for a short moment (the transformer is equipped with a thermo-protec-
tion). Before re-using the device the power plug has to be briey pulled out in order to
restart the protection circuit.
CUTTING VARIANTS
STRAIGHT CUT
Mark the required dimensions on the polystyrene sheet. Lift bow in order to draw the material to be cut underneath the cutting wire.
DIAGONAL CUT
Mark the required step (height and length) on the polystyrene sheet. Lift bow in order to draw
the material to be cut underneath the cutting wire up to the marked length.
TWO-STEP CUT
Lift bow in order to draw the material to be cut underneath the cutting wire up to the
beginning of the cut.
BEVEL
Mark required cut on the polystyrene sheet. Lift bow in order to draw the material to be cut
underneath the cutting wire. Adjust material in such a way that the required cut will exactly
go along underneath the cutting wire.
CONCAVE CUT
Mark required hollow groove on the polystyrene sheet. Lift bow in order to draw the material to be cut underneath the cutting wire up to the marked place.
15

WARRANTY AND CLEANING
Before maintenance, cleaning and storage, pull out the power plug and read all of the safety information and instructions. Failure to comply with the safety information and instructions may result in
electric shock, re and/or serious injury.
Cleaning
In particular, ventilation openings and the tool holder must be cleaned using a cloth
and brush after every use. If compressed air is used, it must not exceed 3 bar. Do not
use solvents to wipe the plastic parts clean.
Disposal
The machine, accessories and packaging should be sorted for environmental-friendly
recycling. Do not dispose of power tools into household waste! Only for EC countries:
According to the European Guideline 2002/96/EC for Waste Electrical and Electronic
Equipment and its implementation into national right, power tools that are no longer
usable must be collected separately and disposed of in an environmentally correct
manner.
Declaration of Conformity
We declare that the following product corresponds to the determinations of the directives
identi ed below – including their changes applicable at the time of the declaration. Any
conversion or change of the machine on the part of unauthorised third parties, which is
not co-ordinated with us, means the immediate loss of the validity of this declaration.
Product: Polystyrene cutter (Foamcutter)
Relevant EU Directives
98/37/EG 73/23/EWG 2004/108/EC 2006/95/EC
Applied standards
EN 55014-1 (VDE 875 Teil 14-1): 2003-09; EN 55014-1:2000 + A1:2001 + A2:2002
EN 55014-2 (VDE 875 Teil 14-2): 2002-08; EN 55014-2:1997 + A1:2001
EN 61000-3-2 (VDE 838 Teil 2): 2001-12; EN 61000-3-2:2000
EN 61000-3-3 (VDE 838 Teil 3): 2002-05; EN 61000-3-3:1995 + Cor.:1997 + A1:2001
EN 60335-1 (VDE 07000-1):2007-02; EN 60335-1:2002+A11+A1+A12+Corr.:+A2:2006
EN 60335-2-45 (VDE 0700 Teil 45): 2003-06; EN 60335-2-45:2002
EN 50366 (VDE 0700-366):2006-11; EN 50366:2003+A1:2006
Applied harmonized standards
EN ISO 12100-1 EN ISO 12100-2 2004/108/EC 2006/95/EC
__________________
Andre Rahe
CEO Bielefeld, 23.08.2011
Pro Bauteam Vertriebs- & Produktionsgesellschaft mbH
Grafenheider Strasse 111 Fon: 0049 521 - 9774401
33729 Bielefeld/ Germany Fax: 0049 521 - 9774406
16

AVERTISSEMENTS DE SÉCURITÉ
FRANÇAIS
Lisez l’ensemble des consignes de sécurité et des instructions. Les négligences peuvent causer un choc
électrique, un incendie, une explosion ou des blessures. Conservez l’ensemble des consignes de sécurité
et des instructions en vue d’une consultation future. Les termes « outil électrique » et « appareil » employés dans les consignes de sécurité et les instructions se réfèrent à coupe mousse de polystyrène. Le terme
: « outil monté » se réfère à l’accessoire.
SÉCURITÉ DE LA ZONE DE TRAVAIL
PROTECTION ANTI-INCENDIE ET SANTÉ : CONSIGNES DE SÉCURITÉ PARTICULIÈRES POUR
L’UTILISATION DE MOUSSES RIGIDES EN POLYSTYRÈNE EXPANSÉ (EPS, STYRODUR©, STYROPOR®), MOUSSE EXTRUDÉE EN POLYSTYRÈNE (XPS) OU SIMILAIRE EN LIEN AVEC LE RISQUE
D’EXPLOSION ET LES VAPEURS DANGEREUSES
1. Notez que la conservation, la manipulation et l’application de mousses rigides sont
soumises à des dispositions de sécurité particulières. Lisez et respectez toutes les
consignes de sécurité et instructions du fabricant de la mousse rigide.
2. Notez que pendant l’utilisation de mousses rigides, en particulier lors de la cou-
pe avec des ls ou lames chauffé(e)s, des vapeurs inammables ou nocives ou
dangereuses pour la santé telles que par ex. du pentane, du styrène, etc. peuvent
s’échapper. Lisez à ce propos les remarques du fabricant, respectez les valeurs VME
et suivez les instructions du fabricant à ce propos. En outre, veillez avant chaque
mise en service et nettoyage à ce que la zone de travail soit sûre en respectant les
remarques suivantes :
2.1 Ne pas utiliser de matériau avec une température de ramollissement inférieure à
100 °C (212 °F).
2.2 Ne pas utiliser de matériau avec une température d’allumage inférieure à 300 °C
(572 °F).
2.3 Ne pas utiliser de matériau auto-inammable ou facilement inammable selon la
norme EN 13501-1 / DIN 4102-1.
2.4 Ne pas utiliser de matériau présentant un risque d’explosion ou pouvant être
comburantes.
2.5 L’ensemble de l’environnement de travail doit être libre de toute source
d’allumage, comme par ex. d’autres outils électriques à moteur allumés (formation
d’étincelles), amme ouverte, cigarettes allumées ou similaire.
2.6 Maintenez votre environnement de travail propre, exempt de poussière et bien
éclairé an d’éviter le risque d’incendie et d’explosion ainsi que les troubles de la
santé dus aux vapeurs.
La mise en service avec les portes et fenêtres fermées n’est pas autorisée. Maintenez votre environnement de travail bien aéré an d’éviter l’accumulation de vapeurs
inammables et / ou nocives pour la santé.
Prenez en compte que les vapeurs inammables sont généralement plus lourdes
que l’air et peuvent donc s’accumuler à proximité du sol. Veillez donc à une aspiration sufsante des vapeurs qui apparaissent ainsi qu’à une bonne ventilation, notamment au niveau du sol.
2.7 Maintenez votre environnement de travail propre, sans poussière, bien éclairé
17

et exempt de sources d’ignition (par ex. outils électriques allumés en raison de la
formation d’étincelles, amme ouverte, cigarettes allumées) an d’éviter le risque
d’incendie, le risque d’explosion ou les troubles de la santé dus aux vapeurs ou aux
poussières. Il est interdit de travailler dans un environnement à risque d’explosion.
SÉCURITÉ ÉLECTRIQUE
3. Avant chaque mise en service, contrôlez la présence de dommages sur le câble
secteur. Soyez prudent avec le câble secteur : évitez de l’enrouler / le plier étroitement, débranchez toujours le câble secteur de la prise par le connecteur, tenez le
câble éloigné de la chaleur, de l’huile et des bords acérés, ne stockez pas le câble
enchevêtré.
4. Assurez-vous de raccorder le connecteur à un réseau électrique avec conducteur
de protection correctement mis à la terre. Le connecteur doit être adapté à la prise.
Respectez la tension de secteur ! La tension de la source électrique doit correspondre
aux indications fournies sur la plaque de type du chargeur.
5. Un disjoncteur C16 A ou supérieur est recommandé.
6. Si vous devez travailler avec l’appareil à l’extérieur, veillez à n’utiliser que des ral-
longes autorisées pour l’extérieur.
Protégez-vous contre les chocs électriques !
7. Pendant que l’appareil est raccordé au secteur, empêchez le contact corporel avec
des surfaces reliées à la terre, par ex. tuyaux, radiateurs, réfrigérateurs, etc.
8. Pendant le travail, tenez l’appareil sur les surfaces de préhension isolées.
9. Pendant la préparation de la mise en service, de la maintenance et du nettoyage,
l’appareil ne doit pas être raccordé au secteur.
10. En cas d’humidité, personne ne doit se trouver dans la zone de travail et l’appareil
ne doit pas entrer en contact avec l’eau écoulée. Veillez à ce qu’aucune eau de pluie
ou humidité ne pénètre dans l’outil électrique. L’utilisation en conditions humides est
strictement interdite.
11. L’appareil ne présente pas d’interrupteur différentiel. N’usinez donc pas de matériaux
humides ou de surfaces humides, ne travaillez pas dans un environnement humide.
12. L’utilisation simultanée de plusieurs outils électriques entraîne des surcharges et
peut éventuellement causer un incendie, un court-circuit et des dommages irréparables
de l’appareil.
13. Nettoyez régulièrement la surface de l’appareil ainsi que toutes les fentes
d’aération de l’outil électrique. Notez que le ventilateur du moteur attire de la pous-
sière dans le boîtier. Une forte accumulation de poussière conductrice (par ex. poussière métallique, poussière humide) peut causer dans certains cas un choc électrique.
SÉCURITÉ DES PERSONNES
14. Une fois que l’appareil est raccordé au secteur, ne touchez jamais l’outil monté
avec des parties du corps. Pendant l’utilisation de l’outil électrique, ne saisissez
jamais sous la pièce d’usinage ou ne tenez jamais la pièce d’usinage à la main ou
sur la jambe. Vous risquez autrement des blessures graves. Notez que les gants ou
les vêtements n’offrent pas une protection sûre contre les blessures ou les brûlures
dues à un outil monté chaud en rotation. Après la séparation de l’outil électrique du
secteur, respectez le temps de refroidissement des outils montés.
18

15. Évitez un démarrage involontaire.
Avant de raccorder l’appareil à l’alimentation électrique, assurez-vous que
l’interrupteur soit sur ARRÊT et que l’outil monté soit à l’arrêt et refroidi.
L’appareil doit être coupé et l’outil monté refroidi avant de déposer l’appareil ou
de remplacer la pièce d’usinage.
Avant chaque remplacement des outils montés, maintenance et nettoyage, la
che secteur doit être débranchée. Notez que l’outil monté ne refroidit pas immédiatement avec la coupure de l’appareil. Patientez jusqu’à ce que l’outil monté soit à
l’arrêt et refroidi.
16. L’outil monté doit être entièrement monté et verrouillé avant de mettre en mar-
che l’appareil. Utilisez uniquement des outils montés d’origine.
17. Sécurisez la mousse rigide contre le glissement an de ne pas entrer en contact
avec l’outil monté chaud par accident.
18. Retirez les outils de réglage (par ex. clé à molette) et maintenez la zone de travail
propre avant d’allumer l’appareil.
19. La découpe de mousses rigides peut causer l’apparition de vapeurs qui peuvent
entraîner des irritations cutanées, des yeux et / ou des voies respiratoires. Portez ainsi
des vêtements de protection appropriés, des gants, des lunettes de protection et un
masque ltrant pour la bouche et le nez.
20. Procédez prudemment avec les pièces mobiles de l’appareil. Attachez
vos cheveux, ne portez pas de bijoux ou de vêtements amples. Ceux-ci pourraient
autrement se prendre dans les appareils en mouvement ou les outils montés.
21. Veillez à conserver une position et une prise fermes et équilibrées pendant le tra-
vail. Ne travaillez pas sur une échelle.
22. Faites attention à chaque signe de fatigue de votre corps et interrompez le travail
en cas de fatigue.
23. Vous ne devez pas utiliser l’outil électrique si vous souffrez d’un décit de som-
meil ou si vous êtes sous l‘inuence de l’alcool, de drogues ou de médicaments.
24. Ne laissez pas des adultes qui n’ont pas lu ces instructions ou qui ne peuvent pas
les suivre utiliser l’appareil.
25. Les enfants et les adolescents ne doivent pas utiliser l’appareil et les outils mon-
tés. Instruisez les enfants qu’ils ne doivent pas jouer avec les objets susmentionnés.
Conservez ces objets hors de la portée des enfants.
UTILISATION DE L’OUTIL ÉLECTRIQUE ET DES OUTILS MONTÉS
26. Ne surchargez pas l’appareil et utilisez l’appareil et ses outils montés conformé-
ment à ces instructions et à l’utilisation conforme aux prescriptions. Il existe autrement des risques pour la santé et la vie.
27. Avant chaque utilisation de l’appareil, vous devez contrôler soigneusement la
présence de dommages sur tous les dispositifs de protection, liaisons par câble,
accessoires et outils montés an de vous assurer que l’appareil et ses outils montés
fonctionnent correctement et avec toutes les fonctions. Réalisez les étapes suivantes :
27.1 Pour les outils électriques avec lames et accessoires : Serrez les vis desserrées.
Pour les outils électriques avec l : Contrôlez les ressorts et la tension du l
19

de découpe. Notez que le l est en particulier utilisé sous tension. Un l usé peut
sauter soudainement et causer des blessures graves. Portez ainsi toujours des lu-
nettes de protection!
27.2 Contrôlez avant chaque utilisation la présence de dommages, ssures, dé-
formations ou traces visibles d’usure sur l’appareil. Le cas échéant, n’utilisez pas
l’appareil.
27.3 Contrôlez l’orientation et les raccordements des outils montés et de toutes les
pièces mobiles ainsi que les ruptures, traces d’usure importante, autres défauts
et tout autre état du câble susceptible(s) d’inuencer le fonctionnement. Le cas
échéant, n’utilisez pas l’appareil et / ou les outils montés.
27.4 Les dispositifs de protection usés ou autres pièces défectueuses doivent être
réparés ou remplacés correctement par un atelier agréé. Les outils montés endom-
magés ou usés ne doivent pas être réparés mais remplacés.
27.5 Une fois l’outil monté contrôlé et installé, effectuez les étapes de test confor-
mément à la description du paragraphe « Mise en service » an d’identier pendant
le test des dommages éventuellement non détectés sur les outils montés. Tenir les
personnes tierces éloignées pendant le test.
28. Les outils montés doivent être parfaitement adaptés au logement d’outil et ne
doivent être utilisés que pour les possibilités recommandées. N’utilisez pas d’outil
monté qui n’a pas été spécialement prévu par le fabricant pour cet outil électrique.
Dans le cas où un outil monté qui ne provient pas d’une fabrication autorisée serait
xé sur l’outil électrique, toute garantie d’utilisation sûre est exclue. L’utilisation
d’intercalaires, de bagues de réduction ou d’adaptateurs est interdite.
29. Risque de brûlure : Ne tenez jamais la main devant l’outil monté chaud. Ne
touchez jamais l’outil monté chaud avec des parties du corps. Pendant l’utilisation
de l’outil électrique, ne saisissez jamais sous la plaque en mousse rigide ou ne tenez
jamais la plaque en mousse rigide à la main ou sur la jambe. Vous vous exposez
autrement à des brûlures graves dues au contact accidentel avec l’outil monté chaud.
Notez que les gants ou les vêtements n’offrent pas une protection sûre contre les
blessures ou les brûlures dues à un outil monté très chaud. Après la coupure, respectez le temps de refroidissement de l’outil monté avant de reposer l’outil électrique.
30. Ne pas usiner des pièces d’usinage dangereuses pour la santé, telles que de
l’amiante.
CONSIGNES DE SÉCURITÉ POUR ACCUS
31. Chargez les accus uniquement dans le chargeur fourni.
32. N’utilisez dans l’outil électrique que les accus fournis, recommandés par le fabri-
cant.
33. Protégez l’accu non utilisé contre les objets métalliques (par ex. pièces, clés, etc.).
Les objets métalliques peuvent causer un pontage des contacts et ainsi des courtscircuits qui peuvent endommager l’accu de manière irréversible.
34. Risque pour la santé : Ne pas ouvrir l’accu. Éviter impérativement tout dommage
mécanique de l’accu. Il existe autrement un risque de court-circuit ainsi qu’un risque
pour la santé : Si du liquide s’échappe de l’accu, cela peut entraîner de fortes irritations cutanées. En cas de contact accidentel avec la peau, rincer immédiatement et
abondamment à l’eau. Si le liquide parvient dans les yeux, un traitement médical
20

est nécessaire. En cas d’inhalation des vapeurs, aller immédiatement à l’air frais. En
cas de troubles durables, consultez immédiatement un médecin.
35. Risque d’explosion : N’exposez l’accu ni à l’eau / l’humidité, ni à la chaleur (par
ex. rayonnement durable du soleil, amme, radiateur).
36. N’utilisez pas d’accu endommagé ou usé.
CONSIGNES DE SÉCURITÉ POUR L’UTILISATION DU CHARGEUR
37. Le chargeur est aussi un outil électrique. Respectez les consignes générales de sé-
curité pour la manipulation des outils électriques, en particulier concernant la sécurité
électrique et la sécurité des personnes.
38. Avant chaque mise en service du chargeur, contrôlez les dommages et les traces
d‘usure sur le câble secteur et le chargeur. Ne pas utiliser un chargeur ou un câble
endommagé.
39. Assurez-vous de raccorder le chargeur à un réseau électrique avec conducteur
de protection correctement mis à la terre. Le connecteur de l’outil électrique doit être
adapté à la prise. Respectez la tension de secteur ! La tension de la source électrique
doit correspondre aux indications fournies sur la plaque de type du chargeur.
40. Le chargeur est uniquement conçu pour une utilisation à l’intérieur : ne l’utilisez pas
à l’extérieur. Maintenez-le dans un état propre et à l’abri de l’humidité et de la pluie.
41. N’utilisez pas le chargeur sur un support inammable (par ex. papier).
ENTRETIEN
42. L’appareil ne doit être réparé que par du personnel qualié et avec des pièces
détachées d’origine. Les outils montés ne doivent pas être réparés mais remplacés.
Caractéristiques techniques
Longueur de coupe
Profondeur de coupe 320 mm 320 mm
Poids
Puissance du
transformateur
Easycutter I Easycutter II
1.070 mm 1.350 mm
10 kg 10 kg
40 V / 160 Watt / 230V – 50/60Hz /
IP 54
40 V / 200 Watt / 230V – 50/60Hz /
IP 68
UTILISATION CONFORME
L‘appareil est conçu seulement pour la découpe de panneaux de polystyrène en mousse
rigide (par exemple de Styropor et Styrodur), pour isolants thermiques pour le bâtiment. Les
panneaux de mousse rigide doivent être exempt de colle, du résidus de colle et d‘autres contaminants.
21

MONTAGE
Avant d’effectuer des travaux sur l’outil électroportatif, retirez la che de la prise de courant
et lire toutes les instructions. Des erreurs lors de l’application des instructions mentionnées
dans la suite peuvent provoquer un choc électrique, un incendie et/ou de graves blessures.
Instructions d‘installation : Page 2-3
Cette notice d‘utilisation décrit tous les modèles ainsi que l‘ensemble des
i
équipements de série et optionnels qui étaient disponibles pour votre Easycut-
ter. Notez que votre n‘est pas obligatoirement équipé de toutes les fonctions
décrites. Vous trouverez les accessoires complets dans notre programme
d’accessoires.
Fils de coupe
Contrairement aux nouveaux ls de rechange le l monté sur l’appareil livré n‘est pas
de couleur cuivre brillant, mais sombre. Ce n‘est pas un défaut, mais c‘est un signe que
l‘appareil a été testé à l’état chaud pour le fonctionnement avant de quitter l’usine.
MISE EN MARCHE
Vant travaux : Lire toutes les instructions. Des erreurs lors de l’application des instructions
mentionnées dans la suite peuvent provoquer un choc électrique, un incendie et/ou de graves
blessures.
Mise en Marche/Arrêt
1. Pour la mise en service il suft de brancher le connecteur XLR (1) du transformateur
dans la prise de l’étrier ainsi que la che d‘alimentation dans la prise de courant.
2. Pour mettre l’outil électroportatif en marche, appuyez sur l’interrupteur Marche/Arrêt (2)
3. Pousser l’étrier en direction du matériau. Le matériau est coupé.
4. Risque d’incendie! Relâcher le bouton „Marche/Arrêt (2)“ après à la fin de
chaque coupe, le l de coupe refroidit en quelques secondes.
1
2
ENTRETIEN
Avant d’effectuer des travaux sur l’outil électroportatif, retirez la che de la prise de courant.
Lire tous les avertissements de sécurité et toutes les instructions. Ne pas suivre les avertis-
sements et instructions peut donner lieu à un choc électrique, un incendie et/ou une blessure
sérieuse.
Montage du fil
1. En cas de rupture du l de coupe, retirer alors les résidus de l en les décrochant sur le
logement supérieur et inférieur du l. Les résidus une fois retirés, il est alors
22

possible d’accrocher un l neuf.
2. Accrocher le l de coupe livré dans les ressorts situés à gauche et à droite.
POSSIBILITÉS DE COUPE
COUPE DROITE
Marquez la mesure désirée sur le panneau de polystyrène. Soulevez l’étrier pour passer le
panneau à couper sous le fil de coupe. Accrochez le panneau sur l’angle de support et poussez
jusqu’au niveau marqué. Appuyez sur le bouton-poussoir et maintenez enfoncé (le fil de coupe
se réchauffe) Poussez l’étrier vers la direction du matriau – matériau est coupé. Relâchez le
bouton-poussoir.
COUPE D´ARRÊTIER
Ajustez l’angle de l’étrier à gauche et à droite à l’angle désiré. A cet effet la butée d’angle livrée
est utilisée. Soulevez l’étrier pour passer le panneau à couper sous le fil de coupe jusqu’au début
du coupe. Appuyez sur le bouton-poussoir et maintenez appuyé (le fil de coupe se réchauffe).
Poussez l’étrier vers la direction du matériau – l’onglet est coupé. Relâchez le bouton-poussoir.
COUPE EN ESCALIER
L’équerre d‘appui sur 0 degré. Soulever l’étrier pour passer le matériau à couper sous le fil
de coupe jusqu’au curseur de butée. Presser et tenir pressé le bouton-poussoir. Pousser
l’étrier en direction du matériau. L’escalier est coupé dans le sens de la profondeur.
Lorsque la profondeur a été atteinte, retirer le matériau du curseur de butée vers la gauche
jusqu’à ce que l’escalier soit entièrement coupé.
COUPE DE NOUES
Ajustez l’angle de l’étrier à gauche et à droite à 0 degré. Marquez la coupe désirée sur le panneau de polystyrène. Soulevez l’étrier pour passer le panneau à couper sous le fil de coupe. Ajustez le panneau pour que la coupe désirée passe exactement en dessous du fil de coupe. Appuyez
sur le bouton-poussoir et maintenez appuyé (le fil de coupe se réchauffe). Poussez l’étrier vers la
direction du matériau – matériau est coupé. Relâchez le bouton-poussoir
COUPE D´ENCASTREMENT
Ajustez l’anglé de l’étrier à gauche et à droite à 0 degré. Marquez la concave désirée sur le
panneau de polystyrène. Soulevez l’étrier pour passer le panneau à couper sous le fil de coupe
jusqu’à l’endroit marqué. Appuyez sur le bouton-poussoir et maintenez appuyé (le fil de coupe
se réchauffe). Poussez l’étrier vers la direction du matériau – profondeur est coupée. Lorsque
vous atteignez la profondeur, déplacez le matériau vers la droite à l’endroit marqué jusqu’à la
longueur de l’escalier est coupée. Tirez l’étrier à partir du matériau. Relâchez le bouton-poussoir.
GUIDE DE DÉPANNAGE
Si l‘appareil - en particulier après une longue période d‘utilisation continue – ne chauffe
plus, alors il faut refroidir brièvement le transformateur (ce dernier est muni d‘un fusible
thermique). Avant la remise en service, il faut débrancher brièvement la prise pour redémarrer le circuit de protection.
23

NETTOYAGE, RANGEMENT
Débranchez la che secteur et lisez l’ensemble des consignes de sécurité et des instructions
avant la maintenance, le nettoyage et l’entreposage. Les négligences concernant le respect
peuvent causer un choc électrique, un incendie et / ou des blessures graves.
Nettoyage
Après chaque utilisation, les ouvertures de ventilation et la réception d’outils doivent
être nettoyées avec un chiffon et un pinceau. Si de l‘air comprimé est utilisé, la pression ne doit pas dépasser 3 bars. N‘utilisez pas de solvants pour essuyer les pièces en
plastique. Essuyez les pièces en plastique uniquement avec un chiffon doux légèrement imbibé d‘eau savonneuse.
Élimination
Ne jetez pas d‘outils électriques à la poubelle ! Conformément à la directive europé-
enne sur les équipements électriques et électroniques usagés et à sa transposition
dans la législation nationale, les outils électriques usagés doivent être collectés sépa-
rément et recyclés de manière écologique.
Déclaration de conformité
Par la présente, nous déclarons que le produit suivant correspond aux dispositions des
directives désignées ci-dessous, y compris à leurs modi cations en vigueur au moment
de la présente déclaration. Cette déclaration perd immédiatement toute validité en cas de
transformation non-concertée avec nous ou de modi cation de la machine par un tiers
non-autorisé.
Produit : L‘outil de découpe polystyrène
Directives européennes en vigueur :
98/37/EG 73/23/EWG 2004/108/EC 2006/95/EC
Normes appliquées :
EN 55014-1 (VDE 875 Teil 14-1): 2003-09; EN 55014-1:2000 + A1:2001 + A2:2002
EN 55014-2 (VDE 875 Teil 14-2): 2002-08; EN 55014-2:1997 + A1:2001
EN 61000-3-2 (VDE 838 Teil 2): 2001-12; EN 61000-3-2:2000
EN 61000-3-3 (VDE 838 Teil 3): 2002-05; EN 61000-3-3:1995 + Cor.:1997 + A1:2001
EN 60335-1 (VDE 07000-1):2007-02; EN 60335-1:2002+A11+A1+A12+Corr.:+A2:2006
EN 60335-2-45 (VDE 0700 Teil 45): 2003-06; EN 60335-2-45:2002
EN 50366 (VDE 0700-366):2006-11; EN 50366:2003+A1:2006
Normes harmonisées appliquées :
EN ISO 12100-1
EN ISO 12100-2
__________________
Andre Rahe
Chef de la direction Bielefeld, 23.08.2011
Pro Bauteam Vertriebs- & Produktionsgesellschaft mbH
Grafenheider Strasse 111 Telefon: 0049 521 - 9774401
33729 Bielefeld / Allemagne Fax: 0049 521 - 9774406
24

AVVERTENZE PER LA SICUREZZA
ITALIANO
Leggere tutte le avvertenze sulla sicurezza e le istruzioni. I guasti possono causare scosse elettriche, incidenti,
esplosioni o lesioni. Conservare tutte le istruzioni per l’uso e le avvertenze di sicurezza per poterle consultare
in futuro.Il concetto di „dispositivo“ utilizzato nelle presenti istruzioni per l‘uso si riferisce al dispositivo di
taglio per polistirolo collegato alla rete (con cavo di rete) e allo stesso dispositivo azionato a batteria (senza
cavo di rete). Il termine: “strumento di applicazione” si riferisce all’accessorio.
SICUREZZA SUL POSTO DI LAVORO
PROTEZIONE ANTINCENDIO E SALUTE: INFORMAZIONI DI SICUREZZA SPECIALI NELL’USO DI SCHIUME
RIGIDE IN POLISTIRENE ESPANSO (EPS, STYRODUR©, STYROPOR®), POLISTIRENE ESPANSO ESTRUSO (XPS)
O PRODOTTI SIMILI IN RIFERIMENTO AL PERICOLO DI ESPLOSIONE E VAPORI PERICOLOSI.
1. Si osservi che lo stoccaggio, la movimentazione e l’applicazione di schiume rigide sono
soggetti a disposizioni di sicurezza speciali. Leggere e seguire tutte le istruzioni per la sicurezza e quelle del produttore di schiuma rigida.
2. Si osservi che durante la lavorazione di schiume rigide, in particolare nel taglio con li
metallici riscaldati o lame, possono fuoriuscire vapori inammabili, nocivi o dannosi per
la salute, come pentano, stirene. Leggere le istruzioni del produttore in merito, osservare
i valori limite di soglia e seguire le istruzioni del produttore in merito. Inoltre, prima di
ogni messa in funzione e pulizia, garantire la sicurezza dell’area di lavoro osservando le
seguenti istruzioni:
2.1 Non impiegare materiali con una temperatura di rammollimento inferiore a 100 °C
(212 °F).
2.2 Non impiegare materiali con una temperatura di accensione inferiore a 300 °C (572 °F).
2.3 Non utilizzare materiali autoinammabili o facilmente inammabili in conformità alla
norma EN 13501-1 / DIN 4102-1.
2.4 Non impiegare materiali che potrebbero essere esplosivi o ossidanti.
2.5 L’intero ambiente di lavoro deve essere privo di qualsiasi fonte di ignizione, come ad
es. altri utensili elettrici azionati a motore elettrico accesi (formazione di utensili), amme vive, sigarette accese o simili.
2.6 Mantenere l’ambiente di lavoro pulito, privo di polvere, ben illuminato per evitare
pericoli di incendio e esplosione e danni alla salute mediante vapori.
La messa in funzione in presenza di porte e nestre non è ammessa. Mantenere
l’ambiente di lavoro ben ventilato per evitare la raccolta di vapori inammabili e/o vapori
pericolosi per la salute.
Si osservi che i vapori inammabili sono generalmente più pesanti dell’aria e possono
fermarsi a terra. Garantire la sufciente estrazione dei vapori risultanti e una buona ven-
tilazione dell’ambiente, anche sul fondo.
2.7 Mantenere l’ambiente di lavoro pulito, privo di polvere, ben illuminato e ventilato e
libero da fonti di ignizione (es. utensili elettrici con formazione di scintille, amme vive,
sigarette accese) per evitare il pericolo di incendio, esplosioni o danni alla salute a causa
di vapori o polveri.
2.8 Lavorare in ambienti a rischio di esplosione è vietato.
SICUREZZA ELETTRICA
3. Vericare la presenza di eventuali danneggiamenti del cavo di rete prima di ogni messa
in funzione. Impiegare il cavo di rete con accuratezza: evitare di avvolgere troppo stretto/
piegare il cavo, staccare il cavo di rete tirando sempre la spina dalla presa, tenere il cavo
lontano da fonti di calore, olio e angoli vivi, non aggrovigliare il cavo.
25

4. Accertarsi di collegare la spia ad una rete elettrica dotata di messa a terra con condut-
tore di protezione. La spina deve essere adatta alla presa. Osservare la tensione di rete!
La tensione della fonte elettrica deve corrispondere ai dati riportati sulla targhetta del
caricabatteria.
5. Si consiglia l’impiego di un interruttore di protezione della linea C16 o più forte.
6. Quando si lavora all’aperto, utilizzare solo prolunghe idonee per questo ambiente.
Proteggersi da scosse elettriche!
7. Quando il dispositivo è allacciato, impedire il contatto del corpo con superci dotate di
messe a terra, come radiatori, frigoriferi, ecc.
8. Durante i lavori, tenere il dispositivo per le impugnature isolate.
9. Il dispositivo non può essere allacciato alla rete elettrica durante la preparazione di mes-
sa in funzione, manutenzione e pulizia.
10. In presenza di bagnato, né le persone operanti nell’area di lavoro né il dispositivo de-
vono venire a contatto con l’acqua uscente. Accertarsi che non penetri pioggia o bagnato
nell’utensile elettrico. Il funzionamento su bagnato è strettamente vietato.
11. L’apparecchio non è dotato di un interruttore di protezione personale. Non lavorare ma-
teriali inumiditi o superci umide e non operare in ambienti umidi.
12. . L’impiego contemporaneo di più utensili elettrici può causare sovraccarichi o, in taluni
casi, incendi, corto circuiti e danni irreparabili al dispositivo.
13. Pulire regolarmente la supercie del dispositivo e le fessure di ventilazione dell’utensile
elettrico. Si osservi che la ventola del motore attira polvere nell’alloggiamento. Un forte
accumulo di polvere conduttiva (ad es. di polvere metallica, polvere umida) può causare
scosse elettriche in talune circostanze.
SICUREZZA DELLE PERSONE
14. Pericolo di ustioni: non tenere mai la mano davanti allo strumento di applicazione ris-
caldato. Non toccare mai con le parti del corpo lo strumento di applicazione riscaldato.
Durante l’uso dell’utensile elettrico, non prendere mai la piastra in schiuma rigida dal di
sotto e non tenerla mai in mano né sulle gambe.Altrimenti si rischiano forti scottature
in caso di contatto accidentale con lo strumento di applicazione riscaldato. Si osservi
che guanti e indumenti non costituiscono una protezione sicura da lesioni o scottature
dovute a strumenti di applicazione fortemente surriscaldati.
15. Evitare un’accensione involontaria.
Prima di allacciare il dispositivo all’alimentazione di rete, accertarsi che l’interruttore sia
posizionato su OFF e che lo strumento di applicazione si sia fermato e raffreddato.
Il dispositivo deve essere spento e lo strumento di applicazione raffreddato prima di
depositare il dispositivo o di sostituire il pezzo di lavorazione.
Il dispositivo deve essere spento e lo strumento di applicazione raffreddato prima
di depositare il dispositivo o di sostituire il pezzo di lavorazione. Prima di ogni cambio
degli strumenti di applicazione, di manutenzione e pulizia, staccare la spina dalla rete.
Si osservi che lo strumento di applicazione non diventa freddo subito dopo aver spento
il dispositivo. Attendere nché lo strumento di applicazione non si sia completamente
arrestato e raffreddato.
16. Lo strumento di applicazione deve essere completamente montato e bloccato prima
di accendere il dispositivo. Impiegare solo strumenti di applicazione originali.
17. Assicurare la schiuma rigida da scivolamenti per evitare il contatto accidentale con lo
strumento di applicazione riscaldato.
26

18. Rimuovere gli utensili di regolazione (es. chiavi) e mantenere pulita l’area di lavoro
prima di accendere il dispositivo.
19. Durante il taglio delle schiume rigide possono formarsi delle polveri che causano
irritazioni alla pelle, agli occhi e/o alle vie respiratorie. Indossare pertanto un abbigliamento protettivo adeguato, guanti protettivi, occhiali protettivi e una mascherina oronasale .
Durante i lavori possono formarsi delle polveri che causano irritazioni alla pelle, agli occhi
e/o alle vie respiratorie. Indossare occhiali protettivi che rispettino i requisiti ANSI e una
protezione contro le particelle volanti, sia frontalmente che lateralmente. Indossare pertanto un abbigliamento protettivo, guanti protettivi, scarpe antinfortunistiche e una mascherina di protezione.
20. Trattare con accuratezza le parti mobili del dispositivo. Legare i capelli,
non indossare gioielli o abiti larghi. In caso contrario, questi potrebbero restare intrappolati nei dispositivi in movimento o negli strumenti di applicazione.
21. Durante i lavori, assicurare una posizione e una presa bilanciate e salde. Non lavorare
su una scala.
22. Prestare attenzione ad ogni segno di stanchezza sica e interrompere il lavoro in caso
di affaticamento.
23. Non utilizzare l’utensile elettrico in caso di privazione di sonno o sotto l’effetto di alcol,
sostanze stupefacenti o farmaci.
24. Non far impiegare il dispositivo da persone adulte che non abbiano letto le istruzioni o
non in grado di seguirle.
25. Non consentire l’impiego del dispositivo e degli strumenti di applicazione a bambini e
giovani. Spiegare ai bambini che non possono giocare con gli oggetti summenzionati. Conservare tali oggetti al di fuori della portata dei bambini.
IMPIEGO DEL DISPOSITIVO E DEGLI STRUMENTI DI APPLICAZIONE
26. Non sovraccaricare il dispositivo e utilizzare il dispositivo e i suoi strumenti di ap-
plicazione secondo le presenti istruzioni e in modo proprio. In caso contrario possono
vericarsi rischi per la salute e la vita.
27. Prima di ogni impiego del dispositivo, vericare a fondo l’eventuale presenza di danni
su tutti i dispositivi di protezione, sui collegamenti dei cavi, sulle parti di accessori e sugli strumenti di applicazione per accertarsi che il dispositivo e i suoi strumenti di applicazione operino in modo regolare e con tutte le funzioni. Eseguire le seguenti fasi:
27.1 Per gli utensili elettrici con lame e attacchi: serrare le viti allentate. Per gli utensili
elettrici con lo metallico: vericare le molle e la tensione del lo di taglio. Si osservi che
in particolare il lo metallico è posto sotto tensione. Un lo metallico consumato può
frantumarsi all’improvviso e causare serie lesioni. Portare pertanto sempre degli occhiali
di protezione!
27.2 Vericare la presenza di eventuali danni, crepe, deformazioni o tracce di usura evidenti
prima di ogni uso. Se presenti, non continuare ad impiegare il dispositivo.
27.3 Vericare allineamento e connessioni degli strumenti di applicazione e di tutte le parti
mobili e la presenza di eventuali rotture, tracce di usura più evidenti, altri danni e condizioni di altro tipo sulle parti del cavo che potrebbero compromettere il funzionamento. Se
presenti, non impiegare il dispositivo né gli strumenti di applicazione.
27.4 I dispositivi di protezione usurati o altre parti difettose vanno fatti riparare o sostituire
in modo consono presso un’ofcina autorizzata. Gli strumenti di applicazione danneggiati
o usurati non possono essere riparati ma vanno sostituiti.
27

27.5 Una volta vericato e impiegato lo strumento di applicazione, eseguire dei test come
descritto nella sezione “Messa in funzione” per identicare eventuali danni non rilevati
sugli strumenti di applicazione nel corso di prova. Tenere le altre persone lontane durante il test.
28. Gli strumenti di applicazione vanno adeguati con precisione all’attacco dello stru-
mento e possono essere impiegati solo per gli impieghi consigliati. Non utilizzare
nessuno strumento di applicazione che il produttore non abbia esplicitamente previsto e
raccomandato per questo utensile elettrico. Nel caso in cui uno strumento di applicazione non autorizzato venga ssato all’utensile elettrico, decade la garanzia per l’uso sicuro.
È vietato l’uso di isolanti , riduttori o adattatori.
29. Dopo lo spegnimento, osservare i tempi di raffreddamento dello strumento di applica-
zione prima di depositare l’utensile elettrico. Le parti mobili del dispositivo o gli strumenti
di applicazione possono diventare molto caldi durante l’esercizio. Non toccare mai gli
strumenti di applicazione quando sono in movimento! Dopo lo spegnimento del disposi-
tivo, osservare un ciclo di funzionamento inerziale dello strumento di applicazione. Solo
dopo aver spento il dispositivo e arrestato completamente lo strumento di applicazione, è
possibile depositarlo.
30. I pezzi di lavorazione pericolosi per la salute, come l’amianto, non possono essere lavorati.
ISTRUZIONI DI SICUREZZA PER LE BATTERIE
31. Caricare le batterie esclusivamente nel caricabatteria fornito in dotazione.
32. Inserire nell’utensile elettrico solo la batteria consigliata dal produttore fornita in dotazione.
33. Proteggere la batteria non utilizzata dagli oggetti metallici (es. monete, chiavi, ecc.). Gli
oggetti metallici possono causare un superamento dei contatti e successivi corto circuiti,
che danneggiano la batteria in modo irreversibile.
34. Pericolo per la salute: il caricabatteria non va aperto. Evitare assolutamente un dan-
neggiamento meccanico della batteria. In caso contrario vi è un pericolo di corto circuito
e per la salute: se fuoriesce del liquido dalla batteria, questo può causare forti irritazioni
cutanee. In caso di contatto accidentale con la pelle, sciacquare a fondo con acqua abbondante. Se il liquido venisse a contatto con gli occhi, richiedere un consulto medico. In caso
di inalazione dei vapori, recarsi immediatamente all’aperto. In caso di disturbi prolungati,
richiedere immediatamente un consulto medico.
35. Rischio di esplosione: non esporre la batteria all’acqua/umidità né al calore (es. irradia-
zione solare continua, amme, radiatori).
36. Non inserire batterie danneggiate o usurate.
ISTRUZIONI PER LA SICUREZZA NELL’USO CON IL CARICABATTERIA
37. Anche il caricabatteria è un utensile elettrico. Seguire le istruzioni per l’uso generali
nell’uso di utensili elettrici, in particolare in riferimento alla sicurezza elettrica e delle persone.
38. Il caricabatteria è adeguato solo per il funzionamento in aree interne: non impiegarlo
all’aperto. Mantenerlo pulito e lontano da pioggia e bagnato.
39. Non operare il caricabatteria su fondi inammabili (es. carta).
ASSISTENZA
40. Il dispositivo può essere riparato esclusivamente dal personale specializzato quali-
cato e con ricambi originali. Gli strumenti di applicazione non possono essere riparati
ma vanno sostituiti
28

Dati tecnici Easycutter I Easycutter II
Lunghezza di taglio 1.070 mm 1.350 mm
Profondeur de coupe 320 mm 320 mm
Peso
Assorbimento/Alimentazione,
con classe di protezione:
10 kg 10 kg
40 V / 160 Watt / 230V – 50/60Hz /
IP 54
40 V / 200 Watt / 230V – 50/60Hz /
IP 68
USO CONFORME ALLE NORME
Il dispositivo è concepito esclusivamente per il taglio di pannelli in polistirolo espanso rigido
(ad es. di tipo Styropor o Styrodur) per solanti termici per edilizia. I pannelli in espanso rigido
devono essere in questo caso privi di colla, resti di colla e altre impurità. Il dispositivo può
essere utilizzato solo da persone che siano state istruite in relazione al suo funzionamento e che
abbiano preso dimestichezza col dispositivo stesso.
MONTAGGIO
Staccare la spina di alimentazione e leggere tutte le avvertenze sulla sicurezza e le istruzioni.
Eventuali omissioni d’osservanza delle avvertenze sulla sicurezza e delle istruzioni possono
causare scosse elettriche, incendio e/o gravi lesioni.
Montaggio; pagina: 2-3
Le seguenti istruzioni di montaggio descrivono tutti i modelli e le dotazioni spe-
i
ciali del dispositivo di taglio del polistirolo. Si prega di notare che il dispositivo
in vostro possesso potrebbe non essere dotato di tutti i componenti/accessori
descritti.
Filo di taglio
A differenza dei nuovi li di ricambio, quello montato sul dispositivo alla consegna non è
più di color rame lucido, bensì scuro. Questo non rappresenta un‘anomalia, ma costituisce
una prova del fatto che il dispositivo è stato sottoposto in ofcina a un controllo all‘uscita
in condizioni a caldo per la verica del corretto funzionamento
MESSA IN FUNZIONE
Leggere tutte le avvertenze sulla sicurezza e le istruzioni. Eventuali omissioni d’osservanza delle avver-
tenze sulla sicurezza e delle istruzioni possono causare scosse elettriche, incendio e/o gravi lesioni.
Accensione e spegnimento con pulsante
1. Inserire il cavo del trasformatore con connettore XLR nella staffa.
2. Premendo il pulsante nella staffa (2), il lo di taglio si scalda nel giro di alcuni
millisecondi,portandosi alla temperatura di esercizio.
Il pulsante non deve mai essere bloccato in nessuna forma possibile (funzionamento
continuo). Pericolo di incendio.
29

1
2
MONTAGGIO DEL FILO
Staccare la spina di alimentazione e leggere tutte le avvertenze sulla sicurezza e le istruzioni su
manutenzione, pulizia e magazzinaggio. Eventuali omissioni d’osservanza delle avvertenze sulla
sicurezza e delle istruzioni possono causare scosse elettriche, incendio e/o gravi lesioni.
1. Nel caso in cui si presenti la rottura del lo di taglio, occorre per prima cosa rimuovere
i resti del lo sganciandolo dal relativo supporto superiore e inferiore. Solo allora è possibile agganciare un nuovo lo.
2. Agganciare il lo di taglio fornito in dotazione alle molle applicate a sinistra e a destra:
Agganciare per prima cosa alla molla su un lato e poi, sotto la tensione di trazione, sul lato
opposto. Le molle generano automaticamente una tensione del lo.
ELIMINAZIONE DEI GUASTI
Qualora dovesse succedere che il dispositivo – soprattutto dopo un utilizzo ininterrotto
per lunghi periodi – non si riscaldi più, occorre a quel punto lasciare raffreddare per breve
tempo il trasformatore (dotato di un fusibile termico).
TIPOLOGIE DI TAGLIO
Per tutte le tipologie di taglio deve essere considerato quanto segue:
1. Subito prima dell’inizio del processo di taglio, premere il pulsante o il pedale e tenere
schiacciato (il lo metallico da taglio si scalda).
2. Spingere l’archetto verso il materiale – il materiale viene tagliato.
3. Al termine di ciascun processo di taglio, rilasciare il pulsante, il lo metallico da taglio si
raffredderà in pochi secondi.
Di seguito vengono illustrati i passaggi di preparazione per ciascuna tipologia di taglio.
TAGLIO DIRITTO
Sollevare l’archetto per spingere il materiale da tagliare sotto al filo metallico da taglio.
Posizionare il materiale sulla guida e spingere fino al cursore.
TAGLIO TRASVERSALE
Bow – Adjust angle right and left to 0 degree. Mark the required step (height and length) on the
polystyrene sheet. Lift bow in order to draw the material to be cut underneath the cutting wire
up to the marked length.
TAGLIO SU DUE LIVELLI
Sollevare l’archetto per spingere il materiale da tagliare sotto al filo metallico da taglio fino al
cursore. Premere il tasto e mantenerlo premuto. Spingere l’archetto verso il materiale – questo
verrà tagliato in profondità. Al raggiungimento del livello di profondità desiderato, spostare il
materiale verso sinistra dal.
TAGLIO ANGOLARE
Sollevare l’archetto per spingere il materiale da tagliare sotto al filo metallico da taglio fino
all’inizio del punto di taglio.
30

TAGLIO CONCAVO
Premere il tasto e mantenerlo premuto. Spingere l’archetto verso il materiale – questo verrà
tagliato in profondità. Al raggiungimento del livello di profondità desiderato, spostare il
materiale verso destra del cursore, fino a che la lunghezza non sarà stata tagliata completamente. Estrarre da sopra l’archetto dal materiale.
PULIZIA, SMALTIMENTO
Staccare la spina di alimentazione e leggere tutte le avvertenze sulla sicurezza e le istruzioni su
manutenzione, pulizia e magazzinaggio. Eventuali omissioni d’osservanza delle avvertenze sulla
sicurezza e delle istruzioni possono causare scosse elettriche, incendio e/o gravi lesioni.
Pulizia
In particolare le aperture di ventilazione e l’attacco dell’utensile vanno puliti dopo ogni uso
con panno e pennello. Se impiegata l’aria compressa, non vanno superati i 3 bar. Non pulire
le parti di plastica con solventi. Solventi come benzina, diluenti, benzolo, ecc. Questi possono
danneggiare la plastica e causare crepe. Non usare nessuno dei solventi menzionati in prece-
denza. Pulire le parti di plastica solo con un panno morbido imbevuto con acqua e sapone.
Smaltimento
Non gettare elettroutensili dismessi tra i ri uti domestici! Conformemente alla norma
della direttiva 2012/19/UE sui ri uti di apparecchiature elettriche ed elettroniche (RAEE) ed
all’attuazione del recepimento nel diritto nazionale, gli elettroutensili diventati inservibili
devono essere raccolti separatamente ed essere inviati ad una riutilizzazione ecologica.
Dichiarazione di conformità
Con la presente si dichiara che la macchina qui di seguito indicata, in base alla sua concezione, al tipo di costruzione e nella versione da noi introdotta sul mercato, è conforme ai
requisiti fondamentali di sicurezza e di sanità delle direttive CE. In caso di modi che appor-
tate alla macchina senza il nostro consenso, la presente dichiarazione perde ognivalidità.
Prodotto: Un dispositivo di taglio a caldo studiato per il taglio di pannelli insonorizzanti e
isolanti in EPS (polistirolo espanso), Styropor®.
Direttive CE pertinenti
98/37/EG 73/23/EWG 2004/108/EC 2006/95/EC
Norme applicate
EN 55014-1 (VDE 875 Teil 14-1): 2003-09; EN 55014-1:2000 + A1:2001 + A2:2002
EN 55014-2 (VDE 875 Teil 14-2): 2002-08; EN 55014-2:1997 + A1:2001
EN 61000-3-2 (VDE 838 Teil 2): 2001-12; EN 61000-3-2:2000
EN 61000-3-3 (VDE 838 Teil 3): 2002-05; EN 61000-3-3:1995 + Cor.:1997 + A1:2001
EN 60335-1 (VDE 07000-1):2007-02; EN 60335-1:2002+A11+A1+A12+Corr.:+A2:2006
EN 60335-2-45 (VDE 0700 Teil 45): 2003-06; EN 60335-2-45:2002
EN 50366 (VDE 0700-366):2006-11; EN 50366:2003+A1:2006
Norme armonizzate applicate
EN ISO 12100-1 EN ISO 12100-2 2004/108/EC 2006/95/EC
____________
Andre Rahe
Direttore amministrativo Bielefeld, 23.08.2011
Pro Bauteam Vertriebs- & Produktionsgesellschaft mbH
Grafenheider Strasse 103 Telefon: 0 521 - 9774401
33729 Bielefeld/ Deutschland Fax: 0 521 - 9774406
31

Genauen Lieferumfang entnehmen Sie bitte Ihrer Bestellbestätigung.
Druckfehler, Irrtümer und Änderungen vorbehalten. Technische Änderungen vorbehalten.
The exact scope of delivery can be found in your order confirmation.
Subject to printing errors, mistakes and amendments. Subject to change without notice.
L’étendue précise de la livraison est stipulée dans votre confirmation de commande.
Sous réserve de modifications. Sous réserve de modifications techniques.
Informazioni dettagliate sul volume di consegna sono riportate sulla conferma d’ordine.
Con riserva di errori di stampa, errori e modifiche.
PRO BAUTEAM
Grafenheider Str. 103
DE-33729 Bielefeld
Tel. 0049 977 44 01
Fax 0049 521 977 44 06
info@probauteam.de
www.probauteam.com
Dieses Produkt ist CE-KONFORM
This product is CE compliant.
Ce produit est en CONFORMITÉ
AVEC LA NORME CE
Questo prodotto è CONFORME CE
 Loading...