

Page 1

Quick start guide
ESATA Storage Array with Port Multiplier Technology
Drive your creativity
PROAVIO
TM
www.proavio.com
EB8PM-UG v.1.4
EB8PM
Page 2
2
1
Thank you for choosing Proavio
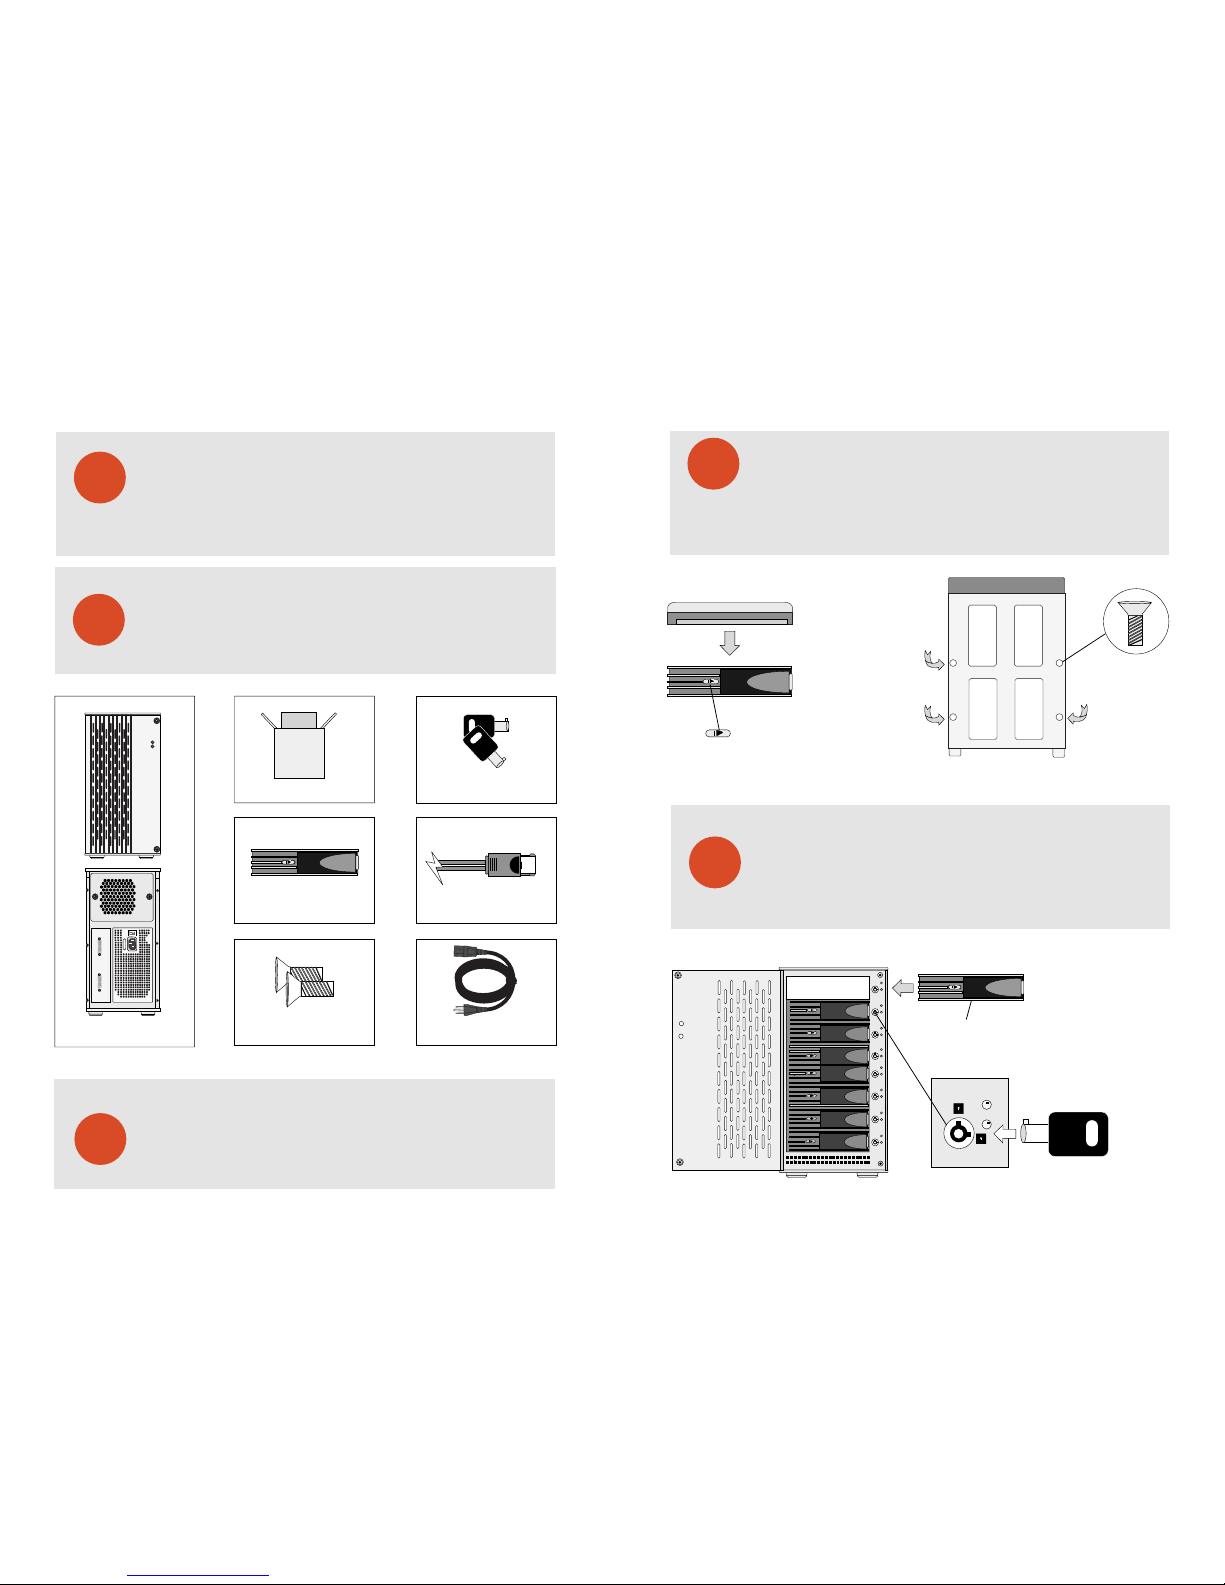
Carefully unpack your EB8PM storage system, and inventory the
accessories according to your model type.
What is in the box?
3
Unpack all components including the HDD mounting screws, key sets and
cables. If you are missing any of the items mentioned above, please contact
your dealer or contact proavio at www.proavio.com.
Unpack your editBOX
Welcome
Thank you for buying editBOX EB8PM, the rst professional Port Multiplier storage
solution designed for high resolution digital media production, and general high
performance storage requirements.
Standard IEC Power Cable - Qty 1
1 Meter E-SATA Cable - Qty 2
HDD Key Set - Qty 2
Hot-swap Disk Trays - Qty 10
EB8PM SATA Disk Array - Qty 1
HDD Mounting Hardware - Qty 40
Double-box Package - Qty 1
PROAVIO
TM
PROAVIO
TM
E-SATA
FULL RANGE
DISKS 1-4 DISKS 5-8
POWER
STATUS
4
Disk Installation
If your EB8PM was purchased with capacity, please skip this section and
immediately go to section 5. If your EB8PM was purchased without disks,
install each disk into the provided disk trays and fasten using the supplied
hdd screws. Do not use any other mounting screws other than the ones provided
with your EB8PM. System or disk damage may occur if using non-approved
mounting hardware.
5
Insert Disk Module
After fastening each disk, insert the disk trays in the open disk bay on your
EB8PM. For added security, your EB8PM is equipped with locking disk
bays to prevent accidental or malicious disk removal.
Hard Disk
Disk Tray
+
+
+
+
NOTE: Push right to unlock
Figure 1. Figure 2.
Disk tray - Bottom view
EB8PM
Quick start guide
EB8PM | ESATA Storage Array with Port Multiplier Technology
PROAVIO
TM
Figure 3.
C
C
Gently “press” tray handle to insert HDD
Page 3
6
HBA/RAID Controller Installation
Your EB8PM features a RAID-ready JBOD architecture. This provides the
best support for a wide range of host bus adapters & PCI RAID controllers.
Always follow your HBA/RAID controller’s installation procedure to ensure
proper operation.
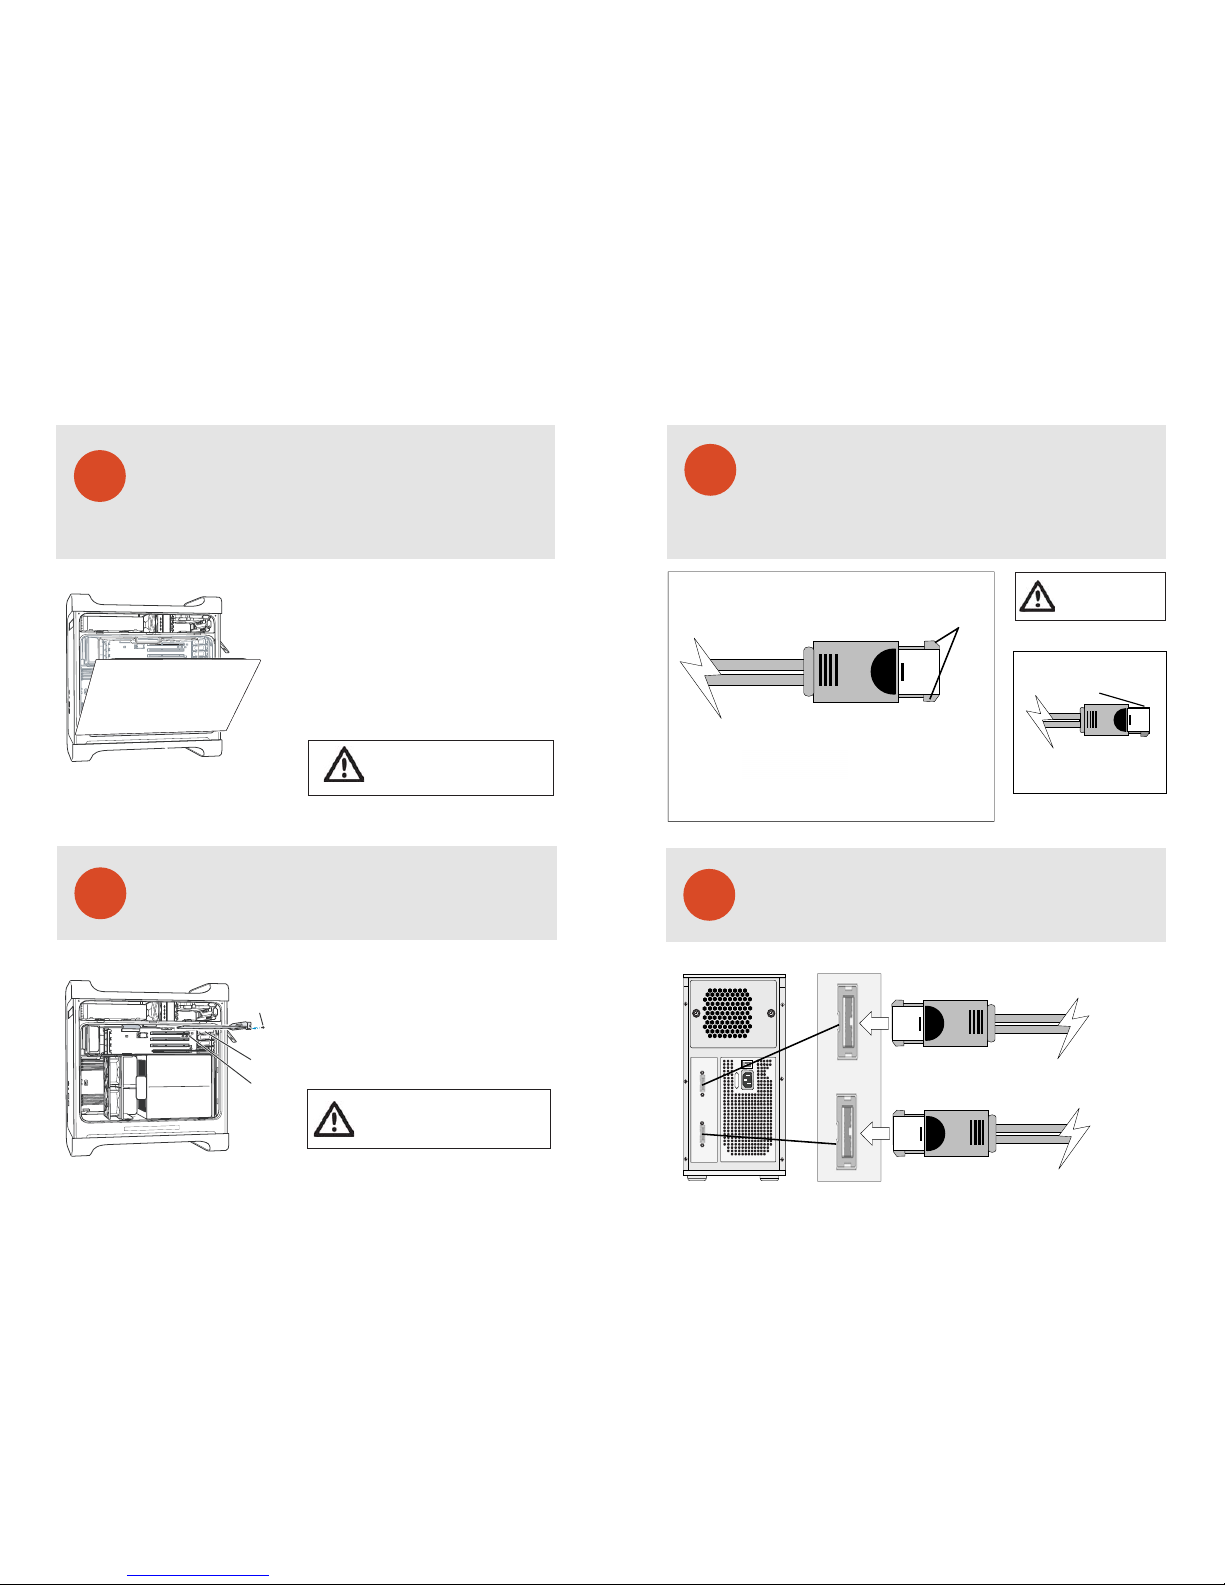
WARNING: Allow a few minutes for the internal
computer compenents to cool down before
opening your computer system.
1. Touch the metal PCI slot covers on the back
of your computer to discharge any static electricity.
2. Unplug ALL cables from your computer, and remove
the side access panel according to your system type.
3. Apple G5 users must rst remove the deector cover
and place it on a clean, safe surface.
NOTE: Remember to replace the air deector after you
have nished installing your HBA/RAID controller card.
7
Please follow your HBA/RAID controller’s driver installation notes to ensure
operation & hassle free conguration.
HBA/RAID Controller Installation - Cont’d
1. Remove the PCI slot cover plate from an available
PCI slot. Consult your HBA or video capture card
for recommended slot postions.
2. Install & secure your PCI controller card into the slot
and rmly press the card into place.
3. Close and replace the system panel.
Port access opening
PCI slot
Reinstall the screw
to secure the card
in place.
WARNING: To minimize the chance of electrical
shock, always follow proper saftey rules when
working with electrical components.
8
Introduction to Port Multiplier Cable Connectors
Port Multiplier Interface Overview
Your EB8PM is equipped with industry standard E-SATA (Port Multiplier)
interface port. Never try to use a non-locking SATA cable with a locking
E-SATA port. When using 3rd. party cables, always double check for proper
connector types.
E-SATA [Locking Connector]
E-SATA [Connector View]
E-SATA Locks
Figure 4.
9
Ensure that the connector is properly secured & fastned. Most commom
issues are related to poor cable connection. Do not force the connector into
the port.
Connecting Your EB8PM - Cable Connections
Figure 5.
E-SATA
Do not try to use a SATA
cable with an E-SATA port.
Doing so may damage
your array and disks.
SATA [Non-locking]
SATA
FULL RANGE
DISKS 1-4 DISKS 5-8
Port 1 [Disks 1-4]
Port 2 [Disks 5-8]
E-SATA
E-SATA
EB8PM
Quick start guide
EB8PM | ESATA Storage Array with Port Multiplier Technology
PROAVIO
TM
Page 4
13
This section is provided as a reference only. Please consult
your dealer regarding the best choice of HBA/RAID controller
for your media requirements.
Qualied Host Adapers & RAID Controllers
All HBA/RAID controllers are cross platform for Mac & PC
HighPoint Technologies - RR2314
PCI-e Port Multiplier HBA controller for Mac & PC. Four E-SATA (PM interface ports.
Supports 3Gb SATA disks only. JBOD, OS Striping (RAID-0), Hardware RAID-0/RAID-5
Silicon Image - SI3124
PCI-e Port Multiplier HBA controller for Mac & PC. Four E-SATA (PM) interface ports.
Supports 3Gb SATA disks only. JBOD & OS Striping (RAID-0)
Sonnet Technologies - E4P/X4P
PCI-e & PCI-X Port Multiplier HBA controller for Mac & PC. Four E-SATA (PM) interface ports.
Supports 3Gb SATA disks only. JBOD & OS Striping (RAID-0)
12
This section covers some common support questions.
If you are experiencing an urgent issue, please contact
your dealer or visit us online at www.proavio.com
Troubleshooting
Connection Problems:
Always double check for loose cable connections or improperly seated disks
if you experience problems where a disk or volume does not appear in your
computer, or you recieve an error message stating a disk missing
when you have the drives congured as a RAID set.
1. Disconnect the data cables and reconnect each cable one at a time,
ensuring each connector is inserted securely in your EB8PM.
2. Make sure the connector is properly secured on your HBA.
3. Check your EB8PM’s drive presence LEDs, located on the front
panel of your EB8PM. If the LEDs are not lit, remove the disk and
reinsert the disk module.
If the problem persists, please contact your dealer or contact Proavio’s support department
at 562-777-3488.
10
Connecting Your EB8PM - Host Workstation
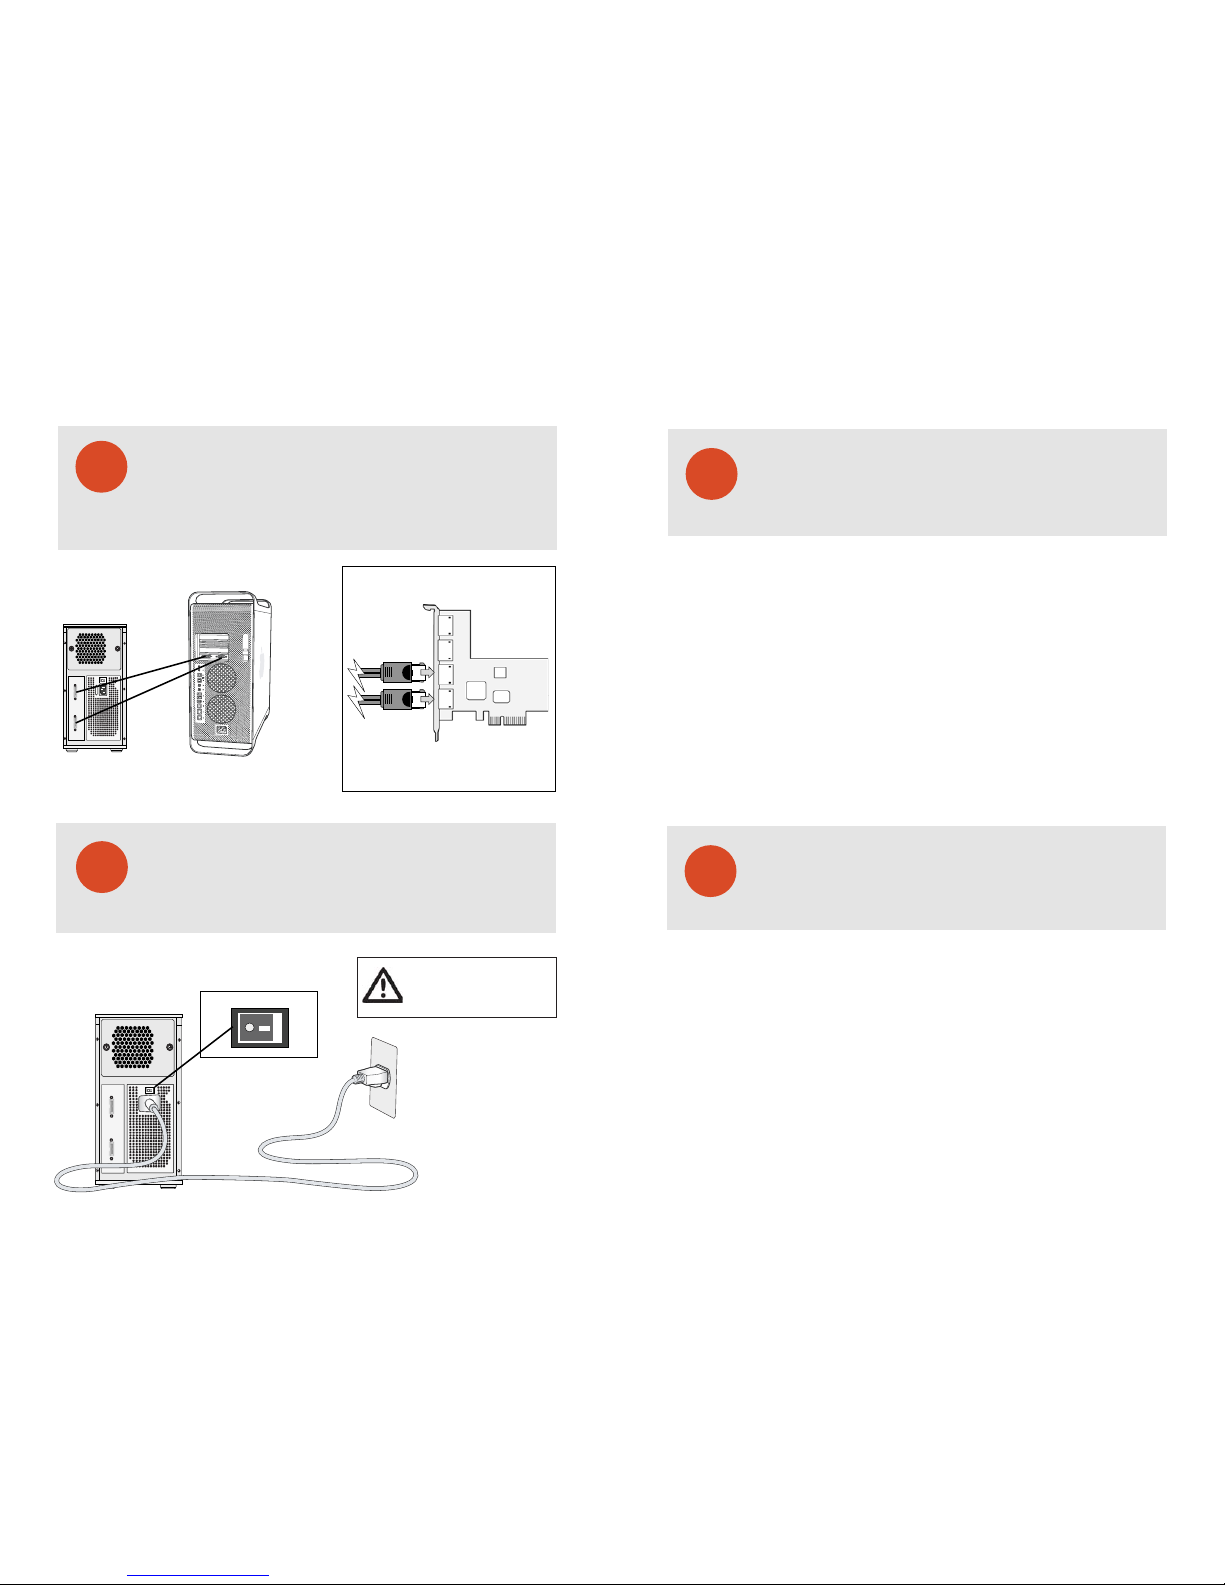
After connecting the cable to your EB8PM, connect the opposite end of the cable
to an open port Port Multiplier HBA or RAID controller. Firmly push the cable
into the available E-SATA port. Always double check for proper cable insertion.
NOTE: Never try to insert a non-locking SATA connector to a locking E-SATA port.
Doing so will damage your EB8PM, and may cause damage to your computer.
Figure 6.
Figure 7.
E-SATA [PM]
11
After connecting both cables to your EB8PM and host workstation, power-on
your EB8PM rst, then power-on your host computer. Your array is now ready
for RAID conguration. To learn more about RAID conguration, please refer
to your HBA or RAID controller’s documentation.
Finished
Figure 8.
E-SATAE-SATA
FULL RANGE
DISKS 1-4 DISKS 5-8
FULL RANGE
DISKS 1-4 DISKS 5-8
On O
WARNING: To minimize the chance of
electrical shock, always follow proper
safety rules when working with
electrical materials.
EB8PM
Quick start guide
EB8PM | ESATA Storage Array with Port Multiplier Technology
PROAVIO
TM
Page 5

PROAVIOTM
© 2007 Proavio, U.S.A. All rights reserved.
Under the copyright laws, this manual may not be
copied, in whole or in part, without the written consent
of Proavio, U.S.A.
Every eort has been made to ensure that the
information in this manual is accurate. Proavio is not
responsible for printing or clerical errors.
Proavio, U.S.A.
12221 Florence Ave.
Santa Fe Springs, CA 90670
(562) 777-3488
www.proavio.com
 Loading...